Categories
Archive

Eq Mistakes That Can Ruin Your Music

Making EQ mistakes in your music can cause irreversible damage to the overall quality of your production. EQing is a crucial step in the mixing process that should be approached with precision and intentionality.

EQing can be difficult to master, especially for beginner producers, but it’s important to get it right in order to create a balanced and dynamic mix. EQ mistakes such as overcompensation, frequency masking, and improper use of EQ can ruin the final result.

Additionally, failing to understand how different EQ tools work can also lead to mistakes. We’ll explore some common EQ mistakes that you should avoid to produce professional-grade music.

Using Too Many Plugins

In the world of music, using too many plugins can ruin the quality of your work. While they can enhance and add creativity to your music, overusing them can lead to muddiness, distortion, and unbalanced sound. It’s important to use them sparingly and intentionally to avoid sacrificing the overall quality of your music.

Eq Mistakes That Can Ruin Your Music

Credit: www.masteringthemix.com

Not Balancing Your Tracks

Not balancing your tracks can be a big mistake in your music production process. This can result in some elements of your music being too loud or too soft, which can make the entire mix sound off.

Not Balancing Your Tracks: One of the most crucial parts of music production is getting the balance right. It’s the foundation of a good mix, and if you don’t get it right, your music will suffer. Unfortunately, many artists make the mistake of not balancing their tracks properly. In this post, we’ll explain why balancing your tracks is so important and provide some tips to help you ensure you’re doing it correctly. Why Balancing Your Tracks Is Important: Balancing your tracks is all about making sure every element in your mix can be heard clearly. If you have too many elements competing for space in the same frequency range, the result will be a muddy, cluttered mix that lacks clarity and impact. Conversely, if some elements are too quiet, they’ll be lost in the mix and won’t have the impact they should. Tips for Balancing Your Tracks: Balancing your tracks isn’t complicated, but it does require some attention to detail. Here are some tips to help you ensure you’re doing it right:

Tip 1: Start with the drumsDrums are the foundation of most genres of music. Start by setting the volume of your drum tracks so you can hear them clearly, but they aren’t overpowering the other elements of your mix.
Tip 2: Use EQ to carve out spaceUse EQ to separate the different elements of your mix and make sure each has its own space. For example, you might cut some low end from your guitar tracks so that they fit neatly with the bass. Similarly, you might boost the midrange of your vocals so that they cut through the other elements of the mix.
Tip 3: Pay attention to the stereo imageIf all your elements are centered, your mix will sound mono and lack depth. Consider panning some elements to the left or right to create a more interesting stereo image.
Tip 4: Use reference tracksListen to reference tracks by other artists in the same genre to get an idea of how they balance their mixes. Use that knowledge to inform your own mix.

These tips should help you get started with balancing your tracks. Remember, the key is to ensure every element has its own space in the mix so that it can be heard clearly and contribute to the overall sound. Spend some time tweaking your mix until you’re happy with the balance, and you’ll be well on your way to creating great music that sounds great too!

Over-compression

Over-compression is a common mistake when mixing music, which can ruin the overall sound quality. When too much pressure is applied, the dynamics of individual instruments are lost, leaving a flat and lifeless track. It is important to use compression sparingly and with precision in order to enhance, not detract from the music.

What Is Over-compression?

Over-compression is a common mistake that can ruin your music. Compression is the process of reducing the dynamic range of a track, which can make the quiet parts louder and the loud parts quieter, creating a more even sound. However, over-compression occurs when too much compression is applied. This can result in a loss of dynamic range, making the music sound flat, lifeless, and lacking in excitement.

How Over-compression Can Ruin Your Music

Over-compression can ruin your music in a number of ways. First, it can make the music sound unnatural and forced. The dynamics of the track are lost, and the music becomes monotonous and repetitive. Second, over-compression can cause distortion, which can be especially noticeable in the bass and drums. Third, over-compression can reduce the impact of important elements in the track, such as vocals or lead instruments. This can make the music sound cluttered or busy.

How To Avoid Over-compression

Avoiding over-compression requires careful attention to the dynamics of the track. One way to avoid over-compression is to use compression in moderation. Use compression to even out the dynamics of the track, rather than to completely squash them. Another way to avoid over-compression is to use multiple stages of compression. This can allow you to apply a moderate amount of compression at each stage, rather than a large amount of compression all at once. Finally, it’s important to use your ears. Listen carefully to the track and adjust the compression settings as necessary to maintain the dynamics and excitement of the music. In conclusion, over-compression is a mistake that can ruin your music. It’s important to use compression in moderation, to use multiple stages of compression, and most importantly, to use your ears. By avoiding over-compression, you can ensure that your music remains dynamic, exciting, and engaging.

Ignoring Eq Basics

Equalization or EQ is a fundamental aspect of music production that allows you to balance and shape the different frequencies in your audio. However, many music producers and enthusiasts tend to overlook the basics of EQ, resulting in muddy, harsh, or dull-sounding mixes.

What Are The Eq Basics?

The EQ basics refer to the fundamental principles of equalization, which include:

  • Understanding the frequency spectrum
  • Knowing the different types of EQ filters
  • Identifying and addressing problematic frequencies
  • Using EQ to enhance or correct tonal balance

By mastering these basics, you can effectively use EQ to make your tracks sound clearer, more defined, and more balanced.

How Ignoring Eq Basics Can Ruin Your Music

If you ignore the EQ basics, you run the risk of making some of these common mistakes:

  • Overuse of EQ, resulting in unnatural or exaggerated tonal balance
  • Using EQ to fix problems that can be addressed by other techniques, such as compression or volume adjustment
  • Not adjusting EQ settings to different audio sources, resulting in inaccurate frequency response
  • Muddying the mix by not addressing conflicting frequencies between different instruments or sounds

These mistakes can result in a mix that lacks clarity, definition, and balance, diminishing the overall impact of your music.

How To Improve Your Eq Skills

To avoid these EQ mistakes and improve your EQ skills, you can follow these tips:

  1. Start with a good recording: Good EQ starts with good source audio, so make sure to capture your audio as cleanly and accurately as possible.
  2. Use different types of EQ filters: Each type of EQ filter has a different frequency response, so knowing when and how to use them can help you achieve a more natural and balanced tone.
  3. Listen critically: Train your ears to identify problematic frequencies and use EQ to correct them accordingly.
  4. Use EQ in moderation: Less is often more when it comes to EQ, so use it sparingly and strategically.
  5. Practice, practice, practice: The more you use EQ, the more comfortable and proficient you become in using it to enhance your music.

By mastering the EQ basics and following these tips, you can ensure that your music sounds clear, defined, and balanced, without any of the common EQ mistakes that can ruin your mix.

Overlooking Phase Issues

As a music producer or audio engineer, ensuring your music sounds great is key. You spend countless hours tweaking the EQ, adjusting the levels, and trying to get that perfect sound. But no matter how good your mix might sound, one factor that can ruin it all is phasing issues.

What Are Phase Issues?

Phase issues can occur when sound waves interact with each other. In layman’s terms, it’s when the peaks and troughs of two or more audio signals don’t align properly, resulting in a weakened or cancelled-out sound.

Example:If you have two microphones that are picking up the same sound source but are placed at slightly different distances, the signals they produce might be out of phase with each other, resulting in a hollow, thin sound

How Phase Issues Can Ruin Your Music

If not addressed, phasing issues can wreak havoc on your mix. They can cause certain instruments to sound weaker, make the overall sound muddy or cause frequency cancellations, removing important elements of your track. As a result, this can weaken the impact of your music and make it less enjoyable to listen to.

How To Prevent Or Fix Phase Issues

Preventing phase issues might seem like a daunting task, but it’s relatively simple with the right tools and techniques. One crucial step is ensuring that all the signals in your mix are in phase with each other. Here are some ways to fix or prevent phase issues:

  • Use one microphone: When possible, use a single microphone to record an instrument or voice.
  • Double-check phase: After recording, use a phase meter to check that all audio tracks are in phase and adjust if necessary.
  • Use stereo miking techniques sparingly: Using a stereo miking technique can create a sense of space and depth but, when not done correctly, can cause phase issues. Use sparingly or with care.

By addressing phase issues in your mix, you can ensure that your music sounds as good as possible and provide an enjoyable listening experience for your audience.
Eq Mistakes That Can Ruin Your Music

Credit: www.masteringthemix.com

Poor Frequency Masking

Poor frequency masking is a common mistake in EQing your music. This occurs when a frequency is boosted or cut too much, causing other frequencies to become masked and lost in the mix. Paying attention to this mistake can help you achieve a well balanced and clear sound.

What Is Frequency Masking?

Frequency masking is a term in music production that refers to when one sound is so loud in a particular frequency range that it masks or covers up other sounds in that same frequency range. This results in the masked sounds becoming indistinguishable, leading to a cluttered mix and a lack of clarity in your music.

How Poor Frequency Masking Can Ruin Your Music

Poor frequency masking can ruin your music by making it sound muddy and unclear. It can also result in important elements of your music, such as vocals or lead instruments, being lost in the mix and not standing out as they should. This can make it difficult for listeners to fully appreciate your music and can lead to your tracks being overlooked or dismissed.

Tips For Avoiding Frequency Masking

There are several ways to avoid frequency masking and ensure your music sounds clear and well-defined. Here are some tips:

  • Use equalization (EQ) to cut certain frequency ranges in less important sounds to make room for more important sounds.
  • Use sidechain compression to automatically lower the volume of one sound when another sound is playing in the same frequency range.
  • Use panning to separate sounds that are in similar frequency ranges. This can help each sound stand out more in the mix.
  • Listen critically to your mix and experiment with different EQ settings to ensure each sound has its own space in the frequency spectrum.

By following these tips, you can ensure your music avoids poor frequency masking and sounds clear and well-balanced.

Not Trusting Your Ears

Not trusting your ears can be a detrimental EQ mistake that ruins your music. Relying solely on what you see on the EQ chart can lead to overcompensation and make your music sound unnatural. It’s essential to train your ears and use them in conjunction with visual tools.

Why You Should Trust Your Ears

Trusting your ears is crucial when it comes to EQ and music production. Your ears are the most valuable tool you have in your arsenal and learning to trust them is an essential part of the process. Good EQing requires a trained ear that can distinguish between frequencies and identify problem areas.

How Not Trusting Your Ears Can Ruin Your Music

Not trusting your ears can lead to an over-reliance on visual cues, such as EQ curves. While these are certainly useful, they don’t always tell the whole story. Visual cues can deceive you and mask underlying issues that your ears could have picked up on. Relying solely on visual cues can lead to a sterile and unexciting mix that lacks warmth and emotion.

How To Train Your Ears

Training your ears takes time and practice, but the payoff is worth it. Here are some ways to get started:

  1. Listen to music critically: Pick apart the mix, and try to identify individual elements and frequencies.
  2. Use reference tracks: Listen to professionally produced music and try to replicate the EQ. Compare your mix to the reference track to see what could be improved.
  3. Take breaks: Your ears can become fatigued, leading to inaccurate EQ decisions. Take regular breaks, and don’t mix for too long in one sitting.
  4. Experiment: Try different EQ techniques and see what works. Don’t be afraid to try something new and trust your ears in the process.

In conclusion, not trusting your ears can be a costly EQ mistake that ruins your music. Learn to trust your ears by training them, and you’ll be well on your way to producing a professional-quality mix.

Eq Mistakes That Can Ruin Your Music

Credit: www.youtube.com

Failing To Sound Check On Multiple Speakers

Failing to sound check on multiple speakers can be a big mistake that can ruin your music. EQ is necessary to balance the sound, and if not done properly, it can cause certain frequencies to dominate or get lost in the mix.

When it comes to producing high-quality music, sound checking on multiple speakers is paramount. By failing to perform this crucial act, your music is at risk of becoming a trainwreck. The word ‘sound checking on multiple speakers’ refers to the process of ensuring your music sounds great on all types of audio equipment. In this blog post, we will examine why sound checking on multiple speakers is important, how not sound checking on multiple speakers can ruin your music, and tips for sound checking on multiple speakers.

Why Sound Checking On Multiple Speakers Is Important

When you sound check on multiple speakers, you get to know how your music sounds in different environments. In other words, you can discern how your music sounds like in different rooms, at different volume levels, and on different sound systems. One advantage of soundchecking on multiple speakers is that it provides a clear indication of how people will experience your music. This way, if any issue arises during the performance, you can quickly sort it out.

How Not Sound Checking On Multiple Speakers Can Ruin Your Music

When you don’t sound check on multiple speakers, you risk producing music that sounds great only on one type of speaker. For instance, if your music sounds great on your studio monitors, that doesn’t mean it will sound great on PA speakers. If you fail to sound check on multiple speakers, people will perceive your music as sloppy and inconsistent. Besides, you run the risk of having to deal with audio issues during live performances. Additionally, people will avoid listening to your music if it sounds terrible on their audio equipment.

Tips For Sound Checking On Multiple Speakers

It’s vital to ensure your music sounds great on as many audio systems as possible. To make this happen, follow these tips:

  • Listen to your music on various speakers: By doing so, you will understand how your music will sound like on different equipment and adjust accordingly.
  • Use reference tracks: Select a track that sounds great on a variety of speakers and use it as a baseline to compare your music.
  • Trust your ears: Even when the levels look perfect on the meters, trust your ears. Follow your gut and decide if your music sounds excellent in all places.
  • Listen at different volumes: Turn your music up or down to get a sense of how it sounds at different volume levels.

By following these tips, you can ensure your music sounds amazing in all places. In conclusion, sound checking on multiple speakers is essential for producing high-quality music. With these tips in mind, you can avoid the mistake of not soundchecking on multiple speakers, and produce great-sounding music.

Frequently Asked Questions Of Eq Mistakes That Can Ruin Your Music

Does Eq Ruin Music?

No, EQ by itself does not ruin music. However, improperly using EQ or using too much can distort the sound and negatively impact the overall listening experience. It’s important to understand how to properly use EQ to enhance, rather than detract from, the quality of the music.

What Type Of Eq Adjustment Should You Avoid?

Avoid over-adjusting the EQ in any specific frequency range, such as boosting or cutting too much bass or treble. This can create an unnatural sound and potentially damage the audio equipment.

Is There A Wrong Way To Eq?

Yes, there is a wrong way to EQ. Overuse or misuse of EQ can result in loss of clarity, reduced dynamic range and distortion. It is important to use EQ judiciously and appropriately for the specific sound you are trying to achieve.

Always ensure that your changes are subtle and enhance the overall mix.

Is It Bad To Have Too Much Eq?

There is no such thing as having too much EQ. In fact, having a higher emotional intelligence can help individuals better navigate situations, communicate effectively and build stronger relationships. However, it’s important to maintain balance and not let emotions cloud judgment.

Conclusion

If you want your music to shine, be conscious of common EQ mistakes. Always listen closely to how each element comes together, and adjust the EQ to create balance and clarity. Avoid over-boosting frequencies, and always cut rather than boost whenever possible.

Pay attention to the phase relationships between tracks, and use EQ to make sure everything is in phase. Remember, good EQ isn’t just about making things louder or clearer; it’s about creating a cohesive and powerful sonic experience. Follow these tips, and you’ll be well on your way to crafting great sounding music.

Happy EQing!

More in our EQ guide.

Categories
Archive

Old School Vinyl Dj Transitions

Old school vinyl DJs used various techniques for transitions, including beat matching and crossfading. These techniques require precise timing and careful attention to music cues.

Vinyl DJs have been around since the late 1960s, and although digital technology has taken over, many DJs still prefer the classic feel of records. When transitioning between tracks, vinyl DJs can’t rely on the sync button or visual waveforms; instead, they have to rely on their ears and skills to beat match and crossfade.

Beatmatching involves matching the tempo and phase of two tracks so that they are in sync, while crossfading involves smoothly blending the two tracks together. These techniques require practice, precision, and a deep knowledge of music. Despite the challenges, many vinyl DJs still use these techniques to create unique and dynamic sets that keep crowds dancing.

Understanding Dj Transitions

Expert vinyl DJs understand that smooth transitions are crucial to a successful set. By carefully selecting tracks and using techniques such as beatmatching and EQ adjustments, they seamlessly blend old school vinyl records to keep the dance floor moving.

What Are Dj Transitions?

Understanding DJ transitions is crucial to being a successful vinyl DJ. In simple terms, DJ transitions can be defined as the art of smoothly moving from one track to another to ensure the music never stops. Transitions are all about timing and it requires skill, experience and practice to get it right. A well-executed transition should be seamless, allowing the listener to stay within the groove of the music.

Importance Of Transitions In Djing

Transitions are an integral part of DJing and they can make or break a set. They are essential to maintain and control the energy and mood of the dance floor. A great transition should enhance the flow of the music and keep the audience engaged. One of the main reasons why transitions are important is that they allow the DJ to create a unique and continuous sound. By blending different tracks together, a DJ can create a musical journey that is both exciting and enjoyable for the listener. The ability to remix and change the mood of a song on the fly is what sets a skilled vinyl DJ apart from the rest. In addition to creating a unique sound, transitions also help a DJ maintain a consistent beat and tempo throughout the set. Consistency and accuracy are key to ensuring that the audience stays engaged and interested. Another importance of transitions that is often overlooked is their ability to showcase the DJ’s creativity. A great transition requires a level of creativity and innovation that can be appreciated by both the audience and fellow DJs. By using creative techniques such as beat juggling, scratching, and looping, a DJ can make their transitions stand out from the rest. In conclusion, understanding transitions is an essential part of being a successful vinyl DJ. The ability to seamlessly move from one track to another can take years of practice and experience to master. Transitions are an integral part of creating a unique and engaging sound that keeps the audience on their feet all night long.

Old School Vinyl Dj Transitions

Vinyl DJing is an art form that has been around for decades, and it has stood the test of time. There is something special about the analog sound produced by vinyl records, and the way DJs manipulate them to create a seamless mix. Vinyl DJ transitions are a crucial aspect of this art form, and learning how to execute them properly is essential for any aspiring vinyl DJ.

Why It’s Important To Learn Vinyl Dj Transitions

If you are serious about vinyl DJing, then learning how to transition between tracks seamlessly is an essential skill. Vinyl records are physical objects, and they require more attention and care than digital music files. As a result, DJs need to be more precise when mixing vinyl records to avoid scratching or damaging them. Proper vinyl transitions are like a dance between tracks, and it takes practice to master them.

The Basics Of Vinyl Dj Transitions

The basics of vinyl DJ transitions involve understanding the structure of the tracks you are mixing. Tracks typically have an introduction, a build-up section, a main section, and an outro. DJs need to select tracks that complement each other and have compatible tempo and key signatures. In addition, DJs need to know how to cue the next track, match the beats, and blend the two tracks seamlessly.

To execute a vinyl transition, DJs use various techniques such as beatmatching, cutting, scratching, and EQing. Beatmatching involves manually adjusting the tempo of one track to match the tempo of the other. Cutting involves using the crossfader to switch between tracks quickly, creating a chopping effect. Scratching involves manipulating the sound of the track using a turntable’s platter, and EQing involves adjusting the levels of the bass, midrange, and treble frequencies to make the transition smoother.

Famous Djs Known For Their Vinyl Transitions

Many famous DJs have made a name for themselves by mastering the art of vinyl transitions. One such DJ is Grandmaster Flash. He is considered one of the pioneers of hip hop and is known for his innovative techniques such as backspinning, cutting, and scratching. Another famous DJ known for his vinyl transitions is DJ Shadow. He is known for his creative use of samples and his ability to blend different genres seamlessly.

Other famous DJs known for their vinyl transitions include DJ Premier, Jazzy Jeff, and Qbert. These DJs have inspired generations of vinyl DJs and have shown what is possible when you master the art of vinyl transitions.

Different Types Of Vinyl Transitions

Vinyl transitions are an essential skill in DJing. Old school vinyl transitions use various techniques such as cutting, fading, beatmatching, and scratching to maintain the flow of music and keep the dance floor moving.

Vinyl transitions are the backbone of a DJ’s set. They set the tone for what’s to come and keep the crowd dancing. There are a few different types of vinyl transitions that DJs can use to keep their set fresh and exciting. In this article, we’ll be discussing cutting and scratching, beatmatching and blending, the drop mix, and the delayed drop.

Cutting And Scratching

Cutting and scratching is a classic vinyl DJ technique that involves manipulating the platter by hand to create unique sounds. DJs use the crossfader to switch between tracks and then utilize scratching to cut in and out of the mix. This technique creates a rhythmic pattern that adds energy to the set. By using a variety of different scratching techniques, DJs can add personality to their set and capture the crowd’s attention.

Beatmatching And Blending

Beatmatching and blending is the art of matching the tempo of two tracks and seamlessly blending them together. DJs use pitch control to match the tempos of the two tracks and then use the EQ to create a smooth transition. This technique allows for a seamless transition between tracks and can create a sense of continuity within the set.

The Drop Mix

The drop mix is a technique that involves dropping a track at the perfect moment to create an impact on the crowd. DJs use the intro of a track to build suspense and anticipation before dropping it at the perfect moment. This technique can create a memorable moment in the set and elevate the energy in the room.

The Delayed Drop

The delayed drop is similar to the drop mix, but instead of dropping the track at the perfect moment, the DJ will delay the drop to create tension and suspense. The DJ can use filters and effects to build up the track and create anticipation before finally dropping it. This technique can create a sense of excitement and anticipation within the crowd, leading to an explosive release of energy when the track finally drops. In conclusion, there are many different vinyl transitions that DJs can use to keep their set fresh and exciting. Cutting and Scratching, Beatmatching and Blending, The Drop Mix, and The Delayed Drop are all essential techniques that any DJ should master. Utilizing these techniques can elevate a DJ’s set and create unforgettable moments on the dance floor.

Old School Vinyl Dj Transitions

Credit: www.npr.org

Equipment Needed For Vinyl Transitions

To transition vinyl records like an old school DJ, you need a few key pieces of equipment. First, you’ll need two turntable setups, a mixer, and a pair of headphones. Additionally, you may want to invest in slipmats for smoother transitions and a record cleaning kit to keep your vinyl in pristine condition.

Old school vinyl DJs still swear by the charm and authenticity of vinyl transitions. The sounds that come from vinyl records are unique and unparalleled. If you are planning to try your hand at vinyl DJing, then here are the equipment you will need.

Turntables And Mixer

The foundation of any vinyl DJ setup is the turntable and mixer. Without these, vinyl transitions are impossible. There are different types of turntables that DJs prefer, but the most popular ones come from Technics. These high-quality turntables are built to last, and they have a pitch control that allows DJs to adjust the tempo of the track. The mixer is what brings everything together. It connects the turntables, and it also allows DJs to blend different tracks. DJs use the mixer to fade in and fade out tracks, and it also has a crossfader that enables them to switch between the tracks seamlessly.

Needle Cartridges And Styli

The needle cartridge and stylus are responsible for the sound that comes from the records. The needle cartridge is what holds the stylus in place, and it also transfers the sound to the mixer. There are different types of needle cartridges, but DJ cartridges are built to last and have a high output. The stylus is the needle that comes in contact with the record. It picks up the sound from the grooves of the record and sends it to the needle cartridge. Stylus comes in different shapes and sizes, and DJs prefer different types of stylus for different types of music.

Records

The vinyl records are the heart and soul of vinyl transitions. DJs need to have a vast collection of records in different genres to keep their sets interesting. Vinyl records are available in different sizes, but the most common ones are 12-inch singles and LPs. It is essential to take good care of the records to ensure they last long. DJs need to keep them clean and organized, and they should also store them properly. Vinyl records are delicate, and they need to be kept away from dust and direct sunlight.

Headphones

Headphones are essential for vinyl DJing as they allow DJs to listen to the tracks and match the beats. Good headphones are a must-have for any vinyl DJ as they help in beatmatching and cuing tracks. DJs prefer closed-back headphones as they offer better noise isolation. In conclusion, vinyl DJing has a charm and authenticity that cannot be replicated by digital DJing. If you are planning to try your hand at vinyl DJing, then investing in quality equipment is a must. With the right gear and practice, you can master the art of vinyl transitions and create unique and unforgettable sets.

Steps To Practice Old School Vinyl Dj Transitions

Practice good old school vinyl DJ transitions with these simple steps. Start with selecting the perfect tracks and matching their beats. Use your imagination and creativity to fade in, fade out, and scratch with precision. With practice and patience, you’ll master the art of vinyl DJ transitions.

Old school vinyl DJ transitions are the transition techniques that were used by DJs in the early days of turntablism, before the advent of digital technology. These techniques require a certain level of skill and practice, but they can add a unique and authentic sound to your DJ sets. Here are some steps to help you practice old school vinyl DJ transitions.

Start With Basic Transitions

If you are new to old school vinyl DJ transitions, it is best to start with the basic techniques. These include the baby scratch, the forward scratch, and the basic scratch. These techniques are the foundation for most old school vinyl DJ transitions, and mastering them is essential for building your skills. Practice each basic technique until you can execute it smoothly and effortlessly.

Practice With Simple Songs

After practicing the basic techniques, try incorporating them into simple songs. Choose tracks that have a slow tempo and a simple rhythm. This will allow you to focus on your technique and timing without being overwhelmed by complex music. Start by using just one basic technique and gradually incorporate more as you become more comfortable.

Build Your Skills With Challenging Tracks

Once you have mastered the basic techniques and simple songs, it is time to challenge yourself with more complex tracks. Choose songs with a faster tempo and complex rhythms and practice incorporating multiple old school vinyl DJ transitions into your sets. Count the beats in the track and practice transitioning at different points in the song, such as at the start of a phrase or on the drop. Keep practicing until you can execute these transitions seamlessly and effortlessly.

Conclusion

By mastering old school vinyl DJ transitions, you can add a unique and authentic sound to your DJ sets. Remember to start with the basic techniques, practice with simple songs, and gradually build your skills with challenging tracks. With time and practice, you can become a master of old school vinyl DJ transitions and take your DJ sets to the next level.

Tips For Perfecting Your Dj Transitions

Mastering old school vinyl DJ transitions requires practice, precision, and the right equipment. Vinyl DJs can perfect their craft by using a mixer with phono preamps, monitoring their mixes through headphones, and using the pitch control to match beats. Additionally, mastering the art of beatmatching is essential to executing smooth transitions.

Old school vinyl DJ transitions may seem like a thing of the past, but they still hold immense value in today’s music industry. A great DJ transition can take the dancefloor on a journey, creating an experience that will never be forgotten. But how can you perfect your transitions? Here are some tips to help you out.

Master Your Timing And Tempo

Timing and tempo are two crucial elements of a good DJ transition. Mastering these skills will take time and practice, but the payoff is worth it. You need to ensure that the beats of both tracks match perfectly, and the transition happens at the right time. A well-timed transition will leave the audience wanting more.

Listen Carefully To Each Track

To create a perfect transition, you need to understand each track’s structure and dynamics, from the beginning to the end. Listen carefully to each detail, from the beat and rhythm to the melody and vocals. This will help you to identify the ideal point at which to transition from one track to the next.

Learn To Read The Crowd

As a DJ, you need to keep the dancefloor moving, and this requires you to read your audience’s vibe. Observe their reaction and adjust your transition accordingly. If you notice that they’re losing interest, it’s time to switch up the tracks to keep them engaged.

Don’t Be Afraid To Make Mistakes

Perfection comes from practice, and even the best DJs make mistakes. Don’t be afraid to experiment with new transitions and take risks. Embrace your mistakes and learn from them, as they will help you improve your skills over time. In conclusion, mastering your DJ transitions takes time and practice. But by mastering your timing and tempo, listening to each track, reading the crowd, and embracing your mistakes, you will be on your way to becoming a successful DJ.

Old School Vinyl Dj Transitions

Credit: www.facebook.com

Frequently Asked Questions Of Old School Vinyl Dj Transitions

What Are Some Of The Most Useful Dj Transition Techniques?

Some of the most useful DJ transition techniques include cutting, chopping, blending, EQ mixing, and using effects such as filters and delays. These techniques help create smooth transitions between different tracks and keep the energy flowing on the dance floor.

Does Anyone Dj With Vinyl Anymore?

Yes, there are still DJs who use vinyl in their performances. Although many DJs have transitioned to digital music, vinyl has remained a popular choice for some due to its unique sound and tactile experience. Additionally, vinyl collectors continue to enjoy the physicality and nostalgia of vinyl records.

How Do You Transition Songs Like A Dj?

To transition songs like a DJ, match the tempos of the two tracks and use phrasing to ensure a smooth flow between them. Use EQ and volume controls to blend the tracks, and consider adding effects such as filters or delays for added flair.

Practice and experimentation are key to perfecting your transitions.

Why Do Djs Spin Vinyl?

DJs spin vinyl because it delivers a unique sound quality and allows for manual manipulation and creative control. Vinyl records provide a warm, natural sound and tactile experience that cannot be replicated with digital formats. It also allows for real-time mixing, scratching, and syncing for a personalized performance.

Conclusion

As modern technology in the DJ industry continues to evolve, there’s something special about going back to the basics with the use of old school vinyl and the art of transitions. The physical manipulation of vinyl records creates a unique and personalized experience for both the DJ and the audience.

While it may require more skill and practice, there’s no denying the raw, authentic sound that can be achieved through this method. So, don’t forget about the beauty and versatility of vinyl in a world where digital has taken over.

It’s worth incorporating into your DJ sets and experiencing the magic of vinyl transitions.

Categories
Archive

How To Use Samples In Ableton Live

To use samples in Ableton Live, drag and drop them into a dedicated audio track. Ableton Live is a digital audio workstation used for music production, live performance, and DJing.

In this platform, producers can manipulate audio clips using various features such as effects, filters, and editing tools. A sample is a short audio clip that can be used to create an entire song or as a part of it.

By implementing samples, producers can add a unique texture to their tracks, adding extra flair and personality. Ableton Live makes it easy to incorporate samples by allowing users to drag and drop them into a track. Once added, producers can manipulate the sample just like any other audio clip, cut it, pitch it and more.

How To Use Samples In Ableton Live

Credit: www.productionmusiclive.com

What Are Samples?

Samples are audio files that can be used to create music in Ableton Live. They can be anything from drum beats to melodies, and can be manipulated and edited to fit the desired sound of the project. To use samples in Ableton Live, simply drag and drop them into a track and start tweaking.

Definition Of Samples

Samples are small snippets or sounds extracted from audio recordings that can be used for creating new music. These are often used as building blocks in electronic music tracks, and can comprise of anything from drums, vocal hooks, and melodies to sound effects, field recordings, and more. Samples play a key role in modern music production, especially in genres like hip-hop, electronic dance music, and pop.

Examples Of Types Of Samples

Samples can be recorded from any source and manipulated using a DAW like Ableton Live. Some common examples of sample sources include individual instruments, drum machines, field recordings, live performances, and sound effect libraries. These are often categorized based on their type or origin, such as acoustic, electronic, synthesized, or processed samples. Samples can be further manipulated using various techniques like EQ, filtering, time-stretching, and pitch-shifting to create unique sounds.

Benefits Of Using Samples In Music Production

Using samples has several benefits in music production. Firstly, it allows producers to access and incorporate sounds that they may not otherwise be able to create themselves. This can broaden their sonic palette and help them create more unique and diverse music. Secondly, using samples can save a lot of time and effort that would be required to record or program sounds from scratch. Thirdly, samples can be easily manipulated and blended with other sounds in a mix to create complex and interesting textures. Lastly, samples can be used to create remixes, mashups, and edits of existing songs, allowing producers to create new versions of popular tracks without having access to the original recordings.

How To Import Samples Into Ableton Live

Learn how to import samples into Ableton Live to enhance your productions and create unique sounds. With this easy-to-follow guide, you can start using samples in your music and take your tracks to the next level.

How to Import Samples into Ableton Live Ableton has revolutionized electronic music production with its unique audio tools and a wide range of features. If you are an Ableton Live user, you must know how samples can make or break a track. In this section, we’ll delve into the process of importing samples into Ableton Live. It is crucial to understand the process since the quality and placement of the samples can impact the entire track. Locating the samples on your computer Before importing samples into Ableton Live, it’s vital to ensure that you have downloaded the sample pack or have individual samples stored on your computer. Ensure that the samples are in a format that Ableton can recognize and support. Ableton Live supports a wide range of sample formats, including WAV and AIFF formats. After making sure that the samples are in the right format, locate them on your computer. It’s best to store them in a separate folder with a clear name to avoid clutter and confusion. Importing samples into Ableton Live Once you have located the sample folder, importing them into Ableton Live is a breeze. Simply follow these steps: 1. Open the Ableton Live project you are working on. 2. At the bottom of the screen, click on the ‘File’ tab to access the browser window. 3. Inside the browser window, navigate to the location of the sample folder by clicking on the appropriate folders. 4. Once you have found the folder, click on the sample you want to import and drag it to the Ableton Live track you want to add the sample. The sample will be automatically added to a new audio track. Alternatively, you can use the shortcut ‘Cmd + Shift + T’ to insert a new audio track, then drag and drop the sample file into the track. Organizing samples in Ableton Live With Ableton Live, you can easily organize your samples. Sample organization can make it easy to access particular sounds, which can be tricky when searching through a pile of samples. Follow these tips to organize your samples in Ableton Live: 1. Use color coding to group similar sounds. Simply right-click on the track name and select the color. 2. Use folders to group sounds of a particular type or genre. 3. Assign descriptive names to the tracks to make it easier to locate them. Overall, importing samples into Ableton Live is a fairly easy process that can be done in a few simple steps. Organizing your samples can save you time, and it’s essential to keep your projects in order. With these tips, you should be able to import and organize your samples with ease, ensuring a flawless audio production experience.

How To Use Samples In The Session View

Learn how to use samples in the session view of Ableton Live to create unique music compositions. By inserting and manipulating audio clips, you can add your own personal touch and style to your tracks.

If you’re new to Ableton Live, you may be wondering how to use samples in the session view. Samples are an essential part of any modern music production, and Ableton Live makes it easy to use them in your tracks. In this guide, we’ll take you through the basics of dropping samples into the grid, adjusting their length and start point, applying effects, and using automation to bring them to life.

Dropping Samples Into The Grid

The first step in using samples in the session view is to load them into the grid. To do this, simply drag and drop the sample from your computer onto one of the empty slots in the clip view. Alternatively, you can use the File menu to load a sample. Once you’ve loaded a sample, you can launch it by clicking on the clip in the grid.

Adjusting The Sample’s Length And Start Point

Once you’ve loaded a sample, you may want to adjust its length or start point to fit your track. To do this, simply click on the clip and adjust the Start and End markers on the waveform display. You can also adjust the Loop markers to create a looped section of the sample. This is ideal for creating a drum groove or chopping up a vocal sample.

Applying Effects To Samples

One of the great things about Ableton Live is its ability to apply effects to samples. To apply an effect, simply click on the clip and then navigate to the mixer view. From here, you can add an effect plugin to the track and adjust its parameters. This is a great way to add character and depth to your samples.

Using Automation With Samples

To make your samples more dynamic, you can use automation to change their volume, panning, or any other parameter over time. To do this, simply click on the clip and then click on the Envelope button. From here, you can draw in automation curves to create complex changes in your sample. This is a great way to create builds, drops, or breakdowns in your track. In conclusion, using samples in the session view of Ableton Live is a powerful tool for music production. By dropping samples into the grid, adjusting their length and start point, applying effects, and using automation, you can create unique and dynamic tracks that stand out from the crowd.

How To Use Samples In Ableton Live

Credit: samplified.us

How To Use Samples In The Arrangement View

Ableton Live is a powerful digital audio workstation that allows you to manipulate sounds and samples in a variety of ways. The Arrangement View is where you can arrange and edit your clips to create a complete musical composition. In this article, we’ll discuss how to use samples in the Arrangement View of Ableton Live.

Creating A New Track For The Sample

Before you start arranging samples, it’s important to create a new track for the sample. This ensures that you can manipulate the sample independently of other tracks in your project. To create a new track, simply click on the “Create” button in the bottom left corner of the screen, choose “Insert Audio Track” and a new track will be added to your project.

Copying And Pasting The Sample Into The Arrangement

Once you have your new track, you can select the sample you want to use by clicking on it in the browser. Then, simply drag and drop it onto the new track in the Arrangement View. You can also copy and paste the sample into the arrangement by highlighting it in the browser, clicking on the Arrangement View, and pressing “Command+C” followed by “Command+V” on a Mac or “Ctrl+C” followed by “Ctrl+V” on a PC.

Arranging Samples In The Arrangement View

Now that you have inserted your sample into the Arrangement View, you can manipulate it in a variety of ways. You can adjust the start and end points of the sample by clicking and dragging the waveform. You can also adjust the tempo of the sample, warp it to fit the tempo of the project, and loop it. It’s important to ensure that each sample is arranged properly and fits seamlessly within the overall composition.

Overall, using samples in the Arrangement View of Ableton Live is a powerful way to create unique musical compositions. By creating a new track, copying and pasting the sample, and carefully arranging it within the composition, you can achieve the perfect sound and song you have in your mind.

Sampling Techniques

Learn how to use samples in Ableton Live with these sampling techniques. Explore different ways to slice and manipulate samples to create unique sounds and enhance your music production skills.

Sampling is a powerful tool for producers and musicians alike. It allows you to take sounds from anywhere and transform them into new, unique creations. In Ableton Live, there are various sampling techniques, each offering a different way to manipulate and utilize samples in your music production.

Chopping Samples

Chopping samples is a popular technique where you take a sample and cut it into smaller pieces, rearranging them to create a new pattern. In Ableton Live, this can be done using the Simpler or Sampler instrument. One way to chop samples is to use the Slice to New MIDI Track feature, which automatically chops the sample into multiple sections and creates a new MIDI track with each slice assigned to a different pad. This allows for easy rearrangement and manipulation of the sample.

Pitching And Time-stretching Samples

Pitching and time-stretching samples can give them a completely different sound and feel. In Ableton Live, this can be done using the Warp feature. Time-stretching changes the length of the sample without affecting its pitch, while pitching changes the pitch without affecting the length. By experimenting with different pitch and time-stretch combinations, you can create unique and interesting sounds.

Layering Samples

Layering samples is the process of combining multiple samples to create a more complex and full sound. In Ableton Live, this can be done using the Drum Rack or Sampler instrument. By layering different samples, such as a kick and a snare, you can create a more intricate drum pattern. You can also layer different sounds, such as a piano and a synthesizer, to create a more unique instrument.

Creating A Sample Library

Creating a sample library is essential for any producer or musician. It allows you to organize and easily access your samples for future projects. In Ableton Live, you can create a sample library by creating a folder and placing all your samples inside. You can then drag and drop samples into your project as needed. It’s important to ensure that each sample is labeled and categorized properly, making it easy to find when you need it. In conclusion, sampling is an essential tool for any producer or musician, and Ableton Live offers a wide range of sampling techniques to help you create unique and interesting sounds. Whether you’re chopping samples, pitching and time-stretching, layering samples, or creating a sample library, there are endless possibilities when it comes to sampling in Ableton Live.

Tips For Using Samples In Ableton Live

Working with samples in Ableton Live can unlock so many creative possibilities, from adding unique textures and sounds to enhancing the overall musical project. Here are some tips to help you get the most out of your samples.

Using Ableton Live’s Built-in Effects With Samples

If you’ve loaded a sample into Ableton Live, you can use the built-in audio effects to manipulate the sound in interesting ways. For example, you can add reverb to make the sample sound like it’s in a large space, or you can use Bitcrusher to replicate a lo-fi sound. The possibilities are endless, so don’t be afraid to experiment.

Using Third-party Plugins With Samples

While Ableton Live has a great selection of built-in effects, sometimes you’ll want to use third-party plugins for further sound manipulation. There are countless options out there, from EQ to distortion, so take some time to research and find the best plugins for your needs. Just make sure to give your computer’s CPU enough room to handle all those extra plugins!

Experimenting With Different Sample Types

Don’t limit yourself to using the same types of samples over and over again. Try branching out and experimenting with different sounds. For example, you could use a field recording of birds or rain as a background texture, or you could chop up a vocal sample to create a unique melody. By embracing unconventional sounds, you’ll add a new layer of creativity to your musical projects.

Using Samples As Inspiration For Creating New Sounds

Samples can provide endless inspiration for creating new sounds. For example, you could take a drum loop and chop it up to create a new beat, or you could sample a guitar riff and manipulate it to create a new melody. Don’t be afraid to experiment with different combinations and workflows to find your unique sound.

How To Use Samples In Ableton Live

Credit: www.productionmusiclive.com

Frequently Asked Questions On How To Use Samples In Ableton Live

How Do I Use Samples In Ableton?

To use samples in Ableton, simply drag and drop them into a new audio track. Manipulate the sample using warp markers, filters, and effects to create a unique sound. Save your customized sample as a new instrument to use in future projects.

How Do I Add Custom Samples To Ableton?

To add custom samples to Ableton, simply click on “File” in the toolbar and select “Collect All and Save”. This will save all associated samples into a folder. Then, drag and drop the custom samples into the Ableton browser under “Places”.

Now, the custom samples will be available for use in your projects.

How Do I Use Mp3 Samples In Ableton?

To use MP3 samples in Ableton, simply drag and drop them into the Session or Arrangement View. You can also use the File Navigator to browse for samples and load them into the Clip Slot. Make sure that the samples are properly labeled for easy identification.

Adjust the volume and time-stretch parameters to fit your project’s tempo and feel.

How Do I Import Samples Into Ableton Note?

To import samples into Ableton Note, drag and drop the file(s) into the session or arrangement view. Alternatively, use the File Browser or the Live’s browser to locate the sample and then drag it onto the preferred audio track. You can also use Ableton’s Import command from the File menu.

Conclusion

To wrap it up, using samples in Ableton Live is an effective way to spark creativity and add uniqueness to your music production. By exploring different sources of samples and experimenting with various techniques, you can create tracks that stand out and appeal to your listeners.

Whether you’re a beginner or an experienced producer, incorporating samples into your workflow can enhance your musical journey and take it to the next level. Happy producing!

Categories
Archive

How To Use Eq Shelf Filters

To use EQ shelf filters, adjust the gain or attenuation of a selected frequency range. To do this, select the filter type and frequency range, then adjust the gain or attenuation to achieve the desired sound.

EQ shelf filters are an essential tool for audio engineers and producers to make sonic adjustments during the mixing process. They work by adjusting the gain or attenuation of a selected frequency range, helping to sculpt a mix to sound the best it can.

The shelf filter type provides an even gain or attenuation across the selected frequency range, making it an ideal choice for boosting or cutting low or high frequencies. However, for more targeted adjustments, a peak filter may be a better choice. Overall, EQ shelf filters are a powerful tool for achieving the desired sound in any mix.

What Are Eq Shelf Filters?

Equalization (EQ) is an audio-processing technique that allows you to change the tonal balance of an audio signal. To do this, an equalizer applies a set of filters to the signal. Each filter is responsible for adjusting a specific frequency range of the audio signal.

Definition Of Eq Filters

EQ filters are circuits that control the frequency response of an audio signal. They operate by either boosting or cutting selected frequencies to enhance or attenuate a particular tonal quality. EQ filters can be either passive or active, and they come in many different forms, each with unique sonic characteristics and application scenarios.

Types Of Eq Filters

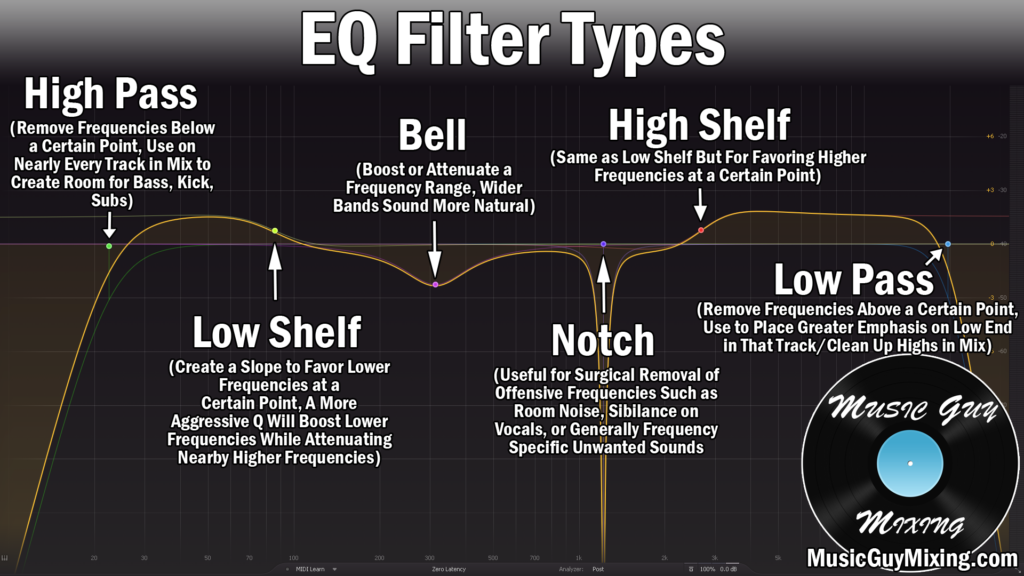
There are various types of EQ filters, including high-pass filters, low-pass filters, band-pass filters, and shelf filters. A shelf filter, also referred to as a “tone control,” is a type of EQ filter that works by attenuating or boosting frequencies above or below a certain cutoff point, creating a “shelf” shape in the frequency response curve.

There are two types of shelf filters: high-shelf and low-shelf. A high-shelf filter attenuates or boosts frequencies above the shelf point, while a low-shelf filter does the same for frequencies below the shelf point.

How To Use Eq Shelf Filters

Credit: www.musicguymixing.com

How Eq Shelf Filters Work

Eq shelf filters are critical audio tools that allow you to adjust specific frequency ranges in a sound signal. These filters work by boosting or attenuating frequency ranges around a particular frequency to achieve your desired tonal balance. With the flexibility to fine-tune sound, EQ shelf filters are a valuable asset in any sound engineer’s toolkit.

Frequency Range

EQ Shelf Filters are used to make changes to the frequency response of an audio signal. They work by allowing selection of a frequency range and altering the amplitude of all frequencies above or below that range.

For instance, if you boost frequencies above the chosen range, you enhance the high frequencies. If you cut frequencies below the selected range, you lower the low frequencies.

Shelving Points

Shelf filters have two shelving points: one is the frequency at which the shelving starts, and the other is the amount of boost or cut applied to the signal.

The shelving points act like a shelf that lets frequencies pass unchanged below the shelf and boosts or cuts frequencies above the shelf.

Types Of Shelving Filters

There are two types of shelf filters: high shelving filters and low shelving filters.

A high shelf filter increases or decreases the level of high frequencies above a particular frequency. Conversely, the low shelf filter boosts or cuts the level of low frequencies below a particular frequency.

In conclusion, EQ shelf filters are a powerful tool that can be used to manipulate the frequency response of an audio signal. By understanding how they work and the different types of shelving filters available, you can enhance the sound quality of your audio recordings.

Understanding The Roles Of Frequency And Gain

Frequency and gain are intricate components in EQ shelf filters, and understanding their roles is crucial in getting your desired sound. By adjusting the gain, you can control the amount of boost or cut in a frequency range, which affects the tone of your music.

Defining Frequency And Gain

Before delving into the use of EQ shelf filters, it is essential first to understand the two fundamental concepts that form the backbone of EQ – frequency and gain. Frequency refers to the pitch of the sound, with high frequencies producing high-pitched sounds, and low frequencies producing low-pitched sounds. Gain, on the other hand, refers to the strength or intensity of the sound. In simpler terms, frequency can be likened to the key on a piano while gain can be compared to how hard the key is pressed. The understanding of these two concepts is critical to using EQ shelf filters effectively.

Relationship Between Frequency And Gain

The relationship between frequency and gain is essential since EQ shelf filters alter both. EQ shelf filters adjust both the frequency and the gain of the audio signal and enable us to boost or reduce the energy levels of specific frequency ranges. For instance, an EQ shelf filter can be used to increase the gain of the high frequencies in a vocal track to make it sound brighter. Conversely, it can be used to reduce the gain of the low frequencies to lessen boomy sounds in a bass guitar track. It’s important to note that the frequency adjustment point must be chosen carefully since boosting or refining too much can result in unnatural or unrealistic outcomes. The art of using EQ shelf filters is finding the perfect balance between frequency and gain adjustments while staying true to the original sound of the audio. In conclusion, understanding the roles of frequency and gain is critical to using EQ shelf filters effectively. The relationship between the two is what enables us to alter the specific frequency ranges that make up the audio signal and can result in high-quality audio output.

How To Use Eq Shelf Filters

Credit: www.mixinglessons.com

How To Use Eq Shelf Filters In Music Production

Learn how to effectively use EQ shelf filters in music production. Adjusting the frequency levels of the high and low end of a sound can help balance and shape the overall mix.

Music production relies heavily on equalization (EQ), a process of manipulating sound frequencies. EQ Shelf Filters are one of the commonly used types of EQs that allow you to alter everything from bass to treble frequencies. By boosting or cutting frequencies with EQ Shelf Filters, you can improve the overall balance and clarity of your tracks. In this post, we will discuss how to use EQ Shelf Filters in music production, including identifying problem frequencies, choosing the right EQ Shelving Filter, and applying EQ Shelving filters to tracks.

Identifying Problem Frequencies

Before applying EQ Shelf Filters to a track, it is essential to identify the problem frequencies that you want to address. These problem frequencies could be resonant frequencies that lead to harsh, unpleasant sounds or muddiness in the tracks. Identifying these frequencies can be done using an EQ analysis tool or by listening carefully to your tracks. It is crucial to identify these frequencies to prevent over-EQing that may lead to music tracks sounding unnatural or hollow.

Choosing The Right Eq Shelving Filter

Once you have identified the problem frequencies, the next step is to choose the right EQ Shelving Filter. EQ Shelf Filters come in two categories: High-Shelf and Low-Shelf. High-Shelf is used to tame treble frequencies, while Low-Shelf helps in controlling bass frequencies. The best practice is to use the same type of EQ Shelving Filter to set a consistent tonal balance in your tracks.

How To Apply Eq Shelving Filters To Tracks

After identifying the problem frequencies and choosing the right EQ Shelving Filter, the final step is to apply the EQ Shelving Filters to tracks. Before applying the EQ Shelving, ensure that your volume levels are balanced. Boost or cut specific frequencies using the chosen EQ Shelving Filter. It is worth noting that EQ adjustments can affect other aspects of your mix, such as dynamics, so it’s essential to monitor how the changes sound together. In conclusion, EQ Shelf Filters are handy tools in music production. Identifying problem frequencies, choosing the right EQ Shelving Filter, and properly applying them to tracks can help improve audio quality. Remember to be mindful of the overall mix as you make EQ adjustments to ensure that your tracks sound cohesive and balanced.

Best Practices For Using Shelving Eq Filters

Eq shelf filters are useful tools for controlling the tonal balance of a mix. Best practices for using shelving eq filters include choosing the appropriate frequency range, setting the filter to the correct slope, and using multiple filters to achieve the desired effect.

It is important to approach equalization with a purpose and a clear understanding of how the tools work to avoid negatively impacting the mix.

Shelving EQ filters are an essential tool for any audio engineer. They allow you to adjust the EQ of a track, boosting or cutting frequencies as needed. However, like any tool, you must use them correctly to achieve the best results. In this section, we will discuss the best practices for using shelving EQ filters, including how to avoid overuse, creative ways to use them, and the benefits of experimenting with shelving vs non-shelving filters.

Avoiding Overuse Of Eq Shelving Filters

EQ shelving filters can be incredibly useful when used correctly, but it’s easy to overuse them. The most common issue is when they are used to fix problems instead of using targeted EQ adjustments. When you apply a shelving filter, you are affecting all frequencies in a particular range, not just the problematic ones. As a result, overuse can muddle the sound and make it less clear. To avoid overuse, it’s essential to use EQ shelving filters sparingly. Consider the overall mix, and try to identify which particular frequencies need boosting or cutting. The best approach is to use a series of targeted EQ adjustments to eliminate specific issues and then use shelving filters to further adjust the overall tone.

Using Eq Shelving Filters In Creative Ways

Shelving EQ filters are not just for correcting problems. They can also be used creatively to shape the sound of a track and add interest to the mix. One way to use them is to create a “smile” or “frown” EQ curve, which shapes the low, mid, and high frequencies in a particular way. Another creative way to use shelving EQ filters is to create a sense of depth and space in the mix. By cutting the low frequencies of a track, you can make it sound like it’s farther away. Conversely, boosting the high frequencies can make a track sound closer.

Experimentation With Shelving Vs Non-shelving Filters

Finally, it’s essential to experiment with shelving vs non-shelving filters to understand their specific benefits. A shelving filter affects all frequencies above or below the cutoff point, while a non-shelving filter affects only a particular frequency or range. Understanding the differences between them will help you make better decisions about when to use each type of filter. To wrap up, using EQ shelving filters can significantly improve the sound of your mix. However, it’s crucial to use them sparingly, creatively, and with a clear understanding of their benefits and drawbacks. With these best practices in mind, you can achieve the results you desire and create a professional-sounding mix that stands out.

How To Use Eq Shelf Filters

Credit: www.youtube.com

Advanced Eq Filtering

Advanced EQ filtering involves using EQ shelving filters to shape the frequency response of specific audio signals in more precise and granular ways. These techniques can be especially useful for special use cases, such as enhancing the sound of a specific instrument or voice, or fixing issues with room acoustics. To get the most out of EQ shelving filters, it is important to use the right tools and plugins that enable you to fine-tune the frequency response to your desired specification.

Eq Shelving Filter Techniques For Special Use Cases

One way to effectively use EQ shelving filters for special use cases is to target problematic frequencies that need to be raised or lowered. For example, if you are working with a vocal recording with too much low-end resonance, a low-shelf filter with a sharp cutoff can help to reduce the unwanted frequencies in a specific range while keeping the rest of the frequency spectrum intact. On the other hand, if you are dealing with a recording that lacks depth, a high-frequency shelf filter can help to boost the upper frequencies and add more presence to the sound.

Another way to use EQ shelving filters is to shape the frequency response of individual instruments so they sit better in the mix. For instance, let’s say that you have a bass guitar track that is competing with the kick drum for space in the lower frequencies – by cutting the bass frequencies with a high-pass filter and boosting the midrange with a low-shelf filter, you can essentially “carve out” a space for the bass guitar that gives it more clarity and definition.

Advanced Tools And Plugins For Eq Filtering

If you want to take your EQ filtering skills to the next level, you can also consider using advanced tools and plugins that offer more precision and flexibility. One popular plugin is FabFilter Pro-Q 3, which provides a range of EQ filtering options, including per-band mid/side processing, dynamic EQ, and EQ matching. Another plugin worth checking out is Waves F6 Floating-Band Dynamic EQ, which allows you to dynamically adjust the frequency response of individual audio bands based on the level of the signal.

When using advanced EQ tools and plugins, it is important to keep in mind that less is often more. Over-processing can lead to a compromised sound that lacks clarity and focus, so use EQ filtering techniques sparingly and only when needed.

Frequently Asked Questions On How To Use Eq Shelf Filters

How Does Shelf Eq Work?

Shelf EQ works by adjusting the tonal balance of audio material, typically for enhancing the sound of music. By adjusting the levels of low, mid, and high frequencies, shelf EQ can alter the overall sound character, helping to add depth and clarity to the music.

How Do Eq Filters Work?

EQ filters work by adjusting the amount of specific frequencies in an audio signal. They can boost or cut specific frequencies, allowing you to adjust the sound of a recording to your liking. EQ filters can be applied to individual tracks or the entire mix in order to achieve a desired sound.

What Is The Difference Between High Shelf And Low Shelf Eq?

High shelf EQ boosts or cuts high frequencies, while low shelf EQ boosts or cuts low frequencies. High shelf EQ is used to add brightness and clarity to audio, while low shelf is used to add warmth and body. Both affect the overall tonal balance of the audio signal.

What Is The Difference Between Shelf Filter And Notch Filter?

Shelf filter and notch filter are both used in audio processing. The main difference is that a shelf filter adjusts all frequencies above or below a certain point, while a notch filter only affects a specific frequency.

Conclusion

EQ shelf filters serve as a powerful tool for enhancing the overall quality of your audio mix. By selectively reducing or boosting specific frequency ranges, you can significantly improve the clarity and balance of your tracks. Whether you’re a seasoned audio professional or a beginner, mastering EQ shelf filters can help take your audio production to the next level.

So don’t hesitate to experiment and fine-tune your sound until you achieve your desired results. Happy mixing!

Categories
Archive

How To Export Multitrack In Reaper

To export multitrack in Reaper, select all the tracks you want to export and go to the File menu, then select “Render”. In the Render Settings window, choose your output format, filename, and output folder, and make sure the “Multichannel tracks” option is selected.

Reaper is a digital audio workstation (DAW) software that is known for being a versatile and cost-effective option for musicians and audio engineers. One of its key features is the ability to record and mix multiple tracks, allowing users to create complex audio projects with ease.

However, when it comes time to export these multitrack projects, there are some important considerations to keep in mind. We will walk you through the steps for exporting multitrack in Reaper, so you can share your audio productions with the world.

How To Export Multitrack In Reaper

Credit: www.soundonsound.com

Preparing To Export

Learn how to export multitrack recordings in Reaper for your audio projects. Follow these simple steps and ensure high-quality audio output for your export needs.

Before exporting multitrack in Reaper, it is essential to make necessary preparations for the process. Following are the crucial factors to consider before exporting.

Naming Tracks

The first and foremost step is to give appropriate names to the tracks, such as lead vocals, guitar-1, guitar-2, bass, drums, etc. It is essential to name tracks correctly as it makes identification easy later on.

Setting Appropriate Levels

To make sure that the levels are consistent, it is crucial to set the volume levels for each track correctly. The level should not exceed -6dBs to avoid any distortion in the final mix.

Muting And Soloing Tracks

Muting and soloing specific tracks can help distinguish which tracks are playing and which are not. It also helps in identifying any technical issues with tracks like unwanted noise.

Setting Loop Region

To make sure that the selected area is exporting precisely, it is crucial to set the loop region at the desired location. One can place the loop region at the start and end points of the track or the section that needs to be monitored. In conclusion, preparing for exporting multitrack in Reaper is essential to execute the process efficiently. Therefore, it is crucial to name tracks appropriately, set appropriate levels, mute and solo specific tracks, and set the loop region for precise exporting.

Export Settings

To export multitrack in Reaper, navigate to the ‘Export Settings’ dialog box and choose the options that best suit your needs. Determine which tracks you want to export, select the appropriate format, adjust any settings as necessary, and click ‘Render’.

Exporting multitrack in Reaper requires several crucial settings such as file format, sampling rate, and channel selection. Understanding the export settings is essential for a professional audio export. In this article, we will discuss step-by-step on how to export multitrack in Reaper with an in-depth guide on each export setting.

Locating The Render Menu

The first step is to find the render menu in the Reaper interface. You can do so by right-clicking on the track you want to export and selecting “Render” from the drop-down menu. Alternatively, you can go to the “File” menu and select “Render.”

Selecting Export Format

After locating the render menu, the next step is to choose the export format. You can choose between WAV, MP3, FLAC, and other formats. Reaper supports a wide range of file formats, so choose the format that best suits your needs.

Setting Up Channel Selection

The channel selection setting is crucial when exporting multitrack audio. This setting determines which tracks will be included in the export. You can select to export all tracks or individual tracks that you want to export. Click on the “Channel Selection” button and choose the tracks you want to export by clicking on the checkboxes next to the track name.

Setting Up Bit Depth And Sample Rate

Bit depth refers to the number of bits used to represent each audio sample. A higher bit depth provides better quality audio. The sample rate refers to the number of samples per second. A higher sample rate provides higher audio quality but also increases the file size. You can set the bit depth and sample rate from the “Render” menu by clicking on the “Format” button and selecting the desired bit depth and sample rate.

Choosing Render Speed Quality

Once you have selected the desired export settings, you can now choose the render speed quality. The render speed quality determines how fast the export process will be. A higher quality setting increases the export time, while a lower quality setting decreases it. You can choose the render speed quality from the “Render” menu by adjusting the slider under the “Render Speed Quality” option. In conclusion, exporting multitrack in Reaper requires several crucial settings, including file format, channel selection, and sample rate. By following the settings guide, you can export professional quality audio in Reaper.

Rendering The Mix

To export multitrack in Reaper, rendering the mix is the key. Go to “File”, select “Render,” and choose “Multichannel” to export your mix with all of its tracks. You can then save your project in a variety of formats, making it easier to share and work on with collaborators.

After you have recorded, arranged, and mixed multiple tracks in Reaper, it is time for you to render (export) the mix. Rendering is the process of combining all tracks in a project and creating a single audio file. With Reaper, you can export your multitrack project in various formats such as WAV, MP3, FLAC, and more. In this section, we’ll discuss the steps for rendering the mix and exporting it as a high-quality audio file.

Choosing Output Directory

Before exporting your mix, decide where you want to save the rendered audio file. To choose the output directory in Reaper, follow these steps:

  1. Click on “File” in the menu bar at the top of the screen.
  2. Select “Render” from the drop-down menu.
  3. Click on the “…” button under “Output File” and navigate to the folder where you want to save the rendered audio file.
  4. Click “OK” to confirm the output directory.

Setting File Type

Next, you need to choose the file format for your rendered audio file. Reaper offers several file types that you can choose from, including WAV, MP3, FLAC, and more. To set the file type, follow these steps:

  1. Click on “File” in the menu bar at the top of the screen.
  2. Select “Render” from the drop-down menu.
  3. Click on the “Options” button.
  4. Choose the desired file type from the “Render format” drop-down menu.

Naming The File

By default, Reaper names the rendered audio file with the name of your project. However, you can change the name before exporting the mix. To name the file, follow these steps:

  1. Click on “File” in the menu bar at the top of the screen.
  2. Select “Render” from the drop-down menu.
  3. In the “Output File” section, type the desired name for your audio file.

Once you have completed these steps, click on the “Render 1 File” button to export your mix as an audio file. With Reaper, you have the flexibility to customize your mix and export it in the file format that best suits your needs.

How To Export Multitrack In Reaper

Credit: m.youtube.com

Verifying The Render

Verifying the render is crucial before exporting multitrack in Reaper. Make sure all the tracks are sounding as expected and check for any inconsistencies in the mix.

After exporting multitrack in Reaper, it is vital to verify the render to ensure that the audio is exported accurately. The process of verifying the render includes ensuring accurate track alignment, checking audio levels, and saving and archiving. Here are the steps to follow:

Ensuring Accurate Track Alignment

After rendering the multitrack, it’s essential to confirm that the exported audio is correctly aligned. This process confirms that all the individual tracks are exported in the same place in time. Some of the steps to align the tracks include:

  • Select all the rendered tracks.
  • Right-click on the tracks and select “properties.”
  • Click on the “Timing basis” tab and ensure that all the tracks have the “project sample rate” selected.
  • Play the rendered tracks to confirm that they are correctly aligned.

Checking Audio Levels

After ensuring accurate track alignment, it’s crucial to check the audio levels of each track. This process confirms that the multitrack was exported with consistent volume levels. To check audio levels, follow the steps below:

  • Play the rendered tracks.
  • Observe the master track to ensure that it doesn’t clip or go past 0db.
  • Check individual track volumes and adjust them as necessary.
  • Confirm that all the tracks are at consistent volume levels.

Saving And Archiving

After ensuring accurate track alignments and checking audio levels, it’s time to save and archive the rendered multitrack. Saving and archiving is an essential process to ensure that you can access the exported audio in the future. Here are some of the steps needed to save and archive the exported multitrack:

  1. Select “File” then “save project as” to save the project with a different name.
  2. Create a new folder where you can store the exported audio and rename the folder appropriately.
  3. Select all the rendered tracks and copy them into the newly created folder.
  4. Confirm that the tracks were copied successfully.

In conclusion, verifying the render is fundamental in ensuring that your exported multitrack is accurate. The steps outlined above are critical and should be taken to ensure high-quality multitrack exports.

How To Export Multitrack In Reaper

Credit: forum.cockos.com

Frequently Asked Questions On How To Export Multitrack In Reaper

How Do I Export Track By Track In Reaper?

To export tracks individually in Reaper, select the track you want to export, click File > Render, choose the appropriate settings, and click Render. Repeat the process for each track you want to export individually.

How Do I Render All Tracks In Reaper?

To render all tracks in Reaper, go to the “File” menu and select “Render”. In the render settings window, choose the desired options, such as file format and location. Then, click “Render” to start the process. All tracks will be rendered according to the settings you chose.

How Do You Bounce Multiple Tracks In Reaper?

To bounce multiple tracks in Reaper, go to “File” and select “Render. ” In the Render dialog box, select “Stems(Selected tracks)” under the “Bounds” section. Then, choose your desired format and click “Render. ” Finally, select the location where you want to save the bounced files and click “Save.

“

How Do You Multitrack In Reaper?

To multitrack in Reaper, first create a new project and add a track. Then, select the track, arm it for recording, and begin recording. To add additional tracks, right-click the track and select “Insert new track,” and repeat the previous steps.

You can then adjust the levels and mix the tracks as desired.

Conclusion

As you can see, exporting multitrack in Reaper is not a complex process. By following these simple steps, you can easily export your multitrack project without losing quality. It is essential to select the right file format and configuration to avoid any potential compatibility issues.

Following the guidelines mentioned above will ensure that your multitrack exports are of the highest quality, making your tracks sound professional. So go ahead and export your track, and don’t forget to share and enjoy your creation with the world!

Categories
Archive

Things You Should Do Every Mix

To ensure a successful mix, every audio engineer should balance levels, EQ, compression, and panning. These tasks should be done in a strategic order to achieve the desired sound.

Mixing is a crucial aspect of music production, and every small task can contribute to a polished final product. From setting initial levels and addressing issues in the frequency spectrum to adjusting dynamics and spatial placement, there are several things you should do every mix.

The process can be overwhelming, but with a systematic approach and proper techniques, you can achieve a mix that perfectly highlights the track’s strengths. We will discuss essential things you should do every mix to achieve a professional sound.

Things You Should Do Every Mix

Credit: www.masteringthemix.com

Choose An Optimal Listening Environment

Choosing an optimal listening environment is one of the most critical and often overlooked steps in the mixing process. Selecting the right environment can make a huge difference in how your mix sounds. Before you begin mixing, there are a few things you should do to create the most optimal listening environment.

Eliminating External Noise

External noise can interfere with how you perceive a mix, and it’s essential to eliminate as much noise as possible. Turn off any unnecessary appliances in your room, including fans, air conditioners, or anything else that creates background noise to create a quieter working space. Wear a pair of noise-canceling headphones to help cancel out any external noise in your environment while you’re mixing.

Calibrating Your Speakers Or Headphones

Calibrating your speakers or headphones is essential in achieving accurate sound reproduction. Before starting a mix, ensure that your speakers or headphones are correctly calibrated to your liking. Make sure to rely on a reference track that you are familiar with and listen to the reference tracks in different environments, including other systems and high-quality systems to have an idea of what a good mix should sound like. Another crucial point is checking the phase alignment of the speakers.

To summarize, selecting an optimal listening environment is an essential part of the mixing process. Eliminating external noise and calibrating your speakers or headphones enables achieving an accurate sound representation in your mix. Take your time to choose the right environment, and you’ll be amazed at the resulting mix.

Arrange Your Tracks In A Logical Order

Arranging your tracks in a logical order is one of the key things you should do every mix. This will make it easier for you to keep track of what you are doing, stay organised, and ensure that you are producing a high-quality mix that is easy to listen to.

When it comes to mixing music, arranging your tracks in a logical order is crucial to achieving a professional sound. To help guide you through this process, we have outlined three main sections that should be arranged in a specific order: drums and bass, melody and harmonies, and vocals.

Start With The Drums And Bass

The foundation of any song should be the drums and bass. These elements work together to form the rhythm and groove of the song. When mixing, it’s important to ensure that the drums and bass are in sync, with the bass providing a solid foundation for the rhythm created by the drums. To achieve a great foundation, it’s ideal to start by mixing the kick drum and bass guitar or synth first. Keeping them level and balanced will create a strong foundation and make it easier to mix the rest of the elements.

Incorporate The Melody And Harmonies

Once you have a solid rhythm foundation, it’s time to incorporate the melody and harmonies. The melody of the song is typically the most memorable part and is what sticks with the listener long after they have finished listening. For this reason, it’s recommended to mix the melody a bit louder than the other elements. When incorporating harmonies, it’s important to ensure that they do not clash with the melody but rather provide a full and rich sound.

Vocals Bring It All Together

Finally, it’s time to bring in the vocals. The vocals are the most important element in most songs, as they tell the story of the song and are the main focus for the listener. When mixing vocals, it’s important to make them clear and audible but not so loud that they overpower the other elements. It’s also crucial to ensure that they sit well in the mix, allowing them to blend in with the other elements rather than standing out as a separate track. In conclusion, when arranging your tracks in a logical order, starting with the drums and bass, incorporating the melody and harmonies, and finally adding the vocals will ensure a well-balanced and professional sound. Taking the time to ensure each element sits well and works together will create a more immersive and memorable experience for the listener.

Maintain A Balanced Frequency Spectrum

To achieve the best mix possible, it’s important to maintain a balanced frequency spectrum. This means ensuring that no one frequency is too overpowering and that each instrument or vocal can be heard clearly in the mix. Paying attention to frequency balance increases the overall quality and clarity of your music.

Maintaining a balanced frequency spectrum is crucial for a high-quality audio mix. This means ensuring that each frequency range is well-represented in the overall mix, without any one range dominating the rest. Here are some tips to help you achieve a balanced frequency spectrum when mixing your audio content. Use EQ to isolate problem frequencies One of the most effective ways to balance your audio mix is to use EQ to isolate problem frequencies. With EQ, you can boost or cut specific frequency ranges to level out your mix. This can help you to reduce unwanted frequency buildups and muddiness. By identifying and addressing problem frequencies, you can ensure that each frequency range is clear and well-defined. Avoid overcompression Compression is a useful tool for balancing levels in your audio mix. However, it’s important to use compression in moderation, as overcompression can lead to a loss of dynamic range and an unbalanced mix. Make sure that each element of your mix has its own space to breathe and contribute to the overall sound. Avoid overusing compression to level out levels and aim to reduce the volume of individual elements with volume automation instead. Balance the mix with panning Panning is a powerful tool to balance your audio mix. Make sure that each element of your mix is panned appropriately to achieve a natural, spacious stereo image. Consider panning elements that share a similar frequency range to opposite stereo fields or, if possible, to different tracks. This will help to create a sense of separation between different elements and ensure a balanced, coherent mix. Use references to check your mix Lastly, don’t forget to use references to check your mix. A reference track can help you to compare your mix to a professional, well-balanced mix. Study the frequency ranges of the reference and make adjustments to your mix accordingly. This can help you to identify problem frequencies and make sure that each frequency range is well-represented in your mix. By maintaining a balanced frequency spectrum, you can ensure a high-quality, professional-sounding audio mix. Use these tips to help you achieve a well-balanced mix with clear, distinct frequency ranges.

Pay Attention To Levels And Panning

As a mixing engineer, paying attention to levels and panning is crucial for creating a well-balanced and immersive mix. This involves making sure that each instrument and element of the mix is at an appropriate level in relation to other elements, and that each element is properly panned in the stereo field. Here are some tips for achieving great levels and panning in every mix:

Avoid Clipping

Clipping is when the audio level exceeds the maximum digital limit, resulting in harsh distortion. This can be easily avoided by monitoring the levels throughout the mixing process and ensuring that no track is peaking above 0dB. In your DAW, adjust the levels of tracks that are pushing too hard to prevent clipping.

Utilize The Full Stereo Field

The stereo field is critical for creating a wide and dynamic mix. You can use panning to place elements of the mix in the left, center, or right of the stereo spectrum, or anywhere in between. When panning, consider the frequency range of each element – for example, low-end tracks like kick drums and bass should often be centered, while higher frequency elements like cymbals can be spread further apart. Take the time to experiment and find the optimal placement for each element.

Overall, paying careful attention to levels and panning can greatly enhance the overall sound and impact of a mix. Be deliberate in your choices, and take the time to craft a well-balanced and immersive mix.

Apply Subtle Effects To Enhance The Mix

Mixing is an essential part of the music production process, and it involves combining different tracks to create a cohesive and compelling sound. One important aspect of mixing is applying subtle effects that can enhance the overall quality of the mix.

Reverb And Delay

Reverb and delay are two of the most commonly used effects in mixing. Reverb helps to give sounds a sense of space and depth. It can be used to create a natural-sounding environment or to add a sense of drama to a particular part of the track. Delay, on the other hand, is used to create echoes and repeats of sounds. It can help to add texture and dimension to a track, especially if used subtly.

  • Use reverb to give sounds a sense of space and depth
  • Apply delay to create echoes and repeats of sounds
  • Use sparingly to avoid overwhelming the mix

Eq And Filtering

Equalization (EQ) is a commonly used tool in mixing, and it involves adjusting the balance of frequencies in different tracks. EQ can be used to create separation between tracks and to emphasize certain frequencies. Filtering is closely related to EQ and involves cutting or boosting certain frequency ranges to achieve a desired effect. Filtering can be used to eliminate unwanted frequencies or to create specific tonalities.

  • Use EQ to balance the frequency content of different tracks
  • Apply filtering to cut or boost specific frequency ranges
  • Use with care to avoid making the mix sound unnatural

Applying subtle effects like reverb, delay, EQ, and filtering can significantly enhance the quality of your mix. However, it is important to use these tools sparingly and with care, as overusing them can make the mix sound distorted or muddy. By using these effects in moderation, you can create a polished and professional-sounding mix that will impress your listeners.

Things You Should Do Every Mix

Credit: m.youtube.com

Take Breaks And Give Your Ears A Rest

To ensure a balanced and accurate mix, it’s important to take breaks and give your ears a rest. Constant exposure to high volumes can lead to ear fatigue and inaccuracies in your mixing decisions. Take frequent breaks to give your ears a chance to reset and maintain a consistent and accurate mix.

When it comes to mixing music, taking breaks and giving your ears a rest is crucial. Your ears are your most valuable tool as a music producer, and as such, it’s important to take good care of them. In this blog, we’ll discuss the importance of taking breaks, and we’ll also provide you with some tips on how to give your ears a rest.

Listen To Reference Tracks

One of the best ways to take breaks and give your ears a rest is to listen to reference tracks. Reference tracks are professionally mixed tracks that you can use as a benchmark to compare your own mix to. By listening to reference tracks, you can give your ears a break from your own mix, while also training them to pick up on the nuances of a well-mixed track.

Take A Walk Or Stretch

Another way to take a break and give your ears a rest is to take a walk or stretch. Sitting in front of a computer screen for hours on end can be tiring, both physically and mentally. Taking a short walk or stretching can help to get your blood flowing and give your ears a break from the constant sound waves.

Benefits of Taking Breaks and Giving Your Ears a Rest

Here are some benefits of taking breaks and giving your ears a rest during a mixing session:

  • Reduces ear fatigue and prevents hearing damage
  • Improves objectivity and helps to maintain perspective on the mix
  • Increases productivity and creativity by giving your brain a break

By incorporating these techniques into your mixing routine, you can improve the quality of your mixes and take care of your most valuable asset, your ears. Remember to listen to reference tracks and take breaks by stretching or going for a walk. Happy mixing!

Leave Your Mix Overnight

Leaving your mix overnight is crucial to achieving a well-balanced sound. After hours of working on your mix, your ears become fatigued and may not perceive sound accurately. Giving your mix a rest will help resensitize your ears and allow you to hear any flaws you may have missed.

Revisit With Fresh Ears

When revisiting your mix with fresh ears, it’s essential to listen attentively. Take note of any parts that sound off and make a list of changes that need to be made. Don’t rush into making adjustments immediately; take breaks in between to avoid ear fatigue.

Make Any Final Adjustments

After taking breaks, come back to your mix and make your final adjustments. It’s recommended that you adjust levels first, followed by EQ and compression. Ensure each track is balanced and sits well in the mix. Be careful not to over-process your tracks, which can lead to a muddy mix.

In conclusion, leaving your mix overnight is an important step to achieving a polished sound. With fresh ears, you can easily identify flaws and make final adjustments to obtain a well-balanced mix.

Things You Should Do Every Mix

Credit: www.youtube.com

Think Outside The Box

To truly enhance your mixing skills, it’s important to think outside the box and explore unique techniques. Experimenting with different genres, incorporating unconventional sounds, and utilizing creative effects can all elevate your mixes to the next level. Keep your mind open and embrace the unexpected for a truly dynamic sound.

When mixing tracks, it’s easy to fall into old habits and use the same techniques and sounds in every mix. But to create unique and engaging tracks, you need to think outside the box.

Experiment With Unconventional Techniques And Sounds

One of the best ways to think outside the box when mixing is to experiment with unconventional techniques and sounds. Don’t be afraid to try new things, whether that’s using a unique effect or trying out a new sample pack. By doing so, you may stumble upon a technique that really makes your mix stand out.

Find Your Own Signature Style

Another way to set yourself apart from the crowd is by finding your own signature style. This means taking the time to experiment with different techniques, sounds, and genres until you find a combination that really speaks to you. Once you have that signature style, you’ll be able to create mixes that are truly yours, and that stand out from the competition. In conclusion, whether you’re a seasoned mixer or just starting out, it’s important to think outside the box if you want to create engaging and unique tracks. By experimenting with unconventional techniques and sounds, and finding your own signature style, you’ll be able to set yourself apart from the crowd and create mixes that really resonate with your audience.

Frequently Asked Questions On Things You Should Do Every Mix

What Are The Keys To A Good Mix?

The keys to a good mix are: balance the levels of all instruments, pan instruments in the stereo field, apply EQ to enhance the clarity of each element, use compression to control dynamics, and apply reverb and delay for depth and space.

How Do I Master My Mix?

To master your mix, ensure that your sound levels are balanced, use EQ to cut unwanted frequencies, pan instruments to create space, use compression to control dynamics, and add reverb and delay for depth. Practice and experimentation with these techniques will help you develop your skills.

What Makes A Perfect Mix?

A perfect mix should have a balance of all the elements used in it, whether it’s music, cocktail or any other product. The right proportion of ingredients, correct timing, precise technique, and perfect measurement can make a mix perfect. Moreover, it should also meet the desired standard of the end-user and fulfil their requirements.

How Can I Get Better At Mixing?

To improve your mixing skills, you can: 1. Practice regularly with different types of music 2. Use reference tracks to compare and learn from 3. Invest in quality headphones and monitors 4. Learn about EQ, compression, and other mixing techniques 5. Take online courses or watch tutorials from experienced mixers.

Conclusion

To sum up, mixing is an art that requires diligence and patience. By following these simple steps, you can ensure a high-quality mix that not only sounds great but also resonates with your listeners. Keep in mind that mixing is an ongoing process, and with practice, you can refine your mixing skills and bring your music to the next level.

Remember to trust your ears, experiment with different techniques, and always be open to learning. With these tips, you’re sure to mix like a pro!

Categories
Archive

How to Avoid Tinnitus As a Musician

To avoid tinnitus as a musician, wear ear plugs during live performances and rehearsals. Additionally, take breaks and limit sound exposure to prevent hearing damage.

Music is an integral part of our lives that we all enjoy listening to. However, excessive exposure to loud music can lead to a ringing sensation in the ears, commonly known as tinnitus. Tinnitus is a common problem for musicians who are regularly exposed to high sound levels during live performances and rehearsals.

Related reading: 5 Workflow Mistakes To Avoid and Eq Mistakes You Need To Avoid. For background, see the Wikipedia article on Tinnitus.

It can have a significant impact on one’s hearing ability. Therefore, it is essential to take measures to avoid the risk of tinnitus. We will discuss some practical tips that you can follow to protect your ears and prevent tinnitus as a musician.

How to Avoid Tinnitus As a Musician

Credit: pirate.com

Know Your Limits for Avoid Tinnitus

As a musician, it’s important to know your limits and protect your hearing to avoid tinnitus – a persistent ringing or buzzing in the ears. Take regular breaks, wear ear protection, and keep volume levels at a safe level to prevent damage to your hearing.

Playing an instrument or singing can be a fun and rewarding hobby or career choice. However, it can also come with risks, such as developing tinnitus. Tinnitus is a condition where one experiences a constant ringing in their ears, which can cause discomfort, hearing loss, and even depression. As a musician, it is essential to know your limits and take the necessary actions to prevent tinnitus.

Volume Control for Avoid Tinnitus

One of the easiest ways to prevent tinnitus as a musician is to pay close attention to the volume. Playing music at high volumes for extended periods can cause damage to your ears, leading to tinnitus. It is best to use earplugs or noise-canceling headphones to protect your hearing. Additionally, try using noise meters to monitor sound levels during practice or performances. Staying within safe recommended levels can reduce the risk of developing tinnitus.

Take Breaks

As a musician, practicing for hours on end may seem like the best way to improve your skills. However, doing so can lead to ear fatigue, leading to tinnitus. It is essential to take breaks every hour or so to give your ears a chance to rest. During these breaks, try to keep it quiet and calm to give your ears time to recover. Over time, taking regular breaks can prevent tinnitus from developing.

Protect Yourself

Along with using earplugs and noise-canceling headphones, there are other ways to protect your ears. Try using in-ear monitors, which can provide better sound quality while also reducing the risk of hearing damage. Additionally, consider limiting your exposure to loud noise outside of practice and performances. For instance, avoid going to loud concerts or clubs or using noisy equipment. Conclusion In conclusion, tinnitus is a common condition among musicians that can have detrimental effects on your hearing and your career. As a musician, it is crucial to take the necessary steps to prevent tinnitus from developing. Knowing your limits, controlling the volume, taking breaks, and protecting yourself are all essential in preventing tinnitus. By following these steps, you can ensure that you continue to enjoy playing music for many years to come.

How to Avoid Tinnitus As a Musician

Credit: www.mla-ltd.co.uk

Protect Your Ears

As a musician, it’s important to protect your ears from tinnitus. Here are a few tips: 1) wear earplugs, 2) take breaks, 3) keep volume levels in check, 4) reduce exposure to loud noise outside of music performance.

As a musician, your ears are your most valuable asset. However, constant exposure to loud music during rehearsals, gigs, and performances can damage your hearing, leading to a condition known as tinnitus. Tinnitus is a ringing or buzzing in the ears that can be persistent and highly frustrating. Fortunately, there are specific measures you can take to protect your ears and avoid tinnitus altogether. Here are some tips.

Earplugs

One of the simplest and most effective ways to protect your ears as a musician is by wearing earplugs. Earplugs are small inserts that fit into the ear canal and reduce the amount of sound that gets in. Musicians’ earplugs are designed specifically for musicians and contain filters that attenuate sound evenly across frequencies without distorting it. This allows you to hear the music clearly while protecting your ears from excessive noise. Invest in a good pair of earplugs and wear them during rehearsals, gigs, and performances to avoid tinnitus.

Noise-cancelling Headphones/monitors

Another way to protect your ears as a musician is by using noise-cancelling headphones or monitors. These devices use active noise-cancellation technology to block out external sounds, allowing you to hear the music clearly at a lower volume. By reducing the amount of noise that gets into your ears, you can protect your hearing and avoid tinnitus. Noise-cancelling headphones or monitors are particularly useful during long rehearsals or recording sessions.

Conclusion

Protecting your ears as a musician should be your top priority. Wear earplugs, use noise-cancelling headphones or monitors, and take regular breaks to allow your ears to rest. Remember, once your hearing is damaged, there is no going back. Take care of your ears, and they will take care of you for years to come.

Maintain Good Health for Avoid Tinnitus

To maintain good health as a musician and avoid developing tinnitus, it’s important to protect your ears from loud noises and take frequent breaks during practice and performances. Use earplugs or noise-cancelling headphones and consider investing in high-quality gear that will reduce the risk of hearing damage.

As a musician, your hearing is your greatest asset, but constant exposure to loud music can have negative consequences, such as tinnitus. While it’s impossible to avoid loud music altogether, it’s essential to take some steps to protect your hearing and prevent tinnitus. One of the best ways to do this is to maintain good health. Here are some ways to do that:

Stress Management

Stress is a significant contributor to tinnitus, so it’s essential to take steps to manage stress. This can include regular exercise, meditation, or mindfulness practices. Identify the causes of stress in your life and try to eliminate or minimize them where possible. Engage in a hobby or activity that you find relaxing or engaging, such as reading, painting, or hiking.

Dietary Changes

Your diet can also have a significant impact on your health, including your hearing. Foods rich in antioxidants, vitamins A, C, and E, and omega-3 fatty acids can help prevent damage to the delicate hair cells in your inner ear. Conversely, foods high in salt, sugar, and caffeine can contribute to tinnitus. Avoid or limit your intake of these foods and focus on eating a balanced, nutritious diet.

Regular Exercise

Regular exercise is vital for good health and can also help prevent tinnitus. Exercise improves blood flow to the ears, which can help nourish and protect the hair cells in your inner ear. Exercise can also help reduce stress and improve your overall mood and outlook. Aim for at least 30 minutes of moderate exercise every day, such as walking, jogging, or cycling. In conclusion, maintaining good health is critical to preventing tinnitus as a musician. By managing stress, making dietary changes, and engaging in regular exercise, you can protect your hearing and enjoy your music for years to come.

How to Avoid Tinnitus As a Musician

Credit: siouxfallshearing.com

Implementing Healthy Habits Into Your Routine for Avoid Tinnitus

As a musician, protecting your hearing is important to prevent damage or permanent hearing loss. Tinnitus is a common issue among musicians, but it can be prevented by implementing healthy habits into your routine. Below are some ways to create a self-care plan and track progress to avoid tinnitus as a musician.

Creating A Self-care Plan for Avoid Tinnitus

Creating a self-care plan ensures that you prioritize your health and well-being. Below are a few self-care habits for musicians:

Healthy HabitsDescription
Eating a Balanced DietEating a balanced diet that includes fruits, vegetables, and lean protein is important in maintaining your overall health and preventing hearing loss.
Wearing Ear ProtectionWearing earplugs or noise-cancelling headphones can protect your ears from loud sounds and prevent tinnitus.
Maintaining Safe Noise LevelsMaintaining safe noise levels, especially during practice sessions and performances, can prevent hearing loss and tinnitus.
Taking BreaksTaking breaks during practice sessions and performances can prevent overexposure to loud music and reduce the risk of tinnitus.

Tracking Progress for Avoid Tinnitus

Tracking progress is important in implementing healthy habits effectively. Some ways to track progress are:

  1. Keeping a Journal – keeping a log of when and where you wear ear protection and how long you take breaks can help track progress.
  2. Using Smartphone Apps – there are various apps to track your safe noise exposure and remind you to take breaks.
  3. Regular Hearing Tests – regular hearing tests can help track any changes in your hearing and catch any issues early.

Implementing these healthy habits may seem difficult at first, but they can greatly reduce the risk of tinnitus and hearing loss in the long run. Prioritizing your hearing health as a musician can help you enjoy and continue your music career for years to come.

Frequently Asked Questions Of How To Avoid Tinnitus As A Musician

How Do Musicians Not Get Tinnitus?

Musicians can protect their hearing by using earplugs or in-ear monitors. They can also limit exposure to loud sounds, take regular breaks, and avoid standing too close to speakers. Tinnitus can be prevented by taking care of your ears and seeking treatment if you experience any symptoms.

What Causes Tinnitus For Musicians?

Musicians are at risk of developing tinnitus due to prolonged exposure to loud sounds during live performances or rehearsals. The loud noise damages the hair cells in the inner ear and generates a constant or intermittent ringing or buzzing sound in the ear.

Proper hearing protection and monitoring sound levels can help prevent tinnitus in musicians.

How Do Professional Musicians Protect Their Ears?

Professional musicians protect their ears by wearing high-quality earplugs or in-ear monitors that filter out damaging sound frequencies without compromising sound quality. They also limit their exposure to loud sounds, take regular breaks, and monitor their sound levels with decibel meters.

Additionally, they take steps to maintain their overall health and wellness, which can contribute to healthier hearing.

Is There A Cure For Musical Tinnitus?

There is no known cure for musical tinnitus. However, various treatment options can help reduce symptoms, such as cognitive behavioral therapy, sound therapy, and medication. It is important to consult a healthcare professional for proper diagnosis and management of the condition.

Conclusion

As a musician, tinnitus can be a real threat to your ability to play and enjoy music. Fortunately, there are several steps you can take to prevent it. From wearing earplugs to taking breaks during practice sessions, by following these tips consistently, you can keep your ears healthy and minimize your risk of developing tinnitus.

Remember, taking care of your hearing should always be a top priority, and with a little bit of effort, you can keep your ears in great shape for years to come.

Categories
Archive

Top Free Emulations Of Famous Synths

Some of the top free emulations of famous synths include Dexed, Helm, and TAL-Noisemaker. When it comes to creating electronic music, having access to quality synthesizers can make a huge difference in achieving the desired sound.

However, purchasing high-end software synthesizers can be quite expensive, especially for those who are just starting out. Also, luckily, there are several free emulations of famous synths available that can provide users with high-quality sounds without the high price tag. Also, we will be exploring some of the top free emulations of famous synths including Dexed, Helm, and TAL-Noisemaker.

Related reading: Best Free Harp Vst and Fl Studio Freebies. For background, see the Wikipedia article on Software synthesizer.

Moreover, these digital instruments offer a wide range of sounds that can create everything from ambient soundscapes to dancefloor bangers. In addition, whether you’re a seasoned producer or a beginner, these free emulations are definitely worth checking out.

1. Dexed

In addition, Dexed offers a free emulation of the popular Yamaha DX7 synthesizer, perfect for musicians looking for a classic 80s sound. For example, its intuitive interface and customizable controls make it a great addition to any digital audio workstation.

Overview Of Dexed for Free Emulations

Furthermore, Dexed is a free, multi-platform, and versatile software synthesizer that emulates the iconic Yamaha DX7 synthesizer. As a result, Dexed utilizes FM synthesis, which makes it capable of producing a diverse array of sounds suitable for a range of music genres, including jazz, pop, funk, and electronic music.

Features Of Dexed for Free Emulations

Additionally, Dexed comes with an intuitive user interface that resembles the original DX7 layout, making it easy to use for those familiar with the vintage synthesizer. However, other features of Dexed include:

  • 16-voice polyphony
  • 128 presets, including original DX7 library
  • Also, modulation matrix with eight operators, including feedback, six EGs, and 10 LFOs
  • Real-time MIDI input and output
  • Microtonal tuning support

How To Use Dexed

Moreover, using Dexed is as simple as downloading and installing the software, opening the plugin in your DAW, and selecting a preset. Dexed also comes with an extensive manual with detailed information on the various features and functions of the synthesizer.

Conclusion

In addition, Dexed is an excellent choice for musicians and producers looking to replicate the classic sounds of the iconic Yamaha DX7, without breaking the bank. Then, with its intuitive interface, versatile synthesis engine, and wide range of features, Dexed is a powerful and free alternative to expensive hardware synthesizers. Try it out today, and explore the exciting world of FM synthesis!

Top Free Emulations Of Famous Synths

Credit: bedroomproducersblog.com

2. Pg-8x

Furthermore, PG-8X is a free emulation of Roland’s classic JX-8P synthesizer, with all the original features faithfully recreated. In short, this top-quality plugin has an intuitive interface and is highly recommended for anyone looking for that vintage synth sound.

Additionally, PG-8X is a free emulation of the popular Roland JX-8P, a 6-voice polyphonic analog synth that was famous in the 1980s. Similarly, developed by Martin Lüders, this emulation captures the original character of JX-8P and adds modern features to enhance the sound and performance. Here’s a brief overview of PG-8X.

Overview Of Pg-8x

Also, PG-8X is a VST plugin that can work in any DAW to create classic analog synth sounds. Also, it features a straightforward interface that replicates the original JX-8P, with parameters such as oscillators, filters, envelopes, and LFOs. PG-8X also has additional features like a built-in arpeggiator, two effects processors, and MIDI CC automation. Overall, PG-8X is a faithful emulation of the JX-8P that offers more flexibility and versatility.

Features Of Pg-8x

Moreover, PG-8X has several features that make it an excellent choice for vintage synth enthusiasts. In addition, here are some of the notable ones:

  • Authentic sound: PG-8X captures the unique sound of the JX-8P with its signature chorus and lush pads. The oscillators and filters are precise and responsive, allowing you to sculpt your sound to perfection.
  • Arpeggiator: PG-8X has a built-in arpeggiator that can generate rhythmic patterns based on the notes you play. You can adjust the tempo, direction, and octave range to create complex arpeggios quickly.
  • Effects processors: PG-8X comes with two effects processors, a stereo delay, and a chorus/flanger. You can apply them to enhance your sound further and create stunning effects.
  • MIDI CC automation: PG-8X supports MIDI CC automation, which means you can map your hardware MIDI controllers to the synth parameters and adjust them in real-time. It gives you more control over your sound and adds expressiveness to your playing.
  • Low CPU usage: PG-8X is optimized for low CPU usage, which means you can use multiple instances in your project without affecting the performance of your computer.

Practical Tips for Free Emulations

In conclusion, PG-8X is an excellent emulation of the Roland JX-8P that offers more features and flexibility. For example, it’s perfect for musicians who want to create classic analog synth sounds with a modern twist. With its authentic sound, built-in arpeggiator, effects processors, and MIDI CC automation, PG-8X is a must-have synth plugin for any DAW.

3. Tyrelln6

If you’re a music producer or a synth enthusiast, you might have heard about TyrellN6. As a result, it’s a free virtual analog synthesizer that emulates the classic Roland Juno 60 sound. This synth is incredibly popular and widely used by musicians and producers around the globe. With its intuitive interface and versatile sound, TyrellN6 is a favorite among many.

Overview Of Tyrelln6

TyrellN6 is a software synthesizer that was developed by the German software company u-he. It was first released in 2011 and has since become one of the best free software synths available. However, the synth is available as a standalone application or as a VST, Audio Units, or AAX plugin. Whether you’re a beginner or an experienced producer, TyrellN6 provides a remarkable sound and a compelling set of features.

Features Of Tyrelln6

TyrellN6 comes with an array of features that allow you to create a wide variety of sounds. Then, some of the prominent features include:

  • 2 oscillators with 7 waveforms and sync.
  • Filter with 2 multimode, 2-band-reject filters, and 3 LFOs.
  • 2 ADSR envelopes and 2 AD envelopes.
  • Chorus, EQ, and delay effects.
  • Built-in arpeggiator.
  • Resizable interface with over 600 free presets.

These features make TyrellN6 a powerful and versatile software synth that can work in a variety of situations. In short, it can produce fat basses, lush pads, sharp leads, and everything in between. The interface is sleek and easy to use, making it an excellent choice for beginners.

4. Tal-noisemaker

When it comes to free synth emulations, TAL-Noisemaker is a name that shouldn’t be overlooked. Similarly, this virtual instrument is widely popular and renowned for its high-quality sound generation capabilities.

Overview Of Tal-noisemaker for Free Emulations

TAL-Noisemaker is an easy-to-use synthesizer plug-in with a simple yet intuitive interface. Also, this virtual instrument is capable of generating a wide range of sounds, including basses, leads, pads, and much more. The synthesizer uses subtractive synthesis, which makes it simple to control and diverse enough to generate an array of unique sounds.

Features Of Tal-noisemaker for Free Emulations

The TAL-Noisemaker comes with a plethora of features that set it apart from the other free synth emulations available:

  • Oscillators: The TAL-Noisemaker has three oscillators, each capable of generating a sine, triangle, saw, and square waveforms.
  • Filters: The synthesizer comes with two filters, the first filter is a low-pass filter with 12dB/oct and a high-pass filter with 6dB/oct, and the second filter is a high-pass filter with 12dB/oct and a band-pass filter.
  • Effects: The TAL-Noisemaker comes with a built-in chorus, reverb, delay, and bit-crusher effects that add depth and character to your sound.
  • Arpeggiator: The arpeggiator feature allows you to create intricate sequences that will elevate your music to the next level.
  • Presets: The TAL-Noisemaker comes with a plethora of presets that will help you get started with creating music right away. The presets range from simple bass and lead sounds to complex pads and sequences.

If you’re looking for a free synth emulation that will give you high-quality sounds at no cost, then TAL-Noisemaker is the perfect synthesizer for you. In addition, its intuitive interface, versatile sound generation capabilities, and plethora of features make it a must-have plugin for any music producer.

5. Ob-xd

OB-Xd is one of the top free emulations of famous synths. For example, with its rich and warm sound, it offers a range of features including filters, oscillators, sync options and more, making it a popular choice for music producers looking to incorporate retro sounds into their modern productions.

If you are a fan of the vintage Oberheim OB-X, then OB-Xd is the emulation for you. As a result, a software synthesizer created by discoDSP, OB-Xd is instrumental in capturing the rich and classic sound of a well-known instrument of the 80s. OB-Xd is an easy-to-use software that reproduces the famous polyphonic analog synth, and it is available for free.

Features Of Ob-xd for Free Emulations

OB-Xd offers a range of features that make it the popular go-to free emulation of the Oberheim OB-X. However, below are some of its key features:

1. Polyphonic

The OB-Xd is a polyphonic synth that gives you the ability to play multiple notes simultaneously. It supports up to eight voices with their waveforms, mix, filter, and envelopes as well.

2. Arpeggiator

OB-Xd comes equipped with an arpeggiator, which allows you to easily create complex patterns and save them as presets.

3. Two Oscillators

OB-Xd features two oscillators which come with seven waveform shapes that can be mixed, synced, or modulated by an LFO.

4. Filters

OB-Xd offers two types of filter: the CEM-type and 12dB SEM-type. These filters deliver a warm, vintage-style sound that is distinctive to the OB-X synth.

5. Modulation

OB-Xd gives you access to a range of modulation options like LFO and AD envelope, which can be mapped to a wide range of parameters. OB-Xd is an excellent free synth emulation that delivers the warm and distinctive sound that made the Oberheim OB-X famous. With its straightforward interface and impressive range of features, OB-Xd is a must-have for any enthusiast of vintage synthesizers.

Top Free Emulations Of Famous Synths

Credit: www.productionmusiclive.com

Top Free Emulations Of Famous Synths

Credit: www.gearnews.com

Frequently Asked Questions Of Top Free Emulations Of Famous Synths

What Are The Best Free Synth Plugins?

Some of the best free synth plugins are Dexed, Tyrell N6, TAL-NoiseMaker, Synth1, and Helm. These plugins offer a range of sounds, from classic analog to modern digital, and are compatible with various DAWs. They are ideal for both beginners and professionals looking for high-quality yet affordable synthesizers.

How Does A Software Synthesizer Work?

A software synthesizer, or synth, works by translating digital signals into sound waves that can be heard. It does this by using algorithms to generate waveform patterns, imitate traditional instruments, and manipulate sound. The resulting sound can be further modified through filters, envelopes, and effects to shape the desired output.

What Is The Name Of Our Top Vst Synthesizer?

Our top VST synthesizer is named [insert name].

What Are The Top 10 Beginner Synthesizers?

Top 10 beginner synthesizers are Korg Volca Keys, Arturia MiniBrute 2S, Behringer MS-1, Roland System-1, Yamaha Reface CS, Novation Bass Station II, Korg Monologue, Arturia MicroBrute, Moog Werkstatt-01 and Teenage Engineering OP-1.

Conclusion

Overall, these free emulations of famous synths offer incredible value and exceptional sound quality for your next music production project. They allow you to access legendary sounds at no cost, and still deliver outstanding results. From the classic analog sounds of the Minimoog to the iconic digital sounds of FM synthesis, these synths can inspire and enhance your music-making journey.

These free emulations are a must-try for any music producer seeking expert-level sounds.

Categories
Archive

Dos When Approaching A Record Label

When approaching a record label, be professional and prepared. Research the label and tailor your approach to their style and needs.

As an artist trying to get signed to a record label, it can be a daunting task. One of the most crucial steps is approaching a record label. It requires being professional and having a strategy in place before reaching out.

With so many artists vying for a spot on the label’s roster, it’s important to stand out and make a good impression from the very beginning. We will discuss some essential dos when approaching a record label to increase your chances of getting signed. Read on to find out more.

Research And Preparation

Before approaching a record label, it’s important to have a solid understanding of what you want and what the record label can offer you. This requires thorough research and preparation to increase your chances of getting signed.

Know What You Want

Start by defining your goals and expectations. What type of music do you create? What are your career objectives? What do you hope to achieve by signing with a record label? Knowing what you want can help you evaluate whether a label is a good fit for you.

Study The Record Label

Research the record label you are interested in. Find out their reputation in the industry, their past and current lineup of artists, and their overall vision and mission statement. This will help you gauge whether they are a good match for your music and goals.

Get Familiar With Their Roster

Knowing the label’s roster of artists is crucial. This will help you identify potential opportunities to collaborate and network, as well as understand how you fit into the label’s overall brand and image. Additionally, it will help you avoid pitching your music if it doesn’t align with the label’s existing artists or genres.

In conclusion, approaching a record label requires careful research and preparation. This includes defining your goals, studying the label, and getting familiar with their roster of artists. By doing so, you can increase your chances of getting signed and forming a successful partnership with a record label.

Professionalism

When approaching a record label, it is crucial to maintain a high level of professionalism to increase your chances of success. This is the first impression a record label will have of you, so it is important to make it count. Here are some dos when approaching a record label that you should keep in mind:

Introduce Yourself Professionally

The first and most essential step when approaching a record label is to introduce yourself professionally. This includes providing your name, your band or artist name (if applicable), and your role in the band or project. You should also provide a brief background and summary of your experience in the music industry, highlighting any significant achievements, awards, or performances you have had thus far. Keep in mind that your introduction should be concise and engaging, aimed at capturing the label’s attention.

Clear And Concise Pitch

Your pitch should be clear and concise, outlining exactly what you are looking for and what you have to offer. Clearly state your goals, whether it is signing a record deal, obtaining financing for your next project, or looking for marketing support. Be specific about how you plan to achieve these goals and what the label can expect from you in return. Your pitch should be well-thought-out, to the point, and demonstrate your knowledge and understanding of the music industry.

Share Your Music Demo

Your music demo is the most crucial part of your approach to a record label. It is the first way for the label to hear what you are capable of. Make sure to share a demo that showcases your best work and the kind of music that will fit in with the label’s portfolio. The demo should be a reflection of your professionalism, quality, and creativity as an artist. Make sure to follow the label’s submission guidelines when submitting your demo. Lastly, make sure to submit a professionally recorded demo.

Networking And Connections

When it comes to getting in touch with record labels and making a name for yourself in the industry, networking and making connections is key. Not only will it help you to expand your reach and get your music heard by more people, but it can also provide you with valuable support and advice from industry professionals.

Network In The Industry

One way to get started with networking is to attend industry events such as music conferences, festivals, and showcases. These events provide you with the opportunity to meet other artists, producers, managers, and record label executives. Be sure to bring business cards, demos, and be prepared to talk about your music in a concise and compelling way.

You can also join professional organizations such as the National Association of Record Industry Professionals (NARIP) or the Music Business Association (Music Biz) to gain access to exclusive networking events and resources.

Work With Industry Professionals

Collaborating with industry professionals such as producers, engineers, and songwriters can also provide you with valuable connections. Not only can these professionals offer feedback and guidance to help improve your music, but they may also have connections to help you get in touch with record labels.

Leverage Your Existing Connections

Don’t underestimate the power of your existing connections. Reach out to friends, family, and acquaintances who may have connections in the music industry. You never know who might be able to offer a referral or introduction to a record label contact.

Additionally, use social media to your advantage. Follow and engage with record label executives on platforms such as Twitter and LinkedIn. Share your music and be sure to tag relevant industry influencers and hashtags.

Dos When Approaching A Record Label

Credit: www.productionmusiclive.com

Persistence

When approaching a record label, persistence is key. Show your dedication and passion for your music by consistently reaching out and following up with the label. Remember to always be respectful and professional in your approach.

Follow Up With Contacts

Persistence is key when approaching a record label. One of the best ways to demonstrate this is by following up with your contacts. Keep in mind that record label executives receive hundreds of emails a day, so it’s crucial to stand out and make them remember you. Sending a brief and professional follow-up email a few days after your initial contact shows that you are serious about your music and are willing to go the extra mile.

Showcase Progress And Growth

Another important factor in approaching a record label is to showcase your progress and growth as an artist. Record labels want to invest in artists who have the potential to generate revenue and build a fan base. Update your contacts on your latest recordings, performances, and any awards or accolades you have received. This shows that you are actively working to improve your craft and that your music has value.

Be Patient, But Persistent

Patience is a virtue, and it’s particularly important when it comes to approaching a record label. It’s important to be realistic and understand that the process can take time. While you should be persistent in following up with your contacts, you don’t want to come across as pushy or desperate. Remember that record labels receive a lot of submissions and it may take some time for them to get back to you. Stay positive and continue to work on your music while you wait for a response.

Frequently Asked Questions On Dos When Approaching A Record Label

How Do You Approach A Record Label?

To approach a record label, prepare a compelling demo package featuring your best work and a detailed biography. Research labels and identify the ones that fit your style. You can reach out through email, social media, or attend music industry events to meet label representatives.

Be professional, persistent, and patient.

What Do You Say When Contacting A Record Label?

When contacting a record label, make sure to introduce yourself and your music briefly. Discuss why you are reaching out to the label and what you hope to achieve by working with them. Be polite and professional, and offer to send samples of your music for their consideration.

Remember to follow up after your initial contact.

What To Do Before Signing With A Record Label?

Before signing with a record label, there are a few important things you must do. Firstly, research the label thoroughly and ensure they align with your goals. Secondly, seek legal advice to understand the terms and conditions of the contract.

Thirdly, build a following and establish a brand. Lastly, have a clear understanding of your value and negotiate accordingly.

How Do You Prepare For A Record Label Meeting?

To prepare for a record label meeting, research the label and their past signings. Showcase your skills by rehearsing and compiling your best work. Be confident and prepared to answer questions about your brand and future goals. Don’t forget to dress and behave professionally to make a good impression.

Conclusion

Approaching a record label can be a daunting task, but following these dos can give you a better chance of success. Be prepared with quality music and a strong online presence, know your audience and target market, position yourself strategically, and be persistent.

Remember that receiving rejection is a natural part of the process, so don’t get discouraged and keep pushing towards your goals. With perseverance and determination, you can increase your chances of getting noticed by a record label and achieving success in the music industry.

Categories
Archive

Lufs Loudness Unit Full Scale

Loudness Unit Full Scale (LUFS) is a measurement used to quantify perceived loudness standardised across all audio devices. It gives an indication of the perceived loudness of an audio signal with higher values indicating louder audio.

LUFS is an important metric in the audio industry and is particularly relevant in broadcasting and streaming services where consistent loudness levels are required. It helps ensure that audio content is delivered at a standardised loudness level regardless of the platform or device.

Using LUFS measurements, audio professionals can apply a process called loudness normalisation to ensure consistent loudness levels across various programs, episodes, and audio tracks. This helps to prevent unexpected changes in volume and enhances the listening experience for the audience. LUFS is a crucial tool for maintaining audio quality and ensuring the best possible listening experience for viewers and listeners.

What Is Lufs?

LUFS or Lufs Loudness Unit Full Scale is a measurement used to indicate the perceived loudness of audio. It is a standardized system that can help ensure consistent audio levels across different platforms and devices.

Definition Of Lufs

LUFS, which stands for Loudness Units Full Scale, is a standardized measurement of loudness levels. It is used to determine the perceived loudness of audio signals and is measured in decibels. LUFS considers the volume level of an entire audio clip and calculates the average loudness of the clip, instead of measuring the highest peaks in the audio. This is helpful when trying to level match audio clips and ensure consistent loudness across all audio signals.

History Of Lufs

The term LUFS was first introduced in 2010 as a standard measurement of loudness for digital audio. This standard was recommended by the International Telecommunication Union and has since been widely adopted by the audio industry. LUFS was created to address the issue of varying loudness levels in audio and ensure consistent loudness across all audio signals, regardless of the playback device or medium. The use of LUFS has become increasingly important with the rise of streaming services and the need for consistent loudness levels across various platforms.

Importance Of Lufs

Using LUFS is crucial in the audio industry to ensure that audio signals are not too loud or too quiet. If the loudness levels are too high, it can cause listener fatigue and damage to hearing, while if it is too low, it can result in the audio being difficult to hear and understand. LUFS ensures that audio levels are consistent across all devices and platforms, providing an optimal listening experience for the listener. It has become an important standard in the industry and is used in music, television, film, and other forms of audio production.

How Lufs Works

When it comes to audio loudness, there are different units of measurements, and one of them is LUFS or Loudness Unit Full Scale. This standard metric has gained wide acceptance in the broadcast industry, ensuring consistent loudness levels across various platforms and contents.

Lufs Vs. Dbfs

To understand LUFS better, we need to differentiate it from dBFS or decibels full scale. dBFS is a digital representation of audio peaks where 0 dBFS is the highest level that a digital system can record. In contrast, LUFS measures perceived loudness, meaning it takes into account the entire audio signal and its dynamics. Essentially, LUFS measures the average loudness of an audio file, taking into account its duration.

Lufs Measurement

LUFS measurement also takes into account the frequency alterations and the ear’s sensitivity to sound, further enhancing the perceived loudness reading. LUFS measurements are more accurate than previous loudness measurement standards, such as RMS and peak leveling. RMS measures the average power of a signal, while peak leveling measures the highest amplitude achieved by the signal. However, LUFS takes both of these measurements and more into account, resulting in an accurate perceived loudness reading.

Lufs And Loudness Range

Loudness Range (LRA) is the difference between the average loudness and the quietest parts of an audio file. When combined with LUFS, it provides more information on audio dynamics and perceived loudness levels. LUFS and LRA readings can help audio engineers adjust audio levels to achieve a consistent and comfortable listening experience across different platforms and content types.

In conclusion, LUFS is an essential tool for audio engineering. Its accuracy in measuring perceived loudness means audio professionals can produce consistent and reliable content across various platforms. By understanding how LUFS works and its differences from other units of measurements, audio engineers can improve their workflow and produce high-quality audio content.

Lufs Standards

LUFS, or Loudness Unit Full Scale, is a standardized measure of audio loudness. It provides a universal way to measure loudness that is applicable to different platforms and mediums, ensuring consistency in audio quality and volume.

Industry Standards

LUFS (Loudness Units Full Scale) is an industry-standard measurement used to determine the volume and loudness of audio signals. It is a standardized method for measuring and normalizing audio levels, ensuring that all audio content across different platforms and devices is delivered at the same level of loudness. The industry standard for LUFS is -23. This means that all audio content should be set to an average loudness level of -23 LUFS.

Lufs For Different Platforms (tv, Streaming Services, Etc.)

Different platforms have different standards for LUFS, and making sure your content meets the standard for each platform is essential for optimum playback. TV broadcasters in the United States require audio to be normalized to -24 LUFS, while streaming services such as Netflix and YouTube have a standard of -14 LUFS. Therefore, it is crucial to use audio normalization tools to meet the standards of different platforms.

Lufs For Music

For music, the standard LUFS level is around -16. This is because music often has more energy and dynamics than spoken word content. However, there is no set standard for music, and often the LUFS level depends on the genre and the personal preference of the audio engineer. In conclusion, understanding LUFS standards is essential for audio content creators. By following the standards, audio content can achieve consistency in volume and loudness, providing a better listening experience for the audience.

Lufs Loudness Unit Full Scale

Credit: www.izotope.com

Lufs In Practice

The Loudness Units Full Scale or LUFS refers to the measurement unit used to detect loudness levels of audio signals. Previously, peak normalization was used for audio measurement but it only measures the loudest parts of the audio signal, disregarding the quieter parts. LUFS, on the other hand, measures the loudness of the entire audio signal, leading to better consistency in audio levels. The use of LUFS has become a standard in different industries such as post-production, broadcasting, and music production.

Lufs In Post-production

Post-production companies encounter different sound files that often have varying volumes, making it challenging to maintain a consistent sound. By using LUFS measurements, audio engineers can detect the loudness levels of different audio files and ensure that they conform to the desired standard for the project. LUFS simplifies the post-production process by standardizing the sound across different audio files, allowing for a more professional and polished audio output.

Lufs In Broadcasting

When broadcasting audio content, maintaining consistent and acceptable loudness levels is crucial to the listening experience of the audience. The use of LUFS ensures that the volume of audio is within the standard levels that correspond to different genres of programming. For example, a news broadcast will have a lower LUFS level than a music concert. LUFS ensures that broadcasts adhere to commercial and regulatory requirements, producing a high-quality sound output.

Lufs In Music Production

Music production utilizes LUFS measurements to maintain optimum sound levels, ensuring that all aspects of the music track are audible. LUFS allows producers to measure the loudness of individual musical elements, such as vocals and instruments, and adjust the sound to fit perfectly into a cohesive composition. The use of LUFS in music production ensures that listeners enjoy a better and more immersive audio experience.

Benefits Of Using Lufs

LUFS (Loudness Unit Full Scale) is a modern standardization for measuring the perceived loudness of audio signals. This measuring tool ensures that all audio has a consistent loudness level, providing benefits when it comes to minimizing listener fatigue and complying with regulations. In this section, we will delve into the benefits of using LUFS and how it improves the audio listening experience.

Consistency In Loudness

One of the primary benefits of using LUFS is that it helps in maintaining a consistent loudness level across different audio tracks. In traditional measuring tools like dBFS (Decibels Full Scale), the perceived loudness varies from one track to another track, making it difficult to adjust the volume levels accordingly. In contrast, LUFS measures the loudness of audio in a way that human ears perceive, ensuring that the loudness level is consistent across all audio files.

Using LUFS in the music industry ensures that songs are played at the same volume level regardless of the genre, allowing the listener to enjoy the music without constantly adjusting the volume. This creates a better listening experience and ensures that the listener is not distracted by sudden increases or decreases in loudness as they move from track to track.

Avoiding Listener Fatigue

Listener fatigue occurs when there is a difference in loudness levels between various audio tracks, which forces the listener to adjust the volume constantly. This can cause fatigue, resulting in the listener losing interest or skipping a particular track. Using LUFS can prevent listener fatigue by ensuring that all audio has a consistent loudness, making it easy and comfortable to listen to.

Moreover, removing sudden spikes in loudness, such as in commercials, can help prevent the listener from being startled and possibly damaging their hearing. With LUFS, the music industry can provide a better listening experience while making sure the listeners’ hearing is protected from sudden bursts of loudness.

Compliance With Regulations

Using LUFS helps ensure compliance with various loudness regulations that vary across regions. Government agencies regulate the maximum perceived loudness level of an audio signal, such as commercials aired on TV and radio. Using LUFS makes it easy to meet these regulations by measuring the perceived loudness of audio better, eliminating penalties or fines in case of non-compliance.

Moreover, using LUFS can help in preparing audio content for various streaming platforms, such as Spotify and YouTube, which require a specific loudness level for optimal playback. With LUFS, there won’t be a need to re-master the audio content to meet the loudness requirements of different streaming platforms.

Benefits of Using LUFS
Consistent loudness level across all audio filesPrevents listener fatigue and creates a better listening experience
Compliance with various loudness regulationsEliminates penalties and fines in case of non-compliance

Using LUFS ensures a standardized, comfortable, and safer listening experience while meeting loudness regulations. It’s essential to use this modern loudness measuring tool in the music industry and throughout different audio platforms. With LUFS, the audio signal can be heard as intended by the content creator while providing an optimal listening experience for the listener.

Lufs Loudness Unit Full Scale

Credit: soundoracle.net

Tools For Measuring Lufs

LUFS (Loudness Units Full Scale) is a unit of measurement commonly used to measure the average perceived loudness of audio. Accurate measurement of LUFS is essential in audio mastering and loudness normalization, especially for broadcasting and digital streaming platforms. Fortunately, there are many tools available for measuring LUFS, including hardware and software meters and DAW plugins.

Hardware Lufs Meters

Hardware LUFS meters are dedicated devices used to measure average loudness levels. These meters come in various forms, including standalone units, rack-mountable devices, and portable meters. They feature calibrated displays that show real-time LUFS levels while simultaneously displaying peaks and RMS levels. These meters are generally considered the most accurate for measuring LUFS and are often used by audio engineers and mastering professionals.

Software Lufs Meters

Software LUFS meters are plugins that can be downloaded and installed on audio editing software such as Pro Tools, Logic Pro, or Cubase. These meters allow users to monitor loudness levels in real-time, using standard units of measurement such as LUFS, LKFS, and RMS. Software meters are affordable, portable, and versatile, making them a popular choice among home studio enthusiasts and podcasters.

Integration With Daws

LUFS meters can also be integrated with digital audio workstations (DAWs), allowing for seamless monitoring of loudness levels during production and mixing. Many DAWs such as Pro Tools, Logic Pro, and Cubase come with built-in LUFS meters, while others require users to purchase and install third-party plugins. Integration with DAWs ensures accurate monitoring of LUFS levels, helping producers achieve compliant loudness levels for broadcasting and streaming platforms.

Lufs Myths And Misconceptions

LUFS, or Loudness Units Full Scale, is a widely accepted standard for measuring loudness in audio. However, there are several myths and misconceptions that surround this topic. Let’s take a look at some of them and explore the facts:

Lufs And Dynamic Range

One common misconception regarding LUFS is that it reduces the dynamic range of audio. It is true that loudness normalization can reduce the difference between the loudest and softest parts of a track. However, this does not mean that dynamic range is lost.

In fact, LUFS can be used to preserve dynamic range and ensure that the quieter parts of a track are still audible. By normalizing to a specific LUFS level, you can ensure that all parts of a track are heard, regardless of their loudness.

Lufs And Mastering

Another myth surrounding LUFS is that it is only relevant to the mastering process. While it is true that LUFS is often used for loudness normalization during mastering, it can also be used in other contexts.

For instance, LUFS can be used during mixing to ensure that different tracks have a consistent loudness. It can also be used in post-production to ensure that audio levels remain consistent throughout a video or film.

Lufs And Perception Of Loudness

A common misconception about LUFS is that it measures the actual loudness of a track. However, LUFS measures perceived loudness, which is not the same as actual loudness.

Perceived loudness takes into account how the human ear perceives different frequencies. For instance, a track with a lot of bass might sound louder than a track without much bass, even if both tracks have the same average loudness.

By using LUFS to measure perceived loudness, you can ensure that your tracks are at a consistent volume, regardless of their frequency content.

Future Of Lufs

Loudness Units Referenced to Full Scale (LUFS) has become a crucial metric in the music industry, especially with the ever-changing landscape of music streaming. As we move forward, it is pertinent to discuss the future of LUFS, new standards, and advancements in technology. In this article, we will delve into these topics to provide insight into the future of LUFS.

New Lufs Standards

The current LUFS standard for music streaming platforms is -14 LUFS. However, there has been a push for a universal standard across all mediums, including broadcasting. The International Telecommunication Union (ITU) is working on introducing a new standard of -16 LUFS for all forms of broadcasting. This proposed standard would mean that music would have to be mixed at a lower level, resulting in a more consistent listening experience for the end-user.

Implications For Music Production And Broadcasting

The new proposed -16 LUFS standard will have implications on both music production and broadcasting. For music producers, mixing at a lower level will result in a reduction in the loudness of the final mix, making it crucial to optimize every element of the mix to achieve the desired loudness level. On the broadcasting front, the -16 LUFS standard will mean that advertisements will be at the same level as the programming, resulting in a more enjoyable listening experience for the listener.

Advancements In Lufs Technology

The software used for measuring loudness has come a long way since the introduction of LUFS. The latest advancements in technology have made it possible to measure and monitor loudness levels in real-time. Moreover, tools like loudness-normalized streaming platforms and loudness correction tools have made it possible to achieve optimum levels for all types of content, from music to podcasts.

As technology continues to advance, it is expected that the use of LUFS as a loudness meter will be more prevalent across all forms of audio content, including virtual and augmented reality experiences, podcasts, and live streaming events.

Conclusion

The future of LUFS is bright, with the industry moving towards universal standards and better technology. As a result, music producers, broadcasters, and other content creators will be able to achieve optimum loudness levels for all types of audio content. By keeping up with these changes in the industry, content creators will be able to provide a better listening experience for their audience.

Frequently Asked Questions For Lufs Loudness Unit Full Scale

What Is A Good Lu Range?

A good LU range refers to a range of light units that can be measured using a light meter. The ideal range will depend on the specific needs of the photographer or filmmaker. Generally, a range of 0-400 LUs is considered good for indoor shooting, while outdoor shooting may require a range of 0-2000 LUs.

It’s important to choose a light meter that meets your specific needs.

Is 10 Lufs Too Loud?

No, 10 LUFS is not too loud. In fact, it’s a common loudness level for audio content in various platforms. However, it’s important to ensure that the audio maintains consistent loudness throughout to provide a better listening experience.

What Is 16 Lufs?

16 LUFS stands for 16 Loudness Units Full Scale and is a measure of the loudness of audio content. It is commonly used as a standard for the loudness of music, podcasts, and other audio broadcasts. A recording with a loudness of 16 LUFS will sound balanced and clear across different listening environments.

Is 9 Lufs Too Loud?

Yes, 9 LUFS can be too loud for certain types of audio content. It is important to consider the context and intended audience when determining the appropriate loudness level for your audio. It is recommended to aim for a range between -16 and -20 LUFS for most content.

Conclusion

The use of LUFS loudness unit full scale is indispensable in the audio and music industry. It is the key to achieving the perfect balance for a song or any audio recording. With LUFS, you can ensure that your audio content’s loudness levels comply with international standards and market requirements.

It might seem daunting for beginners, but understanding LUFS is vital to achieve professional-sounding audio content. Remember that LUFS is not a one-size-fits-all solution, but rather a tool that can help you achieve the best possible sound quality for your audio content.

Keep learning, practicing and experimenting. Happy mixing!