Categories
Archive

Mixing Start To Finish In Fl

In FL Studio, mixing from start to finish involves organizing and labeling tracks, setting levels, applying EQ and compression, adding effects, and adjusting panning for a balanced and cohesive sound. To achieve a professional-sounding mix, it’s important to utilize various tools and techniques to enhance each individual track and blend them together seamlessly.

Mixing is an essential part of music production, and getting a good mix can make or break a song’s success. In FL Studio, there are many tools and features available to help you achieve a balanced, polished mix. From organizing and labeling tracks, to setting levels, applying EQ and compression, adding effects, and adjusting panning, each step in the process requires careful attention to detail.

A great mix should enhance the unique qualities of each individual track while blending them together seamlessly to create a cohesive and professional-sounding final product.

Setting Up Your Project

To set up your project for mixing start to finish in FL, first organize your tracks and samples. Then, create individual mixer channels and balance the volume levels. Add effects, make EQ adjustments, and use compression to create a clean and cohesive mix.

Before you start mixing a track in FL Studio, it’s essential to set up your project to ensure that everything runs smoothly. In this section, we’ll be discussing the important things to consider when preparing your project for mixing.

Choosing Your Tempo And Time Signature

The first thing you need to do when setting up your project is to decide on your tempo and time signature. Determining your tempo will affect the feel and mood of your track, whether you want it to be fast, slow, or somewhere in between. Similarly, choosing the right time signature will give structure to your track, making it easier to follow and allowing you to add different types of beats and rhythms.

Selecting A Key And Tuning Your Instruments

Once you’ve set your tempo and signature, the next step is to select a key and tune your instruments. Choosing a key will determine the overall harmonic structure of your track and make it sound more intentional. While tuning your instruments will ensure that they’re in perfect harmony with each other, making the mixing process much easier.

Setting Up Your Mixer Channels

Finally, it’s essential to set up your mixer channels to ensure that each element of the track is balanced and optimized. Creating a new mixer channel for each instrument and sound allows you to adjust the levels and panning to achieve the desired sound. This way, you’ll give each element its own space in the mix, making it easier to control and adjust when working on the final mixdown. To sum it up, setting up your project correctly before you start mixing will save you time and give you more control over the final result. Remember to choose your tempo and signature, select a key and tune your instruments, and set up your mixer channels properly. If you follow these steps, you’ll be setting up your project like a pro every time.
Mixing Start To Finish In Fl

Credit: www.productionmusiclive.com

Recording Your Tracks

To achieve a polished final mix, it’s important to record your tracks with quality from the get-go. Once recorded, mixing in FL Studio allows you to take your tracks from start to finish with ease. With FL Studio’s vast range of tools and plugins, you can fine-tune every aspect of your mix to achieve the desired sound.

Recording your music tracks is a complex process that requires attention to detail. If you’re using FL Studio (Fruity Loops), then you’re using one of the best software available for recording, mixing, and mastering music. To get the best results, you need to ensure you’re recording the tracks correctly in the first place.

Recording Your Drums

Drums are the backbone of most music tracks, so you’ll want to ensure you record them correctly. When recording your drums, it’s essential to have a clean, noiseless room to avoid any unwanted interference on your track. If you’re using microphones to record the drums, choose the right one that suits your drum. Ensure you place them correctly to capture the desired sound accurately.

Recording Your Bass

Recording your bass guitar or synth bass is crucial for a well-rounded, full sound. Depending on the type of bass you’re using, you may need to think about how you’ll record it. If you’re using a guitar-type bass, then you can record it in the same way as you would a regular guitar. However, if you’re using a synth bass, you may need to record it through a direct input (DI) box to capture its sound accurately.

Recording Your Other Instruments

Recording your other instruments, such as guitars, pianos, or vocals, is where you can get creative with your sound. If you have multiple instruments in your track, you can record each instrument separately, then mix them at the end. Ensure all your instruments are in tune before recording to avoid any off-key sounds. Experiment with different microphone positions to capture the best sound possible. In conclusion, recording your tracks is a foundation for creating a great sound in your finished track. Ensure you have the right equipment, a noiseless room, and proper recording techniques to get the best recording. By following the above tips, you’ll be on your way to creating your next hit track.

Editing Your Tracks

Editing Your Tracks:

Editing your tracks is a crucial part of the mixing process. It involves compiling your best takes, quantizing MIDI, and editing audio clips to ensure everything sounds on point. With that in mind, in this section, we’ll take you through each step of the editing process.

Compiling Your Best Takes:

When compiling your best takes, focus on capturing the best individual performances from different takes. For instance, if you have several guitar takes, listen to each one and pick the best sections. Doing so ensures that your final track sounds polished and more professional.

Moreover, when selecting your best takes, avoid picking the ones that are loud or have low sound quality. Make sure your selected clips have the proper pitch, tempo and timing – this is where the next step, quantizing your MIDI comes in.

Quantizing Your Midi:

If your music contains MIDI instruments, quantizing them will help you ensure that the timing is perfect. During the recording process, there are chances of slightly timing-off or sloppy performance which might impact the overall track. Quantizing allows to adjust all timing or pitch issues that you might have encountered during recording.

Quantizing works by ‘snapping’ MIDI notes to a specific grid, thereby correcting any timing issues to ensure that everything sounds in time. This might feel a bit robotic initially, but with a bit of experimentation, you can make the quantized MIDI sound natural.

Editing Audio Clips:

Lastly, you will want to edit the audio clips. This editing process involves trimming or cutting unnecessary parts of a clip, fading in or out at the start and end, and removing pops or clicks present in the audio. This step requires a keen ear and attention to detail.

Additionally, ensure that when editing audio clips, there are no overlapping sound waves as it could cause phase cancellation that might have adverse effects on the final mix.

In summary, editing your tracks will help you get clearer, punchier, and more professional-sounding results. Compiling your best takes, quantizing MIDI, and editing audio clips are all essential steps to ensure that your tracks are ready for mixing.

Mixing Your Tracks

Learn how to mix your tracks from start to finish in FL Studio, the popular digital audio workstation. This comprehensive guide covers everything from setting up your mix to applying effects and mastering your final product.

Once you have recorded and edited your tracks, the next step is to mix them. Mixing is the process of ensuring all individual tracks sound great when combined together to create a final output. It involves finding the right balance for each track, applying equalization, and adding effects. Let’s explore each of these mixing steps below.

Balancing Your Levels

Balancing your levels is the first step in the mixing process. It involves adjusting the volume levels of each track to create a balanced mix. The aim is to ensure that no individual track overpowers another. An unbalanced mix can lead to a muddy or cluttered sound. You can use the fader controls in your Digital Audio Workstation (DAW) to adjust the volume levels. It’s best to start with the drums and bass tracks and then add the other instruments one by one while ensuring each track is heard clearly.

Equalizing Your Tracks

Equalizing your tracks is the process of adjusting the frequency levels of each track. It involves cutting or boosting certain frequencies to remove unwanted sounds or enhance certain elements of the tracks. The aim is to create a clean and clear sound. You can use the equalizer (EQ) controls in your DAW to adjust the frequency levels. Here’s a quick tip: It’s best to make small adjustments and use the “solo” button to hear each track in isolation while making adjustments. This allows you to identify and remove unwanted frequencies.

Adding Effects

Adding effects is the final step in the mixing process. Effects are used to create a unique sound and add depth to your mix. You can use a variety of effects, including reverb, delay, and compression. It’s important to ensure each effect is used sparingly and complements the sound of your mix. Here’s a quick tip: Use the “dry/wet” control to adjust the amount of effect applied to each track. Start with a small amount and build up slowly. In conclusion, mixing is an essential step in the music production process. By balancing your levels, equalizing your tracks, and adding effects, you can create a unique and polished sound. Practice your mixing skills regularly and have fun exploring different techniques to find your own sound.

Mastering Your Tracks

Mastering your tracks is key to achieving a professional sound. Mixing start to finish in FL Studio allows you to have full control over the sound of your music, ensuring it sounds balanced and polished.

Mastering your tracks is a crucial step in the music production process, which can determine the quality of your final mix. After you have finished mixing your track, the next step is mastering. Mastering is the process of enhancing the overall sound of your track and making it sound more appealing to listeners. Here are the steps to follow for mastering your tracks in Fl Studio:

Preparing Your Mix For Mastering

Before you start mastering your track, it is essential to ensure that your mix is ready to be mastered. It means that your mix should not exceed 0dB, and it should not clip. Clipping can result in distortion, which can ruin your final mix. Therefore, it would help if you lowered the volume of your mix until it doesn’t clip. You can use plugins like Maximus to ensure that your mix is not clipping.

Mastering With Plugins

Fl Studio comes with several built-in plugins you can use for mastering your tracks. You can use plugins like Fruity Limiter, Parametric EQ2, Stereo Shaper, and Waveshaper to enhance the sound of your tracks. For instance, you can use a Parametric EQ2 to remove the unwanted frequencies from your track, which can make it sound more appealing. You can also use Maximus to enhance the loudness of your track. However, be careful not to overdo the loudness, as it can result in distortion.

Exporting Your Final Mix

After you have finished mastering your track, the next step is exporting it as a final mix. It would be best to export your final mix in a high-quality audio format like WAV or MP3. Ensure that you set the desired bit rate and sample rate. If you are planning to upload your track to streaming platforms like Spotify, ensure that you follow their specific audio requirements for the best results. After exporting your final mix, take time to listen to it and ensure that it sounds excellent in different playback devices. Mastering your tracks can be a daunting task, and it requires a lot of skill and experience. However, by following the above steps, you can easily master your track using Fl Studio’s built-in plugins. Take time to experiment with different plugins and settings until you find the right combination that works for your track.

Mixing Start To Finish In Fl

Credit: hacksnation.com

Mixing Start To Finish In Fl

Credit: www.productionmusiclive.com

Frequently Asked Questions On Mixing Start To Finish In Fl

How Do You Mix Tracks In Fl?

To mix tracks in FL, start by importing your audio files into the program. Then, use the mixer to adjust the volume levels, panning, and effects for each track. You can also group tracks together and apply effects to the entire group.

Finally, export your mixed tracks as a new audio file.

How Do I Mix Better In Fl Studio?

To mix better in FL Studio, ensure that you balance your levels and frequencies, use proper gain staging and panning techniques, add proper effects in moderation, and reference your mix on different speakers and devices. Stay organized and take breaks to avoid ear fatigue.

Where Do You Start When Mixing A Song?

To start mixing a song, first, make sure you have all the necessary materials. Next, set levels for each track, making sure everything can be heard without overpowering. Then, use EQ and compression to balance the mix and make adjustments as needed.

Finally, add any special effects and listen back to make sure everything sounds cohesive.

How Do You Finish A Mixing Song?

To finish a mixing song, ensure that all the tracks are balanced and sound polished. Use appropriate compression, equalization, and effects. Follow proper panning, volume, and stereo imaging. Refine the transitions between different sections of the song. Listen to the song on various devices, take feedback, and make necessary improvements.

Conclusion

To wrap things up, mixing from start to finish in FL is a crucial process when it comes to producing quality music. It’s important to understand the basics of mixing and the different plugins you can use to achieve the sound you desire.

Taking breaks, staying organized, and experimenting with different techniques can go a long way in enhancing your mix. With these tips in mind, your music will be on its way to sounding professional and polished. Keep practicing and never stop learning.

Categories
Archive

Top Elements Of Every Trap Beat

Top elements of every trap beat are heavy bass, catchy melody, unique sound design and powerful drums. These elements create the distinctive and popular sound of trap music, a sub-genre of hip-hop that originated in the southern United States.

Trap beats are known for their energetic and hard-hitting sound that has taken over the music industry in recent years. We will delve deeper into each element of a trap beat and discuss how they work together to create this iconic sound.

From the production process to the mixing and mastering techniques, we will explore all the essential components of a high-quality trap beat. So, let’s dive into the world of trap music and discover what makes it so irresistible.

Rhythm

Rhythm is one of the top elements of every trap beat. The right beat can set the tone for the entire song and create a catchy, unforgettable vibe. From the tempo and groove to the drum patterns and percussion, the rhythm must be on point for a successful trap beat.

Syncopation In Drums

The beats in a trap beat are achieved by the use of drums. Rhythm is the foundation of a good trap beat. Syncopation in drums is one of the critical elements that contribute to a standout trap beat. It is one of the ways to make your beats more interesting by introducing unexpected beats to the rhythm. By placing drum hits in unusual places, the rhythm starts to have a unique feel, which sets it apart from other trap beats. Syncopation in drums can be achieved by removing or adding hits from the basic drum pattern, emphasizing certain beats over others, or by playing two different rhythms simultaneously.

Off-beat Hi-hats

Off-beat hi-hats are another essential element of a trap beat. Hi-hats are one of the most used sounds in trap beats, and the way they are placed is crucial. Typically, the hi-hat pattern is placed on the off-beat, which adds an extra layer of syncopation to the rhythm. This element adds a swag and a bounce to the beat that can make it feel more upbeat and danceable. To achieve this, you can use a sequencer or drum machine and place the hi-hat sounds on the off-beat manually, or you can use a pre-made loop and fit it into your beat.

Rolls And Fills

Rolls and fills are an essential part of the rhythm in trap beats. They add variation to the beat and help prevent it from getting repetitive. Rolls are quick successive hits on a particular sound, while fills are longer and more complex patterns that fill the space between two beats. Rolls and fills can be applied to different drum sounds including snares, hi-hats, and kicks. A well-timed roll or fill in the rhythm can make it sound much more dynamic and exciting. It’s important to make sure that the rolls and fills do not overpower the beat but enhance it instead. In conclusion, rhythm is the backbone of any trap beat. The rhythmic pattern, when combined with other elements such as melody, bass, and sound design, contributes to the overall musical feel of a track. By using syncopation in drums, off-beat hi-hats, and incorporating rolls and fills, you can create a compelling and engaging trap beat that stands out in the crowded contemporary music scene.

Top Elements Of Every Trap Beat

Credit: www.rollingstone.com

Tempo

Tempo is one of the essential elements of every trap beat. It sets the pace and determines the mood of the music. Additionally, the right combination of bass, drums, and melody is vital in creating a quality trap beat.

Tempo plays a crucial role in making or breaking a trap beat. It sets the pace and vibe of the track, determining the audience’s experience. Producing a perfect trap beat requires choosing the right tempo and varying it for different sections. In this section, we will discuss how to set the perfect tempo for your trap beat and vary it to add more depth to it.

Choosing The Right Tempo

The tempo of a trap beat varies from 100 to 176 beats per minute (BPM), but the most common range is 140-155 BPM. Choosing the perfect tempo is vital to produce a catchy and engaging beat. A faster tempo is suitable for upbeat and energetic tracks, while a slower tempo sets a more laid-back mood. Generally, the ideal tempo for a trap beat depends on the mood you want to set for your audience. However, you should consider the genre and sub-genre of trap music you are producing and the targeted audience when choosing the tempo. Remember that the tempo sets the pace and energy of the music, and it can have a significant impact on your audience’s mood.

Varying Tempo For Different Sections

Varying the tempo of your trap beat is another excellent technique that you can use to add more depth to it. By starting with a slow tempo and gradually increasing it, you can create a sense of tension and anticipation. This technique is often used in the build-up section of the beat. Another technique for varying the tempo is to drop the tempo for the chorus or bridge sections of the track. By slowing down the tempo, you can create a more relaxed and toned-down mood, which can help highlight the lyrics’ emotion or message. You can also create more complex rhythms and patterns by varying the tempo for different instruments. For instance, you can have a steady tempo for the drums and vary the tempo for the synths or the bassline. This technique can create a more intricate and complex musical composition, making your track stand out from the crowd. In conclusion, tempo plays a vital role in producing a perfect trap beat. By choosing the right tempo and varying it for different sections, you can create a catchy, engaging, and complex beat that your audience will love. Keep in mind that the tempo sets the pace, energy, and mood of the music, so choose it wisely.

Bassline

Bassline is a crucial element in every trap beat, creating a foundation and enhancing the melody. It adds depth and rhythm to the overall sound, making it essential in creating a powerful and dynamic track.

Trap music is generally characterized by aggressive beats, with heavy sub-bass and crisp snares. The bassline is the backbone of trap music, providing the foundation for the track and driving the rhythm. When it comes to producing a top-notch trap beat, there are a few key elements that every beatmaker should consider. Let’s examine some of the most important components that contribute to a killer trap beat, starting with the bassline.

Sub-bass For Groove

The sub-bass is an essential component of any trap beat. Typically, sub-bass frequencies fall within the 20 to 60 Hz range, and can be felt more than heard. It is responsible for creating a sense of groove and driving the rhythm of the track. A well-crafted sub-bassline should be deep, punchy, and consistent, providing a solid foundation for the rest of the track. It sets the tone and gets the listener nodding along from the very beginning.

Melodic Bass For Interest

In addition to the sub-bass, many trap beats incorporate more melodic basslines to add interest and variation. These basslines are typically created using synth or bass guitar sounds, and add a unique flavor to the beat. Melodic basslines often feature swooping glissandos and intricate patterns, weaving in and out of the sub-bass to create a complex and layered sound. When done right, they can add a lot of interest and depth to the beat.

808 Patterns

Of course, no discussion of trap basslines would be complete without mentioning the infamous 808 kick drum. Originally designed for use in drum machines, the 808 kick is now a staple of trap beats. Producers often manipulate the timing and pitch of the 808 to create unique patterns and rhythms. A well-crafted 808 pattern can make a beat stand out and take it to the next level. In summary, the bassline is a critical component of any trap beat. A solid sub-bassline creates groove and rhythm, while a melodic bassline adds interest and variation. 808 patterns can take a beat from good to great. Paying attention to these key elements can help you create a killer trap beat that stands out above the rest.

Melodies

The top elements of every trap beat include heavy and precise bass lines, sharp hi-hats and snares, melodic synthesizers, and vocal samples. The melodies used in trap beats vary widely, but they typically use minor scales with simple, memorable repeating patterns.

These elements come together to create a hard-hitting and energetic sound that is popular in modern hip hop and electronic music.

Top elements of every trap beat involve several factors, including the choice of melodies. One of the crucial reasons why trap beats have gained popularity is their catchy tunes. To make the beat stand out, the selection of the right melody becomes a top priority. The right melody can stir up emotions and give the desired vibe to an instrumental track. Therefore, a trap beat artist must focus on selecting the right melodies to uplift the instrumental.

Simple But Catchy Melodies

The melodies of a trap beat do not necessarily have to be intricate or complex. A simple yet effective melody can make it easier for the listener to relate to and remember the beat. The catchiness of a melody comes from a combination of the rhythm and tune that can leave a lasting impression on the listener’s mind. To do that, a producer can use a simple melody that follows a memorable tune, making it easy to recall and addictive to the listener.

Mood-setting Instruments

Melodies used in a trap beat should set the desired mood and emotions. The tone and sound of the melody must convey the desired feelings to the listener. Producers can use different instruments to set the mood in a trap beat while maintaining a balance between them. By combining different instruments, producers can create a melody that uplifts the listener’s mood, making them more attentive and invested in the beat.

Layering Melodies

Layering melodies can add depth and complexity to a trap beat, making it sound more sophisticated and unique. By doing this, producers can combine two or more melodies and play them simultaneously while maintaining their individuality. Layering a simple melody with a complex one can create an exciting and dynamic sound, making the instrumental stand out even more. In conclusion, melodies are one of the essential elements of every trap beat. Whether it’s a simple or intricate melody, the right tune that sets the desired mood and emotions makes it memorable and catchy. The use of different instruments and layering melodies creates a unique and exciting sound that makes the beat stand out. The selection of the right melody can make or break a trap beat, making it an important aspect for producers and artists to focus on.

Sampling

Sampling: Finding Unique Samples, Chopping and Manipulating Samples, and Incorporating Samples into the Beat

If you’re a producer who’s into making trap beats, then you know just how vital it is to incorporate samples into your beat. The popularity of trap music is based on its unique sound elements. And if you want your beat to stand out, you need to master the art of manipulating samples in creating your sound. Here’s how you can do just that:

Finding Unique Samples

The first step in creating a unique and captivating trap beat is to find unique samples. While it’s tempting to use popular loops and sounds used by other producers, it’s best to explore new sounds and experiment with new techniques to create something unique.

You can find samples that no one else is using by browsing through sample libraries or recording custom sounds. Additionally, you can use the internet to explore new samples or record sounds from your environment.

Chopping And Manipulating Samples

Once you have your samples, it’s time to manipulate them. To do this, you need to chop your samples into individual sections and manipulate each section. This technique is called “sampling” in the trap beat production world. Sampling is all about combining different sounds, chops, and melodies to create something unique and outstanding.

You can manipulate your samples using different techniques such as pitch-shifting, time-stretching, adding effects, and layering them. The goal here is to give the sample a unique sound while still making it fit into the beat.

Incorporating Samples Into The Beat

Now that you have chopped and manipulated your sounds, the next step is to incorporate them into the beat. This is where you need to use your creativity and imagination to place your chops, melodies, and sound effects to create a cohesive sound.

The key here is balance. You want to create a compelling beat, but each element needs to mesh well together. Therefore, you should ensure each sound has its space within the mix. This can involve using techniques such as panning and EQ to create separation. Additionally, you should always be experimenting with the arrangement of your samples to create something unique and original.

The critical element in creating a captivating trap beat is your ability to manipulate and incorporate unique samples into your beat. By following the steps outlined here, you can innovate and create a trap beat that stands out and captures the listener’s attention.

Arrangement

Discover the top elements of every trap beat with a focus on arrangement. From the use of drum patterns to structuring your melody, understanding the key components of a successful trap beat can help elevate your music to the next level.

Arrangement is a crucial element of every trap beat. It is the most important aspect that can make or break the success of a beat. It refers to the order in which the different elements of a beat are placed and how they are arranged to create a cohesive and engaging sound. The arrangement of a beat typically includes an intro, verse, chorus, bridge, and outro sections. The intro sets the tone for the whole beat and usually features a simple melody that hooks the listener. The verse is where the rapper or singer delivers the main message of the track. It may include a repeating pattern to create familiarity for the listener. The chorus is where the most important and memorable part of the beat is placed. It features a catchy melody that is easy to remember and sing along to. The bridge serves as a contrast to the other sections of the beat and typically features a different sound or vibe. It can be used to break up the repetition and add variety to the beat. The outro section usually features a fading out of the beat as it comes to an end. In addition to these sections, adding and removing elements is crucial to ensure variety within the beat. This helps to keep the listener interested and engaged. For example, removing the bassline in the verse section can create a sense of emptiness, which can be filled up again in the chorus section to create a powerful impact. In conclusion, the arrangement of a trap beat is an essential element that requires a well-thought-out plan. With an engaging intro, repetitive patterns, a catchy chorus, contrastive bridge, and a memorable outro, a successful trap beat is guaranteed. Moreover, adding and removing elements to keep the listener engaged creates a versatile sound that keeps them coming back for more.

Mixing

Mixing is an essential part of creating an impressive trap beat. From the hard-hitting 808s to the catchy melodies, these top elements require careful blending and mastering to produce a professional and attention-grabbing track.

When it comes to creating a great trap beat, mixing is the key to success. With the right mixing techniques, you can take your beat to the next level, ensuring that each element is balanced, clear and interesting. In this article, we’ll explore some of the top mixing techniques that you can use to make your trap beats stand out.

Balancing Levels Of Each Element

One of the most important aspects of mixing is balancing the levels of each element in your beat. This includes your drums, bassline, melody, and any additional sound effects. By balancing these elements, you ensure that each sound is heard in the mix and that none of the individual elements are overpowering the others. You can balance your levels by adjusting the volume of each sound in your mix. Start by setting all your tracks to default levels and bring in the elements one by one. Ensure that each sound is audible in the mix without overpowering the others. For instance, if your kick drum is too loud, cut its volume and give some space to other elements in your mix.

Eq And Compression For Clarity

Another crucial step in mixing your trap beats is equalization and compression. EQing helps you in reducing any unwanted frequencies that can muddy your mix and also enhance the frequencies that are essential for your beat. Compression is all about reducing the dynamic range of a sound. When you use compression, it brings down the loudest parts of the sound and lifts the softest parts. It makes the entire sound more powerful, and it will stand out in your mix.

Adding Effects For Interest

Adding effects is the final step that can bring life to your trap beat. This can include adding reverb, delay, distortion, or any other effects that add interest and uniqueness to your beat. Using effects enables you to create a distinctive sound that sets your beats apart from others. In Conclusion Mixing is essential in making your trap beats stand out from the crowd. Balancing your levels, using EQ and compression, and adding effects can make all the difference in the clarity and interest of your beats. By applying the techniques specified above, you’ll be well on your way to making a killer trap beat!

Top Elements Of Every Trap Beat

Credit: www.rollingstone.com

Mastering

Mastering the perfect trap beat requires attention to specific elements, such as a hard-hitting 808, catchy melody, and intricate hi-hat patterns. By focusing on each component and balancing them properly, producers can create dynamic tracks that captivate listeners and make them want to move.

Mastering is a crucial aspect of producing a high-quality trap beat. It involves putting the final touches on the mix and ensuring that it sounds great across all playback systems. The process of mastering can be broken down into three main elements, including limiting and maximizing loudness, adding final touches to the mix, and preparing the beat for release.

Limiting And Maximizing Loudness

Limiting and maximizing loudness is one of the critical elements of mastering a trap beat. The goal is to ensure that the final mix reaches the desired loudness level without compromising the overall quality. This can be achieved by using a limiter plugin, which controls the dynamic range of the mix. It ensures that the loudest parts of the trap beat do not exceed the desired level while preserving its overall character.

Adding Final Touches To The Mix

The next element of mastering involves adding final touches to the mix. It includes enhancing the stereo field, equalization, and dynamic range adjustments. In this stage, it is essential to fine-tune every aspect of the mix carefully. Through equalization, unnecessary frequencies are removed whereas dynamic range adjustments ensure that every sound in the mix sits well together.

Preparing The Beat For Release

The final element of mastering is preparing the beat for release. It involves ensuring that the final mix is consistent and meets the quality standards required before releasing. Further, adhering to technical specifications such as format, bit depth, and sample rate is crucial to ensure that the beat sounds great across all listening platforms. In conclusion, mastering is an essential element of producing a high-quality trap beat. By limiting and maximizing loudness, adding final touches to the mix, and preparing the beat for release, it is possible to create a mix that sounds great across all platforms. Use of limiter plugin, equalization, stereo-enhancers and a keen ear will lead you to a well-crafted beat.

Top Elements Of Every Trap Beat

Credit: www.billboard.com

Frequently Asked Questions On Top Elements Of Every Trap Beat

What Are The Key Elements Of A Trap Beat?

The key elements of a trap beat are a prominent 808 bass line, sharp and rhythmic hi-hats, a simple melody often using brass or keyboard sounds, and varied percussion elements such as claps, snares, and snaps. The tempo is usually slow, ranging from 130-170 beats per minute, and the overall sound is dark and heavy.

What Are The Keys Of Trap Songs?

Keys of trap songs typically include minor keys, low-pitched and distorted basslines, syncopated rhythms, and the use of hi-hats, snares, and 808 kick drums. These elements create the characteristic dark and aggressive sound that defines trap music.

What Makes A Trap Beat Good?

A trap beat is considered good based on several factors, including catchy melodies, memorable hooks, and hard-hitting drums. The use of unique sound selection, rhythmic patterns, and tempo changes are also important in creating an impressive trap beat. Ultimately, a good trap beat should be captivating, generate emotions, and keep the listener engaged from start to finish.

How Do You Structure A Trap Beat?

To structure a trap beat, start with a simple drum pattern made up of kick, snare, and hi-hats. Add unique sounds, like a 808 bass and synth melody. Vary the drum pattern and add fills to keep it interesting. Use effects like reverb and delay to create space and depth.

Finally, add drops and breakdowns for a dynamic sound.

Conclusion

Crafting a top-notch trap beat is no easy feat, but with these key elements, you can take your production skills to the next level. From the signature snare rolls to the deep low-end, every aspect of a trap beat plays an important role.

Remember to experiment with variations of each element to create a unique sound that sets you apart from the crowd. Keep practicing and soon enough, you’ll be producing bangers that’ll have listeners hitting that repeat button.

More in our Drums & beats guide.

Categories
Archive

Creative Mid Side Eq Techniques

Creative Mid Side EQ techniques focus on separating a stereo mix’s mid and side elements to precisely adjust each separately. Mid Side EQ is an effective way to create a clear and balanced mix, adding depth and space to the music.

EQing a stereo mix is a technique used in recording and mixing that enhances the sonic quality of a particular track by making specific frequency adjustments. Mid Side EQ, however, is a technique that is used to separate an audio mix’s mid and side components, allowing them to be treated separately.

This EQ technique is unique and useful in creating clear and balanced mixes with ample space and depth. The mid element is the central part of the mix, usually containing the lead vocal, bass and drums. The side element is the stereo-panned audio, such as guitars, cymbals, and keyboards. The separation of these elements allows a mix engineer to adjust each separately, resulting in a mix where each component sounds distinct and clear.

What Is Mid Side Eq?

Mid Side EQ is a powerful tool that allows for creative mixing and mastering techniques. With this technique, you can separately equalize the mid and side frequencies of your audio, allowing for a more precise and unique sound.

Brief Explanation

Mid Side EQ is a powerful technique used by music producers to separate and manipulate mid and side information in a stereo audio signal. This technique allows the producer to adjust the level and frequency content of the mono and stereo aspects of the mix separately. The isolation and separate treatment of mid and side frequencies can enhance clarity and balance of the mix and create a more captivating sound.

Pros And Cons Of Using M/s Eq

Using Mid Side EQ has its advantages and disadvantages. Here are some pros and cons:

Pros:

  • Mid Side EQ provides more control over the stereo image of the mix, making it a great tool for mastering.
  • The technique can help improve the clarity and balance of the mix by adjusting the mid and side information separately.
  • M/S EQ is an effective tool for fixing phase or stereo imaging problems in a mix.

Cons:

  • The process of mid-side equalization requires a bit more knowledge and time than traditional mixing methods.
  • M/S EQ can overemphasize certain frequencies if not used carefully, which can result in an imbalanced mix.

In conclusion, understanding how to properly use Mid Side EQ techniques can be a powerful tool in music production. However, as with any other technique, it is important for producers to weigh the pros and cons before using it and use it carefully while monitoring the results.

Creative Uses Of M/s Eq

Explore the full potential of your mixes with creative Mid Side EQ techniques. With M/S EQ, you can widen the stereo image, bring focus to specific instruments, and even balance the levels of a mix. These unconventional methods can help you achieve a more unique and dynamic sound.

M/S (Mid/Side) EQ is a powerful tool that allows you to adjust the levels of the mono and stereo components of an audio signal independently. While traditionally M/S EQ has been used for basic tasks like adding clarity or reducing noise, there are many creative ways to employ this type of EQ to add excitement to your mixes.

Eq To Bring Extra Width To Mono Sounds

If you have ever mixed a track and wished a particular sound was just a little bit wider, M/S EQ can be a useful solution. By using an M/S EQ, you can add stereo width to a mono sound without affecting the rest of the mix. For example, let’s say you have a guitar that was recorded in mono, but needs to be more spread out in the mix. By boosting the guitar’s side signal with an M/S EQ, you can effectively create a more defined stereo image for this sound.

Creating Room In A Mix Using M/s Eq

Another great use of M/S EQ is to create space and room in a mix. For instance, when mixing a drum kit, you might want to separate the kick and snare from the rest of the kit to create a punchier sound. By using an M/S EQ on the drum bus, you can add some mid-range punch to the kick and snare — while cleaning up the muddy room sound (by attenuating the side signal). This can help the kick and snare cut through the mix better while providing more clarity to the overall drum sound. In conclusion, M/S EQ is a powerful tool that can help you get creative with your mixes. By utilizing this type of EQ in unique ways, you can add depth, width, and clarity to individual tracks and mixes. So don’t be afraid to experiment with the many applications of M/S EQ to take your productions to the next level.

M/s Eq Techniques For Mastering

Unlock creative potential with M/S EQ techniques for mastering. Enhance your audio mixing abilities with this innovative and flexible approach to processing mid and side signals.

Mastering is the process of making a final mix ready for distribution. One crucial element of this process is using EQ to adjust the balance between the mid and side frequencies. M/S EQ techniques for mastering offers a precise and powerful way to master your audio tracks. Let’s take a closer look at the Adjusting Clarity and Detail and Improving the Soundstage with M/S EQ Techniques for Mastering.

Adjusting Clarity And Detail

Adjusting clarity and detail is one of the most important M/S EQ techniques for mastering. By adjusting the mid frequencies, you can bring out the vocals and the main instruments in your tracks. At the same time, by adjusting the side frequencies, you can bring out the ambiance of the recording. Here are some tips for using M/S EQ to adjust clarity and detail:

  • When you want to bring out the vocals, try boosting the mid frequencies around 2kHz.
  • If you want to emphasize the rhythm section, you can reduce the mid frequencies in the range between 200-500 Hz.
  • If you want to create more space in your mix, try reducing the side frequencies in the range between 2-4kHz.
  • If you want to add depth to your mix, try boosting the side frequencies in the range between 100-500 Hz.

Improving The Soundstage

The soundstage is the perceived location and width of the instruments and voices in your mix. By adjusting M/S EQ, you can improve the soundstage and make your listeners feel like they are in the same room as the musicians. Here are some tips for using M/S EQ to improve the soundstage:

  • If you want to make the vocals sound like they are coming from the center, boost the mid frequencies around 2kHz.
  • If you want to make the guitar sound wider, boost the side frequencies in the range between 2-4kHz.
  • If you want to create a more immersive experience, boost the side frequencies in the range between 7-9kHz to bring out the reverb and ambiance.
  • If you want to create a sense of depth, reduce the side frequencies in the range between 500Hz-1kHz.

In conclusion, M/S EQ techniques for mastering can help you create a more balanced, dynamic, and immersive audio mix. With a little practice, you can master these techniques and take your audio mixes to the next level.

Creative Mid Side Eq Techniques

Credit: www.izotope.com

Using M/s Eq With Reverb

Achieve a unique and spacious mix through creative mid-side EQ techniques when using reverb. Experiment with EQ adjustments on the mid and side signals to create a more open and wider soundstage with increased depth.

Enhancing The Ambience Of A Mix With M/s Eq And Reverb

Enhancing the ambience of a mix is an essential aspect of music production. One technique that can help achieve this is by using mid-side (M/S) equalization with reverb. M/S EQ is a powerful tool for manipulating the stereo width of a track, and when combined with reverb, it can create a more immersive and spacious mix.

How To Use M/s Eq With Reverb

To create a more immersive and spatial mix, follow these steps:

  1. Insert a mid-side equalizer as an insert on the track you want to process.
  2. Use the mid EQ band to reduce any harsh or unpleasant frequencies in the center of the stereo image.
  3. Use the side EQ band to boost the high frequencies to bring out the stereo width of your track.
  4. Insert a reverb plug-in on an auxiliary channel and send some of the original track to the reverb channel.
  5. Use the M/S EQ on the reverb channel to boost the high frequencies of the side channel to enhance the overall width of the mix.
  6. Adjust the parameters of the reverb plug-in to achieve the desired ambience and blend it with the original track.

By using M/S EQ with reverb, you can create a more spacious and immersive mix that enhances the overall listening experience. Experiment with different settings, and let your creativity flow to achieve the best results.

Utilizing M/s Eq To Fix Problems

Creative mid/side (M/S) EQ techniques can help you fix problems in your mix by adjusting stereo imbalance, correcting discrepancies in phase, and much more. Let’s dive deeper into how using M/S EQ can help solve these issues.

Adjusting Stereo Imbalance

If you have a stereo mix that sounds unbalanced or one-sided, M/S EQ can help you correct this issue by adjusting the level of the middle (M) and side (S) elements separately. For example, if you have too much information on one side, you can use a mid/side EQ to cut that side and boost the other side to balance the stereo image. In addition, you can also use M/S EQ to widen the stereo image by boosting the side information.

Correcting Discrepancies In Phase

Discrepancies in phase can cause phase cancellation, which can result in a thin and weak mix. However, M/S EQ can help correct phase issues by adjusting the timing of the M and S elements. For instance, if you have two overhead microphones panned hard left and right, you can use mid/side EQ to delay one side slightly to match the timing of the other side and achieve a more cohesive stereo image.

When using the M/S EQ technique, it’s important to remember that the mid channel contains mono information and the side channel contains stereo information. Therefore, you need to treat them differently when applying EQ. Another aspect to note when using M/S EQ is to avoid overusing it, as it can lead to a phasey sound. Always trust your ears and use your tools sparingly to achieve your desired result.

Creative Mid Side Eq Techniques

Credit: www.masteringthemix.com

Creative Mid Side Eq Techniques

Credit: www.iconcollective.edu

Frequently Asked Questions On Creative Mid Side Eq Techniques

How Do I Improve My Mid Side Eq Mix?

To improve your mid side EQ mix, focus on the stereo image and balance, making sure the center sounds clear and the sides sound wide and open. Use mid/side EQ to adjust frequencies in the center or sides independently. Identify which elements should be in the center or sides.

Reduce excessive low-end in the sides to avoid phasing issues and improve clarity.

What Do You Use Mid Side Eq On?

M/S or Mid-Side equalization is used to fine-tune the stereo image of a mix. It can be applied to any sound source, but it’s particularly useful on vocals, drums, and acoustic instruments. The technique allows you to control the balance between the mid and side channels, expanding or narrowing the stereo image to create a more focused or wider sound.

What Is An Example Of Mid Side Processing?

Mid side processing involves encoding a stereo signal into mid and side components, which can then be manipulated independently. An example of mid side processing is using a stereo imaging plugin to widen or narrow the perceived stereo width of a mix by adjusting the side component.

What Is The Mid Side Mastering Technique?

Mid-side mastering is a technique used in audio post-production to adjust the stereo image of a recording. It involves separating the center and side information of a stereo track, processing each separately and then recombining them to enhance the clarity and width of the mix.

Conclusion

To sum up, mastering Mid Side EQ techniques can elevate the quality of your audio production to a whole new level. By understanding how to manipulate the stereo image of your sound, you can give your tracks a wider, more dynamic and balanced sound.

Whether you are an experienced audio engineer or just starting, experimenting with Mid Side EQ can take your audio production game to a new level. Remember, the key is to use your ears, and always strive to create the perfect sound that resonates with your audience.

Happy mixing!

Categories
Archive

How to Avoid Burnout As a Musician

To avoid burnout as a musician, prioritize self-care and set healthy boundaries. As a musician, it’s easy to get caught up in the hustle and grind of creating new music, touring, and promoting yourself.

However, neglecting your physical and mental health can lead to burnout, which can negatively impact your creativity and overall well-being. Also, to prevent burnout, it’s important to make time for rest and relaxation, maintain open communication with your team and loved ones, and be realistic with your goals and expectations.

Related reading: Mixing And Mastering Burnout: Expert Tips to Find Your Creative Spark and Is Musician a Profession. For background, see the Wikipedia article on Occupational burnout.

We’ll dive deeper into the various ways musicians can avoid burnout and maintain their passion for music.

Recognizing The Signs Of Musician Burnout

Recognizing the signs of burnout is essential for musicians to avoid physical and emotional exhaustion. Symptoms may include lack of motivation, decreased creativity, and physical fatigue. Identifying these signs early can help prevent burnout and ensure a long and fulfilling career in music.

Recognizing the Signs of Burnout is crucial to preventing it from becoming a bigger issue. Burnout is often described as a state of emotional, physical, and mental exhaustion caused by excessive and prolonged stress. It is common among musicians who often spend long hours practicing, performing, and traveling. In this section, we will discuss the Physical Signs, Mental Signs, and Behavioral Signs of Burnout in detail.

Physical Signs

Musicians experiencing burnout may exhibit physical symptoms such as fatigue, headaches, sleeping difficulties, and muscle strains. They may also experience irregularities in their eating habits, resulting in weight loss or gain. Furthermore, they may suffer from frequent illnesses, such as colds or infections. Prolonged physical symptoms can significantly hinder a musician’s ability to perform and enjoy music.

Mental Signs

Musicians with burnout may experience mental symptoms such as a lack of motivation, concentration problems, and mood swings. They may have difficulty concentrating on rehearsals, finding it hard to focus on the music they are playing. They may also lose interest in the activities they once enjoyed, such as attending gigs, music festivals, or socializing with fellow musicians. If left untreated, these symptoms can lead to depression and anxiety.

Behavioral Signs

Behavioral Signs of burnout may include excessive procrastination, avoidance of responsibilities, and a sudden drop in performance quality. For example, a musician experiencing burnout may avoid practicing their instrument or responding to emails about upcoming gigs. They may also become irritable, short-tempered, and find it challenging to get along with other band members. These symptoms can significantly impact a musician’s relationships with fellow band members and their overall career. In summary, recognizing the signs of burnout is crucial to prevent it from becoming a severe issue. The Physical Signs, Mental Signs, and Behavioral Signs of burnout should not be ignored as they could significantly impact a musician’s career and personal life. If you notice these signs, it is best to seek professional help and make changes in your daily routine to avoid burnout altogether.

How to Avoid Burnout As a Musician

Credit: musicianandcompany.com

The Importance Of Taking Breaks

As a musician, it’s easy to get caught up in the demands of the industry and neglect your own well-being. Taking regular breaks is crucial to avoid burnout and maintain creativity. It allows you to recharge, gain perspective, and come back refreshed to create your best work.

As a musician, it can be easy to get caught up in the never-ending process of creating and performing music. However, it is crucial to incorporate breaks into your routine to avoid burnout. Here are some ways to ensure you take enough breaks:

Incorporating Regular Rest Periods for Musician Burnout

One of the best ways to avoid burnout is to schedule regular rest periods during your workday. Taking a short break every 90 minutes or so can help you recharge and refocus. During these breaks, it is important to step away from your work and do something that brings you joy, such as reading a book, going for a walk, or listening to music.

Switching Up Your Routine for Musician Burnout

Another way to prevent burnout is by switching up your routine. If you feel yourself getting bored with your work or stuck in a rut, try changing your environment or incorporating new techniques into your music-making process. It can also be helpful to collaborate with other musicians or take a class to learn something new.

Taking Extended Breaks for Musician Burnout

Finally, taking extended breaks is essential to preventing burnout. Whether it’s a weekend getaway or a few weeks off, taking time away from your work can help you gain perspective and come back feeling refreshed and rejuvenated. It can be challenging to take time off, especially if you’re in the middle of a project, but remember that your health and well-being are worth prioritizing. Incorporating regular rest periods, switching up your routine, and taking extended breaks are all essential to avoiding burnout as a musician. Don’t underestimate the power of rest and leisure – they are crucial to ensuring a long and successful career in music.

Practicing Self-care for Musician Burnout

As a musician, practicing self-care is essential to avoid burnout. This involves activities such as getting enough rest, eating well, exercising regularly, and taking breaks from work. By taking care of yourself both physically and mentally, you can stay motivated and inspired to pursue your passion for music without becoming overwhelmed.

As a musician, it’s easy to get caught up in the excitement of creating and performing music. However, this passion can often lead to burnout due to the demands of the industry, rigorous schedules, lack of rest, unhealthy habits, and constant pressure to meet expectations. Practicing self-care is crucial to prevent burnout and maintain a healthy and prosperous career.

Setting Realistic Goals for Musician Burnout

Setting realistic goals is an essential step in preventing burnout as a musician. It’s tempting to take on as many gigs or projects as possible, but overloading your schedule can lead to exhaustion and low-quality performances. Be honest with yourself about how much you can handle and stick to a manageable routine. Prioritize your gigs and projects based on their importance and align them with your long-term goals. This way, you avoid overwhelming your mind and body while making substantial progress in your music career.

Prioritizing Sleep for Musician Burnout

Sleep is critical to good health and mental well-being. As a musician, you’re likely to have erratic and long schedules that interfere with your sleep patterns. Lack of sleep can lead to decreased energy, focus, and productivity, which eventually leads to burnout. Make it a priority to get adequate sleep daily. Create a conducive sleep environment, including comfortable bedding, pillows, and curtains, and avoid using electronic devices before bedtime. This way, you rest better and wake up refreshed to tackle your schedule.

Eating Healthily And Exercising for Musician Burnout

What you eat and how you move affects your overall wellness and the quality of your music career. A musician’s lifestyle can be hectic, leading to eating on the go or relying on fast food meals that are low in nutrients. This poor eating habit is unsustainable and affects your performance. Instead, prioritize healthy foods, including whole grains, fruits, vegetables, and lean proteins, that provide sustained energy to keep you performing at your best. Regular exercise is also essential, helps oxygenate your body and mind and improves your state of mind and overall well-being.

Meditation And Mindfulness

Meditation and mindfulness practices are excellent tools for calming your mind, decreasing stress levels, and fostering creativity for a better music career. Take time each day to meditate, even if it’s just for a few minutes. Find a quiet and peaceful space, sit comfortably, and focus on your breathing or repeat a positive word or phrase. Engage your senses and pay attention to the present moment as you practice mindfulness. This way, you deepen your inner peace and relaxation, improve your cognitive focus, and enhance your output in your musical career.

In conclusion, practicing self-care is a vital step in preventing burnout as a musician. Setting realistic goals, prioritizing sleep, eating healthily and exercising, and engaging in meditation and mindfulness are helpful tools in achieving overall success. By nurturing a healthy balance of work, rest, and creative pursuits, you can sustain a flourishing career in music and enjoy the journey.

Creating A Support System To Beat Musician Burnout

As a musician, avoiding burnout is crucial to maintain a successful career. Creating a support system can help by providing emotional and practical support, helping to alleviate stress, and spreading the workload. It’s important to prioritize self-care and seek help from friends, family, mentors, or even therapy when needed.

As a musician, it can be easy to get caught up in the pressures of the industry and push yourself to the brink of burnout. To avoid this, having a strong support system in place is crucial. Here are a few ways to create a support system that can help prevent burnout.

Networking

Networking with other musicians and industry professionals can help you build connections and gain support. Attend industry events, join a local music group, or participate in online forums to meet new people. Building relationships with other musicians can provide a sense of community and lead to potential collaborations.

Collaborating With Other Musicians

Collaborating with other musicians can be a great way to share ideas, gain inspiration, and support each other. Working with others can also take some of the pressure off and help you avoid burnout. Look for musicians who share a similar vision or style and reach out to them to see if they’re interested in working together.

Finding A Mentor

Having a mentor can provide invaluable guidance and support as you navigate the music industry. Look for a mentor who has years of experience in the industry and who shares your music values. They can offer advice, help you set goals, and provide encouragement when you’re feeling discouraged. Creating a support system is critical to maintaining a healthy music career and avoiding burnout. Whether it’s networking with other musicians, collaborating with them on projects, or finding a mentor to provide guidance and support, having a support system in place can help keep you inspired and motivated for years to come.

Balancing Work And Personal Life

As a musician, it is important to balance work and personal life to avoid burnout. Incorporate self-care practices, prioritize rest and relaxation, and set boundaries to maintain a healthy work-life balance. By doing so, you can focus on creating music and performing without compromising your well-being.

As a musician, it’s easy to get caught up in your work and lose track of your personal life. However, it’s important to strike a balance between work and personal life to avoid burnout. Here are some tips on how to achieve this balance.

Learning To Say No

One of the most important things you can do to balance work and personal life is to learn to say no. As a musician, you may be faced with many opportunities to perform or collaborate with other artists. While it’s important to take advantage of these opportunities, it’s equally important to know your limits. Saying no to some projects or gigs will help you manage your time effectively and prevent burnout.

Prioritizing Relationships

Another way to balance work and personal life is to prioritize your relationships. As a musician, you may be busy with rehearsals, performances, and studio sessions, but you must not forget your friends and family. Make time to catch up with loved ones and nurture your relationships. You’ll find that having a support system will help you cope with the pressures of being a musician.

Making Time For Hobbies And Other Interests

Lastly, make sure to make time for hobbies and other interests outside of music. Having a hobby or pursuing other interests will help you take your mind off music and prevent burnout. Engage in activities such as hiking, reading, or cooking. These activities will not only help you relax but also give you a fresh perspective on your music career. In conclusion, balancing work and personal life is essential for the well-being of any musician. Learning to say no, prioritizing relationships, and making time for hobbies are effective ways to achieve balance. By implementing these tips, you’ll be able to enjoy your music career while also maintaining a healthy personal life.

How to Avoid Burnout As a Musician

Credit: m.youtube.com

Frequently Asked Questions For How To Avoid Burnout As A Musician

Why Do Musicians Burn Out?

Musicians burn out due to demanding schedules, high-pressure situations, and lack of self-care. They may face physical and emotional strain, creative blocks, and financial stress. The lifestyle also involves frequently traveling and performing, leading to a lack of stability and routine.

All these factors can contribute to exhaustion, stress, and burnout among musicians.

How Do You Prevent Musician Burnout?

To prevent burnout when drawing, ensure to take frequent breaks, stretch your muscles, and drink plenty of water to keep yourself hydrated. Have a proper workspace with adequate lighting, comfortable chair and a supportive computer monitor. Set achievable goals to avoid overworking.

Lastly, take care of your overall well-being by getting enough sleep, eating a healthy diet, and staying active by doing regular physical activities.

What Does Burnout Feel Like?

Burnout feels like a sense of exhaustion, lack of motivation, and detachment from work or activities that were once enjoyable. Physical symptoms, such as headaches and difficulty sleeping, can also be present. It often results from prolonged stress and can impact both personal and professional life.

How Do You Get Out Of A Burnout?

To get out of a burnout, you need to take a break from your routine, practice self-care, hold realistic expectations, prioritize your workload and delegate when possible, and seek help from a mental health professional if needed. By doing so, you will be able to recharge your mind and energy, and regain your productivity and motivation.

Conclusion

As a musician, it’s important to remember that avoiding burnout is crucial in maintaining a successful and healthy career. By implementing self-care practices such as taking breaks, setting boundaries, and seeking out support from others, musicians can prevent burnout and continue to create their art with passion and purpose.

Remember to prioritize your well-being and make sure to take care of yourself both on and off stage.

Categories
Archive

Zooming In Or Out In Pro Tools

To zoom in or out in Pro Tools, use the keyboard shortcut “Command + [plus/minus sign].” This allows you to easily adjust the timeline view and magnify or shrink audio waveforms.

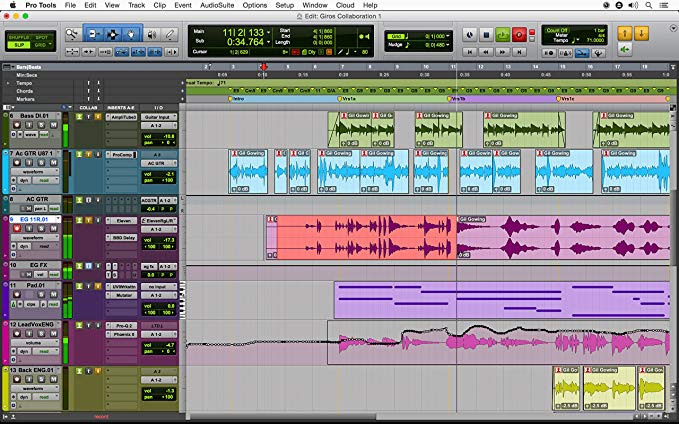
Zooming in or out is a useful feature in any digital audio workstation, especially for precise editing and audio analysis. Also, Pro Tools is a staple in the audio industry. Also, this provides professionals with powerful tools to edit, mix and produce music and sounds.

Related reading: Import Audio Pro Tools and Pro Tools First Grid Mode. For background, see the Wikipedia article on Pro Tools.

Moreover, whether you’re working on post-production for film, music production, or sound design, Pro Tools has a wide range of features to meet your needs. In addition, one such feature is the ability to zoom in or out, which can be done using a simple keyboard shortcut. The zoom function allows you to get a closer look at audio waveforms. This makes it easier to edit and manipulate them with precision. We will take a closer look at how to zoom in or out in Pro Tools and explore some of the benefits this feature can bring to your workflow.

Zooming In Or Out In Pro Tools

Credit: prorec.com

How To Zoom In And Out In Pro Tools

In addition, Pro Tools is a powerful digital audio workstation that is widely used in the music and audio production industry. For example, if you work with Pro Tools, you know the importance of zooming in and out of your project. Zooming in and out can help you focus on a specific part of your project or get a bird’s-eye view of your entire session. In this blog post, we will cover two ways to zoom in and out in Pro Tools: keyboard shortcuts and the zoom tool.

Using Keyboard Shortcuts for Zoom in Pro Tools

Furthermore, using keyboard shortcuts is a quick and easy way to zoom in and out in Pro Tools. As a result, here are the keyboard shortcuts:

ActionShortcut
Zoom in horizontallyOption + Right Arrow
Zoom out horizontallyOption + Left Arrow
Zoom in verticallyOption + Up Arrow
Zoom out verticallyOption + Down Arrow

Using The Zoom Tool In Pro Tools

The zoom tool is another way to zoom in and out in Pro Tools. Here are the steps:

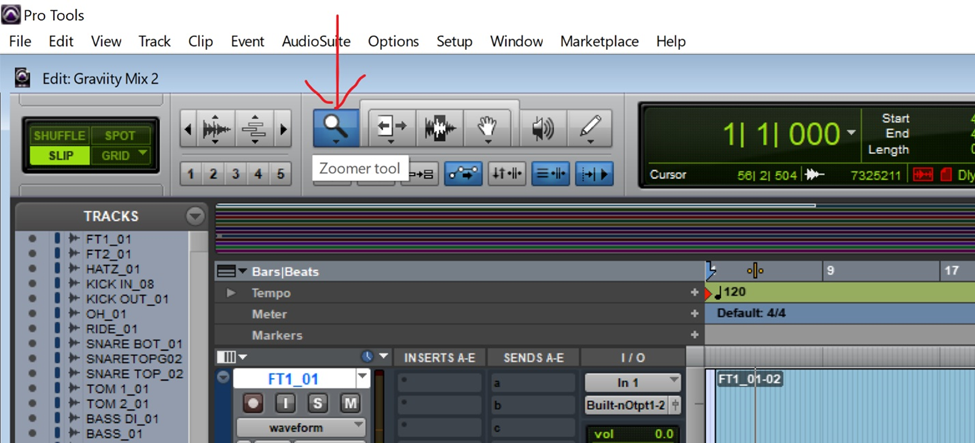
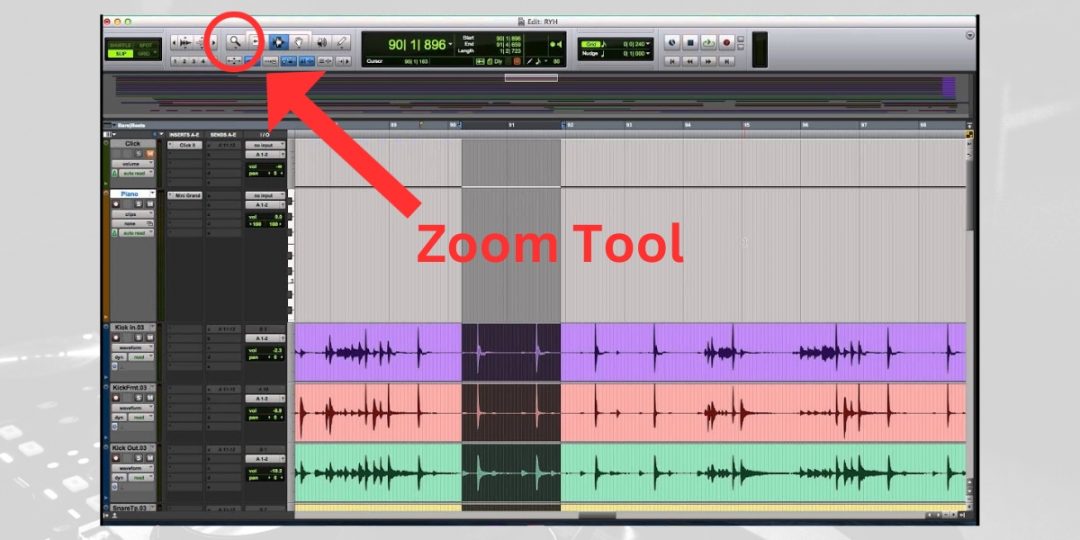
  1. Select the zoom tool from the toolbar or press ‘Z’.
  2. Also, to zoom in, click and drag across the area you want to zoom in on.
  3. To zoom out, hold ‘Option’ and click on the area you want to zoom out on.

In addition, Zooming in and out in Pro Tools is crucial for efficient and effective workflow. However, whether you prefer keyboard shortcuts or the zoom tool, make sure you utilize these techniques to get the most out of your session.

Zooming In Or Out In Pro Tools

Credit: promixacademy.com

Different Zooming Techniques

Zooming in or out in Pro Tools can be done using various techniques, such as using the Zoomer tool or keyboard shortcuts like Command + and Command -. Then, these techniques are essential for efficient editing and navigating through an audio project.

Furthermore, different Zooming Techniques Zooming in and out in Pro Tools is a crucial aspect of audio editing. In short, it helps you see your audio waveforms and make precise edits to your tracks. There are three primary zooming techniques that you can use when working in Pro Tools – horizontal zooming, vertical zooming, and time-based zooming.

Horizontal Zooming

Horizontal zooming, as the name suggests, increases or decreases the horizontal size of your audio waveforms. Similarly, to zoom in horizontally, hover your mouse cursor over the bottom border of the edit window and click and drag upward. This action increases the waveform’s size, allowing you to see more detail in your audio track, making it easier to perform detailed edits. Alternatively, to zoom out horizontally, click and drag downward on the bottom border. This action makes the waveform smaller, allowing you to see more of your audio track. Horizontal zooming is an excellent technique to use when you want to edit small sections of your audio track.

Vertical Zooming

Vertical zooming, on the other hand, increases or decreases the size of your audio waveforms vertically. Also, it helps you see the amplitude of the waveform clearly. To zoom in vertically, hover your mouse cursor over the right border of the edit window and click and drag to the right. This action increases the height of the waveform, allowing you to see the amplitude of the audio track better. To zoom out vertically, click and drag to the left, making the waveform smaller. Vertical zooming is an ideal technique to use when you need to edit a track with a wide range of amplitude levels.

Time-based Zooming

Time-based zooming allows you to focus on a specific time range in your audio track. In addition, you can zoom in to view a fraction of a second or zoom out to view an entire session. To zoom in time-wise, use the keyboard shortcut “T.” To zoom out, use the keyboard shortcut “R.” Alternatively, you can use the zoom tool to draw a rectangle around the region you want to zoom in on. In conclusion, zooming in and out using different techniques is an important aspect of audio editing in Pro Tools. Using horizontal, vertical, and time-based zooming techniques, you can fine-tune your audio tracks, making them sound better.

Changing The Zoom Settings In Pro Tools

Adjusting the zoom settings in Pro Tools allows you to zoom in or out of your audio tracks for better editing precision. For example, you can use keyboard shortcuts or the zoom tool to easily adjust your view.

Changing The Zoom Settings Zooming in and out of your Pro Tools project is an essential function for a smooth workflow. As a result, it helps you navigate and edit the session with ease. You can change your zoom settings to suit your preferences. Here are some ways to customize your zoom settings in Pro Tools. Customizing Keyboard Shortcuts Pro Tools allows you to customize your keyboard shortcuts to zoom in and out of your session easily. You can assign shortcuts to increase and decrease the zoom level, or even to zoom to a specific level. This saves time and increases your productivity.

To customize your keyboard shortcuts, go to the “Edit” menu and select “Keyboard Shortcuts.” Adjusting Zoom Preferences In Pro Tools, you can also adjust the zoom preferences to match your workflow. However, you can set the default zoom level for different types of tracks or adjust the zoom speed. You can also choose whether or not to zoom to the position of your cursor. To adjust your zoom preferences, go to the “Setup” menu and select “Preferences.” Using Zoom Controls Pro Tools also provides easy-to-use zoom controls to change the zoom level quickly.

Practical Tips for Zoom in Pro Tools

You can find these zoom controls at the bottom of the edit window. Then, you can use these controls to zoom in or out, or even to fit the session to the window. In conclusion, changing the zoom settings is an excellent way to improve your workflow in Pro Tools. Customizing keyboard shortcuts, adjusting zoom preferences, and using zoom controls will make editing and navigating your session quicker and easier.

Using Zoom In The Edit Window

If you are working on an audio project in Pro Tools, you will definitely have to zoom in and out of the edit window to make specific edits and ensure high-quality audio. In short, Zooming in to a waveform allows you to get a closer look at a specific section of audio and zooming out will give you an overview of your entire session. So, let’s explore the different ways of using zoom in the edit window in Pro Tools.

Zoom Out And See All

Zooming out in the edit window gives you a bird’s eye view of your session. Similarly, to zoom out, you can use the “-” (minus) key on your keyboard or use the zoom slider at the bottom right corner of the edit window. Zooming out is a quick way to check your progress and ensure that your session is well-organized.

Using The Zoomer Tool

If you want to zoom in on a specific section of audio, you can use the zoomer tool. Also, this tool can be found at the top left corner of the edit window. Click and drag over the waveform to select a specific section that you want to zoom in on. Once you have made your selection, you can press the “z” key to zoom in. You can also use the zoom slider to make more precise adjustments.

Magnifying Parts Of The Waveform for Zoom in Pro Tools

If you want to magnify specific parts of the waveform, you can use the magnify tool in Pro Tools. In addition, this tool can be found next to the zoomer tool at the top left corner of the edit window. Click and drag over the waveform to select the section of audio you want to magnify. Once you have made your selection, you can press the “m” key to magnify the waveform. You can use this tool to make precise edits and ensure that your audio is of the highest quality.

Zooming In The Mix Window

In Pro Tools, zooming in the mix window is essential for precise editing. For example, whether you need to focus on a specific region of your audio or just need to see your waveforms more clearly, the zooming functions in Pro Tools will help you achieve your desired results quickly and efficiently.

If you’re a music producer, you know how important it is to get the right mix in your tracks. One of the tools that you can use to perfect your mix is Pro Tools. With this software, you can zoom in and out of your mix window to get a better view of your tracks and make any necessary adjustments.

Changing Zoom Settings In The Mix Window

To change the zoom settings in the mix window, you can use the View menu or keyboard shortcuts. When you use the View menu, you can choose the zoom level that you want to use. Additionally, you can select the bars and beats, minutes and seconds, or samples time display options to adjust the time scale.

Using The Pro Tools Zoom Bar

The zoom bar is an alternative to using the View menu. With the Zoom bar, you can quickly zoom in and out of your mix window by scrolling left or right. Additionally, you can also use the Zoom Toggle button to switch between the previous zoom level and the last zoom level that you used. In conclusion, adjusting the zoom settings in the mix window can help you get a better view of your tracks and make any necessary changes to your mix. Whether you use the View menu or the Zoom bar, finding the right zoom level can make a significant difference in your music production process.

Zooming In Or Out In Pro Tools

Credit: www.mixinglessons.com

Frequently Asked Questions Of Zooming In Or Out In Pro Tools

Which Option Is Used To Zoom In Or Out?

To zoom in or out, you can use the “Zoom” option available in most software and applications. This option is typically located in the view or settings menu, and allows you to adjust the size of the content on your screen.

How Do You Control Zoom In And Out?

To control zoom in and out, you can use keyboard shortcuts on your computer or pinch gestures on a touchscreen device. On a Windows computer, hold down the “Ctrl” key and use the “+” or “-” keys to zoom in or out.

Additionally, on a Mac, hold down the “Command” key and use the “+” or “-” keys. On a touchscreen device, pinch your fingers together to zoom out or spread them apart to zoom in.

What Is The Shortcut For Zoom Toggle In Pro Tools?

The shortcut for zoom toggle in Pro Tools is “Option+Ctrl+Scroll” on Mac or “Alt+Ctrl+Scroll” on Windows.

How Do I Reset Vertical Zoom In Pro Tools?

To reset vertical zoom in Pro Tools, click the Zoomer tool in the Edit window or Mix window. Then, click and drag upward or downward on the track height indicator until the desired zoom level is achieved. Alternatively, use the keyboard shortcut “Ctrl + Shift + Up/Down arrow” to reset the vertical zoom.

Conclusion

Pro Tools allows for easy zooming in and out to achieve the desired level of precision and control in your audio editing. It is a useful tool for music and post-production professionals alike. Understanding the various methods of zooming in or out can save time and effort that can be invested in other creative endeavors.

Taking advantage of this essential feature will result in greater productivity and improved workflow. So, don’t hesitate to explore this functionality today!

Categories
Archive

Producing Music For Apple Music

Producing music for Apple Music requires following specific guidelines and using Apple’s proprietary software, Logic Pro X. In order to get your music on Apple Music, you must first create an account with Apple Music for Artists and submit your music to Apple’s editorial team for consideration.

Also, Music streaming has become a popular platform for independent artists, bands, and labels to showcase their talent to a global audience. Also, with over 70 million subscribers, Apple’s platform is one of the most popular music streaming platforms. This allows artists to reach a wider audience.

Related reading: Apple Digital Masters How To Create An Apple Digital Master and Music Theory for Producers: The Complete Guide Hub. For background, see the Wikipedia article on Apple Music.

As an artist, producing music for the streaming service requires following specific guidelines and using Apple’s proprietary software, Logic Pro X. In addition, in addition, creating an account with iTunes for Artists and submitting your music to Apple’s editorial team for consideration, is a crucial step in getting your music on the platform. Moreover, we will discuss the process of producing music for Apple’s platform and the steps you need to take to get your music on the platform.

Understanding Music Production Requirements

In addition, to produce music for the streaming service, understanding music production requirements is essential. For example, you need to have a clear understanding of the specific guidelines and specifications set by iTunes, such as file formats, bit rates, and sample rates, to ensure that your music can be accepted and streamed on the platform.

Before submitting music to Apple’s platform, it’s essential to understand the requirements for producing music compatible with the platform. This process can be challenging, particularly if you’re new to the music industry and don’t have a lot of experience with music production. However, the streaming service provides comprehensive guidelines to follow to ensure your music is compatible with their platform. As a result, in this post, we’ll explore the most critical requirements for producing music on iTunes.

Compatibility Guidelines

Furthermore, Apple’s platform requires music files to meet specific guidelines to ensure they’re compatible with their platform. These guidelines include:

  • Mp3 or WAV file formats
  • 44.1kHz sample rate, 16-bit or 24-bit
  • Total file size less than 200mb
  • Metadata in XML or DDP

When producing music for an album, the tracks are typically split into individual files. However, each track must meet these guidelines to be accepted by the streaming service. It’s also essential to ensure that the sample rate and bit depth remain consistent across tracks of the same album for a cohesive listening experience.

Audio Format And Quality Constraints

The audio format and quality constraints also play a significant role in producing music that meets iTunes’s requirements. These include:

  • Additionally, lossless audio for Apple’s “Mastered for iTunes” program
  • No clipping
  • Also, normalization to -16 LUFS (loudness units relative to full scale) or lower
  • Moreover, no added equalization (EQ) or compression except for creative purposes

In addition, for the best listening experience, Apple’s platform recommends lossless audio files to capture the recording’s full dynamic range. You should also avoid clipping, as it can cause distortion and affect the overall sound quality. Then, normalization to -16 is necessary to create consistent audio levels across all tracks, and any added equalization or compression should be used sparingly and for creative purposes only. In conclusion, these are the essential guidelines for producing music compatible with the streaming service. Following these requirements will ensure that your music is accepted by their platform and provides listeners with an enjoyable listening experience. By adhering to these guidelines, you can focus on perfecting your music, knowing that your submissions meet the producer’s requirements.

Producing Music For Apple Music

Credit: itsthedj.com

Creating A Production Strategy for Apple Music

Furthermore, developing a production strategy is crucial for producing music for iTunes. In short, the strategy should include setting realistic timelines, defining clear objectives, and identifying suitable resources for the project. A comprehensive production strategy ensures the music is delivered on time, within budget, and meets the listener’s expectations.

Additionally, Creating A Production Strategy As an independent music producer, getting your music onto iTunes can be a game-changer for your career. Similarly, producing music for the streaming service requires a strategic plan or a production strategy. This strategy has to be based on the success of the music that has previously made it onto the platform. Your first step should be to conduct thorough research on what kind of music is popular with your target audience and the type of music being streamed the most on iTunes. Develop a concept that suits your target audience and represents your music style.

Practical Tips for Apple Music

Also, developing a Concept: Developing a concept is the first step in creating a production strategy. Also, you should be able to differentiate your music from others and create music that suits the taste of the audience that you want to target. The uniqueness of your music is a vital aspect that distinguishes your music from thousands of other songs on Apple’s platform. Decide the type of music that you want to produce by analyzing the most popular music genres on the platform and produce a unique concept.

Moreover, budget Planning: The success of your production strategy vastly depends on creating a realistic budget plan. In addition, this plan should be flexible and considerate of the cost required to create music of high quality. Set aside a budget that covers the cost of music production, including studio setup, mixing and mastering, and record labelling. Consider other essential costs like distribution, and marketing fees. Collaborate with top-notch producers and engineers to ensure that you produce music of high quality. In conclusion, Creating a production strategy for the streaming service requires thorough research, strategic planning, and a realistic budget plan.

Putting It Into Practice

In addition, developing a unique concept for your music is essential to distinguish your music from others and create a loyal listener base. Careful budget planning ensures that you create quality music without financial strain. Plan carefully to ensure your music reaches its intended audience and your music career thrives.

Identifying The Target Audience

Furthermore, identifying the target audience is crucial in producing music for iTunes. Understanding the listeners’ preferences, demographics, and music consumption habits can help artists create content that resonates with their target audience, ultimately increasing their chances of success on the platform.

Identifying the target audience is crucial when it comes to producing music for Apple’s platform. Additionally, without understanding the audience, the music might not reach the right listeners resulting in poor engagement. Let’s dive into the demographics and audience preferences to produce music that resonates with the audience.

Demographics

Also, the first step in identifying the target audience is learning about their demographics. The demographics of the streaming service listeners vary significantly by age, gender, and location. The following table provides a brief overview of the demographics of iTunes listeners.

AgeGenderLocation
16-30Male & FemaleUrban

Moreover, knowing the age group, gender, and location of the target audience will help produce music that appeals to them.

Audience Preferences

In addition to demographics, understanding audience preferences is key to producing music for Apple’s platform. The listeners have different preferences when it comes to genre, lyrics, mood, and beat. Here are some aspects that can help target the audience preferences:

  • Genre: With different genres on the platform, understanding which genre is popular in the target location helps produce music accordingly.
  • MANUAL: For younger audiences, music with explicit lyrics might not work and could prevent it from being featured on Apple Music’s editorial playlists.
  • Mood: The mood and sentiment of the music during different times of the year also influences the popularity of the song.
  • Beat: A song with a catchy and groovy beat has a higher chance of getting noticed on the platform

In conclusion, it’s essential to identify the target audience’s demographics and audience preferences to produce music that resonates with them. Adapting to audience needs and trends can result in higher engagement, resulting in more streams and more followers on iTunes.

Producing Music For Apple Music

Credit: www.youtube.com

Instrumentation And Composition

Produce high-quality tracks for Apple’s platform by honing your skills in instrumentation and composition. Create unique sounds and melodies using various musical instruments and digital tools while maintaining the highest standards in music production.

Tools And Software Used In Production

As a music producer, creating high-quality music for digital music platforms requires access to the right tools and software. The streaming service is one of the leading digital music platforms in the world, and producing music for this platform requires top-notch tools. Some of the essential tools used in music production for iTunes include Ableton Live, Logic Pro X, Pro Tools, and Cubase. These software provide the necessary features for sound recording, editing, and mixing. This makes it easier for producers to achieve the desired sound for Apple’s platform.

Song Structure And Melody Composition

Creating music for the streaming service requires thorough thinking, especially around the structure and melody of the song. The song structure determines how the song progresses from start to finish. It’s important to have a well-structured song to keep the listeners engaged. Melody composition, on the other hand, requires a good understanding of chords and melodies to create catchy hooks. Music producers need to compose melodies that not only sound good but are also memorable for the listeners.

Examples of Song Structure

VerseChorusVerseChorusBridgeChorus
LyricsLyricsLyricsLyricsLyricsLyrics
Verse 1ChorusVerse 2ChorusBridgeChorus

Examples of Melody Composition

  • Creating a catchy hook that repeats itself throughout the song
  • Composing a chorus that stands out from the rest of the song
  • Using chord progressions to create emotional shifts in the song
  • Using different instruments to add depth to the melody

In Conclusion

In conclusion, producing music for iTunes requires meticulous attention to detail in instrumentation and composition. Music producers need to use the right tools and software and create well-structured songs with catchy melodies that keep the listeners engaged. By following these guidelines, music producers can increase the chances of producing high-quality tracks that will be well received by Apple’s platform’s vast audience.

Recording And Mixing for Apple Music

Recording and mixing music for the streaming service requires a skilled ear and attention to detail. From selecting the best equipment to adjusting levels, every step of the process is crucial to producing high-quality music that will stand out on the platform.

Recording and mixing are vital to creating high-quality music for streaming on iTunes. Audio engineering best practices must be followed to ensure that the recorded sounds are clear, clean, and consistent. Post-production and mastering, on the other hand, are essential for the final outcome, as they help improve audio quality and prepare it for distribution on digital platforms like Apple’s platform.

Audio Engineering Best Practices

Recording music for streaming platforms requires attention to detail. It is essential to use high-quality microphones, preamps, and interfaces to capture clean and crisp audio signals. Audio engineers must also make sure that the musician’s equipment such as guitars, drums, and electronics are all set up correctly and in good condition. Audio levels must be carefully monitored during recording, as loud sounds may cause clipping or distortion. The use of noise reduction tools may be needed to eliminate unwanted background noise.

Post-production And Mastering

Post-production work usually involves editing, tuning, and timing corrections to ensure that the final audio is polished, consistent, and on time. Engineers can use software such as Pro Tools, Logic Pro, or Ableton Live for editing and mixing. Mastering is the final step in producing music for streaming platforms. During mastering, the audio levels, EQ, and compression are modified to achieve a loud and consistent final sound. Audio engineers can use mastering software to increase the overall volume of the track without distorting it. Recording and mixing music involves attention to detail at every stage.

Whether recording live bands or computer-generated sounds, audio engineers must be familiar with the best practices of the trade. By adhering to these best practices during recording, post-production, and mastering, music producers can create high-quality tracks fit for streaming on major platforms like the streaming service.

Producing Music For Apple Music

Credit: www.masteringthemix.com

Marketing And Promotion

Producing music for iTunes requires a strategic marketing and promotion plan. Utilizing social media, influencer marketing, and advertising can increase visibility and attract listeners for your music. It’s important to cater to your target audience and consistently create high-quality content to stand out in a competitive industry.

One of the most crucial steps in releasing your music on Apple’s platform is marketing and promotion. With millions of songs available on the platform, it’s essential to stand out and reach your target audience. Here are some strategies that can help you promote your music.

Apple Music Marketing Resources

The streaming service provides a range of marketing resources that can help you promote your music effectively. You can create artist profiles, add your music catalog, and connect with your fans through the platform. The company also has various tools like Apple Music for Artists, which gives you insights into performance metrics, playlist placement, and more, helping you identify areas for improvement.

Strategies For Promoting Your Music

Here are a few ways you can promote your music on Apple Music:

  • Create Compelling Cover Artwork
  • Optimize Your Music Metadata
  • Promote Your Music on Social Media
  • Get Your Music on Playlists
  • Collaborate with Other Artists
  • Engage with Your Fans

One of the best ways to promote your music on Apple Music is to get it on one or more of the platform’s curated playlists. This requires contacting playlist curators and providing them with a compelling reason to include your music. Another effective strategy is collaborating with other artists in the same or a related genre. This can help you reach a broader audience and potentially lead to more fans and followers. In conclusion, there are various ways to promote your music on Apple Music, and using a combination of strategies can help increase your visibility and reach a wider audience. By utilizing the marketing resources provided by Apple Music and implementing these strategies, you can make the most of your music release on the platform.

Distribution And Monetization

Producers can monetize their music by distributing it on Apple Music. Prospective artists can create their account on Apple Music for free and earn money through the streaming of their music. By uploading music artists can reach potential listeners and enjoy royalties on streaming revenue.

Uploading and distributing your music to Apple Music is just the beginning of your journey. The real challenge lies in how to monetize your music to increase your revenue streams. You need to ensure that your music is distributed correctly and optimized for maximum financial gain. In this section, we will discuss the easy and simple steps involved in distributing and monetizing your music on Apple Music.

Uploading And Distributing Your Music To Apple Music

Once you have created your music, the next step is to distribute it on Apple Music. Here are the steps involved in uploading and distributing your music on Apple Music:

  1. Choose a distributor – You can either use a distributor or distribute your music on your own. Popular distributors include CD Baby, DistroKid, and TuneCore.
  2. Create an account – Sign up for an account with your chosen distributor and follow the steps to upload your music.
  3. Enter metadata – Add text information about your music, such as artist name, album name, genre, and release date.
  4. Upload your audio files – Upload the files of your music in various formats, such as MP3 or WAV.
  5. Submit your music – Once you have completed the above steps, submit your music to Apple Music and wait for it to be approved.

Maximizing Financial Gains From Your Music

Now that your music is live on Apple Music, it’s time to start earning revenue from it. Here are some tips to maximize your earnings:

  • Set the right price – Consider the value of your music and set a price that suits it. Make sure to research the market and analyze what other artists in your niche are charging.
  • Promote your music – Use social media to promote your music and reach out to potential fans. Consider collaborating with influencers to get more exposure.
  • Join Apple Music for Artists – This platform allows you to track your streaming performance, see your daily statistics, and optimize your Apple Music profile for maximum visibility.
  • Explore playlists – It’s important to get your music on popular playlists to increase your streams. Reach out to curators of popular playlists and network with other artists to get your music on their playlists.
  • Collect royalties – Ensure that you collect all the royalties you are entitled to. Consider registering your music with a performing rights organization (PRO) like ASCAP and BMI, which will collect your royalties for you.

By following these steps, you can maximize your earning potential and build a successful career as a music producer on Apple Music.

Frequently Asked Questions Of Producing Music For Apple Music

How Do I Make Music For Apple Music?

To make music for Apple Music, you need to upload your music through an authorized aggregator or an Apple-approved label. You can create an account on the Apple Music for Artists page for detailed analytics and promotion purposes. Ensure that your music meets the Apple Music encoding and metadata standards before submission.

Can I Put My Own Music On Apple Music?

Yes, you can put your own music on Apple Music. To do so, you will need to work with a music distributor who can submit your music to Apple Music on your behalf. Additionally, you will need to make sure your music meets Apple Music’s quality and content guidelines.

How Do I Get My Song On Apple Music?

To get your song on Apple Music, you need to use a digital distributor such as DistroKid, TuneCore, or CD Baby. These platforms will upload your music to Apple Music and other streaming services. Make sure your music is properly formatted and has cover art.

The process usually takes a few days and requires a small fee.

Can I Pitch My Music To Apple Music?

Yes, you can submit your music to Apple Music. However, you need to follow certain guidelines and criteria. You can either use a distributor or an aggregator to get your music on the platform. It’s also important to have high-quality content, follow the genre guidelines, and have all necessary rights and licenses.

Conclusion

To conclude, producing music for Apple Music is the next step for aspiring musicians and producers who are interested in reaching a wider audience. By following the tips and techniques outlined you can create high-quality, professional music that stands out in the overcrowded music industry.

With Apple Music’s extensive reach, your music can be enjoyed by millions of listeners from around the world giving you the exposure you need. So, what are you waiting for? Start producing music that touches hearts and souls, and expands your career prospects in the music industry.

Categories
Archive

Inspiring Movies For Musicians

Some inspiring movies for musicians include “La La Land” and “Whiplash.” These films showcase the struggles and triumphs of aspiring musicians as they navigate the competitive music industry.

Music has the power to move people and touch their souls. From classical orchestral pieces to modern pop tunes, music speaks to us in ways that words alone cannot. Many musicians draw inspiration from movies that showcase the ups and downs of pursuing a career in music.

Whether you are a budding musician or simply enjoy a good flick, there are plenty of inspiring movies out there worth watching. We will highlight some of the best movies for musicians that will inspire you to pursue your musical passions and overcome obstacles in your career.

Movies Showcasing The Life Of Musicians

These inspiring movies showcase the ups and downs of the life of musicians, offering valuable lessons for aspiring artists. From biopics to documentaries, these movies provide an insight into the music industry, highlighting the dedication, passion and hard work required to succeed.

Movies showcasing the life of musicians are a great source of inspiration for aspiring musicians. Not only do they provide a glimpse into the lives of famous musicians, but they also shed light on the struggles and perseverance required to achieve stardom. Watching these movies can motivate aspiring musicians to push through the challenging times and keep working towards their dreams.

Get Inspired By The Story Of Famous Musicians

Famous musicians have overcome trials and tribulations to make it big in the music industry. These musicians’ stories can inspire others to follow in their footsteps. Movies such as “Walk the Line” (based on the life of Johnny Cash), “Bohemian Rhapsody” (based on the life of Freddie Mercury), and “Ray” (based on the life of Ray Charles) are excellent examples of musicians’ stories that can motivate and inspire.

How Their Perseverance Led Them To Stardom

The musicians’ stories showcased in these movies often include examples of their perseverance and determination to succeed. Despite the difficulties they faced along the way, they did not give up on their dreams of making it big in the music industry. These stories send a powerful message to aspiring musicians—a message that says “if they can do it, so can you”. Watching movies showcasing the life of famous musicians is an excellent way to stay motivated and inspired. Aspiring musicians can learn a lot from the struggles and perseverance required to make it to stardom. With hard work, dedication, and a never-give-up attitude, anyone can achieve their dreams and make it in the music industry.

Inspiring Movies For Musicians

Credit: www.productionmusiclive.com

Movies About The Power Of Music

Discover the power of music with these inspiring movies for musicians. From the upbeat rhythms of “The Blues Brothers” to the soulful melodies of “Whiplash”, these films showcase the transformative power of music and its ability to bring people together.

Music is a universal language that speaks to people of all ages, races, and cultures. Music has the power to bring people together, heal broken hearts and inspire change. This is why many inspiring movies about the power of music have been produced to document how musicians inspire and transform lives through music. In this blog post, we will discuss some of the most inspiring movies for musicians that emphasize the impact of music on people’s lives.

How Music Can Change Lives

Music has the power to heal, inspire and unite people regardless of their background. The movie “The Soloist” is a testament to the influence of music on changing the way people view mental illness. The story revolves around the life of Nathaniel Ayers, a musician living on the streets of Los Angeles who is battling with schizophrenia. His talent caught the attention of a journalist, Steve Lopez, who became fascinated with Nathaniel’s story and they became friends. Through this uplifting story, the power of music to evoke emotions, connect people and overcome challenges is emphasized. Another movie that captures the power of music to change lives is “Whiplash”. The movie showcases the life of a young jazz drummer named Andrew Neiman, who is determined to become one of the greatest drummers of all time. His dream is however challenged by his abusive and perfectionist jazz band instructor, Terence Fletcher. The movie highlights the value of hard work, discipline, and the importance of pushing through obstacles to achieve success.

Examples Of Musicians Who Used Music To Inspire Change

Music has often been used as a powerful tool to create social change. “Selma”, a movie based on the life of American civil rights activist Dr. Martin Luther King Jr. is an example of how music played a critical role in the fight for equality. The movie showcases how protest marches were led by Dr. King, with a musical accompaniment that represented the heartbeat of the civil rights movement. The movie shows how music and activism combined, bringing attention to the injustices and inspiring change. Another example of how music has been used to inspire change is the movie “Rize”. The movie showcases how dance and music are used to combat gangs and drugs in South Central Los Angeles. Through the use of dance styles like krumping, the movie highlights how youth utilize music to empower themselves and gain a sense of community. In conclusion, music has the power to inspire, transform and unite people from different backgrounds. The movies discussed above are just a few examples of how music has the ability to change people’s lives. If you are a musician seeking inspiration, watching these movies will provide you with a renewed sense of hope and motivation to pursue your dreams.

Movies With Great Musical Performances

Movies with great musical performances can inspire aspiring musicians. From the iconic “The Sound of Music” to the recent biopic “Bohemian Rhapsody,” these films showcase the talent and dedication it takes to succeed in the music industry.

Experience The Magic Of Live Performances

Movies with great musical performances are more than just entertainment. They allow the audience to experience the magic of live performances from the comfort of their own homes. From Jazz to Rock, movies have captured some of the most awe-inspiring musical performances of all time. One such movie is ‘Whiplash’, the story of a young drummer who dreams of becoming one of the greats in jazz. The movie delivers an intense and suspenseful experience of jazz drumming and performances. You will feel the excitement of being in a jazz band and the pressure that comes with it.

Be Inspired By The Talent Of The Musicians

If you are looking for a movie with amazing performances by musicians, then ‘The Soloist’ is a must-watch. It tells the real-life story of a journalist who discovers a talented, yet homeless musician. The movie showcases the musical talent of Nathaniel Ayers, a highly skilled cellist who suffers from schizophrenia. The performances in the movie are emotional and will leave you inspired by the power of music. Another great example is ‘Ray’, which tells the story of Ray Charles, one of the greatest musicians of all time. The movie features some of his most iconic performances, including his famous hit ‘What’d I Say.’ You will be mesmerized by the acting and musical talent displayed in this movie.

Summing It Up

Movies with great musical performances are more than just entertainment, they offer inspiration, emotional experiences, and breathtaking talent. From jazz to classical and everything in between, movies have captured the best performances in music history. So, sit back, relax, and enjoy these cinematic masterpieces that will take you on an unforgettable musical journey.

Inspiring Movies For Musicians

Credit: m.youtube.com

Movies With Messages Relevant To Musicians

Movies with messages that resonate with musicians can be incredibly inspiring for their art. From Whiplash to Almost Famous, these movies showcase the highs and lows of pursuing a career in music, offering valuable lessons in dedication, passion, and perseverance.

Music can inspire, motivate, and stir emotions. It is a medium that connects people across different cultures and languages. Some movies capture the struggles and triumphs of musicians, giving insight into their lives and challenges. These movies showcase perseverance, dedication, and the role of music in people’s lives. Here are some inspiring movies for musicians with messages that are relevant to them:

Learning From The Struggles Of The Characters

The following movies depict the struggle and hard work put in by musicians to achieve their dreams. These stories can inspire other musicians to strive for their goals and not give up, no matter the circumstances.

  • Whiplash
  • Crazy Heart
  • Ray
  • La La Land

In “Whiplash,” the movie shows the struggles of a young drummer who aspires to be one of the greats in jazz. He is pushed beyond his limits by his demanding instructor, but his desire to succeed never waivers. The movie teaches musicians that hard work and discipline are essential to achieving greatness. In “Crazy Heart,” a washed-up country singer must confront his demons and overcome his personal struggles to revive his career. This movie teaches that setbacks and failures are part of the journey, but one must persevere to achieve success. In “Ray,” the movie depicts the life of legendary musician Ray Charles. Despite losing his sight at an early age, he persevered and went on to become one of the greatest musicians of all time. The movie teaches musicians to never let setbacks or disabilities hold them back from achieving their dreams. In “La La Land,” the movie follows the story of two struggling artists in Los Angeles who dream of making it big in Hollywood. They face rejection and disheartening setbacks but do not give up on their dreams. This movie showcases the importance of passion and determination in the pursuit of a career in music.

How The Characters Overcame Challenges Through Music

The following movies showcase how music helped the characters overcome challenges and adversities in their lives. These movies can teach musicians that music can be a powerful tool for healing and self-expression.

  • August Rush
  • Once
  • The Soloist
  • Music of the Heart

In “August Rush,” the movie follows the journey of a young orphan boy who uses his musical talent to reconnect with his parents. Music helps him overcome the challenges he faces in his life and brings him closer to his family. In “Once,” the movie portrayal of the music brought two struggling artists together, healing their individual pain and inspiring them to pursue their passion in music. In “The Soloist,” the movie is a story about a journalist who forms a bond with a homeless musician. Music helps the musician to escape the harsh realities of his life and gives him hope. In “Music of the Heart,” the movie is a story of a music teacher who helps inner-city children realize their musical talent. The journey through music helps these children believe in themselves and their abilities. These movies offer invaluable lessons and can inspire and motivate musicians to pursue their passion without fear. Movies with messages relevant to musicians can provide insight and guidance to anyone seeking a career in music, and these movies will serve as a great guide for music lovers.

Foreign Films For A Fresh Perspective

Explore the world of foreign films and gain new perspectives as a musician. These inspiring movies offer a fresh take on different cultures and musical styles, allowing you to broaden your creative horizons and find new sources of inspiration.

Explore The Culture And Music Of Other Countries

Looking for some inspiration to up your musical game? Forget the usual English and American movies, and explore the world of foreign films. Foreign films give you a unique perspective on culture and music, which can help you in your own musical journey.

Discover New Forms Of Music And Inspiration

One of the biggest advantages of watching foreign films as musicians is the opportunity to discover new forms of music and inspiration beyond what you normally hear on the radio. From Korean pop to Indian classical music, you can gain exposure to new sounds and techniques that can inform your own musical style.

Expand Your Creativity By Stepping Out Of Your Comfort Zone

One of the best ways to expand your creativity is to step out of your comfort zone. Watching foreign films allows you to experience cultures, music, and stories that are unfamiliar to you, which in turn can spark new ideas and creative insights.

Broaden Your Horizons And Challenge Yourself

If you’re in a creative rut, watching foreign films is a great way to broaden your horizons and challenge yourself. It’s easy to get stuck in familiar patterns and styles, but getting exposed to foreign music and culture can help you break free and find new ways to express yourself musically. Overall, watching foreign films as a musician is a great way to gain new perspectives, discover new forms of music, expand your creativity, and challenge yourself. So the next time you’re looking for inspiration, consider stepping outside of your comfort zone and watching a movie from a foreign country.

Inspiring Movies For Musicians

Credit: www.globalrescue.com

Documentaries Featuring Musicians

Documentaries featuring musicians are an excellent source of inspiration for aspiring artists. These films offer a behind-the-scenes look at the lives of famous musicians, highlighting their struggles and achievements. Whether you’re a seasoned pro or just starting out, these documentaries will give you the motivation and insight you need to succeed.

Behind The Scenes Look At The Lives Of Famous Musicians

Documentaries that take a behind-the-scenes look at the lives of famous musicians provide aspiring musicians with valuable insights into what it takes to succeed in the industry. These films show the hard work, discipline, and dedication required to become a successful musician. They also offer a glimpse into the personal lives of these artists, showing how they balance their passion for music with their personal lives.

Born Into This, is a documentary about Charles Bukowski’s life as a writer and a poet. His work and experiences inspired many musicians, including Bono and Tom Waits, among others. The movie explores how Bukowski found his voice and how he maintained it throughout his career. It provides a unique perspective on the creative process, which is something every musician can relate to.

How They Broke Barriers In The Industry

Documentaries featuring musicians who broke barriers in the industry are essential for any aspiring musician. These films offer a glimpse into how groundbreaking artists challenged societal norms and paved the way for future musicians.

One such documentary is What Happened, Miss Simone? The film chronicles the life of Nina Simone and how she fought against racial discrimination and gender inequality in the music industry. It also highlights how Simone used her music to express her political views and advocate for civil rights. This documentary is a must-watch for musicians who want to challenge the status quo and make their mark on the world.

The Bottom Line

Documentaries featuring musicians are an excellent source of inspiration and insight for aspiring artists. Whether you’re looking for a behind-the-scenes look at the lives of famous musicians or want to learn how groundbreaking artists challenged societal norms, there’s a documentary out there for you. So go ahead, grab some popcorn, and get ready to be inspired!

Movies With Soundtracks Worth Listening To

Movies with soundtracks that are worth listening to can be a great source of inspiration for musicians. From iconic classics like The Sound of Music to modern-day hits like La La Land, these films offer a glimpse into the creative process behind some of the most memorable songs in history.

Listening to these soundtracks can help musicians develop new techniques and ideas for their own music.

Curated Soundtracks Featuring Great Musicians And Songs

Movies with great soundtracks can be a perfect way to inspire a musician. The creative work can encourage songwriters, composers and musicians to grow their creativity. Fortunately, there are lots of movies with excellent soundtracks that can give direction to a musician’s path. The best thing about these soundtracks is that they feature renowned musicians and their most exceptional creations. The “A Star is Born” soundtrack features Lady Gaga, one of the most prominent female musicians of the 21st century. Songs like “Shallow” and “Always Remember Us This Way” are perfect examples of how great soundtracks enhance movies. The hit songs won a Grammy award for best song written for visual media. The soundtrack is a perfect companion to the movie and makes it one of the best movies of all time for musicians to watch. Another exceptional soundtrack worth listening to is from the movie “The Lion King,” composed and produced by Sir Elton John. The opening song, “Circle of Life,” remains an iconic song to this day and still inspires new music. Similarly, Phil Collins’ work on “Tarzan” is a great source of motivation for musicians.

How Music Helped Bring These Movies To Life

Music is an essential part of the filmmaking process, and it’s an art that fuses with all aspects of the movie. The right music enhances the mood, accents the visual effects and helps create a lasting impression on the audience, making the movie complete. It’s amazing how a great piece of music can make a mediocre movie experience a fantastic one. Take the movie “The Social Network.” The score, composed by Trent Reznor and Atticus Ross, perfectly captures the story’s emotion, adding tension, suspense and excitement. To create the playlist for the movie “Guardians of the Galaxy,” Director James Gunn spent months selecting the perfect songs that would match the film’s tone, creating a great mix of music and visuals. In conclusion, movies with soundtrack worth listening to can be a great source of inspiration for musicians. They feature some of the greatest musicians and composers of our time and can provide new directions for creative growth. All that’s left is to sit back, watch and let the music uplift your creativity.

Movies With Relatable Characters For Musicians

Discover movies with relatable characters that inspire musicians in their musical journey. From the biopic of Freddie Mercury in “Bohemian Rhapsody” to the soulful story of “The Soloist” featuring Jamie Foxx, these movies showcase the power of music and the perseverance of musicians in pursuing their dreams.

Movies have the power to inspire and motivate us in many ways. For musicians, finding inspiration in the arts in all forms is an essential part of the creative process. Whether you’re a professional artist or just starting out, watching inspiring movies with relatable characters can be an excellent way to get into the right mindset for your next project.

Finding Inspiration In Relatable Characters

One of the best ways to get inspired as a musician is to watch movies that have characters who you can relate to. These characters show us that anyone can overcome even the toughest challenges as long as they are determined and passionate about their craft. One of the most inspiring films for musicians is “Whiplash,” where the main character, Andrew, faces numerous obstacles but eventually goes on to become a successful drummer. Another great movie for musicians is “A Star is Born.” Through the film, we see the journey of Ally, played by Lady Gaga, rise to fame while also navigating the struggles of the music industry.

How These Characters Used Music To Overcome Challenges

One of the main themes of many music-related movies is perseverance in the face of adversity. These characters teach us that no matter how hard things may seem, music can be a powerful tool to help us overcome challenges. In the movie “August Rush,” we see how even a child prodigy can face extreme circumstances, but music inspires him to ultimately find his way back to his family. Moreover, in “Ray,” the protagonist, Ray Charles, overcomes his blindness and struggles with addiction to become one of the most iconic musicians of all time.

Conclusion

Music plays an integral role in our lives, and movies that showcase talented musicians and their stories can be a great source of inspiration. Watching these movies can help you understand the struggles and triumphs of those who have gone before you, and inspire you to keep pushing forward with your craft. So, the next time you need some inspiration, why not watch one of these inspiring films? You never know what kind of spark they might ignite within you.

Frequently Asked Questions Of Inspiring Movies For Musicians

What Is The Inspirational Movie About A Musician?

The inspirational movie about a musician is “Whiplash” which was released in 2014. The movie revolves around the story of a jazz drummer who is an aspiring musician.

What Is The No 1 Motivation Movie?

The No. 1 motivation movie is “The Pursuit of Happyness. ” The movie is based on the true story of Chris Gardner, who overcomes extreme hardships to become a successful stockbroker. The movie inspires viewers to persevere and never give up on their dreams.

What Do You Call A Movie About A Musician?

A movie about a musician is called a music biopic or musical film.

What 90s Movie Is About The Music Industry?

The 90s movie about the music industry is called “Almost Famous”, a coming-of-age story of a teenage journalist who accompanies a rising rock band on tour.

Conclusion

Movies can provide great inspiration for musicians. They teach us about perseverance, passion, and the power of music. Whether you’re a seasoned musician or just starting out, there’s a film out there that can motivate you to keep pushing forward.

From “Whiplash” to “A Star is Born”, these movies offer valuable insights into the music industry and can help you stay focused on your goals. Take some time to watch a few of these inspiring films and see how they can impact your musical journey.

Categories
Archive

What Is Music Recording Software

Music recording software is a tool used to create and produce music digitally. It enables musicians, composers, and producers to record, edit, and mix audio tracks using their computers or mobile devices.

With this software, they can record, produce, and distribute music worldwide seamlessly. In today’s world of fast-paced technology, music recording software has become an essential part of creating and recording music. It has opened up a new world of possibilities to music producers and musicians alike.

This software is accessible to anyone with a computer and can be used to record, edit, and produce music in a variety of genres. Furthermore, it allows for experimentation and exploration of new sounds and techniques that were previously impossible with traditional recording methods. Music recording software has forever changed the way we create and enjoy music.

What Is Music Recording Software

Credit: www.digitaltrends.com

Types Of Music Recording Software

Music recording software is software used to record and produce music. There are many types of music recording software, ranging from basic recording software to professional recording software. These software differ in features, price, and complexity, but all of them are designed to help musicians and producers create high-quality recordings.

Music recording software has become a crucial tool for musicians and sound engineers to record, edit, and produce music. With the advancement of technology, there are various types of music recording software that cater to different levels of expertise and purposes. Generally, music recording software can be divided into two types: basic audio recording software and advanced digital audio workstations (DAW).

Basic Audio Recording Software

Basic audio recording software is usually simple, user-friendly software that enables users to record and edit simple audio tracks. This type of software is suitable for beginners or those who only need to create simple audio recordings. Some notable basic audio recording software includes:

  • Audacity
  • GarageBand
  • Ocenaudio
  • Ableton Live Lite

Advanced Digital Audio Workstations (daw)

Advanced digital audio workstations (DAW) are professional-level software that offer a vast range of features and tools that cater to the needs of professional sound engineers and producers. This type of software usually has a steeper learning curve and requires more technical expertise. Some notable advanced digital audio workstations (DAW) include:

  • Pro Tools
  • Logic Pro X
  • Ableton Live
  • FL Studio

Music recording software has revolutionized the music industry and has made it accessible for anyone to record and produce high-quality music. Whether you are a beginner or a professional, there is music recording software suitable for your level of expertise.

Features Of Music Recording Software

Music recording software is designed to record, edit, and mix music tracks. It offers various features such as multi-track recording, virtual instruments, effects, and automation. With music recording software, artists and producers can create professional-grade music from the comfort of their own homes.

Music recording software enables musicians to record, edit, mix and produce high-quality audio recordings. There are several essential features of music recording software that are crucial for making music, including multi-track recording, virtual instruments, audio effects and plugins, and MIDI compatibility.

Multi-track Recording

Multi-track recording is the ability to record multiple audio tracks simultaneously or separately. This feature is essential for recording live instruments or vocals and enables musicians to isolate the various sounds in the mix to adjust volume levels, add effects, or mute individual tracks. In short, multi-track recording provides greater control of the audio recording process and yields professional results.

Virtual Instruments

Virtual instruments refer to software plugins that generate sound based on MIDI input. These instruments can mimic a wide range of acoustic and electronic instruments, including pianos, drums, guitars, and synthesizers. Virtual instruments can produce high-quality sound, and with advances in technology, they are becoming increasingly realistic, allowing musicians to create tracks that sound incredibly lifelike.

Audio Effects And Plugins

Audio effects and plugins add depth and character to music recordings. These features allow musicians to manipulate an audio signal, enhancing it with effects such as reverb, delay, chorus, or other creative effects. Plugins, in particular, are an essential feature of music recording software, as they allow third-party developers to add new features and effects, pushing the envelope of what is possible.

Midi Compatibility

MIDI (Musical Instrument Digital Interface) is a protocol used for communicating musical information between devices, including digital audio workstations (DAWs), synthesizers, and other hardware. With MIDI compatibility, musicians can control the virtual instruments and effects within their DAW, giving them greater control over their music production. By sending MIDI messages to the software, musicians can adjust pitch, tempo, volume, and more, making music production a creative and collaborative process. In conclusion, music recording software has revolutionized the way musicians create music. With features like multi-track recording, virtual instruments, audio effects and plugins, and MIDI compatibility, musicians can produce high-quality recordings without the need for expensive studio equipment.

Popular Music Recording Software Programs

Music recording software is a digital tool that enables producers to record, edit, and produce high-quality audio tracks. From Pro Tools to Ableton Live, music recording software programs have become increasingly popular in the music industry. These programs not only simplify the recording process but also allow producers to create complex arrangements and effects on their tracks.

Popular Music Recording Software Programs Music recording software programs have been a game-changer for the music industry, particularly for music producers, sound engineers, and musicians. The popularity of music recording software has led to the development of different programs, each with unique features. Here are some of the popular music recording software programs that are commonly used by musicians, producers, and sound engineers. H3: Pro Tools Pro Tools is a well-known and widely used music recording software program for its advanced and user-friendly features. From recording to mixing and mastering, Pro Tools has got all the essential tools to produce high-quality music recordings. It’s best suited for professional music studios, making it a popular choice for music production and sound engineering. H3: Logic Pro Logic Pro is an exclusive music recording software program for Apple users. Its advanced features and user-friendly interface make it a popular choice for music producers and sound engineers. Logic Pro offers various tools for audio editing, mixing, and mastering, making it an all-in-one music production software. H3: Ableton Live Ableton Live is a program designed for electronic music production, live performance, and DJing. Its unique features allow for on-stage music creation and improvisation, making it the go-to software program for electronic music producers and live performers. H3: FL Studio FL Studio is a music production software program designed for musicians who want to create high-quality music recordings. Its user-friendly interface and comprehensive tools enable musicians to produce professional-sounding music recordings. FL Studio is popularly used by electronic music producers and hip-hop artists. H3: Cubase Cubase is a comprehensive music production software program developed by Steinberg. It is widely used by music producers, composers, and sound engineers for recording, editing, mixing, and mastering music. Cubase offers various tools for MIDI sequencing, audio editing, and mixing, making it an all-in-one music recording software program. In conclusion, having a music recording software program is essential for music producers, sound engineers, and musicians who want to create high-quality music recordings. These popular music recording software programs have unique features and tools that cater to different music production needs.

What Is Music Recording Software

Credit: ardour.org

How To Choose The Right Music Recording Software For You

Music recording software is a tool that allows you to record and produce music on your computer. With numerous options available in the market, it can be challenging to choose the right software for you. Factors that can influence your decision include your budget, level of experience, and preferred features.

How to Choose the Right Music Recording Software for You In today’s world, music recording software has become an essential tool for every musician or music producer. The right software makes all the difference in capturing high-quality sounds, mixing and editing tracks, and producing professional-sounding music. However, with so many options available in the market, it can be quite overwhelming to select the right music recording software for your needs. In this article, you will learn how to choose the right music recording software by considering your budget, assessing your needs, researching and reading reviews.

Consider Your Budget

The first thing you should do when looking to invest in music recording software is to consider your budget. Recording software can range from free to high-end software worth thousands of dollars, so it’s essential to know how much you’re willing to spend. While free software might seem like a good deal, keep in mind that the features and functionality might not be as good as paid software. If you’re just starting, it’s best to start with some free software to understand recording basics, but if you’re serious, investing in professional software is necessary.

Assess Your Needs

After considering your budget, assess your needs next. Understand what features you require in your software for producing the music you want to make. For instance, if you’re an electronic musician, you might need a synthesizer or drum machine built into the software or plug-ins that can help you produce certain sounds. Ensure the software you choose has all the necessary features and tools you need to produce your desired sound.

Research And Read Reviews

Before investing in music recording software, do thorough research and read reviews. Check various online forums, reviews from experts, and consumer reviews to determine the efficiency and reliability of the recording software. Reviews often highlight the strengths and weaknesses of a product, giving you an idea of what to expect. It would help if you considered both the audio quality of the software and the ease of use to determine the best software option for your music production needs. In conclusion, selecting the right music recording software can be challenging, but the process becomes easier by considering your budget, assessing your needs, and researching and reading reviews. Keep in mind that no music recording software is perfect, but selecting the right one can make all the difference in producing high-quality music.

What Is Music Recording Software

Credit: producelikeapro.com

Frequently Asked Questions For What Is Music Recording Software

What Does Music Software Do?

Music software allows the user to create, edit, and manipulate music digitally using a computer. It includes features like recording, mixing, sound editing, and effects processing, enabling musicians and producers to create professional-quality music.

What Does Music Recording Do?

Music recording captures and stores sound that is performed by musicians, singers, and other audio performers using various recording technologies. It creates a permanent record of a musical performance that can be reproduced and shared with an audience. Music recording makes it possible to preserve and distribute musical compositions for commercial release, broadcasting, and personal enjoyment.

What Software Is Used For Music?

There are many software used for music production such as Ableton Live, Logic Pro X, FL Studio, Pro Tools, Garageband, Audacity, Cubase, and more. They have different features and tools for recording, editing, mixing, and mastering music to create professional-quality tracks.

Which Software Is Best For Audio Recording?

The best software for audio recording depends on your needs, budget, and skill level. Some popular options include Pro Tools, Logic Pro X, Ableton Live, FL Studio, and Audacity. Research and compare their features before choosing the one that suits you best.

Conclusion

Music recording software is brilliant in helping musicians and enthusiasts produce high-quality sound recordings with ease. With the right knowledge and a bit of experimentation, one can get creative with their music and produce their own unique sound. It’s important to choose the appropriate software that’ll best suit your needs and skillset, regardless of whether you’re a beginner or a professional.

Always remember that music recording software is a tool to bring your vision and creativity to life. So, let it inspire you to make your music dreams a reality!

Categories
Archive

Best Platforms For Musicians

The best platforms for musicians are SoundCloud and Bandcamp. With the rise of digital technology, musicians have more options than ever to share and distribute their music.

However, with so many choices available, it can be difficult to determine which platforms will best suit their needs. SoundCloud and Bandcamp are two of the best platforms for musicians. SoundCloud allows users to upload and share their music, as well as connect with other musicians and fans.

Bandcamp provides a platform for artists to sell their music and merchandise directly to fans, and also offers tools for promotion and analytics. Both platforms have proven to be effective in helping musicians gain exposure and build their audience, making them a must-have for any musician looking to share their music with the world.

Best Platforms For Musicians

Credit: niasounds.com

Top Music Platforms

Musicians can benefit from a variety of platforms for hosting and promoting their music. Some of the top music platforms include Spotify, YouTube, SoundCloud, Bandcamp, and Apple Music. These platforms offer a range of features such as distribution, analytics, and promotion, making it easier for musicians to reach their audience and grow their fanbase.

As a musician, having your music on different platforms can help increase your fanbase and get your music heard by more people. With so many music platforms available, it can be difficult to choose which ones to use. Here are some of the top music platforms that musicians can use to promote their music and reach a wider audience: Spotify is one of the most popular music platforms in the world, with over 356 million active users, including both free and premium subscribers. As a musician, you can upload your music to Spotify and make it available to listeners all over the world. You can also create playlists, interact with fans, and get featured on editorial playlists to help increase your reach. With its massive user base and user-friendly interface, Spotify is a great platform for musicians to use. SoundCloud is a popular platform for independent musicians to promote their music. With its easy-to-use interface, you can upload your music and share it with your fans in just a few clicks. SoundCloud also allows you to interact with your listeners by commenting on their tracks and giving feedback. You can also join groups and communities to connect with other musicians and collaborate on projects. With over 2 billion monthly active users, YouTube is one of the largest platforms for music discovery. YouTube Music allows you to upload your music videos and reach a global audience. You can also create a channel for your band and engage with your fans by responding to comments and creating playlists. YouTube Music is a great platform to use if you want to gain exposure and build a loyal following. Bandcamp is a popular platform for independent musicians and labels to sell their music directly to fans. Unlike other platforms, Bandcamp allows you to set your own prices and keep 85% of your sales revenue. You can also offer discounts, giveaways, and other incentives to encourage fans to support your music. With its easy-to-use interface and vast community of listeners, Bandcamp is a great platform for independent musicians to monetize their music and grow their fanbase. In conclusion, these top music platforms give musicians a variety of options to promote their music and reach a wider audience. Each platform has its own unique features and benefits, so it’s important to choose the ones that best suit your needs as a musician.

Spotify

Spotify is one of the most prominent music streaming platforms, and it provides an excellent opportunity for musicians to showcase their talents to a vast audience worldwide. Launched in 2008, Spotify boasts of over 356 million active users every month, and it also offers free and premium subscription services.

Overview:

Spotify has revolutionized the way we listen to music by making it easy for artists to share their music directly with their fans. Musicians can upload their songs, albums, or EPs and make them available on the platform, giving their audience a chance to stream their music whenever and wherever. Spotify is an excellent platform for artists who want to gain more exposure and grow their fanbase.

Benefits Of Using Spotify For Musicians:

  • Spotify provides a significant revenue stream for music artists and creators by paying them royalties for every stream they receive.
  • Artists can access Spotify for Artists, which is a dashboard that gives them insights about their audience, including where their music is being played, demographics, and listenership trends.
  • Spotify’s algorithms recommend new tracks to listeners based on their listening history, making it easier for musicians to reach potential fans.
  • Spotify provides a platform for music artists to collaborate and connect with other artists by creating playlists and sharing their music on social media platforms.

How To Get Your Music On Spotify:

To get your music on Spotify, you need to follow these simple steps:

  1. Create a Spotify account.
  2. Verify your artist profile
  3. Upload your music. You can do this directly on Spotify or use a third-party distributor such as DistroKid, TuneCore, or CD Baby.
  4. Once your music is uploaded, you need to submit it for review. The review process can take up to a week.
  5. Once your music is approved, it will be available on Spotify for your fans to stream.

Overall, Spotify is a powerful music streaming platform that provides significant benefits for musicians who want to grow their audience and gain more exposure. If you’re a musician looking to get your music out to the world, Spotify is an excellent platform to start with.

Soundcloud

SoundCloud is one of the best digital platforms for musicians, as it allows them to upload and share their tracks with a large audience. With its user-friendly interface and promotional tools, SoundCloud is an ideal platform for both established and emerging musicians to showcase their talent and connect with their fans.

Overview Of Soundcloud For Musicians

SoundCloud is a music-sharing platform that provides emerging and established musicians with a globally-reaching platform to share their music. It offers a host of features specifically designed for artists who want to promote their music to a broader audience.

Benefits Of Using Soundcloud For Musicians

With over 76 million registered users, SoundCloud is a platform that offers significant benefits to musicians. Here are some of the critical advantages of using SoundCloud:

  • Reach a Global Audience: SoundCloud allows artists to promote their music to a global audience of music lovers, making it an ideal platform to gain followers and connect with fans.
  • Easy to Share: SoundCloud makes it easy to share your music on other social media platforms such as Facebook, Twitter, and Instagram, which can help increase your audience reach.
  • Promote Your Music: SoundCloud allows artists to promote their music with SoundCloud ads, which can increase their reach and visibility on the platform.
  • Engage with Fans: SoundCloud has a comment section where fans can interact with artists by giving feedback and asking questions about their music.
  • Insights: SoundCloud provides musicians with data and information on how their music is performing, including the number of plays, likes, and reposts.

How To Get Your Music On Soundcloud

Getting your music on SoundCloud is easy and straightforward. Here are the simple steps that you can follow:

  1. Create an account: To get started on SoundCloud, you need to create an account and verify your email.
  2. Upload your music: SoundCloud allows you to upload your music files, write descriptions, and add tags, making it easier for users to find your music.
  3. Share your music: Once you have uploaded your music, you can share it with your followers, and also on other social networks.
  4. Promote your music: SoundCloud offers several promotional tools to help you reach a larger audience, including SoundCloud ads and partnerships with music blogs and websites.

In conclusion, SoundCloud is an excellent platform for musicians to promote their music, engage with fans, and reach a broader audience. With its user-friendly interface and a host of features designed explicitly for musicians, it is no surprise that SoundCloud has become the go-to platform for artists who want to succeed in the music industry.

Best Platforms For Musicians

Credit: www.didgeproject.com

Youtube Music

YouTube Music is a great platform for musicians, offering access to a vast collection of songs as well as the option to upload music and connect with fans. With its powerful algorithm, musicians can easily reach their target audience and grow their online presence.

Overview

When it comes to music promotion and discovery, YouTube Music is one of the most popular platforms among musicians and fans. It is a music streaming service launched by YouTube, featuring a vast library of official music videos, live performances, remixes, covers, lyrics, and playlists. YouTube Music is available as a mobile app, web player, and through the YouTube Premium subscription.

Benefits Of Using Youtube Music For Musicians

YouTube Music can be a game-changer for emerging and established musicians alike. Here are some ways in which YouTube Music can benefit musicians:

  • Global Reach: YouTube Music has over 2 billion monthly active users worldwide, making it an effective way to reach a massive audience. Whether you’re a local artist or an international superstar, YouTube Music can help you expand your fanbase.
  • Monetization: YouTube Music allows musicians to earn revenue from their music through advertising, fan subscriptions, merchandise sales, and other monetization options. This can be a significant source of income for independent artists who may not have access to traditional distribution channels.
  • Analytics: YouTube Music provides in-depth analytics and insights into your audience, including demographics, watch time, engagement, and traffic sources. This information can help you optimize your content strategy and create more engaging music videos.
  • Collaboration: YouTube Music enables musicians to collaborate with other artists and creators, as well as collaborate with YouTube influencers to reach a wider audience.

How To Get Your Music On Youtube Music

Getting your music on YouTube Music is relatively easy and straightforward. Here are the steps:

  1. Create a YouTube Channel: If you don’t already have one, create a YouTube channel and upload your music videos.
  2. Sign up for YouTube Music for Artists: YouTube Music for Artists is a free platform that allows musicians to manage their artist profiles and get access to insights and promotional tools. Sign up and verify your artist profile through Google for Artists.
  3. Optimize Your Music Videos: Make sure your music videos have attractive thumbnails, descriptive titles, accurate metadata, and annotations. This will help your videos get discovered by users searching for similar music.
  4. Promote Your Music: Promote your YouTube Music videos on social media, your website, and other online platforms. Encourage your fans to subscribe to your channel, leave comments, and share your videos.

In conclusion, YouTube Music can be an essential platform for musicians who want to reach a wider audience, monetize their music, and engage with their fans. By following these tips and using the features and tools available on YouTube Music, musicians can increase their visibility and grow their career in the music industry.

Bandcamp

Bandcamp is among the top platforms for musicians. It allows artists to sell and stream their music directly to fans and keep a significant portion of the revenue. With Bandcamp, musicians can gain exposure to a vast audience and control their creative work.

Bandcamp is a music distribution platform that provides musicians with an easy and affordable way to sell and distribute their music. It is an independent, artist-friendly platform that allows musicians to have total control over their music, pricing, and distribution. In this article, we will look at the benefits of using Bandcamp for musicians and how to get your music on the platform.

Overview

Bandcamp is a unique platform that offers a comprehensive set of tools to help musicians grow their fan base, connect with fans, and sell their music. It provides a variety of features such as customizable storefronts, fan messaging, and real-time sales notifications. Bandcamp also has a massive community of music lovers who use the platform to discover new music. It is a popular platform among indie musicians, labels, and underground genres.

Benefits Of Using Bandcamp For Musicians

Bandcamp has many benefits for musicians. Here are some of the most significant ones:

  • Control over pricing: Musicians can set their pricing for their music products, albums, singles, and merchandise. They can also create different pricing tiers and bundle options.
  • Control over distribution: Musicians can choose which countries they want to sell their music, and there are no restrictions on streaming.
  • Customizable storefronts: Musicians can create a unique storefront that reflects their brand, upload their own artwork, and customize their website.
  • Direct-to-fan communication: Musicians can communicate directly with their fans, offer exclusive content, and grow their fan base.
  • Real-time sales notifications: Musicians receive real-time notifications for all sales, giving them greater control over their revenue.
  • Analytics: Musicians can monitor their sales, track fans, and understand their audience with Bandcamp’s comprehensive analytics.

How To Get Your Music On Bandcamp

Here are the steps to get your music on Bandcamp:

  1. Sign up for an account: Create an account on Bandcamp by providing your name, email, and password.
  2. Upload your music: After creating an account, upload your music in WAV, AIFF, FLAC, or ALAC format.
  3. Customize your storefront: Customize your storefront by uploading your album or single artwork, and creating a unique website reflecting your brand
  4. Set your pricing: Set the price for your music, merchandise, or bundle options.
  5. Promotion: Promote your music by sharing it on social media, sending it to your fan mailing list, and using Bandcamp’s marketing tools.

Bandcamp, with its musician-friendly features and vast community, provides a unique platform for independent artists to sell, distribute their music, and grow their fan base. Follow the steps outlined above to get your music on the platform and start taking advantage of this fantastic opportunity.

Best Platforms For Musicians

Credit: emastered.com

Frequently Asked Questions For Best Platforms For Musicians

What Platform Do Musicians Use?

Musicians use various platforms to promote their music, such as Spotify, Apple Music, SoundCloud, Bandcamp, and YouTube. These platforms allow them to distribute and monetize their music, gain exposure, and build a fan base.

What Social Media Platform Is Best For Musicians?

Instagram and YouTube are the best social media platforms for musicians because they allow for visual and audio content to be shared easily. Instagram also has engagement features like IGTV and stories, while YouTube has a large audience and search engine optimization capabilities.

What Is The Best Platform To Start A Music Career?

The best platform to start a music career depends on your goals and strengths. YouTube and social media can help with exposure and audience building. Music streaming services like Spotify and Apple Music can aid in gaining fans and revenue.

Local gigs and open mics can create opportunities for live performance experience. Ultimately, a combination of these platforms can be the most effective approach.

What Platform Should I Put My Music On?

To reach a wider audience, you should put your music on various platforms such as Spotify, Apple Music, Amazon Music, Deezer, Tidal and many others. By strategically using these platforms, you can increase your exposure and maximize your earnings as each platform offers different benefits and caters to different listeners.

Conclusion

Overall, there are many impressive platforms catering to musicians in today’s digital era. Each of those we have discussed offers particular advantages and features for artists looking for affordable ways to promote and sell their music. From SoundCloud’s social networking capabilities and user-friendly interface to Bandcamp’s customizable storefront and seamless integration with social media, there’s something for every artist.

Ultimately, it’s all about finding the right platform that caters to your specific needs, and we hope this post has helped you to make a more informed decision.

Categories
Archive

Cubase Doesn’t Recognize Sound Card

If Cubase doesn’t recognize your sound card, check the sound card settings and drivers. Incompatible or outdated drivers may be the cause of the problem.

In order to produce high-quality music recordings and audio productions using Cubase, a sound card is required. However, sometimes Cubase may fail to recognize the installed sound card. This can be frustrating for users who want to create quality sound without any hiccups.

If you are experiencing such issues, the first thing to check is the sound card settings and drivers. An outdated, missing, or incompatible driver might prevent Cubase from detecting your sound card. This article will explain some of the common reasons why Cubase fails to recognize sound cards and offer potential solutions to the problem.

Cubase Doesn'T Recognize Sound Card

Credit: www.amazon.com

Outdated Drivers

Outdated drivers can cause issues with sound recognition. If Cubase doesn’t recognize your sound card, check that your drivers are up to date.

If you are encountering issues with Cubase not recognizing your sound card, it could be due to outdated drivers. Drivers are the software programs that allow the communication between your computer and the hardware components, such as your sound card. When the drivers become outdated, they can cause issues with the functioning of your sound card and other hardware components.

Identifying Outdated Drivers

The task of identifying outdated drivers can often seem daunting, but it is relatively simple. Windows offers various ways of identifying outdated drivers, such as using the device manager. To access the device manager on Windows, press the Windows key + XDevice Manager from the list. In the Device Manager window, expand the relevant hardware category and right-click on the device for which you want to update the drivers. Select Update DriverSearch automatically for updated driver software. Windows will then search for the latest driver updates, if available.

Updating Drivers

Updating drivers is critical to maintaining optimum system performance and ensuring that the hardware components function correctly. Updating drivers can fix issues such as Cubase not recognizing the sound card. It is important to note that the process of updating drivers can vary depending on your system and the hardware component you are updating. To update drivers manually, visit the manufacturer’s website for your sound card and search for the latest drivers available. Download the drivers and install them according to the instructions provided. Alternatively, you can use third-party driver updating software such as Driver Booster, IObit Driver Updater, and Driver Easy. These tools scan your system for outdated drivers and then download and install the latest versions for you. In conclusion, outdated drivers can cause numerous issues, including problems with sound card recognition in Cubase. It is essential to keep your drivers updated to ensure that hardware components function correctly. By following the steps outlined in this post, you can easily identify and update any outdated drivers on your system.

Incorrect Sound Card Settings

Incorrect sound card settings might be the reason why Cubase can’t recognize the sound card. Double-check if the sound card is selected as the primary audio device and its settings match the ones in Cubase.

Checking Sound Card Settings In Cubase

If Cubase doesn’t recognize the sound card, it might be due to incorrect sound card settings. To fix this issue, you should check the sound card settings in Cubase and adjust them accordingly. Here’s how:

  • Open Cubase and click on “Devices” in the menu bar.
  • Select “Device Setup” from the drop-down menu.
  • In the “VST Audio System” section, make sure the correct sound card is selected from the list of available devices.
  • Check the “ASIO Driver” settings and configure them according to the sound card’s specifications.
  • If the sound card requires specific sample rates or buffer sizes, make sure to set them in the “Control Panel” section of the ASIO Driver settings.
  • Save the changes and restart Cubase to see if the sound card is now recognized.

Adjusting Sound Card Settings

If the sound card is still not recognized after checking the settings in Cubase, adjusting the sound card settings might help. Here are some steps you can take:

  • Open the sound card manufacturer’s control panel or settings application.
  • Make sure the sound card is selected as the default audio device and enabled.
  • Check the sound card’s input and output settings and configure them according to your needs.
  • If the sound card has multiple inputs or outputs, make sure to select the appropriate ones in Cubase.
  • Adjust the sample rate and buffer size settings if necessary.
  • Save the changes and restart both the sound card settings application and Cubase to see if the issue is resolved.

By following these steps, you should be able to check and adjust the sound card settings in Cubase to resolve any issues with sound card recognition.

Incompatible Sound Card

Cubase may not recognize your sound card if it is incompatible, which can lead to frustrating issues when trying to create music. Double-check that the sound card is listed as compatible with Cubase before investing.

If Cubase is not recognizing your sound card, it is likely that you are dealing with an incompatible sound card issue. This can be frustrating, but luckily, there are ways to check compatibility and replace an incompatible sound card. In this post, we’ll cover the steps you can take to get Cubase to recognize your sound card.

Checking Sound Card Compatibility With Cubase

When you’re experiencing issues with Cubase recognizing your sound card, the first step is to check if your sound card is compatible with Cubase. You can do this by checking the system requirements for your version of Cubase. If your sound card doesn’t meet the minimum requirements for Cubase, you’ll need to upgrade to a sound card that does. Alternatively, you can downgrade to an earlier version of Cubase that works with your current sound card.

Replacing Incompatible Sound Card

If you’ve determined that your sound card is not compatible with Cubase, the next step is to replace your sound card. Before replacing your sound card, make sure to research and purchase a sound card that is compatible with your version of Cubase. When you receive your new compatible sound card, you’ll need to physically install it into your computer. This will require some technical skills, so if you’re not confident in doing it yourself, seek the help of a professional. Once your new sound card is installed, make sure to set it as your default sound card in Windows or macOS settings. This will ensure that Cubase recognizes the new sound card and you can begin using it without issues. In summary, if you’re experiencing issues with Cubase not recognizing your sound card, it’s likely that you have an incompatible sound card issue. Take the time to check compatibility and replace your sound card if necessary, and you’ll be back to working with sound in no time.

Cubase Doesn'T Recognize Sound Card

Credit: forums.steinberg.net

Device Manager Configuration

To resolve the issue of Cubase not recognizing the sound card, configuring the device manager settings is crucial. Check the sound card’s drivers and ensure that they are up to date. Also, make sure that the sound card is selected as the default device in the device manager.

If you are experiencing sound card recognition problems with Cubase, you may need to review your device manager configuration. The device manager is a crucial component of your computer system as it manages your hardware devices, including sound cards. This article will examine how to check and update your device manager settings so that Cubase can recognize your sound card properly.

Checking Device Manager Settings

Before you can update your device manager settings, you will need to check if there are any issues that need fixing. The following steps will guide you:

  1. Open the Start menu and search for “Device Manager.”
  2. Click on “Sound, video and game controllers” to expand the category list.
  3. If your sound card is listed, check if it has a yellow exclamation point or red “x” mark beside it. This indicates an issue with the sound card drivers.
  4. If there is no sound card listed, check if it is identified in “Other devices” with a yellow exclamation mark beside it.
  5. If your sound card is not listed in either category, you may need to install the drivers or replace the hardware device.
  6. Right-click on the sound card and select “Properties.”
  7. Click on the “Driver” tab and verify if the driver provider, date, and version are correct.

Updating Device Manager Settings

If there is an issue with the sound card drivers, you will need to update them for proper recognition within Cubase. Follow these steps:

  1. Open the Start menu and search for “Device Manager.”
  2. Click on “Sound, video and game controllers” to expand the category list.
  3. Right-click on the sound card with the issue and select “Update driver.”
  4. Choose “Search automatically for updated driver software” and follow the prompts to install the latest driver.
  5. Restart your computer to apply the changes.

In conclusion, checking and updating your device manager settings is crucial if Cubase doesn’t recognize your sound card. By using the steps provided above, you can quickly and easily troubleshoot any issues, helping you get back to music-making in no time.

Bios Configuration

To resolve the issue of Cubase not recognizing the sound card, you should check the BIOS configuration. Make sure that the onboard audio is enabled in the BIOS, and the correct driver is installed. You can also try updating the BIOS to the latest version.

If your Cubase software is unable to recognize the sound card in your system, it could be due to incorrect BIOS settings. The BIOS (Basic Input/Output System) is a firmware component that initializes hardware components and allows communication between the software and hardware. Incorrect BIOS settings can prevent the sound card from functioning correctly.

Checking Bios Settings

The first step to resolving the sound card recognition issue is to check the BIOS settings. Access the BIOS by pressing the designated key during startup, which varies depending on your system manufacturer. Check the following settings:

  • Ensure that the onboard audio card is enabled.
  • Check if the BIOS version is outdated and update it if necessary.
  • Verify that the IRQ (Interrupt Request) for the sound card is correctly assigned.
  • Ensure that the plug and play feature is enabled.

If all these settings are correct and the issue persists, move on to adjusting the BIOS settings.

Adjusting Bios Settings

If checking the BIOS settings didn’t resolve the problem, it might be necessary to adjust them. The following steps can help:

  1. Disable the onboard audio card to prevent conflicts with the external sound card.
  2. Change the audio settings from “Auto” to “Enabled” or “Disabled” (depending on your system manufacturer).
  3. Assign the IRQ for the sound card manually.
  4. Disable the plug and play feature for the sound card.
  5. Save the changes and exit the BIOS.

After making these adjustments, restart your system and check if Cubase recognizes the sound card now.

In conclusion, incorrect BIOS settings can cause Cubase to not recognize the sound card. By checking and adjusting the BIOS settings, you can resolve the issue and get back to creating music with your external sound card.

Reinstalling Cubase

Reinstalling Cubase can be a solution when the software doesn’t recognize the sound card. Uninstalling and then reinstalling the latest version of Cubase can fix this issue, ensuring that the sound card is properly detected.

If your Cubase software isn’t recognizing your sound card, you may need to consider reinstalling the software. Reinstalling Cubase is a simple process that can help you solve this problem. But, before reinstalling Cubase, you need to uninstall the existing software properly.

Uninstalling Cubase

To uninstall Cubase from your computer, follow these steps:

  1. Go to the Control Panel on your computer.
  2. Select “Programs and Features” or “Add or Remove Programs.”
  3. Find Cubase from the list of installed programs, and click on it.
  4. Select “Uninstall.”
  5. Follow the prompts to complete the uninstallation process.

Once you have completely uninstalled Cubase from your computer, you can now proceed to reinstall the software. You can either reinstall from your original installation CD or download the software from the official website. Here are the steps on reinstalling Cubase:

  1. Insert the Cubase installation CD or locate the downloaded file on your computer.
  2. Run the installation wizard and follow the on-screen prompts.
  3. When prompted, enter your Cubase activation code or serial number.
  4. Complete the installation process and launch the software.

By reinstalling Cubase, you can ensure that all the necessary drivers and software are installed correctly, which can help your computer recognize your sound card and give you a better experience with Cubase. Don’t forget to restart your computer after the installation process is complete.

Frequently Asked Questions Of Cubase Doesn’t Recognize Sound Card

Why Is My Sound Card Not Detected?

Your sound card might not be detected due to driver issues, faulty hardware, or incorrect BIOS settings. Ensure that your sound card drivers are up to date and check for any hardware problems. You can also try disabling and re-enabling the sound card in the BIOS settings.

If the issue persists, seek assistance from a professional.

How Do I Connect My Sound Card To Cubase?

To connect your sound card to Cubase, you need to ensure that your sound card is installed and configured properly on your computer. Then, open Cubase and go to the “Devices” menu and select “Device Setup”. From there, choose your sound card as the ASIO driver.

Finally, adjust your inputs and outputs in the “Audio Connections” menu to match your sound card.

How Do I Change The Audio Driver In Cubase?

To change the audio driver in Cubase, go to “Studio Setup” in the “Devices” menu. Then select “Audio System” and choose your desired driver from the drop-down menu under “ASIO Driver”. Save the changes and restart Cubase for the new driver to take effect.

How Do I Know If My Sound Card Is Installed?

To see if your sound card is installed, go to your computer’s Device Manager. Look for the Sound, video and game controllers section and click on it. If you see your sound card listed, it is installed. If not, you may need to install it or update the driver.

Conclusion

Overall, troubleshooting audio problems in Cubase can be a daunting task, especially if you can’t seem to get it to recognize your sound card. However, there are some practical solutions that you can try out to get your sound card up and running.

Whether you’re dealing with outdated drivers or faulty hardware, following these steps can help you diagnose and resolve the issue quickly and efficiently. With these guidelines in mind, you should have no trouble getting back to your music production in no time!