To import audio to Pro Tools, you can simply drag and drop the audio file into the Pro Tools session. Once the audio is imported, you can edit and manipulate it as needed.
Pro Tools is a powerful digital audio workstation used by music producers, audio engineers, and sound designers to create music, podcasts, and other audio projects. Whether you’re a seasoned Pro Tools user or just getting started, importing audio is a basic task that you’ll need to know how to do.
We’ll walk you through the steps of importing audio to Pro Tools and give you some tips for working with audio files in this popular software.

Credit: subscription.packtpub.com
Setting Up Your Session
Before you start with importing audio in Pro Tools, you need to set up your session. Creating a new session, browsing workspace and importing audio files properly are crucial steps that ensure your project runs smoothly.
Create A New Session
To begin with, you have to create a new session in Pro Tools. Go to ‘File’ and select ‘New Session.’ Enter the session name and location where you want to save it. You can also select the session template according to your preferences. After this, configure the other settings such as sample rate, bit depth, and I/O settings for your project.
Workspace Browser
Getting started with the Workspace browser is easy and important as it enables you to easily locate the files you need for your project. Click on ‘Window’ and select the ‘Workspace’ option from it. You can access clips, tracks, and regions stored on your computer, external drives, or other devices. You can then proceed to import the audio required for your session.
Importing Audio Files Into Pro Tools
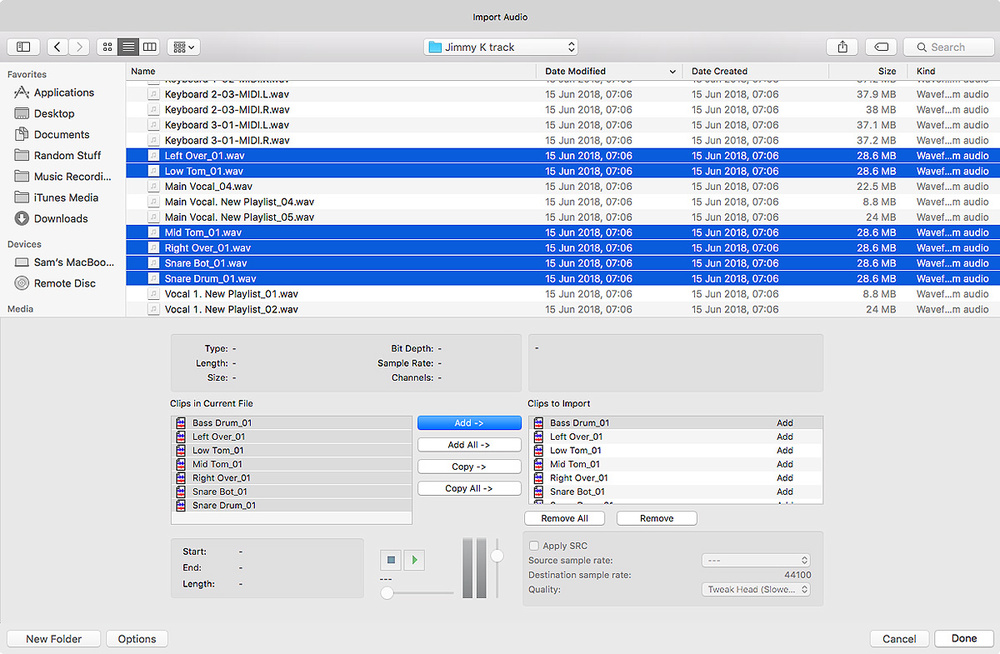
After selecting the audio files, click on the ‘Import Audio’ button, and a dialogue box will appear. Select the files you want to upload and click ‘Open’ to begin the import process. Ensure that the files you import are compatible with your project settings, or you may face issues later on. As the files import, you will receive a notification of their progress and completion.
In summary, setting up your session for importing audio in Pro Tools requires you to create a new session, browse your workspace and import the appropriate audio files required for your project. This process ensures that your project runs smoothly, and you can work on it with ease.
Credit: www.soundonsound.com
Importing Audio Files
Importing audio files into Pro Tools is a simple process. Users can either drag and drop files directly into the session or use the Import Audio function in the File menu. Once imported, audio files can be manipulated, edited, and mixed with ease using Pro Tools’ powerful tools and features.
File Formats Supported By Pro Tools
Pro Tools is capable of importing an array of audio file formats, including AIFF, WAV, SDII, MP3, and AAC, among others. However, to avoid compatibility issues, it’s advisable to use AIFF or WAV file formats if the audio will undergo further editing.
How To Import Audio Into Pro Tools
Importing audio files into Pro Tools is a straightforward process. The following are the steps to follow:
- Open Pro Tools
- Go to the File menu and select “Import.”
- Select the audio file you want to import.
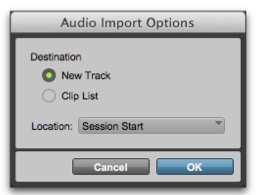
- Choose the options that suit your project. You can auto-create files on import, copy the audio files, convert the audio files to a different format, and many more.
- Click the “Import” button, and Pro Tools will import your audio file instantly.
Preparing Or Optimizing Audio For Importing
Preparing audio files before import can save you time and improve your workflow. The following are some tips:
- Ensure that your audio files have a sample rate and bit depth consistent with the session settings before importing them into Pro Tools.
- Trim or edit any unnecessary parts of the audio file to optimize your workflow.
- Normalize the audio files to ensure that the audio levels are consistent. However, avoid normalizing to the maximum level as it may result in audio distortion.
- If you have multiple audio files, organize them into separate folders to avoid confusion when importing.
- Ensure that the names of the audio files are unique and descriptive to facilitate easy identification.
In conclusion, importing audio files into Pro Tools is a simple task. However, it’s crucial to ensure that the audio files are in the correct format. Preparing or optimizing your audio files before importing can save you time and streamline your workflow.
File Management In Pro Tools
Pro Tools offers a convenient way to import audio files into your project. You can drag and drop audio files into the clip list or import them through the menu bar. Once your files are imported, they can be managed and edited with ease using the software’s powerful file management tools.
Importing audio files in Pro Tools is a crucial step in the audio production process. However, like any other software, it requires you to manage your files to keep your projects organized. The file management process involves several tasks like identifying audio files, renaming them, consolidating regions, and organizing audio clips with playlists. In this section, we will cover some of the critical aspects of file management in Pro Tools.
Naming Audio Files And Consolidating Regions
Naming your audio files is a fundamental aspect of file management in Pro Tools. When importing audio files, Pro Tools automatically assigns a name based on the file’s location. This name might not be descriptive enough to identify the audio file. Therefore, it is beneficial to rename the audio files to something that is easily identifiable. Naming conventions could include the track name, session information, or any descriptive information that can help identify the file. Consolidating regions is another file management task that can help keep your projects organized. Pro Tools allows you to consolidate regions, which makes it easier to move the files between sessions or backup projects. When consolidating regions, Pro Tools makes a copy of the file, and you can choose to trim it according to your original edits. This process helps keep your sessions organized and your files secure should anything happen to your hard disk.
Organizing Audio Clips With Playlists
Playlist organization is an essential aspect of file management in Pro Tools. Playlists enable you to organize audio clips by creating a list of playlists specific to your needs. Once you create playlists, you can easily switch between them and choose the one that suits your needs. For example, you could create a playlist that includes all the audio files from a particular session. Playlists also enable you to move clips between sessions and backup projects with minimal effort.
Editing Audio Clips In Pro Tools
Editing audio clips is the final phase of file management in Pro Tools, and it involves using the various editing tools available in Pro Tools. The editing process enables you to adjust the length of clips, move them around the timeline, and apply various audio effects. You can also split clips, trim them, and adjust fades to polish your audio. The editing process is the final stage in creating a polished audio project that meets your needs. In conclusion, file management is an essential aspect of using Pro Tools to produce professional audio. Naming your audio files, consolidating regions, organizing audio clips with playlists, and editing audio clips are some of the tasks that can help you keep your projects organized and efficiently complete your audio projects.
Tips For Importing Audio Into Pro Tools
Importing audio into Pro Tools can be a daunting task, but following simple steps can make it easy. Make sure the audio file format is compatible, set the correct sample rate, and assign the correct inputs and outputs to avoid any issues.
If you’re working on audio editing, Pro Tools is a comprehensive digital audio workstation that can help you achieve the best outcome. However, in order to achieve the best outcome, it’s essential to import audio files into Pro Tools efficiently. In this section, we’ll provide you with tips to ensure that the audio is correctly imported into Pro Tools.
Importing Audio Preferences And Techniques
Before importing the audio files into Pro Tools, it’s essential to set the correct preferences. To set preferences, click on “Pro Tools” and then “Preferences.” On the Audio tab, select the “Import Audio” option. This is where you can specify the format of the audio file you want to import. Here are some tips for importing audio files into Pro Tools:
- Ensure that the file you are importing has the required sample rate and bit depth.
- Choose the correct file type – MP3, WAV, etc.
- Ensure that the audio file is properly named.
- Organize the session data to reduce clutter.
- Use an external hard drive to prevent the audio files from filling up your computer’s hard drive.
Matching Audio To Tempo And Pitch In Pro Tools
In Pro Tools, users can match audio files to the tempo and pitch of their session. This is particularly useful when working with instrumental or vocal tracks that may have been recorded at different tempos or pitches. Here are some tips for matching audio to tempo and pitch in Pro Tools:
- Use the “Elastic Audio” feature to adjust the tempo of the audio file.
- Use the “Pitch Shift” feature to adjust the pitch of the audio file.
- Use the “Varispeed” feature to adjust both the pitch and tempo of the audio file simultaneously.
Troubleshooting Common Audio Import Issues
There can be several issues when importing audio files into Pro Tools. Here are some common import issues that you may encounter, along with their troubleshooting methods:
| Issue | Troubleshooting Method |
|---|---|
| The audio file won’t import into Pro Tools. | Ensure that the file format is compatible with Pro Tools. Convert the file if necessary. |
| The audio file is distorted after import. | Check the import format. Make sure the sample rate and bit depth are correct |
| The audio file is out of sync with the session. | Manually align the audio file with the session. |
By keeping these tips in mind, you can ensure that your audio files are properly imported into Pro Tools, and spend more time on producing quality audio content.
Credit: www.sweetwater.com
Frequently Asked Questions Of Import Audio Pro Tools
Can You Import Audio Files Into Pro Tools?
Yes, audio files can be imported into Pro Tools. Simply click on File, select Import, and choose the audio file you want to bring in. Pro Tools supports a variety of audio formats, including WAV, AIFF, MP3, and more.
How Do I Add An Audio Track In Pro Tools?
To add an audio track in Pro Tools, go to “Track” on the menu bar and select “New Track. ” Choose “Audio Track” and set your desired settings. Then, locate and import your audio file by going to “File” and selecting “Import.
“
Which Of The Following Methods Can Be Used To Import Audio Into Pro Tools?
There are multiple methods to import audio into Pro Tools. You can drag audio files into the session window, go to the ‘File’ menu and select ‘Import Audio’, use the ‘import audio’ shortcut key, or use the ‘Spot’ feature to import audio from a specific timecode location.
How Do I Drag Audio Into Pro Tools?
To drag audio into Pro Tools, simply navigate to the desired audio file on your computer, click and hold on the file, and drag it into your Pro Tools session’s edit window. The audio file will then import into your session for further editing and manipulation.
Conclusion
To sum up, importing audio files into Pro Tools has never been easier. With just a few clicks, you can bring in your desired sound files and manipulate them to your liking. This will save you time and make your workflow more efficient.
Also, keep in mind that a properly labeled project with well-managed audio files will make it easier for you to keep track of your work. So, follow these steps and get your creative juices flowing!