Categories
Archive

Note To Frequency Chart

Note To Frequency Chart helps to convert musical notes to their corresponding frequencies. It is a chart that contains all the musical notes and their corresponding frequencies.

The chart is especially helpful for musicians, audio engineers, and music producers. As a musician, audio engineer, or music producer, it is essential to understand the relationship between musical notes and their corresponding frequencies. Note to frequency chart is a vital tool that helps with this understanding.

With this chart, you can easily determine the frequency of a note by simply looking at its placement on the chart. This knowledge is crucial for tasks such as tuning instruments, mixing audio tracks, and producing music. In the next few paragraphs, we will delve deeper into the note to frequency chart and how it can be used effectively.

The Basics Of Frequencies

A note to frequency chart is a helpful tool in music production that links musical notes to their corresponding frequencies. Understanding the relationship between notes and frequencies can assist producers in creating harmonious sounds and mixing music effectively.

Understanding Sound Waves And Frequencies

Sound waves are invisible to the naked eye but they play an important role in our lives. From the sound of birds chirping to music playing in the background, sound waves are around us constantly. Understanding the basics of frequencies can help you appreciate sound on a whole new level. There are two main types of sound waves: longitudinal waves and transverse waves. Longitudinal waves occur when sound travels through a medium in a series of compressions and rarefactions, while transverse waves occur when sound travels through a medium in a series of crests and troughs.

The Role Of Frequency In Music

Frequency is the measurement of how many sound waves occur in one second. Different frequencies can be used to create different sounds, which is the basis of music. For instance, high frequency sounds can include the chirping of birds or the sound of a whistle, while low frequency sounds can include the rumbling of thunder or the sound of a bass drum. In music production, accurate frequency mapping is crucial. If the frequencies are not mapped correctly, the music produced may sound off-key or of inferior quality. Therefore, a Note to Frequency Chart is an essential tool for any musician or music producer to ensure that they create songs with accurate frequencies.

The Importance Of Accurate Frequency Mapping

Accurate frequency mapping is essential in order for music to be enjoyable and consistent across different listening devices. The sound of a song played on a home stereo system must be the same as the sound played on a smartphone, laptop or any other device. Therefore, accurate frequency mapping is the key to producing high-quality music. In order to achieve accurate frequency mapping, it is important to use a Note to Frequency Chart. The chart provides a guide to the frequency of notes so that one can ensure that they are producing the right sound. It is especially useful for musicians and music producers who want to create music across different genres. In conclusion, understanding the basics of frequencies is important for anyone who wants to appreciate sound in their daily life. The role of frequency in music cannot be ignored and accurate frequency mapping ensures that high-quality music is produced with the right sounds.
Note To Frequency Chart

Credit: www.poly-ed.com

Reading The Chart

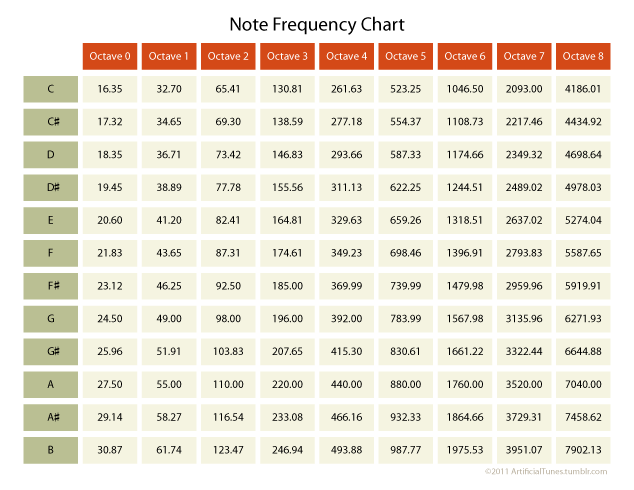
Understanding the note to frequency chart is essential for musicians as it helps in identifying the corresponding frequency of each note. The chart consists of a table that lists all the notes and their respective frequencies. In this section, we will discuss how to read the chart.

Note Names And Frequencies

The note to frequency chart consists of two main columns: note names and frequencies. The note names column lists all the standard music notes, from A0 to C8. Each note corresponds to a specific frequency, which is listed in the corresponding frequency column next to the note name.

For example, A0 has a frequency of 27.50 Hz, B0 has a frequency of 30.87 Hz, and so on. It’s important to note that as the notes go higher in the octave range, the frequencies also increase proportionally.

Octave Designations

Notes in the chart are divided into different octave ranges, represented by different numbers. The first octave range starts at A0 and ends at A0# (or Bb0). The second octave range starts at A1 and ends at A1#. This pattern continues till the eighth octave range, which starts at A7 and ends at C8.

Each octave range consists of twelve semi-tones, labeled as sharp(#) or flat(b). For example, the first octave range consists of A0, A0#, B0, C1, C1#, D1, D1#, E1, F1, F1#, G1, and G1#.

Visual Representation Of Frequencies

It’s important to note that the note to frequency chart not only lists the numerical frequency of each note but also provides a visual representation of the frequency spectrum. The lower the frequency, the longer the wavelength and vice versa. This means lower notes, such as A0, have a longer wavelength than higher notes like C8.

A visual representation of the frequency spectrum can help musicians understand the relationship between notes and frequencies. It can also help in identifying overtones, harmonics, and other tonal patterns that can influence the sound of a particular note.

Understanding the note to frequency chart is crucial for musicians as it can help in tuning instruments and creating music that sounds harmonious and pleasing to the ear.

Using The Chart

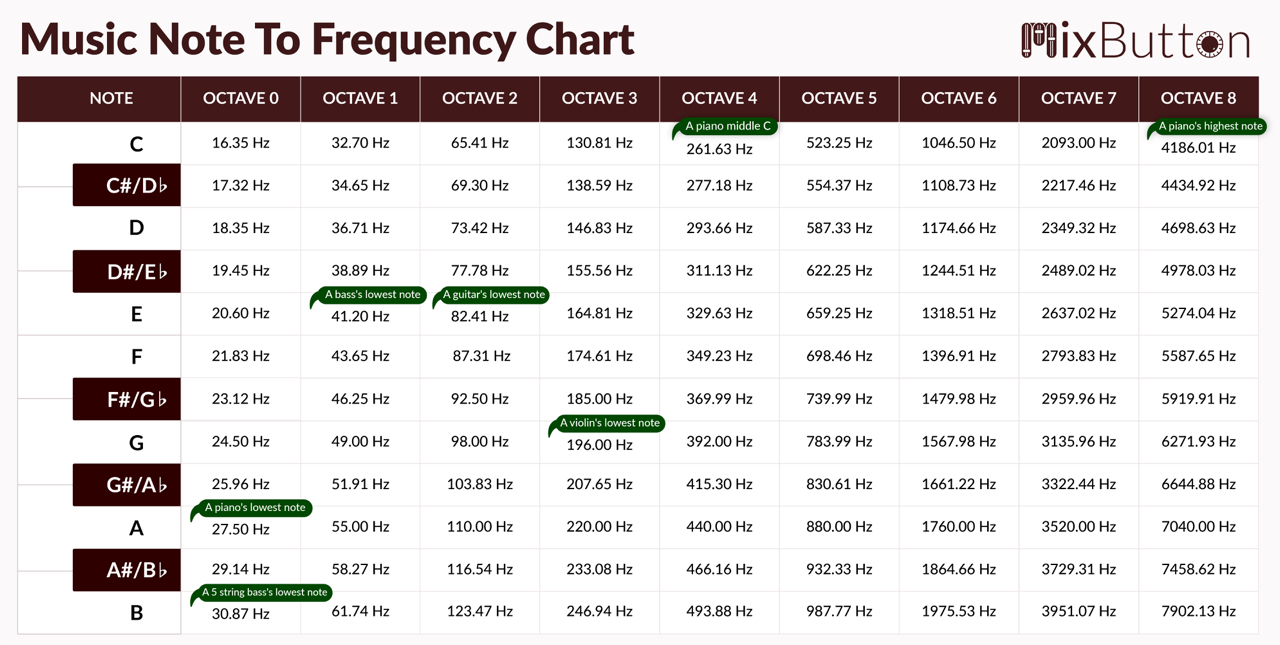
The Note to Frequency Chart is a useful tool for musicians and audio engineers. It helps to identify the frequency of a particular musical note. This chart maps out the frequencies of all the musical notes, making it easier to use and understand. Here are ways to use the chart:

Tuning Instruments

When tuning an instrument, the note to frequency chart can help you identify the correct frequency. Using a tuner that displays the frequency, compare the reading to the note to frequency chart to make sure the note matches. This is especially useful for instruments that need to be tuned to specific frequencies, such as pianos or harps.

Composing Music

Composers often use the note to frequency chart to select the right notes and frequencies to create a specific mood or emotion in their music. This is because certain frequencies can evoke certain emotions in listeners. For example, a low-frequency note can create a sense of heaviness or sadness, while a high-frequency note can create a feeling of lightness or excitement.

Recording And Mixing Audio

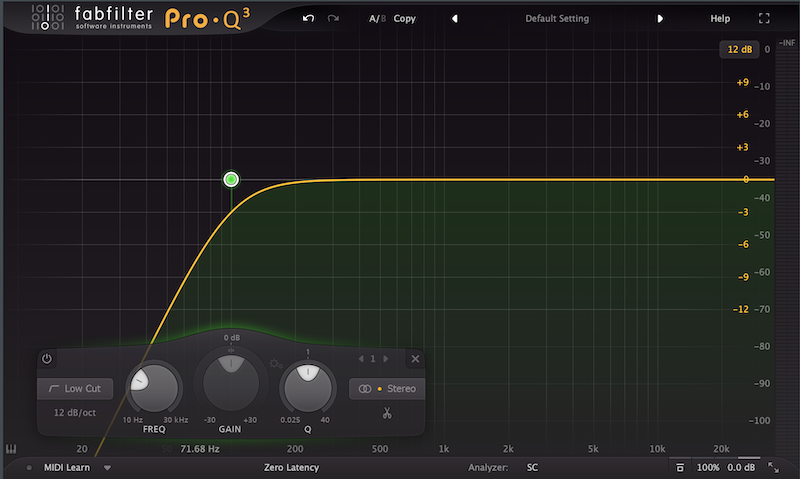
When recording or mixing audio, the note to frequency chart can help you identify and isolate specific frequencies that may be causing problems in your recordings. For example, if you notice a harsh or piercing sound in your mix, you could use the chart to identify the frequency causing the problem and then use an equalizer to reduce that frequency.

In conclusion, the Note to Frequency Chart is a valuable tool for musicians and audio engineers alike. It can be used for tuning instruments, composing music, and recording and mixing audio. By using the chart, you can ensure your music is in tune, evokes the right emotions, and sounds clear and balanced.
Note To Frequency Chart

Credit: mixbutton.com

Advanced Topics

For those who want to dive deeper into the world of note to frequency charts, there are several advanced topics worth exploring. These topics include equal temperament vs. just intonation, harmonic series and overtones, and microtonal music and unusual scales.

Equal Temperament Vs. Just Intonation

Equal temperament and just intonation are two different tuning systems that musicians use to play and compose music. Equal temperament divides the octave into 12 equal parts, resulting in a standard tuning that is used for most Western music. Just intonation, on the other hand, uses ratios to determine the exact frequencies of each note. This tuning system is used in many non-Western musical traditions and is appreciated for its purity of sound.

Harmonic Series And Overtones

The harmonic series is a fundamental concept in music and acoustics. It is a series of frequencies that are multiples of a fundamental tone, with the first harmonic being the fundamental frequency, the second harmonic being twice the fundamental frequency, and so on. Overtones are simply these higher frequencies that result from the harmonic series.

Understanding the harmonic series and overtones is essential for musicians who want to create harmonies and explore the full range of their instrument’s sound. By playing with the overtones of a particular note, musicians can create interesting and complex sounds that add depth and richness to their compositions.

Microtonal Music And Unusual Scales

Microtonal music refers to music that uses intervals smaller than the standard intervals used in Western music. For example, in Western music, the interval between two adjacent keys on a piano is a half-step, but microtonal music may use quarter-steps or smaller intervals. This creates a unique and unusual sound that can be jarring or beautiful, depending on the listener’s perspective.

Unusual scales are also common in microtonal music. For example, the Bohlen-Pierce scale uses only odd-numbered harmonics, resulting in a scale that sounds exotic and unfamiliar to most Western ears.

Conclusion

The world of note to frequency charts is vast and complex, with many different concepts and ideas to explore. Whether you are a musician or simply interested in the science behind music, these advanced topics offer plenty of opportunities to deepen your knowledge and appreciation of this fascinating field.

Creating Your Own Chart

Create your own note to frequency chart with ease. Simply list out all the notes in order and then assign their corresponding frequency values. This chart can be a useful tool in understanding musical frequencies and how they relate to notes.

Creating Your Own Chart Creating your own Note to Frequency Chart can be a useful exercise for musicians, sound engineers, or anyone working with audio frequencies. It allows you to get a better understanding of the relationship between musical notes and their corresponding frequencies. This can be particularly helpful when you are trying to tune an instrument or mix a song. Tools and Resources for Building a Chart To create your own Note to Frequency Chart, you’ll need some basic tools. A pen and paper are essential, but you can also use a spreadsheet program like Microsoft Excel or Google Sheets to create a digital chart. There are also various online tools available that you can use to generate a chart, such as the Note Frequency Calculator. Tips for Accurate Frequency Mapping When creating your Note to Frequency Chart, it’s important to be as accurate as possible. Use a tuning device to ensure that your measurements are correct and use a reference pitch to anchor your chart. You can also use a piano or guitar as a reference for tuning and pitch matching. Another useful tip is to create a legend for your chart, which can help you identify specific notes and frequencies. Customizing Your Chart for Specific Needs One of the great things about creating your own Note to Frequency Chart is that you can customize it to your specific needs. For instance, you might want to create a chart that is specific to a particular musical genre or instrument. You can also add additional information to your chart, such as harmonics or overtones. It’s important to keep your chart organized and easy to read, so consider using color coding or adding a key to help differentiate between various notes and frequencies. In conclusion, creating your own Note to Frequency Chart is a simple yet effective way to better understand the relationship between musical notes and their corresponding frequencies. With these tips and tools, you’ll be well on your way to creating a chart that is accurate, informative, and customized to your specific needs.

Note To Frequency Chart

Credit: mixbutton.com

Frequently Asked Questions Of Note To Frequency Chart

What Is A Note To Frequency Chart?

A Note to Frequency Chart is a diagram that shows the correlation between notes and their corresponding frequencies. It helps musicians understand the pitch and frequency of each note they play.

How Can I Use A Note To Frequency Chart?

You can use a Note to Frequency Chart to tune your musical instruments, or to help you understand the relationship between notes and frequencies. It can also be a helpful tool for music students who are learning about the science of sound.

What Is The Difference Between A Note To Frequency Chart And A Piano Keyboard?

A Note to Frequency Chart provides a visual representation of the relationship between notes and frequencies, while a Piano Keyboard shows the layout of keys on a piano. A Note to Frequency Chart is more focused on the science of sound, while a Piano Keyboard is more focused on playing music.

How Do I Read A Note To Frequency Chart?

To read a Note to Frequency Chart, you need to understand the different elements of the chart, including the note names, the frequency range, and the tuning system. The chart can look complex, but with some practice and guidance, it becomes easy to interpret.

Conclusion

To sum up, understanding and utilizing the Note To Frequency Chart is essential for any musician or sound enthusiast. Whether you’re tuning an instrument, mixing tracks or producing sounds, having a clear understanding of frequencies is crucial. With the help of this chart, you can easily identify and manipulate frequencies to achieve the desired sound.

So, make sure you refer back to this valuable tool and allow it to elevate your sound game to the next level. Happy producing!
Categories
Archive

Sidechain Compression

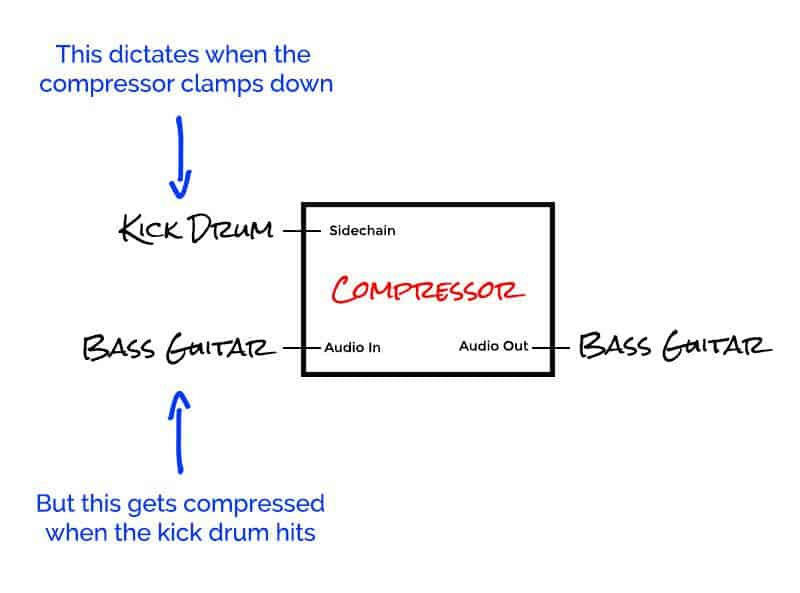
Sidechain compression is a technique used in music production to reduce the volume of one sound when another sound is present. This works by routing the sound into a compressor that is triggered by a sidechain input, causing the level of the compressed sound to decrease when the other sound is playing.

Sidechain compression is a popular technique used in electronic dance music (EDM) and other genres that contain bass-heavy sounds. It is also commonly used in radio broadcasting to ensure that vocals are heard clearly over background music. The technique involves lowering the volume of the instrumental or bass-heavy track when the lead vocal or other important elements are present.

The result is a cleaner and more focused sound that enhances the listening experience for the audience. Sidechain compression can also be used creatively to create unique rhythmic patterns or to add a pumping effect to a track.

Sidechain Compression

Credit: blog.native-instruments.com

How To Set Up Sidechain Compression?

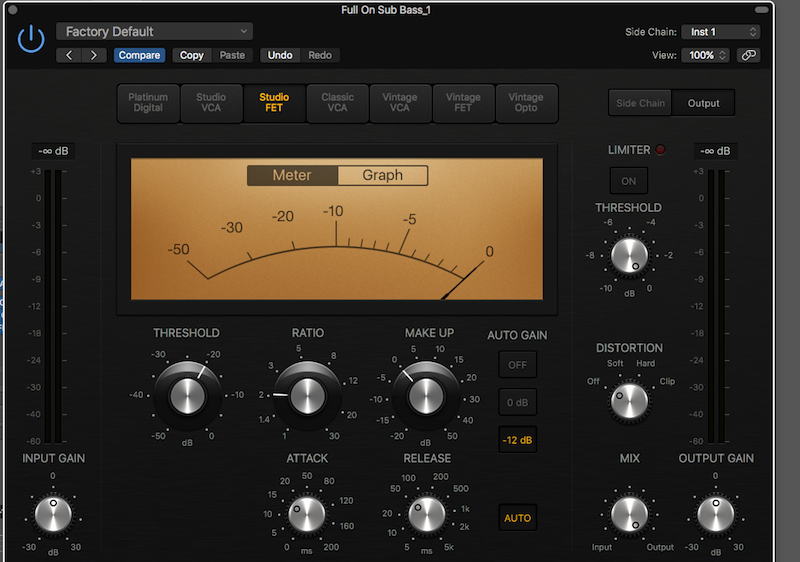
Setting up sidechain compression involves routing the audio signal from one track to another so that the second track’s volume can be controlled by the first track. Begin by choosing the source and destination tracks, enabling sidechain routing, setting the desired compression parameters, and adjusting the threshold and ratio until you achieve the desired effect.

If you are a music producer who wants to add more clarity and dynamics to your mix, then sidechain compression is a technique that you should know. Sidechain compression is a powerful tool that allows you to create space for different instruments in your mix by attenuating their levels whenever another element takes the lead. In this section, we will guide you through the simple steps to set up sidechain compression in your mix, starting from selecting the sidechain source to fine-tuning the settings.

Selecting The Sidechain Source

The first step in setting up sidechain compression is to choose the source that will trigger the compression. Usually, the sidechain source is a kick drum or a bass line. To do this, you need to create a send from the trigger track to the compressor’s sidechain input. In most DAWs, this feature is available under the routing or send options.

Adjusting The Threshold

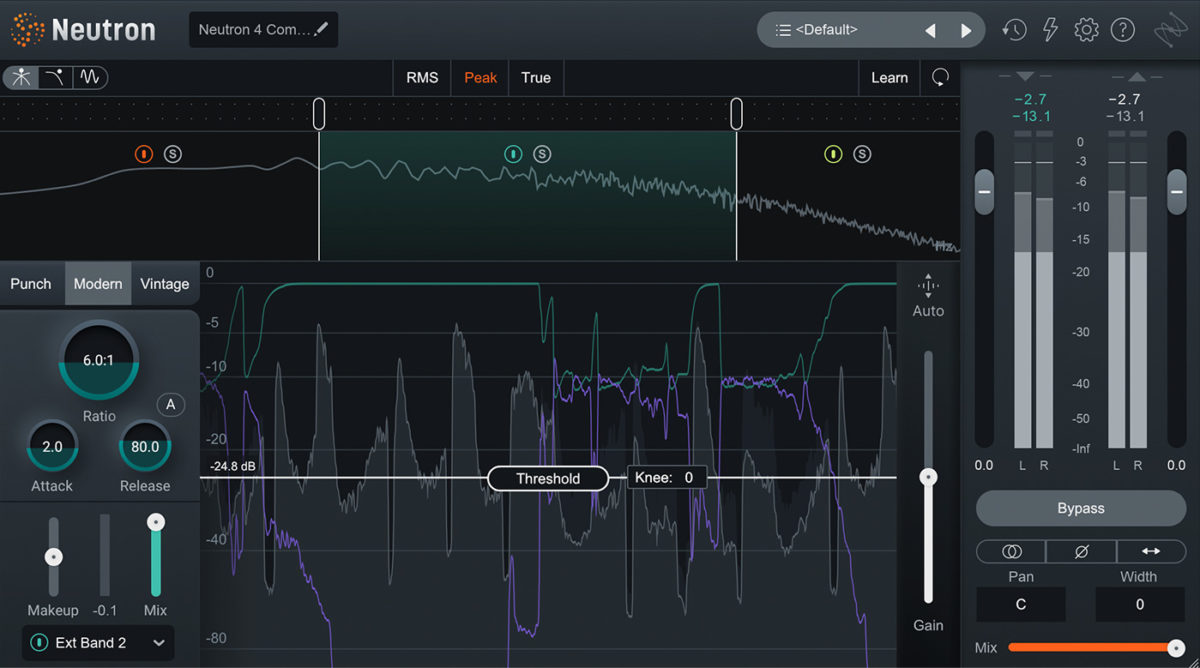
The threshold is the level at which the compression starts to affect the sound. You need to set the threshold so that it triggers the compressor only when the source track is playing. This way, you can create a pumping effect that adds rhythm and groove to your mix. To set the threshold, start by playing the track and gradually lower the threshold until you hear the compression starting to work.

Setting The Ratio

The ratio determines the amount of compression that is applied to the track. You need to choose a ratio that suits the dynamics of your mix. For example, if you want to achieve a subtle effect, you can use a 2:1 ratio. On the other hand, if you want to create a more drastic effect, you can use a higher ratio such as 4:1 or 6:1.

Choosing An Attack Time

The attack time is the time it takes for the compressor to start working after the source track exceeds the threshold. You need to choose an attack time that allows the initial transient of the sound to pass through without getting compressed. For example, if you are sidechaining a kick drum to a bass track, you can use a fast attack time (around 10ms) to let the kick’s punch come through before compressing the bass.

Adjusting The Release Time

The release time is the time it takes for the compressor to stop working after the source track goes below the threshold. You need to choose a release time that matches the rhythm of your track. If your track has a fast tempo, you need a fast release time (around 50ms or less). If your track has a slower tempo, you can use a longer release time (around 100ms).

Fine-tuning The Settings

After you have set up the basic parameters, you can fine-tune the settings until you achieve the desired effect. You can experiment with the attack and release times, the ratio, and the threshold to find the sweet spot that works best for your mix. Keep in mind that sidechain compression is a subtle effect, so avoid overdoing it to maintain the natural dynamics of your mix. In conclusion, sidechain compression is a powerful tool that can add depth, clarity and dynamics to your mix. By following the simple steps outlined above, you can set up sidechain compression in your mix and achieve a more professional sound.

Applications Of Sidechain Compression

Sidechain compression is a production technique that allows you to achieve a balanced mix by reducing the volume of one sound source when another is playing. Applications of sidechain compression include creating space in the mix for kick drums and other percussive sounds, emphasizing vocals, and accentuating basslines.

Sidechain compression is a popular audio technique that has become an essential tool in music production, as well as in other fields such as podcasting, film and TV soundtracks, and voiceover work. Understanding the different applications of sidechain compression allows professionals from different industries to use this technique to their advantage.

In Dance Music

Dance music producers have been using sidechain compression for years to create that unmistakable pumping sound. Sidechain compression is used to duck the volume of one sound source when another sound is playing. This technique is commonly used to create a pumping effect in dance music by inducing a rhythmical rise and fall in the volume of a bassline.

In Podcasting

Podcast recording involves using professional equipment to create high-quality audio. Sidechain compression is a useful tool in podcasting because it helps to balance the different audio sources, such as music and voiceovers, by reducing the level of one sound source while the other is playing. This can help to ensure that the podcast’s message is heard loud and clear, without any distractions from competing audio sources.

In Film And Tv Soundtracks

Sidechain compression is also a powerful tool in film and TV audio production. It can be used to create a range of effects, such as accentuating the sound of a room while keeping dialogue clear. For example, sidechain compression can be used to reduce the background music or sound effects while an actor is speaking, making the dialogue easier to hear.

In Voiceover Work

In voiceover work, sidechain compression is used to bring out the clarity and punch in the voiceover artist’s audio. This helps to ensure that the voiceover audio is distinct and clear, even in the presence of background sounds or music. Sidechain compression can be used to balance the levels of the voiceover and background sounds, making the overall audio more professional-sounding. Overall, sidechain compression is a valuable tool for professionals working in different fields of audio production. It allows for more precise control over audio sources and can produce a variety of effects that can enhance the overall quality of the audio.

Advanced Techniques For Sidechain Compression

Sidechain compression is an essential tool for audio mixing, allowing the compressor to selectively respond to specific frequency ranges, instruments, or vocals. This technique is commonly used in EDM genres like techno, trance, and electro, but it can also enhance the clarity and dynamics of any track. By using advanced techniques for sidechain compression, you can achieve more creative and dynamic results that will make your mix stand out. Here are some advanced techniques to explore:

Using Multiple Sidechain Sources

You can use multiple source signals to trigger different sidechain compressors, creating complex and dynamic interactions between the elements in your mix. For example, you could use one sidechain to respond to the kick drum, another one to respond to the bass, and a third one to respond to the vocals. This way, the different compressors will work together to create a balanced and groovy mix without one element overpowering the others.

Sidechain Eq

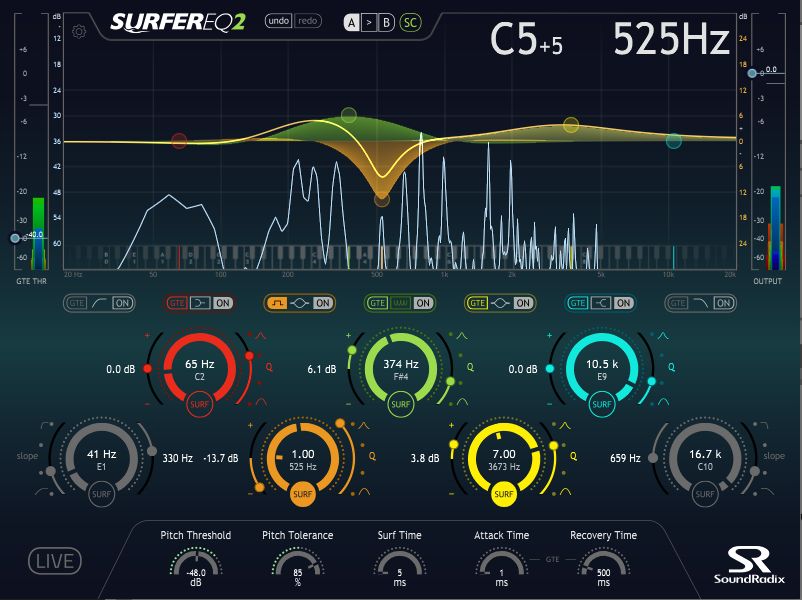
An alternative approach to sidechain compression is to use sidechain EQ, which triggers the compressor based on the frequency content of the sidechain input. You can use this technique to carve out space in your mix for specific elements, such as removing low frequencies from the bass when the kick drum hits, or reducing high frequencies from the vocals when the cymbals are ringing. This way, you can achieve a more transparent and controlled mix without losing the impact and presence of your tracks.

Parallel Compression With Sidechain

Parallel compression is a technique that involves blending a heavily compressed signal with an uncompressed one, creating a thick and punchy sound while retaining the natural dynamics and transients of the original signal. By combining parallel compression with sidechain, you can achieve a more detailed and nuanced sound that still packs a punch. For example, you can use sidechain compression to control the low end of the parallel compressed signal, while keeping the higher frequencies intact.

Midi Triggering

If you want to achieve precise and consistent sidechain compression, you can use MIDI triggering, which allows you to trigger the sidechain compressor with a MIDI note or a pattern. This way, you can sync the sidechain compression with the rhythm of your track, creating intricate and synchronized grooves. You can also use MIDI triggering to create sidechain effects that are not possible with manual triggering, such as stutter effects, gating, or rhythmic pumping.

Sidechain Compression

Credit: producelikeapro.com

Popular Sidechain Compression Plugins

Sidechain compression is an essential tool for mixing in electronic music. Some of the most popular sidechain compression plugins include LFO Tool, VolumeShaper, and Kickstart – all of which utilize this technique to sculpt the dynamics of different elements within a mix.

Sidechain compression is a crucial mixing technique used in various genres of music production, including EDM, hip-hop, and techno. It is a process in which you use a secondary signal to trigger the compression of the main signal, resulting in a pumping effect that is synched to the beat of the track. This technique can be applied to instruments, vocals, and even the entire mix bus. There are a variety of plugins available for sidechain compression, but in this article, we will be discussing three of the most popular ones.

Waves Ssl G-master Buss Compressor

Waves SSL G-Master Buss Compressor is one of the most renowned plugins used for sidechain compression. It is a versatile plugin that can also be used for master buss compression and features an adjustable release time, stereo linking, and automatic makeup gain. The SSL G-Master Buss Compressor has a four-band EQ that can be used for both sidechain and master compression, making it one of the most versatile plugins in the market.

Fabfilter Pro-c 2

FabFilter Pro-C 2 is another popular plugin that offers comprehensive compression controls for sidechain processing. The plugin features six different compressor styles, each with its unique sound characteristics, making it an ideal tool for various genres. With its advanced sidechain EQ, you can easily shape the frequency response of the sidechain signal, making it more precise. Also, FabFilter Pro-C 2 offers a range of creative features such as lookahead, sidechain filtering, and M/S processing.

Kickstart

Kickstart is a sidechain-compression plugin specifically designed for producers of electronic dance music. The plugin features a simple and intuitive user interface, making it easy to use on any track. With its single dial control, you can get your desired pumping effect quickly. The plugin also boasts a variety of sidechain curves, including ramp, square, sine, and triangle, making it ideal for genres such as house, trance, and electro. In conclusion, these are just some of the most popular sidechain compression plugins available in the market. Each of these plugins has its strengths and weaknesses, but they are all worth trying out to see which one works best for you. With their advanced features and versatility, they have become indispensable tools for music producers looking to achieve that pumping sound.

Sidechain Compression

Credit: mastering.com

Frequently Asked Questions On Sidechain Compression

What Does Sidechaining Compression Do?

Sidechaining compression is a technique where the input of a compressor is modified by the level of another audio source. The effect can be used to reduce the level of one track whenever another one becomes more prominent. It’s commonly used in music production to give space for elements like vocals or drums.

What Is The Purpose Of A Sidechain?

A sidechain is a secondary blockchain that operates alongside and is connected to the main blockchain. It allows for the transfer of assets from one blockchain to another, enabling the development of new applications and features without compromising the security and scalability of the main blockchain.

The purpose of a sidechain is to improve the functionality and efficiency of a blockchain ecosystem.

How Do You Make A Sidechain Compression?

To make a sidechain compression, you need to route the audio source that you want to compress to a compressor on a bus channel. Then, you need to use the sidechain input on the compressor to feed the audio signal that you want to use as the trigger for the compression.

This allows you to compress certain parts of the mix, while allowing other elements to stand out.

What Is The Best Compressor Setting For Sidechain?

Set your compressor’s threshold to trigger when the kick or bass hits. Adjust the attack to fit the rhythm, then adjust the release to let the sound breathe. Use a ratio of 2:1 to 4:1 and reduce the gain to less than 3dB.

Start tweaking from there.

Conclusion

After reading this post, it’s clear that sidechain compression is a powerful technique that can enhance the overall sound of your tracks. Whether you’re working on electronic dance music, hip-hop, or any other genre, sidechain compression can help you achieve a more balanced and cohesive mix.

By selectively reducing the volume of certain elements in your tracks, you can create a pumping effect that keeps your music engaging and dynamic. With the right tools and some experimentation, you can master this technique and take your productions to the next level.

Categories
Archive

Serum Presets Ultra

Serum Presets Ultra offers a diverse collection of presets for the popular virtual synthesizer, Serum. This collection includes over 1,400 unique presets that cover a wide range of genres and styles.

Serum Presets Ultra is the ultimate preset pack for Serum users, offering thousands of inspiring presets for any style or genre. With over 1,400 presets, this collection covers everything from basses, leads, plucks, and pads to complex rhythmic sequences and arpeggios, all designed to take your productions to the next level.

The presets are organized by type and genre, making it easy to find the perfect sound for your projects. Whether you’re a seasoned producer or just starting, Serum Presets Ultra is an essential tool for anyone looking to create high-quality music.

Serum Presets Ultra

Credit: www.productionmusiclive.com

What Are Serum Presets?

Serum Presets are pre-designed sounds for the Serum synthesizer, created by sound designers and producers. They are essentially pre-set settings that offer ready-made audio patches, enabling users to create complex and dynamic sounds within seconds. Serum presets offer an opportunity to enhance your music production workflow and take your music to the next level.

Overview Of Serum Synthesizer

Serum is a popular virtual synthesizer plugin developed by Xfer Records. It provides a wide range of features that make it a favorite among music producers worldwide. Serum is best known for its extensive wavetable capabilities, enabling users to create bespoke new sounds or apply pre-designed waveforms. Additionally, Serum has an incredibly intuitive interface, making it an excellent choice for both beginner and advanced users.

Explanation Of Presets

Serum presets are designed to make the sound designing process more accessible by offering ready-made patches. They save time, effort, and add variety to the production process. In practice, presets are generally files that contain all of the Serum’s synth settings, such as wavetables, filters, and envelopes. Consequently, producers can load up the preset and begin tweaking the sound to fit their music. Presets offer the opportunity to experiment with different sound types and genres easily.

The Benefits Of Serum Presets

Time-SavingPreset sounds can be used as is, or as a starting point, which is ideal if you’re pushed for time.
Broad Genre SelectionThere is an extensive range of serum presets available, catering to diverse genres, including EDM, Hip-Hop, Pop, and more.
Easy to CustomizeProducers can quickly tweak serum presets to their liking, adding a personalized touch to the music.
Enhanced CreativityUsing a mix of serum presets can spark new ideas, unlock creativity, and provide inspiration for future music projects.

Using Serum Presets can enhance creativity, speed up your workflow, make the music production process more accessible, save time, and add variety to your music. With an extensive range of presets available, there is something for everyone, regardless of genre preference or skill level.

Why Choose Serum Presets Ultra?

Why Choose Serum Presets Ultra?

Serum Presets Ultra is a popular collection of professionally crafted sounds that provides you with everything you need to take your music production to the next level. This preset pack is carefully curated to meet the needs of the modern music producer and designed to work seamlessly with the Serum synthesizer. Whether you are a novice producer or a seasoned pro, Serum Presets Ultra has something that will inspire you and help you achieve your music production goals.

Benefits Of Serum Presets Ultra

  • Offers a diverse collection of sounds that cater to different genres and styles
  • Comes with easy-to-use presets that can be tweaked to your liking
  • Provides high-quality sounds that are perfect for professional use in music production
  • Offers excellent value for money compared to other premium preset packs
  • Provides regular updates to keep up with the latest trends in music production

Comparison With Other Popular Serum Preset Packs

Serum Presets Ultra offers the best value for money compared to other popular premium preset packs. While other packs may offer a similar number of sounds, they may not have the same level of quality or versatility as Serum Presets Ultra. Additionally, other packs may not be updated as frequently, which means you may not always have access to the latest sounds and trends in music production.

Features Of Serum Presets Ultra

Serum Presets Ultra is a popular plugin that provides an extensive library of high-quality presets for music producers. It is a powerful tool that enables producers to create professional-sounding tracks without the need for complex sound engineering. This section will take a closer look at the features of Serum Presets Ultra, including the large library of presets, variety of included genres, custom-made waveforms, advanced modulation techniques, and easy customization options.

Large Library Of Presets

Serum Presets Ultra offers a vast library of over 2000 presets, including basses, leads, pads, and effects. These presets have been professionally designed by experienced sound designers and offer a massive range of sounds for any music genre. The library is continuously updated, ensuring that producers have access to fresh sounds and new inspiration.

Variety Of Genres Included

Serum Presets Ultra is a versatile plugin that caters to various music genres. The presets library includes genres such as Dubstep, EDM, Trap, Hip-hop, Pop, and many others. This diversity makes it a popular choice for producers, as Serum Presets Ultra has something for everyone.

Custom-made Waveforms

Serum Presets Ultra offers custom-made waveforms, which provide a unique and signature sound to each preset. These waveforms are designed from scratch, ensuring that each sound has a one-of-a-kind character. The custom-made waveforms enable producers to create sounds that are not possible with traditional waveforms.

Advanced Modulation Techniques

Serum Presets Ultra features advanced modulation techniques, including LFO, filter, and amplitude modulation. These techniques enable producers to create complex sounds, textures, and variations in their music. The modulation options allow producers to add depth and dynamics to their tracks, making them sound more professional and polished.

Easy Customization Options

Serum Presets Ultra offers easy customization options that enable producers to tweak every aspect of the preset to suit their needs. The plugin interface is intuitive, with clear controls that make it easy to adjust the sound to perfection. Producers can modify the sound envelope, filter, effects, and many other settings, ensuring that they have complete control over the sound.

Who Can Use Serum Presets Ultra?

Serum Presets Ultra is a versatile tool that can be used by a wide range of individuals involved in music production, composition, and sound design. Whether you are a beginner or a professional, a musician or a producer, you can benefit from the vast collection of sounds, presets, and waveforms included in Serum Presets Ultra.

Musicians And Producers

Music producers, composers, and sound designers can use Serum Presets Ultra to create a wide variety of sounds for their projects. The presets are designed to work seamlessly with different genres of music, including EDM, hip-hop, rock, pop, and more. With Serum Presets Ultra, you can easily create melodies, chord progressions, basslines, and percussion sounds that sound unique and professional.

Beginners And Professionals

Even if you are a beginner in music production, you can use Serum Presets Ultra to get started quickly and easily. The intuitive user interface, the extensive collection of presets, and the wide range of features and effects make it possible to create professional-quality sounds without much experience. For professionals, Serum Presets Ultra offers endless possibilities to explore and experiment with. You can customize the sounds, create your own presets, and use advanced features like wavetable editing and modulation.

Electronic Dance Music Enthusiasts

If you are a fan of electronic dance music, Serum Presets Ultra is a must-have tool in your arsenal. The presets are specifically designed for EDM producers and include a wide range of sounds that are perfect for genres like techno, trance, dubstep, and more. Whether you are looking for hard-hitting basslines, soaring leads, pulsating pads, or percussive sounds, Serum Presets Ultra offers everything you need to create authentic and cutting-edge music.

In conclusion, Serum Presets Ultra is an incredible tool that offers endless possibilities for music production, composition, and sound design. Whether you are a beginner or a professional, a musician or a producer, or an EDM enthusiast, you will find this software to be an invaluable asset in your music-making journey.

How To Use Serum Presets Ultra?

If you’re a music producer, you understand the importance of a good synthesizer. Serum is one of the most popular synthesizers in the music industry, and it’s known for its advanced wavetable capabilities. However, to fully utilize Serum’s potential, you need to have the right presets. That’s where Serum Presets Ultra comes in. In this article, we’ll explore how to use Serum Presets Ultra to enhance your music production experience.

Installation Process

The first step is to install Serum Presets Ultra on your computer. The installation process is straightforward, and you can do it in a few easy steps. All you need to do is download the file from the website and extract it to your preferred location. Once you have done that, open up Serum and click on the Presets tab on the top-right corner. From there, you can browse through the Serum Presets Ultra library and select the preset that you want to use.

Integration With Serum Synthesizer

One of the great things about Serum Presets Ultra is that it integrates seamlessly with the Serum synthesizer. This means that you can use the presets to create unique sounds and tweak them to fit your needs. To integrate Serum Presets Ultra with Serum, simply follow the installation process outlined above. Once you have done that, you can access Serum Presets Ultra from the Presets tab in Serum. From there, you can select the preset that you want to use, and it will load into Serum.

Customization Of Presets For Unique Sounds

If you want to take your music production to the next level, you need to customize your presets. Luckily, Serum Presets Ultra allows you to do just that. The presets are designed to be easily customizable, so you can tweak them to fit your needs. Whether you want to adjust the LFO rate or change the filter cutoff, Serum Presets Ultra gives you the ability to do it. By customizing your presets, you can create unique sounds and stand out from the crowd.

Overall, Serum Presets Ultra is an excellent choice for anyone looking to enhance their music production experience. With a vast library of presets, seamless integration with Serum, and easy customization, Serum Presets Ultra is a must-have for any music producer. So, why not give it a try and see what it can do for you?

Serum Presets Ultra

Credit: www.composerloops.com

Examples Of Sound Design With Serum Presets Ultra

The Serum Presets Ultra offer a range of sound design possibilities suitable for various genres. With these presets, you can create complex patches and shape sounds with ease, from basslines to arpeggios and beyond.

Serum Presets Ultra is a powerful tool for sound design and music production. With over 680 presets designed by professional sound designers, Serum Presets Ultra offers a wide range of sounds that can be used in various genres. In this section, we will explore some examples of sound design using Serum Presets Ultra.

Demonstration Of Presets In Different Genres

One of the great features of Serum Presets Ultra is that it provides a variety of presets for different genres of music, including EDM, Pop, Hip-hop, and more. You can find sounds that can be used for creating a bassline or drum groove for your track, or even create atmospheric sounds that add an extra layer of excitement to your music.

Composition Of A Track Using Serum Presets Ultra

Let’s take a look at how you can compose a track using Serum Presets Ultra. First, start with a basic chord progression and a melody. Once you have the basic structure in place, start adding different sounds from Serum Presets Ultra to fill out the track. Choose sounds that complement each other and enhance the overall feel of the track. Use various effects such as reverb, delay, and distortion to further shape the sounds and bring out the full potential of Serum Presets Ultra. Experiment with different presets and try combining them to create unique sounds that are tailored to your track’s needs. In conclusion, Serum Presets Ultra is a versatile tool that can be used for various genres of music. With its sound design capabilities, you can create complex and compelling sounds that elevate your music to the next level. Experiment with different presets, effects, and techniques to create a truly unique sound that sets your track apart from the rest.

What Are The Reviews For Serum Presets Ultra?

Serum Presets Ultra has received positive reviews for its high-quality sound and versatility. Users highly recommend it for those looking to create unique and professional-sounding tracks.

Serum Presets Ultra is a popular choice among music producers and sound designers for its versatile presets. But, before you invest in these presets, it’s important to know what the reviews are saying. Let’s take a look at customer feedback and professional reviews.

Customer Feedback And Satisfaction

Customers of Serum Presets Ultra have given positive feedback. They have praised the presets for their quality, variety, and ease of use. One user noted, “These presets are amazing, highly recommended.” Another user said, “I love the versatility of these presets and how easy they are to use.” The presets have also received high satisfaction ratings from customers. Users have stated that the presets have helped them speed up their workflow and create unique sounds. They have also appreciated the value for money that Serum Presets Ultra offers.

Professional Reviews By Industry Experts

Music production and sound design experts have also reviewed Serum Presets Ultra. They have noted that the presets provide a wide range of soundscapes that can be easily tweaked to create customized sounds. They have also commented on the quality of the presets and how polished they sound in a mix. One industry expert stated, “Serum Presets Ultra is a must-have for any music producer or sound designer who wants to take their sounds to the next level.” Another expert said, “The presets are highly versatile and can be used across different genres of music.” In conclusion, Serum Presets Ultra has received positive reviews from customers and industry experts alike. With its versatile presets, quality sound, and value for money, it’s no wonder why the product is a popular choice among music producers and sound designers.

Serum Presets Ultra

Credit: ghostproduceredm.com

Frequently Asked Questions Of Serum Presets Ultra

Can You Download Serum Presets?

Yes, you can download serum presets. There are various websites available that offer free or paid preset downloads for Serum, a popular synthesizer plugin. Simply search for ‘Serum presets’ on Google and you will find a range of options to choose from.

Are Serum Presets Free?

No, serum presets are not always free. Some companies may offer free presets as samples or promotions, but most have a cost associated with them. The price can vary depending on the quality and quantity of the presets.

Where Do I Find Serum Presets On Mac?

To find Serum presets on Mac, open the Serum plug-in and click on the “Menu” button. From there, select “Show Serum Presets Folder” to open the location where the presets are stored on your Mac.

How Many Serum Presets Are There?

There are currently 1200+ serum presets available for users.

Conclusion

The Serum Presets Ultra is a must-have for music producers looking to take their sound to the next level. With its diverse range of presets, this plugin offers a wealth of possibilities for creating unique and dynamic tracks. Whether you’re a beginner or an experienced producer, you’ll appreciate the user-friendly interface and intuitive controls that this plugin provides.

With its powerful features and unparalleled versatility, Serum Presets Ultra is an essential tool that every music producer should have in their toolkit. So what are you waiting for? Get your hands on this amazing plugin today!

Categories
Archive

How To Finish A Song

To finish a song, create a clear roadmap of the structure and lyrics, and commit to a regular schedule for writing and revisions. With focus and dedication, completing a song is attainable.

Starting a piece of music can be an exciting and creatively fulfilling experience. But when it comes to finishing a song, many artists can get stuck in an endless cycle of revisions, rewrites, and self-doubt. Luckily, there are practical steps that musicians and songwriters can take to keep themselves on task and push past creative roadblocks.

By establishing a roadmap for the song structure and lyrics, dedicating time consistently to writing and revisions, and being willing to let go of perfectionism, any artist can learn how to finish a song and share their work with the world.

Understand Song Structures

To successfully finish a song, it’s important to understand song structures. Typically, songs consist of verses, choruses, and bridges. The verse is the foundation of a song, the chorus is where the catchy hook lands and the bridge allows for a change in the song’s mood or tone.

By understanding these elements, you can create a cohesive and engaging song.

When it comes to finishing a song, it’s crucial to understand the different song structures that exist. A song structure is essentially the framework of a song that outlines its different components and their sequence. Mastering song structures will help you create a well-organized, coherent song that listeners can follow and enjoy. In this post, we’ll focus on three primary song structures that you should be familiar with: the verse, the chorus, and the bridge. We’ll also discuss repeats and lengths to help you get the most out of your song structure.

Verse

A verse is a section in a song that typically tells a story or develops a theme. It usually has a different melody and lyrics than the chorus, making it an excellent opportunity to explore different emotions and ideas. A song can have one or multiple verses, and they usually have the same structure. A typical verse structure is:

  • The first line introduces the theme or idea.
  • The second line expands on the idea introduced in the first line.
  • The third and fourth lines provide more details or a resolution to the idea.

Chorus

A chorus is the section in a song that typically has a catchy melody and lyrics that listeners can sing along to. It’s usually the most memorable part of a song and often repeats throughout it. The chorus brings the central message of the song and is also an excellent opportunity to connect with the audience emotionally. A typical chorus structure is:

  • The first line introduces the central message.
  • The second line expands on the message.
  • The third line provides a resolution or a call to action.

Bridge

A bridge, also known as the middle eight, is a section in a song that provides contrast to the verse and chorus sections. It usually has a different melody and chord progression and often incorporates a new idea or theme. A bridge is an excellent opportunity to create tension and build up to the final chorus or verse. A typical bridge structure is:

  • The first line introduces a new idea or theme.
  • The second line expands on the idea introduced in the first line.
  • The third line provides a transition back to the chorus or verse.

Repeats And Lengths

Repeats and lengths are two essential considerations when it comes to song structure. Repeating certain sections, such as the chorus or verse, can make a song more memorable and easier to sing along to. Additionally, keeping the lengths of sections consistent can provide better structure and flow. For example, you may want to keep your verses the same length to create a sense of familiarity. In conclusion, understanding song structures is crucial to finishing a song. The verse, chorus, and bridge are the three main sections you should know, and repeats and lengths are important considerations to keep in mind. Remember that song structures are flexible, and it’s important to experiment and find what works best for you. By mastering song structures, you can create a compelling, well-organized song that listeners will love.

How To Finish A Song

Credit: www.jakeyou.com

Gather Inspiration

When it comes to finishing a song, the process can often feel overwhelming and daunting. One of the best ways to overcome this is by gathering inspiration. Here are some creative exercises, collaboration, and real-life experiences that can aid you in getting inspired to finish that song.

Creative Exercises

Creative exercises are activities you can do to stimulate your mind and trigger your creativity. Some examples of creative exercises that can help you gather inspiration include brainstorming, free-writing, and word association. These exercises can help you generate new ideas for your song and help you get unstuck if you’re feeling blocked.

Example:Choose a word or phrase that relates to your song’s theme and create a mind map of related concepts and ideas.

Collaboration

Collaborating with other musicians or songwriters can also be an excellent source of inspiration. Working with someone else can offer a fresh perspective and help you see your project in a new light. Additionally, collaborating can help you tap into new ideas and approaches that you may not have considered on your own.

  • Find someone whose music you admire and collaborate with them on a song.
  • Join an online community of musicians and songwriters to connect with other creatives.

Real-life Experiences

Real-life experiences can be a great source of inspiration for songwriters. Drawing on personal experiences can help you create a song that feels authentic and meaningful. Try drawing inspiration from your own life or the lives of others around you.

  1. Write about a personal experience that has impacted you emotionally.
  2. Write about an experience someone else has shared with you that inspired you.

By utilizing these creative exercises, collaborating with others, and drawing inspiration from real-life experiences, you can gather all the inspiration you need to finish that song!

Start With A Hook

To effectively finish a song, start with a hook that captures your audience’s attention and draws them in. This can be a catchy melody, a meaningful lyric, or even a unique production element. It sets the tone for the entire song and keeps the listener engaged until the very end.

When it comes to songwriting, starting with a hook is a sure-fire way to grab your listeners’ attention and keep them engaged throughout your entire song. A hook can be a catchy melody, a memorable lyric, or a unique chord progression that sets the tone for your song. In this article, we’ll dive into some ideas for creating a hook and how to use it to finish your song.

Melodic Ideas

Melody is key when it comes to creating a hook. It’s what stays in your listener’s head long after your song is over. Here are some ideas to help you find a melodic idea for your song:

  • Start with a simple melody that can be easily sung or hummed.
  • Experiment with different rhythms and note values to add variation to your melody.
  • Use repetition to emphasize certain parts of your melody and make it stick in your listener’s head.
  • Try incorporating a hook from another song and putting your own spin on it.

Harmonic Progressions

A strong chord progression can help you create a hook that will keep your listeners interested. Some ideas for finding a harmonic progression include:

TipDescription
Use unusual chord progressionsExperiment with borrowing chords from different scales and modes to create a unique sound.
Start with a familiar soundTake inspiration from a popular song, but tweak the chords to make it your own.
Try a series of descending chordsA series of descending chords can create a sense of tension and release that will keep your listener engaged.

Lyric Ideas

Another way to create a hook is through your lyrics. Here are some tips to help you find a memorable lyric:

  1. Use strong imagery and sensory descriptions to paint a picture in your listener’s mind.
  2. Create a memorable catchphrase that is repeated throughout the song.
  3. Use a play on words or a rhyme scheme to make your lyrics stick.
  4. Write lyrics that are relatable to your audience.

In conclusion, starting with a hook is an effective way to finish your song. Whether you choose to focus on melody, harmony, or lyrics, a strong hook will keep your listeners engaged and keep your song in their minds long after it’s over. So, experiment with different ideas and see what works best for you.

Develop Your Ideas

To finish a song, start with a clear concept and direction. Stay focussed and work on developing your ideas systematically. Use inspiration as a spark for creativity and experimentation, and write regularly to fine-tune your skills. Don’t be afraid to collaborate, seek feedback and edit ruthlessly.

With patience and persistence, you can develop a song that is uniquely your own.

Develop Your Ideas One of the biggest challenges any songwriter can face is finishing a song. After all, starting a song is easy. But seeing a song through to completion takes patience, dedication, and a fair amount of elbow grease. If you’re struggling with how to finish a song, one technique you can use is to develop your ideas. This involves taking the initial concepts you’ve come up with and building on them until you have a full-fledged piece of music you can be proud of. Write the lyric One important aspect of developing your ideas is to write the lyrics. This step allows you to find the right words to express your thoughts and emotions with your song. You can use your own experiences or observations to create a relatable story or message that resonates with your audience. Find the right chords The next step is to find the right chords to match your lyrics. Experiment with different chords until you find the perfect match that fits the mood of the song. You can use guitar, piano, or any other instrument to create your melody. Don’t be afraid to change the key or the tempo to add more depth to your song. Experiment with tempo and rhythm Once you have the right chords in place, experiment with the tempo and rhythm. Changing the tempo and rhythm can make your song more interesting and dynamic. You can speed up or slow down the tempo to create a different feel for your song. The rhythm can be altered by using different time signatures or adding syncopation to create an intricate beat. Add layers The final step in developing your ideas is to add layers to your song. Layers can include additional instruments, harmonies, or vocal arrangements. Make sure each layer blends seamlessly with the existing melody and doesn’t clash with the other elements of the song. This step gives your song depth and adds a professional touch to the finished product. In conclusion, developing your ideas is a crucial step in finishing a song. By writing the lyrics, finding the right chords, experimenting with tempo and rhythm, and adding layers, you can create a memorable piece of music that will resonate with your audience. With time and practice, you can hone your songwriting skills and finish every song you start.

Craft A Great Arrangement

To finish a song, it’s crucial to craft a great arrangement that highlights its strengths. Start by choosing the right instruments and arranging them in a way that complements the melody. Experiment with different structures and tempos until you find the perfect fit.

Crafting a great arrangement is an essential step to finishing a song. It’s the process of organizing the various musical elements of a song to create a cohesive sound. A great arrangement can take a song from average to exceptional and make it stand out. Here are some tips and techniques to help you craft a great arrangement and finish your song.

Intros And Outros

The introduction and conclusion of a song are vital parts of the arrangement. It sets the tone for the song and helps to make a memorable first impression on the listener. For the intro, keep it short and sweet, usually 8-16 bars is enough to get the listener hooked. The outro should create a sense of resolution and bring the song to a satisfying end. It’s important to experiment with different intro and outro styles to find the right fit for your song.

Transitions And Builds

Transitions and builds help to create a sense of progression and momentum throughout the song. When transitioning between sections, such as verse to chorus, the transition should be smooth and cohesive. This can be achieved through the use of fills or bridges. To create a buildup, consider increasing the intensity of the music gradually or adding layers, such as additional instruments or vocal harmonies.

Instrumentation

Instrumentation refers to the arrangement of musical instruments throughout the song. It’s important to consider the role of each instrument and how they interact with each other. Avoid overcrowding the song with too many instruments or having instruments competing for the same frequency range. Instead, consider the emotional impact of each instrument and use them accordingly to enhance the mood of the song.

Instrumental Breaks

Instrumental breaks can be a great addition to a song, providing listeners with a break from vocals and lyrics. It’s important to keep these breaks interesting so that the listener remains engaged. Experiment with different instrumental combinations or solos to add variety to the break section. In conclusion, crafting a great arrangement is vital to finishing a song with a polished sound. By considering each element mentioned in this article, you can create a memorable song that stands out. Experiment, be creative, and most importantly, have fun!

How To Finish A Song

Credit: m.youtube.com

Take A Break

To successfully finish a song, it’s important to take breaks along the way. This allows for fresh perspectives and can help with creative blocks. Set an achievable goal before each session to keep the momentum going.

As a songwriter, it’s common to get stuck at some point while writing a song. It’s frustrating when you can’t seem to finish a song. However, taking a break can be a useful solution to help you get back on track. Here are some steps you can take during your break to refresh your mind and get back to writing.

Step Back And Listen

Step back from your song, take a break, and come back to it with fresh ears. You’ve probably been working on it for a while, so it’s essential to listen to your song as if you’re hearing it for the first time. This way, you can identify the areas that need work. Listen to the melody, lyrics, instrumentation, and arrangement of your song with a critical ear.

Refresh Your Ears

Sometimes all you need is to give your ears some time off from your song. Go for a walk, read a book, or do something that takes your mind off your song. This way, you can come back to your song with a fresh perspective. If you keep working on your song non-stop without taking a break, you risk losing objectivity.

Get Feedback

Getting feedback from others can help you identify areas that need improvement. Share your song with musicians, songwriters or even listeners for their feedback. They might be able to provide you with a fresh perspective or ideas on how to overcome the challenges you’re facing with your song. Feedback also gives you an idea of how your listeners will perceive your song. In conclusion, taking a break doesn’t mean you’re running away from the task at hand. Instead, it’s a valuable tool to help you overcome writer’s block and finish your songwriting projects. Using these steps during your break can help facilitate the process of finishing a song. While taking a break, try to relax, refresh your mind, and listen to your song with a critical ear. The objective is to come back with a renewed mindset and finish your song with a fresh perspective.

Polish Your Song

Polishing your song is the final stage of finishing your masterpiece. In this stage, you refine the lyrics to be more relatable and catchy to your audience. You also improve the vocal performance to enhance the emotion and intensity of the song. Instrument techniques are also employed to add depth and texture. Finally, you mix all the elements to achieve a balanced and professional sound. In this article, we will explore some effective ways to polish your song.

Lyric Refinement

Lyrics are the heart and soul of any song, and it’s essential that they resonate with your audience. Refine your lyrics by choosing impactful words and phrases that will grab the listener’s attention. Consider the rhythm and flow of your lyrics, ensuring they match the melody and are easy to sing along. You can also seek feedback from fellow writers or your target audience to identify any areas that need improvement.

Vocal Delivery

The vocal performance is where you bring your lyrics to life, and it’s crucial that you deliver them with passion, emotion, and authenticity. Practice your vocal delivery, experimenting with different techniques to find the one that suits your song’s mood and style. Make sure your singing is in tune and well-controlled, and avoid any unnecessary vocal acrobatics that could distract the listener from the song’s message.

Instrument Techniques

The choice and use of instruments can significantly impact the listener’s experience and determine the overall sound of your song. Experiment with different instrument arrangements and techniques, such as layering, panning, and EQ, to find the perfect balance between all the elements. Consider adding instrumental hooks and catchy riffs that will stick in the listener’s mind and make your song more memorable.

Finalize The Mix

The final stage of polishing your song is mixing, where you balance and optimize all the elements to achieve a cohesive and professional sound. Ensure that each instrument and vocal are clearly heard and have their space in the mix. Use EQ, compression, and other effects to enhance and polish the sound, and ensure that you maintain a consistent volume level throughout the song. Once you’re satisfied with your mix, test it on multiple playback devices to ensure it sounds great everywhere.

How To Finish A Song

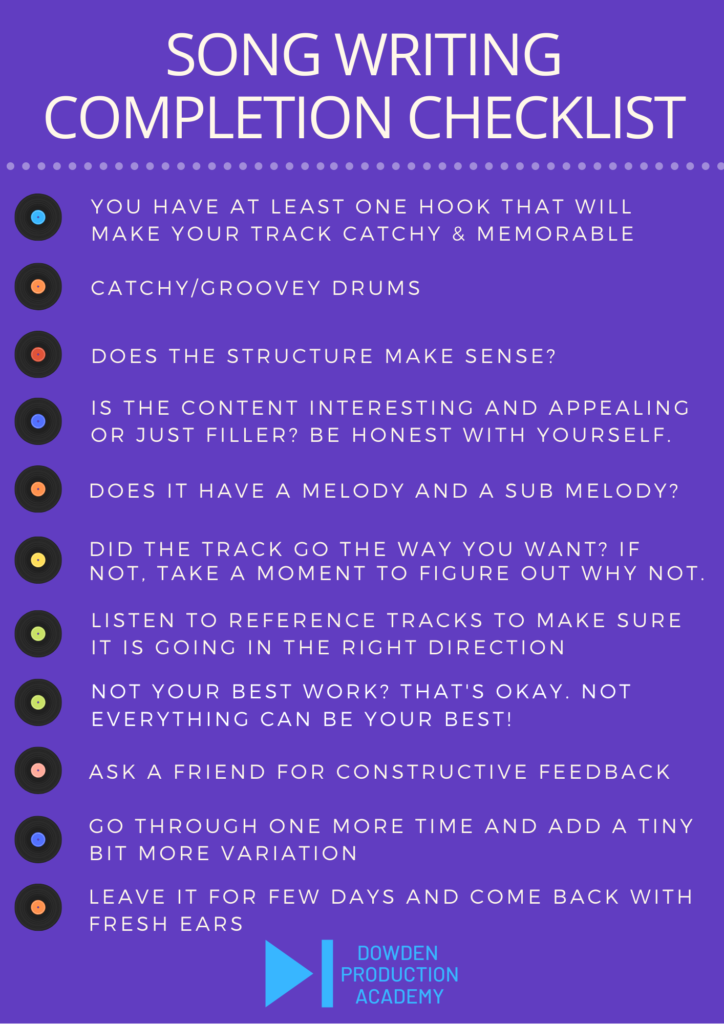
Credit: dowdenmusic.com

Know When To Stop

To finish a song, it is important to know when to stop working on it. This means understanding when the song is complete and avoiding the temptation to constantly make adjustments. Trust your instincts and take breaks to gain perspective to achieve the final product you desire.

Knowing when to stop is a crucial factor in finishing a song. Often, songwriters tend to overthink and overdo the process, leading to dissatisfaction with the end result. As such, it’s essential to identify when your song feels finished and when to revisit it later.

When Your Song Feels Finished

When your song feels finished, it’s time to stop tweaking and perfecting it. You’ll know your song is complete when you feel content with the melody, lyrics, and overall sound. When you listen to your song and don’t feel the need to change anything, that’s a clear indication it’s finished. It’s important to trust your instincts and not over-analyze your song. Too much analysis can cause you to lose sight of the initial inspiration behind the song, leading to unnecessary changes that may disrupt the coherence and flow.

When To Revisit Later

Revisiting your song later is essential to ensure it’s of the best quality. After finishing the song, it’s best to step away from it for a few days, weeks, or even months. This way, you can revisit it later with a fresh perspective and identify areas that need improvement. When revisiting your song, consider getting feedback from other musicians or industry experts. They may offer a different perspective that could help you refine it further without overdoing it. In conclusion, knowing when to stop is the key to finishing a song. When it feels complete, trust your instincts and resist the urge to make unnecessary changes. When in doubt, revise later and seek feedback to ensure the best quality possible.

Frequently Asked Questions For How To Finish A Song

How Do I Complete My Song?

To complete your song, take the time to work on the lyrics, melody, and arrangement until you are satisfied with the final product. It’s also important to consider the mood and theme of the song, as well as any necessary instrumentation.

Collaborating with other musicians or seeking feedback can also be helpful in the completion process.

How Do You Write The End Of A Song?

To write the end of a song, you can use various techniques such as repeating the chorus or adding a final verse to conclude the melody. You can choose to have a fade-out ending or a hard stop. Repeat the final lyrics and gradually lower the volume in the fade-out ending technique.

For a hard stop, end with a sudden silence after a final chord or note. Ultimately, the end of the song should leave a lasting impression on the listener.

How Do You Outro A Song?

To outro a song, gradually decrease the volume or fade it out. You can also use some audio effects such as delay, reverb, or echo. The outro should be smooth and natural, indicating the end of the song.

What Is The Ending Of A Song Called?

The ending of a song is called the outro. It is the section of a song that signals its conclusion and often includes a repetition or alteration of the main melody.

Conclusion

To sum up, finishing a song requires patience and dedication. Start by identifying the purpose of the song and setting achievable goals. Get inspired by other artists and don’t be afraid to experiment with different writing and production techniques. Collaborating with others can also bring fresh ideas and perspectives.

Remember to trust the process and stay committed to your vision. With these tips, you can successfully complete your song and share your creativity with the world.

Categories
Archive

Tips On Recording Vocals

To record quality vocals, start by selecting an appropriate room, placing the mic at the right distance, setting proper levels, and using pop filters. Vocals bring the lyrics and melody of a song to life, making them one of the most important elements in music production.

In order to ensure that your vocal recordings sound professional and polished, there are several tips that can help you make the most out of your vocal recording sessions. We will discuss some essential tips for tracking vocals that will help you capture the best possible performances.

Related reading: Top Vocal Recording Techniques Secrets For Killer Vocals and Vocal Recording Techniques: Master the Art of Captivating Vocals. For background, see Vocal booth on Wikipedia.

Whether you’re an experienced producer or a beginner just starting out, these tips will help you achieve great-sounding vocals that stand out in any mix.

Tips On Recording Vocals

Credit: www.productionmusiclive.com

Recording Vocals: Set Up Your Recording Space

Singers and vocal artists know that recording perfectly reflects their talent and can make a great impact on the audience. However, tracking vocals is not as easy as just plugging in a mic and hitting the record button. Setting up your recording space is essential to achieve a quality sound that complements your vocals. Here are some tips to guide you in preparing your recording area.

Choose A Well-suited Room

The space where you record your vocals plays an essential role in how it will sound. A well-suited room should be spacious enough to provide the ideal environment for the recording, without too much echo or background noise. A room with minimal natural reverb is ideal. A confined space, like a walk-in closet, can also work wonders in reducing echoes.

Fine-tune Your Mic Placement

After choosing your room, it’s time to set up your microphone. The way your mic interacts with your room and surroundings will have an effect on the recorded sound quality. The microphone, when placed correctly, can capture your vocals without picking up too much background noise and audio reflections.

The distance between the microphone and the performer should be around a foot away, though it depends on the mic type used. Set the height of the mic to your chin, then adjust the tilt to capture the best sound possible. You can place a pop filter in front of the mic to avoid plosives that can generate air in the recording. If that doesn’t work, stand so that the plosives are directed slightly to the side of the microphone.

Overall, setting up your recording space is essential to achieving a sound that will reflect your talent in music. By choosing the right room and tuning the mic placement correctly, you can help ensure that your vocal recordings achieve their full potential.

Recording Vocals: Select The Right Microphone

Selecting the right microphone is crucial for recording high-quality vocals. Consider factors such as the microphone type, polar pattern, and frequency response to ensure that your vocals sound clear and crisp. Test different microphones and setups to find the best fit for your voice and recording environment.

Tracking vocals is an essential aspect of music production. It can make or break a track, which is why selecting the right microphone is crucial. There are two main types of microphones: condenser and dynamic. Each type has its unique characteristics and is better suited for specific purposes. Additionally, considering the polar pattern can also contribute to capturing clearer and more balanced recordings. In this post, we will explore the differences between condenser and dynamic microphones and how to select the best polar pattern for your recording sessions.

Condenser Vs Dynamic Microphones

Condenser microphones are more sensitive and more responsive to high frequencies. They are ideal for capturing detailed, nuanced vocals, making them a popular choice for studio recording. On the contrary, dynamic microphones have a less sensitive diaphragm and are better suited for live performances. They’re also more durable and can handle higher sound pressures, making them perfect for recording loud vocals, drums, and guitar amps. Before selecting a microphone, consider the style of your music and the environment where you will be recording. For instance, for rock and metal music, dynamic microphones are preferred since they can handle louder volumes. For R&B and soul music, condenser microphones are ideal because they can pick up delicate details in a vocalist’s performance.

Consider The Polar Pattern

The polar pattern of a microphone refers to its sensitivity to sounds coming from different directions. There are three primary polar patterns: cardioid, bi-directional, and omnidirectional. Cardioid microphones are excellent for recording solo vocals, as they focus on the sound directly in front of the microphone while rejecting sounds from the sides and rear. Bi-directional microphones, also known as figure-8 mics, pick up sound equally from the front and back, making them great for recording duets. Omnidirectional microphones capture sound from all angles, making them perfect for recording choirs or group vocals.

When selecting a microphone, consider the polar pattern that best suits your needs. If you’re recording a solo artist, a cardioid microphone will be a good pick. Also, if you’re capturing a duet or podcast, a bi-directional microphone will be an excellent choice. If you’re recording a choir or group vocals, an omnidirectional microphone will be ideal. In conclusion, selecting the right microphone and polar pattern is crucial when recording vocals. By taking into account the style of your music and the environment where you will be recording, you can determine the best microphone and polar pattern suited for your project.

Recording Vocals: Focus On Vocal Performance

Tracking vocals can be a daunting task, especially if you’re new to music production. Achieving a great vocal performance is crucial to making a successful recording. A great vocal performance doesn’t always mean hitting all the right notes but conveying the right emotion. Here are some tips on how to focus on vocal performance and get the most out of your recordings.

Warm Up And Practice

Before hitting record, it’s essential to warm up your voice to ensure that you’re using it correctly. This involves doing vocal exercises to get your vocal cords ready to sing. It’s also essential to practice your song before recording to ensure that you get the feel and timing correct. Singing the song several times through can help you find the perfect pitch, tone, and timing. When you’re comfortable with the song, you’re more likely to deliver an emotional and authentic performance in the recording.

Get Your Performance Right

The main goal of tracking vocals is to capture the emotion and story behind the lyrics. Sometimes, the singer may be so focused on hitting the right notes that they forget about the delivery of the performance. To ensure that you get the performance right, it’s essential to connect with the song emotionally while singing. It’s also necessary to project your voice and push for strong emotions in the delivery. Don’t be afraid to use dynamics to add more emotion to the recording. Quiet, intimate moments can be just as powerful as a loud climax.

By focusing on your vocal performance, you’ll ensure that you make the most out of your recording sessions. Remembering to warm up and practice, and getting your performance right is a fool-proof way of delivering a memorable performance. With these tips in mind, you can record great-sounding vocals that accurately convey the story and emotion of your lyrics.

Recording Vocals: Optimize Your Signal Chain

Optimize your signal chain for high-quality vocal recordings by paying attention to the microphone choice and placement, preamp settings, and using proper gain staging. Eq and compression can also enhance the vocals in the mix. Remember to monitor the levels to avoid distortion or clipping.

Tracking vocals requires a lot of preparation and attention to detail. One of the most important aspects of tracking vocals is optimizing your signal chain, which basically means ensuring every part of the recording process is set up correctly to capture the best possible sound. Here are some tips to optimize your signal chain when recording vocals.

Use A Pop Filter And Windscreen

When recording vocals, using a pop filter and windscreen is crucial to reduce unwanted noises during the recording process. A pop filter is a device placed in front of the microphone that helps to filter out popping sounds caused by consonants such as ‘p’ and ‘b.’ A windscreen, on the other hand, is a foam cover that surrounds the microphone, preventing wind or breath sounds from entering the microphone. By using a pop filter and windscreen, you can ensure that your vocals are recorded without any unwanted noise, resulting in a clean recording.

Consider Using A Preamp

Using a preamp can help to optimize your signal chain by amplifying the microphone’s signal, resulting in a better recording quality. A preamp is a device that connects between the microphone and the audio interface and adds gain to the microphone signal. Some audio interfaces have built-in preamps, but using an external preamp can often result in better sound quality. When using a preamp, be sure to adjust the gain to prevent any distortion. When recording vocals, every element of the signal chain is essential to achieving a high-quality recording. By using a pop filter and windscreen to reduce unwanted noises and considering using a preamp, you can optimize your signal chain and capture the best possible sound.

Recording Vocals: Save Time With Quick Edits

Save time and streamline your recording process by implementing quick edits in your vocal recordings. This can include things like comping and tuning to create a polished final product. Practice makes perfect, so keep experimenting with different editing techniques to find what works best for you.

Save Time with Quick Edits Recording vocals can be time-consuming. But with some quick, easy edits, you can save time and still get a top-quality sound. Here are some tips for making quick edits and optimizing your recording time: Cut the Dead Space Dead space is silence between phrases or sentences. It often occurs when recording vocals, and it can add up to wasting a significant amount of time. By cutting out dead space, you can reduce the time spent on post-production work. Plus, it makes the recording sound more professional.

Here is how you can cut the dead space: • Highlight the silent section of the recording. • Delete the silence by clicking on the cut option. • Repeat the process across the whole track. Use Audio Editing Tools Audio Editing tools can make quick work of tracking vocals. They make editing and optimizing your recording time more manageable. Here are some of the audio editing tools you can use: • Normalize – Brings the volume of the recording to a consistent level. • EQ (Equalization) – adjust the frequencies of the vocals and remove unwanted background noise.

Recording Vocals: Tips

• Compression – reduces the dynamic range of the recording, reducing volume inconsistencies. When using these editing tools, make sure that you do not over-process your vocals. Over-processing can make the recordings sound unnatural. Conclusion By using these tips and audio editing tools, you can save time and still get excellent results when recording vocals. With some little tweaks, you can reduce time-consuming post-production work and optimize your recording time. Remember to keep a balance while editing – making only necessary edits to avoid making the recording sound unnatural.

Add Some Flavour With Processing

Tracking vocals is not just about capturing a great sound; it’s also about adding a bit of personality and emotion to your vocal. One way to do this is by using processing, which is adding effects like reverb, EQ, compression, and more. Keep in mind that processing can make or break the quality of your recording, so it’s essential to use it judiciously. Here are some essential tips that you can follow to add some flavour to your vocal recordings with processing.

Add Effects As Needed

Processing is about adding effects to your vocals, but it’s crucial to use them only when you need them. Using too many effects can make your recording sound unnatural and robotic. Not every effect is suitable for every vocal performance, so it’s crucial to choose the right effect that suits the song’s mood and style. Reverb and delay are the most commonly used effects for vocals, but try and experiment with other effects and use them to create unique sounds that complement your song.

Recording Vocals: Retain The Natural Sound

While processing is essential, it’s crucial to keep your vocals sounding natural. Use processing to enhance your vocals, not to mask them. It’s important to find a balance between the natural sound and processed sound. Over-processing can lead to a loss of clarity and make the vocal sound muddy. You want to keep the vocal crisp and clear while adding just the right amount of flavour to the recording. It’s always a good idea to use processing plugins that offer presets for quick and easy processing that will help you to achieve that perfect balance.

Consider Alternatives

When recording vocals, consider using alternative recording techniques to capture the best performance. Experiment with microphone placement, room acoustics, and different recording equipment to find the perfect sound.

When it comes to tracking vocals, the most important aspect is to showcase the singer’s voice in the best possible light. While choosing the right microphone, recording software, and editing tools are paramount, a few additional considerations can take vocal recording to the next level. In this post, we’ll focus on one of those considerations – alternative techniques – and discover how they can help you produce a recording that grabs attention.

Try Different Microphone Positions

When recording vocals, the microphone’s placement is key. A mic positioned too close to the singer’s mouth can cause distortion and unwanted background noise, whereas a mic held too far away might produce a thin or weak sound. By experimenting with different microphone positions, you can find the perfect balance between clarity and warmth. Try positioning the microphone slightly above or below the mouth, or placing it off to the side for a unique stereo effect.

Recording Vocals: Experiment With Alternative Vocal Techniques

Most vocal recordings involve singing into a stationary microphone, but it doesn’t have to be that way. Experimenting with different vocal techniques can bring out a distinct sound that stands out from the crowd. Consider recording the vocals while the singer moves around the room or sings while lying down. You never know what unexpected sound or emotion might come out of this experimentation.

The Takeaway

Whether you’re a seasoned professional or just starting with vocal recordings, it’s crucial to keep an open mind and be willing to try new things. By considering alternative methods like microphone placement and vocal techniques, you may discover a sound that can take your vocal recordings to a new level of excellence.

Tips On Recording Vocals

Credit: www.shure.com

Incorporate Feedback

One important tip on tracking vocals is to incorporate feedback from others. Listening to different perspectives can help improve the quality of your recording and avoid errors or technical issues. It’s essential to remain open to constructive criticism and actively seek feedback throughout the recording process.

Recording perfect vocals can seem like a daunting task, but with the right approach, you can improve your vocal recordings. One of the most important things that you must do while recording vocals is to incorporate feedback.

Listen To Playbacks

When recording vocals, you should always listen to the playbacks and analyze them carefully. Listening to playbacks helps you identify any potential issues in your vocal recordings. You need to focus on elements such as pitch, tempo, clarity, and timing. Ensure that you pay attention to the nuances of your vocal performance, so that you can effectively incorporate feedback in the future.

Utilize Feedback In Future Recordings

Incorporating feedback in your future recordings can help you improve your vocals. Feedback can be from your producer, other musicians, or even your audience. You need to be open to constructive criticism, and apply the feedback you receive. Keep track of all the feedback you receive, and use it to tailor your future performances to make it even better. If you improve on the feedback you receive from your audience, your future recordings, and performances will be better than ever. Tracking vocals can be complicated, but with these tips, you can make significant strides towards perfecting your musical craft. Incorporating feedback is an essential part of the process, so be sure to apply the tips mentioned above for your future recordings.

Frequently Asked Questions On Tips On Recording Vocals

How Should You Record Vocals?

To record vocals effectively, ensure proper microphone placement, use a pop filter, adjust gain levels and positioning for optimal sound, and consider room acoustics. Experiment with distance from the microphone to find the ideal recording setup.

How Do You Record Your Voice Perfectly?

To record your voice perfectly, you should first find a quiet location and use a high-quality microphone positioned close to your mouth. Speak clearly and at a consistent volume, avoiding background noise and sudden movements. Use recording software that allows you to monitor and adjust levels in real-time.

Finally, practice and edit as needed to refine your technique.

How Can I Improve My Voice While Recording?

You can improve your voice while recording by following these tips: 1. Practice speaking at a steady, moderate pace. 2. Stay hydrated to prevent vocal strain. 3. Use good posture to support proper breathing. 4. Warm up your voice before recording.

5. Speak from your diaphragm, not your throat. Remember to take breaks as needed to avoid vocal fatigue.

How Do I Make My Vocals Sound Better?

To make your vocals sound better, try using proper breathing techniques, maintaining good posture while singing, and practicing regularly to improve your pitch and tone. Additionally, consider using proper microphone placement, applying EQ to enhance specific frequencies, and learning proper compression techniques to control dynamics.

Experiment with different vocal effects and find what works best for your voice.

Conclusion

To sum up, tracking vocals can be a challenging task, especially if you are new to it. However, with these tips, you’re sure to capture professional-quality sound in no time. Remember to invest in a good microphone, consider your recording environment, warm up your voice, and avoid over-processing your tracks.

Lastly, always trust your ears and experiment with different techniques to find what works best for you. Happy recording!

Categories
Archive

When To Eq In Solo Mode

In solo mode, eq when necessary to fine-tune the sound of the instrument or vocals. Eq can balance the frequency levels, clear up muddiness, and enhance the clarity of the track.

In music production, achieving a good mix is crucial to making a song successful. It involves a series of processes such as editing, equalizing, compression, and more. Equalization, or eq for short, is a process that adjusts the frequency balance of an audio signal.

It can make a track sound brighter, warmer, or clearer, depending on the adjustments made. In solo mode, eq can be used to fine-tune the sound of an individual instrument or vocal track. It can balance the frequency levels, clear up muddiness, and enhance the clarity of the track. However, overusing eq can also result in a dull and lifeless sound, so it’s important to use it sparingly and judiciously.

When To Eq In Solo Mode

Credit: www.pinterest.com

Benefits Of Using Eq In Solo Mode

Using EQ in solo mode can help you make informed adjustments to the audio levels of individual tracks. Benefits include identifying and reducing problem frequencies, and achieving a balanced and clear sound before mixing.

EQ is one of the most essential tools for sound engineers and music producers. It helps to shape the sound of an instrument or vocal, making it sound clearer, more defined, and balanced. In solo mode, an EQ allows you to analyze the frequency content of the sound you’re working with without any other sounds interfering. In this article, we’ll discuss the benefits of using EQ in solo mode and why it’s important for creating the best possible sound for your recordings or live performances.

Improves Clarity And Definition

When you EQ in solo mode, you can focus on specific frequencies of an instrument or vocal. This allows you to improve its clarity and definition. For example, by boosting the upper mid-range frequencies, you can make a vocal sound more intelligible and cut through a mix. On the other hand, reducing the low frequencies can remove any unwanted muddiness or rumble. By adjusting the EQ in this way, you can make an individual sound as clear and defined as possible.

Balances Frequencies

Another important benefit of using EQ in solo mode is that it helps to balance out the frequency content of a sound. When you analyze an instrument or vocal in solo mode, you can identify which frequencies are lacking or too dominant. For instance, if a guitar track sounds too thin, you can use EQ to boost the lower mid-range frequencies, which will make it sound fuller and more balanced. If a vocal track has too much sibilance, you can reduce the high frequencies to even it out. Balancing out the frequencies will ensure that each sound has its own space in the mix, making it sound more professional and polished.

Helps To Shape The Sound

Using EQ in solo mode allows you to shape the sound of an instrument or vocal according to your artistic vision. For example, if you want a guitar to sound brighter and more aggressive, you can boost the high frequencies. Alternatively, if you want it to sound warmer and more mellow, you can reduce the high frequencies and boost the lows. You can also use EQ creatively to add unique character and texture to a sound. For instance, by using a bandpass filter, you can create a thin, lo-fi sound that’s perfect for certain genres like indie rock or hip hop. In conclusion, using EQ in solo mode is essential for creating the best possible sound for your recordings or live performances. It improves clarity and definition, balances out frequencies, and allows you to shape the sound according to your artistic vision. By taking the time to analyze each individual sound in solo mode, you can ensure that they work together perfectly in the final mix.

Factors To Consider Before Eqing In Solo Mode

Before EQing in solo mode, it’s essential to consider the context of the music, the instrument or vocal being EQed, and the desired outcome. It’s also crucial to use reference tracks and use EQ as a tool, not a fixer, to achieve the best possible results.

Factors to Consider Before EQing in Solo Mode: EQing in solo mode can be an effective way to identify problems in your sound source and make the necessary adjustments. However, it’s important to understand that making changes to one element of a mix can have a significant impact on the overall sound. As such, there are a few factors to consider before EQing in solo mode. H3: Know Your Sound Source Before you start EQing in solo mode, it’s important to have a good understanding of your sound source. What is the instrument or sound you are trying to EQ? What are its natural frequencies? This knowledge can help you identify problem frequencies and determine what adjustments need to be made. For example, if you’re working with a guitar track, you might know that the low-frequency range is around 80 Hz. If you’re hearing muddiness in that frequency range, you can use EQ to cut some of those frequencies and clean up the mix. H3: Identify the Problem Frequencies The next step is to identify the problem frequencies. This is where EQing in solo mode can be helpful. Soloing the instrument or sound you’re working on can help you hear problem frequencies more clearly. Make sure to use your ears rather than relying solely on visual representations of the frequency spectrum. Not all problem frequencies are obvious, and sometimes cutting a frequency range too much can negatively impact the overall sound. H3: Understand the Effect of EQing on Other Sounds in the Mix Lastly, it’s important to understand the effect of EQing on other sounds in the mix. EQ adjustments can have a significant impact on the overall balance of a mix. For example, if you cut too much of the high end on a vocal track, it can sound muffled and disappear in the mix. To prevent this, make subtle EQ adjustments and remember to consider the context of the instrument or sound you are EQing. Keep in mind other tracks in your mix and try to balance the frequencies accordingly. In conclusion, EQing in solo mode can be a valuable tool for identifying and correcting problem frequencies in your mix. However, it’s important to approach EQing with a clear understanding of your sound source, problem frequencies, and the impact of your adjustments on the overall mix. With these factors in mind, you can effectively use solo EQing to improve the quality of your mixes.

Eq Techniques For Solo Mode

EQ techniques for solo mode are crucial for achieving a balanced sound that complements a musician’s performance. Knowing when to EQ in solo mode can help identify frequency issues and highlight the instrument’s strengths.

Sweeping The Frequencies

Before you begin any EQ in solo mode, it’s important to first sweep through the frequencies to identify any problem areas. Sweep each band up and down the frequency spectrum and listen carefully for any peaks or dips that stand out. By doing this, you can easily identify the problem frequencies that need to be addressed with EQ.

Using Cuts And Boosts To Create Space

Once you’ve identified any problem frequencies, the next step is to use cuts and boosts to create space for the important elements in your mix. For example, if the bass and kick are clashing in the low end, you can cut some of the bass frequency range to make room for the kick. On the other hand, if the vocals are getting lost in the mix, you can boost the mid-range frequencies to bring them forward.

Using High Pass And Low Pass Filters

Another EQ technique to consider when working in solo mode is using high pass and low pass filters. High pass filters remove frequencies below a certain point, while low pass filters remove frequencies above a certain point. This can be particularly useful when trying to clean up a mix and remove any unnecessary frequencies that are muddying the overall sound. In conclusion, EQ is an essential tool for any producer or engineer, but it’s important to use it wisely. When working in solo mode, be sure to sweep the frequencies, use cuts and boosts to create space, and consider using high pass and low pass filters to enhance the overall sound of your mix.

Common Mistakes To Avoid When Eqing In Solo Mode

When EQing in solo mode, one common mistake to avoid is relying too heavily on your headphones. It’s important to regularly check your mix in different listening environments and not get too fixated on any one frequency range. Additionally, be cautious of over-EQing and giving each element too much space in the mix.

When it comes to music production, EQing plays an essential role in achieving a well-balanced mix. EQing in solo mode is a common practice that allows you to focus on a specific track’s frequencies. However, it’s easy to make mistakes while EQing in solo mode that can negatively affect the overall mix. In this section, we will discuss common mistakes to avoid when EQing in solo mode.

Over-processing The Sound

One common mistake people make is over-processing the sound while EQing in solo mode. When you are listening to a track in isolation, it’s easy to get lost in the individual sound’s details and try to fix everything with EQ. However, this approach can result in an unnatural sound that does not fit into the mix. To avoid over-processing, try to focus on the main elements of the sound and EQ them accordingly. Look for the problem areas and apply subtle changes that improve the sound without altering it drastically. Remember, less is more, and too much EQ can ruin the original character of the sound.

Fixing Non-existent Problems

Another mistake to avoid is fixing non-existent problems. When EQing in solo mode, it’s easy to get carried away and find problems that don’t exist in the mix. For example, you might think that a particular frequency is too harsh or too dull, but when you hear it in the context of the mix, it sounds fine. To avoid fixing non-existent problems, try to refer to the overall mix regularly. Make sure that the changes you are making in solo mode complement the entire mix. Ask yourself if the adjustments you are making are necessary and if they add value to the overall sound.

Ignoring The Overall Mix

Lastly, it’s essential to avoid ignoring the overall mix when EQing in solo mode. EQing in solo mode can be helpful, but it’s only one part of the mixing process. You need to make sure that the EQ adjustments you are making fit into the context of the mix. To avoid ignoring the overall mix, try to refer to the whole mix regularly. Listen to each track in isolation and then together with the rest of the mix. If you notice that the changes you made in solo mode are not working in the mix, don’t be afraid to undo them. Remember, the primary goal is to achieve a well-balanced mix, not to fix individual tracks. In conclusion, EQing in solo mode can be a helpful tool, but it’s essential to avoid common mistakes such as over-processing, fixing non-existent problems, and ignoring the overall mix. By keeping these tips in mind, you can ensure that your EQ adjustments contribute to a well-balanced mix that sounds great.

When To Avoid Eqing In Solo Mode

Solo mode can be useful for making precise audio adjustments but it is not always necessary to EQ in solo mode. It’s important to keep the entire mix in mind and make EQ adjustments accordingly to achieve a balanced sound.

When to Avoid EQing in Solo Mode EQing in solo mode refers to tweaking the sound of a single instrument or element in a mix without considering how it sounds when played together with the other elements in the mix. While it can be useful for identifying frequencies that need correction, it can also lead to over-emphasis on some frequencies, resulting in an unbalanced mix. Here are a few instances when it’s best to avoid EQing in solo mode. When You’re Using Samples Samples often come pre-EQ’d, so tweaking them further in solo mode can make them sound unnatural. It’s best to listen to them in the mix and make adjustments as needed to harmonize with the other elements.

When You’re Mixing Different Genres

Mixing different genres can be tricky. EQing in solo mode won’t take into account how the elements from different genres blend together. Instead, it’s best to focus on creating a balanced mix that works for all genres in the mix.

When You’re Working With Unfamiliar Speakers Or Headphones

Speakers or headphones can have their unique tonal qualities, making the mix sound good or bad depending on the device. To avoid over-emphasizing or cutting frequencies that may not sound good on unfamiliar devices, it’s best to mix in full mode. In conclusion, EQing in solo mode can be useful in some scenarios, but it’s not always the best approach. By avoiding EQing in certain situations, you can create a more natural, balanced mix that translates well across different playback systems.

When To Eq In Solo Mode

Credit: www.elisharecordstudio.com

Frequently Asked Questions Of When To Eq In Solo Mode

How Do You Know When To Eq?

EQ should be applied when there is a need to adjust and enhance the balance and clarity of a specific track or sound within a mix. Proper EQ can help to remove unwanted frequencies or add desirable ones, making the overall sound more enjoyable and polished.

Should You Solo When Mixing?

Mixing solo can help you focus on individual elements of the track and make precise adjustments, but it’s important to check your work on different speakers. Collaborating with others can also bring fresh perspective and improve the overall sound. Ultimately, the choice depends on your personal preference and the specific project.

Should I Use Eq While Recording?

Yes, using EQ while recording can improve the overall quality of your music production. EQ allows you to adjust and shape the frequencies of the sound, enhancing clarity and making the mix sound more balanced. It’s important to use EQ judiciously and not overdo it, as too much EQ can cause unwanted distortion and artifacts in the sound.

How Do You Use Eq Effectively?

To use EQ effectively, start by identifying the frequencies you need to adjust. Listen closely and make small adjustments, rather than drastic ones. Avoid overusing EQ, as it can lead to a loss of quality. Use high-pass filters to reduce low-end rumble and low-pass filters to reduce high-end hiss.

Finally, trust your ears and make adjustments that sound good to you.

Conclusion

EQ in Solo Mode can be a powerful tool when used correctly. By understanding the nuances of your audio needs and with a bit of experimentation, you can create a fully immersive and impactful audio experience for yourself. The key is to approach EQ usage with intention and not as a band-aid solution to poorly recorded audio.

Remember to always trust your ears, and don’t be afraid to make tweaks until you find the right sound. Happy EQing!

Categories
Archive

Markers In Pro Tools First

Markers in Pro Tools First are used for precise positioning within audio files. They help users to mark specific points, allowing for easy navigation and editing.

Pro Tools First is a popular digital audio workstation used by music professionals for editing, recording and mixing music. Markers are an essential tool within Pro Tools First that help users to mark specific points within audio files. This makes it easy to navigate and edit them.

Related reading: Import Audio Pro Tools and Pro Tools First Grid Mode. For background, see pro-tools on Wikipedia.

Whether you’re a professional musician or a beginner, markers can improve your workflow. They also help you create better music. We will explore the use of markers in Pro Tools First. This provides you with a comprehensive guide on how to use them. We will also discuss some tips and tricks for using markers to improve your music production process.

Markers In Pro Tools First

Credit: www.youtube.com

Types Of Markers In Pro Tools First

Pro Tools First offers various types of markers that are essential for audio editing. These include Memory, Song, Spot, and Selection markers. This allows users to quickly navigate through the timeline and edit their audio tracks with precision.

Types of Markers in Pro Tools First When it comes to audio editing, markers are an essential tool that can save you a lot of time. In Pro Tools First, you can use different types of markers to help you navigate through your session and make edits faster. These markers include Memory Locations, Selections, and Clip Groups. H3: Memory Locations Memory Locations are one of the most basic types of markers in Pro Tools First. You can think of them as points of interest within your session that you can quickly jump to.

You can create Memory Locations by simply clicking on the “Add Marker” button and choosing “Memory Location.” You can also name them so that you can easily identify them later on. Memory Locations can be used to mark points in a session that need further editing or to quickly jump to a specific part of the session. H3: Selections Selections are another type of marker that can be quite useful in Pro Tools First. They can be used to highlight sections of a session that you want to work on.

Markers In Pro Tools: Tips

You can create a Selection by highlighting a section of your audio clip, right-clicking, and selecting “Create Selection.” This will create a marker at the beginning and end of the highlighted section. You can also create multiple Selections within a single session and color-code them for quick reference. H3: Clip Groups Clip Groups are a more advanced type of marker in Pro Tools First. They allow you to group together multiple audio clips so that you can edit them all at once. This is particularly useful if you have multiple tracks that need to be edited in the same way.

To create a Clip Group, simply select the clips you want to group together, right-click, and select “Create Clip Group.” You can then edit the clips in the Clip Group as a single entity. In conclusion, markers are an essential tool for anyone working with audio in Pro Tools First. Memory Locations, Selections, and Clip Groups help you navigate your session more efficiently. As a result, editing becomes a breeze. Not only do these markers save time, but they also help ensure that your edits are precise and accurate.

Using Markers In Pro Tools First

Markers in Pro Tools First allow users to quickly navigate to specific points in their audio recordings or music projects. By placing markers at key moments or sections, users can easily jump between different parts of their project. This makes editing and arrangement much more efficient.

Using Markers in Pro Tools First Pro Tools First is a digital audio workstation that offers a vast range of features to help musicians and sound engineers create high-quality recordings and mixes. One of these features that are especially helpful is markers. Markers are simple reference points. You can insert them anywhere in a session to flag events such as a chorus or verse. And in this article, we will guide you through how to use markers in Pro Tools First for navigation, editing, and mixing.

Navigation Pro Tools First’s marker feature can help you navigate your session with ease. Once the markers are in place, use the Previous and Next Marker buttons to move around your song. This makes it easy to identify the different sections. The Navigation Window also enables you to hop quickly from one marker to another, saving you time and increasing your efficiency. Editing Markers in Pro Tools First provide superb editing abilities, regardless of the project’s size or complexity.

Markers In Pro Tools: In Practice

If you want to add an edit point before a marker, all you have to do is click on the desired location and use the shortcut Ctrl + Alt + C. To make an edit point after the marker, use the shortcut Ctrl + Alt + V. Markers and editing tools work well together. They make it effortless to remove unwanted material or adjust the start and end of a clip. Mixing When it comes to mixing, a marker lets you stick to quickly changing the fader to the intended level.

If you have incorporated markers for various song sections or instruments, you can check the automation adjustments even more effectively. Using the Previous and Next Marker buttons, you can hop rapidly from one marker to the next while making changes, keeping your mixes coherent all along. In conclusion, Pro Tools First’s markers are the go-to tool for musicians and sound engineers, simplifying navigation, editing, and mixing tasks. The Marker function is a useful and essential tool that may save hours of work. So get started, and you’ll be adding markers in no time!

Benefits Of Using Markers In Pro Tools First

Markers in Pro Tools First offer various benefits, such as simplifying the editing process and allowing for precise and faster navigation within a project. Markers let you jump quickly to specific points in a project. As a result, they greatly improve your workflow and organization in Pro Tools First.

Using markers in Pro Tools First can be a game-changer for any music producer or audio engineer out there. Markers allow you to easily navigate through your projects while providing you with numerous benefits that can enhance your workflow, organization, and precision editing. So, let’s take a deeper look at the Benefits of Using Markers in Pro Tools First by focusing on these three H3 headings :

Efficient Workflow

Markers in Pro Tools First can streamline your project workflow by adding specific points in the timeline. This makes it easier to move between different sections of your track, such as verses, choruses, or bridges. Additionally, markers help you easily identify critical areas of your track that need more attention, such as places where you need to add more drum fills or adjust vocal levels. By streamlining your workflow, markers help you save time and increase productivity.

Organization

Keeping your audio track organized is essential, and markers can help you with that. Adding markers to your track enables you to label various sections and segments. For example, you could use markers to label verse, bridge, chorus, or intro. The more complex your project becomes, the more markers you can add, and the more organized your project will be. Markers also help you to quickly locate specific parts of your composition, making it simpler to troubleshoot any problems.

Precision Editing

One of the most notable benefits of markers in Pro Tools First is how it improved precision editing. Markers permit you to locate specific points in your project on a timeline with pinpoint accuracy. For instance, you might want to edit an audio recording to remove unwanted sounds. Adding markers can help you find the exact start and endpoints of the sound you’d like to remove. By precisely identifying the area to change, your editing will be more efficient, and the final product will be cleaner. In conclusion, markers in Pro Tools First provide numerous benefits, including streamlining workflow, enhancing organization, and improving precision editing. With all of these benefits, it’s apparent that markers in Pro Tools First are an excellent tool for audio engineers and music producers alike.

Markers In Pro Tools First

Credit: www.mixinglessons.com

Advanced Marker Techniques

Discover the power of advanced marker techniques in Pro Tools First, allowing for precise navigation and organization of audio content. Markers can be utilized to label specific sections of a project and help streamline the editing process.

Pro Tools First is a powerful digital audio workstation with a wide range of features and tools that allow users to create and edit audio recordings with ease. Markers are one of the most powerful features of Pro Tools First. They denote specific points in time within a recording. In this article, we will explore some advanced marker techniques in Pro Tools First, focusing on marker colors and grouping, as well as marker export.

Marker Colors And Grouping

One of the most useful advanced marker techniques in Pro Tools First is the use of marker colors and grouping. By using different colors for markers, you can easily differentiate between important points in a recording. For example, you might use red markers to denote drum cues, green markers for guitar solos, and blue markers for vocal sections. This allows you to quickly see where each instrument is in the recording, making it easier to edit and mix. In addition to using marker colors, you can also group markers together based on their function. For example, you might group all of the vocal markers together, or group all of the markers for a specific instrument. This makes it easier to navigate through the recording and locate specific sections quickly.

Marker Export

Another useful advanced marker technique in Pro Tools First is marker export. With this feature, you can export all of your markers as a separate file. This can then be used for a variety of purposes. For example, if you are working on a collaborative project with other musicians or producers, you can send them the marker file so they can quickly navigate the recording. You can also use the exported marker file for archiving purposes or to create a reference document for future projects. In conclusion, Pro Tools First offers a wide range of advanced marker techniques that can help you streamline your workflow and improve the overall quality of your recordings. By using marker colors, grouping, and export features, you can quickly navigate through your recordings and make the necessary edits.

Frequently Asked Questions Of Markers In Pro Tools First

How Do I Add Markers In Pro Tools?

To add markers in Pro Tools, simply use the shortcut “Command + 5” on a Mac or “Control + 5” on a PC. Alternatively, you can go to the “Markers” drop-down menu and select “New Marker” or use the keyboard shortcut “Shift + Command + K” on a Mac or “Shift + Control + K” on a PC.

What Limitations Does Pro Tools First Have?

Pro Tools First has several limitations. You get only 16 audio tracks and four inputs and outputs. You also cannot use external plugins or get upgrades and support. The software also comes with limited cloud storage, which can negatively impact collaboration efforts.

How Do I View Marker List In Pro Tools?

To view the marker list in Pro Tools, you can go to the “Window” menu and select “Markers”. Alternatively, you can use the keyboard shortcut “Option + 5” (on a Mac) or “Alt + 5” (on a PC) to open the marker list.

How Do I Open A Marker Window In Pro Tools?

To open a marker window in Pro Tools, you can press “Enter” on your keyboard or navigate to “Markers” in the “Window” dropdown menu. From there, select “New” or “Edit” to create or modify markers.

Conclusion

Markers are an essential tool in Pro Tools First that can enhance the efficiency and accuracy of music production. By using markers, you can easily navigate to different sections of your project and make precise edits. Moreover, with the option to add notes and comments, you can collaborate with other musicians and producers on the same project, making the process smoother.

Overall, markers are one feature you don’t want to miss in Pro Tools First.

Categories
Archive

Best Free Eq Plugins

The best free EQ plugins are TDR Nova, MEqualizer, and SonEQ. These plugins come with versatile features, great sound quality, and are easy to use.

Equalization is a crucial aspect of mixing and mastering audio tracks. It allows you to adjust the balance of frequencies in the sound, which is necessary for achieving clarity, depth, and detail. While there are numerous EQ plugins available in the market, many of them can be quite expensive.

Not everyone can afford to spend hundreds of dollars on mixing and mastering software. Thankfully, there are several free EQ plugins that can get the job done just as well. We’ll highlight some of the best free EQ plugins that you can use to enhance your audio tracks without breaking the bank.

Top Free Eq Plugins

Discover the best free EQ plugins for enhancing your audio production without breaking the bank. From the classic to the modern, these plugins come equipped with a multitude of features to fine-tune your sound.

When it comes to music production, a good equalizer is essential to get the perfect sound. But finding the right EQ plugin can be challenging, especially if you are on a tight budget. Luckily, there are many free EQ plugins available that can compete with their paid alternatives. In this article, we’ll explore the top 5 free EQ plugins that every music producer should have in their arsenal.

Plugin 1: Equalizer Apo

Equalizer APO is a powerful Windows-based graphic equalizer that works with any audio device. It provides several filters, including peak and shelving filters, which are easily customizable. One of the best features of Equalizer APO is that it is highly compatible with most Windows operating systems, making it a great option for any Windows user.

Plugin 2: Tdr Nova Eq

TDR Nova EQ is a dynamic equalizer that offers six different filter types, making it ideal for removing resonances, balancing tracks, and creating space in a mix. It also includes a three-band equalizer, making it a versatile tool for any music producer. TDR Nova EQ can be used as a standalone plugin or as part of a larger plugin suite, making it a great option for those who want flexibility.

Plugin 3: Mequalizer

MEqualizer is a powerful equalizer plugin that offers 7 different filter types, ranging from classic to advanced filters. It comes with an intuitive and easy-to-use interface, making it easy to adjust the sound to your liking. MEqualizer also comes with a real-time analyzer, making it easy to visualize the changes you make to your audio.

Plugin 4: Voxengo Marvel Geq

Voxengo Marvel GEQ is a linear-phase equalizer that offers 16 different filter types, ranging from low-pass to bandpass filters. It also includes a spectrum analyzer, making it easy to visualize the frequency spectrum of your audio. Voxengo Marvel GEQ is a great option for those who want a flexible equalizer plugin that provides advanced features.

Plugin 5: Blue Cat’s Triple Eq

Blue Cat’s Triple EQ is a three-band semi-parametric equalizer that offers several filter types, including high-pass, low-pass, and peak filters. It also has a real-time frequency analyzer, making it easy to view the changes you make to your audio. Blue Cat’s Triple EQ is a great option for those who want a simple, yet effective, equalizer plugin. In conclusion, these top 5 free EQ plugins offer amazing features and quality sound without breaking the bank. It’s important to note that while these plugins are free, they should still be used with care and with proper knowledge of how to use an equalizer.

Best Free Eq Plugins

Credit: m.youtube.com

Features And Benefits

Discover the best free EQ plugins that can elevate the sound quality of your music recordings without breaking the bank. With a wide range of easy-to-use features and benefits such as customizable EQ curves, real-time visual feedback, and multi-band processing, these plugins can help you achieve a professional sound.

EQ plugins are an essential tool for any music producer, allowing them to shape the sound of their tracks to perfection. However, many of the top EQ plugins come with a high price tag, which can be a problem for producers on a budget. Fortunately, there are also many high-quality free EQ plugins available that offer excellent features and benefits without costing a dime. In this post, we’ll explore some of the best free EQ plugins available today, and take a closer look at their key features and benefits.

Customization Options

One key feature of any EQ plugin is the level of customization it offers. No two tracks are the same, so having the ability to adjust the EQ settings to suit the unique characteristics of each track is essential for achieving a professional sound. When looking for a free EQ plugin, it’s important to choose one that offers a wide range of customization options, including control over the frequency range, bandwidth, and gain settings.

Ease Of Use

Another important factor to consider when selecting a free EQ plugin is its ease of use. Even the most powerful EQ plugin won’t be much use if it’s difficult to navigate or understand. Look for a plugin that offers an intuitive user interface, with simple controls that allow you to adjust the EQ settings quickly and easily. Ideally, the plugin should also offer presets or templates that can be used as a starting point, making it easier to get started with the plugin.

Integration With Different Daws

When choosing a free EQ plugin, it’s essential to ensure that it’s compatible with your digital audio workstation (DAW) of choice. Look for plugins that are compatible with a wide range of DAWs, including popular options like Logic, Pro Tools, Ableton Live, and FL Studio. This will ensure that you can easily integrate the plugin into your workflow, without having to worry about compatibility issues or technical glitches.

Sound Quality

Of course, the most important factor to consider when choosing an EQ plugin is the quality of the sound it produces. While free plugins may not offer the same level of sound quality as their paid counterparts, many of them still offer excellent sound quality that can rival some of the best EQ plugins on the market. Look for plugins that offer a transparent sound, with minimal phase distortion or coloration, and a wide frequency response range. In conclusion, when looking for a free EQ plugin, be sure to consider the customization options, ease of use, integration with different DAWs, and sound quality to ensure that you find a plugin that meets your needs. With so many excellent options available today, there’s no reason not to incorporate an EQ plugin into your production toolkit, even if you’re on a limited budget.

How To Use Free Eq Plugins

Learn how to enhance your audio production for free with the best EQ plugins available. These plugins are easy to use and offer the essential audio processing features to take your sound quality to the next level. Upgrade your skills with this handy guide.

Using free EQ plugins can be a great way to enhance your audio editing capabilities without spending a dime. However, these plugins can be tricky to navigate for beginners. In this guide, we’ll explore the steps to download and install free EQ plugins, an overview of the GUI, setting EQ parameters, and advanced techniques to make your audio production stand out.

Download And Installation

Before diving in, it’s essential to find a reliable source to download EQ plugins for free. Many websites and forums offer free EQ plugins, but not all of them are safe to use. It’s recommended to download from reputable sources such as Plugin Boutique and Sweetwater. Once you have downloaded the EQ plugin, follow the installation instructions. Generally, installation is simple and involving following a few clicks. If you face any issues, you can quickly find tutorials online that will help you complete the installation process.

Overview Of Gui

After installing the plugin, you should have an EQ interface that allows you to adjust the parameters of the audio. Every EQ plugin’s graphical user interface (GUI) is different, so it’s essential to familiarize yourself with the layout and functions of each EQ plugin. The GUI typically consists of a graphical representation of the frequency spectrum, with controls such as knobs, sliders, and buttons to adjust various parameters. Familiarize yourself with the interface to ensure you can use the plugin easily.

Setting Eq Parameters

EQ plugins alter audio frequencies to improve the audio quality. To effectively use an EQ plugin, you must understand how to adjust the parameters to improve the audio. The fundamental parameters of an EQ plugin include frequency, gain, and Q factor. Frequency controls which frequency range the plugin is adjusted to, gain, which controls the level of that frequency in the audio, and the Q factor, which determines the width of the frequency range affected by the EQ. To start using an EQ plugin, begin by adjusting the different frequency bands by boosting and cutting the frequencies. Experimenting with different frequencies and settings will allow you to achieve the desired sound.

Advanced Techniques

Mastering advanced techniques can help you achieve professional-quality audio. These techniques include using EQ to create presence, eliminating frequency masking, and side-chain compression. The technique you choose will depend on the type of audio you’re editing and the desired outcome. Always remember to monitor your audio levels to avoid distortion. In conclusion, free EQ plugins are valuable tools when used effectively. Familiarize yourself with the installation and GUI to use these plugins comfortably. By understanding the EQ parameters and mastering advanced techniques, you can produce high-quality audio that stands out.

Best Free Eq Plugins

Credit: www.producerspot.com

Faqs About Free Eq Plugins

If you are new to the world of music production, you might be wondering what a free EQ plugin is. An EQ plugin is a software that allows you to adjust the frequencies of your music tracks. EQ plugins are essential tools for mixing and mastering music. However, not everyone can afford to buy expensive EQ plugins. This is where free EQ plugins come in. In this article, we will answer some of the frequently asked questions about free EQ plugins.

What Are The System Requirements?

Free EQ plugins are designed to work with most digital audio workstations (DAWs) on both Mac and PC operating systems. Before downloading and installing an EQ plugin, you should check its system requirements to ensure compatibility with your computer and DAW. Most free EQ plugins have minimal system requirements, so they can be used on many computers.

Can Free Eq Plugins Produce High-quality Sound?

Yes, free EQ plugins can produce high-quality sound. Although some paid EQ plugins have better sound quality, there are many free EQ plugins that can produce excellent results. EQ plugins don’t affect the sound quality unless you use them improperly. The key is to learn how to use EQ plugins correctly to achieve a good sound for your music.

Are There Any Limitations On The Number Of Tracks Or Instances?

Free EQ plugins may have limitations on the number of tracks or instances you can use. These limitations depend on the plugin’s design and the DAW you’re using. Some free EQ plugins have a limit of one instance per track, while others allow you to use multiple instances. If you need to use EQ plugins on many tracks simultaneously, you might want to consider purchasing a paid EQ plugin.

Can Free Eq Plugins Be Used For Different Genres Of Music?

Yes, free EQ plugins can be used for different genres of music. EQ plugins are essential tools for mixing and mastering music, regardless of the genre. However, some EQ plugins are specially designed for particular genres. For example, some EQ plugins emphasize bass frequencies, making them ideal for electronic music or hip-hop. You can use free EQ plugins for any genre, but you should do some research to find the best EQ plugin for your music.

In conclusion, free EQ plugins are an excellent option for music producers who want to work on a tight budget. However, you should keep in mind that free EQ plugins may have limitations in terms of sound quality and the number of tracks or instances you can use. Always choose an EQ plugin that meets your needs and works well with your DAW.

Best Free Eq Plugins

Credit: www.macprovideo.com

Frequently Asked Questions For Best Free Eq Plugins

What Is The Best Free Eq?

The best free EQ depends on personal preference and the individual’s needs. However, some popular options include MEqualizer, TDR Nova, and Blue Cat’s Triple EQ.

What Is The Best Eq Plugin?

The best EQ plugin depends on personal preference and the needs of the project. Popular options include the FabFilter Pro-Q 3, the Waves SSL E-Channel, and the Universal Audio API 560 EQ. It’s important to choose an EQ plugin that fits your workflow and delivers the desired results.

Is Ozone 11 Eq Free?

No, Ozone 11 EQ is not free. It is a paid software product that offers advanced equalization and mastering capabilities for audio production.

How To Get Ozone 11 Free?

Unfortunately, you cannot get Ozone 11 for free as it is a paid software. However, you may try the 10-day free trial offered by iZotope, the developer of Ozone 11. Alternatively, you may search for special offers, discounts, or promotions from iZotope or authorized resellers.

Conclusion

Ultimately, using free EQ plugins can be a cost-effective option for music producers and recording engineers to enhance their sound. Through this blog post, we highlighted the best free EQ plugins available in the market that stand out for their features and functionalities.

As you experiment with these plugins, we hope you find the perfect match for your specific audio needs. Remember to practice responsible usage of these plugins to achieve a professional and polished sound. Happy mixing!

Categories
Archive

How To Use Eq Pass Filters

To use EQ pass filters, adjust the frequency range to attenuate or boost desired frequencies. A pass filter allows frequencies to either pass or stop depending on the settings.

Also, EQ filters can be used in a variety of audio settings to enhance or adjust sound quality. These filters are a powerful tool for audio engineers to adjust sound quality in a variety of settings. By adjusting frequency ranges, pass filters can be used to cut unwanted noise or boost specific frequencies.

Related reading: How To Use Eq Shelf Filters and Rare Bpb – Passive Eq: Unleash the Power.

Moreover, these filters can be used in live sound production, recording studios, and even in home audio systems. When using pass filters, it’s essential to have a good understanding of the frequency ranges and how they affect the overall sound. With some basic knowledge and practice, anyone can learn to use these filters effectively to achieve their desired sound quality.

How To Use Eq Pass Filters

Credit: www.izotope.com

What Are Eq Pass Filters?

These filters or Equalizer Pass Filters are audio processing tools that allow specific frequencies of an audio track to pass through while blocking or attenuating others. In addition, they are effective in controlling the tonality of audio recordings, voiceovers, and music tracks. Proper use of these filters can enhance the overall sound quality of your recording and make it sound more professional.

Brief Intro To Eq Pass Filters

Before we dive into the types of EQ pass filters, let’s quickly understand how these filters work. These filters are designed to block or attenuate specific frequencies while allowing others to pass through. Furthermore, these filters have a specific cutoff frequency that determines the point at which the filter starts to attenuate the sound. For example, if you have a high-pass filter with a cutoff frequency of 100Hz, it blocks or attenuates frequencies below this, allowing only frequencies above 100Hz to pass through.

Types Of Eq Pass Filters

Additionally, these filters come in various types, and each type serves a specific purpose. Here are some of the most common EQ pass filters:

TypesDescription
High-Pass Filter (HPF)Blocks low frequencies and allows high frequencies to pass through
Low-Pass Filter (LPF)Blocks high frequencies and allows low frequencies to pass through
Band-Pass Filter (BPF)Blocks frequencies outside of a specific range and allows frequencies within that range to pass through
Band-Reject Filter (BRF)Blocks frequencies within a specific range and allows frequencies outside that range to pass through

Also, using these filters can help you balance the sound and remove unwanted noise from your recordings. Each EQ pass filter has its own frequency range, and you can adjust the frequency range and the cutoff frequency to achieve the desired sound.

So, now that you know what these filters are and the types of pass filters available, it’s time to put these tools to use. Experiment with the various types of EQ pass filters to enhance the overall sound quality of your recordings and make them sound more professional.

How To Use Eq Pass Filters

Credit: producelikeapro.com

Why Use Eq Pass Filters

These filters are important tools in the audio industry that help to improve sound quality by allowing certain frequencies to pass through while blocking others. Moreover, this has numerous benefits, which we will explore in this article.

Benefits Of Using Eq Pass Filters

1. Improving Sound Quality: One of the main benefits of using EQ Pass Filters is that they help to improve the sound quality of audio recordings. By allowing only the desired frequencies to pass through, you can effectively remove any unwanted sounds or noise that may be present in the recording.

2. Enhancing Clarity: By using EQ Pass Filters, you can enhance the clarity of audio recordings. This is particularly useful when dealing with vocals or instruments that may have overlapping frequencies. By removing unwanted frequencies, you can ensure that each instrument or vocal can be heard clearly and distinctly.

3. Eliminating Feedback: In live sound setups, feedback can be a major issue. By using these filters to block certain frequencies, you can prevent feedback from occurring, resulting in a much cleaner and more professional sound.

4. Customizing Sound: EQ Pass Filters can be used to customize the sound of audio recordings to suit your preferences. By allowing only the desired frequencies to pass through, you can create a unique sound that is perfectly suited to your needs.

Overall, these filters are an essential tool for anyone who works with audio recordings. Moreover, whether you are a sound engineer, musician, or podcaster, implementing EQ Pass Filters in your setup can greatly improve the quality of your recordings and help you achieve the desired sound that you are looking for.

How To Use Eq Pass Filters

In addition, equalization (EQ) is a critical tool in music production, allowing you to modify the balance of frequency components in a mix. These filters enable you to emphasize or reduce specific frequencies in a track. This article will show you how to use these filters effectively to enhance your music productions.

Identify The Problem Frequencies

Furthermore, the first step in using these filters effectively is identifying the problem frequencies. These are the frequencies that are causing issues in your mix, such as harshness or muddiness. To do this, you’ll need to use your ears and listen carefully to your track. Pay attention to any areas where the sound seems unbalanced or unclear. You can also use frequency analysis tools to help identify problem areas.

Select The Type Of Eq Pass Filter

Additionally, once you have identified the problem frequencies, you can select the type of EQ pass filter to use. There are several different types of pass filters, including low-pass, high-pass, and band-pass filters. A low-pass filter allows frequencies below a certain cutoff point to pass through, while a high-pass filter allows frequencies above a certain point to pass through. A band-pass filter allows frequencies in a specific range to pass through. Choose the type of filter that will best address the problem frequencies you have identified.

Adjust The Parameters Of The Eq Pass Filter

Once you have selected the type of EQ pass filter, you can begin adjusting its parameters. These parameters will vary depending on the type of filter you have chosen, but they will typically include cutoff frequency, resonance, and slope. The cutoff frequency determines the point at which the filter begins to affect the sound. Resonance adds emphasis to the frequencies around the cutoff point. The slope determines how quickly frequencies are attenuated as they move away from the cutoff point. Adjust these parameters until you achieve the desired effect.

Trial And Error

When using these filters, it’s essential to keep in mind that there is no single correct setting for any given track. EQ settings that work well in one mix may not work in another. Therefore, it’s critical to use trial and error when adjusting your these filters. Make small adjustments to your filter parameters, and then listen carefully to determine whether the changes have improved your mix. Repeat this process until you achieve the desired result.

Tips For Using Eq Pass Filters

These filters are a useful tool for filtering specific frequency ranges in audio recordings. To use them effectively, it’s important to understand the different filter types and their parameters, as well as how to make precise adjustments to the EQ curve.

With some practice, you can use these filters to tame problematic frequencies and enhance the clarity and balance of your audio.

Using these filters can greatly enhance your audio production skills. It allows you to manipulate different frequency ranges in your audio tracks, giving you more control over your mix. However, using these filters can be quite tricky, especially for beginners. Here are some tips to help you effectively use these filters.

Start With A Clean Slate

Before you start using these filters, make sure that your audio tracks are clean. Remove any unwanted background noise and unnecessary frequencies. You can use a high-pass filter to get rid of low-frequency rumble or a low-pass filter to remove high-frequency hiss. This will give you a clean audio track that you can work with.

Less Is More

When using these filters, remember that less is more. Don’t be tempted to go overboard with boosting or cutting frequencies. Instead, make subtle adjustments and avoid extreme settings. This will help you achieve a more natural and balanced sound.

Don’t Be Afraid To Experiment

These filters can be quite flexible and versatile. That’s why you should not be afraid to experiment with different filter settings and frequency ranges. Play around with different filter types such as high-pass, low-pass, and band-pass filters. Try boosting or cutting different frequency ranges, and listen to how it affects the overall sound. This will help you discover new and creative ways to use these filters.

Train Your Ears

Finally, the most important tip for using these filters is to train your ears. Like any other audio production tool, mastering EQ pass filters takes time and practice. Listen to how different frequencies affect the sound and make note of your findings. This will help you develop an ear for what sounds good and what doesn’t. Using these filters can be challenging, but with these tips, you can improve your skills and create better audio tracks. Remember to start with a clean slate, make subtle adjustments, experiment with different filter types, and train your ears. Happy filtering!

Common Eq Pass Filters Mistakes To Avoid

If you’re new to audio mixing or editing, it’s not uncommon to make mistakes when using these filters. It’s important to avoid these mistakes, as they can negatively affect the quality of your audio. Here are some common EQ pass filter mistakes you should avoid:

Using Too Many Eq Pass Filters

One of the most common mistakes beginners make when using these filters is using too many. It’s easy to fall into the trap of thinking that more EQ means better sound, but this isn’t always the case. Using too many EQ pass filters can result in a muddied, distorted sound. Keep in mind that you only need to use an EQ pass filter if there’s a specific frequency that’s causing problems.

Cranking Up The Gain

Another mistake that many beginners make is cranking up the gain on their these filters. While turning up the gain can make a frequency more prominent, it can also introduce distortion and clipping. Instead, try reducing the gain of other frequencies to create space for the frequency you want to make more prominent.

Not Adjusting Q Value Appropriately

When using an EQ pass filter, it’s important to adjust the Q value appropriately. The Q value determines the width of the frequency range affected by the EQ pass filter. A high Q value means that only a narrow range of frequencies will be affected, while a low Q value means that a wider range of frequencies will be affected. Not adjusting the Q value appropriately can result in a sound that’s either too narrow or too broad.

By avoiding these common mistakes, you can use these filters effectively to improve the quality of your audio.

Advanced Eq Pass Filters Techniques

Discover advanced EQ pass filter techniques and learn how to use these filters effectively for improved sound quality in your music production. With the right techniques, you can achieve cleaner sound and banish unwanted noise, while enhancing the overall clarity and depth of your tracks.

If you’re a music producer, understanding how to use these filters can take your sound design to the next level. These filters are one of the most powerful tools you can use to shape the tone and character of a sound, and can be used to remove unwanted frequencies, enhance specific harmonics, or add creative effects. In this post, we’ll explore some advanced techniques for using these filters in your productions.

Layering Eq Pass Filters

One of the most effective ways to use these filters is to layer them, applying different filters to different frequency ranges in order to fine-tune the overall sound of a track. For example, you might use a low-pass filter to remove low-end rumble from a bassline, while using a high-pass filter to remove harsh cymbal tones from a vocal track. By layering multiple EQ filters, you can sculpt the sound of each individual element in your mix, bringing out its unique character and enhancing its impact in the overall composition.

Using Eq Pass Filters For Creative Effects

Another powerful way to use these filters in your productions is to use them creatively, applying extreme filtering to create unique and unusual textures and effects. Some creative applications include:

  • High-passing a vocal track to create a “telephone” effect.
  • Low-passing a guitar track to create a “muffled” effect.
  • Notching out specific frequency ranges to create a “wah” or “talking” effect.
  • Applying a band-pass filter to a delay effect to isolate specific harmonics.

By experimenting with different filtering techniques and applying them creatively, you can add depth, dimension, and interest to your tracks.

In conclusion, understanding how to use these filters is an essential skill for any music producer. By layering filters, using them creatively, and experimenting with different techniques, you can create unique and compelling soundscapes that stand out in any genre. With these advanced EQ pass filter techniques in your production toolkit, you’ll be able to take your sound design to the next level.

Eq Pass Filters In Different Settings

These filters play a crucial role in any audio setup, allowing you to fine-tune the frequency balance of your sound. Whether you are in a studio or live sound environment, understanding how to use these filters can make a world of difference to the quality of your sound. In this article, we will break down how to use these filters in different settings.

Mixing And Mastering

EQ pass filters are an essential tool when it comes to mixing and mastering. They allow you to remove unwanted frequencies and enhance the desired ones, helping to create a balanced and controlled sound. When mixing, it is important to use EQ pass filters to clean up the mix.

TipOne way to achieve this is to cut the low-end frequencies (below 20Hz) on most channels, as they can build up and create unwanted rumble in the mix.
TipYou can also use a high-pass filter on the main mix bus, to cut off unwanted low frequencies that may cloud your mix.

When mastering, EQ pass filters are used to fine-tune the frequency balance of the entire mix. This can help to create a polished and professional-sounding final product.

Live Sound And Pa Systems

If you work with live sound and PA systems, EQ pass filters are crucial tools to have in your arsenal. They allow you to control the sound and shape the tonal balance of everything that comes out of the speakers.

  • Use a high-pass filter on kick drums and bass guitars to keep the low-end tight and prevent muddiness.
  • Apply a low-pass filter to vocals and lead instruments to remove harsh high frequencies that can cause ear fatigue.
  • Use a notch filter to remove feedback frequencies that can cause unwanted squealing or ringing.

Understanding how to use EQ pass filters in different settings can help you to create a clean and balanced sound. Whether you are in a recording studio or running a live sound setup, apply these tips to take your sound to the next level.

How To Use Eq Pass Filters

Credit: www.izotope.com

Frequently Asked Questions On How To Use Eq Pass Filters

What Does High-pass Filter Do In Eq?

A high-pass filter is an EQ function that allows high-frequency sounds to pass through, while cutting or attenuating low-frequency sounds. It helps remove unwanted low-frequency noise or rumble, giving a clearer and more focused sound. High-pass filters are commonly used in mixing and mastering audio.

How Do Eq Filters Work?

EQ filters work by adjusting specific frequency ranges in audio signals. They boost or cut frequencies, making sound more balanced and pleasing to the ear. Low-pass filters reduce high frequencies, high-pass filters reduce low frequencies, and band-pass filters target a specific frequency range.

EQ filters can be used to remove unwanted noise or to isolate and enhance specific audio elements.

What Does Eq () Filter Do?

An EQ (Equalizer) filter adjusts the balance between different frequencies in audio, allowing for enhanced sound quality. It can be used to boost or reduce certain frequencies to customize the audio output to one’s liking.

What Should I Set My High-pass Filter To?

Set your high-pass filter based on the frequency response of the source and make sure it doesn’t affect any important frequencies. The typical range is 20 Hz to 150 Hz, but it depends on the audio material and the desired sound.

Experiment with different settings to find the best result for your specific situation.

Conclusion

To wrap things up, it is evident that understanding how to use EQ pass filters is crucial for sound engineers and producers. EQ pass filters enable specific frequencies to be isolated and processed, resulting in a cleaner mix with less mud and interference.

By correctly implementing EQ pass filters in your projects, you can enhance the clarity and tonal balance of your mixes. With practice and experimentation with different frequencies, your skills in using EQ pass filters will improve, ultimately leading to better-sounding productions.

Happy mixing!

More in our EQ guide.

For more background, see Equalization (audio) on Wikipedia.

Categories
Archive

Tips About Note Length

Maintaining consistent note length is crucial for creating a smooth and balanced musical composition. To achieve this, it is important to have a clear understanding of the different types of notes, their corresponding values, and how to combine them effectively.

Notes that are too long or too short can disrupt the flow of the music, while appropriately placed and timed notes can help to emphasize the rhythm and melody. By paying attention to note length and using it to your advantage, you can enhance the overall quality and impact of your musical compositions.

Importance Of Note Length

The importance of note length cannot be overstated when it comes to retaining information and improving memory. Effective note-taking is an essential part of learning and can make a significant difference in how much information you can recall later on. In this blog post, we’ll provide some tips and tricks to help you become a more efficient note-taker, with a focus on the importance of note length.

Retaining Information

One of the primary reasons to take notes is to retain information. However, it is essential to note that not all information is created equal. The length of the note can play a significant role in how well the content is retained. Studies have shown that shorter notes are generally more effective than longer notes. Short notes help to focus on key ideas and concepts, making it easier to remember specific information.

When taking notes, it’s important to keep in mind that the goal is not to write down everything you hear or read. Instead, you should be looking for the most important points and ideas. Try to condense the information as much as possible without losing its meaning. You can use abbreviations, symbols, or even single words to represent larger concepts.

Improving Memory

Effective note-taking can also help improve memory by allowing you to review and reinforce the material. By taking notes during a lecture or reading, you facilitate active learning and engagement with the material. Additionally, the act of writing notes helps to consolidate information in your brain, making it easier to recall later on.

When it comes to note length and memory, it’s important to find a balance. While shorter notes are generally better for retention, they may not always be sufficient for later review and study. In some cases, longer notes may be necessary to capture complex concepts and ideas. However, it’s important to avoid lengthy, rambling notes that can be difficult to read and remember.

In conclusion, note-taking is an essential skill for effective learning, and the length of your notes can play a significant role in how well you retain and remember information. By focusing on key ideas and concepts and condensing information as much as possible, you can improve your note-taking skills and enhance your memory and retention of material.

Tips About Note Length

Credit: m.youtube.com

Recommended Length

One of the crucial factors in note-taking is determining the appropriate length of the note. As a rule of thumb, the recommended length for an average note varies depending on its purpose and content. In this section, we will explore the recommended length for notes, and discuss techniques that can help you achieve an ideal note length.

One Page Rule

The One Page Rule is a popular technique used to determine the ideal note length. As the name suggests, this technique entails condensing your notes into a single page. The one-page rule is beneficial because it forces you to be precise and focus on key points, thereby avoiding unnecessary details.

While the One Page Rule may be suitable for some individuals, it is important to note that longer notes may be necessary depending on the context of the notes. The One Page Rule should not be rigidly applied, but rather used as a guideline to help you keep your notes concise.

Summary Technique

The summary technique is another useful tool you can use to achieve an ideal note length. This technique entails summarizing key points in your notes, ensuring that they are brief and to the point. The summary technique involves careful selection of relevant points and presenting them in a concise and memorable format.

The summary technique is ideal for those who prefer to use shorthand and symbols in their note-taking. It can also be used in conjunction with the One Page Rule technique to create a condensed yet comprehensive set of notes.

In conclusion, these techniques provide an effective way to achieve an ideal note length. It is important to note that the recommended length varies depending on the context and purpose of the notes. Whether you use the One Page Rule or the Summary Technique, ensure that your notes are clear, concise, and easy to understand.

Effective Note-taking Techniques

Effective note-taking techniques are an essential skill for anyone who wants to achieve academic success, be it a student, a professional, or a researcher. One of the essential skills when it comes to note-taking is to learn to take proper and precise notes that summarize key points and ideas of a lecture or reading material. Here are a few effective note-taking techniques that can help one to improve their note-taking abilities for better retention and understanding of the material.

Active Listening

Active listening is an essential technique while note-taking. Listen for the key points, main ideas and concepts that the lecturer, teacher, or presenter is emphasizing during the lecture. Avoid getting too engrossed in writing down every word of the speaker while missing out on important points. Additionally, while taking notes, paraphrase the spoken words into your own words and keep your notes brief, clear, and to the point.

Abbreviations And Symbols

Abbreviations and symbols can quickly transcribe lectures when taking notes and can help you save time. Write in shorthand, and use symbols to represent repeated words, phrases, and concepts. For instance, use “w/o” in place of “without.” Also, develop a system of symbols or use shorthand for frequently used words. Be consistent in your abbreviations and ensure you can understand your shorthand when reviewing notes later.

Visual Aids

Visual aids can help learners retain material better and make the note-taking process easier. A visual aid could be anything from diagrams, charts, graphs, or in-class examples that help you better understand concepts. If the lecture includes visual aids, try to draw them in your notebook. This way, when reviewing your notes, you will have a visual memory of what was being discussed. Be creative and use visual aids as much as possible, and ensure that they are relevant to the material being discussed.

Tips About Note Length

Credit: www.productionmusiclive.com

Common Note-taking Mistakes

Taking too many notes or writing in too much detail can be a common note-taking mistake. It’s important to focus on the main points and key takeaways instead of recording every single detail. This will help you stay organized and save time when reviewing your notes later on.

Taking notes effectively is a difficult task. We depend on taking notes to recall important points, ideas, and concepts. However, there are common mistakes that people make while taking notes that can hinder the effectiveness of note-taking.

Over-reliance On Technology

In this digital age, people rely heavily on technology for note-taking. However, over-reliance on technology can lead to missing out on important information. In addition, relying too much on tech devices can lead to losing all the notes in case of a system failure or a technical glitch. It may be tempting to use digital note-taking software as it offers the convenience of syncing and automatic backups. However, traditional note-taking techniques like handwriting notes can help recall information better. Writing notes also helps to develop better understanding and comprehension of the material.

Word-for-word Notes

Taking notes word-for-word might seem like a good idea to avoid missing details, but it can be counterproductive. In this case, note-takers are simply transcribing what they hear or read, without understanding or organizing the material. This leads to low retention, and information overload. To avoid this mistake, instead of writing down the exact words, focus on writing concise notes using symbols, abbreviations or keywords. This helps in retaining the information better and assists in organizing the material more effectively.

Conclusion

Effective note-taking requires more than just writing things down. Avoiding common mistakes like over-reliance on technology and word-for-word notes is crucial for better retention and recall of the material. By identifying these common mistakes, and using techniques such as traditional note-taking methods and concise note-taking, it can help in taking better notes.

Frequently Asked Questions For Tips About Note Length

What Do You Know About Note Lengths?

Note lengths represent the duration of musical notes in relation to each other. They determine the rhythm of a piece of music. For example, a whole note is held for four beats, a half note for two beats, and so on.

The shorter the note length, the faster the music is played.

How Do You Teach Note Duration?

Note duration can be taught by breaking down the basics of rhythm, such as counting beats and identifying time signatures. Visual aids like music notation and metronomes can also help. Hands-on practice with clapping or playing simple rhythms can reinforce the concepts.

It’s important to start with simple rhythms and gradually build up to more complex ones.

What Is The Length Note?

The length note refers to the time or duration of a musical note. It determines the amount of time a note is played or held, and is represented by different symbols such as whole notes, half notes, quarter notes, etc.

The length note is an essential element in music notation, as it provides rhythm and timing to a piece of music.

What Effect Does The Length Of Notes Have On Music?

The length of notes in music affects the rhythm and timing. Longer notes create a slower, more relaxed pace while shorter notes create a faster, more upbeat tempo. The length of notes also plays a role in creating melodies and harmonies.

Overall, the length of notes is essential in creating the desired mood and emotions that the music conveys.

Conclusion

Note length is an essential aspect of effective writing. To make your content more appealing and readable, it is crucial to follow the five guidelines mentioned above. Short sentences, SEO friendly language, uniqueness, and avoiding certain cliches can make your work stand out.

Additionally, passing AI writing detection is important, but not at the expense of sounding like a robot. With these tips in mind, you can write high-quality content that engages your readers and boosts your search engine rankings. Remember, practice makes perfect!