Categories
Archive

Mixing In Mono Why Why Not

Mixing in mono is a common technique in music production that involves mixing audio signals to a mono output. This technique is used to make sure the mix sounds good on all devices, including mono systems.

Mixing in mono is a simple but effective technique used by music producers to achieve a balanced mix of audio signals. By summing all the tracks to mono, a producer can identify problems with the mix and fix them before panning the tracks.

This ensures that the mix sounds good on all devices, especially on mono systems. We’ll explore the concept of mixing in mono and why it is important. We’ll also discuss how to use the technique in music production and how it can benefit your work as a mixing engineer.

What Is Mixing In Mono?

Mixing in mono is a technique used in music production where all audio signals are mixed down to mono instead of stereo. This technique can be useful for ensuring that a mix sounds good on all types of speakers, as well as making it more cohesive and easier to balance.

Mixing in mono is a technique where you mix your audio in a single channel, instead of using a stereo or multichannel setup. It’s a useful technique for checking the mix and ensuring that all the elements work well together when combined. The technique has been around for years and is still used today by many professionals. In this blog post, we’ll explore the basic concept of mixing in mono and how it differs from stereo mixing.

The Basic Concept Of Mixing In Mono

Mixing in mono involves combining all the audio signals into a single channel. This means that you hear everything through one speaker or one earbud. The idea behind this technique is to ensure that all the elements of your mix work well together when combined. By mixing in mono, you can identify any phase cancellation issues and ensure that your mix will sound good on any system.

How It Differs From Stereo Mixing

In stereo mixing, the audio signals are split into two channels, the left and the right. This allows the listener to hear different parts of the mix in each ear. Mixing in stereo can create a more immersive experience, but it can be more difficult to ensure that all the elements of the mix work well together. With mixing in mono, you can focus on the balance and levels of each element without the distraction of panning and stereo effects.

Conclusion

Mixing in mono is a useful technique that can help you ensure that your mix will sound good on any system. It allows you to focus on the balance and levels of each element and identify any phase cancellation issues. While it may not be suitable for all genres or styles, it’s a technique worth trying out.

Pros Of Mixing In Mono

Mixing in mono can be beneficial when it comes to ensuring that the various elements in a mix are balanced in terms of volume. This approach can also help avoid phase issues and masking, resulting in a clearer and more defined sound.

Mixing in mono is a technique that has been around for years, but it has become increasingly popular in recent times. The technique involves mixing a track in mono, meaning that all sounds and frequencies are treated equally.

Improving Mix Translation

One of the significant advantages of mixing in mono is improved mix translation. When a mix is done in mono, it eliminates the possibility of any phasing issues that may occur from panning sounds. This means that when listeners listen to the track on different devices or in different environments, the mix will sound more consistent. By doing so, the mix will sound the same across different platforms, which is essential when releasing music.

Better Balancing Of Frequencies

The next advantage of mixing in mono is better balancing of frequencies. When mixing in mono, it is easier to identify conflicting frequencies and to balance them with other sounds. This is because, in a mono mix, you can easily distinguish which frequencies are clashing and reduce the volume accordingly. This also means that it can make mastering more comfortable as the frequencies have already been balanced.

Simplified Workflow

Another advantage of mixing in mono is simplified workflow. This is because, in a mono mix, you can eliminate any unnecessary effects, EQs, or panning. This reduced number of tools means that you can focus on the essential elements of the track, such as the arrangement, levels, and frequency balance. Additionally, you can work quicker and with greater accuracy, which can help you avoid mixing errors and save time. Mixing in mono has many advantages when compared to a stereo mix. It provides better translation, better balancing of frequencies, and a simplified workflow that streamlines the mixing process. It is an excellent technique that every producer and audio engineer should learn and implement.

Cons Of Mixing In Mono

Mixing in mono can have some drawbacks, such as a loss of stereo depth and a lack of clarity in the mix. While it can be a useful tool for identifying imbalances in the mix, it should be used in conjunction with other techniques rather than as the sole method of mixing.

Mixing in Mono entails mixing a sound recording with precise equalization, levels, and balance, to sound good when played from monaural speaker systems, such as typewriters or telephones. While Mixing in Mono can assist you in identifying flaws in your music, strengthening the mix, and making critical adjustments, it isn’t flawless. Here are the cons of mixing in mono:

Less Apparent Stereo Width

When you mix in mono, the stereo width becomes indistinct or muddled. The stereo mix is a crucial aspect of music production that complements the feeling of space in the image sound. The blending of components that are combined to work together creates a sense of space in a stereo picture. The absence of stereo width in your track weakens its overall music production quality.

Difficulty In Implementing Stereo Effects

Mixing in mono presents a challenge in implementing stereo effects, which are critical elements in music production. Stereo effects include spatial movement, such as panning effects, and sonic enhancements like EQing and filtering. Mixing in mono hamstrings the effectiveness of stereo effects, which can compromise the quality of your overall mix. To conclude, Mixing in Mono can be useful for sound engineers, music producers, and home studio enthusiasts. However, it’s essential to understand the cons of Mixing in Mono, such as less apparent stereo width and difficulty in implementing stereo effects. Therefore, it’s crucial to weigh the pros and cons and decide if mixing in mono is suitable for your music production needs.

Mixing In Mono Why Why Not

Credit: www.audio-issues.com

When Should You Mix In Mono?

Mixing in Mono is a technique used by audio engineers to ensure the balance of all elements of a mix, resulting in a more cohesive sound. It is often used during the initial stages of mixing to help identify frequency issues, phase problems, and stereo imaging.

Mixing in mono refers to mixing a song while only listening to a single sound source. This technique is useful for music creators because it helps them detect phase cancellation and balance the frequencies.

When Working With Mono Playback Systems

If your audience is mainly going to hear your music through a mono system, you should mix in mono. Mono systems are still prevalent in many areas, such as old cars, small speakers or radio stations, so it’s essential to make sure that your music sounds good regardless of the playback system.

When Focusing On Balancing The Frequency Spectrum

Balancing the frequency spectrum means creating a mix that has each instrument or element sound as clear as possible. By mixing in mono, it’s easy to pinpoint which sounds are clashing and adjust them accordingly. This technique ensures that the mix sounds good in both mono and stereo. Overall, mixing in mono can be beneficial to your creation process, and it’s essential to know when to incorporate this technique. Listening to mono playback systems and balancing the frequency spectrum are two great instances when mixing in mono is advantageous. By utilizing this technique, you will create well-balanced music that sounds good in any playback system.

When Not To Mix In Mono?

Mixing in mono can be a helpful technique to maintain the balance of your mix on various mono playback systems, but it may not always be necessary or appropriate for every mix. Factors such as the genre, instrumentation, and client preferences should be considered when deciding whether or not to mix in mono.

Mono mixing has its advantages, but it’s not always the best choice. In some cases, mixing in mono can negatively impact the overall quality of the audio. Here are some situations when mono mixing may not be the right choice:

When Stereo Width Is A Key Element Of The Mix

Stereo width is an essential element in some types of music, such as electronic, pop, and rock. If you’re working on a project that requires a wide stereo field, mixing in mono may not be the way to go. Panning sounds left and right creates a sense of dimension and space that’s lost in mono. When you mix in mono, you’re forced to place every sound in the same space, which can lead to a “wall of sound” effect that’s not desirable for all types of music. If stereo width is an important element of your mix, you may want to consider mixing in stereo instead.

When Working With Stereo Playback Systems

While mixing in mono can help you identify and correct phase issues, it’s important to keep in mind that most playback systems today are stereo. If you mix in mono, you may miss certain nuances and subtleties that are only present in stereo. Mixing in stereo allows you to hear the full range of frequencies and provides a more accurate representation of how your audio will sound on various playback systems. In conclusion, while mixing in mono has its advantages, it’s not always the best choice. When stereo width is a key element of the mix or when working with stereo playback systems, mixing in mono may not be the way to go. It’s important to choose the mixing technique that best suits the needs of your project and ensures the highest quality audio possible.

Mixing In Mono Why Why Not

Credit: producelikeapro.com

How To Mix In Mono

Mixing in mono can be a useful tool in achieving a balanced mix. It allows you to hear individual elements more clearly and helps avoid frequency clashes that can occur in stereo. However, it is not necessary to mix exclusively in mono and should be used as a complementary technique to stereo mixing.

Mixing in mono refers to the process of collapsing the stereo signal of a track and mixing it as one mono signal. This technique was popularized in the early days of audio recording when most listeners only had mono sound systems. Nowadays, with the rise of stereo and surround sound systems, mixing in mono may seem counterintuitive. However, it can still be a beneficial technique in modern music production.

Setting Up Your Daw For Mono Mixing

Before you start mixing in mono, you need to ensure that your DAW is set up correctly. The first step is to find the mono button in your DAW and activate it. Enabling mono will allow you to hear the audio as a single channel. This button is usually located next to the pan control. Once you have activated mono, you can now start mixing your track.

Balancing Levels And Panning In Mono

The next step is to balance the levels of your tracks. This is particularly important when mixing in mono because there are no stereo cues to give you an idea of the levels. You can use a meter plugin to help you adjust the levels of your track. Make sure that each track is balanced in the mix and that there are no prominent frequencies that clash with each other. After balancing the levels, you can proceed to adjust the panning. In mono mixing, you don’t have stereo image to work with so you should focus on panning for clarity rather than stereo width.

Using Stereo Effects Sparingly

When mixing in mono, you need to be careful with your use of stereo effects. Effects like reverb, delay, and chorus can create a wide stereo effect but they can also cause problems when mixed in mono. They can create phasing issues and ruin the overall mix. The trick is to use stereo effects sparingly and ensure that all your effects are compatible with mono mixing. It is always best to check your mix in both mono and stereo to ensure that it is balanced and sounds great in both sound systems.

Famous Mixing In Mono Techniques

When it comes to mixing music, there are several techniques that can be used to achieve the desired sound. One such technique is mixing in mono. Mixing in mono involves combining all the tracks of a song into a single, monophonic signal.

Phil Spector’s ‘wall Of Sound’

One famous example of mixing in mono is Phil Spector’s “Wall of Sound” technique. Spector was known for his use of dense arrangements featuring multiple instruments, vocals, and percussion. By mixing in mono, he was able to create a cohesive sound that was both powerful and balanced.

The Beatles’ Early Albums

The Beatles also employed mixing in mono on their early albums. This was a common practice in the 1960s, as stereo mixes were often considered an afterthought. The benefits of mixing in mono were especially apparent on AM radios, which were the primary way people listened to music at the time.

Motown’s Classic Recordings

Perhaps the most famous use of mixing in mono comes from Motown’s classic recordings. These songs were mixed in mono to ensure that they sounded great on a variety of playback systems, from car radios to jukeboxes. The result was a consistent sound that helped define the Motown sound.

In conclusion, mixing in mono is a valuable technique that can be used to create a cohesive and balanced sound. From Phil Spector’s “Wall of Sound” to Motown’s classic recordings, it has been used to great effect throughout music history.

Mixing In Mono Why Why Not

Credit: www.productionmusiclive.com

Frequently Asked Questions On Mixing In Mono Why Why Not

Why You Should Mix In Mono?

Mixing in mono ensures that the audio will sound the same on all sound systems. It provides clarity, helps with panning decisions, and allows you to identify frequency clashes that may be harder to hear in stereo. Overall, mixing in mono results in a better mix that sounds great on any device or system.

Why Does My Mix Sound Weird In Mono?

A mix may sound weird in mono due to phase cancellation. When sounds that are out of phase combine, they cancel each other out and can lead to an uneven and weak sound. To fix this, it’s important to check the mix in both stereo and mono and adjust accordingly.

Why Check Mixes In Mono?

Checking mixes in mono helps identify phase issues and ensures that the mix will sound consistent across different listening devices. Mono compatibility is also important for radio and other mono playback systems.

Should I Mix My Beats In Mono?

Yes, it’s recommended to mix your beats in mono. This ensures that your mix sounds good on any stereo system. Mixing in mono helps to identify and fix any potential phase issues. However, it’s also important to test your mix in stereo and make adjustments accordingly.

Conclusion

Mono mixing is an essential technique that can make your music sound more cohesive and consistent. While it may seem daunting to mix without stereo, it can actually improve the overall sound quality of your finished product. Keep in mind that every mix is different, and there’s no one-size-fits-all solution.

Experimenting with mono mixing can help you find the best approach for your specific project. With practice and patience, you can master mono mixing and take your music to the next level.

Categories
Archive

What Is A ISRC Code

An ISRC code is a unique, international identification system for music and audiovisual recordings. It stands for International Standard Recording Code and helps identify specific tracks for distribution, sales, and royalty payments.

Music streaming services and digital distribution platforms use ISRC codes to track the usage and payment of copyrighted music. Each recording receives its own code, allowing for easy identification and tracking of individual tracks. This system was introduced in the late 1980s to address the need for a standard method of identifying recordings in the music industry.

With the rise of digital music consumption, ISRC codes have become increasingly important for artists, record labels, and distributors in ensuring that they get their fair share of royalties and recognition for their work.

What Is An Isrc Code?

An ISRC code, also known as the International Standard Recording Code, is a unique identifier assigned to individual audio or music videos recordings. It helps to track the performance, sales and usage of each track. The code also ensures that royalties are accurately paid to the rightful copyright holders.

An ISRC code is a code used to uniquely identify sound and music video recordings. The acronym stands for International Standard Recording Code. It is a twelve-character code that is made up of four parts: a two-letter country code, a three-character alphanumeric designation, two digits indicating the year of recording, and a five-digit unique identifier. The ISRC code is assigned to every track individually, irrespective of the album or product it is included in.

Definition

The ISRC is a unique identifier for a sound or music video recording. It is used to identify a track globally, making it easier to manage and track when it is used commercially. The code is used to distinguish between different versions or formats of the same recording, such as different releases, remixes, or remasters of the same track.

Purpose

The main purpose of the ISRC code is to provide a standard method for identifying and tracking sound and music videos across different platforms, such as radio, television, online streaming services, and physical media. By using the ISRC code, rights-holders can get accurate information about the use of their recordings and ensure that they are receiving proper royalties for their work. Whether you are an independent artist, music label, or distributor, having ISRC codes for your recordings is a significant benefit. It can be used to monetize your music across the platforms and aid you in getting the proper recognition you deserve.

What Is A Isrc Code

Credit: www.audiorecording.me

How To Get An Isrc Code

An ISRC code is a unique code assigned to individual tracks on a recording. It helps track sales and royalty payments for copyright owners. You can obtain an ISRC code through your country’s Performance Rights Organization or from a digital distributor.

ISRC (International Standard Recording Code) is a unique code that identifies a particular recording or track. It is used to track sales and downloads of digital music and videos.

Registration Process

To get an ISRC code, you need to register with your local music rights organization or a designated agency in your country. The registration process involves filling out a form and providing the necessary details such as the track title, artist, and label. You may also need to submit a copy of the audio or video recording. Once your application is processed, you will receive a unique ISRC code for your track. It is essential to include the code in your track metadata (such as the ID3 tags) when releasing your music.

Costs Involved

There is usually a fee involved in obtaining an ISRC code. The cost may vary depending on your location and the agency you register with. Some agencies may charge a flat fee, while others may charge per track or per album. It is advisable to check with your local agency for the exact fee structure. Ensuring each H3 heading adheres to HTML syntax is essential to ensure proper formatting of a blog post. This will make the content visually appealing and easy to read for your readers. By following the above steps, you can register for an ISRC code and have a unique identification for your music track, making it easier to track sales and downloads.

Benefits Of Having An Isrc Code

An ISRC code is a unique identifier for a recorded music track that provides numerous benefits to the music industry and artists. This code allows for more accurate tracking of royalties, improved reporting and charting, and better management of your music catalog.

An ISRC (International Standard Recording Code) is a unique identifier that helps to track ownership, usage, and distribution of music recordings. Having an ISRC code for your music track offers several benefits that are beneficial to your music career. Here are some of the benefits of having an ISRC code:

Track Ownership And Usage

As a music artist, it is important to have control over the ownership and usage of your music. Having an ISRC code allows you to track the use of your music tracks across different platforms including radio, TV, streaming services, and other media. This way, you can keep track of how and where your music is being played, and ensure that you are being properly compensated for your work.

Receive Royalties Accurately

ISRC codes help artists and record labels to receive accurate and timely royalty payments for their music. With an ISRC code, distribution and streaming platforms can easily track the usage of your music and ensure that you are paid the correct amount of royalties. By having an ISRC code, you can be sure that you are receiving all the royalties you are entitled to for your music, without any discrepancies or errors.

Prevent Piracy

Piracy is a major problem in the music industry, with unauthorized copies of music tracks being distributed widely and illegally. With an ISRC code, you can protect your music from piracy and ensure that your music is being used in accordance with your wishes. By adding an ISRC code to your music tracks, you can keep track of how and where your music is being used, and identify any instances of piracy or unauthorized use. In conclusion, having an ISRC code for your music tracks is essential for any serious music artist or producer. With its unique identifier, you can track the ownership and usage of your music, receive accurate royalty payments, and prevent piracy. So if you are serious about your music career, make sure that you have an ISRC code for all your music tracks.

Where Isrc Codes Are Used

Isrc codes are used in the music industry to uniquely identify tracks and ensure proper royalty payments. These codes appear in digital music files and on physical media releases such as CDs and vinyl records, making it easier to track and manage music usage and revenue.

Music Industry

ISRC (International Standard Recording Code) codes are essential for the music industry to manage the rights of audio recordings and tracks. They provide a unique identifier for each recording, helping with the organization and tracking of songs and albums. In addition, ISRC codes help in the distribution and royalty payment of music tracks across the world. Therefore, every audio recording, whether released commercially or independently, should have a unique ISRC code.

Film And Television Industry

ISRC codes are also used in the film and television industry to manage the rights of audiovisual content such as soundtracks, background scores, and theme songs. An ISRC code helps to track the ownership and usage of a particular audio or video recording. It also assists in managing the international distribution of these recordings and royalty calculations.

Video Game Industry

The video game industry uses ISRC codes to track the music and sounds used in games. Game developers need to obtain ISRC codes for the music they use to ensure proper management of rights, payment of royalties, and tracking of usage. Obtaining ISRC codes for in-game sound effects is also a common practice. In conclusion, ISRC codes are a vital part of the music, film and television, and video game industries, providing an essential tool for managing the rights of audio and audiovisual content, international distribution, and calculation of royalties.

How Isrc Codes Work

An International Standard Recording Code (ISRC) is a unique identifier assigned to a recorded track. The ISRC code provides important information about the track’s origin, including the country of registration and the label or distributor responsible for its release. By using an ISRC code, the music industry can track and monetize the usage of a specific recording.

How Isrc Codes Work: Structure Of The Code

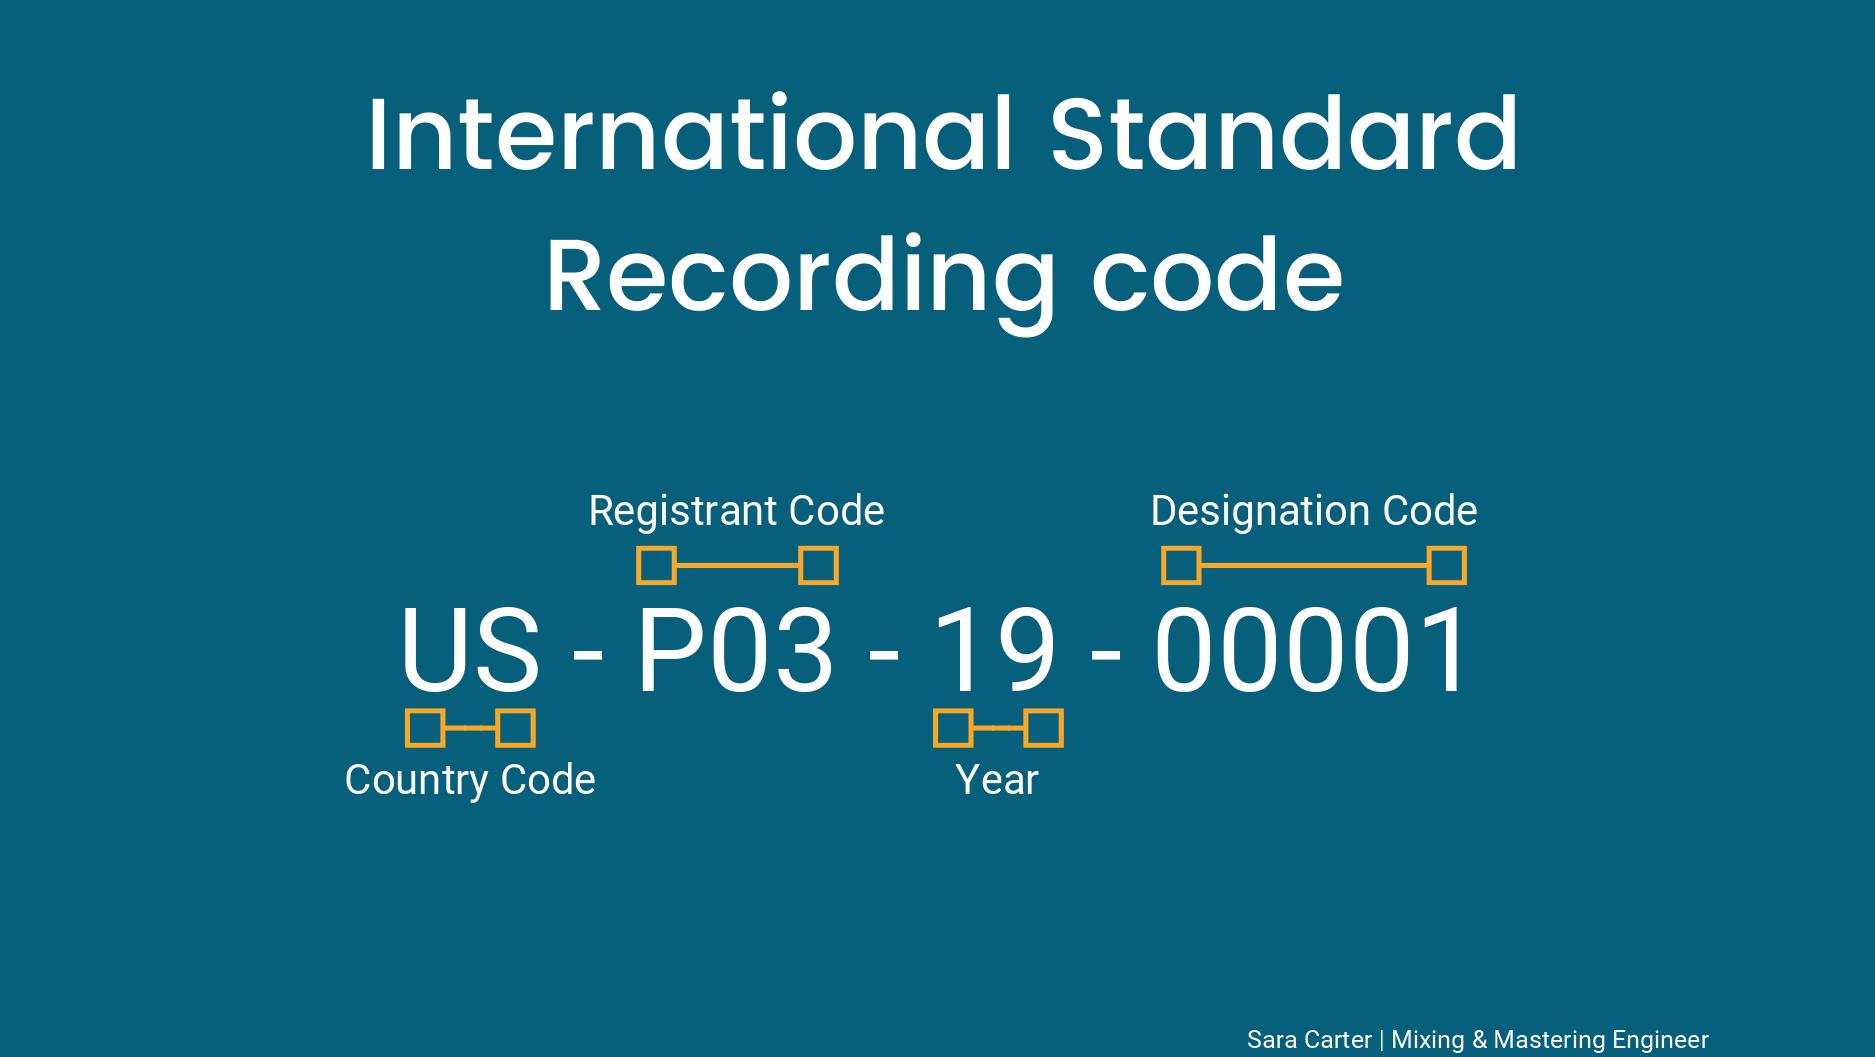
The International Standard Recording Code (ISRC) is a unique identifier given to each sound or music video recording. It is a 12-character alphanumeric code that consists of four parts separated by hyphens. The standard structure of an ISRC code is “CC-XXX-YY-NNNNN”. The first two letters represent the country code, indicating where the registration was made. The next three letters are unique to the registrant and serve as the registrant code. The following two digits are for the year of reference, and NNNNN is a five-digit number representing the unique recording’s reference code within the registrant’s catalog.

How Isrc Codes Are Assigned

The ISRC code is assigned to recordings by the registrant, who could be the recording artist, record label, or distributor, free of charge. Registrants can apply for the codes from the appropriate agency authorized by the International Federation of the Phonographic Industry (IFPI) in their respective countries. In the United States, the Recording Industry Association of America (RIAA) serves as the national ISRC agency, while the Canadian Private Copying Collective (CPCC) serves as Canada’s national agency. The IFPI maintains an international database of all registered codes, to ensure they are unique to each recording.

How To Read An Isrc Code

Reading an ISRC code is simple and straightforward. As mentioned earlier, the code is made up of four parts, but each part has a specific meaning and format. For instance, let’s consider the code for a recording made in the United States. The code would start with the letters ‘US, which is the country code. The next three characters represent their unique registrant code, followed by the two digits signifying the year of reference. Finally, the five remaining characters represent the recording reference code within the catalog. Overall, ISRC codes serve as an essential tool for tracking the use of sound recordings across various platforms and identify the ownership of a recording. It also helps to protect the rights of musicians, composers, and record labels by ensuring they are properly compensated for the use of their work, which makes it an essential aspect of the music industry.

What Is A Isrc Code

Credit: musicmixpro.co.uk

Isrc Codes Vs Other Identification Codes

An ISRC code is a unique identifier assigned to a specific music track, while other identification codes like UPC or EAN are used to identify an entire release. ISRC codes are essential for tracking the use and distribution of individual songs, while other codes mainly help with inventory management.

ISRC codes are one of the many identification codes used to identify various types of media content. These codes serve as a unique identifier, helping the music industry and content providers track their products across different platforms. However, a lot of confusion exists regarding the differences between ISRC codes and other identification codes such as UPC codes, ISBN codes, and ISWC codes. Understanding these differences is crucial in selecting the right identification code for your product.

Upc Codes

UPC (Universal Product Code) codes are used as a standard identifier for retail products. They are 12-digit codes that are used across the world to track products in stores. UPCs are used in the music industry to identify physical copies of music such as CDs or vinyl records.

Isbn Codes

ISBN (International Standard Book Number) is a unique identifier for books. The ISBN is a 13-digit code that identifies each edition of a book published. This code is widely used in the publishing industry to identify books and helps ensure that the correct edition is being sold or used.

Iswc Codes

ISWC (International Standard Musical Work Code) is used to identify musical works. It is a unique identifier for musical compositions and is assigned to a song when it is first registered. ISWC codes are used to identify songs across different platforms, making it easier to track royalties and usage data.

Conclusion

In conclusion, ISRC codes are crucial for the music industry and content providers to track their products across different platforms. Understanding the differences between ISRC codes and other identification codes such as UPC, ISBN, and ISWC is crucial to select the right identification code for your product. So, choose wisely and reap the benefits of using the right identification code.

Challenges And Controversy Surrounding Isrc Codes

An ISRC code, also known as an International Standard Recording Code, is a unique identifier assigned to music and other audiovisual recordings. While this code can be incredibly useful for tracking and cataloging recordings, there are several challenges and controversies surrounding its implementation. These challenges include a lack of standardization, international conflicts, and difficulties in implementation.

Lack Of Standardization

A significant challenge associated with ISRC codes is the lack of standardization across the music industry. While the International Federation of the Phonographic Industry (IFPI) has created guidelines for the use of ISRC codes, these guidelines are not enforced universally. As a result, many music industry professionals have complained of inconsistencies in how ISRC codes are assigned and how they are utilized in practice.

International Conflicts

Another challenge associated with ISRC codes is the potential for conflicts between different countries. Specifically, some countries may have conflicting views on how ISRC codes should be assigned and managed. This can create difficulties for international music distributors and can, in some cases, result in the mismanagement or loss of recording metadata.

Difficulties In Implementation

Finally, there are numerous difficulties associated with the implementation of ISRC codes. These range from issues related to tracking and cataloging recordings to questions surrounding the level of detail that should be included in each individual code. To ensure that ISRC codes are correctly implemented, it is essential that music industry professionals thoroughly understand the guidelines put forth by the IFPI and other regulatory bodies.

What Is A Isrc Code

Credit: help.songtrust.com

Frequently Asked Questions For What Is A Isrc Code

How Do I Get An Isrc Code?

To get an ISRC code, you need to register your music with the appropriate agency in your country. In the US, that would be the RIAA. In the UK, it would be PPL. Once registered, you will receive a unique code that you can use to identify your music.

Do I Need An Isrc Code For My Song?

Yes, it is highly recommended to obtain an ISRC code for your song if you plan to distribute it digitally. The code helps with tracking and identifying your music, ensuring proper royalties are paid to you and other involved parties.

What Does An Isrc Number Do?

An ISRC number is a unique identifier assigned to a sound recording that is used to track it across different formats and platforms. It helps in identifying ownership, tracking royalties, and preventing unauthorized use of copyrighted material.

Where Can I Find Isrc Code For My Song?

You can find the ISRC code for your song through the International Standard Recording Code Agency (ISRC). Contact your record label or distributor to obtain the code as it is assigned by them. The code identifies your track and allows for tracking and royalty distribution.

Conclusion

If you’re a musician or someone involved in the music industry, then understanding ISRC codes is crucial for you. In short, ISRC is a unique code assigned to every sound recording. It helps in identifying and tracking your music all around the world.

Without an ISRC code, your music is only limited to a particular region, and you might not get credit for your work. Hence, make sure to register for an ISRC code and reap its numerous benefits.

Categories
Archive

Parallel Drum Compression

Parallel drum compression involves blending a compressed and uncompressed signal together, resulting in a more balanced and controlled drum sound. Drum compression is an essential tool in music production, shaping the dynamics and impact of the drums in a mix.

However, traditional drum compression can often lead to a loss of natural feel and tone, as drum transients and nuances are squashed. Parallel drum compression offers a solution by allowing the engineer to blend a compressed and uncompressed signal together, retaining the natural dynamics while also providing more control and balance.

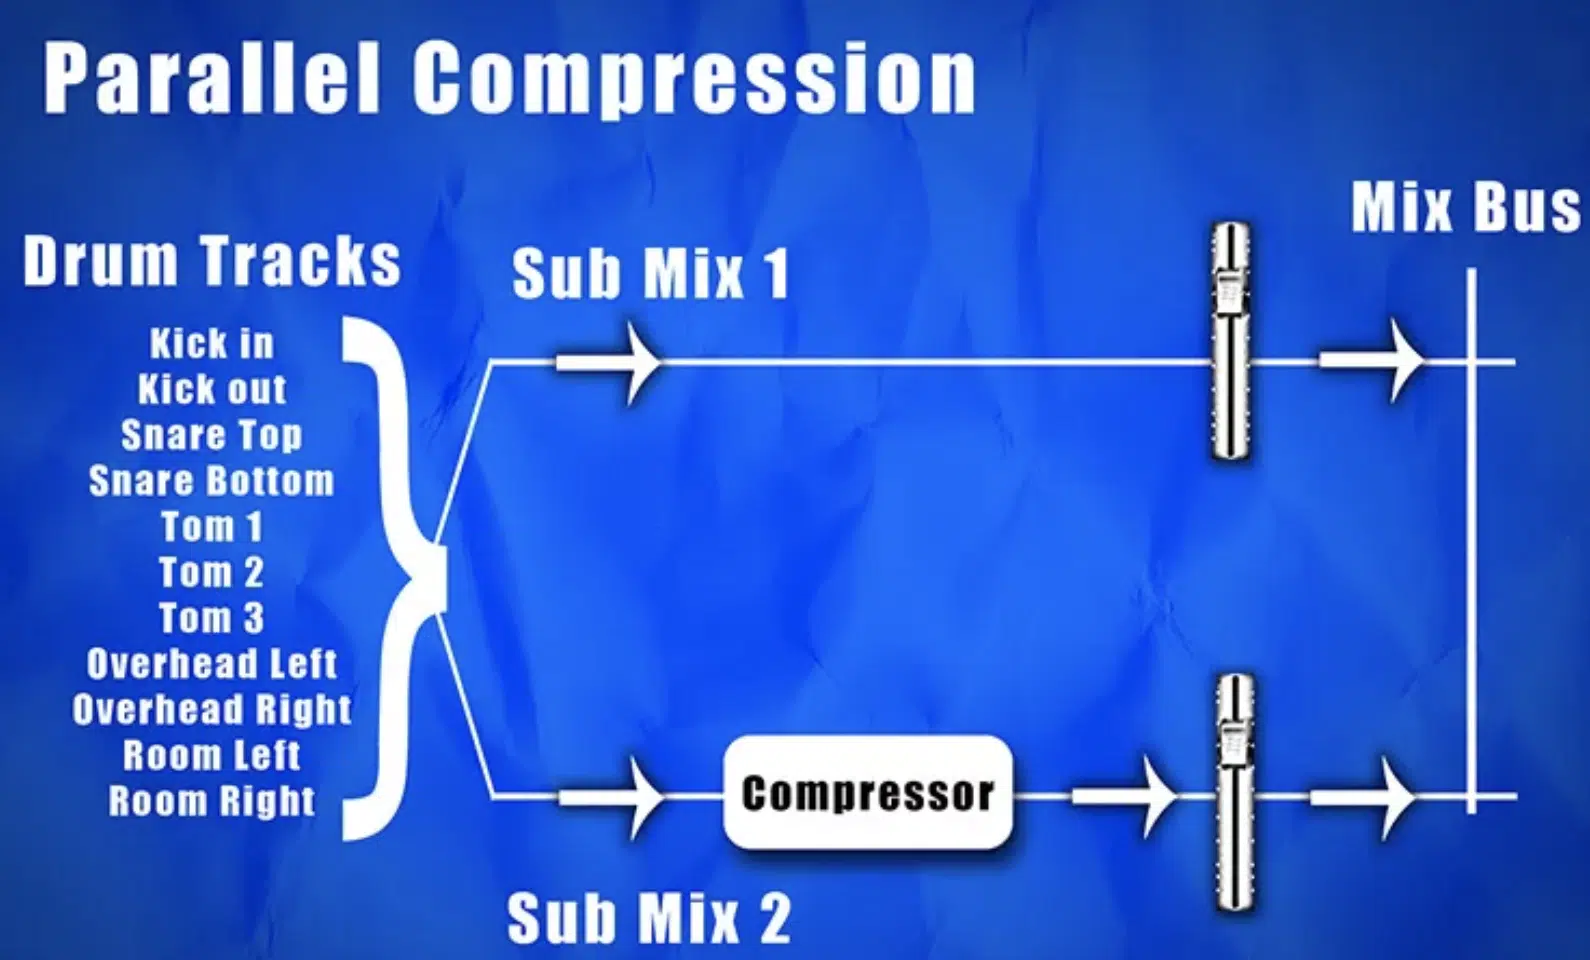
This technique involves sending a copy of the drum track to a compressor, applying heavy compression, and then blending it back in with the original signal. The compressed signal provides added sustain and body, while the dry signal retains the punch and attack. This results in a fuller, more controlled drum sound that still maintains the natural feel and tone of the performance.

Parallel Drum Compression

Credit: abhigginson.wordpress.com

Setting Up Parallel Compression For Drums

Parallel drum compression can add depth and punch to your drum sound. To set it up, route a copy of your drum track to a new channel and apply heavy compression, then blend it with the original track to achieve the desired effect.

When it comes to mixing drums, parallel compression can give your drums the power and punch that they need to cut through the mix. Setting up parallel drum compression can be a little tricky, but with the right compression settings and the proper setup for sends and returns in your DAW, you can achieve amazing results.

Choosing The Right Compression Settings

The first step in setting up parallel compression for drums is selecting the right compression settings. When it comes to parallel compression, you want to use a high compression ratio, typically around 4:1 or higher. You also want to use a faster attack time, around 10-30ms, and a slower release time, around 100-300ms. Use a lower threshold to capture the softer hits and raise the input gain to balance the output level.

Setting Up The Sends And Returns In Your Daw

To set up parallel compression, you’ll need to use sends and returns in your DAW. First, duplicate your drum track and route one track to the main output and the other to a bus. On the bus track, apply your desired compression settings. Then, use a send fader on the original track to send a portion of the audio to the compressed bus. Start with 0dB and adjust as needed.

Adjusting The Relative Mix Of Your Compressed And Uncompressed Signals

Now that your sends and returns and compression settings are in place, adjust the relative mix of your compressed and uncompressed signals. You want to aim for a blend that gives you the power and punch of the compressed signal without losing the natural sound of the original track. Start with the compressed signal at 100% wet and adjust the fader until you reach the desired level of parallel compression. The balance between the original track and compressed track will depend on your preference, so trust your ears and experiment until you find the sweet spot. In conclusion, setting up parallel compression for drums requires attention to detail and a bit of experimentation. By choosing the right compression settings, setting up the sends and returns in your DAW, and adjusting the relative mix of your compressed and uncompressed signals, you can achieve a powerful and punchy drum sound that will cut through your mix.

Parallel Drum Compression

Credit: unison.audio

Using Parallel Compression On Different Drum Elements

By using parallel compression on different drum elements, you can add depth and power to your drum tracks without sacrificing clarity. This technique involves duplicating the drum tracks, compressing one copy heavily while leaving the other untouched, and then blending them together for a fuller sound.

Using Parallel Compression on Different Drum Elements Parallel compression is a popular mixing technique used to enhance the impact and clarity of individual drum sounds. Instead of compressing a drum track and losing its natural dynamic range, parallel compression adds a compressed copy of the original signal, resulting in a full and punchy sound. In this section, we’ll focus on using parallel compression on different drum elements, including the kick drum, snare drum, toms, and cymbals/overheads. Kick Drum The kick drum is the foundation of a drum kit, and parallel compression can help give it the necessary punch and weight in a mix. To apply parallel compression to the kick drum: 1. Duplicate the kick drum track and send it to an auxiliary channel. 2. Add a compressor to the auxiliary channel and set the attack and release times to fast. 3. Apply a high ratio and threshold to compress the signal heavily. 4. Blend the compressed signal with the original kick drum track until you find the desired level of punch. Snare Drum Similar to the kick drum, the snare drum also benefits from parallel compression. It brings out the snap and sustain that can get buried in a mix without proper compression. To apply parallel compression to the snare drum: 1. Duplicate the snare drum track and send it to an auxiliary channel. 2. Add a compressor to the auxiliary channel and set the attack and release times to medium. 3. Apply a moderate to high ratio and threshold to level out the snare hits. 4. Blend the compressed signal with the original snare drum track to achieve the desired snap and sustain. Toms Toms are often overlooked when it comes to parallel compression, but they can add a lot of impact and sustain to a mix. To apply parallel compression to the toms: 1. Duplicate the tom tracks and send them to an auxiliary channel. 2. Add a compressor to the auxiliary channel and set the attack and release times to medium. 3. Apply a moderate ratio and threshold to level out the tom hits. 4. Blend the compressed signal with the original tom tracks to give them extra impact and sustain. Cymbals and Overheads Cymbals and overheads capture the overall sound of a drum kit and can benefit from parallel compression to add clarity and presence. To apply parallel compression to cymbals and overheads: 1. Duplicate the cymbal/overhead tracks and send them to an auxiliary channel. 2. Add a compressor to the auxiliary channel and set the attack and release times to slow. 3. Apply a low ratio and threshold to control the peaks. 4. Blend the compressed signal with the original cymbal and overhead tracks to add clarity and presence to the overall drum sound. Conclusion: Using parallel compression on different drum elements can help bring out the natural characteristics of each drum sound. Whether it’s adding punch to the kick drum or sustain to the snare drum, parallel compression is a powerful mixing technique that can take your drum sound to the next level.

Advanced Tips And Techniques For Parallel Drum Compression

Parallel drum compression is a powerful technique that allows you to achieve a tighter, punchier sound for your drum tracks. By sending a copy of your drum mix through a parallel compression chain, you can effectively balance the mix of your drums, adding depth and thickness while maintaining clarity and separation. In this post, we’ll be discussing advanced tips and techniques for parallel drum compression that can take your mixes to the next level.

Triggering Your Compressor With Drum Samples

One advanced technique for parallel drum compression is to use drum samples to trigger your compressor, rather than relying solely on the actual recorded drums. This can be especially useful if you’re working with drum tracks that lack consistent timing or dynamic range. By blending samples with your original drum mix, you can create a tight, powerful foundation for your mix, while still preserving the unique character of the recorded drums.

Sidechaining Your Compressor To Get Tighter Drums

Another advanced tip for parallel drum compression is to use sidechain compression to create a tighter, more focused sound for your drums. With sidechain compression, you can use the kick drum to trigger the compressor on other drum elements, such as the snare or hi-hat, effectively reducing their volume when the kick drum hits. This can help create a cleaner, more cohesive drum mix, without sacrificing impact or energy.

Creating Parallel Compression Chains For Different Drum Elements

Finally, one effective technique for parallel drum compression is to create different compression chains for different drum elements. For example, you might use a more aggressive compression chain for your kick drum, while using a more subtle approach for your snare or overheads. By tailoring your compression settings to each specific drum element, you can achieve greater control over each part of the mix, leading to a more dynamic, impactful overall sound.

Using Automation To Control Parallel Compression

Automating parallel compression for drums can be an efficient way to achieve a balanced sound. With the right tools, parallel compression can be easily controlled to boost the rhythm of your tracks.

When it comes to producing drum tracks, parallel compression is an excellent technique to enhance the impact and presence of the drums. By routing a duplicate copy of the drum tracks to a compressor, you can apply heavy compression to the duplicate tracks while preserving the transients and dynamics of the original tracks. In this way, you can achieve a powerful and punchy drum sound that sits well in the mix. Using automation to control parallel compression can take your drum mixing to the next level by allowing you to fine-tune your compression settings and make dynamic adjustments over the course of the mix.

Automating Your Sends And Returns

To create a parallel compression track, you need to route a duplicate copy of your drum tracks to a separate channel that has a compressor inserted on it. This can be done by using sends and returns in your DAW. However, manually adjusting the send level and return fader for the parallel track can be time-consuming and tedious. By automating the send level and return fader, you can easily control the amount of parallel compression applied to your drum tracks over time.

Automating Your Compressor Parameters

In addition to automating your sends and returns, you can also automate the parameters of your compressor to create dynamic changes in the level of compression applied to your drum tracks. For example, you may want to increase the ratio or attack time of the compressor during the chorus of a song to make the drums hit harder. By automating these parameters, you can make precise adjustments to your compressor settings without having to do it manually with a mouse or fader.

In Conclusion

In conclusion, by using automation to control parallel compression, you can achieve a more dynamic and powerful drum sound that sits well in the mix. By automating your sends and returns and compressor parameters, you can make precise adjustments to your drum mix that add energy, impact, and depth to your productions. Give it a try and see how it can take your drum mixing to the next level. Happy mixing!

Parallel Drum Compression

Credit: www.youtube.com

Frequently Asked Questions For Parallel Drum Compression

Should You Use Parallel Compression On Drums?

Yes, using parallel compression on drums can enhance their sound and bring out the nuances that may not be apparent with conventional techniques. Parallel compression involves blending an unprocessed signal with a heavily compressed one to achieve a fuller, more dynamic sound.

However, it is not a one-size-fits-all solution, and it’s important to experiment and adjust the settings to get the desired effect.

What’s The Point Of Parallel Compression?

Parallel compression is a technique of blending dry and compressed audio signals to maintain the original sound’s dynamics. It enhances the audio’s loudness and impact while preserving its natural characteristics. Thus, it is useful when the audio lacks punch, or the dynamics needed are challenging to achieve otherwise.

How Much Gain Reduction For Parallel Compression?

The amount of gain reduction for parallel compression depends on the specific mix and desired results. However, typically, the range can be from 2-6 dB of gain reduction.

How Do You Parallel Compress A Drum Bus?

To parallel compress a drum bus, insert a compressor on the drum bus with high compression, low attack, and release settings. Send a copy of the drum bus to another bus without compression. Adjust the fader of the uncompressed bus until the desired amount of parallel compression is achieved.

Experiment with the compression settings on both buses until the desired sound is achieved.

Conclusion

Parallel drum compression is an effective technique for enhancing drum tracks. By blending the compressed signal with the original, you can achieve a fuller, more impactful sound while preserving the natural dynamics and nuances of the performance. However, it’s crucial to exercise restraint and avoid overdoing it.

Experiment with different settings and ratios to find the right balance for each mix. Incorporating parallel compression into your workflow can help you achieve professional-sounding results and stand out in today’s competitive music industry.

More in our Drums & beats guide.

Categories
Archive

Cubase Pro 8 Quadrafuzz V2

Cubase Pro 8 Quadrafuzz V2 is a plugin for guitar amp simulation and distortion effects. It offers four different modes – Fuzz One, Fuzz Two, Fuzz Three, and Fuzz Feedback – each with their own unique sound and character.

As a musician or audio producer, having access to quality plugins that can create a range of sounds and effects is essential. One of the popular plugins for guitar amp simulation and distortion effects is Cubase Pro 8 Quadrafuzz V2.

It comes equipped with four different modes, each with its own specific tone and sound. Whether you’re looking for a gritty, overdriven sound or a smoother fuzz effect, this plugin can help you achieve the desired result. We’ll take a closer look at Cubase Pro 8 Quadrafuzz V2 and explore the features that make it stand out from the crowd.

How To Use Quadrafuzz V2 In Cubase Pro 8?

Learn how to effectively use the Quadrafuzz V2 plugin in Cubase Pro 8 to create dynamic and unique sounds for your audio production projects. With its easy to use interface and extensive range of presets, Quadrafuzz V2 is an essential tool for any audio engineer looking to elevate their mix.

Cubase Pro 8 is a powerful digital audio workstation used by music producers, engineers, and composers. One of its most impressive features is Quadrafuzz V2, a distortion and saturation plugin that provides added warmth and depth to audio tracks. In this article, we will explore how to install and use Quadrafuzz V2 in Cubase Pro 8.

Installing Quadrafuzz V2

To install Quadrafuzz V2 in Cubase Pro 8, follow these steps:

  1. Download the plugin from the Steinberg website or a reputable third-party vendor.
  2. Unzip the file and extract the plugin package.
  3. Copy the plugin file to the appropriate VST folder on your computer.
  4. Refresh your VST plugins list in Cubase Pro 8.

Adding Quadrafuzz V2 To An Audio Track

To add Quadrafuzz V2 to an audio track in Cubase Pro 8, do the following:

  1. Select the audio track to which you want to add Quadrafuzz V2.
  2. Navigate to the inserts section of the track’s mixer channel.
  3. Select “Quadrafuzz V2” from the list of available plugins.

Adjusting Quadrafuzz V2 Parameters

Once you’ve added Quadrafuzz V2 to your audio track, you can adjust its parameters to achieve the desired sound. Here are some important parameters to consider:

ParameterDescription
DriveControls the amount of distortion or saturation applied to the audio signal.
ModeDetermines the type of distortion or saturation applied to the signal (e.g. tube, tape, solid state).
MixAdjusts the balance between the dry (unprocessed) and wet (processed) signals.

Saving And Exporting Quadrafuzz V2 Settings

Once you’ve adjusted the Quadrafuzz V2 parameters to your liking, you may want to save and export your settings for future use or sharing with others. Here’s how:

  1. Click the “Save Preset” button in the Quadrafuzz V2 interface.
  2. Enter a name for your preset and click “OK”.
  3. To export your preset, click the “Export Preset” button and save the file to your desired location.

In conclusion, Quadrafuzz V2 is a powerful plugin that can help you take your audio tracks to the next level in Cubase Pro 8. By following the steps outlined in this article, you can install Quadrafuzz V2, add it to your audio tracks, adjust its parameters, and save and export your settings with ease.

Cubase Pro 8 Quadrafuzz V2

Credit: forums.steinberg.net

Features Of Quadrafuzz V2

Quadrafuzz V2 is a distortion plugin that can be used in Cubase Pro 8. This tool provides a wide range of distortion options for recording enthusiasts and audio professionals alike. Below are some of the features of Quadrafuzz V2:

Four Different Types Of Distortion

Quadrafuzz V2 offers four different types of distortion – Tube, Tape, Diode, and Bitcrusher. Each of these distortion types has a unique sound that audio engineers can use to enhance their recordings. As a result, you can easily create a variety of unique soundscapes by switching between the different distortion types.

Multiple Filter Types

Quadrafuzz V2 also has multiple filter types that allow users to refine their distortion. This plugin includes Low Pass, High Pass, Band Pass, and Notch filters. Combining these filters with the distortion types enables users to fine-tune every harmonic element of their audio recordings.

Intuitive User Interface

The user interface of Quadrafuzz V2 is intuitive and easy to use. It includes simple controls such as Blend, Drive, and Gain. Additionally, there’s an Attack control for dialing in precise timing adjustments. All these controls are put into one single interface, allowing users to easily access them while working on their audio recordings.

Real-time Visual Feedback

Quadrafuzz V2 provides real-time visual feedback that helps users evaluate the sound changes they are making. This visual feedback includes a waveform display and level metering that offer insight into how the distortion plugin is affecting the sound. The real-time feedback offers a visual confirmation of the changes that users are making, which can help speed up the production process.

Benefits Of Using Quadrafuzz V2

Cubase Pro 8 Quadrafuzz V2 is a powerful plugin that enhances sound design possibilities, creative control over audio tracks, improved mixing capabilities and time-saving workflow.

Enhanced Sound Design Possibilities

Quadrafuzz V2 provides users with versatile distortion algorithms, allowing the creation of unique, signature sounds. Users can choose from four different distortion types and blend them together to create complex and rich soundscapes.

Additionally, Quadrafuzz V2 offers tone control options such as low and high cut, along with the option to adjust the frequency response and stereo spread. This level of customization allows users to achieve a broad range of sound design options in a single plugin.

Creative Control Over Audio Tracks

With Cubase Pro 8 Quadrafuzz V2, users can have full creative control over their audio tracks. The multiband processing capability of Quadrafuzz V2 enables users to apply different levels of distortion to specific frequency ranges, producing dynamic and rich textures and soundscapes.

Moreover, Quadrafuzz V2 offers various mixing plugins including reverb, delay, and EQ. These plugins offer an in-depth level of even more customization, enhancing creative control over audio tracks.

Improved Mixing Capabilities

Quadrafuzz V2 makes mixing tracks more efficient. With multiple distortion types offered in a single plugin and an intuitive user interface, users can experiment with different distortion types on the fly.

The ability to adjust the frequency response and stereo spread of each distortion type ensures that tracks are mixed to their fullest potential, producing professional-sounding results.

Time-saving Workflow

Quadrafuzz V2 saves users time with its intuitive design and single-plugin approach. The multiband processing capability allows users to perform a range of sound design, mixing, and mastering tasks within one plugin, simplifying the production process.

With Quadrafuzz V2, users can quickly create complex and rich soundscapes without needing multiple plugins, reducing the time spent bouncing between plugins to achieve desired results.

Cubase Pro 8 Quadrafuzz V2

Credit: www.youtube.com

Tips And Tricks For Using Quadrafuzz V2

Learn how to fully utilize the power of Quadrafuzz V2 in Cubase Pro 8 with our expert tips and tricks. We’ll guide you through the finer points of this versatile plug-in to help you create amazing sounds and take your music production to the next level.

If you’re a music producer who wants to add a unique edge to your projects, you might want to consider incorporating Cubase Pro 8 Quadrafuzz V2. This powerful distortion plugin has a wealth of features that can help you add depth, texture, and excitement to your tracks. Here are some tips and tricks you can use to make the most of Quadrafuzz V2.

Layering Distortion Types

One way to get creative with Quadrafuzz V2 is to layer different types of distortion. This plugin offers four types of distortion: Tube, Diode, Fuzz, and Bitcrusher. By layering these different distortion types, you can create unique and complex sounds that will make your tracks stand out. For instance, you can start with a clean guitar or vocal track, add a layer of bitcrusher distortion to give it some grunge, and then add another layer of tube distortion to smooth out the sound. Experiment with different combinations of distortion types until you find a sound that works for your project.

Using Automation To Create Dynamic Effects

Automation is a powerful tool in music production that can help you create dynamic effects and add depth to your tracks. With Quadrafuzz V2, you can automate the different distortion types to create changes that evolve over time. For example, you can start with a clean guitar track, gradually add a layer of fuzz distortion, and then bring in some bitcrusher distortion at the chorus to give the track a harder edge. You can also automate the mix control to create buildups or breakdowns.

Combining Quadrafuzz V2 With Other Plugins

Quadrafuzz V2 is a versatile plugin that works well with other plugins in the Cubase Pro 8 arsenal. For example, you can combine Quadrafuzz V2 with other distortion plugins or EQ plugins to create a more complex sound. For instance, you can use the built-in EQ in Quadrafuzz V2 to shape the tone of the distortion, and then use a separate EQ plugin to fine-tune the overall sound. You can also use delays or reverbs to create a sense of space around the distorted sound.

Experimenting With Extreme Settings

Finally, one of the most exciting ways to use Quadrafuzz V2 is to experiment with extreme settings. This plugin offers a wide range of controls that can create everything from subtle warmth to extreme fuzziness. By pushing the controls to their limits, you can create sounds that are truly unique and unexpected. For example, you can max out the bit depth control to create a stuttering, glitchy effect, or push the mix control all the way up to create a wall of sound. Of course, extreme settings won’t always work for every project, but they can be fun to play around with and can help you unlock new creative possibilities. In conclusion, Quadrafuzz V2 can be a powerful tool in your music production toolkit. With the tips and tricks outlined above, you can start using this plugin to create unique and exciting sounds that will take your tracks to the next level.

Cubase Pro 8 Quadrafuzz V2

Credit: steinberg.help

Frequently Asked Questions On Cubase Pro 8 Quadrafuzz V2

What Is Quadrafuzz?

Quadrafuzz is a digital distortion plugin used in music production to achieve various types of distortion effects. It was developed by Steinberg and allows users to add warmth, intensity and grit to their sounds. It is commonly used in genres such as EDM, hip-hop and rock music.

Which Version Of Cubase Is The Best?

All versions of Cubase have their unique features and benefits. Cubase Pro 11 is the latest and most advanced version that includes advanced features like Spectral Comparison EQ, Frequency 2. 0 EQ plug-in, MultiTap Delay and Squasher plug-ins. However, the best version depends on the user’s specific needs and level of expertise.

What Is Cubase Pro 8 And What Can It Do?

Cubase Pro 8 is a digital audio workstation software used for recording, editing, and producing music. It offers a wide range of features such as advanced MIDI editing, mixing console, and virtual instruments.

What Is Quadrafuzz V2 And How Does It Work?

Quadrafuzz V2 is a distortion plugin included in Cubase Pro 8. It allows users to add distortion to audio tracks and provides four separate bands for shaping the sound. The plugin offers a range of parameters to adjust the level, distortion, and tone of each band.

Conclusion

Music production is an art form that demands flexibility and innovation, and Cubase Pro 8 Quadrafuzz V2 offers both in spades. As musicians continue to push creative boundaries, software like Cubase pave the way for endless possibilities. With an emphasis on signal processing, this plugin adds depth and range to any sound, making it an essential tool for producers of all levels.

Invest in Cubase Pro 8 Quadrafuzz V2 and watch your music production take flight.

Categories
Archive

Filter Out The Low End

To filter out the low end, adjust the equalizer settings by lowering the bass frequencies. Proper equalization can help improve sound quality and clarity in music production and playback.

Music lovers, composers, and producers are always on the hunt for ways to refine the audio quality of their music. One of the most critical factors in music production and playback is the bass or low-frequency range. The excessive use of low-end bass can compromise the clarity of sound and make it muddy and unappealing.

Related reading: Filtering The Low End and What Eq Filter Is Best For Bass And Low End. For background, see High-pass filter on Wikipedia.

Fortunately, with the help of proper equalization, removing unwanted bass frequencies and filtering out the low-end can elevate the audio quality and give it a clean and polished finish. Hence, adjusting equalizer settings is a crucial skill that every audio professional must master. This article will guide aspiring composers, producers, and music enthusiasts on how to filter out the low end and enhance the sound quality.

Filter Out The Low End

Credit: larslentzaudio.wordpress.com

Why Filter Out Low End?

Filtering out the low end is important to achieve better sound quality in audio production. The low-end frequencies can cause distortion and muddiness, leaving audio sounding unclear and unprofessional.

How to Filter Out The Low End: Effects Of Excessive Low End

Excessive low end or bass in your music may seem impressive, but it can actually harm your final result. Too much bass can make your mix sound muddy, resulting in a lack of clarity. Additionally, when you turn up the volume, it can cause distortion, which can damage speakers. Adhering to HTML syntax, I can say that filtering out low end can help prevent these issues and make your music sound better.

Importance Of Balance

Balance is key when it comes to music production. Each element of your mix (bass, drums, guitar, vocals, etc.) should complement each other. Filtering out the low end helps improve the clarity of your mix and provides a better balance between different elements, ultimately resulting in a better listening experience for the listener. It is essential to remember that music is not only about one element, but rather, the interactions of many elements. Filtering out the low end is just one of the steps to achieve that balanced mix.

How To Identify Low End?

Identifying low end becomes essential especially when you are dealing with audio tracks and need to achieve professional results. Most producers consider low-frequency sound an essential element in audio tracks, as it provides a solid foundation for the rest of the mix. But on the other hand, low end can also be a problematic and tricky area to deal with if not handled properly. Therefore, it is essential to know how to identify low end and how to filter out the unnecessary low-frequency sounds.

How to Filter Out The Low End: Use Of Spectrograms

A spectrogram is a visual representation of the frequency spectrum of an audio signal as it varies with time. It is a useful tool for analyzing complex signals, such as music and speech, and can help identify the low end of a track. The lower the frequency, the smaller the peaks in the spectrogram. Use a spectrogram to identify the area of the low end so that it can be further analyzed using monitoring techniques.

Monitoring Techniques

Monitoring techniques are essential in identifying low end accurately. One common technique is to use high-quality headphones or speakers that reproduce low-frequency sounds accurately. You should listen to the same tracks on different devices, and each device should produce similar sounds. This helps you mix the low-frequency sounds correctly so they appear consistently no matter what device plays the track. Another technique is to use a frequency analyzer to visualize the low end. This allows for a precise measurement and analysis of the low frequencies in the track, which can help determine the presence of unwanted sounds.

Furthermore, there are numerous plugins and software that can help filter out the unnecessary low-frequency sounds and provide a cleaner low end. EQ plugins, high-pass filters, and low-frequency cut filters are some of the commonly used tools for this purpose. The use of such tools can help produce a professional and refined sound in the final audio track.

Conclusion

By following the above techniques, it is possible to identify and filter the low end of an audio track effectively. This helps you mix the low-frequency sounds accurately and keep them consistent across different devices. Understanding how to identify low end is an essential aspect of producing high-quality audio tracks, so do not overlook it.

How to Filter Out The Low End: Types Of Low End Filters

Low end filter types include high-pass filters, low-pass filters and band-pass filters. High-pass filters allow high-frequency signals to pass through and filter out the low end frequencies. Low-pass filters do the opposite, allowing low-frequency signals to pass through and filtering out the high end frequencies.

Band-pass filters allow only a specific range of frequencies to pass through, filtering out all other frequencies.

Low-end filters are audio processing tools that help to remove unwanted frequencies from audio signals. They typically filter out bass frequencies or other low frequencies that can muddy up a mix or cause unwanted distortion. There are different types of low-end filters, including High-Pass Filters and How to Filter Out The Low End: Low Shelf Filters, which we will discuss in more detail below.

High-pass Filters

Also, high-Pass Filters, also known as HPF, are filters that allow high-frequency sounds to pass through and attenuate the lower frequencies. High Pass Filters can remove unwanted low frequencies, such as hum, rumble, and wind noise. They are commonly used in many settings where there is a significant amount of low-frequency noise. These filters are designed to pass frequencies above a particular cutoff point and attenuate or block frequencies below that point. They work by reducing the bass and increasing the treble, which is why they are effective in removing hum and other low-frequency noise.

Low Shelf Filters

Low Shelf Filters are filters that attenuate or boost frequencies below a specified corner frequency. These filters are good at removing unwanted bass frequencies that may be present in an audio signal. Low Shelf Filters are designed to lower or increase the sound level below a certain frequency. They work like this: the filter’s frequency response curve starts at the cutoff point and continues on to another point where it levels off. The frequency response curve reduces the sound level of the frequencies below the cutoff frequency and can also boost levels. Low Shelf Filters are typically used to balance out mixes that are heavy in bass or low-frequency sounds.

In Conclusion

By filtering out the low end, you can achieve a cleaner, more focused mix that is free of unwanted noise and distortion. High-Pass Filters and Low Shelf Filters are just two of the many tools you can use to accomplish this. Try experimenting with different types of filters and see what works best for your mix.

Filter Out The Low End

Credit: m.youtube.com

Settings & Parameters Of Filters

Adjusting the settings and parameters of filters can enhance search results by eliminating undesired low-end data. This can minimize the irrelevant data that appears in searches, making it easier to find the most relevant results.

Filters are an essential component in audio production and play a significant role in the quality of the final product. But what are filters, and what are the settings and parameters involved to filter out the low-end in your track?

How to Filter Out The Low End: Cutoff Frequencies

Cutoff frequencies determine which frequencies the filter should allow to pass through and which frequencies should be attenuated or stopped. The cutoff frequency is the frequency at which the signal strength is reduced by half, expressed in hertz (Hz). Typically, high-pass filters allow high frequencies to pass through and attenuate the low frequencies below the cutoff point. On the other hand, low-pass filters attenuate frequencies above the cutoff point, allowing only the low frequencies to pass through.

Slope Settings

The slope setting of a filter determines how quickly the signal is attenuated after the cutoff point. Slope is measured in decibels per octave (dB/oct), where one octave represents a doubling of frequency. Most filters come with slope settings ranging from 6 dB/octave to 48 dB/octave. A low slope setting results in a gradual roll-off of frequencies, whereas a high slope setting results in a steeper roll-off.

How to Filter Out The Low End: Filter Types

Different filter types offer various ways in which to filter out the low end. Butterworth filters are the most commonly used filters in audio production and provide a flat frequency response in the passband. Chebyshev filters offer steeper roll-offs than Butterworth filters but have ripples in the passband, which may not be ideal for some producers. Elliptic filters provide the steepest roll-off of all filter types but have ripples in both the passband and stopband. Filtering out the low end of an audio track is crucial in providing a clean, well-balanced sound. By adjusting settings such as cutoff frequencies and slope settings, producers can fine-tune their sound and create a top-quality audio product.

Applying Filters In Various Scenarios

Filtering out the low end is an important step in various scenarios, such as in audio mixing or analyzing data. It involves removing unwanted frequencies or values that do not contribute to the overall quality or accuracy of the output.

Choose the appropriate filter for the specific task to achieve the desired results.

Filters are widely used in music production and can be applied in various scenarios during the mixing and mastering stage. Properly filtering out the low end can clean up a mix and create a more defined sound. This technique can be achieved by applying different types of filters such as high-pass, low-pass, and band-pass filters.

How to Filter Out The Low End: In Mixing Stage

During the mixing stage, filters can clean up the low end and prevent muddiness in the overall mix. The low-end frequencies of instruments like the bass and kick drum can conflict in the mix and cause muddiness. Using a high-pass filter on each track can remove the low end, leaving the mid and high frequencies to stand out.

Mastering Stage

You can also apply filters during the mastering stage to ensure the track has a balanced frequency response. Applying a low-pass filter can reduce any unwanted high-end frequencies in the track. This can help with preventing harshness or sibilance in the overall mix. A high-pass filter can also work on the final master to clean up any unwanted low end that may have been missed during the mixing stage.

Conclusion

Properly filtering out the low end is an important technique in music production. Applying filters in various scenarios during the mixing and mastering stage can lead to a cleaner and more defined sound. Try using different types of filters such as high-pass, low-pass, and band-pass to achieve the desired sound for your track.

Filter Out The Low End

Credit: www.audio-issues.com

How to Filter Out The Low End: Potential Pitfalls To Avoid

When creating content, it is important to filter out low-end topics and content that could potentially harm SEO ranking. Avoid using overused phrases and sentences, and instead keep it brief, unique, and in active voice. Using varied phrases in each paragraph and passing AI writing detection can improve reader engagement.

When it comes to mixing music, one of the most critical steps is to filter out the low end. Doing so removes any unwanted low-frequency noises and gives more room for the instruments and vocals to breathe. However, while filtering out low-frequency sounds can enhance the mix, it can also lead to a few potential pitfalls that you should avoid.

Over Filtering

One of the most common mistakes when filtering out the low end is over-filtering. Over-filtering is when you remove too much of the low-frequency range, resulting in a thin and weak-sounding mix. It’s essential to understand that while removing low frequencies can be advantageous, it’s not meant to remove everything below a particular frequency range entirely.

How to Filter Out The Low End: Compromised Tonal Balance

Another potential risk of filtering out the low end is the compromised tonal balance. If you remove too much of the low-frequency range, it can have a significant impact on the overall tonal balance of the mix. You don’t want to end up with a mix that sounds too bright or too thin. Therefore, try to find a balance that retains the tonal balance while eliminating any unwanted low-frequency sounds.

Using The Appropriate Tools

When filtering out the low end, it’s crucial to use the appropriate tools. Several plugins and EQs can help you filter out the low end effectively. Always choose tools that allow for a precise and gradual filtering process. Try to avoid tools that provide you with only fixed frequency options, as they may not be suitable for your mix.

Conclusion

Filtering out the low end is a crucial step in mixing music, but it’s essential to avoid these pitfalls mentioned above. Over-filtering can lead to a weak and thin mix, while inappropriate tools can also harm the entire mixing process. By using the appropriate tools and finding the right balance, you can achieve a mix that sounds full and vibrant.

How Filtering Out Low End Can Enhance Your Mixes

Filtering out low end frequencies from your mixes can enhance the overall sound quality and clarity. It allows other elements in the mix, such as vocals and instruments, to shine through and be heard more clearly.

The low end is an important part of any mix, but it can also be the most problematic. When you have too much low-end rumble in your mix, it can take away from the clarity of your mix and make it difficult for the individual elements to stand out. However, by filtering out the low end, you can enhance your mixes in a variety of ways.

Clarity

One of the biggest benefits of filtering out the low end is that it can greatly improve the clarity of your mix. When there’s too much low-end rumble, it can blur the lines between the different elements of your mix and make it difficult to distinguish one instrument from another. By removing the low end, you can give each element of your mix its own space and clarity, making it easier for your listeners to hear what’s going on.

Improved Level Control

Another benefit of filtering out the low end is that it can give you improved level control. When there’s too much low-end rumble, it can make your mix sound muddy and undefined. By removing the low end, you can give yourself more headroom to work with, which can make it easier to achieve a balanced mix. Additionally, when you have a more defined low end, it’s easier to control the levels of the other elements in your mix.

Better Translations

Finally, filtering out the low end can also lead to better translations of your mix. When you have too much low-end rumble, it can lead to problems when your mix is played on different systems or in different environments. By removing the low end, you can create a more consistent and clear mix that will sound great no matter where it’s played. In conclusion, filtering out the low end can be a powerful tool in your mixing toolbox. It can help improve the clarity of your mix, give you better level control, and lead to better translations of your mix. So the next time you’re struggling with your mix, consider filtering out the low end and hear the difference it makes.

The Future Of Low End Filtering

Low end filtering is a crucial task in music production that ensures that only the most important and relevant parts of a track receive attention while the others remain muted. However, filtering out the low-end range has always been a challenging task, often leading to distortion and dropped volume levels in a mix. But with the rise in technology, new techniques have emerged that are improving the process of low-end filtering. This article focuses on the advancements in mixing technology and innovative filtering techniques that are shaping the future of low-end filtering.

Advancements In Mixing Technology

In modern-day mixing technology, the use of multiband compression and dynamic EQs has revolutionized low-end filtering. The use of these features allows for smooth and seamless cuts to be made in specific frequencies, providing room for the most important parts of a song to shine while maintaining the maximum possible quality level across the mix. Multiband compression and dynamic EQs can work together to create cleaner and more precise filtering, eliminating the need for manual filtering techniques that can destroy the overall quality of the track.

Innovative Filtering Techniques

In addition to advancements in technology, filtering techniques have also evolved significantly in recent years. One such technique is the use of phase cancellation, which cancels out the low-end on a track that is not critical to the overall mix. This technique can bring out the kick and bass in a mix, creating a more powerful and cohesive sound. Furthermore, the use of high-pass filters and low-shelving EQs can help remove unwanted frequencies to create a more accurate and tailored mix.

In conclusion, the future of low-end filtering is looking brighter than ever thanks to the continual advances in technology and innovative filtering techniques. With cutting-edge mixing technology and intuitive filtering tools, music producers can now create mixes with unmatched clarity and depth, elevating the overall sound of their productions.

Frequently Asked Questions For Filter Out The Low End

What Does The Low Cut Filter Do?

A low cut filter reduces or removes low-frequency sounds or noise from an audio signal. It’s also known as a high-pass filter. This filter is useful when working with audio files that have background noise or unneeded bass sounds.

What Is Low End In Music?

Low end in music refers to the bass frequencies or the lower range of notes produced by musical instruments or equipment. It is an essential component of many music genres, including electronic dance music, hip hop, and jazz. The low end adds depth, weight, and rhythm to a composition, creating a full and satisfying listening experience.

What Does The Low-pass Filter Do?

A low-pass filter is an electronic circuit that allows low-frequency signals to pass through while blocking high-frequency signals. It is mainly used to eliminate unwanted noise or harmonics from a signal, making the output smoother and more consistent.

How Do You Balance A Low End Mix?

To balance a low-end mix, focus on reducing the low frequencies that are too pronounced. Use EQ to remove low-end mud, choose appropriate instruments or sounds that aren’t too deep, and try to find a balance between your other frequencies.

Experiment with effects such as compression, saturation, or distortion to sweeten the overall sound, and always reference your mix in various listening environments to ensure it translates well.

Conclusion

Filtering out low-end content is crucial in ensuring top-notch quality for your website or business. By carefully curating your content, you not only improve your site’s overall user experience, but also boost your search engine rankings. Remember to focus on providing value to your readers, rather than simply churning out content for the sake of it.

With these tips, you can effectively filter out low-end content and achieve content marketing success.

Categories
Archive

Yamaha Reface Review

Yamaha Reface Review: The Yamaha Reface series is a set of compact keyboard synthesizers that pack an impressive punch for their size, with four different models catering to different soundscapes. The Reface CS, DX, CP, and YC each have their unique set of features, all housed in a portable and user-friendly design, making them ideal for both gigging musicians and those new to synthesis.

The Yamaha Reface synthesizers have been around for a few years now and have quickly gained a reputation for being some of the best miniature synthesizers available in the market. Yamaha has a long standing reputation as a leader in synthesis and this line of keyboards is no exception.

They are compact, versatile, and highly customizable, impressively squeezing a wide range of sounds and functions into a small package. In this review, we will take a closer look at each of the four models in the Reface series to examine what makes them unique and whether they live up to the Yamaha name.

Design

The Yamaha Reface is a compact-sized synthesizer that scores high on aesthetics and durability. In this section, we will discuss the design aspects of this classic mini keyboard.

Compact Size

The first thing that strikes you about the Yamaha Reface is its small size. This keyboard measures just 20.9 x 6.5 x 2.2 inches, making it ideal for musicians on the move. Its lightweight design allows you to carry it in a backpack or a small bag, making it a popular choice for performers who need a reliable instrument that can fit in tight spots.

Stylish Look

The Yamaha Reface oozes style and sophistication. The elegant white finish and minimalistic design add to its visual appeal. The compact size also means that it doesn’t take up too much space on the stage, leaving more room for other essential equipment.

Sturdy Build

Despite its small size, the Yamaha Reface is built to last. Its sturdy construction makes it an ideal choice for musicians who perform regularly. The durable plastic casing ensures that the keyboard can withstand the rigours of life on the road, including being bumped around in transit. The buttons and knobs are also well-designed, making it easy to navigate through different settings and effects, even in low-light conditions.

Overall, the design of the Yamaha Reface sets it apart from other keyboards in its class. Its compact size, stylish look, and sturdy build make it a popular choice among musicians who demand a reliable instrument that can withstand the challenges of life on the road.

Yamaha Reface Review

Credit: musictech.com

Features

The Yamaha Reface series of synthesizers is a compact and portable collection of four instruments, each with its own unique features and sound. With its intuitive interface, built-in effects, and battery-powered operation, the Reface series is perfect for both live performances and studio recording.

Looking for a compact, yet powerful synth? Take a look at the Yamaha Reface line. These portable synthesizers are perfect for beginners and pros alike, featuring a variety of features that make them ideal for everything from jamming at home to gigging on the road. In this post, we’ll take a closer look at the key features of the Yamaha Reface, including its sound engine, polyphony, effect types, and connectivity options.

Sound Engine

At the heart of the Yamaha Reface is a powerful sound engine that delivers a wide range of sonic possibilities. The engine is based on Yamaha’s proprietary FM synthesis technology, which is known for its rich, complex sound. With the Reface, you can create everything from classic analog tones to cutting-edge EDM sounds. Plus, the sound engine is easy to use, allowing you to tweak and customize your sounds in real-time.

Polyphony

The Reface offers up to eight-note polyphony, which means you can play up to eight notes simultaneously. This is perfect for creating lush, layered sounds, or for playing intricate keyboard parts that require multiple notes. Plus, the Reface features two built-in polyphonic modes, which allow you to play chords or synth leads with ease.

Effect Types

In addition to its powerful sound engine, the Reface also offers a variety of built-in effects. These include delay, reverb, chorus, and distortion, among others. The effects can be used to add depth, dimension, and grit to your sounds, or to shape them in new and interesting ways.

Connectivity Options

Finally, the Reface offers a variety of connectivity options to suit your needs. It features a built-in speaker, as well as a headphone jack for private practice. Plus, it can be powered by batteries or an optional AC adapter, making it perfect for use on the go. And with its MIDI and USB connectivity, you can easily connect it to your computer or other devices for even more creative possibilities. In conclusion, the Yamaha Reface is a powerful, versatile synth that offers a wide range of features to suit any musician or producer. Whether you’re a beginner just starting out or a seasoned pro looking for a portable, easy-to-use synth, the Reface has something to offer. So why wait? Try one out today and see what all the fuss is about!

Playing Experience

Playing the Yamaha Reface can be described as an exceptional experience, thanks to its fantastic features that offer a comfortable and seamless journey for music enthusiasts. Here are some of the reasons why:

Responsive Keyboard

The Yamaha Reface has a responsive keyboard that offers a natural feel, allowing for fluid playing and easy control. The keyboard is also velocity-sensitive, enabling you to play any style from soft to hard sounds with ease. This feature provides not only a pleasurable playing experience, but also enables for more expressive and dynamic performances.

Realistic Sound

The Reface delivers realistic sounds that are produced using Virtual Circuitry Modeling (VCM) technology. This feature provides accurate, rich, and authentic analog sounds, including FM synthesis and a range of vintage sounds. Each Reface also comes pre-loaded with five distinct sound engines providing an array of tones for all styles of music. This feature ensures that you get to enjoy high-quality music performances every time you play on the Reface.

Easy Navigation

The Reface has a clear and easy-to-use interface that provides easy navigation. The control panel is straightforward and simple to use, meaning that users can swiftly customize their sounds and access essential features. The straightforward layout is well-organized and offers an effortless and productive user experience, allowing for customization of your settings to your unique preferences. This feature ensures less time is spent changing settings and more time playing and making music on your Reface.

Yamaha Reface Review

Credit: www.musicradar.com

Pros

Yamaha Reface is an excellent series of compact and portable synthesizers that offer great value for money. The series consists of four models – Reface CP, Reface YC, Reface CS, and Reface DX – each with its unique features and capabilities. In this section, we will focus on the pros of the Yamaha Reface series.

Compact And Portable

The first and foremost advantage of the Yamaha Reface series is its compact size and portability. The synthesizers are designed to fit easily on your desk or carry around with you wherever you go. They are lightweight and can be powered by batteries, making them perfect for on-the-go musicians or performers. Despite their small size, each model packs a powerful synthesizer engine capable of producing high-quality sounds.

High-quality Sound

Another significant advantage of the Yamaha Reface series is its high-quality sound. Each model features a sound engine designed to reproduce the sonic characteristics of classic Yamaha keyboards, making them ideal for musicians looking for vintage sounds. The Reface CP boasts an exceptional selection of classic pianos, while the Reface YC comes with a wide range of organ sounds. The Reface DX offers an authentic FM synthesis experience, while the Reface CS includes an impressive range of analog-style synths.

Great Value For Money

Lastly, the Yamaha Reface series offers excellent value for money, making them an attractive choice for musicians on a budget. Despite their small size, the synthesizers pack a lot of features and capabilities that are typically found in more expensive keyboards. They come with built-in effects, a looper, and a Phrase Looper that enables you to record up to 16 phrases and switch between them seamlessly. Moreover, the synthesizers are compatible with Yamaha’s Soundmondo app, which provides access to a community-driven database of sounds and presets.

In conclusion, the Yamaha Reface series is an excellent choice for musicians looking for a compact and portable synthesizer that offers high-quality sounds and great value for money.

Cons

One potential downside of the Yamaha Reface is its small size, which may feel cramped for some musicians. Additionally, the lack of built-in speakers means you’ll need to have external speakers or headphones to fully enjoy the instrument’s sound.

Limited Polyphony One of the primary downsides of the Yamaha Reface is its limited polyphony. With just a maximum of 8 voices, this synthesizer can quickly become overwhelmed, especially when playing complex chords. This limited capacity requires players to be more mindful of their playing style, ensuring they don’t accidentally create a ‘note-off’ effect when the maximum polyphony is exceeded. Fewer Keys Than a Standard Keyboard Yamaha Reface comes with a smaller keyboard, which is ideal for those who are frequently on the move. However, for professional musicians who are accustomed to full-sized keyboards, this may pose a challenge. As the Reface keyboard has only 37 keys, it offers a limited range of notes, making it unsuitable for more complicated compositions that require a more extensive keyboard range. Not Ideal for Complex Compositions Another downside of the Yamaha Reface is its limited capability in the context of complex compositions. The Reface is primarily designed for simple composition and sound creation, meaning it may not be the best fit for more complicated projects. Its lack of polyphony and limited keyboard range makes complex compositions difficult to execute. If you’re attempting to create orchestral-style music with several layers of sounds, the Reface might not be the ideal choice. In conclusion, the Yamaha Reface is a great synthesizer for beginners or those who need a portable instrument. However, there are downsides to consider, such as the Reface’s limited polyphony and smaller keyboard range. It might not be the right choice for those looking to create more complex and intricate music compositions. Nonetheless, for its intended purpose, the Yamaha Reface is a solid instrument that is easy to use and will likely satisfy most users.

Yamaha Reface Review

Credit: ask.audio

Who’s It For?

If you’re a musician seeking a compact, portable keyboard with plenty of features, the Yamaha Reface is worth a second look. Its versatile sound engine, combined with a suite of customizable effects and easy-to-navigate controls, make it an excellent choice for gigging and studio work alike.

Yamaha Reface is a compact synthesizer series, which appeals to several groups of musicians. Whether you are a beginner or an expert, a performer or a home-studio owner, Reface has something to offer for all. Therefore, let’s dive deeper and explore which group can benefit the most from the Yamaha Reface series.

Beginner And Intermediate Musicians

If you are a beginner or intermediate musician, Yamaha Reface is an excellent option for you. The keyboard is user-friendly, making it easy to learn, play and explore new sounds. It is also lightweight, which means you can carry it anywhere you go. Reface has four models – Reface CS, Reface CP, Reface DX, and Reface YC –each one of them catering to various sound preferences. Moreover, its compact size and affordable price make it an ideal choice for musicians who are low on space or budget.

Live Performers

For live performers, Reface is a perfect choice since it is lightweight and portable. Its battery operation feature comes in handy, allowing you to perform without worrying about electrical outlets. Reface CS and Reface YC models are suitable for playing live since they offer extensive sound editing options and have a built-in phrase looper. This feature enables you to record and loop multiple patterns, allowing you to create a full song even with a one-man-band performance.

Home Studio Owners

If you own a home studio and want a compact synthesizer that allows you to experiment with different sounds, Yamaha Reface may be an excellent option for you. Its ability to connect to a computer via USB port makes it easy to record and edit sounds. Reface models CS and DX come with advanced controls, allowing you to tune the sounds to your preference, making it perfect for music producers and sound engineers. In conclusion, Yamaha Reface is a versatile series of synthesizers, that cater to diverse needs of musicians. Whether you are a beginner seeking to learn and play, a performer looking for a portable instrument, or a home studio owner requiring a compact and powerful synthesizer, the Yamaha Reface series offers the perfect solution for all your needs.

Frequently Asked Questions Of Yamaha Reface Review

Is Yamaha Reface Worth It?

Yes, Yamaha Reface is worth it as it is a compact and portable synthesizer with high-quality sound and versatile features. It is affordable, user-friendly, and perfect for both beginners and professionals who want to create music on the go. You can explore different sounds, effects and customize your own music easily with its innovative interface and intuitive control.

How Long Does Yamaha Reface Last On Batteries?

Yamaha Reface lasts on batteries for approximately 5 hours depending on usage.

What Is The Yamaha Reface Based On?

The Yamaha reface is based on the company’s classic synthesizers combined with modern design and technology. It incorporates four unique versions – reface CP, reface DX, reface YC, and reface CS – each with their own distinct sound and features.

What Are The Effects Of Yamaha Reface Dx?

Yamaha Reface DX has numerous effects that can be utilized to create unique sounds. These effects include tremolo, distortion, chorus, phaser, and reverb, among others. The Reface DX also has a built-in looper, arpeggiator, and sequencer. Overall, the effects of Yamaha Reface DX allow for very versatile sound manipulation.

Conclusion

To sum up, Yamaha Reface is a highly versatile and portable musical instrument that has managed to garner a dedicated fan base since its launch. With its sleek design and impressive sound quality, it is a great investment for musicians who are constantly on the go.

Its range of features and easy-to-use interface adds to its appeal. Overall, Yamaha Reface is definitely worth considering for anyone looking for a high-quality, compact synthesizer. Get your hands on it and take your music to the next level.

Categories
Archive

Analog Vs Digital Summing

Analog summing refers to combining audio signals using an analog mixer, while digital summing involves sorting and merging signals in a digital audio workstation (DAW). Both methods have unique benefits and drawbacks to consider when mixing music.

Also, analog summing is a more traditional approach, and it has a reputation for producing a warmer, more natural sound. The signal processing occurs outside of the computer, often on a hardware mixer that manipulates the audio using analog circuits and components. In contrast, digital summing happens within the DAW using binary code, allowing for precise and accurate manipulation of the sound.

Related reading: Analog Meets Digital and How To Make A Digital Synth Sound Analog. For background, see Audio mixing (recorded music) on Wikipedia.

This also means that digital summing can be undone and redone without losing sound quality, while analog summing is irreversible. Moreover, ultimately, the choice between both methods comes down to personal preference, the type of music you produce, and the available equipment. Mixing engineers often experiment with both methods to determine which produces the best sound for a particular project.

Analog Vs Digital Summing

Credit: m.youtube.com

Analog And Digital Summing: Analog Summing

In addition, analog summing and digital summing have their own advantages and disadvantages. While analog summing offers a warmer sound and more natural harmonics, digital summing can provide greater accuracy and precision. Ultimately, it comes down to preference and the specific needs of the audio project.

Analog summing is an old-school process of mixing audio signals. Using analog summing, you combine audio signals without any conversion to a digital signal, a step that digital summing commonly relies on. Analog summing uses an analog mixer or summing amplifier with multiple channels to combine audio signals, which differs from mixing “in the box” (ITB), where a digital audio workstation (DAW) sums the audio signals.

Advantages

Analog summing has several advantages over digital summing. Here are some of them:

  • Analog summing produces a more natural, warm, and musical sound compared to digital summing. It adds color, character, and dimension to each instrument and track, making them sound more organic and lively.
  • Analog summing can handle high levels of gain without distorting or clipping. It allows headroom so that the peaks of each track can be handled without causing any artifacts.
  • Analog summing allows you to use outboard equipment, such as compressors, equalizers, and preamps, to shape the sound of each instrument before it is summed. It provides a hands-on approach to mixing and allows for more creative possibilities.

Analog And Digital Summing: Disadvantages

Analog summing has some downsides that you should consider. Here are some of them:

  • Analog summing requires additional equipment, such as a summing mixer or analog console, which can be costly and take up space. It is not suitable for those with limited budgets or small studio spaces.
  • Analog summing requires more cables and patching, which increases the likelihood of noise, interference, and hum. It requires meticulous routing and grounding to reduce noise and maintain sound quality.
  • Analog summing is not as flexible or convenient as digital summing. It requires manual adjustment of the mixer’s faders, knobs, and switches for each track, which can be time-consuming and tedious.

Overall, analog summing is a classic technique that has stood the test of time. It provides a unique and desirable sound that many producers and engineers cannot achieve with digital summing alone. However, it also requires careful consideration of the advantages and disadvantages to determine if it is right for you.

Analog Vs Digital Summing

Credit: www.audiorecording.me

Digital Summing

Both methods are two different methods of combining audio signals in the mixing process. While analog summing involves blending the signals through physical equipment, digital summing uses software to perform the same task. Both methods have their advantages and it ultimately depends on personal preference and the specific needs of the project.

Digital summing is the process of adding up individual channels that have been converted to a digital format. Digital summing permits the blend of thousands of channels using software. Let’s take a closer look at the advantages and disadvantages of digital summing.

Analog And Digital Summing: Advantages:

  • Digital summing provides excellent precision and is consistent each time. It produces accurate and reproducible results, which is important in today’s digital age.
  • It’s more versatile and adaptable to revisions than analog summing. Engineers can try out a variety of mix versions and make changes easily without having to start over completely.
  • It can be done in-the-box, making it a more cost-effective and space-saving alternative to outboard analog gear.
  • The digital summing process reduces analog noise that may result from the addition of channels.

Disadvantages:

  • Sometimes, digital summing can lack the warmth and glue that analog summing provides. It can sound overly sterile and lifeless as a result of the process.
  • When digital summing is pushed too hard, it may produce unwanted artifacts such as digital clipping and distortion.
  • Some engineers worry that digital summing can cause phase issues that can disrupt the sonic balance of a track. However, most digital summing engines like SSL Sigma, Waves Soundgrid, and Slate Digital VCC, among others, have phase-locked circuitry that corrects these issues.
  • Digital summing can make a track’s transient response sound flatter and less punchy.

Analog Vs Digital Summing

Summing is an audio mixing technique used to combine multiple audio signals. The technique is used in both analog and digital environments. However, there is an ongoing debate about which method is better – analog or digital.

Analog And Digital Summing: Difference In Sound Quality

One of the biggest differences between analog and digital summing is the sound quality. Analog summing often produces a smoother and warmer sound due to its harmonic distortion and saturation. On the other hand, digital summing can sometimes be harsher and colder.

While digital summing technically has a higher signal-to-noise ratio, resulting in a cleaner sound, analog summing introduces natural harmonics and subtle distortion. This subtle distortion gives the audio a more natural and pleasing feel, especially when dealing with certain genres of music like rock, hip-hop, or country.

Cost Comparison

There is a significant difference in cost between analog and digital summing. Analog mixing consoles and outboard gear are expensive, and the cost of maintenance and repair can add up over time. However, analog summing enthusiasts argue that the added expense is worth it for the superior sound quality.

Digital summing, on the other hand, requires significantly less investment and maintenance. In addition, digital summing allows for more accurate recall of previous mixes, making it a preferred choice for post-production and mastering studios.

Suitability For Different Genres Of Music

While analog summing is generally preferred for genres like rock and hip-hop, digital summing is more commonly used for genres like EDM or pop music which rely heavily on synthesizers and software-based instruments. Analog summing can also add a certain warmth to acoustic instruments like guitars, drums, and even vocals.

Ease Of Use

Digital summing has an edge when it comes to ease of use. The workflow is simpler and more straightforward, allowing for quicker turnaround times. With the use of digital audio workstations, mixing can be done quickly and efficiently. Analog summing, on the other hand, requires set up and routing to different outboard gear. It is also more challenging to recall previous mixes with analog setups.

Analog SummingDigital Summing
Produces warmer and smoother soundProduces cleaner and more precise sound
Expensive and requires maintenanceAffordable and low maintenance
Preferred for rock and acoustic genresPreferred for EDM and pop music
More challenging to set up and recall mixesSimple and straightforward workflow

Overall, the choice between analog and digital summing comes down to personal preference and the specific needs of the project. While analog summing is preferred for its warm, natural sound, digital summing offers greater accuracy and ease of use.

Analog Vs Digital Summing

Credit: www.bhphotovideo.com

Frequently Asked Questions For Analog Vs Digital Summing

Does Analog Summing Make A Difference?

Yes. Analog summing can make a noticeable difference in sound quality when compared to digital summing. This is due to the unique way that analog circuitry processes audio signals, resulting in a warmer, more cohesive sound. However, the difference may not be significant enough for all users to justify the cost and workflow changes required to incorporate analog summing into their setup.

What’s The Difference Between Analog And Digital Mixers?

The main difference between analog and digital mixers is the technology used. Analog mixers use traditional electrical signals while digital mixers convert signals into numerical codes. Digital mixers have more features and offer better sound quality, but analog mixers are simpler to use and more affordable.

Is Analog Mixing Better?

Analog mixing can produce warmer, more natural sound due to the physical process of signal flow. However, digital mixing offers more precise control, easier recall of settings for future use, and the ability to use plugins and virtual instruments. Ultimately, it depends on personal preference and the specific needs of the project.

What Is The Point Of A Summing Mixer?

A summing mixer combines multiple audio signals into a final stereo mix. It allows for better control and manipulation of sound levels, resulting in a more cohesive and polished sound. It is a useful tool in recording studios and live sound situations.

Conclusion

Summing up, both analog and digital summing have their unique pros and cons. While analog mixing provides a warmth, character, and organic feel to the audio, digital summing offers accuracy and a clean sound. The choice of summing technique ultimately depends on the desired outcome, budget, and available gear.

In the end, it’s all about finding the right balance between the technical aspects and personal preferences to achieve the best results in audio mixing.

Categories
Archive

The Theremin Explained

The theremin is an electronic instrument that is played without any physical contact. It produces sound by sensing the movement of the player’s hands in the air.

The theremin, invented by Russian physicist Leon Theremin in 1919, is one of the earliest electronic musical instruments. It has been used in numerous musical genres, including classical, jazz, and popular music. The instrument has a unique sound that has been described as ethereal, spooky, and futuristic.

Despite its initial popularity, the theremin fell out of favor in the mid-20th century, only to experience a revival in the 1990s. Today, it is still played by enthusiasts around the world, and is considered a classic of early electronic music. We will delve into the history, workings, and uses of the theremin.

History Of The Theremin

The theremin is one of the most unique and intriguing musical instruments ever created. It is played without actually being touched, and its eerie, otherworldly sound has been featured in countless sci-fi movies and TV shows. Let’s take a closer look at the history of this fascinating instrument, including its invention and early years, its popularity and decline, and its revival and modern times.

Invention And Early Years

The theremin was invented in 1919 by Russian physicist Lev Sergeyevich Termen, also known as Leon Theremin. He was working on a device that could measure the density of gases when he noticed that the machine emitted a sound that varied depending on the distance between his hands and the device’s antennas. Theremin realized that he had just invented a new kind of musical instrument.

Theremin’s original design was known as the etherphone, and it consisted of a wooden box with two antennas that the player could manipulate to control the pitch and volume of the sound. The first public demonstration of the etherphone took place in 1920, and it quickly gained popularity as a novelty instrument.

Popularity And Decline

Throughout the 1920s and 1930s, the theremin gained popularity as a serious musical instrument, and it was used in orchestral music, popular music, and film scores. However, the instrument was difficult to play and required a great deal of skill, which limited its appeal to a niche audience.

Additionally, the outbreak of World War II led to a decline in the popularity of the theremin. Leon Theremin was forced to return to the USSR, where he was imprisoned and forced to work on government projects. The instrument all but disappeared from public view.

Revival And Modern Times

In the 1950s, a new generation of musicians discovered the theremin and revived interest in the instrument. The theremin was used in the music of avant-garde composers such as Edgard Varèse and Karlheinz Stockhausen, and it also found a place in popular music through the work of bands like The Beach Boys and Led Zeppelin.

In the decades since, the theremin has continued to capture the imagination of musicians and audiences alike. Modern performers have explored new ways of playing and incorporating the instrument into different genres of music, from classical to electronic to experimental.

Today, the theremin remains a one-of-a-kind instrument that continues to fascinate and inspire musicians and enthusiasts around the world.

The Theremin Explained

Credit: www.youtube.com

How Does A Theremin Work?

The Theremin, an instrument not played by touch, but by hand gestures between two antennas. One antenna controls pitch while the other controls volume. When the player’s hand moves closer to or further away from the pitch antenna, it affects the frequency of the sound produced, creating a unique and eerie sound.

The theremin is a unique musical instrument that is played without being touched. Instead, it is played by moving your hands through an electromagnetic field. But, how does it work? Let’s explore the different components of the theremin and their roles.

Electromagnetic Field

The theremin works by generating an electromagnetic field around two antennas. The player moves their hands through this field which changes the capacitance of the antennas. This results in a change in pitch or volume of the sound produced by the theremin.

Pitch And Volume Antennas

The theremin has two antennas that control pitch and volume respectively. The pitch antenna is usually a vertical rod, while the volume antenna is typically a loop. By moving their hand closer or further away from the antennas, the player can control the pitch and volume of the sound produced by the instrument.

Amplifier And Speaker

The theremin’s sound is very quiet, so it requires an amplifier to make it louder. The amplified sound is then played through a speaker, which produces the sound we can hear. The amplifier also helps to control the sound and tone of the theremin. In summary, the theremin works by creating an electromagnetic field around two antennas and the player’s hand changes the capacitance which alters the pitch and volume of the sound produced. The sound is amplified through a speaker with the help of an amplifier. This unique instrument might seem difficult to play, but with practice, it can produce beautiful and haunting sounds.

Famous Theremin Players

From classical music to sci-fi film soundtracks, the theremin is known for its other-worldly sound and unique playing technique. Some notable theremin players include Clara Rockmore, Lydia Kavina, and Pamelia Stickney, who have each contributed to the instrument’s evolution and popularity.

The theremin is one of the most mysterious and fascinating musical instruments of all time. It’s a unique instrument that is played by moving your hands around two antennas to create a variety of sounds. Over the years, the theremin has captivated many musicians, and some have even become famous for their skills in playing this surreal instrument. Here are some of the famous theremin players you should know about:

Clara Rockmore:

Born in 1911, Clara Rockmore is considered the greatest theremin virtuoso of all time. She studied classical violin from a young age, but due to a physical ailment, she had to quit playing. Later, she discovered the theremin and became fascinated by its potential. She worked closely with the instrument’s inventor, Leon Theremin, to improve its design and learn how to play it. Eventually, Rockmore became the most prominent theremin player in the world and performed with many famous orchestras.

Lucie Rosen:

Lucie Rosen was a famous theremin player in the 1930s and 1940s. She was born in Austria but moved to America to pursue a career in music. Rosen was a talented performer who played the theremin with ease and grace. She performed in many concerts and radio broadcasts, and her music captured the hearts of many listeners. Rosen worked with many famous composers and helped bring the theremin into mainstream music.

Lydia Kavina:

Lydia Kavina is a Russian theremin player who has helped bring the instrument back into the spotlight. Kavina is the granddaughter of Lev Termen, the inventor of the theremin. She began playing the instrument at an early age and has become one of the leading experts on playing the theremin. Kavina has performed all over the world, and her music has been featured in many movies and TV shows. She is renowned for her technical skill and musicality. In conclusion, these famous theremin players have helped make the instrument more accessible to a wider audience. Their performances show that the theremin is not just a quirky novelty instrument, but a legitimate musical tool capable of producing a wide range of emotions. Whether you’re a fan of classical music, electronic music, or anything in between, there’s no denying the unique and awe-inspiring sound of the theremin.

Applications Of The Theremin

Despite being invented nearly a century ago, the theremin has continued to captivate music enthusiasts and scientists alike. Its unique sound and features have led to its use in various fields ranging from music production to science and education. Below are some of the popular applications of theremin:

Music Production

The theremin has been used in music production for decades, with many famous tracks featuring the instrument. Due to its unique sound and versatility, it has been commonly used in genres such as electronic, experimental, and avant-garde music. Even legendary artists such as Led Zeppelin, The Beach Boys, and Angelo Badalamenti have used the theremin in their music.

Film Soundtracks

The eerie and otherworldly sound of the theremin has made it a popular choice for film soundtracks, especially in sci-fi and horror movies. Famous examples include the soundtracks for “The Day the Earth Stood Still” and “Forbidden Planet.” The instrument is also popular in modern film soundtracks, such as “The Machinist” and “Ed Wood.”

Science And Education

Aside from music, the theremin has also found numerous applications in science and education. Its unique design and the way it produces sound have made it useful in physics and engineering research. Additionally, the theremin has been used as a tool for teaching music and sound waves in classrooms worldwide.

Diy Theremin Projects

Learn how to build your own Theremin with these easy to follow DIY projects. Discover the fascinating history and principles behind this unique electronic musical instrument.

DIY Theremin Projects offer an incredible opportunity to experience the world of music in a unique way. Building your own theremin puts you in control of the design, features, and sound of the instrument. This article will explain the basics of the theremin and dive into some popular DIY projects that you can try out.

Building A Basic Theremin

Building a Basic Theremin is a great starting point for beginners. This DIY project involves simple components and wiring that can be easily assembled within a few hours. The best part of this project is that it does not require any expertise in electronics. All you need is a basic understanding of the components and some patience.

Digital Theremin Designs

Digital Theremin Designs is a step up from the basic theremin project. This DIY project involves creating a theremin that can be connected to a computer or other digital devices using MIDI protocols. This allows for greater customization of the instrument’s sound and features. This project requires some knowledge of electronics and coding.

Modifications And Upgrades

Modifications and Upgrades can be applied to any theremin, including those you build yourself. These modifications can improve the sound, functionality, and usability of the instrument. Some popular modifications include adding a volume control knob, a pitch quantizer, or a waveform selector. These modifications require expertise in electronics and may not be suitable for beginners. In conclusion, DIY Theremin Projects are a fantastic way to explore the world of music and electronics. Whether you are a beginner or an expert, there is a theremin project that is perfect for you. So grab your soldering iron and start building!

Theremin Vs Other Musical Instruments

The Theremin, one of the earliest electronic musical instruments, is unique in that it’s played without being touched. By using hand movements between two antennas, the player can create a range of sounds, from eerie sci-fi tones to classical music.

Unlike traditional instruments, the Theremin requires no physical contact, making it perfect for experimentation and sound manipulation.

The theremin is a unique musical instrument that is different from all other instruments in many ways. Unlike traditional instruments like the piano, guitar, and drums, the theremin is played by moving your hands in the air around the instrument without actually touching it. This gives the theremin a very distinct sound that is unlike any other instrument. In this section, we will discuss the advantages and limitations of the theremin compared to other musical instruments.

Advantages For Expressiveness

One of the biggest advantages of the theremin is its increased expressiveness. Unlike other instruments where the sound is produced by hitting, plucking, or blowing into the instrument, the theremin is played by moving hands in the air. This means that the theremin player can produce a wide variety of sounds and tones, which can be controlled by hand movements. The player can create tremolos, glissandos, and vibratos with greater ease, which allows for greater expressiveness and nuanced performance.

Limitations For Technical Playing

While the theremin offers greater expressiveness, its unique playing style also leads to limitations for technical playing. Unlike traditional instruments where the player has to learn fingerings and chords, there is no way to effectively “practice” the theremin without actually playing it. This means that the player must have a strong mental image of the sound they want to produce and then attempt to create it with their movements. This makes it difficult to play with precision and can lead to mistakes or inaccuracies in the performance. Additionally, there is only one pitch control, which makes it difficult to play more complex music that requires rapid changes in pitch or multiple notes played simultaneously. Overall, the theremin is a unique and fascinating musical instrument that offers a unique sound and increased expressiveness. While it may have limitations for technical playing, it remains an important instrument in music history and is still enjoyed by countless musicians and music enthusiasts today.

Future Of The Theremin

The theremin is a unique musical instrument that creates sound without any physical contact. With its unusual sound and history, this instrument has carved out a niche in the music industry. Over time, the theremin has gone through various transformations, keeping pace with the technological advancements, and shaping its future.

Contemporary Compositions

The theremin gained popularity in the early 20th century, and its popularity has continued in the modern-day. Contemporary composers have embraced the instrument’s unique sound and included it in their compositions.

One of the recent works is Lux Aeterna composed by György Ligeti, where the theremin’s sound is used to create a dreamlike atmosphere. Other classical composers such as Dmitri Shostakovich and Olivier Messiaen have also used the theremin in their works

Experimental Uses

Besides music, the theremin has been used experimentally in various fields. The instrument has played a vital role in scientific studies such as exploring how the human brain processes sound and the instrument’s application in robotics and artificial intelligence.

The theremin has also been used in dance performances, such as in the contemporary piece “Rainbow Snake” by the choreographer, Merce Cunningham. Moreover, it has been employed in theatrical productions such as “The Day the Earth Stood Still” to create sound effects.

Integration With Other Technologies

The theremin’s unique capabilities have made it an excellent instrument for integration with other technologies. Recent developments in digital signal processing have enabled the creation of virtual theremins that can be played using software.

New technologies such as virtual reality and augmented reality have opened up new possibilities for the theremin’s use. The instrument has been integrated with virtual reality platforms to create immersive musical experiences for the users.

Also, the theremin has been integrated with MIDI controllers to allow it to be played alongside other digital and electronic musical instruments.

Conclusion

The theremin continues to generate interest and has played an essential role in shaping contemporary music and science. With the developments in technology, the theremin’s future looks bright, and it will continue to inspire musicians, scientists, and enthusiasts worldwide.

https://www.tiktok.com/api/img/?itemId=7312498673902996767&location=0&aid=1988

Credit: www.tiktok.com

The Theremin Explained

Credit: en.wikipedia.org

Frequently Asked Questions Of The Theremin Explained

How Does The Theremin Instrument Work?

The theremin instrument works by generating a magnetic field around two antennas, one for controlling pitch and the other for controlling volume. It uses the player’s hand movements to vary the distance to the antennas, generating different frequencies and amplitudes that create the eerie and unique sound of the instrument.

What Is The Theory Of The Theremin?

The theremin is a musical instrument that creates sound without being touched by the musician. Its theory is based on the principle of capacitance between two antennas, which affects the sound produced by the instrument.

Why Is The Theremin Not Popular?

The theremin is not popular due to its difficulty to play. It requires precise hand movements and lacks the traditional physical connection to an instrument. Additionally, its unusual sound can be difficult for mainstream listeners to appreciate.

What Was The Original Purpose Of The Theremin?

The original purpose of the theremin was to create a new musical instrument that could be played without physical contact by the performer. It was invented in 1919 by Russian physicist Lev Theremin and was initially used in experimental classical music compositions.

Conclusion

The theremin, with its unusual sound and unique playing style, is a fascinating instrument that has captured the attention of musicians and enthusiasts alike for many years. With its roots in early 20th century Soviet Russia, the theremin has come a long way and continues to be a popular instrument to this day.

Whether you’re a musician looking to expand your musical horizons, or simply someone who appreciates the beauty of music, the theremin is definitely an instrument worth exploring. So why not give it a try and see where this electrifying instrument takes you?

Categories
Archive

Tube Tech Hlt 2A Review

The Tube Tech Hlt 2A is a high-quality stereo tube equalizer that is highly regarded among audio enthusiasts and professionals. The Tube Tech Hlt 2A is a versatile sound-shaping tool that has garnered an impressive reputation among audio enthusiasts and professionals.

It is revered for its warm, silky, and pleasant sonic character, which is achieved through the use of dual triode vacuum tubes in the signal path. The equalizer comprises two channels, each with four EQ bands, low and high-pass filters, and a unique “Presence” control.

The “Presence” control allows users to add subtle harmonic distortion, which can add pleasant warmth and depth to vocal and instrument recordings. The Hlt 2A is the perfect tool for anyone seeking a high-quality, all-tube equalizer that delivers top-notch sound.

Tube Tech Hlt 2A Review

Credit: www.tube-tech.com

Key Features

The Tube Tech Hlt 2A is an impressive equalizer with versatile features. Its high and low shelf filters, mid range boost and cut, and smooth sound makes it a valuable addition to any studio setup.

Tube Tech Hlt 2A is a high-end tube equalizer that is revered for its superior quality and unique features. In this section, we will look at some of the key features that make this device stand out from the rest.

Overview Of Tube Tech Hlt 2a Features

The Tube Tech Hlt 2A has a wide range of features that make it an optimal choice for sound engineers and music producers. Here are some of the main features of this device:

  1. High-Quality Sound:
  2. The Tube Tech Hlt 2A is a Class-A tube equalizer that provides a warm, smooth, and authentic sound. It features two channels with passive filters that deliver supreme sound quality and unmatched flexibility.
  3. Handcrafted Design:
  4. This high-end tube equalizer is handcrafted with precision and attention to detail, ensuring that each unit meets the highest standards of quality and craftsmanship.
  5. Flexible Frequency Bands:
  6. The Hlt 2A is a dual-channel device that has six fixed frequencies per channel, providing producers with maximum flexibility in terms of tailoring the sound to their specific needs.
  7. Unique Pultec Design:
  8. The Tube Tech Hlt 2A incorporates the classic Pultec design, featuring a passive equalization circuit, which gives it a unique and unmistakable sound.
  9. Low Noise:
  10. The Hlt 2A has low noise levels, providing crystal-clear sound and eliminating any unwanted hiss or hum.

How Does It Compare To Other Tube Equalizers In Its Class?

When it comes to high-end tube equalizers, there are many options available, but the Tube Tech Hlt 2A stands out from the rest. Its unique Pultec design, high-quality sound, and flexible frequency bands make it a top choice for professional studios and producers. The Hlt 2A’s low noise levels and handcrafted design also set it apart from other devices in its class, making it a must-have for anyone wanting to achieve supreme sound quality in their music production.

Tube Tech Hlt 2A Review

Credit: www.frontendaudio.com

Sound Quality

The Tube Tech Hlt 2A Review highlights the exceptional sound quality of its tube technology. This device delivers smooth and warm audio with precise signal processing, creating a truly unique and immersive listening experience.

How Does Tube Tech Hlt 2a Enhance The Sound Quality?

If you’re someone who is looking for an easy-to-use and reliable equalizer to enhance the sound quality of your music recordings or mixes, then the Tube Tech Hlt 2A is definitely worth checking out. This analog device is known for its high-quality sound, and it can help you get the best possible sound from your recordings, whether you are a professional or an amateur. One of the main features of the Tube Tech Hlt 2A is its ability to add warmth to your sound. This is achieved through the use of high-quality vacuum tubes, which give your music a smooth, rich, and full-bodied sound that is difficult to replicate with digital emulations. The Hlt 2A also employs a passive LC filter that provides great accuracy and smoothness.

What Are The Notable Sound Improvements?

The Tube Tech Hlt 2A is designed to bring the best out of your music, and it does so in several ways. Here are some of the notable sound improvements that you can expect from this device:

  • Increased warmth and depth in the low-end frequencies
  • Smoothing out the midrange frequencies for a more natural sound
  • Enhancement of the high-end frequencies for a clear and airy sound
  • Reduced harshness or sibilance in the vocals
  • Improved stereo imaging and separation of instruments
  • Better balance between different tracks and mix elements

Overall, the Tube Tech Hlt 2A provides a subtle but noticeable improvement in your sound quality that can make a huge difference in the final mix or master. With this analog equalizer, you can add a touch of musicality and warmth to your music, which is hard to achieve with plugins or digital processing.

Design

The Tube Tech Hlt 2A is an exceptional piece of equipment, providing high-quality sound with its innovative design. This review highlights its features, benefits and drawbacks for sound engineers and music producers seeking high-end equipment for their recordings.

When it comes to the physical appearance, the Tube Tech Hlt 2A is a sleek, silver-colored unit with a compact size of 2U. It has a solid build quality and can withstand rigorous use. The front panel features a large analog meter that displays the output level, which gives users a clear indication of the unit’s status. The meter’s size enables users to monitor the output level from a distance.

What Is The Physical Appearance Of Tube Tech Hlt 2a?

The unit has a classic and timeless design, which is reminiscent of other Tube Tech products. The front panel has the traditional Tube Tech logo, which adds to the unit’s classic look. The overall design is minimalistic and straightforward, making it a perfect fit for any studio setup.

What Are Its Technical Specifications?

The Tube Tech Hlt 2A is a passive equalizer that features two high-quality passive filters. It also comes with two switchable inputs, which give users more flexibility when it comes to connecting the unit to different sources. The unit uses vacuum tubes to deliver a warm, analog sound, and its frequency response is between 5 Hz – 60 kHz. The Hlt 2A also has a low output impedance and a high input impedance of 10 kohm. In summary, the Tube Tech Hlt 2A’s design is timeless, sleek, and minimalistic. Its technical specifications are impressive, making it an excellent addition to any professional studio setup.

Ease Of Use

The Tube Tech Hlt 2A offers excellent ease of use, making it a go-to choice for any sound engineer. Its simple yet powerful controls make it easy for anyone to achieve a professional sound.

Tips For User-friendly Experience Of Tube Tech Hlt 2a

The Tube Tech Hlt 2A is a high-quality equalizer that is praised for its exceptional clarity and accuracy, making it a popular choice for music producers and audio engineers. However, like any equipment, it comes with a learning curve, and users could face a few challenges while trying to operate it. In this section, we’ll share some tips to help you avoid common pitfalls and ensure a user-friendly experience with the Tube Tech Hlt 2A.

What Are The Common Challenges Users Face With Using Tube Tech Hlt 2a?

Using a Tube Tech Hlt 2A for the first time can be a little intimidating. It’s a complex device with various features and settings, which may overwhelm you. Here are a few issues that users may encounter with the Tube Tech Hlt 2A:

  • Difficulty navigating the various knobs and switches
  • Unfamiliarity with the device’s features and settings
  • Unsure how to apply EQ to the track or mix

Tips For User-friendly Experience Of Tube Tech Hlt 2a

To make your Tube Tech Hlt 2A experience seamless, keep these tips in mind:

  1. Read the Manual: Before using the device, take the time to read the manual and familiarize yourself with how it operates.
  2. Start with Stock Settings: Experimenting with all the device’s settings can be overwhelming at first. Start with the stock settings, make observations, and gradually tweak the settings to achieve your desired sound.
  3. Use Your Ears: Don’t get caught up in the theory of EQ. Use your ears to determine which frequencies need boosting or cutting for a particular track or mix.
  4. Avoid Overprocessing: Adding too much EQ can make your mix sound artificial and disconnected. Avoid over-processing by making subtle adjustments and listening to the changes in context.
  5. Be Patient: Becoming proficient in using the Tube Tech Hlt 2A requires patience and practice. Don’t be discouraged if things don’t sound perfect right away.

By following these tips, you should enjoy a user-friendly experience with the Tube Tech Hlt 2A, allowing you to make the most of this excellent equalizer for your audio recording and editing needs.

Applications

The Tube Tech Hlt 2A is an innovative application that offers impressive review benefits. With its cutting-edge technology, it enables users to enjoy enhanced functionality and delivers remarkable performance, making it a top choice in the audio industry.

In music production, an equalizer is an essential tool for sound engineers and producers. The Tube Tech Hlt 2A is a high-end stereo EQ that provides a wide range of tonal shaping options. This unit is known for its warm and smooth sound, making it a popular choice among producers working in a variety of genres. In this section, we’ll explore the different applications of the Tube Tech Hlt 2A in music production.

How Is Tube Tech Hlt 2a Used In Music Production?

One of the primary uses of the Tube Tech Hlt 2A is for mixing and mastering. This stereo EQ can be used to address frequency imbalances or to enhance specific frequencies in a mix. The Hlt 2A offers three bands of equalization, each with a selectable center frequency and gain control. The high and low bands offer both shelving and peaking filters, while the mid-band provides a fully sweepable parametric EQ. The result is a versatile EQ that can be used for a wide range of applications.

What Are The Best Genres For Which It Is Suitable?

The Tube Tech Hlt 2A is a versatile EQ that can be used in a variety of music genres. However, it is particularly well-suited for genres that feature a lot of acoustic instrumentation, such as folk and jazz music. The warm and smooth sound of the Hlt 2A can help to add depth and dimension to acoustic instruments, such as guitars or pianos. Additionally, the mid-band EQ can be used to add clarity and focus to vocal recordings. Overall, the Tube Tech Hlt 2A is an excellent choice for any producer or engineer looking to add a touch of warmth and character to their recordings.

Price

If you are looking for a high-quality audio tube compressor, the Tube Tech Hlt 2A is a popular product in the market. It is a stereo unit suitable for mastering and mixing applications with a full packed feature set. However, the main question on everyone’s minds is ‘How much does it cost?’. Let’s dive into the price details and answer other questions related to this piece of audio equipment.

How Much Does It Cost?

The cost of the Tube Tech Hlt 2A varies depending on the seller and the country of purchase. On average, you can expect to pay around $4,000 to $5,000 for a brand new model. However, the price may also differ based on the condition of the equipment and the seller preferences. If you prefer purchasing used equipment, the price can be as low as $2,500 but also comes with risks associated with second-hand audio equipment.

Is It A Worthy Investment?

When it comes to investing in high-quality audio equipment, the Tube Tech Hlt 2A is a popular option for many professionals. It has a unique feature set with excellent sound quality that is unmatched by other compressors in the market. Furthermore, the build quality is impressive, making it durable and long-lasting. It is also a versatile compressor that can be used for various applications, including mastering and mixing in different music genres. Therefore, the Tube Tech Hlt 2A is a worthy investment for anyone looking for high-quality audio equipment that delivers a unique sound experience.

In Conclusion

Purchasing the Tube Tech Hlt 2A is a worthy investment if you are looking for high-quality audio equipment for mastering and mixing applications. Although it comes at a high price, the unique features, excellent sound quality, and versatile applications make it a popular choice among professionals. The build quality is impressive, making it durable and long-lasting, hence the price tag is worthy. Always ensure you purchase from reputable dealers and do due diligence when purchasing second-hand audio equipment to avoid any risks associated with buying used equipment.

Tube Tech Hlt 2A Review

Credit: www.thomannmusic.com

Frequently Asked Questions For Tube Tech Hlt 2a Review

What Is The Tube Tech Hlt 2a?

The Tube Tech Hlt 2A is a high-end equalizer designed for professional audio applications. It features two channels of passive tube-based equalization and a unique high and low shelving filter.

What Are The Key Features Of The Tube Tech Hlt 2a?

The Tube Tech Hlt 2A includes a passive tube-based equalization circuitry that provides smooth and warm tone shaping. It also features a unique high and low shelving filter that allows for broad tone sculpting possibilities.

Is The Tube Tech Hlt 2a Suitable For Mastering?

The Tube Tech Hlt 2A is an excellent choice for mastering, as it provides gentle and transparent tone shaping that adds warmth and depth to your mixes. Moreover, the passive tube-based equalization ensures a smooth and natural sound.

Can The Tube Tech Hlt 2a Be Used On Vocals?

Yes, the Tube Tech Hlt 2A is a versatile equalizer that can be used on vocals with excellent results. Its passive tube-based circuitry provides smooth and natural tone shaping that enhances the character and warmth of the voice.

Conclusion

So, after analyzing the Tube Tech Hlt 2A, it’s safe to say that it’s a top-quality tube equalizer that delivers fantastic sound engineering. Its versatility, ease of use, and durability make it a great investment for both beginner and professional musicians.

With its excellent features, this Tube Tech product can do wonders in improving your audio mixing process, leaving you with unique and appealing sound quality. Overall, the Tube Tech Hlt 2A is a reliable and recommendable tool for any music enthusiast who needs to produce high-quality sound.

More in our Gear reviews.

Categories
Archive

Edm Mixing And Mastering

Edm mixing and mastering is the process of fine-tuning and polishing Electronic Dance Music tracks for optimal sound quality and clarity. As the popularity of EDM continues to grow, so does the demand for high-quality, professionally produced tracks.

The process of mixing and mastering EDM involves a range of techniques and tools, such as equalization, compression, and limiting, to ensure that each element of the track fits together seamlessly and sounds great on a range of playback systems.

With the right mixing and mastering techniques, EDM tracks can have a huge impact on the dance floor and beyond, making it a key aspect of any modern producer’s skill set. We’ll take a closer look at the process of EDM mixing and mastering and explore some tips for achieving great results.

Mixing Techniques

Mastering the art of mixing techniques is crucial when it comes to creating a strong and impactful EDM track. By using dynamic EQ and compression, along with other tools like reverb and delay, a producer can create a complex and harmonious sound.

By carefully balancing frequencies and audio elements, the final mix can be transformed into a masterpiece.

When it comes to Electronic Dance Music (EDM), mixing and mastering are crucial steps to achieve a professional sound. Mixing involves combining multiple tracks into one, balancing their levels and frequencies, and adding effects. Applying the right mixing techniques can make or break a track. In this post, we will explore some of the most essential mixing techniques for EDM.

Equalization

Equalization, or EQ, is one of the most crucial tools in mixing. EQ allows you to manipulate the frequency content of a track, boosting or cutting specific frequencies. This technique helps to remove unwanted frequencies, such as low-frequency rumble or high-frequency hiss. It also helps to balance out the frequency levels of each element in a mix, giving each sound its place in the sonic spectrum.

Compression

Compression is another important tool in mixing. It allows you to control the dynamic range of a track, bringing up the quiet parts and reducing the loud parts. This technique helps to add clarity and consistency to a mix, making it sound more polished. Compression can be applied to individual tracks or to the master track.

Panning

Panning refers to the placement of sound in the stereo field. It allows you to move a sound from the left to the right or vice versa. This technique creates a sense of space and can help to differentiate between different elements in a mix. For example, you can pan a guitar to the left and a keyboard to the right, creating a wider stereo image.

Reverb And Delay

Reverb and delay are two effects that are often used in EDM mixing. Reverb creates a sense of space by adding a reflection to a sound, while delay creates an echo effect. These effects can add depth and atmosphere to a mix and can be applied creatively to achieve unique sounds.

Automation

Automation is the process of adjusting a track’s parameters over time. This technique allows you to create movement in a mix, bringing individual elements to the forefront at specific moments. Automation can be used to adjust things like volume, panning, and effects. It adds interest and excitement to a track and can make it feel more dynamic. In conclusion, understanding these mixing techniques is essential for achieving a professional sound in EDM mixing and mastering. By using EQ, compression, panning, reverb, and delay, and automation, you can create a mix that is well-balanced, dynamic, and exciting.

Mastering Techniques

Mastering EDM mixing and mastering techniques can take your music production to the next level. With attention to detail, understanding frequency, and advanced tools, you can create a professional sound that stands out in the industry.

Mastering Techniques are essential when it comes to Edm Mixing And Mastering. As an artist, you spend countless hours creating your track, perfecting every beat and sound. Mastering your track ensures that it sounds the best it can be across all platforms and to all listeners. Let’s dive into some of the crucial mastering techniques that will elevate your track to the next level.

Loudness

The overall loudness of your track is vital to making it stand out among other tracks. A consistent and balanced loudness level across the entire track ensures that your listeners can enjoy it without turning up or down the volume constantly. The goal is to achieve the desired loudness level while maintaining the original dynamics of the mix.

Stereo Imaging

Stereo imaging determines the placement of instruments and sounds in the stereo field. By adjusting the stereo image, you can make your track sound more full and spacious. To achieve this, pay close attention to the placement of audio elements in the stereo spectrum.

Equalization

Equalization can transform your track in various directions, adding clarity and reducing harshness. The goal is to balance the frequencies across all instruments and sounds in the mix. Careful EQ adjustments can give a voice or instrument its unique presence in the mix.

Compression

Compression keeps the dynamics of your track in check, minimizing the difference between the loudest and quietest parts. Compression is also used to control the overall loudness of your track to make sure that it sits well with other tracks.

Saturation

Saturation can be added to give your track a bit of warmth and analog-style vibe. Subtle saturation can add character to individual audio elements or the overall mix.

Limiting

Finally, limiting acts as a safety net for your track, ensuring that the peak levels don’t exceed a specific point. This is especially important if you plan on distributing your music to streaming services such as Spotify or Apple Music, which have specific loudness requirements. In conclusion, Edm Mixing And Mastering requires careful attention to detail on all these mastering techniques. By implementing these techniques, you can bring out the best in your track and take it to the next level. Don’t be afraid to experiment and find your unique sound.

Tools For Mixing And Mastering

When it comes to electronic dance music (EDM), mixing and mastering are essential parts of the production process. You want your track to sound polished and professional, and that’s where the right tools come into play. DAWs, plugins, and reference tracks are three key resources that can help you achieve the best possible mix and master. Let’s take a closer look at each of these tools.

Digital Audio Workstations (daws)

A digital audio workstation (DAW) is the software program you use to record, edit, produce, and mix your music. There are many different DAWs on the market, each with its own strengths and weaknesses. Some popular options include:

NamePriceKey features
Ableton Live$99-$749Session view, audio-to-MIDI, Max for Live, lots of built-in plugins
FL Studio$99-$899Step sequencer, Piano roll, lots of built-in plugins
Logic Pro X$199.99Smart Tempo, Flex Time, lots of built-in plugins

Plugins

Plugins are software programs that run inside your DAW and add additional functionality. There are plugins for all kinds of tasks, from EQ and compression to reverb and delay. Some plugins come bundled with your DAW, while others are third-party and need to be purchased separately. Here are some popular plugins:

  • Waves SSL E-Channel
  • FabFilter Pro-Q 3
  • Izotope Ozone 9
  • Soundtoys 5

Plugins can be expensive, so it’s important to do your research and choose wisely.

Reference Tracks

Reference tracks are professionally produced songs that you use as a benchmark for your own music. They can help you make informed decisions about your mix and master by giving you a standard to compare against. Here are a few things to keep in mind when choosing reference tracks:

  • Choose tracks in a similar genre to yours
  • Choose tracks with a similar instrumentation and arrangement
  • Choose tracks with a similar overall loudness

Reference tracks can be a powerful tool in your mixing and mastering arsenal, so don’t overlook their value.

Edm Mixing And Mastering

Credit: www.airgigs.com

Collaborating With A Mixing Or Mastering Engineer

Collaborating with a mixing or mastering engineer can enhance the quality of your EDM tracks. With their expertise, they can polish and balance your mix for a professional and polished sound. Trusting in their skills and communication can ultimately take your music to the next level.

Collaborating with a mixing or mastering engineer can significantly enhance the quality of your EDM (Electronic Dance Music) tracks, making them sound polished and professional. Engaging a professional can optimize the blending of different instruments, vocals, and sounds in your tracks, elevating their overall quality.

Benefits Of Working With A Professional

When collaborating with a professional mixing or mastering engineer, you can expect several benefits, including:

BenefitsDescription
Efficient WorkflowA professional engineer has specialized knowledge, experience, and tools to work faster and more efficiently, enhancing your project’s turnaround time.
Quality EnhancementWith the right skills and tools, a professional can enhance the quality of your track, making it sound cohesive, balanced, and polished.
Objective FeedbackA professional can offer objective feedback and constructive criticism, revealing issues you may have missed as a producer and helping you take your track to the next level.

How To Find The Right Engineer

Finding the right mixing or mastering engineer for your project is crucial. Here are some tips to help you find the right one:

  1. Check online directories and platforms that specialize in connecting producers with engineers.
  2. Review the engineer’s portfolio and past clients to determine if their style aligns with your project’s needs.
  3. Ask for referrals from other producers in your network or music community.
  4. Communicate your project’s goals and vision with the engineer before engaging their services, ensuring you’re on the same page regarding your desired outcomes.

Effective Communication With Your Engineer

Effective communication with your mixing or mastering engineer is key to ensuring the desired results. Here are some tips to help you communicate effectively:

  • Share reference tracks that can guide the engineer on your desired sound and style.
  • Be clear and specific in your feedback, highlighting any particular issue you’d like to resolve or enhance.
  • Ask questions and clarify any concerns you may have regarding the process or results.
  • Provide the engineer with complete, high-quality files to work with, to optimize their ability to produce the desired results.

Working with a mixing or mastering engineer can optimize the quality of your EDM tracks, elevating their sound and impact. By finding the right engineer and communicating effectively, you can achieve the desired outcomes and take your music to the next level.
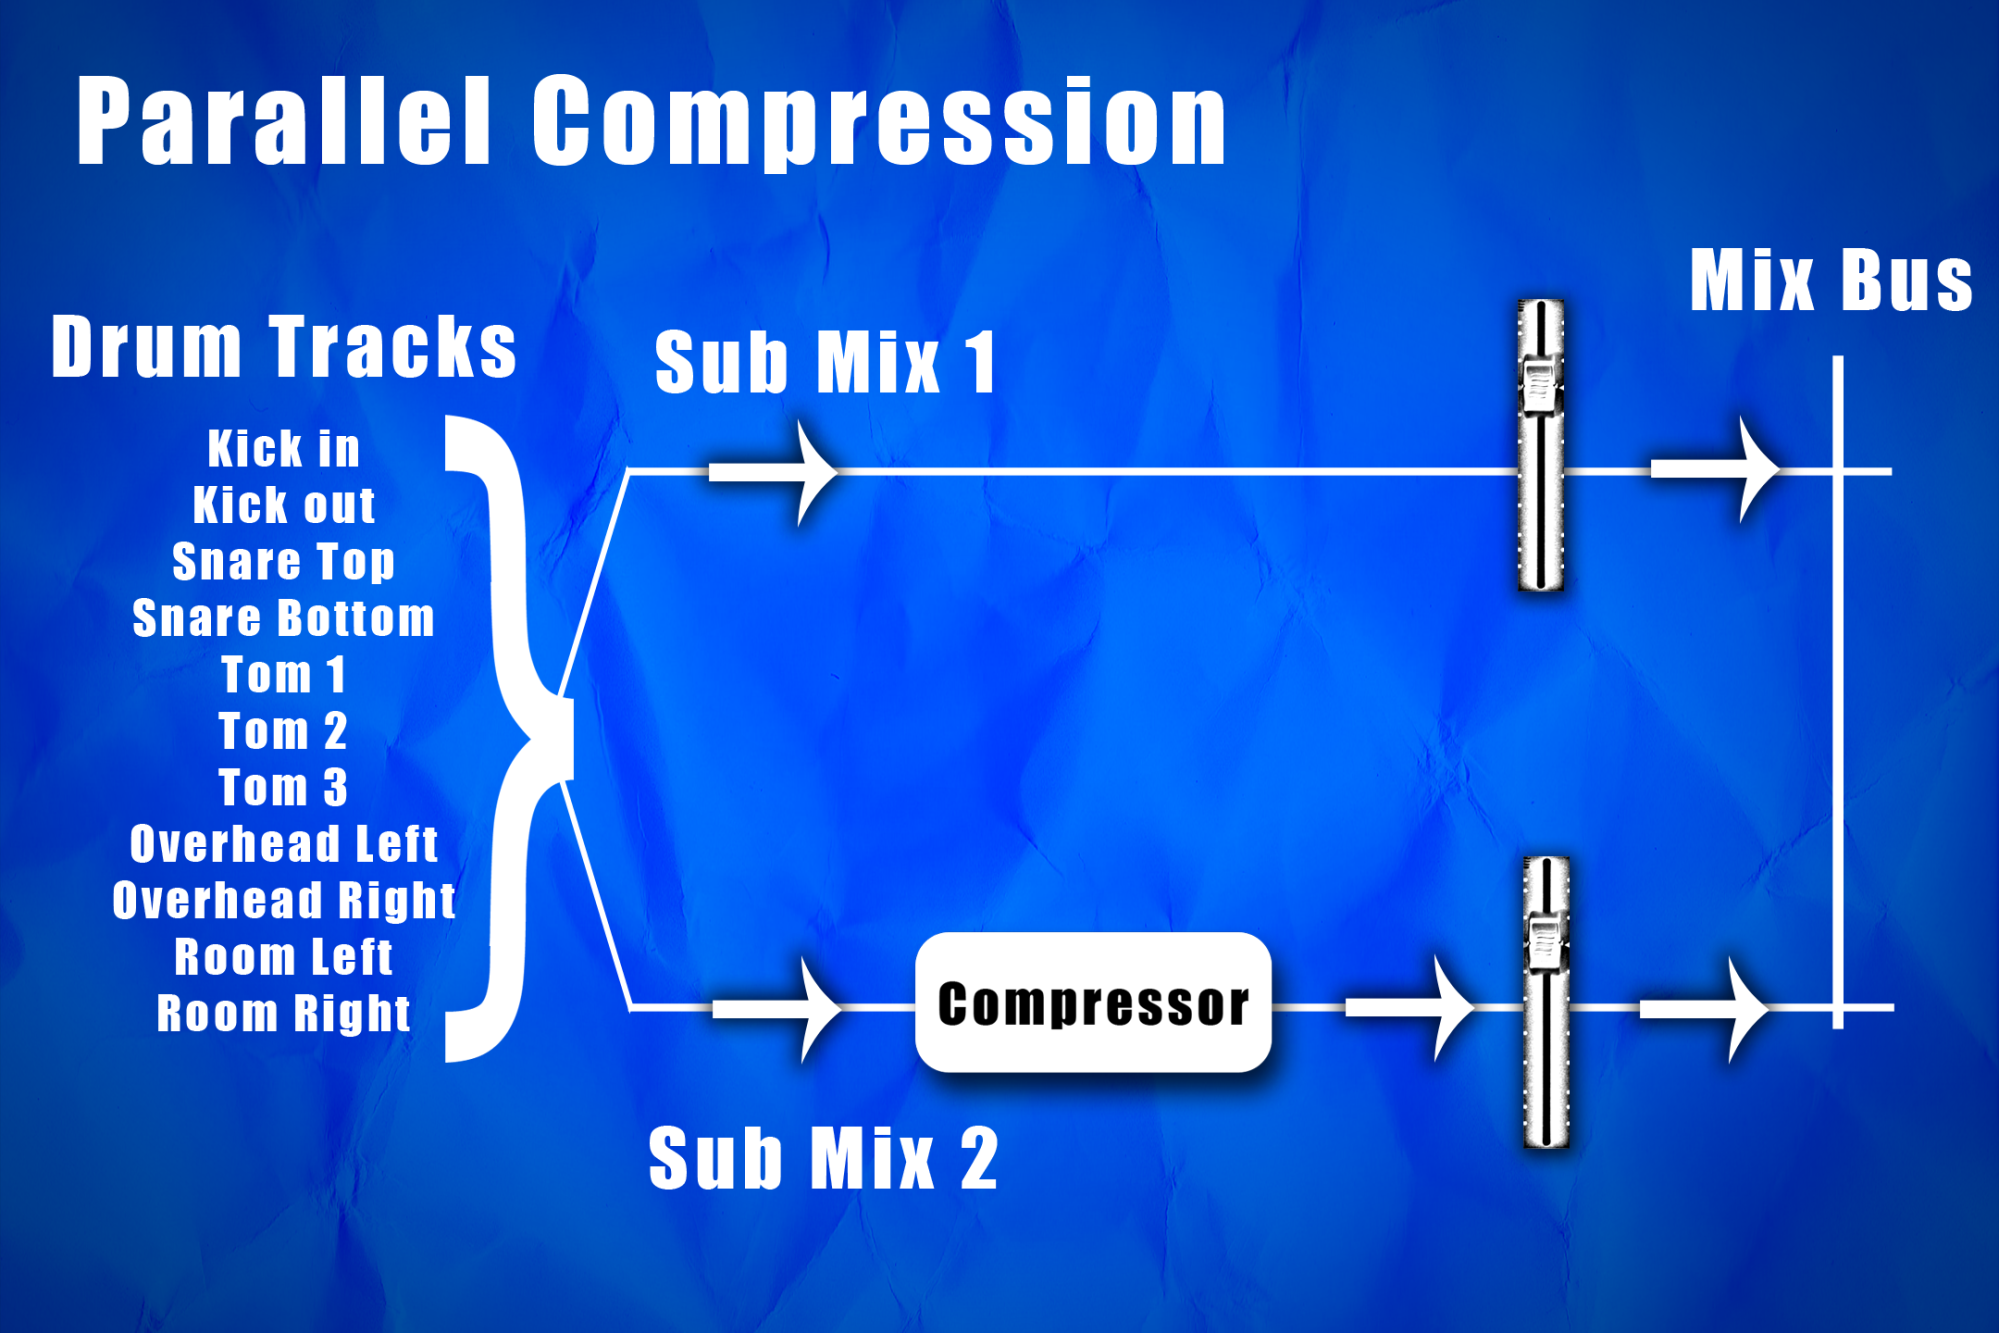
Common Mixing And Mastering Mistakes

Common mixing and mastering mistakes can be detrimental to the final product of any Electronic Dance Music (EDM) track. The most common mistakes include over-compression, insufficient EQ, improper panning, and poor volume management. Taking these factors into account during the mixing and mastering process can greatly improve the overall sound of the track.

When it comes to music production, mixing and mastering play crucial roles in perfecting the final output. However, even the most seasoned audio engineers can make mistakes during this process, resulting in compromised sound quality. Here are some common mixing and mastering mistakes that you should avoid:

Overcompression

Overcompression is a common mistake many audio engineers make, and it occurs when the compressed level of a track is too high, resulting in a loss of dynamic range. It’s essential to strike a balance between compression and dynamic range to avoid reducing the natural dynamics of your mix. Sometimes, a less compressed and dynamic mix may sound better.

Overprocessing

Overprocessing is a common mistake that leads to a muddy and unnaturally processed final mix. Too much EQ, reverb, or any effect can lead to an overprocessed sound, which kills the quality of the mix. Applying a light and gentle touch when using effects is paramount to achieving a balanced, natural-sounding output.

Imbalanced Frequencies

Imbalanced frequencies refer to some sounds in the mix being too loud or too soft, resulting in a dissonant mix. Carefully listening to the mix and adjusting the frequencies can help achieve more clarity, depth, and balance, ensuring that all audio elements in the mix are audible and distinct.

Ignoring The Mixdown

Ignoring mixdown or failing to balance levels, panning, and EQ during the mixing stage can lead to a challenging mastering process. It’s crucial to ensure that each track is the right volume level, and the stereo image is balanced before moving to the mastering stage. A well-balanced mix is easier to master and results in a much higher quality output. In conclusion, avoiding these common mixing and mastering mistakes can no doubt improve the quality of your final mix. Each of these issues has different reasons and different solutions, so it’s essential to know how to approach them. With practice and the right techniques, you can take your mixes to the next level.

Edm Mixing And Mastering

Credit: www.youtube.com

Edm Mixing And Mastering

Credit: www.udemy.com

Frequently Asked Questions For Edm Mixing And Mastering

How Do You Mix And Master An Edm Track?

Mixing and mastering an EDM track requires a few key steps. First, ensure that all individual elements are recorded or sequenced in high quality. Then, balance the levels and frequencies of each element to create a cohesive mix. Apply EQ, compression, and other effects as necessary.

Finally, use a limiter or other mastering tools to bring the overall level of the track up to industry standards while maintaining dynamic range.

What Is Mastering Edm?

Mastering EDM is the process of enhancing and refining the final mix of an Electronic Dance Music track. The mastering process includes adjusting the overall levels, adding more depth and dimension, improving the clarity, and finalizing the sound for distribution.

The aim is to produce a polished and sonically balanced track that sounds great on different systems and platforms.

What Is Edm Mixing?

EDM mixing is the process of blending individual tracks of electronic dance music to create a cohesive and balanced final version. This involves adjusting elements such as volume levels, EQ, panning, and effects to enhance the energy and impact of the music.

The goal is to create a dynamic and engaging listening experience for the audience.

Is Edm Hard To Mix?

EDM (Electronic Dance Music) can be challenging to mix due to its complex and layered sound. It requires an understanding of various techniques and equipment, such as EQ, compression, and filters. With proper planning and practice, however, mixing EDM can be mastered.

Conclusion

To sum it up, Edm mixing and mastering plays a crucial role in the music production process. With the right techniques and tools, producers can fine-tune their tracks and take them to the next level. However, it’s important to keep in mind that the process requires patience, skill, and attention to detail.

By mastering the art of Edm mixing and mastering, you can ensure your music stands out and captivates listeners. So, keep practicing and exploring new ways to enhance your creations!