Categories
Archive

Which is Better Distrokid Or United Masters: Unveiling the Superior Music Distribution Platform

This guide covers DistroKid or UnitedMasters in plain terms. Distrokid offers better distribution services for musicians than United Masters due to its wider reach and competitive pricing. Both platforms have their strengths and weaknesses, making it essential for artists to carefully assess their needs and goals before choosing the right one.

Royalty calculator to compare DistroKid or UnitedMasters payouts

Distrokid is known for its user-friendly interface and fast distribution process, while United Masters provides artists with a range of tools for self-promotion and marketing. Understanding the unique features of each platform can help musicians make an informed decision that aligns with their career objectives.

Related reading: Distrokid – The Best Way to Distribute Your Music? and Is Distrokid Musician Plus Worth It. For background, see the Wikipedia article on Digital distribution.

We will explore the key differences between Distrokid and United Masters to help artists navigate the music distribution landscape effectively.


Cost Comparison

When comparing DistroKid and United Masters, it’s essential to consider the cost implications of each platform. Let’s break down the key factors in the cost comparison.

Subscription Fees for DistroKid Or UnitedMasters

DistroKid offers a fixed annual subscription fee, while United Masters operates on a yearly membership basis.

Royalty Sharing for DistroKid Or UnitedMasters

DistroKid lets artists keep 100% of their royalties. UnitedMasters’ free tier takes a 10% cut, but its paid membership lets artists keep 100%.

Distribution Reach for DistroKid Or UnitedMasters

DistroKid and United Masters are two leading platforms for music distribution, but when it comes to reach, DistroKid has a wider distribution network, allowing artists to extend the reach of their music to more platforms and listeners. With DistroKid, you can ensure your music reaches a larger audience and gain more exposure.

Platforms And Stores for DistroKid Or UnitedMasters

DistroKid: Distributes music to over 150 platforms and stores worldwide including Spotify, Apple Music, and Amazon Music.

United Masters: Distributes music to major platforms like Spotify, Apple Music, and more, focused on empowering independent artists.

International Reach for DistroKid Or UnitedMasters

  • DistroKid: Strong international presence, reaching global audiences with seamless distribution.
  • United Masters: Focuses on expanding the reach of independent artists on a global scale.

Features And Services for DistroKid Or UnitedMasters

Deciding between DistroKid and United Masters? DistroKid offers a simple, cost-effective way to distribute music on major platforms, while United Masters emphasizes its data insights and partnerships, catering to independent artists. Both platforms provide valuable distribution and marketing services, so it ultimately depends on your specific needs and preferences.

DistroKid and United Masters are both leading digital music distribution platforms that offer a wide range of features and services for independent artists. Their offerings vary in terms of marketing tools and analytics and insights. Let’s delve into the key features and services that each platform provides.

Marketing Tools for DistroKid Or UnitedMasters

DistroKid offers a host of marketing tools, including the ability to create hyperfollow pages for upcoming releases, a Spotify for Artists verification, and promotional support via their social media channels. Additionally, artists can take advantage of playlist pitch opportunities and YouTube Content ID for potential monetization. On the other hand, United Masters provides customizable release pages to enhance branding, integrates with TikTok for promotional opportunities, and offers direct-to-fan messaging to engage with their audience. Moreover, artists can leverage partnerships with brands and other artists for collaborative marketing efforts.

Analytics And Insights

DistroKid equips artists with real-time streaming data, enabling them to track their performance on various platforms. Artists can also access comprehensive sales and earnings reports to gain insights into their revenue streams. United Masters offers an intuitive dashboard with in-depth analytics on listener demographics and geographical insights. This allows artists to tailor their marketing strategies and understand their audience better. In conclusion, both DistroKid and United Masters offer unique features and services catered to the needs of independent artists. Whether it’s advanced analytics or robust marketing tools, each platform presents valuable resources for artists to further their music careers.
Artist Control And Ownership

Compare the artist control and ownership between Distrokid and United Masters for music distribution. Consider factors like royalties, creative freedom, and marketing support to make an informed choice. Both platforms offer unique benefits, so weigh your priorities carefully before deciding.

As an artist, having control and ownership over your music is crucial. When it comes to distributing your music online, two popular platforms that offer this level of control are DistroKid and UnitedMasters. In this article, we will compare DistroKid and UnitedMasters in terms of rights ownership and creative control to help you make an informed decision.

Rights Ownership

When it comes to rights ownership, both DistroKid and UnitedMasters offer transparent and artist-friendly terms. However, there are some differences to consider. DistroKid: DistroKid allows you to retain 100% of your rights, meaning you maintain full ownership and control of your music. This is highly beneficial for independent artists who want to maintain creative freedom and retain the rights to their work. With DistroKid, you have the power to make decisions regarding licensing, royalties, and more. UnitedMasters: UnitedMasters takes a slightly different approach to rights ownership. While they also offer artist-friendly terms, it’s important to note that they ask for a 10% share of your royalties. This means that although you retain the majority of your rights, there is a small percentage that goes to UnitedMasters. Keep in mind that this share can vary depending on your specific agreements with them.

Creative Control

Creative control over your music is a fundamental aspect for any artist. Let’s compare the creative control offered by DistroKid and UnitedMasters. DistroKid: DistroKid gives you full creative control over your music. You have the freedom to release as many songs as you want, at any time you choose, without any restrictions. Additionally, DistroKid allows you to customize your artist profile, add collaborators, and manage your releases with ease. With their user-friendly interface, you can maintain complete control over your creative vision. UnitedMasters: UnitedMasters also emphasizes creative control. They provide you with the tools to release your music on various platforms, curate your own brand, and engage with your audience. However, it’s important to note that UnitedMasters does have some guidelines in place to ensure the highest quality standards for releases. While these guidelines can be a positive aspect, they may restrict some artists who prefer complete creative freedom. In conclusion, both DistroKid and UnitedMasters offer artist-friendly control and ownership over your music. DistroKid grants you full rights ownership and unlimited creative control, while UnitedMasters may require a small share of your royalties but still allows for significant creative freedom. Ultimately, the choice between the two platforms depends on your specific needs and preferences as an artist. Whichever platform you choose, remember that maintaining control and ownership of your music is crucial for your long-term success.


Practical Tips

Frequently Asked Questions For Which Is Better Distrokid Or United Masters

Why Is Unitedmasters Better Than Distrokid?

UnitedMasters offers more control and better insights for independent artists compared to DistroKid.

Who Is Better Than Distrokid?

Several digital distribution platforms, such as TuneCore and CD Baby, offer similar services to DistroKid. Each platform has unique features and pricing, making it important to compare them based on specific needs and goals.

What App Is Better Than Unitedmasters?

A better alternative to UnitedMasters is TuneCore. It offers similar services but with better customer support and wider distribution options.

Do I Own My Masters On Distrokid?

Yes, you own your masters on DistroKid.

Conclusion

Ultimately, both DistroKid and UnitedMasters offer unique advantages for musicians. DistroKid’s simplicity and low cost appeal to independent artists, while UnitedMasters’ personalized support and brand partnerships cater to those seeking a strategic approach. The decision ultimately depends on your specific needs and goals as an artist.

Choose wisely based on your individual circumstances and ambitions.

Categories
Archive

Install Serum Presets: Unlock Next-Level Soundscapes!

To install serum presets, upload the preset files to the appropriate folder in your Serum software. This allows you to access and use the new presets seamlessly.


Serum presets enhance your music production by providing a wide range of sounds and effects to choose from. Adding these presets to your library can inspire creativity and streamline your workflow. Whether you’re looking to experiment with new sounds or simply expand your collection, installing Serum presets is a valuable step in optimizing your music production process.


With a few simple steps, you can unlock a world of sonic possibilities and take your tracks to the next level.


Why Install Serum Presets

Installing Serum Presets can greatly enhance your music production experience. Let’s explore the reasons behind why you should consider adding Serum Presets to your arsenal.

Wide Range Of Sounds

Serum Presets offer a diverse array of sounds at your fingertips. From warm pads to crisp leads, there is a preset for every genre and style.

Efficiency And Workflow Improvement

Save time and streamline your workflow by using Serum Presets. They allow you to quickly access high-quality sounds without spending hours tweaking parameters.

Choosing The Right Serum Presets

When diving into the world of music production, choosing the right Serum presets can make a significant impact on your sound. Let’s explore how different presets can cater to various genres and your unique creative vision.

Genre-specific Presets

If you are focusing on a specific genre, using genre-specific Serum presets can streamline your production process. These presets are designed to embody the characteristics and vibes of particular music styles, allowing you to achieve the desired sound more efficiently.

Customizable Presets

For those looking to unleash their creativity and carve out a unique sonic identity, customizable Serum presets provide endless possibilities. By tweaking parameters such as oscillators, filters, and effects, you can tailor presets to fit your artistic vision and stand out in the crowded music landscape.

Installing Serum Presets

When it comes to enhancing your music production, installing Serum presets can be a game-changer. These presets are pre-configured settings that allow you to quickly dial in new sounds and take your tracks to the next level.

Locating The Preset Files

Before you can add Serum presets to your library, you need to locate the preset files on your computer. These files are typically in a specific folder within the Serum application directory.

To find the preset files, navigate to the following location on your computer:

  • Your Drive (C:)
  • Program Files
  • Xfer
  • Serum
  • Presets
  • User

Adding Presets To Serum

Once you have located the preset files, adding them to Serum is a straightforward process. Here’s a simple step-by-step guide:

  1. Open the Serum plugin in your digital audio workstation (DAW).
  2. Navigate to the “Menu” icon within the Serum interface and click “Show Serum Presets Folder.”
  3. Copy the preset files from the location you found earlier and paste them into the Serum presets folder.
  4. Close and reopen Serum to ensure the new presets are loaded and ready to use.

Install Serum Presets: Unlock Next-Level Soundscapes!


Credit: www.facebook.com

Tips For Using Serum Presets

When it comes to producing music, using pre-made presets in your digital audio workstation (DAW) can be a game-changer. Serum presets are particularly popular among music producers due to their versatility and high-quality sound. In this article, we will delve into some essential tips for making the most out of your Serum presets. Let’s explore two key areas: layering and modifying presets, as well as exploring effects and modulation.

Layering And Modifying Presets

One of the best ways to create unique sounds using Serum presets is by layering them. Layering involves combining multiple presets to produce a richer and more complex sound. Here’s where the real magic happens – by mixing different presets, you can unleash your creativity and achieve sounds that are entirely your own.

If you want to create a more massive sound, try layering presets that have similar characteristics. For example, combining two lead presets can result in a more powerful lead sound. On the other hand, if you are looking for contrast, layering presets with different tonal qualities can help you achieve interesting sonic combinations.

Remember, to make your layered presets shine and avoid sonic clutter, it’s important to carefully mix the volume levels of each layer. Adjusting the levels will ensure that no single layer dominates the overall sound, and all the elements blend harmoniously.

Moreover, don’t be afraid to modify the presets to fit your musical vision. Serum’s powerful interface allows for extensive sound customization. By adjusting the envelope, filter cutoff, or adding effects, you can shape the preset to align perfectly with your track. Get creative and tweak those knobs until you achieve the desired sound!

Exploring Effects And Modulation

In addition to layering and modifying presets, another way to take your Serum sounds to the next level is by experimenting with effects and modulation. Serum offers a vast array of built-in effects that can add depth, character, and movement to your sounds.

To enhance your presets further, try adding effects such as reverb, delay, or chorus. These effects can give your sounds a sense of space, create interesting textures, and make them stand out in the mix. Don’t hesitate to adjust the effect parameters to fine-tune the sound to your liking.

Furthermore, Serum’s modulation capabilities open up endless possibilities for creating dynamic and evolving sounds. Utilize the various modulation sources, such as LFOs, envelopes, and macros, to control parameters like filter cutoff, wavetable position, or even effect levels. Experiment with different modulation routings and rates to produce captivating sounds that evolve over time.

In conclusion, by utilizing the tips discussed in this article, you can make the most out of your Serum presets and unlock a world of sonic possibilities. Layering and modifying presets allow you to create unique sounds that fit your musical vision, while exploring effects and modulation takes your sounds to new heights. So go ahead, dive into Serum’s vast sound library, experiment, and create music that truly stands out!

Exploring The Potential Of Serum Presets

Serum presets are an invaluable resource for music producers and sound designers looking to enhance their sonic palette. With a wide range of sounds and effects at your fingertips, these presets offer a quick and efficient way to create unique and professional-sounding tracks. In this article, we delve into the potential of Serum presets, exploring their capabilities and how they can help you take your music to the next level.

Creating Unique Sounds

One of the most exciting aspects of working with Serum presets is the ability to create truly unique sounds. By tweaking and customizing presets, you can add your own personal touch to each sound and make it your own. Whether you’re looking to produce catchy melodies, deep basslines, or atmospheric textures, the possibilities are endless with Serum presets.

Learning From Preset Design

Another benefit of working with Serum presets is the opportunity to learn from their design. By dissecting and analyzing the presets created by expert sound designers, you can gain valuable insights into sound design techniques and principles. This knowledge can then be applied to your own presets and original sound creations, helping you develop a deeper understanding of synthesizers and sound synthesis.

Install Serum Presets: Unlock Next-Level Soundscapes!


Credit: glitchedtones.com

Frequently Asked Questions For Install Serum Presets

How Do You Put Serum Presets Into Serum From Splice?

To put Serum presets into Serum from Splice, download the presets from Splice. Open Serum and go to the menu, then select “Show Serum Presets Folder. ” Copy the downloaded presets into this folder. Refresh Serum’s preset browser, and the new presets will be available for use.

Where Do I Drag Serum Presets?

Drag Serum presets into the Presets folder within the Serum application directory to install them.

Where Is My Serum Presets Folder?

Your Serum presets folder is typically located in the “Presets” folder within the Serum plugin directory.

How Do You Use New Serum Presets On Old Serum?

To use new serum presets on old serum, simply import the presets into the existing plugin. Open the Serum software and navigate to the preset menu. Then, select “import” and choose the new presets from your file system. The new presets will now be available for use within the old Serum plugin.

Conclusion

To sum up, installing Serum presets can enhance your music production with unique sounds. With a wide range of options, you can elevate your creativity and explore new sonic possibilities. By following these steps and experimenting with different presets, you can unlock your full potential as a producer.


Elevate your music with Serum presets today!

Categories
Archive

How Do You Get Paid from Distrokid: Ultimate Payment Guide

To get paid from DistroKid, you can set up payment preferences and receive earnings monthly. DistroKid offers a streamlined approach to receiving your earnings as a musician.


Once you distribute your music through their platform, you can easily set up your payment preferences to receive money directly into your bank account or PayPal account. They provide monthly payments for your music streams and downloads, making it convenient for you to track your earnings.


With this efficient system in place, you can focus more on creating music and less on the hassle of getting paid.

Getting Started With Distrokid

Getting started with DistroKid is easy and straightforward. This guide will walk you through the process step by step, from creating an account to uploading your music and getting paid.

Creating An Account

To get started with DistroKid, go to their website and sign up for an account. Enter your details and choose a subscription plan that suits your needs.

Uploading Your Music

After creating your account, you can start uploading your music. Simply follow the instructions to add your tracks, cover art, and any additional information required.

How Do You Get Paid from Distrokid: Ultimate Payment Guide


Credit: m.youtube.com

Understanding Distrokid Payment System

Royalties And Revenue Splits

DistroKid offers transparent royalty payments. You can view your earnings breakdown easily.

Artists keep 100% of their royalties. DistroKid doesn’t take a cut.

Payment Schedule

Payments are made monthly. You receive earnings from streams and downloads.

Once your earnings reach $5, you can request a payout.

Getting Paid Through Distrokid

DistroKid offers an easy and efficient way for musicians to get paid for their music. When your music is streamed or downloaded, DistroKid collects the earnings on your behalf, and you receive your payments through the platform. Here’s what you need to know about getting paid through DistroKid:

Setting Up Payment Information

To start receiving payments through DistroKid, you first need to set up your payment information.

  • Log in to your DistroKid account and navigate to the “Bank” section in your account settings.
  • Enter your banking information, including your account number and routing number, to enable direct deposit payments.
  • Alternatively, you can set up PayPal as your preferred payment method by providing your PayPal email address.

Payment Methods

DistroKid offers multiple payment methods to ensure convenient and hassle-free transactions.

  1. Direct Deposit: If you choose direct deposit, your earnings will be transferred directly to your bank account.
  2. PayPal: Opting for PayPal allows you to receive payments securely and quickly through your PayPal account.

Earning Potential With Distrokid

If you’re an independent musician or content creator, you’re probably eager to maximize your earnings from your creative work. DistroKid is a popular distribution platform that can help you get your music or content out to various online platforms like Spotify, Apple Music, and YouTube. But how do you actually get paid through DistroKid? Let’s take a closer look at the earning potential and ways to track your earnings with DistroKid.

Maximizing Royalties

When it comes to maximizing your royalties with DistroKid, there are a few key strategies to keep in mind:

  1. Opt for DistroKid’s “Leave a Legacy” feature: DistroKid allows you to pay a one-time fee to make sure your music is available on streaming platforms forever. This can help ensure a steady stream of royalties in the long run.
  2. Publish music on all platforms: By making your content available on popular platforms like Spotify, Apple Music, and YouTube, you can reach a wider audience and potentially earn more royalties.
  3. Collaborate with other artists: By collaborating with other artists, you can tap into their fanbase and increase your chances of earning more royalties.
  4. Promote your content: Utilize social media, emails, and any other promotional channels available to you to drive more streams and increase your earning potential.

Tracking Your Earnings

Keeping track of your earnings is essential to understanding how your content is performing and ensuring you’re being properly compensated. DistroKid makes it easy to track your earnings with their user-friendly dashboard. Here’s how you can do it:

  1. Access your DistroKid account: Log in to your DistroKid account and locate the earnings section.
  2. Monitor your streaming and sales data: DistroKid provides detailed information on your streams and sales, giving you insight into which platforms are generating the most revenue for you.
  3. View monthly reports: DistroKid generates monthly reports that break down your earnings, allowing you to see the growth or decline in your revenue over time.
  4. Export data for further analysis: If you prefer to analyze your earnings data in more detail, DistroKid allows you to export the information into a spreadsheet for further analysis and tracking.

By regularly tracking your earnings and analyzing the data, you can make informed decisions about your content and continue to optimize your earning potential with DistroKid.

Additional Tips And Considerations

When it comes to getting paid from DistroKid, there are a few additional tips and considerations that can help make the process smoother. From tax information to support resources, here’s what you need to know.

Tax Information

Before you start receiving payments from DistroKid, it’s important to provide them with your tax information. This ensures that they can accurately report and withhold any necessary taxes on your behalf. It’s a simple process that you can complete within your DistroKid account. Just navigate to the “Settings” section, and you’ll find the tax information form where you can fill in all the required details.

In addition to providing your tax information, it’s a good idea to consult with a tax professional or accountant to understand how your earnings from DistroKid will impact your overall tax situation. They can help you determine the best approach for reporting and managing your income, ensuring compliance with tax laws and regulations.

Support And Resources

If you have any questions or need assistance regarding the payment process with DistroKid, their support team is always ready to help. You can reach out to them through their online support portal, where you can submit a support ticket or browse through their extensive knowledge base for answers to commonly asked questions. They pride themselves on providing timely and helpful support, so don’t hesitate to reach out if you need assistance.

DistroKid also offers a variety of resources to help you navigate the payment process and make the most of your earnings. They have informative blog posts, video tutorials, and guides that cover topics like royalty collection, streaming services, and music distribution. Taking the time to explore these resources can provide you with valuable insights and tips that can help you optimize your music monetization strategy.

Remember, staying informed and proactive is key when it comes to getting paid from DistroKid. By providing your tax information and leveraging their support and resources, you’ll be well-equipped to manage your earnings effectively and maximize your success as an independent artist.

How Do You Get Paid from Distrokid: Ultimate Payment Guide


Credit: soundtechinsider.com

Frequently Asked Questions Of How Do You Get Paid From Distrokid

How Much Does Distrokid Pay For 1,000 Streams?

DistroKid pays about $4 for 1,000 streams. This rate can vary based on the streaming platform and the listener’s location.

How Long Does It Take For Distrokid To Pay You?

DistroKid pays you within days once your earnings reach $5, with PayPal transfer option available.

How Do I Cash Out On Distrokid?

To cash out on DistroKid, go to the ‘Bank’ tab, select your payment method, and follow the instructions to withdraw your earnings.

How Do I Make Money From Distrokid?

You can make money from DistroKid by earning royalties from your music streams and downloads. DistroKid also offers the option to get your music distributed to various platforms, allowing you to reach a wider audience and potentially increase your earnings.

Conclusion

With easy payment options, DistroKid is a reliable choice for independent musicians. Secure and fast, the platform ensures timely payments for your music. By offering multiple payment methods, DistroKid makes it convenient for artists to receive their earnings. Overall, DistroKid is a seamless and efficient way to get paid for your music.

Categories
Archive

Professional Headphones for Music Production

Professional headphones for music production offer enhanced sound quality and accurate audio representation. They are essential tools for mixing and mastering tracks.


Selecting the right headphones for music production can make a significant difference in the final sound of your work. It’s crucial to choose models that provide a flat frequency response, superior comfort for long sessions, and robust build quality that withstands regular studio use.


Many professionals seek out features like replaceable cables and earpads for longevity. The right pair of professional headphones should give you a true representation of your mix, helping to identify any issues and make precise audio adjustments. Whether you’re recording, editing, or mixing, high-quality studio headphones are non-negotiable for achieving professional-sounding results.


Decoding The Studio Sound

Exploring the realm of music production begins with understanding the heart of studio sound: professional headphones. These critical tools transform how sounds blend and separate, ensuring each note tells its story with clarity. Let’s dive into the sound-shaping features of studio headphones and select the perfect pair for your sonic journey.

Traits Of Professional Studio Headphones

Professional headphones for music production stand apart for their nuanced sound reproduction. These are vital traits:

  • Frequency Response: Studio headphones must translate frequencies accurately, giving a true reflection of the music.
  • Comfort: Long sessions demand headphones that are easy on the ears and atop the head.
  • Build Quality: Durable materials guarantee a lasting partner in your musical pursuits.
  • Sound Isolation: Good isolation keeps the mix pure without outside noise interference.
  • Driver Size: Larger drivers often mean clearer, more dynamic soundscapes.

Open Back Vs Closed Back: Making The Right Choice

Choosing between open back and closed back headphones shapes your production experience.

Open Back Headphones Closed Back Headphones
Natural Sound: Mimics how we hear sounds in the real world. Isolated Listening: Blocks out ambient noise for a pure focus on your mix.
Sound Leakage: Allows some audio to escape, reducing ear fatigue. Privacy: Sound is contained, offering a personal listening bubble.
Spacious Acoustics: Delivers an airy, open soundstage. Bass Response: Enhances lower frequencies for a more pronounced bass.

Your choice depends on your studio environment and the need for sound isolation or openness.

Key Features To Consider

When diving into the realm of music production, the right tools amplify creativity. High-quality professional headphones play a critical role. They let producers hear every nuance. Let’s peel back the layers on key features that matter most. These are the non-negotiables for anyone serious about their craft.

Frequency Response And Clarity

In music production, hearing every detail is crucial. Headphones with a wide frequency response ensure no note goes unnoticed. Look for headphones that offer a range from at least 20 Hz to 20 kHz. Clarity across lows, mids, and highs means better mix decisions. Distortion-free sound is also a must for critical listening.

Durability And Comfort For Long Sessions

Producers often work long hours. Durable and comfortable headphones save the day. Quality materials withstand wear and tear. Memory foam earpads and an adjustable headband offer comfort. Some models even feature replaceable parts. This extends their life and makes them a smart investment.

Cable Detachability And Replacement Options

A broken cable can bring a session to a halt. Detachable cables add versatility and longevity to headphones. Select headphones with a standard audio jack. This ensures easy replacing. Having a spare cable on hand is also a wise choice.

Famous Brands And Models

When selecting headphones for music production, brand and model matter. Professional producers seek gear that blends quality, performance, and durability. This segment explores established favorites and introduces rising contenders in studio headphone manufacturing.

Industry Standards In Studio Headphones

Renowned brands dominate the studio environment, their models becoming almost iconic.

  • Audio-Technica ATH-M50x: Praises include clarity and comfort.
  • Sennheiser HD 600: Known for accurate sound reproduction.
  • Beyerdynamic DT 770 PRO: Offers impressive isolation and low-end precision.

Professionals regard these headphones as reliable tools. They trust them for mixing and mastering tasks. Each model offers a unique sound profile, suiting varied production styles.

Brand Model Notable Features
Audio-Technica ATH-M50x Excellent all-around performance
Sennheiser HD 600 Natural sonic accuracy
Beyerdynamic DT 770 PRO Comfortable for long sessions

Up-and-coming Brands In The Audio World

New brands bring innovative technology and fresh perspectives to the market.

  1. Neumann NDH 20: Features detailed sound with a sturdy build.
  2. HIFIMAN Sundara: Delivers planar magnetic tech at an accessible price.
  3. Focal Listen Professional: Combines comfort with high-end performance.

These burgeoning brands show promise with their strong entries into the pro audio scene. They stand as worthy adversaries to traditional favorites. Each provides features that appeal to modern producers seeking the next great sound tool.


The Price Spectrum

Venturing into the realm of music production requires the right gear, and the centerpiece of any audio professional’s toolkit is a pair of professional headphones. The market offers a broad price spectrum, catering to every level of experience and budget. As we explore the options, it’s essential to balance cost against features, durability, and sound quality.

Budget-friendly Choices For Beginners

Getting your foot in the studio door doesn’t have to break the bank. Budget-friendly headphones prove ideal for those just starting. These options deliver quality sound and comfort while keeping expenses low.

  • Audio-Technica ATH-M20x: Offers excellent sound clarity and durable design.
  • Sennheiser HD 202 II: Known for deep bass response and a secure fit.
  • AKG K72: Provides balanced audio and large, comfortable ear cups.

High-end Investments For Professionals

Seasoned audio professionals seek high-end headphones with unparalleled accuracy and comfort for prolonged sessions. These selections embody premium materials and the finest acoustic engineering for flawless production work.

Model Features Price Range
Beyerdynamic DT 1990 Pro: Open-back design, detailed resolution, and build quality. Above $500
Neumann NDH 20: Closed-back isolation, linear sound balance, and robust construction. Around $500
Audeze LCD-X: Planar magnetic drivers, wide dynamic range, and detailed lows. Above $1000

Balancing Noise Isolation And Monitoring

Professional headphones play a critical role in music production. They must balance noise isolation with accurate sound monitoring. This keeps unwanted noise out. It also ensures the sound inside is clear. Producers and engineers can make sound decisions with them. Let’s explore this balancing act.

The Role Of Sound Isolation In Studio Environments

Sound isolation keeps external noise away. This is key in a studio setting. Strong isolation allows focus on the music only. Noises like traffic, air conditioning, and others do not distract. This way, the sound that reaches the ears is only from the audio source.

  • Less ambient noise: Clearer perception of music detail.
  • Better concentration: Easier to focus on the task.
  • High-quality recordings: No unwanted sounds captured.

Mixing And Mastering: The Need For Critical Listening

Mixing and mastering involve critical listening. The right balance aids in detecting subtle nuances. It helps to fine-tune tracks for perfection. Closed-back headphones are great candidates here. They provide an intimate sound environment for detailed audio analysis.

Feature Benefits
Precise Sound Ensures accurate audio representation.
Flat Frequency Response Achieves a neutral sound, important for making adjustments.

Personalizing Your Sound Experience

Transforming your studio into a sonic sanctuary starts with tailoring every aspect of your audio experience. Professional headphones for music production now offer remarkable avenues for customization. Let’s delve into how personal adjustments not only enhance comfort but also profoundly influence sound quality.

Customizing Headphones With Ear Pads And Cables

The right ear pads redefine comfort and sound delivery. Memory foam pads seal out ambient noise and improve bass. Velour pads adjust to your ears’ shape for extended mix sessions. Breathable material pads keep your ears cool. These simple swaps impact sound isolation and frequency response. Personal choice decides the final mix feel.

Upgraded cables do more than prevent tangles. High-grade cables can enhance clarity and reduce signal loss. Choose between coiled or straight; short or long. Consider materials like oxygen-free copper for uncompromised audio transference.

The Impact Of Impedance On Sound Quality

Impedance measures resistance in headphone drivers. Lower impedance means easier device driving; higher equals need for amplification.

Impedance Benefit
Low (<32 ohms) Perfect for smartphones and portable music players
Medium (32-80 ohms) Decent with small amplifiers and studio equipment
High (>80 ohms) Best for professional studios with dedicated amplification

A higher impedance ensures cleaner sound at higher volumes and less distortion. Pair with a suitable amp for maximized audio fidelity.

Connectivity And Compatibility

Connectivity and compatibility are crucial in choosing professional headphones for music production. Whether you’re in a home studio or a professional setting, the way your headphones connect to your equipment can greatly affect your workflow and sound quality. Let’s explore the different interface options and weigh the advantages and disadvantages of wired and wireless headphones for producers.

Interface Options: Usb, Audio Jack, And Others

Producers must match their headphone interface with their audio equipment. The most common interfaces are:

  • USB Headphones: Offer digital sound transmission and can include built-in DACs for improved audio quality.
  • Audio Jack Headphones: Feature analog connections, widely compatible with various audio interfaces.
  • Others: Professional-grade options include XLR and ¼-inch jacks for studio equipment.

Wireless Vs Wired: Pros And Cons For Producers

  Wireless Wired
Sound Quality Can vary, potential for compression artifacts Generally better, no data compression
Latency Higher, can cause delay Lower, preferred for real-time monitoring
Reliability Depends on battery and signal strength Consistent, no batteries needed
Mobility Free movement, no cables Limited by cable length

Maintenance And Care

Proper maintenance and care of professional headphones are key to their longevity and performance. These high-quality devices need regular upkeep to ensure that every beat and note are heard exactly as intended during music production. Here’s how you can take the best care of your professional headphones:

Cleaning Practices For Hygiene And Longevity

Keeping your headphones clean is vital for both hygiene and durability. Follow these steps:

  • Wipe ear pads and headband with a soft, dry cloth after each use.
  • Use a slightly damp cloth with soap for tougher grime.
  • Remove ear pads, if possible, and clean separately.
  • Avoid using harsh chemicals that can damage materials.
  • Let all parts dry completely before reassembling.

Storage Solutions To Avoid Damage

Storing your headphones correctly prevents physical damage. Keep them safe with these tips:

  1. Use a padded case to protect against impacts.
  2. Keep the cables neatly coiled to prevent tangling.
  3. Avoid exposing your headphones to extreme temperatures.
  4. Store in a dry environment to ward off moisture damage.


The Future Of Studio Headphones

The Future of Studio Headphones is not just bright; it’s revolutionary. Professionals in the music production industry eagerly await the innovations that promise to enhance their auditory work environment. Get ready to dive into a world where technology meets creativity, giving rise to unparalleled sound experiences.

Technological Advances In Audio Production

Recent years have witnessed an impressive evolution in sound technology. This has set the stage for a thrilling future within the realm of studio headphones. Let’s look at some groundbreaking features we’ve started seeing:

  • Integrated Digital Signal Processing (DSP): This brings studio-level audio correction directly into headphones.
  • 3D Audio Technology: Offers an immersive sound experience by replicating real-life acoustics.
  • Artificial Intelligence (AI) Customization: AI algorithms tailor the listening experience to the user’s preferences.
  • Wireless Connectivity: High-fidelity Bluetooth codecs like aptX HD and LDAC ensure no quality is lost sans wires.
  • Noise-Cancellation Improvements: Advanced noise cancellation allows for uninterrupted focus on minute sound details.

Predictions For The Next Big Thing In Studio Headphones

So, what’s around the corner? Let’s lay out some predictions that may soon be a reality in the headphone industry:

Feature Impact on Music Production
Graphene Diaphragms Enhanced durability with excellent acoustic properties.
Augmented Reality Integration Overlay of soundscapes with virtual visual environments.
Real-Time Translation Break the language barrier for producers working with international artists.
Biofeedback Monitoring Adjust sound based on real-time physiological responses.
Solar-Powered Charging Environment-friendly charging options for wireless models.

Imagine headphones that not only adapt to your hearing profile but also guide you through mixing decisions with AI-enhanced feedback. Or ones that translate an artist’s work into different languages in real-time. The blending of such technologies may soon be the norm, offering an enlightened pathway for music production.

Professional Headphones for Music Production: Studio Essentials


Credit: www.amazon.com


Frequently Asked Questions On Professional Headphones For Music Production


What Are The Best Headphones For Music Production?


A great pair of headphones for music production is critical. Look for models with flat frequency response and comfort for long sessions. Brands like Sennheiser, Audio-Technica, and Beyerdynamic are highly regarded for their studio headphones.


How Do Headphones Impact Music Production Quality?


Headphones play a pivotal role in music production. They offer a detailed, intimate listening experience. This helps producers identify nuances and correct issues in the mix, ensuring a high-quality final product.


Why Are Flat Frequency Headphones Preferred For Production?


Flat frequency headphones provide an accurate sound representation. They allow producers to hear the mix as it is, without added bass or highs. This leads to clearer decision-making during mixing and mastering.


Can I Use Gaming Headphones For Music Production?


Gaming headphones are not ideal for music production. They often have exaggerated frequencies that can mislead during mixing. For optimal results, invest in professional studio headphones designed for music production.


Conclusion


Selecting the right professional headphones can elevate your music production to new heights. Quality, comfort, and sound clarity are essential. Remember, your headphones are an investment in your audio work. With the ideal pair, you unlock superior mixing precision. Happy producing!

Categories
Archive

Where Does Reverb Go in Effects Chain: Optimal Placement

Reverb typically goes towards the end of the effects chain. It’s often placed after modulation and delay effects.


Understanding the optimal placement of reverb in the effects chain is essential for achieving the desired sound quality in music production and live performance scenarios. The effects chain order can significantly influence the clarity and texture of the sound. Reverb, an effect that simulates the acoustic properties of physical spaces, is generally positioned after dynamic, filter, and pitch-based effects to preserve its natural ambiance.


This positioning ensures that the reverb tail doesn’t get muddied by subsequent effects. Musicians and sound engineers craft their unique soundscapes by thoughtfully ordering effects, with reverb’s placement being key to the sonic alchemy that transforms a dry signal into a lush, space-filled sound.


The Essence Of Reverb In Music Production

Reverb, or reverberation, is crucial in shaping the ambiance of a track. It gives sounds a spatial context, creating the illusion of a setting, whether it’s a small room or a grand cathedral. This spatial enhancement provides depth and resonance to music, enabling it to breath and resonate with listeners.

The Role Of Reverb

Reverb serves as an auditory cue in music, allowing ears to perceive room size and material characteristics.

  • Depth Perception: Places instruments in front or behind.
  • Sustain Sounds: Reverb prolongs notes naturally.
  • Blend Tracks: Merges separate recordings cohesively.

Historical Use Of Reverb In Recordings

From the Golden Age of Jazz to modern-day pop, artists have sought reverb’s magic.

Decade Milestone
1950s Plate reverb introduction
1960s Spring reverb in guitar amps
1970s Digital reverb emergence

Fundamentals Of An Effects Chain

An effects chain shapes the sound of an instrument. Guitarists and sound engineers often tweak this chain for perfect tone. Knowing where reverb fits in can make or break the sound. Let’s explore the basics and the build of an effects chain.

Signal Flow Basics

Signal flow is the path audio follows through an effects setup. It starts at the instrument and flows through various pedals or rack units. The goal is to create a clean and balanced sound at each step. Signal integrity is key for the best sound.

  • Input: Where your instrument connects.
  • Effects: Pedals or units that alter the sound.
  • Output: Ends with an amp or recording device.

Components Of An Effects Chain

Think of an effects chain as building blocks. Each block adds a layer to the sound. The order of these blocks affects the final tone.

Effect Type Common Position
Dynamics First
Gain/Stompboxes After dynamics
Modulation Middle
Time-Based Last

Reverb usually comes near the end of the chain. It simulates acoustic spaces. Reverb after most effects allows for a more natural sound.

Dynamics control volume and sustain. Gain effects boost signal. Modulation adds texture. Time-based effects, like reverb, add depth.

Reverb’s Impact On Sound

Reverb plays a pivotal role in the realm of music and sound production. This magical effect can manipulate the sonic landscape, adding vitality and ambiance to audio tracks. Understanding its impact is crucial for both novice and professional audio enthusiasts. Picking the right spot for reverb in an effects chain will greatly enhance the end result.

Texture And Depth

The application of reverb can transform a flat, lifeless sound into a vibrant, layered experience. By simulating different acoustic environments, you can add rich texture and depth to sounds. This can make them feel like they’re in a grand cathedral or a cozy room. Here’s what reverb can add to the sound:

  • Space illusion around vocals and instruments
  • Warmth and fullness to the mix
  • Depth that allows elements to sit well in the mix

Proper use of reverb can separate a great mix from an average one.

Common Types Of Reverb

Various reverb types exist, each with unique characteristics. Selecting the appropriate one is essential.

Type Characteristics
Room Emulates the acoustics of small rooms
Hall Emulates larger spaces like concert halls
Plate Creates a smooth decay popular in studio recordings
Spring Known for its distinctive twang and bounciness

Choosing between these types will depend on the texture and space you want to create.

Typical Effects Chain Configurations

Navigating the maze of guitar pedals and effects can be daunting. Understanding where reverb fits into an effects chain is crucial for crafting your sound. Let’s demystify this with typical configurations that make setting up your effects chain simpler.

Serial Vs. Parallel Processing

Guitarists often choose between serial and parallel setups for their effects. In serial processing, the sound flows through one effect after another. This creates a distinct tone as each effect shapes the one before it.

  • Serial Chains: Effects link one after the other
  • Parallel Chains: Effects are independent, blending treated and untreated signals

In parallel processing, two or more effects work side by side. This preserves your clean tone. It adds depth without overwhelming your sound.

Order Of Effects

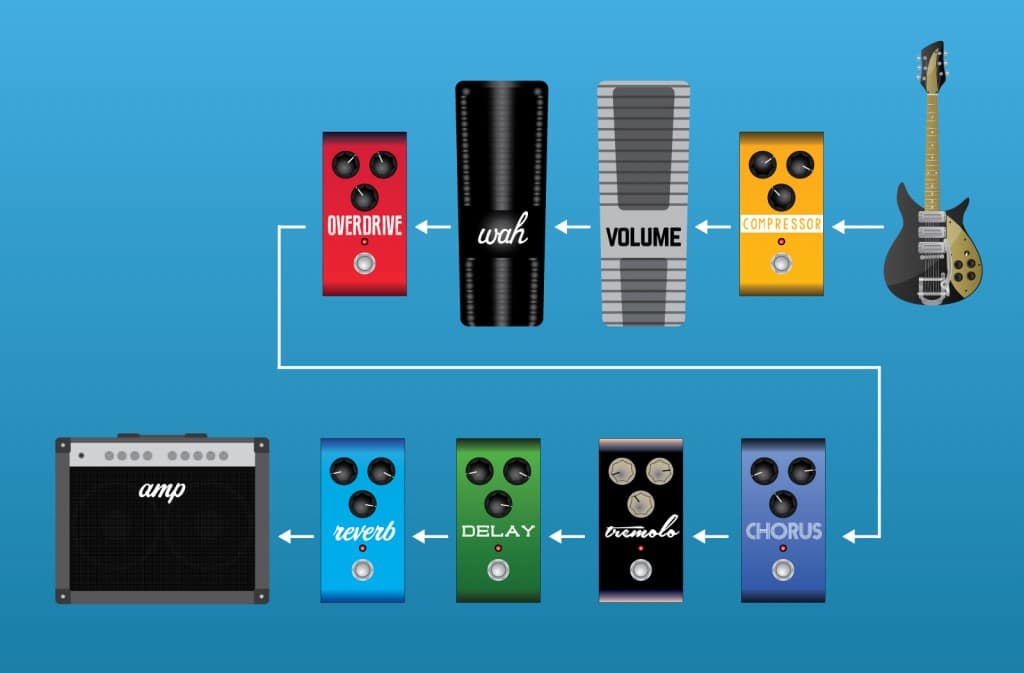
The order of your effects can make or break your tone. Players often follow a basic template:

  1. Dynamics (e.g., compressors)
  2. Filters (e.g., wah pedals)
  3. Gain (e.g., distortion, overdrive)
  4. Modulation (e.g., phasers, flangers)
  5. Time-based effects (e.g., delay)
  6. Reverb

Reverb usually comes last to create a natural echo effect. Placing reverb earlier can muddy your tone. Careful planning goes a long way here.

Effect Type Position in Chain
Dynamics First
Filters Second
Gain Third
Modulation Fourth
Time-based Fifth
Reverb Last

By following these patterns, you can shape your sound more effectively. Experiment with different orders. Find the sound that speaks to you.

Ideal Placement For Reverb

The ‘Ideal Placement for Reverb’ can make or break your sound. It’s like the final dressing to a perfect salad. Where you place it changes the flavor of your music. Let’s dive into the best spots for your reverb in the effects chain.

Reverb Before Dynamics

Placing reverb before dynamics can lead to unexpected results. Dynamics, like compressors and limiters, react to the volume of the signal. When reverb applies before these effects, it can alter their response. Why does this matter? Because it affects the texture and feel of your sound.

Let’s look at why you may or may not want to place reverb here:

  • Bold sound as reverb gets compressed
  • Can cause a washed-out effect
  • Less control over the reverb tail

Reverb After Modulation

Most experts agree that reverb often works best after modulation effects. Modulation can include chorus, flanger, or phaser. Placing reverb after these effects helps to create a more natural and cohesive sound. It lets the modulated signal spread out, feeling more like a part of the room.

Here are the benefits of this placement:

Benefits of Reverb After Modulation
Creates a smoother, more blended sound
Keeps modulated effects from becoming muddy
Gives a sense of space to the modulated tones
Where Does Reverb Go in Effects Chain: Optimal Placement Tips


Credit: www.strymon.net


Exceptions And Creative Uses

Reverb typically washes over sound, giving it depth. But rules are made to be broken. Creative minds often twist conventional methods, achieving unique sounds. This section explores daring approaches to reverb placement and how they defy expectations.

Unconventional Reverb Placement

Standard practice suggests reverb should tail effects chains. Different placement unlocks new sounds. Placing distortion after reverb creates saturated, ambient tones. A compressor following reverb reduces dynamics, intensifying the effect. Experiment to discover impactful sounds.

  • Reverb before distortion: Muddy yet inviting soundscape
  • Reverb before compressor: Enhanced sustain, controlled ambiance
  • Reverb in the loop: Vibrant effects with pronounced trails

Genre-specific Techniques

Genres influence reverb application. For instance, in psychedelic music, reverb might lead the chain for an ethereal quality. Ambient genres often place it upfront for a lush, expansive sound. Metal might push reverb back, preserving aggression while adding space.

Genre Reverb Placement Effect
Ambient Early Expansive atmosphere
Psychedelic Early Ethereal presence
Metal Late Spacious aggression

Adjust reverb placement based on musical genre. Examine the desired outcome. Test unconventional placements for novel effects. Trust your ear; let creativity guide the signal path. Record outcomes for future reference.

Integrating Reverb With Other Effects

Welcome to the dynamic world of music production, specifically, the art of incorporating reverb into your effects chain. Understanding how to effectively integrate reverb with other effects can elevate your sound, creating lush landscapes and professional-grade audio. Let’s delve into the synergy of reverb with other effects to enhance your sonic palette.

Reverb And Delays

Pairing reverb with delays is like weaving two sonic textures together. This combination creates a sense of depth and space that can be both uplifting and ethereal. Consider these steps when mixing:

  1. Place the delay before reverb in your chain for a cleaner echo.
  2. Reverb after delay can smooth out echoes, blending them into the mix.
  3. Experiment with moderate feedback and mix levels for balance.

Reverb With Distortion And Overdrive

Reverb’s interaction with distortion and overdrive drastically affects your tone. Check these tips:

  • Distortion before reverb maintains clarity and prevents a muddy sound.
  • Lower reverb density when using heavy distortion to avoid overwhelming the mix.
  • Tweak reverb decay to ensure notes don’t get lost in the gain.

Balance is key. The right amount of reverb adds dimension without overpowering the core tone.

Where Does Reverb Go in Effects Chain: Optimal Placement Tips


Credit: rolandcorp.com.au


Practical Tips For Optimizing Reverb

Welcome to the slice of audio magic where ambience reigns supreme! Optimizing reverb in an effects chain is crucial. It is the difference between lush soundscapes and muddled noise. Embark on a journey to tweak reverb into perfection. The guide here serves to help musicians and sound engineers alike. It ensures their reverb sits just right, complementing every nuance of their sonic output.

Adjusting Reverb Settings

Setting up your reverb is like adding the right amount of seasoning to a dish. Each adjustment brings you closer to the desired taste. Consider these steps:

  • Start with a dry signal: Mix in reverb slowly until it’s noticeable but not overwhelming.
  • Decay time is key: Tailor it to the tempo and rhythm of your music for natural decay.
  • Pre-delay adds depth: A short delay before the reverb onset separates the sound, creating space.
  • EQ your reverb: Cut low frequencies to avoid muddiness and tweak highs for clarity.
  • Modulation for movement: Adding subtle modulation enriches the reverb tail with texture.

Listening Environment Considerations

The space you listen in affects how reverb is perceived. Be mindful of these factors:

  • Avoid reflective surfaces: Hard surfaces bounce sound causing misleading reverb levels.
  • Treat your room acoustically: Use absorptive materials to control natural reverberation.
  • Consistent monitoring setup: Choose the right speakers and position them for a flat response.
  • Reference with headphones: They offer a direct sound that eliminates room interactions.

Keep these practical tips in mind. With them, the reverb in your effects chain will not just be an effect but the binding element that enhances your entire track.


Advanced Reverb Techniques

Reverb adds space to sounds, making music breathe. Knowing where to place reverb in an effects chain is crucial. Let’s explore advanced techniques that enhance mixes using reverb.

Using Send/return Loops

Send/Return loops can control reverb effects easily. Below are ways to use them:

  • Create a balance between dry and wet signals.
  • Process multiple tracks with the same reverb.
  • Adjust the reverb amount without modifying the original signal.

This method saves CPU resources in digital audio workstations.

Step Action
1 Create a send track with reverb.
2 Route tracks to send.
3 Adjust levels for balance.

Automation For Dynamic Mixing

Automating reverb parameters can bring a mix to life. It customizes the reverb effect throughout a track. Consider these tips:

  1. Tailor reverb size and decay to match song sections.
  2. Change reverb type for diverse sound textures.
  3. Automate send levels for intensity shifts.

These techniques create dynamic songs that capture attention. Automation keeps listeners engaged.

Troubleshooting Common Reverb Issues

Reverb can add depth to your sound. Sometimes it can create problems in your mix. In this section, we walk through common reverb-related issues. We also provide solutions to fix them. This ensures your tracks sound clear and professional.

Muddy Mixes

Muddy mixes hide the details in your music. This often happens when reverb is too heavy on low frequencies. To clean up a muddy mix:

  • Reduce low frequencies on your reverb with an equalizer (EQ).
  • Use a high-pass filter to remove unwanted bass.
  • Apply reverb only to key elements instead of the whole track.

These steps help maintain a clear and defined bottom end in your music.

Excessive Resonance

Reverb can cause certain frequencies to resonate too much. This is often unpleasant. To tackle excessive resonance:

  1. Identify the resonant frequency with a spectrum analyzer.
  2. Notch out the troublesome frequency using EQ.
  3. Use pre-delay to separate the dry signal from the reverb.

These steps should reduce resonance and help your track sound more balanced.


Frequently Asked Questions On Where Does Reverb Go In Effects Chain


What Is The Best Position For Reverb In Effects Chain?


Reverb typically comes later in the effects chain. This emulates how sound naturally reverberates in a space, after all other effects like distortion or modulation have occurred. Placing it towards the end preserves the clarity of preceding effects.


Can Reverb Be Used Before Distortion?


While most prefer reverb after distortion, using it before can create a unique, often washy sound. This unconventional placement blends the reverb into the distorted signal, producing a less distinct but potentially intriguing atmosphere. Experimentation can lead to creative soundscapes.


How Does Reverb Placement Affect Guitar Tone?


Placement can dramatically affect tone. Early in the chain, reverb influences the texture of all subsequent effects. However, placed after effects like overdrive or delay, it provides a spaciousness that doesn’t alter the core tone shaped by these effects.


What Happens If Reverb Goes First In Chain?


Placing reverb first can cause the effect to become overly pronounced and muddy, as every effect afterward amplifies the reverb. It can lose definition and potentially overtake other effects, resulting in a less defined sound overall.


Conclusion


Deciding on reverb placement in your effects chain can profoundly influence your sound. Ideal positioning maximizes clarity and impact. Experiment to find your unique tone. Remember, guidelines are starting points, not rules. Embrace the creative process as you refine your musical expression.

Categories
Archive

Music Copyright 101: The Ultimate Guide to Protecting Your Musical Creations

Music copyright protects original music compositions from unauthorized use or reproduction, ensuring artists’ rights and royalties. Understanding music copyright is essential for artists, composers, and producers as it governs how their work can be used and distributed.


By learning the basics of music copyright, creators can safeguard their intellectual property and earn fair compensation for their talent and creativity. This guide will cover the fundamentals of music copyright, including what it entails, how to obtain copyright protection, and what rights it grants to creators.


Whether you are a musician, songwriter, or music producer, having a solid grasp of music copyright is crucial for protecting your work and ensuring your success in the music industry.

Music Copyright 101: The Ultimate Guide to Protecting Your Musical Creations


Credit: www.copyright.gov

Understanding Music Copyright

Music copyright is an essential aspect for artists and creators. Understanding music copyright ensures that original works are protected from unauthorized use or reproduction. It involves legal rights and licenses, providing creators with the means to control the use of their music and receive fair compensation.

What Is Music Copyright?

Music copyright refers to the legal protection of musical works, giving creators the exclusive right to control how their music is used and distributed.

Copyright ensures artists are fairly compensated for their work and prevents unauthorized use of their music.

The Importance Of Music Copyright

Protecting music copyright is crucial for creators as it safeguards their intellectual property and ensures they receive recognition and financial compensation for their creations.

Key Components Of Music Copyright

`Music copyright entails two key components: Composition Rights and Sound Recording Rights. These elements form the foundation of protecting musical works from unauthorized use or reproduction.

Composition Rights

`Composition rights refer to the protection of the underlying musical composition itself, including the melody, lyrics, and overall arrangement of a song. This aspect of music copyright safeguards the creative expression of the songwriter or composer.

Sound Recording Rights

`Sound recording rights pertain to the protection of the specific audio recording of a musical work. This includes the performance of the artist, production elements, and any enhancements made during the recording process. It ensures that the recorded version of the song is protected from unauthorized duplication or distribution.

Registering Your Music Copyright

Registering your music copyright is a crucial step to protect your creative work. It offers legal protection and ensures that you have the exclusive rights to reproduce, distribute, and perform your music. Whether you’re a songwriter, composer, or recording artist, registering your music copyright is essential for safeguarding your intellectual property.

The Registration Process

Registering your music copyright involves a simple and straightforward process. You can submit your application online through the U.S. Copyright Office’s electronic Copyright Office (eCO) system. The application generally requires information such as the title of the work, the names of the authors, and the type of work (e.g., music composition, lyrics, sound recording).

Benefits Of Registering

Registering your music copyright provides you with several important benefits:

  • Legal Evidence: Registration creates a public record of your copyright and serves as prima facie evidence in court, making it easier to prove ownership.
  • Protection of Your Rights: It grants you the exclusive right to reproduce, distribute, perform, and display your music, empowering you to take legal action against infringement.
  • Statutory Damages and Attorney’s Fees: In case of copyright infringement, registered works are eligible for statutory damages and attorney’s fees, providing a strong incentive for potential infringers to settle out of court.
  • International Protection: Registration can be used to secure protection for your music in foreign countries through international treaties.

Protecting Your Music Copyright

Protecting Your Music Copyright is vital for musicians and artists to ensure that their creative works are not used or reproduced without their permission. As an artist, you invest time, effort, and emotion into writing and producing your music, and it’s crucial to safeguard your intellectual property rights. Understanding infringement and knowing how to enforce your rights are essential aspects of protecting your music copyright.

Understanding Infringement

Infringement refers to the unauthorized use, reproduction, distribution, or public performance of your copyrighted music. This can include someone using your music in their own compositions, sampling your tracks without permission, or even playing your songs publicly without obtaining the necessary licenses.

Understanding what constitutes infringement is crucial in order to protect your music. It’s essential to be aware of the exclusive rights granted to you as the copyright owner, such as the right to reproduce, distribute, perform, and display your work. If anyone uses your music in a way that violates these rights, they may be liable for copyright infringement.

Enforcing Your Rights

Enforcing your rights as a copyright owner is essential to prevent others from using or profiting from your music without your permission. Here are some important steps you can take:

  1. Register your copyright: Registering your music with the appropriate government agency provides you with additional legal protection and evidence of your ownership in case of infringement. Check the copyright registration process in your country and ensure your works are properly registered.
  2. Monitor your music: Regularly monitor different platforms, both online and offline, to identify any unauthorized use of your music. Keep an eye on streaming platforms, social media, radio, TV, live performances, and advertisements. If you find any instances of infringement, make a note with all the necessary evidence, such as dates, locations, and copies of the infringing works.
  3. Issue cease and desist letters: If you discover infringement, sending a formal cease and desist letter to the infringing party can be an effective way to stop the unauthorized use. Clearly state your rights, provide evidence of infringement, and demand the immediate cessation of the infringing activity.
  4. Consider legal action: If the infringement persists despite your cease and desist letter, it may be necessary to consider taking legal action. Consult with an intellectual property lawyer who can guide you through the legal process and help you protect your rights effectively.

Remember, protecting your music copyright is an ongoing process. Stay vigilant, be proactive, and take the necessary steps to ensure that your creative works are fully protected.

Music Copyright And Digital Platforms

As music continues to thrive in the digital age, it is crucial to understand the intricacies of music copyright and how it applies to various digital platforms. Licensing and royalties play a vital role in ensuring that artists are fairly compensated for their work, while challenges arise in dealing with the vastness of digital platforms. However, there are effective solutions to address these challenges.

Licensing And Royalties

Licensing and royalties are at the heart of the music industry, especially when it comes to digital platforms. To legally use copyrighted music on these platforms, proper licensing is required. This allows platforms to offer a vast library of music for users to enjoy, while also ensuring that artists or their representatives are compensated for their creations.

Typically, licensing involves agreements between copyright holders, such as labels and publishers, and digital platforms. These licenses grant platforms the right to stream or make available copyrighted music to their users. In return, the platforms pay royalties, which are calculated based on the number of streams or downloads, ensuring that artists receive their rightful share.

Challenges And Solutions

While digital platforms have revolutionized music distribution and consumption, they have also presented unique challenges when it comes to music copyright. One of the primary challenges is the sheer volume of content being uploaded and shared on these platforms every day.

With millions of songs and videos being added constantly, it becomes increasingly difficult to monitor and enforce copyright protection. Unauthorized uploads and infringements are bound to occur, jeopardizing the rights of artists and creators.

To tackle these challenges, digital platforms have implemented various solutions. One of these solutions is the use of automated technologies that can detect and flag copyrighted content. This helps in identifying potential infringements and taking appropriate actions, such as removing or blocking unauthorized content.

Solution: Benefits of Automated Technologies
Benefits Explanation
Efficiency Automated technologies can quickly scan vast amounts of content, reducing the time and effort required for manual monitoring.
Accuracy These technologies are designed to accurately identify copyrighted material, minimizing the risk of false positives or negatives.
Consistency By employing automated systems, platforms can ensure consistent enforcement of copyright policies across their entire content library.

Additionally, platforms have established mechanisms for artists and copyright holders to report infringements. This allows them to take swift action against unauthorized usage of their copyrighted material, safeguarding their rights and ensuring fair compensation.

In conclusion, music copyright and its relationship with digital platforms are crucial considerations for both artists and users. Licensing and royalties enable legal distribution and compensation for artists’ work, while challenges of copyright enforcement on digital platforms are being addressed through automated technologies and reporting mechanisms. By understanding and navigating these aspects, the music industry can thrive and continue to evolve in the digital age.


Frequently Asked Questions Of Music Copyright 101

What Are The Basics Of Music Copyright?

Music copyright basics include protecting original songs, sheet music, lyrics, recordings, and performances. Copyright gives creators exclusive rights to their work and the ability to license and enforce those rights.

What Are The Rules For Using Copyrighted Music?

To use copyrighted music legally, obtain proper licensing for commercial use from the creator or license holder. Failure to do so may result in legal action.

How Can I Legally Copyright A Song?

To legally copyright a song, create an original work and then register it with the U. S. Copyright Office. Fill out the appropriate forms, pay a fee, and submit your song. Once approved, you’ll have exclusive rights to reproduce, distribute, and perform your song.

How Much Of A Song Can You Use To Avoid Copyright?

To avoid copyright infringement, use only a small portion of a song, such as a few seconds or a short sample. However, it’s advisable to seek permission or obtain a license to use any copyrighted material.

Conclusion

Understanding music copyright is crucial for creators and businesses. It not only protects original works but also ensures fair compensation. By grasping the basics of copyright, individuals can navigate the industry with confidence and integrity. As the digital landscape continues to evolve, staying informed about copyright laws is essential for anyone involved in the music industry.

Categories
Archive

How to Use Distrokid As a Producer: Unleash Your Music’s Full Potential

To use Distrokid as a producer, sign up, upload tracks, add metadata, distribute, and receive royalties. Distrokid simplifies music distribution for producers looking to get their music on major streaming platforms.


As a producer, utilizing Distrokid allows for seamless worldwide distribution of your music, ensuring it reaches a broader audience and generates revenue. With Distrokid’s user-friendly platform, producers can easily manage their music library, track performance, and receive timely royalty payments.


By leveraging Distrokid’s tools and services, producers can focus on creating music while leaving the distribution and administrative tasks to the platform. This streamlined process makes it easier for producers to showcase their work and grow their fan base in the competitive music industry.


Getting Started With Distrokid

As a producer looking to use Distrokid, the first step is to create an account and upload your music. Then, complete the release form and select your release date. Next, finalize the payment process and your music will be distributed to major platforms, making your tracks accessible to a larger audience.

Creating An Account

Create an account on Distrokid by providing basic information and payment details.

  • Go to the Distrokid website.
  • Click on the “Sign Up” button.
  • Fill in your email, password, and artist name.
  • Add payment information.

Uploading Your Music

Follow these steps to upload your music on Distrokid and start sharing your tracks.

  1. Login to your Distrokid account.
  2. Click on the “Upload” button.
  3. Fill in the relevant song details.
  4. Upload your music file.
  5. Choose your release date and distribution options.


Understanding Distrokid’s Distribution Process

Digital Stores And Streaming Platforms

Distrokid’s distribution process ensures your music reaches popular digital stores and streaming platforms.

Some of these platforms include Spotify, Apple Music, Amazon Music, and more, giving your music wide exposure.

Revenue Collection And Distribution

Your revenue from music streams and sales is collected by Distrokid efficiently.

The process involves aggregating earnings from various platforms and distributing them to you directly.

Utilizing Distrokid’s Marketing Tools

When it comes to distributing your music as a producer, Distrokid offers a range of powerful marketing tools to help you promote and customize your releases. Whether you’re looking to maximize your exposure or connect with your audience in a meaningful way, Distrokid has the features and functionality you need to truly make an impact.

Customizing Your Release

With Distrokid, you can customize your release in a way that resonates with your audience. Customizing your release can include updating album art, adding metadata, and specifying the release date.

Promotional Features

Distrokid provides a host of promotional features to help you reach a wider audience, including the ability to create personalized hyperfollow pages, customize your Spotify profile, and utilize smart links to direct your fans to the streaming platform of their choice.

  • Customize your release with album art and metadata.
  • Create personalized hyperfollow pages to engage your audience.
  • Utilize smart links to direct fans to their preferred streaming platform.


Maximizing Your Music’s Reach

Learn how to amplify your music’s reach by leveraging DistroKid as a producer. Maximize exposure and distribution effortlessly.

Playlist Placement Strategies

One of the most effective ways to maximize the reach of your music is by securing playlist placements. Playlists are curated collections of songs that can introduce your music to thousands or even millions of potential fans. By getting your tracks featured on popular playlists, you can significantly increase your exposure and attract new listeners. Here are some strategies to help you secure those valuable playlist placements:

  • Research relevant playlists: Take the time to search for playlists that align with your music genre and style. Look for playlists that have a large number of followers and active listeners.
  • Build relationships: Once you’ve identified relevant playlists, reach out to the curators or playlist owners. Introduce yourself, explain why your music would be a good fit for their playlist, and provide them with a link to your best tracks.
  • Create your own playlists: In addition to reaching out for placements, you can also create your own playlists on streaming platforms. Curating playlists can help you build a loyal fanbase and attract the attention of other playlist curators.
  • Promote your placements: If your music gets featured on a playlist, make sure to promote it on your social media, website, and newsletter. This will help you leverage the exposure and encourage your existing fans to listen and share the playlist.

Social Media Integration

In today’s digital age, social media plays a crucial role in promoting music and connecting with your audience. Integrating your DistroKid releases with your social media channels can significantly boost your music’s reach. Here are some effective strategies to maximize your music’s exposure through social media integration:

  • Share teasers: Before releasing your music, share teasers, snippets, or behind-the-scenes footage on platforms like Instagram, Facebook, and Twitter. This will build anticipation and generate buzz among your followers.
  • Create engaging content: Regularly post engaging content related to your music, such as photos, videos, or blog posts. This will keep your audience engaged and increase the chances of them sharing your content with their own followers.
  • Collaborate with influencers: Partnering with social media influencers or bloggers who have an audience that aligns with your target demographic can expose your music to a whole new group of potential fans.
  • Run social media ads: Consider running targeted ads on platforms like Facebook Ads or Instagram Ads to reach a wider audience. You can choose specific demographics, interests, and locations to ensure your ads are seen by the right people.

By implementing these strategies and utilizing the powerful distribution services provided by DistroKid, you can maximize the reach of your music and increase your chances of finding success in the highly competitive music industry. Remember to stay active, engage with your audience, and constantly seek new opportunities to promote your music.

Optimizing Distrokid For Producer Success

Collaboration Features

With Distrokid, producers have access to a range of collaboration features that can greatly enhance their success in the industry. One such feature is the ability to easily invite artists, songwriters, and other producers to work on a project together. This can lead to creative breakthroughs and the opportunity to collaborate with talented individuals from around the world.

Additionally, Distrokid allows producers to seamlessly share their music with others, making it easy to gather feedback and make necessary changes. This real-time collaboration process ensures that every aspect of a song is perfected through the collective efforts of all those involved.

Performance Tracking And Analytics

In order to achieve success as a producer, it’s crucial to have a clear understanding of the performance of your music. Distrokid provides comprehensive tracking and analytics tools that enable producers to keep track of their streaming numbers, downloads, and royalties in real-time.

Producers can access detailed reports and insights that help them identify trends, understand their audience, and make informed decisions to propel their career forward. This allows producers to focus their efforts on creating music that resonates with their listeners, leading to increased popularity and recognition in the industry.

Benefits of Distrokid’s Performance Tracking and Analytics:
– Real-time streaming numbers and downloads tracking
– Detailed reports and insights for informed decision-making
– Understanding audience preferences and trends

In conclusion, by optimizing Distrokid’s collaboration features and leveraging the power of performance tracking and analytics, producers can elevate their success in the industry. The ability to collaborate easily and receive feedback in real-time, combined with the insights gained from tracking and analyzing their music’s performance, gives producers the competitive edge needed to thrive in the music business.


Frequently Asked Questions For How To Use Distrokid As A Producer

Do Producers Use Distrokid?

Producers commonly use DistroKid for distributing their music to online platforms quickly and easily.

Where Do You Put The Producer On Distrokid?

You can add the producer’s information in the credits section while uploading your music on DistroKid.

How Does Distrokid Pay Producers?

DistroKid pays producers by distributing their earnings directly into their chosen payment method.

How Much Does Distrokid Pay For 1,000 Streams?

DistroKid pays $0. 003 for 1,000 streams.

Conclusion

Using DistroKid as a producer is a game-changer. With its user-friendly interface and cost-effective plans, you can effortlessly distribute your music to various platforms. The reliable customer support and efficient royalty collection make it a go-to choice for producers. Embrace DistroKid and take your music career to new heights.

Categories
Archive

What are the Best Music Production Headphones? Uncover Top Picks!

This guide covers music production headphones in plain terms. As an Amazon Associate I earn from qualifying purchases.

The best music production headphones are the Sennheiser HD 650 and the Audio-Technica ATH-M50x. Also, both offer superior sound quality and comfort for extended studio sessions.

Related reading: Studio Headphones For Music Listening and Why Do Studio Musicians Wear Headphones? Unveiling Audio Secrets. For background, see the Wikipedia article on Headphones.


Moreover, choosing the right headphones for music production is crucial for accurate audio editing and mixing. In addition, Sound engineers and producers require headphones that provide clear, flat response and reveal the finest details in a track. The Sennheiser HD 650 impresses with its open-back design and natural soundstage, making it a favorite among audiophiles.


Meanwhile, the Audio-Technica ATH-M50x stands out with its closed-back design, offering excellent sound isolation, which is perfect for recording and mixing in noisy environments. For example, these models top numerous lists thanks to their consistent performance, durability, and comfort, making them ideal choices for professional studio work. In addition, their clarity across all frequencies ensures producers can trust the reproduction of their mixes for a polished final product.


Introduction To Music Production Headphones

Furthermore, choosing the right headphones is key for any music producer. As a result, Quality headphones give you a clear sound. They help you make the best music. In this post, we explore top headphones for music production.

Essential Features For Studio Headphones

Additionally, the best studio headphones must have certain features.

  • Also, Comfort: They should feel good even after hours.
  • Durability: They must last and handle everyday use.
  • Moreover, Sound Quality: Clear, accurate audio is crucial.
  • In addition, Frequency Response: They need to catch all the sounds.
  • Furthermore, isolation: Good isolation keeps external noise out.

The Role Of Headphones In Music Production

Additionally, Headphones play a massive part in how music is made. However, they let you hear details. You can mix and master with precision. It’s important to choose carefully for the best results.

Closed-back Vs. Open-back Headphones

Also, choosing the right headphones is crucial for music production. Then, closed-back and open-back headphones offer unique experiences. Let’s look at each to find the best option for a music producer.

Pros And Cons Of Closed-back Designs for Music Production Headphones

Moreover, closed-back headphones are all about isolation. In short, they’re great in studios and for recording. But what are the exact benefits and downsides?

  • Pros:
    • Excellent noise isolation
    • Minimal sound leakage
    • Deep, pronounced bass
    • Ideal for tracking and mixing
  • Cons:
    • Can cause ear fatigue
    • Sometimes less natural soundstage
    • Heat buildup around ears

Why Open-back Headphones May Be The Better Choice

Additionally, Open-back headphones give a feel of spacious sound . Similarly, they mimic listening to studio monitors. Perfect for critical listening.

Advantages Disadvantages
  • Natural soundstage
  • Breathable ear cups
  • Reduced ear fatigue
  • Subtle nuances in music
  • Poor isolation
  • Sound leakage
  • Not ideal in noisy environments
  • Less impactful bass

Also, each choice has its place in a music producer’s toolkit. Consider the environment and usage when choosing between closed-back and open-back headphones.

Frequency Response And Sound Quality for Music Production Headphones

Moreover, the heart of music production lies in the subtlety of sound. Also, Frequency Response and Sound Quality play crucial roles. They determine how well headphones capture the essence of music. Let’s explore the importance of these features in choosing the best music production headphones.

Balanced Sound for Accurate Monitoring

Balanced Sound For Accurate Monitoring for Music Production Headphones

In addition, achieving a clean mix starts with headphones that offer a balanced sound . In addition, high-quality headphones do not exaggerate bass, mids, or treble. This ensures that what you hear is as close to the original recording as possible. Such precision allows producers to make sound decisions that translate well across various listening devices.

  • Furthermore, flat frequency response for unbiased listening
  • Additionally, clear differentiation between instruments and vocals
  • Also, no coloration to avoid mix errors

The Importance of Frequency Range

The Importance Of Frequency Range for Music Production Headphones

Moreover, a broader frequency range equips producers to hear every detail, from the deepest bass to the highest treble. For example, Headphones with a wide frequency range reproduce sound more accurately. This makes them a critical tool for fine-tuning tracks to perfection.

Frequency Range Benefit
Low-End Decipher subtle bass frequencies
Mid-Range Capture the warmth of vocals and instruments
High-End Notice fine details and audio textures

In addition, grasping the nuances of frequency response and sound quality is pivotal. As a result, it ensures that producers select headphones that reveal the truth in music. With the right headphones, mastering the art of sound becomes an intuitive and precise process.

Comfort And Build Quality for Music Production Headphones

Furthermore, Music production requires high-quality headphones with excellent comfort and build quality. However, Producers often wear headphones for extended periods , making these two factors critical. These aspects not only enhance the overall experience but also preserve your focus and productivity during those long mixing and editing sessions.

The Search For Long-session Comfort for Music Production Headphones

Additionally, finding headphones that remain comfortable over several hours is essential for musicians and producers . Then, the best music production headphones need to strike a perfect balance between a snug fit and a featherlight touch to avoid any discomfort. Look for features such as:

  • Also, memory foam earpads : They adapt to your head and ears.
  • Moreover, adjustable headbands : They ensure a perfect fit for all head sizes.
  • In addition, Breathable materials : They prevent overheating and sweating.
  • Furthermore, over-ear design : This offers added comfort and noise isolation.

Durability And Longevity In Studio Headphones

Additionally, Studio headphones are an investment for your music production . You want them to last. In short, key indicators of durable headphones include:

Feature Description
Metal components Stronger and last longer than plastic.
Replaceable parts Ear pads and cables can be replaced if needed.
Thick cables Less prone to tangling and wear.
Warranty Longer warranty periods offer peace of mind.

Also, Brands known for their robust build , like Sennheiser and Audio-Technica, often provide such features. Similarly, investing in headphones that stand the test of time makes both practical and financial sense.


Top Picks For Professional Producers for Music Production Headphones

Moreover, the right headphones are essential for music production. The market boasts a myriad of options, so choosing the perfect pair can be daunting. Also, Professional producers need headphones that offer precision, clarity, and a flat frequency response. Below, find the top picks that cater to both seasoned and budding producers.

Premium Headphones: Worth the Investment?

Premium Headphones: Worth The Investment?

In addition, premium headphones represent a significant investment. But for a pro, they’re critical tools. In addition, these headphones don’t just sound good; they reveal every detail in the mix. This precision helps producers make informed decisions during music production.

  • Furthermore, Open-back design for natural sound reproduction
  • High-resolution drivers ensure detailed sound across frequencies
  • Comfortable build for long studio sessions

Consider these top-tier models known for stellar audio performance:

Model Type Price Range
Sennheiser HD 800 Open-back Above $1000
Beyerdynamic DT 1990 Pro Open-back Around $600
Audeze LCD-X Planar Magnetic Above $1000

Affordable Options For Up-and-coming Producers for Music Production Headphones

Not all quality headphones break the bank. Up-and-coming producers can find affordable options that still offer professional-grade sound. For example, these models provide a balanced mix, durable construction, and the comfort needed for extended wear.

  1. Audio-Technica ATH-M50x: Versatile and durable, under $200
  2. Sony MDR-7506: A proven choice with a flat response, around $100
  3. AKG K240 Studio: Semi-open for natural sound, under $70

These headphone options deliver top performance without a large investment, ideal for producers still honing their craft.


Wireless Vs. Wired: The Great Debate

Choosing the best music production headphones often leads to a crossroads: wireless or wired? As a result, each type boasts features appealing to different needs. Producers and audiophiles weigh in, tipping the scales with sound quality, convenience, and precision. It’s a face-off where only your personal studio habits can declare the winner.

The Convenience Of Wireless Headphones

Wireless headphones symbolize freedom. However, nobody enjoys untangling cables or being tethered to their desk. Visualize the ease of moving around your studio space, no strings attached.

  • Portability: Move freely without cables snagging gear.
  • Multi-tasking: Step away to grab a coffee without missing a beat.
  • Clutter-free: A clean workspace fosters creativity.

Despite some concerns over audio fidelity and battery life, the tech advancements have narrowed the quality gap significantly. Then, charging cases and Bluetooth codec improvements make wireless a contender.

Why Wired Headphones Dominate In Studios

In most professional settings, wired headphones reign supreme. In short, ask any seasoned audio engineer and they’ll tell you: precision is key .

Advantages of Wired Headphones
Consistent Sound Quality: No compression means true audio reproduction.
No Batteries Required: Endless power supply from your device.
Minimal Latency: Synchronous audio for meticulous editing.

Purists argue that the physical connection provides an uninterrupted signal flow. This ensures crystal-clear sound — essential when crafting a mix. Additionally, with no risk of interference, wired headphones are a staple in the arsenal of professionals.

Brand Reputation And User Reviews

The quest for the best music production headphones leads us down a path marked by brand reputation and real-world experiences. Similarly, recognized brands carry a promise of quality. But what do the users say? Let’s dive in.

Trusted Brands In Music Production

Trusted brands offer headphones that transform sounds into clear, balanced outputs. Look for these names:

  • Sennheiser: Legendary for their precision.
  • Audio-Technica: Known for durability.
  • Beyerdynamic: Delivers comfort and clarity.
  • AKG: A favorite for their flat-response.
  • Sony: Combines affordability with quality.

Learning From User Experiences And Reviews for Music Production Headphones

User reviews are gold mines of honest feedback. Also, they reveal strengths and weaknesses.

Headphone Model User Rating
Sennheiser HD 650 4.7/5
Audio-Technica ATH-M50x 4.6/5
Beyerdynamic DT 770 PRO 4.5/5
AKG K702 4.3/5
Sony MDR7506 4.4/5

Skim through reviews to gauge consistent patterns in user experiences. In addition, look out for mentions of sound quality, comfort, and build.

What are the Best Music Production Headphones? Uncover Top Picks!


Credit: www.pcworld.com


Additional Considerations

Choosing the right cans isn’t just about sound. For example, other features play big roles in your listening experience. Let’s dive into the finer details that can make or break your headphone selection.

The Impact Of Impedance On Sound Quality

Higher impedance means clearer sound, especially in professional studios. As a result, it’s all about getting every detail in the music. Here’s what you need to know:

  • Low impedance (under 50 ohms): Good for smartphones and standard devices.
  • Medium impedance (50-100 ohms): Versatility for various equipment.
  • High impedance (over 100 ohms): Best with specialized gear for top quality.

Think about where you’ll use your headphones. However, Studio work often demands high-impedance headphones for the best sound.

Cables And Accessories: Small Details That Matter

Don’t overlook cables and accessories. Then, they enhance sound and comfort. Look for these:

Feature Why It’s Important
Detachable Cables They extend headphone life and make storage easy.
Coiled versus Straight Coiled offers more stretch; straight provides length.
Extra Padding Increases comfort for long sessions.

Consider a pair with a carrying case for protection. Don’t forget about adapter needs for different gear. Quality accessories can transform your audio experience.

Conclusion: Making The Final Choice

Selecting the right headphones for music production is crucial. Similarly, your decision impacts how you hear and mix sounds. It shapes the music you create. It’s time to make a final choice.

Summing Up The Essentials For The Best Pick

Remember what matters most:

  • Sound quality should be crystal clear.
  • Comfort is key for long sessions.
  • Durability means longer-lasting headphones.
  • Look for flat frequency response for true sound.
  • Noise isolation helps focus on details.

The Personal Nature Of Selecting Music Production Headphones

Choosing headphones is personal. Everyone’s ears are different. Also, what feels good to you matters. A pair that fits well, sounds great, and suits your budget is the best choice. Trust your ears and your needs.

Test different headphones if you can. In addition, think about what you want. Do sounds feel real? Are the headphones comfy for hours? Your perfect pair is out there. Take your time. Pick wisely. Happy mixing!

What are the Best Music Production Headphones? Uncover Top Picks!


Credit: www.nytimes.com


Frequently Asked Questions Of What Are The Best Music Production Headphones


What Defines The Best Studio Headphones?


Studio headphones should offer flat, neutral sound reproduction. For example, they’re designed for accuracy in music production, allowing producers to hear every detail.


How Do Over-ear Headphones Benefit Producers?


Over-ear headphones provide superior comfort for long sessions. They isolate sound better, which helps in identifying nuances in music during production.


Are Wireless Headphones Good For Music Production?


Wireless headphones can be used, but wired headphones are preferred. They ensure no latency or compression affects the sound quality during production.


What’s The Importance Of Headphone Frequency Response?


Frequency response affects how headphones reproduce bass, mids, and treble. As a result, a wide frequency range allows for detailed sound analysis, crucial for producers.


Conclusion


Selecting the ideal headphones for music production hinges on your personal preferences and requirements. However, prioritize comfort, sound clarity, and durability. As trends evolve, stay informed on the latest models. Explore the headphones highlighted to enrich your production experience. Your perfect match awaits; happy mixing!

Categories
Archive

What’s the Difference Between Reverb and Distortion?

Reverb is an effect that simulates the sound reflections from surfaces in a space, creating an ambiance. Distortion alters the sound wave shape, adding grittiness or “crunch” to the tone.


Understanding the difference between reverb and distortion is crucial for musicians and audio engineers aiming to sculpt their desired sound. Reverb imitates the natural echo you would hear if a sound bounces off walls and other surfaces, contributing to the depth and space of a recording or live performance.


Distortion, on the other hand, is a form of audio signal processing that adds harmonic overtones and can substantially change the character of the sound, often producing a heavier, more aggressive tone. Both effects are instrumental in various music genres, helping to create atmosphere and texture. Choosing the correct application and balance of reverb and distortion can significantly impact the feel and quality of a piece of music.


The Essence Of Audio Effects

The Essence of Audio Effects lies in their ability to transform sound. They shape how we experience music. Audio effects like reverb and distortion are not just tools used by musicians and producers. They are essential elements that define a song’s character and emotion. Each effect has a specific role and creates a unique impact on the final sound output.

Crucial Audio Enhancements

Reverb and distortion stand out as audio enhancements. They bring depth and personality to music.

  • Reverb or reverberation, adds space and atmosphere. Picture a sound echoing in a hall.
  • Distortion intensifies and changes a sound’s texture. It creates a gritty or aggressive edge. Think of an electric guitar’s raw growl.

Each effect has its own parameters allowing for fine-tuning. This gives artists creative control over their sound.

Impact On Music Production

In music production, these effects are powerhouses:

  1. Reverb can make a dry vocal sound like it’s in a cathedral or a small room.
  2. Distortion can turn a smooth guitar into one that screams with emotion.

Artists use them to match a song’s mood to its message. Producers use them to create signature sounds. In essence, reverb and distortion can make or break a track.

Diving Into Reverb

Welcome to the sound-altering world where ‘Reverb’ plays a mystical role in music production! Imagine entering an ancient cathedral and whispering sweet nothings, only to hear them dance around the room, trailing off into a symphony of echoes. That’s reverb for you – the natural spread of sound after it hits your ears, creating a sense of space and depth. Now, let’s take a deeper dive into what makes reverb such an essential effect for audio enthusiasts.

Natural Echoes And Reverberation

We experience reverb daily without even realizing it. It’s all about the reflection of sounds bouncing off various surfaces. In music, reverb adds richness and makes everything feel more alive. It can transform a dry, stale note into a warm embrace enveloping the listener. Here’s how it works in different environments:

  • Small Rooms: Quick, tight echoes blend into a subtle reverb.
  • Large Halls: Longer, grander echoes create a cathedral-like effect.
  • Open Areas: Sparse echoes offer a sense of vastness and infinity.

Common Reverb Tools And Technologies

Music producers wield numerous tools to infuse reverb into tracks. Each tool shapes sound in a unique way. High-quality reverb can turn a bedroom recording into an arena performance. Some of these tools include:

Tool Type Use
Spring Reverb Hardware Creates a twangy, vintage effect popular in guitar amps.
Room Emulators Software Simulate specific spaces like studios or concert halls.
Convolution Reverb Software Uses real sound samples (impulse responses) for authentic echoes.
Digital Reverb Pedals Hardware Offers portable and diverse reverb effects for live performance.

Understanding reverb’s rich dynamics unlocks a whole new dimension in sound design. Whether mixing a track in the studio or setting up for a live gig, knowing how to harness natural echoes and reverberation shapes the listener’s experience.

Understanding Distortion

Distortion twists sound in unique ways. It adds grit and intensity to music. Distortion alters the harmonic structure of musical notes. This creates a thick, powerful sound.

Distortion’s Role In Music

Distortion shapes a song’s emotional impact. Guitar riffs become edgier. Vocals gain raw power. It boosts the energy in rock, metal, and blues genres.

  • Electric Guitars: With distortion, guitars sound louder and more aggressive.
  • Other Instruments: Keyboards and bass can also use distortion for effect.
  • Vocals: Adding distortion can give a raspy, more expressive sound.

Varieties Of Distortion Effects

Several distortion effects are available. They offer different sound characteristics. They fit various musical styles.

Effect Type Sound Characteristic Common Usage
Overdrive Warm, smooth clipping Blues and rock
Fuzz Extreme, buzzy texture Classic rock, psychedelic
High-gain Intense, heavy clipping Metal and hard rock


Differences In Acoustic Properties

Understanding how reverb and distortion shape sound is crucial. They alter audio in unique ways. Let’s explore these changes.

Timbral Alterations: Distortion

Distortion, widely used in electric guitar music, adds grit and intensity. It significantly alters the pure tone of an instrument by creating harmonic overtones. These changes to the sound’s timbre produce a thicker, more aggressive tone. Distortion effects come in different flavors:

  • Overdrive: Simulates pushing an amp beyond its limit subtly.
  • Fuzz: Offers a warm, vintage sound that’s highly modified.
  • Metal: Generates a sharp, cutting tone for heavier genres.

Spatial Enhancements: Reverb

Reverb gives a sense of space to sounds, simulating various environments. It reflects sound waves, creating an echo. Unlike distortion, reverb does not change the original sound’s harmonic content. Instead, it adds depth and atmosphere. Different types of reverb create unique spatial effects:

  • Room: Imitates the acoustics of small spaces.
  • Hall: Replicates larger, more expansive areas.
  • Plate: Uses a metal plate to produce a vintage vibe.

Both reverb and distortion are essential tools for musicians. They give character to music, setting the mood and style of a track.

Application In Genres: Diverse Uses

The Application in Genres: Diverse Uses captures how different musical styles use reverb and distortion. These effects shape the vibe and emotion of the music we love. Rock guitars roar through distortion, while reverb gives a concert hall feel to orchestras and electronic anthems. Let’s explore these sounds and their habitats.

Rock And Distortion’s Symbiotic Relationship

Rock music thrives on distortion. This marriage began in the 1960s, birthing an iconic sound. Guitar riffs get their gritty, aggressive punch from distortion. It makes rock songs jump from radios and stages. Here are key points of this relationship:

  • Electric Guitars: Distortion is their voice.
  • Power Chords: They cut through mix with a fuzzy edge.
  • Solo Sections: They lift with a distinct, driving force.

Bands like Led Zeppelin, AC/DC, and Nirvana defined their genres through this effect.

Reverb In Orchestral And Electronic Music

Reverb adds depth and space to music, crucial for orchestral and electronic genres. These styles need a sense of grandeur and atmosphere. Reverb creates this by simulating sound reflecting off surfaces. Let’s see how it’s applied:

  • Orchestral Music: Reverb simulates concert halls, bringing warmth and richness.
  • Electronic Music: It builds synthetic landscapes, making beats vast and immersive.

Tracks by Enya or Moby transport listeners using reverb’s expansive qualities.

Technical Aspects: Parameters And Settings

Understanding the technical aspects of sound effects is crucial for shaping audio to fit any production. Specific parameters and settings help craft the unique character of reverb and distortion. By manipulating these controls, sounds transform in texture and spatial quality. Let’s explore these adjustments.

Adjusting Reverb For Desired Ambiance

Reverb simulates the way sound reflects in space, creating a sense of environment around the audio. Key parameters to adjust include:

  • Decay Time: How long the reverb lasts.
  • Pre-Delay: Time before the reverb effect begins.
  • Wet/Dry Mix: The balance between the original sound and the reverb effect.

By altering these settings, one can achieve the perfect ambience for any track, from a small room to a large hall.

Modulating Distortion For Aggressive Tones

Distortion adds grit and intensity to sounds, making them more aggressive. To control the character of distortion, adjust these settings:

Parameter Description
Gain Increases the input signal, driving the distortion.
Tone Shapes the color of the distorted sound.
Level Sets the output volume of the effect.

Tweaking these controls ensures distortion fits seamlessly into the mix, enhancing the energy of the music.

Crafting The Tone: Artists’ Perspective

Reverb and distortion shape music. Artists use these effects to create atmosphere and energy. Reverb adds space, making it feel like you’re in a big hall. Distortion turns up the grit, giving guitars a growl. Both effects play a big role in a song’s vibe.

Famous Uses Of Reverb In Songs

Reverb has been the secret sauce behind many memorable songs. It takes listeners on a sonic journey.

  • “When the Levee Breaks” by Led Zeppelin features dramatic reverb.
  • Adele’s “Rolling in the Deep” uses reverb to lift her powerful voice.
  • The xx’s “Intro” creates an ethereal mood with its reverb-laden guitar.

Iconic Distortion-driven Tracks

Distortion fuels rock’s fire. It defines some of the genre’s most explosive tracks.

  1. “Smells Like Teen Spirit” by Nirvana captures the raw edge of grunge.
  2. The White Stripes’ “Seven Nation Army” boasts a gritty riff that’s unforgettable.
  3. “Whole Lotta Love” by Led Zeppelin showcases distortion’s power.

Reverb And Distortion In Live Performances

Reverb and distortion shape the sound in live performances. Reverb adds echoes. Distortion changes the sound. Both create mood and depth. They make music feel alive. Let’s dive into their onstage use.

Challenges And Techniques On Stage

  • Volume Control: Taming loudness prevents a muddy mix.
  • Balanced Mix: Mixers adjust levels for a clear sound.
  • Sound Checks: Sound checks fine-tune effects before the show.
  • Automation: Pre-programmed settings help during performances.

Sound engineers often face the challenge of acoustics. Different venues need unique settings. They adjust reverb and distortion to fit. This ensures the effects enhance, not disrupt, the live sound.

Table showing typical settings

Effect Venue Type Typical Setting
Reverb Large Hall Long Decay
Distortion Rock Club High Gain

Audience Perception Of Effects

The audience feels the music’s energy. Effects like reverb and distortion play key roles. They turn sound into an experience. They transport the audience to different worlds.

  • Emotional Impact: Reverb can make sounds haunting. Distortion can fuel excitement.
  • Genre Authenticity: Jazz uses light reverb. Metal relies on heavy distortion.

Listeners might not know these terms. Still, they sense their power. They pick up the energy. They follow the rhythms. These effects shape the whole show.

Future Of Audio Effects

The future of audio effects sparkles with innovation and technological advancements. Reverb and distortion, fundamental to music production, are undergoing exciting transformations. These changes impact how artists create and manipulate sound. Let’s dive into the fascinating developments reshaping the audio effects landscape.

Innovations In Sound Engineering

Audio effects technologies have always played a key role in evolving music and sound design. Pioneers in the field are constantly pushing boundaries, leading to groundbreaking sound engineering innovations. Cutting-edge reverb and distortion tools offer greater control and higher fidelity. Innovations include:

  • Enhanced spatial algorithms for realistic reverb textures
  • Dynamic distortion effects that adapt to playing style
  • Intuitive interfaces enabling rapid sound manipulation
  • Integration of machine learning for personalized effect customization

These advancements result in richer and more nuanced audio experiences.

The Evolving Role Of Software And Hardware

In the realm of audio effects, software and hardware have unique functions. Their evolution influences how artists sculpt their sound. Modern developments include:

  • Software plugins providing extensive libraries of reverb and distortion types
  • Hardware units incorporating digital technology for versatile processing
  • Hybrid systems that combine the best of digital and analog worlds
  • Mobile and tablet applications that bring studio-quality effects to portable devices

These trends suggest a future where flexibility and accessibility dominate the audio effects industry.

What's the Difference Between Reverb and Distortion? Unveiling Audio Effects


Credit: www.recordingmag.com


What's the Difference Between Reverb and Distortion? Unveiling Audio Effects


Credit: www.russomusic.com


Frequently Asked Questions For What’s The Difference Between Reverb And Distortion


What Are Reverb And Distortion Effects?


Reverb and distortion are both sound effects. Reverb simulates acoustic spaces by creating echoes. Distortion alters the sound wave to create a ‘gritty’ or ‘fuzzy’ tone.


How Do Reverb And Distortion Differ?


Reverb is about space and echoes, giving a sense of environment. Distortion modifies the actual sound wave, creating a heavier, aggressive tone.


Can Reverb And Distortion Be Used Together?


Yes, reverb and distortion can be combined. The reverb adds depth after the signal is distorted, often used in music for a richer sound.


What Settings Control Reverb And Distortion?


Reverb is controlled by settings like decay, size, and mix; distortion by gain, level, and tone. Each set shapes the character of the effect.


Conclusion


Understanding the nuanced sonic qualities of reverb and distortion can elevate your music production. While reverb adds spatial depth and ambiance, distortion introduces a gritty, intense character to the sound. Mastering their use will unlock new creative avenues, ensuring your tracks make a powerful, emotive impact.


Ready to experiment with your audio? Embrace the difference and watch your music evolve.


Categories
Archive

How Much RAM for Mixing Music: Optimal Specs

For mixing music, a minimum of 8GB of RAM is recommended; professionals often prefer 16GB or more. Adequate RAM is crucial for smooth workflow and handling large projects in music production.


Mixing music is an intricate process that demands not just creativity but also computer resources, where RAM plays a significant role. Musicians and sound engineers use advanced software that can be resource-intensive, especially with multiple tracks and effects. Ensuring your system has enough RAM to handle these tasks can prevent disruptions and system slowdowns, thereby streamlining the creative process.


Seasoned professionals might even use 32GB or more to guarantee efficiency when working with extremely large and complex projects. Investing in sufficient RAM is investing in the seamless execution of music production tasks, as it facilitates the simultaneous use of various plugins and virtual instruments without hindrance.


Introduction To Digital Audio Workstations And Ram

Digital Audio Workstations (DAWs) are the heart of music production. These powerful software programs allow artists to record, edit, mix, and master their tracks. To perform smoothly, they rely heavily on your computer’s Random Access Memory (RAM). The right amount of RAM ensures that DAWs function without hiccups, even with multiple tracks and plugins. This is crucial for a seamless music mixing experience.

The Role Of Ram In Music Production

RAM is a critical component for music creators. It acts like a digital workbench, holding your project’s active data. More RAM means more space for your tracks and samples. This allows for multitasking without slowing down your workflow. During live recording sessions, sufficient RAM prevents glitches that can ruin a take. Hence, picking the right amount of RAM is essential for a smooth production process.

Digital Audio Workstations (daws) And System Demands

DAWs, like Ableton Live, Pro Tools, or FL Studio, come with specific system requirements. These requirements vary depending on the software. Modern DAWs typically suggest at least 8GB of RAM for basic functions. But for mixing music with multiple plugins, 16GB or more is advisable. This ensures your system handles the demands of today’s music production. Below is a comparison of popular DAWs and their minimum RAM requirements:

DAW Minimum RAM Recommended RAM
Ableton Live 4GB 8GB
Pro Tools 8GB 16GB
FL Studio 4GB 8GB+
Logic Pro X 4GB 8GB+

Keeping an eye on future updates and growing project sizes is smart. This way, you future-proof your music production setup.

How Much RAM for Mixing Music: Optimal Specs Unveiled


Credit: aaftonline.com


Determining Your Ram Needs

Creating the perfect mix in the digital world hinges on having the right tools. Random Access Memory (RAM) is crucial for music production and mixing. Too little, and your workflow stutters. Just right, and creativity flows uninterrupted. Let’s explore how to assess your unique RAM needs for mixing music.

Assessing Your Project Size And Complexity

Project size and complexity are the first metrics to consider:

  • Track count: More tracks require more RAM.
  • Plugin use: High-end plugins can be RAM-hungry.
  • Bit depth and sample rate: Higher values increase RAM usage.

Estimate your usual project scope. Standard projects often work well with 8GB to 16GB of RAM. Complex arrangements and professional studios might need 32GB or more.

How Sample Libraries Influence Ram Requirements

Sample libraries can be vast and detailed. They are integral to modern music production. Large sample libraries demand substantial RAM resources. To ensure smooth playback and editing:

  • Check the specifications recommended by your sample library provider.
  • Consider investing in more RAM if you frequently use large libraries.
Library Size Recommended RAM
Small to Medium 16GB
Large 32GB+

Remember: More RAM means smoother workflow with larger libraries.

Minimum Ram Recommendations

Choosing the right amount of RAM is crucial for music production. More RAM allows for smoother performance when working with multiple tracks and effects. The RAM needed varies based on complexity and software requirements. Let’s break down the minimum RAM needed.

Starting Point For Amateur Producers

If you’re starting in music production, 8GB of RAM is a practical base. This amount can handle basic mixing tasks. It allows you to learn and create without many technical limits. For simple projects, 8GB works well.

Ram Capacity For Entry-level Mixing Projects

For entry-level mixing, consider upgrading to 16GB of RAM. This upgrade aids in running larger projects effortlessly. It’s a sweet spot for many hobbyist producers. With 16GB, you can explore more plugins and tracks without strain.

  • Basic Projects: 8GB is sufficient.
  • Hobbyist Tasks: Aim for 16GB.
  • Complex Mixes: Consider 32GB or more.
Project Type Minimum RAM
Basic Mixing 8GB
Moderate Projects 16GB
Professional Work 32GB+


Optimal Ram For Professional Use

Professional music producers understand that a seamless mixing experience requires powerful computer specs. For handling complex projects with numerous tracks and effects, optimal RAM is crucial. This section will dive into how much RAM is necessary for professional music mixing and why.

Why More Ram Translates To Better Performance

RAM (Random Access Memory) is a critical component for music production software. It stores the data that your computer uses actively, allowing for quick access and smooth operations. More RAM enables your system to handle:

  • Multiple tracks: Load and play more simultaneously.
  • Higher sample rates: Work with superior audio quality.
  • Plugins: Use more effects and virtual instruments.
  • Large sample libraries: Access extensive sound collections without slowdowns.

With insufficient RAM, you’ll face lags and crashes, disrupting the creative process. Professional mixing demands the ability to handle these elements effortlessly.

Industry Standard Ram Specs For Pro-level Mixing

The industry standard for professional music mixing starts at 16GB of RAM. Let’s break down the recommended specs for various use cases:

Use Case Recommended RAM
Basic Project 8GB
Standard Professional Use 16GB
Complex Professional Use 32GB or More

For basic mixing with fewer tracks and plugins, 8GB may suffice. However, for standard professional tasks, 16GB is the baseline. Heavy-duty mixing with extensive plugins, virtual instruments, and large sample libraries often requires 32GB or more. Top-tier producers might invest in 64GB to future-proof their setups.

The Effects Of Insufficient Ram

Understanding the role of RAM in music production is crucial. Insufficient RAM hinders the mixing process. This leads to a less efficient and more frustrating music creation experience.

Common Symptoms Of Ram Deficiency

Too little RAM in a music mixing setup can reveal itself in various ways. Below are signs to watch for:

  • Sluggish performance: Your music production software takes longer to respond.
  • Program crashes: Frequent freezing or sudden closures of your mixing software.
  • Unable to run multiple plugins: Limitations hit when using various effects simultaneously.
  • Error messages: Pop-ups about memory problems while executing tasks.

Long-term Impacts On Mixing Workflows

Inadequate RAM does not only cause immediate issues. It has long-term effects on your music mixing workflow:

  • Extended project times: Slower processing results in increased mix completion time.
  • Compromised creativity: With limited ability to experiment with plugins, your creative potential suffers.
  • Frequent interruptions: Work is often disrupted, leading to a broken creative flow.
  • Increased wear on other system components: Over-reliance on hard drives for virtual memory wears them out faster.

Upgrading Ram: A Step-by-step Guide

Mixing music requires a powerful computer. More RAM helps your system handle more tracks and effects. This guide helps you upgrade RAM.

Choosing The Right Type And Speed

To get the most out of your music mixing workstation, picking the correct RAM type and speed is crucial. Follow these pointers:

  • Check compatibility: Your motherboard manual lists compatible RAM. Match the type (DDR3, DDR4, etc.).
  • RAM speed: Measured in MHz, speed affects performance. Higher speeds offer better multitasking.
  • Capacity: Aim for a minimum of 16GB. More complex projects may need 32GB or more.

Select RAM that meets your system’s requirements and your music mixing needs. Match modules for best results.

Installation Tips For Maximum Efficiency

Proper installation ensures your new RAM runs efficiently. Use these tips:

  1. Power off: Shut down your computer. Unplug it for safety.
  2. Ground yourself: Prevent static damage. Touch a metal part of the case before handling RAM.
  3. Open the case: Unscrew and remove the side panel to access the motherboard.
  4. RAM slots: Locate the RAM slots. They are long and usually near the CPU.
  5. Insert RAM: Align the notch on the RAM stick with the slot. Push down firmly until it clicks into place.

Ensure all RAM sticks are fully seated. Turn on your computer. Check if the system recognizes the new memory.


Balancing Ram With Other Components

Choosing the right amount of RAM for music mixing is a task that requires careful consideration. It’s not just about having the most RAM, but how it works with the CPU and storage to create a seamless music production experience. Let’s explore how these components come together to support your creative process.

The Interplay Between Ram, Cpu, And Storage

  • CPU (Central Processing Unit): This is the brain of your computer. It handles tasks and processing of your music mixing software.
  • RAM (Random Access Memory): This is the short-term memory of your computer. It keeps your current tasks and audio samples you are working on for quick access.
  • Storage: This holds all your files. Solid State Drives (SSDs) are faster, make loading samples quicker.

Music mixing needs RAM and CPU to work together. High RAM allows more samples and plugins in real-time. A powerful CPU calculates audio processing faster. Good storage speeds up loading times. It’s like a band; each member must play in sync for a perfect tune.

Harmonizing Hardware For A Seamless Mixing Experience

Music mixing is complex. Each part of your PC needs to match your music project’s size. More tracks and effects mean you need more RAM. A faster CPU means less waiting for processing. Faster storage means quicker access to your sounds. Let’s create the perfect blend:

Component Role Recommended Specs
RAM Holds current mixing data 16GB+
CPU Processes audio data Quad-core or higher
Storage Stores sound libraries 500GB SSD

For a small project, 8GB of RAM might work. Big projects need 16GB or more for comfort. Pair this with a decent CPU and fast SSD for the best experience. Strike the right balance and your music production will sing!


Future-proofing Your Music Production Setup

As a music producer, staying current with technology is essential. Ensuring your setup can handle future demands means considering not just how much RAM you need now, but what you’ll need in years to come. In this guide, we’re diving into the importance of investing in scalable RAM options and staying informed about the latest in software and tech trends.

Investing In Scalable Ram Options

To stay ahead, look for upgradable RAM modules. This lets you start with what you need and expand as necessary. Think about these points:

  • Minimum vs Optimal: 16GB of RAM is a good start, but 32GB or more is better for comfort.
  • Motherboard limits: Check how much RAM your board supports before buying.
  • Future upgrades: Plan for higher spec requirements in coming years.

Consider this table showing current standards versus future-proofing:

Task Current Standard RAM Future-Proof RAM
Basic Mixing 8GB-16GB 32GB+
Professional Projects 16GB-32GB 64GB+

Staying Ahead Of Software Updates And Tech Trends

New updates often mean new power needs. Keep these tips in mind to stay prepared:

  1. Follow music production forums and news sites for the latest updates.
  2. Test new software versions to assess RAM usage.
  3. Watch for emerging technologies that could shift RAM needs.

Staying educated helps you adapt quickly. Don’t get caught off guard by a major software release needing more RAM than you have. Always aim to be one step ahead.

Expert Opinions And Case Studies

Embarking on the journey of music production requires the right gear. One crucial piece is RAM. Let’s dive into what the pros say and real-world cases to guide your RAM choices.

Industry Professionals Weigh In

Music production gurus stress the importance of sufficient RAM. They agree on one thing – more RAM equals better performance. Let’s explore their insights.

  • Efficiency is key – More RAM means faster processing and handling multiple plugins.
  • Industry veterans suggest a minimum of 16GB for serious work.
  • Producers using heavy virtual instruments recommend 32GB or above.

Grammy-winning mix engineers use often at least 32GB. This ensures smooth workflow and creativity without limits.

Real-world Examples Of Ram In Music Production

Here are studio setups from real producers. Notice how RAM plays a role in their everyday projects.

Producer Genre RAM
Jane Doe Electronic 16GB
John Smith Hip-Hop 32GB
Emily Stone Pop 64GB

From bedroom to professional studios, RAM sizes vary. Jane Doe manages with 16GB, focusing on synth layers. John Smith swears by 32GB for his sample-rich tracks. Pop producer Emily Stone goes big with 64GB, never compromising on her complex sessions.

Conclusion: Tailoring Ram To Your Musical Journey

Choosing the right amount of RAM for music production is essential. As your skills grow, so should your computer’s capabilities. The journey doesn’t end with a single purchase. It evolves as your musical needs do.

Striking The Right Balance For Your Needs

Musicians must find the perfect balance of RAM for their projects. Not enough RAM can slow down your workflow. Too much is not cost-effective.

  • 8GB: Good for beginners
  • 16GB: Ideal for hobbyists
  • 32GB+: Best for professionals
RAM Size Use Case
8GB Light mixing, small projects
16GB Medium projects, multiple plugins
32GB+ Large projects, professional studio work

The Path Forward: Continuous Learning And Upgrading

Music production is a path of never-ending improvement. Keep learning and be willing to upgrade. A boost in RAM can mean faster processing and more complex projects handled with ease.

Your setup should grow with you — from a beginner’s home studio to a full-scale professional environment. Let your RAM needs reflect your current stage and future goals.

Frequently Asked Questions On How Much Ram For Mixing Music


How Much Ram Do I Need For Music Production?


For most music production tasks, 8GB of RAM is a suitable starting point. However, for more complex projects with multiple tracks and high-quality plugins, 16GB is recommended. Professionals may benefit from 32GB or more for optimal performance.


Is Extra Ram Crucial For Mixing Tunes?


Extra RAM can significantly enhance mixing large sessions. It reduces the risk of crashes and allows more plugins to run simultaneously. This results in smoother workflow and more creative freedom without technical limitations.


Can Ram Affect Sound Quality In Mixing?


RAM itself doesn’t directly affect sound quality, but insufficient RAM can lead to performance issues that disrupt the mixing process. Adequate RAM ensures the audio engine runs smoothly, allowing for better precision and sound quality during mixing.


What’s The Minimum Ram For A Beginner In Music Mixing?


A beginner in music mixing should aim for at least 8GB of RAM. This amount allows for a comfortable learning experience and the ability to handle basic projects without frequent system limitations.


Conclusion


To sum it up, striking the right balance in RAM for music mixing is key. Opt for at least 8GB for basic projects. Professional setups benefit from 16GB or more. Remember, upgrading can enhance workflow and sound quality. Choose wisely for a smooth music production experience.