Categories
Archive

Mixing And Mastering Using Lufs

Mixing and mastering using LUFS involves measuring and adjusting audio levels for optimal playback quality. LUFS, or Loudness Units Full Scale, is a standardized measurement for loudness in digital audio.

By correctly mastering and mixing audio with LUFS, the final product will sound consistent across all playback devices. This technique is critical in music production and podcasting to ensure listeners have an optimal listening experience. Developing your skills in LUFS mixing and mastering could set you apart from other producers, especially in an oversaturated industry.

If you’re planning to release your music or podcast, you need your content to sound great and stand out in the sea of others. Keep reading, and we’ll explore everything you need to know to use LUFS effectively to improve the sound quality of your audio.

Mixing And Mastering Using Lufs

Credit: www.masteringthemix.com

What Are Lufs?

LUFS stands for Loudness Units Full Scale, which is a measurement used in mixing and mastering to ensure the audio is balanced and consistent in volume. Using LUFS can help prevent tracks from sounding too quiet or too loud in comparison to other tracks, resulting in a polished and professional sound.

Introduction To Lufs

LUFS stands for Loudness Units Relative to Full Scale. LUFS is a new digital loudness normalization and measurement system developed to solve the problems of loudness disparity between songs, commercials, and movies. Audio content created with different loudness levels causes significant problems in broadcasting and streaming, so loudness normalization in mastering has become a popular way to tackle these issues.

Why Are Lufs Important In Mixing And Mastering?

LUFS is essential in mixing and mastering because it standardizes loudness levels across different audio formats and platforms. An audio mastering engineer can use LUFS to set the optimal loudness level for the audio without compromising the overall sound quality. LUFS help to provide a consistent and enjoyable listening experience for the audience. Besides, broadcasting and streaming platforms heavily rely on LUFS to ensure audio loudness levels are within acceptable standards. In conclusion, LUFS is a crucial factor in mixing and mastering, providing consistency in loudness levels and ensuring the best listening experience for the audience.

Mixing And Mastering Using Lufs

Credit: www.youtube.com

Mixing With Lufs

Mixing and mastering using LUFS is essential for achieving optimal audio levels and ensuring that your tracks sound great across all platforms. By adjusting your levels to match the industry-standard LUFS values, you can create a polished and professional mix that stands out from the crowd.

If you are a music producer or sound engineer, you know that mixing and mastering are crucial parts of the music production process. Mixing involves combining individual tracks to create a balanced stereo audio file, while mastering involves the final preparation of the mixed track for distribution. One important aspect to consider when it comes to mixing is the Loudness Units Relative to Full Scale (LUFS) measurement.

Balancing Levels Using Lufs

When mixing tracks, it is essential to ensure that the overall loudness level is balanced across all elements. Using LUFS, you can achieve this balance easily. LUFS measures the perceived loudness of an audio signal and is expressed in a negative decibel (dB) value. The reference level for LUFS is -23dB, which is the loudness level that most digital distributors (such as Spotify and Apple Music) require. To balance levels using LUFS, start by setting the reference level for your mix to -23dB. Next, compare the loudness of the individual tracks and adjust their levels until they are all balanced relative to one another. For example, if the vocal track is too loud compared to the instrumental tracks, reduce its level until it sounds balanced. Repeat this process for all tracks until you achieve a balanced mix.

How To Use Lufs To Achieve A Consistent Mix

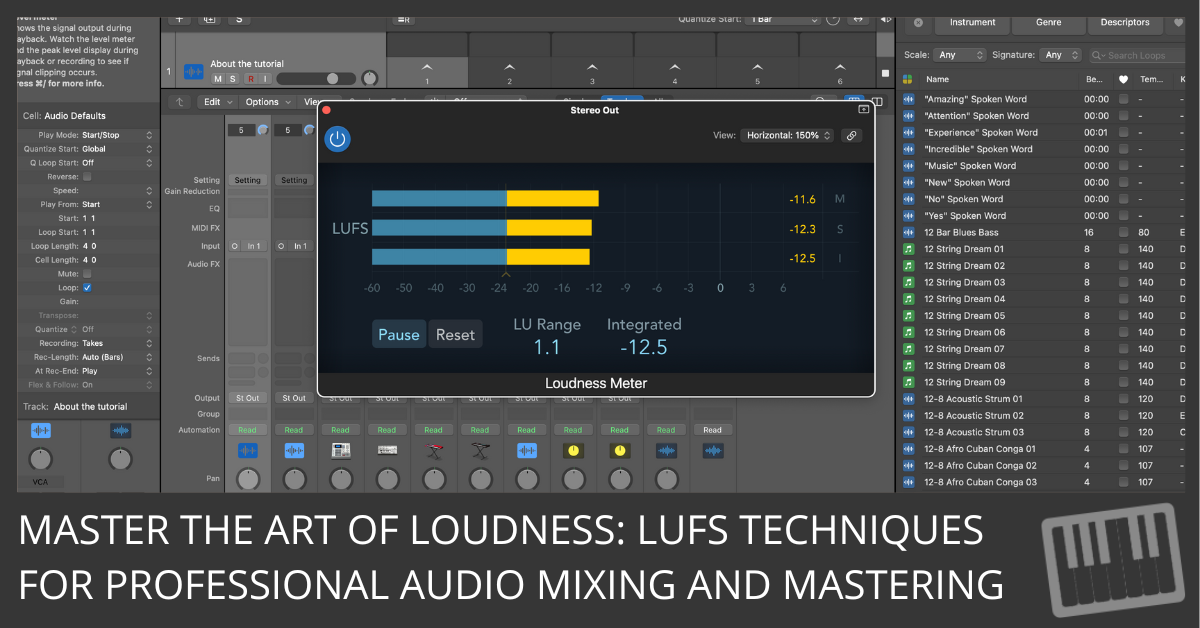
LUFS can help you achieve a consistent mix across different playback systems and environments. A mix that sounds good in the studio may sound different when played on a home stereo, car system or mobile phone. By using LUFS, you can normalize the loudness of your mix and ensure that it sounds consistent across all playback systems and environments. To use LUFS for consistency, start by setting the reference level to -23dB. Next, use a LUFS meter plugin (such as the Waves WLM Plus Loudness meter), to measure the integrated LUFS level of your mix. If the level is higher or lower than -23dB, adjust the overall level of the mix accordingly. Once you have achieved -23dB integrated LUFS, check the short-term LUFS levels (measured over a shorter period, such as 3 seconds). If the short-term levels are consistently higher or lower than the integrated level, adjust the levels of the individual tracks until they are balanced. Using LUFS is an essential tool for any music producer or sound engineer. By balancing levels and achieving a consistent mix, you can ensure that your music sounds great across all platforms and environments.

Mastering With Lufs

Mastering with LUFS is a crucial aspect of the mixing and mastering process. LUFS (Loudness Units Full Scale) measures perceived loudness, and this method ensures that the final mix maintains a consistent volume level while avoiding distortion.

Mastering is the process of polishing a track to sonically enhance the final mix. It involves improving the frequency balance, maximizing the volume, and imparting a sense of depth and clarity. Using LUFS (Loudness Units Full Scale) in the mastering process can help achieve a balanced and loud mix without sacrificing dynamic range.

Using Lufs To Set The Overall Level Of Your Track

LUFS is a standardized measurement of loudness that provides an objective analysis of the perceived volume of a track. It measures the average loudness of a track over time, with the units ranging from -60 to 0. The optimal LUFS level for your track depends on its genre and intended playback medium. To prepare your mix for mastering, you need to ensure its overall loudness falls within an acceptable LUFS range. For instance, if you’re making music for streaming services, you’ll want your tracks to meet their loudness normalization guidelines. Most streaming platforms require tracks to be mastered to a target loudness of -14 LUFS.

How To Use Lufs To Ensure Your Track Stands Out

Using LUFS in mastering helps ensure that your track stands out in a crowded digital landscape. By setting the optimal LUFS level, you can make your track sound louder and clearer while avoiding distortion. When mastering with LUFS, it’s essential to pay attention to the dynamic range. A track that has too much compression and limiting can sound flat and lifeless, while one with too little can be difficult to hear in noisy environments. With LUFS, you can strike a balance between loudness and dynamic range that ensures your track sounds great on any playback system. In conclusion, mastering with LUFS can take your tracks to the next level by emphasizing its unique characteristics and making it stand out from the crowd. By using LUFS to set the overall level of your track and ensuring it stands out, your master will sound dynamic and balanced.

Using Lufs With Eq

Mixing and mastering music is a complex art that requires quite a bit of knowledge about various tools and techniques available. One important tool that has emerged in recent years is LUFS which stands for Loudness Units Full Scale. It is a measurement that helps engineers achieve a consistent and balanced level of loudness across different platforms and devices.

Using Eq To Achieve A Balanced Mix With Lufs

One of the most effective ways to achieve a balanced mix with consistent loudness across different playback systems is by using EQ. EQ is a tool that allows engineers to adjust the tonal balance of a mix by boosting or attenuating certain frequencies. By using EQ, engineers can achieve a more balanced mix while ensuring that the mix stays within the desired LUFS range.

Eqing Your Master With Lufs

Once you have achieved a balanced mix using EQ, the next step is to EQ your master with LUFS in mind. This involves adjusting the overall tonal balance of the mix and ensuring that the levels are consistent across the entire frequency spectrum. One effective way to achieve this is to use a reference track that has a similar tonal balance and level to your mix. By comparing your mix to the reference track and making adjustments, you can achieve a master that is balanced and consistent in terms of loudness.

Using Lufs With Compression

Having a dynamic mix with balanced loudness and tonality is a crucial aspect of audio mixing and mastering. LUFS, or Loudness Units Full Scale, is a solid reference point for calibrating audio at a specific target loudness level. Compression, on the other hand, is a popular mixing tool that can help manage the dynamic range of an audio track. When combined appropriately with LUFS, compression can become an effective tool for achieving a sonically balanced mix.

How Compression Affects Lufs Levels

Compression can affect the LUFS levels by reducing the dynamic range of an audio track. As a result, the quieter parts will sound louder, and the louder parts will sound quieter. If overused, compression can cause unwanted artifacts and pumpings, which could negatively affect the perceived sound quality of the mix. It is, therefore, important to use compression conservatively and with a subtle hand.

Using Compression With Lufs To Achieve A Dynamic Mix

When used correctly, compression is an effective tool that can help achieve a balanced mix. By reducing the dynamic range, compression can make the quieter parts of an audio track more audible and the louder parts less overpowering. Using LUFS as a reference point can ensure that the audio is calibrated to a specific target loudness level. With this in mind, it is important to use compression in moderation, as overcompression can result in an unnatural sound that lacks depth and dimension.

Note that compression is not always necessary, and its application will depend on the individual characteristics of the audio track being mixed. It is therefore important to understand the unique qualities of each track and use compression judiciously as needed.
Mixing And Mastering Using Lufs

Credit: logicstudiotraining.com

Understanding True Peak

Understanding True Peak is crucial when it comes to mixing and mastering using LUFS. It helps to avoid distortion and ensure that the audio does not exceed the maximum level for digital audio, making it sound better on different devices and platforms.

What Is True Peak?

Understanding True Peak is crucial when mixing and mastering audio using LUFS. True Peak refers to the highest level of an audio signal, measured in decibels, as it passes through a digital-to-analog converter (DAC). LUFS (Loudness Units Full Scale) uses an algorithm to measure the perceived loudness of a track. This is especially important for streaming services, where tracks are usually normalized to match the same perceived loudness. But, to ensure the LUFS measurements are accurate, you need to understand the concept of True Peak.

The Importance Of True Peak When Using Lufs

When a digital signal passes through a DAC, the waveform is reconstructed using a process called oversampling. Oversampling creates additional data points between each sample point, which essentially smooths the waveform. This smoothing can cause the signal to exceed 0dBFS, which is the maximum level a digital signal can reach. This results in distortion, known as clipping. True Peak meters can measure the highest level a signal will reach after it passes through a DAC. It provides a more accurate reading of the potential for clipping, and helps you pinpoint where you need to adjust the levels to ensure that your audio sounds great when played back through any system, including on streaming services like Spotify or Apple Music. Ensuring your audio is mixed and mastered to the right levels is essential for any professional production. By understanding the True Peak and using LUFS measurements, you can be confident that your audio will sound great on all playback systems.

Using Lufs In Different Genres

LUFS (Loudness Units Full Scale) is an essential tool in the music production industry as it helps producers and engineers to maintain loudness consistency across all platforms. Whether you are producing EDM, recorded music or any other genre, using LUFS is crucial in achieving a balanced mix and loudness levels that meet industry standards.

Applying Lufs In Edm Music

EDM (Electronic Dance Music) is a genre that demands high energy and loudness levels. Applying LUFS in EDM music helps maintain a consistent and optimum level of loudness, preventing distortion. LUFS can also help bring balance between the kick, bass, and leads to avoid one element from overpowering the other, making all the elements of the mix audible.

  • Using a meter plugin to measure the loudness levels of an entire mix.
  • Use LUFS to measure the loudness level of individual tracks, for example, drums, synths, and vocals.
  • Once you have established the correct loudness levels for each track, you can apply gain staging and compression to maintain uniformity across all tracks.

Using Lufs For Recorded Music

Recorded music is diverse and can include a variety of different instruments and vocal performances. Using LUFS can help ensure that each instrument or vocal track is at the same loudness, producing a well-balanced mix. Here are some tips for using LUFS for recorded music:

  1. Start by measuring the loudness levels of each track to ensure they are all at the same level.
  2. Apply gain staging to bring up or down tracks that require adjustment.
  3. Use EQ and compression to make sure each track is clearly audible in the mix.

Whether you are producing EDM or recorded music, using LUFS can help you achieve a consistent and balanced mix. Make sure to use LUFS and meter plugins to ensure your mix meets industry standards and sounds great across all platforms.

Frequently Asked Questions On Mixing And Mastering Using Lufs

What Is The Best Lufs Level For Mastering?

The best LUFS level for mastering depends on the intended platform and genre of music. Streaming platforms typically require a range between -14 and -16 LUFS, while radio and CD may require -9 to -12 LUFS. Genres with more dynamic range may benefit from lower LUFS levels, while louder genres may benefit from higher levels.

Ultimately, it’s best to consult with a professional mastering engineer for optimal results.

Is It Ok To Master At Lufs?

Mastering at LUFS is a widely accepted standard in the music industry. However, it’s important to use your ears and not rely solely on technical measurements. The best mastering approach is a combination of technical expertise, creative intuition, and aesthetic sensibility.

Is 9 Lufs Too Loud?

Yes. 9 LUFS (Loudness Units Full Scale) is considered too loud for an audio recording as it can cause distortion and lead to listener fatigue. It is recommended to target a loudness level of around -16 to -18 LUFS for music and -24 to -20 LUFS for spoken word content in order to achieve a balanced and comfortable listening experience.

What Is Lufs In Mixing?

LUFS stands for Loudness Units Full Scale. It’s a method to measure the perceived loudness of an audio signal. It’s commonly used in mixing and mastering to ensure consistent loudness levels across different songs or albums. LUFS takes into account human perception of sound, unlike other methods based purely on peak or RMS levels.

Conclusion

To sum up, using LUFS while mixing and mastering can greatly improve the overall quality of your audio. It ensures that the volume levels are consistent and balanced, making it pleasant for the listener to hear. By paying attention to LUFS, you can avoid issues like distorted sound and unnecessary loudness.

All in all, if you want to produce high-quality audio, using LUFS should definitely be a part of your mixing and mastering process.

Categories
Archive

How to Get Discovered As a Musician

To get discovered as a musician, utilize social media and online platforms. Introduce yourself to industry professionals and collaborate with other artists to expand your reach.

As a musician, getting discovered and growing your fan base is crucial for building a successful career. However, with so many other talented musicians out there, it can be challenging to stand out and get noticed. In today’s technologically advanced world, utilizing the power of social media and various online platforms is key to gaining exposure and increasing your chances of success.

Networking with industry professionals, creating visually appealing content, and collaborating with other artists also play essential roles in building a broader audience. We will explore tips and strategies to help you get discovered as a musician and take your career to the next level.

How to Get Discovered As a Musician

Credit: plus.pointblankmusicschool.com

Identifying Your Niche

Discovering your niche is crucial to successfully get noticed as a musician. Finding an area of expertise within your genre and creating unique content tailored towards a specific audience can skyrocket your chances of being discovered.

As a musician, it’s important to find and identify your niche. By doing so, you’re not only able to stand out from the competition but also to attract the right audience. Here are three ways to identify and define your niche:

Define Your Style

Your unique style is what sets you apart from other musicians. You may be influenced by different genres, but it’s important to develop your own sound. Take the time to experiment with different styles and sounds until you find the one that reflects who you are as an artist. When you define your style, make sure it aligns with your personality and brand. Don’t be afraid to take risks and try something new, but make sure it’s authentic to who you are.

Analyze Competition

Identifying your niche also involves analyzing your competition. Research other musicians in your genre and see what they’re doing well. Take note of their branding, marketing, style of music, and the audience they’ve attracted. But don’t just imitate your competitors, use this information to create something unique. Identify what sets you apart and capitalize on that, even if it feels unconventional.

Find Your Audience

Once you have identified your style and analyzed your competition, it’s time to find your audience. This involves understanding who your music appeals to and where they hang out online and offline. Research where your audience is consuming music, what blogs they read, social media platforms they use, and events they attend. By understanding your audience and where they are most active, you can focus on promoting your music where it matters most. In conclusion, identifying your niche is an important first step in getting discovered as a musician. Define your style, analyze your competition, and find your audience to attract loyal fans who appreciate your music.

Create A Brand Identity

Establishing a brand identity is crucial for getting discovered as a musician. Create a memorable logo, define your unique sound, and utilize social media to connect with fans and showcase your music.

As a musician, creating a brand identity is crucial. Your brand will be the first impression your fans and industry peers have of you. How you present yourself will determine if they are interested in knowing more about your music or simply move on to the next artist. With that in mind, here are some tips to help you define your brand, create a logo and visual identity, and develop a website and social media presence.

Define Your Brand

Defining your brand is about creating a unique identity that represents who you are as an artist. Start by asking yourself what makes you different from other musicians. What is the vibe of your music, and what message do you want to convey to your audience? Use this information to craft a unique brand statement that captures the essence and spirit of your music.

Create A Logo And Visual Identity

Once you have a solid brand statement, designing a logo and creating a visual identity that aligns with your brand becomes more manageable. A logo is your visual stamp; it should be easy to recognize and memorable. Make sure your logo reflects your brand statement’s vibe and message. Use complementary color schemes to give your brand a consistent and professional look.

Develop A Website And Social Media Presence

Develop a website and social media presence to showcase your brand and music. Your website should be easy to navigate, visually appealing, and informative. Make sure your website and social media have the same visual and brand identity, consistent with your logo and color scheme. Create engaging content consistently to build a following and interact with your followers actively. Use social media to reach fans and connect with the music industry. Creating a brand identity takes time, effort, and consistency. Make sure your brand reflects your music’s vibe and message, and that your visual identity aligns with your brand statement. Promote your music by building a strong social presence and creating engaging content for your fans. By doing this, you will increase your chances of getting discovered and paving the way for a successful music career.

Creating Quality Content

To get discovered as a musician, creating quality content is crucial. It’s important to release original, engaging and authentic music, alongside captivating visuals, in order to stand out in an oversaturated industry. Social media platforms are a great platform for self-promotion and collaboration, allowing you to grow your fanbase and connect with industry professionals.

Creating Quality Content is a crucial factor in getting discovered as a musician. In today’s digital age, having a strong online presence is a must for any musician looking to make a name for themselves in the industry. High-quality content is essential to achieving this. In this section of the blog post, we’ll discuss how to create quality content that can help you get noticed and build a fanbase. ### Record quality music Recording and producing high-quality music is an essential part of creating quality content as a musician. First, invest in good quality equipment, including microphones, headphones, and a digital audio workstation. It’s also essential to find a quiet and acoustically treated space to record in. You must have a good understanding of music theory and have a well-tuned singing voice. Once you have recorded the music, make sure it is mixed and mastered to a professional standard. This will make sure your music stands out from the crowd. ### Produce music videos Producing music videos is another way to create engaging content and get discovered as a musician. A good video can help you connect with your listeners on an emotional level and showcase your creative vision. You may not have a big budget to make the video, but you can still produce a high-quality video. Consider your clothing and background and make sure both sets an appropriate tone for the song or the album. Good lighting, angles, and interesting shots are a good way to create engaging visuals for your music. Make sure your music video is visually appealing, and you are proud of it before releasing it. ### Collaborate with other musicians Collaborations with other musicians can help you create incredible content, expand your audience and build new relationships in the industry. Collaboration helps to share knowledge and blend your creativity that creates a new masterpiece. The power of collaborating with other musicians can never be overstated. This technique helps you to get exposed to a new audience who are already familiar with your collaborator. When working with other musicians, ensure you find a compatible artist who shares your vision and works well with you. In conclusion, creating quality content can bring about great results and help you get discovered as a musician. Record high-quality music, produce engaging music videos, and collaborate with other artists. These techniques will help you get noticed in the music industry and grow your audience, all while establishing your presence in the industry.

Networking And Building Connections

Networking and Building Connections are crucial to getting discovered and making a name for yourself as a musician. With so much competition in the industry, it’s essential to put yourself in front of the right people and build relationships that can lead to opportunities. Here are a few tips on how to network as a musician.

Join Local Music Communities

Joining local music communities is an excellent way to connect with other musicians, producers, and industry professionals in your area. Attend local events, shows, and jam sessions to meet new people and showcase your talent. You can also join online communities and forums to connect with other musicians and industry professionals outside of your city.

Perform Live Shows

Performing live shows is an effective way to get noticed and build your fan base. Play at local venues, festivals, and events to get your music in front of new audiences. Engage with your audience, connect with other artists on the lineup, and be sure to network with industry professionals in attendance.

Network With Industry Professionals

Networking with industry professionals is essential to get discovered and advance your music career. Attend music conferences, workshops, and seminars to meet people in the industry and learn about the latest trends and opportunities. Connect with producers, record labels, and music supervisors on social media platforms and send them your demos and music videos. Remember, building a relationship takes time, so be patient and persistent.

To sum it up, networking and building connections are critical to get discovered and make a name for yourself in the music industry. Join local music communities, perform live shows and network with industry professionals to build lasting relationships and advance your music career.

Utilizing Online Platforms

As a musician, utilizing online platforms is crucial in getting discovered. By creating profiles on social media and streaming services, sharing your music, and engaging with fans, you can increase your visibility and attract new listeners. Additionally, collaborating with other artists and participating in online communities can expand your network and opportunities for exposure.

As a musician, getting discovered can be a real challenge. However, in the digital age, there are numerous online platforms where you can showcase your music to the world. Utilizing these platforms can help get your music in front of more people and increase your chances of being discovered. Here are some ways you can use online platforms to get your music heard.

Upload Your Music On Streaming Platforms

Streaming platforms like Spotify, Apple Music, and Amazon Music offer a massive audience for musicians. By uploading your music to these platforms, you can reach millions of potential fans around the globe. These platforms also offer features like analytics and playlists, which can help you track your progress and gain more listeners.

Create A Youtube Channel

YouTube is the second largest search engine globally, making it an excellent platform to showcase your music. Create a YouTube channel for your music and upload music videos or lyric videos. YouTube also offers features such as annotations, end screens, and cards, which can help you direct viewers to your website, social media accounts, or other streaming platforms where your music is available.

Pitch Your Music To Blogs And Playlists

Pitching your music to blogs and playlists can help you gain new fans and build a bigger audience. Look for blogs and playlists that feature music similar to yours, and research their submission guidelines. Make sure your pitch is personalized, professional, and includes a link to your music. You can also use email marketing platforms like Mailchimp to create an email list of industry contacts and keep them updated on your latest releases and news. In conclusion, utilizing online platforms is an excellent way to get discovered as a musician. By uploading your music on streaming platforms, creating a YouTube channel, and pitching your music to blogs and playlists, you can reach a broader audience and increase your chances of success. Remember, consistency is key, so stay active on these platforms, engage with your audience, and keep creating great music.

Collaborating With Brands

As a musician, collaborating with brands can be an effective way to get discovered. Seek partnerships with companies that align with your style and values, and use social media to promote your collaborations to a wider audience.

As a musician, collaborating with brands could be a great way to get discovered. By partnering with a brand, you can leverage their resources and audience to expand your fan base. However, it’s important to find the right partnerships that align with your music genre and personal values. Here are some tips on how to collaborate with brands to create exposure and drive engagement:

Find Music Partnerships

One of the best ways to find music partnerships is by networking with industry professionals, attending music festivals and conferences. You can also leverage social media platforms such as LinkedIn and Instagram to network with music producers, record labels, and music supervisors looking for artists to collaborate with.

Work With Brands To Create Music Content

When collaborating with brands, focus on creating music content that aligns with their brand vision and target audience. For instance, if a brand is targeting a new age demographic, creating specific content for that audience will generate more engagement and exposure.

Collaborate With Influencers

Influencer marketing has become a powerful tool to reach new audiences and amplify content. By partnering with influencers in your music genre or havin similar engagement and reach audience, can result in great outcomes that would help you to get discovered as a musician. This is an excellent way to cross-promote your music and grow your social media following on different platforms such as Instagram, YouTube, and TikTok. In summary, partnering with brands and influencers provides a great opportunity for musicians to gain exposure, build their brand and get discovered. However, it’s important to find the right opportunities and create music content that resonates with their target audience. Start by networking with industry professionals, attending music festivals and conferences, and leveraging social media to find the right partnerships.

Building A Fanbase

Building a fanbase as a musician can be a challenging task, but with the right strategy, it is possible to get discovered. Utilizing social media, uploading content to streaming platforms, networking with other musicians, performing live shows, and creating a unique brand can all contribute to building a dedicated fanbase.

Attracting a fanbase is an essential aspect of any musician’s journey to success. Without followers, it would be tough to generate buzz and eventually achieve mainstream popularity. However, building a fanbase requires more than just releasing great music. You also need to interact with your listeners and create a sense of community around your brand. In this blog post, we will cover a few effective techniques for building your fanbase and expanding your reach.

Engage With Fans On Social Media

One of the best ways to build a fanbase as a musician is to interact with your audience on social media platforms. Social media offers an opportunity for direct communication with your listeners, which you can leverage to build brand recognition, loyalty, and trust. Be sure to use social media regularly by posting engaging content, sharing behind-the-scenes moments, and announcing tour dates or upcoming releases. Respond to comments, questions, and DMs, and show your fans how much you care about them. With consistent effort, you can build an engaged online community that will support your musical career.

Run Giveaways And Contests

Running giveaways and contests is another excellent way to attract and retain fans. Offering compelling prizes like concert tickets, merch, or exclusive content would make your fans excited and eager to participate. To get the most engagement, you should promote your giveaway/contest on social media platforms, email list, and website. Make sure the requirements to participate are clear, easy to understand, and follow all guidelines and laws. You’ll be surprised at just how much this can boost your fanbase and engagement levels.

Create Exclusive Content For Fans

Creating exclusive content is another effective way to nurture a fanbase. By offering your supporters something they can’t get anywhere else, you can make them feel special, increase loyalty and make them lifetime supporters. You could create exclusive content like bonus tracks, behind-the-scenes footage of your recording process, sneak peeks of your next album EP, personalized messages, and invites to virtual meet-and-greets. By putting extra effort into creating unique content for your fans, you show them how much you value their support and encourage them to keep listening. Make sure each fan knows the value they bring to your career by offering unique content. In essence, building a loyal fanbase takes dedication and effort, but it is worth the investment. By engaging with fans on social media, running giveaways and contests and creating exclusive content, you are likely to convert casual listeners into enthusiastic supporters. It is essential to remember to stay honest, authentic, and true to your music; that’s the best way to maintain an engaged following over the long haul.

How to Get Discovered As a Musician

Credit: www.loudup.com

Staying Focused And Consistent

To get discovered as a musician, it’s important to stay focused and consistent. This means consistently creating and releasing music, promoting yourself across social media, and networking within the industry. With hard work and dedication, you can increase your chances of being noticed by the right people.

As a musician looking to get discovered, you need to keep in mind that consistency is key. Staying focused on your goals and putting in the work on a regular basis can make all the difference in your journey to success. In this post, we’ll explore some tips that can help you stay focused and consistent on your journey to becoming a successful musician.

Set Goals And Timelines

It’s important to set specific goals for your music career and establish timelines for achieving them. This helps you stay focused and motivated. Your goals should be SMART- specific, measurable, attainable, relevant, and timely. For instance, you could set a goal to release one song a month for the next twelve months. This not only sets you up for success but also helps you track your progress over time.

Stay Consistent With Posting Content

Consistency is crucial in establishing a loyal following for your music. Create a content schedule and stick to it, whether it’s releasing a new single every month, playing weekly gigs or posting content on your social media channels. Consider leveraging social media platforms to showcase your music and connect with your audience. Post regularly, engage with your followers and keep them updated on your progress. Over time, your fans will come to expect your content and will eagerly anticipate your releases.

Continuously Refine Your Brand And Sound

Your music brand and sound should be unique and memorable. This is where continuous refinement comes in. Take the time to listen to feedback from fans, and industry professionals. Use their input to refine your sound and brand, testing new tracks and experimenting with new sounds. This helps you stay relevant and connected to your audience. In conclusion, staying focused and consistent is essential to getting discovered as a musician. Set SMART goals, establish timelines, stay consistent with posting content, and continuously refine your brand and sound. These tips will keep you on track towards becoming a successful musician.

How to Get Discovered As a Musician

Credit: flypaper.soundfly.com

Frequently Asked Questions For How To Get Discovered As A Musician

How Do New Musicians Get Discovered?

New musicians can get discovered through various ways such as promoting their music on social media, collaborating with other artists, playing live shows, submitting their music to blogs and streaming platforms, and joining music competitions. Having a strong online presence and networking with industry professionals can also contribute to their discovery and success.

How Do You Get Noticed As A Musician?

To get noticed as a musician, you can try the following: promote yourself on social media, create a website, collaborate with other artists, play live shows, and submit your music to blogs and playlists. Consistent branding and quality content are also important in capturing and retaining a fanbase.

How Do Musicians Get Known?

Musicians can get known by creating an online presence through social media, performing live shows, collaborating with other artists, submitting their music to blogs and playlists, and networking with industry professionals. It’s also essential to consistently release quality music and engage with their audience.

How Do You Get Heard As A Musician?

To get heard as a musician, you need to create a strong online presence by promoting your music on social media, uploading it to streaming platforms, and collaborating with other artists. Performing at local gigs and festivals can help you build a fanbase and network with industry professionals.

It’s also important to create high-quality recordings and have a unique sound to stand out from the competition.

Conclusion

As a musician, it takes more than just skill and talent to get discovered. It requires a strategic approach, consistent effort, and an understanding of what your fans want. By creating a strong online presence, networking with industry professionals, utilizing social media, and investing in your craft, you can increase your chances of establishing a successful music career.

Remember to stay true to yourself and your brand, and always keep pushing forward towards your goals. With dedication and persistence, you can make your mark in the music industry. Keep playing, keep creating, and keep striving for greatness.

Categories
Archive

How To Mix Drums Bass And Vocals

To mix drums, bass, and vocals, use EQ to carve out spaces for each element and adjust levels to create a balanced mix. Then, apply compression to even out peaks and add depth and clarity with reverb and delay.

Mixing drums, bass, and vocals can be a daunting task for any producer or recording engineer. Achieving a balanced mix where each element sits well in the mix and doesn’t overpower the others can be difficult. However, by using EQ to carve out space for each element and adjusting levels, a well-balanced mix can be achieved.

Compression can then be applied to even out peaks, and reverb and delay can be used to add depth and clarity. We will delve deeper into the techniques used to mix drums, bass, and vocals and how to apply them effectively.

How To Mix Drums Bass And Vocals

Credit: www.youtube.com

Understanding The Basics Of Audio Mixing

Audio mixing is a crucial part of music production that involves blending different sounds to create a cohesive and balanced final result. When mixing drums, bass, and vocals, it’s important to understand the frequency range of each instrument and how they interact with one another to achieve a polished sound.

As a beginner in the world of music production or a musician who wants to take their craft to the next level, it is crucial to have a grasp of the basics of audio mixing. The process of mixing involves combining different audio elements such as drums, bass, and vocals to create a finished product that is enjoyable to listen to. In this section, we will explore the concept of audio mixing, why it is essential and the elements that make up a mix.

What Is Audio Mixing?

Audio mixing refers to the process of combining and adjusting audio tracks to create a final balanced stereo mix. This process involves manipulating individual elements such as volume, panning, equalization, and effects to achieve a cohesive sound. Mixing plays a significant role in the production process, as it can make or break the quality of a final recording.

Why Is It Important?

Audio mixing is a crucial element of music production, as it helps to create a polished and professional sound. A well-mixed track will sound balanced, with each element sitting appropriately in the stereo field, allowing the listener to discern individual elements. Poorly mixed audio, on the other hand, can sound cluttered and amateurish, and may not be enjoyable to listen to.

Elements Of A Mix

A mix comprises different elements that work together to create a cohesive and balanced sound. These elements include:

  • Drums
  • Bass
  • Vocals
  • Melodic Instruments (e.g., guitar, piano, etc.)
  • Effects (e.g., reverb, delay, etc.)

Each of these elements plays a crucial role in the overall mix, and each must be treated and adjusted carefully to achieve a balanced and cohesive sound. For instance, the drums and bass create the foundation of the track, and the vocals and melodies sit on top of this foundation. In conclusion, audio mixing is a crucial element of the music production process that requires careful attention and expertise. A well-mixed track can make all the difference in creating a polished and professional-sounding finished product. By understanding the basics of audio mixing, you can create a cohesive and well-balanced mix that will be enjoyable to listen to.

Preparing For The Mixdown

Preparing for the mixdown requires careful attention to drum, bass, and vocal levels to ensure a balanced and polished sound. By adjusting EQ levels, applying compression, and panning instruments appropriately, you can achieve a professional mix that highlights each element while allowing them to work together harmoniously.

Preparing for the Mixdown To ensure a successful mix, it’s essential to do some preparation work before diving in. One of the most crucial steps is to organize your session, as a well-organized session will make mixing much more manageable. In this post, we’ll discuss the necessary steps you should take before mixing drums, bass, and vocals. Recording the tracks Before mixing, it’s essential to record all of the tracks you need. Ensure that all tracks are recorded at the same sample rate and bit depth, which is typically 44.1kHz and 16-bit or higher. Once all of the tracks have been recorded, import them into your DAW and start organizing. Cleaning up the tracks When you’ve recorded your tracks, the next step is to clean them up. Remove all the unwanted noise, clicks and pops, and anything else that is causing distortion, such as hum or interference. Use your DAW’s built-in tools for this, such as noise gates, EQ, and compressors. This will make it much easier to mix the tracks later on. Organizing the session One of the most important steps when mixing is to keep everything organized. Before you start mixing, create a folder for each track and name them accordingly. Make sure you color code each track to keep everything easy to find and visually appealing. This step will save you hours of time and help make your mix more efficient and professional. Next, create a group for each section of the mix, such as drums, bass, vocals, and so on. This allows you to adjust the levels of each group independently, making the mixing process much smoother. Using sends and auxiliary tracks can also be helpful for adding effects such as reverb or delay to multiple tracks at once. In conclusion, the preparation work is crucial before you start mixing drums, bass, and vocals. Recording all of the tracks, cleaning them up, and organizing your session can make your mix sound more polished and professional. Follow these steps carefully, and you’ll be well on your way to creating a fantastic mix that will sound great on any platform.

Mixing Drums

To achieve a balanced mix of drums, bass, and vocals, it’s important to start by balancing the levels of each element. Then, apply EQ to cut unwanted frequencies and boost desired ones. Use compression to control the dynamics and add depth with reverb and delay effects.

Experiment with panning and volume automation to create space and movement in the mix.

When it comes to mixing music, the drums play a crucial role in creating the perfect sound. But, mixing drums is not as easy as it seems, especially when you need to balance them with bass and vocals. Fortunately, there are techniques that you can apply to make the process easier and achieve the perfect balance of sound. Here are a few tips to get you started:

Applying Eq To Drums

The first step in mixing drums is to apply EQ. This means you’ll be adjusting the frequency levels of the drum kit to make each piece sound unique. You can use EQ to enhance the kick drum’s punch, snare’s crack, and cymbals’ shimmer. Typically, most drum kits will feature around 10 dB boost/cut at specific frequencies. Therefore, by understanding which frequencies are essential, such as the bass drum’s lower frequencies, you can make sure that each component of the drum kit stands out.

Compressing The Drums

Once you’ve applied EQ to your kit, it’s time to compress it. Drum compression is all about controlling volume levels, which will help ensure a smooth, consistent sound across your audio track. It is particularly useful for drums that have a lot of dynamic range or sudden spikes in volume. By compressing your drums, you can make sure that every beat is audible without causing issues with other kit layers.

Using Parallel Compression

Parallel compression is another technique used for mixing drums when you want them to stand out more. This method involves sending the unprocessed drum signal to a second track, which you can then compress heavily. The compressed version is then blended back in with the original sound, providing a fuller and brighter sound. The parallel track ensures that the drums are present, crisp, and cutting through the mix without being too loud or overwhelming.

Adding Reverb And Delay

Finally, consider adding reverb and delay to your drum mix. Adding reverb can add depth and realism to your kit, while delay can provide a sense of movement, particularly if you’re mixing electronic music. Applying these effects to individual drum tracks will help create a bigger sound while ensuring each piece of the kit fits together smoothly. In conclusion, mixing drums is an instrumental part of producing a great track. By using these techniques and understanding what each does to the sound, you’ll be able to create drum tracks that stand out and complement the rest of the mix. Apply these tips and see how they help take your mixes to the next level!

How To Mix Drums Bass And Vocals

Credit: www.masteringthemix.com

Mixing Bass

Achieving a well-balanced mix of drums, bass, and vocals requires careful attention to each element. When mixing bass, it’s important to carve out space for it in the low end and ensure it’s not overpowering the other instruments. Slight EQ adjustments and careful compression can help achieve a cohesive sound.

Mixing bass is a crucial part of producing high-quality music. The bass guitar is the foundation of the rhythm section, and properly mixing it with the drums and vocals can determine the overall sound and impact of the track. Here are some important tips to help you mix your bass with the rest of your music elements.

Setting The Right Levels

Setting the right levels for the bass is critical. You don’t want the bass to be too loud and overpowering, or too soft and buried in the mix. The ideal levels should be balanced, with the bass fitting comfortably within the mix. It’s good practice to start with the kick drum and bass levels, setting the kick slightly louder than the bass, and then adjust the other instruments around them.

Applying Eq To The Bass

EQ is a vital tool to help shape and define the sound of the bass. You can use EQ to enhance the bass’s presence and clarity, and to remove any unwanted frequencies that may cause muddiness or clashes with other instruments. Using a low pass filter can also be useful, allowing you to remove any unnecessary high-end frequencies, leaving more room for other instruments in the mix.

Using Compression On The Bass

Compression can help control the dynamics of the bass and give it a more consistent volume throughout the track. It can also help bring out the subtle details of the bass playing. However, be careful not to overuse compression, as this can cause the bass to lose its natural dynamics and become too flat.

Adding Distortion Or Saturation

Distortion or saturation can add a subtle warmth and edge to the bass sound. It can also work to help it cut through the mix, making it more audible, and giving it a more prominent role in the track. However, be judicious with these effects as excessive distortion or saturation can cause the bass to become too harsh and overwhelming. To sum up, mixing the bass, drums, and vocals is a crucial aspect of producing high-quality music. By adhering to the tips highlighted above such as setting the right levels, applying EQ, using compression, and adding distortion or saturation, you can create a balanced, professional-sounding mix that highlights the best of each instrument.

Mixing Vocals

Mixing vocals requires careful attention when also mixing drums and bass. Start by setting levels and panning for each element, then add appropriate EQ and compression to create a cohesive mix. Finally, use reverb and delay to add depth and dimension.

Mixing vocals is a critical aspect of music production. It involves finding the perfect balance between the vocals and the instrumental tracks, so they all work together cohesively. In this article, we will explore four essential techniques for mixing vocals that can elevate your music production to the next level.

Setting The Vocal Levels

One of the most critical aspects of mixing vocals is setting the levels. The goal is to ensure that the vocals are audible, but not too loud that they overpower the instrumental tracks. To do this, start by soloing the vocal track and adjusting the fader until it reaches a comfortable volume. Then, bring in the instrumental tracks and adjust the vocal levels so they sit well with the other sounds. Remember that a balanced mix is crucial, so take the time to adjust the levels until everything is well-balanced.

Applying Eq To Vocals

Equalization (EQ) is another critical technique for mixing vocals. EQ helps to balance the frequency response of the vocal tracks by removing or boosting specific frequencies. Start by cutting unwanted low-end frequencies and boosting high-end frequencies to add clarity and presence to the vocals. Additionally, a slight boost to the mid-range frequencies can help vocals cut through the mix better.

Using Compression On Vocals

Compression is the process of reducing the dynamic range of an audio signal. By compressing vocals, you can bring out the quieter parts while taming the louder parts. Start by setting the threshold and ratio controls to achieve a 3-6dB gain reduction. Then, adjust the attack and release controls until the vocal tracks sit well in the mix. Remember not to overcompress the vocals, as this can make them sound unnatural.

Adding Effects To Enhance The Vocals

Finally, adding effects such as reverb and delay can enhance vocals and add depth to the mix. Reverb, for example, can help vocals sound more natural and add space to the mix. Delay, on the other hand, can create a sense of movement and interest within the mix. When adding effects, be careful not to overdo it. Too much reverb or delay can make the vocals sound washed out or muddy. In conclusion, mixing vocals is a critical aspect of music production that requires skill and patience. By setting the vocal levels, applying EQ, using compression and adding effects, you can create a well-balanced mix that enhances the overall sound of your music. Start by utilizing these tips in your music production, and with practice, you will master the art of mixing vocals.

Bringing Everything Together

Bringing Everything Together is the final step in mixing drums, bass, and vocals. This is where you blend and balance all the separate elements and create a cohesive and polished sound. In this section, we will cover the crucial steps required to bring everything together for a perfect mix.

Balancing The Mix

The first and most important step in balancing the mix is to ensure each track is at the right level. You don’t want any one track overpowering the others as that will ruin the whole mix. To make things easier, start by turning down all the tracks, except the drums or the vocal. Slowly increase the volume of each remaining track, so they all sit together nicely. Listen, adjust and repeat until everything sounds balance and blended.

Panning The Tracks

Panning gives your mix a sense of space and depth. You can move each individual track left or right in the stereo sound field. The key is to keep the critical elements like the bass and drums right in the center, while the rest of the instruments and vocals can be panned left or right. Always use contrast while panning. For example, if you pan a guitar to the left, you might want to pan a keyboard or another instrument to the right.

Using Automation

Automation allows you to make changes to your mix over time, such as fading in and out or changing the volume of a particular track. This can be done manually or using software easily. Automation is a powerful tool in bringing everything together by making subtle adjustments that make all the difference. If you have a recurring section in the song, you can use automation to increase the volume of the drums or bass, making them more prominent.

Finalizing The Mix

The last step is to finalize the mix. This requires careful listening and making fine adjustments to ensure that all tracks work seamlessly together. At this stage, you can also add some subtle effects like EQ, compression, and reverb, to enhance the overall sound. Remember, the goal is not to overdo any of the effects or processing but to make the mix sound polished and professional.

How To Mix Drums Bass And Vocals

Credit: www.masteringthemix.com

Frequently Asked Questions Of How To Mix Drums Bass And Vocals

How Do You Mix Bass And Drums Together?

To mix bass and drums together, use EQ to ensure each instrument sits in its own frequency range. Use compression to even out volume levels and add punch. Experiment with panning to create a wide and balanced stereo image. Use reverb and delay to add depth and space.

Adjust levels until they work together as a cohesive rhythm section.

Which Instrument Should I Mix First?

There is no set rule on which instrument should be mixed first, as it depends on the type of music and personal preference. However, starting with the most important instrument or the one with the most complex parts is a common practice.

It’s also important to adjust levels, pan, and EQ each instrument to achieve a balanced mix.

Should Drum And Bass Be Mono?

Drum and bass music does not necessarily have to be in mono. It depends on the preference of the producer and the final mixing/mastering. Some producers prefer to have a wider stereo image for their music, while others prefer it to be more centered.

Ultimately, it is up to the producer’s artistic vision.

How Should I Mix My Drums?

To mix your drums effectively, ensure each drum track is clean and has its own space in the mix. Use EQ to balance the frequencies and give each drum its own sound. Adjust levels to bring out the intended impact of each drum.

Use compression to add sustain and clarity. Finally, utilize reverb to create depth and space in your mix.

Conclusion

To create a fantastic mix, understanding the roles of drums, bass, and vocals in a song is essential. Mixing the three elements requires patience, attention to detail, and creativity. Remember to have a clear vision of the intended sound, pay attention to levels, and use effects strategically.

Achieving an excellent mix of drums, bass, and vocals takes time and practice, but with the knowledge and skills learned in this post, you are well on the way to creating amazing mixes. Happy mixing!

Categories
Archive

How To Use Automation In Pro Tools

To use automation in Pro Tools, you can simply select the automation mode, choose the parameter you want to automate, and then add automation breakpoints as needed. Automation in Pro Tools allows for precise control over levels, panning, and other parameters throughout a session.

Additionally, automation can be used to create complex effects, sync delay and reverb, and control plugin parameters in real-time. By automating various parameters, you can achieve a dynamic and polished sound in your recording, mixing, and mastering work. With the option to use automation in various modes and various types of tracks, Pro Tools provides a versatile platform for controlling everything from a single vocal track to a full mix.

Moreover, automating in Pro Tools can save time and effort of manual editing and can help bring out the best from your final product.

What Is Pro Tools?

Pro Tools is a digital audio workstation used for recording, editing, and mixing music and sound. Automation in Pro Tools allows users to automate mixing and editing tasks, saving time and creating a more dynamic and polished sound.

Introduction To Pro Tools

Pro Tools is a digital audio workstation used for recording, editing, and producing music and sound for a variety of media. It’s one of the most popular audio software options available for professionals and beginners alike. Pro Tools comes with a vast array of features and tools that help music producers create high-quality music with ease.

Benefits Of Using Pro Tools

Using Pro Tools provides various benefits, making it a top choice for music producers worldwide. Some of the significant advantages of using Pro Tools are:

  • Industry-Standard Platform: Pro Tools is widely used in the music industry, making it the industry-standard audio workstation software.
  • Professional Quality: With Pro Tools, users can produce high-quality music, ensuring everything from sound design to mixing sound is top-notch.
  • User-Friendly Interface: Pro Tools comes with an intuitive interface that helps creators concentrate on creating audio content rather than learning the software.
  • Automation Capabilities: Pro Tools allows users to automate various functions, such as volume and panning, enabling users to create dynamic soundscapes that are otherwise challenging to achieve manually.

With Pro Tools’ automation capabilities, users can quickly and easily add motion to their mixes using the track’s automation lanes. Automation makes it possible to modify volume, pan, and other parameters throughout a song to create optimal sound quality and a great listening experience.

Using Automation In Pro Tools

Using automation in Pro Tools can seem challenging at first, but with time and practice, it becomes second nature. To use automation, follow these steps:

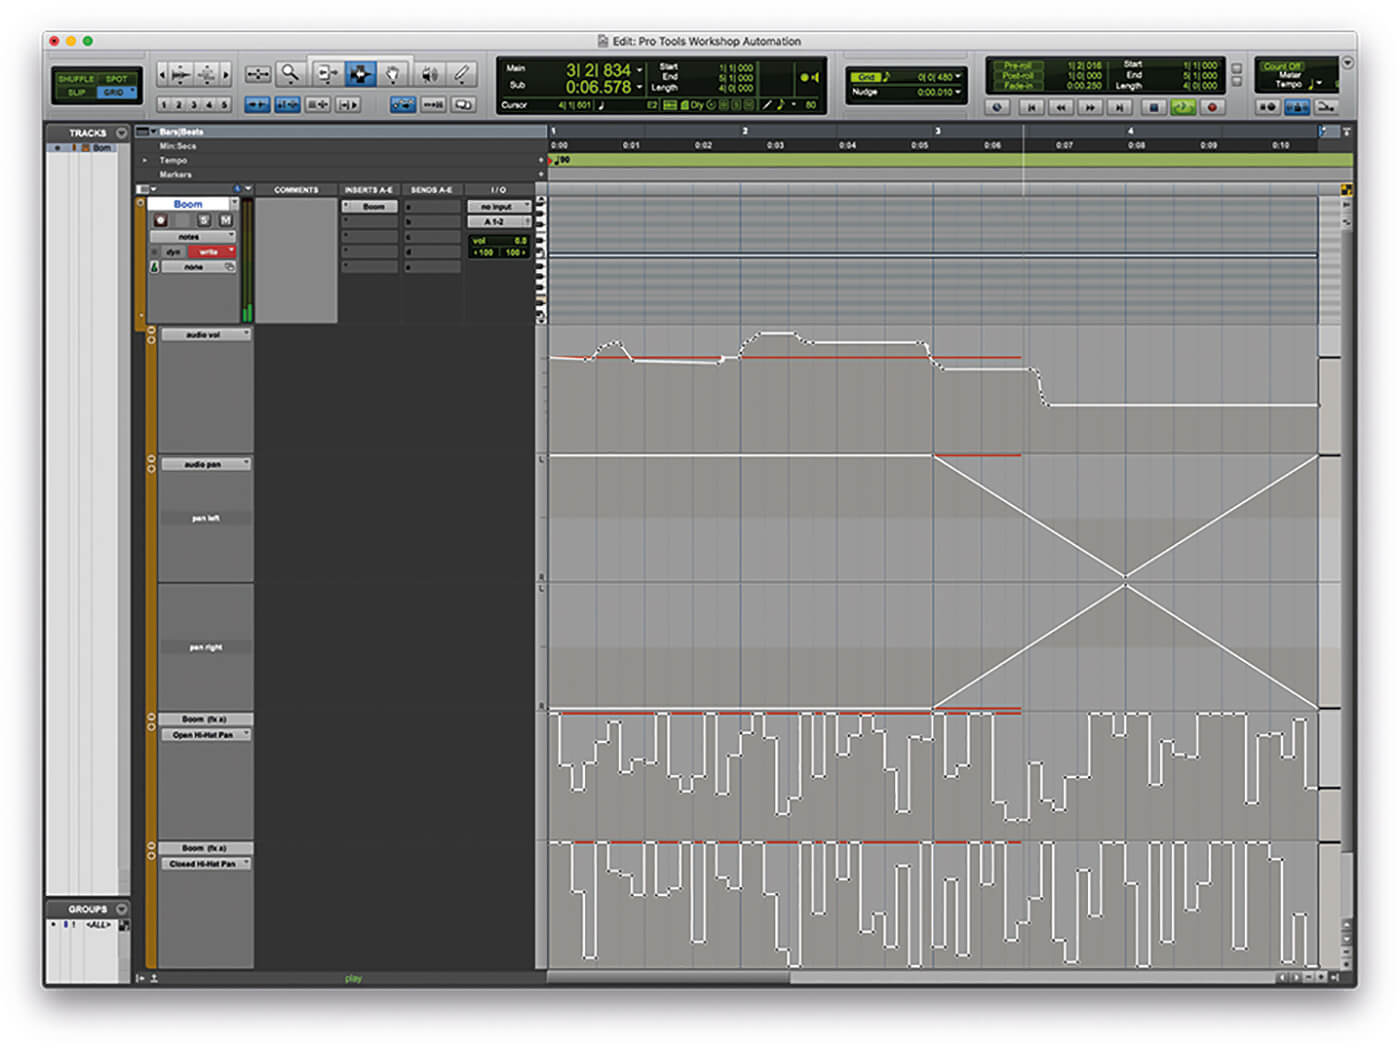
  1. Open the automation lane for the track you want to automate by clicking the automation mode button. The automation lane lets you draw in volume, pan, and other parameters.
  2. Add breakpoints by clicking on the line in the automation lane. These points create an anchor where you can adjust the desired volume or parameter value.
  3. Move your mouse over the point you wish to adjust and change the value by dragging it up or down.
  4. Repeat steps two and three until you achieve your desired sound and motion.

In conclusion, Pro Tools is an industry-standard audio software that provides a wide range of tools and features that make it easy to create high-quality music. Using automation in Pro Tools is a great way to create movement and dynamic soundscapes in your audio productions. With practice and time, you can quickly learn how to use automation effectively on different parameters and create audio content that stands out.

How To Use Automation In Pro Tools

Credit: musictech.com

Why You Should Automate In Pro Tools

Automating in Pro Tools can save you time and give you greater control over your mix. By using automation, you can easily adjust the levels of individual tracks, add effects, and create dynamic changes that bring your music to life.

The Importance Of Automation

In today’s world, where technology plays an essential role in every aspect of life, it is no surprise that the music industry has transformed too. The use of technology has made music production easier than ever before. One of the most beneficial tools for music production is automation. Automation is a process of taking care of the repetitive tasks in a music production workflow. Automating your tasks helps saves time and allows you to focus on the creative process. In Pro Tools, automating your tracks and plugins is considered the backbone of the software. Let’s dive deeper into the importance of automation in Pro Tools.

Overview Of Automation In Pro Tools

Pro Tools is an audio software that is widely used in the music industry. It is known for its powerful features, and automation is one of them. Automation in Pro Tools provides you with the tools you need to make your track sound more polished and professional. You can automate a wide range of parameters like volume, panning, effects, and more. By automating these parameters, you can create dynamic effects, smooth transitions, and add a personal touch to your audio recordings.

How To Use Automation In Pro Tools

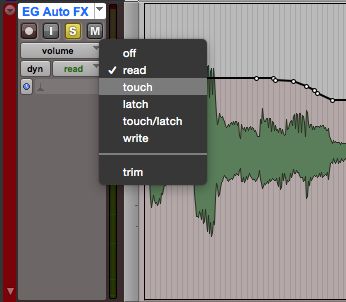
To automate a parameter in Pro Tools, you need to enable automation mode by clicking on the “Auto” button. Once you have enabled automation mode, you can draw in automation data using the “Draw” tool or record automation by moving knobs and faders on your MIDI controller. To change the automation mode, you can simply hit the “Trim” or “Latch” buttons. With Pro Tools, automating your tasks has never been easier.

Conclusion

In conclusion, automation in Pro Tools is a game-changer. It is almost impossible to create a polished track without the use of automation. Pro Tools provides you with the tools you need to automate your tracks and plugins easily. In this blog post, we discussed the importance of automation, an overview of automation in Pro Tools, and how to use automation in Pro Tools. If you haven’t used automation in Pro Tools, we highly recommend that you give it a try. Your music productions will thank you.

What Can You Automate?

Pro Tools is a digital audio workstation (DAW) that provides a range of tools and features to enhance efficiency and productivity. One of the most useful features of Pro Tools is automation, which can streamline workflows and make the mixing and editing process much easier. But, the question is, What Can You Automate? Below are some of the important aspects of automation:

Track Volume And Pan

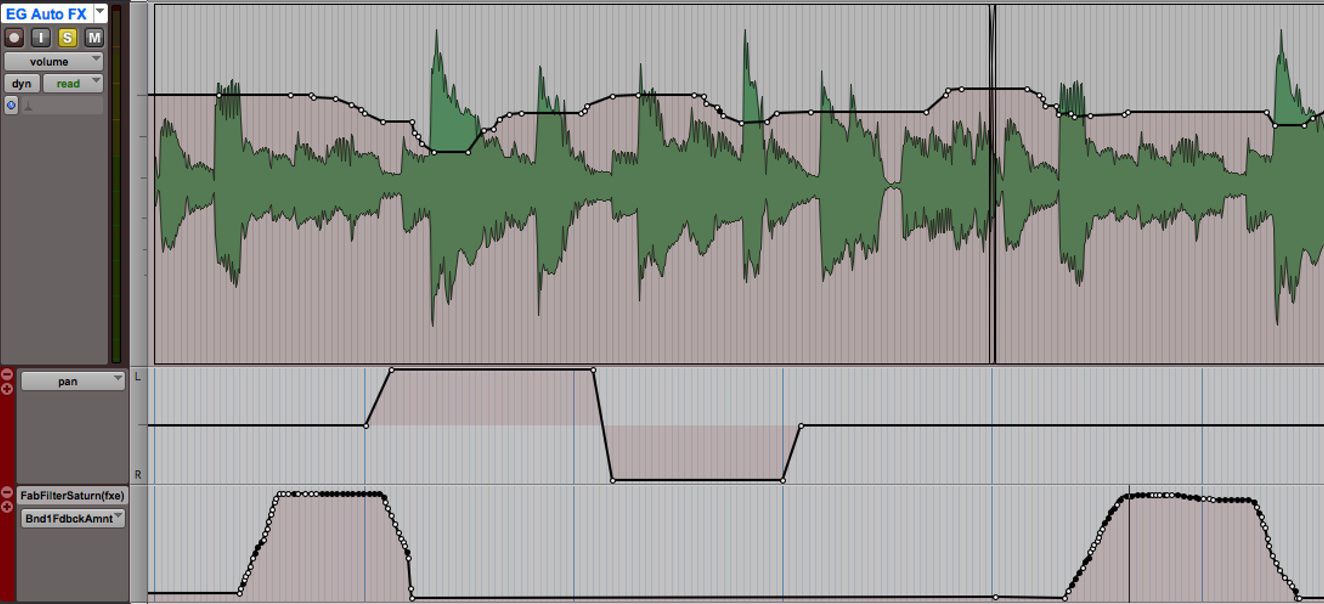
Track volume and pan are basic operations for mixing in Pro Tools. However, adjusting these parameters manually can be quite time-consuming. With Pro Tools automation, you can easily automate the volume and pan for each track to achieve a more accurate and consistent mix. You can use the volume and pan automation to create gradual fades or changes over time.

Plug-in Parameters

With the help of automation, you can customize the parameters of plug-ins and create dynamic changes in your mix. For instance, you might want to automate the parameters of a compressor to create a smooth transition between vocal parts. Use automation for plug-ins to create nuanced changes and specific effects that can elevate your mix.

Mute And Solo

Whether muting or soloing an instrument or a vocal track, the mute and solo automation is an effective way to adjust these parameters easily. This feature saves the time required to manually mute and unmute tracks. You can apply these changes over a longer period of tracks for a well-controlled effect.

Send Levels

Another important feature of Pro Tools automation is controlling send levels. With this automation, you can vary the levels of signal being sent to effects, auxiliary tracks, and buses. This feature allows you to add a range of effects, and you can choose how much of the signal goes to each of those effects.

Clip Gain

Clip Gain allows you to adjust the gain of individual clips in your session without affecting the overall track level, making it easy to level out audio clips. Automating clip gain can help normalize and balance audio that fluctuates in volume, as well as dynamically adjust the volume of individual clips.

These are some of the essential aspects of Pro Tools automation. With these features, you can customize your workflows and make your mixing process more efficient and accurate.

How To Automate In Pro Tools

Discover how to add automation to your Pro Tools project and streamline your workflow. With a few simple steps, you can automate tasks such as the panning of audio tracks, volume adjustments and plugin settings to achieve a more professional sound.

Automation is a powerful tool that can save you hours of time and energy. In Pro Tools, automation can be used to change the volume, pan, and other parameters of your tracks over time. Whether you are working on a music production or a post-production project, automating your tracks is an essential skill. In this post, we will discuss how to set up automation lanes, draw in automation, and edit automation in Pro Tools.

Setting Up Automation Lanes

To set up automation lanes in Pro Tools, you need to do the following steps:

  1. Go to the Edit Window of Pro Tools and select the track that you want to automate.
  2. Click on the “A” button in the track header to open the automation menu.
  3. Select the parameter that you want to automate from the automation menu.
  4. Pro Tools will create a new automation lane for the parameter that you selected.

Drawing In Automation

Drawing in automation is one of the easiest ways to automate a track in Pro Tools. To draw in automation, you need to follow these steps:

  1. Select the automation parameter that you want to edit from the automation lane.
  2. Use the pencil tool to draw in the automation points on the automation lane.
  3. Drag the automation points up or down to adjust the parameter value.

You can also use the smart tool or the trim tool to edit the automation points by clicking and dragging them.

Editing Automation

Editing automation in Pro Tools is a straightforward process but can save you a lot of time. To edit automation, you need to do the following steps:

  1. Select the automation parameter that you want to edit from the automation lane.
  2. Use the selector tool to choose the automation points that you want to edit.
  3. Use the cut, copy, and paste functions to move or duplicate the automation points.
  4. Drag the automation points left or right to adjust the timing of the automation.

Automation in Pro Tools is a powerful feature that can save you a lot of time and effort in your music or post-production projects. By setting up automation lanes, drawing in automation, and editing automation, you can create dynamic and professional-sounding tracks quickly and efficiently. So why not give it a try and unleash the full potential of your creative projects?

Advanced Automation Techniques

Learn advanced automation techniques to speed up your workflow in Pro Tools. From routing audio to setting up macros, automation can help you streamline your editing process and save time.

Pro Tools has always been a favorite DAW for engineers in the music, film, and post-production industries. One of the reasons for its popularity is the advanced automation techniques allowing users to add dynamic movements to a mix.

Grouping Tracks For Automation

Grouping tracks is a helpful technique while working on automation tasks in Pro Tools. Grouping tracks will allow you to automate multiple tracks at once. This can save you a lot of time when working on large projects. Here are the steps to group tracks in Pro Tools:

  1. Select the tracks that you want to group.
  2. Right-click on the selected tracks.
  3. Select “Group” from the contextual menu.
  4. The group menu will appear and will allow you to name the group, choose group attributes and link the group to a keyboard shortcut.

Using Automation Presets

Using automation presets can save a lot of time and streamline the mixing process. It can be useful when you’re trying to replicate automation movements in different sections of a track. To use automation presets in Pro Tools, follow the steps listed below:

  1. In the Pro Tools menu bar, click on the “Mix” button.
  2. Choose “Save Settings As” from the contextual menu.
  3. Give your preset a name that clearly defines its purpose.
  4. Choose the automation parameters you want to save, then click “OK”.
  5. The preset can be accessed later by going to the “Mix” menu, selecting “Plug-In Settings” and choosing the preset from the drop-down menu.

Creating Smooth Transitions

Creating smooth transitions between automated points is crucial to ensuring a mix sounds cohesive. There are a few techniques to achieve seamless transitions, such as:

  • Crossfading: Adjust the volumes of two adjacent regions to create a smooth and gradual transition.
  • Trimming: Create smooth transitions by trimming automation data in Pro Tools.
  • Using Automation Preview mode: Automation Preview mode allows you to preview changes to automation data and see a visual representation of changes before committing to them.

In conclusion, utilizing advanced automation techniques in Pro Tools can enhance your mixing workflow and help you produce high-quality mixes faster. Try grouping tracks for automation, using automation presets, and creating smooth transitions to add movement and depth to your mix.

How To Use Automation In Pro Tools

Credit: ask.audio

Tips For Using Automation Efficiently

Maximizing the use of automation in Pro Tools is key to workflow efficiency. It allows for quick repetitive tasks such as applying effects or edits to be done with ease. Create custom key commands and macros to speed up your workflow and save time.

Automation in Pro Tools is a powerful tool that lets you control various parameters of your music track over time. However, managing automation data can be time-consuming and tedious, especially if you’re working on a complex project. Here are a few tips to help you use automation efficiently.

Using Keyboard Shortcuts

When you’re working with automation in Pro Tools, keyboard shortcuts can be your best friend. They can help you speed up your workflow and make the process more efficient. Here are a few keyboard shortcuts that you can use:

ShortcutAction
Ctrl + Shift + AShow/hide automation lane
Ctrl + Shift + FCreate a fade in or out
Ctrl + clickCreate a breakpoint

Organizing Automation Lanes

Organizing your automation lanes can help you keep things tidy and make it easier to navigate through your project. Here are a few tips to help you organize your automation lanes:

  • Create a separate automation lane for each parameter you want to control
  • Group related lanes together
  • Color-code your lanes for easy identification

Duplicating Automation Data

If you need to repeat the same automation data in different parts of your project, duplicating the data can save you a lot of time. Here’s how you can duplicate automation data:

  1. Select the automation data you want to duplicate
  2. Press Ctrl + D to duplicate the data
  3. Drag the duplicated data to the desired location

Utilizing Templates

Templates can be a lifesaver when you’re working on a project that requires a lot of automation. Here are a few ways you can utilize templates:

  • Create a template with all your commonly used automation lanes and parameters
  • Save a template with common automation patterns, such as volume or panning, that you can use in different projects
  • Modify existing templates to fit the needs of a specific project

In conclusion, using automation efficiently in Pro Tools can help you save time and energy. By using keyboard shortcuts, organizing your automation lanes, duplicating automation data, and utilizing templates, you can streamline your workflow and focus on creating great music.

Common Mistakes To Avoid

When using automation in Pro Tools, it’s important to avoid common mistakes. Don’t overuse automation, make sure you understand the parameters and use a clear naming system. Keeping these things in mind will help you maximize the benefits of automation in Pro Tools.

When it comes to using automation in Pro Tools, there are certain common mistakes to avoid. Over-automating, not checking automation data, forgetting to bypass automation, and not using snapshots are the most common mistakes that can lead to a less-than-optimal workflow. Here’s a closer look at each one.

Over-automating

One of the most common mistakes people make when using automation in Pro Tools is over-automating. While automation can be a great way to add depth and dimension to your projects, it’s important to use it sparingly. Over-automating can make your projects sound cluttered and unprofessional, so it’s important to strike a balance between using automation effectively and knowing when to back off.

Not Checking Automation Data

Another mistake that many people make when using automation in Pro Tools is not checking their automation data. This can result in unintentional changes to your mix, or even worse, complete audio chaos. It’s important to always double-check your automation data before finalizing your project to ensure that everything is where it should be.

Forgetting To Bypass Automation

Forgetting to bypass automation is another common mistake that can cause problems. If you’re tweaking your mix and you’ve got one or more tracks automated, it’s easy to accidentally make changes to a track that you wanted to leave unchanged. To avoid this, always be sure to bypass automation on any tracks that you’re not actively working on.

Not Using Snapshots

Finally, not using snapshots is another mistake to avoid. Snapshots are a powerful tool that lets you save multiple settings for a given mix, which you can then easily switch between. This can save you time and effort when making changes or trying out new ideas. So if you’re not already using snapshots, give them a try! In conclusion, using automation in Pro Tools can significantly enhance your projects, but it’s important to avoid these common mistakes. By being mindful of over-automating, checking your automation data, bypassing automation when necessary, and using snapshots, you can use automation to its fullest potential and create professional-quality mixes that sound great.

How To Use Automation In Pro Tools

Credit: ask.audio

Frequently Asked Questions Of How To Use Automation In Pro Tools

How Do You Do Automation In Pro Tools?

Automation in Pro Tools can be done by using the automation playlists or modes available in the software. First, activate the automation mode for the track you want to automate, then use the pencil tool to write in the automation data on the track timeline.

You can also use the fader or knob controls in real-time to record automation changes.

Why Would You Use Automation In Pro Tools While Mixing?

Using automation in Pro Tools while mixing allows for precise adjustments in volume, panning, and effects at specific points in the track. This technique can save time and ensure consistency throughout the mix, as well as add creative flair to the production.

How Do I Enable Plugin Automation In Pro Tools?

To enable plugin automation in Pro Tools, follow these simple steps: first, select the track containing the plugin you want to automate. Next, click on the track name and select “Auto” from the dropdown menu. Finally, choose the parameter you want to automate and click “Enable”.

How Do You Use Automation?

Automation can be utilized by businesses to simplify tasks, increase efficiency, and save time and money. It involves the use of technology and software to perform repetitive and routine tasks without human intervention. Various systems can be automated such as email marketing, customer service, social media management, data entry, and more.

The main goal is to streamline processes and improve productivity.

Conclusion

Effective automation is an essential tool for music producers and audio engineers. With Pro Tools, there are endless possibilities, from saving time on tedious tasks to enhancing creativity. Implementing automation can be a daunting task, but with patience and practice, you’ll soon realize the power of automation in your music productions.

As you use automation, it’s important to remember to balance human touch with automated precision. Finding that sweet spot will help you create music that not only sounds great but also touches the listener’s soul. Keep exploring, experimenting, and creating with Pro Tools automation!

Categories
Archive

Should You Compress Every Track

Compression should be used strategically and not on every track. Over-compressing can lead to a loss of dynamics and affect the overall quality of the audio.

Compression is an essential tool for audio production, but it should be used logically. Compression helps even out levels and bring out certain sounds in a mix, but over-compressing can cause distortion and a loss of clarity. Every track may not require compression, and some tracks may need more compression than others.

It’s important to use compression as a strategic tool to help enhance the quality of the audio. We will explore the benefits of compression, when to use it and when to avoid it, and how to use it effectively to optimize the production’s sound quality.

Should You Compress Every Track

Credit: m.youtube.com

What Is Audio Compression?

What is Audio Compression?

Compression is an audio signal processing technique that reduces the dynamic range of audio. Simply put, it reduces the gap between the loudest and the quietest parts of the audio signal. Compression makes audio sound louder, clearer, and more consistent. Compression is used to make audio more impactful and to smooth out uneven audio levels. Audio compression is used in most music production, radio and TV broadcasting, podcasts, and streaming platforms.

How Compression Works

Compression software applies a certain amount of gain reduction (amplitude decrease) on audio signals that exceed a specific threshold level. Once the audio crosses the threshold level, gain reduction is applied. This results in a more consistent audio level, effectively “compressing” the dynamic range of audio. The settings on the compression software determine how much gain reduction is applied and how quickly the gain reduction is applied once the threshold is crossed.

Types Of Compression

There are two main types of audio compression: Analog and Digital. Analog compression is achieved through hardware like compressors and limiters. Digital compression applies compression through software like VST plugins and DAWs. There are several different compression types such as VCA, FET, and Optical compression, each with their unique tonal characteristics. Different compression types are suited for different applications; for instance, VCA compression is great for transparent compression, while Optical compression gives a more natural sound.

Should You Compress Every Track

Credit: www.tunecore.com

Why Do People Use Compression?

Compression is a technique used by music producers, sound engineers, podcasters, and home recording enthusiasts to balance and refine audio by reducing the dynamic range. Compression helps in leveling out differences in volume between the soft and the loud sections of an audio track. It is a go-to technique for audio professionals to add energy, presence, and punch to the audio tracks.

Benefits Of Compression

Compression offers the following benefits:

  • Balances Sound – Compression helps in balancing the volume levels of different parts of an audio track.
  • Adds Punch – Compression helps in giving the audio track an energetic and punchy feel.
  • Reduces Noise – Compression reduces the background noise in the audio track.
  • Brings Consistency – Compression eliminates the inconsistencies in sound levels.
  • Allows Better Mixing – Compression allows the sound engineer to mix different elements of the audio track more accurately.

Drawbacks Of Compression

Compression, though useful, has some drawbacks as well. It can cause the following:

  • Loss of Dynamics – Compression can cause the audio track to lose its natural dynamics.
  • Artificial Sound – Compression, when overdone, can make the audio track sound unnatural.
  • Introduces Artifacts – Compression can introduce distortion and other unwanted effects into the audio track.
  • Requires Expertise – As compression can be a complex technique, it requires an expert to use it effectively.

Therefore, before compressing every track, it is important to consider both its benefits and drawbacks to determine the best course of action for the particular audio track in question.

When Should You Compress A Track?

If you are new to music production, compression may seem like a daunting task. However, it is an essential technique for ensuring that your tracks sound professional and polished. But when should you compress a track? Let’s take a closer look.

Factors To Consider

Before you start compressing every track, there are some factors you should consider. Relying on compression too heavily can actually make your music sound worse, so it is essential to use it judiciously.

FactorConsiderations
Dynamic rangeIf a track has a wide dynamic range, compression can help even it out.
InstrumentSome instruments benefit from compression more than others. For example, a bass guitar typically needs more compression than a piano.
MixIf your mix is already well-balanced, you may not need much compression at all.

Common Scenarios

There are several common scenarios where you may want to use compression in your tracks:

  1. Control peaks: If a track has very loud peaks, compression can help bring them down to a more manageable level.
  2. Add sustain: Compression can help add sustain to instruments like guitars and drums, making them sound fuller and richer.
  3. Glue tracks: Compression can help “glue” multiple tracks together, creating a cohesive sound.

Keep in mind that these scenarios are just a starting point. There are countless ways to use compression effectively in your music.

Should You Compress Every Track

Credit: www.audio-issues.com

How To Use Compression?

Compression is a powerful tool that helps to even out the dynamics in an audio track, making it sound more polished and professional. Understanding how compression works can be tricky, but it’s essential if you want to get the most out of your mixes. In this section, we’ll look at how to use compression effectively to enhance your tracks and achieve the perfect sound. Let’s get started!

Setting Threshold And Ratio

The threshold and ratio are two essential parameters on a compressor that you’ll need to set when compressing a track. The threshold determines how loud a signal needs to be before the compressor starts working, and the ratio sets the amount of compression applied once the threshold is reached. To achieve the desired effect, experiment with different threshold and ratio settings until you find the perfect balance.

Choosing Attack And Release

Attack and release refer to how quickly the compressor will start and stop working once the threshold is crossed. Attack sets how fast the compressor kicks in to reduce the signal level, and release determines how long it takes for the compressor to stop working once the signal drops below the threshold. Choosing the right attack and release times is crucial to ensure a clear and punchy sound.

Using Makeup Gain

When you compress a signal, it reduces the overall level of the track. To bring the volume back up to where it was before compression, you’ll need to apply makeup gain. This process ensures that the compressed track has the same level as the uncompressed version and prevents excessive volume differences between tracks in your mix.

By following these tips, you can use compression effectively to polish your tracks and make them sound more professional. Experiment with different settings, keep an ear out for any changes, and adjust your parameters until you get the sound you’re looking for.

What Happens When Every Track Is Compressed?

When it comes to mixing your music, compression can be a valuable tool. By reducing the dynamic range of a track, compression can make the quieter parts louder and the louder parts quieter, helping to even out the sound and make everything sound more cohesive. However, should you compress every track in your mix? What happens when every track is compressed? Let’s take a closer look.

How Compression Affects Mixes

When every track in your mix is compressed, it can lead to a few different issues. Firstly, it can cause the overall mix to sound flat, with little variation in volume between different parts of the song. This can make it harder to create a sense of dynamics and impact in your music. Additionally, when every track is compressed, it can lead to a build-up of unwanted frequencies in the mix, which can muddy the overall sound and make it harder to distinguish individual instruments or parts.

That said, compression can still be a valuable tool in mixing, but it’s important to use it judiciously. Rather than compressing every track, try to identify the parts of the mix that could benefit most from compression. For example, you might compress the vocals to help them sit better in the mix, or compress the bass guitar to add more punch and definition.

Avoiding Compression Pitfalls

If you do choose to compress multiple tracks in your mix, there are some things to keep in mind in order to avoid some common pitfalls. Firstly, make sure you pay attention to the attack and release times when setting your compressor settings. If the attack time is too slow, you risk losing the initial transient of the sound, while a release time that’s too long can lead to a build-up of unwanted noise.

Additionally, make sure you’re paying attention to the relative levels of each track in the mix. If certain tracks are louder than others, you may need to adjust your compressor settings accordingly to prevent the quieter tracks from getting lost in the mix.

Quick tips for using compression in mixing
Use compression judiciously, focusing on the tracks that will benefit most from it
Pay attention to attack and release times when setting your compressor
Adjust the settings of your compressor based on the relative level of each track in the mix

As with any tool in mixing, compression can be a valuable asset when used correctly. By understanding its strengths and limitations and using it judiciously, you can help to create a mix that sounds polished and professional.

Alternatives To Compression

Compressing every track may not always be necessary as there are alternatives such as EQ and limiting that can help achieve a clear and bright sound. It’s important to assess each track individually and consider the overall mix before deciding whether to compress or not.

Compression is widely used in music production, but it’s not the only tool at your disposal. In fact, there are plenty of creative ways to achieve a desired sound without the use of compression. Here are some great alternatives to consider:

Volume Automation

One method is through the use of volume automation. Rather than relying on compression to balance the levels of different elements in a mix, you can automate the volume of individual tracks instead. This gives you more granular control over the dynamic range of your mix, and can be particularly effective for shaping the feel of a track.

Saturation And Distortion

Saturation and distortion are also great alternatives to compression. These effects can add warmth, character, and a sense of grit to an otherwise sterile mix. By pushing the input gain of your tracks, you can introduce pleasing harmonic distortion that can help glue everything together. Saturation is also great for adding some extra flavor to individual elements in a mix, such as drums or bass.

Parallel Processing

Another alternative is parallel processing. Rather than applying compression directly to a track, you can duplicate it and apply different processing to each copy. For example, you could apply heavy compression to one copy and leave the other uncompressed. By blending the two tracks together, you can achieve the desired level of compression without sacrificing the natural dynamics of the original track. In conclusion, compression is a powerful tool, but it’s not the only one. By exploring some of these alternative techniques, you can achieve a more creative and unique sound for your tracks. Whether you’re using volume automation, saturation, or parallel processing, these methods can help take your music to the next level.

Frequently Asked Questions Of Should You Compress Every Track

Do You Put Compressor On Every Track?

No, it is not necessary to put a compressor on every track. The use of compressors should be based on the particular needs of each track. Overusing compressors can impact the dynamics and overall sound quality of the final mix.

Should I Use Compression On Everything?

No, compression should not be used on everything. It is only necessary for large files, like images or videos, to improve website loading speed. However, compressing small files may not be necessary and can even reduce their quality. Consider file size and purpose before deciding to compress.

Should You Compress Individual Tracks?

Yes, you should compress individual tracks to even out the audio levels and make the sound clearer, crisper, and more professional. Compression can help control the dynamic range of audio and eliminate any sudden loud or quiet parts. But be careful not to over-compress and lose the natural dynamics of the sound.

Should You Compress All Your Instruments?

It is not necessary to compress all your instruments. Compression should only be used when it is needed to even out the levels of a track or to add a specific effect. Over-compressing can result in a loss of dynamic range and can make your music sound flat.

Use compression sparingly and only when necessary.

Conclusion

After considering the pros and cons, it ultimately comes down to personal preference and the needs of the project. While compressing every track can create a more polished and professional sound, it can also remove some of the natural dynamics and nuances of the music.

It’s important to consider the style of music and the desired end result before deciding whether or not to compress every track. Ultimately, use compression wisely and in moderation to enhance the overall sound without sacrificing the integrity and character of the music.

Categories
Archive

Cubase Doesn’t Detect My Headphones

To resolve Cubase not detecting headphones, try changing the audio device settings. Check if the headphones are set as default playback device.

In some cases, updating audio drivers may also resolve the issue. Cubase is a popular digital audio workstation used by professional and amateur musicians alike. However, it can be frustrating when the software doesn’t detect headphones. This issue can occur due to multiple reasons such as incorrect audio device settings or outdated drivers.

Fortunately, resolving this problem is usually straightforward. By switching the audio device settings or updating the drivers, you can get Cubase to recognize your headphones. We’ll explore common solutions to help you get back to making music in no time.

Cubase Doesn'T Detect My Headphones

Credit: forums.steinberg.net

Check Headphones And Connection

To troubleshoot Cubase not detecting headphones, ensure that the headphones are properly plugged in and that the audio settings are set to output sound to the correct device. Additionally, check that the headphones are functioning properly by testing them on another device.

If you are facing an issue with Cubase not detecting your headphones, it can be frustrating. But before jumping to conclusions, you must remember that the problem can often be a simple one. Checking your headphones and the connection can be the first few steps you need to take to fix the problem.

Verify Headphone Compatibility

The first step in finding out if there’s a problem with your headphones is to confirm their compatibility with your system. Some headphones don’t work with certain operating systems or devices. For example, if you have a pair of Apple earbuds with a 3.5mm jack that you’re trying to connect to a device that only supports USB-C, you won’t get any sound. So, before you check anything else, make sure the headphones are compatible with your system. You can check with your device’s or headphones’ manufacturer if you’re not sure about the compatibility.

Ensure Proper Connection

The next step is to ensure that your headphones are properly connected to your device. Check if the headphones are plugged into the correct jack or port. Sometimes, it’s just a matter of a loose connection or dirt in the port that may be preventing your headphones from connecting properly. If you’re using a wired connection, try unplugging and plugging your headphones several times to ensure they’re securely and properly connected. In case you have a wireless headset, make sure the Bluetooth connection between the headset and the device is turned on, and both the devices are paired.

Check The Headphones Themselves

If none of the above works, it is time to inspect the headphones themselves. Check if the headphones are turned on, and the volume is up. If the headphones have a mute button, ensure that it is disabled. If your headphones have a “mon” or “mix” switch, ensure that it is on the right setting. Mixing and monitoring modes may have different outputs, and if you’ve chosen the incorrect mode, that could be the reason why you have no sound in your Cubase software.

Wrap-up

In conclusion, Cubase not detecting your headphones can be a simple problem to fix. Verifying headphone compatibility, ensuring proper connection, and checking the headphones themselves are the first few steps to take. Once you have completed these steps, you can start looking into other possible reasons. But it’s always good to start with the basics.

Troubleshoot Audio Settings

To troubleshoot audio settings for Cubase not detecting your headphones, check if the headphones are properly plugged in and have the correct drivers installed. Go to the audio settings in Cubase and ensure that the correct audio device and driver are selected for playback.

If you can’t hear any sound from Cubase despite connecting your headphones, it may be due to some audio settings issue. Follow these troubleshooting steps to ensure your audio settings in Cubase are properly configured.

Check Audio Settings In Cubase

Check your audio interface settings and make sure that it is configured properly. Go to Cubase > Studio > Studio Setup and select your audio interface from the list. Confirm that it is set up correctly. If it’s not, reconfigure it and restart Cubase.

Restart Audio Drivers

Try restarting the audio drivers as they sometimes become unresponsive due to software updates or upgrades. Press the Windows + X keys and select Device Manager. Go to Sound, Video and Game Controllers and locate your audio device. Right-click on it and select Properties. Click on the Drivers tab and select Uninstall Device. Restart your computer and Windows will automatically reinstall the drivers.

Reset Cubase Preferences

If none of the above two methods work, try resetting Cubase preferences. This will restore the default settings and might solve the issue related to your headphones. Close Cubase, and press Windows key + R to open the run command. Type %appdata% and press Enter. Open the Steinberg folder and locate the Cubase version you’re currently using. Right-click on it and select Rename. Rename it to CubaseOld or something similar. Now launch Cubase and it will automatically create a new set of preferences. In conclusion, if your headphones are not detected by Cubase, these troubleshooting steps will help you to identify and resolve audio settings issues. Follow these steps and get back to creating with Cubase.

Update Or Reinstall Audio Drivers

To fix the issue of Cubase not detecting headphones, you can try updating or reinstalling your audio drivers. This can solve any compatibility problems that may be preventing Cubase from recognizing your headphones and allow you to get back to creating and editing your audio projects with ease.

Are you facing the issue of Cubase not detecting your headphones? Is it hindering your music composition process? If your answer is yes, then you are not alone. The problem may arise due to outdated or corrupted audio drivers in your system. Audio drivers are software components that enable your operating system to communicate with your audio hardware. Updating or reinstalling them can fix the issue. In this post, we will discuss how to update or reinstall audio drivers to resolve the issue of Cubase not detecting headphones.

Download And Install Updated Drivers

Downloading and installing updated drivers is the first solution you should try. Follow the steps below:

  1. Identify the brand and model of your audio hardware.
  2. Go to the manufacturer’s website and navigate to their support or drivers section.
  3. Download the latest drivers suitable for your operating system and hardware model.
  4. Double-click the downloaded file and follow the prompts to install the drivers.

If the problem persists, try the next solution below.

Uninstall And Reinstall Audio Drivers

Uninstalling and reinstalling audio drivers can fix the issue if downloading and installing updated drivers did not work. Here’s how:

  1. Press the Windows key + X and select Device Manager from the context menu.
  2. Locate the audio hardware in the list of devices and expand the option.
  3. Right-click on the audio hardware and select Uninstall device.
  4. Check the box to delete the driver software and click Uninstall.
  5. Restart your computer and let Windows reinstall the audio drivers automatically.

If the above methods do not resolve the issue, try contacting the manufacturer’s support team or seeking professional help.

Conclusion

We hope this post has helped you find a solution to the problem of Cubase not detecting headphones. Remember, outdated or corrupted audio drivers can cause this issue, and updating or reinstalling them can fix it. Follow the steps mentioned above and see if it works for you!

Cubase Doesn'T Detect My Headphones

Credit: forums.steinberg.net

Check Operating System Compatibility

When it comes to music production, issues like Cubase not detecting headphones can be quite frustrating and may significantly affect the workflow of the user. This problem is something producers encounter occasionally, so it’s important to know how to troubleshoot the issue.

Verify Cubase Compatibility With Os

Before purchasing a new operating system, it’s crucial to ensure that it’s compatible with the Cubase version in use. This is because different Cubase versions have specific minimum requirements for operating systems, so some may not work with the latest OS. To check the compatibility, visit the Steinberg website to find out more about the software and hardware compatibility.

Ensure Os Is Up-to-date

Having an updated version of your operating system is essential for troubleshooting many errors, and it can also help fix issues arising from Cubase not detecting headphones. Therefore, ensure that your OS is entirely up-to-date and that all critical patches and updates are installed. It will help avoid compatibility conflicts and reduce the likelihood of incompatibilities between the two.

If neither of the two aforementioned solutions resolve the issue, try checking other headphones, guessing there has to be an issue with the headphones or checking the audio setting to ensure that the headphones are selected as the primary audio output device.

By following these essential steps, you can fix the common issue of Cubase not detecting headphones, avoid potential compatibility complications and achieve a better music production experience.

Examine Audio Hardware

If your headphones are not being detected by Cubase, examining the audio hardware might help you troubleshoot the issue. This step is crucial if you want to ensure that everything is functioning correctly on your end.

Test Audio Interface

The first thing to do is test your audio interface. Check the USB or firewire connection and the driver software installed on your computer. If required, update it. Then, open Cubase and go to the Studio Setup window. Select Audio System from the list and choose your audio interface from the drop-down menu. Make sure all the necessary drivers are selected and enabled.

Check Headphone Jack

The headphone jack could also be the culprit. Check for any damage or debris that could be preventing it from functioning correctly. Make sure you’re plugging in your headphones in the right jack and not in the microphone jack if your computer has separate jacks. Additionally, check if your headphones work with other devices. If your headphones still aren’t being detected, try plugging them into a different jack or using a different pair of headphones, if available.

By examining your audio hardware in Cubase, you can isolate the problem and determine whether it’s a problem with the headphones or the software. Make sure all drivers are installed and functioning correctly, and check that your headphones are not damaged or potentially inserted into the wrong jack.

Seek Support From Steinberg

If your Cubase doesn’t detect your headphones, it can be quite frustrating. Before you throw in the towel and give up, you should seek support from Steinberg. Here are some steps you can take:

Search Knowledge Base For Solutions

If you are experiencing problems with Cubase detecting your headphones, you can first try using Steinberg’s knowledge base. This is an excellent source of information that can help you find solutions to your specific problems. It has articles, FAQs, videos, and other resources that can help you diagnose and fix the problem.

Contact Steinberg Support

If you have tried the knowledge base and haven’t found a solution, you can contact Steinberg support. They have a dedicated team of customer service representatives who will help you with any problems you are having. To contact them, you need to fill out a form on their website with your name, email, and a brief description of your problem. They usually respond within 24-48 hours, but if it’s an urgent matter, you can also call them.

Remember, getting support is nothing to be ashamed of. Even the best software can have problems, and Steinberg is dedicated to helping their users get the best out of Cubase.

Explore Alternative Headphone Options

In Cubase, if your headphones aren’t being detected, you may want to try exploring alternative headphone options. There are plenty of other headphones available on the market that could potentially be compatible with Cubase.

If you are having trouble with Cubase not detecting your headphones, don’t worry! There are several alternative headphone options you can explore. Here are some tips to help you get started:

Consider Using Different Headphones

Sometimes, the headphones you are using may not be compatible with Cubase. Consider using a different pair of headphones and see if that resolves the issue. It’s recommended that you use headphones specifically designed for music production as they provide a neutral frequency response and a comfortable sound.

Try A Headphone Amplifier

If you already own a pair of headphones that you like and they are not working with Cubase, you could try using a headphone amplifier. This device boosts the audio signal strength coming from your computer, resulting in a stronger and cleaner audio signal to your headphones. This may help you detect your headphones in Cubase.

Ensure Correct Audio Settings In Cubase

Before you try any alternative headphone option, make sure to check your audio settings in Cubase. Go to Devices > Device Setup > VST Audio System, and make sure your headphones are selected as the Input and Output device.

Check Your Computer’s Audio Settings

Another reason why Cubase may not detect your headphones could be due to your computer’s audio settings being misconfigured. Check your sound settings and ensure your headphones are selected as the default audio output device.

Isolate The Issue

If you’ve tried all of the above and still have issues, it could be an issue with either your headphones or Cubase. You could isolate the issue by trying your headphones on a different computer or trying a different pair of headphones on your computer. If the issue persists, consider reaching out to Cubase support.

Conclusion

By exploring alternative headphone options, you can easily troubleshoot the issue of Cubase not detecting your headphones. By trying different headphones, using a headphone amplifier, and ensuring all audio settings are correct, you can get back to producing music in no time!

Cubase Doesn'T Detect My Headphones

Credit: www.reddit.com

Frequently Asked Questions For Cubase Doesn’t Detect My Headphones

How Do I Get Cubase To Recognize My Headphones?

To get Cubase to recognize your headphones, go to the Studio Setup menu and select Audio System. Choose your headphones in the ASIO Driver dropdown menu, set the buffer size to an appropriate level, and press Apply. Your headphones should now be recognized.

Why Is My Audio Not Coming Through My Headphones?

Your audio may not be coming through your headphones due to several reasons. Check if your headphones are properly plugged in, if the volume is turned up, and if the audio source is correctly selected. If these steps don’t work, try testing your headphones on a different device or checking for any physical damage to the headphones.

Why Is Music Not Playing Through My Headphones?

There could be several reasons why music may not be playing through your headphones. Check if they are plugged in correctly, the volume is turned up, or if the headphones are broken. Additionally, make sure the audio source is correctly selected and not on mute.

How Do I Use Bluetooth Headphones In Cubase?

To use Bluetooth headphones in Cubase, make sure your device supports Bluetooth audio. Ensure Bluetooth is enabled on your computer and headphones. Pair your headphones with the computer and select them as the audio output in Cubase’s audio device settings.

Enjoy wireless audio monitoring.

Conclusion

Overall, Cubase not detecting headphones can be frustrating but it’s important to troubleshoot the issue step-by-step. Check the headphones and their connections, make sure your drivers are up to date, and adjust the settings in Cubase accordingly. With some patience, you can get your headphones working properly and continue to create great music.

Remember to always stay up to date with the latest software updates and check forums for any additional tips and tricks. Happy music making!

More in our DAW guides.

Categories
Archive

How To Choose Audio Interface

To choose an audio interface, consider the number of inputs and outputs, connectivity options, and your budget. Research and read user reviews to find the best option for your needs.

As an Amazon Associate I earn from qualifying purchases.

An audio interface is an essential tool for recording music, podcasts, voiceovers, and other audio content. It connects your instruments or microphones to your computer or other recording devices. With so many options available in the market, selecting the right audio interface can be daunting.

However, it is vital to consider the number of inputs and outputs, connectivity options, and your budget when making a choice. We will guide you through the process of selecting the best audio interface that suits your needs. We will also provide some insights into the important features to consider while making your selection.

Consider Your Requirements

When choosing an audio interface, it’s important to consider your specific requirements. Think about the number of inputs and outputs you need, whether you want built-in effects or preamps, and whether you need compatibility with certain software. By identifying your needs upfront, you can make an informed decision on the best audio interface for you.

Before you start looking for an audio interface, it’s important to know what you need and what you plan to use it for. Think about the type of projects you’ll be working on, and what kind of gear you’ll be connecting to the interface. Here are some of the key considerations to keep in mind when choosing an audio interface:

Number Of Inputs And Outputs

The number of inputs and outputs you need depends on the number of instruments and gear you plan to connect to your computer. If you’re just recording yourself or a single instrument, a two-channel interface will suffice. However, if you’re recording a band or several instruments at once, you’ll need an interface with multiple inputs and outputs. Here’s a breakdown of typical interfaces by channel count:

  • 2 channels: Ideal for singer-songwriters or voice-over and podcast recording
  • 4 channels: Suitable for small bands, home recording studios, and podcasting
  • 8 channels: A good option for medium-sized studios and live performances
  • 16 channels and above: Best for larger studios, recording live events, and theaters

Compatibility With Operating System And Software

It’s crucial to ensure that the interface is compatible with your computer’s operating system and the software you plan to use. Some interfaces work better with certain operating systems, so make sure to check compatibility before you purchase. Most modern interfaces are compatible with both Mac and PC, and typically come with driver software for both operating systems. As for software, ensure that the interface is compatible with your preferred Digital Audio Workstation (DAW) or recording software.

Sample Rate And Bit Depth

The sample rate and bit depth are the two most important factors that determine the quality of the audio. The sample rate refers to the number of times per second an audio signal is measured. The higher the sample rate, the better the audio quality. The standard sample rate for most interfaces is 48kHz or 44.1kHz, although some high-end interfaces support 96kHz or even 192kHz. The bit depth refers to the number of bits of information in each sample. The higher the bit depth, the more accurately the audio can be represented. A bit depth of 24 bits is the standard for most interfaces, although some offer 16-bit or 32-bit resolution. In conclusion, ensure that you consider your requirements like channel count, compatibility and sample rate before purchasing an audio interface. This not only will save you time and money but will also help you choose an interface that suits your needs and workflow.

Determine Your Budget

One of the most important factors to consider when choosing an audio interface is your budget. Determine how much you are able to spend before making your decision. This will help you narrow down your options and find the best audio interface within your price range.

The first and most crucial step when choosing an audio interface is to determine your budget. Your budget will dictate the quality and features you can expect in an audio interface. Audio interfaces vary widely in price, beginning with the affordable entry-level options, followed by the mid-level options and the high-end professional level options. To ensure you get the best value for your money, you want to ensure that you are investing in an audio interface that provides the features you need at a price point that suits your budget.

Entry-level Options

If you are on a tight budget but still want to improve your audio quality, entry-level audio interfaces provide a great starting point. Entry-level audio interfaces are the most affordable of all options. They typically have two inputs and outputs and are USB powered, making them highly portable and easy to use. Popular entry-level options include the Focusrite Scarlett Solo 2nd Gen and the Behringer U-Phoria UM2. While entry-level audio interfaces may not have all the advanced features of higher-end models, they are perfect for those just starting or with a tight budget.

Mid-level Options

Mid-level audio interfaces offer a significant step up in quality, with more inputs and outputs, higher-quality preamps, and advanced features such as DSP effects and MIDI support. Mid-level options provide more functionality than entry-level audio interfaces and are perfect for solo artists or smaller recording studios. Mid-level options include the Audient EVO 4, Universal Audio Apollo Twin MKII, and the PreSonus Studio 68c. With more functionality comes a higher price point, so be sure to consider your budget before selecting a mid-level audio interface.

Professional-level Options

If you are a professional musician, in recording studios, or creating high-quality content, you will need an audio interface with the most advanced features and sound quality. Professional-level audio interfaces provide high-resolution audio, ultra-low latency, and ultra high-quality preamps and convertors. Professional-level options include the Apogee Symphony Desktop, RME Fireface UCX II, and Universal Audio Apollo X4. While they come at a high cost, for those that require the highest quality in recording, professional-level options are a must-have. In conclusion, determining your budget is the first step in choosing an audio interface. Entry-level, mid-level, and professional-level options offer varying features at different price points. Whether you are just starting or a professional seeking high-quality audio, there is an audio interface that meets your needs.

Choose Your Connectivity Type

Choosing the right connectivity type is crucial when selecting an audio interface. Consider factors such as your recording environment, number of inputs and outputs, and computer compatibility to help make your decision.

Choosing the right audio interface can be a daunting task, especially if you’re new to audio engineering. Audio interfaces come in different shapes and sizes, and they offer different connectivity options. When choosing an audio interface, one of the most important factors to consider is the connectivity type. This article is going to explore the four most common connectivity types, USB, FireWire, Thunderbolt, and PCIe, to help you make an informed decision when choosing your audio interface.

Usb

USB is by far the most common connectivity type for audio interfaces. Most modern computers come with USB ports, making USB audio interfaces an excellent choice for beginners. USB audio interfaces are plug and play, so you don’t need to install any drivers to get started. They’re also quite affordable, making them accessible to users on a budget. However, USB audio interfaces have limited bandwidth, which can lead to latency issues when running multiple channels or higher sample rates.

Firewire

FireWire used to be the most popular connectivity type for audio interfaces, but it has been slowly phased out in recent years. If you’re working with an older computer that has a FireWire port, a FireWire audio interface can be a good choice. FireWire interfaces offer fast transfer speeds and low latency, making them ideal for recording multiple channels simultaneously. However, FireWire audio interfaces are not compatible with newer computers that no longer include FireWire ports.

Thunderbolt

Thunderbolt is a newer connectivity type that offers lightning-fast transfer speeds and low latency. Thunderbolt audio interfaces are an excellent choice for professional audio engineers who require high channel counts and high sample rates. Thunderbolt interfaces are also more expensive than USB or FireWire interfaces, and they only work with computers that have Thunderbolt ports.

Pcie

If you’re looking for the fastest and most reliable connectivity type, then PCIe is the way to go. PCIe audio interfaces connect directly to your computer’s motherboard, offering unparalleled performance and low latency. PCIe interfaces are the most expensive and require you to install them into your computer’s PCIe slot. They’re also not portable, making them a bad choice if you need to move your audio interface frequently. In conclusion, when choosing an audio interface, the connectivity type is one of the most critical factors to consider. USB is the most common and affordable connectivity type, FireWire is becoming obsolete, Thunderbolt is ideal for professionals, and PCIe is the fastest and most reliable but expensive. Choose the connectivity type that best suits your needs and budget, and you’ll be on your way to creating high-quality recordings.

Choose Your Form Factor

Choosing the right audio interface can be a difficult task, especially if you don’t know what to look for. There are several factors you need to consider, including the type of interface you need, its connectivity options, the number of inputs and outputs, and more. But one of the most important decisions you’ll have to make is about the form factor of the interface.

Desktop

A desktop audio interface is a great choice if you have a dedicated workspace for recording and mixing. A desktop interface sits on your desk and is connected to your computer or laptop via a USB or Thunderbolt cable. Desktop interfaces typically offer more inputs and outputs compared to portable devices. These types of interfaces also come with more advanced features, such as built-in DSP processors for effects and cue mixing. Desktop audio interfaces are perfect for home recording studios, podcasters, and small bands.

Rackmount

If you have a larger recording or production space, a rackmount audio interface might be the right choice for you. These types of interfaces are mounted in a rack and can be connected to other rackmount gear, like preamps and compressors. Rackmount interfaces generally provide more channels than desktop models, making them ideal for larger recording studios and production houses. They are also built to last and are designed for professional use.

Portable

Portable audio interfaces are designed for musicians and audio engineers who need to record on-the-go. These interfaces are small and lightweight and can easily fit in your backpack or laptop bag. Since they are designed to be transportable, portable interfaces usually have fewer inputs and outputs than desktop or rackmount models. However, they are still capable of delivering high-quality recordings and are perfect for musicians who want to record demos, practice sessions, or live performances.

In Conclusion

When choosing an audio interface, the form factor is just one of the factors to consider. You should also think about the type of interface you need, its connectivity options, the number of inputs and outputs, and more. By considering all these factors, you’ll be able to choose the right audio interface that suits your needs and budget.

Research The Brand

If you are in the music production industry, having the right audio interface is crucial. With so many options available in the market, it can be challenging to choose the right one for your needs. One of the key factors to consider when making your selection is the brand. Here, we’ll guide you on why it’s essential to research the brand of an audio interface.

Read Reviews

One way to evaluate the reputation of an audio interface brand is by reading reviews from other users. Check what users are saying about the product you are interested in and see how it performs over time. Find out what common problems people had with the product, and how they were solved. Avoid brands with many negative reviews, as this could be an indication that the product does not meet the desired standards.

Check For Quality Assurance

The quality of an audio interface is a crucial factor that should be considered when choosing a reliable brand. Check whether the product meets the required industry standards. Most audio interfaces provide specifications that can help you determine their quality. You can also ask for legitimate certification documents or check the manufacturer’s website for quality assurance information.

Warranty And Customer Support

The support provided by the manufacturer is vital when choosing an audio interface. Ensure that the brand offers long-term warranty policies that protect your investment. This way, you can be sure that your audio interface is covered in the event of any malfunctions. Moreover, consider the quality of customer support provided by the brands. This will help you determine how easy it will be to get assistance when you need it.

By researching the brand of an audio interface, you can be sure to invest in a quality product that meets your needs. With the above tips, you’ll be able to choose an audio interface brand that meets your requirements, has an excellent reputation in the industry, and offers reliable customer support.

How To Choose Audio Interface

Credit: www.uaudio.com

Consider Additional Features

When selecting an audio interface, additional features play a vital role in meeting your recording needs. These features range from preamps and input types to headphone outputs, MIDI connectivity, and DSP processing. Evaluating these various features can help you make an informed decision on the best audio interface for your desired recording setup.

Preamps And Input Types

Preamps play a critical role in the quality of sound recordings. A preamp increases the volume of the audio signal from a microphone or instrument before it goes through the interface’s analog-to-digital converter. High-quality preamps allow for clear, crisp, and natural recordings. The number and type of inputs are also essential in an audio interface. Ensure that you have the correct type and number of input for your desired recording setup.

Headphone Outputs

Headphone outputs on an audio interface are essential for monitoring live recordings. You can connect headphones to the interface for real-time monitoring, which is essential for recording and mixing. The number of headphone outputs on an audio interface varies, but it is recommended to have at least two. This is useful for collaboratively recording or mixing with other musicians or producers.

Midi Connectivity

MIDI or Musical Instrument Digital Interface is a protocol that allows for communication between MIDI-enabled musical instruments and audio interfaces. It enables the transfer of performance data such as pitch bend, vibrato, and modulation to your computer. MIDI connectivity is essential for musicians who use electronic instruments like MIDI keyboards, synthesizers, drum machines, and others.

Dsp Processing

Digital Signal Processing or DSP refers to the range of signals processing algorithms employed by audio interfaces. These algorithms can help improve the sound quality of audio recordings, provide real-time mixing capabilities, and allow for the application of various effects such as reverb and compression. It is essential to consider whether the audio interface comes with built-in DSP processing or requires software downloaded onto your computer.

FeatureImportanceQuestions to consider
Preamps and input typesHighHow many pre Amps are suitable? Do you need more than one type of input?
Headphone OutputsHighHow many headphone outputs are necessary? Are you collaborating with other musicians?
MIDI ConnectivityMediumDo you use MIDI-enabled instruments? Is a MIDI input/output necessary for your recording setup?
DSP ProcessingMediumDo you require built-in effects processing? Are you willing to download software for signal processing?

Compatibility With Other Equipment

When selecting an audio interface, you must ensure that it is compatible with your other equipment. It is important to consider whether the audio interface is compatible with any microphones, speakers, guitars, and synthesizers that you currently own or plan to purchase in the future.

Microphones

The audio interface must be compatible with the type of microphone you use. Some microphones require phantom power, which is a feature that not all audio interfaces have. It is important to check if your microphone needs phantom power and ensure that your audio interface supports it to prevent any damage to your microphone.

Speakers

It is essential to check if your audio interface has the appropriate output connections that match your speaker’s input connection. Most audio interfaces provide output connections in the form of 1/4-inch jacks, XLRs, or RCA connectors. If you are using speakers that support digital connections, such as S/PDIF or AES/EBU, make sure your audio interface has these connectors as well.

Guitars

If you want to record your guitar, ensure that your audio interface has an instrument-level input. Regular line-level inputs are not suitable for electric guitars and bass guitars. A guitar-level input provides the correct impedance and gains that are required to record guitars properly.

Synthesizers

If you plan to record synthesizers or other electronic instruments, ensure that your audio interface has both MIDI input and output connectors. These connectors allow you to connect your synthesizer to your computer and control it through a DAW or a MIDI sequencer. It is also essential to check if your audio interface supports the MIDI standard that your synthesizer uses (MIDI 1.0 or MIDI 2.0).

Choosing the right audio interface compatible with your other equipment is crucial for producing high-quality recordings. Make sure to verify the compatibility of your audio interface with any other equipment you plan to use before making your final decision.

How To Choose Audio Interface

Credit: www.soundonsound.com

Read User Manuals And Guides

If you are in the market for an audio interface, it is important that you know what you are looking for. The technical jargon and specifications can be confusing, but one of the best ways to familiarize yourself with an audio interface is to read the user manual and accompanying guides. In this article, we will discuss the importance of reading user manuals and guides when choosing an audio interface, as well as other key factors you should consider.

Analog Vs Digital

Before diving into any technical specifications, you should understand the difference between analog and digital audio interfaces. Analog signals are continuous and fluctuate in voltage, while digital signals are discrete and represented by a series of numbers. Analog interfaces tend to have warmer sound quality, while digital interfaces offer better signal-to-noise ratio and frequency response. Depending on your recording needs and personal preferences, you may favor one over the other.

Latency

Latency can be a major issue in audio recording, especially if you want to record multiple tracks simultaneously. Latency refers to the time delay between when a sound is recorded and when it is played back through the interface’s headphone or speaker output. Lower latency is better, as it reduces the chance of audio lag and allows for real-time monitoring. Make sure to check the manufacturer’s latency figures before purchasing an audio interface.

Gain Staging

Gain staging is the process of setting the gain level at each point in the signal chain to prevent distortion and optimize the signal-to-noise ratio. A good audio interface should have wide gain range and enable you to set the gain level for each input. Look for an interface with clear and intuitive gain controls, and that allows for level matching between channels.

Troubleshooting

Despite your best efforts, you may run into issues with your audio interface. Therefore, it is important to choose a manufacturer that offers in-depth troubleshooting guides and reliable technical support. Make sure to read reviews and ask for recommendations from other musicians or audio engineers to ensure you are purchasing an interface with a solid reputation.

By reading user manuals and guides, and understanding the difference between analog and digital interfaces, latency, gain staging, and troubleshooting, you can find an audio interface that meets your recording needs. As always, make sure to do your research, read reviews, and choose a reputable manufacturer before making any purchase.

How To Choose Audio Interface

Credit: www.bhphotovideo.com

Frequently Asked Questions On How To Choose Audio Interface

How Do I Know What Audio Interface To Buy?

To determine the best audio interface for you, consider your recording needs and budget. Research and read reviews to gauge performance, compatibility, and connectivity options. Choose an interface that best suits your purposes and aligns with your recording software.

Does It Matter What Audio Interface I Get?

The audio interface you get will affect the quality of sound you produce. A good audio interface with high sample rates, low latency, and low noise can improve the quality of your recordings. It is important to research and choose an interface that meets your needs and budget.

Do Expensive Audio Interfaces Make A Difference?

Yes, expensive audio interfaces can make a significant difference in the quality of sound. They offer better components, such as preamps, converters, and quality build, resulting in clearer and richer audio recordings. However, the price alone does not guarantee better sound quality, and you should choose based on your needs, budget, and compatibility.

How Many Preamps Do I Need For My Audio Interface?

The number of preamps you need for your audio interface depends on how many microphones you plan to use simultaneously. Each microphone requires its own preamp. So, if you plan to record two microphones at the same time, you’ll need an audio interface with at least two preamps.

Conclusion

Overall, choosing the right audio interface requires careful consideration of different factors such as compatibility with your device, number and types of inputs and outputs needed, and budget constraints. Investing in a high-quality audio interface will significantly enhance the sound quality of your recordings and live performances.

By following the tips outlined you can make a more informed decision when choosing an audio interface that best suits your needs and preferences.

Categories
Archive

How To Program Drums For Techno

To program drums for techno, use a drum machine or digital audio workstation (DAW). Choose appropriate drum sounds and create a basic rhythm with a kick and snare pattern.

As an Amazon Associate I earn from qualifying purchases.

Related reading: Dark Textures And Soundscapes For Techno and Critical Elements Your Techno Track Needs. For background, see the Wikipedia article on Techno.

Also, Techno music originated in Detroit in the early 1980s and is characterized by its repetitive rhythms, heavy use of synthesized sounds, and often minimalistic approach to composition. When programming drums for techno, it is vital to keep the rhythm steady and consistent while also incorporating variations to maintain interest.

Moreover, using a drum machine or DAW can facilitate this process by allowing for precise control over individual drum sounds and patterns. Also, we will discuss various techniques and tips for programming drums for techno, including creating a strong kick and snare pattern, using percussion to create movement, and incorporating sample manipulation for added texture.

How To Program Drums For Techno

Credit: m.youtube.com

Drum Machines And Samples

In addition, Drum programming for techno has always been a vital part of music production. In addition, in the world of techno, the drum machine is an essential tool that has been used by countless music producers to create unique and groovy beats. But with numerous drum machines and sample packs available in the market, selecting the right equipment can be a daunting task. In this article, we will guide you through the process of selecting the right drum machine and finding the perfect sample pack.

Selecting The Right Drum Machine for Techno Drums

When selecting a drum machine for techno, it is essential to consider the following:

  • Price and budget.
  • Sound quality.
  • Furthermore, the number of pads and controls.

One of the most popular drum machines in the market is the Roland TR-8S. For example, this drum machine is suitable for techno due to its ability to blend with analog and digital sounds. The TR-8S is also ideal due to its numerous sound variations and customization options.

Finding The Perfect Sample Pack

Also, Sample packs usually contain drum sounds and one-shot hits that can be used to create drum patterns for your tracks. As a result, finding the right sample pack is crucial, as it can make the process of drum programming much easier. When looking for sample packs, you should consider the following:

  • The genre – Some sample packs are specifically designed for techno.
  • Moreover, the quality – High-quality samples will make your tracks sound professional.
  • In addition, the number of sounds – Some sample packs come with a wide variety of sounds, including bass and synth loops.

A sample pack we recommend is the Techno Underground by Loopmasters. However, this pack contains a wide variety of drum sounds that are specially designed for techno music. The pack also includes ready-made drum loops and bass and synth sounds that can be used to create a full techno track.

Building A Drum Pattern for Techno Drums

Additionally, to create a driving techno beat, start by selecting drum samples with a punchy, tight sound. Then, use a step sequencer to program the rhythm, focusing on repetition and variation to build complexity. Experiment with adding swing or changing the velocity of individual hits to add interest and a human feel to your pattern.

Also, building a drum pattern is a crucial aspect of creating techno music. In short, it is the foundation of the track. A well-crafted drum pattern can make your techno track stand out from the crowd. In this post, we will go over the process of programming drums for techno. Specifically, we will discuss selecting kick drum patterns, layering with snare and clap, and adding hi-hats and cymbals.

Selecting Kick Drum Patterns

Moreover, the kick drum serves as the backbone of the drum pattern. Similarly, it keeps the beat steady and provides a thumping bass sound that is characteristic of techno music. When selecting a kick drum pattern, consider the groove and feel that you are trying to achieve. You can choose a simple four-on-the-floor pattern or experiment with more complex rhythms.

Layering With Snare And Clap for Techno Drums

Layering the kick drum with snare and clap can add depth and variation to the beat. Also, the snare and clap add a snappy, rhythmic element to the pattern. When layering, be mindful of the placement and timing of the snare and clap hits. You can experiment with different patterns and velocities to find the right combination.

Adding Hi-hats And Cymbals

Adding hi-hats and cymbals provides a shimmering, high-frequency sound to the track. In addition, the hi-hats create a continuous, rhythmic pattern that can add energy and momentum to the beat. The cymbals can be used to accentuate certain parts of the pattern or to create transitions between sections. In conclusion, building a drum pattern is an essential part of creating techno music. By selecting kick drum patterns, layering with snare and clap, and adding hi-hats and cymbals, you can create a dynamic and engaging drum pattern that will keep your listeners grooving.

The Importance Of Groove

When it comes to programming drums for techno, groove is an essential element that shouldn’t be overlooked. For example, the groove of a track is what makes people want to move and dance to the beat. Without a good groove, a techno track can feel dull and lifeless. In this article, we’ll explore the importance of groove and how you can add swing, humanize your drum patterns, and create a dynamic groove that will get people on the dancefloor.

Adding Swing for Techno Drums

Swing is a rhythmic technique that adds a human feel to your drum patterns. When you add swing to your drums, they don’t hit exactly on the grid. As a result, this creates a more natural and groovy sound. You can add swing to your drum patterns in a few different ways:

  • Adjust the swing setting in your DAW: Most DAWs have a swing setting that allows you to adjust the timing and velocity of your MIDI notes.
  • Manually adjust the timing of your MIDI notes: If you don’t want to use the swing setting in your DAW, you can manually adjust the timing of your MIDI notes to create a swing feel.
  • Use a swing plugin: There are a variety of plugins available that can add swing to your drum patterns automatically.

Humanizing Your Drum Patterns

When you humanize your drum patterns, you add subtle variations to the timing and velocity of your MIDI notes. However, this makes your drums sound more natural and less robotic. To humanize your drum patterns, try:

  • Randomizing the timing and velocity of your MIDI notes: Most DAWs have a randomize function that allows you to quickly add variations to your MIDI notes.
  • Manually adjusting the timing and velocity of your MIDI notes: If you want more control over the humanization of your drum patterns, you can manually adjust the timing and velocity of your MIDI notes.
  • Using a humanization plugin: There are several plugins available that can humanize your drum patterns automatically.

Creating A Dynamic Groove for Techno Drums

A dynamic groove is a groove that changes and evolves over time. Then, it keeps the listener engaged and interested in the track. To create a dynamic groove, try:

  • Adding and removing elements: You can add and remove elements from your drum patterns to create variation and keep the groove interesting.
  • Changing the timing and velocity of your MIDI notes: By constantly adjusting the timing and velocity of your MIDI notes, you can create a dynamic and evolving groove.
  • Using automation: Automation is a powerful tool that can be used to create a dynamic groove. Try automating the volume, panning, and effects on your drum patterns.

By adding swing, humanizing your drum patterns, and creating a dynamic groove, you can take your techno tracks to the next level. In short, don’t be afraid to experiment and try new things to find the groove that works best for your track.

How To Program Drums For Techno

Credit: m.youtube.com

Sound Design Tips

Learn sound design tips to elevate your techno music production. Similarly, follow these steps to program drums for techno: choose the right samples, create patterns, add variation, layer and process sounds, apply effects, and mix with care.

If you want your techno tracks to stand out, sound design is crucial. Also, creating your own custom drum sounds can add unique character to your productions. Below are some sound design tips for programming drums that will give your techno tracks that extra edge.

Processing Kick Drums

Kick drums are the foundation of any techno track. You want your kick drums to be punchy and powerful, cutting through the mix. One way to achieve this is by layering multiple kick drum samples together. This can help fill out the low end while adding character and depth to the sound. Another effective technique is to use saturation to add harmonic distortion to the kick drum. This can give it more presence and help it stand out in the mix. Compression can also be used to tighten up the sound, making it more impactful.

Working With Synthesized Percussion

Synthesizing your own percussion sounds can give you complete control over the sound design process. One popular technique is to use a noise generator to add texture to the sound. You can also use modulation to add movement and interest. Don’t be afraid to experiment with different waveforms and filter settings. Sometimes a simple tweak can completely transform a sound. This gives it a unique character that can help it stand out in the mix.

Adding Effects And Processing for Techno Drums

Once you have your drum sounds programmed, it’s time to add effects and processing to give them more character. Reverb can be used to add a sense of space and depth to the sounds. Delay can create rhythmic patterns and movement. Don’t be afraid to get creative with your processing. Experiment with distortion, filtering, and modulation effects to create unique sounds. And remember, the best results often come from layering multiple effects together. By using these sound design tips, you can create custom drum sounds that help your techno tracks stand out from the crowd. Experiment with different techniques and don’t be afraid to get creative with your processing.

Arrangement Techniques

One of the most important aspects of techno is building tension and release in the track to keep the listener engaged. When programming drums, you can use a variety of techniques to build tension and create release, such as:

  • Varying the drum patterns to create a sense of anticipation
  • Gradually adding new elements to the track to build energy
  • Incorporating breakdowns and drops to provide moments of release
  • Using filters and effects to manipulate the sound and create movement

By carefully arranging your drums to build and release tension, you can create a track that keeps the listener engaged from start to finish.

One effective way to add tension and release to your techno track is to incorporate drops and breakdowns. A drop is a sudden pause in the music followed by a burst of energy, while a breakdown typically involves stripping the track down to a few elements before gradually building it back up again.

To create drops and breakdowns when programming drums, try:

  1. Removing the kick drum and other elements to create a moment of silence
  2. Increasing the tempo or adding a new rhythmic element for added energy
  3. Using effects like reverb and delay to create a sense of space and atmosphere

By strategically placing drops and breakdowns throughout your track, you can create a dynamic listening experience that keeps your audience engaged.

Practical Tips for Techno Drums

In addition to programming drums, you can add depth and texture to your techno track by layering in other percussion elements. This can include:

  • Cymbals and hi-hats to add shimmer and sparkle
  • Percussive elements like shakers and tambourines for added groove
  • Cinematic percussion like toms and timpani for added impact

When layering with other percussion elements, make sure each element has a distinct role in the track and doesn’t clash with the existing rhythm. By carefully layering your drums with other elements, you can create a full, rich sound that brings your techno track to life.

How To Program Drums For Techno

Credit: www.attackmagazine.com

Mixing Tips

Learn how to program drums for techno and enhance your beats by using these helpful mixing tips. Experiment with different sounds and rhythms to create unique and dynamic tracks that will captivate your listeners. Whether you’re a beginner or an experienced techno producer, these tips will take your skills to the next level.

When it comes to programming drums for techno, mixing is a crucial step that can make or break the final result. In this section, we’ll explore some mixing tips that can help you take your techno drum programming to the next level.

Equalizing And Compressing Drums

Equalization and compression are essential tools when it comes to mixing techno drums. By using EQ, you can boost or cut certain frequencies to make your drums more prominent in the mix. For example, you might want to boost the kick drum’s low frequencies to give it more weight. Compression, on the other hand, can help you control the dynamics of your drums. By compressing the drums, you can make the softer hits louder and the louder hits softer. This creates a more balanced and consistent sound. Just remember not to overdo it, as too much compression can make your drums sound flat and lifeless.

Using Panning And Stereo Imaging

Panning and stereo imaging are powerful techniques you can use to add depth and width to your drum mix. By panning your drums to different positions in the stereo field, you can create a sense of space and separation between the elements. In techno, it’s common to pan the hi-hats and cymbals to the sides, while keeping the kick and snare centered. Stereo imaging is another way to add width and depth to your drums. By using stereo effects like chorus or flanger, you can create a wider and more interesting sound. However, be careful not to go too far with stereo imaging, as it can make your drums sound disconnected and unnatural.

Adding Reverb And Delay

Reverb and delay are two effects that can help you create a more ambient and immersive drum mix. Reverb simulates the sound of a room or space, while delay produces echoes and repeats. By using these effects on your drums, you can create a sense of space and atmosphere that can take your techno tracks to the next level. However, be careful not to overdo it with reverb and delay, as too much can muddy up your mix and make it sound cluttered. Use these effects sparingly and tastefully, and always remember to listen to your mix with fresh ears to make sure it sounds balanced and cohesive.

Frequently Asked Questions Of How To Program Drums For Techno

What Drums Does Techno Use?

Techno drums typically include the bass drum, snare, clap, hi-hat, and ride cymbal. Other percussion instruments may also be incorporated, such as a shaker, cowbell, or tambourine. The specific drum sounds used vary depending on the style and preference of the producer or musician creating the techno track.

What Drum Machine Is Used In Techno?

The most popular drum machines used in techno are the Roland TR-909 and the Roland TR-808. These machines are known for their deep kicks, crisp snares, and distinctive hi-hats. They have been used in countless techno tracks and continue to be popular among producers.

How Do I Start Programming Drums?

To start programming drums, you will need to choose a digital audio workstation (DAW) and drum samples. Then, you can create a drum pattern by sequencing the samples in the DAW’s piano roll or step sequencer. Adjusting the velocity and adding swing can add dynamics and groove to your drums.

Practice and experimentation are key to improving your drum programming skills.

How To Make Programmed Drums?

To make programmed drums, you’ll need a digital audio workstation (DAW) software and drum samples. Use the step sequencer or MIDI controller to program the drum beats, adjust the velocity and timing for a natural feel. Experiment with adding fills, variations, and effects.

Lastly, mix and export the final output.

Conclusion

To become proficient in programming drums for techno music, your approach must be patient and meticulous. Focusing on the specific rhythms that make up the foundation of techno music and knowing the right techniques to use will set you ahead of the game.

A successful techno beat requires a combination of using samples and programming your own sounds, so keep experimenting and practicing to achieve your desired sound. With these techniques in mind, you can start creating your own techno tracks that will keep audiences moving all night long.

Categories
Archive

How Waves Renaissance Bass Works

Waves Renaissance Bass is a plugin that enhances low frequencies, adding fullness and warmth to bass sounds. It does this by generating harmonics according to a psychoacoustic model, which creates the illusion of deeper bass without actually increasing the amplitude or frequency of the original signal.

The Waves Renaissance Bass plugin is one of the most popular audio plugins used by music producers, mixing engineers, and sound designers. Developed by Waves Audio, this plugin enhances low frequencies, adding fullness and warmth to bass sounds. Unlike other bass boost plugins, which simply raise the bass levels, this plugin generates harmonics according to a psychoacoustic model, which creates the illusion of deeper bass without actually increasing the amplitude or frequency of the original signal.

In this way, the plugin provides a more natural and authentic bass sound that can be used in a wide variety of music genres, from electronic dance music to rock and pop. With its easy-to-use interface and advanced features, Waves Renaissance Bass is a must-have tool for any audio professional who wants to get the most out of their bass sounds.

How Waves Renaissance Bass Works

Credit: www.waves.com

Step-by-step Guide To Using Waves Renaissance Bass

Discover how to enhance your bass sounds with Waves Renaissance Bass, a powerful plugin that adds warmth and depth to your music. This step-by-step guide will help you master the plugin and take your bass to the next level.

If you’re looking to enhance your bass tracks, the Waves Renaissance Bass plugin is a great choice. This plugin increases the perceived low-end of your audio without muddying up the mix. In this step-by-step guide, we’ll walk you through installing the plugin, applying it to a bass track, adjusting the settings, and conducting an A/B comparison.

Installing The Plugin

Before we can take advantage of the Renaissance Bass plugin, we need to install it. Follow these steps:

  1. Open your Waves Central application.
  2. Click on `Install Product`.
  3. Select `Renaissance Bass` from the list of available plugins.
  4. Click on `Install` and wait for the installation to complete.

Now that the plugin is installed, we can begin using it.

Applying The Plugin To A Bass Track

Here’s how to apply the Renaissance Bass plugin to a bass track:

  1. Open your DAW and load the desired bass track.
  2. Find the insert section and click on it.
  3. Select `Waves` from the list of available plugins.
  4. Choose `Renaissance Bass` and apply it to the track.
  5. Make sure to adjust the gain so the track isn’t distorted.

Adjusting The Settings

The Renaissance Bass plugin comes with a variety of settings that you can adjust to your liking. Here are a few to consider:

  • The `Frequency` control allows you to adjust the frequency range where the plugin is enhancing the low-end.
  • The `Harmonics` control adds additional harmonics to the low-end, enhancing its perceived loudness.
  • The `Mix` control allows you to adjust how much of the processed signal is blended with the original signal.
  • The `Output` control changes the output level of the plugin.

A/b Comparison

Finally, it’s important to conduct an A/B comparison to ensure that the effect is working correctly and not causing any unwanted changes to the track. Here’s how to do it:

  1. Copy the original bass track to a new track.
  2. Apply the Renaissance Bass plugin to the new track.
  3. Toggle the new track on and off to compare the before and after sound.
  4. Adjust the settings until you’re satisfied with the results.

With these steps, you should be able to effectively use the Waves Renaissance Bass plugin to enhance your bass tracks.

How Waves Renaissance Bass Works

Credit: www.diymusicbiz.com

Examples Of Renaissance Bass In Action

Waves Renaissance Bass is a versatile plugin that can be used on various instruments, such as bass guitars, drums and synths, to enhance their low-end frequencies. Examples of its use can be found in popular music genres like hip-hop, EDM and rock.

Hip-hop

Hip-hop is a genre of music that’s all about the rhythm and beat. Often, rappers integrate booming bass drops that set an upbeat tempo for their rhymes. With Waves Renaissance Bass, you can take these beats to the next level. For example, you can use the plugin to boost a kick drum’s frequency and give it more thunderous power. This technique emphasizes the song’s groove and can help it stand out in a club or party setting.

Rock

Rock music is known for its big, driving bass lines that energize audiences. To achieve this sound, experienced audio engineers use expensive equipment and state-of-the-art software to mix and master the tracks. However, with Waves Renaissance Bass, you can achieve a similarly aggressive tone without spending a fortune. The plugin achieves this by focusing on the bass frequencies that really matter, making the bassline powerful and prominent in a rock track, making the track sway the audience in the live show.

Edm

EDM is all about getting people to dance. A driving bassline is often the centerpiece of this music genre, creating a beat that is impossible to resist. Renaissance Bass is perfect for EDM as it allows the sound engineer to add warmth and power to the track’s bass drops. As a result, the track will pulse and thump with extra energy, giving listeners an irresistible urge to move their feet and dance. Overall, Renaissance Bass is a powerful tool for those who want to increase the power of their music tracks. Whether you’re producing hip-hop, rock or EDM, this plugin can help you achieve a sound that’s larger than life.

Pros And Cons Of Using Renaissance Bass

If you are in the music production world, you may have heard of Waves Renaissance Bass. It is an audio plugin that enhances the bass frequencies of your music, creating a warm and punchy sound. However, like any tool, it has its pros and cons. Let’s take a closer look:

Pros

  • Easy to use interface with only three knobs that allow you to control the intensity, frequency, and harmonic levels.
  • Creates a fuller and richer sound for your bass without making it sound muddy or boomy.
  • Compatible with almost any DAW and works seamlessly in any genre of music.
  • Can be used on a variety of sound sources, including drums, synths, and vocals, to add depth and warmth to your mix.
  • Provides a quick and simple solution for those who struggle with getting their bass to stand out in their music.

Cons

  • It may not be suitable for all music genres. It works better with genres that require a solid bass foundation like hip hop, trap, and electronic music but may not work as well with acoustic music.
  • It can be easy to overuse and create an uneven mix with too much emphasis on the bass.
  • It is an additional expense for producers who may already have similar plugins that have similar features.

In conclusion, Waves Renaissance Bass can be a useful tool for music producers to enhance the bass frequency of their music. Its easy-to-use interface and compatibility with different DAWs make it a popular choice. However, it is essential to use it judiciously and understand its limitations to avoid overusing it in your mix.

Faqs

Waves Renaissance Bass is a plug-in that uses harmonic wave shaping to enhance the low-frequency presence of any audio track. It creates an illusion of a larger bass, adding depth and fullness to the sound without actually increasing the volume.

Need more information about how it works? Check out our FAQs page.

If you’re looking to add depth, fullness, and dimension to your bass tracks, the Waves Renaissance Bass plugin is definitely worth checking out. Here are some frequently asked questions that you might have when it comes to this powerful tool.

What Genres Is Renaissance Bass Suited For?

Renaissance Bass is incredibly versatile and can be used across a wide range of music genres. From hip-hop and EDM to pop and rock, this plugin can enhance your bass sound regardless of the style you’re working with. Whether you’re looking to create a deep, rumbling bass that supports your track’s low end or add a subtle boost to create a sense of movement, Renaissance Bass has got you covered.

Does Renaissance Bass Work On All Bass Instruments?

Whether you’re working with an electric bass guitar, a synth bass, or any other type of bass instrument, the Renaissance Bass plugin can help you achieve the sound you’re looking for. With its intuitive interface and easy-to-use controls, you can fine-tune your bass sound to perfection. From creating a warm, natural tone to adding a touch of distortion or drive, this plugin is a must-have for anyone who wants to take their bass sound to the next level.

Can Renaissance Bass Be Used In Live Performances?

Yes, Renaissance Bass can be used in live performances as well as in the studio. With its low CPU usage and intuitive interface, it’s a great tool to have at your disposal when you’re playing live or recording on the go. Whether you’re performing on stage or in the studio, adding some extra depth and punch to your bass sound can make a big difference in the overall quality of your performance. So if you’re looking for a versatile and powerful tool to help you enhance your bass tracks, consider adding Waves Renaissance Bass to your collection.

How Waves Renaissance Bass Works

Credit: www.waves.com

Frequently Asked Questions Of How Waves Renaissance Bass Works

How Does Renaissance Bass Work?

Renaissance Bass works by adding harmonics to the bass note to create a richer and more powerful sound. It uses psychoacoustic technology to enhance the low frequency and provide a more impactful bass without overwhelming the rest of the mix.

What Does Waves Maxxbass Do?

Waves MaxxBass is a software audio plugin that enhances bass frequencies in music recordings. It creates harmonics that make bass notes sound more full and rich, even on devices with limited bass capabilities. This results in a more immersive audio experience for listeners.

What Does The R Bass Do?

The R bass is a type of equalization filter commonly used in audio mixing to enhance and control the low-frequency bass sounds in a track. It allows for stronger and more defined bass lines in music productions.

How Does Waves Renaissance Bass Plugin Work?

The Waves Renaissance Bass plugin uses a technology called MaxxBass which generates harmonically rich bass sounds by synthesizing a low frequency octave that enhances the perceived bass energy. This plugin divides the audio signal into different frequency bands, allowing the user to control and shape the bass frequency range with precision.

Conclusion

As we conclude, Waves Renaissance Bass is an excellent tool for enhancing bass frequencies in music production. From its intuitive design to the easy and smooth workflow, the plugin guarantees excellent results when used correctly. Renaissance Bass’s ability to give low frequencies more depth and create a more profound impact is unmatched.

The plugin changes the game when it comes to enhancing bass frequencies. Incorporating it into your music production will undoubtedly take your sound to the next level.

Categories
Archive

How to Choose a Musician Name

Choosing a musician name requires creativity and originality. Research, brainstorm, and consider branding before deciding on a name that stands out and represents you as an artist.

Your chosen name should be easily searchable and memorable for your fans. Many musicians aspire to make their mark in the music industry and owning a unique name is one way to stand out from the crowd. A memorable name is the first step towards establishing your brand and gaining recognition in the industry.

In addition, a good name can help you build a solid fan base and establish a positive reputation. When deciding on your musician name, start by researching other artist names to avoid duplicity. Brainstorm catchy and unique names that accurately reflect your music style and personal brand. Try to create a name that is easy to pronounce, spell, and remember – as well as searchable. Don’t be too obscure, too common, or too similar to existing brands or artist names. Overall, choosing the perfect musician name takes time, effort, and creativity. A memorable name gives you the necessary edge to establish a brand and gain recognition in the industry.

Why Choosing A Musician Name Is Important

Choosing the right musician name is crucial for building a brand and gaining recognition in the music industry. When selecting a name, artists should consider factors such as uniqueness, memorability, and marketability. A strong musician name can differentiate an artist from competitors and make a lasting impression on listeners.

Choosing a name as a musician is a critical step towards establishing your brand. It’s not just about having a catchy name, but it’s about creating a name that reflects your personality and the kind of music you produce. Choosing a name for yourself gives you the power to decide how you want people to view you. Your name can even determine whether or not people will remember you. Thus, making the right choice is essential. In this post, we’ll go over the reasons why choosing a musician name is important, how to establish your brand, and how to separate your personal life from your art.

Establishing Your Brand

As a musician, you’re not just creating music; you’re creating an entire brand based on your music and personality. Your brand influences how people view your music and how they will interact with your music. Your name is the first thing that people will associate with your brand, and it’s often the first impression that people have of you and your music. Therefore, it’s imperative to put enough thought into creating a unique and memorable name that always makes your brand stand out.

Separating Your Personal Life From Your Art

One common mistake many musicians make is to use their real names as their stage names, which can sometimes limit their creativity and flexibility as artists. Using a different name gives you more freedom to separate your personal life from your art. It allows you to be whoever you want to be on stage and during your performance. And, with social media becoming an essential tool for musicians and building their brands, using a stage name ensures that when fans are searching for your name, they get directed to your professional page, not your personal one. A stage name also adds an air of mystique, which can make fans more curious about you and your music.

In Conclusion,

Choosing a name as a musician may seem simple, but it’s one of the most critical decisions you’ll make in your career. Remember, your name is your brand, and it should reflect your style, personality, and music. Setting up the right name for yourself will help you establish a solid brand, set yourself apart from other musicians, and create a lasting impression in the industry.

How to Choose a Musician Name

Credit: d4musicmarketing.com

Considerations Before Choosing Your Name

When choosing a musician name, it is crucial to consider your branding, target audience, and potential trademark issues. Research existing names and choose one that is unique, memorable, and easy to pronounce. Your name should also reflect your music style and persona.

Choosing a name for your musician persona is an exciting process, but it’s important to consider a few key factors before settling on a name. Your name will become a crucial part of your brand, and it needs to be memorable, easy to pronounce, and relevant to your genre and image. Here are a few things to keep in mind as you begin brainstorming potential names.

Genre And Image

Your genre and image are critical components to consider when creating your musician name. Your name should encapsulate what your music is all about and the kind of image you want to project. A pop artist may want a name that is fun and catchy, whereas a hip-hop artist may prefer a name that is edgy and unique. Your name should also reflect the kind of audience you want to attract- if you’re a children’s musician, for example, your name should be simple and easy to remember.

Uniqueness And Memorable

Unique and memorable names are always an excellent choice for a musician. You want a name that will stick in people’s minds and that people will associate with your music. Your name should be distinctive and stand out from other artists’ names in the same genre. You can also consider adding a unique spin on a common word or combining words in a way that makes it unique. Memorable names will help you distinguish yourself in an oversaturated music market.

Ease Of Spelling And Pronunciation

It’s important to keep in mind the audience when considering the ease of spelling and pronunciation of your name. Your name should be easy to spell so that listeners can easily find you online. An easy to pronounce name will also make it easy for your fans to talk about you to their friends and family, which in turn results in free promotion for you. Avoid names that are too complex or difficult to spell, as it may hinder your growth and audience reach. In conclusion, choosing your musician name is a critical step in building your music persona. It is essential to consider your genre, image, uniqueness, memorability, ease of spelling and pronunciation. Take time to pick the best name for your brand. Your name reflects who you are as an artist and will help attract your target audience. By following the above considerations, you’ll be well on your way to selecting the perfect name for your music career.

Step-by-step Guide To Choosing Your Name

If you’re a musician, choosing a name is one of the most important decisions you’ll make. Your name is often the first thing people will know about you, and it can have a huge impact on how others perceive you and your music. In this step-by-step guide, we’ll help you come up with a name that’s catchy, memorable, and, most importantly, uniquely yours.

Brainstorming Sessions

The first step in choosing a musician name is to start brainstorming. Set aside some time to think about the kind of sound and vibe you want to convey with your name. Make a list of words, phrases, and ideas that reflect your music style or personality. You can also find inspiration from your favorite artists or bands, or by looking at some of the most popular musician names of all time. Consider your target audience and what they would respond to.

Narrowing Down Your Options

Once you’ve got a long list of potential names, it’s time to start whittling them down. Try to narrow your options down to the top three to five choices that best represent your music and personality. You can ask for input from friends or family, or try out the names on strangers you meet. Pay attention to how people react to each name, and keep in mind what works for you personally.

Researching Availability And Legality

Now that you have a few top contenders, it’s time to do some research to make sure your chosen name isn’t already taken. Search online for other bands or musicians with the same name. You can also check with your country’s trademark office to see if the name is already registered. It is important to ensure your name is legal and available for use to avoid conflicts with other musicians or legal issues.

Getting Feedback From Friends And Fans

Once you have selected and researched your name, it’s time to get feedback from your friends, followers, and fans. Share your top contenders on social media or with a focus group and collect feedback about each of the names. Take their feedback into consideration and choose the name that resonates with you and your target audience.

Choosing a musician name can be a daunting task, but following these steps will make the process manageable and exciting. Remember to choose a name that reflects your music, personality, and resonates with your audience. Your name represents you and the image you want to convey to the world, so choose wisely.

How to Choose a Musician Name

Credit: www.amazon.com

Avoiding Common Mistakes

Choosing a musician name can be tricky, but by avoiding common mistakes you can create a memorable and unique name for yourself. Consider your brand, audience, and image when selecting a name that will stand out and represent your music.

Selecting the right name for your band or music project can be a tricky task. It needs to be memorable, unique, and reflect your image as an artist. However, there are some common mistakes that you should avoid when choosing your musician name. In this article, we will guide you through the common pitfalls that you should avoid to ensure you select a name that will help you stand out in a crowded industry.

Choosing A Name Too Similar To Another Artist

When selecting a name, it’s essential to research to ensure that it hasn’t been taken by another artist. Choosing a name that is too similar to another artist can result in confusion among your audience and harm your brand. You don’t want to be known as the artist who copied someone else’s name. Example: Instead of choosing “The Beatles,” you can add a unique element like “The Silver Beatles” to differentiate your name.

Selecting A Name Based On Current Trends Only

It is a common mistake for artists to choose a name that is trendy at the moment instead of picking a name that represents their style and resonates with their audience. Using a trendy name that is no longer popular can make your band feel outdated and out of touch with your audience. Example: If you’re a pop artist, instead of naming your band “100 Gecs,” you can choose a name like “Electro Pop Kids” which is more timeless and resonates with your audience.

Being Too Obscure Or Offensive

Being too obscure or offensive with your name can harm your brand and make your audience less likely to take you seriously. It’s important to make sure that your name isn’t offensive to any community and can be meaningful to your followers. Example: Choosing your band or musician name is an essential part of establishing your brand identity. By keeping your name memorable, unique, and relevant to your audience, you can stand out in the industry. Always remember to avoid common mistakes like choosing a name too similar to another artist, selecting a name based on current trends only, or being too obscure or offensive.

Legal Considerations For Your Chosen Name

When choosing a musician name, it is important to consider legal implications. Research to make sure your chosen name is not already trademarked or in use by another artist. Register your name as a trademark to protect it in the future.

Choosing a musician name is an important decision in your career. In addition to sounding catchy and memorable, your chosen name should also be legally suitable. Many factors come into play when selecting a name, especially legal considerations. It is crucial to ensure that your musician name is available for use and that it complies with trademark, domain name, and social media policies. In this section, we’ll cover some legal considerations to keep in mind when picking your musician name.

Trademark Search And Registration

Before selecting a musician name, it’s crucial to perform a trademark search to make sure no one else is already using the name. You don’t have to be a legal expert to do a trademark search – in fact, you can do one yourself by visiting the United States Patent and Trademark Office (USPTO) website. Once you’ve confirmed that the name is not in use, it’s time to register it as a trademark. Doing so will grant you legal rights over the name and allow you to pursue legal action in case of infringement. Trademark registration can be done online, and the process takes between six to twelve months to complete.

Domain Name Availability

Domain name availability is another crucial aspect to consider when choosing your musician name. Your website is your online home as a musician, and it’s essential to have a domain name that matches your artist name. Check if the domain name of your chosen name is available – if it’s not, try to find a different domain name or come up with a unique spelling of your name.

Social Media And Streaming Profiles

In today’s digital age, social media and streaming platforms are vital tools for promoting your music and connecting with fans. Therefore, it’s essential to have social media handles and streaming profiles that match your musician name. Check if your chosen name is available on social media platforms such as Facebook, Instagram, and Twitter. It should also be available on music streaming platforms such as Spotify, Apple Music, and Amazon Music. In conclusion, selecting the right musician name is crucial for your brand and career. Before making a final decision, it’s essential to investigate whether your chosen name is available for use and complies with legal policies. It might seem like a lot of work, but taking these crucial steps early on will save you a lot of headaches and legal problems down the line.

Examples Of Successful Musician Names

Choosing a musician name is crucial for a successful music career. Taking inspiration from established musicians like Beyoncé, Eminem, and Adele can help artists create a memorable and unique name that stands out in the industry.

When it comes to making a name for yourself in the music industry, choosing the right musician name is a crucial first step. A great musician name should be easy to remember, catchy, and reflect your personality or style. The right name can help brand and market yourself effectively and stand out from the competition. In this blog post, we will discuss examples of successful musician names according to their styles, genres, and creativity.

Names That Reflect The Artist’s Personality

Your musician name should reflect your personality, which can help people connect with you on a deeper level. For example, “Lady Gaga” is an attention-grabbing name that reflects her bold and eccentric personality. Similarly, “Snoop Dogg” represents Snoop’s cool and laid-back West Coast vibe. “Lizzo” is another great example of a name that reflects someone’s personality. The star has been vocal about body positivity and self-love, which is reflected in her stage name.

Names Associated With Their Genre Or Style

Choosing a name that is associated with your genre or style can make it easier for people to find and remember you, and it also helps to establish yourself as an artist in that particular genre. For instance, “Metallica” is a name that is associated with heavy metal, and “Marshmello” is associated with electronic dance music (EDM). Similarly, “Kurtis Blow,” a classic rapper from the 80s, chooses his name to reflect the hip-hop culture that was prevalent at the time.

Names That Are Clever Or Playful

Choosing a clever or playful name can be a great way to stand out from the crowd. A good example is “Childish Gambino,” which is the pseudonym for the actor and comedian Donald Glover. The name “Childish Gambino” is a play on the Wu-Tang Clan name generator, but it also represents the artist’s ability to blend childish humor with serious issues. Another example of a name that is both clever and playful is “Blackillac,” a Texas-based hip-hop group that combines the words “black” and “Cadillac” to create a name that is both memorable and unique. In conclusion, your musician name is an important part of your brand and can make a big difference in your success in the music industry. Whether you choose a name that is reflective of your personality, genre, or style, or you go for something more clever and playful, remember to choose a name that is memorable and easy to remember. Use these examples of successful musician names as inspiration to create your own unique and memorable name.

Final Thoughts

When selecting a musician name, consider choosing something that represents your style and image while being easy to remember and pronounce. You also want to ensure it’s unique and not already used by another artist. Take your time and choose a name that resonates with you and your music.

Your Name Is An Extension Of Your Music

Your musician name is the first thing people will hear before experiencing your music, so it must be unique and interesting. Your name is also a reflection of your style, image, and personality. Hence, think from your audience’s standpoint and choose a name that represents you and your music. Your name must be different from other musicians, easily memorable, and easy to spell. Also, consider the genre of music you create and ensure that your name aligns with it and that it is inoffensive.

Don’t Rush The Decision

Choosing the right musician name is a crucial decision in your career as it sets the tone for your music. Therefore, it is vital not to rush the decision and take some time to brainstorm ideas. Do some research and gain inspiration from other musicians, books, websites, and blogs. Consult with your band members, family members, and friends and get their honest feedback. Remember, your musician name will stick with you throughout your career, so take your time to decide and make an informed choice.

Be Open To Changing Your Name In The Future

As an artist, your style and music will evolve as you grow, and so should your name. Don’t be afraid to change your name if it no longer aligns with your music or if you want to reinvent yourself. Also, be open-minded and willing to accept feedback from your fans and industry professionals. Your name is an essential aspect of your brand, and if it’s no longer working, consider changing or rebranding it to reflect your new image and music style. Final Thoughts: Choosing a musician name is a significant decision that can make or break your career. Take some time to brainstorm ideas, research, and gain inspiration from other musicians. Ensure that your name is unique, easy to remember, and aligns with your genre of music. Don’t rush the decision, and be open to rebranding or changing your name in the future. Remember, your musician name is an extension of your music, so choose wisely, and good luck!

Frequently Asked Questions For How To Choose A Musician Name

How Do You Come Up With A Good Musician Name?

A good musician name should be unique and memorable. Consider using your real name or a variation of it. You could also try combining two words or using a pun. Research other artist names and avoid any that are too similar.

Finally, make sure it’s easy to spell and pronounce.

How Do Musicians Get Their Names?

Musicians usually come up with their names in various ways. Some use their birth name, while others choose stage names for marketing purposes. The name could be based on their personality, interests, or something unique that stands out. Other times, a nickname given by friends or family could become their official name.

Ultimately, the name is chosen to become a brand that represents the musician.

How Do You Give Yourself A Music Name?

Choose a name that reflects your music style and personality. Be creative and unique. Research other artists with similar styles and avoid choosing similar names. Consider the availability and simplicity of the name for social media handles, domain names, and trademarks.

Get feedback from friends and fans before finalizing the name.

What Is The Best Name For An Artist?

Choosing an artist’s name is a personal decision. It should be unique, memorable, and easy to spell to aid in searches and branding. It should also reflect the artist’s style and personality.

Conclusion

Choosing a musician name is a crucial step for building your brand as an artist. It’s essential to select a name that aligns with your music style and personality, appeals to your target audience, and is memorable and easy to pronounce.

By following the guidelines outlined you can come up with a unique and compelling name that sets you apart from the crowd and contributes to your success as a musician. Your name is the first impression people will have of you – make it count!