Categories
Archive

Ways To Promote Your Soundcloud

To promote your Soundcloud, utilize social media platforms and engage with your audience. Music streaming platforms like Soundcloud have greatly influenced the growth of independent artists and producers, as they provide a cost-effective means of distributing their music to a wider audience.

However, there are various other elements that indie music artists must consider in order to achieve success. The number of artists joining Soundcloud continues to increase each day, making it important to distinguish oneself from the competition. Fortunately, there are several effective ways to promote your Soundcloud account, and in turn, increase your fanbase.

By utilizing social media platforms like Facebook, Twitter, Instagram and Snapchat to engage with fans and industry influencers, artists can increase their exposure and drive traffic to their Soundcloud account. In addition, collaborations and remixes, ensuring high-quality uploads and taking advantage of Soundcloud marketing and promotion tools are also recommended methods for promoting one’s Soundcloud.

Create High-quality Music

SoundCloud is a platform that rewards skill and success as it presents itself as an online distribution platform for independent artists. So, to maximize your reach, it is important to create high-quality music that is engaging and resonates with your audience. The below headings will assist you in achieving that:

Record In A Studio Or With High-quality Equipment

The first step in creating high-quality music is to use professional equipment for recording, mixing, and mastering tracks. High-quality equipment ensures better sound quality, which is crucial to making your tracks stand out. You can record in a professional studio or purchase equipment that meets your needs and budget.

Mix And Master Your Tracks

Once you have completed the recording process, it is essential to mix and master your tracks in order to polish your sound. Mixing involves balancing the various elements of your track, including instruments, vocals, and effects, while mastering is the process of finalizing the audio mix so that it can be played on a variety of different speakers without losing quality.

It’s important to note that if you are unsure about mixing and mastering, it would be best to hire a professional to assist you. This will ensure that your songs sound their best and are competitive with those released by more established artists.

Creating high-quality music is the first step to promoting it on SoundCloud. By following the above tips, you’ll increase your chances of success, gain more streams, and grow your audience—all while elevating your artistry and sonic excellence.

Ways To Promote Your Soundcloud

Credit: soundcharts.com

Utilize Social Media

If you want to get your music out there, there is no better way to promote it than through social media. Social media platforms such as Facebook, Twitter, and Instagram offer a great way to connect with your fans and promote your music. By utilizing these platforms effectively, you can gain more followers, get more plays, and ultimately grow your Soundcloud presence.

Share Your Tracks On Other Platforms Such As Facebook And Twitter

Sharing your tracks on social media platforms such as Facebook and Twitter can help you gain more exposure and reach a wider audience. When you share your tracks, make sure to include a brief description and use relevant hashtags so that people can find your music easily. You can also use Facebook groups and Twitter chats to connect with other musicians and music enthusiasts.

Engage With Your Audience By Responding To Comments And Messages

Engaging with your audience is crucial if you want to build a loyal fan base. Responding to comments and messages on Soundcloud, Facebook, and Twitter can help you promote your music and build relationships with your fans. Make sure to thank people for their support and ask for feedback on your music. This will not only help you improve but also make your fans feel appreciated and valued.

  • Responding to comments and messages shows that you are actively engaged with your fans.
  • Use your social media platforms as an opportunity to interact with your fans.

Remember, promoting your music on social media is a great way to get discovered and grow your fan base. By utilizing these tips, you can effectively promote your music and reach a wider audience on Soundcloud.

Collaborate With Other Artists

Collaborating with other artists is a great way to promote your Soundcloud. By working with others in the industry, you can cross-promote each other’s music, expand your audience and gain new followers. It’s a win-win situation that can benefit everyone involved.

Collaborating with other artists is an effective way to grow your SoundCloud account and promote your music. By working with other musicians, you can gain exposure to new audiences and potentially increase your fan base. Here are some tips for collaborating with other artists on SoundCloud:

Reach Out To Artists With Similar Styles Or Followings

One way to find artists to collaborate with is to search for musicians on SoundCloud who have similar styles or a similar number of followers as you. Look for artists who have a complementary sound to your own music or who have fans that you think might enjoy your music. Once you’ve found some potential collaborators, reach out to them via email or SoundCloud messaging to gauge their interest in working together.

Create A Joint Track Or Remix Each Other’s Music

When collaborating with another artist on SoundCloud, you can either create a joint track or remix each other’s music. A joint track is a new song that you create together, while a remix involves taking one of your collaborator’s existing songs and putting your own spin on it. Both options can be a great way to attract new listeners to your music and expand your fan base. When collaborating with another artist, it’s important to communicate clearly and often. Make sure that both of you are on the same page about the direction of the project and the timeline for completion. Additionally, be open to feedback and willing to make changes as needed to ensure that the collaboration is a success.

Final Thoughts

Collaborating with other artists on SoundCloud is a great way to promote your music and grow your fan base. By finding musicians with similar styles or followings and creating joint tracks or remixes, you can attract new listeners and gain exposure to new audiences. So don’t be afraid to reach out to other musicians and start collaborating today!

Use Tags And Descriptions

Using relevant tags and descriptions can greatly enhance the visibility of your Soundcloud profile and music. Ensure that the tags and descriptions accurately reflect your music and the audience you are targeting. This will improve your chances of attracting the right listeners and gaining popularity on the platform.

Include relevant tags to help listeners find your music Tags and descriptions are essential parts of promoting your music on Soundcloud. Tags help listeners find your music when searching for specific genres or styles, and the more relevant tags you include, the more likely your music will be discovered. When choosing tags, think about the words that best describe your track, including the genre, mood, and instruments used. To add tags to your Soundcloud track, simply enter them in the “tags” section of the upload page. Consider using a mix of broad and specific tags to maximize visibility. For example, if your track is a downtempo electronic instrumental with a chill vibe, you might use tags such as “electronic,” “downtempo,” “instrumental,” “chill,” and “relaxing.” Write a detailed description of your track with information about your inspiration and process In addition to tags, including a detailed and compelling description of your track is a great way to promote your music on Soundcloud. Your description should provide listeners with some context about the track, including information about your inspiration and creative process. Start by introducing yourself and your music, and then provide some background on the track itself. What inspired you to create this piece? What was your creative process like? You might also include some technical details, such as the instruments and software used. When writing your description, be sure to use keywords that relate to the track, including genre and mood words that you also used in your tags. This will help your track show up in relevant searches and attract more listeners. Finally, don’t forget to include a call-to-action in your description. Encourage listeners to follow you on Soundcloud, check out your other tracks, and share your music with their friends. By using tags and descriptions effectively, you can significantly increase your visibility on Soundcloud and attract more fans to your music.

Run Promotions Or Giveaways

Boost your Soundcloud promotion by running giveaways or hosting promotions. This can attract new followers and encourage existing followers to engage with your music. Offer exclusive content or merchandise as a prize to make the promotion more incentive.

One of the most effective ways to increase your followers on Soundcloud is by running promotions or giveaways. This helps you to attract new followers, increase engagement, and reward your existing fans. Here are some ways you can use promotions and giveaways on Soundcloud:

Offer Special Promotions Or Giveaways For Your Followers

Start by creating a special promotion or giveaway for your followers. This can be anything from a free download of your latest track, a discount on merchandise, or even a one-on-one session with you. You can announce this promotion or giveaway on your profile, and make sure to include clear instructions on how to enter.

Encourage Reposts And Shares In Exchange For Entries

To get the most out of your promotion or giveaway, consider encouraging reposts and shares in exchange for entries. This helps to spread the word about your promotion or giveaway, and increases the chances of attracting new followers. You can use a tool like Gleam to set up a contest where fans can earn entries by taking certain actions like reposting your latest track, following your profile, or sharing your profile on social media.

Make It Easy For Fans To Enter

Finally, make it easy for fans to enter your promotion or giveaway. This means ensuring that the entry process is clear and straightforward, and that fans don’t have to jump through too many hoops to participate. You can use a tool like Rafflecopter to set up a simple entry form that fans can easily complete. Just make sure to include all the necessary information, like the start and end dates of the promotion, and any other terms and conditions.

Conclusion

Running promotions or giveaways on Soundcloud is an effective way to increase your followers, engagement, and rewards. By offering special promotions and encouraging reposts and shares, you can attract new followers, expand your audience, and build a loyal fan base. So, start planning your next promotion or giveaway today, and watch your Soundcloud account grow!

Attend Live Events

One effective way to promote your Soundcloud account is by attending live events and promoting your music to a new audience. By performing in front of a live audience, you can develop a larger and more dedicated fan base, which can help increase your plays and followers on Soundcloud.

Attending live music events is not only a great way to support local artists but also an opportunity to promote your own music on SoundCloud. By attending events, you can connect with other artists, meet new fans, and gain valuable exposure. Here are two ways to make the most of live events:

Attend Local Music Events And Network With Other Artists And Fans

Attending local music events, such as concerts or open mics, provides you with the chance to network with other artists and fans in your community. Whether you’re a musician or a music enthusiast, attending events allows you to meet people who share your interests and possibly collaborate with them in the future. Networking with other artists can also lead to cross-promotion opportunities, as you can support each other on social media and even feature each other’s music on your SoundCloud pages. So, attend local events, and don’t forget to bring your business cards to hand out to potential collaborators.

Perform At Open Mic Nights To Gain Exposure And Connect With Potential Fans

Performing at open mic nights can help get your music noticed by a wider audience. Open mic nights are often attended by music lovers who are looking for fresh talent. The audience might include other artists, producers, or even music industry professionals. By performing at open mics, you can showcase your talent and gain exposure for your SoundCloud page. Additionally, you can use this opportunity to test out new material and get feedback from the audience. As a bonus, you might even connect with potential fans who are interested in following your music journey. In summary, attending live events is a great way to promote your SoundCloud page. By connecting with other artists and fans, you can increase your exposure and gain valuable networking opportunities. Attending local events and performing at open mics could be an excellent starting point on your journey to growing your SoundCloud followers.

Engage With Soundcloud Communities

Engaging with Soundcloud communities is an effective way to promote your music. Join groups that share your music interests, interact with other members, and share your tracks. This is a great way to get exposure and build a fan base on Soundcloud.

Find And Join Soundcloud Groups Related To Your Genre Or Interests

One of the easiest ways to engage with the Soundcloud community is by joining groups that are related to your music genre or interests. To find relevant groups, simply type keywords relating to your preferred genre in the search bar, and scroll through the results to find groups that match your interests. Once you identify these groups, join them, and introduce yourself. This will not only increase your visibility but will also help you connect with other artists and listeners who share similar interests.

Interact With Other Members Of The Community By Leaving Feedback And Commenting On Their Tracks

Engaging with other users on Soundcloud is a great way to build relationships and grow your following. By giving feedback and commenting on other users’ tracks, you will not only show your support but also increase your chances of being noticed by other users. Remember, the more you engage with others, the more likely they are to engage with you. So, make sure to take your time in listening to tracks and leaving meaningful comments.

Share Your Tracks In Relevant Groups

If you want to gain exposure to a broader audience, it’s important to share your tracks in relevant groups. By doing this, you can increase your chances of getting noticed by people who are most likely to enjoy your music. However, before sharing, don’t forget to read the group’s rules to avoid getting banned. Always remember that spamming is discouraged, and sharing your tracks in unrelated groups may result in fewer plays and comments.

Cross-promote Your Tracks On Social Media Platforms

Another effective way to promote your Soundcloud tracks is by cross-promoting them on social media platforms. Share your tracks on social media, include the link in your bio, and add appropriate hashtags to reach a wider audience. This will help you connect with fans and listeners who are active on different platforms and increase your visibility. In conclusion, engaging with the Soundcloud community is a crucial strategy to promote your tracks and grow your following. By joining groups, interacting with other members, sharing your tracks, and cross-promoting them on social media, you will not only increase your visibility but also build relationships with other users. This will translate into more plays, followers, and support for your music career.

Ways To Promote Your Soundcloud

Credit: www.mediamister.com

Optimize Your Profile

Maximizing your Soundcloud profile is crucial in promoting your music. Optimize your bio, include your strongest tracks and playlists, and update your image regularly to capture the attention of potential listeners.

Optimizing your SoundCloud profile is crucial for grabbing the attention of potential fans and increasing your plays and followers. Here are the essential steps to optimize your profile: H3: Choose a Recognizable Profile Picture and Header Image Your SoundCloud profile picture and header image are the first thing people will notice when they visit your page. Choosing an eye-catching and memorable profile picture and header image is essential for creating a strong brand image and making a positive impression on your fans. When choosing a profile picture, make sure it’s high-quality, recognizable, and on-brand. You can use a professional headshot, your logo, or an image that represents your music style and personality. Similarly, your header image should be visually stunning and relevant to your brand and music style. It could be an album cover, concert photo, or a custom design that speaks to your unique sound and vibe. H3: Write a Compelling Bio that Describes Your Sound and Influences Your SoundCloud bio is your chance to introduce yourself to potential fans and provide them with a glimpse of your music style and personality. Writing a clear and compelling bio that accurately describes your sound and influences is key to increasing engagement and building a loyal fanbase. When writing your bio, keep it concise, informative, and interesting. Start with a catchy hook that captures your unique sound and grabs the listener’s attention. Then, highlight your musical influences, achievements, and upcoming projects that your fans can look forward to. Don’t forget to include your social media links and contact information so that your fans can easily connect with you. In summary, optimizing your SoundCloud profile is a crucial step in promoting your music and gaining new fans. Choose a recognizable profile picture and header image that captures your unique style and personality. Write a compelling bio that accurately describes your sound and influences and provides your fans with the information they need to connect with you. With these essential steps, you’re on your way to growing your SoundCloud presence and building a strong fanbase.

Frequently Asked Questions For Ways To Promote Your Soundcloud

How Can I Promote My Soundcloud?

To promote your SoundCloud account, you can collaborate with other artists, share your music on social media platforms, participate in online communities, optimize your profile, and make use of targeted advertising.

How Do I Get My Soundcloud Noticed?

To get your SoundCloud noticed, you should: 1. Share your tracks on social media and other platforms. 2. Collaborate with other artists to gain exposure. 3. Optimize your track titles, tags, and descriptions for search engines. 4. Interact with your listeners by responding to their comments and reposting their tracks.

5. Join and promote yourself in SoundCloud groups related to your genre.

How Do You Make Your Soundcloud Popular?

To make your SoundCloud popular, you can follow these tips: 1. Promote your tracks on social media, blogs and websites. 2. Engage with your audience by responding to comments and reposting other artists. 3. Collaborate with other musicians and repost each other’s tracks.

4. Use relevant tags and descriptions on your tracks. 5. Participate in SoundCloud groups and communities.

How To Get 1000 Followers On Soundcloud?

To get 1000 followers on SoundCloud, you can start by collaborating with other artists, using relevant tags, promoting your music on social media, and engaging with your audience. Interacting with your listeners, posting frequently, and offering exclusive content can also help grow your following.

Conclusion

Promoting your SoundCloud requires consistency, patience, and creativity. By utilizing the various tools and tactics available, such as social media marketing and collaborations, you can successfully grow your audience and increase your plays and followers. Remember to engage with your listeners and optimize your content for search engines.

With a well-planned strategy, you can take your music career to the next level on SoundCloud.

Categories
Archive

Harmony And Chord Progressions

Harmony and chord progressions are essential components of music composition. It is the science of combining different tones, pitches, chords, and melodies to produce pleasing sounds.

The harmony refers to the combination of multiple pitches, creating a fuller and richer sound, while chord progressions refer to the succession of chords played in a specific order. Understanding harmony and chord progressions is crucial for any musician or songwriter to create melodies that sound cohesive and harmonious.

Whether you’re a beginner or an expert, delving into the study of harmony and chord progressions deepens your understanding of music and enhances your ability to produce beautiful compositions. We’ll explore the fundamentals of harmony and chord progressions and how you can use them to create music that resonates with your audience.

The Basics Of Harmony

Harmony refers to the combination of different musical notes played simultaneously, creating a pleasing sound. In music theory, chord progressions help create harmonic movement by defining a sequence of chords in a particular key. Understanding basic harmony and chord progressions is essential to creating and composing music.

What Is Harmony

Harmony is an element of music that adds depth and richness to a song. It refers to the combination of different notes played at the same time to create a pleasing sound. Harmony serves as a support structure to the melody and can be used to create various moods and emotions. In music theory, harmonization involves adding chords to a melody to create harmony. Understanding the basics of harmony is essential for any musician who wants to create engaging music.

The Importance Of Harmony In Music

Harmony plays a significant role in creating a mood or emotion in a piece of music. It can be used to create tension, resolution, depth, and interest in a song. Harmony helps to convey the emotional message of the lyrics and adds musical interest to the melody. A well-crafted harmony can enhance the listener’s experience and make a song more memorable. When used effectively, harmony can provide cohesion and balance to a piece of music. It can bring together different instruments and vocals to create a unified sound. Musicians can use harmony to convey their own unique style and sound, making their music stand out from others. By understanding the importance of harmony, musicians can create music that is enjoyable and engaging for their audience. In summary, harmony is a fundamental element of music that adds depth and richness to a song. Musicians who want to create engaging music must understand the importance of harmony and its role in conveying emotions and creating interest.

Chord Progression Fundamentals

Understand the fundamental elements of chord progressions to create harmony in music. Chord progressions involve a sequence of chords played in a specific order to create a captivating and harmonious sound.

Harmony is a critical element in music production, and chord progressions are essential in creating harmony in music. A chord progression is a series of chords that are played in a specific order to create an appealing sound. In this article, we will look at the basics of chord progressions and why they are essential in music production. We will explore what chord progressions are, their purpose, and the various types of chord progressions that exist.

What Are Chord Progressions?

Chord progressions are a series of chords that follow one another in a pattern. In essence, they are musical building blocks that help create a harmonic foundation for a song. Every chord in a progression has its unique emotion, and when combined with other chords in a progression, they produce a particular effect.

The Purpose Of Chord Progressions

Chord progressions serve several purposes in music production. One of their key roles is to create emotional impact in a song. The use of specific chord progressions can evoke various emotions, such as happiness, sadness, tension, and excitement. Additionally, chord progressions help in structuring a song. They provide a framework for the song’s melody and allow the listeners to anticipate the changes in the music. The use of different chord progressions can also help in creating different sections in a song, such as the verse, chorus, and bridge. There are various types of chord progressions, and each has its unique sound. Some of the common chord progressions include:

  1. The I-IV-V Progression: This is one of the most common chord progressions used in music production. The progression uses the first, fourth, and fifth chords in a key.
  2. The ii-V-I Progression: This chord progression is common in jazz music and uses the second, fifth, and first chords in a key.
  3. The vi-IV-I-V Progression: This chord progression is prevalent in pop music and uses the sixth, fourth, first, and fifth chords in a key.

In conclusion, chord progressions are essential in music production, and understanding their fundamentals is critical in creating great music. Chord progressions help create emotional impact, structure a song, and create different sections in a song. By using various types of chord progressions, a producer can achieve different sounds and evoke different emotions in listeners.

Types Of Chord Progressions

Chord progressions are a sequence of chords that are commonly used in music to provide harmonic structure. There are several different types of chord progressions, including authentic, plagal, deceptive, and circle progressions. Each type of progression offers a unique sound and feel to a musical piece and can have a significant impact on the overall mood and emotion conveyed.

Chord progressions are the backbone of Western music. They provide a sense of structure and direction to a song, and can create a range of moods and emotions. There are many different types of chord progressions, each with its own distinct sound and feel. In this blog post, we will be discussing two categories of chord progressions: common and unusual.

Common Chord Progressions In Music

Common chord progressions are those that have been used in countless songs over the years. They are the building blocks of many genres of music, including pop, rock, and country. Some examples of common chord progressions are:

  • I-IV-V
  • I-V-vi-IV
  • vi-IV-I-V

The I-IV-V progression is one of the most famous chord progressions and is often referred to as the “three-chord trick.” This progression can be found in songs such as “Louie Louie” by The Kingsmen and “Wild Thing” by The Troggs. The I-V-vi-IV progression is also extremely popular and can be heard in songs like “Let It Be” by The Beatles and “Hey Soul Sister” by Train.

Unusual Chord Progressions In Music

Unusual chord progressions are those that are less common and often found in more experimental or avant-garde music. These progressions can be unpredictable, complex, and dissonant, but can also be incredibly beautiful and emotionally powerful. Some examples of unusual chord progressions are:

ProgressionExample Song
I-bVII-IV“Gimme Shelter” by The Rolling Stones
vi-IV-III-VII“All I Want” by Joni Mitchell
bVI-bIII-bVII“The Wind Cries Mary” by Jimi Hendrix

The I-bVII-IV progression, for example, is used in the classic rock song “Gimme Shelter” by The Rolling Stones. This chord progression creates a sense of tension and release, as the bVII chord (or “dominant seventh” chord) adds a dissonant sound that resolves back to the root chord. In conclusion, chord progressions are a vital aspect of Western music. Whether you prefer common or unusual progressions, understanding the basic principles of chord progressions can help you become a better songwriter, musician, or producer.

Harmonizing Melodies

Harmony and melody are two essential elements of music that work in tandem to create a pleasing sound that captures its audience. A melody is the primary tune of a song, while harmony refers to the notes that support the melody. Combining these two elements is commonly known as harmonizing, and it is a crucial aspect of songwriting. In this blog post, we will discuss the role of harmony in melody and songwriting and how you can create harmony for a melody.

The Role Of Harmony In Melody And Songwriting

Harmony adds depth, color, and richness to melodies and songwriting. Without harmony, melodies may sound incomplete, and songwriters may struggle to convey the intended message to their audience. Harmony provides support to the melody, emphasizing the mood of the lyrics and adding complexity to the overall structure of the song. It also helps in defining the melody and making it stand out. Without harmony, songs may sound monotonous and lacking in the depth required to captivate an audience.

How To Create Harmony For A Melody

Creating harmony for a melody involves adding chords to support the melody’s notes. Choosing the right chords requires a basic understanding of music theory and the notes that form the melody. The first step is to determine which key the melody is in. After that, you can choose chords to support each note of the melody.

When choosing chords, look for those that complement the melody and provide a harmonious sound. Some popular chords for songwriting include the C major chord, the G major chord, and the D major chord. You can also experiment with other chords depending on the genre, mood, and tone of your song.

You can use chord progressions to create additional depth to your melody, as each progression has a unique emotional impact on the listener. You can also use inversions, which involve changing the order of the notes in a chord, resulting in a different sound that adds more complexity to the harmony.

Overall, harmonizing melodies is essential to create a well-rounded and complete song that captivates its audience. It may take some practice and experimentation to find the right chords and inversions for your melody, but a solid understanding of music theory fundamentals and practice can help you master the art of harmonizing.

Chord Substitutions And Extensions

Chord substitutions and extensions are useful techniques in creating interesting chord progressions and adding variety to your music. By replacing chords or adding extra notes, you can create a more complex and unique sound to explore different harmonic possibilities.

Chords are the backbone of music. They provide the harmony, setting the tone and mood for the piece. However, as musicians grow and develop their skills, they often desire a more unique sound for their compositions. This is where chord substitutions and extensions come in.

What Are Chord Substitutions?

Chord substitutions are an easy way to take a basic chord progression and give it a fresh new sound. They work by substituting one chord for another that has a similar function within the progression. For example, a C major chord can be substituted with an A minor chord, as both chords have the same function as the tonic chord in the key of C major. By substituting chords, a musician can create a fresh new sound without having to completely re-write the piece.

How Chord Extensions Add Color To Your Music

Chord extensions build on the idea of chord substitutions by adding new notes to existing chords. This allows for the creation of complex, jazz-inspired chords that add color and depth to a piece of music. For example, a basic C major chord can be extended to include a seventh note, resulting in a C major seventh chord. This new chord adds a jazzy, sophisticated sound to the piece, elevating it to a higher level. In conclusion, chord substitutions and extensions are easy and effective ways to give a basic chord progression a fresh, unique sound. By substituting chords and adding extensions, musicians can access a range of new sounds and colors that will help their compositions stand out from the crowd.

Harmony And Chord Progressions

Credit: www.youtube.com

Advanced Concepts In Chord Progressions

Chord progressions come in all shapes and sizes, but advanced concepts can take your harmony to the next level. These concepts include voice leading techniques, using modulations and key changes, and more. Let’s explore each of these advanced techniques in detail.

Voice Leading Techniques For Smooth Chord Progressions

Voice leading is the art of creating smooth, flowing transitions between chords. By strategically choosing which notes to play in each chord, you can create beautiful melodies within the progression. Here are some techniques:

  • Common-tone voice leading: Keep one note the same between two chords to create a smooth transition.
  • Leading-tone voice leading: Move the seventh scale degree of one chord up to the root of the next chord for a pleasing resolution.
  • Chromatic voice leading: Use notes outside of the diatonic scale to connect chords chromatically. This can add tension and interest to your progression.

Using Modulations And Key Changes To Create Interest

Modulations and key changes are powerful tools for adding interest to your chord progressions. Here are some techniques:

  1. Direct modulation: Move directly from one key to another without any intermediate chords.
  2. Pivot chord modulation: Use a chord that belongs to both keys as a pivot point to smoothly transition between them.
  3. Tonicization: Highlight a chord from another key temporarily, without fully modulating to that key.

Conclusion

Advanced concepts in chord progressions, such as voice leading and modulations, can take your harmonies to the next level. By creating smooth transitions and unexpected changes, you can add interest and excitement to your music.

Applying Harmony To Different Genres

Harmony is an essential element in music composition that creates depth, texture, and complexity to a piece. When we talk about harmony, we refer to the accompaniment or chords that support the melody, adding richness to the overall sound. Harmony, to put simply, is a combination of different notes played simultaneously or in sequence to create a unified and pleasant sound.

Harmony In Jazz Music

Jazz is one of the most complex and diverse music genres in terms of harmony. Jazz musicians use intricate chord progressions that often depart from the typical triadic harmony in classical music. The 7th chords, extended chords, and substitutions are some of the techniques used to create complex tonalities and chord movements. Jazz harmony is dynamic, and each improvisation has unique chord changes, adding creativity and spontaneity to the music.

Harmony In Pop Music

Pop music is usually characterized by catchy melodies and simple chord progressions that are easy to sing along to. In pop music, harmony is used to support the melody and create a balanced and pleasant sound. Simplicity is often the key, and chords like the I-IV-V progression are widely used across pop songs. However, some pop artists also incorporate advanced chord movements and modulations to create a more complex sound.

Harmony In Classical Music

Classical music is known for its complex and structured harmony, often following the rules of a specific key or mode. The progression of chords in classical music follows a well-defined structure and pattern, creating a sense of stability and familiarity for the listener. Classical composers often use modulations and chromaticism to add variety and interest to the harmony, creating tension and release points throughout the piece.

Conclusion:

Harmony is a versatile and integral component of music composition that transcends different genres. Whether you’re listening to jazz, pop, or classical music, a deeper understanding of harmony can help you appreciate the music and identify the chord progressions and tonal movements that make each piece unique.

Harmony And Chord Progressions

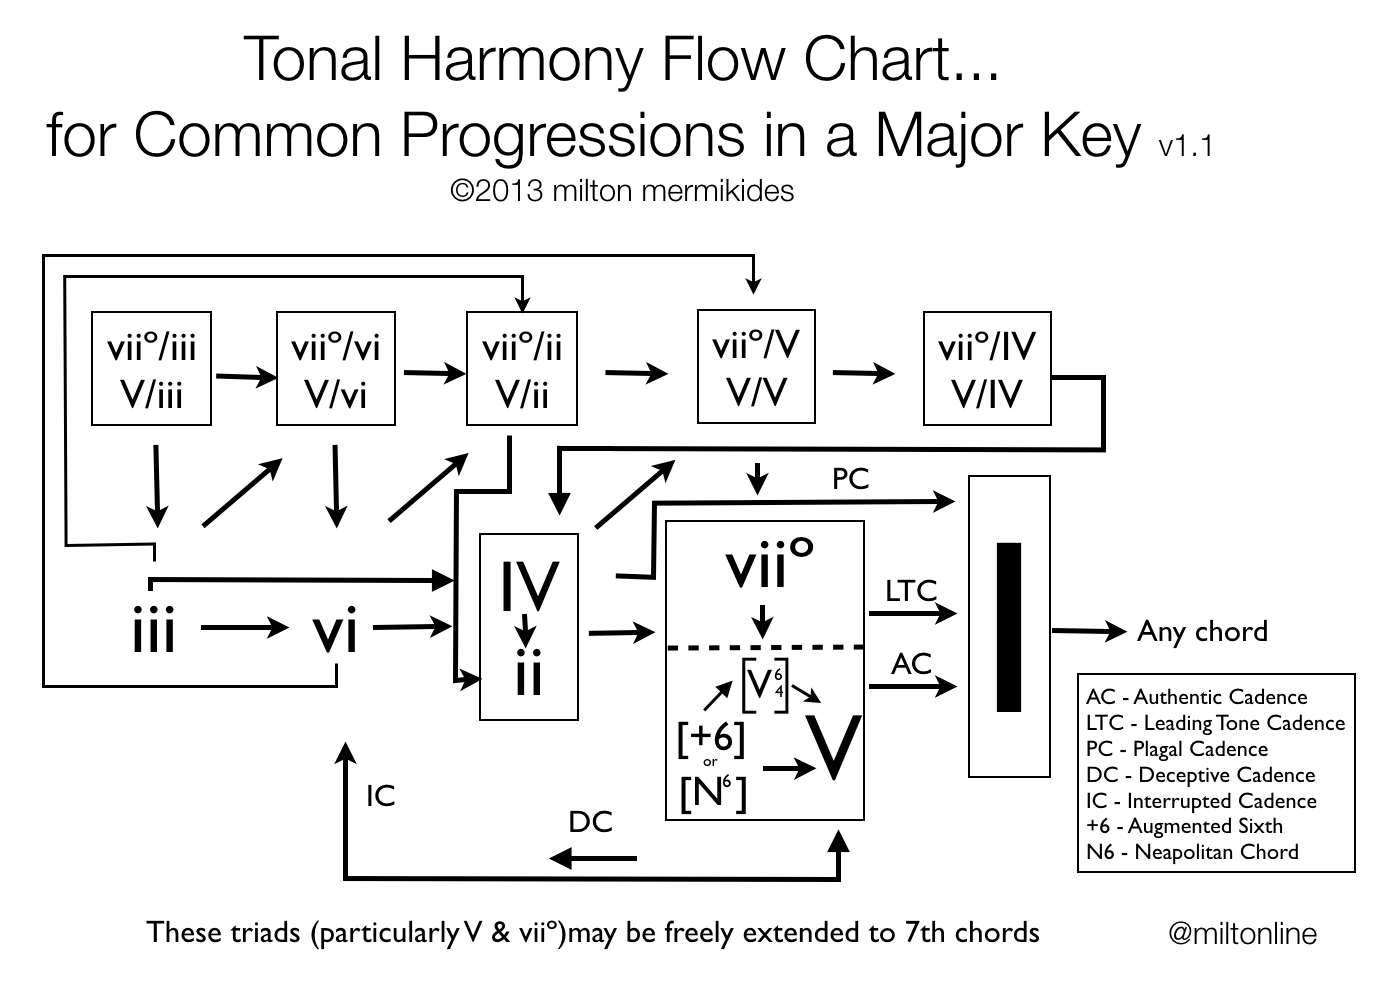
Credit: www.miltonline.com

Mastering Harmony

Mastering harmony is essential for any musician or songwriter looking to create memorable and impactful songs. Understanding chord progressions and how to use them effectively is the backbone of creating harmonies that resonate with listeners.

Harmony is a crucial aspect of music theory that can elevate your compositions and performances to a whole new level. The use of harmony helps to create depth and richness in music that can connect with audiences at a deeper level. At the same time, harmony can be challenging to master, and it requires consistent practice and dedication. In this blog post, we will explore how to master harmony and chord progressions to take your music to new heights.

Tips For Practicing And Improving Your Harmony Skills

Practicing and improving your harmony skills require a disciplined approach. Here are some tips to help you become proficient in harmony:

  • Start by learning the basics of chord progressions and how they work in different musical genres.
  • Practice playing different chord progressions in all keys and modes, paying attention to how they sound and feel.
  • Experiment with different chord voicings and inversions to find the right sound that complements your music.
  • Play along with recordings of your favorite songs, focusing on the harmony and chord progressions.
  • Collaborate with other musicians to learn new techniques and gain insights into different styles of music.

How To Listen For Harmony In Music

Listening for harmony in music requires a good ear and a trained mind. Here are some strategies to help you learn to listen for harmony in music:

  1. Start by identifying the key of the song, and then listen for the chords that are being played.
  2. Pay attention to the melody and how it interacts with the chords.
  3. Listen for common chord progressions, such as the I-IV-V or ii-V-I progressions.
  4. Notice how the harmony changes throughout the song and how it contributes to the emotion and mood of the piece.
  5. Practice transcribing the chords and melody of a song by ear to improve your listening skills.

By consistently practicing and honing your skills in harmony, you can take your music to new heights and create compositions that connect with audiences at a deeper level. Remember, becoming proficient in harmony and chord progressions takes time, patience, and consistent effort, but the rewards are well worth it.

Harmony And Chord Progressions

Credit: www.productionmusiclive.com

Frequently Asked Questions Of Harmony And Chord Progressions

What Are The 4 Harmony Chords?

The four harmony chords are typically identified as the major, minor, augmented, and diminished chords. These chords are created by altering the intervals between the notes in a chord and are commonly used in a variety of musical genres.

What Is The Relationship Between Chord And Harmony?

Chords are a combination of two or more notes played at the same time, while harmony is the relationship between those chords. Chords and harmony work together to create the overall musical sound and feeling.

Are Chords The Same As Harmony?

No, chords and harmony are not the same. Chords are a set of two or more notes played simultaneously, while harmony refers to the combination and progression of chords in a musical piece.

What Is The Harmony Between Chords?

Harmony between chords refers to the combination of different notes played simultaneously to create a pleasing and cohesive sound. It is achieved by choosing notes that complement each other, usually based on the major or minor scale, and arranging them in a way that creates a sense of balance and resolution.

Conclusion

Chord progressions are the backbone of harmony in all genres of music. They give a sense of resolution and convey emotions to the listener. As a musician, understanding chord progressions can greatly enhance your songwriting and improvisation skills. By incorporating various chords, one can create complex and beautiful musical arrangements.

Remember to always experiment with different chord progressions and never stop learning and discovering new ways to express yourself through music.

Categories
Archive

Is It Safe to Put a Piano Upstairs

Yes, it is safe to put a piano upstairs if certain precautions are taken. Pianos are heavy instruments, so it’s important to ensure the stairs are sturdy enough to support the weight and that the piano is properly secured and balanced during the move.

Moving a piano upstairs is a common concern for many homeowners. It can be a daunting task, but it is possible if done properly. Before moving a piano upstairs, it’s crucial to evaluate the strength of the stairs and ensure that they can bear the weight of the piano.

Additionally, measure the clearance space of the stairs to avoid any obstruction while moving the instrument. Once you have ensured the safety of the stairs, remove all objects from the path to avoid accidents and get professional help to move the piano. By following these safety tips, you can move your piano upstairs without any trouble.

Is It Safe to Put a Piano Upstairs

Credit: millersmusic.co.uk

Factors To Consider Before Moving A Piano Upstairs

Moving a piano to an upstairs location can be challenging, especially if you are not experienced with piano moving. To ensure the safety of the piano and those involved, it is important to consider certain factors before moving the piano upstairs. Below are some essential factors you should consider before moving a piano upstairs.

Piano’s Weight And Size

The weight and size of a piano are significant determinants of how challenging it may be to move the piano upstairs. Before moving a piano up the stairs, you must determine the weight and overall size of the piano. Grand pianos, for example, can weigh up to 1,200 pounds, making them challenging to move. The size of the stairway and the weight-bearing capacity of your floors are crucial in deciding whether it is safe to move the piano upstairs.

Staircase Structure And Layout

The staircase structure and layout also matter when it comes to moving the piano upstairs. It’s crucial to consider the width of the stairway and whether it will accommodate the piano. It’s also important to think about the angles and turns if the staircase is not straight. A narrow passageway or a sharp turn on the stairs may make it difficult to maneuver the piano, and it can lead to damage to the instrument and injuries to those involved.

Flooring And Wall Support

The flooring and wall support are other relevant factors to consider before moving a piano upstairs. The flooring on the stairway should be sturdy enough to support the weight of the piano, and there should be no weak spots or cracks that could lead to accidents. Similarly, wall support is necessary because the piano will lean against a wall at some point during the move. It’s crucial to ensure the wall can withstand the weight of the piano without cracking or collapsing.

Moving Equipment And Team Experience

Lastly, the quality of the moving equipment and the experience of the moving team are significant considerations. Moving a piano upstairs requires the use of specialized equipment, such as piano dollies, ramps, and straps. The team should be knowledgeable in moving pianos and have the necessary experience for the job. Adequate planning and attention to detail will ensure the move is successful, and the piano arrives safely at its final destination.

In conclusion, moving a piano upstairs is a complex task that requires the consideration of various factors. Each factor contributes to the successful and safe transportation of the instrument. Ensure you carefully evaluate the weight and size of the piano, staircase structure and layout, flooring and wall support, moving equipment quality, and team experience before moving a piano upstairs.

Is It Safe to Put a Piano Upstairs

Credit: wcmovingandstorage.com

Ways To Move A Piano Upstairs Safely

Moving a piano upstairs safely can be challenging, but it can be done. However, it’s crucial to assess the structural integrity of the floor, enlist a professional moving company or team, and use proper equipment and techniques to ensure the safety of the piano and the movers.

Moving a piano upstairs can be a daunting and risky task, considering its weight and delicate structure. If you’re planning to move your piano upstairs, it’s essential to take all the necessary precautions to prevent any potential damage or accidents. In this blog post, we’ll discuss some of the ways to move a piano upstairs safely, including hiring professional piano movers, use of piano sliders and straps, disassembling the piano before moving, and using a crane for extremely heavy pianos.

Hiring Professional Piano Movers

One of the best ways to ensure that your piano is safely moved upstairs is by hiring professional piano movers. These movers have the necessary skills and equipment to safely move your piano upstairs without causing any damage. They have the right tools, such as piano skids, straps, and dollies, to move the piano safely.

Use Of Piano Sliders And Straps

If you decide to move the piano yourself, you can use piano sliders and straps. Piano sliders are small disks that you can place under the piano’s legs to help it slide smoothly. Additionally, straps can help you secure the piano to a dolly or another moving equipment. By using these tools, you can prevent the piano from sliding or tipping over when you’re moving it upstairs.

Disassembling The Piano Before Moving

If you have a grand piano, it’s recommended to disassemble it before moving it upstairs. Disassembling the piano can help reduce its weight and make it easier to move. You can remove the legs, pedals, and other detachable parts, which will make the piano lighter to carry upstairs.

Using A Crane For Extremely Heavy Pianos

If you have an extremely heavy piano, you might need to use a crane to move it upstairs. Cranes are designed to lift heavy objects safely without causing any damage. With a crane, you can lift the piano through a window or balcony, which can be safer than using stairs. In conclusion, moving a piano upstairs can be challenging, but with the above ways to move a piano upstairs safely, you can make the process smoother. It’s essential to take all the necessary precautions to prevent any potential damage or accidents. Whether you decide to hire professional piano movers or move the piano yourself, make sure you follow all the safety guidelines.

Precautions To Take When Moving A Piano Upstairs

Moving a piano upstairs is not an easy task and requires caution. Before you even consider moving a piano upstairs, it is important to consult a professional. Hiring a professional moving company with experience moving pianos is the safest way to move a piano upstairs.

Moving a piano can be a challenging and risky task, particularly when it comes to moving it upstairs. Safety is paramount when it comes to moving a piano. Therefore, proper precautions need to be taken to ensure your piano gets to its new location without damage and personal injury. In this blog post, we’ll look at some precautions to take when moving a piano upstairs.

Clearing The Staircase And Pathway

Before starting the moving process, ensure that the staircase and pathway are clear of any obstacles that can hinder movement. This means removing all pictures, decorative items, rugs, or furniture that may be in the way. Make sure the stairway and pathway are wide enough for the piano and the people moving it. You don’t want to get stuck in a tight spot or trip over an obstacle and cause damage to the piano or yourself.

Using Protective Gear And Equipment

Protective equipment is essential when moving a piano upstairs. Gloves must be worn to provide protection and to ensure a better grip on the piano. Also, consider using a back support belt to ease the weight of the piano. Moving equipment like a piano dolly, moving straps, and a furniture blanket can help make the job more manageable. These tools can make moving your piano easier and safer.

Avoiding Sudden Movements Or Jerks

To prevent any damages, the piano’s movement must be gentle and slow to avoid sudden jerks. Do not rush the process, take your time to get it right. When moving the piano upstairs, keep it steady, and avoid any sudden actions that can cause it to tip over or slide down the stairs. Ask enough people to help you in carrying the piano upstairs. The more people there are, the smoother the process will be.

Keeping The Piano Tilted Towards The Back

When going up the stairs with a piano, you should keep the piano tilted towards the back and keep the front legs high. This technique ensures that the piano’s weight is distributed evenly, and it is easier to manage the piano’s movement. It also helps prevent any damage to the piano’s legs, especially if they are fragile or made of delicate material. In conclusion, moving a piano upstairs is no walk in the park. It is challenging, risky, and requires a lot of care. By following the precautions listed above, moving a piano becomes an easier task. Remember to take your time with each step and prioritize safety to avoid costly damages and risks of injuries.

Is It Safe to Put a Piano Upstairs

Credit: millersmusic.co.uk

Benefits Of Moving A Piano Upstairs

Choosing the right spot to place a piano can be challenging, especially when dealing with limited space. While many people opt for traditional lower-level locations, placing a piano upstairs can also be a good option. Here are some of the key benefits of moving a piano upstairs:

Better Acoustics And Sound Quality

Moving a piano to an upper floor can significantly improve the quality of sound it produces. Since sound waves travel upwards and outwards, placing a piano upstairs allows for a clearer and more resonant sound. The heightened acoustics also provide a more immersive musical experience, especially when playing classical and orchestral music.

Enhanced Interior Design And Space-saving

Placing a piano upstairs can also enhance the overall interior design of a house. By occupying an otherwise unused area, a piano can act as a focal point, adding an elevated charm and character to any room. Additionally, placing a piano upstairs frees up valuable floor space, making the overall living area feel more spacious and less cluttered.

Less Risk Of Damage From Floods Or Leaks

Situating a piano in a lower-level location puts it at risk of flooding and water damage, especially during heavy rainfall. By moving a piano upstairs, it is less likely to be affected by flood water or leaks. This can save the piano from significant damage, which could be costly to repair and even impossible to replace.

Increased Safety From Theft Or Burglary

Placing a piano upstairs increases its safety from theft or burglary. Intruders are less likely to attempt to carry a bulky item like a piano down a flight of stairs, making it a safer option than if it were located on the ground floor. Additionally, being located upstairs can offer additional security measures such as security cameras or alarms.

Frequently Asked Questions On Is It Safe To Put A Piano Upstairs

Can You Put A Piano Upstairs?

Yes, you can put a piano upstairs. However, it’s essential to make sure that the floor can support the weight of the piano. You may require professional assistance to ensure your safety and the piano’s integrity. Additionally, you may need to consider the size and shape of the stairs for safe transportation.

Is A Piano Too Heavy For Upstairs?

Moving a piano upstairs can be challenging as they are heavy and can cause damage to the floor and walls when not handled properly. It is recommended to seek the assistance of professional piano movers who have the necessary equipment and experience to move the piano safely.

Where Should You Not Put A Piano?

Avoid placing a piano near windows, direct sunlight, or anywhere with extreme fluctuations in temperature or humidity. It’s also best to avoid placing it near sources of moisture or heat, such as radiators, fireplaces, or bathrooms.

Can My Floor Support An Upright Piano?

Yes, most floors can support an upright piano. However, it is important to ensure that the floor is level and that the weight of the piano is evenly distributed. It is also recommended to consult a structural engineer or piano technician to assess the floor’s stability before placing a piano on it.

Conclusion

Based on our discussion, putting a piano upstairs can be safe or risky depending on several factors. It’s best to ask for help from a professional piano mover or an experienced contractor to inspect the structural integrity of your home.

Adequate planning, preparation, and moving equipment are also necessary to avoid injuries and damages. Ultimately, the safe transportation of your piano upstairs boils down to careful consideration and proper execution.

Categories
Archive

How To Study Music Production

To study music production, enroll in a music production course or program, or attend seminars and workshops related to the field. Learning from experienced professionals and practicing regularly will improve your skills.

Music production is a complex and ever-evolving field that requires a diverse set of skills and understanding of technology and creativity. To study music production, one has to learn how to create sounds and manipulate them using various equipment, tools, and software.

Enrolling in a music production course or program is the most effective approach, as it provides a structured and comprehensive education. Additionally, attending industry seminars and workshops and networking with experienced professionals is essential to gain valuable insights and tips. However, practice is key to mastering music production, and consistently producing music will help in enhancing skills and creativity.

Learning The Basics

Learn the fundamentals of music production by studying the basics. Start by understanding the technical aspects of your equipment and software. Practice and experimentation are key to developing your skills.

If you are interested in studying music production, it is important to begin with learning the basics. This includes understanding music theory and becoming familiar with digital audio workstations (DAWs). In this article, we will explore these concepts in detail, providing you with the knowledge needed to get started.

Music Theory

One of the most important aspects of music production is having a solid foundation in music theory. This includes learning the concepts of melody, harmony, rhythm, and form. By understanding these core principles, you will have a greater understanding of how music is created and be better equipped to produce your own music.

Melody

Melody refers to the main musical line of a song or composition. It is what you typically remember and sing along to. When studying melody, it is important to begin by learning scales and intervals. This will allow you to create melodies that sound pleasing to the ear.

Harmony

Harmony is the combination of different notes and chords played together. When studying harmony, it is important to begin by learning the different types of chords and chord progressions. This will give you the ability to create interesting and complex harmony in your music.

Rhythm

Rhythm refers to the timing and duration of notes in a piece of music. When studying rhythm, it is important to understand the different time signatures and rhythmic patterns that are commonly used in music. This will allow you to create rhythms that complement your melodies and harmonies.

Form

Form refers to the structure of a piece of music. When studying form, it is important to understand the different sections of a song, such as the verse, chorus, and bridge. This will allow you to arrange your music in a way that is engaging and interesting to the listener.

Digital Audio Workstations

Digital audio workstations (DAWs) are software programs used to create and edit music. When studying music production, it is important to become familiar with at least one DAW. Some popular DAWs include Ableton Live, Logic Pro, and Pro Tools.

Ableton Live

Ableton Live is a popular DAW used by many electronic music producers. It is known for its user-friendly interface and unique session view, which allows producers to perform and manipulate their music in real-time.

Logic Pro

Logic Pro is a highly versatile DAW used by many professional music producers. It is known for its powerful mixing and mastering tools and its extensive library of virtual instruments and effects.

Pro Tools

Pro Tools is a popular DAW used in the recording industry. It is known for its high-quality audio processing and editing capabilities and is commonly used for recording and mixing live instruments. By becoming familiar with these basic concepts of music theory and digital audio workstations, you will be well on your way to becoming a proficient music producer. With practice and dedication, you will be able to create your own unique style of music and build a successful career in the industry.

Exploring Music Production Techniques

If you are interested in pursuing a career in music production, studying music production techniques is an essential component. Learning the basics of music production will help you to create, mix, and master your music. In this blog post, we will explore three important aspects of music production: sampling, recording techniques, and mixing and mastering.

Sampling

Sampling is the process of taking small pieces of sounds from different sources and using them in your music production. It is a popular technique used by music producers to create unique sounds, beats, and rhythms. By sampling different genres of music, you can create new sounds and beats to incorporate into your own productions.

Sampling is not limited to just music; you can also sample sounds from everyday objects such as water droplets, car horns, and other environmental noises. To get started with sampling, you will need a sampler software and a library of sounds to choose from.

Recording Techniques

The recording process is critical for producing high-quality music productions. Without proper recording techniques, you will not be able to capture the sound you want effectively. There are several recording techniques you can employ to capture sound, including microphone placement and room acoustics.

Microphone placement is crucial to getting the perfect sound. Placing a microphone in the right position can make all the difference in the world. By adjusting your microphones’ positioning slightly, you can capture different tones and nuances of the sound you want.

Mixing And Mastering

Mixing and mastering is the final step in the music production process. This is when you put all the pieces together and make a cohesive sound. Mixing is the process of balancing and blending individual tracks to create a full sound. Mastering is the last stage of music production, and it involves the final touches that make the recording sound its best.

When mixing and mastering music, it is important to have proper acoustics, a good set of speakers, and an understanding of different mixing and mastering software. You can improve your skills in mixing and mastering by listening to different productions and analyzing their tonal balance, dynamics, and stereo imaging.

In conclusion,

Exploring these music production techniques and learning the basics of music production will go a long way towards helping you to achieve your musical goals. The more you learn about music production, the better equipped you will be to produce high-quality music that stands out from the crowd.

Studying Music Genres

Studying music genres is crucial for anyone looking to learn music production. Understanding the characteristics of different genres, such as rhythm, melody, and instrumentation, can help producers create unique and innovative sounds that stand out from the crowd. By exploring various music styles and experimenting with different production techniques, aspiring producers can develop their skills and create music that resonates with their audience.

Are you an aspiring music producer looking to delve into the world of music production? One of the first things you should consider when studying music production is music genres. Understanding music genres can help you develop a unique sound, learn key production techniques and provide inspiration for your work. In this guide, we explore three popular music genres for music production – hip-hop, electronic music, and pop music.

Hip-hop

Hip-hop music has been ruling the music charts for decades and continues to be one of the most popular genres. Understanding hip-hop music can help you learn how to produce beats, write lyrics and create hooks that resonate with an audience. When studying hip-hop music, here are some key things you should consider:

  • History: Understand the origins and evolution of hip-hop music.
  • Structure: Learn about the typical song structure of hip-hop music and how to create beats.
  • Lyrics: Study how hip-hop artists write lyrics and create hooks.
  • Sampling: Learn how to sample music and incorporate it into your hip-hop beats.
  • Mixing and mastering: Practice mixing and mastering techniques specific to hip-hop music.

Electronic Music

Electronic music has grown in popularity over the years and has become an essential part of modern music production. Understanding electronic music production can help you learn how to create unique sounds and incorporate them into your music. When studying electronic music, here are some key things you should consider:

  • History: Understand the origins and evolution of electronic music.
  • Sound design: Learn how to create unique sounds using synthesizers, samplers, and effects.
  • Arrangement: Study how to create dynamic arrangements that keep your listeners engaged.
  • Mixing and mastering: Practice mixing and mastering techniques specific to electronic music.
  • Genres: Experiment with different sub-genres of electronic music, such as techno, house, and ambient.

Pop Music

Pop music is all about creating catchy melodies and hooks that stick in listeners’ minds. Understanding pop music can help you develop your songwriting skills and learn how to create radio-friendly music. When studying pop music, here are some key things you should consider:

  • Songwriting: Learn about the structure of pop songs, including verses, choruses, and bridges.
  • Arrangement: Study how to create dynamic arrangements that keep your listeners engaged.
  • Production techniques: Practice using production techniques to enhance the impact of your music, such as adding vocal harmonies and using effects.
  • Mixing and mastering: Learn how to mix and master your pop music to make it sound professional and polished.
  • Marketing: Study how to promote your pop music and build your fan base.
How To Study Music Production

Credit: insider.dbsinstitute.ac.uk

Networking With Professionals

Networking with professionals is essential when studying music production, as it allows you to learn from experts in the field and gain insights into the industry. By connecting with like-minded individuals, you can access a wealth of knowledge, resources, and potential collaboration opportunities.

Networking with professionals is an integral step towards excelling in music production. Building relationships and seeking advice from industry professionals can open doors to new opportunities and help you grow your skills. Establishing connections can seem daunting, but luckily, there are multiple avenues for getting involved in the industry.

Industry Conferences

Music production conferences are a fantastic way to meet industry professionals. These events often feature keynote speeches, panel discussions, and networking sessions. Attending them can be a valuable learning experience, providing you with the opportunity to learn about the latest trends and techniques in music production. Conferences like the Music Producers Guild Conference, Electronic Music Conference and NAMM Show provide opportunities to connect with professionals, explore commercial products and the chance to collaborate with other musicians.

Online Communities

Online networking has revolutionized the way we connect with professionals. Platforms like LinkedIn, Facebook and Instagram offer opportunities to network on your own schedule. Joining music production groups on these platforms, participating in discussions, and offering thoughtful insights can help you build relationships with professionals. Additionally, there are online platforms that are exclusively designed for connecting musicians and industry professionals, like SoundBetter, Noizefield and Splice. Overall, networking with professionals in the music production industry is a great way to excel in your career. Attending conferences and joining online communities are just two of many ways to meet and collaborate with people in the industry. Try some of these techniques today and watch as your music career starts to take off.

Developing Your Own Sound

Learning how to develop your own sound is a crucial aspect of studying music production. By understanding different techniques, experimenting with sounds and styles, and constantly practicing, you can create a unique and recognizable sound for your music.

Music production is an ever-evolving art form that requires constant experimentation and innovation. Developing your own sound is a crucial aspect of becoming a successful music producer. It involves the continuous process of finding your unique musical identity by experimenting with different elements and techniques until you find the perfect combination that sets you apart from the rest. In this blog post, we’ll focus on “Experimenting with Sound Design” and “Incorporating Unique Elements” to guide you through the process of developing your own sound.

Experimenting With Sound Design

Sound design is the process of creating and manipulating sounds to generate new and unique audio elements. As a music producer, experimenting with different sound design techniques can help you shape your sound and create something unique. Here are a few tips to get you started:

  • Learn the basics of sound synthesis and sound shaping
  • Use different types of synthesis to create unique sounds
  • Experiment with different processing techniques to modify sounds
  • Use sound libraries for inspiration and sound design

Incorporating Unique Elements

To stand out in music production, it’s essential to incorporate unique elements in your tracks. This includes using unconventional sound effects, experimenting with unusual song structures, or layering different instrument sounds together. Here are some ways to incorporate unique elements in your production:

  • Use field recordings and found sounds to add depth to your tracks
  • Try incorporating uncommon instruments in your productions
  • Experiment with different time signatures to create unique song structures
  • Use vocal samples in creative ways

By combining different elements and techniques, experimenting with sound design, and incorporating unique elements, you can create a unique sound that will set you apart from the rest. Developing your own sound takes time and effort, but with patience and persistence, you can create something that is uniquely you.

Collaborating With Other Artists

One effective way to study music production is to collaborate with other artists. By working with different musicians and producers, you can learn new techniques and gain a fresh perspective on your own music. Additionally, collaborating can lead to building a network and finding new opportunities in the music industry.

If you want to become proficient in music production, collaborating with other artists is an essential element of the entire creative process. Working with other music producers, singers and musicians not only enhances your skills but also helps you to learn new techniques, build your network and gain experience. In this section, we will explore how to find collaborators, work on collaborative projects and ensure a successful outcome.

Finding Collaborators

There are several ways of finding musicians, singers, and producers to collaborate with. Here are some ways:

  • Join Facebook groups and communities that are music-related. You can meet people who are working on different projects.
  • Search for music production forums or support groups where you can interact with other artists.
  • Attend music events and shows in your area. There, you can meet new people and find potential collaborators.
  • Use social media platforms like Instagram or Twitter to connect with other artists and musicians.

Working On Collaborative Projects

Once you’ve connected with other artists and found collaborators, it’s time to start working on the project. Here are some tips to ensure a successful outcome:

  1. Establish clear communication: Effective communication is crucial when you’re working with other artists. Discuss your ideas, expectations, and timelines to avoid any confusion.
  2. Define roles and responsibilities: Collaborative projects work best when all members know their roles and responsibilities. Clarifying each person’s role will ensure that everyone stays on task.
  3. Exchange feedback: It’s essential to be receptive to feedback and suggestions from other artists. Constructive criticism can help you refine your work and create a finished product that everyone is happy with.
  4. Set deadlines: Collaborations can start to drag on if there aren’t any deadlines in place. Set realistic timelines for each phase of the project to keep everyone motivated and focused.
  5. Be open-minded: Collaborating with other artists means that you’ll have different perspectives and ideas coming together. Be open-minded and embrace those differences as they will add variety and make your project unique.

By following these tips, you’ll ensure that your collaborative projects run smoothly and that you develop great relationships with your collaborators. In conclusion, collaborating with other artists can help you grow and improve your music production skills. The key to finding success in your collaborations is to find the right people, establish clear communication, define roles and responsibilities, exchange feedback, and be open-minded. With these elements in place, your collaborative projects will be a huge success.

Promoting Your Music

To study music production, start by researching different music production software and hardware options. Practice creating music of different genres and experimenting with different sounds and effects. Consider taking courses or finding mentorship to improve your technical skills and knowledge of the industry.

Promoting your music requires building a strong online presence through social media, streaming platforms, and collaborations with other artists. Stay consistent and engaged with your audience to grow your fan base and marketing potential.

As a music producer, promoting your music is a critical aspect of achieving success. To attract your target audience and increase your fan base, you need to maximize the power of social media and networking with influencers. Here are some methods you can adopt to promote your music:

Social Media Marketing

Social media platforms provide a vast market for promoting your music. Utilizing these platforms can significantly boost your visibility within the online community. To get started, create a fan page for your music and post regular updates. You can also create engaging content that reflects your brand, including behind-the-scenes footage, show dates, and snippets of upcoming releases. Engage with your followers by responding to their comments and direct messages. Share other artists’ music and engage in collaborations. This way, you can attract new followers and network with other music industry professionals.

Networking With Influencers

Networking with influencers can open up new doors for your music career. Identify influencers within your music niche, and reach out to them for collaborations, feedback, or endorsements. You can attend music networking events, join online music communities, and engage with industry professionals on social media. Collaborating with influencers can help you tap into their fan base and leverage their reach to promote your music. If you do not have the resources to collaborate with established influencers, you can team up with up-and-coming musicians and create content together. This way, you can both promote each other’s music and reach new audiences.

Conclusion

Promoting your music is a continuous process that requires consistency, creativity, and persistence. Utilizing social media and networking with influencers can significantly increase your visibility online and promote your music to new audiences. By implementing these strategies, you can attract new followers, build your brand, and establish yourself as a successful music producer.

Continuing Your Education

Learning music production requires dedication and lots of practice. It’s essential to find a reputable school that provides hands-on training, self-study materials, and knowledgeable instructors. Additionally, listening to music carefully, experimenting with different software, and collaborating with other producers are all critical parts of the learning process.

Music production is a constantly evolving field and keeping up with the latest trends and techniques is essential for success. While formal education, such as attending a music production school, is important, continuing education through workshops, seminars and learning from industry leaders is equally crucial. In this article, we will discuss some effective ways to continue your education as a music producer.

Learning From Industry Leaders

One effective way to continue your education as a music producer is to learn from industry leaders. Following established producers and engineers on social media, attending their seminars and workshops, and studying their interviews can provide great insights into the latest trends and techniques. It is important to follow and study the work of successful producers in the music genres you are interested in. Analyzing their production methods, studying their mixing techniques and identifying what makes their productions stand out can be very helpful in your own music production endeavors.

Attending Workshops And Seminars

Attending music production workshops and seminars is another great way to continue your education as a music producer. These events provide an opportunity to learn directly from experienced professionals and network with other music producers. Many music equipment and software companies, such as Ableton, Focusrite, and Yamaha, offer regular workshops and seminars on music production. Attending these events can help you stay up-to-date on the latest music production tools and techniques.

Conclusion

Continuing your education as a music producer is essential to stay relevant and competitive in the industry. Learning from industry leaders and attending workshops and seminars are effective ways to stay up-to-date with the latest trends and techniques. By nurturing your skills and knowledge, you can continue to grow as a music producer and achieve success in your career.

How To Study Music Production

Credit: m.youtube.com

Frequently Asked Questions For How To Study Music Production

How Do I Start Studying Music Production?

To start studying music production, you need to have basic knowledge of music theory, technology, and equipment. You can enroll in courses offered by music schools or online platforms. You can also learn from tutorials, books, and practice using music production software.

Connect with music professionals, attend workshops, and participate in music production challenges to improve your skills further.

What Should I Study To Become A Music Producer?

To become a music producer, you can study music production and recording techniques in formal programs or online courses. You can also learn from experienced producers in the industry and gain hands-on experience through internships or entry-level positions in recording studios.

A strong understanding of music theory and composition, as well as technical skills in software and equipment, is essential for success in this field.

Can I Learn Music Production On My Own?

Yes, you can learn music production on your own. With the abundance of online resources like tutorials and software demos, it’s easier than ever to educate yourself. However, working with a professional or attending a music production course can be beneficial for learning advanced techniques and receiving guidance and feedback.

Is It Hard To Learn Music Production?

Learning music production can be challenging, but it’s not necessarily hard. With practice, patience, and the right resources, anyone can learn how to produce music. It takes time to master the craft, but the process can be a rewarding one.

Conclusion

To sum up, studying music production can be a daunting task, but with the right mindset, resources, and preparation, it is highly achievable. Consistent practice and experimentation are crucial to becoming proficient in this field. Remember that music production is always evolving, so staying up-to-date with technological advancements and industry trends is key.

Whether you pursue formal education or self-teaching, the journey towards becoming a successful music producer is challenging but incredibly rewarding. Keep practicing, learning, and exploring, and you’ll soon be creating your own unique musical masterpieces.

Categories
Archive

How to Make Synths in Fl Studio

To make synths in FL Studio, use the software’s built-in synthesizer plugins. You can customize sounds by adjusting settings like oscillators, envelopes, and filters.

FL Studio is a powerful digital audio workstation with a variety of tools and features for creating electronic music. One key component of electronic music is synthesizers, which are virtual instruments that generate sound through digital signal processing. FL Studio has several built-in synthesizer plugins, including Harmor, Sytrus, and 3x Osc, that allow you to create and customize a wide range of synth sounds.

By adjusting settings like oscillators, envelopes, filters, and effects, you can create anything from classic analog synth sounds to futuristic electronic textures. We’ll show you how to make synths in FL Studio using these powerful tools.

How to Make Synths in Fl Studio

Credit: www.image-line.com

Getting Started

Learn how to create your own custom synths in FL Studio with these easy-to-follow tutorials and step-by-step instructions. From choosing the right plugins to programming your sounds, you’ll be making music like a pro in no time.

Setting up your project
To get started making synths in Fl Studio, the first thing you’ll need to do is set up your project. To do this, open Fl Studio and create a new project. Once your project is open, you’ll want to set your project tempo and time signature so that you can start creating your synth sounds. Selecting the right plugins
The next step is to select the right plugins for your synth. Fl Studio has a huge library of plugins, so it’s important to choose the right ones for your project. Some popular ones include Sytrus, Harmless, and Harmor. Each plugin has its own unique features and sounds, so it’s important to experiment and find the ones that work best for you. Choosing the right sound
Once you have your plugins selected, the next step is to choose the right sound. This is an important step in making your synth sound great. You’ll want to experiment with different waveforms, filters, effects, and modulation to create the perfect sound. It’s also important to ensure that your sound is not too harsh or too soft, as this could affect the overall quality of your synth. In conclusion, getting started with making synths in Fl Studio is easy once you know the basics of setting up your project, selecting the right plugins, and choosing the right sound. With a little practice and experimentation, you can create amazing synth sounds that will take your music to the next level.

How to Make Synths in Fl Studio

Credit: www.youtube.com

Creating Synth Sounds

Learn how to create unique and mesmerizing synthesizer sounds in FL Studio with these easy steps. Discover how to shape waveforms, add effects, and create custom presets that will take your music production to the next level.

Creating Synth Sounds is a fun and essential part of producing music in FL Studio. Creating your own synth sounds can give your tracks an original feel while also allowing you to produce the exact sound you want. In this post, we will guide you through the process of making your own synth sounds in FL Studio, starting with understanding oscillators.

Understanding Oscillators

Oscillators are the heart of any synthetic sound, and FL Studio offers a range of oscillators with different waveforms to choose from. The first step in creating a synth sound is selecting the waveform. The most popular waveforms used for synthesizing sounds are the sawtooth, triangle, square, and sine waveforms.

Adjusting Adsr Envelope

ADSR (Attack, Decay, Sustain, and Release) Envelope is a common tool used in synthesizing to shape the sound’s volume over time. The ADSR Envelope defines how the synthesizer reacts to the MIDI input. Altering the Attack, Decay, Sustain and Release parameters will change the amplitude of the sound.

Adding Effects

Adding effects can enhance a synth sound. Fl Studio offers various effects that you can use to add depth and texture to your sound. For example, you can add a reverb or delay to create a sense of space and depth in your sound or add distortion to create a gritty or aggressive sound. Once you have added the desired effects, you can adjust their parameters to fine-tune the sound to your liking. In Conclusion, creating synth sounds is a fun and integral part of producing music in FL Studio. Understanding oscillators, adjusting ADSR envelope and adding effects can help you create unique sounds that truly reflect your artistic vision. So why not start experimenting with these tools today and start producing your own synth sounds.

Creating Bass Synths

Learn how to create bass synths in FL Studio with these easy steps. Start by selecting the appropriate synthesizer, adjusting the oscillators, detuning, adding filters and effects to create a unique bass sound.

Creating Bass Synths: Bass synths are crucial in creating the foundation of a track, making it sound fuller and pleasing to the ears. FL Studio provides several options to customize and shape your bass synths. In this article, we will discuss how to create bass synths in FL Studio and make them sound even better. Using Distortion for a Strong Bass Sound: Distortion is an excellent tool to shape and define bass sounds. It adds character and warmth to the bass synths while making them sound more organic. The best way to use distortion on bass synths is to apply it sparingly to avoid overpowering the mix. We recommend using the Fruity Fast Dist or Hardcore VST plugin to add distortion to your bass synths. Creating a Sub-Bass Layer: Sub-bass is the foundation of every bass sound. It is essential to create a separate layer for sub-bass to avoid cluttering the mix and ensure that the sound is clean. Use a sine wave to create a sub-bass layer and route it directly to the mixer. To give the sub-bass a more authentic feel, you can adjust the pitch envelope to match the key of your track. Adding Resonance and Filtering: Resonance and filtering are crucial in shaping the overall sound of your bass synths. Adding resonance creates a peak around the cutoff frequency, making the sound more pronounced. On the other hand, filtering reduces the high and low frequencies, making the sound smoother and more refined. You can use the Fruity Love Philter or the Fruity Filter plugin to add resonance and filtering to your bass synths. Creating bass synths in FL Studio is a fun and creative process. By using the distortion, creating a separate sub-bass layer, and adding resonance and filtering, you can create unique bass sounds that will make your tracks sound better. Remember to experiment with different plugins and effects to create your signature bass sound.

Creating Lead And Pad Synths

Learn how to create lead and pad synths in FL Studio with these simple steps. Follow the tutorials and experiment with different effects to customize the sounds to your liking. Get ready to take your music production to the next level!

Creating lead and pad synths is a crucial task in music production, as they add depth and emotion to a track. In FL Studio, creating these types of synths requires knowledge of different tools and techniques. In this article, we will explore three essential techniques for creating lead and pad synths in FL Studio: Using detuning for a fuller lead sound, Creating chord progressions for pad synths, Using automation to bring life to your synths.

Using Detuning For A Fuller Lead Sound

One of the most important techniques for creating a fuller lead sound in FL Studio is detuning. Detuning is the process of slightly altering the pitch of a sound to create a sense of richness and depth. To detune a lead synth in FL Studio, follow these steps:

  1. Select the lead synth you want to detune.
  2. Open the oscillator section of the synth.
  3. Adjust the fine tuning knob on one or more oscillators to slightly alter the pitch of the sound.
  4. Experiment with different detuning amounts until you achieve the desired sound.

By using detuning, you can create a fuller lead sound that will stand out in your mix.

Creating Chord Progressions For Pad Synths

Pad synths are used to create atmospheric and emotional backgrounds in music production. To create a compelling pad synth in FL Studio, you need to understand the basics of chord progressions. A chord progression is a series of chords played in sequence that creates a sense of harmony and mood in a piece of music. Here’s how to create chord progressions for your pad synths:

  • Select the pad synth you want to work with.
  • Open the piano roll of the synth.
  • Select a chord from the chord selector in the piano roll.
  • Create a sequence of chords that sound harmonious together.
  • Experiment with different chord progressions until you find one that fits the mood and emotion of your track.

By creating compelling chord progressions for your pad synths, you can add depth and emotion to your music.

Using Automation To Bring Life To Your Synths

Automation is the process of changing a parameter of a sound over time. It’s an essential tool for creating dynamic and evolving synths in FL Studio. To use automation to bring life to your synths, follow these steps:

  1. Select the synth you want to automate.
  2. Right-click on the parameter you want to automate.
  3. Select “Create Automation Clip”.
  4. Adjust the automation clip to shape the sound over time. You can create rising or falling sounds, fades, or any other effect you desire.
  5. Experiment with different automation clips until you find one that fits the sound and mood of your track.

By using automation to shape your synths over time, you can create dynamic and evolving sounds that add depth and emotion to your music. In conclusion, creating lead and pad synths in FL Studio requires knowledge of different tools and techniques. By using detuning, creating chord progressions, and using automation, you can create compelling and emotional sounds that stand out in your mix.

Sound Design Tips

Learn the best sound design tips to create amazing synths in Fl Studio. Utilize the different features and tools provided by the software to produce unique and high-quality sounds for your music. Master this skill and take your productions to the next level.

If you want to create your own unique sounds in FL Studio, it’s important to experiment with sound design. By using these tips, you can create synth sounds that stand out in your music production. Here are some sound design tips to improve your synth design skills.

Layering Sounds For A Unique Tone

Layering sounds is a powerful technique that can bring depth and character to your synth sounds. To layer sounds, start by selecting two or more sounds that complement each other. Then, adjust each sound’s volume, panning, and effects until they blend together smoothly. Use high-pass and low-pass filters to remove unwanted frequencies and create space in your mix. Remember, less is often more and simple sound layers can create a more complex and exciting sound.

Using Eq To Remove Unwanted Frequencies

EQ is one of the most important tools in sound design. By using an equalizer, you can isolate and control the different frequencies of your synth. Removing unwanted frequencies can create a cleaner sound and make room for other elements in your mix. For example, this technique is often used to remove the low end of a bass sound, making room for the kick drum in your drum mix. Play around with different frequencies until you find the right balance for your sound.

Experiment With Different Sound Combinations

There are countless possibilities when it comes to sound design. Experimenting with different combinations of sounds can lead to some unexpected and exciting results. Don’t be afraid to try new things or just play around with different sounds until you find something you love. Remember, the beauty of music is that there are no rules, so just have fun and let your creativity flow. By incorporating these sound design tips, you can create your own unique synth sounds in FL Studio. Remember to layer sounds, use EQ, and experiment with different combinations until you find the perfect sound for your music production. With practice and patience, you can become a master of sound design and create sounds that stand out in the music industry.

How to Make Synths in Fl Studio

Credit: m.youtube.com

Mixing And Mastering

After creating your synth sounds, the next step is to mix and master your tracks to make them radio-ready. Mixing and mastering involve various techniques that will help glue your sounds together, clarify each element, and bring out the best in your tracks.

Eqing Your Synths To Fit In The Mix

The first step in mixing your synths is to ensure they fit in the mix. To do this, use equalization (EQ) to remove any unwanted frequencies or harmonics that conflict with other sounds in the mix. Make sure you cut the low end (below 40 Hz) to get rid of any low-frequency rumble and high end (above 16 kHz) to remove any unwanted hiss or fizz. Adjust the mid-range within the 400 Hz – 4 kHz range to ensure your synths sit in the right frequency zone.

Adding Reverb And Delay

Reverb and delay can add depth and space to your synths and help them sit better in the mix. When adding reverb, make sure it matches the size and depth of your track’s space, for example, use short decay times in a tight mix and long decay times in an open mix. Similarly, when adding delay, match the tempo of your track with the delay time, and use a ping-pong effect to add width to the sound.

Finalizing Your Synth Sound

Before finalizing your track, take some time to listen to your synth sounds in different contexts and ensure that there are no phase issues or conflicting frequencies. You want to make sure that your synths sound great on different playback systems, so test your mix on different speakers and headphones.

Finally, use a limiter to increase overall loudness without clipping or distorting your sounds. You can also use compression to bring out details and add punch to your mix. But be careful not to overdo it, as too much compression can make your track sound flat and lifeless.

By following these three steps, you can create quality synth sounds in FL Studio and make them ready for radio play. With practice, you can develop your own mixing and mastering techniques that fit your unique style and musical genre.

Frequently Asked Questions For How To Make Synths In Fl Studio

Does Fl Studio Have Synths?

Yes, FL Studio has synths. It comes with a variety of built-in synthesizers, including Sytrus, Harmor, GMS, and more. Additionally, users can install third-party synthesizers and plugins to enhance their sound library.

What Is The Best Synth Fl Studio?

The best synth for FL Studio is subjective and depends on personal preferences and needs. Some popular options include Serum, Sylenth1, and Massive. It is recommended to try out different synths and find the one that works best for you.

What Do You Need To Make Synth Music?

To make synth music, you will need a synthesizer, a computer or MIDI controller, and software to create and edit sounds. You may also need audio cables, headphones, and studio monitors for recording and playback. Additionally, a basic understanding of music theory and sound design will help in creating and arranging music.

How To Layer Synths In Fl Studio?

To layer synths in FL Studio, first load two or more synths into the Channel Rack. Then, assign each synth to a separate mixer channel and adjust their individual levels. Finally, use the mixer’s effects and EQ to blend the sounds together.

Conclusion

As you’ve learned, creating Synths in FL Studio is a process that requires dedication and patience. However, the results can be incredibly rewarding. By following the steps outlined in this post, you can start creating unique and exciting sounds that will set your music apart.

Remember to experiment, be creative, and never give up. With time and practice, you’ll be a synth-making pro. Happy creating!

Categories
Archive

Where To Sell Audio Samples

Audio samples can be sold on various online platforms such as Splice, Loopmasters, and Native Instruments. These platforms offer a marketplace for producers and sound designers to showcase and sell their samples to a global audience of music creators.

As the music industry continues to evolve, so does the demand for high-quality audio samples. Also, these samples can range from drum loops and one-shots to synth sounds and vocal samples. If you are a producer or sound designer looking to sell your audio samples, there are several online platforms available to do so.

Related reading: Free Audio Samples that Shine and Tips For Mixing With Drum Samples. For background, see the Wikipedia article on Sampling.

Also, Splice, Loopmasters, and Native Instruments are just a few examples of platforms that offer a marketplace for audio sample creators. These platforms not only provide a way to showcase and sell your samples, but they also offer collaboration tools and other resources for music producers. In addition, we will explore some of the best places to sell audio samples online and how to get started.

The Growing Demand For Audio Samples

Selling audio samples has become a lucrative business due to the increasing demand in the music industry. For example, various online platforms such as Splice, Loopmasters, and ProducerSpot offer opportunities for music producers to sell their audio samples easily.

Moreover, Audio samples have become an essential part of music production in recent years. As a result, with the rise of digitization and the increasing number of music producers, the demand for high-quality audio samples has skyrocketed. Audio samples help music producers to create unique compositions by blending and chopping different sounds together. In this blog post, we will discuss where to sell audio samples and why it is crucial to ensure that you provide high-quality samples to meet market standards.

Rise Of Digitization for Sell Audio Samples

In addition, the music industry has embraced digitization, bringing a significant transformation in the way music is produced, distributed, and sold. However, this digital disruption has resulted in an increased demand for audio samples. Music producers worldwide now have access to a vast library of sounds and samples available on digital platforms. The speed and convenience that digital sound libraries offer have made them more accessible than traditional sound sources, and this shift in technology has led to more producers making music.

Importance Of High-quality Samples

Furthermore, high-quality samples are a game-changer in the music industry, and music producers are willing to pay a premium price for them. Then, the quality of your samples will determine how well your product sells, how successful it will be in the current competitive market, and whether you will get repeat customers. It is essential to ensure that your samples are of a high standard to be successful in this market. High-quality samples are distinguishable and help a producer create a unique sound. As a producer, it’s crucial to invest in collecting unique and high-quality samples, as this will differentiate your work from others.

Where To Sell Audio Samples

Additionally, there are various platforms where you can sell your audio samples, including personal websites, online marketplaces, and social media. In short, one popular platform is Splice where you can showcase your sounds, share and collaborate with other producers. Other platforms include Loopmasters, Producer Loops, and Sample Magic, which offers a marketplace for audio samples. Selling your audio samples on these platforms is a great way to reach a broader audience and ensure that you receive fair compensation for your hard work. In conclusion, the demand for audio samples continues to rise as the music industry embraces digitization.

Also, Producers worldwide are in constant need of high-quality samples to create their unique compositions, and it’s crucial to provide them with unique and distinctive sounds. Similarly, Platforms like Splice, Loopmasters, and Sample Magic provide opportunities for producers to sell their audio samples and gain a broader audience. Ensure that you invest in collecting unique and high-quality samples, and remember that quality is the key to success in this market.

Where To Sell Audio Samples

Credit: medium.com

Top Platforms To Sell Audio Samples Online

Moreover, discover the top platforms to sell audio samples online and turn your passion into profit. Also, from popular online marketplaces like Etsy and eBay to specialized platforms like Splice and Loopmasters, there are plenty of options to reach a wider audience and increase your revenue.

In addition, are you looking for the best platforms to sell your audio samples online? Look no further! In addition, the demand for audio samples has been increasing as the music production industry continues to grow. As a result, more musicians and producers are looking for ways to monetize their work. In this blog post, we will explore and highlight the top platforms to sell audio samples online.

Splice

Furthermore, Splice is a leading platform for producers, musicians and sound designers looking to sell their audio samples. For example, the platform offers an extensive library of samples across multiple genres, including EDM, hip-hop, pop, and more. Selling on Splice is straightforward, and the platform allows sellers to earn a 70% – 75% commission on their sales. Additionally, Splice provides its users with an analytics dashboard to track their sales and identify their most popular samples.

Loopmasters

Additionally, Loopmasters is a popular platform that offers a wide range of audio samples, loops and sound effects. As a result, the platform is well-known for its high-quality samples, and it sells a variety of genres, including EDM, techno, house, and more. Selling on Loopmasters is relatively easy, and the platform provides its users with an intuitive dashboard to manage their sales and earnings. Loopmasters allows sellers to earn up to a 50% commission on their sales, depending on their exclusivity agreement.

Producer Loops

Producer Loops is another popular platform to sell audio samples, loops and MIDI files. However, the platform offers a diverse range of samples, including EDM, pop, rock, and more. Also, Producer Loops provides its users with an easy-to-use interface for uploading and managing their samples. The platform allows sellers to earn up to a 60% commission on their sales, and it supports various payment methods, including PayPal and wire transfer. In conclusion, the above platforms are the best places to sell your audio samples online. Each platform has its unique selling points, which align with your specific needs as a seller. Consider exploring these platforms and their offerings to identify which best suits your needs.

Splice: The Ideal Platform For Independent Sound Designers

Moreover, Splice is an excellent platform for independent sound designers looking to sell audio samples. Then, with over three million sounds available and a user-friendly interface, Splice is the go-to marketplace for high-quality audio samples.

Background And History:

In addition, Splice is a cloud-based music collaboration and creation platform founded in 2013, which allows users to create high-quality music and audio samples. Splice has revolutionized the music industry by making it easy and accessible for independent sound designers to sell their audio samples online. The platform has grown in popularity due to its unique features and outstanding quality of samples.

Easy Uploading Process:

One of the reasons why Splice is the perfect platform for independent sound designers is because of its user-friendly interface. Uploading audio samples is a breeze with its intuitive drag-and-drop functionality, which eliminates the need for technical skills. The platform supports all popular audio file formats, ensuring that producers can upload their samples without hassle.

Flexible Payment Options:

Splice provides flexible payment options for every sound designer, which makes it easy for them to get paid for their work. You can choose to get paid monthly or by every download. Additionally, you can also set your own price for your audio samples. The platform takes a small commission for each sale, and you get to keep the rest. This allows you to earn more than you would on other platforms that take a larger cut.

Why Choose Splice:

Splice has a global audience of over 4 million creators and is trusted by some of the biggest names in the music industry, including Deadmau5, Metro Boomin, and KSHMR. The platform has a dedicated team of experts who are always available to help you with anything you need. With its easy uploading process and flexible payment options, Splice is the ideal platform for independent sound designers who want to monetize their skills. In conclusion, Splice is an excellent platform that sound designers can use to sell their work. Its user-friendly interface, flexible payment options, and global reach make it the perfect choice for anyone looking to make money from their audio samples.

Where To Sell Audio Samples

Credit: www.productionmusiclive.com

Loopmasters: A Well-established Marketplace For Producers

Loopmasters is a reliable marketplace for music producers to sell audio samples. With a wide variety of samples and an established reputation, it’s a go-to destination for buyers and sellers alike.

Loopmasters is a well-established marketplace for producers to buy and sell audio samples. The platform is known for its vast collection of high-quality samples that cater to various types of music genre. In this section of the blog post, we will focus on the features and benefits of Loopmasters, the types of samples available and their partnerships with well-known brands.

Features And Benefits

Loopmasters offers a user-friendly platform that simplifies the process of buying and selling audio samples. Here are some of the features and benefits:

  • Instant delivery: Buyers can download their purchases immediately after the transaction.
  • Top-notch quality: Loopmasters’ team of experts ensures that every sample is of high-quality.
  • Flexibility: Buyers can purchase individual samples or full sample packs depending on their requirements.
  • Customer support: The platform provides excellent customer support to both buyers and sellers.
  • Exclusive offers: Loopmasters provides exclusive discounts and promotions to its registered members.

Types Of Samples Available

Loopmasters has an extensive collection of audio samples, which include:

Sample PacksSingle Sounds
Drum and BassKicks, Snares, Hi-Hats
Hip HopBasslines, Synth Leads, FX
HouseChords, Pads, Percussion
TechnoClaps, Cymbals, FX

Partnerships With Well-known Brands

Loopmasters has partnerships with various well-known brands in the music industry, which include Native Instruments, Ableton, and Steinberg. These partnerships ensure that Loopmasters provides compatible samples for different digital audio workstations and plugins. Moreover, Loopmasters collaborates with renowned music producers to create exclusive sample packs, which are only available on their platform. In conclusion, Loopmasters is an ideal platform for producers to buy and sell audio samples. The platform’s features and benefits, vast collection of high-quality samples, and partnerships with well-known brands make it an excellent choice for both buyers and sellers.

Producer Loops: A Platform Catering To Diverse Music Genres

Producer Loops offers a diverse platform catering to various music genres, making it an ideal platform to sell audio samples. It provides a wide range of options for music producers looking for new and exciting sounds.

Producer Loops: A Platform Catering to Diverse Music Genres Are you a music producer looking for a platform that caters to diverse music genres, where you can sell your audio samples? Look no further than Producer Loops – the ultimate platform for music producers worldwide, designed to meet your every need. With a wide range of features and functionalities, Producer Loops makes it easier than ever to sell your audio samples online. User-friendly interface Producer Loops boasts a user-friendly interface that makes navigation a breeze.

From the homepage, you can easily find your way around, browse through various sample packs, and view available collaboration opportunities. Additionally, the platform is optimized for mobile devices, ensuring that you can access your account and manage your sales from anywhere, at any time. Sample pack options Producer Loops offers a wide range of sample pack options, ensuring that your audio samples can reach a diverse audience. You can choose to sell your audio samples in various formats, including MIDI, WAV, and REX2, among others. Additionally, you can set your preferred price, which gives you full control over your earnings.

Practical Tips for Sell Audio Samples

Collaboration opportunities With Producer Loops, you have access to various collaboration opportunities, including remix competitions and guest producer opportunities. These collaborations not only give you exposure but also provide an opportunity to work with other music producers. Moreover, the platform has a built-in messaging system that allows you to communicate with potential collaborators and customers, making it easier to build lasting relationships. In conclusion, Producer Loops is the ultimate platform for music producers looking to sell their audio samples online. With a user-friendly interface, sample pack options, and collaboration opportunities, the platform is tailored to meet your every need. Sign up today to start selling your audio samples and collaborating with other music producers worldwide.

Tips For Selling Audio Samples Successfully

If you’re a music producer, audio sampling is an excellent way to showcase your creative ability, create a steady stream of income, and grow your music business. Selling samples can be lucrative, but it requires some strategizing to ensure success. Below are some tips that can help you sell your audio samples more successfully:

Maintaining Quality for Sell Audio Samples

Quality is crucial when it comes to selling audio samples successfully. Creating high-quality samples means that your music will sound professional and that your customers will be satisfied. Maintain your sample quality by:

  • Investing in quality recording equipment
  • Using only the best recording software
  • Checking and editing samples for errors

Make sure to test your samples thoroughly to ensure that they’re of the highest quality and that they will meet the expectations of your customers.

Understanding Pricing for Sell Audio Samples

When it comes to pricing your samples, you must strike a balance between what you think is reasonable and what your customers are willing to pay. If you price your samples too high, you may scare off potential customers. But if you price them too low, you might be undervaluing your work and leave money on the table.

Take time to research what your competitors charge for similar audio samples and make sure you provide value for money. Aim for a price range that is competitive and will make you money while also providing value to your customers.

Establishing Brand Identity for Sell Audio Samples

To succeed in selling audio samples, you must establish a strong brand identity. This is how customers will know you, recognize your work, and keep coming back for more. To establish a solid brand identity for your music business:

  • Pick a unique name that’s easy to remember and spells out what you do
  • Design a logo and a website that are consistent with your brand identity
  • Create branded social media pages and post regularly

Building a strong brand identity takes time and effort, but it can help you stand out from competitors and attract more loyal customers.

Where To Sell Audio Samples

Credit: blog.withkoji.com

Frequently Asked Questions For Where To Sell Audio Samples

Where Can I Sell My Audio Samples?

You can sell your audio samples on various online platforms specializing in music production and sound design. Some popular options include Splice, Loopmasters, and Native Instruments’ Sounds. com. It is important to research each platform’s terms and royalties before uploading your content.

Can You Make Money Selling Music Samples?

Selling music samples can definitely generate income for producers, sound designers, and musicians. By creating and selling unique, high-quality sample packs, you can target a specific audience and earn a profit through online platforms such as Splice or Loopmasters. It’s important to create original content and market it effectively to stand out in the competitive industry.

How To Start Selling Samples?

To start selling samples, identify your target audience, determine what products to sell, create a sample product inventory, set a reasonable price and develop a marketing strategy to reach your target market. Focus on providing exceptional customer service and quality products to build a loyal customer base for your sample business.

How To Sell Vocal Samples?

To sell vocal samples, you can either create your own website or use online platforms like Splice, Loopmasters, and Samplephonics. Make sure your vocal samples are unique and high-quality, and promote them through social media and other marketing channels to reach potential buyers.

Additionally, networking with music producers and vocalists can also help you sell your vocal samples.

Conclusion

Selling your audio samples can be a lucrative and fulfilling endeavor. There are various online platforms where you can market your audio samples and make a profit. From well-established platforms to new and promising ones, you have a world of options at your disposal.

Take time to research and understand what each platform offers to ensure you make the best decision for your business. Good luck on your audio selling journey!

Categories
Archive

Make Kick Drum Sound Punchy

To make a kick drum sound punchy, use EQ to boost the lower frequencies and add a compressor to enhance the attack. Punchiness can be further improved by layering the kick drum with other samples and adding distortion effects.

Creating a powerful and punchy kick drum is vital for most modern music genres, especially for dance and electronic music. The kick drum serves as the foundation of a track and can either make or break a mix. Achieving a punchy kick entails balancing various elements such as EQ, compression, and layering.

Eqing can amplify the lower frequencies, while compression facilitates more dynamic consistency, and layering can bring in added depth and weight to the sound. Furthermore, applying distortion techniques can add some grit and character to the kick sound. We will explore a few techniques and tips to make your kick drums sound punchier and more prominent in the mix.

Make Kick Drum Sound Punchy

Credit: m.youtube.com

Eq Techniques

When it comes to making a kick drum sound punchy, there are a variety of techniques that producers and mixing engineers can use. One of the most commonly used techniques involves working with EQ. By manipulating the frequencies in the kick drum sound, it is possible to create a more pronounced and impactful sound that cuts through a mix. In this article, we’ll explore three different EQ techniques that can help you make your kick drum sound punchier. By boosting the low end, cutting unnecessary frequencies, and using a subtractive EQ, you’ll be able to take your kick drum sound to the next level.

Boosting The Low End

One of the easiest ways to make your kick drum sound punchier is by boosting the low end. This involves increasing the volume of the frequencies below the kick drum’s fundamental pitch. By doing so, you’ll emphasize the bass frequencies in the sound, which can give it a lot of power and impact. Typically, engineers will use a low shelf filter to boost the low end. This type of EQ filter allows you to increase the volume of all the frequencies below a certain point. For example, you might boost the frequencies below 50 Hz to give the kick drum more weight and depth.

Cutting Unnecessary Frequencies

Another way to make your kick drum sound punchier is by cutting unnecessary frequencies. This technique involves identifying which frequencies in the kick drum sound are not adding to its punchiness and removing them from the mix. For example, you might find that there are some mid-range frequencies in the sound that are muddying up the mix and making the kick drum sound less impactful. By removing these frequencies with a narrow EQ cut, you’ll be able to create a cleaner and more focused sound that punches through the mix more effectively.

Using A Subtractive Eq

Finally, using a subtractive EQ can also be an effective way to make your kick drum sound punchier. This technique involves filtering out unwanted frequencies rather than boosting desirable ones. By removing frequencies that are not contributing to the punchiness of the sound, you can create a clearer and more defined sound that cuts through the mix more effectively. Typically, engineers will use a parametric EQ to make narrow cuts in the frequency spectrum, allowing them to target specific problem areas in the kick drum sound.

Make Kick Drum Sound Punchy

Credit: m.youtube.com

Compression Techniques

To make your kick drum sound punchy, compression techniques can be employed. This involves using a compressor to reduce the dynamic range of a kick drum, making the quieter parts louder and the louder parts quieter, resulting in a tighter and more punchy sound.

Compression is an essential tool in music production to make a kick drum sound punchy. This technique involves reducing the dynamic range of the audio signal, which results in a tighter and more controlled sound. One of the most popular ways to achieve this is through the use of compression techniques. In this post, we will cover the three most effective compression techniques, including a fast attack time, setting the release time, and using sidechain compression.

Using A Fast Attack Time

The attack time of a compressor determines how quickly the compressor starts working. A fast attack time is ideal for kick drums because it allows the compressor to catch the initial transient of the kick drum, which is the part of the sound responsible for its punch. By setting a fast attack time on the compressor, you can keep the punchy quality of the kick drum while reducing the dynamic range.

Setting The Release Time

The release time determines how quickly the compressor stops working. Setting the release time too slow can result in “pumping” or “breathing” artifacts, which can be undesirable for kick drums. To avoid this, you should set the release time as fast as possible without causing any pumping or breathing artifacts. By having a fast release time, you can achieve a more controlled sound that is still punchy.

Using Sidechain Compression

Sidechain compression is a popular technique that involves using a separate audio source to trigger the compressor. In the case of kick drums, you would use the kick drum as the sidechain trigger. By doing so, you can create a pumping effect that enhances the punch and rhythm of the kick drum. To use sidechain compression, you would need to insert a compressor on the audio source you want to control and then route the sidechain trigger into the compressor’s sidechain input. By adjusting the threshold, ratio, attack, and release settings, you can achieve the perfect balance between punch and control. In conclusion, these are the three most effective compression techniques to make a kick drum sound punchy. By using a fast attack time, setting the release time, and using sidechain compression, you can achieve a more controlled and tighter sound that is still punchy. With these compression techniques, you can take your kick drums to the next level and enhance the overall rhythm and punch of your music.

Tuning Techniques

Achieving a punchy kick drum sound is possible through tuning techniques. Adjusting the pitch, using compression, and applying EQ can all contribute to creating a powerful and dynamic kick sound in any mix.

If you’re a music producer, you know the importance of a good kick drum. It drives the rhythm and keeps the track moving forward. But getting that perfect punchy sound can be tricky. Fortunately, with the right tuning techniques, you can achieve that coveted sound without too much hassle. In this post, we’ll cover the basics of kick drum tuning and explore some tips and tricks for using samples to enhance your sound.

Tuning The Kick Drum

The first step to achieving a punchy kick drum sound is to tune it properly. If your kick drum is out of tune, it can create unwanted overtones that muddy up the mix. Here are some tuning techniques to keep in mind:

  • Use a Tuner: Start by using a tuner to determine the pitch of your kick drum. Once you know the pitch, you can adjust it to fit the key of your song.
  • Adjust the Lugs: If you’re using an acoustic drum kit, you can adjust the tension of the lugs to tune your kick drum. Tighten the lugs to raise the pitch and loosen them to lower the pitch.
  • Replace the Head: If you’re still having trouble getting the right sound, try replacing the kick drum head. A new head can make a huge difference in the sound of your kick drum.

Using Samples To Enhance The Sound

In addition to tuning your kick drum, you can enhance its sound by using samples. Here are some tips and tricks:

  • Layering: One common technique is to layer a sample on top of your recorded kick drum. This can add depth and punch to your sound.
  • EQ: Use EQ to shape the sound of the sample so that it complements your recorded kick drum. Cut out any unnecessary frequencies and boost those that add punch and clarity.
  • Compression: Use compression to tighten up the sound and add more sustain. This can help your kick drum cut through the mix.
  • Sidechain Compression: Another creative technique is to use sidechain compression to make room for the kick drum in the mix. This involves ducking other elements of the mix when the kick drum hits, creating a more pronounced sound.

In conclusion, tuning your kick drum is an essential step in achieving a punchy sound. By using a tuner, adjusting the lugs, or replacing the head, you can get your kick drum in tune with your track. Additionally, utilizing samples can add depth and punch while EQ, compression, and sidechain compression can help tighten and shape the sound. Try experimenting with these techniques in your next production and watch your kick drum sound come to life.

Layering Techniques

To make your kick drum sound punchy, layering techniques can be used by mixing a low-frequency sine wave with your kick. You can also add an EQ to boost the fundamental frequency of your kick drum. Adding a compressor with a fast attack and medium release can also help to bring out the punchiness of your kick drum.

Adding layers to your kick drum can give it a unique and punchy sound. It’s an effective way to achieve a professional-quality mix and make your drums stand out in the mix. In this post, we’ll explore some layering techniques to help you achieve a punchy kick drum sound that cuts through your mix.

Adding Another Kick Drum

One way to enhance your kick drum’s sound is to layer it with another kick drum sample. This technique helps to create a fuller sound and add more depth to your mix. Here’s how you can do it in a few easy steps.

  1. Pick a second kick drum sample that complements your original kick drum sound.
  2. Layer the second kick drum on top of the original one.
  3. Adjust the volume of the second kick drum sample accordingly so that it blends well with the first one.
  4. Apply EQ or compression to the layered kick drums as needed to further blend them together.

Layering With Percussion

Another way to layer your kick drum is by adding percussion elements. This technique gives your kick drum a rhythmic groove and adds complexity to your track. Below are the steps for layering your kick drum with percussion:

  1. Choose your percussion sample depending on your genre and the vibe you’re going for.
  2. Layer the percussion sound on top of the kick drum.
  3. Adjust the volume of the percussion element to blend well with the kick drum.
  4. Consider applying EQ to the layered kick and percussion sounds to make them sit well together.

In conclusion, layering techniques are a great way to make your kick drum sound punchy, and the options are endless. So, experiment with different kick drums and percussion samples to see what sounds best for your mix. By following our tips, you’ll be on your way to creating an impressive kick drum sound that’ll leave your audience wanting more.

Effects

To make your kick drum sound punchy, you can use various effects such as compression, EQ, distortion, and transient shapers. The combination of these effects can help accentuate the attack and sustain of your kick drum, giving it the desired punch and impact in your mix.

In order to make your kick drum sound punchy, you can use a variety of effects to enhance the sound. These effects can be added during the mixing process to help bring out the punchiness of the kick drum. Here are some of the most effective effects you can use to make your kick drum sound punchy:

Using Reverb

Reverb is a great tool for adding depth to your kick drum and making it sound more natural. To make your kick drum sound punchy, try adding some short reverb to the kick drum track. This will help to accentuate the low-end frequencies of the kick drum and give it more depth.

Applying Distortion

Distortion is another great tool for making your kick drum sound punchy. If you want to add some grittiness to your kick drum, try applying some distortion to the track. There are a variety of different distortion plugins you can use to achieve this effect. Experiment with different levels of distortion to find the right amount for your track. In conclusion, using effects is an important part of making your kick drum sound punchy. By adding some short reverb and applying distortion, you can enhance the sound of your kick drum and make it stand out in the mix. Experiment with different settings and plugins to find the right sound for your track.

Frequently Asked Questions For Make Kick Drum Sound Punchy

How Do I Make My Kick Drum More Punchy?

To make your kick drum more punchy, try the following techniques: 1. Increase the attack and sustain of the kick drum in your mixing software. 2. Add some compression to help the kick drum cut through the mix. 3. Use EQ to reduce any frequencies that clash with the kick drum.

4. Layer the kick drum with a complementary sample to add depth and impact. 5. Experiment with different mic and recording techniques when capturing the kick drum sound.

How Do You Get Punchy Drums?

To get punchy drums, you can: 1. Use EQ and compression to enhance their attack and sustain. 2. Layer samples or use a transient shaper to add extra punch. 3. Ensure the drums are properly mixed and not clashing with other elements in the mix.

4. Experiment with different drum tuning and microphone placement. 5. Consider using drum replacement plugins to enhance the impact of the hits.

What Frequency Is A Punchy Kick Drum?

The frequency of a punchy kick drum is typically between 50 Hz and 100 Hz.

How Do I Make My Kick Drum Sound Tighter?

To make your kick drum sound tighter, ensure that the EQ is adjusted correctly to remove any unnecessary low-end frequencies. Use a compressor or transient shaper to control the attack and release of the kick drum. Optimize the envelope of the kick to allow for a tighter sound.

Experiment with the microphone placement when recording your kick drum to achieve a tighter sound. Finally, use a sample layer to add more punch to your drum.

Conclusion

A punchy kick drum is the backbone of any great mix. As we have seen, there are many techniques you can use to achieve this sound. Experiment with different EQ settings, compression ratios, and mic positions to find the sound that works best for your specific track.

Remember to always trust your ears and work with intention. With practice, you’ll become an expert in creating kick drums that pack a powerful punch in your music production.

Categories
Archive

Can You Be a Musician With Tinnitus

Yes, it is possible to be a musician with tinnitus. Tinnitus is a ringing or buzzing in the ears that can result in hearing loss, but with proper management and protection, musicians can continue to play and create music.

Tinnitus can be caused by exposure to loud noises and music is certainly a potential contributor. Musicians are at risk for developing tinnitus and other hearing-related issues due to prolonged exposure to amplified sounds and concerts. However, with the right precautions, such as wearing hearing protection and monitoring volume levels, musicians can protect their ears and prevent further damage to their hearing.

Related reading: How to Avoid Tinnitus As a Musician and Do Musicians Need To Interact With Their Fans : The Key To Success Revealed. For background, see the Wikipedia article on Tinnitus.

Additionally, there are treatment options available for those suffering from tinnitus, such as sound therapy and cognitive behavioral therapy. With proper management and protection, becoming a musician with tinnitus is possible and can lead to a fulfilling career in the music industry.

Can You Be a Musician With Tinnitus

Credit: www.healthyhearing.com

Understanding Tinnitus

Tinnitus is a condition that affects millions of people worldwide, where a person experiences a ringing or buzzing sound in their ears that doesn’t come from an external source. The sound can range from mild to severe and can be intermittent or constant, affecting a person’s quality of life. For musicians, tinnitus can have a significant impact on their career and overall ability to perform. In this section, we will discuss what tinnitus is, its causes, and its impact on musicians’ careers.

What Is Tinnitus?

Tinnitus is a condition where a person hears a sound in their ears that no one else can hear. This sound can be described as ringing, buzzing, hissing, or clicking. It can be loud or soft, high-pitched or low-pitched. Tinnitus can be caused by a variety of factors, including exposure to loud noise, age-related hearing loss, ear infections, or side effects from medication. It is a common condition, affecting approximately 15-20% of people worldwide.

Causes Of Tinnitus

Tinnitus can be caused by a variety of factors, and it can vary from person to person. One of the most common causes of tinnitus is exposure to loud noise, such as playing music at high volumes without proper ear protection. Other causes can include ear infections, certain medications, and underlying health conditions. Age-related hearing loss is also a common cause of tinnitus, as the hair cells in the inner ear that detect sound can become damaged over time. This leads to hearing loss and tinnitus.

Impact Of Tinnitus On Musicians’ Careers

For musicians, tinnitus can have a significant impact on their career. Persistent and loud tinnitus can make it difficult to focus on playing music, leading to mistakes and decreased performance quality. It can also cause discomfort and pain, making it challenging to practice or perform for extended periods. Moreover, musicians are exposed to loud sounds during their performances and rehearsals, which can cause or exacerbate tinnitus. If left untreated, tinnitus can affect a musician’s ability to play music and even lead to depression or anxiety.

In summary, tinnitus is a hearing condition that causes a ringing or buzzing sound in the ears. It can be caused by exposure to loud noise, age-related hearing loss, and other health conditions. For musicians, tinnitus can have a significant impact on their ability to play music and their overall career. It is crucial to take steps to prevent and manage tinnitus, such as using proper ear protection and seeking medical advice if you experience symptoms.

Challenges Musicians With Tinnitus Face

For music enthusiasts with tinnitus, pursuing their passion can be challenging. Musicians with tinnitus often face difficulty hearing, which can impact the quality of their performances. Despite these challenges, with proper hearing protection and management techniques, it is possible for musicians to continue pursuing their passion.

Musicians rely heavily on their hearing to perform their craft. However, those who suffer from tinnitus face multiple challenges that affect their ability to create music. Tinnitus, a condition characterized by a persistent ringing or hissing sound in the ears, affects millions of people worldwide. It affects musicians in a unique way, often making it challenging to differentiate notes, hear specific sounds, and discern different sounds.

Hearing Loss for Musicians With Tinnitus

Tinnitus can lead to hearing loss, which can adversely affect a musician’s career. Musicians with hearing loss often have difficulty hearing high-pitched notes and vocal harmonies. In addition, noise-induced hearing loss can cause musicians to struggle to hear themselves. This makes it challenging to stay on key or hit the right notes. Musicians must protect their hearing to prevent further damage, and ear protection is a must during rehearsals, live performances, and recording sessions.

Difficulty In Hearing Specific Sounds

Musicians with tinnitus may face challenges hearing specific sounds or frequencies. For example, a guitarist or bassist with tinnitus may struggle to hear low-frequency notes. This makes it challenging to stay in rhythm with other band members. Similarly, a singer with tinnitus may struggle to hear their vocals compared to the instruments playing in the background. This can affect their tone, pitch, and overall performance.

Difficulty In Differentiating Different Sounds

Musicians with tinnitus may face challenges differentiating different sounds, especially when multiple musical elements are playing at the same time. For example, a drummer with tinnitus may find it difficult to differentiate between the cymbals and the snare. Meanwhile, a pianist may struggle to differentiate between different keys of the piano. This can impact the overall quality of the performance and affect the musician’s confidence. In conclusion, tinnitus can be a significant hurdle for musicians, affecting their hearing, timing, and overall performance quality. Musicians living with tinnitus must take steps to protect their hearing and equip themselves with adequate ear protection. Although tinnitus poses significant challenges, it’s possible to be a musician and manage the condition effectively with the right support, treatment, and healthy hearing habits.

Famous Musicians With Tinnitus

Many famous musicians suffer from tinnitus, which is a common problem among those who are frequently exposed to loud music. Despite this, they have continued to pursue their passion for music. While it can be challenging, it is possible to be a musician with tinnitus with proper care and preventative measures.

Overview Of Musicians With Tinnitus

Tinnitus, a problem of the ear where the person hears a constant ringing or buzzing, can be a real impediment for musicians. It can have an adverse effect on their ability to perform, suffer emotionally, and lead to a decline in their overall quality of life. But, there are many successful musicians who have been diagnosed with tinnitus, and they have found ways to manage it and continue with their musical careers.

How These Musicians Have Coped

Many musicians who are dealing with tinnitus have had to take a break from music to deal with their condition. A good example of this is Chris Martin, the lead singer of Coldplay. Chris took a break from music for four years to adjust his health and cope with his tinnitus. Other musicians have been able to manage their condition and continue performing, such as Neil Young, who uses Custom Earplugs that help him control the noise during his performances. There are also other methods that musicians can try to help mitigate the effects of tinnitus.

The use of devices such as in-ear monitors and noise-cancelling headphones can help reduce exposure to high volume sound. These devices allow musicians to hear the music without exposing their ears to the dangerous sounds that can trigger tinnitus. Some musicians, like Eric Clapton, have also turned to alternative treatments such as acupuncture, hypnosis, and meditation to deal with their tinnitus. It is essential to note that what works for one person may not work for another, as the causes and symptoms of tinnitus can vary from person to person.

Conclusion

Overall, there is hope for musicians who suffer from tinnitus. By taking proper precautions and utilizing coping strategies, they can successfully manage the condition and continue enjoying their musical careers. Famous musicians like Pete Townshend, Ozzy Osbourne, and Barbara Streisand have all experienced tinnitus and were able to continue performing. It is important to note that tinnitus should be taken seriously, and if you are experiencing symptoms, you should seek medical attention right away.

Can You Be a Musician With Tinnitus

Credit: chicagohearingservices.net

Ways Musicians Can Prevent Tinnitus

Musicians can prevent tinnitus by wearing earplugs during rehearsals and performances, avoiding loud concerts, taking breaks, and using noise-cancelling headphones. Having tinnitus doesn’t necessarily mean the end of a music career, but it’s important to take precautionary measures to prevent worsening of the condition.

As a musician, tinnitus can be a major source of frustration and can even affect your career. Tinnitus is the perception of noise or ringing in the ears, and it’s often caused by exposure to loud sounds. Fortunately, there are ways to prevent tinnitus and protect your hearing while still enjoying your passion for music. Here are some ways musicians can prevent tinnitus:

Using Ear Protection for Musicians With Tinnitus

Wearing earplugs or earmuffs is one of the best ways to prevent tinnitus. You can invest in custom-fit musician earplugs which can provide a good balance between reducing sound levels and maintaining sound quality. Alternatively, use over the counter (OTC) filters, such as foam earplugs, silicone, or wax earplugs. With earplugs, you will still be able to hear the music, but at safer levels. When purchasing earplugs, look for ones with a high noise reduction rating (NRR).

Taking Breaks During Performances for Musicians With Tinnitus

As a musician, you may be tempted to play for hours on end. However, taking breaks during your performances is essential for preventing tinnitus. Give your ears a rest for at least 15 minutes every hour. If you’re a drummer, switch to rods, brushes, or Hot Rods that are less likely to damage your ears.

Staying Away From Loud Music for Musicians With Tinnitus

The obvious way to prevent tinnitus is to avoid exposure to loud noise. If you know you’re going to be in a loud environment, take steps to protect your ears. When looking for gigs or attending concerts, the use of apps like Soundprint will provide average sound levels of certain venues you choose to attend. In conclusion, Tinnitus can be a frustrating experience for anyone, but it can be especially troublesome for musicians. However, by using ear protection, taking breaks during performances, and staying away from loud music, you can prevent tinnitus and protect your hearing. Protecting your hearing is a lifelong investment that is worth it.

Effective Treatments For Tinnitus

Effective treatments for tinnitus can be a great matter of concern for frequent musicians. However, tinnitus doesn’t always hold back musicians from pursuing their passion of music. Noise cancelling earplugs and tinnitus management therapies can effectively treat the condition while allowing musicians to play their instruments.

Living with tinnitus can be a nightmare for many musicians. The constant ringing, buzzing, or hissing in your ears can affect your ability to perform, and the emotional toll can be overwhelming. While there is no cure for tinnitus, there are several treatments that can help manage its symptoms. In this article, we’ll discuss three effective treatments for tinnitus: sound therapytinnitus retraining therapycognitive behavioral therapy.

Sound Therapy

Sound therapy is a common treatment for tinnitus that involves listening to soothing sounds that can help mask the ringing in your ears. White noise machinessound generatorssound pillows are a few popular examples of sound therapy devices that can help alleviate tinnitus symptoms. These devices produce different sounds, such as ocean waves, rain, or soft music, that can help reduce the perception of ringing in your ears.

Tinnitus Retraining Therapy

Tinnitus Retraining Therapy (TRT) is a type of sound therapy that involves counseling and sound therapy. It is a specialized type of therapy designed to retrain your brain to perceive the sounds of tinnitus as less bothersome. In TRT, patients are exposed to low-level sounds that can help desensitize them to the ringing in their ears. Additionally, TRT counselors can provide advice on how to cope with tinnitus and identify situations that might exacerbate symptoms.

Cognitive Behavioral Therapy

Cognitive Behavioral Therapy (CBT) is a type of therapy that focuses on changing negative thoughts and behaviors related to tinnitus. CBT can help musicians manage the stress, anxiety, and depression often associated with tinnitus. It is a goal-oriented therapy that can help patients identify their negative thoughts and behaviors related to tinnitus and replace them with positive ones. CBT is often used in combination with other tinnitus treatments, such as sound therapy and TRT. In conclusion, tinnitus can be a challenging condition to manage, but there are several effective treatments available. Sound therapy, TRT, and CBT can help alleviate symptoms and improve a musician’s quality of life. If you’re struggling with tinnitus, talk to a healthcare provider about which treatment options might be right for you.

Can You Be a Musician With Tinnitus

Credit: www.earpeace.com

Frequently Asked Questions Of Can You Be A Musician With Tinnitus

How Do Singers Deal With Tinnitus?

Singers can deal with tinnitus by avoiding loud and excessive noise, wearing earplugs or noise-cancelling headphones during performances, taking breaks during rehearsals, and using sound therapy techniques like white noise machines or music therapy. They should also consult an audiologist for customized advice.

Can You Still Listen To Music With Tinnitus?

Yes, you can still listen to music with tinnitus, but you should do so at a safe volume to avoid making your condition worse. It’s important to protect your hearing and avoid any loud music or exposure to loud noises that could make your tinnitus worse.

Consider using noise-cancelling headphones or earplugs to reduce the sounds that may trigger your tinnitus.

Does Tinnitus Affect Music Production?

Yes, tinnitus can affect music production as it can cause difficulty in hearing certain frequencies or pitches and may also lead to problems with concentration or focus. It can also increase sensitivity to sound, making it challenging to work in a noisy environment.

Proper management and treatment of tinnitus are necessary to prevent such issues.

How Many Musicians Suffer From Tinnitus?

Around 60% of musicians have tinnitus, according to a study by Help Musicians UK. Tinnitus is a common problem among musicians due to exposure to loud music and inadequate hearing protection. Prevention is key, and musicians should use earplugs, take regular breaks, and avoid exposure to excessively loud sounds.

Conclusion

Music is a dear passion for many, and the diagnosis of tinnitus should not discourage them from pursuing it. There are many musicians who continue to create beautiful music despite their tinnitus. In fact, it might even make them more aware of the sounds they create.

However, it is essential to take precautions to minimize the impact of tinnitus. Consultation with a physician, taking breaks, and utilizing hearing protection equipment are some helpful steps. With proper care, passion, and commitment, a musician with tinnitus can continue to share the gift of music with the world.

Categories
Archive

How To Export Stems In Logic Pro X

To export stems in Logic Pro X, go to the File menu and select Export > All Tracks as Audio Files. This will export each individual track as a separate audio file.

From there, you can choose to export each track’s audio as a compressed or uncompressed file, such as WAV or AAC. Logic Pro X is a powerful and versatile digital audio workstation that’s popular among audio engineers, producers, and musicians.

One of its many features is the ability to export individual tracks as stems, which can be useful for collaboration, remixes, and other audio editing tasks. In addition to exporting all tracks as audio files, Logic Pro X also provides the option to export stems as separate folders or as a single ZIP archive. Whether you’re exporting tracks for mixing or sharing with collaborators, knowing how to export stems in Logic Pro X is an essential skill for any audio professional.

How To Export Stems In Logic Pro X

Credit: www.macprovideo.com

Preparing Your Logic Pro X Project

To export your stems in Logic Pro X, begin by preparing your project. Make sure to organize and name your tracks, set your levels, and consolidate any midi regions. Once everything is in place, exporting your stems will be a breeze and you’ll have all the separate elements of your project for future mixing and mastering needs.

Before exporting your tracks as stems in Logic Pro X, it’s essential to prepare your project correctly. By organizing and cleaning up your project, you can ensure that your exported stems are high-quality and easy to navigate. Follow these steps to prepare your Logic Pro X project.

Organize Your Tracks

The first step in preparing your Logic Pro X project for stem export is to organize your tracks. Group your tracks by similar instrument types or by section of the song. This way, when you export your stems, you’ll have a clean and organized folder system to work with.

Delete Any Unused Tracks

Delete any unused tracks you no longer need. Extra tracks can quickly clutter your project, making it difficult to navigate and export stems. Before deleting any tracks, make sure you’ve saved a backup of your project to avoid losing any essential data.

Create Group Stems For Each Instrument Group

Create group stems for each instrument group. To do this, select the tracks you want to group together, right-click, and select “Create Track Stack.” Name your track stack with the name of the instrument group, such as “Drums” or “Guitars.” This way, when you export your stems, each instrument group will have its folder.

Add Effects To Each Group Stem

Add effects to each group stem to ensure they’re ready to use in other projects. For example, add compression, EQ, and reverb to the drum stem to provide a balanced sound. This step is crucial because it allows the end user to work with the stems without needing to add effects. By following these steps and preparing your Logic Pro X project correctly, you’ll be ready to export your tracks as stems quickly and efficiently. With organized and clean stems, you can provide high-quality audio for any project.

How To Export Stems In Logic Pro X

Credit: www.youtube.com

Exporting Stems In Logic Pro X

If you’re working on a project in Logic Pro X, you’ll inevitably have to export stems at some point. Stems are individual audio tracks that make up a full mix, and exporting them allows you to use them in other projects or to send them to other people for mixing or mastering. In this article, we’ll go through the steps required to export stems in Logic Pro X.

Select The Group Stems You Want To Export

The first step in exporting stems is to select the group stems you want to export. In Logic Pro X, group stems are created by placing related tracks in a group. To select the group stems for export, follow the steps below:

  1. Open the Logic Pro X project you want to export stems from.
  2. Select the group or groups of tracks you want to export as stems.
  3. Click on the “File” menu, and select “Export” > “All Tracks as Audio Files…”

Set Export Settings

After selecting the group stems you want to export, the next step is to set the export settings. The export settings determine the format and quality of the exported stems. To set the export settings, follow these steps:

  1. Choose the destination folder where you want the stems to be saved.
  2. Select the file format you want to export the stems in, such as WAV or AIFF.
  3. Choose the bit depth and sample rate for the exported stems.
  4. Select whether to export the stems as a continuous file or as separate files.

Export Your Stems

Once you’ve selected the group stems you want to export and set the export settings, the final step is to export your stems. This can be done by following these steps:

  1. Click the “Export” button in the lower right-hand corner of the export window.
  2. Wait for Logic Pro X to export the stems.
  3. Once the export is complete, navigate to the destination folder you selected earlier to find your exported stems.

And that’s it! Exporting stems in Logic Pro X is a straightforward and essential process for any producer or engineer. By following the steps outlined in this article, you should have no trouble exporting your stems and integrating them into your workflow.

Post-export Processing

Post-export processing is an essential step to ensure that your stems are ready for mixing and mastering. After exporting stems in Logic Pro X, there are several tasks you can do to enhance your audio production and streamline your workflow. In this section, we’ll cover the necessary post-export processing steps that you should follow when exporting your stems.

Listen And Check Your Stems

It’s crucial to listen to and check your stems thoroughly to ensure that they are accurately reflecting your mix before processing them further. Verify that each stem is playing back in sync with the project timeline and that there are no technical issues like phase cancelling, clipping, or spikes.

  • Listen to each stem individually.
  • Check the stereo or mono image of the stem.
  • Check for any unwanted clicks, pops, or glitches in the audio.
  • Check the levels of the tracks to ensure that they are not peaking or compressed.

Organize Your Stems In Folders

Organizing your stems in folders can help you keep track of multiple stems, making it easier to mix and master your audio later. Organizing into folders is particularly helpful when working with a large number of individual stems and when managing collaborations with other audio professionals.

Create folders for each group of stems you intend to mix, such as drums, bass, guitars, keys, vocals, and FX. If you have multiple versions of the same instrument or channel, label them so that you can keep track of different stems within the same group.

Create A Master Folder With All Stems Combined

Combining all your stems into a master folder makes it easier to manage your total project later on. By exporting a master folder, you can work with your full track in one go without having to move between the individual subfolders. This step also speeds up the process of sending the entire session to another person for mixing and mastering.

Finally, keep in mind that post-export processing is not the only step in creating high-quality audio. The whole process of mixing, mastering, and post-production plays a significant role in the final output. However, adhering to these post-export processing steps will get your mixes closer to the final goal of producing high-quality audio.

Backing Up Your Stems

To safeguard your Logic Pro X projects, it’s important to export stems. To do this, select all tracks, navigate to the File menu, choose Export, and then select Multitrack Stem. From there, you can choose what tracks to include in your stem export.

If you’re a music producer or audio engineer, you know how important it is to keep your project files organized and backed up. By exporting your stems in Logic Pro X, you can create individual audio files for each track in your project. This makes it easier to work with your mix in other software or back up your work. In this article, we’ll cover how to export stems in Logic Pro X and give you some tips for backing up your files safely.

Make Multiple Copies Of Your Stems

Once you’ve exported your stems in Logic Pro X, it’s essential to make multiple copies of them. This ensures that you always have a backup in case one copy gets lost or corrupted. You can store these copies on different hard drives or in the cloud.

Store Your Stems In A Safe Place

When it comes to backing up your stems, it’s important to store them in a safe place. You don’t want to risk losing all of your hard work if something happens to your computer. We recommend storing your stems on an external hard drive or in the cloud. If you choose to store your files on an external hard drive, make sure to keep it in a safe place and away from anything that could cause damage. Here are some tips for storing your stems safely:

  • Store your stems in a temperature-controlled environment to prevent damage.
  • Use an external hard drive that has been dedicated solely for your audio files.
  • Store your external hard drive in a location that won’t be subject to physical harm like falls or moisture.
  • Keep the hard drive in a fireproof location or in an off-site location in case of a natural disaster.
  • Consider using cloud storage as an additional backup method, especially for critical files.

By following these simple tips, you can protect your stems and ensure that your hard work is safe and secure. Backing up your files is just as important as creating them, so don’t forget to make multiple copies in safe locations.

How To Export Stems In Logic Pro X

Credit: www.youtube.com

Frequently Asked Questions For How To Export Stems In Logic Pro X

How Do You Export Stems In Logic Pro?

To export stems in Logic Pro, first select the track or tracks you want to export. Go to File > Export > All Tracks as Audio Files. Choose the desired file type and location, then click “Save”. In the next window, select “Split” for the “Channels” option, and check the box next to the tracks you want to export as stems.

Click “Export” to complete the process.

How Should I Export Stems?

To export stems, follow these 5 guidelines. Firstly, ensure that your sentences are brief, with a maximum of 20 words each. Secondly, write using SEO friendly, unique, and plagiarism-free content, in easy-to-understand active voice. Thirdly, avoid starting sentences with certain words and phrases.

Fourthly, pass AI writing detection and write like a human. Finally, keep your answer within 50 words.

How Do You Bounce Down Stems In Logic?

To bounce down stems in Logic, you need to select the tracks you want to bounce, adjust the beginning and end points, and then choose “bounce in place” or “export” from the menu. This will create a new audio file with all of the selected tracks bounced down into a single file.

How Do I Export Parts In Logic Pro X?

To export parts in Logic Pro X, select the section you want to export and click on “File” at the top of the screen. Choose “Export”, then select the desired file format and destination. Click “Export” again to complete the process.

Conclusion

To sum up, exporting stems in Logic Pro X is a valuable skill for any music producer. By following these easy steps, you can professionally export your tracks, enabling you to work with them outside of Logic, collaborate with other artists, or simply mix and master your tracks with more flexibility.

Remember to always experiment and have fun with your music, and don’t forget to save your work on multiple locations to avoid any accidental loss. Stay creative!

Categories
Archive

Optimizing How Loud You Record

Optimizing how loud you record is crucial for achieving professional-quality audio. To do this, ensure your levels are set correctly and adjust the gain accordingly.

Additionally, position your microphone and adjust the distance from the sound source to eliminate unwanted background noise and improve the overall quality of your recording. Recording audio can be tricky, especially when it comes to capturing clear and crisp sound.

Optimizing your recording volume is essential to achieving high-quality audio. It involves adjusting gain levels and microphone positioning to ensure that the sound you capture is pleasant to the ear. Failure to do so often leads to poor audio quality and listener dissatisfaction. We’ll explore some tips on how to optimize how loud you record, from setting proper levels to adjusting your microphone distance. These tips will help you achieve professional-quality audio and ensure your listeners enjoy a pleasant experience.

Optimizing How Loud You Record

Credit: lagom-studio.co.uk

Importance Of Optimizing Recording Levels

If you are a sound engineer or a music producer, you would know how essential it is to optimize the recording levels in your sessions. Recording at appropriate levels ensures that your track has clear and crisp audio without any unwanted noise or distortion.

Avoiding Distortion

Distortion is the most common problem faced by audio engineers when recording an audio track. It occurs when the input level of the recording device is set too high, causing the waveform to be clipped. Clipping occurs when the peak of the audio signal is higher than the maximum level, resulting in distortion. To avoid this, you should set the input level of your recording device at an optimal level, keeping the peaks below the maximum level.

Minimizing Noise

Noise is another issue that can affect the quality of your recording. It can be external noise from the environment or internal noise from the recording device. To minimize noise, you should optimize the recording levels of your device. This ensures that your recording device picks up the desired audio at a sufficient level while minimizing any unwanted noise in the background.

Moreover, using high-quality equipment and cables can also help to minimize noise and interference in your recording.

In addition, it is crucial to monitor your recording levels during the recording process to ensure that the levels remain optimal throughout the recording session. You can use a peak meter or visual indicator to monitor the input level of your audio during the recording process.

Therefore, optimizing your recording levels is essential to achieving a high-quality audio recording with minimal noise and distortion, making your track sound professional and clear.

Understanding Peak And Rms Levels

Understanding peak and RMS levels is essential for optimizing how loud you record audio. While peak levels indicate the highest point of sound in a recording, RMS levels measure the average loudness over time, ensuring that audio is consistent and easy to listen to.

When it comes to recording audio, understanding the difference between peak and RMS levels is crucial to getting the perfect recording. Peak and RMS levels help you control the loudness of your recording and ensure that your audio sounds great across all devices.

What Is Peak Level?

Peak level refers to the highest level of audio your recording reaches. It measures the maximum value of the waveform and helps you avoid distortion. Keeping your peak levels below 0dB ensures that your audio won’t clip or distort.

What Is Rms Level?

RMS level (Root Mean Square) measures the average loudness of your recording. RMS level takes into account the volume over time and gives you a more accurate representation of how loud your recording is. By using RMS levels, you can ensure that your audio sounds good across all devices and environments. To optimize your recording, it’s important to find a balance between peak and RMS levels. By keeping your peak levels below 0dB and ensuring a healthy RMS level, you can get a perfect recording that sounds great on everything from earbuds to high-end speakers. Here are some tips for optimizing your recording:

  • Aim for peak levels of -6dB to -3dB
  • Adjust your recording levels to find the perfect balance between peak and RMS levels
  • Use a limiter or compressor to control your peak levels
  • Avoid normalizing your audio, as this can cause clipping
  • Test your audio on multiple devices to ensure it sounds good in different environments

By understanding peak and RMS levels, you can optimize your audio recording for the best possible sound. With practice and experience, you’ll be able to find the perfect balance between peak and RMS levels and get a great recording every time.

Setting Recording Levels

Optimizing how loud you record is crucial to ensuring high-quality audio. Setting recording levels appropriately can prevent distortion and capture the full range of sound, resulting in a clearer and more balanced recording.

Using A Vu Meter

To ensure optimal recording levels, use a volume unit (VU) meter. The VU meter measures audio signal levels and ensures your recordings are not too soft or too loud. A VU meter displays the average level of a signal and provides an accurate reading of the overall loudness of your track. Set your recording levels so that they consistently hit between -18 dBFS and -12 dBFS on your VU meter. Keeping your levels between this range reduces distortion and results in high-quality recordings.

Using Your Ears

While using a VU meter is reliable, don’t underestimate the power of your ears. Listen to your recording and use your ears to ensure that the volume is optimal. You want your recording to sound crisp and clear without sounding distorted or too low. Adjust and fine-tune your levels until you achieve a balanced sound that pleases your ears.

Calibrating Your Equipment

Make sure to calibrate your equipment before recording to ensure optimal levels. Check the manual for your specific device to see how to calibrate it properly. Each device has its calibration process, and setting levels too high or too low can cause distortion or poor sound quality. When in doubt, double-check the manual or consult with a sound professional. By setting recording levels using a VU meter, your ears, and properly calibrating your equipment, you can optimize how loud you record, resulting in high-quality recordings that sound crisp and clear. Remember, keeping your levels consistent, and within the recommended range is key to making high-quality audio recordings.

Optimizing How Loud You Record

Credit: www.linkedin.com

Optimizing Recording Levels For Different Instruments

Optimizing recording levels for different instruments is crucial for achieving an overall balanced mix. You can adjust the gain levels of each instrument to prevent any clipping or distortion and to ensure that they all sit comfortably within the mix.

Optimizing recording levels for different instruments is an essential aspect of music production that every sound engineer must master. Balancing sound levels while recording different instruments is a crucial element in ensuring a quality final mix. In this section, we’ll look at how to optimize recording levels for some commonly used musical instruments such as drums, guitars, and vocals.

Drums

Recording drums requires a careful balancing of individual mics. A poorly balanced mix of drums can result in a mix that doesn’t work. When recording drums, the bass drum should be the loudest and the cymbals the quietest. You may use a limiter or compressor on drums as peaks from some of the drums can cause distortion. It’s also essential to avoid clipping and distortion when recording drums.

Guitars

To optimize guitar recording levels, listen to the guitar sound and ensure it doesn’t clash with other instruments. Ensure that you set a strong level on the guitar when recording to get a good signal-to-noise ratio. When mixing, keep in mind that a lot of guitar tracks will need to be doubled or tripled, so it is crucial to leave enough headroom when recording.

Vocals

When recording vocals, it’s essential to achieve a balance between the words and the backing tracks. The vocal volume should only be too high for specific song parts that require more emphasis. Recording levels should be set such that the vocals are heard over the instrumental tracks and are audible enough without being overwhelming. Always use a pop filter to control plosives and other things that can cause distortion. In conclusion, optimizing recording levels for different instruments is an art that requires attention to detail, experience, and practice. Properly balancing individual channels, using compression and limiters, and leaving room for doubling and editing all contribute to well-recorded and mixed tracks. By following these tips, you can make sure that your recordings will be of excellent quality and sound great on any speakers or headphones.

Using Compression To Control Levels

When it comes to optimizing how loud you record audio, one of the most helpful tools in your arsenal is compression. Compression is an audio processing technique that reduces the dynamic range of an audio signal, meaning it reduces the difference between the loudest and quietest parts of the audio. This can help bring up the quieter parts of the audio while keeping the louder parts in check to achieve a more balanced mix.

What Is Compression?

Compression, in its simplest form, is an audio effect that automatically reduces the level of an audio signal when it reaches a certain threshold. This threshold is set by the user and can be adjusted to suit the specific needs of the audio being recorded. The effect is achieved through the use of a compressor, which is a type of audio processor.

Types Of Compressors

There are two main types of compressors: analog and digital. Analog compressors are older and use electrical circuits to compress the audio signal. Digital compressors use software to achieve the same effect. Both types have their advantages and disadvantages, and which one you choose to use will depend on your personal preferences and the type of audio you are recording.

Setting Compressor Parameters

When using a compressor, there are several parameters that need to be set to achieve the desired effect. These include:

ParameterDescription
ThresholdThe level at which the compressor starts reducing the audio signal. Setting this too high can cause the compressor to have little effect, while setting it too low can cause the compressor to over-compress the signal.
RatioThe amount of gain reduction that will be applied to the signal once it crosses the threshold. A higher ratio means more gain reduction, while a lower ratio means less gain reduction.
AttackThe time it takes for the compressor to start reducing the signal once it crosses the threshold.
ReleaseThe time it takes for the compressor to stop reducing the signal once it falls below the threshold.

By adjusting these parameters, you can achieve the desired effect for your specific audio recording needs.

Post-processing For Optimal Levels

Optimizing how loud you record is crucial for a high-quality audio outcome. Post-processing plays a vital role in achieving optimal levels by balancing the audio frequency spectrum and minimizing unwanted noise.

Recordings with inconsistent volume levels can be frustrating to listen to, so it is important to optimize the loudness of your recordings in post-processing. Normalizing, limiting, and compressing are some of the methods used to achieve this. However, in this section, we will focus mainly on normalizing and limiting the loudness of your recordings.

Normalizing

Normalizing is a technique used to increase the overall amplitude of an audio signal to a target level. It is especially useful for recordings that are too quiet and need to be boosted. By normalizing, you ensure that the loudest part of your track reaches the maximum allowed level without distorting the audio.

How to Normalize

To normalize your audio in a digital audio workstation (DAW) software:

  1. Highlight the sections of your recording you’d like to normalize – for example, the whole track or just a section of it.
  2. Look for the “normalize” option (usually found under “effects”) and apply it to your selection.
  3. Select the target level you want your audio to be normalized to, usually 0 dB.

Limiting

Limiting is a technique in audio mastering aimed at controlling the dynamic range of a single track or an entire mix-down. It is the process of using a compressor on one’s audio and then setting a limit to ensure that the loudest peak is at an acceptable level.

How to Limit

To apply a limiter to your audio track in a DAW:

  1. Insert a limiter effect into the effects chain of your audio track or master bus
  2. Adjust the threshold and output level of the limiter
  3. Preview your track to ensure it is not over-compressed or distorted.

Using both Normalizing and Limiting techniques help you balance the levels of your track, enhancing its loudness without losing the essence of the original file. Remember, post-processing for optimal levels can help your tracks stand out and maximize their impact.

Mixing Considerations

When it comes to optimizing how loud you record, mixing considerations play an important role. The way you balance levels, pan tracks, and equalize frequencies can make or break your recordings. Let’s take a look at each of these factors in detail:

Balancing Levels

The first consideration is the balance of levels between different tracks. Each instrument or voice in your recording should be at the appropriate volume level to achieve a cohesive sound. If one track is too loud, it can overpower the others and cause distortion. On the other hand, if a track is too quiet, it can get buried in the mix and go unnoticed. To ensure proper balance, use your ears and adjust levels accordingly.

Panning

The next consideration is panning, which determines the stereo placement of tracks. When done correctly, panning can create a sense of space and dimension in your recording. For example, panning a guitar track to the left and a keyboard track to the right can make it feel like you’re in the middle of a band. However, too much panning can make your mix sound disjointed and unnatural. Balance is key.

Equalization

The final consideration is the use of equalization, or EQ. EQ allows you to adjust the frequency balance of your tracks, which can help them fit better together in the mix. For example, boosting the high-end frequencies of a vocal track can make it sound clearer and more distinct. However, too much EQ can cause harshness or muddiness, so it’s important to use it sparingly and with intention.

In conclusion, balancing levels, panning, and EQ are all important mixing considerations when optimizing how loud you record. By adjusting these factors with care and attention, you can achieve a balanced and cohesive sound in your recordings.

Mastering For Optimal Levels

Mastering for optimal levels is key when optimizing how loud you record. It involves finding the right balance between loudness and clarity to achieve maximum impact. Utilizing proper tools and techniques, such as compression and equalization, can help achieve the desired outcome.

What Is Mastering?

Mastering is the final stage in the production process, where the finished mix is polished and prepared for distribution. During this process, the audio is adjusted to achieve the best possible sound quality. A mastering engineer typically uses EQ, compression, and limiting to balance the levels, tone, and dynamics of the mix.

Setting Levels For Final Output

When mastering your audio for optimal levels, one critical factor to consider is setting your levels correctly. Your goal is to ensure the final output has consistent volume levels while preserving the dynamics of the original mix. It’s essential to set your levels appropriately, ensuring your music sounds as good on speakers as on headphones. To set levels, start by monitoring your audio for volume peaks and adjusting the gain. You want to ensure your mix doesn’t distort or clip at any point. Adjust your faders and EQ to reduce peaks, ensuring your music is balanced and clear.

Optimizing Your Mix For Streaming Services

When mastering your audio, it’s critical to keep in mind the final output format, especially if you plan to distribute your music through streaming services. Streaming services use loudness normalization algorithms to ensure all music plays back at a consistent volume level. You must optimize your mix’s loudness range to sound its best on these platforms.

Conclusion

By mastering your audio for optimal levels, you can produce a professional-quality mix that sounds great on any device. It’s essential to keep in mind the final output format and optimize your mix for streaming services. Remember to set your levels correctly, reducing volume peaks, and preserving the dynamics of your mix. With these tips, you can produce high-quality audio that sounds great on any platform.

Optimizing How Loud You Record

Credit: moises.ai

Frequently Asked Questions Of Optimizing How Loud You Record

How Loud Should Your Recording Be?

Keep your recording volume consistent and around -12dB to -6dB peak levels to avoid distortion and ensure clarity. Avoid going too low or too high as it may result in loss of quality. Use a level meter to keep track of your recording levels and adjust accordingly.

What Is The Best Db Level For Recording?

The best dB level for recording varies depending on the type of audio being recorded. Generally, for vocals and acoustic instruments, a level between -12dB and -6dB is recommended, while for amplified instruments, such as electric guitars, a level between -18dB and -15dB is best.

It’s important to avoid recording at levels that are too high, as this can cause distortion and other quality issues.

How Can I Improve The Quality Of My Audio Recording?

To improve the quality of your audio recording, try the following tips: 1. Ensure good microphone placement and proper microphone type 2. Choose a suitable room with minimal echo 3. Adjust recording levels and monitor the audio 4. Edit and clean up any unwanted noise or background sounds 5.

Use a pop filter to reduce plosives and sibilance.

How Loud Should You Record In Garageband?

When recording in GarageBand, you should aim for a peak level of -6dB to -3dB. This ensures that your audio won’t clip or distort. Keep an eye on the input level meter while recording, and adjust your levels as needed.

It’s better to record too low and increase the volume later, rather than recording too loud and creating a distorted sound.

Conclusion

Optimizing how loud you record is crucial in achieving high-quality recordings. Through following the tips discussed such as proper microphone positioning and careful monitoring, you can ensure that your recordings are well-balanced and avoid unwanted distortions. By taking the time to carefully adjust your recording levels, you can enhance the overall impact of your audio and produce content that truly resonates with your audience.

So, next time you’re recording, remember to pay close attention to your levels and enjoy the benefits of a properly optimized recording!