Categories
Archive

Easiest Way To Get Better At Mixing

The easiest way to get better at mixing is to practice consistently and focus on improving your listening skills. In order to develop a better ear for balance, tone, and clarity, start by critically analyzing your mixes and taking note of areas that need improvement.

Experiment with different techniques and tools, such as compression and EQ, and don’t be afraid to seek feedback from other experienced mixers. Additionally, make sure you have a good understanding of the basics, such as gain staging and panning, and don’t overlook the importance of a well-treated listening environment and quality monitors or headphones.

With time, patience, and dedication, you can achieve your goals and become a skilled mixer.

Start With Eq

Start with EQ is the easiest and most effective way to improve your mixing skills. By using the equalizer to balance the frequencies of different instruments, you can achieve a cleaner, more professional sound. With practice, adjusting the EQ will become second nature and help you create more dynamic and polished mixes.

As a beginner in mixing, it’s easy to get overwhelmed with all the different techniques and tools available. However, one of the best strategies to improve your mixing skills is to start with the EQ. EQ, short for equalization, is the process of adjusting the balance between different frequency components of an audio signal. In this section, we’ll discuss how to improve your mixing skills by starting with EQ.

Understand The Frequency Spectrum

Before diving into using EQ, it’s crucial to understand the frequency spectrum. The frequency spectrum ranges from low to high frequencies, with low frequencies being bass and high frequencies being treble. Understanding the frequency spectrum is essential because it helps you identify which frequencies are causing problems in your mix. For instance, if your mix sounds muddied, it may be due to too many low frequencies. Similarly, if your mix sounds harsh, it may be due to too many high frequencies. By understanding the frequency spectrum, you can accurately identify problems in your mix and use EQ to fix them.

Use Eq To Cut Before Boosting

A common mistake made by beginner mixers is boosting frequencies rather than cutting them. Boosting frequencies can lead to a muddy and unnatural sound in your mix. Instead, use EQ to cut problematic frequencies before boosting. For instance, if you find that your mix has too much low midrange, use EQ to cut those frequencies rather than boosting the higher frequencies.

Use High-pass And Low-pass Filters

Another EQ technique for improving your mixing skills is to use high-pass and low-pass filters. High-pass filters cut off frequencies below a certain threshold, while low-pass filters cut off frequencies above a certain threshold. Using high-pass and low-pass filters can help to clean up your mix by removing unnecessary frequencies. For instance, if you’re mixing a vocal track, using a high-pass filter can remove low-frequency rumble, while a low-pass filter can remove unwanted high-frequency noise. In conclusion, starting with EQ is the easiest way to improve your mixing skills. Understanding the frequency spectrum, using EQ to cut before boosting, and using high-pass and low-pass filters are all effective techniques for using EQ in your mixes. By mastering these techniques, you’ll be on your way to a cleaner and clearer mix.

Focus On Levels

To become better at mixing, it’s essential to focus on levels. Keep your ears trained to the volume and balance of each instrument within the mix. By adjusting the levels accordingly, you can create a clearer and more cohesive final product.

When it comes to mixing tracks, it’s important to remember that there’s more to it than just adjusting the EQ and throwing in some effects. In fact, one of the most crucial elements to focus on when trying to achieve a well-balanced mix is levels. Here are some tips on how to improve your mixing by focusing on levels.

Use Your Ears

The most important tool in your arsenal when it comes to mixing is your ears. As you’re adjusting levels, make sure to take the time to listen carefully to each element of the mix. Often, small adjustments can make a big difference, and your ears are the best judge of what’s needed. Trust them and don’t rely solely on your meters.

Keep An Eye On The Meters

While your ears are the most important tool, it’s also important to keep an eye on your meters to ensure that nothing is pushed too far into the red. This is especially important when it comes to the master meter, as clipping or distorting the final mix can ruin an otherwise great track. Keep your levels in check throughout the mixing process and you’ll have an easier time getting a well-balanced mix.

Use Automation To Smooth Out Levels

One of the best tools for balancing levels is automation. By using automation to adjust levels during specific sections or moments in the track, you can smooth out any discrepancies and ensure that each element sits just right in the mix. Take the time to work on automation and you’ll quickly see how much of a difference it can make. In conclusion, focusing on levels is key when it comes to mixing tracks. By using your ears, keeping an eye on your meters, and utilizing automation, you’ll be able to achieve a balanced mix that sounds great on any system. So the next time you sit down to start mixing, keep these tips in mind and watch your skills improve.

Importance Of Panning

Effective mixing involves proper planning, and it is a vital part of the process. Planning allows you to anticipate and overcome potential challenges, and it also helps you to organize your workflow efficiently. By taking time to plan meticulously, you can become better at mixing and deliver excellent results consistently.

Panning is the process of distributing audio signals across the stereo image. It is one of the easiest ways to get better at mixing your tracks. Panning helps to create a sense of space and depth in your mix, separating different elements and making them sound more distinct. This improves the clarity and overall quality of your final mix. Here are some ways to use panning effectively.

Basic Stereo Image

The basic stereo image involves dividing the audio spectrum into two parts, left and right, and positioning different elements across the stereo field. The center is reserved for mono signals such as vocals, bass and kick drums. You can place instruments like guitars, keyboards, and drums on either side of the stereo field, depending on where you want them to appear in the mix. This creates a more balanced and natural sound.

Panning Individual Tracks

Panning individual tracks involves assigning a specific stereo position to each track in your mix. This allows you to control the placement and width of individual sounds, giving you more detailed control over the overall mix. You can use this technique to separate elements and create a more dynamic mix. For example, you can pan a lead guitar to the left and a rhythm guitar to the right, or pan a percussion track to one side and a vocal track to the other.

Using Stereo Wideners

Using stereo wideners can help to enhance or widen the stereo image of your mix. These plugins add stereo information to mono tracks, making them sound wider and more spacious. However, it’s important to use them in moderation as too much stereo widening can make some elements sound too distant or disconnected from the rest of the mix. In conclusion, panning is an essential tool for any mixing engineer. By learning to use it effectively, you can improve the clarity, separation and definition of your mix, creating a more professional and polished final product.

Add Effects

Add Effects is the easiest way to improve your mixing skills. With its user-friendly interface and wide range of options, you can add the perfect effects to your tracks quickly and easily. Try it out today!

As a mixing engineer, it’s crucial to understand the use of effects to create a balanced and professional mix. Effects come in different types, including reverb, delay, compression, and others. In this section, we will focus on how to add effects to your mix to enhance the overall sound.

Use Reverb Sparingly

Reverb is an effect that simulates the sound of a room or space. It can add depth and dimension to your mix, but it’s important to use it sparingly. Too much reverb can make your mix sound muddy and washed out. A good rule of thumb is to apply reverb on a bus or a group of tracks, rather than on individual tracks. This will help to create a cohesive and natural-sounding space for your mix.

Use Delay For Depth

Delay is an effect that creates echoes or repeats of a sound. It’s useful for adding depth and texture to your mix. You can use delay on a lead vocal track to create a sense of space and depth. It’s also effective when used on guitar solos or piano arpeggios. However, it’s important not to overuse delay as it can make your mix sound cluttered.

Use Compression To Control Dynamics

Compression is an effect that controls the dynamic range of a sound. It’s useful for ensuring that each track sits well in the mix and doesn’t overpower other tracks. You can use compression on individual tracks or on a bus. The key is to use it subtly to avoid over-compressing your mix. A good starting point is to set a low threshold and a high ratio and then adjust to taste. In conclusion, adding effects to your mix is an essential part of the mixing process. Use reverb sparingly, delay for depth, and compression to control dynamics. Remember to apply effects subtly and create a cohesive mix that sounds natural and balanced. By following these tips, you can master the art of adding effects to your mix and take your productions to the next level.

Avoid Common Mixing Mistakes

Improving your mixing skills can be challenging, but avoiding common mistakes is a great start. Whether it’s using too much reverb or EQing too much, mastering these techniques will ensure a more balanced and professional sound. With a bit of practice and attention to detail, you’ll be well on your way to creating better mixes.

Mixing is an important step in music production that can make or break the quality of a track. However, even experienced producers can fall prey to common mixing mistakes, resulting in a subpar final product. In this post, we’ll point out some common mixing mistakes you should avoid to take your productions to the next level.

Don’t Mix Too Loudly

Mixing loudly may seem like a good idea, but it can lead to ear fatigue, making it harder to hear subtle changes in the audio. Mixing at lower volumes can also reveal issues that may not be noticeable at high levels, such as plosives or harsh frequencies. It’s important to note that mixing at low volumes doesn’t mean you shouldn’t occasionally check your mix at higher levels to ensure it translates well across different playback systems.

Don’t Overdo Effects

Effects such as reverb and delay can add depth and character to your mix, but it’s important not to overdo them. Too much reverb can make vocals or instruments sound distant, while too much delay can muddy up the mix. It’s best to use effects sparingly and occasionally solo them to hear their impact on the overall mix.

Don’t Overuse Compression

Compression is a powerful tool that can help control the dynamic range of a track and make it sound more cohesive. However, overusing compression can suck the life out of a mix, making it sound flat and dull. It’s important to use compression judiciously and set the parameters according to the needs of each track. In conclusion, avoiding common mixing mistakes can make a noticeable difference in the quality of your productions. By mixing at appropriate volumes, using effects sparingly, and using compression judiciously, you can create a mix that is well-balanced and sounds great on various playback systems.

Reference Your Mix

Improve your mixing skills by referencing your mix. This involves comparing your mix to a professional mix, using reference tracks and analyzing the frequency spectrum. It is an easy and effective way to train your ears and enhance your mixing abilities.

Mixing music is an art, but it’s also a science. There are technical skills involved that need to be learned and practiced. One of the easiest ways to get better at mixing is to reference your mix. By comparing your mix to other professionally mixed tracks, you can identify areas that need improvement and make adjustments accordingly. Here are some techniques to help you reference your mix.

Use Reference Tracks

Reference tracks are professionally mixed tracks that you use as a benchmark for your own mix. Choose a reference track that is similar in genre, tempo, and overall feel to your mix. This will ensure that you are comparing apples to apples. Import the reference track into your project and compare it to your mix. Listen to how the levels, panning, and EQing compare. Pay attention to the clarity and separation of the instruments. Use this information to adjust your own mix until it sounds more like the reference track.

Take Breaks

Mixing can be a tedious and repetitive task, which can lead to ear fatigue. When your ears get tired, it’s easy to lose perspective and make bad decisions. One of the easiest ways to avoid this is to take breaks. Step away from your mix for a few minutes or even a few hours. When you come back, your ears will be fresh and you’ll be able to hear things more accurately. This will help you make better decisions and avoid over-correction.

Listen On Different Speakers/headphones

Different speakers and headphones have different tonal characteristics. By listening to your mix on multiple playback systems, you can get a better understanding of how your mix will sound to different listeners. This will help you make adjustments to your mix that will ensure it sounds good on any system. Listen to your mix on both studio monitors and consumer headphones. Try listening in different environments (e.g., your car or a coffee shop). Use this information to make informed decisions about your mix. In conclusion, referencing your mix is one of the easiest ways to get better at mixing. By using reference tracks, taking breaks, and listening on different speakers/headphones, you can improve your mixing skills and create better-sounding mixes. Incorporating these techniques into your workflow will help you achieve better results and make your tracks stand out from the crowd.

Organization Is Key

The easiest way to get better at mixing is to stay organized. Take detailed notes of your mixing process for each project, label your tracks properly, and use color coding to help keep things visually organized. This will not only make your workflow more efficient but also improve the quality of your mixes.

Organization Is Key: Color Code Your Tracks, Use Groups And Buses, And Label Your Tracks Clearly

If you’ve ever tried mixing a song with a lot of tracks, you know how overwhelming it can be. You might find yourself getting lost in a sea of tracks and losing focus on the overall sound. That’s where organization comes in. By keeping your tracks organized and labeled, you’ll be able to mix more efficiently and achieve better results. Here are some tips for organizing your tracks:

Color Code Your Tracks

One of the easiest ways to keep track of your tracks is to color code them. Most DAWs (Digital Audio Workstations) allow you to change the color of each track, so take advantage of this feature. You can assign colors to different types of instruments or even different sections of the song. For example, you could use blue for drums, green for guitars, and red for vocals. This way, you’ll be able to see at a glance which tracks are which.

Use Groups And Buses

Another way to keep your tracks organized is to use groups and buses. Groups allow you to group together similar tracks, such as all the drum tracks or all the guitar tracks. This way, you can adjust the levels and effects of the entire group at once, instead of adjusting each track individually. Buses, on the other hand, allow you to send multiple tracks to the same effects processor. For example, you could send all your vocals to a reverb bus, so they all have the same reverb effect.

Label Your Tracks Clearly

Finally, make sure you label your tracks clearly. This might seem obvious, but it’s easy to forget or get lazy with labeling. Take the time to give each track a clear, descriptive name that will make sense to you later. You can also add extra information like the key or BPM of the track. This way, you’ll be able to find what you’re looking for quickly and easily. By following these tips for organization, you’ll be able to mix more efficiently and achieve better results. It might take a little extra time upfront, but it will save you time and frustration in the long run.

Practice Makes Perfect

The easiest way to get better at mixing is practice. Through consistent practice, you can improve your mixing skills and develop your own unique style. Experiment with different techniques and equipment, and don’t be afraid to make mistakes.

Mixing is a skill that takes time and effort to master. It requires an understanding of audio, technical know-how, and a good ear for music. The more practice you put into it, the better you will become. Here are some tips to help you improve your mixing skills.

Keep Mixing Regularly

The best way to improve your mixing skills is to mix regularly. This means setting aside time each day or each week to work on your projects. Keep a schedule and stick to it. When you mix regularly, you will start to notice improvements in your work. You will become more familiar with your mixing software, and you will begin to understand how different sounds work together. Don’t wait for inspiration to strike – just start mixing.

Ask For Feedback

One of the best ways to improve your mixing skills is to get feedback from others. This can come from other musicians, producers, or sound engineers. Ask them to listen to your mixes and give you constructive criticism. When you receive feedback, don’t take it personally. Instead, use it as a learning opportunity. Take note of the things you did well and the areas where you need improvement. Use this feedback to make your next mix even better.

Join Online Communities

Joining online communities is a great way to connect with other musicians and producers. These communities provide a space for people to share their work, give feedback, and collaborate on projects. Look for communities that are focused on mixing and mastering. Joining these groups will give you access to other people’s work, as well as tips and tricks for improving your own mixing skills. Some examples of online communities include Gearslutz, Reddit’s r/audioengineering, and VI Control.

Conclusion

Mixing is a skill that requires time, patience, and effort to master. By practicing regularly, asking for feedback, and joining online communities, you can take your mixing skills to the next level. Remember to never stop learning and exploring new techniques and ideas.

Easiest Way To Get Better At Mixing

Credit: www.mixinglessons.com

Frequently Asked Questions Of Easiest Way To Get Better At Mixing

How Can I Improve My Mixing Skills?

To improve your mixing skills, practice regularly and listen critically to your mixes. Use reference tracks to compare and evaluate your work, and focus on leveling, EQ, and balance. Experiment with different techniques and tools, such as compression and reverb, and consider investing in quality monitors and headphones.

Keep learning and seeking feedback from experienced mixers.

How Do You Make A Better Mix?

To make a better mix, follow these guidelines: 1. Use quality samples and sounds 2. EQ tracks 3. Use compression correctly 4. Use reverb and delay for depth 5. Mix on a good set of speakers or headphones.

How Long Does It Take To Become A Good Mixer?

It takes time to become a good mixer. Expert level skills require years of practice. Practice every day, study the manuals and reference books for practice with different software and hardware, and learn from fellow professional mixers. Mentors can also help shorten the learning curve.

How Do I Get Better At Mixing Beats?

To get better at mixing beats, you should practice consistently, experiment with different ideas, listen to and dissect other mixes, learn about the technical aspects of mixing, and seek feedback from others in the industry.

Conclusion

To sum it up, there are numerous ways to pace yourself when it comes to mixing. Remember, practice is the key to success, but with the use of these techniques like maintaining good control over your gain structure, adjusting EQ levels, relying on the harmonic mixing technique, and keeping your mix simple, you can take charge of the mixing curve like a pro! Give yourself time, have patience, and work on your skills to improve your mixing performances.

Soon, you will be able to mix like a professional and enjoy your musical journey to the fullest.
Categories
Archive

Parallel Compression Pro Tools

Parallel compression in Pro Tools is a technique where a copy of a track is processed with a compressor and then blended back with the original track. This creates a fuller, more dynamic sound.

Producers and engineers use parallel compression as a way to get their tracks to stand out in a mix without sacrificing the natural dynamics of the performance. It allows for greater control over the balance of the track and gives the producer and mix engineer the ability to emphasize certain elements in a mix.

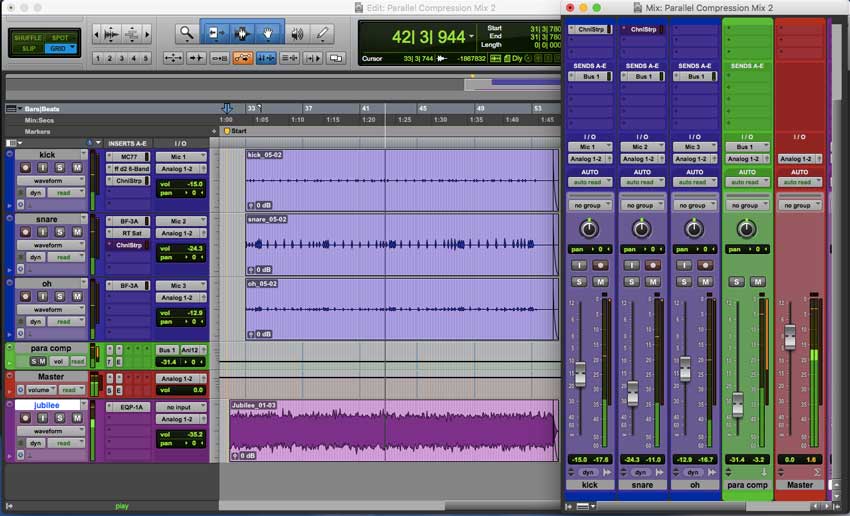
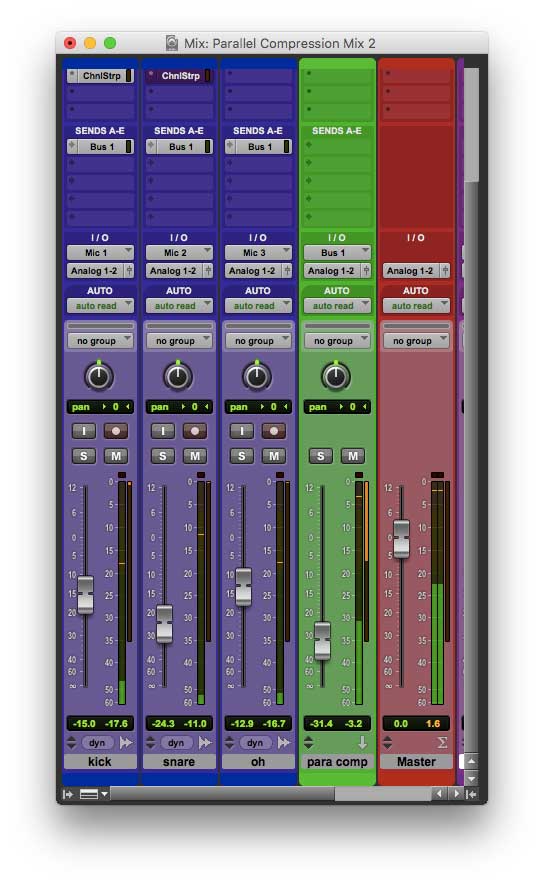
To create parallel compression in Pro Tools, a copy of the track is first created. This copy is then compressed heavily with a fast attack and release time, reducing the dynamic range of the track. The original track and the compressed copy are then blended together, usually using the fader on the compressed track to control the amount of compression applied.

Parallel Compression Pro Tools

Credit: blog.zzounds.com

What Is Parallel Compression?

Parallel compression in Pro Tools is a technique that involves blending a heavily compressed audio signal with a dry signal to add sustain and fullness to a track. This technique can enhance the overall sound of a mix and is commonly used in music production.

Parallel Compression is an audio mixing technique that combines an uncompressed version of a track with a heavily compressed version of the same track. The uncompressed track adds back the dynamic range that was lost while applying the compression, giving us the best of both worlds. Parallel Compression is widely used in Pro Tools and other music software applications.

How Does It Work?

Parallel Compression works by duplicating the audio track to create a second copy, which is then heavily compressed. The compressed track is then mixed back in with the original uncompressed track at a lower volume. The result is a track that has the same dynamics as the original uncompressed track, but also has the added power and punch of the heavily compressed track.

Why Is It Popular?

Parallel Compression is popular because it allows us to add power and punch to a track without sacrificing the dynamics. It is especially useful for drums, bass, and other instruments that need to be both powerful and dynamic. It is also a great way to add more character to a mix and make it stand out from other mixes. Overall, Parallel Compression is a valuable tool for any audio engineer or producer looking to improve their mixes.

Parallel Compression Pro Tools

Credit: blog.zzounds.com

Setting Up Parallel Compression In Pro Tools

Learn how to set up parallel compression in Pro Tools, a technique used to enhance the dynamics of a track without losing its natural sound. With this method, you can maintain the original dynamic range while adding subtle, yet effective, compression.

Setting up parallel compression in Pro Tools is an essential technique to add depth and thickness to your mix. It allows you to blend the uncompressed and compressed signals, resulting in a dynamic and controlled sound. This technique is widely used in music production, and it is easy to set up in Pro Tools. In this post, we will guide you step-by-step in creating parallel tracks, routing audio, and setting up compression on parallel tracks.

Creating Parallel Tracks

To set up parallel compression in Pro Tools, you need to create parallel tracks. These are duplicate tracks that run alongside the original tracks and receive the same audio signal. Follow the steps below to create parallel tracks:

  1. Select the track that you want to process using parallel compression.
  2. Right-click on the track and select “Duplicate” from the drop-down menu.
  3. Rename the duplicated track to identify it as the parallel track (e.g., “Parallel Vox”).

Routing Audio To Parallel Tracks

Once you have created the parallel tracks, you need to route the audio signal to them. Follow the steps below to route audio to your parallel tracks:

  1. Locate the “Sends” section of the original track.
  2. Select the first send and choose the parallel track you want to use from the drop-down menu (e.g., “Parallel Vox”).
  3. Adjust the send level to control the amount of audio that is sent to the parallel track.
  4. Repeat step 2 and 3 for the other parallel tracks.

Setting Up Compression On Parallel Tracks

The final step in setting up parallel compression in Pro Tools is to apply compression to your parallel tracks. Follow the steps below to set up compression on your parallel tracks:

  1. Select the parallel track that you want to apply compression to (e.g., “Parallel Vox”).
  2. Insert a compressor plugin on the parallel track.
  3. Adjust the compressor settings to your taste, ensuring that you set the attack and release times appropriately for your mix.
  4. Blend the uncompressed and compressed signals by adjusting the fader levels of the parallel tracks.

In conclusion, setting up parallel compression in Pro Tools can take your mixes to the next level. By creating parallel tracks, routing audio to parallel tracks, and setting up compression on parallel tracks, you can add depth and thickness to your sound. Try out this technique on your mixes and hear the difference it makes!

Advanced Parallel Compression Techniques

Advanced Parallel Compression techniques in Pro Tools involve splitting a signal into two paths, adding compression to one, and then blending the compressed and uncompressed signals back together. This technique can create a fuller sound with increased depth and clarity.

Parallel compression, also known as New York Compression, is a technique used to bring out the desired characteristics of an audio mix. By duplicating the original audio track and applying heavy compression to its duplicate version, the sound engineer can blend the compressed copy with the original to create a more balanced and fuller sound. However, using advanced parallel compression techniques can take this audio trick to the next level.

Using Eq On Parallel Tracks

One advanced parallel compression technique is to use EQ on each of the duplicated tracks. EQing the tracks before applying compression can highlight specific frequency ranges and minimize any unwanted ones. For instance, if the original audio has a muffled vocal sound, boosting the high-end frequencies of the compressed duplicate track can result in a more distinguishable, clear vocal sound. On the other hand, reducing midrange frequencies of the duplicated track can result in a fuller-sounding instrumental section.

Using Different Types Of Compressors

Another way to experiment with advanced parallel compression techniques is to use different types of compressors on the duplicated tracks. For example, while a fast attack and release compressor may work best on a snare drum, a slower attack and release compressor may sound better on a guitar track. By utilizing different compressor settings, audio engineers can achieve a more dynamic and diverse sound in the mix.

Applying Parallel Compression To Specific Instruments

Parallel compression doesn’t have to be applied to the entire mix. Sound engineers can instead use it to specific instruments in order to achieve a more polished, full-bodied sound. For example, applying parallel compression to the lead vocal track can add depth and character to the vocals, without affecting the other elements of the mix. Similarly, applying parallel compression to the bass guitar track can bring out the low-end frequencies and give the groove of the song more bounce and power. In conclusion, by using advanced parallel compression techniques like EQing on parallel tracks or using different types of compressors, sound engineers can take their mixes to the next level. By experimenting with these techniques and applying parallel compression to specific instruments, they can achieve a fuller, balanced sound that enhances the overall quality of the mix.

Mixing With Parallel Compression

Parallel compression in Pro Tools is a mixing technique that involves blending an uncompressed track with a heavily compressed version. This allows for greater control over the dynamics of a mix while preserving the natural sound of the original track.

Balancing Wet And Dry Signals

Parallel compression, also known as New York compression, is a popular mixing technique used by engineers to add depth and impact to their mixes. One of the challenges in using parallel compression is balancing the wet and dry signals. The dry signal is the original track, while the wet signal is the compressed track. To achieve a balanced mix, start by setting the dry signal’s fader to its original level. Then, slowly increase the wet signal’s fader until you hear a noticeable difference in the mix’s overall impact.

Using Parallel Compression In A Mix

Parallel compression can be applied to any track, from vocals to drums to guitars. To use parallel compression in a mix, you need to create a copy of the original track, apply compression to the copied track, and then blend the two tracks together. To make the process easier, many DAWs, such as Pro Tools, have built-in parallel compression plugins that you can use.

Blending Multiple Parallel Tracks

Blending multiple parallel tracks can add even more depth and impact to your mix. To do this, create a new track and route all the parallel compression tracks to it. Next, add a compressor to the new track and adjust the settings to compress the blended tracks. Finally, blend the compressed track into the original mix to taste. It’s essential to ensure that each parallel track’s compression settings are consistent to achieve a balanced mix. Parallel compression is a powerful mixing technique that can add depth, clarity, and impact to your mixes. By following the tips above, you can master this technique and take your mixing skills to the next level.

Common Mistakes To Avoid

When using parallel compression in Pro Tools, it’s important to avoid common mistakes. These include using too much compression or not adjusting the levels correctly, leading to a lack of balance in the mix. Be sure to carefully listen and adjust to achieve the desired effect.

Common Mistakes to Avoid: Parallel compression is a widely used technique among mixing engineers, yet it’s easy to make mistakes that can lead to unsatisfactory results. In this section, we’ll outline the common mistakes to avoid when using parallel compression in Pro Tools. Overdoing compression: One of the most common mistakes when using parallel compression is overcompressing the signal. This tends to happen when the compressor settings are too extreme, resulting in an overcompressed and unnatural sound. To avoid this, it’s important to use compression settings that are appropriate for the source material. Not properly balancing wet and dry signals: Another common mistake is not properly balancing the wet and dry signals. The dry signal is the original signal, while the wet signal is the compressed signal. It’s important to find the right balance between the two to avoid an unnatural sound. A good starting point is to match the levels of the wet and dry signals, then adjust accordingly. Using too many parallel tracks: Using too many parallel tracks is another mistake to avoid. While it may seem tempting to use several parallel tracks for different frequency ranges, it can lead to a cluttered and messy mix. Instead, it’s better to use a few well-designed parallel tracks that complement the original sound. In conclusion, parallel compression can be an effective technique to enhance the impact and clarity of your mix. It’s essential to avoid these common mistakes to achieve the desired result. By endeavoring to strike a balance between wet and dry signals, avoiding overcompression and using a reasonable number of parallel tracks, you will elevate your mixes to a professional level.

Parallel Compression Pro Tools

Credit: www.protoolsproduction.com

Frequently Asked Questions Of Parallel Compression Pro Tools

What Is Parallel Compression In Pro Tools?

Parallel compression in Pro Tools is a mixing technique where the original dry signal is mixed with a compressed version of itself. This creates a dynamic range where the loud parts are controlled while the quieter parts remain intact, resulting in a more full-bodied sound.

How Do I Parallel Process In Pro Tools?

To parallel process in Pro Tools, first select the tracks you want to process. Then, create a new send on those tracks and route it to a new auxiliary track. Apply the desired plugin to the auxiliary track, and adjust the blend between the processed and unprocessed signals using the faders on the send and auxiliary tracks.

Repeat as needed for additional parallel processing.

Should I Use Parallel Compression?

Yes, parallel compression can be a useful technique in mixing audio. It allows you to add the benefits of compression to a track without completely losing its dynamics. This can be particularly useful for drums or vocals where you want to add some sustain or energy to the sound without sacrificing too much of the original character.

How Do You Set Parallel Compression?

To set up parallel compression, first, duplicate the track you want to compress. Then, apply heavy compression with high gain to one track and leave the other uncompressed. Adjust the faders to blend the compressed and uncompressed signals to your liking.

Conclusion

To conclude, parallel compression in Pro Tools is a powerful mixing technique that can take your productions to the next level. By blending a heavily compressed signal with a dry signal, you can achieve a fuller and more dynamic sound without sacrificing clarity.

With the use of plugins and automation, the possibilities for parallel compression are endless. Embrace this technique and experiment with different settings to find the perfect balance for your mix. Your listeners will thank you for it.

Categories
Archive

Can Cubase Open Nuendo Files

Cubase can open Nuendo files without any issues. In fact, both DAWs share the same file format, which means that projects made in Nuendo can be opened in Cubase and vice versa.

Cubase and Nuendo are two of the most popular digital audio workstations (DAWs) used by music producers, engineers, and artists around the world. While they have some differences in terms of features and target audience, both DAWs share a lot of similarities and use the same file format.

This means that projects created in Nuendo can be opened in Cubase without any issues, and vice versa. This is great news for users who want to collaborate with others who use a different DAW, or for those who want to switch between the two DAWs depending on their needs. We will take a closer look at how Cubase can open Nuendo files and how to do it in a few simple steps.

File Formats In Cubase And Nuendo

Cubase and Nuendo both use different file formats for their project files. While Cubase can open Nuendo files, certain features in Nuendo may not be compatible. It is recommended to use the same software for seamless compatibility and full access to all features.

If you are a music producer, then you must be familiar with Cubase and Nuendo, two of the most popular digital audio workstations in the music industry. Cubase and Nuendo, both are developed by Steinberg, and they share a lot of features. So, if you’re using Cubase or Nuendo and you’re wondering if you can open a file created in the other, then this guide is for you. In this post, we’ll discuss the file formats used in Cubase and Nuendo and whether you can open Nuendo files in Cubase and vice versa.

Audio File Formats

Cubase and Nuendo both support a wide range of audio file formats, including WAV, AIFF, FLAC, MP3, and more. Both DAWs can import and export audio files in these formats, so you won’t have any trouble sharing audio files between them.

Midi File Formats

Like audio file formats, Cubase and Nuendo also support a variety of MIDI file formats, including Standard MIDI File (SMF), General MIDI File (GMF), and MIDI Karaoke (KAR). Both DAWs can import and export MIDI files in these formats, making it easy to work on projects between Cubase and Nuendo.

Project File Formats

When it comes to project file formats, Cubase and Nuendo use different file extensions. Cubase projects have a .cpr file extension, while Nuendo projects have a .npr file extension. Unfortunately, Cubase cannot open Nuendo project files, and Nuendo cannot open Cubase project files. However, you can export audio and MIDI files from Nuendo into Cubase and vice versa, allowing you to collaborate on projects between the two DAWs. In conclusion, while Cubase and Nuendo share some similarities with their support for audio and MIDI file formats, they cannot open each other’s project files. However, with the ability to export audio and MIDI files, you can still collaborate on projects between the two DAWs.

Can Cubase Open Nuendo Files

Credit: forums.steinberg.net

Opening Nuendo Files In Cubase

Opening Nuendo files in Cubase is a common task among audio professionals. Both Cubase and Nuendo are widely used digital audio workstations (DAWs) by Steinberg. While Nuendo is designed specifically for post-production, Cubase is a versatile DAW that is used by composers, producers, and musicians for various music tasks.

Checking Compatibility Of Nuendo Files With Cubase

Before opening Nuendo files in Cubase, it is important to check the compatibility of the files. While Cubase and Nuendo use the same audio engine, it is not guaranteed that Nuendo files can be opened in Cubase. The compatibility depends on the version of both programs you are using. Therefore, it’s recommended to update both Nuendo and Cubase to the latest versions to reduce any potential compatibility issues.

Converting Nuendo Files To A Compatible Format

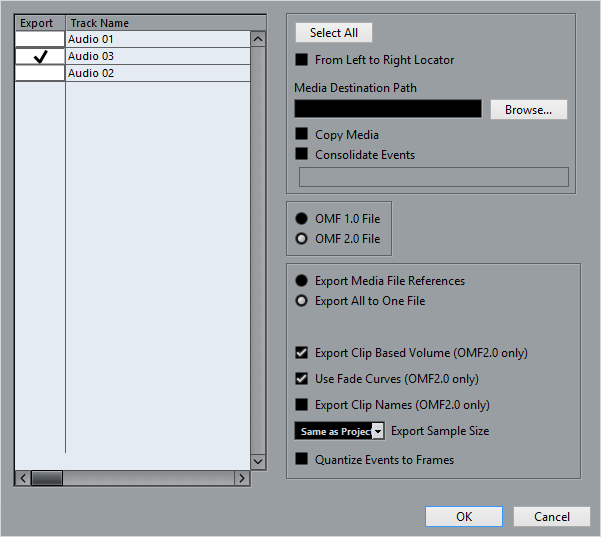
If your Nuendo files are not compatible with your version of Cubase, you can convert them to a compatible format. Steinberg offers software tools such as the “Nuendo to Cubase Project Converter,” which can make the conversion process easier and faster. If you don’t want to use third-party software, you can also try exporting the Nuendo files as midis, audio stems, or MIDI stems to make them compatible with Cubase.

Importing The Nuendo Project Into Cubase

To import the Nuendo project into Cubase, you need to follow these easy steps:

  1. Open Cubase
  2. Select “File” and click on “Import” or use the shortcut “Ctrl+Shift+I” (Windows) or “Cmd+Shift+I” (Mac)
  3. In the “Import” window, select the Nuendo project file you want to open and click on “Open”
  4. Choose the tracks you want to import and select the options you desire (e.g., “copy files to working directory,” “import tempo track,” etc.)
  5. Click “OK” to complete the import process. Your Nuendo project should now be open in Cubase.

Opening Nuendo files in Cubase can be a useful way to collaborate with other audio professionals. By following these steps, you can ensure that your Nuendo files can be opened in Cubase and that you can continue working on your projects seamlessly using the versatile features of Cubase.

Using Cubase And Nuendo Interchangeably

Cubase and Nuendo are two of the most popular digital audio workstations (DAWs) for musicians, sound engineers, and producers. Both software are developed by Steinberg, a leading manufacturer of audio software and hardware. While Nuendo is primarily used for post-production, Cubase is known for its versatility in music production. However, many users wonder if Cubase can open Nuendo files.

If you work with both Cubase and Nuendo, you might be wondering if it’s possible to use them interchangeably. The answer is yes; both DAWs have similar features and share the same audio engine, file format and structure. This means that you can open a project created in Cubase in Nuendo and vice versa.

To import a Cubase project into Nuendo, you need to follow these steps:

  1. Open Nuendo and go to the File menu.
  2. Select “Import” and choose “Cubase Project”.
  3. Locate the Cubase project file on your computer and click “Open”.
  4. Nuendo will now import the Cubase project, including all audio and MIDI data. You can continue working on the project in Nuendo.

If you want to export a Nuendo project to Cubase, you need to follow these steps:

  1. Open Nuendo and go to the File menu.
  2. Select “Export” and choose “Cubase Project”.
  3. Choose the location where you want to save the Cubase project file and click “Save”.
  4. Open Cubase and go to the File menu.
  5. Select “Import” and choose “Cubase Project”.
  6. Locate the Nuendo project file on your computer and click “Open”.
  7. Cubase will now import the Nuendo project, including all audio and MIDI data. You can continue working on the project in Cubase.

While it’s possible to use Cubase and Nuendo interchangeably, there are some workflow considerations you should keep in mind:

  • Plugins: Cubase and Nuendo may have different bundled plugins. If you use a plugin in Cubase that’s not available in Nuendo, you may have to look for an alternative plugin or use a third-party plugin.
  • Compatibility: While Cubase and Nuendo share a similar audio engine and file format, older versions of these DAWs may not be compatible with each other. Make sure you have the latest version of both software to avoid compatibility issues.
  • File management: When working with multiple DAWs, file management becomes crucial. Make sure you have a consistent naming convention for your projects and organize your files in a logical way to avoid confusion.

In conclusion, Cubase can open Nuendo files, and vice versa. This allows for a more versatile workflow for users who use both DAWs. However, there are some workflow considerations you should keep in mind to ensure compatibility and file management.

Can Cubase Open Nuendo Files

Credit: steinberg.help

Plugins And Third-party Software

Cubase can open Nuendo files with the help of specific plugins and third-party software. These tools are essential to ensure compatibility between different DAW software.

Compatibility Of Third-party Plugins With Both Cubase And Nuendo

Third-party plugins allow music producers to enhance the quality of their sound recordings and add effects that are not available on the software. Cubase and Nuendo are compatible with VST, VSTi, and DirectX third-party plugins. However, Nuendo software has advanced functionalities that are not available in Cubase. Therefore, after opening a Nuendo file in Cubase, some of the advanced functionalities will not work. In general, you can use third-party plugins with Cubase files, but not all the functionality will be available.

Issues With Using Different Versions Of Plugins In Both Software

Sometimes, music producers may face compatibility issues when using different versions of plugins in Cubase and Nuendo. This is because Cubase and Nuendo may use different versions of the same plugin. In such cases, the plugins may not function correctly or may not work at all. Issues may also arise if you use a plugin made for Cubase in Nuendo or if you use a plugin not designed for the software.

Solutions For Compatibility Issues

To avoid compatibility issues when using Cubase and Nuendo, you should ensure that you use the same version of plugins in both software. Alternatively, you can purchase plugins that are compatible with both Cubase and Nuendo, or plugins that are specifically designed for Nuendo software. It is essential to update the plugins to the latest versions before using them to avoid any possible compatibility issues. In conclusion, it is possible to use third-party plugins with Cubase and Nuendo, but you must ensure that you use the right version of the plugins and update them regularly. By doing this, you will avoid any potential compatibility issues and enjoy the full range of features that these plugins offer.

Collaboration Between Cubase And Nuendo Users

Cubase and Nuendo users can easily collaborate on projects, as Cubase can open Nuendo files. This makes it easier for professionals using both programs to work together and share their ideas seamlessly.

Collaboration between Cubase and Nuendo users has become seamless and hassle-free with the recent updates in software technology. With the ability to open each other’s files, these two Digital Audio Workstations (DAW) have made it easier for music producers to collaborate on projects. This feature has opened up numerous opportunities for artists to collaborate, exchange ideas, and harness the best of both worlds.

Working With Different Versions Of Cubase And Nuendo

As a Cubase or Nuendo user, it is essential to note that opening older project files in newer versions is always possible. The reverse, however, is not always the case. Users cannot always expect to open newer versions of files in an older version of the software. It is wise to check the compatibility chart for information on which versions of Cubase can open Nuendo files and vice versa.

Sharing Projects Between Cubase And Nuendo Users

Sharing projects between Cubase and Nuendo users is now comfortable and straightforward. Exporting your projects from one software to another is possible with the ‘Nuendo Project Exporter’ option. This option allows users to convert Cubase projects to Nuendo project format and vice versa. Converting the project format is necessary to preserve track and editing data between the two software.

Collaboration Workflows

When it comes to collaboration workflow, Cubase and Nuendo have got users covered. The software’s interoperability allows artists to share their work easily and ensure that there are no compatibility issues between the two software versions. The workflow enables artists to build on projects started by others or even work on unfinished projects together. In conclusion, Cubase and Nuendo’s collaboration capabilities are a massive boost to producers and artists alike. The ability to open each other’s files, work on projects together, and share them seamlessly between the two software is an excellent addition to music production.

Can Cubase Open Nuendo Files

Credit: www.youtube.com

Frequently Asked Questions On Can Cubase Open Nuendo Files

Are Cubase And Nuendo The Same?

No, Cubase and Nuendo are not the same software. Although they are both digital audio workstations (DAWs) developed by Steinberg, they have different sets of features and target different user groups. Cubase is more suitable for music production, while Nuendo is more focused on post-production.

Can You Upgrade From Cubase To Nuendo?

Yes, it is possible to upgrade from Cubase to Nuendo. Steinberg offers upgrade options for Cubase users to upgrade to Nuendo, which provides advanced post-production features and capabilities. Contact Steinberg or visit their website for more information and upgrade options.

Is Nuendo Good For Music Production?

Yes, Nuendo is an excellent choice for music production due to its advanced audio editing features, powerful mixing tools, and support for high-quality audio formats. Its intuitive interface and customizable workflow make it a favorite of professional composers, producers, and audio engineers worldwide.

What Does Cubase Run On?

Cubase runs on both Windows and Mac operating systems.

Conclusion

While both Cubase and Nuendo are digital audio workstations by Steinberg, the question remains as to whether Cubase can open Nuendo files. The answer is yes, with some limitations. Cubase can open Nuendo projects, but it may not recognize some parts like the Control Room.

Nevertheless, both programs are powerful and excellent for music production. With these insights, you can decide which of these DAWs suits your needs.

Categories
Archive

The Pros And Cons Of Mixing In Mono

Mixing in mono can lead to a better balance and clearer sound, but it can also cause issues with stereo separation and lack of depth. Mixing in mono can be a useful tool for achieving a balanced mix with a clear and defined sound.

By collapsing all the tracks into one mono channel, it is easier to identify any clashing frequencies and make necessary adjustments. Additionally, mixing in mono makes it easier to achieve a better balance between the different instruments and vocals. However, there are also downsides to mixing in mono.

Since it eliminates any stereo separation, some of the sense of depth and space can be lost. It can also be difficult to create a wide stereo image or add specific effects to individual tracks. Despite the limitations, many professional mix engineers use mixing in mono as part of their workflow to achieve a better balance and overall sound for their mixes.

The Pros And Cons Of Mixing In Mono

Credit: www.ac3filter.net

What Is Mixing In Mono

Knowing what mixing in mono is all about is important for any music producer. Mixing in mono means combining all audio tracks into one channel, creating a sound mix that plays equally from both speakers. In simple terms, your stereo mix becomes a mono mix. Mixing in mono is an excellent way to ensure your music sounds good on any system, no matter how poor the sonic characteristics of the playback device. In this blog post, we shall learn about the definition, how it works, pros, and cons of mixing in mono.

Definition

Mixing in mono means taking your stereo mix and putting it into a single channel, mainly to check how well the instruments and vocal tracks are separated. Think about it as going back to the drawing board to ensure that your mix is balanced, as you don’t want your snare drum and bass guitar competing over the same frequency range or panning all over the stereo field. Mixing in mono forces you to create a balance between each instrument and vocal track.

How It Works

The process of mixing in mono is simple. You can start by ensuring your master track is in mono. Alternatively, you can use a plugin on your master bus to switch from stereo to mono. This switch forces your tracks to sound equally from both monitors, and you can focus on individual levels, panning, and frequency ranges, then check the balance of each element. For instance, a high-hat that sounds louder in one side than the other could be a result of poor panning decisions, stereo imaging issues, or equalization problems.

Once you’ve completed the mono mix and you’re satisfied with the balance, you can revert to stereo and return the tracks to their original positions. At this point, you’ll have achieved a better mix because you’ve taken into account every element’s placement, and the sound levels are equal.

Pros And Cons Of Mixing In Mono

PROSCONS
Ensures a balanced mixCan be time-consuming and tedious
Helps identify frequency masking issuesMay sound dull or flat if over-relied on
Ensures compatibility on all Playback systemsHas limitations when working with spatial effects
Helps with EQ decisions as you can clearly hear if the levels are balanced.May lack creativity as it limits your spatial options

Mixing in mono can be helpful, especially if you’re working on tracks meant for commercial purposes where sound quality is essential. A mixture of both mono and stereo mixing techniques can be useful, but it’s essential to pay attention to the balance you create. Use mono as a tool to help you achieve a good mix, but don’t rely on it too much that you miss out on creative stereo imaging, spatial effects, and other techniques.

Pros Of Mixing In Mono

Mono mixing has been around since the advent of music production, and it is still a common practice among engineers and producers. Although it may seem counterintuitive to some, mixing in mono has several advantages that can make a difference in the final product. Here are some of the pros of mixing in mono:

Clarity In Mix

Mixing in mono allows you to hear the mix more clearly, as it eliminates the stereo image that can sometimes be misleading. By focusing on the mono signal, you can better hear the individual instruments and make sure they sit well in the mix. It can also help you identify masking issues and avoid overloading the frequency spectrum.

Better Phase Relationships

Mono mixing can help you to ensure that your mix has good phase relationships between the channels. When a mix is summed to mono, any phase issues or cancellation between the channels become more apparent. This can help you to identify and correct issues with phase, which can result in a more coherent mix with better imaging and separation.

Mono Compatibility

Mixing in mono ensures that your mix will be compatible with mono playback systems, like AM radio and some Bluetooth speakers. Without proper consideration of the mono signal, your mix can sound drastically different on mono systems, which can affect its overall quality and translation to different devices. By mixing in mono, you can make sure that your mix will sound good on any playback system.

Overall, mixing in mono can be a valuable tool in the production process, but it is not without its drawbacks. Understanding these pros and cons can help you decide whether or not mono mixing is right for your particular project.

Cons Of Mixing In Mono

Mixing in mono can result in a lack of stereo image and an inaccurate representation of the final product. This method also doesn’t allow for panning and spatial effects.

Mixing in mono can have its drawbacks. Although it may provide a clearer, more focused mix, it also has some disadvantages that must be considered. In this section, we will go over the cons of mixing in mono.

Lack Of Stereo Image

One significant disadvantage of mixing in mono is the lack of stereo image. Mono mixes have all the sounds coming from the same center point, which results in a narrow and flat soundstage. Without the separation of left and right channels, the mix can lose the sense of space, depth, and width that stereo mixes provide. The stereo image helps to create a sense of direction and dimensionality, and if you’re mixing in mono, you run the risk of losing this important aspect.

Mix May Lack Depth

Another disadvantage of mixing in mono is that the mix may lack depth. Depth is the perception of distance between the different instruments in a mix, and it’s essential for creating a natural and immersive sound. Mono mixes can compress the sounds too much, making them feel like they’re all on the same plane and losing the sense of space that depth provides. In mono, the separation between foreground and background is often missing, which can result in a flat and uninteresting sound.

Mono-incompatible Plugins

Finally, certain plugins may not be compatible with mono mixing, which can be a significant disadvantage. Many plugins are designed for stereo mixing and work by manipulating the stereo image. Therefore, these plugins won’t work the same way in mono, and you may be missing out on some of the effects they offer. Additionally, some plugins may introduce phase issues or other problems when used in mono, which can further decrease the quality of your mix. Overall, while mixing in mono can have its advantages, it’s essential to consider the potential drawbacks before committing to it entirely. The loss of stereo image, depth, and incompatibility with certain plugins can negatively impact the final mix.

When To Mix In Mono

Mixing in mono refers to blending all the instruments together in one singular audio channel, rather than the traditional stereo approach where sounds are separated into different channels. When approached strategically, mixing in mono offers numerous benefits, such as simplifying the mixing process and ensuring the final product stands up across a variety of speaker setups.

Mixing Vocals

When mixing vocals, starting in mono is a great option if you’re having trouble separating each layer from the others. Mixing in mono can also help identify vocal recording issues such as eq imbalances, reverb, and phase problems, preventing issues with stereo sound later on. When you have all the vocal tracks playing in mono, it’s easier to identify overlapping frequencies and ensure your vocals shine through in the mix.

Mixing Drums

Mixing drums in mono is useful for identifying overlapping rhythms and eliminating unwanted noise. Starting with drum mixing channels in mono allows you to focus on the composition of each layer; once you’ve achieved the desired balance and sound in mono, you can switch back to stereo for detailed panning adjustments. Additionally, mixing in mono can help tighten the drum sound up, while also giving the producer a better understanding of how the drums will interact in a live setting.

Mixing Bass

Mixing bass in mono offers producers greater control over the low-end of a mix. Starting with a mono mix can help identify clashing frequencies and ensure the bass sound sits solidly in the mix. As with other instruments, the goal here is to eliminate potential mixing issues before applying any reverb or stereo effects. Mixing in mono can also help ensure that the basslines sound great across a variety of speaker setups, particularly key if listening through headphones or a single speaker setup.

Pros of Mixing in MonoCons of Mixing in Mono
Allows for greater control over individual instrument layersMay lead to a lack of stereo width or spaciousness in the final mix
Prevents phasing issuesCan take longer to create a detailed mix in mono
Produces a mix that’s consistent across various playback devicesDoesn’t work well for sounds that rely on stereo separation, such as sound effects

In conclusion, deciding when to mix in mono comes down to a producer’s preferences, experience level and mix quality goals. Mixing in mono allows a more focused approach to mixing, ensuring that your tracks are as clean and perfect as possible before applying any other effects or sending tracks to stereo channels.

How To Mix In Mono

Mixing in mono is a technique where all sound elements are combined into a single channel to create balance. The advantage is a better understanding of the space and a tighter sound, but the drawback is that this technique could struggle with depth and stereo effects.

Mono mixing is an essential technique in music production that has been used for decades. It is the process of mixing a stereo audio signal to mono, making it easier to check the mix’s balance and ensure that it sounds great on all playback systems. However, it is essential to understand its pros and cons before using it in your music production process. In this blog post, we look at setting up a Mono Mix, Mixing Techniques, and the Pros and Cons of Mono Mixing.

Setting Up A Mono Mix

Setting up a Mono Mix is relatively simple. Here are the steps to take:

  1. First, create a Mono track in your DAW software.
  2. Next, set the output of all your tracks to the Mono bus.
  3. Then, listen to the Mono mix using headphones to ensure that it sounds balanced and all the instruments are correctly positioned in the mix.

Mixing Techniques

Mixing in mono requires a different approach than mixing in stereo. Here are some techniques to consider:

  • Begin by panning all your tracks to the center and soloing them one at a time.
  • Ensure that each track is balanced and positively contributes to the mix.
  • Make use of EQ and compression to enhance the clarity of each instrument.
  • Pay attention to the stereo width of your reverb and delay effects.

The Pros And Cons Of Mono Mixing

There are various advantages and disadvantages to mixing in mono. Here are some of them:

ProsCons
Allows for a more transparent and balanced mix.Can be challenging to detect stereo-imagery issues.
Makes it easier to identify and fix tracks that aren’t sitting correctly in the mix.May not be suitable for genres that rely heavily on stereo separation, such as electronic dance music (EDM).
Makes it easier to ensure that the mix sounds great on all playback systems, from mono to surround sound.Can be time-consuming and require a different mixing approach than mixing in stereo.

Mixing in mono may not be suitable for all genres of music. Still, it can be an effective technique for ensuring that your mix sounds great on all playback systems, from mono to surround sound. If you decide to use it in your music production process, make sure to follow the steps above and consider the pros and cons discussed in this blog post.

Famous Mono Mixed Songs/albums

Mixing in mono can have both benefits and drawbacks in the production of famous songs and albums. While it can enhance the overall sound and help achieve a cohesive mix, it may also limit the creative possibilities of stereo mixing.

Several renowned artists, including The Beatles and Phil Spector, utilized mono mixing to great effect in their music.

Mono mixing, the process of combining all audio signals into one single track, was a popular technique used in the recording industry prior to the advent of stereo. Though stereo later became the standard, some artists and engineers still prefer the sound of mono mixing. Here are some famous songs and albums that were mixed in mono.

Sgt. Pepper’s Lonely Hearts Club Band – The Beatles

The Beatles’ iconic 1967 album, Sgt. Pepper’s Lonely Hearts Club Band, was mixed in mono with stereo being an afterthought. Most of the songs on the album had much more interesting mono mixes than they did in stereo. For example, “With a Little Help from My Friends” features a much fuller sound in mono than in stereo.

Everyday Is Like Sunday – Morrissey

Morrissey’s 1988 single, “Everyday is Like Sunday,” was initially released in mono. The song, which became one of his most popular, features a haunting and melancholic sound that is emphasized by the mono mix. The song’s producer, Stephen Street, preferred the mono mix and argued that it was the best way to experience the song’s emotion.

Back In Black – Ac/dc

AC/DC’s classic 1980 album, Back in Black, was recorded and mixed in mono. The band’s sound was already heavily distorted and compressed, and the mono mix added an extra layer of intensity to their music. The album’s producer, Robert John “Mutt” Lange, believed that the energy of the band’s live shows was best captured in mono. If you’re considering mixing in mono for your own productions, it is important to weigh the pros and cons carefully. While mono mixing can add warmth and focus to your sound, it can also limit your ability to create a spacious mix with depth and separation between instruments. Ultimately, the decision to mix in mono or stereo should depend on the needs of your specific project.

The Pros And Cons Of Mixing In Mono

Credit: www.soundonsound.com

Frequently Asked Questions On The Pros And Cons Of Mixing In Mono

Is It Better To Mix In Mono?

Yes, it is generally better to mix in mono. Mixing in mono ensures that the mix sounds good on all speaker systems and allows for better control of the overall balance and clarity of the mix. It also helps in identifying any potential phase issues in the mix.

Should I Mix My Beats In Mono?

Yes, it is recommended to mix your beats in mono as it allows you to focus on the balance and clarity of your mix. Mixing in stereo may cause phase issues and inconsistencies when played on different devices. However, it’s important to check your mix in stereo to ensure it sounds good in both mono and stereo.

What Does Mono Do On A Mixer?

Mono on a mixer combines the signals from different channels into a single output. This is useful when you want to send the audio to one channel, such as a speaker, instead of splitting it between left and right channels.

Mono can improve clarity and reduce interference in some situations.

Why Check Mixes In Mono?

Checking mixes in mono allows you to hear any phase issues or mono compatibility problems that may not be as noticeable in stereo. It also helps ensure that your mix sounds good on all devices, including those with only one speaker.

Conclusion

To mix in mono or not to mix in mono, that is the question. While some audio engineers swear by it, others aren’t as convinced. There are certainly pros and cons to consider before deciding whether or not to try mixing in mono.

Ultimately, it comes down to personal preference and the specific needs of each project. Mixing in mono can yield a more focused and balanced mix, but it can also limit creativity and cause issues with panning. At the end of the day, it’s up to the mixer to decide what works best for them.

Categories
Archive

How to Mix Vocals And Piano

To mix vocals and piano, use EQ to separate them in the frequency spectrum and adjust levels for a balanced mix. Adding reverb and compression can also enhance the blend.

Mixing vocals and piano requires careful balancing of frequencies and levels to create a harmonious sound. By using EQ to separate the two main elements and adjusting levels, the vocals and piano can be mixed to produce a clear and balanced sound.

Adding reverb and compression can also help create a seamless blend. Here are some tips to help you mix vocals and piano effectively.

How to Mix Vocals And Piano

Credit: www.izotope.com

Why Mixing Is Important

When it comes to producing music, the mixing process is crucial. Mixing is the process where individual tracks within a recording are blended together to create a final stereo mix. With the rise of home recording, the importance of mixing has increased significantly.

Balance Is Key

One of the most important aspects of mixing vocals and piano is to achieve a balance between the two. A good mix is one where all the tracks are balanced and nothing is overpowering. When mixing vocals and piano, it’s important to make sure that the vocals don’t overpower the piano or vice versa. You can achieve this balance by adjusting the volume levels of each track.

Importance Of Eq

Equalization or EQ is the process of adjusting the balance between frequency components in an audio signal. In mixing, EQ can help to create space and separation between different instruments. When mixing vocals and piano, you can use EQ to ensure that each instrument occupies its own frequency range. This separation will help to achieve a clear and defined sound.

Importance Of Compression

Compression is the process of reducing the dynamic range of an audio signal. In mixing, compression can help to control the volume levels of different tracks. When mixing vocals and piano, compression can help to ensure that all the notes of the piano are heard clearly and that the vocals are consistent in volume.

By paying attention to these three aspects of mixing, you can achieve a professional-sounding mix of vocals and piano. A well-mixed track can make a huge difference in how a song resonates with the listener. It can make the difference between a track that is forgettable and one that is unforgettable.

How to Mix Vocals And Piano

Credit: www.masteringthemix.com

Preparing Your Tracks

Learn how to mix vocals and piano by preparing your tracks beforehand. Ensure that every layer of the mix is properly balanced and EQ’ed, the levels are set correctly, and any unwanted noise is removed. With these steps, you can achieve a cohesive and professional sound in your mix.

Preparing Your Tracks Before you start mixing vocals and piano, organizing and preparing your tracks is crucial. Without proper preparation, you might end up with an inefficient workflow and a cluttered workspace. Here are the steps you need to follow to prepare your tracks for mixing. File Organization The first step is to organize your files in a logical manner. Make sure all your tracks are labeled correctly, and group them together based on their category. For example, all vocal tracks should be grouped together, and all piano tracks should be grouped together. This will make it easier for you to find the tracks you need during mixing. Adjusting Levels Next, adjust the levels of each track so that they are balanced. This is important because you don’t want any track to overpower the others. Use your ears to determine which tracks need to be turned up or down. You can also use a metering plugin to help you visualize the levels of each track. Bouncing Stems Finally, bounce your stems. This means exporting each track as a separate audio file. This will allow you to import each track into your mixing software and make individual adjustments as needed. Make sure each stem is bounced at the same sample rate and bit depth as your project settings to avoid any issues during mixing. In conclusion, preparing your tracks is essential to ensure a smooth and efficient mixing process. Organize your files logically, adjust the levels of each track to balance them, and bounce your stems for easy mixing. By following these steps, you will have a much easier time mixing vocals and piano.

Eqing The Piano

Achieving a perfect mix between vocals and piano requires proper EQing. Start by cutting out any overlapping frequencies between the two instruments, then boost the frequencies that enhance their unique characteristics. Make sure to continually listen and adjust until you reach a balanced and harmonious blend.

When it comes to mixing vocals and piano, EQing the piano is an essential step to get the perfect balance. EQ stands for equalization, and it involves adjusting the different frequency ranges in an audio track. EQing the piano can help clear muddiness, highlight overtones, and ensure that it blends well with vocals.

Clearing Muddiness

If the piano sound is muddy, it can clash with the vocals, and the overall mix will lack clarity. One way to clear muddiness is by reducing the lower-mid frequencies around 200-300Hz. This frequency range can make the piano sound boxy or boomy, so removing some of it can help create more space in the mix.

Highlighting Overtones

Overtones are the harmonic frequencies that give a piano its unique sound. By emphasizing these overtones, you can enhance the piano’s character and make it stand out in the mix. One way to highlight overtones is by boosting the high frequencies around 3-4kHz. This frequency range can bring out the shimmer and sparkle of the piano sound. Here’s a table summarizing the EQ adjustments:

Frequency RangeAdjustmentEffect
200-300HzReduceClear muddiness
3-4kHzBoostHighlight overtones

Remember to use your ears and adjust the EQ settings to fit the individual piano performance and the rest of the mix. By effectively EQing the piano, you can create a balanced and professional sounding mix that complements the vocals and elevates the overall quality of your music production.

Eqing The Vocals

To effectively mix vocals and piano, it’s essential to EQ the vocals to sit just right in the mix. Start by using a high-pass filter to remove unnecessary low-end frequencies, then address any harshness with a small dip in the high-mids.

Finally, add warmth and clarity with a gentle boost in the high-end.

Cutting Unnecessary Frequencies

When it comes to mixing vocals and piano, EQing the vocals is an essential part of the process. It involves adjusting the tonal balance of the vocal track by using equalization tools to manipulate the frequencies. One important step in EQing vocals is cutting unnecessary frequencies. Vocals can contain a wide range of frequencies that can clash with other instruments in the mix. Therefore, it’s important to identify and remove unwanted frequencies to create space for the other instruments. You can start by sweeping through the different frequency bands to find the problematic areas of the vocal track. Once you have identified the unwanted frequencies, you can reduce or cut them using the EQ controls. This process will emphasize the essential parts of the vocals while removing the elements that don’t add value to the mix. As a result, the overall sound will be clearer, and each instrument will have its distinct space in the mix.

Adding Presence

Another critical aspect of EQing vocals is adding presence. This technique allows the vocals to cut through the mix and be heard more clearly. Presence can be achieved by boosting certain frequencies that enable the vocals to sound bright and lively. To add presence to the vocals, you can boost the high-mids and high frequencies using a bell-shaped EQ. The specific frequencies to boost are subjective and depend on the vocalist’s timbre and the song’s style. However, a general rule of thumb is to boost between 3kHz to 6kHz for female vocals and 2kHz to 5kHz for male vocals. Adding presence should be done in moderation to avoid creating a harsh and unpleasant sound. You can adjust the boost levels by ear and compare the sound to the other instruments in the mix. With this technique, the vocals will stand out without overpowering the other parts of the song. In conclusion, EQing vocals is a vital step when mixing them with piano. By cutting unnecessary frequencies and adding presence, you can create a well-balanced mix that highlights the strengths of each instrument. Continuously practice and experiment to master the art of EQing vocals, and you’ll be on your way to producing professional-sounding tracks.

Adding Compression

To enhance your vocals and piano mix, you can add compression as a technique. This will help to balance the volume levels and create a dynamic range, resulting in a smoother and more polished sound.

Adding Compression When it comes to mixing vocals and piano, adding compression can work wonders. It helps to create a cohesive sound and establish an appropriate balance between the two at different points.

Using Compression To Add Energy

Compression can add energy to a vocal and piano mix by tightening up the sound and making it more consistent. It can also help the track to sound more cohesive and professional. To achieve this, start by adding a compressor to the track in question. Keep an eye on the gain reduction meter, and aim for around 2 to 3dB of gain reduction to start with. Play the track and adjust the attack and release times until you hear the mix starting to come together in a more cohesive way. This will help to ensure that the vocals and piano have a cohesive sound, while still standing out in different parts of the track.

Using Compression To Control Dynamics

Compression can also be used to control dynamics in a vocal and piano mix, which is especially important when working with vocals. The goal here is to ensure that the vocals and piano are balanced and that any peaks or dips in the levels are evened out. To achieve this, bring up the gain to a level where the vocals and piano are comfortably audible, and then adjust the threshold on the compressor so that it kicks in when either of them becomes too loud. Again, aim for around 2 to 3dB of gain reduction, but adjust this as necessary to get the desired balance. Overall, adding compression can help to give your vocal and piano mix a more cohesive and professional sound, while also allowing you to control the dynamics and energy of the track. It takes some trial and error to get the perfect balance, but with practice, you’ll be able to achieve the results you’re looking for.

How to Mix Vocals And Piano

Credit: www.reddit.com

Applying Reverb

When it comes to mixing vocals and piano, applying reverb is a helpful technique to achieve a cohesive and balanced sound. Reverb creates a sense of space and depth, adding character and emotion to both the vocals and piano. In this article, we will delve further into the application of reverb and how to create space for the piano and add depth to the vocals.

Creating Space For The Piano

To create space for the piano, you need to apply reverb that provides a sense of ambiance without overwhelming the mix. Here are some ways to achieve it:

  • Set the wet/dry mix to around 20-30% for the piano track.
  • Choose a reverb type that suits the genre and mood of the song. For example, a bright and short decay reverb fits well with an upbeat pop song.
  • Adjust the decay time depending on the tempo and rhythm of the song. Faster songs need shorter decay times to avoid muddiness.
  • Add a high-pass filter at around 200-300 Hz to reduce low-end buildup from the piano, which can muddy up the mix.

Adding Depth To The Vocals

Depth is crucial for vocals as it creates a sense of space and intimacy. Here are some techniques to add depth to your vocal tracks:

  • Add a small amount of reverb (around 10-20%) to the vocal track to create a sense of space without making it sound washy.
  • Choose a reverb type that enhances the vocal’s character and emotional impact. For example, a warm and lush plate reverb works well with ballads and slow-tempo songs.
  • Adjust the pre-delay time to avoid interfering with the lead vocal. The longer the pre-delay time, the further the reverb appears in the mix, giving a sense of distance.
  • Use side-chain compression to duck the reverb when the vocals are present. This technique helps to retain clarity and focus on the lead vocal.

By using these techniques, you can apply reverb to your vocals and piano tracks effectively. Remember to experiment with different types of reverb and settings to discover what works best for your mix.

Balancing The Mix

Achieving a harmonious balance between vocals and piano is crucial for creating an exceptional musical performance. To do so, it is necessary to adjust the volume and EQ levels of each element, ensuring they complement each other while maintaining their individual clarity.

When it comes to mixing vocals and piano, achieving the perfect balance can be challenging. Balancing the mix requires a delicate touch to ensure each instrument shines through without overpowering the other. In this section, we will go over two essential techniques to help you balance the mix: panning the instruments and using volume to create cohesion.

Panning The Instruments

Panning is an essential technique used to create a more spacious and balanced mix. To balance the mix of vocals and piano, you need to pan each instrument to a specific location within the stereo field. Panning the piano to the left or right and the vocals to the opposite side creates separation and emphasizes each instrument’s unique qualities. For example, you can pan the piano to the left at 20% and the vocals to the right at 20% to create a sense of space and ensure each instrument is heard clearly. This technique can help prevent muddiness and overlapping of frequencies. By panning each instrument to its location, you can create a more balanced and engaging mix.

Using Volume To Create Cohesion

Volume plays a crucial role in balancing the mix. To create cohesion, you need to ensure that the levels of each instrument complement each other. The vocals should be the dominant instrument, but they should not overpower the piano. Find the right balance by adjusting the volume of each track until the vocals and piano are evenly balanced. For example, you can boost the piano’s volume during the instrumental parts to prevent the vocals from overpowering it. Alternatively, you can use automation to adjust the volume levels of each instrument at different parts of the song. This technique helps create a dynamic and engaging mix, making the track more interesting to listen to. In conclusion, balancing the mix of vocals and piano requires a careful approach. Utilizing panning and volume techniques can help you create a more spacious and dynamic mix, where each instrument is heard both individually and in harmony. By following these techniques, you can ensure that your mix sounds balanced and engaging, leaving a lasting impression on the listener.

Final Thoughts

The final step in mixing vocals and piano is to trust your ears and know that mixing is both an art and a science. Let us take some final thoughts into account before we wrap up the discussion.

The Importance Of Trusting Your Ears

When mixing vocals and piano, it’s essential to trust your ears more than relying solely on the technicalities or what mixing plugins might suggest.

You should put your headphones on, listen to the music, and determine what adjustments your ears tell you should be made. Remember, there’s something called personal preference, and you should always trust your instincts when it comes to delivering a great mix.

Mixing Is An Art And Science

The process of mixing vocals and piano requires both technical knowledge and a little bit of creativity. It’s a delicate balance between the logical and emotional aspects of music production.

Use your technical knowledge to boost and refine the elements of your mix that are causing issues, but don’t forget to trust your creativity to enhance the artistic aspects of the track. A skillful blend of technical know-how and artistic creativity will ensure that you end up with the best mix possible.

Now that you’ve got the final thoughts on how to mix vocals and piano, the next step is to implement them and put them to the test. Follow these guidelines, trust your ears and remember that mixing requires both science and art. Good luck!

https://www.youtube.com/watch?v=7nfYZjxtfRA

Frequently Asked Questions For How To Mix Vocals And Piano

How Do You Mix Vocals And Instruments?

Mixing vocals and instruments requires careful attention to levels, panning, and EQ to ensure each element sits well within the mix. Start by identifying the focal point of the song and build the mix around that. Use automation and effects, such as reverb and compression, to add depth and dynamics.

Practice and develop your skills to achieve a well-balanced and dynamic mix.

How Do You Blend Music And Voice?

To blend music and voice, adjust the music levels to allow the voice to be heard clearly. Use EQ to remove frequencies that clash with the voice and add reverb to make the voice sound more natural with the music.

Experiment with different adjustments until the music and voice complement each other seamlessly.

How Do You Make A Piano Sound Good In A Mix?

To make a piano sound good in a mix, consider the following: 1. EQ to remove unwanted frequencies and boost the desired ones. 2. Add reverb to create a natural and spacious sound. 3. Use compression to even out the volume levels and sustain notes.

4. Consider the arrangement of other elements in the mix. 5. Experiment with different processing techniques to find the right balance.

Should You Mix Instrumental Before Vocals?

No, it is not necessary to mix instrumental before vocals. It is up to personal preference and the sound the producer or artist is trying to achieve. It is common to mix the instrumental first, but ultimately, the order is up to the individual’s discretion.

Conclusion

To sum it up, mixing vocals and piano can be a challenging task, but with the right techniques and tools, it can be an enjoyable and rewarding process. Remember to pay attention to the EQ, compression, and reverb of each element to achieve a well-balanced and cohesive sound.

Don’t be afraid to experiment and trust your ears. With practice, you can become a master at mixing vocals and piano. Happy mixing!

Categories
Archive

Mixing And Mastering With Animate

Mixing and mastering with Animate is a powerful tool for audio engineers and producers. With its intuitive interface and advanced processing capabilities, it allows users to achieve professional-level sound quality in their music productions.

As an audio engineer or producer, you know that mixing and mastering are critical steps in the music production process. These two stages are essential for bringing out the best in your tracks, ensuring that they sound great across a wide range of playback systems.

Animate is a software tool that can help you achieve excellent mixing and mastering results without the need for expensive hardware or complex routing setups. We’ll explore what Animate is, how it works, and how you can use it to take your mixing and mastering skills to the next level.

An Introduction To Mixing And Mastering

Learn how to mix and master with Animate, the powerful tool for audio processing. This introduction to mixing and mastering will cover the basics of EQ, compression, and other techniques used in the music production process.

Mixing and mastering are two crucial steps in the production of music. Mixing involves combining individual tracks to create a polished and cohesive sound. On the other hand, mastering is the final stage of enhancing the overall sound quality of the mix. Both mixing and mastering require a deep understanding of audio processing, music theory, and technical skills. Animate is a powerful software that can simplify the mixing and mastering process while delivering professional-quality results.

The Difference Between Mixing And Mastering

Mixing and mastering are often used interchangeably, but they are distinct processes that serve different purposes. Mixing involves bringing together various tracks, including vocals, drums, bass, and guitars, among others, to create a balanced and cohesive sound. In contrast, mastering is the final step in music production that involves polishing the mix, enhancing its overall volume, and improving its clarity and depth.

Why It Is Important

Mixing and mastering are essential components of music production that can make or break a song. A poorly mixed or mastered track can sound unpolished, lacking in balance, or overly compressed. On the other hand, a well-mixed and mastered track can give the music a professional sound that stands out from the crowd. Proper mixing and mastering can improve the overall tonal balance, stereo imaging, and dynamic range, resulting in a polished and professional mix.

The Role Of Animate In The Process

Animate is a powerful tool that can help simplify and automate the mixing and mastering process. Animate offers a wide range of features, including compressors, equalizers, limiters, and stereo wideners, among others, that can be used to enhance the tonal balance, dynamic range, and stereo imaging of a mix. Animate’s intelligent algorithms can analyze the mix and make adjustments automatically, speeding up the production process and ensuring professional-quality results. In conclusion, Mixing and mastering are essential steps in music production that require both technical and creative skills. Animate can simplify and automate both processes, leading to a polished and professional sound.

Mixing And Mastering With Animate

Credit: www.masteringthemix.com

Mixing Techniques With Animate

With Animate, anyone can learn to master the art of mixing and mastering for their music productions. Utilizing advanced techniques, Animate offers a wide range of features that will help musicians achieve the perfect sound for their tracks.

If you’re mixing and mastering your music tracks, it’s essential to have the right tools at your disposal. Animate is one such tool that gives you complete control over your mix. With its intuitive interface and a wide range of features and effects, Animate makes it easy to enhance your music’s sound quality. In this blog post, we’ll take a look at some of the mixing techniques with Animate to help you create a clear, polished sound that stands out in a crowded market.

Balancing Eq And Dynamics

One of the most critical steps in mixing and mastering any music is ensuring that each instrument and sound element has its own space in the frequency spectrum. Using Animate’s EQ and Dynamics controls, you can balance each element’s levels and ensure that they work together cohesively. EQ controls allow you to adjust the levels of each frequency range to bring out the desired tonal qualities of individual instruments or vocal tracks. Additionally, Dynamics controls help you define each element’s punch, presence, and clarity, resulting in a well-rounded and polished mix that sounds pleasing to the ear.

Using Audio Effects

With Animate’s broad array of audio effects, you can add depth and dimension to your mix. Use reverb and delay effects to give your music added space and create a sense of ambience. Chorus, flanger, and phaser effects can add movement and texture to your tracks. In addition, Animate’s distortion and saturation effects can help you add grit and warmth to your mix. However, it’s necessary to apply effects subtly, and in moderation, to avoid overwhelming the mix.

Working With Automated Mixing Techniques

One of the most exciting features of Animate is that it allows you to automate specific mixing tasks. For example, you can automate fader levels, pan positions, and even effects to achieve a more dynamic and coherent mix. Automation allows you to create gradual fade-ins, fade-outs, and volume changes smoothly. This technique enables you to bring out individual elements in the mix at the right times, creating excitement and anticipation for the listener.

In Conclusion

Overall, Animate provides a useful, powerful tool for mixing and mastering your music tracks. By using the right techniques and tapping into Animate’s range of features and effects, you can create a polished, professional sound that captures the essence of your music. The key is to experiment, listen critically, and use your creativity to achieve the desired results.

Mastering Techniques With Animate

Animate is an ideal software for mixing and mastering audio tracks effectively. By utilizing various techniques, audio professionals can deliver high-quality sound that is appealing to the listener.

When it comes to the final stages of music production, mastering is an essential step for producing a cohesive and professional sound. Animate is a powerful tool that provides a variety of mastering techniques to get the best out of your tracks. Here, we will discuss some of the mastering techniques you can use with Animate to achieve a polished and well-balanced sound.

Creating A Cohesive Sound

Creating a cohesive sound across multiple tracks requires careful consideration of each track’s arrangement and mixing. Animate’s mastering features can provide the final touch to tie it all together. One effective technique to create a cohesive sound is to use the same equalizer settings across all tracks. This creates consistency and balance, which helps the tracks blend seamlessly.

Adjusting Loudness And Dynamic Range

Loudness and dynamic range are critical elements of music production, and mastering techniques can help get them right. Animate’s mastering features provide precise control over both loudness and dynamic range, enabling you to make subtle adjustments that can transform the overall sound of your track. By adjusting the loudness and dynamic range of tracks, you can add depth and intensity to your sound.

Applying Eq And Compression

EQ and compression are essential techniques for mastering, and Animate provides a variety of powerful tools for applying them. EQ allows you to fine-tune the balance of different frequencies, while compression helps control dynamic range and can enhance the overall clarity and punch of your track. By carefully applying EQ and compression, you can achieve a polished and professional sound. To summarize, Animate provides a variety of mastering techniques to get the most out of your tracks. Whether you need to create a cohesive sound or adjust loudness and dynamic range, Animate’s mastering features can help you achieve a professional finish. By applying EQ and compression, you can add clarity and punch to your sound. With the right techniques and tools, you can take your music to the next level.

Mixing And Mastering With Animate

Credit: rekkerd.org

Advanced Tips For Mixing And Mastering With Animate

Discover new ways to enhance your mixing and mastering skills with Animate. This advanced tool provides unique features that allow you to add harmonic excitement, stereo width, and dynamic variation to your music production. Master your sound with Animate’s innovative technology and take your music to the next level.

If you’re producing music, then you know how crucial it is to have a polished and professional sound. That’s where mixing and mastering with Animate comes in. Animate is an excellent tool for manipulating sounds to create a balanced mix and master. In this blog post, we’ll delve into advanced tips for using Animate to take your music production to the next level.

Using Analytic Tools For Precision

When it comes to mixing and mastering, precision is key. Animate provides various analytic tools to help you achieve this. The visual analyzer is an excellent tool for identifying frequency imbalances in your mix. You can use this tool to spot problematic frequencies and adjust them accordingly. Another powerful tool is the peak analyzer, which identifies peak levels in your mix. You can use this tool to control the dynamic range and make sure your mix sounds consistent.

  • Visual analyzer lets you identify frequency imbalances
  • Peak analyzer is useful for controlling dynamic range

Understanding The Use Of Multiple Passes

Mixing and mastering with Animate can be a long process, and sometimes one pass isn’t enough. That’s where multiple passes come in. A second or third pass can help you identify any lingering problems in your mix. In your second pass, you can focus on fine-tuning your track to make sure everything is in its right place. You can also make use of different effects, such as EQ, compression, or reverb, to give your mix more depth and dimension.

  • Multiple passes help identify problems in your mix
  • You can fine-tune your mix and add more depth with effects

The Importance Of Room Acoustics In The Process

Room acoustics play a massive role in the mixing and mastering process, and it’s often overlooked. Your room’s size and shape, the type of materials used on the walls, and the position of your speakers can all impact the sound you’re hearing. To combat this, you can use a reference track to gauge how your mix sounds in other environments. You can also use room correction software to account for any acoustic deficiencies in your room.

  • Your room’s acoustics can impact the sound you’re hearing
  • Use a reference track to gauge how your mix sounds in different environments
  • Room correction software can help account for acoustic deficiencies

In conclusion, mixing and mastering with Animate is an excellent way to achieve the polished, professional sound you’re after. With these advanced tips, you’ll be able to fine-tune your mix and master to perfection. By using analytic tools for precision, understanding the importance of multiple passes, and accounting for room acoustics, you’ll be well on your way to producing music that sounds amazing.

Common Mistakes To Avoid

Common Mistakes to Avoid in Mixing and Mastering with Animate

Audio mixing and mastering are critical stages in producing high-quality music. However, without the right skills and knowledge, even seasoned producers can make mistakes that negatively impact the final output. In this article, we will discuss some common mixing and mastering mistakes to avoid when using Adobe Animate to produce your music.

Over-eqing And Compression

One of the most common mistakes in mixing and mastering is over-EQing and compression. Over-EQing is the practice of boosting or cutting frequencies in a recording too much, which can cause unnatural-sounding audio. Similarly, over-compression involves applying too much compression on a track or the entire mix, which can cause the music to sound flat and lifeless. To avoid these mistakes, use EQ and compression in moderation and trust your ears to achieve a balanced mix.

Setting Incorrect Levels

Setting incorrect levels is another mistake that can ruin an otherwise great mix and master. Levels that are too high can cause distortion, while levels that are too low can result in unwanted noise. It is essential to keep an eye on your levels throughout the mixing and mastering process to ensure that they are balanced and cohesive. Often, using a metering plugin can help you keep an eye on your levels more effectively.

Neglecting The Importance Of The Listening Environment

The listening environment is also essential when mixing and mastering a track. Different environments can significantly affect the way a recording sounds, making it critical to ensure that your listening environment is conducive to accurate monitoring. Investing in high-quality headphones or studio monitors and working in an acoustically treated room can help ensure that your mix and master translate well to other systems.

By avoiding these common mistakes, you can enhance your music production skills and achieve a more professional and polished sound when mixing and mastering your tracks with Adobe Animate.

Putting Theory Into Practice: A Step-by-step Guide

Learn how to apply mixing and mastering theory using Animate with this step-by-step guide. From EQ and compression to reverb and delay, you’ll gain the skills needed to polish your audio tracks to perfection.

As a music producer, you understand the importance of mixing and mastering your tracks to ensure they sound their best. But, putting theory into practice can sometimes seem overwhelming, especially if you are new to the game. In this guide, we will walk you through a step-by-step process for mixing and mastering with Animate. From preparing your audio to finalizing your mix, we’ve got you covered. So, let’s get started.

Preparing Your Audio For Mixing

Before you start mixing your tracks, it’s important to ensure they are ready for the process. This means checking that all your audio files are properly labelled, backed up, and organized. You should also make sure that your recordings are free from any unwanted noise or effects, such as distortion or clipping. By taking the time to properly prepare your audio files, you will save yourself a lot of time and frustration down the line.

Setting Up Your Workspace

Once your audio files are prepared, it’s time to set up your workspace. This means selecting your DAW (digital audio workstation) of choice and creating a new project. You should also ensure that your audio settings are properly configured, including sample rate, bit depth, and buffer size. Creating a template for your mixing projects can save you time in the future by providing a consistent starting point for your mixes.

The Mixing Process: Step-by-step

Now that your audio is prepared and your workspace is set up, it’s time to start the mixing process. This involves adjusting levels, panning, EQ, compression, and effects to get the best possible sound out of your tracks. Here is a step-by-step guide to the mixing process:

  1. Set your levels: Start by balancing the levels of each track so that they are audible but not overpowering.
  2. Pan your tracks: Use panning to create space in your mix and ensure that each element can be heard clearly.
  3. Apply EQ: Use EQ to remove unwanted frequencies and enhance the tonal balance of your tracks.
  4. Apply compression: Use compression to even out the levels of your tracks and add sustain to individual elements.
  5. Add effects: Use reverb, delay, and other effects to create depth and atmosphere in your mix.

The Mastering Process: Step-by-step

Once you are happy with your mix, it’s time to move on to the mastering process. This involves adding the finishing touches to your tracks to ensure they sound polished and professional. Here is a step-by-step guide to the mastering process:

  1. Set your levels: Ensure that the overall level of your mix is consistent with industry standards.
  2. Apply EQ: Use EQ to enhance the tonal balance of your mix and remove any final unwanted frequencies.
  3. Apply compression: Use compression to add punch and glue to your mix.
  4. Add limiting: Use limiting to prevent your mix from clipping and to ensure it is loud enough for commercial release.
  5. Add dithering: Use dithering to minimize any potential distortion caused by the conversion from a higher bit rate to a lower one for distribution.

With these steps in mind, you should be well on your way to creating professional-quality mixes and mastering your tracks to perfection with Animate.

Tools And Resources For Mixing And Mastering With Animate

Discover a range of tools and resources for mixing and mastering with Animate. With features like auto-ducking, spectral frequency display and multi-track mixing, Animate offers a user-friendly audio editing suite for both beginners and professionals alike.

Mixing and mastering can be the most challenging yet crucial stages of music production. Without proper mixing and mastering, your music may sound unpolished and unprofessional. Fortunately, with the help of Animate, professional audio mixing, and mastering is achievable. In this article, we will highlight some of the essential tools and resources that can help you mix and master with Animate.

Recommended Plugins And Tools

One of the perks of using Animate is the vast selection of plugins and tools available to enhance your audio mixing and mastering experience. From equalizers and compressors to limiters and meters, the following plugins can help you achieve professional results:

  • Equalizers – FabFilter Pro-Q, Waves SSL E-Channel, and iZotope Ozone Equalizer
  • Compressors – Waves SSL G-Master Buss Compressor, SSL Native Bus Compressor, and Universal Audio LA-2A Compressor
  • Limiters – Waves L2 Ultramaximizer, FabFilter Pro-L, and iZotope Ozone Limiter
  • Meters – Waves WLM Plus Loudness Meter, iZotope Insight Metering Suite, and Klanghelm VUMT

Online Courses And Tutorials

If you are new to audio mixing and mastering with Animate, there are numerous online courses and tutorials available to help you get started. Some of the reputable platforms that offer courses and tutorials include:

  1. PureMix – Offers in-depth video tutorials covering various topics, including music production, mixing, and mastering.
  2. Coursera – Hosts free online courses taught by top instructors in the field of music production and audio engineering.
  3. Udemy – Provides affordable courses covering a broad range of topics, including audio mixing and mastering with Animate.

Finding The Right Studio Monitors And Headphones

Choosing the right studio monitors and headphones is essential when it comes to audio mixing and mastering. Here are some of the factors to consider when selecting studio monitors:

Factors to ConsiderRecommended
Frequency ResponseYamaha HS8, KRK Rokit 8 G4, and JBL 305P MkII
Sound AccuracyAdam Audio A7X, Focal Shape 65, and Neumann KH 120 A
Budget-FriendlyPresonus Eris E4.5, Mackie CR-X Series, and JBL Professional 305P MkII

When it comes to headphones, the following models come highly recommended:

  • Sennheiser HD 660 S
  • Beyerdynamic DT 1990 Pro
  • Audio-Technica ATH-M50x

In conclusion, with the essential tools and resources highlighted above, you can achieve professional-level audio mixing and mastering with Animate. Remember to choose the right plugins, enroll in relevant courses, and select the appropriate studio monitors and headphones to help you achieve your desired audio quality.

Mixing And Mastering With Animate

Credit: www.youtube.com

Frequently Asked Questions For Mixing And Mastering With Animate

What Is Mastering The Mix Animate?

Mastering the Mix Animate is a plugin that allows you to add movement and lifelike dynamics to your mixes. With Animate, you can easily apply subtle or drastic changes to your sounds, adding character and dimension to your music. It’s a powerful tool for producers and engineers looking to enhance their creativity and bring their mixes to life.

Are There Plugins For Adobe Animate?

Yes, there are plugins available for Adobe Animate. These plugins can help you optimize your workflow and add new features to your animations. Some popular plugins for Adobe Animate include Bodymovin, Swift Publisher, and Extension Manager CC.

How Much Does It Cost To Mix And Master A Song?

The cost of mixing and mastering a song can vary greatly depending on a variety of factors, such as the experience and expertise of the engineer, the length and complexity of the track, and the studio’s location. On average, it could range anywhere from $50 to $500 per song.

How To Use Animate Plugin?

To use Animate plugin, first install it in your preferred software. Then select the object you wish to animate and apply the desired animations. You can adjust timing and other attributes to fine-tune your animation. Lastly, preview and export your animation.

Conclusion

To wrap things up, it’s clear that Animate is a powerful tool for mixing and mastering audio. Its intuitive interface and comprehensive range of features make it an ideal choice for producers of all levels. By experimenting with different settings and techniques, you can bring new life to your music and create a sound that’s truly your own.

Whether you’re looking to add depth and complexity to your recordings or simply clean up your sound, Animate is an essential tool in any producer’s arsenal. With continued practice and exploration, the possibilities are truly endless.

Categories
Archive

Analog Styled Compressor Plugins

Analog styled compressor plugins emulate the sound of vintage hardware compressors in digital audio workstations (DAWs). These plugins replicate the warmth and character of the compressors used in classic recordings.

Analog compressors were the go-to hardware for professional sound engineers until the ’90s. Also, today, plugin versions of these compressors replicate their sound in DAWs, creating the analog vibe in digital productions. Also, sound engineers love the analog sound, as it adds richness and warmth that cannot be achieved with digital compressors.

Related reading: Analog Synth Plugins: Unlocking Limitless Sonic Power and Analog Meets Digital. For background, see the Wikipedia article on Dynamic range compression.

Analog styled compressor plugins’ sonic signature is especially good for drums, bass, guitars, and vocals. While some analog style compressors focus only on the sound, others offer additional features such as sidechain, parallel compression, and mix knobs. In addition, they are available as VST, AU, and AAX plugin formats for different DAWs.

Analog Styled Compressor Plugins

Credit: www.youtube.com

What Are Analog Styled Compressor Plugins?

Moreover, what are Analog Styled Compressor Plugins?

Before we dive into the features of Analog Styled Compressor Plugins, let’s first understand what they are. For example, Analog styled compressor plugins are audio plugins designed to mimic the warm, natural sound of analog compressors. In addition, these plugins utilize digital signal processing to simulate the sound and characteristics of classic analog compressors. This gives your audio productions that vintage, warm sound.

Introduction

Furthermore, Analog styled compressor plugins are essential tools for any audio producer or engineer. As a result, they help to add a warm, natural sound to your audio recordings by replicating the sound of classic analog compressors. These plugins are a must-have for anyone looking to achieve that vintage sound and have become increasingly popular in recent years.

Features Of Analog Styled Compressor Plugins

Additionally, Analog styled compressor plugins come with a wide range of features that allow you to customize and shape the sound of your recordings to your liking. However, let’s take a look at some of the key features:

1. Attack and Release Controls

Attack and release controls are used to adjust the speed at which the compressor kicks in and when it releases. Then, with analog styled compressor plugins, you can adjust the attack and release controls to your liking. Also, this gives you more control over the sound of your recordings.

2. Ratio Control

Moreover, the ratio control adjusts the amount of compression that is applied to the audio signal. In short, Analog styled compressor plugins typically offer a wide range of ratio options. This allows you to choose the perfect amount of compression for your recordings.

3. Threshold Control

In addition, the threshold control determines the level at which the compressor starts to apply compression. Similarly, this allows you to tailor the amount of compression to the specific needs of your audio recording.

4. Make-up Gain

Furthermore, Analog styled compressor plugins come with a make-up gain control that allows you to boost the level of the compressed audio signal to match the level of the original signal. This ensures that the compressed audio signals sound natural and are not too quiet compared to the original recording.

5. Sidechain Options

Additionally, some analog styled compressor plugins offer sidechain options that allow you to apply compression to certain frequency ranges only. Also, this helps to create a more balanced sound and prevent unwanted compression of certain frequencies.

Analog Styled Compressor Plugins

Credit: www.waves.com

Why Use Analog Styled Compressor Plugins?

Also, Analog-style compressor plugins offer a warm and natural tone to audio recordings, replicating the sound of vintage analog compressors. In addition, with features like adjustable attack and release times, they allow for greater control and customization in shaping the sound. Using these plugins can add depth, warmth, and character to your mixes.

Advantages

Moreover, Analog Styled Compressor Plugins are an essential tool for every producer and audio engineer. These plugins are designed to emulate the warmth and character of the analog compressors, which are traditionally used in recording studios. The main advantage of using these plugins is the ability to achieve a classic analog sound with modern digital workflows. With analog-style compression, you can achieve a natural-sounding dynamic range compression that can make any digital recording sound more polished and professional.

Benefits Of Using Analog Styled Compressor Plugins

There are many benefits of using analog-styled compressor plugins, such as:

  • In addition, improved sound quality: Analog-styled compressor plugins can enhance the sound quality of your recordings by adding warmth, fullness and depth.
  • Greater control over compression: Unlike analog compressors, where you have to use your ears and adjust knobs to achieve the desired dynamic range compression, you can use these plugins to fine-tune the settings to your liking and easily preview the results in real-time.
  • Cost-effective: Instead of investing in expensive and bulky hardware, you can achieve the same sound by using plugin software.
  • Ease of use: Analog-styled compressor plugins are very user-friendly and can be used by anyone regardless of their level of experience or expertise in the field of audio engineering and production.
  • Furthermore, compatibility: Most analog-styled compressor plugins are compatible with a wide range of digital audio workstations. This provides users with greater flexibility and versatility when working on projects.

Additionally, if you are looking to take your audio recordings to the next level, investing in analog-styled compressor plugins is the way to go. With numerous advantages and benefits, these plugins are an essential tool for any audio engineer or music producer who wants to get the best quality sound from their recordings.

Top Analog Styled Compressor Plugins Of 2021

Discover the top Analog Styled Compressor Plugins of 2021 and enhance your audio mastering experience. These plugins offer vintage analog sound combined with modern technology, providing smooth and warm compression that creates rich, full-bodied mixes. Upgrade your audio game now.

Analog-styled compressor plugins are essential tools for music producers and audio engineers who want to add warmth and character to their tracks. These plugins mimic the sound of vintage analog gear, providing a range of sonic possibilities. In this article, we will look at the top analog-styled compressor plugins of 2021.

Plugin A for Analog Compressor Plugins

Plugin A is a powerful and versatile analog-styled compressor plugin that offers a wide range of options for shaping your sound. It features a smooth and warm sound that adds character and depth to any track. The plugin is easy to use and comes with a variety of presets to get you started quickly.

Plugin B

Plugin B is another fantastic analog-styled compressor plugin that is perfect for adding warmth and depth to your tracks. It features a vintage-style interface that is both intuitive and easy to use. The plugin provides a range of controls that allow you to shape your sound precisely. It also comes with a variety of presets to help you get started quickly.

Plugin C

Plugin C is a unique and powerful analog-styled compressor plugin that offers a wide range of sonic possibilities. It features a vintage-style interface that is both intuitive and easy to use. The plugin provides a range of controls that allow you to shape your sound precisely. It also comes with a variety of presets to help you get started quickly. In conclusion, analog-styled compressor plugins are essential tools for any music producer or audio engineer. The top analog-styled compressor plugins of 2021, Plugin A, Plugin B, and Plugin C, offer a range of options for shaping your sound and adding warmth and character to your tracks. Try them out today and bring your music to life!

How To Use Analog Styled Compressor Plugins

To use analog-styled compressor plugins, start by understanding your plugin’s controls, settings, and interface. Familiarize yourself with the different types of compression, such as peak, RMS, and VCA, to choose the best one for your project. Experiment with attack, release, and ratio settings until you get your desired sound.

Analog compression plugins are designed to emulate the warm, transparent sound of vintage analog compressors, while offering the flexibility and convenience of digital processing. In this post, we’ll explore the basics of using analog-styled compressor plugins and learn some tips and tricks for getting the most out of these powerful tools.

Basic Controls

Most analog compressor plugins have a similar set of controls that allow you to adjust the compression threshold, ratio, attack, release, and makeup gain. Let’s take a closer look at each of these controls and how they affect the sound:

ControlDescription
ThresholdDetermines the input level at which the compressor will start to reduce gain.
RatioSpecifies the amount of gain reduction that will be applied when the input level exceeds the threshold.
AttackControls how quickly the compressor will respond to changes in the input level.
ReleaseSpecifies how long it takes for the compressor to return to its normal state after the input level falls below the threshold.
Makeup GainAllows you to boost the output level to compensate for the amount of gain reduction applied by the compressor.

Advanced Features

While the basic controls listed above are essential for achieving a good compression sound, many analog compressor plugins also offer advanced features that can add extra depth and character to your mix. Let’s explore some of these features and how they work:

  • Saturation: Adds subtle harmonic distortion to the compressed signal, emulating the natural distortion of vintage analog compressors.
  • Sidechain: Allows you to trigger the compressor based on a separate input signal, such as a kick drum or bassline, to create a pumping effect.
  • Multiband: Divides the signal into several frequency bands and applies separate compression settings to each band, allowing you to target specific frequencies with more precision.
  • Linking: Links multiple compressor plugins together so that they behave as a single unit, reducing the risk of phase cancellation and ensuring a consistent level of compression across the stereo field.

Tips And Tricks for Analog Compressor Plugins

Now that we’ve covered the basics of using analog-styled compressor plugins and some advanced features, let’s look at some tips and tricks for getting the most out of these plugins:

  1. Use your ears: While it’s helpful to understand the technical aspects of compression, the most important factor is how it sounds to your ears.
  2. Start with a light touch: It’s easy to overdo it with compression, so start with conservative settings and gradually increase the effect until you find the sweet spot.
  3. Experiment with different settings: Don’t be afraid to try different threshold, ratio, attack, and release settings to find the perfect sound for your mix.
  4. Use automation: Automating the compressor settings can help create a more dynamic mix by adjusting the compression in real-time.
  5. Try parallel compression: Mixing in a dry, uncompressed signal with a heavily compressed signal can add more clarity and depth to your mix.

Overall, analog-styled compressor plugins are powerful tools for achieving a warm, transparent sound in your mix. By mastering the basic controls, exploring advanced features, and experimenting with different settings and techniques, you can take your mix to the next level and achieve a professional, polished sound.

Difference Between Analog And Digital Compressors

Analog styled compressor plugins offer a warmer sound compared to digital compressors. They function by modifying the input signal with a compression circuit that simulates the output of an analog device. The outcome is a smoother and richer sound that many producers prefer.

Sound Quality

Analog compressors are known for their warm and rich sound quality. They use tubes and transistors to compress the audio signal. This makes the output more pleasant to the ears as the intensity of the signal is reduced seamlessly. Digital compressors, on the other hand, use algorithms to squash the signal, leading to precise but sterile results. Digital compressors can be helpful in producing clean audio. But it cannot replicate the warmth and character of an analog compressor.

Visual Interface

One significant difference between analog and digital compressor plugins is the visual interface. Analog compressor plugins come with an intuitive interface that mimics the design of classic analog hardware. They feature knobs and dials that are easily tweakable. This makes it easier for users to adjust the sound and achieve their desired results. Digital compressor plugins, however, come with a graphic user interface that is easy to understand. But it does not replicate the tactile feel of an analog compressor.

Price

When it comes to pricing, analog compressor plugins are usually more expensive than digital compressor plugins. This is because analog compressors are hardware devices, which cost a considerable amount to produce. Digital compressors, on the other hand, are software-based and can be created with fewer resources. Therefore, their production cost is significantly less, making them more affordable for people on a budget. In conclusion, the differences between analog and digital compressors come down to sound quality, visual interface, and pricing. Each type of compressor has its advantages. The choice between them will ultimately depend on the user’s preference, budget, and specific needs.

Analog Styled Compressor Plugins

Credit: www.sweetwater.com

Famous Songs That Use Analog Compressors

Some of the most famous songs in music history, such as “Bohemian Rhapsody” and “Hotel California,” utilized analog-style compressor plugins for their iconic audio output. These plugins emulate the warm, vintage sound of analog compressors while providing the convenience of modern digital technology. This makes them an essential tool for music producers and audiophiles alike.

Analog compressors have been a staple in the music industry for decades, with famous music producers and engineers using it to achieve that signature sound. These compressors are known for their warm, vintage-like tone, which adds character, depth, and richness to recordings. Here are some famous songs that use analog compressor plugins to achieve that iconic sound.

Song A

Song A is one of the most beloved songs of all time and has been covered by countless artists. The song features a rich and emotive vocal, which sounds as if the singer is right in front of you. The producer used an analog-style compressor plugin to tame the peaks in the vocal performance. This adds warmth and character to the track. This technique helped the song stand out and become an instant classic.

Song B

Song B is a well-known pop song that has dominated the charts in recent years. The producer used an analog-style compressor plugin on the drum track, which added punch and depth to the rhythm section. The compressor also helped glue the individual drum hits together, creating a cohesive and powerful sound. This technique made the track stand out on the radio and became a massive hit.

Song C

Song C is a classic rock song that has been played on radio stations for decades. The producer used an analog-style compressor plugin on the guitar tracks, helping to achieve that iconic guitar tone. The compressor added sustain, warmth, and character to the guitar, making it stand out in the mix. The technique used on Song C has been replicated by many producers, with the guitar sound becoming the hallmark of the track. So, whether you’re producing pop, rock, or any other genre of music, analog compressor plugins can help add warmth, character and depth to your recordings. By using these plugins on different elements of your track, you can achieve that iconic sound that fans love and appreciate.

Frequently Asked Questions Of Analog Styled Compressor Plugins

Are Compressors Analog Or Digital?

Compressors can be both analog and digital. Analog compressors use electronic components that manipulate the audio signal, while digital compressors use algorithms to recreate the effect. It ultimately depends on the compressor’s design and technology used.

What Compressor Do Rappers Use?

Rappers use different types of compressors for their music production. However, some of the most popular compressors used by rappers include the Universal Audio LA-2A, the Waves SSL G-Master Buss Compressor, and the Shadow Hills Mastering Compressor. These compressors help the rappers to achieve a polished and professional sound in their music.

What’s The Best Compressor Plugin For Vocals?

The best compressor plugin for vocals depends on personal preference and the type of sound desired. Some popular options include Waves CLA-2A, FabFilter Pro-C, and Universal Audio LA-2A. It’s best to experiment with different plugins to find the one that works best for your vocals.

What Is The Classic Compressor For Vocals?

The classic compressor for vocals is the LA-2A, known for its smooth and warm sound. It’s a tube-based compressor and is often used in recording studios for its ability to level out the dynamic range without losing the natural tone of the original source.

Conclusion

Analog-styled compressor plugins offer a unique and warm sound that is sought after by many audio engineers and producers. They simulate the sound of vintage hardware compressors, which were known for their smooth and musical compression characteristics. With today’s technology, these plugins are more accessible and affordable than ever before, allowing for a wider range of creativity in the modern studio.

By using these plugins, you can add color and depth to your mixes, giving your music a distinct and polished sound.

Categories
Archive

What Is Public Performance Licensing

Public performance licensing is the legal requirement for obtaining permission to play copyrighted music in public. Essentially, it is a way for music creators to earn royalties when their music is played outside of a private setting, such as on the radio or in a concert venue.

Also, this type of licensing applies to a wide range of settings, including bars and restaurants, retail stores, and even fitness studios. Also, without a proper license, businesses risk facing legal action for copyright infringement. However, navigating the complex world of public performance licensing can be overwhelming for business owners.

Related reading: Common Music Licensing Myths: Unraveling the Truth and Licensing Christmas Music: Unlock the Joyful Melodies.

Moreover, we will provide an overview of the fundamentals of performance licensing and offer tips for ensuring compliance.

What Is Public Performance Licensing

In addition, Public performance rights refers to the legal permission required for music and entertainment venues to publicly perform copyrighted works. In addition, this license ensures that the artists receive proper compensation for their work and prevents unauthorized use.

Furthermore, what is Public Performance Licensing If you are running a business where music is played in public, you may require a public performance license. For example, a performance license is permission granted by copyright owners to use their music or audio works in public places. Whether you are playing music in a restaurant, club, or on the radio, you may be legally obligated to purchase a license. Failure to comply with the licensing rules may result in a hefty penalty. The Basics of Public Performance Licensing Public performance licensing is a legal obligation under the Copyright Act of 1976. The U.S.

Practical Tips

copyright law grants the legal right to the author or composer of the work to control the use of their work in public. As a result, the licensing fee charged by licensing agents or agencies is for the use of copyright works for public performance exclusively. Additionally, the Purpose of Public Performance Licensing The purpose of public performance licensing is to safeguard the owners’ rights and entitlements. Through licensing, creators can earn money from the utilization of their copyrighted music or audio recordings. In this way, performance licensing creates a fair balance between the interests of the creators and users, promoting creativity and innovation.

Also, types of Works Covered by Public Performance Licensing Public performance licensing covers a range of works, including: 1. Musical compositions 2. Audiovisual works 3. Sound recordings 4. However, dramatic and literary works 5. Choreographic works 6. Pantomimes Final Words In conclusion, public performance rights is a crucial aspect of playing music in public. It is essential to obtain a license to avoid breaking the law, facing unlimited punishment, legal action, or costly legal disputes. Remember to always consult with licensing agencies or experts to ensure you are following the appropriate legal procedures and protecting the interests of copyright owners.

Who Needs Public Performance Licensing

Moreover, a performance license is required for anyone who wishes to publicly play, perform, or broadcast copyrighted music. Then, this license ensures that the owner of the music is fairly compensated for the use of their work in a public setting, such as in a restaurant or on the radio.

In addition, Performance licensing is a legal requirement that applies to different public events where music is played or performed publicly. In short, the license grants a venue or performer permission to use copyrighted music in public performances. The royalties paid typically support the music creator. Essentially, the license protects the rights of the creator. Without public performance rights, music venues could play music without compensating the original creators for their work, which wouldn’t be fair.

Venues That Require Public Performance Licensing:

Furthermore, if you are running a live music venue or event, you need to get a public performance license to avoid legal issues. Similarly, here are some of the venues that require performance licensing,

  • Nightclubs
  • Bars
  • Concert halls
  • Restaurants with live music
  • Hotels
  • Wedding or event venues
  • Amusement parks
  • Shopping Centres
  • Stadiums
  • Arenas

Any entity that plays music in a public place, including radio stations, television networks, and streaming platforms such as Spotify or Apple Music, should hold a public performance license to compensate creators.

Performers Who Need Public Performance Licensing:

Additionally, performers need a public performance license to play copyrighted music that is not theirs. Also, if you’re a performer, you must have a public performance license if you cover someone else’s music. The following performers need public performance licenses:

  • Also, DJs or Music producers playing others’ music
  • Bands or musicians playing covers
  • Live performers
  • Dancers performing to copyrighted songs
  • Theaters performing musicals or plays

Thus, performance licensing is essential for any business or individual that uses copyrighted music in a public place, such as venues or performers. In addition, without a public performance license, one could face legal action or a damaged reputation. It’s always better to have all legal formalities in place before you start your work.

How To Obtain Public Performance Licensing

Moreover, Public performance rights is an agreement that grants permission to play music in public spaces. For example, obtaining such a license requires contacting the appropriate copyright organization and paying a fee based on the type of venue and frequency of use.

In addition, if you plan to host a public event that involves playing music, it is imperative to obtain public performance rights to avoid legal trouble for copyright infringement. Performance licensing allows event organizers, venue owners, and businesses to legally play copyrighted music in public settings. This ensures that the original composer/s and performers are paid for the usage of their work. Now, let us understand how to obtain public performance rights.

Licensing Agencies And Organizations

To obtain a public performance license, the event organizer, venue owner, or business needs to approach one of the following licensing agencies in the United States:

  1. Furthermore, american Society of Composers, Authors and Publishers (ASCAP)
  2. Broadcast Music, Inc. (BMI)
  3. Additionally, Society of European Stage Authors and Composers (SESAC)

Also, these organizations are responsible for collecting royalties on behalf of composers, songwriters, and publishers for the use of their music.

How To Apply For Public Performance Licensing

Moreover, to obtain a public performance license, follow these steps:

  1. Contact the licensing agency that represents the majority of the music you plan to play.
  2. Provide the agency with details of the event, including the date, time, and location. The type of music to be played.
  3. The agency will then provide you with a license agreement that outlines the fees and terms of the license.
  4. Sign and return the agreement to the agency along with the required fees.

Fees For Public Performance Licensing

The fees for a performance license depend on various factors such as the type of event, the number of attendees, and the duration. The licensing agency will provide you with a fee structure based on your specific event. The fees for performance licensing can range from a few hundred to a few thousand dollars. In conclusion, obtaining performance licensing is crucial when playing copyrighted music in public settings. The license ensures that the music composers and publishers are paid for the usage of their work. By following the steps outlined in this article, you can obtain public performance rights and enjoy a hassle-free music event.

What Is Public Performance Licensing

Credit: www.youtube.com

Benefits Of Public Performance Licensing

Performance licensing is necessary for businesses that play music or videos for customers. It ensures that creators and owners are compensated for the use of their works and protects businesses from copyright infringement claims. This makes it a beneficial investment for both parties.

As a musician or performer, you may put in a lot of work, effort, and money to create your music and performances. However, without proper public performance rights, your hard work could go to waste. A performance license has several benefits, some of them discussed below.

Protecting Your Intellectual Property

The music you create is your intellectual property. Performance licensing protects your intellectual property from unauthorized use. Without licensing, anyone could use your music without your permission, and you would have no legal recourse.

Ensuring Fair Payment For Performances

Public performance rights ensures that you receive fair payment for your performances. Licensing organizations collect fees from businesses that use music publicly, which are then distributed to the rightful owners. This ensures that you, as a musician or performer, get paid for the use of your music.

Maximizing Revenue Opportunities

A performance license provides opportunities for revenue generation. Licensing organizations offer several services such as distribution of royalties, song identification, and music usage reports. These services help you track and maximize your revenue, making it easier for you to monetize your music. In conclusion, performance licensing is crucial for musicians and performers. It protects your intellectual property, ensures fair payment for performances, and provides opportunities for revenue generation. Make sure to obtain public performance licenses for your music to reap these benefits.

Exemptions And Limitations

Public performance rights ensures that copyright owners get fair compensation when their music or other creative works are played to the public. There are limitations and exemptions to this rule which vary from country to country and can include things like playing music in a private setting or for educational purposes.

Exemptions and Limitations on Public Performance Licensing Public Performance Licensing ensures that artists receive fair compensation for the use of their copyrighted material. However, there are some exemptions and limitations to this licensing requirement. Below are the different exemptions and limitations on a performance license.

Public Domain Works

Public domain works are not subjected to performance licensing requirements. These are works whose copyrights have expired, or whose creators have intentionally waived their rights. If a work belongs to the public domain, you can use it however you wish without the need for public performance rights.

Exemptions For Religious Services And Nonprofit Performances

Under certain circumstances, religious services and nonprofit performances may be exempted from a performance license requirements. For instance, performances made for religious purposes in a place of worship may not require performance licensing. Nonprofit performances for educational or charitable purposes may also be exempted. However, to qualify for these exemptions, the performances should not be for commercial purposes and should not charge admission fees.

Limitations On Public Performance Licensing

There are certain limitations to public performance rights requirements too. For instance, playing music in a personal setting such as a home or car does not require performance licensing. Additionally, small businesses such as coffee shops, bars, or restaurants with a capacity of fewer than 2,000 square feet and with less than six loudspeakers are exempted from performance licensing. However, if the business premises exceed the specified size, the organization is required to obtain performance licensing. Overall, it is crucial to understand exemptions and limitations on a performance license requirements before using any copyrighted material to avoid legal problems.

What Is Public Performance Licensing

Credit: www.ppluk.com

Penalties For Non-compliance

Performance licensing is a legal requirement for establishments that play music or screen films to the public. Non-compliance can result in penalties, including fines and legal action. Make sure to obtain the necessary licenses to avoid potential consequences.

If you’re a business owner or event organizer that plays music or any copyrighted content to the public, it’s crucial to understand the legalities surrounding public performance rights. Non-compliance with a performance license can have severe consequences for businesses and individuals alike. This post will focus on the penalties for non-compliance.

Fines And Legal Action For Non-compliance

The most apparent penalty for non-compliance is the possibility of being sued for copyright infringement. This situation can result in legal action with substantial fines and compensation claims that must be paid. Fines and compensation depend on the severity of non-compliance, the length of time it has happened, and the copyrighted content’s usage unlawfully. For example, in the United States, penalties for music copyright infringement can range from $750 to $30,000 per song, while penalties for movie copyright infringement can go as high as $150,000 per work.

Reputational Damage

Businesses that run non-compliant public performances can face severe reputational damage. This damage can be in the form of public backlash through social media, negative reviews, or complaints from customers and visitors. The costs of reputational damage can be even more damaging than financial penalties. So it’s equally important to adhere to performance licensing requirements to safeguard your business’s reputation. In conclusion, it’s essential for businesses and individuals to be aware of the penalties for non-compliance with public performance rights. Fines and reputational damage can be detrimental, and it’s best to follow the legal requirements to avoid these consequences.

Key Terms And Concepts

A performance license is a critical concept in the entertainment industry, and understanding key terms and concepts surrounding this issue is essential to appreciate its significance. In this section, we explore important terms like public performance, licensing, and royalties among others that you need to know to understand what performance licensing is all about.

Public Performance

In addition, Public performance refers to any situation in which copyrighted music or video content is played or broadcasted in public or semipublic spaces like bars, restaurants, concert halls, and other venues. Public performance applies to all forms of media like broadcast television, cable television, radio, and digital networks. Whenever copyrighted content is played in a public or semipublic space, it is considered a public performance, and thus a licensing fee must be paid to the content owners.

Licensing

Licensing refers to the process by which content owners give permission to others to use their copyrighted materials in exchange for a fee. In the music and video industries, licensing agreements are common. They ensure that everyone who uses copyrighted material obtains permission and pays a licensing fee. Licensing is an essential concept in public performance licensing. It ensures that every party involved, including content owners, performers, and distributors, gets compensated.

Royalties

Royalties are fees that content owners earn when their copyrighted materials are used for public performance or other purposes. Whenever copyrighted materials are played publicly, the performer or the venue must pay a licensing fee to the content owner. This is essentially a royalty fee. Royalties are crucial for content owners as they ensure they are compensated fairly for their work. That others cannot use their work without compensation. Content owners also earn royalties from other uses of their materials, like downloads, streaming, and physical sales.

What Is Public Performance Licensing

Credit: www.omarimc.com

The Future Of Public Performance Licensing

Public Performance Licensing is a legal requirement for businesses who play or perform music in a public setting. With the growing popularity of streaming music services and advancements in technology, the future of public performance licensing is likely to evolve and adapt to meet changing industry trends.

Advancements In Technology And Public Performance Licensing

Technology advancements have brought about significant changes in various industries, and the public performance licensing sector is no exception. With the rise of streaming platforms and online music stores, it has become easier to source and play music publicly. As such, there have been concerns over the adequacy of existing public performance licenses to cover these new methods of music distribution. On the other hand, technology has eased the process of tracking, monitoring, and disbursing royalties, reducing cases of copyright violations that could affect popular artists’ revenue. Licensing bodies are also investing in software that can help to ensure that royalties are accurately and efficiently paid.

Impact Of Public Performance Licensing On The Music Industry

Public performance licensing plays a crucial role in the music industry as it helps to ensure that artists and musicians receive the royalties they deserve whenever their music is played publicly. Royalties are an essential source of income for artists and musicians since it makes up a significant portion of their overall earnings. Therefore, a licensing agreement can have a considerable impact on a musician’s career, as it can determine the amount of money they earn from their music. Licensing bodies also provide a means of tracking the use of copyrighted content. This makes it easy to resolve disputes and compensate owners fairly.

ProsCons
-Ensures fair compensation for artists and musicians-Can be costly for small businesses and organizations
-Provides a means of tracking copyrighted content and resolving disputes-May limit the use of copyrighted content in certain circumstances
-Helps support the music industry and encourages creativity-Licensing agreements can be complex and difficult to understand

Public performance licensing is an essential aspect of the music industry that helps to foster creativity, ensure fair compensation for artists and musicians, and protect copyrighted content. As technology continues to advance, there will always be challenges associated with how music is distributed and used publicly. However, licensing bodies are investing in innovative methods to ensure that artists and musicians are well compensated for their work. The music industry continues to thrive.

Frequently Asked Questions On What Is Public Performance Licensing

What Is An Example Of A Public Performance?

A concert, theatrical performance, dance or poetry recital in front of an audience is an example of a public performance.

What Is The Legal Definition Of Public Performance?

Public performance refers to the playing, showing, or performing of a work in front of a larger audience, whether it be in person or through a medium such as television or radio. The legal definition may vary depending on the country or jurisdiction.

Do You Need Permission To Play Music In Public?

Yes, you need permission to play music in public. This is to ensure that the creators of the music receive the appropriate royalties for their work. Failure to obtain permission can result in legal consequences.

Do I Need Both Ascap And Bmi Licenses?

No, you don’t need both ASCAP and BMI licenses. ASCAP and BMI are both performing rights organizations that collect royalties for songwriters and publishers. However, you only need to choose one to license your music. It’s important to research and compare the benefits and services offered by each organization before making a decision.

Conclusion

In short, understanding public performance licensing is essential for anyone who wants to legally use copyrighted works in a public setting. Whether you’re a business owner, event organizer, or content creator, it’s crucial to obtain the necessary licenses to avoid potential legal consequences.

Remember to always do your research, obtain the proper licenses, and stay up to date on any relevant laws and regulations to ensure a successful and legal public performance.

For more background, see Performing rights on Wikipedia. You may also like our guide: What Is Sync Licensing.

Categories
Archive

How To Make Money Off Music Streams

To make money off music streams, artists can sign up on music distribution platforms such as Spotify, Apple Music, and Tidal. These platforms pay artists based on the number of streams their songs receive.

In today’s digital age, music streaming has become the primary way people consume music. With millions of people worldwide using music streaming platforms, it has become an excellent opportunity for musicians to reach a larger audience and earn money. However, the competition among musicians on streaming platforms is fierce, and standing out from the crowd can be challenging.

We will explore some effective strategies that musicians can use to increase their streams and make more money from them. We will also discuss the various ways artists can monetize their music beyond streaming platforms.

Choose The Right Music Stream Platform

Selecting the right music streaming platform can make a huge difference in making money from music streams. Research the platform’s payout rates, royalty system, and audience demographic before choosing the platform that matches your needs.

As a musician, one of the best ways to make money is through music streams. The question is, how can you maximize your profit margin? Well, choosing the right music stream platform is one of the first steps in ensuring that you earn your fair share off music streams. In this section, we’ll look at how you can go about it.

Compare Different Platforms

With the advent of technology, there are now several music stream platforms available for use. However, not all of them are equal when it comes to earnings. That’s why it’s important to compare different platforms before you settle on one. A comparison table will help you analyze the cost, revenue share, royalty rates, user demographics, and additional features available on each platform. Comparison Table for Music Stream Platforms

Music Stream PlatformCost per monthRevenue ShareRoyalty RatesUser DemographicsAdditional Features
SpotifyFree or $9.9970%$0.0032 per streamages 18-34Playlist placement, artist promotion, online concerts
Apple Music$9.9970%$0.006 – $0.0084 per streamages 25-34Exclusive releases, artist interviews, personalized playlists
Tidal$9.99 – $19.9980%$0.0125 – $0.015 per streamages 25-44Master-quality audio, music videos, concert livestreams

Focus On Popular Ones

While there are several music stream platforms available, there are only a few that are popular with music lovers. These platforms include Spotify, Apple Music, Tidal, and Pandora. By focusing on popular platforms, you increase your chances of being noticed and earning more from your music streams. Benefits of Focusing on Popular Music Stream Platforms

  • Higher royalty rates.
  • Larger audience reach.
  • Better promotional opportunities.
  • Higher chances of playlist placement.
  • More likely to attract potential collaborators and fans.

In conclusion, choosing the right music stream platform is crucial in ensuring that you earn your fair share off music streams. By comparing different platforms and focusing on popular ones, you increase your chances of earning more from your music while gaining more listeners. With these tips, you can leverage music stream platforms to your advantage as a musician.

Understand How Streaming Royalties Work

Streaming royalties are a crucial part of making money from music streams. Understanding how royalties work will help you navigate the industry and ensure you receive fair compensation for your work. By staying up to date with industry standards, you’ll be able to monetize your music streams effectively.

Differentiate Between On-demand And Non-interactive Streams

As a musician, understanding the nuances of streaming royalties can help you to make the most out of your music streams. It is important to understand that there are different types of music streams that generate different amounts of royalties. On-Demand streaming refers to platforms where the user can control the selection of the songs they listen to, such as Spotify or Apple Music. On-Demand streaming generates higher royalties than non-interactive streaming platforms. Non-Interactive streaming differs from On-Demand streaming in the sense that the listener does not have complete control over the content they are listening to. Non-Interactive streaming platforms are usually found in internet radio platforms, where the listener is presented with a pre-selected playlist. These platforms generate lower royalties as compared to On-Demand platforms.

Learn About Fractional Licensing

When it comes to making money from music streams, fractional licensing is a concept that is worth considering. Fractional licensing refers to the licensing of songs where multiple parties have ownership over the composition of the song. In a fractional licensing agreement, each party owns a percentage of the composition and can license their respective portions to streaming platforms. This means that royalties from streaming can be split between different parties, allowing for more flexibility in revenue sharing. However, it is important to note that fractional licensing agreements can be complex, and it is advisable to consult a music lawyer before entering into such an agreement. In conclusion, understanding music royalties and how they work can help you as a musician to maximize your earning potential from streaming platforms. By differentiating between On-Demand and Non-Interactive streams and learning about fractional licensing, you can make informed decisions about how to monetize your music.

Maximizing Your Music Streams Revenue

With the rise of online streaming, music is more accessible than ever before. As a result, it has created ample opportunities for artists to generate income from their music. However, with millions of songs available on various platforms, it can be challenging to stand out and get a fair share of revenue. In this blog post, we will discuss practical ways to maximize your music streams revenue and make the most money from your music.

Build A Strong Fanbase

One of the most crucial factors in maximizing your music revenue is building a strong fanbase. Your fans are your most loyal supporters and can generate significant revenue through buying merchandise and attending your shows. The best way to build your fanbase is by establishing a strong online presence. This includes creating social media accounts and engaging with your audience consistently. It’s essential to interact with your fans, answering their questions, and seeking their feedback. This approach helps you build a dedicated fanbase that will go to great lengths to support your music.

Utilize Data Analytics

Data Analytics is a valuable tool to help you understand your audience’s behavior, track your streaming numbers and revenue. Spotify, for instance, provides artists with a dashboard called Spotify for Artists, which enables you to monitor your streaming data. This information can help you identify which songs are most popular, where your audience is located, and how long they listen to your music. These insights can guide you in crafting your music strategy and making data-driven decisions on how to promote your music better.

Update Your Catalog Regularly

One of the best ways to make the most money from music streams is by keeping your catalog up-to-date. Streaming platforms algorithms favor artists who consistently release new content. This does not mean you have to release new music every week. Instead, aim to release a new song or EP at least once a quarter. This strategy helps you stay relevant with your audience and creates fresh content for your fans to enjoy. It’s also a perfect way to build hype around your music and maximize your streaming numbers when you launch your music.

To maximize your music streams revenue, you need to build a robust fanbase, utilize data analytics to make data-driven decisions, and update your catalog regularly. Keeping these factors into consideration will help you increase your streams, generate more revenue, and grow your fanbase over time.

Collaborate With Other Artists

Collaborating with other artists is a smart way to get your music out there and make some money off of your music streams. By collaborating with other artists, you can tap into their fan base and expand your own. You can also create a unique sound and gain exposure to new audiences.

Cross-promotion

Cross-promotion is a great way to get your music heard by new listeners. When you collaborate with another artist, you can share each other’s music on your respective social media accounts and websites. This will help to expose your music to new fans who otherwise may not have heard of you. You can also collaborate on a song together and release it on both of your streaming platforms. This will give you access to each other’s fan base and allow you to reach a wider audience.

Feature On Playlists

Another way to make money off of music streams is to feature your music on popular playlists. Collaborating with another artist who already has a popular song on a playlist can help your music get exposure. You can also create your own playlist with other artists and feature your own music. This will help to bring new listeners to your music and increase your streams.

Collaborating with other artists is a great way to make money off of music streams. By cross-promoting and featuring on playlists, you can expand your fan base and increase your streams.

Use Social Media To Your Advantage

Using social media platforms is undoubtedly the most effective way to create a buzz and get your music noticed by millions of people worldwide. However, it’s not enough to simply upload your music and wait for people to come to you. You need to actively engage with your audience, promote your music, and build a solid fanbase by leveraging the power of social media. Below are a few ways you can use social media to your advantage when it comes to making money off music streams.

Engage With Your Fans

The key to building a loyal fanbase is to engage with your fans. Responding to comments, messages and emails, and reposting user-generated content will show your fans that you appreciate and value their support. This kind of engagement will help create an engaging community of fans who will help you promote your music further. You can also ask for feedback from your audience on new releases and use their suggestions to improve your music. By keeping your fans engaged and happy, you’ll be able to create a strong following that will have a significant impact on your streams and revenue.

Promote Your Music

While having great music is essential to your success, promoting your music is critical. Take advantage of social media’s vast reach by sharing your music content regularly. You can also use social media ads to promote your music to a much wider audience. Additionally, you can collaborate with influencers or bloggers to create more awareness about your music. Ask them to review your music or talk about your story and your journey. Creating a solid content marketing strategy can help you promote your music effectively and creatively, ultimately increasing your streams and revenue.

As you engage with your fans and promote your music through social media, you bring a sense of community to your audience and create enthusiasm around your music. By doing this, you create an environment that encourages people to share your music with others, leading to increased streams and income. Therefore, leveraging social media to your advantage is a crucial aspect of making money off music streams.

How To Make Money Off Music Streams

Credit: dittomusic.com

Experiment With Marketing Strategies

Experimenting with innovative marketing strategies is crucial for musicians to make money from streaming. By testing different approaches, such as creating engaging content, promoting on social media, and collaborating with influencers, musicians can effectively monetize their music and reach a wider audience.

Offer Merchandise And Exclusive Content

One way to monetize your music streams is by offering merchandise and exclusive content. This involves creating products or content that your fans can buy or access. For instance, you can create and sell t-shirts, hats, and other merchandise items with your band name, logo, or song lyrics. You can also create exclusive content such as behind-the-scenes videos, live recordings, or unreleased tracks and offer them to your fans for a fee. This strategy works well with fans who are highly engaged with your music and brand.

Advertise On The Platform

Another strategy to make money off your music streams is advertising your music on the platform. Most music streaming platforms have advertising programs that allow musicians to run ads on their platform. These ads can reach a wider audience, thereby increasing your streams and income. To get the most out of this strategy, ensure that your ads are targeted to your audience and are relevant to your music. You can also use sponsored posts or collaborations with other musicians or influencers to promote your music and reach a wider audience.

Experimenting with marketing strategies is critical to making money off your music streams. By offering merchandise and exclusive content, advertising on the platform, and other marketing techniques, you can significantly increase your streams and income while building a loyal fan base. However, it’s essential to understand your audience and tailor your marketing strategies to their preferences and interests.

Protect Your Rights As A Musician

As a musician, it’s important to protect your rights and make the most out of music streams. Understand the royalties system and register your music with performing rights organizations to ensure you receive proper compensation. Keep active on social media to engage with fans and promote your music to boost streams and increase earnings.

As a musician, it’s essential to know your rights and protect them, especially when it comes to making money off music streams. Here are two ways you can protect your rights as a musician: register with a performance rights organization and consult a music industry lawyer.

Register With A Performance Rights Organization

One of the first steps you can take to protect your rights as a musician is to register with one or more performance rights organizations (PROs). These organizations will help you collect royalties for your music streams, ensuring that your hard work is properly compensated. There are several performance rights organizations you can choose from, such as BMI, ASCAP, and SESAC. Each of them has different requirements and benefits, so it’s essential to research them and determine which one is best for you. Once you register with a PRO, they’ll monitor your music streams and collect royalties on your behalf. They’ll also provide you with access to performance data and other valuable tools to help you manage your career.

Consult A Music Industry Lawyer

Another way to protect your rights as a musician is to consult a music industry lawyer. These professionals can help you navigate the complex legal landscape surrounding music streams and ensure that you’re getting paid what you’re owed. A music industry lawyer can help you negotiate contracts with streaming platforms, record labels, and other industry partners. They’ll also help you understand your legal rights and keep you up to date with any changes to laws or regulations that may affect your career. When choosing a music industry lawyer, it’s essential to find someone with experience in the music industry. They should also be able to provide you with references from satisfied clients and be willing to work within your budget.
In conclusion, protecting your rights as a musician is crucial if you want to make money off music streams. By registering with a performance rights organization and consulting a music industry lawyer, you can ensure that you’re getting paid what you’re owed and that your hard work is properly compensated.

How To Make Money Off Music Streams

Credit: startuptalky.com

Final Thoughts

If you’re looking to make money from music streams, don’t give up. Persistence is key to successfully monetizing your streams. You’ll likely need to put a lot of effort into promoting your music, so don’t be afraid to embrace the digital age.

Persistence Is Key

Remember, making money from music streams isn’t an overnight success story. It takes persistence, determination, and hard work to build a fan base and increase your streams. You’ll need to continuously create new content, engage with your audience, and keep up with trends in the music industry.

Embrace The Digital Age

In today’s world, the music industry is digital-centric. Embrace the online platforms that are available to you, from streaming services to social media. Utilize search engine optimization (SEO) best practices to ensure your music is discoverable to new listeners. Consider collaborating with other artists, getting featured on playlists, and utilizing paid advertising to increase your exposure.

Ultimately, the key to making money off music streams is to stay focused and dedicated to your craft. Keep creating, keep promoting, and stay up-to-date with changes in the industry. With determination and hard work, you can turn your passion for music into a profitable career.

How To Make Money Off Music Streams

Credit: www.linkfire.com

Frequently Asked Questions Of How To Make Money Off Music Streams

Can You Make Money Streaming Music?

Yes, you can make money streaming music through various platforms such as Spotify, Apple Music, and Tidal. Artists receive royalties based on the number of plays and streams they generate. Additionally, some platforms offer opportunities for artists to earn revenue through ads, merchandise sales and collaborations with brands.

How Much Does Spotify Pay Per 1,000 Stream?

Spotify pays an average of $3 to $5 per 1,000 streams or plays for an artist. However, the amount can vary on the artist’s royalty rates, location, and level of streaming subscriptions.

How Much Money Does A Stream Of A Song Make?

The amount of money a song makes per stream depends on various factors, such as the streaming platform, location, and type of subscription. On average, a song can earn between $0. 003 and $0. 0084 per stream. However, this can vary widely, and some streaming services may pay even less.

How Many Music Streams Does It Take To Make $100?

It takes approximately 7,500 music streams to make $100, depending on the platform and the artist’s royalty rate.

Conclusion

Ultimately, making money off music streams requires a combination of creativity, persistence, and an understanding of the music industry landscape. While there are various revenue streams available to musicians, such as merchandise sales and live performances, music streaming platforms are quickly becoming the preferred method of music consumption.

By utilizing the tips and strategies mentioned in this post, you can optimize your music streams and potentially generate a steady stream of income. Remember, success won’t happen overnight, but with consistency and hard work, you can turn your passion for music into a profitable career.

Categories
Archive

Massive Wavetables For Serum

Massive Wavetables for Serum is a comprehensive collection of high-quality wavetables for use in the popular music production software, Serum. This library includes over 400 wavetables with a wide range of sounds and textures to choose from.

If you’re a music producer looking to expand your sound library with versatile and unique soundscapes, Massive Wavetables for Serum is an excellent choice. With its vast selection of high-quality wavetables, this library offers endless possibilities for crafting unique and diverse sounds.

Whether you’re creating EDM, hip-hop, or experimental music, these wavetables provide a wide range of tones, harmonics, and synthesis options to help you realize your artistic vision. Additionally, the ease of use and compatibility with Serum make this collection a must-have for any serious music producer.

Massive Wavetables For Serum

Credit: www.youtube.com

Using Massive Wavetables In Serum

Serum’s massive wavetables offer a wide range of possibilities in sound design and music production. From complex waveforms to unique, user-generated samples, the massive wavetables in Serum provide endless sonic potential for the modern producer.

Using Massive Wavetables in Serum can take your sound design to the next level. With thousands of wavetables to choose from, the possibilities are endless. In this article, we will explore how to import massive wavetables into Serum, manipulate them, and even create custom wavetables. Let’s dive in and discover the power of using Massive wavetables in Serum. #### Importing the Wavetables To start, we need to import the Massive wavetables into Serum. This can be easily done by clicking on the WT button in the oscillator section of Serum and then clicking on the small folder icon to the right of the wavetable display. From here, you can browse your computer and select the Massive wavetable you want to import. Once you have selected your wavetable, it will show up in the wavetable display, ready to be manipulated. #### Manipulating the Wavetables Now that the Massive wavetable is loaded, we can start to manipulate it. Serum offers a variety of ways to manipulate the wavetable, including changing the position, bending the shape, and even fading between two wavetables to create complex sounds. To change the position of the wavetable, simply use the Wavetable Position knob. This will cycle through the wavetable, allowing you to find the perfect spot for your sound. You can also bend the shape of the wavetable using the Warp knob. This will distort the waveform and create interesting textures. Another powerful feature of Serum is the ability to fade between two wavetables using the WT Pos modulation source. This allows you to seamlessly transition between two wavetables, resulting in complex and evolving sounds. #### Creating Custom Wavetables Finally, we can even create our own custom wavetables in Serum using the built-in wavetable editor. This allows you to draw waveforms, import audio files, and even morph between different wavetables. To create a custom wavetable, click on the Edit button in the oscillator section of Serum. This will open up the wavetable editor, where you can draw your own waveform or import an audio file. From here, you can also morph between different wavetables and create unique and dynamic sounds. In conclusion, using Massive wavetables in Serum is a powerful tool for sound designers and producers alike. By importing, manipulating, and creating custom wavetables, you can create complex and evolving sounds that will take your productions to the next level.

Advanced Techniques

Explore the extensive library of Massive Wavetables for Serum and take advantage of advanced techniques to create unique sounds. With a vast range of possibilities, you can produce complex and intricate audio that will captivate your audience.

Advanced Techniques:

Are you looking to take your sound design to the next level? Massive wavetables for Serum have enabled a new era of sound design innovation, offering producers unparalleled creative control over their music productions. With advanced techniques such as modulating wavetables with LFOs, using envelopes to morph wavetables, and using effects to shape the sound, the possibilities are endless.

Modulating Wavetables With Lfos:

One of the most powerful techniques for sound design using massive wavetables for Serum is modulating wavetables with LFOs. By assigning an LFO to the wavetable position parameter, you can create complex and evolving textures that add movement and depth to your music. Try experimenting with different LFO shapes and speeds to see how they affect the sound. Don’t be afraid to get creative and use multiple LFOs to modulate different wavetable parameters simultaneously.

Using Envelopes To Morph Wavetables:

Another technique that can take your sound design to new heights is using envelopes to morph wavetables. By assigning an envelope to the wavetable position parameter, you can create dynamic and evolving sounds that change over time. Try using different envelope shapes and speeds to create unique effects. You can even use multiple envelopes to morph different wavetable parameters simultaneously.

Using Effects To Shape The Sound:

Finally, using effects to shape the sound is a key technique when working with massive wavetables for Serum. By applying effects such as distortion, reverb, delay, and modulation, you can further shape and mold your sounds. Try experimenting with different effect combinations and settings to achieve the desired sound. Remember, the key to successful sound design is to keep experimenting and pushing the boundaries. In conclusion, advanced techniques such as modulating wavetables with LFOs, using envelopes to morph wavetables, and using effects to shape the sound, are just the tip of the iceberg when it comes to sound design with massive wavetables for Serum. With a bit of experimentation and creativity, you can take your music productions to the next level.

Inspiration And Creativity

Unleash your sonic potential with massive wavetables for Serum. Let your inspiration and creativity flourish with a wide range of unique sounds to choose from, perfect for any genre or style of music production. Elevate your tracks to the next level with these versatile tools.

Inspiration and Creativity: Serum is one of the most versatile and powerful synthesizers that come with an extensive library of wavetables. With Serum, you can create mind-boggling sounds that will inspire you to make unique and creative compositions. The Massive Wavetables for Serum are the perfect addition to your arsenal if you want to add some extra spice to your sound design.

Examples of Tracks Using Massive Wavetables: The Massive Wavetables library for Serum comes with a vast selection of waveforms that can be used to create a wide range of sounds. With so many options to choose from, you can create a unique sound that will set your tracks apart from the rest. Some examples of tracks that use Massive Wavetables for Serum include:

  • Deadmau5 – Strobe
  • Skrillex – Scary Monsters And Nice Sprites
  • Daft Punk – One More Time
  • The Prodigy – Smack My Bitch Up

Tips for Using Wavetables for Sound Design: If you’re new to sound design, working with wavetables can be a bit overwhelming. However, with these tips, you can make the most out of your Massive Wavetables for Serum:

  1. Experiment with different wavetables to find the sound that works best for you
  2. Use LFOs and envelopes to modulate the wavetable position and create evolving sounds
  3. Layer multiple wavetables to create complex sounds with a rich harmonic content
  4. Create custom wavetables by importing your own waveforms or using a custom audio editor
  5. Use the wavetable editor to modify existing wavetables, such as changing the waveform position, morphing between different waveforms, or adjusting the waveform amplitude.

With these tips, you can take your sound design to the next level and create unique and inspiring sounds that capture your creativity.

Massive Wavetables For Serum

Credit: www.productionmusiclive.com

Frequently Asked Questions Of Massive Wavetables For Serum

Is Massive A Wavetable Synth?

Yes, Massive is a wavetable synth developed by Native Instruments. It’s a popular software synthesizer used for creating electronic music, and it’s known for its extensive modulation and sound-shaping capabilities.

How Do I Import Wavetables Into Serum?

To import wavetables into Serum, go to the Menu Bar and click “Show Serum Presets Folder. ” Navigate to the “Tables” folder and place your. wavetable files there. Refresh the Serum plugin, then go to the wavetable menu and select “User.

” You will now be able to access your imported wavetables.

Why Is Serum Vst So Popular?

Serum VST is a popular virtual synthesizer plugin because of its user-friendly interface, exceptional sound quality, and extensive sound library. It offers a vast range of customizable parameters that allow music producers to create unique and versatile sounds. Additionally, the plugin’s compatibility with different platforms makes it accessible to many musicians and producers.

How Do You Use Serum Wavetables In Vital?

To use serum wavetables in Vital, you can simply drag and drop them onto the wavetable area. Alternatively, you can click the menu button on the wavetable editor and select “Import Wavetable” to load them in. Once loaded, you can edit and manipulate the wavetable to create unique sounds.

Conclusion

Overall, Massive Wavetables For Serum is a must-have addition for any producers looking to explore new and unique soundscapes. With over 3000 high-quality wavetables, users have endless possibilities to create their own signature sound. Whether you’re a beginner or a seasoned professional, the intuitive interface makes it easy to manipulate and experiment with sound.

Don’t miss out on the opportunity to take your music production to the next level with this powerful tool.