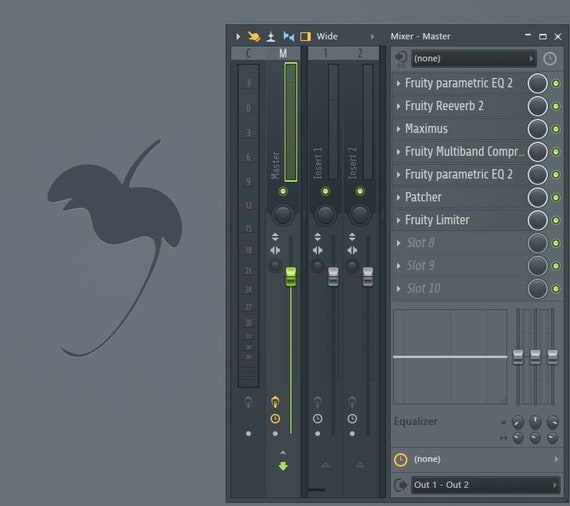
Categories
Archive

How To Record Vocals From Home

To record vocals from home, you need a good quality microphone and recording software. Connect the microphone to your computer, open the software, and press record to start.

Recording vocals from the comfort of your own home has become the norm in recent years. It’s a convenient and cost-effective method for singers and songwriters to create music without having to book expensive recording studios. However, it’s essential to ensure that the recording quality meets industry standards.

We’ll discuss what equipment you’ll need to get started, how to set up your recording space, and some tips for getting the best sound possible. By following these steps, you’ll be on your way to recording professional-quality vocals from the comfort of your own home.

How To Record Vocals From Home

Credit: dittomusic.com

Create A Recording Space

The first step in recording professional-sounding vocals from home is to create a recording space. With the right setup, you can minimize outside noise, prevent echoes, and get the cleanest possible recordings. Here are three key steps for creating a recording space:

Choose A Quiet Area

The first thing to consider when creating a recording space is where you’re going to record. Choose a quiet area of your home, like a spare bedroom or a closet. Stay away from rooms with hard surfaces like tile floors or glass windows since they reflect sound and can add unwanted reverb to your vocals. Carpeted floors and drapes can help absorb sound and reduce unwanted noise. Once you’ve found the right space, clear it out and prepare it for soundproofing.

Soundproof The Recording Space

Soundproofing is essential for creating a recording space that captures clean vocals. You can either hire a professional to soundproof your recording space or do it yourself. Some methods for soundproofing include:

  • Install acoustic panels on the walls
  • Use a room divider to create a smaller space
  • Hang heavy curtains or blankets
  • Put a rug on the floor

By soundproofing your recording space, you’ll eliminate unwanted sounds and create a more controlled environment for capturing your vocals.

Eliminate Echoes

Once your space is soundproofed, the final step is to eliminate echoes. This can be achieved by using items in the room to absorb sound. Some ways to do this include:

  • Adding foam tiles to the walls and ceiling
  • Placing bookshelves filled with books in the space
  • Using furniture like couches or cushions to absorb sound
  • Hanging acoustic blankets or sound-absorbing curtains

By employing these methods, you’ll reduce the amount of sound bouncing around the room and create a more controlled vocal recording environment. Don’t be afraid to experiment with different options to see what works best for your space!

Choose The Right Microphone

If you’re planning on recording vocals from home, one of the most important things to consider is choosing the right microphone. The right microphone can make all the difference in the world when it comes to the quality of your recording. Here are a few things to keep in mind when making your selection.

Dynamic Microphone Vs. Condenser Microphone

The first thing you’ll need to decide is whether you want a dynamic or condenser microphone. A dynamic microphone is generally more rugged and durable, making it a good choice if you plan on using it in a variety of different settings. However, if you’re looking for a microphone that can capture more detail and nuance in your vocal performance, a condenser microphone is probably the way to go.

Cardioid Vs. Omni-directional Microphone

Another important consideration is the directionality of your microphone. A cardioid microphone is designed to pick up sound from a single direction (typically the front of the microphone), while an omni-directional microphone can pick up sound from all directions. If you’re recording vocals, you’ll probably want to go with a cardioid microphone, as it will help to isolate and focus on your voice.

Usb Microphone Vs. Xlr Microphone

Finally, you’ll need to decide whether you want to use a USB microphone or an XLR microphone. A USB microphone is great for beginners, as it can be plugged directly into your computer and doesn’t require any additional hardware. However, if you’re looking for the best possible sound quality, an XLR microphone is the way to go. XLR microphones require an audio interface or mixing console to connect to your computer, but they offer greater flexibility and control over your recording.

Now that you have a better understanding of the different types of microphones available, you can make an informed decision about which one is right for you. Keep in mind that the microphone you choose will have a huge impact on the sound quality of your recording, so don’t skimp on this important piece of equipment.

Set Up Your Recording Equipment

Equip your recording area with a microphone, headphones, audio interface and pop filter. Ensure that your recording space is quiet and free of echoes by using foam panels or blankets. Set up your equipment properly and enjoy recording vocals from the comfort of your own home.

Recording vocals at home is an affordable and convenient way to create your music. But, before you begin, let’s discuss how you can set up your recording equipment. To record vocals from home, you’ll need a microphone, a computer, and software. Here’s a step-by-step guide to setting up your recording equipment.

Connect Your Microphone To Your Computer

To connect your microphone to your computer, you can use an XLR cable or a USB cable. An XLR cable is recommended for professional quality sound. Here’s how you can connect your microphone to your computer:

  1. Plug the XLR cable into the microphone.
  2. Plug the other end of the XLR cable into the audio interface.
  3. Plug the USB cable into the audio interface.
  4. Plug the other end of the USB cable into the computer.

Install A Digital Audio Workstation (daw) Software

To record your vocals, you’ll need a Digital Audio Workstation (DAW) software. A DAW is a program that allows you to record, mix, and edit your audio. There are many DAWs available, and some are free while others require a purchase. Here’s how you can install a DAW software:

  1. Visit the website of your chosen DAW software.
  2. Click on the download button, and the installation process will begin.
  3. Follow the instructions to install the software.
  4. Once installed, open the software.

Select The Correct Audio Interface

An audio interface allows you to connect your microphone and other audio equipment to your computer. When selecting an audio interface for your home recording studio, consider the following factors: number of inputs and outputs, preamp quality, and connectivity. Here’s how you can select the correct audio interface:

  • Research and compare audio interfaces online.
  • Determine how many inputs and outputs you need.
  • Read reviews and consider user ratings.
  • Choose an audio interface that fits your budget.

Setting up your recording equipment is a crucial step in recording vocals from home. By following these steps, you’ll be on your way to creating professional-quality music in no time.

Prepare Your Vocals

To achieve high-quality vocal recordings from home, it’s essential to prepare your voice. Spend some time warming up, hydrating, and experimenting with mic placement until you find the best sound. With these preparations, you can produce professional recordings without leaving the house.

Preparing your vocals is an important step to achieving high-quality recordings from your home studio. In this section, we focus on three crucial aspects of preparing your vocals: warming up your voice, choosing the right song key, and practicing before recording.

Warm Up Your Voice

Before recording, it’s essential to warm up your voice to avoid vocal strain and fatigue during long recording sessions. Warm-ups help loosen up your muscles and improve your vocal range. Here are some effective warm-up exercises:

  • Humming or lip trills to loosen up your muscles
  • Scales to improve your pitch and vocal range
  • Tongue twisters to improve your diction and enunciation

Choose The Right Song Key

Choosing the right key is vital to a successful recording. The key you select will determine whether the song is in your optimal vocal range or not. Singing in a key that’s too high or low for your voice will affect your pitch, tone, and overall performance. Here’s how to choose the right key:

  • Find your comfortable vocal range
  • Transcribe the song into several keys
  • Test each key by singing along to the track
  • Select the key that feels the most comfortable and sounds the best

Practice Before Recording

The more you practice, the better your recording will be. Practice singing the song with the instrumental track and without it. Pay close attention to your pitch, tone, and phrasing. You can record yourself and listen back to identify any areas that need improvement. Here are some tips on how to practice effectively:

  • Use a metronome to keep time
  • Sing with a clear and consistent tone
  • Focus on your breath control and phrasing
  • Record and listen back to your performance to identify areas that need improvement

By preparing your vocals using these techniques, you’ll be well on your way to recording high-quality vocals from your home studio. Remember, warming up your voice, choosing the right key, and practicing before recording are essential steps to achieving a successful recording.

Record Your Vocals

Recording vocals at home can be daunting, especially if you’re new to audio engineering. However, it’s entirely possible to get a professional-sounding recording with some basic equipment and know-how. Throughout this guide, we will discuss how to choose the right recording technique, adjust microphone settings, and record multiple takes to ensure the best possible recording.

Choose The Right Recording Technique

The recording technique you choose will depend on the equipment you have and the type of sound you’re looking to achieve. Here are some popular recording techniques:

TechniqueDescription
Close micPlace the microphone about 6 inches away from your mouth to capture a clear and detailed sound.
Room micPlace the microphone about 3 ft away from you to capture the natural ambience of the room. This technique works well for acoustic recordings.
Vocal boothIf you have access to a vocal booth, use it! It’s ideal for isolating your voice from any external noise.

Adjust Microphone Settings

Adjusting microphone settings is critical for achieving a good vocal recording. Here are a few things to keep in mind when setting up your microphone:

  • Position the microphone directly in front of your mouth
  • Use a pop filter to eliminate popping sounds
  • Check the microphone levels to make sure they’re not too high or too low
  • Experiment with the proximity effect – the closer you get to the microphone, the deeper your voice will sound

Record Multiple Takes

Trust us when we say that recording multiple takes is essential to creating a high-quality vocal recording. Recording multiple takes allows you to choose the best parts of each recording and piece them together to create the perfect track. When recording, try the following:

  1. Record at least three takes of each section
  2. Take breaks if you need them, especially if you’re experiencing vocal fatigue
  3. Encourage experimentation – try different pitches, tempos, and inflections to give yourself more options in post-production

In conclusion, recording vocals from home can be a challenging task, but it is not impossible. With these tips, you’ll be on your way to creating professional-sounding vocal recordings in no time.

How To Record Vocals From Home

Credit: www.supremetracks.com

Edit Your Vocals

Recording high-quality vocals from home is possible with the right techniques. After recording, editing your vocals is crucial for a polished final product. Use EQ, compression and reverb to enhance your recordings.

Now that you have recorded your vocals, the next step is to edit them. Editing helps to refine the sound quality and make it perfect for publication. Here are some editing tips to polish your vocals and make them stand out from the crowd.

Remove Unwanted Sounds

The first step in editing your vocals is removing any unwanted sounds. This includes background noise, pops, clicks, and breaths. You can use a noise reduction plugin to remove any hisses or buzzing sounds. To remove pops and clicks, you can use a de-clicker plugin. You can also manually remove any unwanted breaths using an audio editing software like Audacity.

Adjust Volume And Equalization

The next step is to adjust the volume and equalization. This is important for balancing the vocal with the instrumental track. You can use a compressor plugin to even out the volume fluctuations and make the vocal sound consistent. Equalization helps to enhance the vocal by making it clear and crisp. You can use EQ plugins to adjust the frequencies of the vocal to make it sound better.

Add Reverb And Echo

The last step in editing your vocals is to add some effects like reverb and echo. Reverb is used to create a sense of space while echo adds depth to the vocal. You can use a reverb plugin to simulate different environments like a concert hall or a studio. You can also use an echo plugin to create a delay effect. But make sure not to overuse these effects as it can make the vocals sound unnatural. In conclusion, editing your vocals is an essential part of the recording process. By removing unwanted sounds, adjusting the volume and equalization, and adding effects like reverb and echo, you can make your vocals sound professional and polished.

Mix And Master Your Vocals

Record professional-quality vocals from home by learning how to mix and master them. With the right techniques and equipment, you can achieve a polished sound that rivals studio recordings.

Recording vocals from home is one thing, but making them sound professional with a perfect mix is a whole different story. After recording your vocals, you need to mix and master them to get the perfect sound quality that will make your listeners keep coming back for more. In this section, we’ll show you how to create a balanced mix, apply compression, and add effects and enhancements to your vocals.

Balance The Audio Levels

Before applying any effects or enhancements to your vocals, it’s important to ensure that the audio levels are balanced. You can do this by adjusting the volume levels of each track in your mix. You should aim to balance the levels so that all tracks are audible without one overpowering the other. This will prevent any distortion or clipping and provide a clear and clean sound. You can use a tool like the fader in your DAW to balance the levels.

Steps to Balance Audio Levels:
1. Open your DAW and load your vocal track.
2. Adjust the volume fader until the vocal track’s volume is similar to the other tracks in the mix.
3. Listen to the mix, and if your vocal is overpowering or too quiet, adjust the volume fader accordingly.

Apply Compression

Compression is a powerful tool that can help make your vocals sound more polished and professional. It helps to keep the volume levels consistent throughout the song, making the vocals sound more controlled. Compression can also bring out the details in the vocal performance, making it more dynamic and expressive. To apply compression to your vocals, you can use a compressor plugin in your DAW.

Steps to Apply Compression:
1. Open the compressor plugin and insert it on your vocal track.
2. Adjust the threshold, ratio, and attack and release settings until you achieve the desired compression effect.
3. Listen to the mix and adjust the settings as necessary to achieve a balanced sound.

Add Effects And Enhancements

Once you have a balanced mix and applied compression to your vocals, you can add effects and enhancements to make the vocals sound even better. There are many effects you can add, including reverb, delay, and EQ, to help your vocals stand out and blend better with the rest of the mix.

Steps to Add Effects and Enhancements:
1. Open the effects or enhancements plugin and insert it on your vocal track.
2. Adjust the settings to achieve the desired effect or enhancement.
3. Listen to the mix and adjust the settings as necessary to achieve the desired sound.

With these steps, you can easily mix and master your vocals from home and achieve a professional sound. Just remember to balance the audio levels, apply compression, and add effects and enhancements to create the perfect mix.

Finalize Your Recording

Record vocals from your home like a pro by finalizing your recording. This involves listening to your recording and making any necessary adjustments to the volume, pitch, and timing. Use effects to enhance the sound quality and export the final product.

Finalize Your Recording: Recording vocals from home can be a daunting task, but with the right equipment and setup, it is entirely possible to achieve professional-sounding results. Once you’ve recorded your vocals, it’s time to finalize your recording. In this section, we’ll cover the essential steps you need to take after recording to ensure your vocals are polished and ready for distribution. H3 heading (Export Your Recording): Firstly, export your recording. This is the process of saving your vocals as a file that can be played on different devices or uploaded to various platforms. To export your recording, you need to locate the option “Export” in your recording software. Once you’ve done that, choose a format that suits your needs. For instance, if you want to upload your vocals to SoundCloud, choose the “.wav” format. If you wish to send it over for further editing, you can opt for the “.mp3” format. H3 heading (Listen to Your Recording): Next, listen to your recording. Before you start editing, you need to listen to your recording objectively. Use good quality headphones or speakers and listen to your recording multiple times. While listening, look out for issues like unwanted noise, uneven volume levels, or any pops and clicks. Take notes of everything that needs to be fixed to ensure you do not miss anything during the editing process. H3 heading (Get Feedback from Others): Finally, get feedback from others. After listening to your recording, get the input and thoughts of other people. Ask them what they think of your track and if there’s anything that needs to be improved. If possible, reach out to someone who’s an audio expert; this way, you can get objective feedback that can improve the overall quality of your track. Taking note of their suggestions and comments can help to refine your track and enhance its appeal to your audience. In conclusion, exporting your recording, listening to your recording, and getting feedback from others are the three critical steps to finalize your recording. Once you’ve completed these steps, you can rest assured that your home-recorded vocal will sound professional and ready to take on the world.

How To Record Vocals From Home

Credit: m.youtube.com

Frequently Asked Questions Of How To Record Vocals From Home

What Do I Need To Record Vocals At Home?

To record vocals at home, you will need a computer with recording software, a microphone, an audio interface, headphones, and a quiet recording space. Make sure to choose a quality microphone that suits your voice and recording needs. Plan carefully to ensure the best results for your recording session.

How Can I Record My Voice At Home?

To record your voice at home, you need a microphone, a computer, and audio recording software. You can use a USB microphone or a phone app to record your voice. Place your microphone in a quiet room and speak clearly into it.

Save your recording and edit it as needed using free audio editing software like Audacity.

How Can I Track My Vocals At Home?

To track your vocals at home, you will need a microphone, audio interface, and recording software. Set up your equipment in a quiet room and adjust your microphone settings. Start recording yourself singing and listen back to make adjustments as needed.

Use headphones to monitor your recordings for the best results.

What Is The Best Way To Record Yourself Singing?

To record yourself singing, you will need a good quality microphone, a quiet recording environment, and a software to edit and mix your vocals. Find a room with good acoustics, reduce noise, and adjust mic settings to fit your voice.

Experiment with different recording techniques and take multiple takes to get the best result.

Conclusion

Recording vocals from the comfort of your home isn’t as daunting as you may think. With the right equipment and these tips, you can create professional-grade recordings. From setting up your recording space to selecting the right microphone, this guide has covered everything you need to know to get started.

Remember to experiment and discover what works best for you. Happy recording!

Categories
Archive

The Best 1176 Compressor Plugin

The best 1176 compressor plugin is the Universal Audio 1176LN. This plugin is a faithful software emulation of the classic hardware compressor that has been used in countless music productions.

The Universal Audio 1176LN plugin is the ideal solution for producers and audio engineers who want to add that smooth and warm sound to their tracks. This plugin accurately reproduces the sound of the original 1176LN, which is known for its ability to make vocals and instruments sit perfectly in a mix.

The plugin features all the controls of the original hardware unit, including the famous ratio, attack, release, and input/output gain, which make it easy to dial in the perfect compression. Additionally, the Universal Audio 1176LN plugin is well-known for its flexibility, enabling users to achieve both subtle and heavy compression effects, making it a must-have tool for any recording studio or home setup.

The Best 1176 Compressor Plugin

Credit: www.gearnews.com

Top Features To Look For In A 1176 Compressor Plugin

A great 1176 compressor plugin should have features such as an accurate emulation of the original hardware, adjustable attack and release times, and parallel compression. Look for plugins with high-quality sound and versatility in different audio applications.

When it comes to music production, one of the most important tools in a producer’s arsenal is a compressor plugin. And when it comes to compressors, the 1176 is a classic. The best 1176 compressor plugin should have key features that emulate the sound of the original hardware. Here are some top features to look for in an 1176 compressor plugin:

Authentic Sound

The most important feature of an 1176 compressor plugin is its ability to authentically recreate the sound of the original hardware. The best plugins use advanced circuit modeling algorithms to accurately replicate the sound of the analog 1176 compressor. This gives you the same character, warmth, and tone that the original hardware is known for.

Variable Ratio Control

The 1176 compressor is known for its unique ratio control, which varies the compression ratio based on the input signal level. The best 1176 compressor plugins should offer this same variable ratio control, allowing you to dial in just the right amount of compression for your audio.

Attack And Release Time Controls

Another key feature to look for in an 1176 compressor plugin is the ability to adjust the attack and release time controls. These controls determine how quickly the compressor engages and disengages, and can have a significant impact on the sound of your audio. Being able to adjust these controls gives you more flexibility to achieve the exact sound you’re looking for.

Input And Output Gain Controls

An 1176 compressor plugin should also offer adjustable input and output gain controls. The input gain allows you to adjust the level of the audio going into the compressor, while the output gain lets you set the level of the compressed audio coming out of the plugin. These controls are essential for fine-tuning the compression and ensuring the best possible sound.

Mid Side Processing Capability

Finally, the best 1176 compressor plugins offer mid-side processing capability. This allows you to compress the mid and side signals separately, giving you more control over the stereo image and allowing you to achieve a more balanced sound. This feature is particularly useful for mastering applications. In conclusion, when looking for the best 1176 compressor plugin, make sure you select one that has an authentic sound, variable ratio control, attack and release time controls, input and output gain controls, and mid side processing capability. These features will give you maximum flexibility and control over your compression, allowing you to achieve the best possible sound for your audio recordings.

The Best 1176 Compressor Plugin On The Market

The 1176 compressor plugin has been a staple tool in music production for decades, providing a classic analog warmth and punch to tracks. With so many options on the market, it can be overwhelming to know which one to choose.

Plugin A

Plugin A is a popular choice among producers and engineers alike. With its accurate emulation of the original hardware, it provides users with the signature sound that made the 1176 famous. Its intuitive interface and easy-to-use features make it a favorite for beginners and experts alike.

Plugin B

Plugin B offers a unique twist on the classic 1176 sound. With its added saturation and distortion, it adds a gritty edge to tracks that many producers crave. Its advanced features and customizable controls make it a great choice for those looking to fine-tune their compression settings.

Plugin C

Plugin C is the newcomer to the 1176 plugin market, but don’t let that fool you. Its innovative design and cutting-edge technology make it stand out from the competition. With its transparent compression and low CPU usage, it’s a great option for producers who need to work quickly without sacrificing quality.

PluginProsCons
Plugin AAccurate emulation of original hardware
Intuitive interface
Easy-to-use features
May not offer enough customization for some
Slightly more expensive than other options
Plugin BUnique distortion/saturation
Advanced features
Customizable controls
May not be suitable for all genres
More complex interface
Plugin CInnovative design
Transparent compression
Low CPU usage
Newcomer to 1176 plugin market
May not offer enough customization for some

Ultimately, the best 1176 compressor plugin for you will depend on your personal preferences and workflow. It’s important to consider factors such as price, customization options, and compatibility with your DAW. No matter which option you choose, you can’t go wrong with the classic sound of the 1176 compressor.

Plugin Comparison

In this plugin comparison, we explore the best 1176 compressor plugins available for audio mixing. Each plugin offers unique features and performance, making it easier for users to choose the one that meets their music production needs. Get ready to enhance your tracks with powerful 1176 compressor plugins.

If you’re looking for the best 1176 compressor plugin, you might be overwhelmed with all the options available. To make things easier, we’ll compare different plugins based on their sound quality, ease of use, compatibility, and price.

Sound Quality

When it comes to sound quality, the Waves CLA-76 is a popular choice among engineers. It’s known for its authentic analog sound and modeled after the legendary Universal Audio 1176. The UAD 1176LN is also a top pick among audio enthusiasts because of its smooth and warm sound.

Ease Of Use

If simplicity is what you’re after, the Black Rooster Audio VLA-2A might be your best bet. This compressor plugin is intuitive and straightforward to use, making it a perfect option for beginners. The Waves CLA-76 also features a streamlined interface, with options for different styles and modes.

Compatibility

For maximum compatibility, the UAD 1176LN is a great option as it can be used with both Mac and Windows. Additionally, it can be integrated with all major DAWs, including Logic Pro, Cubase, and Ableton Live. The Waves CLA-76 is also compatible with all major DAWs, but it does require iLok authorization.

Price

When it comes to price, the IK Multimedia Black 76 is a highly affordable option, retailing at only $99. It offers excellent value for money, considering its outstanding features and dynamic range. The Waves CLA-76 is more expensive, but it’s still reasonably priced and an excellent option for those on a budget. In conclusion, there are several excellent 1176 compressor plugins out there, each with its unique features and capabilities. Your choice depends on your needs and budget, so it’s crucial to consider all factors before making a final decision.

The Best 1176 Compressor Plugin

Credit: www.sonicacademy.com

The Best 1176 Compressor Plugin

Credit: sonicscoop.com

Frequently Asked Questions On The Best 1176 Compressor Plugin

What Is The Best 1176 Plugin?

The Universal Audio’s 1176 plugin is considered the best 1176 plugin by most professionals due to its accuracy and quality emulation of the original hardware. The plugin provides classic analog character, versatile compression modes, and a simple yet intuitive interface that makes it easy to use.

What Is The Best Compression Plug In?

The best compression plugin depends on your website’s specific needs. Popular options include WP Rocket, W3 Total Cache, and WP Fastest Cache. It’s important to trial a few options to find the best fit for your site.

Why Is 1176 Compressor So Good?

The 1176 compressor is highly regarded for its fast attack and release times, making it ideal for vocal and instrument recordings. Its sound is described as warm, colorful, and musical, with a vintage character that adds character and depth to recordings.

Its simple controls make it easy to use, even for novice audio engineers. Overall, its unique sound and ease of use make it a favorite among professionals in the recording industry.

What Is The Most Famous Fet Compressor?

The most famous FET compressor is the Universal Audio 1176. It is a popular choice for its fast attack time and high-quality sound, particularly for vocals and drums.

Conclusion

Overall, the 1176 compressor plugin is an essential tool for achieving that classic sound and feel that many producers and musicians desire. It offers a range of features and settings that make it versatile and adaptable to any musical genre or style.

Choosing the best option for your specific needs can be a daunting task, but by considering factors such as budget, personal preference, and intended use, you can find the perfect fit. With the right 1176 compressor plugin, you can take your mixes to the next level and create professional-quality recordings that will stand the test of time.

Categories
Archive

Guide To Panning And Stereo Width

Panning and stereo width are crucial aspects of music production. They help create a sense of space and depth in a mix, allowing the listener to hear each element in its own space.

In this guide, we will explore the techniques and tools used to achieve the perfect placement of sounds in the stereo field. From understanding the basics of panning to using stereo imaging plugins, this guide will provide a comprehensive overview of panning and stereo width for both beginners and experienced producers.

Whether your goal is to create a wide and spacious mix or create an intimate and focused sound, this guide will walk you through the steps to achieve your desired results.

Why Panning And Stereo Width Are Important?

Panning and stereo width are crucial elements in music production as they allow the sound to be spread across the stereo field. By using careful panning techniques, it’s possible to create a more dynamic and interesting listening experience, whilst stereo width can add depth and spaciousness to the mix.

Creating Space In The Mix

Panning and stereo width are crucial to creating a sense of space and dimensionality in your mix. By panning different instruments and sounds to different positions in the stereo field, you can create a more immersive listening experience for your audience. This allows each element to be heard more clearly, reducing clutter and making it easier to hear individual parts.

Enhancing Listener Experience

Panning and stereo width can also enhance the listener experience by creating movement and interest in the mix. This can be achieved by automating panning or using stereo effects like stereo wideners, which can create a wider and more spacious feel to your mix. This ensures that the mix doesn’t become boring or tiresome to the listener.

Balancing The Audio Spectrum

Another key advantage of using panning and stereo width is that it allows you to balance the audio spectrum. By spreading sounds across the stereo field, you can keep the mix balanced without creating a frequency buildup in any single area of the mix. Additionally, you can use panning to separate different instruments that occupy similar frequency ranges, reducing the chance of them clashing with each other. Overall, panning and stereo width are important tools for creating a well-balanced and engaging mix. Whether you’re mixing music or audio for film and TV, understanding how to use these techniques effectively can make a significant impact on the final result.

Guide To Panning And Stereo Width

Credit: www.masteringthemix.com

Panning Techniques

Learn the guide to panning and stereo width techniques for better audio mixing and production. Discover how to manipulate the stereo image, widen the track, and create depth in your mix.

Panning is the process of distributing audio signals across a stereo field. Panning techniques create space and dimension within a mix, and it is a crucial process for creating a balanced stereo mix. There are several panning techniques, some of which are Hard Panning Vs. Soft Panning, Balance Panning, Pan and Volume Automations, and Mid-Side Processing Panning.

Hard Panning Vs. Soft Panning

Hard panning signifies placing an audio signal entirely on either the left or the right channel, whereas soft panning involves distributing the audio signal between the two channels. Hard panning creates a clear separation between the left and the right channels but may sound unnatural and unbalanced. Soft panning, on the other hand, can add depth and spaciousness to the mix.

Balance Panning

Balance panning means panning audio signals so that the mix sounds balanced and centered. Care should be taken to balance the levels between the left and the right channels. This technique makes the mix sound spacious, with each sound occupying its own space.

Pan And Volume Automations

Automating panning and volume changes throughout the mix can add excitement and interest to the mix. For instance, panning a guitar solo from left to right can make the mix feel more dynamic and exciting. Volume automations can help to emphasize critical elements of a song.

Mid-side Processing Panning

Mid-Side processing panning is a technique used to control the center and the width of the mix. This process separates the center of the mix (the mono element) from the sides (the stereo element). Mid-Side processing allows the engineer to adjust the stereo width of each track independently, opening up space in the mix and making it sound more spacious. Panning techniques are vital to achieve a well-balanced stereo mix. Using hard panning, soft panning, balance panning, pan and volume automations, and mid-side processing can significantly add depth, space, and dimension to your mix.

Stereo Width Techniques

Learn how to create a more expansive sound and add dimension to your mix with panning and stereo width techniques. This guide covers different methods to achieve a wider stereo image, enhancing the listener’s experience.

As a music producer, understanding stereo imaging and width can greatly improve the quality of your mix. In this article, we will focus on the different techniques of stereo width and how they can be used to create a more spacious and immersive sound.

Haas Effect

The Haas Effect is a popular technique used for creating a sense of width in a mix. It involves playing the same audio signal through two speakers with a slight delay in one of the channels. The delay time is typically between 1-30 milliseconds and is usually achieved using a delay plugin. This technique creates a psychoacoustic effect that tricks our ears into perceiving the sound as being wider than it actually is. To avoid phase cancellation and ensure mono compatibility, always check the mix in mono before finalizing.

Stereo Width Plugin

Using a stereo width plugin is another effective technique for enhancing the stereo image of your mix. These plugins work by manipulating the stereo information of the audio signal, making it wider or narrower. Examples of stereo width plugins include Waves S1 Imager, Ozone Imager, and Soundtoys Microshift. It is important to use these plugins judiciously and not to overdo it, as excessive application can create phasing issues and reduce overall clarity of the mix.

Ms Processing For Stereo Width

Mid/Side (MS) processing is another powerful approach for creating a wider stereo image. The technique involves separating the mono and stereo elements of the audio signal and processing them independently. The mono element, which is usually the center of the mix, is mono-compatible and should remain unchanged. On the other hand, the stereo element can be widened using a stereo width plugin or other stereo imaging techniques. This approach allows for greater control over the stereo image and can help produce a more defined and spatially aware mix. In conclusion, understanding and utilizing stereo width techniques can help take your mix to the next level, creating a more immersive and engaging experience for the listener. Always monitor your mix in different playback systems to ensure it translates well across different devices and platforms.

Guide To Panning And Stereo Width

Credit: www.masteringthemix.com

Importance Of Monitoring

A crucial aspect of panning and stereo width is monitoring. It ensures accurate adjustment and balance of sound between the left and right speakers for a well-rounded audio experience. Effective monitoring helps to identify and eliminate any problems early on, resulting in an optimal final mix.

Choosing The Right Monitors

Room Treatment

Essential Plugins For Monitoring

When it comes to mixing music or any other kind of audio content, having a proper monitoring setup is essential. Monitoring refers to the process of listening to the audio being mixed in real-time so that the engineer can make informed decisions about levels, panning, EQ, and more. In this guide, we’ll cover the importance of monitoring in the mixing process and some tips for choosing the right monitors, treating your room acoustically, and using plugins for more accurate monitoring.

Choosing The Right Monitors

The first step in setting up a good monitoring system is to choose the right monitors for your needs. Monitors come in various sizes, shapes, and designs, and they can vary widely in price. However, the most expensive monitors aren’t always the best ones for your specific needs. When selecting monitors, consider the kind of content you’ll be mixing and the acoustic properties of the room you’ll be working in. Some popular types of monitors include nearfield monitors, mid-field monitors, and far-field monitors. Nearfield monitors are typically used in small rooms for working on music or other audio content up close. Mid-field monitors are suitable for slightly larger rooms, while far-field monitors are suited for large rooms or commercial studios.

Room Treatment

Once you’ve selected your monitors, you’ll need to make sure your listening environment is acoustically sound. This means the room should be treated to reduce or eliminate any unwanted reflections, resonances, or other distortions that can interfere with your ability to hear the audio accurately. Common room treatments might include acoustic foam, bass traps, or diffusers. Preventing standing waves, which can create crazy echo-like effects that interfere with monitoring, is essential.

Essential Plugins For Monitoring

In addition to your monitors and room treatment, you may wish to consider using plugins for monitoring. These are software-based tools that can help you assess frequency response, stereo width, and other parameters of your audio, giving you a more detailed and accurate assessment of your mix. Some options for plugins include stereo wideners, spectrum analyzers, and phase correlation meters. It’s essential to use those plugins to aid your mixing process, but note that overusing them can lead to poor judgments because they seldom reflect real-world audio or consumer playback devices. In conclusion, monitoring is a crucial aspect of audio mixing. It ensures that the audio being mixed sounds great on a variety of systems and environments rather than only sounding good on your particular device. By selecting the right monitors, treating your room acoustically, and using plugins for monitoring, you’ll be able to make informed decisions about levels, panning, EQ, and more, leading to better mixes that will sound great no matter where they’re played.

Common Mistakes To Avoid

To avoid common mistakes in panning and stereo width, remember to balance both the left and right channels, avoid hard panning, and focus on the center for vocals and drums. Additionally, use reverbs and delays to create depth and avoid cluttering the mix.

When it comes to mixing music tracks, panning and stereo width play a crucial role. Panning refers to the placement of instruments in the stereo field while stereo width determines the width of the mix. However, there are common mistakes to avoid for better mix quality. Here are some of them.

Over-panning

Over-panning is usually common with beginners who want to create a spacious sound mix. Over-panning creates a sound mix that feels unbalanced and chaotic. The purpose of panning is to create a stereo image for each element in the mix. Therefore, instead of over-panning, utilize the stereo field such that you have a balance between left, center, and right.

Neglecting Mono Compatibility

Neglecting mono compatibility is a common mistake that adversely affects the sound mix. Mono compatibility refers to how the mix sounds when played back in mono. When elements of the stereo mix clash, they create phase cancellation. Phase cancellation produces anemic and thin mix, therefore, always test your mix in mono and ensure it sounds good in both cases.

Excessive Stereo Widening

Excessive stereo widening is another common mistake in stereo mixing. When mixing, avoid pushing elements too far in either direction in the stereo field. While widening helps create a stereo effect, excessive use can result in the loss of mono compatibility, subsequently diminishing the mix’s quality. Moderation is key when widening the stereo field.

Ignoring Phasing Issues

If you have two identical signals playing back on top of each other, but out of phase, they will cancel each other out. This phenomenon is known as phase cancellation. Phasing issues usually happen when a single sound source is recorded twice, and when you pan each recording differently, they cancel each other out. The result is a weak and thin mix. Therefore, always check for phasing issues in your mix by listening to it in mono. In conclusion, avoiding the common mistakes in panning and stereo width ensures better mix quality. By taking note of Over-panning, Mono Compatibility, Excessive Stereo widening, and Phasing Issues, you can create a sound mix that is balanced, clear, and pleasant to the listener’s ears.

Guide To Panning And Stereo Width

Credit: www.avid.com

Frequently Asked Questions For Guide To Panning And Stereo Width

What Is Stereo Panning Width?

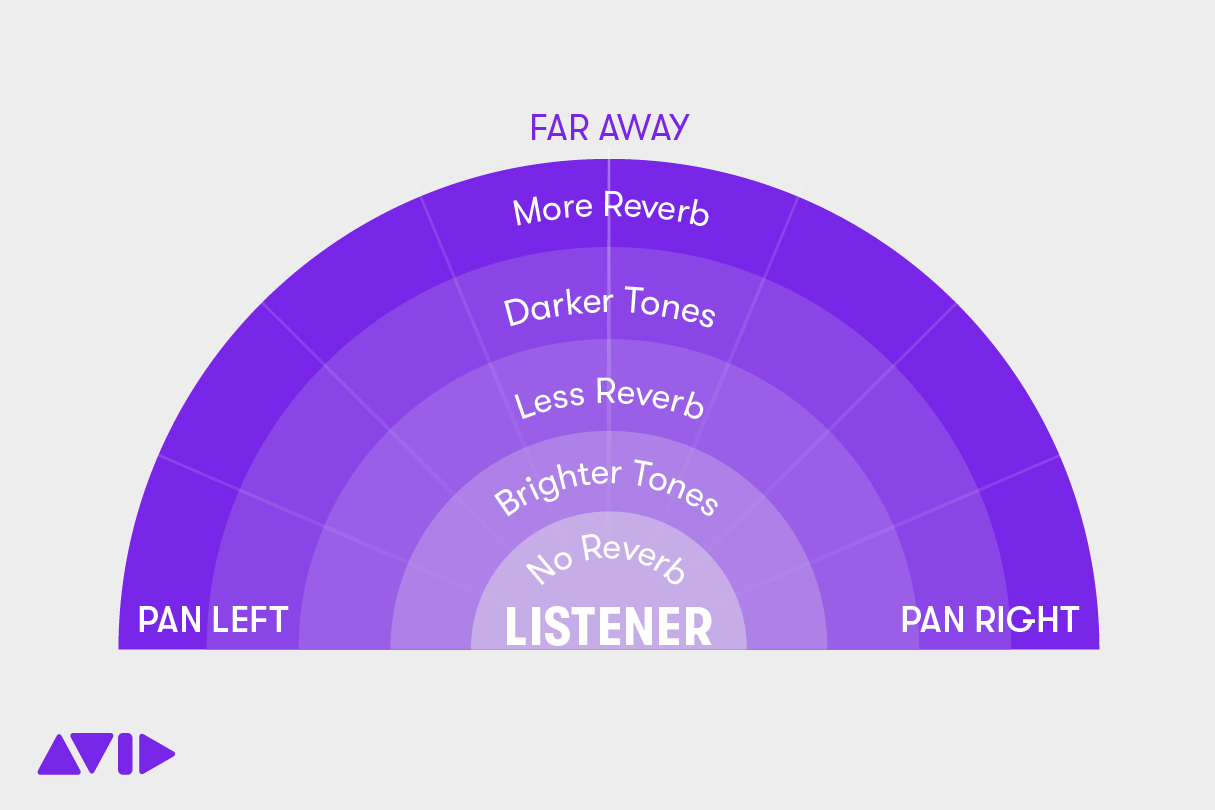
Stereo panning width is the amount of space that a sound occupies in the stereo field. This can be adjusted by panning the sound left or right, making it seem closer or farther away and widening or narrowing the stereo image.

What Does Increasing Stereo Width Do?

Increasing stereo width widens the stereo image of a audio track by boosting the side signals in the mix, making it sound wider. This can enhance the overall listening experience and increase the perceived space of the sound, but can also potentially cause phase issues and mono compatibility problems if not used carefully.

Should You Pan In Mono Or Stereo?

For optimal sound quality, it is recommended to pan in stereo. By doing so, you can create a fuller, more dynamic sound while allowing each instrument or track to have its own space in the stereo spectrum. However, it ultimately depends on the desired effect and the type of music being produced.

How Do You Pan A Stereo Signal?

To pan a stereo signal, adjust the levels of the left and right channels to create a sense of space and depth. This can be done using a panning knob or setting the levels manually. Panning can enhance the clarity and balance of a mix, resulting in a more enjoyable listening experience.

Conclusion

To sum up, panning and stereo width are two important techniques that can enhance the quality of your music production. By understanding these concepts, you’ll be able to create a more immersive and balanced mix that sounds great on any playback system.

Whether you’re working on a professional studio or a home setup, experimenting with panning and stereo width is a must for any music producer. So go ahead and get creative with your stereo image and make your music stand out!

Categories
Archive

Is Music Industry Marketing Legit

Yes, music industry marketing is a legitimate practice. The music industry heavily relies on marketing to promote new artists and their music to a larger audience.

With the rise of digital platforms and streaming services, marketing has become even more essential in the music industry. Record labels and music promotion companies utilize various marketing techniques such as social media campaigns, influencer marketing, and traditional advertising to raise brand awareness and generate interest.

As a result, emerging artists with compelling marketing strategies can gain more exposure, which often results in increased streams and album sales. While some may argue that the music industry is oversaturated, there are still ample opportunities for creative marketing campaigns to make a difference and propel artists to success.

Defining Music Industry Marketing

The music industry marketing is a legitimate way for artists to promote their music and reach a wider audience. It involves strategic planning, promotion, and branding to increase music sales and streams. With the rise of digital platforms, music marketing has become more accessible and efficient.

The Basics Of Music Industry Marketing

In simple terms, music industry marketing refers to any action that promotes and sells music. It is the process of identifying and creating a target audience for your music and finding ways to reach them. There are several basics of music industry marketing that every artist or marketer needs to understand before creating their marketing plan. Firstly, music industry marketing involves identifying your target audience. This can be done by considering the demographic, location, and interests of your fanbase. Once you know your audience, you can tailor your marketing efforts towards their preferences and needs. Secondly, having a strong online presence is essential in music industry marketing. Social media platforms like Instagram and TikTok have become powerful marketing tools for artists to connect with their fans. Thirdly, one of the foundations of music industry marketing is building a strong brand. A brand is the identity of the artist or group, and it defines their values, image, and message.

Understanding Music Industry Marketing Techniques

Music industry marketing techniques include a wide range of tactics that are used to promote and sell music. These techniques are designed to help artists reach their target audience and create a buzz around their music. Here are some common music industry marketing techniques that you need to know: 1. Content Marketing: This technique involves creating and sharing valuable content such as blog posts, videos, and podcasts that attract and engage your audience. 2. Influencer Marketing: This technique involves partnering with influencers (people who have a large following on social media) to promote your music to their audience. 3. Email Marketing: This technique involves sending promotional emails to your fans and subscribers about upcoming releases, tours, and other music-related news. 4. Event Marketing: This technique involves organizing events such as concerts, live shows, and meet-and-greets to promote and sell music. 5. Search Engine Optimization (SEO): This technique involves optimizing your website and online content to rank higher in search engine results, making it easier for fans to find your music. Understanding these music industry marketing techniques is essential for creating a successful marketing plan that promotes your music and grows your fanbase.

Is Music Industry Marketing Legit

Credit: www.researchgate.net

The Legitimacy Of Music Industry Marketing

Music industry marketing has become increasingly important as the industry evolves and adapts to new technologies. With the rise of digital streaming services and social media, there are more opportunities for musicians to connect with fans and promote their music than ever before. However, some have questioned the legitimacy of music industry marketing and its impact on the industry as a whole.

Examining The Positive Impact Of Music Industry Marketing

Despite some controversies surrounding music industry marketing, there are many positive aspects to consider. For one, music industry marketing helps musicians increase their exposure and reach new audiences. This can lead to increased album and ticket sales, as well as other revenue streams such as merchandise sales and sponsorships.

Additionally, music industry marketing helps create buzz and excitement around new releases, concerts, and other events. This can generate interest and anticipation among fans, ultimately leading to a more successful launch or performance.

Benefits of Music Industry Marketing
Increase exposure and reach new audiences
Generate excitement and anticipation
Increase revenue streams such as album sales and merchandise

Controversies Surrounding Music Industry Marketing

While there are many benefits to music industry marketing, some have raised concerns about its potential negative impact on the industry. For example, some critics argue that music industry marketing can create an unfair advantage for larger, more established artists, who may have more resources to invest in marketing and promotion.

There are also concerns about the role of social media influencers in music industry marketing, with some questioning the authenticity of their endorsements and whether they are truly representative of their followers’ preferences.

  • Some argue music industry marketing can create an unfair advantage for larger, established artists
  • Concerns about the role of social media influencers in music industry marketing

Overall, while there are certainly legitimate concerns about music industry marketing, it is clear that this practice plays an important role in the success of many musicians and the industry as a whole.

References:

The Role Of Music Industry Marketing In Business

Music industry marketing plays a vital role in promoting artists and their work, particularly in the digital age. From social media campaigns to targeted advertising, these tactics can legitimize an artist’s brand and attract a wider audience to their music.

Why Music Industry Marketing Is Essential To Business Growth

Music industry marketing plays a significant role in the growth and development of businesses. In the digital era, where every business wants to stand out from its competitors and attract more customers, music can help make this possible. Music has the power to evoke emotions and connect with people in a way that mere words cannot. Therefore, incorporating music in your marketing strategy can make a huge difference in your business’s success.

How Music Industry Marketing Drives Revenue And Brand Awareness

When businesses incorporate music in their marketing strategies, they can achieve several benefits, including increased brand awareness, improved customer engagement, and higher revenue. Here are some reasons why music industry marketing drives revenue and brand awareness:

  • Engaging Content – Music can be an excellent source of engaging content that can attract potential customers to your business.
  • Increased Brand Awareness – Music can help your business connect with people on a deeper level, leading to increased brand awareness and customer loyalty.
  • Strong Emotional Connection – When you use music in your marketing, it can evoke strong emotions that can lead to stronger customer relationships and higher sales.
  • Enhanced Customer Experience – By incorporating music in your marketing, you can create a more enjoyable and memorable experience for your customers, encouraging them to return and recommend your business to others.
  • Higher Revenue – With increased customer engagement and stronger emotional connections, businesses can generate higher revenue and achieve sustainable growth.

In conclusion, music industry marketing is an essential aspect of every business’s growth strategy. It can help you connect with your customers on a deeper level, evoke strong emotions, drive revenue, and increase brand awareness. By incorporating music into your marketing strategy, you can achieve long-term success and thrive in a competitive business landscape.

The Future Of Music Industry Marketing

The music industry marketing is a legitimate and crucial factor for the future of the industry. With the rise of digital platforms and social media, marketing has become a necessary tool for promoting music and engaging with fans. As technology continues to develop, the evolution of music industry marketing will keep on shaping the future of the business.

Emerging Trends In Music Industry Marketing

Music industry marketing has always been a crucial element in promoting new artists and music content. With the ever-changing landscape of technology, music marketing is rapidly evolving to keep up with the digital world. As we move forward, there are several emerging trends to look out for.

  • The rise of influencer marketing in the music industry
  • Increased use of artificial intelligence
  • Personalized marketing strategies to target unique audience segments
  • Expansion of virtual and augmented reality technologies for enhanced music experiences
  • Integration of social media platforms as a powerful tool for music marketing

How Music Industry Marketing Will Change In The Next Decade

The music industry has undergone considerable changes in the past decade and will continue to evolve at a rapid pace. The introduction of innovative technologies and social media platforms has given artists and music marketers a plethora of options to promote their content.

DecadeChange
2010sThe rise of digital streaming platforms
2020sMore emphasis on social media marketing to increase audience engagement

With the gradual shift to a digital-based music industry, marketing strategies will need to be optimized for online platforms. The future of music industry marketing will be centered around data-driven insights, personalized marketing tactics, and virtual reality experiences to engage today’s consumers.

Conclusion

The future of music industry marketing is full of possibilities as technology continues to shape the music landscape. With the integration of advanced technologies, music marketers can promote and distribute music more effectively to wider audiences, making it easier for emerging artists to make a breakthrough in their careers.

The Dark Side Of Music Industry Marketing

The world of music is alluring, and many people aspire to be part of it. With the rise of social media, the music industry has become more accessible than ever, and music marketing has become an essential aspect of promoting artists and their work. However, with this accessibility and the increasing pressure to be successful, there is a dark side to music industry marketing that many people don’t know about.

Exploring The Negative Effects Of Music Industry Marketing

The music industry is known for its cut-throat nature, and marketing is no different. The desire to make money is the driving force behind most music industry marketing campaigns, and it can often lead to negative consequences. The pressure to succeed can cause artists to compromise their artistic vision and authenticity, leading to generic and formulaic music that caters to popular trends and goes against the artist’s original vision.

Moreover, the constant pressure to maintain a certain image can cause artists to develop unhealthy habits such as substance abuse, depression, and even suicide. In some cases, music industry marketing can become so aggressive that it can alienate fans and drive away potential listeners.

The Ethical Implications Of Music Industry Marketing

Aside from the negative effects, there are also ethical implications to consider. For instance, music industry marketing can create unrealistic body standards and beauty standards, leading to a toxic and unhealthy culture. It can perpetuate gender, race, and sexuality stereotypes, and even exploit these identities for commercial gain.

Another ethical issue is the use of subliminal messaging and psychological manipulation to influence consumers into purchasing products. This type of marketing can be misleading and manipulative, leading to false impressions and unfulfilled promises.

Overall, while music industry marketing can be a powerful tool for promoting artists and their work, it is essential to be aware of its negative effects and ethical implications. As consumers, it is essential to be vigilant and informed and to support artists whose values align with our own.

Frequently Asked Questions On Is Music Industry Marketing Legit

Are There Any Legit Music Promotion Services?

Yes, there are legit music promotion services available online. However, it’s crucial to do your research before choosing one. Look for services that have positive reviews, clear pricing, and a proven track record of helping artists grow their audiences. Be wary of services that promise quick results or seem too good to be true.

What Is The Best Music Marketing Agency?

As a AI language model, I cannot provide a personal opinion on which is the best music marketing agency. However, some top agencies in the industry include Universal Music Group, Sony Music Entertainment, Warner Music Group, and Republic Records. It is important to research each agency’s services, clientele, and track record before making a decision.

What Does A Music Marketing Company Do?

A music marketing company specializes in promoting musicians and their music to potential listeners. They use various digital marketing strategies such as social media, email marketing, influencer marketing, and advertising to generate buzz and increase visibility for musicians. Their goal is to help artists gain a larger fan base and ultimately boost their career in the music industry.

How Do I Get A Marketing Job In The Music Industry?

To get a marketing job in the music industry, start by researching companies and job openings. Build a strong network and gain experience through internships or volunteering in the industry. Stay up to date on music industry trends and technologies to demonstrate your expertise.

Tailor your resume and cover letter to showcase relevant skills and experience. Attend industry events and conferences to network and make connections.

Conclusion

After analyzing the music industry marketing tactics, we can conclude that it is a legit and necessary approach for the promotion of artists and their music. It allows for broader recognition, enhanced visibility, and higher chances of success for the artist.

By understanding and implementing the right marketing strategies, music industry marketing can prove to be a valuable asset for both emerging and established artists. Therefore, it is crucial for artists to collaborate with professionals who understand the intricacies of music industry marketing to achieve their desired goals.

Categories
Archive

How To Choose The Right Synth Sounds

To choose the right synth sounds, consider the genre, context, and sonic palette. Here’s a guide on how to pick the ideal synth sounds for your music production.

As a music producer or composer, you understand that choosing the right synth sounds is crucial to the success of your music project. Synthesizers offer a diverse range of possibilities and create new sounds that were unthinkable a few decades ago.

Although the vast array of sounds allows you to be creative as a producer, it can be challenging to pick the right sounds that fit your style and music genre. Factors like context, genre, mood, and style influence the sounds you choose. To help you navigate the overwhelming world of synth sounds, here is a comprehensive guide to choosing the right synth sounds for your music.

How To Choose The Right Synth Sounds

Credit: m.youtube.com

Why Synth Sounds Matter

Choosing the right synth sounds is essential for creating music that engages listeners. With numerous soundscapes to select from, it is important to consider tone, texture, and rhythm. The right choices enhance the overall sound quality of a composition.

The Role Of Synths In Music

When it comes to creating music, synths have become an essential tool for music producers. The versatility of a synthesizer allows for the creation of a wide variety of sounds that can add depth and interest to any song. Synthesizers can create everything from lush pads to pounding bass sounds, and even mimic the sound of traditional instruments. The ability to create unique sounds and textures is what makes synths such a popular choice for music producers across all genres.

How Synths Enhance Musical Expression

One of the main reasons why synth sounds matter so much is the way they enhance musical expression. Synths offer a level of creativity and control that traditional instruments simply cannot match. With a synthesizer, a musician can create sounds that are completely unique and tailor them to fit their exact needs. This allows for a level of musical expression that goes far beyond what is possible with physical instruments.

The Importance Of Choosing The Right Synth Sounds

When it comes to choosing the right synth sounds, there are a few important things to consider. Firstly, it’s important to consider the style of music you’re creating and choose sounds that complement that style. For example, if you’re creating a dance track, you’ll want to focus on choosing synth sounds that have a strong, driving rhythm. Secondly, it’s important to consider the role that the synth sound will play in the song and choose a sound that fits that role. And finally, it’s important to experiment and push the boundaries of what’s possible with your synth to create sounds that are truly unique and memorable.

Important Points
Synths are versatile and can create a wide variety of sounds
Synths enhance musical expression beyond what’s possible with traditional instruments
Choosing the right synth sound requires considering the style of music and the role of the sound within the song
Experimentation is important for creating unique and memorable synth sounds

In conclusion, synth sounds are an essential element in modern music production. They offer a level of versatility, creativity, and control that traditional instruments simply cannot match. By choosing the right synth sounds, music producers can create memorable and unique sounds that enhance the overall musical experience.

Types Of Synth Sounds

Selecting the appropriate synth sounds can be challenging. Synths offer several types of sounds, including leads, basses, pads, and arpeggios. To select the appropriate sound, the preferred genre and musical context must be considered.

Synthesizers, or synths for short, are electronic instruments that can produce a wide variety of sounds. They are widely used in music production for adding texture, tone, and character to a track. When it comes to choosing the right synth sounds, there are different types of synth sounds available to choose from. In this post, we will explore the different types of synth sounds and how you can choose the right synth sounds for your music production needs.

Analog Synths Vs Digital Synths

Analog Synths
Analog synths use purely analog circuits to generate sound waves. They are known for their warm and rich tones. They are ideal for creating classic synth sounds that are heard in many genres of music. Analog synths may require periodic calibration but they offer more flexibility in sound design. Digital Synths
Digital synths use digital signal processing techniques to generate sounds. They offer more versatility as they can produce a wide range of sounds, including realistic instrument sounds and sound effects. Digital synths are easy to use and maintain, but some musicians find their sound less warm compared to analog synths.

Virtual Synths Vs Hardware Synths

Virtual Synths
Virtual synths are software-based synthesizers that run on a computer. They can be used in a Digital Audio Workstation (DAW) to produce music. They offer more convenience and portability and can produce high-quality sounds in a cost-effective way. Virtual synths can be further classified into two main types: sample-based and synthesis-based. Hardware Synths
Hardware synths are standalone physical instruments. They offer more tactile control for sound design than virtual synths. They come in different sizes and shapes and can produce a wide range of sounds. They may require more investment upfront compared to virtual synths but many musicians prefer them for their unique sound character. In conclusion, choosing the right synth sounds depends on various factors such as your music production needs, budget, and personal preference. Analog synths offer warm and classic sounds, whereas digital synths provide versatility. Virtual synths are convenient and portable while hardware synths offer more tactile control. Understanding the pros and cons of each type of synth sound will allow you to make an informed decision when selecting the most suitable synth sounds for your music production.

Factors To Consider

If you are a music creator, you must know how challenging it can be to choose the right synth sounds for your track. It is not easy to make a decision that will define the entire tone of your song. However, there are some factors you can consider that will make the choice easier.

Genre And Mood Of Music

The genre of the music you are creating will play a significant role in deciding which synth sound to choose. For instance, if you are making electronic music, you may want to choose synth sounds with more modern and synthesized tones. On the other hand, if you are creating a track with an acoustic guitar, you may want to choose a synth sound that emulates a plucked acoustic guitar string. Additionally, you should consider the mood of the music and choose synth sounds that complement it. If the song has a dark or sad tone, you may want to select synth sounds with a minor key or sustained tones.

Arrangement Of The Song

The arrangement of the song also plays a crucial role in selecting the right synth sounds. If you have added a lot of instruments to your track, you may want to choose synth sounds that are less prominent and provide background support to other instruments. Conversely, if there is a minimalist arrangement, you may want to choose synth sounds that will serve as the focal point of the track.

Acoustic Vs Electronic Instruments

You should also consider whether you want to use acoustic or electronic synth sounds for your track. Acoustic synth sounds mimic real-life instruments, whereas electronic ones are artificial, with no reference to physical instruments. While acoustic synth sounds are excellent for providing a natural atmosphere to the track, electronic synth sounds offer more versatility and variety, and can often create unique sounds that cannot be replicated by any physical instrument.

So, consider these factors when selecting synth sounds and experiment with different combinations to see what works best for you. By keeping these aspects in mind, you can easily choose the right synth sounds for your next song.

How To Choose The Right Synth Sounds

Credit: www.masteringthemix.com

Choosing Synth Sounds For Different Parts

When it comes to choosing synth sounds for different parts of a song, it is crucial to select the right sound to bring out the emotion and highlight the melody. The sound you select can transform a simple melody into something magical and memorable. In this blog post, we will discuss how to choose synth sounds for different parts, including basslines, lead melodies, pads, and atmospheres, and arpeggios and sequences.

Basslines

The bassline is the foundation of the song and creates the groove and rhythm. When selecting a synth sound for basslines, it’s essential to choose a sound that is punchy, powerful, and sits well in the mix. A sound with a strong attack and a defined sustain will work well as a bass sound. A filtered saw wave or a deep sine wave can create a perfect bassline sound.

Lead Melodies

The lead melody is the most memorable part of a song, and it’s crucial to select a synth sound that creates a catchy and memorable tune. It’s important to choose a sound with a clear and defined attack that stands out in the mix. Try experimenting with different waveform shapes, filters, and effects to create a unique sound that complements the melody and enhances the emotion of the song.

Pads And Atmospheres

Pads and atmospheres are used to create ambient and emotional backgrounds to a song. When selecting a synth sound for pads and atmospheres, it’s important to choose a sound with a slow attack and a long sustain. This creates a smooth and evolving sound that adds depth to the song. Try experimenting with reverb, delay, and other effects to add more space and atmosphere to the sound.

Arpeggios And Sequences

Arpeggios and sequences are used to add movement and rhythm to a song. When selecting a synth sound for arpeggios and sequences, it’s essential to choose a sound with a fast attack and a short sustain. A sound with a simple waveform shape like square, saw, or triangle will work well for arpeggios. Try experimenting with different patterns and rhythms to create a unique and memorable sound.

Methods For Tweaking Synth Sounds

Create interesting and unique synth sounds by experimenting with different parameters such as filters, envelopes, and oscillators. Pay close attention to the characteristics of the sound you want to achieve and tailor your choices accordingly. It may take some time, but with practice, you can become a master at creating unique and captivating synth sounds.

When using a synthesizer, tweaking the sound is crucial in creating a unique and interesting composition. While choosing the right preset is a good starting point, there are several ways to modify and customize the sound to suit your requirements.

Using Effects Processing

One way to add unique characteristics to your synth sound is by utilizing effects processing. Effects processing gives you more options to manipulate your sound by adding extra layers of effects. There are several effects, including filters, reverb, chorus and delay, which can enhance the texture and depth of your sound. For instance, reverb can extend the length of the synth, while delay adds echo that can give a sense of space and ambiance. It is important to experiment with different settings in effects processing because they allow for more creative sound design.

Modulating Filters And Envelope Settings

Filters and envelope settings are two critical synthesize functions that provide a foundation for shaping your sound to your preference. Filters are utilized to adjust the harmonic content, decreasing or increasing the sound tone. Modulating filters and envelopes can be accomplished in various ways, including LFOs, key tracking, and automation. By modulating the filter, you can produce interesting sound effects such as frequency sweeps or modulation effects. Similarly, envelope settings regulate the attack, decay, sustain and release of the sound. Changing the envelope settings can make a difference in resulting sounds.

Incorporating Lfos

LFOs, or low-frequency oscillators, produces a waveform that repeats at a slow speed below the human hearing range. These oscillators are commonly used to create vibrato effects, tremolo, and the impression of the sound pulsating. LFOs can also be employed in modulation routing to dynamically adjust effects or filter settings in response to the keys you play. In conclusion, manipulating synth sounds is an integral part of producing music with synthesizers. From using effects processing, modulating filters and envelope settings to incorporating LFOs, there are several avenues to experiment with to develop your sound. Utilizing these methods can provide endless possibilities to create a unique signature sound that matches your creative vision.

Tips For Experimentation And Creativity

Discovering the right synth sounds can be a challenging task, but with some experimentation and creativity, it’s possible to find the perfect match for your music. It’s important to listen to a variety of sounds, tweak them to your liking, and trust your ear to guide you towards the best option.

Synthesizers offer numerous options to create a unique sound. As a music producer or sound designer, it can be overwhelming and challenging to choose the right synth sounds. Experimenting with different settings and techniques can help you find creative sounds that fit your production. Here are some tips for experimentation and creativity when choosing synth sounds:

Trying Unconventional Settings And Techniques

Exploring the synth settings beyond the default patches can help you achieve unique and unexpected sounds. Experiment with LFOs, filters, envelopes, and oscillators to create your sound. Start by trying to push the settings beyond the default or slightly tweaking them to create a different sound. Don’t be afraid to try new settings and let your ears be the judge.

Emulating Sounds Of Other Instruments

Synthesizers can create sounds that emulate other instruments, such as guitar, piano, or vocals, among others. You don’t have to be a virtuoso in playing these instruments; you can create the sounds using a synth. This technique is useful in genres like electronic dance music, where creating sounds that imitate acoustic instruments is common. Experimenting with different settings can help you achieve the desired sound. Using these tips can help you find the right synth sounds for your tracks. Don’t shy away from experimenting; it can be the gateway to discovering unique sounds.

Resources For Finding High-quality Synth Sounds

Discovering high-quality synth sounds requires proper research that includes checking out sound libraries, demo videos, and user forums. Understanding the different types of synths and their sound capabilities is crucial in making the right choice for your music production needs.

When producing music with a synthesizer, the importance of choosing the right sounds cannot be understated. While it is possible to create your own synth patches and samples, it can be time-consuming and not always necessary. Fortunately, there are a multitude of commercial and free sound libraries available, suitable for any genre of music. Additionally, creating your own samples and presets is a great way to add a personal touch to your music productions. In this article, we will delve into the resources available for finding high-quality synth sounds.

Commercial And Free Sound Libraries

A commercial sound library is a collection of synth sounds that have been created by professional sound designers. These libraries are often designed for specific genres, such as EDM or hip-hop, and are suitable for those who don’t want to spend time creating their own sounds from scratch. Some popular commercial sound library options include Spitfire Audio, Native Instruments, and Loopmasters. For those on a tight budget, free sound libraries can also provide high-quality sounds. Often created by independent developers, these libraries can be found on websites such as GitHub and KVR Audio. Some popular free options include u-he, KORG, and SampleScience.

Creating Your Own Samples And Presets

Creating your own samples and presets is a fantastic way to add uniqueness to your music productions. By sampling different instruments or creating entirely new sounds, you can generate a personalized library of sounds that reflects your own style. Additionally, by learning how to create your own presets, you can gain a deeper understanding of how your synth works. To begin creating your own samples and presets, there are a few things you will need. Firstly, a DAW (digital audio workstation) such as Ableton or Logic Pro will be required. Secondly, it is recommended that you invest in a MIDI keyboard to aid in sound creation. Lastly, some form of sound manipulation software, such as Serum or Massive, will be a great help in creating new sounds. In conclusion, the choice between commercial or free sound libraries versus creating your own sounds is entirely up to personal preference. Both methods have their advantages and disadvantages, and ultimately the decision will come down to the time and budget available to you. By exploring the resources available for finding high-quality synth sounds, you can elevate your music productions and create sounds that stand out from the crowd.

How To Choose The Right Synth Sounds

Credit: m.youtube.com

Conclusion: Personalizing Your Synth Sound Choice

To choose the perfect synth sound, personalize your choice by considering the genre, mood, and texture of the music. Experiment with various presets and adjust filters, envelopes, and LFOs until you achieve the desired sound. Trust your ears and intuition to create a unique and compelling sound that complements your music.

Finding Your Own Voice Through Synthesis

Synthesizers have the power to create some truly unique and amazing sounds. But with so many different options available, it can be tough to narrow down your choices and find the right sound for your music. That’s why it’s important to take the time to experiment and find your own voice. Start by exploring different waveforms, filters, and modulation options. Experiment with different vibrato, pitch bend, and portamento settings. Don’t be afraid to push the limits and try something new. It’s through experimentation that you’ll begin to develop your own personal synth sound.

Pushing The Boundaries Of Synth Sounds

Once you’ve found your own personal sound, it’s time to push the boundaries and keep exploring. Try layering different sounds together to create unique textures and complexity. Experiment with different effects such as delay, reverb, and distortion to add depth and character to your sound. And don’t forget to explore the power of automation. By automating different settings, you can create evolving and dynamic sounds that add interest and intrigue to your music. By taking the time to personalize your synth sound and push the boundaries of what’s possible, you’ll be able to create truly unique and captivating music that stands out from the crowd. So experiment, play, and have fun with your synthesizer, and see where your creativity can take you.

Frequently Asked Questions On How To Choose The Right Synth Sounds

What Should My First Synth Be?

Your first synth depends on your needs and budget. Start with affordable, user-friendly models like the Korg Volca series or the Arturia MicroBrute. More advanced options include the Moog Mother-32 or the Dave Smith Instruments Prophet Rev2. Research and experiment to find the synth that fits your playing style and budget.

What Is The Easiest Synth To Learn?

The easiest synth to learn varies from person to person, but some popular options include the Korg Volca series and the Roland Boutique line. Both of these synths have intuitive interfaces and are great for beginners. Ultimately, the best synth to learn on depends on personal preferences and skill level.

Do All Synths Sound The Same?

No, not all synths sound the same. Each one has its own unique characteristics and sound capabilities depending on their specifications and functionalities. Some synths may have different oscillators, filter types, and modulation options that make them sound distinct from others.

What To Look For When Buying A Synthesizer?

When buying a synthesizer, consider the sound quality, type of synthesis, number of keys, portability, and budget. Look for a synthesizer that fits your music style and needs, and has the features you require. Consider whether you need a basic or advanced synthesizer, and whether you want a digital or analog model.

Additionally, read reviews and test the synthesizer before purchasing to ensure it meets your expectations.

Conclusion

From creating ambient soundscapes to composing full music productions, choosing the right synth sounds is essential in music-making. By understanding the different sound parameters and utilizing various sound sources, one can unleash their creative potential and produce unique, standout pieces.

Remember to experiment and play around with different settings and combinations to discover your own signature sound. With these tips in mind, you can confidently navigate the world of synth sounds and enhance your music-making experience.

More in our Synth guides.

Categories
Archive

Imac Pro Vs Presonus Studio One 4

The Imac Pro is a desktop computer, while Presonus Studio One 4 is music production software. Both have different functions and cannot be compared directly.

The Imac Pro is a sleek and powerful machine designed for graphics-intensive tasks such as video editing, graphic designing, and animation. It is equipped with an impressive 27-inch 5K Retina display and has an eight-core Intel Xeon processor with 32GB RAM and a 1TB solid-state drive.

On the other hand, Presonus Studio One 4 is a complete music production software with a user-friendly interface and professional features such as real-time audio stretching, multi-track MIDI editing, and extensive plugin support. It allows musicians to record, mix, and master their tracks and provides tools for live performances and sound design. Ultimately, the decision to choose between the Imac Pro and Presonus Studio One 4 depends on the user’s needs and goals.

Imac Pro Vs Presonus Studio One 4

Credit: logickeyboard.com

Performance Of Imac Pro And Presonus Studio One 4

The Imac Pro and Presonus Studio One 4 are powerful tools in their own right. With the Imac Pro’s high-performance hardware and the Presonus Studio One 4’s intuitive workflow, music production has never been easier and faster. The combination of Imac Pro and Presonus Studio One 4 sets the bar high for music production workstations.

The performance of a computer when running music production software can be a deciding factor for many producers when it comes to purchasing the right set up. In this comparison, we will take a closer look at the key components of the Imac Pro and Presonus Studio One 4 to determine which one comes out on top in terms of Processor, RAM, Storage, Graphics, and Connectivity.

Processor

The Imac Pro comes with a 10-core Intel Xeon W Processor, while the Presonus Studio One 4 runs on a 64-bit Intel or AMD multi-core processor. While both processors are powerful, the Imac Pro’s 10-core Processor provides superior processing power when running multiple applications at the same time.

Ram

The Imac Pro offers up to 32GB of DDR4 ECC Memory, while the Presonus Studio One 4 has a recommended minimum of 8GB of RAM. RAM is essential to the performance of music production software, as it allows for multiple application windows to be open simultaneously without slowing down the system. Therefore, the Imac Pro’s larger RAM capacity gives it an advantage over the Presonus Studio One 4.

Storage

The Imac Pro has a built-in 1TB SSD, while the Presonus Studio One 4 has no storage, relying heavily on external storage options. With the Imac Pro, producers can store plenty of project files, samples, and other important data on the device itself, which can save time and improve workflow.

Graphics

When it comes to graphics, the Imac Pro is unmatched. It comes with an impressive Radeon Pro Vega 56 graphics card with 8GB of video RAM, which allows for outstanding display quality. The Presonus Studio One 4 can run on almost any graphics card but isn’t designed with high-end graphics in mind.

Connectivity

Both the Imac Pro and Presonus Studio One 4 come with a multitude of connectivity options, including USB, Thunderbolt, Ethernet, and HDMI. The Imac Pro, however, features 10Gb Ethernet, which provides faster data transfer speeds than the Presonus Studio One 4’s standard Ethernet port. Additionally, the Imac Pro’s Thunderbolt 3 ports support up to two 5K displays, while the Presonus Studio One 4 supports only one display. In conclusion, the Imac Pro outperforms the Presonus Studio One 4 in terms of Processor, RAM, Storage, Graphics, and Connectivity. While both options are viable for music production, producers who require high-performance capabilities may want to invest in the Imac Pro.

Imac Pro Vs Presonus Studio One 4

Credit: www.editorskeys.com

Software And Applications Of Imac Pro And Presonus Studio One 4

Imac Pro and Presonus Studio One 4 are both powerful tools for professionals in the digital music industry. While Imac Pro offers a robust system that can handle heavy workloads, Presonus Studio One 4 provides cutting-edge music production software for recording, mixing, and mastering.

Choosing the right tool depends on the specific needs of the user.

If you’re looking for a reliable computer and software for your music production needs, then you might be torn between the Imac Pro and the Presonus Studio One 4. Both devices have their own pros and cons, but when it comes to software and applications, they both offer powerful tools that can deliver high-quality results. Let’s dive deeper into the details for each using the following H3 headings:

Operating System

The Imac Pro runs on macOS, while the Presonus Studio One 4 can run on both macOS and Windows. While macOS is known for its stability and ease of use, some users prefer Windows for its flexibility and customization. It ultimately depends on personal preference and what operating system you’re more comfortable using.

Music Production Software

One of the main advantages of the Imac Pro is that it comes with built-in music production software such as GarageBand and Logic Pro X. These tools are user-friendly and have a wide range of features for recording, editing, and mixing music. On the other hand, Presonus Studio One 4 is a dedicated music production software that offers advanced tools for creating professional-level music tracks. It also has a quick and intuitive workflow, making it easy for users to create and edit music. In conclusion, both the Imac Pro and Presonus Studio One 4 offer powerful software and applications for music production. If you’re a beginner, the Imac Pro may be a better choice as it comes with built-in software that’s easier to use. However, if you’re a professional producer looking for more advanced tools and capabilities, the Presonus Studio One 4 is a great option. Regardless of your choice, both devices can help you achieve high-quality music production results.

Display Of Imac Pro And Presonus Studio One 4

The Imac Pro and Presonus Studio One 4 are two heavyweights in the music production game. Choosing between the two can be challenging, as both offer unique features and benefits. While the Imac Pro is a powerful computer built for performance, Presonus Studio One 4 stands out as an intuitive digital audio workstation for efficient music-making.

The display of Imac Pro and Presonus Studio One 4 are crucial for professionals seeking to elevate their video and audio work. Both products offer different screen sizes, resolutions, and color accuracy.

Color Accuracy

Imac Pro features a stunning Retina 5K display with a wide color gamut of P3. This means that the screen can display a vast range of colors, making it an excellent choice for photographers, video editors, and designers. Additionally, Imac Pro features advanced calibration technology that ensures consistent color accuracy for an excellent visual experience. Presonus Studio One 4, on the other hand, does not come with a display. However, it is compatible with different monitors, which allows users to choose a monitor that suits their preferences and budget. Color accuracy is also dependent on the monitor, making it crucial to invest in a high-quality monitor for a great visual experience.

Resolution

Imac Pro boasts a resolution of 5120×2880 pixels, which means that users can see every detail. This feature makes it an ideal choice for video editors who need a precise and detailed view of their work. The high resolution also means that Imac Pro can handle large-scale projects without compromising on detail. Presonus Studio One 4, when paired with a high-resolution monitor, can also achieve a vibrant and detailed visual display. Users can use a 4K UHD monitor to achieve ultra-high-definition visuals, making it easier to spot and fix any errors in the final product.

Screen Size

Imac Pro comes with a 27-inch screen, which provides users with an ample workspace for their editing work. The large display allows users to have multiple tabs, windows, and applications open without compromising on visibility or efficiency. Similarly, Presonus Studio One 4’s display size depends on the monitor chosen. This means that users can choose a display size that suits their workspace and visual needs. The flexibility to choose a monitor makes it an affordable option for users who want a high-quality visual display. In conclusion, Imac Pro and Presonus Studio One 4 offer different display features, making it crucial for users to select a product that best suits their needs. Color accuracy, resolution, and screen size are essential factors that professionals need to consider when choosing between these two products.

Pros And Cons Of Imac Pro And Presonus Studio One 4

The Imac Pro is an excellent choice for macOS users who demand the highest performance. Its sleek design makes it a stylish addition to any workspace. On the other hand, Presonus Studio One 4 is a powerful digital audio workstation that allows musicians to record, mix, and master their music with ease.

However, the Imac Pro is quite expensive compared to other desktops, while Presonus Studio One 4 is not as intuitive as other music production software.

Pros and Cons of Imac Pro and Presonus Studio One 4 Are you a professional music producer, sound engineer, or composer looking for a reliable computer and digital audio workstation (DAW) to bring your music production game to the next level? If so, you might consider the Imac Pro and Presonus Studio One 4 as the top contenders. However, each of these powerful tools comes with its own set of advantages and disadvantages. In this article, we’ll examine the pros and cons of Imac Pro and Presonus Studio One 4 to help you make an informed buying decision. Advantages of Imac Pro: The Imac Pro is a high-performance machine designed for the most demanding tasks, including music production. Here are some of its advantages: 1. Power: The Imac Pro comes with an 8-core, 10-core, or 18-core Intel Xeon processor, depending on the configuration, making it one of the most powerful computers on the market for music production. 2. Display: The Imac Pro features a stunning 27-inch Retina 5K display with support for one billion colors, providing crystal-clear visuals of your music production projects. 3. Design: The Imac Pro has a sleek and elegant design that matches its top-of-the-line performance, making it an excellent addition to any music studio. Disadvantages of Imac Pro: Despite its impressive capabilities, the Imac Pro has some drawbacks that you need to consider before making a purchase: 1. Price: The Imac Pro is an expensive machine, with price tags ranging from $5,000 to $13,000, depending on the configuration. 2. Upgradability: Unlike some other computers, the Imac Pro is not easily upgradeable, meaning you’ll have to purchase a new one if you want to improve its performance down the line. Advantages of Presonus Studio One 4: Presonus Studio One 4 is a comprehensive DAW software that boasts an array of features and tools to help you produce high-quality music with ease. Here are some of its advantages: 1. User-friendly interface: Presonus Studio One 4 has a user-friendly interface that makes it easy to navigate and use, even for beginners. 2. Flexibility: Presonus Studio One 4 offers flexible routing and mix options, making it easy to create complex music productions with multiple tracks and instruments. 3. Customizability: Presonus Studio One 4 allows you to customize the layout, color scheme, and features to suit your preferences and workflow. Disadvantages of Presonus Studio One 4: While Presonus Studio One 4 is a powerful DAW software, it also has some limitations you need to consider: 1. Compatibility: Presonus Studio One 4 is not compatible with all plugins and virtual instruments, meaning you may have to purchase additional software to use with it. 2. Learning curve: While the interface is user-friendly, some users may still find it challenging to navigate the more advanced features, requiring some practice. In conclusion, the Imac Pro and Presonus Studio One 4 are powerful tools that can help you produce professional-quality music efficiently. However, each of them has its own set of pros and cons, and your choice between them ultimately depends on your preferences, needs, and budget.

Imac Pro Vs Presonus Studio One 4

Credit: www.editorskeys.com

Frequently Asked Questions Of Imac Pro Vs Presonus Studio One 4

Is Presonus Studio One Compatible With Mac?

Yes, PreSonus Studio One is compatible with Mac operating systems.

What Are Some Weaknesses Of Presonus Studio One?

PreSonus Studio One has a relatively limited third-party plugin support when compared to other DAWs like Pro Tools and Ableton Live. Additionally, some users have reported stability issues and crashes, specifically when working with larger, more complex projects. Finally, the software’s user interface may feel overwhelming and cluttered to some users, especially those who are new to using digital audio workstations.

Is Studio One As Good As Pro Tools?

Both Studio One and Pro Tools have their pros and cons. However, many users prefer Studio One for its user-friendly interface and intuitive features. On the other hand, Pro Tools is widely used in professional studios due to its advanced editing capabilities and industry-standard compatibility.

Ultimately, it depends on the user’s needs and preferences.

Does Studio One Work On M1 Mac?

Yes, Studio One works on M1 Mac.

Conclusion

After comparing the standout features of Imac Pro and Presonus Studio One 4, it is clear that both offer unique benefits to users. Depending on your specific goals, one may be a better fit than the other. However, it’s essential to keep in mind that ultimately, the software you choose should align with your workflow, requirements and goals.

By conducting thorough research and testing, you can make an informed decision and create high-quality content that enhances your creativity and productivity.

Categories
Archive

How To Make Melody From Chords

To make melody from chords, you can focus on the chord progression, utilize chord inversions and experiment with melody notes within the chords. Now, let’s dive into the process of creating melodies from chords.

Also, creating a melody over chords can be a challenging task for many musicians. However, with the right approach, it can become an enjoyable and rewarding experience. A melody is a sequence of notes played in a specific order that creates a musical phrase.

Related reading: Chords And Melody Writing and How To Find Chords For Any Melody. For background, see the Wikipedia article on Melody.

On the other hand, chords are a group of notes played together simultaneously. Moreover, combining these two elements can result in a musical masterpiece. We will explore the techniques to make melody from chords and create a harmonious piece of music.

How To Make Melody From Chords

Credit: hubguitar.com

Understanding Chords And Melody

In addition, to create a chord-based melody, one needs to understand the relationship between these two elements of music. A chord progression can provide the foundation for a melody by outlining its tonality and feel. By selecting the right chords and rhythm, one can open up endless possibilities for creating memorable melodies.

Melody from chords – How To Make Melody From Chords

Definition Of Chords

Furthermore, a chord is a group of three or more notes played together to create harmony. Essentially, chords provide the foundation for a song, creating a rich, complex sound. Chords are often classified by their root note and type, such as major, minor, augmented, or diminished. Understanding chord theory and progression is key to playing and making great music.

Definition Of Melody

Additionally, Melody refers to the main musical theme of a song. It is the part that is easy to hum or whistle and is usually the most memorable part of the song. Melodies are created by following a sequence of notes that sound pleasing to the ear. A good melody can be played on its own, without any chord accompaniment, and still be beautiful.

The Relationship Between Chords And Melody

Also, a melody is often created from a set of chords. In other words, the chord progression provides a framework for the melody to be built upon. The melody is usually played over the chord progression, creating a sense of harmony between the two. Alternatively, the melody can be used to create chords. By playing different notes within the melody together, it’s possible to create chords. This technique is often used in jazz and pop music to create complex chord progressions. Understanding the relationship between chords and melody is essential for any musician or music producer looking to create amazing music. With practice and experimentation, creating beautiful melodies from chords will become second nature.

How To Make Melody From Chords

Credit: www.jazzguitar.be

Choosing The Right Chords For A Melody

Moreover, choosing the right chords for a melody is an important step in creating a memorable song. Understanding the relationship between chords and melody is key to making a cohesive and harmonious track. By experimenting with different chord progressions, you can find the perfect fit for your melody and create a truly unique sound.

In addition, Melody and chords are closely intertwined in music theory. A melody is what you sing or hum, while chords are the underlying harmony that supports that melody. Understanding how to create a good melody from chords is crucial for any musician who wants to write great songs. Here are some tips for choosing the right chords for a melody.

Selecting Chords That Complement The Melody

Furthermore, the chord progression you select should serve to support and enhance the melody. One strategy is to choose chords that contain the notes of the melody. For example, if your melody is C, E, G, you can create a chord progression by selecting chords that contain those notes. This creates a sense of cohesion and flow between the melody and the chord progression.

Experimenting With Different Chord Progressions for Melody from Chords

Another way to create a melody over chords is to experiment with different chord progressions. Additionally, keep in mind that not all chords are created equal. Some chords sound more pleasing to the ear than others. That’s why it’s important to experiment with different chord progressions to find the one that best suits your melody.

Code Example:

Also, to help you get started, here is a snippet of code showing how to create a chord progression in the key of C major using the I, IV, and V chords. C - F - G - C This is known as the I-IV-V progression and is commonly used in many genres of music. But don’t be afraid to experiment with other chord progressions as well.

In Conclusion

Moreover, choosing the right chords for a melody is a crucial part of songwriting. By selecting chords that complement and support the melody, and experimenting with different chord progressions, you can create songs that are both catchy and harmonically interesting. Remember to keep an open mind and keep practicing. With some dedication and hard work, you too can learn how to make great melodies from chords.

Creating A Melody From Chords

In addition, creating a chord-based melody can be a daunting task for many songwriters. However, with some basic knowledge of music theory and experimentation, one can learn how to make a melody that harmonizes beautifully with the chord progression and creates a memorable tune that catches the listener’s attention.

Furthermore, keep practicing and trust your instincts to find the right melody for your chord progression.

Additionally, Melody is the soul of music, and it’s essential to creating a captivating piece. Many people believe that creating a melody is a challenging task, but with the right knowledge and skills, it becomes easy and fun. In this blog post, we’ll guide you on how to make a melody over chords. We will focus on starting with a chord progression, identifying the key, and building a melody using the chord progression. Let’s dive in!

Starting With A Chord Progression for Melody from Chords

Also, a chord progression consists of a series of chords played one after the other. It’s the foundation of any song, and it’s where the melody stems from. To start creating a chord-based melody, you need to have a chord progression. You can either create your progression or use an existing one. A chord progression in a specific key gives you a framework for creating a melody that sounds harmonious.

Identifying The Key for Melody from Chords

Moreover, the key of a song is the note or chord that the song revolves around. It’s essential to know the key of the song to create a melody that compliments the song’s harmony. You can identify the key by looking at the chords used in the progression. Once you have a chord progression, you can use the root note of the first chord in the progression as the key of the song.

Building A Melody Using The Chords

Now that you have your chord progression and key, it’s time to build a melody. You can do this by using the notes of the chords in the progression. You can start by playing the notes of each chord one after the other and try to create a melody that sounds good. The notes in a chord provide you with a range of tones you can use to create a melody. You can also use the root note of the chord and build your melody around it. Ensure each note in the melody harmonizes with each chord in the progression. You can also create variations in the melody by using different rhythms, dynamics, and note lengths. Keep playing around with the melody until you find one that sounds good to you. In conclusion, creating a melody over chords requires a bit of creativity, patience, and knowledge of music theory. With the guidelines provided above, you can start creating melodies that complement your chord progressions. Remember, practice makes perfect, so keep experimenting until you find a melody that sounds perfect to you.

Adding Variations To The Melody

Creating an engaging melody is all about adding variations to the chord progression. The chord progression forms the backbone of the song, and the melody is what brings it to life. By adding variations to the melody, you can create a more interesting and engaging sound that keeps the listeners hooked. In this post, we’re going to explore the different ways you can add variations to the melody of your song.

Changing The Rhythm for Melody from Chords

One of the easiest ways to add variation to your melody is by changing the rhythm. The rhythm of the melody determines how the notes are played and the overall pace of the song. By changing the rhythm, you can create a new melody that is both fresh and engaging. You can do this by playing around with the duration of the notes, adding syncopation, or changing the time signature of the song.

Adding Embellishments And Ornaments for Melody from Chords

Adding embellishments and ornaments to your melody is another way to spice things up. These are small touches that add flavor to the melody and make it more interesting. Examples of embellishments and ornaments include slides, trills, turns, and vibratos. Adding these elements to your melody can take it from dull to dynamic in no time. However, be careful not to overdo it, as too many embellishments can make the melody sound cluttered and chaotic.

Examples:

EmbellishmentsDescriptionExample
SlideConnecting two notes in a sliding motion.Before:
C – D – E
After:
C – (slide to) E
TrillRapid alteration between two notes.Before:
C – D – C
After:
C – (trill to) D – C
TurnQuickly connecting three notes in a specific order.Before:
C – D – E – F
After:
C – (turn to) E – D – F
VibratoRapid variation in pitch of a note.Before:
C
After:
C (with vibrato)

Using Melody To Enhance The Chord Progression

Using melody to enhance the chord progression has been a popular technique musicians have been implementing for ages. Melodic notes can take a simple chord progression and turn it into a memorable song for listeners. In this article, we will explore some practical ways to utilize melody to enhance the chord progression.

Creating Strong Melodic Hooks for Melody from Chords

A melodic hook is a short and catchy phrase that listeners can easily remember. Strong melodic hooks often focus on repeating a simple melodic phrase, which can create a memorable and impactful effect with listeners. Whether you are a beginner or an advanced musician, creating a strong melodic hook from a chord progression is an essential technique to improve and enhance your music.

Using Melody To Transition Between Chords

Transitions between chords can often feel abrupt and uneasy for listeners. Using melody to transition between chords can ensure that each chord is more smoothly integrated into the overall progression. A good way to do this is to identify the strongest note in each chord and use melody to lead into it. This creates a smoother transition between chords and allows the listener to follow along with the music more easily.

Utilizing Counter-melodies for Melody from Chords

Another way to use melody to enhance chord progressions is by utilizing counter-melodies. Counter-melodies are melodic lines that contrast with the main melody, adding depth and complexity to the song. Using counter-melodies in your chord progression can make it more interesting and unpredictable. This can help to create a memorable piece of music that will stick with your listeners even after the song has ended.

How To Make Melody From Chords

Credit: m.youtube.com

Tips And Tricks For Making Melodies From Chords

Creating a chord-based melody requires a good ear for pitch and rhythm. Start with a simple chord progression and experiment with different note combinations until you find a melody that fits. Remember to vary the length of each note and use rests to create interest and flow.

Creating a melody that complements the chord progression in a song can be a challenging task for a songwriter. You may have the chord progression worked out, but then you find yourself struggling to come up with a melody that fits perfectly. If you’re finding yourself in this situation, don’t worry. In this article, we will provide you with some tips and tricks for making melodies from chords that are sure to help.

Using Chord Inversions To Create Unique Melodies

One way to create a unique melody from your chords is to use chord inversions. By playing the chords in a different order, you can create a completely different sound. When you invert a chord, you change the position of its notes. For example, instead of playing a C major chord in its root position (C-E-G), you could play it in first inversion (E-G-C) or second inversion (G-C-E). This creates a unique sound that can help you craft a melody that fits perfectly.

Playing With Chord Tensions And Extensions

Another way to create interesting melodies from chords is to play with chord tensions and extensions. Tensions are notes that are added to a chord to create a more complex sound. Extensions are notes that go beyond the basic chord structure. For example, you could add a ninth or eleventh note to a basic major or minor chord. Try experimenting with these tensions and extensions to create unique and interesting melodies that will make your songs stand out.

Using Arpeggios To Create Melodies

Arpeggios are another great way to create melodies from chords. An arpeggio is the notes of a chord played in succession rather than simultaneously. By playing these notes in a specific order, you can create a flowing melody that complements the underlying chords. This technique can be particularly effective when you want to create a lush, flowing sound.

The Importance Of Listening

Finally, the most important tip for making melodies from chords is to listen to as much music as possible. Listen to different genres, different artists, and pay attention to the melodies they use. This will help you develop your own ear for melodies, and you’ll be able to create unique and interesting melodies that will make your songs stand out. In conclusion, making melodies from chords requires practice, experimentation, and listening skills. By using chord inversions, playing with chord tensions and extensions, and using arpeggios, you can create unique and interesting melodies that will complement your chords perfectly. So go out there and start experimenting today!

Frequently Asked Questions On How To Make Melody From Chords

How Do You Turn Chords Into Melodies?

To turn chords into melodies, start by understanding the key of the song and the chord progression. Experiment with different notes within each chord and try to create a catchy melody. Practice and repetition can help refine the melody until it fits well with the chords.

Consider using arpeggios or playing the chords in different inversions to find interesting melody options.

How Do You Find The Melody Of A Chord?

To find the melody of a chord, you need to identify the individual notes of the chord and then create a melody using those notes. This can be done by experimenting with different combinations of notes to create a pleasing and harmonious melody that complements the chord progression.

How Do You Harmonize Chords To Melody?

To harmonize chords to melody, first, identify the key of the song. Then, choose chords within that key that fit the melody notes. Pay attention to the rhythm and timing of both the melody and chords. Experiment with different chord progressions until they sound good together.

Finally, review and adjust as needed.

How Do You Make A Melody?

Making a melody involves creating a sequence of musical notes that sound pleasing to the ear. Start by identifying the key and tempo of the music. Next, experiment with different note patterns and rhythms until you find a catchy melody.

Focus on balancing repetition and variation to keep it interesting. Refine your melody by adding chords and harmonies that complement the melody.

Conclusion

To sum up, making a melody out of chords may seem intimidating at first but it is not impossible. Remember to choose a key, select your chords, and experiment with different melodies until you find one that sounds right. Practice is crucial to improve your skills in creating melodies from chords.

With proper knowledge and practice, you can develop your ability to create unique and beautiful melodies that will touch the hearts of your listeners.

Categories
Archive

Is Fl Studio Good for Mastering

FL Studio can be good for mastering, but it’s not its primary function. Also, FL Studio focuses on music production, so although it has some mastering tools, it’s not as comprehensive as dedicated mastering software.

FL Studio, also known as FruityLoops, is a digital audio workstation used for music production. It has gained popularity among music producers and composers due to its intuitive user interface, customizable workflow. A variety of powerful tools for creating and editing music.

Related reading: Using the Arpeggiator in Fl Studio and FL Studio 21 – The Best Music Production Software?. For background, see the official Image-line website.

However, when it comes to mastering, FL Studio may not be the ideal choice. While it does have some mastering tools like EQ, compression, limiters, and maximizers, these tools are geared more towards polishing individual tracks rather than final mastering. Dedicated mastering software usually has a wider range of tools, more precise control, and specialized features for final mastering. Nonetheless, FL Studio can still be used for basic mastering, especially for those who are on a budget or starting with music production.

Is Fl Studio Good for Mastering

Credit: ask.audio

Is Fl Studio Capable Of Mastering?

Fl Studio is a versatile digital audio workstation that includes powerful tools for mixing and processing audio. But it may not be the best option for mastering. While it certainly can work for mastering, other specialized software and hardware may be better suited for the task.

Introductory Paragraph: Is Fl Studio Capable Of Mastering?

Fl Studio, a popular Digital Audio Workstation (DAW) among music producers, is often used for recording, mixing, and composing music. However, many people wonder if it can work for mastering as well. Mastering is a crucial process in music production that aims to enhance the overall sound quality of a track. In this blog post, we will explore the features and advantages of using the DAW for mastering and answer the question – Is Fl Studio capable of mastering?

Features Of Fl Studio For Mastering

Fl Studio comes packed with various features that make it a suitable option for mastering your tracks. The following are the main features that you can use for mastering in the DAW:

  • Equalizer: Fl Studio has a 30-band graphic equalizer that enables you to make precise adjustments to your track’s frequency response.
  • Compressor: The DAW also has a multi-band compressor that you can use to compress specific frequency ranges individually and control the dynamic range of your track.
  • Limiter: Fl Studio features a mastering limiter that you can use to prevent your track from clipping and control its overall volume.
  • Multiband Dynamics: It also has a multiband dynamics processor that enables you to process different frequency ranges independently.
  • Multiband Stereo Enhancer: The DAW also provides a multiband stereo enhancer that lets you enhance specific frequency ranges’ stereo width.

Advantages Of Using Fl Studio For Mastering

Using the DAW for mastering has several advantages, such as:

  • User-Friendly Interface: Fl Studio’s user-friendly interface makes it easy to navigate and use its mastering features.
  • Compatibility: Fl Studio is compatible with various plug-ins, which gives you more options to enhance your track’s sound quality.
  • Efficiency: Fl Studio’s processing power allows you to master tracks efficiently without compromising on the sound quality.
  • Automation: The DAW provides automation tools that enable you to automate your mastering process with ease.

In conclusion, the DAW is capable of mastering your tracks, and it provides various features and advantages for this purpose. Its powerful processing capabilities and user-friendly interface make it an ideal choice for mastering. Its compatibility with third-party plug-ins gives you even more options to enhance your tracks’ sound quality.

Is Fl Studio Good for Mastering

Credit: www.etsy.com

Limitations Of Fl Studio For Mastering

Fl Studio is a versatile DAW but is not the ideal choice for mastering due to its inherent limitations like limited mastering plugins, lack of accurate metering, and control. It’s best suited for composition and mixing processes.

If you’re in the music industry, you’ve probably heard about Fl Studio before. For those who are not familiar, Fl Studio is a digital audio workstation (DAW) that is commonly used for music production. While it is a popular choice among music producers, many people question whether it is suitable for mastering music. In this article, we will explore the limitations of the DAW for mastering.

Lack Of Certain Tools And Features

One of the major limitations of the DAW for mastering is the lack of certain tools and features that are essential for the mastering process. For instance, the DAW does not come with a dedicated mastering suite. This means that you’ll need to use third-party plugins or software to achieve the desired results. Also, the DAW does not have a built-in spectrum analyzer. This is one of the most crucial tools needed for mastering.

Sound Quality Issues

Another limitation of the DAW for mastering is the sound quality issues that arise when using the software. Many professionals have criticized the sound quality of Fl Studio, saying that it produces a sterile sound that lacks warmth and depth. This is mainly because the DAW uses a 32-bit floating-point audio engine, which may not be suitable for mastering music. Additionally, the DAW has limited headroom, which can result in clipping and distortion when the mastering process is pushed too hard.

To sum it up, while Fl Studio is a great DAW for music production, it may not be the best choice for mastering. The lack of essential tools and features, along with the sound quality issues, makes it challenging to achieve professional-quality results. If you’re serious about mastering your music, it’s better to invest in a dedicated mastering suite or use a different DAW that caters specifically to that purpose.

How To Make The Most Of Fl Studio For Mastering

The DAW is a versatile digital audio workstation that offers a range of tools and features for mastering. With its powerful mixing and mastering plugins, FL Studio can be an effective tool for producing high-quality, professional-level tracks. By carefully mastering the software’s capabilities, producers can optimize their workflow and achieve superior results.

If you are a music producer, you are probably familiar with Fl Studio. While the software is popularly used for composing, arranging, and mixing music, many professionals have questioned its ability to handle mastering. However, with the right tools, settings, and techniques, you can make the most of Fl Studio for mastering and achieve high-quality results. In this post, we will explore how you can use Fl Studio to leverage its powerful mastering capabilities, including effective use of Parametric EQ 2, maximizing the use of Multi-band Compressor, and utilizing Stereo Shaper for a wider sound.

Effective Use Of Parametric Eq 2

Parametric EQ 2 is a powerful equalizer that allows you to boost or cut specific frequencies of your track. To use it effectively, you must identify the problem areas of the mix that need correction. Start by analyzing the frequency spectrum of the track and using the built-in analyzer tool to pinpoint the frequencies that need adjustment. Use narrow Q settings to isolate those areas and apply gentle boosts or cuts as appropriate. Take care not to overdo it with the EQ, as too much boosting or cutting can result in a loss of dynamic range and unnatural-sounding frequencies.

Maximizing The Use Of Multi-band Compressor

Multi-band compression is an essential tool for mastering, as it allows you to compress specific frequency ranges of the track. In Fl Studio, the Fruity Multiband Compressor is an excellent choice for this task. Start by analyzing the track to identify the areas that need compression, and then set the threshold, ratio, attack, and release settings accordingly. Take care not to over-compress the track, as this can result in a loss of dynamics and a flattened sound. Use the gain controls to adjust the output volume as necessary.

Utilizing Stereo Shaper For Wider Sound

Stereo Shaper is a versatile tool that allows you to adjust the stereo width of your track. In mastering, you can use it to create a wider sound and add depth to the track. Start by analyzing the stereo image of the track and identify the areas that need adjustment. Use the stereo separation and phase shift controls to adjust the width of the track and enhance the stereo image. Take care not to overdo it with the stereo width, as this can result in a loss of focus and an unstable mix.

In conclusion, Fl Studio is a capable mastering tool when used correctly. By utilizing the powerful features of Parametric EQ 2, Multi-band Compressor, and Stereo Shaper, you can achieve high-quality mastering results that rival those of dedicated mastering software. Remember to take care not to overdo it with any of these tools – a light touch is often all that is needed to achieve the desired effect. With practice and experimentation, you can master the art of mastering in the DAW.

Is Fl Studio Good for Mastering

Credit: diymusic.co.uk

Frequently Asked Questions Of Is Fl Studio Good For Mastering

Can You Master With Fl Studio?

Yes, you can master with FL Studio. The DAW has a comprehensive set of mastering tools that includes a multiband compressor, limiter, EQ, and stereo enhancer. These tools can help you achieve a professional-sounding master for your music tracks.

Do Any Professionals Use Fl Studio?

Yes, FL Studio is commonly used by music professionals such as DJs, producers, and composers. It is a versatile and powerful digital audio workstation that can work for a wide range of music production needs.

Is Fl Studio Good For Mixing?

Yes, FL Studio is a good option for mixing. It has a range of powerful mixing tools including EQ, compressor and multi-band dynamics, as well as excellent automation capabilities. However, the quality of the mix also depends on the user’s skills and knowledge.

Overall, FL Studio is a versatile and capable software for mixing.

How Long Does It Take To Master Fl Studio?

It can take a few months to years to master FL Studio, depending on the level of dedication and practice. The software is complex and customizable, so the time frame can vary for each individual. Monthly updates and new features also make it an ongoing learning process.

Conclusion

When it comes to audio mastering, FL Studio seems to be a viable option for beginners and experts alike. With its comprehensive range of built-in plugins and intuitive workflow, FL Studio can deliver high-quality results. Although it may lack some of the finer details of mastering, it’s still a valuable tool in the right hands.

Ultimately, whether or not FL Studio is good for mastering will depend on the individual’s skills and preferences.

Categories
Archive

Is Ai Mixing And Mastering Possible

Yes, AI mixing and mastering is possible. With advanced machine learning algorithms, AI can learn and replicate the techniques of professional mixing and mastering engineers.

The music industry has drastically evolved over the years with technological advancements. One notable change is the use of AI in music production. For decades, mixing and mastering were solely performed by professionals. They would use their knowledge, experience, and creativity to produce high-quality tracks.

However, with AI technology, musicians can now automate the process and produce high-quality music with minimal or no professional help. AI mixing and mastering software is equipped with advanced machine learning algorithms that can learn and replicate the techniques used by professionals. This innovation has not only made the production process faster but has also dramatically reduced the cost of hiring professionals.

Is Ai Mixing And Mastering Possible

Credit: www.productionmusiclive.com

What Is Ai Mixing And Mastering?

AI mixing and mastering is slowly becoming a trend in the music industry with the help of advanced software and technology. While it’s not entirely possible for AI to replace human creativity and experience, it can certainly enhance the production process, resulting in more efficient and consistent results.

AI mixing and mastering are two revolutionary advances in the music production industry. Artificial Intelligence, or AI, is used to analyze and manipulate music tracks during mixing and mastering processes, respectively. These digital tools automate several tasks that human engineers would typically perform, such as equalizing frequencies, compression, and adjusting volumes in a mix. The result is a polished, professional-grade track that is more consistent across different playback systems.

Fundamentals Of Ai Mixing

AI mixing employs algorithms that analyze the audio files of each track in a song. The AI breaks down the components of the sound, such as the rhythm and the pitch, to inform mixing decisions. With this data, the tools can make precise adjustments to volume levels, panning, and equalization. It can also identify unwanted background noises, such as hums and pops, and remove them. Furthermore, AI mixing allows engineers to compare mixes across different devices and playback systems, ensuring an optimal listening experience for all users. Some of the popular software tools for AI mixing are iZotope Ozone, LANDR, and Auphonic. These tools make the mixing process faster, more efficient, and more reliable than ever before.

Fundamentals Of Ai Mastering

AI Mastering software uses a combination of machine learning algorithms and human music producers’ expertise to optimize the sound of tracks. This is done by analyzing the audio spectrum of the track, and then making changes to various parameters, such as equalization, compression, and loudness. The goal is to achieve a balanced sound that is consistent across different devices and listening environments. With AI mastering, music producers can achieve a polished sound without the need for extensive studio time. Some popular AI mastering tools include LANDR, CloudBounce, and iZotope Ozone. These tools allow music producers to master their tracks by simply uploading their mixes and letting the software do its magic. In conclusion, AI Mixing and Mastering have ushered in a new era for musicians, where professional-grade production is attainable without expensive equipment, studio time, or training. With these new digital tools, the sky’s the limit in terms of creativity and innovation, and we can expect even more exciting developments in the future.

Benefits Of Ai Mixing And Mastering

When it comes to music production, mixing and mastering are the final (and perhaps most important) steps in the process. In recent years, artificial intelligence (AI) has become increasingly popular in the world of music production and has revolutionized the way mixing and mastering is done.

Quicker Turnaround Time

One of the main benefits of using AI for mixing and mastering is quicker turnaround times. Traditional mixing and mastering can take weeks, whereas AI-powered software can get the job done in a matter of hours. This is because the software can process vast amounts of data quickly, allowing for faster results.

Cost-effective

AI mixing and mastering is also a cost-effective solution for musicians and producers. Hiring a professional mix engineer or mastering engineer can be expensive, but with AI-powered software, you can achieve professional-level results at a fraction of the cost. This is especially useful for independent artists who may not have the budget to hire professionals for each project.

Consistent Results

With AI mixing and mastering, you can also expect consistent results every time. This is because the software uses algorithms to analyze the audio and make informed decisions on how to process it. Unlike humans, AI software does not have off-days or make mistakes, so you can expect the same level of quality every time you use it.

In conclusion, AI mixing and mastering is a game-changer in the world of music production. With quicker turnaround times, cost-effective solutions and consistent results, it’s no wonder why more and more musicians and producers are turning to AI-powered software for their mixing and mastering needs.

Potential Drawbacks Of Ai Mixing And Mastering

AI mixing and mastering is possible, but it also has potential drawbacks. The lack of human touch can result in a sterile sound, and AI algorithms may not always make the best decisions when it comes to nuance and emotion in music production.

With the advent of Artificial Intelligence (AI) in the music industry, various technologies have emerged that claim to offer solutions for music production. One of the most fascinating developments in recent years has been AI mixing and mastering. However, despite the allure of quick, easy and cheap music production, there are potential drawbacks to consider.

Lack Of Human Touch

One of the disadvantages of AI mixing and mastering is the lack of a human touch. While algorithm software can replicate human behavior, it cannot match the intuition of experienced mixing and mastering engineers. AI software is not capable of capturing the emotional nuances of a melody or a lyric or adapting to the subjective preferences of a musician. Furthermore, a recording’s ambiance, tone, or dynamics cannot be captured by an algorithm accurately. This absence of human interaction in the mixing and mastering process can result in a sterile and automated sound.

Restrictions In Customization

Another potential drawback of AI mixing and mastering is the restrictions in customization. AI software provides a standardized approach to mixing and mastering, which minimizes human error but may not cater to the unique needs of each musical composition. The tool’s inability to alter the original track’s core elements such as vocals or instrumentation can lead to limited flexibility in editing the final product. In addition, AI software may not recognize subtle blending and nuances that an experienced human engineer can notice. While it can provide consistency in the sound across an album, it may not necessarily capture the musical personality or preferences of the artist. In conclusion, AI mixing and mastering can be useful in reducing the cost and time in producing high-quality music. However, the potential drawbacks like a lack of human touch and restrictions in customization can impact the final product’s overall quality. Therefore, it is crucial to consider the pros and cons of AI technology and make an informed decision in music production.

Ai Mixing And Mastering Tools

AI technology has accomplished so much in the music production world. From songwriting to beat producing, AI has made processes more efficient and convenient. One of the most interesting applications of AI technology in music production is in mixing and mastering.

Popular Ai Mixing And Mastering Tools

There are several popular AI mixing and mastering tools available in the market today. These tools have been created to help music producers eliminate the strenuous task of manually mixing and mastering tracks. Some of the most prevalent AI mixing and mastering tools include:

AI Mixing and Mastering ToolsFeatures
LANDRProfessional mastering, Unlimited revisions and Algorithmic mixing
Izotope Ozone Imager 2Mastering software that can process individual tracks, stereo field and EQ processing.
MasteringBOXOnline mastering service with AI-powered algorithms to adapt to different genres and environments.

Comparing Ai Tools With Manual Mixing And Mastering

AI tools are gaining popularity in the music industry for being efficient and convenient; however, it is important to note that manual mixing and mastering also has its advantages. The use of manual mixing and mastering provides a unique touch that cannot be reproduced by AI tools. For instance, the personal touch of a professional mixing and mastering engineer brings about an individual and unique sound.

  • Manual mixing and mastering provides a more personalized touch
  • AI tools are more efficient and convenient
  • AI tools can be more cost-effective than manual mixing and mastering

In conclusion, AI mixing and mastering tools can be a great option for music producers looking to save time and money. However, it is important to note that manual mixing and mastering still has its own advantages, and it is up to each individual music producer to decide which option suits their preference and needs best.

How To Prepare Audio For Ai Mixing And Mastering

Mastering your audio with AI is definitely possible. To prepare your audio for AI mixing and mastering, ensure that it’s in WAV format, with good levels and minimal distortion. Properly labeling and organizing your audio files can also help improve the AI’s accuracy.

Artificial Intelligence (AI) has revolutionized the music industry by streamlining the process of audio mixing and mastering. However, before handing over your tracks to an AI algorithm, there are some crucial steps you should take to ensure a successful outcome.

Format and File Requirements

Before you begin the process of AI mixing and mastering, it’s essential to ensure that your audio files are compatible with the software. Here are some basic requirements to keep in mind:

  • Supported file formats: AI mixing software supports various digital audio file formats such as WAV, MP3, and AIFF.
  • Bitrate: Ensure that your audio has an optimal bitrate of at least 16 bits per sample for optimal results.
  • Sampling rate: AI software works best with audio files with a sampling rate of 44.1 kHz. Higher sampling rates may not always give the desired results.
  • Ensure audio files are free of any distortion, clipping or background noise as these issues can affect the accuracy of the AI mixing and mastering algorithms.

Choosing the Right Audio for AI Mixing and Mastering

Not all audio files are suitable for AI mixing and mastering. Ensure that you select high-quality recordings with good sound quality to get the best results. Here are some factors to keep in mind:

  • Clean recordings with minimal background noise are ideal for AI processing.
  • Recordings with dynamic range will allow the AI mixing software to create a balanced mix with the appropriate levels of volume and panning.
  • Ensure that all audio tracks are labeled correctly, with the correct track numbers, and that the same terminology is used consistently throughout the project.
  • Preparing an instrumental mix of the song can help isolate each instrument’s sound, making the AI mixing and mastering process more efficient.

In conclusion,

By following these steps, you can ensure that your audio is optimized for AI mixing and mastering. This will help the algorithms achieve the desired output, a carefully balanced and mastered mix of your audio tracks. AI mixing and mastering provide convenient, efficient, and cost-effective alternatives to traditional music recording studios. It helps to achieve audio quality comparable to studio standard and enhances the audio distribution process’s speed and accuracy.

Is Ai Mixing And Mastering Possible

Credit: www.lalal.ai

Real-world Examples Of Ai Mixing And Mastering

With advances in artificial intelligence (AI) technology, AI mixing and mastering are becoming more popular among music producers. In AI mixing and mastering, intelligent algorithms are used to automate the process of mixing and mastering music tracks. This technology has made the music production process faster, more efficient, and cost-effective. In this section, we will discuss some of the real-world examples of successful AI mixing and mastering.

Case Studies Of Successful Ai Mixing And Mastering

A number of companies are offering AI mixing and mastering services, including LANDR and iZotope. These companies have developed AI algorithms that can mimic the human ear and effectively mix and master music tracks.

LANDR Case Studies

LANDR is a leading online platform that provides AI-based mixing and mastering services for musicians. The company has worked with some of the biggest names in the music industry to deliver high-quality mixes and masters. Here are some of the success stories of LANDR’s AI mixing and mastering:

ArtistTitleDescription
BonoboMigrationGRAMMY-nominated album mixed and mastered with LANDR
CazetteSolo Para TiSingle mixed and mastered with LANDR that hit #1 in Mexico

iZotope Case Studies

iZotope is another popular software company that offers AI-based mixing and mastering services. The company has worked with renowned music producers to create some outstanding music tracks. Here are some of the success stories of iZotope’s AI mixing and mastering:

  1. Gregory Porter: The song “Liquid Spirit” was mixed and mastered with iZotope’s AI technology and won a GRAMMY award
  2. The Chainsmokers: The hit song “Closer” was mixed and mastered using iZotope’s Ozone 7 plugin

These case studies demonstrate the effectiveness and accuracy of AI mixing and mastering technology in the music industry. By using AI technology for mixing and mastering, music producers can save time and reduce costs, while producing high-quality tracks.

Future Trends In Ai Mixing And Mastering

The future trends in AI mixing and mastering explore the possibilities and limitations of artificial intelligence in music production. While AI can mimic human decisions and improve the mixing and mastering process, it’s unlikely to completely replace human input. However, the continuous development of AI technology promises advancements in this field.

Advancements In Ai Technology

As AI technology continues to advance at a rapid pace, so does its ability to perform more complex tasks. In the field of music production, AI mixing and mastering technology is quickly catching up with human experts. With the use of machine learning algorithms, AI systems analyze audio tracks to identify patterns and make adjustments to sound levels, equalization, compression, and effects. This can significantly reduce the time and effort required for mixing and mastering a track, allowing producers to focus on more creative aspects of production.

Integration Of Ai With Human Experts

While AI technology is becoming more sophisticated, it’s important to note that it cannot fully replace human expertise. That being said, there is a growing trend towards integrating AI technology with human experts to achieve better results. For example, an AI system could analyze a mix and make suggestions for improvements, which a human engineer could then implement. This collaboration can lead to a more efficient and effective workflow.

Rise Of Ai Mixing And Mastering Services

With the advancements in AI technology and the integration of AI with human expertise, we can expect to see a rise in AI mixing and mastering services. These services will offer producers a faster and more cost-effective way to get their tracks professionally mixed and mastered. Additionally, AI-based systems will become more accessible to musicians who may not have the financial resources to hire professional engineers, thus democratizing the music production process. In conclusion, the future of AI mixing and mastering is looking bright, with advancements in technology and integration with human expertise leading to more efficient and effective workflows, as well as the rise of AI-based services making professional mixing and mastering more accessible to a wider range of musicians.

Is Ai Mixing And Mastering Possible

Credit: aimixingmastering.com

Frequently Asked Questions For Is Ai Mixing And Mastering Possible

Can Ai Do Mixing And Mastering?

Yes, AI can do mixing and mastering. With advancements in technology, AI tools have been developed to help automate the process of mixing and mastering, making it faster and more accurate. However, human expertise and creativity are still required to produce the best results.

Will Music Artists Be Replaced By Ai?

No, music artists will not be replaced by AI. While AI can assist with music production and composition, human creativity and emotion cannot be replicated by machines. AI can work as a collaborative tool, but artists will always be needed to add their personal touch and unique perspective to the music industry.

Can Ai Combine Two Songs?

Yes, AI can combine two songs using different techniques such as deep learning, neural networks, and machine learning algorithms. These techniques can help to analyze and extract important features from songs, mix them, and create a new song.

Is Ai Good For The Music Industry?

Yes, AI has the potential to revolutionize the music industry by providing new opportunities for music creation, production, and distribution. AI can help artists to create new compositions, generate music that appeals to different tastes, and identify trends that can guide marketing decisions.

Additionally, AI can help identify and protect copyright and royalty rights.

Conclusion

AI mixing and mastering has certainly come a long way, with smarter technology and algorithms that enable it to mimic human skills and creativity to a great extent. While it may not replace the human touch and intuition, it can save time and effort for music producers and increase efficiency.

As a result, it is worth exploring and experimenting with if you want to see what it can do for your music. However, it’s important to remember that AI is a tool, not a replacement for the artist’s personal expression and style.

It’s ultimately up to the artist to decide how much they want AI to be part of their creative process.

For more background, see Audio mastering on Wikipedia.

Categories
Archive

Online Stereo And Stem Mastering

Online stereo and stem mastering is a process of improving the audio quality of tracks for online distribution. This service can enhance the overall sound, clarity, and balance of a track and is an essential step in creating a polished final product.

In today’s digital age, it’s crucial that music tracks are of the highest quality possible, particularly when it comes to online distribution. Online stereo and stem mastering is a process that can make a significant difference in the end result of a track, whether it’s for a single release or for an entire album.

This service can help to create a more balanced and professional sound, resulting in a better listening experience for the audience. As a result, many musicians and producers turn to online stereo and stem mastering services to ensure their tracks sound their best.

What Is Online Mastering?

Before delving into the specifics of online stereo and stem mastering, let’s first understand what online mastering is all about.

Definition Of Online Mastering

Online mastering can be defined as the process of preparing and optimizing audio files for final distribution directly over the internet, without the need for a physical presence in a mastering studio. With the help of professional online mastering services, musicians and sound engineers can access high-quality mastering tools remotely, which they can use to finalize their songs’ production quality.

Evolution Of Online Mastering

The evolution of online mastering has revolutionized the music production industry. Earlier, if you wanted to get your songs professionally mastered, you had to be physically present in a mastering studio. However, the technological advancements of recent years have made it possible to access professional mastering tools and services easily. Now, with just a few clicks over the internet, you can efficiently complete your songs’ production, including stereo and stem mastering.

Benefits Of Online Mastering

Here are some benefits of online mastering:

  • Online mastering is flexible, easy, and fast.
  • You don’t need to visit or ship your audio files to a studio physically. You can upload your songs directly to the online mastering service provider’s site or a file-sharing website to receive optimized audio files to finalize your production quality.
  • Online mastering services are usually cost-effective because there are no studio overheads or physical equipment costs.
  • You can expect high-quality mastering services because of advanced audio processing technologies and professional sound engineers working remotely.

These are just a few of the benefits that musicians, sound engineers, and producers can reap from the online stereo and stem mastering process.

What Is Stereo Mastering?

Stereo mastering is the process of preparing stereo audio recordings for distribution. Online stereo and stem mastering is now widely available, allowing musicians and producers to achieve professional sounding final mixes. With stem mastering, individual tracks are separated allowing for greater control and manipulation during the mastering process.

Overview Of Stereo Mastering

Stereo mastering is a final stage of audio post-production that aims at balancing and enhancing the stereo mix to get a polished and professional audio product. This stage ensures that the audio is consistent and sounds great across different playback systems, including smartphones, laptops, home theatres, and other audio systems. Stereo mastering involves essential processes such as clean up, leveling, automation, and other creative adjustments to make the mix sound the best it can be.

The Role Of A Mastering Engineer In Stereo Mastering

A mastering engineer plays a crucial role in stereo mastering by bringing fresh ears and skills to the project and ensuring consistency across all tracks. They have a deep understanding of various audio processing tools and techniques, making them proficient in deciding the right approach for each track. A mastering engineer ensures that the tracks sound great together while correcting any issues with each track’s tonality. They ensure that the final product sounds good on different playback systems and meets the industry’s standard requirements, ensuring the audio stands out from the crowd.

Tools And Techniques Used In Stereo Mastering

A mastering engineer uses various tools and techniques to enhance and balance the stereo mix. Some of the commonly used tools include compressors, limiters, EQs, stereo wideners, and exciters. Compressors and limiters control the dynamics of the audio, while EQs ensure that the tracks have a similar tonal balance. Stereo wideners make the stereo mix sound more spacious and immersive, while exciters add harmonics to the audio, making it sound more exciting. The mastering engineer might also use advanced techniques like mid-side processing, which controls the stereo width, or stem mastering, which allows the engineer to adjust groups of instruments separately. In conclusion, stereo mastering is an essential process that ensures the audio product sounds polished and professional. The mastering engineer plays a critical role in this process, using various tools and techniques to balance and enhance the stereo mix. A great mastering engineer can bring new life to an audio product and make it sound great on different playback systems.

What Are Stem Files?

Stem files are individual parts of a music track that can be manipulated independently during the mixing and mastering process. This allows for greater flexibility and control in creating a polished and professional sound. Online stereo and stem mastering services offer an affordable and convenient option for musicians and producers to enhance their music.

As an audio engineer or producer, you may have heard of stem files. You may have also come across them during the mastering process of your audio files. But what are stem files?

Definition Of Stem Files

Stem files refer to a type of audio file that contains individual tracks or groups of tracks of a particular audio mix. These groups or tracks could include drums, vocals, bass, synths, or other elements of the mix. In simpler terms, stem files are like a collection of separate tracks that have been grouped together for easier handling during mixing and mastering.

Advantages Of Stem Files

Stem files come with several benefits, including:

  • Greater control over individual elements of the mix.
  • Easier and faster mixing of multiple versions or formats of the same mix.
  • Better sound quality as there is a reduction in processing during mastering.
  • Greater flexibility and efficiency during mastering, allowing for more detailed editing of individual tracks.

Best Practices For Stem File Mastering

When it comes to mastering with stem files, there are certain best practices to observe, which include:

  1. Organize your stems correctly to ensure easy handling and organization during mixing and mastering processes.
  2. Avoid over-processing of individual tracks or stems, as this can lead to sound degradation and reduced clarity of the final mix.
  3. Always ensure that each stem is uploaded at the same gain level for consistency and to avoid any unexpected changes during the mastering process.
  4. Take advantage of the greater control offered by stem file mastering to achieve a more polished and refined sound.

In conclusion, stem files offer greater control, flexibility, and efficiency during the mixing and mastering process, resulting in better sound quality and a more polished end-product. However, observing best practices in the use of stem files is vital to achieve the best possible results.

Online Stereo And Stem Mastering

Credit: www.soundation-studio.de

Online Stereo Mastering Vs. Traditional Stereo Mastering

Online stereo and stem mastering offer an efficient alternative to traditional stereo mastering. With online mastering, you can upload your music and receive expertly tailored results without having to attend a studio. This approach saves time and money, providing accessible and professional results.

Online Stereo Mastering vs. Traditional Stereo Mastering When it comes to music production, a crucial aspect is the post-production phase. Mastering is an essential step that enhances the quality of the final music track. In the past, traditional stereo mastering was the only option available to music producers to perfect their tracks. Nowadays, technological advancements have made it possible to get the same quality results on the internet through online stereo mastering. Differences Between Online and Traditional Stereo Mastering The primary difference between online and traditional stereo mastering lies in the mode of communication. While traditional stereo mastering requires the physical presence of both parties, online stereo mastering is not limited by location. The process of online stereo mastering allows for fast communication and quick turnaround times while ensuring convenience for both the artist and the mastering engineer. Additionally, traditional stereo mastering facilities have more complex equipment, software, and hardware, while online mastering tools are more focused on efficiency and convenience. Benefits of Online Stereo Mastering Over Traditional Stereo Mastering Online stereo mastering offers several advantages over the traditional method. Some of the main benefits of online stereo mastering include faster turnaround times, cost-effective, easy communication, and convenience. By choosing online stereo mastering, music producers can save time and effort by eliminating the need to travel to a traditional mastering studio. Additionally, online stereo mastering is relatively less expensive compared to traditional stereo mastering due to the low overhead cost of online businesses. With online mastering services, it’s easy to communicate with the mastering engineer, which ensures that feedback is taken into account throughout the mastering process. Finally, online stereo mastering provides convenience for musicians. Music producers can work at their own pace, and the mastering engineer can work on the tracks whenever it’s comfortable for them. In conclusion, both traditional stereo mastering and online stereo mastering have their advantages and disadvantages. However, with the growth of internet technology, online stereo mastering has become the preferred method due to its efficiency and convenience. By understanding the differences and benefits of each method, musicians can choose the process that best suits their music production needs.

Online Stem Mastering Vs. Online Stereo Mastering

Online stem mastering and online stereo mastering are two different approaches to mastering a track. While stereo mastering is focused on the overall sound quality of the final mix, stem mastering involves manipulating individual groups of instruments or sounds separately before combining them into a final mix, providing more control over the end result.

Online Stem Mastering vs. Online Stereo Mastering If you’re in the music industry and looking for a way to improve the quality of your tracks, you’ve likely come across the terms “online stem mastering” and “online stereo mastering.” But what do they mean? And which one is best for your music? In this post, we’ll explore the differences between online stem mastering and online stereo mastering and when it’s appropriate to use either method.

Overview Of Online Stem Mastering

Online stem mastering is a process where a mastering engineer receives separate audio files, or “stems,” for each instrument or group of instruments in a track. Then they apply EQ, compression, limiting, and other mastering techniques to each stem individually before combining them into a final mix.

Benefits Of Online Stem Mastering Vs. Online Stereo Mastering

The biggest benefit of online stem mastering is increased control over the individual elements of your track. Since each stem is processed separately, you can make precise adjustments to the EQ, compression, and other effects of each instrument. This level of control can result in a richer, more cohesive sound than traditional stereo mastering. Another advantage of online stem mastering is that it allows for more detailed repair work. If there’s a specific element of the mix that needs fixing, like a drum that’s too loud, an engineer can isolate that stem and make targeted adjustments without affecting the rest of the mix.

When To Use Online Stem Mastering Over Online Stereo Mastering?

While online stem mastering has many benefits, it’s not always necessary for every track. If your mix is already well-balanced, there may not be much benefit to individually processing each stem. Additionally, it’s worth noting that online stem mastering can be more expensive than traditional stereo mastering since it’s a more involved process. That said, if you’re looking for an extra level of control over the sound of your track, or if your mix has some flaws that need correcting, online stem mastering could be the way to go. Ultimately, the decision between online stem mastering and online stereo mastering will depend on the specifics of your project and the goals you’re hoping to achieve. In conclusion, online stem mastering and online stereo mastering are both powerful tools for improving the sound quality of your music. The decision between the two will depend on the complexity of your mix and your desired level of control. By understanding the differences between these two techniques, you can make an informed decision that will help take your music to the next level.

Online Stereo And Stem Mastering

Credit: www.masteryourtrack.com

Finding The Right Online Mastering Service Provider

Whether you’re a professional musician or a budding indie artist, quality music production is essential to your success. One key element of music production is the mastering process, which is responsible for balancing sound and making sure that your music is optimized for different listening conditions. With the rise of online music distribution platforms, it’s now easier and more convenient than ever to find professional online stereo and stem mastering services.

Researching And Vetting Potential Mastering Service Providers

It’s crucial to research and vet potential mastering service providers before you hire them. You want to make sure that they have the right experience, skills, and equipment to provide the sound quality you’re looking for. You can start by looking for online mastering studios and reading reviews from previous clients. Look for studios that specialize in your genre of music and that have a track record of producing high-quality work.

Checking For Accreditations And Testimonials

One way to ensure that you are working with a reputable online mastering service provider is to check for accreditations and testimonials from industry experts. Look for studios that are certified by well-established organizations in the music industry. You can also check for testimonials on their website and social media pages. Testimonials from past clients can give you a fair idea about the quality of service they have received.

Questions To Ask Before Hiring

Before hiring an online mastering service, be sure to ask the following questions:

  • What equipment do you use for mastering?
  • What is your experience with my genre of music?
  • How long will it take to complete the mastering process?
  • What is your pricing structure?
  • What revisions are included in the price?
  • What file formats do you support?

By carefully researching and vetting potential online mastering service providers, checking for accreditations and testimonials, and asking the right questions before hiring, you can ensure that your music is in good hands. Choose wisely to produce the best sounding tracks matching with the industry standard.

Preparing Your Audio Files For Online Mastering

Preparing audio files for online stereo and stem mastering involves several steps, such as ensuring the correct file format, proper naming conventions, and avoiding clipping. It is important to communicate any specific requests or preferences to the mastering engineer and to preview the files before finalizing the mastering process.

Preparing Your Audio Files for Online Mastering: Online stereo and stem mastering can produce excellent results for musicians and producers. It is an efficient and cost-effective way to get your music mastered professionally without leaving your home studio. However, it’s essential to take care of some critical aspects before sending your files for online mastering. In this post, we will discuss the things you need to do to prepare audio files for online mastering. File Formats for Audio Files: The first step in preparing your audio files for online mastering is to ensure you save them in the correct file format. Generally, mastering studios accept WAV or AIFF files with 24-bit or 32-bit depth and 44.1kHz, 48kHz, or 96kHz sample rates. It’s crucial to avoid using lossy file formats like MP3 or AAC, as they compress the audio and can result in loss of quality during mastering. Providing Clear Instructions for Mastering: The second step is to provide clear instructions to the mastering engineer. You may want to communicate your ideas and vision for the final mastered product, including your preferred genre, track order, and any particular effects or processing you want to use. Clear communication with the mastering engineer ensures you get the desired output and can reduce the time needed for revisions. Proper Organization and Labeling of Files: The final step is to organize and label your files correctly. Ensure each file is properly labeled with the track name, artist name, and version. You may want to use a consistent file naming convention to make the mastering studio’s job easier. Creating a zip file or folder that contains all the files with the correct labeling is an easy way to organize your files and make sure nothing is missing. In conclusion, preparing audio files for online mastering is straightforward, provided you follow these essential steps. Proper file formats, clear instructions, and organized labeling can help the mastering studio deliver great results in minimal time.

Online Stereo And Stem Mastering

Credit: www.airgigs.com

Frequently Asked Questions For Online Stereo And Stem Mastering

Is Mastering With Stems The Same As Stereo?

No, mastering with stems is not the same as stereo. Mastering with stems means separating a track into individual parts, while stereo just means two audio channels. Stems allow for more control and flexibility in the mixing and mastering process.

Is Stem Mastering Worth It?

Stem mastering can be worth it if you want more control over individual elements in your mix. It allows you to tweak and fine-tune each stem separately, resulting in a more polished, professional sound. However, it may not be necessary for every project, and the added cost should be considered before committing to it.

What Is The Best Online Mixing And Mastering Service?

The best online mixing and mastering service is subjective and depends on your specific needs. However, some popular options are LANDR, eMastered, and iZotope Ozone. Make sure to do your research and read reviews to find the one that works best for you.

Do You Send Stems For Mastering?

Yes, we do send stems for mastering.

Conclusion

The rise of online stereo and stem mastering has made music production more accessible and convenient. Musicians can now collaborate with professionals from anywhere in the world and create high-quality tracks without leaving their home studios. With the use of advanced technology, these services offer affordable prices without compromising on quality.

It’s evident that online stereo and stem mastering are the future of music production, and it is exciting to see how it will continue to evolve in the coming years. Trust the experts and take advantage of these services to elevate your music to the next level.