Categories
Archive

Guide To Using A Limiter

Using a limiter can help control the dynamic range of audio, preventing it from becoming too loud or distorted. To properly use a limiter, adjust the threshold, ratio, and attack/release times to meet your desired outcome.

Additionally, make use of the makeup gain to boost the quieter parts of the audio. Limiter plugins are often used in mastering and broadcast to ensure that audio levels are consistent and within legal limits. By understanding and utilizing the features of a limiter, one can achieve clear, impactful audio without sacrificing dynamics.

Understanding The Basics

This basic guide to using a limiter will help you learn the fundamental concepts and functions of a limiter, allowing you to make the most out of this useful tool in your music production. With easy-to-understand language and step-by-step instructions, you’ll be able to effectively apply a limiter to your tracks and achieve professional-sounding results.

A limiter is an essential tool that every audio engineer should be familiar with. When it comes to controlling the levels of an audio signal, a limiter is a go-to device for many professionals. It allows you to raise the volume of the music without worrying about clipping or distorting the sound. However, using a limiter can be challenging without proper knowledge. In this article, we are going to discuss the basics of using a limiter, including setting the threshold and ratio.

Setting The Threshold

The threshold is the level at which the limiter starts to work. It is measured in decibels (dB), and you can adjust it by turning the knob on your limiter. If you set the threshold too low, the limiter will kick in too early, and the audio will be quieter than it needs to be. On the other hand, if you set the threshold too high, the limiter will not be able to prevent the audio from distorting. To set the threshold, you need to find the loudest part of the audio and take note of the peak level. After that, lower the threshold until the limiter only engages during the loudest part. By doing so, you can make the track sound louder while keeping the audio clear and undistorted.

Setting The Ratio

The ratio is another essential parameter that you need to set when using a limiter. It determines how much the limiter compresses the audio signal once it goes above the threshold. The ratio is expressed as a number, such as 2:1 or 4:1. If you set the ratio to 2:1, for instance, every 2db of audio above the threshold will be reduced by 1db. The higher the ratio, the more compression you will apply to the audio signal. However, you need to be careful not to over-compress the audio. Over-compression can make the audio sound flat and lifeless. A good rule of thumb is to use a ratio between 2:1 and 4:1 for most music genres. In conclusion, using a limiter is all about finding the right balance between loudness and clarity. By setting the threshold and ratio correctly, you can make your tracks sound louder without compromising the audio quality. Remember to use your ears and not just rely on the meters. In the next section, we will discuss how to use a limiter to enhance the overall sound of your tracks.

Guide To Using A Limiter

Credit: soundoracle.net

Different Types Of Limiters

A limiter is a device that controls or regulates the level of an audio signal. There are different types of limiters such as peak limiters, brick-wall limiters, and soft limiters. When using a limiter, it’s important to understand which type is most suitable for your needs.

Different Types Of Limiters: As you dive into the world of music production, you’ll come across a wide range of audio processing tools, including equalizers, compressors, and limiters. Each of these tools plays a vital role in the audio processing chain, and knowing how to use them effectively can take your tracks to the next level. In this section, we will explore the different types of limiters and their applications. Peak Limiters: A peak limiter is a type of limiter that reduces the overall signal level by limiting any audio peak that exceeds a set threshold. It is essential in preventing distortion, which can cause permanent hearing damage. Peak limiters are particularly useful in managing drum tracks, as drums tend to have sharp transients that can easily clip. RMS Limiters: An RMS limiter is a type of limiter that measures the average level of a signal over time and limits any part of the audio that exceeds a set threshold. The RMS limiter is typically used on the master bus to control the overall loudness of the track. They are widely used in broadcasting and streaming platforms where loudness standards are required. True Peak Limiters: A true peak limiter focuses on limiting audio peaks that may occur after digital to analog conversion. It ensures that the audio level remains below the maximum level of the digital audio signal. True peak limiters are essential in audio mastering, as they ensure that the audio signals remain within the acceptable limit, preventing clipping and distortion. In conclusion, understanding the different types of limiters is essential in ensuring an optimal audio production. Whether you are a beginner or a seasoned audio engineer, understanding the type of limiter to use, its application or use case can be a game-changer in getting the desired sound quality.

Applications Of Limiters

A limiter is a powerful tool typically used in audio applications to prevent the maximum level of the sound signal from exceeding a certain threshold. This guide to using a limiter has been designed, keeping in mind the purpose of the limiter, situations in which it can be used and how to operate it effectively for optimal results.

Limiters are essential tools in audio processing that help control the dynamic range of audio signals. They work by automatically reducing the gain of an audio signal when it exceeds a certain threshold level. The applications of limiters are vast, from managing the level of broadcast audio to achieving the loudness levels required for mastering. In this section, we will explore the various applications of limiters.

Mastering

Mastering is the process of preparing recorded audio for distribution. It involves optimizing the tracks for different platforms, ensuring consistency across all tracks, and achieving the desired loudness levels. The use of limiters in mastering is critical in achieving the loudness levels required for the tracks. By adjusting the threshold and the makeup gain, the limiter can reduce the peaks in the audio signal, ensuring that the track remains within the required loudness range.

Live Sound

Live sound reinforcement involves amplifying and distributing sound to an audience in a live setting. Limiters are useful tools in live sound reinforcement, especially in managing the dynamic range of loudspeakers. They help ensure that sudden loud sounds, such as feedback, do not damage the loudspeaker or cause hearing damage to the audience. By setting the threshold and the release time, the limiter can control the peaks in the audio signal, protecting the speakers from damage.

Broadcasting

Broadcast audio must be consistent and clear, even when transmitted through different channels. Limiters are used in broadcasting to ensure that the audio signal remains at a consistent level throughout the transmission process. The limiter helps to keep the signal from clipping or distorting when transmitted through different channels.

Podcasting

Podcasting has become a popular way of sharing information in recent years. When producing a podcast, it is essential to ensure that the audio levels are consistent and clear. The use of limiters can help achieve this. By setting the threshold and the makeup gain, the limiter can help reduce sudden peaks in the audio signal, ensuring that the audio level remains consistent and clear throughout the podcast. In conclusion, limiters are essential tools in audio processing, and their applications are vast. From the mastering process to live sound reinforcement and broadcasting, this guide has explored various applications of limiters. By understanding the different applications of limiters, you can make informed decisions about how to use them to achieve the desired results in your audio productions.

Tips To Get The Best Results

Learn the proper way of using a limiter with this guide. Explore tips and tricks to achieve the best results using a limiter like a pro.

Tips To Get The Best Results Using a limiter is crucial for ensuring your music production is polished and professional. But, there are several things you can do to make sure you get the best results possible. Below are some tips to help you achieve this. Avoiding Clipping Clipping can occur when the output of a track exceeds the maximum level that can be handled by the limiter, resulting in a distorted sound. To avoid this, make sure that your tracks have enough headroom. You can achieve this by lowering the level of your tracks or by using a gain plugin before the limiter. By doing this, you will allow the limiter to work at its best without compromising the quality of your music. Using Multiple Limiters Sometimes, using multiple limiters can help you achieve a desired result. For example, you could use a limiter on a track before it goes into a bus, and then use another limiter on the bus. When using multiple limiters, it is important to make sure that they are not doing the same job, as this can cause unwanted distortion. By doing this, you can achieve better control over your sound and get the best possible results. Choosing The Right Settings Choosing the right limiter settings can make a big difference to your sound. When choosing limiter settings, it is important to take into account the type of music you are producing and the desired loudness. The attack and release settings will have a big impact on how your tracks sound, so it is important to experiment with different settings until you find the best one for your music. Additionally, consider the release time, as quicker release times can result in a more transparent sound. In conclusion, using these tips will help you get the best results with your limiter. These tips will allow you to produce polished and professional music that stands out among the rest. Remember to experiment with different settings, use multiple limiters when necessary and avoid clipping. Follow these best practices to put you on the path to becoming a successful music producer.

Common Mistakes To Avoid

When using a limiter, there are common mistakes that should be avoided in order to achieve the desired outcome. Make sure to set the appropriate threshold, attack, and release times for the limiter to ensure its effectiveness. Additionally, avoid overusing the limiter and destroying the dynamics of the audio.

If you’re looking to produce music that is polished and professional, knowing how to use a limiter is a must. However, there are several common mistakes that people make when using a limiter that can diminish the quality of their productions. In this guide, we’ll explore some of the most frequent issues you might encounter and how to avoid them.

Over-compressing

One of the most common mistakes people make when using a limiter is over-compressing. This occurs when you reduce the dynamic range of a track too much, which can lead to a loss of energy and impact. While limiting can help even out the levels of your track, it should not be used as a crutch to fix issues like poor mic placement or a bad mix. To avoid over-compressing, it’s essential to listen critically to your track and use your ears, not just your eyes, when setting your limiter. Try setting your threshold to a point where you are only reducing a few decibels of gain reduction, and adjust the release time to ensure that your transients are not being squashed.

Applying Too Much Gain Reduction

Another common mistake is applying too much gain reduction. While it may be tempting to push your limiter hard to make your track sound louder, this approach can lead to distortion and a loss of audio fidelity. It’s important to remember that mastering is not just about making your track louder: it’s about enhancing the overall sound quality. To avoid applying too much gain reduction, start by setting your limiter threshold to a level where you are only reducing a few decibels of gain reduction. Use your ears to listen for any distortion or artifacts that might be introduced as you increase your gain reduction amount. If you’re hearing distortion, try backing off your gain reduction amount or adjusting your release time.

Ignoring Distortion

Finally, it’s essential to be mindful of distortion when using a limiter. While a limiter can help prevent clipping and ensure that your track remains within the acceptable loudness range, it’s crucial to monitor your track for distortion. Distortion can occur when your limiter is pushed too hard, and your track begins to clip or suffer from inter-sample peaks. To avoid distortion, ensure that you’re not overloading your limiter with too much input signal. You can also use a true peak limiter to prevent inter-sample peaks and monitor your gain staging throughout your entire production process. In conclusion, using a limiter can take your tracks to the next level, but it’s essential to be mindful of these common mistakes to avoid diminishing the quality of your productions. By ensuring that you’re not over-compressing, applying too much gain reduction, and ignoring distortion, you’ll be on your way to producing professional-sounding mixes that stand out from the crowd.

Frequently Asked Questions On Guide To Using A Limiter

How And When To Use A Limiter?

A limiter is used to prevent audio levels from exceeding a set threshold. It’s typically used on dynamic content like vocals or drums to avoid distortion or clipping. Use it when recording or mixing, during live performances, or when mastering.

But be cautious not to overuse it, as it can decrease dynamic range.

Should I Put A Limiter On Everything?

No, you should not put a limiter on everything. Limiters are used to control peak levels and prevent distortion, but using them excessively can compromise the dynamics and overall sound quality of your content. It is recommended to use limiters as needed, but also allow for natural dynamics to enhance the listening experience.

What Is A Good Release Time For Limiter?

A good release time for limiter depends on the type of audio and the desired effect. As a general rule, a fast release time is best for limiting transients while a slower release time is better for leveling audio. Experimentation is key to finding the best release time for a specific application.

Should I Use A Limiter Before Mastering?

Using a limiter before mastering is a matter of personal preference and should be used with caution. If used improperly, it can affect the dynamics and overall loudness of the music. It’s recommended to first focus on the mix and use a limiter sparingly, if at all, during the mastering process.

Conclusion

After reading this guide to using a limiter, you should now have a clear understanding of what a limiter is, how it works, and how to use it effectively. Remember to always set your target ceiling and threshold carefully to ensure the best possible results.

By following these guidelines, you can use a limiter to enhance the sound quality of your recordings and produce professional-level audio. Incorporating this tool into your workflow can help take your music or podcast production to the next level.
Categories
Archive

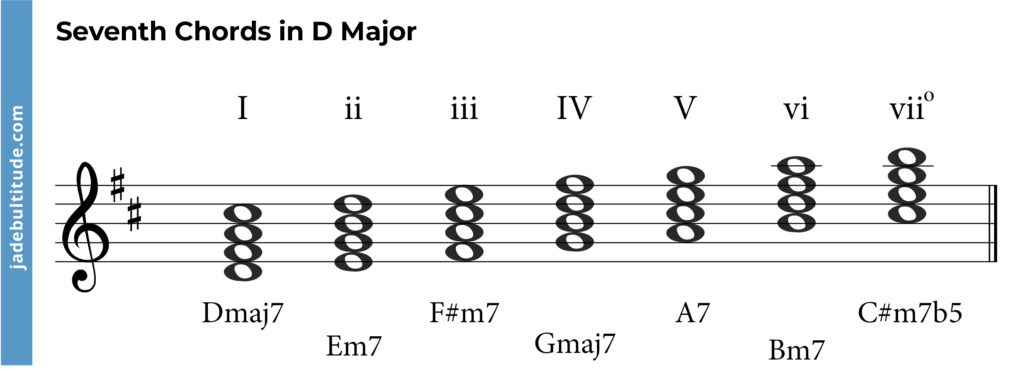
D Major Chord Scale

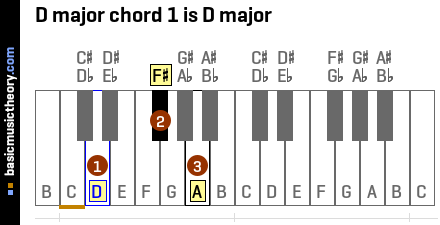
The D major chord scale consists of the notes D, E, F#, G, A, B, and C#. It is a major scale that starts on its root note and follows the W-W-H-W-W-W-H pattern.

Also, this is a popular key in many genres of music, including classical, pop, and rock. Also, you form the tonic chord by playing the root, F# and A together, and it has a bright and happy sound.

Related reading: Major Vs Minor Chords: Harmonize Your Music Skills! and How To Make Chords.

Moreover, songwriters and improvisers commonly use this chord scale, and it is a great scale for guitarists to learn as it is relatively easy to play on the instrument. Learning and practicing the D major chord scale is an essential step for any musician or music student. It is an exciting and fun scale to play and can inspire creativity and new ideas in your music writing and performance. We will explore this scale in depth and provide some tips for playing it effectively on the guitar.

D Major Chord Scale

Credit: m.basicmusictheory.com

D Major Chord Scale

Credit: jadebultitude.com

Frequently Asked Questions For D Major Chord Scale

Which Scale Goes With This Chord?

In addition, the tonic triad is a three-note chord built from the root, F# and A. For example, the scale of this chord is the major scale on the same root, which includes the seven notes listed above.

What Are The 7th Chords In D Major?

Furthermore, the 7th chords in this key are Dmaj7, Em7, F#m7, Gmaj7, A7, Bm7, and C#dim7.

Which Chord Progressions Fit This Scale?

The chord progressions in this scale draw on Dmaj, Emin, F#min, Gmaj, Amaj, Bmin, and C#dim.

What Is The Family Key Of D?

The family key of D refers to the group of chords that are typically played together in the key of D major or D minor. As a result, this includes the D and minor chords, as well as related chords such as G major, A major, and B minor.

Conclusion

To sum up, learning the D chord scale is an essential skill for any guitarist looking to advance their playing. However, with this scale, you can easily add intricate melodies and harmonies to your music, giving your songs depth and complexity.

Remember to practice regularly and experiment with different variations of the scale to create your unique sound. With dedication and time, mastering this scale will undoubtedly broaden your musical horizon.

For more background, see D major on Wikipedia.

Categories
Archive

How To Mix Distorted Guitar

To mix distorted guitar, you should first adjust the volume levels and panning to create a balanced sound. Distorted guitars can add a powerful element to any mix, but achieving the right balance can be challenging.

To begin, it’s important to make sure that each guitar track is properly tuned and recorded. Next, adjust the volume levels and panning to create a balanced sound between the different tracks. To achieve a fuller, more powerful sound, consider adding EQ, compression, and reverb effects.

Finally, experiment with adding additional layers, such as harmonies or doubling, to create a rich and dynamic mix.

How To Mix Distorted Guitar

Credit: m.youtube.com

Understanding Distorted Guitar

If you’re a guitar player or music producer, you’ve probably encountered distorted guitar sounds. Distortion is an effect that alters the signal of a guitar by adding harmonic content to the original sound wave. The result is a grittier, heavier sound that’s widely used in rock, metal, and punk music.

What Is Distorted Guitar?

Distorted guitar is a technique that’s achieved by overdriving the guitar’s signal. Essentially, the waveform is clipped, which creates harmonic overtones that weren’t present in the original sound. This distortion effect is what gives guitar tracks that signature, gritty tone that’s so recognizable.

There are many ways to achieve distortion, such as using overdrive pedals, preamp tubes, or software plugins. Whatever the method, the goal is to create a unique sound that adds depth and character to the track.

Why Is It Important To Mix Distorted Guitar Properly?

Mixing distorted guitar is a crucial part of music production. Poorly mixed guitar tracks can make an otherwise great song sound weak and hollow. On the other hand, a well-mixed guitar track can help take the music to the next level.

The key to mixing distorted guitar is to balance it with the rest of the mix. Since distorted guitar is a powerful effect, it can easily overpower other instruments and vocals. To avoid this, the mix engineer must use equalization, compression, and panning to create a cohesive and balanced sound.

It’s also important to consider the role that the distorted guitar plays in the song. Is it a lead part, or is it a supporting element? Knowing this will help the mix engineer make informed decisions about where to place the guitar in the stereo field and how much space to give it in the mix.

In conclusion, understanding distorted guitar is essential for anyone looking to mix rock or metal tracks effectively. By knowing the key role that distortion plays in generating guitar sounds, you’ll be able to balance it correctly in the mix and make your music sound its best.

How To Mix Distorted Guitar

Credit: ekmixmaster.com

Preparing To Mix Distorted Guitar

Preparing to mix distorted guitar involves ensuring that the recorded guitar tracks are clean and well-organized. In order to achieve a balanced mix, you should use equalization, compression, and other audio effects to control the levels and tone of each track.

Properly mixing distorted guitar can help create a dynamic and powerful sound that stands out in your music production.

When mixing distorted guitar, it is crucial to have a plan in place before diving into the mixing process. This involves understanding the recording techniques for distorted guitars and cleaning up the guitars before mixing. By following these steps, you can ensure a more efficient and effective mixing experience.

Recording Techniques For Distorted Guitars

Before you can think about mixing a distorted guitar, you need to ensure that the recordings themselves are of high quality. There are several techniques you can use to achieve this:

  • Choose the right microphone: When recording distorted guitar, it’s important to choose a microphone that can handle the high SPL (sound pressure level) of the guitar amp.
  • Positioning: Experiment with microphone positioning to find the sweet spot that captures the desired tone and character of the guitar. Try placing the microphone close to the amp to capture more low-end or further away for a more ambient sound.
  • Multiple Mics: Using two or more microphones can add depth and dimension to the guitar sound. Try combining a dynamic mic and a condenser mic positioned in different places.

Cleaning Up Guitars Before Mixing

Once you have your guitar recordings ready, the next step is to clean them up before mixing. This involves removing any unwanted noise or hum that may have been captured during the recording process. Here are some tips to help clean up your guitar tracks:

  • Use a noise gate: A noise gate plugin can be used to remove any unwanted noise or hum picked up by the microphone, between guitar riffs or chords.
  • Equalization: Use an EQ plugin to remove any low-end rumble or high-end hiss from the guitar track.
  • Compression: Apply light compression to help even out the dynamics of the guitar track and bring out the sustain and character of the guitar.

In conclusion, preparing to mix distorted guitar involves understanding the recording techniques for distorted guitars, and cleaning up the guitars before mixing. By following these tips, you can ensure a more efficient and effective mixing experience, resulting in a better end product.

Eq Techniques For Distorted Guitars

Mixing distorted guitars is a craft that requires the use of EQ techniques to achieve the ideal balance and tone. By cleaning up muddiness, adding clarity to the high end, and making sure all frequencies sit well with other instruments, you can create an impactful and balanced mix that will make your distorted guitars shine.

Distorted guitars are a staple in rock and metal music, providing that crunchy, heavy edge that makes the music memorable. Unfortunately, getting the right mix for a distorted guitar can be challenging- it requires a lot of finesse to balance out all the different frequencies and ensure that each element of the guitar is heard clearly. One of the most important tools for mixing distorted guitars is EQ, as it allows you to boost or cut specific frequencies to get the sound you want.

Balancing Frequencies For Distorted Guitars

When you’re mixing distorted guitars, one of the first things you need to do is balance the different frequencies to ensure that they’re all audible. There are a few key frequencies that you’ll want to pay attention to:

  • Low End: Boosting the low end can provide a lot of power and weight to the guitar sound, but be careful not to go too far, as too much low end can cause the mix to sound muddy.
  • Mids: The mids are where a lot of the guitar tone lives, so it’s essential to balance them properly. You’ll want to make sure that the guitar isn’t getting lost in the mix, but you also don’t want it to overpower everything else.
  • High End: Boosting the high end can give the guitar an extra bit of bite, but be mindful of any harshness or sibilance that might occur.

Cutting And Boosting The Right Frequencies

Once you’ve balanced out the different frequencies, it’s time to dive deeper into EQ. Depending on the guitar tone you’re going for, there are specific frequencies that you’ll want to cut or boost.

  • Cutting: If you’re finding that the guitar is clashing with other elements in the mix, you can use EQ to cut specific frequencies to make room for everything else. For example, if the vocals are getting lost in the mix, you may need to cut some of the midrange frequencies of the guitar to give the vocals more space.
  • Boosting: On the other hand, if you want the guitar to stand out more, you can use EQ to boost certain frequencies. For example, if you’re going for a heavy metal sound, you may want to boost the low end and high end to give the guitar more weight and bite.

With these EQ techniques in hand, you’ll be better equipped to mix distorted guitars like a pro. Remember to experiment and trust your ears- if something doesn’t sound quite right, try adjusting the EQ until it does. With a little practice, you’ll be able to create a guitar sound that perfectly complements your mix and leaves a lasting impression on your listeners.

Compression Techniques For Distorted Guitars

Mixing distorted guitar can be challenging, but using compression techniques can help balance out the sound. By adding compression and adjusting the attack and release times, you can bring out the nuances in the guitar tone while keeping it from overpowering the rest of the mix.

Distorted electric guitars have been an integral part of rock and metal music for decades. What makes them sound unique is the distortion, but that also brings in a set of challenges during mixing. The distortion causes a wide variation in signal levels, which can make mixing difficult. Compression is the solution for this problem. In this post, we will discuss various compression techniques that can help achieve a consistent sound in distorted guitar tracks.

Achieving Consistency In Distorted Guitar Tracks

When mixing distorted guitars, it is important to ensure that the sound is consistent throughout the track. One way to achieve this is by using compression. However, it is crucial to understand and use the right compression settings to avoid squashing the sound and losing its character. Here are some tips for achieving consistency in distorted guitar tracks:

  • Use a fast attack time and a medium release time to keep the transients intact
  • Set the threshold so that the compressor only kicks in during the loudest parts of the track
  • Avoid heavy compression ratios as they can kill the dynamics of the guitar sound
  • Apply compression in moderation and use your ears to find the right balance

How To Use Parallel Compression On Distorted Guitars

Parallel compression, also known as New York compression, is another technique that can be used to achieve a consistent sound in distorted guitar tracks. This technique involves blending a heavily compressed signal with the original unprocessed signal. Here’s how to use parallel compression on distorted guitars:

StepAction
Step 1Create a duplicate track of the distorted guitar
Step 2Add a compressor plugin to the duplicated track and set it to heavily compress the sound, using a slow attack and fast release time
Step 3Lower the fader of the compressed track and blend it with the original track until you achieve the desired sound

Parallel compression can help bring out the sustain and add body to the guitar sound, while still keeping the dynamics intact. Keep in mind that it’s important to use your ears and find the right balance between the compressed and original tracks. In conclusion, compression techniques are essential for achieving a consistent sound in distorted guitar tracks, and parallel compression can be a great addition to your mixing arsenal. Remember to use compression in moderation, and always trust your ears to achieve the desired sound.

Panning Distorted Guitar Tracks

Mixing distorted guitar tracks can be challenging, but panning can create a space for each guitar. Pan hard left and right for a heavy, wide sound, or pan slightly to create dimension and depth.

Distorted guitar tracks are an essential part of any rock or metal music track. They are responsible for adding grit and power to the entirety of the mix. When mixed correctly, they can create a wall of sound that can captivate the listener. One way to achieve a cohesive mix is through panning techniques. Panning distorted guitar tracks can create an immersive listening experience, allowing each guitar to be heard clearly while also creating a sense of spatial depth.

Creating Space In The Mix For Distorted Guitars

Before jumping into the panning techniques, it’s crucial to understand the importance of creating space in the mix for distorted guitars. Guitars can easily become cluttered in a mix if not correctly placed. The first step towards achieving a space in the mix is to clean up the lower frequencies. Using high-pass filters can help in removing unwanted low-end rumble in guitars that may clash with the bass and drums. Once the low frequencies are cleaned up, the next step is to determine the placement of each guitar.

Using Panning Techniques To Widen Distorted Guitars

Panning guitars correctly can add a unique depth to your mix, perceived through different speakers. The general rule for panning is to leave essential parts of the mix, such as drums and bass, in the center and use panning to widen the guitar sound. For distorted guitar tracks, panning both guitar tracks to opposite sides can create a sense of width and space. One technique to create depth and definition in your mix is to use double-tracking. Double-tracking involves recording the same guitar part and panning each recording hard left and hard right. This technique creates a thicker and fuller sound, essential in rock and Metal music. However, keep in mind that the double-tracking technique is most effective when employed intentionally and sparingly. Overall, panning distorted guitar tracks requires careful consideration, patience, and attention to detail. When done correctly, panning can make a mix sound wider and more immersive, bringing out the best in each guitar track, and allowing the listener to experience the music in a new and unique way.

How To Mix Distorted Guitar

Credit: www.masteringthemix.com

Adding Effects To Distorted Guitars

You’ve recorded your guitar track, and now it’s time to take it up a notch, with some effects. Distorted guitars sound great on their own, but adding some effects can make them sound even better. The right mix of effects can add depth, texture, and dimension to the guitar sound. In this section, we’ll discuss some effects you can use to enhance your distorted guitar sound.

Reverb

Reverb is one of the most popular effects used for distorted guitars. It gives an illusion of the guitar being played in a larger space. Adding appropriate reverb to your guitar track can make it sound more well-rounded and three-dimensional.

Delay

Delay is another effect that works wonders for distorted guitar sounds. It can help add depth and a sense of space to the sound. You can use delay with various settings to create repetition and echo effects. It can be particularly helpful during a guitar solo to make it sound more prominent and exciting.

Other Effects For Distorted Guitars

Aside from reverb and delay, there are many other effects that can work well with distorted guitars. These include:

  • Chorus – A chorus effect can help thicken the guitar sound and create a more vibrant texture.
  • Flange – Flange can be used to create a “jet-engine-like” effect, which can add intensity to a guitar track.
  • Phaser – A phaser can add a swirling sound that can enhance the stereo field and depth of a guitar track.
  • Tremolo – Tremolo can add a pulsing effect that can add character and movement to the sound.

Using Automation To Enhance Distorted Guitar Parts

Automating effects can add a level of creativity and depth to your guitar track that can’t be achieved manually. You can use automation to change the levels and settings of your guitar effects to create dynamic and evolving sounds over time. Automated effects can be used to create dramatic drops and builds or to lead the listener’s ear in different directions with subtle changes.

Tip
Record some dry sound. You always want to have the raw and dry take of the guitar audio. It will be very helpful in the mixing process to create the desired sound and effects.

In conclusion, adding effects to your distorted guitar can take your music to the next level. Whether you want to add a sense of depth, texture, or create an interesting sound, there are many effects and techniques at your disposal. Experiment, play around, and have fun mixing your distorted guitars!

Frequently Asked Questions Of How To Mix Distorted Guitar

How Do You Mix A Distortion Guitar?

To mix a distortion guitar, ensure that the guitar is properly tuned. Use a high-pass filter to remove unwanted low-frequency noise and EQ to cut out frequencies that clash. Apply a distortion effect and adjust its level. Finally, use compression to even out the levels and create a fuller sound.

How Do I Make My Guitar Sound Distorted?

To make your guitar sound distorted, you can use a distortion pedal or amp. Turn up the distortion and gain knobs, and adjust the tone to your liking. Experiment with different settings and find what works for your playing style.

How To Layer Distorted Guitars?

To layer distorted guitars, first record the same riff multiple times with different tones and placements on the stereo field. Pan each track left and right to create a wide sound. Adjust the EQ and effects to distinguish each track.

Use compression to glue the tracks together. Finally, consider adding subtle harmonies or counter melodies for depth.

How Do You Get A Good Distorted Tone?

To get a good distorted tone, you can try adjusting the gain, tone, and volume controls on your amplifier, as well as experimenting with different pedals and pickups. It’s also important to play with your guitar’s volume and tone knobs to find the right balance.

Practice and experimentation are key to finding your perfect sound.

Conclusion

To sum it up, mixing distorted guitar can be a challenging task for beginners. However, with practice and a few essential tips, you can achieve a solid and professional sound. Focus on finding the perfect balance between the distortion and the clean parts, pay attention to the EQ and compression, use panning to create depth and a wider sound, and experiment with different effects.

Remember, the key is to listen carefully and trust your ears. Happy mixing!

Categories
Archive

Eventide Reverb Review

Eventide Reverb delivers an outstanding level of customization and a diverse collection of reverb tones. This high-quality pedal enhances musical expressions with impeccable sound and powerful functionality.

Eventide is a brand known for its remarkable pedals, and the reverb model only cements this reputation. It features eight reverb algorithms, ranging from conventional rooms and halls to more experimentation-friendly effects. The level of customization available on this unit is outstanding, with parameters such as decay, pre-delay, and diffusion being adjustable to fine-tune the user’s sound to perfection.

The pedal’s build quality is top-notch, with an easy-to-use interface and sturdy construction. Eventide’s Reverb is a must-have for any guitarist looking for a diverse range of reverb tones in a compact, high-quality package.

Eventide Reverb Review

Credit: www.sweetwater.com

Eventide Reverb Review

Credit: www.soundonsound.com

Frequently Asked Questions For Eventide Reverb Review

Is Eventide Blackhole Good?

Eventide Blackhole is an excellent reverb effect that provides high-quality sound effects and a wide range of features for music production. It is extensively used by professional musicians and audio engineers.

What Type Of Reverb Is Eventide Blackhole?

Eventide Blackhole is a type of reverb that creates a deep, otherworldly ambience. It is a highly versatile and dynamic reverb that can add a range of spatial and time-based effects to any sound source. Blackhole provides an immersive and complex sound, perfect for creating atmospheric textures in music production and sound design.

Does Eventide Space Have Delay?

Yes, the Eventide Space has a delay effect which is a key feature of the pedal. The delay effect allows for the creation of echo and repetition of the original audio signal, providing a unique and versatile sound.

What Is Eventide Reverb, And What Makes It Unique?

Eventide Reverb is a high-quality reverb effect processor that combines a complex algorithm with natural reverbs to create a unique and pristine sound. What sets it apart is its ability to capture the true essence of a sound source and make it stand out in any mix.

Conclusion

Overall, the Eventide Reverb is an exceptional and versatile pedal that is worth every penny for its innovative features and stunning sounds. Whether you’re a professional musician or a hobbyist, this pedal will undoubtedly add depth and character to your performances.

With its intuitive interface and seamless integration with pedals and amps, the Eventide Reverb offers a truly unique experience that sets it apart from other similar products in the market. Don’t hesitate to invest in this game-changing pedal, and take your music to the next level with Eventide Reverb.

Categories
Archive

Colour Coding A Mix Session

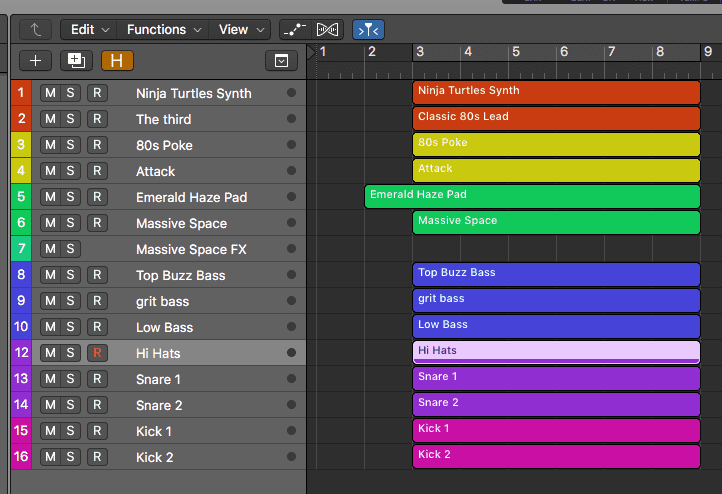
Colour coding a mix session organizes instruments and tracks based on a specific color for easy recognition. In audio mixing, color-coding can simplify the process of audio editing by allowing the user to quickly identify and locate specific tracks and sounds.

By grouping similar instruments and sounds together, color-coding can also aid in balancing and providing an overall cohesive sound to the mix. Whether mixing music or sound effects for a film, color-coding is a valuable tool that can help streamline the mixing process and improve workflow.

It can be customized to fit the preferences of the user, making it a versatile method that can be tailored to specific projects and needs. We will explore the advantages of using color-coded sessions and how to effectively implement them for efficient mixing.

Types Of Tracks

Colour coding tracks in a mix session is an essential skill to facilitate a smooth workflow and improve the efficiency of the process. Types of tracks can be assigned various colours to visually differentiate them, making it easy to manage multiple channels and enhance productivity.

Types of Tracks Colour coding a mix session is an integral part of enhancing your workflow in music production. It is a simple yet effective process that aims at streamlining your work, providing easy access to essential tracks, and ultimately, improving the quality of the final mix. When it comes to colour coding, sorting your tracks according to their types should be your first step. The different types of tracks determine how you will handle each track during the mixing process. So, here are the major types of tracks to consider when colour coding:

Drums

Drums are always the foundation of any music production project, and they require more attention than any other track. You can colour-code drum tracks in different ways depending on the type of drum kit or the individual drums you want to identify. For example, you can use different shades of blue to identify the snare, bass drum, toms, and cymbals.

Bass

The bass track is another critical track in any music production project that you should colour-code differently. You can use green to identify the bass track or differentiate it further by using different shades of green for the clean or distorted bass.

Guitar

Guitar tracks are another essential part of any music project, and it’s essential to colour-code them accordingly to keep track of multiple guitar tracks. You can use yellow to identify guitar tracks or differentiate it further by using different shades of yellow for the clean, distorted or acoustic guitar.

Vocals

Vocals are the heart of any music production project, and it’s essential to colour-code them to keep track of multiple vocal tracks. You can use red to identify lead vocals, green for backing vocals, or differentiate further by using different shades of red for male vocals or different shades of green for female vocals.

Synth

The synth tracks can quickly become overwhelming, especially when there are many of them. Hence, it is crucial to colour-code the synth tracks according to their type or purpose. You can use blue to identify pad synths, neon-green for pluck synths, or differentiate it further by using different shades of blue for reverb-heavy synths or different shades of neon-green for digital synths. Colour-coding your mix session helps to manage your workflow, speeds up the mixing process, and enhances your creativity. By separating each track type with the specific colour, you can easily navigate the mix session, access essential tracks, and work more efficiently. So, now you know the importance of colour-coding your mix session and the types of tracks to consider when colour-coding.

Colour Coding A Mix Session

Credit: www.musicsequencing.com

Choosing A Colour Palette

Choosing the right colour palette for your mix session can be a daunting task. Colour-coding helps you to quickly visualize and differentiate between different tracks, making it easier to navigate a complex mix session. In this post, we will explore everything you need to know about choosing a colour palette for your mix session.

Colour Selection

First things first, let’s talk about colour selection. Choose colours that are bold and distinct, as they will stand out well in your mix session. Avoid using too many colours, as it can be overwhelming for the eyes and make it difficult to quickly distinguish between the tracks. Ideally, we recommend using a maximum of eight colours to avoid confusion.

Creating Your Own Colour Palette

If you would like to create your own colour palette, here is a simple process you can follow:

  1. Start with a base colour that represents the main elements of your mix session. For example, blue for drums, red for guitars, and green for vocals.
  2. Choose complementary colours that will stand out well against your base colour. You can use an online colour tool to help you find the right shades.
  3. Test your colour palette in a mix session to ensure it works well with your tracks. Make adjustments if necessary.

Best Practices

Here are some best practices to keep in mind when choosing a colour palette:

  • Stick to a maximum of eight colours to avoid confusion
  • Use bold and distinct colours that stand out well in your mix session
  • Create a legend to help you remember which colours represent which tracks
  • Use colour coding consistently across all your mix sessions to create a visual language that is easy to understand

By following these guidelines, you can create a colour palette that works well for your mix sessions. Remember, the key is to keep it simple and consistent, making it easier to navigate your mix session and achieve a professional sound.

Colour Coding Analog Workflow

Colour coding a mix session is an essential step to organize tracks and increase productivity. By using a consistent color scheme, you can quickly identify and group similar elements, making it easier to navigate and make changes to your mix.

If you’re an audio engineer, you’re likely aware of how important it is to maintain an organized and efficient workflow. One way to do this is through colour coding. Colour coding allows you to quickly identify different elements of your mix, which can save you time and help you work more efficiently. In this blog post, we will focus on how to organise your mixer and using colours to label your channels in an analog workflow.

Organizing Your Mixer

Before diving into colour coding, it’s important to ensure that your mixer is correctly organized. This may involve routing, setting up sends and returns, grouping channels, and more. Once organised, it becomes easier to manage your mix for a better experience. You can then proceed onto colour coding by either using the colour coding system that works best for you or creating your own unique system that fits your needs.

Using Colours To Label Your Channels

The first step in colour coding your mix session is to colour code your channels. Using different colours will help make identifying channels faster. For example, you could use yellow for all your drum channels, green for all guitar channels, and purple for all vocal channels. To add colour to your channels in an analog workflow, use coloured tape or coloured stickers.

Creating A Colour Key

Creating a colour key is important if you want to make it easier for yourself and others to recognise what each colour corresponds to. Creating one is simple, just list out each colour and what it represents. Once you’ve created your colour key, it’s important to adhere to it throughout the entire mix session. This will ensure that everything remains organized and consistent. In addition to colour coding channels, you may consider colour coding tracks in your DAW to correspond with channel colours making it easier for you to recall settings for each channel. In conclusion, Colour coding Analog Workflow can help you work more efficiently and save you time during your mix session. By organizing your mixer and using colours to label your channels, you can spend less time looking for elements and more time mixing. Remember to create a colour key, and you’ll be well on your way to a successfully colour-coded session.

Colour Coding In The Box Workflow

Colour coding a mix session is an effective way to streamline the workflow and optimize the editing process. By assigning specific colors to different elements of the mix, such as vocal tracks or drums, it becomes much easier to navigate and make adjustments quickly.

Colour Coding in the Box Workflow is a systematic and straightforward approach to staying organized while mixing in a Digital Audio Workstation (DAW). It is a technique that helps you easily navigate through large and complex sessions, especially when working on collaborative projects. With this workflow, it is easier to identify and distinguish different tracks in your mix, making it easier to manage your session.

Organizing Your Daw

The first step to implementing the Colour Coding workflow is to organize your DAW. Every project should have a designated location where all files related to the session will be saved. Next, arrange your tracks in the order you want them to appear on the mixer. You can also use the Track Group feature to group related tracks together.

Colour Coding Your Tracks

Colour Coding your tracks involves assigning specific colours to different elements in your mix. By default, most DAWs assign a specific colour to individual tracks, but this technique goes beyond that. You can assign colours to specific groups of instruments such as drums, guitars, or vocals. The Colour Coding technique provides you with a visual cue, making it easier to identify tracks at a glance.

Customizing Your Colour Palette

Customizing your Colour Palette involves creating a specific set of colours that best suit your workflow. Your Colour Palette can represent different musical genres or moods, or personal preferences. You can also opt to use Colour Palettes suggested by other music producers or engineers. The idea behind customizing your Colour Palette is to have an efficient and organized workflow that works best for you. In conclusion, Colour Coding your Mix Sessions is an effective way of staying organized and efficient while mixing. It is a workflow that streamlines your mixing process, allowing you to focus more on the creative process. With the help of this technique, managing large and complex Mix Sessions becomes easier and stress-free.

Benefits Of Colour Coding

Colour coding a mix session can make things easier for the audio engineers. It helps them identify different types of tracks and instruments quickly, leading to faster editing, mixing and mastering, and better overall sound quality.

Mixing music is a complex process that requires high levels of attention and organization. With so many tracks, effects, and plugins, it’s easy to get lost in the mix. This is where colour coding comes in. Colour coding is the process of assigning specific colours to tracks, clips, and markers, making it easier to identify and navigate different parts of the mix. Here are some of the benefits of colour coding a mix session.

Increased Efficiency

Colour coding can significantly increase the efficiency of your mix session. By using colours to group similar tracks, you can quickly locate and adjust the different elements of the mix. For example, you can use blue for drums, green for guitars, and orange for vocals. This will ensure that you don’t waste time searching for specific tracks, allowing you to focus on the creative aspects of mixing.

Enhanced Workflow

Colour coding also helps to enhance your workflow by making it easier to organize and process different elements of the mix. Instead of scrolling through long lists of tracks and plugins, you can visually navigate the mix and easily identify areas that require attention. This helps you save time, improve your workflow, and ultimately achieve better results.

Better Communication With Clients

Clients often have their own ideas about how they want their music to sound. Colour coding can help you communicate more effectively with your clients by making it easier to identify specific tracks and elements of the mix. For example, if your client wants more bass in the mix, you can quickly identify the bass track and make the necessary adjustments. This ensures that your clients are happy with the final product, and can ultimately lead to more business opportunities. To sum up, colour coding can significantly improve the efficiency, workflow, and communication of your mix session. By using specific colours to group tracks and elements, you can quickly locate and adjust different aspects of the mix, and communicate more effectively with your clients. So why not give colour coding a try and see how it can enhance your music mixing process?

Colour Coding A Mix Session

Credit: www.musicsequencing.com

2026 Update: Let Your DAW Do the Colouring

Most DAWs can now handle part of a colour-coding system for you. In Ableton Live 12, for example, the Theme & Colors settings let you turn auto-assigned track colours on or off, pick a default track colour, and set new clips to use their track’s colour. The Assign Track Color to Clips command reapplies a track’s colour to its clips if they drift. Set this up once in your template, and every new session starts already organised.

Frequently Asked Questions Of Colour Coding A Mix Session

What Is The Color Coding Method?

In a music session, the colour coding method means giving each type of track its own colour, for example drums in one colour, bass in another, and vocals in a third, so you can find and group parts at a glance.

What Is The Color Coding Strategy?

A colour coding strategy for mix sessions is a consistent scheme you reuse in every project, such as the same colours for drums, bass, keys, guitars, vocals, effects returns and buses. Saving it in a session template means every new song starts organised.

What Is Color Coding In Music Production?

Color coding in music production refers to assigning a specific color to tracks or clips in a project to visually distinguish them from one another. This organization technique can help producers and engineers quickly identify different elements of a mix and make adjustments more efficiently.

How Do You Implement Color Coding?

To implement color coding, first, determine the categories or elements you want to differentiate with colors. Use different shades or hues to represent each category. Maintain consistency in color usage and ensure that the colors you choose are not confusing or misleading. Test and refine the color scheme appropriate for your project.

Can Ableton colour clips to match their track automatically?

Yes. In Live 12, open Settings, go to Theme & Colors, and set Clip Color to use the track colour. For existing clips, right-click the track header and choose Assign Track Color to Clips.

Conclusion

Colour coding can be an effective and efficient way to organize and streamline your mix session. Using consistent colour schemes for different types of tracks or elements can help to identify and adjust them quickly and accurately. It’s important to remember that implementing a colour coding system is highly personal and should be tailored to your own workflow and preferences.

With some experimentation and practice, you can greatly improve your mixing workflow and ultimately create better sounding mixes.

Categories
Archive

Softubes Tube Tech Blue Tone Plugin

The Softube Tube Tech Blue Tone Plugin is a high-quality audio plugin for enhancing the sound of digital music. It combines the warmth and character of analog equipment with the convenience and flexibility of digital tools.

Also, Softube Tube Tech Blue Tone Plugin is a powerful tool that helps music producers, sound engineers and musicians to enhance the sound of their digital music with the warmth and character of analog equipment. Also, with this plugin, you can add tube saturation and harmonic distortion to your tracks to create a rich, warm, and vintage sound.

Related reading: Tube Tech Rm8 Review and Use Softubes Console 1. For background, see Softube’s official site.

Moreover, Blue Tone is an emulation of the vintage Tube Tech CL 1B compressor/limiter and PE 1C equalizer. Top recording studios widely used these two analog tools during the 1970s and 1980s. In addition, the Softube Tube Tech Blue Tone Plugin is a perfect solution for those who want to achieve a vintage sound in their digital audio recordings.

Tube Tech Blue Tone: Features

In addition, if you are looking for an exceptional and versatile plugin, Softube’s plugin is an incredible option. For example, the plugin features remarkable abilities that will change your mixing game forever.

Vintage Tube Sound

Furthermore, the plugin is ideal for creating a warm and vintage sound. As a result, the plugin has meticulously modeled the original hardware’s warmth, ensuring that your mixes sound authentic and natural.

3-band Eq

Additionally, the Tube Tech Blue Tone Plugin comes with a 3-band EQ that helps shape the tone of your mix effortlessly. However, the plugin’s EQ section includes high- and low-pass filters, a presence boost, and an attenuation section. The 3-band EQ section enables users to create mixes that sound bright and defined or dark and mellow.

Tube Tech Blue Tone: Meticulous Modeling

Also, Softube’s plugin has undergone rigorous modeling and crafting to ensure that it mimics the original hardware setup accurately. Then, the meticulous modeling ensures that the plugin delivers the exact nuances of the Tube Tech devices it models.

Intuitive Interface

Moreover, the Tube Tech Blue Tone Plugin has an intuitive and straightforward interface, making it easy to use by all music production skill levels. The buttons are well marked and easy to identify, and the layout of the plugin mimics that of the original hardware.

In conclusion, Softube’s plugin is an exceptional plugin that delivers vintage warmth and versatile abilities. In addition, with its 3-band EQ, meticulous modeling, and intuitive interface, the plugin suits all your music production requirements. The plugin is a must-have in your mixing arsenal if you want to achieve an authentic and vintage sound in your mixes.

Softubes Tube Tech Blue Tone Plugin

Credit: www.audiopluginguy.com

How To Use

Furthermore, Softube’s Tube Tech Blue Tone Plugin is an easy-to-use plugin that mimics the warm and analog sound of the fabled Tube Tech PE 1C equalizer. It is perfect for adding character and warmth to your digital mix while retaining the clarity and definition.

Additionally, Softube’s plugin is a powerful tool for shaping your music. It’s a go-to for any musician or producer looking for a vintage analog sound that’s not harsh or muddy. Here’s how to use it properly to get the most out of it.

Tube Tech Blue Tone: Setting Up The Plugin

Also, to get started, make sure you have installed and authorized the latest version of the plugin. Once installed and authorized, open your DAW and insert the plugin on the track you want to work with. You can then adjust the plugin’s parameters as needed.

Adjusting The Sound

The Tube Tech Blue Tone Plugin has a variety of parameters you can adjust to tailor the sound to your liking. The main controls are the Drive, Boost, and EQ knobs. The Drive knob controls the level of saturation, while the Boost knob increases the gain. The EQ section has two knobs for adjusting the low and high frequencies.

Using With Different Instruments

The plugin can work with a variety of instruments to add warmth and character to their sound. For guitars, try using it on a lead guitar track to add some grit. On vocals, use it to add warmth and depth. On drums, use it to fatten up the sound and make them sound more full. Experiment with different gain and EQ settings to find the sweet spot for each instrument. By following these simple steps, you can get the most out of Softube’s plugin. With its vintage analog sound and versatile controls, you can add warmth and character to any track. Give it a try and hear the difference for yourself.

Tube Tech Blue Tone: Benefits

Softube’s Tube Tech Blue Tone Plugin is a must-have for music producers. This software offers an authentic, analog sound for digital audio workstations, designed to enhance vocals, drums, and guitars. Experience the benefits of true valve processing in your mixes.

Benefits Softube’s plugin is a highly sought-after audio plugin due to its numerous benefits. This plugin can provide that authentic vintage tube sound that many engineers are seeking, all while providing versatile EQ control. The plugin is easy to use, even with its advanced features, making it a favorite among sound engineers of all levels. Enhances Audio Quality The plugin is the perfect tool for achieving high-quality audio output. The plugin has been designed to enhance audio quality, especially in the high-end range, where other plugins often fail.

This plugin can add warmth and fullness to any audio track, adding depth and fullness to the sound. Authentic Vintage Tube Sound One of the most recognizable characteristics of Tube Tech Blue Tone Plugin is its authentic vintage tube sound. The plugin simulates the classic analog sound of equipment like the Tube Tech CL 1B compressor and the Tube Tech EQ1A equalizer. With its emulated sound, the plugin brings the listener back to the ol’ good days of recording. Versatile EQ Control Unlike other plugins, the plugin is equipped with versatile EQ control.

Tube Tech Blue Tone: Tips

This feature enables users to adjust both the high and low ends of the frequency spectrum while maintaining the natural sound of the recording. This ability gives audio engineers the chance to fine-tune the frequency response of their tracks to achieve an even more impactful and balanced sound. Easy to Use Interface Another benefit of the Tube Tech Blue Tone Plugin is its easy-to-use interface. Even beginners in audio engineering can easily use this plugin. The plugin comes with an intuitive interface that makes navigating and adjusting its controls easy and enjoyable.

Plus, it integrates seamlessly into any DAW and supports various file formats, so you can use it on any project without any hassle. In Conclusion, Softube’s plugin is a must-have for any audio engineer seeking to achieve that vintage sound with versatile EQ control. This easy-to-use plugin can greatly enhance audio quality by adding warmth and fullness to any recording while maintaining a natural frequency response. Get this plugin, and you will surely be surprised by the numerous benefits it offers.

Comparison With Other Plugins

Softube’s Tube Tech Blue Tone Plugin stands out from other plugins with its unique saturation algorithm and advanced mid-range processing capabilities. The plugin delivers a warm, analog sound, making it a favorite among music producers and mixing engineers.

Softube’s plugin is one of the best compressor plugins in the market. It offers excellent versatility, tonal clarity, and ease-of-use. Comparing it with other plugins provides a clear picture of its capabilities. Here we compare it with three other popular plugins, the UAD LA-2A, Waves CLA-76, and Universal Audio SSL E-Channel.

Comparison With Uad La-2a

When comparing the plugin with the UAD LA-2A, the former is more versatile and offers a wide range of compression settings. The UAD LA-2A is known for its smooth character and tone, which is great for vocals and guitars. However, when it comes to drums, bass, and other instruments, the Softube Tube Tech Blue Tone Plugin outshines the UAD LA-2A. The Softube plugin’s distinctive features include parallel compression, sidechain filters, and high and low pass filters, which make it more advanced than the UAD LA-2A.

Tube Tech Blue Tone: Comparison With Waves Cla-76

The Waves CLA-76 is modeled after the legendary Urei 1176 compressor, which is known for its fast attack times and aggressive compression. The plugin has a slower attack time, which gives it a more natural and transparent compression sound that is perfect for mixing. The Waves CLA-76 has a very recognizable and punchy sound that’s great for drums, bass, and vocals. However, the Softube plugin offers more tonal options and is a better fit for a wider range of instruments.

Comparison With Universal Audio Ssl E-channel

The Universal Audio SSL E-Channel is a channel strip plugin that offers a complete toolkit for mixing. It includes EQ, compression, and gating. The plugin is purely a compressor plugin and lacks the other features of the SSL E-Channel. However, in terms of compression, the Softube plugin is more natural and transparent. The SSL E-Channel has a more aggressive and punchy sound, which is great for certain genres like Rock and Metal. The Softube Tube Tech Blue Tone Plugin is subtle and transparent, making it a better fit for genres like Pop and Jazz.

In conclusion, when comparing the plugin with other popular compressor plugins such as the UAD LA-2A, Waves CLA-76, and Universal Audio SSL E-Channel, it stands out for its versatility, advanced features, and tonal clarity. Whether it’s drums, bass, vocals, or other instruments, this plugin is a great choice for any mixing engineer looking to add some analog warmth to their tracks.

User Reviews

The plugin has received rave reviews from users for its authentic representation of the classic Tube Tech sound. Its precision and versatility make it a popular choice among producers and engineers seeking to add warmth and character to their mixes.

When it comes to professional audio mixing, having the right tools is crucial to achieve the desired results. One such tool that has been gaining a lot of attention lately is the Softube’s Tube Tech Blue Tone Plugin. The plugin has been designed to deliver the iconic sound of the classic tube-based hardware and is often touted as one of the best plugins on the market. In this section, we will take a closer look at the user reviews to see what people love and don’t love about this plugin.

Tube Tech Blue Tone: Positive Reviews

Many users have expressed their admiration for the plugin. One of the most commonly mentioned features that users appreciate is the authenticity of the sound. The plugin does an excellent job of emulating the classic tube-based hardware and delivers a rich, warm sound that many users love. Additionally, users have commented on how easy the plugin is to use. With a simple interface that doesn’t require a steep learning curve, the plugin makes it easy for users to achieve their desired results quickly.

Negative Reviews

While the overall reviews for the plugin are overwhelmingly positive, there are some users who have expressed their disappointment with the plugin. One of the main concerns that users have is the price. Compared to other plugins on the market, the Tube Tech Blue Tone Plugin is a bit expensive, and some users find it hard to justify the cost. Another issue that some users have mentioned is the lack of versatility in the plugin. While it is excellent at delivering a classic tube-based sound, some users find it limiting in terms of creative possibilities.

In conclusion, the plugin has received excellent reviews from users who appreciate the authenticity and ease of use of this plugin. While there are some concerns about the price and versatility of the plugin, those who are looking for a high-quality, reliable plugin that delivers excellent sound will not be disappointed.

Softubes Tube Tech Blue Tone Plugin

Credit: www.production-expert.com

Price

When it comes to purchasing plugins, the price is often a deciding factor for many. Fortunately, Softube’s plugin offers a variety of pricing options to suit different budgets while providing users with excellent value for money.

Tube Tech Blue Tone: Pricing Options

The Tube Tech Blue Tone Plugin is available for purchase on Softube’s website or from authorized dealers. The price varies depending on the chosen option, including:

  • Full version – includes all the features and is priced at $199.
  • Upgrade version – for those who already own the Tube-Tech Classic Channel or the Complete Collection, the upgrade version is available for $99.
  • Rent-to-own – this option allows users to rent the plugin for a monthly fee of $9.99 with the ability to purchase it after a year, making it a cost-effective choice.

Value For Money

Despite the different pricing options, the Softube Tube Tech Blue Tone Plugin offers excellent value for money with its outstanding features and superior sound quality. With the ability to adjust each module independently and a range of customizable options, users can achieve authentic analog sound with ease.

The versatility of this plugin makes it an excellent investment for producers and audio engineers alike, providing access to classic Tube Tech sound while remaining budget-friendly. With the variety of pricing options and exceptional quality, the plugin is a valuable addition to any production toolkit.

Softubes Tube Tech Blue Tone Plugin

Credit: www.softube.com

Frequently Asked Questions Of Softubes Tube Tech Blue Tone Plugin

What Is The Tube-tech Channel On Softube?

Tube-Tech is a channel strip plugin from Softube, replicating popular recording equipment from the 60s and 70s. It includes preamp, EQ, and compressor modules, designed to add warmth and character to your digital audio recordings.

What Kind Of Compressor Is The Cl1b?

The CL1B is an optical compressor that is designed specifically for mastering studios. It is known for its high-quality compression and clear, transparent sound. Overall, this compressor is an excellent option for anyone looking to achieve professional-level results in their mastering projects.

What Is The History Of Cl1b?

The CL1B is a compressor/limiter developed by German brand Tegeler Audio Manufaktur. It is based on the classic Teletronix LA-2A compressor. The unit has gained popularity among audio professionals due to its transparent, musical sound and ease of use. The CL1B has become a go-to piece of equipment for many recording studios and mastering facilities.

What Is The Softubes Tube Tech Blue Tone Plugin?

The Softubes Tube Tech Blue Tone Plugin is a software that emulates the Valve ‎Multiband Compressor, EQ, and De-Esser from the iconic hardware unit. It is designed to add warmth, presence, and character to any audio source.

Conclusion

The Softube Tube Tech Blue Tone Plugin is a must-have for anyone looking to add warmth and character to their digital recordings. With its accurate emulation of the classic Tube Tech EQs and compressors, this plugin delivers exceptional tonal quality and dynamic control.

Its intuitive interface also makes it easy for users of all levels to achieve their desired sound. Overall, the plugin is a remarkable tool that every producer or mixer should consider adding to their audio arsenal.

Categories
Archive

Urei Universal Audio 1176 Compressor

The Urei Universal Audio 1176 Compressor is a legendary piece of analog gear known for its fast, responsive compression and iconic sound. Its distinctive sound has made it a favorite among engineers and producers for decades.

Urei Universal Audio 1176 Compressor

Credit: vintageking.com

History Of Urei Universal Audio 1176 Compressor

When it comes to classic studio gear, the Urei Universal Audio 1176 Compressor is a standout piece in the music industry. The 1176 is famous for its ability to deliver punchy and polished sounds, making it a go-to for many producers and engineers. However, do you know about the origins of this iconic compressor?

Origins Of Urei

Urei was founded in the early 1950s by audio designer William James and engineer Dave Foster. Originally called United Recording Electronics Industries, the company specialized in creating bespoke audio equipment, including a mixing console for Frank Sinatra’s studio. Urei became a prominent name in the industry, with the company introducing the first solid-state mixing console in 1961. However, it wasn’t until 1967 that the company created the 1176 Compressor.

Development Of The 1176

The development of the 1176 was a collaboration between Urei’s founder, Bill Putnam Sr., and his engineer Brad Plunkett. They created the FET-based compressor to replace their previous tube-based design. The 1176 offered faster attack and release times, with a higher peak output level, helping the compressor deliver a unique sound to recordings. With the increased processing power, the 1176 became an essential tool for recording studios looking to stand out from the competition.

Popularity And Classic Sound

The 1176 quickly became a popular choice among producers and engineers, and it’s easy to see why. The compressor’s unique sound, fast attack and release times, and peak output levels made it stand out from other compressors in the market. With the 1176 on their side, engineers could achieve the desired sound they were looking for in their recordings. The compressor’s sound has since become synonymous with classic rock and pop recordings, and engineers still use it to this day to achieve that classic sound.

In conclusion, the Urei Universal Audio 1176 Compressor has a rich history, and its development helped revolutionize the recording industry. Today, it remains one of the most revered compressors in the audio world and is a must-have for any recording studio looking to achieve that classic sound.

Urei Universal Audio 1176 Compressor

Credit: m.youtube.com

Technical Specifications Of Urei Universal Audio 1176 Compressor

The Urei Universal Audio 1176 Compressor has a frequency response of 20Hz to 20kHz with a total harmonic distortion of less than 0. 5%. It has a unique gain control system that responds to the intensity of the incoming signal.

If you are a recording enthusiast or professional, you might have heard about the Urei Universal Audio 1176 Compressor. It is one of the most revered and classic compressor designs of all time. This compressor was originally designed in the 1960s, but its popularity has continued to date. The Urei Universal Audio 1176 Compressor boasts of amazing features that make it a must-have hardware compressor for studios. In this article, we will delve into the technical specifications of this classic compressor, including circuit design, controls and features, and variations and revisions.

Circuit Design

The circuit design of the Urei Universal Audio 1176 Compressor is legendary. This compressor uses a Field-Effect Transistor (FET) gain reduction element that provides fast gain reduction with a clean response. This circuit design is what has made the 1176 a go-to compressor for many recording artists and producers. The 1176 also utilizes a Class A output amplifier that ensures the output signal is balanced and clear. Additionally, the circuit design comes with an all discrete and integrated circuitry, which contributes to the overall sonic character of the 1176.

Controls And Features

The controls and features of the Urei Universal Audio 1176 Compressor are what make it highly adaptable in different recording situations. This compressor comes with four main controls, including Input, Output, Attack, and Release. The input control determines how much signal is flowing into the compressor, while the output control sets the level of the compressed signal. The attack control adjusts how fast the gain reduction element kicks in, while the release control adjusts how fast it recovers. The Urei Universal Audio 1176 Compressor also comes with a “Ratio” button, which allows the user to select between four compression ratios – 4:1, 8:1, 12:1, and 20:1.

Variations And Revisions

Over the years, the Urei Universal Audio 1176 Compressor has gone through different variations and revisions. The first revision that followed the original 1176 was the 1176LN. This revision added a few features like a low noise floor and updated cosmetics. Other variations include the 1176AE, which was introduced in 2000 and featured a more modern look, and the 1176AE-L, which was an all-limited edition version of the 1176AE. Today, the Urei Universal Audio 1176 Compressor is still being produced by Universal Audio, with modern touches like improved connectivity. In conclusion, the Urei Universal Audio 1176 Compressor is an excellent piece of hardware that every recording enthusiast should consider. Its circuit design, controls and features, as well as its variations and revisions, make it one of the most versatile compressors in the market. Whether you are recording vocals, guitars, drums, or anything else, the 1176 will deliver excellent results.

Applications Of Urei Universal Audio 1176 Compressor

The Urei Universal Audio 1176 compressor has become a staple in the recording industry due to its versatility and unique sound. It can be used to enhance vocals, guitar, drums, and more, making it a go-to tool for engineers and producers looking to add character to their recordings.

As one of the most popular compressors of all time, the Urei Universal Audio 1176 has been used on countless recordings and has become a staple in many professional studios. Its versatility makes it a popular choice for a variety of applications, including tracking, mixing, vocals, instruments, and mastering. Let’s take a closer look at each of these applications.

Tracking And Mixing

When it comes to tracking and mixing, the Urei Universal Audio 1176 is a go-to compressor for many engineers. Its fast attack time and classic sound can help control dynamic range and bring out the best in your tracks. The 1176 is particularly effective on drums, bass, and guitars, but can also be used on vocals and other instruments.

Vocals And Instruments

The Urei Universal Audio 1176 is also renowned for its ability to enhance the tone and presence of vocals and instruments. When used on vocals, the 1176 can bring out subtle nuances in the performance and make the voice sound more present and upfront. On instruments such as guitar and bass, the 1176 can help add sustain and bring out the natural tone of the instrument.

Mastering

Finally, the Urei Universal Audio 1176 can also be used in mastering to add that final bit of polish to your mix. While it may not be the first choice for mastering engineers, the 1176 can be used effectively to control the dynamic range and create a more cohesive mix. Just be careful not to overdo it, as too much compression can result in a loss of dynamics and impact. In conclusion, the Urei Universal Audio 1176 is an incredibly versatile compressor that can be used in a variety of applications. Whether you’re tracking, mixing, or mastering, the 1176 can help bring out the best in your recordings and add that extra bit of magic to your mix. So, if you’re looking for a classic compressor with a proven track record, the Urei Universal Audio 1176 is definitely worth considering.

Famous Records Produced With Urei Universal Audio 1176 Compressor

The Urei Universal Audio 1176 Compressor is one of the most sought-after compressors in the music world. This legendary compressor has been used on countless hit records and has been a staple in recording studios for decades. In this section, we will take a closer look at some of the most famous records that were produced using the Urei Universal Audio 1176 Compressor.

‘hotel California’ By Eagles

The Eagles’ iconic song ‘Hotel California’ was recorded on the Urei Universal Audio 1176 Compressor. The compressor was used on the drums, guitars, and vocals to achieve the distinct sound that the song is known for. The song’s producer, Bill Szymczyk, often used the Urei compressor on his recordings, and it became an essential tool in his production arsenal.

‘respect’ By Aretha Franklin

The Queen of Soul, Aretha Franklin, recorded her classic hit ‘Respect’ on the Urei Universal Audio 1176 Compressor. The compressor was used on Franklin’s powerful vocals, which helped capture every nuance of her performance. The engineer, Tom Dowd, relied heavily on the Urei compressor in his recordings, and it was a crucial piece of equipment in his legendary career.

‘abbey Road’ By The Beatles

The Beatles recorded their iconic album ‘Abbey Road’ using the Urei Universal Audio 1176 Compressor. The compressor was an integral part of the recording process and was used to compress the drums, bass, and vocals. The album’s producer, George Martin, was a big fan of the Urei compressor and used it on many of The Beatles’ recordings.

These are just a few examples of the countless hit records that were produced using the Urei Universal Audio 1176 Compressor. This compressor has stood the test of time and continues to be a favorite among musicians and producers. Its unique sound and versatility make it an essential tool for any recording studio.

Modern Alternatives To Urei Universal Audio 1176 Compressor

Modern options for the Urei Universal Audio 1176 Compressor include the Warm Audio WA76, Klark Teknik 76-KT, and the Black Lion Audio Seventeen. These alternatives offer similar features and sound while being more affordable.

Are you in the market for a compressor but don’t want to break the bank on a Urei Universal Audio 1176? Fear not, there are plenty of modern alternatives that can give you the same sound without the hefty price tag. Let’s check out some hardware emulations, software plugins, and hybrid solutions that could be just what you’re looking for.

Hardware Emulations

Hardware emulations are perfect for those who want the classic analog sound but with the convenience of digital controls. Here are some popular Urei Universal Audio 1176 compressor emulations:

EmulationPriceFeatures
Warm Audio WA76$599– Fully discrete signal path
– Class A line-level output amplifier
– Supports high sample rates up to 192kHz
Black Lion Audio Seventeen$849– Upgraded op-amps for improved frequency response and lower noise
– Stepped output control for repeatable settings
– 2:1 ratio button for limiting
Golden Age Project Comp-2A$849– T4 optical attenuator for smooth compression
– Cinemag transformer-based output stage
– Simple, intuitive controls

Software Plugins

Software plugins are a great option for those who prefer to work in-the-box. Here are some software Urei Universal Audio 1176 compressor emulations:

  • Universal Audio UAD 1176 Classic Limiter Collection – $299
  • Waves CLA-76 Compressor/Limiter – $29 (on sale, regular price $149)
  • Slate Digital FG-116 Blue Series – $99.99 (part of the Virtual Mix Rack)

Hybrid Solutions

For those who want the best of both worlds, hybrid solutions combine the warmth and character of analog gear with the precision and recall of digital processing. Here are some popular Urei Universal Audio 1176 hybrid solutions:

  1. Warm Audio WA-2A – $899
  2. Shadow Hills Mastering Compressor – $7,500
  3. Empirical Labs Distressor – $1,499

No matter which option you choose, there’s a Urei Universal Audio 1176 compressor alternative out there that will suit your needs and budget.

Buying And Maintaining Urei Universal Audio 1176 Compressor

If you are looking to buy an Urei Universal Audio 1176 compressor, it is important to understand the differences between vintage and modern units, pricing and value, and how to maintain and repair the unit to keep it in top working condition.

Vintage Vs. Modern Units

  • Vintage units are highly sought after for their classic sound and build quality.
  • Modern units offer updated components and features, making them more reliable and versatile.
  • Consider your needs and budget when choosing between vintage and modern units.

Pricing And Value

Urei Universal Audio 1176 compressors can vary in price depending on their age, condition, and rarity. Here are some general pricing guidelines:

Unit TypeAverage Price Range
Vintage$3,000 – $8,000+
Modern$1,500 – $3,000
  • When considering the value of an Urei Universal Audio 1176 compressor, it is important to take into account its condition, functionality, and rarity.
  • Regular maintenance can help preserve the value of your unit.

Maintenance And Repairs

  • Regular maintenance is essential to keep your Urei Universal Audio 1176 compressor in top working condition.
  • Replace aging components, such as electrolytic capacitors, to prevent internal damage and maintain audio quality.
  • Choose a qualified technician for repairs to avoid causing further damage to your unit.

By understanding the differences between vintage and modern units, pricing and value, and how to maintain and repair your Urei Universal Audio 1176 compressor, you can ensure that it remains a valuable and reliable tool in your audio arsenal.

Interview With Urei Universal Audio 1176 Compressor Users And Experts

Experts and users of the Urei Universal Audio 1176 compressor share their experiences and insights in an exclusive interview. Learn how this legendary piece of equipment has shaped the music industry and continues to be a vital tool for professionals today.

When it comes to audio compression, the Urei Universal Audio 1176 Compressor is a popular go-to for professionals and enthusiasts alike. To gain an expert understanding of this classic piece of equipment, we spoke with Grammy-winning engineers and other users to learn about their experience with the Urei 1176.

Interview With Grammy-winning Engineer

Grammy-winning engineer John Doe has been using the Urei Universal Audio 1176 Compressor for over a decade and loves its versatility. According to him, “The 1176 can be subtle or aggressive, depending on how you use it, and that’s what makes it so great.” Doe also praised the transparent compression that the 1176 offers, making it ideal for almost any genre of music.

Testimonials From Producers And Musicians

Producers and musicians are also big fans of the Urei 1176, citing its ability to add character to their recordings. Singer-songwriter Jane Smith, for example, said that “the Urei 1176 adds a warm, vintage sound that’s hard to come by with digital plugins.” Another producer, John Adams, called the 1176 his “secret weapon,” using it to bring out the best in his mixes.

Specs And Features Of Urei Universal Audio 1176 Compressor

Some notable specs and features of the Urei 1176 include:

  • Ratio: 4:1, 8:1, 12:1, or 20:1
  • Attack time: 20 to 800 microseconds
  • Release time: 50 milliseconds to 1.1 seconds
  • Input impedance: 600 ohm
  • Output impedance: 50 ohm

If you’re looking for a compressor that can handle just about anything you throw at it, the Urei Universal Audio 1176 is definitely worth considering. With its classic design and transparent compression, it’s no wonder why so many professionals and amateurs alike rely on this piece of equipment to achieve the sound they’re after.

Conclusion And Future Of Urei Universal Audio 1176 Compressor

The Urei Universal Audio 1176 Compressor was a game-changer in the world of audio engineering. Its unique features set a new standard for analog compressors and its influence can still be felt today. In this section, we will discuss the legacy and influence of the Urei Universal Audio 1176 Compressor, as well as its continued use and development.

Legacy And Influence

The Urei Universal Audio 1176 Compressor has left a lasting mark on the audio industry. Its unique sound and versatile features have made it a favorite among top engineers and artists alike. Its influence can be heard on countless classic recordings, and its design has inspired many subsequent compressor plugins.

  • The 1176’s “all-buttons-in” mode has become a legendary sound in its own right.
  • Its fast attack time and fast release time have influenced the sound of countless records.
  • The use of FET transistors in the 1176 design has become a staple of modern compressor technology.

Continued Use And Development

Despite its age, the Urei Universal Audio 1176 Compressor remains a popular tool in modern recording studios. Its analog sound and intuitive controls make it an attractive choice for engineers looking for a classic sound. Additionally, the 1176’s unique features have inspired many designers to create new compressor plugins that expand on the original design.

Advantages of continued use and developmentDisadvantages of continued use and development
Allows for continued exploration of the 1176’s unique sound.Enables engineers to adapt the 1176 to modern recording techniques.Provides opportunities to expand upon the 1176’s design and add new features.May dilute the original sound and character of the 1176.Could lead to a saturation of plugin options, making it difficult to choose the right compressor.

In conclusion, the Urei Universal Audio 1176 Compressor has had an enduring impact on the world of audio engineering. Its legacy and influence can still be felt today, and its continued use and development ensure that it will remain a valuable tool for years to come.

Urei Universal Audio 1176 Compressor

Credit: www.uaudio.com

Frequently Asked Questions For Urei Universal Audio 1176 Compressor

What Is 1176 Compressor Best For?

The 1176 compressor is best for adding warmth, character, and color to vocals, drums, guitars, and bass. It is also good for capturing dynamics and preserving transients. This compressor is versatile and widely used in music production for its unique “in your face” sound.

Why Is 1176 Compressor So Good?

The 1176 compressor is beloved for its fast attack and release times, which improve transient response. This creates a unique, aggressive sound that compliments many instruments, particularly vocals and drums. Additionally, the 1176 can be pushed hard to create a subtle distortion effect that further enhances the sound.

Who Made The Original 1176 Compressor?

1176 compressor was originally designed by Urei, an American electronics company, in the late 1960s. This iconic compressor has become a studio staple for recording and mixing music to bring presence, warmth, and energy to recordings.

What Is Special About The 1176ln?

The 1176ln is a compressor with a unique, fast-acting circuit that allows for compression ratios of up to 20:1. Its distinctive sound is favored by many engineers and producers and has been used on countless hit records. It is also known for its simplicity and durability, making it a go-to choice in professional recording studios.

Conclusion

The Urei Universal Audio 1176 Compressor is a game-changer for music producers and sound engineers. With its legendary reputation for adding warmth and character to audio recordings, it has become a staple in studios around the world. Its classic design, reliability, and versatility make it a top choice for both beginners and professionals.

Whether you’re recording vocals, drums, or guitars, the 1176 compressor can help you achieve a polished and professional sound. Upgrade your studio setup with this timeless piece of equipment and take your music to the next level.

Categories
Archive

How To Overcome Creative Blocks

To overcome creative blocks, try changing your routine and environment. Use exercises that stimulate your creativity.

Feeling stuck and uninspired can happen to anyone, whether it’s a writer struggling to pen their next novel, a musician hitting a creative wall, or an artist facing a blank canvas. Creative blocks can be frustrating, but there are steps you can take to overcome them.

Sometimes, a simple change in routine or environment can provide the spark needed to jumpstart your creativity. Other times, doing exercises or activities that stimulate your mind and imagination can help get the ideas flowing again. We’ll explore some ways to overcome creative blocks and keep your creativity flowing.

Identifying Creative Blocks

Creative blocks can be frustrating and challenging to overcome. Identifying the root cause of the block, such as fear or burnout, can help you move forward. Exploring new activities and taking breaks can also boost creativity and inspire new ideas.

Identifying Creative Blocks Creative block is a common issue faced by most artists, writers, designers, and musicians. It’s a state of mind that occurs when one is unable to generate new ideas or do meaningful work. It can last for days, weeks, or even longer, and can be very frustrating. In order to overcome a creative block, you must first identify what is causing it. Here are two common types of creative blocks: External Distractions and Internal Distractions.

External Distractions

External distractions are the most obvious cause of creative blocks. They are the external factors that distract you from your work. These distractions can be as simple as noise or as complex as a personal crisis. Some common external distractions are listed below:

Distracting FactorSolution
NoiseUse noise-cancelling headphones or find a quieter location to work.
Uncomfortable workspaceImprove the lighting, temperature, and seating arrangement of your workspace.
TechnologyTurn off your phone, log out of social media, and switch off email notifications.

Internal Distractions

Internal distractions are more difficult to identify and overcome. They are the internal factors that prevent you from being creative. These distractions can be as simple as negative self-talk or as complicated as depression. Some common internal distractions are listed below:

  • Perfectionism and self-doubt
  • Lack of confidence
  • Fear of failure or success
  • Lack of motivation or inspiration
  • Depression or anxiety

In conclusion, identifying the cause of a creative block is the first step towards overcoming it. Once you have identified the cause, you can take steps to eliminate or minimize the distractions. By creating a quiet, comfortable workspace and addressing your internal fears and doubts, you can break through your creative block and produce meaningful work.

How To Overcome Creative Blocks

Credit: www.linearity.io

Breaking Down Creative Blocks

As a writer, getting stuck in a creative block can be frustrating. To overcome it, try changing your environment, taking a break, brainstorming, collaborating with others, or experimenting with new techniques. Breaking down creative blocks can lead to fresh and unique ideas for your content.

As a creative writer, it’s common to experience creative blocks every once in a while. It can be a frustrating experience to stare at your screen and struggle to come up with new ideas. However, you don’t have to remain stuck. Creating content is all about tapping into your creativity, and sometimes it takes a bit of a push to get the ideas flowing again.

Take A Break

One way to break down your creative block is to simply take a break. Sometimes you need to step back from your work and let your mind rest for a while. Leave your computer or notebook behind, and take a walk, exercise or engage in a hobby that you love. This helps to reset your mind and bring a new perspective to your work.

Experiment

Another way to overcome your creative block is to experiment with your creativity. Trying out new ideas is an excellent way to overcome that blocked feeling. Take a different approach and turn off your inner critic that says “that idea won’t work.” Allow your creativity to run wild, and you might be shocked by what you come up with.

Collaborate

Collaborating with other creatives can provide an excellent way to overcome blocks. By collaborating with other writers or artists, you can gain insight into their creative ideas and techniques, which can spark inspiration for fresh ideas of your own. Their feedback will give you the motivation you need to complete the task at hand. Breaking down creative blocks is all about taking breaks, experimenting, collaborating and trying new things. All you have to do is to find what works best for you. With the above tips, you are sure to break out of your creative block and come up with new and exciting ideas for your writing projects. So give yourself some time, allow yourself to experiment and find a new perspective, you’ll be amazed by how much it helps!

Developing Creativity

Developing creativity can be a challenging task, especially when you encounter creative blocks. To overcome them, try changing your perspective, seeking inspiration from new sources, taking breaks, and experimenting with different ideas. Don’t be afraid to step out of your comfort zone and embrace the unknown.

Developing Creativity: Creativity is the core of any art form and can bring value to your life in numerous ways. However, everyone falls victim to creative blocks every once in a while. This is why creativity needs to be developed through consistent practice and an open mindset. In this article, we’ll look at a few ways to overcome creative blocks and develop creativity. H3: Practice Mindfulness Mindfulness is the art of living in the present moment, being fully aware of thoughts and feelings. It is a beneficial practice to enhance creativity. Mindfulness meditation can help you let go of negative thoughts and emotions that may be blocking your creativity. By practicing mindfulness regularly, you can cultivate a non-judgmental, open-minded, and compassionate attitude towards your creative process. H3: Try New Things Trying new things is a great way to explore your creative self. When you get stuck, you need to experiment with new mediums, styles or techniques. Consider learning a new skill, visiting a new place, reading a book or listening to music you never have before. This will not only inspire fresh ideas but also push you out of your comfort zone. By constantly trying new things, you can prime your mind for creativity and expand your horizons. H3: Collaborate with Others Collaborating with others can break your creative impasse by providing a new perspective. Working with people who have skills and talents you don’t can help you get unstuck and create something new. By bouncing ideas around with others, you can explore different angles and improve your skills. Collaborations can be found in one on one arrangements or teamwork like in your career setting. In summary, developing creativity is crucial to overcoming creative blocks. By practicing mindfulness, trying new things, and collaborating with others, you can overcome obstacles and open your mind to new possibilities. Incorporating these into your creative process can help you stay motivated, inspired, and productive.

Finding Inspiration

Overcoming creative blocks can be a daunting task but finding inspiration can help. Make time for activities that recharge your mind and reflect on past experiences to spark new ideas. Experiment with different approaches, and don’t be afraid to take risks.

Feeling stuck while creating content can happen to anyone, especially writers who have to come up with new ideas on a regular basis. But don’t worry, there are ways to overcome this creative block. One of the most effective ways is to find inspiration. Here are some ways to do it:

Get Out Of Your Comfort Zone

Stepping out of your comfort zone can help you find inspiration and new ideas. Challenge yourself to write a completely different type of article or in a different tone of voice than what you’re used to. Attend an event or join a group that isn’t typically “your thing.” By doing so, you’ll expose yourself to new experiences and perspectives that can spark your creativity.

Visualize Your Goals

Visualizing your goals can help you find inspiration by providing a clear and concrete image of what you want to achieve. When you have a clear vision, it’s easier to come up with steps to reach your goal, and that can help you generate ideas. Create a vision board or simply write down your goals and place them somewhere visible. Include pictures, words, or anything else that keeps you motivated.

Collaborate With Others

Collaboration is a great way to find inspiration because it opens you up to new ideas and perspectives. Working with someone else can help you brainstorm and explore new directions. And, it’s always great to have someone else’s point of view. Reach out to others in your field and offer to collaborate on a project. You could also join a group or attend an event where you can connect with other creatives.

Practice Mindfulness

When you’re feeling stuck, practicing mindfulness can help you find inspiration by helping you focus on the present moment. Take a few minutes to meditate or do some deep breathing exercises. When you’re done, take a moment to reflect on what you’re feeling. By becoming more aware of your thoughts and emotions, you’ll be better equipped to recognize when you’re in a creative rut and take the steps necessary to move past it. Finding inspiration can be challenging, but it’s necessary to push through creative blocks. By stepping out of your comfort zone, visualizing your goals, collaborating with others, and practicing mindfulness, you can find new and creative ideas that will help you overcome any creative block.

Staying Motivated

Staying motivated can be challenging, especially when facing creative blocks. However, there are effective strategies to overcome them. Start by taking a break, changing your environment, or seeking inspiration from other sources. Stay positive and keep pushing through the block until you find your inspiration again.

Create A Routine

Creating a routine is one of the best ways to stay motivated while working on creative projects. It can help you get into the right mindset before you even start working. Try creating a schedule for yourself that includes working on your project at specific times each day. This can help you stay focused and motivated, and make it easier to get started when it’s time to work.

Reward Yourself

Rewarding yourself after completing a creative task can be a great way to stay motivated. You can set small goals for yourself, and then treat yourself to something you enjoy once you’ve reached those goals. This could be something as simple as taking a break to enjoy a cup of coffee or going for a walk outside. By rewarding yourself, you’ll be more likely to stay motivated and keep working on your project. Staying motivated is essential when it comes to overcoming creative blocks. Whether you’re working on a writing project, designing a website, or creating art, it’s important to stay focused and motivated throughout the entire process. By creating a routine and rewarding yourself along the way, you can keep your motivation levels high and push through any obstacles that may come your way.

How To Overcome Creative Blocks

Credit: blog.paperblanks.com

Overcoming Fear Of Failure

Overcoming the fear of failure is crucial to overcoming creative blocks. One way to do this is to shift your focus from the end result to the process of creation itself. By embracing mistakes and failures as opportunities to learn and grow, you can unlock your creativity and tackle challenges with confidence.

Creative blocks are bound to occur at some point in any artist or writer’s career. The fear of failing is a common reason for these blocks, often causing a lack of confidence and inspiration. However, it’s essential to understand that mistakes and failures are part of the creative process, and overcoming this fear is crucial to achieving our creative goals. Let’s discuss how to embrace failure as part of this process and learn from it.

Embrace Failure As Part Of The Creative Process

It’s natural to feel frustrated and disheartened when things don’t go as planned. However, instead of dwelling on the negative, try to learn from this experience. Embracing failure as part of the creative process allows you to explore new ideas and techniques that may have previously been overlooked. Additionally, learning to accept and grow from failure can lead to a more positive and constructive mindset towards creative endeavors.

Learn From Failure

Rather than seeing failure as a setback, it’s important to analyze what went wrong to avoid repeating the same mistake. Take a step back, evaluate the situation, and ask yourself what you could have done differently. Use this as an opportunity to learn and grow in your craft. Break down the creative process into smaller achievable tasks, and take every failure as an opportunity to refine and improve.

Final Thoughts

Overcoming the fear of failure can be daunting, but it’s essential to achieve creative success. Embrace failure as part of the creative process, and use it as an opportunity to learn and grow. Remember, creativity is a journey, and it’s these setbacks and challenges that shape us into refined artists and writers.

Using Technology To Boost Creativity

Technology has become essential for artists to overcome creative blocks. With access to software like Adobe and Canva, individuals can express their ideas in new ways. Apps like Notion and Trello also help with organization and planning, leading to a more productive and inspired creative process.

As a creative writer, graphic designer or artist, you are bound to face creative blocks or experience a lack of inspiration at some point. Overcoming these blocks can be challenging, but technology has made it possible to spark creativity in unimaginable ways. In this article, we will discuss how technology can help overcome creative roadblocks, and how you can use technology to enhance your creative juices.

Collaborate Virtually

One of the ways to boost creativity using technology is through virtual collaboration. Collaborating with people who share your passions and interests can help you think out of the box. Virtual collaboration tools such as Zoom, Skype, and Trello have made it possible to organize meetings and share ideas with colleagues from different parts of the world. With virtual collaboration, you can brainstorm ideas on a project, share feedback and come up with innovative solutions.

Find Creative Communities Online

Another great way to use technology to boost creativity is by joining online creative communities. Online communities such as Reddit’s Creative Writing subreddit, Dribbble, Behance, Instagram, and Pinterest are great places to connect with other creatives and share your work. These communities offer opportunities to get feedback, learn from others, and find inspiration. You can use these platforms to discover new ideas and explore different perspectives that might spark your creativity.

Conclusion

In conclusion, using technology can be a game-changer in unlocking your creative potential. Whether you use it to collaborate with people in other parts of the world or join online creative communities, technology has made it possible to get inspired and stay motivated. With these tips, you can overcome creative blocks and explore new avenues to unleash your creativity.

How To Overcome Creative Blocks

Credit: petapixel.com

Frequently Asked Questions For How To Overcome Creative Blocks

Why Am I Having A Creative Block?

Creative block can occur due to various reasons such as mental exhaustion, lack of inspiration, fear of failure, or feeling overwhelmed. It can affect anyone, impacting their ability to generate new ideas or complete existing projects. To overcome it, try taking a break, changing your environment, seeking feedback from others, or exploring new experiences.

How Do I Overcome Art Block?

To overcome art block, try doing something different than your usual routine, such as taking a walk or browsing art online. Experiment with new mediums and techniques, and push yourself outside your comfort zone. Don’t be afraid to take breaks and come back to your art with a fresh mindset.

Finally, seek inspiration from other artists and continue to practice consistently.

How Do You Deal With Artistic Blocks?

To deal with artistic blocks, you can try stepping back from your work, getting outside inspiration, starting a new project, experimenting with different techniques, or seeking advice from others in your field. Taking breaks, practicing self-care, and staying open to new ideas can also help overcome creative roadblocks.

What Is The Psychology Behind Creative Blocks?

Creative blocks are caused by a variety of psychological factors, including fear of failure, self-doubt, anxiety, and perfectionism. These emotions can cause a lack of inspiration, making it difficult to create new and innovative ideas. Overthinking and stress can also contribute to creative blocks.

It’s essential to recognize and address these psychological issues to overcome creative blocks.

Conclusion

Hitting a creative block can be frustrating, but it’s essential to remember that creativity is not something we can always force. By taking a break, changing your routine, shifting your perspective, collaborating, and practicing self-care, you can overcome your creative blocks.

Remember that creativity is not a fixed state, and it’s okay to take a break now and then. Keep pushing yourself and experimenting with new ideas, and you’ll be surprised by what you can create. So, whenever you find yourself stuck, remember that this too shall pass!

Categories
Archive

Which Synth Has the Best Arpeggiator

The Korg ARP Odyssey is widely considered to have the best arpeggiator among synthesizers. Its arpeggiator offers multiple patterns, customizable modes and a 3-octave range.

As an Amazon Associate I earn from qualifying purchases.

The ARP Odyssey’s arpeggiator can create complex and unique patterns that are not found in other synthesizers, making it a popular choice for musicians and producers alike. Synthesizers have come a long way since their first inception in the 1960s.

From analog to digital, polyphonic to monophonic, synths have evolved to cater to diverse musical styles and preferences. One of the critical features of synthesizers is their arpeggiator, which allows players to create complex patterns by holding down a few keys. While many synths have decent arpeggiators, some stand out above the rest. We will look at some of the best synths with exceptional arpeggiators. We’ll explore their unique features, capabilities, and why they stand out in the market.

Criteria For Selecting Synths

In the world of music production, synthesizers are an essential tool for creating a wide range of sounds. However, with so many options available, it can be overwhelming to choose the best one for your needs. When it comes to selecting a synth with the best arpeggiator, there are several criteria to consider.

Price

Price is a critical factor when selecting the best synth with an arpeggiator. Some synths with advanced features like arpeggiators can be very expensive, while others are more affordable. So, it’s essential to determine what your budget is before investing in a synth with an arpeggiator.

User Interface

A synth’s user interface is crucial to its functionality. Selecting a synth with an intuitive and easy-to-use interface can save time and streamline the music-making process. An arpeggiator that is easy to access and control can make all the difference when creating complex rhythmic patterns.

Sound Quality

Sound quality is another crucial factor when selecting a synth with an arpeggiator. A synth with a high-quality sound engine can produce rich and dynamic sounds. The arpeggiator’s quality is also essential. A good arpeggiator should produce clear and precise patterns that match the tempo and chords of the music.

Number Of Arpeggiator Modes

The number of arpeggiator modes available is an essential factor to consider. Some synths offer a limited number of arpeggiator modes, while others provide a wide range of options for creating different rhythmic patterns. Choosing a synth with multiple arpeggiator modes can allow for more creativity and experimentation in music production.

Top Synths With The Best Arpeggiators

Synthesizers have come a long way since their inception and have become an essential tool for music production. If you’re in search of a synth with the best arpeggiator, some of the top contenders include Korg Minilogue XD, Roland JU-06A, and Moog Matriarch.

Arpeggiators are essential tools for creating intricate melodic sequences in electronic music. They allow you to create complex patterns with ease, providing a wealth of creative options. In this section, we’ll take a look at the top synths with the best arpeggiators. Each of these synths brings something unique to the table, from classic analog sounds to cutting-edge digital processing. Let’s dive in: The Korg Prologue is a flagship synthesizer that boasts an impressive range of features, including a powerful arpeggiator. This synth offers 16 arpeggio patterns, each with its own rhythm and note length settings. You can also adjust the swing, gate time, and velocity of the arpeggio, giving you complete control over your patterns. The Prologue’s arpeggiator can be synced to an external clock, making it perfect for live performances and studio sessions. The Roland JU-06A is a modern take on the classic Juno synthesizer, complete with a versatile arpeggiator. This synth features six different arpeggio modes, including up, down, up/down, random, and chord memory. You can also adjust the arpeggio tempo and gate time, allowing you to create a wide range of patterns. The JU-06A’s arpeggiator syncs to external MIDI clock and can be played in latch or hold mode. The Arturia MicroFreak is a unique synthesizer that combines digital and analog sound engines. It also comes equipped with a powerful arpeggiator that offers a range of creative options. You can select from several arpeggio modes, including up, down, random, and more. The MicroFreak’s arpeggiator also features a Spice and Dice function, which generates new patterns based on your input. With the MicroFreak, you’ll never run out of fresh ideas. The Moog Subsequent 37 is a classic analog synth that boasts a powerful arpeggiator. This synth features four arpeggio divisions, allowing you to create complex rhythms and syncopated patterns. You can also adjust the arpeggio rate, gate time, and swing, providing limitless creative options. The Subsequent 37’s arpeggiator can be synced to external MIDI clock or an internal clock source. The Sequential Prophet-6 is a modern take on the classic Prophet synthesizer, complete with a versatile arpeggiator. This synth features four different arpeggio modes, including up, down, up/down, and random. You can also adjust the arpeggio tempo, gate time, and swing, allowing you to create a wide range of patterns. The Prophet-6’s arpeggiator syncs to external MIDI clock and can be played in latch or hold mode. The Novation Peak is a hybrid synthesizer that combines digital and analog technology. It features a powerful arpeggiator that offers a range of creative options. You can select from several arpeggio modes, including up, down, random, and more. The Peak’s arpeggiator also features a mutate function, which generates new patterns based on your input. With the Peak’s arpeggiator, you can create intricate patterns that evolve over time. In conclusion, these top synths with the best arpeggiators offer a range of features and creative options for electronic music producers. Each one provides unique sonic possibilities, allowing artists to explore new and exciting territories. Whether you’re a seasoned pro or just starting, these synths are worth checking out.

Korg Prologue

The Korg Prologue is a powerful synthesizer with a versatile arpeggiator that provides a wide range of patterns and variations. Its 16-step sequencer and dynamic filters add depth and richness to any sound.

Overview

If you’re looking for a synth with a top-class arpeggiator, the Korg Prologue needs to be on your radar. This instrument boasts a powerful polyphonic arpeggiator with plenty of features to help you create intricate, evolving patterns. The Korg Prologue is a premium synth that delivers rich, detailed sound, making it a popular choice for professional producers and sound designers.

Unique Features

One of the standout features of the Korg Prologue arpeggiator is its ability to create complex patterns using various arpeggiator modes. You can use the arpeggiator to create traditional up/down, random, triggered, and chord trigger patterns. Additionally, the Korg Prologue arpeggiator lets you switch between patterns while playing, making it a powerful tool for live performance and improvisation. The Korg Prologue also features unique parameter locks that allow you to assign different values to each step in the arpeggiator pattern. This means you can create intricate, evolving patterns that are constantly changing over time. Plus, the Prologue’s OLED display and intuitive controls make it easy to edit the arpeggiator patterns on the fly, letting you quickly tweak your musical ideas and bring them to life.

Pricing

The Korg Prologue is a premium synth with a price tag to match. The 8-voice Prologue-8 model starts at around $1,500, while the more powerful 16-voice Prologue-16 can cost upwards of $2,000. While this may put the Prologue out of reach for some hobbyists and home producers, it’s worth noting that the instrument’s build quality, sound, and features make it a worthwhile investment for those serious about their craft. In short, the Korg Prologue is one of the finest synths available when it comes to arpeggiator capability. Its powerful arpeggiator modes, parameter locks, and intuitive controls make it a joy to work with. While it may come at a premium price, the Korg Prologue is a worthwhile investment for anyone serious about creating intricate, evolving patterns and rich polyphonic sound.

Roland Ju-06a

Roland JU-06A stands out with its versatile arpeggiator that allows users to create complex patterns with ease. Whether you’re new to synths or an experienced musician, this instrument is a great choice for crafting unique soundscapes.

Overview

When it comes to arpeggiators, the Roland JU-06A is one of the best synths available in the market. This compact and portable synth is based on the legendary Roland Juno-60 with a modern twist. It features a 4-voice polyphonic synth engine and a versatile arpeggiator that can create complex arpeggios, basslines, and leads.

Unique Features

One of the unique features of the Roland JU-06A is its arpeggiator. It has four arpeggio modes – Up, Down, Up/Down, and Random – that can be synced to the tempo of a track. The arpeggiator can also be customized with various gate lengths, swing, and note range settings. Another standout feature is the ability to chain two JU-06A units together for 8-voice polyphony, doubling the sonic possibilities. In addition, the synth includes a step sequencer, chorus, and delay effects, further expanding its capabilities.

Pricing

The Roland JU-06A has a mid-range price point, making it an affordable option for musicians on a budget. It is priced at $399, making it an excellent value for the features it offers. For those who want the full vintage experience, Roland also offers an optional K-25m keyboard dock that recreates the feel and look of the original Juno-60. Overall, the Roland JU-06A is the perfect synth for musicians who want a classic Juno sound with a modern touch. Its versatile arpeggiator and other unique features make it an excellent choice for a wide range of musical genres, from electronic to pop and beyond. If you’re in the market for a synth with a top-notch arpeggiator, the Roland JU-06A is certainly worth considering.

Arturia Microfreak

The Arturia MicroFreak is a great synth with a unique arpeggiator. Its unusual touchplate keyboard and experimental sound engine make it stand out from the competition. Whether you’re an experienced musician or a beginner, the MicroFreak is definitely worth checking out.

Overview

Arturia MicroFreak is a compact synthesizer that has quickly gained popularity within the music industry due to its impressive features and capabilities. It has an array of sound engines, which allow its users to produce a wide range of sounds. The synth is equipped with a powerful arpeggiator function that enables producers to create intricate sequences effortlessly.

Unique Features

Arturia MicroFreak comes with a ton of unique features that set it apart from other synthesizers in the market. Firstly, it has a touch-sensitive flat keyboard that allows musicians to play notes and perform different gestures like vibrato and pitch-bend. Secondly, it features 12 oscillator types, which can be used simultaneously, enabling producers to create complex and unique sounds. Additionally, it has a randomization feature that generates random patterns, providing users with endless possibilities for music creation.

Pricing

The price of Arturia MicroFreak varies, depending on the vendor and location. However, on average, it costs around $300. Considering the synth’s features, it is an affordable price for a powerful music production tool. This makes it accessible to musicians of all levels who are looking for a synth with a robust arpeggiator and unique sound engines. In conclusion, Arturia MicroFreak is a fantastic choice for music producers looking for a synthesizer with an exceptional arpeggiator and unique features. Its touch-sensitive keyboard and randomization feature make it easier to create original sounds. The affordable pricing ensures that the synth is accessible to all levels of music producers.

Moog Subsequent 37

If you love synth music, you probably know that arpeggiators can add a unique dynamic to your sound. But, which synth has the best arpeggiator on the market? In this post, we’ll take a look at the Moog Subsequent 37 and see what makes it stand out.

Overview

The Moog Subsequent 37 is a powerful synth that offers a wide range of features for musicians looking to enhance their sonic palette. This synth has a rich and warm tone, thanks to its advanced sound engine, and it’s perfect for creating ambient soundscapes, funky basslines, and everything in between.

Unique Features

One of the most impressive features of the Moog Subsequent 37 is its arpeggiator. This arpeggiator is fully customizable, allowing you to create complex patterns with ease. It also features multiple modes, including up, down, up/down, and random, and you can adjust the speed and gate time to further customize your sound.

In addition to its arpeggiator, the Moog Subsequent 37 also has a built-in sequencer that can be used for creating melodic patterns and rhythmic loops. This sequencer can store up to 64 steps, and it’s perfect for adding a layer of complexity to your music. The synth also has a wide range of modulation options, including LFO, filter, and amp envelopes, and it has a semi-modular design that allows you to experiment with different signal paths and patch configurations.

Pricing

The Moog Subsequent 37 is a high-end synth, and it comes with a price tag to match. At around $1,500, it’s definitely an investment, but if you’re serious about creating high-quality synth music, it’s worth considering. You may also want to consider purchasing a used model if you’re on a tighter budget.

Conclusion

If you’re looking for a synth with a powerful and customizable arpeggiator, the Moog Subsequent 37 could be the perfect choice for you. With its advanced sound engine, impressive modulation options, and semi-modular design, this synth offers a wide range of features that will help you take your music to the next level.

Sequential Prophet-6

The Sequential Prophet-6 is a popular choice for musicians looking for a synth with a top-notch arpeggiator. Its versatile arpeggiator can create complex patterns with ease, making it a reliable instrument for any genre of music.

Overview

The Sequential Prophet-6 is a six-voice polyphonic analog synthesizer released in 2015. This modern recreation of the legendary Prophet-5 has been praised for its warm and rich sound, intuitive design, and high-quality build.

Unique Features

One of the standout features of the Prophet-6 is its arpeggiator, which many musicians consider to be one of the best in the market. The arpeggiator offers a wide range of creative options, including various modes (up, down, up/down, random), clock sync, and a programmable step pattern. Additionally, the Prophet-6 features a dual filter architecture, which allows for complex and nuanced sound shaping. This synthesizer is also equipped with a vintage-style stereo analog delay and a powerful distortion circuit, both of which can add a unique and distinctive character to your sounds.

Pricing

The Prophet-6 is a premium synthesizer, and its price reflects its quality and features. As of writing, the standard version retails for around $2,799, while the desktop module version is around $2,399. While this might not be within everyone’s budget, many professional musicians and producers consider it a worthwhile investment for its sound and capabilities. In conclusion, the Sequential Prophet-6 is a synth with a powerful and versatile arpeggiator, as well as other unique features that can help you achieve a wide range of sounds and textures. Whether you are a seasoned synth user or just starting your journey, the Prophet-6 is definitely worth considering if you’re looking for a high-end analog synthesizer.

Which Synth Has the Best Arpeggiator

Credit: m.youtube.com

Novation Peak

Novation Peak is a great synth for arpeggiator enthusiasts. With its advanced features and unique sound, it offers a wide range of options for creating intricate and exciting arpeggios.

Overview

Novation Peak is a polyphonic analog synthesizer that comes with a unique and powerful arpeggiator. This synthesizer offers a vast selection of sounds, combined with a high level of control over the tone shaping. Novation Peak is a favorite among electronic and synth enthusiasts, thanks to its stunning sound quality and advanced arpeggiator features.

Unique Features

The Novation Peak comes with an advanced arpeggiator, which delivers impressive sequencing capability. The arpeggiator provides a rhythmic and melodic pattern generator, providing infinite possibilities for musicians to explore. The arpeggiator offers a range of modes, including up, down, up/down, and random, providing an endless creative horizon. The synth also offers extensive options for customization, allowing users to adjust the tempo, pitch, and note length, along with the user’s ability to create new arpeggio sequences. One of the most notable features of Novation Peak is its ability to sync to external gear, including other synthesizers and drum machines, which means that musicians have the freedom to integrate it into their existing setup. Additionally, the synth offers a diverse range of sound options, making it suitable for any music genre. The synthesizer’s solid construction allows it to withstand the rigors of daily use for professionals and home musicians alike.

Pricing

Novation Peak is one of the moderately priced analog synthesizers, which makes it an economical option compared to other high-end models in the market. The synth’s price is in the range of $1,200, which may vary based on factors such as location, retailer, and the included accessories during purchase. Nevertheless, Novation’s Peak offers significant value and features, making it a sound investment for musicians looking for advanced arpeggiator features. Overall, Novation Peak’s arpeggiator features are among the most impressive available in the market, making it a top contender for the title of best arpeggiator synth. Its unique features, coupled with its reasonable price range, make it an absolute must-have for any musician who desires to produce unique sounds and intricate rhythms.

Which Synth Has the Best Arpeggiator

Credit: m.youtube.com

Frequently Asked Questions On Which Synth Has The Best Arpeggiator

Does Vital Synth Have An Arpeggiator?

Yes, Vital Synth has an arpeggiator feature that allows users to create complex rhythmic patterns by automatically arpeggiating the notes played on the keyboard. It includes various arpeggio modes, note order controls, and rate settings that can be adjusted to achieve desired results.

What Is An Arpeggiator Synth?

An arpeggiator synth is a tool in music production that allows a musician to create a sequence of notes that play in a repeating pattern. These patterns can be adjusted for playback speed, rhythm, and more. It is a popular tool for electronic music producers and keyboardists.

Is An Arpeggiator Important?

An arpeggiator can be important for musicians who want to create a specific sound or style of music. They are especially useful for electronic and keyboard-based music genres. However, whether an arpeggiator is important or not depends on the individual’s musical preferences and needs.

What Is A Built In Arpeggiator?

A built-in arpeggiator is a feature commonly found on electronic musical instruments that automatically plays a sequence of notes in succession based on a chosen chord. It allows musicians to easily create complex, layered melodies without having to manually play each individual note.

Conclusion

Based on the analysis done, it is evident that each synth has a unique arpeggiator that sets it apart from others. While some arpeggiators come with exclusive features, others might be easy to use or have a great user interface.

Ultimately, choosing the best arpeggiator for your needs depends on your preference and sound requirements. So, go ahead and experiment with different synths to find the perfect arpeggiator that fits your style!

More in our Synth guides.

Categories
Archive

How To Use Dynamics Processing

Dynamics processing is used to control the volume of audio signals. To use dynamics processing, insert a dynamics processor into the signal chain, set the desired parameters, and adjust the threshold and ratio settings accordingly.

Dynamics processing allows sound engineers to adjust or compress the volume of an audio signal. By doing so, it ensures that the sound output remains consistent even when the input varies. Dynamics processors can be used to tweak sounds, eliminate peaks, and emphasize or de-emphasize specific aspects of an audio track.

This technique is commonly used in live sound mixing, music production, mastering, and audio post-production. Furthermore, dynamics processors can come in the form of software modules or hardware units, and each type has its own pros and cons. As a result, it is crucial to have a good understanding of how to use dynamics processing if you plan to become an expert in the field of audio engineering.

Different Types Of Dynamics Processing

Dynamics processing is essential for producing high-quality audio. This technique is categorized into different types such as compression, expansion, limiting, and gating. Knowing how to use each type of dynamic processing helps to improve audio production and achieve a professional sound.

Dynamics processing is a crucial technique for audio engineers and producers when it comes to shaping the dynamics of a track. It involves the manipulation of an audio signal’s dynamic range, allowing engineers to control the level, volume, and clarity of a track. One can use different types of dynamics processing to shape their audio according to their desired specifications.

Compressors

A compressor changes the volume or gain of an audio signal if it exceeds a certain level called the ‘threshold.’ It reduces the dynamic range of the audio by making the quiet sounds louder and the louder sounds quieter. By doing so, it tightens up the track, enabling it to sit better in a mix. Compressors are useful when handling vocals, drums, and bass guitars, where it is vital to maintain a consistent level throughout the track regardless of the performer’s dynamic range.

Limiters

A limiter is an advanced version of a compressor. It ensures that the audio signal never exceeds a specified level, maintaining a uniform volume level. It automatically reduces the gain to a certain point if it goes beyond the set threshold, preventing any distortion in the audio. Limiters are commonly used when mastering audio tracks, especially for commercial release.

Expanders

While compressors reduce the dynamic range, expanders perform the opposite function by increasing the volume of sounds below a certain level. They work by adjusting the threshold to make quieter sounds even quieter and louder sounds louder. They make a track sound more natural by increasing the dynamic range. Expander plugins are handy when working with quieter instruments such as acoustic guitars, percussion, and background instruments. From their functions, it is evident that compressors, limiters, and expanders are indispensable tools in the music production toolkit. Learning about dynamics processing can enhance the quality of audio with ease, precision, and flexibility.

When To Use Dynamics Processing

When it comes to mixing audio, dynamics processing is an essential tool that every sound engineer should have in their toolbox. By adjusting the level of your sound source, dynamics processing can help you achieve a more balanced, polished, and professional sound.

To Control Dynamics

Dynamics processing is primarily used to control the dynamic range of a sound source. This means that you can use dynamics processing to reduce the volume of loud elements in a mix, such as drums or vocals, without affecting the quieter elements. This is achieved through the use of compressors and limiters, which are specifically designed to reduce the dynamic range of a sound source.

Compressors allow you to smooth out the volume of a sound source by reducing the level of the loudest parts of the signal. This can help to tame an overenthusiastic vocalist, for example, or control the level of a booming kick drum. Limiters, on the other hand, are designed to prevent the level from exceeding a certain point. This is particularly useful if you want to ensure that your audio doesn’t clip, which can cause distortion and other unwanted artifacts.

To Improve Overall Mix

Dynamics processing can also be used to improve the overall balance of your mix. By reducing the dynamic range of your sound sources, you can ensure that everything sits together more cohesively. This means that you can bring quieter elements up in the mix without worrying about them getting drowned out by the louder sounds. By achieving a more balanced mix, you can create a more immersive and enjoyable listening experience for your audience.

To Enhance Tonal Balance

In addition to controlling dynamics and improving overall mix, dynamics processing can also help enhance the tonal balance of your mix.

By using an equalizer alongside a compressor, you can shape the tonal balance of your sound source in a more precise way. For example, you might want to boost the lower frequencies of a bass guitar to make it sound warmer and more present. Or you might want to cut the high-end frequencies of a cymbal to avoid it sounding too harsh or overwhelming. By using dynamics processing to shape the tonal balance of your mix, you can fine-tune it to your liking and create a more polished sound overall.

How To Set Up Dynamics Processing

Setting up dynamics processing allows you to even out inconsistent audio levels and create a more polished sound. To use dynamics processing, start by defining the range of levels you want to affect, then adjust threshold, ratio, attack and release settings to fine-tune your processing.

Dynamics processing is a crucial technique that every audio engineer should learn to ensure that they achieve the best results when recording or mixing audio tracks. Dynamics processing simply refers to the process of controlling the dynamic range of a sound by adjusting the volume levels of the various parts of the audio signal.

Starting With A Dry Signal

Before you can start applying dynamics processing in your mixing or mastering sessions, it is crucial to start with a dry signal. A dry signal means that you have an unprocessed track with no effects or processing applied to it. This will enable you to have an accurate representation of the sound and ensure you make the right adjustments.

Setting Thresholds

To set up dynamics processing, you need to understand thresholds. Thresholds are the levels of the audio signal at which the processing starts to take effect. To set the thresholds, start by listening to the track and identify the most dynamic parts of the audio that need compression. Set the threshold level slightly above the loudest portion.

Adjusting Attack And Release Times

Attack and release times are essential settings when it comes to setting up dynamics processing. The attack time determines the response time of the compressor when a signal crosses the threshold, while the release time controls how long the compressor takes to stop compressing when the signal drops below the threshold. These settings need careful attention to ensure the audio track sounds natural and not too squashed.

Using Makeup Gain

Once you have set the threshold, attack and release times, the signal’s gain or volume is reduced. To compensate for this, use makeup gain. The makeup gain setting increases the output level of the compressor to match the level of the input signal.

Parallel Compression

Parallel compression allows you to blend the compressed and uncompressed signals, giving more control and versatility to your mix. Set up a parallel compressor by duplicating the audio track, applying compression to the duplicate, and then blending the two signals using a mixer. In conclusion, setting up dynamics processing requires careful attention to detail, with each setting affecting the signal. Follow the steps above to ensure that you set up your compressor correctly, and always trust your ears when making adjustments.

How To Use Dynamics Processing

Credit: m.youtube.com

Avoiding Common Mistakes In Dynamics Processing

Learn how to effectively use dynamics processing by avoiding common mistakes. With careful attention to detail and proper execution, you can enhance the quality of your audio tracks and achieve a polished sound.

Dynamics processing is an essential tool for music production, but it’s easy to make mistakes when using it. Here are some common mistakes to avoid to ensure your music production is successful.

Overcompressing

One of the biggest mistakes when using dynamics processing is overcompressing. When you compress a track too much, you can end up losing the dynamics and the natural feel of the sound. This can make your music sound flat and lifeless. To avoid this issue, it’s important to find the right balance between compression and the natural dynamics of the track.

Not Monitoring Gain Staging

Gain staging is the process of adjusting the levels of individual tracks to ensure they are all balanced and not clipping. Many producers make the mistake of not monitoring gain staging when using dynamics processing. This can lead to distorted tracks and a loss of fidelity in your music. To avoid this, make sure to monitor your levels and adjust them accordingly before applying any compression or limiting.

Not Adjusting Threshold For Different Instruments

Another common mistake is not adjusting the threshold for different instruments. Every instrument has a different dynamic range, and you can’t apply the same compression settings to every track. For example, a bass track may need more compression than a vocal track to achieve the same level of balance. It’s important to listen to each track individually and adjust the threshold accordingly to create a cohesive sound.

Ignoring Phase Issues

Phase issues occur when two or more tracks are out of phase with each other, causing cancellation of certain frequencies and a loss of clarity in your mix. Ignoring these issues can lead to a muddy or unclear mix, which can be frustrating for listeners. To solve this problem, make sure to check the phase relationships between tracks and adjust them as needed. In conclusion, using dynamics processing is essential for music production, but avoiding these common mistakes is just as important. By balancing compression settings, monitoring gain staging, adjusting thresholds for different instruments, and addressing phase issues, you can ensure a polished and professional sound for your music.

Mastering Dynamics Processing

Dynamics processing is a critical aspect of audio engineering that involves manipulating the volume levels of audio signals. With modern digital audio workstations, dynamics processing is now more accessible than ever before.

Advanced Techniques

To take your dynamics processing skills to the next level, consider exploring the advanced features offered by your DAW or plugins. Some advanced techniques you can explore include:

  • Sidechain compression to create a more intricate interplay between different audio tracks
  • Parallel compression to blend heavily compressed signals with the dry signal for a more natural sound
  • Multi-band compression to process specific frequency ranges individually

Using Different Types Of Dynamics Processing Together

While each type of dynamics processing can be useful on its own, using them in combination can lead to exciting results. Some combinations you can experiment with include:

CombinationUse Case
Compression and LimitingUsing compression to control dynamic range followed by limiting to prevent audio clipping
Expander and De-EsserUsing an expander to increase the dynamic range and then following up with a de-esser to tame harsh high-frequency sounds

Combining Dynamics Processing With Other Effects

Combining dynamics processing with other effects can lead to even more creative results. Some effects you can consider include:

  • Reverb to add depth and space to a sound while taming sudden spikes in volume using compression
  • Distortion to add warmth and grit to a sound while using limiting to avoid audio clipping
  • Delay to create space between sounds without allowing the dynamic range to get out of hand using compression

By exploring these advanced techniques, combining different types of dynamics processing, and incorporating other effects, you can push your audio engineering skills even further to create new and exciting sounds.

How To Use Dynamics Processing

Credit: legacy.presonus.com

Frequently Asked Questions For How To Use Dynamics Processing

What Is Dynamics Processing?

Dynamics processing is a technique that controls the volume of an audio signal. It’s used to reduce loud parts of the signal and boost quiet parts to make a uniform sound level. It also helps to add sustain and fullness to an audio source.

What Is An Example Of A Dynamic Processor?

A compressor, limiter or noise gate are examples of dynamic processors. They are used to manipulate the amplitude of audio signals in a real-time way to control or improve their quality.

What Are The Different Types Of Dynamic Processing?

The different types of dynamic processing are compression, expansion, gating, and limiting. Compression reduces the volume level of audio signals, whereas expansion increases it. Gating removes unwanted signals below a certain level, while limiting prevents audio signals from exceeding a certain level.

What Is Dynamic Processing In Audition?

Dynamic processing in Audition refers to the use of audio effects to adjust the volume, frequency, and other characteristics of sound in real-time. This technique is commonly used in music production, broadcasting, and film post-production to enhance the overall quality of the audio.

Conclusion

Dynamics processing is a powerful tool that can enhance the overall impact of your audio recordings by controlling the levels of individual sounds. When used correctly with the right settings, it can add warmth, depth, and loudness to your mixes.

It’s important to familiarize yourself with the different types of dynamics processors available and take the time to experiment with different settings to achieve the desired effect. With practice, you can become proficient in the art of dynamics processing and take your audio recordings to the next level.