Categories
Archive

How Audio Compression Works

Audio compression works by reducing the dynamic range of an audio signal, allowing for a more consistent and even sound. Through a combination of dynamic range compression and data compression algorithms, audio files can be made smaller in size without losing significant quality.

Audio compression is a widely used technique in the music and audio industry. It is the process of reducing the dynamic range of an audio signal, which means it reduces the difference between the loudest and softest parts of the signal.

Compression can be applied to the audio signal during the recording or mixing process, or it can be applied during the encoding of the file. This technology is used in digital audio formats like MP3 and AAC to make the audio files smaller in size without losing much quality. Compression algorithms vary depending on the intended use of the file, with some designed for music and others for spoken word or other types of audio.

The Basics Of Audio Compression

Audio compression is a technique to reduce the dynamic range of audio signals, resulting in smaller file sizes with less bandwidth usage. This is achieved by lowering the volume of the louder parts of the audio while maintaining the overall quality of the sound.

The goal is to make the audio sound as natural as possible while also saving space and enabling faster streaming.

Audio compression is both a complicated and essential process in music production. In simple terms, it is the process of reducing the dynamic range of an audio signal. This process ensures that the volume of all parts of a track is heard clearly.

Dynamic Range

Dynamic range refers to the difference between the loudest and quietest parts of a recording. When the dynamic range is too wide, the listener may miss some of the quieter parts of the track because they are drowned out by the louder sections. Compression evens out the volume of the track, bringing the quieter parts up and the louder parts down, creating a more balanced and consistent sound.

Loudness War

In recent years, there has been a trend towards the “loudness war,” where producers compete to make their tracks the loudest. In turn, this has resulted in music with less dynamic range, making it less interesting to listen to. Compression can be used to remedy this by bringing the dynamics back into the mix, creating a more enjoyable listening experience.

The Need For Compression

Apart from the loudness war, compression is an essential tool for music producers and audio engineers. Without compression, vocals may sound uneven throughout a track or may not cut through the mix, making them hard to hear. Compression can bring vocals to the forefront, making them easier to hear and understand. In conclusion, the basics of audio compression involve reducing the dynamic range of an audio signal to create a more consistent and balanced sound. Compression is a crucial tool for music producers, ensuring that all parts of a track can be heard clearly. Dynamic range, loudness war, and the need for compression are all crucial concepts to understand in audio production.

How Audio Compression Works

Credit: www.practical-music-production.com

Types Of Audio Compression

Audio compression is a technique used to reduce the size of digital audio files while maintaining sound quality. There are two types of audio compression: lossless and lossy. Lossless compression reduces file size without affecting audio quality, while lossy compression sacrifices some audio quality to achieve a greater reduction in file size.

When it comes to audio compression, there are two main types: analog and digital. Analog compression uses hardware devices, such as compressors and limiters, to manipulate the audio signal in real-time. While digital compression uses digital algorithms to achieve similar results, but in a more precise and customizable way.

Analog Compression

Analog compression works by altering the dynamic range of the audio signal, reducing the volume of the loudest parts and increasing the volume of the quietest parts. This creates a more balanced audio signal that is easier to mix and master. The most common type of analog compressor is the optical compressor, which uses a light-dependent resistor to control the volume of the audio signal.

Digital Compression

Digital compression, on the other hand, uses software algorithms to manipulate the audio signal. This allows for more precise control over the compression parameters, such as attack time, release time, and threshold levels. Digital compressors can also be used to limit the volume of the audio signal, without altering its dynamic range. This is known as peak limiting, which is a common technique used in mastering to prevent clipping and distortion.

Peak Limiting

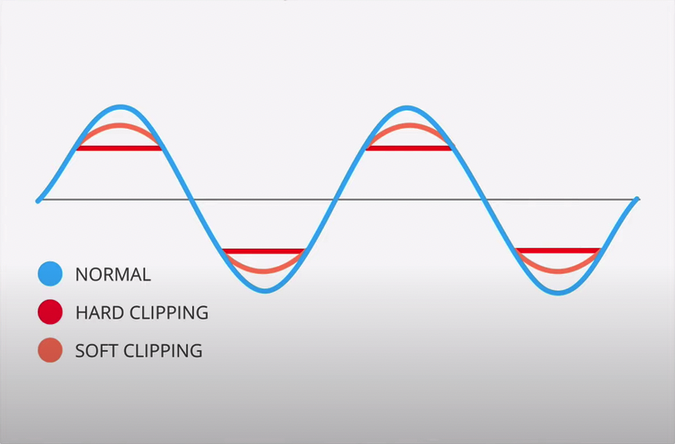
Peak limiting is a type of compression that focuses on limiting the volume of the loudest parts of an audio signal. This ensures that the signal does not exceed a certain threshold level, preventing clipping and distortion. Peak limiters are commonly used in mastering to increase the overall loudness of a track, while maintaining its dynamic range. Unlike other types of compression, peak limiting does not alter the dynamic range of the audio signal, but rather limits the volume of the loudest parts.

Understanding Compression Controls

Audio compression works by controlling the dynamic range of a sound signal. Compression controls help in standardizing the sound level, making it louder without any distortion. Understanding compression controls is essential for balancing audio to create professional-sounding recordings.

Audio compression is a crucial aspect of sound engineering that helps balance the loudness of a track. A compressor reduces the dynamic range of a signal by reducing the volume of loud elements and amplifying quieter sounds. Understanding the compression controls is necessary to achieve the best results. These controls include a variety of parameters: threshold, ratio, attack time, and release time.

Threshold

The threshold is the point at which the compressor starts to reduce the volume of a signal. It is usually expressed in decibels and can be adjusted using the threshold control. If the input signal exceeds the threshold, the compressor starts attenuating the volume.

Ratio

The ratio controls how much the compressor reduces the volume of the signal above the threshold. For example, a ratio of 2:1 means that if the signal exceeds the threshold by 2dB, it will be reduced to 1dB. The ratio control is expressed as a ratio or a percentage.

Attack Time

The attack time is the amount of time it takes for the compressor to start reducing the volume of the signal after it has exceeded the threshold. It is usually measured in milliseconds and is adjusted using the attack control. A fast attack time will cause the compressor to react quickly to sudden increases in volume.

Release Time

The release time controls how quickly the compressor stops reducing the volume of the signal once it falls below the threshold. It is also measured in milliseconds and is adjusted using the release control. A longer release time allows the compressor to smoothly increase the volume of the signal as it falls below the threshold. Each of these controls plays a crucial role in audio compression. Properly adjusting these parameters will improve the overall sound quality of the track, making the sound more balanced and even.

Compression Techniques For Different Genres Of Music

Audio compression is an essential tool for achieving a consistent and polished sound in music production. It is the process of reducing the dynamic range of a sound source by decreasing the volume of the loudest parts while keeping the quieter parts at the same level. Compression can be applied at different stages of music production, including recording, mixing, and mastering. However, different genres of music require different compression techniques to achieve the desired sound. Below are some compression techniques for different music genres.

Recording Techniques For Pop

Pop music is characterized by catchy melodies, strong vocals, and a polished sound. Therefore, during recording, it’s essential to reduce the dynamic range of the vocals to ensure they are consistent throughout the song. This can be achieved through the use of a compressor or by recording the vocals with controlled dynamics. Recording instruments in a pop song may also require compression to achieve a consistent sound. Therefore, it’s essential to use compression at the recording stage to achieve the desired sound.

Mixing Techniques For Hip-hop

Hip-hop is a genre that includes rapping, beatboxing, and electronic sounds. It requires a highly compressed and punchy sound with a strong bass. During the mixing stage, a compressor is used to glue the different elements of the song together. The kick and bass are usually the most critical elements in hip-hop music. Therefore, they require side-chain compression to allow the bass to cut through the mix while still maintaining a consistent volume. The vocals in hip-hop music also require compression to achieve a consistent level throughout the song.

Mastering Techniques For Rock

Rock music is characterized by loud guitars, heavy drums, and powerful vocals. During mastering, compression is used to achieve a polished and dynamic sound. It is used to reduce the dynamic range of the song while still maintaining the loud and powerful elements. Multiband compression is typically used to compress different frequency ranges of the song separately. This ensures that all parts of the song are compressed appropriately, creating a cohesive sound.

The Art And Science Of Audio Compression

Audio compression uses a combination of the art and science of sound to control volume levels and create a balanced sound experience. When applied correctly, this process can enhance the quality and clarity of audio recordings, creating a more enjoyable listening experience for the audience.

Audio compression is fundamental to the music industry. It helps in balancing the dynamic range and loudness of an audio recording. It is the science behind making a track sound good to the audience. But, as much as it is scientific, audio compression is also an art. This technique provides a way to bend the sound to your will and create something artistically meaningful.

Balancing Dynamic Range And Loudness

Dynamic range is the difference between the loudest and quietest portions of a recording. Sometimes a track may be too quiet, and the listener will need to turn it up to hear it properly. Other times, it may be too loud and could cause distortion. Compression helps balance the dynamic range, increasing or decreasing the volume for an even sound. By decreasing the quiet parts and boosting the louder parts, the audio track becomes more audible and enjoyable. Using compression helps to control the loudness and make adjustments without losing the original sound’s quality. It ensures that the audio is pleasing to the listener’s ears in any environment. For instance, radio stations use audio compression to maintain a consistent volume throughout the day as commercial ads are played. This process makes it captivating and engaging for the average listener.

Using Compression For Artistic Expression

Compression goes beyond balancing dynamic range; it is also an artistic tool. It helps performers achieve a distinct sound, emphasizing parts of a song to create a specific effect. For example, when using compression on drums, it can make the hits sound punchier and more pronounced. On the other hand, using it on the vocals can bring out hidden nuances in the singer’s vocal cords. It controls the sound’s texture, making it more interesting and engaging to listeners. In conclusion, compression is an essential component in audio engineering. It shapes the audio world like artists shape a canvas, making audio production an art form. Balancing the dynamic range and the volume while creating an emotion stimulates a listener’s mind and soul. It is the reason why compression continues to remain relevant in the music industry.

How Audio Compression Works

Credit: doctormix.com

Common Audio Compression Mistakes

Compression is an essential tool in the audio industry to control the dynamics of an audio signal. It works by reducing the dynamic range of an audio signal and making it more consistent. However, compression is often misused, resulting in poor sound quality and audio artifacts. Here are some common audio compression mistakes to avoid:

Over-compression

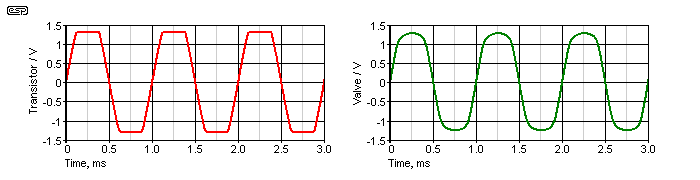
One of the most common mistakes made with audio compression is over-compression. Over-compression occurs when an audio signal is compressed too much, resulting in a flat, lifeless sound. This can happen when compression is used too aggressively, or when the threshold and ratio are set too high. It can also result in audio distortion, which can be very unpleasant to listen to.

To avoid over-compression, it’s essential to use compression sparingly and only where it’s needed. Also, it’s important to use a gentle touch when setting the compression parameters, so as not to squash the life out of the audio signal.

Using Compression To Fix Bad Recordings

Another common mistake is using compression to try and fix bad recordings. While compression can help to even out the levels of an audio signal, it can’t fix a bad recording. If the original recording has poor quality audio or unwanted background noise, compression will only make it worse.

The best way to avoid this mistake is to make sure you have a good-quality recording to begin with. Proper mic placement and recording techniques can go a long way in ensuring a good-quality recording.

Conclusion

By avoiding these common audio compression mistakes, you can ensure that your audio sounds the best it can be. Remember to use compression sparingly, and only where it’s needed. Also, don’t rely on compression to fix bad recordings – ensure that you have a good-quality recording to begin with.

Tools And Software For Audio Compression

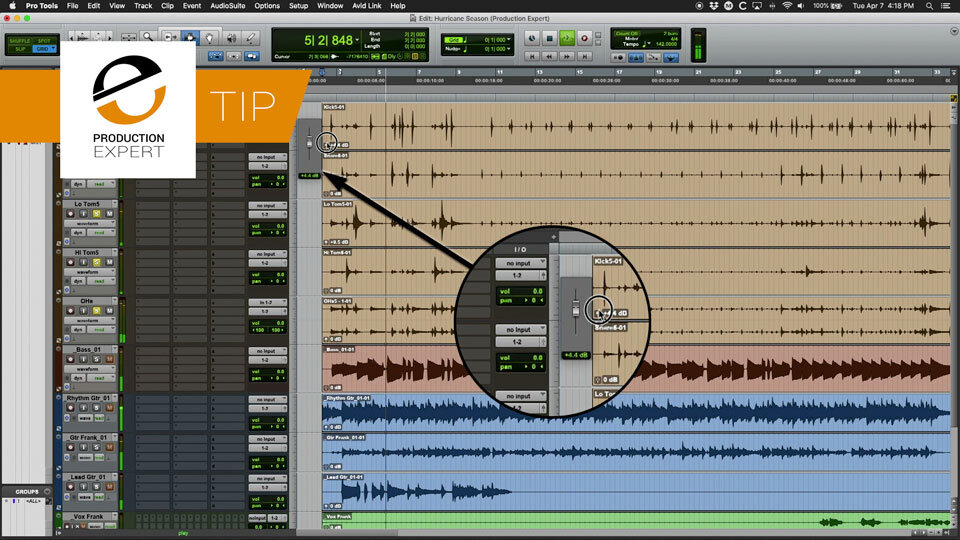
Audio compression tools and software work by reducing the volume levels of certain sounds in audio files. This process can greatly improve the overall quality and clarity of the sound. Popular tools and software for audio compression include Audacity, Pro Tools, and Adobe Audition.

Tools and Software for Audio Compression Audio compression is a crucial tool used in audio engineering and music production. It is a process that reduces the dynamic range of an audio file. This means that the difference between the loudest and softest parts of a track is reduced, making it easier to hear everything. Compression is used in various music genres and has become an integral part of any audio recording or editing process. To achieve the best sound quality, it is essential to use the right tools and software for audio compression. Here are some of the most popular hardware limiters and software plug-ins for audio compression. Hardware Limiters Hardware limiters are stand-alone devices used for audio compression and limiting. They are often used for live sound applications where real-time performance is critical. Below are some examples of popular hardware limiters:

Hardware LimitersDescription
dbx 160AA classic limiter that works well on all kinds of audio material. It has a soft knee compression characteristic that makes it ideal for use on vocals, guitars, and drums.
Universal Audio LA-2AA tube-amp limiter that provides gentle compression that adds warmth and character to any track.
Empirical Labs DistressorA versatile and flexible limiter that can produce a wide range of compression effects. It has different compression modes, which can be used for different tracks and genres.

Software Plug-ins Software plug-ins are digital audio processors that are used within a digital audio workstation (DAW) software. These plug-ins mimic the behavior of hardware limiters and provide a more flexible and cost-effective solution to audio compression. Here are some examples of popular software plug-ins:

1. Waves Ssl G-master Buss Compressor

This software plug-in is designed to emulate the classic SSL console master bus compressor. It is known for its ability to deliver a gluing effect that helps to bring together the different elements of a mix. It has a simple interface and is easy to use for beginners.

2. Fabfilter Pro-c 2

This software plug-in is an all-around compressor that is suitable for various applications. It has a transparent sound quality and flexible features that can be used for detailed compression tasks. It is also an excellent tool for side-chain compression and can be used creatively for sound design.

3. Universal Audio La-2a

This plug-in is a digital version of the hardware LA-2A limiter. It is used extensively in music production for its smooth compression characteristic. It is often used on vocals and acoustic instruments for its natural and warm sound. In conclusion, the choice of tool and software for audio compression depends on your needs and budget. Whether you choose a hardware limiter or a software plug-in, it is essential to use the right tool for each track to achieve the best possible sound quality.

Advanced Audio Compression Techniques

Advanced audio compression techniques involve reducing the size of audio files while maintaining sound quality. This is achieved through various methods including perceptual encoding and psychoacoustic modeling, which take advantage of the way humans hear and process sound.

When it comes to compressing audio, there are different techniques that can be applied to achieve the desired effect. In this section, we’ll dive deeper into three advanced audio compression techniques: sidechaining, multiband compression, and parallel compression.

Sidechaining

Sidechaining is a technique used in audio mixing where the audio of one track is used to control another track’s volume level. In other words, the volume of one track is ducked, or lowered, when sound is detected on another track. This technique is commonly used in genres such as EDM and hip-hop to create a “pumping” effect in the music. To apply sidechaining, a compressor is inserted on the track that needs to be lowered in volume. Then, the sidechain input of the compressor is set to the track that will control the volume level. When sound is detected on the controlling track, the compressor will lower the volume level of the compressed track.

Multiband Compression

Multiband compression is a technique used to apply compression to different frequency ranges in an audio track. This technique allows for greater control over the dynamic range of a track and can help to balance the frequencies in a mix. To apply multiband compression, a plugin or hardware device is used that allows for divided frequency bands. Each band is then compressed separately, allowing for different levels of compression on different frequency ranges.

Parallel Compression

Parallel compression, also known as New York compression, is a technique used to mix compressed and uncompressed versions of an audio track. This technique creates a balance between the sound of a heavily compressed track and the natural sound of the uncompressed track. To apply parallel compression, two versions of the same track are created – a heavily compressed version and an uncompressed version. The two tracks are then mixed together, allowing for greater control over the dynamic range of the track. In conclusion, sidechaining, multiband compression, and parallel compression are advanced audio compression techniques that can help to create a balanced and polished sound in an audio mix. By using these techniques, audio engineers can achieve greater control over the dynamics and frequencies of a track, resulting in a professional-sounding mix.

How Audio Compression Works

Credit: www.youtube.com

Frequently Asked Questions For How Audio Compression Works

How Does Audio File Compression Work?

Audio file compression works by removing redundant or irrelevant data from the audio file, resulting in a smaller file size. This is done by using complex algorithms that analyze the audio data and eliminate sounds or frequencies that humans are less likely to perceive or notice.

The compressed audio file can then be streamed or downloaded faster and uses less bandwidth for storage, making it easier to share and distribute online.

How Does Compressed Sound Work?

Compressed sound works by removing audio data that is deemed redundant or inaudible to the human ear. This reduction in data allows for smaller file sizes without significant reductions in sound quality. The compressed sound can be decompressed on playback to reproduce the original audio with minimal quality loss.

Does Compressed Audio Sound Better?

Compressed audio often results in a loss of quality compared to uncompressed audio. However, the degree of difference in sound quality may not be noticeable to all listeners. The decision to use compressed audio depends on the specific situation and the listener’s preferences.

How Does Audio Compression Ratio Work?

Audio compression ratio works by reducing the file size of audio data by decreasing the amount of data needed to recreate the original sound. The compression ratio is a comparison of the original file size to the compressed file size.

High compression ratios can result in a loss of audio quality.

Conclusion

Understanding audio compression can take your music to the next level. Compressors play a crucial role in balancing dynamics, creating a level sound and preventing distortion. By applying these principles, you can achieve a fuller sound while maintaining clarity and balance.

With practice and experimentation, you can unlock the full potential of audio compression and elevate your mix to professional levels. So go ahead, play around with compressors and see what works best for your music style.
Categories
Archive

Piano Eq

Piano EQ is the process of adjusting the sound frequencies of a piano to achieve a desired tonal balance. Piano EQ enhances the tonal character of a piano and produces a more harmonious listening experience.

A well-tuned piano is essential for music creation, and the process of Piano EQ helps to ensure that every note played on the piano sounds great. Piano EQ involves adjusting frequencies to change the piano’s tonal balance and improve sound quality.

The process is often performed by professional sound engineers or experienced piano technicians with a trained ear. With the right adjustments, Piano EQ can help produce balanced and dimensional sound that is both pleasing and inspiring to listeners. The method is especially appreciated by classical music lovers who are attuned to precise and nuanced sounds.

Anatomy Of Piano Eq

Piano EQ involves adjusting frequency levels to enhance clarity, warmth, or brightness of the sound. It’s important to understand the different elements of the piano, such as the overtones, attack, and sustain, to create an ideal sound.

Eq Frequency Spectrum

The equalization of a piano is essential to get the desired tone and character. The frequency range for a piano spans from 27.5 Hz (A0 on the lowest keys) to 4186 Hz (C8 keys on the highest). Generally, the piano’s sound is divided into three main frequency regions: bass, midrange, and treble. Each region has its own distinctive character and provides the piano with its unique voice. EQ adjustments are made to balance the piano’s frequency spectrum to suit different musical genres and playing styles.

Understanding Octaves

Octaves are a fundamental concept in piano sound design, formed by doubling or halving a tone’s frequency. The note you play and its octave is what creates the piano’s tone. The piano has eight full octaves plus a few additional notes. Each note is usually played with at least three strings, making it’s octave sound fuller and thicker. You can use EQ to control and balance the different frequencies of each note and octave and adjust them according to the desired sound.

Filters

Filters are essential tools used in piano EQ to reduce or boost the piano’s frequency spectrum. Low-pass filters are mainly used for the bass frequencies, cutting out any high frequencies that may muddy the sound. High-pass filters are applied to the treble regions to reduce low-frequency rumble and improve clarity. Bell filters are excellent for fine-tuning the midrange, while shelving filters are used for adjusting the highs or lows of the entire frequency range. By using filters, you can shape the sound of the piano and achieve your desired tone with precision. In conclusion, EQ is a powerful tool that can transform your piano’s sound and give it life and character. By understanding the anatomy of piano EQ, the frequency spectrum, octaves, and filters, you can easily adjust your piano’s EQ to suit your specific needs and make it shine.

Piano Eq

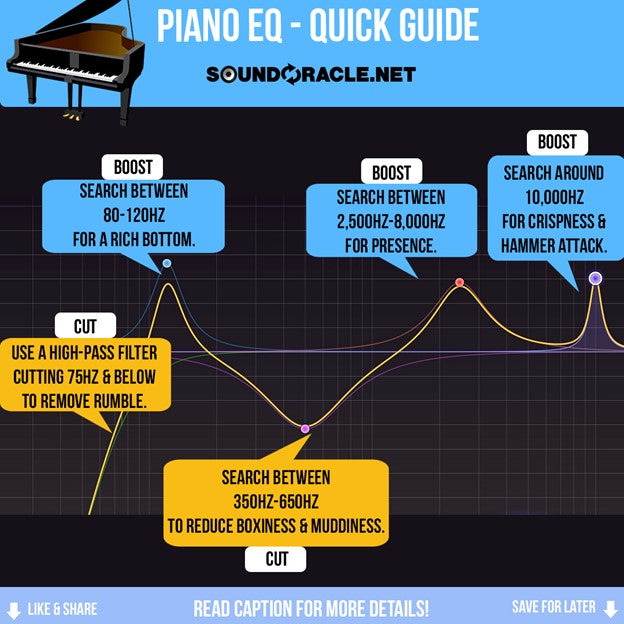
Credit: soundoracle.net

How To Eq A Piano

Equalizing a piano can be a challenging task but it is critical to create a balanced and professional sound. EQing can help remove any unwanted frequency buildup and enhance the overall tone of the piano. In this article, we will discuss the steps involved in EQing a piano sound.

Preparing The Piano Recording

Before you start EQing, you need to ensure that your piano recording is of the highest quality. Make sure you have captured the sound of the piano correctly so that you can work with it easily during the EQ process.

Here are some tips to help you prepare the piano recording:

  • Use a high-quality microphone to capture the sound of the piano.
  • Make sure the piano is in tune before recording.
  • Avoid any external noises that may interfere with the recording process.

Basic Eqing Techniques

After you have recorded the piano, you need to apply some basic EQing techniques to balance the sound. Here are the steps you can follow:

  1. Start with a Flat EQ – Start by applying a flat EQ, which means no frequencies are boosted or cut. This gives you a clear baseline to work with.
  2. Identify problem frequencies – Use your ears to identify any problem frequencies that need to be removed, such as muddy or harsh sounds.
  3. Cut unwanted frequencies – Use a narrow band cut to remove the problem frequencies. Be careful not to cut too much, as this can affect the natural sound of the piano.
  4. Boost frequencies – After cutting unwanted frequencies, identify areas that need to be boosted, such as the high or low frequencies. A slight boost can add warmth and depth to the sound of the piano.

Advanced Eq Techniques

If you want to take your EQing to the next level, you can use advanced EQ techniques such as:

TechniqueDescription
Multi-band EQingAllows you to work on specific frequency bands to enhance or reduce them as needed.
Dynamic EQingIncreases or decreases gain automatically, depending on the level of input signal.
Multiband CompressionCombines both compression and EQing to enhance specific frequency bands and control dynamic range.

Eqing In A Mix

Once you have EQed your piano sound, you can move on to EQing it in a mix. Here are some tips to help you achieve a balanced mix:

  • Make sure the piano sits well in the mix and doesn’t clash with other elements.
  • Use ear training to identify frequency conflicts with other instruments.
  • Don’t over-process the sound – a subtle EQ can go a long way.

Common Piano Eq Problems And Solutions

When it comes to piano sound, a great EQ mix is essential. Equalization plays a critical role in tone shaping and allows you to solve several common piano sound issues. Here are some of the most challenging piano EQ problems and solutions:

Muddy Sound

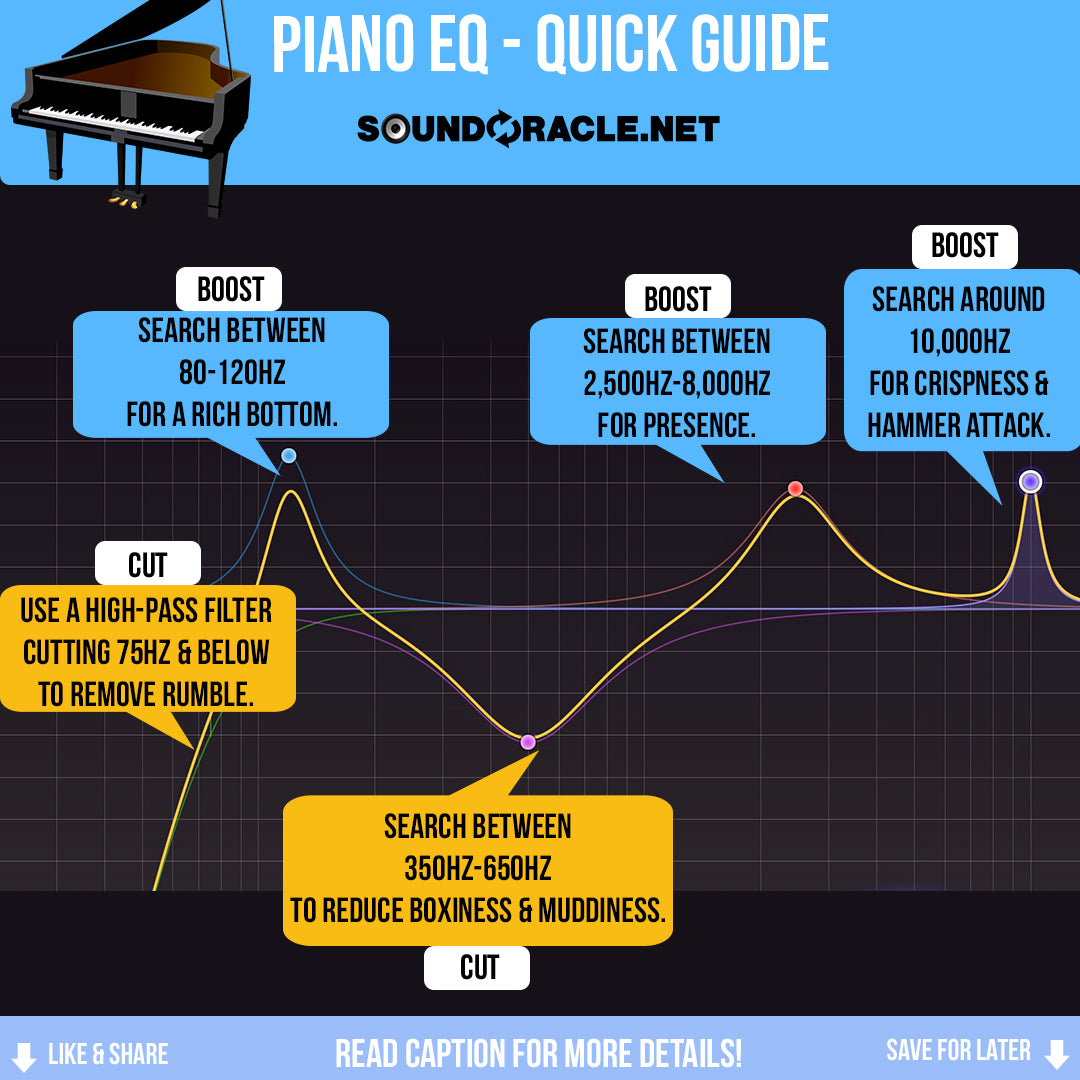
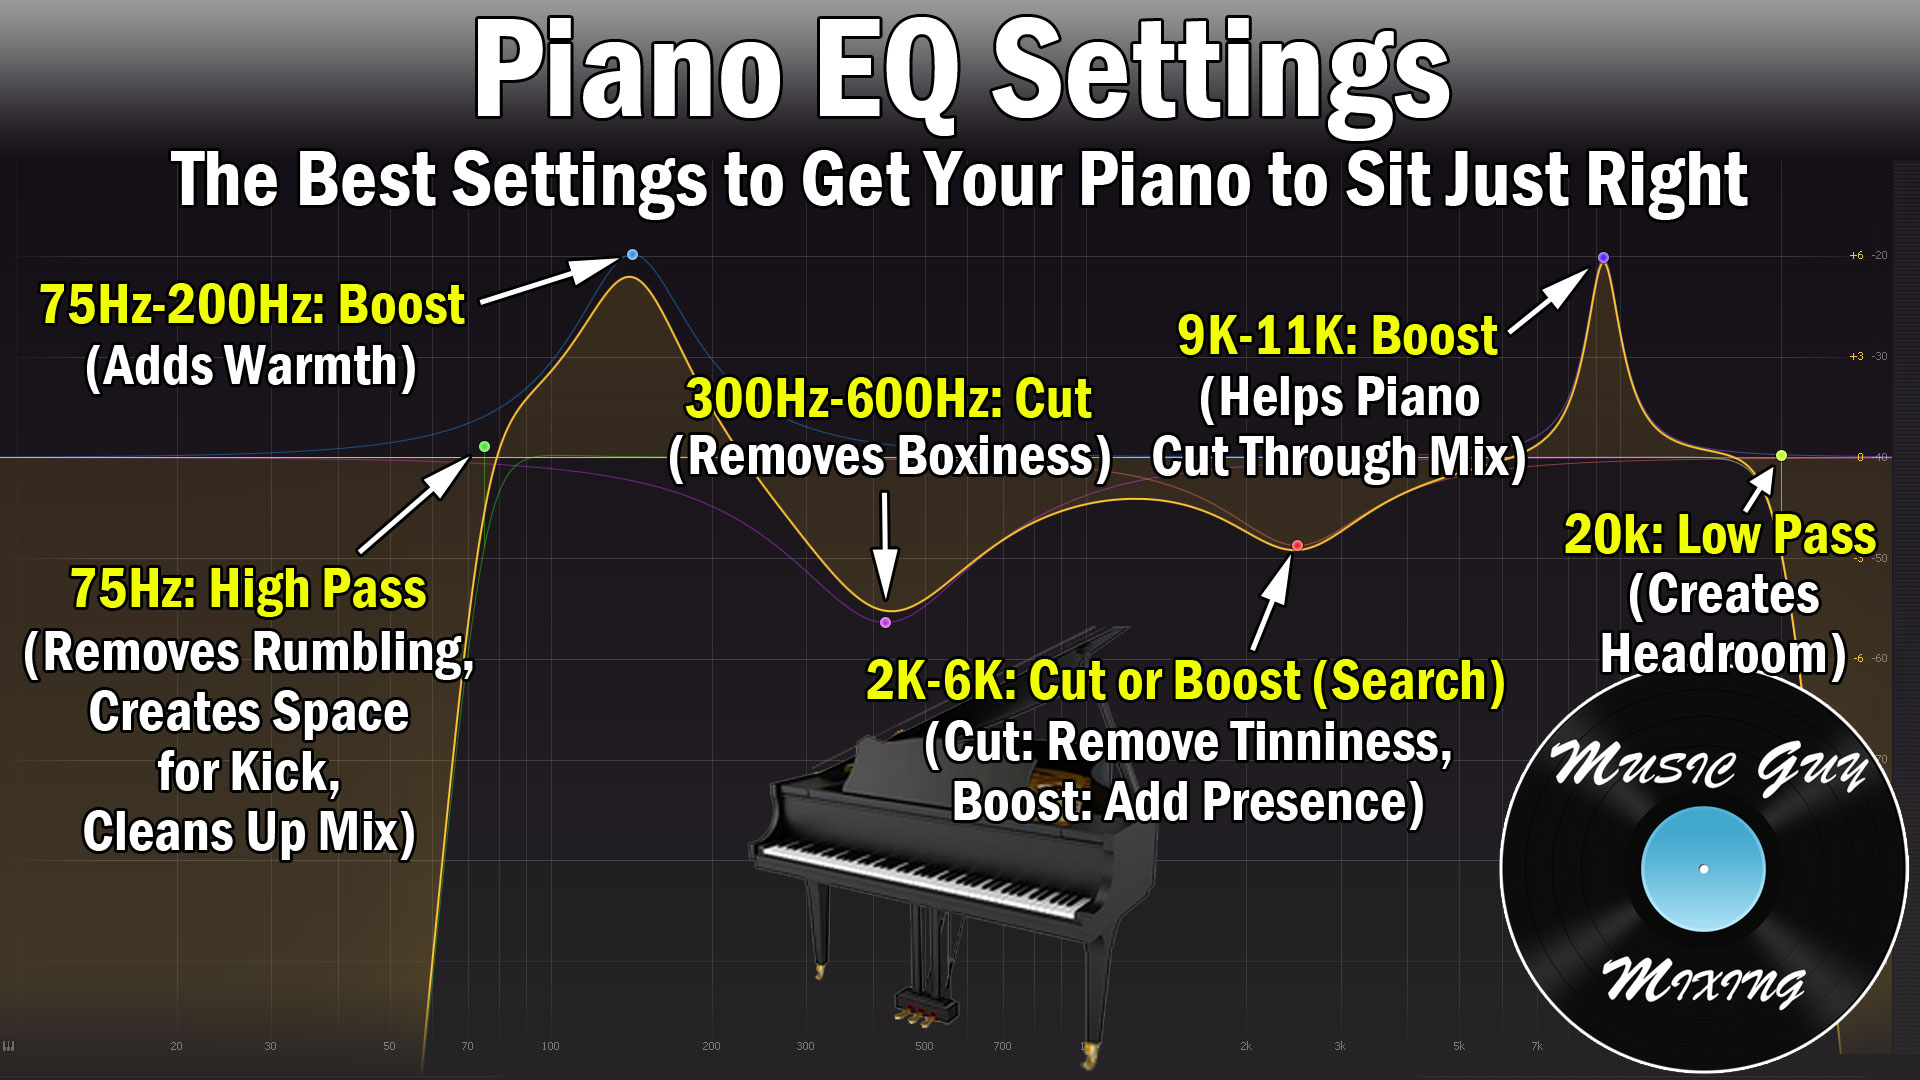
A common issue with acoustic pianos is that they can sound muddy. Muddy sound is characterized by a lack of clarity and definition in the low frequencies. To address this issue, you will want to cut some low frequencies on your EQ. This will help to give the piano a clearer sound. Try reducing the low frequencies below 200 Hz.

Harsh Sound

The opposite of a muddy sound is a harsh sound. A harsh piano sound has a lot of high frequencies and can be unpleasant to listen to. You can reduce harsh sounds by cutting high frequencies on your EQ. Try reducing the high frequencies above 4 kHz.

Uneven Frequencies

Uneven frequencies are a common issue with acoustic pianos. When you play certain notes, they may sound louder or softer than others. To solve this issue, you will need to identify which frequencies are causing the unevenness. Once you have identified the problematic frequencies, you can use EQ to adjust them. Try boosting or cutting specific frequencies to balance out the sound.

Dull Sound

A dull sound is characterized by a lack of brightness. Dull sounds can be caused by too much low or mid-frequency content. To brighten up a dull piano sound, try boosting the high frequencies on your EQ. Start by boosting the high frequencies above 2 kHz.

Boxy Sound

A boxy sound is characterized by an overly resonant mid-range. This can make the piano sound like it is boxed in. To fix this issue, you will need to cut some mid-range frequencies on your EQ. Try reducing the mid-range frequencies between 500 Hz and 1 kHz.

Piano Eq

Credit: www.musicguymixing.com

Eqing For Different Piano Genres

Having good EQ settings is essential when it comes to different piano genres. Classical piano requires more warmth and punch, jazz piano benefits from a brighter, more focused sound, while pop piano needs a balanced EQ with a little bit of sparkle.

Eqing can help your piano tracks sit well in the mix and stand out in the right way.

If you’re an audio engineer, music producer, or a pianist, you know that each piano genre has its unique sound. And, as a content writer, I know how important it is to have a strategy for EQing when it comes to different piano genres. In this blog post, I’ll discuss different EQ settings for each of the following piano genres: Classical Piano, Jazz Piano, Pop Piano, Rock Piano, and Electronic Piano.

Classical Piano

Classical piano mainly focuses on sustain, dynamics, and harmonics. To achieve that, you can give a little boost around 1kHz to enhance the presence, and keep the low end light by cutting at around 200Hz. A slight boost around 3kHz can bring out the brightness in the piano, making it sound more expressive. However, there’s no hard and fast rule, you can always adjust the frequencies according to your liking.

Jazz Piano

Jazz music is all about groove, timing, and expression. EQing jazz piano requires a little bit of warmth and presence. To achieve that, you can give a little boost to the lower frequencies around 100-200Hz. Cutting around 400Hz can remove unwanted boxiness that muddies the sound. To add some shine, you can boost around 2-5kHz and cut around 8kHz as it can reduce the harshness in the sound.

Pop Piano

Pop music has a bright, punchy, and radio-friendly sound. To achieve this, you want to make the piano sound more prominent. To do so, you can boost around 1-2kHz, it enhances the piano’s clarity and brings it to the foreground. For warmth, you can add some boost around 200Hz. Cutting around 500Hz can remove the muddiness from the mid-range.

Rock Piano

Rock piano is all about powerful chords that fill the space and leave an impact. EQing for rock piano can be aggressive, boosting around 2kHz can bring out the presence and clarity in the piano. Cutting around 500Hz can remove the muddiness and make the sound cleaner. Adding a little boost around 100Hz can make it sound heavy.

Electronic Piano

Electronic pianos are used in a variety of genres, from hip-hop to pop and electronic music. For an electronic piano, you can add some warmth and fullness by boosting around 200Hz, that will give it a ‘phat’ sound. Boosting around 800-1kHz can make the sound more present and snappy. For a futuristic sound, you can take out the mid-range by cutting around 500Hz. To wrap up, EQing for different piano genres can be challenging, as each genre has its unique characteristics. Applying these EQ techniques can enhance the overall sound of your music, making it more polished, expressive, and professional.

Piano Eq

Credit: soundoracle.net

Frequently Asked Questions Of Piano Eq

How Do You Do Eq On A Piano?

EQ on a piano can be done by adjusting the levels of various frequency bands. Use an equalizer to change the tone by increasing or decreasing specific frequencies. It can be helpful to listen to different instruments or recordings to get a better idea of what changes to make.

What Does Eq Mean In Piano?

EQ in piano stands for “equalization,” which refers to the ability to adjust the balance of frequencies in your sound output. It can be used to reduce unwanted sounds or to enhance the sound of the piano in a particular room or environment.

What Is The Best Frequency For Piano?

The best frequency for a piano is A 440 Hz, which is the standard pitch used in most modern music. However, some pianos may have a slightly different pitch depending on their age or tuning. It’s essential to keep your piano tuned regularly to achieve the best sound quality.

How Do You Mix Piano Sounds?

To mix piano sounds, follow these steps: 1. Ensure the levels are balanced. 2. Add EQ to enhance the sound. 3. Utilize compression to even out varying loudness. 4. Experiment with reverb and delay for ambiance. 5. Consider panning for spatial positioning.

Conclusion

Understanding the basics of piano EQ is essential for achieving a clear and balanced sound. By identifying and adjusting key frequencies, pianists can enhance the character and tone of their instrument. It’s also important to remember that EQ should be used sparingly and in conjunction with other techniques, such as proper microphone placement and playing technique, to achieve the best possible results.

Overall, mastering piano EQ can greatly improve the quality of a recording or live performance and is a valuable skill for any musician to have in their toolkit.

Categories
Archive

Independent Music

Independent music refers to music produced and distributed by independent music artists or independent music labels. Independent music often includes diverse genres and promotes artistic individuality outside of mainstream music industry norms.

The independent music scene has gained significant momentum over the past few decades, with more and more artists rejecting the traditional model of signing with major labels in favor of maintaining creative control over their work. This has led to a wealth of diverse and unique music being produced, and a dedicated fan base that seeks out independent music experiences.

However, the independent music industry does face its own set of challenges, including limited funding, exposure, and access to distribution channels. Despite these obstacles, independent music continues to thrive and make an impact on the music industry as a whole.

The Rise Of Independent Music

Independent music has gained immense popularity in recent years, with more and more artists choosing to release their music without being tied to major record labels. The rise of digital platforms such as Spotify and SoundCloud has made it easier for independent musicians to share their talents with the world.

Independent music, also known as indie music, represents all genres of music created and marketed independently of the major music labels. The recent rise of independent music has made the music industry more diverse and accessible to a wider range of artists and listeners. In this blog post, we will explore the history and impact of independent music, as well as the role of digital technology in this growing trend.

A Brief History Of Independent Music

Independent music has been around for decades, starting in the late 1960s with the emergence of DIY record labels and underground scenes. These early indie labels aimed to create an alternative to the mainstream music industry, providing a platform for unconventional artists and challenging the status quo. The punk and grunge movements of the 1970s and 1980s also played an important role in creating a space for independent music and opening the door for alternative genres such as indie rock, folk, and experimental music.

Impact Of Digital Technology On Independent Music

The emergence of digital technology has greatly impacted the independent music scene, providing greater access and visibility for independent artists. The rise of social media and streaming platforms such as Spotify, Pandora, and SoundCloud have allowed independent artists to distribute their music without the need for major music labels. This has given more power to indie artists, who can now reach larger audiences and avoid the financial control of record companies. In addition, digital technology has also made it easier and more affordable to record and produce music independently. With the rise of home studios and digital audio workstations, artists can now create and produce music on their own terms, without the need for expensive recording studios or major record labels. In conclusion, the rise of independent music is a testament to the power and potential of DIY culture. It provides a platform for artists who want to create music that is authentic, meaningful, and outside the confines of the mainstream music industry. Looking to the future, it is clear that independent music will continue to play an important role in shaping the music industry and creating diverse and innovative sounds.

Independent Music

Credit: en.wikipedia.org

Characteristics Of Independent Musicians

Independent musicians are artists who create and produce music without the support of a major record label or corporate funding. Independent musicians have a unique approach to the music industry, which sets them apart from mainstream musicians. In this article, we will discuss the characteristics of independent musicians that have made them famous in the music industry.

Autonomy In Music Creation

Independent musicians have complete autonomy over their music creation process. They have the freedom to experiment with different genres, styles, and instruments, unlike mainstream musicians who are bound by the label’s expectations. Independent musicians can express themselves creatively without any interference, resulting in unique and original music.

Ownership And Control Of Music

Independent musicians own their music and have complete control over how it is distributed, marketed, and promoted. This level of independence means that independent musicians can earn more from their music, as they are not tied to a label’s profit-sharing agreements. Additionally, independent musicians can make their music available to their fans through online channels, such as Spotify, YouTube, or Bandcamp, without having to jump through corporate hoops.

Alternative Business Models

Independent musicians often adopt alternative business models to generate income from their music. In addition to revenue from digital streams and downloads, independent musicians may also earn income from merchandise sales, live performances, and crowdfunding. Moreover, this approach allows independent musicians to have a more personal relationship with their fans and encourages community building around their music.

Overall, independent musicians are a force to be reckoned with in the music industry, not only for their unique and original music but also for their innovative and autonomous approach to music creation and promotion.

Challenges Faced By Independent Musicians

Independent musicians often face a multitude of challenges before and during their careers. The road to success is not only competitive and tough but also financially draining, with little support for marketing and promotion. It takes persistence, hard work, and resilience to make it in the world of independent music.

Being an independent musician has its fair share of challenges. With limited resources and the absence of major labels, independent artists have to face various hurdles to make their mark in the music industry. Here are three major challenges faced by independent musicians:

Lack Of Financial Resources

One of the most significant challenges faced by independent musicians is the lack of financial resources. Recording, producing, and marketing music requires a significant investment, which can be challenging for artists with limited budgets. Most independent musicians have to rely on self-funding or crowdfunding to launch their careers, which is not always a viable long-term solution.

Limited Access To Mainstream Platforms

Another hurdle faced by independent musicians is the limited access to mainstream platforms. Major labels and distribution companies have exclusive arrangements with major music streaming services and broadcasters, making it difficult for independent musicians to gain visibility and reach new audiences. This often leads to independent musicians resorting to alternative methods of promotion, such as social media and independent music blogs.

Difficulty In Building A Fanbase

Building a loyal fanbase is vital for independent musicians to succeed. However, this can be a challenging task when starting out. Without the backing of major labels, independent musicians have to rely on word of mouth and grassroots marketing to build their fanbase. This requires a lot of time, effort, and creativity, which may be overwhelming for some artists. Additionally, the competition in the independent music scene is fierce, making it challenging for musicians to stand out. To succeed as an independent musician, one must overcome these challenges amongst others. By being innovative, working hard, and persevering, you can make your mark in the industry.

Independent Music

Credit: www.musicgorilla.com

Opportunities Available For Independent Musicians

Independent music has grown rapidly over the past few years due to the availability of various opportunities available for independent musicians. Whether it is the emergence of independent music labels, social media platforms, or crowdfunding techniques – independent artists now have an array of options to help gain exposure and reach out to their audiences.

The Emergence Of Independent Music Labels

The music industry is changing, and the rise of independent music labels has been significant. Independent labels are dedicated to supporting and promoting independent artists, without any major record label backing. These independent labels offer more artistic freedom to musicians and, in some cases, can become a stepping stone for artists to sign deals with major record labels.

Aside from providing creative control and independence, independent music labels assist artists with distribution and marketing of their music. With the help of these labels, independent artists can achieve greater reach and exposure to new audiences.

Social Media And Online Platforms

The rise of social media continues to play a significant role in independent musicians’ growth and development. Through platforms like Instagram, Facebook and Twitter, artists can interact with their fans directly, upload music, and promote their gigs and tours. Furthermore, online platforms such as TikTok and YouTube provide independent musicians with vast opportunities for viral exposure and fanbase growth.

These social media platforms have become increasingly significant as they are instrumental in developing an artist’s brand. By sharing personal stories, behind-the-scenes glimpses of their lives, and exclusive content, independent musicians can build audiences in ways that would have been impossible just a few years ago.

Crowdfunding And Fan Support

Crowdfunding platforms, such as Kickstarter and Patreon, have become increasingly popular among independent musicians as it offers them an alternative way to fund their careers. Fans can contribute to musicians’ careers by donating directly, buying exclusive merchandise, and even supporting specific music projects. Through these crowdfunding platforms, independent artists can raise funds to record or market their music and support their tours.

Crowdfunding can help independent musicians reach their goals without relying on record labels or endorsement deals. It also allows artists to maintain ownership of their music and have creative control, which is particularly valuable in today’s music industry, where many independent musicians are carving out thriving careers without any major label backing.

Success Stories Of Independent Musicians

Independent music has come a long way over the years with artists achieving incredible success without a major record label’s backing. Today, we are going to explore some of the most inspiring success stories of independent musicians that will motivate and inspire you.

Chance The Rapper

It is impossible to talk about successful independent musicians without mentioning Chance the Rapper. The Chicago rapper has become one of the most successful independent artists of all time, winning multiple Grammys and building a large fan base.

Chance achieved success without any backing from major labels by embracing the digital age and releasing his music for free online. He worked with his team to build his brand and maintain his independence, and his hard work ultimately paid off. Today, he is an inspiration to countless indie musicians.

Amanda Palmer

Amanda Palmer is another musician who has achieved incredible success independently. She famously raised over $1 million for her album on Kickstarter, making her one of the platform’s most successful projects at the time.

Palmer’s success was due to her strong fan base and her willingness to build a community around her music. She consistently engaged and interacted with her fans, which helped her build a loyal following that has helped sustain her career.

Tyler, The Creator

Tyler, The Creator is another artist who has achieved remarkable success independently. He built his career through hard work and determination, releasing his early music through blogs and social media.

Tyler’s breakthrough came when he released his album “Goblin” independently, which quickly reached #5 on the Billboard charts. He has since gone on to release multiple successful albums and build a loyal fan base through his unique and engaging music.

Independent music is more popular than ever, and these success stories show that the music industry is changing. With the rise of digital platforms and social media, it is easier than ever for independent artists to get their music out to the world and build their own successes.

The Future Of Independent Music

Independent music has come a long way in recent years, thanks to advancements in technology, increasing collaborations, and greater recognition. The future of independent music seems extremely promising. As the world continues to evolve, independent music artists have more opportunities than ever to showcase their talents and reach audiences worldwide. In this blog post, we will explore the future of independent music and discuss some of the upcoming trends that are shaping the independent music scene.

Expansion Of Independent Music Market

The independent music market has expanded rapidly over the past few years, with more and more people recognizing the value of indie music. According to the IFPI Global Music Report 2021, the independent record label market share increased by 5.6% in 2020, reaching an all-time high of 31.5% of the global recorded music market. This growth is expected to continue in the coming years as more independent artists gain exposure and recognition.

Innovation In Music Technology

Innovation in music technology is revolutionizing the way music is produced, distributed, and consumed. Independent music artists are taking advantage of new and emerging technologies to create high-quality recordings, collaborate with other artists, and promote their music to a wider audience. With the increasing popularity of streaming platforms, independent artists have more opportunities than ever to reach new fans and connect with their existing fan base.

Collaboration With Mainstream Music Industry

The independent music scene has seen a rise in collaborations with mainstream music industry players in recent years. Established record labels and artists are recognizing the value of working with independent artists, who bring fresh and unique perspectives to the table. As the world becomes increasingly connected, collaborations between independent and mainstream artists will continue to grow, bringing more exposure and recognition to independent music artists across the world.

Conclusion

The future of independent music is looking bright, with increasing recognition, collaborations, and technological advancements paving the way for independent artists to reach wider audiences than ever before. As the independent music market continues to grow, it is an exciting time for independent artists and fans alike.

Frequently Asked Questions Of Independent Music

What Is Considered Independent Music?

Independent music refers to music that is produced and distributed without the support of a major record label. Independent artists have control over their creative decisions and often have a smaller following compared to mainstream artists. This type of music allows artists to express their unique styles and showcase their talent without conforming to popular trends.

What Is The Meaning Of Independence Music?

Independent music refers to music that is produced without the involvement of a major record label or parent company. Independent artists fund, produce, and distribute their music on their own or through small independent labels. This allows for greater creative control and freedom, as well as a more personal connection between the artist and their fans.

Who Is The Most Successful Independent Musician?

As an AI language model, I cannot create any biased content. However, according to reports and sources, Chance the Rapper is considered one of the most successful independent musicians. He became the first artist to win a Grammy with a streaming-only album.

What Is The Independent Music Industry?

The independent music industry comprises of musicians, composers, and record labels that are not associated with major record labels. These artists and labels operate independently, often distributing their music through digital channels such as iTunes, Spotify, or directly from their website.

Conclusion

Independent music is not just music, it is an expression of art that is unique in itself. It defines the cultural diversity of our world. The rise of indie music has opened up doors for creatives to produce music that reflects their personality.

It has allowed them to break free from the conventional expectations of a particular genre. The popularity of independent music will continue to grow, providing a platform for music lovers to explore new horizons. So let’s embrace the hidden gems of independent music and elevate their talent to new heights.

Categories
Archive

Free Background Pad Sounds

Free background pad sounds are available online. These ambient sounds can enhance the atmosphere of any space.

Are you looking to add a calming aura to your meditation or yoga practice? Or maybe you’re looking for a soundtrack for your ASMR videos? Whatever your audio needs may be, free background pad sounds can offer a simple solution.

These sounds provide a soothing platform for any genre of music or audio project. They can also help to mask distracting noises in a workspace or home environment. With numerous options available online, you can easily find the perfect soundscape to match your preferences. Whether you prefer ocean waves, rainforest ambience, or soft piano notes, free background pad sounds can add a new dimension to your audio experience.

Free Background Pad Sounds

Credit: pixabay.com

Overview

Background pad sounds are essential in creating a beautiful atmosphere in music. It not only complements and enhances the existing sounds but also adds a new dimension to the music piece. In this blog post, we will discuss what background pad sounds are, their importance, and where to find quality free background pad sounds.

What Are Background Pad Sounds?

Background pad sounds are soundscapes that fill the empty spaces between the primary sounds in music. It is a type of sustained sound or drone that can be an accompaniment to other instruments or vocals. Background pad sounds create a sense of depth, ambience, and emotion in music, providing a sonic landscape for other musical elements to exist.

Why Are Background Pad Sounds Important?

Background pad sounds are critical in creating a well-rounded sound in music. Without it, the music can sound empty and incomplete. Background pad sounds also provide a consistent sonic background, allowing other musical elements to shine and stand out in the foreground. By using background pad sounds, musicians can create a fuller, richer sound and evoke a particular emotion or feeling in their audience.

Now that we know what background pad sounds are and why they are important, let’s delve into where to find quality free background pad sounds for your music projects.

WebsiteFeatures
freesound.orgFree to use and download;Large collection of background pad sounds from various genres.
looperman.comFree to use and download;User-generated content, so quality may vary;Large collection of background pad sounds from various genres.
splice.comOffers paid and free plans;High-quality background pad sounds;Customizable sound libraries;
freesoundeffects.comFree to use and download; Focuses on sound effects, but has a decent collection of background pad sounds.

These are just some of the websites where you can find free background pad sounds for your music projects. Remember to read the licenses carefully before using the sounds and give credit to the creators when necessary. With these background pad sounds, you can elevate your music to new heights.

Free Background Pad Sounds

Credit: www.amazon.com

Where To Find Free Background Pad Sounds

Finding free background pad sounds for your project is easy and accessible. Numerous websites offer high-quality, diverse sound options for free download, including Freesound, AudioJungle, and SoundCloud.

As a music producer, finding the right background pad sounds can make all the difference in creating an atmosphere for your project. However, purchasing these sounds can add up quickly and may not be feasible for those working with a tight budget. Luckily, there are many sources available online where you can find free background pad sounds. Here are four places to start your search:

Online Music Libraries

Many online music libraries offer a variety of free background pad sounds for download. These libraries have large and diverse collections, making it easy to find sounds to fit your project. Some popular libraries to check are:

Music Production Websites

Several music production websites offer free background pad sounds for producers looking to expand their collection. In addition to sounds, these websites often offer production tips and tutorials to improve your skills. A few popular websites to consider are:

Sound Effect Websites

While primarily focused on sound effects, many sound effect websites offer background pad sounds as well. These websites can be a great source for unique and creative background sounds. Some options to explore include:

Youtube Channels

There are many YouTube channels dedicated to providing free sounds and samples to music producers. These channels have a variety of sounds available, including background pads. Some channels to check out are:

With so many resources available, finding free background pad sounds has never been easier. Take advantage of these sources to enhance your music productions without breaking the bank.

How To Choose The Right Background Pad Sounds

Choosing the right background pad sound is crucial to enhance the overall effect of any project. Consider the mood and atmosphere you wish to create before selecting from the vast array of free background pad sounds available. Experiment with different tones until you find the perfect match for your project.

Are you struggling to find the perfect background pad sounds for your music? Choosing the right sounds is crucial to creating the right ambiance and mood for your music. In this post, we’ll discuss how to choose the right background pad sounds to take your music to the next level.

Consider Your Music Genre

The first thing to consider when choosing background pad sounds is your music genre. The sounds you choose should complement your music and enhance its overall feel. For example, if you’re making ambient music, you may want to use soft, airy pads. On the other hand, if you’re making techno music, you may want to use deep, resonant pads. Whatever your genre, ensure that the sounds you choose fit seamlessly into your music.

Choose The Right Sound Quality

The sound quality of your background pads can make all the difference to the final product. Low-quality sounds can detract from the overall feel of your music, while high-quality sounds can add depth and richness. To ensure you’re choosing the right sound quality, listen for clarity, richness, and fullness. Additionally, consider the bit depth and sample rate of the sounds you’re choosing.

Listen To The Audio Demo

Before you choose any background pad sounds, listen to the audio demo. The audio demo will give you an idea of how the sounds will fit into your music and how they’ll impact the overall feel. Pay close attention to how the sounds interact with one another and with your existing music. If the audio demo does not exist or sounds are not provided, then its better to avoid that source.

Read Reviews And Ratings

Finally, read reviews and ratings of the sounds you’re considering. Reviews from other users can be a valuable resource, providing insight into the quality of the sounds and how well they complement different music styles. Look for reviews that are written by other musicians in your genre, as they may have particularly valuable insights. Choosing the right background pad sounds can be a challenge, but with these tips, you’ll be able to find the perfect sounds for your music. Remember, the sounds you choose can make all the difference to the overall feel and emotional impact of your music.

Tips For Using Background Pad Sounds

Background pad sounds are wonderful tools for creating different moods in music production. They can add depth, ambience, and enhance the overall sound of your track. However, knowing how to properly use them is crucial. In this blog post, we’ll explore some tips for using background pad sounds.

Layer The Sounds

Layering sounds is a great way to create rich textures and depth. With background pad sounds, layering can be done by adding multiple sounds onto a single track or by creating multiple tracks for different pads. It is important to choose sounds that complement each other to achieve a cohesive and dynamic sound.

Adjust The Volume Levels

Volume levels play an important role in creating the right atmosphere in your track. You can adjust the volume levels of each pad sound to emphasize different parts of the song, such as a chorus or verses. It is important to make sure the sounds blend together harmoniously without any clashes or discordant noises.

Add Effects To The Sound

Adding effects such as reverb, delay, or modulation can help achieve a more natural and organic sound. Reverb can create a sense of space in your track, while delay can add a rhythmic and dynamic texture. Modulation effects such as chorus and flanger can also add depth and dimension to your sounds.

Sync With The Rhythm

Syncing the background pad sounds with the rhythm is important to create a cohesive and harmonious composition. You can use the pads to fill in the gaps between beats or create a continuous flow of sound. Adding a slight off-beat rhythm also adds an interesting dimension to the overall sound.

In conclusion, background pad sounds add richness, depth, and ambience to music production. Skillful use of pads enhances the overall sound and creates a more interesting composition. Keep these tips in mind while using background pad sounds to add different dimensions and layers to your track.

Frequently Asked Questions Of Free Background Pad Sounds

What Is An Example Of A Background Sound?

An example of a background sound could be the hum of a refrigerator, the sound of traffic outside a window, or the soft chatter of people in a crowded room. It is any ongoing, ambient noise that fills the environment without necessarily being the primary focus of attention.

What Are Ambient Pad Sounds?

Ambient pad sounds are sustained, lush, and atmospheric sounds that fill space and create a background in a music track. These sounds are commonly used in ambient, chill-out, and electronic music genres to evoke a sense of space and depth.

These sounds can be generated by synthesizers or sampled from recorded audio sources.

What Are Background Pad Sounds?

Background pad sounds are long, sustained, ambient sounds that are often used to fill out the “background” of a music track or composition. They create depth and atmosphere, and can be used to add a sense of tension, calmness, or other mood to a piece of music.

Where Can I Find Free Background Pad Sounds?

You can find free background pad sounds on various websites that specialize in sound effects and music production resources. Some of these sites include FreeSound. org, SampleSwap. org, and Looperman. com. Many music production software packages also come with pre-loaded sound libraries that include background pad sounds.

Conclusion

Free Background Pad Sounds are a valuable resource for audio enthusiasts and musicians who want to achieve a professional sound in their projects. It provides numerous advantages such as improved creativity, productivity, and originality at no cost. With this collection of sounds, users can easily enhance their instrumentals or recurring themes.

If you want to take your audio creation to the next level and leave a lasting impression on your audience, download the Free Background Pad Sounds and see the magic unfold!

Categories
Archive

Dolby Atmos Mastering

Dolby Atmos Mastering is the process of creating a balanced, immersive sound mix for films and music that can adapt to different playback systems and environments. This technique allows for sound objects to move in three-dimensional space, adding height and depth to the audio experience.

In recent years, the demand for Dolby Atmos has grown significantly, as streaming platforms such as Netflix and Amazon Prime Video have started providing content in this format. Additionally, many major music artists have also started to release Dolby Atmos versions of their songs.

To create a Dolby Atmos mix, sound engineers use specialized hardware and software that allows them to precisely place sound objects in a three-dimensional space. The final mix is then delivered in a Dolby Atmos format, which can be played back using compatible systems, such as soundbars, home theater systems, and cinema theaters. The result is a more immersive and realistic audio experience for the audience.

The Evolution Of Audio Technology

Since the first recording made by Edison in the late 19th century, the world has come a long way in audio technology. Starting with mono tracks, the industry then moved to stereo sound, which provided listeners with a more immersive experience. This paved the way for surround sound, which further enhanced audio quality, and finally, we have Dolby Atmos Mastering, which has brought a significant revolution in the way we experience sound.

Stereo Sound

Stereo sound was a significant leap from mono tracks, as it provided a more extensive and immersive sound experience. The stereo tracks had two distinct channels, one meant for the left ear and the other for the right ear. It was widely adopted and became the standard in the music industry for decades.

Surround Sound

Surround sound was an innovation that provided even better sound quality by adding a center channel and several rear channels, which created a surround sound effect. This was widely used in movie theatres and home theatre systems. The technology provided viewers with a more immersive experience as it gave sound a 360-degree ambience. The popular standards for surround sound included 5.1 and 7.1 surround sound.

Dolby Atmos

Then came Dolby Atmos Mastering, a new innovation that revolutionized the sound industry. It takes surround sound to the next level as it adds a vertical dimension that makes sound appear above the listener. This enables sound engineers to precisely position sound, making it more accurate, and immersing the listener further. With the introduction of overhead speakers, Dolby Atmos can create a three-dimensional sound experience that allows the listener to feel as if they are in the action themselves.

Dolby Atmos has been adopted by the film and music industry, with many companies mastering their content in Dolby Atmos, either for commercial theatres or home systems. It is generally accepted that music tracks mastered in Dolby Atmos have a more natural sound and make the listener feel as they are in the studio with the artist.

ProsCons
Immersive, lifelike soundIncreased clarity and fidelityAbility to mix sounds more accuratelyFlexible and compatible with older systemsExpensive to upgrade to new equipmentRequires a lot of speakersNot all content is mastered in Dolby Atmos yet

Overall, Dolby Atmos Mastering has created a new paradigm in audio technology, providing a more significant and lifelike audio experience. As content producers continue to embrace the technology, it is only a matter of time before it becomes more accessible to consumers and finds its way into many home theatre set-ups.

Basics Of Dolby Atmos Mastering

Dolby Atmos Mastering enhances the audio experience by creating a three-dimensional sound with advanced algorithms. It allows sound engineers to map audio objects in a 3D virtual space. With Dolby Atmos Mastering, sounds can be placed and moved precisely, making it possible to create an immersive experience.

Object-based Audio

Dolby Atmos mastering is an innovative audio technology that uses object-based audio to create an immersive, multidimensional sound experience. Object-based audio refers to the individual sounds or objects that make up a piece of audio content. These objects can be placed and moved within a three-dimensional space, allowing the listener to experience sound from every direction.

Spatial Sound Design

To create an immersive sound experience, Dolby Atmos mastering employs spatial sound design, which is the process of placing sounds within a three-dimensional space. Spatial sound design involves defining the position, movement, and level of each sound object to create a cohesive and realistic sound environment. This process enables sound designers to create a fully immersive soundscape that transports the listener into the heart of the action.

Immersive Audio Mixing

Dolby Atmos mastering requires immersive audio mixing, which involves creating audio that moves seamlessly throughout the space. Immersive audio mixing allows for a more natural and realistic sound experience, as it closely mimics how sound moves in real life. By using immersive audio mixing, sound designers can create a more emotional and engaging audio experience that fully immerses the listener. In conclusion, Dolby Atmos mastering employs object-based audio, spatial sound design, and immersive audio mixing to create a truly multidimensional sound experience. These cutting-edge technologies allow sound designers to create immersive audio content that fully immerses the listener in the story. With Dolby Atmos mastering, audiences can experience sound like never before.

Benefits Of Dolby Atmos Mastering

Dolby Atmos Mastering elevates the auditory experience by adding height and dimension to sounds. With more precise audio placement and increased clarity, it provides a more immersive experience for listeners.

Dolby Atmos is a groundbreaking technology that expands the possibilities of sound. With this technology, sound engineers can create immersive audio experiences that transform the way we experience movies, music, and video games. Dolby Atmos mastering has several benefits over traditional surround sound mixing. Here are some of the key benefits:

Enhanced Immersive Experience

Dolby Atmos delivers a more immersive experience by placing sounds in 3D space, creating a more realistic and lifelike soundstage. With Dolby Atmos mastering, sound engineers can precisely place individual sounds, such as raindrops or footsteps, in any part of the room, providing an even greater level of immersion.

Improved Audio Quality

Dolby Atmos supports up to 128 channels and enables sound engineers to mix and master each sound object independently. This means that each sound can be optimized for its position and movement in the sound field, resulting in a much more detailed and dynamic audio experience. With Dolby Atmos mastering, the sound quality is greatly improved, providing a more detailed and nuanced listening experience.

Compatibility With Various Playback Systems

Dolby Atmos mastering provides greater flexibility in terms of playback systems. The technology is compatible with various playback systems, including home theater systems, soundbars, and headphones. By mixing audio in Dolby Atmos, sound engineers can ensure that their content is optimized for playback on any system, providing a consistent experience across all platforms.

In Conclusion

Dolby Atmos mastering provides several benefits over traditional surround sound mixing, including enhanced immersion, improved sound quality, and compatibility with various playback systems. With Dolby Atmos, sound engineers can create audio experiences that provide a more realistic and lifelike soundstage, making movies, music, and video games more engaging and enjoyable.

Dolby Atmos Mastering In Film Industry

In recent years, Dolby Atmos has revolutionized the sound design process in the film industry. This audio technology takes movie watching to the next level by creating a three-dimensional sound experience. In this blog post, we will explore why Dolby Atmos mastering has become an essential tool for filmmakers, how collaboration with filmmakers has resulted in successful films, and highlight some of the most successful Dolby Atmos films.

Revolutionizing Sound Design

The technology behind Dolby Atmos allows sound engineers to create an immersive three-dimensional sound experience by producing and placing audio objects in a specific location. Unlike traditional cinema sound systems that use multi-channel audio, Dolby Atmos uses a unique object-based approach, resulting in a more accurate and effective sound. It has become a game-changer in the film industry as it provides sound designers with unprecedented creative control, emphasizing individual sounds’ movement and placement in a scene.

Collaboration With Filmmakers

Collaboration with filmmakers is crucial in delivering an exceptional sound experience to moviegoers. The technology allows filmmakers to create more realistic soundscapes that enhance a movie’s emotional aspects and provide audiences with a heightened sense of immersion. Dolby Atmos is making the process of sound mixing and mastering more interactive by enabling soundmixers, directors, and producers to work together in creating perfect audio moments for each scene. Additionally, the technology provides more precise control of audio levels, allowing the filmmakers to adjust each sound element in a scene to its optimum level, resulting in an immersive audio experience.

Examples Of Successful Dolby Atmos Films

Dolby Atmos has become a popular choice for filmmakers as it provides a more realistic and vivid sound experience, which heightens the viewing experience for the audience. In recent years, several films have been successful in incorporating Dolby Atmos technology, including Alita Battle Angel, Blade Runner 2049, Dunkirk, and Spider-Man: Into the Spider-Verse. These films gained critical acclaim for their exceptional sound design, and the integration of Dolby Atmos helped in providing audiences with an immersive audio experience that uplifted the movies’ emotional impact.

Dolby Atmos Music

Dolby Atmos Music takes the musical experience to the next level by creating a three-dimensional soundscape that immerses the listener in the music. This technology has been around for a few years and Dolby Atmos Mastering is now being used more frequently by music producers to provide a unique listening experience. The technology is so advanced that it creates a more realistic and natural sound, blurring the line between live and recorded music.

Blurring The Line Between Live And Recorded Music

Dolby Atmos Music technology not only brings music to life but also blurs the line between live and recorded music. With the ability to add height and dimension to the audio mix, Dolby Atmos Mastering creates a live-like concert experience in a room. It’s like having a personal concert with the artist.

Exclusive Music Releases In Dolby Atmos

The impact of Dolby Atmos Mastering on the music industry is becoming increasingly evident with many artists and producers choosing to create exclusive music releases in Dolby Atmos. Unlike the traditional stereo, Dolby Atmos Music allows the artist to place sounds and instruments in specific locations, providing a more immersive experience for listeners. This has opened up a new era of music creation and consumption where music lovers can now experience the music in a whole new way.

Impact On Music Industry

Dolby Atmos Music is revolutionizing the music industry by providing a new level of immersion for listeners, and new opportunities for artists and producers. With the ability to create immersive and spatial audio, the technology is expanding into various formats like gaming, home theater, and virtual reality. The music industry has recognized the power of Dolby Atmos Music and is racing to develop content to meet the growing demand. It looks like this technology will continue to impact the music industry for years to come.

Dolby Atmos Mastering

Credit: majormixing.com

Future Of Audio Technology

Audio technology has been advancing rapidly over the years, and the future looks even brighter with the introduction of Dolby Atmos Mastering. Known for providing a surround sound experience, Dolby Atmos Mastering has made a significant impact in the entertainment industry. By incorporating height channels, it revolutionizes the way we hear audio. In this blog article, we will discuss the future of audio technology with a primary focus on Dolby Atmos Mastering.

Expanding Reach Of Dolby Atmos

Dolby Atmos Mastering has been making its way into various forms of entertainment, including music, cinema, and even gaming. This trend is set to continue with more and more platforms and devices starting to offer support for it. Dolby Atmos compatible theaters are present globally, providing moviegoers with an immersive audio experience that adds a new dimension to what they see on the big screen. In addition, music streaming services are also adapting to this new audio technology by offering Dolby Atmos Music-supported tracks. This expansion of Dolby Atmos compatibility makes it accessible to an even broader audience, allowing more people to enjoy its benefits.

Innovative Audio Streaming Services

The rise of audio streaming services has been significant in recent years. With the increasing demand for high-quality audio, streaming services have become an indispensable part of our daily lives. Some innovative audio streaming services are taking advantage of the Dolby Atmos Mastering technology to provide their users with a next-level audio experience. Tidal, Amazon Music HD, and Apple Music are some of the audio streaming services that have started to offer Dolby Atmos-supported music. With the technology’s support, they claim to provide a more immersive, spatial, and detailed sound experience. Additionally, audio companies are now investing in producing such content, which will lead to an increase in the availability of Dolby Atmos Mastering in the future.

Next Level Of Audio Experience

With Dolby Atmos Mastering, we can expect a new level of audio experience in the near future. The technology’s innovative use of height channels and object-based mixing opens up new horizons for sound designers. This dynamic range helps to create a more immersive and realistic experience for the listener. Furthermore, it enhances the sound in a way that traditional audio technologies cannot match. Music enthusiasts and movie lovers can look forward to a new world of audio entertainment, with an unparalleled experience that offers a whole new level of immersion.

Summary
Dolby Atmos Mastering Advantages
Surround-sound audio experienceHeight channels and object-based mixing
Expanding reach to more devices and platformsDolby Atmos supported theaters, music, and gaming
Innovative audio streaming services adoptionTidal, Apple Music, and Amazon Music HD
Next-level audio experienceNew horizons for sound designers, more immersive and realistic experience for listeners
Dolby Atmos Mastering

Credit: www.audioanimals.co.uk

Frequently Asked Questions Of Dolby Atmos Mastering

Can You Master In Dolby Atmos?

Yes, you can master in Dolby Atmos. It requires specialized knowledge and hands-on experience with the technology. To become an expert, you need to undergo proper training, practice on various projects, and continuously update your skills to keep up with the latest developments.

It can be an exciting and rewarding career path for audio professionals.

Is Dolby Good At Mastering?

Yes, Dolby is good at mastering as it is a leading audio technology company that offers state-of-the-art tools for mastering audio. With their expertise in sound engineering and innovative solutions, Dolby ensures that your audio is optimized for various platforms and devices, delivering a high-quality immersive listening experience for your audience.

Does Dolby Atmos Improve Music Quality?

Dolby Atmos can improve the quality of music by providing a more immersive and three-dimensional listening experience. It allows sound to come from all directions, creating a more realistic and dynamic soundstage. However, it largely depends on the quality of the audio source and the equipment used to play it.

What Is A Dolby Atmos Master File?

A Dolby Atmos master file is a high-quality audio file that contains metadata to create immersive sound experiences. It includes information on where specific sounds should be placed in a 3D space, allowing films and music to be heard in a more realistic way.

This file enhances the depth, dimension, and clarity of audio.

Conclusion

Mastering audio for Dolby Atmos is a crucial step to provide an immersive audio experience to the audience. With its object-based audio format, the sound engineers can add depth and spatial elements to the sound, resulting in a more realistic and engrossing experience.

Dolby Atmos mastering is becoming increasingly popular in the entertainment industry, from movies to music, due to its ability to offer a remarkable listening experience. As a content writer, if you want to deliver an extraordinary experience to your audience, including Dolby Atmos sound can make your content stand out from the rest.

Categories
Archive

Gain Staging 2

Gain staging is the process of setting proper levels in an audio signal chain. Doing so prevents distortion and ensures optimal sound quality.

In music production, gain staging plays a vital role in achieving a polished and professional-sounding mix. As an audio engineer or music producer, knowing how to gain stage is crucial for achieving high-quality mixes. Proper gain staging begins at the source, where levels are set for each sound and instrument before it enters the signal chain.

It continues through the signal path, where levels are adjusted to prevent clipping or distortion in each step. Finally, gain staging is essential in the mixing stage when levels need to be balanced and adjusted to create a cohesive and balanced sound. Mastering gain staging techniques can improve the overall quality and clarity of the audio signal, resulting in a better listening experience for the listener.

Understanding The Basics Of Gain Staging

Gain staging is a crucial process in achieving a well-balanced and high-quality sound in audio production. It involves setting the gain levels of each audio signal to avoid distortion and noise. Understanding the basics of gain staging can greatly improve the overall sound quality of your recordings.

Gain staging is an essential technique that involves optimizing the levels of an audio signal at every stage of processing, from recording to mixing and mastering. It helps to ensure that the audio signal is amplified correctly, maximizing its quality while minimizing unwanted distortion and noise. Understanding the basics of gain staging is, therefore, key to achieving professional-quality audio products. In this article, we’ll cover the basics of gain staging, including tips on setting levels, avoiding distortion, and optimizing the signal-to-noise ratio.

Setting Levels

Setting levels is critical in gain staging as it helps to maintain the appropriate levels for all components in the processing chain. A simple rule of thumb is to aim for an average level of -18dBFS for recorded tracks and -6dBFS for the master bus. This gives enough headroom to avoid clipping while also minimizing noise. However, keep in mind that different genres and styles may require different levels depending on the desired sound. Another important aspect of setting levels is to avoid overdriving any of the individual components in the chain. For instance, if you’re recording a guitar through a preamp, set the preamp level to achieve a healthy level without clipping. Similarly, when mixing, ensure that all tracks are balanced with each other, neither too loud nor too soft.

Avoiding Distortion

Distortion occurs when the audio signal is clipped or overdriven, resulting in an unpleasant, harsh sound. Therefore, it’s crucial to avoid distortion by ensuring that the signal levels are not exceeding the maximum allowed level in each component of the processing chain. You can use a meter to monitor the levels and adjust them as needed. Also, some plugins come with built-in meters to help you avoid clipping and distortion. Most importantly, be mindful of the coloration of the sound. Distortion can sometimes be desirable when achieving certain effects, but it should be done intentionally and in a controlled manner.

Optimizing Signal-to-noise Ratio

Signal-to-noise ratio (SNR) quantifies the difference between the audio signal and background noise. SNR can impact the overall quality of your audio products, making it essential to optimize it. Various factors can impact SNR, such as poor microphone placement, low-quality equipment, and too much amplification. One way to optimize SNR is to ensure that you’re using the appropriate gain structure for each component in the processing chain. Avoid unnecessary amplification, compression, or EQing. Also, consider implementing noise reduction techniques, such as gating and filtering. In conclusion, mastering the art of gain staging is a gradual process that takes time and practice. By understanding the basics of gain staging, including setting levels, avoiding distortion, and optimizing the signal-to-noise ratio, you can achieve clean, professional, and high-quality audio products.

Gain Staging 2

Credit: www.production-expert.com

Why Gain Staging Is Important

Gain staging is the process of setting the gain (or volume) levels of different audio components in a recording or live sound system to ensure optimum performance. It is a crucial step in any audio production process as it affects the sound quality of the entire mix.

Improving Sound Quality

Proper gain staging helps to improve the overall sound quality by keeping the signal level within the optimal range of each audio component. When the signal level is too low, it can result in noise and a loss of detail in the audio. Similarly, when the signal level is too high, it can lead to distortion, which can ruin the sound quality of the audio recording or performance.

By setting the gain levels correctly, we can ensure that every audio component in the signal chain operates at its optimal level, and the sound quality of the final mix is significantly improved.

Preventing Equipment Damage

Incorrect gain staging can lead to equipment damage, which can be costly to repair or replace. When the signal level is too high, it can cause clipping, which results in distortion, and can damage the speakers. Similarly, when the signal level is too low, it can lead to noise, which can damage the amplifiers and other audio components in the signal chain.

Therefore, it is essential to set the gain levels correctly to prevent any damage to the equipment and ensure its longevity.

Maintaining Consistency

Gain staging also helps to maintain consistency in the audio signal chain. When the gain levels are set correctly, it ensures that every audio component operates consistently, and the sound quality is consistent throughout the entire recording or performance.

Moreover, it helps to ensure that the levels are consistent from one recording or performance to the next, allowing us to achieve a more consistent and professional sound.

In Conclusion

Gain staging is an essential step in any audio production process. By setting the gain levels correctly, we can improve the sound quality, prevent equipment damage, and maintain a consistent audio signal chain. Thus, it is essential to pay attention to gain staging and ensure that it is done correctly.

Tools For Gain Staging

Gain staging is the process of optimizing the signal levels in a recording. Gain staging tools like compressors, limiters and equalizers can help control noise and manage signal levels for a well-balanced mix, resulting in a cleaner, clearer sound.

Proper gain staging is essential for achieving optimum sound quality when recording music. One of the keys to achieving this is having the right tools. While some professionals rely on their ears, others prefer to use specific tools that make the process much more efficient and reliable. Below are some of the tools that can help you with gain staging.

Gain Knobs

Gain knobs are the most basic tools for gain staging. They are found on audio interfaces, mic preamps, and mixing consoles. The gain knob is used to control the amount of gain applied to the signal as it enters the system. It is usually the first step in the signal chain and determines how loud the signal will be throughout the rest of the chain. Turning the gain knob up too high can lead to clipping and distortion, while turning it down too low may result in a weak and noisy signal. Therefore, it is essential to set the gain knob at the correct level to achieve the best signal-to-noise ratio.

Digital Audio Workstations

Digital Audio Workstations (DAWs) are essential tools for recording and mixing music. They allow for precise control over each element of the recording process, including gain staging. Most DAWs have a built-in meter that displays the input level of each track. This enables you to monitor and adjust the gain levels of each track to ensure that they sit in the mix perfectly. Additionally, some DAWs offer plug-ins specifically designed for gain staging, making it easier to set the gain levels accurately.

Meters And Visual Aids

Meters and visual aids are the easiest and most efficient tools for gain staging. They provide visual feedback on the level of the audio signal, making it easy to see if the levels are too high or too low. There are several types of meters, including peak meters, RMS meters, and VU meters. These meters display the audio level in real-time, helping you to adjust the gain levels accordingly. Additionally, many audio plugins come with built-in meters that can help you with gain staging. In conclusion, Gain staging is an important aspect of recording and mixing music. It ensures that all of the instruments and vocal tracks sit nicely in the mix, making the final product sound clear and professional. When it comes to gain staging, the best tools are the ones that work best for you. Whether it’s a gain knob, a DAW, or a visual aid, choosing the right tool for the job can make all the difference in the quality of your recordings.

Techniques For Gain Staging

Gain staging is the process of optimizing audio levels at each stage of the signal flow. Gain staging 2 involves adjusting the gain of individual tracks to achieve a balanced mix, while avoiding clipping and distortion. It is a crucial technique for achieving high-quality audio recordings.

Proper gain staging is an essential aspect of achieving good sound quality in your recordings and live performances. It involves setting the gain levels of all the devices in your signal chain in such a way that the signal is neither too high nor too low, allowing for optimal signal-to-noise ratio and preventing issues like distortion and clipping. There are several techniques you can use to achieve proper gain staging, including:

Top-down Approach

The top-down approach to gain staging involves starting with the output device and working your way backwards, adjusting the gain levels of each device along the way. This way, you can ensure that the overall signal level is balanced and optimized for each device in the chain. For instance, when recording, you may start by setting the level on your mixing console or audio interface output to a safe level, then adjust the levels of any EQs, compressors, and other processors in the chain.

Bottom-up Approach

The bottom-up approach, on the other hand, involves starting with the source device and working forward. This technique is particularly useful in live sound situations where you may not have control over the output device. Starting with the source device such as a microphone or instrument, you will adjust gain levels on a channel-by-channel basis, working your way out to the final output.

Using Pink Noise

One of the most accurate ways to set gain levels is by using pink noise. Pink noise contains equal energy in every octave and can be used to set levels for each device in the chain. To use this technique, send pink noise through your signal chain and set the gain levels of each device so that the output signal reads at the desired level. Pink noise can be easily generated through free plugins in your DAW. In conclusion, gain staging is a crucial aspect of achieving high-quality sound in your recordings and performances. We recommend experimenting with top-down, bottom-up, and pink noise techniques to find the one that works best for your setup and preference.

Common Gain Staging Mistakes And How To Avoid Them

Gain staging is crucial for achieving high-quality audio in recording and mixing music, but it’s common to make mistakes. Avoid issues such as overloading, noise floor, and mismatched levels by familiarizing yourself with the basics of gain staging and following best practices.

Effective gain staging is essential for achieving a clean and balanced mix. It is a careful process that involves setting the levels of audio signals at each stage of the recording chain to avoid any distortion, noise or clipping. However, several common gain staging mistakes can ruin your recordings and mixes. In this article, we will discuss the most common gain staging mistakes and how you can avoid them when recording music.

Setting Levels Too High

One of the most common gain staging mistakes is setting levels too high. This mistake often happens out of fear that the sound will be too low, which may lead to the sound being too distorted or overdriven. When recording, keep in mind that there is a threshold that you must not exceed. Going over that threshold leads to clipping. To avoid this mistake, it is crucial to set the levels of your audio signal at a suitable level. You can use gain staging plugins or external hardware to monitor your audio signals at optimal levels.

Not Checking For Clipping

Another common mistake during gain staging is not checking for clipping. Clipping happens when audio signals exceed the maximum level that the system can handle, and this leads to distortion. This issue usually arises when setting levels too high. Clipping can occur at any point in the recording chain: when recording the sound, processing the signal, or during the mixing stage. The best way to avoid clipping is to keep the recording levels low and monitor the audio levels through each stage of the recording chain. Ensure that your meters do not indicate any red lights, which may signal clipping has occurred.

Not Considering The Entire Signal Chain

The third common gain staging mistake is not considering the entire signal chain. Gain staging is a delicate balancing act between all stages of the recording, mixing and mastering chain. Each individual channel in the signal chain affects the final mix, and any adjustments you make at one stage, will impact other stages. To avoid this mistake, it is important to monitor the levels of each signal across the entire signal chain. Ensure that the levels are balanced, and there are no inconsistencies in the recording. That’s it for our discussion on the most common gain staging mistakes and how you can avoid them. Gain staging is a crucial process that can significantly affect the quality of your recordings and mixes. By understanding and following the tips shared in this article, you can avoid these mistakes and achieve a balanced, clear, and noise-free audio output.

Advanced Gain Staging Techniques

Advanced Gain Staging Techniques are crucial to achieve optimal sound quality in music production. In Gain Staging 2, mastering engineers use advanced techniques like multi-band compression and EQ to fine-tune sound levels and ensure the various elements of audio tracks are balanced.

Gain staging is a crucial part of the mixing process, where we adjust the level of audio signals to prevent noise, distortion, and clipping. By managing the gain structure of tracks and plugins, we can achieve a clean and balanced mix, with each element sitting in its proper place. In Gain Staging 1, we covered the basics of gain staging, including setting levels, using headroom, and gain structure. In this article, we’ll explore some advanced gain staging techniques that can take your mixes to the next level. Let’s dive in!

Parallel Compression

One common technique to add punch and depth to drums, bass, and other instruments is parallel compression. It involves duplicating the original track, compressing it heavily, and blending it with the dry signal. The idea is to retain the dynamic range and transient of the original sound while adding sustain and energy from the compressed track. Here’s how to set up parallel compression:

  1. Copy the track you want to process, and name it “Parallel Compressed.”
  2. Insert a compressor plugin on the new track, and set it to a high ratio (e.g., 6:1 or more), fast attack, and long release.
  3. Adjust the threshold to reduce the gain reduction to your liking, typically around 6-10 dB.
  4. Lower the fader of the compressed track to around -20 dB, so that it’s not too loud.
  5. Mix the compressed track with the original one to taste, using the faders or a send/return track.

Serial Compression

Another way to enhance the impact and clarity of a track is serial compression, which means applying multiple compressors in a row to shape the dynamics. While this technique may seem counter-intuitive, as we learned in Gain Staging 1, excessive compression can squash the life out of the sound. However, if we use different compressors with distinct settings, we can achieve a more transparent and musical effect. Here’s how to set up serial compression:

  1. Insert one or more compressors on the track, starting with the most gentle one.
  2. Set the ratio, attack, and release of each compressor according to the desired effect.
  3. Use the makeup gain of each compressor to restore the level lost by the gain reduction.
  4. Pay attention to the gain staging of each compressor, so that they don’t clip or distort the signal.
  5. Compare the sound with and without the compressors, and adjust the settings as needed.

Vocal Mix Buss Processing

When it comes to mixing vocals, one of the critical elements is the vocal mix buss, which is the sum of all the vocal tracks. By processing the vocal mix buss, we can add cohesion, warmth, and presence to the vocals, and make them stand out in the mix. Here are some techniques to process the vocal mix buss:

  • Insert an EQ plugin on the vocal mix buss, and boost the presence frequency around 2-5 kHz to enhance the clarity and articulation of the vocals.
  • Add a gentle compression to the vocal mix buss, with a low ratio (e.g., 2:1), medium attack, and release, to glue the vocals together and tame any peaks.
  • Use a saturation or harmonic distortion plugin to add warmth and harmonics to the vocal mix buss, without overloading it.
  • Apply a stereo imaging or width plugin to widen the vocal mix buss, but be careful not to make it too wide, as it may conflict with other elements.
  • Adjust the level and balance of the vocal mix buss, so that it doesn’t overpower or get lost in the rest of the mix.

Maximizing The Benefits Of Gain Staging

Gain Staging 2 is a critical process that ensures optimal levels for each audio component in your mix. Maximizing the Benefits of Gain Staging will increase the quality and clarity of your audio recordings. Proper gain staging reduces noise, distortion, and frequency interference, improving the overall sound of your recording.

Gain staging is the process of optimizing the signal level before it reaches the recording medium, either analog or digital. By utilizing proper gain staging, you can manage signal levels and reduce noise and distortion, resulting in better sounding recordings. Maximizing the benefits of gain staging can be achieved by creating a gain staging checklist, continuously monitoring levels, and adapting to different recording scenarios.

Creating A Gain Staging Checklist

To ensure that gain staging is done correctly and consistently, creating a gain staging checklist is essential. The checklist should include setting the initial input gain, monitoring levels, adjusting preamp gain, and monitoring output gain. When creating the checklist, it’s essential to have a specific order of tasks to ensure that the sound quality is optimized through the recording process.

Continuously Monitoring Levels

Levels are continuously monitored to ensure that the signal level remains consistent and does not get too hot or too low. By using a level meter, you can maintain the optimal level for each recording scenario. Keeping the signal level consistent throughout the recording process is essential in ensuring that the recording is clear and free from noise.

Adapting To Different Recording Scenarios

Gain staging should be adjusted to suit different recording scenarios. Factors such as microphone type, recording environment, and instruments used, all have an impact on the signal level. Therefore, adapting to different recording scenarios is essential in ensuring that the optimal signal level is achieved. By adapting to different recording scenarios, you are maximizing the benefits of gain staging. In conclusion, by maximizing the benefits of gain staging, you can achieve optimal signal levels, reducing noise and distortion resulting in better sounding recordings. Creating a gain staging checklist, continuously monitoring levels and adapting to different recording scenarios, are just a few ways to achieve this. Proper gain staging is an essential part of the recording process that should never be overlooked.

Gain Staging 2

Credit: www.reddit.com

Gain Staging 2

Credit: www.soundonsound.com

Frequently Asked Questions On Gain Staging 2

What Is The Gain Staging Standard?

Gain staging standard refers to a technique of setting the levels of each stage in an audio signal path, such as microphones, preamps, and mixers, to optimize sound quality and minimize noise. This ensures that the signal doesn’t clip or distort while maintaining a good signal-to-noise ratio.

It’s important to follow this standard to achieve a balanced and professional sound.

What Is The Gain Staging?

Gain staging refers to the process of properly setting levels throughout an audio signal path to avoid distortion and unwanted noise. It’s important to ensure that each device in the signal path is set to an appropriate gain level to achieve a clean, high-quality sound.

What Is The Value Of Gain Staging?

Gain staging is the process of setting the levels of audio signals at each stage of processing to avoid unwanted noise and distortion. Proper gain staging ensures an optimal signal to noise ratio and helps achieve a clear and dynamic mix.

It is essential in creating a high-quality sound recording or live performance.

How Many Decibels Is Gain Staging?

Gain staging is measured in decibels, but there is no specific or fixed decibel range for it. The ideal gain staging depends on the specific equipment and application, as well as the desired sound quality. Proper gain staging ensures minimum noise and maximum headroom for better sound clarity and quality.

Conclusion

Proper gain staging is crucial for achieving an optimal audio experience. By following the steps outlined in this blog, you can ensure that your audio levels are consistent and free from unwanted distortions. Remember to keep a close eye on your input levels and to make adjustments as needed to prevent any audio clipping.

With the right approach to gain staging, you can enhance the quality of your audio and produce content that your audience will love.

Categories
Archive

Improve Your Recordings

To improve your recordings, focus on setting up the right environment and using quality equipment. With the right tools and techniques, you can produce high-quality audio and achieve the best results for your project.

Recording audio can be a challenging task, especially if you’re new to the process. Also, whether you’re recording music, podcasts, or voiceovers, it’s important to have a clear understanding of where to start and what steps to follow. To begin, create a suitable environment for recording.

Related reading: Finishing Your Recordings and Tips For Repairing Bad Recordings. For background, see Sound recording and reproduction on Wikipedia.

Moreover, this could involve finding a quiet space with minimal background noise or investing in sound-absorbing panels to reduce echo and reflections. Additionally, using high-quality equipment such as microphones, mixers, and audio interfaces can make a significant difference in the final product. We’ll explore various tips and techniques to help you achieve the best results when recording audio. From choosing the right microphones to setting up your recording space, we’ll cover everything you need to know to improve your recordings.

Improve Your Recordings

Credit: www.celestionplus.com

How to Improve Your Recordings: Invest In Quality Equipment

Investing in quality recording equipment is a wise decision for improving the overall sound of your recordings. In addition, by upgrading your microphone, interface, and monitors, you can capture every detail of your performance and produce high-quality recordings that stand out.

Furthermore, investing in quality recording equipment is important if you want to produce professional-sounding recordings. It can be tempting to cut corners and opt for cheaper alternatives, but this will only hinder the overall quality of your recordings. In this blog post, we’ll discuss the importance of investing in quality equipment, with a focus on microphones, audio interfaces, and studio monitors.

Microphones

Additionally, a good microphone is the cornerstone of any recording setup. The right microphone will capture the essential nuances of your sound, giving your recordings a polished, professional sound. When choosing a microphone, there are a variety of factors to consider, such as the type of sound you want to capture and the recording environment. Some popular microphone types include dynamic, condenser, and ribbon microphones.

Audio Interface

Also, an audio interface serves as the bridge between your microphone and computer, allowing you to record and monitor your sound. A quality audio interface can make a significant difference in the overall quality of your recordings. Look for an interface with high-quality preamps, low-latency monitoring, and compatibility with your DAW software. Consider your recording needs to determine how many inputs and outputs you require.

How to Improve Your Recordings: Studio Monitors

Moreover, Studio monitors are an essential part of any recording setup. They are designed to provide accurate, uncolored sound reproduction, allowing you to hear your recordings as they truly sound. When shopping for studio monitors, consider the size of your room, the type of music you’ll be recording, and your overall budget. It’s also important to consider things like frequency response, driver size, and sensitivity. Investing in quality recording equipment not only improves the overall quality of your recordings but also makes the recording process much more enjoyable. With a little research and investment, you can take your recordings to the next level and produce polished, professional-sounding tracks.

Improve Your Recordings

Credit: learning.hotjar.com

Understand The Physics Of Sound

The importance of understanding the physics of sound cannot be overstated when it comes to improving your recordings. As a content creator, you want to create audio that sounds not only good but professional. In addition, understanding the science behind sound waves will enable you to manipulate sounds the way you want and achieve your audio recording goals. This post will discuss the three main components of sound, which are frequency, amplitude, and wavelength.

Frequency

Furthermore, frequency is the number of waves produced by a sound source per second. A sound wave’s frequency is measured in Hertz (Hz). Low-frequency sounds, such as bass drums or tubas, produce waves that occur fewer times per second. Sounds like bird chirps or string instruments that produce higher-pitched noises, have waves that occur more often.

How to Improve Your Recordings: Amplitude

Amplitude, also known as volume or loudness, refers to the height of a wave, which directly corresponds to the intensity of the sound. A louder sound produces a higher amplitude wave while a softer sound has a lower amplitude. Volume or amplitude is measured in decibels (dB), and the human ear can generally perceive sounds between 0 dB and 140 dB.

Wavelength

Additionally, wavelength determines the pitch of a sound. It is the distance between two corresponding points of a sound wave, such as the highest points or the lowest points. Higher frequency sounds have shorter wavelengths, while lower frequency sounds have longer wavelengths. Understanding wavelength is essential for ensuring that every frequency of sound in a recording is captured in the final product.

Understanding the physics of sound is crucial in creating quality audio productions, so don’t neglect it. Also, knowing the basics of frequency, amplitude, and wavelength will help you produce a professional-sounding audio that engages your listeners and effectively delivers your message.

Proper Room Acoustics

Moreover, proper room acoustics are crucial to improving your recordings. A room’s acoustic properties can have a significant impact on the quality of your recordings. That’s why it’s essential to create a space that supports your recording efforts by reducing unwanted reflections and echoes that can alter the sound.

How to Improve Your Recordings: Diffusers And Absorbers

In addition, diffusers and absorbers are essential acoustic tools that can balance the sound in your recording room. Diffusers break up sound reflections, preventing the buildup of sound waves in specific areas, while absorbers absorb sound waves, reducing unwanted echoes and improving overall sound quality. Placing diffusers and absorbers in the right locations in your room can make a significant difference in the recording quality.

Speaker Placement

Furthermore, the placement of your speakers in the recording room must be precise. Proper speaker placement ensures that the recorded audio is as accurate and consistent as possible by creating a stereo field that immerses the listener in the sound. In general, speakers should be positioned at an equal distance from the back and side walls of the recording room and at the same distance from the listener.

Reflections

Additionally, reflections play an essential role in the recording process as they define the room’s acoustics and contribute to the recorded sound’s character. However, too many or poorly placed reflections can cause unwanted interference, creating a muddy sound. To reduce reflections, you can use diffusers and absorbers. Placing absorbing acoustic panels or foam in strategic locations can minimize reflections, improving overall sound quality.

How to Improve Your Recordings: Master The Art Of Mic Placement

Master the Art of Mic Placement to Improve Your Recordings. Proper microphone placement can make a significant difference in the quality of your recordings. With the right techniques, you can capture the sound you want and enhance the overall production value of your project.

If you want to make a high-quality recording, mastering the art of mic placement is essential. It’s the key to capturing the sound of your instruments or vocals accurately, bringing clarity and depth to your recordings. Here are some tips on mic placement for vocals, drums, and guitars.

Vocals

When it comes to recording vocals, the microphone should be placed about six to eight inches away from the singer’s mouth. This distance will help prevent excessive sibilance and popping. Additionally, consider the type of microphone you are using, as each microphone has its pickup pattern and frequency response.

Drums

Drums are the foundation of your music, and mic placement plays a crucial role in capturing their sound accurately. Place the kick drum’s microphone around three inches from the drum’s head, facing the beater. For the snare drum, place the microphone about two inches above the drumhead, angled downward towards the center of the snare. The overheads should be placed above the drum kit, around four to five feet away from the drummer, pointing down towards the drum kit.

How to Improve Your Recordings: Guitars

Mic placement is critical when recording guitars, whether it’s acoustic or electric. For an acoustic guitar, place the microphone about six to eight inches away from the instrument, a few inches above the soundhole. For an electric guitar, place the mic directly in front of the speaker cabinet, around one or two inches away from the grille cloth. In conclusion, mastering mic placement works wonders in improving your recordings and bringing out the desired clarity and depth. These are some essential tips when it comes to recording vocals, drums, and guitars. Proper positioning of the microphone is an art, and it takes time and practice to get it right. Work with different mic placements and experiment with microphone types to find the sound that works best for you.

Spend Time On Post-production

To improve the quality of your recordings, it’s important to spend time on post-production. This involves editing and fine-tuning your audio files to remove any unwanted sounds, adjust the levels, and add effects to enhance the overall sound quality. By putting in the effort during the post-production stage, you can ensure that your recordings sound professional and polished.

If you want to improve your recording quality and have a professional sounding track, then you must spend time on post-production. Many people focus solely on the recording process and forget that post-production is equally important for the final product. Post-production includes editing, mixing, and mastering. In this blog post, we will focus on the importance of EQ, compression, and reverb in improving your recordings.

Eq

EQ or Equalization is the process of adjusting the frequency balance of your track. Every sound has a different frequency range, and adjusting these frequencies can give your tracks a more balanced and professional sound. With EQ, you can cut out unwanted frequencies and enhance the desired ones, leading to a cleaner and more polished sound. When applying EQ to your track, use a parametric EQ with a graphical interface for better visualization and accuracy. Always trust your ears and avoid over-processing your tracks with too much EQ.

How to Improve Your Recordings: Compression

Compression is the process of controlling the dynamic range of your track, which is the difference between the loudest and quietest parts. Compression helps in maintaining a consistent signal level, which is essential for a balanced and smooth sound. When applying compression, adjust the attack and release settings carefully and use a ratio of 2:1 or 3:1 for a natural-sounding result. Avoid over-compressing your tracks as it can lead to a loss of dynamics and a squashed sound.

Reverb

Reverb is the process of creating a sense of space and depth in your track. It mimics natural reflections of sound waves bouncing off surfaces within a room. Reverb helps in giving your track a more natural, organic and professional sound. When applying reverb, adjust the decay time and pre-delay settings according to the desired effect and avoid using too much of it. Use reverb sparingly on individual tracks and more generously on group tracks or the overall mix. In conclusion, spending time on post-production is crucial in taking your recordings to the next level. With the right adjustments in EQ, compression, and reverb, you can create a polished and professional sound. So, give your tracks the treatment they deserve and improve your recording quality today!

Improve Your Recordings

Credit: www.youtube.com

Learn From The Pros

Improving the quality of your recordings can be a daunting task, but it doesn’t have to be. There’s so much that you can learn from professional sound engineers and producers who have been in the industry for years. By paying attention to their techniques and implementing them in your recordings, you can make significant improvements to the quality of your music.

How to Improve Your Recordings: Online Tutorials

One of the best ways to learn from the pros is to take advantage of online tutorials. You can find tutorials on almost every aspect of music production, from recording techniques to mixing and mastering. Online tutorials can help you learn new techniques, as well as alternative ways of doing things. You can find a wide variety of tutorials on YouTube, online courses, and blogs.

Studio Visits

Visiting a professional recording studio can also be a great way to learn from the pros. By witnessing their workflow and seeing how they work with equipment, you can learn a lot about the recording process. You may even get to see how different professionals approach different genres of music. If you’re lucky, you might even get to assist in a recording session or two, which can be an invaluable learning experience.

Recording Seminars

Recording seminars can also be an excellent way to learn from the pros. Many professionals hold seminars where they share their techniques and experiences in the industry. These seminars cover a wide range of topics, including recording techniques, mixing and mastering, and the music industry itself. Attending a seminar allows you to interact with other musicians and learn from their experiences too.

By learning from the pros, you can gain valuable insights that can help you improve your recordings. Whether it’s through online tutorials, studio visits, or seminars, there are many opportunities for you to learn from experienced professionals. The more you learn, the better equipped you’ll be to create high-quality music that stands out.

How to Improve Your Recordings: Experiment With Different Techniques

If you want to take your music recordings to the next level and stand out from the crowd, experimenting with different recording techniques can make a huge difference. Here are some ideas to help you produce top-quality recordings!

Layering Tracks

Layering tracks is a smart approach to recording that adds depth and dimension to your recordings. This technique involves recording multiple takes of the same part and stacking them together to create a fuller sound. By layering tracks, you can enhance your tracks without having to rely on heavy processing, EQ or compression.

PROSCONS
Creates a fuller soundRequires multiple takes of the same part
Enhances your tracksCan be time-consuming

Using Effects

Using effects such as reverb, echo, and delay can add depth and richness to your recordings. However, It’s important to know when to use effects and not to overuse them.

  • Use effects to add depth and richness to your tracks
  • Don’t overuse effects and wash out your recordings
  • Experiment with different types and settings of effects

How to Improve Your Recordings: Multitrack Recording

Multitrack recording is a method of recording that allows you to record different parts of a song independently of one another. This technique frees you up to focus on one specific aspect of a song at a time and ensure that each part is properly recorded. Multitrack recording also gives you the flexibility to edit your tracks as needed in the post-production process.

  1. Record different parts of a song independently
  2. Focus on one specific aspect of a song at a time
  3. Edit your tracks as needed in post-production

Practice, Practice, Practice

Recording music can be a frustrating process when your final product doesn’t sound as good as you imagined. The good news is that with enough practice, anyone can improve their recordings. Here are some tips to help you practice effectively and get better results.

Recording Consistently

One of the most important things you can do to improve your recordings is to be consistent in your practice. Establish a routine and stick to it. Whether it’s daily or weekly, make sure you are recording on a regular basis. This will help you become more comfortable with the recording process and fine-tune your technique.

Analyzing Your Recordings

It’s easy to get caught up in the moment and overlook mistakes or areas that need improvement. It’s crucial to listen to your recordings with a critical ear. Take notes on what you think sounds good as well as areas that need work. This will help you identify problems and address them in future recordings.

Making Adjustments

After analyzing your recordings, it’s time to make adjustments. This could mean changing your microphone placement or adjusting the EQ settings in your mixing software. It’s essential not to get discouraged; every mistake is an opportunity to learn and improve. Take the time to experiment with different techniques until you find what works best for you.

Remember, practice makes perfect! Making strides in your recordings may take time, but with enough practice, you’ll be sure to see improvement. Consistency, analysis, and adjustment are key to becoming a better recording artist.

Frequently Asked Questions Of Improve Your Recordings

How Can I Make My Recording Quality Better?

Improve your recording quality by following these tips: invest in a good microphone, adjust the microphone’s position to reduce background noise, use headphones to monitor your recording, record in a quiet place, and edit your recording to enhance the sound quality.

How Can I Make My Recording Sound Better?

To improve the sound of your recording, you can try the following tips: 1. Invest in high-quality recording equipment. 2. Choose a quiet and acoustically treated space to record in. 3. Position your microphone correctly. 4. Control the levels and gain during recording.

5. Use EQ, compression, and reverb during post-production editing.

How Can I Improve The Quality Of My Music Recording?

To improve the quality of music recording, you can follow these tips: 1) Choose a good recording environment that minimizes background noise 2) Invest in high-quality microphones and equipment 3) Optimize your recording levels to avoid distortion 4) Edit your tracks carefully, removing unwanted noise and mistakes 5) Master your music to ensure it sounds its best on different devices and platforms.

How Do I Make My Recordings Clearer?

To make your recordings clearer, you can start by using a high-quality microphone and ensuring it is positioned correctly. Reduce background noise and adjust levels to avoid distortion. Edit the final recording to remove any unwanted sounds or sections. You can also try using EQ and compression to enhance the clarity of the audio.

Conclusion

To sum it up, improving your recordings requires a combination of skill, knowledge, and proper equipment. By following the tips mentioned such as setting the sound levels, mastering your audio, and using quality headphones or monitors, your recordings can go from average to exceptional.

Consistency and experimentation will also aid in achieving your desired sound. Don’t be discouraged if it takes some time and practice – the result will be worth it. Ultimately, the key is to never stop learning and striving for improvement.

Categories
Archive

Mixing Screaming Vocals

Mixing screaming vocals involves using high-pass filters, noise gates, compressors, and EQs to control and enhance the tone and clarity of the vocals. If you’re looking to produce aggressive, heavy metal-styled music, then the screaming vocals are an essential aspect that cannot be overlooked.

As an Amazon Associate I earn from qualifying purchases.

Screaming vocals can bring an energy and ferocity to the music that can’t be achieved with clean vocals. To achieve the right mix of screaming vocals, you need to balance the full range of harmonies, uniqueness, distinctions, clarity, and blending with the other instruments.

This balance requires the use of various techniques such as noise gates, compressors, EQs, and high-pass filters. In this blog, we will explore each technique and how you can use them to achieve the perfect mix of screaming vocals for your production needs.

Setting Up A Recording Space

To get clear and powerful mixing of screaming vocals, it’s vital to have the right recording space set up. The right acoustics, equipment, and microphone position will help capture the vocalist’s unique tone without any unwanted noise or feedback. With these elements in place, you’ll be able to mix the vocals with precision and clarity for an exceptional final track.

Consider Room Acoustics

The first step in setting up a recording space for mixing screaming vocals is to consider the room acoustics. The room in which you record your vocals plays a significant role in the overall sound quality of your recording. If the room is too reflective or has too much echo, it may interfere with your vocals. On the other hand, if the room is too dead, the vocals may sound dull and lifeless. So, it is important to choose a room that strikes the right balance between reflection and absorption.

Invest In Soundproofing

The next step in setting up a recording space for mixing screaming vocals is to invest in soundproofing. Screaming vocals can be extremely loud, and there is a risk that they may disturb people living nearby or cause interference in other equipment. To avoid this, you need to soundproof the room. Soundproofing can be achieved by using materials such as acoustic foam, blankets, and curtains, which help to absorb sound.

Work With An Appropriate Mic

The final step in setting up a recording space for mixing screaming vocals is to work with an appropriate mic. It is essential to choose a mic that works well with screaming vocals. A dynamic mic is the best option as it can handle loud sounds without distortion. However, you may need to experiment with different types of mics to find the one that works best for you. In conclusion, setting up a recording space for mixing screaming vocals requires careful consideration of several factors, including room acoustics, soundproofing, and the type of mic you use. By following these guidelines and taking the time to experiment, you can create a space that produces high-quality recordings of screaming vocals.

Preparing The Vocals

To successfully mix screaming vocals, it’s crucial to prepare the vocals first. Start by listening to the raw tracks and adjusting the volume and pitch as needed. Then, apply compression and EQ to enhance the clarity and intensity of the screams.

Preparing screaming vocals is crucial to ensure your sound is on point. The key is to focus on essential steps to make your vocals stand out. In this article, we will discuss three essential steps to prepare vocals for screaming. We will dive into warm-up exercises, proper technique, and vocal health.

Warm-up Exercises

Before screaming your lungs out, it’s essential to spend some time warming up your vocals. A 5-10 minute warm-up routine can help avoid voice strain, making it easier to scream with power and control. A few warm-up exercises include:

  • Lip rolling
  • Tongue trills
  • Humming
  • Vocal sirens

Use Proper Technique

Using proper technique while screaming can make a difference in the quality of your sound. Here are a few techniques to keep in mind:

  • Maintain good posture with your head up and shoulders back
  • Use your diaphragm to support your vocals
  • Focus on hitting your notes with a relaxed throat and open mouth
  • Avoid pushing your vocals too hard, allowing them to come out naturally

Ensure Vocal Health

Maintaining vocal health is critical. Screaming can lead to vocal strain, causing long-term damage to your voice. Here’s how you can keep your vocals healthy:

  • Avoid or limit smoking and alcohol consumption
  • Stay hydrated by drinking plenty of water
  • Get enough rest to avoid exhaustion
  • Consider seeing a vocal coach to help improve your technique and overall vocal health

Overall, preparing your vocals before screaming can make a significant difference in the quality of your vocals. It’s crucial to focus on warm-up exercises, proper technique, and vocal health to achieve a powerful and controlled scream.

Selecting Effects And Processing

To achieve a mix with screaming vocals, selecting appropriate effects and processing is crucial. Use distortion and saturation to add grit and texture, as well as compression and EQ to control the dynamics and tone.

Mixing screaming vocals perfectly is a challenging task, and it usually depends on the genre of music and personal style. When it comes to selecting effects and processing, it is essential to keep two main things in mind – the song style and vocal type. This sub-topic covers how to choose the right effects, EQ, and compression.

Consider The Song Style

The first step to processing screaming vocals is understanding the type of music style. The song can be aggressive or soft, fast or slow, electronic or instrumental, etc. Depending on the song, the vocal processing might vary. So, before setting up the effects, take the time to listen to the track and understand its style thoroughly.

Choose The Right Effects

The effects you apply to the vocals can turn an average performance into a masterful sound. For screaming vocals, effects such as distortion, delay, and reverb are typically used. Reverb helps to add space, depth, and ambiance to the sound, while delay allows for echo and repetition. While distortion can add grit and character to the vocals. These effects can be subtle or extreme, depending on the outcomes and tastes.

Using Eq And Compression

Equalization (EQ) and compression are vital elements in mixing screaming vocals. EQ can help to accentuate certain frequencies that give the vocals presence and cut unnecessary sound. Compression helps to contain the peaks and valleys of the vocal performance while also providing an even sound. It is essential to use EQ and compression simultaneously, to get the desired effects. A compressor can remove the dynamics of the audio, and the EQ’s role is to equalize the vocals accordingly. To sum up, selecting effects and processing for screaming vocals is highly dependent on the music style and vocal type. It is essential to have a clear understanding of these factors before applying effects and processing vocals. Choosing the right effects, using EQ and compression can significantly contribute to mixing screaming vocals perfectly.

Mixing Screaming Vocals

Credit: majormixing.com

Recording The Screaming Vocals

Recording screaming vocals can add energy and intensity to your music. However, it can be challenging to capture the right sound. Here are some tips to help you record screaming vocals effectively:

Setting Mic Levels

Before you begin recording, you need to make sure your mic levels are set correctly. Adjust the gain on your preamp or audio interface until you get a good signal without any distortion. It’s important to find the right balance between the singer’s natural voice and the screaming vocals to avoid clipping or distorting.

Experimenting With Mic Placement

Mic placement is critical when recording screaming vocals. Experiment with different positions to find the sweet spot for capturing the singer’s voice. Start with the mic about a foot away from the singer and move it closer if needed. You may also want to try angling the mic to capture the nuances of the performance.

Choosing The Right Mic

Choosing the right microphone is essential for capturing screaming vocals accurately. Dynamic mics are often the go-to choice, as they can handle high sound pressure levels and minimize noise pickup. Examples include the Shure SM7B and the Sennheiser e906. However, condenser mics can also work if you’re looking for more high-end detail.

Dynamic MicsCondenser Mics
Shure SM7BAKG C414
Sennheiser e906Neumann U87
Electro-Voice RE20Audio-Technica AT4053b

Ultimately, the right mic depends on the specific sound you’re trying to achieve. When choosing a mic, consider the singer’s vocal tone, the style of music, and the other instruments in the mix.

Mixing Techniques For Screaming Vocals

Achieving a polished mix for screaming vocals requires specific techniques. Compression, EQ, and de-essing are key to bring clarity and balance to the vocals while harmonizing with the overall mix. Balancing the levels of each track is essential in creating a unified and impactful sound.

Screaming vocals are a powerful tool in the arsenal of any metal, hardcore or even punk band. They have the ability to evoke strong emotions and contribute to a track’s energy and intensity. However, mixing screaming vocals can be challenging. Not only do they require special attention to detail, but they also require the use of particular techniques to stand out and blend well with the other instruments. This blog will highlight some mixing techniques for screaming vocals that will make your tracks sound professional and intense.

Adding Reverb And Delay

Adding reverb and delay to screaming vocals is an excellent way to create space and depth, which can enhance their sound. Reverb can help vocals sound larger, adding depth and dimension to the recording, while delay can create a sense of movement and space, giving the vocal a more ethereal quality. When applying reverb and delay, it is essential to use caution because too much can quickly make the vocals sound messy and muddy. A great way to create a balance is to use a pre-delay effect that delays the reverb slightly to prevent it from overloading the vocal. Additionally, adding high-pass and low-pass filters to the effect can help to eliminate unwanted frequencies and echo while retaining the vocals’ clarity and presence.

Creating Atmosphere With Distortion

Distortion is a popular technique used to add character and grit to vocals, which is particularly useful for heavy genres like metal and hardcore. Applying distortion is an excellent way to create atmosphere and help the vocals stand out from the other elements in the mix. When using distortion, it is essential to ensure that the vocal remains intelligible and clear since too much can lead to the loss of clarity. The technique often works best when used with short bursts of vocals, such as in screaming or shouting. Experimenting with different distortion plugins can help you find the perfect balance between grit and clarity.

Sharing Of Frequency Space With Instruments

One of the main challenges of mixing screaming vocals is ensuring they don’t clash with other instruments like guitars and drums. The instruments occupy a similar space in the frequency spectrum, which makes it important to ensure that each element is heard distinctively without overpowering the others. A useful tip is to use EQ to ensure that each element occupies a specific frequency range and doesn’t encroach on the others. For example, cutting low-end frequencies on guitars and bass can help prevent them from conflicting with the vocals. Additionally, using panning and volume adjustments to separate each element can help to create space in the mix and improve clarity. In conclusion, mixing screaming vocals is an art that requires patience, technique, and lots of experimentation. By using these techniques, adding reverb and delay, creating atmosphere with distortion, and sharing frequency space with other elements in the mix, you can create a clear and powerful sound that enhances the guitar and drums’ energy and intensity.

Mixing Screaming Vocals

Credit: m.youtube.com

Post-processing Tricks

Elevate your vocal mixes with these post-processing tricks for screaming vocals. From compressors and EQs to distortion and delay, learn how to achieve the perfect sound and take your productions to the next level.

Mixing screaming vocals can be a challenging task, especially if you’re not familiar with post-processing tricks. However, these tricks can help you take your mix to the next level. Here are some post-processing techniques that can help you achieve a professional sounding mix for screaming vocals.

Stereo Widening Techniques

Widening the stereo image of screaming vocals can make them sound more spacious and immersive. This can be achieved by applying stereo widening effects to the vocal track. Stereo widening effects come in various forms, including stereo imagers, chorus effects and delay effects. Each of these effects can help add depth and space to the vocal track. You can also try using Mid-Side EQ to enhance the stereo image of your vocal track. With Mid-Side EQ, you can boost or cut specific frequencies in the side signal while leaving the mid signal unaffected. This can help enhance the stereo image of the vocal track, making it sound more wide and spacious.

Harmonizing And Doubling Tracks

Doubling and harmonizing screaming vocals can make them sound thicker and fuller. Doubling involves recording the same vocal performance twice and panning one track to the left and the other to the right. This creates a sense of width and presence in the mix. Harmonizing involves adding a second vocal track that harmonizes with the main vocal track. This can be done by recording a second performance or by using pitch-correction software to generate harmonies. It’s important to note that you should never auto-tune screaming vocals since it can change the expressive and emotional nature of the performance.

Leveling And Panning

Leveling and panning are essential parts of mixing screaming vocals. The lead vocal should always be at the center of the mix, while the backing vocals and harmonies should be panned to the left and right. You can also pan the vocals slightly off-center to create an interesting stereo image. It’s important to ensure that each vocal track is leveled properly to avoid any volume discrepancies. You can use compression to even out the dynamic range of each track and make the vocals sit more comfortably within the mix. In conclusion, post-processing tricks can help you mix screaming vocals like a pro. By using stereo widening techniques, harmonizing and doubling tracks, and leveling and panning, you can achieve a professional sounding mix that’s pleasing to the ear.

Mixing Screaming Vocals

Credit: urm.academy

Frequently Asked Questions Of Mixing Screaming Vocals

How Do You Mix Screamed Vocals?

Mixing screamed vocals involves adjusting levels, using appropriate effects like compression and distortion, and ensuring they sit well in the mix. Experiment with different EQ settings and panning to create space for the vocals. Proper use of de-essing, reverb, and delay can also enhance the vocals.

How To Do Screaming Vocals Safely?

To safely do screaming vocals, follow these guidelines: 1. Start with vocal warm-up exercises. 2. Use proper breathing technique. 3. Position the microphone correctly. 4. Don’t push your voice too hard. 5. Take breaks and rest your voice to avoid damage.

Is Screaming A Vocal Technique?

Yes, screaming is a vocal technique that involves producing loud, harsh, and intense sounds using the voice. It is commonly used in various music genres such as rock, metal, and punk, and requires proper control of the vocal cords to prevent damage and injury.

What Are The 6 C’s Of Vocal Mixing?

The 6 C’s of vocal mixing are clarity, consistency, coherence, character, contrast, and compression. Clarity ensures that the vocals are easy to understand and distinguish from other sounds. Consistency maintains the vocal tone and level throughout the track. Coherence makes sure that the vocals match the mood and theme of the song.

Character adds uniqueness and personality to the voice. Contrast creates a dynamic and interesting sound. Compression evens out the vocal volume and makes it sound professional.

Conclusion

Mixing screaming vocals requires a delicate balance between compression, EQ, and effects. Enhancing the vocals’ clarity and presence should be the ultimate goal without sacrificing the raw emotion and power of the screams. Experimenting with different techniques and equipment can lead to unique and exciting results.

Remember to always trust your ears and let the vocals guide you through the mixing process. Keep in mind that with patience, practice, and attention to detail, you can achieve professional-level vocal mixes that will stand out in any genre.

Categories
Archive

How To Set Monitor Gain

To set monitor gain, adjust the level until the audio is at a suitable volume without distortion. Monitor gain is crucial for both recording and playback when it comes to audio quality.

By following a few simple steps, you can set monitor gain correctly. It is important to first set up your studio monitors in a suitable location, then connect your equipment correctly. After that, use a test tone or music to adjust the gain so that the volume is comfortable and distortion is avoided.

Make sure that you use the same level of gain for both speakers for accurate stereo imaging. Finally, test and re-adjust the gain as necessary to adjust to your preferences and to suit the type of audio being played.

How To Set Monitor Gain

Credit: www.reddit.com

Step-by-step Guide To Set Monitor Gain

Setting up your monitor gain correctly is crucial for ensuring a clear and accurate sound in your recording studio. Monitor gain controls the loudness of the audio signal from your monitors, and if it’s set too high, you risk damaging your speakers and your hearing. In this step-by-step guide, we’ll go through the essential steps of setting up your monitor gain to get the best out of your system.

Check The Input Level

The first thing you need to do is to check the input level. Look at the input level meter on your audio interface or mixer to make sure the input signal isn’t too low or too high. If it’s too low, increase the input gain until you see a good level on your meters. But be careful not to push the input too hard, or you’ll end up with distorted audio.

Turn The Volume Down

Before you start adjusting your monitor gain, make sure you turn the volume down on your monitors. This will prevent any sudden loud noises from damaging your ears or your speakers. Set the volume to about 50% of its maximum level so you have room to increase the level as needed.

Play A Reference Track

Play a reference track that you know well, ideally something that has a wide frequency range and dynamic range. This will give you a good reference point to work with so you can hear any changes you make to your monitor gain. Listen to the reference track and adjust the volume until it sounds comfortable.

Adjust The Gain Knob

Now it’s time to adjust the gain knob on your monitors. Gradually increase the gain until the volume of your reference track matches the level you set earlier. Make sure you’re listening at a comfortable level and that the sound isn’t distorted. Keep in mind that different parts of a track may have different levels, so listen carefully and adjust as needed.

Check The Levels Again

After you’ve adjusted the gain, listen to the reference track again and check the level against your meters. Make sure the level isn’t too high or too low and that you’re not pushing your monitors too hard. If necessary, make small adjustments until you’re happy with the sound.

That’s it! By following these simple steps, you’ll be able to set up your monitor gain correctly and get the most out of your studio monitors.

How To Set Monitor Gain

Credit: mrmixandmaster.com

Tips For Setting Monitor Gain

To properly set monitor gain, start by adjusting the output of your source device before adjusting the gain on your monitor. Use reference tracks and meters to ensure accurate levels and avoid clipping.

As an audio engineer or producer, setting the right monitor gain is crucial for producing balanced and professional-sounding audio output. Not only does it ensure that you’re hearing everything accurately, but it also saves your ears from unnecessary damage caused by listening to too-loud audio. Here are some tips to help you set your monitor gain correctly.

Use High-quality Reference Tracks

One of the most effective ways to calibrate your monitor gain is by using high-quality reference tracks that you’re familiar with. These reference tracks should be mixed and mastered by professionals and meet industry standards for audio quality. By playing these tracks at different volumes, you can get a sense of how your own mixes should sound.

Use A Sound Meter For Precision

To ensure precision when setting monitor gain, use a sound meter. This tool helps to measure the loudness of the audio signal coming through your speakers in decibels (dB). For example, if you’re producing music, a common monitor gain level is between 75-85 dB. However, depending on the type of audio you’re working on, you may need to adjust your gain levels up or down.

Be Consistent

When setting your monitor gain, it’s essential to be consistent. If you keep adjusting your levels every now and then, you may become disconnected from your audio output’s real sound, leading to inaccurate and sub-standard mixing results. Therefore, ensure that you spend adequate time deciding and setting your gain levels and stick to them throughout your session.

Know Your Studio Setup

Another crucial factor to consider when setting monitor gain is your studio setup. Knowing your room’s acoustic characteristics is crucial as they significantly impact how you perceive and judge the sound. For example, if you’re working in a small, untreated room, you might experience more low-end build-up, which can mask your midrange and treble frequencies. In such cases, you may need to adjust your monitor gain to counter-balance the effect. In conclusion, setting your monitor gain correctly is essential to achieve balanced and professional-sounding audio output. By using high-quality reference tracks, a sound meter, and being consistent in your approach, you can achieve accurate levels and take your audio production skills to the next level. Remember to play around with your equipment and settings to get the best results.

How To Set Monitor Gain

Credit: www.youtube.com

Frequently Asked Questions On How To Set Monitor Gain

What Does Gain Do On A Monitor?

Monitor gain is the amplification of the incoming signal, and it affects the overall volume and clarity of the sound. The gain monitors and enhances the input level and adjusts it to the optimal level for the output. It is an essential feature for creating the perfect sound mix.

Why Do We Monitor Gain Level?

Monitoring gain level is important to ensure that the audio signal does not clip or distort, which could lead to poor sound quality. It also helps to balance the sound levels, making it easier to mix and master audio recordings.

How Do I Calibrate My Sound Monitor?

To calibrate your sound monitor, use a microphone and software designed for monitor calibration. Follow the software’s instructions to reproduce a series of tones and adjust the monitor’s levels accordingly. Ensure that your room is quiet and that you allow enough time for the process to complete.

What Volume Should I Have My Studio Monitors At?

The ideal volume for studio monitors depends on various factors like room size, speaker placement, and personal preference. However, it’s recommended to keep the volume at around 85dB, which is loud enough for accurate monitoring but not harmful to your hearing.

Use an SPL meter to measure the volume and adjust accordingly.

Conclusion

In short, setting monitor gain helps you to accurately measure and adjust audio levels. By following the simple steps outlined in this guide, you can ensure that your audio recordings are of top-notch quality. Remember to always monitor and adjust your gain to avoid any unwanted distortion or noise.

Implementing these techniques will not only improve your audio quality but also enhance your listener’s experience. Try these tips today and take your audio production to the next level.

Categories
Archive

What Is Soft Clipping

Soft clipping is a technique that controls the level of distortion in audio recordings. Soft clipping is a form of distortion that occurs when a signal exceeds the maximum level that a system can handle.

It is a subtle form of distortion that preserves the tonal character of the original sound while reducing the overall level of the recording. Gentle clipping is particularly useful in music production, where producers often rely on it to add warmth and character to recordings.

Related reading: Use Digital Clipping To Make Your Song Louder and What Is Audio Clipping?: Unraveling the Mystery.

Also, we will explore the concept of gentle clipping in more detail, discussing its uses, benefits, and how you can apply it in various recording contexts. We will also provide tips for achieving optimal results when using gentle clipping in your music production.

What Is Soft Clipping

Credit: sound-au.com

Soft Clipping Explained

Moreover, gentle clipping is a type of distortion that music producers rely on for a warmer, more natural sound. Unlike hard clipping, which produces a harsh distortion when levels exceed a certain threshold, gentle clipping allows for more subtle distortion and can enhance the character of audio signals.

What Is Soft Clipping?

Gentle clipping is a technique in audio processing that prevents distortion of audio signals, especially when audio levels surpass the maximum allowed level. Gentle clipping works by intentionally distorting the audio waveform gradually, reducing amplitude instead of cutting off the waveform entirely.

Why It Matters in Audio Processing

The importance of gentle clipping in audio processing is hard to overstate. Gentle clipping is crucial in audio production as it helps produce a more natural and warm sound that is pleasant to the ear. Gentle clipping protects speakers and headphones from blowing out especially when the audio levels surge beyond their maximum threshold. It also makes the audio sound fuller in the mix and controls the harshness that comes with high amplitudes that cause distortion, preventing fatigue to the listener’s ear.

In conclusion, gentle clipping is an essential tool in audio processing that helps produce high-quality sound without the harshness that comes with high amplitudes. Whether you’re a music producer, audio engineer or musician, comprehending the importance of gentle clipping in audio processing is an excellent way to elevate your audio production and create a unique sound that’s both natural and enjoyable to the listener.

What Is Soft Clipping

Credit: www.abletonprivatelessons.com

Different Types Of Clipping

Gentle clipping is a type of audio signal processing that can limit distortion in music recordings. It works by rounding off the peaks of the waveform more gradually than hard clipping. This results in a smoother, more natural sound.

Different Types Of Clipping When it comes to audio processing, clipping refers to a type of distortion that occurs when the amplitude of a signal exceeds the maximum capabilities of the processing system. Clipping is a common occurrence in digital audio processing and can result in unwanted distortion or even damage to audio equipment. There are two types of clipping, Hard Clipping and gentle clipping. H3: Hard Clipping Hard Clipping is a type of clipping that occurs when the amplitude of a signal exceeds the clipping threshold and the threshold cuts off the signal completely.

This results in a square waveform with sharp edges and is often heard as a harsh, distorted sound. Guitar distortion pedals and other audio effects often rely on hard clipping for a gritty, crunchy sound. H3: Soft Clipping Soft Clipping, on the other hand, is a type of clipping that occurs when the amplitude of a signal exceeds the clipping threshold and the signal rounds off gradually at that threshold. This results in a more rounded waveform and a softer, more natural distortion.

Practical Tips

Audio engineers often apply gentle clipping to add harmonic distortion to a signal. This can enhance the warmth and richness of the sound. In addition to Hard Clipping and gentle clipping, there are also other types of clipping such as Analog Clipping and Digital Clipping. Analog clipping occurs when the input signal exceeds the maximum output level of the analog circuitry, while digital clipping occurs when the signal exceeds the maximum bit depth of the digital audio processing system.

Understanding the different types of clipping is important for audio engineers and content creators looking to achieve a specific sound or effect. By using the right type of clipping, it’s possible to add character, warmth, and depth to audio recordings, while avoiding unwanted distortion or damage to equipment.

Why It Beats Hard Clipping

Many engineers prefer gentle clipping over hard clipping because it offers more natural and subtle distortion to audio signals, whereas hard clipping creates a harsh, digital distortion. Gentle clipping produces a more pleasing sound by only slightly distorting the loudest parts of the signal.

Soft Clipping Vs. Hard Clipping

When it comes to audio production, clipping is a common problem. Clipping happens when the signal level exceeds the maximum level that the system can handle. If left unmanaged, it results in poor sound quality or even damage to the equipment. You can solve clipping using two methods: gentle clipping and hard clipping. Hard clipping is the process of limiting the signal once it reaches the maximum level. This results in a sharp change in the waveform and a distorted sound. On the other hand, gentle clipping is a more gentle limiting process, which gradually distorts the waveform. This results in a more pleasant sound.

Key Benefits

Engineers prefer gentle clipping over hard clipping for several reasons. Firstly, gentle clipping produces a more natural and pleasant sound than hard clipping. It produces a warmer, more atmospheric sound, which suits many genres of music. Additionally, gentle clipping is easier to manage and control, as it produces fewer artifacts and less distortion than hard clipping. One of the other benefits of gentle clipping is that it protects speakers and other audio equipment from damage.

Hard clipping can produce an excessive amount of distortion that can cause physical damage to speakers and other audio equipment. Gentle clipping, on the other hand, gradually distorts the waveform and avoids causing any physical damage, thus making it a more suitable option for long-term use. In conclusion, gentle clipping is a preferred method of limiting audio signals because it produces a more natural, pleasant sound, is easier to manage, and protects equipment from damage. Consider soft clipping if you want to produce a high-quality, distortion-free sound for your audio productions.

Where It Is Used

Gentle clipping is a digital audio processing technique that rounds off the peaks of sound waves as they approach the maximum level, which prevents harsh distortion. In addition, music producers commonly apply gentle clipping to give sounds a warmer, more natural tone.

Gentle clipping is a crucial technique to prevent any digital distortion or damage to audio. It helps to optimize the performance of electronic devices that process audio signals. Gentle clipping is an easy and preferred method to reduce distortion in digital audio applications such as broadcasting, music concerts, and studios. Let’s delve into how the music and broadcast industries apply gentle clipping.

In Music Industry:

The music industry relies heavily on gentle clipping, which many people call saturation or overdrive. It helps to attain a unique sound that is ideal for some genres. The common applications of gentle clipping in music are distortion guitars, kick drums, and bass. A distorted guitar sound is perhaps the most emblematic example of gentle clipping. Distorted guitars can produce a unique sound that rock and metal artists prefer. It takes the audio signal and increases the amplitude until it starts to distort or clip. This distortion creates a unique tone, and gentle clipping helps to control this distortion. For example, the band Nirvana, famous for their unique sound, extensively used soft clipping in their music production. The crunching sound of guitars was achieved with gentle clipping, which created a high harmonic distortion in the soft clipping stage.

In Broadcast Industry:

The broadcast industry also relies on gentle clipping so that the audience receives high-quality sound. The audio that is broadcasted to the listeners might contain high-level signals that can cause digital distortion in low-quality speakers or earphones. In such cases, gentle clipping comes in handy. It ensures that audio signals do not exceed a certain threshold level to prevent distortion in low-quality devices. For example, FM radio stations use gentle clipping to prevent overdriving of their transmitters and maintain quality sound throughout their broadcast.

Gentle clipping limits the maximum level of the audio signals, thereby protecting the speakers and amplifiers from distortion. In conclusion, gentle clipping is an essential tool for audio engineers and professionals in the music and broadcast industry. It allows them to modify and shape the audio signals to create high-quality sound without distortion or damage. Its applications are not limited to these two industries; any audio-processing device can make use of gentle clipping.

What Is Soft Clipping

Credit: www.researchgate.net

Frequently Asked Questions For What Is Soft Clipping

Is Soft Clipping Good?

Soft clipping can be good depending on the desired effect. Soft clipping is a type of distortion that produces a more gentle and warmer effect than harsh clipping. It can add character and warmth to a sound. But it may not be appropriate for all types of audio content.

What Is Soft Clipping Vs Hard Clipping?

Soft clipping and hard clipping are techniques used in audio signal processing to prevent distortion caused by excessive amplitude. Soft clipping gradually reduces the amplitude of the signal. This results in a rounded or softer distortion, while hard clipping is an abrupt cut-off of the signal, resulting in a harsher distortion.

What Does Soft Clipping Sound Like?

Soft clipping is a distortion effect that music producers rely on. It involves rounding off the peaks of an audio signal to create a warmer, more saturated sound. It adds a subtle crunchiness to the mix without drastically changing the dynamics.

Soft clipping is commonly used on bass and drums to give them more presence and drive.

What Is The Difference Between Hard And Soft Clipping Pedals?

Hard clipping pedals produce a square wave sound by limiting the voltage output. Soft clipping pedals create a smooth distortion by gently rounding off the peaks of the waveform. The choice between the two depends on the type of distortion desired.

Conclusion

Soft clipping is a technique used in music production to prevent audio signal distortion. It applies a subtle form of distortion to the peaks of the signal, creating a more natural and pleasant sound. Soft clipping is a powerful tool that can help you achieve a high-quality sound. But it should be used with care.

Remember to always experiment, test, and trust your ears to make the best decisions. Ultimately, the goal is to create music that sounds great both in headphones and on a speaker system.

For more background, see Clipping (audio) on Wikipedia. You may also like our guide: Stop Master Fader Clipping.