Categories
Archive

Dynamic Microphone

A dynamic microphone is a type of microphone that uses a moving coil to capture sound and convert it into an electrical signal. Dynamic microphones are typically used for live performances and recording situations where high volume levels are present.

As an Amazon Associate I earn from qualifying purchases.

Dynamic microphones are a popular choice in the music industry due to their durability, affordability and ability to handle high sound pressure levels (SPLs). They are commonly used by vocalists, drummers and guitarists on stage as they can withstand the wear and tear of touring.

Dynamic microphones are also used in recording studios for capturing loud instruments such as guitar amps and drums. They work by utilizing a diaphragm attached to a coil that moves within a magnetic field, generating an electrical signal that represents the original sound wave. When compared to other microphone types, dynamic microphones are less sensitive and have a narrower frequency response, but they are highly effective at rejecting ambient noise.

How Does A Dynamic Microphone Work?

Dynamic microphones are some of the most commonly used microphones in the music industry. They are rugged, durable, and can accommodate high sound pressure levels. Dynamic microphones are often preferred in live sound reinforcement because they can withstand rough handling, shock, and moisture which makes them more durable than other microphones. But have you ever wondered how a dynamic microphone works?

Key Components Of A Dynamic Microphone

Dynamic microphones are simple devices that contain three essential parts: the diaphragm, the coil, and the magnet. The diaphragm is a thin, flexible material that moves in response to sound waves. The coil is a length of wire wrapped around the diaphragm. The magnet is a permanent magnet placed near the coil.

Understanding The Electromagnetic Principle Behind It

The operation of a dynamic microphone is based on the principle of electromagnetic induction. When sound waves hit the diaphragm, it vibrates, and the coil moves along with it. The movement of the coil in the magnetic field generates an electric current that corresponds to the sound wave. The electric current produced is amplified to produce an audio signal.

Dynamic microphones have several advantages over other types of microphones. They are rugged, durable, and can handle high sound pressure levels. Understanding the basics of how they work can help you choose the right microphone for your needs and make better use of the microphones you already own.

Advantages And Disadvantages Of Dynamic Microphones

Dynamic microphones are affordable, durable and have a high dynamic range making them suitable for live performances and recording loud sound sources. However, they may not be suitable for recording quieter sounds or picking up subtle nuances in the voice or instrument due to their low sensitivity.

Dynamic microphones are a popular choice among professionals for their versatility and resilience. However, they also come with a few drawbacks that users should be aware of. Let’s take a deeper look at the advantages and disadvantages of dynamic microphones to help you decide if they’re the right fit for your needs.

Durability And Sturdiness

One of the strongest advantages of dynamic microphones is their durability. They are built to withstand rugged use and harsh environmental conditions, making them the ideal choice for outdoor and live performances. Dynamic microphones are also less delicate than other types of microphones like condenser mics which are easily damaged even by slight handling. You can count on dynamic mics for the most rugged and intense recording situations, such as recording vocals or instruments on stage.

Noise Rejection And Wind Insensitivity

Dynamic microphones are designed to reject ambient noise thanks to their unidirectional pickup pattern, which makes them suitable for recording in noisy environments. They are less sensitive to wind noise and background sounds, making them a great choice for outdoor recording. Dynamic microphones are ideal for vocalists who want to avoid picking up audience noise or wind noise, while still capturing their voice with clarity.

Limited Frequency Response And Output

One of the main disadvantages of dynamic microphones is that they have a limited frequency response and output compared to other types of microphones. The low output level of dynamic microphones can result in lower volume levels, which might require more amplification. Additionally, their limited frequency response means that they may not capture the nuances of sound waves as well as other mics, which could result in a flatter sound. While dynamic microphones work great for recording vocals, they are not ideal for recording the entire range of instruments such as an acoustic guitar or drum overheads. In conclusion, dynamic microphones are a popular choice for their durability, noise rejection, and wind insensitivity. However, they may not deliver the frequency response and output of other mics. Whether you’re a professional recording artist or just starting, understanding the advantages and disadvantages of dynamic microphones can help you make informed decisions for your recording needs.

Applications Of Dynamic Microphones

Dynamic microphones are widely used in the music industry for recording live instruments and vocals due to their ruggedness and durability. They are also commonly used in public address systems, broadcasting, and in industrial settings for noise measurements and control.

Dynamic microphones are versatile tools used in various applications, ranging from live performances to speech and vocal recordings. These microphones have a dynamic diaphragm that vibrates when sound waves hit it, generating an electrical signal that is then amplified to produce the final output. In this blog post, we will discuss some of the most common applications of dynamic microphones and how they are used in different settings.

Live Performances And Stage Applications

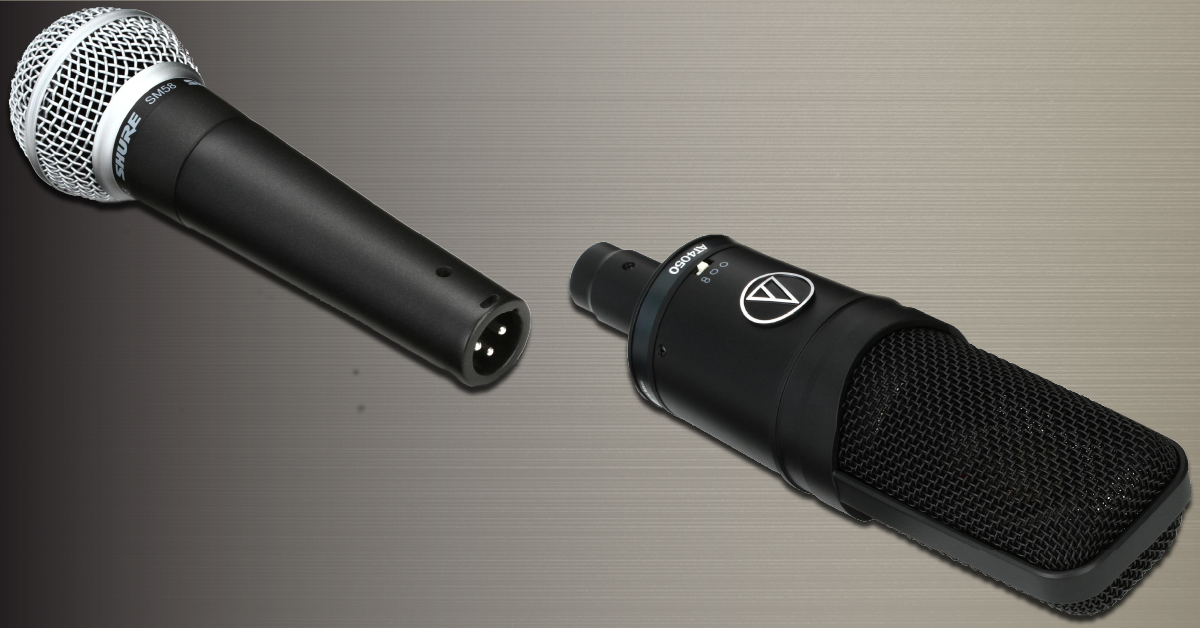
Dynamic microphones are commonly used for live performances and stage applications due to its durability and sturdy construction. They are capable of handling high sound pressures produced by instruments and vocals, making them ideal for amplifying sound on stage. Dynamic microphones are also resistant to feedback, making them suitable for use in loud environments. Some popular dynamic microphones used for live performances include Shure SM58 and Sennheiser e935.

Studio Recording And Broadcasting

Dynamic microphones are also used for studio recording and broadcasting applications, such as radio and podcasting. They are excellent for capturing a natural sound and are often preferred over condenser microphones in certain recording situations. Dynamic microphones are particularly useful for recording loud instruments, such as drums or guitar amplifiers, as they can handle high sound pressure levels without distorting the sound. Some popular dynamic microphones used for studio recording and broadcasting include Electro-Voice RE20 and Shure SM7B.

Speech And Vocal Recordings

Dynamic microphones are ideal for speech and vocal recordings, such as public speaking, lectures, and podcasts. They can capture natural and clear sound without picking up unwanted background noise, such as the rustling of papers or the sound of footsteps. Dynamic microphones are also less sensitive to high-frequency sound and can produce a warm sound that is pleasing to the ear. Some popular dynamic microphones used for speech and vocal recordings include Electro-Voice RE50B and Shure SM58.

Instrument And Amplifier Recordings

Dynamic microphones are also used for instrument and amplifier recordings, especially for instruments known for producing high sound pressure levels, such as drums and electric guitars. Dynamic microphones can handle these high sound pressure levels without distorting the sound, making them perfect for capturing the true sound of the instrument. Some popular dynamic microphones used for instrument and amplifier recordings include Shure SM57 and Sennheiser e609. In summary, dynamic microphones are versatile tools used in various applications, including live performances, studio recording, speech and vocal recordings, and instrument and amplifier recordings. They are durable, reliable, and capable of reproducing natural and clear sound even in high sound pressure environments. Whether you’re a musician, a podcaster, or a public speaker, dynamic microphones are an essential tool to have in your arsenal.

Dynamic Microphone

Credit: sea.audio-technica.com

Choosing The Right Dynamic Microphone For Your Needs

Dynamic microphones are an excellent choice for a wide range of applications. They are rugged, durable, and capable of handling high sound pressure levels. When it comes to selecting the right dynamic microphone for your needs, there are several factors you should consider. In this post, we will guide you through the process of choosing the right dynamic microphone, and the key factors that you should keep in mind.

Matching The Microphone To The Source

One of the crucial factors to consider when choosing a dynamic microphone is to match the microphone to the source. You need to know what you are going to use the microphone for and what type of sound the source produces. For instance, if you are going to use the microphone for recording vocals, you need to select a microphone that is designed for vocals. Similarly, if you are going to use the microphone for drums, you need to select a microphone that is designed for drums.

Considering The Polar Pattern

The polar pattern is another essential factor to consider when selecting a dynamic microphone. The polar pattern of a microphone refers to the microphone’s sensitivity to sound from different directions. There are three types of polar patterns: cardioid, omnidirectional, and bidirectional. Cardioid microphones are best suited for recording vocals, instruments, and live performances. Omnidirectional microphones are ideal for capturing ambient sounds and natural environments. Bidirectional microphones are best suited for recording in a stereo configuration.

Evaluating Frequency Response And Sensitivity

The frequency response and sensitivity of a microphone are also crucial factors to consider when selecting a dynamic microphone. The frequency response of a microphone refers to the range of frequencies that the microphone can capture. Sensitivity refers to the microphone’s ability to capture sounds at low volumes. Generally, dynamic microphones have a limited frequency response and sensitivity compared to condenser microphones. However, they are ideal for capturing louder sounds and are more durable.

Comparing Different Brands And Models

Finally, when selecting a dynamic microphone, you should compare different brands and models. Some of the popular microphone brands include Shure, Sennheiser, AKG, and Beyerdynamic. Each brand offers a range of dynamic microphones, and you need to select a microphone that meets your needs and budget. You can compare the features, sound quality, and price of different microphones before making a decision.

In conclusion, choosing the right dynamic microphone requires careful consideration of several factors, including the source, polar pattern, frequency response, sensitivity, and brand. By keeping these factors in mind, you can select a microphone that meets your specific needs and delivers high-quality sound.

Maintaining And Caring For Your Dynamic Microphone

To keep your dynamic microphone in its best condition, keep it clean and dry, avoid exposing it to extreme temperatures, and store it in a safe place. Regularly inspect the cables and connectors, and avoid rough handling or dropping the mic.

Following these simple steps will ensure that your dynamic microphone performs at its best for years to come.

Dynamic microphones are a popular choice for recording vocals and instruments due to their durability and affordability. Proper maintenance and care are critical in ensuring your dynamic microphone continues to produce quality sound over time. In this section, we will discuss some essential tips for maintaining and caring for your dynamic microphone to extend its lifespan.

Cleaning The Grill And Pop Filter

The grill and pop filter of your dynamic microphone can easily accumulate dirt, moisture, and other debris, affecting the quality of your recordings. It is crucial to keep these components clean by gently brushing them with a soft-bristled brush or wiping them with a clean, damp cloth. Avoid using harsh chemicals as they can damage the microphone’s finish.

Preventing Damage And Wear

Like any other equipment, dynamic microphones are also prone to damage with prolonged use. You can prevent damage by handling your microphone with care, avoiding dropping, hitting, or exposing it to extreme temperatures. Additionally, avoid putting pressure on the microphone cable or stretching it too much. These actions may cause damage to the internal wiring and affect the microphone’s overall performance.

Storing And Transporting The Microphone Safely

Proper storage and transportation of the dynamic microphone are crucial in keeping it safe from damage and wear. Invest in a protective case to safeguard your microphone from external elements while in transportation. Always store your microphone in a dry, cool place to prevent moisture accumulation. In conclusion, maintaining and caring for your dynamic microphone is critical in ensuring its optimal performance, prolonging its lifespan, and producing quality recordings. Remember to always keep your microphone clean, handle and store it with care, and invest in a protective case for transport.

Quick Tips for Maintaining Your Dynamic Microphone
TipsDescription
Clean RegularlyUse a soft-bristled brush or clean, damp cloth to remove dirt and debris from the grill and pop filter.
Handle with CareAvoid dropping, hitting, or exposing your microphone to extreme temperatures.
Store ProperlyInvest in a protective case and store your microphone in a dry, cool place to prevent moisture accumulation.
Dynamic Microphone

Credit: riverside.fm

Dynamic Microphone

Credit: www.sweetwater.com

Frequently Asked Questions For Dynamic Microphone

What Is A Dynamic Microphone?

A dynamic microphone converts sound waves into an electrical signal through the movement of a wire coil within a magnetic field. These mics are often used for live performances and recording applications due to their durability and ability to handle loud sound sources.

Which Mic Is Better Condenser Or Dynamic?

Condenser mics are better for capturing acoustic instruments, vocals, and nuanced sounds. Dynamic mics are better for loud, high-energy sounds like drums and electric guitars. It ultimately depends on the specific use case and the sound you want to capture.

Do Dynamic Mics Sound Better?

Dynamic microphones can sound better depending on the situation. They are great for loud live performances and recording high sound pressure levels. They also have a warm, natural sound that works well with many instruments. However, they may not be as detailed as condenser mics in quiet environments.

What Is The Best Use Of Dynamic Microphone?

Dynamic microphones are widely used for live performances, broadcasting, and recording instruments with high sound volume levels such as drums and guitar amps. They are sturdy and can handle a lot of sound pressure without distortion. They are also less expensive than condenser microphones and do not require external power.

Conclusion

The dynamic microphone has become a staple in the world of music and audio production for its durability and flexibility. Its rugged construction and ability to handle loud sound sources make it a favorite among musicians and audio engineers alike.

Additionally, the dynamic mic’s affordable price point and ease of use make it accessible for beginners and professionals alike. Whether you’re just starting out in the world of audio or are a seasoned pro, the dynamic microphone is a must-have tool for creating high-quality recordings.

Categories
Archive

Is Musician a Profession

Yes, being a musician can be considered a profession. Musicians can earn a living from their artistic skills and performances.

As a musician, one can evoke emotions, memories, and experiences through their music. It is an art form that has been around since the beginning of time, and it continues to evolve and shape culture. While some may argue that music is merely a hobby, the truth is that it can be a full-time career for many.

From songwriting and composing to performing and teaching, there are various avenues for musicians to make a living. However, it can be a challenging industry to break into, and success may require a mix of talent, hard work, and luck. This article explores the profession of being a musician, the potential career paths, and the challenges and rewards of pursuing this artistic career.

Is Musician a Profession

Credit: tomhess.net

Music Industry

The music industry is a vast and complex world that comprises various roles and job opportunities. Musicians are a significant part of the industry, contributing to the creation and production of music that enriches our lives. But is musician a profession? Let’s explore this question and learn about the different types of music industry, revenue, and job opportunities available.

Different Types Of Music Industry

The music industry encompasses a wide range of sectors, including:

Industry TypeDescription
Record LabelsCompanies that scout for talent and offer recording contracts to musicians, ensuring the distribution and promotion of their music.
Music PublishersPublishing companies that represent songwriters and copyright owners. Music publishers are responsible for the protection of intellectual property and the licensing of music for commercial use.
Live Music IndustryConcert promoters, booking agents, and venues that organize live performances and events.
Music EducationSchools, universities, and music institutions that provide music education and training.

Revenue And Job Opportunities

The global music industry generates a significant amount of revenue through various channels such as streaming services, live events, merchandise, and sponsorships. Musicians have the opportunity to earn income through album sales, royalties, and performance fees. Other music-related job opportunities include:

  • Music producers and engineers
  • Music teachers and instructors
  • Music therapists
  • Music journalists and critics
  • Music marketers and publicists

In conclusion, being a musician is a legitimate profession and a vital part of the music industry. Whether you want to pursue a career in performance, production, or education, there are various job opportunities available in the thriving world of music.

Is Musician a Profession

Credit: www.medpagetoday.com

Is Musician a Profession

Credit: www.thomann.de

Frequently Asked Questions For Is Musician A Profession

Is Being A Musician A Profession?

Yes, being a musician can be a profession. Many musicians make a living through music gigs, concerts, recordings, teaching, and selling merchandise. However, it can be a difficult industry to break into and sustain a successful career in.

Does Musician Count As A Job?

Yes, being a musician can count as a job. Musicians can earn income through performances, royalties, teaching, and other music-related activities.

Is Singer A Profession?

Yes, Singer is a profession that involves using your voice to perform professionally. Singers often work in a variety of settings, including music studios, venues, concerts, television, and radio. They can be solo performers or work as part of a group or band.

It is a profession that requires skill, talent, and dedication to succeed.

What Is Considered A Professional Musician?

A professional musician is someone who earns a living by performing, teaching, or composing music. They have established their skills in their chosen genre and have a high level of musical proficiency. Additionally, professional musicians are often recognized by their peer group and have a reputation for reliability, punctuality, and excellence.

Conclusion

To conclude, being a musician can be considered as a profession. It requires dedication and talent, coupled with hard work and persistence. Although the industry is highly competitive, the advantages of being a musician are numerous, including creative freedom, the opportunity to connect with audiences, and the potential for financial success.

Ultimately, a successful career as a musician depends on finding a balance between artistic expression and business acumen, as well as continuous self-improvement and adaptability.

Categories
Archive

Recording Bass At Home

To record bass at home, invest in a good audio interface and microphone. With these tools, you can capture the sound of your bass guitar and record it directly onto your computer.

If you are a bass player, you know the importance of recording your bass lines accurately, whether it’s for your own personal use or for a studio recording. But investing in a professional recording studio can be expensive. Fortunately, with some essential equipment and a little bit of know-how, you can record bass at home and achieve professional-quality recordings.

We will walk you through the steps needed to get started, including selecting the right audio interface and microphone, setting up your recording space, and capturing the best sound possible from your bass guitar. By the end of this article, you will be well-equipped to record your own bass tracks at home.

Understanding Bass Recording

Recording bass at home can seem like a daunting task, but with the right approach, it can be a great way to achieve a professional sound without breaking the bank. A few key tips for recording bass at home include investing in a high-quality DI box, finding the right mic placement, and experimenting with different amp settings.

Recording bass at home can be a challenging task, but with the right techniques and tools, you can achieve professional-sounding results. One of the most critical factors in recording bass is understanding the different types of bass guitars and how to use them effectively.

Types Of Bass Guitars

There are several types of bass guitars, each with its unique characteristics. The most common ones are:

  • Electric Bass: This is the most popular type of bass guitar used in modern music production. It is versatile, produces a wide range of sounds, and can be easily amplified.
  • Acoustic Bass: This type of bass guitar is larger than the electric bass and has a hollow body, which gives it a warmer and softer sound.
  • Fretless Bass: Unlike the electric and acoustic bass, the fretless bass does not have frets. This allows the player to produce more fluid and expressive notes.
  • Upright Bass: Also known as the double bass, the upright bass is the largest of all the bass guitars, and it produces a deep and rich sound commonly found in jazz or classical music.

Bass Recording Techniques

To capture the best sound possible when recording bass at home, consider using the following techniques:

  1. Direct Input: This method involves plugging the bass guitar directly into an audio interface. This technique is best suited for electric bass and allows for more control during post-production.
  2. Mic Placement: This technique involves using a microphone to capture the sound of the bass guitar. The placement of the microphone is crucial in achieving the desired sound. The closer the mic is to the bass, the more low frequencies will be captured, while moving it farther away will result in a more balanced tone.
  3. Room Mic: This technique involves placing a microphone away from the bass guitar to capture the acoustic qualities of the room. This method is best suited for acoustic bass guitars and can add depth and warmth to the sound.
  4. Layering: This technique involves recording multiple tracks of the same bass guitar part and adding them together to create a fuller and thicker sound. This method is best suited for electric bass and can add character to the sound.
  5. Compression: This technique involves using a compressor to even out the dynamics of the bass guitar sound. Compression is best used during post-production to balance out the sound and to prevent it from getting lost in the mix.

In conclusion, understanding the different types of bass guitars and applying the right bass recording techniques can go a long way in recording bass at home. With practice and patience, you can achieve professional-sounding results without having to leave your house.

Setting Up Your Home Recording Studio

To record bass at home, setting up your recording studio should include a proper sound interface, microphone, and a recording software. Find a suitable room where sound quality is optimal to avoid any unwanted noise. Practice with different recording position and microphone placement to perfect your sound.

Choosing The Right Room

Selecting the perfect location to set up your home recording studio is critical. Avoid setting up your recording space in a noisy area or near a busy road. Choose a room that is available, spacious, and with minimal noise distractions. A basement, an extra room, or a garage could be an ideal location for your home recording studio. Ensure that the room is not exposed to high humidity levels and has proper ventilation.

Acoustics

Acoustics also plays a vital role in home recording studios. A poorly treated room can ruin a great recording, but luckily you can solve this problem by installing acoustic treatment. Acoustic treatment is a process of using sound-absorbing products such as foam panels, bass traps, and diffusers to reduce unwanted sound reflections that may occur in the room. If you want to create a great-sounding recording space, you should invest in acoustic treatment.

Equipment Needed

To record bass at home, you need to have the following equipment:

  • A quality bass guitar
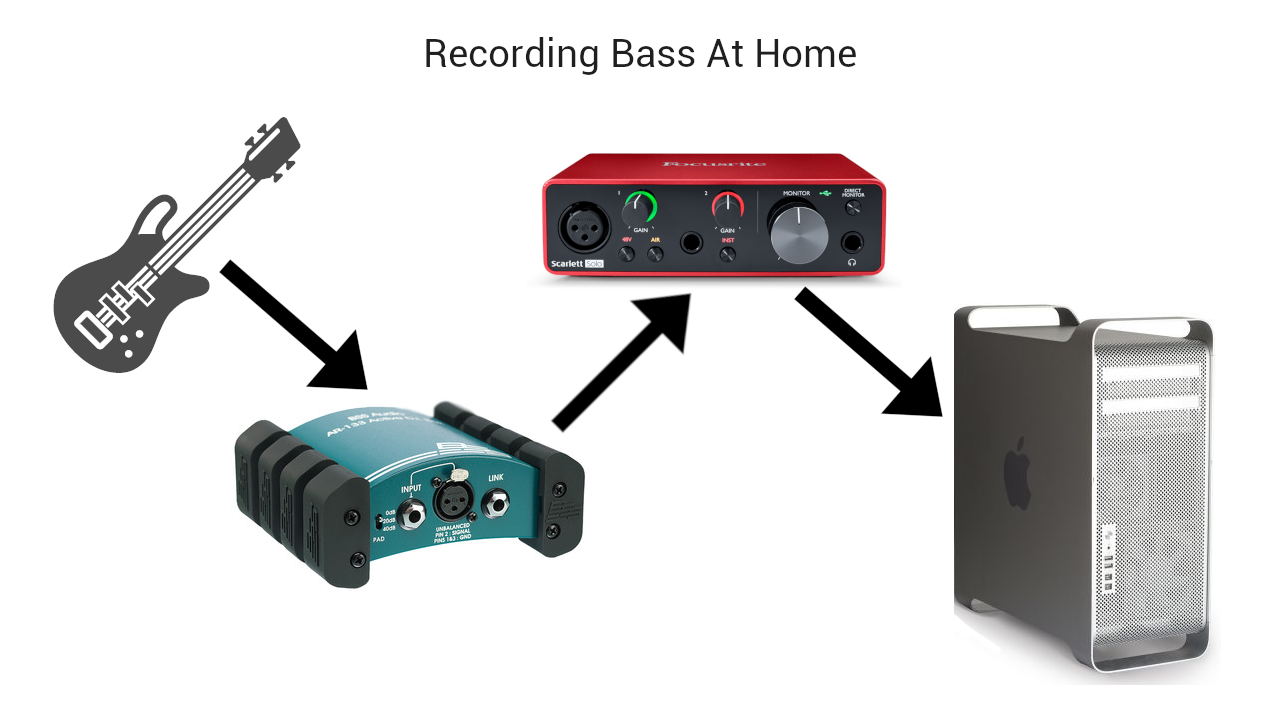
  • A bass amplifier or a direct injection box (DI)
  • An audio interface, mixer, or digital audio workstation (DAW) to capture the sound from your bass guitar
  • Studio monitors or decent headphones for playback and mixing
  • Microphone (optional) to capture the sound of your bass cabinet or amp if you choose to record with a microphone

In conclusion, by setting up your home recording studio, you give yourself the freedom to create and build your own sound without the need to rent a professional studio. With proper room selection, acoustic treatment, equipment, and expertise in recording techniques, you can achieve a quality bass sound that sounds just like in a professional studio. Good luck in your quest for the perfect recording space!

Preparing For The Recording Session

To prepare for a recording session when recording bass at home, ensure your equipment is set up properly, practice your parts thoroughly, and have a clear idea of what the final product should sound like. Test and adjust your tone beforehand and eliminate any potential background noise to get a clean recording.

Preparing for a recording session is vital to ensure that you produce a high-quality bass track. There are several things you can do before you start recording to make sure things go smoothly. In this article, we will discuss how to prepare for a recording session when recording bass at home, including tuning the bass guitar, preparing the DAW, and creating a click track.

Tuning The Bass Guitar

Tuning your bass guitar is an essential part of preparing for a recording session. You want your bass to be perfectly in tune to ensure that it sounds great in the mix. Before recording, use a tuner to check each string’s tuning and make any necessary adjustments. Take the time to play each string individually and identify any notes that sound off so you can quickly tune them.

Preparing The Daw

When you record bass at home, you need to have everything set up properly in your digital audio workstation (DAW). Before starting the recording session, open your DAW and create a new recording session. Make sure your audio interface is connected, and check your audio settings to ensure everything is set correctly. Set your recording level, and make sure your tracks are set up the way you want them to be.

Creating A Click Track

Creating a click track is essential to keep things in time and ensure that your bass playing is steady. A click track is a metronome-like sound that plays in your headphones while recording. It helps keep you on beat and ensures that your playing stays consistent. To create a click track, open a new track in your DAW and select the click track option. Adjust the tempo to match the song’s beat and adjust the volume to your preference. In conclusion, preparing for a recording session is a critical step before recording bass at home. By tuning your bass, preparing your DAW, and creating a click track, you can ensure that your recording session will go smoothly. Take the time to set everything up correctly, and you will get the best possible results from your bass recording.

Microphone Placement Techniques

To capture the best sound possible when recording bass at home, microphone placement is crucial. Experiment with different positions, such as close to the amplifier or in front of the speaker, to achieve the desired tone. The distance from the speaker can also affect the sound, so play around until you find the ideal placement for your setup.

Recording bass at home can be an exciting experience for every bass player. However, getting the right sound can be challenging. One of the essential elements that can determine the quality of your recording is microphone placement. It’s crucial to understand different microphone placement techniques to achieve the sound you desire. Here are some microphone placement techniques to consider:

Di Recording

DI recording is the easiest method of recording a bass guitar. The technique involves plugging the bass guitar into a DI box and recording it directly into your audio interface. DI recording is an excellent technique if you want a clean, reliable, and consistent sound. It’s essential to place the DI box between the bass and the amplifier.

Amplifier Recording

Amplifier recording involves recording the sound of your bass guitar through an amplifier and miking the amplifier with a microphone. This technique produces a more natural and warmer sound than DI recording. If you choose this technique, it’s essential to choose the right amplifier and microphone.

Mic Placement For Amplifier Recording

Mic placement is crucial in amplifier recording. Here are some points to consider:

  • Position the microphone close to the speaker cone for a brighter and detailed sound.
  • For a warmer and less detailed sound, position the microphone in front of the amplifier.
  • For a more robust and less boomy sound, position the microphone on the side of the amplifier.

In conclusion, choosing the right microphone placement technique is essential to achieve the desired sound when recording bass at home. Whether you choose DI recording or amplifier recording, mic placement plays a significant role in the outcome of your recording.

Mixing Your Bass Tracks

Recording bass at home can be a cost-effective solution for musicians. Mixing your bass tracks is essential in producing a polished final product. With proper techniques and equipment, capturing a clean and consistent bass sound in a home studio is achievable.

Recording bass at home can be challenging, but mixing your bass tracks can be even more difficult. Whether you’re new to mixing or a seasoned pro, there are a few things to keep in mind when you’re working with bass tracks. In this section, we’ll go over some essential tips and techniques to take your bass tracks to the next level.

Balancing The Levels

One of the first things you’ll want to do when mixing your bass tracks is to balance the levels. That means making sure the bass isn’t too loud or too soft compared to the other instruments in the mix. You want the bass to complement the other instruments, not overpower them. To balance the levels, start by soloing the bass track and playing it back at the loudest part of the song. Then, gradually add in the other instruments one at a time, adjusting the level of the bass as you go. Keep tweaking until you find the right balance.

Eq And Compression Techniques

Next up, it’s time to work on the EQ and compression of your bass tracks. EQ is essential for shaping the tone of your bass, while compression can help even out the volume and add sustain. Start by using a high-pass filter to remove any unwanted low-end rumble from the bass. You can also boost the midrange frequencies to add some warmth and definition to the sound. Then, use a compressor to tame any peaks and add sustain.

Adding Effects

Finally, you can add some effects to your bass tracks to give them a little extra something. Consider adding some reverb or delay to create a sense of space and depth. You can also experiment with distortion, overdrive, or saturation plugins to add some grit and character to the sound. Remember, when adding effects, a little bit goes a long way. You don’t want to overwhelm the mix with too much processing on the bass. Keep it subtle and tasteful. In conclusion, mixing your bass tracks can be tricky, but it’s an essential part of creating a great mix. By balancing the levels, using EQ and compression techniques, and adding some effects, you can take your bass tracks to the next level and create a cohesive, professional sounding mix.

Recording Bass At Home

Credit: www.joecrowtheaudiopro.com

Editing Your Bass Tracks

Editing your bass tracks is an important process that can make a significant difference to the quality of your music. With the right editing techniques, you can transform raw bass tracks into polished, professional-sounding recordings. In this blog post, we’ll discuss some key editing techniques for bass tracks and explore how you can identify and fix mistakes, utilize punch-ins and outs, and edit for timing to create high-quality bass tracks.

Identifying And Fixing Mistakes

The first step in editing your bass tracks is to identify any mistakes that need to be corrected. When listening back to your recordings, be sure to pay attention to things like timing, pitch, and overall tone. If you notice any errors, take note of them and prepare to make corrections. With bass tracks, some common mistakes include buzzes and unwanted noise, incorrect notes, and inconsistencies in timing or tone. To fix these issues, you may need to use editing software like Audacity or GarageBand and apply techniques such as EQ, compression, and noise reduction.

Utilizing Punch-ins And Outs

Another useful editing technique for bass tracks is utilizing punch-ins and outs. This technique involves isolating a small section of your recording and re-recording that particular section to correct any mistakes. With punch-ins and outs, you can fix errors without having to re-record the entire track. To use this technique effectively, make sure to listen carefully to the section you want to fix and make note of the specific points where you need to punch in or out. Then, use your editing software to create the necessary cuts and make your corrections before stitching the sections back together.

Editing For Timing

Finally, when editing your bass tracks, it is crucial to pay close attention to the timing of your recordings. Bass is an instrument that is often responsible for providing the foundation and rhythm of a song, so it’s important that your timing is spot-on. To edit for timing, listen to your recordings carefully and use a metronome to identify any portions that are out of sync. Once you’ve identified the problematic areas, use your editing software to adjust the timing as needed until everything aligns perfectly.

Exporting Your Bass Tracks

After recording your bass tracks at home, the next step is to export them. Exporting your bass tracks is an important task because it allows you to use them in your mix. In this section, we will discuss how to prepare your tracks for export, the export settings, and how to use your bass tracks in a mix.

Preparing Your Tracks For Export

Before exporting your bass tracks, it’s important to make sure they are properly named, labeled, and organized. This will make it easier to find and use them in your mix. Here are some tips on how to prepare your tracks for export:

  • Make sure the track names are descriptive and easy to understand.
  • Label each track with the instrument name and the number of takes.
  • Keep your tracks organized by grouping them into folders.
  • Trim the beginning and end of each track to remove any unnecessary noise.

Export Settings

When it comes to exporting your bass tracks, there are a few settings you need to pay attention to. Here are some export settings you should consider:

SettingDescription
File FormatYou can choose between different file formats such as WAV, MP3, or AIFF. WAV files are recommended for high-quality audio.
Sample RateThe sample rate determines the quality and size of the audio file. For most recording projects, a sample rate of 44.1 kHz is sufficient.
Bit DepthThe bit depth determines the dynamic range and resolution of the audio file. For most recording projects, a bit depth of 24 bits is recommended.

Using Your Bass Tracks In A Mix

Now that you have exported your bass tracks, it’s time to use them in your mix. Here are some tips on how to use your bass tracks in a mix:

  1. Import your bass tracks into your digital audio workstation (DAW).
  2. Adjust the volume, panning, and EQ of your bass tracks to fit in with the rest of the mix.
  3. Use compression to even out the dynamics of your bass tracks.
  4. Apply effects such as reverb or delay to add depth and character to your bass tracks.
  5. Remember to save your mix as you go, and take breaks to rest your ears.
Recording Bass At Home

Credit: www.soundonsound.com

Frequently Asked Questions On Recording Bass At Home

How Can I Record Bass At Home?

Record bass at home by investing in a USB audio interface, a microphone, a DAW, and quality instrument cables. You can also experiment with microphone placement, room acoustics, and using different amplifiers and pedals to achieve the desired sound. Practice and proper technique can also improve the quality of your recordings.

What Do You Need To Record Bass?

To record bass, you will need equipment such as a bass guitar, a bass amp, and a microphone. You’ll also need an audio interface and a recording software to capture the sound. It’s important to experiment with microphone placement and settings to achieve the desired sound.

How Do I Record Bass On My Computer?

To record bass on your computer, you’ll need a DAW software like GarageBand, a bass guitar with a direct input or microphone, and an audio interface. Connect your bass to your computer using the audio interface, open your DAW software, create a new project, and select the input source as your audio interface.

Arm the track, hit record, and start playing.

Do You Need A Preamp For Recording Bass?

Yes, you will need a preamp for recording bass as the output of a bass guitar is not strong enough to be directly recorded. A preamp boosts the signal level, making it louder and clearer. It also enables mixing and EQ adjustments during the recording process.

Conclusion

Recording bass at home is not a hard nut to crack. With the right setup and techniques, you can achieve a professional sounding track that will make you proud. Remember to keep experimenting with different setups and plugins until you find the perfect match for your tone.

Don’t forget to also learn from other bassists and keep improving your skills. Happy recording!

Categories
Archive

How To Market Your Music

To market your music effectively, utilize social media and targeted advertising. In today’s digital age, musicians can no longer rely solely on traditional methods of promotion, hence promoting music on social media platforms and running targeted ads can significantly increase your visibility and engagement among the target audience.

Artists, bands, and musicians must wear many hats in today’s music industry in order to build a career. In addition to writing, recording, and performing music, you also need to market yourself or your band in ways that will help you gain exposure and connect with fans.

While touring, playing live shows, and word-of-mouth marketing are still valuable tactics, the majority of your marketing efforts should focus on digital promotion. In this technological age, the explosion of social media has made it easier than ever to connect with your audience and promote your music. That’s why you need an effective marketing plan to reach your target audience, stand out from the crowd, and grow your fan base. Here are some useful marketing tactics to help you promote your music effectively in this digital landscape:

How To Market Your Music

Credit: screechhouse.com

Identifying Your Target Audience

Identifying your target audience is crucial when it comes to marketing your music. Understanding who your music appeals to will help you tailor your promotional efforts and increase your chances of success. Conduct research on your target demographic’s music preferences, social media habits, and online behavior to effectively reach and engage with them.

Identifying Your Target Audience is the first step in successfully marketing your music. Without knowing who your audience is, it is impossible to effectively promote your music and gain a following. In this section, we will discuss the different types of audiences you need to identify in order to market your music successfully.

Genre Specific Audiences

One of the first things you need to consider when identifying your target audience is the genre of your music. Different genres appeal to different groups of people, and you need to know who those people are in order to effectively promote your music. For example, if you are a country artist, your target audience will likely be middle-aged individuals who enjoy traditional country music. On the other hand, if you are a hip hop artist, your target audience will likely be younger adults who enjoy rap music.

Demographic-based Audiences

Another important aspect of identifying your target audience is demographic information. This includes factors such as age, gender, and location. Knowing this information is crucial for creating targeted marketing campaigns and reaching your intended audience. For example, if you are a pop artist targeting teenage girls, you may want to focus your marketing efforts on social media platforms like TikTok and Instagram. When it comes to marketing your music, the more you know about your target audience, the better. Identifying your target audience is just the first step in creating successful marketing campaigns, but it is an essential one. By understanding the different types of audiences you need to identify, you can tailor your marketing efforts to reach the people who are most likely to enjoy and support your music.

Developing Your Brand Image

Developing your brand image is vital if you want to market your music successfully. You need to understand your audience, create a unique style, and stand out from the crowd to gain recognition and loyal fans. With the right branding, your music can reach new heights and be noticed by the right people.

Your brand image is critical in distinguishing your music from other artists. Proper development of your brand image ensures that your audience will recognize you and your music with just a glance. The brand image comprises many elements, including your logo design, cover artwork, personal style, and public image. Here are some tips to help you develop your brand image and make your music stand out.

Logo Design And Cover Artwork

Your logo design should reflect your music and your style. A logo represents your brand and should be simple, unique, and memorable. It should be incorporated on your website, social media pages, merchandise, album covers, and wherever your music is promoted. Your cover artwork should also reflect your style and attract the audience’s attention.

Personal Style And Public Image

Your personal style and public image play a crucial role in developing your brand image. It would help if you considered your outfit, hairstyle, and stage presence. Your personal style should be authentic, comfortable, and consistent. It is best to maintain brand consistency, even when you make changes to your style. It will help build a relationship with your audience, and they will be more likely to feel connected to you. Your public image and behavior will also affect your brand image. Be respectful, humble, and kind to your fans, media, and other musicians. Your online presence should be clean and professional, and you should avoid causing any controversy or negative attention.

In Summary

Developing your brand image is crucial in marketing your music successfully. A strong brand image can help attract new fans, build your online presence, and increase overall exposure. Make sure your logo design, cover artwork, personal style, and public image align with your music and brand. Your audience will recognize and appreciate a consistent and authentic brand image.

Social Media Marketing Strategies

A successful social media marketing strategy for music requires choosing the right platforms to promote your content, creating engaging posts with high-quality visuals, and interacting with your audience to build trust and loyalty. Consistency is key in order to establish a strong online presence and grow your fan base.

Social media is an essential tool for musicians to market their music and reach a wider audience. With its massive user base, musicians can leverage social media platforms to promote their music, engage with fans, and build a strong online presence. In this section, we’ll discuss the social media marketing strategies that will help musicians succeed in the competitive music industry.

Platforms Of Interest For Musicians

There are several social media platforms that musicians can use to market their music. Each platform has its own unique features that can be leveraged to build a strong online presence. Here are some platforms that are of interest to musicians:

Social Media PlatformDescription
FacebookThe largest social media platform with over 2 billion users. Musicians can use Facebook to connect with fans, share updates, and promote events and new releases.
InstagramInstagram is a visually-focused platform that is ideal for musicians to showcase their creative work. Musicians can use Instagram to share photos, videos, and behind-the-scenes content with their fans.
TwitterTwitter is a platform for short-form content, making it perfect for musicians to share quick updates, interact with fans, and promote new music.
YouTubeYouTube is the world’s largest video-sharing platform, and it’s a great place for musicians to showcase their music videos, live performances, and create engaging content for fans.

Creating Engaging Content

Creating engaging content is crucial for musicians to attract and retain fans on social media. Here are some ways musicians can create compelling content:

  • Share behind-the-scenes glimpses into the creative process.
  • Provide sneak peeks into upcoming music releases and events.
  • Collaborate with other musicians and artists to create exciting content.
  • Create engaging multimedia content like videos, photos, and livestreams.
  • Interact with fans by responding to comments and messages.

By using these social media marketing strategies, musicians can effectively promote their music and connect with fans on a deeper level.

How To Market Your Music

Credit: www.harmonyroadmusic.com

Promoting Your Music On Streaming Platforms

As a musician, marketing your music on streaming platforms is essential to gain exposure and increase your fan base. Ensure that your profile and metadata are accurate and engaging, and use social media to drive traffic to your platform pages.

Collaborating with influencers, creating playlists, and utilizing targeted ads are also effective strategies to promote your music.

As a musician, you can take advantage of the growing popularity of streaming platforms to market your music to a larger audience. However, with millions of tracks available on these platforms, it can be challenging to stand out and be noticed.

Creating A Strong Profile And Playlist

The first step in promoting your music on streaming platforms is to create a strong profile and playlist. Your profile should be complete with a compelling biography, high-quality profile picture, and album art. Choose a memorable and easy-to-read display name and include links to your social media channels or website. Also, create a playlist on the streaming platform and add your own music and other songs that complement your style. Curate regularly to keep it fresh and engaging to your audience. Optimize your playlist’s title and description using relevant keywords that your audience is likely to use while searching for music. Link your playlist in your bio, social media channels, and website to drive more traffic to your profile and create more visibility for your music.

Engaging With Your Fans

Another critical aspect of promoting your music on streaming platforms is engaging with your fans. Responding to comments and messages helps you build a loyal fan base and develops a strong connection with your listeners. Take advantage of the platform’s features, such as sharing behind-the-scenes photos and videos, to give your fans a glimpse into your world and personality. Run exclusive promotions and giveaways to your fans and offer them early access to your new releases as an incentive for them to stay engaged. Collaborating with other artists on the platform can also help you increase your reach and gain more fans. Engaging with your fans is an ongoing process, but it can pay off in the long run by creating a strong and supportive community that loves and supports your music. In conclusion, promoting your music on streaming platforms requires a combination of smart strategies and consistent effort. To increase your visibility and reach a wider audience, focus on creating a complete and engaging profile, curate playlists with relevant keywords, and engage with your fans. With these tips, you can make the most out of streaming platforms to promote your music and grow your fan base.

Building A Fanbase Through Live Performances

Live performances are a great way to build a fanbase for your music. Getting out and performing in front of people allows you to connect with your audience on a personal level and boost your visibility. Make sure to promote your shows on social media and interact with fans afterwards to keep the relationship going.

Booking Shows And Festivals

One of the most important aspects of building a fanbase as a musician is performing live. The more shows you play, the more exposure you gain and the more fans you attract. But how do you book shows and festivals? The first step is research. Look for venues and festivals that align with your genre and style. Then, research the booking process for each venue or festival and submit a press kit or demo to catch their attention. In addition, network with other musicians and industry professionals to get more leads on potential gigs.

Merchandising And Networking

Live performances are not only an opportunity to showcase your musical talent but also to market your brand. Merchandising is a great way to increase your revenue and visibility. Make sure to have merchandise available for purchase at all shows, including t-shirts, stickers, and CDs. This not only provides fans with memorabilia but also helps to promote your brand. In addition, networking with other industry professionals, including producers, promoters, and record label executives, can help to open more doors and increase opportunities for future gigs and collaborations. Take advantage of every opportunity to connect with others in the industry through social media, networking events, and workshops. In summary, booking shows and festivals and merchandising and networking are two crucial ways to build a fanbase through live performances as a musician. Make sure to research and network in order to find and secure gigs, while also promoting your brand through merchandising and networking. By utilizing these strategies, you will be well on your way to building a dedicated fanbase and ultimately succeeding in the music industry.

How To Market Your Music

Credit: blog.bandlab.com

Collaborating With Other Musicians And Influencers

Collaborating with other musicians and influencers is a great way to market your music. By working with others in the industry, you can expand your audience and reach new fans. This can lead to increased visibility and opportunities for growth.

Collaborating with other musicians and influencers is one of the most effective ways to market your music. It can help you reach new audiences, establish new connections, and take your music to the next level. In this article, we will explore how you can identify potential collaborations, the benefits of cross-promotion, and how you can make the most out of your collaborations.

Identifying Potential Collaborations

To identify potential collaborations, start by thinking about artists who complement your style of music. You can also consider artists who have a similar fan base or are in the same genre. Social media and music-related forums are great places to discover artists and build relationships with them. Another way to identify potential collaborations is by working with influencers. Influencers are individuals with large followings on social media, who can help promote your music to their audience. When identifying influencers, make sure to focus on those who have a similar target audience as yours.

Benefits Of Cross Promotion

Cross-promotion is a great way to expose your music to new fans. The idea behind cross-promotion is simple; you promote someone else’s music, and they promote yours. By cross-promoting your music, you can reach new audiences and grow your fan base. Cross-promotion not only helps you reach new audiences; it can also establish meaningful relationships with other musicians. As you build relationships with other artists, you may find more opportunities to collaborate on future projects.

Making The Most Out Of Your Collaborations

To make the most out of your collaborations, focus on building relationships with other musicians. Take time to get to know them, understand their style of music, and what they are trying to accomplish. By building strong relationships, you can establish trust and work together more effectively. Don’t forget to promote your collaborations on social media. Share the collaborations on your social media channels, and encourage your fans to share them. This will help create buzz around your collaborations and increase visibility. In conclusion, collaborating with other musicians and influencers is an excellent way to market your music. By identifying potential collaborations, utilizing cross-promotion, and focusing on building relationships, you can take your music to the next level and grow your fan base.

Utilizing Email Marketing And Newsletters

One effective way to market your music is by utilizing email marketing and newsletters. By building a mailing list of fans and followers, you can keep them updated on your latest releases, performances, and news. Send personalized and relevant content to engage with your audience and keep them connected with your music.

Utilizing Email Marketing and Newsletters In today’s digital age, effective music marketing can make all the difference between a successful and unsuccessful career. With social media platforms and streaming services, marketing your music has become easier than ever before. However, amidst all of these technological advancements, email marketing remains a very powerful and impactful way of marketing your music. Creating Compelling Email Content Email marketing can be an excellent tool for music marketing, but only if it is done properly. When it comes to email marketing, the first step is to create compelling and creative content. Your emails should be visually appealing, attention-grabbing, and informative. When drafting your email content, you should aim to strike a balance between promoting your music and providing value to your audience. You should also make sure that your email content is personalized and targeted to your audience’s interests. One way to create compelling email content is by using eye-catching subject lines. Your subject line should be concise, creative, and should pique the interest of your email recipient. Avoid using generic titles that do not set you apart from the competition, or that could be perceived as spammy. Monitoring and Analyzing Metrics Email marketing is only effective if it yields positive results. Therefore, it is essential to monitor and analyze your metrics regularly. This includes tracking your open rates, click-through rates, conversion rates, and subscriber growth. Monitoring these metrics will enable you to gauge the impact of your email marketing campaigns and to make adjustments where necessary. There are various email marketing tools available that provide features for monitoring and analyzing metrics. These tools can help you track your email campaigns’ success, identify areas of improvement, and gain insights into your audience’s behavior. With these insights, you can improve your email marketing campaigns and enhance your chances of growing your fanbase. In conclusion, email marketing and newsletters can serve as valuable tools for promoting your music and building a loyal fanbase. By crafting compelling email content and analyzing key metrics, you can enhance your email campaigns’ effectiveness and achieve your music marketing goals.

Experimenting With Paid Advertising

Experimenting with paid advertising is a powerful way to promote your music to a larger audience. While organic promotion through social media and word-of-mouth is essential, it can only reach so far. Paid advertising opens up new opportunities for your music to be discovered by potential fans and listeners.

Understanding Ppc And Influencer Ads

When it comes to paid advertising, there are two main types that musicians should be aware of: Pay-Per-Click (PPC) ads and influencer ads. PPC ads are a type of advertising where you only pay when someone clicks on your ad. This can be an effective way to get your music in front of potential fans who are actively searching for music similar to yours. Influencer ads, on the other hand, involve partnering with social media influencers or bloggers who have a large following. These influencers will promote your music on their platform, giving you exposure to their followers.

Testing And Refining Your Ad Strategy

Once you have decided on the type of ad you want to run, it is important to continually test and refine your ad strategy. This involves experimenting with different ad copy, images, and targeting options to see what works best. One technique is to run a split test where you create two different versions of an ad and compare which one performs better. By constantly refining your strategy, you can ensure that your ads are as effective as possible in reaching your target audience.

Pro tip: When creating your ad, make sure to use engaging visuals and compelling copy that accurately reflects your music and brand. You should also define your target audience clearly, including factors such as age, location, and musical interests. This will help ensure that your ad is reaching the right people.

Frequently Asked Questions Of How To Market Your Music

How Do I Start Marketing My Music?

To start marketing your music, it’s important to have a good understanding of your target audience and create a strong online presence. Utilize social media platforms, create a website, and showcase your music on streaming services. Network with other musicians, collaborate with influencers and bloggers, and perform at live events.

Finally, consider hiring a music promoter or PR agency to help spread the word about your music.

How Do I Attract Listeners To My Music?

To attract listeners to your music, focus on creating quality content and promoting it through social media channels. Engage with your audience by responding to comments and feedback, collaborating with other artists, and performing live shows. Utilize organic and paid marketing tactics to reach a wider audience, and make it easy for fans to find and share your music by distributing it on all major platforms.

How Do I Get My Music Noticed?

To get your music noticed, you should focus on building a strong online presence through social media, music streaming services, and a professional website. Networking with other musicians and industry professionals can also help. Create high-quality music and promote it through collaborations, live performances, and various marketing strategies.

Don’t shy away from utilizing an effective SEO strategy to improve your visibility online.

How Do I Market My Single Music?

To market your single music, you can leverage social media platforms such as Instagram, Twitter and Facebook for free promotion. Create a professional website, optimize your website for search engines, and engage with your fans by hosting virtual events, interviews, and live performances.

Collaborate with other artists and influencers, offer your music on digital music distribution platforms, and use targeted advertising campaigns to reach a wider audience.

Conclusion

Marketing your music can be challenging, but with the right mindset, strategy, and effort it can become easier. Ultimately, it is important to focus on building relationships with your audience, creating engaging content, and promoting your music through multiple platforms.

By implementing these tips and staying consistent, you can boost your chances of success as a musician. Remember, success rarely comes overnight, but with hard work and perseverance, you can reach your goals and make your mark in the music industry.

More in our Music marketing guide.

Categories
Archive

Make More Music

To make more music, set aside dedicated time and prioritize your craft. Making music involves creativity, technical skills, and a lot of effort.

Also, whether you’re a beginner or an experienced musician, finding the time to consistently make music can be challenging. However, dedicating time to practice and create can help improve your skills and increase your productivity. Setting achievable goals and creating a space for yourself to make music can also help with motivation.

Related reading: What Makes Music Sound Louder and Do Subs Make Your Music Louder. For background, see Music production on Wikipedia.

In addition, exploring different genres and collaborating with others can help to expand your musical abilities and inspire new ideas. Making more music requires dedication and effort, but it can lead to a fulfilling and rewarding creative experience.

Make More Music

Credit: musictech.com

How to Make More Music: The Importance Of Consistency

Moreover, the key to becoming a successful musician is consistency. Also, as with any other skill, you need to put in the time and effort to hone your craft. This means setting aside time to practice, learn new techniques, and create new music. In this blog post, we’ll discuss the importance of consistency in making more music, and how to create a routine that works for you.

How to Make More Music: Create A Daily Or Weekly Routine

In addition, creating a routine is one of the most effective ways to ensure consistency in your music-making habits. In addition, by allocating specific times for practice and composition, you create a structure that helps you stay focused and motivated. One way to do this is to create a daily or weekly schedule that outlines specific tasks you need to accomplish. This can include:

  • Practice scales for 15 minutes
  • Learn a new chord progression
  • Furthermore, write a new melody for 30 minutes
  • Record a new song idea

Additionally, by breaking down your larger goals into smaller, manageable tasks, you can create a routine that is both realistic and achievable.

Stick To The Routine No Matter What

Also, once you’ve created a routine, the most important thing is to stick to it. For example, this means making a commitment to your music-making goals and prioritizing them above other distractions or obligations. It can be easy to get sidetracked by other activities or responsibilities, but by staying consistent with your routine, you’ll be able to make progress towards your musical aspirations.

Moreover, if you find yourself struggling to stick to your routine, there are a few things you can do:

  • In addition, identify what is causing you to deviate from your schedule
  • Furthermore, make adjustments to your routine that better suit your needs
  • Additionally, stay accountable by sharing your goals with others
  • Also, reward yourself for accomplishing your goals

Moreover, by staying consistent and committed to your music-making routine, you can make significant progress towards achieving your musical goals and becoming a successful musician.

How to Make More Music: Collaborating With Others

In addition, collaborating with others is key to making more music. As a result, working with other musicians and producers can bring fresh ideas and perspective to your creative process and help you create music that surpasses your individual capabilities. Explore collaborative opportunities with others in the industry to take your music to the next level.

Finding The Right People To Collaborate With

Furthermore, collaborating with others in music can be a great way to create something truly unique and special. However, finding the right people to collaborate with is key. However, you want to work with individuals who share the same vision and passion as you. It’s important to network and connect with other musicians in your community. Attend local shows and open mics or join online music forums to meet potential collaborators. Look for musicians who have skills that complement your own, but also bring something new to the table.

How to Make More Music: Being Open To New Ideas

One of the benefits of collaborating is the ability to receive new and fresh ideas. Then, it’s important to remain open to these ideas, even if they may initially seem outside of your comfort zone. The beauty of collaboration is the opportunity to create something that you never would have thought of on your own. Remember that you’re working as a team, so there needs to be give and take. Be willing to compromise and be flexible in order to create the best possible outcome.

How to Make More Music: Communicating Effectively

Communication is key in any collaboration, and this is especially true in music. In short, clear and effective communication will ensure that the project runs smoothly. Make sure that everyone is on the same page by discussing the expectations from the very beginning. It’s important to establish a timeline, assign responsibilities, and outline the goals and objectives. Regular check-ins throughout the process can help to identify and resolve any issues quickly. Make sure that everyone’s ideas and contributions are taken seriously and that feedback is provided in a constructive and respectful manner.

In conclusion, collaborating with others can be a fantastic way to take your music to the next level. Similarly, by finding the right people, being open to new ideas, and communicating effectively, you can create something truly special and unique. Make sure to take the time to connect with other musicians, listen to their ideas, and work together to create something amazing.

How to Make More Music: Utilizing Technology To Your Advantage

Technology has advanced in the music industry, giving artists the ability to create, record, and produce music with ease. Also, by utilizing software and digital tools, musicians can develop their sound, collaborate with others, and distribute their music to a global audience.

With the help of technology, artists can make more music and reach new heights in their careers.

Utilizing Technology to Your Advantage: Making music has always been a challenging task, but with the advent of technology, it has become much simpler and less expensive. In addition, musicians can now produce studio-quality music without having to pay for expensive recording studios. One of the most significant advantages of technology for music creators is the ability to market their music on a global scale. In this blog post, we will explore how to make more music by utilizing technology to your advantage.

Exploring Music Production Software and Tools: There are numerous music production software and tools available in the market that can help music creators with their craft. For example, these software and tools can range from free to expensive, depending on the level of functionality you require. One such tool is Ableton Live, which is widely used by musicians and producers for its comprehensive functionalities. Another useful software is Pro Tools, which is industry standard software used for professional music production. Regardless of what software or tool you choose, it is important to learn how to utilize it to maximize its potential.

How to Make More Music: Tips

Learning to Use Social Media to Promote Your Music: Social media platforms such as Facebook, Instagram, and YouTube have made it easier for music creators to showcase and share their music. As a result, these social media platforms have millions of active users, and they can offer a ton of organic reach that can help music creators reach their target audience. By keeping your social media accounts updated frequently with fresh and exciting content, you can attract more followers, which can lead to more fans for your music.

Networking Online with Other Musicians and Industry Professionals: Networking is essential in any industry, and music is no exception. However, as a music creator, it is crucial to build relationships with other musicians and industry professionals. This can help you get more exposure, collaborations, and even deals. With the help of the internet, you can connect with many other music creators and industry professionals around the world. Platforms such as LinkedIn and professional music forums can be a great way to connect with music creators and industry professionals in your niche.

Make sure to approach these individuals politely and professionally for the best results. Then, in conclusion, by utilizing technology to your advantage, you can make more music, promote it globally, and network with other music creators and industry professionals. By exploring music production software and tools, learning to use social media, and networking online, you can take your music career to the next level.

Taking Care Of Your Mental And Physical Health

As a musician, it’s easy to get lost in the creative process and lose track of time. However, neglecting your mental and physical health can have a significant impact on your ability to make music. In short, in this blog post, we will explore some effective ways to take care of your mental and physical health to help you make more music and achieve your goals.

How to Make More Music: Finding A Work-life Balance

One of the most essential aspects of taking care of your mental and physical health as a musician is finding a work-life balance. Similarly, many musicians are prone to working long hours, losing sleep and sacrificing personal time to pursue their passion. While this can be beneficial in the short term, it can lead to burnout over time. Try setting boundaries, scheduling regular breaks and making time for activities unrelated to music to help you achieve a healthy balance between work and life.

Incorporating Exercise And Meditation Into Your Routine

Making time to exercise and meditate can be incredibly beneficial for your mental and physical health. Also, exercise releases endorphins, which can boost your mood and improve your focus. Meditation can help reduce stress and anxiety, and improve your mental clarity. Try to incorporate regular exercise and meditation into your routine, even if it’s just for a few minutes each day, to help you stay grounded and focused.

How to Make More Music: Prioritizing Self-care

Self-care is often neglected or considered a luxury, but it’s essential for maintaining good health and well-being. In addition, prioritize self-care by paying attention to your physical needs such as proper sleep, hydration and nutrition. Additionally, it’s crucial to take care of your mental and emotional health by doing things that bring you joy and relaxation, such as spending time in nature, reading a book, or spending time with loved ones.

By following these tips, you can take care of your mental and physical health, allowing you to make more music and achieve your goals. Remember, taking care of yourself is not selfish; it’s necessary for your overall well-being and success.

How to Make More Music: Experimenting With Different Styles And Techniques

Experimenting with different styles and techniques is a creative way to make more music. For example, it allows you to discover new sounds and expand your skills. By trying out different approaches, you may find a unique style that sets you apart in the music industry.

As a musician, it’s important to constantly push yourself creatively. As a result, one way to do this is by experimenting with different styles and techniques. By stepping outside of your comfort zone, you can discover new sounds and develop your own unique style. In this post, we’ll look at three ways you can experiment with different styles and techniques to make more music.

Making A List Of Genres Or Techniques To Explore

One way to start experimenting with different styles and techniques is by making a list of genres or techniques you want to explore. This can include anything from learning a new instrument or genre, to experimenting with different production techniques or vocal styles. By having a concrete list of goals, you can create a roadmap for your experimentation, and ensure that you’re making progress towards your musical aspirations.

Challenging Yourself To Learn Something New

Another way to experiment with different styles and techniques is by challenging yourself to learn something new. This could be as simple as learning a new chord progression or as complex as mastering a new instrument. By setting yourself a challenge, you’re forced to stretch yourself creatively and learn new things. This can be a powerful way to develop your musical skills and discover new sounds.

Combining Elements From Different Styles To Create Something Unique

The final way to experiment with different styles and techniques is by combining elements from different genres or techniques to create something entirely new. For example, you could experiment with blending hip-hop beats with jazz chords, or adding electronic elements to a classical composition. By combining different elements, you can create something truly unique and original. This is an excellent way to develop your own musical style and stand out from other artists. In conclusion, experimenting with different styles and techniques is a critical part of making more music. By making a list of genres or techniques to explore, challenging yourself to learn something new, and combining elements from different styles, you can push yourself creatively and develop your own unique musical voice. So go forth and experiment – you never know what new sounds you might discover!

Investing In Your Craft

Investing in your craft is essential to make more music, as it allows you to continuously improve your skills, knowledge, and techniques. Whether it’s taking classes, collaborating with other musicians, or simply practicing daily, dedicating time and resources to your craft is a worthwhile investment towards achieving your goals.

Investing in Your Craft: Upgrading Your Equipment When it comes to making music, using quality equipment makes a huge difference in the final product. Upgrading your equipment is investing in your craft. There are different levels of investment you can make, depending on your budget and needs. First, think about the essentials of your set up. A quality microphone, headphones, and interface are important for capturing your sound accurately. If you’re a producer, you’ll want to invest in software and hardware that will give you the tools you need to create your desired sound.

If you’re on a budget, start with upgrading one item at a time. Prioritize the item that has the biggest impact on your sound quality. Investing in Your Craft: Taking Music Lessons or Workshops Music is a lifelong learning experience, and it’s important to stay current and learn new skills. Taking music lessons or workshops is another way to invest in your craft. For beginners, there are numerous online platforms to learn from home. These classes help you learn the basics of your instrument or the software you’re using.

How to Make More Music: In Practice

For those who are more experienced, private lessons from a professional musician will help you refine your skills. Workshops are also a great way to learn from experts. These events can range from day-long sessions to week-long retreats. Attending one can give you the opportunity to learn from experienced musicians and connect with other like-minded individuals. Investing in Your Craft: Attending Music Conferences and Networking Events Attending music conferences and networking events is a great way to meet other musicians and industry professionals. It’s also an opportunity to stay up to date on the latest trends in music.

These events can range from local to international. Some events focus on specific genres, while others cover all aspects of the music industry. Attendees can expect to hear from panelists, attend workshops, and even perform in front of a live audience. To get the most out of these events, make sure to research and plan ahead. Look into the schedule and plan out which events and workshops you want to attend. Bring business cards and be ready to meet new people and make connections.

Staying Inspired And Motivated

Staying inspired and motivated is crucial for musicians to produce more music. Setting clear goals, taking breaks, exploring new genres, collaborating with other artists, and pushing through creative blocks can all help to maintain motivation.

Creating music can be a fulfilling experience, but staying inspired and motivated is a challenge that every musician faces. Whether you’re a seasoned pro or a beginner, it’s important to keep yourself motivated to achieve your goals and to create music that you’re proud of. In this article, we’ll share some tips on how to stay inspired and motivated when making music.

Setting Realistic Goals For Yourself

To stay motivated, you need to have tangible targets that you can work towards. Setting realistic and achievable goals for yourself is key to maintaining your motivation. Start by identifying what you want to accomplish with your music. Is it to record a new album or to perform at a big event? Whatever it is, break it down into smaller, more manageable steps, and work towards achieving them one by one. This way, you’ll be able to track your progress and celebrate your accomplishments along the way.

Celebrating Small Successes Along The Way

When you achieve your goals, no matter how small they may seem, it’s crucial to celebrate them. Celebrating your accomplishments will boost your motivation and help you stay on track. It can be as simple as treating yourself to a nice meal or taking a day off to relax. By acknowledging and celebrating your small successes, you’ll be more likely to keep pushing yourself towards your bigger goals.

Finding Inspiration In Everyday Life

Inspiration can strike at any moment, but it’s important to actively seek it out, especially when you need to stay motivated. Look for inspiration in everyday life, whether it’s through nature, art, or the people around you. You can also try new experiences or push yourself out of your comfort zone to find new sources of inspiration. Don’t be afraid to experiment and try new things, as every experience can lead to a new source of inspiration for your music. In conclusion, staying inspired and motivated when making music is a continuous journey that requires focus and dedication. Setting realistic goals, celebrating small successes, and seeking inspiration in everyday life are just a few ways to keep yourself motivated. With perseverance and determination, you can create music that you’re proud of and achieve the success you desire.

Sharing Your Music With The World

Create a buzz for your music by sharing it with the world. The more music you make, the more chances you have of getting noticed. Get your tracks in front of the right audience and watch your fan base grow.

Creating music is an art form that comes from the soul. However, what good is an art form if it is kept to oneself? Music is better appreciated when it is shared with others. Sharing your music with the world is an essential step towards becoming a successful musician. In today’s digital age, the internet is undoubtedly the most effective way to show the world what you have created. With many platforms available, you can get your music out, attract new listeners, and grow your fanbase. Below are three effective ways to showcase your music to the world, gain recognition, and attract new listeners.

Creating A Website Or Online Portfolio To Showcase Your Work

Creating a website or an online portfolio is a fantastic way to showcase your music online. It allows your potential audience to access your music and know more about you as a musician. A website can include your biography, music videos, upcoming events, and contact information, all of which are essential components of your brand. Your website can be used to attract bookings, collaborations or sell merchandise. Moreover, you can get feedback from your audience through a feedback form or live chat. Consider hiring a web developer or a digital marketing expert to create a professional-looking website that appeals to your target audience.

Collaborating With Other Artists To Reach New Audiences

Collaborating with other artists is another way to showcase your music to new audiences. Collaborations allow you to leverage the existing fan base and audience of your partner, which can help you promote your music and attract new listeners. You can collaborate on a single project, a concert or even a joint tour. Consider partnering with musicians from different genres of music or countries. This will not only expose you to new audiences but also introduce you to new music styles.

Being Active In The Music Community And Building A Fanbase

Being active in the music community is essential to showcase your music to the world. Attend music events, join online music communities, and participate in relevant forums and discussions. Get to know other musicians, exchange ideas, and learn new techniques. Participating in music contests and submitting your music to music publications can also help you gain recognition and attract new listeners. As you build your fanbase, engage with them through social media, newsletters, and feedback forms. By staying active and engaging with your fanbase, you can not only showcase your music but also cultivate a loyal following.

In conclusion, sharing your music with the world is critical for success as a musician. By creating a website or online portfolio, collaborating with other artists, and being active in the music community, you can showcase your music to new audiences and start growing your fanbase. These tips are just a starting point, and there are many other ways to promote your music online. The key is to stay up to date with technology, be creative, and stay true to your passion for music.

Frequently Asked Questions On Make More Music

How Can I Make Music?

To make music, you can start by learning how to play an instrument or using a digital audio workstation (DAW). Experiment with creating melodies, rhythms, and chord progressions. Collaborate with other musicians or producers, and listen to feedback to improve your skills.

Stay updated with music trends and technology, and practice consistently to develop your own unique sound.

How Can I Practice Making Music?

To practice making music, set aside regular time for it, start with simple exercises, learn from others through tutorials or lessons, focus on improving specific skills, and experiment with new techniques and styles. Incorporate practice into your daily routine and stay motivated by setting achievable goals.

How To Make Music Without Instruments?

Create music without instruments by using a Digital Audio Workstation (DAW) software that allows you to compose and mix music using samples, loops, and virtual instruments. You can also record and manipulate sounds from your environment or voice using a microphone and audio editing software.

How Do Artists Make Music?

Artists make music by composing lyrics, creating melodies, and arranging instruments to produce a unique sound that reflects their creativity and emotions. They use various techniques, such as recording, mixing, and mastering, to produce a professional final product that can be distributed to listeners around the world.

Conclusion

All in all, making more music is a journey worth taking. Whether you’re a seasoned musician or a beginner, learning to play or write music is a fulfilling and rewarding experience. By using the tips and tricks outlined in this post, you can take your music to the next level and achieve your creative goals.

Whether you’re looking to play for fun, professionally or simply as a hobby, making music is a fantastic way of expressing yourself and spreading joy to those around you. So what are you waiting for? Start making more music today!

Categories
Archive

Scarlett Solo Vs 2I2

Scarlett Solo and 2i2 are both highly popular and reliable audio interfaces used for recording audio, but 2i2 offers additional features like MIDI inputs and a pad switch. Scarlett Solo and 2i2 by Focusrite are two of the most widely used audio interfaces for recording audios by seasoned professionals and enthusiasts alike.

As an Amazon Associate I earn from qualifying purchases.

Related reading: Focusrite Scarlett 2I2 4th Gen Review: Unmatched Clarity! and Scarlett Solo 1st Gen vs 2nd Gen vs 3rd Gen: Ultimate Guide. For background, see focusrite.com on Wikipedia.

Also, boasting impressive quality in compact designs, both devices come with their own unique features that set them apart from each other. While the Solo is more suitable for single recording sessions or podcasting, the 2i2 offers additional features such as MIDI inputs and a pad switch that makes it an ideal choice for artists looking to record various instruments or professionals who require a more comprehensive studio setup.

Moreover, we will briefly compare the Scarlett Solo and 2i2, highlighting their differences and similarities, to help you choose the right audio interface for your recording needs.

Scarlett Solo Vs 2I2

Credit: www.musicradar.com

What Is Scarlett Solo?

In addition, Scarlett Solo and Scarlett 2i2 are both audio interfaces manufactured by Focusrite. Also, Scarlett Solo is the smaller of the two, featuring a single mic preamp and a limited number of inputs and outputs. The Scarlett 2i2, on the other hand, comes with two mic preamps and more connections.

If you are a musician or a podcaster, who is looking for an affordable audio interface that provides great features then the Scarlett Solo is a device that you must consider. In addition, Scarlett Solo is a product of Focusrite, a leading audio equipment manufacturer that has been in the music industry for over 30 years. Furthermore, it is an entry-level audio interface device designed for solo artists who want to record high-quality audio without spending much money.

Scarlett Solo And 2i2: Features Of Scarlett Solo

Additionally, Scarlett Solo is a lightweight and compact device that provides excellent sound quality. For example, here are some key features of Scarlett Solo:

  • 1 microphone preamp with up to 48V phantom power
  • Also, one instrument input for guitar or bass
  • 1 headphone output with gain control
  • Sampling rates up to 192kHz/24-bit
  • Direct monitoring with low-latency

Pros Of Scarlett Solo

Moreover, Scarlett Solo comes with many benefits that make it an excellent choice for solo artists who want to record high-quality audio. As a result, here are some of the pros of Scarlett Solo:

  • Affordable price
  • Excellent sound quality
  • Easy to use
  • Compact and lightweight
  • Compatible with most DAW software
  • Low-latency monitoring

Cons Of Scarlett Solo

Like any other product, Scarlett Solo also has some limitations. However, here are some of the cons of Scarlett Solo:

  • One microphone preamp
  • Limited number of inputs
  • No MIDI input or output
  • Additionally, no built-in DSP processing
  • No mix control software

In conclusion, Scarlett Solo is an affordable and efficient audio interface that provides excellent sound quality. In addition, it is an ideal choice for musicians or podcasters who want to record high-quality audio at an affordable price. However, it has some limitations, but it offers great value for the price.

Scarlett Solo Vs 2I2

Credit: davidasbery.com

What Is Scarlett 2i2?

Scarlett 2i2 is a powerful audio interface that offers more inputs and outputs than the Scarlett Solo. While the Solo is ideal for single-channel recordings, the 2i2 is perfect for multi-channel recordings, making it a better choice for professional audio production.

Furthermore, if you are an aspiring musician or a podcaster, Scarlett 2i2 could be the ideal equipment you need to set up a home recording studio. It is a USB audio interface designed and manufactured by Focusrite, a company known for producing high-quality audio equipment. Scarlett 2i2 is a popular choice thanks to its audio quality, ease of use, and affordability. Let’s dive deeper and look into the features, pros, and cons of Scarlett 2i2.

Features Of Scarlett 2i2

Additionally, Scarlett 2i2 comes with a range of features, which make it suitable for singers, guitarists, and other instrumentalists. Here’s what you get with the Scarlett 2i2:

  • High-quality mic preamps
  • Up to 24-bit/192kHz audio quality
  • Also, direct monitoring with the ability to balance playback and recording levels
  • Moreover, high-impedance instrument inputs to plug in instruments like guitars and basses
  • Two line-level 1/4″ TRS balanced outputs to connect studio monitors
  • Furthermore, a headphone output with an independent level control and source selection
  • MIDI in and out connectivity
  • USB bus-powered and comes with a USB cable

Pros Of Scarlett 2i2

Scarlett 2i2 has several pros that make it stand out as compared to other audio interfaces in the market. Here are some of the advantages of using Scarlett 2i2:

  • It has a sturdy build quality that ensures durability over a long time.
  • Also, it provides high-quality audio output that captures every detail of your voice and instruments recordings.
  • It is highly user-friendly, with an intuitive and straightforward interface that makes it easy for beginners to use.
  • Moreover, it is very affordable as compared to other interfaces in the market and offers excellent value for its price.
  • It comes with a range of features that cater to different recording needs and preferences.

Cons Of Scarlett 2i2

Despite its many advantages, Scarlett 2i2 has a few cons that are worth noting. Here are some of its downsides:

  • It only has two mic preamps, which may not be enough if you’re looking to record multiple instruments simultaneously.
  • It lacks onboard effects and DSP processing, which means you’ll need to invest in third-party plugins and effects to enhance your sound quality.
  • The headphone out doesn’t have a 1/4″ jack, which means you’ll need an adapter to use some headphones.

In conclusion, Scarlett 2i2 is an excellent audio interface that provides high-quality audio output, ease of use, and affordability. Its range of features caters to different recording needs and preferences, making it an ideal equipment for home recording studios. However, it has a few downfalls like the limited mic preamps and lack of onboard effects, which may affect its overall performance.

Scarlett Solo Vs Scarlett 2i2: Inputs And Outputs

Scarlett Solo and Scarlett 2i2 are two popular audio interfaces. While Scarlett Solo has only one input and one output, Scarlett 2i2 has two inputs and two outputs. This makes 2i2 a more versatile option for those who need to connect multiple instruments or microphones.

If you are a podcaster, musician, or voice-over artist, you need a reliable audio interface to record your sound. The Scarlett Solo and Scarlett 2i2 are two of the most popular choices on the market.

Scarlett Solo And 2i2: Number Of Inputs Of Scarlett Solo

The Scarlett Solo has one XLR input for microphones and one 1/4″ jack input for guitars and other instruments.

Number Of Outputs Of Scarlett Solo

The Scarlett Solo has two outputs: a 1/4” stereo jack for headphones and RCA outputs for speakers.

Number Of Inputs Of Scarlett 2i2

The Scarlett 2i2 has two XLR/1/4” combo inputs, which can handle microphones, guitars, and line-level signals.

Number Of Outputs Of Scarlett 2i2

The Scarlett 2i2 also has two balanced monitor outputs, which are 1/4” TRS jacks, and a headphone output with independent level control.

Difference Between The Inputs Of Scarlett Solo And Scarlett 2i2

The biggest difference between the Scarlett Solo and Scarlett 2i2 is the number of inputs. The Scarlett Solo has one XLR input and one 1/4″ jack input, while the Scarlett 2i2 has two XLR/1/4″ combo inputs that allow for greater flexibility in recording different types of audio sources at the same time.

Difference Between The Outputs Of Scarlett Solo And Scarlett 2i2

As for the outputs, the Scarlett Solo has a 1/4” stereo jack for headphones and RCA outputs. The Scarlett 2i2 has two balanced monitor outputs, which are 1/4” TRS jacks, and a headphone output with independent level control. Overall, the Scarlett 2i2 is the better choice if you need more inputs and outputs. However, the Scarlett Solo is a great option if you are just starting out in audio recording and do not need more than one input at a time.

Scarlett Solo Vs 2I2

Credit: www.youtube.com

Scarlett Solo Vs Scarlett 2i2: Sound Quality

HTML Response:

When it comes to selecting a high-quality audio interface, the Focusrite Scarlett series is one of the most reputed options available in the market. Out of the various models offered in the Scarlett series, Scarlett Solo and Scarlett 2i2 are two of the most popular choices. Both of these audio interfaces offer exceptional sound quality, thanks to their preamps and ADC/DAC converters. Let’s explore the sound quality of both Scarlett Solo and Scarlett 2i2 in detail.

Preamp Of Scarlett Solo

The Scarlett Solo comes with a single preamp that delivers a clean and transparent signal. The preamp has a gain range of up to 56dB, which is more than enough to accommodate most dynamic and condenser microphones. The preamp also features a high-quality instrument input that can be used for recording guitars and basses directly, without the need for external amplifiers. Overall, the preamp of Scarlett Solo is ideal for solo musicians and podcasters who require a simple setup with great sound quality.

Preamp Of Scarlett 2i2

The Scarlett 2i2 offers two preamps that are identical to the one in Scarlett Solo. However, the additional preamp allows for recording two sources simultaneously, making it a more versatile option for musicians and recording engineers. The preamp also comes with a switchable 10dB pad that can be used to prevent distortion when recording loud sound sources. If you need a recording setup with more inputs, Scarlett 2i2 is a great option to consider.”

Scarlett Solo And 2i2: Adc/dac Of Scarlett Solo

The Analog-to-Digital Converter (ADC) and Digital-to-Analog Converter (DAC) of Scarlett Solo are of top-notch quality. The ADC/DAC has a maximum resolution of 24-bit/192kHz, which ensures that the recorded audio is captured with intricate detail and accuracy. The audio interface also features a Direct Monitor switch that provides zero-latency monitoring, which means you can monitor your source audio without any delay. Additionally, the DAC of Scarlett Solo provides clear and accurate audio playback, which is ideal for mixing and mastering audio tracks.

Adc/dac Of Scarlett 2i2

The ADC/DAC of Scarlett 2i2 is similar to the one found in Scarlett Solo, with a maximum resolution of 24-bit/192kHz. The audio interface also features the Direct Monitor switch that allows zero-latency monitoring. However, as Scarlett 2i2 features two preamps, it also offers two ADC/DAC converters, making it possible to record two audio sources simultaneously. The ADC/DAC of Scarlett 2i2 also provides detailed and accurate audio playback, which is required for mixing and mastering tasks.

Sound Quality Comparison

ParameterScarlett SoloScarlett 2i2
Preamp1 Preamp – Clean and transparent signal2 Preamps – Identical to Scarlett Solo preamp, switchable 10 dB pad and extra input
ADC/DACSingle ADC/DAC with maximum resolution of 24-bit/192kHzTwo ADC/DAC with maximum resolution of 24-bit/192kHz and Direct Monitor switch
Sound QualityCrystal-clear sound quality with detailed and accurate audio capture and playbackSimilar to Scarlett Solo, but with the added benefit of having an extra preamp and additional input

Overall, both Scarlett Solo and Scarlett 2i2 offer exceptional sound quality, thanks to their high-quality preamps and ADC/DAC converters. Scarlett Solo is ideal for solo musicians and podcasters who require a simple and high-quality recording setup, whereas Scarlett 2i2 is a more versatile option for recording multiple sources simultaneously. Whatever you choose, you can’t go wrong with the Scarlett series.

Scarlett Solo Vs Scarlett 2i2: Design And Build Quality

Are you a music enthusiast or a sound engineer looking to purchase a new audio interface? The Scarlett series by Focusrite has been making waves in the audio industry, and two of its models, Scarlett Solo and Scarlett 2i2, are worth considering. Let’s compare Scarlett Solo vs Scarlett 2i2 based on their design and build quality.

Design Of Scarlett Solo

Scarlett Solo is a compact and portable audio interface that weighs just 0.55 lbs. The interface’s front panel has a sleek and elegant red finish with rounded edges, making it visually appealing. The Solo features a large gain knob for adjusting the gain levels with ease. Besides, it has a direct monitor switch that enables true zero-latency monitoring during recording.

Build Quality Of Scarlett Solo

The Scarlett Solo has a robust aluminum casing that ensures durability and resistance to external shocks. The input and output sockets are sturdy and firmly attached, thus offering a secure connection. The build quality is impressive for its compact size, which makes it an ideal choice for musicians who are always on the go.

Design Of Scarlett 2i2

The Scarlett 2i2, like the Solo, has an elegant red finish with rounded edges that give it a classy appearance. The front panel is similar to the Solo, featuring a large gain knob and a direct monitor switch. However, the 2i2 has additional LED indicators for power, USB, and signal presence, making it easier to monitor recording levels.

Build Quality Of Scarlett 2i2

The Scarlett 2i2 has a rugged construction with a sleek aluminum chassis that ensures the interface’s durability. The inputs and outputs are firmly attached, ensuring a secure connection with no risk of accidental disconnection. It also features rubber feet that offer stability and a firm grip on any surface.

Whether you choose Scarlett Solo or Scarlett 2i2 depends on your needs. Both models have excellent design and build quality, ensuring satisfaction and a long-lasting experience. Scarlett Solo is the perfect choice for musicians who prefer a compact and portable audio interface, whereas Scarlett 2i2 is an excellent option for those who need an interface with additional LED indicators for better monitoring.

Frequently Asked Questions Of Scarlett Solo Vs 2i2

Is Scarlett 2i2 Better Than Solo?

Yes, Scarlett 2i2 is better than Solo. It has more features like dual headphone outputs and MIDI I/O. The 2i2 also has more inputs and outputs for a larger recording potential.

What Is The Scarlett Solo Good For?

The Scarlett Solo is a compact audio interface that is perfect for recording solo instruments or vocals. It offers high-quality sound, easy setup, and versatility for home recording or podcasting. It is also compatible with a variety of software, making it a great choice for musicians, podcasters, and content creators.

Do You Need Speakers For Focusrite Scarlett Solo?

No, you do not need speakers for Focusrite Scarlett solo as it has a headphone output that allows you to hear your playback recordings and audio interface inputs directly in your headphones.

Does Scarlett Solo Have Latency?

Yes, Scarlett Solo has some latency, which is the delay between inputting the audio signal and hearing it through headphones or speakers. However, this latency can be minimized by using the direct monitoring feature, which allows the user to hear the source audio without any delay.

Conclusion

Both Scarlett Solo and 2I2 are excellent audio interfaces that come with unique features and benefits to cater to different recording needs. Scarlett Solo is ideal for solo musicians or podcasters, while the 2I2 is perfect for small bands or those who require more inputs.

Ultimately, it comes down to personal preferences and the desired recording setup. Regardless of your choice, both devices offer outstanding sound quality and dependable performance.

Categories
Archive

What Makes A Good Mix

A good mix is a balanced combination of sounds that enhances the overall listening experience. A well-executed mix should have clarity, depth, and balance, allowing each element to be heard clearly without overpowering one another.

Mixing is an art that requires both technical skills and creativity. A mix can make or break a song, and a good mix can elevate a mediocre track to greatness. The process involves combining individual audio tracks and adjusting their levels, spatial positioning, and frequency content to create a cohesive and enjoyable listening experience.

A good mix should evoke emotion, create a sense of space, and reflect the intended mood of the song. Achieving a good mix is a collaborative effort between the producer, engineer, and artist, who work together to ensure that every element of the track can be heard and appreciated.

Balance

When it comes to audio mixing, “balance” is one of the most essential elements that can make or break a mix. It refers to the relative levels of different elements in a mix, including instruments, vocals, effects, and more. Achieving balance is crucial for creating a clear, cohesive, and dynamic mix that sounds pleasing to the listener.

The Importance Of Balance

Balance is important for several reasons. Firstly, it helps to ensure that each element of the mix can be heard clearly and distinctly. Without proper balance, certain elements may get lost in the mix, making the overall sound muddy or unclear.

Secondly, balance affects the overall tone and mood of the mix. Too much emphasis on one element can make the mix sound cluttered or chaotic, while too little emphasis can make it sound hollow or empty. Achieving the right balance is key to creating a mix that sounds full, rich, and textured.

How To Achieve Balance In Your Mix

There are several techniques and strategies that can help you achieve balance in your mix:

TechniqueDescription
PanningAdjusting the stereo placement of each element in the mix to create a spacious and balanced soundstage.
Volume ControlAdjusting the volume levels of each element in the mix to create a balanced blend of sounds.
EQUsing equalization to sculpt the frequency balance of each element in the mix, ensuring they don’t clash or mask one another.
CompressionUsing compression to control the dynamic range of each element in the mix, making it easier to balance their levels and create a consistent volume.
AutomationUsing automation to adjust the levels, panning, and effects of each element in the mix over time, allowing for greater expressiveness and dynamic contrast.

By using these techniques in combination, you can achieve a well-balanced mix that showcases each element to its fullest potential. Remember to use your ears as your guide and adjust each element until it fits perfectly within the overall context of the mix.

Clarity

To achieve a good mix, clarity is key. Clear and distinct sounds allow each element of the mix to shine through and contribute to the overall sound. Properly adjusting levels and using EQ to carve out space for each instrument or vocal can help achieve clarity.

When it comes to good sound mixing, clarity is one of the most important factors to consider. It refers to the ability to hear individual elements in a mix clearly and distinctly. Without clarity, even the best-made tracks can sound muddy and cluttered, affecting the overall quality of the music.

The Role Of Clarity In A Good Mix

Clarity is crucial in a good mix because it is what separates the instruments and vocals from each other, allowing them to stand out and be discernable to the listener. Without clarity, tracks can become too busy, the mix can sound muddled, and the energy will be lost. When mixing a track, it’s important to consider that each element should have its place in the mix, and every sound should have its distinction and space. This creates a pleasant and enjoyable listening experience that captures the listener’s attention.

Strategies For Improving Clarity

There are several strategies for improving clarity in a mix. These include:

  • EQ: EQ is an essential tool in mixing to balance the different frequencies of each element in the mix. By adjusting the EQ, you can ensure that each sound occupies its frequency range and doesn’t clash with other sounds in the mix.
  • Pan Positioning: Panning different elements in the mix can create space and separation, giving each sound its own room in the mix.
  • Compression: A compressor can help to control the dynamic range of a track, bringing up quieter elements and reducing louder ones, creating a more even and clear mix.
  • Volume: It is important to adjust the volume levels in the mix so that each element can be heard and doesn’t get lost in the mix.

In conclusion, achieving clarity in a mix is essential to creating a great-sounding track. By using the strategies above, you can improve the clarity of your mix and ensure that each element is heard clearly and distinctly. Remember, taking the time to ensure clarity in your mix will create a more enjoyable listening experience for your audience.

Panning

A good mix requires proper panning where each instrument and vocal is placed in the stereo field to create a well-balanced sound. Panning helps create a sense of dimension and depth, making the mix sound more natural and realistic.

Panning is the process of placing each instrument or sound element within the stereo field. It involves creating a feeling of width and depth in the mix and giving each instrument its own place in the mix. Panning is a crucial aspect of the mixing process, as it can make or break the overall sound of a song.

What Is Panning?

Panning is the technique of moving an audio signal from one speaker to another in a stereo mix. In other words, it is the art of balancing the sound between the left and right speakers to create a realistic and enjoyable listening experience. Panning can be applied to any sound element in a mix, including drums, guitars, vocals, and effects.

Creative Panning Techniques For A Better Mix

Panning is not just about placing each sound element in the mix; it is also about creating a sense of movement, dynamics, and excitement. Here are some creative panning techniques that can enhance your mix:

  • Hard Pan: This technique involves panning an instrument fully to one side, creating a wide stereo image. This is often used for percussion, effects, and backing vocals.
  • Mid-Side Processing: This technique involves separating the signal into mono and stereo components and processing them separately. It allows you to adjust the width and depth of the mix and add clarity to the center channel.
  • Auto-Panning: This technique involves automating the panning of a sound element to create movement and interest in the mix. It can be used to create a bouncing effect or to pan a sound across the stereo field.
  • Reverse Panning: This technique involves panning an instrument from the opposite direction, creating an unusual and intriguing effect. It is often used for synth leads, vocals, and guitar solos.

In conclusion, panning is an essential part of the mixing process, and it requires careful consideration and experimentation to achieve a balanced and dynamic mix. By using creative panning techniques, you can add depth, movement, and excitement to your mix and create a professional and engaging listening experience.

Eq

Achieving a good mix involves balancing different elements such as EQ, volume levels, panning, and effects. EQ plays a crucial role in creating a polished sound, ensuring that each instrument has its own space in the mix. A good mix should have clarity, balance and cohesion.

Understanding Eq

EQ, or equalization, is the process of adjusting the balance between different sound frequencies in an audio track. It involves boosting or cutting certain frequencies to create a balanced and pleasing mix. EQ is an essential tool in the mixing process that allows you to bring out the best in each element of the mix.

Using Eq To Enhance Your Mix

Using EQ to enhance your mix requires a good understanding of how different frequencies affect the overall sound. For instance, boosting the midrange frequencies can help make a vocal track more present and clear, while reducing the low-end frequencies can help clean up a muddy bass sound. To obtain a balanced mix, it is important to avoid EQ’ing every track in isolation. Instead, consider the entire mix and aim to create space for each element to sit within the mix. For instance, if you EQ a guitar track to make it stand out in the mix, consider cutting some low-end frequencies in the bass track to allow both instruments to coexist without masking each other.

Tips For Using Eq Effectively

Here are some tips to help you use EQ effectively in your mix:

  • Before making any EQ adjustments, listen to the track and identify which frequencies need to be boosted or cut.
  • If you’re not sure which frequencies are causing issues, use a spectrum analyzer to visualize the frequency content of your mix. This can help you identify problem areas quickly.
  • Be subtle with EQ adjustments. Small, gentle adjustments are usually more effective than drastic ones.
  • Avoid boosting frequencies that are already prominent, as this can create harshness or distortion in the mix.
  • Always listen to your mix in context. Make sure that your EQ adjustments have a positive impact on the overall sound of the mix, rather than just on individual tracks.

Conclusion

EQ is a powerful tool that can help you create a balanced and professional-sounding mix. By understanding how different frequencies interact with each other, and using EQ efficiently, you can bring clarity and definition to your tracks while making sure that each element has its place in the mix. Remember to be subtle with your EQ adjustments and always listen to the mix in context to achieve the best results.

Compression

Compression is an essential tool for achieving a good mix in music production. It can control the dynamic range of instruments and make them sound more cohesive and balanced. However, it’s important to use compression judiciously and avoid over-compressing, which can result in a lifeless and dull mix.

What Is Compression?

Compression is a vital element in the mixing process that helps to control the dynamic range of an audio signal. It involves reducing the volume of the loudest parts of the track, known as peaks, while boosting the quieter sections. Compression helps to balance the overall sound of the mix, bringing up the level of the quiet elements and preventing any clipping or distortion caused by excessively high peaks.

Using Compression To Improve Your Mix

Compression is a tool that every audio engineer should have in their arsenal. Properly used, it can enhance the sound of individual tracks, and improve the overall balance and cohesiveness of the mix. Here are some tips for using compression effectively:

  • Set your attack time: The attack time of a compressor determines how quickly it kicks in. A slower attack time will allow the initial transient, or peak, to pass through before compression is applied. A faster attack time will immediately reduce the volume of the audio signal.
  • Adjust your release time: The release time of a compressor determines how long it takes for the compressor to stop reducing the volume after the signal drops below the threshold. A fast release time can create a pumping effect and make the mix sound unnatural. A slower release time will allow the compressor to smoothly release the audio signal.
  • Set your ratio: The ratio determines the amount of compression that is applied once the signal exceeds the threshold. A high ratio, such as 8:1, will apply a significant amount of compression, while a low ratio, such as 2:1, will apply only a little compression.

It’s important to note that compression should be used sparingly, with a delicate touch. Over-compression can lead to a loss of dynamics and make the mix sound flat and lifeless. In conclusion, compression is an essential tool for audio engineers, and mastering the art of proper compression can take a mix to the next level. Remember to set your attack and release times appropriately, adjust your ratio carefully, and use compression sparingly to achieve the optimal sound for your mix.

What Makes A Good Mix

Credit: soundcloud.com

Reverb And Delay

Reverb and delay are key effects that audio engineers use to enhance the quality of a mix. They bring depth, space, and character to the sound. If used incorrectly, they can make the mix sound muddy, cluttered, and confusing. It’s crucial to understand the fundamentals of reverb and delay and how to use them effectively in a mix.

The Importance Of Reverb And Delay

Reverb and delay are two of the most commonly used effects in mixing. Reverb is the sound of a space, and it adds ambiance and depth to the sound. Delay is an echo effect that repeats the sound after a certain time, which creates a sense of space and dimension.

Using Reverb And Delay Effectively

When it comes to using reverb and delay, less is often more. It’s essential to avoid using too much reverb or delay, as it can blur the sound and make it sound muddy. Instead, a good mix often requires the clever use of these effects.

Here are some tips to use reverb and delay effectively:

  • Listen to the individual instruments: Before adding reverb or delay to a track, it’s important to listen to the individual instruments and determine what kind of space they need to occupy in the mix. For example, a snare drum might need a short plate reverb to give it some air, while a lead vocal might benefit from a longer hall reverb to create a sense of space.
  • Consider the tempo: The tempo of the song can influence the use of reverb and delay. Faster tempo songs might require a shorter delay time and a less pronounced reverb effect, while slower tempo songs might benefit from a longer delay time and a more prominent reverb effect.
  • Use send/return tracks: Instead of adding reverb or delay directly on the track, it’s often better to use send/return tracks. This allows you to apply the effect to multiple tracks and adjust the mix accordingly. It also saves CPU power as you’re only running one instance of the effect.
  • Experiment with different types: There are various types of reverb and delay, from room and plate to hall and spring. Experimenting with different types can give your mix more character and depth. Try to choose a reverb or delay that complements the character of the instrument or vocal.

Overall, reverb and delay are important tools in creating a well-balanced mix. Used correctly, they can provide a sense of space, depth, and character that make the mix sound professional and polished.

Volume

Volume is one of the most important aspects of music production as it can greatly affect the listener’s experience. A good mix should have a balanced and controlled volume, creating an impact and emotion that captivates the listener. In this blog post, we will discuss the importance of volume in music production and how to use it effectively to create an outstanding mix.

Mastering Volume Levels

Before we dive into how volume can be used to create an impact, it’s essential to understand how to master volume levels correctly. The main aim of mastering is to achieve a balanced volume that is consistent throughout the track. This ensures that the overall sound is clear, and no single instrument or vocals overpower the others.

Here are some tips on mastering volume levels:

  1. Use reference tracks to guide you on the optimal levels
  2. Avoid over-compression, which can cause distortion and ruin the mix
  3. Use equalization to balance and control the frequency levels
  4. Avoid cranking up the volume on individual tracks, rather, evaluate the mix as a whole and adjust accordingly

How To Use Volume For Impact

Volume can be used creatively to create an impact on the listener. For instance, you can use low volumes to create tension, and then gradually raise the volume to create an impact. Similarly, you can use volume to emphasize the chorus or bridge of the song.

Here are some tips on how to use volume for impact:

  • Start with a lower volume during the intro and verse, then gradually increase the volume as the song progresses towards the chorus
  • Use volume automation to adjust levels of individual tracks, especially when emphasizing a particular instrument or vocal
  • Use panning to spread the sound stage and create a fuller sound
  • Use subtle volume adjustments to avoid sudden changes that can be jarring to the listener

Conclusion

Mastering volume levels and using volume to create an impact are crucial elements of music production. By using volume creatively, you can control the listener’s emotions and create a captivating experience. Remember to begin with mastering correct volume levels and then explore creative ways to use volume for impact purposes, which will lead to an outstanding mix.

Automation

A good mix of automation involves finding the right balance between streamlining tasks and maintaining a human touch. With the right mix, businesses can save time and resources while still providing personalized experiences for their customers.

Automation is a time-saving tool that can make the mixing process more efficient and effective. It can be particularly useful when working on large projects or when you need to make changes quickly. In this section, we’ll explore what automation is and how you can use it to enhance your mix.

What Is Automation?

Automation is the process of using software to control a mix’s settings and changes automatically. This can include controlling volume levels, fades, panning, and other parameters. Automation can be applied to individual tracks, groups of tracks, or the entire mix. The primary goal of automation is to provide a consistent and accurate mix throughout the entire song.

Ways To Use Automation In Your Mix

Here are several ways you can use automation in your mix:

Automation TechniqueDescription
Volume AutomationControlling the dynamic changes in audio volume levels by adjusting gain levels and applying fades automates changes during recording and mixing.
Pan AutomationAutomating how the sound moves in stereo or surround mix can be achieved with panning automation. This technique can be used to create a sense of space within the mix and provides clarity, too.
EQ AutomationApplying equalization changes at specific moments, on specific tracks or sections of the song, to enhance frequency balance
Send Effects AutomationUsing automation to control the amount or level of send effects like delay and reverb on certain instruments as they play. This technique gives more control over how much of each effect is applied to elements of the mix, leading to a more refined sound.
Mute and Solo AutomationAutomating when an instrument should be muted or soloed will help in achieving better clarity in the mix and can help reduce masking effects.

With automation, a mix engineer can ensure that the overall sound of the mix is consistent and balanced. It minimizes human errors and allows for the automation of tasks that would otherwise be done manually. The result is a more refined mix that meets the desired quality targets. However, too much automation can have an adverse effect on the natural flow of the music. A delicate balance must be struck to ensure that the automated mix remains human-like. In conclusion, automation is a powerful tool that can save both time and effort when mixing audio. It allows a mix engineer to achieve high levels of accuracy and consistency for their mixes. With its many techniques, automation can reduce inter-track interference, reduce mixing time, and aid multi-tasking. However, it’s important to remember that too much automation can adversely affect the natural flow of the music. A balance has to be struck to produce a more refined and human-like mix.

Frequently Asked Questions On What Makes A Good Mix

What Does A Good Mix Consist Of?

A good mix consists of a balance of all the necessary elements, including vocals, instruments, and effects, that blend together harmoniously to create an enjoyable listening experience. A mix should be clear, dynamic, and have appropriate levels of volume for each individual element.

Achieving a good mix takes time and attention to detail in both recording and post-production stages.

What Makes A Perfect Mix?

A perfect mix should be balanced and tailored to the specific needs of the project. It should have clear audio quality, proper tonal balance, good volume levels, and a consistent sound throughout. The mix should also enhance the emotions and message of the music while taking into account the preferences of the client or audience.

How Do I Make Sure My Mix Is Good?

To ensure a good mix, follow these steps: 1. Use quality equipment. 2. Listen to the mix in different environments. 3. Pay attention to the balance of the different elements. 4. Use EQ, compression, and other tools to enhance the mix.

5. Take breaks to avoid ear fatigue and come back with fresh ears.

How Do You Know If Mixing Is Good?

To know if mixing is good, listen for balance between all the elements in the mix, ensure proper EQ and compression is used, check for clarity and definition in each individual track, consider the overall tone and vibe, and test the mix on various systems to ensure it translates well.

Conclusion

To create a good mix, you need to understand the different elements that make up a track and how they interact with each other. The key is to find the right balance between these elements, allowing each one to shine without overpowering the others.

A good mix should also be clear, dynamic, and well-rounded, with every part of the track contributing to the overall sound. By following these guidelines, you can create mixes that are not only pleasing to the ear but also effective in conveying emotion and meaning.

Happy mixing!

Categories
Archive

Whats The Best Daw For You

The best DAW for you greatly depends on your personal preferences and needs. However, popular choices among professionals include Pro Tools, Ableton Live, and Logic Pro X.

Choosing the best DAW (Digital Audio Workstation) can be a daunting task regardless of your level of expertise. With options ranging from basic free versions to premium alternatives, figuring out what fits your workflow and your budget can seem overwhelming.

Ultimately, the choice is yours and should depend on factors such as the type of music you create, the frequency of your production, and what features and plugins you need to get the job done. We will explore some of the most popular choices for music production and discuss the pros and cons of each option.

Factors To Consider When Choosing A Daw

When considering the best DAW, consider factors such as your budget, the type of music you create, the features you need, and your level of expertise. It is important to choose a DAW that suits your specific needs and allows you to create the best music possible.

Factors to consider when choosing a DAW: A digital audio workstation (DAW) is a software used for recording, editing, and producing audio files. It allows you to create professional audio tracks, podcasts, and even albums. However, choosing the right DAW can be daunting since there are many options available. In this article, we will be discussing the factors to consider when choosing a DAW. These factors include your budget, hardware requirements, and workflow preferences. H3: Budget Your budget is one of the significant factors to consider when choosing a DAW. DAWs vary in price, with some being free and others costing hundreds or even thousands of dollars. If you’re a beginner, it’s advisable to start with a free DAW like Audacity or GarageBand. These DAWs offer a basic set of features that will help you learn the ropes. However, they may not be suitable for professional use. If you plan to use a DAW for commercial purposes, you should consider investing in a paid DAW like Pro Tools or Logic Pro X. H3: Hardware requirements Hardware requirements are another factor to consider when choosing a DAW. Some DAWs require high-end computers with powerful processors and large amounts of RAM. Others may work on low-end computers, but with limited functionality. Before choosing a DAW, consider your computer’s specifications and ensure that they meet the DAW requirements. This will prevent you from experiencing playback and recording issues. H3: Workflow preferences Workflow preferences are subjective and vary from one user to another. Some DAWs are designed for electronic or dance music, while others are more geared towards rock or hip-hop. Before selecting a DAW, consider the genre of music that you’ll be producing and choose a DAW that fits its demands. You should also consider the DAW’s interface, ease of use, and customization options. If you’re more comfortable with keyboard shortcuts, choose a DAW that allows for customization. In conclusion, when choosing a DAW, you should consider your budget, hardware requirements, and workflow preferences. Keep in mind that DAWs are not a one-size-fits-all solution, so choose a DAW that meets your needs. Whether you’re a beginner or an experienced sound engineer, selecting the right DAW is crucial to your success.

Daw Options

Choosing the best digital audio workstation (DAW) ultimately depends on your personal preferences and needs. It’s important to weigh factors such as your budget, the type of music you’re producing, and your level of expertise before deciding on a DAW option.

If you are looking for a DAW option that caters to electronic music production, then FL Studio is the one for you. This software, formerly known as Fruity Loops, has come a long way since its inception and is favored by many producers due to its intuitive user interface and extensive sound library. With features like pattern and step sequencers, mixer, and playlist, FL Studio is a one-stop-shop for producers. Ableton Live is another popular DAW option, particularly favored by live performers. Its unique Session View workspace allows users to easily trigger clips and loops on-the-fly, making it a great option for DJs and electronic musicians. Ableton Live also comes with a host of instruments and effects, making it a versatile option for producers. When it comes to recording, Pro Tools is the industry standard and favored by many professional recording studios. Its robust recording and editing capabilities make it a great choice for music, film, and TV post-production. Pro Tools also supports a wide range of plugins, allowing users to further enhance their projects. If you are a Mac user, then Logic Pro X is a great DAW option. This software is packed with features such as a vast library of virtual instruments, MIDI editing tools, and a mixer with a customizable interface. Logic Pro X is also popular among composers due to its built-in scoring and notation tools. Cubase is a DAW option that has been around for quite some time and has developed a loyal following. Its mix console feature, along with its extensive virtual instrument library, make it a great option for modern music production. Cubase is also regularly updated, ensuring that it stays up-to-date with the latest industry standards. Reason is a unique DAW option that simulates a virtual rack of hardware devices and instruments. Its modular design allows for endless sound shaping possibilities and has garnered a following among electronic music producers. Reason also supports third-party plugins, making it a versatile option. Studio One is a relatively new DAW option but has quickly gained popularity due to its intuitive user interface and drag-and-drop functionality. Its mixer features allow for easy channel strip customization, making it a great option for producers or engineers looking to quickly mix projects. Mac users looking for a free DAW option need not look further than GarageBand. This software comes pre-installed on all Macs and offers a host of features such as virtual instruments, MIDI editing, and a multitrack recorder. While it may not have all the bells and whistles of some of its paid counterparts, GarageBand is a great option for beginners or those on a tight budget.

Fl Studio

FL Studio is a popular digital audio workstation that offers a user-friendly interface, extensive plugin support, and a vast collection of features suitable for both beginners and experts. It’s the best DAW to consider for producing electronic dance music, hip hop or trap beats.

If you’re a music producer or artist looking for a high-quality digital audio workstation (DAW), one of the first names that will come up is FL Studio. This versatile software has been around since 1997 and has undergone numerous updates and improvements to make it one of the most powerful tools for music creation on the market. Let’s take a closer look at the FL Studio DAW with an overview, its features and capabilities as well as its cost and pricing options.

Overview Of The Daw

FL Studio, also known as FruityLoops, is a full-featured DAW that offers a range of tools for music production, mixing and mastering. It is a popular choice among electronic and hip-hop producers, as well as sound designers and beat makers. One of the unique features of FL Studio is its pattern-based sequencer, which allows users to create and rearrange musical snippets easily. The DAW also comes packed with a variety of plugins, virtual instruments, and effects. This software is designed to be user-friendly yet capable of producing professional-level tracks. Its intuitive interface is ideal for beginners and professionals alike, making FL Studio one of the most accessible DAWs on the market.

Features And Capabilities

One of the most impressive features of FL Studio is the abundance of plugins and virtual instruments that it comes with. This software has over 80 built-in plugins, including synthesizers, samplers, and effects. Some notable plugins are GMSynth, Harmor, and Sytrus. Moreover, FL Studio supports third-party VST plugins, which means that you can expand the features and capabilities of the software when needed. FL Studio’s mixer is another standout feature. It has an intuitive interface and an endless number of insert and send tracks. The mixer offers a high degree of control over the tracks, with a range of built-in effects like EQ, compression, and reverb. FL Studio also has advanced automation capabilities, which allow for precise control over parameters within your music. The software has a range of automation tools like automation clips, LFOs, and envelopes that you can use to create dynamic and evolving soundscapes.

Cost And Pricing Options

FL Studio comes in several different editions, each with its own set of features and pricing. The Fruity edition is the most basic version, costing around $99. The Producer edition costs around $199, and the Signature edition clocking in at $299. Each step up in the versions provides additional features and plugins, making them more suited for experienced producers. Overall, FL Studio continues to be one of the most popular DAWs amongst producers due to its wide range of features, user-friendly interface, as well as its affordable price points. Whether you are an experienced sound designer or just starting, FL Studio provides a complete set of tools for creating professional-level music.

Ableton Live

Ableton Live is a versatile digital audio workstation (DAW) with a user-friendly interface that suits all types of musicians, producers, and DJs. Its unique features like Session View and Drum Rack make it the best DAW for live performances, while also providing a great production tool for studio recordings.

Overview of the DAW: Ableton Live Ableton Live is a popular digital audio workstation or DAW used for music production, live performances, and DJing. It is designed to be intuitive and easy to use for both novice and professional users, offering a range of features and capabilities that make it a versatile tool for music creation. The program is known for its unique Session View and Arrangement View, allowing users to arrange, mix and edit tracks either in real-time or in a more traditional linear fashion.

Features And Capabilities

One of the key features of Ableton Live is its Session View, which allows users to work with loops, samples, and other audio clips in a non-linear way. This can be useful for live performances as it allows users to quickly and easily manipulate audio in real-time. Ableton Live also offers a range of built-in instruments and effects, as well as support for third-party plugins, making it a powerful tool for sound design and music production. Another useful feature of Ableton Live is its ability to record and manipulate MIDI data. This can be useful for creating complex arrangements, as well as for manipulating virtual instruments. The program also offers a range of options for automating parameters such as effects and filters, allowing users to create dynamic and evolving soundscapes.

Cost And Pricing Options

Ableton Live is available in three different versions: Intro, Standard, and Suite. The Intro version is the most affordable, priced at $99, while the Standard and Suite versions are priced at $449 and $749 respectively. Each version offers a different range of features and capabilities, with the Suite version being the most comprehensive and feature-packed. In addition to the standalone versions, Ableton also offers a range of bundles and upgrades, as well as discounts for students and teachers. The program is available for both Windows and MacOS, and can be purchased directly from the Ableton website or from authorized resellers. Overall, Ableton Live is a powerful and versatile tool for music production and live performance, offering a range of features and capabilities that make it a valuable addition to any musician’s toolkit. Whether you’re a novice producer or an experienced musician, Ableton Live is definitely worth considering.

Pro Tools

Pro Tools is a powerful DAW that offers extensive audio editing and mixing capabilities. With a user-friendly interface and top-notch plugins, it’s an excellent choice for professionals in the music industry looking for a high-level recording software.

Overview Of Pro Tools

Pro Tools is a digital audio workstation (DAW) developed and manufactured by Avid Technology. It has been the industry standard for professional recording, mixing, and editing music for over two decades. It is used by musicians, producers, and engineers to create high-quality audio recordings. Pro Tools has a simple interface, and its platform enables users to work with a wide range of audio formats and plug-ins.

Features And Capabilities

Pro Tools offers a wide range of features such as multitrack recording and editing, MIDI sequencing, and virtual instruments. Users can also edit, mix, and master audio with high precision. Additionally, Pro Tools also has built-in tools, including EQ, dynamics processing, and time-based effects. The software is compatible with both Mac and Windows computers and can connect to a variety of audio hardware.

Cost And Pricing Options

Pro Tools is a premium product, and its cost is often a significant barrier for new users. There are several pricing options available, including monthly and annual subscription models, which provide access to the latest version of the software and regular updates. A perpetual license is also available, which provides a perpetual license to the software and includes a year of updates and support. Pro Tools also offers a free version, Pro Tools First, with limited features that can be used for personal use or smaller projects. Overall, Pro Tools is a powerful and versatile DAW that has been a favorite among professionals for many years. While the cost and learning curve can be steep, the software provides a comprehensive set of tools that are essential for creating high-quality audio recordings.

Whats The Best Daw For You

Credit: m.youtube.com

Logic Pro X

Logic Pro X is a versatile digital audio workstation (DAW) that caters to a wide range of music production needs. With its easy-to-use interface, advanced features, and compatibility with both Mac and PC, Logic Pro X is the best DAW for professional musicians, producers, and sound designers.

Overview Of The Daw

Logic Pro X is a digital audio workstation designed and developed by Apple. It is a popular DAW among professional music producers, composers, and audio engineers due to its comprehensive set of features and user-friendly interface. The latest version of Logic Pro X provides an extensive range of tools for editing, mixing, and producing music. It can run on macOS Mojave or later and has support for the latest versions of both macOS and hardware.

Features And Capabilities

Logic Pro X comes with a vast range of features and capabilities that cater to the needs of different users. It offers a powerful set of tools for recording audio, editing MIDI, composing music, mixing, and mastering tracks. The software includes a variety of virtual instruments, plugins, and effects that users can use to enhance their tracks and create unique sounds. Additionally, Logic Pro X supports a range of third-party plugins, allowing users to add more functionality to the software. One of the best features of Logic Pro X is its intuitive interface, which makes it easy for users to navigate and get started even if they are new to music production. The software’s customizable controls, resizable windows, and smart tool make it a popular choice for professionals who require a DAW that gives them complete control over their work.

Cost And Pricing Options

Logic Pro X is available on the Apple App Store for a one-time payment of $199.99. This purchase provides users with lifetime access to the software, including all future updates and upgrades. This makes Logic Pro X an affordable option for users who require a comprehensive DAW, without any recurring fees. Additionally, Apple provides a free trial version of Logic Pro X, allowing users to test out the software before committing to buying it. In conclusion, Logic Pro X is an excellent choice for users looking for a high-quality DAW with a vast range of features and capabilities. Its intuitive interface, customizable controls, and comprehensive set of tools make it a popular choice among professionals and beginners alike. The one-time payment option makes it affordable for users who want to avoid recurring fees, and the trial version provides a no-risk option for users wanting to try it out before buying.

Cubase

Cubase is a popular digital audio workstation offering a wide range of features such as MIDI sequencing, mixing, and recording capabilities. It is best suited for professional music production due to its advanced features, but also offers a user-friendly interface for beginners.

If you’re a musician or producer looking for a digital audio workstation (DAW), you may have heard of Cubase. Developed by Steinberg, Cubase has been around since the 1980s and has become a popular choice for professional and amateur music-makers alike. In this section, we’ll provide an overview of the DAW, its features and capabilities, and its pricing options.

Overview Of The Daw

Cubase is a comprehensive DAW that allows users to record, edit, mix, and master audio and MIDI tracks. It comes with a wide range of built-in tools and effects, including EQ, compression, delay, and reverb, as well as virtual instruments like synthesizers, drum machines, and samplers. Cubase also supports third-party plugins for users who want to expand their sound palette even further. One of the standout features of Cubase is its ability to handle large and complex projects with ease. Its 64-bit audio engine allows for low-latency recording and mixing, and its advanced routing and grouping options make it easy to manage multiple tracks and busses. Cubase also offers powerful automation features, allowing users to create dynamic and expressive mixes with ease.

Features And Capabilities

Cubase is packed with features and capabilities that make it a versatile and powerful DAW. Some of its key features include:

  • Audio and MIDI recording and editing
  • Flexible mixing and routing options
  • Built-in effects and virtual instruments
  • Advanced automation capabilities
  • Support for third-party plugins
  • Score editing and notation features
  • Video playback and scoring

Cubase also offers a range of tools for music composition and arrangement, including chord pads, a harmonic analysis tool, and a drum editor. Plus, its VariAudio tool allows for detailed pitch and timing correction of vocal and instrument recordings.

Cost And Pricing Options

Cubase is available in several different versions to suit different users’ needs and budgets. The latest version, Cubase Pro 11, starts at $579 for a perpetual license, with upgrade and crossgrade options available for existing Cubase users. Steinberg also offers a subscription option, Cubase Pro Artist, which includes access to all of the features of Cubase Pro for a monthly or annual fee. For users who don’t need all of Cubase’s advanced features, Steinberg offers Cubase Elements and Cubase AI, both of which are more affordable and stripped-down versions of the DAW. Cubase Elements starts at $99, while Cubase AI is often bundled with hardware purchases. Overall, Cubase is a powerful and versatile DAW that offers a wide range of tools for music creation, production, and mixing. Its advanced features and capabilities make it a popular choice for professional users, while its more affordable versions make it accessible to beginners and hobbyists as well.

Whats The Best Daw For You

Credit: blog.groover.co

Reason

Selecting the best DAW can be a tricky task considering the vast options available in the market, yet your ultimate choice should be based on your specific needs and style. Take time to figure out your workflow process and preferred features before making a decision.

When it comes to creating music, choosing the right Digital Audio Workstation (DAW) is crucial. With so many options available in the market, it can be overwhelming to make a decision. You need to consider multiple factors such as your experience level, genre, budget, and preferred workflow.

Overview Of The Daw

The first step in choosing the right DAW is to understand what it is and how it works. A DAW is a software application that lets you record, edit, mix, and produce digital audio. It is the heart of your music production setup, and everything you do in creating music goes through it. Every DAW has a unique interface and workflow. Some are more complex and require a steep learning curve, while others are more intuitive and beginner-friendly. It is crucial to choose a DAW that fits your needs and level of experience.

Features And Capabilities

The features and capabilities of a DAW are another essential factor to consider. Some DAWs are built for specific genres or types of music, while others are more versatile and cater to different styles. Look for a DAW that offers features that align with your creative needs. For instance, if you are into electronic music production, you might want a DAW that has powerful MIDI sequencing capabilities. If you are a singer-songwriter, you might prefer a DAW that excels in recording and editing live instruments.

Cost And Pricing Options

The cost and pricing options of a DAW are also critical factors to consider. Some DAWs are free, while others come with a hefty price tag. However, the cost of a DAW does not always correspond to its quality or features. Consider your budget and what you are willing to spend before making a purchase. Some DAWs offer subscription-based pricing models, while others come with a one-time purchase option. In conclusion, choosing the right DAW for you requires careful consideration of multiple factors. It is crucial to find a DAW that fits your creative needs, experience level, and budget. Whether you are a beginner or a professional, there is a DAW out there that suits your needs.

Studio One

Studio One is a top-rated DAW software with unmatched capabilities for recording, mixing, and mastering. With its easy-to-navigate interface and powerful features, it provides a seamless experience for both beginners and professionals in the music industry.

Overview Of The Daw

Studio One is a digital audio workstation (DAW) developed by PreSonus. It is a versatile and user-friendly DAW that is suitable for musicians, producers, and engineers of all skill levels. Studio One offers a wide range of features and capabilities that make it an excellent choice for music production. It is available in both Professional and Artist versions, with the Professional version offering more advanced features.

Features And Capabilities

Studio One offers a variety of features and capabilities that make it a top contender in the DAW market. One of its standout features is the drag-and-drop functionality, allowing users to easily create and arrange tracks. Studio One also includes features such as Melodyne integration, which allows for powerful vocal editing capabilities. The DAW also has an extensive library of virtual instruments and effects, as well as the ability to use third-party plugins. Another notable feature is the Scratch Pad, which allows users to experiment with arrangements without affecting the original project. Users can also collaborate with other producers and musicians through the cloud-based storage system, Studio One Remote.

Cost And Pricing Options

The cost of Studio One varies depending on the version and license type. The Professional version can be purchased for a one-time fee ranging from $399 to $449, depending on the license type. The Artist version can be purchased for a one-time fee of $99. PreSonus also offers a subscription plan for the Professional version, starting at $16.67/month. The subscription plan provides access to all updates and upgrades during the subscription period. In addition, PreSonus offers a free trial of both the Professional and Artist versions.
In conclusion, Studio One is a highly capable DAW that offers a range of features and capabilities suitable for music production. Its user-friendly interface and drag-and-drop functionality make it an excellent choice for both beginners and advanced users. While the pricing options may be steep for some, the subscription plan provides an affordable option for those who wish to use the Professional version without a large upfront cost.

Whats The Best Daw For You

Credit: www.masteringthemix.com

Garageband

GarageBand is a versatile digital audio workstation (DAW) that is popular among Mac users for its user-friendly interface, extensive sound library, and range of tools for recording, mixing, and mastering music. It’s a great choice for novice producers and musicians who are looking to get their feet wet in music production and recording.

GarageBand is a digital audio workstation (DAW) developed by Apple Inc. and is designed for macOS and iOS devices. It is considered to be an entry-level DAW, and it is one of the easiest music production software to learn and use. In this section, we will give an overview of GarageBand as a DAW, discuss its features and capabilities, and go over the cost and pricing options.

Overview Of The Daw

GarageBand has a clean user interface, which makes it easy for beginners to navigate. It has a range of virtual instruments, including drum kits, synthesizers, and a range of guitar amps and effects. You can also import your own audio files to work with, making it a versatile tool for music production, podcasting, and sound design. The DAW is also designed to work flawlessly with other Apple products, like Logic Pro X for more advanced music production.

Features And Capabilities

GarageBand offers a wide range of features for creating and recording music. Some of these features include virtual drummers, smart controls, and an extensive library of loops, which you can use to create professional-sounding music quickly. The DAW also offers multi-take recording, which allows you to record multiple takes of the same track, giving you more control over the final product. You can also use GarageBand for sound editing, mixing, and mastering, making it a convenient all-in-one tool.

Cost And Pricing Options

GarageBand is a free DAW offered by Apple, making it accessible to everyone. It comes pre-installed on all macOS and iOS devices. This means you can start using it straight away without needing to buy anything extra. If you are looking for more advanced features, you can choose to upgrade to Logic Pro X, which is also developed by Apple. Logic Pro X offers more features and is considered a professional-level DAW. The cost for Logic Pro X is $199.99, with a free trial available. Overall, GarageBand is an excellent entry-level DAW that is perfect for beginners and podcasters. It has a range of features and capabilities that can help you create professional-sounding music quickly and easily. Its clean user interface, compatibility with other Apple products, and free price tag makes it a great choice for anyone looking to start or experiment with music production.

Frequently Asked Questions On Whats The Best Daw For You

How Do I Choose The Best Daw?

To choose the best DAW, consider your needs and budget, assess the software’s interface and workflow, look at the selection of virtual instruments and effects, read reviews and get a hands-on demo or trial. This will help you find a DAW that suits your specific requirements and preferred way of working.

Which Is The Best Daw To Learn?

The best DAW to learn depends on your preference and needs. Popular options are Ableton Live, Logic Pro, Pro Tools, Cubase, and FL Studio. You can try their free trials to see which one suits you best and provides the features you need.

Which Daw Has Best Audio Quality?

There is no definitive answer to this question since audio quality can be subjective and is dependent on multiple factors. However, some popular DAWs that are known for their high-quality audio processing capabilities include Pro Tools, Logic Pro, Cubase, and Ableton Live.

It is recommended to try out a few options and decide based on personal preference and requirements.

Which Daw Is Used The Most?

The most popular DAW (digital audio workstation) software used by musicians and producers today is Ableton Live. It is widely used in electronic music production, but it is also versatile for various genres. Other popular DAWs include FL Studio, Logic Pro, and Pro Tools.

Conclusion

After reviewing the key points and features of various DAWs available in the market, it is clear that finding the best DAW for you is a subjective process. Consider your needs, budget, and technical skills when making your decision. Ensure that the DAW you choose is compatible with your music goals and helps you realize your creative potential.

Keep in mind that DAWs are tools to help you produce music, and your creativity is what truly counts. Happy producing!

Categories
Archive

Studio Headphones Under 100

The best studio headphones under 100 are the Audio-Technica ATH-M20x and the Sony MDR-7506. These headphones offer excellent sound quality and comfort for their price.

As an Amazon Associate I earn from qualifying purchases.

When it comes to recording or mixing music, having a good pair of studio headphones is essential. However, not everyone can afford the expensive options available on the market. Fortunately, there are some great studio headphones available for under 100 dollars.

We will introduce you to the Audio-Technica ATH-M20x and the Sony MDR-7506, which provide high-quality sound and comfort at an affordable price. Whether you’re a beginner or a professional, these headphones are an excellent choice for anyone looking to produce music on a budget.

Factors To Consider Before Buying Studio Headphones

Before buying studio headphones under 100, it’s essential to consider the type of headphones, their sound quality, comfort, noise isolation, and durability. When shopping for headphones, don’t be swayed by brand names alone. Research and read reviews to find the best value for your money.

Factors to Consider Before Buying Studio Headphones: Studio headphones are a crucial tool for music producers and sound engineers. They help in creating high-quality audio recordings by providing accurate and clear sound reproduction. But with so many options available in the market, it can be challenging to find the right pair. To help you make an informed decision, here are some essential factors to consider before buying studio headphones. H3: Sound Quality The most crucial factor to consider when buying studio headphones is sound quality. You need headphones that provide accurate and clear sound reproduction, with a flat frequency response. This means that the headphones should not boost or cut any frequencies, giving you a clear representation of the audio without any coloration. Look for headphones with a wide frequency response range to ensure that they can handle a variety of audio recordings, from deep bass to high treble. H3: Comfort Comfort is another essential factor when it comes to studio headphones. You will probably be wearing them for extended periods, so you need to make sure that they fit comfortably. Look for headphones with adjustable headbands and soft ear cushions that can fit snugly around your ears without causing any discomfort. If the headphones are too tight, they can cause fatigue and headaches, leading to a decrease in productivity. H3: Durability Studio headphones go through a lot of wear and tear, so you need to invest in a durable pair. Look for headphones with sturdy construction, preferably using high-quality materials such as metal or thick plastic. The ear cushions should be replaceable, so you can easily replace them if they become worn out. Also, consider headphones with detachable cords, so you can replace them if they get damaged. H3: Noise Cancellation Noise cancellation is another feature to consider when buying studio headphones. It can help isolate you from external noise, providing a better listening experience. Look for headphones with passive noise isolation, which uses thick ear cushions to block out external noise. If you work in a noisy environment, consider headphones with active noise cancellation technology, which uses built-in microphones to cancel out external noise. In conclusion, when buying studio headphones under $100, you need to consider various factors such as sound quality, comfort, durability, and noise cancellation. By keeping these factors in mind, you can find a pair of headphones that can help you create high-quality audio recordings.

Studio Headphones Under 100

Credit: www.pinterest.com

Best Studio Headphones Under $100

Discover exceptional studio headphones under $100 that provide superior sound quality, comfort and durability. With options from reputable brands, you can enhance your audio production without breaking the bank.

If you’re looking for studio headphones that are budget-friendly, you’re in the right place. There’s no need to spend a fortune to get good-quality headphones for your music productions. In this post, we’ll be taking a look at the best studio headphones under $100. We’ll be covering three models: Sony MDR7506, Audio-Technica ATH-M20x, and JBL Professional 305P MkII.

Sony Mdr7506

The Sony MDR7506 headphones are a popular choice among audio professionals and music enthusiasts alike. They’re a closed-back, over-ear pair of headphones that deliver crisp and clear sound. The headphones feature a large diaphragm and neodymium magnets that provide excellent frequency response and accurate sound reproduction. They’re comfortable to wear for extended periods and come with a long cord that allows you to move around your studio freely.

Audio-technica Ath-m20x

The Audio-Technica ATH-M20x headphones are another great option for those on a budget. These closed-back headphones have a circumaural design and provide excellent sound isolation. They feature 40mm drivers that deliver exceptional clarity and accuracy and are great for detailed monitoring. The headphones have a durable design with a long cord and comfortable earpads that allow for extended wear.

Jbl Professional 305p Mkii

Finally, we have the JBL Professional 305P MkII headphones. These open-back headphones have a sleek and stylish design and deliver exceptional sound quality. They feature 50mm drivers with patented waveguide technology that provides accurate and consistent sound across a wide frequency range. The headphones have a comfortable over-ear design with replaceable earpads and a detachable cable for easy replacement. In conclusion, these are three of the best studio headphones under $100. Each of these headphones has its unique features and benefits, so make sure to consider your specific needs before making a purchase. Whether you’re a beginner or an experienced audio professional, you can’t go wrong with any of these headphones.

Detailed Review Of Sony Mdr7506

If you are searching for studio headphones under 100, then the Sony MDR7506 is a reliable option to consider. The headphones have remained an industry standard for years, thanks to their quality sound and durability. Our detailed review will provide insight into the design, comfort, sound quality, and durability of the Sony MDR7506 headphones.

Design

The design of the Sony MDR7506 headphones is sleek and professional. They are built with a compact folding design for improved portability and storage. The headphones feature a closed-back design that ensures minimal sound leakage and improved instrumental isolation. The earcups are circumaural and coated with soft leatherette material for excellent comfort during extended wear periods.

Sound Quality

The Sony MDR7506 headphones deliver exceptional sound quality with a frequency response range of 10-20kHz. They are designed to reproduce accurate sound such that every instrument is heard distinctly. The headphones feature neodymium magnets and 40mm drivers to produce high-quality sound with adequate bass, mid-range, and treble. You will enjoy the experience of deep bass, clear mids, and sparkling highs in your music.

Comfort

Comfort is a critical factor to consider when it comes to studio headphones. The Sony MDR7506 headphones have a padded headband that rests firmly but comfortably on your head, thus minimizing pressure on your head. The earcups fit perfectly over your ears and remain comfortable throughout extended listening sessions. During use, you experience minimal discomfort and do not feel fatigue even after wearing the headphones for hours.

Durability

The Sony MDR7506 headphones are designed for durability and longevity. They are built with high-quality materials that make them withstand rigorous use in demanding studio and recording environments. The headphones are particularly robust in their construction, and the folding design contributes greatly to their durability since they can easily be packed away for storage without any fear of damage. You can be sure that the Sony MDR7506 headphones will provide value for many years to come.

Conclusion

The Sony MDR7506 headphones are an excellent option to consider if you have a minimal budget and require high-quality studio headphones. The headphones deliver accurate sound, are comfortable for long listening periods, and are built to last. We recommend them for anyone who wants headphones that can withstand rigorous studio use and provide outstanding sound quality.

Studio Headphones Under 100

Credit: m.youtube.com

Detailed Review Of Audio-technica Ath-m20x

In this detailed review, we will take a closer look at the Audio-Technica ATH-M20x, one of the best studio headphones under 100 on the market. These headphones offer a great balance between design, sound quality, comfort, and durability, making them a great option for both professionals and amateurs who are looking for high-quality headphones without breaking the bank.

Design

When it comes to design, the Audio-Technica ATH-M20x has a sleek, minimalist look that is both modern and professional. The headphones feature a durable build with metal reinforcement and a padded headband and ear cups for added comfort during extended use. The ear cups also rotate 15 degrees for a more comfortable fit, and the single-sided cable ensures easy use and storage.

Sound Quality

The Audio-Technica ATH-M20x boasts a high-quality sound that is both accurate and balanced, making them a great option for monitoring during recording and mixing. The headphones feature 40mm drivers and a frequency response range of 15Hz to 20kHz, delivering precise and full-bodied sound that accurately reproduces a wide range of audio frequencies and tones.

Comfort

Comfort is a top priority when it comes to studio headphones, and the Audio-Technica ATH-M20x delivers on this front. The padded ear cups and headband offer a comfortable fit for long listening sessions and can be adjusted to fit securely on your head. Additionally, the ear cups rotate for a more comfortable fit, ensuring that you can wear them for hours without experiencing any discomfort.

Durability

When you invest in a pair of headphones, you want them to last for a long time. The Audio-Technica ATH-M20x is built to last, with a durable design that features metal reinforcement and a single-sided cable that resists tangling. Additionally, the ear cups and headband are padded with high-quality materials that can withstand frequent use and impact, ensuring that your headphones will stay in excellent condition for years to come.

Detailed Review Of Jbl Professional 305p Mkii

The JBL Professional 305P MkII studio headphones are a great budget option for those looking for high quality audio. In this review, we dive into its features and performance, ultimately concluding that it’s a solid choice for anyone looking to get the best bang for their buck.

Design

The JBL Professional 305P MkII studio headphones have a sleek, modern design that looks great in any professional studio setting. The headphones feature a black matte finish with silver accents and a JBL logo on each ear cup. The ear cups are made of high-quality materials that feel sturdy and durable. The headband is adjustable, making it easy to find a comfortable fit.

Sound Quality

The JBL Professional 305P MkII headphones are designed for professional use and deliver exceptional sound quality. The headphones use JBL’s patented Image Control Waveguide technology to provide accurate sound reproduction. The bass response is impressive, and the mids and highs are clear and crisp. Overall, the sound quality of these headphones is outstanding, and they are an excellent choice for music production, mixing, and mastering.

Comfort

The JBL Professional 305P MkII headphones are designed for long listening sessions and provide excellent comfort. The ear cups are large and well-padded, and the headband is adjustable, ensuring a secure and comfortable fit. The headphones are lightweight, so they do not feel heavy on the head. Overall, the comfort of these headphones is excellent, and they are suitable for both short and long listening sessions.

Durability

The JBL Professional 305P MkII headphones are built to last and are made of high-quality materials that feel sturdy and durable. The ear cups are made of a durable plastic material, and the headband is made of a sturdy metal material that can withstand wear and tear. The headphones come with a 1-year warranty, so you can rest assured that they are built to last. In conclusion, the JBL Professional 305P MkII studio headphones are an excellent choice for anyone looking for high-quality, reliable headphones under $100. With their sleek design, exceptional sound quality, and comfortable fit, these headphones are perfect for music production, mixing, and mastering. The headphones are built to last and come with a 1-year warranty, making them an excellent investment for any professional studio setting.

Studio Headphones Under 100

Credit: equipboard.com

Frequently Asked Questions For Studio Headphones Under 100

What Headphones To Use For Studio?

Use headphones that provide accurate and flat frequency response, closed-back design to isolate ambient noise, and comfortable fit, like the Sony MDR-7506, Beyerdynamic DT 770 Pro, or Audio-Technica ATH-M50x. These headphones will ensure a precise and balanced sound that is ideal for studio monitoring.

Is $200 A Lot For Headphones?

Yes, $200 can be considered a lot for headphones. However, the price can depend on the brand and features that the headphones offer. It is important to consider your budget and what you are willing to pay for quality sound and comfort.

Who Makes The Best Budget Headphones?

The best budget headphones available on the market are the Koss Porta Pro and the Mpow 059. These headphones provide excellent sound quality with a comfortable fit at an affordable price point. Additionally, they have durable designs that can withstand daily use.

What Are The Best Entry Level Headphones?

The best entry-level headphones are the Audio-Technica ATH-M20x, Sony MDR-7506, and Sennheiser HD 280 Pro. These headphones offer high-quality audio, comfort, value for money, and durability. They are perfect for beginners who want to experience quality sound without breaking the bank.

Conclusion

To sum it up, finding a great pair of studio headphones doesn’t always mean breaking the bank. With our list of top picks for studio headphones under $100, you’ll be able to find a pair that suits your needs without compromising quality.

Remember to prioritize features such as noise cancellation, comfort, and sound clarity to ensure an optimal experience. Invest in the right pair of headphones, and take your audio production to the next level.

Categories
Archive

Mixing A House Bass

To mix a house bass, adjust the EQ and compression, balance the levels and use a spectrum analyzer. A well-mixed house bass is essential for achieving a cohesive and impactful dance track.

By using the right tools and techniques, you can make sure that the bass sits well in the mix and enhances the overall groove of the track. When mixing a house track, the bassline is one of the most important elements to focus on.

It provides the foundation and energy for the entire track, so getting it right is crucial. A well-mixed house bass should be punchy, yet smooth, with the right amount of low-end and mid-range frequencies. In this guide, we will explore some tips and techniques to help you mix a house bass that hits hard and makes a crowd move. Whether you’re a seasoned producer or just starting, this guide will provide you with the knowledge and tools to take your bass mixing skills to the next level.

Importance Of Bass

When it comes to mixing a house track, the importance of bass cannot be overstated. Not only does it provide the foundation of the track, anchoring everything together, but it also has a significant impact on the groove and carries the melody.

Foundation Of The Track

The bass is the foundation upon which the rest of the track is built. It serves as the glue that holds everything together, giving the track its sense of coherence and direction. Without the bass, a track can feel disjointed and lacking in direction. Because of this, it is vital to mix the bass in a way that emphasizes its role as the track’s foundation.

Impact On Groove

The bass plays a critical role in the groove of a house track. It sets the tempo and provides the rhythm, allowing the other elements of the track to fall into place. It is the rhythmic backbone, determining the cadence and pulse of the track. Any mistakes made in mixing the bass can cause the entire track to feel off-beat, ruining the groove and causing the listener to lose interest. Therefore, it is essential to pay close attention to the balance and timbre of the bass to ensure that it complements the other elements of the track.

Carrying The Melody

In house music, the bass often carries the melody, providing the hook that draws the listener in. Because of this, it is essential to ensure that the bass is mixed in a way that emphasizes its melodic qualities. By doing so, the listener is drawn into the track, captivated by the interplay between the bass and the other elements of the track.

Bass Mixing Tips
TipsExplanation
Use a high-quality bass soundA high-quality bass sound is essential for accentuating the other elements of the track. Make sure to choose a bass sound that complements the other sounds in the track.
Ensure that the bass is in tuneThe bass should be in tune with the other elements of the track, to prevent it from feeling disorienting or out of place
Pay close attention to the balance of the bassMake sure that the bass is appropriately balanced with the other elements of the track, to ensure that it serves as the foundation for the rest of the track

By keeping these tips in mind, you can mix the bass in a way that emphasizes its importance, while ensuring that it complements the other elements of the track. This will help you create a house track that is cohesive, engaging and captivating.

Mixing A House Bass

Credit: www.youtube.com

Preparing The Bass

To create a great house bass mix, it’s important to prepare your bass track properly. Begin by ensuring your audio levels are consistent, removing any unwanted frequencies, and adding effects such as compression and EQ as needed. Experiment with different plugins to find the perfect sound.

Preparing the Bass Mixing a house bass is an incredibly crucial process during music production that would require much attention to detail. The quality of the bass would greatly determine the entire outcome of the track. Preparing the bass properly is, therefore, essential to get the perfect sound. For those who might be new to music production, we have outlined the three essential steps to prepare the bass properly. H3: Tuning the Instrument Before starting to record, you must ensure that the bass instrument is well-tuned. Tuning the bass ensures that it is playing at the correct pitch and that it is in harmony with the other instruments in the song. You can tune the bass by using a guitar tuner or tuner pedal. H3: Setting up the Amplifier The amplifier is an essential part when it comes to preparing the bass for mixing. The quality of the amplifier will affect the sound of the bass. It is essential to ensure that the amplifier is appropriately set up to produce the sound that is desired. Ensure that the amplifier is turned on and that the volume is set appropriately before playing. H3: Choosing the Right Pedals Choosing the right pedals will enhance the bass sound and is an essential aspect of preparing the bass for mixing. When selecting the appropriate pedals, it is essential to consider the genre of music, as different genres require a different sound. Ensure that you test the pedals before recording to determine which pedals would work well for the sound you are going for. In conclusion, preparing the bass properly is an important part of mixing a house bass. Tuning the instrument, setting up the amplifier, and choosing the right pedals are the essential steps in preparing the bass. Paying attention to these steps will ensure that the bass sounds perfect, leading to better results in the final mix.

Recording Techniques

Achieving a perfect mix in house music requires careful attention to the bass. To enhance the bassline, consider adjusting the EQ, compression, and stereo spread, along with trying out different types of saturation to create a fuller, more impactful sound.

Microphone Placement

The first step to properly recording a house bass is to ensure the microphone is properly placed. A common placement technique is to position the microphone directly in front of the bass cabinet. This placement allows the microphone to capture the full range of frequency being produced by the bass. Placing the microphone closer to the bass cabinet produces heavier low frequencies, while positioning it farther from the cabinet results in a brighter, more treble-heavy sound.

Proper Eq And Compression

Equalization and compression are essential in mixing a house bass. Proper equalization allows for a consistent sound across different playback systems. A basic EQ adjustment can be done by using a standard preset for the low, mid, and high frequencies. Compression aids in keeping the bass sound level consistent and can be achieved by adjusting the compression ratio and threshold.

Recording In Mono Or Stereo

When recording a house bass, the question of whether to record in mono or stereo may arise. The decision depends on the specifics of individual projects. For example, when recording a live performance, recording in mono may be preferable due to the consistency it offers across the entire bass register. However, if a bass sound with more depth and width is preferred, recording in stereo can provide the desired effect. Overall, it is important to determine which option is best suited for the desired sound. In conclusion, these recording techniques can provide proper clarity, depth and consistency in mixing house bass.

Editing The Bass Track

The key to mixing a house bass is editing the track to ensure it is clear and impactful. Adjust the EQ to bring out the low-end frequencies and use compression to give it a punchy feel. Adding distortion or saturation can also create depth and texture in the bass.

Cutting Out Bad Takes

Remove the unnecessary part of the bass track for a cleaner mix. Listen to the bass track carefully and identify the parts that do not fit well with the overall sound. Cut those parts out and keep only the essential parts that add to the groove.

Correcting Timing Issues

Making sure the bass track aligns well with the rest of the instruments is crucial. Identify the sections where the timing does not match and use the quantization feature in your DAW to realign those parts to the grid. This will greatly improve the overall sound and enhance the groove.

Adding Effects And Sweeteners

Effects and sweeteners can make the bass sound more lively and appealing. Use compression to control the dynamic range and ensure the bass doesn’t overpower the rest of the mix. Boosting the high frequencies can help bring out the attack of the bass and make it more prominent in the mix. Subtle saturation, distortion or other effects can give the bass a unique character while still remaining cohesive with the rest of the mix.
In conclusion, editing the bass track is an essential step in achieving a professional-sounding mix. By cutting out unwanted parts, correcting timing issues, and adding effects and sweeteners, the bass can be a powerful and cohesive component of the mix. It takes time and practice to master this skill, but the results are worth the effort.

Mixing The Bass

Mixing the bass is crucial to achieving a great sounding house track. It adds warmth, depth, and movement to the music. Without proper mixing, the bassline can overpower the other instruments and muddy up the mix. In this blog post, we’ll explore the key elements of mixing the house bassline to bring out the best in your music.

Starting With The Right Levels

When mixing the house bass, it’s important to start with the right levels. The level of the bass should be in balance with the other instruments in the mix. Too loud, and it will overpower everything else, too soft, and it won’t have the desired impact. A good starting point for the bass level is around -6dB to -3dB. Adjust the level as needed to find the sweet spot for your track.

Balancing With Other Instruments

Balancing the bass with the other instruments is key to achieving a cohesive mix. To balance the bass, listen carefully to the other instruments in your mix and make adjustments accordingly. If the kick drum is getting lost in the mix, you may need to reduce the bass level. If the bassline is overwhelming the melody, you may need to reduce the bass frequency range. A well-balanced mix will ensure each instrument has its own space in the frequency spectrum.

Choosing The Right Processing

After setting the levels and balancing the bass with the other instruments, it’s time to choose the right processing. There are many ways to process bass, including EQ, compression, saturation, and distortion. EQ can help to sculpt the bass and remove unwanted frequencies that clash with other instruments. Compression can help to glue the bass together and bring out the subtle nuances in the performance. Saturation and distortion can add warmth, character, and edge to the bassline. Use different processing tools in combination to achieve the desired sound.

With these tips in mind, you’ll be well on your way to a solid house bass mix that complements the other instruments, sits nicely in the mix, and satisfies the groove. Remember to listen critically and make adjustments as needed until you achieve the desired result.

Mixing A House Bass

Credit: soundcloud.com

Creating Movement And Interest

When it comes to a House music track, the bassline is one of the most important elements that can make or break the groove. A well-crafted bassline not only keeps the track driving forward but also adds movement and interest to it. In this post, we’ll look at some tips on how to create movement and interest while mixing a House bass.

Adding Variations To The Bassline

Adding variations to the bassline is a great way to keep the track evolving and creating movement. You can add variations by changing the rhythm, pitch, or timbre of the bassline. For example, you can use a filter to create a low-pass effect, slowly opening and closing it to make the track breathe. Alternatively, you can use a pitch-shifting effect to create a momentary change in the bassline’s pitch, making the track interesting for listeners.

Creating Fills And Riffs

Another way to add movement and interest to your House bassline is to create fills and riffs. Fills are short, rhythmic phrases that fill in the blank spaces between the main bassline, while riffs are musical phrases repeated throughout the song. By adding fills and riffs to your bassline, you can create tension and release in the track, making it more dynamic and engaging for the listeners.

Using Automation To Build Energy

Automation is a technique that can add a lot of energy to your House track. By automating the volume, panning, or any other effect, you can create tension and release in the track, making it more interesting and fun to listen to. For example, you can use automation to slowly increase the volume of the bassline over time, creating a sense of anticipation, and then suddenly drop it to create a release. Similarly, you can automate the panning of the bassline to create a bouncing effect, making the track more danceable.

To sum up, mixing a House bassline is not just about making it sound good but also about creating movement and interest in the track. By adding variations, creating fills and riffs, and using automation, you can make your House bassline sound more engaging and dynamic.

Making Sure It Translates Well

When mixing a house bass, ensure that it translates well on various sound systems. Test the mix on headphones, studio monitors, and even car and home speakers to make sure it sounds balanced and consistent.

As a producer, you want your music to sound great on every device it’s played on. Bass is a critical component of any electronic music genre, especially house music. It drives the beat and controls the emotions in the audience. It is essential to mix it correctly so that it translates well on all systems. To ensure that your audience hears the bass the way you intended, you need to test it on different devices, make adjustments for different playback systems, and master the final mix.

Testing On Different Devices

Before you finalize your house bass mix, you should test it on different devices, including phones, laptops, and home theater systems. This will help you identify any issues that may arise due to how different audio systems handle bass frequencies. Some systems may emphasize the lower or higher frequencies, while others may attenuate them. Testing on different devices will help you get an idea of how your bass mix will sound on different speakers.

Making Adjustments For Different Playback Systems

Once you’ve tested your mix on different devices, you should make adjustments to ensure that your bass sounds great on each system. For example, if you notice that your bass is too loud on a phone, you may need to reduce its level slightly. On the other hand, if you notice that your bass is too quiet on a home theater system, you may need to increase its level. Making these adjustments will help you create a balanced mix that sounds great on every device. Here’s a quick checklist of some adjustments you may have to make:

  • Adjust the levels of your bass frequencies to ensure they’re not too overpowering
  • Use frequency analysis tools to ensure you’re not overloading certain frequencies
  • Use headphones to ensure your mix is balanced and detailed
  • Use reference tracks to compare your mix to professionally mixed tracks

Mastering The Final Mix

Mastering is the final stage of the mixing process, and it’s critical to ensure that your house bass mix translates well on all devices. Mastering involves processing your mix to ensure that it’s as loud, clear, and detailed as possible. It also involves adding subtle EQ adjustments to ensure that your mix sounds balanced on all systems. Here are a few tips to ensure that your final mix is well-mastered:

  • Use a limiter to ensure that your mix doesn’t clip or overload
  • Use EQ to ensure that your mix sounds balanced on all systems
  • Use compression to ensure that your mix sounds as loud and clear as possible
  • Use reference tracks to compare your master to professionally mastered tracks

In Conclusion, Mixing a house bass is a critical component of producing great house music. It’s essential to ensure that your bass sounds great on all devices, from phones to home theater systems. By testing your mix on different devices, making adjustments for different playback systems, and mastering the final mix, you can create a house bass mix that translates well on every device.

Mixing A House Bass

Credit: m.soundcloud.com

Frequently Asked Questions On Mixing A House Bass

What Level Should Bass Be In A Mix?

The bass level in a mix varies depending on the genre of music. For example, in electronic dance music, the bass is usually more pronounced than in rock or pop music. Generally, the bass should complement the other instruments and vocals without overpowering them.

The key is to find a balance that enhances the overall sound and feel of the song.

Where Should The Bass Be In The Mix?

The bass should be present in the mix but not overpowering the other instruments. It should be balanced with the drums and other low-frequency sounds. The bass guitar or instrument should ideally sit at around 60-80 Hz in the mix with a steady and consistent volume.

How Do You Mix Good Bass?

To mix good bass, you need to ensure that the bass is prominent but not overpowering. Use EQ to cut any overlapping frequencies with other instruments. Apply compression to even out levels and add depth with reverb and delay. Reference commercial tracks to check the balance and adjust accordingly.

What Makes Bass House Bass House?

Bass House is a subgenre of electronic dance music that combines elements of bass-heavy genres (such as dubstep and bassline) with the structure and sound of house music. It’s characterized by its deep, heavy basslines and prominent use of sound effects like intense snares and lasers.

Conclusion

Mixing a house bass can be a daunting task, but with the right techniques and strategies, it can become a seamless process. It’s critical to have a clear understanding of the characteristics of the bass in the song and to use the right plugins to achieve the desired sound.

By following these tips and guidelines, you’ll be able to create a powerful and engaging house mix that stands out and captures your audience’s attention. With the right approach, you’ll be able to produce a remarkable and cohesive sound that will keep your listeners coming back for more.