Categories
Archive

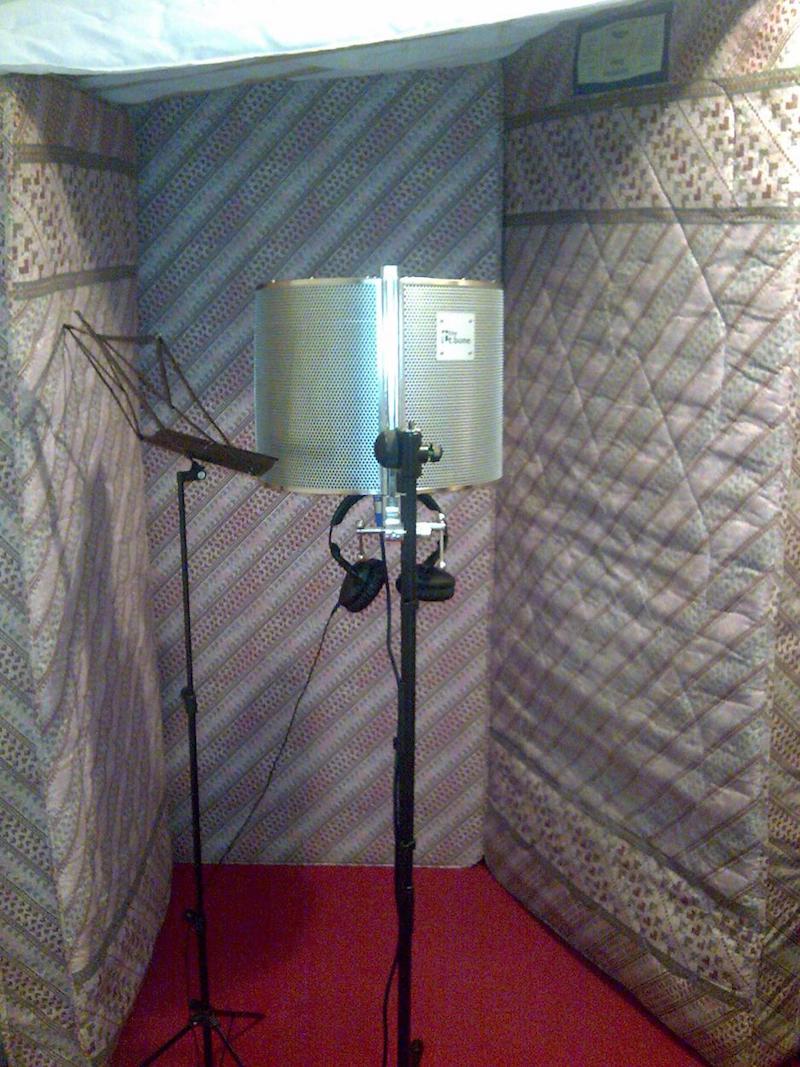
Diy Vocal Booth

A DIY vocal booth can be created using sound-absorbing materials and a simple frame. Here are some easy steps to build your own vocal booth at home.

Recording vocals at home can be a challenge as background noise and echoes can affect the quality of the recording. This is where a vocal booth comes in handy to create a studio-like environment for recording. A DIY vocal booth can be built at home with minimal effort and cost using some sound-absorbing materials and a simple frame.

We will guide you through the easy steps of building your own vocal booth at home without breaking the bank. With a DIY vocal booth, you can record high-quality vocals in the comfort of your own home without any disturbance or background noise.

Diy Vocal Booth

Credit: www.youtube.com

Why Build A Diy Vocal Booth?

Are you tired of recording audio that sounds tinny, echoey, or just plain bad? If you’re serious about producing professional-quality audio content, then you need to consider building a DIY vocal booth. Not only will it improve the sound quality of your audio recordings, but building your own vocal booth is a cost-effective and convenient solution that allows you to record from the comfort of your own home.

Better Sound Quality

A DIY vocal booth provides a controlled environment for recording your voice or instruments. You can customize the size, shape, and materials used in the construction to suit your specific recording needs. The result is less background noise, fewer echoes, and more consistent sound quality across recordings. With your own vocal booth, you’ll be able to produce studio-quality audio content from your own home.

Cost Savings

Building a DIY vocal booth is much cheaper than purchasing a pre-made booth or renting studio space. By using inexpensive materials like PVC pipes, moving blankets, or acoustic foam, you can construct your own vocal booth for a fraction of the cost of other options. Additionally, you’ll save money on transportation costs and time spent traveling to and from a recording studio.

Convenience

Recording from home eliminates the need for scheduling studio time or worrying about outside noise or distractions. With a DIY vocal booth, you can record whenever you want, as often as you want, without worrying about disturbing others or being disturbed. This convenience makes it easier to create content on a regular basis and frees up more time for other important tasks.

Materials Needed

To construct a DIY vocal booth, you will need some basic materials including PVC pipes, acoustic foam panels, and a fabric cover. The foam panels help to reduce the echoes and sound reflections, creating a clean recording environment. PVC pipes and fabric cover serve as the frame and outer shell respectively.

Overall, assembling your own vocal booth does not have to be a complex process, and these materials are easy to find at your local hardware or craft store.

If you’re a musician, podcaster, or voice-over artist, having a vocal booth can greatly improve the quality of your recordings. While professionally-built vocal booths can be expensive, building one yourself can be a cost-effective solution. Here are the materials you’ll need to get started:

Pvc Pipes And Fittings

To create the frame of the vocal booth, you will need PVC pipes and fittings. The pipes should be at least 3/4 inch thick, and you’ll need enough to create a sturdy frame. The fittings will allow you to connect the pipes together securely. It’s important to measure the dimensions of the booth carefully and cut the pipes to the appropriate length before assembling.

Plywood Sheets

Plywood sheets are needed to create the walls and ceiling of the booth. You can choose the thickness of the plywood depending on your specific needs and budget. A thicker plywood will provide better sound insulation but it will also be heavier.

Acoustic Foam Panels

Acoustic foam panels are an important component of a vocal booth because they help to absorb sound waves, reducing echoes and reverberation. You can purchase these foam panels online or from music stores. They come in different shapes and sizes so you can customize them according to the dimensions of your booth.

Adhesive Material

Adhesive material is needed to attach the acoustic foam panels to the plywood sheets. You can use an adhesive spray or glue to achieve a secure bond. It’s important to apply the adhesive carefully and evenly to avoid any air pockets.

Fabric

Fabric is the final component you will need. You can use any fabric of your choice to cover the booth, but it’s recommended to use a breathable material that won’t affect the sound quality. You’ll need enough fabric to cover the entire booth, and it should fit snugly. Wrinkles in the fabric can affect the sound quality, so remember to smooth out any creases.

Conclusion

With these ingredients, you’ve got all you need to build a cost-effective yet high-quality vocal booth. You can customize the measurements to fit your specific needs and budget, but make sure to follow the basic guidelines to achieve good sound isolation. Happy recording!

Step-by-step Guide

Create your own DIY vocal booth at home! Our step-by-step guide provides easy-to-follow instructions on building a high-quality and affordable booth to make your recordings sound professional. Save money and improve the sound quality of your recordings with this simple guide.

Are you a voice-over artist or a podcaster who wants to improve sound quality? A vocal booth can be the perfect solution to ensure crystal clear audio. Professional vocal booths could cost you upwards of thousands of dollars, but with this DIY guide, you can build a vocal booth on a tight budget. Follow the step-by-step guide below to create your own vocal booth.

Designing The Frame

The first step to building your DIY vocal booth is to design the frame. The frame is the foundation of your booth and needs to be sturdy. Here are the materials you will need:

  • 2 wooden sheets (4×4 feet)
  • 8 wooden beams (1×2 inch)
  • Measuring tape and pencil
  • Saw and drill

Start by marking the wooden sheets to the desired size of the booth. Next, cut the wooden beams according to the measurements of the wooden sheets. Once the wooden beams are cut, assemble the frame using the drill. Measure and mark where you want to place the beams before drilling holes to attach them.

Cutting And Assembling The Frame

Now that the frame is designed, it’s time to cut and assemble the frame. The exterior layers of the booth should be made of plywood sheets. Here is a list of materials you will need:

  • 2 plywood sheets (4×4 feet)
  • Acoustic foam panels
  • Spray adhesive
  • Spring clamps
  • Screws and nails

Cut the plywood sheets to match the size of the frame. Once cut, attach the plywood sheets to the frame using screws and nails. The next step is to attach the acoustic foam panels to the interior walls of the booth. Spray adhesive will help hold the panels in place. Use spring clamps to ensure the acoustic foam adheres correctly.

Attaching The Plywood Sheets And Acoustic Foam Panels

The third step is to attach the plywood sheets and acoustic foam panels. Here is a list of materials you will need:

  • Fabric
  • Stapler
  • Scissors

Cut the fabric to the correct size to cover the booth. The fabric should be long enough and wide enough to wrap around the front and back of the booth. Once cut, start stapling the fabric onto the booth, ensuring it is tight and doesn’t have any wrinkles. Make sure to leave an opening for the booth’s entrance.

Covering The Booth With Fabric

The final step is to cover the booth with fabric to give it a finished look. Here is a list of materials you will need:

  • Fabric (same as previous step)
  • Stapler (same as previous step)
  • Scissors (same as previous step)

Wrap the fabric around the booth, ensuring it covers any staple marks from the previous step. This will give your DIY vocal booth a professional touch. In conclusion, creating a DIY vocal booth is an affordable solution to help you achieve clear audio. To build a successful vocal booth, always ensure the frame is sturdy, the acoustic panels are attached firmly and don’t forget to cover the booth with fabric for a smooth and professional appearance.

Tips For Optimal Soundproofing

If you’re a music enthusiast or content creator, investing in a good vocal booth can elevate your recordings. However, purchasing a professional sound booth can be expensive, and that’s where DIY vocal booths come in. One of the most critical aspects of building a DIY vocal booth is soundproofing.

Choosing The Right Location

When selecting the location for your vocal booth, keep in mind that sound reflects off hard surfaces, such as walls, ceilings, and floors. You should choose a space that has minimal hard surfaces or windows to minimize external sound from entering your recording space. For instance, you can build your vocal booth in a corner or an inner part of a room, since corners tend to absorb sound better.

Sealing Air Gaps

Air gaps allow sound to travel in and out of your vocal booth, making it harder to soundproof the area. Start by sealing any holes or openings with acoustic caulk. These include gaps around the door, windows, and any electrical outlets. Once sealed, install weather-stripping to seal the door to the wall tightly. This helps to reduce any unwanted openings that may let in external noise.

Adding Mass To The Walls

For optimal soundproofing, you need to add mass to the walls. You can achieve this by using thick, heavy curtains or blankets. Covering the walls with acoustic foam panels is also an excellent way to soundproof your vocal booth. These materials absorb sound vibrations and prevent them from escaping the booth. Adding mass to the walls also helps to reduce echoes and reverberation, ensuring your recordings are clean and clear.

By following these tips, you can build a DIY vocal booth that provides excellent sound insulation. Remember, soundproofing your vocal booth is the key to producing high-quality recordings. With a little bit of effort and the right materials, you can create a sound booth that rivals professional recordings.

Additional Considerations

When building a DIY vocal booth, there are additional considerations to keep in mind. These include ventilation, lighting, and furniture to ensure your vocal booth is the best it can be.

Ventilation System

Ventilation is a crucial consideration when building a vocal booth because without proper air circulation, the booth can become hot and stuffy. To solve this problem, think about installing a small exhaust fan in the room or adding a duct to the existing HVAC system to remove stale air. Another option is to install a vent in the ceiling or walls to facilitate air movement. Make sure these fixtures have noise dampening properties to prevent audio interference.

Lighting

Lighting is another important aspect to consider when building a DIY vocal booth. Natural light is preferred, but since that is not always possible, it’s a good idea to invest in LED bulbs. These lights are environmentally friendly, emit very little heat, and can be dimmed or brightened to match the desired level of lighting. Separately, you may want to install a spectral meter to ensure precision in controlling the light and its temperature.

Furniture

Furniture is an often-overlooked element when building a vocal booth, but it can have a significant impact on the quality of the recordings. Consider furnishing your booth with items like a comfortable chair for long recording sessions, acoustic foam panels to absorb reflections, and a place to hold your microphones, headphones and other recording devices.
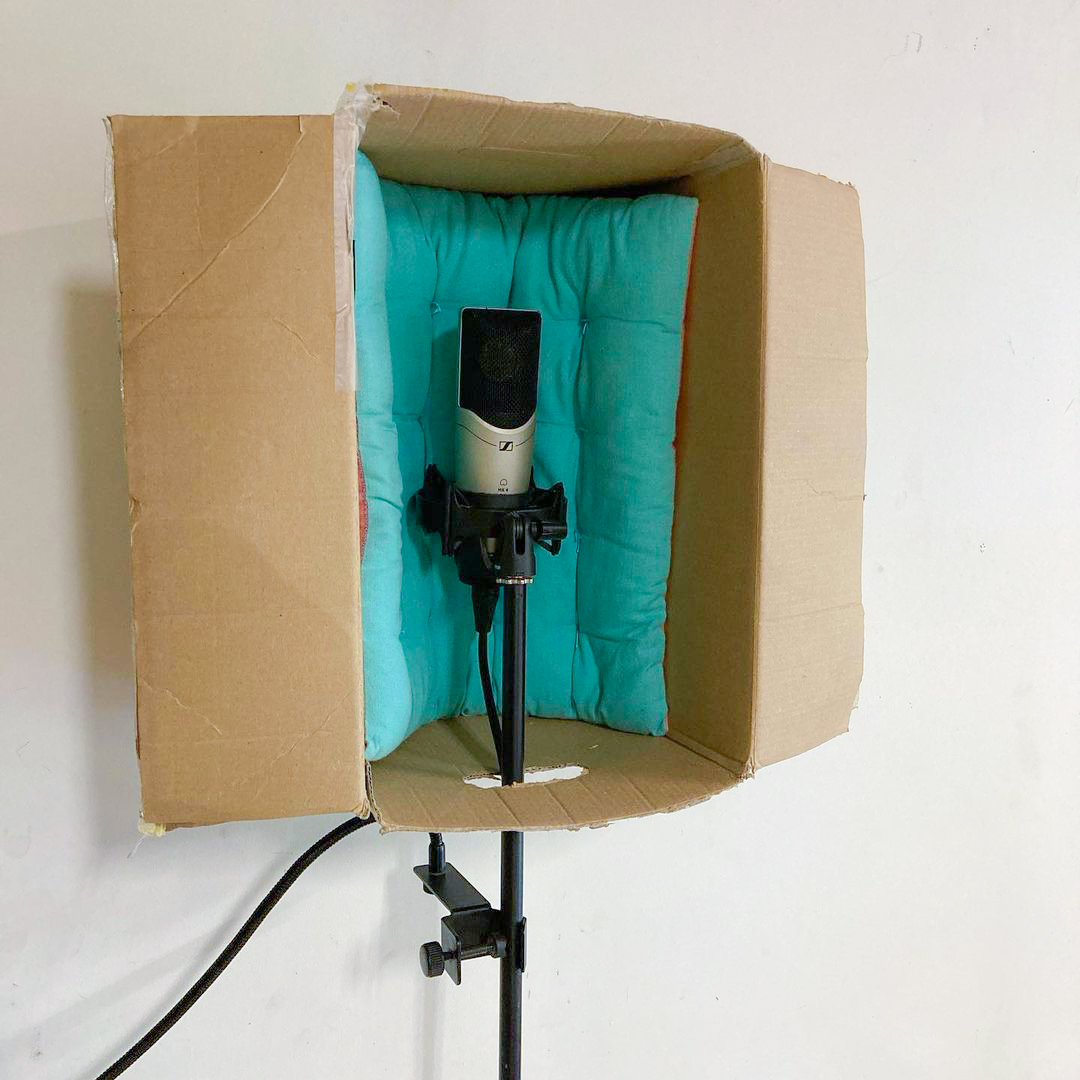
Diy Vocal Booth

Credit: twitter.com

Diy Vocal Booth

Credit: producelikeapro.com

2026 Update: The Closet Trick, From the Source

Shure’s own home-recording guidance backs up one of the simplest DIY booth ideas. Open a closet full of clothes, hang blankets or sleeping bags over the open doors, and point the mic’s least sensitive side into the back of the closet. Shure also advises avoiding hard, reflective surfaces and noisy appliances, and making short test recordings to find the quietest spot.

Frequently Asked Questions Of Diy Vocal Booth

Do Diy Vocal Booths Work?

DIY vocal booths can be effective if they are designed and constructed correctly. They help reduce unwanted noise and reflections, resulting in better sound quality. However, the success of a DIY vocal booth depends on factors like the materials used and the skills of the builder.

What Can You Use Instead Of A Vocalbooth?

A quiet room with good acoustics, a closet filled with clothes, or DIY soundproofing materials like moving blankets or acoustic foam can be used instead of a VocalBooth.

How Do You Make A Makeshift Vocalbooth?

To make a makeshift VocalBooth, you can use soundproofing panels or blankets to create an enclosed space. You can also hang thick curtains or blankets as a backdrop and layer the floor with thick rugs or carpets. Use foam acoustic panels inside for better sound quality. Finally, position a good quality microphone and headphones for recording.

What Is The Best Material For A Vocalbooth?

The best material for a VocalBooth is a dense and sound-absorbing one that minimizes external noise and echoes. Some commonly used materials are mass-loaded vinyl, acoustic foam, fiberglass insulation, and closed-cell foam. The material chosen depends on the level of soundproofing required and the budget available.

Does a closet work as a vocal booth?

Often, yes. A closet full of clothes absorbs many reflections. Shure suggests hanging blankets over the open doors and facing the mic’s least sensitive side into the closet.

Conclusion

So, there you have it, folks – a step-by-step guide to building your very own DIY vocal booth. With some simple tools and a little bit of know-how, you can transform your home studio into a professional-sounding space that will elevate your recordings to the next level.

By following these tips and tricks, you’ll be on your way to creating clearer, more crisp vocal tracks – guaranteed to impress even the most discerning of listeners. So what are you waiting for? Get started on your DIY vocal booth today!
Categories
Archive

Stop Master Fader Clipping

To prevent master fader clipping, adjust levels and use a limiter. Master fader clipping is a common issue that occurs when the audio being output exceeds the capacity of the master fader.

This can result in distorted sound and poor audio quality. To prevent clipping, it’s important to carefully adjust levels, ensuring that the incoming audio does not go beyond the maximum capacity. Additionally, using a limiter can help to prevent clipping by automatically reducing the gain when necessary.

By taking these measures, you can effectively stop master fader clipping and achieve clear, high-quality audio output.

Master Fader Clipping

Stop master fader clipping by keeping the levels below 0 dB. Check levels frequently and use compression and limiting to prevent clipping, which can cause distortion and a loss of audio quality.

Master Fader Clipping is a common problem many sound engineers face. Clipping is when the audio signal exceeds the limits of the amplifier or digital processor, causing a distorted sound. Master Fader Clipping occurs when the levels of the master fader exceed the maximum limit, and the audio signal becomes distorted.

What Is Master Fader Clipping?

Master Fader Clipping occurs when the master fader level goes beyond the maximum limit of the audio system. This causes the audio signal to sound distorted, similar to the sound produced when a speaker is overloaded.

Why Is Master Fader Clipping A Problem?

Master Fader Clipping is a problem because it makes the audio sound distorted, affects the quality of sound, and can cause damage to the speakers. The distorted sound can be discomforting and unpleasant to the listeners, leading to a bad experience.

How To Identify If Master Fader Is Clipping

To identify if the Master Fader is clipping, check the audio levels on the mixer or soundboard. If the levels are reaching or constantly exceeding the maximum limit, then the Master Fader is clipping.

What Causes Master Fader Clipping?

Master Fader Clipping can occur due to several reasons. One of the most common reasons is when the audio level in one or more channels exceeds the maximum limit, causing the Master Fader to clip. Another reason could be due to a malfunctioning amplifier or speaker.

How To Prevent Master Fader Clipping?

Here are some tips to prevent Master Fader Clipping:

  • Monitor the audio levels in each channel and make adjustments accordingly
  • Use a limiter to prevent the audio levels from exceeding the maximum limit
  • Avoid overloading the amplifier or the speakers
  • Use a compressor to balance the dynamics of the audio
  • Make sure all the connections are secure and of good quality

In conclusion, Master Fader Clipping can be a frustrating problem that affects the quality of sound. By understanding what causes it and implementing the preventive measures, it can be avoided, and the audio can sound clear and smooth.

Best Practices For Preventing Master Fader Clipping

To prevent master fader clipping, it’s important to pay attention to your levels and not push them too high. Use a limiter or compressor to control the peaks, while experimenting with different EQ settings in the mix. It’s also recommended to use headphones or monitors to monitor the levels and make adjustments as needed.

Master fader clipping is a common issue that audio engineers face when mixing tracks. It happens when the level of the master fader exceeds 0dB, causing distortion and a loss of audio quality. Here are some best practices for preventing master fader clipping:

Avoid Excessive Eq On Individual Tracks

EQ can greatly enhance the sound of individual tracks, but too much of it can cause clipping in the master fader. It’s essential to keep a balance between the different tracks’ EQ levels to prevent this from happening. While making adjustments, ensure you’re not getting carried away and apply EQ as needed, but moderately.

Use High-pass Filters

High-pass filters can cut off the low frequencies that may not be necessary for the track, reducing the risk of excess frequencies that lead to distorted sound and clipping in the master fader. Use High-pass filters to adjust the frequencies on individual tracks and in sub-groups.

Avoid Over-compression On Individual Tracks

Over-compression on individual tracks can make the audio sound lifeless and flat, and amplify unwanted noise that can result in clipping on the master fader. Use compression sparingly and moderately, depending on the track.

Adjust Track Levels For A Balanced Mix

Track levels are often the culprits causing master fader clipping. Ensure the levels of all tracks are balanced to avoid one track overpowering others and, in turn, causing clipping in the master fader.

Use Sub-group Processing

Sub-group processing involves grouping similar tracks together and processing them as a unit. This method helps balance audio levels and reduce the risk of clipping in the master fader.

Apply Limiting On The Master Fader

Applying limiting on the master fader helps restrict the volume from going beyond 0dB, preventing clipping. However, it’s crucial to use limiting sparingly and at the end of the mixing process.

Importance Of Good Gain Staging

Gain staging ensures that all tracks are at the right level throughout the mixing process, reducing the risk of clipping in the master fader. It is essential to set the gain levels of each track correctly to achieve a perfect mix.

Monitor Your Master Fader

Keep an eye on your master fader throughout the mixing process. Monitoring your master fader ensures you stay within the acceptable range and avoid clipping, giving you the best audio quality possible. In conclusion, preventing master fader clipping is essential to guarantee a great audio mix. By using the best practices mentioned above, you will ensure that your mix is loud and clear without any distortion.

Fixing Master Fader Clipping

Master fader clipping can cause harsh audio distortion that can ruin a recording or live performance. To stop master fader clipping, adjust the gain levels and consider using a limiter or compressor to control the volume.

Master fader clipping can be frustrating when trying to deliver high-quality audio productions. However, it is a common problem that can be fixed if you follow the right steps and techniques. In this post, we’ll discuss what you need to do when the master fader is clipping, using gain staging to optimize levels correctly, mixing with your ears, not your eyes, applying corrective EQ to individual tracks, using a limiter to avoid peaking, and the importance of proper dithering.

What To Do When Master Fader Is Clipping

Clipping occurs when the audio signal exceeds the maximum level that your digital audio workstation (DAW) can handle. When the master fader clips, it affects the overall mix’s quality, and is often characterized by distorted, harsh, and unpleasant sounds. To fix this issue, the first step is to identify the tracks causing the problem. You can use the built-in meters on the tracks to see which tracks are peaking. Lower the gain on the problematic tracks, and then adjust the master fader to achieve the desired mix volume level.

Use Gain Staging To Optimize Levels

Gain staging involves setting the proper volume levels for each track in your mix to achieve the perfect balance without clipping. The process of gain staging ensures that tracks with lower volumes can be boosted while keeping the higher volumes within the required limit. You can use your DAW’s volume sliders to adjust the channel levels, starting from the lowest, most delicate signals to the highest and loudest signals.

Mix With Your Ears, Not Your Eyes

Although it’s tempting to rely on meters and other visual cues on your DAW, the best way to fix master fader clipping is to trust your ears. Your ears should be the primary tool for making mix decisions. Listen for distortion, harsh sounds, and other undesirable elements. Aim for a balanced, clear, and punchy mix that sounds great on different playback systems.

Apply Corrective Eq To Individual Tracks

Corrective equalization can make a significant difference in a mix. You can use EQ to solve tonal issues, such as frequency buildup, or harsh and unpleasant sounds in individual tracks. Identify the affected tracks, open up an equalizer, and sweep through the frequencies to see where the issues lie. Once you’ve found the problematic frequency, lower it slightly until that track sounds cleaner and less distorted.

Use A Limiter To Avoid Peaking

A limiter is an essential tool for preventing peaks and clipping in your mix. A limiter works by limiting the audio level beyond a specific point, ensuring that no signal goes above that limit, and helps prevent distortion. Place a limiter on the master fader, set the threshold to a point where peak reduction occurs but doesn’t affect the mix’s overall impact.

The Importance Of Proper Dithering

Dithering is a crucial technique to use in the final stages of mastering your mix. When digitally reducing bit depth, use dithering to add low-level noise to the mix, ensuring that audio sounds smoother and less distorted. Ensure that you enable proper dithering during the export of your mix. An audio dither plugin can be used on the master fader before exporting the mix to an audio file format. Stop master fader clipping by properly managing the levels using gain staging, mixing with your ears, applying corrective EQ, using limiting to avoid peaking, and proper dithering during the release of your mix. When you follow these tips and techniques, you can deliver high-quality mixes without having to worry about unwanted distortion and clipping.

Stop Master Fader Clipping

Credit: m.youtube.com

Stop Master Fader Clipping

Credit: www.mixinglessons.com

Frequently Asked Questions Of Stop Master Fader Clipping

How Do I Stop My Master From Clipping?

To prevent your master from clipping, you can try using a limiter to reduce the overall volume peaks. Another option is to lower the levels of individual tracks or instruments that are causing the clipping. You can also adjust the gain staging to ensure all levels are balanced.

Finally, consider using a high-quality audio interface or soundcard to capture better quality recordings.

How Do I Stop Audio From Clipping?

To stop audio from clipping, follow these steps: reduce the input volume, adjust the audio levels to avoid sudden peaks, use a limiter to limit the output level, use a clipper to smoothly reduce peaks, and use a highpass filter to reduce low frequency rumble.

How Do I Get Rid Of Clipping Logic?

To get rid of clipping logic, you need to adjust the volume levels of the audio to ensure that it does not exceed the maximum level and cause distortion. You should also consider using a limiter or compressor to control the audio levels.

Additionally, you can try reducing the gain or adjusting the EQ to prevent clipping.

How Do I Stop My Microphone From Clipping?

To avoid microphone clipping, make sure your microphone volume and input levels are not too high. Use a pop filter to reduce harsh sounds, and speak directly into the microphone without breathing or speaking too loudly. Adjust your recording settings and add post-production effects if necessary.

Conclusion

In short, mastering fader clipping requires careful attention to gain structure, calibration, and technique. By using the guidelines outlined in this post, you can effectively avoid the unwanted clipping that occurs as a result of poor mixing practices. Ultimately, mastering this skill will allow you to produce clear, quality sound that retains the intended dynamics of your music.

So, don’t hesitate to experiment with different approaches until you find what works best for you. Happy mixing!

Categories
Archive

Yamaha Montage Review

The Yamaha Montage is an outstanding synthesizer with exceptional sound quality and versatile features. This synthesizer is great for professional musicians looking for a high-performance tool that can help them create and perform music with ease.

The Yamaha Montage synthesizer is a fantastic addition to the music world. It is a highly advanced synthesizer that offers exceptional sound quality and versatility, making it an excellent choice for professional musicians. With its powerful features and intuitive interface, the Yamaha Montage allows you to create and perform music with ease.

Moreover, it has a wide variety of features that give you complete control over sound shaping and creativity. Its robust build quality and reliable performance make it a great investment for music lovers who want to take their craft to the next level. In this review, we will deep dive into the Yamaha Montage, its features, pros and cons, and our expert opinion.

Yamaha Montage Review

Credit: www.youtube.com

Introducing Yamaha Montage

Yamaha Montage is a versatile synthesizer that offers impressive features for music production. Its flagship AMW (Advanced Wave Memory) sound engine, eight rotary encoders, and 88 key-weighted keyboard make it an ideal choice for professional and aspiring musicians. Overall, Yamaha Montage is a solid investment for anyone looking to create high-quality music.

The Latest Music Production Machine

Introducing the Yamaha Montage, the latest music production machine that’s taking the world by storm. Yamaha has always been known for producing high-quality musical instruments, and the Montage is no exception. The Montage is a synthesizer that combines the best of Yamaha’s previous synthesis technologies, AWM2 and FM-X, to create a powerful and versatile sound engine that can handle any type of music production. One of the standout features of the Montage is its 8-operator FM-X engine, which allows for complex, evolving soundscapes. The Montage also features a variety of on-board effects, including EQ, reverb, and distortion, that can be used to shape and enhance sounds in real time.

Key Features Worth Mentioning

The Montage’s sound engine is just the start of the features that make this synthesizer such a standout piece of equipment. Here are some key features that are worth mentioning:

  • The Montage has 61 or 76 semi-weighted keys, as well as aftertouch, allowing for expressive playing.
  • The Super Knob is a performance feature that allows for smooth, real-time control over multiple parameters.
  • The Montage has a variety of performance tools built-in, including a customizable arpeggiator and a motion sequencer.
  • The Montage also features a built-in USB audio interface, as well as MIDI and CV/Gate connectivity.

Overall, the Yamaha Montage is a powerful and versatile tool for music production and performance. Its blend of FM-X and AWM2 sound engines, along with its variety of on-board effects and performance features, makes it a standout synthesizer in its class.

Yamaha Montage Review

Credit: www.soundonsound.com

Yamaha Montage Design

The Yamaha Montage design combines a sleek black matte finish with a touch screen interface, making it easy to navigate through the various sound options. Additionally, it boasts a 128-note polyphony and over 2 GB of waveforms, giving musicians plenty of creative freedom in their compositions.

Yamaha Montage is a highly advanced synthesizer designed to cater to the needs of beginners and professionals alike. The Yamaha Montage is a combination of high-quality sounds and state-of-the-art technology, all of which are packed into a sleek and contemporary design. In this section, we will dive deep into the design of the Yamaha Montage and explore its contemporary and sleek design, quality build with premium materials.

Contemporary And Sleek Design

The Yamaha Montage is designed to impress. Its sleek and contemporary design is a perfect reflection of its incredible capabilities. The synthesizer boasts a well-designed interface that features a large color touch screen display that is incredibly easy to navigate. The touch screen is well laid out and intuitive, making it easy for you to make changes to your sounds and patches. The buttons and knobs are all well laid out and easy to use, making it simple for you to make adjustments to your sounds. The Montage also boasts a stylish metallic finish that gives it a premium look and feel. The synth’s modern design is not just aesthetically pleasing, but it also makes it easier to transport and store this masterpiece.

Quality Build With Premium Materials

The Yamaha Montage is built to last, with a robust and reliable build quality. The synth is constructed with premium materials that not only ensure its longevity but also give it a sleek and premium look that stands out from other synthesizers in the market. The Montage’s front panel is made of high-quality brushed aluminum, providing a sturdy and solid feel. The buttons and knobs are well-built and built to last, ensuring that you can use them repeatedly without any wear and tear. The keys are also of high quality and are incredibly responsive, adding to the overall playing experience. In conclusion, Yamaha Montage is a synthesizer that is packed full of excellent features, giving it unrivaled capabilities. Its design is sleek and contemporary, and it’s built to last, ensuring you get the best out of the synthesizer for many years to come.

Sound Quality Of Yamaha Montage

The Yamaha Montage offers exceptional sound quality with a vast range of features, making it a popular choice for professional musicians. Its advanced synthesis capabilities, powerful effects and intuitive controls allow for seamless integration into any performance.

Advanced Sound Engine Technology

Yamaha Montage is a powerful synthesizer that features an advanced sound engine technology, which produces a wide variety of sounds with incredible accuracy. The AWM2 and FM-X sound engines are responsible for generating some of the most dynamic and expressive sounds possible on a synthesizer. The combination of these two engines allows Montage to produce high-quality sounds that are unique and have a lot of depth.

Great Sound Library With Over 2000 Presets

With Yamaha Montage, you have access to a fantastic sound library that has over 2000 presets that allow you to create music in any style. Whether you want to play pop, jazz, classical or even experimental music, Montage has you covered. The presets are well-organized and sorted into different categories, making it easy to find the sound you want.

Custom Sound Editing And Creation Options

The Montage comes equipped with some of the best sound editing and creation options in the game. You can tweak and customize any of the existing presets to create a custom-made sound for yourself. Additionally, with the Motion Control System, you can add new layers, loops, textures, and patterns to your sound, making it more dynamic and expressive. Overall, the sound quality of Yamaha Montage is excellent, and it is one of the most versatile synthesizers available today. Its advanced sound engine technology, great sound library, and custom sound editing options make it one of the top choices for musicians in need of a high-quality synthesizer.

Performance And Playing Experience

When it comes to performance and playing experience, the Yamaha Montage is one of the most versatile and powerful synthesizers on the market. It is designed to bring out the best in both professional musicians and amateur players, offering an intuitive, dynamic, and expressive platform for creating and performing music. In this article, we’ll take a closer look at the key features that make the Yamaha Montage an excellent choice for any musician looking for high-quality sound, advanced sequencing, and precision controls.

Responsive Keyboard And Fast Controls

The Yamaha Montage is equipped with a highly responsive keyboard that provides an incredibly natural playing experience. It features a Balanced Hammer Action mechanism that mimics the touch and feel of a traditional piano, making it easy for pianists to adjust to the synth’s keyboard. The Montage’s keyboard also offers fully programmable aftertouch, allowing players to add even more expression and nuance to their performances. In addition, the synth comes with a range of fast and intuitive controls that make it easy to adjust the sound and effects on the fly. Whether you are playing live or recording in the studio, you’ll appreciate how quickly and easily you can tweak your sound with the Yamaha Montage.

Dynamic And Expressive Sound Options

The Yamaha Montage has a vast library of dynamic and expressive sound options that allow you to create virtually any sound you can imagine. It features two sound engines: the AWM2 and FM-X, each with a dedicated set of parameters for shaping and sculpting your sound. Furthermore, the Montage comes with a range of high-quality effects, including reverbs, delays, modulations, and more. Whether you want to create lush soundscapes, soaring leads, or thunderous basslines, the Yamaha Montage has you covered.

Powerful Sequencer And Arpeggiator

The Yamaha Montage features a powerful sequencer and arpeggiator that makes it easy to create intricate and complex musical sequences. The sequencer allows you to create up to 16 tracks, each with its own set of parameters, including note length, velocity, and more. It also includes a variety of editing tools that let you fine-tune your sequences and adjust them to fit your exact needs. The arpeggiator, on the other hand, lets you create automatic patterns and sequences based on your playing. It offers a range of arpeggio types, including ascending, descending, and random patterns, each with its own unique sound and feel.

Overall, the Yamaha Montage is an exceptional synthesizer that offers outstanding performance and playing experience. With its responsive keyboard, fast controls, dynamic and expressive sound options, and powerful sequencer and arpeggiator, it is a top choice for any musician looking to take their music to the next level.

Connectivity And Integration

The Yamaha Montage comes with advanced connectivity and integration, making it versatile and easy to use. With its USB, MIDI, and Ethernet ports, it can connect to a wide range of devices and control multiple instruments simultaneously, making it an excellent choice for professional musicians.

Yamaha Montage is a powerhouse that offers an impressive combination of sound creation capabilities, excellent keyboard feel, and extensive control. But what’s more impressive is its connectivity and integration. In this section, we’ll dive deeper into the multiple input and output options, the compatibility with different devices and software, and seamless integration with DAWs- all of which make the Yamaha Montage a versatile and powerful tool for music production.

Multiple Input And Output Options

The Yamaha Montage boasts a comprehensive range of input and output options, which allows it to function as the central hub for your music production setup. With its pair of 1/4″ line inputs, stereo 1/4″ outputs, 1/4″ headphone out, and two pairs of assignable outputs, you can integrate the Montage with a wide range of peripherals such as guitar stompboxes, modular synths, and external effects units. Additionally, its 5-pin DIN MIDI in/out and USB-to-host connectivity allow for communicating with other standard MIDI devices and computer software.

Compatibility With Different Devices And Software

Yamaha Montage supports a wide range of devices and software to help you create music without limitations. It provides a USB audio interface that allows you to connect it directly to your computer and record audio without the need for an external interface. Montage also supports MONTAGE Connect, a free plug-in that seamlessly integrates the synth with your DAW (Digital Audio Workstation), allowing you to control the Montage and its sounds within your music production environment.

Seamless Integration With Daws

Thanks to the MONTAGE Connect plug-in, Montage works seamlessly with your DAW. With this feature, the Montage acts as a control surface, so you can adjust all synthesis parameters and tweak sounds right from your DAW. Additionally, all Montage Performances are available for immediate use in your DAW. You can also create, save, and recall MONTAGE Performances directly from your DAW, offering tight integration and improving your workflow. In conclusion, If you’re looking for a synth that delivers a fantastic playing experience, impressive sounds, and extensive connectivity and integration options, look no further than the Yamaha Montage. With its wide range of functionality and capabilities, it’s no wonder why it’s a go-to synth for many professionals across different music genres.

Yamaha Montage Review

Credit: yamahamusicians.com

User Interface And Navigation

The Yamaha Montage boasts a user-friendly interface and navigation, allowing users to easily access its wide range of features. The touch screen display and intuitive menus make it easy for both novice and experienced keyboardists to navigate and customize the instrument to their liking.

When it comes to sound synthesis, Yamaha Montage is a popular choice among professionals. In addition to its high-quality output, another feature that sets Montage apart is its user interface and navigation system. Several aspects of Montage’s interface make it intuitive and easy-to-use even for beginners.

Intuitive And Easy-to-use Interface

Montage’s interface comprises a touch screen and several assignable buttons, making it both versatile and user-friendly. The screen provides an easy-to-read visual representation of sound synthesis. Its touch functionality enables users to navigate through menus, files, and sounds quickly. The buttons, on the other hand, can be assigned to frequently used features, reducing the time it takes to access them.

Touch Screen And Assignable Buttons

Montage’s touch screen is a high-resolution display of 7 inches, making it easy to read and navigate. Its touch response is excellent, ensuring that users don’t encounter any lag while navigating through various menus and sound banks. Additionally, Montage’s 8 assignable buttons can be customized to fit the user’s needs by attaching them to frequently used features.

Customizable Workflow And Settings

Yamaha Montage comes with a customizable workflow and settings, ensuring that users can fully personalize their experience. If you’re a keyboardist looking for a particular sound, you can save it as your default setting. Furthermore, Montage’s workflow can be modified according to the user’s preferences, making it more intuitive and enjoyable to use. In conclusion, Yamaha Montage’s user interface and navigation system provide an easy-to-use and enjoyable sound synthesis experience. With features such as a touch screen, assignable buttons, and customizable workflow and settings, users can rest assured that they’ll spend less time navigating through menus and more time making music.

Pros And Cons Of Yamaha Montage

Yamaha Montage is a versatile workstation with advanced features such as motion control and FM synthesis. Its high-quality sounds, easy integration and intuitive interface make it a popular choice among musicians. However, it can be quite heavy and expensive compared to other synthesizers in the market.

Yamaha Montage is an excellent synthesizer for sound designers and keyboard players who want to express themselves and create music in a unique and creative way. Like any other product, Yamaha Montage has its advantages and disadvantages. In this section, we will explore the Pros and Cons of Yamaha Montage.

Advantages Of Using Yamaha Montage

  • High-quality sound and over 2,000 preset sounds, rhythms, and effects that can be tailored to the user’s individual preferences.
  • The Super Knob feature is a game-changer, allowing users to morph between sounds and effects in real-time for unparalleled sound manipulation.
  • The Motion Control feature enables users to control various sound parameters using their physical gestures, creating a truly unique interactive experience.
  • The AWM2 and FM-X engines allow users to combine multiple synthesis methods for even more sound customization and creation opportunities.
  • The Montage Connect software makes it easy to connect to computers and other music production devices for seamless integration in the studio or on stage.

Limitations And Possible Downsides

ProsCons
High-quality sound engineThe keyboard may feel light for some users, leading to less tactile feedback while playing
Multiple synthesis engines for versatile sound creationNo built-in sampler, which could limit users who rely on sampled sounds
Super Knob feature and Motion Control for real-time sound manipulationThe Montage Connect software can be a bit tricky to set up for some users
Easy connectivity with other music production devicesExpensive compared to other synthesizers on the market

Overall, the Yamaha Montage is an excellent choice for any musician seeking the ultimate sound customization experience and can afford the high price tag. With its innovative features, multiple synthesis engines, and easy connectivity, the pros outweigh the cons, making this synthesizer a top choice for many professionals in the industry.

Verdict On Yamaha Montage

The Yamaha Montage is a powerful and versatile synthesizer that offers extraordinary sound quality and impressive performance capabilities. With a range of customizable features and intuitive controls, this keyboard is ideal for both professional musicians and hobbyists looking for a top-notch synthesizer.

Overall Assessment

Yamaha Montage is a top-of-the-line synthesizer that is packed with features, making it a great option for musicians who require high-quality sound production and versatility. To begin with, the Montage has a sleek design that is both visually appealing and functional. It’s equipped with a 7-inch TFT color display that provides a clear, crisp view of the synthesizer’s myriad features. One of the most impressive features of the Montage is its sound quality. Yamaha has spared no expense in ensuring that the synthesizer produces high-quality sound that is rich, warm, and authentic. The Montage comes loaded with 2 GB of waveforms, 1,000 present performances, 500 user performances, and 640 MB of user waveforms, all of which contribute to the production of excellent sound. Another standout feature of the Montage is its user-friendliness. The synthesizer is relatively easy to use, even for beginners, thanks to its intuitive interface. Additionally, with the Montage, you can easily customize and save your performances, making it an ideal option for musicians who are particular about their sound.

Recommendation

If you’re in the market for a top-quality synthesizer that delivers when it comes to sound quality and versatility, then the Yamaha Montage should definitely be on your list. It’s packed with features, user-friendly, and produces high-quality sound that is true to your musical style and genre. Whether you’re a professional musician or an aspiring producer, the Yamaha Montage is a synthesizer that delivers on all fronts.

Final Thoughts On Yamaha Montage Review

In conclusion, the Yamaha Montage is well worth the investment for musicians who require top-quality sound production and versatility. It’s packed with features that are sure to elevate your music to the next level, and it’s relatively easy to use, even for beginners. Whether you’re producing electronic music or composing orchestral pieces, the Montage is a synthesizer that can deliver on all fronts. We highly recommend the Yamaha Montage as a synthesizer that is both versatile and reliable.

Frequently Asked Questions On Yamaha Montage Review

Has The Yamaha Montage Been Discontinued?

No, as of now the Yamaha Montage has not been discontinued. It is still available in the market and can be purchased from authorized Yamaha dealers.

What Is The Difference Between Montage 6 And Montage 7?

The main difference between Montage 6 and Montage 7 is that Montage 6 is a portable EEG system that can be used for clinical and research purposes, while Montage 7 is more advanced and includes additional channels for better data collection and analysis.

What Is The Difference Between Montage 6 And Montage 8?

Montage 6 and Montage 8 are different deices of Medtronic’s Neurostimulation System. Montage 8 has 8 electrodes while Montage 6 has 6 electrodes. The number of electrodes allow for different levels of customization and placement and has an impact on the coverage of the pain or condition being targeted.

What Is The Difference Between Modx And Montage?

MODX is a content management system (CMS) that allows users to create and manage websites, while Montage is a web application framework that allows developers to build single-page applications (SPAs). MODX is more suitable for managing website content, while Montage is optimal for building complex SPAs with rich client-side interactions.

Conclusion

After closely examining the Yamaha Montage, it is clear that this keyboard is a powerhouse in the music industry. With its impressive sound quality, intuitive touch screen, and endless sonic possibilities, the Yamaha Montage is the perfect tool for both professional musicians and hobbyists alike.

Its easy-to-use interface and intuitive controls make it accessible to all skill levels, while its advanced features and high-quality sound set it apart from its competitors. If you’re looking for a top-of-the-line keyboard that can deliver on all fronts, the Yamaha Montage should be at the top of your list.

More in our Gear reviews.

Categories
Archive

Deezer Pay Per Stream

Deezer pays its artists based on their pay-per-stream model, where each stream earns a fraction of a penny. Deezer is one of the leading music streaming platforms, allowing users to access millions of songs from various genres and artists.

However, this service wouldn’t be possible without the hard work of musicians, singers, and songwriters who produce the content that listeners enjoy. One of the ways Deezer compensates these artists is through their pay-per-stream model, where they pay a certain amount every time a user streams their song.

While the exact amount varies depending on factors such as location and listener type, the pay-per-stream model ensures that artists receive some compensation for their work. This model has faced some criticism as some believe it’s not enough to support musicians and the music industry as a whole, but it remains a significant source of income for many artists.

Understanding Deezer’s Pay Per Stream Model

Deezer’s Pay Per Stream Model is an innovative approach to compensating artists for the use of their music on the platform. Under this model, artists are paid based on the number of times their songs are streamed by Deezer users. In this blog post, we’ll explore the key features of this model and how it works.

How Does Deezer’s Pay Per Stream Model Work?

Deezer’s Pay Per Stream model works by compensating artists based on the number of times their music is streamed. Every time a user streams a song, the artist receives a fraction of the revenue generated by that stream. The exact amount an artist is paid per stream varies based on a variety of factors, including the user’s location, the subscription tier they are on, and the popularity of the artist’s music.

In order to ensure that artists are fairly compensated, Deezer uses a complex algorithm to calculate the revenue share for each stream. This algorithm takes into account a wide variety of factors, including the amount of revenue generated by advertising, the number of streams a particular artist receives, and the total amount of revenue generated by the platform.

Key Features Of Pay Per Stream Model

The Pay Per Stream model has a number of key features that make it an attractive alternative to traditional music distribution models. These features include:

  • Transparency: Deezer’s algorithm for calculating revenue share is transparent and publicly available, meaning that artists can be confident that they are being compensated fairly for their work.
  • Flexibility: The Pay Per Stream model is incredibly flexible, allowing artists to distribute their music on the platform without signing exclusive contracts or giving up control of their work.
  • Global reach: Deezer has a massive global audience, meaning that artists who distribute their music on the platform have the potential to reach a massive audience.
  • Revenue potential: Because artists are compensated based on the number of times their music is streamed, there is potentially no limit to the revenue they can generate on the platform.

Overall, the Pay Per Stream model is a revolutionary new approach to music distribution that has the potential to transform the industry. With its emphasis on transparency, flexibility, and fairness, it’s easy to see why so many artists are choosing to distribute their music on Deezer.

Deezer Pay Per Stream

Credit: www.statista.com

Advantages Of Deezer Pay Per Stream

Deezer Pay Per Stream offers numerous advantages for artists, including fair compensation for their work and the ability to earn money on a per-stream basis. This system also enables artists to track their earnings and determine which songs are most popular with their audience.

Advantages of Deezer Pay Per Stream As a leading music streaming platform, Deezer Pay Per Stream (PPS) has been gaining popularity among music enthusiasts and artists alike. This payment model offers several advantages that make it an attractive option for both listeners and music creators. Let’s take a look at some of the main reasons why Deezer PPS stands out. Fair Payment for Artists Deezer PPS ensures that artists are paid fairly for their music. This model is based on the number of streams an artist receives, which means that they get paid for every play. Unlike other streaming services that pay a flat fee to artists, Deezer PPS ensures that artists receive a share of the revenue that their music generates. This approach provides an incentive for artists to create and promote their music on the Deezer platform. Flexible for Users Deezer PPS is a flexible payment model that allows users to access their favorite music on the platform without committing to a fixed monthly subscription. This means that users can pay for what they listen to, which is an attractive option for those who may not want to commit to a subscription. Plus, with no minimum payout threshold, small artists can also monetize their work on the platform. Accurate Analytics Deezer PPS offers accurate analytics that provide insights into the performance of an artist’s music. This data can help artists to understand their audience better and adjust their strategy accordingly. The analytics dashboard enables them to track the number of streams, geographic location of listeners, and other metrics that are useful for their brand building. Easy Payment Method Paying for music on Deezer PPS is easy and hassle-free. Users can access their music through various payment options such as mobile billing, credit/debit card, and PayPal. Additionally, Deezer’s partnership with mobile phone companies allows users to pay for their music subscription via their phone bills. This makes it convenient for users who prefer to pay via their phone bills. In conclusion, Deezer PPS offers several advantages to both artists and music enthusiasts. Its fair payment model, flexible payment options, accurate analytics, and easy payment methods make it a popular choice among its users. So, as a music creator or subscriber, Deezer PPS is definitely worth exploring.

Challenges Of Deezer Pay Per Stream

Deezer is one of the well-known music streaming services that brings music lovers from across the globe together. It is available in more than 180 countries, and its pay per stream service is widely popular among music creators. However, like any other service, the Deezer Pay Per Stream has its own set of challenges, which are discussed below.

Low Payout For Streams

One of the significant challenges of Deezer Pay Per Stream is the low payout for streams compared to other competitors in the music streaming industry. According to Music Business Worldwide, Deezer paid an average of $0.0064 per play to the rights holders in 2020. Although improvement has been seen since in 2019 when the payout was around $0.0056 per play, it is still considerably low. This issue raised questions among music creators and resulted in many of them preferring other better-paying music services.

Competition With Popular Streaming Services

Deezer Pay Per Stream faces stiff competition from other popular streaming services like Spotify, Amazon Music, and Apple Music. These competitors have a more extensive customer base and better payouts to rights holders compared to Deezer. Thus, music creators may prefer to distribute their music across these platforms. This high competition results in Deezer having a smaller user base, making it difficult for musicians to get noticed, especially independent artists who rely on music streaming services to reach their audience.

Overall, Deezer Pay Per Stream has come a long way in establishing its name as a music streaming service, and it has been facing these challenges for some time now. However, despite the challenges, Deezer is continuously working towards improving payouts and its customer base, ultimately benefiting the music creators.

Comparison With Other Streaming Services

Compared to other streaming services, Deezer’s pay-per-stream model offers a unique approach. With this pricing method, users can choose which tracks they want to purchase instead of paying for a subscription. This can be beneficial for those who only listen to a few select songs rather than a wide range of music.

Deezer is a popular music streaming service offering a pay-per-stream model for its users. This model is different from Spotify, Apple Music, and Tidal, which use subscription-based revenue models. Let’s take a closer look at the revenue models of these streaming services to understand their differences.

Spotify’s Revenue Model

Spotify is a subscription-based music streaming service. It offers different pricing tiers for its users, including a free option with ads, a premium subscription, a student subscription, and a family subscription. In the premium subscription, users pay a monthly fee to access ad-free music and other features like offline playback, high-quality audio, and unlimited skips. Spotify pays royalties to artists based on the number of streams their songs receive.

Apple Music’s Revenue Model

Apple Music offers a subscription-based revenue model similar to Spotify. It offers a free trial period for its users, after which they are required to pay a monthly fee to access the service. Apple Music also offers a family subscription and a student subscription. Like Spotify, Apple Music pays royalties to artists based on the number of streams their songs receive.

Tidal’s Revenue Model

Tidal is another music streaming service that offers a subscription-based revenue model. It offers a standard subscription and a HiFi subscription with high-quality audio. Tidal also pays higher royalties to artists compared to other streaming services. In addition, Tidal offers exclusive content and events for its users. In conclusion, Deezer’s pay-per-stream model is different from other streaming services like Spotify, Apple Music, and Tidal, which use subscription-based revenue models. However, each revenue model has its own advantages and disadvantages for users and artists. As a user, it is important to choose a streaming service that suits your needs and preferences.

Future Of Deezer Pay Per Stream

The future of Deezer Pay Per Stream looks bright as it offers artists and labels a fair share of revenue. With a focus on privacy and audibility, it competes with other streaming platforms in the market. However, it remains to be seen how it will stack up against competitors in the long term.

Deezer Pay Per Stream is a popular online music streaming platform that offers over 73 million tracks to its users. With the rise of digital music consumption, the company has been exploring new avenues to expand its user base while delivering a superior streaming experience. One such initiative that Deezer introduced was its ‘Pay Per Stream’ model, which allows artists to get paid for every song played by users. However, the company has been looking at redefining this model to keep up with market trends and changes in user behavior.

Market Trends And Changes In User Behavior

It is no secret that online music streaming has become one of the fastest-growing industries in the world. With the rise of smartphones and the internet, people can now listen to their favorite tracks from anywhere and at any time. As a result, the competition has become fierce, and music platforms need to offer something unique to stand out. Today, consumers are increasingly looking for personalized experiences that are tailored to their interests. Streaming platforms like Deezer are leveraging artificial intelligence and data analytics to offer such experiences to their users.

Deezer’s Plans For The Future

Deezer is continually exploring new ways to expand its user base and deliver a superior streaming experience. The company realizes that its Pay Per Stream model needs to evolve to keep up with market trends and user behavior. Therefore, Deezer has been working on a new revenue-sharing model that will benefit independent artists and labels. The new model will be based on a user’s streaming activity and the revenue generated from advertising. Deezer has also been leveraging blockchain technology to ensure that artists get paid in a transparent and efficient manner. In conclusion, Deezer Pay Per Stream is a unique revenue-sharing model that benefits both artists and streaming platforms. Deezer has been looking at ways to improve this model to keep up with market trends and user behavior while ensuring that artists get paid their due. By exploring new revenue-sharing models and leveraging emerging technologies, Deezer aims to stay ahead of the competition and continue to offer a personalized music streaming experience to its users.

Deezer Pay Per Stream

Credit: musicdigi.com

Deezer Pay Per Stream

Credit: www.viberate.com

Frequently Asked Questions On Deezer Pay Per Stream

How Much Is 1k Streams On Deezer?

1k streams on Deezer varies in payout depending on the country and subscription plan. However, on average, 1k streams can earn around $5-$6 for artists.

How Much Does Deezer Pay For 1 Million Views?

Deezer pays $1000-$3000 for 1 million views.

Does Deezer Pay More Than Spotify?

Deezer and Spotify pay different rates to artists, but there is no clear answer on which service pays more. It largely depends on the users’ location, the type of subscription they have, and the artist’s popularity. However, both platforms aim to provide fair compensation to artists for their streaming revenue.

How Much Does Spotify Pay Per 1,000 Streams?

Spotify pays between $0. 003 and $0. 005 per stream. So, for 1,000 streams, a user could expect to earn between $3 and $5.

Conclusion

After considering the Deezer Pay Per Stream model, it’s evident that it can be an effective way for artists to get paid for their music. Not only does it offer fair compensation for streams, but it also provides insight into who is listening and where.

However, it’s important to keep in mind that Pay Per Stream is not the only revenue stream available for musicians. Diversifying income streams can lead to greater financial stability and success in the industry. Overall, Deezer Pay Per Stream can be a valuable tool for artists, but it should be used in conjunction with other revenue streams.

Categories
Archive

Why Do Synths Sound So Good

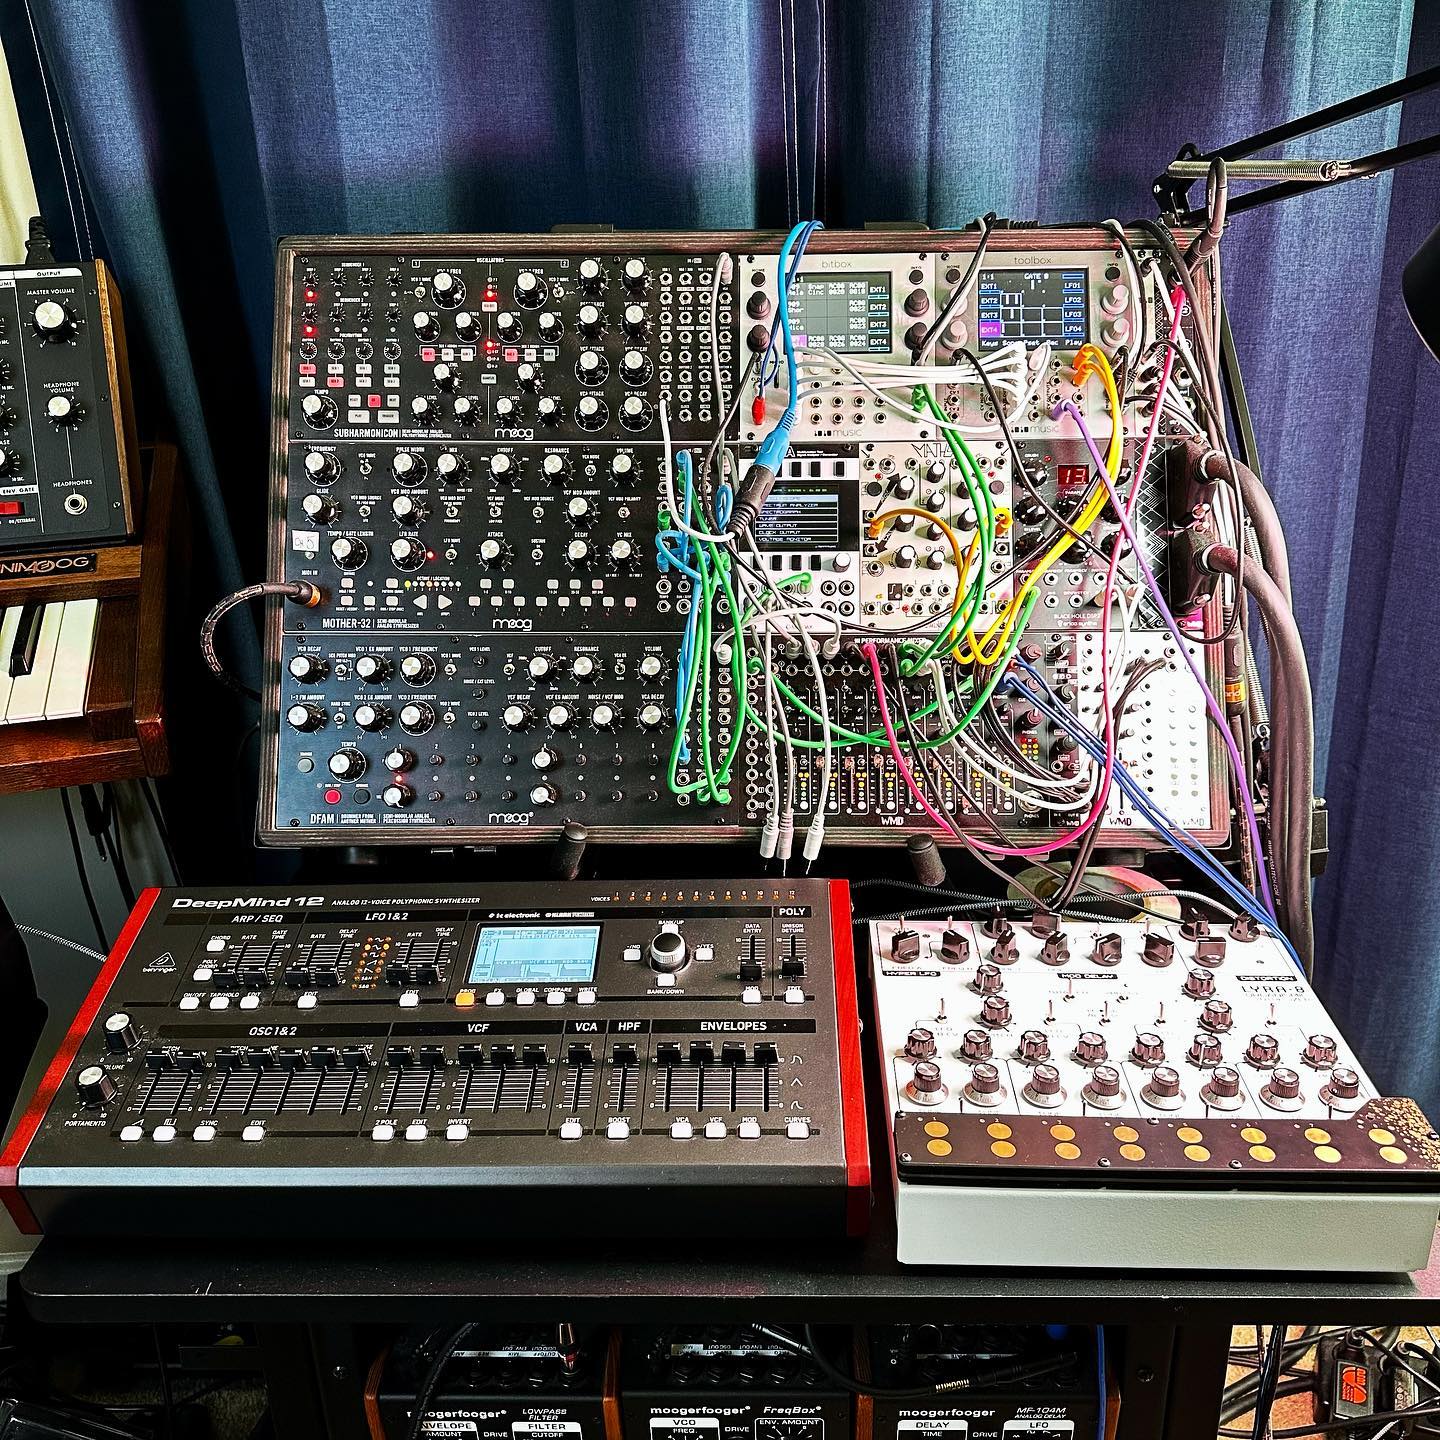
Synths sound so good because they have the ability to create complex and unique sounds, thanks to their electronic components and advanced digital signal processing. With a wide range of parameters and adjustable settings, synths offer unparalleled versatility and expressiveness, making them a popular choice for musicians and producers across different genres.

With just a few knobs and controls, synths can produce a vast array of sounds, from rich basslines to ethereal pads and everything in between. Whether you’re a seasoned player or just starting out, the world of synthesizers offers endless possibilities and inspiration.

We’ll explore some of the reasons why synths sound so good and what makes them such a valuable tool for music production and performance.

The Science Of Synthesizers

The Science of Synthesizers is a fascinating topic that explores how synthesizers produce sound. Synthesizers have been around for a long time and have been used in a wide variety of music from pop to experimental and electronic.

An Overview Of Synthesizer Technology

Synthesizers are electronic instruments that create sound. They come in many forms, from small portable keyboards to large modular systems. Synthesizers use a complex network of electronic components to produce sound, including oscillators, filters, envelopes, and amplifiers. These components are manipulated in real-time using knobs, faders, and buttons to create unique sounds.

How Synthesizers Produce Sound

Synthesisers produce sound by generating signals from oscillators. These signals can be shaped using various components such as filters, envelopes, and LFOs, to create complex waves or sound effects. The oscillators produce waveforms that can have unique and complex harmonic content, which is then routed through filters that cut or boost specific frequency ranges. Envelopes can also be used to shape the amplitude of the sound over time, adding realism to a sound or creating interesting sounds. Finally, the signal is amplified by an amplifier and sent out through the synth’s output.

Synthesizers are capable of creating complex and unique sounds that are difficult to produce with traditional instruments. The flexibility of synthesizers makes them an excellent tool for sound designers and musicians, allowing them to create innovative soundscapes and explore new creative territories. Synths have played a vital role in the development of electronic music, and their influence can be heard in everything from pop to hip-hop to experimental and avant-garde.

The science of synthesizing is complex and deep, but with practice and experience, it can be incredibly rewarding. Understanding how synthesizers produce sound can help to unlock the full potential of these instruments and create unique and exciting music.

Why Do Synths Sound So Good

Credit: grahamenglish.com

The Evolution Of Synths

The evolution of synths has been an exciting one, from its humble beginnings in the 1960s to the powerhouse it is today. Synths or synthesizers are electronic instruments that can create different sounds, from imitating traditional instruments to producing unique and completely new sounds. One of the most fascinating aspects of synths is the incredible range of sounds they’re capable of creating.

From Analog To Digital Synthesizers

Analog synths were the first type of synthesizers developed in the 1960s, and they generated sound through analog circuits. This original technology allowed musicians to create unique sounds that couldn’t be achieved through traditional instrumentation.

Today, digital synths have revolutionized the way we create music. These synths use mathematical algorithms to produce sound. Unlike their analog counterparts, digital synths are capable of producing an infinite number of possible sounds. Not to mention that they’re more affordable and accessible than ever before!

How Synths Have Changed Music Production

  • Synths have made it easier for musicians to experiment with unique sounds and express themselves in new ways.
  • Thanks to synths, we’ve heard entirely new styles of music, including electronic, techno, and house.
  • Synths have also changed the way music is produced. With the help of technology, musicians can create music right from their laptops and release it online without ever entering a traditional studio.
  • Additionally, live performances have been completely transformed thanks to synths and their ability to create unique sounds that wouldn’t be possible with traditional instruments.

Synths have been instrumental in the evolution of music as we know it. As technology continues to advance, we can expect even more incredible advancements in the world of synthesizers.

The Advantages Of Synths

Synths sound so good because they offer a wide range of sonic possibilities, allowing for the creation of unique and complex sounds. The ability to manipulate various parameters in real-time also adds to their appeal, making them a popular choice for electronic music producers and performers alike.

Synth (short for synthesizer) is an electronic instrument that generates audio signals using various modules. The sound it produces is so good that it has become a popular choice for musicians, composers, and sound designers. In this section, we will discuss the advantages of using synths, specifically focusing on sound manipulation, versatility, and ease of use.

Sound Manipulation

Synths offer unparalleled possibilities for sound manipulation. Unlike traditional instruments like guitars or pianos, synths can manipulate waveforms using modules such as filters, envelopes, and LFOs. These modules allow the user to shape the sound in ways that are impossible with acoustic instruments. For instance, one can use a filter to highlight or remove certain frequencies, an envelope to alter the volume or pitch over time, or an LFO to create vibrato or tremolo effects. With synths, the possibilities are endless, and the user can create sounds that are unique and distinctive.

Versatility

Synths are incredibly versatile instruments that can emulate a wide range of sounds, from classical pianos or orchestras to futuristic soundscapes. They can produce sounds that are entirely synthetic, or they can simulate real-world instruments convincingly. Furthermore, synths can be used in various music genres, such as pop, rock, electronic, or ambient. They can be used as lead or rhythmic instruments or as atmospheric pads or sound effects. Because of their versatility, synths have become a staple of modern music production, and they have contributed to shaping the sound of popular music.

Ease Of Use

Another advantage of synths is their ease of use. Despite being complex instruments, synths are relatively easy to operate, and they offer intuitive interfaces that allow the user to create sounds quickly. Modern synths often have preset banks or sound libraries that the user can use as a starting point or modify to their liking. Additionally, synths can be easily integrated into digital audio workstations (DAWs) using software plugins or MIDI connections, which allows the user to control and automate the synth’s parameters. Overall, synths offer a user-friendly experience that encourages experimentation and creativity. In conclusion, synths have several advantages that make them a popular choice for producers, composers, and musicians alike. The ability to manipulate sounds, their versatility, and ease of use have made synths an essential tool for modern music production.

Why Do Synths Sound So Good

Credit: m.youtube.com

The Role Of Synths In Popular Music

Synthesizers, or synths, have been a mainstay in popular music for decades. From the electronic music revolution of the 1980s to the present day, synths have been used to create iconic sounds and push the boundaries of music production. In this section, we will explore the role that synths have played in popular music and the impact they have had on the industry.

Electronic Music Revolution

The emergence of electronic music in the 1980s was largely driven by the use of synthesizers. Synths allowed artists to create new and innovative sounds that had never been heard before, and paved the way for new genres like techno, trance and ambient. The Roland TB-303 and Yamaha DX7 are just a few examples of iconic synths that came to define the sound of electronic music in its early days.

Iconic Synth Sounds

Synths have also been responsible for creating some of the most recognizable sounds in popular music. From the opening riff of Van Halen’s “Jump” to the signature synth sound of Survivors “Eye of the Tiger”, synth sounds have become synonymous with certain songs and genres. Even in modern pop music, synths continue to be used to create chart-topping hits, with artists like The Weeknd and Billie Eilish incorporating synths into their music in creative ways.

Influence On Modern Music Production

Synths have had a profound impact on modern music production, allowing artists to create complex and dynamic sounds that were once impossible to achieve with traditional instruments. The rise of digital audio workstations (DAWs) and software synths has made synths more accessible than ever, and has given rise to a new generation of producers and sound designers that are pushing the boundaries of what is possible with electronic music.

In conclusion, synths have played a crucial role in shaping the sound of popular music over the past few decades, from the electronic music revolution of the 1980s to the present day. They continue to be used in creative and innovative ways by artists and producers alike, and will undoubtedly continue to shape the future of music for years to come.

The Future Of Synths

Synths sound so good because they effectively emulate sounds from various instruments in a way that’s not possible with traditional instruments. The future of synths looks bright as technology continues to advance, making it possible for musicians to achieve even more sounds and effects than before.

As technology continues to evolve, so does the future of synths. Synths have come a long way since the days of analog hardware synths, and now with digital and software advancements, synths have become more powerful and versatile than ever before. In this blog post, we’ll explore the advances in synth technology, innovative synth interfaces, and the potential impact on music and culture.

Advances In Synth Technology

Synths have evolved from their humble beginnings to become incredibly sophisticated instruments. Recently, there have been significant advancements in synth technology such as:

  • The use of Artificial Intelligence (AI) for sound design and music composition.
  • Flexible and programmable modulation capabilities that allow users to create complex and evolving sounds.
  • Virtual analog modeling and wavetable synthesis that provide a vast array of sonic possibilities.

These advancements have made synths more user-friendly and accessible to everyone, not just professional musicians and producers. Whether you are a beginner or an experienced musician, these new features make it easier to create unique sounds and expand your creative possibilities.

Innovative Synth Interfaces

Innovation in synth design has also led to new and innovative interfaces that allow for more intuitive and expressive control over sound production. These interfaces include:

InterfaceDescription
MIDI controllers, touchpads, and ribbon controllersAllow for hands-on manipulation of sound parameters.
Sensor technology (motion, pressure, and light sensors)Offers new ways for controlling synths parameters and sound expression.
Vocal and gesture controlProvide a more intuitive and natural way of interacting with synths through voice and body movements.

These innovative interfaces provide more creative options and a fluid experience to produce music, giving the ability to sculpt, move, and modulate sound in real-time.

Potential Impact On Music And Culture

As technology advances, so does the potential impact on music and culture. The future of synths will have a significant impact on the way music is produced, performed, and consumed. It can lead to:

  1. More personalized and unique music production.
  2. The ability to perform new types of music with innovative sounds.
  3. The transformation of modern genres and new music styles.
  4. A new generation of electronic musical instruments with more versatility and creativity.
  5. New forms of sonic art and performances.

Overall, the future of synths promises a bright and exciting future for the music industry. With the combination of innovative interfaces, advances in synth technology, and new creative potentials, music production and consumption are bound to experience new levels of ingenuity and originality.

Frequently Asked Questions Of Why Do Synths Sound So Good

Why Are Synthesizers So Cool?

Synthesizers are cool because they allow for the creation of unique sounds that cannot be replicated by traditional instruments. They give artists the ability to customize their music to their liking, making it more enjoyable and unique to their fans.

The endless possibilities of sound and experimentation make synthesizers an essential tool for any musician.

What Makes Synths Sound Different?

Synths sound different due to the various waveforms produced by the oscillators, differences in filter types, envelope generators, LFOs, and effects. The use of analog or digital technology also affects the sound produced, as well as the use of presets and programming options.

What Makes Moog So Good?

Moog synthesizers are renowned for their distinctive sound, analog circuitry, and vintage aesthetic. Their attention to detail in creating high-quality components and their commitment to preserving the traditional sound-making methods has made them a preferred choice among musicians and music producers worldwide.

Can A Synth Sound Like A Guitar?

Yes, with advanced technology, modern synthesizers can emulate the sound of a guitar to a great extent. Synths can produce different guitar tones, from electric to acoustic, by using various techniques, including sampling, modeling, and software plug-ins. However, they cannot fully replicate the tonal nuances and dynamic range of a real guitar.

Conclusion

To sum up, the ability of synths to produce complex and diverse sounds is what makes them highly regarded in the music industry. Their versatility and unique capabilities have made them an essential tool for music producers, composers, and artists to express themselves in a way that was not possible with traditional instruments.

With the constant evolution of technology, we can expect synths to continue to push the boundaries of sound and inspire creative experimentation in music. If you’re looking to explore the vast world of synths, there’s no better time to start than now.

Categories
Archive

Parallel Kick Compression

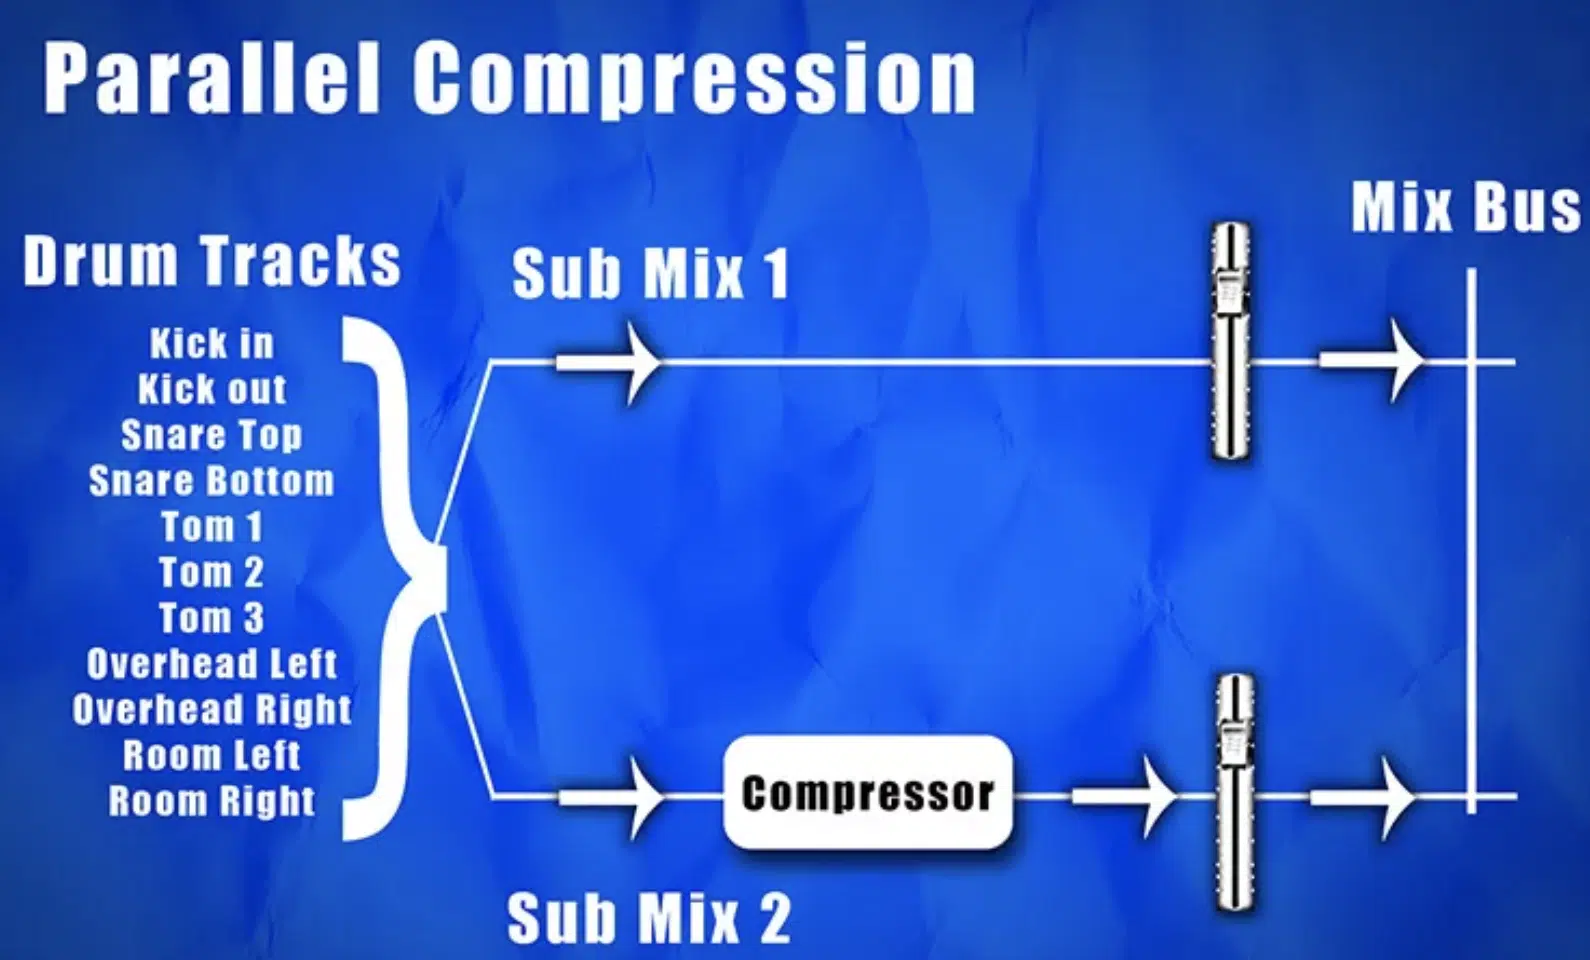
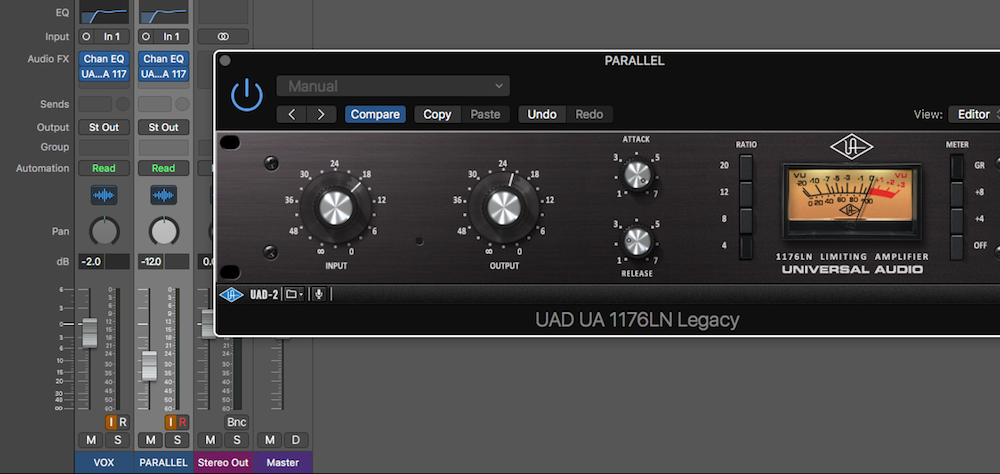
Parallel kick compression is a technique used in audio production to help instruments cut through the mix and create a fuller sound. This technique involves duplicating a track or instrument and compressing it with the same settings as the original, then panning the duplicate track to the opposite side of the stereo field.

This creates the effect of the instrument being present in both ears and helps it stand out in the mix. Parallel kick compression is commonly used on drums, but can also be applied to other instruments such as bass and guitars.

It’s a popular technique among producers and engineers looking to achieve a polished and professional sound.

What Is Parallel Kick Compression

Parallel Kick Compression is a technique used in music production for bringing out the transients or the attack of a sound. It is a technique that has been used by professional sound engineers for years, but with the advent of computer-based recording software, it is now easily accessible to everyone. So, what exactly is Parallel Kick Compression? Let’s explore.

Definition Of Parallel Kick Compression

Parallel Kick Compression is a technique that involves blending a heavily compressed version of a kick drum with the original uncompressed kick drum signal. It is used to bring out the punch or attack of a kick drum.

How Parallel Kick Compression Works

  • First, duplicate the original kick drum track
  • On the duplicated kick track, add a compressor with a high ratio and a fast attack time
  • Set the threshold low enough so that the compressor activates on every kick hit
  • Adjust the attack and release times to taste, keeping in mind that a faster attack time will bring out more of the punch in the sound
  • Mix the heavily compressed kick drum track with the original kick drum track to taste
  • Make sure the compressed kick drum track is not too loud in the mix, as it can quickly become overpowering

Parallel Kick Compression is a powerful tool for enhancing the attack and punch of a kick drum without sacrificing the body of the sound. It is a technique that can be used in any genre of music and is particularly effective in genres like electronic music, hip-hop, and rock.

Now that you understand what Parallel Kick Compression is and how it works, try experimenting with it in your own music productions. Remember, like all production techniques, the key is to use it in moderation and to trust your ears when it comes to mixing.

Parallel Kick Compression

Credit: unison.audio

Applications Of Parallel Kick Compression

Parallel Kick Compression is a highly effective and widely used method of compression, which is why it has numerous applications across various industries. Some of the most prominent applications of Parallel Kick Compression are the following:

Oil And Gas Industry

Besides discovering and extracting oil and gas deposits, the oil and gas industry also often requires extra assistance in transporting and refining these materials for commercial purposes. Strong compression is required to achieve this, which is where Parallel Kick Compression comes in. It makes it possible to maintain multiple stages of compression so that the extracted oil and gas can be efficiently transported and refined.

Industrial Air Compression

Parallel Kick Compression is also used for industrial air compression purposes. In this case, the compressor has multiple stages and is designed to deliver high volumes of air efficiently, and with minimal energy consumption. This makes the Parallel Kick Compression method ideal for a range of industrial applications such as manufacturing, medical, and gas generation processes.

Other Applications

Other than oil and gas extraction and industrial air compression, there are many other applications of Parallel Kick Compression. For example, it is used in the production of polyethylene and other plastics, the vapor recovery process, and chemical manufacturing.

IndustryApplication
Oil and GasEfficient transportation and refinement of extracted resources
IndustrialAir compression for manufacturing, medical, and gas generation
OtherPolyethylene and plastics production, vapor recovery process, chemical manufacturing

In conclusion, with its multiple stages, ease of use, and energy efficiency, Parallel Kick Compression is a popular compression method that offers numerous applications across a wide range of industries.

Advantages Of Parallel Kick Compression

Parallel kick compression offers numerous benefits for gas processing facilities, including a higher capacity for gas processing, lower energy consumption, and a smaller environmental footprint. With this technology, multiple stages of compression can be combined and operated in parallel, resulting in a more efficient and cost-effective process.

Parallel Kick Compression (PKC) is a technology that has been developed to increase the efficiency and reliability of gas compression systems. PKC is an innovative approach that uses multiple small cylinders in a parallel configuration instead of the traditional large cylinder, allowing for a higher compression ratio and greater system efficiency. In this blog post, we will discuss the advantages of PKC, including efficiency, reliability, and cost savings.

Efficiency

The parallel configuration of PKC cylinders means that each cylinder handles a smaller volume of gas, allowing the system to operate more efficiently. The smaller cylinders generate less friction and heat, improving the overall compression efficiency. Additionally, PKC allows for a higher compression ratio, resulting in a greater amount of compressed gas for each unit of energy used. This increased efficiency leads to lower operating costs and reduced greenhouse gas emissions.

Reliability

PKC systems are designed to be more reliable than traditional compression systems. The use of multiple small cylinders means that if one cylinder fails, the system will still be operational. This redundancy reduces downtime and maintenance costs. Additionally, PKC systems are designed to operate at a lower RPM, resulting in less wear and tear on the components and increased system lifespan.

Cost Savings

Finally, PKC provides significant cost savings over traditional compression systems. The increased efficiency and reliability of PKC systems reduce operating and maintenance costs. The lower RPM operation also reduces maintenance and replacement costs. Additionally, the smaller footprint of PKC systems means that they require less space for installation, resulting in reduced construction costs. In conclusion, the advantages of PKC systems are significant and make it an attractive option for gas compression applications. The increased efficiency, reliability, and cost savings make PKC ideal for use in a variety of industries.

Parallel Kick Compression

Credit: www.youtube.com

Components Of Parallel Kick Compressor

Parallel kick compressors have several components, including two or more compressor cylinders, intercoolers to cool the compressed air, and an aftercooler to reduce the air temperature further. These components work together to efficiently compress air, making them ideal for several applications, including natural gas processing and transportation.

Components of Parallel Kick Compressor Parallel kick compressors are high-performance compressors used for heavy-duty industrial applications such as oil and gas processing and petrochemical plants. A parallel kick compressor is an effective compressor that consists of multiple cylinders, pistons, valves, intercoolers, and aftercoolers. These components work in tandem to deliver high compression ratios and increased efficiency. H3: Cylinders Cylinders are the heart of a parallel kick compressor. They create the compression of the gas and allow it to be transferred between stages. It is a closed metal structure that enables the piston to move in a linear motion. Each cylinder contains a piston, a valve, and some other components that work together to compress the gas. Typically, a parallel kick compressor has multiple cylinders to provide better compression. H3: Pistons Pistons are the moving components inside every cylinder of the parallel kick compressor. They move in a linear motion, compressing the gas inside the cylinder. The pistons are responsible for transferring the compressed gas from one cylinder to another. Typically, parallel kick compressors have two or more pistons inside each cylinder, which move back and forth with the help of a crankshaft. H3: Valves Valves are crucial for maintaining the air flow inside the parallel kick compressor. They regulate the gas pressure and control the flow of the gas while it moves between stages. At every stage, there are two valves, one for suction and one for discharge. The suction valve allows the gas to enter into the cylinder, and the discharge valve releases the compressed gas. The valves in a parallel kick compressor are designed to work together, ensuring maximum efficiency. H3: Intercoolers Intercoolers are essential for the efficient operation of the parallel kick compressor. They are located between the cylinders and cool the gas by removing the heat generated during compression. They help the compressor to reject heat from the system and prevent any damage to the downstream equipment. The intercoolers also reduce the workload on the compressors, which helps to increase the compressor’s lifespan. H3: Aftercoolers Aftercoolers help in the final stage of parallel kick compressor operation. They are used to cool the compressed gas after it leaves the compressor. This cooling process further reduces the temperature of the gas and increases its density. Lowering the temperature and increasing the gas density before sending it to downstream equipment increases the compressor’s efficiency. The aftercoolers also remove any remaining moisture in the compressed gas, preventing damage to equipment and increasing the system’s life span. Overall, the components of a parallel kick compressor must be maintained and optimized to ensure long life, maximum efficiency, and safe operation. The use of quality parts and regular maintenance is crucial in ensuring optimal performance and a long service life for the compressor.

Maintenance Of Parallel Kick Compressors

Proper maintenance is crucial for the uninterrupted performance of parallel kick compressors. The compressors need regular check-ups, timely replacement of parts, and lubrication to remain operational and avoid any downtime and production loss.

Maintaining parallel kick compressors is vital for their efficient functioning and maximizing their lifespan. Regular inspections, proper lubrication, and cleaning are key components of maintenance, as well as monitoring for potential issues through troubleshooting.

Regular Inspections

Regular inspections play an important role in detecting any potential issues before they become significant problems. Inspections should include checking the alignment of the parallel kick compressors, ensuring that all the components are properly secured, and verifying that there are no leaks or corrosion. In addition, it is important to keep a record of any issues found during inspections to track patterns and anticipate future problems.

Proper Lubrication

Proper lubrication of parallel kick compressors is crucial to ensure their smooth functioning. Lubrication helps to reduce friction and wear of the moving parts, thus helping to extend the life of the compressor. The amount of lubrication needed will depend on the type of compressor and the environment it is operating in. It is essential to use the correct type of lubricant and to follow the manufacturer’s instructions for application and frequency of application.

Cleaning

Cleaning is essential for the smooth operation of parallel kick compressors. The accumulation of dirt and debris can cause clogs, overheating, and damage to the compressor. Cleaning should be done on a regular basis, depending on the operating environment and the manufacturer’s recommendations. This includes cleaning the exterior, the air intake, and the internal components. It is important to use appropriate cleaning materials and to avoid damaging any delicate components.

Troubleshooting

Despite regular inspections and maintenance, issues may still arise with parallel kick compressors. Troubleshooting involves identifying the problem and taking appropriate action to resolve it. This may involve checking for loose components, leaks, or damage, and repairing or replacing any faulty parts. In addition, troubleshooting may involve adjusting settings, such as pressure or temperature, to optimize the compressor’s performance. In conclusion, regular inspections, proper lubrication, cleaning, and troubleshooting are essential for maintaining parallel kick compressors. By following these maintenance practices, you can ensure that your compressor runs efficiently and prolong its lifespan.

Parallel Kick Compression

Credit: producelikeapro.com

Comparison With Conventional Compression

Parallel kick compression offers clear advantages over traditional compression methods, such as higher efficiency and faster processing speeds. In comparison to conventional compression, it reduces the processing time and minimizes energy consumption while improving performance, making it a superior choice for companies seeking a more efficient compression solution.

Parallel kick compression is a technology that has significantly improved the performance of air compressors. When it comes to conventional compression, the design, and performance of these compressors differ considerably. In this section, you’ll explore the differences in design and performance comparison between parallel kick compression and conventional compression.

Differences In Design

The design of parallel kick compression differs from that of conventional compression in several ways. Firstly, parallel kick compression utilizes a parallel configuration of multiple compressor stages to increase efficiency. In contrast, conventional compression systems rely on single-stage compressors that operate at a higher pressure ratio, leading to greater energy consumption. Additionally, parallel kick compressors feature an inter-stage coolers and heat exchangers, allowing for better thermal management and increased reliability. In contrast, conventional compressors lack these features, leading to a greater risk of overheating and breakdowns.

Performance Comparison

Compared to conventional compressors, parallel kick compressors offer a range of performance benefits. For instance, parallel kick compression is capable of processing larger volumes of gas with higher discharge pressures, making it ideal for heavy-duty applications. In contrast, conventional compressors are limited in the volume of gas they can process. Moreover, parallel kick compressors are more energy efficient, with a lower specific power consumption compared to conventional compressors. This means higher energy savings and reduced operating costs over the long term. Overall, parallel kick compression is a superior technology that offers improved performance and energy efficiency compared to conventional compression systems. With its unique design and performance capabilities, it’s no surprise that parallel kick compression is increasingly becoming the preferred technology for heavy-duty industrial applications.

Future Of Parallel Kick Compression

Parallel Kick Compression has the potential to revolutionize data storage and access by enabling faster data transfer rates and reducing latency. With advancements in technology, the future of Parallel Kick Compression looks bright, offering improved performance and efficiency for various applications and industries.

Parallel kick compression is a technique that has been around for some time now, but the future of this technology is looking brighter than ever. With continued advancements in technology and the potential for growth in various industries, parallel kick compression may become the go-to choice for enhancing performance and efficiency. In this post, we will explore some of the aspects of the future of parallel kick compression, including advancements in technology and potential areas of growth.

Advancements In Technology

Advancements in technology have played a significant role in the development of parallel kick compression. In recent years, we have seen an increase in the use of machine learning and artificial intelligence, which has led to the creation of more powerful and efficient compressor systems. These systems can analyze data and make real-time adjustments to optimize performance, resulting in higher levels of efficiency and energy savings. Additionally, the development of more sophisticated algorithms and software has also led to the creation of more customizable compressor systems. With the ability to customize compression settings based on specific industry requirements, businesses can optimize their operations and save on operating costs.

Potential Areas Of Growth

There are many potential areas of growth for parallel kick compression in various industries. For example, in the energy industry, parallel kick compression has the potential to improve the efficiency of gas turbines, resulting in reduced emissions and increased energy production. In the manufacturing industry, parallel kick compression can be used to improve the efficiency of pneumatic systems, resulting in increased productivity and reduced operating costs. Similarly, in the automotive industry, parallel kick compression can be used to improve the energy efficiency of combustion engines, resulting in reduced fuel consumption and lower emissions. In conclusion, the future of parallel kick compression is bright, with continued advancements in technology and potential areas of growth in various industries. As more businesses realize the benefits of parallel kick compression, we can expect to see widespread adoption of this technology in the coming years.

Frequently Asked Questions For Parallel Kick Compression

What Should Parallel Compression Settings Be On Kick Drum?

For parallel compression on kick drum, start with a low compression ratio around 2:1 or 3:1, and a moderate attack time between 10-30ms. Set the release time to match the tempo of the track. Adjust the threshold to achieve a gain reduction of 3-6dB.

Finally, blend the compressed signal with the dry signal to taste.

What Is The Point Of A Parallel Compression?

Parallel compression is a mixing technique that is used to add more depth, power, and control to audio. This technique involves duplicating the original audio signal, compressing the duplicate, and then blending it back with the original signal at a lower volume.

The result is a more even sound with improved dynamic range and sustain, without losing the natural sound and character of the original signal.

What Is The Best Compression Setting For Kick?

The best compression setting for kick depends on the track itself, mixing style, and the sound you’re going for. A good start is a ratio of 4:1 with an attack of around 10ms and a release of around 100ms. However, it’s important to experiment and adjust the settings to achieve the desired sound.

How Much Compression Should A Kick Drum Have?

The amount of compression required for a kick drum depends on the desired sound. Generally, a ratio of 4:1 or higher is used to control peaks and even out the sound. The attack and release times should be set to match the drum’s natural decay.

It’s important to experiment with the settings to achieve the desired result.

Conclusion

To sum up, parallel kick compression is a technique that can greatly improve the quality of your audio recordings. By using this method, you can enhance the impact of your kicks and produce a more dynamic mix. It’s a simple yet effective tool that can help take your music to the next level.

Whether you’re a professional sound engineer or a budding music producer, parallel kick compression is definitely worth considering as part of your toolkit. So, try it out and see the difference for yourself!

Categories
Archive

How To Eq During Mastering

To EQ during mastering, use a digital or analog equalizer on the final mix to enhance specific frequencies and improve the overall sound quality. During the mastering process, EQ adjustments can be made to address any problem areas in the mix and enhance the sound’s clarity, balance, depth, and dynamics.

Mastering plays an integral role in ensuring that your music sounds excellent for playback across multiple platforms, from vinyl records to digital streams. EQ is an essential tool in this process, allowing you to sculpt the final mix and bring out the best in your sound.

While EQ can be used in the mixing stage, the mastering phase is ideal for making final tweaks and adjustments to the overall sound. With the right EQ settings and a keen ear, you can transform an average mix into a polished, professional-quality piece of music that will stand the test of time.

How To Eq During Mastering

Credit: www.izotope.com

Choosing The Right Eq

Choosing the right EQ during mastering is crucial for achieving the desired sound. EQ can enhance certain frequencies while reducing others, and it’s important to have a clear understanding of the impact it has on the overall mix.

Different Types Of Eqs

When it comes to mastering, choosing the right EQ is crucial for achieving a professional-sounding mix. Understanding the different types of EQs can help you select the right tool for the job. Graphic EQs are the most common type, featuring a set of fixed frequency bands that can be boosted or cut to shape the sound. Parametric EQs, on the other hand, offer greater control by allowing you to adjust the center frequency, bandwidth, and gain of each band. Dynamic EQs are a hybrid of graphic and parametric EQs, providing dynamic control over frequency bands.

Hardware Vs. Software Eqs

Hardware EQs are standalone units that offer high-quality sound and tactile control, making them popular with professionals. Software EQs, on the other hand, offer greater flexibility and precision at a lower cost. Some engineers prefer to use a combination of both, using software EQs for surgical adjustments and hardware EQs for broad strokes. Ultimately, the choice between hardware and software EQs comes down to personal preference and budget. When selecting an EQ for mastering, it’s important to consider factors such as type, quality, and cost. Take the time to experiment with different options to find the one that best suits your needs and workflow. With the right EQ, you can achieve a polished and balanced mix that will impress listeners.

How To Eq During Mastering

Credit: www.masteringthemix.com

Preparing Your Mix For Eq

Prepare your mix for EQ by starting with a clean slate, ensuring all instruments are well-balanced and panned, and adjusting any volume or panning issues. Use high-pass filters to remove unnecessary low-end and boost or cut EQ as needed to enhance the mix’s overall sound.

Preparing Your Mix for EQ Before you start the mastering process, it’s important to prepare your mix for EQ. This involves identifying frequency imbalances, fixing issues with volume instead of EQ, and using compression before EQ. Here’s what you need to know. Identify Frequency Imbalances The first step in preparing your mix for EQ is identifying frequency imbalances. This involves listening to your mix and determining which frequency ranges are too loud or too quiet. For example, if your mix sounds muddy, you may have too much low-end frequency. On the other hand, if your mix sounds thin, you may have too little high-end frequency. By identifying these imbalances, you can make informed decisions about how to apply EQ during the mastering process. Fixing Issues with Volume Instead of EQ Sometimes, issues with your mix can be fixed simply by adjusting the levels of certain tracks. For example, if your mix sounds dull, you may be able to brighten it up by increasing the volume of the high-end frequency tracks. By doing this, you won’t need to rely on EQ as heavily as you would if you were trying to fix the issue solely with EQ. Using Compression Before EQ Another important step in preparing your mix for EQ is using compression before EQ. Compression helps to even out the levels of your tracks, making them easier to EQ. By using compression first, you’ll be able to get a more accurate representation of what your mix actually sounds like. Once you’ve applied compression, you can then use EQ to fine-tune the frequency balance of your mix. In conclusion, preparing your mix for EQ is an essential part of the mastering process. By identifying frequency imbalances, fixing issues with volume instead of EQ, and using compression before EQ, you’ll be able to achieve a more polished, professional-sounding final mix.

Eq Techniques For Enhancing Your Mix

HTML Syntax:

During mastering, EQ is a crucial tool for enhancing your mix and making sure it sounds great on all playback systems. Here are some essential EQ techniques for shaping the overall tone, dealing with problem frequencies, adding warmth and depth, and creating space with stereo EQ.

Shaping The Overall Tone

The EQ curve you use during mastering can greatly impact the overall tone of your mix. One effective technique is to use a high-pass filter to remove any unwanted low-frequency rumble or noise. From there, you can use a shelving EQ to boost or cut the highs and lows to give your mix more brightness or warmth depending on the style of the track. Be sure not to overdo it with EQ, as too much boosting or cutting can lead to a harsh or hollow-sounding mix.

Dealing With Problem Frequencies

Problem frequencies are certain frequencies that can cause unpleasant resonances or harshness in your mix. To deal with them, use a narrow Q setting on your EQ to surgically remove any problematic frequencies. Remember that less is often more when it comes to EQ, so only remove what is absolutely necessary.

Adding Warmth And Depth

Adding warmth and depth to your mix can greatly enhance its overall vibe and make it more inviting to listeners. To do this, try using a low-pass filter to cut out any unwanted high frequencies, and then add a subtle boost to the lower mids around 300-500 Hz. This will give your mix a warm and full-bodied sound. Additionally, you can use a stereo imager to add depth to your mix, making it sound wider and more spacious.

Creating Space With Stereo Eq

Using stereo EQ can be a powerful tool for creating space in your mix. One effective technique is to use a mid-side EQ to separate the center (mono) and side (stereo) information in your mix. From there, you can EQ each separately to create more separation and clarity between the different elements in your track. For example, you can boost the highs in the center to make the vocals or lead instrument stand out, or cut the low end on the sides to make room for the bass and kick drum.

Avoiding Common Mistakes When Eqing During Mastering

Achieving a balanced and polished sound during mastering is crucial, and EQing plays a significant role in achieving this. However, there are common mistakes to avoid, such as over-EQing, cutting too much or too little, and neglecting stereo image. Follow these guidelines to improve your EQing skills during mastering.

EQing during mastering is a crucial step to achieve a well-balanced, polished, and professional-sounding mix. However, it’s important to avoid some common EQ mistakes that can lead to a distorted, unnatural, or muddy mix. In this article, we’re going to discuss the most common mistakes that engineers make when EQing during mastering and how to avoid them.

Overuse Of Eq

One of the most common mistakes when EQing during mastering is to overuse EQ. Some engineers tend to apply too much EQ to ‘fix’ various issues in a mix, which can lead to a distorted or unnatural sound. Moreover, excessive EQ can create phase and frequency conflicts, which can further damage the mix. To avoid overusing EQ, it’s important to adjust the balance between the low, mid, and high frequencies carefully. Start by checking the frequency response of each track and identify any problematic frequencies. Use surgical EQ to cut or boost these frequencies slightly to achieve a natural sound. Remember to apply EQ gently and avoid making drastic changes.

Making Drastic Changes

Another mistake when EQing during mastering is making drastic changes to the mix. While EQ can help fix minor issues and balance the frequency spectrum, it shouldn’t be used to make significant changes to the mix. Some engineers try to boost the bass or treble too much or cut frequencies entirely, leading to a distorted or unnatural sound. To avoid making drastic changes, use EQ to enhance the strong points of the mix rather than trying to fix the weak points. Start by analyzing the mix as a whole and identify its strengths. Use EQ to enhance these strengths slightly and avoid making extreme changes that can damage the mix.

Not Referencing Other Tracks

Another common mistake when EQing during mastering is not referencing other tracks. While it’s important to EQ each track independently, it’s also crucial to ensure that the mix sits well with other tracks. In other words, the final mix should sound cohesive and balanced with other tracks of similar genres. To avoid this mistake, reference other tracks as you work on your mix. Listen to other tracks and compare their frequency spectrum to your mix. If you notice any significant differences, adjust your EQ settings slightly to match them. Remember that the end goal is not to copy other tracks, but rather to achieve a cohesive and balanced mix that sounds great on various playback systems. In conclusion, EQing during mastering is a crucial step to achieve a well-balanced, polished, and professional-sounding mix. Avoid overusing EQ, making drastic changes, or neglecting to reference other tracks. Apply surgical EQ to enhance the strengths of the mix and avoid making significant changes that can lead to a distorted or unnatural sound. With these tips, you can achieve a great-sounding mix that stands out and captivates listeners.

How To Eq During Mastering

Credit: splice.com

Frequently Asked Questions On How To Eq During Mastering

How Do You Use Eq When Mastering?

EQ is used to adjust the tonal balance of individual tracks and the overall mix during mastering. It can be used to enhance or attenuate specific frequency ranges to achieve a desired sound. It’s important to use a transparent EQ and make subtle moves to avoid altering the natural character of the music.

What Is The Best Eq For Mastering?

The best EQ for mastering ultimately depends on personal preference and the specific song being worked on. However, many professionals recommend using a linear-phase EQ, like FabFilter Pro-Q 3 or DMG Audio EQuilibrium, for transparent, precise control. It’s important to use EQ subtly and sparingly during mastering to avoid negatively impacting the overall balance of the mix.

How Should We Approach Equalization During Mastering?

Approach equalization during mastering by being careful and adhering to certain guidelines. Firstly, trust your ears and use EQ sparingly. Focus on problem areas and try to correct them without overdoing it. Use high-pass filters to remove low end rumble and low-pass filters to remove harshness.

Finally, use a spectrum analyzer to ensure a balanced sound.

What Frequencies To Cut When Mastering?

When mastering, frequencies to cut will depend on the specific track and its mix, but common areas include low-end rumble and muddiness, harsh high-end frequencies, and resonant frequencies of specific instruments. It’s important to make subtle cuts and adjustments to maintain a balanced and clear mix without overdoing it.

Conclusion

Mastering is a crucial step to achieving a polished and professional sound in your music. Proper EQ techniques can make a significant difference in the final product. Remember to keep your goals in mind, trust your ears, and don’t be afraid to experiment with different EQ settings.

By adhering to these guidelines, you can master your music with confidence and achieve the desired results. With enough practice and experience, anyone can become skilled at EQ during mastering. So, keep honing your skills and unleash the full potential of your music.

Categories
Archive

Solid Slate Raven Mti2

The Solid State Raven MTi2 is a professional-grade audio production console. It offers a range of intuitive features and high-quality audio components, making it a popular choice for music producers, engineers, and sound designers.

The Solid State Raven MTi2 is a cutting-edge audio production console designed for professional-level music production, mixing, and mastering. With a sleek, ergonomic design and state-of-the-art audio components, the Raven MTi2 is the perfect tool for audio professionals who demand only the best.

The console offers a range of intuitive features, including a touchscreen interface and extensive editing capabilities. Additionally, the Raven MTi2 is compatible with a wide range of software applications, making it suitable for use in virtually any recording or production environment. Whether you’re a seasoned industry veteran or just starting in the music business, the Solid State Raven MTi2 is a powerful and versatile audio production console that is sure to meet your needs.

Design And Build

When it comes to digital audio workstations (DAWs), the Slate Raven MTi2 is one of the most popular options available in the market. This DAW was designed to make audio production easier and more efficient than ever before. In this blog post, we will focus on the design and build of the Slate Raven MTi2. We will take a closer look at the durable construction and sleek aesthetics that make this device stand out among its competitors.

Durable Construction

The Slate Raven MTi2 is built to last, thanks to its durable construction. This device was created with a solid aluminum frame that ensures its sturdiness and stability. It also comes with a multi-touch display panel that is designed to resist scratches and withstand heavy usage. Its quality materials and build guarantee that the device can survive the wear and tear of daily use in a professional audio production environment.

Sleek Aesthetics

In addition to its durability, the Slate Raven MTi2 also boasts a sleek and stylish design that is sure to turn heads. Its slim and compact size not only makes it easy to use but also convenient for portability. Its appearance is further enhanced by its slim and clear display panel, which is surrounded by an elegant black finish. The device’s overall design and look enhance the professional setting where it can be in use, making it an impressive addition to any studio, organization or event.

In conclusion, the Slate Raven MTi2 is a distinctive DAW that stands out in the market with its durable construction and sleek aesthetic appeal. The device’s solid aluminum frame, multi-touch display panel, and slim size make it an ideal choice for audio producers.

Sold Slate Raven Mti2

Credit: www.youtube.com

Display And Touchscreen

When it comes to producing great music, having the right tools is essential. The Sold Slate Raven MTi2, with its advanced technology, is one such tool that has been designed specifically for the music production process. The Display and Touchscreen are key components of this tool, providing users with a seamless experience.

High-resolution Display

The Raven MTi2 boasts a crystal clear high-resolution display that measures 27 inches, ensuring that your eyes won’t miss a beat. The display provides users with a unique and customizable user interface that is unmatched by any other product on the market. This feature allows users to drag and drop items, access plugins easily, and mix tracks with incredible precision. That’s not all; the display can be angled to provide the user with the perfect viewing angle, which is especially handy when working long hours in the studio.

Responsive Touchscreen

The Raven MTi2’s touchscreen is incredibly responsive and intuitive. It allows users to interact with their work with ease, changing parameters with a simple swipe of the finger. The touchscreen also features the ‘multi-touch’ function, which means that the user can use all ten fingers to control plugins, adjust volume, or edit tracks.

In conclusion, the Sold Slate Raven MTi2 is a high-quality tool that provides an unrivaled user experience. With its high-resolution display and responsive touchscreen, it simplifies the music production process, making it easier and more enjoyable than ever before.

Workflow Integration

Sold Slate Raven Mti2 offers seamless workflow integration for efficient project management. Stay organized and increase productivity with this innovative system.

Sold Slate Raven Mti2 is a well-known mixing console known for its advanced features that meet the needs of modern studios. One of the standout features of this console is its seamless integration with popular digital audio workstations (DAWs).

Compatibility With Major Daws

The Sold Slate Raven Mti2 mixer is compatible with all major DAWs, including Pro Tools, Cubase, Logic Pro X, and Ableton Live. This compatibility ensures that users can switch between different DAWs without worrying about compatibility issues.

Customizable User Interface

The customizable user interface is another fantastic feature of the Sold Slate Raven Mti2 console. The console comes with a 46-inch multitouch screen that allows users to interact with the DAWs seamlessly. The interface is entirely customizable, and users can personalize the screen to suit their needs. The console’s touch screen is also modularly designed, which means users can add more screens if they need more visual real estate. Each module can be set up in different ways, making the console a highly versatile mixing environment. In conclusion, the Sold Slate Raven Mti2 console is a powerful tool that enhances the workflow of modern studios. Its seamless compatibility with major DAWs and customizable user interface means it can be tailored to suit the needs of any studio environment.

Sold Slate Raven Mti2

Credit: www.sweetwater.com

Advanced Features

Sold Slate Raven Mti2 offers advanced features that push the boundaries of music production. With its multi-touch display, complete DAW integration, and a variety of packages, the Mti2 enables a seamless workflow that takes your creativity to the next level.

If you are a music producer, the Sold Slate Raven MTi2 is among the best control surfaces that can revolutionize your workflow. This touch-screen technology features a number of advanced features that make it stand out from other control surfaces available in the market. In this blog post, we will focus on the advanced features of the Sold Slate Raven MTi2, including Multi-Touch Control and Gesture-based Navigation.

Multi-touch Control

The Sold Slate Raven MTi2 offers a large multi-touch screen that allows you to interact with your favorite DAW in a more intuitive way. With this technology, you can easily navigate through your session, select tracks, and edit parameters with ease. The multi-touch control of the MTi2 makes it possible to perform multiple actions simultaneously, which saves you time and effort. Additionally, the touch technology is highly responsive, giving you a natural feel when controlling your DAW.

Gesture-based Navigation

The Sold Slate Raven MTi2 also offers Gesture-Based Navigation, which is a highly intuitive way of navigating through your session. Gestures such as swipe, tap, and pinch-to-zoom, makes it possible to control your DAW without the need for a mouse or keyboard. This feature not only speeds up your workflow but also makes it possible to make precise parameter adjustments. Additionally, this technology is customizable, allowing you to create your own custom gestures for easy navigation.

Customizable Layouts

Another advanced feature of the Sold Slate Raven MTi2 is the customizable layouts. With this technology, you can easily create your own custom layouts that meet your specific needs. From custom button layouts to personalized fader banks, the Sold Slate Raven MTi2 makes it possible to create your own ideal working environment. This feature is particularly useful for users who frequently switch between different DAWs or require a unique setup for a particular project. In conclusion, the Sold Slate Raven MTi2 offers a range of advanced features that make it a top choice for music producers. The Multi-Touch Control, Gesture-Based Navigation, and Customizable Layouts are just some of the many features that make it stand out from other control surfaces. If you are looking to optimize your workflow and take your music production to the next level, then the Sold Slate Raven MTi2 is definitely worth checking out.

Connectivity

The Slate Raven MTi2 offers outstanding connectivity options for audio production enthusiasts. With its advanced multi-touch control surface, it allows users to seamlessly integrate various devices and software for a flawless creative workflow.

The Solid State Logic Raven MTi2 is a digital console that provides seamless connectivity options, making it easy to integrate into any studio setup.

Multiple Input And Output Options

The Raven MTi2 features multiple input and output options, allowing you to easily connect to various devices. This console has eight faders and eight rotary encoders, each with LED rings. With the eight analog inputs and eight stereo outputs, you can easily connect your interface and external devices to the console. Moreover, the console includes USB 2.0 and Ethernet connectivity, so you can easily connect it to your computer.

Ethernet And Wi-fi Capabilities

The Raven MTi2 also offers Ethernet and Wi-Fi capabilities, making it easy to connect to a network. With the Ethernet port, you can connect the console to your network and remotely control it from your computer. The Wi-Fi connectivity also enables you to control the console using a mobile device. This feature is particularly useful for engineers who do not want to be tied to their desk. Additionally, the console has an HDMI port that allows you to connect an external display for better visual feedback. With the Raven Control software, you can control the console remotely, even from another room. In conclusion, the Solid State Logic Raven MTi2 is a well-connected console that provides flexibility and functionality for your studio needs. With its wide range of connectivity options, it is easy to integrate into any studio setup and provides a seamless workflow.

Sold Slate Raven Mti2

Credit: www.youtube.com

Price And Availability

Sold Slate Raven Mti2 is a highly coveted audio production console, known for its exceptional quality and performance. It’s no surprise that the price and availability of this masterpiece are among the top concerns for potential buyers.

Affordable Luxury

One thing that sets Sold Slate Raven Mti2 apart is its affordability. Despite its luxury features and superior performance, this console is reasonably priced, making it accessible to a wide range of customers. At a cost of around $10,000, the Sold Slate Raven Mti2 remains an excellent investment for recording studios and audio production firms.

Widespread Availability

Another advantage of Sold Slate Raven Mti2 is its widespread availability. You can easily order it online from the official website, and major online retailers such as Amazon and Sweetwater also stock it. If you prefer to buy from a physical store, you can check out audio equipment stores in your locality, as most of them carry Sold Slate products.

Sold Slate Raven Mti2 is in high demand, and its availability is subject to change depending on the season. Therefore, it’s advisable to place orders early and check with various outlets to get the best deals.

Frequently Asked Questions On Sold Slate Raven Mti2

Is The Slate Raven Worth It?

Yes, the Slate Raven is worth it for those who prioritize efficient workflow in their audio production. With its advanced features, user-friendly interface, and customizable controls, this digital audio workstation controller enhances creativity and productivity.

How Do You Set Up A Slate Raven In Mti2?

To set up a Slate Raven in MTi2, first, connect the Raven to your computer via Ethernet or Wi-Fi. Then, install the latest driver and firmware updates and configure the Raven’s settings according to your preferences. Finally, calibrate its touch display and MIDI devices, and launch your desired DAW or software.

Does Slate Raven Work With Luna?

Yes, Slate Raven is compatible with Luna.

What Is Slate Control?

Slate control refers to the ability to maintain consistency in a particular product or project. It involves using a set of predefined rules and guidelines for content creation, management and distribution. This can range from maintaining the same tone of voice in writing to ensuring branding is consistent across all platforms.

Conclusion

The sale of a Slate Raven MTi2 means that this powerful tool is now in the hands of someone who understands its value. With its intuitive touchscreen control, high-quality audio features, and easily customizable interface, the Raven MTi2 is the best in its class.

Whether pursuing a professional music career or enjoying music as a passionate hobby, the Slate Raven MTi2 is the ideal solution for making music production more efficient. Invest in excellence, invest in the Slate Raven MTi2.

Categories
Archive

Eq Electric Guitar

An EQ electric guitar is an electric guitar equipped with an equalizer that can adjust the guitar’s tone. With this feature, guitarists can enhance or cut specific frequencies to achieve their desired sound.

EQ electric guitars have become a popular option for professional musicians and guitar enthusiasts who are looking for versatility and flexibility in their playing style. These guitars can produce a range of tones from rich and warm to bright and crisp, making them suitable for various musical genres.

We will explore the benefits of EQ electric guitars, how they work, and how they can improve your guitar playing experience. From rock to jazz and everything in between, an EQ electric guitar is an excellent choice for guitar players who want to take their playing to the next level.

Components Of An Eq Electric Guitar

The components of an EQ electric guitar include the equalizer, which controls the tone, and pickups, which transmit the sound to an amplifier or recording device. Other components include the volume and tone controls, bridge, and strings, all of which contribute to the guitar’s overall sound.

An EQ electric guitar is a popular instrument that comprises various components that come together to produce the desired sound. As a guitarist, it’s important to understand each of these components, how they work, and how they impact the sound produced. In this section, we will take a closer look at the key components that make up an EQ electric guitar.

Body

The body is the largest part of an electric guitar, and it is responsible for producing the guitar’s sound. EQ electric guitars come in different body styles such as solid-body, semi-hollow, and hollow-body. Each style has a unique sound, and you should consider the style that best suits your playing style and music genre. The body is usually made of wood and can have different finishes, such as glossy or matte.

Neck

The neck is the long and narrow part of the guitar that connects the body to the headstock. It is usually made of wood and can be bolted or glued to the body. The neck has a fretboard where the guitarist presses and releases the strings to produce different notes. The neck can have various shapes, such as C-shape, V-shape, U-shape, and others, and each shape affects the level of comfort and playability.

Pickups

Pickups are the parts responsible for converting string vibrations into electrical signals, which are then transmitted to an amplifier. An EQ electric guitar can have one or more pickups, and they can be single-coil or humbucker. Single-coil pickups produce a bright and clear tone, while humbucker pickups produce a warm and thick tone.

Bridge

The bridge is the part that anchors the strings to the body of the guitar. It works together with the pickups to determine the guitar’s intonation and sustain. There are different types of bridges, such as fixed bridges, tremolo bridges, and tune-o-matic bridges. Each type of bridge has a unique impact on the guitar’s sound and the level of control the guitarist can have over the strings. To sum up, the body, neck, pickups, and bridge are the key components that make up an EQ electric guitar. Each of these components plays a crucial role in determining the guitar’s sound quality, playability, and level of control. As a guitarist, understanding these components will help you make an informed decision when choosing an EQ electric guitar that matches your playing style and music genre.

Types Of Eq Electric Guitars

EQ electric guitars come in various types, each with unique features that cater to different playing styles. Some popular types include solid-body, semi-hollow body, and hollow body guitars, each providing a distinctive tone and versatility to the guitarist.

If you’re looking to buy an electric guitar with EQ, knowing the different types of EQ electric guitars is important. There are three common categories: solid-body, hollow-body, and semi-hollow body. Each of these guitar types is designed differently and delivers a unique sound.

Solid-body Electric Guitar

Solid-body electric guitars are the most common and popular type of EQ electric guitar. These guitars are made of a single block of wood, which helps create a bright and articulate sound. Since they don’t have a resonating chamber for sound, solid-body guitars are often used in styles of music that need high-volume amplification, such as heavy metal and rock. Here are some examples of solid-body electric guitars:

  • Fender Stratocaster
  • Gibson Les Paul
  • Ibanez RG

Hollow-body Electric Guitar

Hollow-body electric guitars have a completely hollow body, creating a more resonant and warm sound. Because of their construction, these guitars are more prone to feedback at high volumes, so they’re often played at lower volumes. Hollow-body guitars are good for jazz, blues, and other genres where a warm, full-bodied tone is desired. Here are some popular hollow-body electric guitars:

  1. Gretsch G5420T
  2. Gibson ES-335
  3. Epiphone Casino

Semi-hollow Body Electric Guitar

Semi-hollow body electric guitars are a hybrid of solid-body and hollow-body models. They have a solid center block of wood to reduce feedback but still have hollow chambers for increased resonance. Semi-hollow body guitars produce a bright, round tone, perfect for blues, jazz, and rock music. Here are some popular semi-hollow body electric guitars:

BrandModel
GibsonES-335
EpiphoneSheraton II
IbanezAS93

In conclusion, choosing an EQ electric guitar is all about personal preference and musical style. Depending on what you’re looking for, one type may be more suitable than the others. So, whether it’s a solid-bodied guitar for metal or a semi-hollow body for jazz, choosing the right EQ electric guitar can take your music to the next level.

Famous Eq Electric Guitars

When it comes to electric guitars, the EQ (equalizer) plays an important role in shaping the sound of the instrument. The EQ can boost or cut certain frequencies to create a customized tone that suits the player’s preferences. Some of the most famous electric guitars of all time have distinct EQ settings, which have become synonymous with their unique sound.

Fender Stratocaster

The Fender Stratocaster is one of the most iconic and recognizable electric guitars in the world. It has been used by legendary guitarists like Jimi Hendrix, Eric Clapton, and Stevie Ray Vaughan to create some of the most memorable guitar riffs of all time. The Stratocaster’s EQ settings include a treble boost that accentuates the guitar’s bright and clear tone, as well as a mid-range scoop that creates a smooth and mellow sound.

Gibson Les Paul

The Gibson Les Paul is another legendary electric guitar that has been played by countless musicians, including Jimmy Page, Slash, and Joe Perry. The Les Paul’s EQ settings are characterized by a warm and rich tone, with a prominent mid-range that makes the guitar sound thick and full. This EQ setting is achieved by using a pair of humbucking pickups that cancel out feedback and noise, resulting in a clear and articulate sound.

Ibanez Jem

The Ibanez JEM is a signature guitar model designed for virtuoso guitarist Steve Vai. It features a distinctive EQ setting that includes a high-pass filter that removes low frequencies, resulting in a bright and cutting sound. The JEM’s EQ can also be adjusted using a “Monkey Grip” handle, which allows the player to change the position of the guitar’s whammy bar while playing.

In conclusion, the EQ is an essential part of an electric guitar’s sound, and famous guitars like the Fender Stratocaster, Gibson Les Paul, and Ibanez JEM have distinct EQ settings that have become synonymous with their unique sound. Whether you prefer a bright and clear tone, a thick and full sound, or a cutting and articulate sound, there is an EQ electric guitar out there that will suit your preferences.

Eq Electric Guitar

Credit: www.guitarpedalx.com

Choosing An Eq Electric Guitar

When it comes to choosing the perfect electric guitar, one of the most important things to consider is the EQ or equalization. The type of EQ electric guitar you choose can significantly affect the way your guitar sounds and performs. There are several factors you need to take into consideration before making a purchase.

Budget

One of the primary things to consider when choosing an EQ electric guitar is your budget. EQ electric guitars can range from a couple of hundred to thousands of dollars. If you’re new to playing, you might want to invest in a less expensive model and upgrade as you progress. More experienced players might want to splurge and get a higher-end model for a better sound quality.

Playing Style

No guitar is perfect for everyone, and you need to consider what type of playing style you have. If you’re a guitarist who likes to play heavy music, you want an EQ electric guitar that can handle high gain and distortion. If you prefer playing clean sounds, then you want one that emphasizes clarity and brightness. It’s important to know your playing style before making a purchase.

Tonewood

The tonewood of an EQ electric guitar can also significantly impact the overall sound and feel of the guitar. Some tonewoods are better suited for heavy music, while others lend themselves well to lighter genres. Mahogany is excellent for darker, heavy sounds, while maple is perfect for sparkly, high-end tones. Consider the tonewood when choosing your EQ electric guitar.

Maintaining An Eq Electric Guitar

To keep your EQ electric guitar in top shape, regular cleaning and maintenance is crucial. Wipe down the strings and fretboard after each use, check the tuning regularly, and keep the guitar properly humidified. It’s also important to bring the guitar to a professional for any necessary repairs or adjustments.

Maintaining an EQ Electric Guitar is essential for its longevity and optimal performance. Proper care can make a significant difference in the sound quality and overall appearance of the electric guitar. In this blog post, we will discuss some simple techniques for cleaning, polishing, string replacement, and hardware maintenance.

Cleaning And Polishing

To maintain the shine and overall look of your EQ electric guitar, it is important to keep it clean and polished. Here are some simple cleaning steps that you can follow: – Use a microfiber cloth to remove dirt, dust, and fingerprints from the body and neck of the guitar. – Apply a small amount of guitar cleaner or a mild soap solution to the cloth and gently scrub the surface. – Wipe away the excess moisture with another dry cloth. – Use a specialized guitar polish to restore the shine and protect the finish of the guitar.

String Replacement

Replacing old or worn-out strings is crucial for the sound quality and playability of the guitar. Here are the steps to follow: – Loosen the old strings and remove them carefully from the guitar. – Clean the fingerboard and frets with a soft cloth. – Choose the right gauge of strings for your guitar and install them in the right order. – Tighten the new strings to the desired tuning and trim the excess wire with wire cutters. – Stretch the new strings gently to maintain their tuning stability.

Hardware Maintenance

The hardware of the guitar includes the bridge, tuners, and other metal parts that need proper maintenance to prevent rusting or malfunctioning. Here are some steps to follow: – Clean the hardware with a soft cloth and apply a rust inhibitor to prevent corrosion. – Check the bridge and saddle for any wear and tear and replace them if needed. – Check the tuning pegs and lubricate them with a specialized guitar lubricant. – Adjust the guitar’s intonation and action to ensure its optimal playability. Conclusion: Maintaining an EQ Electric Guitar is not rocket science. Simple and regular cleaning, polishing, string replacement, and hardware maintenance can help to keep your guitar in good condition and ensure its longevity. Follow these techniques to keep your guitar sounding great and looking fantastic.

Eq Electric Guitar

Credit: www.musicguymixing.com

Eq Electric Guitar

Credit: neuraldsp.com

Frequently Asked Questions Of Eq Electric Guitar

What Is The Best Eq For Electric Guitar?

The best EQ for electric guitar depends on your playing style and preferences. Generally, it’s a good idea to start with a flat EQ and adjust from there. Experiment with different frequencies to find the sweet spot for your sound.

Consider getting a graphic EQ pedal for more precise control.

What Is The Eq Of A Guitar?

The EQ or equalization of a guitar refers to adjusting and balancing the frequency levels of the guitar’s sound. This can be done through tone controls, pedals, or amps to achieve the desired sound. It basically allows you to carve out specific frequencies and get the best tonal balance to improve the guitar’s sound output.

How Do You Use An Eq On A Guitar Amp?

Using an EQ on a guitar amp involves adjusting the frequency levels to shape the sound according to your preference. Turn the EQ knobs on your amp to increase or decrease the highs, mids, and lows. Experiment with different settings to find what sounds best for your playing style and guitar.

How Do You Eq An Electric Guitar To Sound Acoustic?

To EQ an electric guitar to sound acoustic, reduce the bass and increase the treble frequencies on the guitar amp. Use an EQ pedal to further adjust the sound by boosting the upper midrange and rolling off the low end.

Experiment with different EQ settings until you achieve a balanced and natural acoustic sound.

Conclusion

The EQ electric guitar is one of the most versatile instruments available today. With its wide range of tonal capabilities, beautiful design, and affordable price point, it’s clear why this model is a popular choice for both beginner and professional guitarists.

Whether you’re a blues aficionado or a metalhead, the EQ electric guitar offers something for everyone. So if you’re looking for a high-quality instrument that won’t break the bank, be sure to consider the EQ electric guitar.

Categories
Archive

Basics Of Ghost Production

Ghost production refers to the process of producing music anonymously for others. It involves a producer creating music for a client who is credited as the artist.

Ghost production has become increasingly popular in the music industry for various reasons. Some artists lack production skills, while others prefer to remain anonymous to avoid the pressure and attention that comes with being in the limelight. We will discuss the basics of ghost production, including its history, benefits, and challenges.

We’ll also delve into what makes a good ghost producer and provide tips for artists looking to hire one.

What Is Ghost Production?

Ghost production is the process of creating and producing music without taking credit for it. It often involves unsigned artists who have their work produced and marketed under a different name, allowing them to maintain anonymity and focus on their craft without the pressure of notoriety.

The Definition Of Ghost Production

Ghost production is a form of music production where a producer creates a musical track on behalf of another music artist who then releases the track under their own name. The producer remains anonymous and takes no credit for their work. This type of production is quite common in the music industry and has been around for many years. The process of ghost production starts with an artist or DJ approaching a producer with a specific request for a musical track. The producer then creates the track and delivers it to the artist, who can then release it under their own name. The producer is often paid upfront for their work and takes no royalties or credits for the track.

Why Do Artists Use Ghost Producers?

Artists may use ghost producers for a variety of reasons. Firstly, it saves them time and effort, as they can focus on performing and promoting the tracks without having to spend time creating them. Secondly, it allows them to release a high-quality track without the skills and knowledge required to create one themselves. Finally, it helps them maintain their artistic image by ensuring that the quality of their music is consistent.

Is Ghost Production Legal?

Ghost production is a legal practice, and there is no law that prohibits artists from using ghost producers. However, it is worth noting that some music fans and critics may view the practice negatively and consider it to be disingenuous. It is up to the artist to decide whether they are comfortable with using ghost producers or not.

The Pros And Cons Of Ghost Production

There are pros and cons to using ghost production. Some of the advantages include saving time and effort, providing high-quality music, and enhancing an artist’s artistic image. However, some of the disadvantages include a lack of creative control, the potential for negative reactions from fans and critics, and the cost of hiring a skilled ghost producer. Overall, ghost production is a common and legal practice in the music industry that can provide many benefits to artists and producers alike. However, it is important to consider the pros and cons carefully before deciding whether to use ghost production or not.

Why Artists Choose Ghost Production?

Why Artists Choose Ghost Production?

Ghost production has become a popular practice in the music industry in recent years. Mainly, upcoming and established artists use ghost production services for creating their music releases. Ghost production involves a talented producer working with an artist to create a track on behalf of the artist, who then takes credit for the release. So, why do artists choose ghost production?

Save Time And Money

In today’s fast-paced music industry, artists need to release new music frequently to maintain their popularity. Hiring a ghost producer can save an artist time and money. The producer takes care of all the music production tasks, such as composing, arranging, mixing, and mastering. It allows the artist to focus on their performance and promotion of the track. In addition, ghost production services are often affordable compared to hiring a full-time producer.

Access To Professional Production Skills

Ghost production allows artists to work with top-level producers who have extensive experience in the industry. These producers can help elevate an artist’s sound to a more professional level. They bring knowledge, skills, and techniques that many artists may not possess. The producer also ensures that the final product meets industry standards and quality. Working with a ghost producer will give an artist a competitive edge in the industry and increase the chances of their success.

In conclusion, ghost production is a valuable service that artists use to save time, money, and access professional production skills. Hiring a talented ghost producer can help artists create high-quality releases that will resonate with their audience and keep them relevant in the competitive music industry.

How Does Ghost Production Work?

Ghosts are real, but not in the way you might be thinking. Ghost producers are music producers who create tracks for other artists anonymously. In this post, we’ll break down the basics of ghost production, starting with how it works.

Finding A Ghost Producer

Finding a ghost producer can be tricky, but not impossible. Many ghost producers advertise their services online, either on their own websites or on freelance platforms. You can also network with other musicians to see if they know of any good ghost producers.

Agreeing On Terms

Once you’ve found a ghost producer, you’ll need to agree on terms. This includes how much you’ll pay the producer, who will retain the rights to the finished track, and whether or not the producer will receive credit for their work.

The Production Process

The production process for ghost production is similar to traditional music production. The artist will typically provide the ghost producer with a general idea of what they want the finished product to sound like, including any specific motifs or themes. The ghost producer will then create a track based on this input, sending drafts to the artist for feedback and revisions.

Once the final track is completed, the artist will pay the ghost producer and receive the finished product. From there, the artist can release the track under their own name, while the ghost producer remains anonymous.

Ghost production can be a great way for artists to get high-quality tracks without having to spend time and resources on producing them themselves. By working with a ghost producer, artists can focus on other aspects of their careers while still putting out great music.

Legal And Ethical Issues

Ghost production is a common venture in the music industry where producers create songs and sell them to other artists. However, it raises both legal and ethical concerns about who owns the rights to the music and whether the original creator should remain anonymous.

When it comes to music production, the use of ghost producers has become a common practice for several reasons, including keeping the artist’s name on the front while someone else does the actual work. Ghost production raises some legal and ethical concerns that must be addressed to avoid future issues. Here are some basic legal and ethical issues related to ghost production:

Rights And Ownership

One of the major legal concerns when it comes to ghost production is the ownership rights of the final output. Ghost production is usually done on a work-for-hire basis, which means the ghost producer owns no rights to the final product and cannot make decisions regarding the commercial use of it. In the case of disputes related to rights and ownership, a written contract is essential, stating the specifics of the project.

Transparency And Disclosure

Ghost production can have ethical implications as well, primarily when the audience is unaware of the contribution of ghost producers. The most ethical approach in such situations is to disclose the use of ghost production, so the audience knows who the actual producer is. The implication does not mean that the artist must label each track or song where they used ghost production, but they should be transparent with their fans and followers that they use someone else’s work to create their music.

Conclusion

In conclusion, ghost production can be a useful tool for artists and producers alike, but it is essential to consider and address the legal and ethical implications. By prioritizing transparency and ownership rights from the beginning of the project, artists can ensure that ghost production is both legal and ethical.

Benefits And Drawbacks Of Ghost Production

Ghost production can offer benefits like time-saving, access to talented producers, and the ability to focus on other aspects of music creation. However, it can also include drawbacks such as lack of creative input and ethical concerns. Overall, it’s important to weigh the pros and cons when considering ghost production.

Benefits And Drawbacks Of Ghost Production: Ghost production is a popular music production process that allows a producer to create music for another artist without receiving any public credit. This process offers a lot of benefits, but it also has some drawbacks. In this post, we’ll discuss the advantages and disadvantages of ghost production, so you can decide if it’s the right choice for your music career.

Advantages Of Ghost Production:

Ghost production has several benefits, which are: – It saves time: Ghost production enables artists to save a lot of time that they would have spent learning how to produce music. – It helps improve the quality of music: Professional producers with years of experience can create high-quality music that may not have been achievable by the artist alone. – Musicians can focus on their strengths: Ghost production allows artists to concentrate on writing lyrics and singing, while leaving the music production process to the professionals. – It provides room for experimentation: Ghost producers can try out different sounds and approaches to create unique music that suits the artist’s style.

Disadvantages Of Ghost Production:

Although ghost production has some advantages, it also has some drawbacks, which include: – It can be expensive: Ghost production services provided by professional producers come at a premium price, particularly if the producer is experienced and has a proven track record. – The artist may not have ownership of the finished product: As the produced music belongs to the ghost producer, the artist has no ownership rights to the finished product. – It can generate negative public relations: Ghost production is controversial as fans don’t like to think that their favourite artists have relied on someone else, leading to a negative public relations situation. – There is less control over the finished product: The artist has little to no say over the final product, meaning that the song might not turn out as expected. In conclusion, ghost production has its benefits, but it also has some drawbacks. Weigh the pros and cons before deciding on using this process because as an artist, it’s vital to discover what works best in terms of music production.

Basics Of Ghost Production

Credit: innovationsounds.com

Ghost Production In Today’s Music Industry

Ghost production has become increasingly common in today’s music industry, where producers create tracks for artists to release under their own name. This type of production is often kept a secret to maintain the appearance that the artist created the music, and it has sparked debate about its ethics in the industry.

The term “ghost production” refers to the act of creating music for another person without receiving credit or recognition for the work. In today’s music industry, ghost production has become a widespread practice. Many popular musicians and producers use ghost producers to create music that they release under their own name. Ghost production has gained significant attention, as controversy and misconceptions surround the practice. In this article, we will explore the basics of ghost production, focusing on trends, controversies, and the impact of ghost production on today’s music industry.

Trends In Ghost Production Usage

Ghost production has become increasingly popular in the music industry. It has provided an efficient solution for producing music when established artists find it challenging to keep up with the demand for new music. As a result, they need to outsource this work to maintain their reputation and stay relevant. Moreover, new musicians with weaker skills, tendency often seek out experienced producers when starting their careers as they struggle to produce high-quality music on their own. In addition, increased access to affordable music-making software and the rise of social media platforms has contributed to this popularity.

Controversies Around Ghost Production

Ghost production has sparked many debates among experts and music aficionados. Some argue that this practice perpetuates a lack of proper artist recognition. Many feel that music created and released under somebody else’s name is dishonest and misleading. Many fans believe that purchasing a track created by a ghost producer is a waste of money, and they do not support artists who use ghost producers. On the other hand, others argue that ghost production provides a plausible marketing strategy for the music industry in the digital era. They contend that the real value of a track lies in its ability to make an impact and resonate with the audience rather than its creator. In conclusion, ghost production has come under scrutiny and criticism in recent years as its prevalence within the music industry increases. However, it remains a common and necessary practice for many artists to keep their music careers afloat. While some view it as a deceitful practice, ghost production continues to be a feasible option to meet the high demand for quality music in today’s fast-paced music industry.

Basics Of Ghost Production

Credit: www.linkedin.com

Frequently Asked Questions Of Basics Of Ghost Production

How Do I Start A Ghost Production?

To start a ghost production, first define your niche and target audience. Create a unique brand and style, set your rates, and build a portfolio of work. Use online platforms to promote your services and network with potential clients. Communication is key to ensure that both parties are satisfied with the final product.

How Does Ghost Production Work?

Ghost production is a process in which a music producer creates a track on behalf of another artist. The artist pays the producer a fee for creating the music, and then the artist releases the track under their own name.

The producer remains anonymous and does not take credit for the work.

Is It Legal To Ghost Produce?

Ghost producing is not illegal, but it can lead to legal issues if you do not properly credit the original creator of the work. It is important to have clear agreements and contracts in place to avoid any potential legal disputes.

How Much Should I Charge For Ghost Production?

The amount you should charge for ghost production depends on your experience, skills, and the complexity of the project. Ghost producers typically charge a flat fee, which ranges from $500 to $10,000 per track. Factors such as the artist’s popularity, the genre of the music, and the producer’s reputation can also affect pricing.

It’s best to research industry standards and negotiate with clients based on your expertise and the project’s requirements.

Conclusion

Ghost production is definitely a lucrative opportunity for both new and experienced music producers. It enables them to create outstanding tracks for renowned artists while keeping behind the curtains. By understanding the basics of ghost production, you can start your journey in the industry with ease and with all the right knowledge.

Remember, ghost production demands hard work, dedication, and professionalism. Keep honing your craft, build connections, and don’t forget the importance of communication with your clients. With all these skills in your arsenal, you can increase your chances of becoming one of the most sought-after ghost producers in the music industry.