Categories
Archive Audio Production

How to Effortlessly Install Vst Plugins in Fl Studio

To install VST plugins in FL Studio, download the plugin and place it in the correct folder. Then, open FL Studio, go to Options, Manage Plugins, and add the directory where the plugin is located.


This will enable FL Studio to recognize and use the VST plugin seamlessly. Are you looking to enhance your music production in FL Studio? One way to unlock a new world of sounds and effects is by installing VST plugins.


By following a few simple steps, you can integrate third-party plugins into FL Studio to expand your creative possibilities. In this guide, we’ll walk you through the process of installing VST plugins in FL Studio, allowing you to take your music production to the next level.
How to Effortlessly Install Vst Plugins in Fl Studio


Credit: unison.audio


Choosing Vst Plugins

When selecting VST plugins for FL Studio, it is essential to invest time in researching to find high-quality options.

With a myriad of plugins available, research is crucial to determine which ones will best suit your needs.

Consider user reviews, professional feedback, and demo versions to discover the most effective plugins.

Considering Compatibility

When choosing VST plugins for FL Studio, compatibility is key to ensure smooth integration and functionality.

  • Check the system requirements of the plugin to ensure it is compatible with your FL Studio version.
  • Confirm if the plugin supports the operating system you are using on your computer.
  • Verify if the plugin is compatible with the specific hardware and software configurations of your setup.
How to Effortlessly Install Vst Plugins in Fl Studio


Credit: www.youtube.com


Acquiring Vst Plugins

When it comes to installing VST plugins in FL Studio, the first step is acquiring the plugins you want to use. Whether you are looking for free or paid plugins, it’s essential to download them from trusted sources to ensure they work properly with your software.

Free Vs. Paid Plugins

1. Free Plugins: Can be a great starting point for beginners on a budget.

2. Paid Plugins: Offer advanced features and professional quality but at a cost.

Downloading Plugins From Trusted Sources

  1. Visit the official website of the plugin developer to ensure authenticity.
  2. Check for user reviews and ratings to gauge the plugin’s reliability.
  3. Scan the plugin files for viruses before installation using a trusted antivirus program.


Installing Vst Plugins

To install VST plugins in FL Studio, you need to follow a few simple steps. One of the crucial steps in the process is Installing VST Plugins.

Locating The Plugin Folder

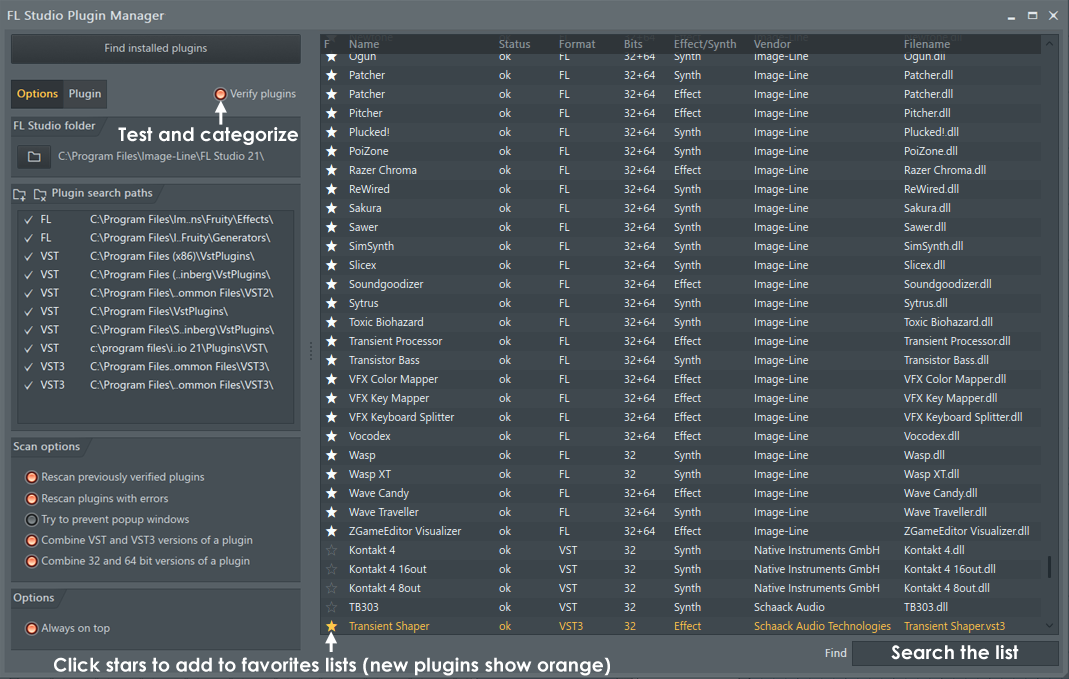
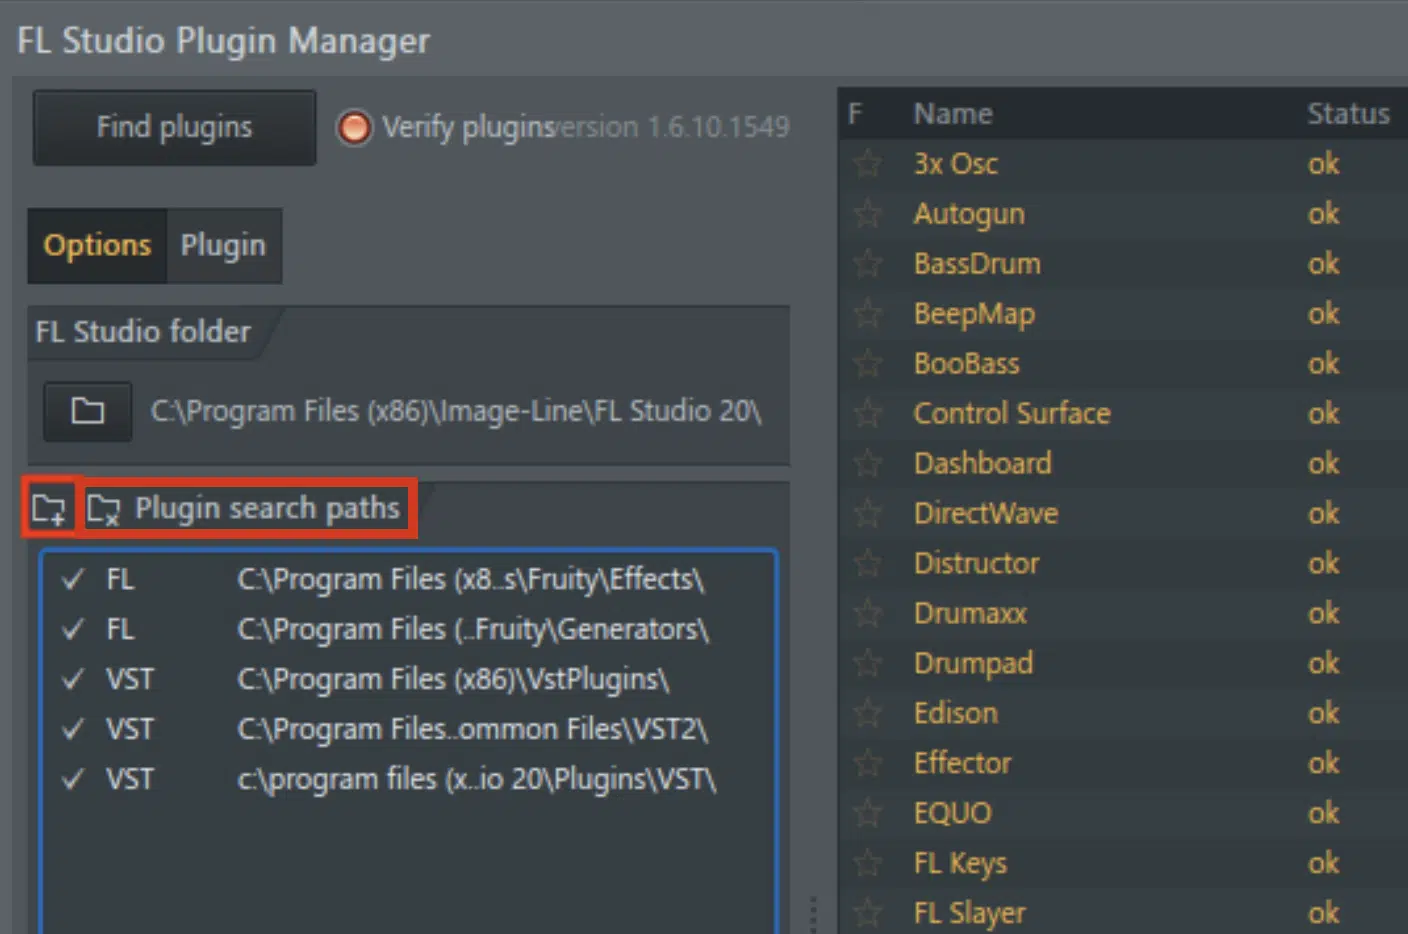
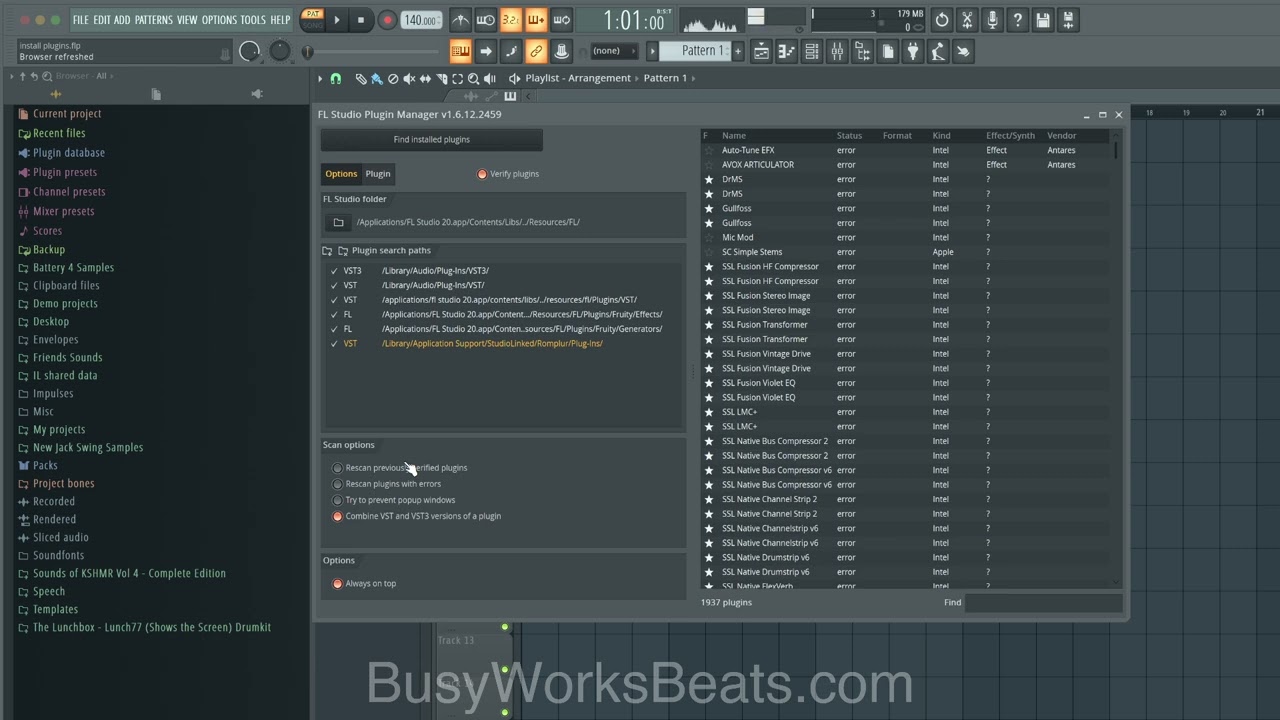
First, you need to locate the plugin folder in your FL Studio installation directory. To do this, open FL Studio, go to the “Options” menu, and select “Manage Plugins.” Here, you will find the option to open the plugin manager, which will show you the list of all the installed plugins, and their installation path.

Copying And Pasting The Plugin Files

  1. Once you have located the plugin folder, navigate to the location on your computer where your VST plugin files are stored.
  2. Copy the plugin files from this location and paste them into the plugin folder within your FL Studio installation directory.

Adding Vst Plugins To Fl Studio

Installing Vst plugins in Fl Studio allows you to expand your creative possibilities and take your music production to new heights. Whether you are a beginner or an experienced producer, this guide will walk you through the process of adding Vst plugins to Fl Studio, so you can start exploring a variety of new sounds and effects. In this section, we will cover two important steps – scanning for new plugins and organizing them in Fl Studio.

Scanning For New Plugins

Before you can start using your newly downloaded Vst plugins, you need to let Fl Studio know where they are located on your computer. The scanning process in Fl Studio automatically searches your computer for any new plugins and adds them to your library. Here’s how you do it:

  1. Open Fl Studio and navigate to the “Options” menu at the top. Click on “Manage Plugins” to access the plugin manager.
  2. In the plugin manager window, click on the “Find plugins” button. Fl Studio will start scanning your computer for new plugins.
  3. Once the scan is complete, Fl Studio will display a list of all the newly found plugins. You can select the ones you want to add by checking the boxes next to their names.
  4. Click on the “Add selected” button to add the plugins to your Fl Studio library.
  5. Restart Fl Studio to make sure the newly added plugins are properly integrated.

Organizing Plugins In Fl Studio

With all your plugins added to Fl Studio, it’s essential to keep them organized for easy access and efficient workflow. Here are some tips on how to keep your plugin library in order:

  • Create custom folders in the Fl Studio browser to categorize your plugins based on their type or purpose. For example, you can have separate folders for synths, effects, drums, etc.
  • Use color-coding to visually distinguish between different types of plugins. Fl Studio allows you to assign different colors to plugin names, making it easier to identify them at a glance.
  • Drag and drop your most frequently used plugins onto the toolbar for quick access. This way, you won’t have to search through your library every time you need a specific plugin.
  • Regularly update and maintain your plugin library by removing any plugins that you no longer use. This will help free up space and keep your workspace clutter-free.

By following these steps, you can ensure that your Vst plugins are organized and readily available whenever you need them, saving you valuable time and enhancing your creative workflow in Fl Studio.

Testing And Troubleshooting

Once you have successfully installed your VST plugins in FL Studio, it’s important to test their functionality and address any common installation issues you may encounter. This step is crucial to ensure that your plugins are working properly and that you can start creating music seamlessly. In this section, we will walk you through the process of verifying plugin functionality and provide solutions to common installation issues.

Verifying Plugin Functionality

After installing a VST plugin in FL Studio, it’s essential to verify its functionality to guarantee smooth usage. Here’s what you need to do:

  1. Load the Plugin: Open FL Studio and select a project or create a new one. Navigate to the plugin browser and locate the installed VST plugin. Double-click on the plugin to load it into your project.
  2. Test Basic Functions: Once the plugin is loaded, test its basic functions such as playing an instrument or applying effects. Make sure that you can hear the sounds and that the plugin’s parameters can be adjusted without any issues.
  3. Check Compatibility: Some plugins may have compatibility issues with specific versions of FL Studio. Verify that the plugin you installed is compatible with your version of the software. Check the plugin manufacturer’s website for compatibility information and any available updates or patches.
  4. Ensure Stability: Run your project with the plugin loaded for a reasonable amount of time to ensure that it remains stable and doesn’t cause any crashes or system errors. If you experience any issues, proceed to the next section to address common installation problems.

Addressing Common Installation Issues

Despite following the installation instructions carefully, you may encounter common issues when installing VST plugins in FL Studio. Here are some solutions to help you troubleshoot these problems:

Issue Solution
Plugin not showing up in FL Studio Check the plugin’s installation directory and ensure it is located in the correct folder. In FL Studio, go to the Plugin Manager and verify that the plugin is scanned and detected. If not, manually add the plugin path to the search list.
No sound or audio glitches Ensure that the plugin’s audio output is correctly routed in FL Studio’s mixer. Check your audio settings and make sure the plugin is assigned to the correct input channel. Additionally, update your audio drivers and, if necessary, adjust the sample rate and buffer size settings to optimize performance.
Crashes or system errors Update FL Studio and your plugins to the latest versions as they often include bug fixes that can resolve stability issues. Disable any conflicting plugins or presets and test if the crashes persist. If the problem continues, reach out to the plugin manufacturer’s support for further assistance.

By following these steps, you can verify the functionality of your VST plugins in FL Studio and troubleshoot any common installation issues that may arise. Remember that each plugin may have specific troubleshooting steps provided by the manufacturer, so always consult their documentation or support resources if needed. With your plugins validated and working smoothly, you can now focus on creating amazing music!
How to Effortlessly Install Vst Plugins in Fl Studio


Credit: m.youtube.com


Frequently Asked Questions Of How To Install Vst Plugins Fl Studio


How Do I Install Vst Plugins In Fl Studio?


To install VST plugins in Fl Studio, go to the “Options” menu, select “Manage Plugins,” and click on “Add path. ” Locate the folder where your VST plugins are stored and select it. Now, your plugins will be available in Fl Studio.


Can I Use Third-party Vst Plugins In Fl Studio?


Yes, you can use third-party VST plugins in Fl Studio. Simply install the plugins as mentioned earlier, and they will be ready to use. Third-party VST plugins offer a wide range of additional effects and instruments to enhance your music production.


Are There Any Free Vst Plugins Available For Fl Studio?


Yes, there are numerous free VST plugins available for Fl Studio. Many developers offer free versions of their plugins, allowing beginners and budget-conscious producers to access high-quality tools without spending a dime. You can find these plugins on various websites and forums dedicated to audio production.


Conclusion


Learning to install VST plugins in FL Studio can significantly enhance your music production experience. By following the steps outlined in this guide, you can expand your sonic capabilities and take your creativity to new heights. Embrace the opportunity to experiment with different plugins and unlock the full potential of your music.

Categories
Archive Audio Production

How To Mix Hip Hop Song: Master the Art of Sonic Excellence

To mix a hip hop song, adjust levels for vocals, beats, and instruments. Balance frequencies for clarity.


Mixing a hip hop song involves blending vocals, beats, and instruments to create a cohesive and powerful sound. By adjusting the levels to ensure each element is heard clearly and balancing the frequencies to prevent muddiness or harshness, you can achieve a professional and polished mix.


With careful attention to detail and a good ear for sound, you can elevate your hip hop track to the next level and make it stand out in the crowded music scene. Experimenting with various techniques and effects can help you find the perfect mix that complements the unique style of the hip hop genre.


Credit: stanforddaily.com


Understanding Hip Hop Mixing

Understanding Hip Hop Mixing: Exploring the art of mixing in hip hop music is essential for creating professional-level tracks that stand out. Mastering the nuances of hip hop mixing involves a deep understanding of the specific elements that contribute to the genre’s unique sound. By grasping the key components and common techniques employed in hip hop mixing, you can elevate the quality of your productions.

The Elements Of Hip Hop Mixing

  • Drums: Drum rhythms are at the core of hip hop music. Perfecting the balance and impact of kick, snare, and hi-hat sounds is crucial.
  • Vocals: Clear and well-mixed vocals are vital in hip hop. Pay attention to effects, levels, and vocal presence in the mix.
  • Bass: Deep and powerful basslines are characteristic of hip hop. Ensure the bass is punchy and sits well in the mix without overpowering other elements.
  • Sampling: Sampling is a common practice in hip hop. Blend samples seamlessly with other elements while maintaining clarity and cohesion.

Common Mixing Techniques For Hip Hop

  1. Compression: Use compression to control dynamics and add consistency to drum elements and vocals.
  2. EQ: Utilize EQ to sculpt the frequency balance of different elements and create space in the mix.
  3. Reverb and Delay: Experiment with reverb and delay effects to add depth and atmosphere to vocals and instruments.
  4. Stereo Imaging: Enhance stereo width to create a spacious soundstage and enhance the overall mix.

Preparing Your Mix

Get ready to elevate your hip hop songs with a professional mix by following these essential steps.

Setting Up Your Daw And Session

  • Open your digital audio workstation (DAW) to start the mixing process.
  • Ensure your session is set to the appropriate sample rate and bit depth.
  • Adjust the buffer size for smooth playback and recording in your DAW.

Organizing And Labeling Tracks

  • Organize your tracks by grouping them based on instrument type or sound category.
  • Label each track with clear and concise names for easy identification.
  • Color code your tracks to visually distinguish between different elements in the mix.

Crafting The Hip Hop Sound

Crafting the Hip Hop Sound involves a seamless blend of various elements to create a unique and captivating audio experience. To achieve this, it’s essential to focus on specific aspects such as balancing levels and panning, as well as utilizing EQ and compression techniques to ensure a polished and professional sound.

Balancing Levels And Panning

When mixing a hip hop song, achieving the right balance of audio levels is crucial. Each element, from the vocals to the instruments, should be carefully adjusted to ensure that they complement each other harmoniously. Additionally, panning can be utilized to create a sense of depth and space within the mix, providing a more immersive listening experience.

Utilizing Eq And Compression

EQ and compression are indispensable tools in crafting the hip hop sound. EQ allows for the fine-tuning of frequencies, ensuring that each element occupies its rightful place within the mix. Compression, on the other hand, helps control dynamics and can add punch and clarity to individual sounds, contributing to the overall impact of the track.

How To Mix Hip Hop Song: Master the Art of Sonic Excellence


Credit: m.facebook.com


Enhancing With Effects

When it comes to mixing a hip hop song, adding effects is a key step in bringing the track to life. Effects can transform a dry and static mix into something dynamic and exciting. In this section, we will explore two essential techniques for enhancing your hip hop song with effects: creating depth with reverb and delay, and using creative effects for impact.

Creating Depth With Reverb And Delay

Reverb and delay are powerful tools for adding depth and dimension to your mix. Reverb recreates the sound of a space, making your instruments and vocals sound like they’re in a specific environment. Delay creates echoes and repeats, adding a sense of space and movement to your mix.

To create depth with reverb, follow these steps:

  1. Start by inserting a reverb plugin on your track or bus.
  2. Adjust the reverb time and decay settings to control the length and clarity of the reverb.
  3. Experiment with different room sizes and types to find the right ambiance for your mix.
  4. Use EQ to shape the reverb, cutting or boosting frequencies to make it fit seamlessly with your mix.
  5. Finally, adjust the reverb level to ensure it enhances the vocals or instruments without overpowering them.

Next, let’s explore how to use delay to add depth:

  1. Insert a delay plugin on your track or bus.
  2. Set the delay time to determine the length of the repeats.
  3. Adjust the feedback parameter to control the number of repeats.
  4. Experiment with different delay types, such as ping-pong or tape delay, to add movement and character.
  5. Finally, adjust the delay level to achieve the desired balance between the dry signal and the delays.

Using Creative Effects For Impact

In addition to reverb and delay, there are numerous creative effects you can use to make your hip hop song stand out. These effects can add unique textures, enhance transitions, and create exciting moments in your mix.

Here are several creative effects for added impact:

  • Reverse reverb: Create a reverse reverb effect by reversing a vocal or instrument track, applying reverb, and then reversing it back. This effect can add a surreal and ethereal quality to your mix.
  • Filter sweeps: Use high-pass or low-pass filters to create sweeping effects that add energy and movement to your mix. Automate the filter cutoff frequency to create rhythmic or melodic variations.
  • Crushing distortion: Apply heavy distortion to drums, vocals, or instruments to add grit and aggression. This technique is especially effective in sections where you want to create intense impact.
  • Panning and automation: Experiment with panning and automation to create interesting stereo movement. You can pan individual elements to different positions, automate the panning throughout the mix, or create auto-panning effects.

By incorporating these creative effects into your mix, you can make your hip hop song sound unique, engaging, and memorable.

Mastering And Finalizing

Once you have finished the mixing process, it’s time to move on to mastering and finalizing your hip hop song. Mastering is the last step in the production process and involves making the necessary adjustments to ensure your mix is polished, well-balanced, and ready for distribution.

Understanding The Mastering Process

During mastering, a skilled audio engineer will carefully examine your mix and make small adjustments to enhance its overall sound quality. This involves using a combination of specialized tools and techniques to address any issues and bring out the best in your mix.

  • Compression and equalization ensure that the different elements of the song are well-balanced and blend together harmoniously.
  • Limiting and maximizing the loudness of the song to make it competitive with other tracks when played on different media platforms.
  • Adding a final touch of depth and dimension to the mix using effects such as reverb and stereo enhancement.

Preparing Your Mix For Distribution

Before you can release your hip hop song to the world, it’s important to ensure that your mix meets the necessary quality standards and is compatible with various playback systems. Below are some key steps to prepare your mix for distribution:

  1. Export your mix in a high-quality audio file format, such as WAV or FLAC.
  2. Check the overall volume levels to avoid clipping and ensure consistency.
  3. Apply dithering to reduce quantization noise when converting the audio to a lower bit depth for online streaming.
  4. Add metadata, such as artist name, track title, and album information, to the audio file.
  5. Ensure your mix sounds good on different sound systems and headphones by conducting thorough playback tests.

By following these steps and working with a professional mastering engineer if needed, you can ensure that your hip hop song achieves its fullest potential and is ready to captivate listeners worldwide.

How To Mix Hip Hop Song: Master the Art of Sonic Excellence


Credit: www.nytimes.com


Frequently Asked Questions For How To Mix Hip Hop Song


How Can I Mix A Hip Hop Song?


To mix a hip hop song, start by setting the levels for each track, ensuring that they blend well together. Use EQ to balance the frequencies and make sure everything sounds clear. Add effects like reverb or delay for depth, and pan different instruments to create a wide stereo image.


Finally, use compression to control dynamics and make everything sound cohesive.


What Are Some Common Mixing Mistakes In Hip Hop Songs?


Common mixing mistakes in hip hop songs include using too much compression, neglecting proper leveling, overusing effects, and not paying attention to the low end. It’s important to maintain a balanced mix and avoid cluttering the sound with unnecessary elements.


Taking breaks while mixing can also help to avoid ear fatigue and make better decisions.


How Do I Make The Vocals Stand Out In A Hip Hop Mix?


To make vocals stand out in a hip hop mix, start by ensuring they have a clear space in the frequency spectrum. Use EQ to boost the desired frequencies and cut any unnecessary ones. Then, apply compression to control vocal dynamics and make them more present.


Adding subtle reverb or delay can also help to create depth and make the vocals pop in the mix.


Conclusion


Mixing a hip hop song requires precision and creativity. By balancing levels, adding effects, and fine-tuning the details, you can make your mix stand out. Remember to trust your ears and experiment with different techniques. With patience and practice, you can elevate your hip hop mixes to the next level.


https://www.youtube.com/watch?v=SfsJK-5gp9w


Categories
Archive Audio Production

How to Master VST Plugins in Cakewalk: Unleash Your Musical Potential

To use VST plugins in Cakewalk, simply navigate to the plugin manager and scan for new plugins. Select the desired VST plugins to use in your project.


VST plugins enhance the functionality and creativity of Cakewalk, a popular digital audio workstation. By incorporating these plugins, users can access a wide range of effects, instruments, and tools to elevate their music production process. Integrating VST plugins in Cakewalk allows for customization and experimentation, enabling musicians and producers to achieve the desired sound and quality in their projects.


In this guide, we will explore the seamless integration of VST plugins within Cakewalk, offering insights and tips on optimizing their usage to enhance the overall music production experience.

How to Master VST Plugins in Cakewalk: Unleash Your Musical Potential


Credit: usashop.jzmic.com


Choosing The Right Vst Plugins

Researching Vst Plugins

Before delving into Cakewalk, research various VST plugins to find ones that suit your needs.

  • Check reviews from reputable sources.
  • Explore demo versions to test compatibility.
  • Consider the reputation of the plugin developer.

Understanding Your Specific Needs

Identify what you require from VST plugins to enhance your music production in Cakewalk.

  1. Determine the type of instruments or effects you need.
  2. Assess your production style and genre preferences.
  3. Consider the technical requirements of your setup.
How to Master VST Plugins in Cakewalk: Unleash Your Musical Potential


Credit: m.youtube.com


Integrating Vst Plugins Into Cakewalk


To integrate VST Plugins into Cakewalk, open the DAW and go to the Preferences menu. Under the VST settings, select the correct plugin location and rescan for plugins. Once the scan is complete, the new VST plugins will be available for use in Cakewalk’s interface.

Installing Vst Plugins

To install VST plugins in Cakewalk, follow these simple steps:

  • Download the VST plugin files to your computer.
  • Locate the downloaded files and extract them if necessary.
  • Copy the extracted plugin files to the designated VST folder on your computer.
  • Open Cakewalk and navigate to the plugin manager to scan for new plugins.
  • Once the scan is complete, your VST plugins will be available for use in Cakewalk.

Setting Up Vst Plugin Paths

Follow these steps to set up VST plugin paths in Cakewalk:

  1. Open Cakewalk and go to the settings menu.
  2. Locate the VST settings section and add the path to your VST plugin folder.
  3. Scan for new plugins to ensure Cakewalk recognizes the added paths.
  4. Your VST plugins are now integrated and ready for use in Cakewalk.


Optimizing Workflow With Vst Plugins

When it comes to optimizing your workflow within Cakewalk, utilizing VST plugins effectively is crucial. These plugins can greatly enhance the quality and creativity of your music production. In this guide, we will explore how to make the most out of VST plugins in Cakewalk by focusing on the subheading: Optimizing Workflow with VST Plugins.

Utilizing Presets Effectively

Utilizing presets can significantly save time and help you discover new sounds that you might not have considered before. When importing a VST plugin, be sure to explore its preset library to get a feel for the variety of sounds available. Additionally, consider organizing and categorizing presets based on the type of instrument or effect for easy access during production.

Customizing And Saving User Presets

Customizing and saving user presets allows you to tailor VST plugins to your specific preferences. Take advantage of the customization options within each VST plugin, such as adjusting parameters and creating unique sound profiles. Once you’ve crafted a personalized preset, be sure to save it for future use. This ensures that your favorite settings are easily accessible in future projects, enhancing your workflow.

How to Master VST Plugins in Cakewalk: Unleash Your Musical Potential


Credit: www.amazon.com


Advanced Techniques For Vst Plugins

When it comes to music production, using VST plugins can take your tracks to a whole new level. Cakewalk is a powerful digital audio workstation (DAW) that allows you to harness the full potential of these plugins. In this article, we’ll explore some advanced techniques for using VST plugins in Cakewalk, including unleashing sound design potential and exploring automation and modulation. Let’s dive in!

Unleashing Sound Design Potential

If you want to make your tracks truly unique, sound design is the key. VST plugins offer a myriad of possibilities to shape and manipulate sounds in ways you never thought possible. Cakewalk provides a variety of tools and features that allow you to unleash your creativity and take your sound design to the next level.

One technique to explore is layering multiple VST instruments to create complex and rich sounds. By combining different VST plugins, you can blend their unique characteristics and create sounds that have depth and complexity. Experiment with different combinations and tweak the settings to achieve the desired sound.

Pro Tip: Use the mixer in Cakewalk to fine-tune the levels and panning of each layer, creating a balanced and immersive soundstage.

Another way to unleash the sound design potential of VST plugins is by utilizing the extensive range of effects they offer. From reverb and delay to distortion and modulation, these effects can transform your sounds and add depth and character to your tracks. Experiment with different parameters and presets to find the perfect combination that complements your music.

Exploring Automation And Modulation

Automation and modulation are essential techniques for adding movement and dynamics to your tracks. By utilizing the automation features in Cakewalk, you can control various parameters of your VST plugins over time, creating evolving and dynamic sounds. From volume and filter cutoff to effect parameters, automation allows you to breathe life into your music.

Another powerful technique is modulation. With Cakewalk’s modulation routing capabilities, you can assign different modulation sources to control various parameters of your VST plugins. This opens up a world of possibilities, allowing you to create expressive and dynamic sounds that evolve and change with the music.

Pro Tip: Experiment with different modulation sources, such as LFOs and envelopes, to add movement and expression to your sounds. Combine multiple modulation sources for even more intricate and unique effects.

In conclusion, by unleashing the sound design potential of VST plugins and exploring automation and modulation techniques in Cakewalk, you can take your music production to a whole new level. The possibilities are endless, so don’t be afraid to experiment, and let your creativity soar!

Troubleshooting Vst Plugin Issues


Having trouble with VST plugins in Cakewalk? Ensure your plugins are compatible and up to date. Check settings for routing and conflicts to troubleshoot any issues effectively. Experiment with different plugins to enhance your music production experience.

Resolving Compatibility Problems

If you are experiencing compatibility problems with VST plugins in Cakewalk, there are a few troubleshooting steps you can take to resolve the issue. Incompatible plugins can cause crashes, freezes, or unexpected behavior within your DAW.

Here are some simple steps you can follow to resolve compatibility problems:

  1. Check System Requirements: Ensure that your computer meets the minimum system requirements for the VST plugin. Double-check if you need a specific version of Cakewalk or if any additional software is required.
  2. Update Everything: Keep your Cakewalk software, VST plugins, and your operating system up to date. Developers often release updates to address compatibility issues and enhance performance.
  3. Disable Conflicting Plugins: If you suspect that a particular VST plugin is causing compatibility issues, try disabling it to see if the problem persists. If the issue is resolved, contact the plugin developer for an updated version or seek alternative plugins with similar features.
  4. Scan for Plugins: In Cakewalk, navigate to the Plugin Manager and run a plugin scan to ensure that all your VST plugins are recognized and properly installed. Sometimes plugins may not appear or function correctly due to installation errors.

Dealing With Latency And Performance Issues

Latency and performance issues can be frustrating when using VST plugins in Cakewalk. These issues can result in audio delays, glitchy playback, or high CPU usage. Fortunately, there are several steps you can take to address these problems:

  1. Adjust Buffer Size: In Cakewalk’s audio settings, try increasing or decreasing the buffer size to find a balance between low latency and stable performance. Lower buffer sizes reduce latency but may require more processing power.
  2. Free Up Resources: Close any unnecessary applications or processes running in the background to free up system resources. This can help reduce CPU usage and improve the performance of your VST plugins.
  3. Disable Unused Plugins: If you have multiple VST plugins loaded in your project, consider disabling any that are not currently in use. This can help reduce CPU usage and improve overall performance.
  4. Use Freezing or Bouncing: If you have complex projects with many resource-intensive plugins, consider freezing tracks or bouncing them to audio. This can alleviate strain on your CPU by processing the plugins ahead of time.

By following these troubleshooting tips, you can resolve compatibility problems and address latency and performance issues when using VST plugins in Cakewalk. Remember to stay updated with the latest versions of your plugins and make use of the tools provided in Cakewalk to optimize your workflow.

Frequently Asked Questions For How To Use Vst Plugins In Cakewalk


How Do I Install Vst Plugins In Cakewalk?


To install VST plugins in Cakewalk, simply go to the Cakewalk menu, select “Utilities,” and click on “Cakewalk Plugin Manager. ” From there, click on “Scan VST plugins” and select the folder where your VST plugins are located. Cakewalk will then scan and load the plugins for you to use.


Can I Use Third-party Vst Plugins In Cakewalk?


Yes, Cakewalk supports third-party VST plugins. You can easily add and use VST plugins from different developers in Cakewalk by following the installation process mentioned in the previous question. This allows you to expand your collection of plugins and explore different sounds and effects to enhance your music production.


How Do I Use Vst Plugins In Cakewalk?


To use VST plugins in Cakewalk, open a project and navigate to the track where you want to apply the plugin. Click on the FX button on the track’s inspector panel and select “Insert VST Plugin. ” Choose your desired VST plugin and adjust the settings.


You can then start applying the plugin’s effects or instruments to your track.


Conclusion


Incorporating VST plugins into Cakewalk can significantly enhance your music production experience. With a wide range of plugins to choose from, you have the power to customize your sound and unleash your creativity. By following these simple steps, you can take your music to the next level and create professional-grade tracks.

Categories
Archive Audio Production

How to Select the Ultimate Audio Engineer for Your Song

To choose an audio engineer to mix your song online, evaluate their experience and portfolio. Finding the right audio engineer to mix your song online is essential for achieving the desired sound quality.


With the rise of online music production, there are many options available, making it crucial to assess various factors before making a decision. By considering an audio engineer’s experience, portfolio, and communication skills, you can ensure that your song is mixed to perfection.


In this digital age, selecting the right professional for online mixing can significantly impact the overall success of your music project.


Understanding Audio Engineering

The Role Of An Audio Engineer

An Audio Engineer is responsible for blending different sounds into a harmonious mix.

They optimize the sound quality, balance volume levels, and ensure clarity.

Their role is crucial in enhancing the overall listening experience for the audience.

Key Skills And Expertise

  • Technical Proficiency: Knowledge of audio equipment and software is essential.
  • Attention to Detail: Precision in adjusting levels and fine-tuning sound is key.
  • Creative Flair: Ability to experiment and add unique elements to the mix.
Role Skills Needed
Audio Engineer Technical proficiency, attention to detail, creative flair
How to Select the Ultimate Audio Engineer for Your Online Song Mix!


Credit: www.avid.com


Finding The Right Audio Engineer

When it comes to finding the right audio engineer to mix your song online, it is essential to conduct thorough research and evaluate their previous work to ensure the best possible outcome for your music.

Researching Audio Engineers

Begin your search by exploring online platforms and forums for recommendations on skilled audio engineers.

  • Look for professionals who have experience in your specific music genre.
  • Read reviews from clients to assess reliability and quality of work.
  • Check the engineer’s website for credentials and a portfolio of past projects.

Assessing Previous Work

Listen to samples of their previous work to gauge their mixing and production skills.

  1. Ensure their style aligns with your vision for your song.
  2. Evaluate the clarity and balance of the mixes they have done before.
  3. Reach out to them for additional information or to discuss your project in detail.


Communication And Collaboration

Communication and collaboration are crucial components when choosing an audio engineer to mix your song online. Establishing clear expectations, providing effective feedback and input are vital in ensuring the successful outcome of your music project.

Establishing Clear Expectations

Clear communication from the start is essential. Provide detailed guidelines on your vision for the mix, including preferred tones, effects, and specific references for the desired sound. Clearly outline your goals, deadlines, and any technical requirements for the project. This initial communication will set the foundation for a productive partnership.

Effective Feedback And Input

When the mixing process is underway, it’s important to provide constructive feedback, emphasizing what you like and dislike about the current mix. Be specific about the changes you desire, whether it’s adjusting the levels of instruments, enhancing vocals, or refining the overall sound. Exchange ideas with the audio engineer, as collaboration can lead to innovative solutions and an exceptional final product.

How to Select the Ultimate Audio Engineer for Your Online Song Mix!


Credit: blog.adobe.com


Technical And Creative Compatibility


Choosing a suitable audio engineer for online song mixing requires considering both technical expertise and creative compatibility. Look for professionals who demonstrate a strong grasp of sound engineering principles and have a proven track record of bringing creative visions to life.


These qualities will ensure a seamless and effective collaboration.

When it comes to choosing an audio engineer to mix your song online, it is crucial to consider both technical and creative compatibility. Finding someone who understands your musical vision and has the technical skills to bring it to life is essential for a successful collaboration.

Technology And Software Proficiency

One of the first things to evaluate when choosing an audio engineer is their technology and software proficiency. The engineer should be well-versed in the latest tools and techniques used in the audio industry. This includes having knowledge of popular digital audio workstations (DAWs) such as Pro Tools, Logic Pro, or Ableton Live. Ensure that the engineer has experience working with the specific software you prefer, as this will streamline the collaboration process.

Creativity And Artistic Vision

Alongside technical expertise, an audio engineer should possess creativity and an artistic vision. They need to understand the genre and style of music you’re working with to produce a mix that aligns with your vision. Look for an engineer who can offer unique ideas and suggestions to enhance your song’s overall sound. A good audio engineer knows how to balance technical precision with artistic flair, resulting in a mix that stands out from the crowd.

Budget And Timelines


For your online song mixing, prioritize finding an audio engineer who respects your budget and meets agreed timelines. This ensures a seamless and cost-effective process, making it a decisive factor in selecting the right professional for your project.

Negotiating Fees And Costs

audio engineer to mix your song online, budget plays a crucial role. Negotiating fees and costs can help you find the right balance between the quality of the service and your financial resources. Here are a few tips to keep in mind:

  • Research different audio engineers to get an idea of their typical rates.
  • Compare prices and services offered to ensure you are getting a fair deal.
  • Consider the complexity and length of your song, as these can affect the overall cost.
  • Be open to discussion and willing to communicate your budget limitations.
  • Ask about any additional charges, such as revisions or mastering, to avoid surprises.

negotiating fees and costs with prospective audio engineers, you can find a balance that works for both parties involved. It’s important to be transparent about your budget upfront, as this will allow the engineer to provide you with options that fit within your financial constraints.

Setting Realistic Timeframes

setting realistic timeframes is vital when choosing an audio engineer for your online song mix. It ensures that you receive your final product within the desired timeframe without compromising the quality of the mix. Here are some guidelines to help you with this process:

  • Discuss your preferred timeframe with the audio engineer before committing to their services.
  • Clarify any specific deadlines or milestones you have in mind.
  • Consider the complexity of your project and allow for ample time for revisions and adjustments.
  • Ask about the engineer’s availability and workload to ensure they can meet your desired timeline.

setting realistic timeframes and communicating them clearly to your audio engineer, you can ensure a smoother process and avoid unnecessary stress. Remember that rushing the mix process can compromise the quality, so it’s crucial to find a balance that works for both parties involved.

How to Select the Ultimate Audio Engineer for Your Online Song Mix!


Credit: www.husson.edu


Frequently Asked Questions On How To Choose An Audio Engineer To Mix Your Song Online


How Do I Find A Reliable Audio Engineer Online?


Finding a reliable audio engineer online can be done through research on reputable websites, reading customer reviews, and checking their previous work samples. It’s important to also communicate and ask for references to ensure their expertise matches your requirements.


What Qualities Should I Look For In An Audio Engineer?


When choosing an audio engineer, it’s crucial to consider their experience, technical skills, attention to detail, ability to communicate effectively, and their understanding of your specific genre and requirements. They should also have a good track record of delivering high-quality audio mixes.


How Do I Evaluate An Audio Engineer’s Previous Work?


To evaluate an audio engineer’s previous work, listen to their portfolio or samples of the songs they have mixed. Pay attention to the sound quality, balance, clarity, and how the mix enhances the overall song. It’s also helpful to consider if their previous work aligns with your musical style and objectives.


Are There Different Types Of Audio Engineers?


Yes, there are different types of audio engineers specialized in recording, mixing, mastering, and sound design. It’s important to understand your specific needs and hire an engineer who specializes in the area you require. Some audio engineers may offer a combination of these skills.


Conclusion


Choosing an online audio engineer can make or break the success of your song. It’s essential to prioritize experience, communication, and understanding of your musical style. By carefully considering these factors, you can ensure that your song is mixed to the highest standard and truly represents your artistic vision.

Categories
Archive Audio Production

How to Effortlessly Install VST Plugins in FL Studio 20

To install VST plugins in FL Studio 20, simply place the plugin file in the designated folder and then refresh the plugin list. Once the plugin is properly installed, you can access it within FL Studio.


If you encounter any issues during the installation process, make sure to check the plugin’s compatibility with your version of FL Studio. Proper installation of VST plugins is essential for enhancing the functionality and capabilities of FL Studio 20. By following the correct steps, you can easily integrate a wide range of plugins to expand your creative possibilities within the software.


Whether you are a beginner or an experienced user, installing VST plugins can take your music production to the next level.

How to Effortlessly Install VST Plugins in FL Studio 20


Credit: m.youtube.com


Choosing The Right Vst Plugins


To install VST plugins in FL Studio 20, start by selecting the “Channels” tab and then clicking on “Add One” in the pop-up window. Once there, choose “More plugins” and “Manage plugins” from the list. Next, click on “On disk” and select the VST plugin folder.


Finally, click on “Start scan” to complete the process.

Researching And Selecting Vst Plugins

Before diving into the process of installing VST plugins in FL Studio 20, it’s crucial to choose the right ones for your needs. Research and carefully select VST plugins that align with your music production goals.

Considerations For Compatibility

Compatibility with your operating system and FL Studio version is key. Check if the VST plugins you are considering are compatible with FL Studio 20 to ensure smooth integration and operation.

How to Effortlessly Install VST Plugins in FL Studio 20


Credit: www.image-line.com


Understanding Fl Studio 20 Compatibility

FL Studio 20 supports VST plugins to enhance your music production process. To ensure compatibility, follow these crucial steps:

Identifying Compatible Vst Plugin Formats

FL Studio 20 is compatible with VST, VST2, and VST3 plugin formats, offering flexibility for your music projects.

Exploring Fl Studio 20’s Vst Plugin Locations

Locate or set your VST plugin directories in FL Studio 20 under the Plugin Manager for easy access and integration.

Installing Vst Plugins In Fl Studio 20


To install VST plugins in FL Studio 20, simply navigate to the plugin options and select ‘install. ‘ Locate the VST plugin file on your computer, then click ‘scan and verify plugins’ within FL Studio to add the new plugin to your library.

Locating Vst Plugin Installation Files

Before you begin installing VST plugins in FL Studio 20, you need to ensure that you have the relevant plugin installation files readily available. These files are typically acquired from the plugin developer’s website or through a reputable plugin marketplace. Make sure to keep track of where these files are saved on your computer for easy access during the installation process.

Placing Vst Plugins In The Correct Fl Studio 20 Folder

Once you have the VST plugin installation files at hand, the next step is to place these plugins in the appropriate folder within FL Studio 20. The default location for VST plugins is the ‘VSTPlugins’ folder within the FL Studio installation directory. However, it’s a good practice to double-check the specific installation instructions provided by the plugin developer, as some plugins may require placement in a different folder.

Activating And Using Vst Plugins In Fl Studio 20


Learn how to easily activate and use VST plugins in FL Studio 20 to enhance your music production. Installing VST plugins in FL Studio 20 is a straightforward process that allows you to unlock a plethora of creative possibilities in your projects.


Start exploring new sounds and effects today with VST plugins in FL Studio 20.

Scanning For Vst Plugins In Fl Studio 20

Before you can start utilizing VST plugins in FL Studio 20, it’s essential to scan and add them to your library. FL Studio offers a convenient feature that automatically scans your computer for VST plugins and adds them to your plugin database. Here’s how you can scan for VST plugins in FL Studio 20:

  1. Launch FL Studio 20 on your computer.
  2. Go to the “Options” menu at the top of the interface and click on “Manage Plugins.”
  3. A window will appear with various plugin settings. Here, click on the “Add” button located at the bottom-left corner.
  4. FL Studio will start scanning your computer for VST plugins. This process may take a few minutes, depending on the number of plugins you have installed.
  5. Once the scan is complete, FL Studio will display a list of all the detected VST plugins.
  6. Select the plugins you want to add to your library by checking the boxes next to their names.
  7. Click on the “Enable” button to activate the selected plugins in FL Studio.
  8. Finally, click on the “Close” button to exit the plugin manager.

Utilizing Installed Vst Plugins In The Daw

Now that you have successfully added and activated your VST plugins in FL Studio 20, it’s time to start using them in your projects. Here’s how you can utilize the installed VST plugins:

  1. Create a new project or open an existing one in FL Studio.
  2. Click on the “Channels” menu at the top of the interface and select “Add One” or “Add Multiple” depending on your preference.
  3. A list of plugin categories will appear. Navigate to the desired category where your installed VST plugins are located.
  4. Select the VST plugin you want to use and click on the “Add” button.
  5. FL Studio will insert the selected VST plugin into the channel rack.
  6. To access the plugin’s user interface and make adjustments, simply double-click on its name in the channel rack.
  7. Experiment with the various controls and settings provided by the VST plugin to achieve the desired sound.
  8. You can add multiple VST plugins to different channels to create complex and unique sounds in FL Studio.

By following these steps, you can easily activate and use VST plugins in FL Studio 20, unleashing a whole new world of sound possibilities for your music production endeavors.

https://www.youtube.com/watch?v=HBa7oK1EjkA


Troubleshooting Vst Plugin Installation Issues

Are you excited to dive into the world of VST plugins but facing some installation issues in FL Studio 20? Don’t worry, troubleshooting these problems is easier than you think. In this section, we will explore the common problems you may encounter during VST plugin installation and provide simple solutions to resolve them. We will also discuss how seeking help from the FL Studio 20 community can assist you in overcoming any hurdles you may face.

Common Problems And Solutions

When it comes to installing VST plugins in FL Studio 20, you may encounter a few common issues. However, with the right solutions, these problems can be quickly resolved, allowing you to enjoy the full potential of your VST plugins.

Problem 1: VST plugin not detected

If you find that your VST plugin is not being detected by FL Studio 20, it could be due to several reasons. One common cause is an incorrect installation path. Ensure that you have selected the correct folder for your VST plugins during the installation process.

If the plugin is installed in the correct location, try refreshing the plugin list in FL Studio. Navigate to the Options menu, select Manage Plugins, and then click on the Refresh button. This action will prompt FL Studio to scan for any newly installed plugins.

In some cases, the VST plugin may be installed as a 32-bit version while FL Studio is running the 64-bit version. This mismatch can result in the plugin not being detected. Make sure that both the plugin and FL Studio are running on the same architecture, either 32-bit or 64-bit.

Problem 2: Plugin crashes or freezes FL Studio

If your VST plugin causes FL Studio 20 to crash or freeze, it can be frustrating. One possible reason for this problem is an outdated or incompatible plugin version. Ensure that you have the latest version of the plugin installed by visiting the manufacturer’s website and downloading any available updates.

Another possible cause could be conflicts with other plugins or settings in FL Studio. Try disabling any other plugins you have installed and see if the issue persists. If it does not, you can then narrow down the problematic plugin by re-enabling them one at a time.

Seeking Help From The Fl Studio 20 Community

If you are still facing difficulties with your VST plugin installation in FL Studio 20, reaching out to the FL Studio community can be immensely helpful. The community is filled with experienced producers and FL Studio users who are always ready to lend a helping hand.

There are various ways to seek assistance from the FL Studio community. You can visit the official FL Studio forums, join online communities, or participate in social media groups focused on FL Studio 20. These platforms provide an opportunity to connect with like-minded individuals, share your installation issues, and gather valuable insights and solutions.

Remember, you are not alone in your journey to install VST plugins in FL Studio 20. By utilising the troubleshooting solutions presented here and seeking help from the vibrant FL Studio community, you will be well-equipped to overcome any issues that come your way and unlock the true potential of your music production.

How to Effortlessly Install VST Plugins in FL Studio 20


Credit: unison.audio


Frequently Asked Questions For How To Install Vst Plugins In Fl Studio 20


How Do I Install Vst Plugins In Fl Studio 20?


To install VST plugins in FL Studio 20, you need to navigate to the “Options” menu, select “Manage Plugins,” and click on “Start Scan. ” FL Studio will then scan for all available plugins and make them accessible in the browser.


From there, you can select and use the plugins in your projects.


Can I Use Third-party Vst Plugins In Fl Studio 20?


Absolutely! FL Studio 20 supports third-party VST plugins. To use them, you simply need to install the VST plugin in your system and follow the steps mentioned earlier to scan and access the plugin within FL Studio’s browser. This way, you can expand your sound library and explore endless creative possibilities.


What Are Vst Plugins And Why Are They Useful?


VST (Virtual Studio Technology) plugins are software instruments or effects that can be used within a digital audio workstation (DAW) like FL Studio 20. They allow musicians and producers to enhance their music production by adding virtual instruments, effects processors, and various sound manipulation tools.


VST plugins provide a wide range of sounds and effects, making your music production versatile and professional-sounding.


Conclusion


Installing VST plugins in FL Studio 20 is a straightforward process that can enhance your music production experience. By following the steps outlined in this guide, you can unlock a world of creative possibilities and access a wide range of high-quality virtual instruments and effects.


With these tips, you’ll be well-equipped to take your music to the next level.

Categories
Archive Audio Production

The One Trick Every Successful Singer And Rapper Does That Helps Their Songs Sound Better: Mastering Harmony

One trick every successful singer and rapper uses to enhance their songs is proper vocal training. This training helps improve their voice control, pitch accuracy, and overall performance quality.


By mastering vocal techniques such as breathing, resonance, and diction, artists can deliver powerful and emotive vocals that resonate with their audience. Successful singers and rappers also prioritize vocal health, ensuring longevity and consistency in their music careers. Investing time and effort in vocal training can significantly impact the quality and success of a song, making it an essential practice for any aspiring artist in the music industry.


The Importance Of Harmony

How Harmony Enhances Songs

Harmony is crucial in creating well-rounded, dynamic music that resonates with fans.

• Complementing Melodies: Harmony enriches melodies, creating depth and emotion.

• Filling Sound: Harmonies fill out the sound, making songs more engaging and captivating.

The Impact Of Harmony On The Listener

Listeners are subconsciously drawn to songs that incorporate harmony due to its powerful effects.

• Emotional Connection: Harmony evokes strong emotions, connecting listeners to the music.

• Memorability: Harmonious arrangements make songs more memorable and enjoyable to revisit.

The One Trick Every Successful Singer And Rapper Does That Helps Their Songs Sound Better: Mastering Harmony


Credit: soundbetter.com


The Role Of Harmony In Music Production

The Role of Harmony in Music Production

Creating Harmony In The Studio

Harmony in music production is vital for creating depth and richness in songs.

  • Artists must experiment with different vocal tones to find the perfect harmonies.
  • Using techniques like layering vocals can enhance the overall sound quality.

Using Harmony To Elevate Song Quality

Harmony isn’t just about singing the same notes; it’s about blending voices in perfect unison.

  1. Adding harmonies can evoke emotion and captivate listeners.
  2. It accentuates the melody, making the music more appealing.

Harmony Techniques For Singers And Rappers

When it comes to making music that stands out, harmony techniques for singers and rappers can make a significant difference. Developing vocal harmony skills and incorporating harmony into songwriting are the essential techniques that successful musicians use to enhance the quality of their songs.

Developing Vocal Harmony Skills

Developing vocal harmony skills is crucial for singers and rappers to create captivating melodies and arrangements. Mastering techniques such as layering and finding harmonies for different parts of a song can add depth and emotion to the music. These skills allow artists to create a rich and dynamic sound that resonates with their audience.

Incorporating Harmony Into Songwriting

Integrating harmony into songwriting is another crucial aspect of enhancing songs. By understanding chord progressions and melodic phrasing, singers and rappers can craft melodies that complement the harmonies in their music. This integration helps in creating cohesive and compelling compositions that elevate the overall quality of their work.

The Psychological Effect Of Harmony On Audiences

Successful singers and rappers understand the importance of the psychological effect of harmony on their audiences. By incorporating harmonies into their songs, these artists are able to create a deeper emotional connection with listeners, enhance the memorability of their music, and increase audience engagement. Let’s take a closer look at the specific ways in which harmony can have a profound impact on the way audiences perceive and connect with music.

Emotional Connection Through Harmony

Harmony has a powerful ability to evoke emotions and create a strong emotional connection between the listeners and the music. When harmonies are skillfully used within a song, they can elicit feelings of joy, nostalgia, or even sadness. By strategically incorporating harmonies that complement the main melody, singers and rappers can enhance the overall emotional experience of their music, resonating deeply with the audience on a subconscious level.

Harmony’s Influence On Memory And Engagement

Harmonies play a significant role in enhancing memory and increasing audience engagement with music. Research shows that when a song contains harmonies, the brain is stimulated in a way that facilitates memory consolidation. This means that listeners are more likely to remember and recall a song that includes harmonies compared to a song without. Furthermore, harmonies can help in engaging the audience by adding complexity and variety to the musical arrangements, keeping their attention captivated throughout the song.

Harmonies have a unique ability to create a sense of completeness and satisfaction within a song. When the right harmonies are introduced at the right moments, they can elevate the overall quality of the music and leave a lasting impression on the listeners. Successful singers and rappers understand this psychological effect of harmony and utilize it as a tool to enhance the impact of their songs, ensuring that their music resonates deeply with audiences and leaves a lasting impression.


Conclusion: Mastering Harmony For Musical Success


Mastering harmony is the one key that successful singers and rappers use to enhance the quality of their songs. Understanding how to harmonize effectively can elevate musical performance and breathe new life into compositions. This skill is a crucial element in achieving musical success.

In the world of music, harmony plays a crucial role in creating songs that truly resonate with listeners. From famous singers to aspiring rappers, successful artists understand the power of harmony and its ability to elevate their music to new heights. In this article, we explored how harmony is not just a key element in song creation, but also how it can be maximized to amplify impact and appeal. By honing their skills in creating harmonious melodies, singers and rappers can enhance their musical abilities and pave the way for long-term success.

Harmony As A Key Element In Song Creation

Harmony is more than just a combination of notes; it is the foundation upon which great music is built. Singers and rappers who prioritize harmony in their song creation process unlock the potential to create captivating melodies that resonate deeply with their audience. By blending different notes and chords in thoughtful ways, artists can create a harmonious tapestry of sound that complements their lyrics and emotions. This deliberate attention to harmony ensures that the song not only sounds cohesive but also evokes the desired emotions in the listener.

Maximizing Impact And Appeal Through Harmony

When singers and rappers master harmonizing techniques, they unlock the potential to maximize the impact and appeal of their songs. By incorporating harmonies strategically throughout their tracks, artists can create moments that are both musically and emotionally powerful. These harmonious elements can add depth and complexity, capturing the listener’s attention and leaving a lasting impression. By skillfully utilizing melodies and harmonies, singers and rappers can engage their audience on a deeper level and create music that resonates long after the final note fades away.

So, if you aspire to be a successful singer or rapper, learning to master harmony is a crucial step on your musical journey. Take the time to develop your skills in creating harmonious melodies, and you will undoubtedly enhance the overall sound and impact of your songs. Remember, harmony is not just about blending notes; it’s about creating a seamless and enchanting musical experience that captures the hearts of your listeners. Embrace the power of harmony, and watch your musical success soar to new heights.

The One Trick Every Successful Singer And Rapper Does That Helps Their Songs Sound Better: Mastering Harmony


Credit: blog.native-instruments.com


The One Trick Every Successful Singer And Rapper Does That Helps Their Songs Sound Better: Mastering Harmony


Credit: tim.blog


Frequently Asked Questions On The One Trick Every Successful Singer And Rapper Does That Helps Their Songs Sound Better


What Is The One Trick That Successful Singers And Rappers Use To Make Their Songs Sound Better?


Successful singers and rappers often use vocal warm-ups before recording or performing. These exercises help improve vocal range, tone, and control, resulting in better sounding songs.


Why Is It Important For Singers And Rappers To Warm Up Their Voices?


Warming up the voice helps prevent strain and injury while singing or rapping. It also helps improve vocal technique, breath control, and overall performance quality.


How Can Vocal Warm-ups Enhance The Sound Of A Song?


Vocal warm-ups increase vocal flexibility, allowing singers and rappers to hit high notes with ease and maintain consistent control and tone throughout a song. This enhances the overall sound and quality of their performance.


Are There Any Specific Vocal Warm-up Exercises That Singers And Rappers Should Do?


Singers and rappers can benefit from exercises such as lip trills, sirens, humming, and tongue twisters. These exercises focus on breath control, vocal resonance, articulation, and vocal range, contributing to better sounding songs.


Conclusion


Incorporating emotion into songwriting is crucial. Capturing the audience’s feeling and engaging them is key. Remember, authenticity is key when connecting with your audience. So, let your emotions shine through your music, and watch as your songs resonate with listeners on a deeper level.

Categories
Archive Audio Production

Mastering VST Plugins in Pro Tools

To use VST plugins in Pro Tools, first ensure they are compatible with the software version. Then, install the plugins following manufacturer instructions.


Are you a music producer looking to enhance your Pro Tools experience with VST plugins? Learning how to seamlessly integrate these powerful tools can take your productions to the next level. VST plugins offer a diverse range of effects and instruments to diversify your sound palette in Pro Tools.


Let’s explore the simple steps required to properly utilize VST plugins within the Pro Tools interface. By incorporating these plugins effectively, you can elevate your music production experience and achieve professional-quality results.

Mastering VST Plugins in Pro Tools: Unleash Your Music Production Potential


Credit: www.groove3.com


Choosing The Right Vst Plugins

Understanding Different Types Of Vst Plugins

When selecting VST plugins, it’s crucial to understand the various types available.

  • Instrument Plugins
  • Effect Plugins
  • Utility Plugins

Researching And Selecting The Best Vst Plugins

Before diving in, thorough research is essential to identify top-quality VST plugins.

  1. Read Reviews and User Feedback
  2. Consider Compatibility with Pro Tools
  3. Check for Demo Versions or Free Trials

Optimizing Vst Plugin Workflow In Pro Tools

Enhancing your efficiency when using VST plugins in Pro Tools can significantly boost your productivity. From organizing and categorizing your plugins to utilizing shortcuts and macros, optimizing your workflow is essential.

Organizing And Categorizing Plugins

  • Group similar plugins together for easy access.
  • Create folders based on instrument type or effect category.
  • Utilize color-coding for visual organization.
  • Regularly update and clean up your plugin library.

Utilizing Shortcuts And Macros For Efficient Workflow

  1. Learn essential Pro Tools keyboard shortcuts for quick navigation.
  2. Create custom macros for common plugin actions.
  3. Use batch commands to speed up repetitive tasks.
  4. Assign shortcuts to frequently used plugins for instant access.

Exploring Advanced Vst Plugin Techniques

When diving into the world of music production, understanding advanced VST plugin techniques can take your sound to the next level. In this guide, we’ll explore how to use VST plugins in Pro Tools to achieve professional and creative results. Let’s dive in and uncover the power of these techniques.

Understanding Signal Flow And Chain

Signal flow is the path that audio signals travel through a software or hardware setup. In Pro Tools, understanding the signal flow and chain of your VST plugins is crucial for achieving the desired audio effect.

Here’s a brief breakdown of the signal flow:

  • Input signal enters Pro Tools
  • Signal passes through the track’s inserts
  • Signal flows through the VST plugins in the specified order
  • Output signal exits Pro Tools

By comprehending the signal flow and chain, you can effectively manage the order of your VST plugins to achieve the desired audio processing and manipulation.

Utilizing Automation And Modulation For Creative Effects

Automation and modulation allow you to add dynamic movement and variation to your audio tracks. In Pro Tools, these advanced VST plugin techniques open the door to unparalleled creative possibilities.

Using automation, you can precisely control the parameters of your VST plugins over time, creating smooth transitions and evolving textures within your music. Moreover, harnessing modulation effects such as tremolo, chorus, and flanger can infuse your tracks with depth and character.

By incorporating automation and modulation into your workflow, you can elevate your productions and craft immersive sonic experiences for your listeners.

Mastering VST Plugins in Pro Tools: Unleash Your Music Production Potential


Credit: www.izotope.com


Troubleshooting Vst Plugin Issues In Pro Tools

Working with VST plugins in Pro Tools can greatly enhance your audio production process, allowing you to access a wide variety of sounds and effects. However, sometimes you may encounter issues that prevent the smooth operation of these plugins. In this section, we will discuss common troubleshooting techniques to help you resolve latency problems, as well as compatibility and stability issues with VST plugins in Pro Tools.

Identifying And Resolving Latency Problems

Latency can be frustrating when working with VST plugins in Pro Tools, as it can significantly affect the timing and synchronicity of your audio tracks. Fortunately, there are several strategies you can employ to identify and resolve latency issues:

  1. Check your buffer settings: Adjusting the buffer size in your Pro Tools preferences can help reduce latency. Larger buffer sizes can increase latency but improve stability, while smaller buffer sizes can reduce latency but may cause audio dropouts. Experiment with different buffer sizes to find the right balance for your needs.
  2. Utilize delay compensation: Pro Tools offers a delay compensation feature that automatically adjusts the timing of tracks to compensate for plugin-induced latency. Ensure that this feature is enabled, and Pro Tools will accurately align all your tracks, regardless of the latency introduced by VST plugins.
  3. Disable unnecessary plugins: If you’re experiencing excessive latency, check if you have any unnecessary plugins running in your session. Disabling or removing these plugins can help reduce latency and optimize performance.
  4. Monitor CPU usage: High CPU usage can contribute to latency issues. Keep an eye on your computer’s CPU meter in Pro Tools to identify any plugins or processes that may be causing excessive CPU usage. Consider freezing tracks or bouncing them to audio to alleviate the processing load.

Dealing With Compatibility And Stability Issues

Another common challenge when using VST plugins in Pro Tools is compatibility and stability issues. These can manifest as crashes, plugin errors, or even Pro Tools failing to load the plugins properly. Here are some troubleshooting steps to tackle these issues:

  1. Update plugins and Pro Tools: Ensure that both your VST plugins and Pro Tools software are up to date. Developers frequently release updates to address compatibility issues and bug fixes. Keeping your software current can help resolve any compatibility problems.
  2. Verify plugin compatibility: Double-check that the VST plugins you are using are compatible with your version of Pro Tools. Visit the plugin manufacturers’ websites or forums to confirm compatibility and find any specific instructions or workarounds.
  3. Isolate problematic plugins: If you experience crashes or errors, isolate the problematic plugin by systematically removing or disabling plugins one by one. This process can help you identify the culprit and find a solution.
  4. Reset Pro Tools preferences: Corrupted preferences can sometimes cause stability issues. Resetting your Pro Tools preferences can often rectify these problems. Consult Pro Tools documentation or online resources for instructions on how to perform a preferences reset.

By following these troubleshooting techniques, you can address common VST plugin issues and ensure a smoother workflow in Pro Tools. Identifying and resolving latency problems, as well as dealing with compatibility and stability issues, will help you make the most of the powerful VST plugins available for your audio production needs.


Maximizing Mixing And Mastering With Vst Plugins

Maximizing Mixing and Mastering with VST Plugins can take your Pro Tools sessions to a whole new level of professional sound. VST plugins offer a wide range of dynamic mixing and mastering tools that allow you to enhance and perfect your audio recordings. Whether you’re working on a music track, podcast, or audio for film and television, utilizing VST plugins in Pro Tools can help you achieve a polished and impactful sound.

Utilizing Vst Plugins For Dynamic Mixing

With VST plugins, you have the power to precisely control and shape the dynamics of your mix. From compressors and equalizers to reverbs and delays, VST plugins provide a toolbox of powerful processing tools that allow you to sculpt your mix in any way you desire.

One effective technique for dynamic mixing is using a VST plugin compressor. Compressors allow you to control the dynamic range of your audio, tightening up the peaks and boosting the quieter elements. By applying compression selectively, you can bring out the nuances in your mix, ensuring that every instrument and vocal has its rightful place in the sonic spectrum.

Another useful tool for dynamic mixing is an equalizer plugin. With an equalizer, you can shape the frequency response of individual tracks, making them fit together better in the mix. Whether it’s boosting the lows on a kick drum for extra punch or cutting the harsh frequencies of a vocal, using equalization can help you achieve a balanced and cohesive sound.

Mastering Techniques And Best Practices With Vst Plugins

When it comes to mastering, VST plugins become indispensable tools for adding that final touch of polish to your mix. While mixing focuses on individual tracks, mastering involves the overall enhancement and optimization of the entire mix, ensuring it sounds great across different playback systems.

One key technique in mastering is using a multiband compressor. This type of compressor allows you to control the dynamics of different frequency bands independently. By compressing the low, mid, and high frequencies separately, you can achieve greater clarity and balance in your final mix.

In addition to compression, a limiter is another crucial plugin in the mastering process. Limiters help prevent audio from exceeding a certain loudness threshold, ensuring that your mix sounds loud and punchy without distorting. They act as a safety net, catching any stray peaks and allowing you to increase the overall volume while maintaining the desired clarity and dynamics.

A great approach in mastering is to use a combination of EQ, compression, and other plugins to properly shape the overall sound of your mix. Each master may require different adjustments, and experimenting with different VST plugins and settings is crucial in achieving a professional and commercially competitive result.


Frequently Asked Questions On How To Use Vst Plugins In Pro Tools


Can I Use Vst Plugins In Pro Tools?


Yes, Pro Tools supports VST plugins. With the help of a VST wrapper, you can use your favorite VST plugins seamlessly in Pro Tools, enhancing the creative possibilities and expanding your sound palette.


How Can I Install Vst Plugins In Pro Tools?


To install VST plugins in Pro Tools, you’ll need a VST-to-RTAS adapter. After installing the adapter, simply place the VST plugin files in the designated plugin folder, and Pro Tools will recognize them. You can then access and use the plugins from the Pro Tools interface.


Are There Any Limitations When Using Vst Plugins In Pro Tools?


While Pro Tools supports VST plugins, it’s important to note that not all VST plugins may be compatible or optimized for Pro Tools. The performance and stability of VST plugins can vary, so it’s recommended to research and choose plugins that are known to work well with Pro Tools to avoid any issues or incompatibilities.


Conclusion


Using VST plugins in Pro Tools can greatly enhance your music production. By following the steps outlined in this guide, you can seamlessly integrate these powerful tools into your workflow. With the ability to access a wide range of sounds and effects, your creative potential is limitless.


Embrace the power of VST plugins and unlock new possibilities in your music projects.

Categories
Archive Audio Production

Unveiling the Secret: Where Are VST Plugins Stored on Windows?

VST plugins are stored in a specific folder on Windows, typically located in the “VSTPlugins” directory within the program files. These plugins are essential for enhancing audio production and creating unique sounds in music production or editing software.


VST plugins play a crucial role in enhancing audio quality and offering a wide range of effects and instruments for music creators. Understanding where VST plugins are stored on Windows is essential for easy access and integration into your preferred digital audio workstation (DAW).


By knowing the exact location of these plugins, you can seamlessly install and utilize them to elevate your music production workflow. In this guide, we will explore the storage location of VST plugins on Windows and how you can effectively manage and organize them for optimal performance and creativity in your projects.

Unveiling the Secret: Where Are VST Plugins Stored on Windows?


Credit: bedroomproducersblog.com


Locating Vst Plugins

When it comes to locating VST plugins on Windows, it’s essential to know where these plugins are stored on your system. This information ensures you can easily access and manage your plugins for seamless integration into your music production workflow.

Default Installation Folder

The default location where VST plugins are stored on Windows is in the Program Files folder.

Custom Installation Locations

If you have custom VST plugins, their installation locations can vary based on your preferences or the plugin developer’s instructions.

Unveiling the Secret: Where Are VST Plugins Stored on Windows?


Credit: www.producerspot.com


Managing Vst Plugins

Managing VST Plugins is essential for maintaining a streamlined workflow in your digital audio workstation (DAW).

Organizing Plugins In Daw

Arrange VST plugins in categorized folders within your DAW for easy access and navigation.

  • Create folders based on plugin type (e.g., EQ, compressor, reverb) for efficient organization.
  • Sort plugins alphabetically within each folder to quickly locate specific plugins.
  • Utilize color-coding or tagging features if supported by your DAW for visual organization.

Updating And Removing Plugins

Regularly update VST plugins to ensure compatibility and optimal performance in your DAW.

  1. Check for updates on the plugin developer’s website or through the plugin manager within your DAW.
  2. Remove unused or outdated plugins to declutter your plugin library and improve loading times.
  3. Disable plugins that are temporarily not needed rather than uninstalling them completely for future use.


Optimizing Plugin Performance

The performance of VST plugins on Windows can be optimized by streamlining the plugin folder structure and resolving plugin path issues. By organizing the plugin folders and ensuring the correct path, you can improve the efficiency and functionality of your VST plugins.

Streamlining Plugin Folder Structure

Organizing the plugin folders in a structured manner can significantly enhance the performance of VST plugins. By creating separate folders for different plugin types such as instruments, effects, and utilities, you can easily locate and manage the plugins. This also helps in optimizing the loading time and reduces the strain on system resources when loading plugins in your DAW.

Resolving Plugin Path Issues

Ensuring that the plugin paths are correctly set is crucial for optimizing plugin performance. Incorrect path configurations can lead to plugins not being located or loaded properly, resulting in performance issues. By verifying and correcting the plugin paths in your DAW settings, you can prevent any potential disruptions and ensure smooth operation of the VST plugins.

Unveiling the Secret: Where Are VST Plugins Stored on Windows?


Credit: m.facebook.com


Frequently Asked Questions Of Where Are Vst Plugins Stored On Windows


Where Are Vst Plugins Stored On Windows?


VST plugins are typically stored in a specific folder on your Windows computer. The location can vary depending on the software you’re using, but common locations include the VSTPlugins folder within your DAW’s installation directory or a dedicated VST folder within the Program Files directory.


Check your software’s documentation for the exact location.


How Do I Find The Vst Folder On Windows?


To find the VST folder on Windows, open your digital audio workstation (DAW) software and go to the preferences or settings menu. Look for the “Plugins” or “VST” section, where you will likely find the path to the VST folder.


Alternatively, you can search for “VST folder” in the search bar of your computer’s file explorer.


Can I Change The Default Vst Plugin Folder Location On Windows?


Yes, you can change the default VST plugin folder location on Windows. Most DAW software allows you to specify a custom folder for VST plugins. In the preferences or settings menu, look for the “Plugins” or “VST” section, and there should be an option to change the folder location.


This can be useful if you want to keep your plugins organized or if you have limited storage space on your system drive.


How Do I Install Vst Plugins On Windows?


To install VST plugins on Windows, first, download the plugin files from the developer’s website. Then, navigate to the VST folder on your computer. Copy the plugin files (typically. dll files) into the VST folder. Finally, open your DAW software and scan for new plugins.


The newly installed VST plugins should appear in your DAW’s plugin list.


Conclusion


Knowing the storage location of VST plugins on Windows is essential for seamless music production. With a solid understanding of where these plugins are stored, you can easily manage and access them. Make sure to keep your VST plugins organized to streamline your workflow and enhance your creative process.

Categories
Archive Audio Production

How To Prepare Songs For Mastering: Expert Tips for Perfect Audio Quality

To prepare songs for mastering, ensure they are properly mixed and organized for optimal sound quality. Use high-quality audio files and properly label tracks to streamline the process.


Mastering is a crucial step in the music production process, enhancing the overall sound and ensuring consistency across tracks. By following these steps, you can ensure your songs are ready for mastering, resulting in a polished and professional end product that resonates with your audience.


Let’s explore the essential tips and techniques for preparing your songs for mastering to achieve the best possible quality and impact.


Choosing The Right Format

Choosing the Right Format is crucial in preparing songs for mastering. Let’s discuss the importance of selecting the optimal format for your audio files.

Selecting Lossless Formats

Choose lossless formats like WAV or FLAC for high-quality audio without compression artifacts.

  • WAV and FLAC maintain audio fidelity during the mastering process.
  • Lossless formats preserve the original recording quality.

Avoiding Lossy Compression

Avoid lossy compression formats such as MP3 or AAC to prevent data loss.

  1. Lossy compression reduces audio quality through data compression.
  2. Opt for lossless formats to retain the nuances of your music.
How To Prepare Songs For Mastering: Expert Tips for Perfect Audio Quality


Credit: blog.groover.co


Organizing Tracks And Files


Prepare songs for mastering by organizing tracks and files meticulously. Ensure each audio file is properly named and labeled for easy navigation. Arrange tracks logically, keeping instrumental, vocal, and effects separated. This streamlined approach will streamline the mastering process and yield a polished end result.

“` Organizing Tracks and Files File Naming and Metadata Consistent File Structure “` As you prepare your songs for mastering, effective organizing of tracks and files is crucial. Your files need to be structured and labeled systematically for a smooth mastering process. File Naming and Metadata can make a significant difference in how your mastering engineer interacts with your tracks. Ensure each file is correctly named with track titles and numbers for easy identification. Maintaining a consistent file structure across all tracks helps in streamlining the mastering process. Create a clear hierarchy with folders for each song, including stems, mixes, and any reference materials. In the table below, see an example of a structured file arrangement for mastering: | Root Folder | |:———–:| | Song 1 | | – Stems | | – Mixes | | – References| Adhering to a systematic file organization approach facilitates efficient communication between you and your mastering engineer. This enables a seamless workflow and ensures that nothing gets lost in the process.

https://www.youtube.com/watch?v=QiBmQuz9yr4


Cleaning Up Audio Tracks

Sure, here is the HTML-formatted content for the “Cleaning Up Audio Tracks” blog post section. “`html

Before sending your songs for mastering, it’s crucial to clean up the audio tracks to ensure the final output is of the highest quality. This process involves addressing issues such as unwanted noise and clipping, which can greatly affect the overall sound.

Removing Unwanted Noise

Unwanted noise can detract from the clarity and impact of your music. Identify and eliminate background noise, hums, hisses, or any other unwanted sounds that might have been captured during recording. Utilize noise reduction tools and plugins to clean up the audio tracks effectively.

Addressing Clipping Issues

Clipping occurs when the audio signal exceeds the maximum level, resulting in distortion. Carefully examine the audio waveform for any signs of clipping and take measures to address these issues. Use a limiter or gain automation to prevent clipping and ensure a balanced overall volume throughout your tracks.

Balancing Levels And Panning

When it comes to preparing songs for mastering, one of the crucial steps is balancing levels and panning. This ensures that each element in the mix is properly mixed and positioned to create a cohesive and balanced sound. In this section, we will explore two key aspects of this process: setting proper levels and adjusting stereo spread.

Setting Proper Levels

Setting proper levels is essential to achieve a well-balanced mix. It involves controlling the volume of each individual track to ensure that no element is too loud or too soft. Here’s a step-by-step guide to help you set the levels:

  1. Start by soloing each track one by one and adjust the volume so that it sits comfortably within the mix.
  2. Listen to the individual tracks in the context of the entire song, making sure that no track overpowers the rest.
  3. Use your ears and pay attention to any inconsistencies or imbalance in the mix. This could be an instrument that stands out too much or vocals that get lost.
  4. Make subtle adjustments to the levels of each track until you achieve a cohesive and balanced mix.

Adjusting Stereo Spread

Another important aspect of balancing levels and panning is adjusting the stereo spread. This refers to the placement of instruments across the stereo field, creating a sense of width and depth in the mix. Here are some tips to help you optimize the stereo spread:

  • Start by panning instruments that naturally exist in stereo, such as guitars or keyboards. This creates a sense of width.
  • Avoid hard panning unless you intentionally want to create extreme stereo effects. Instead, aim for a balanced spread that allows the elements to sit well together.
  • Consider the frequency range of each instrument. For example, low-frequency instruments like bass and kick drums generally sound better when placed centrally, while high-frequency instruments can be panned wider.
  • Regularly listen to the mix in mono to ensure that important elements remain audible even when the audio is played through mono playback systems.

Overall, balancing levels and panning is crucial in ensuring that your songs are ready for mastering. By setting proper levels and adjusting the stereo spread, you can achieve a well-balanced mix that enhances the impact and clarity of your music.

Utilizing Reference Tracks


When preparing songs for mastering, utilizing reference tracks can help ensure the desired sound consistency and quality throughout the process. By comparing your mix to professionally mastered tracks, you can identify areas for improvement and achieve a polished final product.

Utilizing Reference Tracks: Comparing with Professional Masters: When it comes to preparing songs for mastering, utilizing reference tracks is an essential step that can greatly enhance the quality and impact of your music. Reference tracks are professionally mastered songs in the same genre or style as your own music, serving as a benchmark for how your final mix should sound. By carefully analyzing and comparing your mix with a reference track, you can identify areas that need improvement and make necessary adjustments to achieve a professional and polished sound. Analyzing Frequency Balance: One important aspect to consider when comparing your mix with a professional master is the frequency balance. Frequency balance refers to the distribution of different frequencies across the audio spectrum. Having a well-balanced mix ensures that each element of the song can be heard clearly and that no frequency range dominates or is lacking. Analyzing the frequency balance in your reference track can guide you in achieving a similar balance in your own mix. To analyze the frequency balance, use a spectrum analyzer plugin or software, which displays the level of each frequency in your mix. Compare this with the spectrum of the reference track to identify any discrepancies. Pay close attention to the bass, midrange, and high frequencies, ensuring that each frequency range is well-defined and not overpowering or lacking in presence. Make note of any adjustments needed to achieve a similar balance. Where possible, use a high-quality pair of monitor headphones or studio speakers to accurately assess the frequency balance. Listening on different playback devices can also help identify any issues that might not be apparent on a specific device. Ordering the H3 headings with HTML syntax:

Comparing With Professional Masters

Analyzing Frequency Balance

How To Prepare Songs For Mastering: Expert Tips for Perfect Audio Quality


Credit: www.nytimes.com


Frequently Asked Questions Of How To Prepare Songs For Mastering


How Do I Prepare Songs For Mastering?


To prepare songs for mastering, ensure they are properly mixed, have consistent levels, and are free of any unwanted noises or artifacts. Clean up any hiss, clicks, or pops. Make sure all tracks are properly labeled and organized. Export your tracks in the highest quality format possible, like WAV or AIFF.


Should I Normalize My Songs Before Mastering?


Normalizing your songs before mastering is not necessary. The mastering engineer will optimize your tracks to achieve the best overall sound and volume. However, if you have any extremely quiet or loud sections in your song, it can be helpful to normalize those specific areas to avoid any potential issues.


Can I Master My Own Songs?


While it is possible to master your own songs, it is recommended to hire a professional mastering engineer. They have the expertise, specialized equipment, and trained ears to enhance the sound quality of your songs and ensure they translate well across different playback systems.


A mastering engineer can provide an objective perspective and bring out the best in your music.


What Is The Purpose Of Mastering In Music Production?


The purpose of mastering is to optimize the overall sonic characteristics of a song or album. It involves enhancing the sound quality, balancing the levels, adjusting the frequency response, and adding final touches like compression and EQ. Mastering also ensures the songs are consistent in volume and sound coherent when played together as a collection.


Conclusion


Preparing your songs for mastering is an essential step in achieving high-quality audio. By following the steps outlined in this post, you can ensure that your songs are optimized for the mastering process, resulting in professional and polished sound. By understanding the importance of proper preparation, you can make the most out of your mastering experience and elevate the quality of your music.

Categories
Archive Audio Production

Unlock Limitless Creativity: Use VST Plugins in Garageband Today!

Yes, you can use VST plugins in Garageband to enhance your music production capabilities. Integrating VST plugins in Garageband allows you to access a wide range of additional sound effects and instruments to create high-quality tracks.


By utilizing VST plugins, you can customize your music productions with various effects and instruments that may not be available within Garageband’s native features. This flexibility gives you the opportunity to explore new sounds and experiment with different effects, ultimately enhancing the overall quality of your music compositions.


Adapting VST plugins into Garageband can significantly expand your creative possibilities and take your music production to the next level.

Unlock Limitless Creativity: Use VST Plugins in Garageband Today!


Credit: www.uvi.net


Exploring Vst Plugins


Explore VST plugins in Garageband to enhance your music production. With a wide range of VST plugins available, seamlessly integrate them into Garageband for an enriched sound experience. Elevate your creativity and customize your music with the flexibility of using VST plugins within Garageband.

What Are Vst Plugins?

VST plugins are small software programs that are used to add various effects and instruments to digital audio workstations like Garageband.

How Vst Plugins Enhance Creativity

VST plugins provide a wide range of sounds and effects, allowing users to experiment and enhance their music production in Garageband.

Setting Up Vst Plugins In Garageband


Discover how to integrate VST plugins seamlessly into Garageband for a more dynamic music production experience. Easily enhance your tracks with a wide range of third-party effects and instruments to unlock endless creative possibilities. Master the art of setting up VST plugins in Garageband to elevate your sound effortlessly.

Understanding Compatibility

Garageband accepts AU plugins natively, not VST. To utilize VST plugins, a VST to AU adapter is needed.

Not all VST plugins might work seamlessly in Garageband due to compatibility issues.

Installing Vst Plugins

  1. Download and Install VST to AU adapter software.
  2. Locate the VST plugins folder on your system.
  3. Run the VST to AU adapter and point it to the VST folder.
  4. Load your desired VST plugin in Garageband.

Remember, even though Garageband was not designed for VST compatibility., there are workarounds to make it possible.

Top Vst Plugins For Garageband

Are you wondering if you can enhance your Garageband experience with VST plugins? Well, the good news is, you definitely can! Incorporating VST plugins into Garageband can take your music production to a whole new level. Whether you are looking for creative effect plugins or instrument plugins, there are plenty of options to explore. Let’s delve into some of the top VST plugins that you can seamlessly integrate into your Garageband setup.

Creative Effect Plugins

When it comes to spicing up your tracks with unique effects, creative effect plugins certainly come in handy. From adding a touch of reverb to producing futuristic sounds, these plugins offer endless possibilities. Some top choices include:

  • ValhallaRoom
  • Soundtoys Effect Rack
  • FabFilter Saturn

Instrument Plugins

For those seeking to enrich their musical compositions with a wide range of virtual instruments, instrument plugins can significantly expand your sonic palette. Here are some notable instrument plugins:

  1. Native Instruments Kontakt
  2. Xfer Records Serum
  3. Spectrasonics Omnisphere

Unlock Limitless Creativity: Use VST Plugins in Garageband Today!


Credit: blackoctopus-sound.com


Harnessing The Power Of Vst Plugins


Unlock the potential of VST plugins with GarageBand and elevate your music production. Incorporate third-party plugins seamlessly for enhanced creativity and customization. Experiment, mix, and master your tracks with the vast array of VST options available.

Experimenting With Sound

One of the most exciting aspects of using VST plugins in Garageband is the ability to experiment with sound like never before. These plugins open up a world of possibilities, allowing you to create unique and professional-sounding tracks with just a few clicks. Whether you’re a seasoned music producer or a beginner, VST plugins give you the power to transform your music and take it to the next level.

By adding VST plugins to your Garageband setup, you can access a vast library of virtual instruments, effects, and audio processing tools. Want to add a realistic drum kit to your song? There’s a VST plugin for that. Need a soaring synth lead or a funky bassline? You can find a plugin that perfectly fits the sound you’re after. With so many options at your fingertips, you can let your creativity run wild and experiment with different sounds to find your unique musical style.

Customizing Your Musical Style

When it comes to personalizing your musical style, VST plugins are a game-changer. These plugins offer an incredible range of customization options, allowing you to tailor your sound to suit your artistic vision. Whether you prefer a clean and polished sound or a gritty and distorted one, VST plugins can help you achieve the exact sound you’re looking for.

With the ability to adjust parameters like EQ, compression, reverb, and more, you have complete control over every aspect of your sound. You can fine-tune the tone, shape the dynamics, and add spatial effects to create a sound that is uniquely yours. The flexibility of these plugins allows you to explore different genres and musical styles effortlessly. Whether you’re into pop, rock, hip-hop, or electronic music, VST plugins can help you achieve the specific sounds you need to make your tracks stand out.

https://www.youtube.com/watch?v=AyrjkNkgft4


Overcoming Common Challenges

Can You Use VST Plugins in Garageband? Absolutely! However, like any creative endeavor, there can be challenges along the way. In this section, we will discuss the most common challenges users may face and how to overcome them.

Optimizing Performance

Optimizing performance is crucial for a smooth experience while using VST plugins in Garageband. Here are a few tips to ensure your Garageband session remains snappy:

  1. Keep your plugins and software updated regularly. Developers often release updates that contain performance optimizations and bug fixes.
  2. Limit the number of plugins you use in your project. While it can be tempting to layer multiple effects, using too many plugins can strain your computer’s resources and lead to lagging or crashes.
  3. Close any unnecessary applications running in the background. This will free up more processing power for Garageband and your VST plugins.

Dealing With Latency Issues

Latency, or the delay between when you play a note and when you hear the sound, can be frustrating when using VST plugins. Here’s how to address latency issues in Garageband:

  • Adjust the buffer size in Garageband’s audio preferences. Decreasing the buffer size can reduce latency but may require more processing power.
  • Consider using a dedicated audio interface. This hardware can help minimize latency by processing audio outside of your computer.
  • Disable any unnecessary audio processing effects or plugins while recording. This can reduce the strain on your computer and decrease latency.

By implementing these suggestions, you can optimize the performance of your VST plugins, ensuring a seamless experience in Garageband. Don’t let common challenges hinder your creativity, overcome them and get back to making incredible music!

Unlock Limitless Creativity: Use VST Plugins in Garageband Today!


Credit: www.loopazon.com


Frequently Asked Questions Of Can You Use Vst Plugins In Garageband


Can You Use Vst Plugins In Garageband?


Yes, you can use VST plugins in GarageBand. However, GarageBand only supports AU (Audio Units) plugins by default. To use VST plugins, you will need to use a plugin host application such as Carla or jBridge to bridge the VST plugins to GarageBand.


How Do I Install Vst Plugins In Garageband?


To install VST plugins in GarageBand, you will need to use a plugin host application such as Carla or jBridge. Once you’ve installed the plugin host, you can then install VST plugins by following the instructions provided by the plugin developer.


After installation, the VST plugins should be available in GarageBand for you to use.


What Are The Benefits Of Using Vst Plugins In Garageband?


Using VST plugins in GarageBand opens up a world of possibilities for your music production. VST plugins offer a wide range of effects, virtual instruments, and sound processing capabilities that can enhance your tracks. With VST plugins, you can achieve professional-level sound in your GarageBand projects.


Are Vst Plugins Free To Use In Garageband?


Some VST plugins are available for free, while others may require a purchase. There are many websites where you can find both free and premium VST plugins to use in GarageBand. It’s important to read the licensing and usage terms of each plugin before using them in your projects to ensure compliance with the developers’ requirements.


Conclusion


Using Vst plugins in Garageband opens up a world of possibilities for music production. With the right tools and knowledge, you can enhance your creativity and produce professional-quality tracks. The flexibility and versatility of Vst plugins make them a valuable addition to any musician’s toolkit.


Start exploring and experimenting with Vst plugins in Garageband to elevate your music production experience.