Categories
Archive Audio Production

Strategies For Booking And Promoting Your Own Gigs: Unleash Your Gigging Potential

To book and promote gigs effectively, utilize social media, build relationships with venues, and create a professional press kit. When booking gigs, focus on networking, sending out press releases, and leveraging online platforms like GigSalad.


As an independent artist or band, booking and promoting your own gigs can be a challenging but vital aspect of growing your fan base and establishing a presence in the music industry. By implementing strategic approaches such as leveraging social media, engaging with local venues, and showcasing your work through a professional press kit, you can increase your chances of securing gigs and reaching a wider audience.


In this guide, we will explore some key strategies that can help you effectively book and promote your own gigs to advance your music career.


The Importance Of Booking And Promoting Your Own Gigs

The Importance of Booking and Promoting Your Own Gigs:

Booking and promoting your own gigs is crucial for musicians and bands to gain exposure, build their fan base, and establish a successful music career.

Creating Opportunities

  • Don’t wait for opportunities to come to you – create them by actively seeking gigs and events to perform at.
  • Reaching out to venues, event organizers, and festivals can help you secure more performance opportunities.

Building Your Brand

  1. Establishing a distinctive brand identity through consistent promotion can help you stand out in the competitive music industry.
  2. Utilize social media, websites, and promotional materials to showcase your unique style and connect with your audience.

By taking control of your booking and promotion process, you can proactively grow your music career and reach a wider audience.


Credit: www.amazon.com


Understanding The Gigging Landscape

Researching Venues and Events: Scout venues and events for suitability and audience alignment.

Understanding Audience Demographics: Analyze the audience profiles for effective gig promotion.

https://www.youtube.com/watch?v=JApVs5bqUvU


Developing A Gig-worthy Performance

Creating a performance that captivates your audience is crucial for booking and promoting your gigs. To stand out in a competitive industry, crafting a captivating setlist and enhancing stage presence are essential. These strategies will differentiate you from other acts and leave a lasting impression on your audience.

Crafting A Captivating Setlist

Create a setlist that engages the audience from start to finish. Incorporate a mix of popular covers and original songs to keep the energy high. Strategic song placement can build momentum and maintain interest throughout the performance. Additionally, consider the flow of the setlist to ensure a seamless transition between songs, enhancing the overall experience for the audience.

Enhancing Stage Presence

Stage presence is a vital component of a memorable performance. Engage with the audience and exude confidence to create a connection. Utilize body language and movement to command attention. Moreover, embrace authenticity to establish a genuine connection with the audience, leaving a lasting impression.

Effective Promotion Strategies

When it comes to booking and promoting your own gigs, effective promotion strategies can make a world of difference. These strategies will help you reach your target audience and ensure maximum attendance at your events. In this section, we will explore two key strategies: Utilizing Social Media and Collaborating with Local Influencers.

Utilizing Social Media

Utilizing social media is one of the most powerful promotion strategies in today’s digital age. With billions of active users, platforms like Facebook, Instagram, Twitter, and LinkedIn offer tremendous opportunities to connect with your audience.

Here are some practical tips to make the most of your social media presence:

  • Create a professional and engaging profile with high-quality images and an enticing bio.
  • Identify the platforms where your target audience is most active and focus your efforts on those channels.
  • Regularly post engaging content that showcases your gigs, such as sneak peeks of rehearsals or behind-the-scenes footage.
  • Use relevant hashtags to increase visibility and reach a wider audience.
  • Interact with your followers by responding to comments, messages, and mentions in a timely manner.
  • Collaborate with other artists or bands through cross-promotion, sharing each other’s content to expand your reach.

Collaborating With Local Influencers

Collaborating with local influencers can significantly boost your gig promotions by leveraging their existing fanbase and credibility within the community. These influencers can be bloggers, vloggers, social media personalities, or even local radio DJs.

Here’s how you can effectively collaborate with local influencers:

  1. Identify relevant local influencers who resonate with your target audience and have a genuine interest in your music genre.
  2. Reach out to them with a personalized and compelling message, explaining how collaborating with you can benefit them.
  3. Offer them exclusive access to your gigs, backstage passes, or even the opportunity to interview you, in exchange for promotion on their platforms.
  4. Provide them with high-quality promotional materials such as professional photos, videos, or sneak peeks to make their content more engaging.
  5. Encourage them to share their experience with their followers, whether through blog posts, social media posts, or live streaming.
  6. Monitor the results and engage with their audience by responding to comments or messages, building a positive relationship and expanding your own fan base.

By implementing these effective promotion strategies, you can ensure that your gigs receive the attention they deserve. Remember, consistency and engagement are key to building a loyal fan base and attracting new attendees to your future events.

Navigating The Booking Process

Booking and promoting your own gigs can be an exciting and rewarding experience as a musician or performer. However, it’s important to have a solid strategy in place to ensure you secure the best opportunities and make the most out of your live performances. In this section, we will explore two key aspects of the booking process: building relationships with venue managers and negotiating performance agreements.

When it comes to booking gigs, developing strong relationships with venue managers is crucial. These professionals are your gateway to being able to showcase your talent to a wider audience. Here are a few strategies to help you build these valuable connections:

1. Do your research: Before reaching out to a venue, take the time to research and understand their target audience and musical preferences. This will allow you to tailor your pitch to their specific needs and increase your chances of securing a booking.

2. Attend local events: Show support for the local music scene by attending other performances at the venues you’re interested in. This not only shows your genuine interest but also gives you an opportunity to network with venue managers and fellow musicians.

3. Be professional and proactive: When contacting venue managers, make sure to present yourself professionally. Provide them with a well-crafted electronic press kit (EPK), including your bio, music samples, and any past performances or press coverage. Also, follow up promptly and consistently to show your dedication.

Negotiating performance agreements is an important part of the booking process. Here are some key factors to consider:

1. Define your requirements: Before entering into negotiations, clearly define your performance requirements, including the date, duration, setlist, and compensation expectations. Being prepared will help you confidently communicate your needs.

2. Discuss logistics: In addition to the performance details, discuss logistical aspects such as sound equipment, lighting, and stage set-up. Make sure both parties are on the same page to avoid any last-minute surprises.

3. Protect yourself with a contract: A written contract is essential to protect both parties involved. Include clauses covering cancellation policies, payment terms, and any other specific agreements made. Consult with a legal professional to ensure your contract is comprehensive and legally binding.

In conclusion, successfully navigating the booking process requires building strong relationships with venue managers and negotiating performance agreements effectively. By adopting these strategies and being proactive in your approach, you can increase your chances of booking and promoting successful gigs.

Strategies For Booking And Promoting Your Own Gigs: Unleash Your Gigging Potential


Credit: issuu.com


Strategies For Booking And Promoting Your Own Gigs: Unleash Your Gigging Potential


Credit: m.facebook.com


Frequently Asked Questions Of Strategies For Booking And Promoting Your Own Gigs


What Are Some Effective Strategies For Booking Your Own Gigs?


– Utilize social media platforms to create buzz and connect with potential venues and fans. – Build a solid online presence by having a professional website with a booking contact form. – Collaborate with local musicians and bands to host joint gigs and reach a wider audience.


How Can I Promote My Own Gigs Successfully?


– Leverage email marketing to keep your fans updated about upcoming gigs. – Create captivating posters and flyers to distribute in your local community. – Partner with local influencers and bloggers to help spread the word about your gigs.


Is It Necessary To Have A Press Kit When Booking Gigs?


– Yes, having a well-crafted press kit with your bio, high-quality photos, and samples of your music is crucial. – It helps venues understand your brand and style, increasing your chances of getting booked. – Include testimonials and reviews from previous gigs to showcase your professionalism and talent.


How Can I Negotiate Better Deals For My Gigs?


– Research the market and understand typical gig fees in your area to set realistic expectations. – Highlight your unique selling points and explain the added value you bring to venues. – Offer flexible dates and times, which can sometimes lead to better negotiations and higher fees.


Conclusion


Incorporating these strategies into your gig booking and promotion efforts can help elevate your career in the music industry. By adopting a proactive approach, leveraging online and offline channels, and building strong relationships, you can increase your visibility and attract larger audiences to your gigs.


Implement these tactics to boost your bookings and enhance the success of your performances.
Categories
Archive Audio Production

Master the Trick to Exporting Individual Tracks in Audacity for Flawless Mixing

To export individual tracks in Audacity for mixing, simply select the desired track and use the Export Audio feature. This allows you to save the track as a separate file for further editing or mixing.


Are you ready to take your audio editing skills to the next level? Audacity provides a user-friendly platform for creating and editing audio tracks. One essential feature is the ability to export individual tracks, which can be helpful for mixing multiple audio files seamlessly.


In this guide, we will walk you through the process of exporting individual tracks in Audacity, empowering you to enhance your audio projects effortlessly. Let’s dive into the steps to efficiently export your tracks in Audacity for a seamless mixing experience.


The Importance Of Exporting Individual Tracks

The Importance of Exporting Individual Tracks:

In Audacity, exporting individual tracks is crucial for achieving clarity in sound production.

Achieving Clarity And Quality

Exporting individual tracks enhances clarity and enables better mixing techniques.

Facilitating Precise Mixing

Exported tracks aid in precise mixing by allowing manipulation of each element separately.

Preparing Tracks For Export


To export individual tracks in Audacity for mixing, prepare your audio tracks by carefully labeling and organizing them. Ensure each track is properly balanced and edited for clarity before exporting. This step will help streamline the mixing process and ensure a smoother workflow when working with your audio files in Audacity.

Cleaning Up And Organizing

Before exporting, clean and organize each track to ensure clarity.

Adjusting Levels And Effects

Make sure to balance the levels and apply effects for a polished sound.

Exporting Individual Tracks In Audacity

When it comes to audio editing and mixing, exporting individual tracks in Audacity can be a crucial step in getting the perfect sound. By exporting each track separately, you can have more control over the mixing process and make adjustments to individual elements of your project. In this section, we’ll explore how to export individual tracks in Audacity for efficient and precise mixing.

Selecting And Soloing Tracks

To export individual tracks in Audacity, start by selecting the specific track you want to export. You can do this by clicking on the track name or using the selection tool to highlight the portion of the track you want to export. Additionally, you can solo the track to isolate it from the rest of the project, ensuring that only the desired audio is exported.

Using The Export Option

Once you have selected and soloed the track you want to export, navigate to the “File” menu and click on “Export” to access the export options. From here, you can choose the desired file format, such as WAV or MP3, and adjust the export settings to meet your specific requirements. Finally, click “Export” to save the individual track to your desired location.

Master the Trick to Exporting Individual Tracks in Audacity for Flawless Mixing


Credit: manual.audacityteam.org


Organizing Exported Tracks For Mixing

When it comes to mixing audio tracks in Audacity, organizing exported tracks is essential to ensure a smooth and efficient process. By creating a dedicated folder and properly naming and labeling tracks, you can easily navigate through your project and maintain a clear overview of your audio files. In this article, we will explore the trick to exporting individual tracks in Audacity and focus on the subheading: Organizing Exported Tracks for Mixing.

Creating A Dedicated Folder

To begin organizing your exported tracks, it’s important to create a dedicated folder for your project. This ensures that all your audio files are stored in one central location, making it easy to find and access them whenever needed. Additionally, having a dedicated folder helps to keep your project files organized and reduces the chances of accidentally deleting or misplacing important tracks. Here’s how you can create a dedicated folder for your Audacity project:

  1. Open File Explorer or Finder on your computer.
  2. Navigate to the location where you want to create the folder.
  3. Right-click (or Control-click on Mac) and select “New Folder” from the context menu.
  4. Give the folder a descriptive name, such as “Audacity Project,” or name it according to the specific project you’re working on.

Creating a dedicated folder ensures that all your exported tracks are stored in one place, simplifying the process of managing your audio files.

Naming And Labeling Tracks

To maintain a clear overview of your exported tracks, it’s crucial to properly name and label each track. This allows you to identify and distinguish between different audio files, making it easier to navigate through your project and locate specific tracks when needed. Here are some tips for naming and labeling your tracks effectively:

  • Use descriptive names: When naming your tracks, be specific about the content or instrument they represent. For example, instead of naming a track “Track 1,” consider something like “Lead Guitar” or “Vocal Harmony.”
  • Add numbers or letters for organization: If your project includes multiple tracks of the same instrument or content, numbering or using letters can help you differentiate between them. For instance, “Lead Guitar 1” and “Lead Guitar 2.”
  • Apply color coding: Many digital audio workstations, including Audacity, allow you to assign colors to individual tracks. Utilize this feature to visually group similar tracks together or differentiate between different sections of your project.
  • Add markers or labels: To mark important sections or specific points in your tracks, consider using markers or labels within Audacity. This can be useful for highlighting key moments or indicating sections that require further editing or adjustments.

By following these practices, you can effectively name and label your tracks, ensuring a well-organized and streamlined workflow during the mixing process in Audacity.

Ensuring Seamless Integration

When it comes to exporting individual tracks in Audacity for mixing, ensuring seamless integration is crucial to achieve professional-quality results. By maintaining consistency in settings and checking for compatibility, you can seamlessly combine and mix your tracks without any issues. In this article, we will explore these essential steps to ensure that your exported tracks integrate seamlessly.

Maintaining Consistency In Settings

Consistency is key when it comes to exporting individual tracks in Audacity. By maintaining consistent settings throughout your project, you can avoid any discrepancies or inconsistencies that may occur during the exporting process. Here’s how you can do it:

  1. Start by setting the appropriate sample rate and bit depth for your project. These settings should be consistent for all the tracks you plan to export.
  2. Ensure that the track gain and pan settings are uniform across all your tracks to maintain a balanced mix.
  3. Double-check the positioning and alignment of each track to avoid any unintended shifts in the final mix.
  4. Make sure to apply any necessary effects or editing to your tracks consistently before exporting.

Checking For Compatibility

Compatibility is vital to ensure that your exported tracks can seamlessly integrate into your mixing process. Here are a few steps you can take to check for compatibility:

  1. Verify that all the plugins and effects used in your project are compatible with the version of Audacity you are working with. Incompatible plugins can cause issues when exporting individual tracks.
  2. Check the file format of your exported tracks to match the desired format for your mixing software or platform. This will ensure that the tracks can be easily imported without any conversion problems.
  3. Test the compatibility of your exported tracks by loading them into your mixing software and listening for any anomalies or glitches. This step will help you identify and resolve any compatibility issues before the final mix.

By following these steps to maintain consistency in settings and checking for compatibility, you can export individual tracks in Audacity and seamlessly integrate them into your mixing process. This will ultimately result in a polished and professional-sounding final mix.

Master the Trick to Exporting Individual Tracks in Audacity for Flawless Mixing


Credit: www.magix.com


Master the Trick to Exporting Individual Tracks in Audacity for Flawless Mixing


Credit: www.amazon.com


Frequently Asked Questions Of Trick To Exporting Individual Tracks In Audacity For Mixing


How Do I Export Individual Tracks In Audacity For Mixing?


To export individual tracks in Audacity for mixing, you can use the “Export Multiple” feature. This allows you to select the tracks you want to export and specify the desired file format and settings. By exporting each track separately, you can then import them into another audio editing software for mixing.


Can I Export Tracks From Audacity As Separate Files?


Yes, you can export tracks from Audacity as separate files. By using the “Export Multiple” feature, you have the option to export each track individually. This allows you to save each track as a separate file, which can be helpful for mixing, editing, or sharing purposes.


What Is The Benefit Of Exporting Individual Tracks In Audacity?


Exporting individual tracks in Audacity has several benefits. Firstly, it allows you to work on each track separately in other audio editing software, enabling more precise mixing and editing. Secondly, it gives you the flexibility to use specific tracks for different purposes, such as creating a separate audio file for vocals or instruments.


Conclusion


To sum up, utilizing Audacity for exporting individual tracks can greatly enhance the quality of your mixing process. By following the steps outlined in this blog post, you can streamline your workflow and achieve a professional sound. Understanding this trick will enable you to take your audio production to the next level.


https://www.youtube.com/watch?v=APBxbeXLcWY


Categories
Archive Audio Production

How To Easily Export Individual Tracks In Pro Tools: Step-by-Step Guide!

To export individual tracks in Pro Tools, open the session, select the tracks, and then choose the export option. Pro Tools allows users to easily export individual tracks by following these steps.


Whether you’re sharing your tracks with collaborators or creating stems for mixing and mastering, exporting them is essential for a seamless workflow. By exporting individual tracks, you can ensure that each element of your project is properly isolated and ready for further processing.


This simple process streamlines your workflow and allows for greater flexibility in your production process. In this guide, we will walk you through the steps to export individual tracks in Pro Tools efficiently and swiftly.

How To Easily Export Individual Tracks In Pro Tools: Step-by-Step Guide!


Credit: promixacademy.com


Choosing The Right Workflow

Choosing the Right Workflow is essential when exporting individual tracks in Pro Tools. This involves Understanding Export Options and Setting Up Session for Export effectively.

Understanding Export Options

  • Select the individual track you want to export
  • Access the ‘File’ menu and choose the ‘Export’ option
  • Explore various export formats like WAV, MP3, or AIFF
  • Ensure to set the correct bit depth and sample rate

Setting Up Session For Export

  1. Organize your tracks and mute any that you don’t want to include
  2. Set the playback range for the specific track you’re exporting
  3. Check the levels and apply any necessary plugins for optimization

Preparing Individual Tracks

Preparing individual tracks in Pro Tools is crucial for a smooth and efficient export process. Follow these simple steps to ensure your tracks are properly named and adjusted before exporting.

Naming Tracks

1. Click on the track name in the Edit window. 2. Input the desired name for the track.

Adjusting Track Settings

1. Access the track settings by right-clicking on the track header. 2. Make adjustments to volume, panning, and effects as needed.

Exporting Individual Tracks

Exporting individual tracks in Pro Tools allows you to easily share, collaborate, and transfer your audio projects. This process is essential for producing professional-quality music and audio recordings. In this blog post, we will explore the three simple steps to export individual tracks in Pro Tools, empowering you to efficiently manage and share your audio creations.

Selecting Tracks For Export

Before exporting individual tracks in Pro Tools, you must first select the specific tracks that you wish to export. To do this, navigate to the tracks list and click on the track names to highlight them. You can select multiple tracks by holding down the Ctrl (Command for Mac) key while clicking on each track. Ensure that you have accurately chosen the tracks that you want to export, as this selection will determine the content of your exported files.

Applying Export Settings

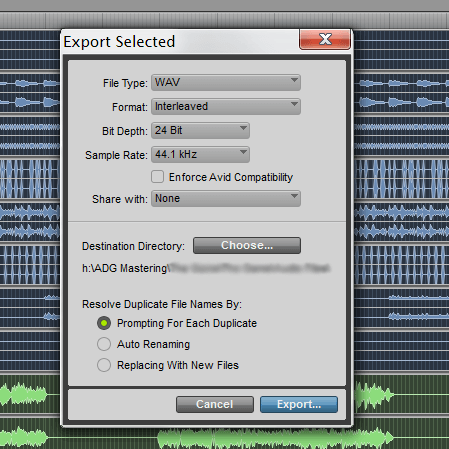
Once you have selected the desired tracks, it is time to apply the export settings. Navigate to the “File” menu and select the “Export” option. A submenu will appear, offering various export formats such as WAV, AIFF, MP3, and more. Choose the format that best suits your requirements. You can adjust additional settings such as sample rate, bit depth, and file name conventions. Double-check that you have configured the export settings according to your preferences, ensuring that the exported tracks will meet your specific needs.

Verifying Exported Tracks


Verify exported tracks in Pro Tools in 3 simple steps. After exporting individual tracks, ensure accuracy by listening to each one meticulously. Check for any anomalies in the audio, such as clipping or distortion, to guarantee a flawless export process.

Once you have successfully exported your individual tracks in Pro Tools, it is essential to verify that the exported files are in the correct format and that they sound as intended. This step is crucial in ensuring that your exported tracks can be easily integrated into other projects or shared with collaborators.

Checking File Format

One of the first things you need to do when verifying exported tracks is to confirm that the file format is suitable for your intended use. Pro Tools offers various export options, including WAV, AIFF, MP3, and others. Different formats have different characteristics and compatibility, so it’s important to choose the format that best suits your needs.

Here is a table comparing some commonly used file formats:

File Format Characteristics Compatibility
WAV (Waveform Audio File Format) Lossless audio quality Compatible with most audio software and platforms
AIFF (Audio Interchange File Format) Lossless audio quality Compatible with most audio software and platforms
MP3 (MPEG Audio Layer-3) Compressed audio format Widely supported, suitable for online streaming and sharing

By ensuring your exported tracks are in the correct format, you can optimize their compatibility and maintain the intended audio quality.

Listening To Exported Tracks

Another vital step in verifying exported tracks is to listen to them carefully to ensure they sound as expected. This involves playing each exported track and comparing it to the original recordings or mix within Pro Tools. Here are some guidelines to follow:

  1. Use high-quality headphones or monitors to accurately hear the nuances in the tracks.
  2. Listen for any unwanted artifacts, distortion, or anomalies that might have been introduced during the export process.
  3. Compare the exported tracks with the original recordings or mix to check for any discrepancies or alterations in sound.
  4. If you are collaborating with others, share the exported tracks for feedback and incorporate any necessary revisions.

By actively listening to the exported tracks and ensuring their fidelity and quality, you can address any issues before finalizing your project or delivering the tracks to clients.

Advanced Tips And Considerations

Exporting individual tracks in Pro Tools allows you to have more control over your audio files and is a great way to collaborate with others or work on multiple projects simultaneously. While the basic steps of exporting tracks in Pro Tools are relatively straightforward, there are some advanced tips and considerations that can greatly enhance your workflow and save you time and effort. In this section, we will explore two essential aspects of exporting tracks: batch exporting tracks and dealing with bus and group tracks.

Batch Exporting Tracks

Batch exporting tracks is a valuable technique that enables you to export multiple tracks simultaneously, saving you significant time and effort. Rather than exporting each track individually, you can select multiple tracks and export them all at once. Here’s how you can do it:

  1. Select the tracks you want to export by holding down the Ctrl (Windows) or Command (Mac) key and clicking on the desired tracks.
  2. Go to the File menu and select “Export” to open the Export Audio dialog box.
  3. In the Export Audio dialog box, choose your desired export settings including file format, sample rate, bit depth, and file location.
  4. Click “OK” to start the batch export process. Pro Tools will export each selected track individually and save them to the specified location.

Dealing With Bus And Group Tracks

When exporting individual tracks that are routed through bus or group tracks, it’s important to ensure that the exported audio files capture the full audio signal. Here’s what you need to keep in mind:

  • If you have tracks routed through bus or group tracks, make sure to enable the option to include these tracks in the export process. This ensures that the exported audio files contain the audio from the bus or group tracks as well.
  • Double-check your routing and ensure that the bus or group tracks are set up correctly. This ensures that the audio signals are properly routed to the desired bus or group tracks.
  • Consider using individual auxiliary tracks for your bus or group processing. This allows you to easily export the processed audio separately without affecting the original tracks.
  • When exporting tracks with bus or group processing, it’s crucial to listen to the exported files to ensure that the audio signals are properly captured and that no artifacts or unwanted effects are present.

By following these advanced tips and considerations, you can ensure that you export individual tracks in Pro Tools efficiently and accurately. Whether you need to export multiple tracks at once or deal with bus and group tracks, mastering these techniques will enhance your Pro Tools workflow and help you achieve professional-grade audio exports.

How To Easily Export Individual Tracks In Pro Tools: Step-by-Step Guide!


Credit: blog.hootsuite.com


How To Easily Export Individual Tracks In Pro Tools: Step-by-Step Guide!


Credit: www.adgmastering.com


Frequently Asked Questions Of How To Export Individual Tracks In Pro Tools In 3 Steps


How Do I Export Individual Tracks In Pro Tools?


Exporting individual tracks in Pro Tools is easy. Simply select the track you want to export, go to the File menu, choose Export, and select the desired format. Make sure to check the “Selected Tracks Only” option to export only the selected track.


Can I Export Multiple Tracks At Once In Pro Tools?


Yes, you can export multiple tracks at once in Pro Tools. Simply select the tracks you want to export, go to the File menu, choose Export, and select the desired format. Check the “Selected Tracks Only” option and Pro Tools will export all the selected tracks as separate files.


What File Formats Can I Export Individual Tracks In Pro Tools?


Pro Tools allows you to export individual tracks in various file formats, including WAV, AIFF, MP3, and more. Choose the format that suits your needs and select it in the export settings. Pro Tools will export the individual track in the selected format.


Can I Export Effects Applied To Individual Tracks In Pro Tools?


Yes, you can export effects applied to individual tracks in Pro Tools. When exporting a track, make sure to check the “Include Inserts and Sends” option in the export settings. This will export the track with all the effects applied to it.


Conclusion


Ready to master the art of exporting individual tracks in Pro Tools? With just three simple steps, you can effortlessly streamline your workflow and create professional-grade mixes. By following these steps, you’ll gain more control over your music production and achieve a polished, studio-quality sound.


Start maximizing your Pro Tools proficiency today!


https://www.youtube.com/watch?v=zyzZ3NWsAOc


Categories
Archive Audio Production

Master the Art of Track Exporting in FL Studio

To export individual tracks in FL Studio for mixing, simply right-click on the track and select “Consolidate this track.” Then, go to File > Export > WAV file and choose your settings.


Creating separate tracks for mixing in FL Studio is a crucial step in producing high-quality music. By exporting individual tracks, you can have better control over each element of your song during the mixing process. This allows you to adjust levels, apply effects, and fine-tune the overall sound of your music with precision.


With a few simple steps, you can optimize your workflow and achieve professional results in your music production.


Credit: opensea.io


Choosing The Right Tracks For Exporting

When exporting individual tracks in FL Studio for mixing, it’s crucial to select the right tracks to ensure a smooth and efficient workflow. Below, we’ll discuss the key steps to consider when choosing tracks for export.

Selecting Individual Tracks

Select specific tracks based on their relevance to the final mix to streamline the export process.

  • Identify essential tracks that require individual treatment.
  • Avoid exporting unnecessary tracks to reduce clutter in the mixing environment.

Grouping Tracks For Export

Group related tracks together to maintain consistency and facilitate efficient export.

  • Create subgroups for similar tracks to enhance organization.
  • Ensure each track is clearly labeled to avoid confusion during the export process.


Preparing Tracks For Exporting

Cleaning Up The Mix

In FL Studio, clean up the mix by muting any unwanted sounds and removing any unnecessary effects. This ensures each track is clean and clear.

Setting Proper Levels And Panning

Adjust the levels of each track to ensure they are not clipping or too quiet. Proper panning creates a wide stereo image for a balanced mix.

Exporting Tracks In Fl Studio

When working on a music project in FL Studio, exporting individual tracks is a crucial step for further mixing and mastering. By exporting tracks, you can ensure that each element of your composition has its audio file, allowing for more precise adjustments in the mixing stage. In this section, we will explore the process of exporting tracks in FL Studio, including using the export function and customizing export settings.

Using The Export Function

FL Studio offers a user-friendly export function that allows you to extract individual tracks with ease. To export a track, simply navigate to the File menu and select the ‘Export’ option. From there, you can choose ‘WAV’ or ‘MP3’ as the file format and specify the destination folder for the exported track. This streamlined process makes it convenient to extract each track for further processing.

Customizing Export Settings

When exporting tracks in FL Studio, it’s essential to customize the export settings to match your project requirements. You can adjust the sample rate, bit depth, and other parameters to ensure the exported tracks maintain the desired quality. Additionally, FL Studio allows you to export tracks with or without effects and automation, providing flexibility in preserving the original sound or including specific modifications.

Options For Exported Tracks


When using FL Studio for mixing, you can easily export individual tracks as audio files. This allows for seamless transfer to other DAWs or for collaboration with other producers. Simply select the tracks you want to export, choose the export settings, and FL Studio will render each track as a separate audio file for further processing.

Choosing File Formats

When exporting individual tracks in FL Studio for mixing, one of the key considerations is choosing the appropriate file format. Understanding the different options available will allow you to optimize the track’s quality and compatibility with other software or platforms.

FL Studio provides various file formats that cater to different needs and preferences.

  • WAV: This is an uncompressed audio format that retains the highest quality. WAV files are suitable for professional use and offer compatibility across different software and platforms.
  • MP3: The MP3 format is a compressed audio file that maintains a good balance between quality and file size. It is commonly used for online streaming platforms and personal listening.
  • FLAC: FLAC is a lossless audio format that provides high-quality audio while also reducing the file size. This format is ideal if you want to retain the original audio quality but require smaller file sizes.

When choosing a file format for exporting tracks, consider your specific requirements and the intended purpose of the exported audio.

Including Effects And Processing

One of the advantages of exporting individual tracks in FL Studio is the ability to include effects and processing in the exported files. This allows you to enhance the sound and make adjustments, ensuring the tracks are ready for further mixing or standalone use.

Before exporting, you have the option to apply effects and processing to the individual tracks. These may include:

  • Equalization (EQ): Adjusting the frequency balance of a track to enhance certain elements or remove unwanted frequencies.
  • Compression: Controlling the dynamic range of a track, making the loud parts quieter and the quiet parts louder.
  • Reverb: Adding a sense of space and depth to the track, creating a natural or artificial reverberation effect.
  • Delay: Replicating the sound of an audio signal being repeated over time, adding a sense of spaciousness and rhythmic depth.

By including effects and processing in the exported tracks, you can save time during the mixing process and ensure that the audio already has the desired characteristics. It is important to find the right balance between enhancing the track and preserving its original sound.


Utilizing Exported Tracks In Mixing

Once you have exported individual tracks in FL Studio for mixing, you can integrate them seamlessly into your digital audio workstations (DAWs). This process allows for greater flexibility and control when it comes to adjusting and fine-tuning each track during the mixing phase. In this section, we will explore how to import these exported tracks into your DAW and how to integrate them with other projects effectively.

Importing Into Digital Audio Workstations

Importing your exported tracks into your DAW is a simple process that can be done in just a few steps. Follow these instructions to ensure a smooth integration:

  1. Open your DAW and create a new project or open an existing one.
  2. Locate the exported tracks on your computer and import them into your project.
  3. Arrange the tracks according to your desired arrangement.
  4. Label each track appropriately to maintain organization and clarity.

Integrating With Other Projects

Integrating your exported tracks from FL Studio with other projects can be especially beneficial when you are working on multiple songs or collaborating with other artists. Follow these guidelines to ensure a seamless integration:

  1. Create a new project or open the existing project you want to integrate the exported tracks into.
  2. Import the exported tracks into the project, ensuring they are aligned with the existing tracks.
  3. Adjust the volume levels, panning, and effects of each track to ensure a cohesive mix.
  4. If necessary, make any additional edits or modifications to the tracks to fit the project’s requirements.

By following these steps, you can leverage the power of FL Studio’s exporting capabilities to enhance your mixing process. Whether you are importing tracks into your DAW or integrating them with other projects, this seamless workflow will allow you to achieve professional and polished results in your mixes.

Master the Art of Track Exporting in FL Studio for Impeccable Mixing


Credit: www.amazon.in


Frequently Asked Questions For How To Export Individual Tracks In Fl Studio For Mixing


How Can I Export Individual Tracks In Fl Studio For Mixing?


To export individual tracks in FL Studio, first, mute all other tracks except the one you want to export. Then, go to the File menu, select Export, and choose WAV or MP3 format. Click on Start and FL Studio will export the selected track as a separate audio file.


Can I Export Multiple Tracks At Once In Fl Studio?


Yes, you can export multiple tracks at once in FL Studio. Simply select the tracks you want to export by holding down the Ctrl key, then follow the same steps as exporting an individual track. FL Studio will export each selected track as a separate audio file.


What Is The Benefit Of Exporting Individual Tracks For Mixing?


Exporting individual tracks for mixing allows for more control and flexibility during the mixing process. It allows you to apply specific effects and adjustments to each track individually, resulting in a more polished and professional sounding mix.


Can I Export Tracks In Different File Formats In Fl Studio?


Yes, FL Studio supports exporting tracks in various file formats such as WAV, MP3, and more. You can choose the desired file format in the export settings before exporting your tracks.


Conclusion


In mastering the art of exporting individual tracks in FL Studio for mixing, you’ve embraced a crucial element of music production. Properly rendered tracks enhance the quality of your final mix, leading to a professional sound. With the knowledge gained from this guide, you’re now equipped to handle your tracks with confidence and precision.


Elevate your production game by incorporating these techniques into your workflow.

Categories
Archive Audio Production

I Sell Beats Online: Mastering Secrets for Sound Quality

Yes, it is crucial to get your beats mixed and mastered to enhance their quality and appeal to potential buyers. Professional mixing and mastering can make a significant difference in the overall sound and help your beats stand out in the competitive market.


Quality audio can attract more customers and increase your sales, making it a worthwhile investment for your online beat-selling business. By ensuring your beats are mixed and mastered properly, you can create a strong brand reputation and cater to the preferences of your target audience.


Ultimately, the decision to invest in mixing and mastering your beats can lead to higher sales and success in the online music industry.

I Sell Beats Online: Mastering Secrets for Optimal Sound Quality


Credit: cdmusicmastering.com


Optimizing Sound Quality

Improving the sound quality of your beats is crucial for making them stand out in a competitive online market.

Choosing The Right Equipment

Quality equipment is essential for producing professional beats. Invest in studio monitors, headphones, and a microphone for accurate sound monitoring.

Setting Up Your Home Studio

Create a dedicated space for your studio with soundproofing materials and proper acoustic treatments to minimize external noise.

I Sell Beats Online: Mastering Secrets for Optimal Sound Quality


Credit: cdmusicmastering.com


Mastering Techniques


Considering whether to get your beats mixed and mastered is crucial for enhancing their quality and appeal. These techniques can elevate the sound and make your beats stand out in the market. By investing in professional mixing and mastering services, you can ensure that your beats are polished and ready for sale, attracting more potential buyers.

Understanding Compression

Compression is a crucial mastering technique that ensures consistent levels in your beats.

It reduces the dynamic range and helps maintain a uniform volume.

Balancing Eq And Frequencies

Proper EQ adjustments are essential for a well-rounded sound.

Balancing frequencies will result in clarity and richness in your beats.

Creative Approaches

I Sell Beats Online Should I Get Them Mixed And Mastered can be a crucial decision for producers. When it comes to creative approaches to mixing and mastering your beats, there are several unique tactics to explore. Experimenting with effects, incorporating live instruments, and utilizing innovative techniques can all contribute to enhancing the overall quality and appeal of your beats.

Experimenting With Effects

Embracing creative effects can add a unique dimension to your beats. From reverb and delay to distortion and modulation, experimenting with different effects can help you achieve a distinctive sound that sets your beats apart from the competition. Consider blending various effects and adjusting parameters to create a signature sound that resonates with your audience.

Incorporating Live Instruments

Incorporating live instruments into your beats can inject an organic and authentic feel. Whether it’s adding live drums, guitar riffs, or piano melodies, live instruments can elevate the emotional impact of your beats and bring a level of depth that programmed sounds may not achieve. Integrate live instruments strategically to complement your electronic elements and create a compelling sonic fusion.

Marketing And Selling

When it comes to selling beats online, building your brand is crucial. Your brand is what sets you apart from the competition and helps you establish a loyal customer base. To build a strong brand, start by defining your unique selling proposition (USP). What makes your beats special? Is it your unique style, high-quality production, or versatility? Determine your USP and use it as the foundation for your branding efforts. Your website, social media profiles, and promotional materials should all reflect your brand identity.

Next, focus on creating a professional and visually appealing website. Your website serves as your online storefront, so it should showcase your beats in an organized and user-friendly manner. Use high-quality graphics, set up an easy-to-use navigation menu, and ensure that your website is mobile-friendly. You want your visitors to have a seamless browsing experience, increasing the chances of them making a purchase.

To promote your brand and increase your visibility, it’s essential to utilize social media platforms. Facebook, Instagram, Twitter, and YouTube are powerful marketing tools that allow you to reach a wider audience. Create engaging content, share snippets of your beats, and interact with your followers. Consistency is key when it comes to social media. Regularly post new content and engage with your audience to build a loyal following.

In the highly competitive world of beat selling, finding your niche market is essential for success. Instead of trying to appeal to everyone, focus on a specific audience segment. By targeting a specific niche, you can tailor your marketing efforts and resonate with your target customers on a deeper level.

Start by conducting market research to identify underserved or untapped niche markets. Is there a particular genre or style that you excel in? Is there a demand for beats of a certain mood or tempo? Once you identify your niche, create beats that cater to the unique preferences of your target audience.

To effectively reach your niche market, it’s important to understand their habits and preferences. Are they active on specific social media platforms? Do they prefer to listen to beats on streaming platforms like SoundCloud or Spotify? By knowing where your target audience hangs out, you can strategically place your beats in front of them.

Additionally, consider collaborating with artists or influencers who resonate with your niche market. Partnering with artists who align with your style can help you tap into their fan base and gain exposure. Collaborations can take the form of joint projects, featuring other artists on your beats, or getting your beats featured on popular playlists or channels.

Staying Competitive

When it comes to selling beats online, it is crucial to stay competitive in order to stand out in a saturated market. One of the key factors that can help you stay ahead of the game is ensuring that your beats are mixed and mastered to a professional standard. In this article, we will explore the importance of getting your beats mixed and mastered, focusing on two essential aspects: staying updated with styles and networking with other producers.

Staying Updated With Styles

In the ever-evolving music industry, staying updated with the latest styles and trends is essential. By investing in professional mixing and mastering services, you ensure that your beats sound current and relevant to the artists you are targeting. Whether it’s the booming 808s of trap music or the vintage sounds of boom-bap, a professional mix and master can help you achieve the desired sonic aesthetic.

Moreover, a polished mix and master can also enhance the overall impact of your beats. With the right balance and attention to detail, your beats will sound full, punchy, and complete, allowing them to compete with the top producers in the industry. Remember, artists are always looking for high-quality beats that can help them stand out and make an impact, and a professional mix and master can significantly increase the perceived value of your work.

Networking With Other Producers

In addition to having a solid sounding product, networking with other producers can be a game-changer in your journey to success. By connecting with other like-minded individuals in the industry, you open the door to collaboration, knowledge sharing, and exposure to new opportunities.

Attending industry events, joining online communities, and participating in producer showcases will provide you with valuable connections that can help you grow your business. When you collaborate with other producers, you not only gain access to their unique skills and sound, but you also tap into their network of artists and industry professionals. This can lead to collaborations with established artists, placements on major projects, and increased exposure for your beats.

Remember, building relationships with other producers is not about competition, but rather about creating a supportive community where everyone can thrive. By sharing your knowledge, giving feedback, and collaborating with others, you not only contribute to the growth of the community but also create opportunities for your own success.

I Sell Beats Online: Mastering Secrets for Optimal Sound Quality


Credit: unison.audio


Frequently Asked Questions Of I Sell Beats Online Should I Get Them Mixed And Mastered


Can I Sell Beats Online Without Getting Them Mixed And Mastered?


Yes, you can sell beats online without getting them mixed and mastered. However, getting your beats mixed and mastered can greatly enhance the quality and appeal of your music, attracting more potential buyers and increasing your chances of making sales.


It is recommended to invest in professional mixing and mastering for a polished and professional sound.


What Are The Benefits Of Getting Beats Mixed And Mastered?


Getting beats mixed and mastered offers several benefits. It improves the overall sound quality of your beats, enhances the clarity and balance of individual elements, and ensures that your beats sound great on various listening devices. Professionally mixed and mastered beats also stand out from the competition, increasing your chances of attracting more buyers and generating sales.


How Does Getting Beats Mixed And Mastered Affect Sales?


Getting your beats mixed and mastered can significantly impact your sales. High-quality, professionally mixed and mastered beats sound more appealing and professional, making them more attractive to potential buyers. It helps establish credibility and trust with your audience, increasing the likelihood of them purchasing your beats.


Investing in mixing and mastering can lead to higher sales and a stronger reputation in the industry.


Is It Worth Getting Beats Mixed And Mastered If I’m Just Starting Out?


Yes, it is worth getting beats mixed and mastered even if you are just starting out. Investing in professional mixing and mastering early on sets a high standard for your music. It helps you stand out from the competition, build a strong reputation, and attract more potential buyers.


Quality beats that are well-mixed and mastered are essential for making a lasting impression in the music industry.


Conclusion


Getting your beats mixed and mastered can significantly enhance the quality and appeal of your music. With the competitive nature of the online music industry, investing in professional mixing and mastering services can help your beats stand out and attract more customers.


Don’t underestimate the power of high-quality sound in making a lasting impression on your audience.


Categories
Archive Audio Production

Create Unforgettable Tracks: Mixing and Mastering Tips

Create unforgettable music by applying these essential mixing and mastering techniques. Learn how to elevate your sound.


Crafting the perfect music track requires skill and precision in mixing and mastering. Whether you are a seasoned producer or a budding musician, understanding these techniques is crucial for creating professional-grade music. By mastering the art of audio engineering, you can enhance the impact of your music and leave a lasting impression on your listeners.


Dive into the world of mixing and mastering to unlock the full potential of your musical creations. With the right tools and knowledge, you can make your music stand out in a crowded industry. Mastering these techniques will help you achieve a polished and professional sound that resonates with your audience.

Create Unforgettable Tracks: Masterful Mixing and Mastering Tips


Credit: fastercapital.com


The Art Of Mixing

The Art of Mixing is crucial in creating professional-sounding music. Balancing Different Elements is essential for a cohesive sound. Utilizing Panning and Stereo Imaging adds depth and dimension to your mix.

Balancing Different Elements

  • Adjust volume levels of instruments to ensure they blend harmoniously.
  • Use EQ to carve out space for each element in the mix.

Utilizing Panning And Stereo Imaging

  1. Pan instruments to the left or right to create a wide stereo image.
  2. Experiment with stereo enhancers to add depth and spaciousness.
Create Unforgettable Tracks: Masterful Mixing and Mastering Tips


Credit: www.amazon.com


Mastering Techniques


Learn how to elevate your music production with expert mixing and mastering techniques. Discover valuable tips to create unforgettable tracks, enhance sound quality, and captivate your audience with professional audio output. Master the art of music production with these essential strategies.

Mastering techniques play a crucial role in giving your music that professional polish. These techniques involve understanding signal processing and enhancing dynamics with compression.

Understanding Signal Processing

Signal processing in mastering is about optimizing the balance and clarity of different elements in your audio track.

Enhancing Dynamics With Compression

Compression can help control the dynamic range of your music, making it sound more consistent and balanced. Mastering techniques are essential for creating high-quality and engaging music. Understanding how signal processing and compression work is key to achieving professional results.

Creating Impactful Soundscapes

Creating Impactful Soundscapes is essential for making memorable music. By strategically layering instruments and sounds, as well as utilizing effects for depth and texture, you can achieve the desired impact and immerse your audience in a rich sonic experience.

Layering Instruments And Sounds

Layering instruments and sounds is a powerful technique for creating depth and richness in your music. By combining different elements such as melodies, harmonies, and rhythms, you can build a multidimensional sonic landscape that captivates your listeners. Ensure that each layer complements the others, adding to the overall sonic tapestry without cluttering the mix.

Utilizing Effects For Depth And Texture

Effects play a crucial role in enhancing the depth and texture of a sound. Reverb and delay can create a sense of space and ambience, while modulation effects like chorus and phaser can add movement and dimension. Experiment with different effect parameters to find the perfect combination that elevates your soundscapes to the next level.

Optimizing Playback For Various Platforms


Enhance your music playback across all platforms with these mixing and mastering tips for creating memorable tunes. Reach a wider audience by optimizing your sound quality for different devices and ensure your music stands out.

In today’s digital age, it’s essential for musicians and producers to optimize their music for different platforms to ensure the best listening experience for their audiences. This involves addressing loudness and EQ settings for streaming and preparing tracks for different output formats. Let’s explore these techniques in detail.

Addressing Loudness And Eq For Streaming

When it comes to streaming your music on popular platforms like Spotify or Apple Music, it’s important to consider the loudness and EQ settings. Streaming platforms often normalize the loudness of your tracks to ensure a consistent volume level across different songs. It’s crucial to avoid excessive loudness, as this can lead to distortion or clipping. Instead, focus on achieving a balanced mix with a controlled dynamic range. Bold: Avoid excessive loudness to prevent distortion and clipping in your streamed music. To optimize your music for streaming, pay attention to the EQ settings as well. Streaming platforms have various algorithms that can alter the frequency response of your tracks. Boosting or cutting certain frequencies excessively can result in an imbalanced sound. Aim for a natural and transparent EQ balance during the mixing and mastering process. Bold: Create a natural and transparent EQ balance to ensure optimal sound on streaming platforms.

Preparing Tracks For Different Output Formats

When sharing your music across various output formats, such as CD or vinyl, it’s crucial to ensure compatibility and quality throughout the distribution process. Here are some tips to prepare your tracks effectively:

  1. Choose the appropriate file format: Different output formats may require specific audio file formats. For CDs, uncompressed formats like WAV or AIFF are typically recommended for the highest quality. Vinyl, on the other hand, may benefit from a specific mastering process to address potential limitations.
  2. Normalize your tracks: To avoid inconsistencies in volume, normalizing your tracks can ensure they reach a consistent level before distribution. This step helps maintain the intended dynamics of your music.
  3. Consider different mastering for each format: Each output format may have specific requirements or limitations. For example, vinyl may require adjustments to account for its frequency response and potential distortion. Investing time in format-specific mastering can greatly enhance the overall listening experience.

Bold: – Choose appropriate file formats for each output format. – Normalize your tracks to maintain consistent volume. – Consider format-specific mastering to optimize the listening experience. By addressing loudness and EQ for streaming and preparing tracks for different output formats, you can ensure that your music sounds its best across various platforms and delight your listeners with a memorable musical experience.

The Importance Of Quality Monitoring

When it comes to creating music that leaves a lasting impact, quality monitoring is key. It’s not just about having the right equipment and software – it’s about ensuring that what you hear is an accurate representation of your music. In this article, we will explore the importance of quality monitoring and how you can set up an effective monitoring environment, as well as utilize reference tracks for comparison.

Setting Up An Effective Monitoring Environment

To ensure that you are hearing your music as accurately as possible, it is crucial to create an effective monitoring environment. Here are some tips to get started:

  1. Choose a suitable room: Select a room that is acoustically treated, free from excessive reverb or background noise.
  2. Position your speakers correctly: Place your speakers at ear level and ensure they are equidistant from each other and from your listening position.
  3. Consider speaker placement: Avoid placing speakers too close to walls or corners, as this can cause unwanted reflections and coloration in the sound.
  4. Calibrate your speakers: Make sure your speakers are properly set up and calibrated according to the manufacturer’s guidelines. This will ensure consistent and accurate monitoring.
  5. Invest in quality headphones: In addition to speakers, having a reliable pair of headphones can provide an alternative perspective when monitoring your music.

Utilizing Reference Tracks For Comparison

One effective way to gauge the quality of your mix is by utilizing reference tracks for comparison. Reference tracks are professionally mixed and mastered songs that you can use as a benchmark for your own work. Here’s how you can make the most out of reference tracks:

  • Select reference tracks that are similar in genre and style to your own music. This will give you a better idea of how your mix should sound.
  • Import the reference tracks into your project and listen to them alongside your own mix. Pay attention to the balance, dynamics, and overall clarity.
  • Compare the frequency spectrum: Use an EQ plugin to analyze the frequency response of your mix and compare it to the reference tracks. Make adjustments if necessary to achieve a similar frequency balance.
  • Compare the stereo image: Use a stereo imaging plugin to analyze the width and placement of elements in your mix. Aim to achieve a similar stereo image as the reference tracks.
  • Listen on various systems: Test your mix on different playback systems, such as headphones, car speakers, and consumer-grade speakers. This will help uncover any issues that might not be apparent in your monitoring environment.

By setting up an effective monitoring environment and utilizing reference tracks for comparison, you can ensure that your mix translates well across different playback systems and leaves a lasting impression on your audience. Remember, quality monitoring is an essential step in the music production process that should never be overlooked.


Frequently Asked Questions For Make Memorable Music With These Mixing And Mastering Tips


How Can I Improve The Clarity Of My Mix?


To improve clarity in your mix, focus on balancing the different elements of your track. Use EQ to remove muddiness and enhance the desired frequencies. Pay attention to panning and stereo imaging to create a sense of space. Compress and apply light reverb to add depth and cohesion to the mix.


What Is The Role Of Mastering In Music Production?


Mastering is the final step in music production that ensures your tracks are polished and ready for distribution. It involves optimizing the overall volume, tonal balance, and dynamics of your songs. Mastering also ensures consistency in volume between different tracks and enhances the overall commercial sound quality.


Why Is A Well-calibrated Listening Environment Important?


A well-calibrated listening environment is vital for accurate mixing and mastering. It allows you to hear the subtle nuances and details in your music. Proper speaker placement, acoustic treatment, and monitor calibration help eliminate frequency imbalances and give you a more accurate representation of your mix, resulting in better decisions during the production process.


Conclusion


Incorporating these mixing and mastering tips into your music production process can elevate your tracks to new heights. By focusing on improving balance, clarity, and depth, you can create memorable soundscapes that captivate your audience. Embracing these techniques will empower you to produce professional-quality music that leaves a lasting impact on your listeners.


Categories
Archive Audio Production

Mixing Music: Crucial Mistakes You Must Avoid

Avoid over-compression and excessive use of effects when mixing music. It is essential to maintain balance and clarity in sound to prevent muddiness and distortion in the final mix.


As a music producer or engineer, steering clear of these common mistakes can significantly enhance the overall quality of your music productions. While it may be tempting to apply heavy processing to achieve a certain sound, it is crucial to always prioritize the clarity and balance of the mix.


By avoiding these mistakes, you can create professional and polished mixes that truly showcase the musical elements in their best light. Let’s explore some of the crucial mistakes to avoid when mixing music to help you elevate your production skills and deliver high-quality music.


Common Mistakes In Music Mixing

Skipping Reference Tracks

Not using reference tracks can lead to inaccurate sound judgments.

  • Listen to professional tracks to compare your mix quality.
  • Adjust your mix based on reference track dynamics.

Overlooking Room Acoustics

Room acoustics greatly impact your mixing decisions.

  1. Address room reflections by using acoustic treatment.
  2. Consider monitoring in different parts of the room for accuracy.

The Importance Of Proper Equipment

Investing in Quality Monitors: Great monitors are essential for accurate sound representation.

Utilizing High-Quality Headphones: Ensure proper sound isolation and detailed audio.


Understanding Eq And Compression

When it comes to mixing music, understanding EQ and compression is crucial for achieving a well-balanced and professional sound. EQ allows you to manipulate the frequency content of audio signals, while compression helps control the dynamic range, ensuring a more even and consistent performance.

Balancing Frequency Bands

Balancing frequency bands is essential for ensuring that each instrument and vocal sits well in the mix. It involves adjusting the levels of different frequency ranges to create space and clarity. Use a spectral analyzer to identify overlapping frequencies and make cut and boost adjustments accordingly.

Remember to apply EQ subtractively by cutting unwanted frequencies, rather than boosting excessively. This approach prevents the mix from sounding harsh or muddy. Take a surgical EQ approach and make subtle adjustments to avoid drastic tonal changes.


Avoiding Over-compression

Avoiding Over-Compression is crucial to maintain the natural dynamics of the music. Use compression sparingly and set appropriate attack and release times to preserve transients. Apply minimal gain reduction to prevent squashing the audio and maintain a natural and dynamic sound.

It’s important to listen critically and ensure that the compression is enhancing the performance, rather than detracting from it. Experiment with different compression ratios and threshold settings to achieve the desired balance without compromising the integrity of the original recording.


Mixing Music: 6 Crucial Mistakes You Must Avoid


Credit: www.izotope.com


Effective Use Of Reverb And Delay


Mastering the effective use of reverb and delay in music mixing is crucial to achieving a professional sound. Avoid common pitfalls like overusing these effects, which can muddy the mix and diminish the clarity of your tracks. By using reverb and delay in moderation and with intention, you can enhance the overall quality of your music production.

Creating Depth And Space

When it comes to mixing music, an important aspect is the effective use of reverb and delay. These effects can add depth and space to your mix, giving it a more immersive and professional sound. Reverb helps create the illusion of a specific acoustic environment, while delay adds echoes and repetitions to enhance certain elements of the mix. However, it’s crucial to use these effects wisely to avoid clutter and muddiness in your mix.

Avoiding Clutter And Muddiness

To avoid clutter and muddiness in your mix, it’s important to exercise restraint when using reverb and delay. Too much reverb can make the mix sound washed out and distant, while excessive delay can create a messy and indistinct sound. Here are some tips to help you use reverb and delay effectively without compromising clarity and cohesion in your mix:

  1. Start with the dry sound:

    Ensure your mix sounds good without any effects first. Get the balance and EQ right before adding reverb and delay.

  2. Use reverb and delay as enhancements:

    Instead of relying on reverb and delay to cover up flaws in your mix, use them to enhance specific elements, such as vocals or instruments.

  3. Adjust the decay time:

    Shorter decay times can create a tighter and more focused sound, while longer decay times can add a sense of space and depth. Experiment with different settings to find the right balance.

  4. Consider the pre-delay:

    Pre-delay determines the time between the dry sound and the beginning of the reverb or delay effect. A shorter pre-delay can make the effect feel closer to the dry sound, while a longer pre-delay can create a sense of distance. Choose the pre-delay that fits the mood and intention of your mix.

  5. Don’t forget about EQ:

    Applying EQ to the reverb and delay effects can help control frequencies that may clash with the dry sound. Consider cutting or boosting certain frequencies to ensure clarity and avoid muddiness.

  6. Use automation:

    Automating the reverb and delay parameters can add dynamics and movement to your mix. Experiment with different levels and timings to create a more engaging and dynamic listening experience.

Avoiding Over-processing And Over-editing


When mixing music, it’s crucial to avoid the trap of over-processing and over-editing. Striking the right balance ensures a clean and polished sound without compromising the original creativity and emotion of the music. Stay mindful of this key aspect to maintain the authenticity and impact of your mix.

Preserving The Natural Sound

One crucial mistake to avoid when mixing music is over-processing and over-editing. It’s easy to fall into the trap of thinking that adding a bunch of effects or manipulating the audio too much will make it sound better. However, in reality, over-processing can lead to a loss of the natural sound and can make the mix sound artificial.

When it comes to preserving the natural sound, it’s important to resist the temptation to go overboard with plugins and effects. Instead, focus on enhancing the existing qualities of the audio without overshadowing its authenticity. By maintaining the integrity of the original recording, you can create a mix that sounds organic and pleasing to the ears.

Here are a few tips for preserving the natural sound:

  • Avoid excessive EQ boosting or cutting. Instead, focus on addressing specific problem areas and enhancing the overall balance.
  • Use compression sparingly and only when necessary. Don’t squash the dynamics too much; let the natural ebb and flow of the music shine through.
  • Be mindful of the reverb and delay effects. While they can add depth and space to the mix, overusing them can make it sound unnatural.

Maintaining Dynamics

Maintaining dynamics is another critical aspect to consider when mixing music. Dynamics refer to the variation in volume and intensity throughout a song. A mix with well-maintained dynamics feels alive and engaging, capturing the listener’s attention and conveying the emotional impact of the music.

To maintain dynamics effectively, follow these guidelines:

  1. Avoid excessive compression or limiting, which can result in a flat and lifeless mix. Instead, use compression judiciously to control peaks and even out the levels.
  2. Pay attention to the balance between the different instruments and elements in the mix. Ensure that each element has its own space and doesn’t overpower others.
  3. Consider automation to manually adjust the volume levels of individual tracks or sections. This way, you can emphasize the important elements and create a sense of movement within the mix.
  4. Experiment with panning to create a wider stereo image and enhance the sense of space without sacrificing the dynamics.

By avoiding over-processing and over-editing and focusing on preserving the natural sound and maintaining dynamics, you can achieve a well-balanced mix that captures the essence of the music and engages the listener from start to finish.

Mixing Music: 6 Crucial Mistakes You Must Avoid


Credit: www.gearnews.com


The Impact Of Proper Mixing Techniques

The impact of proper mixing techniques cannot be overstated when it comes to creating high-quality music. It is crucial to understand the essence of achieving a balanced mix and enhancing clarity and definition to ensure the perfect sound. By avoiding common mistakes and mastering these essential elements of music mixing, you can significantly improve the overall quality of your tracks.

Enhancing Clarity And Definition

Clarity and definition are vital in music mixing. By paying attention to each instrument’s frequency ranges and ensuring each one has its place in the mix, you can achieve a clear and defined sound. EQ adjustments play a significant role in this process, allowing you to carve out space for each element and prevent muddiness.

Achieving A Balanced Mix

Balancing the elements in a mix is essential for creating a cohesive and impactful sound. By adjusting volume levels, panning, and dynamic processing, you can ensure that every instrument and vocal sits well in the overall mix, creating a balanced and harmonious listening experience.

Frequently Asked Questions On Some Crucial Mistakes To Avoid When You Are Mixing Music


What Are The Common Mistakes To Avoid When Mixing Music?


Avoid these common mistakes when mixing music to achieve a better sound: 1) Over-processing – use effects sparingly; 2) Lack of balance – focus on the levels of each instrument; 3) Ignoring the room – consider the room’s acoustic properties when mixing; 4) Neglecting EQ – use EQ to enhance each instrument’s clarity; 5) Poor panning – create space by placing instruments in the stereo field; 6) Skipping reference tracks – compare your mix to professional tracks.


How Important Is Proper Gain Staging In Music Mixing?


Proper gain staging is essential in music mixing as it ensures that all tracks have consistent levels and prevents distortion during the mixing process. By setting appropriate levels for each track, you achieve a balanced mix and avoid clipping or overwhelming certain elements.


Don’t overlook gain staging; it forms the foundation of a clean and professional mix.


What Role Does Eq Play In Music Mixing?


EQ (Equalization) is a crucial tool in music mixing. It allows you to adjust the frequency balance of individual tracks, enhancing clarity and avoiding frequency clashes between instruments. Use EQ to cut unwanted frequencies, boost desired elements, and create space for each instrument within the mix.


A well-utilized EQ can improve the overall sound quality and balance of a mix.


Conclusion


Avoiding common mistakes when mixing music is crucial for producing high-quality tracks. By steering clear of excessive compression, neglecting to reference professional mixes, and failing to trust your own ears, you can ensure a better end result. By following these tips, you can elevate your music production skills and create exceptional, professional-sounding tracks.

Categories
Archive Audio Production

The Power of Professional Audio Mastering for Your Audio Project: Unlocking Sonic Brilliance

Professional audio mastering is crucial for enhancing the overall quality and consistency of your audio project. It ensures a polished sound that meets industry standards, making your project stand out.


Audio mastering plays a vital role in elevating the clarity, depth, and balance of your audio tracks, resulting in a professional and engaging listening experience for your audience. By working with skilled mastering engineers and utilizing specialized tools and techniques, you can achieve a final product that is competitive and captivating in today’s saturated audio market.


Whether you are a musician, podcaster, or content creator, investing in professional audio mastering is essential for making a lasting impact with your work.

The Power of Professional Audio Mastering for Your Audio Project: Unlocking Sonic Brilliance


Credit: www.linkedin.com


The Importance Of Professional Audio Mastering

Enhancing Audio Quality

Mastering plays a crucial role in enhancing the overall sound quality of your audio project.

Balancing And Polishing Sounds

Professional mastering ensures a balanced and polished final product with every sound optimized.

Key Components Of Audio Mastering

The Key Components of Audio Mastering:

Equalization

Adjusting frequencies to balance sound and enhance clarity.

Compression And Limiting

Smoothing out audio levels and preventing distortion.

The Role Of Mastering In Creating A Cohesive Listening Experience

Professional audio mastering plays a crucial role in shaping the overall sound and quality of your audio project. It acts as the final stage of production, ensuring that each track is polished to perfection and contributes to a seamless listening experience.

Seamless Transitions Between Tracks

Mastering helps in achieving smooth transitions between tracks, ensuring that the overall audio project flows seamlessly from one track to another. By applying consistent tonal balance and adjusting the spacing between tracks, the mastering process creates a cohesive listening experience for the audience.

Maintaining Consistent Sound Levels

Another important aspect of mastering is maintaining consistent sound levels across all tracks. This ensures that no track stands out as too loud or too soft compared to the rest. By carefully adjusting the dynamics and volume of each track, mastering contributes to a balanced and enjoyable listening experience.

The Power of Professional Audio Mastering for Your Audio Project: Unlocking Sonic Brilliance


Credit: www.facebook.com


How Professional Mastering Impacts Marketing And Distribution


Professional audio mastering plays a crucial role in enhancing the quality of your audio project, elevating its appeal to potential listeners. This process not only improves the overall sound but also impacts the marketing and distribution of your content, making it more competitive and attractive in the market.

How Professional Mastering Impacts Marketing and Distribution Improving Marketability Professional audio mastering plays a crucial role in enhancing the marketability of your audio project. By refining and optimizing the sound quality, mastering brings out the best in your music, podcast, or other audio content. The impact of high-quality mastering is evident in ensuring that your project stands out among the competition and grabs the attention of your target audience. Adapting to Various Platforms In today’s digital age, distribution of audio content across various platforms is a common practice. Each platform has its specific requirements and standards for audio quality. With professional mastering, your audio project can be adapted to fit the technical specifications of different platforms seamlessly. Whether it’s streaming platforms like Spotify and Apple Music, online platforms like YouTube and SoundCloud, or traditional broadcasting platforms, professional mastering ensures that your audio content meets the quality standards of each platform. This adaptability not only enhances the listening experience but also increases the chances of your content reaching a wider audience. Improved Sound Consistency Professional mastering also contributes to the overall sound consistency of your audio project. By carefully balancing the levels and frequencies, mastering ensures that every track or episode in your project sounds cohesive and harmonious. This consistency is essential for creating a professional and engaging listening experience for your audience. Furthermore, mastering also enhances the dynamic range of your audio, making it more enjoyable to listen to across various devices and settings. Whether your audience is streaming your content through headphones, car speakers, or home sound systems, professional mastering ensures that the audio remains clear, balanced, and immersive. Increased Listener Engagement When your audio project is professionally mastered and stands out in terms of sound quality, it has a higher chance of keeping your audience engaged. The improved sonic characteristics captivate the listener’s attention and encourage them to listen to your content for longer durations. Additionally, professional mastering helps in reducing ear fatigue, as excessive volume discrepancies and harsh frequencies are eliminated or minimized. This enables your audience to enjoy your audio content comfortably, leading to increased engagement and a more positive listening experience. In conclusion, professional audio mastering plays a crucial role in the marketing and distribution of your audio project. It enhances marketability, adapts to various platforms, improves sound consistency, and increases listener engagement. By investing in professional mastering, you not only ensure that your audio content sounds its best but also improve its chances of reaching and resonating with your target audience.

Choosing The Right Mastering Engineer For Your Project


Choosing the right mastering engineer for your project is a crucial step in ensuring the final audio product is of the highest quality and meets your desired outcome. The expertise and experience of the mastering engineer greatly affect the overall sound and impact of the audio. Effective communication and collaboration between you and the engineer also play a vital role in achieving optimal results.


Experience And Expertise


When it comes to selecting a mastering engineer, experience and expertise are key factors to consider. An experienced mastering engineer brings valuable insights and technical knowledge to the table. They have refined their skills through years of practice, allowing them to understand various genres and styles of music. This experience enables them to effectively enhance the depth, clarity, and overall quality of your audio project.


Communication And Collaboration


Effective communication and collaboration between you and the mastering engineer are essential for a successful audio project. The engineer needs to understand your artistic vision and goals, as well as any specific requirements or preferences you may have. Clear communication ensures that the engineer executes the desired changes and enhancements accurately.


A good mastering engineer is adept at actively listening to your feedback and addressing any concerns you may have. They should be open to suggestions and possess the ability to translate your ideas into tangible improvements in the audio. Regular communication throughout the mastering process allows for adjustments and fine-tuning, resulting in a final audio product that meets or exceeds your expectations.


Collaboration extends beyond just communication; it involves a mutual understanding and respect between you and the mastering engineer. A professional engineer values your creative input and works alongside you to elevate your audio to its fullest potential.

The Power of Professional Audio Mastering for Your Audio Project: Unlocking Sonic Brilliance


Credit: www.elysia.com


Frequently Asked Questions For The Importance Of Professional Audio Mastering For Your Audio Project


How Does Professional Audio Mastering Enhance The Quality Of Your Audio Project?


Professional audio mastering brings out the full potential of your audio project by improving clarity, balance, and overall sound quality. It enhances the volume, dynamics, and frequency response, ensuring that your audio sounds polished, professional, and ready for distribution or broadcast.


What Are The Benefits Of Hiring A Professional Audio Mastering Engineer?


Hiring a professional audio mastering engineer ensures that your audio project receives expert treatment. They have the experience, skills, and specialized equipment to bring out the best in your audio. They can fix any imperfections, optimize the audio for different platforms, and provide a fresh perspective on your work.


Can I Master My Audio Project Myself Without Professional Help?


While it is possible to master your audio project yourself, it is highly recommended to seek professional help. Audio mastering requires a trained ear, technical expertise, and specialized tools. A professional mastering engineer can provide objective feedback, ensure optimal sound quality, and save you time and effort in the process.


How Long Does The Audio Mastering Process Typically Take?


The duration of the audio mastering process depends on various factors, such as the complexity and length of your audio project. It can range from a few hours to a few days. It is important to allocate enough time for the mastering process to ensure a thorough and high-quality result.


Conclusion


Professional audio mastering is essential for ensuring your audio project stands out in today’s competitive industry. With the ability to enhance the overall quality, balance, and clarity of your music, a skilled mastering engineer can truly elevate the impact of your work on your audience.


Embracing the importance of professional mastering can ultimately make a significant difference in the success of your audio project.


https://www.youtube.com/watch?v=wiL0DUQV_38


Categories
Archive Audio Production

5 Proven Methods to Perfect a Song Mix That Fails to Translate!

To fix a song mix that doesn’t translate, adjust volume levels, EQ settings, pan positions, compression, and reverb. Ensuring each element of the mix is balanced will enhance the overall sound and clarity for listeners.


It is important to address these five key areas to optimize the mix and make it more cohesive and impactful. By implementing these strategies, you can significantly enhance the quality and effectiveness of your song mix, ultimately improving the listening experience for your audience.


Let’s explore these five ways in more detail to help you achieve a professional and polished mix for your music production.


Understanding The Problem


To fix a song’s mix that doesn’t translate, it’s crucial to first understand the problem. Identify any frequency clashes, muddiness, or dynamics issues. Pay attention to the balance between instruments and vocals. Use reference tracks to compare the mix and ensure it translates well across different playback systems.

Challenges Of A Bad Mix

Songs that do not translate to different playback systems can face various challenges, such as unbalanced sound levels and poor clarity.

Impact On Audience

A poorly mixed song can result in a disengaged audience due to the lack of cohesive, enjoyable listening experience.

Setting The Stage For Success


Enhance your song mix with these 5 expert tips to ensure optimal sound quality and audience connection. Setting the stage for success starts by addressing common issues that may hinder your music’s impact. Take action to fix translation problems and elevate your musical creations to new heights.

Setting the Stage for Success

Quality Tracking And Editing

Quality tracking and editing are vital for improving the mix of a song. Ensure each instrument is clear and balanced to enhance the overall sound.

Creating A Vision

Develop a clear vision for how you want the song to sound. This provides direction for the mixing process.


Five Proven Methods

Balancing Eq And Dynamics

When it comes to fixing a song mix that doesn’t translate well, balancing EQ and dynamics is key. Use an EQ to ensure each instrument sits well in the mix without conflicting frequencies. It’s also important to control dynamics, ensuring the volume levels of different elements complement each other effectively.

Effective Panning Techniques

To improve the mix, utilize effective panning techniques. By spreading out the instruments across the stereo field, you can create a sense of space and separation, effectively enhancing the overall clarity and coherence of the mix.

Utilizing Reverb And Delay

Adding reverb and delay can significantly improve the perception of depth and space in the mix. Carefully utilize these effects to create a cohesive and immersive sonic environment, while ensuring they do not overwhelm the overall balance of the mix.

Importance Of Compression

Compression plays a crucial role in ensuring a consistent and controlled dynamic range in the mix. By applying the right amount of compression to individual tracks and the overall mix, you can achieve a more polished and professional sound.

Refining With Automation

Automation allows for precise control over various parameters throughout the song. Use automation to refine the mix, adjusting levels, panning, EQ, and effects to ensure that every part of the song receives the attention it needs, creating a more engaging and polished final product.

5 Proven Methods to Perfect a Song Mix That Fails to Translate!


Credit: www.waves.com


Harnessing Advanced Tools


Enhance your song mix with advanced tools to improve its translation across different platforms. Adjust levels, EQ, compression, stereo imaging, and apply subtle effects for a professional sound. Mastering these techniques will elevate your music production game.

When it comes to fixing a song mix that doesn’t translate well, relying solely on your ears might not be enough – especially if you’re dealing with complex issues. That’s where harnessing advanced tools can make a significant difference. In this article, we will explore two powerful techniques that can help you troubleshoot your mix and enhance its overall sonic quality. By utilizing multiband compression and exploring parallel processing, you’ll have the necessary arsenal to take your mix to the next level.

Utilizing Multiband Compression

Multiband compression is an incredibly effective tool that allows you to target specific frequency ranges and apply compression to those areas individually, giving you much finer control over the dynamics of your mix. By splitting the audio signal into multiple frequency bands, you can treat each band separately, effectively maximizing the impact of your changes.

Here’s a breakdown of how you can utilize multiband compression:

  1. Identify problematic frequency ranges in your mix that need improvement.
  2. Insert a multiband compressor on your master bus or individual tracks to isolate these frequency ranges.
  3. Adjust the compression settings for each band, tweaking the attack, release, threshold, and ratio to achieve the desired balance.
  4. Regularly reference your changes by listening to the mix in various playback systems to ensure it translates well across different mediums.

Exploring Parallel Processing

Parallel processing, also known as New York compression or parallel compression, is a technique that involves blending a heavily compressed signal with the original dry signal. By doing so, you can achieve a more powerful and upfront sound without sacrificing the dynamics and natural feel of the mix.

Here’s an approach to explore parallel processing:

  1. Create a parallel processing chain by duplicating the track or bus you want to process.
  2. Apply aggressive compression to the duplicated track, emphasizing the desired characteristics.
  3. Gradually blend the heavily compressed signal with the original signal until you achieve the desired balance.
  4. Experiment with different settings, such as EQ or saturation, to further enhance the parallel processed signal.

By harnessing the power of advanced tools like multiband compression and parallel processing, you can effectively address mix translation issues and breathe new life into your songs. Remember to experiment, trust your ears, and make small adjustments to achieve the desired results. With these techniques in your toolkit, you’ll be able to create mixes that truly shine across different playback systems.

Mastering The Final Mix

Mastering the final mix is a crucial step in fixing a song mix that doesn’t translate well. It involves refining transitions, polishing with equalization, and maximizing loudness to ensure a professional and balanced sound. In this article, we’ll explore these techniques in detail to help you achieve a mix that sounds great on any playback system.

Refining Transitions

Transitions play a significant role in how well a song flows from one section to another. Uneven transitions can create jarring interruptions in the listening experience. To refine transitions:

  1. Identify problematic transitions: Listen to your mix with a critical ear, paying attention to any abrupt changes or abruptness.
  2. Smooth out the transitions: Use crossfades, automation, or volume adjustments to create seamless transitions between sections.
  3. Experiment with effects: Reverb, delay, or filters can be used to smoothen transitions and add depth to your mix.

Polishing With Equalization

Equalization, or EQ, is an essential tool for balancing the frequency spectrum in your mix. It allows you to enhance or reduce specific frequencies to achieve clarity and separation. When polishing your mix with equalization:

  • Address muddiness: Identify frequency ranges where multiple instruments may be competing for space and use EQ to carve out their respective frequencies.
  • Enhance tonal balance: Adjust the levels of different frequency ranges to achieve a pleasing and balanced overall sound.
  • Sculpt individual elements: Apply EQ to individual instruments or vocals to address any sonic issues or enhance desired characteristics.

Maximizing Loudness

Loudness is an important aspect of a mix, especially in the modern music industry where competitive loudness levels are expected. To maximize loudness and ensure your mix stands out:

  1. Use compression wisely: Apply compression to control dynamic range and achieve a more consistent volume level throughout the song.
  2. Limiting: Utilize a limiter to prevent any unwanted peaks from exceeding the desired loudness level.
  3. Carefully revise levels: Make small adjustments to the overall volume of individual elements to ensure a cohesive and impactful mix.

These techniques can greatly improve the translation of your song mixes across different playback systems and enhance the overall listening experience. By refining transitions, polishing with equalization, and maximizing loudness, you’ll be well on your way to an expertly mastered final mix. Remember, practice and experimentation are key to finding the right balance for each individual song.


Frequently Asked Questions For 5 Ways To Fix A Songs Mix That Doesnt Translate


How Can I Fix Songs That Don’t Sound Good On Different Devices?


To fix songs that don’t translate well across devices, you can try adjusting the EQ settings, reducing reverb, and making sure the mix isn’t too crowded. Additionally, optimizing for the lowest common denominator and using reference tracks can help improve the overall sound on different devices.


What Are The Common Problems In Song Mixes That Don’t Translate?


Some common problems in song mixes that don’t translate include excessive low-end frequencies, unbalanced levels, lack of stereo width, and inconsistent tonal characteristics. These issues can result in a mix that sounds great on one device but performs poorly on others.


Identifying and addressing these problems can greatly improve the mix’s translation.


Can Using Different Playback Systems Affect The Mix’s Translation?


Yes, using different playback systems can significantly impact how a song mix translates. Each device has its unique frequency response and sonic characteristics, which can alter the perception of the mix. It is essential to test the mix on various devices, including headphones, car speakers, and studio monitors, to ensure it sounds good across different systems.


Conclusion


To sum up, improving a song’s mix for better translation is crucial for its impact. By implementing these strategies, you can enhance the overall quality and ensure a seamless listening experience for your audience. Remember to focus on balancing levels, utilizing proper EQ, paying attention to stereo imaging, using reference tracks, and testing across different playback systems.


With dedication and practice, you can achieve a mix that resonates across various platforms and devices, ultimately maximizing the reach and impact of your music.

Categories
Archive Audio Production

Is Buying Beats Actually Better Than Making Your Own Cheat Code? Discover the Ultimate Sound-Boosting Secret

Buying beats can save time. Making your own cheat code offers more creative control.


Deciding which method suits you best depends on your goals and preferences. Whether you prioritize convenience or artistic freedom may influence your choice. Let’s delve deeper into the pros and cons of buying beats versus creating your own cheat code to help you make an informed decision.


While purchasing beats can provide ready-made solutions and professional production quality, crafting your cheat code allows for unique customization and personal expression. Each approach comes with its own set of advantages and considerations, making it essential to weigh them against your individual needs and aspirations.


Credit: www.ambitiouskitchen.com


The Pros And Cons Of Buying Beats

Quality Guarantee

Buying beats often comes with a quality guarantee, ensuring professional sound production.

  • Experienced producers ensure top-notch sound quality.
  • Access to a wide range of genres and styles.

Cost Considerations

While buying beats may offer convenience, it also involves some financial considerations.

  1. Initial cost is higher but saves time on production.
  2. Licensing fees may add up over time.

If you’re considering buying beats, weigh these pros and cons carefully.


Credit: us.macmillan.com


The Art And Science Of Creating Your Own Cheat Code

Considering whether to buy beats or create your own cheat code can be a key decision for aspiring musicians. Let’s delve into the Customization and Originality aspect first.

Customization And Originality

Creating your own cheat code allows for complete artistic customization that reflects your unique style. You can craft beats that are truly original and stand out in a crowded music landscape.

Learning Curve And Time Investment

Learning to make your own cheat code involves a significant learning curve and requires time to master the necessary skills. However, the investment in time ultimately results in a deeper understanding of music production.

https://www.youtube.com/watch?v=PjDRm9sR77E


Unveiling The Ultimate Sound-boosting Secret

Exploring Hybrid Approaches

In the ever-evolving world of music production, exploring hybrid approaches can revolutionize the way you create beats. By combining the convenience of buying beats with the freedom of making your own, you can achieve a unique and impactful sound that sets you apart from the crowd. This approach allows you to leverage the strengths of both options, maximizing efficiency without sacrificing creativity.

Maximizing Creative Potential

Maximizing creative potential is the key to unleashing your artistic vision. Whether you’re a seasoned producer or just beginning your musical journey, finding the right balance between buying beats and creating your own can open up new possibilities. By embracing this hybrid model, you can infuse your tracks with a blend of authenticity and innovation, helping you reach new heights in your musical endeavors.

Is Buying Beats Actually Better Than Making Your Own Cheat Code? Discover the Ultimate Sound-Boosting Secret


Credit: neilpatel.com


Frequently Asked Questions On Is Buying Beats Actually Better Than Making Your Own Cheat Code


Is Buying Beats A Better Option Than Making Your Own Cheat Code?


Buying beats can save you time and effort in the music production process. Professional beat producers provide high-quality production that may be hard to achieve on your own. However, making your own cheat code gives you creative control and can be a rewarding experience for musicians wanting to create a unique sound.


What Are The Advantages Of Buying Beats?


When you buy beats, you gain access to professionally produced tracks that are ready to use. This saves you time and effort in the music production process. Additionally, buying beats allows you to collaborate with talented producers, providing a fresh perspective to your music.


Why Should Musicians Consider Making Their Own Cheat Code?


Making your own cheat code allows you to have full creative control over your music production. It gives you the opportunity to experiment, innovate, and create a unique sound that reflects your artistic vision. Additionally, making your own cheat code can be a rewarding learning experience and help you develop your skills as a musician.


Conclusion


In the end, whether to buy beats or make your own cheat code boils down to personal preference. Both options have their advantages and drawbacks, but the key is finding what works best for you. Ultimately, the decision hinges on factors such as time, expertise, and creative vision.


Whichever path you choose, the goal remains the same: to create music that resonates with your audience and fulfills your artistic vision.