Categories
Archive

Eq Frequency Guide

EQ frequency guide provides information on the frequency range of different instruments and vocal ranges for equalization. In this guide, you can find the frequency range for different instruments, such as drums, guitar, bass, piano, and vocals, along with a brief explanation on how to adjust the EQ for each instrument or range.

Below are some additional details on what you can expect to learn from an EQ frequency guide. An EQ frequency guide is an essential tool for musicians, sound engineers, and producers. Understanding how to identify and adjust the various frequencies in a mix can make a significant difference in the overall sound quality.

With an EQ frequency guide, you can learn how to remove unwanted frequencies, enhance the desired ones, and add clarity to a mix. We will explore the significance of an EQ frequency guide, how to use it effectively, and why it is essential to have one in your arsenal as a music professional.
Eq Frequency Guide

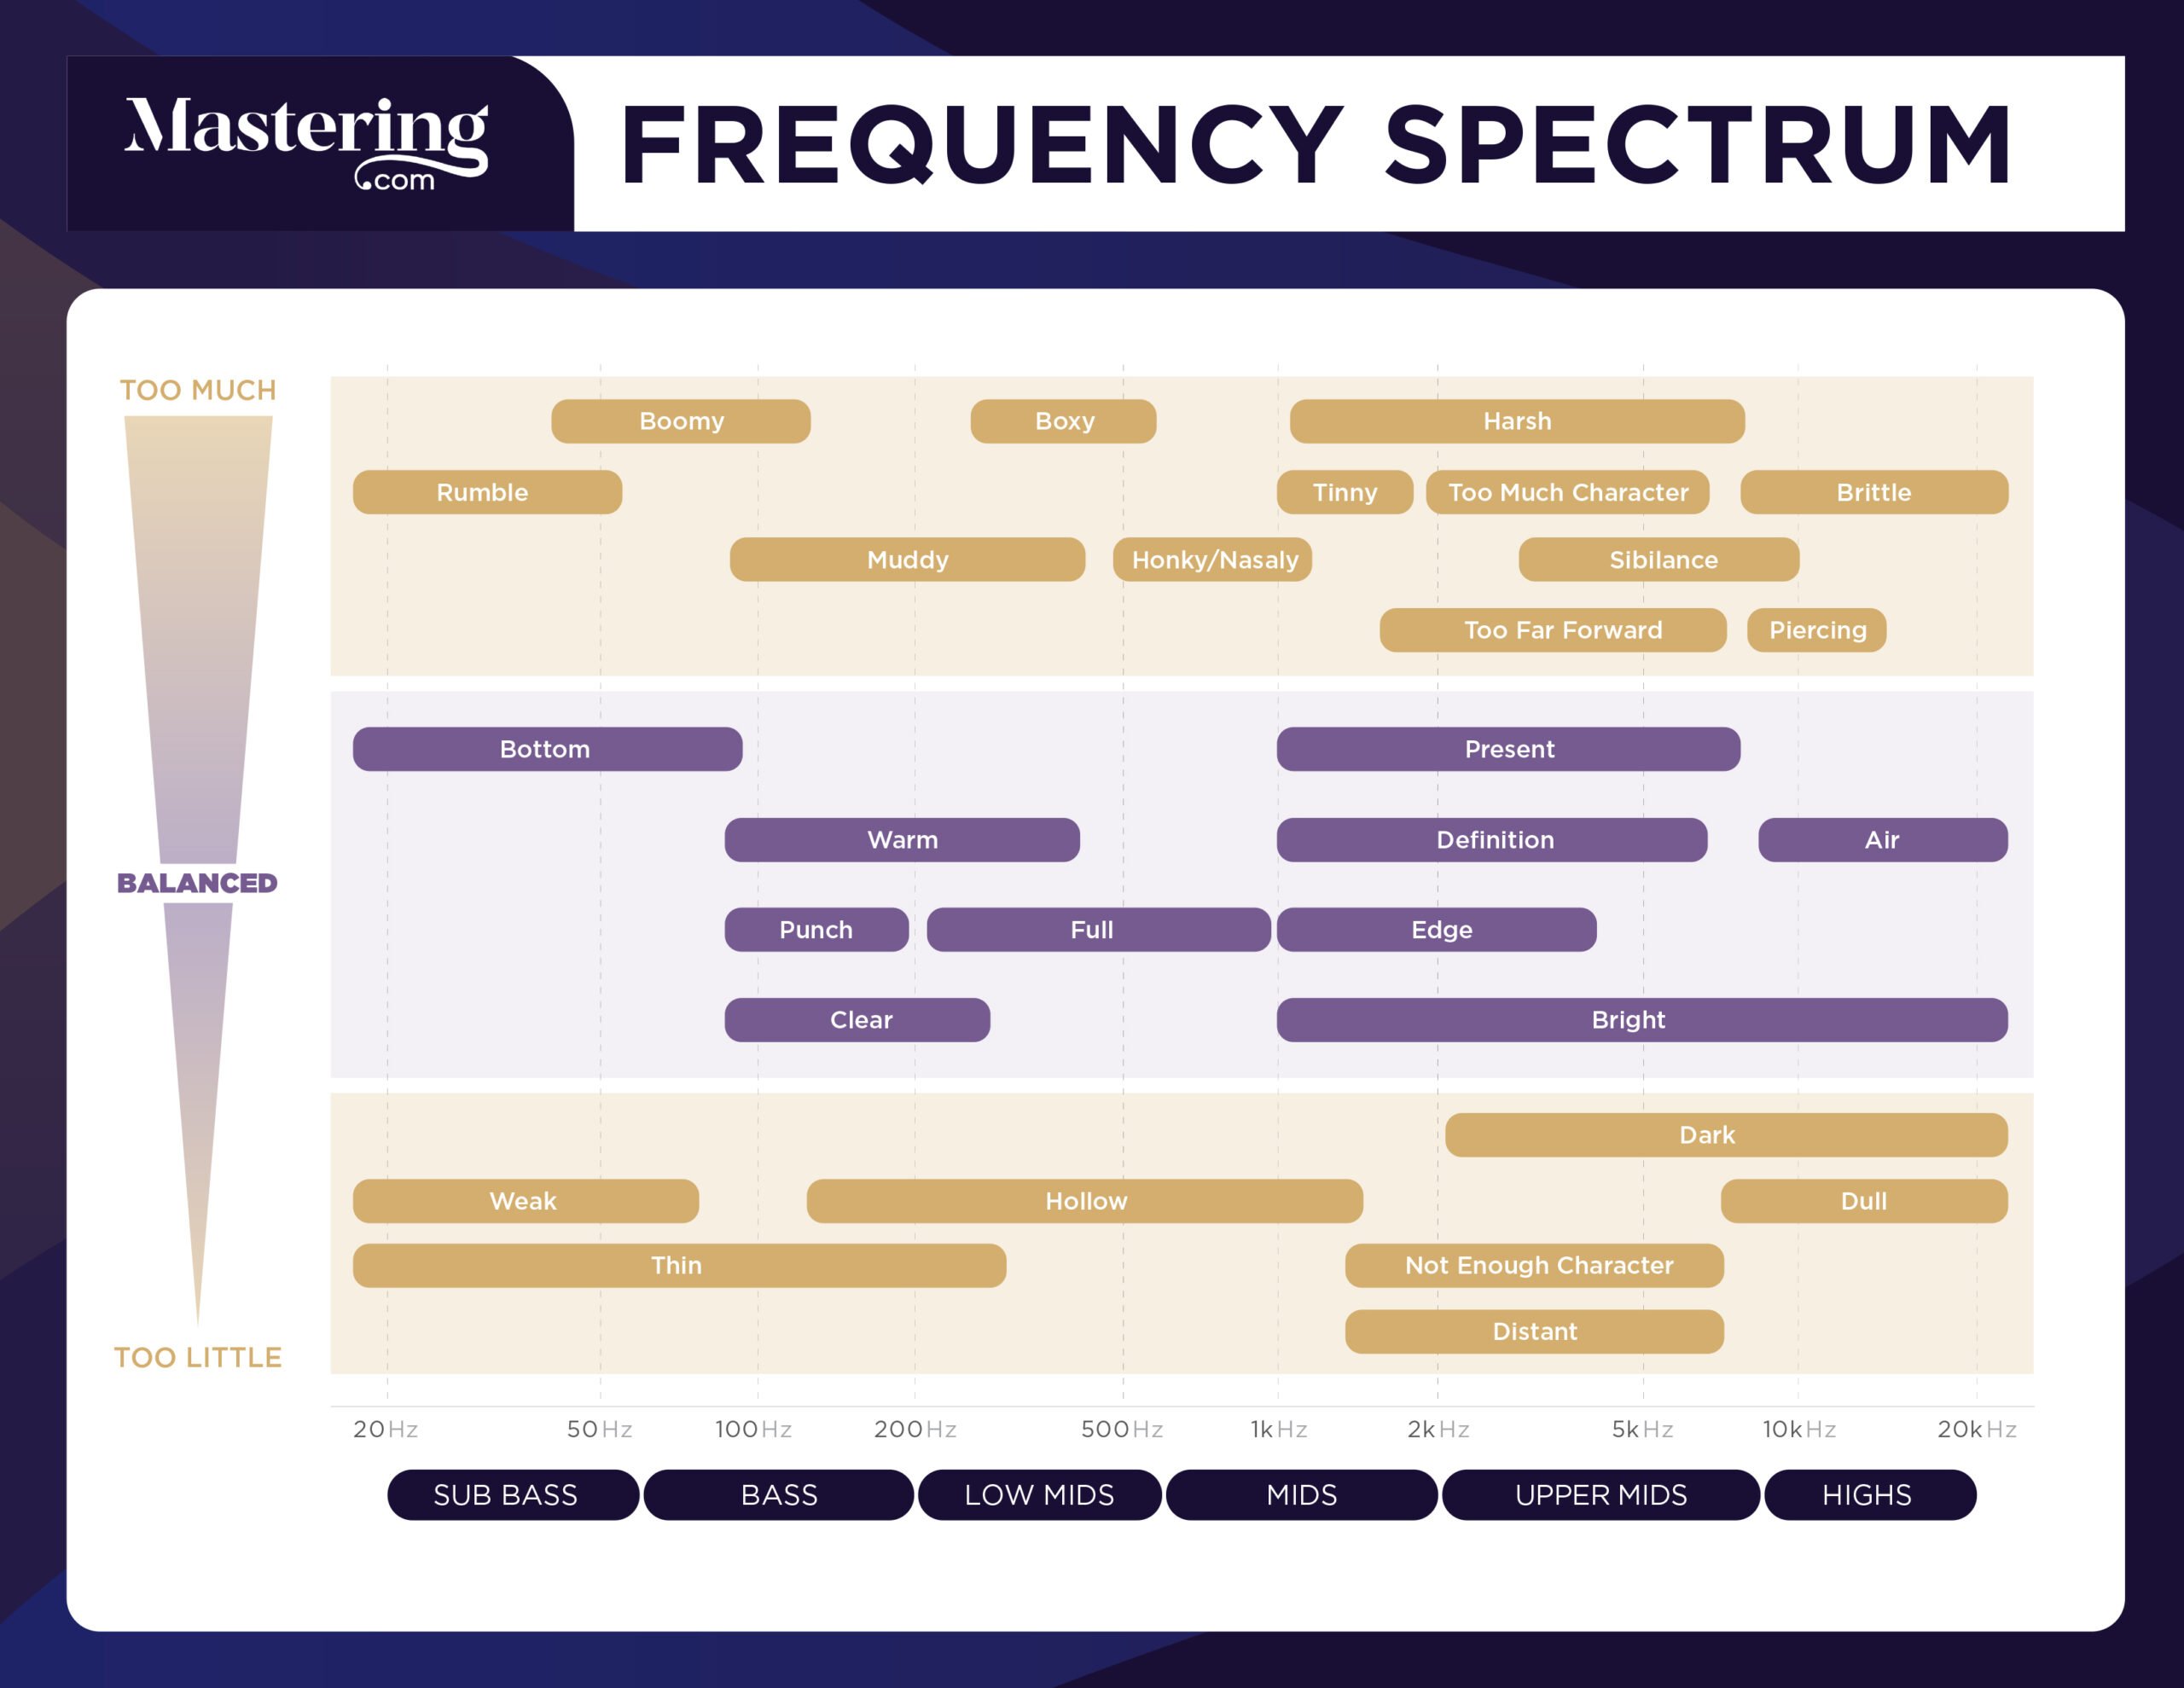
Credit: mastering.com

What Is Eq Frequency?

EQ frequency refers to equalization, a process used to adjust sound by increasing or decreasing specific frequencies. An EQ frequency guide can help you understand what frequencies to adjust for different instruments or vocals, resulting in a better mix and overall sound quality.

Frequency Spectrum Basics

The frequency spectrum refers to the range of frequencies that an instrument can produce. It is typically measured in hertz (Hz), which is a unit of frequency that indicates the number of cycles per second. The human ear can detect sounds that range from 20 Hz to 20 kHz, while certain animals can detect sounds beyond this range. Understanding the frequency spectrum is important when it comes to audio production, as different instruments and sounds will produce different frequencies.

Defining Eq Frequency

EQ or equalization relates to the process of adjusting the balance between different frequency components within an audio signal. This enables sound engineers to fine-tune the overall sound of a recording or a live performance. EQ can be applied in many ways, such as boosting the bass frequencies of a kick drum or reducing the high frequencies of a guitar amplifier. When adjusting the EQ of an audio signal, you are essentially manipulating the frequency spectrum to achieve a desired effect. EQ frequency refers to the individual frequencies that are being adjusted. For example, a boost at 1kHz would increase the volume of that frequency. In conclusion, understanding EQ frequency is crucial when it comes to audio production, as it allows engineers to tailor the sound to their specific needs. By understanding the basics of the frequency spectrum and how EQ works, you can begin to craft your own unique sound.

Eq Frequency Guide

Credit: www.audio-issues.com

Eq Frequency Ranges

EQ frequency ranges refer to the different frequencies that can be adjusted on an equalizer. Understanding these ranges is crucial for achieving the desired balance in audio production and mastering.

An essential aspect of music production is equalization (EQ). EQ is a tool that helps in manipulating the frequencies of audio tracks. The ability to understand and recognize the various frequency ranges is essential for effective use of EQ. In this blog post, we will discuss the EQ Frequency Guide, focusing on the subheading: EQ Frequency Ranges. We will explore the different frequency ranges such as low frequencies, low-mid frequencies, mid frequencies, high-mid frequencies and high frequencies, including their characteristics and usage.

Low Frequencies

Low frequencies are the bass elements that occupy the lowest part of the frequency spectrum. These frequencies can range from 20Hz to 200Hz, and they are responsible for producing the fundamental tones of kick drums, bass guitars, and other types of bass instruments. Low frequencies give the music a sense of power and weight. However, excessive low frequencies can make the mix muddy and cluttered, resulting in a loss of clarity. Reducing low frequencies can be helpful in eliminating unwanted noises, but care should be taken to ensure that the mix doesn’t sound thin and weak.

Low-mid Frequencies

The low-mid frequencies range from 200Hz to 500Hz. These frequencies are responsible for creating the warmth and depth of instruments like drums, guitars, and pianos. They are also responsible for the body of vocals. Too much low-mid frequency can make the mix sound boomy and boxy, while not enough can make it thin and weak. Therefore, a careful balance of low-mid frequency is essential for a clear and balanced mix.

Mid Frequencies

Mid frequencies range from 500Hz to 2000Hz. These frequencies bring out the presence and clarity of instruments like vocals, guitars, and horns. Too much mid frequency can cause ear fatigue, while not enough can make the mix sound hollow and lifeless. Finding the right balance of mid frequencies is critical in creating a clear and present mix.

High-mid Frequencies

High-mid frequencies range from 2000Hz to 4000Hz. These frequencies are responsible for creating the definition and clarity of instruments like cymbals, snare drums, and hi-hats. They also bring out the attack and sharpness of guitars and other instruments. Too much high-mid frequency can cause ear fatigue and make the mix sound harsh and shrill. On the other hand, not enough high-mid frequency can make the mix sound dull and lifeless.

High Frequencies

High frequencies range from 4000Hz to 20,000Hz. These frequencies give the mix the air and sparkle, resulting in a bright and lively sound. They bring out the shimmer of cymbals, the brilliance of strings, and the sizzle of percussion instruments. However, excessive high frequency can cause ear fatigue and make the mix sound harsh and piercing. Therefore, it is essential to strike a balance between high frequency and other frequencies to produce a well-balanced mix. Understanding the EQ frequency ranges is essential in creating a balanced and transparent mix. Effectively using EQ to manage the frequencies is a critical skill for any music producer or audio engineer. By carefully considering the characteristics and usage of each frequency range, one can produce a mix that is both clear and captivating.

Identifying Eq Issues

EQ frequency guide helps in identifying issues related to emotional intelligence in individuals. By understanding different frequencies of EQ, individuals can assess their own emotional intelligence and work on areas that need improvement.

Identifying EQ Issues: EQ frequency is essential to achieving a perfect mix, but it can be challenging if you don’t know what to look or listen to. To identify EQ issues, you must understand frequencies and their effects on our ears. Here, we will examine some of the most common EQ issues that you may encounter in your mixing process. Muddiness: Muddiness is a common problem in the low-mid frequencies between 200-500 Hz. The muddiness issue implies a lack of definition and clarity in the mix, which can make it dull. To address muddiness, you need to pinpoint the problematic frequency range and subtract it using an EQ’s band. Boxiness: Boxiness occurs around 400 Hz to 600 Hz, and it’s a resonance problem that creates a boxy sound in the mix. It’s common in recordings made in small rooms with square walls. To fix boxiness, try cutting around the resonance frequency using a narrow band. Honkiness: Honkiness is a nasal, annoying sound mainly from the mid-range frequencies between 600-1000 Hz. You can fix honkiness by using a narrow band to cut the problematic frequency range and then adjusting the bandwidth until it sounds natural. Harshness: Harshness is a problem that occurs around 2-4 kHz, and it creates a sharp, unpleasant sound. It’s common in vocal recordings, and you can fix it by cutting the frequency range using a narrow band and then adjusting the attenuation to achieve a natural sound. Tininess: Tininess is a problem that occurs in the high-frequency range, around 8-12 kHz. It produces a thin, brittle sound and can make the mix sound harsh and amateurish. To fix tininess, increase the frequency range using a wide band and adjust the gain until it blends naturally into the mix. In summary, understanding how frequencies affect our ears is crucial in identifying and fixing EQ issues. By addressing muddiness, boxiness, honkiness, harshness, and tininess, you can achieve a crisp, clear, and professional sound in your mix.

Fixing Eq Issues

Fixing EQ issues can be a challenging task, especially for beginners. The EQ frequency guide can help you identify and correct any issues with the sound quality of your audio to ensure it sounds balanced and clear to your audience.

If you are an audio engineer or music producer, you know the importance of EQ in achieving a good mix. However, sometimes things don’t sound as good as you want them to, and this is where the EQ frequency guide comes in.

Using Low-cut Filters

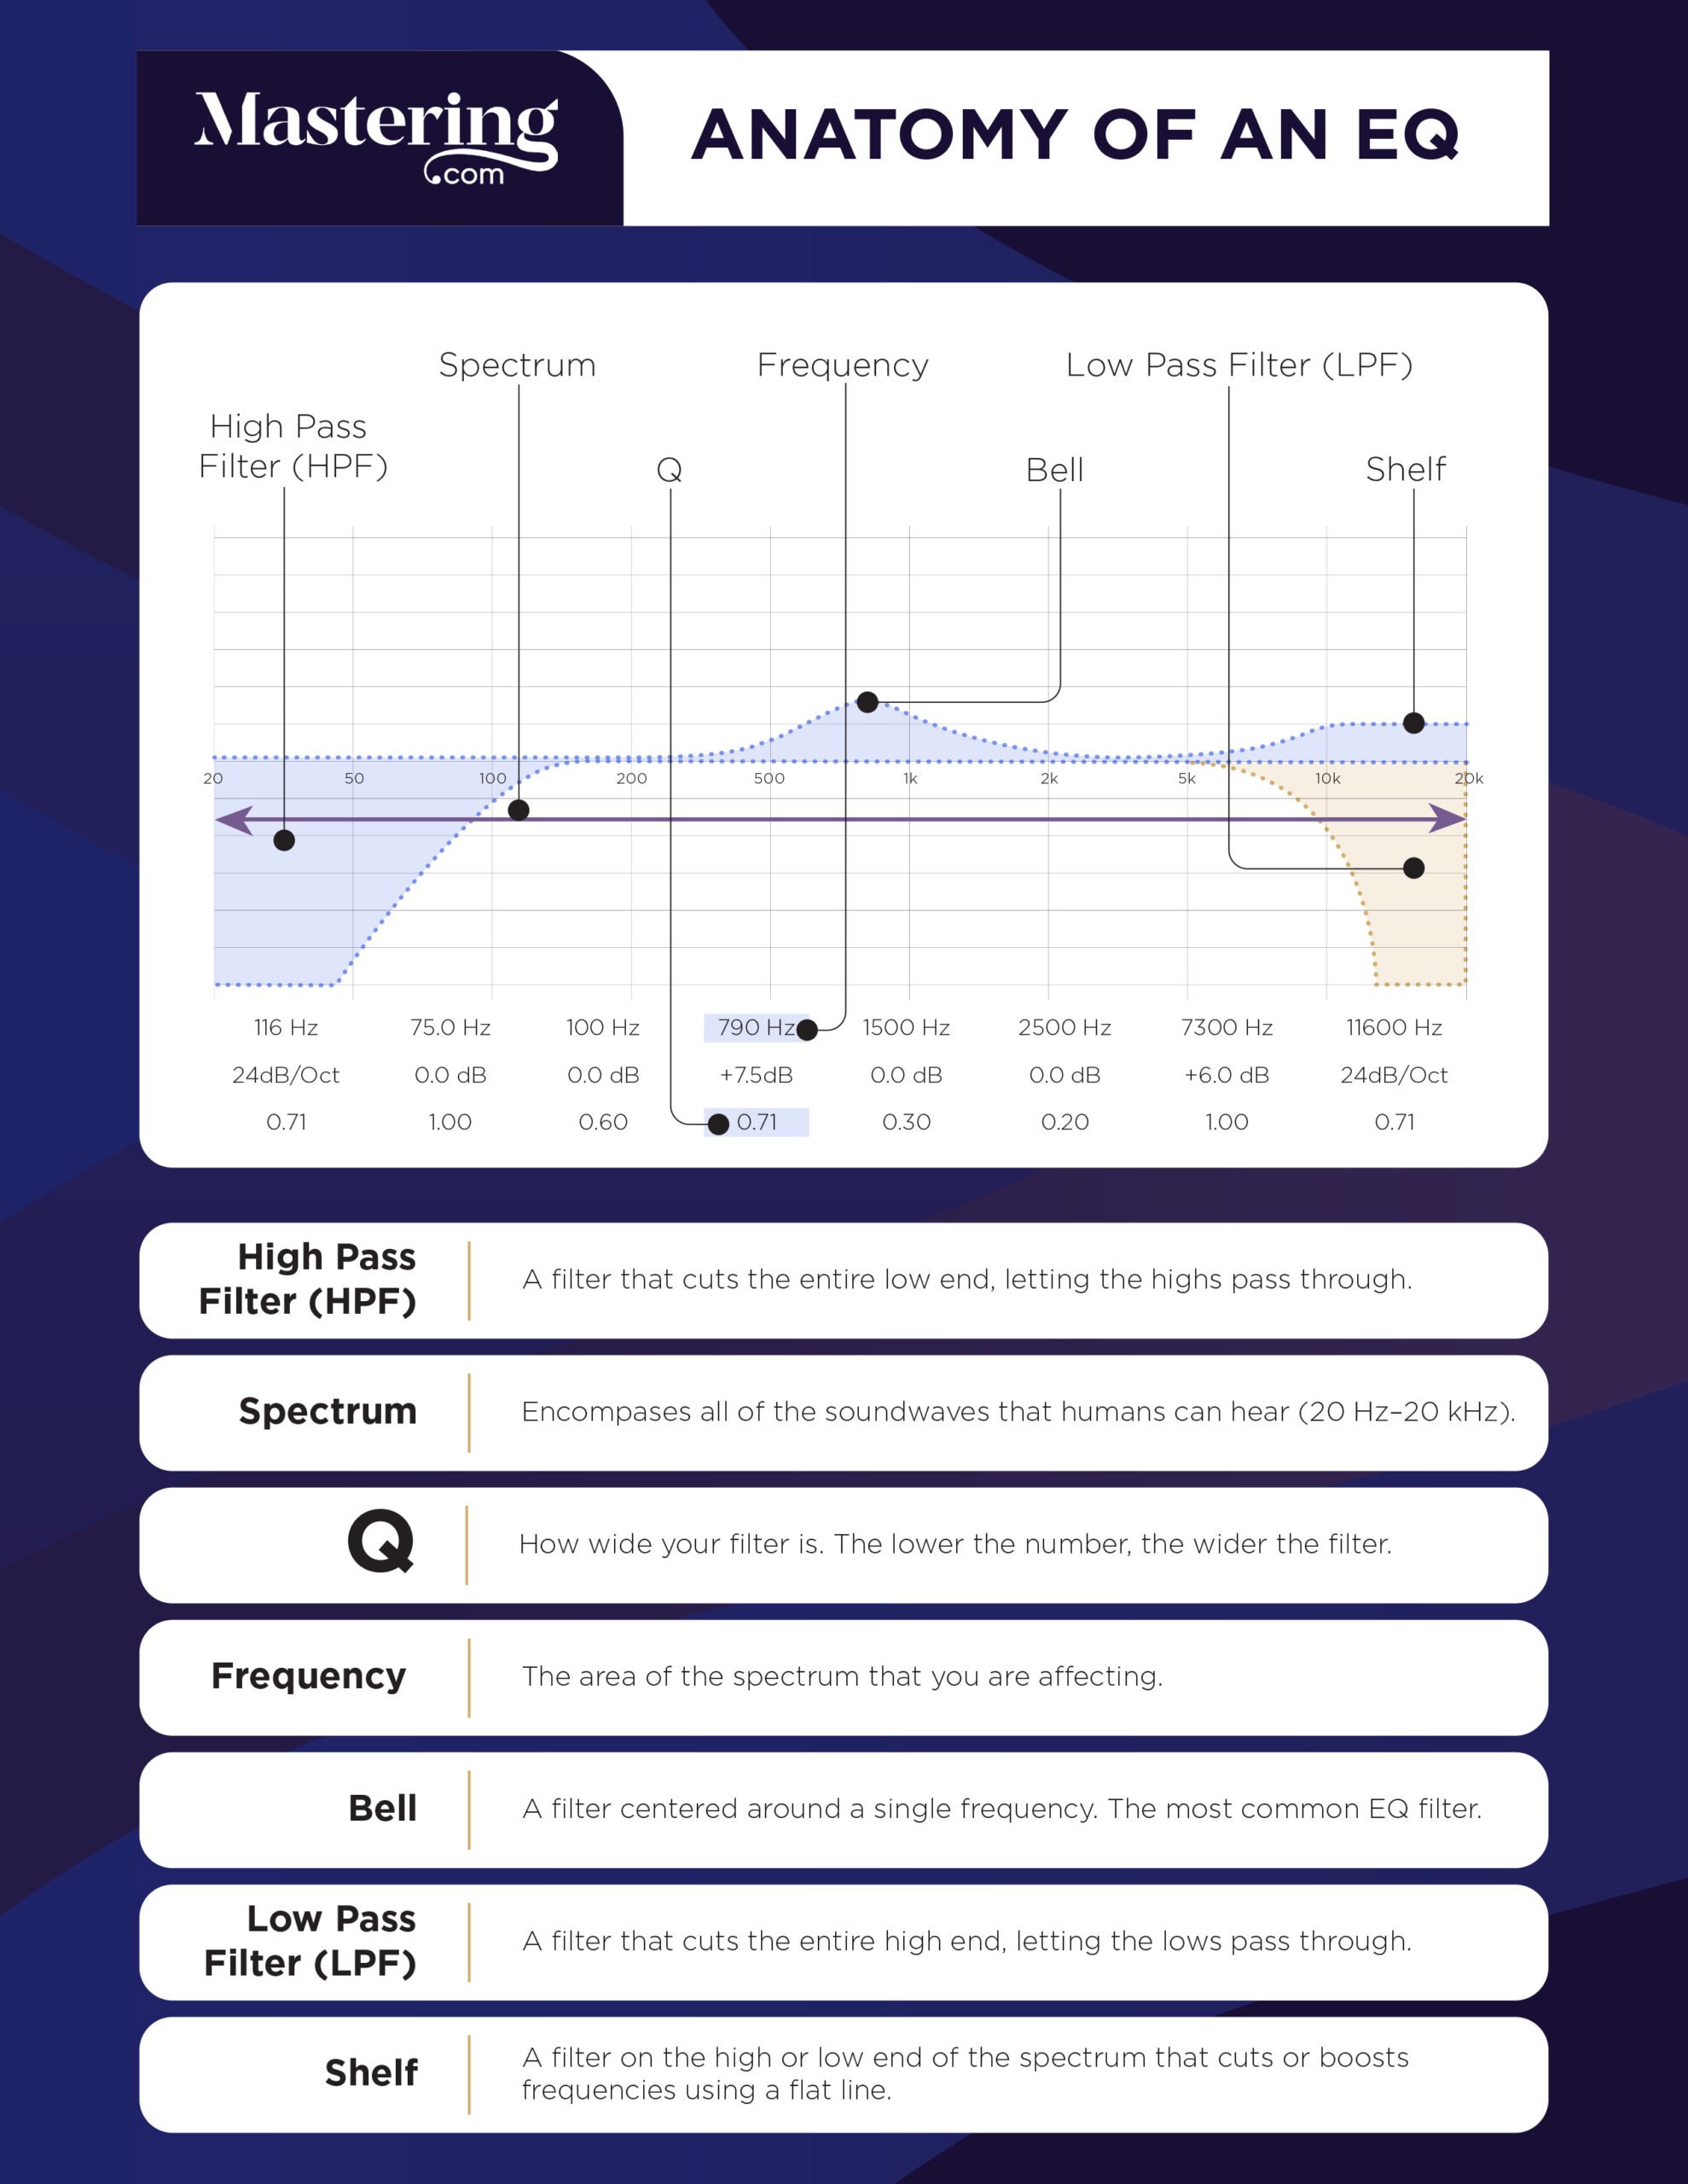
One common issue that may arise when EQing is the presence of unwanted low frequencies. Using low-cut filters is an easy and effective way to remove those frequencies. Simply set the filter at the frequency below where you want to keep the audio, and the filter will remove the rest.

Using Hi-cut Filters

On the other hand, if you are dealing with unwanted high frequencies, you can use hi-cut filters. Set the filter at the frequency above where you want to keep the audio, and it will remove the rest.

Using Bell Filters

Bell filters allow you to boost or cut a specific frequency range. They are particularly useful for balancing the frequencies of individual instruments in a mix. For example, if a guitar sound is too thin, you can use a bell filter to boost the midrange frequencies of the guitar to make it sound fuller.

Using Wide-q Filters

Wide-Q filters are similar to bell filters, but with a broader range. They are useful for making more significant adjustments to the overall sound of your mix. For example, if you feel like the overall mix is too boxy, you can use a wide-Q filter to cut the low-mid frequencies. In conclusion, using EQ can be tricky, but with the EQ frequency guide, fixing issues is manageable. Try out these techniques, and you will notice significant improvements in your mixes.

Tips For Using Eq Effectively

To use EQ effectively, it’s important to understand the frequency ranges of different instruments and vocals. A basic EQ frequency guide can help you achieve a better mix by allowing you to boost or cut certain frequencies to bring out the best in your music.

Using an EQ Frequency Guide can be incredibly helpful when it comes to mixing music, especially when trying to balance different sounds in a mix. But it’s important to keep in mind that EQ is a powerful tool that can easily be overused, resulting in a mix that sounds overly processed or unnatural. To avoid these pitfalls, here are some tips for using EQ effectively:

Less Is More

It’s tempting to want to EQ every track in a mix, but this can quickly lead to an overly processed sound. Instead, try to be selective about which tracks you EQ and how much you EQ them. In many cases, subtle adjustments are all that’s needed to make a track sit better in a mix. Remember, less is often more when it comes to EQ.

Don’t Solo Eq

Another common mistake when it comes to EQing is to solo individual tracks while making EQ adjustments. While this might make it easier to hear what you’re doing, it can also lead to a mix that sounds unnatural. After all, your mix won’t be heard in isolation – it will be heard as part of a larger piece of music. To ensure your mix sounds natural, make EQ adjustments while listening to the entire mix.

Always Use Your Ears

While an EQ Frequency Guide can be helpful, it’s important to remember that every mix is unique. What sounds good in one mix might not sound good in another. As such, it’s important to always use your ears when EQing. Trust your intuition and make adjustments based on what sounds good to you.

Take Breaks

Finally, it’s important to take breaks when EQing. Your ears can quickly become fatigued when you’re listening to music for extended periods of time, which can make it difficult to make accurate EQ adjustments. Take frequent breaks and give your ears a rest. This will help ensure that you’re making the best possible EQ adjustments. By following these tips, you’ll be well on your way to using an EQ Frequency Guide effectively to create great-sounding mixes. Remember to be selective in your EQ adjustments, avoid solo EQing, trust your ears, and take breaks when needed. Happy mixing!
Eq Frequency Guide

Credit: mastering.com

Frequently Asked Questions On Eq Frequency Guide

What Frequencies Should I Eq Out?

It depends on the specific audio. EQ out frequencies that sound harsh or muddy. Cut low end below 30Hz to reduce rumble. Roll off high end above 16kHz to prevent hiss. Narrow cuts around trouble frequencies are more effective than broad ones.

Always trust your ears, not charts.

What Is Eq Frequency Chart?

An EQ frequency chart is a visual representation of the frequency range that an audio equalizer can adjust. It displays the frequency bands, their corresponding frequencies in Hertz, and the amount of boost or cut that can be applied to each band.

This helps sound engineers adjust and balance the different frequencies in an audio mix.

What Should I Set My Eq To?

Setting EQ depends on the type of music you are listening to and personal preferences. Start by setting all frequencies to zero and adjust each band to enhance or reduce specific frequencies based on the music. Trust your ears and experiment until you find the perfect balance.

What Is 400 Hz In Equalizer?

In equalizers, 400 Hz is a frequency range that can be adjusted to boost or cut certain frequencies in audio. It can affect the warmth and clarity of sounds. A precise setting of 400 Hz can make a big difference in the overall sound quality of the audio.

Conclusion

Eq Frequency Guide provides an in-depth understanding of how equalization works and how it can be used in music production. By understanding the different frequency ranges and their impact on sound, you can achieve a more balanced and polished final product.

Whether you’re a professional musician or just starting, this guide will help you take your mixes to the next level. Remember to experiment with different EQ settings and trust your ears to achieve the best results.

More in our EQ guide.

Categories
Archive

How To Draw Midi Chords

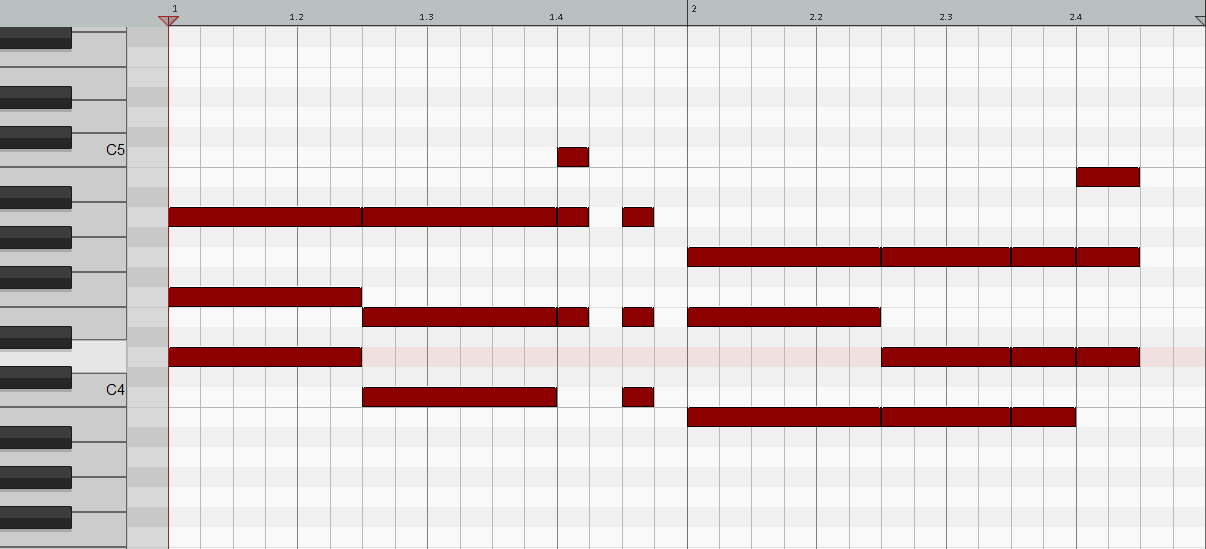
To draw MIDI chords, select a chord type, choose a root note, and create the chord by adding other notes. Drawing MIDI chords involves selecting the chord type, picking a root note, and adding the necessary notes to create your chord.

This can be done using a variety of MIDI editors or DAWs such as Ableton Live or Logic Pro. With MIDI chords, even beginner musicians can quickly create complex chord progressions and melodies to enhance their music. Read on to learn more about how MIDI chords work and some tips for creating your own.

Creating The Chord Progression

Drawing midi chords may seem daunting, but with the right tools, it can be both fun and easy. Start by creating the chord progression to build a solid foundation for your composition. With practice, you can master the art of creating beautiful melodies and harmonies using midi chords.

Creating the Chord Progression: Creating MIDI chords may sound difficult at first, but with some practice and understanding, it can be easily achieved. In this section, we will focus on creating the chord progression. We will start with understanding basic chords and then move on to adding variations and extensions to chords. We will also cover creating inversions and voicings, allowing you to create a unique and interesting chord progression. Understanding Basic Chords: Before we dive into creating chords, it’s important to understand what basic chords are. A chord is a combination of notes played simultaneously to create harmony and add depth to a melody. Basic chords are formed using triads, which consist of three notes played together. The three notes are usually the first, third, and fifth notes of a scale. Adding Variations and Extensions to Chords: Now that we have a basic understanding of chords, let’s dive into adding variations and extensions to them. A variation changes the basic chord’s structure, while an extension adds additional notes to the basic chord to create a more complex sound. Some popular variations include suspended chords, diminished chords, and augmented chords. On the other hand, some common extensions include seventh chords, extended chords, and suspended chords. Creating Inversions and Voicings: Creating inversions and voicings is crucial to create a unique and interesting chord progression. Inversions are created by rearranging the notes of a chord to create a different order or arrangement. Voicings, on the other hand, refer to the way the notes of a chord are spread out or played across different octaves. Creating inversions and voicings allow you to create a more complex and interesting chord progression. In conclusion, creating MIDI chords is a crucial skill for anyone who wants to create their own music. Understanding basic chords, adding variations and extensions, and creating inversions and voicings can help you create a unique and interesting chord progression. With some practice and understanding, you can create beautiful and catchy music using your MIDI chords.

How To Draw Midi Chords

Credit: forum.ableton.com

Programming Midi Chords

To draw MIDI chords, start by opening a new MIDI clip and adding a virtual instrument. Once you’ve created a new MIDI clip, select the chord drawing mode and use your mouse or keyboard to add chords to the timeline.

Finally, adjust the chord length and the velocity of each note to create your desired sound.

If you are a music producer or composer, midi chords can be an essential tool in your arsenal. Midi chords allow you to create complex chord progressions with ease, and they can be used in various genres such as EDM, house, and pop. In this article, we will explore different ways to draw midi chords. We will discuss how to use a midi keyboard, programming in a midi editor, and using chord progression tools.

Using A Midi Keyboard

You can use a midi keyboard to draw midi chords. A midi keyboard is a controller that sends midi signals to your computer or midi device. To use a midi keyboard, follow these steps:

  1. Connect your midi keyboard to your computer or midi device.
  2. Open your DAW or midi editor.
  3. Select your preferred sound or plugin.
  4. Choose the chord you want to draw on your midi keyboard.
  5. Press and hold the keys that you want to use for the chord.
  6. Record the chord into your midi editor.
  7. Repeat the process for different chords and notes.

Programming In A Midi Editor

If you don’t have a midi keyboard, you can program midi chords directly in your midi editor or DAW. Programming midi chords allows you to have more control over the timing and velocity of each note. Here’s how you can program midi chords:

  1. Open your DAW or midi editor.
  2. Select your preferred sound or plugin.
  3. Go to the midi editor and select the pencil or draw tool.
  4. Draw the chord you want to use on the midi editor.
  5. Edit the timing and velocity of each note to your preference.
  6. Repeat the process for different chords and notes.

Using Chord Progression Tools

If you’re not a music theory expert, using chord progression tools can be a lifesaver. Chord progression tools allow you to create chord progressions without any knowledge of music theory. Here are some chord progression tools you can use:

  • Cthulhu by Xfer Records
  • Cthulhu Chords by ADSR Sounds
  • Scaler by Plugin Boutique
  • Chordz by CodeFN42

Using these chord progression tools is simple. All you have to do is select the key, scale, and chord progression you want to use. The tool will then generate the chords for you. In conclusion, drawing midi chords can be done in various ways, such as using a midi keyboard, programming in a midi editor, and using chord progression tools. Each method has its benefits, so choose the one that works best for you. With midi chords, creating complex chord progressions has never been easier.

Adding Other Elements To The Track

To add more elements to your MIDI track, start by selecting the notes you want to turn into a chord, then holding down the ‘Ctrl’ key while dragging them to a new location. You can also create variations by editing the chord’s velocity, duration, or by playing with the rhythm.

With these tools at your disposal, you can create unique, complex chord progressions that sound great.

Creating Melodies And Harmonies

To make your MIDI chords more interesting, you can add melodies and harmonies to your track. Creating a melody involves selecting a series of notes that sound good together and playing them in a certain order. You can use the same process to create harmonies, which involve playing multiple notes together to create a fuller, richer sound.

Choosing The Right Sounds

Selecting the right sounds to complement your MIDI chords is essential to bring depth and texture to your track. Experiment with different types of instruments to find the perfect sound. Choose sounds that complement each other rather than competing for attention, making sure that each sound blends with the other elements in the track.

Adding Drums And Percussion

Adding drums and percussion to your MIDI chords creates a solid rhythmic foundation to your track. Consider the tempo and style of your track when selecting drums and percussion. A slower tempo track might work well with a soft snare pattern while a faster track might work with a peppy kick and fast-paced snare pattern. To make sure everything comes together as a cohesive whole, play around with various combinations of instruments, melodies, and harmonies. Once your MIDI track is complete, share it with the world and don’t forget to give your track an interesting and SEO optimized title.

How To Draw Midi Chords

Credit: www.youtube.com

How To Draw Midi Chords

Credit: hackmusictheory.com

Frequently Asked Questions Of How To Draw Midi Chords

How Do You Write Midi Chord Progressions?

To write MIDI chord progressions, start by deciding on a key and selecting chord inversions that fit your desired sound. Create a pattern for your progression and add variations to keep it interesting. Experiment with different rhythm and note lengths, and use tools like arpeggiators or sequencers to enhance your progression.

With practice, you can create unique and compelling chord progressions to suit any style or genre.

What Is The Chord Midi Effect?

The chord MIDI effect is a plugin used in digital audio workstations to manipulate MIDI data and create chords. It allows users to play complex chords through a single key or trigger, saving time and improving workflows. The effect is popular in electronic music production but can be used in any genre.

What Is A Chord In Piano?

A chord in piano is a group of three or more notes played together at the same time. These notes create a harmony that is pleasing to the ear. Chords can be simple or complex, and are an essential element in playing the piano.

What Is The Basic Definition Of A Chord In Music?

A chord in music is the sound created by playing two or more notes simultaneously. It is essentially a group of notes played together to create harmony and melody. Chords are the building blocks of music and are used in various genres, including pop, rock, jazz, and classical.

Conclusion

To conclude, drawing MIDI chords may seem overwhelming at first, but with the right techniques and tools, it can become a breeze. Remember to start with simple chords, listen to your music and experiment with different variations. Utilizing plugins and other resources can also help elevate your chords to the next level.

With practice and persistence, you’ll be creating complex and captivating MIDI chord progressions in no time. Keep honing your skills and exploring new ideas to unleash your full creative potential. Happy creating!

Categories
Archive

Best Free Delay Plugins

The best free delay plugins are Tal-Reverb-4, TDR Feedback Compressor II, Voxengo Tempo Delay, and Valhalla Freq Echo. Delay plugins add depth and character to music tracks, but acquiring the best ones can become a financial burden for some users.

Hence, our team has compiled a list of the best free delay plugins available in the market to save you the trouble. These plugins provide professional results. We will discuss the top-notch free delay plugins available for the music producers that can give a high performance without costing a dime.

Our list includes plugins that offer various features, including filter, modulation, and feedback options, which can enhance the music project to the next level. Let’s dive into each plugin and see how it can help produce excellent music.

Best Free Delay Plugins

Credit: m.youtube.com

Top Free Delay Plugins

Discover the best free delay plugins that can help you achieve diverse effects while working on your tracks. These plugins offer a range of features such as customizable delay time, feedback, filter, and modulation options, which can elevate your music production to another level.

Delay plugins are a great way to add depth and space to your audio tracks, regardless of whether you’re producing music or recording podcasts. As a content creator, you don’t necessarily have to break the bank to access these plugins. In fact, some of the best delay plugins on the market are available for free. Here are the top three free delay plugins that will help elevate your audio quality.

Plugin 1: Tal-dub-iii

Tal-Dub-III is a great free delay plugin that comes with a ton of features and options. This plugin has two delay lines that can be used in either series or parallel mode, allowing you to create complex delay patterns. It has a high-pass filter and a low-pass filter that can be applied to the delayed signal, as well as a feedback loop that can be tweaked to create longer delay times. The plugin also has a saturation knob that can add warmth and grit to your signal.

Plugin 2: Valhalla Freq Echo

Valhalla Freq Echo is a frequency shifter, combined with an analog-style echo. It can create everything from subtle chorus effects to extreme pitch-shifting delays. This plugin is perfect for producers and musicians looking to create experimental sounds. It has a simple user interface with three modes of operation, allowing you to switch between frequency shifting, echo, or a combination of both. It also has a built-in LFO with a range of wave shapes that can be used to modulate the delay time, providing some interesting modulation effects.

Plugin 3: Super Delay Feedback

Super Delay Feedback is an excellent free delay plugin created by CodeFN42. This plugin is simple to use, with only a few parameters, making it perfect for beginners. It has a delay time control that ranges from 20ms to 1000ms, a feedback control that determines the amount of echo in the delayed signal, and a mix control that determines the balance between the dry and wet signal. It also has a stereo width control that can be used to create a wider sound image. Overall, this plugin is an excellent choice for those looking for a simple delay plugin that gets the job done. In conclusion, these three free delay plugins are excellent tools for content creators who want to add depth and space to their audio tracks. Whether you’re a producer, musician, or podcaster, these plugins can help elevate your audio quality without breaking the bank. So download them and start adding some delay effects to your tracks today!

Features To Look For In A Delay Plugin

When searching for the best free delay plugins, there are several essential features to consider. Firstly, it’s important to look for plugins that offer a range of delay types, including tape, analog and digital delay. Additionally, features such as tempo sync, feedback control and modulation options can add depth and character to your sound.

Delay plugins are an essential tool when it comes to producing high-quality audio. With so many delay plugins available, it can be a challenge to know which one to choose. In this article, we’ll discuss the features that you should consider when selecting a delay plugin. Here are some important features to look for in a delay plugin:

Delay Time Range

One of the essential features of a delay plugin is the range of delay times that it offers. A good delay plugin must provide the ability to adjust the delay time according to the music. Therefore, before selecting a delay plugin, ensure that it has an adequate delay time range, allowing you to create the delay effect you are looking for.

Feedback Control

Feedback control is another critical feature of a delay plugin. This feature determines how long the delay will continue after the initial signal has been produced. A good delay plugin should allow you to adjust the feedback control according to your needs. It should allow you to create either subtle or more extreme effects.

Filtering

Filtering is another essential feature to consider. A good delay plugin should offer filtering options that allow you to shape the sound and frequency range of the delayed signal. This feature ensures that the delayed signal complements the original sound. Therefore, you should look for a delay plugin that provides flexible filtering options.

Wet/dry Mix Control

The Wet/Dry Mix control feature enables you to control the level of the wet signal (the delayed signal) versus the dry signal (the initial or unprocessed signal). A good delay plugin should provide a Wet/Dry Mix Control feature that allows fine-tuning of the signal levels, ensuring that the delay effect blends well with the original signal. In conclusion, when looking for a delay plugin, ensure to check if it has the features mentioned above. A delay plugin with flexible filtering options, a wide range of delay times, feedback control, and a Wet/Dry Mix Control feature will help you achieve the desired effect and produce high-quality audio.

How To Choose The Right Delay Plugin

Choosing the right delay plugin can elevate the quality of your music production. Explore the best free delay plugins available and consider factors such as sound quality, features, and compatibility with your software before making a decision.

Delay plugins are immensely popular among music producers, and for a good reason. These plugins can add a unique character to your tracks, making them sound more polished and professional. With an overwhelming number of delay plugins available in the market, selecting the right one can be a daunting task. In this article, we’ll discuss some key criteria you should consider when choosing the best free delay plugin for your specific needs.

Identify Your Needs

Before you start searching for a delay plugin, you need to assess your production needs. Consider what features you require and what type of music you are producing. If you are looking for a simple and versatile delay plugin that can be used across multiple genres, then a plugin like TAL Dub III or Valhalla Freq Echo is a great option. On the other hand, if you are looking for more specific delays like vintage tape delays, then plugins like Vulf Compressor or Abby Road Chambers may be more suitable.

Check Compatibility With Daw

Compatibility with your DAW is another crucial factor to consider when choosing a free delay plugin. Ensure that the plugin you select is compatible with your DAW software by checking its specifications. Some delay plugins may only work with specific DAWs or may require advanced technical skills to set up correctly. To avoid any frustration, check the compatibility of the plugin before downloading.

Read Reviews

One of the best ways to select a delay plugin is by reading reviews from other music producers. This will give you a better understanding of the plugin’s performance, sound quality, reliability, and ease of use. Reviews can also help you identify any potential issues with particular plugins. However, keep in mind that reviews can be subjective, and what works for someone else may not work best for you. When selecting the right free delay plugin, ensure that the plugin aligns with your specific production needs, is compatible with your DAW software and that you have read trusted reviews. By considering these factors, you’ll be one step closer to finding the perfect delay plugin to add shimmer and depth to your tracks.

Installation And Setup

The installation and setup process of free delay plugins can be a bit tricky for beginners. However, with the right guidance and resources, it can be completed easily. Here are some of the best free delay plugins that can be set up quickly and deliver high-quality results when used in your music productions.

One of the biggest advantages of using free delay plugins is that they are easy to install and set up. All you need to do is download the plugin and install it on your digital audio workstation (DAW). Here’s a step-by-step guide on how to install and set up your free delay plugin:

Download And Installation Process

The first step is to find a reliable website that offers the free delay plugin you are interested in downloading. Once you have found the website, click on the download link and save the plugin file to your computer. Next, open your DAW and locate the plugin installation folder. This folder is usually located under the “Plugins” folder in your DAW’s installation directory. Once you have located the folder, copy and paste the plugin file into the folder. After the plugin file has been copied into the installation folder, open your DAW and scan for new plugins. This will vary depending on the DAW you are using, but most DAWs have an option to scan for new plugins under the “Plugin Manager” or “Preferences” menu. Once the scan is complete, the new delay plugin should appear in your list of available plugins.

Daw Setup

Once the plugin has been installed, it’s time to set it up in your DAW. The first step is to create a new audio track and assign the delay plugin as an insert effect on the track. This can be done by simply dragging and dropping the plugin onto the track or by selecting it from the list of available plugins. After the plugin has been added to the track, you can adjust the delay settings to your liking. This includes adjusting the delay time, feedback, and mix levels. Most free delay plugins come with a range of presets that you can use as a starting point, or you can create your own custom delay settings. In conclusion, installing and setting up a free delay plugin is a simple process that can be done in just a few steps. With a little bit of practice, you can create unique and interesting delay effects that will take your audio productions to the next level.

Tips For Using Delay Plugins

Learn to effectively use delay plugins in your music production with our list of the best free delay plugins. Incorporate different types of delays and experiment with settings such as feedback and modulation to achieve unique sounds.

Delay plugins are essential tools for adding depth, space, and dimension to your audio tracks. They can produce various creative effects, such as echo, reverb, and slapback. However, using delay plugins effectively requires some know-how. Here are some tips to help you make the most of your delay plugins.

Experiment With Different Settings

The beauty of delay plugins lies in their versatility and flexibility. You can achieve a wide range of effects by tweaking the settings. Therefore, don’t be afraid to experiment with different parameters, such as delay time, feedback, and mix. Try out different delay types, such as tape, digital, and analog. Be creative and see what sounds good to your ears.

Use Delay To Create Depth And Space

One of the most common uses of delay plugins is to create a sense of space and depth. You can add spatial effects, such as stereo widening or panning, to your tracks to make them sound fuller and wider. You can also use delay as a reverb alternative to create a sense of space. By adjusting the delay time, feedback, and mix, you can create a subtle or pronounced echo effect that can make your tracks sound like they were recorded in a bigger room.

Automate Parameters For Creative Effects

Another way to enhance your audio tracks with delay plugins is to automate the parameters. Automating the delay time, feedback, or mix can create interesting rhythmic patterns or textures that add movement and variation. You can also automate the parameters to create creative effects, such as reverse delay or filter sweeps. The possibilities are endless, so don’t be afraid to experiment with automation. In conclusion, delay plugins are powerful audio tools that can transform your tracks in endless ways. By experimenting with different settings, using delay to create depth and space, and automating parameters for creative effects, you can take your audio production to the next level. Remember to keep an open mind and have fun.

Best Free Delay Plugins

Credit: www.audiopluginguy.com

Best Free Delay Plugins

Credit: www.productionmusiclive.com

Frequently Asked Questions Of Best Free Delay Plugins

What Is The Best Plugin For Slapback Delay?

The best plugin for slapback delay is subjective to personal preference, as each plugin has its own unique features and sound. Some popular options include Waves H-Delay, Soundtoys EchoBoy, and FabFilter Timeless. It’s best to try out a few different plugins and see which one works best for your specific needs.

What Are Delay Plugins?

Delay plugins are audio processing tools that add a repeating echo effect to the sound being played. They allow for dynamic manipulation of the delay time and feedback amount, creating interesting sonic textures and adding depth to audio mixes. They are commonly used in music production and sound design.

What Is A Tape Delay?

A tape delay is an audio effect that was commonly used in the earlier days of recording music. It involves recording a sound onto a length of tape and playing it back after a short delay to create an echo effect.

What Are Delay Plugins?

Delay plugins are music production software that create the effect of echoing or repeating sound. They can be used on various audio sources such as vocals, drums, and guitars to add depth and dimension to the sound.

Conclusion

Overall, these best free delay plugins offer exceptional sound quality and versatility to enhance any mix. From the classic analog effects to modern DSP-based emulations, there are endless options to explore. By incorporating these plugins into your workflow, you can achieve greater control and precision over delay effects, all without breaking the bank.

Don’t hesitate to try them out and see how they can transform your music production game. The world of delays is waiting for you!

Categories
Archive

Top Free Vst Piano Plugins

Some top free VST piano plugins include LABS Soft Piano, Iowa Piano, and Keyzone Classic. These plugins offer high-quality piano sounds and a range of features for free.

Music production can be an expensive hobby, but finding the right plugins can make all the difference. We will highlight some of the best free VST piano plugins available. These plugins can help add depth and texture to your music productions, without breaking the bank.

Whether you are looking for a classic grand piano sound or a more experimental and unique tone, there is sure to be a plugin on this list that will suit your needs. So, read on to discover some of the top free VST piano plugins for your music productions.

Top Free Vst Piano Plugins

Credit: surgesounds.com

Top Free Vst Piano Plugins

Discover the top free VST piano plugins that can enhance your music production. These plugins provide high-quality sounds and are easy on the budget, making them an ideal choice for music makers who want to create stunning piano tracks without breaking the bank.

Improve your music with these top free VST piano plugins!

Pianos are versatile musical instruments that can be used in different genres of music. However, a traditional piano may not always be available to everyone, and hence, the need for a virtual instrument arises. Fortunately, many free VST piano plugins can replicate the sound of a real piano, which can be used by music enthusiasts to create high-quality music.

Piano One

Piano One is a powerful and popular VST piano plugin that features a highly-detailed piano sampling for an authentic sound. It has up to seven selectable velocity zones that allow for a wide range of expression and dynamics. You can also tune and adjust various parameters such as sympathetic resonance, reverb, and EQ to get the perfect sound.

4front Piano

4Front Piano is a self-explanatory plugin with a simple interface that is easy to use. It is modeled on a Yamaha C7 Grand Piano and features a crystal clear tone that makes it perfect for classical and jazz music. 4Front Piano has a sustain pedal that adds realism to the sound.

Keyzone Classic

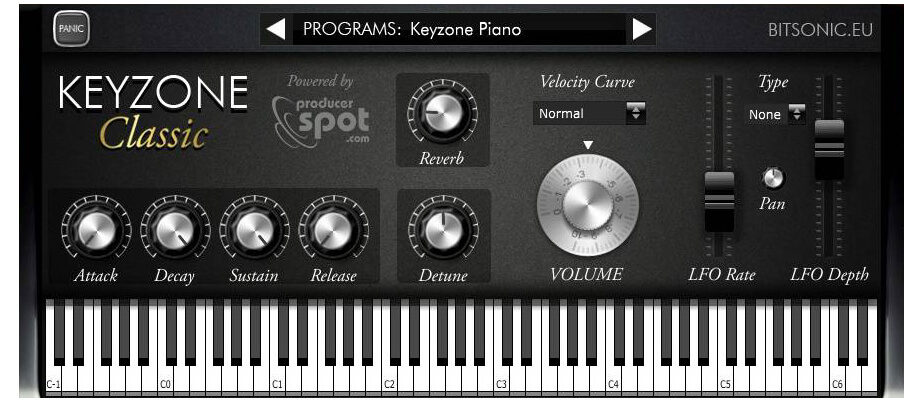
Keyzone Classic is an easy-to-use sample-based VST piano plugin. It has a simple interface with four fundamental controls that allow you to tweak the sound in real-time. The plugin includes five different types of pianos, each with its own unique sound character.

Vs Upright 1

VS Upright 1 is a classic piano plugin that emulates the sound of an upright piano. It features a simple interface with controls for volume, tone, and decay, making it easy to use. The plugin is perfect for capturing the warm and intimate sound of an upright piano.

Dpiano-a

DPiano-A is a free piano plugin that features a high-quality sound engine with an intimate and delicate tone. It has realistic key and pedal noises that add to the authenticity of the sound. The plugin also features a built-in reverb that adds depth and dimension to the sound.

Amore Grand Piano

Amore Grand Piano is a premium quality piano plugin that is available for free. It has a complex sound engine that produces a rich and full-bodied tone. The plugin features three different sample sets, each with its own unique characteristics, allowing you to choose the sound that best fits your project.

Labs Soft Piano

LABS Soft Piano is a free VST piano plugin by Spitfire Audio. It features an intimate, delicate, and expressive sound that is perfect for cinematic and ambient music. The plugin is incredibly easy to use with just one control knob that adjusts the reverb.

Iowa Grand Piano

Iowa Grand Piano is an excellent VST piano plugin that features the sound of a Steinway grand piano. It has a detailed sound engine and realistic key and pedal noises that add to the authenticity of the sound. The plugin also has a simple interface with controls for attack, decay, and release times. In conclusion, there are many free VST piano plugins that can satisfy your piano needs. With the right plugin, you can create high-quality music that sounds just like a real piano. Try out some of the above-listed plugins and enjoy the rich and authentic sound of a piano.

Top Free Vst Piano Plugins

Credit: m.youtube.com

Top Free Vst Piano Plugins

Credit: www.productionmusiclive.com

Frequently Asked Questions On Top Free Vst Piano Plugins

What Is The Best Free Piano Vst?

The best free piano VST is the LABS Soft Piano by Spitfire Audio. It is a high-quality virtual instrument with a warm and resonant sound. It can be used with any music production software and is perfect for adding a realistic piano sound to your compositions.

What Plugins To Use For Piano?

For piano plugins, popular choices are Native Instruments’ “The Giant” and “The Maverick,” as well as Spectrasonics’ “Keyscape” and Addictive Keys’ “Studio Grand. ” It ultimately depends on personal preference and intended use, so it’s worth experimenting with different options to find the perfect fit.

Is Piano One Still Free?

Yes, Piano One is still available for free.

What Is The Best Free Plugin?

The best free plugin depends on your specific needs. For SEO, Yoast SEO is highly recommended. For forms, Contact Form 7 works well. For security, Wordfence Security is a popular choice. For caching, WP Super Cache and W3 Total Cache are both effective options.

Research carefully and choose the plugin that best suits your website’s requirements.

Conclusion

Overall, these top free VST piano plugins provide a variety of options for musicians and producers to add realistic and high-quality piano sounds to their music. Whether you’re looking for a basic sound or more advanced features, there’s a plugin available for you.

By using any of these VST piano plugins, you can take your music to the next level without breaking the bank. Keep experimenting and exploring to find the perfect fit for your music production needs.

Categories
Archive

Chords And Melody Writing

Chords and melody writing in music involves choosing the appropriate harmony and arranging it in a manner that creates a pleasing tune. Creating the correct harmony requires a deep understanding of music theory, and the ability to choose which notes sound good with one another.

As a musician, understanding chords and melody writing can help you write compelling music tracks that will resonate with your audience. The chords you choose have a massive impact on the feeling and vibe of the song, as your audience will feel the rhythm and energy that you create.

Additionally, emerging trends in music are often based on certain chords or melody lines that catch on with listeners, making this knowledge even more valuable. Through practice, you can master the art of chords and melody writing and create music that is unique, satisfying and beautiful. In the next section, we will delve into the details of chords and melody writing, including factors to consider when creating melodies, types of chords to use, chord progressions, and more.

Chords And Melody Writing

Credit: m.youtube.com

1. Types Of Chords

Chords are crucial for writing melody. The most common types of chords are major and minor, while others include augmented, diminished, and dominant seventh chords. Understanding different chord types can help you create unique and compelling melodies for your music.

If you want to write a great melody, you have to start with the right chords. There are four basic types of chords: major, minor, diminished, and augmented. Let’s take a closer look at each of them.

Major Chords

Major chords are bright and happy-sounding. They’re built using the first, third, and fifth notes of the corresponding major scale. For example, the C major chord is made up of the notes C, E, and G.

Minor Chords

Minor chords have a more melancholic feel to them. They are constructed using the first, third, and fifth notes of the corresponding minor scale. For example, the A minor chord is built using the notes A, C, and E.

Diminished Chords

Diminished chords are tense and unstable sounding. They consist of the first, third, and fifth notes of the corresponding diminished scale. For example, the C diminished chord is constructed using the notes C, E flat, and G flat.

Augmented Chords

Augmented chords create a sense of tension, like diminished chords. They are built using the first, third, and fifth notes of the corresponding augmented scale. For example, the C augmented chord is constructed using the notes C, E, and G sharp. In summary, understanding the different types of chords is crucial when it comes to writing melodies. By choosing the right chords, you can communicate the appropriate emotion and create the desired atmosphere for your music.

2. Progressions

Progressions play an essential role in chord and melody writing. They help to create a sense of movement and development in the music, challenging the listener’s ear with harmonic surprises and building tension to release in an emotive resolution. Experimenting with different progressions can elevate your compositions to new heights.

Songwriting involves two important elements: chords and melody. While melody writing is fairly straightforward, chord progressions require a little more thought and creativity. Progressions, in the simplest terms, refer to the order in which chords are played in a song. They are essential in creating the mood and feel of the song. Let’s dive in and explore some common progressions, cadences, and changing keys.

Common Progressions

Some progressions are used more commonly than others and are found in countless hit songs. Using common progressions can help you create catchy and memorable songs, but don’t be afraid to try something new and unique. Some of the most popular progressions are:

ProgressionExample Song
I – V – vi – IVLet Her Go by Passenger
I – V – vi – iii – IV – I – IV – VSomewhere Over the Rainbow by Israel Kamakawiwo’ole
I – V – vi – IV – VDon’t Stop Believin’ by Journey

Cadences

Cadences are musical phrases that signify the end of a section or phrase in a song. They can also create tension and resolution. Understanding and using cadences can help you create a well-structured and cohesive song. Some common cadences are:

  • Authentic cadence: V – I
  • Half cadence: V – any chord
  • Plagal cadence: IV – I
  • Deceptive cadence: V – vi or V – IV

Changing Keys

Changing keys can add a new dynamic to a song and keep it interesting for the listener. When changing keys, it’s important to do it in a way that doesn’t sound jarring or abrupt. To transition smoothly, try using pivot chords, which are chords that exist in both keys. Some common pivot chords are:

  1. V7 (dominant 7th chord)
  2. IV (subdominant chord)
  3. iii (mediant chord)

In conclusion, progressions play a significant role in songwriting. Being aware of common progressions, cadences, and changing key techniques can help you create a well-structured and dynamic song. But always remember to experiment and not be afraid to go beyond the norm. With practice and creativity, you can write a song that is both unique and memorable.

3. Using Chords In Melodies

Chords play a pivotal role in music composition, and using them in the melody-writing process can enhance the musicality of a song. Incorporating chords into melodies add depth and harmony, which elevates the song’s overall sound. With that being said, let’s dive into how to use chords in melodies.

Arpeggios

Arpeggios are a commonly used technique that involves playing the notes of a chord individually, rather than simultaneously. Using arpeggios in melodies can add a unique flavor and texture to the music, making it more interesting to listen to. Arpeggios help in creating a sense of rhythm, especially if you are aiming for something upbeat. Experiment with different arpeggios, and see how they can elevate your melody.

Chord Tones

Chord tones refer to the individual notes that make up a chord. Using chord tones in melodies can provide stability to the music, as these notes provide a sense of harmony. Starting with the root note of the chord and building around it is a good way to create melodies using chord tones. You can also experiment with playing with various chord tones to create different feelings and tones in your melody.

Passing Tones

Passing tones are notes that are played between two chord tones. These notes create a sense of movement in the melody, making it more dynamic and interesting. Using passing tones in the melody can help to connect the notes and make the transitions more fluid. Don’t be afraid to experiment with passing tones, as they can add a unique flavor to the music.

Overall, incorporating chords into melodies is a great way to add depth and harmony to your music. Using arpeggios, chord tones, and passing tones can help to create a unique sound that is both musical and interesting.

Chords And Melody Writing

Credit: hubguitar.com

4. Writing Melodies To Chord Progressions

Writing melodies to chord progressions is an essential aspect of creating music. It requires understanding the relationship between chords and melody. By following basic music theory principles, you can craft catchy and memorable melodies that complement your chord progressions.

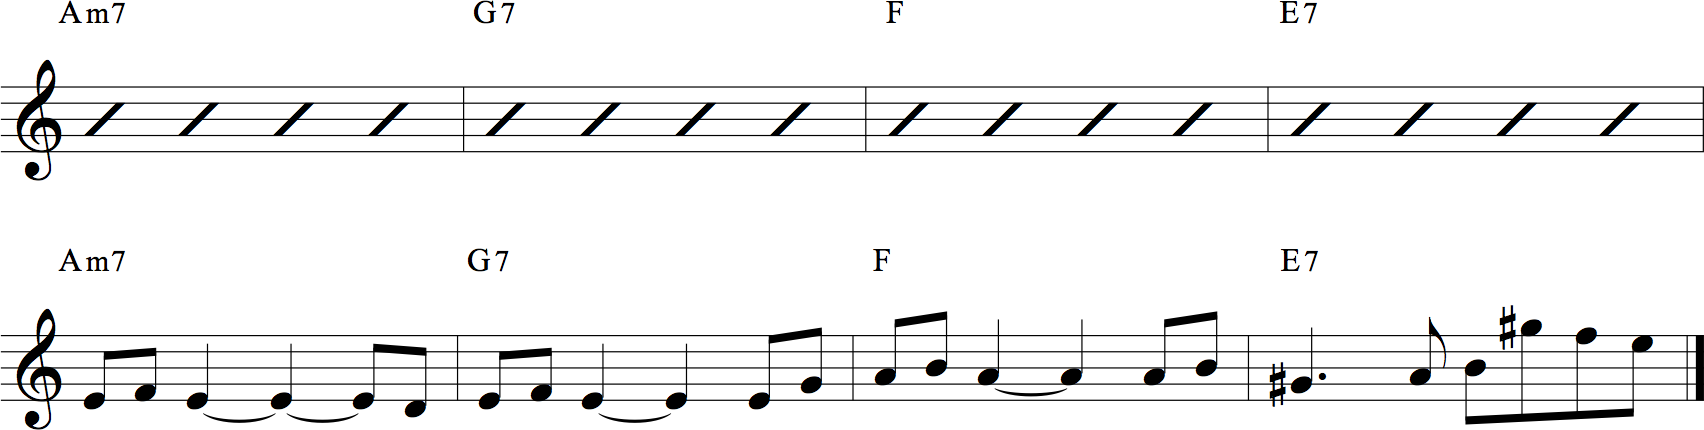
Melody writing is a crucial aspect of music composition. It can make or break a song, and when written to suit the chord progressions, it can create a pleasing and harmonious experience for the listener. In this section, we’ll take you through the essential steps involved in writing melodies to chord progressions.

Choosing A Key

Choosing a key is the first step in writing a melody to a chord progression. It’s important to choose the key that complements the chords. Sometimes, the key of the melody may change or modulate within the song, but it should always start and end in a harmonious manner. Here are some things to consider when choosing a key:

  • Choose a key where the melody can fully utilize the range of the singer’s voice or instrument
  • Consider the genre of music you’re writing for
  • Take into account the feel or mood you want the melody to convey

Finding The Chord Tones

The next step in writing a melody to a chord progression is finding the chord tones. Chord tones are the notes that are part of the chords being played. They provide a strong sense of harmony and are usually the notes that last longer. Here are some ways to identify chord tones:

ChordChord Tones
C majorC, E, G
G majorG, B, D
D minorD, F, A

Working With The Rhythm

The last step in writing a melody to a chord progression is working with the rhythm. The rhythm of the melody should complement the rhythm of the chords. Here are some things to consider when working with the rhythm:

  1. Ensure that the melody doesn’t clash with the rhythm of the chords
  2. Try to syncopate the melody with the rhythm of the chords
  3. Consider the dynamics of the melody and how it affects the rhythm

In summary, writing melodies to chord progressions involves choosing the right key, finding the chord tones, and working with the rhythm. By following these steps, you can ensure that the melody complements the chords and creates a harmonious and pleasing experience for the listener.

5. Harmony And Melody Connections

Harmony and melody connections are a critical aspect of chords and melody writing. By understanding the relationship between the chords and the melody, you can create a cohesive and balanced composition that captivates your listeners.

When it comes to writing music, harmony and melody are two crucial components that work together to create a memorable piece. In this section, we’ll dive into the different ways harmony and melody can connect to elevate your songwriting.

Parallel Harmony

One popular approach to harmony and melody writing is using parallel harmony. This involves playing two different chords that share the same root note. Parallel harmony can create a sense of stability and consistency in your music, but can also become repetitive if overused. It’s important to strike a balance between predictability and surprise in your harmonic choices.

Counterpoint

Another way harmony and melody can work together is through counterpoint. Counterpoint involves writing two distinct melodies that complement each other and create a sense of tension and release. This technique is commonly used in classical music, but can also be applied to popular music genres. By layering melodies, you can create a complex and interesting piece of music.

Creating Tension And Release

Harmony and melody can also work together to create tension and release in your music. This involves choosing chords that create a sense of tension, and then resolving that tension with a chord progression or melodic line. This can create a powerful emotional impact on your listeners, and is commonly used in pop, rock, and other modern music genres. In conclusion, the way harmony and melody connect in your music can make or break your songwriting. By using parallel harmony, counterpoint, and tension and release techniques, you can elevate your music to create a memorable and impactful piece.

Chords And Melody Writing

Credit: www.musictheoryacademy.com

6. Advanced Chord Techniques

Enhance your chord progression skills with advanced chord techniques. Learn to write melodies that complement your chords, adding depth and complexity to your music. Master the art of combining chords and melody writing to create gripping compositions.

As you progress in your songwriting career, you’ll want to explore advanced chord techniques to add complexity and richness to your music. Mastering these techniques can help you create unique and unforgettable melodies that resonate with your audience. In this section, we’ll discuss three advanced chord techniques: Modal Chords, Extended Chords, and Altered Chords.

Modal Chords

Modal chords are chords that evoke a particular mood or feeling. There are seven modes, and each mode has a unique set of chords that create its characteristic sound. Here are the modes and their corresponding chords:

  • Ionian mode: Major chords
  • Dorian mode: m7 chords
  • Phrygian mode: m7(b9) chords
  • Lydian mode: Maj7#11 chords
  • Mixolydian mode: 7 chords
  • Aeolian mode: m chords
  • Locrian mode: m7(b5) chords

Using modal chords can add depth and complexity to your music, and experimenting with different modes can help you find your unique style.

Extended Chords

Extended chords are chords that have additional notes beyond the basic triad. These additional notes can add color and richness to your harmony. Here are some common extended chords:

  • 9th chords: Dominant 7th chords with an added 9th
  • 11th chords: Dominant 7th chords with an added 9th and 11th
  • 13th chords: Dominant 7th chords with an added 9th, 11th, and 13th
  • Maj7#11 chords: Major 7th chords with an added #11

Using extended chords can create a sense of tension and release in your music, and can help you create interesting and unexpected chord progressions.

Altered Chords

Altered chords are chords that have one or more altered notes. These alterations can be flat or sharp, and can create dissonance and tension in your music. Here are some common altered chords:

  • 7alt chords: Dominant 7th chords with one or more altered notes
  • Imaj7#5 chords: Major 7th chords with an added #5
  • IIIm7b5 chords: Minor 7th chords with a flat 5th

Using altered chords can add complexity and intensity to your music, and can help you create a unique and memorable sound. Incorporating these advanced chord techniques into your songwriting can take your music to the next level. Experiment with different chords and modes to find your unique sound, and don’t be afraid to push the boundaries of conventional harmony.

7. Experimenting With Melody And Chord Writing

Now that you have a basic understanding of chord and melody writing, it’s time to take things up a notch. Experimenting with different styles and techniques can help you come up with unique melodies and chord progressions that stand out from the crowd. Here are three ways to take your melody and chord writing to the next level:

Exploring Different Genres

One way to expand your musical horizons is by exploring different genres. Whether it’s rock, pop, jazz, or classical, each genre offers a unique perspective on melody and chord progressions. Take the time to analyze songs from different genres and pay attention to how they use melody and chords to create emotion and atmosphere.

Combining Styles

While it’s important to have a solid foundation in a particular genre, combining different styles can help you create something truly unique. For example, you could combine a jazz chord progression with a pop melody or a classical melody with a rock chord progression. Don’t be afraid to experiment!

Learning From Other Musicians

One of the best ways to improve your melody and chord writing skills is by learning from other musicians. Attend concerts, watch YouTube videos, and listen to podcasts where musicians discuss their craft. You never know what you might learn!

By experimenting with different genres, combining styles, and learning from other musicians, you can take your melody and chord writing to the next level. Don’t be afraid to step outside of your comfort zone and try something new. Who knows, you might just create the next big hit!

8. Practice Routines For Chord And Melody Writing

Looking to improve your chord and melody writing skills? Check out these practice routines to enhance your musical abilities. With consistent practice, you can develop your technique and creativity, bringing your compositions to the next level.

As with any skill, regularly practicing chord and melody writing is the key to becoming proficient in this area. Avoid getting stuck writing the same old chord progressions and melodies by incorporating the following routines into your practice sessions.

Ear Training

Develop your ear by spending time each day listening to music and identifying different chord progressions and melodies within the songs. Once you can identify these elements, try transcribing them onto paper or using a music notation software. This helps to train your ear to recognize chord progressions and melodies to use in your own writing.

Improvisation

Improvisation is an excellent way to develop chord progressions and melodies. Start by playing a chord progression and improvising a melody over the top. Focus on creating a unique melodic line that is catchy and memorable. You can also experiment with changing the chords and melody to create a new sound.

Using Music Theory

Music theory provides an excellent framework for understanding chord progressions and melody writing. Learn the basics of music theory such as scales, chord construction, and chord progressions. Use this knowledge to make informed decisions about which chords and melodies to use in your writing.

Structured Practice Sessions

Structure your practice sessions by focusing on one aspect of chord and melody writing each day. For example, spend one day focusing on chord progressions, one day on melody writing, and one day on combining the two. Experiment with different rhythms, tempos, and musical genres to help expand your writing skills. Incorporating these practice routines into your daily writing can help improve your chord and melody writing skills. Remember to regularly assess your progress and adjust your practice sessions accordingly to ensure that you continue to make progress.

Frequently Asked Questions Of Chords And Melody Writing

How Do You Write A Melody With Chords?

To write a melody with chords, start by choosing the key for your song. Then, decide on the chord progression you want to use and create a simple melody that fits over those chords. Experiment with different chord inversions and melodies until you find what sounds best.

Practice playing and singing your melody with the chords until they flow seamlessly together.

Do You Write Melody Or Chords First?

As a content writer, there is no right or wrong way to write melodies or chords first. Some songwriters start with a melody and build chords around it, while others begin with chord progressions and then craft a melody that fits.

It all depends on your creative process and what works best for you.

What Are The Rules Of Melody Writing?

The rules of melody writing include creating a memorable and catchy melody that is easy to sing and play, using repetition and variation to create interest, understanding the principles of harmony and chord progression, and considering the lyrics and overall feel of the song.

It’s important to also stay true to the genre and style of music you are writing for.

What Is The Relationship Between Chords And Melody?

Chords and melody have a close relationship in music. A melody is often built on top of a chord progression, and the chords provide the harmonic framework for the melody. Chords support the melody and create the overall mood of the piece, while the melody adds the lyrical quality.

Both elements are essential for creating a complete musical composition.

Conclusion

To sum it up, writing melody and chords that complement each other effectively is crucial in crafting a memorable and compelling piece of music. With the right techniques and tools, anyone can learn to create captivating music that connects with their audience.

So whether you’re a beginner or a seasoned musician, keep practicing and experimenting to find the perfect balance between melody and chords. As the legendary musician Miles Davis once said, “Don’t play what’s there, play what’s not there. “

Categories
Archive

How to Reset Cubase

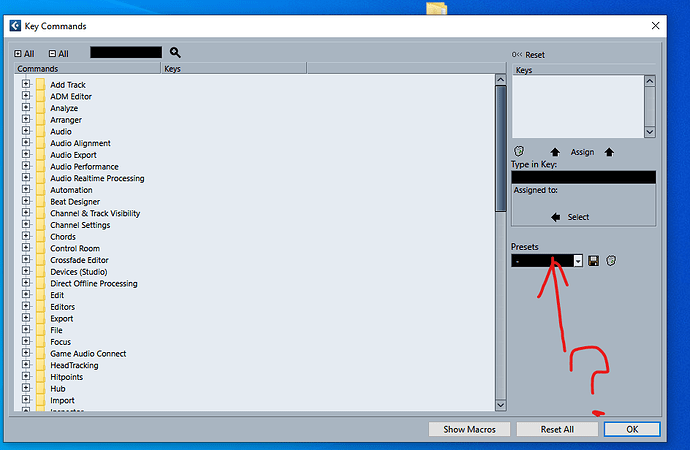
To reset Cubase, go to the Cubase preferences folder and remove the folder called “Cubase XX_XX.” Cubase is a popular digital audio workstation used by music producers and audio engineers to create and edit music.

However, from time to time, users can run into issues like crashes, freeze-ups, or other problems. In such cases, resetting Cubase can be a possible solution. Resetting Cubase will restore the software to its default settings and resolves the issues that can’t be fixed by simply restarting the computer or refreshing the software.

We’ll show you how to reset Cubase quickly and easily by following a few simple steps.

How to Reset Cubase

Credit: forums.steinberg.net

Backup Your Cubase Settings

To reset Cubase settings, it’s crucial to backup your current settings. This will ensure you don’t lose any important data and can easily restore your settings. Follow these steps to backup and reset your Cubase settings.

Create A Backup Of Your Cubase Settings

Creating a backup of your Cubase settings is a crucial step before resetting the software. It ensures that you do not lose any important data, settings, or preferences that you have made in Cubase. The process of creating a backup is simple and straightforward. To create a backup of your Cubase settings, follow these steps:

  1. Launch Cubase and navigate to the “File” menu
  2. Select “Preferences” and then “General”
  3. Click on the “Save As” button and save the file with a recognizable name, such as “Cubase Settings Backup”

With these steps, you will have successfully created a backup of your Cubase settings file.

Save The Backup In A Safe Place

Now that you have created a backup, it is important to save it in a safe place. A safe place could be an external hard drive, cloud storage, or a USB drive. We recommend saving your backup in multiple locations to ensure that you can retrieve your files in case of a data loss. It’s important to note that you can also use this backup to restore settings that you deemed ideal a long time ago, even if the settings have been overwritten over time. Additionally, if you’re using Cubase at a professional level, we recommend that you create backups periodically, to ensure no data is lost in the event of an accident. That’s all there is to creating a backup of your Cubase settings. With a backup safely in hand, you can now proceed with resetting Cubase without the fear of losing any important data or settings.

How to Reset Cubase

Credit: m.youtube.com

Resetting Cubase To Its Default Settings

To reset Cubase to its default settings, you need to first close the program and navigate to the Cubase preferences folder. Once there, rename the preferences folder and restart Cubase. The program will then create a new default preferences folder.

Cubase is one of the most popular digital audio workstations (DAWs) primarily used for music production and audio editing. However, it can become sluggish over time or prone to errors, which can make it frustrating to use. Thankfully, there’s a straightforward solution – resetting Cubase to its default settings. This will wipe all your custom settings and preferences, but it should restore Cubase to its default, optimal performance. Here’s how to do it:

Close Cubase Application

Before resetting Cubase to its default settings, close the Cubase application. This will ensure that Cubase isn’t running in the background while you’re making changes to its preferences. To do this, simply go to the “File” menu and click on “Exit.”

Find The Cubase Preference Folder

The next step is to locate the folder where Cubase stores its preferences. This folder is usually located in the following directory: ~/Library/Preferences/Cubase X/ Note: Replace “X” with the version of Cubase you’re using. You can also access the folder by opening Finder, holding down the “Option” key, clicking on the “Go” menu, and selecting “Library.” Then navigate to “Preferences” and find the Cubase folder.

Rename The Cubase Preference Folder

Once you’ve located the Cubase preference folder, it’s time to rename it. This will generate a new preference folder with Cubase’s default settings. To do this, right-click on the Cubase preference folder and select “Rename,” or click on the folder once and press the “Enter” key. Rename the folder to something like “Cubase Preferences Backup.”

Restart Cubase Application

Finally, restart the Cubase application. When you open Cubase, it will generate a new preference folder with default settings. You’ll need to reconfigure your settings, but Cubase will be restored to its optimal performance. In conclusion, resetting Cubase to its default settings is a simple solution to improve its performance. Follow these easy steps, and you’ll be up and running in no time.

Reconfiguring Cubase Settings

If you are facing problems with your Cubase software or just notice a decrease in performance of your system, resetting Cubase to its default settings is an excellent idea. One of the benefits of resetting Cubase is reconfiguring the settings, which can help to optimize the performance of the software. In this blog post, we will guide you through how to reset Cubase and reconfigure its settings.

Setting Up Audio Interface

If you plan to use an audio interface with Cubase, it is important to set it up correctly. Cubase allows you to use any audio interface that uses ASIO drivers to connect with your computer. To set up your audio interface, follow these simple steps:

  1. Open Cubase and go to ‘Devices > Device Setup.’
  2. Select your audio interface from the list on the left-hand side of the screen.
  3. Click on the ‘Control Panel’ button and configure your audio interface settings.
  4. Once you have finished configuring your audio interface, click ‘OK’ and exit the Device Setup window.

Preferences Settings Configuration

If you want to reset your preferences settings in Cubase, follow these simple steps:

  1. Open Cubase and go to ‘Preferences.’
  2. Click on the ‘Reset Preferences’ button to reset the software to its default settings.
  3. Once you have finished, exit the Preferences window.

Midi Device Setup Configuration

To configure your MIDI device setup settings, follow these simple steps:

  1. Open Cubase and go to ‘Devices > MIDI Device Manager.’
  2. Select your device from the list on the left-hand side of the screen.
  3. Configure your MIDI device settings by clicking on the ‘Device Setup’ button.
  4. Once you have finished configuring your MIDI device, click ‘OK’ and exit the MIDI Device Manager window.

Vst Plug-ins Installation

If you want to install VST plug-ins in Cubase, follow these simple steps:

  1. Download your preferred VST plug-in to your computer.
  2. Open Cubase and go to ‘Devices > Plug-in Manager.’
  3. Click on the ‘VST Plug-ins’ tab and then click on the ‘Add’ button.
  4. Select the folder where you saved the downloaded VST plug-in and click ‘OK.’
  5. Once the VST plug-in has been added, you can use it in Cubase.

Follow these steps to configure and optimize your Cubase settings for high performance and stability. Reconfiguring your settings can help to improve the software’s performance, and it is always a good idea to reset Cubase to its default settings once in a while to ensure that everything is working correctly.

How to Reset Cubase

Credit: steinberg.help

Frequently Asked Questions Of How To Reset Cubase

How Do I Reset My Cubase To Default?

To reset Cubase to default, go to File > Preferences > General and click “Reset” next to “Reset Program Preferences to Factory Defaults. ” This will reset all settings to their default values, including key commands, preferences, and user interface settings.

How Do You Reset The Workspace In Cubase?

To reset the workspace in Cubase, go to the “Edit” menu, click on “Preferences”, select “General” and click on “Reset Layout”. Alternatively, you can use the keyboard shortcut “Alt + Shift + Right Click” and select “Workspace > Reset Default Workspace”.

How Do You Reset On Stop In Cubase?

To reset the playback cursor to the start position in Cubase, simply press the Stop button or use the keyboard shortcut “0” on the numeric keypad.

How Do I Clean Up Cubase 10?

To clean up Cubase 10, you can uninstall unused programs, delete unnecessary files and folders, and clear the cache. Make sure to use a reliable antivirus to scan for any corrupt files. Additionally, regularly updating your computer’s operating system and Cubase version can also improve its performance.

Conclusion

To conclude, resetting Cubase is a straightforward task that can help troubleshoot any lingering issues with the software. With the step by step instructions provided in this post, users can feel confident in their ability to reset their Cubase program and get back to making music.

Remember to always backup your work before resetting, and don’t hesitate to seek professional help if necessary. With these tips in mind, happy producing!

Categories
Archive

How To Remix Music

To remix music, you need to select the song, isolate the parts you want to use, and arrange them in your desired order. Remixing is a skill that takes time and practice to perfect.

It involves taking an existing song and manipulating it to create something new and unique. Whether you’re a DJ looking to create a dance hit or a musician wanting to explore new possibilities, the key to successful remixing lies in your ability to identify the best parts of the original track and blend them with your own creative ideas.

We’ll explore the techniques and tools you need to know to remix music like a pro, from selecting the right software to understanding the basics of structure and beat matching.

Choose Your Song

Choosing the right song to remix is the first step in the music remixing process. Ideally, you want a song that you love and that sparks creativity. But, there are other factors to consider as well that can impact the success of your remix. In this blog post, we’ll cover some tips on how to choose the perfect song for your remix.

Select A Song To Remix

If you’re just starting out with remixing music, it’s important to pick a song that’s relatively easy to work with. Look for a track that has a clear structure, with a strong beat and melody. This will make it easier to identify the song’s key features and to break it down into individual parts that you can manipulate and rearrange.

Break Down The Song Into Parts

Once you’ve selected a song to remix, it’s time to break it down into its individual parts. This will allow you to see how the different elements of the song fit together and also give you an opportunity to identify sections that you might want to emphasize or modify in your remix.

You can break down a song into parts in a number of ways. Some musicians like to use a DAW (Digital Audio Workstation) to visualize the waveform of the song and identify where different parts begin and end. Others prefer to use a pen and paper to jot down notes as they listen to the song repeatedly.

Using a DAW

If you’re using a DAW to break down a song, start by importing the track into the software. Then, use the zoom function to get a closer look at the waveform. You can use markers to highlight different sections of the song and to label them (e.g. intro, verse, chorus, bridge, etc.).

Section of SongDescription
IntroThe beginning of the song that sets the tone and introduces the main melody
VerseThe section of the song where the story is told and the melody typically changes
ChorusThe most memorable and catchy part of the song that’s repeated several times
BridgeA transitional section between the chorus and the verse that adds variety and keeps the listener engaged

To make things even easier, you can use color-coding to differentiate between different sections of the song.

Using Pen and Paper

If you prefer the old-school approach of using pen and paper to break down a song, start by listening to the track repeatedly. As you listen, write down the timecode (minutes and seconds) for the different sections of the song (e.g. intro starts at 0:00 and ends at 0:30).

Once you’ve identified the different sections, you can use arrows and other symbols to indicate where different elements of the song (e.g. drums, bass, vocals) begin and end. This will help you get a better sense of the song’s structure and will make it easier to identify areas where you can make changes or add your own creative elements.

By following these two steps – selecting the right song and breaking it down into its individual parts – you’ll be well on your way to creating a killer remix that will get people on the dance floor.

Get Your Equipment Ready

Remixing music requires a certain set of tools and equipment to get started. From software to hardware, having the right equipment is crucial to producing a high-quality remix. In this article, we’ll take you through all the necessary steps to prepare your equipment and set up before diving in.

Set Up Your Studio

The first step in preparing for a music remix is setting up your studio. This includes finding a suitable room with adequate space and soundproofing to avoid any external noises interrupting your process. The room should also be equipped with audio monitors and headphones for optimal sound quality. Once you’ve found the perfect room, it’s time to set up your equipment.

Gather Your Equipment

To get started with music remixing, you’ll need a computer or a laptop with a suitable operating system. For music production, Macs are often preferred by professionals. You’ll also need a digital audio workstation (DAW) software such as Ableton, Logic Pro X or FL Studio, to name a few. Some DAWs offer free trials for you to test them before investing in the software.

In addition to software, you’ll need audio interfaces to connect your audio monitors, headphones, and microphone. Selecting the right audio interface is crucial, as it can affect the quality and clarity of your recordings. M-Audio, Focusrite, and PreSonus are popular options that offer both affordability and quality.

Next, you’ll need a MIDI controller, a device that allows you to create music using virtual instruments and plugins. MIDI controllers come in various shapes and sizes, from keyboards to drum machines, so choose one that best suits your needs. Other essential equipment includes a microphone, cables, and stands.

Create A Project File

Once you have all your equipment ready, it’s time to create a project file. A project file is where you store all your audio files, samples, and settings for your remix project. It helps keep everything organized, making it easier to navigate and locate specific audio files.

Create a new project file in your DAW software and import your original music track into it. Organize your individual tracks by separating each instrument or part into a different channel, making it easier to edit and process them separately. It’s also advisable to name each track according to its corresponding instrument or part.

Finally, save your project and start your remixing journey!

Chop And Slice

Learn how to remix music like a pro with the Chop and Slice technique. This popular method involves breaking down tracks and rearranging them to create a fresh and unique sound. With a bit of practice and creativity, you can take your DJ skills to the next level.

One of the most exciting aspects of music production is the ability to remix a song and make it completely your own. One of the most important components of remixing is chopping and slicing. This process involves breaking down the original track into sections and rearranging them to create something new and unique. Here are some steps to help you with the process:

Choose Your Sections

The first step is to listen to the original track and identify the sections that you want to use in your remix. It’s essential to choose sections that work well when rearranged. Typically, the intro, verse, chorus, bridge, and outro are the most manageable sections to work with. Once you have decided which sections you want to use, you can start isolating them and chopping them up.

Edit Your Sections

Once you have your sections isolated, it’s time to start editing them. This step can involve adding effects, adjusting levels, filtering, and EQing. The goal is to make the sections sound unique while still fitting together cohesively. Keep in mind that this step is not a one-size-fits-all process – the editing required will vary depending on the track you’re working on and the sound you’re going for. Take your time and experiment with different techniques until you’re happy with the result.

Add Your Own Sounds

Finally, you can add your own sounds and instruments to the mix. Adding your own sounds can help to give your remix a unique flavour and separate it from the original track. It’s important not to go overboard with this step – your goal should be to add just enough to create something new without losing the essence of the original track.

By following these steps, you can chop, slice, and remix a track into something entirely new and exciting. Remember, the more time you spend experimenting and refining your remixing skills, the better your final product will turn out.

Add Effects

To remix music, one must know how to add effects. Effects such as reverb, delay and distortion can improve the overall sound. Experiment with different effects and adjust their intensity to create the desired sound.

To make a remix of an original track, adding effects can enhance the sound and bring a whole new dimension to the mix. Effects like reverb, delay, and chorus can add depth, while distortion, filtering, and phasing can modify the tone of the track. However, it’s important to use effects smartly and experiment with them to create a well-produced remix. Here are some tips on how to effectively add effects to your remix.

Find The Right Effects

The first step in adding effects to a track is finding the right ones. It’s important to select effects that complement the track, and not just add them for the sake of it. Before adding any effect, carefully listen to the original track and identify what elements could be improved with an effect. For example, if the vocals sound too dry, adding some reverb can give them more depth. If the drums need to stand out more, try adding some compression. Take your time to experiment with different effects and find the ones that work best for your remix.

Apply The Effects Smartly

Once you have found the right effects, it’s important to use them smartly. Avoid overusing effects as it can make the track sound messy and unprofessional. Use effects subtly and only when they are necessary to enhance the track. It’s also important to avoid using too many effects at once. This can cause the track to become muddy and lose its clarity. Instead, focus on using a few key effects to enhance specific elements of the track.

Experiment With The Effects

The key to creating a unique and well-produced remix is to experiment with the effects. Try different settings and combinations of effects to see what works best. Don’t be afraid to take risks and try something new. However, keep in mind that some effects work better on certain elements of the track than others. For example, reverb can sound great on vocals but may not work as well on a bassline. Experiment with the effects until you find what works best for your remix. In conclusion, adding effects is an important part of remixing a track. By finding the right effects, applying them smartly, and experimenting with them, you can create a unique and well-produced remix. Take your time and don’t be afraid to experiment with different effects until you find what works best for your track.

Layer Your Sounds

Remix music is a great way to show your creativity and add your personal touch to a song. One of the key elements of remixing is adding layers to your track. This can help you make your remix sound fuller and more interesting. In this section, we will discuss how to layer your sounds effectively.

Add Layers To Your Remix

When you listen to a song, you may notice that it has multiple layers of sounds playing together. These layers can include instruments, vocals, percussion, and other elements. To remix a song, you need to identify the layers that make up the original track and then add your own layers on top of them.

One way to add layers is to start with the drums. You can add a new beat or add more percussion to the existing drums. You can also add a bassline or another instrument that complements the melody of the original song.

Experiment With Different Sounds

Once you’ve added new layers, experiment with different sounds and effects to make your remix more interesting. You can try adding a delay or a reverb effect, or you can use a filter to change the tone of the sound.

Don’t be afraid to try new things and take risks. Some of the best remixes come from taking a traditional song and flipping it on its head with a unique sound or effect.

Create Your Unique Sound

To create a unique sound, try combining different elements from different genres. For example, you can add a hip-hop beat to a pop song or a reggae bassline to a rock song.

Another approach is to add vocals or samples from different sources. You can sample a section from a different song or add vocals from a different artist to create a mashup remix.

Remember, the key to creating a great remix is to have fun and experiment. Layering your sounds, experimenting with different sounds, and creating your unique sound can help you take your remix to the next level.

How To Remix Music

Credit: m.youtube.com

Structure Your Remix

To effectively remix music, it’s important to structure your remix by following certain guidelines. Focus on creating brief and engaging sentences, using a variety of phrases, and avoiding repetitive terms. Additionally, ensure your writing is SEO-friendly, unique, and easy to understand.

Creating a remix can be an exciting and challenging experience. When it comes to structuring your remix, there are a few key elements to consider that will help you create a cohesive and engaging track. Here are some tips on how to structure your remix effectively.

Arrange Your Remix

Before you start remixing, it is essential to have a clear idea of the direction you want to take with your track. Analyze the original song and think about how you can enhance or manipulate the elements to create something unique. Once you have a clear understanding of what you want to achieve, it’s time to arrange your remix. Start by identifying the main sections of the original track, such as the intro, verse, chorus, and bridge. Use these sections as a guide to create a similar structure for your remix. You can enhance each section by adding new elements, such as a new melody or rhythm. Consider experimenting with the order of the sections to create a more dynamic and engaging remix. For example, you could move the chorus to the beginning or change the order of the verses.

Create Transitions

Transitions are an essential element of a remix. They help to smooth out the different elements of your track, creating a seamless flow. There are different ways to create transitions, including using fades, filters, and effects. Use fades to gradually bring in or fade out different elements, such as vocals or instruments. Filters can be used to create a sense of movement and change between sections. You can play with different effects, such as delay or reverb, to create a unique sound and add interest to your remix.

Polish Your Remix

Once you have arranged your remix and created transitions, it’s time to polish your track. This involves refining the different elements of your remix, such as the levels, EQ, and effects. Start by adjusting the levels of each element to create a balance between them. Use EQ to cut or boost frequencies to create clarity and separation between different elements. Finally, add effects to enhance the overall sound of your remix. You can experiment with different effects, such as compression or distortion, to create a unique sound and add interest to your track. In conclusion, structuring your remix is essential to create a coherent and engaging track. By arranging your remix, creating transitions, and polishing your track, you can create something unique and compelling.

Finalize Your Remix

To finalize your remix, adapt it to the desired platform’s specifications, check audio levels, mix various tracks, and build tension with breaks and drops. Collaborating with other artists can add new dimensions to your work and enhance creativity.

Before you release your remix to the world, it’s important to spend some time finalizing it. This means making sure all the elements of your remix work together seamlessly, that it’s mixed well, and that the overall sound is polished and professional. Here are a few steps to take when finalizing your remix:

Make Final Tweaks

At this stage, you should be happy with the overall structure of your remix. Now it’s time to make those final tweaks to really make it shine. This might involve adjusting the EQ, adding or removing elements, or rearranging sections to improve the flow. Listen to your remix multiple times to ensure every detail is perfect.

Mix Your Remix

To mix your remix, you’ll want to focus on balancing the levels of each instrument and making sure the elements are panned effectively. Make sure nothing is overpowering and that each element has its own space in the mix. Use EQ to cut out any unwanted frequencies, like low rumble or high hiss, that might interfere with the clarity of your remix.

Master Your Remix

After you’ve finished mixing your remix, it’s time to get it ready for release by mastering it. Mastering brings all the elements of your remix together and ensures the final sound is cohesive. It involves making final adjustments to the EQ, compression, and volume levels, as well as ensuring that the overall loudness is appropriate for the genre. By following these steps, you’ll be able to finalize your remix, ensuring it’s mixed and mastered to perfection. Don’t rush this process, as proper mixing and mastering will take your remix to the next level and help it stand out in a crowded market.

How To Remix Music

Credit: www.magix.com

Distribute Your Remix

Learn how to distribute your remix and share your music with the world. With various online platforms available, it’s never been easier to showcase your music and reach a wider audience.

Creating a remix can be a lot of fun, but it’s equally important to distribute your remix to make it accessible to a wider audience. After all, there’s no point in creating something amazing if nobody gets to hear it! In this section, we’ll discuss the different ways you can distribute your remix, promote it, and get noticed.

Upload To Music Platforms

The easiest and most effective way of distributing your remix is by uploading it to music platforms. Music platforms are online portals that host millions of songs, including remixes, covers, and collaborations. By uploading your remix on music platforms like Spotify, Apple Music, or SoundCloud, you can potentially reach millions of listeners worldwide. To upload your remix to a music platform, you’ll need to create an account and follow their guidelines. Most platforms require you to provide some information about the song, including the artist name, title, lyrics, and artwork. You’ll also need to choose a distribution plan, which can be free or paid. Once you’ve uploaded your remix, you can share it on social media or embed it on your website or blog.

Promote Your Remix

Promoting your remix is crucial to reach your target audience and gain more plays, likes, and followers. One effective way to promote your remix is by using social media platforms like Instagram, Twitter, and Facebook. These platforms allow you to connect with your fans and share updates about your music, upcoming gigs, and new releases. Another way to promote your remix is by collaborating with other artists or DJs. By collaborating, you can reach new audiences and gain more exposure. You can also submit your remix to music blogs and playlists, which can feature your music and help you gain more followers.

Get Noticed

To get noticed, you need to stand out from the crowd. One way to do this is by creating a unique and creative remix that showcases your style and skills. You can also use different techniques like adding vocals, changing the tempo, or mixing different genres to create a distinct sound. Another way to get noticed is by participating in remix contests. Remix contests are competitions organized by music labels or bands, where you can submit your remix and compete with other artists. Winning a remix contest can help you gain more exposure and recognition in the music industry. In conclusion, distributing your remix is the key to gaining more plays, likes, and followers. By uploading your remix to music platforms, promoting your music on social media, and getting noticed, you can reach a wider audience and showcase your skills as a remixer.

How To Remix Music

Credit: www.productionmusiclive.com

Frequently Asked Questions For How To Remix Music

How Can I Make A Music Remix?

To make a music remix, you can use a digital audio workstation (DAW) software or a website that specializes in music remixing. Import the original song and make sure you have the legal right to remix it. Experiment with modifying different elements of the song such as tempo, pitch or adding new instrumentation.

Mix and master your remix until you are happy with the final product.

Is It Easy To Remix A Song?

Remixing a song requires knowledge and skills in music production software and techniques. It can be an easy or a complex process depending on the level of expertise of the person doing it. However, with dedication, practice, and training, anyone can learn how to remix a song and produce unique and creative versions of it.

Can I Remix Songs Legally?

Yes, you can legally remix songs, but only if you have the proper licenses and permissions from the original copyright holders. It is not legal to use copyrighted material without permission.

What Is Required To Remix A Song?

To remix a song, you need the original song file, a DAW or music production software, and creativity to alter the elements of the song. You also need permission from the copyright owner or a valid license to use the song.

Conclusion

Mastering the art of music remixing takes time, effort, and patience. It involves paying close attention to detail and being creative with your mix. With the right tools, techniques, and passion for music, you can create unique and compelling remixes.

Keep practicing and experimenting with different styles and sounds, and you’ll soon find yourself becoming a skilled music remixer. So keep learning, keep growing, and keep the music alive!

Categories
Archive

Best Beginner Daw Software

The best beginner DAW software is GarageBand. It is a free and user-friendly option for Mac users, offering a variety of features for recording and editing audio tracks.

GarageBand is a great choice for beginners due to its intuitive interface and wide range of features, including virtual instrument options, multi-track recording capabilities, and built-in effects and plugins. Additionally, it offers easy integration with other Apple products for seamless workflow.

While it may not have all the advanced features of more professional DAWs, it provides an excellent platform for learning the basics of music production and recording. As a SEO friendly content writer, it is important to highlight the significance of choosing a good DAW, and GarageBand is undoubtedly a great starting point for beginners.

Best Beginner Daw Software

Credit: producelikeapro.com

Criteria For Selecting A Beginner Daw Software

Selecting the right digital audio workstation (DAW) software can be tricky for beginners. When choosing the best beginner DAW software, factors to consider may include ease of use, affordability, compatibility with your computer system, available features, and overall user experience.

Criteria for selecting a beginner DAW software: Choosing the right digital audio workstation (DAW) software can be a daunting task, especially for beginners. With so many options available, it can be hard to determine which one suits your needs. To make your selection process easier, we have compiled a list of important criteria that you need to consider when selecting a beginner DAW software. These criteria include user-friendly interface, affordability, compatibility, and availability of technical support and resources. Let’s take a closer look at each criterion.

User-friendly Interface

A beginner DAW software should have an intuitive and user-friendly interface. It should be easy to navigate and understand, even for users who have never used a DAW before. The layout should be well-organized and should not overwhelm the user with too many options at once. A good beginner DAW software should provide a smooth and seamless user experience.

Affordability

Affordability is an important factor to consider when selecting a beginner DAW software. While there are many expensive DAWs out there, there are also many affordable options that offer a range of features. It’s important to determine your budget before making a purchase, but it’s also important to remember that price should not be the only factor you consider. Some of the best beginner DAW software options are free.

Compatibility

Compatibility is another important factor to consider when selecting a beginner DAW software. The software should be compatible with your computer’s operating system and hardware. It’s also important to consider the compatibility with other devices such as MIDI controllers and audio interfaces. A good beginner DAW software should work seamlessly with other hardware and software.

Availability Of Technical Support And Resources

When selecting a beginner DAW software, it’s important to consider the availability of technical support and resources. The software should offer online documentation, tutorials, and a user forum where you can ask questions and get help. It’s also important to determine whether the software provider offers technical support and how you can contact them. In conclusion, choosing the best beginner DAW software can be a daunting task, but by considering the criteria we have provided here, you can make an informed decision. Remember to look for a user-friendly interface, affordability, compatibility, and availability of technical support and resources.

Best Beginner Daw Software

Credit: www.musicradar.com

List Of Best Beginner Daw Software

New to digital audio workstations (DAW)? Here are our top picks for the best beginner DAW software: FL Studio, GarageBand, Ableton Live Lite, Pro Tools First, Cubase Elements, and Mixcraft 9.

If you’re interested in creating your own music, you’ll need a Digital Audio Workstation (DAW) software that suits your needs. There are many DAWs available in the market, ranging from beginner level to professional. As a beginner, it’s important to choose a DAW that is easy to use and doesn’t take much time to understand. Here is a list of some of the best beginner DAW software for your music production needs:

Garageband

GarageBand is a beginner-friendly DAW that comes pre-installed on all Apple desktop and laptop computers as well as iPads and iPhones. This software is an excellent choice for beginners since it’s very easy to use and requires no additional software/hardware purchases. It provides a simple layout with various pre-made samples, loops, and virtual instruments to choose from making it perfect for beginners. Also, it has multi-touch features that make it an enjoyable experience.

Fl Studio

FL Studio is another beginner-friendly DAW that is suitable for both Windows and Mac OS. Its simple and user-friendly interface makes it easy for beginners to learn and understand. It also offers a wide range of virtual instruments, sounds, and effects that can all be accessed from one place. The demo version of this software is available for free, and the paid version begins with a reasonable price.

Ableton Live

Ableton is an excellent option for those who need a live-performance DAW software for electronic music. With Ableton Live, you can create, mix, and master your music projects in a single software. Ableton Live has a user-friendly interface and takes a unique approach to music production. It is available for both Windows and Mac OS.

Logic Pro X

For Mac users, Logic Pro X is a great beginner-friendly DAW software that offers a range of features suitable for both beginners and professionals. It has a highly intuitive user interface that is easy to understand and learn, making it a perfect choice for beginners. Logic Pro X offers a massive library of virtual instruments, sounds, and effects, making it a great option for music composition, recording, editing, and mixing.

Cakewalk By Bandlab

Cakewalk by BandLab is a free DAW software available for Windows users. It offers a range of features that can compete with premium DAWs in the market. Cakewalk comes with an easy-to-understand user interface and provides a wide range of effects, instruments, and sounds that make it perfect for beginners. It also features a touch-optimized interface for Windows touchscreen devices. In conclusion, the choice of DAW software depends on personal preferences and intended use. These five DAW software mentioned above offer variance in features and capabilities, so one is sure to find a program that meets their needs.

Features And Pros Of Each Software

Beginner DAW software such as GarageBand, LMMS and FL Studio offer a range of features and benefits. GarageBand is a free DAW and offers an intuitive interface, while LMMS offers a wide range of pre-installed plugins. FL Studio is perfect for beginners as it offers easy-to-use tools and an extensive library of midi instruments.

Features and Pros of Each Software: If you’re a music enthusiast or aspiring musician, a Digital Audio Workstation (DAW) software can be your go-to tool to create melodies and record them with ease. DAWs allow you to record, edit, and mix audio and MIDI tracks, add effects and virtual instruments, and even produce complete songs. Here, we’re going to highlight some of the best beginner DAW software that comes loaded with excellent features and benefits. H3: GarageBand GarageBand is a free DAW software exclusive to macOS and iOS users. This software is famous for providing various pre-installed virtual instruments, loops, and sound effects. GarageBand features an easy-to-use interface suitable for beginners, making it a good starting point for those venturing into music production. Additionally, GarageBand offers seamless integration with other Apple software and hardware, allowing you to utilize and maximize your creative potential within the Apple ecosystem. H3: FL Studio FL Studio is a well-known and widely used DAW software among music producers. It features an intuitive interface and a vast array of tools to create high-quality music. FL Studio comes with a step sequencer, a powerful MIDI controller, and a sampler, among other features. Additionally, FL Studio allows real-time recording and pitch correction, making it an excellent software for those looking to create hip-hop, EDM, or any other electronic genre. H3: Ableton Live Ableton Live is another popular DAW software among artists and producers worldwide. It provides a professional quality audio processing environment with an innovative approach to music creation, combining the abilities of both a performance instrument and composition tool. Ableton Live features a Session View that allows the simultaneous triggering of loops and samples for a more creative performance. The software also offers some exclusive virtual instruments like Wavetable, Operator, and Analog. Ableton Live is best suited for electronic music and live performances. H3: Logic Pro X Logic Pro X is an excellent DAW software exclusively for macOS users. It provides an intuitive interface and an extensive collection of virtual instruments and effects, including many third-party plug-ins. Logic Pro X is an all-in-one DAW software that caters to a wide variety of genres. The software features a powerful MIDI editor, a built-in sampler, and an advanced mixer. Logic Pro X also allows integration with other Apple software and hardware to leverage its full potential. H3: Cakewalk by BandLab Cakewalk by BandLab is a free DAW software designed specifically for windows users. It comes with a user-friendly interface, unlimited tracks, and a vast array of loops and samples suitable for different genres. Cakewalk by BandLab also provides a robust mixer, a virtual drum machine, and advanced editing capabilities. Additionally, the software allows seamless integration with other DAWs and plug-ins, making it a versatile tool for any music production project. In conclusion, choosing the right DAW software is crucial for beginners in music production. Our recommended DAWs offer different features and benefits suitable for various genres and levels of expertise. Whatever software you choose, remember that the ultimate goal is to have fun and produce quality music.

Comparison Of Beginner Daw Software

DAW software is crucial for music production, but with so many beginner options available, it can be tough to choose the right one. Some popular beginner DAWs include GarageBand, FL Studio, and Ableton Live, each with its unique features and benefits to suit different needs and preferences.

If you’re new to the world of digital audio workstations (DAW), it can be overwhelming to decide which software to use. There are many options available in the market, and it can be challenging to compare them all. In this article, we will compare some of the best beginner DAW software options, focusing on pricing, interface and workflow, features, and compatibility.

Pricing Comparison

When choosing a beginner DAW software, pricing is a significant factor for many users. Some users are happy to pay for premium software, whereas others want a more affordable option. In the table below, we’ve compared the pricing of some popular beginner DAW software.

SoftwarePricing
AudacityFree
GargebandFree for Mac users
FL Studio Fruity Edition$99
Ableton Live Intro$99
Pro Tools FirstFree

Interface And Workflow Comparison

The interface and workflow of a beginner DAW are crucial factors as they determine how easy the software is to use. Some users prefer a simple and easy-to-use interface, while others want a more complex and feature-rich interface. Here is a brief comparison of the interface and workflow of some beginner DAW software:

  • Audacity: Simple and straightforward interface, easy to use for basic editing and recording.
  • Garageband: Intuitive interface and easy navigation, ideal for Mac users.
  • FL Studio Fruity Edition: A bit complicated but feature-rich interface with many options and tools.
  • Ableton Live Intro: Simple interface with a good workflow, suitable for electronic music producers.
  • Pro Tools First: Intuitive interface but limited in features.

Features Comparison

The features offered by a DAW software also influence the user’s decision in selecting the right one. Most beginner DAW software comes with basic features, but some offer advanced functionalities that can enhance the user’s experience. Here is a comparison of some key features of popular beginner DAW software:

SoftwareFeatures
AudacityBasic editing, recording, noise reduction, and effects
GaragebandBasic editing, recording, virtual instruments, and MIDI editing
FL Studio Fruity EditionAdvanced sequencer, mixer, advanced plug-ins, and virtual instruments
Ableton Live IntroAdvanced looping, MIDI sequencing, and virtual instruments
Pro Tools FirstBasic editing, recording, and mixing with a limited number of tracks and plug-ins

Compatibility Comparison

The compatibility of a DAW software is an essential factor for users who want to use their software with different operating systems or plug-ins. While most beginner DAW software is compatible with a range of operating systems, compatibility with plug-ins requires more research. Here’s a quick comparison of compatibility for some beginner DAW software:

  • Audacity: Compatible with Windows, Mac, and Linux, but third-party plugin support is limited.
  • Garageband: Only available for Mac and iOS devices, with limited third-party plugin support.
  • FL Studio Fruity Edition: Compatible with Windows and Mac, with support for VST and AU plugins.
  • Ableton Live Intro: Compatible with Windows and Mac, with a range of third-party plugin support.
  • Pro Tools First: Compatible with Windows and Mac, with limited support for third-party plugins.
Best Beginner Daw Software

Credit: www.youtube.com

Frequently Asked Questions On Best Beginner Daw Software

Which Is The Easiest Daw For Beginners?

For beginners, GarageBand is the easiest DAW to use. It’s free and comes pre-installed on Apple devices. It has a user-friendly interface and intuitive controls. It also includes a range of virtual instruments and effects to get you started.

What Is The Best Daw To Start Producing With?

The best DAW to start producing with depends on personal preference and needs. Popular options include Ableton Live, FL Studio, and Logic Pro X, each with unique features and workflows. It’s important to evaluate demos or trial versions and compare prices before committing to a DAW.

What Is The Easiest Music Recording Software To Use?

Audacity is considered the easiest music recording software to use. It’s free, open-source, and compatible with Mac, Windows, and Linux. Its interface is simple and straightforward, making it a popular choice for beginners and experienced users alike.

What Daw Is Best For Low End?

For low-end recording, Reaper and FL Studio are great DAW options. Reaper offers flexible routing for optimizing low-end processing, while FL Studio boasts a user-friendly interface and powerful mixer. Both are affordable and compatible with many plugins, making them popular choices.

Conclusion

After considering the various options available, it is clear that the best beginner DAW software is one that is easy to use, affordable, and offers a range of features. While personal preference will certainly play a role in which DAW software is chosen, it is important to take into account the needs and goals of individual users.

Ultimately, by choosing the right DAW software, beginners can begin to unlock their full creative potential and take important steps towards achieving their musical aspirations.

Categories
Archive

A B Testing Audio

A/B testing audio involves creating two or more versions of an audio file and measuring the outcomes to determine which version performs better. This process helps in making informed decisions to optimize audio content for better engagement and increased conversions.

Audio content has become increasingly popular in recent years, with businesses using podcasts, webinars, and audio ads to engage their target audience. However, simply creating audio content is not enough to stand out in a competitive market. A/B testing audio is a reliable way to optimize the audio content for better outcomes.

By creating multiple versions of an audio file and comparing the metrics to determine which version performs better, businesses can make informed decisions on how to optimize the content for increased engagement and ultimately increased conversions. As an SEO-friendly content writer, incorporating A/B testing into audio content strategy could significantly improve the overall success of the content.

Preparation

Before conducting an A/B testing for audio, preparation is key. Ensure that you have a clear plan in place, with defined goals and target audience, as well as reliable recording equipment. Testing different audio versions can help you determine what resonates best with your listeners and improve engagement.

Choose Your Audio Components

Before beginning with A/B testing audio, it is crucial to have the right set of audio components. The audio components may include microphones, headphones, amplifiers, and other audio equipment that would produce the best possible sound within the testing environment. It’s essential to choose audio components with optimal performance that can deliver realistic and accurate sound for the listener.

Set Up Your Testing Environment

The next step in preparing for your A/B testing audio is to create a testing environment. Ideally, the environment should be a quiet space with no distractions that could interfere with the testing process. It’s essential to make sure that the environment has a consistent temperature as changes in temperature can affect the quality of sound produced. Moreover, ensure that each of the audio components is also set up in the environment to reduce any potential noise or interference.

Code for unordered list:

  • Choose the right audio components.
  • Set up your testing environment.

Code for ordered list:

  1. Select the audio equipment that produces realistic and accurate sound.
  2. Find a quiet space with consistent temperature.

Table for choosing audio components:

Audio ComponentFeatures
MicrophoneDirectionality, frequency response range, noise level, sensitivity
HeadphonesOpen or closed-back design, frequency response range, impedance, sensitivity
AmplifiersPower output, distortion, signal-to-noise ratio, features

Choosing the right audio components and creating an optimal testing environment will help produce accurate test results. Remember to consider the factors that could affect the testing process, such as external noise and temperature changes. Once you have all your equipment set up, you’ll be one step closer to executing an efficient and effective A/B audio test.

How To Conduct An A/b Test

To conduct an A/B test for audio, start by defining your goals and selecting your metrics. Create two versions of your audio and randomly assign them to your test groups. Analyze the results and adjust accordingly. A/B testing allows you to make data-driven decisions to improve the effectiveness of your audio content.

An A/B test is a powerful way to test one variable against another to determine which one performs better with visitors. This type of testing can be used for website design, copy, images, and even audio. Audio can have a significant impact on user experience, and it’s essential to ensure that the right sounds are being played at the right time. In this section, we’ll discuss how to conduct an A/B test for audio and the essential steps involved.

Define Your Hypothesis

The first step in conducting an A/B test is to define your hypothesis. In other words, what are you trying to test, and what’s your goal? For audio testing, your hypothesis might be that playing specific sounds on your website will increase engagement and retention. Once you have a hypothesis, you can move on to the next step.

Determine Your Test Group

The next step is to determine your test group. This group will be split into two segments, the control group, and the test group. The control group will receive the original audio, while the test group will receive the new audio you’re testing. It’s important to ensure the size of your test group is large enough to draw accurate conclusions.

Randomize Your Test Group

When conducting an A/B test, it’s essential to ensure that your test group is random. This means that both your control group and your test group are selected in a random and unbiased way. Randomizing your test group will help you draw accurate conclusions and ensure there are no underlying biases.

Capture And Compare Results

Finally, to conduct an A/B test effectively, it’s essential to capture and compare the results accurately. This means tracking metrics such as engagement, retention, and conversions to determine whether your new audio is performing better than your original audio. Ensure that you measure the results over the same time period, and that there are no external factors that might have affected the outcome. In conclusion, when it comes to A/B testing audio, there are essential steps to follow to ensure accurate results. It’s vital to define your hypothesis, determine your test group, randomize your test group, and capture and compare results. By following these steps, you can maximize the effectiveness of your audio and ensure that it’s driving engagement and retention on your website.

Best Practices

When it comes to A/B testing audio, it’s important to follow certain best practices to ensure accurate results and meaningful insights. Here are some guidelines to keep in mind:

Keep Variables To A Minimum

To accurately test the impact of different audio variations, it’s important to keep variables to a minimum. This means changing only one variable at a time, such as volume or tone, while keeping other factors constant. By doing so, you can isolate the impact of each variable on listener behavior and make more informed decisions about your audio content.

Test One Variable At A Time

Testing one variable at a time is essential for accurate A/B testing. By changing multiple variables at once, it can be difficult to determine which variable had the most impact on the listener’s behavior or perception. It’s also important to test the variations long enough to detect consistent trends in the data.

Increase The Sample Size For Accuracy

Having an appropriate sample size is crucial for getting reliable results. If your sample size is too small, you may not get accurate insights. At the same time, increasing the sample size will increase the accuracy of your results. The more data you have, the more confident you can be in your conclusions.

Document Your Results

Documenting your results and keeping track of any changes you make is important for comparison and learning from past tests. Documented results allow you to analyze trends and make decisions based on data.

By following these best practices, you can make informed decisions about your audio content and improve the overall listening experience for your audience.

A B Testing Audio

Credit: audiosciencereview.com

Interpreting Your Results

Evaluating the results of A/B testing audio can help you determine which version of your audio content performs better. Analyzing the data can guide you to identify areas for improvement and make data-driven decisions to optimize your audio content for your audience’s preferences.

Interpreting your results from an A/B test is crucial for making informed decisions that will optimize your audio content strategy. Here are three key steps to interpreting and acting on your A/B test results.

Analyzing Statistical Significance

When you conduct an A/B test, you should have established a hypothesis and defined a statistical significance level before collecting any data. Now that you have the results, it’s time to determine whether they are statistically significant. In essence, statistical significance reveals if your A/B test data is reliable enough to assume that a change in group B (the group that received the test variation) was not due to chance. Look at the confidence interval and the p-value to determine if your results meet your defined statistical significance level.

Identifying Patterns

While statistical significance should be your main priority, it’s also valuable to look for visible patterns in the data and any significant differences between the results of groups A and B. This can include customer behaviors, preferences, and feedback, as well as other variables that could not be accounted for in the test experiment. Identify patterns and collect data with precision from the data you’ve collected.

Leveraging Insights For Further Testing

The final step is to leverage the insights gained from your analysis to plan next steps. Based on patterns and significant difference you’ve identified, you can follow up with another A/B test that builds on the learnings from the previous test. You might try a new hypothesis for the next test or decide to explore other changes to your audio experience. It is important to continue testing and learning throughout the lifecycle of your audio content to keep improving your user experience.

Case Studies

Case studies are an important tool in measuring the success of A/B testing audio. They provide real-life examples of how changes in equipment or content have impacted various businesses and individuals.

Case Study 1: Audio Equipment

A well-known podcast hosting company was looking to improve the quality of their audio recordings. They conducted an A/B test, where they recorded an episode using their current equipment, and an episode using upgraded equipment. The results were significant: the episode recorded using the upgraded equipment had a 34% increase in downloads compared to the episode recorded with the previous equipment.

Downloads for Podcast Episodes
Current EquipmentUpgraded Equipment
Episode 110,00013,400
Episode 212,50016,750

This case study shows that investing in better audio equipment can have a positive impact on the success of a business’s audio content.

Case Study 2: Audio Content

A popular meditation app wanted to experiment with the length of their guided meditations. They conducted an A/B test, where half of their users were given a 10-minute meditation and the other half were given a 20-minute meditation. After a week, they analyzed the results and found that the 20-minute meditation had a 25% increase in engagement compared to the 10-minute meditation.

  1. 10-minute meditation: Average engagement = 2 minutes
  2. 20-minute meditation: Average engagement = 4 minutes

This case study shows that the length of audio content can have a significant impact on user engagement, and conducting A/B tests can help businesses determine which length is most effective for their audience.

By utilizing A/B testing, businesses can gain insights into what is working and what needs improvement in terms of audio equipment and content. With the help of case studies like these, businesses can make informed decisions on how to improve their audio strategy and increase their success.

A B Testing Audio

Credit: wistia.com

A B Testing Audio

Credit: www.researchgate.net

Frequently Asked Questions Of A B Testing Audio

What Is The A B Testing?

A/B testing is the process of comparing two versions of a web page or email to determine which one performs better. It is used to optimize conversion rates, user engagement, and other key metrics. In this method, two or more versions of a page are compared to see which one has the best performance in terms of clicks, engagement, and conversions.

What Is Ab Testing In Ai?

AB testing in AI refers to a method of comparing the performance of two different algorithms or models to find out which one is better. The process involves dividing a sample group into two and exposing each group to a separate algorithm.

The results are then analyzed to determine which algorithm is more effective.

How Do You Do Ab Test Messaging?

AB testing messaging involves creating two different versions of a message and sending them to separate groups to see which performs better. This can be done by changing the subject line, email content, or call-to-action. By comparing the results, you can optimize your messaging to increase conversions or engagement.

Use an AB testing tool to ensure accurate results and test one variable at a time.

How To Do A Audio Test?

To perform an audio test, ensure that your device’s sound is turned on. Play an audio file or a video on the device and check if the sound is audible. You can also use online audio testing tools or a sound meter to check decibel levels.

Adjust the volume settings as necessary for optimal audio quality.

Conclusion

Audio A/B testing is a valuable tool for businesses to help determine the effectiveness of audio content. With careful planning, execution, and analysis, it can help increase engagement and conversion rates. Remember to define clear goals, develop a structured plan, and make data-based decisions.

By conducting audio A/B testing, you can fine-tune your audio content and deliver the best possible experience to your audience. Start A/B testing today and watch your business grow.

Categories
Archive Gear

Ribbon Microphone

A ribbon microphone is a type of microphone that uses a thin piece of metal suspended between two magnets to capture sound. It has a natural and warm sound, which makes it popular in recording studios and for live performances.

Ribbon models have been around for over 90 years and have a unique design that sets them apart from other microphones. They work by using a long, thin piece of metal called a ribbon that hangs between two magnets.

Related reading: Dynamic Microphone and Types Of Microphone. For background, see Ribbon microphone on Wikipedia.

When sound waves hit the ribbon, it vibrates and produces an electrical signal that you can amplify and record. One of the main advantages of ribbon models is their ability to capture high-frequency sounds with great detail, which makes them ideal for recording instruments such as violins, acoustic guitars, and cymbals. They are also known for producing a warm, natural sound that is highly sought after in professional recording environments. However, because of their delicate nature, they require careful handling and storage to maintain their performance.

Ribbon Microphone

Credit: www.bumblebeepro.com

What Is A Ribbon Microphone?

If you are wondering what a ribbon model is, then you are in the right place. A ribbon model is a type of microphone that uses a thin metal ribbon suspended in a magnetic field to pick up sound waves. This microphone has a warm, vintage sound, and many engineers in the music recording industry rely on it.

Understanding The Technology

The technology behind ribbon microphones is relatively simple. Sound waves cause the ribbon to vibrate, which creates a small electrical current that is then amplified by the microphone. The ribbon hangs between the poles of a magnetic field, and makers form it from a thin sheet of aluminum or other metal that is light and flexible enough to vibrate with the sound waves.

Ribbon models typically have a figure-eight polar pattern. This means that they pick up sound from the front and back of the microphone while rejecting sound from the sides. This makes them great for recording vocals, acoustic instruments, and other sound sources where you want to capture the natural sound of the room.

A Brief History Of Ribbon Microphones

Ribbon models have been around since the 1920s, and the movie industry first adopted them for sound recording. They were some of the first microphones that radio and television broadcasters adopted, thanks to their ability to capture sound in a natural way.

One of the most famous ribbon microphones is the RCA 44, which RCA introduced in the late 1930s. This microphone appears on many famous recordings, including songs by Frank Sinatra, Bing Crosby, and Elvis Presley. Today, musicians and recording engineers around the world still prize ribbon models for their warm, natural sound.

Advantages Of A Ribbon Microphone

Ribbon models have several advantages over other types of microphones, including a natural and warm sound, accurate transient response, and the ability to capture subtle nuances in vocal and instrument performances. These characteristics make them a popular choice for recording studios and live performances alike.

Ribbon models are highly sought after in the audio recording industry due to their unique and impressive features. They offer many advantages over their counterparts, such as dynamic and condenser microphones. Here are some advantages of a ribbon model.

Natural Sound Reproduction

One of the most significant advantages of a ribbon model is its ability to reproduce natural sounds. The ribbon technology in these microphones lets them capture sound in a way that closely mimics how the human ear hears it. The result is a warm, detailed, and natural representation of the sound, making it perfect for recording acoustic instruments like guitar, drums, vocals, and brass.

Versatility In Recording Situations

Another advantage of a ribbon model is its versatility in recording situations. These microphones are excellent for use in both studio and live settings, making them a favorite of many musicians, sound engineers, and producers. Their ability to capture natural sound makes them perfect for recording live sessions, and their durability allows them to withstand the rigors of touring. They are also great for use as drum overheads or in capturing room ambience, and their unidirectional nature means they can pick up sound from a specific direction, reducing background noise. Manufacturers build ribbon microphones for professionals and enthusiasts who need high-quality audio recordings. With natural sound reproduction and versatility in recording situations like live sessions or studio recordings, these mics might be what you need to take your recordings to the next level.

Disadvantages Of A Ribbon Microphone

Ribbon models have become increasingly popular in recording studios due to their rich, warm sound and ability to capture detailed audio. However, these microphones also come with their fair share of drawbacks. Let’s take a closer look at some of the main disadvantages of a ribbon model.

Durability And Fragility Concerns

One of the biggest concerns with ribbon models is their fragility. These microphones consist of a thin metal ribbon that can easily break or become damaged if mishandled. Unlike other microphones, ribbon models are not suited for rough situations or high-pressure sound environments.

Moreover, ribbon models are not known for their durability and can easily suffer from wear and tear over time. Factors such as humidity and temperature changes can impact their performance and make them more delicate.

Limited Frequency Response

Another disadvantage of ribbon models is their limited frequency response. These microphones have a warm, natural sound, which some people find appealing. However, due to their design, they may not capture the full frequency range of certain instruments or voices accurately. This can result in a muddier or less defined sound, which is not ideal for certain recording situations.

Additionally, ribbon models tend to exhibit more proximity effect than other microphone types, meaning that the closer they are to the sound source, the more bass they emphasize. This can be useful for certain applications, but it can also result in a boomy sound that may not always be desirable.

Disadvantages of a Ribbon Microphone
Durability and Fragility ConcernsRibbon models are delicate, not suited for rough situations, and easily suffer from wear and tear over time.
Limited Frequency ResponseRibbon models have a warm, natural sound but may not capture the full frequency range of certain instruments or voices accurately. They also tend to exhibit more proximity effect than other microphone types.
  • Ribbon models are delicate and can easily break or become damaged if mishandled.
  • Factors such as humidity and temperature changes can impact their performance and make them more fragile over time.
  • Ribbon models have a limited frequency response and may not capture the full range of certain instruments or voices accurately.
  • They tend to exhibit more proximity effect than other microphone types, which can result in a boomy sound that may not always be desirable.

Ribbon Microphone Vs. Other Microphone Types

When it comes to microphones, there are different types available. Each has its own set of features and benefits. The ribbon model is one such type that has been around for decades. Although it may not be as popular today as other types, it still holds a special place in the recording industry due to its unique sound quality and design.

Dynamic Vs. Ribbon Microphones

Dynamic microphones are commonly used for live performances and recording instruments such as drums and electric guitars. They are durable, affordable, and can handle high sound pressure levels. On the other hand, ribbon models are more sensitive and delicate in design. They excel at capturing the nuances of acoustic instruments such as strings and woodwinds. They are also known for their smooth and warm sound quality, making them a popular choice for vocal recordings.

Condenser Vs. Ribbon Microphones

Condenser microphones are another popular type used in recording studios. They are known for their high sensitivity and ability to capture detailed sound. While ribbon microphones are also sensitive, they differ in their design. They don’t require an external power source like condenser mics, making them more versatile and easy to use. Ribbon models also offer a natural and detailed sound with less unwanted noise and distortion, making them ideal for acoustic recordings.

In Conclusion

Overall, ribbon models differ from other types of microphones in their design and sound quality. They are more delicate in construction but offer a unique and natural sound that can enhance any recording. They may not be suitable for all recording situations, but they remain a top choice for musicians and recording engineers who prefer a warm and natural sound in their recordings.

How To Use A Ribbon Microphone

To use a ribbon model, plug it into a preamp or mixer that supplies phantom power. Position it close to the sound source for the best audio quality. Avoid subjecting it to strong winds or excessive vibrations.

If you’re looking for a microphone that can capture a warm and natural sound, a ribbon model might be just what you need. But how do you use one properly to get the best results? Proper placement and use of the right preamp and impedance considerations are key.

Proper Placement And Distance

Also, proper placement and distance are crucial when using a ribbon model. With a directional pick-up pattern and a high sensitivity to sound waves, even small changes in placement can have a significant impact on the audio recording. Here are some tips for proper ribbon microphone placement:

  • Start with the microphone around 6-12 inches from the sound source to capture a full-bodied sound.
  • If you want more low-end, move the microphone closer to the sound source.
  • If you want more air and space in the recording, move the microphone away from the sound source.
  • Always use a pop-filter between the microphone and the sound source to minimize plosives and wind noise.

Preamp And Impedance Considerations

When it comes to ribbon models, preamp and impedance considerations are important factors to keep in mind. Ribbon models require a high-gain preamp that can handle their low output levels, so always check the preamp’s gain range before use. Additionally, the impedance of the preamp can have a significant impact on the sound quality. Ribbon models have a low output impedance, so preamps with a low input impedance can cause a mismatch, resulting in a loss of signal. To avoid this, use a preamp with an input impedance of at least 1,200 ohms.

If you’re not sure, check the manufacturer specifications of both the microphone and preamp to ensure compatibility. Overall, using a ribbon model can result in a warm and natural sound, but proper usage and placement are crucial. Keep in mind the tips outlined here for proper placement and preamp and impedance considerations, and you’ll be well on your way to capturing great audio recordings.

Ribbon Microphone

Credit: www.micandmod.com

Famous Recordings Utilizing Ribbon Microphones

Ribbon models have been used in many famous recordings throughout history, like the RCA 44 which was featured in Elvis Presley’s ‘Jailhouse Rock’. These mics are known for producing a warm, natural sound that captures every detail of the performance.

Ribbon models have been a staple in the music recording industry for decades. Their unique sound and character make them a favorite among musicians and producers alike. There have been countless famous recordings that have utilized ribbon microphones to achieve a signature sound. In this article, we’ll highlight some of the most notable recordings that have used ribbon microphones and how they helped shape the character and uniqueness of the tracks.

Classic Rock And Roll Recordings

Ribbon models have been a key element in some of rock and roll’s most iconic recordings. One of the most notable examples is The Rolling Stones’ “Brown Sugar”. The opening riff was recorded using a ribbon model, emphasizing the grit and rawness of the guitar sound. Another classic rock song, Led Zeppelin’s “Whole Lotta Love”, also features the distinct sound of a ribbon model capturing the explosive guitar riffs and bluesy vocals. The Smashing Pumpkins’ “Siamese Dream” album also famously relies on ribbon models, delivering a warm and intimate sound to the layered guitars.

Modern And Alternative Recordings

Ribbon models are not just confined to classic rock and roll recordings. In fact, they are still widely used today across different genres, including alternative and modern music. For example, Radiohead’s critically acclaimed “In Rainbows” album heavily relied on ribbon models to capture the atmospheric and intimate sound of the tracks. Billie Eilish, who has taken the music industry by storm in recent years, also has her unique sound partly attributed to the use of ribbon models for vocals.

In addition, Bon Iver’s haunting and atmospheric “For Emma, Forever Ago” album famously utilized ribbon microphones to capture the intimate vocals and acoustic guitars. Ribbon models have played a vital role in shaping the sound and character of some of the most iconic recordings in music history. From classic rock and roll to modern and alternative music, ribbon models continue to deliver a unique sound that producers and musicians alike strive to achieve.

Top Ribbon Microphone Models

If you’re looking for a warm, natural sound for your vocals or instruments, a ribbon model is the perfect choice. With its delicate and subtle sound, it’s no wonder that ribbon models are becoming increasingly popular among artists and sound engineers alike.

Cost-effective Options For Home Studio Use

For those who are just starting out with their home studio or looking for a cost-effective option, the Rode NTR and Cascade Fat Head II are great choices. These microphones are perfect for bringing out the warmth in vocals and guitar, and their affordable price tag makes them a popular choice among hobbyists.

MicrophonePrice
Rode NTR$799
Cascade Fat Head II$349

Professional-grade Models For Studio And Live Performances

For professional-grade ribbon microphones, the Royer R-121 and AEA R44 are highly recommended. These microphones are perfect for recording a range of instruments, from drums to brass instruments, and are ideal for use in a professional studio or live performance setting. The Royer R-121 is known for its high SPL handling and smooth frequency response, while the AEA R44 is famous for its classic vintage sound and stellar build quality.

MicrophonePrice
Royer R-121$1,295
AEA R44$3,995

Whichever ribbon microphone you choose, you can be sure that it will bring out the warmth and natural sound in your recordings or live performances. So go ahead and add one to your collection today!

Ribbon Microphone

Credit: www.amazon.com

Conclusion And Final Thoughts

After examining the benefits and drawbacks of ribbon models, it’s clear that they are a valuable tool for recording studios and sound engineers. Their unique sound profile and sensitivity make them ideal for capturing delicate and nuanced audio sources. However, they may not be the right choice for every application, and buyers should carefully consider their intended use before making a purchase.

The Timeless Appeal Of Ribbon Microphones

Ribbon models are an excellent choice for recording a wide range of sound sources. Due to their natural sound and ability to capture all the nuances of an audio signal, they have become a favorite among recording engineers and artists alike. Whether you are recording vocals, acoustic guitar, brass instruments, or drums, a ribbon model can add warmth, depth, and character to your recordings. One of the main reasons why ribbon microphones have a timeless appeal is that they are incredibly durable and reliable. Unlike other types of microphones, they are not as susceptible to damage or wear and tear.

They can last for many years if treated properly and stored in a safe and dry place. Another reason for their popularity is that they offer a unique and distinct sound. Due to their design, ribbon microphones produce a natural and smooth sound that is often described as warm, vintage, and intimate. They can pick up subtle changes in the sound and reproduce them faithfully, resulting in a recording that is rich and dynamic.

Where To Purchase And How To Care For Your Ribbon Microphone

If you are looking to purchase a ribbon microphone, there are several reputable brands to choose from. Some of the popular brands include Royer, AEA, and Cascade. You can purchase them online or from your local music store. Before making a purchase, it’s always a good idea to do some research and read reviews from other customers to ensure that you are getting the best quality for your money. When it comes to caring for your ribbon microphone, it’s essential to handle it with care. Ribbon microphones are delicate and can be damaged easily if dropped or mishandled.

Always store your microphone in a protective case or bag when not in use. Also, avoid exposing it to extreme temperatures or humidity, as this can damage the delicate ribbon element. In conclusion, ribbon microphones are an excellent choice for anyone looking to record high-quality audio. They offer a unique and natural sound that is highly sought after in the recording industry. Whether you are a professional recording engineer or a hobbyist musician, investing in a high-quality ribbon microphone is a decision you won’t regret.

Frequently Asked Questions On Ribbon Microphone

What Are Ribbon Mics Used For?

Ribbon mics are used primarily for capturing natural and warm sound in music recordings. They excel at picking up delicate nuances in sounds like vocals, acoustic guitars, and strings. Ribbon mics have become more popular in recent years for their superior ability to capture sound in a music recording.

Are Ribbon Mics Better Than Condenser?

Both ribbon and condenser mics have their own strengths and weaknesses. Ribbon mics are known for their warm, vintage sound and are excellent for recording acoustic instruments, while condenser mics are versatile and better for capturing the nuances of vocals and high-frequencies.

Ultimately, it depends on the sound you’re looking for and the type of recording you’re doing.

What Not To Do With A Ribbon Mic?

Be careful not to expose your ribbon mic to moisture or humidity, as this can damage the ribbon. Additionally, avoid using phantom power with ribbon mics, as it can also cause damage. Handling the microphone roughly or dropping it can also harm the delicate ribbon.

Finally, do not use ribbon mics with extremely loud sources, as they may not be able to handle the high sound pressure levels.

What Is The Weakness Of A Ribbon Mic?

The weakness of a ribbon mic is its fragility and sensitivity. It can be damaged by excessive vibration or wind pressure, and its output level is lower than other types of microphones. However, it offers a unique and warm sound that is favored by many recording artists.

Conclusion

Overall, a ribbon microphone is a versatile and unique tool for recording various types of sound. Its delicate design and precise sensitivity offer a warm and natural sound that cannot be replicated by other types of microphones. While it may require extra care and maintenance, the quality of the sound it produces makes it a valuable investment for any studio or home recording setup.

By understanding how to properly use and maintain the ribbon microphone, you can elevate your recordings to a new level of audio excellence.