Categories
Archive Gear

Recording Vocals At Home

To record vocals at home, you need a quiet environment and a decent microphone setup. Creating a makeshift recording studio in your home can help improve your vocal recording quality.

As an Amazon Associate I earn from qualifying purchases.

Recording vocals at home can be a challenging task, especially if you lack the right equipment or knowledge. However, creating a makeshift recording studio in your home can help improve your vocal recording quality. It’s important to choose an area that is quiet and free of background noise.

Investing in a good microphone setup, such as a condenser microphone and a pop filter, can also make a difference in the quality of your recordings. Setting up acoustic panels or soundproofing material can improve the overall acoustics of your recording space. Careful attention to the details, such as microphone placement and vocal technique, can help you achieve professional-sounding vocal recordings from the comfort of your own home.

Benefits Of Recording Vocals At Home

Recording vocals at home can have numerous benefits such as cost-effectiveness, flexibility in terms of scheduling, and the ability to control the environment and equipment to create high-quality recordings. With advancements in technology, it is now easier than ever to create professional-sounding vocal recordings from the comfort of your own home.

Recording vocals at home has become more popular due to the increasing advancements of technology and the ease of access to affordable recording equipment. In this section, we will discuss the benefits of recording vocals at home, including affordability and convenience, control over the recording process, and the opportunity for creative expression.

Affordable And Convenient

Recording vocals at home can be significantly more affordable than going to a professional studio. Investing in quality equipment, such as a microphone, audio interface, and recording software, can seem expensive at first, but in the long-run, it can save you a considerable amount of money. Convenience is another significant benefit of recording vocals at home. You can record at any time without having to worry about scheduling issues or having to pay an hourly rate at a studio. This allows you to take your time and experiment with different recording techniques and vocal performances without any additional pressure.

Control Over Recording Process

Recording at home allows complete control over the recording process. You can experiment with different recording techniques, mic placements, and processing settings without worrying about studio time constraints. This freedom allows for more experimentation and can aid in crafting a more unique and polished sound. Additionally, home recording allows for more flexibility in the mixing and editing process. You can tweak and revise the vocal tracks as much as necessary without having to worry about incurring additional fees or taking up recording studio time.

Opportunity For Creative Expression

Recording vocals at home provides an excellent opportunity for creative expression, giving you complete control over the entire recording process. You can experiment with vocal harmonies, add effects and layers, and get as creative as you want. This allows you to explore new vocal concepts and sounds without worrying about someone else’s creative vision. Moreover, recording vocals at home allows you to be comfortable and relaxed, which can positively impact your performance. Being able to control the recording environment can reduce stress and create a more relaxed atmosphere, leading to a better vocal performance. In conclusion, the benefits of recording vocals at home are numerous, including affordability, convenience, control over the recording process, and the opportunity for creative expression. With the right equipment and set up, you can produce high-quality vocal recordings at home that can stand up to any professional recording studio.

Recording Vocals At Home

Credit: www.abbeyroad.com

Equipment Needed For Recording Vocals At Home

To record vocals at home, you will need a few essential pieces of equipment. These include a microphone, audio interface, pop filter, headphones, and recording software. With these components, you can capture high-quality vocals in the comfort of your own home studio.

If you’re looking to record vocals at home, there are certain pieces of equipment that you’ll need to ensure a high-quality recording. In this post, we’ll explore the necessary equipment for recording vocals at home and provide you with some tips for choosing the right gear.

Microphones

The first piece of equipment you’ll need for recording vocals at home is a microphone. There are a variety of microphones available on the market, but it’s essential to choose one that is specifically designed for vocal recording. The most common types of microphones for recording vocals are condenser microphones and dynamic microphones. The condenser microphones are known for their sensitivity and capture the nuances of vocals, while dynamic microphones are more rugged and are ideal for recording live performances.

Audio Interface

An audio interface is necessary to connect your microphone to your computer for recording. This device acts as a bridge between the analog world of your microphone and the digital world of your computer. You can choose from USB, Thunderbolt, or Firewire audio interfaces, depending on the type of computer you’re using.

Pop Filter

A pop filter is a crucial accessory for vocal recording. It helps to reduce popping sounds that can occur when pronouncing certain consonant sounds, such as “p” and “b.” A pop filter is a physical barrier that goes between the microphone and the vocalist’s mouth, which helps to soften the impact of the air expelled from the mouth.

Headphones

Headphones are an essential piece of equipment for recording vocals at home. They allow the singer to hear themselves as they record and monitor the recording quality. It’s best to use closed-back headphones for recording, as they offer better sound isolation, so the vocalist can hear themselves over the recorded music.

Computer With A Daw

Finally, you’ll need a computer with Digital Audio Workstation (DAW) software for recording, editing, and mixing your recordings. There is a range of DAW software available, including some that offer a free trial before purchasing. You can choose from popular options like Pro Tools, Logic Pro X, or Garageband, depending on your level of expertise and budget. In conclusion, recording vocals at home requires specific equipment, including microphones, audio interfaces, pop filters, headphones, and a computer with DAW software. By following this guide on the right gear, you can get started with recording vocals at home and improve the quality of your music recordings.

Preparing Your Home Studio For Vocal Recording

Prepare your home studio for vocal recording by selecting a room with good acoustics and avoiding any background noises. Invest in a quality microphone, pop filter, and headphones to ensure a professional sound. Proper preparation can lead to successful recording and a polished final product.

Preparing Your Home Studio for Vocal Recording: Recording vocals at home can be quite challenging if you haven’t set up your studio for vocal recording. Before starting the recording process, it’s important to prepare your home studio to ensure you get the best sound quality possible. Here are three crucial steps to follow when preparing your home studio for vocal recording. Selecting the Right Room: The first step to preparing your home studio for vocal recording is selecting the right room. Not all rooms are suitable for recording vocals, and you don’t necessarily need a large room either. Rather, you need a room that has the least amount of natural reverb and outside noise. The ideal room should have neutral wall colors and minimal windows. A room with curtains and carpets is ideal for recording vocals as they help to absorb sound reflections. Acoustic Treatment: The next step is to ensure your room has proper acoustic treatment. This step ensures that every sound that enters the microphone is clear and free from any outside noise or distortion. Acoustic treatment involves the use of acoustic panels or foam that helps control soundwaves and sound reflections in the room. By strategically placing the acoustic panels or foam, you can reduce unwanted frequency reverberations and ensure a cleaner, clearer vocal recording. Setting Up Recording Equipment: When it comes to setting up recording equipment, every step matters. A minor inconvenience or mistake can lead to unsatisfactory results. Before you start your vocal recording session, ensure your recording equipment is set up correctly. This ensures that you capture the best quality sound from your vocals. Set up the microphone and ensure you’re using the right microphone for your recording requirements. Ensure that your pop filter is in place to prevent any popping sounds. Finally, check that your headphones are in good condition and plugged in correctly. In conclusion, preparing your home studio for vocal recording is essential to achieving the best sound quality possible. Start by selecting the right room, add acoustic treatment to absorb sound reflections and then set up your equipment. Remember that every component matters, and a little attention to detail can go a long way towards achieving the perfect vocal recording.

Tips For Recording Great Vocals At Home

Get studio-quality vocal recordings from the comfort of your own home with these tips. Invest in a quality microphone, create a soundproof environment, experiment with mic placement, and utilize editing techniques to perfect your vocals.

Recording vocals at home can be challenging, but with the right setup and techniques, you can achieve a professional sound. Here are some tips for recording great vocals at home:

Mic Placement Techniques

Mic placement is crucial for capturing a clear and balanced vocal performance. Start with the mic about 6 to 8 inches away from the singer’s mouth and experiment with different angles and distances to find the sweet spot. A pop filter can also help reduce plosives and hissing sounds.

Getting The Right Levels

Proper levels are essential to avoid distortion and background noise in your recordings. Use a recording software’s built-in meter to check the levels and adjust the mic gain accordingly. The rule of thumb is to aim for a peak level of -6dB to give you enough room for post-processing.

Eliminating Background Noise

Background noise can ruin a good recording, but you can minimize it by choosing a quiet room and turning off any unnecessary equipment. Use acoustic panels or blankets to absorb reflections and reduce echoes in the room. You can also use noise reduction plugins in post-production to further clean up the sound.

Using Headphone Mixes

Using a headphone mix can help the singer hear themselves clearly and stay in tune. Set up a separate mix with the vocals and any instrumental tracks, and adjust the balance to the singer’s preference. Make sure to use quality headphones and check for any latency issues.

Taking Breaks

Recording sessions can be tiring, both physically and mentally. To avoid vocal fatigue and maintain a consistent performance, take breaks every 20-30 minutes to rest your voice and regain focus. Hydrate properly and warm up your vocals before each take. In conclusion, recording great vocals at home requires attention to detail and patience. By following these tips, you can improve the quality of your recordings and achieve a more professional sound.

Editing And Mixing Your Recorded Vocals

Learn tips for recording vocals at home and the importance of editing and mixing them. With proper techniques and software, you can enhance the sound quality of your recorded vocals and create a professional-sounding track.

Editing and Mixing Your Recorded Vocals Once you have recorded your vocals, the next crucial step is editing and mixing them to produce a perfect sound quality. This process requires techniques and software that can enhance the recorded vocals, such as normalization, compression, EQ, reverb, delay, and level balancing. In this section, we discuss the steps and techniques you can use to edit and mix your recorded vocals effectively. ### Importing Your Track to a DAW The first step in editing and mixing your recorded vocal is importing the track into a Digital Audio Workstation (DAW). A DAW is a software application used to record, edit, and produce audio files. Popular DAWs include Pro Tools, Logic Pro, Ableton Live, FL Studio, and Cubase. Once you import your track, your DAW will display the recorded vocals waveform, where you can make necessary adjustments. ### Editing Techniques Editing techniques include cutting out unwanted portions, aligning takes, and adjusting timing. You can easily cut portions of the vocals that you don’t need and eliminate any clicks, pops, or breath noises. You can align different takes and punch-in corrections in the timeline to ensure the recorded vocals are in sync. In addition, you can apply fades and crossfades to smoothen transitions between tracks. ### Normalization Normalization is the process of adjusting the overall sound level of your vocals to a consistent, optimal level. A normalized track will have the same loudness level as any other track, making it easier to mix. You can select a specific part of the track, apply normalization, and adjust the gain to avoid clipping. ### Compression Compression helps balance the dynamic range of your recorded vocals. It reduces the differences in volume between the quiet and loud parts, making them sound more even. Compression can help the vocals cut through the mix and enhance the clarity and richness of the sound. ### EQ Equalization (EQ) enables you to adjust the tonal balance of the recorded vocals. You can finely adjust the frequency spectrum of the track, cutting or boosting particular frequencies. For vocals, it is recommended to cut the low frequency (below 100Hz) to eliminate rumble and cut the high frequency (above 10kHz) to reduce sibilance. You can also boost the mid frequencies (between 2kHz and 5kHz) to add clarity and presence. ### Reverb and Delay Reverb and delay are important effects for adding depth and space to your recorded vocals. Reverb simulates the sound of a performance in a room, while delay repeats the sound to enhance the groove and rhythm. You can experiment with different types of reverb and delay to achieve the desired effect. ### Balancing Levels Balancing levels is the process of adjusting the volume of each individual track in a mix to create a cohesive and balanced sound. You can adjust the volume fader of each track and pan the vocals to the left or right, depending on the sound you want to achieve. ### Exporting Your Final Mix Once you have completed your editing and mixing, the final step is to export your mix in WAV, MP3, or other audio formats. You can name the file appropriately and store it in a specific location. Make sure you listen to the final mix through different playback devices to ensure it sounds good on each. In conclusion, editing and mixing your recorded vocals require techniques and software application that can smooth out sound discrepancies, balance sound levels, apply sound effects, and produce desired sounds. With these tips, you can achieve a perfect sound quality for your recorded vocals.

Recording Vocals At Home

Credit: www.youtube.com

Common Mistakes To Avoid When Recording Vocals At Home

When recording vocals at home, there are some common mistakes that can be easily avoided. Firstly, ensure that the recording area is free from any background noise or echo. Secondly, use a pop filter to reduce popping sounds and enunciate words clearly.

Finally, experiment with microphone placement and consider investing in a good-quality microphone for best results.

Common Mistakes to Avoid When Recording Vocals at Home Recording vocals at home may seem like a convenient and cost-effective solution, but there are many traps to avoid. Several mistakes can cause your vocals to sound amateurish, which can be incredibly frustrating, especially if you aim to produce professional-quality recordings. Poor Mic Placement One of the most common mistakes when recording vocals at home is poor mic placement. Placing the mic too close or too far from the singer can impact the tone of the vocals, resulting in a poor recording. Therefore, it’s essential to find the sweet spot between the singer and the microphone to capture the best vocal sound. Recording in a Poorly Treated Room Another common mistake is recording vocals in a poorly treated room. The acoustic quality of the room can affect the quality of the recording. Many home studios lack proper sound isolation, and the sound reflects off the walls, which leads to echo, distortion, and other audio anomalies. To avoid this, ensure that your recording space is adequately treated to minimize unnecessary noise and enhance the sound quality. Over-compression Over-compression can be another mistake that hampers the quality of your recordings. Over-compressing your audio can cause it to be too loud and subsequently lose its dynamics. Moreover, it makes the recording sound unnatural, as if they are competing in a shouting contest. To avoid this, it’s best to use compression sparingly and only to the degree required to achieve the sound you’re aiming for. Overuse of Reverb and Delay While using reverb and delay in your recordings can add depth and texture, one common mistake that people make is overusing them. Too much reverb can make the vocals unrecognizable, while too much delay can make the recording sound cluttered and washed out. It’s best to use these effects subtly to achieve the desired sound and avoid making the mix sound messy. Using the Wrong Mic for the Job Using the wrong mic is also one of the most common mistakes that people make while recording vocals at home. Not all microphones are designed for voice recordings. Using a dynamic mic for a recording that requires a large diaphragm condenser mic or vice versa results in substandard audio results. To avoid this, it’s essential to choose the right microphone for the job. Not Taking Breaks People often forget to take regular breaks when recording, which leads to fatigue and ultimately impacts the quality of the recording. Regular breaks ensure that the microphone and monitors don’t cause ear fatigue while enabling the singer to rest their voice. Therefore, it’s best to take short breaks regularly and keep the recording sessions short, with enough time to rest in between. To sum up, by avoiding the common mistakes while recording vocals at home, you can increase the odds of producing a professional sounding track. Take note of these mistakes and take necessary measures to avoid them to achieve a more polished recording.

Recording Vocals At Home

Credit: www.levelsmusicproduction.com

Frequently Asked Questions On Recording Vocals At Home

What Is The Best Way To Record Vocals At Home?

The best way to record vocals at home is to have a quiet and controlled environment, use a condenser microphone with a pop filter, position the microphone at a proper distance, use headphones to monitor the recording, and consider using acoustic treatment for the room to minimize reflections.

How Can I Record My Voice At Home Professionally?

To record your voice at home professionally, you’ll need a quiet space, a good quality microphone, and recording software. Set up your microphone, select a recording software, and position yourself a comfortable distance away from it. Also, use a pop filter to minimize background noise and improve sound quality.

Record your voice and edit your audio file using software like Audacity or GarageBand to fine tune your sound and get a professional result.

What Do Singers Use To Record Their Voice?

Singers use a microphone and a recording device, such as a computer or digital audio workstation (DAW), to record their voice. These devices capture the soundwaves of the singer’s voice and convert them into digital data that can be edited and manipulated.

What Equipment Do I Need To Record Myself Singing?

To record yourself singing, you need a microphone, a computer or a smartphone, and an audio interface or a USB audio converter. Popular microphone options include the Shure SM58 and the Audio-Technica AT2020, while audio interfaces like the Focusrite Scarlett and the PreSonus AudioBox provide better sound quality.

Recording software like GarageBand and Audacity can help to edit and finalize your recordings.

Conclusion

Recording vocals at home may seem daunting at first, but with the right equipment and techniques, it can lead to professional-quality recordings without breaking the bank. Whether you’re an aspiring musician or a podcaster, the tips and tricks outlined in this blog post should help you get started on your home recording journey.

Remember to experiment, practice, and most importantly, have fun. With a little practice and patience, you’ll be well on your way to producing studio-worthy vocals from the comfort of your own home!
Categories
Archive

Immersive Mid Side Mixing

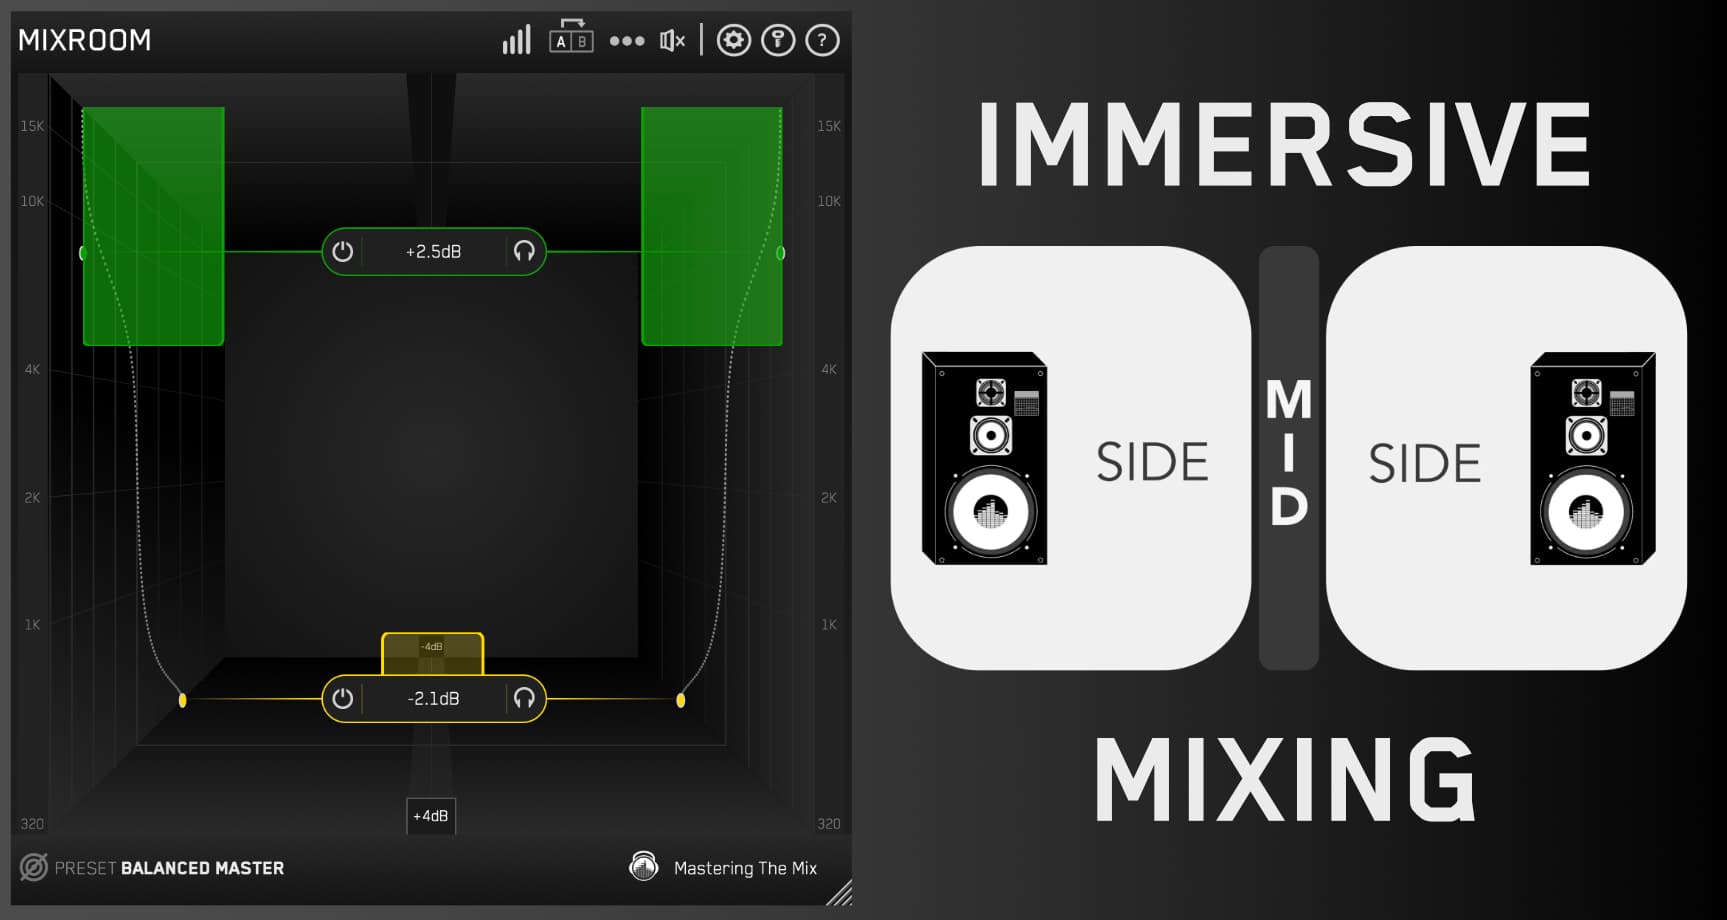
Immersive mid side mixing is a mixing technique that involves manipulating the stereo field of a mix to create a wider and more spatially dynamic sound. This technique is achieved by using a mid-side (M/S) processing technique that separates the mono (mid) and stereo (side) elements of a mix and allows for individual processing of each channel.

By adjusting the balance between the mid and side channels, and applying EQ, compression, or other effects to them separately, the audio engineer can create a more immersive and impactful mix. This technique is particularly useful for enhancing the stereo image of a mix, adding width to a narrow-sounding recording, or creating a more natural and spacious soundstage.

What Is Mid Side Mixing?

If you’re an engineer or producer, the concept of mid-side mixing may not be completely foreign to you. Mid-side mixing is an advanced mixing technique that lets you manipulate the stereo width of a mix. It’s a technique that’s commonly used in mastering and has recently been the topic of contention when it comes to its potential in immersive audio. However, let’s first understand what Mid Side Mixing is.

Definition Of Mid Side Mixing

Mid side mixing is a technique that separates the audio signal into two components: the mid and side components. The mid represents the mono information of the signal while the side is the stereo information. Mixing engineers can independently manipulate the volumes, EQ, and processing of the mid and side signals to achieve a more controlled and cohesive stereo image. Mid-side processing is often used to fix stereo width issues in a mix, add depth, and enhance stereo separation.

How Mid Side Mixing Works

The process of creating a mid-side mix is relatively simple. It requires decoding a stereo mix into its separate Mid and Side signals. The Mid is created by adding the left and right channels together, and then dividing by two, and the Side component is created by subtracting the left channel from the right channel.

  • To widen the stereo image, increase the gain of the side component while leaving the mid component untouched.
  • To make the mix appear more mono or narrow, reduce the gain of the side component and leave the mid component untouched.
  • It is important to note that excessive widening can result in phase issues, causing the loss of mono compatibility and potential cancellation issues on mono playback systems.

Immersive mid-side mixing applies the concept of mid-side processing to immersive audio, and it’s not simply left to right. It includes front to back too, which allows for full control of the placement of sounds in three-dimensional space. First, the encoding process turns a 3D audio mix into a B-format signal, which is then decoded and mixed into the desired output format, such as 5.1 or 7.1.

In conclusion, mid-side mixing is a popular technique to adjust and optimize stereo width in stereo mixes. While it has the potential for immersive mixes, it’s essential to use this technique with care and understand that excessively using this technique can lead to various phase and cancellation issues.

Advantages Of Mid Side Mixing

Mid Side Mixing is an effective technique for creating an immersive sound experience. It allows audio engineers to make the mix sound wider and more spacious without sacrificing the balance between the center and sides. Using Mid Side Mixing can add depth and dimension to music and other audio productions.

Mid Side Mixing is a technique that has been used for a long time in audio engineering to manipulate stereo signals, and it has numerous advantages over conventional stereo mixing techniques. Here are a few of the advantages of Mid Side Mixing.

Increased Clarity And Separation Of Sounds

With the Mid Side Mixing technique, each sound element can be treated separately, allowing for greater clarity and separation of sounds, as each element can be panned and EQ’d individually. This separation ensures that each instrument maintains its own distinct place in the stereo spectrum and avoids any masking between the instruments.

Greater Control Over Stereo Width

Mid Side Mixing offers greater control over the stereo width of your mix. You can adjust the stereo width of specific elements without affecting other elements in the mix. This allows you to create a mix that is more spacious and dynamic.

Easy Correction Of Phase Issues

Phase issues can be a significant problem when dealing with stereo mixing. Mid Side Mixing allows you to correct phase issues quickly and easily, resulting in a much more stable and accurate mix. You can check the phase of each element and make any necessary adjustments in real-time. In conclusion, Mid Side Mixing offers benefits that cannot be achieved through conventional stereo mixing. It provides greater control, improved clarity, and easier correction of phase issues. By incorporating this technique into your mixing workflow, you can create stunning and immersive mixes that sound fantastic on any system.

How To Set Up Mid Side Mixing In Your Daw

Mid Side mixing is a technique where you split your mix into two components: mid and side. The mid component contains the information that is panned to the center, while the side component contains the information that is panned to the sides. This technique allows you to make more precise adjustments to your mix. In this post, we’ll take a look at how to set up mid side mixing in your DAW.

Configuring Your Tracks For Mid Side

The first step in setting up mid side mixing is configuring your tracks. To do this, you’ll need to create two separate tracks for each element in your mix: one for the mid component and one for the side component. Most DAWs have a mid side plugin that you can use to split your track into mid and side components.

Once you have your tracks set up, you’ll need to make sure they’re panned correctly. The mid track should be panned to the center, while the side track should be panned all the way to either the left or right.

Using Plugins For Mid Side Mixing

After configuring your tracks, you can start using plugins to adjust the mid and side components separately. There are many different plugins you can use for mid side mixing, including EQ, compression, and reverb plugins.

EQ plugins are especially useful for mid side mixing. With an EQ plugin, you can adjust the levels of specific frequencies in either the mid or side component. For example, if you want to boost the bass in the center of the mix, you can use an EQ plugin to increase the levels of low frequencies in the mid component.

Using Mid Side Eq Techniques

There are several different EQ techniques you can use for mid side mixing. One popular technique is to use a low-cut filter on the side component. This helps to remove any low-frequency information that may be causing phase issues and muddying up the mix. Another technique is to use a high-shelf filter to boost the high frequencies in the side component, creating a wider stereo image.

It’s also important to make sure that the levels of the mid and side components are balanced. You may need to adjust the levels of each component to ensure that the mix sounds balanced and cohesive.

Overall, mid side mixing is a powerful technique that can give you more control over your mix. By using the right tools and techniques, you can create a more dynamic and interesting mix that stands out from the crowd.

Immersive Mid Side Mixing

Credit: www.sweetwater.com

Tips And Tricks For Successful Mid Side Mixing

Discover the secrets to successful immersive mid side mixing with these valuable tips and tricks. Learn how to master techniques such as EQ, panning, and balance to create a full and dynamic sound that truly engages listeners.

Mid Side Mixing is a powerful technique used by audio engineers to achieve a wider stereo image by separating the sound sources into two parts – the mid and side. Mid refers to the audio in the center of the stereo field, while side refers to the audio that is panned to the left or right. In this blog, we will discuss some tips and tricks for successful Mid Side Mixing.

Choosing The Right Sounds For Mid Side Mixing

When selecting sounds for Mid Side Mixing, it is important to choose sounds that fit the desired mood and atmosphere of the track. Mid side mixing is most effective when used with sounds that have a strong stereo presence, such as wide pads, reverbs, and atmospheres. Avoid using sounds that are too mono-heavy, such as bass and kick drums, as they may lead to phase cancellation when panned too wide.

Panning Drums With Mid Side Mixing

Drums are an essential part of any mix, and using Mid Side Mixing can help you achieve a more natural and wider drum sound. Start by placing the kick, snare, and other central drums in the mid channel, while panning cymbals and other wide drums to the sides. This will create a natural stereo image that is pleasing to the ear.

Using Automation With Mid Side Mixing

Automation is an essential tool in Mid Side Mixing, as it allows you to create dynamic changes in the stereo field throughout the song. For example, you can use automation to widen the stereo field during the chorus, creating a more expansive soundstage. You can also use automation to emphasize certain sounds or instruments by increasing their presence in the mix. In conclusion, Mid Side Mixing is a powerful technique that can help you achieve a wider and more natural stereo image. By choosing the right sounds, panning drums effectively, and using automation, you can create a mix that is both engaging and immersive. Remember to experiment with different techniques and find what works best for your mix.

Common Mistakes To Avoid In Mid Side Mixing

Immersive Mid Side Mixing is a popular technique used in audio production. However, there are common mistakes to avoid such as improper panning and EQ adjustments. Careful attention to sound placement and balance will enhance the listener’s experience in this mix style.

Mid Side Mixing can be a powerful tool for enhancing the stereo image of your mix. However, if not used correctly, it can lead to more harm than good. In this section, we will discuss some common mistakes to avoid when using Mid Side Mixing and how to correct them.

Using Mid Side Mixing When It’s Not Necessary

One of the common mistakes that people make is using Mid Side Mixing when it’s not necessary. Just because you have the tool doesn’t mean you have to use it. If you have a well-balanced stereo mix and don’t need to make any changes to the stereo image, then there is no need to use Mid Side Mixing. Using Mid Side Mixing unnecessarily can cause problems in your mix. It can create unnecessary phase problems that can lead to an unbalanced mix. So, before you use Mid Side Mixing, make sure there is a specific reason for using it and that it will enhance your mix.

Overusing Mid Side Eq

Another common mistake is overusing Mid Side EQ. While Mid Side EQ can be a powerful tool, using it too much can lead to problems. Over-EQing the Mid and Side channels can cause phase issues and make your mix sound unnatural. To avoid this mistake, use Mid Side EQ sparingly. Only make small adjustments to the Mid or Side channels as needed. If you’re not sure whether you need to make any adjustments, try listening to the mix without Mid Side EQ and see if it sounds natural.

Expecting Mid Side Mixing To Fix Bad Arrangements

A very common mistake is expecting Mid Side Mixing to fix bad arrangements. Mid Side Mixing is not a miracle tool and cannot fix badly arranged tracks. If your tracks are not well arranged, trying to fix them with Mid Side Mixing will only make matters worse. To avoid this mistake, focus on arranging your tracks properly before you start mixing. Make sure the instruments are well balanced and sit in the right frequency range. This will make it easier to mix your tracks and use Mid Side Mixing to enhance your mix. Good use of Mid Side Mixing can take your mix to the next level, but it’s important to avoid the common mistakes mentioned above to achieve the best result. Only use Mid Side Mixing when necessary, don’t overuse Mid Side EQ, and avoid expecting Mid Side Mixing to fix bad arrangements. With proper application, Mid Side Mixing can help you create a fuller and more dynamic stereo image in your mix.

Immersive Mid Side Mixing

Credit: www.masteringthemix.com

Case Studies Of Successful Mid Side Mixing In Popular Music Tracks

Immersive Mid Side Mixing is a technique that has gained popularity in recent times. Many successful music producers and engineers have used this technique in their music production. Let’s take a look at some famous case studies of Mid Side Mixing and how it has contributed to the success of popular music tracks.

Exploring Mid Side Mixing In Daft Punk’s ‘get Lucky’

The Grammy award-winning hit song ‘Get Lucky’ by Daft Punk was mixed using Mid Side Mixing technique. The technique helped create a more spacious sound that made the track stand out. The drums were panned to the center while other sounds like the guitar, synth, and bass were panned to either side of the stereo image. This separation of sounds allowed the listener to identify and appreciate the different elements in the mix. Mid Side Mixing also brought more clarity to the vocals and made the track sound more balanced.

Analyzing Mid Side Mixing In Lorde’s ‘royals’

The 2013 hit song ‘Royals’ by Lorde also used Mid Side Mixing technique to create a distinctive sound. The production team used the technique to give an airy and atmospheric feel to the track. The vocals were mostly centered while other sounds such as the drums, bass, and synths were panned to either side. The use of the technique created an immersive sound that complemented the theme of the song. The track showcased how Mid Side Mixing can be used to create a dynamic and spacious mix.

Mid Side Mixing has been used in several other music tracks such as Radiohead’s ‘Kid A’ and Beyonce’s ‘Drunk in Love’. The technique provides a unique way to control the stereo width of the mix and create a more immersive and engaging experience for the listener. If you are a music producer or engineer, trying out Mid Side Mixing can help you add more depth and clarity to your mixes.

Famous Mid Side Mixing Engineers You Should Know

Immersive Mid Side Mixing has been practiced for decades but not everyone is well-versed in this technique. It’s a process that involves manipulating the stereo image for a more full and wide sound. There are various approaches to achieving that and some engineers have mastered it so well that their names have become synonymous with the technique. In this blog post, we’re shining the spotlight on some famous Mid Side Mixing engineers you should know.

Dave Pensado

Dave Pensado is often regarded as one of the greatest mixing engineers of all time. He’s been in the music industry for over three decades and has mixed records for some of the biggest names in the industry, including Beyoncé, Mariah Carey, Christina Aguilera, and more. He’s known for his use of Mid Side Mixing in his mixes, which allows him to craft a wider stereo image that makes the music sound more immersive.

Andrew Scheps

Andrew Scheps is a multi-Grammy award-winning mixing engineer who’s worked with artists like Adele, Beyoncé, Metallica, and more. He’s well-known for his use of Mid Side Mixing, which allows him to create a unique sound that’s both spacious and immersive. Scheps has also developed a plugin called Scheps Omni Channel, which allows music producers to use the Mid Side Mixing technique with flexibility.

Manny Marroquin

Manny Marroquin is a mixing engineer with over 250 Grammy nominations and 8 wins to his name. He’s mixed records for artists like Bruno Mars, Kanye West, and Lady Gaga. Manny’s use of Mid Side Mixing is evident in his mixes, where he applies this technique to make the sound more expansive and immersive. He often uses a combination of analog and digital gear to achieve his signature sound.

In conclusion, these famous Mid Side Mixing engineers have proven that this technique is an essential tool in the music production world. Their expertise, creativity, and innovation have made them legendary in the music industry.

Immersive Mid Side Mixing

Credit: www.masteringthemix.com

Conclusion: Why Mid Side Mixing Is A Valuable Tool For Modern Music Production

Mid Side mixing is a valuable tool that can enhance modern music production by creating an immersive audio experience for listeners. By manipulating the center and side channels of a mix, the producer can create depth and dimensionality to the sound, making it more engaging and enjoyable.

Recap Of Mid Side Mixing Benefits

Mid Side Mixing is a technique widely used in music production to enhance the stereo width of a track, without causing it to sound too muddy or cluttered. By splitting a stereo signal into its Mid and Side components, producers can apply different processing to each part, thereby creating a more spacious and well-balanced sound. One of the main benefits of Mid Side Mixing is that it allows producers to control the mono compatibility of a track. If a mix contains too many sounds panned hard left or right, it can cause issues when played back in mono, as some of the sounds may disappear or become quieter. However, by using Mid Side Mixing, producers can ensure that the important elements of the mix remain present and audible, regardless of the playback system. Another benefit of Mid Side Mixing is that it enables producers to “fix” flawed mixes. For example, if a mix has too much reverb on the center-panned vocal, but not enough on the instruments panned left and right, a producer can adjust the levels of each component separately using Mid Side Mixing. This can result in a more balanced and cohesive mix.

Future Of Mid Side Mixing In Music Production

As technology continues to evolve, it’s likely that Mid Side Mixing will become an even more integral part of the music production process. With the rise of virtual and augmented reality, for example, the ability to create immersive, 3D soundscapes will be more important than ever. Mid Side Mixing provides producers with the tools they need to create these types of experiences, by allowing them to position sounds more precisely within the stereo field. Additionally, with the increased popularity of streaming music services, there is a greater need for producers to create mixes that sound good on a wide range of playback systems, including smartphones, laptops, and home speakers. Mid Side Mixing can help ensure that a mix remains clear and balanced, regardless of the device it’s played on. In conclusion, Mid Side Mixing is a valuable tool for modern music production, offering numerous benefits that help producers create better-sounding, more engaging mixes. Whether you’re mixing a pop song, a film score, or a virtual reality experience, Mid Side Mixing can help make your work stand out.

Frequently Asked Questions On Immersive Mid Side Mixing

What Is Mid Side Processing In Mixing?

Mid-side processing is a mixing technique that works separately on the center and side content of a stereo mix. The center contains the mono elements while the sides contain elements panned left or right. This technique allows for more precise control over the stereo image, making it easier to adjust the balance and width of the mix.

When Should You Use Mid Side Eq?

Use mid-side EQ when you want to adjust the stereo image of a mix. It allows you to independently adjust the middle and sides of the audio, making it effective for fixing stereo imaging issues and controlling the overall balance of the mix.

How Do I Improve My Mid Side Eq Mix?

To improve your mid-side EQ mix, start by panning your tracks to the center or sides. Then, use a mid-side equalizer to adjust the frequencies. Boost the mid-range frequencies for the center tracks and adjust the side-range frequencies for the side tracks.

Use subtle adjustments and make sure to listen closely while making changes.

How Do You Mix Mid Frequencies?

To mix mid frequencies, start by using EQ to identify the frequencies that need boosting or cutting. Use a narrow bandwidth to target specific frequencies, and be sure to reference the context of the mix to prevent overcompensation. Finally, use compression to control any harshness or inconsistencies in the midrange.

Conclusion

Incorporating Mid Side Mixing can revolutionize the way we listen to music. By adding a three-dimensional element and enhancing the stereo field, producers can create a more immersive listening experience for their audience. By carefully balancing the center and side signals, producers can unveil new layers in their audio productions.

As technology continues to advance, so too will mixing techniques. It is a promising sign for the future of music production. Keep experimenting with Mid Side Mixing and push the boundaries of what’s possible in your audio productions.

Categories
Archive

Cubase Won’T Snap to Grid

If Cubase won’t snap to grid, check the “snap type” and “quantize” settings, and make sure the grid is enabled. Cubase is a popular digital audio workstation used for music production.

However, users may encounter issues where tracks won’t snap to the grid, causing frustration and delays in production. One possible solution is to check the snap type and quantize settings, as well as ensuring that the grid is enabled. Incorrectly setting these can cause tracks to not align with the grid, creating an undesirable effect on the final product.

This article will explore the different possible causes, as well as provide step-by-step instructions for correcting the issue. By following these guidelines, users can ensure that their tracks snap to the grid correctly, helping to create a polished and professional finished product.

Possible Causes Of Cubase Not Snapping To Grid

Some potential reasons why Cubase may not be snapping to the grid include incorrect grid settings, zoom level, snap properties, or a malfunctioning mouse. Check these factors and adjust them accordingly to solve the issue and regain precise time alignment in your arrangements.

Possible Causes of Cubase Not Snapping to Grid: Cubase is a powerful music production software used by musicians, producers, and sound designers around the world. One of the essential features of Cubase is snapping to grid, which allows you to align notes, audio files, and MIDI events to a specific rhythm. However, sometimes, Cubase may not snap to grid, and this can be frustrating, especially if you’re working on a complex project. Here are some possible causes of Cubase not snapping to grid:

Incorrect Grid Settings

One of the common reasons why Cubase won’t snap to grid is incorrect grid settings. Cubase provides several grid types and resolutions, and if you’re not using the right one for your project, snapping to grid won’t work correctly. To fix this issue, you need to ensure that your project’s grid settings match the rhythm and tempo of your music. You can access Cubase’s grid settings by going to “Project” > “Grid Type” or by pressing “Shift + F2” on your keyboard.

Snap To Grid Disabled

Another possible cause of Cubase not snapping to grid is that the “Snap to Grid” option is disabled. Snap to Grid is a feature that allows you to align your audio and MIDI events to the project’s grid. To enable Snap to Grid, you need to go to “Snap Settings” and make sure that the “Snap to Grid” option is turned on. You can also enable Snap to Grid by clicking on the “S” button in the toolbar.

Objects Not Aligned To Grid

Sometimes, Cubase will snap an object to the nearest grid line, even if it’s not aligned correctly to the grid. If this happens, it could be because the object’s starting point is not on the grid line. To fix this issue, you need to select the object and drag or resize it so that it aligns with the nearest grid line. You can also use the “Align To Grid” option in the “Snap Settings” to align objects to the grid automatically. Conclusion: In conclusion, Cubase not snapping to grid can be frustrating, but it’s usually caused by incorrect grid settings, disabled Snap to Grid feature, or objects not aligned to the grid. By understanding these possible causes, you can diagnose and fix the problem quickly. Remember to double-check your project’s grid settings and enable Snap to Grid to ensure that your music productions are perfectly aligned with the rhythm.

Cubase Won'T Snap to Grid

Credit: m.youtube.com

Troubleshooting Cubase Not Snapping To Grid

As a music producer, you rely on Cubase for precision in your recordings. However, sometimes Cubase can be stubborn and not snap correctly to the grid. This issue can be frustrating, especially when trying to achieve a tight and polished sound. If you are one of those who are experiencing this issue, don’t worry. We’ve got you covered with some steps to help you troubleshoot Cubase not snapping to the grid.

Adjusting Grid Settings

The grid is an essential tool when trying to achieve time precision, so having the right settings is crucial. If the grid is too wide, Cubase may not snap to the edges as desired. To adjust the grid, follow these steps:

  1. Go to the toolbar and select ‘File’
  2. Choose ‘Project Setup’ option and then select ‘Grid’ option from the sidebar menu
  3. Change the ‘Grid Type’ and ‘Quantize Type’ to match your desired settings of the tightened grid size

Enabling Snap To Grid

The next step to troubleshoot Cubase not snapping correctly to the grid is to make sure that the “Snap to Grid” option is turned on. If it’s turned off, Cubase won’t be able to detect the grid and adjust to the desired positions. Here’s how to turn on the Snap to Grid option:

  1. Go to the toolbar and select ‘Transport’
  2. Select the ‘Snap Type’ option and ensure that ‘Snap to Grid’ is enabled
  3. Try moving an object after ensuring the “Snap to Grid” is enabled. You should notice Cubase snapping objects to the grid correctly.

Aligning Objects To Grid Manually

If the above steps didn’t solve the issue, you can still align objects manually, ensuring they are snapped to the grid edge. While producing music, sometimes a human touch is necessary to fine-tune the alignment. Here’s how to align objects manually:

  1. Select the object you want to align to the grid
  2. Hold down the ‘Alt’ key,’ and while dragging or moving the selected object, it should snap to the nearest grid line edge.

By following these steps, you should be able to troubleshoot Cubase not snapping to the grid. Remember, the grid is fundamental for music producers. If you follow the right settings, you can turn even the most complicated projects into a breeze.

Additional Tips For Cubase Grid Snapping

If you have been using Cubase for a while, you might have encountered the problem of the software not snapping to the grid. This can be frustrating, especially when you are working on a project that requires precision and accuracy. The good news is there are several additional tips that can help you overcome this challenge. In this blog post, we will explore some of the best tips that you can use to ensure Cubase snaps to the grid. These tips include using snap modes, using snap types, and using quantize settings. Let’s dive into each of these in detail.

Using Snap Modes

Snap modes determine how Cubase responds to objects or events that are moved or placed in the project view. Cubase has several snap modes, including:

Snap ModeDescription
Grid SnapThis mode causes all objects or events to snap to grid lines.
EventsThis mode causes objects or events to snap only to other similar objects or events.
Grid RelativeThis mode snaps objects or events to grid lines relative to the current position.

You can switch between these snap modes by clicking on the snap mode icon in the toolbar, or by using the keyboard shortcut ‘J.’

Using Snap Types

Snap types determine how objects or events snap to grid lines. Cubase has several snap types, including:

  • Grid Lines: This type snaps objects or events to the closest grid line.
  • Grid Points: This type snaps objects or events to the closest grid point.
  • Events: This type snaps objects or events to other similar objects or events.

The snap types can also be accessed from the snap mode icon in the toolbar.

Using Quantize Settings

Quantize settings allow you to adjust how closely objects or events snap to grid lines. Cubase has several quantize settings, including:

  • Quantize Note Onsets: This setting snaps note onsets to the nearest grid line.
  • Quantize Lengths: This setting adjusts the length of events to the nearest grid line.
  • Quantize MIDI CCs: This setting snaps MIDI controller data to the nearest grid line.

You can adjust these settings by opening the MIDI editor and selecting the appropriate setting from the quantize menu.

By using these additional tips, you can ensure that Cubase snaps to the grid, making your workflow smoother and more productive. Experiment with different snap modes, snap types, and quantize settings to find what works best for you.

Cubase Won'T Snap to Grid

Credit: www.reddit.com

Common Mistakes To Avoid

One common mistake to avoid when using Cubase is assuming the software will always snap to the grid. This may happen due to various reasons like wrong settings, or other technical issues. Make sure you check your settings and determine the cause to fix the problem.

When you’re producing music, having your Cubase DAW snap to the grid can help you align your beats and keep everything in time. But what happens when Cubase won’t snap to the grid? In this case, you might be making some common mistakes that are derailing your workflow. In this article, we’ll explore some of the most common mistakes to avoid when Cubase isn’t snapping to the grid.

Not Checking Grid Settings

One of the simplest explanations for why Cubase won’t snap to the grid is that your grid settings aren’t correct. This can happen if your project has been set up with the wrong time signature, tempo, or grid resolution. To fix this issue, you need to go to the Project Setup window and adjust your settings to match the type of music you’re producing. Make sure you double-check your settings before starting your project to avoid any headaches later on.

Forgetting To Enable Snap To Grid

This might seem obvious, but if Cubase isn’t snapping to the grid, there’s a chance you forgot to enable the “Snap to Grid” function. Cubase’s Snap to Grid function is located at the top of the project window, and you can turn it on by clicking the magnet icon. If the magnet is grayed out, that means it’s turned off, so make sure to check this first if your beats aren’t snapping to the grid.

Not Aligning Objects To Grid Manually

Sometimes, Cubase won’t snap to the grid because you’re not aligning your objects manually. This means that instead of relying on the Snap to Grid function, you’re placing audio or MIDI events on the timeline without scaling them to fit the grid. To fix this problem, you need to manually align your objects to the grid, which can be done by dragging the edges of each event until they snap to the grid lines. It can be tedious, but manually aligning your objects will ensure that everything is in time. In conclusion, if Cubase isn’t snapping to the grid, there’s usually a simple explanation for the problem. By checking your grid settings, enabling the Snap to Grid function, and manually aligning your objects to the grid, you can ensure that your beats stay in time and your projects run smoothly.

Cubase Won'T Snap to Grid

Credit: m.youtube.com

Frequently Asked Questions On Cubase Won’t Snap To Grid

How Do You Snap To Grid In Cubase?

To snap to grid in Cubase, select the audio or MIDI region you want to align. In the toolbar, click the “Snap Type” drop-down menu and select the desired grid type. Then, move the region to the desired grid position.

You can also use the “Snap to Zero Crossing” option to align audio to the nearest zero crossing point.

How Do I Turn Off Snapping In Cubase?

To turn off snapping in Cubase, simply go to the toolbar and click on “Snap” to disable it. You can also use the keyboard shortcut “J” to turn it on and off quickly.

How Do I Turn Off The Grid In Cubase?

To turn off the grid in Cubase, go to the “Grid Type” dropdown menu, located in the upper-right corner of the project window, and select “Off”. You can also use the shortcut “Ctrl+Shift+G” on Windows or “Command+Shift+G” on Mac to toggle the grid on and off.

Why Can’t I Record In Cubase?

You may not be able to record in Cubase due to incorrect audio settings, driver issues, or problems with your audio interface. Check your audio settings, update your drivers, and ensure your interface is properly connected and recognized by Cubase.

Conclusion

To conclude, Cubase not snapping to grid can be a frustrating experience for music producers. However, there are several solutions to fix the issue. Whether it’s adjusting the snap settings, updating the software, or checking for preferences, these tips can help users get back on track.

With the continued evolution of music production software, it’s important to stay up-to-date and knowledgeable in troubleshooting common issues. By applying these tips, producers can get back to creating quality music without any interruptions.

Categories
Archive

Dbtp Decibel True Peak

Dbtp or Decibel True Peak is a measurement of the highest peak in a digital audio signal, measured in decibels. Decibel True Peak is important to monitor because it ensures that audio levels do not exceed the maximum safe level, preventing distortion and added noise in audio recordings.

As the world becomes more digitalized, digital audio has become an essential part of our daily lives. From music streaming and video production to podcasts and audiobooks, the importance of audio quality cannot be overemphasized. The quality of audio is even more important in professional settings, such as in the music and film industry.

To ensure good audio quality, it is important to understand the concept of Dbtp or Decibel True Peak. We will explore the meaning, importance, and how to measure Decibel True Peak.

What Is Dbtp?

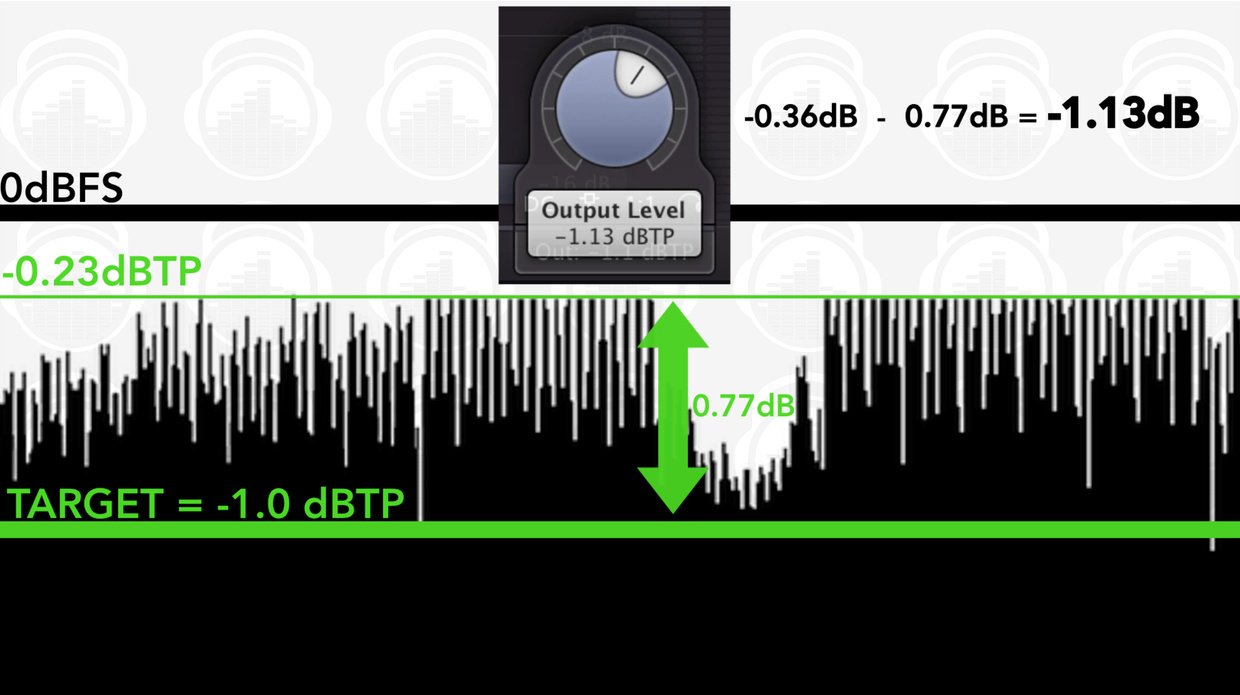
Dbtp, short for Decibel True Peak, refers to the highest peak of digital audio signals in decibel above 0dBFS. Maintaining Dbtp levels ensures that audio signals do not distort and produce the highest quality sound possible.

Definition Of Dbtp

Dbtp stands for Decibel True Peak. In audio, it is a metric used to measure the maximum level of audio signals. True Peaks can occur in digital audio due to the nature of the digital-to-analogue conversion process. A True Peak is the highest peak that an amplifier will produce when asked to increase the volume of an audio signal. However, the amplifier can’t exceed 0 dBFS (decibels relative to Full Scale) when producing output.

Why Dbtp Is Important In Audio

Appropriate levels of Dbtp are crucial in producing high-quality audio, and this is because of loudness. Audio with high levels of loudness appears better if the Dbtp is within acceptable limits. If the Dbtp is not well regulated, it might create issues like volume discrepancies, distortions, and sound artefacts. When producing high-quality audio, sound engineers must keep an appropriate level of Dbtp. Well-managed levels of True Peaks permit engineers to attenuate signals without worrying whether the peaks might cause clipping or distortion. To keep desirable Dbtp levels, engineers apply volume normalization and limiters. Normalization helps adjust levels for uniform loudness, while limiters support protecting against excessive levels.

Conclusion

Measuring Dbtp

Dbtp, which stands for decibel true peak, is a measure of the highest peak in an audio signal. It is important for ensuring that audio does not clip or distort when being played back on different devices or in various environments.

In the world of audio production, Dbtp, or decibel true peak, is a vital metric for ensuring high-quality sound output. Dbtp is essentially the maximum peak level that an audio signal can reach before experiencing any distortion and can be measured using various tools. This measurement is essential for producing audio that meets industry standards and offers an excellent listening experience.

Tools For Measuring Dbtp

There are several tools available for measuring Dbtp, ranging from hardware to software. Below are some popular options:

Hardware ToolsSoftware Tools
– Audio Analyzer– Loudness Meter
– Peak Meter– True Peak Limiter
– Oscilloscope– DAW Plugins

How To Interpret Dbtp Measurements

Interpreting Dbtp measurements is crucial in ensuring that audio signals are not clipped or distorted, resulting in an unpleasant listening experience. The measurements are typically displayed in decibels and can be read as positive or negative values. A positive value indicates that the audio signal has exceeded the recommended threshold and may require adjustment. On the other hand, a negative value indicates that the signal is within the prescribed threshold and is unlikely to cause distortion. To ensure that audio meets industry standards, it is recommended to maintain a Dbtp level of -1dBTP, which is the maximum level allowed before any distortion occurs. In conclusion, measuring Dbtp is an essential aspect of producing high-quality audio output. By using the right tools and interpreting the measurements correctly, audio producers can ensure that their output meets industry standards and delivers an excellent listening experience.

Dbtp Vs Other Audio Levels

Dbtp, or Decibel True Peak, measures the highest peak of an audio wave and can provide more accurate information on potential distortion than other audio levels. It’s important for audio engineers to be aware of Dbtp in order to ensure high-quality sound.

Difference Between Dbtp And Rms

When it comes to measuring the loudness of audio, there are several methods used in the industry, such as peak levels and average levels. Two common methods are dBTP and RMS, but what are the differences? Dbtp measures the highest peak level in an audio signal, while RMS measures the average loudness of the audio signal. Dbtp is crucial for digital audio which may clip when audio levels exceed a certain limit.

Why Peak Levels Matter In Addition To Average Levels

While RMS levels are key in determining the overall loudness of an audio signal, peak levels are just as important. Peak levels refer to the maximum value of an audio signal, and it’s essential in ensuring that an audio signal doesn’t clip or distort when played back. An audio signal that exceeds 0 dBtp is often clipped, resulting in audible distortion that doesn’t sound pleasing to the human ear. So, regardless of an audio’s RMS rating, its peak levels must always be inspected to maintain the quality of sound.

In Conclusion

When mixing or mastering audio, it’s vital to keep track of both RMS and dBTP levels to ensure the best possible quality for playback. By understanding the differences between RMS and dBTP, you can ensure that your audio is optimized for listening pleasure.

Dbtp Decibel True Peak

Credit: www.mixinglessons.com

The Impact Of Dbtp On Audio Quality

Dbtp Decibel True Peak has a significant impact on audio quality, ensuring that peak levels do not go beyond digital limits and cause distortion. It guarantees that the audio output is optimized and enhanced, ensuring that the audience gets the best listening experience.

Decibel True Peak or Dbtp is a critical aspect of audio quality. It refers to the highest level of sound intensity in a recording before it begins to distort. Exceeding these limits can cause severe sound distortions in your audio, making it less than ideal for listening.

Distortion Caused By Exceeding Dbtp Limits

When audio levels exceed the Dbtp limits, it can lead to distortion in the sound quality. The distortion may be slight or extreme, depending on how much the Dbtp limits are exceeded. With excessive distortion, the sound may become noisy or abrasive, making it challenging to listen to. Therefore, it is essential to monitor and maintain appropriate Dbtp levels to avoid distortion and ensure optimal sound quality.

How To Avoid Dbtp-related Distortion

To avoid Dbtp-related distortion, it is essential to ensure that the audio is recorded and mastered correctly. Some ways to avoid distortion are:

  • Use high-quality equipment that can handle the required audio levels without distortion.
  • Monitor audio levels while recording to ensure levels don’t exceed the Dbtp limits.
  • Use a limiter to control audio levels and prevent them from exceeding the Dbtp limits.
  • Regularly check Dbtp levels to ensure optimal sound quality.

By following these tips, you can prevent Dbtp-related distortion, ensuring that your audio maintains optimal sound quality. In conclusion, Dbtp is crucial in maintaining high-quality audio. Understanding how it impacts audio quality and the steps necessary to maintain appropriate Dbtp levels ensures exceptional sound quality for all your audio projects.

Dbtp And Streaming Services

Dbtp is essential for streaming services to ensure audio quality. This technology allows for accurate peak limiting, preventing distortion and providing a better listening experience for users.

Streaming services have revolutionized the way we consume music. But have you ever wondered how they maintain a consistent audio quality across hundreds of thousands of tracks? That’s where Dbtp or Decibel True Peak comes in. It is a tool that ensures consistent loudness levels and helps prevent distortion in music tracks. In this article, we will discuss why streaming services have Dbtp limits and how you can ensure your audio meets streaming service Dbtp standards.

Why Streaming Services Have Dbtp Limits

Streaming services operate with specific loudness standards, and Dbtp helps maintain these standards. When a user plays a track, the loudness level of the track is checked against the streaming service’s target loudness level. If the track’s loudness level exceeds the target level, it may cause distortion in the track. To avoid this scenario, streaming services have adopted Dbtp limits, which is a peak level that no part of the music signal can exceed.

How To Ensure Your Audio Meets Streaming Service Dbtp Standards

To ensure your audio meets streaming service Dbtp standards, you need to use a loudness meter that supports Dbtp measurements. There are many loudness meters available, such as the Waves WLM Plus, iZotope Insight 2, and the Nugen Audio VisLM. These meters will help you measure the true peak level of your audio and ensure it’s within the Dbtp limits set by the streaming service. Before uploading your audio, make sure to export it to the correct audio format and sample rate recommended by the streaming platform. These are usually displayed on the upload page and can differ between platforms. In conclusion, Dbtp is a critical factor when it comes to maintaining consistent loudness levels in streaming services. By understanding Dbtp and adhering to streaming platform limits, you can ensure that your music is delivered to your audience with optimal sound quality.

Dbtp In Mastering

When it comes to audio mastering, maintaining optimal decibel true peak (Dbtp) levels is crucial to ensure that the final mix sounds great across all devices and platforms. Dbtp is a measure of the highest possible level of the peak in a digital audio signal, and in mastering, it is important to keep this level within acceptable limits to avoid distortion and ensure the perfect output. In this article, we will discuss how to handle Dbtp in the mastering process and the role of mastering engineers in maintaining Dbtp levels.

Mastering process involves several steps, such as equalization, compression, and limiting, that ultimately result in a final mix that sounds great. Each of these steps can have an impact on the Dbtp levels, and it is necessary to pay close attention to these levels throughout the process. Here are a few tips on how to handle Dbtp in the mastering process:

Tips for Handling Dbtp in Mastering
1. Use a Dbtp meter to monitor levels throughout the process
2. Use a limiter to keep levels within acceptable limits
3. Ensure that the final mix is not compressed excessively
4. Use high-resolution exports to avoid clipping

Mastering engineers play a vital role in maintaining Dbtp levels and ensuring that the final mix is of the highest quality. They are responsible for ensuring that the final mix meets the standards set by the client, and that the mix sounds great across all devices. Here are a few ways in which mastering engineers maintain Dbtp levels:

  1. They use professional-grade equipment to monitor levels throughout the process
  2. They use their expertise and experience to make adjustments to the mix to ensure optimal Dbtp levels
  3. They communicate with the client to ensure that the final mix meets their expectations

In conclusion, Dbtp levels play a critical role in audio mastering, and it is essential to maintain them within acceptable limits to ensure a final mix that sounds great across all devices and platforms. Mastering engineers play a vital role in this process and are responsible for ensuring that the final mix meets the highest quality standards. By following the tips presented in this article, you can ensure that your final mix sounds amazing and stands out from the crowd.

Common Dbtp Myths Debunked

Discovering the right dBTP value for your audio file can be tricky. Various myths about dBTP are circulating the audio community, making it more difficult for audiophiles to select the best dBTP value to ensure their audio’s optimal quality. In this blog, we debunk the myths about dBTP and set the record straight.

Dbtp Doesn’t Measure The ‘loudness’ Of Audio

One common myth about dBTP is that it measures the overall loudness of an audio file. In reality, dBTP measures the true peak value of the audio. True peak raises the value of audio above the practical limit of the digital signal, which turns into unexpected clipping. When the value of dBTP is higher, the likelihood of the audio clipping increases.

Dbtp Limits Don’t Necessarily Mean Sacrificing Dynamics

Another myth about dBTP is that the limits on dBTP mean that you have to sacrifice the dynamics of your audio. This myth is false because limiting dBTP doesn’t automatically affect dynamics. It’s possible to maintain the dynamics of audio while staying within the limits of dBTP. You don’t have to lose out on the important details of your audio because of dBTP.

It’s essential to set the right dBTP value to ensure optimal audio quality. Correcting common myths surrounding dBTP values is important to ensure you’re making informed decisions to achieve the best audio results.

Dbtp Decibel True Peak

Credit: www.masteringthemix.com

Dbtp Decibel True Peak

Credit: www.mixinglessons.com

Frequently Asked Questions On Dbtp Decibel True Peak

How Loud Should True Peak Be?

True peak should be -1dBTP for streaming services and -2dBTP for CD mastering. It’s important to consider the loudness level of the program material and make sure the true peak doesn’t exceed this. The true peak level should also be measured with a true peak meter to ensure accuracy.

What Db Should My Mix Peak At?

Your mix should generally peak at around -6 dB to -3 dB to allow headroom for mastering. However, the specific peak level depends on the genre and style of music. Always use your ears as the ultimate guide and don’t rely solely on technical guidelines.

What Db Is Considered Peaking?

The dB level that is considered peaking depends on the specific equipment and context. Generally, a dB level higher than 0 dB can cause peaking and distortion, but this can vary. It’s important to monitor levels and adjust accordingly to avoid damage to equipment and ensure quality sound.

Is Dbtp The Same As Db?

No, dBTP is not the same as dB. DBTP stands for decibels below full power and is used to measure power levels relative to a maximum capacity. DB, on the other hand, is a unit of measurement used to express the intensity of a sound or signal on a logarithmic scale.

Conclusion

Decibel True Peak (Dbtp) is an important aspect to monitor when it comes to audio production. Whether it’s for music, podcasts, or other audio content, being aware of the Dbtp levels is crucial in ensuring that your content meets the required loudness standards.

By using Dbtp meters, we can accurately measure and adjust the levels accordingly, resulting in quality audio output that meets the necessary loudness requirements. It’s a simple yet essential step that should not be ignored. Keep your audience’s listening experience in mind and pay attention to Dbtp levels to create exceptional audio content.

Categories
Archive Gear

Guide To Music Compressors

A guide to music compressors: learn how to use them effectively. Compressors can help control volume and create unique soundscapes, but choosing the right compressor and understanding its settings is key to achieving optimal results.

Music compression is an essential tool for many recording artists, producers, and engineers. It offers a range of benefits like controlling the dynamic range of vocals or instruments and adding depth and character to your sound. However, compression can be a challenging concept to grasp, especially for novice musicians.

In this guide, we will dive deep into the world of music compressors. We’ll explore the different types of compressors, explain the various settings, and provide tips on how to use compressors effectively. By the end of this article, you’ll have a clear understanding of how compressors work and how to use them to take your music productions to the next level.

Introduction To Music Compressors

Music compressors are essential tools for audio engineers looking to balance track levels and enhance the sound of recordings. They work by reducing the dynamic range of a signal to create a more even sound. With this guide to music compressors, you can learn how to use them effectively in your own music production.

Music compressors are essential tools for music production, mastering, and mixing. As a beginner in music production, you might wonder what a compressor is and why it is so crucial. In this guide to music compressors, we will introduce you to the basics of compression and everything you need to know to get started with using a compressor in your music production.

What Is A Compressor?

A compressor is a signal processing tool that reduces the dynamic range of an audio signal. It does this by reducing the amplitude of louder sounds while leaving quieter sounds unaffected. A compressor consists of several parameters such as threshold, ratio, attack, release, and makeup gain that can be adjusted to achieve the desired level of compression.

Why Do You Need A Compressor?

A compressor is a crucial tool in music production as it helps to balance the dynamics in the audio signal, making the mix sound more polished and professional. When used correctly, compressors can bring out the most important parts of the mix, making them more audible while taming any loud or harsh sounds. It can also help to control the levels of individual tracks in a mix, making them fit better together and sound musical. If you are serious about music production, learning how to use a compressor is essential. It can help to take your music to the next level by improving the overall quality of the mix. Next, we will discuss the different types of compressors and when to use them.

Guide To Music Compressors

Credit: www.groove3.com

Types Of Compressors

A music compressor is an essential tool to enhance the sound quality of any audio production. There are two main types of compressors, the optical compressor and the electronic compressor. The optical compressor uses a photocell to control the audio signal, while electronic compressors use transistors to monitor the audio signal.

Analog Compressors

Analog compressors are the original types of compressors that preceded the digital compressors in the market. These compressors use analog circuitry that offers warm and vintage quality sounds, which make them suitable for various music genres such as rock, blues, and jazz. They are typically made up of analog components such as transistors, transformers, and tubes that cause the sound to saturate, making the audio come alive. Analog compressors make use of the VU meter to measure signal levels, and the knob controls are more straightforward, making them simpler to use. Some of the most popular models include FET compressors, optical compressors, tube compressors, and VCA compressors.

Digital Compressors

Digital compressors are a recent addition to the compressor market. They make use of digital signal processing and sampling to create a precise and clean sound that is ideal for today’s music genres such as EDM and Hip hop. They offer features such as multi-band processing, look-ahead limiting, and side-chain EQ, making them highly customizable and more versatile than their analog counterparts. Digital compressors are more convenient and compact since most of them are software-based, allowing them to be used directly in a DAW. They use LEDs to measure signal levels and have a digital display that makes it easier to set precise values. Popular digital compressor models include SSL Bus compressor, API 2500, Waves CLA-76, among others.

Which Type Of Compressor Should You Use?

Both analog and digital compressors have their unique features and benefits. Choosing whether to use an analog or digital compressor largely depends on the kind of sound you are looking to achieve, the genre of music you are working on, and your personal taste. If you want to achieve a classic and vintage sound, then an analog compressor would be the best option. On the other hand, if you want to achieve a clean and precise sound with modern processing features, then a digital compressor would be ideal. Some producers opt to use both types of compressors in their setup, making it possible to get the best of both worlds.

Conclusion

The type of compressor you choose to use in your setup largely depends on the kind of sound you want to achieve, the genre of music you are working on, and your personal taste. Understanding the difference between analog and digital compressors is crucial for every music producer or audio engineer. By knowing their unique features, you can choose the best equipment to use that will add value to your music.

How Do Compressors Work?

Compressors are essential tools for music producers and engineers. These devices work by reducing the dynamic range of a track, resulting in a more consistent and balanced mix. Compressors come in many shapes and sizes, but they all function by applying varying levels of gain reduction to a signal.

As a content writer, it’s important to understand the basics of music compressors. If you are writing a blog post about music compressors, it’s essential to cover how they work and what the various components of a compressor are. Here is a beginner-friendly guide to music compressors that explains how compressors work and their different components.

Threshold

The threshold is the first control found on a compressor. The threshold sets the volume level at which the compressor begins to reduce the volume of the audio signal. Once the audio signal reaches the threshold level, the compressor will kick in and start reducing the volume.

Ratio

The ratio determines how much the compressor will reduce the volume of the audio signal once it reaches the threshold. For example, if the ratio is set to 2:1, for every 2DB that enters the compressor, only 1DB will come out, which indicates that there’s a 50% volume reduction. The higher the ratio, the more severe the compression effect.

Attack & Release

Attack and release dictate how fast or slow the compressor starts working and when it stops reducing the volume level of the audio signal. Attack controls how fast the compressor starts compressing. The quick attack time is used for sounds with sharp, fast transients like drums. Release, on the other hand, controls how fast the compressor stops compressing once the audio signal drops below the threshold level.

Makeup Gain

The makeup gain is found on compressors and it’s used to increase the volume of the compressed signal with the same amount that the compressor has just reduced it by. This means that the sound does not lose volume after compressing it. It brings the overall volume back up after the sound has been compressed. In conclusion, understanding how music compressors work is essential for any content writer. The different components of a compressor, such as threshold, ratio, and attack and release, among others, provide you with various ways of compressing audio signals that can help you achieve some fantastic effects. By understanding these components, we hope that this beginner’s guide to music compressors will demonstrate how they can be used to improve music production.

Guide To Music Compressors

Credit: www.amazon.com

Understanding Compression Parameters

Music compressors are crucial tools for audio mastering. Understanding compression parameters such as threshold, ratio, attack, release, and makeup gain is vital to achieving the desired sound quality. With the right guide to music compressors, you can learn how to use them and enhance your audio production skills.

Threshold Explained

When it comes to understanding compression parameters, threshold is one of the most essential terms that we need to know. In simple terms, the threshold is the level at which the compressor begins to kick in and reduce the volume of the audio signal. For instance, if the threshold is set at -12dB, any audio parts that exceed that level will be compressed.

Ratio And Its Uses

The ratio is another important parameter to consider in music compression. This parameter defines the amount of compression applied to the audio signal once it passes the threshold. A ratio of 2:1 means for every 1dB over the threshold, the compressor will reduce the volume to 0.5dB.

Attack And Release Settings

Attack and Release are two critical parameters that control how fast the compressor will start compressing the audio signal and how quickly it’ll stop compressing it. The attack setting determines how long it takes the compressor to start reacting to the audio signal, and the release determines how long it takes the compressor to stop reacting to the audio signal.

Makeup Gain And How To Use It

Once you’ve compressed a signal, you may have to increase the volume to make up for the loss in loudness. This is where the makeup gain comes in. It allows you to boost the level of the compressed signal to match the original input level. It’s essential to adjust makeup gain correctly to avoid adding unwanted noise to the signal. In conclusion, understanding compression parameters is essential for creating polished and professional music productions. By paying attention to the threshold, ratio, attack, release, and makeup gain, you can achieve a compelling and cohesive sound.

Using Compression In Different Music Genres

Compression is an essential tool when it comes to mixing music tracks. From rock and pop to classical and jazz, all genres benefit from this technique. Music compressors can help shape and balance sounds, giving them more impact and clarity for a better listening experience.

Using Compression in Different Music Genres Compression is a crucial tool for music producers, as it helps polish the sound of a track, making it sound better and stand out. The same techniques, however, cannot be applied everywhere. Different music genres have different types of sounds, which require different treatments. In this article, we’ll explore how compression is used in Rock, Hip-hop, Electronic music, and Classical music.

Rock

Rock music is best known for its powerful, in-your-face sound. Compression in rock music is used to even out the volume of individual tracks, giving the sound a more coherent feel. A common trick is to apply heavy compression on drums and bass, which are the backbone of rock music. This way, the drums and bass can be heard over the electric guitar, and the overall sound is punchier.

Hip-hop

Hip-hop is a genre that relies heavily on the use of samples and beats. Compression is used to give the beat a tight, consistent sound. Hip-hop producers often use sidechain compression, which is a technique that ducks the volume of one track when another track is playing. This creates the distinctive pumping sound that is synonymous with hip-hop music.

Electronic Music

Electronic music encompasses a wide range of sub-genres, from ambient to techno to trance. Compression in electronic music is used to make the sound more dynamic and lively. Producers use sidechain compression to create a pulsing, rhythmic effect that is common in dance music. They also use compression to tame the transient peaks of synthesizers, giving them a smoother sound.

Classical Music

Classical music is all about dynamics. The use of compression in classical music is more subtle than in other genres. Compression is used to even out the volume of orchestral instruments, making sure that no instrument overshadows the others. It’s also used to control the peaks of solo instruments, such as a piano or violin. Classical music producers often use multi-band compression, which allows them to apply different compression settings to different frequency bands. In conclusion, compression is an essential tool for music production, and understanding how to use it in different music genres can take your tracks to the next level. Whether you’re producing rock music, hip-hop, electronic music, or classical music, compression can help shape the sound and give it character.

Famous Compressors And Their Characteristics

Discover the unique characteristics of some of the most famous compressors with our comprehensive Guide To Music Compressors. From the warm tones of the LA-2A to the versatile settings of the 1176, explore how these tools enhance the audio quality of your music production.

Compressors are essential studio tools for musicians, music producers, and sound engineers. They help control the dynamic range of audio, enabling engineers to manipulate a recording’s character. The choice of compressor can have a significant influence on the sound of a recording. Here, we’ll look at three famous compressors and what makes them so popular.

Ssl G Series

The SSL G Series is a popular compressor due to its versatility, and it’s been used on countless recordings. It’s a soft-knee compressor with four different ratios: 1.5:1, 2:1, 3:1, and 4:1. It also has an auto-release feature, which makes it easy for engineers to use. The SSL G Series is known for imparting a particular character on recordings. It has a subtle, yet present compression, which adds warmth and dimension to the sound. The compressor can be used across the mix bus, drums, bass, and vocals, and it’s great at bringing out the details in a recording.

La-2a

The LA-2A is an iconic vintage compressor. It’s a tube-based optical compressor, which means it uses an electro-optical attenuator to control gain reduction. The LA-2A has a fixed ratio of 3:1 and is well suited to vocals, bass, and guitars. The LA-2A is admired for its transparent compression, which brings out the natural character of the recording. It has a slow attack time, which allows transients to pass through, making it great for enhancing the sustain and presence of vocals. The LA-2A also adds warmth and color to the sound.

Dbx 160

The DBX 160 is a classic VCA compressor that’s been used on countless recordings. It has a fast attack time, making it great for drums, bass, and guitar. The compressor has both hard-knee and soft-knee modes, with ratios ranging from 1:1 to infinity:1. The DBX 160 is known for its punchy and aggressive compression. It’s great at controlling transients and adds a noticeable character to the sound. This compressor is ideal for adding excitement to a recording, and it works well on mix bus, drums, and bass. In conclusion, these famous compressors have distinct characteristics that make them stand out. Whether you’re looking for warmth, transparency, or punch, there’s a compressor out there that will suit your needs. Understanding the unique characteristics of each compressor is essential to using them effectively in the studio.

Setting Up A Compressor In Your Studio

Setting up a compressor in your studio can seem like a daunting task, but with a little bit of know-how, it can be a seamless process. By connecting your compressor to your recording chain, setting the gain stage, and knowing how to use the compressor while recording, you’ll be able to achieve a professional sound in no time.

Connecting The Compressor To Your Recording Chain

Connecting your compressor to your recording chain involves a few steps. First, you’ll need to decide where the compressor will fit in your signal chain. Typically, the compressor is placed after the preamp, but before any EQ or effects. Once you’ve determined the placement, connect your compressor using balanced cables to ensure optimal sound quality and reduce noise interference.

Gain Staging

Setting the gain stage is essential to ensure optimal signal quality. Begin by setting the input gain on your preamp to achieve the desired level. Next, adjust the threshold on the compressor to the appropriate level, typically around -20dB. From there, increase the gain reduction until the desired level of compression is achieved. Be sure to monitor your levels to avoid clipping and maintain a healthy signal-to-noise ratio.

How To Use A Compressor While Recording

Using a compressor while recording can help achieve a polished sound. Begin by setting your compressor to a ratio of 2:1 or 3:1. A lower ratio will result in less compression, while a higher ratio will result in more compression. Once you’ve set your ratio, adjust the attack and release times to your liking. Too fast of an attack can result in a distorted sound, while too slow of a release can result in a loss of dynamics. Additionally, be sure to adjust the makeup gain to achieve a consistent level.

Tips And Tricks For Using Compressors

Discover useful tips and tricks for using compressors in your music production. This guide to music compressors helps you understand how to achieve the desired level of sound and enhance your overall music mix. Learn about different compressor types, settings, and techniques to create brilliant musical compositions.

Compressors are essential tools for music production, helping to control the dynamics and balance of a mix. However, using compressors can be tricky, and knowing how to use them effectively takes practice. Here are some tips and tricks to help you get the most out of your compressors.

Parallel Compression

Also known as New York compression, parallel compression involves blending an uncompressed signal with a compressed signal. This technique helps to retain the original dynamics of the performance while adding sustain and density. Here’s how to set it up:

  1. Create two identical audio tracks.
  2. Apply heavy compression to one track.
  3. Leave the other track uncompressed.
  4. Adjust the levels to blend the compressed and uncompressed tracks to taste.

Sidechain Compression

Sidechain compression involves using an external signal to activate the compressor, creating a pumping, breathing effect. This technique is commonly used in EDM and dance music. Here’s how to set it up:

  1. Insert a compressor on the track you want to compress.
  2. Select the external signal you want to use to activate the compressor.
  3. Adjust the threshold, ratio, attack, and release settings to create the desired effect.
  4. Experiment with different external signals, such as a kick drum or bassline, to create different pumping patterns.

Mix Bus Compression

Mix bus compression involves applying compression to the entire mix, helping to glue the elements together and add cohesion. However, it’s essential to use mix bus compression sparingly, as too much compression can squash the dynamics and reduce the impact of the mix. Here’s how to set it up:

  1. Create a bus track and route all the individual tracks in your mix to it.
  2. Insert a compressor on the bus track.
  3. Adjust the threshold, ratio, attack, and release settings to control the dynamics of the mix.
  4. Use a gentle touch, aiming for no more than 2-3 dB of gain reduction.

Using these tips and tricks can help you get the most out of your compressors and take your mixes to the next level. Remember to experiment and adjust the settings to suit your particular track and mix.

Guide To Music Compressors

Credit: blog.bandlab.com

Frequently Asked Questions Of Guide To Music Compressors

What Are The Best Compressor Settings For Music?

The best compressor settings for music depend on the genre, goal, and individual tracks. Experiment with threshold, ratio, attack, and release controls, aiming for subtle compression that doesn’t squash the music. Use makeup gain to restore lost levels and balance.

Always listen to the tracks in context and make adjustments as needed.

Should I Eq Or Compressor First?

It depends on the specific sound you are trying to achieve. If you want to shape the overall tone of the sound, EQ should come first. If you want to control the volume and dynamic range, use the compressor first.

What Are The Different Types Of Compressors In Music?

The different types of compressors in music are analog compressors, digital compressors, tube compressors, optical compressors, and FET compressors. These tools help in controlling the dynamic range of audio or music recordings, making the sound more balanced and enhancing its clarity and loudness.

Which Compressor Should I Use?

The compressor you should use depends on your specific needs and requirements. Factors such as the type of project, budget, and size of the desired output should be considered. Some of the most commonly used compressors are reciprocating, rotary screw, and centrifugal compressors.

Consult an expert in the field to determine which one is best for you.

Conclusion

Music compressors are an essential tool in every producer’s arsenal. They can bring clarity and punch to vocals and instruments, while also controlling the dynamic range of the track. Understanding the different types of compressors and their settings is crucial to achieving a professional-sounding mix.

With this guide, you should be equipped to choose and use the right compressor for your music production needs. Keep experimenting and practicing with compressors, and you’ll be on your way to creating better, more polished tracks.

Categories
Archive

Analog Meets Digital

“Analog Meets Digital” refers to the combination of traditional and modern technology. It involves using both analog and digital components to create a more advanced and efficient system.

The integration of these technologies is becoming increasingly common in numerous industries, including the music and medical fields. In recent years, technological advancements have led to a fusion of old and new systems, resulting in the emergence of the concept Analog Meets Digital.

The use of analog components, which rely on physical signals, has its advantages, but in order to achieve greater accuracy and efficiency, digital technology has been introduced. This integration has not only improved the performance of existing systems but has also resulted in new products and processes. For instance, in the music industry, producers are now using analog equipment to record sounds, which they then modify using digital software. This blend of technology is also being used in the medical industry for precision diagnoses and treatment. Overall, the combination of analog and digital technology has created a more advanced and efficient system in various industries.

Analog Meets Digital

Credit: trendland.com

The Evolution Of Analog And Digital

The evolution of technology has brought the worlds of analog and digital together, changing the way we live and work. With the rise of digital technology, analog devices have become obsolete, but the warmth and character they once provided are still sought after by musicians and audiophiles.

The two worlds continue to coexist, offering different experiences for different purposes.

Analog and digital are two words that have dominated modern technology for decades, but it’s important to understand their evolution. The transition from analog to digital has drastically changed the way we receive, transmit, and store information. This evolution has revolutionized the world of communication and technology.

The Definition Of Analog

Analog refers to a continuous signal, where data is transmitted in its original form. It involves physical quantities that vary continuously over time. An example of an analog signal is a vinyl record playing music. The stylus needle reads the grooves on the vinyl and produces a sound wave that we hear as music.

The Definition Of Digital

On the other hand, digital refers to a signal that is made up of discrete values. Digital data is represented by numbers, which can be read and manipulated by computers. This means that digital signals have a finite number of distinct values that the data can take. An example of digital data is a song downloaded from iTunes.

Analog Vs. Digital

While analog and digital are different, they both have their strengths and weaknesses. Here are some differences between the two:

AnalogDigital
Continuous signalDiscrete signal
Less accurateMore accurate
Prone to interferenceLess prone to interference
Easier to understandMore complicated to understand

In conclusion, the evolution of analog and digital has transformed the way we communicate and use technology. While both have their advantages and disadvantages, digital technology has become increasingly dominant in today’s digital age. As technology continues to advance, it’s interesting to think about where it will take us next.

The Advantages And Disadvantages Of Analog And Digital

Analog and digital technologies both have their advantages and disadvantages. While analog offers a more natural and continuous signal, digital provides better accuracy and storage capabilities. The integration of these two technologies has led to improved performance in many fields.

Analog and digital are two technological worlds that are often compared. Analog is the traditional way of recording data by physical means, while digital technology uses computer-based systems for the same purpose. Both of these technologies have their own advantages and disadvantages, making them valuable in different fields. This blog post will explore the advantages and disadvantages of analog and digital technologies in detail.

Advantages Of Analog

Analog technology has its unique charm. It captures continuous signals and data, making it ideal for audio recordings, music production, and radio transmissions. Analog technology may offer the following advantages:

  • High-quality, warm sound: Analog recordings are said to have a more organic and warm sound, which makes them desirable in the music industry.
  • Simple to use: Analog devices often have fewer buttons and knobs, making them simpler to use.
  • No digital artifacts: Since there is no conversion of the signal, there is no chance of having digital artifacts.

Disadvantages Of Analog

Although analog technology has its charms, it has several disadvantages that could hinder its usage in the modern world. They could be:

  • Difficult to store data: Analog data is stored on physical media, such as tapes and vinyl records. This makes it harder to maintain and store data than digital data.
  • Prone to interference: Analog signals are sensitive and could be easily distorted by interference from the environment.
  • Quality loss in copying: Every copy of an analog recording loses some quality, which makes it not easy for mass production.

Advantages Of Digital

Digital technology is the modern way of recording data and is increasingly widespread. It offers numerous advantages compared to its analog counterpart. The following are some of the advantages of digital technologies:

  • Easily stored and retrieved: Digital data can be stored in tiny chips or easily accessible memory devices. This makes it easier to maintain and store data than analog data.
  • Higher quality recordings: Digital recordings produce clear sound without any background noise or distortion of signals.
  • Easy to copy: Digital copies are cheaper to produce and maintain as they do not lose any quality produced in the original.

Disadvantages Of Digital

However, digital technology also has a few disadvantages, which could hinder its usage. For instance:

  • Digital artifacts: During data compression, digital recordings could be distorted resulting in digital artifacts.
  • Less warmth: Digital recordings are often criticized as being too cold or sterile compared to their analog counterparts.
  • Security risk: As the data can be easily accessed and shared, digital technology has a significant security risk or concern than analog technology.

Both analog and digital technology have different strengths and weaknesses. Understanding these differences is important when choosing the right technology for specific applications. Analog technology is still fondly referred to by music enthusiasts, while digital technology is the go-to for modern recording techniques. Ultimately, embracing the advantages while mitigating the downsides of these technologies can lead to a better product and user experience.

When Analog Meets Digital

With the advent of technology, we are heading towards a world where everything from light bulbs to cars is connected to the internet. This integration between analog and digital technologies is known as analog-digital convergence. The concept behind this technology is to create a seamless experience for users by combining the best of both worlds.

The term analog-digital convergence is increasingly becoming popular due to its ability to improve the user experience. Whether it’s the use of sensors to track activity or wearable technology to monitor health, these applications are making our lives easier.

The use of analog-digital convergence can be seen in various industries like healthcare, education, and entertainment. One such example is the use of virtual reality (VR) in education. Students can experience and interact with the virtual environment, making it easier for them to understand complex concepts.

In healthcare, the integration of analog and digital technologies has led to better diagnosis and treatment. Sensors embedded in a patient’s body can provide real-time vital signs to doctors, ensuring timely interventions.

Another example is the use of augmented reality (AR) in the entertainment industry. It allows users to have an immersive experience by combining digital and real-world elements. These are just a few examples of how analog-digital convergence is transforming various industries.

Benefits of Analog-Digital Convergence
Improved user experience
Increased efficiency and productivity
Better data analysis
Real-time monitoring and alerts

In conclusion, analog-digital convergence is the future of technology. It is transforming the way we live, work, and entertain ourselves. With the increasing adoption of this technology, we can expect to see more innovative applications in the near future.

How Analog And Digital Work Together

Analog meets digital when converting signals, like from a traditional phone call to a digital stream. Analog records the gradient and digital turns it into binary code. Together, they create efficient communication that is easy to store and transport.

Analog and digital seem to be complete opposites of each other, but they can work together seamlessly to create some incredible technology. Understanding how these two types of signals work together is essential in understanding modern electronics. In this blog post, we will examine “How Analog And Digital Work Together” and consider the roles each of them plays. Let’s get started!

The Role Of Analog In Digital Devices

Analog signals refer to continuous signals that range over a range of values. Analog signals are natural and exist in the real world. Digital signals, on the other hand, are discrete and have only two possible values-0 and 1. The role that analog signals play in digital devices is crucial, as they provide input to the digital domain. Analog signals are first converted to digital signals through a process called analog-to-digital conversion (ADC). This process involves taking the analog input and sampling it at regular intervals to produce a digital representation of the signal. Without this process, digital devices would not be able to interact with the natural world, which could cause a lot of limitations on what digital devices could do.

The Role Of Digital In Analog Devices

Digital signals are ideal for long-distance communication since they are more immune to noise, unlike analog signals, which tend to change and distort over long distances. Digital signals are used to control many analog devices that we use every day, such as motor control, temperature control, and lighting control. In analog devices, digital signals control the accuracy and range of the analog device. A good example of this is a digital thermometer: it uses a digital signal to control a temperature sensor that gives an analog output. The digital signal ensures that the analog output is accurate and within a certain range.

Conclusion

The interaction between analog and digital signals can provide fantastic opportunities for many applications, including communication systems and control systems. Analog signals provide the physical world with input for digital devices, while digital signals help control the accuracy and range of analog devices. We cannot underestimate the importance of analog signals in the digital world.

Examples Of Analog And Digital Integration

Analog and digital integration is becoming increasingly common, with examples including the use of digital filters in audio equipment and digital-to-analog converters in mobile devices. The combination of these different technologies can offer improved performance and functionality for a range of applications.

Analog and digital technologies have been around for decades and are often considered entirely separate entities. However, more recently, they have begun to merge, and analog and digital integration is becoming increasingly common in modern technology. Here are a few examples of how this integration is taking place:

Hybrid Audio Amplifiers

Hybrid audio amplifiers are a relatively new technology that combines the sound quality of a traditional analog amplifier with the flexibility and precision of a digital counterpart. The analog stage of a hybrid amplifier provides a warm, natural sound that many people prefer, while the digital stage allows for easy adjustment of sound levels and other settings.

Digital Analog Watches

Digital analog watches are another example of how analog and digital technologies can be combined. These watches have traditional analog watch faces but also feature digital displays that provide additional information such as the date, time in different time zones, and even weather forecasts. With digital analog watches, wearers can have the style and elegance of a classic analog watch with the convenience of digital technology.

Analog-digital Oscilloscopes

Analog-digital oscilloscopes, which are commonly used in electronic engineering, offer the best of both analog and digital technologies. They provide the real-time waveform analysis capabilities of an analog oscilloscope while also enabling advanced digital signal processing and data analysis. Overall, the integration of analog and digital technologies is creating a more versatile and innovative range of products that combine the best of both worlds. Whether it’s in audio amplifiers, watches, or oscilloscopes, the blending of these two technologies is opening up new possibilities for creativity and functionality.

Analog Meets Digital

Credit: www.productionmusiclive.com

The Future Of Analog-digital Integration

With the ever-evolving digital world, analog technology has struggled to keep up. However, the future of technology lies in the integration of analog and digital technology, developing new systems that offer superior efficiency, accuracy and customization. As a result, the integration of these technologies would lead to more creative, useful and revolutionary solutions.

Analog and digital technologies have long coexisted, but now we are seeing an unprecedented integration of both in various aspects of our lives. The analog and digital worlds can complement each other to improve the overall experience for users. This integration of the two has a huge impact on how we live, work and play. Let’s take a deeper look into the emerging technologies and trends, challenges and opportunities of this integration.

Emerging Technologies And Trends

With the rapid advancements in technology, we are seeing new opportunities for integrating the analog and digital worlds. Some emerging technologies include:

  • Internet of Things (IoT)
  • Augmented Reality (AR)
  • Virtual Reality (VR)
  • Artificial Intelligence (AI)
  • 5G networks

IoT is one of the most significant emerging technologies that has enabled the integration of physical devices with sensors to connect them to the digital world. Augmented Reality (AR) and Virtual Reality (VR) are transforming various industries such as gaming, healthcare, and education. AI has empowered various industries such as finance, healthcare, retail, and e-commerce to improve their products and services.

Challenges And Opportunities

The integration of analog and digital also brings significant challenges and opportunities. One of the significant challenges is the cost of adopting new technologies. Businesses also need to bridge the gap of skill set between their workforce and the new technologies. The opportunities presented by the integration of analog and digital are limitless. With the availability of products and services available in the market, businesses can leverage the advantages of this integration. There are significant opportunities in the digital tools and devices for the healthcare industry, especially with the COVID-19 pandemic. Another opportunity is in digital marketing techniques, such as email campaigns, social media ads, and search engine optimization (SEO). In conclusion, the integration of analog and digital will shape the future of our lives. The emergence of new technologies, combined with the influx of data, has the potential to transform industries and provide countless new opportunities. While the challenges are real, they can be mitigated by focusing constantly on the advantages presented by the two technologies.

The Impact Of Analog-digital Integration On Business And Society

Analog meets digital: a significant shift in the business world impacting society. The integration of both worlds generates new opportunities for companies and society to leverage shared advantages and transform in unexpected ways.

As technology continues to advance rapidly, we’re experiencing an increasing number of instances in which analog meets digital. Analog-digital integration has an enormous impact on every facet of life, from personal to business and beyond. With the rise of digital tools and platforms, the distinction between analog and digital is beginning to blur, affecting our lifestyle, work, and economy.

The Changing Nature Of Work

The integration of analog and digital tools is changing the way we work. Today, remote work and virtual meetings are more common than ever before. The integration of digital platforms allows employees to work from virtually anywhere, making physical location less of a consideration for job opportunities. Moreover, digital tools are increasingly allowing individuals to work non-traditional hours which provides better work-life balance and assessment of productivity. For businesses, embracing analog-digital integration can reduce costs and increase flexibility. With the help of technology, employees can work more efficiently and effectively than ever before.

New Business Models And Opportunities

Analog-digital integration brings about new business models that were previously impossible or uneconomical. For example, the integration of physical brick-and-mortar stores with e-commerce platforms creates an omnichannel experience for customers that can result in higher revenue and customer satisfaction. Additionally, small businesses have greater access to tools that were previously the exclusive domain of larger businesses.

Social Implications

The increasing integration of analog and digital tools can have a profound effect on society. While the digital revolution has brought great benefits to society, it has also created unprecedented challenges such as cybercrime, data privacy risk, lack of digital equity, etc. Therefore, it’s important for society to recognize the potential risks and put safeguards in place. Also, digital integration has laid-off employees who had traditional skills and jobs during the digital revolution. To avoid these issues, there should be a collaborative solution to preserve traditional knowledge and upskill the professionals at risk while facilitating transition. Overall, analog-digital integration is creating new opportunities, changing how we work and communicate, and transforming our society. It is up to us to utilize the benefits of this integration while also managing the potential risks it poses.

Analog Meets Digital

Credit: www.productionmusiclive.com

Frequently Asked Questions On Analog Meets Digital

What’s The Difference Between Analog And Digital?

Analog and digital are two types of signals used to process and transmit information. Analog signals are continuous, while digital signals are discrete. Analog uses physical properties like sound waves, light waves, and electrical voltage. Digital, on the other hand, uses binary numbers to represent signals.

What Is The Difference Between Digital And Analog Recordings?

Digital recordings store sound in binary code as 0s and 1s. Analog recordings use physical waveforms to capture sound. Analog recording reproduces sound with more warmth and naturalness, while digital provides clearer, cleaner sound, wider dynamics, and more accuracy.

What Is An Example Of Analog?

An example of analog is an old-fashioned watch with hands that move around a dial to show the time instead of a digital display.

What Is The Difference Between Digital Video And Analog Video?

Analog video transmits signals that vary continuously, while digital video is a digitally-encoded representation of those signals, in 1s and 0s. Analog videos can suffer from noise and distortion, whereas digital videos are less prone to errors. Digital videos are also easier to edit and share due to their digital format.

Conclusion

As technology advances, it is important to remember the roots of analog processes. Analog meets digital in a harmonious, complementary way. While digital technology offers convenience and speed, analog processes provide depth and warmth. By integrating these two worlds together, we can create something truly unique and beautiful.

The possibilities are endless when we embrace the best of both worlds. Let’s continue to innovate and push the boundaries of what is possible in this exciting and dynamic age of technology.

Categories
Archive

Record Drums With One Mic

Recording drums with one microphone is possible; however, it requires proper placement and technique. To achieve a balanced sound, the microphone should be placed halfway between the kick drum and snare drum, and pointing towards the center of the kit.

In addition, the drummer should play evenly and adjust volume accordingly. Recording drums with one mic can be a challenging yet rewarding task for any home recording engineer looking to capture the genuine acoustic sound of the drums. While many professional studio drum recordings use multiple mics to achieve optimal sound production, one microphone can still produce a great sound by careful placement and technique.

Whether you’re an experienced drummer or a beginner, recording drums with one mic can test your drumming control and engineer skills, resulting in a unique, one-of-a-kind sound. We will discuss the best ways to record drums with one mic and achieve a balanced drum sound.

Record Drums With One Mic

Credit: soundcloud.com

Preparing For Recording

To record drums with one mic, it’s important to prepare the room and the drum set beforehand. Make sure the kit is tuned properly, set up the mic at a distance from the drummer’s perspective, and consider using acoustic panels to control any unwanted reflections.

Record Drums With One Mic

Credit: www.youtube.com

Techniques For Recording With One Mic

Recording drums can be a daunting task, especially if you don’t have a lot of microphones or recording equipment. However, with the right techniques, you can record an amazing drum sound with just one mic. In this post, we’ll explore some techniques for recording with one mic and how to get the best results.

The Overhead Technique

The overhead technique is a popular method for recording drums with a single mic. To use this technique, place the mic about 3 to 4 feet above the drum kit, pointed towards the center of the kit. This will capture the overall sound of the drums and cymbals. Since the mic is pointed downwards, it will also capture some of the room sound, giving you a more natural and ambient overall sound.

The Front Of Kit Technique

The front of kit technique involves placing the mic in front of the kit, about 1 to 3 feet away from the bass drum, pointed towards the snare drum. This technique will give you a more focused sound, with less room ambiance. You can experiment with moving the mic closer or further away from the kit to adjust the balance between the drums and cymbals.

The Room Mic Technique

The room mic technique involves placing the mic at a distance from the drum kit, usually 6 to 8 feet away, facing the kit. This technique captures a lot of room sound, giving you a more ambient and natural sound. To get the best results, make sure the room you’re recording in has a good sound and good acoustics.

Blending Multiple Techniques

While each of these techniques can be effective on their own, blending multiple techniques can give you an even better overall sound. For example, you could use the overhead and front of kit techniques together to capture both the overall sound and the focused sound of the drums. Or you could use the room mic technique along with one of the other two techniques to add more room sound to the mix.

TechniquePlacementSound Characteristics
Overhead3-4 feet above kit, pointed towards centerOverall sound, captures some room sound
Front of kit1-3 feet away from bass drum, pointed towards snareFocused sound, less room ambiance
Room mic6-8 feet away, facing kitAmbient, natural sound with a lot of room sound
  • Experiment with different mic positions and distances to find the best sound
  • Use headphones to monitor the sound while recording
  • Consider using a pop filter or windscreen to reduce plosives and other unwanted sounds
  • Make sure the gain level on your recording device is set correctly to avoid distortion

By using these techniques, you can record an amazing drum sound with just one mic. Whether you’re recording at home or in a professional studio, these techniques will help you get the best possible sound out of your drum kit.

Tips For Getting The Best Results

Recording drums with only one mic can be challenging, but with careful planning, you can achieve great results. Below are some tips to help you get the best results when recording drums with one mic.

Ensuring Proper Drum Tuning

Before you start recording, it’s crucial to ensure that the drums are tuned properly. A poorly tuned drum can overwhelm the mic, making it difficult to achieve clarity in the recording. Ensure that the drummer or a professional has tuned the drums accurately.

Using Proper Drumsticks And Mallets

The type of drumstick or mallet you use can affect the quality of the recording. For example, using wooden drumsticks may produce a brighter sound, while using nylon-tipped drumsticks may produce a more mellow sound. Experiment with different types of drumsticks to find the ones that work best with your mic and recording setup.

Considering The Drummer’s Playing Style

The drummer’s playing style can also affect the quality of the recording. For example, if the drummer hits the drums with a lot of force, it may overload the mic, making the recording sound distorted. Ensure that the drummer plays with the appropriate force and that the mic is placed in the right position to capture the sound accurately.

With these tips in mind, you can achieve great results when recording drums with only one mic. Remember to experiment with placement and techniques to find the perfect sound for your recording.

Mixing And Mastering The Recording

Record drums with just one mic and achieve a high-quality sound with proper mixing and mastering. The key is to position the mic in the right spot and adjust the placement for different drum components.

After having successfully recorded drums with just one microphone, the next step is mixing and mastering the recording. This step is crucial to ensure that the final mix sounds great and can be enjoyed by listeners. Here are some tips on how to mix and master a single mic drum recording.

Adjusting Sound Levels

The first step in mixing a single mic drum recording is to adjust the sound levels of each drum. Start with the kick drum and adjust its level to a suitable volume, then move to the snare and do the same. Next, listen for cymbals and toms and adjust their levels to create a balanced mix. Keep in mind that the volume of each drum should be adjusted according to its importance in the music.

Adding Effects And Plugins

After setting the basic levels, it’s time to add some effects and plugins to enhance the sound quality of the drum recording. You can start by adding some EQ to the kick, snare, and other drums to enhance their frequencies. Compression can also be used to bring out the dynamics of the drums. If required, you can add some reverb to create a sense of space and depth in the recording.

Mastering The Final Mix

Now that the mix sounds great, it’s time to start mastering the final mix. This process involves using tools such as a limiter, equalizer, and compressor to ensure that the mix sounds great across all listening devices. Some final touches include adjusting the volume of the mix, making sure it’s not too loud or too quiet, and making sure the drums sound cohesive with the other instruments in the mix. In conclusion, mixing and mastering a single mic drum recording may seem daunting, but it’s a great way to create a unique and authentic sound. By following these tips, you’ll be able to create a high-quality recording that sounds great across all listening devices.

Record Drums With One Mic

Credit: m.youtube.com

Frequently Asked Questions On Record Drums With One Mic

Can You Use 1 Mic To Record Drums?

Yes, you can use one mic to record drums, but the resulting sound quality may not be as desirable compared to using multiple mics. With one mic capturing all the sounds, it may be difficult to balance the mix and accurately capture each drum element.

However, it can still produce decent results for home recordings or demos.

How To Record Drums With One Sm57?

To record drums with one sm57, place it in front of the snare drum at a distance of 2-3 inches. Position the microphone at a 45-degree angle towards the center of the drumhead. Adjust the level to ensure there is no clipping.

Keep experimenting with positions and levels to get the perfect sound.

Can You Use One Overhead Mic For Drums?

Yes, you can use one overhead mic for drums. However, it may not capture all the nuances of the different drums and cymbals in the kit. It is better to use multiple mics to properly capture the individual sounds of each element in the drum kit.

Where Is The Best Mic Placement For One Mic Drum Recording?

The best mic placement for one mic drum recording is between the snare and the kick drum. This placement gives an overall balanced and authentic sound. Situate the mic a few inches above the drumhead and angled slightly towards the center of the kit.

Experimenting with placement can help you find the best sound for your recording.

Conclusion

To sum it up, recording drums with only one mic isn’t impossible, but it requires careful placement, acoustically suitable space, adjustments to the drummer’s technique, and post-processing enhancements. Whether you’re a home studio owner or a professional sound engineer, this technique offers convenience and cost-effectiveness, but it won’t replace the rich and dynamic sound of a multi-mic setup.

With these tips and tricks, you can experiment with different mic positions and find the sweet spot that works for your sound and style. Happy drumming!

Categories
Archive

How To Envision Your Sound

To envision your sound, examine your personal experiences and what you wish to convey through your music. This process should include identifying your musical inspirations and establishing a target audience.

As a musician, you aim to convey an experience through your music. Your sound should be a reflection of your artistic vision. But how can you identify your unique sound? Start by reviewing your life experiences, influences, and emotions. These factors can provide inspiration and insight into what type of sound you want to create.

Next, study other artists and explore various genres that pique your interest. By understanding and analyzing these different sounds, you can begin to create a style that genuinely reflects you as an artist. This process should include determining your target audience and whether your sound aligns with their musical preferences. By taking these steps, you can envision your sound and develop a genuine artistic identity that connects with your listeners.

How To Envision Your Sound

Credit: m.youtube.com

Get Inspired

Envisioning your sound is all about exploring new possibilities and getting inspired by things around you. Whether it’s a new genre, live music show, or your favorite artist, there are plenty of ways to feel motivated and start building your sound. In this article, we’ll discuss different ways you can get inspired and unleash your creative potential.

Explore Different Genres

To envision your sound, it’s essential to explore and experiment with different genres. Step out of your comfort zone and try to listen to genres that you’re unfamiliar with. This will allow you to discover new sounds, techniques, and styles that you can incorporate into your work. Moreover, you can learn about the history and evolution of various music genres and how they’ve influenced the current music landscape.

Here are some ways to explore different genres:

  • Use music streaming platforms like Spotify or Apple Music to discover new music. They have curated playlists and an algorithm that suggests music based on your listening history.
  • Attend music festivals that feature a diverse range of genres. This will help you experience different types of music in a live setting.
  • Listen to the local radio station that plays music outside your usual preferences. You might discover something new that you like.

Attend Live Music Shows

Live music shows are a great way to experience music in a different way and get motivated. Seeing a band or musician perform live can be inspiring and energizing. You can learn a lot by watching live performances and seeing how they engage with the audience and perform their music.

Here are some ways to attend live music shows:

  • Check out local venues in your city or town that host live music events.
  • Look for music festivals and events in your area and attend them.
  • Follow your favorite artists or bands on social media to stay updated on their touring schedule.

Listen To Your Favorite Artists

Your favorite artists can be a great source of inspiration and guidance. Listening to their music can help you understand their style, technique, and creative process. You can analyze their lyrics, chord progressions, and production techniques to learn from them and incorporate them into your work.

Here are some ways to listen to your favorite artists:

  • Create a playlist of your favorite songs and analyze them to understand their structure, melody, and harmony.
  • Watch interviews and documentaries of your favorite artists to learn about their creative process and inspiration.
  • Follow them on social media to stay updated on their new releases, collaborations, and insights.

By exploring different genres, attending live music shows, and listening to your favorite artists, you can get inspired and start envisioning your sound. Don’t be afraid to experiment, collaborate, and take risks in building your unique sound. Remember, music is all about expressing yourself and connecting with your audience.

Create Space

Create Space is the most adaptable and user-friendly digital audio workstation that can help you envision your sound. With its diverse range of tools for creating music, mixing, and mastering, it can help take your music to the next level.

Creating a space that inspires creativity is paramount when it comes to crafting a unique sound. Designing your workspace, integrating elements of nature, and arranging aesthetic components can significantly impact your sound production process. Here are some tips on how to create a space that allows you to envision your sound.

Design Your Workspace

Your workspace must be suitable for your work and your style. It should be a reflection of your personality and preferences. When designing your workspace, consider the following elements:

LightingProper lighting can create a particular ambiance and improve your productivity.
Color SchemeChoose colors that are relaxing, inspiring, or energizing, depending on your preference.
FurnitureInvest in comfortable furniture, such as chairs, desks, and sofas. Make sure they are ergonomic and functional.
Equipment and ToolsHave all the essential equipment and tools, such as headphones, microphones, monitors, and computers, to ensure a smooth workflow.

Integrate Nature

Incorporate natural elements to create a relaxing and stress-free environment that fosters creativity. Here are some ideas:

  • Plants – Add plants to your workspace to improve air quality and enhance mood. Choose plants that are easy to care for and complement your workspace’s color scheme.
  • Natural Light – Take advantage of natural light by placing your workspace near a window or using sheer curtains or blinds to let light in.
  • Nature Sounds – Play natural sounds, such as waterfalls or rain, to soothe and inspire you.

Arrange Aesthetic Elements

Aesthetic elements create an inspiring and aesthetically pleasing work environment. Consider the following:

  1. Artwork – Hang artwork that inspires you and complements your workspace’s color scheme.
  2. Texture – Add texture to your workspace using rugs, throw pillows, or textured wallpaper to create a cozy and inviting atmosphere.
  3. Decorative Items – Use decorative items, such as candles, sculptures, or figurines, to add personality to your workspace.

In conclusion, creating a space that inspires your creativity and vision is essential to developing a unique sound. Design your workspace, integrate natural elements, and arrange aesthetic components to achieve this goal. With these tips, you can create an inspiring space that fosters your sound production process.

Experiment With Sounds

If you want to create a unique and personal sound, one of the first steps is to experiment with different sounds. Let your creativity run wild and try out different instruments, software, and recording methods. Here are some ways to get started:

Experiment With Different Instruments

Whether you’re a seasoned musician or just starting, trying out different instruments can lead to new and interesting sounds. For example, a guitar or piano can be completely transformed with the use of effects pedals and software. Don’t be afraid to mix traditional and electronic instruments to create a completely new sound. You can even try out unique instruments such as a theremin, didgeridoo, or kalimba.

Try Out New Softwares

With the rise of technology, there are countless software options that can help you create and manipulate sounds. From digital audio workstations (DAWs) to virtual instruments and effects plugins, you can customize your sound to your liking. Take some time to explore different software options and experiment with their various settings and functions. Don’t forget to read reviews and watch tutorials to get the most out of each software.

Record Sounds With Your Phone

Your phone can be a powerful recording tool that you can use to capture everyday sounds. While you’re out and about, record sounds that you find interesting such as birds chirping, cars honking, or the sound of waves crashing at the beach. You can use these sounds in your music and manipulate them with effects to create unique textures and layers. Just make sure to ask for permission before recording in public spaces.

How To Envision Your Sound

Credit: m.youtube.com

Develop Your Techniques

Developing your techniques in music production requires envisioning your sound first. Consider the mood, genre, and message you want to convey with your music. Experiment with different tools and techniques to achieve your desired sound.

Develop Your Techniques: When you want to envision your sound, developing your techniques is crucial. It takes time and effort to master an instrument or become an expert in a particular genre of music. However, with consistent practice, you can refine your skillset and develop your sound. In this section, we’ll examine some techniques that can help you envision your sound and enhance your music-making process. Learn From Experts: One of the best ways to develop your techniques is to learn from experts. You can attend music schools, mix with seasoned musicians, and connect with music mentors. By learning from those who have already achieved success in the industry, you can gain insights into their techniques and learn from their experiences. You can watch their videos, attend their performances and follow their work to learn how they envision their sound and get better at your craft. Follow Online Tutorials: Another effective way to enhance your techniques is by following online tutorials. The internet has a wealth of information and resources that can help you become a better musician. You can watch tutorials, read blogs, and use various software programs to refine your techniques. You can also join online groups and forums where you can interact with other musicians and gain further insights. Practice, Practice, Practice: Finally, practice is the key to enhancing your techniques and envisioning your sound. You need to find time to practice every day, no matter how busy your schedule may be. You can practice with your instrument using specific techniques, experiment with new sounds, and apply what you’ve learned from experts and online tutorials. Playing with other musicians can also help you develop your techniques, as you can learn from their style and explore different genres together. In conclusion, developing your techniques is essential to envisioning your sound. By learning from experts, following online tutorials, and practicing consistently, you can enhance your techniques and develop your sound. Keep experimenting with new sounds, and don’t be afraid to take risks. With patience and perseverance, you can achieve your goals and become the musician you want to be.

Find Your Sound

Finding your sound is a crucial part of any musician’s journey. Your sound is uniquely you and sets you apart from other artists. To find your sound, you need to experiment, have an open mind, and trust your intuition. Here are three steps to help you find your sound:

Familiarize Yourself With Your Equipment

Whether you are a seasoned pro or a beginner, it’s important to familiarize yourself with your equipment. Understanding your instruments and the tools you use will help you create a sound that is uniquely yours. Take the time to learn about the different settings and features of your equipment. Experiment with different combinations to find the sound that resonates with you.

EquipmentFeatures to Learn
GuitarTone and volume knobs, pickups, effects pedals
DrumsTypes of cymbals, drumsticks, tuning, and drum heads
KeyboardTypes of keys, synthesizers, and various effects

Explore Different Sound Effects

Sound effects can take your music to the next level. They add texture, depth, and character to your sound. Explore different sound effects and try them out until you find the ones that work for you. Don’t be afraid to experiment with unconventional sounds. You never know what you may discover and how it can influence your sound.

  • Delay effects
  • Reverb effects
  • Chorus effects
  • Distortion effects
  • Wah-wah effects

Trust Your Intuition

When it comes to finding your sound, trust your intuition. Your instincts will lead you to create a sound that is unique to you. Don’t let external factors influence your creative process. Trust in your abilities and believe in your sound.

  1. Listen to your inner voice
  2. Don’t compare yourself to others
  3. Embrace your imperfections
  4. Experiment with different genres

Ultimately, finding your sound is an ongoing process. As you grow and evolve as a musician, your sound will change too. It’s essential to trust yourself and allow your creativity to guide you. The key is to be open-minded and patient with the process. Remember, your sound is unique, special, and something to be celebrated.

Collaborate With Others

To envision your sound, collaborating with others can bring fresh perspectives and ideas. Working with musicians, producers, and engineers can help you refine your sound and create a unique sonic identity. Listening to feedback and incorporating new ideas can also help you grow as an artist.

When it comes to creating your own music, working with others is an excellent way to refine your sound. Collaborating with other musicians can help you open your mind and broaden your creative horizons. Here are some ways to collaborate with others to envision your sound:

Join A Band Or Musical Group:

If you’re looking for a collaborative experience, joining a band or musical group is an excellent way to get started. Being part of a group allows you to bounce ideas off of others and get feedback on your work. This can help you fine-tune your sound and develop your skills as a musician.

Find Like-minded Musicians:

Finding other musicians who share your musical vision is a crucial step in creating your sound. Whether you’re looking for musicians to jam with or to form a band, there are plenty of resources available to help you connect with like-minded individuals. You can start by attending local music events or using online resources like Craigslist or Bandmix to find other musicians in your area.

Share Your Work With The Community:

Sharing your music with others is an essential part of the collaborative process. Whether it’s through local music festivals or online platforms like Soundcloud or Bandcamp, sharing your work can help you get feedback and connect with other musicians and fans. This can help you grow as a musician and further refine your sound. In conclusion, collaborating with others is an excellent way to envision your sound and refine your musical skills. By joining a band or musical group, finding like-minded musicians, and sharing your work with others, you can create a rich and rewarding collaborative experience that will help you grow as a musician.

Incorporate Your Personality

Bringing your own personality into your music is crucial to building a distinct sound. Envisioning your sound requires introspection and self-awareness, allowing you to create a unique style that resonates with your audience and sets you apart from the rest.

To stand out in the music industry, you need to find your distinct sound. Creating music that represents your personality and style can help you build a unique brand and attract loyal fans. Incorporating your personality is not as daunting as it may seem. Here are three ways to do it:

Write Personal Lyrics

Your lyrics play a crucial role in telling your story and expressing your emotions. To incorporate your personality, focus on writing lyrics that reflect your life experiences and speak to your audience. Avoid generic or overused phrases and instead use your personal experiences to create relatable content. Embrace your vulnerability and let your fans know the real you through your lyrics.

Infuse Your Unique Style

While it’s crucial to study your influences and learn from them, it’s also essential to infuse your unique style into your music. Experiment with different genres and sounds to create something new and fresh that reflects who you are as an artist. Incorporate your unique voice, instruments, and songwriting techniques to create a distinctive sound that sets you apart from the crowd.

Draw Inspiration From Your Life

One of the best ways to incorporate your personality into your music is by drawing inspiration from your life. Your life is a rich source of experiences that can inspire song ideas. Think about the people, places, and events that have shaped you and incorporate them into your music. Don’t be afraid to express yourself and let your experiences guide your songwriting process. Incorporating your personality into your music is key to building a loyal fan base and creating a unique brand. By writing personal lyrics, infusing your unique style, and drawing inspiration from your life experiences, you can create music that speaks to both you and your audience. So, embrace your individuality and start creating music that represents the real you.

Keep Evolving

Keep evolving – that’s the key to success when it comes to envisioning your sound! Don’t be afraid of change, and don’t get too comfortable with what you’re doing. If you want to stay relevant, you need to constantly try new things and keep exploring. In this section, we’ll explore some strategies that can help you keep evolving and find fresh inspiration for your music.

Stay Up-to-date With Music Trends

One of the most important things you can do to stay fresh and relevant is to keep up with the latest music trends. Whether it’s a new genre or a new production technique, staying in the loop will help you stay ahead of the competition. To keep up with trends, try attending music festivals or concerts, reading industry blogs and publications, and following key players on social media. You can also participate in online forums and communities where musicians discuss the latest trends and share new ideas.

Try New Approaches

If you want to evolve your sound, you need to be willing to try new approaches. This might mean experimenting with different genres or mixing styles that you wouldn’t normally combine. You can also try using new tools or software to create your music, or collaborate with other musicians to get fresh perspectives. Don’t be afraid to take risks and step outside of your comfort zone – you might just discover something amazing.

Keep Exploring

Finally, one of the best ways to keep evolving is to never stop exploring. This means staying curious and open to new experiences, and being willing to learn from everything around you. Whether it’s listening to new music, attending art exhibits, or traveling to new places, every new experience can give you fresh inspiration and new ideas. Keep an open mind and a hungry heart, and you’ll never run out of ideas for your music.

How To Envision Your Sound

Credit: m.facebook.com

Frequently Asked Questions For How To Envision Your Sound

How Do I Find My Music Sound?

To find your music sound, experiment with different styles and genres to see what resonates with you. Consider your personal influences and experiences, and focus on creating music that feels authentic to you. Seek feedback from others to refine your sound and continue to evolve and grow as an artist.

How Does Music Create Atmosphere?

Music creates atmosphere by setting the emotional tone of a space. It can evoke feelings of excitement, tension, relaxation, or joy depending on the genre, tempo, and volume. Music also has the ability to trigger memories and associations that contribute to the overall ambiance.

What Is Sound Envisioning And Why Is It Important?

Sound envisioning means creating a mental picture of how you want your music to sound in the end. It is essential
because it helps in focusing on the end goal, improving the quality of music, and communicating your vision with others.

How Can I Improve My Sound Envisioning Skills?

Improving sound envisioning skills requires regular practice, listening to music attentively, and paying attention to
details like melody, rhythm, and instruments used. It can also help to collaborate with other musicians and seek feedback.

Conclusion

To conclude, envisioning your sound can help you identify the musical style that feels most natural and authentic to you. By taking the time to explore your personal influences and musical tastes, you can create a unique sound that stands out in the crowded music industry.

Remember to be true to yourself and allow your passion to guide you in the creative process. With focus, dedication, and a willingness to experiment, you can turn your vision of music into a reality and make a lasting impact on the world.

Categories
Archive

Ultimate Auto Tune Tutorial

This Ultimate Auto Tune Tutorial will show you how to use Auto Tune to enhance your vocal recordings. In this tutorial, you will learn about the basics of Auto Tune, including how to set up Auto Tune in your DAW, how to adjust pitch and timing, and how to use different Auto Tune modes to achieve different types of effects.

Additionally, the tutorial will cover some tips and tricks for using Auto Tune effectively, as well as some common mistakes to avoid. Whether you’re a seasoned pro or a beginner, this tutorial will give you the knowledge and skills you need to improve your vocal recordings with Auto Tune.

Ultimate Auto Tune Tutorial

Credit: www.antarestech.com

Why Auto Tune Matters

Auto Tune has become a vital tool in music production, providing pitch correction and creating unique sounds. In this Ultimate Auto Tune Tutorial, you’ll learn the ins and outs of using Auto Tune in your own music, including different settings, techniques, and tips to enhance your vocals.

Auto-Tune is an audio processing tool that has been a game-changer in the music industry. Initially created as a pitch correcting tool, Auto Tune has become a common fixture in studios across the world. The tool can alter the intended pitch of a musical performance and transform it into something new which has become a defining characteristic of modern pop music. In this article, we will discuss the importance of Auto Tune in music production and how it can enhance your music.

How Auto Tune Can Enhance Your Music

Auto-Tune is a robust audio processor that can improve the quality and impact of your vocals. Here are some ways that Auto Tune can enhance your music:

Ways Auto Tune HelpsBenefits
1. Pitch CorrectionAuto Tune can help correct the pitch of off-key notes to improve the sound quality of a track.
2. Creativity and OriginalityThe tool can be used to create unique musical effects that add a distinctive flair to your music.
3. Time-SavingAuto Tune saves a considerable amount of time editing and re-recording vocals to correct pitch issues.
4. Consistency in performancesAuto Tune keeps pitches consistent between different vocal sections of the performance to create a polished sound.

Examples Of Popular Songs Using Auto Tune

Auto Tune has become a prevalent tool in music production over the last few decades; here are some of the most iconic songs that creatively use Auto-Tune:

  • 1. Cher – Belive
  • 2. Daft Punk – One More Time
  • 3. T-Pain – Buy U A Drank
  • 4. Destiny’s Child – Survivor
  • 5. Kanye West – Heartless

In conclusion, Auto-Tune is essential in modern music production and can be the difference between a mediocre and a successful track. By using Auto Tune to correct pitch issues, create new unique effects, maintain consistency, and save time, you can make your music stand out.

Basic Concepts Of Auto Tune

Are you someone who is looking to improve their music and sound quality? Auto tune is an impressive technology that can transform an average voice into a melodious and professional tune. Auto tune has been around for many years, and it has consistently proven to be effective in producing high-quality sound. In this ultimate auto tune tutorial, we will be discussing the basic concepts of auto tune, what pitch correction is, and how it works, as well as understanding how the auto tune interface works.

What Pitch Correction Is And How It Works

Pitch correction is a technique that helps correct or alter the pitch of a recorded sound. In simpler terms, it is the process of tuning the notes sung by a singer to keep them in the correct key. Many professional singers use auto tune to correct notes that may be out of tune. The pitch correction process is done using a computer program that measures the pitch of the recording and applies adjustments to the sound waves to align them with the proper key. This process can be done both manually or automatically, depending on the project. Auto tune technology can help save time during the recording process and achieve impressive pitch-corrected results.

How The Auto Tune Interface Works

The auto tune interface features several key components, including the pitch indicators and the retune speed. The pitch indicator helps in visualizing the notes and their movement in relation to the correct key or pitch. It displays the pitch as it moves, and it can help identify areas where corrections need to be made. The retune speed feature is used to adjust the speed at which corrections are made. A slow speed may be useful when correcting minor errors, while fast speed is better suited for more significant correction actions.

The auto tune tutorial above has covered the basic concepts of auto tune, including how pitch correction works and how the auto tune interface operates. Auto tune technology provides an excellent opportunity for singers and producers to develop impressive sound quality that their fans will enjoy. Follow the steps outlined above in this ultimate auto tune tutorial, and you’ll be on your way to creating professional and high-quality music.

Using Auto Tune In Practice

Auto Tune can be a powerful tool when used correctly in music production. In this ultimate tutorial, you will learn how to utilize Auto Tune to enhance your vocals, how to adjust settings, and tips for achieving the perfect pitch correction while avoiding an overly processed sound.

As a music producer or artist, you must have heard about Auto Tune, which is now seen as a must-have tool in any recording studio. Auto Tune is an audio processor that corrects pitch in vocal performances and has been widely used in music production for decades. In this post, we will explore how to use Auto Tune in practice, which includes setting up Auto Tune on your DAW, recording your vocals with Auto Tune, using Auto Tune for creative purposes, and using Auto Tune for live performances.

How To Set Up Auto Tune On Your Daw

Setting up Auto Tune on your Digital Audio Workstation (DAW) is quite easy. To use Auto Tune in your DAW, follow these steps:

  1. Install the Auto Tune software on your computer.
  2. Launch your DAW and create a new project.
  3. Insert the Auto Tune plugin on the vocal track.
  4. Set the desired key and scale of the song.
  5. Adjust the retune speed and other parameters based on your preference.

Recording Your Vocals With Auto Tune

Recording with Auto Tune allows you to fix the pitch of your vocals as you sing. Here is how to record your vocals with Auto Tune:

  • Open your DAW and select the Auto Tune plugin on the vocal track.
  • Set the key and scale of the song.
  • Set the retune speed and other parameters according to your preference.
  • Start recording and sing your song.
  • The Auto Tune plugin will automatically correct the pitch in real-time.

Using Auto Tune For Creative Purposes

Auto Tune is not just a correcting tool; it can also be used creatively to achieve unique vocal effects. Here are some ways to creatively use Auto Tune:

EffectDescription
Cher EffectUsed to replicate the iconic Cher sound in her hit song “Believe.”
T-Pain EffectUsed to create the robotic vocal effect popularized by T-Pain.
Vocoder EffectUsed to create a harmonizing effect on vocals.

Using Auto Tune For Live Performances

Auto Tune is not just limited to studio recordings. It can also be used for live performances. However, to use Auto Tune for live performances, you need a hardware processor such as Antares Auto-Tune Pro. Here’s how to use Auto Tune for live performances:

  1. Connect your microphone to the hardware processor.
  2. Connect the processor to your sound system.
  3. Set the desired key and scale.
  4. Adjust the retune speed and other parameters based on your preference.
  5. Sing into the microphone, and the processor will automatically correct the pitch in real-time.

Using Auto Tune in practice is an excellent way to improve your vocal performances and achieve unique effects in your music production. With the above guide, you should be able to set up and use Auto Tune in your recordings and live performances.

Advanced Auto Tune Techniques

This ultimate auto tune tutorial will teach you advanced techniques for tuning your car to its peak performance. With step-by-step instructions and expert tips, you’ll learn how to analyze data logs, adjust fuel and ignition tables, and optimize your engine for maximum power and efficiency.

Advanced Auto Tune Techniques are essential to create high-quality music productions that stand out from the rest. One of the most important aspects of using Auto Tune is mastering the advanced techniques that help take your music to the next level. This tutorial will cover all the essential advanced Auto Tune techniques to step up your game. You will learn how to manipulate formants, create harmonies, correct pitch drift, and generate special effects with Auto Tune. In this tutorial, we have structured the content into four sections, each focusing on a specific technique to help you achieve the desired results. H3: Manipulating Formants with Auto Tune Manipulating Formants with Auto Tune is one of the most advanced techniques for creating unique sounds. Auto Tune allows you to modify the formants of a vocal to produce a vast range of vocal timbres. You can use it to create robotic or deep bass sounds, making your voice sound like a completely different instrument altogether. You can manipulate formants by adjusting the retune speed or pitch, and by selecting the target note, among other things. It’s essential to experiment with different settings and find one that works best for your production. H3: Using Auto Tune to Create Harmonies Using Auto Tune to Create Harmonies is an excellent way to add depth and complexity to your music production. You can use Auto Tune to create harmonies in a few different ways. One of the most popular ways is to use the graph mode to create a harmony line that follows the lead vocal pitch. This technique involves duplicating the lead vocal track, setting the target note to the desired harmony, and adjusting the pitch to achieve the desired effect. You can also use the MIDI control mode to add multiple pitch-corrected harmonies, where you control each note’s timing and pitch. H3: Using Auto Tune to Correct Vibrato and Pitch Drift Using Auto Tune to Correct Vibrato and Pitch Drift is a game-changer for music producers and singers, as it ensures a pitch-perfect performance. Vibrato and pitch drift are common issues that can reduce the quality of a vocal recording. However, with Auto Tune, you can quickly correct these issues. By adjusting the target note, retune speed, and response time, you can correct vibrato and pitch drift, creating a smooth, polished sound. H3: Creating Special Effects with Auto Tune Creating Special Effects with Auto Tune enhances creativity by providing unique vocal effects. Auto Tune’s creative potential is infinite when it comes to special effects. Some examples include creating stuttering effects, glitching vocals, or even turning the vocal into something that sounds like an instrument. You can use the MIDI control mode to add different instrument effects, such as a guitar or a piano, to vocal tracks. You can also make use of the modulation section to create vocal effects such as bitcrushing or ring modulation. In conclusion, Advanced Auto Tune Techniques, including manipulating formants, creating harmonies, correcting pitch drift and vibrato, and creating special effects are essential to create music productions that stand out from the rest. By understanding and mastering these techniques, you can create unique sounds and enhance your creativity to produce a high-quality final product.

Troubleshooting Auto Tune

Auto Tune can be a powerful tool in achieving a polished and professional sound for your music. However, like any tool, it can encounter some problems that need to be addressed. In this section, we will discuss the common problems you might encounter when using Auto Tune as well as the solutions for overcoming these issues.

Common Problems You Might Encounter

One of the most common problems encountered when using Auto Tune is pitch detection issues. This can be caused by a variety of factors, including poor microphone quality, excessive background noise, and unstable vocal performances. In addition, Auto Tune may struggle when attempting to correct extreme pitch inaccuracies or when trying to correct multiple notes simultaneously.

Another issue that can arise with Auto Tune is the introduction of unwanted artifacts, such as robotic or metallic sounds. This can occur when Auto Tune is applied too heavily or when the pitch correction is exaggerated beyond the natural vocal range.

Solutions For Overcoming Auto Tune Issues

To overcome pitch detection issues, ensure that the microphone being used is of good quality and that excessive background noise is minimized. If pitch inaccuracies are extreme or multiple notes need to be adjusted, consider manually editing the pitch instead of relying solely on Auto Tune.

If unwanted artifacts are introduced, reduce the amount of pitch correction being applied or adjust the settings to create a more natural sound. It can also be helpful to use a gentle hand when applying Auto Tune, using it as a subtle enhancement rather than a heavy-handed tool.

Finally, a good rule of thumb when using Auto Tune is to use it sparingly and only when necessary. Not every vocal performance requires pitch correction, and sometimes imperfections can add character and authenticity to a recording.

Ultimate Auto Tune Tutorial

Credit: m.youtube.com

Alternative Pitch Correction Plugins

Looking for alternative pitch correction plugins to use in your auto-tune projects? Look no further! Our Ultimate Auto Tune Tutorial covers everything you need to know, including a breakdown of the best plugins out there. From Melodyne to Waves Tune, we’ve got you covered.

Introduction To Other Pitch Correction Options

If you’re a music producer or singer, you’re probably already familiar with Auto-Tune, the pitch correction tool that has become a standard in the music industry. But did you know that there are other pitch correction plugins that offer similar features? In this section, we’ll introduce you to some alternative pitch correction plugins that you might want to check out.

Comparison Of Auto Tune Alternatives

Here’s a quick comparison of some of the popular alternatives to Auto-Tune:

PluginDeveloperCompatibilityFeatures
MelodyneCelemonyWindows/Mac OS XPitch correction with Natural VibratoRhythm and timing correctionOffline editing
Waves TuneWaves AudioWindows/Mac OS XReal-time pitch correctionVocal tuning in any keyFormant correction
Antares Harmony EngineAntares Audio TechnologiesWindows/Mac OS XReal-time pitch and harmony generationAutomatic building of vocal harmoniesMulti-part harmony control

As you can see, each of these pitch correction plugins offers unique features that might suit your specific needs. It’s all about finding the one that works best for you and your music.

Auto Tune In Industry Trends

Auto-tune, a digital audio processor, has revolutionized the music industry over the past two decades. Its popularity can be attributed to its ability to tweak an artist’s vocal pitch and eliminate errors, enhancing the overall quality of music productions. Auto-tune can achieve an incredible amount of fine-tuning, recognized by many as an art form on its own. The Ultimate Auto Tune Tutorial is a comprehensive guide that will teach you how to use auto-tune like a pro.

How Auto Tune Is Used In Today’s Music Industry

Auto-tune has become an essential tool for today’s music industry. It is widely used across various genres, including pop, hip-hop, EDM, and more. Auto-tune helps artists achieve a perfect pitch, even when performing under challenging conditions such as live performances or when recovering from vocal surgery. It also helps achieve consistent and reliable performances in the studio, making it an indispensable tool for producers, audio engineers and recording artists.

Trends In Auto Tune Production

The use of auto-tune in music production continuously evolves with the constantly changing trends in the music industry. In the past, it was primarily used to correct pitch issues, but nowadays, artists are pushing their creativity boundaries by using it for artistic purposes. Some popular trends in auto-tuned productions include pitch shifting, robotic vocals, harmonizing, and using it to create unique and subtle audio effects in modern productions.

The Ultimate Auto Tune Tutorial is an essential resource for producers and artists looking to tap into this revolutionary audio processing technique fully. From mastering the basics to exploring the latest trends, the tutorial can help artists and producers produce stellar audio productions that stand out in the current music industry.

Ultimate Auto Tune Tutorial

Credit: www.youtube.com

Frequently Asked Questions Of Ultimate Auto Tune Tutorial

How Do You Use Auto-tune Perfectly?

To use Auto-Tune perfectly, follow these steps: 1. Begin with a strong vocal performance. 2. Set the key and scale correctly. 3. Adjust the “Retune Speed” and “Flex-Tune” settings to taste. 4. Tune individual notes manually if necessary. 5. Use pitch correction sparingly and creatively to enhance rather than replace the natural vocal performance.

What Auto-tune Do Professionals Use?

Professional musicians often use Antares Auto-Tune Pro, which provides advanced pitch correction and customizable settings to tweak vocal tracks to perfection. Other popular options include Celemony Melodyne and Waves Tune Real-Time, both of which offer similar features and compatibility with multiple platforms.

What Is The Auto-tune Technique?

Auto-Tune is a technique used in music production to correct pitch inaccuracies in a singer’s performance. This technology can detect off-key notes and adjust them to the correct pitch in real-time. It has become popular in the music industry and is used by many artists as a creative tool.

How Do I Set Up Auto-tune Unlimited?

To set up Auto-Tune Unlimited, you need to follow these simple steps: 1. Go to the Antares website and sign up for a subscription. 2. Download and install the Auto-Tune Unlimited software on your computer. 3. Launch the software and enter your subscription credentials.

4. Choose your preferred Auto-Tune version and start using the software. 5. Make sure you have a compatible DAW and follow the user manual for optimal performance.

Conclusion

To sum up, auto-tuning is an important aspect of modern music production, and with tools such as Antares Auto-Tune, it has become easier than ever to create pitch-perfect tracks. In this guide, we’ve covered the basics of auto-tuning, including the different types of tuning, popular software options, and tips for using it effectively.

With the right approach and some practice, you can take your music to new heights and explore new creative possibilities. Thanks for reading, and we wish you the best of luck in your auto-tuning endeavors!

Categories
Archive

Background Vocals

Background vocals are additional vocal tracks that support the lead vocal in a song. These vocals add depth and texture to the overall sound, and can be used to create harmony, counter-melodies, and call-and-response elements.

In modern music production, backing vocals play a crucial role in enhancing the overall listening experience. Also, artists and producers use backing vocals to give their songs a unique identity and make them stand out from the rest. The technique of layering different vocal tracks is a common practice in genres such as pop, R&B, and hip-hop.

Related reading: De Ess Vocals and Mixing Rap Vocals.

When done correctly, backing vocals can give a song a fuller sound and add emotional depth to the lyrics. In addition, we’ll explore the importance of backing vocals in music production and how they’re used to create memorable songs.

Types Of Background Vocals

Also, backing vocals are a crucial element to adding dimension and depth to a song. For example, the types of background vocals can range from harmonies, ad-libs, to call-and-responses. Each type of background vocal serves a unique purpose in enhancing the overall sound of a musical piece.

Moreover, backing vocals are an important aspect of any song, providing depth, texture, and emotion to the lyrics. As a result, they can range from simple harmonies to intricate counter melodies, giving the song a new dimension. Let’s dive into the types of background vocals that add flavor to any song:

Harmonies

In addition, harmonies are the most common type of background vocal. They are created by singing notes that complement the melody line, enhancing the overall sound. They can be simple with just one additional note or complex with multiple harmonies interweaving together. Harmonies elevate the song and add an extra layer of depth that makes the melody stand out.

Ad-libs

Furthermore, ad-libs are spontaneous ad hoc vocal parts added to a song that enhance the lyrics. They are usually not planned and arise naturally when the music is being created. Ad-libs are often used in rap or hip-hop music, but they’re also used in other genres. They allow the singer the chance to experiment with sound, tone, and pitch for dramatic effect. Ad-libs add a sense of spontaneity and originality to the song.

Counter Melodies

Additionally, counter melodies are a type of background vocal that creates an alternative melody to the song’s primary melody. It adds variety to the song and provides a new texture to the overall sound. Counter melodies are not in harmony with the main melody and require a skilled singer to execute them successfully. The result is a layered sound that creates an emotional impact to the listener. Backing vocals are a fundamental aspect of any song. They add depth, texture, drama and emotional impact to the lyrics. They can range from simple harmonies to complex counter melodies, and at times are spontaneous ad-libs. By understanding the types of background vocals, singers and songwriters can create an authentic and personalized sound which elevates their song.

Background Vocals

Credit: producelikeapro.com

Tips For Recording Background Vocals

Also, backing vocals can add depth, harmony, and texture to a song. They give the song an extra layer of emotion that the lead vocal alone may not be able to convey. Recording background vocals can be challenging because they need to fit seamlessly with the lead vocal while standing out in their own right. If you’re struggling with recording background vocals, these tips can help you achieve the sound you’re looking for.

Vocal Arrangement

Before recording background vocals, it’s essential to have a good vocal arrangement planned out. Moreover, a well-arranged vocal track can make the difference between a good recording and a great one. Here are some tips:

  • In addition, consider the melody of the lead vocal and find harmonies that work well with it. Try experimenting with different intervals to find what sounds right.
  • Furthermore, think about the rhythm and timing of the backing vocals. Are they going to be straight or syncopated? Will they be sung at the same time as the lead or slightly behind it?
  • Additionally, plan out the phrasing of the backing vocals. Try repeating certain lyrics or adding new lyrics to create a call-and-response pattern.

Microphone Selection

The right microphone can make a huge difference in the quality of your backing vocals. Here are some things to consider when choosing a microphone:

Microphone TypeUsage
Large diaphragm condenser microphoneGreat for capturing a full, warm sound for solo background vocals
Small diaphragm condenser microphoneGood for capturing high-frequency detail
Dynamic microphoneGreat for recording background vocals with a lot of dynamic range
Ribbon microphoneIdeal for adding a vintage feel to backing vocals

Recording Techniques

The technique you use to record background vocals can affect the final sound in a significant way. Here are some tips to help you achieve the sound you’re looking for:

  1. Use a pop filter to prevent plosives (popping sounds) from the singer’s breath.
  2. Have the singer stand about six inches from the microphone to achieve a good balance between proximity effect and ambient sound.
  3. Consider recording each singer separately to achieve a cleaner sound.
  4. Use a reverb or delay effect to place the backing vocals in the same acoustic space as the rest of the track.

How To Mix Background Vocals With Lead Vocals

When it comes to creating a professional-sounding track, mixing background vocals with lead vocals is a crucial step. Backing vocals serve the purpose of filling out the sound of a track, while the lead vocals convey the message and story of the song. Getting the perfect mix of background and lead vocals can be a bit tricky, but by following a few essential techniques, you can create a well-balanced and engaging track. In this article, we will discuss how to mix background vocals with lead vocals focusing on adjusting levels, panning, and EQ.

Adjusting Levels

Adjusting levels is an essential part of creating a well-balanced track. The first step is to identify which background vocals are vital to the song and which ones are supporting. The supporting vocals should be adjusted to sit behind the lead vocals and not draw attention away from them. The best way to achieve this is to lower the volume of the supporting vocals and slightly raise the volume of the lead vocals. To make sure the vocals are mixed appropriately, play back the track at various volumes and adjust the levels until the vocals are balanced and prominent without overpowering each other.

Panning

Panning is a technique used to create a stereo image of the vocals. For example, the lead vocal should be panned in the center to create a strong presence and to take hold of the listener’s attention. The backing vocals can be spread out in the stereo field by panning them to the sides. This technique enables the listener to differentiate between the two types of vocals and appreciate the full spectrum of the song. However, it is crucial to pan the vocals sparingly to avoid having an imbalanced mix.

Eq

Equalization is an essential tool to optimize the quality of the vocals’ frequencies. Adjusting the EQ can help the vocals not to clash with each other. For instance, the lead and the backing vocals may occupy the same frequency range. They should be equalized to add more clarity and ensure that they complement each other. For instance, vocals panned in the center can be equalized to boost their mid frequencies, while those panned on the sides can have their high frequencies enhanced. EQing the main vocal slightly brighter than the background allows it to cut through the mix without obscuring the lyrics or harming the backing vocals.

Conclusion

Knowing how to mix background vocals with lead vocals can be tough, but by adjusting levels, panning and EQing, you can produce a professional sound that can add value to your music. Ensure that you give each technique careful attention, and create a mix that delivers the right sound.

Background Vocals

Credit: carnegiecarnegie.org

The Evolution Of Background Vocals In Popular Music

Backing vocals have been an integral part of popular music since its inception. Over the years, the role of backing vocals has evolved, from simple harmonies to complex arrangements that add depth and texture to songs. In this blog post, we will explore the history of backing vocals in popular music, from the early days to modern pop and hip hop.

The Early Days

In the early days of popular music, backing vocals were mostly limited to simple harmonies that complemented the lead vocals. Gospel music was the first genre to extensively use backing vocals, as it was primarily an a cappella form of music. The harmonies in gospel music added depth and emotion to the songs, and this technique was soon adopted by other genres, such as doo-wop. In doo-wop, backing vocals were used to create intricate harmonies and counterpoints that served as a backdrop to the lead vocals.

The 60s And 70s

The 60s and 70s saw a major transformation in the role of backing vocals in popular music. With the advent of multi-track recording, artists started experimenting with more complex arrangements that featured multiple layers of backing vocals. The Beatles were one of the first bands to extensively use backing vocals in their recordings. Their album, Sgt. Pepper’s Lonely Hearts Club Band, featured complex vocal arrangements that blended seamlessly with the music. Other artists, such as The Beach Boys, The Mamas & The Papas, and Simon & Garfunkel, also used background vocals to great effect, creating intricate harmonies and vocal textures that were a defining feature of their music.

Modern Pop And Hip Hop

Modern pop and hip hop have taken the use of backing vocals to new heights. In these genres, backing vocals are used not just for harmonies, but also for ad-libs, vocal chops, and vocal layering. Vocoders and auto-tune have made it possible to manipulate the sound of backing vocals to create new and interesting textures. Artists like Beyoncé, Justin Timberlake, and Taylor Swift use backing vocals to create intricate arrangements that add depth and complexity to their songs. In hip hop, backing vocals are often used to add emphasis and energy to the lyrics, as well as for creating catchy hooks and choruses.

In conclusion, the evolution of backing vocals in popular music reflects the changing tastes and preferences of audiences. From simple harmonies to complex arrangements, backing vocals have played a crucial role in shaping the sound of popular music. As technology continues to evolve, we can expect to see even more innovative uses of backing vocals in the years to come.

Background Vocals

Credit: bobbyowsinskiblog.com

Frequently Asked Questions For Background Vocals

What Are Background Vocals Called?

Backing vocals are also known as backing vocals. They are additional vocals that support the lead vocal in a song. These vocals enrich and emphasize certain parts of the song, adding depth and harmony.

What Is The Background Vocals In A Song?

Backing vocals in a song refer to the additional singing that supports the lead vocals and adds depth and harmony to the track. These vocals can be sung by other singers or by the same artist over the top of the main vocals.

They fill out the sound and enhance the overall quality of the song.

What Is The Purpose Of Background Vocals?

Backing vocals add depth and dimension to a musical composition. They provide harmonic support to the main melody and enhance the overall sound of the track. Backing vocals also accentuate emotions conveyed by the lyrics and make the song more memorable for listeners.

Are Background Vocals Necessary?

Backing vocals can enhance a song’s overall sound and create a fuller, more dynamic listening experience. However, they are not always necessary and can sometimes distract from the main vocals. Ultimately, it depends on the artist’s style and preference.

Conclusion

After reading this article, it’s clear that backing vocals play a crucial role in elevating the overall sound and emotion of a song. The techniques and tips discussed here can help you achieve the right balance and create a masterful track.

With practice and experimentation, you can hone your skills as a background vocalist and make a lasting impact on your audiences. Keep in mind that every song is unique, so it’s important to tailor your approach accordingly. Don’t be afraid to take risks and push boundaries – the results may surprise you.

For more background, see Backing vocalist on Wikipedia.