Categories
Archive

Cubase Won’t Record Audio

Cubase not recording audio? Check your audio interface settings and cables.

If you’re experiencing the frustration of trying to record audio in Cubase and finding that it’s not working, there could be a few reasons for this. One of the most common is an issue with the configuration of your audio interface settings or possibly a problem with connectivity between your interface and computer.

While it might be tempting to jump on forums and search for detailed solutions, the key to fixing the issue is often a simple one. We’ll take a closer look at some of the things you can do if you find yourself unable to record audio in Cubase.

Cubase Won'T Record Audio

Credit: forums.steinberg.net

Check Audio Interface

Check your audio interface if Cubase won’t record audio. This could be caused by a faulty connection or incorrect settings.

Ensure Audio Interface Is Connected

If Cubase isn’t recording audio, the best thing to do is to check if your audio interface is properly connected. Ensure that all cables are plugged in their respective ports and make sure the interface is powered on. If your audio interface has multiple input/output channels, double-check if the correct channels are configured in Cubase’s preferences. If everything looks alright, but you’re still not getting any audio, try replacing the interface’s USB/FireWire cable as it might be faulty.

Update Audio Interface Drivers

An outdated audio interface driver can cause compatibility issues with your computer and cause Cubase to malfunction. Therefore, it’s important to check if there are any new updates for your audio interface’s driver and install them immediately. You can find the latest driver version from the manufacturer’s website or from Cubase’s website. Once you’ve downloaded the driver, install it on your computer following the provided instructions. Furthermore, you can try troubleshooting the audio driver from the Windows Device Manager or the Mac’s Audio MIDI Setup. If any issues are found, you can attempt to resolve them from there. If the problem persists even after updating the driver, consider contacting the manufacturer’s customer support for further assistance. In summary, if Cubase won’t record audio, you should start by checking if your audio interface is connected and configure the correct input/output channels. If everything seems fine, proceed to update your audio interface’s driver to ensure compatibility and eliminate the chance of malfunction. Keeping your audio drivers updated is a crucial task as they will ensure the smooth running of your audio interface and Cubase.

Check System Settings

Introductory paragraph

If you are experiencing audio recording problems in Cubase, checking the system settings is the first step to troubleshooting the issue. In this section, we will explore the important system settings to check when Cubase won’t record audio and provide some solutions to the problem.

H3 Heading 1

Check Input And Output Settings

Ensure that your input and output settings are correctly configured. To do this, go to the “Devices” menu and click “Device Setup.” Then, make sure that the proper input and output devices are selected. If you are using an external audio interface, ensure that it is properly connected to your computer and is selected as your audio device in the device setup menu.

H3 Heading 2

Check Sample Rate And Bit Depth

Another important system setting to check is the sample rate and bit depth of your audio interface. Cubase requires that your audio interface matches the sample rate and bit depth of your project. To check your computer’s sample rate and bit depth settings, go to the “VST Audio System” menu under the “Devices” tab. If the settings do not match, adjust your interface settings to match your project settings.

Check Cubase Settings

To troubleshoot Cubase’s failure to record audio, checking the settings is crucial. Ensure that the selected audio input device and input channels match the one connected to the computer. Also, check the audio driver and sample rate settings under the device setup menu.

If you are facing issues with recording audio in Cubase, the problem may lie with the settings. To fix the issue, you need to check the Cubase settings and ensure that they are configured correctly. Here are a few things to check.

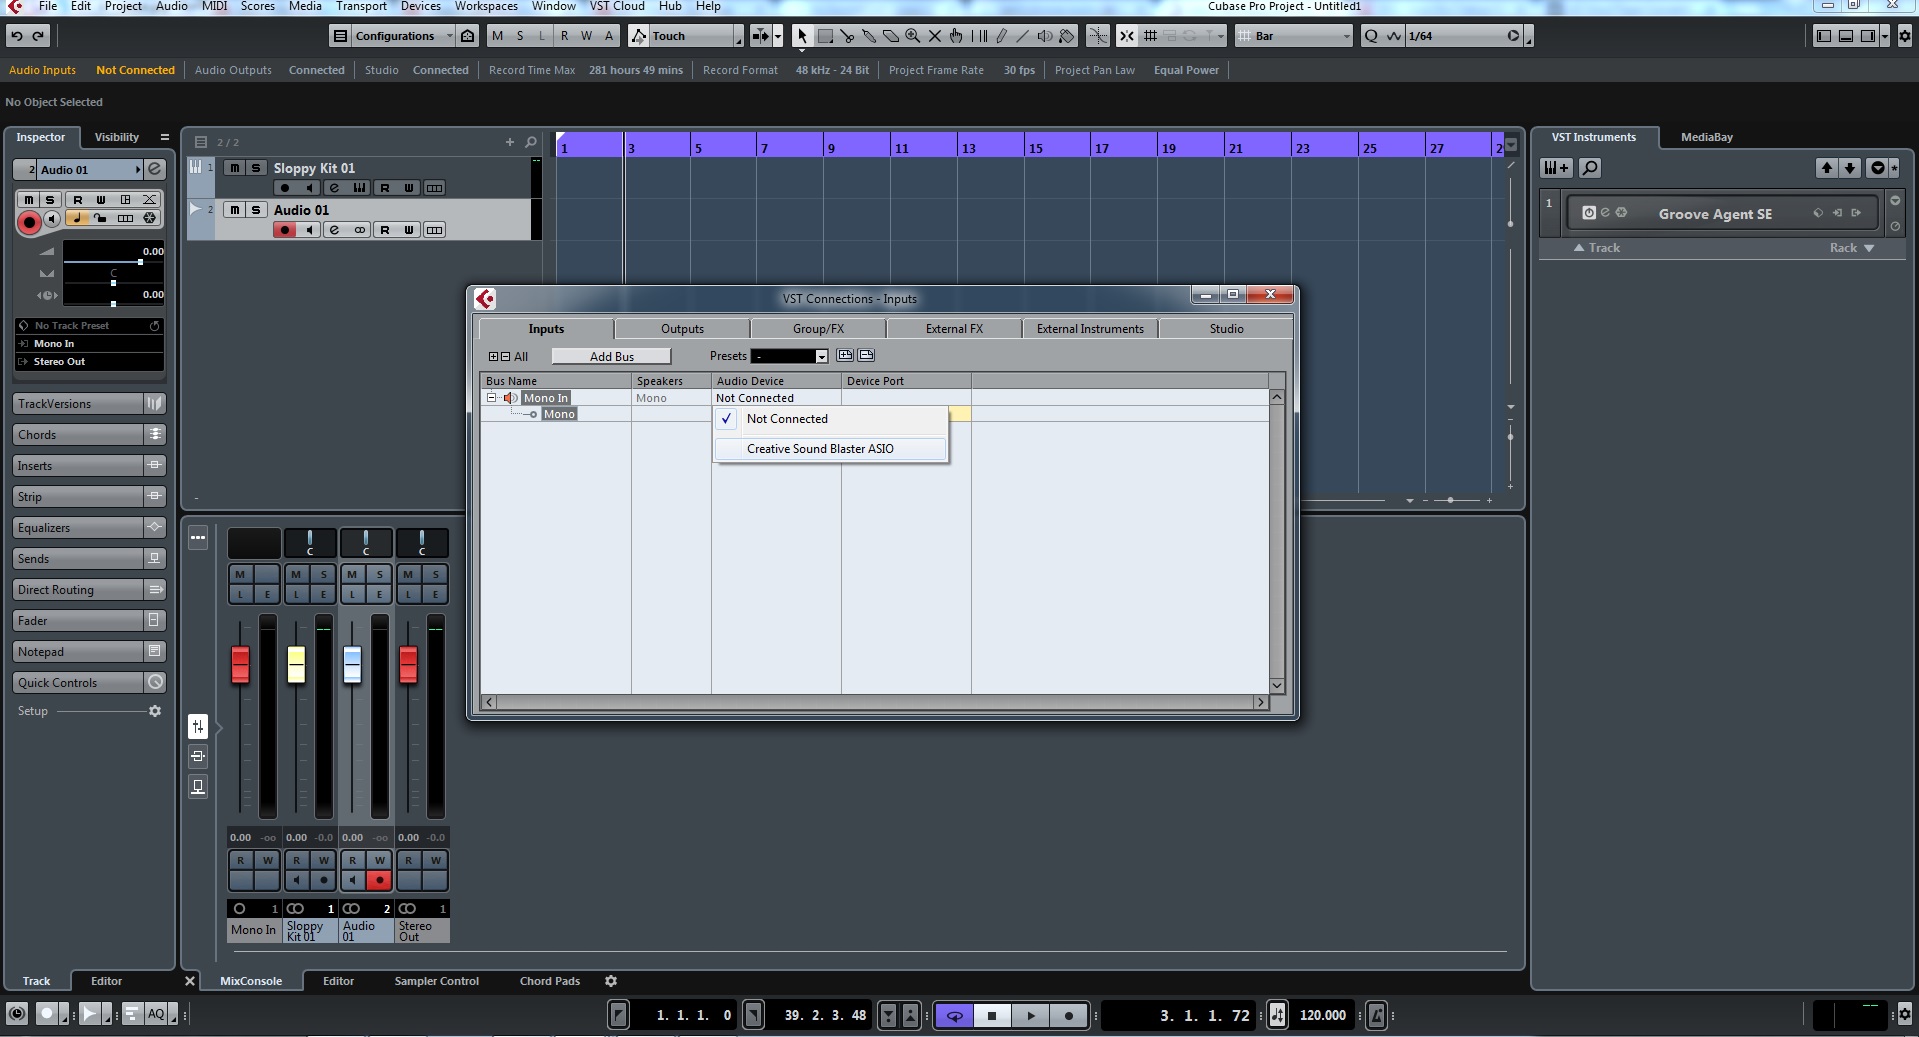
Check Audio Connections In Vst Connections

The VST Connections window is where Cubase manages all inputs and outputs. If your audio interface is not connected properly, you won’t be able to record any audio in Cubase. To fix this, open the VST Connections window and check if your audio inputs and outputs are configured correctly.

Check Input And Output Buses In Audio Connections

In the VST Connections window, you will also find Input and Output Buses. Each input and output bus must be correctly assigned to an audio interface, and audio channels must be activated for recording. If you are trying to record audio from an external device, such as a microphone or guitar, make sure that it is selected as the input source.

Check Sample Rate And Bit Depth

The sample rate and bit depth also play a critical role in recording audio in Cubase. Make sure that both are correctly set in Cubase and your audio interface. Using the wrong settings can result in distorted audio or no audio at all.

Restart Your Computer And Audio Interface

If all else fails, restarting your computer and audio interface may help. This simple fix can resolve any conflicts that may be causing Cubase not to record audio. By checking the Cubase settings, you can resolve most issues with recording audio in Cubase. Follow these steps, and you’ll be recording audio in no time.
Cubase Won'T Record Audio

Credit: forums.steinberg.net

Check Track Settings

If you are a fan of using Cubase for recording audio and you are experiencing an issue where Cubase won’t record audio, there could be various reasons why. However, one of the most common reasons for this issue is due to the incorrect settings on your track. Therefore, to resolve this problem, you should start by checking the track settings to ensure they are correctly configured.

Check Track Input Routing

The first thing you need to consider when checking your track settings is the input routing. You need to make sure that you have selected the appropriate input routing for your device. Cubase allows you to select from different input options like mono, stereo, and group channels. Therefore, if you have selected the wrong input option, your audio won’t get recorded. To check the input routing of your track, follow the steps below:

  1. Click on the track where you want to check the input routing.
  2. Open the mixer view by clicking on the mixer icon on the left-hand side of the screen.
  3. From the mixer view, locate the input routing selector, and ensure you have selected the right option for your device.

Check Track Monitoring

The second track setting you need to check is the monitoring settings. Monitoring allows you to hear the live input from your device. If you have not enabled the monitoring settings, you won’t be able to hear any sound when you are trying to record. To check the monitoring settings of your track, follow these steps:

  1. Click on the track where you want to check the monitoring settings.
  2. Locate the monitoring section and check if the monitor button is activated.
  3. If it’s not activated, click on it to enable monitoring.

By doing the above checks, you should be able to sort out any configuration issues with your track settings and start recording audio in Cubase.

Check Recording Settings

To troubleshoot Cubase not recording audio, make sure to check your recording settings. It’s possible that the input source or audio interface is not configured properly, which can prevent audio recording.

If Cubase won’t record audio, it’s essential to check the recording settings. The issue may arise if the settings are not configured correctly. You can begin by checking the record enable and arming the track for recording.

Check Record Enable

The first thing to do when you encounter recording problems is to check if the record enable button is activated for the track. The record enable button is akin to the record arm button on other DAWs, but this button is specific to Cubase. The record enable button must be active for the audio track you intend to record. To verify this, you can access the track via the Cubase mixer, then navigate to the track that is not recording. Next, locate the record enable button, which is usually found on the left-hand side of the mixer channel. If the button is not activated, click on it to enable it.

Check Arm Track For Recording

Another reason why Cubase may not be recording audio is if the track is not armed for recording. Arming a track for recording is a necessary step to ensure that audio can be recorded on that track. To arm a track for recording, click the “Arm for Record” button, which is typically located near the Track Visibility Settings. You can also arm a track by pressing the record enable button on your device controller. You can ensure that the track is recording by looking at the level meters next to the track. If you see a signal when making sound into the microphone, then the track is recording, and you’re good to go. In summary, when encountering issues with Cubase not recording audio, check if the recording settings are correctly configured. Ensure that the record enable button is activated, and the track is armed for recording. Following these steps will likely fix the problem.

Check Signal Flow

To troubleshoot Cubase not recording audio, it’s important to check signal flow. Make sure your microphone and audio interface are properly connected, and check that your input and output routing is correct in Cubase’s mixer. Double-check your settings and restart your computer if necessary.

If you are trying to record audio with Cubase and you are facing issues with no audio being recorded or recorded audio is silent or cuts out then the first step in troubleshooting should be to check the signal flow. Signal flow refers to the path of audio from your audio source all the way to Cubase for recording. It is essential to ensure that the audio signals are traveling in the right direction and connections are established properly.

Check Instrument Or Mic Cables

Check the cables that connect your musical instrument or microphone with the audio interface if the audio interface recognizes your instrument or microphone, but the sound is not being captured or is too low. Ensure that all cables are plugged in properly and no cables are obstructed or damaged. Ensure that the appropriate input is being used for your instrument or microphone type.

Check Audio Signal Chain

The audio signal chain from your instrument or microphone to Cubase is crucial, and a break in the chain may result in errors. Check your audio interface if it is correctly set up and responds appropriately. Ensure that all input and output levels are optimal, and that the correct input is being used on the audio interface. Check the routing of signals from the audio interface to Cubase. Ensure that the signal is routed to the correct channel and that the correct channel is selected for recording in Cubase. In summary, when dealing with Cubase issues, the most crucial first step is to check the audio signal flow. Check your cables, audio interface, and routing in Cubase, and you should be able to isolate any signal flow glitches and rectify the issue.

Check Cubase Version Compatibility

To ensure proper recording of audio on Cubase, always check compatibility with your software version. This step can help you avoid any technical issues that may arise from running an unsuitable version of the program.

Are you encountering issues with Cubase not recording audio? One possible cause could be an incompatibility with your system’s audio interface or Cubase version. Before delving into more complex solutions, it’s wise to first cross off compatibility issues.

Check If Audio Interface Is Compatible

The audio interface is the hardware that permits audio input and output from your computer. For Cubase to record audio, it needs to have access to the audio interface. If your audio interface isn’t compatible with your version of Cubase, this can be the root of the problem. Before checking if your Cubase version supports the audio interface, make sure you have the latest version of the audio interface drivers installed and properly configured.

Check If Cubase Version Is Supported

Another compatibility issue that can impact Cubase’s ability to record audio is whether your version of Cubase is supported. This can occur if you’re using an older version of Cubase with a more modern audio interface or vice versa. Confirm whether your version of Cubase is suitable for recording audio or if it requires additional updates or upgrades. Additionally, ensure your hardware and operating system meet the required specifications for your version of Cubase. In conclusion, Cubase not recording audio can be caused by a variety of reasons, starting with compatibility issues. Be sure to check if your audio interface is compatible and if your Cubase version is supported by reviewing the system specifications and updating drivers and software.

Check For Software Conflicts

To troubleshoot Cubase not recording audio, check for software conflicts in the system. Make sure there are no other audio software programs running at the same time. This can cause conflicts and prevent Cubase from recording audio.

When Cubase won’t record audio, it can be a frustrating experience. However, one of the reasons this error occurs is due to software conflicts. Check for software conflicts by following these simple steps.

Close Other Audio Applications

The first step is to ensure that any other audio applications are closed. If multiple audio applications are open simultaneously, they can cause conflicts and prevent Cubase from recording audio correctly. Close any audio applications that might be running in the background before you try to record audio in Cubase.

Check For Audio Plug-in Conflicts

The next step is to check for audio plug-in conflicts. Audio plug-ins can cause issues if they are not compatible with Cubase or if they conflict with other plug-ins in use. To resolve such conflicts, you need to check the plug-ins and see which one is causing the problem. One way to do this is to disable all third-party plug-ins in the “Plug-In Information” window. Once disabled, test to see if Cubase records audio correctly. If the problem persists, then try disabling any other VST instruments, effects, or MIDI devices that you’re not using. This can help isolate the issue and determine which plug-in is causing problems. In summary, when Cubase won’t record audio, it’s essential to check for software conflicts to get to the root of the problem. By closing other audio applications and checking for audio plug-in conflicts, you can ensure that Cubase works correctly and records your audio without any issues.
Cubase Won'T Record Audio

Credit: forums.steinberg.net

Frequently Asked Questions Of Cubase Won’t Record Audio

Why Can’t I Record In Cubase?

You may not be able to record in Cubase due to incorrect audio device settings, unavailable inputs or outputs, or incompatible driver updates. Check your audio settings and ensure that your device is properly connected and selected in Cubase’s device setup.

Additionally, update your audio drivers and try resetting your preferences if necessary.

Why Is Cubase Not Making Sound?

Cubase may not be making sound due to various reasons such as incorrect audio device settings, faulty cables or speakers, or audio driver issues. Check the device settings, connections, and update the audio drivers to resolve the issue.

Why Can’t I Hear Sound When I Record?

If you can’t hear sound when recording, check if your audio is properly plugged in, and your device isn’t muted. Ensure that the microphone is not obstructed and has sufficient battery life. Moreover, allow microphone access to your device and ensure that your recording software settings are correct.

How Do I Enable Recording In Cubase?

To enable recording in Cubase, follow these steps: 1. Open a new project in Cubase. 2. Go to “Devices” and select “Audio Device Settings”. 3. Ensure that your audio interface is selected. 4. Go to “Devices” again and select “VST Connections”.

5. Configure your input and output buses, then select a stereo or mono bus for recording.

Conclusion

Troubleshooting Cubase’s audio recording problems can be a daunting task, but it is not impossible to fix. With the proper knowledge and expertise, one can identify and solve the root cause of the issue. Whether it is a hardware or software issue, do not hesitate to seek technical support or consult online resources for more information.

By doing so, you can get back to making music without any interruptions.

Categories
Archive

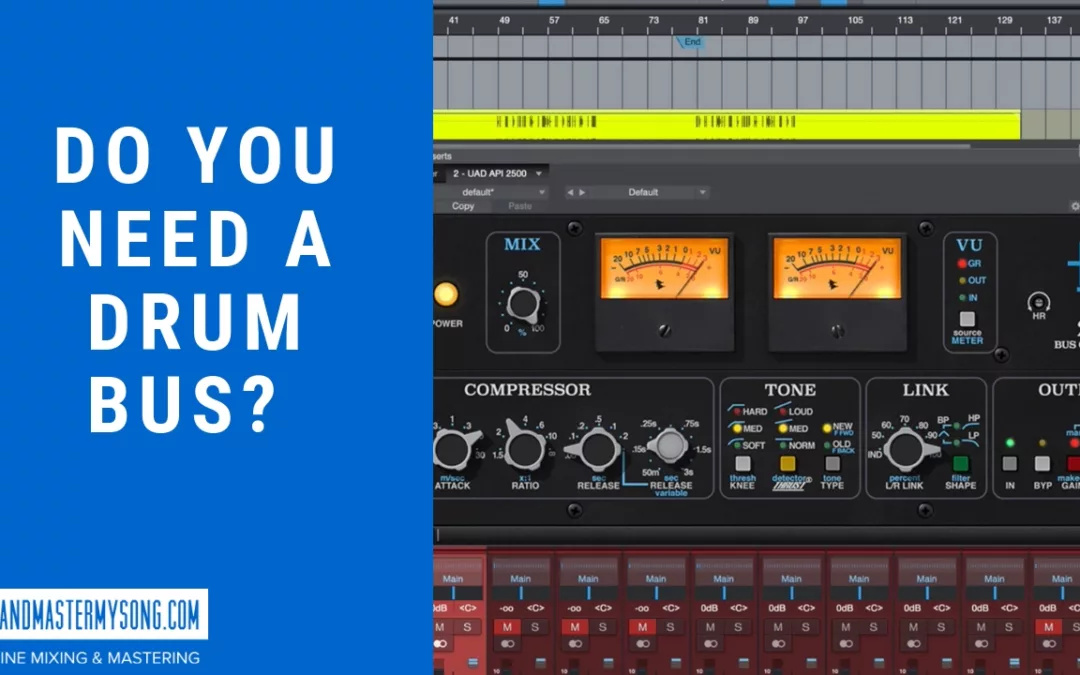
Do You Need A Drum Bus

Yes, a drum bus is essential for any music producers to create a cohesive mix. A drum bus is a crucial element in music production that allows music producers to enhance the overall sound of their drum tracks.

It’s a group channel where all the drum sounds are routed to so they can be processed as one unit. Also, the bus allows music producers to apply equalization, compression, and other effects to the drums more effectively. This helps to create a more cohesive mix, where all the drum sounds are working together rather than competing for space in the mix.

Related reading: Drum Recording and Programming Drums.

Moreover, without the group, the drum sounds’ individual processing will result in conflicting sounds, causing clashing in the mix. We’ll dive into why you need the group and how to set it up in your music production system.

Do You Need A Drum Bus

Credit: www.noizemusic.io

Benefits Of Using A Drum Bus

In addition, using the group can greatly benefit your mixing process, providing a cohesive sound that ties together all the drum elements. It is an essential tool for achieving a professional sound and can also help save valuable mixing time.

Using the group can help improve your drum sound significantly. The group is a technique where all the drum tracks in a mix are combined into a single track, allowing you to apply the same processing to all drums collectively. This process has several benefits, including improved clarity and punchinessbetter control over individual drum levelsease of processing.

Improved Clarity And Punchiness

One of the essential benefits of using the group is that it helps achieve better clarity and punchiness in your drum mix. By combining all the drum tracks into one, you can apply a compressor and EQ to all the drums collectively, eliminating inconsistencies in the mix. By doing so, you can make sure that none of the drums stand out too much or clash with each other.

Better Control Over Individual Drum Levels

With the group, you have better control over each drum’s levels. Instead of adjusting levels for each individual drum track, you can use the bus fader to adjust the levels of all the drums collectively. This allows for greater precision in mixing, ensuring that the drums sit well together in the mix.

Ease Of Processing

Another benefit of using the group is that it simplifies the processing chain. Instead of applying multiple plugins to each individual drum track, you can apply plugins to the group. This saves time, streamlines your workflow, and makes it easier to achieve a cohesive drum sound. Additionally, it allows for quicker adjustments to the drum sound, should the need arise. In conclusion, using the group can help achieve a more professional and polished drum sound. This technique provides better clarity and punchiness, better control over individual drum levels, and ease of processing. By utilizing the group, you can create a more cohesive and balanced drum mix that will enhance your overall sound.

When Should You Use A Drum Bus?

When it comes to mixing drums, the group is a powerful tool that can help glue all the individual drum tracks together and give your drums a more cohesive sound. It allows you to apply processing to all the drums at once, giving you more control over the overall drum sound. But when should you use the group? Here are a few scenarios:

Mixing Live Drums

If you’re working with a recording of live drums, the group can help you get a more natural sound by simulating how the drums were recorded together. This is especially useful if you’re dealing with multiple microphones on the kit. For example, if you have separate mics on the kick, snare, toms, and overheads, the group can help you balance the levels and apply processing to all the tracks at once.

Working With Virtual Drums

If you’re using virtual drum instruments in your music production, the group can help you make the drums sound more like they were played by a real drummer. By applying processing to all the drum tracks at once, you can create a more cohesive sound and add some character to the drums.

Creating Punchier Drum Sounds

If you want your drums to have more impact and punch, the group can help you achieve that. By applying compression, EQ, and other processing to all the drums at once, you can create a more unified and powerful sound. You can also use parallel processing techniques, such as parallel compression or distortion, to further enhance the impact of the drums.

In conclusion, the group can be a valuable tool in your mixing arsenal. Whether you’re working with live drums or virtual drums, or trying to create a punchier drum sound, the group can help you achieve your goals. So give it a try and see what kind of results you can get!

Setting Up A Drum Bus In Your Daw

Setting up the group in your DAW is essential to achieve a cohesive drum sound. It allows you to group all your drum tracks together and apply the same processing to them. Whether you are working on a project with live drums or using virtual instruments, the group can add depth and character to your mix.

If you’re looking to give your drums more presence and impact in your mix, setting up the group can be a great technique to achieve this. By routing multiple drum tracks to a single bus, you can apply processing to the drums as a whole, rather than on an individual track basis. In this article, we’ll guide you through how to create the group in your DAW, route your drum tracks to it, and add processing to it.

Creating A Bus Channel

Before you can set up the group, you need to create a new bus channel in your DAW. This is simply a new audio channel that acts as a bus, allowing multiple tracks to be routed to it. Different DAWs will have different ways of creating a bus channel, but the basics are the same. Here’s an example of how to create a new bus channel in Ableton Live:

  1. Right-click on an empty area in the mixer and select “Insert Audio Track”.
  2. Click on the “Audio To” drop-down menu on your drum tracks and select the new bus channel you just created.
  3. Play your drum tracks and make sure their audio is now routing through the new bus channel.

Routing Your Drum Tracks

Once you’ve set up your bus channel, you need to route your individual drum tracks to it. This will vary depending on your DAW, but the basic idea is the same. Here’s how to route your drum tracks to your newly created bus channel in Logic Pro X:

  • Click and hold on the output of a drum track in the mixer and drag it to your new bus channel.
  • Repeat this for all your drum tracks.
  • Play your drum tracks and make sure their audio is now routing through the new bus channel.

Adding Processing To The Bus

Now that you’ve set up your bus channel and routed your drum tracks to it, it’s time to apply processing to the bus. This is where you can really start to shape the overall sound of your drums. Here are a few examples of processing you might want to apply to your the group:

ProcessingExplanation
EQCut or boost specific frequencies to shape the overall sound.
CompressionEven out the dynamics of your drums and add sustain.
SaturationAdd warmth and character to your drums.
ReverbAdd a sense of space and depth to your drums.

By applying processing to your the group, you can really make your drums stand out in your mix. Experiment with different types of processing and find what works best for your particular drum sound. In conclusion, the group can be a powerful tool in your mixing arsenal. By combining multiple drum tracks into a single bus, you can apply processing that affects the overall sound of the drums, giving them more presence and impact in your mix. Follow these steps to create the group in your DAW, route your drum tracks to it, and add processing to it, and take your drum sound to the next level!

Do You Need A Drum Bus

Credit: mixandmastermysong.com

Tips For Using A Drum Bus

If you are struggling with getting your drums to sound tight and cohesive, using the group can be a great solution. It allows you to process all of your drum tracks collectively and apply EQ, compression, and other effects.

By doing this, you can achieve a more balanced and professional sound.

If you want to take your drum tracks to the next level, the group can be a powerful tool. This technique involves routing all of your individual drum tracks to a single bus track, allowing you to process them as a group. Here are some tips for getting the most out of your the group:

Using Parallel Compression

Parallel compression is a technique that involves mixing a heavily compressed version of your drums with the dry signal. This can help to bring out the quieter elements of your drum mix, while still maintaining the punch and impact of the original tracks. To use parallel compression on your the group, follow these steps:

  1. Create a new aux/auxiliary track
  2. Route all of your individual drum tracks to the new aux track
  3. Apply heavy compression to the aux track
  4. Blend the compressed and dry signals to taste

Using Eq To Enhance The Mix

EQ can be a powerful tool for shaping the sound of your the group. By cutting or boosting certain frequencies, you can create more clarity and separation between the different elements of your drum mix. Here are some tips for using EQ on your the group:

  • Cut any frequencies that clash with other elements in the mix (e.g. guitar, bass, vocals)
  • Boost the high-end for more sparkle and presence
  • Use a low-pass filter to roll off any unwanted high-end noise
  • Sculpt the midrange to highlight the most important elements of your drum mix (e.g. kick and snare)

Using Saturation Or Distortion For Character

If you want to add some extra character and warmth to your the group, consider using a saturation or distortion plugin. This can help to add some grit and texture to your sound, and can be particularly effective for genres like rock and metal. To use saturation or distortion on your the group, try these tips:

StepDescription
1Insert a saturation or distortion plugin onto your the group track
2Adjust the amount of saturation/distortion to taste
3Use the plugin’s EQ controls to shape the sound further

Overall, the group can be a powerful tool for enhancing the impact and clarity of your drum tracks. By using techniques like parallel compression, EQ, and saturation, you can achieve a more professional and polished sound for your mix.

Common Mistakes When Using A Drum Bus

When it comes to mixing drums, using the group is a popular technique to achieve a cohesive sound. However, not everyone uses it correctly, leading to common mistakes that can negatively impact the mix. In this blog post, we will discuss the most common mistakes when using the group and how to avoid them.

Overprocessing The Bus

One of the biggest mistakes when using the group is overprocessing it. It’s easy to get carried away with plugins, such as EQ and compression, and apply them heavily to the bus. But this can result in a muffled or distorted sound, which defeats the purpose of using the group in the first place.

Instead, start with minimal processing and make small adjustments until the mix sounds balanced. Use a light touch with EQ and compression, and remember that less is often more. You can always add more processing later if needed.

Neglecting Individual Drum Track Levels

Another common mistake when using a drum bus is neglecting the individual drum track levels. It’s essential to balance the levels of each drum track before sending them to the bus. If one drum track is too loud or soft, it will affect the overall sound of the drums.

Use a reference track or listen critically to each drum track to make sure they’re balanced. Adjust the levels accordingly, and then send them to the drum bus. This will ensure a coherent and punchy drum sound.

Not Balancing The Mix Properly

Finally, not balancing the mix properly can lead to a weak or unbalanced drum sound. It’s important to balance all elements of the mix, including vocals, guitar, bass, and drums. Neglecting one element can result in the other elements overpowering it.

Use panning, EQ, and volume faders to balance the mix. Pay attention to the drum bus’s level and adjust it until it fits perfectly with the rest of the mix. This will result in a well-balanced mix with a cohesive drum sound.

In conclusion, using a drum bus can be an effective technique for achieving a cohesive drum sound. However, it’s important to avoid common mistakes such as overprocessing the bus, neglecting individual drum track levels, and not balancing the mix properly. By following these guidelines, you can achieve a powerful and punchy drum sound in your mix.

Do You Need A Drum Bus

Credit: www.youtube.com

Frequently Asked Questions Of Do You Need A Drum Bus

What Is The Point Of A Drum Bus?

A drum bus allows you to group multiple tracks together and apply effects and processing to all of them simultaneously, resulting in a more cohesive and polished sound. It helps in enhancing the overall dynamics and tonality of the drums.

What Does Drum Buss Do In Ableton?

The drum buss in Ableton is a plugin that helps enhance and shape the sound of drum tracks. It adds warmth and punch, while also giving control over the individual elements of the drums for better mixing. It includes a variety of processing options such as compression, saturation, and transient shaping.

What Kind Of Compressor Do I Need For A Drum Bus?

For a drum bus, you’ll need a compressor that can handle fast transient peaks and has a fast attack/release time. A FET or VCA compressor would be a good choice. Look for a compressor with a high ratio and a low threshold.

This will prevent the drums from overpowering the rest of the mix.

Should I Put Reverb On Drum Bus?

Adding reverb to drum bus can enhance the overall sound and create a more cohesive mix. However, it depends on the type of music or the specific track. You should experiment with the amount of reverb and find the right balance that complements the drum and the rest of the instruments in the mix.

Conclusion

A drum bus can make a significant impact on your music production. Whether you are a professional or a bedroom producer, utilizing a drum bus can enhance the overall sound and energy of your drums. By adding depth, clarity, and punch to your mix, the drum bus can take your tracks to the next level.

Don’t underestimate the power of this tool and consider incorporating it into your workflow. Happy producing!

For more background, see Audio mixing (recorded music) on Wikipedia. You may also like our guide: Setting Up Drum Bus Guitar Bus Vocal Bus.

Categories
Archive

Finishing Your Recordings

To finish your recordings, start by organizing your files, editing out any mistakes, and applying the right mastering techniques. From there, use the right distribution channels to get your music heard by your target audience.

Music production is a challenging yet fulfilling endeavor, and one of the most critical stages is finishing your recordings. Whether you’re a seasoned producer or just starting, the final stages of producing music can be overwhelming, with numerous steps that require more attention than ever before.

You need to ensure that the sound quality is top-notch, the tracks are well-organized, and all the elements work well together without any flaws. Furthermore, the tracks need to be appropriately mastered, and you need to select the right distribution channels to share your music with your audience. We will provide you with some tips to finish your recordings professionally and get them out to the world.

Credit: learningandteaching.byui.edu

Choosing The Right Tools

Recording music is an art that requires skill, patience, and the right tools. If you want to create high-quality recordings that resonate with your audience, you need to choose the right tools. This includes selecting the right software, using high-quality monitors, and having the right audio equipment. In this article, we’ll explore some of the essential tools you need to finish your recordings and take your music to the next level.

Selecting The Right Software

The right software is essential when it comes to finishing your music recordings. It should be easy to use and have the features you need to create the sound you want. There are a variety of software options available, from free open-source programs to professional-grade software. Some popular options include:

Software NameDescription
AudacityA free, open-source audio editing software with basic editing functionalities suitable for beginners.
Adobe AuditionA professional-grade editing tool with advanced features for audio mixing, mastering and editing.
Pro ToolsA widely used audio production software, ideal for advanced audio professionals in music, film, and TV post-production.

It’s important to research and compare different software options and choose one that suits your needs and budget.

Importance Of High-quality Monitors

High-quality monitors are another crucial tool for finishing your recordings. They allow you to hear the subtle nuances and details in your music, which helps you to make better mixing and mastering decisions. Good monitors should have a flat frequency response to accurately represent the sounds in your recordings. Some popular monitor brands include:

  • Yamaha HS8
  • Adam Audio A7X
  • Genelec 8020D

It’s also recommendable to calibrate your studio monitors to your room. This will help to eliminate any acoustic issues and to ensure accurate sound reproduction. Tools like Sonarworks Reference4 can help you with monitor calibration.

By selecting the right software and using high-quality monitors, you can apply the final touches to your music recordings and bring out the best sound possible.

The Bottom Line

Choosing the right tools for finishing your recordings is essential for creating high-quality music that resonates with your audience. Invest in suitable software, high-quality monitors, and audio equipment to ensure your music sounds as good as possible.

Finishing Your Recordings

Credit: diymusician.cdbaby.com

Mastering Your Tracks

Mastering your tracks is an essential step in finishing your recordings. It involves fine-tuning the sound quality to achieve a professional result that will impress your listeners. With the right skills and tools, you can master your tracks and take your music to the next level.

Mastering is the final step to make your tracks sound polished and ready for release. It involves a series of processing techniques to balance the mix, enhance its tonal and dynamic characteristics, and adjust its loudness. In this post, we will discuss four essential mastering techniques – equalization, compression, limiting, and stereo widening – that can significantly improve the sound quality of your recordings.

Equalization

Equalization or EQ is the process of adjusting the frequency response of a mix or a track. It helps to enhance or reduce certain frequency ranges to achieve a balanced and pleasing tonal balance. EQ can be used to remove unwanted resonances or harshness, boost the clarity or warmth, or shape the tone of individual instruments or the entire mix. To use EQ effectively, start by listening to your mix and identifying the frequency ranges that need attention. Use a parametric or graphic EQ to adjust the gain or cut of those frequencies and monitor the changes in real-time. Avoid over EQ-ing as it can result in unnatural or phasey sounds.

Compression

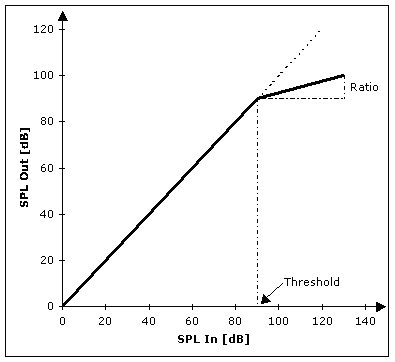
Compression is a dynamic processing technique that reduces the dynamic range of a mix or a track by attenuating the louder parts and boosting the quieter parts. It helps to bring out the details, control the peaks, and glue the mix together. Compression can also enhance the sustain and punch of individual instruments or the entire mix. To use compression effectively, start by setting the threshold, ratio, attack, release, and makeup gain according to the mix’s dynamic characteristics. Use a moderate ratio and attack time to avoid pumping or breathing artifacts. Avoid over compressing as it can result in a dull or lifeless sound.

Limiting

Limiting is a dynamic processing technique that prevents the mix or track from exceeding a certain maximum level. It helps to increase the perceived loudness while avoiding distortion or clipping. Limiting can also enhance the impact and presence of the mix or track. To use limiting effectively, start by setting the threshold and ratio according to the desired output level and the mix’s dynamic characteristics. Use a transparent limiter with a fast attack and release time to avoid distortion or pumping artifacts. Avoid over limiting as it can result in a compromised dynamic range or an unnatural sound.

Stereo Widening

Stereo Widening is a spatial processing technique that expands the stereo image of a mix or a track beyond its original width. It helps to create a sense of space, depth, and dimensionality in the mix and enhance the separation and clarity of individual instruments. Stereo widening can also make the mix more engaging and immersive. To use stereo widening effectively, start by listening to your mix and identifying the elements that need to be widened. Use a stereo imager or a mid-side processing tool to adjust the stereo width of those elements without affecting the mono compatibility or the phase coherence. Avoid over widening as it can result in a diffused or unnatural sound. In conclusion, mastering is a crucial step in the recording process that can make a significant difference in the sound quality of your tracks. By using the essential mastering techniques of equalization, compression, limiting, and stereo widening in a balanced and creative way, you can achieve a polished and professional sound that stands out from the crowd.

Exporting Your Recordings

After completing your recording, it’s important to export it in a usable format. Select your preferred export settings and save your recording to your desired location. With the right exporting process, your recording will be ready to be shared or edited for final touches.

After spending countless hours recording your music, the final step is to export your recordings. Exporting your recordings is a crucial part of the process because it determines the quality of your music’s sound when distributed to various platforms. In this section, we will discuss different technical aspects of exporting your recordings such as file formats, bit rates, naming conventions, and metadata, along with the preparation for distribution.

File Formats And Bit Rates

File format and bit rate are crucial considerations when exporting your recordings. The file format determines the type of audio file you will be exporting, whereas the bit rate represents the quality of the audio file. Generally, the higher the bit rate, the better the quality of your recording. However, higher bit rates also result in larger file sizes, which could take longer to upload and cause compatibility issues with some platforms. Here are a few popular audio file formats and their recommended bit rates:

Audio File FormatBit Rates (kbps)
MP3128-320
WAV1411 (CD-Quality)
FLAC500-1000 (Lossless)

Naming Conventions And Metadata

When exporting your recordings, it is important to maintain consistent naming conventions and add accurate metadata about your songs, including title, artist name, album name, and genre. Naming conventions are vital because they make it easier to organize and identify your recordings, whereas metadata provides important information about your recordings and helps improve your music’s discoverability. Here are a few tips for naming conventions and metadata that you should follow when exporting your recordings:

  • Use consistent naming conventions for tracks, such as “Track Number – Song Title – Artist Name”.
  • Include accurate metadata such as song title, artist name, album name, year of release, and genre.
  • Ensure that your metadata is standardized and consistent across all your recordings.
  • Use a reliable Tag Editor software to accurately add your Metadata

Preparing For Distribution

Before you distribute your music, take a few extra steps to ensure that your recordings are ready for distribution. Ensure that you have confirmed the right to distribute all the samples and instrumental samples you have used in the recording, agreed on with the artist name spelling with all features and have proper cover art. Here are a few steps you can take to ensure that you are ready for distribution:

  1. Preview your recordings to check for errors or potential quality issues.
  2. Confirm that you have obtained the necessary rights for any samples or instrumental tracks used in your music.
  3. Proper agreements with Artists that featured on your recording
  4. Create and upload your album art in the right dimensions and with relevant information.
  5. Identify and research different music streaming platforms available for distribution, and choose the one that best suits your needs.

In conclusion, exporting your music recordings in the right format and bitrate, maintaining proper naming conventions and metadata, and preparing for distribution are all vital steps to ensure that your music has the best possible chance of reaching your target audience. By following these steps carefully, you can make sure that your final music output is of high-quality standards and is ready for the world to hear.

Finishing Your Recordings

Credit: www.mixinglessons.com

Quality Control

To ensure the quality control of your recordings, it is important to finish them with a critical ear. Listen to each track and make adjustments to levels, EQ, and compression where necessary. Pay particular attention to the timing, pitching, and dynamics of your tracks to achieve a polished final product.

Once all the recording is done, the next step is ensuring the quality of the final product. Quality control is an important part of the recording process, ensuring that the recording is polished and error-free. Here are three key steps to quality control: listening for issues, fixing technical problems, and final checks.

Listening For Issues

The first step in quality control is listening to the final recording from start to finish. Pay close attention to any inconsistencies or mistakes that need to be addressed. Listen carefully for any audio distortion or background noise. Ensure that the volume levels are consistent throughout the recording.

Fixing Technical Problems

Once the technical issues are identified, it’s time to fix them. This step includes removing any distortion or background noise, ensuring the volume levels are level throughout the recording, and adjusting the overall EQ levels for better clarity.

Final Checks

Once the audio is polished and free of technical errors, it’s time to perform final checks. This includes checking the metadata of your project, ensuring that the title, artist name, and other details are correct. You should also confirm that the files are properly formatted for the desired output, such as mp3 or CD. Finally, have a listen to the final mix to ensure the highest-quality sound. To conclude, quality control is essential in the recording process, ensuring that the recording is flawless and professional. By following the three steps: listening for issues, fixing technical problems, and final checks, you can guarantee that your recording is of the highest quality.

Frequently Asked Questions Of Finishing Your Recordings

What Makes A Great Recording?

A great recording is defined by its clear sound quality, with minimal background noise or distortion. A great recording captures the authenticity and emotion of the performance, with balanced levels and harmonious tones throughout. It should also be well-mixed and mastered to ensure consistency across all devices and platforms.

Overall, a great recording relies on the technical ability of the recording engineer and the artistry of the performer.

How Do You Finish A Music Project?

To finish a music project, carefully plan your schedule, create a project plan, and stick to deadlines. Be open to changes and feedback during the creative process and know when to stop tweaking and let go. Finally, master the final mix and deliver the product on time.

What Are Some Common Mistakes To Avoid When Finishing Recordings?

Common mistakes to avoid when finishing your recordings include improper EQ, overcompression, using too much reverb or delay, poor timing/alignment issues, improper stereo image, and over-processing. It’s important to make sure your recordings sound balanced and cohesive before finishing them.

How Can I Improve The Overall Sound Quality Of My Recordings?

To improve the overall sound quality of your recordings, you can start by making sure you’re using high-quality equipment and microphones. Pay attention to your recording environment and try to minimize any unwanted noise or interference. Additionally, make sure to properly EQ each track to ensure a well-balanced mix.

Conclusion

Congratulations on completing your recordings! By implementing these tips and techniques, you can put the finishing touches on your tracks to create a polished and professional sound. Remember to prioritize sound quality, use your ears as your guide, and trust your instincts when it comes to processing and optimizing your recordings.

With a little dedication and attention to detail, you can produce exceptional recordings that will captivate and engage your audience. Happy recording!

Categories
Archive

Understanding Music Rights

Music rights refer to the legal ownership of a piece of music, granting exclusive rights to use and profit from it. Understanding music rights is crucial for those who use, create or distribute music.

Music rights are often confusing for musicians, producers and other music industry professionals. The music industry is incredibly complex, with several different rights holders who can all claim ownership of a single piece of music. This complexity can lead to legal battles and disputes over royalties, licensing and other issues.

Understanding music rights is essential for any artist, songwriter or label looking to monetize their work and protect their interests. We’ll explore the different types of music rights, who owns them, and how they can be managed and enforced.

Understanding Music Rights

Credit: www.linkedin.com

What Are Music Rights?

Music rights refer to the legal ownership and control of music, allowing musicians and songwriters to earn money from their work. Understanding music rights is crucial for protecting intellectual property and ensuring fair compensation in the music industry.

Definition

Music is one of the most important aspects of human culture. It is a form of expression that has the power to transcend language barriers and bring people together. However, with the widespread use of music in various mediums, there arises a need to protect the rights of those who create and own music. This is where music rights come into play. In simple terms, music rights are the legal rights that dictate who has the right to use, distribute, and profit from a piece of music. These rights can be owned by individuals, groups, or organizations, and they are designed to protect the intellectual property of the creator of the music.

Importance

Understanding music rights is crucial for anyone involved in the music industry. Whether you are an artist, a songwriter, a producer, or a music label, knowing your rights and how to protect them is essential for the success and longevity of your career. Music rights protect the creators and owners of music from unauthorized use, reproduction, and distribution. They ensure that the rightful owners of the music receive fair compensation for their work, and that their work is not exploited for someone else’s gain. Moreover, having a clear understanding of music rights also helps in preventing legal disputes and protects the integrity of the music industry as a whole. In conclusion, music rights are an essential part of the music industry, and understanding them is crucial for anyone involved in creating or distributing music. By protecting the intellectual property of those who create and own music, we ensure that the music industry remains fair and equitable for everyone involved.

Types Of Music Rights

Music rights are various types of legal ownership and protections for the creation and distribution of music. These include copyright, mechanical, synchronization, and performance rights. Understanding music rights is essential for anyone involved in the music industry.

Understanding music rights is crucial in the music industry, as it can determine the success of an artist’s career. Music rights refer to the legal rights an artist has over their original music compositions. There are three types of music rights that an artist needs to understand, and they include performance, mechanical, and synchronization rights.

Performance Rights

Performance rights refer to the legal rights an artist has when their music is played or performed publicly. This includes live performances, radio airplay, and streaming services. The artist is entitled to receive royalties for their music’s public performance, and these royalties are collected by performance rights organizations such as ASCAP, BMI, and SESAC.

Mechanical Rights

Mechanical rights refer to the legal rights an artist has when their original music is reproduced or distributed. This includes physical copies such as CDs and vinyl records, as well as digital downloads and streaming services. A mechanical license is required to use an artist’s music, and the artist is entitled to receive royalties for the use of their music.

Synchronization Rights

Synchronization rights refer to the legal rights an artist has when their music is used in audiovisual productions such as television shows, movies, and advertisements. A synchronization license is required to use an artist’s music in these productions, and the artist is entitled to receive royalties for its use. In conclusion, understanding the types of music rights is crucial for an artist’s success in the music industry. By knowing their rights, artists can ensure they receive the appropriate compensation for their original music compositions.

Who Owns Music Rights?

Music rights are owned by the individuals who created the music, such as composers, lyricists, and recording artists. These rights typically include the right to perform and receive payment for the use of their music in various formats such as streaming, download, and physical sales.

Understanding music rights is essential for both creators and users of music.

Understanding music rights is crucial for anyone involved in the music industry. From songwriters and composers to record labels and publishers, each stakeholder has a specific role to play when it comes to owning and monetizing music. In this section, we will discuss who owns Music Rights and their respective roles.

Songwriters And Composers

As the creators of musical compositions and lyrics, songwriters and composers hold the original copyright to their works. This means they have exclusive rights to reproduce, distribute, and perform their music. However, to receive royalties for their works, songwriters and composers need to be affiliated with a Performing Rights Organization (PRO). A PRO is a membership-based organization that collects and distributes royalties to its members for the use of their music.

Publishers

Publishers act as a liaison between songwriters and composers and the music industry. They promote and license the works of their clients to artists and record labels. Publishers also collect and distribute royalties on behalf of songwriters and composers. In return, they take a percentage of the revenue generated from the music.

Record Labels

Record labels are responsible for the production and distribution of music recordings. They sign and promote artists, and support them in making and releasing music. Record labels also negotiate with streaming services and radio stations to ensure that their music is played and listened to by audiences. In exchange, the record label takes a percentage of the revenue generated from the sales and streaming of the music. In conclusion, understanding music rights is key to success in the music industry. Songwriters and composers, publishers, and record labels all play an essential role in owning and monetizing music. By working together, they can ensure that music is produced, promoted, and enjoyed by audiences around the world.

Understanding Music Rights

Credit: www.rabbeats.com

How Are Music Rights Licensed?

Music rights are owned by the creator or their publishing company. In order to legally use a piece of music, a license must be obtained from the copyright holder. The licensing process varies depending on the type of use, such as in a film or on a streaming service.

Music rights licensing is the process by which the owner of a copyrighted song grants permission for others to use the song in exchange for payment. Music licensing can be a complicated process, and it is essential that artists and anyone using music in their work understand the different types of licenses available and how they work.

Overview Of Licensing

There are several types of music licenses that can be obtained, depending on the nature of the use. In general, music licenses fall into two categories: synchronization licenses and mechanical licenses. A synchronization license is required if you want to use a song in conjunction with video or film footage. This type of license gives you the right to use the music in your video production. A mechanical license, on the other hand, is required if you want to reproduce a song in an audio-only format, such as a CD or digital download.

Types Of Licenses

There are different types of music licenses, and it’s important to choose the right one based on the intended use of the music. Some of the types of licenses include:

  • Public performance rights: This license is required if you want to play a song in public, such as in a restaurant, store, or on the radio.
  • Master use license: This license gives you the right to use a specific recording of a song.
  • Compulsory mechanical license: If you want to release a cover version of a song, you can obtain a compulsory mechanical license. This license is a set fee that allows you to legally reproduce the song.
  • Print rights: If you want to print sheet music or lyrics to a song, you will need to obtain a print rights license.

Conclusion

Understanding music rights is crucial, especially in the era of online content creation where music plays a significant role. By having the right license, you can avoid legal issues, and the rightful owner of the song receives compensation for the use of their music. With the knowledge of different types of licenses, choosing the right one will become easy.

Issues And Controversies Related To Music Rights

Understanding music rights can be a complex topic with various issues and controversies arising, including disputes over copyright and royalty payments. It is important for individuals and businesses in the music industry to stay informed and up-to-date on these matters to ensure the fair treatment of all involved parties.

Music rights have been a topic of discussion and debate for decades. With the emergence of digital technology, the issues and controversies have increased manifold. This article will shed light on the major issues and controversies related to music rights that are affecting the music industry in today’s world.

Copyright Infringement

One of the major issues that artists and musicians face today is copyright infringement. With the rise of the internet and music-sharing platforms, it has become relatively easy for people to share and access music. Unfortunately, this has also led to a rise in piracy and the unauthorized use of copyrighted music. This not only hurts the artist financially but also undermines their creative efforts. To prevent copyright infringement, many artists are now resorting to using digital watermarks and other technological solutions to protect their music.

Streaming And Digital Revenue

Another issue that has emerged in recent years is the low revenue generated from digital streaming services such as Spotify and Apple Music. While these platforms have made it easier for people to access music, they have also significantly reduced the amount of money that musicians can earn from their music. This has led to an ongoing debate over fair compensation for artists and whether the existing revenue-sharing models are adequate. Some artists are now trying to bypass these platforms and connect directly with their fans through platforms like Patreon and Bandcamp.

In Conclusion

In summary, music rights issues and controversies are complex and multi-faceted. Copyright infringement and revenue generation are just two of the many issues that artists and musicians face today. It is important to have a deeper understanding of these issues and to work towards building a fair and sustainable music industry that benefits both artists and consumers.

Understanding Music Rights

Credit: www.waterandmusic.com

Recent Developments In Music Rights

Recent developments in music rights have brought about an increased focus on understanding the complex world of music licensing and ownership. With the rise of digital streaming platforms and the ongoing debate over fair compensation for artists, it is more important than ever to have a clear understanding of music rights and the legal frameworks that govern them.

Music rights refer to the legal ownership of musical content, which includes sound recordings, lyrics, and compositions. In recent years, there have been significant developments in music rights brought about by advances in technology. These advancements have not only impacted the way music is created, produced, and distributed but also how artists are compensated for their work. In this blog, we will discuss two of the most crucial recent developments in music rights: The Music Modernization Act (MMA) and the impact of technology on music rights.

Music Modernization Act

The MMA was signed into law in October 2018 with the aim of improving music rights management. The act made significant changes to the way that mechanical royalties, which are paid to songwriters and publishers for the use of their music, are determined. Under the MMA, the process of obtaining licenses for music rights has been streamlined, making it easier for digital service providers to obtain the necessary rights to stream music online. Another important provision of the MMA is the creation of the Mechanical Licensing Collective (MLC), a non-profit organization responsible for administering mechanical licenses for streaming services. The MLC also manages the distribution of mechanical royalties to songwriters and publishers, ensuring that they are paid accurately and on time.

Impact Of Technology

With the increasing use of technology in the music industry, the traditional methods of music rights management have been disrupted. The emergence of streaming services, social media platforms, and digital downloads has made it necessary for music rights holders to adapt quickly to these changes. The rise of user-generated content has also created new challenges for music rights management, as it can be challenging to identify and track the use of copyrighted material on these platforms. However, technology has also made it easier for music artists to connect with their fans and promote their work. Social media platforms such as Instagram and TikTok have become essential tools for artists to reach wider audiences and create new revenue streams. At the same time, technology has also enabled music rights holders to track how their music is being used and identify cases of infringement. In conclusion, recent developments in music rights have created both opportunities and challenges for the music industry. While advancements in technology have made it easier for music artists to promote their work and reach new audiences, it has also necessitated a new approach to music rights management. The Music Modernization Act and the emergence of new technologies are just two examples of the ongoing evolution of music rights management.

Future Of Music Rights

Music rights are a complex issue that requires a deeper understanding from creators, publishers, and platforms. As the industry advances, it is important to maintain a clear distinction between performance, mechanical, and sync rights to ensure fair distribution of royalties.

Understanding music rights has become increasingly important in today’s digital age where music can be accessed and utilized in various ways. With the evolution of technology and the rise of different platforms, there has been a significant shift in the way artists and the music industry as a whole are compensated for their work. In this blog post, we will be discussing the future of music rights and how emerging technologies and new business models are changing the industry.

Impact Of Ai And Blockchain

Artificial Intelligence (AI) and Blockchain technology have been making waves in the music industry with their potential to improve the way music rights are managed. AI-powered systems can help identify and track music usage across different platforms, making it easier for artists to be compensated for their work. On the other hand, Blockchain technology offers a decentralized, secure, and transparent system that allows for fair compensation and tracking of music rights. Some companies have already started using these technologies. For instance, a music streaming service could use AI-powered systems to identify which songs are being played the most and then distribute the royalties accordingly. Similarly, Blockchain could be used to create a smart contract that would ensure that artists are paid promptly and transparently for their creative work.

Emerging Business Models

The music industry is also seeing the emergence of new business models that are focused on creating a fairer and more sustainable industry for artists. One example is the rise of the sharing economy, where artists can monetize their creative talents by offering music services like sample packs, loops, and instrumentals on platforms like Splice and Beatstars. These platforms allow artists to retain ownership of their work and receive a percentage of the revenue generated when their music is used. Another emerging business model is the use of crowdfunding platforms. These platforms allow artists to raise funds from fans to create new music or finance their tours. Crowdfunding has given artists more flexibility, control, and autonomy in how they fund their careers. In conclusion, the future of music rights looks promising with the emergence of new technologies and business models that prioritize fairness, transparency, and sustainability. The music industry is a dynamic and ever-evolving field, and it’s important that we continue to understand and adapt to the changes happening within it.

Frequently Asked Questions On Understanding Music Rights

How Does Music Rights Work?

Music rights refer to the legal ownership and control of music compositions and recordings. These rights include the right to reproduce, distribute, perform, and make derivative works of the music. They are typically owned by the songwriter, composer, or recording artist and are managed through organizations like ASCAP, BMI, and SESAC.

Licensing is required to use music in various settings and for different purposes, such as in films, TV shows, and commercials.

What Are The 4 Types Of Music Royalties?

The 4 types of music royalties are mechanical, performance, synchronization, and print. Mechanical royalties are paid for the reproduction of a song on an album or single. Performance royalties are paid for live performances or radio airplay. Synchronization royalties are paid for music used in TV shows and movies, while print royalties are paid for sheet music sales.

What Does Owning The Rights To Music Mean?

Owning the rights to music means having exclusive control over the use of that music. This includes the ability to sell, distribute, and use the music in various ways. It also means that others cannot use the music without permission or payment.

What Are The Copyright Rules For Music?

Copyright rules for music protect the original creator’s work from being played, distributed, or used without their permission. Music copyright laws apply to both the composition and the sound recording and usually last for the artist’s lifetime plus 70 years.

It is illegal to use copyrighted music without proper licensing or permission.

Conclusion

As a music creator, understanding music rights is crucial. It is essential to know the types of music rights available and the proper way to monetize your work. Copyright infringement is detrimental to your creative business. Therefore, it is essential to be knowledgeable about music rights and how to protect them legally.

By following the above practices, you can improve your music career, avoid legal issues, and ensure that you get appropriate rewards for your efforts. Stay informed about music rights and keep creating!

Categories
Archive

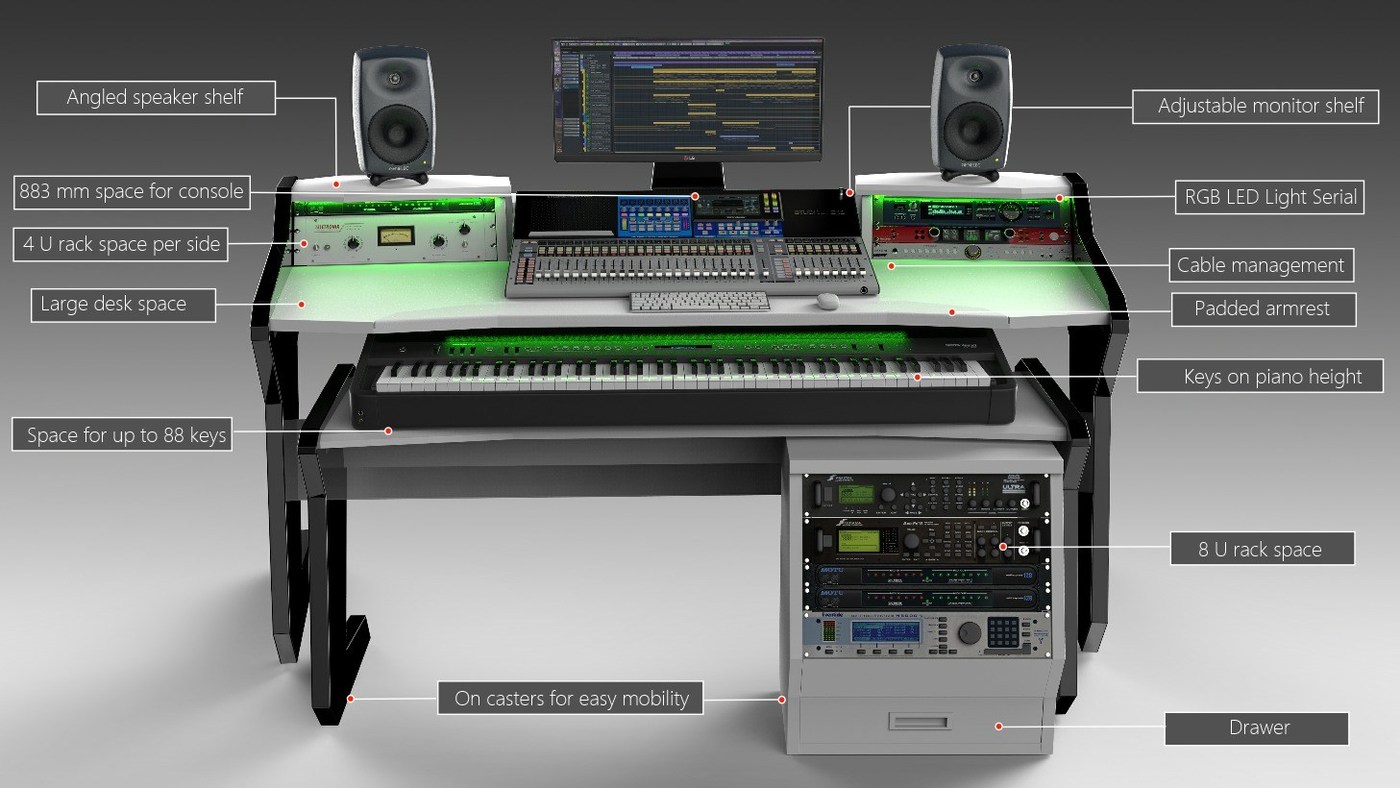
Studiodesk Music Commander

The Studiodesk Music Commander is an all-in-one music production and mixing workstation. It features a motorized desk that can be adjusted for height and angle, as well as built-in monitors, a mixer, and dozens of inputs and outputs for attaching external instruments and equipment.

For musicians and producers looking to streamline their workflow and consolidate their gear, the Music Commander offers an attractive all-in-one solution. With its adjustable desk and built-in equipment, it offers a professional-grade setup that can be adapted to fit different working styles and preferences.

Additionally, its numerous inputs and outputs make it easy to incorporate outside gear, from synthesizers and drum machines to outboard effects processors and more. Whether you’re a seasoned pro or just starting out, the Music Commander is a versatile and powerful tool that can help you take your music production to the next level.

Studiodesk Music Commander

Credit: www.studiodesk.net

Design And Features

Studiodesk Music Commander offers a sleek design and premium features that cater to the needs of modern musicians. With its integrated audio interface and ergonomic layout, the Music Commander provides a comfortable workspace tailored to music production.

Studiodesk Music Commander is an epitome of a perfect workstation as it offers a sleek and modern design coupled with features that cater to the needs of professional music producers and sound engineers. Let’s dive into some of the key features of this workstation.

Sleek And Modern Design

The Music Commander boasts a sleek and modern design that seamlessly blends with any studio environment. The workstation is available in two color options: Black and White. The minimalistic design language of the desk is highlighted by the powder-coated aluminum frame, which is not only robust but also adds a premium feel to the workstation.

Multiple Monitor Support

The Music Commander is designed to support multiple monitors, allowing users to work on multiple projects simultaneously. The desk offers enough space to accommodate up to three 27-inch monitors, providing producers with an immersive workspace. The monitors can either be mounted on the provided monitor arms or placed on the desk itself.

Ample Desk Space

The Music Commander offers ample desk space, providing users with an uncluttered workspace essential for productivity. The desk is 63 inches wide and 30 inches deep, which is enough to accommodate a full-size keyboard, mouse, and other necessary equipment. The desk also features elevated speaker stands, which are designed to isolate the sound and prevent any unwanted vibrations.

Built-in Cable Management System

The Music Commander comes equipped with a built-in cable management system that keeps all cables and wires organized and out of sight. The desk features a cable tray that runs along the rear end of the desk, allowing users to stash all the cables in one place, thus avoiding clutter and making maintenance a breeze.

Adjustable Height

The Music Commander offers adjustable height, allowing users to set the desk at their preferred working height. The desk can be set between 28 and 45 inches, making it suitable for any individual, irrespective of their height. The height can be adjusted using the electric motor present on the desk, which is both silent and efficient. In summary, the Music Commander is a top-of-the-line workstation designed for professional music producers and sound engineers who need ample space, organization, and multiple monitoring solutions. From the sleek and modern design to the adjustable height, this desk is a must-have for anyone serious about music production.

Studiodesk Music Commander

Credit: www.pinterest.com

Functionality

One of the most significant considerations when choosing a workspace for music production and audio mixing is the functionality. The Studiodesk Music Commander is a dream come true for sound engineers, producers, and music composers due to its exceptional functionality.

Integrated Audio Interface

The Music Commander is designed to cater to all the needs of a modern recording studio. It boasts a high-quality audio interface, which enables users to achieve crystal-clear recordings and mixes. With the integrated 24-bit/96kHz studio-quality audio I/O, this desk ensures that your recording and mixing sessions sound as professional as possible.

Touchscreen Control Surface

What’s more, the Music Commander’s touchscreen control surface adds a new dimension of control and convenience that is unmatched by any other workstation. It enables you to adjust volume, pan, EQ, and automation parameters with ease. The touchscreen display is easy to navigate, responsive, and customizable, making it a pleasure to use.

Flexible Workflow Setup

The Music Commander workstation supports versatile workflow setups, providing you with the flexibility to use a variety of studio equipment. You can add audio plugins, outboard gear, and other hardware to either the built-in rack or the desktop. This setup allows for a more streamlined workflow, saving you time and effort.

Versatile Connectivity Options

The desk’s versatile connectivity options make it easy to connect to a range of external devices like MIDI controllers, synths, and other digital audio workstations (DAWs). With USB, Thunderbolt, and Ethernet ports, you can connect to numerous devices easily.

Performance

When it comes to music production, having the right tools is essential. That’s why Studiodesk has designed the Music Commander to provide musicians and producers with a system that delivers exceptional performance.

Custom Audio Systems

The Music Commander comes equipped with custom audio systems that are designed to deliver the most accurate and detailed sound. These systems have been optimized to enhance all aspects of music production, including mixing, editing, and mastering.

The built-in audio systems feature high-quality studio-grade components that ensure you get the most out of your audio recordings. Whether you’re a seasoned professional or a budding musician, the custom audio systems of the Music Commander are sure to meet your needs.

Pro-quality Monitoring

One of the standout features of the Music Commander is its pro-quality monitoring system. This system is designed to provide accurate and detailed sound so that you can hear every nuance of your music. The monitors are also optimized for precision, so you can be sure that your mix is balanced and ready for mastering.

The monitoring system also allows you to adjust your sound to suit your preferences. Whether you want a flat, neutral sound or something with a bit more bass or treble, the Music Commander has you covered.

Effortless Workflow

The Music Commander is designed with the workflow of musicians and producers in mind. The system is easy to use, with an intuitive interface that allows you to quickly access the tools you need. Whether you’re recording, editing, or mixing, the Music Commander streamlines the process, so you can focus on your music.

The Music Commander also comes with a range of features that make music production a breeze. For example, the system includes a built-in MIDI controller that lets you control your music software without having to use a separate device. It also features an ergonomic design that reduces fatigue during long recording sessions.

Price And Value

Price and Value:

If you are a musician or a music producer, having the right studio equipment is essential to create high-quality sound productions. Spending money on high-end equipment can be daunting, especially when you are starting. Getting the best product at an affordable price is always a top priority, and Studiodesk understands this concern.

Competitive Price:

Studiodesk Music Commander is a top-of-the-line product that offers high-end features at an affordable price. At $4,299, the Studiodesk Music Commander costs much less than other competitor brands. Despite the lower price, it still offers top-quality performance, making it an excellent investment for any musician or music producer.

High-end Features:

Not only does the Studiodesk Music Commander offer an affordable price, but it also offers high-end features. Its features make it the ideal choice if you want a workstation with all the essential tools required for music production, from recording, mixing, to mastering. Studiodesk Music Commander offers an extensive range of workspace functions, motorized desk height adjustment, modular input/output design, integrated speakers, and much more, making it an all-in-one solution for all your music production requirements.

Long-term Investment:

Investing in a Studiodesk Music Commander is a long-term investment. The product is built with high-quality materials and is designed to last for years with its durable, sturdy design. The product is designed for music producers of all levels of expertise, from beginners to professionals, making this product a must-have. Additionally, it has a modular design, which means you can easily upgrade and change the parts as you wish, making it a long-term investment that grows with you and offers endless music production opportunities.

Studiodesk Music Commander

Credit: ar.pinterest.com

Frequently Asked Questions Of Studiodesk Music Commander

What Is The Studiodesk Music Commander?

The Studiodesk Music Commander is a professional desk specifically designed for musicians and producers. It features a built-in 12U rack to hold all your gear and a cable management system to keep your wires tidy. The desk also has a keyboard tray and plenty of surface space for monitors, speakers, and controllers.

Is The Studiodesk Music Commander Worth The Investment?

Yes, the Studiodesk Music Commander is worth the investment for serious musicians and producers. It offers a comfortable and ergonomic workspace while also providing ample storage and organization for your gear. The desk is built to last with high-quality materials and craftsmanship.

How Does The Studiodesk Music Commander Compare To Other Studio Desks?

The Studiodesk Music Commander stands out from other studio desks due to its unique design and features. The built-in 12U rack and cable management system make it easy to keep your gear organized and accessible, while the keyboard tray and surface space provide a comfortable and practical workspace.

The desk is also made from high-quality materials and has a sleek, modern design.

Can The Studiodesk Music Commander Be Customized?

Yes, the Studiodesk Music Commander can be customized to fit your specific needs. The desk comes in a variety of finishes and sizes to match your aesthetic and space requirements. You can also add optional accessories such as monitor arms, speaker stands, and extra rack units to customize your workspace further.

Conclusion

The Studiodesk Music Commander is a game-changer for music producers and enthusiasts. Its ergonomic design and advanced features provide comfort, functionality, and convenience, allowing for a seamless music-making experience. With its innovative technology and superb craftsmanship, the Music Commander is the perfect choice for those who demand high-quality gear.

Investing in a Music Commander is a wise decision that you will never regret. Experience the difference for yourself and elevate your music production to the next level.

Categories
Archive

Dynamic Range Processors

Dynamic range processors are tools used to control the audio signal’s dynamic range. They help even out the loud and soft parts.

Dynamic range processors, also known as compressors and limiters, are valuable tools in music production and live sound reinforcement. They are used to balance the level of sound by reducing the dynamics, which is the difference between the loudest and softest sounds.

By doing so, they help produce a consistent and balanced sound, allowing the listener to hear all the details without being overwhelmed by loud sounds or missing out on softer sounds. This article will explore what dynamic range processors do, how they work, and their various types. It will also discuss their applications, advantages, and limitations.

Dynamic Range Processors

Credit: www.mixinglessons.com

Types Of Dynamic Range Processors

Dynamic range processors are essential tools in audio production that help smooth out the loudness variations in a recording. There are several types of dynamic range processors, including compressors, limiters, expanders, and gates, each with specific functions that aid in achieving a balanced and polished final sound.

Dynamic range processors are an essential tool in any sound engineer’s arsenal. They help create a more polished and balanced sound by controlling the volume of individual sounds or tracks in a recording. There are four main types of dynamic range processors: compressors, limiters, expanders, and noise gates. Each type has its unique characteristics and applications.

Compressors

Compressors are used to reduce the dynamic range of audio signals by attenuating high levels of volume. They work by decreasing the volume of sounds that exceed a predetermined threshold. This results in a more consistent and controlled sound. Compressors are commonly used in music production and live sound applications to help vocals and instruments sit better in a mix.

Limiters

Limiters are similar to compressors but are used to prevent signals from exceeding a certain level. They work by setting a threshold above which sound cannot go. Once the limit is reached, the limiter attenuates the sound. Limiters are often used in mastering to prevent clipping and distortion in a final mix.

Expanders

Expanders work in the opposite way to compressors. They increase the dynamic range of an audio signal by attenuating sounds below a certain threshold. This can help bring out quieter elements in a mix. Expanders are especially useful in speech applications, as they can help reduce background noise.

Noise Gates

Noise gates are used to eliminate unwanted background noise by cutting off the audio signal below a certain threshold. This can help create a cleaner and more focused sound. Noise gates are often used on live microphones to reduce unwanted audience noise or in music production to eliminate unwanted hum or hiss. In conclusion, understanding the different types of dynamic range processors is crucial in creating a polished and balanced sound in audio recordings. Each type has its unique features and applications, and choosing the right type for a particular situation is essential for producing high-quality audio.

Applications Of Dynamic Range Processors

Dynamic range processors are essential tools used in various audio applications, owing to their ability to control the range between the loudest and quietest sounds in a piece of audio. They do this by compressing or limiting the dynamic range of the audio, resulting in a more balanced sound. Here are some applications of dynamic range processors:

Broadcasting

Dynamic range processors are widely used in broadcasting to control the range between the peak and average loudness levels. They ensure that the audio output is consistent and within acceptable levels, without any sudden spikes or dips in volume that can be detrimental to the listener’s experience. The goal is to keep the loudness levels within a specific range, irrespective of the content.

Studio Recording

Dynamic range processors are used extensively in studio recording to shape the sound of a recording by controlling the dynamics of each individual track. They help in reducing any background noise or static, balancing the levels between the different tracks, enhancing the final product, and making it sound polished and professional. They can be used during both the recording and mixing stages, giving great versatility to music producers and engineers.

Live Sound Reinforcement

Dynamic range processors are also employed in live sound reinforcement systems to ensure that the audio output is clear and articulate. Live sound reinforcement engineers use dynamic range processors to control the sound levels and avoid feedback, particularly when there are multiple microphones and loudspeakers in use. This helps provide an incredible listening experience for attendees.

Music Production

Dynamic range processors are also used in music production, where the goal is to create a high-quality sound with minimal leveling and distortion. They are utilized to control and shape the dynamics of the audio soundscape, producing the desired audio effect. They make it possible to create the desired sound that is expected by the listener.

Factors To Consider When Choosing A Dynamic Range Processor

Dynamic range processors are essential audio tools that help with controlling the levels and dynamics of audio recordings. With numerous options available, selecting the right dynamic range processor can be quite challenging. Here are some crucial factors to consider when selecting the best dynamic range processor for your audio needs.

Threshold

The threshold is a crucial aspect of the dynamic range processor that determines when the compressor kicks in. Finding the right threshold setting is critical to achieving the right compression amount and retaining the natural sound of the audio. A lower threshold results in more compression, while a higher threshold setting produces less compression.

Ratio

The compression ratio is the amount of gain reduction applied to the audio. Understanding ratios is crucial because it enables you to control how much compression the processor applies. Higher ratios result in more compression, while lower ratios result in less compression.

Attack And Release Times

The attack and release times affect how quickly the compressor applies gain reduction and how quickly it stops when the audio drops below the threshold. Faster attack times help with controlling transients, while slower release times enable the audio to recover naturally without sounding artificial.

Knee

The knee is another vital aspect of dynamic range processing that determines how the processor kicks in when the audio crosses the threshold. Hard knee settings result in the compressor applying gain reduction immediately, while with soft knee settings, the compressor kicks in gradually.

Makeup Gain

The makeup gain is a crucial feature of the dynamic range processor that allows you to add gain to the processed audio. It is essential because the compression can reduce the overall volume of the audio file. Therefore, adding makeup gain helps bring back the lost volume and maintain the optimal loudness level.

Choosing the best dynamic range processor is critical to optimal audio recording. With the factors above in mind, it becomes easier to choose the best processor to achieve the desired results. Always remember to adjust the settings based on the specific audio recording requirements.

Dynamic Range Processors

Credit: www.ebay.com

Famous Dynamic Range Processors

Dynamic range processors are essential tools for audio engineers seeking to enhance the sound quality of recordings. Some of the most famous dynamic range processors include the Fairchild 670, the UA 1176, and the SSL G-Series Bus Compressor. These processors have earned their place in audio history for their unique characteristics and contributions to the music industry.

Dynamic range processors, also known as compressors, are an essential tool in any audio engineer’s arsenal. They help maintain a balance between the loud and quiet parts of a recording, ensuring that the overall sound is smooth and even. Among the many compressors available, a few stand out as the most popular and widely used. Here we’ll take a closer look at three of the most famous dynamic range processors: the Empirical Labs Distressor, the Universal Audio LA-2A, and the dbx 160.

Empirical Labs Distressor

The Empirical Labs Distressor is a versatile and powerful compressor that has become an industry standard since its release in 1996. Its unique design allows for a wide range of control over the sound, making it suitable for everything from subtle compression to heavy limiting. One of the Distressor’s most popular features is its “Distressor mode,” which emulates the sound of classic compressors like the Urei 1176 and the Teletronix LA-2A. With its exceptional sound quality and flexibility, the Distressor is a must-have tool for any audio professional.

Universal Audio La-2a

The Universal Audio LA-2A is a classic compressor that has been in use since the 1960s. Its distinctive sound is due to its use of an optical attenuator, which functions like a photocell to control the gain reduction. The LA-2A is renowned for its ability to provide smooth, silky compression on vocals, guitars, and other instruments. It’s also a popular choice for mastering, where its ability to add warmth and character to the sound can be particularly useful. Despite its age, the LA-2A remains one of the most sought-after compressors and has been emulated by many other manufacturers.

Dbx 160

The dbx 160 is a classic compressor that has been used on countless recordings since its introduction in the 1970s. It’s known for its fast attack time, which makes it particularly well-suited for drums and percussion. The dbx 160 features both compression and limiting modes, allowing for precise control over the dynamics of a recording. Its transparent sound and reliable performance have made it a favorite among audio engineers for decades. Overall, these three compressors represent some of the best and most famous dynamic range processors available. Each has its unique characteristics that make it suitable for different scenarios, but all are essential tools for achieving great-sounding recordings.

Dynamic Range Processors

Credit: multimed.org

Frequently Asked Questions Of Dynamic Range Processors

What Processors Control Dynamic Range?

Processors control dynamic range.

What Are Examples Of Dynamic Processors?

Dynamic processors include compressors, limiters, and gates that adjust the levels of audio signals in real-time. Other examples include expanders and de-essers. These devices are commonly used in music production, live sound reinforcement, and broadcasting.

What Is Dynamic Range Signal Processing?

Dynamic range signal processing is a technique used to reduce the difference between the loudest and softest parts of an audio signal. It involves adjusting the gain of the signal in real-time to improve the overall sound quality and ensure that all elements of the audio are audible.

Which Signal Processor Is Used To Restrict Dynamic Range?

A compressor is the signal processor typically used to restrict dynamic range. It reduces the level of loud sounds while maintaining the level of quieter sounds, resulting in a more even and controlled dynamic range.

Conclusion

Dynamic range processors undoubtedly play an essential role in the audio mixing and mastering industry. From compressors to limiters, these powerful tools provide an array of benefits to sound engineers and musicians alike. With an understanding of the features and functions of these processors, any sound engineer can elevate their mixes to the next level.

Proper usage of dynamic range processors can enhance the overall sound quality and clarity of any track. Keep in mind the importance of balancing and controlling dynamics to achieve a polished and professional sounding production.

Categories
Archive

Serum Tutorial Beginner

Serum is a popular software synthesizer used by music producers to create digital sounds. With its intuitive interface and powerful features, even beginners can quickly create unique sounds.

As a beginner in the world of music production, you may be intimidated by the complexity of Serum’s interface. But fear not, as we’ve got you covered. In this tutorial, we’ll guide you through the basics of Serum, from loading and editing presets to creating your own sounds from scratch.

So, let’s dive in and explore the wonderful world of Serum!

Getting Started With Serum

New to Serum? This beginner tutorial will guide you through the basics of navigating Serum’s interface and creating your first sound. Explore Serum’s powerful features and take your music production to the next level with this comprehensive guide.

Are you a music enthusiast excited about producing your own tracks? Have you heard about Serum, the innovative wavetable synthesizer VST plugin that could take your music production skills to the next level? Serum is not only user-friendly but also embraces a professional approach that makes it an easy-to-use instrument. If you are new to Serum, this tutorial will guide you on how to get started using this versatile software. Ready to begin? Great! Here we go.

Installing Serum

By now, you may be wondering how to install Serum. Fortunately, it is easy. First, download the plugin from the official Xfer Records website and extract the files, and then copy and paste the appropriate files into your VST plugin folder. It’s that simple! If you are still unsure about the installation process, but you can still refer to Xfer’s online tutorial or manual for detailed instructions.

Setting Up Serum In Your Daw

Once you have completed the installation, it’s time to set up Serum in your preferred DAW. In your DAW, create a new software instrument track, and then select Serum from the VST plugins list. Next, attach the output of Serum to the correct channel strip in your DAW’s mixer. That’s it! Serum setup is easy and straightforward. In conclusion, getting started with Serum is straightforward and beginner-friendly. Follow these simple steps to install and set up Serum in your DAW to begin producing your own music. Whether you are a beginner looking for an easy-to-use plugin or an experienced producer looking for a new tool, Serum has what you need. Start exploring Serum’s features today and create the music you’ve always wanted to make.

Serum Tutorial Beginner

Credit: www.productionmusiclive.com

Understanding Serum’s Interface

Explore the interface of Serum with this beginner tutorial. Learn how to navigate the software’s features and create your own sounds using this powerful tool.

If you’re new to Xfer Serum, then it’s vital to get a grip on the interface. It can seem daunting at first, but don’t worry, understanding the interface is the first step in unlocking the power of this synthesizer.

Main Viewing Area

The main viewing area of Serum is where you can access all the presets, wavetables, and noise samples. The first thing you’ll notice is a browser located on the left side of the interface. You can browse through various categories, including Bass, Leads, Pads, etc.

Navigation And Toolbar

The Navigation and Toolbar sections aid you in navigating through Serum’s vast range of options. It’s where you can find various options such as the Undo/Redo button, Mixer, and FX. The toolbar also contains a settings and a help button.

Oscillator Section

In the Oscillator section, you’ll find the oscillator controls that allow you to modify the waveforms of your sounds. You can change the wave’s shape, pitch, and add harmonics by using the main controls.

Filter And Effects Section

The Filter and Effects section in Serum is where you can add depth and character to your sound. You can choose from a variety of filters, like low pass, bandpass, notch, etc. The effects section contains various effects ranging from Reverb and Delay to Distortion and Hyper Dimension.

Modulation Section

The Modulation section is where you can add movement to your sounds by assigning various parameters to the modulation sources. It includes features like LFOs, Envelopes, and the Matrix. By using these components, you can create complex and dynamic sounds. In conclusion, understanding the interface is the first step to utilizing Serum’s vast capabilities. Now that you have a better idea of the interface’s sections, it’s time to play around with them and explore the software further.

Creating Sounds With Serum

If you are a beginner in Serum Tutorial, creating your own sounds can be a daunting task. However, with a little guidance, you can easily start building your own sounds in no time. In this section, we will explore how you can create your own sounds from scratch, explore Serum’s presets, and customize them to fit your needs.

Building Your First Sound

Building your first sound in Serum Tutorial can be overwhelming, but it doesn’t have to be. Here’s how you can create your first sound:

  1. Open Serum and click the Init Preset button (top left corner).
  2. On the OSC tab, select a waveform of your choice.
  3. Adjust the settings on the oscillator to create your desired sound.
  4. Play your sound and fine-tune it until you’re satisfied with the outcome.

Remember to experiment with different settings and waveforms to create unique sounds.

Exploring Serum’s Presets

If you’re not ready to create your own sounds yet, you can start by exploring Serum’s presets. Here’s how you can do it:

  1. Click on the Preset tab to access Serum’s presets.
  2. Scroll through the presets and preview them by clicking on the play button.
  3. Select a preset that suits your needs and start playing with it.

Exploring presets is a great way to get a feel for what sounds can be created with Serum.

Modifying And Customizing Presets

Once you’re comfortable with exploring Serum’s presets, you can start customizing them to fit your needs. Here’s how:

  1. Select a preset that you want to customize.
  2. Start by adjusting the settings on the oscillator to create your desired sound.
  3. Play your sound and fine-tune it until you’re satisfied with the result.
  4. Experiment with the filter settings to further shape your sound.
  5. Adjust the effects settings to add more depth to your sound.

Remember to save your customized preset so that you can use it in your future projects.

Frequently Used Serum Features

In this tutorial for beginners, we will explore the frequently used features in serums. These include hydration, brightening, and anti-aging properties. Understanding the benefits of each can help you choose the right serum for your skincare needs.

If you’re new to Serum, it can be overwhelming to know where to start. But learning the frequently used features can help you create amazing sounds that stand out. In this tutorial, we will cover the top Serum features that are most commonly used by beginners.

Using Lfos To Modulate

LFOs are Low-Frequency Oscillators that change a sound’s parameters over time. They are one of the most powerful ways to add movement and interest to your sounds. To use LFOs, simply select the parameter you want to modulate, click on the LFO tab, select the waveform you want to use, and adjust the rate and depth of the modulation until you achieve the desired effect.

Creating And Editing Envelopes

Serum’s envelopes are essential tools for shaping your sounds. They allow you to control the level and characteristics of various aspects of the sound over time. To create or edit an envelope, simply click on the envelope tab, adjust the parameters such as attack, decay, sustain, and release, and draw the desired shape on the envelope grid.

Using The Wavetable Editor

The Wavetable Editor is one of Serum’s unique features. It allows you to create and edit your own waveforms or import external ones. To use the Wavetable Editor, click on the pencil icon in the oscillator or sub-oscillator tab, adjust the grid size, draw or import the waveform, and use the various tools to edit and manipulate the sound.

Applying Effects To Your Sounds

Serum offers a range of high-quality built-in effects that can take your sounds to the next level. These effects include distortion, EQ, reverb, delay, and more. To apply an effect, simply select the desired effect from the dropdown menu and adjust the parameters to suit your needs.

Making Your Sounds Stand Out

To make your sounds stand out among the crowd, it’s important to use a combination of the abovementioned Serum features creatively. Try using multiple LFOs on different parameters, combine different envelopes to shape your sound, and experiment with the Wavetable Editor to create unique waveforms.

Summary

In conclusion, mastering the frequently used Serum features such as LFOs, envelopes, Wavetable Editor, and effects can help you create unique and professional sounds that stand out. Don’t be afraid to experiment and use these features in creative ways to make your sound truly one-of-a-kind.

Tips And Tricks For Serum Production

Serum is a powerful synthesizer and a go-to instrument for music producers. Learning how to use this software effectively can give you an edge in music production. In this article, we will focus on some tips and tricks that will help you to create better sounds and maximize Serum’s performance.

Tips For Layering Sounds In Serum

Layering is an essential technique that helps you to create a full and rich sound. Here are some tips that will help you to layer sounds in Serum effectively:

  • Use different waveforms: Experiment with different waveforms and combine them to create a unique sound. You can also use different combinations of waveforms with different harmonics.
  • Layer with similar sounds: Layering similar sounds together can create a powerful and unified sound. For example, layering different types of strings can create a full, orchestral sound.
  • Use different octaves: Layering sounds in different octaves can create a layered and complex sound.

Advanced Sampling Techniques

Sampling is the process of capturing and manipulating sounds to create new and unique sounds. Here are some advanced sampling techniques that can help you create more complex sounds in Serum:

Sampling TechniqueDescription
Granular SamplingBreaks down recordings into tiny grains to manipulate and create new sounds.
TimestretchingChanges the tempo of a sound without affecting its pitch.
Reverse SamplingPlays a sound backward, creating a reverse effect.

Maximizing Serum’s Performance

Serums’s performance is boosted when optimized correctly. Here are some tips that can help maximize Serum’s performance:

  1. Use low polyphony: Reducing the number of voices played at once in Serum can help regulate CPU use.
  2. Use Smart Disable: Smart disable temporarily turns off CPU-intensive effects when they’re out of use by the synth patch, freeing up CPU resources.
  3. Use Unison wisely: Using multiple unison voices in Serum can create a fuller sound but uses more CPU power.

Creating Complex Sounds With Multiple Modulations

Modulations are used to create depth and variation in sounds. Here are some tips to help you create more complex sounds with multiple modulations in Serum:

  • Use multiple modulations: Apply more than one modulation to the same parameter, creating complex and dynamic sounds.
  • Use LFO Sync: LFO sync locks an LFO’s waveform cycle to the song’s tempo, ensuring the effect is in time with the beat.
  • Combine several envelopes: Using multiple envelopes can create more creative and complex soundscapes.
https://www.tiktok.com/api/img/?itemId=7180896770942061870&location=0&aid=1988

Credit: www.tiktok.com

Troubleshooting Common Serum Issues

Learn how to troubleshoot common serum issues with this beginner-friendly tutorial. Discover how to resolve common errors and optimize your serum experience.

Using Serum can be a little daunting at first, especially for beginners. There may be times when you encounter common problems, such as latency, error messages, or lack of optimization, that may affect your Serum experience. However, fret not; this tutorial covers some easy solutions to combat these problems so that you can enjoy Serum to its full extent.

Dealing With Latency Issues:

If you find significant latency or lag in Serum, don’t worry. There could be a few reasons that might cause this issue. First, try checking your buffer size and sample rate in your DAW settings. You should set your buffer size to 256 samples or lower to experience minimum latency. It is also advisable to check your audio device settings in your computer and ensure that Serum is using the correct audio driver. If you still feel latency while playing, try increasing your DAW’s processing speed, and Serum’s performance using synth quality options.

Common Error Messages And How To Fix Them:

Several common error messages can halt Serum’s functioning in real-time. One such error is the ‘Init Presets Dir Error,’ caused by Serum not finding its presets directory. To fix this, you need to go to Serum’s preferences and add the preset folder’s path label. Another error called ‘No Audio’ may occur due to Serum not accepting the audio rate of your DAW. You can fix this by matching the sample rates in Serum’s audio preferences to your DAW’s sample rate.

Optimizing Serum’s Performance:

Optimizing Serum’s performance will enhance your Serum experience with faster processing and improved sound quality. You can start by checking your computer’s processing speed and ensure that your CPU and RAM are sufficient to run Serum smoothly. You can also increase Serum’s performance by turning off unnecessary options like unison on multiple oscillators. This saves valuable processing power, especially on more complex sounds. For further optimization, you can also check Serum’s quality settings, which will affect how much CPU Serum uses. In conclusion, troubleshooting Serum’s common issues can be straightforward with minor adjustments and tweaks in settings. Check your buffer size, sample rate, audio device setting, and consider Serum’s quality options for a better experience. In case you encounter any error messages, simply check Serum’s preferences and audio settings to fix them. With optimized performance, Serum’s unique sound design capabilities will make your music stand out.

Serum Tutorial Beginner

Credit: m.youtube.com

Frequently Asked Questions For Serum Tutorial Beginner

Is Serum Easy To Learn?

Yes, Serum is easy to learn. It has an intuitive user interface and comprehensive documentation. Additionally, there are numerous tutorials, videos, and articles online that can help beginners learn how to use Serum efficiently.

Can You Pay For Serum Monthly?

Yes, you can pay for serum monthly. Most brands offer a monthly subscription service that allows you to pay for the serum each month instead of a one-time payment. Simply choose the subscription option during checkout and you’ll be charged monthly.

How Do You Set Up Serum?

Setting up Serum involves downloading and installing the software, authorizing it with your serial number, and adding it to your preferred digital audio workstation. You can also customize Serum’s preferences, import or create your own wavetables, and access its various features and functions.

How Do You Make Serum Work?

To make serum work, simply apply it to your skin after cleansing and toning. Allow it to fully absorb before applying any other products. It’s important to choose a serum that targets your specific skin concerns and to use it consistently for optimal results.

Additionally, be sure to store your serum in a cool, dry place and avoid exposure to sunlight and extreme heat.

Conclusion

Mastering the basics of using serum can be overwhelming for beginners. However, as you practice and experiment with different techniques, you’ll be able to create impressive music productions in no time. Keep in mind that serum provides endless possibilities, and you should take advantage of that by exploring and tweaking different settings.

Remember to always have fun and enjoy the creative process as you continue building your skills. Happy producing!

Categories
Archive

What Are Dynamics In Music

Dynamics in music refer to the variations in loudness and softness within a musical piece. Dynamics in music can make a big impact on how a piece of music is perceived by the listener.

Music is often described as a universal language that everyone can understand and appreciate, but it’s important to understand the various elements that go into creating a musical masterpiece. One of the most important elements of music is dynamics. Dynamics in music refer to the range of loudness and softness within a musical piece.

This can have a huge impact on how the music is perceived and experienced by the listener. Dynamic variation can help to create contrast and interest in a musical piece, making it more engaging and exciting to listen to. We’ll explore what dynamics are and how they are used in music.

Defining Dynamics

Dynamics in music refer to the variations in sound intensity, ranging from soft to loud. It is an essential element in musical composition that adds emotion and expression to a piece. Understanding dynamics is crucial for musicians and songwriters to create a captivating and memorable melody.

Music is a form of art that utilizes sound, rhythm, and melody to convey emotions and ideas. One of the essential elements of music is ‘Dynamics.’ Dynamics is the varying levels of sound in a piece of music. It’s the loudness or softness of music that creates a sense of contrast and emotion. In simple words, dynamics refer to the intensity or volume of music. In this article, we will discuss the different aspects of dynamics in music, starting with defining dynamics and how its adds value to music.

Volume As A Musical Element

Volume is one of the essential elements of music dynamics. It refers to the loudness or softness of sound. In music, volume is measured in decibels (dB). A typical musical composition has different volume levels resulting from the varying intensity of beats and sounds. The intensity can range from pianissimo (very soft) to fortissimo (very loud). Volume enhances the emotion and mood of music, making it more compelling and memorable. The skillful use of volume in music engages the listener’s senses and enriches the listening experience.

How Dynamics Add Meaning To Music

Dynamics add meaning to music patterns, reflecting the overall theme of the music. Soft sounds can create a sense of calmness, while loud sounds evoke emotions like aggression or excitement. Musicians use dynamics to highlight the most important parts of the music and to create a sense of journey or progression within the music. Dynamics add depth and dimension to music pieces, conveying emotions, and creating mood shifts that capture the pulse of the listener. For instance, a song about heartbreak may begin softly, building up to a climax (a fortissimo) to create an emotional surge. In conclusion, dynamics in music are crucial for conveying emotions and ideas. The skillful use of volume can make a musical piece more dynamic, engaging, and memorable to the listener. Varying levels of sound define the templates and patterns of music, making it more emotional and adds value to the listener’s experience.

Types Of Dynamics

Music dynamics refer to the changes in volume and intensity of music as it is played. These changes bring variation and creativity to music, allowing musicians to express their emotions and make the music more interesting for their listeners. Dynamics in music are divided into several types, each with its unique characteristics and ways of playing.

Fortissimo (ff)

Fortissimo is an Italian term that means very loud. In music notation, ff is commonly used to indicate when a composer wants a particular section of a piece to be played very loudly. Fortissimo passages are typically big and bold and used to express powerful emotions or to create excitement and drama in music.

Pianissimo (pp)

Pianissimo is the opposite of fortissimo and is an Italian term that means very quiet. It is represented in music notation as pp, and it is used to indicate that a particular section of music should be played very softly. Pianissimo passages are often used to create a sense of intimacy or to convey a feeling of delicacy and vulnerability.

Crescendo (cresc.)

Crescendo is an Italian term that means gradually getting louder. In music notation, it is indicated by the symbol cresc. and is used to indicate that a particular section of music should gradually increase in volume over time. Crescendo passages are commonly used to create a sense of anticipation or to build up to a particular musical climax.

Decrescendo (decresc.)

Decrescendo is the opposite of crescendo and is an Italian term that means gradually getting softer. In music notation, it is indicated by the symbol decresc. and is used to indicate that a particular section of music should gradually decrease in volume over time. Decrescendo passages are commonly used to create a sense of release or to bring a musical passage to a gentle close.

Conclusion

Dynamics are an essential aspect of music, and understanding the different types of dynamics can help musicians express themselves more effectively and convey specific emotions through their music. Whether playing fortissimo to create a sense of drama or pianissimo to convey a sense of intimacy, dynamics can make music more engaging and exciting for listeners.

Dynamics Markings

Dynamics markings are essential elements in the musical composition that give instructions on how to play a piece. Dynamics refer to the variations in loudness and softness of notes and are represented by different notation symbols.

Notation Symbols For Dynamics

The notation symbols for dynamics are usually located above or below the staff and indicate the volume of the music. Factors that influence dynamics include the composer’s intention, the instruments involved, and the musical genre. The following are the most common symbols used in music notation to indicate dynamics:

SymbolMeaning
piano (p)soft
mezzo-piano (mp)moderately soft
forte (f)loud
mezzo-forte (mf)moderately loud
fortissimo (ff)very loud
pianissimo (pp)very soft

How To Interpret Dynamics Markings

Interpreting dynamics requires more than simply knowing the notation symbols. Emphasis, expression, and other musical factors play crucial roles. The following tips can help bring dynamics markings to life:

  • Follow the notation symbols precisely as they are written
  • Convey the intended emotions through your playing
  • Adjust the volume of the piece in real-time, depending on the mood, expression, and context of the music.

Conclusion: Understanding dynamics markings can enhance your appreciation of music and enable you to communicate its various emotions. Ensuring their correct interpretation can change the entire listening experience.

What Are Dynamics In Music

Credit: www.hoffmanacademy.com

Dynamic Contrast

Dynamics in music refer to the variations in volume and intensity throughout a song. Dynamic contrast is the interplay between loud and soft, which can create tension and interest in the music. Professional musicians often incorporate dynamics to enhance the emotional impact of their compositions.

The Importance Of Dynamic Contrast

Dynamic contrast is an essential element of music as it creates emotion, tension, and excitement in the listener. It refers to the variation in volume or intensity of sound in a musical piece. The dynamics in music can range from soft to loud, and the shifts between the two can create a powerful impact on the listener. Dynamic contrast is the backbone of expressive playing, and it is one of the most crucial aspects of music that makes it so enjoyable. Dynamic contrast can be used to highlight specific parts of the music, such as the climax or the chorus. It can also be used to create a sense of calm or tension in a piece, adding an extra layer of depth to the music. It can be used to convey emotions, setting the mood, and evoking feelings such as sadness, joy, or anger. Dynamic contrast is essential to keep the listener engaged throughout the song.

Examples Of Dynamic Contrast In Music

Many classical pieces use dynamic contrast to achieve various effects on the listener. For example, Beethoven’s Symphony No. 5 uses dynamic contrast to great effect in the opening four-note motif. The first movement of this symphony alternates between the loud, dramatic theme and a quieter, more peaceful theme. Another example of dynamic contrast in music is in the song “Bohemian Rhapsody” by Queen. The song starts with a soft, piano-based introduction and gradually builds up to the operatic section, which is loud, grand, and overpowering, before settling back into the softer section again. In conclusion, dynamic contrast is a crucial part of music, and it plays a significant role in creating an emotional experience for the listener. By using dynamics effectively, composers can convey a wide range of emotions, moods, and feelings, keeping the listener engaged and interested in the music. Understanding and utilizing dynamic contrast is an essential skill for any musician, adding depth and complexity to their compositions.

Expression And Emotion

Music dynamics refer to the variation of loudness and intensity of sound in a musical piece. Dynamics can convey expression and emotion, and are indicated in music notation by symbols such as p (piano, soft) and f (forte, loud). Understanding dynamics is crucial for creating a compelling and engaging musical performance.

Dynamics As A Tool For Expression

Music is a universal language that can communicate emotions with or without words. Dynamics, which refer to the variation in loudness, are an essential tool for expressing a range of emotions in music. Musicians use dynamics as a way to add drama, emphasize specific moments, and create contrast. For example, a crescendo (gradual increase in volume) followed by a sudden forte (loud) chord can create a dramatic effect in a piece of music.

How Dynamics Evoke Emotion In Music

Dynamics play a significant role in evoking emotions in music. Soft dynamics can express a sense of intimacy, vulnerability, or sadness, while loud dynamics can express joy, excitement, or anger. A well-placed dynamic can turn an ordinary musical phrase into a powerful emotional statement, leaving the listener with a lasting impression. It is worth noting that dynamics alone cannot create emotion in music. Other factors such as melody, harmony, and rhythm are just as important in creating emotional impact. However, combining dynamics with other musical elements can create a powerful emotional experience for the listener, leaving a lasting impact on their memory.

Conclusion

In conclusion, dynamics are an essential aspect of music that contributes to its expressiveness and emotional impact. By using dynamics as a tool for expression, musicians can add nuance and depth to their compositions, leaving a lasting impression on their listeners.

What Are Dynamics In Music

Credit: juliajooya.com

Examples In Popular Music

Examples of dynamics in popular music include the sudden changes in volume or intensity of sound. These changes can create tension and excitement, or provide contrast and emphasize specific parts of a song. Understanding dynamics is essential for musicians and producers to create impactful and memorable music.

Dynamics are a crucial aspect of music. The creative use of dynamics can make a song more engaging and increase its emotional impact on listeners. In popular music, dynamic changes are often used to express the mood of the song. The interplay between loud and soft sounds, and the resulting contrast, can create a sense of tension and release that draws the listener in.

Case Studies Of Dynamics In Popular Music

Let’s take some case studies to understand how dynamics are used in popular music:

SongArtistNotes on dynamics
Bohemian RhapsodyQueenThe song starts with a soft piano intro and gradually builds up to a loud, powerful chorus. The quiet verses and explosive choruses create a dramatic effect.
Stairway to HeavenLed ZeppelinThe song begins with a gentle acoustic guitar and vocals and gradually builds up to an epic, full-band sound. The use of dynamics effectively conveys the song’s emotional journey from introspection to grandeur.

How Dynamics Affect The Overall Sound

The creative use of dynamics can significantly affect the overall sound of a song. Dynamics can convey a sense of emotion, create an atmosphere, and highlight certain elements of a song. For example, a quiet moment in a song can draw attention to the lyrics or a specific instrument, while a sudden loud chord can create an emotional impact. The use of dynamics can also help to structure a song, defining its sections and creating a sense of progression. In essence, dynamics are an essential tool for a songwriter or producer, allowing them to shape the listener’s experience of a song.

What Are Dynamics In Music

Credit: mramusicplace.net

Frequently Asked Questions For What Are Dynamics In Music

What Does Dynamics Mean In Music?

In music, dynamics refer to variations in volume or intensity. It includes changes in sound levels from pianissimo (very soft) to fortissimo (very loud), as well as everything in between. Dynamics are generally indicated in sheet music with symbols such as “p” for piano (soft) and “f” for forte (loud).

What Do The Terms Dynamics Describe In Music?

Dynamics in music describe the volume or intensity of sound. It refers to the variation in loudness and softness within a musical composition.

How Do You Identify Music Dynamics?

Identifying music dynamics involves analyzing the volume and intensity of a composition. Pay attention to the changes in volume, tempo, and articulation to identify dynamic shifts. Look for notations such as pianissimo, forte, crescendos, and decrescendos to help guide your analysis.

What Are Dynamic Signs In Music?

Dynamic signs in music refer to the changes in volume, intensity, and tempo of a composition. These signs are indicated by symbols such as crescendo, decrescendo, forte, piano, and others. Dynamic signs add expression, emotion, and contrast to the music being played or performed.

Conclusion

In brief, dynamics in music refer to the variations in loudness or softness, creating a sense of emotional depth and energy in a composition. These variations can enhance the listener’s experience, provoke an emotional response, and add a level of complexity to music.

Whether through crescendos or decrescendos, staccatos or legatos, dynamics add an indispensable element to music that cannot be ignored. By understanding and utilizing dynamics, musicians can create works that fully capture the listener’s attention and resonate with them on a deeper level.

Categories
Archive

Can Cubase Run on Linux

No, Cubase cannot run on Linux. It is supported only on Windows and macOS operating systems.

Cubase is a popular digital audio workstation used by many music producers and audio engineers. However, Linux users might wonder if they can use Cubase on their system. Unfortunately, the answer is no. The software is only designed to work on Windows and macOS operating systems.

While some users may try to run Cubase on Linux using compatibility tools or virtual machines, this is not a recommended or supported solution. Linux users who want to use a similar digital audio workstation must look for alternative software options that are compatible with their operating system. Linux users must forget about Cubase and focus on finding a suitable alternative.

Can Cubase Run on Linux

Credit: www.soundonsound.com

System Requirements For Cubase

Cubase is a digital audio workstation that is only officially supported on Windows and macOS operating systems. It cannot run natively on Linux, but users can try running it through compatibility layers such as Wine or virtual machines. However, the performance may vary in such cases.

Cubase is a popular digital audio workstation (DAW) used by music producers, composers, and audio engineers for recording, editing, and mixing audio. It is known for its advanced features and capabilities, and many users wonder if Cubase can run on Linux. One important factor to consider before installing Cubase on Linux is the system requirements. Here are the minimum and recommended system requirements for Cubase, as well as the operating systems compatible with the software.

Minimum System Requirements For Cubase

If you plan to use Cubase on your Linux system, you must ensure that your computer meets the minimum system requirements. Here are the minimum system requirements for Cubase:

  • 64-bit Ubuntu Linux
  • Intel or AMD multi-core CPU
  • 4 GB RAM
  • 20 GB of free hard-disk space
  • Display resolution of 1366 x 768 pixels
  • Graphics card with DirectX 10 and WDDM 1.1 support
  • USB port for USB-eLicenser (license management)
  • Internet connection for license activation

Recommended System Requirements For Cubase

If you want to get the best performance out of Cubase, it is recommended that you use a computer that meets the recommended system requirements. Here are the recommended system requirements for Cubase:

  • 64-bit Ubuntu Linux
  • Intel or AMD multi-core CPU (Intel i5 or faster recommended)
  • 8 GB RAM (16 GB or more recommended)
  • SSD for installation (high-speed SSD recommended)
  • Graphics card with DirectX 10 and WDDM 1.1 support (NVIDIA recommended)
  • USB port for USB-eLicenser (license management)
  • Internet connection for license activation

Operating Systems Compatible With Cubase

Cubase is compatible with a variety of operating systems, including Linux. Here are the operating systems compatible with Cubase:

  • 64-bit Ubuntu Linux 18.04 LTS or higher
  • macOS 10.14 or higher
  • Windows 10 64-bit version 1909 or later
Can Cubase Run on Linux

Credit: www.reddit.com

Alternatives For Running Cubase On Linux

Are you a Linux user looking to use Cubase for music production? Unfortunately, Cubase is not compatible with Linux. However, there are alternatives you can try to run Cubase on Linux. Here are three cost-effective options for Linux users to consider.

Wine Emulator

One option for running Cubase on Linux is to use the Wine emulator. Wine is an open-source program that allows you to run Windows applications on Linux. Although it may not always work, Wine has a good compatibility rating with Cubase according to the Wine AppDB. You need to install Wine and configure the necessary settings and codecs to use Cubase on Linux. Then, you can use Cubase on Linux as if you’re in a Windows OS environment. However, it could be a bit tricky, and you may require technical assistance for setting it up.

Dual-boot Linux And Windows

Another option to run Cubase on Linux is to install Windows as a secondary operating system. You can easily create multiple partitions on your hard drive, install a Windows operating system on one partition and Linux on another. This technique is known as “dual booting.” Dual booting allows you to switch between two operating systems as per your requirement. Though it may take more time to switch between the two operating systems, it’s a reliable and cost-effective solution. But, it requires restarting your PC every time you wish to switch operating systems.

Virtual Machine

The third option for Linux users is to install a virtual machine like VirtualBox or VMWare, enabling you to run Windows as a guest operating system within Linux. With a virtual machine, you can use Cubase on Linux without the need to reboot your computer to switch between operating systems. Instead, you can launch Cubase in a window on your Linux machine. However, performance issues arise while running a virtual machine, as it requires significant hardware resources to emulate another operating system simultaneously.

All three options have their pros and cons, and it’s up to you to decide which one works best for your needs. Try them out and select the option that makes the most sense for you.

Pros And Cons Of Running Cubase On Linux

Cubase, an industry-standard music production software, can be run on Linux with some technical tinkering. The advantages of this are stability, customizability, and savings on software costs. Yet it has potential downsides such as limited support, lack of essential plugins, and compatibility issues.

Cubase is a popular digital audio workstation used for music production, editing, and recording. Many music producers, composers, and artists prefer to use Cubase because of its exceptional features. However, Cubase is not natively compatible with Linux. Running Cubase on Linux requires additional software and tools, which may come with advantages and disadvantages.

Advantages Of Running Cubase On Linux:

  • Linux is a more stable operating system compared to Windows or macOS. It rarely suffers from crashes, freezes, or system failures. Therefore, running Cubase on Linux provides a reliable and stable music production environment.
  • Using Cubase on Linux can save costs on software licenses. Linux is an open-source operating system, and most of the tools needed to run Cubase are also open-source and free to use. This can cut down expenses for music producers, especially those who are just starting in the industry.
  • Linux offers a greater level of customization and flexibility. Users can customize their Linux environment to run Cubase optimally. Plus, Linux has better accessibility to command-line interfaces, which music producers can use for debugging or automating tasks.

Disadvantages Of Running Cubase On Linux:

  • Running Cubase on Linux requires additional software tools, such as Wine or PlayOnLinux. These tools may not always be stable or compatible with the latest version of Cubase. Therefore, running Cubase on Linux can be a cumbersome process.
  • There may be hardware compatibility issues when running Cubase on Linux. Some hardware drivers may not be available or may not be compatible with Linux. This can lead to audio problems or a lack of features.
  • Linux is not as widely supported as Windows or macOS. Therefore, finding support or solutions to issues can be more challenging. Plus, Cubase updates may not always be available for Linux users.

In summary, running Cubase on Linux can have its advantages and disadvantages. Linux is a stable and customizable operating system that may save costs for users. However, running Cubase on Linux requires additional software and tools, and hardware compatibility may be an issue. Ultimately, the decision to run Cubase on Linux depends on the user’s preferences and needs.

Can Cubase Run on Linux

Credit: forums.steinberg.net

Frequently Asked Questions Of Can Cubase Run On Linux

What Kind Of Computer Do I Need To Run Cubase?

To run Cubase, you need a computer with 64-bit Windows 10 or macOS Sierra or newer, at least 4 GB of RAM (8 GB or more recommended), 30 GB of free storage space, and a multi-core processor (Intel i5 or higher).

It also requires a display with 1280 x 800 resolution or higher and a compatible audio interface.

What Does Cubase Run On?

Cubase runs on Windows and Mac operating systems.

Which Is Better Cubase Or Ableton?

It depends on your needs. Cubase is better for traditional recording, mixing, and mastering with high-quality plugins. Ableton is ideal for electronic music production with an easy-to-use interface, live performance features, and built-in instruments.

Why Is Cubase So Expensive?

Cubase is a professional-grade software that offers advanced features and tools for music production. Its price is justified by the level of sophistication of the software’s technologies and the expertise required to engineer and maintain it. Additionally, Steinberg (the company behind Cubase) invests in research and innovation to continuously improve their product.

Conclusion

After all the research done, it is deemed possible to run Cubase on Linux through Wine or virtualization software. However, it requires technical knowledge and may not provide a perfect performance. The decision to use Linux ultimately relies on personal preference and the software compatibility needed for the work.

Running Cubase on Linux is feasible with extra effort and knowledge.

Categories
Archive

Serum Preset Bundle

The Serum Preset Bundle is a collection of custom-made presets for the Serum synthesizer. It contains a variety of unique sounds and styles to enhance your musical creations.

The Serum Preset Bundle is an essential tool for any music producer who uses the Serum synthesizer. This bundle is a collection of expertly crafted presets that will help you create unique and original tracks. Whether you are looking to produce hip-hop, EDM, or any other genre, the Serum Preset Bundle has something for you.

The presets have been designed to be easy to use and customize, giving you the freedom to explore your creativity. With the Serum Preset Bundle, you can add depth and complexity to your tracks, making them stand out in a crowded market. So if you’re serious about making music, the Serum Preset Bundle is a must-have addition to your toolkit.

Serum Preset Bundle

Credit: www.productionmusiclive.com

Benefits Of Using Serum Preset Bundle

If you are a music producer, you know how important it is to have a wide variety of high-quality sounds at your disposal. However, creating these sounds from scratch can be a time-consuming and challenging task. That’s where a Serum Preset Bundle comes in handy!

Saves Time And Effort

With a Serum Preset Bundle, you don’t have to waste time creating every sound from scratch. You can easily browse through the presets and find the perfect sound for your project. This not only saves you time but also reduces the effort needed to create professional-grade music.

High-quality Sound

Serum Preset Bundles are created by professionals who have extensive experience in music production. Therefore, these presets are of high quality and deliver exceptional sound. You can easily create music that sounds like it was produced in a professional studio.

Versatile Sounds

Whether you need a bassline, lead, or pad sound, a Serum Preset Bundle has got you covered. These preset bundles offer a wide variety of sounds that can be used in different music genres. You can easily find the perfect sound for your track, regardless of the style of music you are producing.

Affordable

Investing in a Serum Preset Bundle is more affordable than hiring a professional sound designer. These bundles offer hundreds of high-quality sounds at an affordable price. Moreover, you can use these presets in multiple tracks, making it a cost-effective investment.

BenefitsDescription
Saves Time and EffortWith a Serum Preset Bundle, you don’t have to waste time creating every sound from scratch. You can easily browse through the presets and find the perfect sound for your project.
High-Quality SoundSerum Preset Bundles are created by professionals who have extensive experience in music production. Therefore, these presets are of high quality and deliver exceptional sound.
Versatile SoundsA Serum Preset Bundle offers a wide variety of sounds that can be used in different music genres. You can easily find the perfect sound for your track, regardless of the style of music you are producing.
AffordableInvesting in a Serum Preset Bundle is more affordable than hiring a professional sound designer. These bundles offer hundreds of high-quality sounds at an affordable price.
  • Saves time and effort
  • High-quality sound
  • Versatile sounds
  • Affordable
  1. Using a Serum Preset Bundle saves time and effort.
  2. The high-quality sound of Serum Preset Bundles deliver exceptional music.
  3. These preset bundles offer a wide variety of sounds that can be used in different music genres.
  4. Investing in a Serum Preset Bundle is more affordable than hiring a professional sound designer.
Serum Preset Bundle

Credit: www.ghosthack.de

How To Use Serum Preset Bundle

Learn how to elevate your music production with the Serum Preset Bundle. With high-quality presets, this bundle provides an extensive range of sounds to help you create your unique sound. Take your music to the next level with this bundle.

If you’re a music producer or sound designer, you likely know the importance of having a variety of sound presets at your disposal. The Serum Preset Bundle is a collection of carefully crafted sound presets for the popular Serum VST. With over 500 presets, this bundle offers versatility and a range of creative possibilities. In this article, we’ll explore how to use the Serum Preset Bundle in your projects.

Install The Serum Preset Bundle

To begin, you will need to purchase and download the Serum Preset Bundle. You can then install it by following these steps:

  1. Open the Serum VST.
  2. Click on the “Menu” button located in the top right corner of the Serum interface.
  3. Select “Show Serum Presets Folder” to open the folder containing the presets.
  4. Copy and paste the preset files from the Serum Preset Bundle into this folder.

Open Serum Vst

Once you have installed the Serum Preset Bundle, you will need to open the Serum VST to access the sound presets. Follow these steps:

  1. Open your DAW (Digital Audio Workstation) of choice and create a new project.
  2. Insert a new instance of Serum onto a track.
  3. Click on the “Menu” button located in the top right corner of the Serum interface.
  4. Select “Rescan folders on disc” to ensure Serum recognizes the new presets.

Import Presets Into Serum

Now that Serum recognizes the new presets, you can easily import them into your project. Here’s how:

  1. Click on the “Menu” button located in the top right corner of the Serum interface.
  2. Select “Presets” from the dropdown menu.
  3. Browse through the list of available presets to find the ones you want to use.
  4. Click on a preset to load it into Serum.

Use Serum Presets In Your Projects

With the presets now loaded into Serum, you can use them in your projects. Here are some tips:

  • Experiment with different presets to find the right sound for your project.
  • Combine multiple presets to create unique sounds.
  • Adjust the parameters of each preset to tailor it to your specific needs.
  • Save your own presets based on the modifications you make.

In conclusion, the Serum Preset Bundle is a valuable resource for music producers and sound designers looking to expand their sound collection. By following these simple steps, you can easily incorporate these presets into your projects and take your music to the next level.

Top Serum Preset Bundles In 2021

If you’re a music producer or composer looking for high-quality presets to enhance your sound, then you’ve come to the right place. In this post, we’re going to take a closer look at some of the best Serum preset bundles on the market today. Each bundle includes a wide range of presets designed specifically for genres such as techno, trap, hip hop, and EDM. So, whether you’re a beginner or a seasoned pro, there’s sure to be a bundle that suits your needs.

Serum Complete Preset Bundle

The Serum Complete Preset Bundle is a comprehensive collection of over 2500 presets for Serum, including leads, pads, basses, and more. These presets are suitable for all kinds of electronic genres, making it an ideal choice for producers who want to experiment with different sounds.

Serum Ultimate Preset Bundle

The Serum Ultimate Preset Bundle is a massive collection of over 6000 presets for Serum. This bundle includes presets for a wide range of genres, including trap, dubstep, hip hop, and more. The presets are organized into easy-to-use categories for quick browsing, so you can find the right sound for your track in no time.

Future Bass & Chill Serum Presets Bundle

The Future Bass & Chill Serum Presets Bundle is the perfect choice for producers who want to create laid-back, relaxing tracks. The bundle includes over 250 presets specifically designed for the future bass and chill genres. These presets include rich pads, warm basses, and ethereal leads.

Masterpiece – Modern Serumscapes

Masterpiece – Modern Serumscapes is a collection of 50 presets that are perfect for producers who want to create atmospheric soundscapes. The presets include a range of ambient pads, plucks, and leads, all designed to help you create intricate, lush soundscapes.

Techno Serum Presets Bundle

The Techno Serum Presets Bundle is a collection of over 300 presets specifically designed for techno producers. This bundle includes everything from punchy basses to gritty leads, making it an ideal choice for producers who want to create hard-hitting techno tracks.

Trap & Hip Hop Serum Presets Bundle

The Trap & Hip Hop Serum Presets Bundle includes over 450 presets specifically designed for trap and hip hop producers. This bundle includes everything from distorted 808s to atmospheric pads, so you can create the perfect trap or hip hop beat in no time.

Edm Serum Presets Bundle

The EDM Serum Presets Bundle is a collection of over 300 presets designed specifically for EDM producers. This bundle includes everything from soaring leads to hard-hitting basses and plucks. The presets are organized into easy-to-use categories, so you can find the right sound for your track quickly.

How To Choose The Right Serum Preset Bundle

If you’re into music production, you know that Serum synth is one of the most popular VST plugins in the market. The plugin offers a wide range of options and possibilities, making it a favorite among producers worldwide. However, sometimes, creating sounds from scratch can be overwhelming and time-consuming. That’s where the Serum preset bundles come into play. In this article, we’ll go over how you can choose the right serum preset bundle for your music.

Consider Your Music Genre

The first thing you need to consider before purchasing a Serum preset bundle is your music genre. Every genre has a different sound and vibe, and preset bundles are designed accordingly. For example, if you’re into trap music, you need a bundle that offers deep basslines and hard-hitting drums. Similarly, if you’re into ambient music, you need a preset bundle that provides atmospheric pads and ethereal soundscapes. So, before making a purchase, make sure the bundle aligns with your music’s style and genre.

Read Reviews

Checking out reviews of the preset bundle you’re interested in can give you an idea of the quality of presets included in the bundle. Reviews can help you to know if the presets work as advertised, if they are easy to use, and if they are compatible with your DAW. So, make sure to check the reviews and ratings before making your purchase.

Check The Preset List

It’s essential to check the preset list provided by the vendor. The list will give you an idea of the type of sounds included in the bundle, making it easier for you to decide if the presets are what you’re looking for. Make sure to check if the bundle provides leads, basses, pads, arps, and other sounds that you will need in your music production.

Look For Bundle Deals

Companies sometimes offer bundle deals that provide multiple preset bundles at a discounted price. It’s always a good idea to check the bundle deals as it might be a more cost-effective way to get the presets you need. Moreover, bundle deals often include additional sounds or bonuses, making the deal even better.

Serum Preset Bundle

Credit: www.dnbacademy.net

Frequently Asked Questions Of Serum Preset Bundle

How Many Presets Does Serum Come With?

Serum comes with over 500 presets, including basses, leads, pads, and more. These presets are designed to help users get started quickly and inspire creativity.

Is Serum Preset Free?

Yes, some serum presets are free. You can download them from websites that offer free presets or get them from the manufacturer’s website.

How Do I Get More Serum Presets?

To get more serum presets, you can search for them online on various websites or purchase them from online stores. Additionally, you can also create your own presets by experimenting with different settings and parameters. Joining online communities and forums for music producers can also help you find and share presets with other like-minded individuals.

Where Is The Xfer Serum Preset Folder?

The Xfer Serum preset folder is usually found in “C:\Users\YourUserName\Documents\Xfer\Serum Presets\Presets”.

Conclusion

As we wrap up our discussion on Serum Preset Bundle, it’s evident that this tool can help produce quality music effortlessly. These efficient presets provide a foundation for your creativity to flow while enhancing the flexibility of your sound design.

Whether you’re a seasoned producer or a newcomer, this bundle has the necessary ingredients to create something unique and impressive. With a straightforward interface and intuitive features, it offers an opportunity to experiment with sounds and achieve your music production goals.

Get this bundle today to elevate the music production experience!