Categories
Archive

Using Compression in Fl Studio: Master Your Tracks!

Compression is a powerful tool in the world of music production. It helps to control the dynamics of audio signals and can drastically improve the overall sound quality of your tracks. FL Studio, one of the most popular digital audio workstations, offers a wide range of compression tools that you can utilize to enhance your music productions. In this article, we will explore the basics of compression and how you can effectively use it in FL Studio to take your music to the next level.

Using Compression in Fl Studio: Master Your Tracks!

Credit: howtomakeelectronicmusic.com

The Basics of Compression

Before diving into the specifics of using compression in FL Studio, it’s essential to understand the basics of compression. In simple terms, compression reduces the dynamic range of an audio signal by attenuating the louder parts, resulting in a more balanced and controlled sound. This is achieved through the use of threshold, ratio, attack, and release parameters.

Threshold And Ratio

The threshold determines the level at which the compression begins to kick in. Any signal above the set threshold will be affected by the compression. The ratio dictates how much the signal above the threshold will be compressed. For example, a 4:1 ratio means that for every 4dB the signal goes over the threshold, only 1dB will be allowed through.

Attack And Release

The attack parameter determines how quickly the compression reacts once the signal crosses the threshold, while the release parameter governs how long the compression persists after the signal drops below the threshold. These parameters play a crucial role in shaping the overall dynamics of the audio signal.
Using Compression in Fl Studio: Master Your Tracks!

Credit: macprovideo.com

Using Compression in FL Studio

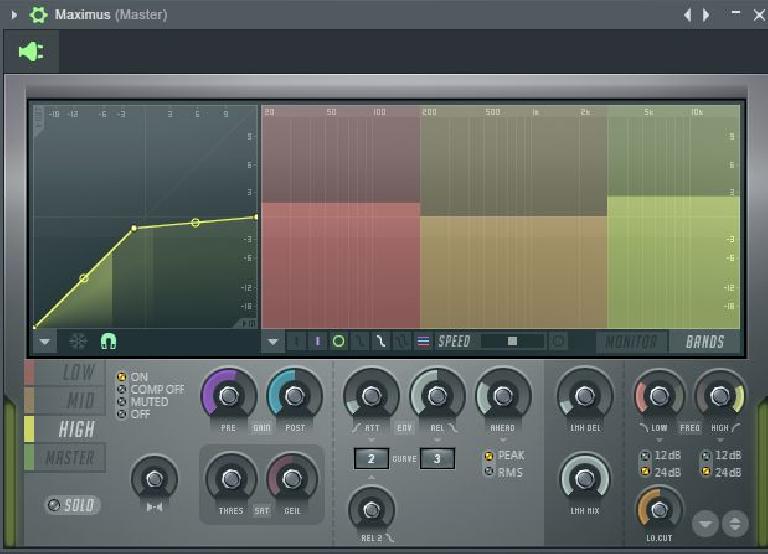
FL Studio provides a variety of compression tools, including the Fruity Limiter, Fruity Compressor, and Wave Candy, among others. Let’s take a closer look at how you can effectively use compression in FL Studio to enhance your music productions.

Fruity Limiter

The Fruity Limiter is a versatile tool that offers compression, limiting, and noise gating functionalities. To use compression with the Fruity Limiter in FL Studio, follow these steps:

Step Description
1 Insert the Fruity Limiter on the track you want to compress.
2 Adjust the threshold to set the level at which compression will begin.
3 Set the ratio to control the amount of compression applied to the signal.
4 Tweak the attack and release parameters to fine-tune the compression’s response.

By following these steps, you can effectively use the Fruity Limiter to achieve dynamic control and enhance the sound quality of your tracks in FL Studio.

Fruity Compressor

Another powerful compression tool in FL Studio is the Fruity Compressor. This plugin offers precise control over the compression process and can be used to shape the dynamics of individual sounds or entire mix buses. Here’s how you can use the Fruity Compressor:

  1. Insert the Fruity Compressor on the desired track.
  2. Adjust the threshold to determine the compression level.
  3. Set the ratio to control the amount of compression applied.
  4. Fine-tune the attack and release settings to achieve the desired compression response.

With the Fruity Compressor, you can effectively shape the dynamics of your audio signals and ensure a more balanced and polished sound in your FL Studio productions.

Wave Candy

Wave Candy is a visualization tool in FL Studio that can also be used to understand the effect of compression on audio signals. It provides real-time visual feedback, allowing you to see the changes in the waveform as you apply compression. By using Wave Candy in conjunction with other compression tools, you can gain a better understanding of how compression impacts your audio signals and make more informed decisions when tweaking the compression parameters.

Frequently Asked Questions For Using Compression In Fl Studio: Master Your Tracks!


How Does Compression Work In Fl Studio?


Compression in FL Studio works by reducing the dynamic range of audio signals, controlling the volume levels and enhancing the overall clarity and balance of the mix.


Why Should I Use Compression In Fl Studio?


Using compression in FL Studio helps to bring out the details in your audio, increase the perceived loudness, and create a more professional and polished sound.


What Are The Benefits Of Using Compression In Fl Studio?


Compression in FL Studio provides benefits like improving the overall balance of the mix, reducing harsh peaks, controlling dynamics, and adding a sense of cohesion to the audio.


How Do I Set Up A Compressor In Fl Studio?


To set up a compressor in FL Studio, insert the plugin on the desired audio track, adjust the threshold to control when compression starts, set the ratio to determine the amount of compression, and adjust the attack and release to shape the compression envelope.

Conclusion

Understanding how to use compression effectively is crucial for achieving professional-sounding music productions. With the diverse range of compression tools available in FL Studio, you have the power to shape the dynamics of your audio signals and elevate the overall sound quality of your music. By mastering the art of compression and making use of the versatile tools in FL Studio, you can take your music production skills to new heights and create impactful and polished tracks that stand out in the crowded music industry.

Categories
Archive

Using Distortion in Fl Studio : Mastering Sonic Edge

Distortion is an essential tool in music production. It can add character, grit, and excitement to your tracks. FL Studio, one of the leading digital audio workstations (DAW), provides a wide range of distortion plugins and effects that can help you shape your sound. In this article, we will explore how to effectively use distortion in FL Studio to enhance your music.

1. Understanding Distortion

Distortion occurs when an audio signal exceeds the maximum amplitude available in a system. This leads to the clipping of the waveform, resulting in harmonic overtones and a unique tonal color. Distortion can be applied to various elements in a song, such as drums, guitars, synths, or vocals, to create a desired effect.

Credit: www.sweetwater.com

2. Choosing the Right Distortion Plugin

FL Studio offers a plethora of distortion plugins, each with its own unique characteristics. The choice of plugin depends on the type of sound you want to achieve. Some popular distortion plugins in FL Studio include:

Distortion Plugin Description
Fruity Blood Overdrive Creates a warm, vintage-style distortion effect.
Fruity Fast Dist Provides aggressive and edgy distortion perfect for rock and metal genres.
Fruity Waveshaper Allows precise and customizable waveform shaping.
Fruity WaveShaper+ An advanced version of Fruity Waveshaper with additional features.

3. Using Distortion on Different Elements

Now let’s dive into how you can use distortion on various elements in your FL Studio projects:

A) Drums:

Distorting drum samples can add punch and harmonically rich textures. Experiment with different distortion plugins and settings to find the right balance between excitement and clarity.

B) Guitars:

For guitar recordings, distortion is often used to achieve a crunchy, overdriven tone. Consider using amp simulators and specific guitar-focused distortion plugins for realistic and satisfying guitar sounds.

C) Synths:

Distorting synth sounds can add character and make them stand out in a mix. Experiment with different distortion types, such as wavefolding or saturation, to add warmth or harmonic complexity to your synths.

D) Vocals:

When used tastefully, distortion can add grit and attitude to vocals. Apply a subtle amount of distortion to give your vocals a vintage or gritty edge, or go for more aggressive distortion for a modern and unique vocal effect.

4. Understanding Distortion Parameters

When using distortion plugins in FL Studio, it is essential to understand the various parameters available:

  • Drive: Controls the amount of distortion applied.
  • Tone: Adjusts the tonal characteristics of the distortion effect.
  • Presence: Enhances the upper harmonics and presence of the distorted sound.
  • Mix: Controls the balance between the dry and distorted signals.

Experimenting with these parameters will allow you to fine-tune the distortion effect to suit your specific needs.

Credit: vi-control.net

5. Automation and Modulation

Adding movement and dynamics to your distorted effects can greatly enhance the overall impact. FL Studio provides comprehensive automation and modulation features that allow you to automate distortion parameters over time. This can create interesting and evolving distortion effects throughout your tracks.

Frequently Asked Questions For Using Distortion In Fl Studio : Mastering Sonic Edge


What Is Distortion In Music Production?


Distortion refers to altering the sound’s waveform, adding harmonics, and creating a gritty, edgy tone.


How Can Distortion Enhance Audio In Fl Studio?


Distortion can add warmth, energy, and excitement to audio, creating powerful and dynamic sound.


What Types Of Distortion Effects Are Available In Fl Studio?


FL Studio offers various distortion effects like overdrive, bitcrushing, and fuzz to shape diverse audio characters.


Why Is Distortion Widely Used In Electronic Music Production?


Distortion is popular in electronic music as it adds edge, intensity, and sonic interest to sounds and instruments.

Conclusion

Using distortion in FL Studio is a powerful method to shape and enhance your music. By understanding the basics of distortion, choosing the right plugins, and experimenting with different elements and parameters, you can create unique and captivating sounds for your projects. Remember to utilize automation and modulation to add dynamic movement to your distorted effects. As with any production technique, practice and experimentation are key. So, start exploring the world of distortion and take your music production to the next level!

Categories
Archive

Using the Glue Compressor in Ableton Live: Master Dynamic Beats

When it comes to music production, using the right tools can make all the difference in achieving a professional and polished sound. One such tool that has gained significant popularity among producers is the Glue Compressor in Ableton Live. In this article, we will explore what the Glue Compressor is, how it works, and how you can use it to take your tracks to the next level.

Credit: m.youtube.com

What is the Glue Compressor?

The Glue Compressor is a versatile and powerful dynamics processor that is specifically designed to “glue” together individual tracks or an entire mix. It is based on the legendary SSL bus compressor and provides a characteristic analog-style compression that adds depth, punch, and cohesion to your audio.

How does it work?

At its core, the Glue Compressor works by automatically adjusting the gain of an audio signal, reducing the dynamic range and making the overall sound more consistent. It does this by applying both downward and upward compression simultaneously, resulting in a smooth and transparent sound.

The Glue Compressor features various parameters that allow you to fine-tune the compression to suit your needs. The most essential controls are the Threshold, Ratio, Attack, Release, and Makeup Gain.

Parameter Description
Threshold Determines at what level the compression will be applied. Signals above the threshold will be compressed.
Ratio Controls the amount of compression that will be applied to the signal above the threshold.
Attack Determines how quickly the compression will be applied once the signal crosses the threshold.
Release Determines how quickly the compression will stop once the signal falls below the threshold.
Makeup Gain Allows you to compensate for the volume loss that occurs due to compression.
Using the Glue Compressor in Ableton Live: Master Dynamic Beats

Credit: audioordeal.co.uk

Using the Glue Compressor in Ableton Live

Now that we understand the basics of the Glue Compressor, let’s explore how you can use it in Ableton Live to enhance your tracks.

  1. Start by adding the Glue Compressor to the track or the group you wish to compress.
  2. Set the Threshold to a level where the compression starts to engage. You can use the visual feedback on the meter to guide you.
  3. Adjust the Ratio to control the amount of compression. Higher ratios result in more pronounced compression, while lower ratios provide a more transparent effect.
  4. Fine-tune the Attack and Release settings to shape the dynamics of the track. Experiment with different settings to find the perfect balance between smoothness and punch.
  5. Use the Makeup Gain to compensate for any volume loss caused by the compression.
  6. Lastly, listen critically to your track and make further adjustments as needed. Remember, the Glue Compressor should enhance the sound without compromising its integrity.

With the Glue Compressor, you have the ability to add that extra touch of professionalism to your music. From tightening up drums to gluing together your entire mix, this versatile tool can make your tracks sound cohesive and professional.

Frequently Asked Questions Of Using The Glue Compressor In Ableton Live: Master Dynamic Beats


What Is The Glue Compressor In Ableton Live?


The Glue Compressor in Ableton Live is a versatile tool used for dynamic audio processing.


How Does The Glue Compressor Differ From Other Compressors?


The Glue Compressor is designed to “glue” the mix together, emphasizing cohesiveness and enhancing the overall sound.


What Are The Key Features Of The Glue Compressor In Ableton Live?


Key features of the Glue Compressor include soft clipping, a Dry/Wet control, and an external sidechain input.


How Do I Use The Glue Compressor To Enhance My Mix?


You can use the Glue Compressor to add punch and warmth to a mix, improve the overall dynamic range, and create a more unified sound.

Conclusion

The Glue Compressor in Ableton Live is a powerful tool that allows you to take control of your dynamics and achieve a polished sound. By understanding its parameters and learning how to use it effectively, you can elevate your music production to new heights. So give it a try and experience the magic of the Glue Compressor for yourself.

Categories
Archive

Master the Beat: Unleashing the Potential of the Warp Function in Ableton Live

Are you a music producer looking to take your tracks to the next level? One of the most powerful tools in Ableton Live that can help you achieve this is the Warp function. The Warp function allows you to manipulate the tempo and timing of audio clips, giving you the flexibility to experiment and create unique sounds.

Understanding Warp Modes

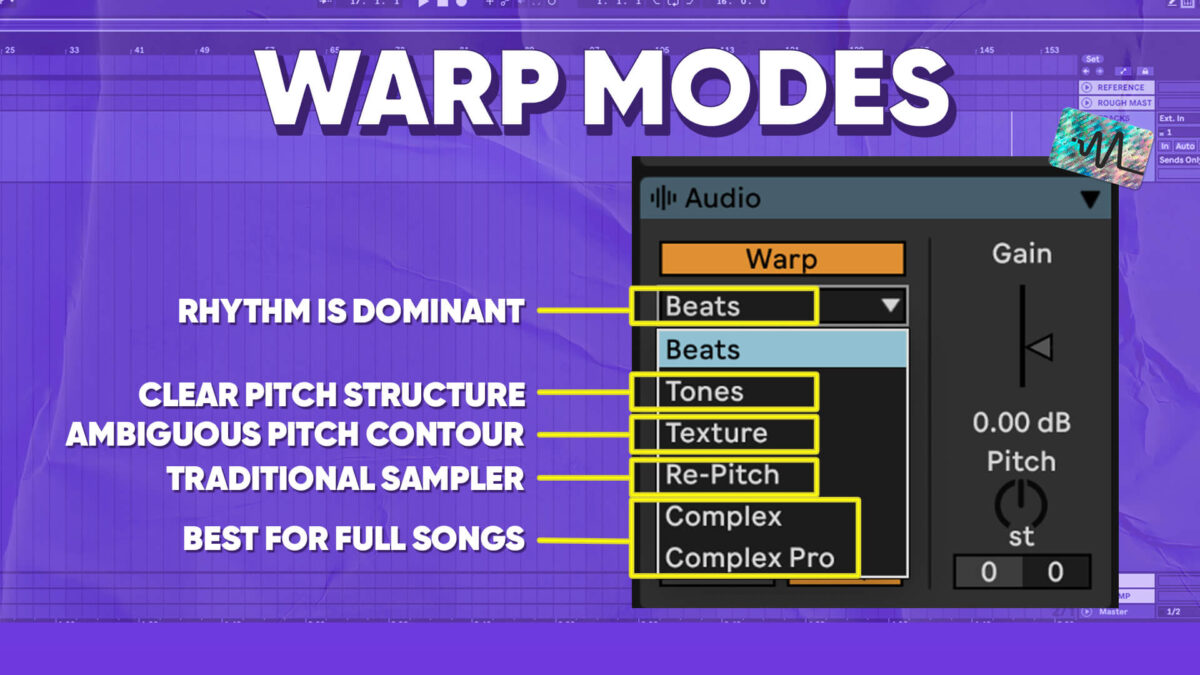
Before diving into how to use the Warp function, it’s important to understand the different Warp modes available in Ableton Live. There are several Warp modes to choose from, each with its own characteristics:

Warp Mode Description
Beats Great for rhythmic material such as drums and percussion.
Tones Ideal for melodic material like vocals and synths.
Texture Perfect for complex audio textures and soundscapes.

Credit: m.youtube.com

Using the Warp Function

Now that you’re familiar with the Warp modes, let’s explore how to use the Warp function in Ableton Live:

  1. Select the audio clip you want to Warp in the Arrangement View.
  2. Right-click on the audio clip and choose “Warp” from the dropdown menu.
  3. Choose the desired Warp mode based on the characteristics of your audio clip.
  4. Adjust the Warp markers to manipulate the timing and tempo of the audio.
  5. Experiment with different Warp modes and settings to create unique sounds.

Tips for Warp Function

Here are some tips to make the most out of the Warp function in Ableton Live:

  • Use Warp markers to align audio transients for precise timing adjustments.
  • Try using the Complex Pro Warp mode for high-quality time-stretching of audio clips.
  • Automate Warp settings to create dynamic and evolving sounds throughout your track.
Master the Beat: Unleashing the Potential of the Warp Function in Ableton Live

Credit: distinctmastering.com

Final Thoughts

The Warp function in Ableton Live is a powerful tool that can help you unlock new creative possibilities in your music production. By understanding the different Warp modes and following these tips, you can take your tracks to new heights and explore innovative ways to manipulate audio. Experiment, have fun, and let the Warp function propel your music to the next level!

Frequently Asked Questions On Master The Beat: Unleashing The Potential Of The Warp Function In Ableton Live


What Is The Warp Function In Ableton Live?


The Warp function in Ableton Live allows you to change the tempo and timing of audio clips.


How Can I Use The Warp Function In Ableton Live?


You can use the Warp function in Ableton Live by activating the Warp switch in the clip view and adjusting the markers.


Why Is The Warp Function Important In Music Production?


The Warp function is crucial in music production as it enables aligning audio clips to different tempos and creating seamless transitions.


What Are The Benefits Of Using The Warp Function In Ableton Live?


Using the Warp function in Ableton Live offers the advantage of matching audio clips to the project tempo and experimenting with creative time-stretching techniques.

For more background, see Ableton Live on Wikipedia. You may also like our guide: How To Warp Or Cut A Track In Ableton Live.

Categories
Archive

Creating a New Project in Ableton Live : Ultimate Guide for Beginners

Ableton Live is a powerful digital audio workstation that is widely used for music composition, production, and performance. If you are new to Ableton Live, this step-by-step guide will help you get started with creating a new project in the software.

Credit: www.productionmusiclive.com

Step 1: Launching Ableton Live

Start by launching Ableton Live on your computer. Once the software is loaded, you will be presented with the Live’s Session View.

Step 2: Creating a New Live Set

To create a new project, click on “File” in the top menu bar and select “New Live Set” or use the shortcut Ctrl+N (Windows) or Command+N (Mac).

Step 3: Specify Project Settings

When you create a new Live Set, a dialog box will appear where you can specify the project settings:

Setting Explanation
Sample Rate Choose the desired sample rate for your project. The standard is 44.1 kHz.
Bit Depth Select the bit depth for your project. 24-bit is the standard for high-quality recordings.
Tempo Set the tempo for your project. This will determine the speed of the music.

Credit: www.levelsmusicproduction.com

Step 4: Organizing Your Project

Once you’ve specified the project settings, Ableton Live will create a new Live Set and open the Session View. Here are a few tips on organizing your project:

  • Tracks: Add tracks to your project by right-clicking in the empty space of the Session View and selecting “Insert Audio Track” or “Insert MIDI Track”. You can also use the shortcuts Ctrl+T (Windows) or Command+T (Mac) to add a new track.
  • Clips: Drag and drop audio or MIDI clips onto the tracks in the Session View. You can also record audio or MIDI directly into the clips.
  • Device View: To access the Device View, click on the “Device” button in the bottom left corner of the Ableton Live window. This view allows you to control and manipulate the devices on each track.

Step 5: Saving Your Project

Remember to save your project regularly to avoid losing your work. To save your project, click on “File” in the top menu bar and select “Save” or use the shortcut Ctrl+S (Windows) or Command+S (Mac). Choose a location on your computer and give your project a descriptive name.

That’s it! You have now successfully created a new project in Ableton Live. Take the time to explore the features and experiment with different possibilities to make the most out of your music production journey.

Frequently Asked Questions For Creating A New Project In Ableton Live : Ultimate Guide For Beginners


What Are The System Requirements For Ableton Live?


The minimum system requirements for Ableton Live are a multi-core processor, 4 GB RAM, and Windows 7 or later, or OS X 10. 11. 6 or later.


How Can I Create A New Project In Ableton Live?


To create a new project in Ableton Live, open the software, click “File” and then “New Live Set. ” You can also use the shortcut Ctrl + N (Windows) or Command + N (Mac).


What Are The Initial Setup Steps For A New Project?


After creating a new project, set the tempo, time signature, and routing options. You can then start arranging tracks and adding instruments and effects.


Can I Import Audio And Midi Files Into A New Project?


Yes, you can import audio and MIDI files into a new project by dragging and dropping them directly into Ableton Live’s interface.

Categories
Archive

Using the Harmor Synthesizer in Fl Studio: Master Sound Design

FL Studio is a popular digital audio workstation (DAW) used by producers and musicians around the world. One of the most powerful synthesizers within FL Studio is Harmor. In this guide, we will explore how to use Harmor to create unique and captivating sounds.

Understanding Harmor

Harmor is a software synthesizer that allows you to generate sounds using advanced additive synthesis techniques. Unlike traditional subtractive synthesizers, Harmor focuses on the manipulation of harmonics to create complex and rich tones. Its visual interface and extensive modulation capabilities make it a popular choice for sound designers.

Credit: www.instagram.com

Getting Started with Harmor

To begin using Harmor, open FL Studio and add an instance of Harmor to your project. Once added, you’ll notice Harmor’s interface consists of various sections, including the additive synthesis section, the effects section, and the modulation matrix.

Additive Synthesis

The additive synthesis section in Harmor allows you to manipulate individual harmonics to shape your sound. By adjusting the amplitude, phase, and frequency of each harmonic, you can create unique timbres and textures. Experiment with different settings to achieve the desired sound.

Effects Section

Harmor comes equipped with a range of built-in effects to enhance your sounds. From filters and distortion to delay and reverb, you can add depth and character to your creations. Simply toggle the effects on or off and adjust their parameters as necessary.

Modulation Matrix

The modulation matrix in Harmor allows you to assign various parameters to modulate other parameters over time. This adds movement and dynamics to your sounds. Experiment with different modulation sources, such as envelopes and LFOs, to create evolving and expressive patches.

Using the Harmor Synthesizer in Fl Studio: Master Sound Design

Credit: www.youtube.com

Tips for Harnessing the Power of Harmor

1. Understand the harmonic series: Familiarize yourself with the harmonic series to effectively manipulate harmonics in Harmor. This knowledge will help you create more musical and pleasing sounds.

2. Utilize the resynthesis feature: Harmor’s resynthesis feature allows you to analyze audio samples and recreate them as additive synthesis patches. This opens up endless possibilities for sound design and manipulation.

3. Experiment with presets: Harmor comes with a wide range of presets to get you started. Explore these presets to learn different sound design techniques and gain inspiration for your own creations.

4. Combine Harmor with other plugins: FL Studio offers a vast array of plugins and instruments. Experiment with combining Harmor with other synthesizers and effects to create truly unique and layered sounds.

5. Learn from tutorials and resources: There are numerous tutorials and resources available online that can help you master the intricacies of Harmor. Take advantage of these to expand your knowledge and skills.

Frequently Asked Questions Of Using The Harmor Synthesizer In Fl Studio: Master Sound Design


What Are The Main Features Of Harmor Synthesizer?


Harmor offers advanced resynthesis capabilities, additive, and subtractive synthesis along with image and audio resynthesis.


How Can I Use Harmor In Fl Studio?


To use Harmor, open FL Studio, insert the plugin, and start creating unique sounds by adjusting its parameters.


What Makes The Harmor Synthesizer Unique?


The Harmor Synthesizer stands out for its resynthesis technology, image and audio import features, and precise sound design capabilities.


Can I Import My Own Audio In Harmor Synthesizer?


Absolutely, Harmor allows you to import your own audio files to create unique and personalized sounds.

Conclusion

The Harmor synthesizer in FL Studio is a powerful tool for sound design and music production. With its advanced additive synthesis capabilities, comprehensive effects section, and versatile modulation matrix, Harmor offers a wealth of possibilities for creating captivating and original sounds. By familiarizing yourself with its features and experimenting with different techniques, you can unlock the full potential of Harmor and take your music production to new heights.

Categories
Archive

Understanding Sampling in Fl Studio : Master the Basics

Sampling is an essential technique used in music production, allowing producers to manipulate recorded sounds to create unique compositions. FL Studio, a popular digital audio workstation, offers a wide range of sampling capabilities that can help you elevate your music to the next level. In this article, we will explore the basics of sampling in FL Studio and how you can effectively use this feature in your own productions.

Understanding Sampling in Fl Studio  : Master the Basics

Credit: www.image-line.com

What is Sampling?

In the context of music production, sampling refers to the process of taking a portion or a snippet of a recorded sound and reusing it in a new composition. This can include anything from sampling a drum break, a guitar riff, or even a vocal line. By sampling, producers can tap into a vast library of existing sounds and manipulate them to create something entirely new and unique.

Getting Started with Sampling in FL Studio

FL Studio offers several tools and features that make sampling a breeze. Here are the key steps to get started:

  1. Importing Audio: FL Studio allows you to import audio files into your project. Simply drag and drop the audio file into the playlist or use the “File” menu to import it.
  2. Slicing and Chopping: After importing the audio, you can use the “Slice” tool to cut the audio into smaller parts or “chops.” This is particularly useful for drums or rhythmic elements.
  3. Mapping to Sampler: FL Studio’s Sampler allows you to map the chopped samples across the keyboard, turning them into playable instruments. This enables you to create melodies or trigger specific sounds as needed.
  4. Applying Effects: FL Studio provides a vast array of effects that you can apply to your samples to enhance or manipulate their sound. Experiment with parameters such as reverb, delay, or distortion to shape the desired sound.
  5. Arranging and Sequencing: Once you have your samples set up, you can arrange and sequence them in the playlist to create your composition. FL Studio’s intuitive interface makes it easy to arrange your samples precisely.
Understanding Sampling in Fl Studio  : Master the Basics

Credit: www.youtube.com

Tips for Effective Sampling

Here are some tips to help you make the most out of your sampling experience in FL Studio:

  • Dig Deep: Explore various genres of music and dig deep into the archives to find unique and obscure samples. This will help you stand out and add a distinctive touch to your music.
  • Layering: Experiment with layering multiple samples to create complex and textured sounds. Combine different elements to achieve a unique sonic result.
  • Pitch and Time Manipulation: Take advantage of FL Studio’s tools for pitch-shifting and time-stretching. Altering the pitch and tempo of your samples can give them a completely different vibe.
  • Add Your Own Touch: While sampling is a great way to incorporate existing sounds, don’t shy away from adding your own elements to truly make the composition your own. You can record your own vocals, play an instrument, or incorporate original melodies.

The Legal and Ethical Side of Sampling

It is important to note that sampling can have legal and ethical implications. While it is common for producers to sample copyrighted material, it is crucial to obtain the necessary permissions or licenses, especially if you plan to release your music commercially. Respect the intellectual property rights of others and make sure to give credit where credit is due. There are also websites and services available that offer royalty-free samples that you can use without any legal issues.

Final Thoughts

Sampling in FL Studio opens up a world of creative possibilities for music producers. By understanding the basics of sampling and learning how to effectively use the tools and features provided by FL Studio, you can take your compositions to new heights. Remember to stay creative, experiment, and always respect the legal and ethical aspects of sampling. Happy producing!

Frequently Asked Questions For Understanding Sampling In Fl Studio : Master The Basics


What Is Sampling In Fl Studio?


Sampling in FL Studio refers to capturing and reusing audio snippets for music production.


How Can I Use Sampling In Fl Studio?


You can use the sampler to import and manipulate audio samples in FL Studio.


What Are The Benefits Of Sampling In Music Production?


Sampling allows the creation of unique sounds, adds versatility, and enhances creativity in music production.


Where Can I Find High-quality Samples For Fl Studio?


You can find high-quality samples on reputable websites, sample libraries, and digital marketplaces.

Categories
Archive

Using the Sytrus Synthesizer in Fl Studio : Mastering Music Creation

FL Studio is a popular digital audio workstation (DAW) used by musicians and producers to create music. One of its most powerful tools is the Sytrus synthesizer, which offers a wide range of features and capabilities for crafting unique sounds. In this article, we will explore how to effectively use the Sytrus synthesizer in FL Studio.

Introduction to the Sytrus Synthesizer

The Sytrus synthesizer is a versatile plugin that provides a comprehensive set of tools for sound design. It is capable of creating a variety of sounds, from simple pads and leads, to complex textures and basslines. With its extensive sound-shaping capabilities, the Sytrus synthesizer is ideal for both beginners and professional musicians alike.

Getting Started with Sytrus

To begin using the Sytrus synthesizer, we first need to load it into our FL Studio project. This can be done by navigating to the plugin database, locating Sytrus, and dragging it onto an empty instrument channel in the mixer.

Once Sytrus is loaded, we are presented with a user-friendly interface consisting of multiple oscillators, filters, and effects. Each section can be customized to shape the sound to our liking.

Credit: www.image-line.com

Creating Sounds with Sytrus

One of the key features of Sytrus is its extensive modulation capabilities. By assigning different modulation sources to various parameters, we can achieve dynamic and evolving sounds. This can be done by right-clicking on a parameter, selecting ‘Link to Controller,’ and choosing a modulation source from the list.

For example, by assigning an envelope to the filter cutoff, we can create a sweeping effect that changes over time. This adds movement to our sound, making it more interesting and expressive.

Exploring the Oscillators

The oscillators in Sytrus are responsible for generating the basic waveform of the sound. Sytrus offers a range of oscillator types, including sine, sawtooth, square, and more. Each oscillator can be fine-tuned, detuned, and adjusted to create complex harmonic relationships and rich textures.

Using Filters and Effects

In addition to the oscillators, Sytrus provides a variety of filters and effects that can further shape our sound. Filters help remove unwanted frequencies, while effects add depth and character to the sound.

By experimenting with different filter types, such as low-pass, high-pass, and band-pass, we can sculpt the frequency content of our sound. Effects like reverb, delay, and distortion can be used to add spatialization, ambience, and grit to our sound.

Credit: online.fliphtml5.com

Utilizing Presets and Customization

Sytrus comes with a vast library of presets that cover a wide range of musical genres. These presets serve as a great starting point for beginners and can be easily customized to fit our specific needs.

Customization options in Sytrus are endless. We can modify parameters such as envelope curves, filter resonance, oscillator waveforms, and more. This allows us to create truly unique sounds that are tailored to our musical vision.

Frequently Asked Questions On Using The Sytrus Synthesizer In Fl Studio : Mastering Music Creation


What Is The Sytrus Synthesizer?


The Sytrus Synthesizer in FL Studio is a powerful software synthesizer that allows users to create a wide variety of sounds, from traditional to experimental.


How To Use The Sytrus Synthesizer?


To use the Sytrus Synthesizer in FL Studio, simply open the plugin, browse through the presets or create your own sounds by manipulating the various oscillators, filters, and envelopes.


What Makes The Sytrus Synthesizer Unique?


The Sytrus Synthesizer stands out for its extensive modulation capabilities, flexible oscillator algorithms, and advanced filtering options, allowing for complex sound design.


Why Should I Use The Sytrus Synthesizer?


Using the Sytrus Synthesizer in FL Studio provides access to a palette of sounds suitable for genres ranging from electronic and hip-hop to orchestral and ambient music production.

Conclusion

The Sytrus synthesizer in FL Studio is a powerful tool for sound design and music production. By understanding its various features and experimenting with different parameters, we can create captivating sounds that elevate our music to the next level.

Whether you are a beginner or an experienced producer, the Sytrus synthesizer offers endless possibilities for creating your own signature sound. So go ahead, dive in, and let your creativity soar with the Sytrus synthesizer in FL Studio!

Categories
Archive

Using the Simpler in Ableton Live for Sampling: Master the Art

Have you ever wanted to incorporate sampled sounds into your music productions? The Simpler in Ableton Live is a powerful tool that allows you to easily sample and manipulate audio. In this article, we will explore how to use the Simpler for sampling in Ableton Live.

Credit: www.youtube.com

What is the Simpler?

The Simpler is a device in Ableton Live that specializes in sampling and playing back audio. It allows you to take any audio file and map it across a keyboard or MIDI controller, giving you the ability to play and manipulate the sampled sound in various ways.

Sample Importing

Importing a sample into the Simpler is an easy process. To begin, simply drag and drop an audio file directly onto the Simpler device in your Ableton Live project. Alternatively, you can right-click within the Simpler and select “Import Sample” to choose a file from your computer.

After importing the sample, you will notice waveform representation of the audio. This visual representation allows you to precisely set the starting and ending points of the sample, as well as loop and adjust its playback mode.

Sample Mapping

Once you have imported your sample, you can map it across the keyboard or MIDI controller within the Simpler. This allows you to play the sample in different pitches and octaves. To do this, click on the “Simpler” tab in the device view, then click on the “Zone” button.

In the Zone view, you can see the keyboard layout and the sample mapping. By default, the entire sample is mapped from C3 to C4, but you can adjust the range by dragging the start and end markers. Additionally, you can set different parameters like velocity sensitivity and key tracking to further customize your sample playback.

Sample Manipulation

The Simpler offers a variety of tools for manipulating your samples. Here are some key features:

  1. Envelope: The Envelope section allows you to shape the amplitude of your sample over time. You can adjust the Attack, Decay, Sustain, and Release parameters to create dynamic and expressive sound variations.
  2. Filter: The Filter section enables you to apply different types of filters to your samples. You can choose from a range of filter types such as low-pass, high-pass, band-pass, and more. Adjusting the cutoff and resonance parameters gives you further control over the character of your sound.
  3. Warping: Ableton Live’s powerful warping capabilities are also available within the Simpler. You can stretch, pitch shift, and time warp your samples to fit your project’s needs. This is particularly useful when working with samples of different tempos or musical phrases.
  4. LFO: The Simpler includes a dedicated LFO (Low-Frequency Oscillator) section, allowing you to modulate various parameters of your sample. You can use this to create rhythmic movement, vibrato, or other dynamic effects.

Sample Slicing

If you want to further explore the individual components of your sample, you can utilize the Slice mode in the Simpler. By slicing your sample, you can trigger and rearrange different sections of it in real-time. This is great for creating glitchy, chopped-up patterns or drum loops.

To slice a sample, select the Slice tab within the Simpler. You can then choose automatic slicing based on transients or manually set your own slice points. Each slice is then assigned to a MIDI note, allowing you to trigger them independently.

Credit: www.udemy.com

Frequently Asked Questions Of Using The Simpler In Ableton Live For Sampling: Master The Art


How Can I Use Simpler In Ableton Live?


You can use Simpler in Ableton Live for easy and efficient sampling of audio clips.


What Are The Key Features Of Simpler?


Simpler offers intuitive sample-based synthesis and is perfect for shaping and manipulating sounds.


Can I Import My Own Audio Samples Into Simpler?


Yes, you can import your own audio samples into Simpler to create unique and personalized sounds.


How Does Simpler Simplify The Sampling Process?


Simpler streamlines the sampling process by providing easy-to-use controls for adjusting start, loop, and end points.

Conclusion

The Simpler in Ableton Live is a versatile and essential tool for anyone interested in sampling and creating unique sounds. With its intuitive interface and powerful features, you can seamlessly incorporate samples into your music productions. Use the Simpler to bring new life to your tracks and explore the endless possibilities of audio manipulation.

Categories
Archive

Using Compression in Ableton Live : Improve Sound Quality with Ease

Compression is an essential tool in music production that helps to control the dynamics of a sound. In Ableton Live, compression can be used to even out the volume levels of different tracks, add sustain to instruments, and bring out the details in a mix. In this article, we will explore the basics of compression and how to effectively use it within Ableton Live.

Credit: www.waves.com

Credit: www.amazon.com

Understanding Compression

Compression works by reducing the dynamic range of an audio signal. It reduces the volume of the loudest parts of a sound while raising the level of the softer parts. This helps in achieving a more balanced mix where all the elements can be heard clearly.

When using compression, it is important to understand a few key parameters:

Parameter Description
Threshold This sets the level at which the compression begins to take effect. Any audio above this threshold will be compressed.
Ratio The ratio determines how much the audio will be compressed once it exceeds the threshold. A ratio of 4:1 means that for every 4dB above the threshold, only 1dB will be allowed through.
Attack This controls how quickly the compression engages after the audio surpasses the threshold.
Release The release time determines how long it takes for the compressor to stop compressing once the audio falls below the threshold.
Gain After applying compression, you might need to boost the overall volume. The gain control allows you to make up for any perceived loss in volume.

Using Compression in Ableton Live

Ableton Live offers several devices and plugins for applying compression. The most commonly used ones are the “Compressor” and “Glue Compressor” found in the audio effects section.

Step 1: Insert The Compressor

To add compression to a track, first, select the track you wish to compress. From the “Audio Effects” section, drag and drop the “Compressor” device onto the track.

Step 2: Set Up The Parameters

Adjust the compression settings based on the characteristics of the track. Start by setting the threshold. If you want gentle compression, set a higher threshold, and for more aggressive compression, lower the threshold.

Next, adjust the ratio to control the amount of compression you desire. A lower ratio gives a more transparent and subtle effect, while a higher ratio provides a more pronounced compression effect.

The attack and release settings determine how quickly the compression engages and releases. For most instruments, a relatively fast attack and release time works well, but feel free to experiment and see what suits your track best.

After setting up the parameters, use the gain control to adjust the post-compression volume. Increase it to compensate for any perceived loss in loudness.

Step 3: Utilize Sidechain Compression

In addition to regular compression, Ableton Live also offers sidechain compression. This technique allows you to create a pumping or breathing effect by using another audio source to trigger the compression on a different track.

To set up sidechain compression, simply click on the small triangle on the top left corner of the “Compressor” device and enable the sidechain option. Then select the audio source you want to use as the trigger, such as a kick drum. Adjust the settings to achieve the desired effect.

Tips for Effective Compression

Here are some tips to help you make the most out of compression in Ableton Live:

  • Use compression sparingly to avoid over-compressed sounds.
  • Experiment with different compression settings to find the right balance for your mix.
  • Consider using parallel compression, where a heavily compressed signal is blended with the original signal, to achieve a more controlled sound without sacrificing dynamics.
  • Use automation to adjust the compression settings over time for added dynamic variation.

By understanding the principles of compression and how to effectively use it in Ableton Live, you can enhance the quality and clarity of your mixes. Experiment, trust your ears, and have fun exploring the countless possibilities that compression brings to your music production!

Frequently Asked Questions On Using Compression In Ableton Live : Improve Sound Quality With Ease


What Is Compression In Music Production?


Compression is a technique used to control the dynamic range of audio signals, making loud parts quieter and quiet parts louder. It helps to even out the volume and add punch to sounds.


How Does Compression Affect Sound Quality?


Compression can enhance sound quality by reducing inconsistencies in the audio levels, making the overall mix sound more balanced and polished.


When Should I Use Compression In Ableton Live?


Compression can be used during both the recording and mixing stages of music production to improve the overall sound and dynamics of the music. It can be applied to individual tracks or the master track.


Can Compression Be Overused?


Yes, over-compression can result in loss of dynamics and make the music sound unnatural or dull. It’s important to use compression judiciously to avoid these effects.