Categories
Archive

Using the Spectrum Analyzer in Ableton Live : Mastering Audio Analysis

Are you an aspiring music producer or DJ looking to take your skills to the next level? If so, then you’re probably familiar with Ableton Live, one of the most popular digital audio workstations (DAWs) used in the industry today. One of the powerful tools available in Ableton Live is the Spectrum Analyzer, which can greatly assist you in analyzing and visualizing audio signals in real-time.

The Spectrum Analyzer is an essential tool for audio engineers, producers, and DJs as it provides a comprehensive and detailed view of the frequency content of a sound. It allows you to identify the various components of a sound, such as its low, mid, and high frequencies, and assess its overall tonal balance. With the Spectrum Analyzer, you can make informed decisions about EQ adjustments, identify problematic frequencies, and enhance the overall mix.
Using the Spectrum Analyzer in Ableton Live  : Mastering Audio Analysis

Credit: resoundsound.com

Getting Started with the Spectrum Analyzer in Ableton Live

To use the Spectrum Analyzer in Ableton Live, follow these simple steps:

  1. Open Ableton Live and select a track you wish to analyze.
  2. Click on the “Devices” tab in the browser located on the left-hand side of the screen.
  3. Navigate to “Audio Effects” and then select “Spectrum”.
  4. Drag and drop the Spectrum device onto the desired audio track.
  5. Once the Spectrum Analyzer is added, you will see a real-time visual representation of the audio signal.
  6. Explore the various parameters and settings available in the Spectrum Analyzer to customize your analysis.

Understanding the Spectrum Analyzer Display

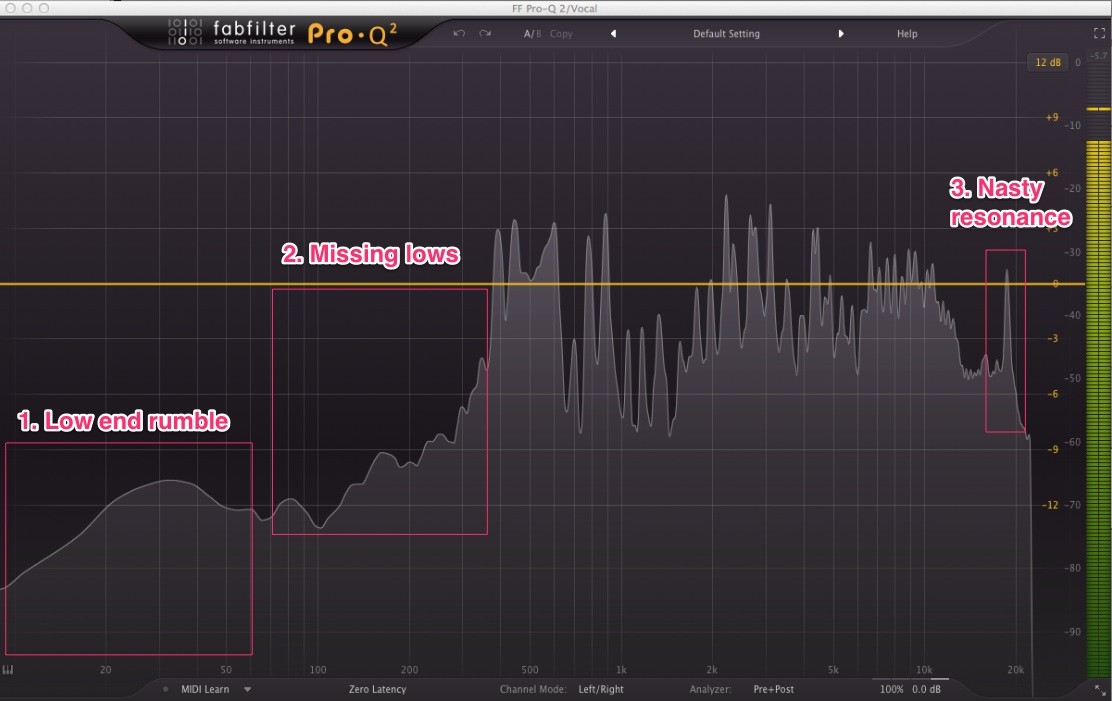
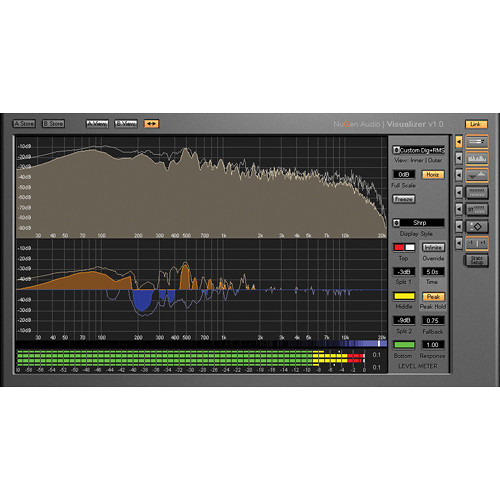
The Spectrum Analyzer display consists of a graph with the frequency range on the x-axis and the amplitude or energy level on the y-axis. The spectrum is usually represented using different colors to differentiate between different frequency bands. For example, low frequencies might be represented as blue, mid frequencies as green, and high frequencies as red.

By observing the spectrum display, you can identify the dominant frequencies in a sound, detect resonant peaks or notches, and pinpoint areas where certain frequencies may need adjustment. Analyzing the spectrum can help you identify frequency clashes between different elements of your mix and make precise EQ decisions.

Advanced Features and Tips for Using the Spectrum Analyzer

Beyond the basic functionality of the Spectrum Analyzer, Ableton Live offers several advanced features to enhance your analysis capabilities. Here are a few tips to make the most out of this powerful tool:

  • Adjust the FFT Size: The FFT (Fast Fourier Transform) Size determines the resolution of the spectrum analysis. A smaller FFT Size provides a broad overview, while a larger FFT Size offers more detailed information.
  • Change Display Modes: Experiment with different display modes such as Bar, Dot, or Line to suit your preference and improve visibility.
  • Use Freeze Mode: The Freeze button allows you to freeze the spectrum display, allowing you to closely examine certain sections of the audio signal.
  • Compare Spectrums: Enable the “Delta” function to compare the spectrum of the selected track with another track in your mix. This can be helpful in identifying frequency imbalances between different audio sources.
  • Utilize EQ Eight Integration: Ableton Live’s built-in EQ Eight can be linked to the Spectrum Analyzer to make precision EQ adjustments directly from the analyzer display.
Using the Spectrum Analyzer in Ableton Live  : Mastering Audio Analysis

Credit: www.bhphotovideo.com

Why the Spectrum Analyzer is a Must-Have Tool

Integrating the Spectrum Analyzer into your workflow can significantly improve your mixing and mastering process. By visually understanding the frequency content of your audio, you can make more informed decisions and achieve a more balanced and professional sound quality in your mixes.

Whether you are a beginner or an experienced music producer, the Spectrum Analyzer in Ableton Live offers an intuitive and powerful way to analyze audio signals. Take advantage of this tool to enhance your creativity and improve the overall quality of your music productions.

Now that you have a better understanding of how to use the Spectrum Analyzer in Ableton Live, you can start exploring its capabilities and incorporating it into your production workflow. Analyze, adjust, and elevate your music with the help of this invaluable tool.

Frequently Asked Questions Of Using The Spectrum Analyzer In Ableton Live : Mastering Audio Analysis


What Is The Spectrum Analyzer In Ableton Live?


The Spectrum Analyzer in Ableton Live is a visualization tool for analyzing the frequency content of audio signals.


How Can I Use The Spectrum Analyzer For Mixing?


You can use the Spectrum Analyzer in Ableton Live to identify and adjust the frequency balance of your mix.


Is The Spectrum Analyzer Helpful For Sound Design?


Yes, the Spectrum Analyzer in Ableton Live can be very useful for visualizing and understanding the frequency characteristics of sound.


What Are The Key Features Of The Spectrum Analyzer?


The Spectrum Analyzer in Ableton Live offers real-time frequency analysis, customizable settings, and easy integration within the software.
Categories
Archive

Understanding the Ableton Live Interface: Mastering Tips and Tricks

Ableton Live is a powerful digital audio workstation (DAW) that offers a wide range of creative possibilities for musicians, producers, and DJs. To fully harness its potential, it is essential to have a solid understanding of the Ableton Live interface. In this article, we will explore the various components of the interface and how they work together to create music.

The Arrangement View

The Arrangement View is the main workspace in Ableton Live, where you arrange and edit your music. It consists of vertical tracks that represent different elements of your composition, such as instruments, vocals, and effects. Each track contains individual clips that can be arranged horizontally along the timeline.

The Arrangement View allows you to easily arrange your music in a linear fashion, making it ideal for recording and editing. You can easily move and resize clips, add automation, and apply various effects to each track.

Understanding the Ableton Live Interface: Mastering Tips and Tricks

Credit: blog.native-instruments.com

The Session View

The Session View is a unique feature of Ableton Live that sets it apart from other DAWs. It provides a non-linear, improvisational approach to music creation. In the Session View, you can trigger and manipulate clips in real-time to create dynamic performances.

Clips in the Session View are organized into scenes, which can be launched individually or together to create different song sections. This allows for spontaneous experimentation and live performance possibilities. You can also record your performance in the Session View and later drag it to the Arrangement View for further editing and arrangement.

Credit: shop.343labs.com

The Browser

The Browser in Ableton Live is where you can access your audio files, presets, and devices. It provides a streamlined workflow by allowing you to easily search, preview, and drag and drop various elements into your project. The Browser is divided into different categories, such as Instruments, Audio Effects, MIDI Effects, and Samples, making it simple to find what you need quickly.

The Mixer

The Mixer in Ableton Live allows you to control the volume, panning, and effects of each track. It provides a visual representation of your audio levels and offers flexible routing options. You can add insert and send effects to individual tracks, as well as group tracks together for easier control.

The Mixer also features a master track, where you can apply global effects and adjust the overall volume of your mix. It provides precise control over your audio and ensures that each element sits well in the mix.

The Clip View

The Clip View is where you can edit and manipulate individual clips in Ableton Live. When a clip is selected, its parameters are displayed in the Clip View, allowing you to make adjustments and apply effects. You can change the clip’s start and end points, adjust its volume and fades, and apply various time-based and modulation effects.

Frequently Asked Questions Of Understanding The Ableton Live Interface: Mastering Tips And Tricks


What Are The Main Features Of Ableton Live Interface?


Ableton Live Interface offers a user-friendly design, flexible workflow, session view, and arrangement view.


How Can I Customize The Ableton Live Interface?


You can customize Ableton Live Interface by rearranging windows, changing color schemes, and organizing device chains.


What Is The Purpose Of The Session View In Ableton Live Interface?


The Session View allows for non-linear workflow, launching clips, creating arrangements, and improvising live performances.


How Can I Access The Mixer In Ableton Live Interface?


Access the mixer in Ableton Live Interface by clicking on the mixer icon in the bottom right corner of the interface or pressing the “M” key.

Conclusion

Understanding the Ableton Live interface is essential for making the most out of this powerful software. By familiarizing yourself with the Arrangement View, the Session View, the Browser, the Mixer, and the Clip View, you will be able to create, arrange, and perform your music with ease.

Whether you are a beginner or an experienced musician, mastering the Ableton Live interface opens up a world of possibilities for your musical journey. So, take the time to explore and experiment with the interface, and unleash your creativity in ways you never thought possible.

Categories
Archive

Using the Wavetable Synthesizer in Ableton Live: Mastering Sound Creation

When it comes to music production and sound design, having a versatile and powerful synthesizer is essential. One such tool that has gained popularity among electronic music producers is the Wavetable Synthesizer in Ableton Live. In this article, we will explore how to make the most out of this feature-packed synthesizer to create unique and captivating sounds for your productions.

Using the Wavetable Synthesizer in Ableton Live: Mastering Sound Creation

Credit: sequence-one.teachable.com

Credit: seedtostage.com

Understanding Wavetables

Before diving into using the Wavetable Synthesizer, let’s first understand what wavetables are. A wavetable is a collection of single-cycle waveforms, typically arranged in a grid or a series. These waveforms can consist of different harmonics and timbres, allowing for infinite sound possibilities.

Ableton Live’s Wavetable Synthesizer provides an intuitive interface to browse, select, and manipulate these wavetables. With its powerful sound engine and extensive modulation capabilities, it enables you to sculpt sounds that range from warm analog tones to futuristic digital textures.

Getting Started with the Wavetable Synthesizer

To begin using the Wavetable Synthesizer in Ableton Live, simply create a new MIDI track and load the instrument by selecting “Wavetable” from the instrument options. Once loaded, you will be presented with a visually appealing interface that consists of several sections to shape your sounds.

The heart of the Wavetable Synthesizer lies in the oscillator section. Here, you can choose from a wide selection of wavetables or even import your own. Experiment with different wavetables to discover unique combinations and textures that fit your musical style.

Alongside the oscillator, you will find various parameters to shape your sound further. Envelopes, filters, and LFOs (Low-Frequency Oscillators) provide means to add movement and dynamics to your sound. Dive deep into these controls, and you’ll unlock the true potential of the Wavetable Synthesizer.

Modulation and Effects

To add depth and complexity to your sounds, take advantage of the Wavetable Synthesizer’s modulation and effects capabilities. By utilizing modulation sources such as envelopes and LFOs, you can assign them to various parameters and create evolving textures and sequences.

Ableton Live also offers a range of built-in effects such as reverb, delay, distortion, and more. Applying these effects to your wavetable sounds can help you achieve the desired atmospheric, spatial, or distorted characteristics.

Advanced Sound Design Techniques

While the Wavetable Synthesizer provides an extensive collection of preset sounds, it is in the realm of sound design where its true potential shines. By utilizing the modulation matrix, you can explore complex and intricate soundscapes that are uniquely yours.

Consider experimenting with automation and macro controls to create dynamic and expressive performances. By mapping parameters to macro knobs or automation lanes, you can manipulate various aspects of your sound during live performances or studio sessions.

Frequently Asked Questions Of Using The Wavetable Synthesizer In Ableton Live: Mastering Sound Creation


What Is A Wavetable Synthesizer?


A Wavetable Synthesizer is a digital instrument that creates sound using pre-recorded waveforms.


How Does A Wavetable Synthesizer Work?


It works by blending and morphing different waveforms to create evolving and complex sounds.


What Are The Benefits Of Using A Wavetable Synthesizer In Ableton Live?


Using a Wavetable Synthesizer in Ableton Live offers a wide range of preset sounds and the ability to create unique and evolving textures.


Can I Import My Own Wavetables Into Ableton Live’s Wavetable Synthesizer?


Yes, Ableton Live allows users to import their own custom wavetables to create completely unique sounds.

Conclusion

In conclusion, the Wavetable Synthesizer in Ableton Live opens up endless possibilities for sound creation and music production. Its user-friendly interface, extensive sound design capabilities, and modulation options make it an indispensable tool for any electronic music producer.

Whether you are new to synthesizers or an experienced sound designer, the Wavetable Synthesizer provides a playground for sonic exploration. Take your music to new heights by unleashing the power of the Wavetable Synthesizer in Ableton Live.

Categories
Archive

Using the Audio Editor in Ableton Live : Boost Your Music Production

Introduction

Ableton Live is a powerful digital audio workstation (DAW) used by musicians, producers, and DJs worldwide. One of its standout features is the Audio Editor, a versatile tool that allows users to manipulate and enhance audio files. In this article, we will explore the various capabilities of the Audio Editor and how you can make the most of it in your music production process.

Basic Editing Functions

The Audio Editor in Ableton Live offers a wide range of basic editing functions, such as cutting, cropping, and fading. By simply selecting a portion of the audio file, you can easily delete or crop unwanted parts, ensuring seamless transitions in your tracks. Additionally, you can apply fades to smoothen abrupt starts and endings, creating a more polished and professional sound.

Advanced Editing Techniques

Beyond the basic editing functions, the Audio Editor provides advanced techniques to fine-tune your audio. One such feature is the ability to warp audio, which allows you to adjust the timing and tempo of a sample or loop. This is particularly useful when trying to match the timing of different elements in your track or when creating unique rhythmic patterns.

Another powerful feature of the Audio Editor is the ability to apply audio effects. Ableton Live offers a wide array of built-in effects, such as EQ, reverb, and compression, which can be applied directly within the editor. This allows you to experiment with different sound treatments and enhance the sonic characteristics of your audio.

Working with Transients

Transients are the short, impactful peaks in audio waveforms, such as drum hits or plucked guitar strings. Ableton Live’s Audio Editor features a transient detection tool that automatically identifies these transients within an audio file. By selecting and manipulating the transients, you can easily adjust the timing and emphasize specific elements of your audio, adding more energy and impact to your music.

Pitch and Time Manipulation

The Audio Editor also allows you to manipulate the pitch and time of your audio files. You can transpose audio up or down to create unique melodies or harmonies, and adjust the timing to match the tempo of your project. This enables you to experiment with different creative ideas and explore new musical possibilities.

Collaborative Editing

Ableton Live’s Audio Editor supports collaborative editing, making it easy to work with other musicians and producers. You can export specific sections of audio, create loops, or even edit multiple tracks simultaneously. This collaborative approach promotes creativity and allows for seamless integration of audio recorded by different artists.

Credit: www.amazon.com

Using the Audio Editor in Ableton Live  : Boost Your Music Production

Credit: www.logicalincrements.com

Frequently Asked Questions On Using The Audio Editor In Ableton Live : Boost Your Music Production


What Is The Audio Editor In Ableton Live?


The Audio Editor in Ableton Live is a powerful tool that allows users to precisely manipulate audio waveforms and apply various editing effects.


How Can I Use The Audio Editor For Audio Comping?


You can use the Audio Editor in Ableton Live for audio comping by seamlessly selecting and combining the best parts from multiple recordings into one cohesive take.


What Features Does The Audio Editor Offer For Mixing?


The Audio Editor in Ableton Live offers features such as volume automation, audio effects, and the ability to fine-tune individual audio clips for effective mixing.


Can The Audio Editor Be Used For Time-stretching Audio?


Yes, the Audio Editor in Ableton Live can be used for time-stretching audio, allowing you to adjust the tempo and timing of audio clips in a flexible manner.

Conclusion

The Audio Editor in Ableton Live offers a powerful set of tools and features for manipulating and enhancing audio files. By using its basic editing functions, advanced techniques, transient manipulation, pitch and time adjustment, and collaborative editing capabilities, you can take your music production to the next level. Experiment with the Audio Editor, unleash your creativity, and create professional-quality tracks that stand out from the crowd.

Categories
Archive

Using Delay in Ableton Live : Mastering the Technique

Delays are indispensable tools in music production, as they add depth, character, and dimension to your sound. Ableton Live offers a variety of delay effects that can take your tracks to the next level. In this comprehensive guide, we will explore how to effectively use delay within Ableton Live to enhance your music.

Understanding Delay

Delay is an audio effect that plays back an input signal after a specified amount of time. It can create echoes, repeats, and spatial effects that give your music a sense of space and movement. There are different types of delay effects, such as tape delay, analog delay, digital delay, and ping-pong delay, each offering unique characteristics.

Using Delay in Ableton Live  : Mastering the Technique

Credit: www.udemy.com

Applying Delay in Ableton Live

Ableton Live provides several built-in delay devices that are easy to use and versatile. Let’s discuss some of these devices:

1. Simple Delay

The Simple Delay device is a straightforward, no-frills delay effect. It allows you to adjust the delay time in milliseconds or sync it to the song’s tempo. You can also control the feedback, filter, and ping-pong settings to create interesting delay patterns or stereo effects.

2. Ping Pong Delay

The Ping Pong Delay effect bounces the delayed signal between the left and right channels, creating a mesmerizing stereo effect. You can adjust the delay time, feedback, and filter settings to add depth and movement to your tracks.

3. Grain Delay

The Grain Delay device is unique, as it allows you to manipulate the grains of the audio signal to create complex and granular delay effects. It offers control over parameters like delay time, pitch, spray, and randomization, enabling you to achieve experimental and unique sounds.

Credit: www.facebook.com

Advanced Delay Techniques

Once you have mastered the basics of using delay in Ableton Live, you can explore more advanced techniques to take your tracks to the next level:

1. Automated Delays

Use automation to change delay settings over time. This can help create dynamic and evolving delay patterns that add movement and interest to your music. Experiment with automating parameters like delay time, feedback, and filter frequency.

2. Parallel Processing

Parallel processing involves splitting the audio signal and sending it to multiple delay devices with different settings. This technique allows you to create rich and complex delay textures while retaining the clarity of the original sound. Be creative and experiment with different delay combinations.

3. Modulation And Filters

Introduce modulation and filtering to your delay effects to create interesting textures and movement. Modulating the delay time or adding filter sweeps can give your tracks a unique character and depth. Additionally, try experimenting with different filter types, such as low-pass, high-pass, and band-pass filters.

Best Practices for Using Delay

While using delay in Ableton Live, keep the following best practices in mind:

  • Start with subtle delay settings and gradually increase the intensity to avoid overwhelming your mix.
  • Avoid excessive feedback to prevent your delays from becoming too chaotic or prominent.
  • Consider the tempo of your song when setting the delay time. Syncing the delay time to the tempo can create rhythmic and synchronized effects.
  • Experiment with different delay types and settings to find the sound that best complements your music.
  • Listen to your delays in the context of your mix to ensure they enhance the overall arrangement and not overpower other elements.

In conclusion, delay is an essential tool for enhancing the depth and character of your music in Ableton Live. By understanding the different delay devices available and exploring advanced techniques, you can create captivating and unique delay effects. Remember to experiment, have fun, and let your creativity shine.

Frequently Asked Questions For Using Delay In Ableton Live : Mastering The Technique


What Is Delay In Ableton Live?


Delay is an audio effect in Ableton Live that produces an echo of the incoming signal.


How Can I Use Delay In Ableton Live?


You can use Delay in Ableton Live to create depth, space, and rhythmic effects in your music productions.


What Are The Different Types Of Delay In Ableton Live?


The different types of Delay in Ableton Live include simple delay, ping pong delay, and grain delay.


What Is The Parameter Modulation Feature In Delay?


Parameter modulation in Delay allows you to modulate the delay time, feedback, and filter frequency over time.

Categories
Archive

Using Automation in Ableton Live : Master Your Music Tech

Ableton Live is a powerful and versatile software that allows musicians, producers, and DJs to create, record, and perform music. One of the key features that sets Ableton Live apart from other digital audio workstations is its robust automation capabilities. Automation is the process of controlling various parameters over time, such as volume, panning, effects, and more, to bring life and movement to your music.

Why use automation?

Automation is an essential tool in music production as it enables you to add dynamic changes throughout your tracks. By automating different parameters, you can create builds, transitions, and intricate changes that enhance the overall musical experience. Automation allows you to breathe life into your compositions, making them more engaging and expressive.

Credit: www.amazon.com

Understanding automation lanes

In Ableton Live, automation is represented by automation lanes. These lanes are displayed below the track waveform and allow you to draw, edit, and manipulate automation data. Each parameter has its own dedicated automation lane, making it easy to control and modify specific aspects of your music.

Creating automation in Ableton Live

Creating automation in Ableton Live is a straightforward process. To get started, make sure the Arrangement View is selected. Right-click on the automation lane of the parameter you want to automate and select “Show Automation.” A new lane will appear, and you can either draw automation curves or record them in real-time.

Using Automation in Ableton Live  : Master Your Music Tech

Credit: www.linkedin.com

Types of automation

Ableton Live offers various types of automation that you can utilize to enhance your music productions.

Volume Automation

Automating the volume allows you to control the overall loudness of your tracks. By adjusting the volume level at different points in your song, you can create emphasis, build tension, or introduce delicate nuances.

Panning Automation

Panning automation changes the position of the sound in the stereo field, allowing you to create a sense of movement and space. By automating panning, you can make elements in your mix appear to move from left to right, creating an immersive listening experience.

Effect Automation

Ableton Live offers a wide range of effects that you can automate, such as filters, delays, reverbs, and more. Automating effects allows you to sculpt and shape your sounds over time, introducing unique textures and atmospheres to your tracks.

Parameter Modulation

In addition to automation, Ableton Live also provides parameter modulation capabilities. With modulation, you can create complex and evolving sounds by assigning parameters to various modulation sources, such as LFOs (low-frequency oscillators) or envelopes.

Tips and tricks for using automation effectively

  • Start with simple automation and gradually experiment with more complex techniques.
  • Use automation to create smooth transitions between different sections of your track.
  • Combine multiple automation lanes to create intricate and evolving changes.
  • Don’t be afraid to automate unconventional parameters to add unique character to your music.
  • Experiment with different automation shapes to achieve the desired effect.
  • Utilize Ableton Live’s automation recording feature for expressive and improvised performances.

Final thoughts

Automation is a powerful tool in Ableton Live that allows you to bring your music to life. By harnessing the capabilities of automation, you can create dynamic, expressive, and captivating compositions. Experiment with different automation techniques, and let your creativity guide you. Unlock the true potential of your music with Ableton Live’s automation features!

Frequently Asked Questions For Using Automation In Ableton Live : Master Your Music Tech


What Is Ableton Live Automation?


Ableton Live automation allows you to control mix, effects, and devices over time.


How Can I Use Automation In Ableton Live?


You can automate parameters by recording movements, drawing breakpoints, or using automation envelopes.


Why Is Automation Important In Music Production?


Automation adds dynamics and expression to your music, enhancing the overall quality.


Can I Automate Third-party Plugins In Ableton Live?


Yes, you can automate parameters of third-party plugins within Ableton Live.

Categories
Archive

Creating Percussion Sounds in Ableton Live: Master Your Beat

Are you a music enthusiast who loves experimenting with different sounds and beats? Look no further than Ableton Live, a powerful digital audio workstation that enables you to create unique and captivating percussion sounds. In this article, we will explore various techniques and tools that will help you unlock your creativity and take your percussion game to the next level.

1. Choosing the Right Samples

The foundation of any great percussion sound lies in the quality of the samples you use. Ableton Live offers a vast library of pre-recorded percussion samples that span multiple genres and styles. Take the time to explore the library and select samples that resonate with your desired sound. From traditional instruments to boisterous electronic beats, you’ll find an impressive selection to work with.

Credit: www.productionmusiclive.com

2. Layering and Processing

Layering percussion sounds can add depth and texture to your tracks. Experiment with blending different samples together to create a unique sound. Ableton Live provides a straightforward approach to layering by allowing you to stack multiple samples within a single drum rack. Once you’ve achieved the desired combination, you can further enhance the sounds using a variety of effects within Ableton Live’s extensive arsenal.

3. Applying Effects

Ableton Live offers a range of effects that can help transform your percussion sounds. From simple EQ adjustments to complex reverbs and delays, these effects allow you to sculpt your sound and add a professional touch. Experiment with different settings and parameters to find the perfect balance that complements your track.

4. Incorporating Automation

Automation is a powerful feature in Ableton Live that allows you to create dynamic and evolving percussion sounds. By automating parameters such as volume, panning, and filter cutoff, you can add movement and interest to your beats. Spend time experimenting with automation to bring your percussion patterns to life.

5. Sampling and Manipulating

Taking advantage of Ableton Live’s sampling capabilities can elevate your percussion sounds to new heights. Record and manipulate your own samples or import pre-recorded sounds into Ableton Live’s Simpler or Sampler devices. From there, you can chop, stretch, and pitch-shift the samples to create entirely unique percussion textures.

6. Utilizing MIDI Controllers

Ableton Live seamlessly integrates with MIDI controllers, providing a hands-on approach to creating percussion sounds. By connecting drum pads or MIDI keyboards, you can program beats in real-time, giving you more control and allowing for a more immersive creative process. Experiment with different MIDI controllers to find the one that suits your workflow.

7. Exploring Drum Synthesis

For the more adventurous music producers, Ableton Live offers a range of drum synthesis tools that enable you to design your own percussion sounds from scratch. From FM synthesis to physical modeling, these tools provide endless possibilities for creating unique and unconventional percussion textures.

Creating Percussion Sounds in Ableton Live: Master Your Beat

Credit: unison.audio

Frequently Asked Questions For Creating Percussion Sounds In Ableton Live: Master Your Beat


How To Create Percussion Sounds In Ableton Live?


To create percussion sounds in Ableton Live, use drum racks and experiment with different samples and effects.


What Are Some Techniques For Designing Unique Percussion Sounds?


Experiment with layering different sounds, manipulating parameters, and using unconventional samples for designing unique percussion sounds.


Why Is It Important To Have Unique Percussion Sounds In Music Production?


Unique percussion sounds can add character and depth to your music, helping it stand out and create a memorable listening experience.


What Are Some Essential Ableton Live Devices For Percussion Sound Design?


Ableton Live offers a range of devices such as Simpler, Drum Rack, and Impulse that are essential for percussion sound design.

Conclusion

With Ableton Live, the possibilities for creating unique and captivating percussion sounds are endless. By selecting the right samples, layering and processing, applying effects, incorporating automation, sampling and manipulating, utilizing MIDI controllers, and exploring drum synthesis, you’ll be well on your way to producing beats that stand out from the crowd. So, let your creativity soar and watch as your percussion creations take your music production to the next level!

Categories
Archive

Using the Operator Synthesizer in Ableton Live : Master the Art

When it comes to creating unique and complex sounds in your music productions, the Operator synthesizer in Ableton Live is an incredibly powerful tool. Whether you’re a beginner or an experienced producer, learning how to use the Operator can greatly enhance your sound design capabilities.

What is the Operator Synthesizer?

The Operator is a versatile FM synthesizer that is built into Ableton Live. FM stands for Frequency Modulation, and this synthesis technique allows for the creation of rich and evolving sounds by modulating one oscillator with another. The Operator consists of four oscillators, each capable of generating a wide range of waveforms, and a comprehensive modulation matrix that allows for complex sound manipulation.

Creating and Editing Sounds

When you open the Operator, you’ll be greeted with a streamlined interface that allows for quick and intuitive sound creation. Each of the four oscillators can be individually tuned, shaped, and modulated to create your desired sound. The modulation matrix offers a wide range of modulation options, including envelope generators, LFOs, and more. This allows for intricate sound design and the ability to create evolving and dynamic textures.

One of the key features of the Operator is its ability to create complex harmonic relationships. By modulating one oscillator with another, you can achieve a wide range of tones, from bell-like timbres to metallic and gritty textures. Experimenting with different modulation routings and parameters will unlock a world of sonic possibilities.

Credit: www.facebook.com

Sound Design Tips

Here are some sound design tips to get the most out of the Operator synthesizer:

  • Start with a simple waveform and gradually introduce modulation to add complexity.
  • Experiment with different modulation routings to create unique and evolving textures.
  • Use the built-in filters and effects in Ableton Live to further shape and sculpt your sound.
  • Try layering multiple instances of the Operator to create rich and lush sounds.
  • Don’t be afraid to experiment and push the boundaries of what the Operator can do.

By employing these sound design techniques, you’ll be able to create sounds that stand out and add a unique flavor to your music productions.

Using the Operator in a Musical Context

While the Operator is a powerful tool for sound design, it is also a great synthesizer for creating musical elements in your tracks. Whether you’re looking to create basslines, leads, pads, or even drum sounds, the Operator’s versatility makes it suitable for a wide range of musical applications.

When using the Operator in a musical context, it’s essential to pay attention to factors such as modulation depth, envelope settings, and the overall tonal balance of the sound. These parameters will help ensure that your sounds sit well in the mix and contribute to the overall musicality of your tracks.

Credit: www.mind-flux.com

Frequently Asked Questions For Using The Operator Synthesizer In Ableton Live : Master The Art


What Is Operator Synthesizer?


The Operator Synthesizer is a powerful digital synthesizer available in Ableton Live, designed for creating a wide range of sounds through digital frequency modulation.


How To Use Operator Synthesizer?


You can use Operator Synthesizer in Ableton Live by selecting it from the instrument rack, then adjusting parameters such as oscillators, filters, and envelopes to craft your desired sound.


What Are The Key Features Of Operator Synthesizer?


The Operator Synthesizer is known for its versatile sound design capabilities, offering advanced oscillator configurations, filter types, and modulation options for creating unique and dynamic sounds.


Can Operator Synthesizer Create Bass Sounds?


Yes, Operator Synthesizer is capable of producing deep and powerful bass sounds, thanks to its flexible oscillator and filter settings that allow for shaping low-end frequencies.

Conclusion

The Operator synthesizer in Ableton Live is a powerful tool for sound design and musical composition. By understanding its capabilities and exploring its features, you can unlock a world of sonic possibilities and take your music productions to new heights. So, dive in, experiment, and let your creativity soar with the Operator!

Categories
Archive

Using the Analog Synthesizer in Ableton Live: Master Your Sound

As an Amazon Associate I earn from qualifying purchases.

Ableton Live is a versatile digital audio workstation that offers a wide range of tools and features for music producers and enthusiasts. One particularly powerful tool in Ableton Live is the Analog Synthesizer. In this article, we will explore the capabilities of the Analog Synthesizer and provide tips for using it effectively in your tracks.

Credit: www.343labs.com

Introduction to the Analog Synthesizer

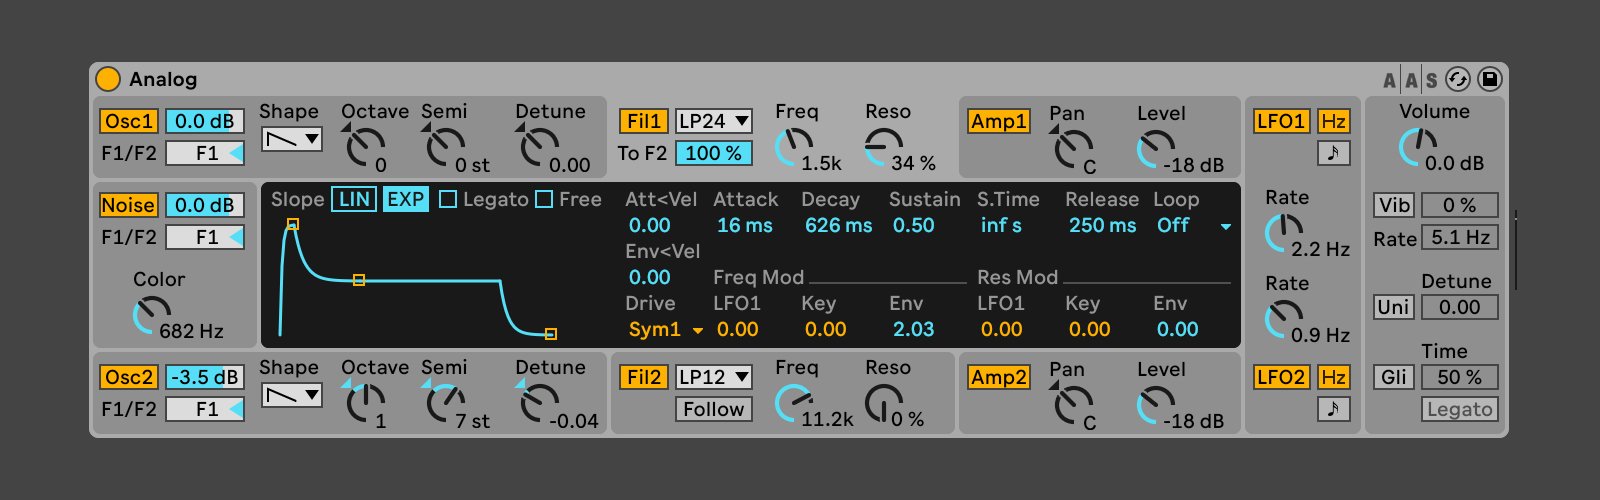
The Analog Synthesizer in Ableton Live is a virtual instrument that emulates the sound and functionality of classic analog synthesizers. It offers a vast array of possibilities for creating unique and textured sounds, giving your music that distinct analog warmth and character.

The Analog Synthesizer features a user-friendly interface that allows you to manipulate various parameters such as oscillators, filters, envelopes, and modulation sources. Whether you are new to synthesis or an experienced sound designer, the Analog Synthesizer provides a powerful and intuitive platform for crafting your sonic creations.

Getting Started with the Analog Synthesizer

After opening Ableton Live and creating a new MIDI track, you can easily add the Analog Synthesizer to your session by selecting it from the list of available instruments. Once added, you can start exploring its features and begin shaping your sounds.

Oscillators:

The oscillators in the Analog Synthesizer are the heart of your sound. They generate the basic waveform that serves as the foundation for your patches. You can choose from various waveforms such as sine, triangle, sawtooth, and square, each offering its own unique tonal characteristics. Experimenting with different combinations and detuning the oscillators can create rich and complex sounds.

Filters:

The filters in the Analog Synthesizer allow you to shape the frequency content of your sound. The low-pass, high-pass, and band-pass filters can be used to cut or boost specific frequency ranges, adding color and character to your patches. Automating the filter cutoff and resonance parameters can create dynamic and evolving timbres.

Envelopes:

Envelopes play a vital role in defining the shape and behavior of your sound over time. The Analog Synthesizer provides flexible envelope generators for controlling parameters such as volume, filter cutoff, and modulation intensity. By adjusting the attack, decay, sustain, and release stages, you can sculpt the envelope to match your desired sound characteristics.

Modulation:

Modulation adds movement and variation to your sounds. The Analog Synthesizer offers multiple modulation sources, including LFOs (Low-Frequency Oscillators) and envelope followers. By assigning these modulation sources to different parameters, such as oscillator pitch or filter cutoff, you can create evolving and animated sounds.

Using the Analog Synthesizer in Ableton Live: Master Your Sound

Credit: www.ableton.com

Tips for Using the Analog Synthesizer Effectively

Here are some tips that will help you make the most out of the Analog Synthesizer in Ableton Live:

  1. Experiment with different waveform combinations to add depth and complexity to your patches.
  2. Use automation to create evolving sounds by adjusting parameters such as filter cutoff and resonance over time.
  3. Utilize the modulation sources to add movement and variation to your sounds. Try assigning an LFO to oscillator pitch for subtle vibrato or use an envelope follower to modulate filter cutoff.
  4. Combine the Analog Synthesizer with other effects in Ableton Live, such as reverb or delay, to further enhance your sounds.
  5. Take advantage of the built-in presets for quick inspiration, or create your own library of personalized sounds to use in future projects.

Frequently Asked Questions Of Using The Analog Synthesizer In Ableton Live: Master Your Sound


How Does An Analog Synthesizer Work?


An analog synthesizer generates sound using electronic circuits to create and manipulate waveforms.


What Are The Advantages Of Using Analog Synthesizers?


Analog synthesizers offer rich, warm, and organic sounds with hands-on control for a unique sonic experience.


How Can I Integrate An Analog Synthesizer In Ableton Live?


You can integrate an analog synthesizer in Ableton Live using MIDI connectivity and audio interface for recording.


What Are The Popular Analog Synthesizers Used In Music Production?


Popular analog synthesizers used in music production include Moog Subsequent 37, Korg Minilogue, and Arturia MiniBrute.

Conclusion

The Analog Synthesizer in Ableton Live offers a powerful and intuitive platform for unleashing your creativity in sound design. With its versatile features and user-friendly interface, you can easily craft unique and expressive patches that bring your tracks to life. Experiment with the various parameters, explore different waveform combinations, and embrace the endless possibilities provided by the Analog Synthesizer. Happy synthesizing!

Categories
Archive

Using the Audio Effects in Ableton Live: Master Your Sound Creatively

When it comes to music production, having a versatile set of audio effects is essential. Ableton Live, a popular digital audio workstation, offers a wide range of built-in audio effects that can elevate your music to new heights. In this article, we will explore some of the most commonly used audio effects in Ableton Live and provide insights on how to incorporate them into your productions.

1. EQ Eight

EQ Eight is a powerful equalizer that allows you to shape the frequency response of your audio tracks. It features eight adjustable frequency bands and various filter types, including high-pass, low-pass, and bell filters. With EQ Eight, you can boost or cut specific frequencies to achieve a more balanced mix, remove unwanted noise, or add creative coloration to your sounds.

2. Compressor

The Compressor is a fundamental audio effect used to control dynamics and add punch to your tracks. It reduces the dynamic range of a sound by decreasing the volume of louder elements and increasing the volume of softer elements. Whether you’re looking to tighten up drums, even out vocal performances, or add sustain to a guitar solo, the Compressor is a go-to tool that can enhance the impact and clarity of your mix.

3. Reverb

Reverb is an indispensable effect for creating depth and ambience in your music. Ableton Live offers various reverb algorithms, including room, hall, plate, and more. By simulating the natural reverberation of different spaces, reverb can give your sounds a sense of space and realism. You can customize parameters such as decay time, pre-delay, and damping to achieve the desired reverb characteristics.

Credit: www.amazon.com

4. Delay

Delay is a time-based effect that produces repetitions of a sound with varying time intervals. It can be used to create echoes, rhythmic patterns, or subtle spatial effects. With Ableton Live’s versatile Delay effect, you can adjust parameters like feedback, filtering, and ping-pong mode to add depth, width, and movement to your tracks. Experimenting with different delay settings can open up a world of creative possibilities.

5. Chorus

Chorus is an effect that creates the illusion of multiple sources playing the same musical part. It thickens the sound by detuning and delaying the original signal, resulting in a wider and richer stereo image. Ableton Live’s Chorus effect offers controls for rate, depth, feedback, and more, allowing you to achieve subtle widening or lush modulated textures depending on your creative vision.

6. Distortion

If you’re looking to add some grit, warmth, or aggression to your sounds, Ableton Live’s Distortion effect is a great choice. It can emulate the characteristics of analog hardware or create entirely new tones. Adjust parameters such as drive, tone, and output level to achieve anything from subtle saturation to fully distorted sounds. Distortion is a versatile tool that can take your tracks from clean to dirty with just a few adjustments.

7. Filter

Ableton Live’s Filter effect allows you to shape the frequency content of your audio in real-time. By using low-pass, high-pass, band-pass, or notch filters, you can control the brightness, darkness, or presence of a sound. The Filter effect offers additional features like resonance, drive, and modulation to further sculpt your audio. It’s a powerful tool for sound design, creating filter sweeps, and adding movement to your tracks.

8. Auto Filter

Auto Filter is a variation of the Filter effect in Ableton Live, specifically designed for modulation and automation. It offers built-in LFOs (low-frequency oscillators) that can modulate the filter cutoff frequency, resulting in dynamic filter movements. Whether you’re aiming for subtle filter sweeps or radical filter modulation, the Auto Filter is a versatile tool that can add interest and movement to your sounds.

Using the Audio Effects in Ableton Live: Master Your Sound Creatively

Credit: www.ableton.com

Frequently Asked Questions On Using The Audio Effects In Ableton Live: Master Your Sound Creatively


What Are Some Popular Audio Effects In Ableton Live?


Popular audio effects in Ableton Live include reverb, delay, EQ, compression, chorus, and distortion.


How Can I Use Audio Effects To Enhance My Music Production?


Audio effects can be used to add depth, atmosphere, and texture to your music, enhancing the overall listening experience.


What Is The Purpose Of Using Audio Effects In Ableton Live?


Audio effects in Ableton Live help to modify and improve sound by adding creative and technical enhancements to the audio signal.


Can I Automate Audio Effects In Ableton Live?


Yes, you can automate audio effects in Ableton Live to create dynamic changes in the sound throughout your music production.

Conclusion

Ableton Live provides a wide range of audio effects that can help you shape and enhance your music in countless ways. Whether you’re a producer, mixer, or sound designer, mastering the proper use of these tools is crucial for achieving professional-sounding results. By experimenting with EQ Eight, Compressor, Reverb, Delay, Chorus, Distortion, Filter, and Auto Filter, you can unlock a whole new level of creativity and take your productions to the next level.