Categories
Archive

How To Check Your Final Masters Like A Mastering Engineer

To check your final masters like a mastering engineer, use a reference track and compare levels and frequency response. After that, use spectrum analysis to identify any problems and make necessary adjustments.


Mastering is the final step in the music production process before distribution. The mastering engineer’s role is to ensure that the sound quality of the final mix is optimized for the intended playback. To check your masters as a mastering engineer, you need to be able to focus on details, understand the technicalities of audio equipment, and be able to distinguish good sound from bad sound.


We will explore the techniques that mastering engineers use to check their masters, and how you can use those techniques to ensure that your final mix is as good as it can be.


Preparing Your Tracks


Learn how to check your final masters like a mastering engineer by preparing your tracks properly. Follow best practices such as properly labeling files, avoiding overcompression and leaving enough headroom for mastering. With these tips, you can achieve high-quality, professional sounding masters.

File Format

The first step to preparing your tracks is to make sure they are in the correct file format. Most mastering engineers prefer to work with lossless audio files such as WAV or AIFF. These formats maintain the highest quality audio and are the most commonly used in the music industry. Avoid using compressed audio files like MP3, as they can cause loss of quality and artifacting during the mastering process.

Naming Convention

It’s important to use a consistent and organized naming convention for your tracks. This makes it easier for the mastering engineer to understand and work with your project. Use a format like “Track Name – Artist Name”. Avoid using ambiguous abbreviations or generic track names like “Track 1” or “Untitled”.

Track Order

Another important aspect of preparing your tracks is to ensure they are in the correct order. This is especially important if you’re creating an album or EP. Decide on the track order beforehand and name your tracks accordingly. This will save time for the mastering engineer and ensure a seamless listening experience for your audience. To summarize, preparing your tracks for mastering can greatly improve the quality of your final product. Use lossless file formats like WAV or AIFF, create a consistent naming convention, and arrange your tracks in the correct order. By doing these simple steps, you can deliver high-quality audio files that will impress both listeners and mastering engineers.

Creating A Mastering Session


Learn how to evaluate your final masters like a professional mastering engineer by creating a mastering session. Through careful analysis, you can ensure the quality of your final product and provide your audience with a superior listening experience.

Creating a Mastering Session requires more than just technical skills. It’s an art form that requires an understanding of the music genre, as well as the equipment and software used. One of the key steps in mastering is checking the final masters like a mastering engineer. This process involves several stages, including gain staging, EQ and compression, stereo imaging, and limiting. Let’s explore each of these stages to help you check your final masters like a pro.

Gain Staging

Gain staging is about optimizing the levels of a track to ensure the best sound quality. Start by setting the input levels properly to avoid distortion and clipping. Use a VU meter or loudness meter to monitor the levels and adjust them accordingly. Check the output levels as well, and adjust them if necessary. Use your ears to make sure the balance between individual tracks is right.

Eq And Compression

EQ and compression are essential tools in enhancing the sound quality of a track. Use an EQ plugin to adjust the frequency range of each track to optimize the sound. Compression helps to even out the levels of a track, making the quieter parts louder and the louder parts quieter. Use a compressor plugin to compress individual tracks and ensure that the levels are consistent.

Stereo Imaging

Stereo imaging is all about creating a sense of width and depth in the mix. It involves panning individual tracks to the left or right, as well as applying stereo effects like reverb and delay. Use your ears to make sure that the stereo image is balanced and centered. Tweak the levels of each track until you get the desired effect.

Limiting

Limiting is the final stage of mastering, and it involves controlling the peak levels of a track. Use a limiter plugin to ensure that the levels don’t exceed a certain point, as this can cause distortion or clipping. Set the threshold of the limiter carefully, to avoid compromising the sound quality. In conclusion, mastering involves a range of technical and creative skills. By following these steps and using your ears to check the final masters, you can achieve professional-sounding results. Remember to always trust your instincts and experiment until you find the perfect sound.


Room And Monitoring Setup


Achieving a mastering engineer’s level of expertise is possible with careful room and monitoring setup. Ensure accurate final masters by paying attention to factors like room acoustics, speaker placement, and monitoring levels.

When it comes to checking your final masters like a mastering engineer, having a proper room and monitoring setup is crucial. This will ensure that you’re able to hear all the details in your mix accurately. In this post, we’ll go over three important factors for your room and monitoring setup: room treatment, monitor calibration, and reference tracks.

Room Treatment

The first step in setting up your room for mastering is to ensure that your room is properly treated. This means that you need to address any acoustic issues, such as reflections that can cause phasing and other problems. You can achieve this by adding bass traps, acoustic panels, and diffusers to your room. By doing so, you’ll get a more accurate representation of your mix.

Monitor Calibration

The next step is to calibrate your monitors. This involves setting the correct levels and balance between the left and right channels. You can do this by using a sound meter, and various software tools like Sonarworks and Reference 4. It’s important to ensure that your monitors are properly calibrated to get an accurate representation of your mix.

Reference Tracks

Finally, it’s important to have reference tracks when you’re checking your masters. These are tracks that you know well and can use to compare your mix to. You should choose reference tracks that are in the same genre and have a similar feel to your mix. By having reference tracks, you’ll be able to ensure that you’re not missing any important details in your mix. In conclusion, having a proper room and monitoring setup is crucial when checking your final masters. This involves treating your room, calibrating your monitors, and having reference tracks. By taking these steps, you’ll be able to ensure that you’re getting an accurate representation of your mix, and your final masters will sound their best.

How To Check Your Final Masters Like A Mastering Engineer


Credit: www.masteringthemix.com


Listening Techniques


Learn how to polish your final masters like a mastering engineer with effective listening techniques. By acutely tuning in to frequency levels and subtle changes in volume, you can take your tracks to the next level and perform like a true professional.

As a music producer or engineer, it is important to be able to check your final masters like a mastering engineer. One of the most important skills to have is good listening techniques. This can help you identify any errors or issues in your tracks, which can then be addressed. Here are three important listening techniques that you should consider when checking your final masters:

Critical Listening

Critical listening is a technique that involves listening to music with a specific goal in mind. This technique requires you to listen to the details of the music such as the timing, rhythm, melody, and overall balance of the track. You should take your time when critical listening and focus on one element at a time. This will help you identify any issues or areas that need improvement.

A/b Comparisons

A/B comparisons are an effective way to identify differences between two songs or tracks. This technique involves comparing a mastered version of the track with the unmastered version, or comparing two different masterings of the same track. You can use this technique to identify areas where there is too much or too little compression or to check whether the overall balance of the track is correct. A/B comparisons are an important tool in the mastering process and can help you make informed decisions about your final masters.

Spectrum Analysis

Spectrum analysis involves breaking down a track into its individual frequency bands. This technique can help you identify frequency imbalances or issues with your mix, such as too much or too little bass. You can use spectrum analysis tools to see the frequency response of your track and identify peaks or dips in the frequency spectrum. Spectrum analysis is an important tool for mastering engineers and can help you make informed decisions about EQ and balance. Overall, by using these three important listening techniques, you can effectively check your final masters like a mastering engineer. This level of precision and attention to detail is what sets great producers apart from the rest.

Mastering Tools


Mastering tools are essential for checking your final masters like a professional audio mastering engineer. With these tools, you can analyze and adjust various aspects of your audio such as volume, EQ, compression, and more to ensure the best possible sound quality for your final product.

Mastering Tools are vital in producing high-quality sound in your tracks. Understanding the mastering process and having the right set of tools can be the difference between a mediocre mix and an excellent one. In this section, we’ll be discussing the two types of mastering tools: Plugins vs Hardware. We’ll also be identifying the essential mastering plugins you need to achieve that crisp sound in your final masters.

Plugins Vs Hardware

When it comes to mastering, there are mainly two types of tools: Plugins and Hardware. Plugins are software applications that run entirely within your digital audio workstation (DAW). They are less costly and more convenient to use compared to hardware. On the other hand, hardware tools are physical devices that offer a more tactile workflow. Hardware is quite expensive compared to plugins, but it’s preferred by most mastering engineers because it delivers a unique analog sound signature, which is hard to replicate in plugins.

Essential Mastering Plugins

Let’s delve deeper into the essential mastering plugins. These are plugins that every mastering engineer needs to produce a professional and polished master.

  • Equalizers (EQ) plugins – they are used to manage the frequencies in your mix. They help to balance the tone of the mix by boosting or cutting frequencies in specific areas.
  • Compression plugins – these plugins help to control the dynamic range of your mix. They help bring out the quieter parts of the sound, making it sound fuller.
  • Stereo Imagers – these plugins help to widen or narrow the stereo image in your mix. They give you greater control over the stereo sound while adding more depth and dimension to it.
  • Limiter plugins – they are used to control the maximum level of your mix. They prevent audio distortion by setting an upper limit on the gain of the sound, which is especially important when releasing your music on various streaming platforms.

These are the essential plugins that every mastering engineer needs to achieve that polished and professional sound in their final masters. Ensure that you have them in your DAW and master your tracks like a pro.


Finalizing The Master


Successfully finalizing the master of your audio tracks is crucial to achieve the desired sound before releasing them. To check your final masters like a mastering engineer, pay attention to elements such as overall volume, dynamics, frequency balance, and clarity.

Finalizing a master recording requires precision, attention to detail, and a good ear for music. To ensure that your final master sounds as professional as possible, follow the steps below.

Exporting The Master

The first step in finalizing a master recording is to export it as a high-quality audio file. This file will serve as the master copy of your recording, from which all other copies will be replicated. When exporting the master, be sure to select the appropriate file format and sample rate. Most mastering engineers prefer to work with high-resolution audio files that have a sample rate of at least 44.1 kHz and a bit depth of 24 bits.

Preparing The Master For Distribution

Once the master has been exported, it’s time to prepare it for distribution. This involves adding metadata, such as track titles and artist names, to the file. This metadata will be displayed when the file is played on media players or streaming platforms. In addition, you may need to create multiple versions of the master for different distribution channels. For example, you may need to create a version of the master that is optimized for streaming platforms like Spotify, as well as a version that is optimized for physical media like CDs. When preparing your master for distribution, it’s important to work closely with your mastering engineer to ensure that the final product meets all of your specifications.

Code Example

To export a master recording as a high-quality audio file, you can use the following code:
ffmpeg -i input.wav -sample_rate 44100 -bit_depth 24 -c:a pcm_s24le output.wav
This command tells the ffmpeg tool to convert the input file (input.wav) to an output file (output.wav) with a sample rate of 44.1 kHz and a bit depth of 24 bits. By following these steps, you can ensure that your final master is of the highest quality possible, and that it will sound great on all types of playback systems.

How To Check Your Final Masters Like A Mastering Engineer


Credit: www.masteringthemix.com


Frequently Asked Questions On How To Check Your Final Masters Like A Mastering Engineer


How Do You Tell If Your Song Is Mastered Properly?


To tell if your song is mastered properly, listen for a balanced frequency response, clear and distinct levels, and consistent dynamics. Use reference tracks to compare and ensure a similar loudness level. Pay attention to the overall sound quality and make adjustments as necessary for a polished, professional sound.


How Do I Test My Master?


To test your master, follow these steps: 1. Verify that all connections are secure and cables are working properly. 2. Ensure that the correct configurations are in place. 3. Use diagnostic tools to check for errors and irregularities. 4. Monitor the system for performance and functionality.


5. Test the system under different circumstances to ensure its stability and reliability.


How Long Does It Take A Mastering Engineer To Master A Song?


A mastering engineer can take anywhere from a few hours to a day to master a song. The exact time needed depends on the complexity of the track, the client’s requirements, and the engineer’s workload. However, it is important for the engineer to take the necessary time to ensure the best possible outcome.


What Is The Average Mastering Level?


The average mastering level is typically around -6dB to -8dB RMS for commercial releases. However, the specific level can vary depending on the genre, target audience and other factors.


Conclusion


After implementing the steps mentioned in this blog post, you’ll be able to check your final masters like a pro mastering engineer. Always remember that listening carefully and paying attention to detail is key. By taking the time to properly check your final masters, you’re ensuring that the end result is of high-quality and reflects your hard work and dedication.


Don’t be afraid to experiment and try new things. With patience and practice, you’ll be able to master this skill and achieve the perfect final masters every time.
Categories
Archive

How To Install Presets For Xfer Serum Vst Synthesizer Guide

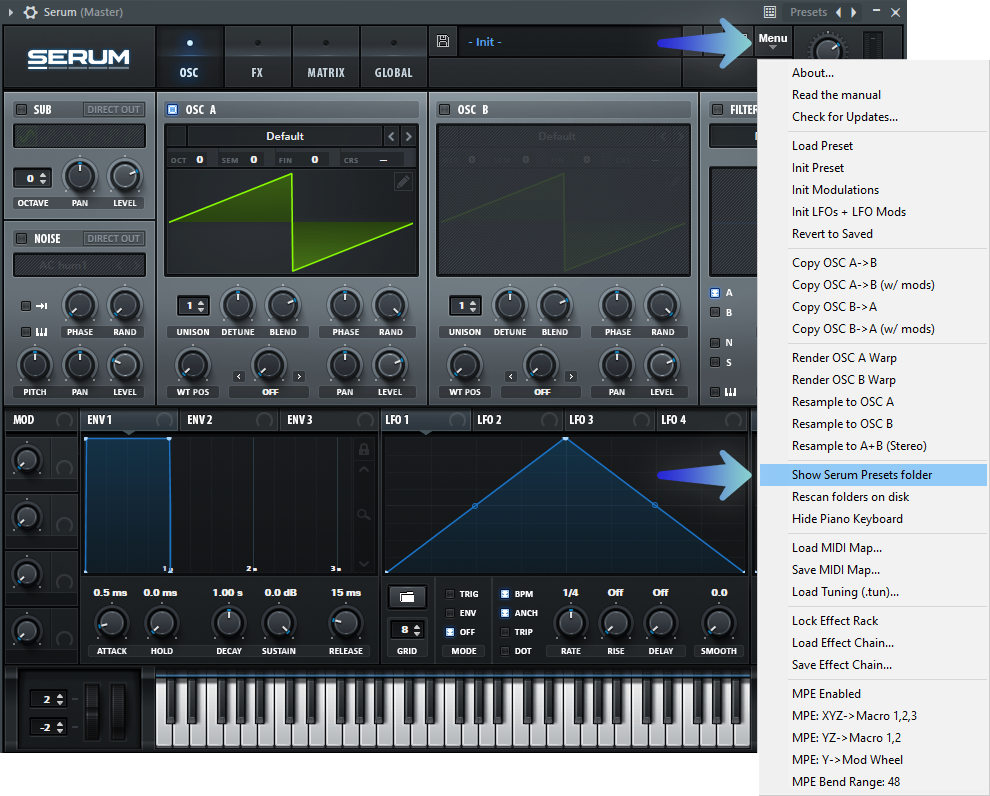
To install presets for Xfer Serum VST synth, simply open Serum, click on the menu icon, choose “Show Serum Presets Folder,” and drag and drop the preset folder into it. The process is easy and straightforward.


Xfer Serum VST Synthesizer is known for its versatility, range of features and high-quality sound. It allows users to create, edit and manipulate sounds in almost any imaginable way. One of the most significant advantages of using Xfer Serum VST synth is the availability of numerous presets, which can be used to jumpstart your music production.


Installing presets for Xfer Serum VST synth is a simple process that can be accomplished even by beginners. In this guide, we will walk you through the step-by-step process of how to install presets for Xfer Serum VST synth easily and quickly. Let’s dive in and get started!


Downloading And Installing Presets For Xfer Serum Vst Synthesizer


Installing presets for Xfer Serum VST synthesizer is a breeze. All it takes are a few steps to start exploring new sounds. With this guide, you can download and install presets for Xfer Serum in no time.

Finding Preset Files Online

When it comes to downloading and installing presets for Xfer Serum VST Synthesizer, the first step is to find the preset files online. There are several websites available that offer a wide range of presets for this plugin. Some of the most popular sites for downloading and installing Serum presets include Splice, 99sounds, and Loopmasters.

Locating The Serum Presets Folder

Once you have downloaded the preset files, you will need to locate the Serum presets folder on your computer. This folder is typically located in the Xfer Records folder in your Documents folder. However, if you installed Serum in a different location, you may need to search for the folder manually.

Installing The Preset Files

To install the preset files, first, open your DAW and load Serum as an instrument. Then, click on the dropdown menu located in the top right corner of the Serum interface and select “Show Serum Presets folder.” Next, drag and drop the downloaded preset files into the Serum presets folder. Finally, reopen Serum and access the presets you just installed by selecting them from the preset menu. In conclusion, installing presets for Xfer Serum VST Synthesizer is a straightforward process that involves finding the preset files online, locating the Serum presets folder, and dragging and dropping the files into the folder. By following these simple steps, you will be able to add a wide range of sounds and textures to your music productions, saving time and enhancing creativity.

How To Install Presets For Xfer Serum Vst Synthesizer Guide


Credit: techhousemarket.com


Using The Installed Presets In Xfer Serum Vst Synthesizer


Learn how to easily install and use presets for the Xfer Serum VST Synthesizer with this comprehensive guide. With just a few clicks, you can expand your sound library and enhance your music production.

After installing presets for your Xfer Serum VST Synthesizer, you can start using them in your music productions. This section outlines the steps you need to follow to load, adjust, and save modified presets, enabling you to create unique sounds that fit your music style perfectly.

Loading Presets Into Xfer Serum Vst Synthesizer

Once you have installed your favorite presets, such as those from Cymatics, you can load them into your Xfer Serum VST Synthesizer by following these steps:

  1. Open your Xfer Serum VST Synthesizer on your Digital Audio Workstation (DAW)
  2. Select the “Menu” option located at the top left corner of the plugin interface
  3. Choose “Show Serum Presets Folder.” This action will open your computer’s Finder or Explorer window showing the Serum Presets Folder
  4. Drag and drop the preset files you downloaded onto the Presets folder.
  5. Return to your Xfer Serum VST Synthesizer and click on the “Menu” button
  6. Select “Rescan folders on disk” to enable Serum to recognize the new presets.
  7. You should now see the newly installed presets in the Presets browser, where you can select them and begin making adjustments.

Adjusting Preset Parameters

Once you have loaded a preset, you can adjust the different parameters to create and customize your unique sound. Here’s how you can do it:

  • On the Xfer Serum VST Synthesizer plugin interface, you will see multiple tabs with different parameters
  • Click on a tab to reveal the parameters for that tab
  • Use the sliders or knobs to adjust the parameters to your liking
  • You can adjust parameters such as filter, LFO, and even the wavetable itself
  • Take some time to explore each parameter and how it affects the audio output
  • Keep experimenting to find the sound that is unique to your work.

Saving Modified Presets

After adjusting the preset parameters and achieving a sound that fits your music style, you can save the new presets by following these steps:

  1. Click on the “Save” button located at the bottom of the preset browser
  2. Enter a name for your modified preset and click “Save”
  3. You can now access the saved preset in the user presets folder
  4. Alternatively, you can save a copy of the preset under the same name to the default presets folder by clicking the “Save As” button in the Presets Browser.

Using installed presets in Xfer Serum VST Synthesizer is simple and straight forward. Loading presets in Serum is as easy as dragging and dropping the files into the presets folder, adjusting parameters to achieve unique sound effects, and then saving those effects as new presets. With these steps, you can enhance your music production and bring your unique style to the audio world.

How To Install Presets For Xfer Serum Vst Synthesizer Guide


Credit: www.productionmusiclive.com


Frequently Asked Questions Of How To Install Presets For Xfer Serum Vst Synthesizer Guide


How Do I Add Serum Presets To Serum?


To add serum presets to Serum, open the Serum plugin and click on the menu icon in the top left corner. From there, select “Show Serum Presets Folder” and copy the preset folders you want into this directory. The presets will be ready to use in Serum.


How Do I Add Presets To Vst?


To add presets to VST, follow these steps: 1. Locate the “presets” folder of the VST plugin. 2. Download the preset files and extract the folders. 3. Copy and paste the preset folders into the “presets” folder. 4. Launch your DAW and load the VST plugin to access the added presets.


5. Enjoy using the new presets in your music production.


Where Are Xfer Serum Presets Stored?


Xfer Serum presets are stored in the Presets folder, which you can find by going to the Serum menu and clicking “Show Serum Presets Folder. ” They are organized by category, such as Arp, Bass, Lead, and so on. You can also create custom folders within the Presets folder to keep your presets organized.


How Do I Add Presets To Splice Serum?


To add presets to Splice Serum, go to the Serum preset folder and copy the. fxp file. Open Serum and click on the Menu button, then select “Show Serum Presets Folder. ” Paste the. fxp file into the folder, and it will appear in the preset list next time Serum is opened.


Conclusion


To sum up, installing presets for Xfer Serum VST Synthesizer is a simple process that can help you enhance the quality of your music production. Remember to download reliable presets from trusted websites, make sure you have the latest version of the VST software installed and correctly locate the preset files on your computer.


With just a few clicks, you can take your music to the next level and create unique sounds that will make your music stand out from the rest.


Categories
Archive

What is the Difference between a Sampler And a Synthesizer

A sampler plays back recorded sounds while a synthesizer creates its own sounds from oscillators and filters. Both samplers and synthesizers have been essential tools for music production for decades.


There are however, significant differences between these two digital audio workstations. Samplers, as the name suggests, take audio samples and manipulate them through various processes such as pitch shifting, looping, and filtering. On the other hand, synthesizers generate sound waves through oscillators and manipulate them using filters, envelopes and modulations.


Understanding these differences is crucial for music producers, as they can determine the type of sounds you can produce, and the limitations of each respective instrument. This article will delve deeper into the similarities, differences, and use cases of each instrument.

What is the Difference between a Sampler And a Synthesizer


Credit: www.sweetwater.com


The Basics


Samplers and synthesizers are both electronic musical instruments used to create sounds, but they differ in their methods. Samplers record and play back real-world sounds, while synthesizers generate sounds electronically from scratch.

When it comes to the world of music production, there are several essential equipment that you should be familiar with. Two of those are samplers and synthesizers.

Definition Of Sampler

A sampler is an electronic device that records and plays back audio samples. In simple terms, it’s a digital instrument that allows you to take snippets of audio from one source and manipulate or combine them to create new sounds. Samplers come in different types, but they all share the same goal: to create new sounds from pre-existing audio.

Definition Of Synthesizer

On the other hand, a synthesizer is an electronic musical instrument that generates sound using various methods. Rather than using pre-existing audio as a starting point, synthesizers create sound from scratch, using mathematical algorithms to generate waveforms. These waveforms can then be shaped and manipulated to create a wide variety of sounds, from traditional instrument sounds to futuristic and abstract tones. In summary, samplers use pre-existing audio to create new sounds, while synthesizers generate sound from scratch using mathematical algorithms. Understanding the difference between these two instruments is crucial for any aspiring music producer who wants to create unique sounds and music.

What is the Difference between a Sampler And a Synthesizer


Credit: m.youtube.com


Functionality


A synthesizer produces new sounds electronically from scratch while a sampler records and plays back audio clips. A synthesizer creates an original sound, while a sampler reproduces already existing ones. Knowing their differences is crucial to make informed choices when choosing a musical instrument.

When it comes to music production, samplers and synthesizers are essential tools for creating unique sounds and beats. While both instruments are electronic devices used to generate sound, their functionality is quite different. Samplers allow users to record and manipulate audio samples while synthesizers use electronic oscillators to create sounds from scratch. Let’s explore the functionality of these devices further.

How Samplers Work

Samplers record audio clips and play them back at various pitches and speeds. They consist of two primary components: a sampler engine and a set of sample libraries. The engine processes the audio and allows users to modify it with effects, filters, and other settings. While the sample library gives access to pre-recorded sounds, including drums, vocals, and instruments.

How Synthesizers Work

Synthesizers, on the other hand, generate sound through a combination of oscillators, filters, and amplifiers. Users can create a range of sounds by manipulating the waveform, adjusting the filters, and changing the envelope parameters. Synthesizers are used to create sounds from scratch that are not easily generated with traditional instruments.

Sampling And Playing Back Audio

When it comes to sampling and playing back audio, samplers have the upper hand. They allow users to record real-world sounds and manipulate them in a variety of ways. In contrast, synthesizers operate by creating new sounds from scratch, which may not always be suitable for certain music genres.

Creating Sounds From Scratch

If you’re looking to create your sounds from scratch, a synthesizer is the go-to choice. Synthesizers give musicians complete control over creating unique sounds that cannot be found in any pre-recorded sample library. They allow users to experiment with different waveforms and filters to generate unique sounds and tones. In conclusion, both samplers and synthesizers have their unique functionalities and benefits in music production. Understanding the difference between the two is fundamental in choosing the right tool for the job. Whether you’re creating your unique sounds or manipulating pre-recorded samples, both instruments are essential for producing music that stands out.


Sound Quality


A sampler and a synthesizer differ in their sound quality. A sampler records and plays back real-world acoustic sounds while a synthesizer generates sounds electronically. Each has its strengths, with samplers offering natural sounds and synthesizers providing endless possibilities for customization.

Sampling Versus Synthesizing Sound

The sound quality of a sampled sound and a synthesized sound varies significantly. When it comes to sampling sound, a portion of a pre-recorded sound is captured and used later in a sampler for playback. On the other hand, synthesizing involves creating new sounds that are not pre-recorded or stored.

Pros And Cons Of Sampling

Sampling is an efficient method of reproducing sounds that are difficult or impossible to replicate. Using a sampler means that you can take a snippet of a sound that is unique, and replicate it multiple times. Additionally, the sampled sounds can be manipulated in many ways, such as pitch, tempo, and timbre. With these options, the sounds can be modified to create an entirely new sound. However, the quality of a sampled sound depends on the resolution of the original sound source and the number of samples used.

Pros And Cons Of Synthesizing

Unlike sampling, synthesizing produces original sounds that can be manipulated in many ways. A synthesizer allows users to create a wide range of sounds, from simple to complex. This variety of sounds makes synthesizers the go-to instrument for many music producers and sound artists. However, the quality of the synthesizer sound can vary depending on the type of synthesis used, the quality of the sound-card, and the output of the instrument. In conclusion, the choice between using a sampler and a synthesizer comes down to personal preference and the task at hand. Both have their advantages and disadvantages, and the quality of the sound produced will depend on how they are used.

What is the Difference between a Sampler And a Synthesizer


Credit: www.reddit.com


Application


Samplers record and manipulate real sounds, while synthesizers generate electronic sounds from scratch. A sampler allows a musician to play back prerecorded sounds in various ways, while a synthesizer creates electronic waveforms that can be shaped and modulated to create new sounds.


The ultimate choice depends on the intended use and personal preference.

Best Use Cases For Samplers

Best Use Cases For Synthesizers

Modern Applications

When it comes to creating electronic music, both samplers and synthesizers play a critical role. Understanding the difference between the two can help you choose the right tool for your music making. Samplers and synthesizers have their own strengths and weaknesses, and each one is suited to particular applications. Knowing when to use a sampler and when to use a synthesizer can make a big difference in the quality of your music.

Best Use Cases For Samplers

A sampler allows you to record and manipulate audio samples. This is perfect for creating beats and rhythms, as well as for adding texture and variety to your tracks. Here are some of the best use cases for samplers:

  • Creating your own beats and drum loops
  • Sampling and manipulating sounds from the real world
  • Adding unique textures and layers to your tracks
  • Creating your own sample library for future use

Best Use Cases For Synthesizers

A synthesizer generates sounds from scratch, making it a powerful tool for creating your own unique sounds. Here are some of the best use cases for synthesizers:

  • Creating your own unique sounds for lead melodies and basslines
  • Adding pads and atmospheric sounds to your tracks
  • Experimenting with sound design and synthesis techniques
  • Layering and processing synthesized sounds to create complex textures

Modern Applications

Both samplers and synthesizers are still widely used in modern music production, but their functions have expanded over time. Here are some modern applications for both samplers and synthesizers:

Samplers Synthesizers
Chopping up and manipulating samples in real-time while performing live Using digital modeling and synthesis techniques for more detailed and realistic sounds
Sampling and resampling to create unique soundscapes and textures Using software synthesizers to create complex layered sounds
Creating sample-based instruments for use in live performance Using modular synthesizers to create complex, modular sound systems

Frequently Asked Questions Of What Is The Difference Between A Sampler And A Synthesizer


How Is A Sampler Different From A Synthesizer?


A sampler records and plays back audio while a synthesizer generates sound electronically. Samplers use real audio clips while synthesizers use generated sound waves.


What Is The Difference Between Sampling And Synthesis?


Sampling involves capturing and reusing existing audio recordings, while synthesis generates entirely new sounds either from scratch or by manipulating existing sounds. Sampling is a digital recording technique while Synthesis is an electronic process to create artificial sounds.


What Is The Purpose Of A Sampler?


A sampler is a musical instrument or sound device used to record and manipulate sounds or music. Its purpose is to capture and store sounds for later use in composing, editing, or performance. Samplers are used in various music genres such as hip hop, electronic, and pop music.


What Is The Difference Between A Sampler And A Sequencer?


A sampler is used for recording and playing back audio samples. A sequencer is used for arranging and triggering those samples into a musical composition. The sampler captures individual sounds, while the sequencer combines and plays them in a specific sequence.


Conclusion


Overall, there are fundamental distinctions between a sampler and a synthesizer, though they share similar sound creation purposes. A sampler records and plays back real-world sounds, while a synthesizer generates original sounds using sound waves in oscillators. Choosing between a sampler and synthesizer depends on the intended purpose, desired sound, and budget.


Whichever you opt for, ensure to master using the instrument and understand its features to create exceptional sounds.

Categories
Archive

Trap Beat Guide Bass Essential Tips For Making 808 Patterns

To make effective 808 patterns in trap beat, EQ and compression are significant in processing the bass. Bass should be creatively played and must be in harmony with other elements.


Now, let’s dive deeper into essential tips for making the bassline in trap beat. Trap beat is a subgenre of hip-hop music known for its heavy bass and crisp snares. The key to making a successful trap beat is to master the bassline.


In this guide, we will discuss some essential tips for making 808 patterns with your bassline. To begin with, the bassline must be creatively played and must be in harmony with other elements like drums and synths. EQ and compression are significant in processing the bass, and mastering these techniques can help you achieve the desired sound. Additionally, you can use different techniques like sidechaining and layering to add depth and texture to your bassline. With this guide, you’ll be sure to create a powerful 808 bassline that’ll hit hard and make your trap beat stand out.

Trap Beat Guide Bass Essential Tips For Making 808 Patterns


Credit: www.productionmusiclive.com


Tips For Crafting Effective Basslines


Crafting effective basslines for trap beats is crucial to creating a captivating and memorable track. Some essential tips for making 808 bass patterns include experimenting with different note lengths, incorporating subtle variations in pitch and rhythm, and utilizing various sound design techniques to create unique and powerful bass sounds.

Crafting effective basslines is a necessary skill for any producer looking to create trap beats. The bassline creates the backbone of the beat and sets the tone for the entire composition. Creating a strong and effective bassline can make or break a track. Here are some tips to help you craft effective basslines for your trap beats.

Selecting The Right 808 Sample

One of the most important elements of an effective bassline is selecting the right 808 sample. 808 samples come in a wide variety of sounds, from deep and punchy to distorted and gritty. It’s essential to choose a sample that complements the other elements of your beat and fits the melody and rhythm of your track. When selecting an 808 sample, consider the key, tone, and pitch of the sample to ensure it blends well with the other elements.

Layering Your Basslines

Layering your basslines is another effective way to add depth and complexity to your patterns. Layering involves adding additional sounds or samples to your 808 to create a fuller, more resonant bass. Experiment with layering different types of bass sounds to create a unique and powerful effect. Be careful not to overdo it, as too many layers can clutter your mix.

Adding Variation To Your Patterns

Adding variation to your bass patterns is a great way to keep your audience engaged and interested. One way to add variation is by using different note lengths or patterns throughout your track. This adds depth and complexity to your beat and allows you to create different sections with different moods.

Experimenting With Gross Beat

Finally, experiment with using Gross Beat to manipulate your bass patterns and add variation. Gross Beat is a real-time audio manipulator that can be used to chop, slice, and loop samples. By using Gross Beat, you can create unique and interesting bass patterns that add depth and complexity to your tracks. Experiment with different effects and settings to see what works best for your beats. In conclusion, crafting an effective bassline is all about selecting the right samples, layering your sounds, adding variation, and experimenting with different effects and tools. By understanding these essential tips, you can create powerful and impactful basslines that drive your trap beats and keep your audience engaged.

Trap Beat Guide Bass Essential Tips For Making 808 Patterns


Credit: articles.roland.com


Creating A Full Trap Beat


Learn essential tips for creating a full trap beat by mastering 808 patterns. From choosing the right bass to creating unique soundscapes, this trap beat guide will help you perfect your craft and produce music that stands out.

Creating a Full Trap Beat A trap beat is essential for any modern Hip-Hop or Electronic artist. It provides a rhythmic foundation for the track to build upon while maintaining energy and groove. One of the most important elements of a trap beat is the bassline, particularly the 808. In this post, we will discuss the essential tips for making 808 patterns to create a full trap beat. Adding Drums and Percussion Adding drums and percussion is essential to bring life into your beat. It’s important to take note of the different types of drum patterns that are commonly used in trap beats. These include the Kick and Snare pattern, the Hihat pattern, and the Percussion pattern. You can also add some sound effects to add some extra flavor to your beat. A good rule of thumb is to keep your drums simple but effective to make the 808 pattern stand out. Adding Melodic Elements Once you have your drums and percussion laid out, you can start adding in your melodic elements. The melody is what gives your beat its overall feeling and emotion. Common melodic elements in a trap beat include lead synth, chords, arpeggios, and bass. It’s essential to choose the appropriate type of sound to complement the overall feeling of your track. You can also layer your melodic elements to add depth and texture to your beat. Arranging Your Beat After you have your drums, percussion, and melodic elements in place, it’s time to arrange your beat. Proper arrangement is essential to ensure that your beat flows well and hits all the necessary climaxes and breakdowns. A good way to arrange your beat is to start with an intro, followed by a verse, then a pre-chorus, chorus, and finally an outro. You can use different variations of your melody, drums, and percussion throughout each section to add interest. In conclusion, creating a full trap beat involves adding drums and percussion, melodic elements, and arranging your beat effectively. By following these essential tips, you’ll be well on your way to creating a professional-sounding trap beat in no time. Remember to keep your beat simple but effective, and let the 808 pattern shine through.


Mixing And Mastering Your Trap Beat


Learn how to create impactful 808 patterns for your trap beat with essential tips on bass mixing and mastering. Elevate your sound to the next level with these expert tricks.

Mixing and Mastering Your Trap Beat Once you have created your trap beat and have the 808 pattern down, it’s time to move on to the mixing and mastering stage. This is where you can truly bring your beat to life and make it stand out from the rest. In this section, we’ll cover some essential tips for processing your bass, balancing your mix, adding fades and automation, and mastering your final track. H3: Processing Your Bass The bass is one of the most important elements of a trap beat, so it’s essential to process it correctly. Here are some tips: – Use EQ to remove any unwanted frequencies and boost the bass frequencies in the 40-160 Hz range. – Add distortion or saturation to give your bass some presence and warmth. – Use sidechain compression to make sure the bass doesn’t overpower other elements in the mix. H3: Balancing Your Mix Balancing the elements in your mix is crucial for a professional-sounding trap beat. Here are some tips: – Use panning to separate the elements and create a wider stereo image. – Use volume automation to highlight important elements and create movement in the mix. – Make sure the kick and bass are working together and not clashing. H3: Adding Fades and Automation Fades and automation can add interest and dynamics to your trap beat. Here are some tips: – Use volume automation to create a build-up and release in your beat. – Use filter automation to create movement and interest in your elements. – Use fades to smooth out transitions between different sections of your beat. H3: Mastering Your Final Track Finally, mastering is the process of optimizing the final mix for distribution. Here are some tips: – Use EQ, compression, and limiting to balance the elements and make them sound cohesive. – Pay attention to loudness levels, making sure they’re high enough to compete with other tracks in the genre but not too high that they’re distorted. – Listen to your beat on different systems to make sure it sounds good everywhere. By following these tips for processing your bass, balancing your mix, adding fades and automation, and mastering your final track, you can create a professional-sounding trap beat that will stand out from the rest.

Trap Beat Guide Bass Essential Tips For Making 808 Patterns


Credit: m.youtube.com


Frequently Asked Questions On Trap Beat Guide Bass Essential Tips For Making 808 Patterns


How Do You Make A Perfect 808?


To make a perfect 808, start with the basic sound and add effects like distortion and saturation. Use EQ to enhance the bass frequencies and a compressor to control the volume. Experiment with envelope settings to create a unique attack and sustain.


Lastly, layer the 808 with other sounds to create depth and character.


How To Make Basslines 808?


To make basslines that sound like 808s, use a synthesizer that specializes in low-frequency oscillation. Set the attack and decay to zero, then adjust the sustain and release to your liking. Experiment with various waveforms and filters until the bassline sounds perfect.


Play around with the level, panning and effects to enhance the sound.


What Are The Essentials Of A Trap Beat?


Essentials of a trap beat include a pulse-pounding bassline, repetitive use of hi-hats, snares and claps, and the use of a synthesizer or other electronic instrument to create unique sounds. Trap beats often have a syncopated rhythm that emphasizes off-beats.


Additionally, they frequently incorporate vocal samples and 808 drums.


What Are The Key Elements Of A Trap Beat?


The key elements of a trap beat are heavy basslines, 808 drum patterns, hi-hats, snares, and sound effects. The tempo is usually slow, ranging from 120 to 140 BPM, and the overall sound is dark and atmospheric. These elements combine to create the signature sound of trap music.


Conclusion


As you can see, making 808 patterns for trap beats can be challenging but rewarding. By understanding the key elements of creating a strong bassline, experimenting with different variations, and utilizing the right tools, you can take your trap beats to the next level.


Remember to keep it simple, yet effective, and don’t be afraid to try new things. With practice and patience, you’ll be on your way to producing some fire trap beats that will have everyone nodding their heads. So, take what you’ve learned from this guide and let your creativity flow!

Categories
Archive

Everything You Need To Know About Mixing Acoustic Guitars

To mix acoustic guitars, pay attention to the arrangement and placement of microphones. Typically, placing a condenser mic above the guitar and a dynamic mic near the soundhole produces a balanced sound.


Mixing acoustic guitars can be a daunting task, especially for those with little experience in the field. Knowing where to begin is crucial to getting the perfect mix. The arrangement and placement of microphones play a critical role. By positioning a condenser mic above the guitar and a dynamic mic near the soundhole, you can produce a balanced sound.


However, there are many additional factors involved in the mixing process that should be considered, such as EQ, compression, reverb, and delay. We will delve deeper into the techniques used for mixing acoustic guitars to help you achieve a pristine and polished sound.

Everything You Need To Know About Mixing Acoustic Guitars


Credit: www.masteringthemix.com


Why Mixing Acoustic Guitars Matters


Mixing acoustic guitars can greatly enhance the depth and texture of your songs. Using panning, EQ, and reverb can create a balanced and natural sound. It’s important to experiment with different techniques to achieve the desired result.

Acoustic guitars are essential instruments in various genres, from folk to country, from rock to pop. As such, knowing how to mix them is crucial in producing high-quality recordings. The right mix can make all the difference in the sound quality and the overall impact of a song. This article will explore the reasons why mixing acoustic guitars matter and why it is worth spending time getting it right.

Creating A Balanced Sound

The primary reason for mixing acoustic guitars is to create a balanced sound that complements the other instruments in a recording. Without adequate mixing, the acoustic guitar can clash with other instruments or get lost in the background. A balanced mix ensures that the acoustic guitar has its space in the mix while still being able to work with other instruments in harmony. To achieve a perfect balance, you need to pay attention to every detail, including the EQ, panning, compression, and reverb. Each element plays a vital role in bringing out the desired sound and ensuring that the acoustic guitar blends perfectly with the other instruments.

Importance In Different Genres

Mixing acoustic guitars is vital in every genre, but it becomes even more important in certain styles. In genres such as folk and bluegrass, the acoustic guitar is the primary instrument and needs to be mixed accordingly. In contrast, in a rock or pop song, the guitar may take a backseat to the vocals or the drums. Understanding the different roles of the acoustic guitar in various genres is essential in producing a polished, professional-sounding mix. It allows you to tailor the mix to suit the specific style of music and create a sound that resonates with your audience. In conclusion, mixing acoustic guitars is not an easy feat and requires a careful understanding of the instrument and its role in the song. However, when done right, it can take a song to a whole new level, making it memorable and impactful. With the tips provided in this article, you can take your mixing skills to the next level and produce high-quality recordings that stand out from the crowd.

Preparing Your Acoustic Guitar For Mixing


Get ready to mix your acoustic guitar like a pro with these essential tips. From proper tuning to suitable microphones, this article will guide you through the process of preparing your guitar for mixing.

Preparing your acoustic guitar for mixing is a crucial step in the recording process. You want to ensure the guitar sounds clean and polished so that it can be properly mixed. In this article, we’ll discuss the two essential steps for preparing your acoustic guitar for mixing: string selection and tuning, and maintaining proper intonation.

String Selection And Tuning

The type of strings you choose can significantly affect the sound of your acoustic guitar. Some strings are designed for strumming, while others are intended for fingerpicking. The gauge of the strings also plays a role in the sound produced. Light gauge strings tend to produce a bright and lively sound, whereas heavier gauge strings produce a warmer and fuller sound. When selecting strings, consider the sound you want to achieve and look for a set that matches your preferences. Once you have chosen your strings, it is essential to tune your guitar correctly. Proper tuning ensures that every note you play on the guitar is at the intended pitch. Use an electronic tuner or a tuning app to ensure that all strings are in tune. Always check your tuning before recording to avoid any tuning inaccuracies that may affect the final mix’s sound quality.

Maintaining Proper Intonation

Intonation refers to the accuracy of the guitar’s tuning up and down the neck. Poor intonation can result in some notes sounding out-of-tune, even when the guitar is correctly tuned. To maintain proper intonation, make sure the string height, or action, is adjusted correctly to prevent any buzzing or unwanted noises. Adjust the saddle’s position to improve intonation if necessary. Regular maintenance of your guitar will also help maintain proper intonation. Clean your guitar regularly and replace old strings as needed. Properly storing your instrument in a case or stand can also prevent warping, which can lead to intonation issues. In conclusion, preparing your acoustic guitar for mixing is a vital step in recording high-quality music. Pay attention to string selection and tuning, and maintaining proper intonation to ensure your guitar sounds clean and polished before recording. By taking these steps, you’ll be one step closer to achieving the perfect mix.

Microphone Selection And Placement


Placement and selection of microphones for the acoustic guitar can make a significant difference when mixing. Placing the mic at the right distance from the guitar and selecting the right type of microphone can help you achieve the perfect blend of sound for your mix.

When mixing acoustic guitars, microphone selection and placement play a critical role in capturing the perfect sound. The right combination can ensure that your guitar track stands out and has the desired impact. Here are some key aspects to consider:

Dynamic Vs. Condenser Mics

Selecting between a dynamic and a condenser microphone depends on what you want to achieve. A dynamic microphone is more rugged and can handle high sound pressure levels (SPL). It is suitable for capturing sounds that are loud, such as guitar amps and snare drums. On the other hand, a condenser microphone has a broader frequency response and is more sensitive to detail. It is ideal for capturing sounds that are not as loud, such as acoustic guitars.

Positioning For Optimal Sound Capture

The positioning of the microphone plays a crucial role in capturing the desired sound. Here are some common microphone placements when recording acoustic guitars:

  • At the 12th fret: This position captures a balance between the low and high frequencies.
  • At the soundhole: This position captures a brighter sound with more bass.
  • Near the bridge: This position captures a more percussive sound with a strong attack.

Remember to experiment with different microphone placements to find the perfect sound for your mix. Overall, the key to capturing the perfect acoustic guitar sound is to experiment with different microphones and placements to find what works best for your unique sound.

Eq Techniques For Acoustic Guitars


Mixing acoustic guitars requires the utilization of EQ techniques to achieve balance and clarity in the sound. It involves adjusting frequencies, volume, panning, and other parameters to produce a well-rounded acoustic guitar mix. Good EQ techniques can help accentuate the beauty of the instrument and make it stand out in the final mix.

When it comes to mixing acoustic guitars, one of the most important tools at your disposal is equalization or EQ. EQ is used to balance the various frequencies produced by the guitar, ensuring that each frequency is heard clearly and without interference. Here are some EQ techniques that can help you achieve a balanced sound when mixing acoustic guitars.

Cutting Unwanted Frequencies

One of the first things to consider when EQing acoustic guitars is cutting unwanted frequencies. Unwanted frequencies can be caused by many different factors, such as poor recording techniques or room acoustics. One way to identify unwanted frequencies is to use a spectrum analyzer, which will show you the frequencies that are most prominent in the recorded audio. Once you’ve identified the unwanted frequencies, you can use a graphic EQ to cut them from the mix. This can usually be done by adjusting the sliders for the affected frequencies downward until the sound becomes cleaner and more balanced. In general, it’s best to start with a narrow cut and then widen it gradually until you find the sweet spot.

Boosting Harmonic Overtones

Another powerful EQ technique for acoustic guitars is boosting the harmonic overtones. Harmonic overtones are the higher-frequency harmonics that are produced by the guitar strings when they vibrate. By boosting these frequencies, you can add brightness and clarity to the guitar sound. To boost harmonic overtones, you can use a High Shelf filter or a Parametric EQ. With a High Shelf filter, you can boost the higher frequencies over a certain threshold, while with a Parametric EQ, you can select a specific frequency range to boost. In general, it’s best to approach EQing acoustic guitars with a light touch, making small adjustments rather than drastic changes. By cutting unwanted frequencies and boosting harmonic overtones, you can achieve a balanced and natural sound that will bring out the best in your acoustic guitar recordings.

Compressing Acoustic Guitar Tracks

When mixing acoustic guitar tracks, compressors are crucial tools that can enhance the sound quality. Compressors work by reducing the dynamic range of the guitar tracks, making the quieter parts louder and the louder parts quieter. This technique helps to produce a more consistent and polished sound.

Applying Light Compression For Clarity

Applying light compression is essential to ensure the acoustic guitar tracks sound clear and well-balanced. By doing so, it helps to bring out the subtle nuances of the guitar’s sound, such as the harmonics and finger noises.

Here are some tips for applying light compression:

  • Set a low compression ratio, typically between 1.5:1 and 3:1.
  • Keep the attack time short to preserve the transients of the guitar’s sound.
  • Set a longer release time to let the compression effect blend smoothly.
  • Use a low threshold to ensure the compressor is only activated during loud parts.

Avoiding Over-compression

While compressing acoustic guitar tracks can improve the sound quality, over-compression can ruin it. Overdoing it can cause the guitars to lose their natural sound and dynamics.

Here are some tips for avoiding over-compression:

  • Set a moderate compression ratio, typically between 3:1 and 6:1.
  • Adjust the attack time to preserve the transients of the guitar’s sound.
  • Set a shorter release time to prevent over-compression and ensure the effect is not prolonged.
  • Use a higher threshold to ensure the compressor is activated only during louder parts of the guitar’s sound.

In conclusion, compressing acoustic guitar tracks is an essential technique for enhancing the sound quality. By using compressors, mixing engineers can ensure the guitars sound clear, well-balanced, and retain their natural dynamics.

Everything You Need To Know About Mixing Acoustic Guitars


Credit: www.izotope.com


Reverb And Delay For Acoustic Guitars


Mixing acoustic guitars requires a delicate balance between reverb and delay effects. Reverb helps to create a sense of space and depth, while delay adds a sense of motion and texture to the sound. Finding the right mix requires experimentation and careful listening.

Creating A Sense Of Space

When it comes to mixing acoustic guitars, one of the most crucial effects is reverb and delay. They give your guitars the necessary space in your mix. Reverb creates a sense of space, and delay adds a rhythmic echo to your sound. To create a sense of space, you need to adjust the reverb time and decay. Longer decay times give your guitar a larger room sound, while shorter decay times give a tighter sound. A good starting point is to set the reverb time to 1.5 seconds and decay to around 50%.

Adding Ambience Without Muddying The Mix

When adding reverb and delay, it’s crucial to avoid muddying the mix. Adding too much reverb or delay can create a cluttered sound, making it difficult to distinguish individual instruments. Using EQ can help to prevent this. To add ambience without muddying the mix, you should engage high-pass filters that reduce the lower frequencies. Using a low-pass filter allows you to smooth-out excessive highs. Using a separate reverb bus for each instrument and adjusting the send levels can also solve the problem of overall muddiness.

Additional Tips

Here are some additional tips for using reverb and delay:

  • Use a pre-delay to avoid masking the attack of your guitar’s sound.
  • Change the positioning of your guitar recordings to affect the overall sound and ambience.
  • Consider using compression on your acoustic guitar recordings to maintain a consistent level before engaging reverb and delay.

Remember that the ultimate goal is to enhance the natural sound of your acoustic guitar. Reverb and delay can make your guitar stand out in the mix or disappear when utilised poorly. By paying attention to details and giving it space and ambience, you can achieve a natural and organic sound that beautifully complements your music.

Panning Acoustic Guitars In The Mix


Mixing acoustic guitars can be challenging, but panning can make all the difference. Positioning guitars left and right and ensuring they don’t clash with other instruments in the mix can create a balanced and natural sound.

When it comes to mixing acoustic guitars, panning is a crucial step in achieving an ideal stereo mix. Panning involves placing each guitar track in either the left or right speakers of the mix, creating a sense of space and depth in the overall sound. Stereo width plays a significant role in this, as it determines how much the guitars will be spread across the stereo field. Understanding this is important in achieving a balanced and natural-sounding mix.

Effective Panning Techniques

To achieve a natural and engaging acoustic guitar mix, using effective panning techniques is key. It’s essential to avoid hard-panning, where each guitar is placed only in the left or right speaker, as this can lead to an unnatural and unbalanced sound. Instead, try a moderate panning approach. This involves placing each guitar track slightly off-center from each other, allowing them to occupy different positions in the stereo field. This creates a natural and spacious mix that sounds pleasing to the listener.

Using Tables To Visualize Pan Positions

One way to visualize panning positions is to use a table. For example, the following table shows an effective pan setting for a two-guitar mix:

Guitar Tracks Panning
Guitar 1 Left -30%
Guitar 2 Right +30%

This table shows that Guitar 1 is positioned slightly to the left of center, while Guitar 2 is positioned slightly to the right of center. The percentage value indicates how far each guitar is panned in that direction. Using a table can help visualize pan positions, allowing you to experiment with different panning techniques until you find the right balance for your mix. In conclusion, panning acoustic guitars in the mix is vital in achieving a natural and engaging sound. Understanding the role of stereo width and using effective panning techniques, such as moderate panning and visualizing pan positions using tables, can help you achieve a professional and balanced mix.


Finalizing The Mix


Achieving a well-balanced and clear sound while mixing acoustic guitars is crucial. It involves finding the right EQ, compression, and panning to highlight the guitar’s character and blend it with the other instruments in the track. Additionally, paying extra attention to the auxiliary effects such as reverb and delay can help add depth and presence to the acoustic guitar’s sound.

When it comes to mixing acoustic guitars, finalizing the mix is a crucial step. This is where you glue everything together to create a polished and cohesive sound. In this section, we’ll look at how to balance levels with other instruments, fine-tune EQ, and compression.

Balancing Levels With Other Instruments

Balancing levels is an essential step in creating a professional-sounding mix. You don’t want the acoustic guitar to be overpowering or buried behind other instruments. Here are some tips for balancing levels with other instruments:

  • Use volume faders to adjust the levels of each instrument.
  • Use panning to create separation between instruments.
  • Avoid frequency masking by EQing the instruments to fit together.

Fine-tuning Eq And Compression

EQ and compression are powerful tools when it comes to mixing acoustic guitars. They can help control dynamics, enhance tone, and create space in the mix. Here are some tips for fine-tuning EQ and compression:

  1. Use a high-pass filter to remove unwanted low-frequency rumble.
  2. Cut or boost frequencies that clash with other instruments.
  3. Use compression to control peaks in volume and add sustain.
  4. Experiment with different compression settings to find the sweet spot.

In conclusion, finalizing the mix is one of the most critical steps in creating a polished and professional-sounding mix. By balancing levels with other instruments and fine-tuning EQ and compression, you can create a cohesive sound that enhances the acoustic guitar.


Frequently Asked Questions For Everything You Need To Know About Mixing Acoustic Guitars


How Should You Mix An Acoustic Guitar?


Mixing an acoustic guitar requires you to follow these 5 guidelines: 1. Balance the volume of each string 2. Ensure the sound is not too bright or dull 3. Eliminate unwanted noise like fret buzz 4. Use proper EQ to boost or cut certain frequencies.


5. Lastly, use reverb and compression to enhance the overall sound.


How Loud Should Acoustic Guitar Be In A Mix?


The acoustic guitar should be prominent enough to be heard and add depth to the mix, but not so loud that it drowns out other instruments. Aim for a balanced mix where all instruments can be heard clearly, while still maintaining the natural sound of the guitar.


Ultimately, the volume will depend on the specific song and the desired effects.


How Do You Mix An Acoustic Session?


To mix an acoustic session, follow these steps: Firstly, organize your recording session files accordingly. Secondly, establish an appropriate gain stage for each source, balance levels, and EQ, if needed. Thirdly, use compressors and limiters for dynamic range control. Fourthly, add reverb and delay for ambiance, if necessary.


Lastly, mix everything together, taking into account panning and individual instrument placements to create a cohesive sound.


Where Do You Pan An Acoustic Guitar In Mix?


Pan the acoustic guitar in the mix to the left or right, depending on its tonal balance and the intended sound. Panning it hard-left or hard-right creates a wide and spacious sound. To achieve a centered, intimate sound, pan it to the center.


Experiment with panning to find the best placement in the mix.


Conclusion


To sum up, mixing acoustic guitars requires careful attention to detail and a thorough understanding of the instrument and its nuances. With a little bit of experimentation and practice, you can be well on your way to achieving a balanced and dynamic mix that’s sure to impress.


From choosing the right microphones to positioning them properly, every step of the process plays a critical role. Remember to trust your ears, take your time, and don’t be afraid to try new things. Happy mixing!

Categories
Archive

Sidechain Compressor Vs Volume Shaper What Should I Choose

For dynamic processing on individual tracks, choose a sidechain compressor. For precise rhythmic shaping needs, select a volume shaper.


When it comes to music production, two of the most commonly used plugins are the sidechain compressor and volume shaper. While both are dynamic processors, they serve different purposes. A sidechain compressor is best used for controlling the dynamics of individual tracks by responding to the level of another track, often used in genres such as electronic dance music.


On the other hand, a volume shaper is designed for precise rhythmic shaping needs by altering the volume envelope of a track over time, creating unique gating and pumping effects. Understanding the differences between the two can help you choose the best plugin for your specific needs.


Understanding The Basics


To select between a sidechain compressor and a volume shaper, understanding the basics is crucial. While a sidechain compressor allows a particular frequency range to trigger compression, a volume shaper offers more flexibility in shaping different audio signals. The choice depends on the requirements of the audio project.

What Is A Sidechain Compressor?

A sidechain compressor is a tool used to control the volume of one track based on the volume of another track. This is commonly used in music production to help certain elements, such as vocals or bass, cut through the mix. The sidechain signal can be created from any source, and the compressor will reduce the level of the audio signal every time the sidechain signal is present.

What Is A Volume Shaper?

A volume shaper is another tool used in music production to shape the volume of an audio signal. Instead of using a sidechain signal to control the volume, a volume shaper typically works by drawing in a curve that determines the shape of the volume changes. This can be used, for example, to create rhythmic pumping effects on a synth or to shape the transient of a drum hit.

Understanding The Basics:

In music production, both sidechain compressors and volume shapers can be incredibly useful tools for controlling the dynamics of a mix. While they can both be used to achieve similar results, they work in different ways and may be better suited to different situations. Understanding the basics of how each tool works is essential to deciding which one to choose for your particular mix. Consider the source audio, the type of effect you’re looking to achieve, and the overall style and feel of the track. By taking these factors into account, you can make an informed decision and choose the tool that best suits your needs.

Sidechain Compressor Vs Volume Shaper What Should I Choose


Credit: www.audiomixingmastering.com


Sidechain Compressor


The sidechain compressor and volume shaper are both popular plugins used in mixing. While the former is great for controlling the dynamics of a particular track via another, the latter is perfect for shaping specific parts of a track’s volume.


Ultimately, the choice depends on the desired effect and the mixing task at hand.

If you are looking for ways to control the volume of your audio tracks, then you might have come across two popular options – Sidechain Compressor and Volume Shaper. In this blog post, we will discuss the Sidechain Compressor and explore its pros and cons to help you decide whether it’s a suitable option for your audio needs.

How It Works

In simple terms, a sidechain compressor allows you to control the level of one track based on the level of another. This works by using the audio signal from one track to “trigger” the compressor on another track. For instance, if you have a bassline and a kick drum track, you can use a sidechain compressor to dip the volume of the bassline every time the kick drum hits. This creates more space in the mix, allowing the kick drum to cut through without overpowering the bassline. Here’s a quick rundown of how to use a Sidechain Compressor:

  1. Insert the compressor plugin on the track that needs to be compressed.
  2. Select the sidechain input source from which the compressor will get the signal.
  3. Adjust the threshold setting to determine how much compression to apply when the sidechain signal exceeds a certain level.
  4. Adjust the attack and release times to control how quickly the compression kicks in and how long it lasts.

Pros And Cons

Like most audio tools, Sidechain Compressor has its advantages and disadvantages. Here are some of the pros and cons of using a sidechain compressor: Pros

  • Helps to create a cleaner mix by sidechaining one track to another
  • Can be used creatively for special effects and rhythmic patterns
  • Allows you to control the dynamics of a track without losing the overall feeling of the mix

Cons

  • Requires some knowledge of mixing to use effectively
  • Can sound unnatural if overused or poorly set up
  • May affect the tonal balance of the track if not carefully tuned

Examples Of When To Use It

A sidechain compressor can be used in various ways, but here are some examples of when it might come in handy:

  • To reduce the volume of a bassline when a kick drum hits
  • To create a “pumping” effect on a pad or synth sound that responds to the kick drum track
  • To make room for a lead vocal or instrument that needs to cut through the mix.

In conclusion, Sidechain Compressor is an excellent tool to help control the dynamics and improve the overall balance of your audio tracks. With the tips and tricks discussed above, you should be able to use a sidechain compressor effectively in your mixing projects.


Volume Shaper


Volume Shaper and sidechain compressors serve different purposes in shaping your music’s sound. While sidechain compressors manipulate the volume of a track based on another track’s volume, Volume Shapers allow you to automate volume-shaping to create more dynamic and precise audio effects.


Choose the tool that best suits your desired result.

Volume Shaper is another popular audio tool that is often compared to a Sidechain compressor. While Sidechain compressors primarily control the volume of one instrument using the volume of another, Volume Shaper is a tool that modulates the volume of an instrument over time, allowing you to create complex sounds or rhythms.

How It Works

Volume Shaper is essentially an advanced volume automation plugin that enables you to shape the contours of a sound by adjusting the volume in various ways. It allows you to create anything from subtle titillations that provide a little bit of flavor to the track to complex rhythmic patterns that you can use as the basis for your track. To use Volume Shaper you simply need to drag it onto the audio channel you want to use, set the tempo, and then adjust the parameters to create the sound you’re looking for.

Pros And Cons

Like any audio tool, Volume Shaper has its own set of pros and cons that users should be aware of before integrating it into their workflow. Some of the significant benefits include:

  • Allows you to create complex rhythms and patterns.
  • Provides precise control over the volume of your audio.
  • Easy to use and intuitive interface.

However, there are some drawbacks as well:

  • Not as versatile as Sidechain compressors
  • Can be difficult to use if you’re unfamiliar with automation techniques.

Examples Of When To Use It

Volume Shaper is a powerful tool that can be used in many different ways. Here are some examples of when you may want to use it:

  • Creating complex sound effects.
  • Adding a rhythmic element to a track.
  • Changing the dynamics of a specific instrument.

In conclusion, Volume Shaper is a great tool that allows you to create complex sounds and rhythms with ease. However, it’s important to consider whether it’s the right tool for the job before integrating it into your workflow.

Sidechain Compressor Vs Volume Shaper What Should I Choose


Credit: m.youtube.com


Difference Between Sidechain Compressor And Volume Shaper

In music production, both sidechain compressors and volume shapers are essential tools for shaping the dynamics of your sound. While they have similar applications, the key difference between a sidechain compressor and a volume shaper lies in how they approach the processing of your sound.

Key Differences

  • A sidechain compressor adjusts the volume of one track, based on the volume of another track.
  • On the other hand, volume shapers apply volume automation to the amplitude of a track
  • Sidechain compressors allow the original sound to come through more while volume shapers can completely cut off the signal.
  • Volume shapers offer more precise control over the volume of individual elements in a mix.

When To Choose One Over The Other

Choosing between a sidechain compressor and a volume shaper depends on your desired outcome. Consider the following:

  • Use a sidechain compressor when you want to make room for vocals or other lead elements in a mix, without having them compete in the same frequency range as other instruments.
  • If you want to create a rhythmic effect like a pumping bassline or a sidechain kick, use a sidechain compressor.
  • When you want to create smooth transitions between sounds or elements, use a volume shaper.
  • If you want more precise control over specific elements in a mix, use a volume shaper to isolate and modify individual tracks.

Keep in mind that you can use both sidechain compression and volume shaping together to create dynamic and engaging soundscapes. It ultimately comes down to personal preference and the specific needs of your mix.

Factors To Consider When Choosing

Both sidechain compressor and volume shaper are essential tools for controlling audio dynamics in music production. However, selecting the most suitable option for your music production needs can be challenging. Some of the key factors to consider while choosing between sidechain compression and volume shaping include:

Type Of Sound

The type of sound you are working with is crucial when determining whether to use a sidechain compressor or volume shaper. If you are producing music with sustained notes such as pads or vocals, a sidechain compressor is ideal for managing the audio dynamics. On the other hand, if you have staccato notes such as percussion and drums, volume shaping allows you to shape and isolate the individual transients.

Genre Of Music

Genres such as house, techno, and EDM rely heavily on sidechain compression to create the characteristic pumping effect that is associated with these styles of music. If you are producing such music, sidechain compression can help you achieve the desired impact. However, in other genres such as hip hop, volume shaping is preferred to create the signature rhythm and groove. Therefore, understanding the requirements of your genre is vital to choosing the right tool.

Personal Preference

Personal preference is perhaps the most crucial factor in choosing between sidechain compression and volume shaping. While both tools can achieve similar results, one may feel more intuitive and convenient for you. It is advisable to try both options and experiment with their features to determine the one that best serves your production needs.

Important Note: While considering these factors is essential, remember that the choice between sidechain compression and volume shaping is subjective. You can use either tool to achieve fantastic results depending on your production needs and preferences.

Sidechain Compressor Vs Volume Shaper What Should I Choose


Credit: www.cableguys.com


Frequently Asked Questions On Sidechain Compressor Vs Volume Shaper What Should I Choose


Should I Use Sidechain Compression?


Using sidechain compression can be a useful technique in mixing music. It helps to create more space, clarity and balance in the mix by reducing the volume of selected instruments when the kick drum or other trigger sound hits. However, it’s not necessary for every mixing situation and should be used thoughtfully to avoid overuse or unnatural sound.


What Is The Best Compressor Setting For Sidechain?


The best compressor setting for sidechain varies depending upon the specific audio project. However, a good starting point is to set a fast attack time and release time, a low ratio, and to adjust the threshold to match the desired amount of compression.


Experimentation is key to finding the perfect setting.


Should I Sidechain Or Eq First?


It depends on the results you want to achieve. If you want to control the volume of one track with another, use sidechain compression. If you want to adjust the tonal balance of a track, use EQ. Both techniques have different purposes and can be used together for better results, depending on the situation.


What Sounds Should You Sidechain?


Sidechain compression should be used on sounds that may clash with the kick drum, such as bass, synths, and percussion. By sidechaining, these sounds will be ducked in volume when the kick drum hits, allowing it to cut through the mix more effectively.


Conclusion


Ultimately, the decision to choose between a sidechain compressor and a volume shaper comes down to personal preferences and the specific needs of your production. While sidechain compression offers a more traditional approach in controlling dynamics, volume shaping is capable of crafting more precise and dynamic transients.


In either case, understanding the use cases and limitations of both tools can lead to achieving the desired results in your mixing and mastering processes. Happy producing!

Categories
Archive

Common Mistake Musicians Make When Mixing Their Own Music

One common mistake musicians make when mixing their own music is overdoing it with effects and processing. Mixing is about balance and clarity, not drowning out everything with reverb and distortion.


A great mix can make or break a song’s success, and musicians often take on the challenge of mixing their own music. However, it’s easy to fall into the trap of overprocessing and adding too many effects, which can ultimately harm the final product.


Mixing is all about finding a balance and creating a clear, cohesive sound. It’s important to pay attention to levels, panning, EQ, and compression, using effects sparingly and purposefully. We’ll dive into some of the common mistakes musicians make when mixing their own music and how to avoid them for a professional-sounding mix.


Starting Without A Clear Plan

Mixing music is a complex process that requires a lot of attention to detail, careful listening, and technical expertise. But one of the most common mistakes musicians make when mixing their own music is starting without a clear plan, which can lead to a messy, inefficient process and ultimately, a disappointing result.

Lack Of Clarity On The End Result

Before you start mixing your music, it’s essential to have a clear idea of what you want to achieve. As a musician, you might be focused on creating a specific sound or atmosphere, or you might be trying to highlight particular elements of your composition. But if you’re not clear on what your end goal is, you’ll quickly find yourself getting lost in the mixing process.

One approach to addressing this problem is creating a mixing plan. This plan should specify the key elements you aim to highlight, the balance between different instruments or tracks, and any unique effects you’d like to incorporate, among other things. Essentially, a mixing plan gives you a roadmap for your mixing process, helping you avoid aimless adjustments that waste your time and mental energy.

Ineffective Time Management

Mixing music is a time-consuming process, which can make it challenging to structure your working days and ensure that you’re being productive. But if you don’t manage your time effectively, you’ll struggle to complete your mixing project in a timely manner.

One solution to this problem is breaking down your mixing process into smaller, more manageable tasks. This can help you stay motivated and focused on specific elements of your project, rather than getting bogged down in the big picture. Additionally, setting deadlines for different stages of your mixing process can help you stay on track and ensure you complete your project within a reasonable timeframe.

In summary, starting without a clear plan can be a costly mistake for musicians who are mixing their own music. A mixing plan can help you stay focused and efficient, while careful time management can ensure that you complete your project in a timely and stress-free manner.

Common Mistake Musicians Make When Mixing Their Own Music


Credit: www.izotope.com


Ignoring The Importance Of Eq


One common mistake musicians make when mixing their own music is ignoring the importance of emotional intelligence (EQ). Focusing solely on technical aspects and ignoring the emotional impact of the music can lead to a mix that may sound technically sound, but lacks emotional depth and connection with the audience.

Ignoring the Importance of EQ Musicians often make the mistake of ignoring the importance of EQ when mixing their own music. EQ, or equalization, refers to the tonal balance of a recording and is a crucial aspect in getting a professional-sounding mix. It’s all too easy for budding musicians to skip or rush through the EQ process, resulting in a lackluster final product. In this article, we’ll take a closer look at the common mistake made by amateurs and how they can avoid it. Poor EQ Balance One of the most common mistakes made in mixing is poor EQ balance. This happens when certain frequencies are either too prominent or too weak in the mix, resulting in a muddy or harsh sound. It’s crucial to ensure that all frequencies are balanced and playing a part in the final mix. Creating a great mix requires a well-rounded sound, so it’s essential to spend time tweaking the EQ until you achieve a balanced sound. Overuse of EQ Another mistake many musicians make when mixing is overuse of EQ. While EQ can positively shape a mix, it’s important to use it in moderation. Over-equalizing can result in a loss of clarity and an artificial sound. Additionally, if you try to fix every problem with EQ adjustments, you’ll quickly find yourself confusing the mix and losing balance of the sound. Instead, when it comes to EQ, less is often more. Start with small adjustments and make sure to listen carefully before making any drastic changes. Tips for Improving EQ Here are some actionable tips that can help you avoid the common mistakes related to ignoring the importance of EQ: 1. Mix in a suitable environment: Mixing in an untreated room or relying on consumer grade speakers can lead to inaccurate and misleading results. Invest in acoustic treatment or consider getting high-quality monitors or headphones. 2. Listen critically: Take regular breaks when mixing and listen to the mix on different systems. Make sure to listen for every detail, including frequency balance, dynamics, and overall sound. 3. Don’t hesitate to experiment: Mixing is an art form and experimentation is key to finding the right balance of EQ. While it’s important to have a plan, keep an open mind and experiment with different approaches. In conclusion, it’s essential to pay attention to EQ when mixing your own music. Poor EQ balance and overuse of EQ are common mistakes that can ruin your sound. Take time to tweak your EQ and listen critically throughout the process to ensure you get a professional-sounding mix.

Not Considering The Effects Of Compression

Compression plays a crucial role when it comes to music mixing, but many musicians make the mistake of not considering its effects. Compression can help even out sound levels and boost volume, but overusing it or not using it consistently across tracks can affect the overall sound quality. In this article, we will dive deeper into one of the most commonly made mistakes related to compression when mixing music.

Over-compressing Individual Tracks

One of the most common mistakes musicians make is over-compressing individual tracks. Compression can help make a track more balanced and consistent, but overdoing it can negatively affect the overall sound quality. When a track is over-compressed, it can lose its dynamics and sound flat and lifeless.

To avoid over-compressing, it is important to understand how compression works. A compressor reduces the dynamic range of a track by lowering the volume of the loudest parts. This helps bring up the overall volume of the track, but too much reduction can make the track sound unnatural.

It’s essential to keep a balance when using compression. Don’t overdo it, or your music will lose its sound dynamics. But don’t underuse it either, as it can leave some parts of the track sounding too quiet.

Inconsistent Use Of Compression Across Tracks

Another common mistake in music mixing is the inconsistent use of compression across tracks. Every instrument possesses its own dynamic range and needs different compression settings. Failing to use consistent settings across all tracks can lead to an uneven sound mix.

Thus, it’s essential to ensure that the compressor settings for each track are suitable for that instrument or track. For instance, use more compression on drums and bass tracks to provide them with a more consistent sound, while using lower levels of compression on guitar and vocals to keep dynamics intact.

The Bottom Line

  • Compression is one of the essential tools in music mixing.
  • Over-compression and inconsistent use of compression are common mistakes that should be avoided.
  • It is essential to understand how compression works to create a well-balanced sound mix.
  • Use a consistent compression setting across all tracks to create an even sound mix.

After reading this, we hope you now have a better understanding of the effects of compression on music mixing. Make sure to avoid these common mistakes in your next project to achieve a better sound mix.

Failing To Address Phase Issues

When it comes to mixing their own music, many musicians make the mistake of overlooking the importance of addressing phase issues. These issues occur when sound waves from different audio sources clash, resulting in phase cancellation and a loss of sonic quality. In this post, we will explore the common errors musicians make when it comes to phase issues and how to avoid them.

Lack Of Attention To Track Positioning

One of the most common mistakes that musicians make is failing to pay attention to the positioning of their audio tracks. If multiple tracks are out of phase, it can lead to a muddy and unclear mix. To avoid this, it’s crucial to ensure that all your audio tracks are correctly aligned and have the same start time. This can be achieved by creating a “reference track” that all other tracks should follow in terms of timing.

Disregard For Microphone Placement

The microphone placement is another critical factor that can lead to phase issues if not handled correctly. Musicians need to ensure that all microphones are set at the same distance from the audio source, and with the same angle. When using multiple microphones, it’s vital to adjust the gain and phase settings to ensure the sound waves are aligned. Failure to do so can result in unpleasant phasing effects and a poor quality mix.

Common mistakes musicians make when mixing their own music Ways to avoid these mistakes
Failure to address phase issues Ensure all audio tracks are correctly aligned, create a reference track to follow timing, adjust gain and phase settings on multiple microphones
Lack of attention to track positioning Create a reference track for timing, check the alignment of all tracks, ensure they are all the same distance from the source
Disregard for microphone placement Set microphones at the same angle and distance from the source, adjust the gain and phase settings to align sound waves

By paying attention to the positioning of audio tracks and microphone placement, musicians can avoid many phase issues that lead to poor quality mixes. Always take the time to ensure that all tracks are correctly aligned, use a reference track to guide timing, and adjust gain and phase settings to eliminate any phasing effects. Don’t let phase issues ruin the quality of your music, and take the time to address them carefully.

Overusing Reverb And Delay

When musicians mix their own music, they often make common mistakes. One essential aspect of music mixing is using reverb and delay to add depth and space to the mix. However, it’s easy to go overboard with these effects. Overusing reverb and delay can result in muddying up the mix and creating a disconnected sound, making the individual tracks harder to distinguish.

Muddying Up The Mix

Overusing reverb and delay can muddy up the mix, making it sound less clear and cohesive, which can lead to confusion among the listeners. It is crucial to have a clear mix where each instrument can be heard distinctly. Applying too much reverb or delay to every instrument will create a chaotic, undefined sound that will distract the listeners from the overall beauty of the song, making it sound unprofessional and messy.

Creating A Disconnected Sound

Over-reliance on reverb and delay can create a disconnected sound where each track sounds like a different entity, rather than a part of a cohesive mix. It’s essential to use these effects selectively, to create space and depth for the tracks without losing their clarity and coherence. Musicians should use these effects to highlight specific parts of the song, like vocal harmonies, or instrumental solos, which will add to the song’s emotional impact and sonic depth.

It’s essential for musicians to be aware of the potential pitfalls of overusing reverb and delay. To avoid these mistakes, they need to experiment with different levels of these effects, using them sparingly and selectively, so that the mix sounds clear, cohesive, and beautiful.

Common Mistake Musicians Make When Mixing Their Own Music


Credit: www.masteringthemix.com


Forgetting The Importance Of Panning


One common mistake musicians make when mixing their own music is forgetting the importance of panning. Properly panning your tracks can help create a more balanced and dynamic sound. Neglecting this step can result in a muddy and dull mix.

As musicians mix their own music, they often focus on the levels and equalization of each element in the track. While these are important, another crucial aspect that often gets overlooked is panning. Panning is the process of placing each element of the mix in the stereo field, creating a wide and balanced soundstage. This can be a common mistake as some musicians may mix their music in mono or place elements improperly in the stereo field, resulting in a lackluster and uninteresting mix.

Mono Mixing

One of the most common mistakes musicians make is mixing their music in mono. Mixing in mono combines all elements of the track and sends them equally to both speakers. This not only limits the width of the mix, but it muddies up the sound, making it difficult for individual elements to stand out. While mono mixing can be useful during the mixing process to ensure that all of the elements blend well together, it should not be used for the final mix.

Improper Stereo Placement

Another mistake that can be made is improper stereo placement. This is when elements in the mix are excessively panned to one side or the other, resulting in an unbalanced mix. For example, if the drums are panned hard left and the guitar is panned hard right, the bass and vocals may become lost and difficult to hear. It’s important to find balance and spread the elements evenly across the stereo field, creating a clear and focused mix. To avoid these mistakes, it’s important to understand the importance of panning in the mixing process. Taking the time to properly place each element in the stereo field can enhance the overall sound of the mix, creating a dynamic and engaging listening experience for the audience.

Mixing At Too High Levels

Mixing music is an art form that requires precision, creativity, and patience. Many musicians make the mistake of mixing their own music at high levels, which can lead to loudness fatigue and an inaccurate representation of the final product. Let’s dive into these two common mistakes and how to avoid them.

Loudness Fatigue

When mixing your own music, it’s easy to get carried away and turn up the levels. However, this can lead to what’s known as loudness fatigue. This occurs when your ears become tired from listening to music at high levels for an extended period of time. When you experience loudness fatigue, you become desensitized to the loudness and your perception of the mix becomes skewed.

To avoid loudness fatigue, it’s important to take breaks and listen to your mix at lower levels. This allows your ears to rest and ensures that you’re not overcompensating for the lack of volume. Additionally, investing in a good pair of studio headphones or monitors can provide a more accurate representation of your mix at lower levels.

Inaccurate Representation Of The Final Product

Another common mistake that musicians make when mixing their own music at high levels is an inaccurate representation of the final product. When you mix at high levels, you’re not hearing the music as it will sound to your audience. In fact, the loudness can mask certain frequencies and make it difficult to achieve a balanced mix.

To ensure an accurate representation of the final product, it’s important to mix at a lower volume. This allows you to hear all the frequencies and ensures that you’re not relying too heavily on the loudness to mask imperfections in the mix. If you’re concerned about how your mix will sound to your audience, consider testing it on different playback devices, such as earbuds, car speakers, and home theater systems.

Mixing your own music can be a rewarding experience, but it’s important to avoid common mistakes that can compromise the quality of your final product. By mixing at lower levels, you can avoid loudness fatigue and achieve a more accurate representation of your mix.


Relying Too Much On Mastering To Fix Issues


Overuse of mastering to fix issues is a common mistake musicians make when mixing their own music. While mastering can polish the final product, it cannot fix fundamental mixing errors. It is important to develop mixing skills and address issues early on in the process.

Ignoring Problems That Could Have Been Addressed In Mixing

Many musicians tend to focus more on the mastering process to enhance their music quality. They presume that mastering can fix all issues they find on the track. However, it is important to note that mastering only addresses problems that arise at the final stage of music production. If you ignore potential issues while mixing, they can compound with time, eventually leading to poor quality audio. Such issues may include missed sounds, wrong EQ settings, and poor volume balance. It is important to resolve these issues during the mixing process to ensure that the final product is of high quality.

Inability To Identify And Correct Issues Without Mastering

A common mistake musicians make while mixing their music is that they get so engrossed in perfecting the sound quality that they may be unable to identify and correct issues on their own. If you are relying too much on mastering, there is a possibility that you may be missing out certain aspects of the mixing process that can enhance the overall sound quality. To avoid this, it is important to use reference tracks, take brief breaks while mixing to refresh your ears, and mix at a low volume. This will allow you to identify and correct issues during the mixing stage, resulting in a higher-quality final product.

Common mistakes musicians make when mixing their own music How to avoid these mistakes
Relying too much on mastering to fix issues Understand that mastering only addresses issues at the final stage of production. Resolve all issues during the mixing process.
Ignoring problems that could have been addressed in mixing Resolve all potential issues during the mixing process to ensure a high-quality final product.
Inability to identify and correct issues without mastering Utilize reference tracks, take brief breaks while mixing to refresh your ears, and mix at a low volume to identify and correct issues during the mixing process.

In conclusion, every musician should aim to produce high-quality sound and a polished final product. Relying too much on mastering to fix issues is a common mistake that can significantly impact the overall quality of your music. By resolving issues during the mixing process, you can achieve a higher-quality final product that you can be proud of.


Frequently Asked Questions For Common Mistake Musicians Make When Mixing Their Own Music


Is It Bad To Mix Your Own Music?


Mixing your own music is not necessarily bad as long as you have the knowledge, skills, and tools to do so effectively. However, improper mixing can adversely affect the quality of the music. It is advisable to seek the services of a professional music mixer if you are not confident in your mixing abilities.


Should An Artist Mix Their Own Music?


Yes, an artist should mix their own music as it gives them creative control over the final product. However, if the artist does not have the mixing skills or equipment, it is advisable to seek the help of a professional mixing engineer to ensure a high-quality final mix.


What Is Bad Mixing In Music?


Bad mixing in music refers to a poor balance between different instruments or vocals resulting in an unpleasant or unsatisfying sound. It can also include issues like excessive volume levels, distortion, or lack of clarity in the mix. A well-mixed track should have all the elements blend harmoniously, creating a professional-sounding product.


What Not To Do When Making Music?


Don’t ignore your target audience, ignore the importance of practice and avoid copying others’ work. Don’t limit yourself to one genre and avoid not taking risks. Lastly, don’t overlook the importance of good sound quality and mixing techniques.


Conclusion


To achieve a professional sound in music production it is important to invest in quality equipment, acquire the necessary skills and train the ears to distinguish the sounds. Many musicians make the mistake of mixing their own music without mastering these fundamentals.


This can lead to a poorly mixed track that fails to resonate with the audience. To avoid this, musicians should aim at improving their mixing skills and seeking feedback from professionals. Lastly, patience and perseverance are key ingredients in music production.


So take your time, practice and learn from your mistakes.

Categories
Archive

Ableton Live How To Create A House Beat Beginners Tutorial

To create a House beat in Ableton Live, first select and arrange samples in the drum rack, then use the sequencer to program the beat. This tutorial is perfect for beginners.


If you want to create a House beat in Ableton Live but feel overwhelmed by the process, don’t worry – it’s simpler than you might think. By selecting and arranging samples in the drum rack, using the sequencer to program the beat, and adding effects for interest, you’ll be producing House tracks in no time.


This tutorial is tailored specifically for beginners in music production and will guide you through every step of the process. Whether you’re looking to get started with electronic music production or explore a new sub-genre, creating a House beat in Ableton Live is an excellent place to start.


Understanding Ableton Live


Learn how to create a house beat for beginners using Ableton Live. This tutorial will guide you step by step on how to produce a high-quality track with the popular digital audio workstation.

What Is Ableton Live?

Ableton Live is a software application that is designed for music production, live performance and DJing. It has become one of the most popular digital audio workstations (DAW) available today, used by professional musicians and beginners. Ableton Live is known for its unique session and arrangement views, which allows users to create, arrange, and mix music in real-time – making it perfect for live performances.

Overview Of Ableton Live Interface

Ableton Live’s interface is divided into two main views, the Session View and Arrangement view. The Session View allows users to create, edit, and rearrange musical ideas in a non-linear way. It is designed to be used for live performances, with clips that can be triggered individually or as groups to build tracks in real-time. The Arrangement view is more conventional with a timeline, and it is used to edit and arrange tracks in a more traditional, linear approach. It is typically used when a user is ready to start recording and refining their session ideas. Some of the other key components of Ableton Live’s interface include:

  • The Browser: where users can browse and organize their sound library
  • The Mixer: where users can control the volume and EQ of individual tracks
  • The Clip View: where users can edit individual MIDI or audio clips

Understanding Ableton Live is crucial for getting the most out of this versatile software and creating your own unique sounds through its various features.

Creating A New Project


Learn how to create a house beat in Ableton Live with this beginner’s tutorial. From creating a new project to adding drums and basslines, this guide covers everything you need to know to start making your own music.

Creating a new project is the first step towards making music in Ableton Live. The software provides a simple and intuitive interface for beginners to get started easily. In this tutorial, we will go through the steps needed to create a new project and get you started with making house beats in no time. So, let’s dive right in!

Setting Up A New Project

To set up a new project, simply open Ableton Live and click on “File” in the top left corner of the screen. From there, select “New Live Set” or use the shortcut “Ctrl+N” (Windows) or “Cmd+N” (macOS). This will create a new project with default settings, ready for you to start creating your house beat.

Selecting A Tempo And Time Signature

Once you have created your new project, you need to select a tempo and time signature. This is an essential step in music production as it defines the overall pace and structure of your track. To do this, locate the “Master” track in the left-hand side of the screen and click on the “Clip/Device View” button (located on the left-hand side of the track header). Next, click on the “Tempo” box in the “Master” track and enter the tempo you want for your track. The time signature can be changed by clicking on the “Time Signature” button next to the “Tempo” box. You can also choose to have Ableton Live automatically set the tempo and time signature based on an audio file you are bringing into your project. This can be done by dragging and dropping the audio file onto the “Master” track. The software will analyze the file and set the tempo and time signature accordingly. By following these simple steps, you can easily create a new project in Ableton Live and start making house beats like a pro. Now that you have set up your project with the right tempo and time signature, it’s time to start adding some instruments and drums to your track. Stay tuned for the next section of this tutorial!

Building The Beat

Creating a beat from scratch can be challenging for beginners. But with Ableton Live, you can create your own beats with ease! In this tutorial, we will go through the steps to create a house beat in Ableton Live. Let’s start by building the beat.

Creating A Kick Drum

The kick drum is the foundation of any beat. In Ableton Live, you can create a kick drum synth by using the Analog instrument. Start by selecting the “Analog” instrument from the Software Instrument track in Ableton Live. Go to the oscillator section and choose “Sine” waveform. Adjust the volume and release settings to create a punchy kick sound. Now, create a MIDI clip and add the kick pattern in the arrangement view. Your kick drum is ready.

Adding A Snare Drum

The snare drum adds a bright and sharp sound to the beat. In Ableton Live, you can create a snare drum synth by using the Operator instrument. Start by selecting the “Operator” instrument from the Software Instrument track in Ableton Live. Choose “Noise” waveform and adjust the filter envelope settings to create a snappy snare sound. Now, create a MIDI clip and add the snare pattern in the arrangement view.

Incorporating Hi-hats And Percussion

The hi-hats and percussion add rhythm and texture to the beat. In Ableton Live, you can create hi-hats and percussion sounds by using drum kits. Choose a drum kit from the Drum Rack section and select the hi-hats and percussion sounds that you want to use. Create a MIDI clip and add the hi-hat and percussion patterns in the arrangement view.

Creating A Bassline

The bassline adds depth and groove to the beat. In Ableton Live, you can create a bassline synth by using the Serum instrument. Start by selecting the “Serum” instrument from the Software Instrument track in Ableton Live. Choose a waveform that suits the bassline you want to create. Then, adjust the filter and envelope settings to create a bassline sound. Now, create a MIDI clip and add the bassline pattern in the arrangement view.

Ableton Live How To Create A House Beat Beginners Tutorial


Credit: www.productionmusiclive.com


Arranging The Beat

Arranging is the process of putting all the clips together in a sequence that creates a song. This is the part where you will be adding and removing clips, creating variation, and building energy throughout the track until you have a finished product you are happy with.

Organizing The Clip View

Before you start working on arranging your beat, it’s important to make sure that you have a good understanding of where all of your clips are and how they relate to each other. One helpful way to do this is by using the clip view in Ableton Live. Here’s how to do it:

  1. Open Ableton Live and select the project you are working on.
  2. Click on the “Session View” button in the top right corner to switch to clip view.
  3. Organize your clips by dragging them around until they are in an order that makes sense to you.
  4. Use colors to help you keep track of different elements, such as drums, basslines, and melodies.
  5. Make sure that each clip is labeled appropriately so you can easily find it when you need it.

Working In The Arrangement View

Once you have a good understanding of where all of your clips are and how they relate to each other in the clip view, it’s time to start building your track in the Arrangement View. Here’s how to get started:

  1. Click on the “Arrangement View” button in the top right corner to switch to arrangement view.
  2. Drag and drop your clips from the clip view into the arrangement view to create the structure for your track.
  3. Start building the arrangement by placing clips in the order you want them to appear in the song.
  4. Add and remove clips as needed to create variation and keep the listener interested throughout the song.
  5. Use automation to add effects, create buildups, and add breaks to the track.

Structuring Your Beat

As you work on arranging your beat, it’s important to keep the overall structure of the song in mind. Here are some tips to help you structure your beat:

  • Start with an intro that sets the tone for the track and introduces the main elements of the beat.
  • Build up the energy throughout the first section of the song, adding and removing elements as needed to keep the listener engaged.
  • Create a breakdown section that gives the listener a chance to rest before building up to the next section.
  • Use the buildup to create tension and anticipation before the drop.
  • Create a drop section that is the climax of the song, with all elements working together to create a big sound.
  • Finish the track with an outro that resolves the tension and gives the listener a sense of closure.

Remember, there is no one right way to structure a beat – it’s all about finding what works best for your track and your own personal style.

Adding Effects


Learn how to add effects to your house beat with this beginner’s tutorial using Ableton Live. Enhance your production skills and take your tracks to the next level with the help of this step-by-step guide.

With every tool we learn in Ableton Live, we are getting one step closer to our perfect house beat. In the previous section, we have learned about creating melodic elements. Now it’s time to take it up a notch and add some Effects to our beat. The effects are a great way to make your sounds bigger, fuller, and more exiting. In this tutorial, we will cover how to enhance your beats with reverb and delay, and apply filters and EQ to create a more dynamic arrangement.

Enhancing Your Drum Sounds

When it comes to house music, drums are the backbone of the beat. Therefore, it’s important to get them right. Adding effects to drum sounds can give them more depth and character. Let’s see how we can achieve that in Ableton Live:

  • Apply an EQ to your drum track. This will help to remove any unwanted frequencies and make room for other elements in the mix.
  • Use a compressor to tighten up the drums and give them a more consistent volume.
  • Experiment with adding reverb to the snare and clap to enhance the tail of the sound.
  • Try adding some delay to the hi-hat or percussions to create a more complex rhythm.

Using Reverb And Delay

Reverb and Delay are two of the most commonly used effects in house music production. They can transform a sound from dull and lifeless to vibrant and exciting. Here’s how to make the most of them:

  • Reverb adds a virtual room to your sound, making them sound like they were played in a larger space than they actually are.
  • Use a long reverb with a decay time around 2-3 seconds for a more prominent effect.
  • Delay creates a sense of space between sounds, making them feel more spread out.
  • Try adding a delay with a short delay time and few feedbacks to add some rhythm to your percussion.

Applying Filters And Eq

Filters and EQ are some of the most versatile tools in Ableton Live. They allow you to shape your sound to fit your desired frequency spectrum. Here’s how we can achieve that:

  • Use low-cut and high-cut filters on any sound element to remove unwanted frequencies.
  • Add a slight boost around 200-500 Hz on your kick drum for a more pronounced punch.
  • Cut the low-end of your melodic elements to make room for the bassline.
  • Apply a filter sweep to create a sense of tension and release in the arrangement.

In conclusion, adding effects to your house beat can take it from mundane to magical. Don’t be afraid to experiment with different settings and combinations of effects. Remember, music production is all about creativity and expression, so let your imagination run wild!

Ableton Live How To Create A House Beat Beginners Tutorial


Credit: m.youtube.com


Mixing And Mastering


Learn how to mix and master your own house beat in Ableton Live with this beginner tutorial. Follow step-by-step instructions to create your own unique and professional sounding track that’s ready for release.

Once you’re happy with the arrangement of your house beat in Ableton Live, it’s time to move onto mixing and mastering to give your track the polished, professional sound it deserves. In this tutorial, we’ll go through the basics of mixing and mastering your track, covering balancing your levels, adding compression and saturation, and finalizing your mix.

Balancing Your Levels

The first step in mixing your house beat is balancing your levels. This means ensuring that all your tracks sit at the correct volume in relation to each other. A good starting point is to set the volume of your kick drum to around -6dB. From here, adjust the levels of your other tracks to sit nicely in relation to the kick drum.

Adding Compression And Saturation

Next, let’s add some compression and saturation to your tracks. Compression can help even out the levels of your tracks and add some punch to your drums, while saturation can add warmth and character to your sound. Start by adding a compressor to your kick drum and adjusting the settings to taste. Then, add saturation to your drums and bassline to give them some warmth and drive.

Finalizing Your Mix

Finally, it’s time to finalize your mix. This includes adding effects like reverb and delay, EQing your tracks, and making any final adjustments to your levels and panning. It’s important to listen to your mix on a variety of speakers and in different environments to ensure it sounds great everywhere. By following these basic steps, you can create a polished, professional-sounding house beat in Ableton Live. Remember to take your time and trust your ears when making mixing and mastering decisions. Happy producing!

Ableton Live How To Create A House Beat Beginners Tutorial


Credit: www.sonicacademy.com


Frequently Asked Questions Of Ableton Live How To Create A House Beat Beginners Tutorial


How Do You Start Making House Beats?


To start making house beats, first, select the right digital audio workstation (DAW) for your needs. Next, choose the genre and tempo you want to create. Then, select the drum kit and start creating a basic drum pattern. Add bassline and chords using synthesizers or samples and create the melody.


Finally, add effects, mix and master the track to create a polished sound.


What Is The Basic Beat Of House Music?


The basic beat of house music is a four-to-the-floor rhythm, with a kick drum playing on every beat and a snare or clap on every second and fourth beat. This creates a pulsing, danceable groove that is characteristic of the genre.


Is Ableton Easy For Beginners?


Yes, Ableton is easy for beginners. It has a simple and intuitive interface, which allows users to navigate and experiment easily. Plus, it provides a wide range of built-in tutorials to guide users on how to use the software. So, beginners can quickly get started with Ableton and create music effortlessly.


Does Ableton Have A Beat Maker?


Yes, Ableton has a built-in beat maker called “Impulse”. It is a virtual drum machine that allows users to create and modify beats, patterns and sounds. It includes various preset kits and instruments that can be customized to the user’s preference.


Conclusion


To conclude, creating a house beat on Ableton Live is a lot easier than it may seem. With a few simple steps and some understanding of the software, even beginners can create their own professional-sounding tracks. Remember to experiment with different sounds and effects to create a unique beat that represents your style as a music producer.


Keep in mind the basics of mixing and mastering, and you’re on your way to creating a hit house track. Get creative, have fun, and let your imagination run wild!


Categories
Archive

Mastering Your Music Is Important Tips From A Mastering Pro

Mastering your music is crucial for a professional sound, and mastering pro Tom Frampton shares tips to help you achieve the best results. In today’s music industry, where competition is fierce, mastering has become a critical step in the music production process.


A mastering engineer can enhance your mix and make it sound polished and professional. There are a few things you can do to prepare your mix for mastering, and we will cover some tips from Tom Frampton, a mastering engineer, on how to do so.


From choosing the right mastering engineer to leaving enough headroom in your mix, this article will provide valuable insights into achieving top-notch master quality.


Why Mastering Is Important


Mastering your music is crucial for ensuring that it sounds polished and professional. As a mastering pro, I can attest to the impact it has on the final product. With the right techniques and tools, you can take your music to the next level and stand out in a crowded industry.

Mastering is an essential process that comes after recording and mixing a song. It is crucial to the overall sound quality of the final product. Mastering involves several techniques, including balancing EQ and dynamics, adding stereo width, and optimizing loudness. The primary goal of mastering is to make the song sound as good as it can be on all playback devices, such as smartphones, laptops, and Hi-Fi systems. Without mastering, a song, no matter how well-recorded and mixed, will not reach its full potential.

Balancing Eq And Dynamics

Balancing EQ and dynamics is one of the most crucial elements in mastering. It involves adjusting the frequency balance and volume levels of the different instruments and components of the song to ensure that they work together in harmony. During mastering, a mastering engineer utilizes specific EQ tools to adjust the levels of different frequencies.

Adding Stereo Width

Another important aspect of mastering is adding stereo width. Stereo width refers to the spatial width of a song, and it can be enhanced during the mastering process. The mastering engineer can use different tools like delay, reverb, and stereo enhancers to add stereo width to a song. This technique creates a more immersive listening experience, making the song sound larger than life and more enjoyable.

Optimizing Loudness

Optimizing loudness is essential in ensuring that a song sounds loud and clear on all playback devices. The mastering engineer uses several techniques, such as compression and limiting, to balance the overall volume levels of the different components of the song. A well-mastered song should have consistent volume levels, which makes it enjoyable to listen to on any device. In conclusion, mastering is an essential process in creating a polished, professional-sounding song. It involves several techniques that work together to produce a final product that sounds as good as possible on all playback devices. By balancing EQ and dynamics, adding stereo width, and optimizing loudness, a mastering engineer can help take a song to the next level.

Preparing Your Mix For Mastering

Preparing your mix for mastering is one of the most critical steps in achieving a professional sound. As a mastering pro, I have seen mixes that sound great but are not suitable for mastering. In this section, we will discuss the essential tips that will help you prepare your mix for mastering.

Levels And Headroom

One of the most important aspects of preparing your mix for mastering is ensuring the right levels and headroom. It would be best if you made sure that your levels are consistent throughout the mix, and there is enough headroom. Headroom is the space between the highest peak of your audio and the 0dB ceiling. Ideally, you should aim for at least 6dB of headroom to avoid clipping.

Avoiding Overcompression

Over compression is another common mistake that people make when preparing their mix for mastering. Compression is a useful tool, but too much of it can make your mix sound flat and lifeless. You should avoid over compressing individual tracks and the master mix.

Using Reference Tracks

Using reference tracks is an excellent way to ensure that your mix is on the right track. A reference track is a professionally produced track that has similar sonic characteristics to your mix. You can use it as a benchmark to compare your mix and ensure that it sounds good. By doing so, you can identify any issues in your mix and make adjustments accordingly.

Choosing The Right Mastering Engineer

When it comes to mastering your music, choosing the right mastering engineer is crucial. A mastering engineer will have the final say on how your music sounds, so it’s important to carefully consider your options before making a decision. In this post, we’ll go over some key factors to keep in mind when choosing a mastering engineer.

Experience And Credentials

The mastering engineer you choose should have a solid amount of experience in the field. Look for someone who has worked on projects similar to yours and has a track record of producing high-quality work. Credentials are also important, as they can give you an idea of the mastering engineer’s level of expertise. Look for someone who has attended audio engineering school, has worked with well-known artists or record labels, or has received awards or recognition for their mastering work.

Communication And Collaboration

Communication is key when it comes to working with a mastering engineer. Look for someone who is easy to get in touch with and is responsive to your questions and concerns. A good mastering engineer should also be open to collaborating with you to achieve the sound you’re going for. This may involve sending multiple revisions back and forth or discussing different mastering techniques.

One way to gauge a mastering engineer’s communication style is to look at their website or social media profiles. Are they active and engaged with their audience? Do they respond promptly to questions and comments? These are good indicators of how they will communicate with you during the mastering process.

Choosing the right mastering engineer can make all the difference in the final sound of your music. By considering their experience, credentials, and communication skills, you’ll be on your way to finding the perfect mastering partner.

Mastering Your Music Is Important Tips From A Mastering Pro


Credit: blog.groover.co


Key Tools And Techniques For Mastering


Learn the key tools and techniques for mastering your music from a master audio engineer. With the help of a professional, you can improve the balance, clarity, and overall impact of your music. Take your sound to the next level with expert guidance and tips.

As a music producer, mastering your tracks is an essential step to ensure they sound professional and polished. To achieve great results, you need to arm yourself with the right tools and techniques. Here, we’ll discuss three key mastering tools and techniques that can help you take your tracks to the next level: Equalization and Compression, Multiband Processing, and Limiting and Clipping.

Equalization And Compression

Equalization (EQ) and compression are the building blocks of mastering, and they’re used to correct, balance, and enhance individual elements in your mix. EQ allows you to adjust the frequency balance of your mix, while compression controls the dynamic range of your tracks. Some tips for using EQ and compression in mastering include: – Use EQ to cut out unwanted frequencies that can cause muddiness or harshness in your mix. – Use compression to even out the levels in your mix and add warmth and presence. – Try using a multiband compressor to apply different amounts of compression to different frequency ranges.

Multiband Processing

Multiband processing is a powerful tool that allows you to apply different processing to different frequency ranges. This is particularly useful for mastering, where you may need to address specific issues in different parts of your mix. Some tips for using multiband processing in mastering include: – Use a multiband compressor to compress specific frequency ranges. – Use a multiband EQ to balance frequency ranges. – Use a multiband limiter to limit specific frequency ranges.

Limiting And Clipping

Limiting and clipping are techniques used to increase the overall loudness of your mix while preventing distortion. Limiting reduces the dynamic range of your mix by reducing the level of the loudest parts, while clipping cuts off the peaks of your audio waveforms. Some tips for using limiting and clipping in mastering include: – Use a limiter to increase the overall level of your mix and prevent clipping. – Use clipping for creative effect, but be careful not to overdo it. – Watch your levels carefully to avoid introducing unwanted distortion. By using these three key tools and techniques in your mastering process, you’ll be well on your way to achieving a polished and professional sound for your music productions.

The Importance Of A/b Testing

Mastering is the final stage in music production, where a skilled audio engineer uses specialized tools and techniques to polish and enhance a mix for release. However, with countless options available for mastering software, plugins, hardware, and techniques, it can be challenging to make informed decisions about your final mix. This is where A/B testing comes in. It allows you to test different mastering approaches and determine which one sounds best for your music. In this post, we’ll discuss the importance of A/B testing and how it can help you get the best possible results.

Setting Up Your Session

Before you start A/B testing, it’s essential to set up your session correctly. This involves importing your mix into your mastering software and making sure your output is set to your desired specifications. Once your session is set up, you can start to experiment with different mastering techniques.

Making Informed Decisions

When A/B testing, it’s important to make informed decisions about what you’re hearing. This means paying attention to subtle differences and listening closely to the details in your mix. It’s also crucial to keep notes so that you can refer back to them later and make informed decisions about what worked best for your music.

  • Listen to the mix at various volume levels
  • Use different speakers or headphones
  • Test different mastering tools and techniques
  • Make notes about what you like and what you don’t like

Testing and experimenting with different techniques can take time, but the end result can be a polished and professional-sounding mix that stands out from the crowd. Remember, the mastering process is just as important as the mix itself and should be approached with the same level of attention and care.

Mastering Your Music Is Important Tips From A Mastering Pro


Credit: blog.beatstars.com


Delivering Your Mastered Tracks


As a professional music mastering expert, it is important to deliver your mastered tracks with the highest quality possible. Tips such as checking for technical errors, using the right compression and equalization tools, and referencing with several listening devices will ensure your music reaches its full potential.

Once you have mastered your music tracks, it’s time to deliver them to the client or make them ready for distribution. A great mastering job is not complete until the tracks are delivered in the proper format, with correct metadata, and sequencing. Here are some tips from a mastering pro on how to deliver your mastered tracks effectively.

Formats And Bitrates

The format and bitrate of your mastered tracks are essential to how they will be received by the listener. It’s crucial to deliver your tracks in the right format and bitrate. Some common formats include MP3, WAV, FLAC, and AIFF. Each format has its advantages and disadvantages. Here’s a quick breakdown:

Format Advantages Disadvantages
MP3 Small file size, widely supported Lossy compression, lower quality
WAV Uncompressed, high quality Large file size, not widely supported
FLAC Lossless compression, high quality Large file size, not widely supported
AIFF Uncompressed, high quality Large file size, not widely supported

It’s also important to consider the bitrate of your tracks. Bitrate refers to the number of bits in each second of audio data. It affects the quality of the audio. A higher bitrate means better quality audio but a larger file size. Use a bitrate of at least 320 kilobits per second for MP3 files.

Metadata And Track Sequencing

Metadata is all the information that describes your tracks. It includes the track name, artist name, album name, album artwork, and more. Correct metadata ensures that your tracks are organized correctly, and they will be easy to find in music libraries. Metadata also ensures that your tracks are played in the correct order in an album. You should also take care of track sequencing when delivering your mastered tracks. The order in which tracks are sequenced in an album can affect the listener’s experience. Sequencing your tracks correctly can result in a smoother transition from one track to another. In conclusion, delivering your mastered tracks in the right format, bitrate, and with accurate metadata and track sequencing is vital to the success of your music. Use the above tips and ensure your tracks are ready to be shared with the world.

Mastering Your Music Is Important Tips From A Mastering Pro


Credit: www.izotope.com


Frequently Asked Questions For Mastering Your Music Is Important Tips From A Mastering Pro


What Makes A Good Mastering Engineer?


A good mastering engineer should have a good ear for detail and technical expertise to balance the mix. They need to have the ability to enhance the overall sound quality while maintaining the artistic vision of the recording. A deep understanding of the tools and technologies involved in the process is also crucial.


Additionally, the mastering engineer should be able to communicate effectively with clients and have excellent project management skills to ensure timely delivery.


How Important Is Good Mastering?


Good mastering is extremely important as it enhances the final sound quality and loudness of the audio track. Proper mastering ensures that the track is balanced, has good tonal quality, and sounds great on all playback systems. A well-mastered track can make a big difference in terms of audience engagement, making it an essential part of the music production process.


How Do You Master A Song Like A Pro?


To master a song like a pro, follow these steps: 1. Start by cleaning up the mix and eliminating any unwanted noise. 2. Adjust the EQ to make sure each instrument and vocal sits well in the mix. 3. Use compression to level out dynamics and add punch.


4. Add reverb and other effects as needed to enhance the overall sound. 5. Finally, listen critically and make any necessary adjustments to achieve a balanced and professional-sounding mix.


Should I Get My Song Professionally Mixed And Mastered?


Yes, getting your song professionally mixed and mastered can significantly improve its overall sound quality and increase its chances of success in the competitive music industry. Professional mixing and mastering can enhance the clarity, depth, and balance of different elements of your song, resulting in a more polished and professional final product.


Conclusion


As a music mastering professional, I’ve learned that it’s not enough to simply create a great track – mastering is crucial to elevating the final product to new heights. From understanding the technical side of EQ and compression to the importance of balancing volume and dynamics, there are many factors to consider when mastering music.


But with the right techniques and a bit of practice, anyone can become a mastering pro. So take these tips and start mastering your music like a pro today!


Categories
Archive

Home Studio Setup For An Advanced Ableton Bedroom Producer

This guide covers Ableton bedroom producer in plain terms. As an Amazon Associate I earn from qualifying purchases.

Also, an advanced Ableton home studio needs a strong computer, an audio interface, and studio monitors. Also, add a MIDI keyboard and acoustic treatment. Creating your own music at home has never been easier with the advanced tools available for modern producers.

Related reading: Mixing Tips In Ableton Live Mixing Problems Every Producer Will Face and Ableton or FL Studio?. For background, see the Wikipedia article on Ableton Live.


But setting up your own home studio can sometimes be a daunting task, especially when it comes to knowing which equipment to use. In addition, as an Ableton producer, it is important to have a comprehensive home studio setup that will enable you to achieve professional level results.


In addition to the essential equipment mentioned above, you’ll need to take a few other factors into consideration. For example, this includes proper cable management, ergonomics, and lighting. Moreover, we’ll explore the steps and equipment necessary to set up a high-quality home studio for advanced Ableton bedroom producers.


Selecting An Ideal Room for Ableton Bedroom Producer

In addition, want the ideal Ableton bedroom studio? As a result, start by picking the right room in your home. This decision will impact the quality of sound produced in your home studio, productivity levels, and inspiration during production. Here are some key factors to consider while selecting an ideal room:

Setting Up A Productive Workstation for Ableton Bedroom Producer

The most important factor when setting up a productive workstation is to ensure that the space you select has minimal interruptions. Try to select a room that has private access so that external noise is reduced. Also, ensure that the space is comfortable, well-lit, and has adequate ventilation. However, the room should have a good vibe. Furthermore, that way, you can stay disciplined and remain focused on producing the right quality of music. If there is limited access to a private space, then consider investing in high-quality noise-cancellation headphones to block out external noise.

Considerations For Room Acoustics for Ableton Bedroom Producer

Another key consideration is the room’s acoustics, which will impact the overall sound quality of your music production. If your room has too many reflective surfaces like glass windows and walls, you may need to soundproof the space. Additionally, before you start filling up your room with music equipment, ensure that you first take the time to test the acoustics of your space by clapping or playing some sound and analyzing the echo. You can also purchase a room acoustic treatment to even out the sound frequencies.

Additional Considerations for Ableton Bedroom Producer

Finally, consider the room’s size and the layout of your workstation. Ideally, you want to aim for a room that is big enough to fit all of your equipment and still have space to move around. Then, ensure that the layout of the room is efficient and has furniture that complements your production style. If you require natural lighting, select a room with adequate access to sunlight to further boost your creativity.

Additionally, picking the right room for Ableton bedroom production matters a lot. In short, it affects your sound, your output, and your inspiration. Take time to choose the best space you can. Then set up a workstation that suits your needs and style.

Essential Tools And Equipment for Ableton Bedroom Producer


Also, to perfect your home studio setup as an advanced Ableton bedroom producer, you will need essential tools and equipment to facilitate your creative process. Similarly, a reliable computer, audio interface, studio headphones, studio monitors, MIDI keyboard, and acoustic treatment are crucial for producing high-quality music.

Moreover, as an advanced Ableton bedroom producer, your home studio setup is crucial to creating quality music. Also, you need to have the essential tools and equipment to deliver top-notch music that meets industry standards. In this section, we will discuss the must-haves for your home studio setup. This includes computer and audio interface requirements, MIDI controller, quality studio headphones, studio monitors, and microphone.

Computer And Audio Interface Requirements for Ableton Bedroom Producer

In addition, your computer is the engine of your home studio. Therefore, it’s paramount you choose a computer that can handle the processing demands of music production. When selecting a computer, you want to consider factors such as processor speed, RAM, storage capacity, and connectivity options. In addition, for an optimal experience, a computer with a quad-core processor, 16GB of RAM, and solid-state drive (SSD) storage should suffice. An audio interface is essential to link your computer and other devices. It serves as a bridge between your computer and other audio devices such as microphones and studio monitors. When selecting an audio interface, you want to consider factors such as the number of inputs and outputs, the type of connectivity, and sound quality. USB and Thunderbolt are the most common connectivity options.

Midi Controller

A MIDI controller is an electronic device used to control other devices such as synthesizers, samplers, and virtual instruments. For example, it serves as a physical interface between the producer and their digital audio workstation (DAW). When selecting the right MIDI controller, you want to consider factors such as the number of keys, pads, knobs, faders, and compatibility with your DAW. Furthermore, the Akai MPK series and Novation Launchkey are popular choices.

Quality Studio Headphones

Additionally, Studio headphones are an essential tool for any music producer. As a result, they give you a clear and accurate representation of your music as you produce and mix. When selecting a quality pair of studio headphones, you want to consider factors such as sound quality, comfort, durability, and noise isolation. Sennheiser HD 600 and Beyerdynamic DT 770 PRO are popular choices.

Studio Monitors

Also, Studio monitors are specialized speakers designed for music production purposes. However, they are engineered to provide clear, uncolored, and accurate sound representation. This allows you to hear the details of your music as you produce and mix. When selecting studio monitors, you want to consider factors such as sound quality, frequency response, connectivity options, and room size. Yamaha HS8 and KRK Rokit 8 G4 are popular choices.

Microphone

Moreover, a microphone is an essential tool for capturing vocals and acoustic instruments. When selecting the right microphone for your needs, you want to consider factors such as microphone type, pickup pattern, frequency response, and sensitivity. The Shure SM7B and AKG C414 are popular choices. In conclusion, an advanced Ableton bedroom producer needs a well-equipped home studio to create quality music. The right tools and equipment are essential to achieve industry-standard results. Invest in high-quality equipment, and you’ll be on your way to making great music!


Software And Plugins


In addition, for an advanced bedroom producer using Ableton, software and plugins are essential for a top-quality home studio setup. In short, these tools can help to enhance the creativity and simplify the production process for producing industry-standard audio tracks.

Furthermore, to create professional-level music in your home studio, you need to have the right software and plugins at your disposal. Luckily, there are many affordable options available that can provide you with the tools you need to take your sound to the next level.

Ableton Live

Additionally, one of the essential tools for any bedroom producer is a powerful digital audio workstation (DAW). Ableton Live is widely considered one of the best DAWs for electronic and experimental music production, thanks to its user-friendly interface and deep feature set. It also includes many high-quality built-in effects and instruments to create everything from ambient soundscapes to pounding techno rhythms.

Vst Plugins

While Ableton Live comes with a solid selection of built-in instruments and effects, you may want to expand your sonic palette with third-party plugins. Also, VST plugins are virtual instruments and effects that can be used inside your DAW. There are thousands of VST plugins available, covering everything from vintage analog synths to cutting-edge digital effects. Some popular examples include Serum, Massive, and Omnisphere.

Synth And Instrument Plugins

In addition to effects plugins, you may also want to invest in some high-quality synth and instrument plugins. Moreover, these plugins can emulate the sound of classic hardware synthesizers or provide unique timbres and textures that are difficult to achieve with traditional instruments. Some popular instrument plugins include Kontakt, UVI Falcon, and Arturia V Collection. With the right collection of software and plugins, you can transform your bedroom studio into a professional-level workspace. Whether you’re looking to create cutting-edge electronic music or classic analog sounds, the right tools will make all the difference in achieving your creative vision.


Optimizing Your Workflow for Ableton Bedroom Producer


An effective home studio setup helps advanced bedroom producers optimize their workflow in Ableton. This results in a faster, more efficient creative process. By organizing your workspace, minimizing distractions, and customizing your setup to suit your needs, you can focus on producing high-quality music.

As an advanced Ableton bedroom producer, one of the most important aspects of your home studio setup is optimizing your workflow. This means finding ways to work more efficiently and effectively with your digital audio workstation (DAW) to help you create better music faster. Here are a few tips for optimizing your workflow in Ableton.

Keyboard Shortcuts

Using keyboard shortcuts is a great way to improve your workflow when producing music in Ableton. By memorizing a few essential keyboard shortcuts, you can quickly achieve tasks that would otherwise take much longer. Here are a few keyboard shortcuts you should definitely learn:

  • Select Track: Ctrl+Click
  • Loop Selection: Shift+Cmd+L
  • Duplicate Selection: Cmd+D
  • Undo: Cmd+Z
  • Redo: Shift+Cmd+Z

Creating Templates for Ableton Bedroom Producer

Creating templates is another great way to optimize your workflow in Ableton. Create templates for different styles of music. You won’t have to rebuild the same tracks and effects for each new project. Here are a few example templates you might create:

  • Drum Kit: a template with all of your preferred drums and effects already loaded
  • Synth: a template with your favorite synthesizers and effects already loaded
  • Bus: a template with all of your favorite buses and effects already loaded

Customizing Ableton’s Interface

Customizing Ableton’s interface is the final tip for optimizing your workflow. By customizing Ableton’s interface to better suit your needs, you can work faster and more efficiently. Some possible customizations include:

Customization Description
Color Scheme: Choosing a color scheme that is easy on your eyes and helps you differentiate between different tracks and elements in your music.
Screen Layout: Organizing your screen layout in a way that makes sense for the type of music you’re producing and the tasks you need to accomplish.
Favorite Effects: Adding your most commonly-used effects to your favorites list so they’re always readily available.

Optimizing your workflow in Ableton is all about finding ways to work faster and more efficiently. By using keyboard shortcuts, creating templates, and customizing Ableton’s interface, you’ll be well on your way to producing better music in less time.

Arrangement And Mixing Techniques


This article explores advanced techniques for arrangement and mixing in a home studio setup using Ableton. Learn how to effectively layer instruments, use automation, and EQ to create a polished final product.

Arranging and mixing techniques are crucial for an advanced Ableton bedroom producer. They aid in ensuring that your music sounds polished and professional. However, achieving these techniques requires an in-depth understanding of certain aspects such as stereo imaging, frequency mixing/mastering, and processing techniques for mixing and mastering. This article will delve into these techniques and equip you with the knowledge you need to take your music production to the next level.

Understanding Stereo Imaging for Ableton Bedroom Producer

Stereo imaging is an essential aspect of music production. It refers to the perceived location and width of sound sources in a stereo mix. Understanding stereo image enables you to create a balanced mix, eliminate unpleasant phasing, and achieve the desired panning effect. To manipulate the stereo image, you need to understand the panning technique. This allows you to control how mono and stereo tracks occupy the stereo field. For instance, panning a track hard left makes it occupy the left speaker. Meanwhile, a hard right-panned track occupies the right speaker. Besides, understanding mid-side processing (M/S) is vital, as it allows you to separate the center signal (vocals and snare) from the stereo signal (guitar and cymbals) and treat them differently.

Frequency Mixing/mastering

Frequency mixing involves combining sounds that occupy different frequency ranges to create a cohesive mix. Achieving this requires a robust understanding of EQ (Equalization), compression, and reverb. Proper use of EQ involves determining which frequency bands different sounds occupy and removing or boosting specific frequencies to create room for other sounds in the mix. Compression, on the other hand, controls the dynamic range of sounds. This ensures that they don’t sound too loud or too soft. Reverb creates depth in the mix by simulating the natural reverb that occurs in a room. This gives the sounds you’re mixing a sense of space.

Processing Techniques For Mixing And Mastering for Ableton Bedroom Producer

Processing techniques for mixing and mastering refer to the various tools and plugins used to refine the sound of individual tracks and the final mix. These tools include Limiters, Saturation, Compressors, Delay, and Reverb, among others. Limiters, for instance, regulate the volume of the mix, ensuring that it doesn’t exceed the desired level and cause distortion. Saturation adds warmth and character to the sound. Compressors control the dynamic range and help balance levels.

Delay and reverb, as mentioned earlier, add depth and space to the mix, making it sound more natural. In conclusion, understanding arrangement, stereo imaging, frequency mixing/mastering, and processing techniques for mixing and mastering are crucial for an advanced Ableton bedroom producer. Ensure that you practice these techniques constantly, and you will be well on your way to producing professional-quality music.

Collaboration And Feedback


To elevate your home studio setup as an advanced Ableton bedroom producer, collaboration and feedback are essential. Work with other musicians, producers, and vocalists to expand your sound and receive constructive criticism to improve your skills.

As an advanced Ableton bedroom producer, collaboration and feedback are crucial elements to improving your music production skills, getting inspired, and diversifying your body of work. This section covers finding collaborators and getting feedback. It also shows how to share your work on social media.

How To Find Collaborators

Finding collaborators can elevate your music production skills and bring out the best in you. You can easily identify potential collaborators from social media platforms like Instagram, Twitter, and Facebook by joining music production groups or following popular music producers and DJs. Alternatively, you can also explore music production websites like Splice, which enable you to collaborate with other producers worldwide. Once you’ve identified potential collaborators, reach out through direct messages or social media comments stating your interest in collaborating. Always ensure that you showcase your style, skill, and enthusiasm to earn collaborations with other artists.

The Importance Of Feedback

Feedback is essential for every music producer seeking growth and improvement. Receiving critique from other producers or industry professionals can offer you a fresh perspective and insights into areas that need improvement. Peer-to-peer feedback offers a way to learn from other professionals with experience in different genres and backgrounds. Also, seek feedback from your audience through live shows and social media platforms like YouTube. By sharing your music with an audience, you can get both positive and negative feedback that will help you fine-tune your music to specific audiences.

Using Social Media To Share Your Work And Connect With Other Producers

Social media provides infinite opportunities to showcase your music to the world and connect with fellow producers worldwide. Instagram, Twitter, Facebook, and YouTube are excellent platforms to share your work, engage with your audience, and connect with like-minded producers. Besides sharing your music, social media is an excellent resource for discovering new music, collaborations, and industry insights. By following other music producers, DJs and industry professionals, you can learn new techniques, news, analytical insights about different software and plugins, and stay up-to-date with industry trends. Conclusion Collaboration and feedback are vital elements of a bedroom producer’s journey to building their skills and producing unique music. Find collaborators, seek feedback, and use social media. These steps grow your skills, your audience, and your network of producers.

Mindset And Habits


As an advanced Ableton bedroom producer, your home studio setup is crucial for success. Developing a mindset and habits that prioritize organization, creativity, and self-discipline will help you optimize your workflow and produce high-quality tracks. With a well-equipped workspace and a focused mindset, you’ll be ready to produce your best work yet.

As an advanced Ableton bedroom producer, your mindset and habits play a crucial role in your success. Developing a positive mindset and habits can help you set goals, overcome writer’s block, and stay consistent with your music production. In this post, we will discuss the mindset and habits you need to develop to achieve success in your home studio setup.

Setting Goals And Deadlines for Ableton Bedroom Producer

Setting goals and deadlines is crucial for achieving success in music production. Without concrete goals, it is easy to get lost in the creative process and lose sight of your objectives. Setting deadlines helps you create a sense of urgency and keeps you on track with your music production. When setting your goals, try to be specific, measurable, and realistic. This way, you can easily track your progress and adjust your plan accordingly.

Overcoming Writer’s Block for Ableton Bedroom Producer

Writer’s block is a common problem that many music producers face. It is important to understand that writer’s block is a natural part of the creative process. It is not something to be afraid of. When you feel stuck or uninspired, take a break from your music production and try to do something else that you enjoy. This can help clear your mind, reduce stress, and enhance your creativity. You can also try using different production techniques, experimenting with new sounds, or collaborating with other artists to overcome writer’s block.

Maintaining Consistency And Discipline for Ableton Bedroom Producer

Maintaining consistency and discipline is key to your success in music production. A regular production schedule can help you stay focused and productive, even when you are not feeling inspired. It is important to carve out time for your music production and make it a habit. This means setting specific times and days for your music production and sticking to them consistently. Staying disciplined will help you develop a strong work ethic, improve your skills, and achieve your goals.

Home Studio Setup For An Advanced Ableton Bedroom Producer


Credit: blog.native-instruments.com


Marketing Your Music for Ableton Bedroom Producer


As an advanced Ableton bedroom producer, creating a well-equipped home studio setup is crucial to marketing your music. With the right tools and equipment, you can elevate the production quality and make your tracks stand out. Invest in quality headphones, monitors, and a reliable audio interface to get started.

Marketing your music is essential to help your tracks reach a wider audience and establish a solid fan base. As an advanced Ableton bedroom producer, you need to ensure that you have a comprehensive marketing plan in place to take your music to the next level. In this blog post, we will discuss some effective marketing strategies you can use to promote your tracks and grow your fan base.

Establishing Your Brand for Ableton Bedroom Producer

Establishing a brand is crucial in the music industry, especially for independent artists. It helps you stand out from the crowd and connect with your fans on a deeper level. To establish your brand, you need to focus on three key elements; your music, your image, and your message. Firstly, ensure that your music is unique, memorable, and reflects your personality. It should resonate with your target audience and leave a lasting impression. Secondly, pay attention to your image, including your album art, social media handles, and website design. Keep it consistent with your style and genre, and make sure it’s visually appealing and easy to remember. Lastly, your message should be clear and consistent across all your marketing channels. It should reflect your brand’s core values, and you should communicate it effectively to your fans.

Building A Fan Base for Ableton Bedroom Producer

Building a fan base is essential to grow your music career, and social media is a powerful tool to help you achieve this. Identify your target audience and focus on building a strong presence on platforms like Instagram, Facebook, and Twitter. Create engaging content that showcases your music and personality and encourages your fans to interact with you. Utilize features like Instagram Stories and Facebook Live to connect with your fans on a deeper level and give them a glimpse into your creative process. Another effective way to build a fan base is to collaborate with other artists and producers. This can help you reach a wider audience and establish valuable connections in the music industry.

Digital Distribution And Promotions

Digital distribution is essential to ensure your tracks reach a wider audience and are available on all major streaming platforms. Services like DistroKid, TuneCore, and CD Baby can help you distribute your music efficiently and effectively. Once your tracks are available online, you need to promote them effectively. Utilize platforms like SoundCloud, YouTube, and Spotify to showcase your music and reach new listeners. Paid promotions on these platforms can help you reach a wider audience and grow your fan base.

In conclusion, marketing your music is crucial to establish your brand, build a fan base, and take your music career to the next level. Utilize social media, collaborate with other artists, and distribute and promote your music effectively to reach your goals. Keep these strategies in mind, and you’ll be on your way to success as an advanced Ableton bedroom producer.

Home Studio Setup For An Advanced Ableton Bedroom Producer


Credit: indietips.com


Frequently Asked Questions On Home Studio Setup For An Advanced Ableton Bedroom Producer


How Do You Set Up A Bedroom Music Studio?


To set up a bedroom music studio, start by choosing a dedicated space for your equipment and acoustic treatment. Invest in quality recording gear, like a microphone and audio interface. Arrange your setup to optimize sound quality and workflow. Use sound-proofing materials to create a comfortable listening environment.


Finally, practice and experiment to achieve the perfect sound.


How Do I Start A Bedroom Producer?


To start as a bedroom producer, you need to have a computer with music production software, headphones, and a midi controller. Learn the basics of music theory and sound engineering. Build your skills by practicing and experimenting with different styles.


Network with other producers and build a presence on social media.


How Much Does It Cost To Build A Home Studio?


The cost of building a home studio varies depending on the equipment and materials you need. However, a basic setup with a computer, microphone, and headphones can cost around $500. Higher-end equipment can cost several thousand dollars.


What Do I Need For A Home Production Studio?


To set up a home production studio, you need a computer with professional software, a high-quality microphone, audio interface, headphones, and acoustic treatment. You may also want to invest in a camera, lighting equipment, and video editing software. Make sure to choose the right equipment for your needs and budget, and learn how to use it effectively.


Conclusion


After implementing the tips discussed you’re well on your way to creating your ultimate home studio setup for Advanced Ableton Bedroom Production. Remember to invest in quality equipment, prioritize ergonomics and good acoustics, and experiment with creative sound-design techniques.


A versatile, efficient workspace pays off. It lets you focus on your musical ideas and grow your skills. With dedication and practice, your home studio can become a hub of musical inspiration and achievement.


Start building your dream setup today!