Categories
Archive

What is the Difference between Piano And Pianoforte

Piano and Pianoforte are synonymous terms for the same musical instrument. The main difference between Piano and Pianoforte is that Pianoforte was the earlier name given to the instrument before it was shortened to just Piano.


The Piano, also known as the fortepiano or pianoforte, is a keyboard instrument that produces soft and loud sounds depending on how hard or soft the keys are struck. The creation of the Piano in Italy in the early 1700s revolutionized keyboard instruments due to its ability to sustain notes and play dynamically.

Related reading: Piano Eq and Mixing Piano.


As the instrument evolved, people shortened Pianoforte to Piano. While there is no difference between both names, musicians and purists still use the original name Pianoforte to accurately describe the first version of the instrument.


Construction And Mechanics Of The Piano And Pianoforte


The difference between a piano and a pianoforte lies in the construction and mechanics. The pianoforte was the term used for early pianos, with a different mechanism that allowed for dynamic range and expression. Meanwhile, the modern piano uses hammers to strike the strings.


Both instruments have unique qualities and are still used today in different styles of music.

Both names are two different musical instruments that people often mistake for the same. Although they both have a keyboard as their main component, they differ in their construction and mechanics. Builders developed early pianos across different eras, and their construction reflects this. In this article, we will delve into the construction and mechanics of both instruments, and what sets them apart.

The Soundboard for Piano and Pianoforte

The soundboard is the main part of the instrument responsible for generating sound. A modern piano’s soundboard, usually spruce, is larger and thicker than a pianoforte’s. A pianoforte’s soundboard uses thinner wood, which gives a softer sound. Because the soundboard of the piano is thicker, it produces a louder sound that resonates better.

The Action

Also, the action is another component that sets both names apart. The action of the piano is a complex system of levers, hammers, and strings that work together to produce sound. When you press a key on the piano, the corresponding hammer moves toward a string, which in turn generates sound. In contrast, the action of the pianoforte is a simpler mechanism that relies on the use of quills to produce sound. When you press a key on the pianoforte, the quill plucks the string, producing a softer sound.

The Strings

Moreover, the strings of the early piano are another component that sets them apart. The strings of a piano are made of steel and are under high tension, while those of a pianoforte are made of brass and are not under as much tension. This difference in tension results in a more sustained sound for the piano and a softer, more delicate sound for the pianoforte.

The Hammers

The hammers are responsible for striking the strings of both instruments to produce sound. The hammer of a piano is heavier than that of a pianoforte, and it strikes the strings with more force. This results in a louder and more sustained note. The hammer of a pianoforte is lighter than that of a piano. It strikes the strings with less force, resulting in a softer and less sustained sound. In conclusion, the instrument share many similarities, but their construction and mechanics set them apart. The soundboard, action, strings, and hammers are all components that contribute to the unique sound of each instrument. Whether you prefer the loud, sustained sound of a piano or the soft, delicate sound of a pianoforte, both instruments are a testament to the beauty and versatility of music.

What is the Difference between Piano And Pianoforte


Credit: www.thesprucecrafts.com


Tone And Sound Production


Both names differ in tone and sound production. The piano strikes the strings with hammers and creates a loud sound. Meanwhile, the pianoforte uses leather-covered hammers that produce softer tones. The terms are now interchangeable and refer to the same instrument.

When we talk about the early piano, tone and sound production matter most. The tone and sound differences between the two instruments make them unique. In this section, we will discuss the differences in sound, the role of dynamics, and technical difficulties of both instruments.

Differences In Sound

The first and most significant difference between a piano and a pianoforte is their sound. A piano produces a consistent volume no matter how hard the player strikes the keys. A pianoforte changes volume depending on how hard you press the keys. This is because pianoforte keys produce sound by striking the strings, which creates a different tone at different volumes. On the other hand, piano keys activate hammers that strike the strings. This is a consistent sound, regardless of the pressure applied.

The Role Of Dynamics

Dynamics also play an essential role in the difference in sound between the instrument. Dynamics refer to the degree of loudness or softness of a sound. A pianist can control the dynamics on a pianoforte by playing with varying degrees of intensity. This allows for endless possibilities of expression and tonal variety. A piano, however, has limited options for dynamics, as adjusting the volume is not possible.

Technical Difficulties

Playing a pianoforte requires more technique and skill than playing a piano due to the complexities of sound production. A pianist must have a solid technique and a good ear to produce a wide range of dynamics and colors. On the other hand, playing a piano requires more strength and endurance as the pianist needs to strike the keys consistently to produce a clean sound. In conclusion, the main difference between both names is the sound production. The pianoforte produces varying degrees of volume and tone, while the piano produces a consistent sound. Dynamics play a crucial role in the production of sound in pianoforte. In contrast, strength and endurance are more important in playing a piano.

Popularity Of The Piano And Pianoforte


No one can deny the early piano’s popularity over the centuries. Both instruments have many similarities, but the main difference lies in their mechanisms. The pianoforte is an older instrument that uses hammers while the piano uses springs.

In everyday talk, people use the two names interchangeably. However, there is a difference between these two instruments, and understanding the distinction is crucial for anyone interested in musicology. Both both names are some of the most popular and widely played musical instruments globally, with both having their unique feature that distinguishes them from each other.

Classical Music

The early piano have been essential tools of Classical Music for centuries. The piano is an upgraded version of the Pianoforte, which was widely used in the Classical period for its unique ability to produce a range of dynamics. The piano’s design made it easier for musicians to increase or decrease the volume of each note with little effort, compared to the Pianoforte, which required the performer to be more physical in the way they played the instrument.

Jazz

Jazz music, which originated in New Orleans in the early 20th century, is another genre where the piano has flourished. The piano’s versatility makes it one of the most popular instruments in Jazz music. This allows musicians to improvise and express their creativity. Despite the rise in electronic instruments, the piano still maintains its status as the backbone of Jazz music.

Popular Music

In Popular Music, the piano and electronic keyboards are often used interchangeably. The piano’s presence continues to be prominent in many contemporary songs, as it provides a unique sound and character that is difficult to replicate. Additionally, pop songs often feature an electronic keyboard, which is a digital version of the piano and capable of producing a range of sounds that may not usually be heard in classical music or jazz. In conclusion, while both instruments have similarities, the difference between both names is that the piano has greater versatility and is more suitable for modern music genres, while the pianoforte was mainly used for classical music productions. Today, both instruments remain vital to the world of music, despite the advancement in technology, and have left an indelible mark on the world of music.

What is the Difference between Piano And Pianoforte


Credit: www.quora.com


Frequently Asked Questions On What Is The Difference Between Piano And Pianoforte


Is A Piano And A Pianoforte The Same Thing?


Yes, both names are the same thing. Piano comes from the original term pianoforte. Both refer to a musical instrument with a keyboard played by striking strings with hammers.


Why Is Piano Called Fortepiano?


People also call the piano a fortepiano because the name joins two Italian words – forte (loud) and piano (soft). Bartolomeo Cristofori invented it around 1700 to play both soft and loud, which allows expressive playing. Over time, people shortened the name to just “piano.


“


What Is The Difference Between A Grand Piano And A Fortepiano?


A grand piano has a larger size and a more resonant sound than a fortepiano. Fortepianos were popular in the 18th century, before the modern grand piano took over.


Why Is A Piano Also Called The Pianoforte Or The Soft Loud?


The piano is also called the pianoforte because it can produce sounds of varying volume, from soft to loud. The term pianoforte combines the Italian words for soft (piano) and loud (forte).


Conclusion


Ultimately, the main difference between both names is their dynamic range. While pianoforte and piano were originally interchangeable terms for the same instrument, the development of the piano allowed for a greater range of dynamics and volume control. Today, the terms are used more specifically, with pianoforte referring to early keyboard instruments with a limited dynamic range, and piano referring to modern pianos with a wide range of dynamics.


Regardless of the terminology, both instruments have played significant roles in music history and continue to be beloved by musicians and audiences alike.


For more background, see Piano on Wikipedia. You may also like our guide: What is the Difference between Piano And Casio.

Categories
Archive

What is the Difference between Synthesizer And Keyboard

A synthesizer produces sound via electronic manipulation of sound waves, while a keyboard is simply an instrument with keys that produce sound. Synthesizers and keyboards are both popular musical instruments that produce sound by pressing keys, but they differ in their sound generation methods.


Synthesizers create sound via electronic manipulation of sound waves, whereas keyboards produce sound through physical strings, hammers, or other mechanical means. While early synthesizers were large and expensive machines, modern synthesizers come in various sizes and price ranges, making them widely accessible to musicians of all levels.


Keyboards, on the other hand, can be digital or acoustic, with digital keyboards being more popular due to their affordability and versatility. Despite their differences, both instruments play an essential role in modern music production and performance.

What is the Difference between Synthesizer And Keyboard


Credit: www.gearank.com


What Is A Keyboard?

A keyboard is an electronic musical instrument, which produces sound through a series of pressed keys. The keyboard’s keys are usually arranged in a similar pattern to that found on a piano, with white keys for natural notes and black keys for sharps and flats. Keyboards can be used for a wide range of musical purposes, from creating simple melodies and chord sequences to playing complex polyphonic arrangements.

Definition Of A Keyboard

The keyboard is a type of musical instrument that produces sound by pressing keys. Unlike traditional pianos, which use hammers to strike a series of strings, keyboards rely on electronic circuits to generate sound. This means that they can produce a wide range of sounds, including synthesizer, organ, and string instrument sounds.

Types Of Keyboards

There are several types of keyboards, including:

  • Portable Keyboards – These are lightweight keyboards that can be easily carried around and used for practice or performance.
  • Arranger Keyboards – These keyboards come with built-in auto-accompaniment features that allow the user to create full backing tracks.
  • Synth Workstations – These keyboards are designed for professional musicians and composers and include a wide range of on-board sound processing features.
  • MIDI Controller – This is a type of keyboard that is used to control other MIDI-compatible instruments or software.
  • Digital Piano – These keyboards are designed to replicate the sound and feel of a traditional piano as closely as possible.

Each type of keyboard has its own strengths and weaknesses, and choosing the right one for your needs can be a matter of personal preference.

What Is A Synthesizer?

Music has the power to bring people together, evoke emotions, and create memories that last a lifetime. Whether you’re a professional musician or just starting on your musical journey, understanding the difference between a synthesizer and a keyboard can help you create the sounds and melodies you’ve always dreamed of.

Definition Of A Synthesizer

A synthesizer is an electronic instrument that generates audio signals, which can be manipulated using various parameters to create unique sounds. Unlike a traditional instrument, a synthesizer doesn’t rely on sound vibrations created by physical objects such as strings or drums. Instead, it uses electronic circuits to create sound waves that can be manipulated and reconfigured.

Types Of Synthesizers

There are various types of synthesizers available, each with its own unique features and capabilities. Here are some of the most common types of synths:

Type of Synthesizer Description
Analog Uses analog circuits to create sounds, typically known for warm and rich sounds.
FM Uses frequency modulation synthesis to create complex and metallic sounds.
Virtual Analog Emulates the sound of analog synthesizers using digital technology, combines the best of both worlds.
Wavetable Uses pre-recorded waveforms to create complex and evolving sounds.

When choosing a synthesizer, it’s important to consider the type of music you’ll be making and the features you need. Some synthesizers may offer more advanced sound design capabilities, while others may be more suited for live performance or studio production.

In conclusion, the main difference between a synthesizer and a keyboard is that a synthesizer generates sound electronically, while a keyboard is a musical instrument that produces sound using physical objects such as strings or percussion. Understanding the different types of synthesizers available can help you choose the best instrument for your needs and create the music you’ve always dreamed of.

Functionality

When it comes to music, many people use the terms “keyboard” and “synthesizer” interchangeably, but they are two different devices with different functionality. While keyboards often have a basic set of features, synthesizers provide an extensive range of sound creation tools to produce a wide variety of sounds.

Playing Experience With Keyboard

A keyboard is a musical instrument with a set of keys to play music tones. It comprises different sounds such as Piano, Organ, Strings, and Brass. The keyboard offers various pitch modes and octave levels to enhance the sound quality. It is a perfect choice for beginners, and with the weighted key feature, the sensation of playing an acoustic instrument can be achieved. Players also have the option to transpose the keys to create a different feel.

The portability and size make keyboards an excellent option for on-the-go music enthusiasts. The built-in sound engine allows for real-time recording and playback, making it simple to write and create songs. In addition, most keyboards have an in-built drum machine and accompaniment library that provides complete sets of rhythms and musical backing tracks.

Sound Creation With Synthesizer

The primary functionality of a synthesizer is sound creation. It uses a digital or analog sound engine to produce various sounds. Synths come with numerous oscillators, filters, envelopes, and effects to create extremely-modern and unique sounds beyond natural acoustic instruments.

It’s a perfect choice for advanced users looking to create a wide range of musical landscapes through experimentation. It is used in music genres such as electronic, techno, and ambient music, and its polyphonic capabilities add depth to sound creations.

Synthesizers come in different types, including Analog, Digital, and Hybrid Synthesizers, with different features and specs. With Midi connectivity, synthesizers provide a more significant level of control and flexibility in sound creation.

Conclusion

Keyboards and synthesizers offer unique features and functionality, making them suitable for different music purposes. Choosing between them can depend on the genre and style of music and personal preferences. Whether a beginner or an advanced musician, these devices provide endless creative possibilities for unique musical expression.

What is the Difference between Synthesizer And Keyboard


Credit: www.quora.com


Design And Build


A synthesizer is an electronic instrument that produces sound through the modulation of electric signals, while a keyboard is an instrument that produces sound through the manipulation of hammers, strings, and other mechanical components. The difference lies in the way the sound is created, as well as the flexibility and range of sounds that can be produced.

Design and Build: When it comes to choosing between a synthesizer and a keyboard, one of the key factors to consider is their design and build. Both instruments come in various sizes and shapes, and each has its own unique features. Physical Appearance of Keyboard: Keyboards tend to be more compact in size and typically have 61 keys, although smaller and larger sizes are available. They are designed to mimic traditional pianos, with black and white keys aligned in a linear fashion. Keyboards have a range of features, such as built-in speakers, sustain pedals, and tone controls, making them suitable for both beginners and professionals. Physical Appearance of Synthesizer: Synthesizers, on the other hand, have more of a futuristic and modern look, with a variety of knobs, sliders, and buttons. They have fewer keys than keyboards, usually ranging from 25 to 49 keys, but can produce a wider range of sounds and effects. Synthesizers often have a modular design, meaning that individual components, such as oscillators, filters, and sequencers, can be interchanged to create unique and customizable sounds. In Summary: In conclusion, keyboards and synthesizers have distinct design and build characteristics. Keyboards offer a more traditional look and feel, while synthesizers provide a more innovative and customizable approach to music-making. Ultimately, the choice between the two instruments will depend on personal preference, playing style, and musical needs.


Sound Quality

Sound quality is an important factor when it comes to choosing between a synthesizer and a keyboard. While both instruments produce sound, their sound quality can vary significantly due to their respective designs.

Keyboard Sound Quality

The sound quality produced by a keyboard is often more basic than a synthesizer due to its limited sound creation capabilities. A keyboard typically reproduces sounds that have already been recorded and stored in its memory. Keyboards often come with an inbuilt sound library, such as piano, guitar, strings, and drums, allowing the user to select from a limited range of instruments and effects. This makes keyboards a popular choice for beginners and musicians who do not need to create complex soundscapes and who prioritize portability, affordability, and ease of use.

Synthesizer Sound Quality

Synthesizers, on the other hand, are designed to create sounds electronically. They have a significant advantage over keyboards in terms of sound quality and versatility. Synthesizers use sound generators, filters, and envelopes to create sounds from scratch rather than reproducing pre-recorded sounds. This gives users much more control over their sound, allowing them to tweak every aspect, from pitch to harmonic content, modulation, and more. Unlike keyboards, synthesizers are also capable of producing complex sounds and effects, such as waveforms and oscillations, that cannot be achieved with a keyboard’s limited sound library.

When it comes to sound quality, the choice between a synthesizer and a keyboard depends on the user’s needs and preferences. While keyboards are suitable for beginners and musicians who require basic sounds and portability, a synthesizer is a better choice for professionals and advanced users who require full creative control over their sound and sophisticated soundscapes that cannot be achieved with a keyboard.

Which One To Choose?

Which One to Choose? Choosing between a synthesizer and a keyboard can be a difficult decision, especially if you’re a beginner in the world of music. Both instruments are versatile and offer unique features that allow musicians to explore various genres and experiment with different sounds. In this blog post, we will discuss the differences between synthesizers and keyboards, and which one to choose based on your specific needs.

Factors To Consider While Choosing Keyboard Or Synthesizer

When deciding between a synthesizer or a keyboard, there are several factors to consider:

  • Your music genre: If you are a classical piano player or a jazz musician, a keyboard might be the best fit for you. However, if you are into electronic or experimental music, a synthesizer might be more suitable.
  • Sound: Keyboards are designed to mimic the sound of acoustic pianos, while synthesizers generate electronic sounds. If you prioritize natural piano sounds, then a keyboard is a clear choice. However, if you want to explore a wider range of sounds, then go for a synthesizer.
  • Portability: Keyboards are lightweight and easy to set up, making them more portable than synthesizers. If you’re someone who travels frequently or performs at different venues, then a keyboard would be a practical choice.
  • Features: Synthesizers come with a variety of features such as inbuilt effects, sequencers, arpeggiators and more. Keyboards offer basic features for playing and recording music. Think about what functionality you need to create the sound you want before deciding between a keyboard or synthesizer.

Cost Comparison Between Keyboard And Synthesizer

Cost is an important factor to consider when purchasing any musical instrument, especially when deciding between a keyboard and a synthesizer. Here is a comparison of the costs:

Instrument Type Price Range (USD)
Keyboard $150 – $1,500
Synthesizer $300 – $3,000+

As you can see, synthesizers tend to be more expensive than keyboards. However, the extra features and sound design capabilities may justify the cost for musicians looking for sonic exploration.

Overall, which instrument you choose is dependent on your personal needs and interests. A keyboard is best suited for classical and jazz musicians that prefer natural piano sounds and portability, while a synthesizer is ideal for sound designers and electronic music producers that love to experiment with different sounds and effects.

What is the Difference between Synthesizer And Keyboard


Credit: www.bananas.com


Frequently Asked Questions On What Is The Difference Between Synthesizer And Keyboard


Is A Synthesizer Better Than A Keyboard?


Both synthesizers and keyboards have their unique set of features and advantages. While synthesizers specialize in creating electronic sounds, keyboards offer a broader range of sounds and features. It ultimately depends on your specific needs and preferences.


What Makes A Keyboard A Synthesizer?


A keyboard becomes a synthesizer by being able to manipulate and generate various sound waves, tones, and timbres electronically. It can produce a wide range of sounds through a variety of filters, modulations, and effects. Essentially, a synthesizer keyboard can create new sounds from scratch, unlike a traditional piano or keyboard that produces pre-recorded sounds.


What Is The Point Of A Synthesizer?


A synthesizer is an electronic musical instrument that can create a vast range of sounds by generating and manipulating electronic signals. The main point of a synthesizer is to create or reproduce a wide variety of sounds that cannot be produced by traditional instruments.


It is primarily utilized in music production, live performances, and sound design.


What Is The Difference Between A Synthesizer And A Midi Keyboard?


A synthesizer is an electronic instrument used to create and manipulate sounds. A MIDI keyboard is a controller that sends MIDI signals to a synthesizer or computer. While a synthesizer can produce sound on its own, a MIDI keyboard requires external sound sources for functioning.


Conclusion


To sum it up, while both synthesizers and keyboards are electronic musical instruments with similar features, they possess noticeable differences. The synthesizer is designed to generate and manipulate sound, allowing you to create customized tones and effects, while the keyboard is mostly a piano-based instrument that produces pre-recorded sounds.


Understanding their differences is crucial when choosing the right instrument for your musical career. Remember to pick an instrument based on your needs, budget, and level of expertise, and always keep practicing to improve your skills.

Categories
Archive

How To Perfectly Mix My 808 And Kick Without Clashing

To avoid clashing between the 808 and kick, use EQ to carve out space for each. Start by identifying the fundamental frequency of each and adjust accordingly.


Finding the right sound for the 808 and kick can be a challenge, and getting them to work together without clashing can be even more difficult. However, with the right techniques, you can perfectly mix your 808 and kick to create a cohesive and balanced sound that will elevate any track.


EQ is a powerful tool for carving out space for each element in your mix, and it’s essential for getting your 808 and kick to work together harmoniously. We’ll explore some strategies for using EQ to balance and blend your 808 and kick, so you can create a professional-sounding mix that delivers the impact and power you’re looking for.


Understanding The Role Of 808 And Kick In A Track


The 808 and kick are essential components in creating an appealing track. To achieve a seamless mix, it’s important to understand their individual roles and frequencies and make necessary adjustments to avoid them clashing. Proper mixing results in a balanced and dynamic track that sounds great across different devices.

Kick And 808: Why They Clash

When creating music, it’s essential to understand the role that each element plays in a track. Two of the most important elements are the kick and 808. However, it’s common for them to clash and cause an unpleasant sound. The kick and 808 both occupy similar frequency ranges, making it essential to ensure they’re mixed perfectly. A common issue is that the 808 can overpower the kick, resulting in a distorted sound. It’s important to understand the reasons why the kick and 808 clash to prevent this problem from occurring. To understand why the kick and 808 clash, it’s essential to understand their role in a track. The kick provides the low-end punch to a song, while the 808 provides the bassline. When mixed correctly, the kick and 808 complement each other, creating a powerful, harmonious sound. However, when mixed incorrectly, they can overlap, resulting in a muddy, distorted sound. As a result, it’s essential to understand the dynamic range in low-end elements and how to mix them to achieve a clean sound.

Dynamic Range In Low-end Elements

The dynamic range of a track refers to the difference between the loudest and softest parts of the song. In low-end elements such as the kick and 808, it’s crucial to preserve their dynamic range to provide a clear sound. When mixed incorrectly, one element can overpower the other, affecting the overall dynamic range of the track. To avoid this, it’s necessary to mix the kick and 808 separately, adjust their individual levels, and then blend them together. Additionally, it’s essential to ensure that the kick and 808 are not playing at the same time, allowing them to occupy their individual frequency ranges. To conclude, understanding the role of the kick and 808 in a track and being aware of their dynamic range is critical when mixing. By preventing the clashing of these elements, a clean and harmonious sound can be achieved.

How To Perfectly Mix My 808 And Kick Without Clashing


Credit: m.youtube.com


Preparing The Sounds Before Mixing


To perfectly mix your 808 and kick without clashing, it’s important to prepare the sounds before mixing. Start by ensuring the 808 and kick sample are in the same key and EQ out any frequencies that clash. Use compression and sidechain techniques to make them work together harmoniously.

Preparing the Sounds Before Mixing Before you start mixing your 808 and kick, you need to ensure that both sounds are in their best form. Here are the steps to prepare your sounds before mixing: Tuning the Kick and 808 The first step to preparing your sounds is to ensure that your kick and 808 are in tune. Tune your kick and 808 to match each other, so you won’t end up with clashing sounds. You can use a tuner or pitch-correction software such as WavesTune, Melodyne, or AutoTune to tune your sounds. Proper EQ adjustments The second step to preparing your sounds is to make proper EQ adjustments. Cut the frequency range of the kick slightly below where the 808 is hitting, typically around 120 Hz. On the other hand, remove or cut the frequency range of the 808 where the kick hits, which is usually around 60-80 Hz. Proper EQ adjustments will eliminate frequency clashes that might ruin your mix. Sidechain Compression Setup The third and most critical step to preparing your sounds is setting up sidechain compression. Sidechain compression will prevent your kick and 808 from clashing, as it compresses the 808 when the kick hits. This compression technique creates a ‘pumping effect’ that can add groove to your music. To set up sidechain compression, you’ll need a compressor that can detect an external key input such as a sidechain input. In Conclusion Preparing your sounds before mixing is an essential process that can make or break your mix. By tuning your kick and 808 to match each other, making proper EQ adjustments, and setting up sidechain compression, you can achieve a perfectly mixed track. Follow these steps, and you’ll be on your way to creating professional-sounding music.

Techniques For Mixing The 808 And Kick

If you work with music production, you know how important it is to mix the right audio files together. When it comes to the 808 and kick, it can take some technical know-how to get these two elements to mix perfectly. Whether you’re a newbie producer or experienced, there are various mixing techniques that can help balance your 808 and kick sounds in the most effective way possible. In this post, we will discuss some of the most efficient and practical methods to mix your 808 and kick without clashing.

Volume Balancing Between Kick And 808

The volume balance between both tracks is significant in getting that clear and great sound. Make sure your kick is your loudest element before trying anything else. Dial down the 808, and slowly bring it up. Do this until you find the sweet spot where the two sounds are blending well together, and you can hear both elements clearly. Another technique you could try is ducking the 808 when the kick hits. This method can be useful in dance or hip hop music where a big kick sound is desired.

Panning The 808 And Kick

Panning is another critical technique where you give space to both audio files. Panning the audio between the right and the left stereo field can create an immersive sound. It helps in giving each audio file a different sense of space while keeping them balanced. You could pan the kick right and the 808 left or vice versa. Another option is to keep them centrally aligned and then use other elements of the mix for panning. Try various panning techniques until you get the perfect mix of sounds.

Time-aligning The Kick And 808

When mixing your kick and 808, time alignment is necessary to ensure that both elements are in sync with each other. For this process, you could use the transient of both tracks to line them up or adjust the phase of the 808 track until it matches with the kick’s phase. Ensure that the transient of both elements falls perfectly in-sync, and you will avoid flabby bass and punch-less kick.

Parallel Processing On Kick And 808

Parallel processing is an efficient technique where both elements are processed differently, and then their signals are combined for the final mix. This technique allows you to boost the frequencies that are failing, reduce the unneeded frequencies, and reduce unwanted overtones without interfering with the overall harmony of the mix. Experiment with individual EQ settings, compression, saturation, and then mix in parallel to finally get that crisp and clear mix that you desire.


Advanced Tips And Tricks For 808 And Kick Mixing


Learn how to flawlessly mix your 808 and kick with these advanced tips and tricks. Avoid frequency clashing, balance your levels, and achieve a powerful sound that won’t disappoint. Perfect for producers looking to take their mixing skills to the next level.

When it comes to producing thumping beats, the 808 and kick are crucial elements. However, sometimes mixing them can be challenging and lead to clashing of sounds. Fear not, as we have gathered some advanced tips and tricks that will help you mix your 808 and kick seamlessly. Let’s dive in!

Adding Saturation And Harmonic Distortion

Saturation and Harmonic Distortion are excellent tools to help add character to your sound. By using them, you can make your 808s and kicks sound fuller and warmer, without the risk of clashing. Saturation can help your 808s sound more pronounced, while harmonic distortion will add grittier harmonics to your kick. Add them in moderation, and you’ll hear the difference.

Using Multi-band Compression

Multi-Band Compression is an excellent tool to have in your arsenal to help you control the dynamics of your 808 and kick. By splitting the mix into different frequency bands, you can compress different sections separately. This allows you to reduce the chances of clashing and control the volume of individual elements. Be careful not to overuse it, as it can cause the sound to lose its punch.

Automation Of Levels And Eq

Automation can help you avoid clashing of sounds by automating the levels and EQ of individual elements in your mix. By automating levels, you can balance the sound of different elements throughout the track. EQ automation allows you to control the frequencies of various elements, reducing the likelihood of clashing. When using automation, take care not to set drastic changes that may cause the sound to lose its natural flow. In conclusion, these advanced tips and tricks will help you mix your 808 and kick seamlessly, without the risk of clashing. By adding saturation and harmonic distortion, using Multi-Band Compression and automating levels and EQ, you can create a full, warm, and balanced sound that will have your listeners nodding their heads in satisfaction.


Frequently Asked Questions For How To Perfectly Mix My 808 And Kick Without Clashing


How Do I Stop 808 And Kick From Clashing?


To prevent 808s and kicks from clashing, you can try EQ’ing, adjusting the timing, changing the octave, or using sidechain compression. EQ’ing involves cutting the frequencies that clash. Adjusting the timing ensures they don’t hit at the same time. Changing the octave can help too.


And sidechain compression allows the kick to be heard without clashing with the 808.


How Do You Match Kick And 808?


To match kick and 808, identify their frequencies and ensure they do not interfere with each other. Make sure the kick hits between the 808 hits, and use EQ to reduce any clashing frequencies. Use sidechain compression or volume automation on the 808 to make it duck when the kick hits.


How Do You Blend Kick And 808?


To blend kick and 808, you must adjust the pitch and volume of each one so they complement each other. The kick should provide the attack and the 808 should create the low-frequency punch. Use EQ to make sure the sounds don’t interfere with each other, and add compression to glue them together.


Experiment with different settings to find the perfect balance.


How Do You Balance Kick And 808?


To balance kick and 808, adjust their respective frequencies and levels until they complement each other without overwhelming the mix. Use EQ to reduce frequencies that clash and enhance those that blend. You can also try sidechaining the 808 to the kick, so they don’t compete at the same time.


Practice with different combinations and listen carefully to the results.


Conclusion


With these techniques and tips, you can learn to master the art of mixing your 808s with your kick without clashing. Remember to use EQ to remove frequencies that interfere with each other, use compression to control the dynamic range of each element, and experiment with different volume levels to achieve balance.


Also, be sure to use high-quality samples and always trust your ears. By following these guidelines, you’ll be able to create powerful and cohesive beats that will make listeners groove to your rhythm. Happy mixing!

Categories
Archive

Dont Let These Common Issues Ruin Your Vocal Recording

To ensure a successful vocal recording, avoid excessive background noise and microphone proximity. These issues can be detrimental to the quality of your recording.


The process of recording vocals can be a challenging one, particularly if you’re not familiar with the many variables that can impact the final outcome. From background noise and microphone placement to vocal technique and the use of proper equipment, there are a wide range of factors to consider for a successfully recorded and well-mixed vocal.


Unfortunately, all too often, musicians find themselves struggling with common recording issues that can ruin the final product. If you’re a musician who is just starting to record yourself or you’re a seasoned pro who wants to improve your recording process, it’s crucial to be aware of these common pitfalls in order to overcome them and create the best possible recording.


Room Acoustics And Soundproofing

If you’re a budding artist or a podcaster, then you know the importance of having a recording space that produces high-quality sound. Your recording room’s acoustics and soundproofing elements are critical when it comes to achieving professional-grade vocal recordings. These elements play a crucial role in ensuring that your recordings sound crisp and clear without any background noise or echoes that may ruin your work.

Importance Of Acoustically Treating Your Recording Space

The key to achieving good sound is to have a recording space that has good acoustics. Proper acoustic treatment helps to minimize unwanted reflections that cause reverberation and ultimately affect the vocal quality. When sound waves bounce off bare walls, they cause echoes and distortions that impact the quality of your recording. This is where acoustics come in. You need to acoustically treat your recording space to ensure that the sound waves are absorbed instead of bouncing off your walls.

How To Soundproof Your Recording Space

Soundproofing your recording space is equally as important as acoustically treating it. Soundproofing helps to eliminate all external noise pollution, making it easier to record in an otherwise noisy environment. There are several ways to soundproof your recording space, but the most effective method is to add mass to the walls. You can add decoupled walls, triple leaf walls, or simply opt for material that has high sound insulation properties. Other options include using a sound blanket or a reflective panel to muffle external sounds that may interfere with your recording.

Additional Tips

  • Always use high-quality recording equipment. It doesn’t matter how well you treat your recording space if you’re using poor-quality equipment. Invest in reliable mics, interfaces, and headphones to get the best results.
  • Avoid recording in large rooms. Large rooms have more reflections, which can make your recording sound hollow or echoey. Instead, choose smaller rooms or record in a dedicated vocal booth.
  • Consider using bass traps to eliminate low frequencies that may cause your recording to sound boomy or muddy.

By implementing the tips mentioned above, you can achieve professional-grade vocal recordings that are free from all background noise, distorted echoes, or reverberations. Remember, a properly acoustically treated and soundproofed recording space can make all the difference in producing high-quality vocal recordings.


Microphone Selection


Proper microphone selection is crucial to achieving high-quality vocal recordings. Common issues like background noise and poor sound quality can be avoided by choosing the right microphone for your needs.

Whether you’re an experienced vocalist or new to the game, selecting the right microphone is crucial for achieving the best vocal recording. As a singer, you need to know how to choose the right microphone for your voice to avoid common issues like muddled sound and poor quality recordings.

Types Of Microphones

There are different types of microphones, including condenser, dynamic, and ribbon microphones. Each of these types has its benefits and shortcomings. Condenser microphones are sensitive and produce high-quality recordings, but they’re also more delicate and expensive. Dynamic microphones are more rugged and affordable, but they don’t capture the same level of detail as condenser microphones. Ribbon microphones are ideal for recording vocals with a warm, vintage tone, but they’re also sensitive to loud sounds and require a preamp to operate.

How To Choose The Right Microphone For Your Voice

When selecting a microphone, consider your voice type, the music you’ll be singing, and the acoustics of your recording space. Here are some tips to help you choose the right microphone for your voice:

  • Consider the frequency response of the microphone and how it suits your voice tone
  • If you have a high-pitched voice, a condenser microphone may be your best option
  • If you have a deeper voice, a dynamic or ribbon microphone may be better for capturing the richness of your sound
  • Factor in your recording space. If you’re working in a home studio or a smaller space, a dynamic microphone may be a better choice for reducing background noise

The microphone you choose will have a significant impact on the overall quality of your recording. Remember to do your research, read reviews, and test out various microphones before making your final decision.

Microphone Placement

When it comes to recording vocals, microphone placement is a critical factor to consider. Proper placement of the microphone can make or break the quality of the recording.

Importance Of Proper Microphone Placement

The placement of the microphone has a significant impact on the overall sound quality of the recording. A microphone placed too close to the vocalist can result in distorted and distorted low frequencies, commonly known as pops. On the other hand, a microphone placed too far away from the vocalist can result in a weak and hollow sound.

Tips For Finding The Sweet Spot

To find the sweet spot or the ideal microphone placement, follow the tips below:

  • Experiment with the distance: Start with placing the microphone 6-8 inches away from the vocalist’s mouth and adjust the distance accordingly. Try moving the microphone closer or farther to make necessary adjustments.
  • Position the microphone: The position of the microphone is equally important. It’s recommended to position the microphone slightly above the vocalist’s mouth, facing downwards. This angle ensures that the microphone captures the vocalist’s voice accurately.
  • Use a pop filter: A pop filter is an accessory that helps prevent pops and hisses in the recording. It’s advisable to place a pop filter between the vocalist and the microphone, at a distance of 2-4 inches.
  • Consider the acoustics: The environment and room acoustic conditions also affect the recording quality. A well-treated room with minimal reverberation and echo offers the best recording environment. Avoid recording in environments with too much background noise.

Remember, taking the time to experiment with microphone placement and positioning can make a significant difference in the quality of your vocal recordings.

Plosives And Sibilance


Plosives and sibilance can seriously affect the quality of your vocal recording. These common issues occur when harsh sounds are made, such as “p,” “t,” and “s”. To avoid these problems, use proper microphone technique, add a pop filter, and adjust your EQ settings.

Plosives and sibilance are two of the most common issues that can ruin your vocal recording. These are the popping or explosive sounds heard in words containing “P,” “B,” or “T” and the hissing sound heard in words containing “S,” “SH,” “CH,” or “Z.” If these issues are not addressed, they can make your recording sound unprofessional and distract from the message you are trying to convey. In this article, we will discuss what plosives and sibilance are, and ways to mitigate them.

What Are Plosives And Sibilance?

Plosives are the sharp sounds you hear when you say words that start with “P,” “B,” or “T.” When you say these consonants, a gust of air is expelled from your mouth onto the microphone, causing an unwanted popping sound. Sibilance, on the other hand, refers to the hissing sound that is produced when you say words containing “S,” “SH,” “CH,” or “Z.” These sounds can be exaggerated if there is too much emphasis placed on the “S” or “T” sounds in a word.

Ways To Mitigate Plosives And Sibilance

To avoid plosives, try using a pop filter, which is a device that attaches to your microphone and acts as a barrier to the gusts of air coming from your mouth. Another way is to position the microphone slightly above or to the side of your mouth. This helps to divert the force of your exhale away from the microphone. To reduce sibilance, you can try moving the microphone slightly to the side of your mouth. Another way is to use a de-esser, which is a tool that compresses the “S” and “T” sounds in a word, making them less pronounced. You can also try adjusting the EQ of your microphone to reduce the emphasis on the high frequencies, which can contribute to sibilance. In addition to these techniques, it’s important to be aware of your speaking habits. Try to speak slowly and softly, and avoid over-emphasizing the problematic consonants. With a little bit of practice and attention to detail, you can easily mitigate plosives and sibilance, and achieve a professional-sounding vocal recording.

Breath Control And Vocal Technique


Mastering your breath control and vocal technique is crucial to ensure a high-quality vocal recording. Common issues such as breathiness, pitch problems, and vocal strain can ruin your recording. Practice proper breathing techniques and vocal exercises to overcome these obstacles.

When it comes to recording vocals, there are several common issues that can ruin the quality of your recording. One of the most important aspects of recording vocals is breath control and vocal technique. Without proper breath control and vocal technique, your recording can sound flat, rasp, or out of rhythm. So, let’s dive into the importance of breath control and vocal technique when recording vocals and some tips to improve your vocal performance.

Importance Of Breath Control And Vocal Technique

Breath control and vocal technique are essential for recording vocals that sound professional. While recording, it is essential to keep a steady and controlled breath flow, leading to a smoother and softer voice. Controlling your breath while singing also allows you to produce more sounds with less effort. Along with that, proper vocal technique protects your voice from damage and helps you to sing for a longer time.

Tips For Improving Your Vocal Performance

The following are some tips for you to enhance your vocal performance:

S.No Tip
1 Practice breathing exercises to improve breath control
2 Warm-up your voice before recording to avoid vocal strain
3 Focus on your posture while recording to improve breath control
4 Learn to use your diaphragm to control airflow
5 Avoid straining your voice and take regular breaks when recording

Improving your vocal skills takes time and effort, but it will be worth it when you hear the final product! Remember, breath control and vocal technique are crucial in recording excellent quality vocals, so make sure to dedicate time to these elements. By following these tips, you will not only achieve great vocal recordings, but you’ll also improve your overall vocal skills and ability to sing with ease. It is essential to have good breath control and vocal technique to ensure that your vocal recordings are not ruined. Practising these elements regularly can take your singing skills to the next level, which ultimately improves the quality of your final recordings. So, start practising and working on your vocal technique!

Editing And Mixing


Getting the perfect vocal recording can be challenging. Common issues such as background noise, breath sounds, and inconsistent volume levels can ruin the final product. Editing and mixing techniques, including noise reduction, EQ, and compression, can help you achieve a polished vocal track.

Importance Of Editing And Mixing In Vocal Recording

Editing and mixing are essential components of vocal recording that can make or break the overall quality of the recorded vocals. Editing and mixing enable you to adjust various aspects of the vocal recording such as volume, pitch, timing, and ambiance, thus resulting in a polished and professional sound. Without proper editing and mixing, your vocal recording might sound raw, amateurish, and inconsistent.

Tools And Techniques For Editing And Mixing Vocals

Before starting the editing and mixing process, you need to ensure that you have the right tools for the job. Some of the commonly used tools for editing and mixing vocal recordings are:

  • A digital audio workstation (DAW) software like Ableton Live, Logic Pro, or FL Studio
  • Audio plugins like EQ, compression, reverb, and delay
  • Audio editing software like Audacity or Adobe Audition

Once you have the right tools, you can start editing and mixing your vocal recording by following these techniques:

  1. Remove background noise and unwanted sounds to ensure a clean recording
  2. Adjust the volume and gain levels to ensure consistency throughout the recording
  3. Use EQ to enhance or reduce specific frequencies in the recording
  4. Use compression to control dynamic range and make the recording sound more balanced and polished
  5. Add reverb or delay to create ambiance and depth in the recording
  6. Use automation to adjust different parameters of the recording over time, such as volume, panning, and effects

By applying these techniques, you can ensure that your vocal recording sounds professional, polished, and engaging. So, do not overlook the importance of editing and mixing in vocal recording!


Frequently Asked Questions Of Dont Let These Common Issues Ruin Your Vocal Recording


Why Do My Recorded Vocals Sound So Bad?


Poor quality vocals can be caused by several factors, such as lack of proper microphone technique, using a low-quality microphone, poor recording environment, or improper mixing and mastering. To improve the quality of your vocals, consider investing in a good quality microphone, using proper microphone placement, and recording in a dedicated, acoustically treated room.


Additionally, ensure that you have a skilled mixing and mastering engineer to achieve a polished final product.


Is Proximity Effect Bad For Vocals?


Proximity effect isn’t inherently bad for vocals. In fact, it can enhance deep, warm tonality in certain contexts. However, when used improperly, proximity effect can overwhelm the mix and cause muddiness. So, it’s important to experiment and find the right balance for your specific recording needs.


Is A Closet Good For Recording?


Yes, a closet can be good for recording as it can provide a quiet and enclosed space to reduce outside noise and echo. However, it is important to treat the space with sound-absorbing materials such as foam or blankets to improve sound quality.


Should I Record Vocals Dry Or Wet?


It ultimately depends on your preference and the style of the song. Recording vocals dry means no effects are added, while recording wet involves adding reverb, delay, or other effects. Experiment with both options and choose what sounds best for the song.


Conclusion


Vocal recording can be a challenging task, and the mistakes we make during the process can ruin the entire project. However, by following the aforementioned tips, you can avoid common recording issues and achieve high-quality vocals that will stand out.


Remember to choose the right equipment, establish a good recording environment, warm up your vocal cords, monitor your levels, and seek feedback from others. With these guidelines, you can produce professional-grade vocal recordings that you’ll be proud of!


Categories
Archive

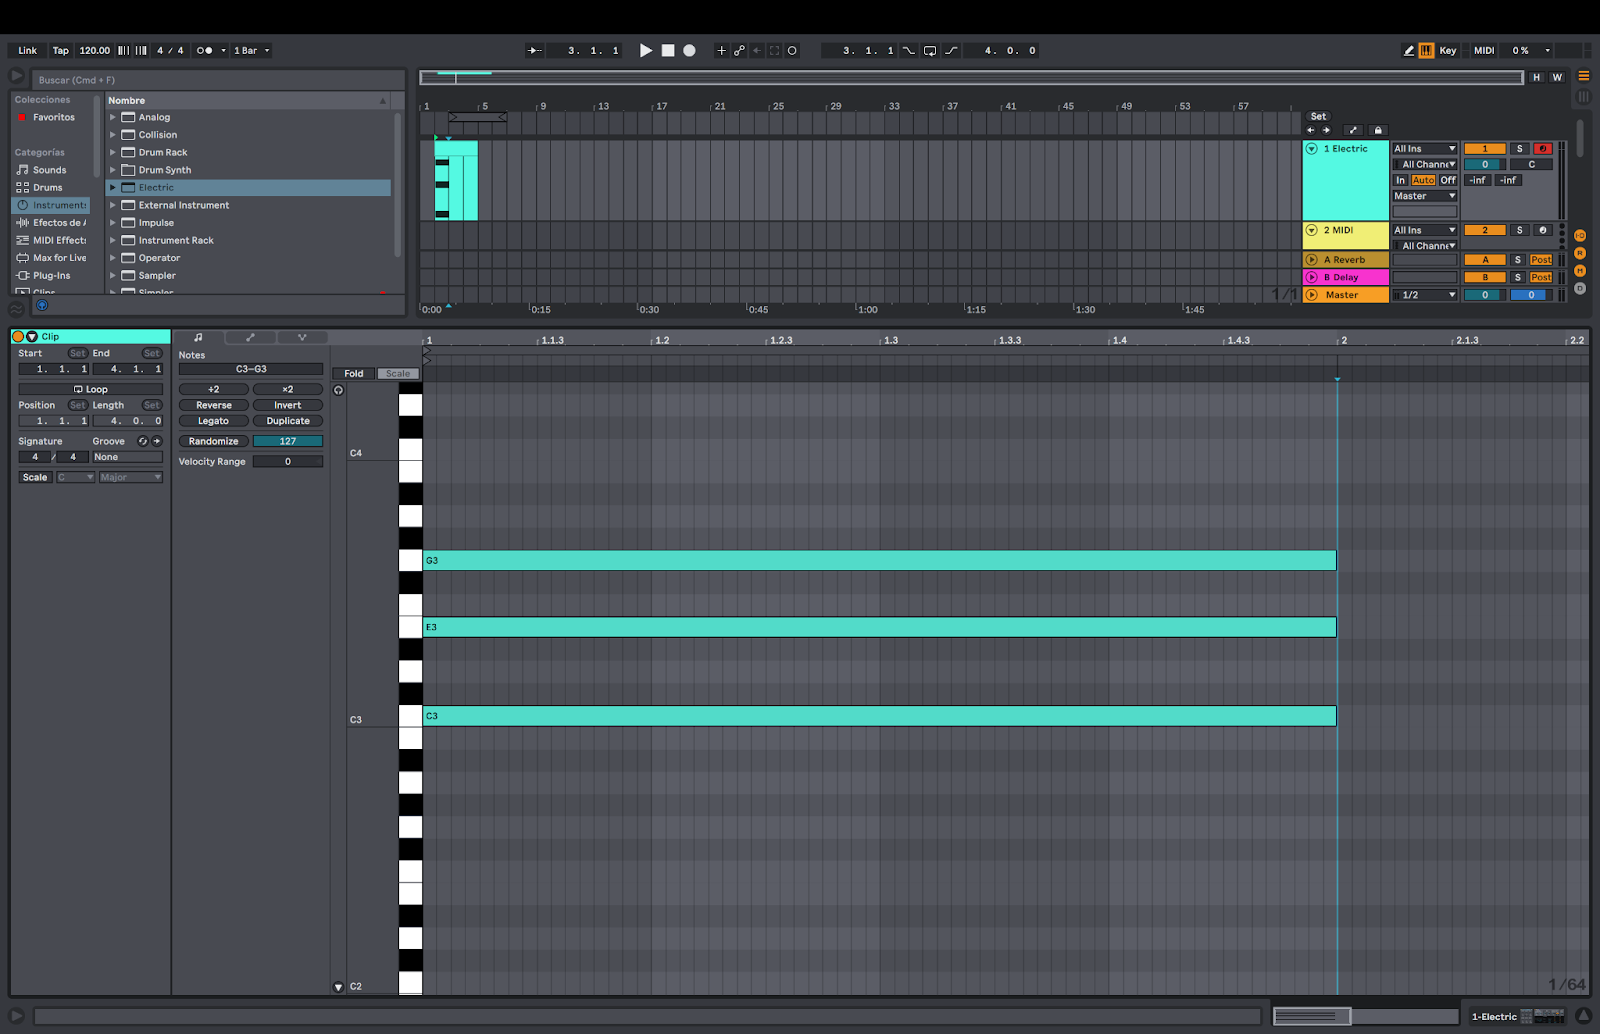
How To Set Up The Moog Subsequent 37 With Ableton Live

Setting up the Moog Subsequent 37 with Ableton Live is a quick and simple process. Connect the MIDI cables, launch Ableton Live, and select the Subsequent 37 as your MIDI input and output device.


From there, you can adjust your MIDI settings and start creating music. In this guide, we’ll go over the steps in detail and provide some tips to help you make the most out of your Moog Subsequent 37 and Ableton Live setup.


Whether you’re a beginner looking to get started or an experienced producer wanting to integrate new gear into your workflow, this guide will walk you through everything you need to know.

How To Set Up The Moog Subsequent 37 With Ableton Live


Credit: www.productionmusiclive.com


Setting Up The Hardware


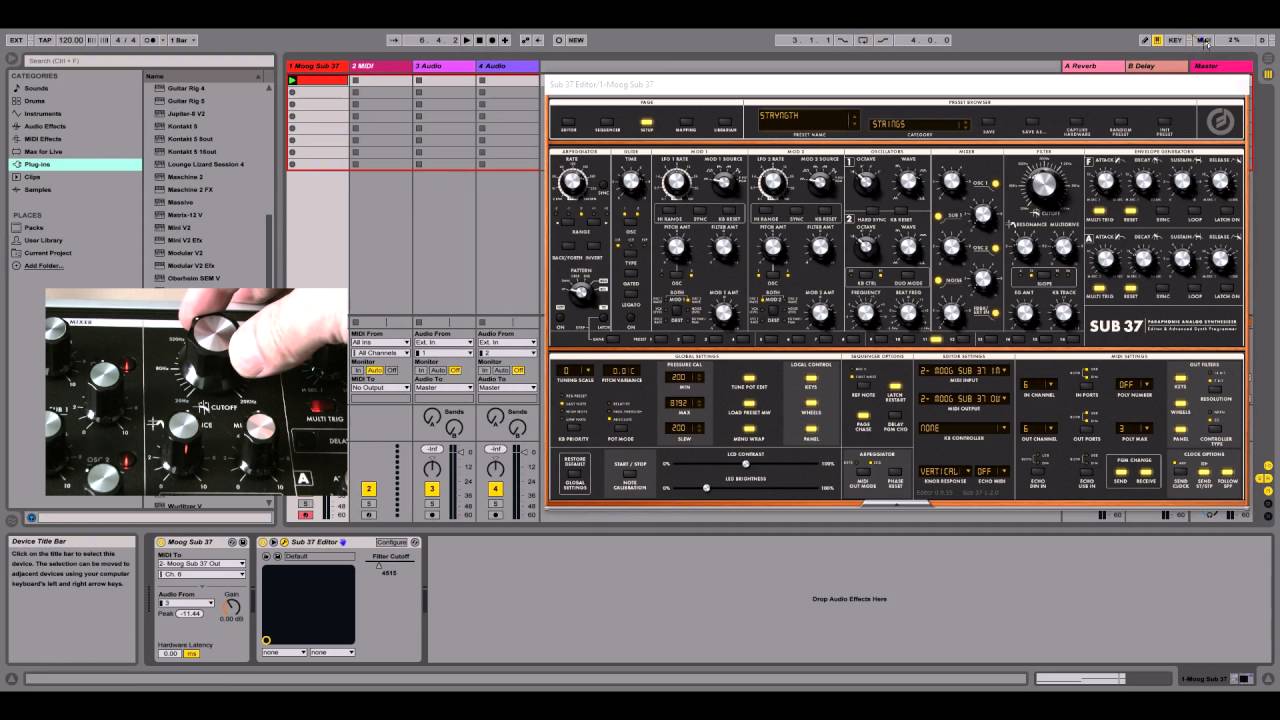
Setting up the Moog Subsequent 37 with Ableton Live is relatively easy. Connect the Subsequent 37 to your computer via USB, and launch Ableton Live. Once your Subsequent 37 is recognized by Ableton, you can start creating music using the synthesizer’s amazing capabilities.

Connecting The Moog Subsequent 37 To Your Computer

Connecting the Moog Subsequent 37 to your computer is crucial for getting the audio signal into Ableton Live. To set up the hardware, you will need a USB cable and a 1/4 inch audio cable. Connect one end of the USB cable to the USB-B port on the rear of the Moog Subsequent 37, and the other end to an available USB port on your computer. Next, connect one end of the audio cable to the “Output” jack on the back of the Moog Subsequent 37, and connect the other end of the cable to an available “Line-In” or “Mic-In” jack on your computer’s sound card. This will enable you to record audio from the Moog Subsequent 37 directly into Ableton Live.

Connecting The Audio Interface To Your Computer

In order to get the best audio quality from your setup, you will need to use an audio interface. Connect one end of a standard USB cable to the USB port on your audio interface and the other end to an available USB port on your computer. Make sure that your audio interface is powered on before connecting it to the computer. To set up the audio interface on Ableton, go to the “Preferences” window and under the “Audio” tab, select your audio interface from the list of available devices. This will route the audio from the Moog Subsequent 37 through the audio interface’s converters, giving you a much cleaner and higher quality audio signal. Setting up the hardware for the Moog Subsequent 37 with Ableton Live may seem daunting at first, but it’s actually quite simple. By following these straightforward instructions, you’ll be recording your Moog Subsequent 37 directly into Ableton Live in no time.

How To Set Up The Moog Subsequent 37 With Ableton Live


Credit: m.youtube.com


Software Setup

If you’ve just purchased your Moog Subsequent 37, congratulations – you’ve just made a fantastic purchase! If you’re wondering how to set up this exquisite synthesizer with Ableton Live, don’t worry – we’ve got you covered. In this post, we’ll discuss everything you need to know about the software setup for the Moog Subsequent 37.

Installing The Moog Subsequent 37 Editor

The Moog Subsequent 37 Editor is a software application designed specifically to help you manage your Moog Subsequent 37 from your computer. To install the Moog Subsequent 37 Editor, follow these simple instructions:

  1. Go to the Moog website and download the Editor for your operating system
  2. Run the installer once the download is complete
  3. Follow the on-screen instructions to install the Editor

Once you’ve successfully installed the Editor, you’ll be able to control many of the Subsequent 37’s parameters directly from your computer.

Setting Up Midi Preferences In Ableton Live

Once you’ve installed the Editor, the next step is to set up the MIDI preferences in Ableton Live. Here’s what you need to do:

  1. Open Ableton Live and go to Preferences (PC: File > Preferences, Mac: Live > Preferences)
  2. Go to the MIDI/Sync tab
  3. In the ‘Input’ section, find your Moog Subsequent 37 and enable the ‘Track’ and ‘Remote’ options by clicking the buttons next to them
  4. In the ‘Output’ section, again find your Moog Subsequent 37 and enable the ‘Track’ option
  5. Click ‘OK’ to save your preferences

Once you’ve finished these steps, Ableton Live will recognize your Moog Subsequent 37 and you’ll be ready to start using it as a MIDI controller.

That’s it – you’re now ready to start using your Moog Subsequent 37 with Ableton Live! With these simple steps, you’ll be able to unlock the full potential of your new synthesizer and start creating amazing music in no time.

Using The Moog Subsequent 37 In Ableton Live


Set up the Moog Subsequent 37 with Ableton Live for seamless music production. Connect the synthesizer to Ableton, calibrate it properly, and learn how to use it within the software to create rich, analog sounds.

If you’re a fan of analog synths, then the Moog Subsequent 37 is a great choice for your setup. Ableton Live, on the other hand, is a popular choice for music production and performance. Fortunately, the Moog Subsequent 37 is fully compatible with Ableton Live, allowing you to integrate it into your workflow seamlessly. In this post, we’ll take a look at how you can use the Moog Subsequent 37 in Ableton Live. We’ll cover everything from loading the editor to mapping the controls.

Loading The Moog Subsequent 37 Editor In Ableton Live

Before we can start working with the Moog Subsequent 37 in Ableton Live, we’ll need to load the editor first. The editor allows us to access all of the synth’s parameters and settings from within Ableton Live. To get started, just follow these steps:

  1. Connect the Moog Subsequent 37 to your computer using a USB cable.
  2. Launch Ableton Live and create a new project.
  3. Click on the “Options” menu in Ableton Live and select “Preferences”.
  4. Select the “MIDI/Sync” tab from the left-hand menu.
  5. In the “Input” section, ensure that the Moog Subsequent 37 is selected as a control surface.
  6. Switch to the “Output” section and ensure that the Moog Subsequent 37 is selected as a MIDI output.
  7. Close the preferences window and navigate to Ableton Live’s “Device” menu.
  8. Select the “VST Plugins” option and then select the “Moog Subsequent 37 Editor” from the list of available plugins.
  9. The editor will now open, and you should be able to access all of the synth’s parameters and settings.

Mapping The Moog Subsequent 37 Controls In Ableton Live

Once you’ve loaded the Moog Subsequent 37 editor into Ableton Live, the next step is to map its controls. Mapping the controls allows you to automate and control the synth’s parameters in real-time. Here’s how to map the Moog Subsequent 37 controls in Ableton Live:

  • Select the instrument track containing the Moog Subsequent 37.
  • Click on the “Map” button in the Ableton Live interface.
  • Select the parameter that you’d like to map from the Moog Subsequent 37 editor.
  • Move the control on the synth that corresponds to the parameter you’ve selected.
  • Repeat these steps for all of the parameters you’d like to map.

Once you’ve mapped your controls, you’ll be able to automate and control them in real-time using MIDI or automation envelopes. With a little practice, you’ll be creating amazing synth sounds in no time!


Advanced Techniques

Now that you’ve got your Moog Subsequent 37 and Ableton Live setup sorted, it’s time to dive into some advanced techniques. Here are some ways to take your music production to the next level.

Using The Moog Subsequent 37 As An Audio Interface

If you want to get the most out of your Moog Subsequent 37, try using it as an audio interface. This will allow for higher quality audio recordings, especially if you’re using the synth for bass or other low-frequency sounds.

To set this up, simply plug your microphone or instrument into the Moog Subsequent 37 and connect it to your computer via USB. Then, select the Subsequent 37 as the audio input device in Ableton Live’s preferences.

Creating Custom Presets In The Moog Subsequent 37 Editor

If you want to create your own unique sounds on the Moog Subsequent 37, you can do so using the Subsequent 37 editor. This software allows you to tweak and adjust every parameter of the synth, from the filter cutoff to the LFO rate.

Once you’ve created your custom preset, you can save it to the synth’s memory, so it can be easily recalled later. This is a great way to get creative and experiment with new sounds that are all your own.

To use the Subsequent 37 editor, simply download it from the Moog website and connect your synth to your computer via USB. From there, you can start tweaking and adjusting to your heart’s content.

Frequently Asked Questions On How To Set Up The Moog Subsequent 37 With Ableton Live


How Do I Sync Moog To Ableton?


To sync Moog with Ableton, you need a MIDI cable to connect the Moog to your computer and a MIDI interface or USB MIDI cable. In Ableton, go to Preferences and MIDI Sync and select the MIDI interface. Then, in the Moog’s MIDI settings, enable MIDI clock.


Now, the two should be in sync.


How Do I Use My Moog Sub 37 As A Midi Controller?


To use your Moog Sub 37 as a MIDI controller, connect it to your computer or another MIDI device using a standard MIDI cable. Then, select the Sub 37 as your MIDI input device in your preferred music software. You can now use the Sub 37’s keys, knobs and buttons to control other MIDI-enabled devices.


How Do I Set Up An External Synth In Ableton?


To set up an external synth in Ableton, connect your audio interface to your computer and turn on your synth. Go to “Options” and select “Preferences” in Ableton. Then, go to “Audio” and select your audio driver. After that, choose the input channel for your synth and activate it.


Finally, add a new MIDI track and set its output to the external synth.


Does The Moog Subsequent 37 Have A Sequencer?


Yes, the Moog Subsequent 37 does have a sequencer.


Conclusion


Setting up the Moog Subsequent 37 with Ableton Live can be intimidating, but with the right steps, it can be a smooth and rewarding process. Remember to connect the right cables, download the necessary software, and explore the limitless possibilities of this powerful combination.


Develop your unique style, experiment with different sounds, and keep creating. Happy producing!


Categories
Archive

How To Produce A Full Length Album Without Going Crazy

Producing a full-length album without going crazy involves creating a well-organized plan and schedule, prioritizing tasks, and staying focused on the end goal. By breaking down the process into manageable steps, collaborating with the right people, and maintaining a positive mindset, you can release a successful album without losing your mind.


Creating a full-length album is a dream come true for many musicians, but it can also be an overwhelming undertaking. Juggling songwriting, recording, mixing, mastering, and promoting an entire album is no easy feat, and it’s easy to become stressed and burned out in the process.


However, with careful planning and prioritizing, you can create a successful album and remain sane through the process. We’ll explore some tips and strategies for producing a full-length album without going crazy, so you can enjoy the creative process and achieve your goals as an artist.

How To Produce A Full Length Album Without Going Crazy


Credit: www.masteringthemix.com


Set Realistic Goals

Setting realistic goals is critical when it comes to producing a full-length album without burning yourself out. Many artists get too enthusiastic and promise to record and release an album in record time, which is difficult to achieve and can lead to disappointment. To avoid this, it is important to create reasonable goals that take into account the time, budget, creative energy, and skill of everyone involved in the project.

Decide On Album Themes And Genre

Before diving into album production, it is important to decide on the album’s theme(s) and genre(s). Determine what you want to communicate through your music and how this will reflect your brand or image. As a result, knowing the general thematic direction of your potential songs and genre would determine whether a particular song will fit into the body of work.

Set A Production Timeline

Once you have a clear idea of the album’s themes and genre(s), it is time to develop a practical production timeline. Ensure it’s understood that the more time you give yourself to plan and produce your album, the better your work will be. When creating a production timeline, take into account the schedules and availability of all the people involved, including producers, musicians, and engineers. Consider the availability of recording studios for your album, along with daily schedules to keep yourself accountable. Always have spare days for unforeseen circumstances, which always arise.

Create a timeline that’s practical for you, and stick to it. Determine when you want to start and when you intend to finish the record. All artists’ pace differs, but some good benchmarks to aim for might be: writing and pre-producing material in 2-3 months, recording basic tracks in 1-2 weeks, vocals and overdubs in another 2-3 months, mixing in 1-2 months, and mastering in 2-3 weeks.

Finally, please note that there are no hard-and-fast rules on making an album through the timeline. Allotting reasonable time on every step will ensure proper concentration, attention, and care are given to the album’s details, resulting in a great album worthy of the listener’s attention.


Create A Detailed Plan


Before recording a full-length album, it’s essential to create a detailed plan. The plan should include the number of songs, recording studio, budget, timeline, and marketing strategy to ensure the success of the project. By having a step-by-step plan, you can avoid feeling confused and overwhelmed throughout the process.

Producing a full-length album can be a daunting task. While it’s exciting to think about recording your music, the process can quickly become overwhelming and lead to burnout. However, with a detailed plan, you can stay on track and maintain your creative momentum. Here are some steps you can take to create a plan that ensures you produce a full-length album without going crazy:

Breakdown Songs By Sections

Before you start recording, it’s helpful to break down your songs by sections. This can help you stay organized and focused throughout the recording process. Identify the intro, verse, chorus, bridge, and outro of each song. Make sure you have a clear idea of the song structure that you want to follow. You can write this out in a table to stay organized.

Establish A Recording Schedule

Having a recording schedule is essential for staying productive and on track. It’s easy to get lost in the recording process and lose sense of time, but by creating a schedule, you can stay focused and make progress. Decide on how long each section of the song will take to record, and set a deadline for completing each song. Once you have a clear idea of the recording schedule, you can create a calendar to keep track of your progress.

Allocate Time For Mixing And Mastering

Mixing and mastering can take a lot of time and require careful attention to detail. Set aside a specific period in your recording schedule for mixing and mastering. Plan on taking breaks to rest your ears and avoid ear fatigue. Block out time on your calendar for review and revisions as well. While it’s important to push yourself, it’s also essential to set realistic goals. Evaluate your bandwidth and make sure your plan is something you can stick to. Don’t aim to record an album in a week if you know that’s not possible with your schedule. Set attainable goals that allow you to make steady progress on your album and maintain a healthy work-life balance.

Conclusion

By creating a detailed plan, you can produce a full-length album without going crazy. Breaking down your songs by sections, establishing a recording schedule, allocating time for mixing and mastering, and setting realistic goals are all key elements in a successful plan. With patience, discipline, and a clear plan, you can produce a full-length album that is worth all the hard work you put into it.

Make The Most Of Your Resources

Producing an album is a massive undertaking, even for the most accomplished musicians. From writing songs to recording, mixing, mastering, and promotion, there are many steps involved in creating a great-sounding record. However, it doesn’t have to be an expensive and overwhelming process. One of the keys to keeping things manageable is to make the most of your available resources. This includes your recording setup, software, and the skills and expertise of those around you.

Record At Home Or Find A Studio

Whether you record your album in a professional studio or in your own home studio, doing so can be a significant expense. However, if you have the necessary recording gear, a quiet room and some time to invest, recording at home can be an excellent option to save money. Regardless of where you choose to record, setting a schedule, and sticking to it can help you maintain focus and ensure that you stay on track.

Utilize Free Or Affordable Software

There is a vast selection of excellent recording, mixing, and mastering software available, some of which are free or low cost. Examples of this include free DAW (Digital Audio Workstation) software such as Audacity or affordable options like Reaper or Adobe Audition. With a little bit of research, you can find more affordable options that might not be as well-known, but still provide excellent features and functionality.

Free Software Affordable Software
Audacity Reaper
Ardour Studio One
Cakewalk by Bandlab Adobe Audition

Get Creative With Your Resources

Other resources available to you may not be as obvious as recording gear or software. For example, if you have friends with musical talents, consider asking them to help with specific tracks on your album. If you have a limited social circle, consider reaching out to other musicians on online forums and music groups, where you might find talented individuals who are looking for new projects to work on.

  • If you have a talented friend that can mix and master, ask for help with this task on your album.
  • If you need help with the artwork, ask other friends for their suggestions and opinions or find affordable graphic design services.
  • Consider hosting a crowd-funding campaign to support production costs.

With these tips, producing a full-length album can be a lot less daunting and more affordable. The key is to make use of the resources around you and to stay focused and organized from start to finish. Once you have completed your album, ensure you promote it in the right way to reach your target audience.

Collaborate With Others


Collaborating with others is crucial when producing a full-length album. Surrounding yourself with talented and skilled individuals can help take the load off your shoulders and ensure a successful outcome. From picking out beats to writing lyrics, working together can make the process a lot smoother.

Producing a full-length album can be a daunting task, especially when you’re doing it all on your own. Collaborating with other musicians can help ease the burden and make the process more enjoyable.

Find Compatible Musicians

When looking for collaborators, it’s important to find musicians who share your vision and style. You don’t want to waste time with someone whose style clashes with yours. Network and attend events to meet other musicians who could potentially collaborate with you. You can also use social media platforms to find musicians looking to collaborate.

Seek Feedback from Trusted Sources

When working with others, it’s important to seek feedback from people you trust. Get their opinions on the direction of the project and any areas that may need improvement. This can help you refine your work and make it the best it can be. Collaborating with others can be a rewarding experience that can help you produce a full-length album without the stress of doing it all on your own. Find compatible musicians and seek feedback from trusted sources to ensure the project is successful.

Take Breaks When Needed


Take frequent breaks to prevent burnout when working on your full-length album. Step away from your project and come back with fresh ears to avoid feeling overwhelmed. It’s important to prioritize your mental health while staying dedicated to your music.

Producing a full-length album can be an intensive process that requires time, creativity, and hard work. It is important to keep in mind that breaks are essential to avoid burnout and fatigue. Here are some ways to incorporate breaks into your album production process.

Avoid Burnout And Fatigue

When it comes to producing an album, it’s easy to become consumed by the work. You may feel as though every moment needs to be spent working on your project. However, it’s important to remember that burnout and fatigue can often impede progress. Taking a break when needed can help prevent burnout and keep the creative juices flowing.

Shift Focus To Other Creative Projects

Taking breaks doesn’t always mean stopping work altogether. Instead, you can shift focus to other creative projects. This shift in focus can help to reignite your passion and inspire new ideas for your album. Consider working on a new song or collaborating with other artists. This can help keep you motivated and energized for the album production process.

Set Realistic Milestones

In addition to taking breaks, setting realistic milestones is also important. This will help you stay on track and avoid feeling overwhelmed. Break the album production process into smaller tasks and assign deadlines to each one. This will not only help you stay organized but will also give you a sense of accomplishment as you complete each task.

Conclusion

In conclusion, taking breaks is an important part of the album production process. It’s important to avoid burnout and fatigue by stepping away when needed. Shifting your focus to other creative projects and setting realistic milestones are effective ways to take breaks and keep your momentum going. Remember, the most important thing is to stay inspired and enjoy the creative process.

Stick To Your Budget

Music is a passion for many, and producing an album is a dream for most talented musicians. However, the process of producing an album can be overwhelming and stressful, especially when it comes to budgeting. Budgeting is crucial to ensure you do not run out of money for your project. In this post, we will discuss how to stick to your budget while producing a full-length album.

Determine Album Expenses Upfront

The first step in sticking to your budget is to determine all the expenses for your album upfront. This will help you get an idea of how much money you will need to produce your album. Make a list of all the costs associated with producing an album, including studio time, musicians’ fees, mixing, mastering, artwork, marketing, and other miscellaneous expenses. Ensure that you have taken the time to research each of these expenses to get an accurate estimate.

Track Production Costs As You Go

Once you have determined the expenses required for your project, it is essential to track the costs as you go. This will give you a clear understanding of how much money you have spent and how much money you have left in your budget. Create a spreadsheet to track each expense, including the date, the description of the expense, and the amount. This will help you identify areas where you may have overspent and make adjustments to prevent exceeding your budget.

Find Cost-effective Alternatives

Some expenses associated with producing an album can add up quickly. However, there are ways to find cost-effective alternatives to these expenses. For example, instead of renting an expensive studio, consider recording at home or a less costly studio. You can also hire a lesser-known producer or engineer with excellent skills rather than a more expensive, well-known producer. Consider creative ways to market your album, such as social media, instead of relying solely on costly advertising.

Finally, setting realistic goals for your project can help you stick to your budget. Consider the timeline, the number of songs you want to include, and how much time you can realistically dedicate to the project. Setting realistic goals will help you avoid overcommitting and potentially overspending.

Producing an album can be a challenging and rewarding experience. By following these tips and sticking to your budget, you can produce a full-length album without going crazy.


Practice Self-care

Producing a full-length album can be both exciting and overwhelming. The process of creating music requires a lot of dedication, time, and energy. However, it is also important to take care of yourself while working on your album. Practicing self-care is an essential part of the creative process, and it can help you avoid burnout and achieve your goals while staying sane. Let’s explore some ways to practice self-care while producing your album.

Prioritize Sleep And Exercise

Sleep and exercise are two crucial components of self-care that can significantly impact your mood, energy levels, and productivity while working on your album. Make a habit of getting enough sleep each night and try to keep a consistent sleep schedule. Additionally, find time to exercise each day, even if it is just a quick walk or stretch. Regular exercise can help reduce stress and anxiety and increase mental clarity, which can ultimately lead to better creativity and output.

Manage Stress And Mental Health

Producing an album can be a complex and stressful process that can take a toll on your mental health. Stress can lead to burnout, which can damage your progress and creativity. Therefore, It’s important to take breaks and schedule time for activities that help you relax and reduce stress. Meditation, yoga, and deep breathing techniques are some of the effective methods for reducing stress levels. Moreover, if you find yourself struggling with mental health issues, such as anxiety or depression, it’s important to seek professional help.

Self-Care Tips For Producing A Full Length Album
Get enough sleep each night
Try to keep a consistent sleep schedule
Make time for regular exercise
Breaks and schedule time for activities that help you relax
Use meditation, yoga, and deep breathing techniques to reduce stress levels
Seek professional help if struggling with mental health issues

In conclusion, self-care is crucial for producing a full-length album without going crazy. It is important to prioritize sleep, exercise regularly, and manage stress levels to maintain your mental and physical health throughout the creative process. Remember, your well-being is essential to creating the best music possible. So, don’t hesitate to take breaks and care for yourself along the way.

How To Produce A Full Length Album Without Going Crazy


Credit: www.masteringthemix.com


Celebrate Milestones

Producing a full-length album can be an overwhelming task, but it’s crucial to celebrate every step of the way. Celebrating milestones can help you stay motivated and prevent burnout. Every achievement – big or small – deserves to be acknowledged and celebrated.

Acknowledge Progress Throughout Production

During the production process, it’s important to acknowledge progress and celebrate each milestone that takes you closer to the finish line. Creating a timeline with specific benchmarks can help you track your progress and give you a reason to celebrate. For example, every time a song is completed, take a moment to recognize the achievement.

You can also create a checklist of tasks that need to be accomplished for each song. As each task is completed, mark it off the list and take a moment to celebrate the progress made. Celebrating these achievements can help keep you motivated and mentally prepared to complete the album.

Celebrate Completion Of The Album

Once the album is complete, it’s time to celebrate! Whether it’s a small gathering with the production team or a big party with friends and family, it’s important to celebrate the completion of a project that required so much time and dedication. The celebration doesn’t have to be extravagant, but it should be a meaningful way to recognize the accomplishment and let loose after the intense work period.

If you have a budget for the album, consider hiring a publicist to help promote the release. This can lead to media coverage, interviews, and other opportunities to celebrate and showcase your work. While the album’s completion is a significant milestone to celebrate, don’t forget that there are still more milestones to come like the release date, reviews, fan feedback, and awards.

In conclusion, taking the time to celebrate milestones can help keep you motivated, prevent burnout, and ultimately make the album production process more enjoyable. Celebrating progress and achievement can help keep you focused on the bigger picture, even when the going gets tough.

Frequently Asked Questions On How To Produce A Full Length Album Without Going Crazy


What Makes A Full Length Album?


A full length album typically consists of at least 10 tracks and has a total runtime of 30 minutes or more. It’s considered a complete musical project that tells a cohesive and comprehensive story through its songs. The album may also have a common theme, sound, or genre.


How Do I Make A Full Album?


Making a full album requires selecting songs, recording them, mixing and mastering, and distribution. Ensure that all songs relate to a cohesive theme or sound, and are of high quality. Additionally, artwork and marketing strategies are necessary. Seek professional help if needed.


How Many Songs Can Be On A Full Length Album?


A full-length album typically contains 10 to 15 songs, with an average length of three to five minutes per song. The total running time of a typical album is between 30-60 minutes, although some artists might release longer albums.


Why Is It So Hard To Make An Album?


Album making is a complex process that requires creativity and technical skills in music production. It involves recording, mixing, mastering, and packaging of tracks that meet the expectations of both the artist and the audience. The process is time-consuming and demands attention to detail, hence the difficulty in making an album.


Conclusion


Producing a full-length album can be a daunting task, but it doesn’t have to be. By following the steps outlined in this blog post, you can create a plan that works for you and your team. Remember to stay organized, take breaks when needed, and don’t be afraid to ask for help.


With dedication and hard work, you can produce a high-quality album that you can be proud of. Good luck on your musical journey!

Categories
Archive

How Much To Build A Cheap Home Music Studio Best Quality

As an Amazon Associate I earn from qualifying purchases.

A cheap home music studio of best quality costs around $1000-$3000. Building a successful music career requires a lot of effort, time, and resources.


However, building a home music studio can be a great start and cost-effective. The cost of building a cheap home music studio with the best quality is around $1000-$3000. This setup includes a computer, software, audio interface, microphone, headphones, and monitors.


You can also add other equipment such as MIDI controllers, synthesizers, and outboard gear for a more advanced recording setup. We will discuss the cost breakdown of building a cheap home music studio, the required equipment, and essential tips to make the best of your equipment. By the end of this article, you’ll have a clear idea of what it takes to build a decent home music studio without breaking the bank.


The Importance Of Building A Home Music Studio

The Importance of Building a Home Music Studio

A home music studio is an excellent way to create high-quality music while enjoying the comfort of a personal space that is consumer-friendly. Professional music studios can be expensive, where every minute counts; a home music studio is more relaxed where the clock and unwelcoming recordings are a thing of the past. Hence by opting to build a home music studio, artists or music enthusiasts can take advantage of personalized recording sessions, allowing them to achieve their maximum potential creativity.

In addition to providing the comfort of a personal space, a home music studio is an excellent way to save money on studio time. Renting a professional studio can be expensive, especially for new artists. Investing in personal music equipment and a suitable space can be a cost-effective way to save on studio time. This way, more money can be invested in producing high-quality music with fewer budget constraints. Moreover, owning equipment enables the artist to innovate more music at their convenience.

A home music studio provides a space for artists to explore their musical abilities without worrying about time and budget constraints. When building a home music studio, remember to invest in the necessary equipment and a suitable space to achieve optimal sound quality.

Factors That Determine Cost


The cost of building a cheap home music studio largely depends on various factors such as the quality of the equipment, size of the room, soundproofing, and acoustic-treated panels. Proper research on the essentials that fit your budget and prioritizing them can help in building a music studio with the best quality without breaking the bank.

Factors That Determine Cost Building a cheap yet quality home music studio involves several factors that determine its overall cost. These considerations include the size and shape of the room, acoustic treatments, and audio equipment. Understanding these factors is crucial in determining the budget needed to build a home music studio that meets your needs without breaking the bank. Room Size and Shape The size and shape of the room where you plan to build your home music studio can significantly impact the overall cost of the project. Ideally, the room should be big enough to accommodate your equipment and provide ample space for your sound recordings. A bigger room means a higher cost since it would require more materials for construction. The shape of the room also plays a crucial role since certain room shapes may cause audio issues that affect the quality of recordings. For example, a square room would cause standing waves that would affect the sound quality, while a rectangular room might offer better acoustics. Acoustic Treatments Acoustic treatments are necessary for ensuring that the sound quality in your home music studio is top-notch. These treatments involve the use of acoustic panels, bass traps, and diffusers on walls and ceilings. The number and quality of acoustic treatments needed will depend on the size and shape of the room. Acoustic treatments can significantly impact the cost of building your home music studio. The more treatments your room requires, the more expensive it will be. However, it is crucial not to compromise on acoustic treatments since they are essential in creating a conducive environment for music recording. Audio Equipment The cost of building a home music studio is also heavily dependent on the audio equipment you choose to use. Audio equipment includes microphones, mixers, computers, and speakers. High-quality audio equipment can be costly, but it is necessary to ensure the production of top-quality sound recordings. There are several options available in the market, ranging from budget-friendly to top-of-the-line equipment. While it may be tempting to go for the cheaper options, compromising on equipment quality may result in inferior sound recordings. In conclusion, factors such as room size and shape, acoustic treatments, and audio equipment significantly impact the cost of building a home music studio. It is essential to consider all these factors when determining the budget for your home music studio project. Remember that while it is possible to build a cheap home music studio, compromising on quality in any of these three factors may result in inferior sound recordings.

Creating A Budget For Your Home Music Studio


Building a cheap home music studio with the best quality requires creating a budget. Determine your priorities and invest in essential equipment such as a computer, audio interface, and studio monitors, while cutting costs on non-essential items.

Creating a Budget for Your Home Music Studio Building a music studio at home may seem like an expensive proposition, but it doesn’t have to be. With the right approach and a little research, you can create a cheap home music studio without sacrificing quality. The key to success lies in creating a budget and sticking to it. In this article, we’ll explore three key aspects you need to consider when establishing a budget for your home music studio: evaluating your space, selecting the appropriate audio equipment, and determining the cost of acoustic treatments. Evaluate your space The first step in creating a music studio at home is to evaluate your space. Consider the size of the room, the shape, and whether there are any structural issues that may affect the audio quality. You want to choose a quiet space and one that’s away from any outside noise disturbances. Additionally, the room should have adequate ventilation and heating, especially if you plan to spend long hours in the space. Choose the right audio equipment The right audio equipment is the foundation of your studio. As tempting as it may be to skimp on cost at this stage, it pays to invest in quality audio equipment. Look for items such as a computer or laptop, an audio interface, microphones, headphones, and studio monitors. While it’s essential to invest in quality audio equipment, it’s just as crucial to ensure that your audio equipment matches your requirements. You do not want to buy something that’s too basic or too sophisticated for your needs, leading to overspending or under-serving. Determine the cost of acoustic treatments Acoustic treatments refer to the strategies used to minimize or prevent reflected sound waves in your music studio. Poor acoustics could lead to sound distortion and interference. Some of the key acoustic treatment methods include bass traps, acoustic panels, and diffusers. To determine the cost of each treatment method, conduct research, and compare prices across multiple suppliers. In conclusion, building a budget-friendly home music studio that produces quality sound requires careful consideration and research. By evaluating your space, choosing the right audio equipment, and determining the cost of acoustic treatments, you can create a home studio that’s perfect for your needs. Remember, the success of your home music studio does not lie in how much you spend but rather in how well you plan and manage your resources.


Cost Breakdown Of A Cheap Home Music Studio

Building a home music studio can be an exciting and rewarding experience for musicians and audio enthusiasts alike. However, the costs can quickly add up if you’re not careful. In this article, we’ll break down the cost of a cheap home music studio into three main categories: basic equipment cost, acoustic treatments cost, and furniture cost.

Basic Equipment Cost

When building a home music studio, the most obvious expense is equipment. Here are the basic equipment that you need to purchase and their expected costs.

Equipment Expected Cost (USD)
Computer $500-$1,500
Audio Interface $100-$500
Microphone $100-$300
Headphones $50-$300
Studio Monitors $100-$500
DAW Software $0-$500 (depending on the software)

Acoustic Treatments Cost

Acoustic treatments are essential for creating a good-sounding recording environment. Here are some typical acoustic treatments you’ll need and their approximate cost.

  • Bass Traps – $30-$100
  • Acoustic Panels – $50-$200
  • Diffusers – $100-$300
  • Foam Wedges – $20-$50

Furniture Cost

Finally, you’ll need some good-quality furniture to make your home studio feel like a professional environment. Here are some typical furniture items that you’ll need and their cost.

  • Desk – $100-$500
  • Chairs – $50-$300
  • Rack or shelving unit – $50-$200
  • Cables and Accessories – $50-$200

Keep in mind that these are just typical costs, and you may find lower or higher prices depending on your specific needs and the brands you choose. With this cost breakdown in mind, you can create the perfect home music studio for your needs, without breaking the bank.

Selecting The Right Audio Equipment


Building a home music studio with high-quality audio equipment doesn’t have to cost a fortune. You can start with a cheaper option and gradually upgrade over time to create the perfect setup. Researching and selecting the right equipment will ensure that you get the best sound quality for your budget.

Selecting the Right Audio Equipment When building a home music studio, selecting the right audio equipment is crucial for achieving the best quality sound. In this guide, we’ll discuss the cost-effective equipment you’ll need for your space. Below are the essential pieces of equipment you’ll need to build an affordable, but quality, home music studio.

Studio Monitors

Flat response studio monitors are the most critical component of a home recording studio. They ensure that the sounds that you mix will sound the same outside your recording environment. Most budget-friendly studio monitors come in a pair set. The Behringer Studio50USB is a popular choice for beginners with a tight budget, while the JBL LSR305 offers more advanced features at a slightly higher price point.

Audio Interface

An audio interface connects your studio monitors to your computer, enabling you to record audio and MIDI signals. When selecting an audio interface, your budget should largely determine your choice. The Focusrite Scarlett 2i2 is a popular and affordable option for novices, while the RME Babyface Pro appeals to experienced producers willing to spend more.

Microphones

Purchasing the right microphone is essential when building a home recording studio. Large diaphragm condenser microphones are recommended for most studio vocal recordings. For a budget-friendly option, you can’t go wrong with the Audio-Technica AT2020, which is popular among home studio owners. If you’re looking for a professional-grade microphone, the Neumann TLM 103 is an ideal choice. In summary, when building a cheap home music studio, it’s crucial to select the right tools for capturing and mixing sound. Studio monitors, audio interfaces, and microphones are the most essential pieces of equipment that you’ll need to ensure the best quality sound in your home studio.

The Importance Of Acoustic Treatment

If you are thinking of building a home music studio, then the most important thing to consider is the acoustic treatment. Acoustic treatment means controlling the sound within a space so that the sound does not reflect off the walls, floor or ceiling. In other words, acoustic treatment is what makes your music sound great.

What Is Acoustic Treatment?

Acoustic treatment is the practice of improving the acoustic properties of a room to make it suitable for recording or listening to music. It involves the use of various techniques such as absorption, diffusion, and reflection to control the sound in a specific space.

Types Of Acoustic Treatment

There are different types of acoustic treatment that you can use in your home music studio. The most common types are:

Type Description
Absorption Panels These panels are designed to absorb sound energy and reduce the reflections in a room.
Diffusion Panels These panels scatter the sound waves in different directions, creating a more natural sound.
Bass Traps These are special panels designed to absorb low-frequency sound waves.

Diy Acoustic Treatment

You can also do acoustic treatment on your own without spending a lot of money. Some of the best DIY acoustic treatments include:

  • Using bookshelves or furniture to break up sound reflections
  • Using thick curtains or blankets to absorb sound
  • Creating your own acoustic panels using foam and wood

In conclusion, to build a cheap home music studio with the best quality, it is essential to consider acoustic treatment. Acoustic treatment will not only make your music sound great, but it will also help you create an environment that is conducive to professional-quality recordings.

Design And Layout Of Your Home Music Studio


Building a cheap home music studio with the best quality involves paying attention to the design and layout of the space. It’s important to consider factors like soundproofing, equipment placement, lighting, and acoustics to create a functional and inspiring workspace for your music production.

Maximizing Space

Creating a music studio at home can feel like a daunting task, but it’s easier than you might think. Before anything else, consider the amount of space you have and how to make the most of it. Begin by decluttering and removing anything that doesn’t belong in your studio. We recommend installing shelves or desks to keep things organized, so you have more floor space to work on your music.

Optimizing Acoustic Treatments

The acoustic treatment in your studio is essential to the quality of sound. Without proper treatment, your music might sound wrong, and it could negatively affect your experience. Acoustic panels are your best option for soundproofing. You can purchase them or create them at home with materials such as insulation and fabric. Hang panels on the walls and ceilings to reduce the echoes and reverberations in the room.

Ergonomic Layout For Your Workspace

The ergonomics of your studio are a crucial aspect as you will be spending a lot of time working there. You must organize your equipment in a way that allows for maximum productivity. Use adjustable tables and chairs that will keep you comfortable and prevent back and neck pain. Arrange your equipment to suit your style of working, ensuring that everything is within arm’s reach. Remember, design and layout of your home studio is critical in music production and can positively affect the outcome of your work. Maximizing your space, optimizing acoustics, and arranging your workspace ergonomically will result in your music sounding its best and you being productive for extended periods without any health issues.

How Much To Build A Cheap Home Music Studio Best Quality


Credit: www.primacoustic.com


Tips For Building A Quality Home Music Studio On A Budget


Creating a home music studio doesn’t have to break the bank! With some smart budgeting, you can build a high-quality music studio for less. Check out these tips for building a quality home music studio on a budget.

Building a home music studio on a budget can be a daunting task, but it is possible. With the right mindset, careful planning, and some tips and tricks, you can create a high-quality music studio without breaking the bank. Here are some essential tips to help you build a quality home music studio on a budget.

Prioritizing Equipment Purchases

When building a home music studio on a budget, it is essential to prioritize equipment purchases. Figure out the essentials you need first before investing in the extra gear. For instance, a good quality microphone should be your priority. A microphone is the heart of a studio. Without it, it is impossible to record high-quality sound. You can start by buying a more affordable microphone and upgrade later when you have more money.

Consider Used Equipment

Another option to consider when building a home music studio on a budget is used equipment. Used equipment can be a great way to save money while still getting quality gear. Make sure to do your research and buy from reputable sellers. It is also essential to inspect the gear before purchasing it to ensure it is functioning correctly.

Diy Acoustic Treatment And Furniture

Acoustic treatment and furniture can be expensive when building a home music studio. A great way to save money is by making your own acoustic treatment and furniture. Building your own acoustic panels, for example, is relatively easy and much cheaper than buying pre-made ones. You can also repurpose items, such as bookshelves or storage bins, as furniture to save money. In conclusion, building a quality home music studio on a budget requires careful planning and smart purchasing decisions. Prioritize essential equipment, consider used gear, and make your own acoustic treatment and furniture to save money. With these tips, you can create a professional-sounding studio at an affordable cost.

How Much To Build A Cheap Home Music Studio Best Quality


Credit: audient.com


Frequently Asked Questions On How Much To Build A Cheap Home Music Studio Best Quality


How Much Does It Cost To Build A Music Studio At Home?


The cost of building a music studio at home can range from $5,000 to $100,000, depending on the equipment and soundproofing needed. A DIY approach may be more cost-effective, but professional installation may improve sound quality.


What Is A Good Size For A Home Music Studio?


A good size for a home music studio depends on your needs and available space. It can range from a small corner to a dedicated room. The space should be able to accommodate your equipment, instruments, and offer soundproofing if required.


Consider your budget and purpose in designing the space.


How Much Does A Small Home Studio Cost?


The cost of a small home studio can vary widely depending on the equipment needed, but it typically ranges from $500 to $5,000. Factors that impact price include the quality of the microphone, the type of computer or laptop, and the software used for recording and editing.


How To Build A Cheap Sound Studio?


To build a cheap sound studio, use affordable soundproofing materials such as blankets, foam panels, and thick curtains to reduce noise. Purchase second-hand audio equipment, or rent it when necessary. Optimize the space for acoustics by using furniture and bookcases to dampen sound.


Use software such as Audacity to edit recordings instead of expensive professional software. Lastly, research tutorials and tips on creating a home studio for more ideas.


Conclusion


To sum it up, building a cheap home music studio with the best quality requires careful planning and budgeting. You need to consider your music needs, equipment, software, and acoustic treatment for your studio. It’s possible to build a decent home music studio with affordable equipment, such as a simple audio interface, microphone, headphones and a DAW.


However, investing in quality gear can greatly improve your recordings. Remember to shop around for deals and read reviews before making your purchases. With these tips in mind, you can build a home music studio that meets your needs with quality sound.


Categories
Archive

Writing Chord Progressions In Ableton Lives Piano Roll

When writing chord progressions in Ableton Live’s Piano Roll, users can simply click and drag to create chords and adjust the length of the notes. From there, they can experiment with different root notes and add variations for interest and tension.


Additionally, users can also use the “scale” feature to limit which notes are available in the chord progressions. Overall, Ableton Live’s Piano Roll provides an easy-to-use, creative tool for composers to explore and experiment with chord progressions.


Why Ableton Live’s Piano Roll Is Perfect For Writing Chord Progressions

As a songwriter or music producer, one of the key elements of creating a catchy and engaging tune is the chord progression. Ableton Live’s Piano Roll is the ideal tool to help you easily create and experiment with chord progressions for your music.

Intuitive Layout

The Piano Roll in Ableton Live features an intuitive layout that allows you to create chord progressions with ease. With the grid-based system, you can easily place and move notes with accuracy. You can also adjust the velocity, length and timing of each note quickly and easily, ensuring your chords are perfectly in time and sounding as they should.

Visual Representation Of Notes And Chords

The Piano Roll in Ableton Live offers a visual representation of notes and chords for an intuitive approach to songwriting. This makes it easier for songwriters to see which notes are being played and how they fit into the chords being constructed. The layout is clean, making it easy to spot chord changes, making it perfect even for those with limited music theory knowledge.

Easy Playback And Editing

Ableton Live’s Piano Roll allows you to playback your chord progressions and experiment with different notes and chords, giving you more creative freedom and the ability to hear how things are coming together. You can also change chords on the fly, or shift notes up and down to create new melodies, all while maintaining the original structure of the chord progression.

Editing is also a breeze with Ableton Live’s Piano Roll. You can easily copy and paste notes or sections of your chord progression, making it easier to create a consistent structure throughout your song. You can also quantize your notes to ensure they are perfectly in time, providing a polished sound to your music.

In conclusion, Ableton Live’s Piano Roll is the perfect tool for songwriters and producers looking to experiment with different chord progressions. With its intuitive layout, visual representation of notes and chords, and easy playback and editing, creators can easily bring their musical ideas to life.

Writing Chord Progressions In Ableton Lives Piano Roll


Credit: m.youtube.com


Understanding Chord Progression Basics

If you have ever heard a song that made you tap your feet or hum along, then you have experienced the power of chords. Chord progressions are a series of chords played in a specific order that provide the musical backbone of a song. Understanding the basics of chord progressions can help you compose catchy and memorable music tracks. In this article, we will explore the foundation of chord progressions and how to use them to create great music.

What Is A Chord Progression?

A chord progression is a series of chords played in sequence that create a musical pattern. These chords are typically arranged in a way that gives a song its unique sound and feel. In Ableton Live’s Piano Roll, chord progressions can be created by adding notes to a MIDI clip. To get started, you need to understand the most common chord progressions and the sounds they produce.

Common Chord Progressions And Their Sounds

There are many chord progressions to choose from, but some are used more often than others. The most common chord progressions include the I-IV-V, ii-V-I, and iii-vi-ii-V-I progressions. Each of these progressions produces a distinctive sound and feel. For example, the I-IV-V progression sounds bright and uplifting, used in many pop songs, while the ii-V-I progression sounds more relaxed and jazzy.

Chord Progression Genre Example Song
I-IV-V Pop, Rock, Blues Johnny B. Goode – Chuck Berry
ii-V-I Jazz, Blues Autumn Leaves – Joseph Kosma
iii-vi-ii-V-I Pop, Funk Still Dre – Dr. Dre ft. Snoop Dogg

How To Use Tension And Release In Chord Progressions

Chord progressions are not just a series of chords played in sequence; they can be designed to create tension and release. Tension happens when a chord progression creates an unresolved feeling, while release resolves the tension and creates a sense of completion. To create tension, you can add a chord that sounds dissonant, or add a pause in the progression. To release tension, you can return to a familiar chord, or add a chord that sounds consonant. Using these techniques in your chord progressions can help to make them more interesting and surprising.

  • Use dissonant chords to create tension.
  • Use a pause in the progression to create tension.
  • Use consonant chords to release tension.
  • Returning to a familiar chord can also release tension.

Understanding the basics of chord progressions is essential for creating memorable and catchy music. By using common progressions, adding tension and release, and experimenting with different sounds, you can create unique and captivating music tracks. With Ableton Live’s Piano Roll, you have all the tools you need to get started on your music journey.

Step-by-step Guide To Writing Chord Progressions In Ableton Live’s Piano Roll

If you’re a music producer or songwriter, coming up with a fresh chord progression is the first step towards creating a great track. Ableton Live’s Piano Roll is a powerful tool that enables you to play and record MIDI notes and create musical ideas. In this guide, you’ll learn how to write chord progressions in Ableton Live’s Piano Roll through a simple and effective step-by-step process.

The first step is to set up your MIDI track in Ableton Live. To do this, click on “Create” and select “Insert MIDI Track.” Once you’ve created your MIDI track, you can choose your instrument and adjust its settings if necessary.

Before writing your chord progression, you need to choose your key and scale. You can set your key by clicking on the “Fold” button at the bottom of the Piano Roll and selecting the key that you want to work in. Then, choose your scale by selecting the scale from the drop-down menu.

Now that you’ve chosen your key and scale, it’s time to choose your first chord. The first chord is the most important chord in your progression since it sets the tonal center. You can choose your first chord by selecting a root note and then selecting a chord from the Piano Roll’s chord library. Alternatively, you can use your musical knowledge to create your chord from scratch.

With your first chord selected, you can now start building your chord progression. To do this, choose the intervals that you want to use to create your next chord. You can use common chord progressions such as the I-IV-V or try something new and innovative. Keep in mind that the chord progression should sound interesting and complement your melody.

Repeat the same process to create your third, fourth, and final chords. Once you’ve created your chord progression and are happy with the results, you can start experimenting with different melodies and rhythms to bring your track to life.

In conclusion, writing chord progressions in Ableton Live’s Piano Roll is an essential skill for any producer or songwriter. By following this step-by-step guide, you can create chord progressions that sound unique, interesting and complement your melody. So, grab your instrument and start creating your next musical masterpiece!

Adding Depth And Interest To Your Chord Progressions

Adding depth and interest to chord progressions is essential in making music that connects with the listener. If you’re using Ableton Live, then you have all the tools you need to make the most out of your chord progressions. In this post, we’ll explore how you can incorporate additional chords, use inversions and arpeggiators, and add melodic interest to take your chord progressions to the next level.

Incorporating Additional Chords

Adding additional chords to your chord progressions is a great way to add depth and interest. Though it’s important to remember that not every chord will work in every progression. When using additional chords, make sure they are in the same key as your current progression to avoid clashing. Additionally, you can experiment by extending or cutting your chords to create a more dynamic and musical phrase.

Using Inversions And Arpeggiators

Inversions and arpeggiators are great for creating interesting rhythm and texture in your chord progressions. Inversions are essentially rearranging the order of the notes in a chord to create a different pattern. This not only adds a fresh sound to your chords but also creates new harmonic possibilities. Arpeggiators, on the other hand, are a great way to create an interesting rhythmic pulse and can help you add momentum and energy to your chord progressions.

Adding Melodic Interest

To add melodic interest in your chord progressions, try adding melodies that emphasize certain notes of your chords. For example, you can add a melody that emphasizes the third or seventh note of a chord. You can also try incorporating passing notes to create a smoother and more interesting chord progression.

In conclusion, by using these techniques, you can add depth and interest to your chord progressions in Ableton Live’s Piano Roll. By incorporating additional chords, using inversions and arpeggiators, and adding melodic interest, you can take your chord progressions to the next level and create music that is both engaging and dynamic.

Advanced Techniques For Creating Unique Chord Progressions

Writing chord progressions is an essential part of any musician or songwriter’s work. You need to have a solid foundation to make a great song. But, when you are done with the basics, how do you make your music stand out? What advanced techniques can you use to create unique chord progressions that will capture your audience’s attention?

Modal Interchange

Modal Interchange is also known as Modal Mixture or Borrowed Chords. Melodies and harmonies can be written using modes instead of traditional scales. These modes can be used interchangeably to create a unique sound. For example, you can use the relative minor scale of the major key to introduce a new chord or progression. This would be a harmonic minor scale. By using these borrowed chords, you will achieve a unique sound compared to traditional chord progressions.

Secondary Dominants

Secondary Dominants add excitement to your music by using a non-diatonic chord and making it the dominant function of another chord. For example, if you are in the key of C, you can use the chord progression of G7 – C. With secondary dominants, you can add more tension and excitement to chords that lead to the final chord. This is a great technique to make your song more memorable.

Chromatic Chord Progressions

Chromatic Chord Progressions are another advanced technique that can help you create unique chord progressions. You can add a chromatic chord, which is a note outside of the key you’re in, to make a chord progression more interesting. For example, you can change a triad to a seventh chord by adding the major seventh of the key which leads to a more resolving ending. Chromaticism is a great way to add diversity to your music and make it more interesting.

By using these advanced techniques, you can create unique chord progressions that will make your music stand out. Try them out in Ableton Live’s Piano Roll and see what kind of sounds you can create.

Writing Chord Progressions In Ableton Lives Piano Roll


Credit: www.aulart.com


Using Ableton Live’s Midi Effects To Enhance Your Chord Progressions


Enhance your chord progressions in Ableton Live’s piano roll by utilizing its MIDI effects. These effects can add complexity and depth to your music, making it easier to create unique melodies and harmonies that stand out from the crowd.

Writing chord progressions in Ableton Live’s Piano Roll is a simple but specific task that can take your music production to the next level. However, using Ableton Live’s MIDI effects enhances your chord progressions by adding an extra layer of creativity and complexity to your music. In this blog post, we’re going to discuss some MIDI effects that you can use to give your chord progressions more depth and variety.

Chord

The Chord MIDI effect is one of the most popular MIDI effects in Ableton Live’s library. It allows you to play chords with a single note, making it easy to come up with complex and interesting chord progressions quickly. With the Chord effect, you can create a chord sequence by playing only one note on your MIDI controller. You can also select the type of chord you want to play, such as major, minor or diminished. With the Chord effect, you have the ability to add more harmonic interest and variety to your music.

Scale

The Scale MIDI effect is another powerful tool available in Ableton Live. The Scale effect ensures that all the notes you play on your MIDI controller stay within a specific scale. This means you can experiment with more exotic scales and modes without having to worry about playing the wrong notes. The Scale effect can help you create unique melodies and chord progressions that would be challenging to achieve otherwise. With the Scale effect, you can create harmonic interest in your tracks without worrying about playing out of key.

Arpeggiator

The Arpeggiator MIDI effect is an effective way to create rhythmic interest in your chord progressions. This effect takes the notes you’ve played and turns them into an arpeggio or broken chord pattern. With the Arpeggiator, you can experiment with different rhythmic patterns and sequences until you find the perfect one that fits your track. The Arpeggiator also has controls for the velocity and note length which allows you to create more intricate and dynamic patterns.

Random

The Random MIDI effect is an excellent way to add unpredictability and flair to your music. The Random effect selects random notes from a predefined range to create unique, unpredictable patterns. With the Random effect, you can add interest and variation to your tracks without having to painstakingly program every note. The Random effect is also excellent for generating new ideas and breaking creative ruts. In conclusion, using Ableton Live’s MIDI effects is an effective way to enhance your chord progressions and bring new dimensions to your music. With the Chord, Scale, Arpeggiator and Random effects, you have a wide range of tools to create dynamic and interesting music. Incorporating these effects into your production workflow can help you produce higher-quality tracks in less time.

Tips And Tricks For Polishing Your Chord Progressions


Discover some valuable tips and tricks for enhancing your chord progressions when writing music in Ableton Live’s Piano Roll. With careful attention to details like proper voice leading, and utilizing tension and release techniques, your chord progressions can become more polished and professional sounding.

Writing chord progressions in Ableton Live’s Piano Roll can be a daunting task, but with some useful tips and tricks, you’ll be able to create a polished sound that will elevate your music. In this post, we’ll discuss how to fine-tune velocity and timing to add expression with modulation, and how editing and quantizing can help you refine your chord progressions to create a polished sound.

Fine-tuning Velocity And Timing

Velocity and timing are crucial elements to consider when creating chord progressions. By adjusting the velocity, you can create accents on specific notes and add depth to your chord progressions. Similarly, timing can help you create tension or release in your progressions. In Ableton’s Piano Roll, you can use the “velocity” and “nudge” functions to fine-tune the velocity and timing of each note.

Adding Expression With Modulation

Modulation is an excellent way to add expression to your chord progressions. Ableton Live’s “MIDI Effect” devices, such as “Auto Filter” and “Arpeggiator,” can help you introduce modulation to your chord progressions. By adding these effects to your chord progressions, you can create subtle variations in the texture and rhythm, making your music more engaging for listeners.

Editing And Quantizing For A Polished Sound

Editing and quantizing are the final stages of polishing your chord progressions. These processes can help you refine your chord progressions, making them sound more polished and professional. Ableton Live’s Piano Roll offers a range of editing and quantizing options, including “Quantize,” “Legato,” and “Time Warp,” which can help you align notes with the beat, adjust note length and create seamlessly flowing chord progressions. In conclusion, crafting polished chord progressions requires a combination of technical proficiency and creativity. By fine-tuning velocity and timing, adding expression with modulation, and editing and quantizing, your chord progressions will sound polished and professional, creating a memorable listening experience for your audience.

Writing Chord Progressions In Ableton Lives Piano Roll


Credit: www.aulart.com


Taking Your Chord Progressions To The Next Level With Sound Design And Arrangement


Discover how to elevate your chord progressions in Ableton Live’s piano roll by incorporating sound design and arrangement techniques for a truly unique sound. This blog post provides tips and tricks to take your music to the next level.

Creating chord progressions in Ableton Live’s Piano Roll is easy. However, taking those basic progressions and elevating them to the next level with sound design and arrangement is what sets a great track apart from a mediocre one. In this article, we’ll share some tips on how to do just that.

Layering Sounds For Depth

Layering sounds is an effective way to add depth and richness to your chord progressions. By combining multiple sounds, you can create a unique and complex texture that will capture the listener’s attention. One way to layer sounds is to use multiple instruments to play the same chords. For example, you can use a piano, a bass guitar, and a string section to play the same chord progression. Another option is to use effects such as reverb and delay to create a sense of space and depth. Experiment with different combinations and see what works best for your track.

Creating Movement Through Automation

Automation is a powerful tool that allows you to create movement and variation in your chord progressions. By automating effects, such as filters, you can create a sense of tension and release. For example, you can use a low-pass filter to gradually cut out the high frequencies as the chords progress, and then open it up again for the next section. This creates a sense of anticipation that keeps the listener engaged. Experimenting with automation is a great way to add dynamics to your track.

Structuring Your Chord Progressions In A Song

Structuring your chord progressions in a song is crucial to creating a cohesive track. Start with a basic chord progression for your verse, chorus, and bridge sections. Then, introduce variations to each section to keep it interesting. For example, you can add a different chord or change the rhythm in the second chorus. This will keep the listener engaged and create a sense of progression throughout the track. Remember to use your layering and automation techniques to add depth and movement to each section. In conclusion, creating chord progressions in Ableton Live is just the beginning. Taking those progressions to the next level with sound design and arrangement is where the magic happens. By layering sounds, automating effects, and structuring your progressions in a song, you can create a track that captures the listener’s attention and keeps them engaged.

Frequently Asked Questions Of Writing Chord Progressions In Ableton Lives Piano Roll


How Do You Write Chord Progressions In Ableton?


To write chord progressions in Ableton, simply choose a key to work in and use the MIDI effects available in the software to create different chord progressions. Experiment with different combinations of chords and use your knowledge of music theory to create interesting and unique progressions that sound good to your ear.


With practice, you can create captivating chord progressions for your tracks in no time!


How Do You Use The Piano Roll In Ableton?


To use the piano roll in Ableton, open a MIDI clip containing notes and double-click on the clip to open the piano roll. Click and drag to create or edit notes, adjust their length by dragging their edges, and move them up or down to adjust pitch.


Use the tools at the top for further editing options.


How Do You Scale A Piano Roll In Ableton?


To scale a piano roll in Ableton, click and drag the bottom right corner of the piano roll to increase or decrease the size. Alternatively, use the zoom in and out buttons located above the piano roll.


How Do I Make My Own Chord Progression?


To create your own chord progression, start by choosing a key and familiarizing yourself with the basic chords in that key. From there, experiment with different sequences and progressions until you find something that sounds good to you. You can also use existing songs as inspiration and modify their progressions to fit your own style.


Conclusion


To sum up, creating chord progressions in Ableton Live’s Piano Roll can be an exciting and creative process. By following the steps outlined in this blog post, you can easily experiment with different chord combinations and create unique melodies that will bring your music to life.


Whether you’re a beginner or an experienced music producer, using Ableton Live’s Piano Roll to create chord progressions can take your compositions to the next level. Remember to keep practicing and pushing yourself creatively, and you’ll be amazed at the results you can achieve.


Categories
Archive

Simple Habits That Will Make You A Real Music Producer

To make it as a music producer, develop a consistent routine and stick to it. Focus on honing your skills, networking, and staying up-to-date with industry trends.


Music production is a highly competitive field that demands discipline, creativity, and dedication. If you want to succeed, you need to establish a daily routine that prioritizes your craft. Start by practicing consistently, using online tutorials and courses to improve your skills.


Attend networking events and connect with other producers to learn about new opportunities and build your reputation. Finally, stay current with industry trends by reading industry publications, following industry leaders on social media, and attending conferences and other events. By following these simple habits, you can increase your chances of becoming a successful and respected music producer.


Set Goals


Setting goals is a simple habit that can transform you into a real music producer. By setting achievable targets, you can ensure progress and stay motivated, ultimately improving your skills and creating better music.

Create A Vision For Your Music Production Career

As with any profession, having a vision for your music production career is essential. Visualize where you want to be in 5 or 10 years and what kind of music producer you want to become. This will give you purpose and direction in your career, and help you make informed decisions along the way. Being clear about your vision also helps you to stay motivated and focused on your goals.

Set Smart Goals To Achieve Your Vision

Setting SMART goals is a proven method of achieving your desired outcomes. SMART goals are Specific, Measurable, Achievable, Relevant, and Time-bound. When setting your goals, make sure they are specific, so you know what you want to achieve. Your goals should also be measurable, so you can track your progress along the way. Make sure your goals are achievable and relevant to your overall vision for your career. Finally, set a deadline for achieving your goals. This will help to keep you motivated and focused on your progress.

Examples of setting SMART goals to achieve your vision:

Goal SMART Criteria
Learn a new production technique Specific: Learn how to use compression effectively. Measurable: Watch and practice using compression on ten different tracks. Achievable: Take an online course to learn more about compression. Relevant: Compression is an important technique used in music production. Time-bound: Learn and practice using compression over the next month.
Release an EP on a record label Specific: Release a six-track EP on a record label. Measurable: Finish producing six tracks for the EP by the end of next month. Achievable: Submit the EP to five different record labels. Relevant: Releasing music on a record label is important in the music industry. Time-bound: Submit the EP to record labels within the next three months.
Perform at a music festival Specific: Get booked to perform at a music festival. Measurable: Contact ten different music festivals with an EPK and video showcasing your music. Achievable: Network with industry professionals to get your name out there. Relevant: Performing at music festivals can increase your visibility. Time-bound: Get booked for a festival by the end of the year.

In conclusion, setting goals and having a vision for your music production career is critical to your success. Use the SMART criteria to ensure your goals are specific, measurable, achievable, relevant, and time-bound. By incorporating these habits into your daily routine, you will be one step closer to becoming a real music producer.


Practice Consistently

If you want to become a successful music producer, you must know that it takes more than just technical knowledge or creativity. One of the most important factors that will determine your success is how much time and effort you put into practice.

Make A Schedule And Stick To It

To make sure you practice consistently, it’s a great idea to create a schedule. You can use a planner or a digital calendar to allocate specific hours to practice every day. It’s important to be realistic and make sure you have enough time to focus on your music. Stick to the schedule and treat your practice sessions like any other important appointment.

Devote A Specific Time To Practice Every Day

It’s important to create a routine and practice at the same time every day. Choose the time when you feel most creative and energized. For some people, it’s early in the morning while others find that practicing late at night works best for them. Whatever your preference, make sure to devote specific hours every day to practice your music. Consistency is key.

Take Breaks And Avoid Burnout

Although it’s important to practice consistently, you also need to balance it with rest and relaxation. Taking breaks is crucial to avoid burnout and keep your creativity flowing. Take a short walk, have a healthy snack, or do something that helps you relax. It’s also good to take time off from your music from time to time to gain perspective and avoid getting stuck in a creative rut.

By applying these simple habits to your music production routine, you’ll be able to stay disciplined, focused, and on track to becoming a real music producer.

Collaborate With Other Musicians

Collaborating with other musicians is an excellent way to develop your skills and grow your network. Music production can be a solitary task, but working with other musicians will provide you with fresh perspectives and new ideas that can take your music to new heights.

Build Relationships With Other Musicians

Building relationships with other musicians is key to successful collaborations. Attend gigs, join local music clubs, and participate in online forums to connect with other musicians. Networking is an important part of any industry, and the music industry is no different. Get to know musicians and build meaningful connections that can lead to future collaborations.

Work With Musicians Who Have Complementary Skills

When collaborating with other musicians, it’s essential to work with those who have complementary skills. Look for musicians who have skills that you lack, such as writing lyrics or creating melodies. Combining your talents with their skills can produce some fantastic results.

Be Open To Feedback And Constructive Criticism

When collaborating with other musicians, be open to feedback and constructive criticism. The purpose of collaboration is to learn and grow, and listening to others’ opinions is a significant part of that process. Be receptive to new ideas and approaches, and be willing to compromise. Being open-minded will result in a better final product.

Collaborating with other musicians is an essential habit for any budding music producer. By building relationships, working with complementary skills, and being receptive to feedback, you can create music that’s unique, fresh, and stands out

Learn From Others


Learn simple habits from experienced music producers to improve your skills and produce quality music. Take notes and study the techniques they use to help accelerate your growth as a producer.

If you are looking to become a successful music producer, it is essential to learn from others who have already made their mark in the industry. With the internet offering a plethora of resources, it has never been easier to access valuable information.

Attend Workshops And Seminars

Attending workshops and seminars is one of the most effective ways to learn about music production. These events provide an opportunity to interact with experts in the field, gain new perspectives, and learn about the latest production techniques. You can also network with other producers and build relationships that could be beneficial for your career in the future. Here are some workshops and seminars that you can attend to improve your music production skills:

Name Description Location
ASCAP Expo Annual conference for songwriters, composers, and music producers. Los Angeles, California
Winter Music Conference Conference for electronic dance music industry professionals. Miami, Florida

Take Online Courses

Online courses are a convenient way to learn about music production in the comfort of your own home. Many online courses offer a structured curriculum and provide you with the opportunity to connect with instructors and other students. There are various online courses available for music production at different levels, from beginner to advanced. Here are some popular online courses:

  • Berklee Online
  • PureMix
  • Udemy Music Production

Watch Tutorials On Youtube

YouTube is an excellent resource for learning about music production. You can find tutorials on different music production topics, from creating beats to mixing and mastering your tracks. Many producers post free tutorials on YouTube, and you can learn a lot from their experiences. Some popular YouTube channels for music production tutorials are:

  1. Busy Works Beats
  2. Point Blank Music School
  3. In The Mix

Read Books About Music Production

Reading books about music production can give you in-depth knowledge about the various aspects of the music industry. You can learn about music theory, composition, arranging, mixing, and mastering. Here are some books that you can add to your reading list:

  • The Mixing Engineer’s Handbook by Bobby Owsinski
  • The Music Producer’s Handbook by Bobby Owsinski
  • Modern Recording Techniques by David Miles Huber

By attending workshops and seminars, taking online courses, watching tutorials on YouTube, and reading books about music production, you can learn from others and develop your skills as a music producer. Always remember that learning is a continuous process, and there is always something new to discover in the world of music production.


Experiment With New Sounds

One of the essential skills you need as a music producer is the ability to create unique sounds that will set your tracks apart from the rest. This is why it’s crucial to explore new sounds continually. In this article, we’ll discuss simple habits that you can adopt to help you experiment with new sounds.

Play Around With Different Instruments And Software

As a music producer, your primary tool is your Digital Audio Workstation (DAW), which allows you to create, edit, and mix your music. However, there are numerous software packages and virtual instruments that you can incorporate into your workflow to enhance your sound. Try out new instrument plugins and explore their features. Every instrument plugin has its unique sound that can add depth to your music.

Try Out New Genres And Styles

Working with different genres and styles can ignite your creativity and help you develop new techniques. Experiment with unconventional genres or incorporate different styles into your existing compositions. This experimentation will help you find your sound and expand your creative skills.

Get Outside Of Your Comfort Zone

It’s easy to stick to a familiar sound, but it’s vital to push yourself outside of your comfort zone. Challenge yourself to produce a track that incorporates sounds you’ve never used before, or try writing a song in a different key than your usual preference – this will give you a fresh perspective and a new direction to explore.

By trying new things and getting out of your comfort zone, you can discover new sounds that will make your music unique. Remember that your goal is to create music that sounds fresh and exciting to your listeners, and the best way to achieve this is through experimentation.

Invest In Quality Equipment


Investing in quality equipment is a simple habit that can make you a real music producer. With the right tools, you can achieve professional-level sound and take your music to the next level. Remember, your equipment is an investment in your craft.

Investing in quality equipment is a crucial aspect of becoming a successful music producer. Great music cannot be solely produced from talent alone, the tools utilized also play a significant role. Hence, it is essential to research and invest in high-quality equipment and upgrade them as your career progresses. So, let us delve into the first subheading.

Research And Invest In High-quality Equipment

Before investing in any equipment, it is essential to conduct proper research. You can begin by reading reviews from reliable sources, asking for recommendations from experienced producers, and visiting music stores to test equipment’s performance. Investing in high-quality equipment initially may seem costly, but it will always pay off in the long run. You can start with the basic equipment and gradually add to your collection, depending on your production needs.

Upgrade Your Equipment As You Progress In Your Career

As you become more skilled, your production needs may change. Therefore, it is crucial to upgrade your equipment to ensure your productions continue to improve. Upgrading could mean purchasing new equipment or replacing old ones whose performance has deteriorated with use. Always ensure that you buy equipment that is compatible with other equipment in your collection. In conclusion, investing in quality equipment is a fundamental step towards becoming a successful music producer. Researching and investing in high-quality tools and upgrading them as you progress in your career can significantly impact the quality of your productions. Remember always to stay up-to-date with the industry’s equipment standards to ensure your productions remain relevant.

Take Care Of Your Mental Health


Developing simple habits is the key to becoming a real music producer. By consistently practicing your craft, actively seeking out inspiration and constructive feedback, and staying organized, you can improve your skills and take your productions to the next level.


Remember to take care of your mental health too, as it plays a crucial role in your overall well-being and productivity.

Practice Self-care

As a music producer, it is essential to practice self-care to maintain your mental health. Self-care helps to improve your mood, reduce stress, and increase confidence. You can practice self-care by taking breaks in between work, indulging in hobbies, spending quality time with loved ones, meditating or practicing yoga, and doing physical exercises. Self-care enables you to rejuvenate your mind and body, allowing you to tackle challenges that come with producing music.

Get Enough Sleep

Sleep is crucial for your mental and physical well-being. Lack of sufficient sleep can lead to fatigue, irritability, reduced concentration and focus, and mood swings. These are situations that can compromise the quality of music production. Getting enough sleep helps you to improve your creativity, boost your memory, and increase your energy levels. Aim to sleep at least 7-8 hours every night, which will maintain good mental health and allow you to work on your music projects effectively.

Seek Professional Help If Needed

It may be beneficial to seek professional help if you are experiencing any mental health issues. Mental health professionals are trained to help you cope with challenges such as anxiety, depression, stress, and addiction. Such challenges can impact your ability to produce music. Seeking help will help you overcome these challenges and maintain your mental health. There is no shame in seeking help, and it’s a sign of strength to take care of yourself. In conclusion, music production is a demanding task, and it’s essential to take care of your mental health to be successful. Self-care, sufficient sleep, and seeking professional help are some of the simple yet effective habits to maintain good mental health. Incorporating these practices into your everyday life will provide an increased level of happiness and productivity, enhancing your ability to create music that moves people.

Simple Habits That Will Make You A Real Music Producer


Credit: www.renegadeproducer.com


Promote Your Music


Learn simple habits that will transform you into a true music producer. Cultivate discipline, creativity, and patience to nurture your skills and pursue your passion. Create unique tracks that will make your mark in the industry.

Create A Website Or Social Media Profiles

Building an online presence is a vital step in advancing your music career. It’s essential to create a website or social media profiles where your fans can easily follow your updates. A user-friendly and visually appealing website can distinguish you from your competitors, and social media profiles can help you to engage with fans directly. Your website should include your bio, discography, upcoming shows, and links to your social media profiles. When creating social media profiles, prioritize platforms that your fans use the most. You can also share your website links and social media profiles links on other platforms like forums, directories, and other sites.

Share Your Music On Streaming Platforms

Streaming services have become a prevalent way of consuming music, and it’s essential to get your music on popular streaming platforms. Spotify, Apple Music, Deezer, Pandora, and Tidal are some of the leading streaming platforms. The more platforms your music is available on, the higher reach and engagement you can expect from your audience. Ensure that the sound quality of your music is top-notch, and the track titles and descriptions are optimized with relevant keywords that best describe your music.

Collaborate With Other Artists To Increase Exposure

Collaborating with other artists provides a great opportunity to expand your reach and promotes your music to a new audience. It’s essential to collaborate with artists who share the same music genre and have a similar fan base. Look for opportunities to contribute to various music projects and events. Collaborations are not only a chance for increased exposure but also a chance to improve your skills and learn from other artists.

Engage With Your Audience And Build A Fan Base

Building a fan base requires more than talent alone. It comes with actively engaging with your audience. It’s essential to engage with your listeners frequently, responding to their comments and DMs. Use your website and social media profiles to offer exclusive content, previews, and discounts on your music and merchandise. Listening and welcoming feedback is an excellent way to improve your music, gain fans’ trust and get a better understanding of your fan base. Additionally, offering live shows, meet and greets, or Q&A sessions to your fans is an ideal way to show your appreciation and give back to your fans. In Conclusion, creating a website and engaging with your audience is an ongoing process. It requires patience, effort, and consistency. By following these simple habits, you can promote your music to a wider audience, grow your fan base, and improve your overall music career.


Frequently Asked Questions On Simple Habits That Will Make You A Real Music Producer


What Do You Need To Do To Become A Music Producer?


To become a music producer, you need to have a strong passion and love for music. Focus on learning music theory and production techniques. Get hands-on experience with software and hardware tools used in music production. Build a portfolio of your work, network with other music industry professionals, and be persistent in promoting your skills.


How Do I Establish Myself As A Music Producer?


To establish yourself as a music producer, you should focus on building a strong brand, networking with industry professionals, creating high-quality music, promoting your work on social media and online platforms, and continuously honing your skills through education and practice.


By following these steps, you can increase your visibility, attract clients, and establish yourself as a reputable and successful music producer.


What Makes A Good Music Producer?


A good music producer needs to have excellent communication skills, technical expertise, creativity, a keen ear for music, ability to manage time and team members, and knowledge of the latest technological advancements. They should be able to bring out the best in an artist and create a unique sound that appeals to the target audience.


What Is The Daily Routine Of A Music Producer?


A music producer’s daily routine involves various tasks such as conceptualizing, composing, recording, arranging, editing, and mixing music. They also communicate with artists, labels, and managers, attend meetings, and manage their business. They must prioritize time management, creativity, technical skills, and networking.


Conclusion


Becoming a real music producer requires constant effort and dedication. By adopting simple habits like listening to different genres, practicing regularly, and seeking feedback, you can learn and grow as a music producer. Additionally, developing technical skills and networking with other professionals in the industry can help open doors to new opportunities.


Remember, becoming a real music producer isn’t an overnight process, but by implementing these habits consistently, you can take your passion for music to new heights.

Categories
Archive

Essential Todos Before Sending Your Track To Mastering

Essential todos before sending your track to mastering are finalizing arrangement, tuning vocals and instruments. This adds fades and spaces, and exporting your track in high-quality format. Producing a high-quality music track is a meticulous process that requires attention to detail.

Pre-master checklist to run before sending your track to mastering


While mastering engineers can enhance the clarity, loudness, and overall quality of your track, it is essential to follow some essential steps before sending your track for mastering. Firstly, ensure you have finalized the arrangement of your track, including the fades and spaces.

Related reading: Stem Mastering A Country Rock Track and How To Use Reference Tracks When Mastering. For background, see the Wikipedia article on Audio mastering.


Tuning the vocals and instruments and organizing the track’s elements into separate stems is also crucial. Furthermore, it would be best if you exported your track in high-quality format. This ensures it is free from any distortion or clipping. Following these essential todos will not only save you from any potential errors that could hinder the mastering process but also make it easier for the mastering engineer to elevate your track to its full potential.


Checklist For Perfect Mastering


Optimizing your track for mastering is essential to achieve professional-level sound quality. Before sending it for mastering, make sure to check the overall mix, levels, EQ, and compression to ensure a top-notch final product. Don’t forget to take these essential steps before submitting your track to a professional.

Mastering is the final step in the music production process. It’s crucial as it gives your music the finishing touch that can take it to the next level. A perfectly mastered track has a balanced overall sound, good equalization, and consistent volume levels. However, before sending your track for mastering, there are several essential todos you must perform to ensure everything is perfect. In this post, we’ll discuss a checklist for perfect mastering to help you prepare your track for mastering.

Check The Mix In Multiple Playback Systems

Checking your mix in multiple playback systems is a necessary step to create a well-balanced and polished sound. Different playback systems can emphasize different frequencies in your mix, causing your track to sound unbalanced in some systems. Therefore, check your mix on different systems, such as a laptop, headphones, studio monitors, and car audio, to identify any issues that need fixing before mastering.

Ensure Consistent Volume Levels for Sending Your Track to Mastering

Inconsistent volume levels can ruin the mastering process and make your track sound unprofessional. Thus, before mastering, ensure that all the tracks have consistent volume levels. Adjust the volume levels of each track to ensure that they have similar loudness levels.

Delete Unwanted Tracks Or Noises

Deleting unwanted tracks or noises from your mix can help make the mastering process smoother and easier. Ensure that you have deleted any tracks or noises that don’t add to your mix’s overall quality. These could include unwanted reverb, breathing, or background noise.

Ensure Proper Editing for Sending Your Track to Mastering

Before mastering, edit your tracks carefully. Check all the tracks for any pops, clicks, or glitches and fix them. Also, ensure that the track has the right fade-in and fade-out levels.

Check Your Mix Equalization for Sending Your Track to Mastering

Check your mix for good equalization before sending it to mastering. Ensure that the mix has a good balance between the lows, mids, and highs. Use EQ to adjust the frequency levels and ensure that your mix has a full, balanced sound.

Confirm Proper Head And Tail Cuts for Sending Your Track to Mastering

Set your track’s head and tail cuts carefully before mastering. Head and tail cuts are the start and end points of your track, respectively. Check them to avoid awkward silence or abrupt endings.

Ensure Consistent Spacing Between Tracks

Also, ensure that there is consistent spacing between tracks. Ensure that the spacing is neither too long nor too short between tracks.

Ensure All Your Audio Files Are Properly Labeled

Give every audio file a clear label before you send it for mastering. Clear labels help the mastering engineer understand each track and how to process it.

In Conclusion

In conclusion, to achieve perfect mastering, you need to ensure that your mix is well-balanced, has consistent volume levels, has no unwanted tracks or noises, is correctly edited, has good equalization, and has correct head and tail cuts. Label all your audio files clearly too. Following this checklist will help you create a polished track ready for mastering and make the mastering process smoother.


Frequently Asked Questions On Essential Todos Before Sending Your Track To Mastering


What To Do Before Mastering A Track?


Before mastering a track, ensure that all the individual tracks are organized and balanced, adjust the volume and panning, EQ each track, compress tracks to even out levels, and add effects like reverb or delay only where necessary.


How Do You Prepare A Song For Mastering?


To prepare a song for mastering, you should first ensure that it is well mixed and sounds great. Make sure that there are no harsh frequencies or unwanted noise in the track. You should also consider the length and structure of the song. This makes sure that it flows well and has appropriate transitions.


It is also important to provide the mastering engineer with clear instructions on what you are looking for in the finished product.


How Do I Prepare A File For Mastering?


To prepare a file for mastering, finish the mix and edits, manage levels, and avoid clipping. Export it in high-quality format, such as WAV or AIFF, at the appropriate bit depth and sample rate.


Remove any unwanted gaps or silence at the beginning or end of the audio file and ensure that it complies with any specific requirements of the mastering engineer.


What Should My Mix Be Before Mastering?


You should balance your mix and free from any technical issues before mastering. This includes ensuring proper levels, EQ, and compression, among other things. Good mixing ensures a good final master.


Conclusion


To wrap things up, preparing your track before sending it for mastering is a crucial task that requires careful attention and dedication. By following these essential steps, you can ensure that your track is ready for its final polish and that your vision and message will be conveyed to the audience as intended.


Remember to be mindful of the technical aspects, trust your ears, and communicate effectively with your mastering engineer to achieve the best possible outcome. With these tips in mind, you’re well on your way to creating a professional and polished track that captivates your listeners.


https://www.youtube.com/watch?v=rPDRg6xXJ_Q