Categories
Archive

Mastering Vs Stem Mastering Whats The Difference

Mastering involves the final tweaks to a stereo audio mix, whereas stem mastering allows for processing on individual elements or groups within the mix. Stem mastering is a more flexible option for fine-tuning the overall sound.


It provides added control over the mix and can correct any imbalances between the elements. This technique has become increasingly popular in recent years particularly in electronic music.

Mastering Vs Stem Mastering Whats The Difference


Credit: www.masteringthemix.com


Understanding Audio Mastering

Audio mastering is the process of preparing and transferring final audio mixes to the master source. The mastering process can help to enhance and improve the quality of the audio tracks, giving them a polished, professional sound.

Definition Of Audio Mastering

Audio mastering is a technical process that involves taking a final mix of a song or audio recording and enhancing it to achieve a polished, professional sound. The objective is to make sure the audio track sounds consistent and clear when played on any device or platform.

Reasons For Audio Mastering

Mastering is an important step in the music production process because it ensures that the final product is polished, consistent and sounds great. The following are some of the reasons why audio mastering is essential:

  • Enhancement of frequency balance, dynamics, and stereo image of the track;
  • Normalization of audio levels to ensure that the track plays at a constant volume level;
  • Addition of fades, spacing between tracks, and other important elements to enhance the overall flow of an album;
  • Optimization of the track for various listening mediums, including streaming and physical media like vinyl or CD;
  • Identifying and correcting any errors, inconsistencies or glitches to ensure a seamless, professional sound.

With these benefits, it is clear that the mastering process is crucial to ensure that a final track is of the highest quality possible.

Mastering Vs Stem Mastering: What’s The Difference?

While the traditional mastering process involves working on a single stereo mix of a song, stem mastering involves processing various subgroups of instruments separately before mixing them back together to create the final mix. The following table summarizes the differences between the two processes:

Mastering Stem Mastering
Usually only involves processing a fully mixed stereo track Involves processing several pre-mixed subgroups of a song
Provides a cohesive, polished sound to a final track Offers greater flexibility and control over the final sound of a track
Works well for simple mixes with not many individual elements Makes it easier to process complex arrangements with many individual instruments and elements

Overall, both mastering and stem mastering are essential steps in the music production process and can help to achieve a polished, professional sound. The decision to use one process over the other depends on the specific needs of the track and the preferences of the artist or producer.

What Is Stem Mastering?

If you’re a music producer or someone who creates audio content, you might have heard about mastering and stem mastering. These two terms are often used interchangeably, but they’re not entirely the same thing. In this article, we’ll be focusing on stem mastering.

Explanation Of Stem Mastering

Stem mastering is a process where a mixdown is split into subgroups or stems, usually by instrument or element. For example, a stem might contain all the drums, another for all the guitars, and another for the vocals. Each stem is then treated as a separate element and processed individually in a mastering software.

In simpler terms, stem mastering allows for more control over the final sound of your mix by separating it into smaller groups that can be tweaked and optimized individually. It’s an effective way to address specific issues in your mix without affecting the overall balance of your sound.

Advantages Of Stem Mastering

Some advantages of stem mastering include:

  • Greater control over individual elements of a mix.
  • Ability to address specific issues or flaws in a mix without affecting the rest of the elements.
  • Improved sound quality and clarity, as each stem can be optimized for its specific frequency range and dynamics.
  • Efficient workflow, as stem mastering minimizes the need for extensive revisions and reworks.
  • Flexibility in formatting and delivery, as individual stems can be grouped differently depending on the desired output, such as 5.1 surround sound or stereo files for streaming platforms.

If you’re looking to take your audio content to the next level, stem mastering is definitely worth considering. With greater control and flexibility, you can ensure your final product sounds as good as it possibly can.


What Is Mastering?


Mastering is the final process in music production that prepares the recording for distribution. Stem mastering involves breaking up the mix into individual submixes, while mastering typically involves processing the overall stereo mix.

Explanation Of Audio Mastering

Simply put, mastering is the final step in audio production. It is the process of preparing and transferring recorded audio from the source (such as a studio recording or a live performance) to a format that can be replicated on various platforms for consumption by an audience. It involves enhancing the overall sonic quality of the audio to meet industry standards while also ensuring that it sounds consistent across different mediums. Mastering is essential for any audio project regardless of its intended platform or genre.

Advantages Of Audio Mastering

The advantages of audio mastering go beyond just making the audio sound better. The process of mastering also involves listening and adjusting the various tracks in a mix, bringing them together as a cohesive whole. This fine-tuning of the mix helps highlight important parts of the audio, such as vocals or instruments, and eliminates unwanted frequencies or background noise. Additional benefits of mastering include:

  • Setting the overall volume and loudness levels of the audio
  • Ensuring that the audio is compatible with different playback systems
  • Correcting any phase or timing issues between the different tracks of the mix
  • Adding subtle effects or polish to the audio to make it stand out

Mastering is an important aspect of audio production that requires a skilled audio engineer to perform. Without proper mastering, your audio may not sound as good as it could, and it may not be compatible with all playback systems. Therefore, if you want your audio to stand out and sound its best, mastering is a crucial step that should never be overlooked.

Mastering Vs Stem Mastering Whats The Difference


Credit: m.youtube.com


Mastering Vs Stem Mastering


Mastering and Stem Mastering are two different approaches to audio post-production. Mastering involves the final touch-up of a mix, while Stem Mastering is a more detailed process that breaks the track into individual stems to be refined separately. The overall goal of both is to improve the sound quality of the final track.

Mastering is an essential part of music production that involves the process of fine-tuning and enhancing the audio to its fullest potential. Whereas, Stem Mastering is a technique that requires splitting the audio elements into individual channels, creating separate groups for each element and applying various processing techniques to each element group.

Differences In Techniques Used

One of the significant differences between Mastering and Stem Mastering is the techniques used in each process. The traditional mastering process involves working with a stereo audio mix, allowing the mastering engineer to focus on balancing the tonal and dynamic elements of the mix. In contrast, Stem Mastering involves an additional step where the separate elements of the mix are grouped, processed, and then summed back together. Mastering primarily focuses on polishing the stereo mix’s overall sound quality through techniques like equalization, compression, and limiting. The mastering engineer can use these techniques to correct subtle mixing issues, enhance perceived loudness, and unify the sonic character. On the other hand, Stem Mastering enables the engineer to focus on specific sonic attributes, like the vocals’ clarity, bassline thickness, snare punch, etc.

Comparison Of Outputs

When it comes to output quality, the difference between Mastering and Stem Mastering is not necessarily about which option has a better output but what you want to achieve from the output. The ultimate goal of Mastering is to create a cohesive sound that complements the entire project, bringing out the music’s full potential. The output is a single, polished stereo mix, tailored to fit different playback systems, like radios, CDs, streaming platforms, and clubs. In contrast, Stem Mastering offers a more customized output that focuses on a detailed mix. Because Stem Mastering provides individual processing for different elements of the mix, it permits the engineer to make more precise and targeted adjustments to the mix. The end output includes the stereo mix along with the separate components of the mix, such as drums, vocals, basslines, etc., allowing for better control when handed over to the mix engineer. In conclusion, Mastering and Stem Mastering have their place depending on the music genre and what audio elements the artist wants to highlight. Hopefully, this article has helped you understand the differences between the two, allowing you to make an informed decision on which approach could be the best fit for your next music project.

Which Method Should You Choose?

Mastering and stem mastering are two methods used to bring out the best in a mix and make it sound the way you want it to. However, there is a difference between these two processes, and deciding which method to choose can make a big difference in how your music comes out. In this post, we’ll explain the differences between mastering and stem mastering and help you decide which technique is right for your music.

Factors To Consider

Before choosing between mastering and stem mastering, it is important to consider several factors that will impact the final sound of your mix. These factors include:

  • The complexity of your mix: If your mix is very complex, meaning that individual tracks are fighting for space in the mix, stem mastering may be the way to go.
  • Level of control: If you want more control over the final sound of your mix, stem mastering is the way to go, as it allows you to focus on specific elements of your mix.
  • Budget: Mastering is usually less expensive than stem mastering, so if affordability is an issue, you may want to choose the former.

Examples Of Songs That Benefit From Each Method

While there is no one-size-fits-all answer when it comes to choosing between mastering and stem mastering, certain songs may benefit from one method over the other. Here are some examples:

Song Method
A song with complex layering and intricate details Stem Mastering
A song with a simple arrangement and transparent mix Mastering
A song with a poorly recorded performance that requires individual adjustment Stem Mastering

In conclusion, both mastering and stem mastering have their benefits and drawbacks. Ultimately, the decision on which method to choose depends on factors like the ones listed above. Make a smart choice and let your sound stand out!

Mastering Vs Stem Mastering Whats The Difference


Credit: www.masteringthemix.com


Frequently Asked Questions Of Mastering Vs Stem Mastering Whats The Difference


What Is The Difference Between Stem Mastering And Mastering?


Stem mastering focuses on individual audio tracks while mastering works on the final stereo mix. Stem mastering allows for greater control over individual elements while mastering optimizes the overall sound of the mix.


Is Stem Mastering Worth It?


Yes, stem mastering is worth it because it allows for better control over the individual elements of a track and can result in a cleaner, more balanced mix. It also allows for easier adjustments in the mastering process and can lead to higher quality final sound.


Can You Master A Song Without Stems?


Mastering a song without stems is possible, but it has its limitations. While you can still enhance the audio quality and overall sound, the lack of individual tracks can make it difficult to make significant changes to the mix. It’s best to work with the available audio files to achieve the desired outcome.


Should I Send Stems For Mastering?


It is recommended to send the stems for mastering if you want your audio to sound the best it can. Sending stems allows the mastering engineer to have more control over the individual elements in your mix, resulting in a higher quality final product.


Conclusion


Mastering and Stem Mastering are two different processes that serve different purposes in the music production world. While mastering focuses on the overall sound of a mix, stem mastering is more specific and flexible in its approach. Each method has its own unique advantages and can be effective in achieving different results.


Ultimately, the choice between mastering and stem mastering will depend on the specific needs and goals of the music producer. By understanding the differences between the two, producers can make informed decisions that will help them achieve their desired sound.

Categories
Archive

Everything You Need To Know About Mid Side Processing

Mid-side processing is a technique used in audio production to manipulate and adjust stereo sound signals. It involves isolating the center and side channels of a stereo recording and processing them separately.


By doing so, the producer or engineer can make changes to the individual elements of the recording, such as vocals or instrumental tracks, without affecting the overall stereo balance. This technique is widely used in music production, particularly in genres such as electronic music, where the manipulation of individual elements is crucial for creating a rich, dynamic sound.


We will take a closer look at mid-side processing, including how it works, its benefits and limitations, and some common applications in music production.

Everything You Need To Know About Mid Side Processing


Credit: www.masteringthemix.com


How To Apply Mid Side Processing In The Studio

Mid Side processing is a popular mixing technique applied in the studio. It helps add depth and clarity to the sound by processing the center and stereo information separately. To apply mid side processing in the studio, you need to select the right microphones, set up the mics for mid side recording and mid side processing in the mix.

Selecting The Right Microphones

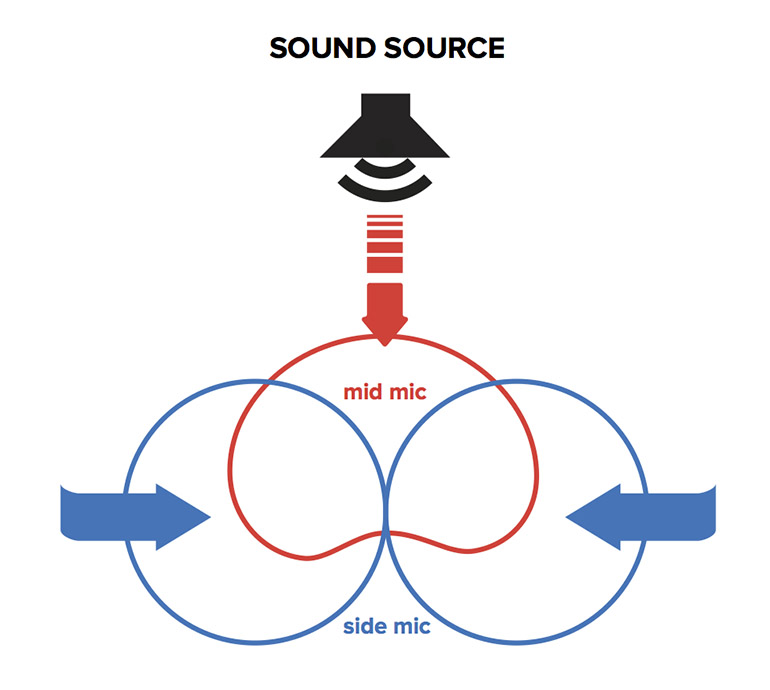
The first step towards mid side processing is selecting the right microphones that capture the desired sound in the center and stereo. The center mic should be a directional microphone like a cardioid or hyper-cardioid that captures the sound from the front and rejects the sound from the sides and rear. The stereo mic that captures the ambience should be a figure-eight or bidirectional microphone that captures sound from the front and back and rejects sound from the sides.

Setting Up The Mics For Mid Side Recording

Once you have selected the microphones, set them up for mid side recording. The center mic should be placed facing the sound source while the stereo mic should be placed at a right angle to the center mic. This ensures that the stereo mic captures sound from the sides and not from the center.

Mid Side Processing In The Mix

After recording the sound, it’s time to process it in the mix stage. To do this, you need to separate the center and stereo information using mid side processing, apply EQ and effects separately, and then combine them again. EQ the center information to add clarity and presence, while EQing the stereo information can help create a wider, more spacious sound. You can also add compression, reverb, and other effects to each channel separately.

Mid side processing is a powerful technique that can add depth and width to your sound in the mix. By selecting the right microphones, setting them up correctly, and processing the center and stereo information separately, you can achieve a more professional and polished sound.

Famous Examples Of Mid Side Processing In Action


Mid Side Processing is a technique that is widely used in music production and sound engineering. Some famous examples of its application include Daft Punk’s “Get Lucky” and Michael Jackson’s “Billie Jean”. This technique allows for greater control over the stereo field, resulting in a clearer and more defined sound.

Mid Side Processing has been used in several popular songs, including Michael Jackson’s ‘Billie Jean’ and Daft Punk’s ‘Get Lucky’. Let’s take a closer look at how this technique was used in these famous tracks.

Michael Jackson’s ‘billie Jean’

Mid Side Processing was used in the mastering process of Michael Jackson’s ‘Billie Jean’. By using this technique, the vocals were placed in the middle of the mix while the rhythmic elements were spread wider. This creates a more immersive listening experience for the listener.

Daft Punk’s ‘get Lucky’

In Daft Punk’s hit single ‘Get Lucky’, Mid Side Processing was used to create separation between the lead vocals and the instruments. By placing the vocals in the center and the instrumentation wider, the mix was able to achieve a more dynamic and clear sound. Overall, Mid Side Processing can enhance the listening experience by creating a more spacious and immersive sound. It is no wonder that this technique has been used by some of the most successful artists in the music industry.

Tips For Using Mid Side Processing On Different Instruments


Mid side processing is a powerful mixing technique that can help you achieve a more balanced and dynamic sound. When using this technique on different instruments such as drums, guitars, and vocals, it’s important to understand the nuances of mid side processing and how to apply them effectively for optimal results.

When it comes to mixing and mastering, mid side processing is a technique that can help you achieve a wider and more dynamic sound. However, applying this technique to different instruments requires a different approach. Here are some tips to get you started.

Drums

When processing drums with mid side techniques, it is best to start with EQ. Boosting the mid frequencies can help bring out the punch and attack of the kick drum and snare, while widening the stereo image of the cymbals with side processing can add depth and ambience. You can also use mid side compression to control the dynamics of the drum mix, emphasizing the center or sides as needed.

Guitars

Mid side processing works great for guitars because it can help separate the different layers of the sound. Boosting the mids can help make the guitar sound more present and focused, while adding width to the side can help create a more immersive stereo field. You can also use mid side reverb to add depth and space to the guitar sound.

Keyboards

When processing keyboards with mid side techniques, you can use EQ to separate the different layers of the sound. Boosting the mid frequencies can help make the piano or the organ more prominent, while widening the stereo image with side processing can help create a more spacious sound. You can also experiment with mid side distortion to add warmth and character to the keyboard sound.

Vocals

Mid side processing can help add clarity and presence to vocals by boosting the mid frequencies and adding width to the side. You can also use mid side compression to tame any harsh or uneven parts of the vocal performance. Additionally, mid side saturation can add warmth and texture to the vocal sound, making it stand out in the mix. Overall, mid side processing is a great tool for achieving a more dynamic and immersive mix. By applying these tips to different instruments, you can achieve a polished and professional sound that will engage your audience.


Everything You Need To Know About Mid Side Processing


Credit: www.izotope.com


Frequently Asked Questions For Everything You Need To Know About Mid Side Processing


What Does Mid Side Processing Do?


Mid side processing separates a stereo signal into two components: a mono mid-channel and a stereo side-channel. This allows the engineer to adjust the levels, EQ and processing of these channels independently. The technique can be used for fixing stereo imaging, adding stereo wideness and more.


What Is The Formula For Mid Side Processing?


The formula for mid side processing involves splitting a stereo audio signal into two components: one that is the sum of left and right channels (the mono or “mid” signal), and one that is the difference between the two channels (the stereo or “side” signal).


The two components can then be manipulated separately for processing and stereo imaging effects.


How Do You Process Mid Side Mics?


To process mid side mics, you need to convert the stereo recording into two mono tracks, one for the mid signal and one for the side signal. Then, you can adjust the levels of each track and apply EQ, compression, and other effects separately to each track.


Finally, you need to recombine the two tracks to create the stereo recording again.


What Is The Mid Side Mastering Technique?


Mid side mastering is a technique used in audio production where the stereo mix is separated into two components: mid and side. The mid component contains the sounds in the center of the mix, while the side component contains the sounds on the left and right sides.


This allows for greater control over the stereo image during the mastering process.


Conclusion


Overall, Mid Side Processing is a powerful technique that provides incredible flexibility and control over the stereo image of a mix. Understanding how to use it effectively can greatly improve the clarity and focus of your tracks. By using a Mid Side Processor, you can balance the levels of your tracks with surgical precision, create a well-defined stereo image and add depth and dimension to your mixes.


Whether you are a new or experienced producer, understanding mid-side processing should be an essential part of your toolkit. With practice, you can harness its power to create mixes that are more detailed, clear and precise than ever before.


Categories
Archive

How To Dial In Perfect Stereo Width When Mastering

To dial in perfect stereo width when mastering, use a stereo imaging plugin and adjust the width in small increments. This technique can enhance the stereo field without it becoming too wide or narrow.


Mastering engineers often use this method to achieve balance and clarity in their final mixes. Stereo width refers to the perceived space between the left and right channels of a stereo mix. It’s an essential aspect of mastering that can impact the listener’s overall experience.


When done correctly, stereo width can bring a sense of spaciousness and depth to a mix. However, overdoing it can result in an unnatural and unpleasant sound. We’ll explore different techniques and tips for dialing in perfect stereo width when mastering. Whether you’re a beginner or a seasoned mastering engineer, these tips will help you achieve the best possible sound.


Understanding Stereo Width In Mastering

Are you a music enthusiast who’s passionate about creating perfect-sounding tracks? Then you know that mastering is a critical step in ensuring your music sounds at its best. One crucial aspect of mastering is stereo width. Getting stereo width right can make the difference between a bland-sounding track and one that immerses the listener. In this blog post, we’ll dive deep into understanding stereo width in mastering and how you can dial in the perfect stereo width for your tracks.

Defining Stereo Width

Stereo width refers to how wide the stereo image is in a recording or a mix. A recording’s stereo image is the sonic space that instruments and vocals occupy, creating a three-dimensional effect that gives your track width and depth. When you pan audio tracks left or right, it increases the stereo width of the mix.

Importance Of Stereo Width In Mastering

When it comes to mastering, stereo width is a crucial aspect that can make a difference in how your music is perceived. Achieving the perfect stereo width can enhance and add a new dimension to your music, making it more immersive and engaging. Stereo width can affect the perceived loudness of your track, making it sound louder without actually increasing the volume. You can also use stereo width to create more separation between instruments, making each one stand out more.

With stereo width, it’s important to find the right balance. Overdoing the stereo width can lead to an unnatural-sounding mix with instruments competing for the same space, and underdoing it can result in a flat-sounding track. By adjusting the stereo width, you can create a fuller, more cohesive mix that sounds great on any listening device.

Stereo Width Techniques

To achieve the perfect stereo width, you need to use various techniques such as:

  • Panning: This is the most common technique for adjusting stereo width. It involves positioning audio tracks to the left, right, or center channel of the mix. Panning can help create more separation between instruments and vocals, but overdoing it can lead to an unbalanced mix.
  • Mid-Side Processing: This technique involves separating the audio mix into two channels- the mid-channel and the side channels. You can then process each channel independently, allowing you to increase or decrease the stereo width as needed.
  • Stereo Widening Plugins: There are many stereo widening plugins that you can use to enhance the stereo width of your mix. These plugins work by increasing the stereo width of specific frequencies in the mix, which can give your track a more immersive sound.

Understanding stereo width in mastering is crucial to achieve the perfect mix. By learning these techniques and experimenting with them, you can create a mix that sounds great on any listening device. Remember, don’t overdo the stereo width, find the balance, and let your music take center stage!

How To Dial In Perfect Stereo Width When Mastering


Credit: www.masteringthemix.com


Factors That Affect Stereo Width


Achieving perfect stereo width when mastering can greatly enhance the spatial depth and clarity of your audio. However, several factors influence the stereo image, such as the mix balance, panning, equalization, and compression. Properly adjusting these parameters can help you dial in ideal stereo width for your tracks.

Factors that Affect Stereo Width: Before we dive into the intricacies of how to dial in perfect stereo width when mastering, let’s first understand the factors that affect stereo width. The most important aspects include panning techniques, use of stereo enhancers and widening tools, EQ, and compression. Let’s have a closer look at these: H3: Panning Techniques Panning is a crucial factor that determines the stereo width in a mix. It involves placing different instruments at various points across the stereo field to create a sense of space. When done properly, panning can make the mix sound more natural and spacious. However, excessive use of panning or improper placement of elements can make the mix sound unbalanced and cluttered. Therefore, it is essential to use panning sparingly and judiciously. For instance, bass instruments are usually placed in the center, while high-frequency sounds like hi-hats and cymbals are panned towards the sides. H3: Use of Stereo Enhancers and Widening Tools There are numerous tools available to enhance the stereo image and widen the soundstage. One such tool is a stereo enhancer, which can add depth and dimension to the mix. It works by manipulating the phase relationship between the left and right channels. Widening tools, on the other hand, can increase the stereo image’s width by adding a slight delay to one of the channels. However, these tools can also have adverse effects on the mix if used excessively, causing phase cancellations and making the mix sound unnatural. H3: EQ and Compression Both EQ and compression play a vital role in determining the stereo width of a mix. EQ can help shape the sound’s frequency spectrum and separate different instruments across the stereo field. Compression, on the other hand, can balance the levels of different elements and bring them to the forefront or the background of the mix. Therefore, using EQ and compression appropriately can enhance the stereo width and create a more balanced and pleasing mix. In conclusion, understanding the factors that affect stereo width is crucial to dialing it in perfectly. Panning, use of stereo enhancers and widening tools, EQ, and compression are vital components that influence the stereo image and the soundstage. Using these tools appropriately and not overdoing them is the key to achieving a well-balanced and natural mix.

Analyzing The Stereo Image

When it comes to mastering, achieving the perfect stereo width is critical to make the mix sound balanced and create a well-defined soundstage. Stereo width refers to the perceived distance between the left and right channels of a stereo audio file or mix, and it can be adjusted to create a more immersive listening experience. One of the essential aspects of achieving perfect stereo width is analyzing the stereo image. In this section, we will discuss the critical listening and analysis tools necessary to analyze the stereo image effectively.

Critical Listening

The first and most crucial step in analyzing the stereo image is critical listening. Critical listening involves listening to the stereo mix with an attentive ear, paying close attention to the left and right channels’ interplay. By listening critically, you can identify any elements that may be too loud, too soft, or panned too far left or right. You should also listen out for any frequencies that may be masking others and making the mix sound muddy or unclear. One thing to note is that critical listening takes time. It is a skill that develops over time and requires practice.

Analysis Tools

In addition to critical listening, using analysis tools can also help you analyze the stereo image. Analysis tools, such as phase correlation meters, stereo scopes, and correlation meters, provide visual information about the stereo mix’s frequency spectrum, left and right balance, and phase coherence. For example, a phase correlation meter analyzes the phase relationship between the left and right channels, indicating any mono compatibility issues that may occur when listening to the mix in mono. A stereo scope displays the stereo image as a visual representation, making it easier to identify any imbalances or phasing issues.

However, it is crucial to remember that analysis tools should not be relied on solely. They are meant to complement critical listening, not replace it. It is essential to consider and analyze both the visual information presented by analysis tools and what your ears tell you through critical listening to make informed decisions on adjusting the stereo width.

How To Dial In Perfect Stereo Width When Mastering


Credit: www.reddit.com


How To Achieve Perfect Stereo Width


Achieving perfect stereo width is vital to producing high-quality audio. One useful tip is to use mid-side processing to separate stereo and mono information, then adjust the width accordingly to achieve the desired effect. Another technique is to use panning to enhance the stereo field and create a wider sound.

When it comes to mastering audio, achieving perfect stereo width is crucial. Not only does it make the mix sound bigger, but it also helps with imaging and making sure each element of the song can be heard in its place. In this article, we’ll explore some of the best techniques for achieving perfect stereo width during the mastering process.

Starting With A Balanced Mix

Before adding any processing or making any changes, it’s crucial to start with a well-balanced mix. This means making sure that each instrument is panned correctly and that the EQ balance is correct. If the mix is unbalanced, it can be difficult to achieve perfect stereo width, no matter what techniques are used.

Using Panning Techniques To Widen Or Narrow The Stereo Field

One of the most basic ways to manipulate stereo width is by using panning techniques. By panning different elements of the mix to opposite sides of the stereo field, you can create a wider stereo image. Conversely, if you want to narrow the stereo field, you can pan elements towards the center. It’s important to note that panning should be done in moderation, as extreme panning can make the mix sound unrealistic and unbalanced.

Adding Width With Stereo Enhancers And Widening Tools

Stereo enhancers and widening tools are plugins that are specifically designed to create a wider stereo image. These plugins work by manipulating the stereo spread of different frequency bands in the mix. When using these tools, it’s important to use them in moderation, as too much processing can make the mix sound unnatural.

Using Eq And Compression To Enhance Stereo Width

Finally, EQ and compression can be used to enhance stereo width. By boosting certain frequencies in the sides of the stereo image and compressing the center, you can create a wider stereo image. It’s important to use these tools judiciously, as too much processing can make the mix sound harsh and unnatural. In conclusion, achieving perfect stereo width is an essential part of the mastering process. By starting with a balanced mix and using techniques like panning, stereo enhancers, and EQ and compression, you can create a wider stereo image that enhances the overall mix.


Common Mistakes To Avoid


Mastering engineers often struggle with achieving perfect stereo width, but there are some common mistakes to avoid. One mistake includes relying too heavily on stereo widening plugins, which can create an overly wide mix. Another is neglecting to properly balance the stereo image, which can result in an unbalanced mix.

When it comes to mastering audio, achieving the perfect stereo width can greatly impact the overall quality of the sound. However, dialing in the desired stereo width is not without its challenges. Many novice engineers make common mistakes that can negatively affect the final mix. In this post, we’ll explore the most common mistakes to avoid when trying to achieve perfect stereo width in mastering.

Overuse Of Stereo Enhancers

Stereo enhancers can be a great tool to widen the stereo field and add depth to the sound. However, overuse of these tools can lead to a mix that sounds unnatural and artificial. Instead, try using stereo enhancers sparingly and with intention. A little goes a long way, so take it easy and make incremental changes to the stereo width until you achieve the desired effect.

Disregarding Mono Compatibility

While stereo width is important, it’s equally important to ensure that your mix sounds great in mono as well. Many playback systems (such as phone speakers, laptops, and mono PA systems) use mono audio. If your mix sounds great in stereo but falls apart in mono, you’ll lose a valuable chunk of your listeners. To prevent this, frequently check your mix in mono and adjust the stereo width accordingly.

Neglecting The Importance Of Volume Levels

One common mistake many novice engineers make is neglecting the importance of volume levels when dialing in stereo width. When widening the stereo field, it’s essential to balance the volume levels between the left and right channels. If one side is louder than the other, your mix will sound unbalanced and unnatural. So don’t forget to pay attention to volume levels when making adjustments to the stereo width. In conclusion, achieving perfect stereo width when mastering audio takes time and practice. By avoiding these common mistakes and approaching the process with intention and care, you’ll be well on your way to creating amazing-sounding mixes.

How To Dial In Perfect Stereo Width When Mastering


Credit: www.youtube.com


Frequently Asked Questions For How To Dial In Perfect Stereo Width When Mastering


What Is Stereo Width In Mastering?


Stereo width in mastering refers to the perceived distance between sound sources in a stereo mix. It can be adjusted during the mastering process by manipulating the stereo image. The goal is to create a pleasing, balanced sound that is not too wide or too narrow.


How Do You Add Width To Mastering?


To add width to mastering, you can use stereo widening plugins, EQ hard-panning, mid/side processing, and stereo imaging tools. These techniques help spread the stereo image, making it sound wider. However, be careful to avoid overdoing it, as too much width can make the mix sound unnatural and affect mono compatibility.


How Do You Widen Stereo Using Eq?


To widen stereo using EQ, you can boost the high-frequency range of one channel while cutting the same range on the other channel. This will create a wider stereo image. Additionally, you can use a stereo widener plugin or effect to enhance the stereo field.


How Do You Hear Stereo Width?


Stereo width is the perceived distance between the left and right audio channels in a stereo mix. The wider the stereo image, the farther apart the left and right channels will sound. This can be achieved through techniques such as panning, stereo effects, and EQ adjustments.


The ear perceives stereo width by comparing the relative volume, arrival time, and frequency content of sounds in the left and right channels.


Conclusion


To sum it up, achieving perfect stereo width can greatly enhance the overall quality of your master. The key lies in finding the right balance and using the right techniques. By considering the tips discussed such as layering, panning, using stereo wideners and EQ, you can bring your mixes to life and take them to the next level.


Experimentation is the key, so don’t be afraid to try new things until you find what works best for you. With the right tools and knowledge, you can dial in perfect stereo width every time.

Categories
Archive

How To Disable Normalize On Apple Music And Spotify

To disable normalize on Apple Music and Spotify, go to settings and turn off the normalize feature. If you don’t want your music volume to change automatically, disabling normalize is the solution.


Both Apple Music and Spotify come with this feature enabled by default, but some users may want to turn it off to have a consistent volume level across their playlists. The normalize option analyzes the loudness of the tracks and adjusts them accordingly, which may not be preferable for some listeners.


Fortunately, the process of deactivating the feature is quick and straightforward, and this article will walk you through the steps involved. So, let’s dive in and learn how to turn off normalize on Apple Music and Spotify.

How To Disable Normalize On Apple Music And Spotify


Credit: www.reddit.com


Disabling Normalize On Spotify


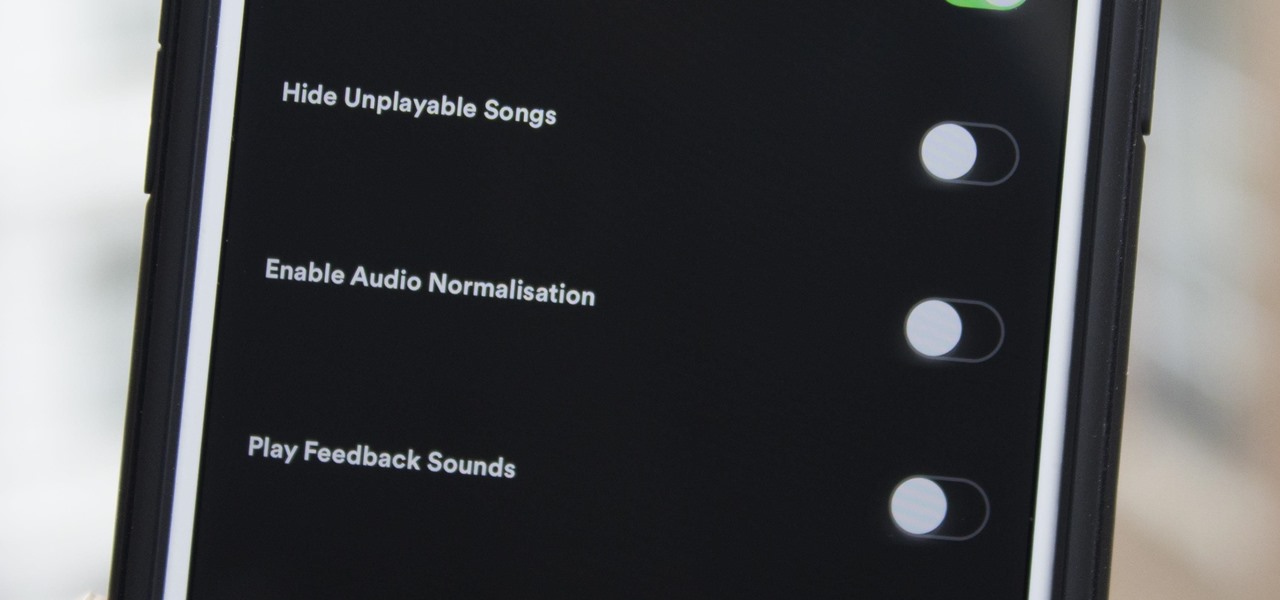
Disabling Normalize on Spotify can improve the sound quality for music enthusiasts. To do this, simply go to the Settings menu and switch off the Normalize volume option.

Disabling Normalize on Spotify If you’re like most people, you probably use Spotify to listen to music. It’s a great platform, but one thing that can be annoying is the audio normalization feature. Audio normalization is a feature that automatically adjusts the volume of songs so that they’re all the same level. While this may sound like a good thing, it can actually make some songs sound worse. Fortunately, it’s easy to disable audio normalization on Spotify. Here’s how to do it: Step 1: Open Spotify on Your Device The first step to disabling normalize on Spotify is to open the app on your device. You can do this by clicking on the Spotify icon or searching for it in your app drawer. Step 2: Go to Settings Once you have the app open, you need to navigate to the settings menu. You can do this by clicking on the gear icon in the top right-hand corner of the app. Step 3: Find the Playback Section In the settings menu, you’ll see several different sections. Look for the “Playback” section, which is usually near the top of the list. Click on this to open the playback settings. Step 4: Turn Off ‘Enable Audio Normalisation’ Finally, you need to turn off the “Enable Audio Normalization” feature. This is usually a toggle switch that you can find in the playback settings. Once you’ve found it, simply turn it off, and you’re done! Conclusion Disabling audio normalization on Spotify is a great way to improve your music listening experience. By following the steps outlined above, you can easily turn off this feature and enjoy your music the way it was intended to be heard. Give it a try and see the difference for yourself!

How To Disable Normalize On Apple Music And Spotify


Credit: mixandmastermysong.com


Disabling Normalize On Apple Music


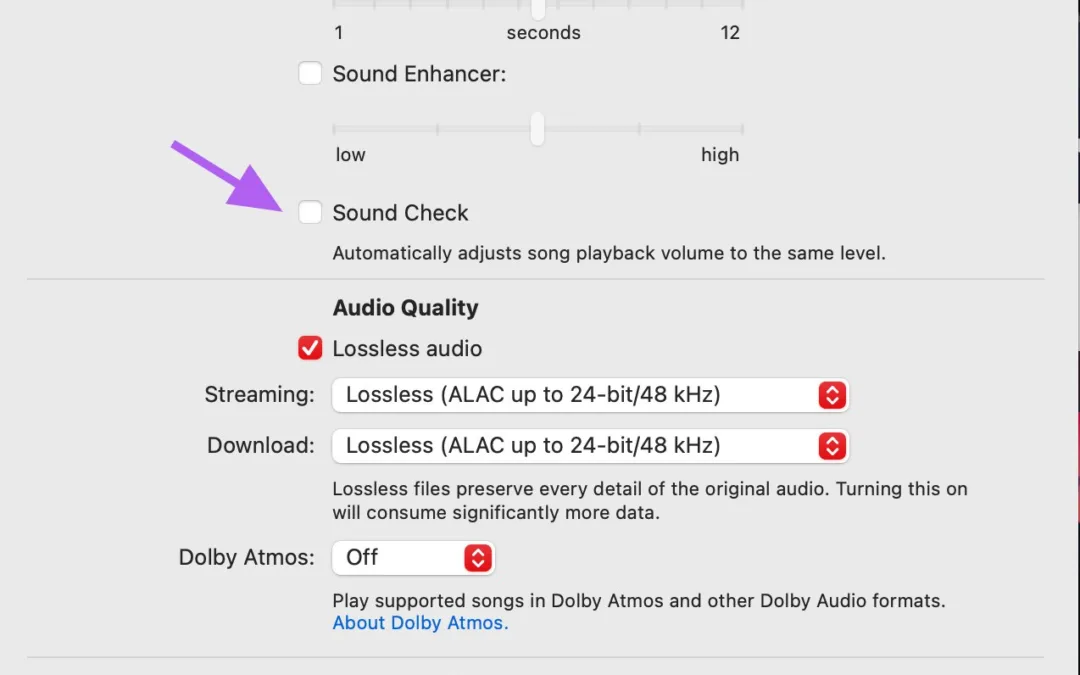
Disabling normalize on Apple Music and Spotify is easy. Simply go to your settings, turn off the “sound check” feature, and enjoy the music as it was intended to be heard. This will prevent any automatic adjustments to volume and ensure a consistent listening experience.

Disabling Normalize on Apple Music Do you often find that the volume levels on your Apple Music playlists are uneven? This can be particularly frustrating when you’re listening to music on shuffle and the volume jumps from one song to the next. Fortunately, there’s a way to disable the “Normalize Volume” feature on Apple Music and Spotify, which can help to make your listening experience much smoother and more enjoyable. Step 1: Open the Settings app on Your iOS Device The first step to disable Normalize on Apple Music is to locate and open the Settings app on your iOS device. This is the app with the gear icon, usually found on your home screen. Clicking on this icon will open the “Settings” menu. Step 2: Go to Music The next step to disabling Normalize on Apple Music is to locate and click on the “Music” option within the Settings menu. You may need to scroll down to find it. Once you’ve located it, click on it to proceed. Step 3: Find the Playback Section Within the Music settings, you’ll see a variety of options related to how you play and listen to music on your device. Scroll through this menu until you find the “Playback” section. It should be towards the bottom of the list. Step 4: Turn Off ‘Sound Check’ The final step in disabling Normalize on Apple Music is to click on the “Sound Check” option within the “Playback” section. This option is responsible for equalizing the volume levels on your music and is what causes the volume to jump around on your playlists. To turn off Sound Check, simply toggle the switch next to it so that it turns from green to grey. This will disable the feature and ensure that your music is played at its original volume levels, without any additional tweaking. Conclusion Disabling Normalize on Apple Music is a simple process that can greatly enhance your listening experience. By following these four easy steps, you’ll be able to listen to your music without worrying about fluctuating volume levels and enjoy your favorite songs just the way they were meant to be heard.

How To Disable Normalize On Apple Music And Spotify


Credit: smartphones.gadgethacks.com


Frequently Asked Questions Of How To Disable Normalize On Apple Music And Spotify


How Do I Turn Off Audio Normalization On Apple Music?


To turn off audio normalization in Apple Music, go to Settings and then Music. Under Playback, turn off the switch for Sound Check. This disables the feature that adjusts volume levels for different songs, allowing them to play at their original levels.


How Do I Turn Off Auto Normalize On Spotify?


To turn off auto-normalize on Spotify, go to Settings in the app, select Playback, and turn off the toggle for “Enable Audio Normalization. “


Does Apple Music Use Normalization?


Yes, Apple Music uses normalization to ensure consistent volume levels for all songs in a playlist or album. This feature is turned on by default and can be turned off in the app’s settings if desired.


Should Normalization Be On Or Off Spotify?


Normalization on Spotify is a feature that makes sure that all songs have the same playback volume. It helps to prevent songs from sounding too loud or too quiet. Whether you should have it on or off is up to your personal preference.


If you don’t want to experience drastic volume changes when listening to music, keep it on. Otherwise, turn it off.


Conclusion


To conclude, disabling normalize on Apple Music and Spotify may seem like a simple task, but it can greatly enhance your listening experience. Fine-tuning audio levels and eliminating distortions can make a world of difference, allowing you to fully appreciate the intricacies of your favorite tracks.


With these easy steps, you can customize your playback settings and take control of your music. Give it a try and enjoy the full potential of your streaming service. Happy listening!


Categories
Archive

How To Make A Reese Bass Long Deep Bass In Serum

To create a Reese bass long deep bass in Serum, adjust the wavetable position and use a low-pass filter with resonance. Reese bass is a popular technique used in electronic dance music, especially in genres like drum and bass and dubstep.


The Reese bass sound is characterized by its long, deep, and pulsating quality. One software synth that has become a go-to for creating this type of bass is Serum. With a few tweaks to the synth’s settings, you can create a powerful and driving bassline that will give your track the energy it needs.


We will show you how to make a Reese bass long deep bass in Serum. We will cover the basics of sound design, including using wavetable synthesis, filters, and effects to create the perfect sound. So, whether you’re a beginner or an experienced producer, read on to learn how to craft a punchy and dynamic Reese bass in Serum.

How To Make A Reese Bass Long Deep Bass In Serum


Credit: mysticalankar.com


Creating The Perfect Base

When it comes to creating a Reese Bass in Serum, one of the most crucial aspects to get right is the base of the sound. This involves choosing the right waveform and adjusting the different parameters to get the perfect tonal balance. In this article, we’ll take a look at some tips and tricks to help you create the ideal base for your Reese Bass.

Choosing The Right Saw Waveform

The first step in creating the perfect base for your Reese Bass is to choose the right saw waveform. This is the foundation of the sound, so it’s essential to get it right. There are different types of saw waveforms to choose from, including:

Type Description
Saw A basic saw waveform with no modifications.
Super Saw A detuned saw waveform with additional voices. This creates a thicker and wider sound.
Hyper Saw A detuned saw waveform with even more voices than the Super Saw. This creates an even thicker and wider sound.

Experimenting with these different saw waveforms can help you find the right base for your Reese Bass sound.

Adjusting The Voices

Once you’ve chosen the right saw waveform, the next step is to adjust the voices. This involves controlling how many detuned voices are added to the sound. Adding too many voices can make the sound muddy, while using too few can make it thin and weak. Some tips for adjusting the voices include:

  • Start with around 2-3 voices and adjust from there.
  • Try detuning the voices to create a wider and thicker sound.
  • Experiment with different levels of detuning to find the perfect balance.

Tweaking The Noise Generator

The final step in creating the perfect base is to tweak the noise generator. This adds some grit and texture to the sound, giving it more character. Some tips for tweaking the noise generator include:

  1. Start with a low level of noise and adjust from there.
  2. Try different types of noise, such as white or pink noise.
  3. Experiment with filtering the noise to control the tonal balance.

By following these tips and adjusting the different parameters of your saw waveform, voices, and noise generator, you can create the perfect base for your Reese Bass sound. Remember to experiment and try different things until you find the sound that works best for your track.

How To Make A Reese Bass Long Deep Bass In Serum


Credit: m.youtube.com


Modulation Techniques


To create a long, deep Reese bass in Serum, one must understand modulation techniques. Applying the right modulation to the filter cutoff and wavetable position can give depth and movement to the sound. Experiment with LFOs and envelopes to create varied and dynamic basslines.

Creating a Reese bass is all about modulation. A Reese bass has a deep, resonant quality that comes from the overlapping of two detuned sawtooth waves. In Serum, we can apply modulation techniques to achieve this effect. Here are the two most commonly used modulation techniques:

Using Lfos To Create Movement

LFOs, or low-frequency oscillators, are a staple in sound design. Using LFOs in Serum can help create movement in the Reese bass. By assigning an LFO to the pitch, filter, or amplitude parameters, you can produce a pulsing, wobbling bass sound that can add depth and interest to your track. You can choose from different waveform shapes and sync the LFO to your track’s tempo to create a more precise modulation effect.

Applying Envelopes For More Nuance

Another way to achieve modulation in Serum is by using envelopes. Envelopes control different parameters over time, such as volume or filtering. By assigning an envelope to your Reese bass’s pitch, you can create a more subtle modulation effect. You can control the attack, decay, sustain, and release of the envelope to achieve the desired effect. Using envelopes in combination with LFOs can create even more complex and nuanced modulation patterns for your Reese bass.

By using both LFOs and envelopes, you can produce complex, sweeping Reese bass sounds in Serum. Experimentation is key, so don’t be afraid to try different combinations of LFO shapes and rates, and envelope settings to find your unique sound.

Adding Effects To Round Out The Sound

Adding effects to round out the sound can take your Reese bass from good to great. Properly implemented effects can add warmth, depth, and character to the sound. In this section, we’ll explore some popular effects often used by producers to make their Reese bass stand out.

Using Distortion And Saturation

Distortion and saturation effects are often used to add edge and aggression to the Reese bass. They can also help in filling out the mid-range and giving the bass more presence in the mix. Using too much distortion or saturation can make the bass sound harsh, so it’s important to experiment with different amounts and find the sweet spot.

You can achieve distortion and saturation effects using plugins such as FabFilter Saturn, Decapitator by Soundtoys, or by using Serum’s built-in distortion. Start by turning up the drive just a little bit and tweaking other parameters to achieve the desired effect.

Implementing Reverb And Delays

Reverb and delay can add space and depth to the Reese bass. They can help the bass sit better in the mix and make it sound bigger overall. Just like with distortion and saturation, it’s important to experiment with different levels of reverb and delay to find the sweet spot.

You can use plugins such as Valhalla Room, ArtsAcoustic Reverb, or Serum’s built-in reverb. When it comes to delays, there are many great plugins available, including EchoBoy by Soundtoys, Echo by FabFilter, or Serum’s built-in delay.

Experimenting With Modulation Effects

Modulation effects such as chorus, phaser, and flanger can add movement and character to the Reese bass. These effects can help make the sound more interesting and can also help it stand out in a mix. Just like with distortion, saturation, reverb, and delay, it’s important not to overdo it with modulation effects.

Plugins such as MicroShift by Soundtoys, Serum’s built-in chorus, and the phaser effect in Valhalla VintageVerb are all great examples of modulation plugins that can be used on Reese bass. By experimenting with different settings and amounts, you can achieve a unique, high-quality Reese bass sound.

Advanced Techniques And Tips


Learn how to create a long and deep Reese bass in Serum with advanced techniques and tips. Master the art of sound design and take your music production to the next level.

Are you looking to take your Reese Bass sound to the next level? In this section, we will explore some advanced techniques and tips to enhance the depth and dynamics of your bass using Serum.

Automating Parameters For More Dynamic Sound

One way to create a more dynamic sound is by automating various parameters in Serum. This means changing the settings over time to create movement in the sound. For example, you can automate the filter cutoff frequency to gradually increase or decrease the amount of high-frequency content in the sound. Similarly, automating the LFO rate can create pulsating effects in the sound. Another good option is automating the Serum’s built-in effects to take your Reese Bass to the next level. This can add extra depth or distortion to the sound, creating more character and excitement.

Layering Multiple Instances Of The Bass

To make your Reese Bass even thicker and more powerful, try layering multiple instances of the bass on top of each other. This can be done by using Serum’s handy copy and paste functions. You can experiment with different waveforms and envelope settings to create different layered bass sounds. This can create a much richer and more complex sound with more sonic depth.

Using Macro Controls For Easy Tweaks

Why waste time tediously tweaking every single parameter of your Reese Bass when you can make adjustments with just one knob? By mapping various parameters to a single macro control in Serum, you can easily make global adjustments to your sound. For example, you can map the filter cutoff frequency, resonance, and LFO rate to a single macro control called “depth”. This will allow you to easily adjust the depth of your sound with a single knob. In conclusion, these advanced techniques and tips can help take your Reese Bass sound to the next level of depth and dynamics. Try experimenting with different combinations of these techniques to create your own unique and powerful Reese Bass sound.

How To Make A Reese Bass Long Deep Bass In Serum


Credit: www.productionmusiclive.com


Frequently Asked Questions On How To Make A Reese Bass Long Deep Bass In Serum


How Do I Make My Bass Sound Deeper?


To make your bass sound deeper, adjust the bass EQ settings on your device, use headphones or speakers with better bass response, add a subwoofer to your speaker system, or use a bass boost plugin or app. Additionally, experimenting with different playing techniques can also affect the depth of the sound.


How To Make A Reese Bass?


To make a Reese bass, you will need a sine wave and a saw wave. Set the saw wave’s filter to low-pass and modulate the cutoff frequency with an LFO. Route the modulating LFO to the filter cutoff frequency, and adjust to taste.


Mix the two waves together, and adjust the volume levels as needed.


How Do You Make A Bass Wobble In Serum?


To create a bass wobble in Serum, add an LFO to the filter cutoff or wavetable position. Adjust the LFO rate and shape to create the desired wobble effect. Experiment with different wavetables and filters to customize the sound.


How Do You Make Bass Growls In Serum?


To make bass growls in Serum, select an oscillator waveform, set its wavetable position to something other than 0%, add distortion, and use the filter section to set a steep high-pass filter followed by a mild low-pass filter. Play with the intensity, frequency, and resonance parameters to find the perfect growling bass sound.


Conclusion


After going through the steps on how to make a Reese Bass Long Deep Bass in Serum, it is apparent that with the right tools, knowledge and practice, anyone can create high-quality bass sounds. Utilizing the versatile features in Serum, such as filter effects and LFOs, can also create unique effects that set your bass apart.


By continuously exploring and experimenting with different sounds in Serum, you are on your way to making amazing music. Now it’s your turn to create your ground-shaking bass. Happy producing!


https://www.youtube.com/watch?v=vVeE1MitsVo


Categories
Archive

What is the Difference between Reverb Echo And Delay

Reverb, echo and delay are all audio effects used in music production. The difference between them is that reverb simulates the sound of an environment, echo repeats the original sound with decreasing volume and delay creates an identical copy of the original sound that is played back after a specific time delay.


Audio effects are essential in music production, as they add depth, character and texture to the sound. Reverb, echo and delay are three commonly used effects, often used interchangeably. However, there are significant differences in the way they affect the audio signal.


Understanding these differences is crucial for any musician or sound engineer trying to achieve a particular sound or effect. We will explore the differences between reverb, echo and delay in more detail, including their applications and settings.


Echo


Echo is a delay effect that creates a single repetition of a sound and is a type of reverb. Reverb, on the other hand, is multiple echos that create a sense of space and depth, while delay creates a series of echos with defined time intervals.

Echo is a phenomenon of sound that can be commonly heard in nature and in various instances in our daily lives. It is a reflection of sound where it bounces back to our ears after hitting a flat surface such as walls, floors, and ceilings. Additionally, an echo can happen if sound waves travel a distance and are reflected back to their source. It can occur naturally but can also be artificially produced using technology. Echo works by reflecting sound waves, which creates a delay. This delay can vary depending on the distance between the source of the sound and the reflective surface. Furthermore, the delay can be manipulated by adjusting the physical properties of the environment such as the distance and size of the reflective surface. A microphone placed in the path of the reflected sound waves can pick up the echo and transmit it electronically to a speaker or recording device. Examples of Echo can be heard in various scenarios such as in canyons, valleys, or large, empty rooms. Moreover, it’s used in music and audio production to add depth and create a more immersive sound. It’s frequently used in instruments like guitar, drums, and piano to create a sense of space and atmosphere. Echo can also be artificially created using electronic devices such as delay units, digital audio processors, and reverb pedals in audio production. These devices have different sets of parameters that can be manipulated to create various types of echo effects.

Echo Description
Slapback Echo Short repeating echo, useful in creating rhythmic patterns
Ping-Pong Echo Alternating echo effect between the left and right channels
Reverse Echo Echo effect in which the delay occurs before the original sound
Plate Reverb Reverb effect created by reflecting soundwaves, which simulates an echo effect

In conclusion, Echo is a reflection of sound that can be naturally occurring or artificially created in various scenarios, including music and audio production. Understanding how Echo works is essential to use it to achieve a desired audio effect.

What is the Difference between Reverb Echo And Delay


Credit: www.youtube.com


Reverb


Reverb, echo, and delay are commonly used audio effects, but they have distinct differences. Reverb is used to create an atmospheric and natural echo-like effect, while echo involves repeating a sound at regular intervals, and delay simply duplicates the original sound with a time gap.

Reverb is the reflection of sound waves that bounce off surfaces in a room or environment. It is an essential audio effect used in professional recordings, stage productions, and live performances. Reverb can add richness and depth to sound, making it sound more natural and realistic. Reverb is created by sound bouncing off surfaces and then blending into one another. The time it takes for sound to reflect from different surfaces and reach the listener produces the unique characteristics of the reverb. Typically, the larger the room, the longer the reverb time. A concert hall’s reverb will sound different from a smaller recording studio, where surfaces are made of materials with different physical properties. There are various types of reverb that can be used in audio production, including:

Reverb Type Description
Room Reverb Simulates the sound of a small to medium-sized room.
Hall Reverb Simulates the acoustics of a concert hall or cathedral.
Plate Reverb Simulates the sound of audio going through a metal place or sheet.
Spring Reverb Uses a spring to create reverb, often used in guitar amps.
Convolution Reverb Uses samples of the impulse response of physical spaces to create realistic spatial effects.

Reverb can be used to create a sense of space, provide depth in a mix, and enhance the clarity and presence of a sound. It is an important tool for producers and sound engineers to master when mixing and mastering tracks.

Delay


Reverb, echo and delay are all sound effects used in music production to create spatial depth. While reverb and echo are similar, with reverberation sounding like multiple echoes, delay is a single repetition that is made to be heard distinctly with slight time intervals.


Understanding their differences can greatly improve a sound’s overall aesthetic.

What Is Delay?

Delay, a popular audio effect used in music production, is a time-based effect that produces an echo-like sound. In simple words, the delay effect repeats the input signal after a set period, creating an echo effect.

How Does Delay Work?

Delay works by capturing the input signal and storing it in a buffer before playing it back after a set amount of time. This delayed signal is then mixed with the original signal to create the desired effect. The time delay determines the number of times the signal is repeated. The longer the delay, the more repetitions occur, creating a thicker and more prominent effect. Delay can be adjusted to give the output a sense of rhythm or showcase the various layers of sound. It also can simulate natural reverb and create a sense of space or distance from the listener.

Examples Of Delay

Here are some common examples of delay that you may find in music production:

  • Slapback delay: A short delay which repeats the input signal once.
  • Multi-tap delay: A delay which can produce several taps, allowing for complex rhythmic repetitions.
  • Reverse delay: A delay which plays the input signal backward and then repeats it forward.
  • Chorus: A delay effect which can be modulated to create a thicker sound with a sense of movement and vibration.

Understanding the basics of delay and its different types is essential for any music producer or audio engineer. By using the delay effect creatively, you can enhance your tracks and create unique sounds that stand out.


Key Differences

Audio effects like echo, reverb, and delay can greatly enhance recordings and music productions. However, these terms are often used interchangeably, leading to confusion among audio enthusiasts and beginners. Understanding the key differences between these three effects is essential for creating top-notch music mixes. Below, we’ll explore what differentiates these three effects and their pros and cons.

What Differentiates Echo, Reverb, And Delay?

Effect type Description Example
Echo A repetition of sound waves that are heard as separate distinct sounds. Hearing your voice repeated several times after shouting in a cave.
Reverb Short for reverberation, it’s the reflection of sound waves in an enclosed space in an uncontrolled manner. Hearing your footsteps echoing in a church or large hall.
Delay A repeat of audio signal with a pre-determined gap between the repeated sounds, often used for creating rhythm. Hearing audio feedback with short or long gaps between sounds.

Pros And Cons Of Each Effect

Echo:

  • Pros:
    • Can give vocals more presence and power in a mix.
    • Commonly used in rock and pop music genres.
  • Cons:
    • Too much echo can make a mix sound muddy and cluttered.
    • May not be suitable for all music genres.

Reverb:

  • Pros:
    • Adds depth and space to a mix, making it sound more natural and full.
    • Can be used on any type of instrument or vocal.
  • Cons:
    • Too much reverb can make a mix sound distant and washed out.
    • May not be ideal for specific music styles, like EDM or trance.

Delay:

  • Pros:
    • Creates rhythmic variations in a mix, making it more interesting.
    • Can be used to create intricate guitar solos and drum fills.
  • Cons:
    • Too much delay can make a mix sound cluttered and disorganized.
    • May not be suitable for all types of music, like classical or jazz.

Applications


Reverb, echo and delay are three commonly used effects in audio applications. Reverb creates a sense of space and depth, echo replicates a sound bouncing off a surface and delay repeats the original sound with a specified delay time. Each effect has its unique characteristics and can be used creatively to enhance audio recordings.

When it comes to music production, understanding the differences between reverb, delay, and echo is important. These three effects are commonly used to create a sense of space, depth, and atmosphere in audio recordings. In this post, we will focus on the applications of these effects in music production.

Common Applications Of Echo

Echo is an effect that creates a repetition of the original sound, with each repetition gradually getting quieter. Some common applications of echo in music production include:

  • Creating a sense of depth in sounds such as vocals or guitar.
  • Adding a rhythmic effect to percussion tracks.
  • Creating a haunting or eerie atmosphere in a song.

Common Applications Of Reverb

Reverb is an effect that simulates the natural reverberation of a space. It is commonly used to create a sense of space and depth in an audio recording. Some common applications of reverb include:

  • Creating a sense of space in a vocal recording.
  • Adding depth to a guitar or piano recording.
  • Creating a sense of realism in a drum recording.

Common Applications Of Delay

Delay is an effect that creates a single, repeated copy of the original sound. It can be used to create a sense of space, depth, and atmosphere in a recording. Some common applications of delay include:

  • Creating a rhythmic effect on a guitar or synthesizer track.
  • Adding depth and complexity to a vocal recording.
  • Creating a subtle sense of space in a drum or percussion track.

In conclusion, understanding the differences between echo, reverb, and delay is essential for any music producer. Each of these effects has its unique applications and can be used creatively to add depth and atmosphere to any recording.

What is the Difference between Reverb Echo And Delay


Credit: www.guitarguitar.co.uk


Frequently Asked Questions Of What Is The Difference Between Reverb Echo And Delay


What Is The Difference Between Echo And Reverb?


Echo is a delayed repetition of sound that is distinct and clear, while reverb is a more diffuse or blended sound that occurs when sound waves bounce off walls or other surfaces. Echo is often used to create a specific effect in music or movies, while reverb is more commonly used in recording studios to add depth and warmth to audio recordings.


Do I Need Delay If I Have Reverb?


No, delay and reverb are separate effects and serve different purposes. While reverb simulates the natural acoustics of a space, delay creates echos and repeats. Both effects can be used together to create a unique sound, but delay is not necessary if you only have reverb.


Are Reverb And Echo The Same Effect?


No, reverb and echo are not the same effect. While both create a sense of space, reverb is made up of multiple repeated echos that blend into one, simulating the sound of a room, while echo is a distinct repetition of the original sound, often with a noticeable delay between them.


Should Delay Go Before Or After Echo?


Delay should go before echo.


Conclusion


To sum up, reverb, echo, and delay all create varying effects on sound. While they may appear quite similar and often used interchangeably, they all serve their individual purposes and can vastly enhance the quality of music. Knowing the differences and how each is best utilized is key to achieving a sound that resonates with the listeners.


Whether you’re a music enthusiast or a professional producer, understanding these effects is essential in creating music that stands out.


Categories
Archive

How To Make My Mix Sound Professional Golden Rules

To make your mix sound professional, follow these golden rules: use high-quality sounds, balance the levels and frequencies, add depth and dimension, and use automation to create movement and interest. These guidelines will help you create a well-balanced and polished mix that will sound great on any system.


Making a mix sound professional can be challenging, especially if you’re new to music production. But by following a few basic rules, you can achieve a polished and professional sound that stands out from the crowd. We’ll discuss the golden rules of mixing, including how to use high-quality sounds, balance the levels and frequencies, add depth and dimension, and use automation to create movement and interest.


Whether you’re mixing for a client or just for fun, these guidelines will help you create a well-balanced and polished mix that will sound great on any system.


Master The Fundamental Elements

When it comes to making your mix sound professional, there are some golden rules that you should follow. One of these rules is to master the fundamental elements of mixing. Whether you’re a beginner or an experienced producer, it’s essential to get the basics right.

Balance Levels And Panning

The first step in mastering the fundamental elements of mixing is to balance levels and panning. This involves adjusting the volume levels of each instrument or vocal track to make sure they sit nicely together in the mix. Panning is also important to create a sense of space and depth. You can pan instruments to the left or right to create a stereo image.

Equalize To Boost Or Cut Frequencies

The next step is to equalize the tracks in your mix. Equalization involves boosting or cutting specific frequencies to make the mix sound balanced and clear. You can use equalization to remove unwanted frequencies, such as low-end rumble or high-end hiss, and bring out the natural characteristics of each instrument or vocal.

Compress Dynamics For Control

Compression is an essential tool for controlling the dynamics of your mix. It helps to even out the volume levels of each track and make them more consistent. This is particularly important for vocals and drums, which can have a wide dynamic range. By compressing these tracks, you can make sure that they are always present in the mix and don’t get lost in the other instruments.

In conclusion, mastering the fundamental elements of mixing is essential for creating a professional-sounding mix. By balancing levels and panning, equalizing to boost or cut frequencies, and compressing dynamics for control, you can take your mix to the next level. Keep these golden rules in mind and experiment with different techniques to find what works best for your mix.

Add Depth And Dimension


To achieve a professional sound when mixing music, it’s important to add depth and dimension to your tracks. Utilizing different elements such as reverb, EQ and panning can create a sense of space and can help each individual instrument stand out in the mix.

Reify Stereo Field With Effects

To add depth and dimension to your mix, try reifying the stereo field by using effects. By panning elements in your mix, you can create a sense of space and make it feel like the listener is “in” the mix. One way to do this is to use stereo imaging plugins that can widen the stereo field of certain elements such as synths or vocals. You can also use plugins that simulate analog hardware to add warmth and character to the sounds. Example:

  • Pan guitars left and right to create a wide stereo field.
  • Use a chorus effect on synths to widen the sound.
  • Use a stereo imaging plugin to adjust the stereo width of certain elements.
  • Use analog saturation plugins to add warmth and character to your sounds.

Integrate Ambient Space With Reverb

Another way to add depth and dimension is to integrate ambient space with reverb. By adding reverberation to elements in your mix, you can create a sense of space and make it feel like the listener is “in” the room where the mix is being played. One way to do this is to use convolution reverb plugins that allow you to load impulse responses of real spaces, such as concert halls or churches. You can also use plate, room, or hall reverbs to simulate the effect. Example:

  • Add reverb to drums to create a sense of space.
  • Use a convolution reverb plugin to simulate the sound of a real space.
  • Use a plate, room or hall reverb to create a sense of space.
  • Automate the reverb decay time to create dynamic changes in the space.

Use Delays To Create Delay

Delays can also be used to add depth and dimension to your mix by creating a sense of space and adding movement to the elements. By using different delay times and feedback levels, you can create interesting rhythmic patterns and textures. You can also use delay with modulation to create psychedelic or ambient effects. Example:

  • Use a ping-pong delay on guitars to create a bouncing effect.
  • Automate the delay time on synths to create a rhythmic pattern.
  • Use a tape delay plugin with modulation to create a vintage feel.
  • Add delay to vocals to create a sense of space and movement.

Create Tonal Excitement And Variation


Creating tonal excitement and variation is a key element in making your mix sound professional. To achieve this, use a variety of dynamics and panning techniques, experiment with EQ and saturation, and add small variations in volume and timing to keep the listener engaged.

When it comes to making a mix sound professional, tonal excitement and variation are two key ingredients. To achieve this, you need to add harmonic content, manipulate timbre, and add character to your mix. Here are some tips on how to do it:

Add Harmonic Content With Saturation

Saturation is a great tool to add warmth and color to your mix. By adding harmonic content, you can make your mix sound fuller and more interesting. You can use saturation plugins to add harmonic distortion to your tracks or use analog gear like tape machines and preamps to add saturation to your mix.

Manipulate Timbre With Modulation

Modulation is an effective way to manipulate the timbre of your tracks. By adding modulation effects like chorus, flanger, and phaser, you can add movement and depth to your mix. You can also use modulation to create stereo effects by modulating the left and right channels of your tracks.

Add Character With Distortion

Distortion is a powerful tool to add character to your tracks. By adding distortion to your mix, you can make your tracks sound grittier and more aggressive. You can use distortion plugins to add distortion to your tracks or use hardware gear like guitar pedals and analog synths to add distortion to your mix. In conclusion, tonal excitement and variation are essential to making your mix sound professional. By adding harmonic content with saturation, manipulating timbre with modulation, and adding character with distortion, you can create a mix that stands out and captures the attention of your listeners.

How To Make My Mix Sound Professional Golden Rules


Credit: m.youtube.com


Ensure Smooth Transitions And Movement

If you want your mix to sound professional, you need to ensure that the transitions and movement between different sections of the track are smooth. This means that you need to pay attention to things like levels, effects, and stereo image. Here are some tips on how to achieve smooth transitions and movement in your mix.

Automate Levels And Effects

One way to achieve smooth transitions is to automate the levels and effects of different tracks as they move from one section to another. This means that you will need to adjust the volume and effects of each track as the song progresses. You can use automation to gradually increase or decrease the volume of a track, add or remove effects, and even change the EQ settings.

Use Risers And Swells For Transitions

Another way to achieve smooth transitions is to use risers and swells. A riser is a sound effect that gradually increases in volume and intensity, while a swell is a sound effect that gradually decreases in volume and intensity. You can use these effects to create a sense of anticipation as the song moves towards a new section, or to bring a section to a close.

Modulate Stereo Image With Panning

Panning is another important tool for achieving smooth transitions and movement in your mix. By modulating the stereo image with panning, you can create a sense of space and depth in the mix. You can pan different tracks to different positions in the stereo field, or use automation to create movement within the stereo image.

Table 1: Summary of Tips for Smooth Transitions and Movement

Tip Description
Automate Levels and Effects Adjust the volume and effects of each track as the song progresses.
Use Risers and Swells Gradually increase or decrease the volume and intensity of sound effects.
Modulate Stereo Image with Panning Create a sense of space and depth by panning tracks to different positions in the stereo field.

By following these tips and techniques, you can ensure that your mix has smooth transitions and movement, and sounds professional. Experiment with different combinations of techniques and discover what works best for your mix!

Maximizing Loudness While Retaining Dynamics


To achieve a professional sound in your mix, it’s crucial to maximize loudness while retaining dynamics. This can be done by using proper compression, EQ, and limiting techniques. With the right approach, you can achieve a balanced and polished sound that stands out from the competition.

Focus On The Calibrated Loudness

To create a professional-sounding mix, mastering your audio is crucial. And when it comes to loudness, there are some golden rules to follow. One of them is focusing on the calibrated loudness. You have to understand that the loudness of your mix can be affected by different factors such as EQ, compression, and volume levels. A good practice is to set your volume levels to a calibrated scale. By doing so, you can ensure that your mix will play at a consistent volume level across different platforms.

Hard Limiting, Compression, Or Brickwall Limiting

Hard limiting, compression, and brickwall limiting are techniques commonly used to maximize the loudness of a mix while retaining its dynamics. Hard limiting involves setting a maximum level for the audio, effectively limiting the dynamic range. Compression, on the other hand, involves reducing the dynamic range of the audio, making it easier to increase its overall loudness. And brickwall limiting is a type of hard limiting that sets an absolute maximum level for the audio, preventing it from exceeding that threshold.

Add Harmonic Excitement With Multiband Compression

Multiband compression is another effective technique you can use to add harmonic excitement to your mix while retaining its dynamics. This technique involves splitting the audio into different frequency bands and processing them individually. By doing so, you can apply different levels of compression to each band, effectively controlling the dynamic range of your mix while adding harmonic content. The result is a professional-sounding mix that’s both loud and dynamic. In conclusion, maximizing loudness while retaining dynamics is key when it comes to creating a professional-sounding mix. By following the golden rules mentioned above and utilizing techniques such as hard limiting, compression, and multiband compression, you can create a mix that sounds great across different platforms while retaining its dynamics.

Proper Use Of Reference Tracks


To make your mix sound professional, proper use of reference tracks is essential. By comparing your mix to a high-quality, well-mixed reference track, you can identify areas that need improvement and ensure your final product sounds polished and cohesive. Use reference tracks throughout the mixing process to achieve a more professional sound.

When it comes to producing music, making the mix sound professional is crucial. One of the most effective ways to achieve this is by using reference tracks. Reference tracks are songs that have a sound close to what you are hoping to achieve with your mix. In this section, we will look at the golden rules for using reference tracks, including selecting appropriate tracks, comparing track loudness, and analyzing the techniques used for mix correction.

Selecting Appropriate Reference Tracks

The first and most important rule for using reference tracks is to select appropriate tracks. Consider selecting tracks from a similar genre, tempo, and instrumentation to your mix. If you are producing a pop song, use pop reference tracks. Similarly, if you are producing a rock track, use rock reference tracks. This will ensure that you are comparing your mix to songs with similar production values.

Comparing Track Loudness

Another golden rule for using reference tracks is comparing track loudness. You want to ensure that your mix’s loudness is on par with the reference track. Keep in mind that it’s not just about making your mix loud. Instead, it’s about making sure that your mix’s loudness is similar to that of the reference track. The importance of comparing loudness during mixing cannot be overstated as it helps you find a balance between loudness and dynamic range.

Analyzing Techniques Used For Mix Correction

Finally, when using reference tracks, you should analyze the techniques used for mix correction. Listen to the reference tracks and pay attention to how the instruments complement each other. Analyze the use of effects, panning, and EQ adjustments. Use this knowledge to improve your mix and achieve a professional sound. In conclusion, following these golden rules when using reference tracks will help elevate your mixing skills to a professional level. Remember that the goal of using reference tracks isn’t to copy another artist’s sound, but to learn how to create professional mixes.

Be Critical And Deliberate In Every Decision

Mixing music is an art that requires a critical ear. It takes patience, practice, and skill to create a professional-sounding mix. To achieve this, be deliberate and critical in every decision you make. Below are some golden rules you can follow to make your mix sound professional.

Train Your Critical Listening Skills

Training your critical listening skills is vital in creating a professional-sounding mix. You must be able to hear and identify individual elements of a mix. This way, you can make informed decisions about each element’s placement and levels in the mix.

Be Consistent And Intentional With Your Decisions

Being consistent and intentional with your decisions is key to making a mix sound professional. Stick to your decisions once you’ve made them and ensure that they remain consistent throughout the mix. Every decision you make should have a purpose in contributing to the overall sound of the mix.

Revise And Refine Your Mix Multiple Times

Once you’ve finished your mix, it’s time to revise it multiple times. Listen to it through different sound systems to check for any flaws in the mix, such as frequency imbalances or cluttered areas. Refine your mix until it sounds polished and professional.

Remember, being critical and deliberate in every decision you make is crucial to creating a professional-sounding mix. Train your critical listening skills, be consistent and intentional, and revise and refine your mix multiple times.

Equip Yourself With The Right Tools

Mixing music is not an easy task, and it can be challenging to accomplish a professional result without the proper tools. Learning how to make your mix sound professional requires that you equip yourself with essential resources that you need to produce an excellent track. In this section, we will discuss the importance of investing in quality speakers and headphones, a reliable acoustic treatment, and quality plugins.

Invest In Quality Speakers And Headphones

When it comes to mixing music, having the right set of speakers and headphones can make a world of difference. Investing in quality gear will ensure that you can hear every detail in your mix without any distortion, which is crucial when working on a professional project. Some of the best studio monitors and headphones in the market include:

Speakers Headphones
Adam Audio A7X Sennheiser HD 600
Yamaha HS8 Beyerdynamic DT 1990 PRO
JBL 305P MkII Audeze LCD-X

Get Reliable Acoustic Treatment

A reliable acoustic treatment should be a top priority when setting up your studio. This will help eliminate any unwanted reflections or echoes that could compromise the quality of your mix. You can accomplish this by adding acoustic panels, bass traps, and diffusers to your studio space. Some popular brands that offer high-quality acoustic treatment include:

  • Auralex
  • Primacoustic
  • GIK Acoustics

Utilize Quality Plugins

When mixing music, using quality plugins can help take your mix to the next level. You can find plugins that can help you with EQ, compression, reverb, and other essential effects. Some of the best plugin brands in the market include:

  1. Waves
  2. FabFilter
  3. Universal Audio

Investing in quality speakers and headphones, getting reliable acoustic treatment, and utilizing quality plugins are the essential tools you need to produce a professional mix. As a result, you can be confident that the work you produce will stand out from the rest and meet your expectations.


How To Make My Mix Sound Professional Golden Rules


Credit: doctormix.com


Frequently Asked Questions For How To Make My Mix Sound Professional Golden Rules


How Can I Make My Mixes Sound More Professional?


To make your mixes sound more professional, focus on leveling and balancing your tracks, using EQ to clean up and tone down problematic frequencies, using compression to add depth and clarity to your mix, and paying attention to the stereo image.


Additionally, consider the use of reverb to create space and dimension, and always reference your mix on different speakers to get a better perspective.


How Do You Mix Music Like A Professional?


To mix music like a pro, follow these five guidelines: First, ensure that the sound levels are consistent across all tracks. Second, EQ each track to remove overlapping frequencies. Third, use compression to even out any peaks in the sound.


Fourth, add space and depth with reverb and delay effects. Finally, use panning and volume automation to create movement and emphasize important elements.


How Do You Mix Sound Properly?


To mix sound properly, you should first ensure that all the audio levels are balanced and set to an appropriate level. It’s essential to use good quality headphones or monitors to hear the sound accurately. Also, use EQ and compression to adjust the frequency response and dynamic range.


Finally, add reverb and other effects to enhance the sound.


How Do You Mix A Professional Beat?


To mix a professional beat, you need to focus on these key aspects: balance and EQ, compression, reverb and delay, stereo width, and mastering. Try to achieve a balanced sound and eliminate unwanted frequencies. Use compression to control the dynamics, apply reverb and delay to create a sense of space, adjust the stereo width to make your beats sound full, and use mastering to enhance the overall sound quality.


Conclusion


Making a mix sound professional requires proper attention and adherence to the golden rules of mixing. These rules include paying attention to EQ, compression, reverb, stereo imaging, and overall balance. To make your mix stand out, it is important to avoid over-processing and making sure all elements blend seamlessly together.


Remember, a professional sounding mix can take some time and dedication, but with patience and practice, you can achieve incredible results. Follow these golden rules and enjoy the satisfaction of a well-mixed and polished track.

Categories
Archive

How To Get Your Music Featured On Spotify Playlists

To get your music featured on Spotify playlists, you need to submit your tracks to Spotify curators directly or via third-party services. Once your music is approved, it will be made available on various playlists.


Getting your music featured on Spotify playlists can be a game-changer for independent artists looking to gain visibility and increase their fanbase. Spotify is currently the leading music streaming platform, with over 356 million active users worldwide. With Spotify playlists, you can reach new listeners, increase streams, and improve your chances of being discovered by record labels, booking agents, and other industry professionals.


But how do you get your music featured on Spotify playlists? There are several strategies you can use, including submitting your tracks through Spotify for Artists, using playlist pitching services, collaborating with playlist curators, and creating your own playlists. We’ll explore these and other methods to help you get your music featured on Spotify playlists and make a name for yourself in the music industry.


Understand The Importance Of Playlist Placement

Are you an aspiring musician who wants to get your music heard by a broader audience? Then Spotify is one of the best platforms to help you achieve your goals. With over 320 million monthly active users, Spotify is a hub for music enthusiasts, and getting your music featured on Spotify playlists can help skyrocket your career. However, understanding the importance of playlist placement is crucial if you want to achieve the best results.

How Placement On Spotify Playlists Impacts Your Music Career

Playlist placement holds a significant impact on your music career. Getting featured in a popular Spotify playlist means that thousands of people would be listening to your music every day. With each stream, your listener base expands, and if you’re consistently creating high-quality music, you’ll likely get more followers. In a nutshell, placement on Spotify playlists is the shortcut you need to gain exposure and take your career to the next level.

Why Getting Featured On Spotify Playlists Is Critical

Getting your music featured on Spotify playlists is an essential part of your music career. It directly impacts the number of plays, shares, and followers you get, offering a considerable boost in your exposure. It’s not just about getting featured in a playlist, but also about the number of followers, shares, and plays you get that determines your success on the platform.

Spotify editors curate playlists based on the genre, listening history, and interests of their users. Therefore, it’s critical to understand how to promote your music and catch the editors’ and listeners’ attention. A Spotify playlist placement can take you a long way, helping you gain a considerable amount of exposure, new fans, and expand your career to an international level.

How To Get Your Music Featured On Spotify Playlists


Credit: www.masteringthemix.com


Optimize Your Spotify Profile


Optimizing your Spotify profile is key to getting your music featured on their playlists. Ensure your profile picture, bio, and tags accurately reflect your music and engage with your fans by making and sharing playlists. Don’t be afraid to promote yourself on your social media channels too!

Why An Optimized Spotify Profile Is Essential

Your Spotify profile is your digital identity on the platform. If you want to gain more followers, increase your engagement and boost your chances of getting featured on notable Spotify playlists, then optimizing your Spotify profile is essential. By optimizing your Spotify profile, you’re also increasing your chances of being noticed by curators, playlist makers, and music industry professionals who scour the platform for new artists. Your brand identity and overall presentation on Spotify play a significant role in the decision-making process of these curators.

Elements Of A Great Spotify Profile

Now that you know why an optimized Spotify profile is essential, let’s delve into the elements that make a great Spotify profile:

1. Profile Picture

Your profile picture is the first thing that people will see when they come across your Spotify profile. Make sure it’s a high-quality image that correctly represents your brand and style of music. Avoid using blurry images or any image with low resolution as it can negatively affect your overall presentation.

2. Biography

A well-crafted biography can grab the attention of potential followers and curators. Your bio should be brief, informative, and engaging, showcasing your uniqueness and what sets you apart from other artists.

3. Discography

Your Spotify discography should reflect your music history and artistic journey. It’s essential to make sure that your discography is up-to-date, well-organized, and easy to navigate. Ensure your music is categorized and labeled correctly.

4. Playlists

Creating your playlists is a fantastic way to showcase your taste in music and promote your music to a wider audience. Curated playlists that feature not only your music but also other artists’ work can help you connect with potential followers and the music industry.

5. Social Media Links

Having links to your social media accounts on your Spotify profile can help creators and industry professionals get to know you better. Plus, it can lead to more followers on other platforms and a broader audience for your music. Overall, optimizing your Spotify profile can significantly boost your chances of getting featured on top Spotify playlists. By following the elements listed above, you can create an impressive profile that stands out from other artists and catches the attention of curators and fans alike.


Target The Right Spotify Playlists


To get your music featured on Spotify playlists, it’s essential to target the right playlists. Identify and reach out to curators who feature similar artists and genres, and ensure your music aligns with their style. Engage with your audience and promote your music on social media platforms to increase discoverability.

If you’re an upcoming artist trying to grow your fan base and get your music heard, you can’t ignore Spotify playlists. Getting your music featured on popular playlists can help you reach a wider audience, gain new fans, and boost your streaming numbers. But how do you get your music featured on Spotify playlists? The answer is simple – targeting the right playlists. In this post, we’ll show you how to find the best playlists for your genre, and why targeting niche playlists can be more effective.

How To Find The Best Playlists For Your Genre

The first step to getting your music featured on Spotify playlists is to find playlists that are a good fit for your genre. Start by researching playlists that feature similar artists to you. Use Spotify’s search function to look for relevant keywords, e.g., “indie pop playlists” or “hip-hop playlists”. You can also browse through Spotify’s “Browse” and “Discover” sections to find playlists that fit your style. Once you’ve identified potential playlists, listen to them and check the playlist’s description and curator information. This will give you an idea of what the playlist is looking for and how to submit your music.

Why Targeting Niche Playlists Can Be More Effective

While it may be tempting to submit your music to the most popular playlists on Spotify, it’s important to remember that these playlists are often highly competitive. Instead, consider targeting niche playlists that cater to a specific subgenre or mood. These playlists may have smaller audiences, but they often have more engaged listeners who are more likely to discover and support new artists. In addition, targeting niche playlists allows you to stand out from the crowd and increases your chances of being selected for the playlist. Keep in mind that building momentum on smaller playlists can lead to getting featured on larger playlists down the line. In conclusion, targeting the right Spotify playlists is key to getting your music heard and growing your fan base. By researching playlists that fit your genre and targeting niche playlists, you can increase your chances of getting featured and building a loyal fan base. Remember to read the playlist’s description and curator information, follow submission guidelines, and keep track of your progress. With persistence and a bit of luck, you could be the next rising star on Spotify.

How To Get Your Music Featured On Spotify Playlists


Credit: www.masteringthemix.com


Network With Curators

If you are an upcoming artist, getting your music featured on Spotify playlists can be a significant boost to your music career. Spotify playlist curators are always on the lookout for new artists and tracks to feature on their playlist. Networking with these curators is one of the best ways to get your music heard by the masses. This article highlights why building relationships with curators is important and the best ways to reach out to playlist curators.

Why Building Relationships With Curators Is Important

Building relationships with curators is essential because it gives you an opportunity to introduce yourself and your music. Curators are more likely to feature artists they have a relationship with. By building a relationship with a curator, you increase your chances of having your music featured. Additionally, curators can give you feedback on your music, which can help you improve your craft. Overall, building a relationship with a curator can help you build a strong foundation for your music career.

The Best Ways To Reach Out To Playlist Curators

Reaching out to playlist curators can be a bit tricky because they receive thousands of emails from artists looking to be featured on their playlists. You need to stand out from the crowd to get their attention. Here are some tips on how to reach out to playlist curators:

  1. Research the curator: Take the time to research the curator and their playlist. Understand the genre they focus on and the types of songs they usually feature on their playlist. This information can help you tailor your pitch to the curator.
  2. Personalize your pitch: Avoid sending generic emails to curators. Personalize your pitch by addressing the curator by their name and mentioning their playlist. This shows that you have done your research and are genuinely interested in their playlist.
  3. Keep it short and sweet: Curators receive hundreds of emails, so keep your pitch short and sweet. Introduce yourself, your music and explain why you think your music would be a good fit for their playlist. Attach a link to your music and press kit for easy access.
  4. Follow up: If you do not hear back from the curator, follow up after a week or two. Keep your follow-up short and to the point.
  5. Be professional: Lastly, you need to be professional in your approach. Avoid being pushy or rude if a curator declined to feature your music. Thank them for their time and ask for feedback on how you can improve your music.

By following these tips, you increase your chances of having your music featured on Spotify playlists. Remember, networking with curators is not a guarantee that your music will be featured, but it does increase your chances.

Focus On High-quality Production

One of the most crucial factors in getting your music featured on Spotify playlists is the quality of your production. Spotify has strict guidelines on the quality of music it adds to its playlists, and to meet these standards, your music must be of high-quality. Focus on creating music that sounds professional, well-produced, and appealing to your audience.

Why Production Quality Matters On Spotify

The quality of your music production has a significant impact on how it is received on Spotify. Firstly, high-quality music is more likely to be added to Spotify’s official playlists. Secondly, it helps to establish your brand as a professional artist and can increase your chances of getting discovered by the right people.

Furthermore, high-quality audio production can improve the listening experience for your audience, ensuring that they keep coming back to your music on Spotify. When the mix is clean, a listener can enjoy the different elements of your song, whether it’s the lyrics, melody, or instrumentation.

Tips For Improving Your Recording Quality

Here are some tips that you can consider to improve your music recording quality:

  1. Invest in quality equipment and software to record, mix, and master your music.
  2. Keep the recording environment in mind to minimize background noise and other interference.
  3. Ensure that you record in high-quality formats, such as WAV files.
  4. Use headphones while recording to monitor your volume levels and ensure that everything sounds balanced.
  5. Consider hiring a professional sound engineer or music producer to help with the mixing and mastering process.

By following these tips, you can improve your recording quality and increase your chances of getting your music featured on Spotify playlists. Remember that quality music production is essential to attracting listeners and growing your fan base on Spotify.


Promote Your Music Through Social Media


Learn how to increase your chances of getting your music featured on Spotify playlists by promoting your music on social media. Build a strong following, engage with your audience, and catch the attention of Spotify curators by showcasing your talent through social media.

Why Social Media Is Essential For Promoting Your Music On Spotify

With over 2.2 billion monthly active users, social media has become an integral part of promoting any business or product, and the music industry is no exception. Whether you’re an independent artist or a signed musician, promoting your music on social media platforms can help you reach a wider audience and increase your chances of getting featured on Spotify playlists. Spotify has over 345 million active users, and getting your music featured on playlists can significantly boost your streams and followers. Social media platforms like Facebook, Instagram, Twitter, and Tiktok allow you to drive traffic to your Spotify profile and make it easier for fans and potential listeners to find and follow you.

How To Effectively Use Social Media To Promote Your Music

1. Create A Social Media Strategy: Establish a plan for your social media campaigns to maximize your reach. Determine your target audience, set measurable goals, and create a content calendar to ensure you post consistently. 2. Engage With Your Followers: Encourage your fans to engage with your content by liking, sharing, and commenting. Respond to their comments and messages to build a loyal fan base. 3. Collaborate With Other Artists: Collaborating with other artists in your genre can help you reach a wider audience and gain more followers. Cross-promote each other’s music on your social media platforms. 4. Use Hashtags: Use relevant and trending hashtags in your posts to make it easier for users to search and find your content. Use tools like Hashtagify to find the best hashtags for your music. 5. Run Contests and Giveaways: Running contests and giveaways on your social media platforms can help you increase engagement and attract new followers. Offer exclusive merch or concert tickets as prizes to incentivize users to participate. In conclusion, social media marketing is crucial for promoting your music on Spotify and maximizing your chances of getting featured on playlists. By creating a strong social media strategy, engaging with your followers, collaborating with other artists, using hashtags, and running giveaways, you can increase your streams, followers, and fan base.

Submit Your Music To Spotify Playlist Curators


To get your music featured on Spotify playlists, submit your music to verified playlist curators through platforms like SubmitHub or directly through Spotify for Artists. Focus on finding playlists that fit your genre and audience, personalize your pitch to each curator, and promote your music on all social media channels.

Submitting your music to Spotify playlist curators is a great way to get your music featured and promoted. Spotify playlists are a great way to expose your music to new potential fans, increase your streams, and build your overall credibility as an artist. In this blog, we will discuss why submitting your music to curators is a great strategy and provide tips on how to write a compelling pitch to playlist curators.

Why Submitting Your Music To Curators Is A Great Strategy

Submitting your music to Spotify playlist curators is a fantastic strategy for several reasons. Here are some key benefits to keep in mind:

  • Increased Exposure: Submitting your music to curators can get your music exposed to a larger audience than you may have been able to reach on your own.
  • Credibility: Getting your music featured on a Spotify playlist can help establish credibility and show potential fans and industry professionals that your music is noteworthy.
  • Increased Streams: Getting your music featured on a playlist can increase your streams and generate more income.
  • Networking Opportunities: By connecting with Spotify curators, you have the opportunity to develop relationships in the industry and potentially lead to future collaborations.

How To Write A Compelling Pitch To Playlist Curators

Crafting a compelling pitch is crucial to getting your music featured on Spotify playlists. Here are some tips to help you write a pitch that stands out:

  1. Do Research: Look for playlists that fit the genre, mood, and sound of your music.
  2. Know the Curator: Make sure to research the Spotify curator and their playlist style before making your pitch.
  3. Be Professional: Your pitch should be concise and professional, so make sure to proofread and check for errors.
  4. Be Creative: Use descriptive language and vivid imagery to help convey your music and captivate the listener’s attention.
  5. Offer Exclusives: Provide the curator with exclusive content such as new songs or unreleased tracks to generate interest.

Overall, submitting your music to Spotify playlist curators can be a great strategy to help you gain exposure, increase streams and credibility as an artist. By taking the time to research curators, craft a compelling pitch and offer exclusives, you can improve your chances of getting featured on a playlist and attracting new fans.

Track Your Success

Track Your Success: How To Get Your Music Featured On Spotify Playlists. Once you’ve tried to get your music featured on Spotify playlists, you need to keep up with your performance to know what works and what doesn’t. To do so, you must analyze your performance on the platform.

Why Analyzing Your Performance Is Essential

Analyzing your performance is essential because it gives you insights into your audience, their preferences and behavior, and your actual reach. You may think that identifying your audience is not important because Spotify is a massive platform with millions of users, but knowing who your tracks resonate with will help you understand how to optimize your marketing strategy or the type of music you create.

The Best Tools For Analyzing Your Spotify Metrics

Spotify offers built-in analytics tools to help you analyze your performance on the platform. However, these analytics will often provide surface-level metrics like the number of streams, the number of followers, and recent listeners. Fortunately, third-party analytics tools that you can integrate with your account provide more in-depth insights into your performance metrics.

Here’s a list of some of the best tools to help you analyze your Spotify metrics:

Tool Description
Chartmetric Comprehensive analytics tool showing everything from follower growth to competitor analysis.
SpotOnTrack Allows you to track your performance on multiple playlists. You can also perform playlist monitoring through this tool, and keep track of your followers, plays, and saves.
Soundcharts Analytics dashboard for monitoring your performance along with the performance of other artists on the platform.

By using these tools, you can determine the demographics and listening habits of your listeners, which will help you tailor your content to their preferences. They also help you to track your progress over time as well as the marketing campaigns that were successful.

Remember to analyze your metrics regularly to understand how your tracks are performing and to make the necessary changes to optimize your strategy.

Frequently Asked Questions Of How To Get Your Music Featured On Spotify Playlists


How Do You Get Featured On Spotify Playlists?


In order to get featured on Spotify playlists, there are a few things you need to do. First, make sure your songs are unique and of high quality. Second, build relationships with curators and other industry professionals. Third, focus on promoting your music through social media and other channels.


Fourth, pay attention to trends in the music industry and tailor your music accordingly. Finally, be patient and persistent – getting featured on playlists takes time and effort.


How Do You Get Placed On Spotify Playlists?


To get on Spotify playlists, follow these guidelines: 1. Submit your music through Spotify playlist submission tools and playlists curators. 2. Build your own fanbase and engaging social media presence. 3. Collaborate with other artists, especially those with established playlists.


4. Stay active and consistent in producing quality music. 5. Utilize Spotify for Artists and use data to strategically target playlists and promote your music.


How Do I Get My Song On More Playlists On Spotify?


To get your song on more playlists on Spotify, focus on promoting your music across various social media platforms. Create engaging content and connect with influencers to increase your reach and gain more followers. Utilize Spotify’s playlist submission feature and engage with playlist curators to increase your chances of being featured.


Consistency is key, so keep creating quality music and actively promoting it.


How Do I Get My Music Listed On Spotify?


To get your music listed on Spotify, you need to use an online music distributor such as DistroKid or TuneCore. These platforms allow you to upload your music and distribute it to various streaming services, including Spotify. Make sure your music meets Spotify’s technical requirements and follows their content policies.


It may take a few days or weeks for your music to be processed and added to Spotify’s library.


Conclusion


Getting your music featured on Spotify playlists can greatly improve your visibility and help you gain more followers. It’s important to optimize your profile, network with curators and build relationships, promote your music through various online channels, and create high-quality content that resonates with your audience.


Remember, the key is to be patient, persistent, and adaptable in your approach. With these tips in mind, you’ll be well on your way to Spotify playlist success.

Categories
Archive

Streamline Your Process To Finish Your Songs Faster

To streamline your process and finish songs faster, establish a routine and use technology to your advantage. Dedicate specific times for writing and editing, utilize tools like voice memos and apps for organization, and stay focused with minimal distractions.


If you’re a songwriter, you know the struggle of starting a project and not knowing where to go with it. Sometimes, it can feel like you’re stuck in a rut and can’t seem to finish any songs. However, with some simple adjustments to your process, you can streamline your workflow and crank out more tracks in less time.


We’ll discuss some practical tips on how to optimize your routine and make use of technology to help you with writing and editing. From setting specific times for certain tasks to using voice memos and apps, these strategies will help you stay focused and efficiently complete your songs.

Streamline Your Process To Finish Your Songs Faster


Credit: m.youtube.com


Understand Your Creative Process

When it comes to creating music, the creative process can look vastly different for each person. Understanding your creative process is the key to streamlining your workflow and finishing your songs faster. Here, we’ll cover some steps to take to better understand your process and optimize it to work for you.

Identify What Works For You

What works for one songwriter may not work for another, and that’s okay. The first step to understanding your creative process is identifying what works best for you. Do you write lyrics first and then add chord progressions, or do you create a melody and build around that? Perhaps you enjoy experimenting with different instruments and sounds to see what resonates with you. Whatever your method is, jot it down and keep it in mind while you work on your songs.

Take Note Of Your Distractions

Distractions can drag out the creative process and leave you feeling unproductive. Take note of your distractions and work to eliminate them during your creative sessions. Maybe you get easily distracted by your phone, so you turn it off or put it on silent while writing. You might also find it helpful to pick a specific time of day to work on your music, when you’re less likely to be interrupted.

Develop A Clear Outline

A clear outline can help you stay on track and focused during your songwriting process. Start by jotting down your ideas and main themes you’d like to convey through your music. Once you have a general idea, organize your thoughts into a clear outline. Include a chorus, verse, and bridge in your outline, ensuring that each section flows seamlessly into the next. Having a clear outline can save you time and make the writing process more efficient.

Maximize Your Productivity


Maximize your productivity as a music creator by streamlining your process and finishing your songs faster. By implementing efficient workflow techniques and organizing your workspace, you can boost your creativity and achieve better results.

As a songwriter, it can be easy to get sidetracked and bogged down by distractions, causing your productivity to suffer. However, by implementing some simple steps and habits, you can significantly increase your productivity and streamline your process to finish your songs faster. In this post, we’ll explore some effective strategies for maximizing your productivity.

Eliminate Distractions

Distractions are one of the biggest productivity killers for any songwriter. To eliminate distractions, start by identifying them. For example, social media, text messages, and email notifications can be major distractions. Turn off your phone notifications and move away from social media when working on your songs. If you find external noises distracting, consider wearing noise-canceling headphones.

Create An Environment That Promotes Focus

Creating the right environment can make all the difference in your productivity. Ensure your workspace is comfortable, well-lit, and organized, removing anything that may distract you. Having a designated space for songwriting will help put you in the right mindset for focusing on your creative work.

Discover The Right Time And Space To Work On Specific Aspects Of A Song

Everyone has times when they feel more productive and creative than others. Some people work better in the morning, while others are more creative at night. Experiment to find out what works for you. Also, consider where you are when ideas come to mind. You may find that you get more inspiration while taking a walk or during your morning shower. Another strategy for optimizing productivity is to work on specific aspects of a song during certain times. For instance, you may feel your best working on lyrics during the morning hours and composing melodies in the afternoon.

Break The Task And Take Breaks

Songwriting can be a daunting task, especially if you view it as a single, whole project. Breaking the task down into smaller, achievable goals can help make the process more manageable. Create a songwriting schedule or a to-do list to keep you organized and focused. Also, taking breaks is essential for maintaining productivity. Taking breaks helps prevent burnout and helps you recharge your creative juices. Take short breaks during your songwriting sessions, and make sure to step away for a more extended period to rest and come back ready to work.

Implementing these strategies will help streamline your process and improve your productivity, enabling you to finish your songs faster. By eliminating distractions, creating a conducive workspace, discovering the right time and space to work on specific aspects of a song, and breaking your task into smaller, achievable goals while taking breaks will help maximize your productivity, allowing you to create great music.

Create A Solid Workflow


Create a solid workflow to streamline your process and finish your songs faster. By organizing your tasks and setting goals, you can eliminate unnecessary steps and optimize your productivity. With a clear plan, you can focus on the creative process and produce high-quality music efficiently.

Creating a solid workflow is essential to finishing your songs faster. Having a refined process will help you complete tasks efficiently and reduce the time you spend bouncing between different stages. To help you establish a practical workflow, we’ve put together four key steps to streamline your process.

Establish A Routine

Creating a routine is an effective way to break up the songwriting process into smaller, achievable goals. Establishing a daily or weekly routine will help you stay on track and avoid getting bogged down in one area. For example, scheduling time for writing melodies, lyrics, and arranging your tracks will keep you progressing and on track. Ensuring that you have a routine established will help you build a habit of writing music, making it more likely that you will continue to write songs consistently.

Manage Your Time Effectively

Managing your time effectively is crucial when it comes to creating a workflow that works for you. Start by setting realistic deadlines or timelines for completing each stage of your song. Breakdown larger tasks into smaller ones, and ensure that each task is given the right amount of attention. Planning time for writing and editing is just as important as planning time for mix-downs, mastering, and promotion. It is essential to balance your time across all stages of the process to ensure a high-quality product.

Use Technology To Your Advantage

Technology has revolutionized the music industry, providing musicians with various tools and resources that make the music-making process more comfortable and efficient. From digital audio workstations (DAWs) to virtual instruments and vocal tuning plugins, using the right technology can make all the difference. Learning how to use music production software, sample libraries, and plugging packages can help you work faster and save valuable time. Automation, shortcut keys utilization, and other such methods also save time in producing music.

Collaborate With Others

Collaboration is an excellent way to streamline your workflow and finish songs faster. Working with other musicians, producers, and writers can help you build a team that understands your creative vision and can contribute to its execution. Collaboration also enables dividing complex tasks and increasing efficiency. Having different perspectives and skill sets in your team can bring new ideas and a fresh take on the creative process. By dividing responsibilities and working together, you can accomplish more and create a polished final product.

Streamline Your Process To Finish Your Songs Faster


Credit: www.holistic-songwriting.com


Tools To Streamline Your Process


Streamline your songwriting process with these helpful tools. From project management software to songwriting apps, these resources will help you stay organized and focused, allowing you to finish your songs faster and with greater ease.

If you are a songwriter or producer, you know the importance of streamlining your songwriting process. It not only saves valuable time but also helps you stay focused and motivated. Thankfully, there are several tools available that can help you simplify your workflow and finish your songs faster. Let’s take a look at some of the crucial tools that you can use to streamline your process.

Software For Recording, Editing, And Mixing

The right recording, editing, and mixing software can undoubtedly make your songwriting process much more manageable and efficient. There are various software options to choose from, such as:

  • Pro Tools: widely regarded as the industry-standard recording and editing software
  • Logic Pro X: a popular choice for Mac users with robust features for recording and virtual instruments
  • Ableton Live: excellent for EDM and electronic music production with its unique Live Session View
  • Cubase: a comprehensive digital audio workstation with powerful features for recording, mixing, and mastering

Storage And File Management

Another crucial aspect of keeping things streamlined is effective storage and file management. Here are some tools that can help you keep all your projects organized:

Tools Features
Dropbox Cloud storage and backup, file sharing and collaboration
Google Drive Cloud storage, easy collaboration, sharing of files and folders
OneDrive Cloud storage, file sharing, and backup with Microsoft apps integration

Virtual Instruments And Effects

Most modern digital audio workstations (DAWs) come with built-in virtual instruments and effects, but sometimes it’s necessary to use additional plugins. Here are some examples of virtual instruments and effects that can help you create professional-sounding tracks with ease:

  • Komplete: an extensive collection of virtual instruments, sounds, and effects from Native Instruments
  • Serum: a popular wavetable synthesizer for sound design and electronic music
  • Omnisphere: a powerful synthesizer with a massive library of sounds and textures

Online Resources For Inspiration And Collaboration

As a songwriter, you may often feel stuck, uninspired, or alone in the creative process. Fortunately, there are online resources that can help you find inspiration and collaborate with other artists. Some examples include:

  • Splice: a platform that offers royalty-free samples, loops, and sound effects, as well as project hosting and collaboration tools
  • Landr: an AI-powered platform that offers online mastering, distribution, and collaboration features
  • Sounds.com: a subscription-based platform offering high-quality samples and loops from popular genres and producers

By incorporating these tools into your songwriting process, you can streamline your workflow, save time, and take your music to the next level.

Overcoming Creative Blocks


A streamlined songwriting process can help overcome creative blocks and boost productivity. By breaking down the steps and focusing on each one individually, you can speed up your workflow and finish songs faster. With practice and dedication, you’ll find your creativity flowing more freely than ever before.

As a music producer or songwriter, sometimes you may find yourself struggling with creative blocks, making it difficult to finish your songs on time. These blocks are not uncommon, and the good news is that they can be overcome. In this article, we’ll cover some practical methods to help you identify the root cause of your creative block and streamline your process to finish your songs faster.

Identify The Root Cause

The first step in overcoming creative blocks is to identify the root cause. This can be a daunting task, but it’s crucial if you want to regain your creative flow. Here are some questions you can ask yourself to help:

  • Are you feeling burned out?
  • Do you have too much on your plate?
  • Have you been working on the same project for too long?

You can also try journaling to help identify any sources of stress or anxiety that may be affecting your creativity. Once you’ve identified the root cause, you can create a plan to address it, whether that’s taking a break, delegating tasks, or setting a specific deadline to finish your work.

Take A Break And Find A New Perspective

When you feel stuck creatively, taking a break can be the best thing you can do for yourself. Stepping away from your work can help you gain a fresh perspective and allow your mind to rest. During this break, try to engage in other activities such as:

  • Taking a walk outside
  • Listening to music
  • Reading a book or article
  • Spending quality time with friends or family

These activities will help you reset your mind and give you a renewed sense of inspiration.

Explore Other Forms Of Art

Exploring other forms of art can also help you overcome creative blocks. When you immerse yourself in other creative activities, you can develop new ideas and techniques that you can apply to your own work. Here are some examples of other art forms you can explore:

Art Form Description
Painting Creating art through the use of paint and a canvas
Dance Expressing ideas and emotions through movement
Poetry Using language to evoke emotions and ideas

Seek Inspiration From Other Musicians

Lastly, seeking inspiration from other musicians can help you overcome creative blocks. Listening to different genres or collaborating with other artists can give you a fresh perspective and help you come up with new ideas. Some ways you can find inspiration from other musicians include:

  • Attending concerts or music festivals
  • Collaborating with other artists
  • Joining online music communities
  • Listening to music you never listened to before

Whether you’re a seasoned music producer or a songwriter just starting, creative blocks can happen to anyone. However, by implementing these strategies, you can streamline your process, find inspiration, and regain your creative flow.

Streamline Your Process To Finish Your Songs Faster


Credit: www.masteringthemix.com


Frequently Asked Questions On Streamline Your Process To Finish Your Songs Faster


What Is The Process Of Mastering A Song?


Mastering a song is the final step in music production. The process involves preparing the final mix for distribution by enhancing the sound quality in various ways, such as equalization, compressing, and limiting the audio. Mastering helps balance the overall sound of the album and ensure it sounds consistent across different listening environments.


How Long Should It Take To Complete A Song?


The time it takes to complete a song varies widely, depending on factors such as the genre, complexity of the song, and the songwriter’s process. Some songwriters can finish a song in just a few hours, while others may take weeks or even months to perfect their music.


Ultimately, the length of time it takes to complete a song is up to the artist’s individual creative journey.


What Is The Process Of Music Production?


Music production involves several stages, including songwriting, arranging, recording, editing, mixing, and mastering. The process begins with creating the composition, adding instruments, recording vocals, and then fine-tuning the sound with software. The final step is mastering, where the sound is optimized for streaming or CD production.


How Do You Master A Song From Start To Finish?


To master a song from start to finish, follow these steps: 1. Mix the track, ensuring volume levels are balanced and EQs are adjusted correctly. 2. Apply dynamic processing, such as compression and limiting, to control the sound’s dynamics. 3.


Add stereo enhancement to widen the sound field. 4. Finalize the track by adjusting the levels and adding dither and noise reduction. 5. Export the final mastered file.


Conclusion


To sum it up, streamlining your songwriting process is essential to finish your songs faster. By setting realistic timelines, gathering inspiration beforehand, and utilizing helpful tools, you can tackle your music with confidence and ease. Organizing your sessions, finding collaborators, and taking breaks when needed can also help you avoid burnout and keep your creativity flowing.


Experimenting with different methods and techniques is another great way to stay motivated and engaged throughout the process. Whether you’re a beginner or a seasoned pro, these strategies can help you unlock your full songwriting potential and achieve your musical goals.


Categories
Archive

Creating Your Own Synth In Ableton Instrument Racks

Creating your own synth in Ableton Instrument Racks is easy and straightforward. By following a few simple steps, you can create your own unique sound for your productions.


Ableton Instrument Racks are perfect for creating custom synths and unique sounds for your music productions. With the ability to combine multiple instruments and effects, you can create complex sounds that are one-of-a-kind. In this guide, we’ll explore how you can create your own synth using Ableton Instrument Racks.


We’ll dive into the basics of synth sound design and how you can use the instrument racks to create your own unique sound. With these tips, you’ll be well on your way to creating your own signature sound that sets your music apart from the rest.

Creating Your Own Synth In Ableton Instrument Racks


Credit: www.youtube.com


Understanding Ableton Instrument Racks


Ableton Instrument Racks enable users to create their own unique synth by combining multiple instruments and effects. These racks provide a versatile platform for sound design and allow for endless experimentation with various sound sources, filters, and modulation. With Ableton Instrument Racks, creating custom instrumentation is a breeze.

What Are Ableton Instrument Racks?

Ableton has been one of the most popular and widely-used digital audio workstations (DAW) in the music industry for many years now. One of the main reasons for its popularity is its ability to make complex music creation workflows much simpler. One of these powerful features of Ableton is the Instrument Racks. An Ableton Instrument rack is a versatile tool within the DAW’s ecosystem, designed to help music producers capture specific sounds with ease. It is a container of up to 128 instruments, effects, and MIDI effects all within a single channel. The Instrument Rack’s unique architecture allows users to create a powerful, customized virtual instrument that can be saved and used in future productions.

How Do They Work?

Instrument Racks are known for being intuitive and simple to use, and they have various applications in the music production process. A rack consists of a chain, which contains a series of instrument devices, along with accompanying presets and audio effects. Within the chain, users can add or remove devices in order to create a customized rack template best suited for the project at hand. Perhaps the most significant benefit of using an Instrument Rack in Ableton is the ease with which users can access a more comprehensive range of sounds within a single channel. This feature helps create structured musical compositions and streamlines the production process. In short, Instrument Racks in Ableton are a powerful tool that can help content creators capture specific sounds through the combination of multiple devices and presets. Their simplicity and ease of use make them a preferred tool choice for music producers looking to streamline their recordings and create polished compositions with ease.

Choosing Your Synth Components


To create your own synth in Ableton Instrument Racks, carefully choose your synth components, considering their compatibility and versatility. Make sure the components work together to produce unique sounds and enhance your overall production quality.

Creating your own synth in Ableton is a fun and rewarding task, but it can be quite overwhelming for beginners. One of the most significant decisions you’ll need to make when creating your synthesizer is selecting the right components. Each component plays a critical role in shaping the sound of your synth. In this blog post, we’ll discuss the essential synth components and how they work, so you can create the perfect synth for your music style. Oscillators: The oscillator is the heart of any synth. It generates the basic sounds that you’ll manipulate with other components. Ableton offers several types of oscillator waveforms, including sine, triangle, sawtooth, and square. Each waveform produces a different sound and has its unique characteristics. You can choose one or a combination of waveforms to create rich and complex sounds. Filters: Filters shape the sound of your synth by attenuating or boosting specific frequencies. They help you create a range of sonic textures, from warm and mellow to harsh and aggressive. Ableton provides various types of filters, including Low-Pass, High-Pass, Band-Pass, and Notch filters. Each filter type removes a specific part of the audio frequency spectrum. For example, a Low-Pass filter removes high-frequency sounds, while a High-Pass filter removes low-frequency sounds. Envelopes: Envelopes control how a sound changes over time. They define the attack, decay, sustain, and release of a sound. The envelope is a crucial component in creating dynamic and expressive sounds. Ableton has two types of envelopes: Amplitude and Filter Envelopes. Amplitude envelopes apply to the volume of the synth, while filter envelopes apply to the filter cutoff. LFOs: LFO (Low-Frequency Oscillator) generates a cyclic waveform that modulates a parameter’s value of your synth. It provides a wide range of rhythmic and pulsing effects that can help bring your synth to life. Ableton has several LFO waveform types, including Sine, Triangle, Sawtooth, and Square. Effects: Effects are the finishing touches that add the final polish to your synth sound. Ableton has a wide range of effects, such as Reverb, Delay, Chorus, Flanger, Phaser, and more. Each effect adds a unique flavor to your synth sound and helps you create your signature sound. In summary, choosing the right synth components is essential in shaping the sound of your synthesizer. Ableton offers a wide range of oscillators, filters, envelopes, LFOs, and effects that can help you create any sound you want. By understanding how each component works, you can create the perfect synth for your music style.

Building Your Synth From Scratch

Creating your own synth in Ableton Instrument Racks is a great way to customize your sound and create something unique. One of the most exciting parts of the process is building your synth from scratch. In this guide, we will walk you through the steps from creating a new Instrument Rack to adjusting parameters and mapping controls.

Creating A New Instrument Rack

To get started, open a new MIDI track in Ableton. Click on the “Instruments” tab and select “Instrument Rack”. A new window will appear with an empty Instrument Rack. Next, click on “Chain List” to access the drop-down menu and select “Show/Hide Chain List”. This will allow you to add new components to the rack.

Adding And Configuring Components

Now it’s time to start adding components to your rack. There are many possibilities to choose from, such as oscillators, filters, and envelopes. Simply click on the “Chain List” drop-down menu and select “Create Empty”. From there, you can select the type of component you want to add.

Once you have added your desired component, you can configure it to your liking. This includes adjusting the waveform of an oscillator or the cutoff frequency of a filter. You can also add effects and adjust their parameters.

Adjusting Parameters And Mapping Controls

The final step is to adjust the parameters and map the controls to your MIDI controller if desired. This is where you can fine-tune your sound and make it truly unique. To do this, simply click on the “MIDI” button in the upper right-hand corner of the Instrument Rack and select “Map”. This will allow you to map parameters to different MIDI controls.

When adjusting parameters, it’s important to listen to the changes in your sound as you make them. Don’t be afraid to experiment and try different combinations until you find the sound you’re looking for. Remember, the goal is to create something truly unique that fits your music style.

Parameters you may adjust:
Component Parameters
Oscillator Waveform, pitch, volume, phase, detune
Filter Cutoff frequency, resonance, envelope
Envelopes Attack, decay, sustain, release
Effects Dry/Wet mix, level, parameters specific to the effect
  • Remember to save your custom Instrument Rack for future use.
  • Experiment with different combinations of components to create unique sounds.
  • Don’t be afraid to adjust parameters and mappings until you get the sound you’re looking for.


Exploring Advanced Tweaks

Creating your own synth in Ableton Instrument Racks is an engaging process that allows you to craft custom sounds that suit your production needs. Now that you’ve got your basic synthesizer set up, it’s time to take things to the next level with advanced tweaks. Let’s explore some of the ways you can do that:

Macro Controls

If you want to take your synth modifications to the next level, you can create macro controls in Ableton to allow for a more intuitive and accessible way to change multiple parameters at once. These macro knobs can be assigned to any parameter within your synthesizer rack, so you can get creative with how you use them.

For example, you might create a macro that controls the amount of reverb, delay, and filter all at once. This lets you create complex sounds that can evolve over time, while still being able to easily modify the parameters from one control instead of three.

Automation

If you want to add even more variation to your sounds, you can use automation to modulate the parameters of your synth rack over time. This lets you add subtle variations to your sounds that can make them more interesting and organic. Automating the macro controls you created earlier is a great way to get started with automation.

For example, you might record automation that slowly increases the rate of an LFO or slowly unbends a pitch wheel over time. This will give your sound an evolving, organic feel that’s hard to get any other way.

Chaining Multiple Racks

If you really want to create something unique, try chaining multiple copies of your synthesizer rack together. This will allow you to create more complex sounds that build on top of each other.

For example, you might create one synthesizer rack that provides the basic sound, and another that uses granular synthesis to create a more textural layer. You could then chain these together so that the granular layer is triggered when a certain threshold is reached. This would create an interesting, evolving sound that slowly becomes more complex as the threshold is crossed.

Integrating With Other Devices

Finally, once you’re happy with your custom synthesizer rack, it’s time to integrate it with other devices in your Ableton session. This could mean setting up MIDI mappings to control it with a MIDI controller, or using it as the backbone of a larger instrument ensemble.

For example, you might use your custom synth to create the lead riff of a song, then use a drum rack to create a beat to go with it. You could then use a bass synth to create a bass line that fits in with the lead riff. This would create a cohesive, fully-formed electronic song that’s entirely your own.

Using Pre-made Synth Racks


Build your own synth with Ableton Instrument Racks using pre-made synth racks. Easily create unique sounds and incorporate them into your music production.

If you’re not a sound design wizard, creating your own synth from scratch might seem daunting. Luckily, Ableton’s Instrument Racks come ready to use with some pre-made synth racks. This means that you can start using synthesized sounds right away without needing to create them yourself. In this blog, we’ll explore how to find and utilize pre-made synth racks and customize them to suit your needs.

Finding And Utilizing Pre-made Racks

You can find pre-made synth racks in Ableton’s browser by selecting Instruments and then Instrument Racks. Here, you’ll find a range of pre-made racks that you can use as is, or load into an existing instrument rack. To use a pre-made synth rack, simply drag and drop it into an instrument rack. Once loaded, you can play around with different parameters, such as cutoff and resonance, to shape the sound to your liking. It’s worth noting that you can also save your customized synth rack for later use by clicking the ‘Save’ icon.

Customizing Pre-made Racks

While pre-made synth racks are useful for getting started, you might want to customize them to produce a unique sound that fits your project. To do this, simply open the synth rack and click the ‘Show/Hide Chain List’ button. Here, you can access individual chains, which are the building blocks of the synth rack. To customize a chain, click the ‘Show/Hide Devices’ button and select the device you want to modify. From there, you can adjust parameters to your liking, such as the oscillator waveform or envelope settings. In addition, you can also add new devices to the chain by dragging and dropping them from the browser. This allows you to create complex and unique sounds by layering different synths and effects. In conclusion, pre-made synth racks are a great way to get started with sound design in Ableton without having in-depth knowledge of synthesis. And with the ability to customize pre-made synth racks, you can create unique sounds that fit your creative vision.

Creating Your Own Synth In Ableton Instrument Racks


Credit: www.youtube.com


Tips And Tricks For Creating Unique Sounds


Discover new ways to create unique sounds in Ableton by crafting your own synthesizers using Instrument Racks. With this feature, you can design custom sounds to suit your style and stand out in the music industry.

Creating your own synth in Ableton instrument racks can be a challenging and rewarding experience. One of the benefits of working with Ableton is the ease with which you can create a unique sound. Here are some tips and tricks to help you get started.

Layering Multiple Synths

Layering multiple synths can add depth and complexity to your sound. Start with a basic sound and then add layers with different parameters such as pitch or modulation. By combining different synths, you can create a sound that’s entirely your own.

Modulating Effects And Parameters

Modulating effects and parameters can add movement and interest to your sound. Some of the most common effects to modulate include reverb, delay, and filter frequency. By experimenting with different modulations, you can create a unique sound that evolves over time.

Working With Midi Controllers

MIDI controllers allow you to manipulate your synths in real-time. This can be particularly useful when performing live. By mapping parameters to your MIDI controller, you can control everything from filter cutoff to the pitch of your sound.

Experimenting With Unconventional Components

Experimenting with unconventional components can lead to truly unique sounds. Consider adding non-synth elements such as field recordings or samples. By doing so, you can create a sound that’s entirely your own. In conclusion, creating your own synth in Ableton instrument racks can be a fun and rewarding experience. By following these tips and tricks, you can create a unique sound that sets you apart. Remember to experiment with different sounds, modulations, and effects to find the perfect sound for your next production.

Frequently Asked Questions Of Creating Your Own Synth In Ableton Instrument Racks


How Do I Make An Instrument Rack In Ableton?


To make an instrument rack in Ableton, first create a new MIDI track and click on “show/hide details. ” Then, drag the instruments you want into the space below the track’s title. Finally, group the instruments by right-clicking and selecting “Group Tracks,” and save the rack for future use.


How Do I Set Up An External Synth In Ableton?


To set up an external synth in Ableton, follow these steps: 1. Connect the synth to your computer using USB or MIDI cables. 2. In Ableton’s preferences, select the MIDI/sync tab and choose the input and output ports for your synth.


3. Create a new MIDI track and select your synth as the input source. 4. Arm the track for recording, and you’re ready to play and record with your external synth.


How Do I Turn A Sample Into A Synth In Ableton?


To turn a sample into a synth in Ableton, drag the audio file onto a new MIDI track. Select the sample and right-click to choose “Slice to New MIDI Track. ” Choose “Simpler” as the instrument and adjust the settings.


Lastly, save the preset as a new synth in your library.


Does Ableton Have An Additive Synth?


Yes, Ableton Live has an additive synth called operator that allows for the shaping of complex sounds using sine waves to build up timbre. It’s a versatile tool for sound design that is capable of everything from rich mellow pads to scorching leads and basses.


Conclusion


Creating your own synth in Ableton instrument racks might seem overwhelming at first, but with a little understanding and experimentation, the possibilities are endless. With the ability to customize and fine-tune your sound, you can create something truly unique that sets you apart from other producers.


Don’t be afraid to experiment and think outside the box to create your own signature sound. Happy producing!


More in our Synth guides.