Setting up the Moog Subsequent 37 with Ableton Live is a quick and simple process. Connect the MIDI cables, launch Ableton Live, and select the Subsequent 37 as your MIDI input and output device.
From there, you can adjust your MIDI settings and start creating music. In this guide, we’ll go over the steps in detail and provide some tips to help you make the most out of your Moog Subsequent 37 and Ableton Live setup.
Whether you’re a beginner looking to get started or an experienced producer wanting to integrate new gear into your workflow, this guide will walk you through everything you need to know.

Credit: www.productionmusiclive.com
Setting Up The Hardware
Setting up the Moog Subsequent 37 with Ableton Live is relatively easy. Connect the Subsequent 37 to your computer via USB, and launch Ableton Live. Once your Subsequent 37 is recognized by Ableton, you can start creating music using the synthesizer’s amazing capabilities.
Connecting The Moog Subsequent 37 To Your Computer
Connecting the Moog Subsequent 37 to your computer is crucial for getting the audio signal into Ableton Live. To set up the hardware, you will need a USB cable and a 1/4 inch audio cable. Connect one end of the USB cable to the USB-B port on the rear of the Moog Subsequent 37, and the other end to an available USB port on your computer. Next, connect one end of the audio cable to the “Output” jack on the back of the Moog Subsequent 37, and connect the other end of the cable to an available “Line-In” or “Mic-In” jack on your computer’s sound card. This will enable you to record audio from the Moog Subsequent 37 directly into Ableton Live.
Connecting The Audio Interface To Your Computer
In order to get the best audio quality from your setup, you will need to use an audio interface. Connect one end of a standard USB cable to the USB port on your audio interface and the other end to an available USB port on your computer. Make sure that your audio interface is powered on before connecting it to the computer. To set up the audio interface on Ableton, go to the “Preferences” window and under the “Audio” tab, select your audio interface from the list of available devices. This will route the audio from the Moog Subsequent 37 through the audio interface’s converters, giving you a much cleaner and higher quality audio signal. Setting up the hardware for the Moog Subsequent 37 with Ableton Live may seem daunting at first, but it’s actually quite simple. By following these straightforward instructions, you’ll be recording your Moog Subsequent 37 directly into Ableton Live in no time.
Credit: m.youtube.com
Software Setup
If you’ve just purchased your Moog Subsequent 37, congratulations – you’ve just made a fantastic purchase! If you’re wondering how to set up this exquisite synthesizer with Ableton Live, don’t worry – we’ve got you covered. In this post, we’ll discuss everything you need to know about the software setup for the Moog Subsequent 37.
Installing The Moog Subsequent 37 Editor
The Moog Subsequent 37 Editor is a software application designed specifically to help you manage your Moog Subsequent 37 from your computer. To install the Moog Subsequent 37 Editor, follow these simple instructions:
- Go to the Moog website and download the Editor for your operating system
- Run the installer once the download is complete
- Follow the on-screen instructions to install the Editor
Once you’ve successfully installed the Editor, you’ll be able to control many of the Subsequent 37’s parameters directly from your computer.
Setting Up Midi Preferences In Ableton Live
Once you’ve installed the Editor, the next step is to set up the MIDI preferences in Ableton Live. Here’s what you need to do:
- Open Ableton Live and go to Preferences (PC: File > Preferences, Mac: Live > Preferences)
- Go to the MIDI/Sync tab
- In the ‘Input’ section, find your Moog Subsequent 37 and enable the ‘Track’ and ‘Remote’ options by clicking the buttons next to them
- In the ‘Output’ section, again find your Moog Subsequent 37 and enable the ‘Track’ option
- Click ‘OK’ to save your preferences
Once you’ve finished these steps, Ableton Live will recognize your Moog Subsequent 37 and you’ll be ready to start using it as a MIDI controller.
That’s it – you’re now ready to start using your Moog Subsequent 37 with Ableton Live! With these simple steps, you’ll be able to unlock the full potential of your new synthesizer and start creating amazing music in no time.
Using The Moog Subsequent 37 In Ableton Live
Set up the Moog Subsequent 37 with Ableton Live for seamless music production. Connect the synthesizer to Ableton, calibrate it properly, and learn how to use it within the software to create rich, analog sounds.
If you’re a fan of analog synths, then the Moog Subsequent 37 is a great choice for your setup. Ableton Live, on the other hand, is a popular choice for music production and performance. Fortunately, the Moog Subsequent 37 is fully compatible with Ableton Live, allowing you to integrate it into your workflow seamlessly. In this post, we’ll take a look at how you can use the Moog Subsequent 37 in Ableton Live. We’ll cover everything from loading the editor to mapping the controls.
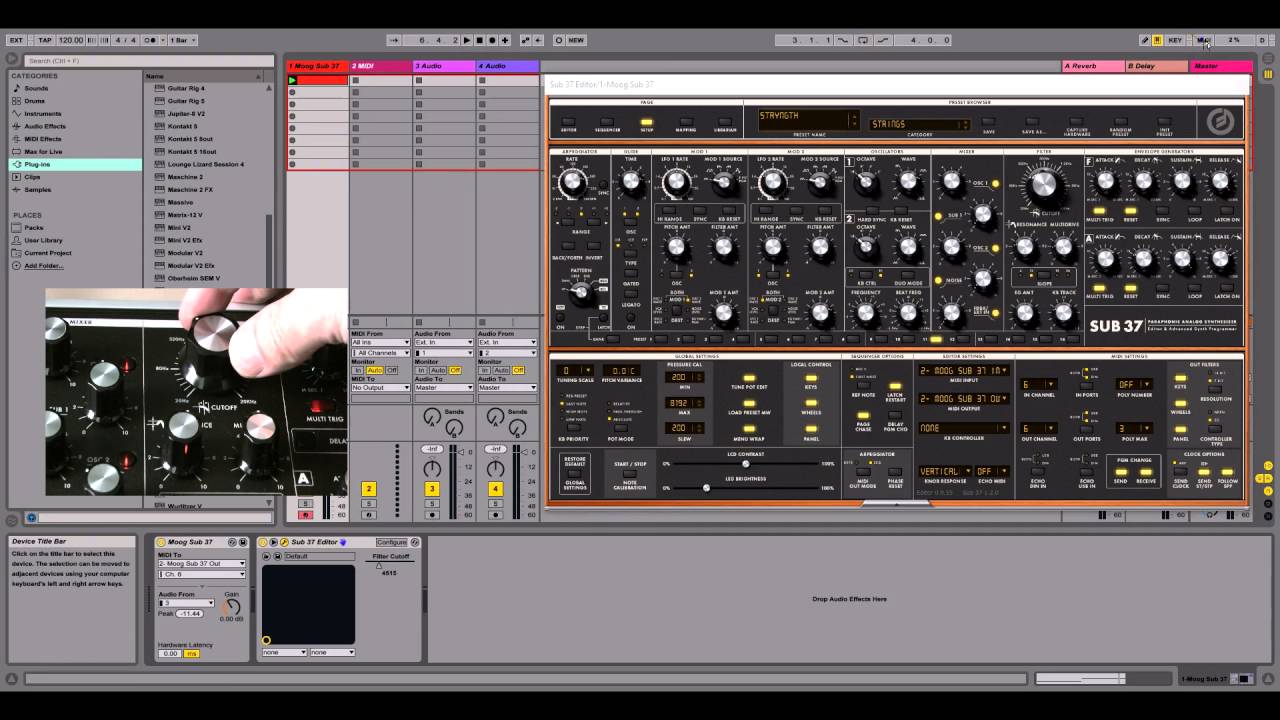
Loading The Moog Subsequent 37 Editor In Ableton Live
Before we can start working with the Moog Subsequent 37 in Ableton Live, we’ll need to load the editor first. The editor allows us to access all of the synth’s parameters and settings from within Ableton Live. To get started, just follow these steps:
- Connect the Moog Subsequent 37 to your computer using a USB cable.
- Launch Ableton Live and create a new project.
- Click on the “Options” menu in Ableton Live and select “Preferences”.
- Select the “MIDI/Sync” tab from the left-hand menu.
- In the “Input” section, ensure that the Moog Subsequent 37 is selected as a control surface.
- Switch to the “Output” section and ensure that the Moog Subsequent 37 is selected as a MIDI output.
- Close the preferences window and navigate to Ableton Live’s “Device” menu.
- Select the “VST Plugins” option and then select the “Moog Subsequent 37 Editor” from the list of available plugins.
- The editor will now open, and you should be able to access all of the synth’s parameters and settings.
Mapping The Moog Subsequent 37 Controls In Ableton Live
Once you’ve loaded the Moog Subsequent 37 editor into Ableton Live, the next step is to map its controls. Mapping the controls allows you to automate and control the synth’s parameters in real-time. Here’s how to map the Moog Subsequent 37 controls in Ableton Live:
- Select the instrument track containing the Moog Subsequent 37.
- Click on the “Map” button in the Ableton Live interface.
- Select the parameter that you’d like to map from the Moog Subsequent 37 editor.
- Move the control on the synth that corresponds to the parameter you’ve selected.
- Repeat these steps for all of the parameters you’d like to map.
Once you’ve mapped your controls, you’ll be able to automate and control them in real-time using MIDI or automation envelopes. With a little practice, you’ll be creating amazing synth sounds in no time!
Advanced Techniques
Now that you’ve got your Moog Subsequent 37 and Ableton Live setup sorted, it’s time to dive into some advanced techniques. Here are some ways to take your music production to the next level.
Using The Moog Subsequent 37 As An Audio Interface
If you want to get the most out of your Moog Subsequent 37, try using it as an audio interface. This will allow for higher quality audio recordings, especially if you’re using the synth for bass or other low-frequency sounds.
To set this up, simply plug your microphone or instrument into the Moog Subsequent 37 and connect it to your computer via USB. Then, select the Subsequent 37 as the audio input device in Ableton Live’s preferences.
Creating Custom Presets In The Moog Subsequent 37 Editor
If you want to create your own unique sounds on the Moog Subsequent 37, you can do so using the Subsequent 37 editor. This software allows you to tweak and adjust every parameter of the synth, from the filter cutoff to the LFO rate.
Once you’ve created your custom preset, you can save it to the synth’s memory, so it can be easily recalled later. This is a great way to get creative and experiment with new sounds that are all your own.
To use the Subsequent 37 editor, simply download it from the Moog website and connect your synth to your computer via USB. From there, you can start tweaking and adjusting to your heart’s content.
Frequently Asked Questions On How To Set Up The Moog Subsequent 37 With Ableton Live
How Do I Sync Moog To Ableton?
To sync Moog with Ableton, you need a MIDI cable to connect the Moog to your computer and a MIDI interface or USB MIDI cable. In Ableton, go to Preferences and MIDI Sync and select the MIDI interface. Then, in the Moog’s MIDI settings, enable MIDI clock.
Now, the two should be in sync.
How Do I Use My Moog Sub 37 As A Midi Controller?
To use your Moog Sub 37 as a MIDI controller, connect it to your computer or another MIDI device using a standard MIDI cable. Then, select the Sub 37 as your MIDI input device in your preferred music software. You can now use the Sub 37’s keys, knobs and buttons to control other MIDI-enabled devices.
How Do I Set Up An External Synth In Ableton?
To set up an external synth in Ableton, connect your audio interface to your computer and turn on your synth. Go to “Options” and select “Preferences” in Ableton. Then, go to “Audio” and select your audio driver. After that, choose the input channel for your synth and activate it.
Finally, add a new MIDI track and set its output to the external synth.
Does The Moog Subsequent 37 Have A Sequencer?
Yes, the Moog Subsequent 37 does have a sequencer.
Conclusion
Setting up the Moog Subsequent 37 with Ableton Live can be intimidating, but with the right steps, it can be a smooth and rewarding process. Remember to connect the right cables, download the necessary software, and explore the limitless possibilities of this powerful combination.
Develop your unique style, experiment with different sounds, and keep creating. Happy producing!