Categories
Archive

Mixing Fundamentals Importance Reference Rough Mixes

Mixing fundamentals are important for creating reference rough mixes. They help ensure the technical and creative aspects of a mix are aligned.


When creating a mix, it is easy to get lost in the creative process and lose sight of technical aspects such as EQ and balance. This is where mixing fundamentals come in. It is important to have a solid understanding of these fundamentals in order to create a mix that not only sounds good but meets technical standards as well.


Reference rough mixes are also an essential part of the mixing process. They provide a guide to ensure the mix is heading in the right direction, and can be used to make necessary adjustments before finalizing the mix. We will explore the importance of mixing fundamentals and reference rough mixes in creating a successful final mix.

Mixing Fundamentals Importance Reference Rough Mixes


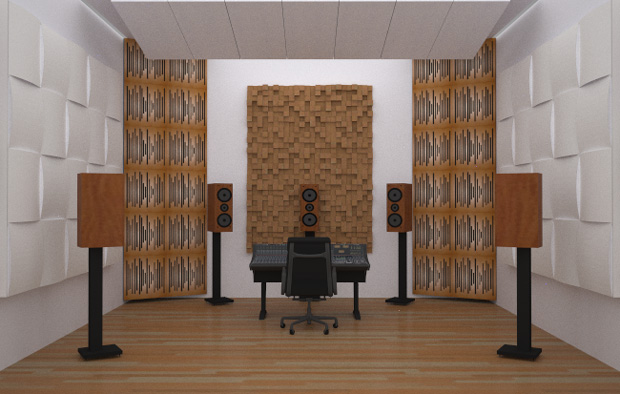
Credit: www.soundonsound.com


Why Mixing Fundamentals Are Important


Understanding mixing fundamentals is crucial to produce well-balanced and high-quality music. By referencing rough mixes, you can identify issues such as frequency masking and phase cancellation. Investing time in learning these essential techniques can help you achieve professional-sounding mixes.

Mixing is undoubtedly one of the most critical steps in music production. Whether you are working on a pop song, a hip hop beat, or any other musical genre, you need to ensure that your mix sounds great and is balanced. This is where mixing fundamentals come in. In this post, we will discuss why these fundamentals are essential and how they can help create a better mix.

A Solid Foundation For Mixing

The first rule of mixing is to have a solid foundation. This means that you need to have a basic understanding of how sound works and how different elements in a mix interact with each other. You also need to be familiar with the tools at your disposal, such as EQ, compression, and panning. Without this crucial knowledge, it would be impossible to create a great mix.

Understanding Signal Flow

Signal flow is the path that an audio signal takes from the source to the output. Understanding signal flow is essential in mixing because it helps identify problems that can arise when processing audio. Different tools in a mixing console have a specific place in the signal flow, and knowing their position will help you make informed decisions.

Balancing Levels

One essential mixing fundamental is balancing levels. This involves adjusting the volume levels of different tracks to achieve a balanced mix. Balancing levels can be one of the most time-consuming aspects of mixing, but it is also one of the most crucial. Without proper balance, some elements will sound too loud, while others will be too soft.

Equalization Techniques

Equalization is a tool that enables you to adjust the frequency response of individual tracks. With equalization techniques, you can remove unwanted frequencies and emphasize desirable ones, making each track sound its best. EQ is one of the most powerful tools at your disposal, and mastering it is crucial for producing great mixes.

Introduction To Compression

Compression is another fundamental tool in mixing that helps control the dynamic range of audio signals. Compression can make loud elements sound softer and soft elements sound louder, resulting in a more balanced mix. The application of compression is a delicate process that requires careful attention, but once mastered, it can make a significant difference in your mix.

Panning Techniques

Panning techniques allow you to place elements in the stereo field, creating width and depth in your mix. Panning is a powerful tool that can make your mix sound more significant and more engaging. With the use of panning, you can create a sense of space and movement in your mix, making it more enjoyable to listen to. In conclusion, mixing fundamentals are crucial in producing great-sounding mixes. By understanding the basics of mixing, you can create a foundation upon which to build a great mix. With the use of the right tools and techniques, you can manipulate individual tracks to fit together beautifully, resulting in a cohesive, well-balanced mix.

The Role Of Reference Rough Mixes

If you want to achieve a professional-sounding record, you need to mix it properly. Mixing is all about finding the right balance between different elements of your track. To do so, you need to understand the fundamentals of mixing. One of the most important aspects of mixing is creating reference rough mixes.

What Is A Reference Rough Mix?

Reference rough mix is basically a provisionary mix that plays an essential role in the first stage of mixing a track. The primary purpose of reference rough mixing is to define the broad layout of your song, allowing you to quickly hear whether the different tracks in the song are gelling well together or not.

Benefits Of Using Reference Mixes

Reference mixes offer several benefits. First and foremost, they enable you to work faster. As you listen to different tracks one by one, references help you gauge which sounds could complement each other better and which needs tweaking to fit in the mix. Further, it’s easier to identify any flaws that might be present when reference rough mixes are created, allowing you to make necessary adjustments before proceeding with the final mixing.

How To Use Reference Rough Mixes

The best way to use reference rough mixes is by starting by setting all the faders in their starting position. After this, assign different colours to each track and place similar tracks together, like, basses, drums, synths, and vocals. Start by playing each track individually, and then, slowly bringing them together to harmonize them with one another.

If some track stands out more than intended, it’s good to attenuate it to find the right balance. When all the tracks sound at a similar level, you’ll know that you have created a reference mix. This exercise helps you set the gain level right, allowing you to lead a mix that won’t distort during the final mastering.

Examples Of Popular Reference Mixes

Name Artist Genre
The Middle Zedd, Maren Morris, Grey Pop
Stay High Tove Lo (Feat. Hippie Sabotage) Pop
2012 Jay Sean (Feat. Nicki Minaj) Hip-hop

Creating a perfect mix is a daunting task, but reference rough mixes make it easier for you. Use them effectively while maintaining the correct level of gain to create a mix that sounds incredible!

Best Practices For Mixing With Reference Rough Mixes


Mixing with reference rough mixes is an essential technique for achieving professional-level sound quality. Using a well-executed reference mix as a guide offers valuable insights into balancing, EQ, and overall composition. Incorporating best practices for reference mixing into your process can vastly improve the final product.

Best Practices for Mixing with Reference Rough Mixes One of the crucial parts of the mixing process is the ability to compare and analyze your mix against a reference mix. A reference mix is a professionally mixed song that can help you identify the areas that need improvement in your own mix. Mixing with reference rough mixes is a common mixing technique used by experienced producers and engineers. In this blog post, we will talk about the best practices for mixing with reference rough mixes and how it can help you create better-sounding mixes. Identifying Key Elements in Reference Mixes The first step in using a reference rough mix is to identify the key elements of the reference track. This includes the instruments, vocals, drums, and any other important elements that stand out in the mix. Once you have identified these elements, you can start analyzing and comparing them to your own mix. Using Matching EQ Techniques Matching EQ is a technique used to match the frequency response of one track to another. This technique can be used to match the tonal balance of your mix to the reference mix. By utilizing matching EQ, you can adjust your mix to be more dynamically balanced and tonally appropriate. Comparing Dynamic Range Dynamic range is the difference between the loudest and quietest parts of a song. By comparing the dynamic range of your mix to the reference mix, you can ensure that your mix has the appropriate level of contrast and impact. Analyzing Panning and Stereophonic Width Panning and stereophonic width are crucial parts of creating a wide and spacious mix. By analyzing the panning and stereophonic width of the reference mix, you can adjust your mix to ensure that the sounds are appropriately placed in the stereo image. Analyzing Reverb and Time-Based Effects Reverb and time-based effects are critical parts of creating depth and space in a mix. By analyzing the reverb and time-based effects used in the reference mix, you can adjust your mix to achieve the same level of depth and space. Implementing Techniques in Your Own Mixes Once you have analyzed and compared your mix to the reference mix, it’s essential to implement the techniques used in the reference mix to your own mix. This includes adjusting the EQ, compression, and reverb levels to match the reference mix. By implementing these techniques, you can create a mix that sounds more professional and polished. In conclusion, when mixing with reference rough mixes, it’s essential to identify the key elements, use matching EQ, compare dynamic range, analyze panning and stereophonic width, analyze reverb and time-based effects, and implement techniques in your own mix. By following these best practices, you can create better-sounding mixes that are more professional and polished.

Mixing Fundamentals Importance Reference Rough Mixes


Credit: www.avid.com


Common Mixing Mistakes And How To Avoid Them


Mixing fundamentals are the backbone of any great song, but common mixing mistakes can hinder your progress. Proper reference tracks, rough mixes and a focus on the importance of balance can help you avoid these pitfalls and create a polished final product.

Mixing a track is an essential part of the music production process that can make or break a song. While mixing is an art that requires experience and knowledge, there are some common mixing mistakes that you should avoid at all costs. In this section, we will discuss these common mixing mistakes and how to avoid them, so your final mix is optimized for a better listening experience.

Overcompression

Compression is a useful tool in a mixer’s arsenal, but overusing it can ruin a mix. Overcompression can flatten the dynamics of a track and make it sound lifeless. It can also create pumping and breathing artifacts that are unpleasant to listen to. To avoid overcompression, it’s best to keep an eye on the gain reduction meter and ensure that it’s not constantly peaking. Also, use compression sparingly and only where it’s needed.

Overusing Effects

Effects like reverb, delay, and chorus can add some sparkle to a mix, but overusing them can cause a mix to sound muddy and cluttered. It’s crucial to use effects judiciously and make sure that they complement the track rather than overpower it. An easy way to ensure this is to use a reference track that you’re familiar with and compare it to your mix periodically.

Excessive Eq

While EQ is an essential tool in mixing, it’s easy to get carried away and apply too much EQ to a track. Excessive EQ can cause a track to sound unnatural and fatiguing to the ears. The best approach is to apply EQ only where needed and use a gentle touch. It’s also a good idea to use frequency analyzers to identify problem areas and address them accordingly.

Lack Of Stereo Image

A lack of stereo image can make a mix sound narrow and uninteresting. It’s essential to create a broad stereo image that’s pleasing to the ears. One way to achieve this is to use stereo wideners and panning. However, it’s crucial to use these tools judiciously and ensure that the soundstage is balanced.

Inadequately Balancing Levels

Balancing levels is a critical aspect of mixing that can help create a cohesive and balanced sound. Inadequate balancing of levels can cause some elements to overpower others, resulting in a disjointed mix. The best approach is to gain-stage all your tracks, so they’re at an equal volume and then balance the levels based on the importance of each element in the mix.

Poor Low-end Management

The low-end is the foundation of a mix, and it’s crucial to take care of it. Poor low-end management can make a mix sound messy and unclear. It’s essential to cut unnecessary low-end frequencies from all tracks to create more headroom. It’s also a good idea to use high-pass filters and ensure that the kick and bass frequencies are not clashing. In conclusion, avoiding the common mixing mistakes discussed in this section can help you achieve a better final mix. The key takeaway is to use your tools judiciously and ensure that each element plays its role in creating a cohesive and balanced sound.

Mixing Strategies For Different Genres

As a music producer, it is imperative to understand that there is no one-size-fits-all approach to mixing music. Mixing is an art, and every genre has its unique characteristics and challenges. Therefore, it is important to employ different mixing strategies that are tailored to each genre. In this article, we will discuss the mixing strategies for different genres, including rock and metal, pop and EDM, hip-hop and R&B, and classical and orchestral music.

Rock And Metal

When mixing rock and metal music, the emphasis is on the loudness and dynamics of the music. It is essential to keep the vocals and guitars upfront while balancing the drums and bass to create a powerful sound. Here are some mixing strategies:

  • Use parallel compression on drums to add more punch and sustain
  • Add distortion or saturation to drums, guitars, and bass to make them sound bigger
  • Use a transient shaper to emphasize the attack of the snare and kick drums
  • Automate the guitar solos to make them more prominent in the mix

Pop And Edm

Pop and EDM music rely heavily on the rhythm and the overall energy of the music. The mixing strategy, therefore, aims to enhance the rhythm and the dynamic range of the music. Here are some mixing strategies:

  • Use side-chain compression to create space for the kick and bass by ducking instruments that clash with them
  • Use a lot of reverb and delay to create a sense of space and depth in the mix
  • Automate the volume of the vocals to emphasize certain phrases and add dynamics to the song
  • Use a multiband compressor to tame harsh frequencies in synths and vocals

Hip Hop And Rb

Hip-hop and R&B music rely heavily on the groove, and the mixing strategy should enhance the rhythm and groove of the music. Here are some mixing strategies:

  • Use parallel compression on drums to add more punch and sustain
  • Use a lot of saturation on drums, bass, and vocals to give them a warmer and grittier sound
  • Use a stereo imager to widen the stereo field of synths and vocals
  • Use a de-esser to tame harsh sibilance in vocals

Classical And Orchestral

Classical and orchestral music require a delicate mixing strategy that brings out the nuances and subtleties of the music. The mixing strategy should prioritize clarity and separation of instruments. Here are some mixing strategies:

  • Use a stereo microphone technique to capture the natural acoustics of the recording venue
  • Use EQ to cut resonant frequencies and tame harshness in certain instruments
  • Use a gentle compression to even out the dynamics of the music without compromising its natural dynamics
  • Use a reverb to add depth and space to the mix without making it sound too washed out
Mixing Fundamentals Importance Reference Rough Mixes


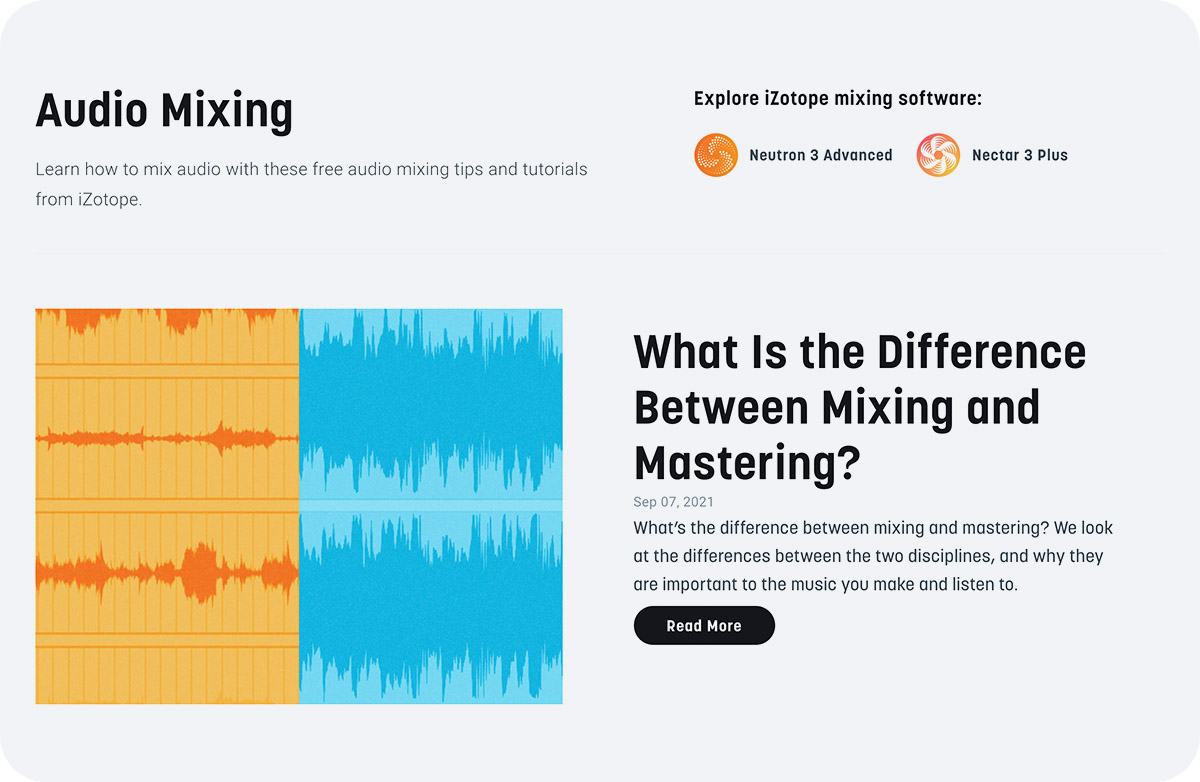
Credit: www.izotope.com


Incorporating Creative Techniques Into Your Mixes


One of the key aspects of mixing fundamentals is the importance of reference rough mixes, which allows you to identify areas for improvement. Incorporating creative techniques into your mixes can enhance the overall sound and help your track stand out from the crowd.

When it comes to mixing, you can never go wrong with the fundamentals. However, incorporating creative techniques can elevate your mix to a whole new level. In this post, we will discuss the importance of reference rough mixes and how to incorporate creative techniques such as automation, parallel processing, sidechaining, sample-flipping, creative EQ and filtering, and distortion and saturation to take your mix to the next level.

Automation

Automation is the key to achieving a dynamic and engaging mix. It allows you to adjust the levels of specific instruments or effects at different points in the song to create a sense of movement and progression. By automating parameters such as volume, panning, EQ, and effects, you can add life and depth to your mix.

Parallel Processing

Parallel processing involves duplicating a track and then processing the duplicate with a different effect or setting to create a unique sound. It’s a useful technique for adding depth, width, and impact to a mix. For instance, you can create a duplicate track with a heavily compressed signal and blend it with the original track to achieve a more powerful sound.

Sidechaining

Sidechaining is a compression technique used to enhance the groove and rhythm of a mix. It involves using a trigger signal to activate the compression on a specific track. For example, you can sidechain the bass to the kick drum to create a pumping effect that makes the mix feel more alive and energetic.

Sample-flipping

Sample-flipping is the process of taking samples from different sources and combining them to create a new sound. It’s a popular technique in electronic music that can help you create unique and interesting sounds that stand out from the crowd.

Creative Eq And Filtering

EQ and filtering are essential tools for mixing, but using them creatively can take your mix to another level. Rather than simply adjusting the levels, you can use EQ and filtering to shape the sound of individual instruments. For instance, you can use a high-pass filter to remove low-frequency content from a guitar to make it sound more airy and spacious.

Distortion And Saturation

Adding distortion and saturation can add warmth, character, and grit to your mix. You can use distortion and saturation plugins to add harmonic richness to individual tracks or the entire mix. Saturation can help to glue individual elements together, creating a cohesive and integrated sound. In conclusion, incorporating creative techniques into your mix can help you achieve a more dynamic, engaging, and unique sound. From automation and parallel processing to sidechaining, sample-flipping, creative EQ and filtering, and distortion and saturation, there are many techniques you can use to elevate your mix. By experimenting with these techniques, you can find your own unique style and stand out from the competition.

Mixing In The Digital Age: An Overview Of Modern Tools And Software


This overview of modern mixing tools and software explores the importance of understanding mixing fundamentals, including reference tracks and rough mixes. By leveraging these techniques, producers can create high-quality mixes that sound great on any playback system.

Mixing music used to be a complex process requiring multiple pieces of expensive hardware. Nowadays, with the abundance of digital audio workstations and mixing plugins, anyone can achieve professional-quality mixing on their laptop. While the fundamentals of mixing remain the same, the tools and software have become more user-friendly and accessible. In this post, we will explore the importance of reference rough mixes and discuss some of the modern tools and software available for mixing music.

Popular Daws

Digital audio workstations (DAWs) are the foundation of modern mixing. DAWs allow you to record, edit, and mix audio on your computer. Some of the most popular DAWs include:

  • Pro Tools
  • Logic Pro X
  • Ableton Live
  • FL Studio
  • Studio One

Each DAW has its own strengths and weaknesses, so it’s important to choose one that fits your needs and workflow.

Key Mixing Plugins

Mixing plugins are digital tools used to shape and enhance the sound of your mix. Some of the most popular mixing plugins include:

Plugin Function
FabFilter Pro-Q 3 Equalization
Waves SSL G-Master Buss Compressor Compression
UAD Ocean Way Studios Reverb
Soundtoys Decapitator Saturation and distortion

These plugins can help you achieve a more polished and professional-sounding mix.

Analysis And Metering Tools

In addition to mixing plugins, there are also analysis and metering tools that can help you make informed mixing decisions. Some examples include:

  • iZotope Ozone Imager
  • Sonarworks Reference 4
  • Plugin Alliance bx_meter

These tools can help you visualize and analyze the frequency spectrum, stereo image, and loudness of your mix.

Integrated Vocal Tuning

Vocal tuning has become an essential part of modern music production. With tools like Auto-Tune and Melodyne, you can tune your vocals to perfection. Some DAWs like Logic Pro X also have built-in vocal tuning capabilities.

Mastering Suites

Mastering is the final stage of the mixing process, where your mix is prepared for distribution. A mastering suite is a collection of plugins and tools designed specifically for mastering. Some popular mastering suites include:

  • iZotope Ozone
  • Waves Abbey Road TG Mastering Chain
  • Brainworx bx_masterdesk

Advanced Routing And Busing

Advanced routing and busing are techniques used to increase the efficiency and flexibility of your mixing workflow. Instead of processing each track individually, you can route multiple tracks to a bus and apply processing to the bus. This can save you time and allow you to make global changes to your mix. In conclusion, modern mixing tools and software have made it easier than ever to achieve professional-quality mixes. By using reference rough mixes and taking advantage of the wide variety of tools available, you can take your mixing to the next level.

Frequently Asked Questions Of Mixing Fundamentals Importance Reference Rough Mixes


What Is The Purpose Of A Rough Mix?


A rough mix is a preliminary version of the final mix which is used for reference purposes during the production process. It allows the sound engineer to listen to the tracks and make adjustments to the levels, EQ, and effects.


The purpose of a rough mix is to give the producer and the band an idea of what the final mix might sound like.


What Are The Fundamentals Of Mixing?


The fundamentals of mixing include balancing different audio elements, adjusting volume, panning, equalizing, compressing, and adding effects. It is important to understand the role of each instrument or sound in the mix and how they interact with each other. The goal is to create a cohesive and well-balanced sound that enhances the overall listening experience.


What Is The Most Important Aspect Of Mixing?


The most important aspect of mixing is achieving a balanced blend of all the individual elements in a track, including vocals, instruments, drums, and effects. Balancing the levels, panning, EQ, compression, and other processing is crucial to create a cohesive and polished sound that sounds good on different playback systems.


How Do You Professionally Mix Tracks?


To professionally mix tracks, you need to have a good understanding of the individual elements in a track, such as the vocals, drums, and bass. You should use EQ to cut or boost certain frequencies, pan tracks to give them a sense of space, and use compression to control dynamic range.


It’s also important to use effects such as reverb and delay to add depth and dimension to the mix. Ultimately, the goal is to create a well-balanced, cohesive sound that highlights the strengths of each individual track.


Conclusion


To sum it up, the importance of reference rough mixes in mixing fundamentals cannot be overstated. It is a crucial step in achieving a professional sound in your final mix, allowing you to make informed decisions on balancing and shaping the elements of your mix.


By establishing a solid foundation, you can streamline the process and avoid common mistakes, leading to a more efficient and effective mixing workflow. Remember, taking the time to create a reference rough mix can ultimately make or break the quality of your final product.



Categories
Archive

Making A Track From Start To Finish In Session View

To make a track from start to finish in session view, start by organizing your sounds into tracks and creating a basic arrangement. After that, add and manipulate audio and MIDI clips, apply effects and automation, and finalize the mix.


Are you a budding music producer looking to create your first track in session view? It might seem overwhelming at first, but with the right approach, it’s not as complicated as it seems. In session view, you can break down your track into individual clips and manipulate them individually.


This means you can experiment with ideas, and see what works and what doesn’t on the fly. We’ll guide you through the process of creating a track from start to finish in session view. From organizing your sounds to adding effects and automation, we’ll cover everything you need to know to create a polished, professional-sounding track.

Making A Track From Start To Finish In Session View


Credit: www.productionmusiclive.com


Setting Up The Session View


In session view, the first step in making a track is setting it up. This involves creating different clips, assigning them to tracks, and organizing the arrangement of your session view. A carefully planned setup can help you produce a track from start to finish efficiently and effectively.

Configuring Audio And Midi Devices

Before you start making a track from scratch in Session View, it is necessary to configure your audio and MIDI devices correctly. This ensures that you get optimal sound quality and can use all the features of Session View. To set up your audio and MIDI devices, go to the ‘Preferences’ section in Ableton Live and select ‘Audio’ or ‘MIDI.’ Here, you can choose the input and output devices, buffer size and sample rate.

Working With Session View

Session View is where you will spend most of your time creating a track. It allows you to arrange your clips, loops, and samples in different scenes and trigger them as per your song structure. To create a new session in Session View, select ‘File’ > ‘New Live Set.’ Then, drag and drop your clips and samples into Session View. You can organize them by color, group them into a drum rack or synth rack, and apply different effects to each channel. Ensure that you have a clear vision of the arrangement before you start creating clips, loops, and samples in Session View. It is recommended that you create a rough sketch of your song structure beforehand, so you have an idea of what scenes to create and which clips to use. In conclusion, setting up the Session View in Ableton Live is essential to get the best out of the software. By configuring your audio and MIDI devices correctly, and organizing your session view for easy access, you can create a track from scratch efficiently and professionally.

Creating The Basic Structure


To start creating a track from scratch in Session View, focus on building the basic structure first. Start by selecting a tempo and choosing the right instruments and samples to create the foundation of the track. Keep in mind the genre and style you want to achieve and experiment with different elements until you find the right combination.

Creating The Basic Structure When it comes to creating a track in session view, the first step is to establish the basic structure. This involves laying down the foundation of the track with the drums, adding bass, and melodic elements to create a cohesive and engaging sound. In this article, we will look at each of these elements and explore how to create a basic structure that serves as the backbone of your track. Starting with Drums The first step in creating a basic structure is to start with the drums. The drums are the backbone of your track, and they serve as the foundation on which you build the rest of your song. When creating a drum track, it is essential to consider the rhythm and tempo of your track, as well as the overall feel and vibe you want to create. To create a drum track in session view, you can use the drum rack or drum pad, which allows you to choose from a variety of preloaded drum sounds and patterns. Alternatively, you can create your drum pattern from scratch, by adding individual sounds to the drum rack or pad. Adding Bass and Melodic Elements Once you have created your drum track, the next step is to add bass and melodic elements. When adding bass and melodic elements, it is important to ensure that they complement each other and the drum track. The bass can be as simple or complex as you want, depending on the overall sound and vibe you are trying to create. When it comes to melodic elements, the key is to ensure that they are memorable and engaging. This can be achieved by using catchy melodies, unique sound design, and a variety of effects and processing techniques. Additionally, it is important to ensure that each melodic element has its sonic space in the mix so that it doesn’t clash with the other elements in the track. In Conclusion: Creating a basic structure in session view is the first step towards making a track from start to finish. By starting with the drums and adding bass and melodic elements, you can establish the foundation of your track and create a cohesive and engaging sound. Whether you prefer a simple or complex structure, the key is to ensure that each element complements the other and contributes to the overall vibe and feel of the track.

Building The Energy

Building energy in a track is an essential part of keeping your audience engaged. In this section, we will focus on how to introduce new elements and create tension to build momentum in your track.

Introducing New Elements

Introducing new elements is one of the best ways to keep your track interesting throughout. It also helps to develop the energy in your track and keep the listener engaged. To introduce new elements, you can:

  • Add new tracks with different instruments or samples.
  • Layer multiple sounds to create new textures.
  • Shift the melody or harmony of a section.

Make sure that the new element complements the existing elements and doesn’t clash with them. A small change can add a lot of interest and dynamics to your track.

Creating Tension

Creating tension is another effective way to build energy in your track. By creating tension, you can prepare the listener for a satisfying release. Here are some ways to create tension:

  • Add or remove elements gradually.
  • Play with the rhythm – shift the beat or change the tempo.
  • Use a riser or a sweep to build anticipation.
  • Make use of a breakdown section to create contrast and make the drop more effective.

Always keep in mind that creating tension is all about balance. You don’t want to create too much tension that it becomes overwhelming or too little that it falls flat. Experiment with your track and trust your ears to find the right balance.

By introducing new elements and creating tension, you can keep the energy in your track consistent and build it up to create an impactful drop. The possibilities are endless, and with enough experimentation and practice, you’ll be able to find your unique way of building energy in your tracks.

Making A Track From Start To Finish In Session View


Credit: www.youtube.com


Using Audio Effects


Throughout the process of creating a track from start to finish in session view, using audio effects can add depth and character to your music. Experiment with different effects such as delays, reverbs, and filters to shape your sound and enhance the overall production quality.

Making a track in Session View is a popular way to create music tracks. One of the crucial steps in creating a track is using audio effects to enhance the sounds and add depth to your track. Using audio effects in Session View can be a fun and creative way to develop your track quickly. Below we discuss two methods of using audio effects in Session View: Layering and Mangling Sounds and Automating Audio Effects.

Layering And Mangling Sounds

To enhance your track’s sounds, you need to layer and mangle sounds. Layering involves adding multiple sound sources to a single track, while mangling sounds includes applying different audio effects to achieve unique sounds. By combining different sounds and effects, you can create a unique track that stands out.

Here are the steps to layer and mangle sounds.

  1. First, choose a sound that you want to enhance, for example, a kick drum.
  2. Next, duplicate the sound on another track and apply a different effect such as distortion, reverb or delay.
  3. You can further add more effects like a phaser, filter, or chorus on different layers to create a unique sound.
  4. Repeat this step for different samples to create a unique and complex sound arrangement. This process can be lengthy, but the results are worth the effort.

Automating Audio Effects

Automating audio effects is an essential technique that helps bring a track to life. It involves changing the effect parameters over time to create a sense of movement and variation in your track. Automation is a powerful tool that enables you to create dynamic mixes easily.

Here are the steps to automate audio effects.

  1. First, add an audio effect to a track and enable the automation view by clicking the small ‘A’ button in the upper left of the effect.
  2. Click the ‘Show/Hide Automation’ button on the track header to reveal the automation lanes.
  3. From here, you can add breakpoints to the automation lane and adjust the effect parameters at any point in time.
  4. By automating different effects and parameters, you can create a wide range of dynamic changes to your track, from subtle variations to dramatic shifts.

Using audio effects in Session View can significantly enhance your music production, and with some experimentation and practice, you can achieve outstanding results. The above methods of layering and mangling sounds and automating audio effects can help you to develop a unique and dynamic sound that stands out.


Adding Fills And Transitions

Creating a track from start to finish in session view is a fascinating process. One of the essential elements of crafting an engaging track is adding fills and transitions. Fills are recurring rhythmic or melodic patterns that keep the energy of the track flowing, while transitions are used to switch from one part of the track to another smoothly. In this section, we’ll explore how to create build-ups, add risers, and perfect your fills and transitions.

Creating Build-ups

Build-ups are an integral part of every track. They are designed to build anticipation and prepare the listener for the next part of the song. One way to create an effective build-up is to use automation. Begin with a drum pattern, and gradually introduce more elements such as hi-hats, snares, and bass lines. Increase the volume, add more complexity, and change the effects over time. You can also use a white noise riser or a reversed crash sound to create tension and to signal a change in the track.

Adding Risers

Risers are used to create tension and excitement in the build-up section of the track. A riser is a sound that starts low and rises in pitch and volume over time. It is like building a musical rollercoaster that reaches a peak right before the drop. To create a riser, you can use a synth or a sample library, and automate the pitch, filter cutoff, and resonance over time. You can also use a granular synth to create a unique and textural riser.

Perfecting Your Fills And Transitions

Fills and transitions are used to keep the track dynamic and exciting. Fill can be as simple as a drum roll, or as complex as a melodic line that repeats throughout the track. To perfect your fills, you need to find the right balance between repetition and variation. Too much repetition, and the listener may lose interest, too much variation, and the track may become too chaotic.

Transitions are used to switch from one part of the track to another smoothly. The most common transition is the breakdown, which is a section that strips away most of the elements in the track to create a moment of tension and release. To make your transitions work, focus on the contrast between the different parts of the track. You can use effects, automation, and volume changes to emphasize the contrast between different parts of the track.

Making A Track From Start To Finish In Session View


Credit: www.productionmusiclive.com


Working With Automation


Learn the process of making a track from scratch in session view with automation. With easy-to-follow steps, you can create an engaging and dynamic audio piece with its unique sound effects and elements.

Modulating Parameters

When it comes to creating a dynamic and evolving track, automation is your best friend. In Session View, you can easily automate any parameter of your choice, such as volume, panning, filters, and effects. By modulating these parameters, you can add interest, drama, and energy to your track. To begin with, select the device or track you want to automate, then click on the automation button at the top of the screen. This will bring up a new lane where you can draw in your automation curves. Remember to enable automation recording first to capture your movements.

Developing A Dynamic Arrangement

One of the most exciting aspects of working with automation is developing a dynamic arrangement. Instead of simply looping the same parts over and over again, you can use automation to introduce changes and variations. For example, you could gradually filter out the low end of your track to create a breakdown, or automate the reverb of a snare hit to make it tail off into the background. To achieve this, simply draw in your automation curves over time, and experiment with different shapes and speeds.

Table

Here are some tips for working with automation in Session View:

Tip Description
Use multiple lanes Don’t be afraid to use multiple automation lanes to control different parameters at once.
Experiment with shapes Try using different shapes for your automation curves, such as ramps, S-curves, and triangles.
Use snap-to-grid When drawing in automation, enable snap-to-grid to ensure your movements are precise and consistent.
Record in real time Instead of drawing in automation by hand, try recording your movements in real time using a MIDI controller.

By following these tips and getting creative with your automation, you can elevate your tracks to the next level and keep your listeners engaged from start to finish.

Finalizing The Mix


Once you have added and arranged different elements of your track in Session View, it’s time to finalize the mix. Start by adjusting the volume levels of each track to create a balanced sound, and then move on to applying effects such as reverb and compression to enhance the overall quality of the track.

After recording, arranging, and adding effects to your tracks, it’s time to finalize the mix. This is where you get to adjust the levels, add EQ, compression, and tweak all the other parameters until you achieve a well-balanced and coherent mix. Here are some essential steps to guide you in finalizing the mix:

Balancing The Levels

The first step in finalizing your mix is to balance the levels of each track. You want to make sure that no single track is dominating or overpowering the mix. To achieve this, use your ears to determine how each track should sit in the mix. Adjust the faders of each track until every sound is audible, and the mix sounds harmonious.

Adding Compression And Eq

Once you have balanced the levels, the next step is to add compression and EQ. Compression is useful for taming peaks and adding sustain, while EQ can help remove unwanted frequencies and shape the tonality of each instrument. Apply compression and EQ judiciously to each track, taking note of the overall effect on the mix.

Applying Reverb And Delay

Reverb and delay are essential for adding depth and space to your mix. Use reverb or delay to place the instrument in a virtual space, creating a sense of cohesion and realism. Apply reverb to tracks that require a sense of spaciousness, and delay to add interest to individual parts. A subtle use of reverb and delay can go a long way in gluing the mix together.

Panning And Automation

The last step in finalizing the mix is to apply the panning and automation. Panning allows you to move sounds from left to right in the stereo field, creating a sense of space and dimensionality. Automation can help bring out specific parts like a guitar solo or vocal line. Use panning and automation creatively to elevate your mix to the next level. Finalizing the mix is not an easy task, but with patience and attention to detail, you can create a well-balanced and engaging track from start to finish. Remember, the goal is to create a mix that sounds good on as many playback devices as possible. Use these steps to achieve that goal, and you’ll be well on your way to creating a professional-sounding track.

Frequently Asked Questions Of Making A Track From Start To Finish In Session View


How Do I Move Clips From Arrangement To Session View?


To move clips from Arrangement to Session View in Ableton, simply select the clip you want to move, copy it, then navigate to the Session View and paste it where you want it. Alternatively, you can drag and drop the clip from the Arrangement View to the Session View.


How Do I Record From Session View To Arrangement View?


To record from Session View to Arrangement View in Ableton Live, simply launch Session Record mode and trigger clips as desired. Once you have captured the perfect arrangement, stop the Session and hit the “Back to Arrangement” button. Your captured clips will now appear as individual tracks in the Arrangement view, ready for further editing.


What Is The Difference Between Session View And Arrangement View?


Session view is used for live performances and improvisation while Arrangement view is used for arranging and recording music tracks. In session view, different ideas can be experimented with in real time, while Arrangement view allows for the organization and refinement of these ideas into a finished product.


How Does Ableton Session View Work?


In Ableton’s session view, tracks run horizontally for easy comparison of different versions. It is for live performances and recording with a loop-based approach to music-making. Clips can be triggered and looped, and all tracks play simultaneously. The screen interface shows audio clips for each track, and with drag and drop functionality, music can be created on the fly.


Conclusion


To sum up, creating a track from start to finish in Session View can be a challenging yet rewarding experience for any producer. With the right tools, techniques, and mindset, anyone can produce a professional-grade track that can compete with industry standards.


It’s all about finding your unique creative process and allowing your ideas to come to life. Remember, there is no right or wrong way to make music, so don’t be afraid to experiment and have fun with it!

Categories
Archive

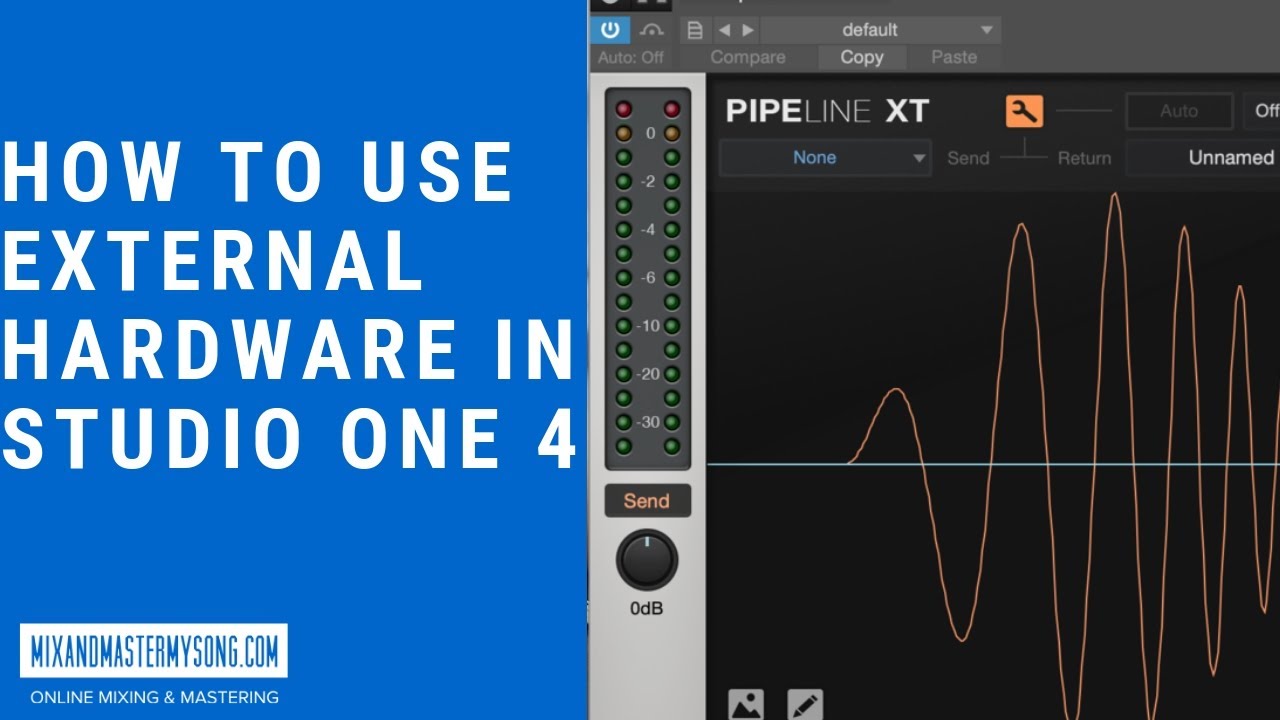
How To Use External Hardware With Presonus Studio One

To use external hardware with Presonus Studio One, simply connect it to your computer and select it as your audio device within Studio One’s audio settings. This allows you to use hardware such as audio interfaces, MIDI controllers, and external effects processors with your Studio One projects.


Presonus Studio One is a powerful digital audio workstation that offers a variety of tools and features for recording, editing, and mixing music. However, many musicians and producers prefer to use external hardware to add additional sonic character and control to their recordings.


Whether you’re using an audio interface for high-quality recording or a MIDI controller for hands-on performance, Studio One makes it easy to integrate external hardware into your workflow. We’ll walk you through the steps for setting up and using external hardware with Presonus Studio One.


Connecting External Audio Devices


Easily connect external audio devices with Presonus Studio One by using the Audio Device Setup menu. Simply choose the appropriate device and adjust settings for optimal performance.

Connecting External Audio Devices is an essential part of music production. In the case of using PreSonus Studio One, incorporating external hardware is an incredibly useful way to boost your music production quality. Here are some guidelines on how to connect different external audio devices like Audio Interface, MIDI Controller, and External Microphone with PreSonus Studio One effectively.

Audio Interface

Plugging an Audio Interface into your computer can help you achieve better sound quality while producing music. Here’s how to connect your Audio Interface with PreSonus Studio One: 1. Firstly, power off your audio interface and computer before starting the connection process. 2. Next, use the USB cable and plug one end into the Audio Interface and the other into your computer. 3. Then, turn on your audio interface and computer. 4. Launch PreSonus Studio One, navigate to “Studio One” -> “Options” -> “Audio Setup.” 5. Choose your Audio Interface from the list of devices available, and that’s it!

Midi Controller

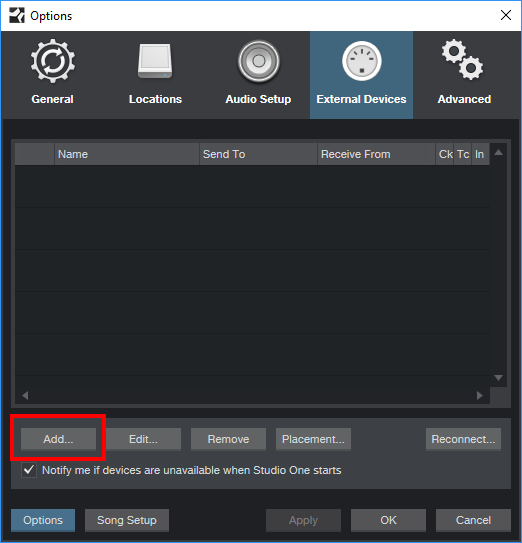
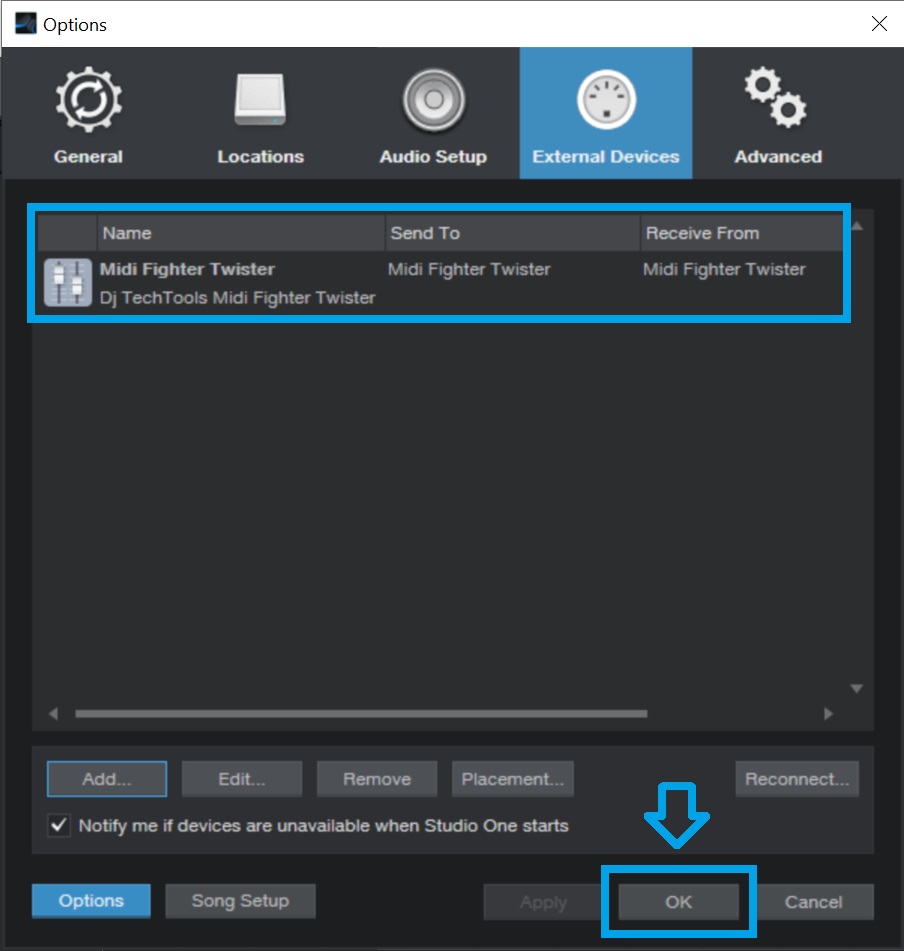
MIDI Controllers can significantly improve workflow and enable you to control different aspects of your music production from a single device. Here is how to connect your MIDI Controller with PreSonus Studio One. 1. Start by powering off your MIDI Controller and computer. 2. Connect the USB cable to the MIDI Controller and your computer. 3. Turn on the power of your MIDI Controller and computer. 4. Launch PreSonus Studio One, navigate to “Studio One” ->”Options” ->”External Devices.” 5. Here, click on “Add” and select your MIDI Controller Manufacturer and Model. 6. To make sure your MIDI Controller works correctly with PreSonus Studio One, select the “Receive From” and “Send To” options appropriate to your needs.

External Microphone

For recording different instruments and vocalists, it’s always best to use an external microphone. Here’s how to connect your external microphone with PreSonus Studio One: 1. Power off your external microphone and computer before starting the connection process. 2. Next, connect the XLR cable to your external microphone and the other end to the Audio Interface. 3. Power on your external microphone and computer. 4. Launch PreSonus Studio One and create a new Audio Track. 5. Make sure your Audio Interface is selected as the primary input source for recording. In conclusion, connecting external audio devices with PreSonus Studio One is a seamless and straightforward process. Just follow the necessary steps for each device, and you’ll be able to produce high-quality music in no time!

How To Use External Hardware With Presonus Studio One


Credit: m.youtube.com


Configuring Audio And Midi Settings


To use external hardware with Presonus Studio One, configuring audio and MIDI settings is crucial. By selecting the correct audio device and configuring MIDI settings to use the external device, you can start recording, editing, and mixing your audio tracks with greater ease and control.

When it comes to recording music, using external hardware with PreSonus Studio One can help take your productions to the next level. However, to make the most out of your equipment, you need to configure your audio and MIDI settings.

Audio Device Settings

To begin, you want to ensure that your audio device is selected and correctly configured in PreSonus Studio One. Here are the steps to follow:

  1. Go to “Studio One” and select “Options”
  2. Select “Audio Setup” and choose your audio interface device from the drop-down menu.
  3. Ensure that the audio device has the correct input and output configuration selected and click “OK”.

Buffer Size And Sample Rate

The buffer size and sample rate are crucial settings that affect the quality and performance of your recordings. Here is what you need to do:

  • Go to “Studio One” and select “Options”
  • Select “Audio Setup” and choose the correct buffer size for your system.
  • Choose an appropriate sample rate, such as 44.1kHz or 48kHz.
  • Click “OK” to save the changes.

Midi Device Settings

A MIDI device can connect your hardware synthesizer or MIDI controller to your computer to help you generate sounds. To configure it correctly, follow these steps:

  1. Go to “Studio One” and select “Options”
  2. Select “External Devices” and click “Add”.
  3. Select the category of your device (such as MIDI keyboards).
  4. Select the manufacturer and the model you are using and click “OK”.
  5. Your MIDI device should now be added to the list of external devices. Make sure it is enabled by clicking the checkbox next to its name.

By following these steps, you should be able to easily configure your audio and MIDI settings in PreSonus Studio One to optimize your recordings. Remember, better sound quality and performance is just a few clicks away!

Using External Hardware Instruments


Using external hardware with Presonus Studio One is simple and straightforward. After connecting your hardware, you can easily integrate it into your workflow by mapping the controls to your preferred functions. This allows you to make the most of your hardware and create a seamless production experience.

Adding Hardware Instruments To A Song

When setting up Presonus Studio One to work with external hardware instruments, the first step is to add the instrument to the song. To do this, go to the “External Devices” menu and click “Add.” From there, you can select the type of instrument you want to add, such as a synthesizer or drum machine. Once you’ve added the instrument, you can assign it to a specific track in your song.

Recording With External Hardware Instruments

To record with an external hardware instrument in Presonus Studio One, you’ll need to make sure that the instrument is properly connected and assigned to a track in the software. Then, simply hit record and start playing your instrument. You can use the transport controls to start and stop recording, and you can use the mixer to adjust levels and add effects to your instrument’s output.

Saving And Recalling External Hardware Instrument Settings

Once you’ve set up your external hardware instruments in Presonus Studio One, you may want to save your settings so that you can recall them later. To do this, go to the “External Devices” menu and click “Save Setup.” You can then give your setup a name and save it for future use. To recall your settings, simply go back to the “External Devices” menu and select the setup you want to use. By saving and recalling your settings, you can quickly switch between different setups and get the sound you’re looking for without having to spend time reconfiguring your instruments each time.

Using External Hardware Effects Processors

One of the most interesting aspects of digital audio production is the ability to blend the worlds of analog and digital audio processing. With modern DAWs such as Presonus Studio One, it’s easier than ever to incorporate external hardware effects processors into your workflow. In this section, we’ll explore the various ways you can use external hardware effects processors with Presonus Studio One, focusing on inserting them into tracks, recording with them, and automating and controlling them.

Inserting External Hardware Effects Processors Into Tracks

The process of inserting an external hardware effects processor into a track in Presonus Studio One is relatively straightforward. First, you’ll need to connect your external processing unit to your audio interface using the appropriate cables. Then, create a new track in Studio One by right-clicking in the track list and selecting “Add Track”.

Next, open the mixer view and navigate to the track you’ve just created. Click on the “FX” button at the top of the channel strip to open the plug-in browser, and select “External Plugins” at the bottom of the list. From here, you should see your external processing unit listed as an available insert.

Recording With External Hardware Effects Processors

Recording with external hardware effects processors is a bit different than with software plug-ins. First, ensure that your audio interface is set up to route the input signal through your external processor. Then, record-enable the track in Studio One and start recording as normal.

When you’re done recording, it’s important to note that the processed audio will now be “printed” onto the track. This means that any changes you make to the external processing unit after the fact will not affect the recorded audio. For this reason, it’s a good idea to spend some time dialing in the perfect sound before hitting the record button.

Automation And Control Of External Hardware Effects Processors

One of the main advantages of using external hardware effects processors is the ability to manipulate them in real-time via physical controls. With Presonus Studio One, it’s possible to automate these parameters just like with any software-based effect.

First, ensure that your external processing unit is set up to receive MIDI messages. Then, click on the “Show Automation” button at the top of the track list in Studio One. This will open the automation lane for the currently selected parameter (e.g. the wet/dry mix of a reverb effect).

If you move a physical control on your external processing unit, you should see the automation lane in Studio One update in real-time. From here, you can edit the automation just like with any other parameter in the DAW.


Tips And Troubleshooting


Learn how to seamlessly connect external hardware to your Presonus Studio One with these simple tips and troubleshooting methods. From setting up audio interfaces to configuring MIDI devices, this guide will help you take your music production to the next level.

Presonus Studio One is one of the most popular digital audio workstations that musicians, producers and engineers use to record, mix and master their tracks. While Studio One comes with a range of built-in plugins, sometimes you need to use external hardware devices to achieve your desired sound. In this post, we’ll share some tips and troubleshooting techniques to help you get the most out of using external hardware devices with Presonus Studio One.

Common Issues When Using External Hardware

When using external hardware devices with Presonus Studio One, you may run into some common problems. Here are some of the issues you might experience and how to troubleshoot them:

  • No Sound: If you’re not getting any sound from your external hardware device, make sure it’s properly connected to your computer and that the correct input and output channels are selected in Studio One. Check the device manufacturer’s instructions for any specific settings you need to adjust in your audio settings.
  • Latency: Latency issues can cause an unwanted delay between your playing and the audio output. To reduce latency, try increasing the buffer size in your audio settings or investing in an external audio interface with lower latency.
  • Driver Issues: Make sure your external hardware device has the latest driver updates installed. Search the manufacturer’s website for the latest driver software downloads and follow their instructions for installation.

Recommended Hardware Devices For Studio One

Studio One is compatible with a range of external hardware devices. Here are some of our top picks for recommended hardware devices that work well with Studio One:

Device Name Type Price
Focurite Scarlett 2i2 Audio Interface $159
Universal Audio Apollo Twin MkII Audio Interface $899
Mackie Big Knob Studio+ Monitor Controller $299
dbx 286s Channel Strip Processor $199

Optimizing Your System For External Hardware

To get the most out of using external hardware devices with Studio One, it’s important to optimize your system settings. Here are some tips for optimizing your system:

  1. Update Your Software: Make sure you are using the latest version of Presonus Studio One and your external hardware device drivers. This ensures that all compatibility issues are resolved and any reported bugs are fixed.
  2. Manage Your Plugins: Only use the plugins you need for your projects. Using too many plugins can slow down your system, so consider disabling any plugins you’re not using.
  3. Upgrade Your Hardware: If you’re experiencing latency issues or slow performance, consider upgrading your computer’s hardware components, such as your processor or RAM.
  4. Use Direct Monitoring: Direct Monitoring allows you to monitor through your external hardware while you’re recording. This reduces latency and ensures you’re hearing your sound in real-time.

By following these tips and troubleshooting techniques, you can use external hardware devices with Presonus Studio One effectively and maximize your music production workflow.

How To Use External Hardware With Presonus Studio One


Credit: mixandmastermysong.com


How To Use External Hardware With Presonus Studio One


Credit: support.presonus.com


Frequently Asked Questions For How To Use External Hardware With Presonus Studio One


How Do I Use External Instruments In Studio One?


To use external instruments in Studio One: 1. Connect your instrument to your computer 2. Open Studio One and create a new instrument track 3. Click on the “Input” button on the track and select your external instrument 4. Press “Record” or play your MIDI keyboard to start making music 5.


Adjust your settings and options as needed for optimal performance.


How Do I Add External Plugins To Studio One?


To add external plugins to Studio One, follow these steps: First, locate the plugin file and copy it into the correct plugin folder. Next, open Studio One’s Preferences and go to the Locations tab. Click on the VST Plugins tab and add the folder containing the newly added plugin.


Finally, restart Studio One and the plugin should now be available to use.


How Do I Add An Instrument To My Presonus Studio One?


To add an instrument to your PreSonus Studio One, go to the Instruments tab, and choose your preferred instrument from the list. You can also install third-party plug-ins from the Studio One Extension Manager. Simply select the plug-in you want, and it will be added to your instruments list.


How Do I Set Output Device In Studio One?


To set output device in Studio One, go to Options, then Audio Setup. Under Audio Devices, choose your desired output device from the drop-down menu. If it doesn’t appear, click on Configure Audio Devices and select it from there. Lastly, click Apply and OK to save the changes.


Conclusion


To sum up, external hardware is a fantastic addition to Presonus Studio One that will elevate your audio production experience. With the right equipment and setup, you can maximize the creative potential of your DAW and bring your music to life.


Whether it’s a MIDI controller, an audio interface or any other external hardware, Studio One has everything you need to make the most of it. So don’t hesitate to explore the possibilities and take your music to the next level.

Categories
Archive

Understanding Mastering Eq Balancing The Spectrum

Understanding and mastering EQ balancing involves carefully adjusting the frequency spectrum to achieve a well-rounded sound. In other words, it’s finding the perfect balance between bass, mid-range, and treble to create a pleasant listening experience.


EQ balancing is crucial for any music producer or sound engineer, as it can make or break a song’s overall sound quality. A balanced frequency spectrum can improve the clarity, depth, and overall tonality of any piece of music. We’ll take a closer look at mastering EQ balancing and explore some techniques to help you achieve a balanced sound in your productions.

Understanding Mastering Eq Balancing The Spectrum


Credit: www.masteringthemix.com


The Basics Of Eq

The Basics of EQ are crucial to mastering audio mixing. EQ, or equalization, is the process of adjusting the balance between frequencies within an audio signal. This process is essential in achieving a balanced and well-rounded sound for your audio project. Proper EQing offers a distinct advantage in making your music, podcast, or video production sound more polished and professional.

Frequency Spectrum

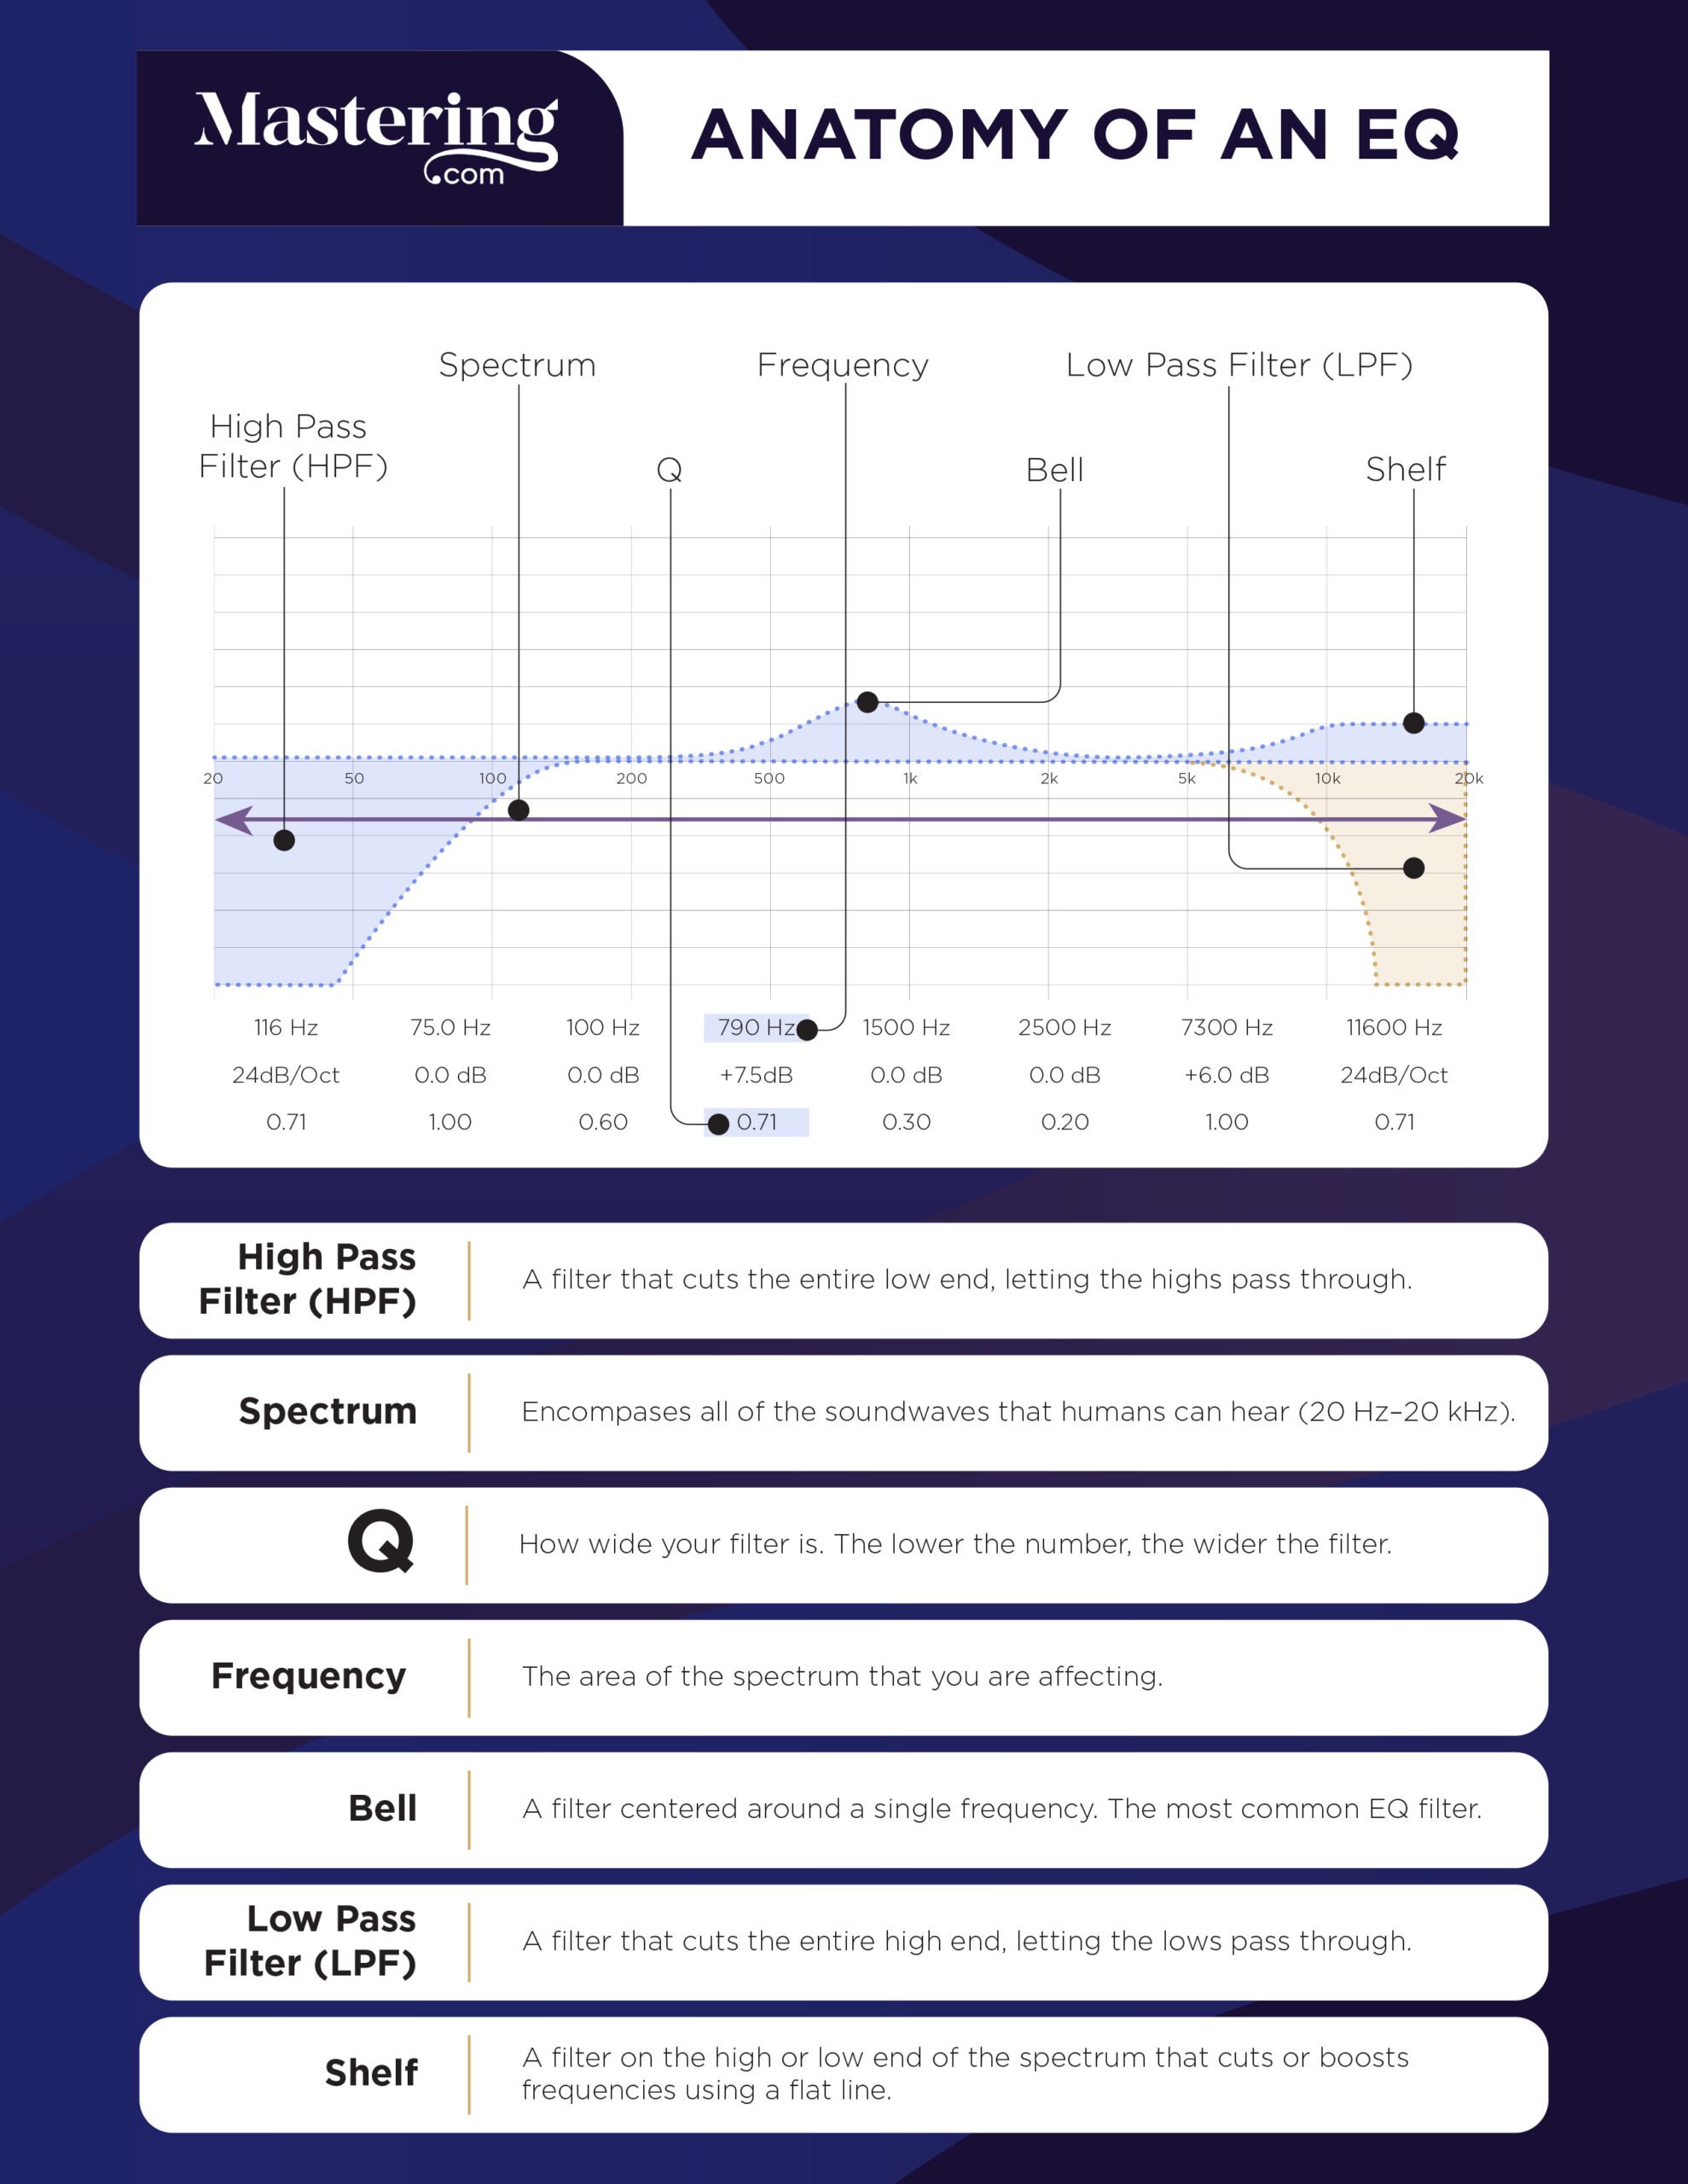
The Frequency Spectrum is a range of frequencies that are audible or perceptible to the human ear. The audible frequency spectrum ranges from 20Hz to 20kHz. Understanding this spectrum is essential in mastering musical production and being able to create balanced sound profiles for any project. A standard EQ interface provides you with the visual representation of these frequencies split into bands, each with its own range of frequencies.

Types Of Eqs

When it comes to EQs, there are two fundamental types – graphic EQ and parametric EQ. Graphic EQ works by providing preset frequency bands that can be raised or lowered. On the other hand, a parametric EQ allows you to change different aspects of the EQ, such as center frequency and bandwidth.

Common Frequency Ranges

One of the most important aspects of understanding EQ is being able to recognize common frequency ranges. Here are some of the most used frequency ranges:

Frequency (Hz) Range Description
20Hz – 100Hz Sub-bass Lowest bass notes present in music, felt more than heard.
100Hz – 250Hz Bass Low-end frequencies; the bass notes that provide a foundation.
250Hz – 500Hz Low mids The range where instruments with low midrange tones sit.
500Hz – 2kHz Mids The frequency range in which clarity and presence lie.
2kHz – 4kHz Upper mids The part of the spectrum where sounds become more clear and sharp.
4kHz – 6kHz Presence The range in which vocals and melodic instruments naturally sit.
6kHz – 20kHz Brilliance High-end frequencies, responsible for sparkle and clarity.

Understanding the basics of EQing and how to balance the frequency spectrum is critical to creating a well-rounded and professional-sounding audio project. Mastering EQing is an ongoing process and an art form that requires a lot of practice and dedication. But, once you gain a deep understanding of how EQ works, you’ll be able to create audio that’s not only well-balanced but also has a particularly distinctive sound.

Understanding Mastering Eq Balancing The Spectrum


Credit: mastering.com


Mastering Eq Techniques


Boost your music production skills with mastering EQ techniques, which involve understanding how to balance the sound spectrum. From boosting individual frequencies to taming harsh sounds, mastering EQ techniques are essential for achieving a polished and professional sound.

Gain Staging

Gain staging is an essential technique in mastering EQ. It involves setting the input levels of each plugin in the signal chain to avoid distortion and optimize the signal-to-noise ratio. Proper gain staging ensures the volume levels are consistent throughout the mixing process, enabling a clear understanding of the EQ balance and preserving the integrity of the audio signal.

Filters

Using filters is a practical mastering EQ technique for removing unwanted frequencies from audio signals. Different types of filters, including low-pass, high-pass, and bandpass filters, can be used to adjust tonal balance better. Mastering engineers can remove unwanted artifacts resulting from the mixing process and other noise with these filters. It’s essential to use filters carefully when mastering; otherwise, you risk removing too many frequencies from the signal, resulting in a dull or lifeless sound.

Multi-band Eqs

Multi-band EQs are tools that can be used to control specific frequencies. They divide the sound spectrum into various frequency ranges, allowing the mastering engineer to adjust each band separately. By doing so, multi-band EQs enable more precise control over the tonal balance of a mix, which can help to bring out specific elements in the music. When using multi-band EQs, it’s crucial to avoid overdoing it as it may change the feel of the original mix.

Putting It All Together

Mastering EQ techniques come together to balance the spectrum of sound. Proper gain staging, filter application, and multi-band EQ adjustments can help to optimize the overall sound quality, adding clarity, and helping individual instruments cut through the mix. By using each technique correctly in mastering, you can take a mix to a professional standard that sounds great across different systems.

Tips For Mastering Eq


Balancing the spectrum with mastering EQ is essential for professional audio production. Understanding the different frequencies and how to adjust them is key to achieving a balanced sound. With practice and experimentation, you can master EQ and enhance the overall quality of your audio.

Mastering EQ (equalization) is one of the most crucial steps in music production, responsible for balancing the different frequencies of a track. While it can seem daunting for beginners, with the right approach, mastering EQ can be a breeze. Below are a few tips to help you master EQ balancing the spectrum effectively.

Using Reference Tracks

Using reference tracks is a great way to learn EQ balancing. A reference track is a professional track in the same genre as the track you’re working on. By comparing your mix to the reference track, you can identify areas where your mix may need some EQ adjustments. It helps you to improve your EQ balancing and achieve a clean, balanced mix.

Avoiding Over-eqing

One common mistake that beginners make is over-EQing. While EQ is an essential tool to bring out the best in your mix, overusing it can quickly ruin your track. When you use too much EQ, it can create phase problems and distort the sound. EQ is meant to be used sparingly, you should only cut or boost frequencies that need adjusting. Always take breaks while working on your track to avoid ear fatigue that leads to over-EQing.

Working In Context

Another crucial tip when mastering EQ is to work in context. Working in context means EQ’ing your track within the context of the whole song. You should EQ while listening to the entire track instead of an individual instrument. You’ll need to be aware of the different parts of the song and how they interact. This way, you can make informed decisions about where to make cuts and boosts with EQ to improve the sound of your mix. In conclusion, mastering EQ is critical to achieving a well-balanced mix. Using reference tracks, avoiding over-EQing, and working in context are essential tips to help you master EQ balancing the spectrum. With practice, you’ll develop a keen ear for EQ, and balancing the different frequencies of your mix will become second nature.

Eq Balancing In Different Genres


Achieving EQ balance is crucial when mastering audio in different music genres. Understanding how to balance the spectrum for each genre ensures that every instrument and vocal is heard clearly, resulting in a professional and polished finish.

When it comes to mastering the art of EQ balancing, it’s important to note that different music genres require different approaches. Rock/metal, hip hop/R&B, and electronic music all have distinct sound characteristics that should be considered when balancing the spectrum. Let us explore each genre’s specific EQ nuances to get a better understanding.

Rock/metal

Rock and metal music are characterized by heavy bass, guitar riffs, and powerful drums. When balancing the EQ for these genres, it’s crucial to have a clear mix. EQ can help to bring out the unique sound of each instrument without overloading the mix. In general, the guitar and bass should occupy the low-end spectrum, while the vocals and cymbals should occupy the high-end spectrum. For example:

  • Bass guitar: 100-800Hz
  • Electric guitar: 800Hz-6kHz
  • Vocals: 800Hz-6kHz
  • Cymbals: 6kHz-20kHz

Hip Hop/rb

When balancing EQ in hip hop and R&B, it’s essential to achieve a full, warm sound. The bass and drums play a crucial role in defining the overall sound of the genre, along with vocals. Hip hop and R&B vocals generally occupy the lower spectrum, with the kick and bass occupying the low-end frequencies. For example:

  • Bass: 20-60Hz
  • Kick drum: 80-150Hz
  • Snare drum: 100-250Hz
  • Vocals: 100-250Hz

Electronic Music

Electronic music is all about creating a unique sonic experience, with a mix of synthesized sounds and samples. When EQ balancing electronic music, it is crucial to remember that a heavy, overpowering bass can quickly overwhelm the mix. The key is to balance the kick and bass with the high-end spectrum, which includes lead sounds, pads, and vocals. For example:

  • Bass: 60-250Hz
  • Kick drum: 80-150Hz
  • Snare drum: 100-250Hz
  • Lead sound: 800Hz-6kHz
  • Pads: 1kHz-6kHz
  • Vocals: 1kHz-6kHz

In conclusion, mastering the art of EQ balancing requires a good understanding of the sound characteristics of each genre. EQ balancing is all about ensuring that each instrument has its space in the mix, and nothing is overpowered. With careful consideration of each genre’s unique sound nuances, you can achieve a well-rounded, polished mix that sounds great in any context.

Advanced Eq Techniques

Advanced EQ techniques are essential when it comes to balancing the spectrum of your audio mix. These techniques can help you fine-tune your music and bring out the best in your audio, leaving you with a clean and professional-sounding track. Here are some advanced EQ techniques you can use to take your audio to the next level:

Mid-side Eqing

Mid-side EQing is a powerful technique that allows you to control the stereo image of your mix. By separating the mid (center) and side (periphery) frequency information of a stereo track, you can adjust the stereo image to make it wider or narrower depending on your preference. For example, boosting the high frequencies in the side channel can create a wider sound. On the other hand, cutting the low frequencies in the mid channel can help enhance the clarity of the vocals or other instruments that are panned to the center of the stereo field.

Parallel Processing

Parallel processing is when you duplicate a track, apply a certain effect or EQ, and mix it back into the original track. This technique can help you add more color and depth to your audio by compressing or EQing only a portion of the track without affecting the entire mix. For example, you can use parallel processing to add more punch to the drums by applying a heavy EQ and compression to only the drum track.

Dynamic Eqs

Dynamic EQs are like standard EQs, except they have the added ability to dynamically adjust the frequency boost or cut based on the input signal. This can help you achieve a more natural-sounding result and eliminate the need for additional compression or other processing. For example, you can use a dynamic EQ to tame harsh frequencies in a vocal recording without affecting the overall clarity of the track.

In conclusion, mastering the art of EQ balancing with advanced techniques like mid-side EQing, parallel processing, and dynamic EQs can help you create a radio-ready mix with a professional-sounding finish. By applying these techniques wisely and with attention to detail, you can take your audio to the highest level possible.

Using Eq In The Mixing Process


Mastering EQ balancing is an essential process in mixing music. Focusing on the full spectrum, including lows, mids, and highs, allows for a well-rounded and polished sound. Utilizing EQ techniques can bring clarity and depth to a mix, creating a more enjoyable listening experience.

Using EQ in the Mixing Process: EQ is a crucial tool in the mixing process. Understanding and mastering EQ balancing the spectrum is essential for any musician or music producer. EQ can help you solve problems in your mix, as well as create a unique and compelling sound. In this article, we will dive deeper into using EQ as a problem solver and a creative tool, as well as exploring different EQ techniques for different instruments. H3: EQ as a problem solver EQ can solve a myriad of problems in a mix. For example, if your mix sounds muddy, you can use EQ to cut out some of the low end to make it clearer. Likewise, if your mix lacks clarity, you can boost the higher frequencies to make it more defined. EQ can also be used to fix harsh or dull sounding vocals by cutting or boosting the mid frequencies. Here are a few situations where you can use EQ as a problem solver:

  • Reduce harshness in cymbals by cutting high frequencies
  • Reduce boomy bass by cutting low frequencies
  • Reduce nasal vocals by cutting mid frequencies

H3: EQ as a creative tool EQ can also be used as a creative tool to shape a unique and compelling sound. By boosting or cutting certain frequencies, you can create a specific tone or sound. For example, boosting the bass frequencies can create a deep and powerful sound, while cutting the same frequencies can produce a thin and weak sound. EQ can also be used to create space in a mix by cutting frequencies of one instrument that interferes with another. Here are some creative ways to use EQ:

  • Use EQ to create a telephone effect by cutting high and low frequencies
  • Use EQ to create a lo-fi sound by cutting high frequencies and boosting lower ones
  • Use EQ to create a distant sound by cutting high and boosting mid frequencies of a reverb effect

H3: EQ techniques for different instruments Different instruments require different EQ techniques to sound their best in a mix. For example, a bass guitar may need to be boosted in the low frequencies to create a full and rich sound, while a piano may need to be cut in the same range to avoid muddiness. Here are some EQ techniques for various instruments:

Instrument Technique
Electric guitar Boosting mid frequencies for a cutting sound
Drums Cutting low frequencies for a tighter sound
Vocals Boosting high mid frequencies for clarity

In conclusion, understanding and mastering EQ balancing the spectrum is essential for any musician or music producer. EQ can be used as a problem solver to fix issues in a mix, as well as a creative tool to shape a unique and compelling sound. By using different EQ techniques for different instruments, you can ensure that each element of your mix is well-defined and sounds its best.


Understanding Mastering Eq Balancing The Spectrum


Credit: www.groove3.com


Frequently Asked Questions For Understanding Mastering Eq Balancing The Spectrum


What Is The Best Eq Curve For Mastering?


The best EQ curve for mastering varies depending on the specific track and its intended outcome. There is no one-size-fits-all answer, as each track has its unique attributes. Skilled mastering engineers select EQ curves based on their training and experience, always prioritizing what sounds and feels best for the track and target audience.


What Is An Ideal Eq Type To Use During Mastering?


The ideal EQ type for mastering varies depending on the mix. It’s important to listen carefully and make adjustments accordingly to best enhance the overall sound. A combination of EQ types, such as shelving and parametric, may be necessary to achieve the desired results.


How Should We Approach Equalization During Mastering?


When approaching equalization during mastering, follow these 5 guidelines: 1) listen carefully and make small adjustments, 2) prioritize fixing frequency problems first, 3) use high-quality EQ tools, 4) use reference tracks to achieve a balanced sound, and 5) trust your ears and make subjective decisions.


How Do You Balance Frequencies?


Balancing frequencies involves adjusting the levels of different frequency bands in an audio mix to achieve a pleasing balance. This can be done through the use of EQ (equalization) and other audio processing tools. It’s important to pay attention to the overall balance of the mix and not overemphasize any particular frequency range.


Conclusion


To sum up, mastering EQ balancing is an essential skill for audio engineers and producers. It allows for a dynamic and well-rounded sound that enhances the overall listening experience. By understanding and manipulating the frequency spectrum, one can create a more defined and polished mix.


Remember to take your time and approach EQ balancing with intention and careful consideration of the individual track and the overall mix. With practice and attention to detail, you can master the art of EQ balancing and take your music to the next level.

Categories
Archive

Tips On How To Make Sub Bass Sound Better In Your Mix

To make sub bass sound better, use filtering, compression, EQ and limiting in moderation. In doing so, you can achieve a clear, punchy and well-balanced mix.


Sub bass is a crucial element of electronic and hip-hop music. When done well, it adds depth and weight to a track. On the other hand, when it’s not mixed correctly, it can create issues with audio quality, causing tracks to sound muddy and unbalanced.


If you’re looking to improve your sub bass mixing skills, there are several tips that you can follow to achieve better results. We’ll explore some of the techniques you can use to enhance your sub bass in a mix. By mastering these tips, your sub bass will be well defined and perfectly balanced with the rest of the track.

Tips On How To Make Sub Bass Sound Better In Your Mix


Credit: producelikeapro.com


Start With A Solid Foundation

Sub bass is an essential element of any modern music track, providing depth and impact to the overall sound. However, to make sub bass sound better in your mix, you need to start with a solid foundation. This means getting the fundamental aspects of your sub bass right, before you start applying any fancy processing or effects.

Choose The Right Sounds

The first step in creating a solid foundation for your sub bass is choosing the right sounds. This means selecting sounds that are well-suited to the genre and style of music you are producing. For example, if you are producing a bass-heavy electronic track, you might want to choose a deep and resonant sine wave as your sub bass sound.

When selecting sounds, it is important to pay attention to their frequency content. You want to make sure that your sub bass sound is occupying a distinct frequency range, and is not clashing with other elements of your mix. Use a spectrum analyzer to visualize the frequency content of your sounds, and make adjustments as necessary.

Tune Your Kick And Bass

Once you have chosen the right sounds, it is important to tune your kick and bass so that they are playing in harmony with each other. This means making sure that the fundamental frequencies of your bass and kick are aligned, so that they are not clashing or creating unwanted overtones.

Use a tuner plugin to identify the fundamental frequencies of your kick and bass, and make any necessary adjustments. You may need to transpose one or both of the sounds up or down by a few semitones to get them in tune with each other.

Remember, getting the basics right is key to making your sub bass sound better in your mix. By choosing the right sounds and tuning your kick and bass, you can create a solid foundation for your sub bass to sit on, and make it sound fat and powerful.


Sculpting Your Sub Bass


Enhancing the sub bass in your mix is essential to create a well-rounded sound. By adjusting the frequency range, adding harmonics, and using compression and EQ, you can sculpt your sub bass to perfection. These tips will help you to create a fuller, deeper, and more impactful sub bass.

Creating a sub bass that sounds good and blends well with the rest of the mix is often a daunting task for beginner producers. The sub bass takes considerable space in the frequency spectrum and can easily become muddy, overpowering, or even disappear completely in some sound systems. In this section, we will discuss some techniques that can help you sculpt your sub bass and give it the clarity, presence, and depth it deserves.

Cut The Mids

One of the primary reasons why sub bass sounds muddy or unclear is that it often has too much mid-range content. By cutting the mids around 200-400 Hz, you can free up some space in the mix and prevent the sub bass from clashing with other elements such as kicks or synths. A gentle cut of -3 to -6 dB should suffice, and you can use a bell-shaped or shelf EQ depending on the tonal balance you want to achieve.

Add Saturation Or Harmonics

Another way to enhance your sub bass is to add some saturation or harmonics to it. Saturation plugins, such as Waves’ J37 or Softube’s Saturation Knob, can add warm analog-style distortion to the sub bass, making it more present and lively. Harmonic exciter plugins, such as iZotope’s Ozone Exciter or Waves’ Vitamin, can add artificial overtones to the sub bass that complement its fundamental frequency and give it more character. Be careful not to overdo it and keep the sub bass level in check.

Sidechain Like A Pro

Sidechaining is a popular technique for making the sub bass and kick drum work together and avoid clashing. By sidechaining the sub bass to the kick drum, you can make the sub bass duck or lower its volume every time the kick hits, creating a rhythmic and dynamic effect. You can achieve this by using a compressor or a volume shaper plugin and setting the input to the kick track and the output to the sub bass track. Adjust the threshold, ratio, attack, and release parameters until you achieve the desired pumping effect without sacrificing the sub bass’s tonal balance.

Eqing For Clarity

EQing is, of course, one of the most crucial steps when mixing sub bass. You need to ensure that the sub bass frequency range is not too narrow or too broad and that each note is audible and defined. A typical sub bass frequency range lies between 20-120 Hz, but you can adjust it based on your track’s genre and style. Use a steep high pass filter to remove all frequencies below the sub bass range and avoid any unwanted rumble or noise. Boosting the fundamental frequency between 50-80 Hz can give the sub bass some warmth and impact. Use a gentle shelving boost of +1 to +3 dB and listen to how it interacts with other elements in the mix. By applying these techniques, you can start sculpting your sub bass and make it sound better and richer in your mix. Be patient and experiment with different settings until you find the sweet spot that works for your track.

Effects And Processing

When it comes to mixing music, one of the most critical elements to get right is the sub-bass. It can be the difference between a track that sounds muddy and unclear, or one that is punchy, powerful and crystal clear. The key to an excellent sub-bass mix lies in the processing and effects that you use to enhance the sound.

Add Texture With Reverb And Delay

Reverb and delay are two effects that can add texture and depth to your sub-bass. By carefully adjusting the decay time, you can create a sense of space around the sound, making it feel bigger and more spacious. Similarly, by adding a unique delay, you can create a more complex and interesting sound that will keep your listener engaged.

Experiment With Distortion And Compression

Distortion and compression are two effects that can add grit and punch to your sub-bass, making it feel more powerful and dynamic. Distortion can be used to create a more intense and aggressive sound, while compression can help to control the dynamics, making the bass more audible on smaller speaker systems. By experimenting with these effects, you can find the perfect balance of punchiness and clarity for your sub-bass mix.

Polishing Your Mix

Polishing your mix is a crucial part of making your sub bass sound better. This step should be done after you’ve made all necessary adjustments to your mix. Since bass frequencies are difficult to hear on most speakers, polishing your sub bass ensures that it will be audible on any playback system. Two techniques that can aid you in polishing your mix are ‘Reference and Compare’ and ‘Get a Second Opinion’.

Reference And Compare

When polishing your mix, it’s smart to use a reference track with similar sub-bass, so you can compare it to your mix. This process makes it easier to listen to what’s working and what’s not. Analyze the overall mix and compare it to your reference track. Try to match the frequency and tonality of the sub bass while also keeping in mind that the overall mix should blend well. Also, compare the stereo width and the mix’s general feel with the reference track. This technique can aid in making your mix sound polished and professional.

Get A Second Opinion

Another technique to polish your mix is to rely on a second opinion. It is challenging to catch all the issues when you’ve been listening to a track for an extended period. A second listening from another producer or musician can aid you in identifying areas that need improvement. You can ask the second listener to highlight areas that could be improved and provide their perspective on the overall mix. It’s important not to neglect other listeners’ feedback and take their objective criticism for what it is worth.


Frequently Asked Questions On Tips On How To Make Sub Bass Sound Better In Your Mix


How Can I Make My Sub-bass Sound Better?


To enhance the sound of sub-bass, you can follow these steps: – Use a high-quality audio system or headphones – Consider adjusting the EQ settings to increase the low frequencies – Cut out any unwanted frequencies with a high-pass filter – Experiment with different levels of compression to balance the sub-bass with other elements – Consider layering different bass sounds to add depth and richness.


How Can I Make My Bass Sound Better In Mix?


To make your bass sound better in mix, you should consider EQing the bass to eliminate any unwanted frequencies, including low-end rumble. Experiment with compressors and limiters to bring out the bass’s natural sound and control its dynamics. Use saturation or distortion plugins to add character to the bass and make it stand out more in the mix.


Finally, ensure that the bass sits well in the mix by adjusting its volume level, panning, and stereo imaging.


What Effects To Add To Sub-bass?


Sub-bass effects should be used sparingly and should complement the composition’s overall sound. Adding subtle pitch modulations, distortion, and filtering can enhance the sub-bass’s character, whereas overuse of effects can result in a muddy and indistinct bassline. It’s best to experiment with different effects and use only what sounds good for the track.


How Do You Make A Punchy Sub-bass?


To make a punchy sub-bass, start by choosing a sine wave or low-frequency oscillator. Add saturation, compression, and EQ to boost the low end. Add harmonic distortion to add texture and presence. Use a sidechain compressor to make it fit with the rest of the mix.


Lastly, layer the sub-bass with a higher-frequency bass for added depth and clarity.


Conclusion


Making sub bass sound better in your mix requires patience and attention to detail. It’s essential to identify the root cause of any issues and use EQ, compression and saturation strategically. Additionally, understanding the relationship between the key elements in your mix can help you create a balanced and impactful sound.


Remember to trust your ears and experiment until you find the right sound for your track. With these tips, you should be well on your way to creating a professional-sounding mix that will stand out from the crowd.


Categories
Archive

How To Get The Right Amount Of Punch In Your Master

To get the perfect amount of punch in your master: first, ensure that each element in your mix is well-balanced in terms of volume and frequency. Second, use compression and limiting techniques to boost the overall loudness of the mix without compromising the dynamics of the individual elements.


When mixing and mastering your music, achieving the right balance between all of the individual elements can be a challenging task. While there are many important considerations to keep in mind during the mastering process, getting the right amount of punch is essential for creating a professional-quality track that will pack a punch.


While there are no hard and fast rules when it comes to mastering a track, there are a few tips and techniques that can help you achieve the perfect balance between volume, dynamics, and punch. We will take a closer look at some of the most effective techniques for getting the right amount of punch in your master, so you can create tracks that are powerful, polished, and professional-sounding.


Mastering Techniques To Achieve Punch


To achieve the right amount of punch in your master, mastering the right techniques is crucial. The key lies in balancing the levels and dynamics so that each element can be heard clearly without overpowering one another. By carefully adjusting the EQ and compression, you can achieve a powerful and impactful master.

Mastering a track is a crucial step in the music production process. It gives the final polish to the song, making it ready for distribution. One important aspect of mastering is achieving the right amount of punch. Punch gives a song impact, power, and clarity. However, getting the perfect balance of punch can be challenging. In this article, we will explore some mastering techniques to achieve punch. We will focus on Compression, Saturation, EQ, and Multiband Compression.

Compression

Compression is an essential tool for mastering engineers. It helps even out the levels of a track, making it sound more cohesive. However, using too much compression can suck the life out of a song, and not using enough can make it sound weak. When it comes to achieving punch, compression can help control the levels of the drums, bass, and vocals, which are the crucial elements that contribute to punch. To achieve punch, try a combination of light, transparent compression on the individual tracks, and then a bit more aggressive compression at the stereo bus.

Saturation

Saturation is the process of adding harmonic distortion to a track. It can make the track sound warmer and more organic. Saturation can also help bring out the punch in a song by adding harmonics to the transients. It can be used on individual tracks or mixed in at the stereo bus. There are different types of saturation plugins available in the market, such as tape and tube emulators. Experiment with different types of saturation and find the ones that work best for your track.

Eq

EQ is an essential tool for shaping the frequency response of a track. When it comes to achieving punch, EQ can help bring out the low, mid, and high frequencies of the drums, bass, and vocals. Boosting the low-mids and the high frequencies can make the track sound more powerful. However, make sure not to go overboard with the EQ, or it can negatively affect the balance of the mix.

Multiband Compression

Multiband compression is a type of compression that divides the frequency spectrum into multiple bands. It allows the mastering engineer to apply different compression settings to each band. Multiband compression can help bring out the punch in a song by controlling the levels of the low, mid, and high frequencies. For example, the low-end can be tightened using multiband compression, making the drums and bass sound more powerful. In conclusion, achieving punch in a song requires a balanced use of compression, saturation, EQ, and multiband compression. Experiment with different settings and plugins to find the ones that work best for your track. Remember to always trust your ears and make adjustments based on what sounds best. With the right approach, it’s possible to achieve that perfect balance of punch in your master.

Using The Right Tools For Punchy Masters


Getting the right punch in a master is essential for creating a powerful and impactful sound. This can be achieved by using a combination of tools such as equalizers, compressors and limiters, and properly setting them to enhance the sound’s dynamics.

When it comes to creating a master that really packs a punch, having the right tools is absolutely essential. Whether you’re a professional producer or just getting started with mastering, investing in the right equipment can make all the difference. In this article, we’ll take a look at some of the key tools you need to achieve the perfect punch in your masters.

High-quality Speakers

One of the most important tools in your mastering arsenal is a set of high-quality speakers. These will allow you to hear every detail of your mix, and ensure that your master sounds great on a wide range of playback systems. Look for speakers that offer a flat, neutral frequency response, and aim to test your mix on a variety of different speakers to ensure it sounds great everywhere.

Acoustically Treated Room

Another key factor in achieving a punchy master is ensuring that your listening environment is acoustically treated. This means using acoustic panels and other materials to reduce reflections and other unwanted noise in your space. A well-treated room will allow you to hear your mix more accurately, and make more informed decisions about your processing.

Professional Audio Interface

When it comes to capturing the perfect master, having a high-quality audio interface is essential. This hardware sits between your computer and your speakers, and ensures that you’re getting the cleanest, highest-quality signal possible. Look for an interface with high-quality converters, low latency, and plenty of inputs and outputs to suit your needs.

Up-to-date Daw

In addition to your hardware, having an up-to-date digital audio workstation (DAW) is also essential for punching master. This software is where you’ll be doing the actual mastering work, so it’s important to choose a platform that offers the tools and features you need. Look for a DAW that offers powerful audio processing tools, intuitive workflow, and plenty of compatibility with different plugins and third-party software.

Analog Gear

Finally, for those looking to take their mastering to the next level, investing in some high-quality analog gear can be a great way to achieve a truly punchy, professional sound. From analog compressors to EQs and limiters, these pieces of gear offer a warm, natural sound that can be hard to replicate in the digital domain. While they can be expensive, investing in a few choice pieces can make a huge difference in the quality of your masters. By investing in the right tools and equipment, you can achieve a punchy, professional sound in your masters that will sound great on any system. From high-quality speakers and acoustically treated rooms to professional audio interfaces and analog gear, each of these tools plays an important role in getting the most out of your mixes. So if you’re serious about mastering, be sure to put the time and effort into choosing the right equipment for the job.

Punchy Mastering Tips And Tricks

When it comes to getting the right amount of punch in your master, there are several techniques that can help you achieve the desired result. In this blog post, we will discuss some punchy mastering tips and tricks that can make your tracks stand out.

Parallel Compression

Parallel compression, also known as New York Compression, is a technique that involves mixing a heavily compressed signal with an unprocessed signal. This technique can help you achieve a more prominent and thicker sound without losing clarity and dynamics.

The process involves sending your track to two different channels. One channel will have heavy compression applied to it, while the other remains unprocessed. Once the two signals are mixed together, you’ll have a more full-bodied sound.

Sidechain Compression

Sidechain compression is a popular technique used by many music producers and engineers to create punchy and dynamic tracks. The process involves using a compressor to reduce the volume of one track when another track plays at the same time.

For example, sidechain compression can be used to reduce the volume of a bassline every time a kick drum hits, creating a sense of groove and rhythm that is essential in dance music.

Exciters

Exciters are devices that enhance the harmonic content of a signal, making it sound brighter and more exciting. They work by adding higher frequency harmonics to the original signal.

The process of using an exciter can help you add more presence and brightness to your mix, making it sound more polished and professional.

Stereo Widening

Stereo widening is a technique that involves making a track sound wider and more expansive. This is often used to create a sense of space and depth in a mix, giving the listener a more immersive experience.

There are several stereo widening plugins available that can help you achieve this effect. However, it’s essential to use these plugins sparingly, as overuse can result in a mix that sounds muddy and undefined.

Automation

Automation is the process of changing certain parameters in a mix over time. This technique can help you create dynamic and engaging tracks that keep the listener’s attention.

Automating elements like volume, panning, filters, and effects can help you create builds, drops, and other impactful moments in your mix, making your tracks more punchy and exciting.

Conclusion

Using the punchy mastering tips and techniques outlined above can help you create tracks that stand out and sound professional. Whether you’re working on a new track or tweaking an old one, utilizing these techniques can take your mix to the next level.


How To Get The Right Amount Of Punch In Your Master


Credit: www.masteringthemix.com


Frequently Asked Questions On How To Get The Right Amount Of Punch In Your Master


How Do I Make My Sound More Punchy?


To make your sound more punchy, try using compression to even out the sound’s peaks and make it more consistent. Use EQ to boost the midrange frequencies, which are responsible for punch and clarity. Consider adding distortion or saturation to create harmonics and add edge to the sound.


Experiment with volume automation to add emphasis to specific parts of the sound. Lastly, make sure your mix isn’t too busy, as having too many elements can make your sound less impactful.


How Do You Add Punch In Mastering?


To add punch in mastering, you can give importance to the overall tonality of the mix, balance the levels of various components of the mix, use compression and limiters, and apply equalization. Additionally, you can also experiment with different techniques like parallel compression, saturation, and stereo enhancement to enhance the mix’s impact and punch.


How Loud Should My Master Be In Db?


The recommended loudness of a master depends on the type of audio you’re creating and its intended platform. Generally, you want your master to peak between -1dB and -0. 1dB. However, if you plan to release music on streaming platforms like Spotify, you should aim for a lower loudness level of around -14dB to -9dB LUFS to comply with their loudness normalization standards.


What Level Should My Mix Be At For Mastering?


Your mix should be at a consistent and moderate level, with peak levels averaging around -6 dB to -3 dB. This will allow room for the mastering engineer to apply their own dynamics processing and maximize your track’s loudness without causing distortion or clipping.


Make sure to avoid excessive compression or limiting on your mix bus to prevent loss of dynamic range.


Conclusion


Achieving the right amount of punch in your master is crucial for an impactful and effective sound. From understanding the dynamics of your mix to utilizing tools such as compression and EQ, there are various techniques to help you achieve the perfect balance of punchiness in your final mix.


Remember to regularly reference your mix against other professional recordings, experiment with different techniques, and trust your ears. With practice and patience, you’ll be able to achieve the punchy and powerful sound you’ve been aiming for.


Categories
Archive

Which Pro Tools Is Right For Me A Complete Guide

This guide covers Pro Tools version in plain terms. Choosing the right Pro Tools depends on your needs and budget. Here’s a comprehensive guide to help you make the best choice.


Also, as a music producer, sound editor, or musician, Pro Tools is one of the most renowned Digital Audio Workstations (DAW) software available. It is used mostly by professionals in the audio and music industry, for recording, editing, and mixing audio or music.

Related reading: Import Audio Pro Tools and Pro Tools First Grid Mode. For background, see the Wikipedia article on Pro Tools.


However, choosing the right Pro Tools version that suits your needs can be tricky since Avid offers several options with different features and prices, including Pro Tools First, Pro Tools Standard, and the Pro Tools Ultimate. This guide breaks down the features, differences, and prices of each Pro Tools version to help you make an informed decision.


Pro Tools First


In addition, the Pro Tools First software is a free option for beginners to learn about digital audio recording and editing. It has a variety of features to create high-quality sound recordings. But more advanced users may opt for paid versions of Pro Tools.

Pro Tools First: Free Vs Paid Versions

Furthermore, if you are new to music production and looking for a professional-grade DAW software, Pro Tools First is a great option to start with. It’s a free version of Avid’s Pro Tools lineup and offers many essential features for beginners and hobbyists. But, before you jump into any decision, you should know the differences between the free and paid versions of Pro Tools.

Features

Additionally, Pro Tools First comes with many features that are essential for music production. You get up to 16 audio tracks and 16 MIDI tracks, support up to four inputs and four outputs, and access to 23 plugins. This includes EQs, compressors, reverbs, and more. Additionally, you get the session templates, cloud collaboration. The ability to save and share your projects, making it easier to work with other musicians and producers. The paid version of Pro Tools offers higher track counts and premium plugins. It also adds deeper mixing and editing tools and wider hardware support. The paid versions are more suited for professional audio engineers, music producers, and commercial studios that require advanced features, flexibility, and scalability.

In Conclusion

Also, Pro Tools First is a free, feature-packed DAW software that provides beginners and hobbyists with an excellent platform to start their music production journey. It’s a great way to learn and experiment with all the essential tools and techniques used in the music industry. However, if you require advanced features and flexibility, you should consider a paid version of Pro Tools. Choose the version that suits your needs and budget and start making music today!


Pro Tools Standard


Pro Tools Standard is a powerful audio editing software that offers many essential features such as editing, mixing, and recording. Moreover, it is an ideal choice for music enthusiasts and beginners who want to create professional audio recordings without breaking the bank.

In addition, if you’re shopping for a Pro Tools subscription plan, you’ll come across the Pro Tools Standard option. This edition is designed for professionals and enthusiasts who require advanced audio editing tools but don’t need some of the more advanced features found in the Pro Tools Ultimate package. Let’s discuss the features that come with Pro Tools Standard subscription plan and whether it’s right for you.

Standalone Vs Subscription for Pro Tools Version

Furthermore, Pro Tools Standard comes with two licensing options: standalone and subscription. Standalone is a perpetual license that grants you access to the software indefinitely. In contrast, a subscription license is a renewable option that gives you access to the software for a limited time. Standalone licenses are ideal if you don’t plan on upgrading frequently and don’t want to pay an annual fee. However, if you plan on upgrading your software regularly or want access to new features when they come out, a subscription license may be a better option for you.

Features

Additionally, Pro Tools Standard comes with a broad range of editing and mixing capabilities suitable for most audio production workflows. Here are some of the core features you can expect:

  • 16 audio tracks
  • 16 instrument tracks
  • 128 MIDI tracks
  • Also, over 80 plug-ins, including virtual instruments and sound processing tools
  • Signal processing capabilities, including EQ, compression, and reverb
  • Support for 5.1 surround mixing
  • Automated track creation and preset recall workflows

Its feature list is shorter than Pro Tools Ultimate offers. Still, it packs enough power for most music and post-production projects. You now know the features and licensing options for Pro Tools Standard. That makes it easier to judge whether this edition meets your needs.

Pro Tools Ultimate


Pro Tools Ultimate is an advanced version of the Pro Tools software, with added features to help professionals create high-quality audio productions. It’s the right choice for composers, music producers, recording and mix engineers who require powerful tools and flexibility in their audio workflow.

Pro Tools Ultimate is the top-of-the-line version of Pro Tools, designed for audio post-production professionals, music producers, and sound designers who require advanced features and capabilities.

Standalone Vs Subscription for Pro Tools Version

Pro Tools Ultimate is available as a standalone software or as a subscription-based service. The standalone version is a perpetual license, meaning you own the software and can use it indefinitely. On the other hand, the subscription-based version offers more flexibility in terms of payment options and access to the latest updates and features.

Features

Pro Tools Ultimate is packed with a wide range of features. This makes it the go-to choice for professionals in the industry. Some of its standout features include:

  • Advanced automation and control surface functionality
  • Dolby Atmos support for immersive audio post-production
  • Nuendo integration for audio post-production workflows
  • Extended video workflows for picture editors
  • Over 200 plugins and tools
  • High track counts and surround sound support
  • Complete audio and MIDI production environment

If you’re a professional looking for a powerful and comprehensive audio production software, then Pro Tools Ultimate might just be the right fit for you. It brings advanced features, flexible licensing, and support for industry standards. All of that helps you take your audio work further.

Comparison Of Pro Tools Versions


Pro Tools comes in different versions with varying features and prices. The right version for you depends on your needs and budget. This guide examines the different versions of Pro Tools available and helps you choose which one best suits your specific requirements.

If you’re trying to determine which version of Pro Tools is right for you, then you’ll be happy to know that this article is for you. While there are different versions of Pro Tools to select from, the feature differences and price can be confusing. So, let’s dive into a detailed comparison of these versions to give you a good understanding of the differences.

Feature Differences for Pro Tools Version

The feature differences are a crucial factor to consider when choosing the software. Here’s a quick overview of the feature differences between each version.

Pro Tools Version Feature Description
Pro Tools First Tracks Limited to 16 audio tracks, 16 MIDI tracks.
Pro Tools Standard Tracks Supports up to 128 audio tracks, 512 MIDI tracks.
Pro To

Factors To Consider for Pro Tools Version


Choosing the right Pro Tools software can be overwhelming. But considering factors like your budget, level of experience, and specific needs can help make the decision easier. Whether you’re a beginner or professional, there are options available for you.

As a music producer, investing in the right software is crucial. With numerous digital audio workstations (DAWs) in the market, it can be challenging to select the best for your needs. Pro Tools is one of the popular DAWs that music producers trust. However, which Pro Tools version is best suited for your projects can be a tough question to answer. Here are some factors that you should consider when selecting the right Pro Tools version:

Budget:

Affordability is a major factor when looking for a Pro Tools version. The good news is that Avid, the developers of Pro Tools, have different pricing plans that cater to different budgets. For instance, if you are a beginner, Pro Tools First is freely available to download. It provides you with essential tools to create music. If you need more features and flexibility, you can consider purchasing the standard Pro Tools version or the Pro Tools Ultimate subscription.

Type Of Projects:

The type of projects you intend to work on will determine which Pro Tools version is appropriate for you. If you specialize in podcasting, voice-over work, or music production, Pro Tools Standard will suit your needs. However, if you mainly work on large-scale audio/musical productions at the professional level, you might benefit from the Pro Tools Ultimate version.

Collaboration Needs:

If you plan to collaborate with other music producers, artists, or engineers, the Pro Tools version that you select must support collaboration. Pro Tools Standard and Pro Tools Ultimate feature the Avid Cloud Collaboration tool. This means that you get to collaborate with other Pro Tools users in real-time, regardless of their location.

Hardware Compatibility:

Finally, ensure that the Pro Tools version you choose is compatible with your hardware. Notably, some Pro Tools versions require a higher RAM or specific processor to function optimally. Check the recommended hardware requirements before purchasing your preferred Pro Tools version.

Conclusion:

In conclusion, when selecting the right Pro Tools software, you need to consider numerous factors such as budget, hardware compatibility, collaboration features, and type of project. Weigh your needs against this guide. Then pick the Pro Tools edition that fits your music work best.


Frequently Asked Questions Of Which Pro Tools Is Right For Me A Complete Guide


Why Was Pro Tools Discontinued?


Pro Tools was not discontinued. It is still actively developed by Avid Technology as the industry standard digital audio workstation used by professionals worldwide. Avid continues to release updates and new versions of Pro Tools for users to purchase and use.


What Is The Difference Between Pro Tools And Pro Tools Hd?


Pro Tools is a music production software for recording, editing and mixing audio. Pro Tools HD is an advanced version of the software that offers higher processing power, additional features and better audio quality. HD systems require special hardware, while Pro Tools works with standard computers.


Which Is Better Pro Tools Artist Or Studio?


Pro Tools Artist is the better option for individuals and small studios, while Pro Tools Studio is suitable for larger production settings and advanced audio tasks. Choosing between the two depends on your needs and budget.


What Are The Different Versions Of Pro Tools?


Pro Tools has several versions, including Pro Tools | First, Pro Tools, Pro Tools Ultimate, and Pro Tools for Education. Moreover, Pro Tools | First is a free version with limited features, while Pro Tools is the standard version for music and audio production.


Pro Tools Ultimate includes advanced features for film and television production, and Pro Tools for Education is a discounted version for students and educators.


Conclusion


To sum up, choosing the right Pro Tools can be a daunting task. But it ultimately depends on your specific needs and budget. You should consider the level of functionality you require, the type of music you produce, and your own personal preferences.


Overall, any version of Pro Tools will offer you advanced features, high-quality sound, efficient workflow, and reliable support. So, take your time, do your research, and pick the perfect Pro Tools for your music production needs. Happy mixing!


Categories
Archive

Things Your Mix Is Missing And What To Do About It

This guide covers mix is missing in plain terms. To enhance your mix, you may need to adjust certain elements like EQ, compression, levels, and panning. Experimentation and critical listening can help you identify problems and make the necessary changes.

Waveform comparison that helps show what your mix is missing


Also, if you want your music to stand out from the crowd, you need to create something that sounds unique and fresh. However, achieving this is easier said than done. Besides relying on your creativity and skill, there are specific elements that every mix must possess to sound professional and engaging.

Related reading: Mixing: The Complete Guide Hub and Mixing Piano. For background, see the Wikipedia article on Audio mixing.


Moreover, these are things like clarity, balance, depth, and cohesion. Achieving these aspects in your mix can be a challenge, but it is possible with a little guidance. We’ll explore some common mix issues and recommend some practical solutions to help you perfect your tracks.


The Importance Of A Good Mix


In addition, a great mix can make or break a track, and there may be missing elements that are affecting its quality. Ensure your mix has a balanced frequency spectrum, clear musicality, and is free of distracting inconsistencies by analyzing and adjusting elements such as levels, EQ, and compression.

Why A Good Mix Is Essential

Furthermore, your mix can make or break your entire music project. A good mix is the foundation of any great song. It’s what makes everything sound full, cohesive, and balanced. If your mix is not up to par, it can leave your listeners feeling unsatisfied and even turn them off from your music altogether. A lack of balance between the different elements of your song can cause it to sound cluttered or disjointed.

What A Good Mix Sounds Like

Additionally, a good mix should sound natural and unprocessed. It should be dynamic, with the appropriate amounts of loud and soft parts. All the different instruments and vocals should be heard clearly and sit properly in the mix. The mix should also be appropriate for the genre of music that you are creating. For instance, a hip-hop mix should sound different from a rock mix in terms of the amount of bass and emphasis on the vocals.

What Your Mix Might Be Missing

Also, your mix might be missing a few things that could make all the difference in the final product. Some common elements that are often left out of a mix include:

  • Moreover, proper frequency balance: This means that the different frequencies, from bass to treble, are balanced and not overwhelming or underwhelming each other.
  • In addition, spatial balance: This means that each instrument and vocal is occupying the appropriate space in the mix. So nothing feels cluttered or too isolated.
  • Furthermore, Dynamics: This means that there is a proper balance between the loud and soft parts of the song. This makes for a more engaging listening experience.
  • Additionally, Clarity: This means that every element in the mix can be heard clearly, and isn’t being drowned out by other elements.
  • Also, presence: This means that each element in the mix has a clear place in the sonic landscape and is not being overshadowed or lost in the mix.

What To Do About It

Moreover, if you feel like your mix is missing these elements, it might be time to go back to the drawing board. Mixing is a skill that takes time and practice to perfect. So don’t be too hard on yourself if you’re struggling. Here are some things to keep in mind when working on your mix:

  • In addition, reference other songs in your genre to get a better sense of what a good mix sounds like.
  • Furthermore, use EQ to balance out the different frequencies in your mix.
  • Additionally, use panning to create a more spacious and natural sound.
  • Also, use compression to control the dynamics of your mix.
  • Moreover, consider hiring a professional mixing engineer if you’re really struggling.

In addition, time spent on your mix lifts your music. It also gives your audience a more engaging listen.


Identifying Issues In Your Mix

Furthermore, creating a great mix can be a challenging task for even the most experienced music producers. However, identifying issues in your mix is the first and most crucial step to take in music production. Knowing what is missing in your mix can help you make an informed decision on how to fix it.

Common Mix Problems

There are common issues that arise when mixing music that can cause an unbalanced mix. Knowing what these issues are can help you identify them more quickly. Some of the common mix problems include:

  • Harsh or piercing highs
  • Muddy or boomy lows
  • Muffled or boxed-in midrange
  • Poor soundstage or panning
  • Clarity and loudness issues

Identifying these issues will help you to focus on fixing them more effectively.

Tools To Help Identify Issues for Mix Is Missing

Fortunately, there are tools available that can help you identify issues in your mix. Here are some of the most commonly used tools:

Tool Description
Reference tracks Listening to professionally produced tracks can help you compare and contrast your mix with a professionally mixed track. This can help you identify issues with your mix.
Spectrograms A spectrogram is a visual representation of sound. Using a spectrogram tool, you can analyze frequencies and identify issues in your mix visually.
Equalizers An EQ allows you to adjust the various frequencies in your mix. Using an EQ, you can identify issues with your mix and adjust them precisely.
Goniometers A goniometer shows you the stereo field of your mix and can help you identify issues with panning and stereo imaging.
Multimeter A multimeter is a tool that measures various aspects of your mix, such as loudness, RMS, and peaks. It helps you identify issues with volume and consistency in your mix.

Using these tools effectively can help you identify issues with your mix and make informed decisions on how to fix them.


Solving Common Mix Problems


Is your mix lacking that professional sound? It may be missing key elements such as balance, EQ, or compression. Analyzing your mix with fresh ears and adjusting these factors can help elevate your sound.

Are you struggling to get that perfect mix for your music tracks? It can be disheartening when you’ve spent hours on a mix, and it still doesn’t sound right. There are common mix problems that every musician faces, but the good news is that they’re easily solvable. In this post, we’ll discuss how to improve clarity, deal with muddiness, manage dynamics, and fix stereo imbalance in your mixes.

Improving Clarity for Mix Is Missing

Clarity is essential in a mix, and it is what separates a good mix from a bad one. If your mix lacks clarity, it will sound muddy and indistinct. This makes it hard for your audience to differentiate between the different instruments. Here are some tips to help improve clarity in your mix:

  • Use EQ to remove any low frequencies that aren’t needed in each track
  • Use panning to separate instruments and give each element of the mix its space
  • Cut out any overlapping frequencies to avoid clashing sounds
  • Add reverb to create depth and add a sense of space to your mix

Remember, a clear mix doesn’t mean a loud mix. Always prioritize clarity over volume.

Dealing With Muddiness for Mix Is Missing

Muddiness is a common mix problem that happens when frequencies clump together, creating a muddled and indistinct sound. The key to fixing muddiness is to identify which frequency ranges are causing the problem and then doing some EQ adjustments. Here are some tips for dealing with muddiness:

  • Use a spectral analyzer to visualize where the clashing frequencies are
  • Use EQ to reduce the problem frequencies without affecting the quality of the sound
  • Try using sidechain compression to separate instruments and avoid clashes

Managing Dynamics for Mix Is Missing

Dynamics are what give your mix its energy and flow, but they can also be a challenge to manage. If your mix isn’t balanced correctly, some instruments may be too loud, while others may sound too quiet. Here’s what you can do to manage dynamics in your mix:

  • Use compression to balance the volume of your tracks
  • Automate the volume of individual tracks to create a natural feel
  • Use sidechain compression to separate instruments and avoid clashes

Fixing Stereo Imbalance for Mix Is Missing

Stereo imbalance happens when the balance between the left and right channels of a mix is off. This can be especially noticeable when listening on headphones. Here are some tips to help fix stereo imbalance:

  • Use a stereo imaging plugin to widen the stereo image of your mix
  • Check your panning to make sure that there isn’t too much going on in one channel
  • Use mid/side processing to adjust the levels of your mix

In conclusion, these common mix problems can be easily solved with the right techniques and tools. Remember to prioritize clarity, manage dynamics, deal with muddiness, and fix stereo imbalance to create the perfect mix.


Mixing For Different Platforms

Creating an amazing mix is one thing. But making it sound great for various platforms is a task that requires a whole new level of expertise. When it comes to streaming platforms, club play, or even radio play, there are different techniques and strategies that you can apply to achieve the best possible mix. Let’s take a closer look at how you can adapt your mix for different platforms.

Adapting For Streaming for Mix Is Missing

Online streaming platforms such as YouTube, Spotify, and SoundCloud have become the go-to platforms for music lovers worldwide. This means that your mix should sound just as good on these platforms as it would on any other device or medium.

To ensure your mix sounds good on streaming platforms, keep the following tips in mind:

  • Compress your mix to ensure it sounds good on mobile devices and laptops with less-than-ideal speakers.
  • Avoid heavy limiting or equalization of your mix, as this can lead to distortion or reduction in overall loudness.
  • Listen to your mix on various devices to ensure it sounds great regardless of the medium.

Creating A Club-ready Mix

If your mix is meant to be played at a club, you need to ensure that it sounds great on a powerful sound system in a large room with plenty of people. This means that the mix should have adequate energy and should be tailored to suit the club atmosphere.

To create a club-ready mix, keep the following tips in mind:

  • Pay attention to the energy levels of each track and ensure that they build up to a climax.
  • Avoid abrupt changes in tempo or genre. Meanwhile, this can disrupt the flow of the mix and the atmosphere of the club.
  • Use EQ and compression to make the mix sound cohesive and smooth on the dance floor.

Mixing For Radio Play

Radio play has been a traditional way of broadcasting music to the masses. To make your mix sound great on the radio, you need to make sure it has the right balance of energy and dynamics.

To mix for radio play, keep the following tips in mind:

  • Avoid using explicit language, as this can lead to your mix being blacklisted by certain radio stations.
  • Pay attention to loudness levels, as excessive levels of compression and limiting can lead to a reduction in overall loudness on the radio.
  • Ensure that the mix has the same level of energy and excitement from start to finish, as radio listeners tend to tune in and out of channels frequently.

In conclusion, adapting your mix for different platforms requires attention to detail and a deep understanding of what works best in each medium. Whether it’s online streaming platforms, club play, or radio play, following the right techniques and processes can help you create a mix that sounds great and reaches a wider audience.

Mastering Your Mix


Mastering Your Mix can be a challenging task, as sometimes there are things missing that can impact the quality of the final product. However, with the right approach, you can identify and address these missing elements to enhance your mix and achieve a polished sound.

The Importance Of Mastering for Mix Is Missing

Mastering is the final and perhaps the most critical step in the process of music production. It represents the last chance to enhance your mix and make it sound professional. The mastering engineer’s job is to optimize and correct any issues in the mix, ensuring that the track is cohesive and balanced. Working on mastering helps to make your music stand out from the competition, and with today’s highly competitive landscape, it is essential to have a well-mastered track.

Diy Mastering Tips in Mix Is Missing

While there is nothing to stop you from mastering your own tracks, it takes years of dedication to become a skilled mastering engineer. There are a few things you can do, however, to ensure your mix is well-prepared for the mastering process. Here are some DIY mastering tips that you can try out:

  • Listen to commercial reference tracks to learn how professionally mastered mixes should sound.
  • Ensure your mix has no harsh frequencies and that there’s plenty of headroom.
  • Use a high-quality limiter to avoid distortion and preserve your mix’s dynamic range.
  • If you’re new to EQ, use reference EQ curves in your DAW to get a sense of the frequency allocations of various instruments.

Getting Professional Help for Mix Is Missing

If you’re serious about your music and you want to sound as good as possible, then perhaps it’s time to consider getting professional assistance. While mastering plugins and online services may be easy and inexpensive, they can only take your mix so far. A professional mastering engineer has an experienced ear and access to industry-standard equipment. This enables them to enhance your mix in ways you may not have thought possible. Remember: if your music is worth producing, it’s worth mastering.

Working With A Professional Mixer / Masterer


A professional mixer/masterer can add the finishing touches to your music production that you may not have knowledge of. They can provide the missing elements of your mix that make it sound fuller, balanced, and more polished. Trusting in their expertise can take your music to the next level.

Good mixes can make or break a song. If you’re having trouble achieving the sound you want, it may be time to consider working with a professional mixer or masterer. Here are some of the benefits of working with a pro, as well as some tips on how to find a good one.

Benefits Of Working With A Pro for Mix Is Missing

1. Improved Sound Quality – Professionals have the experience, knowledge, and equipment necessary to produce high-quality mixes. They can improve your sound by removing background noise, balancing levels, and enhancing clarity and depth. 2. Faster Turnaround Time – Since professional mixers are experts at their craft, they can complete projects quickly. This not only saves time but can also help you avoid the frustration of spending hours on a mix that just doesn’t sound right. 3. Objective Feedback – It’s difficult to be completely objective about your own work.

A professional mixer can provide a fresh perspective and offer constructive criticism to help you improve your mix. 4. Better Gear – Professional mixers and masterers invest in high-quality gear to give their clients the best possible sound. They have access to advanced hardware and software that may be out of reach for most home studios.

How To Find A Good Mixer / Masterer

1. Check Their Portfolio – Look at previous work by the mixer or masterer to see if their style matches yours. Make sure their previous work sounds polished and professional. 2. Read Reviews – Look for reviews from previous clients to get an idea of their experience working with the mixer or masterer. Positive reviews are a good sign that you’re dealing with a professional who delivers great results. 3. Ask for Recommendations – Ask other musicians or industry professionals for recommendations. Word-of-mouth referrals can be a great way to find a reliable and talented mixer or masterer. 4.

Communication – Communication is key when working with any professional. Make sure to discuss your vision and goals for the project before you get started. Make sure you’re on the same page and that the mixer or masterer is open to feedback throughout the process. In conclusion, working with a professional mixer or masterer can have a huge impact on the quality of your final mix. By choosing a mixer or masterer who has the experience, gear, and style to complement your music, you can achieve the professional quality sound you’re after.


Frequently Asked Questions For Things Your Mix Is Missing And What To Do About It


Why Does My Mix Sound Lifeless?


Your mix may sound lifeless due to lack of proper EQ and compression, poor balance of levels, or insufficient use of reverb and delay. These factors greatly affect the overall sound. Experiment with each element until you find the right balance that gives life to your mix.


How Do You Fix Muddy Mix?


To fix a muddy mix, start by using EQ to boost or cut problem frequencies. Then, try using compression or limiting to control dynamics. Reverb and delay can also add clarity and separation. Finally, ensure each element has its own space in the mix and avoid overloading the low end.


Why Does My Mix Feel Empty?


The mix may feel empty due to various reasons such as lack of instrument frequency range, improper balancing of sound levels, insufficient reverb, or inadequate use of effects. Try experimenting with different plugins and adjusting the EQ levels to add depth and clarity to your mix.


Why Do My Mixes Lack Clarity?


Your mixes might lack clarity due to various reasons such as poor EQ and compression techniques, excessive reverb, lack of proper balancing of instruments, or use of low-quality equipment. Give each instrument its own space and process it individually. Use EQ to remove needless frequencies, compress with care, and keep reverb in check for a clear mix.


Conclusion


Your mix is a crucial component of your music. Consequently, missing out on essential elements could make or break it. With the tips and suggestions provided in this blog post, you can now identify the common shortcomings in your mix and take steps to remediate them.


Remember to use reference tracks, critically analyze your mix, and invest in quality equipment and plugins to achieve a quality sound. With effort and practice, you can master the art of mixing and create music that truly stands out.

Categories
Archive

Use Dj Techtools Midi Twister Presonus Studio One

The Dj Techtools Midi Twister can be used with Presonus Studio One. This combination allows for customizable MIDI control within the software.


Presonus Studio One is a popular Digital Audio Workstation (DAW) used by many producers and engineers for its streamlined workflow and comprehensive features. The Dj Techtools Midi Twister is a versatile and customizable MIDI controller that allows users to assign functions and parameters to its knobs, buttons, and sliders.


When used in tandem, the Midi Twister can be configured to control various aspects of Studio One, such as mixing, effects, and virtual instruments. The result is a more efficient and hands-on approach to music production that allows for greater creativity and flexibility in the studio.


Overview Of Dj Techtools Midi Twister

DJ Techtools Midi Twister is a versatile controller that allows you to take control of your software and hardware, giving you the creative freedom to explore new possibilities. It has been designed to provide an intuitive and responsive performance experience for DJs, producers, and anyone who wants to take their music production to the next level.

What Is Dj Techtools Midi Twister?

DJ Techtools Midi Twister is a compact and powerful MIDI controller that allows you to fully customize your workflow and control any software or hardware that supports MIDI. It is a highly versatile device that can be used for a variety of applications, including DJing, music production, and live performance. Its compact size and sturdy build make it ideal for both studio and live use.

Features Of Dj Techtools Midi Twister

The Dj Techtools Midi Twister is equipped with 16 RGB, backlit knobs that provide visual feedback, allowing you to see the status of various parameters in real-time. The knobs are also pressure-sensitive, allowing you to apply different levels of pressure to control a variety of parameters, including levels, filters, and effects.

  • The controller also features 6 push-button encoders and 4 function buttons,
  • which allow you to assign up to 8 functions per knob, providing a wide range of control options for your software.
  • It also features MIDI in and out ports, as well as USB connectivity, making it easy to integrate with your existing setup.
  • The device is compatible with a wide range of software, including Ableton Live, NI Traktor, Serato, and Reason, among others.

Overall, DJ Techtools Midi Twister is a powerful and intuitive controller that provides a wide range of customization options for DJs, producers, and musicians. Whether you are looking to take your DJ sets to the next level or want to create complex soundscapes in the studio, this device has you covered.

Introduction To Presonus Studio One


Learn to use your Dj Techtools Midi Twister with Presonus Studio One, the intuitive DAW perfect for music production. This powerful software offers a range of features and tools for mixing, mastering and more, making it a great option for DJs and producers alike.

What Is Presonus Studio One?

If you’re a music producer or an artist looking for a robust digital audio workstation (DAW), then Presonus Studio One is one of the top DAWs you should consider. Presonus Studio One is renowned for its excellent audio quality and its user-friendly interface. Studio One offers everything that a digital music maker will ever need, whether it’s for a professional studio or your home-based studio setup.

Features Of Presonus Studio One

Presonus Studio One is an all-in-one package that provides everything you would need to make fantastic music. Here are some of the key features of Studio One:

1. User-Friendly Interface

Studio One provides an intuitive drag-and-drop workflow, making music production more natural and more creative.

2. Unlimited Audio and MIDI Tracks

Studio One provides unlimited audio and MIDI tracks, allowing you the freedom to craft your music without worrying about track limitations.

3. Advanced Editing Tools

With advanced editing tools such as quantization, groove templates, and comping, Studio One enables you to edit your music professionally and efficiently.

4. Comprehensive Plugin Collection

Studio One’s comprehensive plugin collection includes various virtual instruments, effects, sound samples, and loops to help you in your music production.

5. Integration with DJ TechTools Midi Twister

When connected with DJ TechTools Midi Twister, Studio One allows you to control various aspects of your music production, including effects, macros, and mixing, all from a single controller.

6. Collaboration Tools

Studio One’s collaboration tools offer real-time cooperation, allowing you to work remotely with other people on the same project. In conclusion, Presonus Studio One is an excellent DAW that provides everything you would need for music production. Its user-friendly interface, advanced editing tools, plugin collection, and compatibility with DJ TechTools Midi Twister make it a solid choice for any music maker, whether you’re a beginner or a professional.


Setting Up Dj Techtools Midi Twister With Presonus Studio One


Discover how to set up your DJ Techtools Midi Twister with Presonus Studio One for an unparalleled music production experience. Seamlessly integrate these two powerful tools with easy-to-follow steps and elevate your music production game.

Setting up DJ Techtools Midi Twister with Presonus Studio One can be a daunting task for many people. However, if you follow the right steps, the process can be quite easy. In this post, we will show you how to connect DJ Techtools Midi Twister to your computer and configure it in Presonus Studio One. Let’s dive in!

Connecting Dj Techtools Midi Twister To Your Computer

Before you start, make sure you have all the necessary equipment: your computer, the DJ Techtools Midi Twister, and a USB cable. Here are the steps to follow:

  1. Plug one end of the USB cable into the Midi Twister, and the other end into your computer.
  2. If this is your first time connecting the Midi Twister to your computer, you might need to download and install the necessary drivers.
  3. Once connected, the Midi Twister should power up automatically. You will see the LED lights turn on.

Configuring Dj Techtools Midi Twister In Presonus Studio One

Once you have connected your Midi Twister, it’s time to configure it in Presonus Studio One. Here’s how:

  1. Open Presonus Studio One on your computer.
  2. Click on “Studio One” in the menu bar, and select “Options.”
  3. In the Options window, select “External Devices.”
  4. Click on “Add” to create a new device.
  5. Under “Device Class,” select “MIDI.”
  6. Under “Manufacturer,” select “DJ Techtools.”
  7. Under “Device,” select “Midi Twister.”
  8. Click on “OK” to exit the Options window.

Now that you have configured your Midi Twister in Presonus Studio One, you can start using it to control your music software. Make sure you save your settings and preferences so that you don’t have to configure it again the next time you use it. In conclusion, setting up DJ Techtools Midi Twister with Presonus Studio One is a simple process. By following these steps, you can ensure that your Midi Twister is connected and configured correctly, allowing you to control your music software with ease.

Using Dj Techtools Midi Twister With Presonus Studio One


The DJ Techtools Midi Twister is a versatile MIDI controller that works seamlessly with Presonus Studio One. With its 16 knobs and 8 buttons, you can create a unique music production setup. The two devices complement each other, giving you greater flexibility and control over your music.

Using DJ Techtools Midi Twister with Presonus Studio One If you’re a DJ, you probably know that mastering the art of mixing music requires you to have the right equipment and software. One such tool that can provide you with the edge you need is the DJ Techtools Midi Twister. With its integration capabilities with the Presonus Studio One, it becomes a powerful tool that can help you load, manipulate, mix, and master your tracks to deliver exceptional beats that captivate the audience.

Loading And Manipulating Audio Files With Dj Techtools Midi Twister

One of the great features of DJ Techtools Midi Twister is the ability to load and manipulate audio files. To get started, you need to connect the Midi Twister to your computer via USB, launch the Presonus Studio One software, and load your audio tracks. You can then map the controls on the device to your desired parameter to manipulate different settings, such as volume, pitch, effects, and much more.

Mixing And Mastering Your Tracks With Dj Techtools Midi Twister

Once you have loaded and manipulated your audio tracks, you need to mix and master them to deliver the perfect sound. With the DJ Techtools Midi Twister, you have the power to control the different settings and effects in the Presonus Studio One, such as EQ, compression, reverb, and more. You can use the control knobs to adjust the settings and fine-tune them to your desired sound. This allows you to produce high-quality tracks that are ready for your next performance. In conclusion, DJ Techtools Midi Twister is an excellent tool to have in your DJ arsenal. With its integration capabilities with the Presonus Studio One software, you have a powerful tool that can help you load, manipulate, mix, and master your audio tracks to deliver exceptional beats that captivate the audience. So why not try it out today and take your mixing and mastering skills to the next level?

Creating Custom Mappings In Dj Techtools Midi Twister For Presonus Studio One


Customize your Presonus Studio One workflow by using DJ Techtools Midi Twister. With this tool, you can easily create custom mappings to control various parameters and enhance your overall production experience.

Creating custom mappings in DJ Techtools Midi Twister for Presonus Studio One is vital to ensure that you get the most out of your Midi Twister controller. In this post, we will explore how to do that, including understanding MIDI mapping in DJ Techtools Midi Twister, and how to map your DJ Techtools Midi Twister controller to Presonus Studio One.

Understanding Midi Mapping In Dj Techtools Midi Twister

Before we delve into how to use DJ Techtools Midi Twister with Presonus Studio One, it’s essential to understand what MIDI mapping is and how it works. In simple terms, it’s a way to connect two devices, allowing them to communicate with each other and control one another. In the context of Midi Twister, MIDI mapping enables you to assign specific controls, such as knobs, buttons, and faders, to various functions and parameters in Presonus Studio One. This feature is useful because it allows you to tailor your workflow and make use of some under-utilized functions in Presonus Studio One.

Mapping Your Dj Techtools Midi Twister To Presonus Studio One

Mapping your DJ Techtools Midi Twister controller to Presonus Studio One involves several steps, and here is a step-by-step guide to achieve that:

  1. Connect your Midi Twister to your computer via USB cable and launch Presonus Studio One.
  2. Go to the Studio One menu and select External Devices, then Add.
  3. In the External Devices window, select your Midi Twister from the list of devices and click OK.
  4. Now, select the device and click Edit.
  5. In the Edit window, select the MIDI Maps tab and click Add.
  6. Select the function you want to map from the Presonus Studio One under Device Control and assign it to the Midi Twister controller function under MIDI Controller.
  7. Save the MIDI Map.

Repeat these steps for all the controls you want to map. With all the mappings in place, you should be able to control almost everything you need in Presonus Studio One using your DJ Techtools Midi Twister controller. In conclusion, creating custom mappings in DJ Techtools Midi Twister for Presonus Studio One is straightforward once you understand MIDI mapping in DJ Techtools Midi Twister. With the step-by-step guide above, you should be able to map any function in Presonus Studio One to your Midi Twister easily. Don’t shy away from experimenting, and you will be amazed at what you can achieve using your Midi Twister controller.

Use Dj Techtools Midi Twister Presonus Studio One


Credit: m.youtube.com


Tips And Tricks For Using Dj Techtools Midi Twister With Presonus Studio One


Learn how to optimize your audio production workflow by incorporating the DJ Techtools Midi Twister with Presonus Studio One. Our tips and tricks will help you unlock the full potential of these tools and enhance your music-making process.

As a DJ or music producer, it’s important to have the right equipment to enhance your creativity and productivity. DJ Techtools Midi Twister is an excellent tool that enables you to control multiple parameters of your music production software with just a few twists and turns. One of the top music production software, Presonus Studio One is now compatible with DJ Techtools Midi Twister, making it easier for producers and DJs to create music and remixes.

Keyboard Shortcuts For Dj Techtools Midi Twister In Presonus Studio One

If you’re interested in using DJ Techtools Midi Twister with Presonus Studio One, there are several keyboard shortcuts you should know. These shortcuts will help you to quickly navigate through your music production process and make adjustments much faster. Here are some of the keyboard shortcuts that can be used in conjunction with the DJ Techtools Midi Twister.

Keyboard Shortcuts Functions
Ctrl + drag Allows you to copy and paste a parameter onto another
Alt + drag Allows you to fine-tune the values of parameters
Ctrl + Z Undoes the last action taken
Ctrl + Shift + D Duplicates the selected item
Ctrl + E Enables the editing of the selected item

Advanced Techniques For Dj Techtools Midi Twister In Presonus Studio One

Once you have a good handle on the basic keyboard shortcuts, you can move on to some more advanced techniques to enhance your production process further. Here are some advanced techniques for using DJ Techtools Midi Twister with Presonus Studio One that you can try:

  1. Create multiple pages on DJ Techtools Midi Twister to control different levels
  2. Use mapping to control different parts and plugins of your Presonus Studio One DAW
  3. Use the Midi mapping feature to create custom commands for your DJ Techtools Midi Twister
  4. Assign different colors to different parameters on DJ Techtools Midi Twister to quickly identify them
  5. Use the Shift button on DJ Techtools Midi Twister to switch between different modes while using your controller

In conclusion, using DJ Techtools Midi Twister with Presonus Studio One can significantly enhance your music production process. By learning the basic keyboard shortcuts and advanced techniques, you can increase your productivity and make your music stand out. So, give it a try and see the difference in your music production workflow.

Use Dj Techtools Midi Twister Presonus Studio One


Credit: techtools.zendesk.com


Frequently Asked Questions On Use Dj Techtools Midi Twister Presonus Studio One


How Do I Connect My Midi Keyboard To My Presonus Studio One?


To connect your MIDI keyboard to Presonus Studio One, connect the MIDI cables from your keyboard to the MIDI In ports on your audio interface. Then open Studio One, go to the Studio One menu, select Options, and click on External Devices.


Click Add and select your keyboard from the list of devices. Finally, click Apply and OK to finish the setup.


How Do I Import Midi Files Into Studio One?


To import MIDI files into Studio One, go to the File menu and select “Import. ” Then choose “MIDI File” and select the file you want to import. The MIDI track will appear in the timeline, and you can customize it using various editing tools.


How Do I Open Neural Dsp In Studio One?


To open Neural DSP in Studio One, follow these easy steps: first, ensure you have downloaded and installed the plugin; then, open Studio One and create a new project or open an existing one. Finally, navigate to the “Inserts” tab and search for ”Neural DSP” in the list of available plugins to add it to your project.


Does Studio One Have Midi?


Yes, Studio One has MIDI capabilities for recording, sequencing, and editing MIDI notes and events. It also includes support for virtual instruments and MIDI controllers.


Conclusion


Using DJ Techtools MIDI Twister with Presonus Studio One opens up endless possibilities for music production and performance. The customizable knobs and shortcuts save time and allow for more creative freedom. This powerful combination is perfect for DJs, producers, and musicians alike.


Take your music to the next level with this innovative pairing and see how it enhances your workflow. Start using DJ Techtools MIDI Twister with Presonus Studio One today and unlock your full potential.

Categories
Archive

How To Mix Better On Budget Speakers And In Bad Rooms

To mix better on budget speakers and in bad rooms, focus on getting the best possible sound at the listening position. Start by placing the speakers correctly and using sound-proofing materials if possible.


Mixing music is never easy, but it’s even harder when you’re using budget speakers in a less-than-ideal room. That doesn’t mean it’s impossible, however. With some careful placement and a few tricks, you can get an accurate mix without spending a fortune on gear.


We’ll cover some tips and techniques for mixing on a budget in a less-than-perfect space. From speaker placement to utilizing sound-absorbing materials, we’ll help you make the best of what you’ve got. So grab your notepad and let’s get started!


Optimizing Your Mixing Environment

Creating a perfect mixing environment can be a challenging task, especially if you are working with a limited budget and in a problematic room. A good mixing environment is essential for producing high-quality music that sounds great on any playback device. In this blog, we will discuss some tips and tricks to optimize your mixing environment so you can create the best possible sound without breaking the bank.

Use Of Acoustic Treatment

The first step in optimizing your mixing environment is to use acoustic treatment. Acoustic treatment helps to minimize acoustic problems caused by unwanted reflections, resonances, and standing waves in the room. You can use simple and affordable solutions like acoustic foam, dense blankets, and curtains to treat your room. These materials can effectively reduce unwanted reflections and absorb sound, which will help you to hear the sound from your speakers without room interfering with the sound.

Strategic Speaker Placement

Another important aspect of optimizing your mixing environment is strategic speaker placement. When it comes to speaker placement, you need to consider the position of your speakers in relation to the walls, corners, and other objects in the room. Proper placement of speakers can help minimize bass buildup, enhance stereo imaging, and create a more balanced sound. You should experiment with the speaker placement until you find the best possible position that gives you optimal performance.

Removing Unwanted Noise

In any mixing environment, unwanted noise can always be a problem. Unwanted noise, whether it comes from outside, electrical interference, computer fans, or other sources, can interfere with your ability to hear and accurately assess the sound from your speakers. To avoid this problem, you can use noise-cancelling headphones or a noise gate to eliminate unwanted noise. These are cost-effective solutions that can improve the quality of your mixing environment without requiring significant investment.

Overall, optimizing your mixing environment is all about creating the best possible sound with the resources available at your disposal. With the tips discussed above, you can create a great-sounding mix on budget speakers, and in bad rooms. By following these tips and tricks, you can make the mixing process easy, efficient, and enjoyable.

How To Mix Better On Budget Speakers And In Bad Rooms


Credit: www.masteringthemix.com


Calibrating Your Listening System


Calibrating your listening system is crucial when mixing on budget speakers and in bad rooms. This involves properly setting up your speakers, positioning them correctly and using calibration tools to ensure your ears hear sounds accurately. With a properly calibrated listening system, you can achieve better mixes even in less-than-ideal environments.

Calibrating Your Listening System Mixing music on a budget and in a bad room can be quite challenging, but with the right techniques and tools, you can still achieve great results. One of the essential steps in this process is calibrating your listening system. This involves understanding your speaker specifications, proper speaker connection and amplification, equalization, and room correction. In this post, we’ll focus on each of these steps and provide you with the necessary information to get your listening system perfectly calibrated. Understanding Speaker Specifications Speaker specifications are a crucial starting point for calibrating your listening system. These specifications include the speaker’s frequency response, sensitivity, and impedance. Understanding these factors will help you optimize your mixing space to get the best performance out of your speakers. Here are some key factors to keep in mind: – Frequency Response: This specification shows the range of frequencies the speaker can reproduce. Look for speakers with a flat frequency response, which means that no frequencies are artificially boosted or suppressed. – Sensitivity: This specification reveals how loud the speaker can get with a given amount of power. Choose speakers with higher sensitivity as they will provide more volume without having to push the amplifier as hard. – Impedance: This specification tells you how much electrical resistance the speaker presents to the amplifier. Make sure your amplifier and speakers are compatible to optimize your system’s performance. Proper Speaker Connection and Amplification Once you have the right speakers, the next step is to connect them properly and amplify them at the correct level. Your speaker’s documentation will provide guidance on the proper connection, but here are some general principles to follow: – Keep your cables as short as possible to minimize signal loss. – Make sure your cables are well shielded to reduce interference and noise. – Use good quality connectors and terminations. – Amplify your speakers at the appropriate level to avoid damaging the speakers or causing distortion. Equalization and Room Correction The final step in calibrating your listening system is to implement equalization and room correction. These techniques will help compensate for any deficiencies in your system and your room. Here are some tips to keep in mind: – Use an equalizer to balance out any frequency imbalances in your system. – Treat your room to reduce acoustic anomalies such as standing waves and reflections. – Consider using room correction software to help mitigate any remaining issues. By implementing these steps, you can get the most out of your budget speakers and make the best of a bad room. With patience and attention to detail, you can calibrate your listening system and achieve great sounding mixes.


Working With Limited Speaker Frequency Response

Mixing on budget speakers in bad rooms can be challenging. However, with some techniques, you can improve your mix to sound clear and balance on almost any speaker. One of the most important aspects of mixing on a limited budget speaker is to understand and compensate for the speaker frequency response. Most budget speakers have limited frequency response, which means that they cannot reproduce all frequencies required for accurate mixing.

Alternate Listening Devices

One solution to working with budget speakers is to use alternate listening devices to cross-check your mix. You can use headphones to check the stereo balance and panning. Earbuds and laptop speakers can help you understand how your mix will sound on smaller devices. It’s important to remember that every speaker device has its own frequency response. Therefore, switching between different speakers and devices can give you a better perspective of how your mix sounds on different systems.

Reference Tracks

Using reference tracks can help you achieve a tonally balanced mix. Professional mastering engineers usually mix and master their tracks on high-end monitors. However, they also use reference tracks to understand how their mix will sound on other systems. Use a reference track that has a similar frequency response to your speakers. Analyze the differences in tonal balance, stereo width, and panning. Use this information to improve your mix and to make sure that it sounds good on budget speakers.

Focusing On Critical Frequency Regions

Due to a budget speaker’s limited frequency response, it’s important to focus on the critical frequency regions that are essential for a balanced mix. The most critical frequency regions for a mix are the high-mids, low-mids, and bass frequencies. These regions are responsible for the clarity and definition of your mix. To compensate for the limited frequency response of budget speakers, you may need to boost or cut certain frequencies to achieve a balanced mix.

Overall, mixing on budget speakers in bad rooms requires careful consideration of frequency response, tonal balance, and critical frequency regions. By using alternate listening devices, reference tracks, and focusing on critical frequency regions, you can achieve a well-balanced mix even on a limited budget.

How To Mix Better On Budget Speakers And In Bad Rooms


Credit: arqen.com


Mixing Techniques And Strategies

Mixing music can be challenging, especially if you are using budget speakers and working in a bad room. However, with the right techniques and strategies, you can overcome these obstacles and create a quality mix that sounds good across different devices. In this blog post, we will explore some tips that can help you mix better with budget speakers in a bad room.

Avoiding Overprocessing

One common mistake when mixing music is overprocessing. This happens when you use too many effects, such as reverb, compression, or EQ. The result is a mix that sounds cluttered, muddy, or distorted. To avoid overprocessing, you need to be selective and intentional about the effects you use. Ask yourself if the effect is necessary for the song or if it adds something unique to the mix.

Using Less Reverb

Reverb is an essential effect that can add depth, dimension, and realism to your mix. However, too much reverb can also create a bad mix, especially if you use budget speakers in a bad room. To avoid this, use less reverb and adjust the decay time, pre-delay, and diffusion settings to match the song’s mood and style. You can also use different types of room simulators or delays to create a sense of space without overwhelming the mix.

Panning For Better Separation

Panning is another technique that can help you create a better mix, especially with budget speakers and a bad room. By panning different instruments to different positions in the stereo field, you can create more separation, clarity, and directionality in the mix. For example, you can pan the drums and bass to the center, the guitars to the sides, and the vocals to the center or slightly off-center. However, be careful not to overdo it, as extreme panning can also create an unbalanced or unnatural mix.

Checking Mix On Multiple Devices

Finally, to ensure that your mix sounds good across different devices, you need to check it on multiple speakers, headphones, or monitors. This can help you identify any issues with the frequency response, dynamics, stereo width, or volume levels of the mix. Ideally, you should listen to the mix on at least three different devices, such as a car stereo, a smartphone, and a laptop, and make adjustments accordingly.


Frequently Asked Questions For How To Mix Better On Budget Speakers And In Bad Rooms


How Do I Make My Mix Sound Good Everywhere?


To make your mix sound good everywhere, use high-quality headphones and speakers to listen to your mix from different locations, both indoors and outdoors. Ensure that the mix is well balanced, paying attention to the levels of the vocals, drums, and other instruments.


Use EQ and compression to adjust the frequency and dynamic range of each sound element. Finally, get feedback from others and use reference tracks to guide your mixing decisions.


Is It Better To Mix On Speakers?


Mixing on speakers is a popular choice among audio engineers, as it allows them to accurately judge the balance and frequencies of the music. However, it ultimately depends on personal preference, budget, and the environment in which you are mixing.


Some engineers also use headphones or a combination of both speakers and headphones.


Do You Need Two Speakers To Mix?


No, you do not necessarily need two speakers to mix. However, having different speakers can help you to create a more balanced and accurate mix. With one speaker, you might not be able to hear the stereo image or the frequency balance properly.


How Do I Get The Best Out Of My Speakers?


To get the best out of your speakers, follow these tips: 1. Place the speakers on the correct height and distance from each other. 2. Adjust the eq​ualizers accordingly 3. Keep the speakers clean and free from dust 4. Use high-quality speaker cables 5.


Avoid running the speakers at their highest volume for extended periods of time to prevent damage.


Conclusion


Mixing on budget speakers in a bad room can be a daunting task for many music producers. However, with the right techniques and tools, anyone can get their mix to sound great. Remember to properly position your speakers, use acoustic treatment, and utilize reference tracks.


By implementing these tips, you can save money while still achieving a professional sounding mix. So, don’t let your finances or surroundings hold you back from creating quality music. Get mixing today!