Categories
Archive

The Ultimate Guide To Understanding Microphones

Understanding microphones can be complicated but this ultimate guide breaks it down concisely. From dynamic to condenser microphones, learn the basics to make informed choices.


If you’re a musician, podcaster, or content creator, it’s essential to have basic knowledge about microphones. With so many varieties available, understanding their differences and uses can get overwhelming. Fortunately, we’ve got you covered in this ultimate guide. We’ll cover the most common types of microphones, their components, and what to consider when buying one.


Understanding microphones’ technical aspects and characteristics is vital to choosing the right one for your purpose. We’ll help you make informed choices about the microphone that best suits your needs. Whether you’re a beginner or a pro, this ultimate guide will pave the way for better-quality recordings and performances.


Types Of Microphones

Microphones are an essential part of any recording setup and understanding the types of microphones will help you choose the best microphone for your specific application. There are three main types of microphones: dynamic microphones, condenser microphones, and ribbon microphones.

Dynamic Microphones

Dynamic Microphones are the most commonly used microphones. They are also known as moving-coil microphones because they use a small coil of wire that moves within a magnetic field to produce sound. Dynamic microphones are rugged and can handle high sound pressure levels, making them ideal for loud sources like guitar amps and drums. They are also less sensitive than some other types of microphones, meaning that they pick up less background noise. Dynamic microphones are typically less expensive than other types of microphones and are a great choice for beginners.

Condenser Microphones

Condenser microphones use a thin diaphragm made of plastic or metal coated with a conductive material to capture sound. They require an external power source such as phantom power or a battery to operate. Condenser microphones are more sensitive and can capture more detail than dynamic microphones, making them ideal for recording vocals and acoustic instruments. They are also more expensive and fragile than dynamic microphones, but their high-quality sound is worth the investment.

Ribbon Microphones

Ribbon microphones use a thin strip of metal suspended between two magnets to capture sound. They are the most fragile of all microphone types and need to be handled with care. They are also very expensive and require a preamp with a high gain to work properly. Ribbon microphones have a warm and natural sound, making them great for recording delicate instruments like strings and woodwinds.

Understanding the different types of microphones is essential to make the best recording decisions. Depending on your recording goals and budget, you may consider a dynamic, condenser, or ribbon microphone.

The Ultimate Guide To Understanding Microphones


Credit: mixandmastermysong.com


Polar Patterns


Polar patterns refer to the sensitivity of microphones to sounds coming from different directions. Understanding polar patterns is crucial for selecting the right microphone for a specific application, and achieving optimal sound quality. This guide provides an in-depth analysis of various types of polar patterns commonly used in microphones, including cardioid, omnidirectional, and bidirectional.

Polar Patterns: When it comes to understanding microphones, one of the most important concepts to grasp is polar patterns. A polar pattern is the three-dimensional space around a microphone where it can pick up sound. There are various types of polar patterns, but the three most common are cardioid, omnidirectional, and bidirectional. Each pattern has a unique set of features that make it suitable for different recording scenarios. H3: Cardioid Cardioid microphones are incredibly versatile and feature a heart-shaped pattern with maximum sensitivity at the front of the microphone and limited sensitivity at the back. This makes them perfect for recording a single sound source while rejecting any unwanted background noise. Cardioid microphones are ideal for studio recording, podcasting, and live sound reinforcement. H3: Omnidirectional An omnidirectional microphone is designed to pick up sound equally from all directions, making them suitable for recording ambient sounds such as crowd noise, nature sounds, and room acoustics. They are also suitable for recording group performances, interviews, and conferences. H3: Bidirectional Bidirectional microphones, also known as figure-of-eight microphones, pick up sound from the front and back of the microphone but reject sound from the sides. They are suitable for recording dialogue between two people facing each other or for capturing the ambience of a room from opposite ends. Bidirectional microphones are also popular for recording musical duets or interviews. In conclusion, understanding polar patterns is crucial to selecting the right microphone for any recording situation. Each polar pattern has its unique advantages, and choosing the right one will ultimately impact the quality of the recording.

Choosing The Right Microphone


Selecting the right microphone is crucial in any recording process. Whether you’re a seasoned professional or just starting out, understanding the functionality and various types of microphones available is vital to achieving high-quality sound output. Our ultimate guide to understanding microphones will equip you with the necessary knowledge to choose the best microphone for your recording needs.

When it comes to recording audio, choosing the right microphone can make a huge difference in the sound quality of your recordings. With so many different types of microphones available, it can be overwhelming to know which one to choose. In this section, we will explore three main types of microphones: Vocal Microphones, Instrument Microphones, and Studio Microphones.

Vocal Microphones

Vocal microphones are designed to capture the human voice and are commonly used for live performances, podcasts, and vocal recordings. The two main types of vocal microphones are dynamic and condenser microphones. Dynamic microphones are durable and can handle high sound pressure levels, making them a popular choice for live performances. Condenser microphones, on the other hand, are more sensitive and capture a wider range of frequencies, making them a better choice for studio recordings.

Instrument Microphones

Instrument microphones are designed to capture the sound of musical instruments. There are many different types of instrument microphones, each designed for a specific instrument. For example, a microphone designed for a guitar may not be suitable for a drum kit. Some common instrument microphones include drum mics, guitar mics, and bass mics.

Studio Microphones

Studio microphones are versatile and can be used to record both vocals and instruments. They are typically more sensitive and are designed to capture a wider range of frequencies than other types of microphones. Studio microphones are often large-diaphragm condenser microphones, which use a larger diaphragm to capture more sound and are well-suited for recording in a controlled studio environment. Choosing the right microphone can be a challenge, but understanding the different types of microphones and their uses can help you make an informed decision. Whether you are recording vocals or instruments, there is a microphone that can meet your needs and deliver high-quality sound.

The Ultimate Guide To Understanding Microphones


Credit: reads.alibaba.com


Microphone Techniques


From dynamic to condenser, ribbon to lavalier, understanding microphone types and techniques is crucial for high-quality recording. Learn to master microphone placement, gain structure, and other tips with this ultimate guide to improve your audio recordings.

As a content creator or a musician, one of the essential tools in your arsenal is a microphone. However, getting quality sound with a microphone is not simply about pointing it at the direction of the sound source and pressing record. Utilizing various microphone techniques is crucial to achieving the best sound quality possible. Here are some microphone techniques you should know:

Proximity Effect

What is Proximity Effect? The proximity effect refers to an increase in low-frequency response as you get closer to the microphone. This effect can be used to increase the perceived bass response of a voice or an instrument. It can also be used to bring out the warmth and depth of a voice. How to Use Proximity Effect? To utilize the proximity effect positively, place the microphone closer to the sound source. You can experiment with different distances to achieve different tonal qualities. For example, positioning the microphone approximately 6 inches from the sound source gives a neutral tone, while positioning it at 1-2 inches gives a bass-enhanced tone.

Off-axis Rejection

What is Off-Axis Rejection? Off-axis rejection refers to the ability of a mic to reject sound that comes from directions different than where it is aimed. A microphone with a high off-axis rejection minimizes background noise and other unwanted sounds. How to Use Off-Axis Rejection? To use off-axis rejection, aim the microphone directly at the sound source. Avoid pointing it towards reflective surfaces or other sources of unwanted sounds. Also, to minimize off-axis sound, place your mouth or instrument close to the microphone and speak or play directly into it.

Plosives

What are Plosives? Plosives are explosive consonant sounds like “P,” “B,” and “T” that produce a burst of air when pronounced, causing pops or distortion in the microphone sound. How to Minimize Plosives? To minimize plosives, use a pop filter. A pop filter is a mesh or foam shield that sits between the microphone and the sound source, breaking up the burst of air before it hits the microphone. You can also avoid speaking or singing directly into the microphone or positioning it slightly to the side of your mouth. In conclusion, using the right microphone techniques can go a long way in improving your sound quality. Use proximity effect to bring warmth and depth to your recording, off-axis rejection to reduce unwanted sounds, and pop filter to avoid plosives.


Frequently Asked Questions Of The Ultimate Guide To Understanding Microphones


What Is The Microphone 3 To 1 Rule?


The microphone 3 to 1 rule refers to the recommended distance between a speaker and microphone. The microphone should be positioned three times the distance from the speaker than the distance between two speakers, with the goal of reducing any echo or feedback.


This rule is commonly used in live sound engineering.


What Are The Basics Of Microphones?


Microphones are devices that convert sound waves into electrical signals. They have three basic components: a diaphragm, which vibrates in response to sound waves; a magnet, which produces a magnetic field around the diaphragm; and a coil, which converts the movement of the diaphragm into an electrical signal.


Different types of microphones have varying sound pickup patterns, sensitivity levels, and frequency responses.


What Are The 4 Characteristics Of Every Microphone?


The four characteristics of every microphone are sensitivity, frequency response, directional pattern, and self-noise. Sensitivity refers to how well a microphone can pick up sound, while frequency response measures the range of frequencies a microphone can detect. Directional pattern refers to how a microphone captures sound from different angles, while self-noise is the amount of noise a microphone produces.


What Is A Good Db For A Mic?


A good microphone DB requires a preamp to boost the low audio signal to line level so that it can be recorded or amplified further. The dB range you need depends on what you plan to record. However, a standard microphone DB level is about -60 dB.


Conclusion


To sum it up, understanding microphones can be a daunting task for beginners, but it is essential for recording studio professionals, musicians, podcasters, and YouTubers. We hope this guide was helpful in getting you acquainted with the types of microphones, their features, and usage scenarios.


Keep experimenting and exploring different recording techniques to enhance the quality of your audio recordings. Remember, the right microphone is the key to capturing a crystal-clear sound. Happy recording!


Categories
Archive

Top Ai Plugins And Tools For Music Producers

Artificial intelligence (AI) plugins and tools for music producers include Amper Music, AIVA, and Melodrive. These software solutions use algorithms to create music compositions, improve sound quality, and enhance the overall production process.


Music producers have long relied on technology to create and refine their sounds. With the advent of AI, they now have access to a variety of tools that can save them time and increase their creativity. We’ll explore some of the top AI plugins and tools for music producers, and how they can be used to improve the music-making process.


Whether you’re a professional musician, a hobbyist, or a beginner, these AI tools can help take your music to the next level.

Top Ai Plugins And Tools For Music Producers


Credit: m.youtube.com


Melodyne Ai


Melodyne AI is a popular AI plugin for music producers. It allows for detailed pitch and timing adjustments, making it ideal for vocal editing and harmonization.

When it comes to music production, Melodyne AI is a game changer. This AI plugin allows you to manipulate audio in ways that were once impossible. The tool allows you to refine timing, transpose notes, and adjust pitch, among many other things.

Features

Melodyne AI offers a range of features that sets it apart from other AI plugins available for music production. Some of its key features include:

  • Ability to manipulate individual notes within chords
  • Transposition
  • Adjustment of timing and note lengths
  • Pitch modulation
  • Formant shifting

These features allow you to have unprecedented control over your vocal and instrumental performances.

Benefits To Music Producers

Music producers can benefit greatly from Melodyne AI in various ways. Some of the benefits include:

  • Improved workflow and efficiency in production
  • The ability to fix pitch and timing issues that would otherwise require re-recording
  • The ability to create harmonies and explore unique chord structures
  • The ability to adjust the timing and rhythm of individual notes within a performance

Melodyne AI makes it possible to make changes that were once impossible, which can save producers time, money and effort. If you are a music producer, Melodyne AI is a must-have tool in your arsenal. Its features allow you to manipulate your audio like never before, while its benefits make your production workflow more efficient. Try it out and experience its capabilities firsthand.

Virtual Drummer


Virtual Drummer is a top-notch AI plugin used by music producers for creating professional-level drum tracks. With an intuitive interface and various customization options, this tool offers high-quality drum sounds and patterns that can bring your music to life.

Features Of Virtual Drummer

Virtual Drummer is a powerful tool designed to assist music producers in creating drum sounds without the need for actual drums. Some of the features of Virtual Drummer include customizable drum patterns, a wide variety of drum sounds to choose from, and the ability to adjust the volume, pitch, and tone of each drum sound. Additionally, Virtual Drummer allows you to experiment with different grooves and rhythms until you find the perfect fit for your music.

Benefits To Music Producers

Virtual Drummer eliminates the need for expensive drum machines and recording equipment, saving you time and money. As a music producer, you can now access a range of high-quality drum sounds with just a click, without the need to hire a professional drummer. Virtual Drummer also offers precision and consistency in drumming, that cannot be found with live drumming sessions, allowing you to customize your drum sounds to fit perfectly with your music. With Virtual Drummer, you can take total control of your music production.

Table Representation Of Top Virtual Drummer Ai Plugins And Tools For Music Producers

Virtual Drummer Plugin Features Compatibility Price
Superior Drummer 3 Customizable drum patterns, extensive drum sound libraries Windows, Mac $419
Addictive Drums 2 Large built-in MIDI library, adjust velocity and pitch Windows, Mac $149
EZ Drummer 2 Intuitive interface, song creator feature Windows, Mac $149
Abbey Road Drums Authentic sounds from Abbey Road Studio 2 drum kit Windows, Mac $149

Virtual Drummer is an essential tool in any music producer’s toolkit. With its customizable drum patterns, a wide range of drum sounds, and flexible controls, you can create the perfect drum beats and grooves for your tracks. The benefits of using Virtual Drummer include saving time and money, precision and consistency in drumming, and total control over your music production. Check out the table above for a comparison of the best Virtual Drummer AI plugins and tools for music producers.

Izotope Ozone 9


Izotope Ozone 9 is one of the top AI plugins and tools for music producers. It offers intelligent mixing and mastering features that enhance and polish recorded music to professional-grade quality.

Izotope Ozone 9 is a popular AI plugin and tool for music producers. This powerful tool is equipped with features that automate the mastering process, giving producers a professional-sounding finished product. In this section, we will explore the Features and Benefits of this amazing tool for music producers.

Features

Izotope Ozone 9 boasts of various AI-powered features that enhance the mastering process. Below are some of the notable features of this tool:

  • Master Assistant: This feature suggests starting points for your mix based on the genre, loudness, and preferred intensity.
  • Tonal Balance Control: This feature analyses and measures your mix’s tonal balance against professionally produced music. It highlights any imbalances and suggests corrective actions.
  • Match EQ: This feature enables you to match the tonal balance of your mix with that of a reference track.

Benefits To Music Producers

With Izotope Ozone 9, producers can achieve high-quality, professional-sounding music effortlessly. The following are the benefits that music producers can derive from using this powerful tool:

  1. Efficient Workflow: The AI-powered features of Izotope Ozone 9 hasten the mastering process. Producers can complete their projects faster and with precision.
  2. Improved Sound Quality: With its AI-powered features, Izotope Ozone 9 offers music producers a more balanced, fuller sound quality that can easily compete with professionally produced music.
  3. Enhanced Creativity: Using this tool allows producers to experiment with different styles and sounds, creating an endless possibility of music styles and techniques. It helps in expanding creativity and innovative thinking.

In summary, the Izotope Ozone 9 is a must-have tool in the arsenal of every music producer. Its AI-powered features enhance the mastering process, simplify the workflow, improve the sound quality, and enhance creativity and innovation.

Top Ai Plugins And Tools For Music Producers


Credit: www.animotica.com


Aiva


AIVA is a top AI plugin for music producers, assisting in composing and arranging music with its intelligent algorithms and various instruments. With its ease of use and innovative features, AIVA is becoming a popular choice amongst music producers looking to increase their productivity and creativity.

AIVA, or Artificial Intelligence Virtual Artist, is an AI-powered music composition tool that allows music producers to create professional-quality music scores with ease. It uses machine learning algorithms to analyze music data and generate original compositions in various styles and genres. AIVA’s advanced features and benefits make it an essential tool for music producers looking to streamline their creative process and expand their musical repertoire.

Features

AIVA boasts an impressive range of features, including:

  • Customizable parameters: AIVA allows users to adjust key, tempo, mood, instrumentation, and more to create unique compositions that align with their individual style and preferences.
  • Realistic sound quality: AIVA’s music scores sound lifelike and are virtually indistinguishable from those composed by humans.
  • Multiple genres: AIVA can generate music in a range of genres, including classical, pop, rock, and electronic.
  • Continual learning: AIVA continually updates its algorithms to produce even better compositions and can learn from feedback from users.
  • Easy integration: AIVA integrates effortlessly with most popular music production software, allowing music producers to incorporate AI-generated music directly into their projects.

Benefits To Music Producers

Music producers can reap numerous benefits from using AIVA:

  1. Increased efficiency: AIVA can generate high-quality compositions in minutes, freeing up valuable time for other creative tasks.
  2. Expanded creativity: With access to a virtually limitless array of musical styles and genres, music producers can experiment and explore new musical territory.
  3. Cost savings: Hiring a professional composer can be expensive, but with AIVA, music producers can generate original compositions at a fraction of the cost.
  4. Consistent quality: AIVA produces consistent, high-quality music, ensuring that every composition meets professional standards.
  5. Revolutionary tool: AIVA represents a new era in music production, where AI and machine learning are used to augment human creativity and offer new paths for musical exploration.

With its extensive features and benefits, AIVA is undoubtedly one of the top AI plugins and tools for music producers. Whether looking to streamline their creative process or expand their musical horizons, AIVA provides an invaluable resource for music producers of all levels.


Amadeus Code

One of the most innovative and promising tools for modern music producers is Amadeus Code. This AI-powered tool can create original song compositions, provide musical inspiration, and generate backing tracks. It has become increasingly popular amongst producers, especially those focused on electronic, pop, and rock music genres.

Features

Amadeus Code uses a deep learning neural network to analyze thousands of popular songs across many different genres. From there, it generates unique chord progressions, melody sequences, and instrument parts based on a user’s specific preferences. The tool also allows for customization such as tempo, key signature, and beats per minute.

Features of Amadeus Code  
AI-powered song composition ✓
Customizable tempo, key, and beats per minute ✓
Analysis of thousands of popular songs ✓
Generates unique chord progressions, melodies, and instrument parts ✓

Benefits To Music Producers

  • Efficiency: Using Amadeus Code saves time and effort in the songwriting process. It generates inspiration, which can be used as a starting point for original song production.
  • Creativity: Amadeus Code’s neural network has access to a wider range of musical patterns, providing more creative possibilities for producers.
  • Consistency: The tool’s output has a consistent quality, which can be hard to achieve when writing songs from scratch.
  • Originality: Using AI generated content can help producers stand out in an industry that heavily relies on derivative sounds and styles.

Amadeus Code continues to evolve and is becoming an increasingly important tool for producers, regardless of their level of experience. This innovative technology reduces the time-consuming task of creating basic musical elements, leaving producers free to push their creative boundaries and develop their signature sound.

Roli Studio Player

If you’re a music producer, you understand the need for quality plugins and tools to enhance your production. With the advancement of technology, AI plugins and tools are becoming increasingly popular in the music industry. These AI-powered plugins can help make your production faster, more efficient, and creative. One of the most talked-about AI plugins for music producers out there is the ROLI Studio Player.

Features

The ROLI Studio Player is a powerful software instrument plugin that offers many features to music producers. It has over 500 sounds that can be used in your productions, ranging from classic synths to modern beats. The plugin also has a multi-layered arpeggiator feature that makes it possible to create complex patterns quickly. The sound-shaping controls and filters of the ROLI Studio Player enable you to add texture and dimension to your compositions effortlessly. The plugin is easy to use and integrates with your digital audio workstation (DAW) seamlessly.

Benefits To Music Producers

  • Access to over 500 high-quality sounds in one plugin;
  • The arpeggiator feature enables faster production of complex patterns;
  • Easy integration and usability in different DAWs;
  • Sound-shaping controls and filters enable music producers to add texture and dimension in compositions.

The ROLI Studio Player takes music production to another level by providing a vast variety of sounds and features that make the music production process much easier for producers. Whether you’re a beginner or an experienced self-producing artist, the ROLI Studio Player’s user-friendly features will help you bring your musical ideas to life.

Smarteq Live

If you’re a budding music producer, one of the most exciting developments in the field is the advent of artificial intelligence (AI) tools. These powerful tools can help music producers create tracks faster and with greater accuracy than ever before. One such tool that is generating a lot of buzz is the SmartEQ Live.

Features

The SmartEQ Live is a cutting-edge AI plugin that utilizes deep learning algorithms to analyze music and apply EQ adjustments in real-time. This powerful tool is designed to make the EQ process faster and more accurate, saving music producers significant amounts of time.

Here are some of the key features of the SmartEQ Live:

  • Real-time EQ adjustments
  • Deep learning algorithms
  • User-friendly interface
  • Compatible with major DAWs (including Ableton Live, Logic Pro X, and Pro Tools)
  • Affordable pricing

Benefits To Music Producers

The SmartEQ Live offers several benefits to music producers that make it a valuable addition to any production toolkit. Here are a few reasons why music producers are raving about this plugin:

  • Faster EQ adjustments: The SmartEQ Live allows music producers to make EQ adjustments faster and more accurately than ever before. With this tool, you can focus on the creative aspects of music production rather than getting bogged down in technical details.
  • Real-time feedback: The real-time feedback provided by the SmartEQ Live helps music producers make informed decisions about EQ adjustments. You can hear the changes you’re making as you make them, making it easier to achieve the desired sound.
  • User-friendly interface: The SmartEQ Live features a user-friendly interface that makes it easy to get started. Whether you’re a seasoned music producer or new to the field, you’ll find the interface intuitive and easy to use.
  • Affordable pricing: The SmartEQ Live is affordable and offers great value for its price. This makes it accessible to music producers of all skill levels, regardless of budget constraints.

If you’re looking to take your music production to the next level, the SmartEQ Live is a tool you’ll definitely want to check out. With its powerful features and user-friendly interface, it’s a valuable addition to any music producer’s toolkit.

Top Ai Plugins And Tools For Music Producers


Credit: www.productionmusiclive.com


Frequently Asked Questions On Top Ai Plugins And Tools For Music Producers


What Is The Best Ai For Making Music?


The best AI for making music is AIVA (Artificial Intelligence Virtual Artist). It is an innovative platform that produces original compositions that can be used in various applications such as video games, movies, and commercials. AIVA can generate music in multiple genres and styles with a high level of creativity, complexity, and quality, making it a reliable solution for music composition.


Do Music Producers Use Ai?


Yes, music producers are using AI in the music industry. AI technology can help with music composition, sound engineering, and even building custom-made instruments. However, human creativity and input are still crucial in the music-making process and can’t be replaced by AI.


What Is The Ai Assistant For Music Production?


The AI assistant for music production is a computer program that uses artificial intelligence to assist in the creation and manipulation of musical content. This tool enables composers, producers, and music enthusiasts to simplify and streamline their music-making processes, providing them with a range of intelligent features for everything from chord composition to sound mixing.


What Is The Ai Tool To Create Song?


The AI tool used for creating songs is Amper Music. It is an intelligent music composition software that allows users to create original music with ease. With Amper Music, users can choose their preferred genre, mood, and instrumentation, and the tool will produce original music based on their preferences.


Conclusion


The world of music production is rapidly evolving and incorporating AI technology is playing a huge role in revolutionizing the industry. From advanced mix analyzing tools to intuitive songwriting assistants, the AI-powered plugins mentioned in this post will assist producers to enhance their creative capabilities and streamline their workflow in unimaginable ways.


The integration of these AI tools and plugins will not only empower musicians, but also push the boundaries of innovation in the music industry. Don’t hesitate to try them out and take your music to new and exciting levels.

Categories
Archive

Understanding Compressors And Their Differences

Compressors are machines that increase the pressure of gas or air for various applications. Each compressor type differs in its design, operation, and efficiency.


Compressors play a crucial role in various industries such as manufacturing, construction, automotive, and aerospace. These machines are designed to increase the pressure of gas or air, making them essential for powering various tools and equipment. Compressors come in different types, including rotary, reciprocating, and centrifugal, each with a unique design and function.


Reciprocating compressors use pistons to compress air, while rotary compressors use impellers or rotors to create pressure. On the other hand, centrifugal compressors rely on centrifugal forces to increase the pressure of the gas or air. Understanding the differences between these compressors is essential in selecting the right machine for your specific application.


What Is A Compressor?


Compressors are mechanical devices that increase the pressure of a gas or air to provide power to various industrial applications. These machines are available in different types, such as reciprocating, screw, rotary vane, and centrifugal, each having its unique application areas and benefits.

An Overview Of Compressors

A compressor is a mechanical device that is designed to increase the pressure of a gas or air by decreasing its volume. In simple terms, a compressor can be thought of as a pump that compresses the air or gas to increase its pressure. Compressors are used in a variety of applications, including HVAC systems, refrigeration, and industrial processes.

Importance Of Compressors

Compressors play a critical role in many industries, particularly in the manufacturing and processing sectors. Compressed air is used to power machinery, convey material, provide pressure, and perform other important functions. Compressed air is also used to clean machinery, products and to operate power tools.

It is imperative to choose the correct compressor design for your specific requirement. Reciprocating, rotary screw, and centrifugal compressors are the most common types of compressors available on the market, and each has its own unique advantages and disadvantages.

Reciprocating Compressors

Reciprocating compressors are positive displacement compressors that use pistons to compress the gas or air. They are efficient and can deliver high-pressure output. They are usually found in smaller applications like refrigeration units and air conditioners.

Rotary Screw Compressors

Rotary screw compressors are positive displacement machines that use two helical screws to compress the gas or air. They are energy efficient and have low maintenance costs, making them suitable for industrial applications that require continuous compressed air supply.

Centrifugal Compressors

Centrifugal compressors use high-speed impellers to accelerate and compress the gas or air. They are best suited for high volume applications, but they have a lower efficiency compared to reciprocating or rotary screw compressors.

Understanding the differences between compressor types can help to make the right choice when selecting a compressor for your specific application. In the next post, we’ll discuss the factors you must consider when selecting a compressor to meet your needs.

Types Of Compressors

Compressors come in different types, each with its unique features and purposes. Understanding these types and choosing the right one for your needs is vital in ensuring proper compression and system optimization. Below are some of the most common types of compressors:

Reciprocating Compressor

Reciprocating compressors work by drawing in air, trapping it in a chamber, and then decreasing the chamber’s volume to compress the air. The compressed air is then released, and the process begins again. These compressors are commonly used in small to medium-sized applications, such as air conditioning units, refrigeration systems, and pneumatic tools.

Rotary Compressor

Rotary compressors use rotating vanes or blades to compress air. These compressors are more efficient and quieter than the reciprocating compressor, making them an ideal option for larger systems and industrial applications, such as gas pipelines and pneumatic conveyors.

Scroll Compressor

Scroll compressors operate using two spiral-shaped components that rotate in opposite directions. One component remains stationary, while the other moves, compressing the air as it moves inward. These compressors are commonly used in applications where continuous air supply is required, such as refrigeration and air conditioning systems.

Centrifugal Compressor

Centrifugal compressors use centrifugal force to compress air. Air enters the center of the compressor, where it is flung outward at high speeds, generating pressure. These compressors are suitable for large-scale industrial applications, such as natural gas processing and petroleum refining.


How Do Compressors Work?

If you are a professional in the field of construction, HVAC, or auto repair, you are probably already familiar with compressors. They are essential machines that are used for a variety of tasks, such as powering pneumatic tools, inflating tires, and even refrigerating food in your fridge. But how exactly do compressors work? Let’s explore the basics.

Compressor Basics

A compressor is a device that increases the pressure of a gas or air by reducing its volume. They work by sucking in low-pressure gas or air and then increasing the pressure inside a closed chamber, which is then released through an outlet pipe or valve. This process can be done using various types of compressors, but they all work on the same principle of reducing the volume of air or gas to increase its pressure.

Components Of Compressors And Their Functions

The components of compressors can vary depending on the type of compressor you are using, but some common elements include:

Component Function
Motor Drives the compressor’s pump or piston
Pump Draws in and compresses air or gas
Tank Stores compressed air or gas for later use
Pressure Switch Controls the compressor’s operation by turning it off when the maximum pressure is reached
Regulator Controls the pressure output of the compressor

Some compressors may also have additional features such as filters, coolers, and moisture separators to ensure clean and dry air supply for your application.

  • Compressors are used for a variety of tasks, including powering pneumatic tools, inflating tires, and refrigerating food.
  • They work by sucking in low-pressure gas or air and then increasing the pressure inside a closed chamber.
  • Some common components of compressors include a motor, pump, tank, pressure switch, and regulator.

Now that you have a basic understanding of compressors and their components, you can choose the best one to suit your needs.

Understanding Compressors And Their Differences


Credit: www.audiomixingmastering.com


Factors To Consider When Selecting A Compressor


Selecting the right compressor can be a daunting task. Several factors need to be considered before making a purchase, such as the type of compressor, the task at hand, and the required output. Understanding the different types and their features can help narrow down the best option for your needs.

When selecting a compressor, it is important to consider a variety of factors such as the applications, air quality requirements, operating cost, and maintenance. Knowing what these factors are and how they apply to your specific situation can help you select the right compressor for your needs.

Applications

The first factor to consider when selecting a compressor is the applications you will be using it for. Compressors are used for a variety of tasks, including powering air tools, spray painting, and operating production machinery. Knowing the specific application requirements will help you choose the right compressor type and size. For example, if you need a compressor for spray painting, you will need to choose a compressor with a low CFM rating that produces clean, dry air.

Air Quality Requirements

Another important factor to consider when selecting a compressor is the air quality requirements for your application. Different applications require different levels of air quality, and compressors can produce varying levels of air purity. For example, if you are using a compressor for medical purposes or in a clean room, you will need a compressor that produces air that is free from oil and other contaminants. In contrast, applications such as powering air tools may not require such high air quality.

Operating Cost

The operating cost of a compressor is another important factor to consider. The cost of operating a compressor can vary greatly depending on the type of compressor, its efficiency, and its maintenance requirements. Choosing an energy-efficient compressor can help to save on operating costs over time. It is also important to consider the cost of maintenance, including regular maintenance and any repairs that may be needed over time.

Maintenance

Finally, maintenance is an important factor to consider when selecting a compressor. Different types of compressors have different maintenance requirements, and it is important to choose a compressor that is easy to maintain and repair. Proper maintenance and regular inspections can help to prolong the life of a compressor and prevent costly breakdowns. In conclusion, selecting the right compressor requires careful consideration of a variety of factors, including the applications it will be used for, air quality requirements, operating cost, and maintenance requirements. By taking the time to understand these factors and how they apply to your specific situation, you can make an informed decision and choose the right compressor for your needs.

Advantages And Disadvantages Of Compressors


Compressors offer an efficient method for generating and storing compressed air or gas, making it easier to transport or utilize in various applications. However, they can also be expensive and require regular maintenance to prevent malfunctions or breakdowns. Understanding the different types of compressors and their advantages and disadvantages is crucial to determining the right one for your specific needs.

Understanding the advantages and disadvantages of compressors is vital before purchasing one. A compressor is a device used to increase the pressure of a fluid or gas. They come in different types, sizes, and capacities, each with its own set of benefits and drawbacks. In this blog post, we will delve into the pros and cons of using compressors.

Pros Of Using Compressors

Compressors have numerous benefits, making them ideal for various applications. Some of the advantages are:

  • Enhanced efficiency: Compressors can store gas or air for use on demand, which enhances productivity by allowing continuous operation. They reduce the amount of time spent waiting for pressure to build up.
  • Increased power: Compressed air or gas provides a reliable source of power. It can power your tools, equipment, and pneumatic machines, making it a preferred alternative to electricity.
  • Cost-effective: Compressed air or gas is cheaper than electricity, making it a more cost-effective solution in the long run.
  • Safe: Compressed air or gas is safer than electricity since there is no risk of electrocution or fire. Moreover, it does not produce sparks, making it ideal for hazardous environments.
  • Multifunctional: Compressors have multiple uses, from inflating tires to powering industrial tools. Their versatility makes them an excellent addition to any home or business.

Cons Of Using Compressors

Despite the numerous benefits of compressors, they have some drawbacks, which include:

  • High maintenance: Compressors require frequent maintenance to ensure they operate optimally. They need regular oil changes, filter replacements, and belt adjustments, among other things.
  • Noise: Air compressors produce a loud noise during operation, which can be uncomfortable for some users. This is especially important to consider when using a compressor in enclosed spaces.
  • Size and weight: Some compressors can be large and heavy, making them difficult to move from one location to another.
  • Environmental impact: Compressed gas can have an adverse impact on the environment if not handled correctly. It can cause air pollution and contribute to global warming.
  • Energy-intensive: Compressors require a lot of energy to operate, which means higher energy bills.

In conclusion, understanding the pros and cons of compressors is crucial to determine which one is best suited for your needs. Compressors have several advantages, including enhanced efficiency, increased power, cost-effectiveness, and versatility. However, they also have some drawbacks, such as high maintenance, noise levels, environmental impact, and high energy consumption. By weighing the pros and cons, you can make an informed decision on the type of compressor that is ideal for your specific needs.


Maintenance And Troubleshooting


Understanding compressors is crucial for proper maintenance and troubleshooting. Different types, such as reciprocating and rotary screw compressors, have varying designs and functions. Familiarizing oneself with their differences can help identify issues and prevent breakdowns.

Preventive Maintenance Tips

Regular maintenance of compressors is significant to ensure optimal performance and longevity. Here are some preventive maintenance tips to help you maintain your compressor for optimal operational efficiency:

  • Keep the compressor clean and free from debris and dirt buildup. Oil and water filters should be checked regularly as well.
  • Check the oil level regularly and change it when necessary. Dirty oil can lead to increased wear and tear and decreased performance.
  • Ensure all hoses and fittings are free from cracks, leaks, and other signs of damage.
  • Invest in a regular inspection by a professional to ensure all parts are in good working order.

Common Compressor Issues And Solutions

Despite regular maintenance, compressors can still experience issues. Here are some common compressor issues you may encounter and their possible solutions:

Issue Solution
The compressor fails to start and make any noise. Check the power supply and circuit breaker. If the issue persists, consider checking the pressure switch or motor.
The compressor is making loud, unusual noises while running. Check for loose parts, damaged bearings, or broken components that may require replacement or repair.
Low or no pressure output from the compressor. Check the air filter, air intake, and valves. If all seem okay, the compressor’s piston rings or valve plate may be in need of replacement.
Excessive heat or smell from the compressor. The issue may be due to overheating caused by low oil levels, dirty oil, or damaged components. Check the oil level and replace if necessary and seek professional maintenance.

Final Thoughts

Preventive maintenance is crucial in ensuring the proper functioning of your compressor. In case of any issues, it is best to seek professional assistance to prevent further damage. With the right maintenance routine in place, your compressor can last for years while performing optimally.


Frequently Asked Questions Of Understanding Compressors And Their Differences


What Are The 3 Types Of Compressors?


The 3 types of compressors are centrifugal, reciprocating, and rotary screw compressors. Centrifugal compressors use a rotating impeller to compress air, while reciprocating compressors use pistons in a cylinder to compress air. Rotary screw compressors use two interlocking screws to compress air.


What Are The Differences Between Air Compressors?


Air compressors differ in their size, power source, PSI capacity, and lubrication type. Some are portable and suitable for small applications, while others are stationary and designed for industrial use. Choosing the right compressor depends on your application needs, budget, and maintenance requirements.


How Do I Know What Compressor To Use?


To determine the right compressor, consider the purpose, power source, required pressure, airflow, and tank size. Evaluate the tasks the compressor will perform, such as powering airbrushes or operating pneumatic tools. Determine the power source, whether electric or gas. The required pressure, airflow, and tank size depend on the task to be performed.


What Are The 4 Types Of Ac Compressor?


There are 4 types of AC compressors: reciprocating, rotary, scroll, and variable speed. The reciprocating and rotary compressors are the most common, while the scroll and variable speed compressors are more energy efficient but less common.


Conclusion


To wrap it up, compressors are essential for various businesses requiring compressed air or other gas streams. Selecting the right type of compressor should be guided by the application requirements, as different compressors have varying features and limitations. Remember, choosing the wrong compressor can hurt your productivity, and ultimately, your bottom line.


Always consult with an expert for professional advice, and ensure you pick the compressor best suited for your needs.

Categories
Archive

How To Save A Mix Using Unorthodox Techniques

To save a mix using unorthodox techniques, try using unconventional tools and experimenting with unique mixing approaches. In doing so, you can create a distinct and personalized sound that sets your music apart from the norm.


Also, in the world of music production, there are endless possibilities. There’s no right or wrong way to make a mix. By stepping outside of the traditional mixing techniques, you can discover new and exciting ways to improve your music.

Related reading: Techniques for a Better Mix and Mixing Guitars Techniques for Texture and Tone. For background, see the Wikipedia article on Audio mixing.


Sometimes, using unconventional tools like toys or household items can add character and texture to your music, while experimenting with unique mixing approaches like bouncing tracks or reversing sounds can add depth and interest. Moreover, we’ll explore some unorthodox techniques that can help you take your mix to the next level, showcasing the importance of thinking outside the box in music production.


Start With The Basics in Unorthodox Techniques

When mixing music, it’s easy to get caught up in using conventional techniques. However, sometimes it’s the unorthodox methods that can make all the difference. In addition, here, we’ll explore some tips and tricks for saving a mix using unorthodox techniques.

Eq-cutting And Boosting for Unorthodox Techniques

Furthermore, EQ is a powerful tool for shaping the tonal balance of a mix. But it’s often used in a very rigid, formulaic way. By experimenting with more extreme EQ settings, you can create some interesting effects that can help to save a mix.

When it comes to cutting, try sweeping a high-pass filter up to the point where it just starts to thin out the sound. This can help to reduce muddiness and give the mix more clarity without sacrificing too much low-end. Conversely, try boosting the mids or highs to add some brightness or presence to a dull or lifeless mix.

Compression

Compression is another powerful tool in the mixing engineer’s arsenal. You can overus but it and can lead to a mix that sounds flat and lifeless. Additionally, to save a mix, try using compression in a more creative way.

For example, instead of compressing the entire mix, try using it on individual elements to create some interesting dynamics. Also, or, try using a parallel compression technique where you blend a heavily compressed signal with the original signal to add some thickness and punch without sacrificing the dynamic range.

Mixing Levels for Unorthodox Techniques

Moreover, one of the most basic tenets of mixing is to balance the levels of each element in the mix. However, sometimes a mix can still sound off even when the levels are set correctly. In these cases, it’s worth experimenting with some unorthodox mixing techniques.

For example, try using volume automation to accentuate certain parts of a track or to create interesting transitions between sections. In addition, or, try using extreme panning to create a sense of space and depth in the mix.

Conclusion

In conclusion, by breaking free of conventional mixing techniques and experimenting with some unorthodox methods, you can breathe new life into a struggling mix. Furthermore, try using these tips and tricks to help you save your next mix.

Embracing The Unconventional for Unorthodox Techniques


Additionally, learn to save a mix using unconventional techniques by embracing experimentation and thinking outside of the box. Mixing engineers can achieve unique and interesting results by trying new methods and exploring unconventional options.

Distortion

Also, distortion is usually considered a bad thing in music production. But using it intentionally can add warmth and character to a mix. One way to add distortion is by using guitar pedals or saturation plugins. This can work on individual tracks or even the master bus to give the mix a cohesive sound. Don’t be afraid to experiment and find the sweet spot for each track.

Frequency Modulation for Unorthodox Techniques

Moreover, often used in electronic music, frequency modulation (FM) synthesis can create unique sounds that can’t be achieved through traditional synthesis. It involves modulating the frequency of one wave with another to create complex harmonics. Try using FM plugins on individual tracks or even as an insert on a bus or master channel to add texture to the mix.

Ambient And Foley Recording for Unorthodox Techniques

In addition, adding ambient and foley recordings to a mix can add a sense of space and depth. Recordings of room tone, nature sounds, and even everyday objects can create a unique soundscape. Try recording with both stereo and binaural microphones to capture the full dimension of the sounds. These recordings can be blended with the original tracks or used to create transitions between sections. Embracing unorthodox techniques can add creativity and character to your mixes. Don’t be afraid to experiment and try new things. Who knows, you might stumble upon a technique that becomes a signature sound in your productions.

Effect Layering And Resampling for Unorthodox Techniques


Furthermore, one way to save a mix using unorthodox techniques is by using effect layering and resampling. This involves layering multiple effects on top of your audio tracks and resampling them to create new, unique sounds. By experimenting with this technique, you can add depth and texture to your mixes that stand out from the crowd.

If you’re looking to add some uniqueness to your mix, unorthodox techniques such as effect layering and resampling can help you achieve just that. These techniques can take a little longer, but the result is a well-crafted mix that stands out from the rest. Additionally, here, we’ll take a closer look at how you can use parallel processing, granular resampling, and pitch-shifting to make the most of these techniques and take your mix to the next level.

Parallel Processing for Unorthodox Techniques

Also, parallel processing involves combining multiple effects to create one unique sound. By splitting a track into two or more copies, you can apply a different effect to each one and blend them together. Here are a few steps to follow when using parallel processing:

  1. Moreover, create multiple copies of the track you want to work on.
  2. In addition, apply different effects to each copy.
  3. Furthermore, adjust the levels to blend the effects together.
  4. Additionally, combine the copies to create your final sound.

Granular Resampling for Unorthodox Techniques

Also, granular resampling is a process where you break down the audio into tiny grains and manipulate them in various ways. This technique allows you to create unique sounds by stretching, reversing, and pitch-shifting audio in different ways. Here’s how you can use granular resampling to add some excitement to your mix:

  • Moreover, select a small piece of audio that you want to manipulate.
  • Break the audio down into tiny grains.
  • Apply different effects to each grain.
  • Recombine the grains to create your final sound.

Pitch-shifting

Pitch-shifting is a technique that involves adjusting the pitch of a sound without changing its tempo. This technique is useful when trying to create a unique sound or when trying to fit a sound into a specific key. Here’s how you can use pitch-shifting to take your mix to the next level:

Tip: For a more natural sound, try adjusting the pitch in small increments instead of large jumps.

  1. Select the audio clip you want to pitch-shift.
  2. Adjust the pitch up or down using a pitch-shifter effect.
  3. Listen and adjust until you achieve the desired sound.

Managing Dynamic Range for Unorthodox Techniques


Learn how to manage dynamic range in your mix by using unorthodox techniques. With careful planning and strategic use of tools like compression and EQ, you can achieve a polished sound without sacrificing dynamics. Get creative and experiment with different approaches to save your mix!

Managing Dynamic Range is an essential step in a mix to ensure each element in a track is heard clearly without overwhelming the listener. Unorthodox techniques can help achieve a balanced dynamic range, and in this section, we will cover three of them. Multiband Compression, Side-Chaining, and Transient Shaping.

Multiband Compression

In addition, Multiband Compression is a dynamic range control technique that compresses different frequency bands separately. It allows the engineer to compress only the frequencies where it is needed without affecting the rest of the mix. In other words, Multiband Compression helps to tame harsh highs, muddy lows, and mid-range resonances. Using Multiband Compression to manage dynamic range involves setting the threshold and ratio for each band. It’s essential to use visual meters to check the compression level of each band while adjusting them to avoid over-compression or under-compression.

Side-chaining

Side-Chaining is a technique that involves using an external audio source to trigger a compressor or a gate. For instance, in a mix with a loud bassline and a kick drum competing for space, side-chaining can allow the kick to cut through the mix by ducking the bassline. To implement side-chaining, the compressor’s side chain input is routed to the audio source that you want to trigger the compression or gating. When the audio source is detected, the compressor or gate is activated to adjust the volume of the target audio accordingly.

Transient Shaping

Transient shaping is a dynamic range control technique that focuses on shaping the onset of individual sounds in a mix, enhancing or reducing its impact. It helps to achieve precise control over individual sounds without altering their tonality. This leads to a more natural and clear mix. Transient shaping works by attenuating or boosting the transient (the initial peak) and the sustain (the body of the sound). The attack and release controls shape the transient. Meanwhile, the sustain control adjusts the sustain. In conclusion, managing dynamic range is crucial in achieving a balanced mix that sounds good across all playback systems. And by using unorthodox techniques such as Multiband Compression, Side-Chaining, and Transient shaping, you can achieve a unique sound that stands out from the crowd.

Going Beyond The Computer for Unorthodox Techniques

When it comes to mixing, most producers rely on their digital audio workstations and plugins to do the heavy lifting. While this can produce great results, sometimes it pays to go off the beaten path and explore unorthodox methods.

Hardware Effects Processors

If you want to give your mixes a unique character, consider investing in hardware effects processors. These devices can add warmth, color, and texture to your tracks in a way that plugins simply can’t match. Some popular options include:

Device Description
Analog compressor Smooths out peaks and adds thickness to sounds.
Tape delay Creates a warm, vintage echo effect.
Spring reverb Emulates the sound of a reverb tank from a guitar amp.

Analog Summing

Another way to add richness and depth to your mixes is by using analog summing. This technique involves sending individual tracks out of your DAW and into an analog mixer. The mixer then combines the tracks into a stereo signal, which you can record back into your computer. This can help preserve the nuances of each track and give your mix a more natural sound.

Tape Saturation

If you’re looking for a quick and easy way to add warmth and depth to your mixes, try using tape saturation plugins. These plugins emulate the sound of analog tape machines, which were known for their ability to add subtle harmonic distortion and compression to audio tracks. This can help give your mixes a vintage vibe and make them sound more organic and less sterile.

  • Remember, mixing is an art, not a science.
  • Don’t be afraid to experiment with different techniques and processes.
  • Invest in quality hardware and plugins to get the best results.
  • Always trust your ears and mix for the song, not for the gear.

By going beyond the computer and exploring unorthodox methods, you can give your mixes a unique character and make them stand out from the crowd.


Automated Techniques


Save time and effort by using automated techniques to create unique and captivating mixes that stand out. Unorthodox methods can lead to a more dynamic and interesting sound, by using tools such as multiband processing, parallel compression and creative EQ techniques.

Automated Techniques To Save A Mix

Saving a mix is crucial for every music producer. And for efficient workflow, automation techniques can be a lifesaver. Here are some unorthodox automated techniques to save a mix in a breeze.

Utilizing Macros for Unorthodox Techniques

Macros are a series of pre-determined commands that can be performed with a single click. Macros are time savers and can automate repetitive tasks. You can use any DAW to create macros for quick access to tasks such as EQ, compression, and reverb.

Customizing Midi Controllers for Unorthodox Techniques

You can create custom MIDI controllers to manage tasks such as mixing, mastering, and automation. MIDI controllers can easily be programmed to provide shortcuts to the functions you use the most. You can create multiple controllers for multiple uses or use one master controller for all.

Envelope Follower

An envelope follower is a tool that converts the amplitude of an audio signal into control signals for other devices. It can save your mix by automatically adjusting EQ and compression parameters. You can use it to create dynamic effects such as sidechain compression, ducking, and gating. By using automated techniques, you can save time and focus on being creative without worrying about repetitive tasks. Utilizing macros, customized MIDI controllers and an envelope follower can bring a new level of efficiency to your mixing process.


Exploring Experimental Mixing for Unorthodox Techniques

For experienced sound engineers and mixers, being unorthodox can sometimes save the day when you’re facing a creative dead end. Exploring experimental mixing techniques can help you add that creativity to your mix without sacrificing quality.

Noise Generation

Noise generation is the process of intentionally adding noise to your audio mix to create a unique sound. This can be done by feeding a noise generator into your track, then adjusting the level of the noise to blend with your other instruments.

One way to use this technique is to create a noise floor under your mix that will help boost the overall energy of your track. You can also use it to add a lo-fi or vintage sound to your mix by adding a layer of vinyl noise or tape hiss.

Glitch Techniques

Glitch techniques involve intentionally creating errors in your track to create unique sounds and rhythmic patterns. This can be done by manually cutting and pasting sections of your audio, or by using effects such as stutter or delay to create unusual patterns.

Another way to use glitch techniques is to add a rhythmic texture to your mix. By adding quick cuts and subtle edits to your drums or percussion, you can create a complex and interesting rhythm that’s not achievable with traditional methods.

Real-time Feedback

Real-time feedback involves using a microphone to capture the sound of your audio system and feeding it back into your mix. This creates a sound loop you can manipulate for unique effects.

You can use real-time feedback to create a variety of effects such as delay, reverb, and distortion. This technique is particularly useful for adding depth and movement to your mix, as well as creating unusual timbres and textures.

By exploring these experimental mixing techniques, you can add new layers of creativity to your mixes and set your work apart from others. Remember, the key is not to overdo it. Use these techniques sparingly and strategically to avoid overwhelming your mix.

How To Save A Mix Using Unorthodox Techniques


Credit: www.masteringthemix.com


Moving Forward for Unorthodox Techniques

Once you have applied some unorthodox techniques to your mix, you are almost reaching the finish line. However, it is important to keep in mind that there are still a few crucial stages left before your final product is ready.

The Final Mastering Stage

Mixing and mastering are two different processes that require distinct skillsets. Mastering, in simple words, is the final stage of the production process and involves enhancing the overall sound quality of your mix.

At the mastering stage, it is important to ensure that your mix is ready for different playback systems and environments. You can use tools like EQ, compression, and limiting to fine-tune your mix and achieve the desired loudness and overall sonic balance.

Avoiding Overuse Of Unconventional Techniques

While experimenting with unorthodox techniques can help bring a fresh and unique sound to your mix, it is essential to maintain a balance and not overdo it. Overuse of unconventional techniques can lead to a messy and unprofessional final product.

Hence, it’s important to exercise restraint and apply these techniques only where necessary. Always keep in mind that the primary focus should be to serve the song and not just to showcase your creative abilities.

Incorporating Your Own Ideas for Unorthodox Techniques

Unconventional techniques are just one aspect of mixing. It’s important to incorporate your own creative ideas into the mix as well. Remember, you are in charge of the final product, and your personal touch can help make your mix stand out.

So, don’t hesitate to incorporate your unique ideas into the mix. Try different things and experiment until you find the perfect balance between the conventional and the unconventional.

Do: Don’t:
Use unconventional techniques sparingly Overuse unconventional techniques
Exercise restraint while applying unorthodox ideas Focus only on showcasing your creativity
Incorporate your own creative ideas into the mix Depend completely on unconventional techniques

Remember, mixing is an art form, and there are no hard and fast rules to it. Trust your instincts, experiment, and let your creativity flow. With time and practice, you will develop your own mixing style and techniques that work best for you.


Frequently Asked Questions On How To Save A Mix Using Unorthodox Techniques


How Do You Rough Mix A Song?


To rough mix a song, start by setting the levels for each instrument and vocal track. Use compression and EQ to balance the frequencies and achieve a cohesive sound. Add effects such as reverb and delay to enhance the overall mix.


Finally, make sure to listen back and make any necessary adjustments before moving on to the final mix.


How Do You Arrange Instruments In A Mix?


When arranging instruments in a mix, it’s important to consider the frequency range of each instrument and to avoid clashing sounds. Use panning to place instruments in the stereo field and adjust volume levels appropriately. Consider using effects, such as EQ and compression, to enhance the sound of each instrument.


How To Make A Music Mix?


To make a music mix, follow these simple steps: 1. Choose the songs you want to include. 2. Decide on the order and transitions between songs. 3. Use a music editing software to put the songs together. 4. Adjust the volume levels and EQ settings to create a seamless flow.


5. Save your mix and enjoy listening to it!


How Can I Save A Mix Without Compression?


The key is to make sure that each element in the mix has its own distinct frequency range. By using EQ and volume adjustments, you can achieve a balanced mix without relying on compression.


Conclusion


Unconventional techniques can often give a fresh perspective when it comes to mixing music. Don’t be afraid to experiment with various methods, such as using household items or recording in unusual environments. By incorporating these unorthodox techniques into your mixing process, you can achieve a unique sound and elevate your music to the next level.


Keep an open mind and never stop learning new ways to improve your craft. Happy mixing!

Categories
Archive

Chandler Limited Tg12413 Zener Limiter

The Chandler Limited Tg12413 Zener Limiter is a top-of-the-line device for professional audio limiting applications. This studio-grade limiter works by capturing the sound dynamics and limiting the output, resulting in a polished, distortion-free sound.


Professional audio engineers and music producers have been relying on the Chandler Limited Tg12413 Zener Limiter for years due to its outstanding performance and quality. The device is used to shape and fine-tune audio recordings, making them sound polished and professional.


The Tg12413 Zener Limiter features a Zener diode, which provides a unique colouration to the sound, giving it a vintage and warm quality. The device also offers a range of features such as side-chain filtering, fast recovery, and dedicated control knobs for threshold, ratio, and output level. Overall, the Chandler Limited Tg12413 Zener Limiter is a must-have for any serious audio production studio looking to enhance the sound of their recordings.

Chandler Limited Tg12413 Zener Limiter


Credit: chandlerlimited.com


History Of Chandler Limited


Chandler Limited is a manufacturer of high-end audio equipment. The Chandler Limited TG12413 Zener Limiter is a famous product in their line, inspired by the legendary EMI TG12413 limiting amplifier used in Abbey Road Studios.

Origins

Chandler Limited is a company that is dedicated to creating high-quality studio equipment. It was founded in 1999 by Wade Goeke, an electronics designer, and recording engineer. Goeke’s passion for creating music and perfecting recordings led him to build his own studio in Iowa. He soon learned that the equipment he was using was not up to his standards. He decided to start building his own gear to achieve the sound he desired. This led Goeke to start Chandler Limited and create a range of studio equipment that he would be proud to use.

Product Range Overview

Chandler Limited produces a range of high-end audio equipment that is used by professionals in the music industry. Their product range includes preamps, compressors, equalizers, and more. One of their most popular products is the Chandler Limited TG12413 Zener Limiter. This limiter is a recreation of the classic EMI TG12413 limiter, which was used in the EMI/Abbey Road recording studios in the 1960s and 1970s. The Chandler Limited TG12413 Zener Limiter provides users with the same rich, warm sound that the original limiter was known for, but with improved reliability and consistency. It is a favorite among recording engineers who want to achieve that classic sound on their recordings. In conclusion, Chandler Limited has become well-known in the music industry for their dedication to producing high-quality studio equipment. The Chandler Limited TG12413 Zener Limiter is just one example of their commitment to recreating classic gear while adding modern improvements.

Chandler Limited Tg12413 Zener Limiter


Credit: www.milkaudiostore.com


Understanding Limiters

Understanding limiters is essential in the world of audio engineering, as it helps to achieve professional sound quality. The Chandler Limited Tg12413 Zener Limiter is a popular and powerful tool used for limiting. In this section, we will discuss the basics of limiters, how they work, and the benefits of using the Chandler Limited Tg12413 Zener Limiter.

What Is A Limiter?

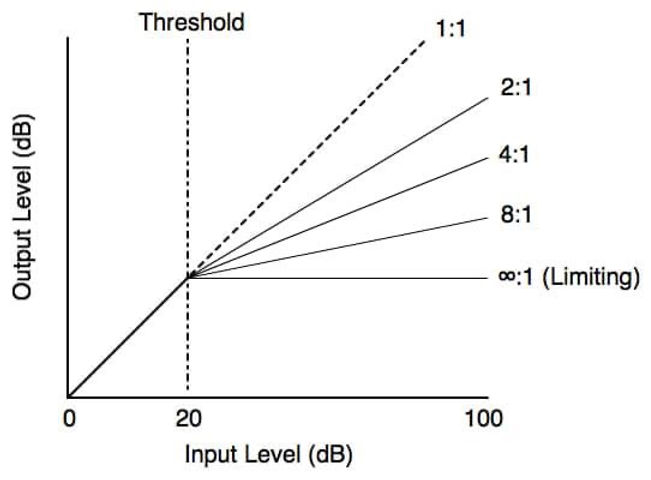
A limiter is a dynamic range processor used to prevent audio levels from exceeding a certain level, known as the threshold. The purpose of a limiter is to control the level of the audio and maintain a consistent volume. It is commonly used in mastering tracks, broadcasting, and live sound applications to keep the sound from distorting or getting too loud.

How Do Limiters Work?

Limiters work by setting a threshold level. Any audio that goes beyond the set threshold level is automatically reduced in volume by the limiter. The reduction in audio level is done in a way that is not audible to the human ear, ensuring that the sound remains natural without any distortion even while limiting. The mechanism that makes this possible is the compressor. The Chandler Limited Tg12413 Zener Limiter uses a FET-based compressor and Zener diode, which makes it a powerful and reliable tool compared to other limiters in the market.

Benefits Of Using The Chandler Limited Tg12413 Zener Limiter

Benefits
Transparent and natural sound
No pumping or breathing artifacts experienced when limiting
Flexible threshold control and switching options
Classic analog sound that is widely used in the music industry

These are some of the benefits of using the Chandler Limited Tg12413 Zener Limiter. With this limiter, you can easily keep your audio levels in check without losing sound quality. The transparent and natural sound produced by the limiter ensures that your audio remains uncolored, making it perfect for mastering tracks, broadcasting, and live sound applications.

Features Of Chandler Limited Tg12413 Zener Limiter

The Chandler Limited Tg12413 Zener Limiter is an impressive device that delivers an amazing sound quality. Here are some of the key features that make it stand out:

Controls

The Chandler Limited Tg12413 Zener Limiter comes with a set of easy-to-use controls that allows you to fine-tune your audio settings with precision. The limiter has two Threshold controls, one for each channel, that you can set independently. In this way, you can adjust the limiter to suit the specific dynamics of your audio without affecting its stereo image.

You can also control the amount of compression by using the Depth control, which adjusts the ratio between the input signal and the output signal. Furthermore, the limiter features a Release control that lets you adjust the speed at which the limiter responds to changes in the audio level.

Circuitry

The Chandler Limited Tg12413 Zener Limiter is based on the legendary EMI TG12413 circuitry, which is known for its warm, colorful, and cohesive sound. The limiter uses only high-quality, discrete components that ensure a clean and transparent sound. Furthermore, the limiter’s Class-A circuitry provides a fast and smooth transient response with low harmonic distortion.

Build Quality

The Chandler Limited Tg12413 Zener Limiter is built to the highest standards of quality. The device is housed in a robust steel chassis that provides excellent protection against shock and interference. Moreover, the limiter’s components are carefully selected and hand-wired to ensure maximum reliability and longevity.

In conclusion, the Chandler Limited Tg12413 Zener Limiter is not only a highly capable and flexible piece of audio equipment but also a device that delivers exceptional sound quality and excellent build quality. Whether you are a professional audio engineer or a home studio owner, the Chandler Limited Tg12413 Zener Limiter is a great investment that will elevate the quality of your audio productions to new heights.

Chandler Limited Tg12413 Zener Limiter


Credit: chandlerlimited.com


Sound And Usage


The Chandler Limited Tg12413 Zener Limiter is a must-have for sound engineers. With its unique sonic character, it adds warmth, clarity, and depth to any track, making it ideal for mastering and mixing. Its multi-colored meter allows for precise monitoring, ensuring optimal usage.

Chandler Limited Tg12413 Zener Limiter, a professional audio equipment, has become a go-to for sound engineers, recording artists, and producers for its remarkable sound and usability. The device operates by controlling the level of peaks in audio signals to prevent the sound from being too loud or distorted.

Characteristics Of The Tg12413 Sound

The Tg12413 sound has distinctive characteristics that separate it from other limiters. The Chandler Limited device produces a rich and warm sound with a vintage touch. The sound quality is excellent, and it extends all the way to the high and low-frequency range. This device is also praised for its quick and precise response, which preserves the original sound while limiting the peak levels.

Applications For The Zener Limiter

Chandler Limited Tg12413 Zener Limiter has many applications in various audio recording and production setups. Here are some of the most common applications for the Zener Limiter:

  • Mastering: The Zener Limiter is frequently used in the mastering process to achieve higher levels for commercial release while still maintaining sound quality and dynamic range.
  • Mix bus: A mix bus is central to a mixing console, where all the channels are summed up to create a single output. The Zener Limiter is used on the mix bus to give a cohesive sound to all the tracks in a mix.
  • Individual tracks: The Zener Limiter can also be applied to individual tracks such as drums, bass, guitar and vocals. It helps in controlling the level spikes in the tracks to avoid distortion and ensure consistency in the sound while still preserving its original quality.
  • Live Sound Reinforcement: The Tg12413 Zener Limiter is also used in live sound reinforcement. At concerts, limiters are used on multiple channels of audio, including vocals, instruments, and ambient microphones. The Zener Limiter ensures that the audio levels don’t become too loud, preventing unwanted distortion that may occur during live performance.

Chandler Limited Tg12413 Zener Limiter is a versatile device that has won the hearts of many musicians, producers, and audio engineers. It’s known for its exceptional sound quality and quick response and has found numerous applications in mastering, mixing, and live sound reinforcement.


Reviews And Endorsements

The Chandler Limited Tg12413 Zener Limiter has received high praise from both users and industry experts alike. Let’s take a closer look at what people are saying about this incredible tool.

User Testimonials

Users of the Chandler Limited Tg12413 Zener Limiter have raved about its performance and versatility. Many have noted that the Zener Limiter has become an essential part of their recording and mastering setup.

  • “The Chandler Limited Tg12413 Zener Limiter is hands down the best limiter I’ve ever used. It adds warmth and character to my recordings, and I couldn’t be happier with the results.” – John D.
  • “I’ve been using the Zener Limiter in my mastering chain for months now, and the results speak for themselves. It’s incredibly easy to use, and the sound is simply amazing.” – Sarah T.
  • “I was skeptical about the Zener Limiter at first, but now I can’t imagine recording or mixing without it. It glues everything together in a way that other limiters just can’t match.” – Mark P.

Industry Expert Opinions

Industry experts have also given the Chandler Limited Tg12413 Zener Limiter their seal of approval. Music producers and engineers have noted the exceptional sound quality and unparalleled performance of the Zener Limiter.

Expert Opinion
Andrew Scheps “The Chandler Limited Zener Limiter is a modern classic. It’s an incredibly musical tool that can handle anything you throw at it, from subtle limiting to aggressive clipping. I couldn’t imagine mixing without it.”
Bob Clearmountain “The Zener Limiter is one of the few compressors that can add depth and dimension to a mix without sacrificing clarity or punch. It’s a secret weapon that every mixer should have in their arsenal.”
Greg Wells “The Chandler Limited Tg12413 Zener Limiter is one of the most musical and versatile compressors out there. It has a unique sound that is both transparent and colored, and it works wonders on both individual tracks and entire mixes.”

Alternatives To The Chandler Limited Tg12413 Zener Limiter

Alternatives to the Chandler Limited Tg12413 Zener Limiter

If you are looking for a limiter that can help you enhance the sound and quality of your recordings, the Chandler Limited Tg12413 Zener Limiter is a great option. However, it’s not the only one out there. In this section, we will explore some similar limiters available in the market, and their pros and cons.

Similar Limiters In The Market

Model Pros Cons
Universal Audio Teletronix LA-2A + Smooth, natural compression
+ Versatile for different instruments and sounds
– Pricey
– Requires periodic maintenance
Shadow Hills Industries Mastering Compressor + Wide range of controls and settings
+ Transparent compression and limiting
– Expensive
– Can be overwhelming for beginners
Empirical Labs Distressor + Unique, versatile sound and character
+ Easy to use and customize
– Lacks some of the traditional features of a limiter
– May not suit every type of recording

Pros And Cons Of Different Models

  • Universal Audio Teletronix LA-2A: This limiter is widely recognized as a classic in the music production industry. It offers a smooth, natural compression that adds warmth and depth to the sound. However, it is a pricey investment and requires periodic maintenance.
  • Shadow Hills Industries Mastering Compressor: This limiter is a powerhouse, with a wide range of controls and settings that offer precise and transparent compression and limiting. However, it is quite expensive and may be overwhelming for beginners.
  • Empirical Labs Distressor: This limiter is known for its unique, customizable sound and character. It is easy to use and can be adapted to different types of recordings. However, it lacks some of the traditional features of a limiter and may not suit every recording scenario.

These are just a few of the many limiters available in the market. Each limiter has its own strengths and weaknesses, and the right choice will depend on your personal preference and specific recording needs. Conducting thorough research and testing different limiters can help you determine which one is the best fit for you.

Frequently Asked Questions On Chandler Limited Tg12413 Zener Limiter


What Is A Zener Limiter?


A Zener limiter is a type of electronic component that helps protect against voltage spikes in electrical circuits by limiting the voltage to a predetermined level. The Zener diode is used as the main component in this type of limiter.


What Is The Chandler Limited Tg12413 Zener Limiter?


The Chandler Limited Tg12413 Zener Limiter is a high-end compressor and limiter used in professional audio mastering.


How Does The Tg12413 Zener Limiter Work?


The Tg12413 Zener Limiter uses a combination of diode bridge and transformer-based gain reduction to produce smooth, natural compression.


What Are The Key Features Of The Tg12413 Zener Limiter?


The Tg12413 Zener Limiter features discrete transistor circuitry, a variable sidechain filter, and a bypassable UV meter for gain reduction.


Conclusion


The Chandler Limited Tg12413 Zener Limiter is a powerful tool for any recording studio. Its unique features and capabilities make it stand out in the market. With its ability to add character and warmth to any recording, it is a must-have for any serious music producer.


The limiter’s versatility and reliability make it a valuable asset to any recording setup. Invest in the Chandler Limited Tg12413 Zener Limiter and take your recordings to the next level.

Categories
Archive

How To Get A Recording Studio Internship

To get a recording studio internship, network with industry professionals and attend industry events to make connections. Then, reach out to studios directly with a polished resume and cover letter expressing your passion and eagerness to learn.


Aspiring audio professionals often begin their careers with an internship at a recording studio. Whether you’re interested in music production, audio engineering, or another aspect of the industry, this type of hands-on experience is crucial for building your skills and establishing yourself in the field.


Landing a recording studio internship can be competitive, but by putting in the effort to network, attend events, and tailor your application to each studio, you can increase your chances of success. We’ll explore the steps you can take to get a recording studio internship and start your career in audio today.


Researching Studios

Researching studios is an essential step towards getting a recording studio internship. Knowing the different studios gives you insights into which one to apply for and how to get accepted. There are several ways to research for studios, and we will cover the most effective ones in this article.

Networking In The Music Industry

Networking is a great way to learn about the different recording studios in your area. Attend music industry events, concerts, or shows, and take the opportunity to speak to professionals in the industry. You can ask them about the studios they know, their experiences working with them, and if they are currently offering internships. Be sure to have your resume and business cards on hand in case an opportunity arises.

Using Online Resources To Find Studios

The internet is an excellent resource for researching recording studios. You can use search engines to find studios in your area or check online directories. Some popular online directories include StudioFinder, Recording Studio World, and StudioList. Additionally, you can use social media platforms like LinkedIn, Facebook, and Instagram to find studios or individuals who work in the music industry.

Applying To Studios Directly

If you have already identified studios that interest you, consider applying to them directly. Visit their websites and check if they have any internship opportunities available. If they do not, send them an email expressing your interest in learning more about the company and any upcoming internship opportunities. Be sure to attach your resume and any other relevant documents that can help you stand out from other applicants.

Remember, researching studios is just the first step in getting a recording studio internship. Once you know which studios you want to apply for, make sure you tailor your resume and cover letter to their specific internship requirements. With persistence and dedication, you can land the internship opportunity of your dreams.

Preparing Your Resume And Cover Letter

One of the best ways to enter the music industry and gain valuable experience is by getting an internship at a recording studio. In this article, we will delve into the essential elements that can help you get a recording studio internship, starting with preparing your resume and cover letter.

Showcasing Your Music Experience

When preparing your resume, don’t forget to highlight your music experience, including any concerts or gigs where you had an active role. List any awards or certifications you have received in the music industry to showcase your knowledge and experience. It is recommended to attach a link to your music portfolio for the potential employer to listen and get an insight into your previous works.

Highlighting Relevant Skills

Be sure to include all relevant skills you have gained that align with the requirements and responsibilities of a recording studio intern. If you have any experience with sound editing software or instruments, list them on your resume. You can also include your ability to work in a team, manage projects, and your flexibility to work on a specific schedule, as these are highly valued skills in the industry.

Emphasizing Your Passion For Music

When writing a cover letter, take time to emphasize your passion for music and why you are interested in a recording studio internship. Mention any inspiration behind your love for music and how it motivates you to learn and grow in the industry. Highlighting your passion will show the employer how dedicated and interested you are in music, making them more likely to consider you for the position.

To sum up, preparing a standout resume and cover letter is essential for landing a recording studio internship. Make sure to showcase your music experience, highlight relevant skills, and emphasize your passion, which will leave a lasting impression on potential employers.

Interview Process


To secure a recording studio internship, the interview process is crucial. Show your knowledge of the studio’s equipment and software, demonstrate your passion for music, and come prepared with questions about the internship program. It’s also important to present yourself professionally and with a positive attitude.

If you have successfully completed the application process for a recording studio internship, the next step is an interview with the studio’s management team. The interview process is an important step where the studio evaluates your skills, experience and personality and determines if you are a good fit for the internship position. The interview is an opportunity for you to demonstrate your passion and professionalism. Standing out from the competition in the interview can help you secure the internship. Below are some tips to help you prepare for the interview process.

Preparing For The Interview:

Before the interview, research the studio and the recording industry. Visit the studio’s website and learn more about their services, clients and location. This will give you an idea of what the studio does and how you can contribute. Look at the company’s LinkedIn page to get an insight into the staff’s backgrounds. You can also search for interviews or articles featuring the studio’s CEO or other influential staff members. This will provide you with a broader perspective of the industry.

What To Wear / Bring:

Dressing appropriately for the interview is essential. For the recording studio internship, you don’t need to wear formal attire, but you should look professional. Wear clean, neat clothes that are comfortable and appropriate for the studio environment. Bring a portfolio of your work, resume, and a list of references that can speak to your skills and work ethic. Having extra copies of your resume to hand out to the interviewer is also a good idea.

Answering Common Interview Questions:

During the interview, you can expect to be asked common questions that employers ask in interviews. Some of these include:

  • Why do you want to intern for this studio?
  • What skills can you bring to the internship?
  • How do you handle constructive criticism?
  • What is your experience in recording or music production?
  • What are your future career goals?

Be prepared to provide clear examples of your skills, experience, and achievements. Show how your skills align with the job requirements and how you can contribute to the studio’s success. Also, be honest in your responses and don’t exaggerate your abilities or experience. In conclusion, the interview process is an important step in securing a recording studio internship. Researching the studio and industry, dressing appropriately, and being prepared to answer common interview questions can help you stand out from the competition and make a positive impression on the interviewer.


Making The Most Of Your Internship


Maximizing your recording studio internship starts with researching prospective studios and crafting a compelling resume and cover letter that highlights your skills and passion for the industry. During your internship, be proactive, observe and ask questions, and network with professionals to gain valuable experience and build relationships.

An internship in a recording studio provides an opportunity to gain invaluable experience and knowledge within the music industry. Making the most of your internship requires effort and dedication to learn as much as you can from your time there. Here are a few ways to make the most of your recording studio internship.

Staying Positive And Professional

Your attitude can make or break your experience as an intern. It’s crucial to maintain a positive and professional mindset throughout your time in the studio. Stay focused on your goals, and be open to feedback. Take constructive criticism positively and use it to improve your skills. Keep a positive attitude towards every task, even if it’s not your favorite kind of work. Remember, every task has a valuable lesson to offer.

Building Relationships With Staff

The connections you make during your internship can help establish your music career. Take the time to introduce yourself to the staff members and show your enthusiasm for their work. Attend studio events, participate in conversations, and offer your help whenever possible. Building relationships with the staff will give you the opportunity to learn from their experiences and create a network of valuable contacts.

Soaking Up Knowledge And Experience

As an intern, your main objective is to learn and gain as much experience as possible. Take every opportunity to observe and assist with the studio work. Note down some of the techniques, software, and programs used in the studio. Ask relevant questions and take notes for future reference. Taking advantage of this opportunity will help you acquire new skills and techniques that you can use to build your career in the music industry. In conclusion, getting a recording studio internship is an excellent way to start your career in the music industry. However, it’s how you make use of this opportunity that will determine your success. Follow these tips, and you’ll make the most out of your internship and create a foundation for a prosperous career in the music industry.


Networking For Future Opportunities

Networking is a crucial step in securing a recording studio internship, especially if you’re looking to jumpstart your career in the music industry. By making connections with people in the industry, you can learn about opportunities that might not be publicly available and gain valuable insights into what it takes to succeed in the industry.

Making Connections In The Industry

Start by attending industry events, such as conferences, workshops, and concerts, where you can meet other aspiring musicians, audio engineers, and music producers. Consider joining online music forums, groups, and social media groups to connect with people in the industry.

When networking, it’s important to be genuine and professional and avoid coming across as desperate or pushy. Ask for advice and insights, not for a job. Be sure to exchange contact information and follow up with a thank-you note after the conversation.

Following Up With Studio Staff

After you’ve landed a recording studio internship, make sure to follow up with the studio staff and stay in touch after the internship ends by connecting with them on social media or professional networking sites like LinkedIn. This can help you stay on their radar and increase the chances of getting a job in the future.

It’s also essential to be reliable, punctual, and professional during the internship. Show a genuine interest in learning, ask questions, and take every opportunity to connect with the experienced industry professionals around you.

Using Internship Experience On Your Resume

Finally, use the experience gained during your recording studio internship to enhance your resume and set yourself apart from other job applicants. Be specific about the tasks you performed, the challenges you faced, and the results you achieved.

Also, highlight any positive feedback or endorsements you received from the studio staff or clients. This can help you demonstrate your skills, work ethic, and motivation to potential employers.

How To Get A Recording Studio Internship


Credit: m.youtube.com


Frequently Asked Questions For How To Get A Recording Studio Internship


How To Intern For Music Studios?


To intern for music studios, you can start by researching studios in your area and reaching out to them for potential opportunities. Networking, attending industry events, and creating a strong online presence can also increase your chances of securing an internship.


It’s important to have a strong passion for music and a willingness to learn and work hard.


How Do I Get Work Experience In A Recording Studio?


Gain work experience in a recording studio by interning or volunteering at a local studio, attending a recording school, networking with professionals in the industry, or creating your own home recording setup to practice and improve your skills. You can also look for entry-level positions such as studio assistant or runner to gain experience and work your way up in the industry.


What Does An Intern Do In A Studio?


An intern in a studio is responsible for assisting in daily tasks such as equipment management, cleaning, and setting up for shoots. They may also assist in post-production tasks such as editing and social media management. Overall, interns in a studio gain hands-on experience in the production and logistics of media projects.


Is It Hard To Get A Job In A Recording Studio?


It can be difficult to get a job in a recording studio due to high competition and limited positions available. However, gaining experience through internships, networking, and showcasing your skills can improve your chances of landing a job in the industry.


Conclusion


In today’s competitive music industry, landing a recording studio internship can be the first step towards a successful career. With dedication, persistence, and an understanding of the industry, you can increase your chances of securing such an opportunity. Remember to research studios, tailor your resume and cover letter, utilize networking, and be willing to work hard and take on any task given to you.


By following these tips, you can set yourself apart from the crowd and pave the way for a future in the recording industry.

Categories
Archive

How To Balance Kick And Bass In A Mix

To balance kick and bass in a mix, use EQ to make room for both frequencies. By cutting overlapping frequencies and boosting where needed, you can achieve a balanced sound.


Balancing kick and bass in a mix can be a daunting task, but it’s crucial for creating a tight and powerful sound. The kick drum and bass guitar both occupy the lower frequencies, and if they clash, the mix can sound muddy or loose.


To achieve a balanced sound, you need to use EQ to make room for both frequencies. This means cutting overlapping frequencies and boosting where needed. With a little experimentation and careful listening, you can create a mix where the kick and bass complement each other, creating a powerful foundation for the rest of the instruments to sit on. We’ll explore some tips and techniques for balancing kick and bass in a mix.


Understanding The Role Of Kick And Bass In A Mix


Achieving a balanced mix between kick and bass can be challenging, but understanding their roles is key. The kick provides the rhythm, while the bass adds depth and warmth to the track. To achieve a harmonious blend, experiment with EQ and compression techniques.

Importance Of Kick And Bass

Kick and bass are the foundation of every song. They provide the drive and energy that a mix needs. The kick drum provides the beat, while the bassline adds depth and warmth. Without these two elements, a song can sound weak and lack impact. Getting the kick and bass balance right is crucial in creating a great sounding mix. It’s not just about making sure they are heard. They need to work together to create a powerful and cohesive sound.

Challenges In Balancing Kick And Bass

One of the biggest challenges in balancing kick and bass is avoiding the clash between the two frequencies. The kick drum usually sits in the lower frequency spectrum, while the bassline sits in the mid to low frequency range. If these two elements are not balanced correctly, they can create masking issues where one frequency overlaps and interferes with the other. Another common problem is making sure both elements cut through the mix. If the bassline is too loud, it can overpower the kick drum, and if the kick drum is too loud, it can drown out the bassline. Finding the right balance is essential to ensure each element has its place in the mix. The kick drum provides the backbone of the rhythm in a mix, while the bassline adds harmonic depth. The relationship between kick and bass is symbiotic, meaning they should complement and support each other. The kick drum provides the punch and emphasis in the rhythm, while the bassline adds movement and groove. In order to achieve a good balance, it’s essential to understand the role of each element and make sure they work in tandem. One way to achieve this is to EQ them separately to ensure they aren’t occupying the same lane in the frequency spectrum. Another is to sidechain the bassline to the kick drum, allowing each to occupy their respective space. In conclusion, understanding the role of kick and bass is important in achieving a balanced mix. Balancing the two can be challenging, but by using EQ and sidechain techniques, producers can create a powerful sounding mix that grooves effortlessly.

Achieving Separation Between Kick And Bass


Achieving the perfect balance between kick and bass is essential for creating a clear and powerful mix. To achieve separation between these two elements, it’s important to choose complementary sounds, tune the kick to fit the key of the track, and use EQ and compression to create space.

Balancing the kick and bass in a mix can be challenging because the two elements occupy similar frequency ranges. However, it’s essential to ensure each element is audible, and they don’t overlap each other in the mix. Achieving separation between kick and bass is essential for a clear and punchy mix.

Eq Strategies

The first step to achieving separation between kick and bass is using EQ. EQ strategies that can help create a balanced mix include:

  • Low Cut Filter: Use a low cut filter to remove unwanted frequencies from the bass, such as rumble and low-end noise.
  • Notching: Use notching to identify frequencies that clash between kick and bass and reduce them with a notch or cut.
  • Sidechain: Use sidechain EQ to duck or reduce the bass when the kick hits.

Sidechain Compression Techniques

Another effective way to achieve separation between kick and bass is using sidechain compression techniques. These techniques help to prevent the bass and kick from occupying the same frequency range. Below are some sidechain compression techniques:

  1. Sidechain Compression: Use a compressor with a sidechain input to reduce the volume of the bass when the kick hits.
  2. Pumping: Pumping can create a groovy effect by creating a short delay effect on the bass when the kick hits.
  3. Ducking: Ducking involves reducing the volume or EQ of the bass when the kick hits, and it’s useful in creating a groove in electronic dance music (EDM).

Overall, balancing the kick and bass in a mix requires practice and experimentation. Using EQ strategies and sidechain compression techniques can significantly help in achieving separation between the kick and bass, creating a punchy and clear mix.

Tools For Balancing Kick And Bass

When it comes to mixing music productions, the most challenging aspect is to balance the kick and bass. Both the elements play a crucial role in creating a powerful groove, but if they don’t complement each other, it can be a complete disaster. To achieve the perfect combination, music producers and mastering engineers use various tools for balancing kick and bass. Let’s explore them:

Using Spectrum Analyzers

Spectrum Analyzers are essential tools that help analyze the frequency of each element in a mix. It is an excellent visual aid that displays the frequency range of each sound, making it easier to identify any interference or overlap between the kick and bass.

With the help of Spectrum Analyzers, a music producer can adjust the amplitude of the kick and bass, ensuring they are not competing for the same frequency range. This balancing technique can ensure both the elements are heard distinctly in the mix.

Volume Leveling Techniques

Another effective way of balancing kick and bass is using Volume Leveling Techniques. In this method, a mastering engineer adjusts the volume levels of both the elements to ensure they are heard well without overpowering each other.

The most commonly used volume balancing technique is Side-Chaining, where the volume level of the bass is ducked whenever the kick hits. This technique creates a space for the kick to be prominently heard without affecting the bass’s presence.

Using Reference Tracks

Using Reference Tracks is another efficient way of balancing kick and bass. In this method, a mastering engineer compares the mix with a well-mastered track in a similar genre and style.

By analyzing the reference track, a music producer can identify the tonal balance of the kicks and bass and replicate the same in their mix. This technique ensures that the kick and bass are heard distinctly and complement each other while maintaining a cohesive sound.

By using these tools for balancing kick and bass, music producers and mastering engineers can create a well-balanced mix that sounds great on any sound system. Incorporating these techniques can enhance the music production and take it to the next level.

How To Balance Kick And Bass In A Mix


Credit: m.youtube.com


Tips And Tricks For Effective Kick And Bass Mixing

To produce a mix that sounds balanced and full, it’s essential to put together a great kick and bass combination. When combining these two elements, you’re working with the most significant foundation of any track or composition. It is important to ensure that the kick and bass are clear, defined, and supportive of the rest of the instruments in the mix. One of the best techniques for getting the perfect balance between the kick and bass is using A/B Testing. Additionally, there are many other Tips and Tricks for Effective Kick and Bass Mixing to help achieve a great mix.

A/b Testing

One of the best techniques to determine whether your kick and bass combination is correct or not is by utilizing A/B testing. A/B testing is the process of comparing two versions of a mix to decide which one is better. Professionals usually follow this technique by comparing an unprocessed mix with processed one. The processed mix contains compressors, EQs, or other effects applied to the tracks. Using A/B testing helps to determine whether the mix has made an improvement or not.

Mono Compatibility

Mono compatibility is critical when it comes to kick and bass mixing. Mono compatibility refers to how a mix or sound will translate when played through a single channel. For example, if you’re playing through a sound system that has only one speaker, it should sound the same as if it were played through two speakers. If the kick and bass are not mono compatible, it can result in a lack of clarity and focus, and the listener may be hearing an uneven mix. To ensure mono compatibility, you can check your mix in mono while mixing to ensure your kick and bass are balanced.

Low Cut Filtering

Low Cut Filter is essential when it comes to mixing kick and bass. Low-cut filtering is simply rolling off the lows on elements within the mix, reducing the amount of unwanted resonance that can build up and clash with the fundamental frequencies of the kick and bass. For instance, if there are rumble sounds, or low-end hum, or other instruments which overlap with the kick and bass frequencies, having a Low Cut Filter set just below these frequencies can help to prevent these elements from interfering with the foundation of the mix.

Effective kick and bass mixing can be a challenging task, but utilizing the A/B Testing technique, ensuring mono compatibility and Low Cut Filtering can help take the mix to the next level. Start applying these tips and tricks for your next production, and you’ll be amazed at how much better your kick and bass can sound.

The Final Mix


Achieving the perfect balance between kick and bass is crucial for a well-produced mix. By utilizing frequency analyzers and sidechain compression, you can ensure that each element has its own space in the mix without overwhelming the listener.

After going through all the steps of mixing a track, you finally arrive at the most crucial part – the final mix. This is where you polish the track and make the necessary adjustments to ensure it sounds good on any device. Achieving the perfect balance between the kick and bass is a critical element in the process. Below are some tips on how to balance the kick and bass while listening to the final mix with a fresh perspective.

Balancing The Kick And Bass

To balance the kick and bass, listen to the mix on various systems to ensure that it sounds good on all devices. Here are some steps to help you achieve this:

  • Listen to the mix on headphones, speakers, studio monitors, and any other device you have available.
  • Check the amplitude levels of the kick and bass tracks and ensure that the two tracks are not competing for the same frequency range.
  • Use EQ to reduce the conflicting frequencies in each of the tracks, so they don’t overlap.
  • If the bass sound is not clear, add some harmonics to the track, which can be done with the help of distortion plugins.
  • Adjust the volume of each track so that they are not clashing or overpowering each other, and each is serving its purpose.

Listening To The Mix With A Fresh Perspective

Sometimes, after working on a mix for a long time, it can be challenging to hear it afresh. That’s why listening to the mix with a fresh perspective can be essential in achieving a good balance between the kick and bass. Here are some steps to help you achieve this:

  1. Take a break from the mix – step away from it for a few hours and listen to something different.
  2. When you come back, try to listen to it as though you’ve never heard it before.
  3. Focus only on the bass and the kick and try to hear how they are working together and analyze any imbalances.
  4. Take notes on anything you find and make the necessary adjustments.
  5. Listen to the mix again on various devices, as mentioned above.

Putting in the effort to get the perfect balance between the kick and bass can be quite challenging, but the results are worth it. By following the tips listed above and utilizing your listening skills, you can achieve the perfect balance and create a mix that sounds fantastic.

How To Balance Kick And Bass In A Mix


Credit: www.masteringthemix.com


How To Balance Kick And Bass In A Mix


Credit: www.ujam.com


Frequently Asked Questions For How To Balance Kick And Bass In A Mix


How Do You Balance Bass And Kick?


To balance bass and kick, you should focus on reducing frequency overlap, adjusting levels and EQ, and using sidechain compression. Start by boosting the kick drum and cutting the bass frequencies that clash with it. Turn up the bass until it balances with the kick, then compress the bass when the kick hits.


This will make the frequency range of both instruments clearer in the mix, improving their impact and clarity.


How Do I Stop My Bass And Kick From Clashing?


Avoid clashing between the bass and kick by EQing each sound and carving out their frequencies to avoid overlap. Use sidechain compression to reduce the volume of the bass whenever the kick hits. Use different patterns for the bass and kick to avoid clashing rhythms.


Make use of panning and stereo imaging to separate the two sounds in the stereo field. Lastly, use reference tracks to help you mix and balance the sounds effectively.


How Do You Make A Bass And Kick Fit?


To make a bass and kick fit, adjust their levels so that they don’t overpower each other. Use EQ to give each instrument its own frequency range and remove any clashing frequencies. Add compression to glue the two sounds together, and use sidechain compression to duck the bass when the kick hits.


Finally, choose appropriate sounds that complement each other.


How Do You Balance Bass In A Mix?


Balancing bass in a mix takes a careful approach. You can start by checking the levels and frequencies of other instruments to make sure the bass isn’t overpowering them. Use EQ to adjust the bass without losing its character. Use compression to control the dynamic range of the bass.


Finally, reference the mix on different speakers and devices to ensure it sounds balanced.


Conclusion


Balancing the kick and bass is a critical task in music production that requires attention to detail, creativity, and an understanding of how sound waves interact. Keep in mind the importance of using proper EQing, compression, and volume balance to get that perfect mix.


Remember, a well-balanced kick and bass will make the track stand out, sound fuller, and give it the ability to shake the dance floor. Happy mixing!


Categories
Archive

How Do I Make My Songs Louder Without Clipping

To make your songs louder without clipping, use compression and limiting. Compression will even out the levels, while limiting will prevent the signal from going over the maximum level.


Properly balancing the levels in your mix and using EQ can also help make your tracks sound louder without clipping. Experiment with these techniques to find the right balance and achieve a louder, more cohesive sound. As a content writer, it is important to understand the importance of producing high-quality audio.


Whether for personal or professional use, an expert understanding of audio production techniques can take your music to the next level. By implementing the above techniques, you can make your songs sound louder without sacrificing audio quality. Remember, good audio is a result of proper recording and mixing techniques, so it’s important to get the basics right before trying to boost the volume. With the right tools and techniques, you can create music that sounds great and impresses listeners.

How Do I Make My Songs Louder Without Clipping


Credit: m.youtube.com


The Importance Of Loudness


Achieving a loud mix without clipping is important to maintain the clarity and quality of your music. Using techniques such as compression, EQ, and limiting can help boost the volume while keeping the balance of your mix intact. With careful attention to detail, you can create a loud and impactful final product.

Why Loudness Matters

When it comes to music production, loudness is paramount. The ability to make your tracks louder and stand out from the rest is vital. If you want your music to be played on the radio, in a club or festival, or in any other environment, it has to be loud enough to be heard over other sounds.

The Drawbacks Of Clipping

If you try to make your tracks louder without taking proper measures, it can lead to clipping. Clipping happens when the loudest parts of a track exceed the maximum level that can be accurately reproduced. Instead of turning up the volume, the waveform gets squared off, resulting in distorted and unpleasant sound. Clipping can ruin the quality of your music and leave your audience disappointed. To make your songs louder without clipping, you need to use specific techniques. One of the most commonly used techniques is compression. Compression is a powerful tool that can help you control the dynamic range of your track, resulting in a louder sound without clipping.

Using Compression To Increase Loudness

To use compression, you’ll need to adjust the threshold, ratio, attack, and release settings. The threshold setting determines at what level of loudness the compressor will kick in. The ratio setting determines how much the compressor will reduce the audio signal once it goes over the threshold. The attack and release settings control how quickly the compressor will start and stop reducing the signal. It’s essential to experiment with these settings to achieve the desired result. You may also try using equalization (EQ) to boost specific frequencies without distorting them. EQ is an effective tool to increase the perceived loudness of a track. You can make your track sound louder by increasing the volume of specific frequency ranges, such as the bass. In conclusion, to make your songs louder without clipping, you need to use specific techniques and tools such as compression and equalization. It’s essential to understand the drawbacks of clipping and how to prevent it to create high-quality music. Remember to experiment with different settings to achieve the desired result.

Techniques For Increasing Loudness


Achieving loudness in songs without clipping requires a combination of proper mixing and mastering techniques such as EQing, compression, limiting, and using subtle saturation. By balancing the different elements of a track and using compression to bring down the louder elements, you can then use limiting to increase the overall volume without sacrificing the clarity and quality of the music.

As a musician, you understand that loudness can make your tracks stand out from the crowd. However, simply turning up the volume isn’t always the best solution. Clipping, distortion, and other unwanted effects can ruin a good mix. Fortunately, there are several techniques for increasing loudness without sacrificing quality. Here are a few of the most effective:

Compression

Compression reduces the dynamic range of your track by lowering the volume of the loudest parts and raising the volume of the quietest parts. This evens out the levels and makes the overall sound louder without introducing any clipping or distortion. To use compression, insert a compressor plugin on the channel you want to boost and adjust the threshold, ratio, attack, and release settings until you achieve the desired effect. Keep in mind that too much compression can make your track sound dull and lifeless, so use it sparingly.

Limiting

Limiting is similar to compression, but it’s more extreme. It sets a hard limit on the maximum volume of your track and prevents it from clipping. This allows you to push your track to the absolute limit without sacrificing quality. To use limiting, insert a limiter plugin on the master channel of your mix and adjust the threshold and output settings until you achieve the desired effect. Be careful not to overdo it, as too much limiting can make your track sound thin and harsh.

Eq

EQ can be used to shape the tonal balance of your track and make it sound louder. By boosting the frequencies that are most important to your track and cutting the frequencies that aren’t, you can create a more balanced and powerful mix. To use EQ, insert an EQ plugin on the channel you want to boost and adjust the frequency, gain, and Q settings until you achieve the desired effect. Keep in mind that too much EQ can make your track sound unnatural and muddy, so use it with caution.

Saturation

Saturation adds harmonic distortion to your track, which can make it sound warmer, fuller, and louder. It can also add a pleasing analog-style saturation that’s hard to achieve with digital processing. To use saturation, insert a saturation plugin on the channel or master bus you want to boost and adjust the drive and output settings until you achieve the desired effect. Keep in mind that too much saturation can make your track sound distorted and unpleasant, so use it sparingly. In conclusion, there are several techniques for increasing loudness without clipping. Compression, limiting, EQ, and saturation can all be used to boost the volume of your tracks while maintaining their quality and clarity. Experiment with each technique and find the right balance for your mix.

Mastering For Loudness

If you’re a musician or producer, you know that making your songs stand out requires creating a loud, professional-sounding mix. However, getting the desired loudness without clipping can be tricky, and it’s where mastering for loudness comes in. Mastering for loudness ensures that your final mix is as loud as possible while maintaining clarity and dynamic range without clipping.

Preparing Your Mix

The first step to mastering for loudness is preparing your mix. It’s essential to make sure your mix is balanced and sounds the way you want before moving onto the mastering phase. Ensure that each track is audible and that there are no inconsistencies in the levels between different tracks. You can use gain staging to adjust the levels and ensure that each element sits in the right place in the mix.

Choosing The Right Tools

When mastering for loudness, choosing the right tools is crucial. You can use a limiter, compressor, and EQ to adjust the levels and add depth and clarity to your mix. Make sure you use plugins that are designed for mastering, as they have specialized features to help you achieve the right level of loudness without affecting the quality of the sound.

Optimizing Level And Loudness

Finally, when mastering for loudness, optimizing level and loudness is essential. You can use peak normalization to bring up the overall level without causing clipping. However, be careful not to overdo it, as too much normalization can reduce the dynamic range and make your music sound flat. You can also use an LUFS meter to measure the loudness of your mix and ensure it’s within a suitable range. Aim for a loudness level around -13 to -15 LUFS for a balanced and professional-sounding mix.

In conclusion, mastering for loudness is an essential process for any musician or producer looking to make their music stand out. By preparing your mix, choosing the right tools, and optimizing level and loudness, you can create a loud, professional-sounding mix without clipping.

How Do I Make My Songs Louder Without Clipping


Credit: flypaper.soundfly.com


Alternatives To Increased Loudness

Want to make your songs sound louder without compromising on quality? While increased loudness might seem like the obvious solution, it can lead to clipping or distortion. Thankfully, there are several alternatives to increased loudness that can help enhance the overall sound of your music.

Creative Mixing Techniques

One alternative to increased loudness is to use creative mixing techniques that focus on balancing each element in your mix. This involves achieving a harmonious blend of instruments and sounds, and can be achieved through EQ, panning, and reverb. EQ can help remove unwanted frequencies from each instrument, while panning can help create space and width in your mix. Reverb can be used to create a sense of depth and space, making your mix sound bigger without increasing the volume.

Dynamics Processing

You can also use dynamics processing to make your songs sound louder without clipping. The most common dynamics processing tools are compressors and limiters. Compressors will compress the dynamic range, while limiters will prevent any peaks from going over a certain level. These tools can help control the overall volume of your mix, making the quiet parts louder and the loud parts quieter.

Harmonic Exciters

Another alternative to increased loudness is to use a harmonic exciter. A harmonic exciter is a tool that adds harmonics to your audio signal, making it sound brighter and more defined. This can help make your mix sound louder without the risk of clipping. However, it’s important to use this tool subtly, as adding too much can lead to a harsh and artificial sound.

Conclusion

By using creative mixing techniques, dynamics processing, and harmonic exciters, you can make your songs sound louder without clipping or compromising on quality. These alternatives to increased loudness help enhance the overall sound of your music, making it sound bigger, brighter, and more defined.

How Do I Make My Songs Louder Without Clipping


Credit: www.reddit.com


Frequently Asked Questions On How Do I Make My Songs Louder Without Clipping


How Do You Make Beats Louder Without Clipping?


To make beats louder without clipping, use a limiter to control the dynamic range. Increase the volume of individual elements in the mix, keeping the overall level below 0dB. Use EQ to remove unwanted frequencies, allowing the important ones to shine.


Apply compression to even out levels and add punch. Finally, consider parallel processing to add depth and energy to the mix.


How To Get To Lufs Without Clipping?


To get to LUFS without clipping, you need to adjust the levels of your audio mix. Start by setting the peak level to -6 dB, adjust the fader levels for each track so they don’t clip, and then use a limiter to control the overall loudness.


Test the mix with a LUFS meter to ensure it is at the desired loudness level.


How Can I Make My Song Louder?


To make your song louder, consider adjusting the volume levels of specific tracks or instruments, using compression and limiting techniques, or utilizing EQ to boost certain frequency ranges. However, be careful not to over-compress or distort the sound. It’s important to also keep in mind the dynamic range and overall quality of the mix.


How Can I Increase The Volume Of A Song Without Distortion?


To increase the volume of a song without distortion, you can use a limiter or compressor plugin, adjust the EQ settings, use a volume normalization tool, or use a mastering service. It’s important to be careful not to over-compress or over-equalize, as this can cause distortion and loss of audio quality.


Conclusion


Louder songs are definitely more enjoyable to listen to, but it’s important to ensure that you don’t compromise the quality by allowing clipping. With the techniques outlined in this blog post, you’ll be able to make your songs louder without experiencing any clipping.


You do not need special equipment or software, all you need is practice and a good ear. The key is to use EQ, compression, and limiting wisely to achieve a clean and loud sound. Follow these tips and you will undoubtedly be able to produce louder and better-sounding tracks.


Categories
Archive

Professional Mixing Tips Lead Vocal Tutorial

In this Professional Mixing Tips Lead Vocal Tutorial, you will learn the essential techniques and strategies for mixing lead vocals. Discover how to equalize, compress, and apply effects to emphasize the vocals and make them stand out in the mix.


As a mixing engineer, there’s nothing more crucial than properly mixing the lead vocals. It’s often the most important element in a mix as it carries the melody and lyrics. The lead vocal should be clear, upfront, and emotive while still fitting perfectly into the mix.


But, to achieve a professional-sounding mix, you need to have the right tools, skills, and techniques. In this tutorial, we’ll cover the essential steps in mixing lead vocals. From properly EQ-ing, compressing, and adding effects to make the vocals sound amazing. By the end of the tutorial, you’ll have a better understanding of how to mix lead vocals like a pro!


Get Your Equipment Ready

If you want to create high-quality vocal recordings, having the right equipment is a must. Here are some essential items you’ll need:

Invest In A Good Pair Of Speakers Or Headphones

A good pair of speakers or headphones is essential for mixing vocals. You want to be able to hear every nuance of the recording, from the subtle vibrato in the singer’s voice to the reverb in the room. Look for speakers or headphones that have a flat frequency response, which means they reproduce sound as accurately as possible.

Ensure You Have A Reliable Daw Or Mixing Console

Whether you’re using a digital audio workstation (DAW) or a mixing console, you need a reliable piece of equipment to mix your vocals. Choose a DAW that suits your needs and has a good reputation for stability and ease of use. A good mixing console should have enough inputs, good EQ and compression, and be easy to operate.

With the right equipment in place, you’re ready to start mixing your lead vocal to perfection. But before you do, it’s crucial to have a clear understanding of the production process and the factors that can affect the quality of your recording.

Professional Mixing Tips Lead Vocal Tutorial


Credit: www.crutchfield.com


Pre-mixing Tips

If you’re a music producer or sound engineer, the lead vocal is one of the most essential elements in the mix. To make sure that the lead vocal is perfect, you need good pre-mixing techniques that will make your job easier during the actual mixing. In this tutorial, we will cover some crucial pre-mixing tips that will help you get started.

Identify The Strengths And Vulnerabilities Of The Vocal Track

Before you start mixing the lead vocal, you need to critically listen to the vocal track and identify its strengths and weaknesses. Analyze the overall tone of the voice to determine its pitch and timbre. Check to see if there are any specific parts of the vocal that stand out or if there are inconsistencies in the performance, such as varying volumes or tonal fluctuations.

Clean Up Any Unwanted Noise

Noise in the recording can include any external sounds such as humming noises, background noises or electric hum. Before you start mixing, clean up any unwanted noise from the vocal track by applying noise reduction tools to make the vocal sound cleaner and smoother. This will help to eliminate any distractions that could make the mix muddy.

Adjust The Levels To Avoid Clipping And Distortion

One of the biggest issues that can arise during mixing is clipping or distortion in the vocal. To avoid this, adjust the levels of the track so that the vocal does not exceed 0dB. Clip reduction plugins can be used if you need to reduce some of the sharp peaks in the recording. Doing this will ensure that your mix can be mastered with ease, and the vocal will sound clear and well-defined.

Balancing The Levels With Eq


In professional mixing, it is crucial to balance the levels of the lead vocal with EQ. This tutorial will guide you on how to use EQ efficiently to highlight the vocals and create a well-balanced mix.

Lead vocals are the heart of any song, and as a mixing engineer, balancing the levels is crucial to ensure that the vocals are audible. EQ is a powerful tool that helps enhance the quality and tonal balance of lead vocals, thus achieving a polished and clear sound. Here are some practical steps to balancing the levels with EQ:

Start With A Flat Eq

The first step is to set the EQ settings to zero, also known as a flat EQ, to understand the base sound that you are dealing with. This helps you identify any undesirable frequencies that need to be enhanced or removed. Next, identify the frequency bands that require adjustment, typically between 200Hz – 4kHz.

Add A High-pass Filter

Adding a high-pass filter helps eliminate low-frequency noise that can muddy the mix, leaving only the essential elements to work with. Start by setting your high-pass filter at around 100Hz and gradually increase it until you notice a positive difference in the clarity of the vocals.

Enhance The Presence Of The Lead Vocal

To enhance the presence of the vocals, focus on the frequency ranges between 2kHz – 6kHz. These frequencies add clarity and brightness to the vocals, making them stand out in the mix. A gentle boost of 1-3dB can make a huge difference, but be careful not to overdo it, as it can lead to harshness.

Cut Unnecessary Frequencies

Cutting unnecessary frequencies that aren’t adding value to the mix is just as important as boosting the right frequencies. Roll off the low-end frequencies below 100Hz using a high-pass filter and cut the muddy mid frequencies between 300Hz – 500Hz. This helps create space in the mix, preventing the vocals from competing with other elements such as guitars or drums. In conclusion, balancing the levels with EQ is an essential process in professional mixing and can help achieve a polished and clear sound. By starting with a flat EQ and gradually adjusting the frequency ranges, you can enhance the quality and tonal balance of lead vocals. Just remember to cut unnecessary frequencies and use subtle boosts to prevent harshness. These tips will help improve your mixing skills and take your music production to the next level!

Compressing The Vocal Track


When it comes to professional mixing, compressing the lead vocal track is crucial for achieving a polished sound. By reducing the dynamic range, the vocals become more consistent and easier to hear in the mix. Follow our tutorial to learn the best practices for compressing your lead vocal track.

Apply Slight Compression To Even Out The Vocal Levels

Compressing the vocal track can help smooth out the dynamics of the vocal performance and bring the vocal levels to a more consistent range. This is especially important for lead vocals, as they are usually the focal point of the song. However, it’s important not to over-compress the vocal track, as this can lead to a loss of natural dynamics and make the vocal sound dull and lifeless. To apply slight compression to the vocal track, start by setting the threshold so that the compressor kicks in when the vocal level reaches a certain point. The ratio should be set modestly, around 2:1 or 3:1, depending on the dynamic range of the vocal performance. Adjust the gain reduction until the vocal levels are more consistent, but be careful not to overdo it.

Use A Faster Attack Time To Control The Transients

The attack time on the compressor determines how quickly the compressor reacts to changes in level. For lead vocals, a faster attack time can be used to help control the transients, which are the short, sudden bursts of energy in the vocal performance. By setting a fast attack time, the compressor can quickly respond to these transients and prevent them from being too loud in the mix.

Set The Release Time To Complement The Tempo Of The Song

The release time on the compressor determines how quickly the compressor stops compressing when the vocal level falls below the threshold. For lead vocals, it’s important to set the release time so that it complements the tempo of the song. This ensures that the compressor doesn’t interfere with the rhythm of the vocal performance and allows the natural dynamics of the vocal to come through. When setting the release time, listen carefully to how the vocal sounds in the mix and adjust the release time accordingly. For faster songs, a shorter release time may be more appropriate, while slower songs may benefit from a longer release time. As with all compression settings, it’s important to use your ears and make adjustments based on what sounds best in the context of the mix.

Adding Effects


Learn how to add professional vocal effects in your music mixing with this lead vocal tutorial. Follow these tips to achieve a polished and cohesive sound that will make your music stand out. Experiment with different effects to create your own unique sound.

Adding effects is a crucial step in professional mixing, and it can enhance the quality of a lead vocal tremendously. The right effects can add depth, space, and atmosphere to the vocals. In this tutorial, we’ll cover some useful tips for using effects to get the best possible sound. Use reverb to add depth and space Reverb is one of the most widely used effects when it comes to adding depth and space to lead vocals. It helps create a natural-sounding ambience that can make the vocals sound like they were recorded in a larger space. To use reverb effectively on lead vocals, you need to pay attention to the decay time, pre-delay, and wet/dry mix. These controls will determine the amount and type of reverb you use, and different combinations can achieve vastly different effects. Add delay to create a sense of atmosphere Delay is another popular effect for adding atmosphere to lead vocals. It’s suitable for creating an echo or to make the vocals sound like they were recorded in a bigger space. To use delay effectively, you need to pay attention to the feedback, time, and mix controls. These all play a crucial role in creating the desired effect, and you need to experiment with them until you achieve the perfect sound. Use de-essers if needed When mixing lead vocals, sibilance or harsh “S” sounds can sometimes be a problem. This is where de-essers come in handy. They can help dampen these sounds, and make the vocals less harsh. To use de-essers effectively, you need to find the right frequency range and adjust the reduction level appropriately. Apply parallel processing techniques Parallel processing is an excellent technique that involves running two or more versions of the same audio signal, with each version processed differently. This technique is commonly used in mixing lead vocals, and it can help to create a more natural-sounding vocal performance. The key to using parallel processing effectively is to balance the level of the dry and wet signals, so they blend correctly. In conclusion, adding effects is a crucial aspect of mixing lead vocals, and it can make a considerable difference in the quality of the final mix. So, if you want to achieve the best sound possible, use reverb, delay, de-essers, and parallel processing techniques wisely. These techniques will ensure your vocals stand out in the mix and bring your music to life.


Automation


Automating vocal mixing can give your lead vocal a professional sound in your music production. By using automation, different qualities of the vocal such as volume, EQ, and effects can be controlled and adjusted throughout the track, giving it a polished and cohesive feel.

Automation is a crucial tool in achieving consistency in lead vocal mixing. By automating different aspects of the mix, you can ensure that the final product sounds cohesive and polished. In this tutorial, we will go through some tips for automating volume levels, EQ adjustments, and reverb and delay sends. Automate volume levels to avoid inconsistencies One of the most important aspects of lead vocal mixing is ensuring that the volume levels remain consistent throughout the song. This is where automation comes in handy, allowing you to easily adjust the volume levels for different sections of the song, such as verses and choruses. To automate volume levels, you can use a technique called volume automation. This involves drawing in volume changes on a track’s volume fader over time. You can also use plugins like Waves Vocal Rider or iZotope Neutron to automate the volume levels automatically. Automate EQ adjustments for different sections of the song In addition to volume, you may also need to make EQ adjustments for different sections of the song. For example, you may want to boost the high frequencies during a chorus to make the vocals sound brighter and more present. To automate EQ adjustments, you can use EQ automation. This involves drawing in EQ changes on a track’s EQ plugin over time. You can also use plugins like FabFilter Pro-Q3 or Oeksound Soothe to automate the EQ adjustments automatically. Add automation on reverb and delay sends Finally, automation can also be used to add more depth and space to the lead vocal using reverb and delay sends. By automating the amount of reverb and delay at different sections of the song, you can create a dynamic and interesting mix. To automate reverb and delay sends, you can use send automation. This involves drawing in send level changes on a track’s send level fader over time. You can also use plugins like Valhalla VintageVerb or FabFilter Timeless to automate the reverb and delay sends automatically. In conclusion, automation is an essential tool for achieving consistency and coherence in lead vocal mixing. By automating volume levels, EQ adjustments, and reverb and delay sends, you can create a polished and professional-sounding mix that enhances the overall impact of the song.

Checking The Mix


Learn professional mixing tips for lead vocals in this tutorial on checking the mix. Ensure your vocals stand out by adjusting EQ, compression, and volume levels to create a balanced and cohesive sound.

When it comes to mixing vocals, the final result is what matters the most. Checking the mix is an essential part of the mixing process to ensure that the final result is of high quality. A mix with a poorly balanced lead vocal can be an instant turnoff for listeners. Here are some things to keep in mind when checking the mix.

Listen To The Mix In Different Environments

One of the key things to consider is the environment in which the mix will be listened to. It’s always best to check the mix in different environments, such as in headphones, speakers, and on different devices. Though listening to the mix in different environments can be time-consuming, it ensures that all the nuances of the mix are captured.

Compare The Mix To Reference Tracks

It’s always a good idea to compare the mix to reference tracks with a similar sound profile. It helps to identify any potential flaws or issues in the mix. A good reference track can also provide a basis for comparison and help achieve the desired result.

Get Feedback From A Trusted Source

The final stage of checking the mix is to get feedback from a trusted source, such as a colleague, a fellow musician, or a music producer. They can listen to the mix and provide valuable feedback on the overall sound quality. Keep in mind that feedback should be welcomed, even if it’s critical, as it can help in improving the mix. In conclusion, checking the mix is an essential part of the mixing process, and it should be done carefully. By following these tips, you can ensure that the mix is of high quality, and it meets your expectations.

Professional Mixing Tips Lead Vocal Tutorial


Credit: www.linkedin.com


Finalizing The Mix


Learn how to mix lead vocals like a pro with these helpful tips on finalizing the mix. From adjusting levels to adding effects, this tutorial will guide you through the process of achieving a polished sound for your vocals.

Once you have gone through all the stages of mixing your lead vocals, it’s time to finalize the mix. This is the stage where you polish the mix, iron out any inconsistencies, and ensure that everything is sounding perfect.

Export The Mix At The Appropriate Level

When it comes to exporting your mix, it’s essential to ensure that you have set the appropriate level. Exporting a mix at too low a level will result in a dull, weak mix, and exporting at too high a level will cause distortion. Therefore, it’s crucial to find the sweet spot and export the mix at the right level.

Consider Mastering Options To Enhance The Overall Sound

While mastering is not a part of mixing, it is an essential stage in the production process. A professional mastering engineer can bring out the best in your mix, enhancing its overall sound and making it sound polished and professional. So, consider taking your mix to a mastering engineer to give it that extra push it needs to stand out from the rest.

Save The Mix And Take A Break Before Revisiting For Final Tweaks

Once you have exported your mix, it’s essential to save the project file and take a break before revisiting it for final tweaks. This will give you a fresh perspective on the mix and help you identify any changes that need to be made. You can then make those changes with a fresh mindset, ensuring that your mix is sounding its best. In conclusion, finalizing a mix is one of the most crucial stages in the production process. With these professional mixing tips, you can take your mix to the next level, making it sound polished and professional. Remember to export at the appropriate level, consider mastering options, and take a break before revisiting for final tweaks. These tips will help you achieve a mix that stands out from the rest.


Frequently Asked Questions Of Professional Mixing Tips Lead Vocal Tutorial


How Do You Mix Lead Vocals?


To mix lead vocals, start by identifying the key elements of the track. Set the levels, pan the tracks, add effects, and use EQ to enhance the vocal performance. The aim is to create an overall balance while highlighting the lead vocal.


Master with compression and limiting for a polished sound.


What Are The 6 C’s Of Vocal Mixing?


The 6 C’s of vocal mixing are: clarity, consistency, character, compression, creative effects, and continuity. These elements are crucial for achieving a clean and balanced vocal sound in a mix, ensuring that the vocals cut through and sit well with the rest of the music.


How Do Professionals Mix Vocals?


Mixing vocals professionally involves using tools like equalization, compression, and reverb to balance levels and enhance clarity, tone, and emotion. This process requires a trained ear and attention to detail, as well as knowledge of the song’s genre and intended audience.


Overall, a successful vocal mix should support the story and performance conveyed by the singer.


How Should Lead Vocals Be Panned?


Lead vocals should be panned in the center to ensure clarity and prominence. However, some producers and engineers may choose to slightly pan the vocals for stereo effect. It’s important to keep in mind that over-panning the vocals can make them sound too separated and distracting.


Ultimately, the decision depends on the desired effect of the song.


Conclusion


To sum up, mastering the art of vocal mixing requires effort and dedication. Knowing some professional mixing tips will help you create a masterpiece. Start by setting realistic expectations and choosing the right tools for the task. Then, implement these strategies to tailor your sounds for optimal results.


Remember to prioritize the vocals and make sure they stand out in the mix. Lastly, don’t forget to practice and experiment to see what works best for you. Keep these tips in mind, and you’ll be on your way to becoming a pro mixing engineer.

Categories
Archive

Faq Online Mixing And Mastering Questions

Online mixing and mastering services offer professional audio mixing and mastering for music tracks or podcasts. They can help enhance sound quality, balance audio levels, and make tracks sound polished and ready for distribution in a variety of formats.


If you’re a musician or content creator, you know that the quality of your audio can make or break your success. That’s why investing in online mixing and mastering services could be a game-changer for you. However, with so many options available, it can be tough to know where to start.


This FAQ guide will answer some common questions about online mixing and mastering services to help you make an informed decision.

Faq Online Mixing And Mastering Questions


Credit: www.prosoundweb.com


Introduction To Online Mixing And Mastering


Online mixing and mastering is a modern approach to producing high-quality music. With the convenience of the internet, musicians can now have their music professionally mixed and mastered online with just a few clicks. Here are some common FAQ online mixing and mastering questions answered for those seeking this service.

Online mixing and mastering refers to the process of enhancing the sound quality of audio recordings using digital tools and techniques. Professional audio engineers use specialized software and equipment to fine-tune the tracks, resulting in a polished and sonically cohesive final product. In recent years, online mixing and mastering services have become increasingly popular due to their convenience, affordability, and accessibility.

Definition And Explanation

Online mixing and mastering are two separate processes that are often performed together. Mixing involves balancing the individual tracks of a recording to create a harmonious and well-rounded sound. This process includes adjusting levels, panning, equalization, and effects processing for each track. Mastering, on the other hand, is the final step in the audio production process. It involves optimizing the overall loudness and tonal balance of the recording, as well as adding final touches like compression, limiting, and stereo widening.

Advantages Of Online Mixing And Mastering

Online mixing and mastering offer numerous benefits for musicians and producers, including:

  • Professional-quality results: Online mixing and mastering services are provided by highly skilled audio engineers with years of experience in the industry, providing access to professional-grade equipment and software that’s unaffordable for most home studio setups.
  • Convenience: Online mixing and mastering allows musicians and producers to work with their audio engineers regardless of location. Musicians can upload their recordings to the engineer’s online platform, which is then mixed and mastered remotely, saving time and effort in travel.
  • Cost-effective: Online mixing and mastering services are generally more affordable than attending a physical studio. Working remotely, and with lower overheads, audio engineers can charge clients less while still producing quality output.
  • A fast turnaround: Online mixing and mastering platforms are equipped to handle large volumes of work, allowing for quick turnaround times. Musicians can get their work done in a matter of days, meeting project timelines and enabling artists to release their work faster.

In conclusion, online mixing and mastering is a modern and convenient way to enhance your audio recordings, offering numerous benefits. As with any service, it’s vital to choose a reputable provider with a proven track record of delivering high-quality output to ensure that your project is successful.


Frequently Asked Questions Of Faq Online Mixing And Mastering Questions


What To Ask For In Mastering?


Ask for consistency in volume and tone, clarity in the mix and mastering, EQ balance, stereo and mono compatibility, and loudness levels that meet industry standards. It is also important to communicate any specific goals or preferences you may have for the final product.


What Is The Best Online Mixing And Mastering Service?


LANDR is considered the best online mixing and mastering service. With its AI technology and affordable pricing, users can get professional quality sound for their tracks. Additionally, LANDR offers a variety of options for different genres and styles of music.


What Is The Average Mixing And Mastering Rate?


The average mixing and mastering rate varies depending on the experience level and location of the audio engineer. However, the typical cost ranges from $50 to $200 per song.


What Db Should My Mix Be Before Mastering?


Your mix should be between -6dB and -3dB before mastering. This will allow room for the mastering engineer to make necessary adjustments without compromising the quality of your mix. However, it’s important to note that the appropriate dB level can vary depending on the specific genre and style of your music.


Conclusion


Online mixing and mastering services offer a convenient and affordable way to get professional-quality sound for your music. Whether you’re a seasoned pro or just starting out, these services can help you achieve the results you’re looking for. By choosing a reputable provider and taking the time to communicate your needs clearly, you can ensure that your final product will sound amazing and stand out in a crowded market.


So why wait? Start exploring your options today and take your music to the next level!