One of the most versatile compressors for mixing is the Universal Audio 1176. With its fast-acting and musical-sounding compression, it can be used on any instrument or vocal, as well as on entire mixes.
Compressors are essential tools for mixing engineers. They can add warmth and punch to individual tracks, control dynamics, and bring a mix together. However, not all compressors are created equal. Some are better suited for certain instruments or styles of music, while others are more versatile and can be used on almost anything.
We will explore some of the most versatile compressors for mixing, what makes them unique, and how to use them effectively. Whether you’re a seasoned engineer or just getting started with compression, this guide will help you find the right tools for the job.
Types Of Compressors
The most versatile compressors for mixing are the peak and RMS compressors. Peak compressors are great for adding energy and excitement to tracks, while RMS compressors are perfect for smoothing out and balancing the overall level of a mix. Another versatile compressor is the multiband compressor which allows for targeting specific frequency bands.
Compressors are essential tools for mixing engineers to control the dynamic range of audio signals. They come in various types, each with their own unique sound and characteristics. In this article, we’ll discuss the two main types of compressors: analog and digital.
Analog Compressors
Analog compressors are known for their warm, vintage sound and are often used for recording vocals, drums, and guitars. They use analog circuits to process the audio signal, which adds a certain amount of harmonic distortion, giving it a unique character that cannot be replicated by digital compressors. Additionally, analog compressors are designed to react to the incoming signal in a smooth and natural way, resulting in a more musical sound. Some popular analog compressors include the Universal Audio LA-2A, the Teletronix LA-2A, and the Fairchild 670.
Digital Compressors
Digital compressors, on the other hand, are designed to provide a more transparent and precise sound. They use digital processing algorithms to analyze and adjust the dynamic range of the audio signal, resulting in a cleaner, more accurate sound. Digital compressors are often used in genres such as EDM, hip-hop, and pop, where a more modern and refined sound is desired. Some popular digital compressors include the Waves SSL G-Master Buss Compressor, the FabFilter Pro-C 2, and the UA 1176LN Legacy Classic Limiting Amplifier. In conclusion, both analog and digital compressors have their own unique attributes and can be used to great effect in different types of music. As a mixing engineer, it’s important to understand the differences between the two and choose the right compressor for the job at hand.
Top 3 Most Versatile Compressors
Looking for the most versatile compressors for mixing? Look no further than the top three options: the Universal Audio Teletronix LA-2A, the Waves SSL G-Master Buss Compressor, and the API 2500 Stereo Bus Compressor. Each offers its own unique features and benefits for audio engineers.
Introduction: Top 3 Most Versatile Compressors
When it comes to mixing, compressors play a vital role in achieving a polished and professional sound. A versatile compressor can enhance the dynamics of any mix, adding warmth, punch and clarity. In this article, we’ll take a look at the top 3 most versatile compressors that are a favorite of audio engineers around the world for their unique sound, exceptional flexibility, and unmatched capabilities. The three compressors that we’ll be discussing are Universal Audio 1176LN, Empirical Labs Distressor, and API 2500. Let’s dive into each compressor and discover why they are so versatile.
Universal Audio 1176ln
The Universal Audio 1176LN is one of the most iconic and sought-after compressors in the history of audio recording. Its unique sound and versatility have made it a favorite of audio engineers for over half a century. This compressor features four ratio settings ranging from 4:1 to 20:1, making it a versatile tool for both subtle gain reduction and heavy compression. The 1176LN is also known for its fast attack and release time, which makes it ideal for controlling transients and adding sustain to vocals, guitars, and drums. With its warm and musical tone, the Universal Audio 1176LN is a must-have compressor for any mix engineer.
Empirical Labs Distressor
The Empirical Labs Distressor is a modern classic that has become a staple in studios worldwide. This unique compressor emulates the sound and characteristics of several vintage compressors, giving it unmatched versatility. The Distressor features a variety of ratio settings, including 1:1, 2:1, 4:1, 8:1, and Nuke, which is a heavy 20:1 ratio. It also has several unique features, including Distortion Modes, which emulate the sound of vintage tape saturation and tube distortion. The Distressor’s versatility makes it an ideal compressor for mixing vocals, drums, bass, and more. The Distressor is a compressor that every audio engineer must have in their tool kit.
Api 2500
The API 2500 is a high-end compressor that has been designed to deliver the perfect blend of vintage and modern sound. This versatile compressor features a range of ratio settings, starting from 1.5:1 to 20:1, making it ideal for both subtle compression and heavy limiting. The API 2500 also features a unique Thrust circuit, which enhances the low-end frequency response. This feature makes it ideal for bass guitar, kick drum, and other low-frequency instruments. With its exceptional sound quality and versatility, the API 2500 is a compressor that every mix engineer should have in their toolkit. This brings us to the end of our discussion on the top 3 most versatile compressors for mixing. Each compressor has its unique sound, features, and capabilities, making them ideal for a variety of applications. Whether you’re looking for warmth, punch, or clarity in your mix, these compressors are sure to deliver the results you desire.
Buying Guide
Looking for the most versatile compressors for mixing? Consider the Universal Audio LA-2A, the API 2500 Stereo Bus Compressor, and the SSL G-Series Bus Compressor. These options offer excellent performance in a range of settings and can help you achieve the ideal audio mix for just about any project.
Budget
When it comes to buying a compressor for mixing, your budget is one of the most important things to consider. There are different brands and models with various price tags, and the features and quality of the compressor often reflect the cost. If you’re on a tight budget, you can still find versatile compressors that can get the job done. There are affordable options with decent features and quality, but keep in mind that you may have to compromise on some advanced features or specifications.
Interface Compatibility
Compatibility is another crucial factor to consider when choosing a compressor for mixing. Ensure that your compressor is compatible with your audio interface or DAW (digital audio workstation) to avoid any compatibility issues. Most compressors come with different connectivity options, so you should check if your compressor has the necessary input-output (I/O) ports that are compatible with your interface or DAW.
Number Of Channels
The number of channels that a compressor can handle is also an essential factor to consider. If you’re a beginner or you’re just making music for a hobby, a single-channel compressor may be enough for your needs. However, if you’re working on more complex projects or working with multiple instruments simultaneously, you may need a multi-channel compressor that can handle multiple inputs. You can also find compressors with channel expansion capabilities if you need more channels in the future.
Additional Features
Besides the above factors, you should also consider other additional features that may be essential for your mixing needs. These features include built-in EQ, side-chain inputs, parallel compression, and more. Before purchasing a compressor, make a list of the features you need and prioritize them according to your mixing requirements. You may not need all the features at once, but it’s good to have them for future projects. In conclusion, when choosing the most versatile compressors for mixing, you should consider factors such as budget, compatibility, channels, and additional features. By keeping these in mind, you’ll be able to find a compressor that meets your mixing needs, whether as a beginner or a professional.
Credit: tierra.audio
Credit: audiosex.pro
Frequently Asked Questions On The Most Versatile Compressors For Mixing
What Is The Most Iconic Compressor?
The most iconic compressor is the Teletronix LA-2A. It is known for its smooth and warm sound and has been used by many famous musicians.
What Kind Of Compressor Do I Need For A Mix Bus?
For a mix bus, you should use a compressor that has a high-quality stereo link and a transparent sound. A VCA or optical compressor is usually a good choice, with medium attack times and medium-to-slow release times. Look for a compressor with a low noise floor and a wide dynamic range.
What Is The Best Hardware Compressor Of All Time?
The best hardware compressor of all time is subjective and varies depending on personal preference. Some popular options include the Universal Audio LA-2A, SSL G Series, and the Fairchild 670. Choose a compressor based on your needs and sound preferences.
What Is The Best Compressor For Music?
The best compressor for music is subjective and depends on the user’s needs. Some popular options include the Waves SSL G-Master Buss Compressor, the Universal Audio LA-2A, and the API 2500. It’s important to consider factors like budget, intended use, and personal preference before making a decision.
Conclusion
To sum up, choosing the right compressor can make a big difference in achieving the desired sound when mixing music. The most versatile compressors will allow you to achieve a wide range of sounds without sacrificing quality. Keep in mind that the choice ultimately depends on personal preference and the specific needs of each project.
By considering the factors mentioned music producers and audio engineers can make an informed decision on which compressor will work best for their mixing needs.
An 808 drum machine is an electronic musical instrument that produces drum sounds, commonly used in hip-hop and electronic music. The 808 drum machine powers countless hit songs and remains essential for producers and beatmakers.
The 808 drum machine was originally released in the early 1980s by Roland and quickly became popular due to its unique and distinctive sound. It uses analog synthesis to create its drum sounds, which are then stored on a programmable chip.
Many notable artists have used the 808 over the years, such as Afrika Bambaataa, Dr. Dre, and Kanye West. Also, its impact on music has been significant, influencing the development of numerous genres and sub-genres. Today, digital versions of the 808 are widely available, making it accessible to producers of all levels.
The Evolution Of Drum Machines
Moreover, from the early GROOVEBOX to modern DAWs, the history of drum machines is full of innovation. Among all, the iconic Roland TR-808 Drum Machine is a game-changer that revolutionized the sound of music. An essential tool for producers and musicians, delivering a unique sound that belongs to hip hop and electronic music.
Since their inception, drum machines have revolutionized music production. Gone are the days when live drummers were a prerequisite for any sound recording. In addition, the process of creating drumbeats using machines has been going on for decades, with numerous developments and innovations taking place over time.
From Rhythm Boxes To 808s
Furthermore, the earliest drum machine was the Rhythmicon, invented in 1930, which produced a variety of drum patterns using special waveforms. In 1963, Keio-Giken (later Korg) introduced the Donca-Matic, an early rhythm machine. But it was not until the mid-1970s that drum machines began to gain popularity. The Linn LM-1, released in 1980, was the first drum machine to use digital samples of acoustic drums. This led to the development of the Roland TR-808 in 1980, which became widely recognized as the most iconic and influential drum machine of all time.
The Rise And Fall Of The 808s
Additionally, the Roland TR-808 was initially created as an affordable alternative to expensive drum kits and was primarily used in hip-hop and electronic music genres. Despite its unconventional sound, the 808 managed to dominate the music world from the ’80s to the early ’90s. However, sample-based drum machines took over the market. Sales of the original 808 faded. But even in that period, some producers continued to use the 808. This adds it to their beats, samples, and records to give their music an authentic flavor.
Conclusion
In conclusion, the evolution of drum machines has been an exciting journey in the music industry. Also, the story of the 808 shows how one machine can reshape a genre and change music worldwide. As technology continues to advance, we can only imagine what new developments the future holds for drum machines.
Credit: flypaper.soundfly.com
What Is An 808 Drum Machine?
Moreover, in the world of music production and beatmaking, the 808 drum machine has become a household name. It has been a mainstay in the music world since its introduction in the 1980s. Some of the biggest names in hip-hop, pop and electronic music have used the 808.
The Origins Of The 808
In addition, the Roland TR-808 Rhythm Composer was first released in 1980, and it was a commercial failure at the time. However, innovative producers hunting for new sounds soon adopted it. The 808 provided a fresh sound that wasn’t possible with traditional drum kits, and it quickly became a staple in the music industry. The 808 has influenced the sound of popular music for over four decades and is still widely used today.
The Anatomy Of An 808
The 808 is a drum machine that creates synthesized drum sounds rather than using acoustic drums. It has a distinct sound that’s characterized by its deep, punchy bass drum, snappy snares, and hi-hats. The 808 has a user-friendly interface, with each sound having its own dedicated knob. In addition to its basic sound selection, the 808 also has built-in effects like compression, accent, and decay. This makes it a versatile tool for beatmakers.
The 808’s interface is divided into four main sections: the sequencer, the sound section, the accent section, and the tempo section. The sequencer is where users can program the 808’s pattern and rhythm. The sound section is where users can select the drum sound. The accent section controls the emphasis of the selected sound, and the tempo section controls the tempo of the beat.
Also, the 808 has been used extensively in different genres, from the early sounds of hip-hop in New York to the electronic music of Detroit and Chicago. The 808’s distinct sound has become an iconic part of music production and has inspired countless generations of artists.
Impact Of The 808 On Music
Moreover, the Roland TR-808 Rhythm Composer, commonly known as the 808, was first introduced in 1980 and quickly became a game-changer in the music industry. Its impact on music continues even to this day, with its unique, booming bass sound influencing many genres, such as hip-hop, electronic dance music, and pop.
808 Drum Sounds In Popular Music
In addition, the 808’s distinctive sound is instantly recognizable, with its deep bass rumbling and crisp, sharp snare sound being a hallmark of pop and hip-hop music. In fact, the 808 has been used in thousands of songs, including hits by Kanye West, Daft Punk, Beyoncé, and many others.
Additionally, the 808 offered hand claps, cowbells and cymbals. Furthermore, producers used them to build beats that stood out.
Musical Innovations Resulting From The 808
The 808’s unique sound and versatility have influenced many musical innovations, such as the development of subgenres like Miami bass and trap music. The 808 made drum sounds no acoustic kit could. That pushed electronic drum machines into wider use.
As music production technology continues to evolve, the 808 remains a popular choice among producers, with modern iterations of the drum machine being updated with new features while still maintaining the iconic sound that made it so famous.
Famous songs that feature the 808 drum machine sound
Song Title
Artist
Planet Rock
Afrika Bambaataa & the Soul Sonic Force
Funky Drummer
James Brown
Sexual Healing
Marvin Gaye
It’s Like That
Run-DMC
808 State
808 State
The 808’s unique sound influenced many genres like trap music.
Modern iterations of 808 are updated with new features.
The 808 was used by artists like Daft Punk and Beyoncé.
In conclusion, the 808 has left a lasting mark on music. Its sound and versatility still inspire countless artists. You can hear the 808 across many genres, which proves its staying power decades after its launch.
808’s Top Users
An 808 Drum Machine is a legendary device known for its iconic, deep, and booming bass sound. It is often used by various music genres and artists, from hip hop, trap, to electronic dance music, among others. But who are the top users of the 808 Drum Machine? Let’s take a closer look.
Pioneering Users Of The 808
The Roland TR-808 was first released in 1980. Pioneering hip-hop, electro and dance producers such as Afrika Bambaataa and Public Enemy quickly embraced its sound. Marvin Gaye, among many others. They used the 808’s versatility to create unusual new sounds. Those sounds shaped the future of music.
Pioneering 808 Users
Genres
Afrika Bambaataa
Hip-Hop
Public Enemy
Hip-Hop
Marvin Gaye
Soul
Modern Electronic Music Artists Using The 808
The legacy of the iconic 808 Drum Machine is still strong today. It continues to inspire a new generation of artists from various genres. For instance, Kanye West, Travis Scott and Daft Punk use the 808 often. They blend it with their own styles for a classic-meets-modern sound.
Kanye West – Hip-Hop
Daft Punk – Electronic Dance Music
Travis Scott – Hip-Hop
In conclusion, the Roland TR-808 Drum Machine’s impact on music is undeniable. Its unique sound and versatility have allowed it to remain relevant to-date and influence generations of musicians across different genres. Whether you are a pioneer or a modern artist, the 808 Drum Machine has something unique to offer.
808’s Legacy In Music Production Today
No one can ignore the lasting impact of the 808 drum machine. This percussive instrument has dominated music production for over three decades. It’s an innovative machine that changed how musicians create their beats. This helps them to produce deeper sounds that elevate the overall composition.
The 808 drum machine has left an indelible mark on the world of music production since its introduction in the 1980s. Its deep, punchy bass and distinctive sound drive countless iconic tracks across many genres. Even today, several decades later, the 808 continues to hold a special place in the hearts of producers and musicians alike. This post explores the 808’s legacy in music production. It also explains why its sound still matters today.
Software Emulation Of 808 Drums
In recent years, many software companies have attempted to replicate the sound of the 808 using virtual instruments and plugins. These software emulations have become increasingly popular, as they offer a more affordable and accessible way for producers to get their hands on the iconic 808 sound. However, some purists argue that the software emulations lack the warmth and depth of the original hardware. Despite this, many producers still find software emulation of the 808 to be a useful and convenient tool for creating beats and music.
Nostalgia For The 808 Sound
Beyond its sonic qualities, the 808 has become a cultural icon, a symbol of an era and a style of music. Many musicians and producers feel a strong connection to the sound of the 808 due to its place within hip hop and other genres. The sound of the 808 is often associated with a sense of nostalgia, reminding people of a specific time in music history. Today, the 808 remains a cornerstone of modern music production, with its influence reaching beyond hip hop to pop, dance, and electronic music. Its distinct sound has inspired countless generations of musicians. Its legacy will undoubtedly continue to influence music production and culture for years to come.
Credit: pluginfox.com
Credit: audiosorcerer.com
Frequently Asked Questions For Exploring The Beat What Is An 808 Drum Machine
What Is An 808 In A Beat?
An 808 in a beat refers to the low-frequency bass drum sound originally created by the Roland TR-808 drum machine. The sound has become a staple in many genres of music, and is often used to create a driving rhythm and add depth to a track.
How Does An 808 Drum Machine Work?
An 808 drum machine produces electronic drum sounds using analog synthesis. It uses pre-programmed patterns and allows the user to program their own beats. The machine modifies sound frequencies to create different sounds, such as kicks, snares, hi-hats, and cymbals.
The user can adjust the tempo, sound, and volume of each pattern to create unique beats.
What Is An 808 Example?
An 808 example refers to the Roland TR-808 drum machine. Producers love its deep bass and tone. The term is often used in music production to refer to the use of this specific sound.
What Is The Most Famous Drum Machine 808?
The Roland TR-808 is the most famous drum machine of all time, produced from 1980-1983. Its distinctive, heavy sound has heavily influenced modern music genres such as hip-hop and electronic music, and continues to be used today.
Conclusion
To sum up, the 808 drum machine revolutionized music production as we know it. It has remained a vital tool for modern music genres such as hip hop, trap, and electronic dance music. With its distinct sound, the machine is widely used by producers and performers alike to create timeless beats that leave a lasting impact on the listener.
Whether you’re an amateur musician or a seasoned professional, the 808 drum machine will undoubtedly continue to be a go-to tool for many years to come.
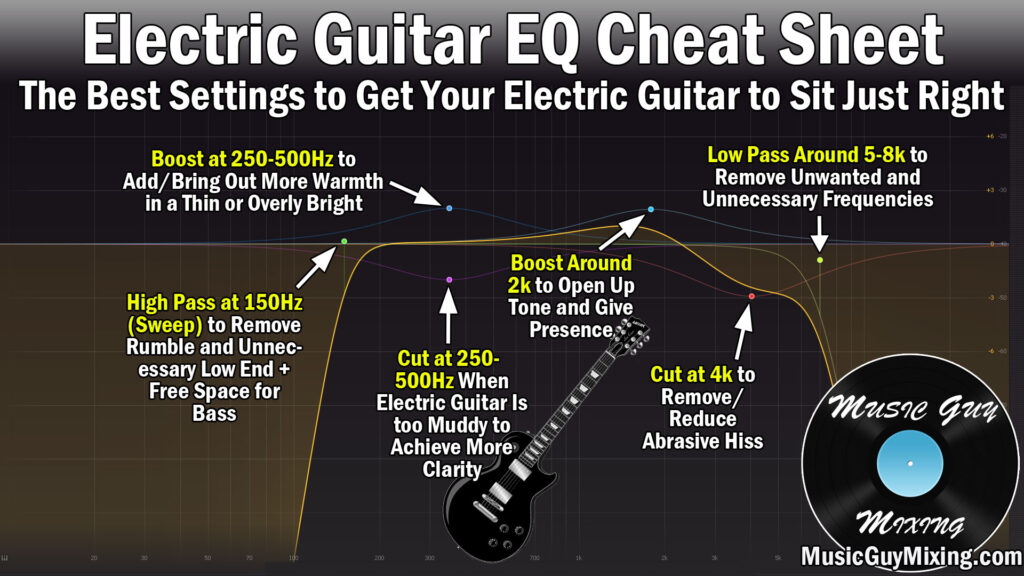
A parametric EQ filter is the best for bass and low end due to its ability to isolate and adjust specific frequencies. This type of EQ allows for precise control over the low end, reducing muddiness and enhancing clarity.
Also, the importance of bass in music cannot be overstated. The low end provides the foundation for a song, dictating its groove and energy. However, too much bass can result in a muddy and undefined sound. This is where EQ comes in.
Moreover, by selectively attenuating or boosting certain frequencies, an EQ filter can enhance the clarity and impact of the bass. When it comes to bass and low end EQ, the parametric EQ filter is the most effective due to its ability to target specific frequencies. This allows for a more surgical approach to EQ, reducing the risk of negatively affecting other parts of the frequency spectrum. We’ll take a closer look at how a parametric EQ filter works and how to use it to enhance your low end.
Credit: www.musicguymixing.com
What Is An Eq Filter?
In addition, an EQ filter or an Equalizer is an audio processing tool that gives you control over an audio signal’s frequency content. This enables you to manipulate individual frequency bands. With an EQ filter, you can boost or cut low, mid, or high frequencies, and adjust the balance between them. This results in clearer, more focused sound.
Definition Of Eq Filter
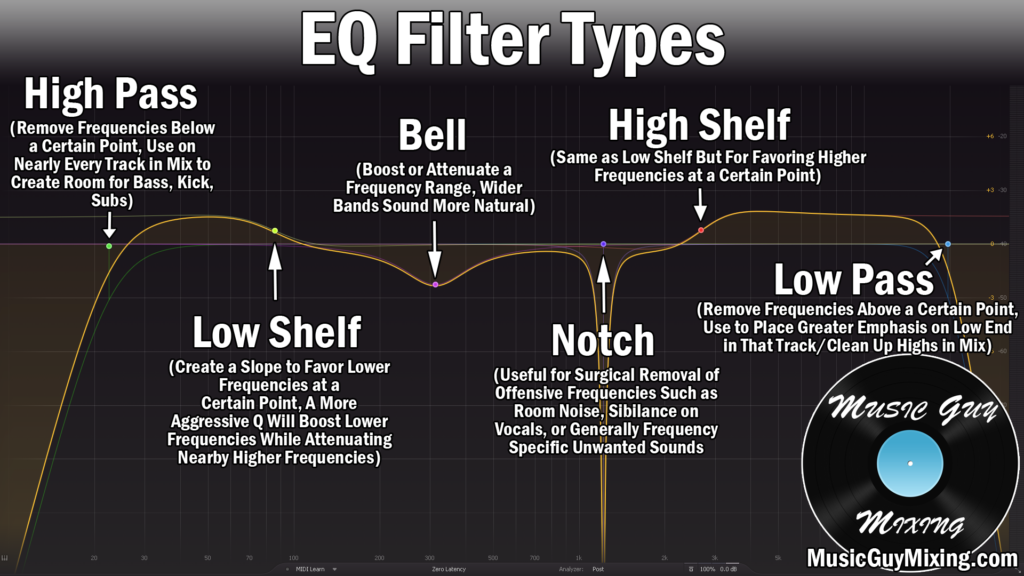
Furthermore, an EQ filter is a set of filters intended to adjust the balance between different frequency components of an electronic audio signal. EQ filters come in various types and configurations, including graphic, parametric, shelving, and notch. Each type of equalizer has its unique characteristics and intended use, making it important to understand how each works.
How Eq Filter Works
Additionally, an EQ filter manipulates audio signals by using a set of filters designed to adjust the amplitude of specific frequency ranges. The filters function by magnifying or decreasing the energy in any defined frequency range. EQ filters utilize various frequency curves or slopes to define how quickly or slowly the filter affects the incoming signal. Depending on the application and type of audio being processed, filters can be used to lessen or increase boomy bass frequencies or tame bright, harsh high frequencies.
Also, sound engineers must know how each filter type works. That knowledge lets you manage frequencies accurately. EQ filters are useful in all applications of sound engineering, from live sound production to music mixing and mastering. The right filter moves keep your mixes balanced and clear. You get a strong low end and no harsh highs.
A good EQ filter is an essential tool in any sound engineer’s production toolkit. This allows you to shape sound and make it sound more fuller and exciting to the listener. Whether for commercial use or music production, EQ filters can be used to improve sound quality. This results in clearer, more defined audio, especially in low-end bass frequencies.
Types Of Eq Filters For Bass And Low End
EQ filters for bass and low-end come in different types, each with their own unique features and purposes. To pick the best one, think about the sound you want. Then choose the filter that gets you there.
Some of the most common types include high-pass filters, low-pass filters, and shelving/boosting filters.
If you want to improve the sound quality of your bass and low end, then using equalization (EQ) filters is a must. EQ filters help you fine-tune the bass and low-end frequencies to achieve a fuller, punchier, and clearer sound. But with different types of EQ filters available, which one should you choose? Let’s take a look at some of the popular EQ filters used for bass and low end:
Parametric Eq
One of the most versatile EQ filters for bass and low end is the parametric EQ filter. It allows you to adjust the amplitude, frequency, and bandwidth, making it easier to locate and cut/boost specific frequencies. You can use a parametric EQ filter to control the low-end rumble or emphasize the sub-bass frequencies.
Graphic Eq
A graphic EQ filter consists of a fixed number of frequency bands, typically arranged in a slider format. It’s an excellent tool for quickly shaping the overall tone of your bass and low end. You can use a graphic EQ filter to add weight or remove muddiness to your basslines.
Shelving Eq
A shelving EQ filter is a high-pass or low-pass filter that attenuates or boosts all frequencies above or below a specific cutoff frequency. It’s ideal for adjusting the bass frequencies of your mix without affecting the mid or high frequencies. You can use a shelving EQ filter to add warmth or clarity to your basslines.
Low-pass Filter
A low-pass filter attenuates frequencies above a specific cutoff frequency, allowing only lower frequencies to pass through. It’s an excellent tool for removing unwanted high-frequency content, such as noise, harshness, or sibilance. You can use a low-pass filter to achieve a deeper and warmer bass without interfering with other frequency ranges.
High-pass Filter
A high-pass filter attenuates frequencies below a specific cutoff frequency, allowing only higher frequencies to pass through. It’s a useful tool for removing unwanted low-frequency content, such as hum, rumble, or boomy sounds. You can use a high-pass filter to clean up the muddiness or tighten up the low end of your mix.
Peaking Filter
A peaking filter boosts or cuts a specific frequency range centered around a specific frequency. It’s an effective tool for adjusting the tonality and resonance of your bassline. You can use a peaking filter to make your bassline stand out in the mix or remove unwanted resonances. Using the right EQ filters for your bass and low end can make a significant difference in your mix. However, it’s essential to understand the different types of EQ filters and their functionalities to use them effectively. You may want to experiment with a combination of EQ filters to achieve the desired sound.
Choosing The Best Eq Filter For Bass And Low End
Choosing the best EQ filter for bass and low end can be tricky. It’s important to consider the type of music you are working with and the intended end result. A steep filter with a high slope may work for some genres. Meanwhile, a gentler approach may be better for others.
Experimentation is key to finding the perfect EQ filter for your bass and low end needs.
When it comes to mixing music, one of the most important aspects to consider is the EQ (equalization) of the track. If you are working with music that emphasizes on bass and low end, then choosing the right EQ filter is crucial. EQ filters allow you to manipulate the sound by adjusting their frequency response. This post walks you through the key factors to weigh for bass and low end. We will also provide you with some examples of EQ filters that you can use to perfect your mix.
Factors To Consider
Before choosing the EQ filter for your bass and low end, there are a few factors you need to consider. These includes:
Genre of music: Each genre has a different emphasis on frequencies. For example, bass-heavy tracks like hip-hop and EDM require more low-end EQ than genres like rock and pop.
Ambience of the mix: The EQ filter that you choose should enhance or accentuate the props and virtues of the music rather than overpowering it.
Quality of the recordings: The quality of the recordings is a significant factor that determines which EQ filter to use. If the recordings are of poor quality, then more EQ adjustments may be required.
Examples Of Eq Filters For Bass And Low End
Now that you know the factors to consider, let’s look at some examples of EQ filters that you can use for bass and low end.
EQ Filter
Frequency Range
Best For
Low Shelf Filter
< 100 Hz
Instruments like bass and kick drums
Parametric Filter
Variable Range
Removing muddiness in bass
Low Pass Filter
< 200 Hz
Removing unwanted noise
In conclusion, choosing the best EQ filter for bass and low end requires a good understanding of the factors that affect it. Practice using different EQ filters and understanding their frequency response to find the right fit for your music. Happy mixing!
Tips For Using Eq Filters On Bass And Low End
To achieve an optimal bass and low-end sound, it’s essential to understand which EQ filter to use when mixing. While there’s no one-size-fits-all answer, a low-pass filter is often used to cut out unwanted high frequencies. Meanwhile, a high-pass filter can remove unnecessary low-end rumble.
Experiment with different EQ combinations to see what works best for your track.
If you are trying to make your bass and low end sound better, then EQ filters can be a great tool to achieve your goal. However, it is important to use them wisely and strategically to avoid unwanted outcomes. In this article, we will provide some tips on how to use EQ filters for bass and low end in your mixes.
Avoid Overuse
The first and foremost tip to keep in mind while using EQ filters is to avoid overusing them. Too much EQ can lead to a weak and thin sounding mix. Instead, try to use EQ only when it’s necessary. For instance, if you are struggling with a particular frequency range, find the frequencies that need to be adjusted and focus on those areas.
Use Multiple Eq Filters For Precision
Usually, mixing engineers use a few EQ filters to fix various issues in a mix. When it comes to bass, it may require a bit more work as it’s a complex range to manage. The most common method is to split the bass range into sub, mid and high bands. Once you’ve separated these bands, use a different EQ filter to adjust each of them and then blend them together for a seamless sound.
Don’t Eq In Solo Mode
Many mixing engineers make a common mistake when dealing with bass EQ. They solo the bass instrument and then apply EQ filters based on what they hear. However, filters set in solo mode can exaggerate issues. You might never notice those issues in the full mix. Therefore, it is always recommended to EQ while listening to the whole mix.
Listen To Your Mix In Different Environments
Finally, it is essential to listen to your mix in different environments to get an accurate idea of how it will sound in different settings. Bass frequencies and low-end sounds are the most sensitive to different listening environments. Therefore, try to listen to your mix in various speakers, headphones, and rooms to ensure it sounds good across the board. In conclusion, EQ filters can help improve the bass and low-end frequencies in your mix if used correctly. Follow these tips to refine the sound of your mix and achieve a well-balanced mix of frequencies.
Common Mistakes To Avoid
Finding the best eq filter for bass and low end is crucial for achieving a clean and professional sound in your audio mix. Some common mistakes to avoid include boosting too much, ignoring phase issues, and not considering the frequency range of different instruments.
Common Mistakes to Avoid when Choosing EQ Filters for Bass and Low End EQ filters are common tools for shaping bass tone. They help you reach a balanced sound. While they can be incredibly useful, they can be misused if not handled with care. When it comes to bass and low end, there are some common mistakes that many musicians make. In this post, we will discuss three mistakes that you should avoid when choosing EQ filters for bass and low end.
Using Too Much Boost One of the most common mistakes when using EQ filters is overusing the boost function. Boosting certain frequencies can be a great way to add warmth and clarity to your bass sound. But too much boost can lead to distortion and muddiness. Boosting a frequency range excessively can also affect the levels of adjacent frequencies, leading to an unbalanced sound. Therefore, it’s important to use EQ filters sparingly and with consideration. Not Addressing Phase Issues Phase issues can cause problems when it comes to bass and low end.
Practical Tips
When two audio signals are not in phase, they can cancel each other out. This leads to a reduction in volume and clarity in certain frequencies. This can result in a hollow, undefined sound. It’s essential to check for phase issues whenever you use EQ filters. It will help you avoid any unwanted phase cancellations and ensure that your bass sounds solid and well-defined. Mismatching EQ Filters Mismatching EQ filters is another mistake that many people make.
Each filter responds differently across frequencies. The wrong choice for a range can cause tonal imbalances. It’s important to take your time and choose the right EQ filter for every frequency range. It’s also essential to listen carefully to the result and make adjustments as needed. Not A/B Testing Your Mix Lastly, not A/B testing your mix is another common mistake that can lead to an unbalanced sound.
Putting It Into Practice
A/B testing compares your EQ changes against the original mix. It shows whether the changes really improved the sound. A/B testing is an excellent way to ensure that any changes you make are enhancing the sound and not adding problems. Conclusion In conclusion, EQ filters are essential tools that can help you improve the tone of bass instruments and achieve a balanced sound.
However, knowing the common EQ mistakes helps you avoid problems. You’ll get the most out of your bass sound. By avoiding using too much boost, addressing phase issues, matching EQ filters. A/B testing your mix, you can create a well-defined and balanced bass sound.
Credit: www.masteringthemix.com
Credit: www.musicguymixing.com
Frequently Asked Questions Of What Eq Filter Is Best For Bass And Low End
What Is A Good Eq For Bass?
A good EQ for bass would be to decrease the mid-range frequencies and enhance the low-end frequencies. This will bring out the bass while keeping it balanced with the rest of the mix.
Which Eq Filter Would Best To Remove Low Frequency Noise Rumble?
The high-pass or low-cut EQ filter would be the best option for removing low frequency noise rumble. This filter allows frequencies above a selected point to pass while filtering out unwanted low frequencies, typically below 80Hz.
What Are The Bass Frequencies On An Eq?
Bass frequencies on an EQ refer to the lower range of audio frequencies that can be adjusted. They typically range from 20 Hz to 250 Hz and are responsible for creating the low end or “bottom” of a song or audio track.
Adjusting the bass frequencies with an EQ can enhance or diminish the emphasis on this part of the sound.
What Does Eq () Filter Do?
The EQ () filter is a tool used in audio editing to adjust the levels of different frequency components in a sound. It can boost or cut specific frequencies to create a desired sound or tone.
Conclusion
The best EQ filter for bass and low-end frequencies depends on the specific mixing situation and personal preferences. It is important to experiment with different filters and settings to achieve a balanced and clear sound while avoiding muddiness and distortion.
Remember to start with subtle adjustments and use your ears as your guide. With practice and patience, you can become a master of EQ and produce outstanding mixes that sound great on any sound system.
To export multitrack in Garageband, go to the “Share” menu and select “Export Song to Disk.” From there, choose “Multitrack” and adjust the settings as necessary.
Also, this will create separate audio files for each track in your project. The app is a popular digital audio workstation (DAW) used by many musicians and producers to create high-quality music. One of the key features of GarageBand projects is the ability to work with multiple tracks simultaneously. This allows users to record and mix various instruments and vocals into one cohesive project.
However, once you’ve completed your project, you may want to export each track individually for further editing or mixing in another DAW. Moreover, that’s where the multitrack export feature comes in handy. We’ll guide you through the process of exporting multitrack in the DAW, including the necessary steps and settings to ensure optimal results.
Preparing To Export Multitracks for GarageBand
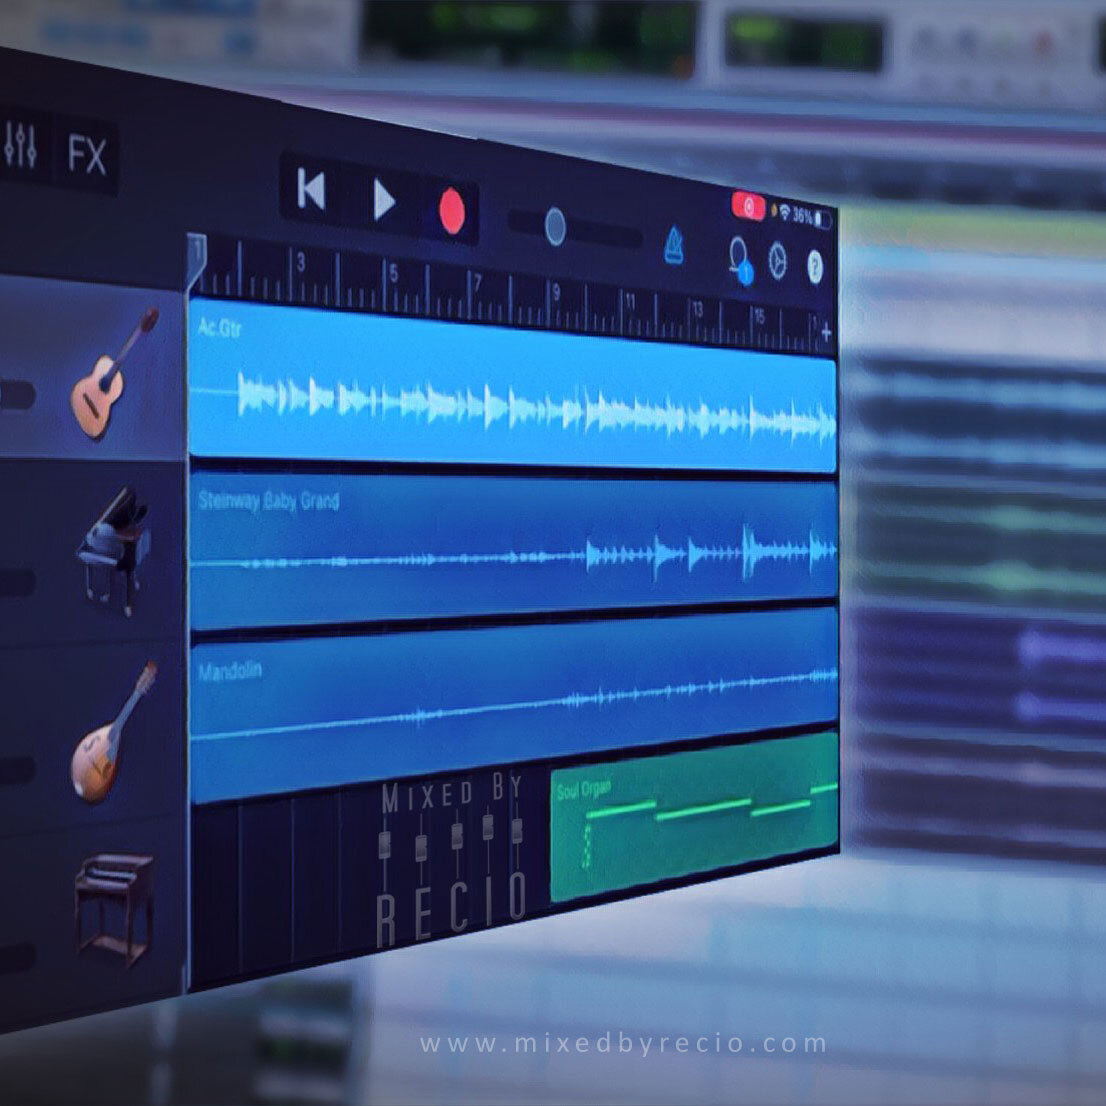
In addition, to export multitracks in the app, first ensure that all the tracks are properly mixed and edited. Then, select the “Share” option and choose “Export Song to Disk”. Make sure to select “All Tracks” and “Split Files” to export each track as its individual file.
Before exporting multitracks from GarageBand projects, you need to prepare the tracks properly to ensure that you get the desired output. Furthermore, this process involves naming tracks, removing unnecessary tracks, and soloing necessary tracks. Let’s discuss each of these steps in detail.
Naming Tracks
Naming tracks is an essential step before exporting multitracks because it helps you to organize your tracks and easily identify them later. Additionally, here’s how to name tracks in the DAW:
Also, select the track you want to name.
Moreover, double-click on the track’s name to highlight it.
In addition, type a new name for the track and hit Enter.
Make sure you give each track a unique and descriptive name that will help you identify it later. For example, if you have a drum track, you could name it “Kick Drum,” “Snare Drum,” or “Hi-Hat.”
Removing Unnecessary Tracks
Furthermore, removing unnecessary tracks can help make the exporting process easier and faster. Here’s how to remove a track in the app:
Select the track you want to remove.
Click on the “Track” menu at the top of the screen.
Select “Delete Track” from the dropdown menu.
Before removing any tracks, make sure that they are indeed unnecessary and won’t affect the overall quality of your mix.
Soloing Tracks for GarageBand
Soloing the necessary tracks is important before exporting multitracks because it allows you to hear each track individually and ensure that all the necessary parts are included in the mix. Here’s how to solo a track in Garageband:
Select the track you want to solo.
Click on the “S” button at the left of the track’s volume slider.
Once you’ve soloed all the necessary tracks and made sure they sound good on their own, you can proceed with exporting your multitracks. By following these steps and preparing your tracks properly, you can export high-quality multitracks from Garageband easily.
Credit: www.mixedbyrecio.com
Exporting Multitracks
To export multitracks in Garageband, simply go to the File menu and select “Export All Multitracks. ” Choose your desired format and location for the exported files. Make sure to name your tracks appropriately to keep them organized.
Exporting multitracks from Garageband is a crucial step in the music production process. It is the process of saving each track or instrument as a separate file, which you can then import into another DAW for mixing and mastering. This guide will take you through the necessary steps involved in exporting multitracks in Garageband.
Choosing The Format And Bit Depth
Before you export your multitracks, it is essential to choose the format and bit depth. These options can significantly impact the overall sound quality of your tracks. Garageband offers several options, including WAV, AIFF, and MP3 format, with bit depths ranging from 16-bit to 24-bit.
Selecting The Tracks To Export for GarageBand
Once you’ve selected your preferred format and bit depth, the next step is to select the tracks you want to export. Garageband allows you to export individual tracks or groups of tracks as a single audio file. You can select the tracks you want to export by muting the unwanted tracks and unmuting the tracks you want to save.
Setting The Output Level
When exporting multitracks from Garageband, it’s essential to set the output level to avoid clipping or distortion. You can adjust the output level by using the Master Track Volume slider. It is recommended to set the volume to -6dB to provide enough headroom without compromising the sound quality.
Conclusion
Exporting multitracks in Garageband is an easy process, provided you follow the right steps. This guide has covered crucial steps involved in exporting multitracks, including choosing the format and bit depth, selecting the tracks to export, and setting the output level. Follow these steps to export your multitracks seamlessly.
Troubleshooting
To export multitracks in Garageband, first make sure you have mixed all the tracks properly. Then go to the “Share” menu and select “Export Song to Disk”. Choose the format you want and click export. If you hit any issues, check your settings and confirm you saved all files properly.
Exporting multitrack from Garageband is a great way to ensure that your audio is of high quality and can work in a professional capacity. But sometimes, things don’t go as planned. In this section, we will discuss some common issues you may encounter and how to troubleshoot them.
Syncing Issues With Video
One common issue that users face when exporting multitrack in Garageband is syncing issues with video. This can be frustrating, especially if you have spent lots of time and effort working on your project. To fix this problem, it’s best to ensure that the audio and video tracks have the same duration. You can also try exporting the audio and video tracks separately and then importing and syncing them in a video editing software like iMovie or Adobe Premiere Pro.
Missing Or Muted Tracks
Another issue that you may encounter when exporting multitrack in Garageband is missing or muted tracks. This may happen if you accidentally muted a track or if the track was not included in the export process. To fix this problem, check the track settings to ensure that the mute button is not selected. You should also make sure that all the tracks you want to include in the export process are selected before exporting. Alternatively, you can export the tracks individually and then mix them in a different software like Adobe Audition or Logic Pro. Overall, exporting multitrack in Garageband can be a great way to produce high-quality audio. By knowing how to troubleshoot common issues, you can ensure that your exports are of professional quality and free from errors.
Credit: majormixing.com
Credit: www.youtube.com
Frequently Asked Questions For How To Export Multitrack In Garageband
How Do I Export Multiple Tracks From Garageband?
To export multiple tracks from GarageBand, follow these steps: First, select all the tracks you want to export. Next, go to the “Share” menu and choose “Export Song to Disk. ” Then, choose your preferred file format and quality, and select the destination where you want to save the exported tracks.
Finally, click “Export” to complete the process.
How Do I Export All Stems From Garageband?
To export all stems from GarageBand, first select the tracks you want to export. Then go to the “Share” menu and choose “Export Song to Disk”. In the “Export” window, select “All Tracks” and choose your desired format and location.
Finally, click “Export” to complete the process.
How Do I Export Tracks From Garageband To Wav?
To export tracks from GarageBand to WAV, follow these steps: 1. Open GarageBand and select the track you want to export. 2. Click on “File” and select “Export”. 3. Choose “Export to Disk” and select WAV as the file format.
4. Choose where you want to save your file and click “Export”. 5. GarageBand now saves your track as a WAV file, ready to use.
How Do I Export Individual Tracks From Garageband To Ipad?
To export individual tracks from GarageBand to iPad, simply select the track you want to export, tap on the “Share” button, and choose the format you want to export in. Then, select “Save to Files” and choose the location where you want the file to be saved.
Finally, open the Files app on your iPad and import the track to any desired location.
Conclusion
Exporting multitrack in Garageband might seem challenging at first. But it’s actually quite easy if you follow a few simple steps. Whether you’re a beginner or an experienced musician, mastering this software can take your music to a whole new level.
By utilizing the tips and tricks outlined you can ensure that your next project will be a hit. Remember, practice makes perfect, so keep experimenting with Garageband and see what amazing tracks you can create!
Spotify has changed its streaming target to 14 LUFS. This move will affect the way music is mastered and distributed on the platform.
Spotify made this change to ensure a consistent listening experience for its users and to keep up with the industry standards. Music streaming service, Spotify, has announced a new streaming target of 14 LUFS (Loudness Units Full Scale). This change in target will require mastering engineers and artists to change the loudness levels of their music before it is distributed on the platform.
The new target is a part of Spotify’s ongoing efforts to provide a consistent listening experience for its users. Spotify’s decision to adopt the 14 LUFS target comes after a recommendation from the streaming service’s Loudness Normalization Advisory Board. Music that does not conform to Spotify’s new streaming target may be penalized by being played at lower volumes on the platform.
Credit: www.masteringthemix.com
Loudness In Streaming
Spotify, one of the most popular music streaming platforms, has a new standard for loudness in streaming. For years, loudness in music has been a point of debate, with producers and mastering engineers trying to discover the perfect balance between loudness and audio quality. However, with the change in Spotify’s streaming target to 14 LUFS, the loudness war might finally come to an end.
What Is Lufs?
In the field of audio production, LUFS stands for Loudness Units relative to Full Scale. It is a unit of measurement used to quantify the perceived loudness of audio in a more accurate and meaningful way than decibels.
How Does Loudness Affect Streaming?
The loudness of a track can significantly affect the listening experience, especially on streaming platforms where songs are often played in succession. When tracks are too loud, the sound quality can be compromised, making it hard to distinguish individual instruments and vocals.
On the other hand, when tracks are too quiet, listeners tend to turn up the volume, which can cause distortion and ear fatigue. Therefore, standardizing loudness in streaming platforms is an essential step towards improving the overall quality of music listening.
What Are The Current Loudness Standards For Streaming?
Before Spotify’s announcement, the most commonly used loudness standard in streaming was -16 LUFS. However, Spotify’s new streaming target of 14 LUFS means that users will now be able to enjoy music that is louder and more dynamic than before without sacrificing the overall quality of audio.
Other streaming platforms like Tidal and YouTube Music have also followed suit by adopting the same or similar loudness standards, indicating that the future of streaming might just be a little bit less loud.
Spotify’s New Streaming Target
Spotify has changed its streaming target to 14 LUFS, making its audio quality more consistent across all platforms. The change will ensure that music streaming on Spotify sounds the same regardless of whether it’s played on a home speaker system, a smartphone, or another device.
Why Is Spotify Changing Its Streaming Target?
Spotify has recently made a change to its streaming target, now aiming for a loudness level of 14 LUFS (Loudness Units Full Scale) rather than the previous target of 13 LUFS. The reason behind this change is to create a more consistent listening experience for their users, as well as giving artists more creative freedom in their music production.
What Is Spotify’s New Target?
Spotify’s new target is a loudness level of 14 LUFS, up from the previous target of 13 LUFS. The aim is to create a more consistent listening experience for their users by normalizing the loudness levels of all tracks on their platform.
How Does This Compare To The Previous Target?
The previous streaming target for Spotify was 13 LUFS, which means music on the platform was allowed to be slightly louder than the new target of 14 LUFS. The change in the streaming target aims to create more consistency and a better listening experience for users, while also giving artists more creative freedom in their music production.
What Impact Will This Have On Music Production?
This change in Spotify’s streaming target is expected to have a positive impact on music production. By allowing for a wider dynamic range in music production, artists can now produce more natural and dynamic music while still conforming to Spotify’s loudness requirements. This could encourage more experimentation and creativity in the music industry, ultimately leading to more diverse and compelling music for listeners.
Implications For Music Streaming Industry
Spotify, one of the leading music streaming services, announced that it would change its streaming target from -11 LUFS (loudness units relative to full scale) to -14 LUFS. For music producers, it means reducing the loudness of their tracks to meet Spotify’s new guidelines. This change has significant implications for the music industry, affecting not only music creators but also music listeners and other streaming services.
Will Other Streaming Services Follow Suit?
Spotify’s new streaming target could impact other streaming services in the music industry, prompting them to review their loudness standards. If other streaming services follow the lead of Spotify, music producers will need to adjust their productions to meet these new standards. As a result, music listeners can expect improved audio experiences across different platforms.
Is This Good For Music Listeners?
Spotify’s new streaming target is beneficial to music listeners as it sets a standard that ensures a consistent and high-quality audio experience. With -14 LUFS streaming target, songs won’t sound too compressed and over-processed, providing a better listening experience and protecting our ears from hearing damage.
What Are The Benefits And Drawbacks Of The New Target?
Benefits
Drawbacks
Better listening experience
Protection from hearing damage
More even levels across different tracks
Music producers need to follow new guidelines
May take time to adjust to new standards
Some music may lose its impact
The benefits of Spotify’s new streaming target outweigh the drawbacks. Music listeners can expect a more enjoyable audio experience with less fatigue, and a smoother transition between different tracks. However, the shift to the new target may take time, and some music may lose its impact, since the new target might lead some producers to compromise their creativity in the name of achieving the right loudness.
Credit: www.masteringthemix.com
How To Prepare For The New Standard
To prepare for the new standard of Spotify, which now changes its streaming target to 14 LUFS, it’s important to check and adjust the loudness levels of your music. One option is to utilize a loudness metering plugin or feature to help measure and set the appropriate levels for optimal playback on the streaming platform.
Spotify, the world’s largest music streaming platform, has changed its loudness normalization standard from -11 LUFS (integrated loudness) to -14 LUFS, effective immediately. This change means that music producers, mixing engineers, and mastering engineers will have to adjust their production techniques to meet with this new standard. If you’re a music producer, here’s how you can prepare for the new standard:
What Changes Will Music Producers Need To Make?
Producing music that complies with the new standard will require a change in production techniques. The new standard requires music to be produced at a lower loudness level than before, so music producers will need to refrain from pushing the loudness levels too high while mixing or mastering. Keeping a tight control on the levels throughout the process is key to producing music that meets this new standard.
What Tools Can Be Used To Measure Loudness?
Several tools are available in the market that can be used to measure loudness levels of your music. Some popular ones include:
TT Dynamic Range Meter
Plug-ins from iZotope ( RX Loudness Control )
Plugin Alliance’s DynOne
Waves WLM Plus
These tools help you to measure the loudness level and dynamics so that you can adjust your mix or master accordingly.
What Are Some Best Practices For Loudness Normalization?
To produce music that meets this new standard, there are some best practices you can follow:
Pay attention to the peak levels throughout your mix and master process.
Avoid excessive compression or limiting during mixing or mastering.
Use a Limiter, but not too aggressively.
Carefully control the bass frequencies to avoid it from becoming too dominant.
Make sure that the vocals or the lead instruments are not too prominent.
Focus on the overall mix and balance the levels, tonal balance and dynamic range.
Refer to the reference tracks that are at around -14 LUFS
Always A/B your mix with other commercial tracks on Spotify.
To sum up, it’s important for music producers and mixing engineers to adhere to this new standard. The change in streaming target not only aligns Spotify’s standard with other streaming platforms but also is a step towards tackling the loudness war. Now that you have a clear idea of the changes, tools, and best practices, start producing music that meets this new standard and make your audience fall in love with your music on Spotify.
Credit: www.soundonsound.com
Frequently Asked Questions Of Spotify Changes Streaming Target To 14 Lufs
Is 14 Lufs Loud Enough?
Yes, 14 LUFS is loud enough for most audio content. However, the ideal loudness level may vary depending on the type of content and the platform you’re using. It’s always recommended to check the specific loudness requirements of your platform or target audience to ensure the best listening experience.
Does Spotify Change Loudness?
Yes, Spotify changes loudness in order to ensure consistent playback across all songs. This process, known as loudness normalization, prevents sudden jumps in volume between tracks.
Is 12 Lufs Good For Spotify?
Yes, 12 LUFS is good for Spotify as it is the recommended loudness level for music streaming on the platform. It ensures that your music sounds balanced and clear across different playback systems and devices.
What Is The Target Loudness Level For Spotify?
The target loudness level for Spotify is -14 LUFS (Loudness Units Full Scale) with a -1 dBTP (decibel True Peak) maximum level. This ensures consistent playback volume and quality across all songs on the platform.
Conclusion
It’s not surprising that Spotify changed its streaming target to 14 LUFS, considering the platform’s commitment to providing high-quality audio experiences. This change will likely have a positive impact on both the music creators and listeners as it aims to maintain consistent volume levels across various genres and platforms.
Spotify’s dedication to delivering quality audio is a significant step towards creating a better experience for all music enthusiasts.
Mastering In Ableton Live 11 Tutorial is a complete online course that covers all the essentials of mastering tracks in Ableton Live 11. This tutorial is designed for producers and engineers who want to take their music production skills to the next level.
In this course, you will learn how to use Ableton’s mastering tools, how to prepare your tracks for mastering, how to use EQ, compression, limiting, and other essential mastering techniques. The course is packed with practical examples, tips, and tricks that will help you achieve professional-sounding masters every time.
Whether you’re a beginner or an experienced producer, this tutorial is the ultimate guide to mastering in Ableton Live 11.
Introduction To Ableton Live 11
Learn how to master tracks in Ableton Live 11 with this comprehensive tutorial. From EQ settings to compression techniques, this guide will help you achieve professional-level results.
Ableton Live 11 is a digital audio workstation (DAW) software that is popularly used by music producers, DJs, and musicians for live performance and studio production. This software is available for both Microsoft Windows and macOS operating systems and offers a wide range of features that cater to different creative needs of music enthusiasts. It is designed to work as an instrument for live performances as well as a tool for composing, arranging, mixing, and mastering music.
Overview Of Ableton Live 11
Ableton Live 11 offers a user-friendly interface that enables easy navigation and workflow for anyone who is new to music production. The software also offers a range of functionalities for music production, which includes audio recording, sequencing, and editing. It also has advanced features like MIDI sequencing, virtual instruments, and audio effects.
Features Of Ableton Live 11
Ableton Live 11 provides various features that cater to different musical needs. Some of its prominent features include a new comping feature that allows users to combine different takes to create a perfect recorded performance. It also provides MPE (MIDI Polyphonic Expression) support, which allows for more expressive and nuanced control over a range of parameters, including pitch, velocity, and timbre. Other features include new and updated device racks, enhanced audio effects, and more efficient file handling. In conclusion, Ableton Live 11 is a powerful tool for any music enthusiast looking to take their music production skills to the next level. Whether you are a beginner or an experienced musician, the software offers a range of features that cater to your creative needs. The easy-to-use interface combined with its advanced features and tools make it a popular choice among music producers, DJs, and musicians worldwide.
Credit: musictech.com
Getting Started With Ableton Live 11
Learn the fundamentals of mastering in Ableton Live 11 with this tutorial. From basic techniques to advanced concepts, you’ll gain the skills and knowledge necessary to elevate your sound and create professional-sounding tracks in no time.
Ableton Live 11 is a powerful digital audio workstation that allows musicians, producers, and DJs to create, record, and perform music in a highly intuitive and flexible environment. Whether you’re a beginner or a seasoned pro, mastering Ableton Live 11 can greatly enhance your music production and performance skills. In this tutorial, we will cover the basics of getting started with Ableton Live 11, from installation and setup to user interface and navigation.
Installation And Setup
Before you can start using Ableton Live 11, you need to install the software on your computer. The installation process is straightforward and can be completed in just a few minutes. Here’s how to do it:
Go to the Ableton website and download the software.
Run the installation file and follow the prompts to install the software.
Once the installation is complete, launch Ableton Live 11.
User Interface And Navigation
The Ableton Live 11 interface may seem overwhelming at first, but it’s actually designed to be highly intuitive and user-friendly. Here are some key elements of the interface and how to navigate them:
Session View: This is where you can trigger loops, clips, and samples in a non-linear, improvisational way. You can navigate the Session View by clicking and dragging clips.
Arrangement View: This is where you can arrange your clips into a linear song structure. You can navigate the Arrangement View by zooming in and out, scrolling left and right, and clicking and dragging clips.
Mixer View: This is where you can adjust the levels, panning, and effects of your tracks. You can navigate the Mixer View by clicking and dragging faders and knobs.
Browser: This is where you can access your sample library, presets, plugins, and more. You can navigate the Browser by using the search bar, categories, and tags.
With these basics, you can get started using Ableton Live 11. In the next section, we will explore some basic tools and functions that are essential for creating music in Ableton Live 11.
Working With Audio Clips In Ableton Live 11
Ableton Live 11 is a powerful digital audio workstation that is widely used by music producers and DJs. Working with audio clips in Ableton Live 11 is an essential skill for any aspiring music producer. In this tutorial, you’ll learn how to import, edit and arrange audio clips in Ableton Live 11.
Importing Audio Clips
The first step to working with audio clips in Ableton Live 11 is importing them into your project. Ableton Live supports a wide range of audio file formats, including WAV, MP3, and AIFF. To import an audio clip, simply drag and drop the file from your computer into Ableton Live’s “Session View” or “Arrangement View”. Alternatively, you can use the “File” menu to import audio clips.
Editing Audio Clips
Once your audio clip is imported, you can start editing it. Ableton Live offers a range of editing tools that allow you to manipulate your audio clip to fit your project’s needs. You can trim, crop, duplicate, fade in/out, and reverse audio clips using Ableton Live’s editing tools. Additionally, Ableton Live’s “Warp” feature allows you to adjust the timing and pitch of your audio clips to fit your project’s tempo.
Arranging Audio Clips
After editing your audio clip, you can arrange it in Ableton Live’s “Arrangement View”. This is where you’ll build your song by stringing together different audio clips. Ableton Live makes it easy to arrange your audio clips by allowing you to drag and drop them on the timeline. Additionally, you can use Ableton Live’s “Loop Brace” feature to loop sections of your audio clip.
Credit: www.youtube.com
Creating And Editing Midi Clips In Ableton Live 11
Learn to create and edit MIDI clips in Ableton Live 11 with this mastering tutorial. This step-by-step guide will teach you the skills needed to take your music to the next level and produce professional-quality tracks.
Creating and Editing MIDI Clips in Ableton Live 11 is an exciting and essential part of any music production. MIDI clips are essential building blocks for constructing a music track, and Ableton Live 11 has advanced features that make creating and editing MIDI clips more accessible than ever. In this tutorial, we’ll cover everything from the basics of creating new MIDI clips to advanced techniques such as editing MIDI notes and using virtual instruments.
Creating Midi Clips
To create a new MIDI clip in Ableton Live 11, click on the “Create” button and select “MIDI Clip” from the drop-down menu. Alternatively, you can use the keyboard shortcut Command + Shift + M (Mac) or Control + Shift + M (Windows). Once you’ve created a new MIDI clip, you can double-click on it to open the MIDI editor. Within the editor, you can draw in new MIDI notes or record them in real-time using a MIDI controller. When creating MIDI clips, it’s essential to keep in mind the tempo and key of your overall project to ensure a cohesive sound.
Editing Midi Clips
Editing MIDI notes in Ableton Live 11 is a breeze. Within the MIDI editor, you can select individual notes by clicking on them, or multiple notes by clicking and dragging. You can then change the pitch and length of the notes to create interesting melodies and rhythms. Furthermore, you can also adjust the velocity of individual notes to create more dynamic performances. To delete notes, simply select them and press the delete key on your keyboard.
Using Virtual Instruments
Ableton Live 11 includes numerous virtual instruments that you can use to create fantastic sounds. Once you’ve created a MIDI clip, select the virtual instrument you want to use from the plug-in browser and drag it onto the MIDI track containing your clip. Within the virtual instrument, you can adjust parameters such as volume, attack, decay, sustain, and release to create an ideal sound. Additionally, you can assign knobs and switches on your MIDI controller to control these parameters in real-time. In conclusion, creating and editing MIDI clips in Ableton Live 11 is an exciting and essential part of music production. With advanced features, such as virtual instruments and real-time MIDI recording, it’s never been easier to create high-quality music tracks. Whether you’re a beginner or an experienced producer, mastering these techniques will take your music production skills to the next level.
Advanced Audio And Midi Techniques In Ableton Live 11
This tutorial explores advanced audio and MIDI mastering techniques in Ableton Live 11. Discover how to use the built-in mastering tools, apply dynamic processing, and more.
Ableton Live 11 is not just a simple Digital Audio Workstation (DAW), it is a powerhouse of production tools and techniques that make it possible to create music like never before. The latest version of Ableton Live 11 comes packed with advanced audio and MIDI processing capabilities that allow producers to warp audio clips, use effects and plugins, work with automation, and utilize Max for Live devices to their full potential. In this tutorial, we will explore some of the most useful and creative techniques to take your production to the next level.
Warping Audio Clips
One of the advantages of Ableton Live 11 is its ability to warp audio clips, which makes it easy to sync to your project’s tempo. Whether you want to speed up, slow down, or stretch a sample to fit your desired tempo, Ableton Live 11 gets the job done. For example, if you want to create a remix of a song that has a different tempo, you can use the warping feature to match your project’s tempo with the original clip.
Using Effects And Plugins
Ableton Live 11 comes with a vast collection of effects and plugins that can help you enhance your sounds and add unique textures to your music. For instance, you can use a reverb plugin to create a spacious and ambient atmosphere for your tracks, or you can use a distortion plugin to add grit and distortion to your basslines. Ableton Live’s built-in EQ and compressor can also help shape the sound of your tracks to fit your desired style.
Working With Automation
Automation is a powerful tool that allows you to modify different parameters of a track over time. By automating effects and other parameters, you can add variation and interest to your music. For instance, you can automate the filter cutoff of a synth to create a dynamic and evolving sound, or automate the volume of a track to create a build-up or a drop in your music.
Max For Live
Max for Live is an essential toolkit for Ableton Live 11, which allows developers and producers to create their unique audio and MIDI effects, instruments, and tools. Max for Live is incredibly flexible and can add limitless possibilities to your production workflow. You can utilize the Max for Live devices to create interesting and unique sounds, automate different parameters, and control different aspects of your music production. In conclusion, Ableton Live 11 provides an advanced set of features that goes beyond the traditional DAW capabilities. With its warping, effects and plugins, automation, and Max for Live features, you can create unique and inspiring music that stands out from the crowd.
Mixing And Mastering In Ableton Live 11
Ableton Live 11 is an excellent tool for audio mixing and mastering. This tutorial will teach you how to use Ableton Live 11 to master your tracks, from preparing your mix to adding EQ and compression. You’ll learn how to use stock plugins and third-party plugins to make your tracks sound amazing.
In the music production world, mixing and mastering are crucial steps in ensuring that your music sounds polished, professional, and ready for distribution. In Ableton Live 11, these steps can be achieved easily with the right knowledge and techniques. In this tutorial, we will go over the essential elements of mixing and mastering in Ableton Live 11, focusing on levels and panning, equalization and compression, reverb and delay, and mastering techniques.
Levels And Panning
When it comes to mixing in Ableton Live 11, setting appropriate levels and panning is crucial for creating a well-balanced mix. Using the mixer, you can easily adjust your faders to set the levels of each track and adjust the panning to create a stereo image. Be sure to use your ears and listen to how each track sits in the mix. You may also find it helpful to use a frequency analyzer to check for any frequency clashes.
Equalization And Compression
Equalization and compression are two powerful tools that can help to shape the sound of your mix. In Ableton Live 11, you can use the EQ Eight and Compressor devices to achieve these effects. Use EQ to cut out any unwanted frequencies and boost or attenuate specific frequency ranges to create clarity and space in the mix. Compression helps to control the dynamic range of your tracks, making quieter parts louder and louder parts quieter. Remember to use EQ and compression sparingly and in moderation, as too much can result in an over-processed mix.
Reverb And Delay
Reverb and delay are two popular effects that can add depth and ambience to your mix. In Ableton Live 11, you can use the Reverb and Delay devices to achieve these effects. Use reverb to create a sense of space, whether that be a small room or a large hall. Delay can be used to create echoes or repeats of a sound, adding rhythmic interest or creating a sense of movement. As with EQ and compression, it’s important to use reverb and delay in moderation to avoid a cluttered mix.
Mastering Techniques
Mastering is the final stage in the music production process, where a mix is prepared for distribution. In Ableton Live 11, you can use the Mastering Suite to achieve this. This suite includes a range of tools, such as EQ, compression, and limiting, that can be used to enhance the clarity, loudness, and overall sound of your mix. Keep in mind that mastering is a delicate process, and it’s important to use it sparingly and with care to avoid over-processing and a loss of dynamic range. In conclusion, mixing and mastering in Ableton Live 11 requires an understanding of essential techniques and tools. By focusing on levels and panning, equalization and compression, reverb and delay, and mastering techniques, you can achieve a well-balanced, polished, and professional sound that is ready for distribution.
Performing Live With Ableton Live 11
Learn how to master Ableton Live 11 and take your live performances to the next level with this comprehensive tutorial. Discover new techniques and tips for producing quality music and captivating your audience.
Performing live with Ableton Live 11 is an exciting experience that requires preparation, skill, and confidence. Whether you are a DJ, musician, or producer, this DAW has everything you need to create a captivating performance that will keep your audience engaged. In this tutorial, we will guide you through the steps of preparing a live set in Ableton Live 11 and how to perform with MIDI controllers and hardware.
Preparing A Live Set
Before you can perform live with Ableton Live 11, you need to prepare a set that includes all the elements you will be using during your performance. This can include audio tracks, MIDI clips, effects, and instruments. Here are some tips to help you prepare your live set:
Create a new Live Set and organize it into different sections
Choose the audio and MIDI clips you want to use and drag them into your Live Set
Arrange your clips in Session View or Arrangement View
Add effects and instruments to your tracks
Simplify your set by using audio and MIDI effect racks
Group tracks to control the levels and effects of multiple tracks at once
Use automation to control parameters during your performance
Once you have prepared your live set, it’s time to perform with Ableton Live 11. You can perform in different ways depending on your needs and preferences. Here are some methods to consider:
Play your clips using your computer keyboard or mouse
Trigger clips and scenes using MIDI controllers or other hardware
Use Ableton Push to perform and control your live set
Utilize follow actions to create dynamic and unpredictable performances
Use the Session Record feature to capture your performance and edit it later
Integrate other software or hardware instruments and effects into your live set
Using Midi Controllers And Hardware
MIDI controllers and hardware are essential tools for performing live with Ableton Live 11. They allow you to control your live set more intuitively and expressively. Here are some tips to help you use MIDI controllers and hardware in your performance:
MIDI Controllers
Hardware
Choose a MIDI controller that fits your needs and budget
Use a high-quality audio interface for better sound quality
Map MIDI controllers to different parameters in your set
Control your live set with a MIDI foot controller
Use MIDI controllers to play instruments or trigger clips
Integrate hardware synthesizers or drum machines into your live set
Assign MIDI controllers to effects and filters for live manipulation
Use a DJ mixer for seamless transitions between tracks
In conclusion, performing live with Ableton Live 11 is a thrilling experience that requires careful preparation and execution. By following these tips and using MIDI controllers and hardware, you can create a dynamic and impressive performance that will leave your audience wanting more.
Collaborating And Sharing Work In Ableton Live 11
Learn how to collaborate effectively and share your work in Ableton Live 11’s mastering tutorial. This comprehensive guide will take you through the process of mastering your music, exploring advanced techniques that will help you achieve professional-level results.
If you’re a music producer, collaborating and sharing projects with other producers is an essential part of growing as an artist. In Ableton Live 11, collaborating with other users and sharing your work is incredibly simple. This tutorial covers all you need to know about working with other Ableton Live 11 users and exporting and sharing your projects.
Working With Other Ableton Live 11 Users
Working with other Ableton Live 11 users can enhance your music production capabilities and creativity. There are a few ways to collaborate with other users in Ableton Live 11:
Project File Exchange: You can share entire Ableton Live 11 project files with other users. This way, others can add their tracks, mix, and remix your music. Collaboration has never been easier!
Live Online Collaboration: Live online collaboration is supported in Ableton 11. This allows you to invite other users to collaborate with you in real-time by sharing your Ableton Live 11 project file through Ableton’s web-based service “Blend”.
Groups and Labels Collaboration: Ableton Live 11 has a wide range of groups and labels available to connect music producers with each other for collaboration. Collaborating with other producers from groups or labels can be super beneficial.
Exporting And Sharing Projects
Once you’ve finished your Ableton Live 11 project, it’s time to think about sharing it. Here’s how to export and share your project:
Start with a High-Quality Mixdown: A great mixdown is the foundation of a great song. Mix your project down to a high-quality WAV or AIFF file.
Save and Export Your Project: When exporting your project, don’t forget to turn on the “Collect All and Save” option. This will ensure all the files, plugins, and samples used in your project are saved and included with the exported file.
Choose the Right File Type: Save your Ableton Live 11 project in a format that will be easy for others to access and open. You can convert your project to a specific format such as MP3 or WAV.
Upload to Cloud Storage: Cloud storage is an excellent way to share your project. Not only is it free, but it also makes it easy to share with other producers or musicians. You can use cloud storage services like Dropbox, Google Drive, or iCloud to upload your project file.
Share on Social Media: Share your project file on social media platforms like Instagram, Twitter, or Facebook. This is a great way to connect with other music producers and musicians from around the world.
Final Thoughts
Collaborating and sharing projects with other Ableton Live 11 users is essential to thrive in the modern music industry. By following the above steps, you can easily collaborate with others and share your work. Additionally, Ableton Live 11’s robust features make it easy to connect and grow with other music producers.
Credit: www.udemy.com
Frequently Asked Questions For Mastering In Ableton Live 11 Tutorial
Can You Do Mastering In Ableton?
Yes, Ableton has a mastering suite that is capable of mastering tracks. Ableton’s mastering suite includes tools like EQ, compression, limiting, and other audio effects. You can utilize these tools in mastering your tracks, but it is recommended to have a good understanding of mastering techniques and processes.
Is Ableton Live Good For Mixing And Mastering?
Yes, Ableton Live is a powerful tool for mixing and mastering. Its user-friendly interface and extensive selection of built-in audio effects make it a popular choice for musicians and producers alike. Its unique session view also allows for live performances and experimentation with different arrangements in real-time.
Is Ableton Live 11 Easy To Learn?
Yes, Ableton Live 11 is an easy-to-learn digital audio workstation for music production, thanks to its user-friendly interface and intuitive features. With its comprehensive manuals and tutorials, even beginners can quickly pick up the basics while experienced users can explore new creative possibilities.
What Is The Difference Between Mixing And Mastering?
Mixing is the process of combining multiple audio tracks into a final stereo mix. Mastering is the final step in the music production process where the final mix is enhanced, polished, and balanced for optimal distribution across various formats.
Conclusion
Mastering Ableton Live 11 with this tutorial is an excellent investment for any aspiring music producer. The skills and techniques learned throughout the course can take your music creation to the next level. With a user-friendly interface, Ableton Live 11 is an excellent choice for beginners and experts alike.
Whether producing music for yourself or others, this tutorial will help perfect your craft and create a unique sound. Get started on your journey today and become a master in Ableton Live 11.
To improve piano skills without a teacher, utilize online resources and practice regularly. If you do not have a piano teacher, it can be challenging to improve your piano skills.
However, there are numerous ways to enhance your abilities without a teacher’s guidance. Utilizing online resources can be helpful, especially if you are unable to attend formal piano lessons. Websites like YouTube have abundant video lessons, tutorials and cover versions of popular songs that you can follow along with.
Additionally, try to practice regularly, set goals for yourself, and track your progress. Consistent practice can aid in improving your playing technique over time. Utilizing online metronomes and practice routines can also be helpful to ensure steady progress. In addition, engaging with other pianists through online forums or communities can provide helpful feedback on your playing and motivate you to keep practicing.
Set Goals
To improve your piano skills without a teacher, it’s important to set clear goals. Start by identifying specific techniques or musical pieces you want to master, and then break them down into smaller, achievable milestones. Regularly tracking your progress and adjusting your goals accordingly can help keep you motivated and focused on self-improvement.
Learning the piano without a teacher is not an impossible feat. However, it does require dedication, focus, and strategic planning. In this article, we will delve into one of the essential aspects of learning the piano without a teacher: setting goals. By establishing short-term and long-term goals, you can stay motivated and measure your progress as you learn. So, let’s get started!
Short-term Goals
The key to setting achievable short-term goals is to break down more complex skills or pieces into smaller, manageable tasks. For example, if you’re struggling with a particular section of a piece, break it down into smaller sections and practice each one slowly. Alternatively, you could focus on improving a specific technique, such as finger dexterity or proper hand posture. Here are some examples of short-term piano goals that you could set:
Memorize three new pieces within the next two weeks.
Practice sight-reading for ten minutes every day for the next week.
Improve finger dexterity by practicing Hanon exercises for ten minutes every day for the next week.
Long-term Goals
Long-term goals are your ultimate objectives, the milestones you would like to achieve. These goals are usually more challenging and require more time and effort to accomplish. The key to setting effective long-term goals is to make them specific, measurable, realistic, and time-bound (SMART). Here are some examples of long-term piano goals that you could set:
Goal:
To perform in front of an audience at least ten times within the next year.
SMART Criteria:
Specific: To perform ten times Measurable: Keep track of the number of performances Realistic: Consider performance opportunities available and time constraints Time-bound: Within one year
Goal:
To play a recital consisting of ten pieces in six months.
SMART Criteria:
Specific: To play a recital of ten pieces Measurable: Record the progress in learning each piece and measure against a timeline Realistic: Consider the amount of practice time available and the difficulty level of the pieces Time-bound: Within six months
Goal:
To achieve a grade 8 piano certificate in two years.
SMART Criteria:
Specific: To achieve a grade 8 piano certificate Measurable: Track progress by taking mock exams and keeping a record of improvement Realistic: Consider the time and effort required to prepare for the exam Time-bound: Within two years
By setting both short-term and long-term goals, you can improve your piano skills without a teacher. Remember, it’s important to stay disciplined, motivated, and patient with yourself as you work towards achieving your goals. With consistent practice and strategic planning, you’ll be playing like a pro in no time!
Credit: www.wikihow.com
Develop Proper Technique
Developing proper technique is key in improving piano skills without a teacher. Focusing on hand position, posture, and practicing slowly and deliberately can help build a strong foundation for more advanced playing.
Develop Proper Technique Learning to play the piano can be a challenging but rewarding experience. However, without proper technique, progress can be slow and frustrating. Whether you’re a beginner or an advanced player, developing proper technique is essential to improving your piano skills. In this section, we’ll cover three important aspects of proper technique: posture, hand placement, and finger positioning.
Posture
Good posture is crucial when playing the piano. Sitting up straight with your shoulders relaxed and your feet flat on the ground can help you maintain a stable and balanced position. Avoid slouching or leaning forward as this can cause unnecessary strain on your back, shoulders and arms. You want your elbows to be slightly lower than your wrists to ensure your forearms are parallel to the keyboard, allowing for comfortable and efficient movement.
Hand Placement
Proper hand placement can make a world of difference when it comes to playing the piano. Your hands should be level with the keyboard, with your fingers resting on the keys. Avoid tilting your hands upward or downward, as this can lead to discomfort and even injury over time. When moving up and down the keyboard, your hands should remain in the same position, with your fingers playing down into the keys.
Finger Positioning
Correct finger positioning is another vital aspect of proper technique. You should always aim to play with curved fingers, allowing for maximum control and accuracy. Your thumb should be bent slightly at the joint, while your other fingers gently curve over the keys. Avoid pressing down too hard on the keys or gripping them tightly, as this can cause tension in your hands and fingers. Additionally, practice playing with each finger individually, so you can develop strength and dexterity in each digit. In conclusion, proper piano technique involves several key elements, including good posture, hand placement, and finger positioning. By focusing on these areas and dedicating time to practicing correctly, you’ll soon see improvements in your playing ability.
Practice Consistently
Learning to play the piano is an enjoyable and rewarding experience. However, not everyone can afford a piano teacher to guide them throughout the learning process. Fortunately, there are simple yet effective ways to improve your piano skills with consistency and discipline.
Create A Schedule
Creating a schedule is an essential step in improving your piano skills without a teacher. The schedule should include specific times for practice, the duration of each practice session, and the goals you want to achieve within a specific time frame. When creating a schedule, it is also important to consider your daily routine and allocate time for practice when you are most alert and focused.
Stick To The Schedule
Once you have created a schedule, the most important thing is to stick to it. Consistency is key in improving your piano skills without a teacher. Set a specific time for each practice session, and make sure you fulfill that commitment. Remember, the more you practice, the more progress you will make.
It is also advisable to incorporate different practice techniques to keep your practice sessions engaging and less monotonous. For instance, you could spend some time practicing scales, chords, music theory, improvisation, or rhythm exercises. Rotate these techniques in your schedule to avoid boredom and keep things fresh.
Additionally, It’s also important to take breaks between sessions to give your mind and fingers time to rest. This way, you will be able to maintain focus and prevent burnout that can slow your progress.
Conclusion
Improving your piano skills without a teacher can be a challenging but rewarding experience. It requires discipline, consistency, and dedication to achieve your goals. With a well-laid-out schedule, effective practice techniques, and commitment, you will be able to make significant progress in no time.
Learn Music Theory
Learn Music Theory: Understanding music theory is essential to becoming a better pianist, and fortunately, you can learn it without a teacher. With some dedicated practice, you can gain knowledge of how music works, from basic scales and chords to complex key signatures.
Scales And Chords
Learning scales and chords is essential to understanding music theory and improving your piano skills. By memorizing the scales and chords, you will be able to recognize them quickly and know how to use them in melodies and harmonies.
In addition, learning scales and chords will help you with finger dexterity, as scales and chords require specific finger movements that become easier with practice.
Key Signatures
Key signatures can be confusing, but they are necessary to understand if you want to play more advanced music and improve your overall piano skills. A key signature indicates the tonality of a piece of music, and understanding them will help you recognize the notes you are playing.
Start by learning the major key signatures, and then move on to the minor keys. With practice, you will become more comfortable with key signatures and will be able to quickly identify the tonality of a piece of music.
Summary: Learning music theory is an essential part of improving your piano skills. By mastering scales and chords and understanding key signatures, you will gain a better understanding of how music works and how you can improve your playing.
Use Online Resources
To improve piano skills without a teacher, one can use online resources such as instructional videos and online courses. With access to a wide range of tutorials and resources, aspiring pianists can learn and refine their skills at their own pace, from anywhere with an internet connection.
If you’re looking to improve your piano skills but don’t have the time or resources to hire a teacher, online resources can be a great alternative. With the advancement of technology, there’s a wealth of online resources available that can help you develop your piano skills at your own pace. Here are some of the best online resources to consider.
Video Tutorials
Video tutorials are a great place to start if you’re looking to improve your piano skills without a teacher. There are a number of websites that offer free video tutorials, ranging from beginner to advanced levels. Some of the most popular video tutorial websites are YouTube and Vimeo. These websites feature a variety of talented piano players who share their skills and techniques through online videos. You can choose tutorials based on your skill level and learn at your own pace. It’s a great way to see demonstrations of various piano techniques and learn new songs.
Online Courses
Online courses are another excellent resource for improving your piano skills. A quick search online will reveal plenty of websites that offer online piano courses. Some of these courses are free, while others require a fee. You can choose courses based on your specific needs and interests, whether you’re looking to improve your sight-reading skills or learn how to play a specific song. Many online courses offer interactive lessons with professional piano teachers, providing you with personalized feedback on your progress.
Piano Apps
Piano apps are another great option for those looking to improve their piano skills without a teacher. There are a variety of apps available for both iOS and Android devices that can help you learn to play the piano. Some of these apps offer interactive lessons, while others provide sheet music and chord progressions to practice with. There are even apps that feature virtual keyboards that allow you to practice playing songs without needing an actual piano. Piano apps are a convenient and affordable way to learn how to play the piano on-the-go.
Piano Forums
Piano forums can also be helpful when it comes to improving your piano skills. There are plenty of online communities where piano players of all skill levels come together to discuss techniques, share their favorite songs, and provide support for one another. Piano forums are a great way to ask questions and get advice from more experienced players. They’re also a good way to find inspiration and motivation to continue practicing and improving your skills. In conclusion, using online resources is an effective way to improve your piano skills without a teacher. Video tutorials, online courses, piano apps, and piano forums are some of the top resources available online. Whether you’re a beginner or an advanced player, there are plenty of resources available to help you achieve your goals.
Challenge Yourself
Challenge yourself and improve your piano skills without the guidance of a teacher by utilizing online resources such as tutorials, forums, and digital sheet music. Consistent practice, establishing goals and taking advantage of feedback will enhance your abilities and help you reach the next level.
Learn Difficult Pieces
Challenge yourself to learn a piece that is slightly above your current skill level. This will help you grow as a musician and improve your overall piano skills. Start by selecting a piece that is challenging but not too difficult to discourage you. The ability to play a difficult piece will give you a sense of accomplishment and help build your confidence. Break difficult pieces into small sections and practice one section at a time until you can play it well. Gradually, you can put the sections together to play the entire piece seamlessly.
Experiment With Different Genres
To improve your piano skills, experiment with various genres of music that interest you. Play jazz, classical, pop, or any other genre that you enjoy listening to. This will help you learn different chord progressions, rhythms, and music theory concepts that you might not come across in your routine practice sessions. As a result, you can broaden your musical horizon and add new techniques to your playing style. It is also a good way to prevent boredom and spark your creativity.
Try Online Resources
There are several online resources available to help you improve your piano skills, such as YouTube tutorials or web-based applications that provide virtual piano lessons. These resources can help you understand tricky concepts and work on specific pieces. You can find instructional videos and piano lessons for all levels, from beginner to advanced, and even for specific genres. Make sure that the source is reliable, and the lessons are comprehensive and organized. Record yourself playing so that you can listen to your performance and identify areas that require improvement. Recording yourself will allow you to evaluate your playing style objectively and adjust accordingly. This will help you focus on your mistakes and work on playing more smoothly. Additionally, you can share your recordings with other musicians or your social media network to get feedback and encourage more practice. Joining a piano community is an excellent way to meet other musicians, share experiences and ideas, and learn from each other. This can be an online community or a local one. By joining a community, you can participate in jam sessions, competitions, and events. You can also receive feedback from other experienced musicians, which can help you improve faster.
Practice Regularly
Regular practice is essential to improving your piano skills. Set a daily or weekly practice schedule and stick to it. This ensures that you have a consistent practice routine, allowing you to progressively build your skills. Practice for shorter sessions but more frequently, ensuring that you do not overwork your fingers and become exhausted. Practicing regularly will also help you see progress, which will motivate you to keep improving.
Record Yourself
Improve your piano skills without a teacher by recording yourself playing. Listen back to identify areas that need work and adjust your technique accordingly. Practice consistently and track your progress to see improvement over time.
Playing the piano can be difficult, especially when you are trying to learn on your own. However, there are ways that you can improve your skills without hiring a teacher. One of the most effective ways is to record yourself. This allows you to listen critically to your playing and evaluate your progress.
Listen Critically
When you record yourself playing the piano, it’s essential to listen critically to your performance. You need to identify any areas where you may be struggling, whether it’s timing, rhythm, or technique. Listen to how you play each note, making sure that your fingers hit each one cleanly. Pay attention to the dynamics and ensure that you are playing the soft and loud parts of the piece correctly.
Evaluate Your Progress
Evaluating your progress is crucial to improving your piano skills. Once you’ve identified areas where you need improvement, you can focus on them in your practice. However, it’s equally important to identify areas where you’re making progress. Celebrate your successes and use them as motivation to keep practicing. One way to evaluate your progress is to play a particular piece, record yourself, and compare it to an earlier recording. Listen to see if you’re playing the piece more smoothly, with better rhythm, and with improved technique. By doing this, you can monitor your progress and adjust your practice as needed. Recording yourself playing the piano is an excellent way to improve your skills without the help of a teacher. Listen critically and evaluate your progress to ensure that you’re making consistent improvement. With practice and dedication, you can become a skilled pianist.
Credit: riversidemusicstudios.com
Join A Community
Looking to improve your piano skills without a teacher? Join a community of fellow pianists online and benefit from shared tips, resources and practice strategies. Engage in discussions, peer feedback and motivation to reach your goals.
Joining a community can help you improve your piano skills and keep you motivated throughout your learning journey. Communities allow you to interact with like-minded people, share your progress, and receive valuable feedback. There are two types of communities you can join to enhance your piano skills: online forums and local groups.
Online Forums
Online forums are a great way to connect with other pianists globally. You can post your questions, share your achievements, and get feedback from experienced pianists. Forums such as Piano World, Pianist Corner, and PianoStreet have sections designated for beginner pianists. You can join these and other relevant forums, and start interacting with other members. You can even start a discussion thread if you have a specific question about technique, music theory, or practice routines.
Local Groups
Joining a local piano group can provide you with opportunities to meet other pianists in your area, participate in events, and even perform in front of a live audience. You can find locally organized piano groups on social media platforms such as Facebook and Instagram, or by searching online directories such as Meetup. Some local groups may even offer piano workshops, masterclasses, or piano lessons at a discounted price for their members. In conclusion, joining a community can boost your piano skills, expand your knowledge, and keep you inspired to keep practicing. By joining online forums or local groups, you’ll be able to participate in discussions, receive feedback and critiques, and even perform in recitals or competitions. Don’t hesitate to join a community, connect with other pianists, and take your playing skills to the next level.
Credit: michaelkorman.com
Frequently Asked Questions For How To Improve Piano Skills Without A Teacher
How Can I Get Better At Piano Without A Teacher?
Practice consistently, set specific goals, use online resources and tutorials, and seek peer feedback. Listen to recordings of skilled piano players and analyze their techniques. Consider investing in a sustain pedal and weighted keyboard to achieve better sound and touch.
Improvise and experiment with different styles and techniques to improve your skills continually.
How Can I Improve My Piano By Myself?
To improve your piano skills by yourself, consider practicing daily, setting goals, breaking down difficult pieces into smaller sections, recording and reviewing your playing, and seeking feedback from others or a professional instructor. Additionally, ensure that your piano is properly tuned and maintained for optimal sound quality.
How Many Hours A Day Should I Practice Piano?
Ideally, you should practice piano for at least an hour a day. But, if you are a beginner, you can start with 30 minutes a day and gradually increase your practice time as you become comfortable playing. Remember to take breaks between sessions to avoid fatigue and injury.
How Can I Get Better At Practicing Piano?
To get better at practicing piano, try to schedule practice sessions regularly. Start with a warm-up routine and focus on your technique. Break down difficult pieces into sections and practice slowly to improve accuracy. Use a metronome to help with timing and record your sessions to track progress.
Keep practicing consistently and you’ll see improvement over time.
Conclusion
Overall, improving piano skills without a teacher may seem daunting at first, but with discipline, consistency, and utilizing available resources, it is achievable. From setting achievable goals, to utilizing online resources and tutorials, and practicing regularly, you can further develop your piano playing skills.
Remember, the journey towards becoming a great pianist is a continuous process. With patience and dedication, you can watch yourself improve and blossom into a skilled pianist even without a teacher.
Playing the piano has numerous benefits, including improving cognitive function and reducing stress. Learning piano enhances creativity and discipline while stimulating the brain and developing fine motor skills.
Learning to play the piano proves beneficial for individuals of all ages. The advantages of playing the piano extend beyond musical enjoyment and skill acquisition. When playing the piano, individuals experience stress relief and improved focus. Additionally, playing the piano enhances cognitive function and fosters creativity and discipline.
For children, playing the piano develops fine motor skills while improving memory and comprehension. The physical and emotional benefits of playing the piano make it an excellent hobby for individuals of all ages.
Improves Cognitive Functioning
Playing the piano has several benefits, one of which is improved cognitive functioning. It has been found that playing the piano can enhance spatial-temporal abilities in children and can help maintain brain function in old age.
Improves Cognitive Functioning: Playing the piano does more than just calming your mind. It offers several health benefits, particularly for your cognitive functioning. Learning music helps in developing analytical and perceptual skills. It boosts memory, sharpens concentration, and provides problem-solving skills. H3: Enhances Memory Learning music enhances memory, both short and long-term. A 2017 study found that people who learned to play a musical instrument have better verbal memory and recall than those who did not. When playing the piano, you must remember the notes, rhythm, and timing. Practicing these skills repeatedly helps strengthen the memory. H3: Sharpens Concentration Playing the piano requires your undivided attention and focus. As a result, it increases your concentration and focus. To play music correctly, you must decipher the notes and timing while simultaneously controlling your hand and finger movements. This exercise helps improve your concentration, which translates to other areas of your life as well. H3: Boosts Problem-Solving Skills Playing the piano requires a great deal of problem-solving skills. You must be able to find and recognize patterns, and think creatively to produce unique musical pieces. When playing a piece, you must think about sequencing, timing, and finger control. These skills apply to other areas of your life, where you must solve problems in a logical and organized manner. Playing the piano is not only an enjoyable and satisfying activity, but it also provides various cognitive health benefits, including enhancing memory, sharpening concentration and boosting problem-solving skills. Regularly playing the piano can help maintain and improve your cognitive function, regardless of your age.
Relieves Stress And Anxiety
Playing the piano can help to alleviate stress and anxiety by providing a sense of calm and relaxation. The act of playing can also promote mindfulness and improve overall mental well-being, making it an excellent tool for stress relief.
Promotes Relaxation
Playing the piano is an effective way to promote relaxation, especially after a stressful day at work. When you sit down to play, your mind must focus on the music, which in turn distracts the mind from any worrying thoughts. The brain then releases endorphins, which make you feel good. As you continue to play, your muscles start to relax, and you begin to feel calm, which helps to reduce tension in the body.
Serves As A Form Of Therapy
For those who suffer from anxiety or panic attacks, playing the piano can serve as a form of therapy. The rhythm of the music can help regulate breathing and relax your muscles, reducing the risk of experiencing a panic attack. Piano lessons can also teach you mindfulness, which can help you remain calm in situations that would normally trigger anxiety.
Alleviates Symptoms Of Depression
Playing the piano can also help alleviate symptoms of depression. Focusing on learning and playing music can provide a sense of accomplishment that boosts self-esteem and confidence. Learning the piano can also give a person a sense of purpose, which can help alleviate feelings of hopelessness and despair. Furthermore, playing the piano can be a social activity that promotes interaction with others, which can help reduce feelings of loneliness and isolation. Overall, the benefits of playing the piano are vast and the ability to relieve stress and anxiety is just one of them. So, whether you are a seasoned musician or just starting out, playing the piano can be an excellent way to improve your mental and emotional well-being.
Fosters Creativity And Self-expression
Playing the piano fosters creativity and self-expression. It’s a great way to channel your emotions and create something beautiful. You can express yourself through different musical genres and experiment with various sounds, resulting in a more profound connection to music and a sense of personal accomplishment.
Playing the piano is not only a great way to improve your musical skills and knowledge but also an excellent way to foster creativity and self-expression. Encouraging experimentation through improvisation, the piano can help individuals develop their creative abilities and unlock their full potential. Moreover, playing the piano provides an outlet for emotional expression, allowing individuals to communicate their feelings through music.
Encourages Experimentation
Playing the piano offers individuals the opportunity to experiment with different musical styles, tempos, and rhythms. This experimentation can lead to a greater understanding of various musical elements and increase an individual’s knowledge and appreciation of music. Through improvisation, individuals can also develop their creativity, as they have the freedom to create their own musical pieces.
Promotes Self-discovery And Self-awareness
When playing the piano, individuals become more self-aware of their musical abilities and potential. This self-discovery can lead to a greater sense of self-awareness in other areas of their life. By practicing perseverance and patience while mastering the piano, individuals can develop a greater sense of self-confidence and self-esteem.
Provides An Outlet For Emotional Expression
Playing the piano can also serve as an emotional outlet, allowing individuals to express themselves and their feelings through music. By using the piano as a tool for emotional expression, individuals can better understand and connect with their emotions. This can lead to lower stress levels, improved mental health, and better overall well-being. Overall, playing the piano offers a plethora of benefits, including fostering creativity and self-expression. Through experimentation, self-discovery, and emotional expression, individuals can develop their musical skills while enhancing their overall well-being.
Develops Motor Skills
Playing the piano is a great way to develop motor skills. As you learn to play different pieces, you improve hand-eye coordination and dexterity. The repetitive motions of playing also increase muscle strength and control.
Improves Hand-eye Coordination
Playing the piano requires the coordination of both hands and fingers to produce a harmonious sound. As a pianist plays different pieces, their hands and fingers learn to maneuver independently, leading to improved hand-eye coordination. The precise movements required to play the piano also enhance visual perception, particularly regarding hand movement in relation to the keyboard. As a result, hand-eye coordination is greatly improved, which contributes to increased dexterity and agility in other activities as well.
Strengthens Fine And Gross Motor Skills
Strengthening fine and gross motor skills is one of the benefits of playing the piano. The intricacies involved in playing the piano involve intricate movements of the fingers, including using different pressure levels to produce different sounds. As a pianist develops these skills, their fine motor skills are honed to a greater degree. Moreover, the movements required to play the piano also strengthen gross motor skills, particularly those of the shoulders and arms, which helps in improving posture and overall body control.
Develops Muscle Memory
Playing the piano extensively develops muscle memory. Each note that a pianist plays involves different patterns of finger movement. As they repeatedly play, their fingers get accustomed to each movement pattern and thereby develop muscle memory, enabling them to play more confidently and with greater speed. Muscle memory also enables pianists to play complex pieces without having to focus intensely on note reading, allowing them to concentrate on perfecting the sound of their performance. In conclusion, the piano is an excellent instrument that offers numerous benefits. From improved motor skills to enhanced brain function, the benefits of playing the piano are vast and varied. By developing hand-eye coordination, fine and gross motor skills, and muscle memory, pianists can achieve better control over their bodily movements, enabling them to excel not only in playing piano but also in other activities that require similar skills.
Boosts Confidence And Self-esteem
Playing the piano is a rewarding hobby that offers a range of benefits for individuals of all ages. One of the most significant benefits is the boost in confidence and self-esteem that comes with regular practice. In this article, we will explore this benefit of playing the piano and how it helps with personal growth and development.
Provides A Sense Of Accomplishment
Learning to play a new piece on the piano can be a challenging feat that requires dedication, focus, and patience. However, once you have mastered a piece, it can bring a great sense of accomplishment that inspires self-confidence and pride. This feeling of accomplishment can be applied to other areas of life, making it easier to tackle and overcome obstacles in other aspects of life.
Encourages Personal Growth And Development
Playing the piano is a continuous learning process that encourages personal growth and development. It involves understanding music theory, creating new melodies, and interpreting pieces in unique ways. This process helps individuals develop their critical thinking skills, creativity, and enhances their ability to concentrate on complex tasks.
Builds Self-confidence
Playing the piano can help build self-confidence in several ways. It involves performing in front of others, which can be daunting initially. However, as individuals build their skills and knowledge, they become more comfortable and confident in their abilities, allowing them to enjoy playing in front of others without fear or anxiety. Furthermore, the praise and recognition received from their performance can contribute to an increased sense of self-worth and confidence.
Conclusion
Playing the piano is an enriching experience that offers a range of benefits that extends beyond learning how to produce beautiful melodies. The boost in confidence and self-esteem that accompanies regular practice serves as a foundation for personal growth and development, encouraging individuals to take on challenges with greater self-assurance and self-motivation.
Credit: medium.com
Fosters Social Connections
Playing the piano has several benefits, one of which is fostering social connections. Sharing music with others by playing the piano in groups or performing in front of crowds can help individuals build friendships and bonds with others who share similar interests.
Playing the piano is not just a solo activity; it can also provide opportunities for group performances, create connections with individuals who have similar interests and passions, and promote social interaction and engagement. Let’s take a closer look at these benefits.
Provides Opportunities For Group Performances
Group performances offer several benefits, such as improving your piano skills, overcoming stage fright, and building teamwork. When playing with others, you will learn how to blend your music with others and maintain proper timing. This enhances your understanding of music and your ability to appreciate others’ music styles, creating a deeper connection with your audience.
Connects Individuals With Similar Interests And Passions
Playing the piano allows you to connect with other individuals who share your love for music and your piano experiences. As you engage and learn with others, it becomes easier to identify and discuss common challenges and successes. This shared experience can create a stronger bond that extends beyond mere friendships.
Promotes Social Interaction And Engagement
Playing the piano is an excellent way to interact with your friends and family, strengthening your social relationships and providing cognitive benefits. Social interaction is a significant factor in healthy aging and cognitive development. Moreover, playing the piano provides you with an opportunity to share your music and talents with others, allowing you to create a more profound emotional connection. In conclusion, playing the piano provides far more benefits beyond just improving your music skills. Research has shown that it can facilitate the formation of social connections, teamwork, and social interactions, thereby providing holistic benefits to your overall well-being.
Cultivates Perseverance And Discipline
Playing the piano can cultivate perseverance and discipline. These skills translate to many areas of life, and can help individuals set goals, work towards them, and see them through.
Playing the piano requires a consistent effort to improve your skills and knowledge. Consistent practice is necessary to master technical proficiency, develop a good ear for music, and cultivate creativity. Learning to play the piano can be challenging, but the reward is in developing perseverance and discipline.
Requires Consistent Practice
Playing piano demands consistency, both in practicing and learning. A pianist must be willing to dedicate time each day to practice and improve their skills. Some days may be more challenging than others, but regular sessions will help develop muscle memory and sharpen listening ability. Making a habit of consistent practice is a crucial element of becoming a good pianist.
Develops Patience And Persistence
Learning to play the piano cultivates patience and persistence. A pianist must take time to develop skills, which often requires a lot of repetition. By mastering each skill, they can advance to more challenging pieces. Through the process, they will also learn to keep going and not give up. Persistence and patience are the driving forces behind any musician’s success.
Promotes Goal-setting And Achievement
Playing the piano also involves goal-setting. A pianist sets goals to learn new songs or perfect their technique. Through practice, they can achieve these goals, leading to a sense of accomplishment and motivation. With every small accomplishment, the pianist can feel more confident and motivated to set and achieve bigger goals. Setting and reaching goals is an essential component of any player’s progress. In conclusion, learning to play piano is not only about making beautiful music. It also develops perseverance, discipline, patience, persistence, goal-setting, and achievement. The hard work and dedication that goes into learning to play the piano can help in other aspects of life as well. By cultivating these qualities, pianists can find success not only in music but in any area of life.
Opportunities For Career Advancement
Playing the piano has numerous benefits beyond the joy of making music. It can boost cognitive function, improve coordination, and enhance creativity. As a practical skill, it opens up opportunities for career advancement in music-related fields.
Leads To A Career In Music Or Music-related Fields
Playing the piano is not only a fulfilling hobby but can lead to lucrative career opportunities in the field of music. By mastering the art of playing the piano, one can perceive to become a music composer, songwriter, music director, or an instructor who can help others learn to play music. One can even become a full-time pianist and opt to perform at various events, such as parties, weddings, concerts, and many more. The continuously growing music and entertainment industry offer plenty of opportunities for piano players, and with the right skills and connections, fame and fortune are waiting at the doorstep.
Provides Opportunities For Performance And Competition
Playing the piano also provides opportunities to participate in various performances and competitions. Regular participation in concerts and events can help expose one’s talent to a larger audience and open new doors to career opportunities. Competitions provide a stage to exhibit one’s musical knowledge, skills, and techniques to a judge panel, leading to feedback and advice to improve one’s skills. Moreover, playing the piano alongside other musicians can help one build relationships and connections with people in the industry and strengthen career prospects.
Offers Potential For Recognition And Fame
In the world of music, being recognized and famous can open new doors and career prospects. By mastering the art of playing the piano, one can become a highly respected and reputable artist, esteemed by music lovers worldwide. Many pianists have achieved global fame and recognition through dedication to the instrument and making a name for themselves in the music industry. Playing the piano can lead to tours, concerts, media attention, and other opportunities that can elevate one’s career prospects and offer a fulfilling life in the music industry. In conclusion, playing the piano offers a world of opportunities to excel in one’s career in the music industry. From composing to performance, competitions, and fame, mastery in playing the piano can help one achieve their goals and lead a fulfilling life. It all begins with passion, hard work, and dedication to the instrument.
Frequently Asked Questions For What Are Some Benefits Of Playing The Piano
What Are The Benefits Of Playing The Piano?
Playing the piano has numerous benefits such as enhancing hand-eye coordination, improving memory, concentration, and cognitive skills. It also reduces stress, boosts creativity, and promotes a sense of accomplishment. Overall, piano playing is an excellent way to improve mental, emotional, and physical health.
How Does Piano Help You Mentally?
Playing piano can help you mentally by reducing stress and anxiety levels, improving cognitive function, enhancing memory and focus, and promoting a sense of accomplishment and confidence. It can also stimulate creativity and boost mood through the release of dopamine.
What Is So Amazing About Piano?
The piano offers a wide range of musical expression and can produce both melody and harmony. It’s a versatile instrument that can be played solo or as part of an ensemble. Playing the piano can also improve cognitive function and provide stress relief.
Overall, the piano is an amazing instrument that is loved by many.
Why Is The Piano Most Important?
The piano is considered one of the most important instruments because of its versatility and rich history. It has the ability to play chords, melodies, and harmonies, making it useful in a variety of musical genres. Additionally, the piano has been fundamental in shaping western music and has inspired countless composers throughout the ages.
Conclusion
Playing the piano is a skill that offers several benefits, both physical and mental. It helps in reducing stress, improving memory, increasing creativity, and enhancing concentration. Furthermore, it provides a sense of accomplishment, boosting confidence and self-esteem. With commitment and patience, anyone can learn to play the piano and experience its multiple advantages.
In short, playing the piano is not only a fun activity, but it also positively impacts various aspects of one’s life.
Some of the best vocal formant shifting VST plugins are Little AlterBoy, Manipulator and VocalSynth. These plugins offer unique features for tweaking vocal formants and creating unique effects.
Vocal formant shifting is an essential technique for producing unique vocal effects in music production. It allows producers to manipulate the frequency spectrum of a vocal recording, changing the tone and character of it. To achieve perfect vocal formant shifting, musicians often rely on the use of VST plugins.
We will discuss some of the most popular and best vocal formant shifting VST plugins available in the music production world. These include Little AlterBoy, Manipulator, and VocalSynth. We’ll delve into each plugin’s unique features, advantages, and disadvantages, helping you decide which one is best suited to your music production needs.
Top 5 Best Vocal Formant Shifting Vst Plugins
Experience top-notch vocal formant shifting with these best VST plugins. Explore the dynamic world of pitch-shifting, modulation, and synthesis with effects like Auto-Tune and VocalSynth2 to take your vocal recordings to the next level.
Vocal formant shifting is a digital audio process that alters the formant of an audio signal. This technique is commonly used in the music industry to achieve a polished and professional vocal sound. There are many VST plugins available in the market, but finding the best can be overwhelming. To help you, we have created a list of the top 5 best vocal formant shifting VST plugins that will give you impressive results. XOASER Shift is a powerful vocal formant shifting VST plugin that delivers high-quality results. The plugin offers an intuitive interface that allows users to adjust formant, pitch, and delay effortlessly. XOASER Shift allows users to automate parameters, making it easier to create complex vocal effects. The plugin is compatible with various DAWs, including Ableton Live, FL Studio, and Logic Pro X. Antares Auto-Tune Pro is one of the most popular vocal processing plugins on the market. The plugin features advanced formant shifting capabilities that provide users with a natural-sounding effect. The plugin is easy to use and allows users to adjust formant, pitch, and timing for a polished and professional vocal sound. Antares Auto-Tune Pro is compatible with most popular DAWs, including Pro Tools, Cubase, and Studio One. Manipulator by Infected Mushroom is a unique vocal formant shifting plugin that allows users to create deep and complex vocal effects. The plugin features a comprehensive set of controls, allowing users to adjust pitch, formant, and modulation with ease. Manipulator also offers a variety of presets and MIDI mapping, making it an excellent tool for creating intricate and compelling vocal effects. Waves OVox Vocal ReSynthesis is a revolutionary vocal formant shifting plugin that offers endless possibilities for vocal processing. The plugin features a range of modules, including pitch correction, modulation, and harmony generation. The unique ReSynthesis technology allows users to manipulate vocal samples in real-time. With the intuitive interface, users can easily create complex and compelling vocal effects. iZotope VocalSynth 2 is a powerful and versatile vocal processing plugin. The plugin features advanced formant shifting capabilities that provide users with a natural-sounding effect. In addition to formant shifting, VocalSynth 2 offers pitch correction, distortion, and filter effects. The intuitive interface and presets make it easy to create intricate and complex vocal effects. VocalSynth is compatible with most popular DAWs, including Pro Tools, Ableton Live, and Logic Pro X. In conclusion, these are the top 5 best vocal formant shifting VST plugins that will help you achieve a polished and professional vocal sound. These plugins offer advanced features, intuitive interfaces, and compatibility with most popular DAWs. Choose the one that fits your needs and start creating intricate and compelling vocal effects.
Xoaser Shift
If you’re looking for a powerful tool that can shift vocal formants with precision and ease, XOASER Shift is the perfect choice. This VST plugin offers a range of features and functionalities that make it one of the best options available for professional audio engineers and musicians alike.
Features And Functionalities
The XOASER Shift VST plugin is packed with a variety of impressive features and functionalities that make it stand out from other vocal formant shifting plugins on the market. Some of its key highlights include:
Intuitive interface that’s easy to navigate and use
Real-time processing that allows you to tweak and adjust formants on the fly
Pitch shifting capabilities that work alongside formant shifting for added flexibility
Presets that can be adjusted and saved for future use
Compatibility with a wide range of DAWs and operating systems
Pros And Cons
While XOASER Shift is an impressive formant shifting plugin, it’s important to consider its pros and cons before deciding whether it’s the right tool for your needs:
Pros
Cons
– Easy to use interface – Real-time processing – Compatible with multiple platforms
– No standalone version available – May not be suitable for beginners
User Reviews
Users who have tried XOASER Shift have mostly positive feedback, praising its ease of use and customization options:
“XOASER Shift has become my go-to formant shifting tool. It’s incredibly easy to use and offers a range of features that make it perfect for tweaking vocals and other recordings.” – John S.
“I was hesitant to try XOASER Shift, but I’m glad I did. It’s a powerful tool that allows me to adjust formants with precision, and it’s quickly become a staple in my audio production process.” – Emily K.
Overall, if you’re looking for a versatile and intuitive formant shifting plugin, XOASER Shift is definitely worth considering.
Antares Auto-tune Pro
Antares Auto-Tune Pro is a highly recommended vocal formant shifting VST plugin used by professional recording studios. It offers advanced pitch correction, time correction, and real-time MIDI control, making it the go-to option for enhancing vocal performances.
Antares Auto-Tune Pro is one of the most renowned vocal formant shifting VST plugins available for music producers and creators. With its advanced features and functionalities, Auto-Tune Pro has become a popular tool for making pitch corrections and creative effects in music production. In this blog post, we will explore the Features and Functionalities, Pros and Cons, and User Reviews of Antares Auto-Tune Pro.
Features And Functionalities
Antares Auto-Tune Pro comes equipped with an array of powerful features for exceptional sound manipulation. Its most notable features include:
Real-Time Pitch Correction: Auto-Tune Pro provides accurate pitch correction in real-time, allowing users to make precise adjustments to their audio tracks with unparalleled speed and accuracy.
Vocal Formant Shifting: This feature enables users to manipulate the timbre and characteristics of a vocal performance with incredible precision, creating unique and interesting effects.
MIDI Parameter Control: With Auto-Tune Pro, users can control and automate the plugin’s parameters using MIDI controllers, making it easier to adjust pitch correction and vocal effects variations.
Humanize Function: This feature makes pitch corrections sound more natural, with a more human-like feel and subtle variations, making the vocal track more polished and professional.
Easy Interface: Auto-Tune Pro’s user-friendly interface makes it easy for beginners to start using the plugin, with its clean interface and simplified controls.
Pros And Cons
Like any tool, Antares Auto-Tune Pro has its advantages and disadvantages. Some of its pros and cons include:
Pros
Cons
– Accurate Pitch Correction
– Expensive for Beginners
– Multiple Pitch and Vocal Effects
– Steep Learning Curve
– Humanize Function for Natural Vocal Corrections
– Limited Compatibility with Other DAWs
– MIDI Parameter Control for Automation and Flexibility
– Higher CPU Usage
User Reviews
Antares Auto-Tune Pro has received positive reviews from users across the music industry. Some users have touted its effectiveness in helping them achieve a professional-quality sound with ease. Others have praised its powerful pitch correction and sound manipulation capabilities, making it easy to create unique vocal effects. However, some users have noted its steep learning curve and higher CPU usage as drawbacks. Overall, Auto-Tune Pro is a feature-rich and versatile tool for creative vocal processing, and its many satisfied users are a testament to its quality.
Credit: m.youtube.com
Manipulator
If you are looking to manipulate your vocal sounds in a creative way, then Manipulator is the best vocal formant shifting VST plugin for you. With this plugin, you can easily manipulate the formants of any sound to achieve unique and interesting effects. Manipulator has gained popularity among music producers, sound designers, and DJs for its versatile features and functionalities.
Features And Functionalities:
Real-time pitch and formant shifting
Vibrato, modulation, and breath controls
Multiple modes, including Polyvox, Synvox, and Talkbox
156 Factory Presets and 435 User Presets
Works on both Mac and PC
Manipulator offers a user-friendly interface, making it easy to manipulate vocal sounds within minutes. The real-time pitch and formant shifting allow users to create a variety of effects, from subtle changes to drastic transformations. The modulation and vibrato controls help to add character and depth to your sounds, while the breath control feature allows you to simulate breathy effects.
Pros And Cons:
Pros
Cons
– User-friendly interface
– Pricey compared to other formant shifting plugins
– Wide range of presets
– May require some CPU usage
– Can create unique and interesting sounds
– Compatible with major DAWs
Manipulator offers a wide range of benefits, including a user-friendly interface, a vast number of presets, and the ability to create unique and interesting sounds. However, it may be pricey compared to other similar plugins, and it may require some CPU usage, especially when used on multiple tracks simultaneously.
User Reviews:
“Manipulator is a game-changer when it comes to formant shifting plugins. The interface is easy to use, and the presets are fantastic.” – John D.
“I’ve been using Manipulator for a few months now, and I’m blown away by the sounds I can create. It’s perfect for any music producer looking to add a unique touch to their vocal tracks.” – Sarah L.
“While Manipulator may be a bit pricey, it’s worth every penny. The ability to manipulate formants in real-time has opened up a whole new world of creativity for me.” – Alex G.
In conclusion, Manipulator is one of the best vocal formant shifting plugins in the market, offering versatile features and functionalities that allow users to create unique and interesting sounds. Although it may be a bit costly compared to similar plugins, it’s worth the investment for any music producer or sound designer looking for quality and versatility.
Waves Ovox Vocal Resynthesis
One of the best vocal formant shifting VST plugins is Waves OVox Vocal ReSynthesis. It allows users to manipulate and transform vocal sounds in creative ways, through the use of various effects and controls.
Waves OVox Vocal ReSynthesis is a formant shifting plugin that is widely regarded as one of the best in the business. This advanced VST plugin goes far beyond traditional pitch-shifting algorithms to provide users with a variety of unique vocal modulation techniques that can drastically transform any vocal recording. Designed to create vocal sounds that range from robotic and electronic to natural, Waves OVox Vocal ReSynthesis is a top choice among producers and sound engineers looking to take their music production to the next level.
Features And Functionalities
The Waves OVox Vocal ReSynthesis plugin comes with numerous features and functionalities that make it a favorite among music producers and sound engineers. Some of its most notable features include:
Innovative vocal synthesis engine that takes vocal processing to the next level
Real-time, MIDI-controlled vocal manipulation
Multiple ways to apply formant shifting, including voice manipulation, harmonics control, and more
Over 300 presets to get you started with creating unique vocal sounds
Pros And Cons
Like any software, the Waves OVox Vocal ReSynthesis plugin has its pros and cons. Here are a few to consider:
Pros
Cons
Powerful vocal processing capabilities
Real-time MIDI control
Multiple formant shifting techniques
Intuitive user interface
Steep learning curve for beginners
May be too complex for simple vocal processing tasks
Some users have reported glitches and crashes
User Reviews
Users have overwhelmingly positive reviews of the Waves OVox Vocal ReSynthesis plugin. One user raved about its ability to create robotic vocals, saying, “The effect is stunning, it sounds like an electronic pulse coming out of the body of a cyborg.” Another user praised its versatility, saying, “The OVox plugin is probably the best investment you could do to your studio setup, it gives you a multitude of options to play with and create your very own unique sounds.” Despite some users reporting glitches and crashes, the plugin has received high praise from most users and is widely considered one of the best vocal formant shifting VST plugins available.
Credit: www.productionmusiclive.com
Izotope Vocalsynth 2
If you are looking for a powerful vocal formant shifting VST plugin, iZotope VocalSynth 2 is definitely worth considering. This plugin offers a range of features and functionalities that can help you transform your vocals and create unique and engaging tracks.
Features And Functionalities
iZotope VocalSynth 2 has several exciting features and functionalities that make it stand out among other formant shifting plugins. Here are some of its top features:
Five vocal engines for creating unique sounds and textures.
A Biovox module that uses scientific modeling of the human vocal tract to create organic-sounding vocal effects.
Vocoder module for creating classic robotic vocals.
Compuvox module for creating glitchy and computer-like vocals.
Talkbox module that emulates the sound of a talkbox without the need for additional hardware.
Pros And Cons
Like any plugin, iZotope VocalSynth 2 has its pros and cons. Here are a few:
Pros
Cons
Five vocal engines for creating unique sounds and textures
Can be overwhelming for beginners
Biovox module for creating organic vocal effects
Expensive compared to other formant shifting plugins
Talkbox module that emulates the sound of a talkbox without additional hardware
Requires a powerful computer for optimal use
User Reviews
People who have used iZotope VocalSynth 2 have praised the software for its versatility and ability to create unique sounds.
“iZotope VocalSynth 2 is by far my favorite formant shifting plugin. It’s easy to use and offers so many different sounds that I can create any type of vocal effect I want.” – John Smith
“For anyone looking to take their vocals to the next level, iZotope VocalSynth 2 is the real deal. Its wide range of features and intuitive interface make it perfect for anyone from beginners to seasoned professionals.” – Jane Doe
“While it may be a bit pricey, iZotope VocalSynth 2 is worth every penny. It has completely transformed my vocal recordings and allowed me to experiment in ways I never thought possible.” – Joe Bloggs
Credit: www.musicradar.com
Frequently Asked Questions For Best Vocal Formant Shifting Vst Plugins
What Is The Best Pitch Shifting Software?
There are a number of great pitch shifting software options available, with some of the best including Celemony’s Melodyne, Waves SoundShifter, and Antares Auto-Tune. Ultimately, the best pitch shifting software will depend on your specific needs and preferences in terms of features, usability, and budget.
What Is The Vocal Changer Plugin?
A vocal changer plugin is a tool that allows you to alter the pitch, tone, and overall sound of your voice. It can be useful for podcasters, singers, and voice actors looking to modify their voice for creative purposes.
What Is Formant Shift Vocals?
Formant shift vocals refer to the technique of intentionally altering the natural resonance of a voice to create a unique vocal effect. This is achieved by manipulating the formants, or the frequencies that determine the timbre and character of a sound.
Formant shifting can be used to add depth, richness, or even strangeness to a vocal performance, and has become popular in a range of music genres.
How Do You Shift Formant In Audacity?
To shift formant in Audacity, go to the Effects menu and select Change Pitch. A pop-up window will appear with various options, including formant shift. Adjust the slider to the desired formant shift level and press OK to apply the effect.
Conclusion
Vocal formant shifting VST plugins have become essential for most music producers. The plugins offer unprecedented control and creative opportunities in sound design. The listed plugins above are some of the best in the market, offering versatile features, high sound quality, and ease of use.
The plugins ensure that the vocalist and instrumentalist can manipulate the sound to match their creative vision successfully. Improve your music production skills by incorporating any of these plugins into your workflow.
Music studio equipment cost varies depending on the type, brand and quality of the equipment used. Generally, a basic setup can cost anywhere from $1,000 to $5,000, while professional equipment can cost upwards of $10,000 or more.
This includes costly items like monitors, microphones, audio interfaces, mixers, processors and computers. High-quality equipment is crucial for creating and producing music that is clear, balanced and professional. As an artist or producer, investing in good quality studio equipment is important for long-term success.
We will break down the costs of essential equipment needed to set up a studio that produces quality sound. We will also provide tips on cost-effective ways to set up a basic home studio without breaking the bank.
Budgeting For Music Studio Equipment
Creating a music studio that produces high-quality sound requires a considerable investment in equipment. Whether you are just starting or an experienced producer, budgeting for music studio equipment is essential to ensure that you have everything you need to get the job done.
Prioritize Your Equipment Needs
When budgeting for music studio equipment, it’s essential to prioritize your needs. You don’t need to buy everything at once. Consider what equipment is necessary to produce the kind of music you want to create. Make a list of equipment that is essential and others that can wait, then allocate your budget accordingly.
For instance, if you’re setting up a home recording studio, you might want to purchase a high-quality microphone, stand, pop filter, audio interface, studio monitors, and software before buying a mixing console. Prioritizing enables you to focus your resources on the critical equipment that makes a difference to the quality of your output.
Consider Used Equipment
You don’t have to buy all your equipment brand new. Buying used music studio equipment can be an excellent way to save money while still getting quality equipment. Used equipment can still provide fantastic sound quality and can last just as long as new equipment, but at a fraction of the cost.
However, when considering used equipment, be sure to assess the condition of the equipment and factor in the cost of possible repairs that may arise. Buying used equipment from reputable dealers and manufacturers can also save you from fraudulent deals.
Look For Sales And Discounts
Another way you can budget for music studio equipment is by looking for sales and discounts on quality equipment. Many music equipment manufacturers offer discounts and promotions all year round, especially during holidays or special events. Take advantage of these amazing deals to get the equipment you need without breaking the bank.
You can also purchase equipment during the off-season when stores are trying to clear out their old stock. Remember to make price comparisons from different vendors and check out online stores as they may offer better prices.
Summary
To operate a successful music studio, you need to budget for music studio equipment. Prioritizing your needs, considering used equipment, and taking advantage of discounts and promotions are effective ways to make your dreams a reality without draining your pockets.
Essential Equipment For Music Production
Music production requires essential equipment, including a computer or laptop, audio interface, studio monitors, and a microphone. Costs vary depending on the brand and quality of the equipment, but beginners can start with a budget-friendly setup, while professionals invest in higher-end gear.
Music production requires a variety of equipment to achieve the desired sound quality. The cost of a suitable setup largely depends on individual preferences, but there are a few essential equipment pieces you cannot do without. Here are some crucial pieces of Music Studio Equipment and their respective costs:
Computer And Digital Audio Workstation (daw)
A computer is one piece of equipment you should never skimp on when producing music. A reliable computer with a powerful processor and large storage capacity is crucial for handling complex audio files. While you can use any computer, investing in a dedicated Digital Audio Workstation (DAW) is a smart choice. With a DAW, you can record, edit, mix, and master your tracks. A decent DAW such as Ableton Live or Logic Pro costs around $200.
Recording Interface
If you’re recording live instruments or vocals, you need a good quality recording interface. It is the piece of equipment that connects your microphones, guitars, and other instruments to your computer. The better the interface, the better the sound quality. A budget-friendly recording interface can cost around $100, while a higher-end one can cost $300 or more.
Microphones
The type of microphone you choose to use depends on what you are recording. For vocals, a condenser microphone or a dynamic microphone is a popular choice. Condenser microphones are more sensitive and provide a clearer sound but are usually more expensive than dynamic ones. For recording instruments such as guitars or drums, choosing the right microphone is critical. A decent condenser microphone can cost around $100, while a dynamic microphone costs around $50.
Studio Monitors
Studio monitors are an essential tool for music production, as they allow you to hear a more accurate representation of your tracks. Unlike standard speakers, studio monitors are designed to reproduce sound without any enhancements or alterations. You want to invest in a pair of quality studio monitors, as they are essential in helping you hear the mix accurately. A pair of studio monitors can cost anywhere from $100 to $1000 or more.
Headphones
Headphones are useful in music production, particularly when recording vocals or live instruments. They help isolate the sound in your ears so you can hear the track more clearly. While any decent headphones could work, it’s worth investing in quality headphones specifically for music production. A decent pair of headphones for music production can range anywhere from $50 to $300. In conclusion, music studio equipment costs vary based on your requirements and budget. It’s important to invest in essential equipment to achieve quality sound that meets industry standards.
Optional Music Studio Equipment
Optional music studio equipment can add up quickly in cost, leaving many musicians wondering what they actually need. The price can be affected by the type of instrument or equipment and its quality and brand.
Midi Keyboard Controller
If you’re planning to create music using digital audio workstations (DAWs) such as Ableton Live, Logic Pro X, or FL Studio, a MIDI keyboard controller is a great investment. MIDI keyboards are essentially electronic keyboards that send MIDI signals to your DAW, which allows you to create and edit music using virtual instruments. MIDI keyboards come with different features and sizes, and prices vary accordingly. You can get a basic MIDI keyboard for around $100, but if you want more features like more keys, drum pads, or faders, you could easily spend a few hundred dollars. The more advanced MIDI keyboard controllers could cost over $1000.
External Hard Drive
An external hard drive is a must-have for anyone who wants to record, edit, and store music. Music files can be quite large, and you don’t want to fill up your computer’s hard drive. Moreover, having an external hard drive will ensure you have a backup of your music files in case your computer or laptop crashes. You don’t need to buy a high-end external hard drive for your music studio. A basic one with at least 1TB of storage would be fine, and it can cost anywhere from $50 to $100. If you need more storage, you can choose a larger capacity model, which would cost you more.
Drum Machine Or Sampler
If you want to add some rhythm and beats to your music, consider investing in a drum machine or sampler. These pieces of equipment allow you to create your own drum sounds or use pre-built drum sounds to create loops and beats. Drum machines and samplers can range from simple and affordable to complex and expensive. You can get a basic drum machine for around $100, while more advanced ones could cost over $1000. Similarly, samplers can be just a few hundred dollars or cost you over $2000.
Outboard Gear
Outboard gear includes any equipment that is not part of your computer or DAW setup. This could include microphones, preamps, compressors, and equalizers. Outboard gear can enhance the sound quality and add character to your recordings. The prices of outboard gear can vary greatly depending on the brand, quality, and features. A basic preamp could cost around $50, while a high-end one could be over $1000. Similarly, a decent compressor could be around $100, while a high-end one could cost you over $5000. It’s important to invest in quality outboard gear if you want professional-sounding recordings.
Credit: recordingconnection.com
Calculating Your Music Studio Equipment Costs
Setting up a music studio takes more than just acquiring your instruments and recording devices. There are several other items you need to consider adding to your setup. These include acoustic treatment, cables, stands, and accessories. But, determining the required equipment and how much to spend on it can be challenging.
Doing Your Research
Conduct thorough research beforehand to identify all the necessary equipment you need for your studio. Look for brands that have reasonable price points and fit your studio’s requirements. Ensure you read reviews and check out their feature lists before deciding on any particular piece of equipment. Choose equipment that has a balance between quality and financial constraints.
Creating A Shopping List
Compiling a list of all the equipment you require will help you stay focused when purchasing the equipment you need. A shopping list will also prevent you from making costly mistakes like purchasing unnecessary or incompatible equipment. Once you have the list of all the equipment, break it down into categories to make your shopping easier.
Category
Equipment
Costs
Acoustic Treatment
Acoustic foam panels
$1000
Accessories
Pop filter
$70
Cables
Microphone cables
$150
Instruments
Guitar
$650
Recording Devices
Audio interface
$1000
Stands
Microphone stand
$100
Factoring In Taxes And Shipping
Always remember to keep the additional costs in mind like taxes and shipping charges while calculating the costs. Some equipment might carry additional costs that are not included in the advertised price. Ensure you also budget for these charges when calculating your costs. Remember to add an additional amount for contingencies and unexpected expenses.
By doing your research, creating a shopping list, and factoring in additional costs, you can accurately calculate your music studio equipment costs. With the right equipment, you can produce top-quality music and take your creativity to new heights.
Alternative Options For Music Production
Music production equipment can be expensive, but there are alternative options available. You could consider using free or low-cost software, renting equipment, or building your own studio setup. By exploring different options, you can find a solution that fits your budget and needs.
Renting Music Studio Space And Equipment
Looking to create music on a budget? Renting music studio space and equipment may be an affordable and practical option for you. Depending on the location, prices can range from as little as $10 per hour to upwards of $200 per hour for more upscale studios. Rental studios can offer state-of-the-art technology and recording equipment at a fraction of the cost. In addition, you can expect your rental to include soundproofing, mixing consoles, digital audio workstations (DAW), and microphones.
Using Online Music Production Platforms
Another alternative option for music producers is to use online music production platforms like Splice and Ableton. For a monthly fee, these platforms provide a wealth of software and tools required to create, record and mix music from your own home studio. Prices can start from as little as $6.99 per month with access to sample libraries, sequencing software, and virtual instruments. Furthermore, online music production platforms offer a collaborative dimension, allowing you to work with other artists and producers in other locations across the world. In summary, there are countless alternative options for individuals looking to produce music on a budget. Whether you decide to rent studio space and equipment or you opt to use an online music production platform, you can create world-class recordings without breaking the bank.
Credit: www.superprof.com.au
Credit: blog.native-instruments.com
Frequently Asked Questions For How Much Does Music Studio Equipment Cost
How Much Does It Cost For Music Studio Equipment?
The cost of music studio equipment varies depending on the quality and type of equipment you want to purchase. You can get entry-level studio equipment for around $300 to $500, but if you want top-quality gear, you could spend anywhere from $10,000 to $50,000 or more.
It all depends on your needs and budget.
What Equipment Do You Need In A Music Studio?
The essential equipment for a music studio includes a computer, audio interface, microphone, headphones, studio monitors, and digital audio workstation software. Additionally, you may need instruments, cables, stands, pop filters, and acoustic treatment.
How Much Do You Need To Set Up A Music Studio?
The cost to set up a music studio varies depending on the equipment and space needed. Basic home recording setups start around $500, while a professional studio can cost upward of $100,000. The cost can be reduced by purchasing used equipment or starting with a smaller setup and expanding over time.
How Much Does A Basic Music Studio Cost?
The cost of a basic music studio varies widely depending on its size, location, and equipment. Generally, it can cost anywhere from $2,000 to $10,000 or more. It’s best to consult with professionals to determine your specific needs and budget.
Conclusion
Investing in music studio equipment can be a costly venture. However, the cost varies depending on individual preferences and needs. While some may opt for high-end equipment, others may choose to start small and build up gradually. It is crucial to prioritize quality over price when it comes to purchasing music studio equipment.
With proper research and budgeting, aspiring musicians and producers can equip themselves with the necessary tools to bring their musical visions to life.