Categories
Archive

Switching From Pro Tools To Studio One

Switching from Pro Tools to Studio One is an easy transition, as both are professional-level digital audio software. Pro Tools, the industry-standard for audio production, has been a popular choice for sound engineers and music producers worldwide.


However, with the rise of new software and technology, many are exploring other options. Studio One is a relatively new software that has gained popularity in recent years, offering similar features and functionalities as Pro Tools but with a more user-friendly interface.


We will explore the benefits and drawbacks of switching from Pro Tools to Studio One and offer tips on how to make a smooth transition. Whether you are a seasoned audio professional or a beginner, this article is for you.


Why Studio One Is A Viable Alternative To Pro Tools


Studio One is a highly competitive and professional music production software for digital audio workstations. It is an excellent alternative to Pro Tools as it offers an intuitive interface, unique workflow, and a range of innovative features that are easy to use.


With its advanced audio engine, extensive plugin library, and cost-effectiveness, Studio One is rapidly becoming a preferred choice for music producers who are looking to switch from Pro Tools.

Why Studio One is a Viable Alternative to Pro Tools: Pro Tools has been the go-to digital audio workstation (DAW) for many audio professionals for decades. However, Studio One by Presonus has been gaining popularity as a viable alternative. In this article, we will explore Studio One’s capabilities and why it could be a logical choice for those considering a switch.

Overview Of Studio One’s Capabilities

Studio One is a full-featured DAW with a robust set of tools and functionalities. Here are some of its key capabilities:

  • Intuitive drag and drop interface
  • Powerful audio processing with a 64-bit floating point resolution
  • Support for VST2, VST3, AU, and AAX plugins
  • Extensive MIDI editing capabilities
  • Advanced features like scratchpad, chord track, and arrangement tools
  • Time-stretching algorithms for pitch correction and tempo manipulation

Comparison Between Studio One And Pro Tools

While Pro Tools has been the industry standard for audio recording, mixing, and mastering for years, it does have some limitations. Here is how Studio One compares:

  Studio One Pro Tools
Interface Drag-and-drop with customizable layouts, making it easy to navigate and use Requires a pro-level sound engineering background to navigate
Compatibility Supports VST2, VST3, AU, and AAX plugins Primarily supports AAX plugins, which can be limiting
Price More affordable with three versions to choose from Expensive with a monthly/annual subscription model
Workflow Intuitive workflow that speeds up editing and mixing Can be slow due to its complex interface and routing

Advantages Of Choosing Studio One Over Pro Tools

Here are some advantages of choosing Studio One over Pro Tools:

  • More affordable pricing compared to Pro Tools
  • Intuitive drag and drop interface makes it easy for beginners
  • Supports a broad range of plugin formats
  • Integrated Melodyne essential pitch correction and editing tool
  • Built-in mastering and stem exporting options
  • Superior time-stretching algorithms for pitch manipulation and beat correction

In conclusion, while Pro Tools has been king in the audio industry for a long time, Studio One is fast becoming the choice for those looking for a more affordable, intuitive, and creative DAW. Whether you are a beginner or pro, Studio One’s capabilities could make it the perfect alternative to Pro Tools.

Switching From Pro Tools To Studio One


Credit: m.youtube.com


Making The Transition: Tips And Strategies


Transitioning from Pro Tools to Studio One can be a challenging task, but proper planning and the right strategies can make the process smoother. Tips such as familiarizing oneself with the new software interface and mapping Pro Tools shortcuts to Studio One can ease the transition.

Switching from Pro Tools to Studio One can be a daunting task for any audio professional. Pro Tools has been the industry standard for decades, but Studio One has become increasingly popular due to its user-friendly interface and powerful features. Making the transition can be challenging, but with the right tips and strategies, it can be a smooth and seamless process. In this article, we’ll provide you with some helpful tips and strategies to help you make the switch.

Understanding The Interface And Workflow

One of the most significant challenges of switching from Pro Tools to Studio One is getting accustomed to the interface and workflow. Although both DAW software programs are designed to accomplish the same tasks, they do so in very different ways. Here are some helpful tips to get you started:

  • Take some time to explore the interface – Studio One has a very user-friendly interface that is easy to navigate
  • Check out some YouTube tutorials to help you understand the workflow
  • Read the manual – Studio One has a comprehensive manual that is easy to understand and will answer most of your questions

Converting Sessions From Pro Tools To Studio One

Another hurdle to overcome when switching to Studio One is converting sessions from Pro Tools. Here are some tips to help you with the process:

Tip Description
Create a new session Start by creating a new session in Studio One
Import tracks Import the tracks from your Pro Tools session into Studio One
Adjust settings Adjust the settings to match your Pro Tools session, such as sample rate and tempo

Adapting To Different Shortcuts And Commands

One of the biggest adjustments when switching to Studio One is adapting to the different keyboard shortcuts and commands. Here are some tips to help you adjust:

  1. Start slowly – Try to incorporate a few new shortcuts at a time, rather than trying to learn everything at once
  2. Customize your shortcuts – Studio One allows you to customize keyboard shortcuts to match those in Pro Tools
  3. Practice often – The more you practice using the new shortcuts, the more comfortable you will become with them

In conclusion, switching from Pro Tools to Studio One can be a challenge, but with the right tips and strategies, it can be a smooth transition. Understanding the interface and workflow, converting sessions, and adapting to different shortcuts and commands are all important factors to consider. Remember to take your time and practice often to ensure a successful transition.

Key Features Of Studio One


Studio One offers key features like a drag-and-drop interface, seamless integration with third-party plugins and instruments, customizable layouts, and a range of professional mixing and mastering tools. Making the switch from Pro Tools to Studio One can provide a fresh and efficient approach to music production.

As a music producer, switching from one digital audio workstation (DAW) to another can be both fascinating and daunting at the same time. If you’re a Pro Tools user, you might be wondering what Studio One has to offer. Well, let’s dive into some of the key features of Studio One that make it a powerful DAW worth exploring as an alternative to Pro Tools. H3: Unified Workspace for Recording, Mixing, and Mastering One of the most significant features Studio One offers that makes it an excellent alternative to Pro Tools is its unified workspace for recording, mixing, and mastering. Unlike Pro Tools, which requires you to switch between multiple workspaces for different phases of your project, Studio One enables you to do everything in one place. This feature streamlines the workflow and makes it easier to navigate and stay organized throughout the production process. H3: Drag-and-Drop Functionality for Easy Workflow Studio One offers drag-and-drop functionality that optimizes your workflow and allows you to be more creative. This feature enables you to drag audio files, virtual instruments, and plugins directly onto the project window, making it easier to experiment with different sounds and arrangements. With Studio One, you can create music without being limited by the DAW’s functionality, which is something you’ll undoubtedly appreciate as an experienced Pro Tools user. H3: Advanced Audio Editing Tools Suppose you’re a Pro Tools user, accustomed to its advanced audio editing tools. In that case, you’ll be delighted to know that Studio One offers similar and advanced audio editing tools. Studio One offers non-destructive audio editing, allowing you to edit and manipulate audio files without altering the original files. Additionally, Studio One features Melodyne Essential, a pitch correction software that enables you to correct mistakes and fine-tune vocals with ease. H3: Virtual Instruments and Effects As a music producer, you want access to a wide range of virtual instruments and effects to be able to create a diverse range of sounds. Studio One offers an extensive library of virtual instruments and effects, including its proprietary sampler – the Presence XT. The Presence XT sampler offers an extensive sound library and other features that make it an excellent alternative to Pro Tools’ Structure sampler. Additionally, Studio One has a variety of built-in effects and plugins like EQ, compression, reverb, and delay, further expanding your production toolkit. In conclusion, Studio One is an excellent alternative to Pro Tools and has many features that make it a strong contender. With its unified workspace, drag-and-drop functionality, advanced audio editing tools, and robust library of virtual instruments and plugins, Studio One is a DAW worth exploring in-depth.
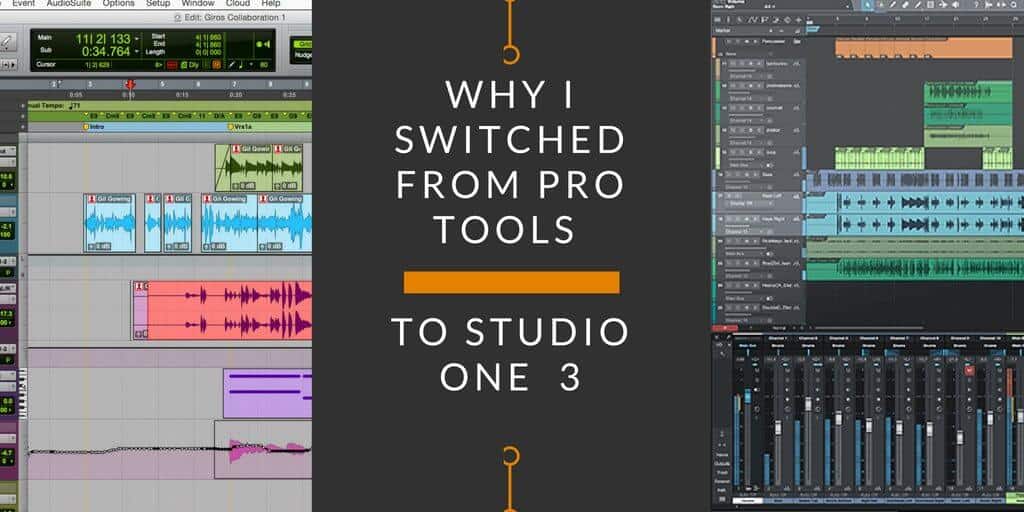
Switching From Pro Tools To Studio One


Credit: mixandmastermysong.com


Advanced Techniques And Tips For Studio One Users


For those looking to switch from Pro Tools to Studio One, there are a number of advanced techniques and tips that can make the transition smoother. Some of the key differences between the two digital audio workstations (DAWs) include the way they handle tracks, arranging, and effects, so it’s important to take these into account when making the switch.


By following best practices and utilizing the unique features of Studio One, users can get the most out of this powerful software.

Advanced Techniques and Tips for Studio One Users: Studio One is known for its simplistic design and efficient workflow, making it an ideal choice for beginners and professionals alike. Once you have switched from Pro Tools to Studio One, it is crucial to understand how to fully utilize the software to achieve your desired sound. This blog will explore advanced techniques and tips for Studio One users to create custom macros and templates, utilize advanced editing features, and maximize efficiency with third-party plugins. Creating Custom Macros and Templates: One of the benefits of using Studio One is the ability to create custom macros and templates to streamline your workflow. With macros, you can automate multiple steps of your editing process into a single command. To create a macro, simply record your desired steps in the Macro Toolbar and assign a key command for easy access. Templates, on the other hand, allow you to customize your preferences and load preset settings for various types of projects. To create a template, save your preferred settings in the Song Setup dialogue. Creating custom macros and templates will save you time and provide a consistent approach for all projects. Utilizing Studio One’s Advanced Editing Features: Studio One’s advanced editing features give you precise control over your audio and MIDI recordings. The Event Inspector panel allows you to edit individual notes, which is exceptionally useful for MIDI editing. The Range Tool can quickly select and edit specific portions of your audio tracks, while the Slice Tool can split a track into separate regions. Additionally, with the Arranger Track, you can quickly reorder sections of your project to create different arrangements. Utilizing Studio One’s advanced editing features will take your projects to the next level. Maximizing Efficiency with Third-Party Plugins: While Studio One has an extensive collection of built-in plugins, third-party plugins offer unique sounds and effects to elevate your music. To maximize efficiency when using third-party plugins, create a default folder for your plugins so they are easily accessible. Set favorites and organize your effects to stay within your workflow. It is also important to use plugins that are compatible with your version of Studio One. Maximizing efficiency with third-party plugins will enhance your creativity, workflows, and productivity. In conclusion, Switching from Pro Tools to Studio One requires an understanding of advanced techniques and tips to fully utilize the software. By creating custom macros and templates, utilizing advanced editing features, and maximizing efficiency with third-party plugins, you can achieve a professional sound. Studio One’s intuitive and efficient design ensures that your workflow will be enhanced, allowing you to focus on the creativity and feel of your music.

Real World Examples: Top Producers Who Have Made The Switch

Moving from one digital audio workstation (DAW) to another can be a daunting task, as each DAW has its own unique features and workflow. While Pro Tools has been the industry standard for years, more and more music producers are transitioning to Studio One, a DAW developed by PreSonus. Let’s take a look at some top producers who have successfully made the switch to Studio One.

Overview Of Producers Who Have Made The Transition

The music industry is filled with prominent producers who are successfully using Studio One for their productions. Some of the top producers who made the transition from Pro Tools to Studio One are:

Producer Name Artists they have worked with
Steve Evetts The Dillinger Escape Plan, Every Time I Die, Story of the Year, Sepultura
Will Putney Thy Art Is Murder, The Amity Affliction, Northlane, Body Count
Ahmed Al-Nasheet Amr Diab, Assala Nasri, Sherine Abdel Wahab, Tamer Hosny

Interview With A Producer Who Switched From Pro Tools To Studio One

We had a conversation with Will Putney, a famous American producer who has worked with bands like Body Count and Four Year Strong, to talk about his experience of switching from Pro Tools to Studio One. Will said, “I made the switch to Studio One because I was getting a bit ‘stale’ with my Pro Tools workflow. Studio One’s interface has a lot of similarities to Pro Tools, so I didn’t face any significant difficulties learning it. Studio One’s drag-and-drop features have improved my workflow efficiency incredibly.” In the end, Will Putney said that Studio One is “one of the best things to happen to me professionally in a long time.”

Demonstration Of A Studio One Production Workflow

Let’s take a deep dive into Studio One’s production workflow using a step-by-step guide to create a simple song:

  1. Start by creating a new song and inserting your desired instruments and plugins.
  2. Use the drag-and-drop feature to record a guitar or other instrument track into the DAW.
  3. Next, record a vocal track. Studio One’s Melodyne integration makes it easy to tune vocals.
  4. Then, arrange the track by dragging and dropping the clips. Studio One’s Arranger track feature makes track arrangement simple and easy.
  5. Use the mixer and various built-in instruments and effects to mix your track to achieve an outstanding sound.
  6. Finally, use the mastering feature to give the track a final boost.

Studio One’s workflow is intuitive and fast, making it a perfect choice for a music producer looking to streamline their workflow without sacrificing any features.

Getting The Most Out Of Studio One: Resources And Support


Maximizing Studio One’s resources and support is key for a smooth transition from Pro Tools. With its intuitive interface and vast library of tutorials and forums, Studio One offers abundant opportunities to enhance your workflow and create professional-level productions.

If you’ve decided to switch from Pro Tools to Studio One, you may be wondering how to get the most out of this powerful software. Thankfully, there are numerous resources and support options available to help you learn the ins and outs of Studio One. In this article, we’ll explore some of the best ways to get started with Studio One and take your recording and mixing skills to the next level.

Official Studio One Documentation And Tutorials

Official documentation and tutorials are an excellent resource when you’re first getting started with Studio One. These resources are designed to help you master the software’s features and capabilities, as well as troubleshoot any issues you may encounter. Some of the best official resources include:

  • PreSonus Studio One Manuals: These documents cover every aspect of the software and are available for free on the PreSonus website. Whether you’re a beginner or an advanced user, the manuals can help you get up to speed quickly.
  • Studio One Tutorials: PreSonus offers a range of tutorial videos on their website, covering everything from basic recording techniques to advanced mixing and mastering tips.
  • Studio One Demo Songs: If you’re looking for inspiration or want to see the software in action, check out the demo songs included with Studio One. These songs showcase the software’s capabilities and offer insight into how to use its features effectively.

Online Communities For Studio One Users

Another excellent resource for Studio One users are online communities. These forums and social media groups are filled with experienced users who can offer guidance and advice on everything from specific features to general recording and mixing techniques. Some of the most popular online communities for Studio One users include:

  • PreSonus Studio One Forums: The official Studio One forums are a great place to ask questions, get help with troubleshooting, and connect with other users. The forums are monitored by PreSonus staff, so you can be sure you’re getting accurate information.
  • Facebook Groups: There are many Studio One groups on Facebook, each catering to different levels of experience. These groups can be a great place to connect with other users and get feedback on your work.
  • Reddit: Although Studio One doesn’t have its subreddit, r/audioengineering and r/musicproduction are both excellent communities for discussing music production in general. You can find experienced Studio One users there, too.

Professional Training And Certification Programs

Finally, if you’re serious about taking your Studio One skills to the next level, consider enrolling in a professional training or certification program. These programs are designed to provide comprehensive training on all aspects of the software, including recording, mixing, and mastering. Some of the best training and certification programs available for Studio One include:

Training Program Description Cost
PreSonus Certified Studio One Professional This program offers in-depth training on all aspects of Studio One and prepares you to take the Certified Studio One exam. The certification demonstrates your expertise with the software and can be a valuable asset when seeking work in the music production industry. $200 for the exam
Lynda.com Studio One courses Lynda.com offers a range of courses on Studio One, covering everything from the basics to more advanced topics like mixing and mastering. The courses are self-paced and allow you to learn at your own speed. $19.99/month or $29.99/month for access to all courses

No matter which Studio One resources you choose to use, remember that practice is key. With time and effort, you can become a master of this powerful software and take your music production skills to new heights.

Conclusion: Choosing The Best Daw For Your Needs


Switching from Pro Tools to Studio One can be a great decision for music producers who are looking for a fresh perspective. With its user-friendly interface and powerful features, Studio One offers an efficient and creative workflow that can enhance the music production process.

Conclusion: Choosing the Best DAW for Your Needs Overview of Pro Tools and Studio One Pro Tools has been the industry-standard digital audio workstation (DAW) for decades. It is used extensively by professionals for music production, post-production, and sound design. Studio One, on the other hand, is a newer DAW introduced in 2009 by PreSonus. Despite being a relative newcomer, it has gained popularity among musicians and producers for its intuitive workflow and powerful features. Factors to Consider When Choosing a DAW When deciding which DAW to use, there are several factors to consider. Firstly, you need to consider your budget and the features you need. Pro Tools is a more expensive option and requires specific hardware, while Studio One offers a more affordable solution with flexible hardware requirements. Secondly, consider the type of music or audio you produce. Pro Tools is a better choice for working on large-scale projects like films and TV shows, while Studio One is better suited for music production. Finally, consider the workflow and interface. Pro Tools can be more complex and difficult to learn, while Studio One offers a more user-friendly experience. Final Thoughts on Making the Switch to Studio One In conclusion, switching from Pro Tools to Studio One can be a beneficial move for many musicians and producers. Studio One offers a more affordable solution with a user-friendly interface and powerful features that cater to the needs of most music producers. When making the switch, take the time to learn the new software and adapt to its workflow. Once you do, you’ll be able to take advantage of the many benefits of using Studio One.

Switching From Pro Tools To Studio One


Credit: www.groove3.com


Frequently Asked Questions For Switching From Pro Tools To Studio One


Is Studio One As Good As Pro Tools?


Both Studio One and Pro Tools are powerful digital audio workstations. Their features and capabilities are comparable, but it ultimately comes down to personal preference and what fits your specific needs as a musician or producer.


Is Presonus Compatible With Pro Tools?


Yes, PreSonus is compatible with Pro Tools. You can use PreSonus hardware with Pro Tools using the Universal Control driver. This driver allows communication between the software and PreSonus devices. Simply download and install the Universal Control driver onto your computer to start using PreSonus with Pro Tools.


Why Do Most Studios Use Pro Tools?


Most studios use Pro Tools because it is the industry standard for audio recording, mixing and editing. It is reliable, efficient, and consistent, with a user-friendly interface. Additionally, Pro Tools offers advanced features for professional audio engineers, making it the go-to choice for all audio production needs.


Is Studio One Good For Producing?


Yes, Studio One is an excellent DAW (digital audio workstation) for producing music. It has a user-friendly interface, powerful audio editing tools, and supports third-party plugins. Many professional producers use it for a variety of music genres, from electronic music to pop and rock.


Conclusion


To sum up, making the switch from Pro Tools to Studio One can be a daunting task at first, but the benefits outweigh the initial learning curve. Studio One offers a quicker and more intuitive workflow, with its drag-and-drop interface and customizable shortcuts.


Its excellent sound quality and extensive plugin collection make it a great option for mixing and mastering as well. With a little patience and practice, you may find that Studio One becomes your new go-to DAW.


Categories
Archive

How To Make Your Snare Drum More Punchy

To make your snare drum more punchy, consider adjusting the tuning, changing the drumhead, and experimenting with damping techniques. To achieve a more aggressive sound, increase the tension of the top drumhead, and decrease the tension of the bottom drumhead.


If you prefer a brighter tone, switch to a thinner drumhead. Additionally, try using a snare weight or adding tape or moon gel to dampen the overtones. With these simple adjustments, you can easily transform the sound of your snare drum to better suit your musical style.


When it comes to creating an impactful sound and standing out in a mix, the snare drum is an essential element in any drummer’s arsenal. Whether you play rock, jazz, or any other genre, having a punchy snare can elevate your performance and make it more memorable. We will explore the different ways to make your snare drum sound punchier. From adjusting the tuning to experimenting with dampening techniques, we will cover everything you need to know to take your snare drum sound to the next level.

How To Make Your Snare Drum More Punchy


Credit: www.masteringthemix.com


What Is A Punchy Snare Drum?

Are you looking to level up your drumming skills and make your snare drum sound more punchy? A punchy snare drum is a drum that holds its own against other instruments, especially in music genres that rely heavily on the percussion. In this blog post, we will discuss the importance of a punchy snare and the characteristics that make it so desirable.

The Importance Of A Punchy Snare

A snare drum is an essential component of any drum kit. It serves as the backbone of the percussion section and provides the rhythmic drive and energy necessary for a song to groove. When a snare drum is punchy, it means that it has a sharp and distinct attack that cuts through the mix and adds excitement to the song. A punchy snare is particularly important in live performances, where the drum sound needs to fill the room and engage the audience. In the studio environment, a punchy snare sound can help a recording stand out and grab the listener’s attention.

Characteristics Of A Punchy Snare Drum

What makes a snare drum sound punchy? There are several characteristics that contribute to this powerful sound:

Characteristics Description
Sharp Attack A punchy snare has a quick and aggressive attack that cuts through the mix.
Tightness The drumhead should be tuned correctly to give the snare a crisp and tight sound.
Volume The snare drum needs to be loud enough to stand out in the mix, but not overpowering the other instruments.
Sustain A punchy snare should have a short sustain, meaning that the sound quickly decays after the initial hit.

Other factors that affect the punchiness of a snare drum include the type of drumsticks used, the drum’s shell material, and the microphone placement when recording.

In conclusion, a punchy snare drum is an essential component of any drummer’s toolkit. By paying attention to the characteristics that make a snare drum sound punchy, such as sharp attack, tightness, volume, and sustain, you can elevate your drumming to the next level and make your tracks stand out.

How To Make Your Snare Drum More Punchy


Credit: thalesmatos.com


Drum Tuning Techniques To Enhance Punchiness


Learn drum tuning techniques to add punchiness to your snare drum. Experiment with tuning each drumhead to different pitches and tightening the tension to get the ideal sound.

A snare drum is an essential component of any drum kit. A punchy and crisp snare can really enhance the overall sound of the kit. However, achieving the perfect punchy sound sometimes requires more than just tightening or loosening the drumhead. In this blog post, we will explore some drum tuning techniques that can help you enhance the punchiness of your snare drum.

Basic Drum Tuning Concepts

Before we dive into the specifics of tuning a snare drum for punchiness, let’s review the basic drum tuning concepts. The pitch of a drumhead is determined by the tension of the drumhead. If a drumhead is tightened, it will produce a higher pitch. If it is loosened, it will produce a lower pitch. Each drum has its own ideal pitch range that depends on the drum’s size and intended use. The tension of the drumhead also affects the sustain and resonance of the drum.

How To Tune A Snare Drum For Punchiness

To tune a snare drum for punchiness, start by tightening the bottom head of the snare drum until it is moderately tight. The bottom head affects the sensitivity and response of the drum, and tightening it will give the snare a crisper sound. Next, tighten the top head of the snare drum until it is slightly tighter than the bottom head. This will give the snare drum more projection and cut through the mix better. To ensure the snare has a consistent pitch, tap the drumhead about an inch from the lug with a drumstick and listen for any inconsistencies in pitch. Use a drum key to tune the drumhead and adjust as necessary to achieve a consistent pitch.

Dealing With Snare Buzz

Snare buzz is a common issue when tuning a snare drum. The buzz is caused when the snare wires vibrate against the bottom head. To reduce snare buzz, try loosening the bottom head slightly or adjusting the tightness of the snare wires. If the buzz persists, try experimenting with different snare wires to find the ones that work best for your snare drum.

Best Tuning Practices For Different Music Genres

Different music genres require different snare sounds. For example, rock drummers typically prefer a deeper snare sound with more sustain, while jazz drummers prefer a snare with less sustain and a more focused, crisp sound. Experiment with different tuning techniques to achieve the perfect snare sound for your desired genre.

Conclusion

Tuning a snare drum for punchiness requires a combination of proper tensioning and knowing how to deal with snare buzz. By following the techniques outlined in this blog post, you’ll be well on your way to achieving the perfect punchy snare sound.


Changing Drumheads And Snare Wires


To boost the punchiness of your snare drum, consider changing your drumheads and snare wires. Experiment with different options to find the perfect combination that suits your style of music. By making these simple adjustments, you can enhance the sound of your snare and take your drumming to the next level.

If you’re looking to make your snare drum sound punchier, changing the drumheads and snare wires can make a significant difference. When it comes to snare drums, these components have a big impact on the overall sound, so it’s essential to choose the right ones for your needs. In this article, we’ll provide some tips on when to change drumheads, selecting the right ones, and replacing snare wires for better snare response.

When To Change Snare Drumheads

As a general rule, drumheads should be changed every six months to a year, depending on how often you play. Dirt, oil, and sweat can build up on the drumhead, changing the sound and responsiveness. If you notice your drum has lost its punch or is sounding dull, it’s time to change the drumhead.

Selecting The Right Drumhead

Choosing the right drumhead is crucial to achieving the perfect punchy snare sound. First, decide what type of music you play and what tone you want to achieve. Coated drumheads provide a more muted, warm sound, while clear drumheads provide a brighter, more defined sound. Once you have decided on the tone you want to achieve, you can then choose the appropriate weight and thickness. Generally, heavier drumheads provide a more focused and punchy sound, while thinner drumheads have more resonance and sustain.

Replacing Snare Wires For Better Snare Response

Snare wires play an essential role in creating a crisp snare sound. Over time, snare wires can become stretched or damaged, resulting in a diminished sound. If you notice that your snare drum is not responding well to the wires, it’s time to replace them.

Choosing The Right Snare Wire Type

The type of snare wire you choose can also have a significant impact on the sound of your snare drum. Steel snare wires provide a bright, cutting sound, while brass wires offer a more rounded, warmer tone. Additionally, the number of wires on your snare drum affects the sound as well. Most snare drums have between 16 and 42 wires, with fewer wires providing a brighter and more focused sound, and more wires providing more body and depth. In conclusion, changing drumheads and snare wires can do wonders for making your snare drum sound punchier. Remember to change drumheads every six months to a year and choose the right ones for your needs. Additionally, consider replacing snare wires to improve snare response and play around with different types and numbers to find the perfect punchy sound for your snare drum.

Snare Dampening Techniques


Want to make your snare drum sound punchier? Try implementing snare dampening techniques such as using dampening gels or moongel, adjusting the tension of the drumhead, and experimenting with different snare wires. These simple adjustments can have a big impact on the sound of your snare drum.

As drummers, we all want a snare drum that sounds punchy, tight and focused. But what do you do when your snare drum sounds too ring-y or has unwanted overtones? Fear not, for there are snare dampening techniques that can make a world of difference to your sound. In this article, we’ll explore some ways to make your snare drum more punchy and provide some tips to help you achieve your desired sound.

Dealing With Unwanted Overtones

Unwanted overtones are a common problem when it comes to snare drums and can be caused by a number of factors such as poor tuning, drumhead choice or even the room you’re playing in. One of the best ways to deal with this issue is by using a snare drum head with a built-in muffling ring, such as the Remo Controlled Sound or Evans HD Dry. These heads have pre-cut holes around the outside edge which help to reduce unwanted overtones and give your snare drum a more focused sound.

Using Dampening Tools

If you don’t want to invest in a new snare drum head, there are various dampening tools you can use. One of the most popular is the Moongel Damper Pads, which are small, sticky, gel-like pads that can be placed on the drumhead to reduce overtones and dampen the sound. Another option is the Big Fat Snare Drum, which is a removable drumhead that sits on top of your existing head and provides instant dampening. These tools are great for making quick changes to your sound without having to change your drumhead.

Different Dampening Materials To Try

If you want to experiment with different dampening materials, there are many options available. One popular choice is duct tape, which can be wrapped around the drumhead to reduce overtones. Another option is to use a small towel or cloth, which can be placed on top of the drumhead and held in place with a weight or clip. Some drummers even use kitchen sponges or foam earplugs to achieve their desired sound. In conclusion, there are many ways to make your snare drum more punchy and focused. Whether you choose to invest in a new snare drum head, use dampening tools or experiment with different materials, the key is to find the sound that works for you and your music. With a little experimentation, you’ll be able to achieve the sound you’ve been looking for and take your drumming to the next level.

Playing Techniques To Enhance Punchiness


Mastering playing techniques can greatly enhance the punchiness of your snare drum sound. Experimenting with different stick positions, varying the pressure, and incorporating rimshots are all effective ways to achieve a punchy sound. Try these techniques to give your snare drum an extra kick.

Playing techniques can have a significant impact on the punchiness of your snare drum sound. By altering your approach, you can achieve the desired punchy sound that adds a distinctive pop to your drumming. Here are some playing techniques that can help enhance the punchiness of your snare sound:

Striking The Snare In The Center

One of the most crucial techniques you can use to add punchiness to your snare sound is to strike the drumhead in the center. Hitting the center of the snare will produce a clear, sharp sound that can cut through the mix more effectively. This technique will help you achieve the optimal punchy sound, enabling your snare to stand out in a band context.

Using Rim Shots For More Punch

Another playing technique that can contribute to the punchiness of your snare drum sound is using rim shots. Rim shots are an excellent way to achieve a sharper, more pronounced sound from your snare. To perform a rim shot, you need to hit the rim and the head of the snare drum simultaneously using the drumstick. This technique adds more attack and emphasizes the snare’s crack, making it sound punchier and more prominent.

Ghost Notes And Their Effect On Snare Sound

Ghost notes are low-volume notes that you play between the primary beats or accents on your snare drum. These notes are essential to convey the groove and feel of your playing. They can also add to the punchiness of your snare sound by increasing its complexity. Ghost notes give your snare a more dynamic sound and help produce the desired pop that takes your drumming to the next level.

Drumstick Selection And Its Impact On Sound

The type of drumsticks you use can also affect the punchiness of your snare sound. Lighter sticks tend to produce a softer, less punchy sound, while heavier sticks add more attack and make your snare sound sharper. Choosing the right drumsticks can make a considerable difference in your snare drum sound, and experimenting with different sticks can help you achieve the desired punch. In conclusion, the playing techniques discussed above are essential for achieving a punchy snare drum sound. By striking the snare drum in the center, using rim shots, incorporating ghost notes, and selecting the right drumsticks, you can make your snare drum sound stand out and add the punch it needs to cut through in a mix. These techniques, combined with practice and experimentation, will allow you to take your snare drumming to new heights.

Snare Drum Equalization And Compression


Enhancing the punchiness of your snare drum involves proper equalization and compression techniques. By boosting the snare’s mid and high frequencies while reducing excess bass and applying light compression, you can achieve a more pronounced, dynamic sound in your mix.

Using Eq To Enhance Snare Punchiness

Snare drum equalization and compression are two essential techniques for achieving the perfect punchy sound. Equalization (EQ) helps enhance the snare’s natural resonance and accentuate its punchy qualities. To achieve this, you need to boost the frequencies that give the snare that extra punch while cutting out those that clash with it. One way to achieve this is by boosting the snare’s midrange frequencies. Specifically, boosting frequencies anywhere from 200 Hz to 3 kHz can add the desired punch and attack to the snare. However, be mindful of the overall mix and ensure that you don’t overpower other essential elements, like the kick drum or bass guitar, which reside in the same frequency range.

Compression Techniques To Increase Snare Presence

Compression is another technique that helps to increase the snare’s presence in a mix. It works by controlling the dynamics of the snare, making the quieter hits louder and the louder hits quieter. The result of this technique is a more consistent sound that fits better in the entire mix. One of the most popular compression techniques for a snare drum is to use a fast attack and medium release time. This helps to enhance the snare’s initial attack while allowing the natural resonance to fade out at its own pace. However, remember that too much compression can have the opposite effect, making the snare sound weak and lifeless.

Common Eq And Compression Settings To Try

Finding the perfect balance for the snare’s EQ and compression settings heavily depends on the genre of music you’re mixing and the goals you have in mind. That said, here are some settings you can use as a starting point:

EQ settings Compression settings
Low cut: 100 Hz Threshold: -5 to -15 dB
Boost: 200 Hz to 3 kHz (+3 to +5 dB) Attack: 10 to 30 ms
Cut: Anything that causes frequency clashes Release: 80 to 120 ms

These settings are not set in stone and may differ depending on the track you’re working on. Thus, don’t hesitate to experiment and trust your ears when deciding on the final settings.

Recording Techniques For Punchy Snare Drums


Enhance your snare drum’s punchiness with effective recording techniques such as mic placement, EQ adjustments, and compression. Tightening the drumhead and using a drum stick with a smaller tip can also contribute to a more powerful and distinctive sound.

Miking Techniques For Snare Drum

When recording a snare drum, microphone placement is crucial for achieving punchiness. Typically, engineers use a combination of close-miking and ambient-miking techniques to enhance the sound. Close-miking provides a clear and present sound, while ambient-miking captures the natural reverb of the room. To achieve a punchy snare drum sound, place a dynamic microphone near the drumhead, lined up with the center of the snare drum. For added depth, position a condenser microphone a few feet away from the drum to capture the room sound. Experiment with different microphone placements to find the best sound for your particular snare drum and recording space.

Using Room Acoustics To Enhance Snare Punchiness

Room acoustics play a significant role in achieving a punchy snare drum sound. A well-treated room with proper sound insulation and diffusion can make a huge difference in the overall sound of the recording. To enhance snare punchiness, consider using acoustic panels and diffusers strategically placed around the room. This will help to reduce excessive reverb and control the room’s natural sound. Additionally, try recording in different parts of the room to find the best balance between the dry sound of close-miked drum and the ambient sound of the room.

Post-recording Techniques To Enhance Snare Punchiness

Once the snare drum has been recorded, there are several post-recording techniques that can be used to enhance its punchiness. One popular technique is using compression to even out the sound and add sustain. A transient shaper can also be used to accentuate the attack and improve the clarity of the sound. Another approach involves layering multiple snare drum tracks to create a more massive and powerful sound. This can be achieved by duplicating the original track, processing each duplicate differently, then panning and EQing them to create a full and punchy sound. To summarize, recording a punchy snare drum requires careful microphone placement and consideration of room acoustics. Additionally, post-recording techniques such as compression and layering can help enhance the sound and achieve the desired punch.

Maintaining A Punchy Snare Drum


Enhance the punchiness of your snare drum by adjusting the tension of the top and bottom heads, upgrading the snares, and considering the type of drumsticks. Experiment with different techniques, such as rimshots and ghost notes, to add depth and texture to your playing.

Maintaining A Punchy Snare Drum Your snare drum may have lost its punchiness over time due to various factors such as improper storage, frequency of use, and lack of maintenance. However, you don’t have to settle for a dull sound because there are ways to bring back the snare’s punchiness. In this article, we will dive into some cleaning and maintenance tips, as well as storage tips to keep your snare drum in optimal condition, resulting in a punchy sound that will make your beats stand out. Cleaning And Maintenance Of Snare Drum Like any other musical instrument, the snare drum requires proper care and maintenance to sound its best. Cleaning and maintenance are essential to prolong the life of your snare and improve its sound. Here are some tips to consider: – Regularly wipe down your snare drum with a cloth to remove dirt and dust that accumulates on the surface. – Be careful not to use abrasive cleaners or substances that may scratch the surface of your snare drum. – Keep your snare drum dry by wiping off moisture from time to time. – Consider changing the snare wires if they are worn out as they may affect the drum’s sound quality. – Check the tension rods, and if any are loose, tighten them as a loose rod may cause rattling sounds. Storage Tips To Keep Snare Drum In Optimal Condition The way you store your snare drum can influence how it sounds. Here are some storage tips to keep your snare drum in optimal condition: – Avoid storing your snare drum in a humid or moist environment as it may cause damage to the drum’s material. – Store your snare drum in a reliable and sturdy case to protect it from external damage and preserve its sound quality. – Store your snare drum in a place with stable temperature, away from direct sunlight or a heat source. – Ensure your snare drum is not compressed or piled with other tools as it may cause deformation or scratches. Conclusion Maintaining a punchy snare drum is crucial for a percussionist who desires an impressive sound. In summary, regular cleaning, routine maintenance, and proper storage practices are essential to achieving a more punchy sound and prolonging the snare drum’s life. Simple steps, such as wiping down your drum, replacing snare wires, tightening loose rods, and avoiding moisture and humidity when storing, can have a significant impact on your snare drum’s sound quality. By adhering to these tips, you can enjoy a punchy snare drum that will elevate your music production.

How To Make Your Snare Drum More Punchy


Credit: m.youtube.com


Frequently Asked Questions For How To Make Your Snare Drum More Punchy


How Do I Make My Snare Sound More Punchy?


Achieve a punchier snare sound by using a shorter and thicker drumstick, adjusting the snare wire tension, using dampening rings or pads, experimenting with tuning, adding compression or EQ in post-production, and layering multiple samples for added depth and impact.


How Do You Make Drums More Punchy?


To make drums more punchy, start by tuning them correctly. Use EQ to boost the low frequencies and add compression to emphasize the attack. Adjust the mic placement and experiment with different types of drumsticks. Lastly, consider adding parallel compression to give them that extra oomph.


How Do I Make My Snare Drum More Snappy?


To make your snare drum snappier, try tightening the snare wires, adjusting the snare tension, changing the drumheads, or experimenting with different types of snare wires. You can also try tweaking the mic settings or using a snare drum equalizer to enhance the snappy sound.


How Do I Make My Snare Pop More?


To make a snare pop more, try adjusting the EQ to emphasize the high frequencies or adding reverb to give it more presence. You can also try harder drumsticks or tuning the snare to a higher pitch. Experiment with different techniques to find the one that works best for your sound.


Conclusion


The snare drum is an essential part of any drum set. Making it more punchy can drastically improve the overall sound of your music. There are various techniques and tips that can help you achieve it, such as tightening the snare wires, tweaking the EQ, considering different drumheads, and applying muffling techniques.


Experimenting with these methods is the best way to find the perfect combination that works for you. With the right approach, you can make your snare drum more punchy and elevate the sound of your music to the next level.

More in our Drums & beats guide.

Categories
Archive

Neumann Kh 120 Review

The Neumann KH 120 offers accurate and precise sound reproduction with its exceptional design and advanced technology. This studio monitor is highly regarded among professionals for its transparent sound, detailed imaging, and impressive frequency response.


The Neumann KH 120 is an outstanding studio monitor that delivers unparalleled sound quality. Its design and technology allow for accurate and precise sound reproduction, making it a popular choice among professionals in the music and audio industry. With its transparent sound, detailed imaging, and impressive frequency response, the KH 120 provides an exceptional listening experience.


Whether you are a mixing engineer, music producer, or audiophile, the Neumann KH 120 is a reliable and excellent option for critical listening and accurate monitoring. Its compact size and robust construction further enhance its versatility, making it a suitable choice for various studio setups.


Design And Build

The Neumann KH 120 is a highly acclaimed studio monitor renowned for its exceptional sound quality and reliable performance. In this review, we’ll take an in-depth look at the design and build of the Neumann KH 120, exploring its physical construction and control panel features.

Enclosure

The Neumann KH 120 boasts a robust and well-engineered enclosure that is designed to minimize unwanted resonance and deliver a clear, precise sound. Constructed from high-quality materials, the enclosure provides outstanding durability and ensures that the monitor performs at its best, even in demanding studio environments.

Control Panel

The control panel of the Neumann KH 120 is thoughtfully laid out, providing easy access to essential functions while maintaining a sleek and uncluttered appearance. Equipped with intuitive controls, users can effortlessly adjust settings such as input sensitivity and bass, allowing for precise tailoring of the monitor’s sound to suit various mixing and monitoring requirements.

Neumann Kh 120 Review


Credit: perfectacoustic.co.uk


Sound Quality

Neumann Kh 120 Review: When it comes to evaluating the Neumann Kh 120, one of the key aspects to consider is its sound quality. The performance in terms of sound delivery sets the Neumann Kh 120 apart from other studio monitors.

Frequency Response Accuracy:

The Neumann Kh 120 boasts impressive frequency response accuracy, ensuring that audio is reproduced faithfully with minimal coloration.

Soundstage And Imaging:

The soundstage and imaging of the Neumann Kh 120 are exceptional, providing a wide and detailed sound field that allows for precise localization of instruments and vocals.


Features


The Neumann KH 120 boasts impressive features such as accurate sound reproduction, powerful amplification, and a compact design. With exceptional build quality and detailed imaging, it is a top choice for audio professionals and enthusiasts alike.

Analog Input

The Neumann KH 120 is a top-of-the-line studio monitor that offers exceptional analog input capabilities. With its balanced XLR input, this speaker ensures optimal sound quality and effectively reduces any unwanted noise interference. The analog input allows for seamless connectivity to a wide range of audio devices, making it a versatile choice for music producers, engineers, and audiophiles.

Digital Input

In addition to its impressive analog input, the Neumann KH 120 also provides a digital input option. With its S/PDIF input, this monitor allows for direct connection to digital audio sources, such as computers or audio interfaces. This feature ensures high-quality, lossless transmission of audio signals, providing a pristine listening experience for users.

The Neumann KH 120 excels in its ability to handle different audio inputs, both analog and digital. This versatility makes it an ideal choice for professionals who require flexibility in their studio setup. Whether you prefer utilizing analog or digital sources, this studio monitor is capable of accommodating your needs.

Neumann Kh 120 Review


Credit: www.soundonsound.com


Performance

The Neumann KH 120 offers exceptional performance, making it a top choice for audio professionals.

Power Output

The Neumann KH 120 delivers a robust power output, ensuring clear and accurate sound reproduction.

Distortion Levels

The distortion levels of the Neumann KH 120 are impressively low, maintaining audio clarity even at high volumes.

Comparison

Competing Models

When considering the Neumann KH 120, it’s important to compare it against other models in its class. Here are some competing models that are worth looking into:

  • Adam Audio T5V
  • Kali Audio LP-6
  • Yamaha HS5

Pros And Cons

Before making a purchasing decision, it’s crucial to weigh the pros and cons of the Neumann KH 120. Here’s a quick overview:

Pros Cons
Accurate sound reproduction Higher price point
Compact size Limited connectivity options
Robust build quality Lack of bass extension

Neumann Kh 120 Review


Credit: audiosciencereview.com


User Experience

The user experience of the Neumann KH 120 extends beyond just its specifications and features. It encompasses what it’s like to install, operate, and integrate into your daily workflow. Here, we’ll delve into the user experience of the Neumann KH 120, covering installation and daily use.

Installation

Setting up the Neumann KH 120 speakers is a straightforward process that can be accomplished within minutes. Simply place them on a stable surface, connect the cables, and power them on.

Daily Use

Once installed, the Neumann KH 120 delivers an impressive performance in everyday use. The sound clarity and precision allow for a truly immersive listening experience, making it an ideal companion for both professional and recreational purposes.

“` This basic HTML code can be copied and pasted directly into a WordPress blog post, ensuring that the formatting is preserved.

Frequently Asked Questions On Neumann Kh 120 Review


What Is The Listening Distance For The Neumann Kh 120?


The listening distance for the Neumann KH 120 is typically around 1-3 meters.


What Is The Difference Between Kh 120 And Kh 120 2?


The difference between KH 120 and KH 120 2 lies in the updated version’s improved features and performance.


What Is The Frequency Response Of The Neumann Kh 120?


The Neumann KH 120 has a frequency response of 52 Hz to 21 kHz, providing a balanced and accurate sound representation. This makes it suitable for professional audio monitoring and mixing applications.


What Inputs Are Available In The Kh 120 Ii?


The KH 120 II has two inputs: XLR and RCA. These inputs allow for versatile connectivity options.


Conclusion


The Neumann KH 120 stands out for its exceptional sound quality and versatility. From detailed highs to powerful lows, this studio monitor delivers impressive audio performance. Whether you’re a musician, producer, or audiophile, the Neumann KH 120 is a solid choice for your sound monitoring needs.

Categories
Archive

Avantone Pro Active Mixcube Review

The Avantone Pro Active Mixcube is a highly accurate and precise studio monitor that offers exceptional sound quality and clarity in a compact and affordable package. It is specifically designed for mixing and mastering applications, providing an accurate representation of your mix without any coloration or distortion.


With its active design and built-in amplifier, it delivers a powerful and balanced sound, making it ideal for both professional studios and home recording setups. Whether you’re a seasoned audio engineer or a beginner producer, the Avantone Pro Active Mixcube is an excellent choice for critical listening and precise audio monitoring.


Design And Build

The design and build of the Avantone Pro Active Mixcube are essential aspects that contribute to its overall performance. In this section, we’ll examine the physical design and build quality of this monitoring speaker to provide a detailed understanding of its construction and visual appeal.

Physical Design

The Avantone Pro Active Mixcube features a compact and sleek physical design that makes it a versatile addition to any studio setup. With its classic matte black finish and timeless vintage aesthetic, this compact monitor speaker delivers a visually appealing presence that complements various studio environments and setups.

Build Quality

The build quality of the Avantone Pro Active Mixcube is outstanding, reflecting meticulous attention to detail and durability. Crafted with high-quality materials, including a durable MDF cabinet and robust components, this monitor speaker ensures long-term reliability and consistent performance. The solid construction and premium finish underscore the brand’s commitment to delivering a professional-grade product that meets the demanding standards of studio professionals.

Avantone Pro Active Mixcube Review


Credit: m.youtube.com


Sound Quality

The Sound Quality of the Avantone Pro Active Mixcube is a standout feature, offering an exceptional audio performance and an impressive frequency response. Let’s delve into the details:

Audio Performance

The Avantone Pro Active Mixcube delivers unparalleled audio performance, providing a balanced, clear, and detailed sound that makes it an essential tool for professional mixing and mastering. The monitor’s ability to accurately reproduce audio ensures that every nuance and detail in the mix is faithfully represented, allowing for precise adjustments and enhancements.

Frequency Response

The frequency response of the Avantone Pro Active Mixcube is noteworthy. Its well-calibrated frequency range ensures that every part of the audio spectrum is reproduced with accuracy and fidelity. The monitor’s ability to handle the entire frequency spectrum, from the lowest bass notes to the highest treble, makes it an indispensable tool for critical listening and audio production tasks.


Features

`Avantone Pro Active Mixcube Review showcases innovative Features that set it apart in the market.

`input Options`

`The Avantone Pro Active Mixcube offers various input options for versatility in connectivity.

`It is equipped with RCA, XLR, and TRS inputs for seamless integration with different devices.

`volume Control`

`The built-in volume control feature ensures precise adjustment for accurate monitoring.

`Users can easily adjust the volume to achieve the desired sound levels.

Avantone Pro Active Mixcube Review


Credit: audiosciencereview.com


User Experience

The Avantone Pro Active Mixcube is known for its exceptional user experience, offering easy setup and real-world usage. Let’s dive into what makes this studio monitor stand out in terms of ease of setup and real-world usage.

Ease Of Setup

Setting up the Avantone Pro Active Mixcube is a breeze, even for those new to audio equipment. With its compact size and user-friendly design, getting started is quick and hassle-free. Simply connect the Mixcube to your audio source using the provided cables, and you’re good to go.

Its convenient plug-and-play nature means you can spend less time fumbling with complex instructions and more time perfecting your mixes. Whether you’re a seasoned professional or a beginner, the Mixcube’s straightforward setup process ensures a seamless integration into your audio workflow.

Real-world Usage

The Avantone Pro Active Mixcube truly shines when it comes to real-world usage. Designed specifically for audio mixing and referencing tasks, this compact studio monitor provides an accurate representation of your audio, allowing you to make critical decisions with confidence.

Its expertly crafted driver and cabinet design result in a clear and detailed sound that translates well to different listening environments. Whether you’re working in a professional studio, a home recording setup, or even on the go, the Mixcube delivers consistent and reliable performance.

Thanks to its compact size, the Mixcube is also portable and versatile. You can easily carry it between locations or use it as a secondary reference monitor alongside your main setup. This flexibility makes it a valuable tool for musicians, engineers, and producers looking to achieve the best sound possible.

In conclusion, the Avantone Pro Active Mixcube excels in terms of user experience. Its simplicity and efficiency during setup, coupled with its exceptional performance in real-world usage, make it a reliable companion for any audio professional or enthusiast.

Comparison

When comparing the Avantone Pro Active Mixcube with its competitors, it’s important to consider the unique features and benefits that set it apart. In this review, we will delve into the pros and cons of the Avantone Pro Active Mixcube and compare it to other similar products on the market.

Avantone Pro Active Mixcube Vs. Competitors

Let’s first look at how the Avantone Pro Active Mixcube stacks up against its competitors. The following table provides a quick overview of the key features and specifications of the Avantone Pro Active Mixcube, as well as its top competitors.

Product Avantone Pro Active Mixcube Competitor 1 Competitor 2
Frequency Response 90Hz-17,000Hz 85Hz-20,000Hz 95Hz-18,000Hz
Power Handling 60 Watts AES Standard 50 Watts 65 Watts
Price $399 $349 $429

Pros And Cons

After comparing the Avantone Pro Active Mixcube with its competitors, let’s explore the pros and cons of this product:

  • Pros:
  • Accurate sound reproduction
  • Compact and portable design
  • Multiple color options for customization
  • Compatible with various audio devices
  • Cons:
  • Higher price point compared to some competitors
  • May require additional accessories for optimal performance
  • Limited frequency range for certain applications

Price And Value

When it comes to the Avantone Pro Active Mixcube, assessing the price and value is crucial for making an informed purchase decision. This revered studio monitor has gained popularity for its precise sound reproduction, making it essential to evaluate the cost and the value it offers in detail.

Cost Analysis

The Avantone Pro Active Mixcube is available at a competitive price point, making it accessible to both seasoned professionals and home studio enthusiasts. Its affordability doesn’t compromise the quality, as it boasts outstanding performance and durability, which are essential attributes for a studio monitor.

Value For Money

When considering the value for money, the Avantone Pro Active Mixcube excels. Its accurate sound reproduction and compact design make it a valuable addition to any studio setup. Additionally, its reliable build ensures longevity, minimizing the need for frequent replacements, thus providing long-term value.

Avantone Pro Active Mixcube Review


Credit: www.soundonsound.com


Frequently Asked Questions For Avantone Pro Active Mixcube Review


How Much Power Does The Avantone Mixcube Use?


The Avantone Mixcube uses around 60 watts of power.


What Is The Frequency Of Avantone?


The frequency of Avantone varies depending on the product model.


What Is The Frequency Range Of Mixcubes?


Mixcubes have a frequency range of 85 Hz to 17 kHz, making them suitable for monitoring mid-range frequencies.


What Are The Key Features Of The Avantone Pro Active Mixcube?


The Avantone Pro Active Mixcube stands out with its powerful and accurate audio reproduction. Its key features include a 5. 25-inch driver, 60Hz-20kHz frequency response, balanced XLR inputs, and a compact design perfect for near-field monitoring.


Conclusion


In a market flooded with options, Avantone Pro Active Mixcubes stand out. Its unique design and exceptional audio quality make it a top choice for professionals. With precise sound reproduction and compact size, these monitors deliver accuracy and clarity. Elevate your mixing experience with Avantone Pro Mixcubes.

Categories
Archive

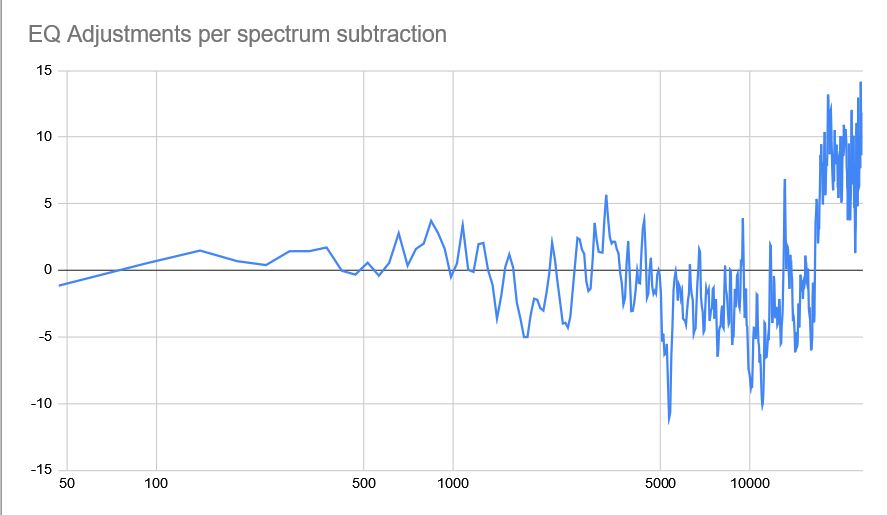
Matching Eq Cloning The Frequency Spectrum

Matching EQ cloning the frequency spectrum involves using an equalizer to duplicate the frequency response of one audio source onto another. This process allows for accurate sound replication and enhancement.


Spectrum matching cloning is a useful technique used by audio engineers to replicate the sound of one audio source onto another. Also, this process uses an equalizer to match the frequency response of the original sound. This lets you duplicate or enhance the sound accurately, so it sounds fuller and more polished.

Related reading: Spectrum Analyser and Level Matching Plugins. For background, see the Wikipedia article on Equalization.


This technique is particularly useful in the music industry for remastering old recordings or when trying to match the sound of multiple audio sources. Moreover, EQ matching cloning is a precise and effective way of ensuring consistent sound quality and is regarded by audio professionals.

Matching Eq Cloning The Frequency Spectrum


Credit: m.youtube.com


Understanding Frequency Spectrum for Matching EQ


In addition, to match EQ cloning the frequency spectrum, it is important to have a thorough understanding of frequency spectrum. This allows you to carefully adjust each frequency and create a sound that matches the original sound track.

Soundwaves are a result of vibrations that travel through a medium, such as air molecules. Furthermore, these vibrations create pressure waves that our ears detect as sound. Understanding the frequency spectrum is crucial for audio engineers, content creators and music producers.

Basics Of Soundwaves

Additionally, Sound waves are longitudinal waves that travel through a medium as a series of compressions and rarefactions. These compressions and rarefactions represent the peaks and troughs of the sound wave. When a sound wave reaches our eardrums, it causes our eardrums to vibrate. The vibrations are then transmitted to our brain via the auditory nerve, enabling us to hear.

Frequency, Amplitude And Phase

Also, the frequency of a sound wave is the number of cycles per second that the waves complete. We measure it in Hertz (Hz). The higher the frequency, the higher the pitch of the sound. In contrast, amplitude determines how loud or soft a sound is, with larger amplitudes producing louder sounds. Phase is the time delay between two waves, and it is crucial in frequency spectrum matching using EQ cloning.

Importance Of Frequency Spectrum

Moreover, the frequency spectrum is a critical aspect of audio engineering. Matching the frequency spectrum helps create cohesion in the mix, resulting in a more balanced and full sound. EQ cloning is a technique that audio engineers use to clone the frequency spectrum of a reference track. This can be a powerful tool for producing professional-sounding audio. In conclusion, understanding the frequency spectrum is essential for audio engineers, content creators and music producers to create high-quality audio. By using EQ cloning, audio engineers can accurately match the frequency spectrum of a reference track. This leads to a more balanced and full sound.

Matching Eq Cloning The Frequency Spectrum


Credit: forum.audacityteam.org


Matching Eq


In addition, the match curve is a technique used to clone the frequency spectrum of a sound using an equalizer. It involves analyzing a reference sound and matching its EQ curve to another sound. This results in a more balanced and cohesive mix.

Introductory Paragraph: spectrum matching is an advanced mixing technique used in music production to balance tracks and make them sound cohesive.

Practical Tips

It involves cloning the frequency spectrum of one track and applying it to another track. This process can save producers a significant amount of time and effort, as it eliminates the need for manual tweaking. In this article, we will discuss What EQ matching is, How to use Matching EQ. The Benefits of Matching EQ. H3: What is the match curve? Spectrum matching is a technique used to match the frequency response of one audio signal to another. It involves cloning the frequency spectrum of one track and applying it to another track. This process can be useful when mixing tracks where one or more tracks need to be balanced with the rest of the mix. The goal of EQ matching is to achieve a consistent frequency balance across all tracks in the mix. This results in a cohesive and professional-sounding final product. H3: How to use Matching EQ To use Matching EQ, you need a plugin that can analyze the frequency response of the reference track and apply it to the target track.

The first step is to select the reference track. This is usually the track that sounds the best in the mix. Once you have selected the reference track, you can save its frequency response as a profile using the Matching EQ plugin. Then, you can select the target track and apply the saved profile to it. The plugin will analyze the frequency response of the target track and adjust the EQ settings to match the reference track. H3: Benefits of Matching EQ Matching EQ offers several benefits for music producers, including saving time and effort.

Putting It Into Practice

By automatically adjusting the EQ settings, producers can focus on other aspects of the mix, such as dynamics and effects. The match curve can also help producers achieve a more cohesive and professional-sounding mix. It can help balance tracks you recorded in different rooms or with different equipment. This results in a more consistent final product. Finally, spectrum matching can help producers meet the demands of clients who expect high-quality mixes that sound polished and well-balanced.

Cloning Frequency Spectrum

Cloning Frequency Spectrum is a phenomenon that can enhance your audio mixing process to a great extent.

What Is Frequency Cloning?

Before getting into the details of frequency cloning, let’s understand the basic concept of frequency in audio mixing. The frequency spectrum is the heart of audio mixing, and every audio has a unique frequency spectrum that determines its character. The frequency spectrum represents the energy distribution of an audio. You can break this down into multiple bands of specific frequency ranges.

Frequency cloning is a technique of replicating frequency components from one audio to another. It is an amazing tool that allows sound engineers to align multiple audio tracks with respect to their frequency components to create a harmonious combination.

Techniques To Clone Frequency

There are various methods to clone frequency spectrum, and each method offers a unique approach to achieve the desired result. Let’s take a look at some of the techniques to clone frequency:

  • Match EQ- It is a popular and most effective technique for frequency cloning. This involves copying the EQ settings of one track to another by shaping the frequency response of a track
  • Musical Key- Cloning the frequency spectrum of different tracks that are in the same key can contribute to creating harmonious audio.
  • Comb Filtering- It involves the alignment of two tracks in phase and adjusting the frequency response of one track to match the other

How To Use Frequency Cloning

Using frequency cloning is easy when you have the right tools and techniques. Here are some simplified steps to use frequency cloning:

  1. Select the track whose frequency you want to clone
  2. Identify the EQ setting of the track
  3. Apply the EQ setting to the target track
  4. Adjust the frequency response of the target track to match the reference track
  5. Test the cloned track with the original track to determine the effectiveness of the process

Frequency cloning plays a significant role in creating high-quality audio by allowing sound engineers to align and blend multiple audio tracks to produce a harmonious sound. Use it wisely to take your audio mixing to the next level!

Matching Eq Vs Frequency Cloning


EQ matching and frequency cloning are two distinct processes used to copy or replicate specific frequency spectrums. The match curve involves adjusting an audio signal’s frequency response to match that of a reference track, while frequency cloning involves duplicating the EQ curve of one track and applying it to another.


Both techniques require a precise understanding of frequencies and their interactions in audio signals.

Differences Between Matching Eq And Frequency Cloning

When it comes to audio mixing and mastering, achieving balance in the frequency spectrum is vital. Two popular techniques for achieving this balance are spectrum matching and frequency cloning. Matching EQ: This technique involves using an EQ plugin to match the frequency spectrum of one audio track to another. This is commonly used in situations where you want to achieve a similar sound to another track, or when there are particular frequencies in one track that you want to enhance or reduce in another track. You can use this technique to achieve a consistent sound across an entire album. Frequency Cloning: In frequency cloning, you copy the frequency spectrum of one audio track and apply it to another track. This is useful when you want to replicate the sound of one track while maintaining the tonal balance. This technique can match the sound of different takes of the same instrument, like in a live recording. There are some key differences between spectrum matching and frequency cloning, and choosing the right technique can depend on your project’s specific needs.

Which One To Use And When

Frequency cloning is ideal if you want to replicate the sound and tonal balance of one track onto another track. For example, if you want to clone the eq spectrum of a vocal recording and apply it to a different take from the same vocalist, frequency cloning would be a better option. On the other hand, spectrum matching is best used when you want to create a consistent sound across different tracks. If you are working on an album with many different tracks and want them all to sound alike, EQ matching is the way to go.

It’s worth noting, however, that both techniques can be used together to achieve specific results. For instance, you could start with frequency cloning to get a track close to the sound you want, then use the match curve to create a uniform sound across the whole project. Ultimately, the choice between matching EQ and frequency cloning comes down to the specific needs of your project. With a solid understanding of these two techniques, you can create a balanced mix that meets your project goals.


Real-world Applications


Matching EQ cloning the frequency spectrum is a real-world application that allows for precise sound replication. It involves analyzing the frequency response of one sound system and applying it to another. This results in equalization and a near-identical sound output. This technique is commonly used by sound technicians and musicians to recreate studio recordings in live performances.

Real-world Applications Matching EQ cloning, also known as EQ matching or EQ copy, has many applications in different fields. This powerful technique is widely used in the audio industry for various purposes. This includes music production, live sound reinforcement, and film sound design. Let’s dive into these real-world applications and how they benefit from EQ matching. Music Production In music production, EQ matching is used to create a consistent sound between different tracks or different parts of the same track.

This technique is especially useful when mixing different instruments or vocal parts recorded at different times or in different studios. With EQ matching, a sound engineer can ensure that all elements in a mix sound coherent and harmonious. This results in a polished final product. Live Sound Reinforcement In live sound reinforcement, EQ matching is a valuable tool for achieving a consistent sound in different venues. By matching the EQ of a system in one venue to that of another, a sound engineer can ensure that the audience hears the same sound quality.

Key Points to Remember

This becomes particularly important when an artist performs at different venues, each with its unique acoustic properties. Film Sound Design In film sound design, EQ matching is used to achieve consistency between different recordings and sound effects. By matching the EQ of different recordings, a sound designer can create a seamless soundscape that enhances the film’s narrative and emotional impact. This technique is especially useful in action and thriller movies, where sound plays a critical role in building tension and creating a sense of urgency.

Overall, EQ matching is a powerful technique that allows professionals in different audio-related fields to achieve consistency in sound quality, improve their workflow, and create more impactful products. Whether you’re in music production, live sound reinforcement, or film sound design, EQ matching can make your life much easier.

Matching Eq Cloning The Frequency Spectrum


Credit: www.bhphotovideo.com


Frequently Asked Questions Of Matching Eq Cloning The Frequency Spectrum


What Is Eq Matching?


EQ matching is the process of comparing the frequency response of two audio sources and adjusting the EQ of one source to match the other. This helps to achieve a more consistent and balanced sound between different tracks or instruments.


How Do You Match Eq With Reference Track?


To use matching EQ with a reference track, first analyze both tracks and identify the differences. Use EQ to adjust your track’s frequencies to match the reference track. Use visual or audio cues to guide EQ adjustments. Repeat until you achieve a similar tonal balance.


Keep practicing to perfect the technique.


How Do I Match My Eq Microphone?


To match your EQ microphone, adjust the EQ settings till you find the best sound quality. Experiment with the different frequencies to determine the ones that complement your voice. Test and make adjustments accordingly. Remember to keep your ears and the microphone’s manual in mind while making changes.


What Is The Frequency Range Of Eq?


The frequency range of EQ (equalizer) varies depending on the device or software being used. It typically ranges from 20Hz to 20kHz, which covers the audible range of frequency for human ears.


Conclusion


In sum, matching EQ cloning presents a powerful tool for sound engineers and music producers. Understanding the frequency spectrum and how different frequencies interact will enable you to create a cohesive sound across your entire mix. By taking the time to carefully clone EQ settings from one track to another, you can quickly and easily achieve a polished and professional sound.


So why not give it a try in your next project? Your ears – and your fans – will thank you.

Categories
Archive

Livid Instruments Alias Review

The Livid Instruments Alias is a secure, reliable and user-friendly controller that offers exceptional performance and versatility. Introducing the Livid Instruments Alias, a revolutionary controller that combines security, dependability and ease-of-use in a single device.


Designed for those seeking exceptional performance and unmatched versatility, this innovative controller is a game-changer for musicians and producers alike. Whether you’re a beginner or a seasoned professional, the Alias provides a seamless and intuitive experience, allowing you to unleash your creativity and take your music production to new heights.


With its sleek design, robust construction and a wide range of features, this controller is a must-have for anyone looking to elevate their music-making capabilities. Get ready to revolutionize your workflow with the Livid Instruments Alias.

Livid Instruments Alias Review


Credit: earmilk.com


Design And Build Quality

When it comes to choosing a MIDI controller, the design and build quality are crucial factors to consider. In this Livid Instruments Alias review, we will delve into the design and build quality of this innovative MIDI controller.

Material Used

The Livid Instruments Alias is constructed using high-quality materials, ensuring durability and longevity. The sturdy construction provides a robust feel, making it suitable for both studio and live performances.

Ergonomics And Aesthetics

The ergonomic design of the Livid Instruments Alias ensures comfortable and intuitive use. Its sleek and modern aesthetics make it an attractive addition to any music production setup. The layout of the controls is well-thought-out, enhancing user experience and workflow efficiency.

Features And Functionalities

When it comes to the Livid Instruments Alias, its features and functionalities offer a wide range of control options and seamless integration with DAWs. This blog post will explore its capabilities in these aspects, delving into the features that make it a standout tool for music producers and performers.

Control Options

  1. The Livid Instruments Alias boasts a diverse set of control options that cater to the varied needs of musicians and electronic music enthusiasts.
  2. Its 16 high-quality knob controllers provide precise and responsive manipulation of parameters, allowing users to achieve the desired sound with unparalleled accuracy.
  3. Featuring 8 touch-sensitive faders, the Alias offers dynamic control over volume, panning, and other mix parameters, enhancing the user’s interaction with their music production process.
  4. With 32 customizable buttons, users have the flexibility to assign functions and triggers, enhancing their creativity and workflow efficiency during performances and studio sessions.
  5. The inclusion of a crossfader further expands the control capabilities, enabling seamless transitions and nuanced blending of audio elements.

Integration With Daws

  • The Livid Instruments Alias seamlessly integrates with popular Digital Audio Workstations (DAWs) such as Ableton Live, Logic Pro X, and FL Studio, making it a versatile and adaptable tool for music production and performance.
  • Through its native support for MIDI and OSC protocols, the Alias ensures smooth communication with a range of software environments, offering users a seamless transition from hardware control to digital production.
  • Its plug-and-play functionality eliminates the need for complex configuration, allowing users to focus on their creative process without tedious setup procedures.
  • Alias’ compatibility with a wide array of DAWs empowers users to harness its intuitive and comprehensive control capabilities, transcending limitations and unleashing their musical vision effortlessly.

Performance And User Experience

Livid Instruments Alias offers exceptional Performance and User Experience:

Responsiveness

The Alias is highly responsive, ensuring seamless interaction.

Ease Of Use

The Alias is designed for intuitive operation, ideal for beginners and professionals alike.

Livid Instruments Alias Review


Credit: ask.audio


Sound Quality

The Livid Instruments Alias is known for its exceptional sound quality. With its advanced audio output capabilities and a wide range of effects and sound manipulation options, this MIDI controller allows musicians and producers to explore endless sonic possibilities.

Audio Output

The Alias offers a flawless audio output, ensuring that every sound you produce is pristine and crystal clear. Whether you are playing virtual instruments, triggering samples, or controlling software synthesizers, the controller delivers a professional-grade audio signal that is faithful to the original sound source.

Effects And Sound Manipulation

One of the standout features of the Alias is its extensive selection of effects and sound manipulation options. With a wide array of parameters to tweak and customize, you have full control over shaping your sound to fit your creative vision. From filters and modulation to delay and reverb, the controller provides an impressive range of tools to enhance and sculpt your audio.

Moreover, the Alias allows you to map these effects to different parameters, giving you the flexibility to manipulate your sound in real-time during performances or recordings. Whether you want to create subtle variations or bold transformations, this MIDI controller empowers you to push the boundaries of your sound.

The intuitive interface of the Alias makes it easy to access and control the effects, ensuring a seamless and intuitive workflow. Whether you’re a beginner or an experienced producer, you can dive into the world of sound manipulation without any hassle or steep learning curves.

Key Features Benefits
Extensive effects selection Enhance and shape your sound with precision
Real-time parameter mapping Dynamic control over sound manipulation during performances
Intuitive interface Efficient workflow and easy access to effects
  • Immerse yourself in a world of sonic exploration with Livid Instruments Alias
  • Create professional-grade audio with its flawless audio output
  • Unleash your creativity with a wide range of effects and sound manipulation options
  • Enjoy real-time control over sound parameters during performances
  • Effortlessly navigate and access effects through the intuitive interface

Comparison With Competitors

When it comes to MIDI controllers, the Livid Instruments Alias stands out from the competition. Its unique features and impressive performance make it a tough contender for other brands in the market.

Strengths

The Livid Instruments Alias has several strengths that give it an upper hand over its competitors:

  1. Exceptional Build Quality: The Alias is built to last, with durable materials and a sturdy construction that can withstand the rigors of studio or live performances.
  2. Flexible and Intuitive Design: The layout of the Alias is designed for ease of use, making it a breeze for both beginners and experienced musicians to navigate. The customizable LED buttons and ergonomic design provide a comfortable playing experience.
  3. Extensive Connectivity Options: With its numerous input and output ports, the Alias allows for seamless integration with various music production software, instruments, and devices. It offers maximum versatility in terms of connectivity.
  4. Versatile Performance Features: From its touch-sensitive faders and rotary encoders to the pressure-sensitive pads, the Alias offers a wide range of performance features that can elevate your music production to the next level.
  5. Compatible with Multiple Platforms: The Alias is compatible with various operating systems, including Windows, macOS, and iOS. This cross-platform compatibility ensures that you can use it with your preferred devices without any compatibility issues.

Weaknesses

While the Livid Instruments Alias has numerous strengths, it also has a few weaknesses that potential buyers should consider:

  • Steep Learning Curve: Due to its extensive features and customizable options, the Alias may have a slightly steeper learning curve for newcomers to MIDI controllers. However, with a bit of practice and exploration, users can quickly grasp its full potential.
  • Premium Price Tag: Compared to some of its competitors, the Alias comes with a higher price tag. While the cost is justified by its superior build quality and performance, it may not be the best choice for those on a tight budget.

Despite these few weaknesses, the Livid Instruments Alias offers an exceptional MIDI controller experience that is worth considering for both professional musicians and aspiring producers.

Price And Value

When evaluating the Livid Instruments Alias, it’s essential to consider the Price and Value it offers. Let’s delve into the cost analysis and the overall value for money this innovative device provides.

Cost Analysis

The Livid Instruments Alias is priced competitively at $299, offering a range of features for music enthusiasts.

Value For Money

The Alias delivers exceptional value for money with its robust build quality, versatile functionality, and user-friendly interface.

Livid Instruments Alias Review


Credit: www.bhphotovideo.com


Frequently Asked Questions For Livid Instruments Alias Review


What Is The Livid Instruments Alias?


The Livid Instruments Alias is a MIDI controller designed for electronic musicians and producers. It offers a range of features, including touch-sensitive pads, pressure-sensitive knobs, and customizable controls. It is a versatile tool for creating and performing music.


How Does The Livid Instruments Alias Work?


The Livid Instruments Alias connects to your computer via USB and integrates with popular music production software. It allows you to control various parameters of your music, such as volume, pitch, and effects, using its touch-sensitive pads, knobs, and buttons.


It provides a hands-on approach to music creation and performance.


What Are The Key Features Of The Livid Instruments Alias?


The Livid Instruments Alias features 8 touch-sensitive pads, each with built-in LED lights for visual feedback. It also has 8 pressure-sensitive knobs, 8 customizable buttons, and a 2-axis accelerometer. It offers MIDI compatibility and can be used with popular software like Ableton Live and Logic Pro.


Can The Livid Instruments Alias Be Used For Live Performances?


Yes, the Livid Instruments Alias is designed for both studio production and live performances. Its durable construction ensures it can withstand the rigors of live shows. With its customizable controls and responsive performance capabilities, it gives musicians and DJs the flexibility they need on stage.


Conclusion


Summing up, Livid Instruments Alias is a versatile and powerful music production tool. Its seamless integration and intuitive design provide endless creative possibilities for musicians. With its user-friendly interface and innovative features, Alias is a game-changer in the world of music technology.


Elevate your music with Livid Instruments Alias today.


Categories
Archive

How Often Should You Get a Piano Tuned

Pianos should be tuned twice a year to maintain their optimum sound quality and performance. Regular piano tuning is crucial to maintain the instrument’s sound quality and playability.


It ensures that the instrument remains in tune and produces accurate pitch. Moreover, keeping the piano well-tuned helps prevent damage to its strings, bridges, and soundboard. Piano tuning should be done twice a year, as seasonal changes in temperature and humidity affect the piano’s tuning stability.


Neglecting regular maintenance can lead to bigger expenses in the future, as a piano that remains untuned for an extended period may go out of tolerance, leading to more significant repair costs. Therefore, it is essential to have your piano tuned regularly by a professional to ensure that it remains in the best possible condition and can be enjoyed by generations to come.


Importance Of Piano Tuning


Keeping a piano well-tuned is of great importance to its overall health and longevity. Generally, it is recommended to get a piano tuned at least once every six months to maintain its sound quality and prevent any damages to its internal parts.

As a piano owner, it is crucial to understand the importance of regular tuning for your instrument. A piano consists of over 12,000 parts that work together to create beautiful melodies. These parts can easily get out of alignment due to factors such as humidity, temperature changes, and regular wear and tear. Regular piano tuning ensures that these parts are in sync, resulting in better sound quality and a longer lifespan for your instrument.

Why Piano Tuning Is Important

Regular piano tuning has several benefits that go beyond just sound quality. Here are some reasons why piano tuning is so important:

  • Improved sound quality: Regular tuning ensures that your piano produces accurate and consistent notes, resulting in a more pleasing sound. This is particularly important for professional musicians who require perfect pitch.
  • Easier to play: A piano that is out of tune can be difficult to play, especially for beginners who are still learning to recognize pitch. Regular tuning ensures that the keys are easier to press and produce sound more predictably.
  • Preventative maintenance: Regular tuning can help identify and fix minor issues before they turn into major problems. This can help prevent costly repairs down the line.
  • Extend lifespan: Like any other instrument, regular maintenance can extend the life of a piano. Regular tuning can prevent damage to the strings, hammers, and other internal components.

How Piano Tuning Affects Performance

Regular piano tuning can have a significant impact on the overall performance of the instrument. Here are some ways that piano tuning affects performance:

  • Tonal balance: A piano that is in tune will have a more balanced sound across all octaves. A poorly tuned piano may sound overly bright or dull in certain areas.
  • Volume: A piano that is out of tune may sound muted or overly loud in certain areas. Piano tuning can help ensure that the volume is consistent across all octaves.
  • Expressivity: A piano that is in tune will allow for more expressive playing. A musician can play with more dynamics when they do not have to compensate for irregularities in tuning.

In conclusion, regular piano tuning is essential for maintaining your instrument and ensuring optimal sound quality. It is recommended that you have your piano tuned at least twice a year, depending on usage and environmental factors. Taking care of your piano will ensure that it maintains its value and provides years of enjoyment.

Factors Affecting Piano Tuning Frequency


Regular piano tuning is essential to maintain its sound quality and longevity. The frequency of piano tuning depends on several factors, including the age of the piano, how frequently it is played, and its location. In general, it is recommended to get a piano tuned at least once a year, but if you use it more often or it’s exposed to fluctuating temperatures, then more frequent tunings may be necessary.

Factors Affecting Piano Tuning Frequency Regular maintenance is the key to keeping your piano in excellent condition and ensuring it plays beautifully for years to come. One of the most important aspects of maintenance is tuning. But how often should you tune your piano? This depends on a few factors, including climate and weather conditions, frequency of use, and playing style. Climate and Weather Conditions Your piano is made of natural materials, and these materials can be affected by changes in temperature and humidity. Extreme variations in climate and weather can cause your piano to go out of tune more quickly than it otherwise would. To keep your piano in top condition, it’s important to monitor your home’s temperature and humidity levels and make adjustments as needed. Frequency of Use and Playing Style Another factor that can affect how often you should tune your piano is how often you play and your playing style. If you play your piano daily, you may need to have it tuned more frequently than someone who only plays once a week. Additionally, if you play your piano with a heavy hand, you may need more frequent tuning to keep the sound in good condition. In conclusion, regular tuning is key to keeping your piano in top condition. By considering factors like climate and weather conditions, frequency of use, and playing style, you can determine how often your piano needs to be tuned and ensure it continues to play beautifully for years to come.

Frequency Of Piano Tuning

Regular tuning of your piano is essential to maintain its quality and keep it in tune with the correct pitch. But how often should you get it tuned? This question is often posed by piano owners, and there is no one-size-fits-all answer.

General Guideline On Tuning Frequency

The general guideline is to tune your piano at least once every year. However, this frequency can vary depending on certain factors, such as climate, usage, and age of the piano.

Factors Tuning Frequency
Climate If your climate is dry or humid, your piano will go out of tune faster. In this case, you may need to tune your piano twice a year.
Usage If you play your piano frequently, it will go out of tune faster. You may want to get it tuned every six months in this case.
Age of Piano If your piano is older or has not been tuned in a long time, it may need a pitch raise. In this case, it may need to be tuned two or three times within the first year to get it back to the right pitch.

How Often Should A New Piano Be Tuned?

If you have just bought a new piano, you need to get it tuned at least four times in the first year. This is because the strings and wood are still adjusting to each other and settling into their permanent positions. After that, you can follow the general guideline and get it tuned once or twice a year.

Factors That May Require More Frequent Tuning

In addition to climate, usage, and age of the piano, there are other factors that may cause your piano to go out of tune faster:

  • Fluctuations in temperature
  • Moving your piano to a new location
  • Playing vigorously or loudly

If you notice any of these factors affecting the pitch of your piano, you should get it tuned more frequently.

How Often Should You Get a Piano Tuned


Credit: www.pianogallery.com


How To Know When Your Piano Needs Tuning

If you’re a music lover or a musician, you might have come across the question, “how often should you get your piano tuned?” The answer to this depends on various factors, including the make and age of the piano, the climate in the location it’s placed, how often it’s played and the quality of the tuning job done during the last service.

Signs Your Piano Is Out Of Tune

One of the most significant signs that your piano is out of tune is its sound. A properly tuned piano will sound pleasant to the ears, with each key producing the intended pitch and tone. If you notice that some notes sound off, or the overall sound produced is unsatisfactory, then it’s time to get the instrument tuned. Other signs your piano is out of tune include:

  • Difficulty in playing the instrument
  • Keys that stick or are slow to respond
  • Rust on the strings or tuning pins
  • Visible changes in the overall appearance of the piano

Difference Between Tuning And Repairs

It’s essential to understand that tuning and repairs are two distinct piano services that serve different purposes. Tuning is about correcting the pitch of the keys, ensuring the piano sounds as intended. On the other hand, repairs are about fixing any physical damage to the instrument. Examples of piano repairs include replacing broken strings or fixing broken pedal mechanisms. Knowing the difference between these two services will help you determine whether your piano needs tuning or repairs.

Regular piano tuning is essential for musicians or anyone who owns a piano. Understanding how to know when your piano needs tuning can go a long way in preserving its sound quality and longevity. By paying attention to sound changes and other physical signs, you can stay on top of your piano’s maintenance needs and enjoy playing it for years to come.

Cost Of Piano Tuning


To keep your piano sounding its best, it’s recommended to have it tuned at least once or twice a year by a professional. The cost can vary depending on your location and the condition of the piano, but it’s an investment that will ensure your instrument stays in top shape for years to come.

Purchasing a piano is a significant investment, and maintenance is essential to keep the instrument in optimal condition. Regular piano tuning is necessary to maintain the pitch and tone of your piano. The cost of piano tuning is an important factor to consider when budgeting for piano maintenance.

Factors Affecting Piano Tuning Costs

Quality of the Piano: The cost of tuning a piano depends on the piano’s quality, brand, and age. A high-end and antique piano may require more time and attention during tuning, which results in a higher cost. Location: Where you live can impact tuning costs because the prices vary depending on your region’s economy. Typically, metropolitan areas have higher piano tuning costs than small towns or rural areas. Frequency of Tuning: The more frequently you have your piano tuned, the lower the cost per tuning. If your piano hasn’t been tuned for many years and requires more work to get it back to pitch, the cost will be higher.

Average Cost Of Tuning A Piano

The average cost of piano tuning ranges between $150 to $300. Moreover, if your piano has not been maintained for a long time, it may require pitch correction or other additional services that can add extra costs. A pitch correction can cost anywhere from $200 to $500. Some piano tuners may charge an additional travel fee if they need to travel a significant distance to your home. In conclusion, Piano tuning is a critical part of maintaining your instrument’s quality. The cost to tune a piano depends on various factors such as the quality of your piano, location, and how often you tune your instrument. By scheduling regular piano maintenance and tuning, you can extend your piano’s lifespan and preserve its sound quality.

How Often Should You Get a Piano Tuned


Credit: www.modernpiano.com


Finding A Qualified Piano Tuner


To keep your piano sounding its best, it is recommended to have it tuned at least once a year. However, the frequency may vary depending on how often the piano is played and environmental factors such as humidity. Finding a qualified piano tuner can ensure your instrument is properly maintained.

Keeping your piano tuned is essential to maintain its musical quality. Therefore, finding a qualified piano tuner is crucial to ensure that your piano is well-maintained. A good piano tuner can tune your piano to the right pitch, fix any technical issues, and adjust any parts of the piano to improve its overall performance. Here are some tips for finding a qualified piano tuner.

Certifications And Qualifications To Look Out For

When looking for a qualified piano tuner, you should look for someone with the necessary qualifications and certifications. Qualified piano tuners undergo years of training and education to become certified professionals. Hence, it is always a good idea to ask for their certifications to ensure they are qualified for the job. Here are the most common certifications that you should look for when hiring a piano tuner:

Organization Certification Description
PTG (Piano Technicians Guild) Registered Piano Technician (RPT) The highest standard of piano service and expertise
ISM (Institute of Musical Instrument Technology) Registered Piano Tuner (RPT) The most recognized qualification in the UK
NAAMM (National Association of Accredited Musical Merchants) Master Piano Technician (MPT) The highest level of piano service and expertise in North America.

Questions To Ask When Hiring A Piano Tuner

Before hiring a piano tuner, you should ask them the right questions to assess their skills and experience. Here are some questions to ask:

1. How long have you been tuning pianos?

Ask the piano tuner about their experience as it shows their expertise and skills in the industry. You should look for someone who has been tuning pianos for at least five years.

2. Do you have any references or testimonials?

A qualified piano tuner will have a list of references and testimonials from satisfied customers. You can contact these references to verify their work quality and reliability.

3. What tuning method do you use?

There are various tuning methods, and a good piano tuner should be conversant with all of them. Ask the tuner about their preferred method to see if it will work for your piano.

4. Do you provide a guarantee for your work?

A reputable piano tuner will offer a guarantee or warranty for their work. Enquire about any after-service warranties or guarantees that their work can sustain. In conclusion, finding a qualified piano tuner is vital for maintaining your piano’s sound and performance. Ensure that you look for someone with proper certifications, training, and experience. Also, you should ask the right questions to verify their skills and expertise.

Tips On Maintaining Your Piano’s Tuning


Regular tuning of your piano is crucial to maintain its sound quality. A piano should be tuned at least twice a year, even if it is not frequently played. More frequent tuning may be necessary if the piano is used extensively or if it is placed in an environment with extreme temperature or humidity changes.

Proper Care And Maintenance For Your Piano

Maintaining your piano’s tuning is essential to keep the sound of your piano pure and consistent. Proper care and maintenance of your piano is the key to keeping it in perfect tune. Ensure that you clean your piano regularly, dusting the piano every day to remove any dust or grime. Keep your piano away from direct sunlight, windows, vents, and heaters to prevent damage due to fluctuations in temperature or humidity. Regularly check the pedals, legs, and hinges to ensure that they are tight and secure.

How To Protect Your Piano From Climate Changes

Climate changes can damage your piano, causing warps and cracks. It’s essential to protect your piano from extreme climate changes by keeping it in a controlled environment. One of the easiest ways of doing this is by investing in a good-quality dehumidifier or a humidifier. This device helps regulate the humidity levels in the air, keeping it at the optimum level for your piano. You can also use a piano cover to protect it from sudden changes in temperature or humidity.

Importance Of Regular Piano Tuning

Regular piano tuning is essential to maintain the quality of sound and to prevent any damage to the piano. Experts advise that you tune your piano at least once a year, but it’s also a good idea to tune your piano twice a year if it’s in use frequently or if you live in a place where the climate is unpredictable. Neglecting regular piano tuning can lead to severe damage to your piano, which could be irreversible in some cases.

Conclusion

Maintaining your piano tuning is essential to keep your piano in perfect condition. Following the above tips on proper care and maintenance, protecting your piano from climate changes and scheduling regular piano tuning appointments will ensure that your piano remains in excellent condition for years to come.

How Often Should You Get a Piano Tuned


Credit: www.colinbattremovals.co.uk


Frequently Asked Questions Of How Often Should You Get A Piano Tuned


How Long Can A Piano Go Without Being Tuned?


A piano can go without being tuned for about 6 to 12 months. However, it is recommended to get a piano tuned at least once or twice a year to maintain its sound quality and overall performance. Neglecting regular tuning can lead to expensive repair costs in the future.


What Happens If You Don’t Tune A Piano For 10 Years?


If a piano is not tuned for 10 years, the pitch will gradually decline and become unstable. The longer the piano goes without tuning, the more difficult it will be to bring it back to its proper pitch. Additionally, there may be other problems with the instrument such as sticky keys or broken strings that will also need to be addressed.


How Often Are Professional Pianos Tuned?


Professional pianos should be tuned at least twice a year to maintain optimal sound quality. However, the frequency of tuning may depend on factors such as how often it is played, the environment it is kept in, and the level of humidity.


It is recommended to consult with a professional piano tuner for personalized advice.


How Do You Know If A Piano Need Tuning?


A piano needs tuning when the sound it produces becomes out of tune. This can be identified when some notes sound different from others, or if the piano sounds flat or sharp. It is advisable to have it tuned every six months to maintain its pitch stability and avoid further damage.


Conclusion


After considering all the factors, it is clear that piano tuning is essential for maintaining the quality and longevity of your beloved instrument. As a general rule of thumb, it is recommended to get your piano tuned at least once a year.


However, if you use your piano frequently or experience significant changes in temperature or humidity, you may need to schedule more frequent tuning appointments. By taking good care of your piano and investing in regular maintenance, you can ensure that it will continue to bring joy and beauty to your life for years to come.


Categories
Archive

Choosing The Right Mic For Your Vocals

As an Amazon Associate I earn from qualifying purchases.

Choosing the right mic for your vocals is crucial. Here’s a quick guide to help you make the right decision.


Your mic choice could make or break your vocal performance. With so many options available, choosing the right microphone can be overwhelming. Your decision should be based on three factors- your budget, your style of music, and your vocal characteristics.


Understanding these three factors will help you determine which microphone will best suit your needs. It’s important to note that not all microphones are created equal, and what may work best for one vocalist may not work for another. We’ll break down the different types of microphones available and what to consider when selecting the right mic for your vocals.

Choosing The Right Mic For Your Vocals


Credit: m.youtube.com


Types Of Microphones


Selecting the appropriate microphone for vocal recording can be overwhelming. Understanding the different types, like dynamic and condenser, and polar patterns, such as cardioid or omnidirectional, can help ensure you choose the right mic for your needs.

When it comes to selecting the right microphone for your vocals, it’s essential to understand the types of microphones available in the market. Each type of microphone has its unique characteristics that determine the quality of sound it produces. Here are the three primary types of microphones:

Condenser Mics

Condenser microphones are ideal for recording studio vocals and capturing low-level sounds like acoustic guitars and pianos. They are more sensitive than dynamic mics, and they produce a more transparent, detailed sound. These mics work on the principle of capacitance, where an electrically charged diaphragm vibrates in response to sound waves, generating an electrical signal.

Dynamic Mics

Dynamic microphones are more robust than condenser mics and are less sensitive and affordable. They are perfect for live performances, as they can handle high sound pressure levels like drums and electric guitars. They work on electromagnetic induction, where a wire coil moves within a magnetic field, generating an electrical current as the sound waves hit the diaphragm.

Ribbon Mics

Ribbon microphones are the most delicate and expensive type of microphone, primarily used in the recording of brass instruments, string sections, and vocals. These mics work on the dynamic principle, but instead of a wire coil, they have a thin metal ribbon that vibrates in a magnetic field, generating an electrical signal. Ribbon mics are incredibly detailed and produce a warm, natural sound. In conclusion, selecting the right microphone type is essential for getting the best sound quality from your vocals. Choosing the right microphone is not only a technical decision but also depends on your voice, style, and the environment you’re using it in. Take some time to research and test different microphones to find the one that suits your needs the best.

Choosing The Right Mic For Your Vocals


Credit: m.youtube.com


Factors To Consider


Choosing the perfect mic for your vocals can greatly impact the quality of your recording. Factors to consider include polar pattern, frequency response, sensitivity, and your budget. Deciding on the right type of microphone for your vocals can make a world of difference in your overall sound.

Factors to Consider When Choosing the Right Mic for Your Vocals: The right microphone can make all the difference when it comes to recording high-quality vocals. However, with so many different types and models on the market, it can be overwhelming to determine which one is best for you. Here are the four key factors to consider when choosing a microphone for your vocals: H3: Vocal Range Your vocal range can greatly impact the type of microphone you should choose. If you have a higher-pitched voice, a microphone that accentuates the high frequencies may be better suited to your needs. Alternatively, if you have a lower-pitched voice, you may want a microphone that emphasizes the mid-range frequencies. H3: Polar Pattern The polar pattern of a microphone determines how it picks up sound from various directions. Some microphones have a cardioid pattern, which means they are most sensitive to sounds coming from the front. Others have an omnidirectional pattern, which picks up sound from all directions. Consider the intended use of your microphone and whether you want to prioritize isolating your vocals or capturing ambient noise as well. H3: Sensitivity Microphone sensitivity refers to how well it can pick up soft sounds. If you tend to sing with quieter dynamics, a microphone with higher sensitivity may be better suited to your needs. Alternatively, if you have a more powerful voice and tend to sing loudly, a less sensitive microphone may be a better choice to avoid distortion. H3: Frequency Response The frequency response of a microphone refers to the range of frequencies it can accurately capture. For vocals, it’s essential to choose a microphone with a frequency response that complements your voice and style. If you tend to sing with a lot of high-pitched notes, a microphone with an extended frequency response in the higher ranges may be desirable. On the other hand, if you have a deeper voice, you may want a microphone with an extended low-frequency response to capture the richness of your vocals. By considering these four factors when choosing a microphone for your vocals, you can ensure that you select the best option for your unique needs and preferences.

Best Mics For Different Voices

When it comes to recording vocals, choosing the right microphone is crucial. The microphone you choose will have a significant impact on the overall sound quality of your recordings. Therefore, it’s essential to select a mic that suits your specific vocal style and tone. In this article, we’ll go through the best mics for different voices, giving you an idea of what works best for male, female, high-pitched, and deep voices.

Male Vocals

Male vocals can vary in tone and timbre, so it’s essential to choose a microphone that can handle a wide range of frequencies. A dynamic microphone like the Shure SM58 or the Audio-Technica ATM21 is an excellent option for male vocals. These mics are known for their ability to handle high sound pressure levels and dynamic range, making them standout choices for recording vocals with more power and punch.

Female Vocals

When it comes to recording female vocals, the microphone’s sensitivity and frequency response are of paramount importance. Condenser microphones like the AKG C414 and Neumann U87 are perfect for recording female vocals. These mics have a wide frequency response, allowing for the capture of high frequencies and clarity that can bring out the best in any female vocal.

High-pitched Voices

Choosing the right microphone for high-pitched vocals can be a challenge, as they require a microphone that can handle high sound pressure levels while still retaining clarity and detail. A condenser microphone like the Audio-Technica AT4053B or the Rode NT5 can help in producing clear recordings with detailed high-pitched vocals. These mics can handle high sound pressure levels while still delivering accurate and detailed sound.

Deep Voices

Deep voices require a microphone that can handle low-frequency resonances. A dynamic microphone like the Electro-Voice RE20 or the Shure SM7B can handle low-frequency resonances exceptionally well. These mics also have excellent dynamic range and a high output level, making them popular for recording deep voices with utmost clarity.

Conclusion

Choosing the right microphone for your vocals can take some time, but when you get it right, the results can be nothing short of amazing. Whether you have a deep bass or a high-pitched falsetto, there is a microphone out there for you, fitting your vocal needs. With this guide, we’re confident you’ll be well-equipped to find the perfect mic for your vocal style.

Popular Mic Models

Choosing the right mic for vocals can be a daunting task, with so many options to choose from. However, some popular mic models have stood the test of time and become go-to choices for many singers, musicians, and recording engineers. Here are the top four:

Shure Sm7b

The Shure SM7B is a dynamic microphone that is ideal for vocals due to its smooth, warm sound. It is commonly used in radio stations and music studios and has been used to record vocals for famous albums. The mic has an internal shock mount that helps reduce noise and vibration, and its cardioid polar pattern ensures excellent isolation of the sound source from surrounding noise. It also has a switchable bass cut and mid-range boost that helps enhance the sound quality.

Akg C414

The AKG C414 is a versatile condenser microphone that is used for recording different instruments, including vocals. It has nine polar patterns, which provides flexibility in recording different soundscapes. The mic’s large diaphragm captures a wide frequency range, making vocal recordings sound clear and detailed. It also has switchable bass cut and pad options that help remove unwanted low-frequency sounds.

Audio-technica At4053b

The Audio-Technica AT4053b is a shotgun condenser microphone that is ideal for recording vocals in a noisy environment. Its narrow acceptance angle helps focus the mic on the sound source, thereby reducing background noise. The mic’s bass roll-off switch helps remove unwanted low-frequency sounds, and its cardioid polar pattern ensures excellent isolation of the sound source from surrounding noise.

Neumann U87

The Neumann U87 is a classic condenser microphone that has been used to record vocals for famous artists. Its large diaphragm captures a wide frequency range, making vocal recordings sound detailed and natural. The mic’s three polar patterns allow recording in different environments, and its low-frequency roll-off switch helps reduce unwanted bass sounds. The Neumann U87 remains a top choice for many recording studios due to its excellent performance.

Mic Placement Techniques

Choosing the right microphone is essential for producing quality vocals. However, it’s equally important to use the correct mic placement techniques. Proper mic placement can make or break a recording session. In this post, we’re going to focus on the different mic placement techniques that you can use to get the best results from your microphone.

Distance From Mouth

The distance between the microphone and the performer’s mouth plays a crucial role in the overall sound quality. The ideal distance is typically between 6-12 inches, but it’s always best to experiment with different distances to find the perfect one for your particular mic and voice.

Angle Of Mic

The angle at which the microphone is placed can affect the clarity of the vocals. The best angle usually ranges from 30-45 degrees off-axis from your mouth. This technique helps to minimize plosive and sibilance sounds while reducing the chances of picking up additional background noise.

Using A Pop Filter

A pop filter can significantly improve the sound quality of your vocals. It helps to reduce plosive sounds, removes excessive air from vocal recordings, and helps you to record clean and clear sounds. Ensure you properly place the pop filter between your mouth and the microphone, at an appropriate distance.

Eliminating Background Noise

Background noise can interfere with the quality of your vocal recording, and it’s essential to eliminate it as much as possible. Ensure you choose a good recording environment and use soundproofing techniques along with a directional microphone to minimize noise.

In conclusion, the microphone placement technique used for your vocal recording is a matter of trial and error. Be creative and take notes of each recording session, remember what works best for your mic and voice, and repeat it for every session.

Choosing The Right Mic For Your Vocals


Credit: www.shure.com


Budget Mics For Home Recording

If you’re beginning your home recording journey and are on a tight budget, choosing the right microphone for your vocals can be tough. However, there are several options available at affordable prices that can produce great results. In this blog, we will look at some budget mics for home recording that are perfect for beginners who want to record high-quality vocals.

Samson C01

The Samson C01 is a great entry-level budget condenser microphone that is designed for home recording. It is ideal for vocal and acoustic guitar recordings and can produce excellent sound quality. The microphone comes with a shock mount and a carry case, which makes it easy to use on the go. The Samson C01 has a cardioid polar pattern, which means it picks up sound mostly from the front of the microphone and rejects sound from the sides and back. This makes it perfect for recording vocals in a home studio.

Behringer B-1

The Behringer B-1 is another budget-friendly option that offers outstanding sound quality. It is a large-diaphragm condenser microphone that is suitable for recording both vocals and instruments. The microphone has a switchable -10dB attenuator, which makes it ideal for high-sound pressure level (SPL) applications. The Behringer B-1 also has a selectable low-frequency roll-off and a switchable -6dB/octave high-pass filter, which helps eliminate unwanted low-frequency noise.

Mxl V67g

The MXL V67G is a great budget condenser microphone that is perfect for recording vocals at home. It has a large gold-sputtered diaphragm that produces a warm and natural sound. The MXL V67G also has a cardioid polar pattern, which means it picks up sound mostly from the front and rejects sound from the sides and back. This makes it a perfect choice for recording vocals in a home studio.

Audio-technica At2035

The Audio-Technica AT2035 is a large-diaphragm condenser microphone that offers excellent sound quality and is perfect for recording vocals. It has a switchable -10dB pad and a switchable low-frequency roll-off, which makes it perfect for recording high-SPL sources and eliminating low-frequency noise. The Audio-Technica AT2035 also has a cardioid polar pattern and a high SPL handling capability, making it suitable for recording vocals in a loud environment.

Choosing the right mic for your vocals can be tricky when you’re on a budget, but it is essential to ensure that you get the best audio quality possible. The Samson C01, Behringer B-1, MXL V67G, and Audio-Technica AT2035 are all great budget-friendly options for home recording. Each of these microphones has its own unique features that make them suitable for different recording situations. Consider the features that you need and choose the one that fits your budget and recording needs the best. With the right microphone, you can create high-quality vocal recordings at home without breaking the bank.


Maintaining Your Mic


Choosing the right microphone for your vocals is crucial in ensuring top-quality sound. It’s important to consider factors such as directionality, sensitivity, and frequency response. Regular maintenance, such as cleaning and storage, can also extend the life of your microphone.

Choosing the right mic for your vocals is crucial for producing high-quality recordings or live performances. However, it’s equally important to maintain your mic so that it lasts long and delivers optimal performance. Here are some essential tips for maintaining your mic.

Storing Your Mic

Storing your mic correctly is crucial to ensuring its longevity. When not in use, it’s best to store your mic in its case or a protective bag. Avoid leaving it in an exposed area, which can lead to dust accumulation or damage from accidental falls. It’s essential to keep your mic dry at all times, so avoid storing it in damp areas or near water sources.

Cleaning Your Mic

Cleaning your mic regularly is necessary for maintaining hygiene and sound quality. Wipe your mic with a clean and dry cloth before and after every use to remove any fingerprints, dust, or debris. If the grime is stubborn, dampen the cloth slightly with water or rubbing alcohol and wipe it gently. Avoid using harsh detergents or chemicals that can damage the mic.

Avoiding Damage

Mishandling or accidental drops can cause severe damage to your mic, affecting its performance and lifespan. Always handle your mic with care, and avoid placing it on unstable surfaces or in high traffic areas. Use a shock mount to absorb vibrations and prevent damage from sudden shocks or drops. If you’re traveling with your mic, carry it in a secure case or bag.

Maintaining Performance

Regular maintenance is key to maintaining your mic’s performance. Test your mic periodically to ensure that it’s functioning correctly. Check for any loose connections or unusual noises and address them immediately. Keep your mic away from extreme temperatures and humidity, as these can affect its performance. If you notice any issues, take your mic to a professional for repair or replacement. Maintaining your mic takes some effort, but it’s a small price to pay for excellent sound quality and longevity. With the proper care and attention, you can keep your mic in top shape and deliver outstanding vocals every time.

Frequently Asked Questions Of Choosing The Right Mic For Your Vocals


How Do I Choose The Right Microphone For My Voice?


To choose the right microphone for your voice, consider the type of microphone, its sensitivity, directional patterns, and frequency response. Dynamic mics are ideal for loud vocals while condenser mics are better for quiet, detailed sounds. Directional patterns like cardioid, omnidirectional, and bidirectional dictate how the mic picks up sound.


Lastly, frequency response shows how the mic responds to high and low frequencies. Test various mics to see which one works best for your voice.


What Kind Of Microphone Should I Select To Use With Vocals?


For vocals, it’s best to select a condenser microphone due to its sensitivity to capture details and clarity. Large-diaphragm condenser microphones are the most popular for vocal recording as they offer warmth and depth to the tone, but smaller diaphragm condensers can also work well depending on the specific application.


Which Microphone Will You Prefer For Singing?


For singing, I would prefer a condenser microphone with a wide frequency response range. Some great options include the Shure SM7B, Audio-Technica AT4053b, and Neumann TLM 102. The microphone should also have a cardioid or supercardioid polar pattern to reduce background noise and focus on the singer’s voice.


Does Microphone Quality Matter For Singing?


Yes, microphone quality matters for singing as it can greatly affect the clarity, tone, and overall quality of the recorded or live voice. A high-quality microphone reduces background noise, captures the nuances of the voice, and delivers a more professional sound.


It is recommended for singers to invest in a good microphone for optimal performance.


Conclusion


To sum up, choosing the right mic for your vocals can make a huge difference in the sound quality of your recordings. It’s important to consider your budget, the type of vocals you’ll be recording, and the size of your recording space when making your decision.


Take the time to research and test out different options before making a final purchase. Remember, a high-quality microphone can take your music to the next level and help you stand out in a crowded industry.

Categories
Archive

How To Reduce Distortion When Mastering

To reduce distortion when mastering, apply EQ and compression to the mix before limiting. Additionally, ensure that the mix is properly balanced with no frequencies overpowering others.


Mastering is the final step in the music production process, where all tracks are combined and prepared for distribution. However, it’s also where distortion can occur, ruining the quality of the audio. Therefore, it’s crucial to know how to reduce distortion when mastering to achieve the best sound quality.


One way to do this is to apply EQ and compression to the mix before limiting. It’s also essential to ensure that the mix is properly balanced with no frequencies overpowering others. This article will provide further insight into reducing distortion during mastering, so keep reading to learn more.


Understanding Distortion Types

Distortion is an integral part of music production, but it can be a double-edged sword. It can add a unique character to your mixes, but excessive distortion can ruin the quality of the sound. Therefore, it’s essential to understand the different types of distortion to reduce it to an acceptable level. Here we’ll explore the three types of distortion, including harmonic distortion, intermodulation distortion, and clipping.

Harmonic Distortion

Harmonic distortion arises when additional frequencies are generated, resulting from the introduction of non-linearities in the sound signal. This type of distortion is usually present in analogue gear, such as preamps, compressors, and equalizers, giving them their unique ‘warmth.’ However, when mixing, an excess of harmonic distortion can deteriorate sound fidelity, resulting in an inharmonious clash of frequencies.

Harmonic Distortion Effect on Audio Signal
2nd order (even harmonics) increases basic tone, gives warmth
3rd order (odd harmonics) harshness or grittiness to the sound
Higher-order harmonics clutter and overbearing

Intermodulation Distortion

Intermodulation distortion occurs when two or more frequencies mix together, producing additional harmonic and non-harmonic frequencies. This type of distortion is common in recordings with numerous instruments playing together. Intermodulation distortion causes some instruments to mask other instruments, making the mix sound ‘muddy.’ To reduce this distortion, it’s crucial to analyze each instrument and their collision frequency and EQ adequately.

Clipping

Clipping is the most commonly known type of distortion. It arises when the signal exceeds the maximum capacity of the audio device, causing a flattening of the waveform. Clipping results in the loss of essential information and harmonic overtones, making the sound harsh and unpleasant. While an occasional clip can add character, excessive clipping can ruin the quality of the mix. However, modern digital equipment with high-quality limiters and compressors can help reduce clipping from occurring.

  1. Harmonic distortion adds warmth to the sound, but too much can harm fidelity.
  2. Intermodulation distortion creates muddy sounds in multi-instrument recordings.
  3. Clipping flattens the waveform and causes the sound to be harsh.
How To Reduce Distortion When Mastering


Credit: www.masteringthemix.com


Best Practices For Avoiding Distortion


To reduce distortion when mastering, it is important to use high-quality equipment and monitoring systems, avoid overprocessing the audio, maintain appropriate levels, and address any potential phase issues. Additionally, it is crucial to have an experienced and trained ear to listen for distortions and make adjustments as necessary throughout the mastering process.


Following these best practices will result in a clean and clear final mix.

Distortion causes an unpleasant and fatiguing listening experience. Mastering engineers strive to produce distortion-free music, but sometimes, it’s tough to avoid it. However, applying the best practices in gain staging, EQ and compression, limiters, and using saturation plugins can go a long way in reducing distortion in mastering.

Gain Staging

Gain staging is the process of optimizing the levels of audio signals at every stage of processing, from recording to master mixing. It’s crucial to avoid low-level signals that result in high noise floor or high-level signals that result in distortion. The best method is to start by setting levels at the source. For example, in recording, the artist should maintain a consistent distance from the microphone\s, followed by pre-processing (EQ, Compression, etc.) utilization, then exporting the tracks to the mixing engineer. Furthermore, during mixing, keep an eye on the levels and make adjustments as necessary to avoid clipping.

Eq And Compression

EQ and compression can bring about unwanted distortion if not used correctly. It’s best to start with relatively flat EQ settings and avoid excessive boosting. When compression is necessary, use a smooth attack and release, a low ratio, and keeping the gain reduction at a minimum. Using a multi-band compressor helps prevent distortion when compressing a specific frequency range.

Limiters

Limiters are the last stage of processing in mastering and are used to achieve higher loudness. However, a strong emphasis on loudness can result in distortion. To avoid this, ensure that the limiter threshold is set at the maximum level without causing distortion. Moreover, using two limiters set at different thresholds ensures that no distortion occurs.

Using Saturation Plugins

Using saturation plugins helps emulate the warmth and richness of analog recordings without causing distortion. It does this by adding harmonics to the audio signal. It’s best to use them sparingly, keeping the input level below the limit, and to use the right type of plugin for the material being mastered. With these practices in mind, it’s easier to reduce distortion in mastering. It’s essential to understand that mastering is a delicate process and that distortion can occur at any stage. Hence, it’s always advisable to have a good monitoring system and to monitor at low volume levels to avoid ear fatigue.

Tools For Measuring Distortion

Distortion is an unpleasant effect of audio mastering that can ruin the overall quality of your music production. In order to achieve high-quality mastering, it’s essential to measure and reduce distortion levels as much as possible. Thankfully, there are several tools available to measure distortion levels, including spectrum analyzers, oscilloscopes, and distortion meters. In this blog post, we’ll discuss each of these tools in detail and how they can be used to reduce distortion when mastering.

Spectrum Analyzers

Spectrum analyzers are a popular tool for measuring distortion in audio mastering. This tool works by displaying the frequency makeup of a signal, indicating the areas where distortion may be present. By analyzing the signal’s frequency makeup, you can get an idea of the amount and type of distortion in your audio and adjust settings accordingly to reduce them.

Oscilloscopes

An oscilloscope is another tool used to measure distortion in audio mastering. It works by displaying the signal’s waveform, providing an accurate representation of its shape and potential distortion. You can use the waveform to make adjustments and reduce distortion levels, ensuring that your music sounds as intended.

Distortion Meters

Distortion meters are a specialized tool that is designed to measure distortion in an audio signal. These meters work by analyzing the signal’s waveform and providing quantifiable measures of distortion in percentages or decibels. This tool is particularly useful when mastering music, as it can help you fine-tune your settings and achieve the desired level of distortion for your music production.

Conclusion

Overall, measuring and reducing distortion when mastering audio is crucial for achieving high-quality results. By using a combination of the above tools, you can accurately measure distortion levels, identify problem areas, and make adjustments accordingly, resulting in music with a clean, clear and distortion-free sound.

Techniques To Reduce Distortion


Reducing distortion while mastering is crucial for producing high quality audio. To achieve this, techniques such as using limiters, compressors, EQ and multiband processing can be effective. Another useful method is to avoid clipping and ensure proper gain staging during recording and mixing.

Techniques to Reduce Distortion: Distorted audio can be a frustrating issue when it comes to mastering tracks. Fortunately, there are a variety of techniques you can use to reduce distortion and achieve a clean, professional sound. In this post, we’ll cover some of the most effective ways to reduce distortion during mastering, including using EQ to cut problem frequencies, multiband compression, dynamic EQ, and stereo widening techniques. Using EQ to Cut Problem Frequencies: EQing is an essential tool in reducing distortion during mastering. By identifying and cutting problem frequencies, you can effectively reduce distortion while preserving the clarity and detail of your track. When using EQ to reduce distortion, consider the following: – Identify problem frequencies using a spectrum analyzer or by listening for harsh, muddy, or boomy areas of the mix. – Cut frequencies that are causing distortion using a surgical EQ, notch filter, or high-pass filter. – Be careful not to overdo the EQ, as excessive cutting can result in an unnatural sound. Using Multiband Compression: Multiband compression is an effective technique for reducing distortion while maintaining the overall dynamics and balance of your track. When using multiband compression, consider the following: – Set the crossover points carefully to ensure that each band is compressed effectively. – Use a fast attack time to catch any sharp transients, and a medium release time to prevent excessive pumping. – Be careful not to over-compress, as this can result in a loss of detail and dynamics. Using Dynamic EQ: Dynamic EQ is a powerful tool that can be used to reduce distortion while preserving the natural dynamics of your track. When using dynamic EQ, consider the following: – Identify problem frequencies as with standard EQ and multiband compression. – Set the threshold and ratio to catch problem frequencies only when they exceed a set level. – Use a medium attack time to catch fast transients, and a medium release time to preserve the natural decay of the sound. Stereo Widening Techniques: Stereo widening can add clarity and dimension to your tracks, but it can also introduce distortion if not used carefully. When using stereo widening techniques, consider the following: – Use a mid/side equalizer to cut problem frequencies in the side channel only. – Use a stereo imager to adjust the width of the stereo field without introducing phase issues. – Use stereo delay or reverb to create a sense of depth and space, but be careful not to overdo it. In conclusion, by using the techniques mentioned above, you can effectively reduce distortion and achieve a clean, professional sound during mastering. Remember to use these tools carefully and creatively to avoid over-processing and to preserve the natural dynamics and balance of your track.

Using Monitoring Cautiously

Mastering is a crucial process in audio production, where all the individual tracks are combined, balanced, and polished to create a cohesive final mix. However, it is often accompanied by distortion, which can adversely impact the audio quality. In this blog post, we will discuss various techniques to reduce distortion when mastering, focusing on the subheading – Using Monitoring Cautiously.

Headroom Considerations

Headroom refers to the amount of space available between the highest peak of the audio signal and the maximum level at which it can be played back without distortion. When mastering, one should always maintain adequate headroom to avoid distortion. It is recommended to maintain at least 3-6 dB of headroom, depending on the nature of the audio material. This ensures that the final mix does not get clipped or distorted at high playback levels.

The Importance Of Multiple Listening Devices

Using multiple listening devices while mastering can help you identify any distortion that might be present in the final mix. Listening to the mix on different devices like headphones, monitors, speakers, etc., can help you get a better sense of the overall sound quality. However, it is essential to ensure that each device is calibrated to the same volume level to make a fair comparison.

Moreover, it is advisable to listen to the mix in different environments and take notes for further reference. Listening to audio in a controlled listening environment like a treated mixing room can also help reduce distortion.

In conclusion, using monitoring devices cautiously is a crucial aspect of reducing distortion while mastering audio. By following the above-mentioned tips like maintaining headroom and using multiple listening devices, you can minimize distortion and achieve a high-quality final mix.

How To Reduce Distortion When Mastering


Credit: m.youtube.com


Testing Your Mixes For Distortion


Reduce distortion in your mastered mixes by testing them thoroughly. Play them on different devices at different volumes to ensure they sound good and are free from any unwanted distortion or clipping.

Distortion is a common problem in music production and can be caused by a variety of factors, including clipping, over-compression, and EQ boosting. The good news is that you can minimize distortion in your masters by testing your mixes before finalizing them. In this article, we’ll explore how to listen for distortion and use visualization tools to identify it, so you can create high-quality masters that sound great on any playback system.

How To Listen For Distortion

Listening for distortion is crucial when testing your mixes because it can be hard to detect through visual analysis alone. Start by playing your mix at various volume levels and listen for any crackling, buzzing, or other unwanted noise. Another way to listen for distortion is to isolate different frequency ranges in your mix to see if any particular frequencies are overloading. Using headphones can also help you hear distortion more clearly. Additionally, it’s a good idea to listen to your mix in different playback environments to identify inconsistencies. For example, what sounds good in your studio may not translate well to a car stereo or a pair of earbuds.

Using Visualization Tools To Identify Distortion

Visualization tools such as spectrometers, peak meters, and oscilloscopes can help you identify distortion in your mix by analyzing the waveform and frequency spectrum. Peak meters, for example, show how close the levels are to clipping, making it easier to detect distortion caused by overloading the input or output stage of your equipment. Spectrometers, on the other hand, show the frequency distribution of your mix, making it easy to identify areas that may be too loud or too quiet. Oscilloscopes can help you identify waveform distortion such as clipping, which can create unwanted artifacts in your mix. Using these visualization tools can be incredibly helpful, but it’s important not to rely on them too heavily. Always trust your ears first and use the visualization tools as a supplement to your listening. In conclusion, testing your mixes for distortion is an essential part of the mastering process. Listen carefully for any unwanted noise and use visualization tools to help you identify problem areas. With practice, this process will become easier, and your masters will sound better than ever.


How To Reduce Distortion When Mastering


Credit: www.masteringthemix.com


Frequently Asked Questions Of How To Reduce Distortion When Mastering


How Do I Stop Distortion When Mastering?


To stop distortion when mastering, you should use a limiter or compressor to control the dynamic range, adjust the frequency balance with an EQ, avoid overloading the mix with too much compression, use high quality audio equipment, and listen to the mix at different volumes and on different systems to ensure clarity.


How Do You Reduce Distortion?


To reduce distortion, make sure to avoid overloading the signal, use high-quality cables, keep the audio equipment and speakers away from magnetic or electric interference, use proper speaker placement, and set the EQ correctly.


How Do You Prevent Distortion In Mixing?


To prevent distortion in mixing, you should ensure that your levels are consistent, monitor your bass levels carefully, use EQ sparingly, avoid excessive compression, and use a limiter to keep peaks in check. Be sure to take breaks to rest your ears and listen on different devices for accuracy.


How Do I Reduce Distortion In My Speakers?


To reduce distortion in your speakers, ensure that you are not overdriving them by keeping the volume below the maximum. Position the speakers at least a foot from walls or corners to avoid bass buildup. Also, avoid placing objects in front of the speakers that may obstruct the sound waves and prevent proper dispersion.


Finally, use high-quality cables and avoid daisy-chaining multiple speakers together.


Conclusion


In mastering, the reduction of distortion is a crucial process that improves the overall quality of the final mix. By following the steps outlined above, you can effectively reduce distortion and achieve a more professional mix. These guidelines include addressing unwanted frequencies, using proper compression, and utilizing the right limiting techniques.


It is important to remember that patience and practice are key components to mastering, and with dedication and hard work, you can achieve the perfect mix. So, keep this information in mind, and start mastering like a pro today!

Categories
Archive

Quested S6R Review

The Quested S6R is an outstanding studio monitor, providing accurate and precise sound reproduction for professionals in the music industry. With its clear highs, detailed midrange, and tight bass response, the S6R offers an exceptional listening experience.


Its compact design and robust construction make it suitable for both small studios and larger control rooms, while its intuitive controls and versatile connectivity options ensure seamless integration into any setup. The Quested S6R is a top choice for audio engineers, producers, and musicians who demand superior performance and reliability in their monitoring system.


Sound Quality

The Quested S6R is well-known for its exceptional sound quality, making it a popular choice among audio professionals and enthusiasts. With its remarkable performance, this studio monitor delivers a truly immersive listening experience, offering a range of impressive attributes that set it apart from other speakers in its class.

Clarity And Detail

The sound produced by the Quested S6R is characterized by stunning clarity and impeccable detail. Whether you’re mixing tracks or simply enjoying your favorite music, the level of intricacy in the sound reproduction is truly remarkable. Every nuance and subtlety in the audio is faithfully captured, allowing you to hear even the most delicate elements with remarkable precision.

Bass Response

One of the standout features of the Quested S6R is its impressive bass response. The low frequencies are reproduced with exceptional depth and power, creating a rich and full-bodied sound that adds a new dimension to your listening experience. Whether you’re working on bass-heavy music or enjoying movies with impactful sound effects, the S6R’s bass performance will undoubtedly impress.

Midrange And High-end

When it comes to the midrange and high-end, the Quested S6R excels in delivering a balanced and articulate sound. The midrange is clear and well-defined, ensuring that vocals and instruments are reproduced with utmost accuracy. Additionally, the high-end frequencies are crisp and detailed, providing a sparkling brilliance that adds a delightful sheen to the overall sound.

Quested S6R Review


Credit: vintageking.com


Compatibility

When it comes to compatibility, the Quested S6R offers flexibility and versatility.

With Various Devices

The Quested S6R is compatible with a wide range of devices, including computers, mobile phones, and audio interfaces.

  • Connects seamlessly with laptops for easy audio monitoring
  • Pair with smartphones or tablets for on-the-go mixing and referencing
  • Compatible with audio interfaces for professional studio set-ups

Room Acoustics

When it comes to room acoustics, the Quested S6R adapts well to different environments.

  • Integrated EQ settings for adjusting to specific room characteristics
  • Enhanced bass response in smaller rooms without compromising sound quality
  • Optimized dispersion for precise sound imaging in various room sizes

“`

User Experience

When it comes to the Quested S6R studio monitors, user experience is of paramount importance. From the initial setup process to long-term durability, these monitors are designed to provide an exceptional user experience from start to finish.

Setup Process

The setup process for the Quested S6R monitors is straightforward and hassle-free. With their compact size and ergonomic design, these monitors can be easily positioned in any studio setup. Connecting the monitors to your audio interface or mixing console is a breeze, thanks to their balanced XLR inputs.

The user-friendly setup instructions provided with the monitors ensure that even those with little technical knowledge will be able to get them up and running in no time. By following the step-by-step guide, you can optimize the placement and positioning of the monitors to achieve the best possible sound reproduction.

Ease Of Use

Once set up, the Quested S6R monitors offer a seamless and intuitive user experience. The front-panel controls allow for quick adjustments to the volume and tweeter level, giving you complete control over your monitoring environment. The LED indicators provide clear visual feedback, ensuring that you can easily monitor the status of your monitors at a glance.

The ergonomic design of the Quested S6R monitors also contributes to their ease of use. The front-firing bass ports and precisely engineered cabinet reduce unwanted resonances, resulting in a more accurate and focused sound. With their compact size, these monitors can fit into any studio space without sacrificing audio quality.

Durability

When investing in studio monitors, durability is a crucial factor to consider. The Quested S6R monitors are built to withstand the rigors of professional use, ensuring years of reliable performance. With their robust construction and high-quality components, these monitors are designed to deliver consistent and accurate sound reproduction for extended periods.

The rigorous testing carried out during the manufacturing process ensures that each Quested S6R monitor meets the highest standards of durability and performance. Whether you’re a professional sound engineer or a home studio enthusiast, you can rely on these monitors to provide reliable and accurate audio monitoring, session after session.

Comparison

When considering purchasing monitor speakers, it’s essential to compare different options to find the best fit for your needs. In this Quested S6R review, we’ll take a look at how these speakers stack up against other monitor speakers in the market and evaluate their value for money.

Versus Other Monitor Speakers

Comparing the Quested S6R with other monitor speakers reveals some standout features that set it apart from the competition. Here’s a breakdown of how the Quested S6R compares to other popular monitor speakers:

Aspect Quested S6R Competitor A Competitor B
Frequency Response 45Hz – 20kHz 50Hz – 18kHz 40Hz – 22kHz
Power Handling 120W 100W 150W
Price $$$ $$ $$$

Value For Money

When it comes to value for money, the Quested S6R stands out as an excellent investment. Its competitive price point combined with its superior frequency response and power handling make it a top choice for both amateur and professional audio engineers.

Pros And Cons

When considering investing in professional studio monitors, such as the Quested S6R, it’s essential to weigh the pros and cons of the product to make an informed decision. This review will outline the advantages and drawbacks of the Quested S6R studio monitors to help you determine if they’re the right fit for your studio setup.

Advantages

The Quested S6R studio monitors come with several noteworthy advantages that make them a sought-after choice for audio professionals.

  • Accurate sound reproduction for critical monitoring needs.
  • Excellent build quality, ensuring durability and reliability.
  • Wide frequency response and detailed imaging for precise audio production.
  • Convenient room tuning controls for adaptable monitoring in various studio environments.

Drawbacks

However, it’s crucial to be aware of the potential drawbacks when considering the Quested S6R studio monitors for your setup.

  • Higher price point compared to some competitors in the market.
  • Heavier weight, which may not be suitable for all studio configurations.
  • Limited connectivity options, potentially requiring additional equipment for specific setups.
Quested S6R Review


Credit: www.musicngear.com


Quested S6R Review


Credit: vintageking.com


Frequently Asked Questions Of Quested S6r Review


What Is The Frequency Response Of The Quested S6r?


The frequency response of the Quested S6R is accurate and flat across the audio spectrum, ensuring faithful sound reproduction.


What Are The Key Features Of The Quested S6r Studio Monitor?


The Quested S6R studio monitor features a powerful bi-amplified design, with a 6. 5-inch woofer and a 1-inch tweeter. It offers exceptional clarity and accuracy across the frequency spectrum, making it ideal for professional audio monitoring. The monitor also includes a range of customization options for room acoustics and listening preferences.


How Does The Quested S6r Compare To Other Studio Monitors In Its Price Range?


Compared to other studio monitors in its price range, the Quested S6R stands out for its exceptional build quality, precise audio reproduction, and versatility. It delivers a balanced and detailed sound, with a wide and accurate stereo image. The monitor’s robust construction ensures long-lasting performance, making it a worthwhile investment for audio professionals.


Can The Quested S6r Be Used In Home Studios?


Yes, the Quested S6R can certainly be used in home studios. Its compact size and exceptional audio performance make it an ideal choice for smaller recording spaces. With its accurate and balanced sound, the monitor allows home studio owners to achieve professional-level audio monitoring for their music production, mixing, and mastering needs.


Conclusion


To sum up, the Quested S6R speakers offer exceptional sound quality and precision. Their compact design makes them suitable for various applications. With advanced features and a reputation for excellence, the S6R is a top choice for audiophiles and professionals alike.


Invest in quality sound with Quested.