Categories
Archive

Behringer Nekkst K10S Review

The Behringer Nekkst K10S provides accurate and precise audio reproduction for professional sound monitoring needs. This review will cover its features, performance, and overall value for money.


Combining advanced technology and meticulous design, the Behringer Nekkst K10S is a powerful studio subwoofer that delivers exceptional low-frequency response. With a frequency range of 25 Hz to 180 Hz, it reproduces bass with utmost clarity and accuracy. The 10″ glass fiber woofer cone ensures durability and reduces distortion, while the front-firing port enhances bass extension.


Equipped with a built-in 180-watt amplifier, the Nekkst K10S boasts ample power for demanding audio applications. Its advanced control panel features adjustable crossover frequency, phase switch, and room compensation EQ, allowing for precise tailoring to any acoustic environment. Additionally, the subwoofer’s Auto Standby mode conserves energy when not in use. The Behringer Nekkst K10S provides professional sound engineers and music producers with a reliable and high-quality solution for precise low-frequency monitoring in the studio.

Behringer Nekkst K10S Review


Credit: www.sweetwater.com


Design And Build Quality


The Behringer Nekkst K10S offers a sleek design and high-quality build, ensuring durability and impressive performance. Its sturdy construction and attention to detail make it a reliable choice for individuals seeking top-notch audio equipment.

Design and Build Quality The design and build quality of the Behringer Nekkst K10S subwoofer are essential factors contributing to its overall performance and longevity. Let’s delve into the specifics of its exterior design and construction materials. Exterior Design The Behringer Nekkst K10S boasts a sleek and contemporary exterior design, featuring a minimalist aesthetic that seamlessly blends with various audio setups. Its compact form factor makes it suitable for both home and professional studio environments, while the strategically placed control panel ensures easy access and intuitive operation. Construction Materials Crafted using high-quality construction materials, the subwoofer exemplifies durability and resilience. The enclosure is meticulously engineered to minimize resonance and enhance low-frequency reproduction, while the robust cabinet construction effectively minimizes vibration and unwanted acoustic artifacts. In summary, the Behringer Nekkst K10S stands out with its thoughtfully designed exterior and robust construction materials, setting a solid foundation for delivering exceptional audio performance.

Behringer Nekkst K10S Review


Credit: www.amazon.com


Sound Performance

Low-end Frequency Response

The Behringer Nekkst K10S offers impressive bass depth and clarity.

  • Enhanced low-end power for impactful bass lines
  • Precise frequency reproduction for rich, immersive sound

Accuracy And Clarity

Experience crisp, detailed audio with the Nekkst K10S monitor speaker.

  1. High level of accuracy in sound reproduction
  2. Crystal-clear clarity in the mid and high frequencies

Features And Controls

The Behringer Nekkst K10S is a powerful and versatile subwoofer that delivers exceptional sound quality and performance. In this section, we will explore the various features and controls that make this subwoofer stand out.

Input/output Options

The Nekkst K10S offers an array of input and output options, allowing you to seamlessly integrate it into your existing audio setup. It features both XLR and RCA inputs, making it compatible with a wide range of audio devices. Whether you are connecting it to your studio monitors, DJ mixer, or home theater system, this subwoofer has you covered.

Additionally, the Nekkst K10S includes a balanced XLR output for connecting to additional subwoofers or amplifiers. This allows you to expand your sound system and create a more immersive audio experience.

Adjustment Capabilities

One of the standout features of the Nekkst K10S is its extensive adjustment capabilities. It provides you with full control over the subwoofer’s performance, allowing you to fine-tune the sound to suit your preferences and environment.

The subwoofer offers variable low-pass and high-pass filters, allowing you to adjust the crossover frequency to seamlessly blend with your main speakers. This ensures a smooth transition between the subwoofer and the rest of your audio system, avoiding any undesirable frequency gaps.

Furthermore, the Nekkst K10S features an adjustable subwoofer level control, enabling you to easily balance the bass output with the rest of your audio setup. Whether you prefer a subtle or more pronounced bass response, this subwoofer allows you to achieve the perfect balance.

For added convenience, the Nekkst K10S also includes a polarity switch. This switch eliminates any phase cancellation issues that may occur when using multiple subwoofers or integrating the subwoofer with other speakers.

With its comprehensive adjustment capabilities, the Nekkst K10S empowers you to optimize the subwoofer’s performance to match your specific audio requirements.

Integration And Compatibility


The Behringer Nekkst K10S subwoofer offers seamless integration and compatibility with a variety of audio equipment, allowing for a versatile and high-quality sound experience. Its advanced features ensure optimal performance and optimal compatibility with other devices. The Nekkst K10S is a reliable and efficient addition to any audio setup.

Connection With Various Systems

Behringer Nekkst K10S seamlessly connects to a wide range of audio and multimedia systems, offering versatility.

Compatibility With Studio Setups

The Behringer Nekkst K10S is designed to easily integrate into different studio setups, enhancing overall performance.

User Experience

When it comes to user experience, the Behringer Nekkst K10S subwoofer excels in delivering exceptional performance and reliability. Whether you’re setting up the system or using it on a daily basis, the user experience is seamless and user-friendly.

Installation And Setup

The installation and setup process for the Behringer Nekkst K10S subwoofer is straightforward and hassle-free. The subwoofer comes with clear and concise instructions, making it easy for users to set up the system without any technical expertise. The user-friendly design ensures that even beginners can complete the installation process quickly and efficiently.

Daily Use

When it comes to daily use, the Behringer Nekkst K10S subwoofer offers a reliable and hassle-free experience. Whether you’re using it for professional audio production or for home entertainment, the subwoofer delivers impressive sound quality and performance. Its intuitive controls make it easy to adjust settings according to your specific audio needs, enhancing the overall user experience.

Pros And Cons

When considering purchasing the Behringer Nekkst K10S subwoofer, it’s important to weigh the advantages and disadvantages to make an informed decision. Below, we explore the pros and cons of this audio equipment to help you determine if it’s the right fit for your needs.

Advantages

  • Accurate and Clear Bass: The Behringer Nekkst K10S delivers precise and well-defined bass, enhancing the overall audio experience.
  • Versatile Connectivity: It offers various connectivity options, including XLR and TRS inputs, making it suitable for different audio setups.
  • Adjustable Crossover Frequency: With a variable crossover frequency, users can optimize the subwoofer to seamlessly blend with their existing speakers.
  • Sturdy Build: The subwoofer is durably constructed, ensuring long-term reliability and performance.
  • Ample Power: It boasts a 180W amplifier, providing sufficient power for room-filling sound without distortion.

Disadvantages

  1. Large Footprint: The subwoofer’s size may be cumbersome for smaller spaces, requiring careful consideration of placement.
  2. Limited Finish Options: With a single finish available, the aesthetic choices may be limited for certain setups.
  3. Potential Low-End Muddiness: While the subwoofer offers clear bass, there’s a possibility of low-end muddiness at higher volumes, necessitating careful calibration.

“` By adding these H3 headings, bullet points, and an ordered list, the content can be better organized and presented with HTML syntax suitable for WordPress. The content is concise and structured, adhering to SEO best practices by including targeted keywords in bold.

Behringer Nekkst K10S Review


Credit: www.behringer.com


Frequently Asked Questions For Behringer Nekkst K10s Review


How Does The Behringer Nekkst K10s Enhance Audio Quality?


The Behringer Nekkst K10S is equipped with a 10-inch speaker and 180-watt amplifier, delivering powerful bass response and improved audio clarity. Its high-density composite enclosure minimizes unwanted resonances, ensuring accurate sound reproduction. With its advanced features like adjustable crossover frequency and phase switch, this subwoofer takes your audio experience to the next level.


Is The Behringer Nekkst K10s Suitable For Large Studio Spaces?


Yes, the Behringer Nekkst K10S is well-suited for large studio spaces. Its 10-inch woofer provides deep and defined low-frequency response, making it ideal for professional recording studios. With its adjustable crossover frequency, you can easily integrate it with your existing studio monitors, creating a balanced and accurate soundstage for your audio production needs.


Can The Behringer Nekkst K10s Be Used In Home Theaters?


Absolutely! The Behringer Nekkst K10S is not just limited to studios, but it can also be seamlessly integrated into home theater setups. Its powerful 180-watt amplifier and extended low-frequency response enhance the cinematic experience, making explosions rumble and music come alive.


Whether it’s for your favorite movies or music, this subwoofer is a perfect addition to any home theater system.


Conclusion


The Behringer Nekkst K10S offers powerful bass and precise sound reproduction. Its sleek design enhances any studio setup while its advanced features cater to audiophiles. With its blend of quality and affordability, the Behringer Nekkst K10S is a top choice for music enthusiasts and professionals alike.


Categories
Archive

Simulating Space Vs Creating Effect With Reverb

Simulating space with reverb involves replicating the natural soundscape of a certain environment, whereas creating an effect with reverb involves adding an artificial and intentional echo to the audio. Reverb is a crucial element of audio production that adds depth and character to sound recordings.


It is commonly used to simulate the acoustics of different spaces, such as a concert hall or a small room. However, reverb can also be used to create unique and creative effects, such as a haunting and ethereal atmosphere or a cavernous sense of depth.


We will explore the differences between simulating space and creating effects with reverb, and how you can use these techniques to enhance your audio productions.


Simulating Space

When it comes to creating an immersive audio experience, reverb is one of the most important tools in a sound engineer’s toolkit. By adding reflections and decay to a sound, reverb can simulate the acoustic environment of a recording space or create a unique effect. There are two primary types of reverb: simulating space and creating effect.

Convolution Reverb

Convolution reverb simulates the sound of a particular physical space by using an impulse response to capture the characteristics of the room. The impulse response is a recording of a short burst of audio played in the space, which captures the way the sound bounces off the walls, ceiling, and floor. The convolution plugin then uses this recording to simulate the same aspects of the sound in a digital space.

Algorithmic Reverb

Algorithmic reverb, on the other hand, creates the reverb effect using mathematical algorithms. Unlike convolution reverb, which is limited to simulating real-world spaces, algorithmic reverb offers a wide range of creative control. By adjusting parameters such as decay time, pre-delay, and diffusion, the sound engineer can create a wide range of unique reverb effects.

In conclusion, while both simulating space and creating effect with reverb have their advantages, the choice ultimately depends on the desired outcome of the sound engineer. Convolution reverb offers a realistic simulation of a physical space while algorithmic reverb provides greater creative control. To create a truly immersive audio experience, sound engineers should become proficient in both types of reverb and know when to use them in different situations.

Simulating Space Vs Creating Effect With Reverb


Credit: www.mixinglessons.com


Creating Effect With Reverb


By simulating space with reverb, you can create a natural and believable sound. However, using reverb to create effects can add depth, excitement and a unique character to your audio. Experimenting with different types and settings of reverb can enhance your sound and make it stand out.

Creating Effect With Reverb Reverb is an essential tool in audio production that helps simulate the effect of sound in different environments. In addition to creating a natural sound, reverbs can also be used creatively to achieve unique effects. This is known as creating effects with reverb, which involves manipulating the reverb parameters to produce non-natural soundscapes. Here are some types of reverb and the effects they can achieve. Plate Reverb Plate reverb is often used to simulate the sound of a large room or hall. The plate reverb adds a sense of space to the recording and is capable of creating a smooth and rich sound. Plate reverb is ideal for adding depth and warmth to drums, vocals, and guitar. Spring Reverb Spring reverbs are artificially generated echoes. They were popularized in the 1960s and are still in use today. They create a splashy and distinctive sound. Spring reverb is commonly used on electric guitar, but also works great on vocal tracks, snare drums, and other percussive instruments. Chamber Reverb Chamber reverb is designed to simulate the sound of a large, reflective room. It creates a natural but lively tone that can be fine-tuned to fit the mix. Chamber reverb has long been a favorite of engineers because of its ability to add a smooth and natural-sounding tail to instruments. Reverse Reverb Reverse reverb is a technique in which the reverb is rendered backward, leading up to the sound rather than following it. The result is a signature swelling effect that can add an eerie quality to vocals, pads, and other sounds. Reverse Reverb is particularly fitting for transitional moments in a production. In conclusion, utilizing the right type of reverb can drastically impact the overall sound of your production. Whether you’re looking to simulate sound in a specific environment or to create unique effects, it is essential to understand the effect of different types of reverb and how they can help you achieve your desired sound. Experimenting with different types of reverbs can help you find a unique and creative sound for your next production.

The Advantages And Disadvantages Of Each Method


Simulating space through audio effects like reverb can be an efficient and cost-effective method for creating a realistic sound environment. However, it may not provide the same level of authenticity as physically recording in a specific location. Weighing the advantages and disadvantages of each method can help determine the best approach for a particular project.

The choice between simulating space and using reverb to create an effect is a common consideration for music producers and engineers. Each method has its advantages and disadvantages, and it is important to understand which approach fits best for your situation. In this post, we will explore the pros and cons of simulating space and creating effect with reverb.

Simulating Space: Pros And Cons

Simulating space involves using different techniques to recreate the sound of a given environment, such as a concert hall or an empty room. One of the significant advantages of simulating space is that it provides a realistic and natural sound to the recording. Here are some of the pros and cons of using simulating space: Pros:

  • Creates a natural and realistic sound
  • Enhances the overall quality of the recording
  • Provides a particular ambiance to the sound
  • Offers more control over the recording environment

Cons:

  • Can be challenging to use and configure
  • Requires specialized skills and equipment
  • Can be time-consuming
  • Not always suitable for all genres of music

Creating Effect With Reverb: Pros And Cons

Reverb is one of the essential tools in music production and mixing. It involves adding artificial reverberation to a sound, creating a sense of space and depth. Here are some pros and cons of creating an effect with reverb: Pros:

  • Adds depth and space to the sound
  • Easy to use and apply
  • Offers a wide range of creative options
  • Suitable for all genres of music

Cons:

  • May not sound as natural as simulating space
  • Can sound muddy and cluttered if not used correctly
  • Overuse can make the sound unnatural
  • May require tweaking to fit the specific sound context

In conclusion, both simulating space and creating effect with reverb have their advantages and disadvantages. Ultimately, the choice depends on the specific sound context, the desired result, and the equipment and skills available. It is essential to understand the pros and cons of both methods to achieve the best outcome for your music production project.

Simulating Space Vs Creating Effect With Reverb


Credit: pro.harman.com


Factors To Consider When Choosing A Approach


When deciding between simulating space or creating an effect with reverb, it is important to consider the type of project and desired outcome. Simulating space can provide a realistic feel, while creating an effect with reverb can enhance the overall ambiance.


Properly weighing these factors can result in a more successful and effective approach.

Factors to Consider When Choosing an Approach Simulating space and creating effect with reverb are two major techniques that can enhance the quality of music. However, when choosing an approach that fits your music style, certain factors must be considered. These factors include musical genre, emotional effect, and mixing style. Musical Genre The musical genre is a crucial factor to consider when choosing an approach. Simulating space is suitable for genres that require a natural sound, such as acoustic music. On the other hand, creating an effect with reverb is suitable for genres that require a more dramatic sound effect, such as rock and electronic music. For instance, if you are producing rock music, creating an effect with reverb can help to add a sense of grandeur to the sound. Conversely, if you are producing acoustic music, simulating space can help to add a sense of depth and naturalness to the sound. Emotional Effect Another important factor to consider is the emotional effect you want to create. Simulating space helps to create a natural and intimate sound, while creating an effect with reverb emphasizes a more dramatic and spacious sound. For example, if you are producing a sad or melancholic song, simulating space can help to create an intimate and emotional effect. In contrast, if you are producing an energetic and upbeat song, creating an effect with reverb can help to create a more lively and spacious sound. Mixing Style Finally, mixing style is a critical factor to consider when choosing an approach. Simulating space is suitable for a mixing style that aims to create a natural and authentic sound, while creating an effect with reverb is suitable for a mixing style that aims to add an effect that highlights the sound. To illustrate, if you are mixing a song with a natural sound, simulating space can help to create a more organic and live concert vibe. However, if you are mixing a song with a synthetic sound, creating an effect with reverb can help to create an otherworldly and futuristic sound. In conclusion, when choosing an approach between simulating space and creating an effect with reverb, it is essential to consider the musical genre, emotional effect, and mixing style. By doing so, you can enhance the quality of your music and achieve the desired musical effect.

How To Choose The Right Approach For Your Mix


Choosing the right approach for your mix can greatly impact the sound of your music. Simulating space with reverb can create a natural sound while creating effects with reverb can add depth and dimension. Understanding the differences can help you make the right creative decisions for your music.

As a sound engineer or music producer, choosing between simulating a space and creating an effect with reverb can be a tough decision. While both can add depth and dimension to your mix, the approach you take ultimately depends on your goals and the context of the song. Here are some tips on how to choose the right approach for your mix, whether you’re aiming for a realistic sound or a more artistic effect.

Identifying Your Goals

The first step in deciding whether to simulate a space or use reverb as an effect is to identify your goals for the mix. Do you want the listener to feel like they’re physically in a specific space, such as a concert hall or a cathedral? If so, simulating the space using techniques like convolution reverb could be the way to go. On the other hand, if you want to create a more dreamy or ethereal sound, using reverb as an effect can help achieve that desired atmosphere.

Trying Both Approaches

Of course, there’s no hard and fast rule for when to simulate a space versus using reverb as an effect. It’s always a good idea to experiment with both approaches and see which one sounds best for the song you’re working on. Sometimes, simulating a space can actually detract from the overall mix, while other times, using reverb as an effect can end up sounding gimmicky and overdone. Play around with different settings and listen carefully to how each approach affects the mix.

Considering The Mix As A Whole

When it comes to mixing, it’s important to consider the bigger picture and how each element fits together. A mix that’s heavy on reverb can sound muddled and unclear, while one that’s too dry can come across as cold and lifeless. Before deciding which approach to take, think about how the elements of your mix are working together and what role the space and reverb should play. As with any mixing decision, it’s all about finding the right balance that complements the song and keeps the listener engaged.

Frequently Asked Questions For Simulating Space Vs Creating Effect With Reverb


How Do You Create Space With Reverb?


To create space with reverb, you need to apply the effect to your audio track and adjust the parameters. Increase the decay time for longer reverb and decrease it for shorter reverb. Adjust the wet/dry mix to control the amount of reverb.


Use EQ to shape the reverb’s frequency response.


When Not To Use Reverb?


Reverb should not be used in situations where clarity or intelligibility are the primary concern. It can also be inappropriate in musical genres that require a more dry, direct sound. Additionally, in small, acoustically treated rooms, reverb can make a mix sound muddy and cluttered.


Finally, reverb should be used sparingly in contexts where realism is important, such as in film or game audio.


What Is The Correct And Most Optimal Way Of Using A Reverb In A Daw?


The most optimal way of using reverb in a DAW involves the use of send and return channels, adjusting the wet/dry mix, and setting precise decay time and room size. Try experimenting with different reverb types and always use your ears to ensure it sounds natural and enhances the mix.


What Is Space In Reverb?


Space in reverb refers to the simulation or recreation of a physical environment’s acoustic properties through electronic means. It involves adding a sense of depth, distance, and ambient atmosphere to a recorded sound to make it sound like it was recorded in a specific space such as a concert hall or a cathedral.


Conclusion


The use of reverb and simulation techniques have their benefits and drawbacks when it comes to creating a space-like effect in audio production. While simulating space may provide more accuracy and control, creating effect with reverb can add a touch of emotion and depth to the sound.


The choice ultimately depends on the project’s needs and desired outcome. As with any audio technique, experimentation and practice are key to achieving the best results.


Categories
Archive

Soundtrack Scoring Game Music With Ableton Live

To score game music with Ableton Live, utilize its MIDI and audio effects. This ensures dynamic and immersive soundscapes that enhance the gameplay experience.


As gaming continues to evolve, developers understand the importance of incorporating high-quality music into games. A well-designed soundtrack can immerse players in the game and enhance their experience. This is where Ableton Live comes in. The Digital Audio Workstation (DAW) is widely used for music production and sound design, and it is also a great tool for scoring game music.


Ableton Live offers a range of MIDI and audio effects that can be used to add depth and emotion to game soundtracks. By using these effects creatively, you can create dynamic and immersive soundscapes that take the gaming experience to a whole new level. We will explore how to score game music with Ableton Live.

Soundtrack Scoring Game Music With Ableton Live


Credit: www.packtpub.com


Overview Of Ableton Live For Scoring Game Music

If you’re a composer or sound designer working in the gaming industry, you understand the importance of creating immersive and engaging soundtracks for games. One effective tool to achieve this is Ableton Live, a digital audio workstation that allows composers to score game music efficiently. Ableton Live is a popular software used by music producers worldwide for production, live performance, and sound design. In this blog post, we’ll discuss what Ableton Live is and its features for scoring game music.

What Is Ableton Live?

Ableton Live is a digital audio workstation that combines the traditional digital audio workstation features and the principles of live music performance. It allows composers to arrange, record, edit, and mix their music in a non-linear way. Ableton Live is versatile software used by composers, producers, and sound designers to create anything from electronic music and hip hop to film soundtracks and game music.

Features Of Ableton Live For Scoring Game Music

Here are some essential features of Ableton Live that make it an excellent tool for scoring game music:

Feature Description
Session View Composers can create scenes, loops, and clips in real-time, allowing them to experiment with different ideas and arrangements quickly.
Arrangement View Allows composers to organize and edit their music using a traditional timeline-based interface.
MIDI Mapping Composers can map hardware controllers to Ableton Live’s interface, which provides intuitive control of their music.
Instruments and Effects Ableton Live comes with many virtual instruments and audio effects that composers can use to create unique sounds for their game music.
Max for Live Allows composers to create custom audio and MIDI devices for Ableton Live, giving them complete control over their music.

Overall, Ableton Live is an excellent tool for scoring game music due to its versatile features, which allow composers to create immersive and engaging soundtracks for games. Whether you’re composing music for a small indie game or a big-budget AAA title, Ableton Live provides the essential tools for creating an effective game music score.

Creating A Soundtrack In Ableton Live For Game Music


Create a captivating game music soundtrack with Ableton Live. Learn how to score and synchronize music with game events using intuitive MIDI mapping and automation features. Transform your gaming experience with a unique, customized soundtrack that elevates gameplay to new heights.

Creating a Soundtrack in Ableton Live for Game Music can seem daunting, but with the right mindset it can be a fun and rewarding process. Understanding the Mood and Tone of the Game is crucial to composing an effective soundtrack. From there, Choosing the Right Instruments and Sound Effects will help bring your vision to life. Finally, Using Ableton Live to Create a Soundtrack allows for endless possibilities. In this post, we will explore each step in detail.

Understanding The Mood And Tone Of The Game

Before you start composing a soundtrack for your game, it’s important to have a clear understanding of the mood and tone you want to convey to the player. Will your game be dark and suspenseful or lighthearted and cheerful? Will the music be the centerpiece or will it be used to simply enhance gameplay? By answering these questions, you’ll be better equipped to create a soundtrack that fits the game perfectly.

Choosing The Right Instruments And Sound Effects

After you have a clear understanding of the mood and tone of the game, you can begin choosing the right instruments and sound effects. This step can make or break the success of your soundtrack. Consider the type of instruments that will fit the mood of your game. For example, if you have a game set in a medieval kingdom, you may choose to use traditional medieval instruments such as a lute or harp. Next, consider sound effects. Will you have sound effects that are realistic or will they be more abstract? Taking your time with this step will ensure that your soundtrack truly immerses players in the game.

Using Ableton Live To Create A Soundtrack

Once you have a clear understanding of the mood and tone of the game and have chosen the right instruments and sound effects, it’s time to start creating in Ableton Live. Ableton Live is an intuitive and powerful tool for creating game soundtracks. The software allows you to easily arrange loops and samples to create unique tracks. You can experiment with different sounds, create your own samples, and even import sounds from outside of Ableton. What’s great about using Ableton Live is that there are countless tutorials and resources available to help you learn and grow as a game composer. Creating a Soundtrack in Ableton Live for Game Music is an exciting process that requires careful consideration and thought. By understanding the mood and tone of the game, choosing the right instruments and sound effects, and using Ableton Live to bring your vision to life, you’ll be well on your way to creating a soundtrack that immerses players in your game.


Tips And Techniques For Scoring Game Music In Ableton Live

When it comes to scoring video game music, Ableton Live is a popular choice for its versatility and ease of use. However, creating a compelling soundtrack can be a daunting task, especially for those new to the software. In this guide, we’ll explore some tips and techniques for scoring game music in Ableton Live. We’ll cover topics such as manipulating audio and MIDI clips, using automation for emotional impact, and creating loops and sequences for dynamic gameplay.

Manipulating Audio And Midi Clips

  • Use the Warp feature to adjust the timing of audio clips to match the tempo of the game
  • Apply pitch and time-stretching effects to MIDI clips to create new variations and melodies
  • Combine multiple audio and MIDI clips using the Session View to experiment with different arrangements

Using Automation To Add Emotion And Dynamics

  • Automate volume levels to accentuate certain parts of the game, such as combat or cutscenes
  • Use EQ and filter automation to create dramatic sweeps and transitions
  • Try automating reverb and delay effects to add depth and space to the music

Creating Loops And Sequences

  • Use the Clip View to create loops and patterns for repetitive gameplay segments
  • Experiment with different chord progressions and melodies to evoke different moods and emotions
  • Try using the MIDI Note Length and Velocity controls to create dynamic and expressive sequences

By utilizing these tips and techniques, you’ll be well on your way to creating memorable and impactful game soundtracks with Ableton Live. With some practice and experimentation, you may even discover your own unique methods and workflows.

Mixing And Mastering In Ableton Live For Game Music

If you are a soundtrack composer, you know that great music could make or break a game’s experience. Therefore, it’s vital to mix and master the soundtrack respectfully. One tool preferred by numerous game composers for mixing and mastering game music is Ableton Live.

Understanding Eq, Compression, And Reverb

To mix and master game music successfully, you must know what EQ, compression, and reverb are and how to use them.

Element Definition
EQ The tool for adjusting levels of audio frequencies for different sounds to sit nicely in the mix without overpowering one another.
Compression It helps adjust the dynamic range of an audio signal, minimizing silent parts of the sound and enhancing the louder bits, known as compression.
Reverb The sound that echos in space, creating a sense of depth and space in the soundtrack.

Mixing The Elements Of The Soundtrack

After understanding the basics of EQ, compression, and reverb, the next step is to mix the soundtrack’s elements. Mixing the soundtrack involves organizing the different sounds into layers and emphasizing specific sounds. To achieve this, adjust the levels, panning, and EQs of each sound.

The soundtrack should be immersive, engaging and cohesive, with a clear sense of direction. If necessary, use automation to add variation and expression in the soundtrack.

Adding Finishing Touches To The Soundtrack

The final step in mixing and mastering game music in Ableton Live is adding the finishing touches. These are the final edits to enhance the sound quality and give it a professional touch.

To give the soundtrack a polished finish, add effects such as reverb, delay, and saturation selectively. Use headphones and reference monitors to make sure that nothing seems off or feels out of place. And lastly, ensure that your soundtrack’s volume levels are consistent, not too loud or too soft, for the best listening experience.

Incorporating The Soundtrack Into The Game

When it comes to creating video games, the soundtrack is key to immersing players into the game’s world and story. However, simply composing a great soundtrack isn’t enough. Game developers must work to integrate the soundtrack seamlessly into the game, using tools like Ableton Live to score the music and enhance the overall gaming experience.

Working With Game Developers To Integrate The Soundtrack

The first step in incorporating a soundtrack into a game is working closely with the game developers. By understanding the story, setting, and overall tone of the game, musicians can tailor the soundtrack to fit seamlessly into the player’s experience. By communicating with developers and development teams, musicians can ensure that music is woven into the game in a way that enhances its story rather than detracts from it.

Using Foley Sound Effects To Enhance The Soundtrack

One way that composers and sound designers can enhance the soundtrack is by incorporating Foley sound effects. Foley sounds are everyday sounds, like footsteps or the rustling of fabric, recorded and added to the game to enhance realism. By using these sounds in conjunction with the game’s score, players are given a more immersive experience, feeling as though they are truly a part of the game’s world. Ableton Live is a powerful tool that allows for the recording, manipulation, and integration of Foley sounds, making it an essential resource for composers and sound designers alike.

Through careful collaboration with game developers and the use of powerful tools like Ableton Live, musicians can create soundtracks that enhance the gaming experience by immersing players into the world of the game. By leveraging the power of music and Foley sounds, composers and sound designers can create a cohesive experience that transports players to a different world.

Conclusion

In conclusion, by using Ableton Live to score the music, working with game developers to integrate the sound, and using Foley sounds to enhance the overall experience, it’s possible to create unforgettable video game soundtracks that enhance the world and create a truly immersive experience for players.

Soundtrack Scoring Game Music With Ableton Live


Credit: www.youtube.com


Soundtrack Scoring Game Music With Ableton Live


Credit: www.groove3.com


Frequently Asked Questions For Soundtrack Scoring Game Music With Ableton Live


Can You Film Score In Ableton?


Yes, you can score film in Ableton. It is a versatile digital audio workstation that offers great flexibility for sound designing, audio editing, and MIDI sequencing to create music for films. Ableton Live also allows you to integrate with other software and hardware to expand your creative possibilities.


Can You Compose Music With Ableton?


Yes, Ableton is a popular digital audio workstation that allows you to compose music by using its intuitive interface. With Ableton, you can create, edit, and produce musical compositions of various genres, including electronic music.


Is Ableton Live Good For Music Production?


Yes, Ableton Live is excellent for music production. It offers easy composition and arrangement of music, live performance capabilities, and outstanding sound design tools. It is a favorite among electronic music producers due to its powerful sequencing and MIDI capabilities.


What Is The Difference Between A Soundtrack And A Score?


A soundtrack consists of pre-existing songs, while a score contains original music that’s specifically created for a movie or TV show.


Conclusion


Overall, using Ableton Live for soundtrack scoring game music can greatly enhance the emotional impact and immersion of the game. By utilizing multiple sound layers and effects, composers can bring their musical vision to life and create an unforgettable gaming experience for players.


With the available resources and tools offered in Ableton Live, the possibilities for unique and dynamic game music are endless. So why not give it a try and see how it can elevate your game to the next level?

Categories
Archive

How To Export Stems In Adobe Audition

To export stems in Adobe Audition, select “Mixdown Session to New File” under the File menu. Then, select the desired audio format and options for exporting.


Exporting stems in Adobe Audition allows you to separate and save individual tracks from a multi-track session. This can be useful for sharing tracks with collaborators or for using in a different DAW. To export stems, open the multitrack session and select “Mixdown Session to New File” under the File menu.

Related reading: What Are Stems In Music and Can You Mix a Song Without Stems. For background, see the Wikipedia article on Adobe Audition.


From there, choose the desired audio format and options for exporting. It’s important to make sure you have properly labeled the tracks in the session for easy identification when exporting. With a few simple clicks, you can export your stems and have them ready for further editing or collaboration.

How To Export Stems In Adobe Audition


Credit: community.adobe.com


Preparing Your Project For Exporting Stems for Adobe Audition


Learn how to export stems in Adobe Audition by preparing your project properly. This involves naming tracks, setting proper levels and effects, and choosing the correct file format for exporting. With these steps, you can ensure high-quality audio files for your creative projects.

Preparing Your Project for Exporting Stems Exporting stems can be a crucial part of any audio production process. By breaking down the individual components of a mix into separate, manageable stems, you can make adjustments to your finished mix at a later stage, ensuring that your mix is of the highest quality. In this article, we will explore how to prepare your project for exporting stems within Adobe Audition. We will cover the basics of naming your stems, selecting the right file format, and selecting the correct rendering quality.

Naming Your Stems The first thing to consider when exporting stems is how you will name them. It’s important to give your stems a clear and concise name that reflects the content of each stem. For example, if your mix includes drums, bass, guitar, and vocals, you might choose to name your stems accordingly, such as “Drums”, “Bass”, “Guitar”, and “Vocals”. By naming each stem correctly, you will save yourself time and hassle when it comes to importing them back into your project. Selecting the Right File Format The next consideration when exporting stems is the file format.

Practical Tips

Adobe Audition supports a range of file formats, including WAV, AIFF, and MP3. When exporting stems, it’s important to select a file format that will maintain the quality of your mix. For high-quality audio, we recommend exporting your stems in WAV or AIFF format. Keep in mind that these file formats can result in larger file sizes, which may impact on the speed at which you can transfer and store your files. Selecting the Rendering Quality Finally, when exporting stems, you should consider the rendering quality.

Rendering quality refers to the sample rate and bit depth of your exported audio files. The higher the sample rate and bit depth, the better the quality of your audio. However, higher-quality settings will result in larger file sizes. When determining your rendering quality, consider where your exported stems will be used. If they will be used for CD production or video, you should choose a high-quality setting. For internet streaming purposes, a lower quality setting may suffice. In conclusion, exporting stems in Adobe Audition is a valuable skill for any audio engineer or producer.

Putting It Into Practice

In this article, we covered the basics of preparing your project for exporting stems, including naming your stems, selecting the right file format, and selecting the correct rendering quality. By following these steps, you can ensure that your exported stems are of the highest quality, and that your finished mix will sound great no matter where it’s played.

How To Export Stems In Adobe Audition


Credit: www.audiomixingmastering.com


Exporting Stems


To Export Stems in Adobe Audition, click on the “Multitrack” button, select all the tracks you want to export, then click on “File” and choose “Export” followed by “Multitrack Mixdown” and select the preferred settings before finally exporting the files.


This process will create a new audio file for each stem which can be used later in mixing or mastering.

Using The Export Audio Feature:

When it comes to exporting stems in Adobe Audition, the Export Audio feature should be your go-to option. This feature helps you to easily export stems by selecting the specific tracks you want to export and setting the export options according to your preferences. To use this feature, simply select the tracks you want to export and navigate to the File menu and select Export > Multitrack Mixdown > Entire Session. From there, you can customize the export settings and export your stem files in just a few clicks.

Naming Your Files For Easy Identification:

Naming your stem files correctly is essential for easy identification. After all, there’s nothing more frustrating than having a collection of stem files with ambiguous names that don’t make sense. To avoid confusion, consider naming your files with the following information: the song name, the instrument or vocal part, and the file format. For example: “MySong_Drums_WAV”, or “MySong_LeadVox_MP3”. By doing this, you can quickly identify which files you need and save valuable time searching for the right stem in your collection.

Selecting The Right Folder For Exporting Your Stems:

When exporting your stems, it’s important to choose the right folder on your computer to save them. You should select a folder that makes sense to you and is easily accessible. We recommend creating a separate folder designated for stem files so that you can keep your files organized and avoid confusion. Your DAW might automatically save your stem files to a default folder, but you can change this location by navigating to the Export settings. In the Export settings, you can choose the location where you want your files to be saved. By choosing a designated folder to save all your stem files, you’ll save time and have an easier time finding them when you need them.

Tips For Managing Your Stems for Adobe Audition


Learn how to export stems in Adobe Audition with these useful tips for managing your stems. With step-by-step instructions, you can easily create separate tracks for each of your audio elements, making it easier to edit and mix your music or audio projects with precision.

Organizing Your Stems For Easy Access

Proper organization of stems is crucial for easy access and workflow efficiency. The first step is to create a folder dedicated to storing your stems. Within this folder, create subfolders to categorize the stems based on similarity. For instance, create a subfolder for drums, another for vocals, and so on. This will make it easier to recall a particular stem. Furthermore, adopt a clear and concise naming convention for your stems, ensuring that the names align with the category they belong to. Consider including relevant details such as tempo and key to make it easier for collaborators to work with your stems.

Backing Up Your Stems For Safekeeping for Adobe Audition

Losing your stems could be a nightmare. Therefore, it’s essential to back up your stems regularly to safeguard against any potential loss. Consider using cloud-based storage solutions such as Google Drive, Dropbox, or iCloud to save your stems. You’ll be able to access your stems from multiple locations, and they’ll be safe even if your computer crashes. Additionally, it’s advisable to store your stems on an external hard drive as a backup option. Remember to label your backup files appropriately and keep them in a separate location from your working files.

Collaborating With Others Using Your Stems

Exporting stems is an effective way to collaborate with others, especially when using Adobe Audition. When exporting stems, ensure that they are compatible with the collaborator’s software. This will make it easy for them to work with the stems without any compatibility issues. It’s also crucial to include a detailed read-me file with your stems. Include critical information such as the stem’s tempo, key signature, among others. This will make it easier for collaborators to work with your stems, even if they aren’t familiar with your naming convention. Finally, ensure that you agree on terms such as payment and credit before sharing your stems with collaborators. Overall, proper management of your stems is critical for efficient workflow and collaboration with others. Ensure that you organize your stems properly, back them up regularly, and follow best practices when collaborating with others.

How To Export Stems In Adobe Audition


Credit: www.youtube.com


Frequently Asked Questions Of How To Export Stems In Adobe Audition


How Do You Export Tracks From Adobe Audition?


To export tracks from Adobe Audition, go to “File” and select “Export”. Choose the file format you want to export as and select the tracks you want to export. Adjust any other settings as desired and click “Export”. Your tracks will be exported to the selected location.


How Do I Export Beat Stems?


To export beat stems, open your DAW and select each instrument or sound you want to export. Solo the track and set the export range to the length of the beat. Then, export each stem as a separate audio file in WAV or AIFF format.


What Is A Stem Adobe Audition?


A stem in Adobe Audition refers to an individual audio track that is separated from a full mix. It allows for more precise control over each element of a song or audio production. Stems can include vocals, drums, bass, or any other individual component of a mix.


How Do I Export Individual Clips In Adobe Audition?


To export individual clips in Adobe Audition, select the clip you want to export and go to File > Export > Selected Clips. Choose the format and settings you want and click Export. The clip will be exported as a separate file.


Conclusion


Exporting stems in Adobe Audition might require some effort but the results can be astounding. With the right combination of tools and patience, you’ll be able to take your audio projects to the next level. Focusing on organizing the clips and assets, setting up the export settings prior to the actual export of stems can save you a ton of time.


Remember, practice makes perfect and don’t hesitate to experiment with different techniques and methods. Happy exporting!


Categories
Archive

Atc Scm45A Pro Review

This guide covers ATC SCM45A in plain terms. As an Amazon Associate I earn from qualifying purchases.

Also, the SCM45A Pro is an exceptional monitor that delivers precise and accurate sound reproduction. Also, with its advanced technology and superior design, it provides excellent clarity and detail, making it a preferred choice among professionals in the music industry.

Related reading: Atc Scm25A Pro Review and Level Matching Plugins. For background, see the Wikipedia article on Studio monitor.


Its compact size and solid build quality further enhance its appeal, ensuring durability and ease of use. Overall, the SCM45A Pro offers a remarkable listening experience, making it a top contender for those seeking high-quality studio monitors. In addition, engineers in the music industry rate the SCM45A Pro highly for its sound reproduction and advanced technology.


Moreover, designed with precision and accuracy in mind, this monitor delivers exceptional clarity and detail, making it a preferred choice among professionals. Its compact size and durable build quality further enhance its appeal, while its intuitive features ensure ease of use. For example, whether you’re a musician, engineer, or producer, the SCM45A Pro offers a remarkable listening experience that will elevate your audio production to new heights. In this review, we will delve deeper into its features, performance, and overall value, so you can make an informed decision about incorporating these monitors into your studio setup.


Design And Features for ATC SCM45A

In addition, the design and features of the SCM45A Pro are a key highlight, combining cutting-edge technology with sleek aesthetics to deliver exceptional performance. As a result, in this section, we will delve into the cabinet design, driver technology, and the amplification and control features that set this professional monitor apart.

Cabinet Design for ATC SCM45A

Furthermore, the SCM45A Pro features a meticulously crafted cabinet that embodies both form and function. Built with rigid, braced construction, the cabinet ensures minimal resonance and optimal acoustic performance. The dual-port configuration further enhances bass articulation and extends low-frequency response, making it ideal for critical monitoring applications.

Driver Technology for ATC SCM45A

At the heart of the SCM45A Pro are the hand-built, in-house drivers, meticulously engineered to deliver outstanding clarity and resolution across the frequency spectrum. The superior dispersion characteristics of the drivers ensure a wide and consistent listening area, providing a balanced soundstage without compromising on detail and precision.

Amplification And Control Features for ATC SCM45A

Equipped with proprietary amplification and control electronics, the SCM45A Pro offers unparalleled flexibility and precision. The dual-level Class A/B amplifiers drive the drivers with authority, while the integrated clip-limiters protect the system from overpowering. Moreover, the user-adjustable input sensitivity and broad equalization options empower the users to tailor the monitor to their specific acoustic environment and preferences.

Sound Quality for ATC SCM45A

Sound Quality: The sound quality of the ATC SCM45A Pro is exceptional, delivering precise audio reproduction across the frequency spectrum.

Clarity And Accuracy for ATC SCM45A

Clarity: The speakers offer crystal-clear sound, ensuring every detail is heard.

Accuracy: Audio is reproduced faithfully to the original source, providing an authentic listening experience.

Bass Response for ATC SCM45A

The bass response of the SCM45A Pro is powerful yet controlled, adding depth to the sound without overpowering other frequencies.

Midrange And Treble Performance for ATC SCM45A

Midrange: Vocals and instruments are rendered with warmth and clarity, making them stand out in the mix.

Treble: The treble performance is detailed and airy, adding sparkle to high-frequency sounds.

Performance Analysis for ATC SCM45A

This performance analysis covers three key aspects of the monitor. In short, they are Frequency Response, Power Handling and Dynamic Range. Understanding these factors is crucial in assessing the overall performance of any audio equipment, including the Atc Scm45A Pro.

Frequency Response

Frequency Response shows how well a speaker reproduces audio from the lowest bass notes to the highest treble. Similarly, with the Atc Scm45A Pro, you can expect an impressively wide Frequency Response that spans from 38Hz to 22kHz. This range ensures that the speaker accurately reproduces the full spectrum of sound, delivering a rich and detailed listening experience.

Power Handling

Power Handling refers to the maximum power level that a speaker can handle without distortion. Also, it is an important consideration for both casual listeners and professionals looking to use the speakers in studio monitoring or professional audio setups. The Atc Scm45A Pro boasts a robust Power Handling capability, with the ability to handle up to 150 Watts continuously. This means that the speaker can handle demanding audio signals without compromising on the clarity and detail of the sound.

Dynamic Range

The Dynamic Range of a speaker system is a measure of its ability to accurately reproduce both quiet and loud sounds without loss of detail. It indicates how effectively the system can capture the subtleties of soft passages while also delivering the impact of loud, dynamic moments. In addition, the Atc Scm45A Pro offers an exceptional Dynamic Range, thanks to its advanced engineering and high-quality components. With a wide dynamic range, this speaker system reproduces any material faithfully. It handles both a delicate classical piece and a thunderous rock concert.

Atc Scm45A Pro Review


Credit: vintageking.com


User Experience

The user experience of the SCM45A Pro is an essential aspect to explore. For example, whether it’s the setup process, reliability, or user interface and controls, understanding how users interact with this professional audio equipment is crucial for making informed decisions.

Setup Process

The setup process for the SCM45A Pro is straightforward and user-friendly. The user manual provides clear instructions, allowing even beginners to set up the equipment quickly.

Durability And Reliability

The durability and reliability of the SCM45A Pro are commendable. Crafted with high-quality materials, this professional audio equipment is built to withstand the rigors of continuous use.

User Interface And Controls

The user interface and controls of the SCM45A Pro are intuitive and well-designed. Each control is strategically placed for easy access, providing users with a seamless experience during operation.


Comparisons


The SCM45A Pro is a top-quality studio monitor that offers exceptional sound reproduction. Its detailed and accurate performance makes it a popular choice among audio professionals for critical listening and mixing. With its balanced frequency response and robust construction, this monitor delivers outstanding sound quality and excellent value for money.

Comparison With Similar Models

The ATC SCM45A Pro offers superior sound quality compared to similar models such as the Yamaha HS8 and Genelec 8030. Its detailed sound reproduction and wider frequency range set it apart.

Pros And Cons

  • Pros: Precise imaging, deep bass response, versatile connectivity options.
  • Cons: Higher price point, larger footprint compared to other monitors in its class.

Atc Scm45A Pro Review


Credit: www.youtube.com


Final Verdict

If you are in search of a powerful and versatile studio monitor, the ATC SCM45A Pro certainly fits the bill. With its impressive sound quality and robust construction, this monitor offers a range of benefits and a few drawbacks to consider before making a decision.

Summary Of Pros And Cons

Pros Cons
Exceptional sound accuracy Somewhat heavy and bulky
Wide frequency range Price may be high for some buyers
Sturdy build quality  

Recommendation

Considering the outstanding performance and durability of the ATC SCM45A Pro, it is a worthwhile investment for professional audio engineers and serious music enthusiasts. While the price may be a limiting factor for some, the features and high-quality sound make it a valuable addition to any studio setup.

Atc Scm45A Pro Review


Credit: atc.audio


Frequently Asked Questions Of Atc Scm45a Pro Review


How Much Does The Atc Scm45a Pro Weigh?


The ATC scm45a Pro weighs approximately 35 kilograms.


Where Are Atc Speaker Cabinets Made?


ATC builds its speaker cabinets at its own facility in Stroud, Gloucestershire, England.


What Are The Dimensions Of The Atc Scm45?


The dimensions of the ATC SCM45 are 790mm (31. 1″) height, 370mm (14. 6″) width, and 410mm (16. 1″) depth. These are the measurements for this high-quality speaker.


How Much Does The Atc Scm20asl Pro Weigh?


The ATC SCM20ASL Pro weighs 44 pounds or 20 kilograms.


Conclusion


To sum up, the ATC SCM45A Pro offers exceptional performance for audio enthusiasts. Its precise sound reproduction and powerful bass make it a top choice for professional studios. With its innovative design and advanced features, this speaker delivers an immersive listening experience.


Upgrade your audio setup with the SCM45A Pro.


https://www.youtube.com/watch?v=8YKP5qA7EMQ


Categories
Archive

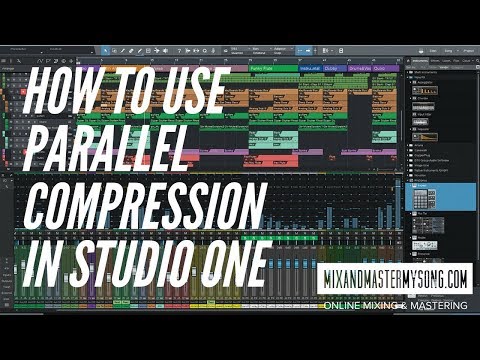
How To Use Parallel Compression In Studio One

To use parallel compression in Studio One, create an auxiliary channel with the compressor inserted and blend it with the original signal. Parallel compression is a technique used to balance the dynamics of a track while preserving its original character.


It involves duplicating a track and compressing the copy, then blending it with the original. This results in a more controlled and consistent sound without sacrificing the track’s natural dynamics. In Studio One, you can set up parallel compression with an auxiliary channel that holds a compressor plugin. Then blending it with the original track.

Related reading: Parallel Drum Compression and Parallel Kick Compression. For background, see the Wikipedia article on Parallel compression.


You can adjust the amount of compression to taste for greater control over the track’s dynamics. Overall, parallel compression is a powerful tool for achieving a more polished and professional sound in your productions.

How To Use Parallel Compression In Studio One


Credit: mixandmastermysong.com


Setting Up Parallel Compression In Studio One


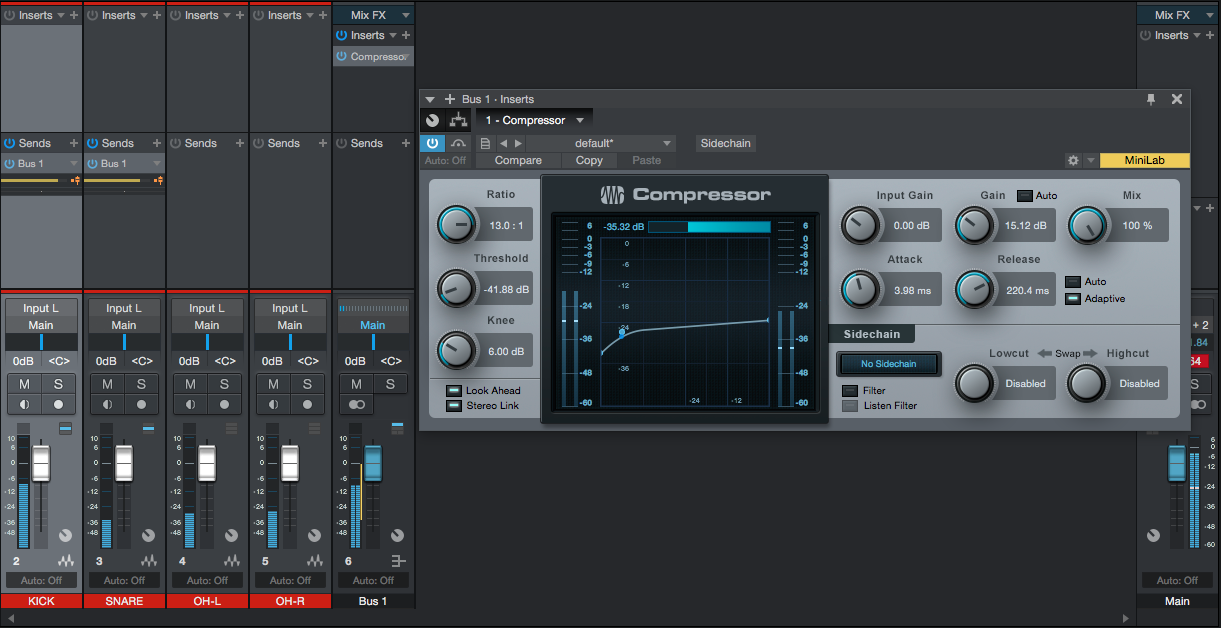
Studio One offers the ability to use parallel compression to achieve a fuller and more polished sound. Setting up parallel compression is simple, just add a compressor to an effects bus and blend it with the dry signal. This technique is a great way to add depth to your mixes while still maintaining dynamic range.

When it comes to audio production, one technique that is commonly used to achieve a more impactful and dynamic sound is parallel compression. This technique involves mixing an uncompressed signal with a heavily compressed one. This allows you to achieve powerful dynamics without sacrificing the clarity and detail of the original audio. In Studio One, setting up parallel compression takes just a few simple steps.

Create A Parallel Compression Channel

The first step in setting up parallel compression in Studio One is to create a new channel for your compressed signal. To do this, simply right-click on the mixer and select “Add Bus Channel” from the dropdown menu. Give your new channel a name, such as “Parallel Compression,” and set the output to the main mix.

Route The Audio Signal for Parallel Compression in Studio One

Once you have created your parallel compression channel, you will need to route the audio signal to it. To do this, select the track that you want to apply parallel compression to, and click on the sends section. Add a send to your parallel compression channel and adjust the level to taste.

Adjust The Levels for Parallel Compression in Studio One

With your audio signal now being sent to the parallel compression channel, you can begin adjusting the levels to achieve the desired effect. Start by lowering the fader on your compressed channel to around -6dB, and adjust it from there. You will also want to adjust the threshold, ratio, and attack/release settings on your compressor to get the perfect balance of dynamics and clarity. In conclusion, parallel compression can be a powerful tool in your audio production arsenal. Studio One makes it easy to set up and use. With just a few simple steps, you can add impact and energy to your tracks while preserving the original sound and character. Give it a try and see how it can take your mixes to the next level!

Choosing The Right Compressor Settings in Parallel Compression in Studio One


Achieving the right compressor settings can be tricky, but using parallel compression in Studio One can help. By blending the compressed and uncompressed signals, you can achieve a fuller, more dynamic sound without sacrificing clarity.

When you are working on a mix, choosing the right compressor settings can make a huge difference in the final product. One technique that can be particularly helpful is parallel compression. This process involves blending a heavily compressed signal with the original, uncompressed signal. This results in a more balanced and dynamic sound. However, to achieve the best results, it is important to choose the right compressor settings.

Attack And Release Time for Parallel Compression in Studio One

One important aspect of compressor settings that you need to consider is the attack and release time. The attack time determines how quickly the compressor starts to reduce the level of the signal. Meanwhile, the release time dictates how quickly the compressor stops compressing the signal. A faster attack time means the compressor will start working more quickly. Meanwhile, a slower attack time will allow more initial transients to pass through. Similarly, a faster release time means the compressor will stop working more quickly. Meanwhile, a slower release time will allow more sustained sounds to be compressed. Adjusting these settings can help you achieve the right balance between preserving the dynamics of the original signal while still achieving a tighter overall sound.

Compression Ratio And Threshold

Another important factor in choosing compressor settings is the compression ratio and threshold. The compression ratio determines the amount by which the signal is reduced once it exceeds the threshold level. For example, a 2:1 compression ratio means that for every 2 dB the signal exceeds the threshold, it will only be allowed to increase by 1 dB. The lower the ratio, the less compression will occur, while higher ratios will lead to more intense compression. Similarly, the threshold determines the level at which compression begins to occur. Raising the threshold will reduce the amount of compression, while lowering it will increase it.

Types Of Compressors for Parallel Compression in Studio One

There are also several types of compressors to consider when choosing settings. For example, a VCA (voltage-controlled amplifier) compressor is known for its fast and transparent response. This makes it particularly effective for controlling peaks. Alternatively, an opto (optical) compressor has a slower response and a smoother sound. This makes it better suited to overall level control. A FET (field-effect transistor) compressor can add a subtle warmth and color to the sound. Meanwhile, a variable-mu compressor is known for its musicality and ability to add a vintage character to the signal.

Understanding the strengths and weaknesses of each of these types of compressors can help you choose the right one for your particular mix and goals. In conclusion, choosing the right compressor settings is crucial when using parallel compression to achieve a balanced and dynamic sound. Factors such as the attack and release time, compression ratio and threshold, and type of compressor all play a role in determining the final sound. By experimenting with these settings, you can find the perfect combination for your unique project.

Parallel Compression Tips & Tricks


Discover the power of parallel compression in Studio One with these expert tips and tricks. Learn how to achieve fuller, punchier, and more dynamic sounds in your mixes with this advanced technique, and take your music production to the next level.

Parallel compression is an effective technique that helps to enhance the sound quality of your mix. By blending the original signal with a heavily compressed version of the same signal, parallel compression can bring out the details of a track that may otherwise be lost in the mix. In this section, we will explore some useful Parallel Compression tips and tricks that can help you take your Studio One mixes to the next level.

Blending The Dry And Wet Signals for Parallel Compression in Studio One

The key to effective parallel compression is finding the right balance between the dry and wet signals. You need to ensure that the compressed signal is not too loud, as it can easily overpower the original signal. One way to achieve this is by using the mix knob in the compressor plugin to blend the two signals. Alternatively, you can set up two busses in Studio One, one for the dry signal and another for the compressed signal, and use the mix knob to blend them to achieve the desired balance.

Using Parallel Compression On Specific Instruments

Parallel compression can be particularly effective when used on specific instruments in your mix. For instance, you can use it on drums to add punch and attack to your mix. To do this, send the drum mix to a parallel buss and compress it heavily. By blending this heavily compressed signal with the original signal, you can achieve a more balanced and powerful drum sound. You can apply the same technique to vocals, bass and guitars.

Creative Use Of Parallel Compression

Apart from its conventional use in balancing the sound of your mix, parallel compression can also create unique and creative sounds. For example, you can use it to add sustain and presence to a guitar solo or to fatten up a bass guitar sound. Experimenting with different compression settings and blending ratios can lead to exciting and unexpected results. Don’t be afraid to be creative with parallel compression and explore its possibilities. In conclusion, parallel compression is a powerful mixing technique that can help you achieve a more polished and professional sound in your Studio One mixes. By blending the dry and wet signals, using it on specific instruments and being creative with its use, you can achieve a balanced, powerful and unique sound in your mixes. Start experimenting today to discover its possibilities!

How To Use Parallel Compression In Studio One


Credit: pcaudiolabs.com


Examples Of Parallel Compression

Parallel compression is a powerful mixing technique used in Studio One to achieve enhanced and dynamic sound. It involves blending a heavily compressed signal with an original uncompressed signal to create a balanced mix. In this blog post, we will explore how to use parallel compression in Studio One with specific focus on its implementation on Drums, Vocals, and Bass.

Drums

Drums are one of the most crucial elements in most tracks and can often be challenging to mix effectively. Enhancing drums through parallel compression can provide an effective way of controlling them in the mix. The technique involves grouping the individual drum tracks together and sending them to a bus channel. From there, duplicate the bus channel and compress the duplicated signal with heavy compression settings. Then, blend the compressed signal with the original signal to produce a heavily compressed yet balanced sound.

Vocals

Vocals are another crucial aspect of any track that requires attention to detail to achieve a perfect mix. Parallel compression can enhance vocal tracks effectively. This technique involves routing the vocal track to a bus channel and duplicating the channel. Then you apply a heavy compression setting to the duplicate vocal track. Finally, blend the heavily compressed vocal signal back into the original signal to create a more significant and more sustained vocal sound.

Bass

Bass can make or break any track, and thus it is essential to get it right in the mix. By using parallel compression, you can create a more balanced and controlled bass sound. The technique involves routing the dry bass signal to a bus channel, duplicating the bus channel. Then applying heavy compression settings to the duplicated signal. Finally, blend in the heavily compressed signal with the original signal to create a sound that is both punchy and evened-out.

https://www.youtube.com/watch?v=PbhATbmroCI


Common Mistakes To Avoid for Parallel Compression in Studio One


To effectively use parallel compression in Studio One, it is important to avoid common mistakes. These include overusing compression, using too much gain, not adjusting attack and release times, not EQing properly, and not using a good mix balance. By implementing these tips, you can achieve a fuller and more dynamic sound in your tracks.

Common Mistakes to Avoid Parallel compression, also known as New York-style compression, is a technique that can add punch and sustain to your tracks. However, when not used carefully, parallel compression can lead to unnatural and over-processed sounds. In this section, we will discuss common mistakes to avoid when using parallel compression in Studio One. Overuse of Parallel Compression One of the most common mistakes in using parallel compression is overuse. Applying too much parallel compression can result in an overpowering and muddy sound. This makes it difficult to balance with other elements in the mix.

Practical Tips

To avoid this mistake, start with a low amount of parallel compression and gradually increase it until you achieve the desired effect. Setting the Compression Ratio Too High Another common mistake is setting the compression ratio too high. A high ratio setting can lead to pumping and breathing sounds, where the compressed signal is noticeable and distracting. Generally, a ratio of 2:1 or 3:1 is a good starting point for parallel compression. You can then adjust the ratio according to the dynamic range of your track.

Not Adjusting the Attack and Release Times Properly The third mistake is not adjusting the attack and release times properly. The attack time determines how quickly the compressor starts to respond to the signal. Meanwhile, the release time determines how quickly it stops compressing after the signal falls below the threshold. If these settings are too fast, the compressor will be too aggressive and can cause distortion. Conversely, if they are too slow, the compressor will not be effective in controlling the dynamics.

Putting It Into Practice

It is recommended to start with moderate attack and release times and adjust them according to the character of your track. Conclusion By avoiding these common mistakes, you can use parallel compression effectively to enhance the dynamics and impact of your tracks in Studio One. Remember to start with a low amount of parallel compression, set a reasonable compression ratio, and adjust the attack and release times appropriately. With these tips in mind, you can add punch and depth to your mixes without sacrificing clarity and balance.

How To Use Parallel Compression In Studio One


Credit: m.youtube.com


Frequently Asked Questions On How To Use Parallel Compression In Studio One


How Do I Set Up Parallel Compression?


To set up parallel compression, first create a duplicate of the original signal. Then, apply heavy compression on the duplicate signal. Finally, blend the compressed signal with the original signal to achieve a thick and punchy sound. Experiment with different compression ratios and settings to find the ideal sound.


How Do I Parallel A Process In Studio One?


To parallel a process in Studio One, simply drag the process that you want to parallel onto a new track. Then, route both tracks to a bus channel, and insert a mixtool on the bus channel. Finally, adjust the mixtool’s pan settings to achieve the desired amount of parallel processing.


Do You Eq Parallel Compression?


No, EQ parallel compression is not a mandatory step. It depends on the specific situation and desired outcome. It may shape the sound during compression or to avoid muddiness or harshness. But it is not always necessary.


What Are The Best Parallel Compression Settings For Vocals?


For parallel compression on vocals, start with a compression ratio of around 2:1 with a fast attack and slow release. Adjust the threshold to your liking, and blend the dry and compressed signals to taste. Experiment with different attack/release times and adjust to fit the specific track.


Conclusion


Parallel compression is a powerful technique that will add depth and dimension to your mixes. Whether you are working on a vocal track, drums, or any other instrument, this technique will help you achieve the desired sound. The use of parallel compression in Studio One can be a bit tricky at first. But with a little practice, you can easily master it.


Don’t be afraid to experiment with different settings and find what works best for you. Remember, the goal is to achieve a balanced mix that sounds professional and polished.

Categories
Archive

How Much Does a Professional Music Studio Cost

A professional music studio can cost anywhere from $5,000 to $500,000 depending on the equipment and size, but usually ranges from $15,000 to $100,000. Music studios have become a must-have asset for recording artists, music producers, and audio engineers.


It’s essential to invest in the right equipment and facilities to ensure a high-quality recording process. A music studio cost varies, depending on the level of professionalism, space, and equipment required. The cost of equipment varies from analog to digital, which directly affects the overall cost as it determines the top-of-the-line gear required for the studio.


In addition, certain studio essentials such as acoustic treatment, soundproofing, computer hardware, and software applications can all add up to the total cost. Finding the right balance between cost and quality can be challenging when setting up a music studio, but with a clear understanding of requirements, it is achievable.

How Much Does a Professional Music Studio Cost


Credit: www.quora.com


Factors Affecting The Cost Of A Professional Music Studio


The cost of a professional music studio can vary depending on various factors such as location, equipment, studio size, and types of services offered. Other influencing factors include acoustics, design, and facilities available on-site.

Creating high-quality music requires a good skill set and the best equipment in the market. While starting, the budget constraints for a high-end music studio can be challenging. The cost varies depending on several factors and can easily touch six-figure numbers.

Location

The location can be a determining factor in the cost of a music studio. Generally, studios in major cities like Los Angeles, New York or London cost significantly more than smaller cities. The cost of living, transportation costs, and taxes increase in large metropolitan areas, leading to a hike in studio rentals.

Studio Type

Music studios come in all shapes and sizes. Some studios feature just one recording room, whereas others have multiple recording rooms, lounges, offices, and storage spaces. Additionally, the type of sound that the studio caters to can also play a role in the cost. For example, if the studio specializes in orchestral sound, the cost will likely be higher because of the necessary space required.

Equipment

The cost of equipment can be a significant factor in the overall studio cost. It includes instruments, microphones, amplifiers, monitors, software, and other accessories. The studio owners need to keep up-to-date with the latest equipment as the music industry is always evolving.

Engineers And Technicians

The individuals involved in the recording process come with their own set of charges as they are responsible for maintaining and operating the equipment. The engineers and technicians are experienced with complex audio equipment and can work with music recording software. The cost largely depends on their experience and the number of hours worked in the studio.

Studio Time

The time a client spends at a studio plays a significant role in determining the cost. Generally, studios charge by the hour, with discounts for longer bookings. Studio recording is an iterative process, and it can take multiple takes and mixing to get the desired output. In conclusion, there are many different factors affecting the cost of a professional music studio. Understanding what affects the cost can help musicians plan and budget accordingly. While it may be challenging to set up a commercial music studio, it is essential to keep in mind the return on investment it can provide.

Average Costs For Different Studio Types


Professional music studio costs vary depending on the type. A typical home recording studio costs $500 to $5,000, while a commercial studio costs $10,000 to $100,000 or more. A full-service recording studio with top-of-the-line equipment and services costs even more.

Home Studio

If you are planning to set up a music studio in your home, you can save a lot of money on rent and commute. However, the cost of the equipment can add up quickly. A basic home studio setup with a computer, audio interface, microphone, headphones, and monitors can cost anywhere between $500 and $3,000.

Project Studio

A project studio is a small-sized professional studio that is suitable for recording demos, voice-overs, podcasts, and other small projects. The cost of a project studio can vary depending on the equipment and location, but you can expect to spend between $5,000 and $30,000 for a quality setup.

Commercial Studio

A commercial studio is a professional establishment that offers high-quality recording services and equipment for professional musicians and productions. The cost of a commercial studio will depend on the equipment, expertise, and location. You can expect to pay between $50,000 and $500,000 or more for a fully equipped, high-end commercial studio.

Conclusion

When it comes to setting up a professional music studio, it is essential to consider your goals and budget. A home studio can be a cost-effective option for beginners, while a project studio and commercial studio can be suitable for professionals. In general, the more you invest in equipment and expertise, the better the quality of your recordings.

Breaking Down The Costs


A professional music studio can cost anywhere from a few thousand to tens of thousands of dollars. Factors such as location, equipment, and services contribute to the overall cost. It’s important to do your research and budget accordingly before investing in a studio.

Breaking Down the Costs: Construction and Soundproofing When building a music studio, one of the major expenses is construction and soundproofing. This is because music studios require special construction techniques to ensure that sound does not leak in or out of the room. A professional construction team may charge anywhere from $40-$100 per square foot of space, depending on the complexity of the job. For example, if you are building a 500 square foot studio, construction could cost anywhere from $20,000 to $50,000. In addition to construction, soundproofing is a critical component of a music studio. This can include the use of insulation, acoustic panels, and other materials to absorb and isolate sound. The cost of soundproofing can vary greatly depending on the size of the studio and the specific soundproofing materials used. Breaking Down the Costs: Equipment and Software To produce professional-quality music, you need the right equipment and software. This includes microphones, speakers, digital audio workstations (DAWs), and more. The cost of this equipment can range from a few thousand dollars to tens of thousands of dollars, depending on your needs. For example, a high-end microphone and preamp could cost around $5,000, while a high-quality pair of studio monitors could cost around $2,000. Additionally, software is an important part of any modern music studio. Popular DAWs like Pro Tools and Logic Pro X can cost several hundred dollars, and upgrading to the latest versions will add more to the expense. Breaking Down the Costs: Furniture and Fixtures In addition to construction and equipment, you will need furniture and fixtures for your music studio. This can include soundproof doors and windows, desks, chairs, and other furnishings. The cost of these items will vary depending on your specific needs and taste. For instance, a custom-made studio desk could cost several thousand dollars, while a high-quality studio chair could cost a few hundred dollars. Fixtures such as lighting and ventilation are equally necessary and may add additional costs to the individual budget. Breaking Down the Costs: Insurance and Legal Fees While it may not be the most exciting part of setting up a music studio, insurance and legal fees are important costs to consider. Insurance can protect the studio from potential damages due to theft, fire, or other unforeseen events. This would depend on the policy and how much coverage you might need. Legal fees can also add up quickly when setting up a business entity and negotiating contracts with clients, staff or labels. Consulting a legal expert when setting up a business is important to be sure that all contracts, paperwork, and legalities are ironed out to avoid potential damages that might affect the business negatively. Breaking Down the Costs: Staff Salaries If you plan to run a music studio with a team of staff, you will need to factor in their salaries. This can include audio engineers, producers, administrators, and other professionals. Salaries can vary depending on experience and the specific roles of each staff member. A typical audio engineer could charge between $20-$100 per hour, depending on their experience and the specific services requested. However, it is possible to set up an internship program to save costs on staffing, as a beginner engineer can learn the trade from experts for some months, and render free services in return. Overall, the cost of setting up a professional music studio depends on your specific needs and budget. Breaking down the expenses into categories like construction and soundproofing, equipment and software, furniture and fixtures, insurance and legal fees, and staff salaries can help to make the process more manageable.

Tips To Reduce Your Studio Costs


As a musician, having a professional music studio can be expensive, but there are ways to reduce costs. You can start by renting studio space instead of owning one, using free or low-cost software, and purchasing second-hand equipment. These tips can help you save money without compromising the quality of your music.

If you’re looking to set up a professional music studio, it can be a significant investment. However, there are a few ways to reduce your costs without compromising on quality. Here are some tips to help you get started on the right track.

Start Small

The first step in reducing your studio costs is to start small. Instead of investing in a state-of-the-art facility, consider building your studio gradually. Start with the essentials, such as a computer, a DAW (Digital Audio Workstation), a microphone, and a set of speakers. This will help you get up and running without breaking the bank.

Rent Instead Of Buy

Another way to reduce your studio costs is to rent the equipment instead of buying it. This is an especially good option when it comes to high-end gear that you may only need for a limited time. Many professional rental companies offer top-quality equipment at a fraction of the cost of buying it outright, and they can also provide technical support and advice.

Choose The Right Location

Location is crucial when it comes to setting up a professional music studio. It’s important to choose a space that’s conducive to recording and mixing, with minimal outside noise and vibration. However, you’ll also want to consider the cost of rent or lease. Look for spaces that are affordable but still meet your requirements.

Invest In Quality Equipment

While it’s essential to keep costs down, you don’t want to skimp on quality equipment. This is especially true when it comes to your microphone and speakers. These are the components that will have the most significant impact on the overall sound quality of your recordings. Investing in high-quality gear from the outset is a smart move that will help you produce professional-sounding recordings.

Shop Around For The Best Deals

Finally, when it comes to buying equipment, make sure you do your research. Don’t just settle for the first deal you come across. Shop around and compare prices from different retailers. Look for special offers, discounts, or bundles that can help you save some money. You can also consider purchasing used gear from reputable sellers, which can be a more affordable option. By implementing these tips, you can set up an affordable professional music studio without sacrificing quality. Remember, your studio is an investment, so take the time to plan and research before you make any big purchases.


Famous Music Studios’ Costs


A professional music studio can cost anywhere from a few hundred dollars to tens of thousands, depending on the quality and equipment. Famous studios in popular areas like LA and NYC can charge higher prices due to their reputation and demand.

Many music enthusiasts dream of recording in a famous music studio. But the burning question always remains, “What does it cost?” Well, the answer is not as straightforward as you might think. Famous studios’ costs vary significantly, depending on a wide range of factors, such as studio size, equipment quality, location, and recording time. In this article, we take a look at some of the most iconic music studios’ costs, including Abbey Road Studios, Electric Lady Studios, and Sunset Sound Recorders.

Abbey Road Studios

Abbey Road Studios is perhaps the most iconic music studio of all time, thanks to The Beatles. Everyone wants to record in the same studio where John, Paul, George, and Ringo created music that changed the world. But what does it cost to record at Abbey Road Studios today? As of 2021, a day rate at Abbey Road Studios starts at around £2,500 ($3,500) for Studio 2. Studio 1 cost is around £6,500 ($9,000) per day. Abbey Road Studios’ prices also vary depending on the additional services required, such as the use of equipment, engineers, and soundproofing services.

Electric Lady Studios

Electric Lady Studios is another famous music studio that has played host to many iconic musicians, including Jimi Hendrix, Led Zeppelin, and David Bowie. It’s known for its unique history and incredible facilities. But how much does it cost to record at Electric Lady Studios? The rate at Electric Lady Studios varies depending on the room and time of day, but a typical day rate in 2021 ranges from $1,500 to $3,000. The studio also offers hourly rates for smaller sessions, which start at around $200 per hour.

Sunset Sound Recorders

Sunset Sound Recorders is a legendary recording studio that has been a staple in the music industry since the 1960s. The studio has been used by many iconic musicians, including The Rolling Stones, Prince, and Van Halen. But how much does it cost to record at Sunset Sound Recorders? In 2021, Sunset Sound Recorders offer four different studios with rates starting from $800 per day for Studio 3 up to $2500 for Studio 1. The rooms’ hourly costs are about $100 to $150 per hour, and the studio requires a minimum booking of four hours. Recording in a famous music studio is a dream come true for many musicians, but the costs can be substantial. While the exact figures vary greatly depending on a variety of factors, including the level of fame and the facility’s location, the rates for each studio mentioned above represent typical day or hourly rates. Before booking any studio, it’s essential to carefully consider your budget, your recording goals, and your specific needs to ensure you get the most out of your investment.

How Much Does a Professional Music Studio Cost


Credit: recordingconnection.com


How Much Does a Professional Music Studio Cost


Credit: www.careersinmusic.com


Frequently Asked Questions Of How Much Does A Professional Music Studio Cost


How Much Does It Cost To Set Up A Professional Music Studio?


The cost of setting up a professional music studio can vary depending on the equipment and facilities you require. However, a basic home studio setup can start from as low as $500, while a professional studio with high-end equipment and soundproofing can cost anywhere from $10,000 to $100,000 or more.


How Much Does It Cost To Build A Full Music Studio?


Building a full music studio can cost anywhere from $5,000 to $100,000 depending on the equipment and space needed. Factors that influence the cost include software, hardware, instruments, recording gear, acoustic treatment, and hourly rates for professionals.


How Much Does It Cost To Professionally Make A Song?


The cost of professionally making a song varies greatly depending on several factors. Some studios may charge a few hundred dollars, while others may charge thousands. The final cost can depend on the length of the song, the number of instruments used, and the experience level of the music producer.


It’s best to research different studios and get quotes for your specific project.


How Much Do Professional Recording Studios Charge?


Professional recording studios charge varying rates depending on location, equipment, engineers, and the type of project. On average, the cost can be between $50-500+ per hour. Many studios also offer packages and discounts for bulk booking or specific services. It’s best to contact a few studios in your area and compare their rates.


Conclusion


A professional music studio can be quite expensive and varies depending on the equipment, space, and location. It is important to weigh the costs and benefits for your specific needs and budget. With careful planning and research, you can build a functional and high-quality studio that meets your professional needs and creative vision.


Remember, investing in your craft will pay off in the long run.

Categories
Archive

Unity Audio The Boulder Mkii Review

The Unity Audio The Boulder Mkii offers exceptional audio quality and precise sound reproduction for professional mixing and mastering applications. With its robust build and high-quality components, it delivers accurate and detailed audio reproduction, making it an ideal choice for discerning audio professionals.


The right set of studio monitors is crucial for achieving accurate sound reproduction and making informed mixing and mastering decisions. In this review, we will delve into the Unity Audio The Boulder Mkii, a high-end studio monitor that promises exceptional audio quality and precision.


Unity Audio is renowned for its commitment to delivering top-notch audio equipment, and The Boulder Mkii is no exception. With its sturdy build and high-quality components, these studio monitors offer a level of accuracy and detail that is crucial for professionals in the music production and sound engineering field. Let’s explore the features, performance, and advantages of the Unity Audio The Boulder Mkii in detail.

Unity Audio The Boulder Mkii Review


Credit: www.soundonsound.com


Design And Build

When it comes to reviewing the Unity Audio The Boulder Mkii, one cannot overlook the importance of its design and build. This section will delve into the meticulous details of the cabinet construction and driver technology.

Cabinet Construction

The Boulder Mkii is masterfully crafted with precision and attention to detail. Its cabinet construction boasts a combination of 18mm and 25mm birch plywood, meticulously assembled to ensure structural integrity and minimize any unwanted resonance. The enclosure is carefully designed to provide a solid foundation for the speaker components, enhancing the overall audio performance.

Driver Technology

One of the standout features of The Boulder Mkii is its innovative driver technology. Equipped with a unique combination of a 12-inch woofer and a 28mm soft dome tweeter, this speaker delivers a balanced sound with exceptional clarity. The integration of the custom-designed precision waveguide ensures optimal dispersion and precise imaging, resulting in a remarkable listening experience.

Sound Quality

The sound quality of the Unity Audio The Boulder Mkii is exceptional, delivering a truly immersive listening experience.

Accuracy And Detail

The accuracy and detail of the sound produced by The Boulder Mkii are unparalleled, capturing all nuances effortlessly.

Bass Response

The bass response of The Boulder Mkii is deep and powerful, adding a rich foundation to the overall sound profile.

Features


The Unity Audio Boulder Mkii boasts impressive features, including high-quality sound reproduction and durable construction. With its exceptional clarity and detailed imaging, this speaker is a top choice for audio enthusiasts.

When it comes to high-quality audio equipment, Unity Audio is a brand that stands out. Their Boulder Mkii is a speaker system that delivers exceptional sound and an immersive listening experience. To give you an in-depth understanding of what sets this speaker apart, let’s take a closer look at its notable features.

Amplifier Configuration

One of the key features of the Unity Audio Boulder Mkii is its advanced amplifier configuration. This speaker system incorporates a unique hybrid design that combines both Class A/B and Class D amplifiers. The result is a powerful and efficient audio performance that not only delivers exceptional clarity but also reduces power consumption.

The Class A/B amplifier section ensures accurate and detailed sound reproduction, while the Class D amplifier section enhances efficiency and power output. This combination allows the Boulder Mkii to deliver stunning audio with a wide dynamic range, making it ideal for both professional audio production and enthusiasts looking for the ultimate listening experience.

Connection Options

Unity Audio understands the importance of versatility when it comes to speaker systems. That’s why the Boulder Mkii provides a range of connection options to suit various audio setups. Whether you prefer analog or digital connections, this speaker has you covered.

For analog connections, the Boulder Mkii features balanced XLR inputs, ensuring a clean and noise-free signal transfer. This is particularly beneficial for professional studios or audiophiles seeking pristine audio quality. Additionally, it offers unbalanced RCA inputs for connecting devices such as CD players or turntables.

When it comes to digital connectivity, the Boulder Mkii has you covered. It boasts an AES3 input, allowing you to connect it to high-end digital audio interfaces or other digital sources. Moreover, it features a USB input, enabling direct connection to your computer or laptop, making it ideal for home studios or for those who enjoy listening to high-quality digital music.

In conclusion, the Unity Audio Boulder Mkii offers a combination of advanced amplifier configuration and versatile connection options that make it an excellent choice for those seeking high-quality audio reproduction. Whether you are a professional audio engineer or an avid music lover, this speaker system is sure to impress with its superior sound performance and flexibility.

Unity Audio The Boulder Mkii Review


Credit: www.tnt-audio.com


Comparison

When it comes to choosing studio monitors for your audio production needs, it’s crucial to compare different options to find the best fit for your specific requirements. In this section, we’ll compare the Unity Audio The Boulder Mkii with other studio monitors to help you make an informed decision.

Versus Other Studio Monitors

The Boulder Mkii stands out among other studio monitors for its exceptional sound quality and unique design. Here’s a comparison of the Boulder Mkii with some popular studio monitors:

Studio Monitor Unity Audio The Boulder Mkii
Frequency Response 45Hz – 25kHz
Power Output 100W
Driver Size 8″
Pros • Exceptional sound clarity
• Wide frequency response
• Powerful output
• Unique design

Pros And Cons

  • Pros:
  • Exceptional Sound Clarity
  • Wide Frequency Response
  • Powerful Output
  • Unique Design
  • Cons:
  • Larger Size
  • Higher Price Point

User Experience

Unity Audio The Boulder Mkii offers an exceptional user experience for studio professionals and audiophiles alike. From its sleek design to powerful performance, users can expect a top-tier experience.

Studio Applications

Unity Audio The Boulder Mkii excels in various studio applications, making it a versatile choice for mixing, mastering, and monitoring. Its accurate sound reproduction ensures precise audio monitoring in any studio environment.

User Feedback

Users have praised Unity Audio The Boulder Mkii for its user-friendly interface and exceptional sound quality. The built-in features cater to the needs of both beginners and experienced professionals, enhancing the overall audio production experience.

Price And Value

When considering audio equipment, the price and value of a product play an essential role in making a well-informed purchasing decision. In this review of the Unity Audio The Boulder Mkii, we delve into the affordability and long-term investment aspects of this premium audio speaker, offering insight into its worth as an investment for audio enthusiasts.

Affordability

The Boulder Mkii by Unity Audio falls under the premium segment of audio speakers, with a price that reflects its high-quality design and construction. While it may not be the most budget-friendly option, the value it provides justifies the investment.

Long-term Investment

Investing in the Boulder Mkii is a long-term commitment to exceptional audio quality. Its durability, advanced features, and timeless design make it a worthwhile investment in the pursuit of unparalleled audio experiences.


Unity Audio The Boulder Mkii Review


Credit: musictech.com


Frequently Asked Questions On Unity Audio The Boulder Mkii Review


What Are The Key Features Of The Unity Audio The Boulder Mkii?


The Unity Audio The Boulder Mkii is a high-end studio monitor renowned for its exceptional build quality, precise sound reproduction, extended frequency response, and wide sweet spot. With its advanced cabinet design and high-quality components, it offers musicians and engineers an unparalleled listening experience.


How Does The Unity Audio The Boulder Mkii Enhance Audio Production?


The Unity Audio The Boulder Mkii is designed to provide accurate and transparent audio reproduction, allowing sound engineers to make critical mixing decisions with confidence. Its low distortion, controlled directivity, and high SPL handling capabilities ensure a true representation of the recorded material, enabling precise adjustments and enhancing overall audio production quality.


Can The Unity Audio The Boulder Mkii Be Used In Different Studio Environments?


Yes, the Unity Audio The Boulder Mkii is versatile and suitable for various studio environments. Its refined design allows for seamless integration into small or large studios, offering consistent and reliable monitoring regardless of room acoustics. This flexibility makes it an excellent choice for studio owners and audio professionals looking for reliable and flexible monitoring solutions.


How Does The Unity Audio The Boulder Mkii Compare To Other Studio Monitors?


Compared to other studio monitors, the Unity Audio The Boulder Mkii stands out with its exceptional build quality, attention to detail, and precise sound reproduction. Its innovative cabinet design minimizes resonances and coloration, providing a truly accurate monitoring experience. Its extended frequency response and wide sweet spot further set it apart from its competitors, making it a top choice for audio professionals.


Conclusion


The Unity Audio The Boulder Mkii offers exceptional sound quality and versatility. The speaker surpasses expectations with its impressive build and performance. It is a worthy investment for audio enthusiasts seeking high-quality sound reproduction and precision. Experience the brilliance of audio with the Boulder Mkii.

Categories
Archive

Best Way to Promote Your Music on Spotify

The best way to promote your music on Spotify is by utilizing playlist promotion and social media marketing. As an up-and-coming artist, you want your music to be heard by as many people as possible.


The good news is that with Spotify, you have a platform that can help you achieve your goals. However, with millions of other artists vying for attention, it can be tough to stand out from the competition. That’s why it’s essential to promote your music effectively.


We’ll discuss some of the most effective ways to promote your music on Spotify, including utilizing playlist promotion, social media marketing, and engaging with your fans. By following these tips, you can increase your chances of success and build a loyal fanbase that will support your music for years to come.

Best Way to Promote Your Music on Spotify


Credit: bandzoogle.com


Create High-quality Content


Promoting your music on Spotify can be challenging. Creating high-quality content is key to building a loyal fanbase. Consider partnering with influencers or playlist curators, using data to inform your strategy, and engaging with your audience through social media to increase your visibility.

Creating high-quality content is the key to promoting your music on Spotify. By producing music that is unique, catchy, and easily relatable, you can attract a large audience to your profile. To help you with creating high-quality content, we have put together some tips and tricks on how to record high-quality music and write catchy lyrics.

Record High-quality Music

One of the most important aspects of creating high-quality content is recording high-quality music. A poorly recorded track can ruin the listener’s experience and drive them away from your profile. To ensure that your songs are recorded to a high standard, you’ll need to invest in a good quality recording studio, equipment, and a professional engineer. This will help produce a clean sound and make your music stand out from the crowd.

Write Catchy Lyrics

Catchy lyrics are the key to a great song and are essential to creating high-quality content. When writing your lyrics, ensure that they are easy to understand and relate to. You should aim to create lyrics that connect with your audience on an emotional level and leave an impact. Make sure that the lyrics match the mood of the song and are memorable enough for your listeners to sing along. In conclusion, creating high-quality content is vital to promoting your music on Spotify. By recording high-quality music and writing catchy lyrics, you will attract a larger audience to your profile, increase your plays, and ultimately gain more followers. By following these tips and tricks, you’ll be able to produce content that stands out from the crowd and connects with your listeners on a deeper level.

Optimize Your Spotify Profile


To effectively promote your music on Spotify, it is crucial to optimize your profile by regularly updating your bio, using high-quality images, and engaging with your audience through playlists and social media. Utilize Spotify’s promotional tools, such as their algorithmic playlist submissions and feature placements, to increase your reach and visibility to potential listeners.

Optimize Your Spotify Profile: As a new artist on Spotify, having a properly optimized profile is essential for promoting your music and increasing your visibility on the platform. A well-crafted profile communicates your brand image, helps listeners connect with your music, and encourages followers. In this post, we’ll explore the best ways to optimize your Spotify Profile so you can attract more listeners and improve your chances of success. Create a Compelling Profile Bio: Your Spotify profile bio is your chance to tell your story and create an emotional connection with your listeners. You have only a few sentences to entice your potential fans into checking out your music. Therefore it’s essential to ensure that your bio is compelling and summarizes who you are as an artist. Keep it concise, engaging, and user-friendly. Add a Professional Profile Photo: Adding a high-quality profile picture to your profile is just as important as your bio. It’s the first thing your potential fans will see, and your photo should represent your brand image and the type of music you produce. A professional profile picture that fits your genre and style can help build your brand image and attract more listeners. Keep Your Profile Up-to-Date: Make sure your profile is always up-to-date. Updating your profile regularly shows that you are actively involved in your music career. It’s also a great way to keep listeners engaged and shows that you are committed to your music project. You can add links to your other social media accounts and update your playlist regularly to give fans a chance to hear more of your music. In conclusion, a well-optimized Spotify profile can do wonders for your music career. With these tips in mind, give your profile a makeover and see how it helps you connect with more listeners and grow your fan base. Remember, your Spotify profile is your gateway to your music, and the more optimized it is, the better chance you have of making a name for yourself.

Collaborate With Other Artists


Collaborating with other artists is one of the best ways to promote your music on Spotify. By working together, you can reach new listeners and expand your fan base. It also allows you to tap into different genres and styles, creating unique and diverse content that will appeal to a wider audience.

Collaborating with other artists can be a great way to promote your music on Spotify. Not only can you tap into their fanbase, but you can also get creative and come up with something unique that stands out in the crowded world of music streaming. Here are some steps you can take:

Find Artists In Your Genre

To find potential collaborators, start by looking for artists within your genre. This will ensure that your collaborative efforts sound cohesive and resonate with fans who already enjoy your style of music. Follow them on social media and see what they’re up to. Are they also promoting new music? Are they open to collaborations?

Reach Out To Collaborate

Once you’ve identified potential collaborators, it’s time to reach out. Social media is a great way to initiate contact, but email can be more professional. Be sure to introduce yourself, mention why you want to collaborate, and include links to your music. Keep your message short and to the point, as artists are likely busy and receive many messages.

Release Collaborative Music On Spotify

Once you’ve worked with another artist to create something new, make sure to release it on Spotify. Collaborative music is often well-received on the platform and can help both artists gain new followers. Use collaborative playlists to share your work with fans, and reach out to music bloggers and journalists to see if they’re interested in covering your project. Collaborating with other artists can be a win-win situation, allowing both parties to reach a wider audience and produce something unique and memorable. So if you’re looking for a way to promote your music on Spotify, consider teaming up with a fellow artist.

Engage With Your Audience


Engaging with your audience is key to promoting your music on Spotify. Interact with your fans by sharing behind-the-scenes content, responding to comments, and utilizing social media platforms to reach a wider audience. Collaborating with other artists and promoting your work on playlists can also boost your exposure.

As a musician, it is essential to engage with your audience to promote your music on Spotify. Engaging means interacting with your fans by creating playlists, responding to comments and messages, and keeping your social media active. Here are some ways you can engage with your audience to promote your music on Spotify.

Respond To Comments And Messages

Responding to comments and messages is a crucial part of engaging with your audience. When you respond to comments and messages, your fans feel acknowledged, and they are more likely to stream your music repeatedly. Make sure to reply to positive and negative comments and messages, and adopt a friendly tone. By doing so, your fans will appreciate you and develop a connection.

Create Playlists For Your Audience

Creating playlists for your audience is an excellent way to engage with them. According to Spotify, playlists are one of the most popular features on the platform. Curate playlists featuring your songs, along with your favorite tracks, and share them with your fans. You can create different playlists, such as workout playlists, party playlists, or even seasonal playlists. When you create playlist, ensure that you give appropriate names and add a description that explains what the listeners can expect from the playlist.

Keep Your Social Media Active

Your social media presence is essential to engage with your audience and promote your music on Spotify. Be active on social media platforms such as Instagram, Twitter, or Facebook. Share snippets of your music, behind-the-scenes moments, and upcoming events. Update your fans regularly about new releases, collaborations, or shows. When you post, ensure that you include relevant hashtags and tag your tracks properly. In conclusion, engaging with your audience is crucial in promoting your music on Spotify. Respond to comments and messages, create playlists for your audience, and keep your social media active to grow your fan base. By doing so, you will increase your streams, gain more followers and establish a loyal fanbase.

Advertise On Spotify


Advertising on Spotify is the best way for musicians to reach their fans and promote their music. With over 299 million active users, Spotify is the leading platform for music streaming, making it an essential tool for any musician looking to get their voice heard.

As an increasing number of people are turning to music streaming platforms like Spotify to find and stream music, it’s only natural to want to promote your music on this platform. While it is possible to grow an organic following on Spotify over time, running paid ads on the platform is a great way to increase your exposure and reach out to more listeners. Here are some tips to help you create effective ads and target the right audience to promote your music on Spotify.

Create Effective Ads

When you advertise on Spotify, you have various options to choose from, including audio, video, and display ads. It’s important to create ads that resonate with your audience to capture their attention and increase the chances of them clicking on your ad. Keep in mind that the first few seconds of your ad are crucial, so make sure to make them count. Some tips to help you create effective ads include focusing on a clear message, using a strong call to action, incorporating an eye-catching image, and using a conversational tone to connect with your target audience. By creating ads that speak directly to your audience’s interests and needs, you can increase the chances of them clicking on your ad and listening to your music.

Target The Right Audience

One of the advantages of advertising on Spotify is the ability to target specific groups of people based on their listening habits, behaviors, and interests. With Spotify’s advanced targeting options, you can set your ads to display to users based on their age, gender, location, and even the type of device they use to stream music on Spotify. To ensure that you’re targeting the right audience, it’s essential to understand who your fans are and what kind of music they enjoy. You can take advantage of Spotify’s data and analytics to identify your target audience and create ads that cater to their interests. By doing so, you can increase the chances of your ads getting clicked on and your music getting played.

Allocate A Budget For Advertising

When it comes to advertising on Spotify, it’s important to set a budget that you’re comfortable with. You can choose between two different types of campaigns on Spotify: a cost-per-click (CPC) campaign, where you pay each time someone clicks on your ad, or a cost-per-impression (CPM) campaign, where you pay based on the number of times your ad is displayed to a user. It’s important to allocate a budget that makes sense for your goals, audience, and overall marketing strategies. By deciding on a budget in advance, you can ensure that you stay within your advertising budget and avoid overspending. In conclusion, advertising on Spotify is an effective way to promote your music, reach new listeners, and grow your fan base. By creating effective ads, targeting the right audience, and allocating a budget for advertising, you can increase your exposure and promote your music on one of the world’s leading music streaming platforms.

Build Your Spotify Network

Building your Spotify network is critical when it comes to promoting your music. Not only can it help increase your plays and followers, but it can also aid in getting your tracks added to playlists. In this article, we will explore the best ways to build your Spotify network, including joining Spotify groups and communities, submitting your music to curators, and attending music industry events.

Join Spotify Groups And Communities

By joining Spotify groups and communities, you can connect with like-minded individuals who share your passion for music. These groups are often populated by bloggers, playlist curators, and other musicians who are looking for new music to feature. By sharing your music in these groups, you can increase its visibility and attract new followers.

Submit Your Music To Curators

Submitting your music to curators can be an effective way to get your tracks featured on popular playlists. Curators are individuals who create playlists on Spotify and have a substantial following. By reaching out to them with your music, you can capture their attention and potentially get your music added to their playlists. This can help expand your reach and increase your plays on Spotify.

Attend Music Industry Events

Finally, attending music industry events can be a great way to network and build relationships with industry professionals. These events can include conferences, live shows, and other gatherings where musicians and industry insiders come together. By attending these events and introducing yourself to others, you can increase your exposure and potentially land lucrative gigs or music placements.

Building your Spotify network takes time and effort, but it is critical if you want to succeed in the music industry. By joining groups and communities, submitting your music to curators, and attending music industry events, you can increase your visibility and attract new followers on Spotify.


Stay Consistent

Spotify is one of the most popular music streaming platforms, with over 356 million active users. As an artist, staying consistent on the platform is crucial for success. Below are some tips on how to stay consistent on Spotify that will help you to promote your music on this platform.

Release Music Regularly

One of the best ways to stay consistent on Spotify is by releasing music regularly. Fans love to hear new songs from their favorite artists and consistently releasing music keeps your audience engaged. Make sure to have a release schedule and stick to it.

Keep Your Profile Updated

Keeping your profile updated is essential to your success on Spotify. Ensure your profile picture and header are up-to-date and reflect your current image as an artist. Additionally, update your bio with any significant achievements such as album releases and collaborations. Consistent updates will ensure your profile stays fresh, and fans remain engaged.

Make Use Of Spotify Analytics

Spotify provides an analytics tool for artists that gives insight into their audience, including demographics and location. Use this data to identify which songs are performing well, and the audience’s response to your music. This information will guide you in creating more music that resonates with your fans.

By following these tips, you can stay consistent on Spotify and promote your music to a broader audience. With hard work and effort, you can establish yourself on the platform, gain fans, and achieve success.

Best Way to Promote Your Music on Spotify


Credit: bandzoogle.com


Best Way to Promote Your Music on Spotify


Credit: dittomusic.com


Frequently Asked Questions Of Best Way To Promote Your Music On Spotify


How Do I Promote My Music On Spotify?


To promote your music on Spotify, you can create a profile, engage with fans, submit to playlists, collaborate with influencers and other artists, and advertise through the Spotify Ad Studio platform.


How Do You Make Your Music Go Viral On Spotify?


To make your music go viral on Spotify, focus on creating an original and unique sound while promoting it on social media and music blogs. Utilize Spotify’s playlist feature by submitting your music to curators and collaborating with fellow artists.


Consistency in creating and releasing new content, as well as engaging with your audience, can also boost your chances of going viral.


How Do I Get My Music Heard On Spotify?


To get your music heard on Spotify, you need to first create an artist account and upload your music to the platform. Optimize your Spotify profile and promote your music through social media and playlist collaborations. Consider hiring a PR team or using music distribution services to increase your visibility on the platform.


How Much Does Spotify Pay Per 1000 Streams?


Spotify pays an average of $4 per 1000 streams, but this amount can vary depending on factors such as the location of the listener and the type of account the user has.


Conclusion


To wrap up, promoting your music on Spotify is all about optimization, audience engagement, and consistency. Utilize all the features and tools offered by the platform, stay connected with your fans, and keep producing high-quality content to keep them engaged.


Remember, it takes time and patience to build a dedicated fan base, so don’t get disheartened if you don’t see results right away. Keep at it, and success will surely follow – one Spotify stream at a time.

Categories
Archive

Best Websites For Mixing And Mastering Music

Some of the best websites for mixing and mastering music are SoundBetter, LANDR, and iZotope. These websites offer a range of features and tools for musicians and audio engineers to create professional-sounding tracks.


Mixing and mastering are critical aspects of producing high-quality music, and with the advancement of technology, it is now possible to achieve outstanding results from the convenience of your computer. For musicians looking to create polished tracks, websites like SoundBetter and LANDR offer a range of features, including access to experienced audio professionals who can mix and master your tracks for you.


Additionally, iZotope provides a suite of tools for mastering your own tracks, making it perfect for those who want to take control of their sound. With these excellent websites, musicians now have everything they need to produce professional-sounding tracks.

Best Websites For Mixing And Mastering Music


Credit: tellingbeatzz.com


Top Websites For Mixing Music


Get ready to produce and blend tunes flawlessly with the top websites for mixing music. Elevate your production skills by accessing the best websites for mixing and mastering music, like SoundBetter, LANDR, and BandLab.

Are you an aspiring musician looking for the best websites to mix your music? Look no further. We’ve scoured the internet and compiled a list of the top websites for mixing music. These websites offer a plethora of features such as online audio editing, sound libraries, and professional-grade tools. Here are the top websites for mixing music:

Online Audio Editor

MixPad is one of the best online audio editors available on the internet. With MixPad, you can create custom soundtracks, add sound effects, and mix audio recordings. This online audio editor is perfect for beginners who are just starting their music career. MixPad is user-friendly and easy to navigate, making it the perfect tool for editing and mixing music.

Soundtrap

If you’re looking for an online platform for mixing music, Soundtrap is the perfect solution. This website is a cloud-based music studio that allows you to collaborate with other musicians in real-time. Soundtrap is perfect for musicians who want to create professional-grade music without breaking the bank. With Soundtrap, you can mix and master music, record vocals, and add sound effects easily.

Pro Tools First

Pro Tools First is a powerful music mixing tool that is available for free. This website offers a wide range of features such as unlimited projects, 16 tracks, and 23 high-quality plugins. Pro Tools First is perfect for musicians who want to create professional-grade music without spending a fortune. With Pro Tools First, you get access to a wide range of tools to mix and master music, record vocals, and add sound effects. In conclusion, these websites provide the perfect platform for musicians to mix and master their music. Whether you’re a beginner or a seasoned professional, these websites have something to offer everyone. So why wait? Sign up today and start mixing your music like a pro!

Best Websites For Mixing And Mastering Music


Credit: www.masteringthemix.com


Top Websites For Mastering Music


Mastering music can be a challenging task, but with the help of top websites, it can become much easier. Websites such as iZotope, LANDR, and MasteringBOX provide exceptional mastering tools and services that can help you produce professional-quality music.

Looking to create professional-grade music tracks? Then it is imperative that you choose websites for mastering music that provide high-quality audio engineering and mixing services. Mastering music can enhance the quality of your tracks by adjusting levels, applying effects, and optimizing sound quality. To help you find the best websites for mastering music, we have picked out three platforms that offer some of the most reliable services.

Landr

If you’re looking for a website that offers instant gratification, look no further than LANDR. It is an AI-based online tool that helps you master music tracks in just a few moments. One of the key benefits of LANDR is its ease of use, just drag and drop your track and choose from a range of options. It offers instant mastering that analyzes and optimizes the sound of your music with presets. The platform also allows you to preview different versions of your mastered tracks to ensure you get the desired results before downloading the final product.

Emastered

If you’re looking for a website that offers mastering services for free, emastered is an excellent option. This website has a simple interface, and you can easily upload your tracks and get started. With emastered, you can adjust your tracks’ volume, EQ, and apply compression, but you will need to sign in to access some of the features. The platform also offers custom mastering at an affordable price, where you get to work with professional audio engineers.

Bandlab

BandLab is another excellent website for mastering music, and it offers an all-in-one studio experience. The platform features a range of professional audio editing tools, a virtual MIDI keyboard, and a library of samples. With BandLab, you can mix, master, and collaborate on tracks, all in one place. You can also access a range of features like tempo, pitch, and timing adjustments along with a suite of mastering tools. In conclusion, when you want to release music that stands out from an increasingly crowded field, mastering is essential. These websites offer you the chance to do so with ease, affordability, and quality. Choose the one that fits your requirements and start creating professional-grade music tracks.


Best Websites For Mixing And Mastering Music


Credit: www.audiomixingmastering.com


Frequently Asked Questions On Best Websites For Mixing And Mastering Music


How Much Does It Cost To Professionally Mix And Master A Song?


The cost of professional mixing and mastering for a song varies widely depending on factors such as the quality of the studio, the complexity of the project, and the experience of the engineer. On average, however, expect to pay anywhere from $500 to $2000.


What Is The Best Way To Learn Mixing And Mastering?


The best way to learn mixing and mastering is through practice, study and learning from experienced professionals. You can take online courses, watch tutorial videos, attend workshops, collaborate with other musicians and experiment with different software tools and plugins. Consistency and dedication are key to mastering this skill.


Which Software Is Best For Mixing And Mastering?


The best software for mixing and mastering depends on personal preference, but some popular options include Pro Tools, Ableton Live, Logic Pro X, and FL Studio. It’s important to choose a program that suits your needs and skill level to achieve the best results.


What Is The Best Website For Making Music?


Some of the best websites for making music include Soundtrap, Splice, and BandLab. These sites offer a range of tools and resources for creating beats, editing music, and collaborating with other musicians. Each site has its strengths, so it’s worth exploring them to find what works best for you.


Conclusion


Having access to the best mixing and mastering websites can greatly enhance your music production. These websites offer a variety of tools and resources that can help you add the finishing touches to your music tracks. Whether you are a professional producer or just starting out, these websites can provide you with the tools you need to create high-quality music.


So, give them a try and take your music to the next level. Happy mixing and mastering!