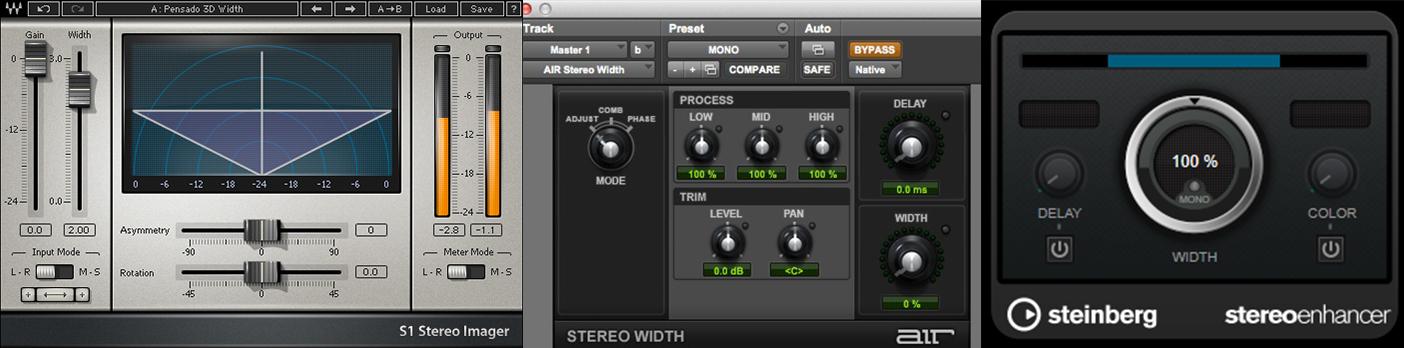
To get wide stereo sound in mastering, utilize stereo widening plugins and panning techniques. By using tools like the Haas effect and stereo imager, you can enhance the stereo image of your mix and add depth and space.
Stereo widening is a crucial technique used in mastering that can make a significant difference in the final mix. It entails making a stereo track sound wider and more spacious. A wide stereo sound can help to separate instruments and create a more immersive and enjoyable listening experience.
However, achieving a wide stereo mix requires some skill and know-how. We’ll explore some effective techniques and tools for achieving a wide stereo sound in mastering. We’ll also discuss some best practices for using stereo wideners to ensure that your mix doesn’t suffer from phase cancellation or other issues.
Credit: m.youtube.com
Achieving Wide Stereo Sound
To achieve wide stereo sound in mastering, try panning instruments and vocals left or right, using stereo imaging plugins to widen the stereo field, and using reverb and delay effects. Proper EQ and compression can also help enhance the stereo image.
Achieving Wide Stereo Sound is the holy grail of mastering music. It creates a sense of depth and immersion, making the music sound much fuller. But how do you achieve this? In this blog post, we’ll cover a few tips and techniques that will help you achieve a wide stereo sound that will give your tracks the space they need.
Balancing Mono And Stereo Signals
The first step in achieving wide stereo sound is to balance your mono and stereo signals. When mixing, it’s important to ensure that sounds that need to be mono are in mono, and sounds that can benefit from being stereo are in stereo. This will prevent any phasing issues and ensure that the sound is as clear as possible.
Using Panning To Create A Wider Sound
Panning is a great way to create a wide stereo sound. By panning different elements left and right, you can create more space in the stereo field. But be careful not to go too extreme with your panning, as this can cause a loss of focus in the mix. It’s important to listen to each element and decide how wide it needs to be, based on the other sounds in the mix.
Using Stereo Widening Plug-ins
Stereo widening plugins are another way to expand the stereo field. These plugins work by taking the stereo signal and widening it, making the sound appear wider than it actually is. But like panning, it’s important not to go too extreme with stereo widening, or it can cause phase issues and make the mix sound unnatural.
Adding Reverb For Depth And Space
One final technique for achieving wide stereo sound is adding reverb. Reverb can give your mix depth and space, making it feel like it’s in a larger environment. You can use different types of reverb to achieve different effects, such as a short plate reverb for a more focused sound, or a longer hall reverb for a more ambient sound. In conclusion, achieving wide stereo sound involves a combination of balancing your mono and stereo signals, using panning and stereo widening plugins, and adding reverb for depth and space. By following these tips and techniques, you’ll be able to create a mix that sounds fuller and more immersive.
Credit: majormixing.com
Mastering Techniques For Wide Stereo Sound
Achieving a wide stereo sound in mastering can greatly enhance the overall quality of the mix. Strategies such as adjusting the panning, using mid-side processing, and using stereo widening effects can help achieve a more spacious and immersive listening experience for the listener.
Mastering Techniques for Wide Stereo Sound Mastering is the final step in the music production process, where the tracks are polished, balanced, and prepared for distribution. A crucial aspect of mastering is creating a wide stereo sound. It enables a more immersive and engaging listening experience that captures the listener’s attention. Using EQ to Enhance the Stereo Width EQ is a powerful tool in a mastering engineer’s arsenal. It can be used to adjust the stereo width of a track. A simple EQ trick to enhance the stereo width is to cut or attenuate the low-frequency content in the mid-side channel and boost the high-frequency content in the side channel. This technique gives prominence to the stereo image, making it sound wider and more spacious. Using Mid-Side Processing to Control Stereo Field Mid-side processing is another technique to control the stereo field. It works on the principle of separating the mid and side channels of a stereo signal. The mid channel comprises the sounds that are common to both left and right channels, while the side channel comprises the difference between the left and right channels. By adjusting the levels and EQ of these channels, one can control the stereo width and depth. Applying Parallel Compression for More Impactful Sound Applying parallel compression can add more impact to a track and make it sound wider. Parallel compression involves duplicating the original track and compressing the duplicated track heavily. The compressed track is then blended with the original track using a mixer or fader. The result is a thicker and more impactful sound that enhances the stereo image. Limiting and Clipping to Control Dynamics Limiting and clipping are techniques used to control the dynamics of a track. They help to ensure that the peaks of the signal do not exceed a certain level, preventing distortion and other unwanted artifacts. By controlling the dynamics, one can achieve a more consistent and balanced sound, with a wide stereo image. However, it is important to use these techniques wisely, as excessive limiting or clipping can result in a flat and lifeless sound. In conclusion, creating a wide stereo sound in mastering requires a combination of techniques, including EQ adjustments, mid-side processing, parallel compression, and dynamic control. Each technique plays a vital role in enhancing the stereo image and creating an immersive listening experience. Mastering engineers must understand these techniques and use them wisely to achieve the desired results.
Final Tips For Wide Stereo Mastering
Achieving wide stereo sound in mastering can make a huge difference in the overall quality of your audio production. To enhance the stereo image, consider using techniques such as panning, stereo width plugins, and mid/side processing. A balanced mix with a wide stereo field can create a more immersive listening experience for your audience.
Avoiding Phase Cancellation
One crucial factor to keep in mind while creating a stereo mix is avoiding phase issues that could cancel each other out. Phase cancellation occurs when two opposing sound waves meet, resulting in a dip in the frequency response. To avoid this, make sure to check the phase of your stereo mix using a phase correlation meter or simply a mono switch on your playback system. Adjust the panning of different elements, such as guitars or synths, to avoid any conflicting frequencies.
Monitoring In Mono To Check Mix Clarity
Even though wide stereo can sound incredible, it can also make a mix sound muddled or unclear if not executed correctly. An effective way to check clarity is by monitoring your mix in mono. This ensures that there is no frequency competition between the right and left channels. If you can still hear individual elements of the mix, such as the bass and the lead vocal, you are on the right track. This technique also helps in identifying any phasing issues.
Preventing Ear Fatigue
Long hours of mixing and mastering can result in ear fatigue, which can affect your judgment. To avoid this, take frequent breaks, and rest your ears regularly. You can also adjust the volume of your playback system to minimize the strain on your ears. If you are using headphones, ensure they have a flat frequency response to avoid any bias towards certain frequencies.
Avoiding Overprocessing
While trying to achieve wide stereo, it is tempting to use plugins excessively. However, overprocessing can lead to a mix that sounds unnatural and fatiguing to the ears. Instead, use stereo-imaging plugins sparingly and try to achieve natural width using panning, delays, and reverb. Ensure that each element of the mix has its space, and the width is not compromised by excessive processing. By adhering to these tips, you can create a wide and natural-sounding stereo mix that enhances the listening experience of your listeners.
Credit: www.masteringthemix.com
Frequently Asked Questions On How To Get Wide Stereo Sound In Mastering
What Is Stereo Width In Mastering?
Stereo width in mastering refers to the perceived distance between the left and right channels of a stereo audio track. It can be adjusted to make a mix sound wider or narrower, depending on the desired effect. It is a common technique used by mastering engineers to enhance the spatial dimensions of a mix.
How Do I Widen My Stereo Sound?
To widen your stereo sound, try the following: 1. Use stereo widening plugins or EQs to manipulate the panning of your mix 2. Use delay or reverb effects to create a sense of spaciousness 3. Use double tracking technique to record multiple takes of a part with slight variations to create a wider sound 4.
Use mid/side processing to enhance the stereo width of specific frequencies 5. Carefully balance and pan your mix to create a wide stereo image.
How Do You Widen Stereo Using Eq?
Widening stereo using EQ involves manipulating the stereo information contained in an audio file. This can be done by applying EQ to different parts of the frequency spectrum using specialized stereo widening plugins. By doing this, you can widen the stereo field and provide your audio with a more spacious and engaging sound.
How Do You Get A Wide Master?
To get a wide master, start by EQ’ing the main channels of your mix and removing any frequencies that compete with your master. Use a multiband compressor to control dynamics and ensure each frequency range is levelled out. Saturation and stereo widening plugins can be useful to add warmth and depth to your mix.
Finally, use a limiter to bring the overall volume up to the desired level without causing distortion.
Conclusion
To get wide stereo sound in mastering, you need to take an intentional approach, paying attention to every detail of the process. It starts with high-quality recordings and progresses through careful mixing and mastering. By following this guide and using the right tools, you can achieve a sound that is wide, full, and immersive.
As always, experimentation is key. Don’t be afraid to try new things and push the boundaries of what you think is possible. With patience, practice, and a little bit of luck, you’ll achieve a sound that will elevate your music to new levels.
To write a future bass track from scratch, start with a catchy melody and add a strong beat. Mix in some atmospheric elements and vocal chops to complete the sound.
Future bass is a subgenre of electronic dance music that has gained in popularity over the years. It is characterized by its unique sound palette, with lush, layered synths and melodic basslines that are both heavy and emotive at the same time.
Writing a future bass track can be a challenging but rewarding process, requiring a blend of creativity and technical skills. We will explore the steps involved in writing a future bass track from scratch, including choosing the right sounds, crafting the melody, programming the drums, and adding the finishing touches.
Credit: hy2rogen.com
Understanding Future Bass Genre
Future bass is a genre that blends electronic dance music (EDM) with elements of pop, hip-hop, and trap. To write a future bass track from scratch, producers need to focus on a few key elements such as using rich chord progressions, creating catchy melodies, incorporating vocal chops, and utilizing dynamic drums and basslines.
With these tips in mind, aspiring future bass producers can craft their own unique and dynamic tracks.
Future Bass is a popular electronic dance music (EDM) genre that has evolved significantly over the past few years. It has garnered a massive following among fans of electronic music because of its unique musical characteristics. In this blog post, we’ll take a deep dive into the Future Bass genre and show you how to produce a track from scratch, so let’s get started!
Origin Of Future Bass
Future Bass is a sub-genre of electronic music that originated in the early 2010s in North America. Its origins can be traced back to several electronic genres, including trap, hip-hop beats, and dubstep. The genre is a fusion of various musical styles, including pop, R&B, and soul, with a focus on melodic and harmonic structure and heavily synthesized sounds.
Musical Characteristics
Future Bass is all about lush, melodic, and uplifting sounds, characterized by heavy drops and sweet chord progressions. The genre is more focused on melodies and harmonies than on beats, unlike other genres like techno and house. Future bass tracks are typically composed of layered synths, vocal chops, and atmospheric sounds. The music is often euphoric and emotive, making it ideal for dance floors and clubs. When learning to produce Future Bass, be sure to experiment with different chord progressions, melodies, and even incorporating live instruments. Keep your focus on creating uplifting and emotive sounds that will resonate with your audience. By using the right sounds and applying the right techniques, you can produce a Future Bass track that stands out from the crowd. Whether you are a beginner or an experienced producer, producing a Future Bass track can be both exciting and challenging. By following these tips and understanding the basics of the genre, you can start producing your own Future Bass tracks from scratch. So, get your creativity flowing and make some beautiful music!
Credit: www.productionmusiclive.com
Necessary Tools For Producing Future Bass
To write a Future Bass track from scratch, you will need some essential tools. These include a powerful Digital Audio Workstation (DAW), virtual instruments, sound libraries, and a creative mind. With these tools, you can produce a dance beat with catchy melodies, big drops, and energetic vibes that will keep your listeners bouncing.
If you’re interested in producing future bass music, it’s important to have the necessary tools to bring your vision to life. With the right digital audio workstation (DAW) software, virtual instruments, and samples and loops, you’ll be well on your way to creating a professional-sounding track. Here’s a breakdown of the essential tools you’ll need:
Daw Software
Your digital audio workstation (DAW) software is the backbone of your music production setup. It’s where you’ll spend most of your time recording, editing, and mixing your tracks. Some popular DAWs for producing future bass include Ableton Live, FL Studio, Logic Pro X, and Cubase. Each DAW has its own unique features and workflow, so it’s important to choose one that suits your needs and preferences.
Virtual Instruments
Virtual instruments are software-based instruments that replicate real-life instruments. They can range from synthesizers and pianos to drums and percussion. When it comes to producing future bass, you’ll want to have a good selection of virtual instruments that are capable of producing the signature sounds associated with the genre. Some popular virtual instruments for future bass include Serum, Massive, Sylenth1, and Nexus.
Samples And Loops
Samples and loops are pre-recorded sounds and rhythms that you can use in your track. Future bass music often features interesting vocal chops, atmospheric pads, and tight drum loops. Having a good library of samples and loops can help speed up your workflow and add variety to your track. Some popular sample and loop packs for future bass include Cymatics’ Future Bass for Serum, Splice’s Future Bass Bliss, and Origin Sound’s Future Bass. With these essential tools at your disposal, you’ll be well-equipped to create a future bass track that’s unique and professional-sounding. Keep in mind that the most important thing is to experiment and have fun with your music production process!
Creating The Chord Progression
Creating the chord progression is a crucial step in producing a future bass track. Start by choosing the key of your track and experimenting with different chord progressions until you find the perfect fit. Incorporating seventh and ninth chords can also add depth and emotion to your melody.
Creating The Chord Progression is one of the most crucial steps to writing a Future Bass track from scratch. The chord progression sets the tone and vibe of the track, and it is the foundation upon which the rest of the song can be built. In this section, we’ll discuss how to choose the right key for your track and build a solid chord progression that will keep the listener engaged from start to finish.
Choosing The Right Key
The first step in creating a killer chord progression is choosing the right key for your track. A good key can make or break the entire feel of the song. When choosing a key, it’s important to consider the emotion and vibe you want to convey in your track. This will set the foundation for your chord progression and bring your vision to life. Here are a few tips for choosing the right key:
Think about the mood or feeling you want to convey in your track. Is it happy? Sad? Dreamy?
Consider the range of your vocalist or instruments that you’ll be using. Choose a key that is comfortable for them.
Experiment. Try playing around with a few different keys and see which one feels the best for your track.
Building The Chord Progression
Once you’ve chosen the right key, it’s time to start building your chord progression. There are endless chord progressions you can use, so it’s important to experiment and find what works best for your track. Here are a few tips to get started:
Start with a simple chord progression. Begin with a basic four-chord pattern, and then build on it as you go along.
Use inversions. Inversions can add some unique flavor to your chord progression and make it sound more interesting.
Add some variety. Don’t be afraid to mix it up with a different progression, or even change the key mid-track.
Pay attention to timing. Consider the length of each chord and how long you want your progression to be.
Experiment. Don’t be afraid to try something new, or even just play around with different chord progressions until you find one that feels right for your track.
Remember, creating a great chord progression takes time and experimentation. Don’t be afraid to try new things, and keep refining until you’ve created a progression that truly captures the mood and feel of your track. With these tips in mind, you’re well on your way to writing a killer Future Bass track from scratch.
Credit: www.youtube.com
Melodic And Rhythmic Elements
Creative Sound Design Techniques
Learn how to create a dynamic future bass track from scratch by utilizing creative sound design techniques. Explore methods for crafting unique basslines, powerful drums, and atmospheric effects to create a professional, polished sound.
Creating a Future Bass track from scratch can be a daunting task, especially for beginners. However, with some creative sound design techniques, you can produce a track that is unique and captivating. In this post, we will explore some sound design techniques that can help you create a Future Bass track from scratch.
Manipulating Synths And Virtual Instruments
One of the essential techniques for creating a Future Bass track from scratch is manipulating synths and virtual instruments. Here are some tips on how to manipulate synths and virtual instruments:
Experiment with different LFO shapes to create unique sounds
Use automation to create movement in your sound design
Add vibrato and glide to create a more organic and human feel to your synth
Layer different synths to create a full and rich sound
These are just a few examples of how you can manipulate synths and virtual instruments to create unique sounds. The possibilities are endless, so don’t be afraid to experiment!
Adding Special Fx And Transitions
Adding special FX and transitions is crucial to make the track sound more interesting. Here are some tips on how to add special FX and transitions:
Use reverb and delay to create a sense of space in your mix
Add risers and impacts to build energy and tension
Use filter sweeps and cutoff automation to create interesting movement in your sound design
Chop up samples and use them as glitch effects
By adding special FX and transitions, you can take your track to the next level and make it more exciting for the listener. In conclusion, Creative Sound Design Techniques can help you create a Future Bass track from scratch that stands out from the crowd. By manipulating synths and virtual instruments and adding special FX and transitions, you can create a unique and captivating track that keeps your listeners engaged.
Arrangement And Mixing Techniques
Arrangement and mixing techniques are critical aspects of producing any type of music, including future bass. By arranging the elements in a logical and compelling way, you can create a dynamic listening experience that keeps your audience engaged from start to finish.
Structuring The Track
The structure of your future bass track can greatly impact how it is perceived by your audience. A good structure can enhance the overall experience of your production while also giving it a sense of purpose and direction.
Begin with a strong introduction that sets the tone for your track and grabs the listener’s attention.
Create the main drop, which is the core of your track and the most energetic part of it.
Next, follow that with a breakdown that offers some relief from the intensity of the drop.
Build up the tension again in the pre-chorus, and then release it in the chorus.
Finally, wrap up your track with a conclusion that leaves your audience feeling satisfied.
Use Of Eq And Compression
Using EQ and compression can make a significant difference in the quality, balance, and clarity of your mix. You can correct the problems related to the tonal balance of your mix with EQ, and compression can be used to reduce unwanted peaks or add some punch to your track.
Frequency Range
Recommended EQ Adjustments
20Hz – 50Hz
Boost for more bass impact.
100Hz – 250Hz
Boost to add warmth and depth.
500Hz – 1kHz
Cut to remove muddiness.
2kHz – 4kHz
Boost to add brightness and clarity.
5kHz – 20kHz
Cut to prevent ear fatigue.
When it comes to compression, it’s essential to find the right balance between dynamics and loudness. Too much compression can make your track feel flat, while too little can make it sound weak. It’s essential to experiment with different parameters to find the right settings for your mix.
Mastering The Final Mix
After arranging and mixing your future bass track, it’s essential to master it for optimal playback across different systems and devices. Mastering involves setting the final levels, preparing the track for distribution, and ensuring that the overall sound meets the industry standards.
Start by setting the final levels for your track. Use a limiter to prevent any unwanted distortion, but be careful not to overdo it.
Next, take a break from your mix to give your ears some rest, and then come back to it with fresh ears. Listen to your mix across different systems and devices to ensure that it translates well.
Finally, export your mix as a high-quality WAV or AIFF file, and submit it to your distributor of choice.
By applying these arrangement and mixing techniques, you can create a future bass track that stands out and resonates with your audience. Remember to always experiment and trust your intuition, and you’ll be surprised at what you can achieve with your music.
Frequently Asked Questions On How To Write A Future Bass Track From Scratch
How Do You Structure A Future Bass Song?
To structure a future bass song, start with an intro that gradually builds up, leading into the first verse. The chorus should have a strong melody and energetic beats. Include a breakdown section with fewer instruments before building up to the next verse and chorus.
Add a bridge for variety before the final chorus. Use a combination of synths, basslines, and drums to create a full and dynamic sound.
Is Future Bass Easy To Make?
Future bass can be easy to make with the right tools and knowledge. It combines elements of electronic dance music with pop and future garage. However, it still requires creativity, skills, and practice to produce a quality track.
What Is The Future Bass Format?
Future bass is a music genre that emerged in the late 2000s and became mainstream in the 2010s. It combines elements of bass-heavy electronic music, garage, dubstep, and pop music. Future bass is characterized by its emotional and melodic sound, prominent synths, and heavy use of vocal chops.
It continues to evolve with new artists and sub-genres emerging constantly.
What Is The Chord Pattern For Future Bass?
The chord pattern for future bass typically involves using minor 7th and major 7th chords, as well as suspended chords and inverted chords. The chords are often played in arpeggios and have a dreamy, atmospheric sound. Experimenting with different chord progressions can help create a unique and dynamic future bass track.
Conclusion
By following the steps outlined in this guide, you can easily create a future bass track from scratch. Remember to start with a strong chord progression, layer your sounds creatively, and use automation to add movement and interest to your track.
Finally, don’t be afraid to experiment and try something new – that’s often where the best ideas come from. With some patience and dedication, you can produce a unique and exciting future bass track that’s sure to impress your listeners.
To fix muddiness when mastering music, use EQ to remove unwanted frequencies and adjust the mix balance. Then, use compression to control dynamics and add clarity.
Mastering music is the art of transforming a raw mix into a polished final product that sounds great on every device. However, it is common to experience muddiness in the final product, leaving a mix that lacks clarity and sounds cluttered.
Muddiness can be caused by overlapping frequencies, incorrect mix balance, and a lack of control over dynamics. Fixing muddiness can be achieved through equalization (EQ) adjustments and compression techniques. EQ can be used to remove unwanted frequencies that disrupt the mix, while compression is useful in controlling dynamics and adding clarity. These techniques can help create a polished final product that sounds great across all devices.
Credit: www.musicguymixing.com
Common Audio Problems
Eliminating muddiness in a song’s mastering can be tricky, but it’s a common audio problem that can be solved by using equalization. By cutting the problematic frequencies and boosting the right ones, you can restore clarity and detail to your music.
When it comes to mastering audio, there are several common problems that most engineers encounter. These problems can significantly affect the quality of the final output and ruin the listening experience for the listeners. The most common audio problems include clipping, distortion, muddiness, and many more.
Clipping
Clipping is a prevalent audio problem that occurs when the input signal level is higher than the maximum output level of the equipment. When the audio signal exceeds the maximum limit, the peaks of the waveform get cut off, causing unpleasant distortion. To fix clipping, reduce the gain levels, lower the input levels or use a compressor to control the peaks.
Distortion
Distortion is an annoying problem that occurs when the audio waveform gets altered beyond recognition. This problem usually arises from using an overdriven amplifier or over-processing the audio signal. The solution to this problem is to find the source of the distortion and check your levels carefully. Ensure that you use the right processing equipment and avoid overloading the signal.
Muddiness
Muddiness is another prevalent audio problem that results in a lack of clarity and definition in the audio mix. It occurs when several instruments occupy the same frequency range, making it challenging to distinguish them from one another. To fix muddiness, you can use EQ to carve out specific frequencies and harmonics, allowing each instrument to occupy its own sonic space. Additionally, you can use a multiband compressor to control the troublesome frequencies. In conclusion, to achieve a high-quality final mix, it is essential to fix the common audio problems such as clipping, distortion, and muddiness. By following these simple tips, you can enhance the clarity and definition of your music and deliver a perfect listening experience to your audience.
Credit: www.masteringthemix.com
Understanding Muddiness
When it comes to mastering music, one of the most frustrating issues is muddiness. Muddiness refers to a lack of clarity and definition in the sound, making it difficult to distinguish between different instruments and elements in the mix. Understanding the causes and effects of muddiness is the first step in correcting the issue and achieving a professional-sounding track.
Causes Of Muddiness
There are several factors that can contribute to muddiness in a mix:
Overlapping Frequencies: When different instruments or elements in the mix occupy the same frequency range, they can create a muddy, cluttered sound. For example, if the bass guitar and kick drum both have a lot of low-end information, they may clash and create muddiness.
Excessive Reverb: While reverb can add a sense of space and depth to a mix, too much can make it sound muddy and washy. This is because reverb can blur the lines between different elements in the mix, creating a lack of clarity.
Too Many Tracks: If a mix has too many tracks or layers, it can quickly become muddy and overwhelming. This is especially true if the tracks are all fighting for space in the mix and competing for attention.
Effects On Sound Quality
Muddiness can have a negative impact on the overall sound quality of a mix. Here are some of the most common effects:
Lack of Clarity: Muddiness can make it difficult to hear individual instruments or elements in the mix, resulting in a lack of clarity and definition.
Poor Separation: When different elements in the mix are muddied together, they can lose their distinctiveness and blend together in an undesirable way.
Muffled Sound: Muddiness can create a muffled, indistinct sound that lacks the crispness and clarity of a professional track.
Tools For Fixing Muddiness
Learn how to fix muddiness in your mastered music with the right tools. Whether it’s using EQ to clean up the low end or tweaking the stereo width with a multiband imager, these techniques can help you achieve a clearer and more balanced mix.
Muddiness in music is a common problem that can affect the overall quality of a song. It can be caused by too much bass, too many overlapping frequencies, or poor mixing. Fortunately, there are tools available that can help to fix muddiness, and the most effective ones are equalizers, multiband compressors, and de-essers. Here we will discuss each tool’s use and how it can help to fix muddiness when mastering music.
Equalizers
Equalizers are powerful tools that can help to balance the frequencies in a mix. When it comes to fixing muddiness, the most important frequencies to focus on are the low frequencies. A common technique is to use a high-pass filter to remove any frequencies below a certain point. This will help to reduce the amount of low-end rumble and tighten up the mix. Additionally, cutting or attenuating the frequencies that are clashing with each other can help to create more clarity and separation between the instruments.
Multiband Compressors
Multiband compressors are a type of compressor that allows you to compress different frequency bands independently. This is useful for fixing muddiness because it allows you to target problem frequencies without affecting the rest of the mix. If there are certain frequency ranges that are causing muddiness, you can use a multiband compressor to reduce the dynamic range of those frequencies. This can help to create a more balanced and controlled sound.
De-essers
De-essers are designed to reduce the amount of sibilance in a mix. Sibilance refers to the harsh, hissing sounds that can be caused by excessive high-frequency content, such as “sss” and “shh” sounds. While de-essers are primarily used to fix sibilance problems, they can also be effective for reducing muddiness. This is because sibilance can often mask other frequencies, making the mix sound less clear. By reducing the amount of sibilance in a mix, you can create more space for other frequencies to come through. In conclusion, equalizers, multiband compressors, and de-essers are powerful tools for fixing muddiness in music. By using these tools correctly, you can create a more balanced and controlled mix that sounds clear and professional. Remember, every mix is different, and there is no one-size-fits-all solution to fixing muddiness. You may need to experiment with different settings and techniques to find what works best for your mix.
Techniques For Fixing Muddiness
Learn effective techniques for fixing muddiness in your mastered music. By adjusting the frequency balance, using EQ and compression, and referencing your mix, you can achieve a clearer and more dynamic final product.
Mixing music can be a challenging task, but mastering the final mix can be even more complicated. Muddiness is one of the common problems that can occur during the mastering process. It can be caused by several factors such as improper use of EQ, overcompression, cluttered arrangement, and many more. Here we will discuss some techniques for fixing muddiness when mastering music.
Identifying Problem Frequencies
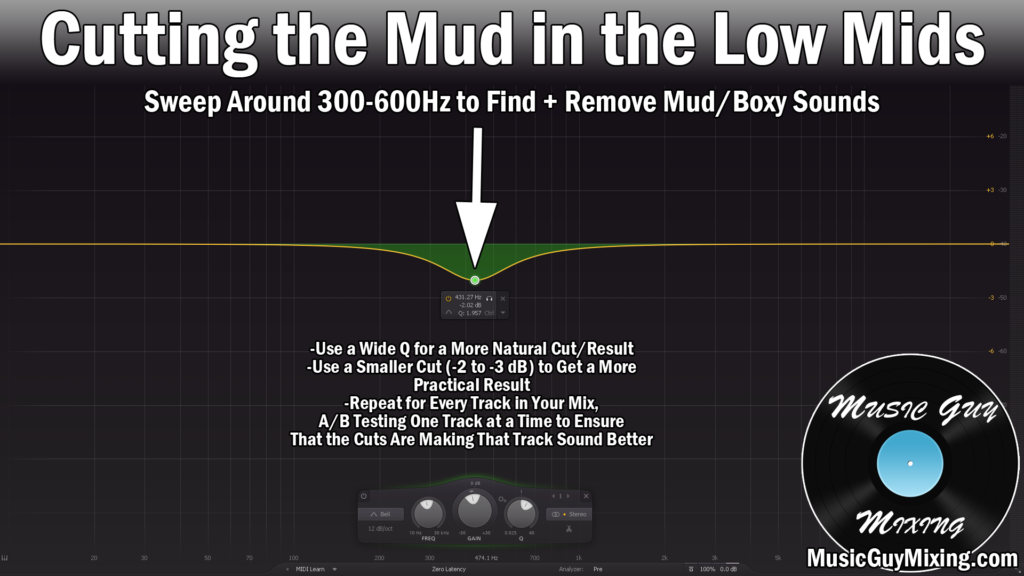
The first step in fixing muddiness is identifying the problematic frequencies. Using an EQ analyzer plugin can help you visualize the frequency spectrum of the mix. Generally, the low-mid frequencies (200-500 Hz) are the ones that can cause muddiness. You can identify these frequencies by sweeping through the range and listening to which frequencies are dominating the mix.
Reducing Muddiness With Eq
Once you identify the problematic frequencies, you can use an EQ plugin to reduce them. Start by applying a wide cut of around 2-3 dB to the problematic frequency range. Be careful not to cut too much because it can result in a hollow sound. If the mix still sounds muddy, a slight boost in the high-mid range can help add clarity to the mix. Always make sure to use a high-quality EQ plugin that can make surgical cuts without affecting other frequencies.
Using Multiband Compression
Multiband compression can be a helpful tool in fixing muddiness. It allows you to compress specific frequency ranges separately, which can help tame the muddiness without overcompressing other parts of the mix. Start by applying a multiband compressor to the low-mid frequencies and set the threshold to catch the peaks that are causing muddiness. Adjust the attack, release, and ratio parameters until you achieve a balanced and transparent compression. In conclusion, fixing muddiness when mastering music takes time, patience, and a good ear. Use these techniques wisely as every mix is different, and there is no one-size-fits-all solution. By properly identifying the problematic frequencies, using EQ, and multiband compression, you can achieve a clear and transparent final mix that will sound great on any system.
Tips For Avoiding Muddiness In Mixes
Achieving a clean and clear mix is crucial when mastering music. To avoid muddiness, ensure each instrument has its own space in the mix, use EQ to cut frequencies that clash, and consider panning and stereo imaging to create separation.
Mixing music can be a complicated process, especially when it comes to achieving a clear and balanced sound. One of the most common problems that can affect the quality of a mix is muddiness. A muddy mix can make it difficult for listeners to hear individual instruments and vocals clearly, leading to a less enjoyable listening experience. If you’re struggling with muddiness in your mixes, here are some useful tips to help you avoid this problem:
Proper Level Balancing
One of the main causes of muddiness is improper level balancing. This happens when some instruments or vocals are too loud compared to others, causing certain frequencies to dominate the mix. To avoid this problem, you should spend time adjusting the levels of each track until they are balanced and sitting well in the mix. You can use a visualizer plugin to help you identify any frequencies that are too dominant and adjust them accordingly.
Avoiding Overlapping Frequencies
Another common cause of muddiness is overlapping frequencies. This happens when two or more instruments or vocals share the same frequency range, causing them to clash and create a muddy sound. To avoid this problem, you should identify which tracks are clashing and use EQ to cut the offending frequencies. This will help each instrument and vocal to stand out in the mix and create a more defined sound.
Keeping The Low-end Tight
The low-end of a mix is where muddiness can be at its worst. This is because many instruments, such as bass and kick drums, share the same low frequency range. To keep the low-end tight and clear, you should be careful with your EQ and use sidechain compression to carve out space for each instrument. You can also try using a high-pass filter to cut out any low-end frequencies that aren’t necessary for each instrument. In conclusion, muddiness can be a challenging problem to overcome when mastering music. However, by following these tips for avoiding muddiness in mixes, you can achieve a clearer and more balanced sound that will enhance the listening experience for your audience. Remember to focus on proper level balancing, avoiding overlapping frequencies, and keeping the low-end tight. With practice and patience, you can master the art of producing high-quality music mixes.
Expert Advice From Industry Professionals
Get expert advice on how to fix muddiness when mastering music straight from industry professionals. Learn the best techniques and tips to enhance the clarity and balance of your music production.
Mastering music is a crucial step in the music production process. However, muddiness can be a frustrating problem that can make a song sound dull and lifeless. Luckily, there are some expert tips and tricks that you can use to fix this issue. In this blog post, we will explore the topic of fixing muddiness in music mastering. We have talked to mastering engineers, Grammy-winning producers, and music experts to get their advice on how to fix muddiness.
Interview With A Mastering Engineer
To get a better understanding of how to fix muddiness in music mastering, we reached out to a mastering engineer. According to our expert, the most common cause of muddiness in a mix is an excessive amount of low frequencies. To fix this issue, he recommends using a high-pass filter in the mastering chain. This filter will cut off the low frequencies and make the mix sound cleaner and clearer.
Tips From Grammy-winning Producers
In addition to the advice from our mastering engineer, we also got some tips from Grammy-winning producers. According to their advice, it is essential to make sure that your mix has a balanced frequency response. This means that all frequency ranges should be present in the mix, and none should dominate the others. They also recommended using EQ and compression techniques to remove muddiness from a mix. To conclude, fixing muddiness in music mastering can be challenging, but it is essential to make sure that your mix sounds clear and well-balanced. By following the advice from our experts, you can fix muddiness in your mixes and make your music stand out.
Examples Of Well-mastered Music
Achieving a well-mastered music output is an art form. When mastering music, ‘muddiness’ could be a significant challenge to surmount. Here are some examples of well-mastered music, and the methods that help fix muddiness in music mastering.
Mastering music is a complex process of enhancing audio quality to produce the best sound possible. For beginners, analyzing well-mastered music tracks can be a helpful way to learn and improve their skills. We have provided before and after audio clips and an analysis of the mastering techniques used on some popular songs to help you understand how to fix muddiness when mastering music.
Before And After Audio Clips
Listening to before and after audio clips of a mastered song can provide an example of the difference between a poorly and properly mastered song. Here are some examples:
Song
Before Mastering
After Mastering
Uptown Funk by Mark Ronson ft. Bruno Mars
Take on Me by A-ha
Analysis Of Mastering Techniques
Understanding the techniques used to master a well-produced song is important to fix muddiness in your own tracks. The following list contains some common mastering techniques used to enhance the clarity and loudness of audio:
Equalization: Adjusting the balance of frequencies to achieve a more balanced sound
Compression: Reducing the dynamic range of audio to create a more consistent sound
Stereo Widening: Enhancing the stereo field to create a more immersive sound
Loudness: Increasing the overall volume of audio without distorting it
Credit: www.masteringthemix.com
Frequently Asked Questions Of How To Fix Muddiness When Mastering Music
Why Do My Masters Sound Muddy?
Muddy sound in masters may occur due to excessive low-frequency build-up, improper EQ and compression settings, or poor recording techniques. It can also be caused by the room’s acoustics and monitor placement. Proper treatment of the room, careful monitoring, high-pass filtering, and other corrective EQ may help to address the issue.
How Do I Make My Audio Less Muddy?
To make your audio less muddy, follow these steps: 1. Cut the low frequencies using a high-pass filter. 2. Use EQ to adjust the midrange and high frequencies. 3. Reduce the reverb and echo. 4. Use a noise gate to remove unwanted background noise.
5. Normalize the volume levels.
Why Does My Audio Sound Muddy?
Audio can sound muddy due to excessive low-frequency content or a lack of high-frequency content. It can also be caused by improper microphone techniques, poor room acoustics, or low-quality equipment. Proper EQ and mixing techniques can greatly improve audio clarity.
Why Does Music Sound Muddy?
Music may sound muddy due to excessive low frequencies, lack of clarity in the midrange, and poor sound quality from speakers or headphones. Additionally, too many sounds competing for attention can result in a muddled overall sound.
Conclusion
Having a clean and polished audio track is essential for any musician. With the steps outlined fixing muddiness during mastering is no longer a daunting task. By taking the time to properly EQ each instrument, utilizing compression effectively, and making use of other mastering tools, you can achieve the clarity and coherence your track deserves.
Keep these tips in mind to ensure that your music sounds its absolute best.
To optimize your computer for music production, increase your RAM and storage space. After that, optimize your operating system, and update the audio interface and software drivers to their latest versions.
Music production requires a modern and efficient computer system to avoid delays, glitches, and crashes. A computer that works fine for daily use may not be suitable for music production purposes, as it requires significant processing power and memory. There are several ways to optimize your computer for music production.
First, check your RAM and storage capacity and upgrade if necessary. Additionally, optimize your operating system and update your audio interface and software drivers to their latest version. This guide delves deeper into optimizing your computer for music production to minimize any technical issues that may arise in the production process.
The Importance Of Optimizing Your Computer
Optimizing your computer for music production plays a crucial role in ensuring smooth, high-quality audio production. As a music producer, you need your computer to perform efficiently to create the sound you desire.
Ensure Smooth Music Production
The first step to ensuring smooth music production on your computer is to ensure that it has the necessary hardware components and specifications. Your computer should have a fast processor, a large RAM, and enough storage space. A well-optimized computer can run different music production tools without any lag or freezing.
Avoid System Crashes
When your computer is not optimized for music production, you may experience system crashes and errors. These issues can lead to data loss or project interruption that could delay your work. Optimizing your computer for music production can help reduce the occurrence of these issues and enable you to work without interruptions.
Increase Productivity
Optimizing your computer for music production not only helps you avoid crashes and produce high-quality audio, but it also increases productivity. With a well-optimized computer, you can work faster and spend less time troubleshooting issues. This can lead to more time spent on creating new music and being more productive.
Overall, optimizing your computer for music production is a wise investment. You can avoid system errors, improve productivity, and create high-quality music effortlessly. Ensure your computer is well-optimized, and you will have a seamless audio production experience.
Hardware Considerations
If you are passionate about creating music, you know how important it is to have a high-performing computer that can handle the load of your audio software. Music production requires powerful hardware choices that can help you work efficiently with no lag. In this blog post, we will discuss the essential hardware considerations that you need to keep in mind to optimize your computer for music production.
Choose A Processor With Adequate Power
A processor is the brain of your computer that helps you execute multiple tasks simultaneously. When it comes to music production, you need a processor with adequate power to handle the load of your audio software. A dual-core processor is good enough, but for more intensive work, you should invest in a quad-core processor. This will help you perform multiple tasks with ease, such as playing virtual instruments, mixing, and mastering tracks. A powerful processor will also reduce latency, allowing you to record in real-time with no delay.
Get Sufficient Ram For Your Needs
RAM stands for Random Access Memory, and it is one of the most important components for music production. It helps you run multiple software applications simultaneously, which is essential for music production. Ensure that your computer has sufficient RAM that can handle your workload. At a minimum, you should have 8GB of RAM, but for more intensive work, you should aim for at least 16GB of RAM. Having enough RAM ensures you can run your virtual instruments, digital audio workstations (DAWs), and various plugins efficiently, without any lag.
Select A High-quality Sound Card
One of the critical components for music production is a high-quality sound card or an audio interface. An audio interface helps you connect your computer to your mixer, microphone, and other external audio devices. Ensure that the sound card has a high signal-to-noise ratio and a low-latency rate. A low-latency rate reduces the delay between input and output, making it possible to record live instruments in real-time. A high-quality sound card or audio interface will also improve the sound quality of your recordings.
Software Considerations
Optimizing your computer for music production requires specific software considerations. Ensuring your system met the recommended specifications for your digital audio workstation (DAW) and plugins, avoiding unnecessary background processes, keeping your drivers and software up-to-date, and using an optimized audio interface can all make a significant difference in your workflow and final output quality.
Optimizing your computer for music production requires not only the right hardware but also the right software. In this section, we’ll look at the essential software considerations for music production, including the operating system, music production software suite, and virtual instruments (VSTs) and plugins.
Use A Reliable Operating System:
Your choice of operating system plays a significant role in music production. A reliable and stable operating system ensures your computer runs smoothly without any crashes or delays that can interrupt workflow. Windows 10 and macOS are popular choices for music production. Both operating systems provide excellent performance and support for a wide range of software, including popular digital audio workstations (DAWs) like Ableton Live, FL Studio, and Logic Pro.
Install A Music Production Software Suite:
To produce music on your computer, you need a music production software suite or DAW. DAWs allow you to record, edit, and mix audio tracks, create MIDI sequences, and apply effects and plugins. Popular music production software suites include Ableton Live, FL Studio, Cubase, and Pro Tools. When choosing a DAW, consider your budget, workflow requirements, and preferred style of music.
Vsts And Plugins: What You Need To Know:
Virtual instruments (VSTs) and plugins are essential tools for adding effects, instruments, and processing to your tracks. VSTs and plugins can range from simple utility tools like EQs and compressors to more complex instruments like synthesizers and samplers. Many DAWs include built-in VSTs and plugins, but you can also purchase third-party plugins to expand your sonic palette. When selecting VSTs and plugins, consider your music production goals and budget. In summary, choosing the right operating system, music production software suite, and VSTs and plugins are crucial software considerations when optimizing your computer for music production. By ensuring your software is reliable, efficient, and tailored to your needs, you’ll be well on your way to producing high-quality music on your computer.
File Management And Backup Solutions
Efficient file management and backup solutions are essential for optimizing your computer for music production. By organizing files and regularly backing up your work, you can avoid system lags and potential data loss, allowing you to focus on creating high-quality music.
Organizing And Storing Your Music Files
Proper file organization is crucial for efficient music production. A cluttered file system can lead to confusion, slow down your workflow, and waste valuable time. Follow these tips to keep your music files organized:
Create a main folder for your music projects, and then create subfolders for each project.
Name your files consistently to avoid confusion. Use a standard naming convention like “Artist Name – Song Title – Version Number”.
Separate your audio files and project files into different folders.
Use color-coding to distinguish files related to each project quickly.
Regularly delete unused files and backups to avoid clutter.
Protecting Your Work With Regular Backups
Losing hours or even days of work can be devastating for a music producer. Therefore, it’s crucial to have a backup system in place. Here are a few ways to keep your files protected:
Use an external hard drive or USB flash drive to make regular backups of your project files.
Use backup software like Time Machine, which comes installed on all Mac computers, or a third-party program like Carbon Copy Cloner.
Use a RAID system for added protection. This setup involves using multiple hard drives that automatically duplicate your files.
Cloud-based Backup And Storage Options
Cloud-based backup and storage options provide the ultimate protection against computer crashes and physical damage. Here are a few cloud-based services worth considering:
Service
Cost
Storage Limit
Dropbox
Starting at $9.99/month
2 TB
Google Drive
Starting at $1.99/month
2 TB
iCloud
Starting at $0.99/month
50 GB
By implementing the above file management and backup solutions, you can ensure your music files are organized, safe, and secure, allowing you to focus on what’s essential – creating great music.
Optimizing Performance
Optimizing the performance of your computer is crucial for music production. By optimizing your system settings, cleaning up unnecessary files, and upgrading your hardware, you can ensure that your computer runs smoothly and can handle the demands of recording and producing music.
Optimizing your computer for music production is crucial for achieving the best sound quality and performance. To optimize performance on your computer, there are a few key areas to focus on. These include reducing latency, improving audio quality, and optimizing buffer size and sample rate. Let’s dive into each of these performance optimization areas.
Reducing Latency
Latency is the time it takes for your computer to process audio data and output it to your speakers or headphones. High latency can cause delays, resulting in a lag between what you hear and what you’re playing or recording. To reduce latency, here are a few optimization tips:
Close unnecessary applications and processes to free up CPU usage.
Lower the buffer size to reduce the amount of data your computer processes at once.
Use an audio interface with its own processor to offload some of the work from your computer.
Use an ASIO driver, which is optimized for low-latency audio performance.
Improving Audio Quality
Improving the audio quality of your music production is paramount. High-quality audio can make or break your final track. Here are a few optimization tips to improve the audio quality on your computer:
Use high-quality audio equipment, such as studio monitors, headphones, and sound cards.
Use high-quality audio file formats, such as WAV, AIFF, or FLAC.
Disable any audio enhancements or effects in your audio settings to prevent distortion.
Apply noise reduction techniques in your recording process to improve the signal-to-noise ratio.
Optimizing Buffer Size And Sample Rate
Buffer size and sample rate are critical settings that affect the performance and audio quality in your music production. Here are a few optimization tips to optimize buffer size and sample rate:
Set the buffer size according to your audio interface and computer’s processing power.
Use a higher buffer size for recording and a lower buffer size for playback and mixing.
Set the sample rate according to your audio interface and recording needs.
Use a higher sample rate for capturing high-frequency sounds, such as cymbals and vocals.
In conclusion, optimizing your computer for music production is crucial for achieving high-quality sound and optimal performance. By focusing on reducing latency, improving audio quality, and optimizing buffer size and sample rate, you can take your music production to the next level.
Credit: sonicboombap.com
Tips For Streamlining Workflow
If you’re a music producer, you know how important it is to have a smooth workflow as it greatly affects the quality of your music production. Your computer’s performance can have a major impact on your workflow and final product. Therefore, optimizing your computer for music production is crucial. In this post, we will focus on tips for streamlining your workflow, which can help you produce music with ease and efficiency.
Customizing Your Digital Audio Workstation
Most DAWs offer a wide range of customization options, and taking the time to learn and implement them can save you significant time in the long run. Customizing your DAW’s interface and shortcuts to suit your unique workflow will help you work faster. For example, using templates and presets can speed up your workflow and help you stay organized.
Maximizing Shortcuts And Hotkeys
Using shortcuts and hotkeys can be a game-changer when it comes to workflow optimization. Investing time in learning and using them can make a significant impact on your workflow. For example, using hotkeys to move and resize windows, play/pause, record, add effects, etc., can save you minutes in each session and enable you to focus on your productivity.
Managing Resources Effectively
Resource management is crucial for optimal music production as it frees up your computer’s resources. You can do several things to manage resources effectively, such as closing unnecessary background processes, reducing sample quality when working with virtual instruments, and saving your projects on an external hard drive. By doing so, you can avoid performance issues due to insufficient computing power, and avoid system crashes, which may lead to losing your progress.
Optimizing your computer for music production requires patience, dedication, and the ability to apply the right techniques. Whether you customize your DAW, maximize shortcuts and hotkeys, manage resources effectively, or all of the above, it is important to work on the techniques that best suit your workflow. By streamlining your workflow, you can produce high-quality music more efficiently, and without the stress of a slow-performing computer.
Troubleshooting Common Issues
To optimize your computer for music production, you may encounter some common issues such as latency, crackling sound, and slow performance. Troubleshooting these problems can help you create high-quality music efficiently. With proper optimization and maintenance, your computer can become a powerful tool for music production.
Troubleshooting Common Issues: Optimizing your computer for music production involves configuring your system settings and hardware to optimize performance and enhance workflow. However, while the focus is on optimizing your system, problems may still arise. In this section, we will discuss common issues that music producers face and provide solutions to resolve them. Identifying System Bottlenecks: System bottlenecks, such as outdated hardware or insufficient RAM, can significantly affect performance. Identifying the bottleneck is the first step in finding a solution. One way to diagnose the bottleneck is to use monitoring software such as Task Manager or Resource Monitor. These tools help identify the resource-hogging applications that are causing the bottleneck. Dealing with Audio Glitches and Dropouts: Audio glitches and dropouts can ruin a project and can be caused by various issues, including insufficient CPU usage, conflicting audio drivers, and insufficient RAM. One solution to avoid this issue is to increase the buffer size, which allows the audio to load faster, and helps relieve pressure on the CPU and RAM. Using an external hard drive to store files can also help alleviate the issue. If you still experience glitches and dropouts, consider updating your audio drivers or increasing your RAM. Diagnosing and Fixing Common Problems: Technical issues may arise when using a DAW or music software. Some of the most common issues experienced by producers include latency issues, error messages, and plugin conflicts. To fix such problems, try clearing your system cache or troubleshoot the software by reinstalling it, checking for updates, or checking the manufacturer’s website for known issues. You can also disable or remove problematic plugins. In conclusion, identifying system bottlenecks, dealing with audio glitches and dropouts, and diagnosing and fixing common problems can help optimize your computer for music production. By implementing these steps, you can optimize your system’s performance, improve workflow, and minimize any technical issues that may arise.
Credit: www.mixinglessons.com
Final Thoughts
Final Thoughts:
Why Optimization Is Key To Music Production
If you want to create high-quality music, optimizing your computer is crucial. Having a well-optimized system ensures that the programs you use in music production run smoothly, providing you with the best possible result.
Continuing To Improve Your Technology Setup
It’s not just enough to optimize your computer once and forget about it. Technology continues to evolve at a rapid pace, and so should your setup. Keep an eye out for the latest hardware and software advancements and continuously make tweaks and adjustments to your system.
Apply What You’ve Learned And Start Creating!
Now that you know how to optimize your computer for music production, it’s time to start creating! Put everything that you’ve learned into practice and watch as your music production skills soar. Keep learning, refining, and developing your craft, and the sky’s the limit!
Credit: www.sweetwater.com
Frequently Asked Questions For Optimize Your Computer For Music Production
How Do I Optimize My Computer For Audio Production?
To optimize your computer for audio production, ensure that your PC meets the requirements for your preferred Digital Audio Workstation (DAW). Use an external hard drive for storing music files and install an audio interface for better sound quality. Update your operating system and DAW software regularly, and close unnecessary programs while working.
Lastly, use high-quality headphones or monitors for accurate sound monitoring.
How Good Of A Computer Do You Need For Music Production?
A good computer for music production should have at least a quad-core processor, 8GB of RAM, a solid-state drive, and a dedicated graphics card. Higher specifications mean smoother and faster performance. It’s crucial to choose a reliable brand with an excellent audio interface to minimize latency and sound quality glitches.
How Can I Speed Up My Music Production On Windows 10?
To speed up music production on Windows 10, you can try increasing your RAM, disabling unnecessary programs and plug-ins, optimizing sample rates, using SSD storage, and customizing your workflow with program shortcuts. These steps can help improve overall performance and efficiency.
Is Ram Or Processor More Important For Music Production?
Both RAM and processor are important for music production, but the processor is more crucial. It enables the software to operate, opens and runs multiple applications. As a result, a high-performance, multi-core CPU is preferable. However, a decent amount of RAM is also necessary to ensure smoother and better performance.
Conclusion
With the increasing opportunity for digital music creation, optimizing your computer for music production is essential. Whether you are an experienced music producer or just starting, a well-managed system will provide you with a smooth and efficient work environment. By following the optimization steps, you can maximize your computer’s performance and run powerful software without interruptions.
Ensure to keep your software updated, optimize your hard drive, and remove unnecessary PC programs to maintain the best music production experience that you deserve.
To produce tropical pop with Ableton, start by selecting a suitable template or create your own. Create a melody with a lively rhythm, add a bassline that complements it and layer catchy tropical instruments.
Then, sync the different patterns to create a harmonious beat, apply dynamic effects, and mix with care. Also, the style is a genre that has grown in popularity in recent years. Also, it is characterized by its fusion of upbeat dance rhythms and exotic sounds.
Moreover, if you’re interested in producing your own tropical house music with Ableton, there are a few key steps to keep in mind. By following some simple guidelines and tricks, you can create a catchy and energizing track that will get people moving. The key is to select the right instruments, stay on rhythm, and apply dynamic effects during the mixing and mastering process.
Credit: abletunes.com
Choosing The Right Sounds for Tropical Pop
Choosing the right sounds is crucial when producing tropical house with Ableton. In addition, you want to aim for instruments and effects that create a warm, bright, and beachy vibe. In addition, think steel drums, marimbas, and tropical synths with reverb and delay to give that relaxed island sound.
Selecting Tropical Pop Style Drum Kit
When it comes to producing tropical house, the first thing to consider is the drum kit. For example, this is the backbone of the genre. Furthermore, to produce the perfect tropical house track, you must select a drum kit with the perfect mix of live and electronic sounds. A good tropical pop drum kit has kick, snare, hi-hat, tom and percussion sounds. It should also feel mellow. One way to achieve this is by selecting sounds with a longer decay. Some examples of drum kits that are well suited for this genre are Bossa Nova, Reggae, and Soca. For instance, a Bossa Nova drum kit gives a gentle beat and clear percussion for a groovy tropical house rhythm.
Choosing Caribbean Inspired Keys And Chords
The next thing to consider when producing tropical house is the keys and chords. As a result, a good tropical pop track should have a bright, summery, and fresh feel to it. Additionally, one way to achieve this is by using Caribbean-inspired keys and chords. These keys and chords have a vibrant, upbeat sound and perfectly capture the essence of this genre. The most commonly used Caribbean-inspired chords are major and minor keys, and seventh chords. Try experimenting with these chords by using different voicings and inversions to add variety to your track.
The use of the guitar is also quite common in the style. Overall, selecting the right sound is crucial when it comes to producing tropical house with Ableton. However, pick a mellow drum kit and Caribbean-inspired keys and chords. Then you can create your own tropical pop banger!
Credit: www.youtube.com
Creating A Catchy Melody for Tropical Pop
Also, learn how to produce tropical pop with Ableton by creating a catchy melody. Start by experimenting with different chord progressions and then layering instruments to create a unique sound. Then, don’t be afraid to try new things and incorporate your own personal style.
Using The Major Scale
Moreover, creating a catchy melody is the cornerstone of producing tropical pop. In short, it is what sets the mood and captures the listener’s attention. To create a catchy melody, you first need to choose a key and mode. The major scale is the most commonly used scale in pop music and is perfect for creating a joyful and upbeat vibe. A good starting point is to use the C major scale or A minor scale, which both have all white keys on the keyboard.
Using An Arpeggiator To Create Rhythmic Hooks
In addition, once you have chosen your scale and key, you can start playing around with melodies on your keyboard or MIDI controller. Similarly, one useful tool for creating groovy and rhythmic hooks is the arpeggiator. Ableton has an arpeggiator MIDI effect that can automatically turn a chord into a rhythmic pattern. You can adjust the rate, rhythm, and octave range to create interesting and complex arpeggios that add motion and energy to your melody.
Conclusion
Furthermore, by using the major scale and an arpeggiator, you can create a catchy melody that hooks the listener’s ear. Remember to keep experimenting and trying different variations until you find the right notes and rhythm that make you tap your feet. Also, in the next section, we will discuss how to add chords and harmonies to your melody to fill out your track.
Designing A Tropical Groove
Additionally, if you want to produce tropical pop music, you have to create a groove that exudes a happy, sunny, and carefree vibe. In addition, the groove should have a syncopated rhythm that makes you want to dance along, and you have to add percussion that enhances the tropical feel. Let’s discuss the different techniques you can use to design a tropical groove using Ableton.
Using Syncopated Rhythms for Tropical Pop
Also, a syncopated rhythm is a crucial element of tropical pop music that gives the groove its unique and infectious feel. For example, to create a syncopated rhythm, you need to accent the off-beats and create unexpected beats. One technique to achieve this is by using 16th note hi-hat patterns that emphasize the “and” of the beat. You can also experiment with percussion patterns like bongos or congas and play them in-between the beat to create syncopation. Remember, the key to creating a tropical groove is to keep the rhythm lively and unpredictable.
Adding Percussion To The Mix
Percussion is an essential element of tropical pop music that adds depth, texture, and rhythm to the groove. As a result, you can add various percussion instruments like shakers, tambourine, guiro, and maracas in your mix to create a tropical feel. Don’t limit yourself to using only one percussion instrument; instead, layer different percussion sounds to achieve a fuller and more complex sound. As you add percussion, make sure each part serves the groove. It shouldn’t clash with other elements.
By adding syncopated rhythms and percussion to your mix, you can create a unique and infectious tropical groove that keeps your listeners dancing. However, experiment with different techniques and instruments to find the perfect combination that fits your melody and vision. Ableton has all the tools you need for a professional tropical pop track.
Credit: m.youtube.com
Processing Tropical Pop Vocals
One of the most essential aspects of producing tropical pop is nailing the vocal tracks. Then, the vocals are the backbone of tropical pop music, and getting them right can make or break the entire song. So, in this section, we will discuss processing tropical pop vocals using Ableton. We’ll focus on reverb and delay for a lush vocal sound. We’ll also cover EQ and compression on vocal tracks.
Using Reverb And Delay To Create A Lush Vocal Sound
Reverb and delay can help to give vocal tracks that space and depth needed for a tropical pop sound. In short, Reverb can create a sense of space, making the vocals sound like they were recorded in a large room. Delay can add a rhythmic element to the vocals, making them more interesting to listen to. Here’s how to use reverb and delay in Ableton:
Add a reverb plug-in to the vocal track.
Adjust the decay and room size to give your vocals that spacious sound.
Add a delay plug-in to the vocal track.
Adjust the feedback, time and wet/dry mix to give the vocals a rhythmic element.
Be careful not to overdo it with the reverb and delay, as this can make the vocals sound muddy and unclear. Similarly, a good rule of thumb is to use just enough to give the vocals that tropical pop sound.
Applying Eq And Compression To Vocal Tracks
Aside from reverb and delay, EQ and compression are also essential tools for processing tropical pop vocals. EQ cuts unwanted frequencies and brings out the best parts of the vocals. Compression then adds consistency and clarity. Here’s how to do it in Ableton:
Add an EQ plug-in to the vocal track.
Cut out any unwanted frequencies using the high-pass and low-pass filters.
Boost the frequencies that make the vocals sound best.
Finally, add compression to the vocal track.
Adjust the ratio and threshold until you get a consistent and clear sound.
Remember, each vocal track is different, so you’ll need to experiment with the settings to get the best sound for your particular track. But with a little practice and some know-how, you can produce tropical pop vocals that sound just as good as the pros.
Adding Tropical Instrumentation
To produce tropical pop with Ableton, it’s important to add tropical instrumentation to your tracks. This can include using steel drums, maracas, and other percussion instruments that are commonly associated with the genre. These elements can help give your songs a laid-back, summery feel that’s sure to get people dancing.
Incorporating Steel Drums for Tropical Pop
Steel drums are a hallmark of tropical music. Adding them to your pop beats boosts the summer vibe. You can create the sound of steel drums in Ableton using a synthesizer or a sampler. To create a realistic sound, use a sample of a real steel drum and adjust the pitch to fit your melody. To add variation, play with the attack and decay parameters of your instrument. Don’t overdo it, though, as the sound can quickly become overwhelming. Use steel drums sparingly and strategically to add a touch of tropical flavor to your pop beats.
Using Marimbas
Marimbas can add a melodic component to your tropical pop production. Marimbas are percussive instruments that are similar to xylophones. They have a bright, warm sound that will complement your steel drum elements. Realistic marimba sounds work like steel drums in Ableton. You can use a synthesizer or a sampler. Use a sample of a real marimba and adjust the pitch and parameters to fit your melody. Add marimba elements to your chorus or bridge to create a tropical, upbeat vibe.
Using Latin Percussion Instruments for Tropical Pop
Latin percussion instruments like congas, bongos, and timbales can add groove and rhythm to your tropical pop beats. These instruments can be synthesized in Ableton, but they also have real samples that you can use. Use these percussion elements to create energy in your verses and to add spice to your transitions. You can also use Latin percussion instruments to create traditional percussion patterns like the clave rhythm or the tumbao rhythm. Incorporating Latin percussion instruments is an easy and effective way to add tropical elements to your pop production.
Mixing And Mastering Your Track
Learn how to produce tropical pop using Ableton by mastering the art of mixing and mastering your track. With the right techniques and tools, you can create a vibrant and upbeat sound that will have your listeners dancing and singing along.
Mixing and mastering your track is the final step in producing tropical pop that sounds professional and polished. Balancing mix elements and mastering your track are two crucial steps in ensuring that your track sounds great on any sound system.
Balancing Mix Elements
Moreover, balancing mix elements involves ensuring that all the instruments in your track work together and stand out in the mix. Here are some tips to help you balance mix elements:
Use EQ to remove any unwanted frequencies that clash with other instruments and create muddiness in the mix.
Pan your instruments to separate them and create more space in the mix.
Use compression to even out the levels of your instruments and add punch to your mix.
Add effects like reverb and delay to create a sense of space and depth in your mix.
Mastering Your Track For A Punchy And Dynamic Sound
Mastering your track involves preparing it for distribution by optimizing its sound quality and loudness. Here are some tips to help you master your track for a punchy and dynamic sound:
Use a limiter to increase the overall loudness of your track and ensure that it is competitive with other tracks in your genre.
In addition, use EQ to make sure that all the frequencies in your track are balanced and that there are no harsh or muddy areas.
Use compression to add punch and dynamic range to your track.
Choose the right format and bit rate for your track to ensure that it sounds great on all devices and platforms.
Follow these tips, and your tropical pop will sound polished and ready for release.
Frequently Asked Questions On How To Produce Tropical Pop With Ableton
What Is Ableton Erosion?
Ableton Erosion is a digital audio effect in Ableton Live that adds distortion and noise to sound. It emulates the sound of degraded audio, which can be used creatively to add character and texture to tracks.
Can You Produce Music On Ableton?
Yes, Ableton is a digital audio workstation (DAW) that allows users to produce music. It is a popular choice among music producers and offers a wide range of tools for recording, composing, arranging, mixing, and mastering music.
How Do I Record Youtube In Ableton?
To record YouTube audio in Ableton, use separate audio or screen recording software while the video plays. Then you can import the audio file into Ableton and use it as a sample or loop.
Ensure to comply with copyright laws and give proper attribution if necessary.
What Is Tropical Pop Music?
Tropical Pop Music is a genre that combines elements of tropical music with pop music to create a fun, upbeat sound. The genre uses tropical instruments like steel drums and marimbas. It also has a laid-back island vibe.
Conclusion
To produce tropical pop with Ableton, you need a proper understanding of the necessary elements and tools. From the beat and melody to the instrument and effects, this genre requires an excellent mastery of Ableton software. Once you learn these steps, you can create a catchy track that stands out in the genre.
So start exploring with the tools and techniques discussed in this guide, and you’ll be on your way to producing your own tropical pop hit.
Getting signed to a record label involves building a strong image, networking, and creating quality music. To accomplish this, follow these nine easy steps.
Also, as an aspiring musician, getting signed to a record label is both a milestone and an essential requirement to take your music career to the next level. However, getting noticed by a record label can be a daunting task, especially with numerous artists fighting for the same opportunity.
Moreover, to ensure success, you need to approach the process strategically and with diligence. Also, this article offers a comprehensive guide with nine easy steps to follow to increase your chances of getting signed to a record label. By the end, you will learn the necessary steps needed to create quality music, network with industry professionals, and build a strong image to stand out and secure a record deal.
Set Your Goals for Record Label
In addition, follow these 9 easy steps, starting with Set Your Goals, to land a deal with a record label. In addition, from creating quality demos to networking and building your online presence, this guide covers all aspects of the process.
Before you start any journey, you need to know where you’re headed. For example, the same goes for getting signed to a record label. Furthermore, setting your goals is the first step in achieving success in the music industry. Your goals should be specific, measurable, achievable, relevant, and time-bound. Once you have set your goals, you will have a clear idea of what you want to achieve. You can start creating a plan to make it happen.
Determine Your Music Style
Additionally, to land a record label deal, you need a unique sound that stands out from the crowd. As a result, determine your music style, and make sure it is different and unique. You don’t have to reinvent the wheel, but you should have your own sound. Your music style should resonate with your personality, and it should be something you’re passionate about. The more unique your sound is, the more likely you are to attract the attention of a record label.
Define Your Target Audience
Also, knowing your target audience is essential for getting signed to a record label. However, your target audience is the group of people who are most likely to buy and enjoy your music. It’s important to know who these people are. There, they live, what they do, and what type of music they love. Once you know who your target audience is, you can market your music to them effectively. Understanding your target audience also helps you create music that resonates with them. This gives you a better chance of getting signed to a label.
In conclusion, setting your goals, determining your music style, and defining your target audience are crucial steps in getting signed to a record label. Then, they help you create a clear path to success and give you a better chance of standing out in music. Moreover, remember, getting signed to a record label takes hard work, dedication, and persistence. But with the right approach, you can make it happen.
Create A Buzz for Record Label
In addition, if you are an aspiring musician, you know that getting signed to a record label can be the ticket to success. However, it’s not an easy journey, and you need to put in the work to catch the attention of a record label. In short, creating a buzz around your music is one way to grab the attention of a record label and get them to notice you. Here are a few ways to create a buzz:
Record A Professional Demo
Furthermore, the first step in creating a buzz is to have a professional-sounding demo. This is vital because it shows record labels that you’re serious about your craft and that you have the potential to be a successful recording artist.
Additionally, you need to ensure that your demo is of high quality and features your best work. Similarly, it should demonstrate your unique sound and show off your vocal range and instrumental abilities. You can use a recording studio or invest in professional recording equipment and create a mini-studio at home.
Perform Live Shows
Also, performing live shows is a great way to create a buzz around your music. This is because live performances give potential fans, record labels, and industry insiders a chance to see you perform and experience your music firsthand.
Moreover, you can start small by performing at local open mic nights and gradually work your way up to bigger venues. Additionally, you can organize your own shows and gain a following by promoting them on social media and inviting your friends and family.
Promote Your Music On Social Media
In addition, Social media is an essential tool in creating a buzz around your music. It’s an excellent way to reach a large audience and build a following. Also, you can start by creating social media profiles and sharing your music on platforms like Facebook, Twitter, Instagram, and YouTube.
Furthermore, you can use social media to connect with fans, promote your live shows, and share behind-the-scenes footage of your music-making process. Additionally, you can collaborate with other artists and participate in online challenges to gain more exposure.
In conclusion, creating a buzz around your music is crucial in getting signed to a record label. In addition, Record a professional demo, play live shows and promote your music on social media. Additionally, these steps raise your chances of getting noticed.
Identify Potential Record Labels
One key step toward a record label deal is finding labels that suit your style of music. For example, research and narrow down a list of labels that align with your career goals and submit your music to them in a professional manner.
This could be your step towards achieving the dream of being a recording artist.
Finding a record label that could help you launch your music career can be tough. However, with the right approach and patience, you can land a record label deal. The first step in getting signed to a record label is identifying potential record labels that match your music style.
Research Record Labels That Match Your Music Style
It is important to research record labels that specialize in the type of music you create. Take your time to understand their mission, vision, and core values. This will help you gauge if the record label aligns with your goals and aspirations. Use Google to search for record labels, music industry websites, and magazines to gather information about record labels.
Check Each Record Label’s Roster
Once you have identified a few record labels that match your music type, it’s essential to check their roster of artists. It is a good idea to know who represents the label and if artists under their management share similar music taste with you. This shows you what each label wants in an artist. It also helps you decide if you want to join it.
Reach Out To Each Record Label
After identifying and researching potential record labels, start reaching out to them. You can find their contact information on their website or social media profiles. Draft an email or letter introducing yourself, your music, and why you think you would be a good fit for their record label. Keep your email brief, professional, and to the point.
Attend Gigs And Industry Events
Attending gigs and industry events is another way to attract a record label. This way, you can network and meet someone who could help you land a deal. Make sure to bring along a demo or business card with you, and don’t be afraid to introduce yourself to people.
Utilize Social Media
Social media is a powerful tool that can help record labels discover you. Make sure to create a presence on social media platforms such as Instagram, Facebook, and Twitter. Share posts and photos about your music, gigs, and studio sessions, and interact with other musicians and record labels. This will help you increase your visibility, and who knows, someone from a record label may notice your work and reach out to you.
Collaborate With Other Musicians And Producers for Record Label
Collaborating with other musicians and producers can help you create good music and also increase your chances of getting signed to a record label. Look out for musicians who create similar music as you and aim to collaborate with them. This will help you expand your music reach and grow your network.
Submit Your Music To Online Platforms
Many online platforms like YouTube, SoundCloud, and Bandcamp have become great platforms for music discovery. Submit your music to these platforms. With luck, label executives who scout for talent may notice it.
Be Persistent And Patient
The music industry is competitive. Landing a record label deal takes a lot of time and effort. With persistence and patience, you can eventually land a deal. Keep honing your craft, perfecting your art, and, most importantly, keep learning from other artists and industry professionals.
Plan Your Pitch for Record Label
Before you start sending your demos to record labels, it’s crucial that you have a plan in place for approaching them. This plan should include crafting your elevator pitch, preparing a press kit, and selecting the record labels you want to target. The better your pitch, the more likely a label will offer you a deal.
Craft Your Elevator Pitch
Your elevator pitch is a short and snappy description of yourself as an artist. People call it an elevator pitch because you should be able to deliver it during a brief elevator ride. Keep it concise, 30 seconds or less, and focus on what makes you unique. Your pitch should include a brief introduction to yourself, your music style, and your achievements.
Prepare A Press Kit
Once you have your elevator pitch sorted, you need to prepare a press kit. Your press kit should contain all the essential information about you, including your bio, music samples, high-quality photos, and any press coverage you’ve received. Make sure your press kit is professional and engaging as it’ll be a reflection of your work as an artist.
Send A Demo To Your Target Record Labels
Now that you have your pitch and press kit ready, it’s time to send your demo to your target record labels. Make sure you research the record labels you’re interested in and find out their submission process. Some labels may require you to submit your demo online, and others may ask for a physical copy. Whatever the process, make sure to follow it to the letter.
Be strategic: Pick no more than five record labels to send your demos to. Sending your demo to every record label out there is a recipe for failure. Make sure you’re targeting the labels that share your music style and aesthetic.
Personalize your pitch: When you’re sending out your demos, include a personalized message to each record label. Explain why you’re interested in them and why you feel your music aligns with their brand. This will increase your chances of grabbing their attention and getting signed.
Be patient: Getting signed to a record label takes time, and you may not hear back from them immediately. Don’t be discouraged and keep working hard on your music. If you don’t hear back from a label, don’t be afraid to follow up several times, but don’t be too pushy.
Follow Up With The Record Label
One of the most crucial steps to getting signed to a record label is following up after your initial contact. This shows the label that you’re serious about your music and that you’re willing to put in the effort to make things happen.
Send A Follow Up Email Or Call
After you’ve sent your demo or had a meeting with a label representative, it’s important to follow up within a reasonable timeframe. This could be a few days to a week, depending on the circumstances. If you’ve sent an email, make sure it’s professional and concise. Keep it short and to the point, reminding them of who you are and your interest in working with their label. If you’re following up with a call, make sure you have a clear purpose for the conversation and prepare some key points to make.
Be Persistent But Professional
While it’s important to follow up, it’s equally important to be persistent without being pushy. Try to find ways to stay on their radar without being annoying or intrusive. This could mean sending occasional updates on your music career, sharing new tracks or videos, or even inviting them to a show or event. Whatever you do, make sure you’re always professional and respectful.
To summarize, following up is an essential part of the process of getting signed to a record label. It shows your dedication and willingness to put in the work to make things happen. Whether you choose to send an email or make a call, make sure you’re being persistent but professional. With these tips in mind, you’ll be one step closer to achieving your musical dreams.
Negotiate Your Contract
Learn how to negotiate your contract and get signed to a record label in just 9 easy steps. From identifying your worth to having the right legal representation, this guide will equip you with everything you need to make informed decisions and secure a favorable deal.
Negotiating a contract with a record label can be a daunting task. But it’s crucial to protect your rights and interests. A well-negotiated contract can help you succeed in the music industry and avoid legal problems down the road. In this article, we’ll go over the steps you should take to negotiate a contract with a record label.
Hire An Attorney Before Signing With A Record Label
The first step in negotiating a contract with a record label is to hire an attorney. A lawyer who specializes in the music industry can help you navigate the complexities of the music business and ensure that your contract is fair and equitable. Your attorney can also help you understand your legal rights and obligations, and negotiate favorable terms in your contract.
Understand The Terms And Conditions
Before you begin negotiating your contract, it’s essential to understand the terms and conditions that the record label is offering. Take the time to read through the entire contract carefully, paying attention to the fine print. If there’s anything you don’t understand or agree with, make sure you ask questions and seek clarification. An experienced attorney can help you understand the legal jargon and explain the implications of each clause in the contract.
Negotiate With The Record Label
Once you understand the terms and conditions of the contract, it’s time to negotiate with the record label. Be respectful but firm in your negotiations, and don’t be afraid to ask for what you want. A good attorney can help you identify areas where you can negotiate, such as the length of the contract, royalties, and creative control. Make sure you negotiate all the terms and conditions of the contract before signing. In conclusion, negotiating a contract with a record label can be a complex process. Your lawyer’s job is to protect your rights and interests. Hire an attorney, understand the terms and negotiate with the label. That way, you can secure a fair contract.
Sign The Record Label Deal
After months of pitching, meetings, and negotiations, you have finally secured a record deal, and you are about to seal it. This is a major achievement, and it is important that you sign the deal the right way to avoid any legal or financial mishaps. Here are some things you need to know before putting pen to paper.
Celebrate Landing A Record Label Deal
Before signing the deal, it is important to take a moment and celebrate your success. You’ve worked hard to reach this point, and it’s important to acknowledge and appreciate your efforts. This is also a good time to reflect on your journey and think about what led you to this point. You can also use this opportunity to thank those who have supported you along the way.
Make Sure All Legal And Financial Procedures Are Correct
Before you sign the deal, ensure that all legal and financial procedures are in place and correct. Hire a reputable attorney to guide you through the process, reviewing and verifying the contents of the contract. Ensure you understand every detail and everything is in compliance with the law. Hidden clauses or fees can catch you off guard, so take the time to review the document carefully.
Ensure You Get The Best Deal Possible
Before you sign the deal, ensure that you negotiate for the best deal possible. You want to make sure that you are getting a fair share of the revenue and that the contract is mutually beneficial. Never let anyone pressure you into signing an unfavorable contract. Remember, this is a business deal, and it is important to advocate for yourself and your interests.
Seek Professional Guidance for Record Label
It is always a good idea to seek professional guidance when signing a record deal. You may want to hire a manager, lawyer, or financial advisor to help you navigate the process. These professionals have experience in negotiating deals and will be able to guide you towards a better decision. They will also be able to spot any potential red flags and provide you with the necessary advice and guidance.
Be Prepared
Before you sign the deal, ensure that everything is in order. Make copies of the contract, consult with professionals, and ensure that everything is in compliance. Be prepared to ask questions and negotiate for fairer terms. Do not sign the deal until you are ready, and do not let anyone rush your decision.
In Conclusion
Signing a record deal is a major accomplishment and step in your music career. Take time to review the contract terms and get professional advice. Negotiate the best deal, check the legal and financial details, and then celebrate your success. Always remember to be prepared, advocate for yourself, and take your time before putting pen to paper.
Promote Your First Album
Looking to get signed to a record label? Follow these 9 easy steps to increase your chances of success and promote your first album. From developing your sound to networking with industry professionals, these tips will help you navigate the competitive music industry.
Releasing your first album is a dream come true for every musician, but promoting it can be overwhelming. You need to put yourself out there and let people know about your music. Here are some easy steps to promote your first album.
Release Your First Single
The first step in promoting your album is to release your first single. This will give people a taste of what to expect from your album and help build momentum for its release. Choose your strongest song and create a music video to generate some buzz.
Plan An Album Launch Party
Host an album launch party to celebrate the release of your first album. Invite your friends, family, and fans to attend the event. Make it a night to remember by performing some songs from your album and giving a sneak peek into the making of the album.
Embark On A Promotional Tour
Embarking on a promotional tour can give you the chance to interact with fans and promote your album. Plan a tour and reach out to local radio stations, music festivals, and clubs. This is a great opportunity to network and get your music heard by a wider audience.
Choose your tour dates wisely and book them in advance.
Plan your travel arrangements and accommodation ahead of time.
Have a merch table to sell CDs, t-shirts, and other merchandise.
Collaborate with local artists or bands to create a buzz in each city.
Final Thoughts
Promoting your first album is an exciting phase in your music career. Use these easy steps to promote your album and make a name for yourself in the music industry. Remember to be persistent, stay focused, and believe in your music.
Frequently Asked Questions On Get Signed To A Record Label 9 Easy Steps
How Do You Get Signed To A Record Label Easily?
Getting signed to a record label is not an easy task. However, some ways can increase your chances. Firstly, create quality music. Then, build a fan base and social media presence. Send your demos to record labels or connect with A&R reps directly.
Be persistent and network in the industry. Finally, seek legal guidance before signing any contracts.
Is It Easy To Get Into A Record Label?
Entering a record label is not a simple task. It depends on various factors such as your talent, dedication, hard work, and luck. You need people with the right connections to get you in front of decision makers. They help persuade a label to sign you.
How Long Does It Take To Get Signed To A Record Label?
The time it takes to get signed to a record label can vary depending on several factors. Labels discover some artists quickly, while others put in years of hard work before anyone notices them. In general, it can take anywhere from a few months to several years to secure a record deal.
What Are The Chances Of Getting Signed To A Record Label?
The chances of getting signed to a record label vary depending on a variety of factors, including talent, persistence, and luck. However, with the rise of independent music and digital distribution, artists have more opportunities than ever to make a name for themselves without the help of a traditional record deal.
Conclusion
Achieving success in the music industry is not an easy task, but it is definitely achievable. Applying the nine easy steps can increase your chances of getting signed to a record label. From establishing yourself as an artist to building a following, networking, and showcasing your talents, it takes dedication, hard work, and resilience.
Remember, there is no one path to success. However, with persistence and effort, you can reach your goals and make a name for yourself in the industry. Stay focused, stay positive, and never give up on your dreams.
Acustica Audio’s Purple is a Pultec-style EQ plugin. It offers several tips for using the plugin effectively./ Acustica Audio’s Purple is a powerful Pultec-style EQ plugin that often intimidates new users.
The plugin has a complex interface, but it offers exceptional tonal shaping capabilities once you understand how to use it. This guide will explore several useful tips for getting the most out of the Purple EQ plugin. We’ll discuss which controls to use and how to use them, as well as some creative applications for the plugin.
Whether you are a seasoned audio engineer or just starting, the tips in this guide will help you unlock the full power of the Acustica Audio Purple plugin.
Credit: www.youtube.com
Introduction To Pultec Eq And Acustica Audio’s Purple
Discover the power of Pultec EQ combined with the Acustica Audio’s Purple plugin for an exceptional audio mixing experience. With Pultec EQ Tips, you can enhance your sound and achieve professional-grade quality without any hassle.
Pultec Equalizers have been loved by music producers for over half a century and remain popular today due to their unique sweeping filters, rich harmonics, and musical character. Acustica Audio, a company known for their cutting-edge software plugins, offers a plugin emulation of the Pultec EQ, called the Purple. This plugin has received widespread praise from audio engineers and music producers for accurately replicating the tonal characteristics of the original hardware Pultec EQs. In this post, we will explore the history of the Pultec EQ, and provide an overview of Acustica Audio’s Purple plugin.
Brief History Of Pultec Eq
The Pultec EQ was first introduced in the 1950s by the Pultec company. It was widely used in recording studios, mainly for shaping the sound of snare drums, kick drums, bass guitars, and vocals. The Pultec EQ operates differently from traditional EQs and relies on passive filters that add harmonics, thicken the sound, and add depth and dimension to the audio. The Pultec EQ became famous for its unique ‘low-end trick,’ which boosted and cut the low frequencies simultaneously, providing a punchy and tight bottom end. In the 1970s, the production of Pultec EQs ceased, but existing units remain highly sought after by music producers and engineers.
Overview Of Acustica Audio’s Purple Plugin
Acustica Audio’s Purple plugin is a software emulation of the Pultec EQ. The plugin models three versions of the original Pultec EQ hardware, including the MEQ-5, EQP-1A and HLF-3C. Purple convincingly replicates the unique musicality of the original hardware by modeling the distortion, saturation, and phase distortion characteristic of the vintage Pultec EQs. It is designed to work equally well on individual tracks or on a mix bus, and provides complete control over the low-end and high-end frequencies. The intuitive and simple-to-use interface is packed with features such as a mix knob, frequency-dependent Q, and an output stage with smooth and rich analog-style saturation. The Purple plugin has received rave reviews from music producers, engineers, and mastering experts for its warm and natural sound, and its authentic emulation of the Pultec EQ hardware.
Using Pultec Eq In Mixing
Achieving a top-notch mix involves using the right tools, and a Pultec EQ certainly fits the bill. By implementing Acustica Audio’s Purple EQ, tips and tricks can be employed to create an even more impressive and polished sound.
Using Pultec EQ in Mixing can be a game-changer when it comes to adding character, warmth, and clarity to your mix. Pultec EQs are known for their unique boost/cut filters and enhancing midrange and high-frequency spectrum with shelf filters. When combined with Acustica Audios Purple Plug-in, it can offer endless sonic possibilities.
Balancing Low-end With Pultec’s Unique Boost/cut Filters
Pultec EQs are popular for their “Trick” of boosting and cutting the same frequency range at the same time. This “Trick” enables you to balance and tighten up low-end that lacks punch and clarity. You can use Pultec’s low-frequency boost to add weight to the bass without muddying up the mix. This will help the bass to sit well with other instruments in the mix. Pultec’s unique boost and cut filters work differently than conventional EQ filters, which make it more effective in fixing low-end issues.
Enhancing Midrange With Pultec’s Presence Boost
Midrange frequencies are where vocals, guitars, and other critical instruments compete for space. That’s why Pultec EQ’s Presence Boost feature comes in handy. Presence Boost provides a subtle boost to midrange frequencies that can add richness, warmth, and clarity to your instruments. When you mix this with Acustica Audios Purple plug-in, you have an incredibly smooth, warm, and dynamic midrange that cuts through the mix effortlessly.
Adding Air And Sparkle To High Frequencies With Pultec’s Shelf Filters
Shelf filters are an excellent tool to add air and sparkle to high frequencies. Pultec EQ’s shelf filter works differently than other EQs, which adds subtle saturation and harmonic distortion to the sound. This subtle saturation enhances the high frequency by adding depth and dimension to your mix. The Pultec “Trick” of boosting and cutting the same frequency range comes in handy when it comes to Shelf Filters as well. You can use the high frequency cut of a Pultec EQ to tame any harshness or sibilance in the mix.
Acustica Audio’s Purple Plugin
Acustica Audio’s Purple plugin is a popular Pultec EQ tool that offers powerful tips to enhance your audio mixing experience. With its unique combination of vintage and modern elements, Purple can produce rich and warm tones that will impress even the toughest audio critics.
Acustica Audio’s Purple Plugin is a powerful tool for audio engineers and music producers. It is an emulation of the classic Pultec EQ that is highly popular among mixing professionals. The Purple plugin is designed to give you the vintage sound of the Pultec EQ with modern features. In this blog post, we will delve into a detailed review of Purple’s features, comparing it with other Pultec emulations and sharing tips and tricks for using Purple in your mixes.
Detailed Review Of Purple’s Features
Acustica Audio’s Purple Plugin comes with a plethora of features that enable users to get the best out of their audio mixing experience. From its high-quality filters to the harmonic distortion options, Purple’s features can help you achieve a warm and vintage sound similar to that of the Pultec EQ. Additionally, its intuitive user interface allows you to tweak and adjust different parameters easily and efficiently. With the Purple plugin, you are guaranteed the flexibility and improved sonic quality needed for a modern-day mix.
Comparing Purple With Other Pultec Emulations
When it comes to Pultec emulations, Acustica Audio’s Purple Plugin stands out from the rest. It packs a powerful punch with its advanced features and unique approach to mixing. Compared to other Pultec EQ emulations, Purple allows for a more fine-grained and precise tweak, making it easier to master your tracks. Additionally, its harmonics engine gives a truly authentic analog sound that other emulations can’t match. With the Purple plugin, you get a level of accuracy and detail that is unmatched in the market.
Tips And Tricks For Using Purple In Your Mixes
To get the most out of the Acustica Audio’s Purple Plugin, you need to apply the right tips and tricks to your mixing process. One of the most important is to understand the harmonic distortion options. By understanding how they work, you can increase the warmth and richness of your tracks without causing any issues. You should also experiment with different gain settings and filter options to find the right balance for your tracks. Additionally, you can use Purple to create space and separation in your mixes, making each instrument or sound occupy a unique sonic space. By using these tips and tricks, you can take full advantage of what Purple has to offer and achieve amazing results with your mixes. In conclusion, Acustica Audio’s Purple Plugin is undoubtedly a top-class Pultec EQ emulation that provides a warm, vintage sound with modern features. Its advanced features, intuitive interface, and excellent sound quality make it a compelling addition to your mixing arsenal. By following the tips and tricks outlined above and fully exploiting Purple’s features, you can transform your mixes and achieve outstanding results.
Advanced Techniques
Learn advanced Pultec EQ tips and techniques using Acustica Audio’s Purple plugin. Explore new ways to enhance your audio with the top-notch quality and functionality of this powerful equalizer.
Using Pultec In Parallel Processing
A great way to add depth and warmth to your mix is by using the Pultec EQ in parallel processing. When using parallel processing, you duplicate your track and apply a different effect to each one before blending them back together. By using the Pultec EQ on one of the duplicated tracks and blending it with the original track, you can achieve a full and dynamic sound.
Applying Pultec On Individual Tracks Vs. Buses
When using the Pultec EQ, you have the option to apply it on individual tracks or buses. Applying the EQ on individual tracks can help bring out specific frequencies that may be lacking. However, if you are trying to create a unified sound for multiple tracks, applying the EQ to a bus can be more effective. This way, you can control the levels of all the individual tracks with a single EQ.
Mastering With Pultec Eq
The Pultec EQ can be particularly useful during mastering to add the finishing touches to your mix. When mastering, it is important to ensure that your mix sounds as clean and balanced as possible. Use the Pultec EQ to gently boost and cut the necessary frequencies to get a smooth and consistent sound. Additionally, when mastering, ensure that you are using the Pultec EQ subtly to avoid over-processing your tracks. In conclusion, the Pultec EQ offers various advanced techniques that can elevate your mix to the next level. With Acustica Audio’s Purple, you can take things even further and achieve a unique and dynamic sound. Use these advanced techniques to improve your mix and stand out from the crowd.
Credit: www.youtube.com
Frequently Asked Questions For Pultec Eq Tips With Acustica Audios Purple
What Is The Pultec Trick?
The Pultec trick is a technique used in audio production to enhance the sound of recordings. It involves using a combination of a Pultec Equalizer and a high-pass filter to add warmth and depth to the low end of a track while cutting out unwanted frequencies.
This technique is popular among engineers and producers in the music industry.
What Is The Pultec Best For?
The Pultec is best for boosting and attenuating frequencies, creating warmth and natural sound, and shaping tone. Its unique passive equalization design makes it a popular choice for mastering and mixing engineers in music production.
How Do You Use Pultec Eq On Vocals?
Using Pultec EQ on vocals involves boosting the low and high frequencies simultaneously, while cutting a small amount at the midrange. Start by adjusting the low frequency attenuator and the boost knob to add warmth and presence to the vocals.
Then, adjust the high frequency boost to add air and clarity. Finally, adjust the midrange cut to remove any harsh frequencies.
What Is The Use Of Pultec Eqp-1a?
The Pultec EQP-1A is a type of audio equalizer that is widely used to produce warm tonal qualities in recorded music. It is known for its unique design that allows for mid-range frequency adjustment and has been favored by many top producers and engineers in the music industry for decades.
Conclusion
To sum up, Acustica Audio’s Purple plugin is a powerful tool that can enhance your sonic creations with the classic Pultec EQ sound. By utilizing its advanced features and techniques, you can help to bring out the best in your mix, and create a cohesive and polished final product.
Whether you are a seasoned professional or a new musician on the scene, the Purple plugin is a fantastic addition to your toolkit. Don’t hesitate to give it a try and see what it can do for you!
Make your music sound better by working on your recording quality, mixing techniques, mastering process and adding creative effects. In today’s digital age, everyone can make music but making it sound professional and better than the rest is a difficult task.
We will discuss some tips and tricks that can help you take your music quality to the next level. Whether you are a beginner or an experienced music producer, these tips will teach you how to enhance your production skills.
It all comes down to one thing – you need to have a good ear for music. So let’s begin with how to improve your recording quality.
Choose The Right Software
If you want to make your music sound better, one of the most important things to do is to choose the right music production software. There are a variety of different types of software out there that can help you with this process, so it’s important to understand the differences and choose the one that is right for you.
Understand The Different Types Of Software
Before you can choose the right software for your music production needs, it’s important to understand the different types that are available.
Type of Software
Description
DAWs (Digital Audio Workstations)
These are the most common types of music production software. DAWs allow you to record, edit, and mix your music all in one place.
Virtual Instruments
These are software versions of traditional musical instruments. They can be used in your music production to add variety and depth to your tracks.
Effects Plugins
These are software plugins that can be added to your DAW to add various effects to your music, such as reverb, delay, and compression.
Research Music Production Software
Once you understand the different types of software available for music production, you’ll want to research different music production software options available to you. Here are a few popular options:
Ableton Live: This software is known for its live performance capabilities, but it can also be used in the studio for recording and production.
Pro Tools: A professional-grade DAW with powerful editing and mixing capabilities.
Logic Pro X: A popular choice among Mac users, with a wide range of virtual instruments and effects included.
Consider The Features Provided
When choosing your music production software, it’s important to consider the features that are provided. Here are a few key features to look for:
Recording Capabilities: Make sure your software has the ability to record audio and MIDI.
Editing Capabilities: Look for software that allows for easy editing of your recordings.
Mixing Capabilities: The ability to mix your tracks is crucial, so be sure your software has adequate mixing capabilities.
Virtual Instruments: Consider the number and variety of virtual instruments that come with the software.
Effects Plugins: Look for software that includes a variety of effects plugins.
By choosing the right music production software and understanding its features, you can take your music to the next level and ensure it sounds better than ever before.
Invest In Quality Equipment
Improving the quality of your music involves investing in quality equipment. Quality equipment not only enhances the sound of the music but also eliminates any background noise, resulting in a clean recording. With professional tools at your disposal, music recording can become an enjoyable and rewarding experience.
Good music needs quality equipment to sound great. No matter how talented you are as a musician, without the right equipment, your music will not be able to achieve its full potential. Investing in quality equipment is a must if you want to produce great music that people will enjoy listening to. In this post, we will explore some tips on how to make your music sound better by investing in quality equipment.
Get Good Quality Headphones
Good quality headphones are a must if you want to produce high-quality music. Headphones allow you to hear every little detail in your music, which is essential for mixing and mastering your tracks. When choosing headphones, look for a pair that is comfortable to wear for long periods and has a flat frequency response. A flat frequency response means that you can hear all the frequencies in your music equally, giving you the most accurate representation of your tracks.
Invest In Monitors And Speakers
Monitors and speakers are essential tools for any music producer or musician. They allow you to hear your music in a way that headphones can’t. Monitors and speakers give you a better sense of the overall sound of your music and help you make more informed decisions when mixing and mastering your tracks. When choosing monitors and speakers, look for a pair that has a neutral sound and a flat frequency response. This will allow you to hear your music accurately and make the necessary adjustments.
Consider Audio Interfaces
An audio interface is a device that connects your instruments or microphones to your computer. It is a crucial piece of equipment for recording music, as it helps ensure that the audio quality is as high as possible. When choosing an audio interface, look for one that has good preamps, high-quality converters and has low latency. A good audio interface will help you capture the nuances of your music and help you achieve a better mix. In conclusion, investing in quality equipment is a must if you want to make your music sound better. Good quality headphones, monitors and speakers, and audio interfaces can make a significant difference in the quality of your music. Remember to choose equipment that has a neutral sound and a flat frequency response, and always go for the best quality you can afford. With the right tools, you can produce high-quality music that people will love to listen to.
Understand Sound Mixing Techniques
Understanding sound mixing techniques is one of the key elements to make your music sound better. Sound mixing is a process where multiple audio tracks are combined to create a wholesome and cohesive sound. While each audio track may sound excellent on its own, combining them requires some knowledge of sound mixing techniques to ensure that the audio sounds balanced. In this post, we will look at some essential sound mixing techniques that every music producer should know.
Equalization
Equalization, or EQ, is the process of adjusting the balance between different frequency components within an audio signal. EQ can help to clean up a mix and make it sound more polished. Use EQ to boost or cut specific frequencies in your mix and create space for each instrument to stand out. It is crucial to note that excessive EQing can lead to a hollow-sounding mix, so always use it in moderation.
Compression
Compression is the process of reducing the dynamic range of an audio signal. Compression can help to make quiet sounds louder and loud sounds quieter, resulting in a more balanced and consistent sound. Use compression to smooth out vocals and control the attack and release of drums and other instruments. However, it’s important to use compression with caution since too much compression can make the mix sound flat and lifeless.
Reverb
Reverb is the process of adding artificial room sound to the audio. It can create a sense of space and depth in the mix and help to blend the sounds together. Use reverb to create a sense of cohesion in your mix and give the sense that all the instruments are played in a single space. However, be careful not to overdo it as excessive reverb can make the mix sound muddy and unclear.
Panning
Panning is the process of positioning audio signals in the stereo field. Use panning to create a sense of space and width in the mix. For example, you can pan the guitar to the left speaker and the drums to the right to create a more dynamic mix. However, be sure to use panning judiciously since excessive panning can lead to an unbalanced sound.
Volume
Volume balancing is the process of adjusting the volume levels of different instruments in the mix. Use volume to ensure that each instrument is audible and balanced within the mix. Quiet instruments should be louder, and loud instruments should be quieter. Remember to mix at a comfortable volume, and always check the mix at different volumes to ensure that it sounds good in different environments.
Credit: m.youtube.com
Improve Your Recording Environment
Enhancing your recording environment can make a huge difference in the quality of your music. By minimizing unwanted sounds and maximizing sound diffusion, you can achieve a cleaner and more professional sound. Some tips on achieving this include eliminating background noise, using acoustic panels and carpeting, and investing in high-quality recording equipment.
Improving your recording environment can dramatically enhance the quality of your music and take it to the next level. A well-designed studio can help in reducing noise, improving acoustics, and provide an isolated space for recording. In this section, we’ll be discussing some tips on how you can create an ideal recording environment for your music.
Choose A Quiet And Isolated Room
The first step in creating a perfect recording environment is to select a quiet and isolated room. The room you choose should be free of any external noise or sound that could disrupt your recording process. Selecting a room with minimal ambient noise from outside is essential to ensure the recording picks up the right sound.
Control Sound Reflections And Absorption
Once you have selected the room, the next step is to manage sound reflections and absorption. Unwanted sound reflections can lead to audio distortion and reduce the quality of your recording. Consider using materials that aid in absorbing sound like acoustic foam and fiberglass to control sound absorption. Also, adding sound diffusers like bookshelves, diffuser panels, or furniture can help break up reflections and improve your audio clarity.
Consider Room Treatment Options
An alternative option can be to treat the room itself with acoustic materials. Treatment options range from simple to complex and can include wall and ceiling panels, bass traps, and diffusers. Room treatment efforts should depend on the kind of music you are recording and the room’s size. A proper, well-treated room can give you a professional-grade recording studio feel at home. In conclusion, having an ideal recording environment is critical if you want your music to sound better. Choosing a quiet and isolated room, managing sound reflections, and treating the room with acoustic materials can make all the difference to your recording quality. Keep these tips in mind during your next recording session and enjoy a more polished and refined outcome.
Focus On Sound Design
Achieving great sound design is one of the keys to making your music stand out. A few tips to make your music sound better include using EQ to balance frequencies, experimenting with different effects, and layering sounds for depth and texture.
Music that sounds “good” is subjective and can vary depending on the individual’s preference. However, there are ways to make your music sound better by focusing on sound design. Sound design involves creating and manipulating sounds to fit the specific needs of a song. Here are some tips to help take your music to the next level.
Create Unique Sounds
One of the best ways to make your music stand out is by creating unique sounds that listeners haven’t heard before. This can be done by using uncommon instruments, manipulating samples, or creating entirely new sounds using virtual synthesizers. Experiment with different effects like reverb, delay, and modulation to achieve your desired result. Identify the key elements of your song and use them as a base for creating unique sounds that will create an impact.
Layer Sounds For Depth
Adding layers to your sounds can add depth to your music, making it sound fuller and more interesting. Layering involves stacking multiple sounds on top of each other to create a complex texture. This can be done by using similar sounds with different variations to add a sense of harmony. Combining different sounds and frequency ranges can help create wider sounds and emphasize certain parts of the song.
Consider Sound Modulation
Sound modulation is the process of altering the sound waves of a source to change its tonal qualities. This can be done with filters or effects such as chorus, flanger, and phaser. Modulating sounds can make them sound more interesting and dynamic. By incorporating sound modulation, one can change the characteristics of the sound and play with frequencies. It can make the song sound more vibrant and engaging. In conclusion, focusing on sound design is crucial in making your music sound better. With these tips to create unique sounds, layer multiple sounds, and to use sound modulation effects and techniques, you can improve the quality of your music and make it stand out. Keep in mind that the key to a good sound design is to let the music guide you, experiment with different techniques and effects, and stay creative.
Credit: www.audiophileon.com
Editing And Post-production Techniques
Improve the quality of your music by utilizing effective editing and post-production techniques. These tips include adjusting volume levels, adding harmonies or backing vocals, incorporating creative effects, and mastering for a polished final product. With careful attention to detail and a keen ear, you can create professional-sounding music that stands out from the crowd.
Editing and post-production are essential steps in producing high-quality music. These techniques involve removing unwanted background noise, enhancing sound quality, and creating smooth transitions between tracks. This section will discuss the most effective editing and post-production techniques to improve the overall sound quality of your music.
Get Rid Of Background Noise
Background noise can be a nuisance and can ruin the quality of your music. One of the best ways to get rid of background noise is to use noise reduction tools available in your software. You can also reduce background noise by recording in a soundproof room or using a noise gate. By eliminating unwanted sounds, you can give your music a clean and professional finish.
Quantize Your Tracks
Quantizing is a process that aligns the timing of musical notes with a set grid. It is an effective way to enhance the rhythm and groove of your music. Quantizing can be done manually or by using software that automatically adjusts the timing of each note. This technique ensures that all the notes in your music are in sync, giving your tracks a polished and professional sound.
Use Automations Effectively
Automation is a powerful tool that can add dynamics and expressiveness to your music. You can use automation to adjust various parameters such as volume, panning, and filters over time. By automating these parameters, you can create interesting and dynamic changes in your music. However, it’s important to use automation in moderation, as too much can lead to a cluttered sound.
Create Proper Transitions
Smooth transitions between tracks are essential for producing a seamless listening experience. To create proper transitions, you should focus on the arrangement of your tracks. You can use techniques such as fade-ins, fade-outs, and crossfades to create smooth transitions between tracks. Ensure that each track flows seamlessly into the next to keep your listener engaged and ready for what’s next. In conclusion, editing and post-production are crucial steps in creating high-quality music. By getting rid of unwanted background noise, quantizing your tracks, using automation effectively, and creating proper transitions, you can enhance the overall sound quality of your tracks. With practice, these techniques will become second nature, and you’ll achieve professional results that will help your music stand out.
Mastering Techniques
Improve the sound quality of your music by mastering techniques such as EQ, compression, and reverb. Experiment with different effects and change the settings until you achieve the desired results. Don’t be afraid to try new things and trust your ears to guide you in your musical journey.
When it comes to music production, mastering is one of the most crucial aspects that can help to make your music sound better. Mastering involves the use of various techniques to refine and enhance the final mix of your music before it is ready for release and distribution. In this blog post, we will discuss some mastering techniques that you can utilize to make your music sound amazing.
Get Your Track Ready For Release Or Distribution
Before you jump into mastering your music, it is essential to understand that your track must be ready for release or distribution. This means that you have completed the recording and mixing phase and have a final mix that you are happy with. It is crucial to ensure that your mix has enough headroom to accommodate the mastering process.
Equalization
Equalization or EQ is a crucial mastering technique that helps to balance the frequencies in your mix. EQ can enhance the clarity of different instruments and make them stand out. It is essential to use EQ subtly to avoid over-processing which may result in an unnatural sound. Highpass filters can be used to remove the low-end rumble, whereas a low-pass filter can be used to get rid of high-frequency noise.
Compression
Compression is another critical technique that can greatly enhance your music. Compression allows you to even out the dynamics of your mix, making it sound more polished and professional. Use compression subtly to avoid over-processing which can suck the life out of your music.
Limiting
Limiting is used to increase the volume of your mix and make it sound louder without causing distortion. It is essential to use limiting with caution as over-limiting can result in an unnatural sound. Ensure you do not overdo it as dynamics are essential in music.
Stereo Widening
Stereo widening can enhance the stereo width of your mix and make it sound more spacious. Use this technique to make a mono instrument sound wider without panning it to the left or right. However, use this technique with caution as overusing it can lead to a phase cancellation which results in an unnatural sound. In conclusion, mastering techniques are essential in making your music sound better. By understanding and utilizing the techniques mentioned, you can enhance the balance, clarity, dynamics, loudness, and stereo width of your mix. Remember, subtlety is key to avoid the over-processing which can transform your music into an unnatural sound.
Credit: www.renegadeproducer.com
Collaborate With Other Musicians And Producers
Collaborating with other musicians and producers can greatly enhance the quality of your music. From sharing ideas and techniques to learning from each other, collaborating allows for a more dynamic and comprehensive sound.
Collaborating with other musicians and producers can significantly enhance the quality of your music. Feedback from other people, learning new techniques and ideas, and networking are some of the benefits of collaborating with fellow musicians and producers.
Get Feedback From Other People
Receiving feedback from other musicians and producers can help you identify areas in your music that need improvement. Feedback given by music enthusiasts is particularly valuable because it helps you understand what your audience expects from your music. Take criticism constructively and work on improving your weaknesses.
Learn New Techniques And Ideas
Collaborating with other musicians and producers exposes you to new techniques and approaches to music production. You can learn from their skills and expertise, and expand your knowledge in music production. You can also exchange ideas and experiment with different styles, which can result in innovative music.
Network And Build Relationships
When you collaborate with other musicians and producers, you build long-lasting relationships that can benefit you in your music career. Networking with other music professionals provides opportunities for partnerships and gigs. You can also learn about new music trends and opportunities in the music industry. Collaborating with other musicians and producers is a sure way to improve the quality of your music. You can get valuable feedback, learn new techniques and ideas, and build lasting relationships. Don’t be afraid to collaborate with others and expand your musical horizons.
Frequently Asked Questions For Tips On How To Make Your Music Sound Better
How Can I Make My Song Good?
To make a good song, you should focus on creating catchy melodies and memorable lyrics. Find inspiration from your personal experiences or current events. Collaborate with other musicians and constantly seek feedback to improve. Record and produce the song with quality equipment and hire professionals if necessary.
Finally, promote your song through social media and live performances to build an audience.
How Can I Improve My Music Making?
To improve your music making, you should practice regularly, study music theory, listen to a wide variety of music, collaborate with other musicians, and seek feedback from both peers and professionals. Consistent effort and seeking improvement through experience and education will help you hone your skills and create better music.
How Can I Improve The Quality Of A Song?
To improve the quality of a song, consider refining the lyrics, melody, and arrangement. Ensure the song is polished, well-recorded, and mixed professionally. Consider collaborating with experienced musicians and producers to help bring your vision to life. Lastly, always take feedback from listeners and incorporate it to continuously improve your music.
How Can I Make My Music Sound More Professional?
To make your music sound more professional, ensure that all instruments and vocals are properly recorded and mixed. Use quality equipment and plugins for mixing and mastering. Pay close attention to the levels, EQ, compression, and reverb. Also, make sure your music is properly mastered for release.
Hire a professional if needed.
Conclusion
To truly make your music stand out, it’s important to focus on enhancing the quality of your sound. Whether you invest in high-quality equipment or simply fine-tune your mixing and mastering techniques, there are plenty of ways to elevate your music to the next level.
By keeping these tips in mind and taking the time to perfect your craft, you can create truly extraordinary music that captivates and inspires your listeners. Remember to always stay curious, experiment, and keep pushing yourself to grow and develop as an artist.
“The best tape stop plugin for Studio One 4 is the HalfTime plugin by Cableguys. It offers smooth and glitch-free tape stop effects with a variety of customization options.”
Studio One 4 is an excellent digital audio workstation that offers a range of features and plugins. However, if you’re looking to add tape stop effects to your tracks, you might need a specialized plugin for that purpose. Tape stop effects add a unique touch to your music and can be used to introduce tension and excitement to your tracks.
We will discuss the best tape stop plugin for Studio One 4. We’ll look at its features, its pros and cons, and how it compares to other tape stop plugins available in the market. Whether you’re a seasoned producer or just starting, you’ll find this guide helpful in choosing the best tape stop plugin for your Studio One 4 projects.
Credit: bedroomproducersblog.com
Top Tape Stop Plugins For Studio One 4
Discover the top tape stop plugins for Studio One 4. Enhance your music productions with the best tape stop effect plugin that adds a sense of nostalgia to your tracks. Choose from a range of options and elevate your music to the next level.
Studio One 4 is an excellent digital audio workstation that offers multiple features for music production and sound engineering. With the help of various plugins, users can create unique sound effects that make their music stand out from the rest. One such effect that has become increasingly popular is the tape stop effect. If you’re looking for the best tape stop plugin to use on Studio One 4, here are the top five options:
1. Halftime
HalfTime is a popular tape stop plugin that’s ideal for producing trap, R&B, and hip-hop beats. It’s known for its ability to create instant half-speed effects that can help add depth and texture to your music. The plugin is easy to use and comes with a range of parameters that allow users to fine-tune the effect to suit their needs. With HalfTime, you can create everything from subtle tape stop effects to more noticeable ones that can add a unique twist to your tracks.
2. Cableguys Timeshaper 2
Cableguys TimeShaper 2 is a versatile tape stop plugin that offers more than just tape stop effects. It’s ideal for producing electronic music and comes loaded with various features like stutter, reverse, and gate effects. Its interface is easy to use and allows users to create complex patterns of tape stop effects that can add a unique edge to their tracks. Cableguys TimeShaper 2 is perfect for producers looking to experiment with different sound textures and effects.
3. Dblue Tapestop
dBlue TapeStop is a free tape stop plugin that’s compatible with Studio One 4. It’s a simple plugin that’s easy to use and comes with a range of parameters that allow users to control the depth and length of the tape stop effect. The plugin is perfect for creating quick and easy tape stop effects that can help add a unique twist to your tracks.
4. Soundtoys Panman
Soundtoys PanMan is another versatile plugin that offers more than just tape stop effects. It’s ideal for producing electronic music and is known for its advanced panning effects. The plugin offers multiple modes that allow users to create complex tape stop patterns that can add a unique texture to their tracks. Soundtoys PanMan is perfect for producers looking to create spatially dynamic tracks with a touch of tape stop effects.
5. Kilohearts Tape Stop
Kilohearts Tape Stop is a simple plugin that’s perfect for creating quick and easy tape stop effects. It’s ideal for producers looking for a plugin that’s easy to use and offers multiple parameters to control the depth and length of the effect. Kilohearts Tape Stop is perfect for adding a unique texture to your tracks and can create everything from subtle tape stop effects to more noticeable ones that can make your music stand out. With these top tape stop plugins for Studio One 4, you can create unique sound textures that can help your music stand out from the crowd. Whether you’re looking for a simple plugin to create quick and easy tape stop effects or a more advanced one that offers a range of features, these top pickings can help take your music to the next level.
Credit: mixandmastermysong.com
Halftime
HalfTime is a popular tape stop plugin that works seamlessly with Studio One 4, providing a unique way of creatively manipulating your audio tracks. Its intuitive design and high-quality features make it the go-to plugin for music production professionals and enthusiasts alike.
HalfTime is a plugin that provides time-altering effects to audio recordings. The plugin is popular for its ability to create halftime and reverse effects usually heard in Trap, Hip-hop, and Electronic Dance Music. If you’re a Studio One 4 user looking for an excellent tape stop plugin, you may want to check out HalfTime. In this article, we’ll take a closer look at the features, pros, and cons of HalfTime and explore how to use it in your Studio One 4 productions.
What Is Halftime?
HalfTime is a plugin from Cableguys that creates creative time-based effects in your audio recordings. The plugin is compatible with various digital audio workstations, including Studio One 4 and supports different types of input signals. HalfTime works by slowing down and stretching out your audio in real-time, making it easier to accent certain moments in your music composition.
Features Of Halftime
The HalfTime plugin boasts of several features that make it an excellent time-stretching and tape stop plugin for Studio One 4 users. Some of the standout features include:
Real-time audio processing
Ability to time-stretch and slow down audio by up to 50%
Built-in filters, LFO, and modulation controls
Works with different types of inputs (monophonic, polyphonic, etc.)
Supports automation and MIDI learning
Pros And Cons Of Halftime
Like any other plugin, HalfTime has its fair share of pros and cons. Here are some of them: Pros:
Easy to use and set up
Works with different types of input signals
Works well with other plugins and effects
High-quality audio processing with little to no artifacts
Offers creative sound design options for producers and music composers
Cons:
Can be CPU-intensive and slow down your computer
Not suitable for heavy time-stretching
May distort audio if used excessively
May take some time to get used to the controls
How To Use Halftime In Studio One 4
Using HalfTime in Studio One 4 is relatively straightforward. Here’s a step-by-step guide:
Insert HalfTime as a plugin in your Studio One 4 session
Select the audio track that you want to apply the time-stretching effect to
Choose your preferred time-stretching algorithm from the plugin window (e.g., Slow, 2x, Reverse, etc.)
Use the built-in LFO and modulation controls to add movement to your audio
Review your audio in real-time to preview the effect before making the changes permanent.
Automate or assign MIDI controls to control the plugin parameters as desired.
In conclusion, HalfTime is a fantastic tape stop plugin that offers creative time-stretching options for music producers and composers using Studio One 4. The plugin can add a unique sound design to your music productions and help you achieve that reverse or halftime effect with ease. With its easy-to-use controls and high-quality audio processing, HalfTime is undoubtedly one of the best tape stop plugins for Studio One 4 users.
Cableguys Timeshaper 2
Cableguys TimeShaper 2 is the ultimate tape stop plugin for Studio One 4. With its advanced features, it allows you to create unique and creative sounds by manipulating time and pitch in real-time. Its intuitive interface makes it easy to use, even for beginners.
Cableguys TimeShaper 2: The Best Tape Stop Plugin for Studio One 4 If you’re looking to add a creative effect to your music production, a tape stop plugin is a great choice. This effect is commonly used in electronic and hip hop music to create a sudden pause or slow-down in the music’s rhythm. There are many tape stop plugins available on the market, but Cableguys TimeShaper 2 stands out as one of the best options available for Studio One 4. Let’s take a closer look at this plugin and its features.
What Is Timeshaper 2?
TimeShaper 2 is a powerful audio effect plugin that allows you to bend, warp, and shape any audio signal in creative ways. It lets you combine multiple effects such as stutter, reverse, and glitch to create unique and out-of-the-box sound effects. Its user-friendly interface allows easy manipulation of sounds in real-time, and its advanced algorithms ensure smooth and seamless processing.
Features Of Timeshaper 2
TimeShaper 2 comes loaded with an array of features that make it a versatile and indispensable tool for music producers. Some of its notable features include:
Ability to apply various effects such as stutter, reverse, tape stop, and glitch.
Smooth real-time processing with no latency.
Precision controls for adjusting the modulation and timing parameters.
Snapshots feature to capture and recall your favorite effects settings.
Resizable and customizable interface for easy workflow management.
Pros And Cons Of Timeshaper 2
As great as this plugin is, there are also a few advantages and disadvantages to consider before purchasing. Pros:
Easy to use, with a user-friendly interface.
Offers a wide range of effects and modulation options.
Seamless real-time processing with no lag.
Resizable and customizable interface for easy workflow management.
Cons:
There is no free trial version available.
It may not be ideal for beginners who are still learning how to use audio effects.
How To Use Timeshaper 2 In Studio One 4
Using TimeShaper 2 in Studio One 4 is easy and straightforward. Here’s a quick guide:
Open Studio One 4 and create a new audio track.
On the track, add an instance of TimeShaper 2 plugin.
Select the desired preset or manually adjust the effect parameters on the plugin interface.
Play the track and listen to the effect in real-time.
If necessary, make further adjustments to the effect settings to get the desired sound.
In conclusion, Cableguys TimeShaper 2 is an excellent tape stop plugin that offers a range of creative effects and easy-to-use interface. If you’re a music producer looking to add some unique creative flair to your music, then TimeShaper 2 is a plugin you should definitely consider.
Dblue Tapestop
DBlue TapeStop is the ultimate tape stop plugin for Studio One 4. It allows you to create that classic tape stop effect with a variety of different controls and parameters, giving you full creative control over your sound.
As a music producer, you may be familiar with the technique of using tape stops to create dramatic pauses or sudden shifts in your music. Luckily, with the use of plugins, achieving this effect has become much simpler than physically manipulating tape machines. One popular plugin that is frequently used for this purpose is dBlue TapeStop. In this article, we will discuss what dBlue TapeStop is, its features, pros and cons, and how to use it in Studio One 4.
What Is Dblue Tapestop?
dBlue TapeStop is a free VST plugin that simulates the effect of a stop in tape playback. This plugin is created by Illformed, the same software company that developed the popular glitch effect plugin, Glitch 2. TapeStop is a very simple plugin that can be used to create a range of effects from a simple slowdown to a complete halt in playback.
Features Of Dblue Tapestop
dBlue TapeStop is a simplistic plugin with only a handful of features. Some of the most noteworthy features of this plugin include:
Available as a free download
Easy to install on your DAW
Can be used on any track or effect within a project
Simple interface consisting of basic parameters like slowdown and time
Pros And Cons Of Dblue Tapestop
Like any plugin, dBlue TapeStop has its fair share of pros and cons. Some of the most notable pros and cons include:
Pros
Cons
Free to downloadEasy to useCreates realistic tape stop effectsLight on CPU usage
Only available as a VST plugin (no AU or AAX version)May not be suitable for more complex effectsOnly a few parameters to work with
How To Use Dblue Tapestop In Studio One 4
Using dBlue TapeStop in Studio One 4 is a quick and easy process. Here’s a step-by-step guide to getting started:
First, download the plugin from the Illformed website and install it onto your computer.
In Studio One 4, create a new audio or instrument track and add the plugin to the track as an insert.
Adjust the parameters of the plugin to fine-tune the effect to your liking.
Automate the plugin’s parameters to create a tape stop effect at a specific moment in your track.
Repeat the process on any other tracks or effects that require the same effect.
In conclusion, dBlue TapeStop is an excellent plugin for anyone looking to create tape stop effects in their music. Its user-friendly interface and simple parameters make it a great option for beginners, while its ability to create authentic tape stop effects makes it a must-have for more experienced producers.
Soundtoys Panman
Soundtoys has introduced the A-list tape stop plug-in, PanMan. Its smooth panning capabilities make it the best tape stop plug-in for Studio One 4. The plug-in allows users to create custom panning curves, set up LFOs, and much more.
Soundtoys PanMan is a tape stop plugin that is gaining popularity among music producers and sound engineers. Its unique features and user-friendly interface make it a reliable tool for manipulating audio files. If you are a Studio One 4 user looking for a powerful tape stop plugin, then Soundtoys PanMan might be the perfect fit. In this article, we will be discussing what Soundtoys PanMan is, its features, and its pros and cons. We will also be showing you how to use it in Studio One 4.
1. What Is Soundtoys Panman?
Soundtoys PanMan is a powerful tape stop plugin that is designed for manipulating audio files. Its primary function is to create rhythmic movement and panning effects on your tracks, giving your music a unique feel. This plugin is compatible with most digital audio workstations, including Studio One 4. Soundtoys PanMan features a user-friendly interface, making it easy for beginners and seasoned professionals to use.
2. Features Of Soundtoys Panman
Soundtoys PanMan comes with several features that make it a reliable tool for manipulating audio files. Some of these features include:
Auto Pan – This feature allows you to create auto-panning effects, making your tracks sound more dynamic.
Rhythmic Pan – With this feature, you can create rhythmic pan effects that sync with your track’s tempo.
Shuffle – This feature adds a shuffle effect to your panning, making your tracks sound more groove-oriented.
Preset Library – Soundtoys PanMan comes with a comprehensive preset library, allowing you to quickly select the right sound for your needs.
3. Pros And Cons Of Soundtoys Panman
Before investing in Soundtoys PanMan, it is essential to consider the pros and cons. This will help you make an informed decision. Here are the pros and cons of Soundtoys PanMan:
Pros
Cons
-user-friendly interface
– Expensive compared to other tape stop plugins
-Comes with several features
– May be overwhelming for beginners
-Compatible with most digital audio workstations
4. How To Use Soundtoys Panman In Studio One 4
Using Soundtoys PanMan in Studio One 4 is easy. Here is a quick guide to help you get started:
Open Studio One 4 and create a new project
Import the audio file you want to edit
Go to the mixer window and select the track you want to edit
Click on the insert effects button and select Soundtoys PanMan from the drop-down menu
Adjust the settings to your liking
Hit the play button to preview your changes
Once you are satisfied with your edits, export the audio file
Soundtoys PanMan is a powerful tape stop plugin that is perfect for Studio One 4 users looking to manipulate audio files. With its unique features and user-friendly interface, this plugin is an excellent investment for any sound engineer or music producer.
Credit: www.youtube.com
Kilohearts Tape Stop
If you are a music producer, you understand the value of a good tape stop plugin. Kilohearts Tape Stop is a plugin that simulates the effect created by slowing down the tape machine, stopping it, and then speeding it up again. This plugin is popular among music producers as it adds a creative touch to their music. This post will explore Kilohearts Tape Stop, its features, pros and cons, and how to use it in Studio One 4.
What Is Kilohearts Tape Stop?
Kilohearts Tape Stop is a plugin that recreates the iconic tape stop effect in music production. The plugin works by slowing down the audio, stopping it completely, and then speeding it up again. This creates a scratching or slowing down sound effect that adds a creative touch to music. The Kilohearts Tape Stop plugin is compatible with major DAWs such as Studio One 4, Ableton Live, FL Studio, Logic Pro X, and more.
Features Of Kilohearts Tape Stop
Feature
Description
Automation
Kilohearts Tape Stop can be automated to create dynamic tape stop effects
Customizable Settings
The plugin has customizable settings such as volume, pitch, and speed
Multiple Presets
Kilohearts Tape Stop has multiple presets to choose from for added convenience
MIDI Control
The plugin can be controlled using a MIDI controller for ease of use
Pros And Cons Of Kilohearts Tape Stop
Pros
Ease of use
Compatible with major DAWs
Customizable settings
Multiple presets available
Cons
Only one tape stop effect available
May not be suitable for all music genres
How To Use Kilohearts Tape Stop In Studio One 4
Using Kilohearts Tape Stop in Studio One 4 is simple. Here are the steps:
Open your audio track in Studio One 4
Locate “Kilohearts Tape Stop” in the effects list and add it to your track
Select a preset or customize the settings to create your desired tape stop effect
Automate the plugin to create dynamic tape stop effects
Kilohearts Tape Stop is a versatile plugin that can add creativity and depth to your music. With customizable settings and multiple presets, it is worth considering for your next production.
Frequently Asked Questions For The Best Tape Stop Plugin For Studio One 4
How Do You Tape Stop In Studio One?
To stop recording in Studio One, simply hit the stop button on the transport bar or use the shortcut key “spacebar”. This will immediately stop recording and return the playback head to the beginning of the timeline.
What Plugin Type Does Studio One Use?
Studio One uses a variety of plugin types including VST, AU, and AAX.
How Do I Organize My Studio One Plugins?
To organize your Studio One plugins, you can create custom folders and subfolders within the plugin manager. You can categorize your plugins based on function, instrument type, or any other criteria that make sense to you. This way, you can quickly find the plugins you need and keep your workflow organized.
Does Studio One 5 Artist Support Vst?
Yes, Studio One 5 Artist supports VST plugins. This allows for a wide range of possibilities when it comes to adding effects and instruments to your projects.
Conclusion
After assessing various tape stop plugins for Studio One 4, we have determined that the Waves J37 Tape Saturation is the best option. Its perfect blend of warm vintage tones and modern convenience make it an ideal choice for any producer or engineer looking to add some character and depth to their mixes.
The intuitive interface and easy-to-use features make it accessible to beginners while still offering advanced options for more experienced users. With the Waves J37 Tape Saturation plugin, you can achieve that classic tape stop effect seamlessly and efficiently.
The best VST plugins for professional vocal mixing include Autotune, Waves Tune, Melodyne, and Nectar. If you’re a mixing engineer or music producer looking for top-quality VST plugins to enhance your vocal mixing, you’re in the right place.
We’ll explore some of the best VST plugins that can take your vocal production to the next level. These plugins offer various features such as pitch correction, vocal tuning, EQ, compression, reverb, and other effects. We’ll provide an in-depth analysis of each plugin’s capabilities and compatibility with different DAWs.
So, whether you’re new to the game or an experienced professional, let’s find out which VST plugins can help you achieve the perfect vocal mix!
1. Understanding Vst Plugins
Looking for the best VST plugins for professional vocal mixing? Understanding VST plugins is crucial for enhancing the quality of your recordings. Check out plugins like Waves Tune Real-Time, Nectar 3, and Auto-Tune Pro for top-notch vocal processing.
What Are Vst Plugins?
VST (Virtual Studio Technology) plugins are software programs that aid in creating music by enhancing its sound quality. They work as an add-on program to digital audio workstations and allow users to adjust parameters of sound, add effects and improve overall sound quality.
Why Are They Important For Vocal Mixing?
When it comes to vocal mixing, VST plugins are extremely valuable. They help to enhance a singer’s voice, allowing them to sound more natural and polished. These plugins can be used to eliminate unwanted background noise, add reverberation or delay effects, enhance vocal harmonies and even give singer’s voices an entirely new texture. One of the primary benefits of using these plugins for vocal mixing is the amount of control they provide. They enable sound professionals to adjust specific parameters of a voice, edit, and manipulate them in real-time. In addition, these plugins can help save time and money in post-production as they eliminate the need for additional equipment, reducing production and release time. Here are some of the best VST plugins for professional vocal mixing:
Plugin Name
Manufacturer
Antares Auto-Tune Pro
Antares Audio Technologies
Izotope Nectar 3
Izotope
Waves Tune Real-Time
Waves Audio
Melodyne 5 Editor
Celemony
Slate Digital Virtual Mix Rack (VMR)
Slate Digital
Overall, VST plugins are essential for professional vocal mixing as they offer a wide range of benefits including enhanced sound quality, improved production efficiency, and flexibility. The plugins listed above are just a few examples of the many powerful tools available to music professionals today.
2. Top Vst Plugins For Professional Vocal Mixing
Discover the top VST plugins for professional vocal mixing to achieve perfect tone, clarity, and depth for your vocals. Essential plugins includes Antares Autotune Pro, Waves Vocal Rider, and FabFilter Pro-Q2 among others.
When it comes to professional vocal mixing, having the right tools is crucial. And with the numerous VST plugins available, it can be overwhelming to decide which ones to use. In this section, we’ve narrowed down the top plugins that can help achieve the best sound for your vocals.
1. Waves Tune Real-time
Waves Tune Real-Time is a pitch correction plugin that can be used for both live performances and studio recordings. This plugin enables you to correct slight pitch inaccuracies in real-time with minimal latency. The intuitive interface and automatic pitch detection make it easy to use, and it also includes a variety of creative features like vibrato control and formant correction.
2. Antares Autotune Pro
Antares Autotune Pro is a well-known plugin for its pitch correction capability. It allows for precise pitch adjustments, including natural-sounding retuning and quick fixes for pitchy recordings. This plugin also has advanced features like the Humanize function, which adds natural variations to pitch correction for a more realistic sound.
3. Izotope Nectar 3
iZotope Nectar 3 is a comprehensive vocal processing plugin that includes everything from pitch correction to harmonization and compression. This plugin also has AI-powered features like Vocal Assistant, which analyzes the vocal track and suggests optimal settings for EQ, compression, and more. Nectar 3 also includes additional modules like Breath Control, which helps eliminate unwanted breaths in a recording.
4. Waves Vocal Rider
Waves Vocal Rider is an innovative plugin that automatically levels the vocal volume in a mix. This plugin helps reduce the need for manual volume automation and saves time during the mixing process. Vocal Rider enables the vocals to sit perfectly in the mix, making them clearer and more prominent without sacrificing the overall balance of the track.
5. Soundtoys Little Alterboy
Soundtoys Little Alterboy is a vocal transformer plugin that can create unique vocal effects. This plugin allows for manipulation of vocal formants, pitch shifting, and distortion to create new and interesting sounds. Little Alterboy is also versatile and can be used for subtle processing or extreme effects. Overall, these top VST plugins are the perfect addition to any professional vocal mixing toolkit. Incorporating these plugins into your workflow can result in a polished and professional sound for your vocal recordings.
3. Advantages Of Using Vst Plugins For Vocal Mixing
With the best VST plugins for professional vocal mixing, the advantages are many. These plugins offer the ability to enhance and refine vocal tracks, with features like compression, EQ, reverb, and more. They are easy to use, affordable, and can help take your music production to the next level.
Mixing vocals is a critical part of producing any music track. It’s the process of equalizing, compressing, and processing the vocals to create a final polished sound that will resonate with the audience. The good news is that with the advancement in technology, you don’t have to be a professional sound engineer to get great-sounding vocals. By using the right VST plugins for mixing vocals, you can achieve a high-quality, professional vocal mix that will enhance your music production tenfold. Below are three advantages of using VST plugins for vocal mixing.
1. Time-saving
One of the main advantages of using VST plugins for vocal mixing is the time it saves. Mixing vocals can be a repetitive and time-consuming task, especially if you’re working on multiple tracks. But using VST plugins can cut your mixing time by half or even more. With VST plugins, you don’t have to manually tweak each vocal channel’s settings or dial in the right EQ. Instead, you can choose a preset that fits your needs or adjust the plugin’s parameters to your desired setting. As a result, using VST plugins for vocal mixing can speed up your workflow and give you more time to focus on other creative aspects of your music production.
2. Consistency & Accuracy
Another benefit of using VST plugins for vocal mixing is the consistency and accuracy they provide. When you’re mixing vocals, it’s crucial to maintain consistency across different tracks and takes. With VST plugins, you can achieve this by using the same settings and plugins across your vocal channels. This creates a uniform sound and helps avoid any unwanted variation or inconsistency. Additionally, VST plugins provide accurate and precise controls that allow you to fine-tune your vocal mix to your exact liking. This accuracy is key to achieving a professional-sounding vocal mix that will stand out in the music industry.
3. Wide Range Of Options
VST plugins for vocal mixing offer an extensive range of options that you can use to create your desired vocal sound. There are VST plugins for every stage of the vocal mixing process, from basic compression to advanced equalization. This range of options enables you to experiment and discover new sounds and techniques that can help set your music production apart. Furthermore, some VST plugins come with unique features that can add character to your vocal mix, such as distortion, saturation, and delay effects. By using VST plugins for vocal mixing, you have the freedom to create a unique vocal sound that will make your music production stand out from the rest.
4. Cost-effective
VST plugins for vocal mixing are cost-effective compared to traditional mixing methods. You no longer have to invest in expensive hardware or hire a professional engineer to achieve a great-sounding vocal mix. Instead, you can purchase high-quality VST plugins for a reasonable price or even use free plugins available online. This accessibility and affordability mean that anyone can get a professional-sounding vocal mix with minimal investment, making VST plugins a cost-effective option for music producers of all levels. In conclusion, using the right VST plugins for vocal mixing can save you time and money while providing consistency, accuracy, and a wide range of options. These advantages make VST plugins the go-to option for any music producer looking to achieve a high-quality, professional-sounding vocal mix.
Credit: medium.com
4. How To Choose The Right Vst Plugins For Your Vocal Mix
Choosing the right VST plugins is crucial for achieving a professional vocal mix. Look for plugins that offer a variety of effects and tools such as compressors, equalizers, and reverbs, to help you achieve the desired sound. Use high-quality plugins that cater to your specific needs.
1. Identify Your Vocal Needs
Before you start searching for VST plugins, it’s important to identify your vocal needs. Do you need help with pitch correction, EQ, dynamics processing, or all of the above? Being clear about what you’re looking for can help you narrow down your search and find the right plugins for your vocal mix.
2. Consider Your Budget
Investing in high-quality VST plugins can make a significant difference in the quality of your vocal mix. However, it’s important to consider your budget before making any purchases. Some plugins can be quite expensive, while others are more affordable. Consider how much you’re willing to spend and look for plugins that offer the features you need within your budget.
3. Read Reviews & Try Demo Versions
Before purchasing any VST plugins, it’s important to do your research. Read reviews from other producers and engineers to get an idea of the plugin’s effectiveness. Many companies also offer demo versions of their plugins for you to try before you buy. Take advantage of these opportunities to ensure that the plugin you’re considering is the right fit for your vocal mix.
4. Compatibility With Your Digital Audio Workstation
When choosing VST plugins, it’s important to consider compatibility with your digital audio workstation (DAW). Some plugins may only work with certain DAWs, so make sure you check the compatibility before purchasing. Using plugins that are not compatible can lead to technical difficulties and poor performance, so it’s important to choose plugins that will work seamlessly with your DAW. In conclusion, choosing the right VST plugins for your vocal mix can make a significant difference in the quality of your final product. By identifying your vocal needs, considering your budget, reading reviews, and checking compatibility with your DAW, you can find the plugins that will take your vocal mix to the next level.
5. Tips For Using Vst Plugins Effectively In Vocal Mixing
Improve your vocal mixing skills with these five tips for effectively using VST plugins. Discover the best plugins for a professional sound, including those for compression, EQ, reverb, and more. With the right tools and techniques, you can take your vocal mixes to the next level.
If you are seeking to become a professional music producer, mastering the art of vocal mixing is paramount. Using VST plugins appropriately is a significant factor that affects the quality of your mix. In this section, we will discuss 5 tips for using VST plugins effectively in vocal mixing.
1. Keep It Simple
The first tip for using VST plugins efficiently is to maintain simplicity. You may feel tempted to use multiple plugins, but it is essential to keep your chain of plugins minimal. If you find your mix being cluttered with multiple plugins, it may be challenging to fix it later. Strive to use only the necessary plugins to achieve a balanced mix.
2. Practice And Experiment
To become a great vocal mixer, you must practice and experiment with VST plugins regularly. Understanding each plugin’s functionality enables you to achieve your desired effect more efficiently. Spend time understanding how each plugin will affect your vocal track. This will help you identify which plugins will work best for your mix, and also help you add value to your client’s projects.
3. Use Presets As A Starting Point
When working with VST plugins for vocal mixing, it is recommendable to use presets as a starting point. Using presets saves time and, in many cases, yields professional-sounding results. Start with a preset, then adjust the settings later to achieve your desired outcome. Make sure to tailor the preset to get the desired effect.
4. Don’t Overuse Autotune
Autotune is a plugin that’s commonly used in vocal mixing, but overusing it can ruin your mix. Use Autotune wisely and make sure that it sounds natural. Remember, not every note needs to be corrected, and use the effect sparingly. The goal should be for the effect to enhance the track, not to hide the flaws of the vocals. To sum up, using VST plugins efficiently requires an understanding of each plugin’s functionality and its effect on the mix. Keep all the tips mentioned above in mind, practice, and experiment with VST plugins, and you will achieve a professional sound in your vocal mixing.
Credit: www.productionmusiclive.com
Frequently Asked Questions Of Best Vst Plugins For Professional Vocal Mixing
What Plugins Do Professionals Use For Vocals?
Pro professionals, some of the most popular plugins used for vocals include Antares Auto-Tune, Waves Tune, Melodyne, and Soundtoys Little AlterBoy. These plugins offer features such as pitch correction, vocal tuning, and effects processing to enhance the sound of vocals in different ways.
How Do You Professionally Mix Vocals?
To professionally mix vocals, follow these tips: 1. Use EQ to boost or cut frequencies on individual tracks. 2. Apply compression for a more consistent vocal level. 3. Add effects like reverb, delay, and chorus to enhance the vocal. 4.
Use automation to adjust volume levels throughout the song. 5. Use a reference track to compare your mix to professional ones.
What Are The Best Plugins For Pro Tools Mixing?
Some of the best plugins for Pro Tools mixing include Waves SSL E-Channel, FabFilter Pro-Q 3, Soundtoys Little Plate, and UAD Pultec EQP-1A. These plugins add powerful functionality and help you achieve professional-sounding mixes.
What Plugins Do Rappers Use For Vocals?
Rappers use various plugins for their vocals, but the most common ones are Auto-Tune, Melodyne, Waves Tune, Nectar, and iZotope RX. These plugins help fix pitch issues, enhance vocals, and add different effects to vocals, giving them a unique sound.
Conclusion
After considering various VST plugins for professional vocal mixing, we have concluded that the best options are those that offer high-quality effects and intuitive interfaces. From the Waves CLA Vocals to the iZotope Nectar 3, each plugin has unique strengths that cater to specific vocal mixing needs.
Ultimately, the key to achieving professional vocal mixing is to experiment with different plugins and find the ones that work best for your specific projects and preferences. With these plugins in your arsenal, your vocal mixes are sure to sound amazing.