Categories
Archive

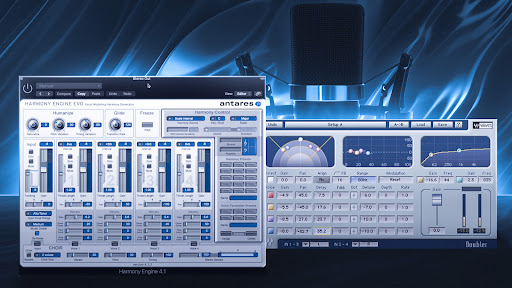
Creative Vocal Effects Antares Harmony Engine

Antares Harmony Engine is a vocal effects processor that creates realistic, lush harmonies. It is a powerful tool for music producers and singers alike.

Antares Harmony Engine is the plugin of choice for music producers and singers looking to create lush, realistic harmonies. With its cutting-edge technology, the software allows users to create rich vocal harmonies, from simple chords to complex arrangements. The plugin features a range of intuitive controls, including harmony type, scale, and key, allowing users to achieve the perfect harmony for any song.

Whether you’re a professional musician or a hobbyist, Antares Harmony Engine is an essential tool for taking your vocal performances to the next level. So if you’re looking to add some magic to your vocal tracks, look no further than Antares Harmony Engine.
Creative Vocal Effects Antares Harmony Engine

Credit: www.puremix.com

Antares Harmony Engine

Antares Harmony Engine is a powerful vocal processing tool that enables musicians to create rich and creative harmonies. It uses advanced algorithms to analyze live or pre-recorded vocal tracks and generate up to four additional harmony parts, giving artists the ability to explore their creativity and experiment with new sounds.

With its intuitive interface and extensive customization options, Antares Harmony Engine is a popular choice for producers, engineers, and artists looking to enhance their vocal recordings.

Antares Harmony Engine is a unique software plug-in that allows vocalists and musicians to create various vocal effects and harmony arrangements, making it an essential tool for music producers. The Antares Harmony Engine offers an incredible variety of vocal harmonies and effects, helping users complete their projects with ease. In this blog post, we will explore the Antares Harmony Engine’s functions and features to give you a better understanding of what it can do.

Overview

At its core, the Antares Harmony Engine is a pitch shifter with a wide range of powerful features that enable musicians to take their vocal tracks to the next level. The software is compatible with several digital audio workstations and can be used with both Mac and Windows operating systems.

How It Works

The Antares Harmony Engine works by analyzing the lead vocal and generating up to four harmony parts based on that analysis. This process is called “voicing.” The software also offers several customizable parameters, such as timing, scale, and gender, to help create unique and realistic harmonies. The Antares Harmony Engine’s real-time MIDI capabilities allow users to control the software using a MIDI keyboard and get instant access to a variety of harmonies and effects.

Popular Features

The Antares Harmony Engine offers a range of features that make it an essential tool for anyone working on vocal-oriented music projects. Some popular features include:

  • Realistic Vocal Harmony: The Antares Harmony Engine generates up to four voices of realistic-sounding harmonies.
  • Humanization: This feature allows users to adjust the timing, pitch variation, and vibrato of each harmony voice to create a more natural-sounding vocal performance.
  • Note-by-Note Harmony: Users can select individual notes on a MIDI track to create specific harmonies.
  • MIDI Control: The software’s MIDI capabilities give users near-instant access to a variety of harmonies and effects, making it easy to experiment and create the perfect sound.
  • Advanced Vocal Effects: In addition to its harmony creation capabilities, the Antares Harmony Engine also offers several advanced vocal effects, such as modulation, delay, and reverb.

In conclusion, the Antares Harmony Engine is a powerful tool for anyone looking to create unique and realistic vocal harmonies and effects. Its user-friendly interface, MIDI capabilities, and a wide range of features make it an essential tool for music producers who want to take their vocal-oriented projects to the next level.

Creative Vocal Effects Antares Harmony Engine

Credit: www.antarestech.com

Ways To Incorporate Antares Harmony Engine In Your Music

Discover new and exciting ways to elevate your music with Antares Harmony Engine. This powerful tool can add creative vocal effects to your tracks, including harmonies, tuning, and more. Experiment with different settings and unleash your creativity to take your music to the next level.

Incorporating Antares Harmony Engine in your music is an excellent way to enhance your vocals. The Harmony Engine offers a wide range of creative vocal effects, making it possible to produce a unique sound that stands out from the rest. In this blog post, we will explore the various ways you can incorporate Antares Harmony Engine in your music.

Creating Vocal Harmonies

One of the most significant benefits of the Antares Harmony Engine is the ability to create vocal harmonies quickly and easily. Whether you’re a solo artist wanting to add depth to your singing or a group looking to create complex harmonies, the Harmony Engine has got you covered. With its advanced vocal modeling technology, the Harmony Engine can generate up to four distinct vocal parts. You can also customize the harmony settings to align with your taste, allowing you to create unique and complex harmonies effortlessly.

Pitch Correction

Antares Harmony Engine also offers pitch correction, another critical feature in music production. Pitch correction ensures that your vocals are always on key, even when you’re not singing in tune. Harmonic Engine’s pitch correction ensures that your vocals remain in key while preserving the quality of your voice. The feature is especially useful if you’re struggling to hit those high notes or if you’re trying to achieve a specific music style.

Adding Depth And Texture To Vocals

Antares Harmony Engine offers numerous options to add depth and texture to your vocals. One such option is the ‘Throat Modeling’ feature, which allows you to change the vocal timbre significantly. With throat modeling, you can adjust the size, shape, and curvature of the throat, giving your voice a unique sound. You can also apply various audio effects, such as reverb and delay, to add texture to your vocals. In conclusion, incorporating Antares Harmony Engine in your music is a game-changer. Whether you’re looking to create complex vocal harmonies, correct pitch, or add depth and texture to your vocals, the Harmony Engine has got your back. With its unique features and advanced vocal modeling technology, Antares Harmony Engine is undoubtedly one of the best tools for music producers and singers.

Tips And Tricks For Using Antares Harmony Engine Effectively

Discover a plethora of tips and tricks on how to effectively use the Antares Harmony Engine to create incredible and unique vocal effects. From choosing the right settings to using automation, this powerful tool can take your music production to the next level.

Antares Harmony Engine is a powerful vocal effects plugin that can take your music production to the next level. It allows you to create interesting and unique harmonies, and add depth and character to your vocals. In this article, we’ll explore some tips and tricks that can help you get the most out of Antares Harmony Engine.

Experimenting With Different Settings

One of the best ways to use Antares Harmony Engine is to experiment with its different settings. The plugin comes with various options that you can customize to create unique vocal effects. For instance, you can adjust the pitch, timing, and amplitude of the harmonies to create different textures and emotions. You can also experiment with different scales and modes to create more complex harmonies. Moreover, you can use the modulation section to add vibrato, tremolo, and other effects.

Using Automation For Dynamic Effects

Another great way to use Antares Harmony Engine is to automate its settings. Automation allows you to create dynamic vocal effects that change over time. For instance, you can automate the pitch and timing of the harmonies to create a rising or falling effect. You can also automate the amplitude to create a pulsing or fading effect. Additionally, you can use automation to add or remove harmonies throughout the song to create a more dynamic and engaging vocal performance.

Blending Natural And Synthetic Vocal Effects

Finally, you can blend natural and synthetic vocal effects to create a unique sound that stands out. Antares Harmony Engine allows you to mix the original vocals with the harmonies and add different effects to each of them. For instance, you can use a natural-sounding harmony for the chorus and a more synthetic-sounding harmony for the verse. Moreover, you can use delay, reverb, and other effects to enhance the vocal texture and create a sense of space. In conclusion, Antares Harmony Engine is a versatile and powerful vocal effects plugin that can help you create unique and engaging harmonies. By experimenting with its different settings, automating its parameters, and blending natural and synthetic effects, you can take your music production to the next level. So, start using Antares Harmony Engine today and see how it can transform your vocals!

Famous Songs That Use Antares Harmony Engine

Famous songs have capitalized on the innovative vocal effects provided by the Antares Harmony Engine, making it a popular choice among musicians. The software creates stunning harmonies that enhance vocals and add depth to recordings, as heard in hits by Ariana Grande, Daft Punk, and countless others.

Famous Songs That Use Antares Harmony Engine Antares Harmony Engine is a software tool that allows musicians to add a range of creative vocal effects to their tracks. It can harmonize vocal parts, add chorus or doubling effects, and even create unique vocal arrangements that were once impossible to achieve. This tool has been used extensively in the music industry, resulting in some famous songs that are instantly recognizable. Here are some examples of such songs that utilize Antares Harmony Engine. H3: Song #1 One of the most famous songs utilizing Antares Harmony Engine is “Fireflies” by Owl City. The song’s lead vocals, performed by Adam Young, are thickly layered with harmonies and robotic sounding effects, giving it a unique and distinctive sound. The Harmony Engine allowed Adam to create multiple vocal harmonies with little effort, resulting in the instantly recognizable sound of “Fireflies”. H3: Song #2 Another famous song that heavily relies on the Antares Harmony Engine is “Believe” by Cher. The song’s iconic and unusual effect on Cher’s vocals is hard to miss. This effect is possible because of the Harmony Engine’s ability to create complex harmonies and artificial-sounding vocal effects. The song was a massive hit in the late 1990s and is still a favorite among fans of the pop music genre. H3: Song #3 “Good Life” by OneRepublic also uses the Antares Harmony Engine to create a distinctive vocal effect that is hard to miss. The tool allowed the band’s lead vocalist, Ryan Tedder, to create a complex vocal arrangement seamlessly, resulting in a polished and unique sound. The vocal harmonies and distinctive “auto-tune” effect are the signature sound of “Good Life,” making it one of the most famous songs to utilize the Harmony Engine. In conclusion, Antares Harmony Engine is a powerful tool that has played an essential role in creating unique vocal effects in popular music. Its ability to simplify the complex process of creating harmonies and artificial vocal effects has changed the landscape of modern music production. These famous songs are just a glimpse of what can be achieved with the Harmony engine, making it an indispensable tool for any musician.

Creative Vocal Effects Antares Harmony Engine

Credit: mixandmastermysong.com

Frequently Asked Questions For Creative Vocal Effects Antares Harmony Engine

Is Antares Harmony Engine Worth It?

Yes, Antares Harmony Engine is worth it. This plug-in is perfect for music producers looking to enhance vocal harmonies, with plenty of customization options available. It’s compatible with several DAWs, making it a versatile tool for any music project. Overall, Antares Harmony Engine is a great investment for any musician or producer looking to create amazing vocal harmonies.

How Do You Make Vocal Harmonies Sound Good?

To make vocal harmonies sound good, ensure each singer holds their note steady by using a sustained “ahh” sound. Ensure singers match vowel sounds and pitches and don’t over-sing. Make sure to blend all the voices together and sing on key.

A bit of reverb and light compression can also help.

What Plugin Creates Harmonies?

A plugin named “Harmony Engine” by Antares Audio Technologies is specialized in creating various harmonies for music.

Is Harmony Engine Part Of Auto-tune Unlimited?

No, Harmony Engine is not a part of Auto-Tune Unlimited. It is a separate plugin offered by Antares, which can be purchased separately.

Conclusion

To sum up, the Antares Harmony Engine is a game-changer in the world of music production. It provides endless creative possibilities for vocal effects that will elevate any song to a whole new level. From subtle harmonies to extreme pitch-shifting, this plugin is a must-have for any producer or artist looking to create unique and innovative vocal tracks.

With the Harmony Engine, the sky’s the limit, and the only thing holding you back is your own imagination.

Categories
Archive

How To Create Sounds With Moog Subsequent 37

To create sounds with Moog Subsequent 37, access the synthesizer’s oscillator, filter, and modulation sections. Use the editor software, keyboard, or sequencer to adjust and customize the sound.

Also, the Sub 37 is a versatile and powerful analog synthesizer that allows musicians and producers to create unique sounds. Also, with its high-quality oscillators, filters, and modulation sections, the Subsequent 37 delivers classic to modern analog sounds. We will explore how to create sounds with this synth.

Related reading: Minimoog Model D Review and How To Make a Moog Bass With Arturia Mini V3. For background, see the official Moogmusic website.

Moreover, learn the oscillator, filter and modulation sections, plus the editor, keyboard and sequencer. In addition, that knowledge gives beginners and pros endless options. Let’s get started.

How To Create Sounds With Moog Subsequent 37

Credit: www.productionmusiclive.com

Setting Up The Moog Subsequent 37

In addition, setting up the Moog is essential to exploring the capabilities of creating unique sounds. For example, for example, by exploring the parameters, you can craft distinct soundscapes with the classic Moog character.

Furthermore, creating sounds with the Sub 37 can take your music production to the next level. However, before you can start producing sounds, you need to set up your synthesizer properly. As a result, here’s a step-by-step guide on how to connect your power, audio output, and MIDI devices to your this synth.

Connecting The Power for Moog Subsequent 37

Additionally, to power up your the Moog, follow these simple steps:

  1. Also, find the power cord that came with your the Sub 37.
  2. Moreover, connect one end of the power cord to the power inlet located on the back panel of this synth.
  3. In addition, plug the other end of the cord into an AC outlet, making sure to use a power outlet that is compatible with your specific region’s standard voltage.

Connecting The Audio Out

Furthermore, to hear your sound, you need to connect the Moog’s audio out. However, to set it up, follow these simple steps:

  1. Additionally, find an audio cable that can connect to your monitor speakers or audio interface.
  2. Also, connect one end of the audio cable to the output jack located on the back panel of the Sub 37.
  3. Moreover, connect the other end of the audio cable to the input jack on your monitor speakers or audio interface.

Connecting Midi Devices

In addition, you can even connect your MIDI devices to your this synth to get the most out of your synthesizer. Here’s how:

  1. Furthermore, find a MIDI cable that can connect to your MIDI device like a keyboard.
  2. Additionally, connect one end of the MIDI cable to the MIDI OUT jack located on your MIDI device.
  3. Also, connect the other end of the MIDI cable to the MIDI IN jack located on the back panel of the Moog.

That’s it! By following these simple steps, you’ll be ready to start creating and tweaking sounds with your the Sub 37 in no time.

How To Create Sounds With Moog Subsequent 37

Credit: www.youtube.com

Understanding The Controls

Moreover, learn how to create amazing sounds with this synth by understanding its controls. Then, with this synth, you can unleash your creativity and experiment with different settings to produce unique and dynamic sounds.

If you are a music enthusiast, you may have heard about the Moog, a powerful analog synthesizer that is quickly gaining popularity among musicians. In short, the Sub 37 is versatile, and it can be used to create sounds across a wide range of genres. In this article, we will explore how to create sounds with this synth, focusing on understanding the controls.

Knobs And Switches

At the heart of the Moog is the panel of knobs and switches that control the various parameters of the synthesizer. Similarly, these knobs and switches allow you to shape and mold your sound to your liking. Some of the essential knobs and switches on the Sub 37 include:

Knob/SwitchFunction
Oscillator 1&2 knobsControls the pitch and waveform for each oscillator
Filter knobsControls the cutoff frequency and resonance of the filter
Envelope knobsControls the attack, decay, sustain, and release of the envelope
LFO knobsControls the rate, amount, waveform, and destination of the LFO
Modulation knobsControls the amount and polarity of modulation from various sources
Arpeggiator/Sequence switchesTurns on/off arpeggiator or sequencer, allowing for complex rhythmic patterns

Oscillators

The oscillators are the sound generators for this synth. Also, there are two oscillators, and you can switch between different waveforms, including sawtooth, square, triangle, and more. You can also control the pitch of each oscillator using the corresponding knob. By detuning the oscillators, you can create a more complex sound with a wider range of frequencies.

Envelopes

Envelopes are what give a sound its shape over time. In addition, the Moog has two envelopes, one for the filter and one for the amplitude. Each envelope has four stages: attack, decay, sustain, and release. Attack is the time a sound takes to reach full volume. Decay is the time it takes to fall to the sustain level. Sustain is the level held until you release the key. Release is the time from sustain to silence. By adjusting the envelope parameters, you can create sounds that evolve over time.

Lfos

The LFO (Low-Frequency Oscillator) is a waveform that operates at a frequency below the audible range. For example, the LFO can be used to modulate various parameters of the Sub 37, such as the filter cutoff, oscillator pitch, and more. You can control the rate of the LFO using the corresponding knob, and you can choose from a variety of waveforms, including triangle, sawtooth, square, and more. By routing the LFO to different destinations, you can create complex, evolving sounds. In conclusion, this synth is a powerhouse of a synthesizer, with a wealth of controls to explore. Understanding the controls is essential when it comes to creating unique and interesting sounds. By experimenting with the oscillator, envelope, and LFO parameters, you can create sounds that are truly your own.

Creating Your First Sound

If you’re new to synthesisers, the Moog is a great place to start honing your sound design skills. Creating your own sounds can be a fun yet challenging process, but with the right guidance, you’ll be creating professional-level sounds in no time. As a result, in this post, we’ll take you through the process of creating your first sound with the Sub 37.

Choosing A Preset

Before you get started creating your own sound, it’s a good idea to familiarize yourself with the pre-existing presets on the Moog Subsequent 37. However, this will give you an idea of the range of sounds the synth is capable of producing. To choose a preset:

  1. Press the ‘PRESET’ button on the right-hand side of the control panel
  2. Turn the ‘PRESET’ knob to scroll through the presets
  3. Select a preset by pressing the ‘LOAD’ button

Adjusting Parameters To Modify The Sound

Once you’ve selected a preset, you can dive deeper into sound design by modifying the parameters to create your unique sound. Then, here are some of the essential parameters you can adjust on the Moog Subsequent 37:

ParameterDescription
OscillatorsYou can adjust the waveform, frequency, and amplitude of each oscillator to create the basic sound of your patch
FilterThe filter is a critical component of the subtractive synthesis process. You can adjust cutoff frequency, resonance, and filter type.
EnvelopesEnvelopes shape the sound by controlling the volume and modulation of the oscillators and filter over time. You can adjust attack, decay, sustain, and release parameters.
ModulatorsModulators can be used to add movement and complexity to your sound. The Moog Subsequent 37 offers two modulators—an LFO and an onboard arpeggiator. You can adjust the rate, depth, and waveform of each modulator.

Once you’ve adjusted the parameters to your liking, don’t forget to save your new sound by pressing ‘STORE’ and choosing an available preset location.

Congratulations! In short, you’ve created your first sound on the Moog Subsequent 37. Experiment with different presets and parameter settings to continue exploring the potential of this fantastic analogue synth.

Exploring Sound Design Techniques

Get ready to enhance your sound design skills as we show you how to create unique sounds using the Moog Subsequent 37. Similarly, with this powerful synthesizer, you can experiment with various effects, filters, and modulation techniques to produce sounds that stand out from the crowd.

Exploring Sound Design Techniques: Moog Subsequent 37 is one of the best analog synthesizers used by sound designers and professionals to create high-quality sounds. Also, it features 37 keys, two-note polyphony, and a rich array of modulation and expansion options. In this article, we’ll explore some of the sound design techniques that you can use to create unique sounds with Moog Subsequent 37. Adding Filter Modulation: Moog Subsequent 37’s filter modulation allows you to create dramatic, dynamic, and expressive sounds. The filter’s cutoff and resonance parameters can be modulated using the LFO, Envelope Generator, and mod wheel.

Practical Tips for Moog Subsequent 37

To add filter modulation to your sound, follow these steps: 1. In addition, select the filter you want to modulate. 2. Turn the LFO, Envelope Generator, or mod wheel knobs to add modulation. 3. Adjust the cutoff and resonance parameters to fine-tune the effect. Using Overdrive and Distortion: Moog Subsequent 37’s overdrive and distortion features are perfect for creating gritty, aggressive, and raw sounds. Overdrive adds subtle harmonic warmth to your sound, while distortion creates a more aggressive and distorted effect. To use overdrive and distortion, follow these steps: 1. Select the oscillator you want to overdrive or distort. 2.

Turn the overdrive or distortion knob to add the effect. 3. For example, adjust the output level to balance the effect with the rest of your sound. Creating Articulations with the Modulation Wheel: Moog Subsequent 37’s modulation wheel is a powerful tool for creating expressive and nuanced sounds. The modulation wheel can be assigned to any parameter in your synth, allowing you to create a wide range of articulations and effects. To create articulations with the modulation wheel, follow these steps: 1. Select the parameter you want to assign the modulation wheel to. 2.

Putting It Into Practice

Turn the modulation wheel amount knob to set the range of modulation. 3. As a result, use the modulation wheel to add expressive articulations to your sound. In conclusion, exploring sound design techniques with Moog Subsequent 37 is a great way to create unique and expressive sounds. Filter modulation, overdrive, distortion and mod wheel articulations are just a few techniques. Each one can push your sound design further.

Advanced Sound Design

If you are looking to take your sound design to the next level, the Moog Subsequent 37 is a must-have synthesizer. However, with its advanced features, you can create unique and complex sounds that will make your music stand out from the rest. In this article, we will explore some of the advanced techniques you can use to create sounds with the Moog Subsequent 37.

Using External Audio As A Sound Source

The Moog Subsequent 37 allows you to use external audio as a sound source, which can be a game-changer for your sound design. Then, by using external audio, you can add unique textures and layers to your sounds. To use external audio, connect your source to the external audio input. Then set its level in the mixer section.

Creating Layered Sounds

Layered sounds can add depth and complexity to your music. In short, with the Moog Subsequent 37, you can easily create layered sounds by using the two-note paraphonic mode. To create a layered sound, simply activate the two-note paraphonic mode and play two different notes. You can then adjust the volume of each note using the mixer section.

Creating Sequences With The Arpeggiator

The Moog Subsequent 37 features a powerful arpeggiator that can be used to create complex sequences. Similarly, to use the arpeggiator, simply select a preset or create your own sequence. You can then adjust the rate, duration, and octave range of the sequence to create unique and intricate patterns.

By using these advanced techniques, you can take your sound design to the next level and create sounds that are truly unique. Also, the Moog Subsequent 37 is a powerful tool for any musician or producer looking to create innovative and original music.

Recording And Performing With The Moog Subsequent 37

Discover the beauty of creating unique sounds with the Moog Subsequent 37 – a powerful and versatile synthesizer perfect for both recording and performing. In addition, experiment with different waveforms, filters, and modulation options to create customized sounds that will elevate your music to the next level.

Moog Subsequent 37 is a monophonic analog synthesizer designed for creating unique sounds with high-quality sound output. This synthesizer offers multiple features to enhance your recording and performing experience.

Recording Midi And Audio

Recording MIDI and audio with Subsequent 37 is a straightforward process, thanks to its built-in MIDI and USB connectivity options. You can connect your keyboard, computer device, or another MIDI device to the synthesizer for recording. Additionally, Subsequent 37 offers various types of audio inputs to capture external audio sources such as microphones, guitars, or bass. To record MIDI, ensure that your MIDI device is connected to the Synthesizer through the MIDI In/Out ports. After selecting the right MIDI channel, you can proceed with recording your MIDI tracks by pressing the ‘Record’ button on your DAW software. Recording Audio is also simple by selecting the ‘Audio Input Source’ from the Synthesizer’s settings menu. You can record your desired sounds by adjusting the levels and parameters. Alternatively, you can connect an external audio interface to enhance your recording quality.

Performing Live With The Moog Subsequent 37

Subsequent 37 is an ideal choice for live performances because of its robust build quality, easy to use interface, and versatile sound options. The synthesizer offers a range of performance features such as Arpeggiator, Glide, and LFO for creating dynamic and engaging sounds. To perform live, you can connect your Subsequent 37 to your amp or mixer through the audio outputs. You can also use the built-in USB port to connect your Synthesizer to your computer for additional controls and effects.

Subsequent 37 also offers various performance modes, such as Mono and Duo modes, for creating unique sounds with your performance. Additionally, the Keyboard can be split into two sections for playing different sounds simultaneously. In conclusion, Moog Subsequent 37 is a versatile synthesizer that offers multiple features for recording and performing. With its multiple connectivity options and performance features, you can unleash your creativity and create unique sounds for your music projects.

How To Create Sounds With Moog Subsequent 37

Credit: www.youtube.com

Frequently Asked Questions On How To Create Sounds With Moog Subsequent 37

Does The Moog Subsequent 37 Have A Sequencer?

Yes, the Moog Subsequent 37 has a sequencer.

What Is Moog Subsequent 37 Good For?

Moog Subsequent 37 is great for creating unique and powerful sounds ideal for diverse music genres. It boasts a classic design, intuitive interface, and advanced features such as sequencer, arpeggiator, and preset storage. Whether you’re a beginner or an experienced musician, this synthesizer can help you produce high-quality and versatile music.

Does Moog Subsequent 37 Have Presets?

Yes, Moog Subsequent 37 has presets which allow for quick and easy access to previously saved sound configurations.

Is Moog Sub 37 Discontinued?

Yes, the Moog Sub 37 has been discontinued, but it has been replaced by the Moog Subsequent 37 CV.

Conclusion

Finally, mastering the art of creating sounds with Moog Subsequent 37 can take some time and practice, but the reward is worth it. With this synthesizer, you can create a variety of sounds that can transport you to a different space.

By playing with the different controls and exploring the different modes, you can create sounds that are unique and personalized. Don’t be afraid to experiment and try new things. With enough time and effort, you’ll be creating soundscapes that you never thought possible.

Keep practicing and have fun!

Categories
Archive

Difference Between Peak And Rms Compression

Peak compression limits the loudest parts of an audio signal, while RMS compression reduces the overall volume level. Peak compression is focused on the loudest parts of the signal, while RMS compression affects the entire signal’s volume.

Compression is a crucial tool for controlling the dynamic range of audio signals. When producing music or editing audio for video, it is essential to understand the differences between peak and RMS compression. Peak compression is used to reduce the highest peaks of the audio signal, preventing distortion or clippings, while RMS compression is used to smooth out the entire signal to maintain a consistent volume level.

We will explore the differences between peak and RMS compression in more detail, including when to use each type and how to achieve the desired effect.

The Basics Of Compression

Peak and RMS compression are two different methods for reducing the dynamic range of audio signals. Peak compression is used to reduce the level of loud sounds while RMS compression is used to reduce the dynamic range of a signal, maintaining the overall volume level.

Understanding when and how to use each can improve the quality of audio recordings.

If you are working with audio, then compression is an essential tool to consider. It’s one of the most popular processors in the production process, but it can be a bit daunting at first. Among the different types of compressions, there are two ways that you can compress audio: Peak and RMS compression. So let’s find out more about these types of compression.

What Is Compression?

Compression is a technique that reduces the dynamic range of audio signals. In simpler terms, it makes the quieter parts of an audio signal louder while keeping the louder parts at the same level. The goal is to level out the audio and make the overall volume more consistent. This makes it easier to hear everything, especially in complex mixes where elements can easily get lost.

Why Is Compression Used?

Compression is used for a variety of reasons. One of the primary reasons to use compression is to improve the overall sound quality of the audio signal. Compressed audio sounds more professional and polished. Moreover, it can also be used to prevent distortion. When signals get too loud, they can clip, leading to distortion. Compression keeps the audio levels in check, preventing clipping and distortion.

Peak Vs Rms Compression

When deciding to use compression, the two common types to consider are peak and RMS compression. Peak compression only compresses the loudest parts of the signal. It leaves the lower-level signals unaffected, making it well-suited for percussive sounds such as drums. RMS compression, on the other hand, compresses the entire range of the audio signal. It is more subtle and can be used to control the overall dynamics of multiple instruments. Both types have their place, and which one you should choose depends on your needs. A good rule of thumb to follow is to use peak compression for elements such as drums that need more control, and use RMS compression to master the complete mix. In conclusion, understanding the difference between peak and RMS compression can be crucial for audio professionals. Choose what works for your audio signal, keeping in mind that both options give different results, and use them wisely.

Difference Between Peak And Rms Compression

Credit: www.mixinglessons.com

Peak Compression

When it comes to audio compression, two types are commonly used – peak compression and RMS compression. Both have their own set of benefits and drawbacks, making it essential to understand the differences between the two.

How Peak Compression Works

Peak compression is a type of audio compression that reduces the amplitude of the audio waveform when it exceeds a specific threshold, known as the peak level. It essentially “chops off” any peaks above the threshold, ensuring that the resulting audio level does not exceed the threshold. While peak compression can result in a more punchy and exciting sound, it is also known to cause distortion and can result in a loss of transient detail.

Pros And Cons Of Peak Compression

Like any other audio processing technique, peak compression comes with its set of advantages and disadvantages.

ProsCons
Helps to maintain a consistent volume levelCreates an exciting and punchy soundCan cause distortionMay result in a loss of transient detail

Overall, peak compression can be an effective tool in achieving a desired sound, but it should be used judiciously and not overused.

Rms Compression

Peak and RMS compression are two fundamentally different techniques of audio compression. Peak compression reduces the amplitude of audio signals, whilst RMS compression reduces the overall level, dynamically.

If you are involved in audio production and looking for ways to control your sound levels with compression, you might have come across two popular types of compression: peak and RMS (Root Mean Square). In this section, we will focus on RMS compression.

How Rms Compression Works

Unlike peak compression that reduces the amplitudes of the loudest parts, RMS compression reduces the overall volume of the audio signal. RMS compression is calculated using the RMS level of the signal, which is measured by squaring each sample, averaging the resulting values, and taking the square root of that average. The compressor applies gain reduction according to the RMS level, providing consistent volume control. RMS compression is desirable for its ability to maintain a more natural sound, as it reduces the overall gain of the signal without altering its peak levels drastically.

Pros And Cons Of Rms Compression

RMS compression is widely used in mastering and broadcast processing because it can provide smooth volume control and maintain the overall balance of the mix. It is especially useful when dealing with audio with a large dynamic range. Here are some of the pros and cons: Pros:

  • It maintains a more natural sound.
  • It allows for consistent volume control.
  • It can handle large dynamic range audio.

Cons:

  • It may not be suitable for all types of audio as it lowers the overall volume.
  • It’s not effective when there are only a few loud peaks in the audio.
  • It can cause pumping and breathing artifacts if the attack and release settings are not properly adjusted.

In conclusion, RMS compression is a useful tool for audio engineers and producers who want to maintain the overall dynamic balance of the audio signal while controlling the level. It is important to note that while RMS compression can do wonders on the right type of audio, it is not a one-size-fits-all solution to every mix.

Difference Between Peak And Rms Compression

Credit: www.pianoforproducers.com

Comparing Peak And Rms Compression

Peak compression and RMS compression are two different types of audio compression methods. Peak compression focuses on reducing the gain of the loudest peaks in the audio signal, while RMS compression works by reducing the gain of the entire audio signal based on its average loudness level.

Understanding the difference between these two compression methods is essential for achieving optimal audio processing.

Differences Between Peak And Rms Compression

It’s important to understand the differences between peak and RMS compression in audio engineering. Peak compression reduces the amplitude of signals that exceed a certain threshold, while RMS compression averages out the amplitude over time and reduces the overall volume. Both types of compression are used in different situations and have their own unique benefits. Peak compression is best suited for controlling sudden, sharp spikes in audio volume, such as when a vocalist belts out a high note. RMS compression, on the other hand, is more suited to controlling the average volume level of a track, such as when blending and balancing instruments in a mix.

Which One Should You Use?

The choice between peak and RMS compression depends on the specific needs of your audio track. If you want to control sudden volume spikes, peak compression should be your go-to. On the other hand, if you need to control the overall volume of a track, RMS compression is the way to go. In some cases, you may even use both types of compression in combination to achieve the desired dynamic range.

Examples Of Peak And Rms Compression In Action

To better understand the differences between peak and RMS compression, let’s look at some examples. A track featuring a live drum kit may have peaks that are too loud and distracting. By using peak compression, you can tame those peaks and achieve a more balanced sound. On the other hand, a track with a variety of instruments may require RMS compression to bring everything together and control the overall volume. This is particularly important when working with genres such as rock or metal, where the individual instruments may be very loud and need to be balanced against each other. In summary, both peak and RMS compression are useful tools in audio engineering. The choice between the two depends on the specific needs of the track you are working on. By understanding the differences between the two and how they can be used in combination, you can achieve a professional, polished sound for your music.

Difference Between Peak And Rms Compression

Credit: www.mixinglessons.com

Frequently Asked Questions Of Difference Between Peak And Rms Compression

What Is The Difference Between Peak And Rms?

Peak refers to the maximum amplitude of a waveform, while RMS is the square root of the average power in the waveform. Peak is a measurement of the highest point of a signal, while RMS measures the average voltage over time.

What Is The Difference Between Rms And Peak Limiter?

RMS limiter reduces a signal’s average power to a specific level, while a peak limiter reduces the signal’s maximum amplitude to a set limit. RMS limiter controls the dynamic range, while peak limiter avoids distortion by keeping the peaks under control.

What Does Rms Stand For Compressor?

RMS stands for Root Mean Square in compressor terminology. It’s a method of measuring the compressor’s output power. The RMS value takes into account both the peak and low levels of the compressor’s output wave, and it’s a more accurate representation of the compressor’s power than peak or maximum output ratings.

What Is The Difference Between Rms And Peak Expander?

RMS and peak expanders are both audio processors commonly used in music production. The RMS expander adjusts the overall loudness of a signal, while the peak expander targets and enhances the peaks of the signal. The main difference between the two is that RMS expanders affect the entire signal, whereas peak expanders only target peaks.

Conclusion

Compression is an essential tool in the world of audio production. Understanding the difference between peak and RMS compression is crucial for a clear understanding of music dynamics and production. RMS compression helps maintain a more consistent balance, while peak compression controls the peaks and can be used for creative effect.

Both have their strengths and weaknesses, and the right choice depends on the specific needs of the production. With a solid understanding of these two compression methods, producers can create music that will captivate their listeners and stand the test of time.

Categories
Archive

How To Keep Reverb From Overwhelming Your Mix

To keep reverb from overwhelming your mix, use EQ to remove any excess low-end frequencies and adjust the reverb’s decay time. By doing so, you can create more space and separation in your tracks without muddying the sound.

Reverb can add depth and dimension to a track, but too much of it can easily dominate and mask important elements, leading to a cluttered and unfocused mix. Learning how to effectively manage reverb is a crucial skill for any audio engineer or producer.

We’ll discuss several strategies for controlling reverb, including using EQ to remove unwanted frequencies, adjusting decay time, and utilizing different types of reverb. Through a combination of these techniques, you can achieve a clear and balanced mix with just the right amount of reverb.

How To Keep Reverb From Overwhelming Your Mix

Credit: www.practical-music-production.com

Understanding Reverb

Understanding reverb is crucial for balancing and enhancing the sound of your mix. To prevent reverb from becoming overwhelming, use it sparingly and pay attention to its decay time, EQ, and placement in the stereo field.

Reverb Basics

Reverb is an essential element of mixing music. Understanding reverb is vital to prevent over-reverb or under-reverb in your mix. Reverb gives a sense of space and depth to the sound, and it’s the reason why recordings sound like they were made in a specific room or hall. It’s essential to know that using too much reverb can make your mix sound muddy, and too little can result in a dry and artificial-sounding mix. To utilize reverb effectively, we need to understand its basics.

Different Types Of Reverb

There are different types of reverb, and they all vary in sound and decay time. The most common types are room, hall, plate, spring, and chamber reverb. Room reverb refers to the sound of a smaller space such as a bedroom or rehearsal room. Hall reverb, on the other hand, refers to a larger, more spacious area and is useful for simulating larger spaces such as concert halls. Plate reverb is a type of artificial reverb that uses a metal plate to create reverb effects, while spring reverb uses a spring for simulation. The chamber reverb is another type of artificial reverb that simulates reverberation in a small booth or chamber.

Using Reverb

To get the most out of your reverb, you should take some time to experiment with different types and amounts of reverb. For example, if we want to create an intimate, dry sound, it’s best to use a smaller room or plate effect with less decay time. However, if we want to create a more epic or cinematic sound, it’s best to use a longer decay time with a larger hall or chamber effect. Using reverb the right way allows us to create a sense of depth and space to our mix, making it sound more professional and polished.

Avoiding Over-reverb

It’s important to use reverb in moderation. Too much reverb can result in a muddy and overpowering mix. As a rule of thumb, try to add reverb to individual tracks, keeping the overall mix in mind. It’s also important to listen to your mix using different environments, such as a car stereo or earphones, to check if the reverb is too much. Additionally, it’s helpful to use EQ to cut off the low end of the reverb track, keeping the mix balanced.

Conclusion

Understanding reverb is essential for creating a good mix. Knowing the basics and different types of reverb and using it in moderation can elevate your mix to the next level. By experimenting with different types and amounts of reverb, you can create a unique and professional sound that will stand out.

How To Keep Reverb From Overwhelming Your Mix

Credit: bedroomproducersblog.com

Why Reverb Can Overwhelm Your Mix

If you’re a music producer or sound engineer, you would know the importance of reverb in adding depth and space to your mix. However, if not used correctly it can easily get out of hand and become overwhelming to the point where it muddies up your mix. Let’s explore why reverb can become an issue and how to solve it.

Reverb Layering

One of the most common reasons for reverb overwhelming your mix is due to layering. If you keep adding layers of reverb to different parts of the mix without a proper plan, it can result in an excess of reverb and muddy up the entire mix. It is important to keep in mind how different instruments and sounds would react to the reverb, and make use of only apt amount of reverb space to those instruments.

Reverb Conflicting With Other Effects

Another reason for reverb taking over your mix is because it is clashing with other effects, like delay or chorus. All of these effects are meant to complement each other, but sometimes reverb can be overly dominant in a way that it is competing against the other effects in the mix and creating chaos in the overall sound. Make sure that the levels of different effects in your mix are well balanced so that each of them are able to add to the overall ambiance instead of creating a conflict.

Conclusion

When you’re working with reverb, it is necessary to pay attention to its use. Reverb can be a great way to give your mix some space and depth but when overused it can easily cloud the entire mix. By being aware of the different instances in which reverb can become overwhelming, you can prevent it from interfering with your mix and produce a final product that sounds clean and of good quality.

Strategies For Taming Reverb

Taming reverb in a mix can be a challenge, but it is crucial to maintain clarity and balance. Strategies include adjusting the reverb level, adding EQ and compression, using shorter decay times, and incorporating automation to control the reverb’s impact.

Reverb is an essential tool for creating depth and space in a mix. However, it can quickly become overwhelming if not tamed properly. Here are several strategies for controlling reverb and keeping it from taking over your mix.

Eqing Reverb

One way to control reverb is by EQing it. By removing unwanted frequencies from reverb, you can ensure that it complements the mix without interfering with other elements. Here’s how to do it:

  1. Create a send track for your reverb
  2. Insert an EQ plugin on the send track
  3. Use a high-pass filter to remove low-end frequencies
  4. If necessary, use a low-pass filter to remove high-end frequencies
  5. Adjust the EQ settings until the reverb complements the mix without overwhelming it

Using Sidechain Compression

Another effective strategy for controlling reverb is by using sidechain compression. By sidechaining the reverb to a specific track, you can ensure that it only comes through when that track is playing. Here’s how to do it:

  1. Create a send track for your reverb
  2. Insert a compressor plugin on the send track
  3. Route the sidechain input to the track you want the reverb to come through
  4. Set the compressor settings to reduce the reverb volume when the sidechain track is playing
  5. Adjust the compressor settings until the reverb complements the mix without overwhelming it

Using Volume Automation

Volume automation is a great way to control the level of the reverb throughout the song. By automating the send level of the reverb, you can ensure that it only comes through at the appropriate times. Here’s how to do it:

  1. Create a send track for your reverb
  2. Draw in automation for the send level on the send track
  3. Adjust the send level to ensure that the reverb complements the mix without overwhelming it
  4. Make sure the automation is consistent throughout the song
  5. Listen to the mix and make adjustments as necessary

By using these strategies, you can tame reverb and keep it from overwhelming your mix. Remember, reverb is a powerful tool, but like any effect, it must be used in moderation.

Mixing With Reverb In Mind

When mixing with reverb in mind, it’s important to keep it from overwhelming your mix. To achieve this, you should use different types of reverb for each instrument, set the pre-delay time appropriately, and use EQ to shape the sound.

Considering Reverb During Arrangement

When it comes to mixing with reverb in mind, it’s important to consider it during the arrangement phase. You should be aware of what tracks will receive reverb and what tracks will be kept dry. This will help in creating a cohesive sound and avoid the reverb from overwhelming the mix. To achieve this, start by identifying the primary instruments of the track, such as lead vocals, guitars or piano. These tracks shouldn’t have excessive reverb, as this can make the mix sound fuzzy. The other supporting tracks such as electric guitars and drums must receive reverb to create a sense of space.

Creating Space With Reverb

Reverb is excellent for creating a sense of space in your mix; it gives the track a feeling of depth. However, too much reverb can make the mix sound muddy and unclear. To keep reverb from overwhelming the mix, You should use EQ (Equalizer) to cut out any unwanted low frequencies before adding reverb. It helps in controlling the frequency range and reducing muddiness in the mix. Furthermore, You should adjust the reverb settings such as early reflection, decay time and the size of the room to emphasize the desired character of the track. Another essential ingredient to consider while working with reverb is to keep the mix balanced. You have to listen intentionally to the track and make sure the reverb is not overpowering any other instrument in the mix.

In Conclusion:

Mixing with reverb in mind is an excellent way of creating a well-balanced and spacious mix. But it requires careful consideration and experience. Follow these tips and keep in mind the arrangement and space while working with reverb. Remember to always listen to the mix with an intention to balance the reverb and ensure it compliments your mix.

Using Alternative Techniques

To avoid overwhelming reverb in your mix, try using alternative techniques such as EQ and compression to control the sound. Experiment with different settings to find the perfect balance and avoid overloading the track with too much reverb.

If you’ve been struggling to find a way to keep reverb from overwhelming your mix, using alternative techniques might be your solution. These methods can help you create a sense of space without resorting to reverb and keep your mix clean and clear. In this blog post, we’ll explore two of these techniques: using delay instead of reverb and creating ambience with other effects.

Using Delay Instead Of Reverb

Delay is a great alternative to reverb because it can add space without muddying up your mix. Rather than creating a continuous wash of sound, delay adds a series of distinct echoes that allow you to create a sense of depth and dimensionality. Here are a few tips for using delay instead of reverb:

  • Use shorter delay times for a tighter sound.
  • Increase the feedback to create a longer tail.
  • Experiment with different delay patterns, like ping-pong or reverse, to create interesting textures.

Creating Ambience With Other Effects

In addition to delay, there are a number of other effects you can use to create ambience in your mix. One example is chorus, which adds a sense of movement and dimensionality to your sound. Another is phaser, which can create a subtle swirling effect that enhances the width of your mix. Here are a few other effects you might consider:

  1. Flanger, which can add a sense of depth and movement.
  2. Tremolo, which can create a pulsing effect that adds energy to your mix.
  3. Filter sweeps, which can create a sense of movement and evolution by sweeping the frequency range of your sound.

Experimenting with these alternative techniques can help you achieve a clear and balanced mix without relying on reverb. Try incorporating them into your next project and see what kind of results you can achieve!

Common Mistakes To Avoid

When mixing a track, every sound and effect should be crafted carefully to ensure that the final product sounds cohesive and professional. Reverb is a commonly used effect that can add depth and texture to a track, but it can also quickly become overwhelming. In this post, we’ll explore some common mistakes to avoid when using reverb in your mix, so that you can achieve a balanced and polished sound.

Overusing Reverb

One of the most common mistakes when using reverb is overusing it. When every track in the mix has heavy reverb on it, the sound can become muddy and lose clarity. To avoid this, consider applying reverb sparingly, and only to tracks that you feel will benefit from it the most. For example, you might want to apply more reverb to a vocal track to create a sense of space, while applying less reverb to a bass track to maintain clarity and definition.

Avoid the temptation to use a “one-size-fits-all” approach to reverb, and instead, experiment with different levels and types of reverb to find what works best for each individual track in the mix.

Not Tailoring Reverb For Each Track

Another common mistake is not tailoring the reverb effect for each individual track. Each track in the mix has unique characteristics that require different levels and types of reverb. For example, a snare drum might sound best with a short decay time and a small room size, while a guitar might benefit from a longer decay time and a larger room size.

Take the time to experiment with different reverb settings for each track, and listen carefully to how they interact with the other elements in the mix. Adjust the decay time, room size, and other parameters until you find a reverb that complements the track and enhances its overall impact.

Summary

  • Avoid overusing reverb to prevent a muddy and overwhelmed mix.
  • Experiment with different levels and types of reverb on each track in the mix.
  • Tailor the reverb effect to each individual track to enhance its impact.

By avoiding these common mistakes and taking the time to carefully craft your reverb settings, you can achieve a clear and balanced mix that allows each element to shine. Remember, the key is to use reverb tastefully and thoughtfully, and to always keep the overall sound and impact of the track in mind.

Frequently Asked Questions Of How To Keep Reverb From Overwhelming Your Mix

How Do I Get Perfect Reverb Every Time?

To achieve perfect reverb every time, you should consider the following steps: 1. Choose the right reverb type. 2. Adjust the reverb parameters, such as decay and pre-delay. 3. Use EQ to shape the reverb. 4. Think about room size and reflective surfaces.

5. Experiment with different settings until you find the perfect balance.

Can You Have Too Much Reverb?

Yes, you can have too much reverb. Excessive reverb can make a mix sound muddy and unclear, masking important elements of the audio. It is important to find the right balance of reverb that enhances the mix without overwhelming it.

How Do You Control Reverb?

To control reverb, adjust the acoustic properties of your recording environment such as adding wall panels, sound absorbers, and bass traps. You can also use a directional microphone, record in a dead room, and add reverb digitally during the mixing process.

How Do I Make My Reverb Less Muddy?

To make your reverb less muddy, try adjusting the pre-delay, decay time, and EQ settings. Increasing the pre-delay time can help separate the reverb from the dry signal, while shortening the decay time can reduce muddiness. Use EQ to cut any excessive low frequencies and boost high frequencies.

Conclusion

Reverb can add depth and space to your mix, but it must be used in moderation to avoid overwhelming your music. Implementing a few simple techniques, such as using automation, using EQ to control frequencies, applying reverb to individual tracks, and using different types of reverb, can make a significant difference in the final mix.

Keep experimenting to find the perfect balance and remember that less is often more when it comes to reverb. With these tips, you can achieve a well-balanced mix that sounds professional and polished.

Categories
Archive

Do You Need Analog Hardware For Mixing

Analog hardware is not mandatory for mixing, but it can enhance the sound quality and add warmth to the final mix. Digital mixing tools and plugins can deliver similar results without the need for expensive analog gear.

Mixing is the process of blending individual tracks of a song into a cohesive, polished, and balanced mix that will sound great on any listening device. The mixing process can be done in the analog domain, using traditional hardware mixers and outboard gear, or in the digital domain, using software mixing tools and plugins.

Analog gear has been praised for imparting a warm, rich, and musical character to the sound, but it comes at a high cost, both in terms of money and space. On the other hand, digital mixing tools can provide a wide range of processing options, quick recallability, and improved workflow. Ultimately, the choice between analog and digital mixing depends on personal preference, budget, and the type of music you are working on.

Do You Need Analog Hardware For Mixing

Credit: m.youtube.com

The Importance Of Analog Hardware

Analog hardware has undeniable importance in mixing, as it provides a unique warmth and organic depth to sound that digital plugins cannot replicate. While it is possible to mix entirely in the digital realm, incorporating analog hardware can bring a level of character and texture that elevates the overall sonic quality.

Analog Vs. Digital Mixing

Analog and digital mixing both have their own benefits, but the former offers a unique warmth and depth to the audio that is unmatched by the latter. Digital mixing uses software plugins, whereas analog mixing involves manipulating sound through physical hardware. The difference between the two is in the way they process sound. Because analog processing is continuous, it helps to preserve the original sound and adds a certain characteristic that is highly desirable in the music industry.

Advantages Of Analog Hardware

One of the biggest advantages of using analog hardware for mixing is that it can produce a unique sound. Analog gear provides a natural compression that results in a more authentic sound. Also, the sound quality is not affected by the sample rate, as is the case with digital audio. Even though analog mixing can be more time-consuming and expensive, it is worth the investment if you need to create a truly distinctive sound. Moreover, physical contact of the mixer with knobs and sliders helps you have full control over the sound.

The Unique Qualities Of Analog Sound

Analog sound has unique qualities that are not found in digital mixing. Analog mixers often have harmonic distortion, which can add richness, depth, and character to the sound. Furthermore, analog hardware offers an inherent sound quality that is more organic than digital. Analog gear captures and processes sound in a way that is much closer to the way our ears and brain naturally perceive it. It has a warm and pleasant quality that digital audio sometimes lacks. The subtle nuances of analog sound create an immense impact that makes the listener glued to the music.

Digital Mixing Alternatives

Digital mixing alternatives provide a convenient and cost-effective way to achieve high-quality sound without the need for analog hardware. With advanced digital tools and plugins, mixing on a computer has become a popular choice for many music producers and engineers.

Digital mixing has taken over the music industry, and almost everyone is starting digital studios. With all the benefits that come with digital mixing, analog mixing in modern times may seem outdated. However, analog mixing is still relevant in today’s music industry because of its warm, rich sound. The question is, do you need analog hardware for mixing? The answer is no! There are several digital alternatives to analog hardware that can help you achieve a warm and rich analog-like sound. Here, we will explore two digital alternatives to analog mixing hardware- plugins and virtual effects, and digital emulation of analog sound.

Plugins And Virtual Effects

Plugins and virtual effects refer to software that you can use to achieve an analog-like sound when mixing your tracks. A plugin is usually designed to emulate the function of a specific piece of analog hardware (such as compressors, EQs, and reverbs), and it can be used within your digital audio workstation. Virtual effects, on the other hand, are standalone software that is used outside of your digital audio workstation. The benefit of using plugins over analog hardware is that they are less expensive, take up less physical space, and offer more flexibility. Moreover, plugins allow you to save our preferred settings, which you can reuse in the future, saving time and making the mixing process more efficient.

Digital Emulation Of Analog Sound

Digital emulation provides a host of benefits that can make mixing much faster and efficient than analog mixing. Analog emulation software can recreate the sound of an analog mixing desk or hardware unit, allowing you to work with a warm, rich analog-like sound in digital audio software. Digital emulation of analog sounds can simulate a wide range of hardware-based effects and mixing tools such as equalizers, compressors, and reverbs. Many top music production software companies offer digital emulation of analog sounds, which can be used within a digital audio workstation. In conclusion, analog hardware is still essential for some music producers that are pursuing a vintage sound, but digital mixing alternatives offer several benefits that can help producers achieve similar results. Plugins and virtual effects offer flexibility and affordability while digital emulation of analog sound offers the warmth and richness of an analog sound. Choose the alternative that best suits you based on your needs.

Factors To Consider

When it comes to mixing, there is an ongoing debate between analog hardware versus digital plugins. While both have their advantages and disadvantages, the decision ultimately comes down to personal preference and the specific needs of your project. Before investing in any equipment, it’s important to consider several factors to determine whether or not analog hardware is right for you.

Budget Constraints

One of the biggest factors to consider when deciding whether or not to use analog hardware for mixing is your budget. High-quality analog equipment can be expensive, and it’s important to calculate the cost-benefit ratio before making any purchases. You’ll need to weigh the benefits of analog hardware, such as warmth and character, against the cost of acquiring and maintaining the equipment.

Personal Preferences

Another crucial factor to consider is personal preference. Some people prefer the sonic characteristics of analog equipment, while others prefer the convenience and flexibility of digital plugins. There is no right or wrong answer, as the choice ultimately comes down to what sounds best to your ears and serves your specific needs.

Compatibility With Existing Equipment

Compatibility with your existing equipment is also a significant factor to consider. While analog hardware can add warmth and character to your mix, it can also introduce noise and inconsistencies. It’s important to make sure that your analog equipment is compatible with your existing setup, and that it can integrate seamlessly into your workflow. Keep in mind that some analog equipment requires additional signal processing, such as mic preamps or compressors, which can further complicate your setup.

Ultimately, the decision of whether or not to use analog hardware comes down to personal preference and the specific needs of your project. While it can add warmth and character to your mix, it can also be expensive and introduce complications. By weighing the benefits and drawbacks, you can make an informed decision that will help you achieve the sound you’re looking for.

Do You Need Analog Hardware For Mixing

Credit: m.youtube.com

Professional Opinions

Professional opinions on the topic of using analog hardware for mixing vary. Some producers and engineers swear by it, while others prefer to use digital plugins exclusively. In this post, we’ll take a closer look at what the pros have to say about the importance of analog gear in the mixing process.

Interviews With Producers And Engineers

We spoke with a handful of producers and engineers to get their take on whether or not analog hardware is essential for mixing. Here’s what they had to say:

NamePositionOpinion
Bob ClearmountainProducer/Mixer“I love working with analog gear because it gives me more control and precision over the sound. It’s like having an extra set of hands in the mix.”
Andrew SchepsProducer/Mixer“I think analog gear can be great in certain situations, but it’s not always necessary. With the advancements in digital technology, you can achieve great results without spending a fortune on hardware.”
Chris Lord-AlgeMixer“Analog gear is definitely a must-have for me. There’s a warmth and depth to the sound that you just can’t get with digital plugins.”

Industry Trends Towards Analog Hardware

While opinions on analog gear are divided, one trend that’s hard to ignore is the resurgence of analog in the music industry. In recent years, there’s been a renewed interest in vintage gear, with many producers and engineers seeking out classic pieces to add to their studios.

  • Companies like Universal Audio have developed analog emulations of classic gear, which have become popular tools for in-the-box mixing.
  • Many studios are investing in high-end analog equipment like Neve consoles and SSL compressors to give their clients the best possible sound.
  • Producers and engineers who specialize in genres like rock and metal are particularly fond of analog gear, as it allows them to achieve the aggressive and powerful sound these genres are known for.

Despite the benefits of analog gear, it’s clear that digital plugins have come a long way in recent years. With the right tools and techniques, it’s possible to achieve great results without ever setting foot in an analog studio. Ultimately, whether or not you need analog hardware for mixing comes down to personal preference and the needs of your particular project.

Do You Need Analog Hardware For Mixing

Credit: www.music-tech.com

Frequently Asked Questions For Do You Need Analog Hardware For Mixing

Do I Need An Analog Mixer?

It depends on your needs and preferences. If you want to mix several audio sources simultaneously and control the levels, effects, and EQ, an analog mixer can be helpful. Digital mixers offer advanced features and better connectivity but at a higher cost.

Ultimately, it depends on your budget, setup, and skill level.

Is Analog Mixing Better?

Analog mixing provides warmth to the sound, making it more natural and pleasing to the ears. It also allows for more hands-on control, resulting in a unique sound. However, digital mixing offers more precision and flexibility in editing. Ultimately, it depends on personal preference and the type of music being produced.

What Is The Difference Between Analog And Digital Mixers?

Analog mixers use electrical signals, while digital mixers process information through microchips. Analog mixers are known for their warmth and natural sound, while digital mixers offer advanced functionality and flexibility. Digital mixers are also easier to store and recall settings.

What Is Analog Mixing And Mastering?

Analog mixing and mastering refers to the process of using traditional analog equipment to balance and enhance audio recordings. This includes using hardware-based mixing consoles and outboard processing units. These analog techniques often bring a warm and natural sound to the recording, resulting in superior sonic quality compared to digital processing.

Conclusion

In the end, the answer to whether you need analog hardware for mixing depends on your personal preference. While some swear by analog equipment, others find success with digital tools. Ultimately, it’s about finding the right balance between control and ease of use.

Whether you choose to use analog hardware, digital tools, or a combination of both, what matters most is that you are comfortable and confident in your mixing process. Remember, no matter what tools you use, your ears are the most important asset in achieving great sound.

Categories
Archive

How To Use A Meter When Mastering Your Music

To use a meter when mastering your music, set the meter to measure peak levels and adjust the volume until the loudest parts of the music hit between -1dB and -0.5dB. Mastering a piece of music involves optimizing its sound quality, durability, and level.

A crucial step in the process is using a meter to check the levels and adjust the volume accordingly. Meters display the electrical signal of the music, indicating its volume and peak levels. By setting the meter to measure peak levels and adjusting the volume until the loudest parts of the music hit between -1dB and -0.

5dB, you can ensure that your music sounds great on any platform it’s played on. We will dive deeper into how to use a meter when mastering your music and discuss why it’s a crucial step in the mastering process.

Understanding Meters

Using a meter is essential when mastering your music, as it allows you to accurately measure aspects such as volume and frequency. Understanding the basics of using a meter can greatly improve the overall quality of your finished product.

Understanding Meters: Mastering your music can be a daunting task, especially if you are not familiar with the technical aspects of music production. One of the most important aspects of mastering is the use of meters. A meter is a tool used to measure the loudness of sound and the dynamic range of a track. In this blog post, we will discuss the different types of meters and how they are used in mastering. Different Types of Meters: There are several types of meters used in mastering, including peak, RMS, VU, and LUFS meters. Each of these meters has a different function and is used to measure different aspects of the sound. Peak Meters: Peak meters measure the maximum level of the signal. They are ideal for detecting loudness peaks and avoiding distortion. RMS Meters: RMS meters take into account the average level of sound over time. They are ideal for measuring the overall loudness of a track. VU Meters: VU meters are used to measure the average level of sound over a longer period of time. They are ideal for measuring the perceived loudness of a track. LUFS Meters: LUFS meters are used to measure the loudness of a track in accordance with international loudness standards. This meter is commonly used in broadcasting and streaming platforms. How Meters Measure Sound: Each meter measures sound differently, depending on its purpose. Peak meters, for example, measure sound levels by identifying the highest level of the signal. RMS meters measure sound by calculating the average level of the signal over time. VU meters measure sound by detecting the average level of the signal over a longer period of time. LUFS meters measure sound by comparing the perceived loudness of a track to its actual loudness. In mastering, it is important to use the right type of meter for the job. Using the wrong meter can lead to inaccurate readings and poor quality sound. By understanding the different types of meters and how they measure sound, you will be able to choose the right meter for your mastering needs. To conclude, metering is an essential tool in mastering your music. Understanding the different types of meters and how they measure sound is crucial in achieving the best quality sound possible. Whether you are using peak, RMS, VU, or LUFS meters, each has an important function in ensuring your tracks sound their best.

Preparing Your Track For Metering

To prepare your track for metering when mastering your music, it’s important to ensure it meets technical requirements. This includes setting appropriate gain levels and avoiding clipping, as well as utilizing EQ and compression to create a balanced mix. Using a meter can help you achieve optimal levels and avoid distortion in your final track.

Before mastering your music, you need to prepare your track for metering. Metering refers to the measurement of loudness levels and dynamics of your music. With a meter, you can measure the dynamic range and peak levels of your music. Proper use of a meter can help you avoid distortion and ensure optimal playback across various systems. Here are some helpful tips to prepare your track for metering.

Setting Proper Gain

Setting proper gain is the first step in preparing your track for metering. The gain stage sets the level of the signal, which affects the overall loudness of your track. You want to have enough headroom in your mix to avoid distortion. Aim for a peak level of around -6 dBFS to -3 dBFS to allow for enough headroom. Adjust the gain stage using a preamp or plug-in to achieve the desired level.

Using Eq To Optimize Your Track

Using EQ is an essential tool when preparing your track for metering. EQ adjusts the balance of frequencies across your track and can help avoid unnecessary peaks or resonances. Start by cutting any unwanted frequencies with a high-pass filter. Next, focus on the low-end to ensure it is balanced and not too boomy. Finally, use a spectrum analyzer to identify any peaks and eliminate them with surgical cuts.

Avoid Over-processing Your Track

You want to avoid over-processing your track during preparation for metering. Over-processing can lead to distortion, which affects the loudness levels. Use compression to even out the levels of your track, but be careful not to overdo it. Also, avoid using too much limiting, which can squash your mix and make it sound lifeless.

Conclusion

By following these tips, you can effectively prepare your track for metering. Setting proper gain, using EQ to optimize your track, and avoiding over-processing are essential steps in the process. With proper preparation, you can achieve optimal playback across various systems and ensure that your music sounds its best.

Using A Meter In Mastering

Using a meter when mastering your music is essential to producing a professional-quality sound. By monitoring the levels of your audio, you can ensure that your music has a balanced and consistent sound across all platforms and devices. Be sure to use a reliable and accurate meter to achieve the best results.

Mastering is a crucial step in music production that involves polishing and enhancing the final mix before releasing it to the public. Using a meter in mastering can help you achieve a balanced and professional sound. A metering tool measures the level and dynamic range of the audio signal, giving you a visual representation of the sound. This section will guide you on how to use a meter in mastering and optimize it for the best results.

Choosing The Right Metering Tool

Choosing the right metering tool is essential in achieving accurate readings. Various metering tools have different features and functionality, with some being more useful than others. One popular metering tool is the loudness meter, which measures perceived loudness as opposed to peak values. It is recommended to use a metering tool that supports various standards, such as LUFS, RMS, and True Peak. Some popular metering tools include:

  • iZotope Insight 2
  • Waves WLM Plus Loudness Meter
  • MeterPlugs K-Meter

Setting Your Meter For Correct Readings

Before using the meter, it is crucial to set it up for accurate readings. First, set the meter to measure the appropriate level. Most metering tools have presets, with -14 LUFS being the most common. It is also essential to set the meter’s integration time, which determines how the meter measures audio levels. A short integration time is ideal for fast transients, while a longer integration time works better for sustained sounds. Setting the meter correctly ensures that the readings are accurate and reliable.

Interpreting The Meter’s Readings

Once your meter is set up, you can now begin to interpret the readings. Loudness meters typically display values in LUFS, with a range of -23 to -7 being acceptable for music streaming services. RMS meters display the average energy of the audio signal, with -14 dB RMS being a common target for mastering. It is essential to refer to reference material to ensure your readings are within an acceptable range. Avoid solely relying on the meter and use your ears to make critical judgments on the sound. In conclusion, using a meter in mastering is an excellent way to achieve accurate and consistent sound. By choosing the appropriate metering tool, setting it up correctly, and interpreting the readings, you can achieve optimal results. Using a meter in mastering is not a substitute for your ears, but it can provide valuable information that can help you create high-quality music.

How To Use A Meter When Mastering Your Music

Credit: m.youtube.com

Using Metering To Adjust Dynamic Range

Using a meter when mastering your music can help you achieve the best possible sound quality. When it comes to making sure that your music has the perfect dynamic range, metering is essential. Here, we will walk you through how to use metering to adjust dynamic range so you can create the best-sounding music possible.

Understanding Dynamic Range

Dynamic range refers to the range of volume levels in your music, from the quietest to the loudest parts. The goal of metering is to ensure that the dynamic range is appropriate for your track. Too narrow of a range can cause your music to sound flat and lifeless, while too wide of a range can result in distortion and an unbalanced mix.

Using Meter Readings To Adjust Levels

The first step in metering to adjust dynamic range is to get a proper meter reading. This can be done in a few different ways, such as using a peak meter or a VU meter. A peak meter will show the highest level your track reaches, while a VU meter will show you the average level. Both types of meters can be useful depending on your specific needs.

Once you have your meter reading, you can adjust the levels on individual tracks to ensure that they are within the appropriate dynamic range. This can be done by increasing or decreasing the volume on specific tracks, using compression to even out the levels, or adjusting EQ to make sure that each instrument fits properly in the mix.

Remember, the goal of using metering to adjust dynamic range is to ensure that your music has a balanced sound, with each instrument and track fitting properly together. Don’t be afraid to experiment and try different techniques until you find the perfect sound for your music.

Using Metering For Stereo Imaging

Metering can be a useful tool when mastering music, especially for achieving better stereo imaging. By using a meter to measure the width of the stereo field, you can make adjustments to ensure that your mix is balanced and sounds great on any playback system.

If you’re looking to create a professional-sounding mix, then using metering for stereo imaging is a crucial step in the process. Stereo imaging refers to the width and depth of your mix, and the goal is to create a balanced stereo image that sounds natural and pleasing to the ear.

How To Read A Stereo Meter

Before you can adjust your stereo image, you need to know how to read a stereo meter. With a stereo meter, you can see exactly where your audio sits in the stereo field. The most common types of stereo meters are the correlation meter and the vector scope. The correlation meter displays the correlation between the left and right channels and ranges from -1 to 1. If the meter reads -1 or 1, then your audio is completely mono. If it reads 0, then your audio is completely stereo. The vector scope shows the direction and level of your audio’s stereo image. If your audio is panned hard left, then the vector will be on the left side of the scope. If it’s panned hard right, then it will be on the right side of the scope.

Adjusting Stereo Image With Meter Readings

Now that you know how to read a stereo meter, you can start adjusting your stereo image to create a more balanced and natural sound. If you see that your audio is panned too far left or right, then you can adjust the pan of the track to bring it closer to the center. If your audio is too wide, then you can use a stereo imaging plugin to narrow the stereo image. Conversely, if your audio is too narrow, then you can use the same plugin to widen the stereo image. In addition, you can use EQ to adjust the stereo image. For example, if the low end of your mix is too wide, then you can use a high-pass filter to remove some of the low end from the sides. Overall, using metering for stereo imaging is a crucial step in the mastering process. By understanding how to read a stereo meter and adjust your stereo image accordingly, you can create a more balanced and professional-sounding mix.

How To Use A Meter When Mastering Your Music

Credit: www.masteringthemix.com

Using Metering For Frequency Balancing

Frequency balancing is a crucial part of music mastering, as it ensures that all elements of a track are heard equally. Using a meter for frequency balancing can help you achieve a more balanced sound in your production.

Understanding Frequency Balance

Before diving into using meter readings to balance frequencies, it’s important to have a basic understanding of frequency balance. Frequency balance refers to the distribution of frequencies in a piece of music. In simpler terms, it means ensuring that all elements of a track are heard equally. Every instrument and sound has its place in the frequency spectrum, and balancing them can help to avoid any sounds being buried in the mix and create a more professional sound.

Using Meter Readings To Balance Frequencies

Using meters can help you visualize the frequency distribution of your music and identify any problem areas that need to be addressed. The most commonly used meter for frequency balancing is the FFT meter, which displays the amplitude of each frequency band in real-time.

To use a meter for frequency balancing, start by analyzing your mix with the meter. Look for any frequency areas that appear too high or too low in amplitude. Once you identify these areas, you can adjust the levels of individual tracks or apply EQ to rebalance the spectrum.

It’s worth noting that while using meters is an important tool for achieving a balanced mix, it’s important to use your ears as well. Don’t rely solely on the readings from meters, as they can sometimes be misleading. Take the time to listen to your mix and make any necessary adjustments to ensure every element sounds clear and present.

How To Use A Meter When Mastering Your Music

Credit: www.masteringthemix.com

Frequently Asked Questions For How To Use A Meter When Mastering Your Music

How Do You Use Mastering Metering?

Mastering metering is a crucial process in audio production. It involves adjusting the levels of sound elements to ensure they’re consistent and balanced. To use mastering metering, you need to use audio metering tools like peak meters, RMS meters, and LUFS meters.

These tools allow you to monitor various aspects of your audio levels and make adjustments accordingly.

Is 10 Lufs Too Loud?

No, 10 LUFS is not too loud. In fact, it’s a standard loudness level for broadcasting and streaming audio. However, it’s important to tailor the loudness level to the specific platform and context in which your content will be played.

How Loud Should My Mastered Song Be?

A mastered song’s loudness should be between -14 and -8 LUFS (Loudness Units Full Scale). This range maintains the song’s dynamic range and keeps it compatible with most playback systems. It’s important to consider the genre and intended audience when determining the ideal loudness for a song.

What Is A Lufs Meter?

A LUFS meter is a tool used in audio production to measure the loudness of a sound or music piece. It determines the audio levels based on the ear’s response to different frequencies. It helps in ensuring that audio is consistent and appropriate for different platforms and audiences.

Conclusion

So there you have it. We hope this article gave you a detailed understanding of mastering techniques using a meter in the music production process. Remember to always use high quality and calibrated meters, and pay attention to the dynamics of your music.

Mastering is a crucial element to making your music sound professional and stand out in today’s industry. Incorporate these techniques into your workflow, and you’ll be sure to achieve the results you desire. Happy mastering!

Categories
Archive

Is Waves Silk Vocal The Soothe 2 Killer

No, Waves Silk Vocal is not the Soothe 2 killer. Both plugins have their unique features and benefits.

Waves Silk Vocal and Soothe 2 are two different vocal plugins that offer distinct features. Waves Silk Vocal is specifically designed to enhance the vocal presence in a mix, providing an all-in-one solution for vocal processing. It features six different processors that can be used to add warmth, clarity and depth to vocal tracks.

On the other hand, Soothe 2 is a dynamic resonance suppressor that can be used to reduce harshness and sibilance in vocals. It dynamically detects and removes harsh resonances in real-time, making it a powerful tool for achieving a smooth and polished vocal sound. While both plugins can be used for vocal processing, they have different functions and are not interchangeable.

The Benefits Of Waves Silk Vocal For Music Production

Waves Silk Vocal is a powerful tool for music producers to enhance the vocal tracks. With its advanced algorithms, it can effectively reduce unwanted harshness and sibilance, while retaining the natural character of the vocals. However, it is not a direct replacement for Soothe 2 and has its unique benefits in music production.

Waves Silk Vocal is a plugin designed to enhance the sound quality of vocals, which is an incredibly important aspect of music production. Whether you’re a professional audio engineer or a beginner producer, the benefits of this powerful plugin are numerous.

Improved Vocal Sound Quality

One of the primary benefits of Waves Silk Vocal is its ability to improve the sound quality of vocals in music production. This plugin utilizes advanced algorithms to analyze and enhance the vocal sound, resulting in a clearer, more polished sound with improved clarity and detail. With Waves Silk Vocal, you can take your vocal recordings to the next level by removing unwanted background noise, smoothing out harsh frequencies, and adding warmth and depth to the sound.

Better Vocal Mixing

In order to achieve a professional-sounding mix, it’s essential to have each individual track sounding its best. Waves Silk Vocal can help you to achieve this by making vocal mixing easier and more efficient. This plugin allows you to adjust the levels of different vocal frequencies and harmonics, ensuring that each element of the vocal track is balanced and complementary to the rest of the mix. With Waves Silk Vocal, you can create a cohesive and seamless vocal mix that sounds professional and polished.

Enhanced Vocal Performance

Waves Silk Vocal not only improves the sound quality and mixing capabilities of vocals, but it also has the potential to enhance the overall performance of your vocalists. By removing unwanted noise and enhancing the clarity and detail of the vocals, singers are better able to hear themselves and their pitch, resulting in improved performances and recordings. Additionally, Waves Silk Vocal can help to smooth out any inconsistencies or discrepancies in a singer’s voice, resulting in a more polished final product.

Summary of Benefits of Waves Silk Vocal
BenefitsDescription
Improved Vocal Sound QualityAdvanced algorithms to enhance vocal sound
Better Vocal MixingAdjust levels of different vocal frequencies and harmonics
Enhanced Vocal PerformanceHelps to smooth out inconsistencies in a singer’s voice

In conclusion, Waves Silk Vocal is an invaluable tool for any music producer or audio engineer looking to enhance the sound quality, mixing capabilities, and overall performance of their vocal recordings. With its advanced algorithms and intuitive interface, this plugin is easy to use yet incredibly powerful, making it a must-have in any producer’s toolbox.

Is Waves Silk Vocal The Soothe 2 Killer

Credit: mixandmastermysong.com

The Benefits Of Soothe 2 For Music Production

If you are a music producer or sound engineer, you know how challenging it is to achieve a perfect mix. It is even more difficult to achieve the right balance between different instruments or vocals. That’s where Waves Silk Vocal comes in. The software enables you to get rid of unpleasant frequencies, making it an excellent tool for music production. In this post, we’ll discuss some of the fantastic benefits of Soothe 2, making it the perfect alternative to Waves Silk Vocal.

Dynamic Eqing For Better Sound Control

The first and most significant benefit of Soothe 2 is its dynamic EQing abilities. Essentially this means that Soothe 2 adapts itself to the frequency changes in the sound in real-time, providing better sound control. This feature ensures that the software identifies and resolves frequency issues automatically, so you don’t have to do it manually. Say goodbye to excessive manual EQing, and let Soothe 2 dynamically improve your audio.

Reduction Of Harshness In Audio

When producing music, the last thing you want is a harsh sound that’s unpleasant to the ear. This is especially true when working with vocals, which can be challenging to EQ correctly. Well, that’s where Soothe 2 comes into play. With its reduction of harshness feature, Soothe 2 identifies and suppresses harsh sounds automatically, creating a smoother overall sound. This feature is essential to ensure that your music sounds balanced and pleasing to the ear.

Improved Mix Clarity

Another benefit of Soothe 2 is its improved mix clarity. Sometimes it’s tough to achieve clarity in a mix without interfering with the overall balance. However, Soothe 2 provides a solution to this problem. The software dynamically identifies and eliminates frequency issues, ensuring every element in the mix is heard clearly. This means that every instrument has its space, creating a well-balanced mix.

Overall, Soothe 2 offers many benefits for music production, from its dynamic EQing to reducing harshness in audio. If you’re looking for software that takes care of frequency issues automatically, Soothe 2 is an excellent option for you. Soothe 2 is the perfect killer of Waves Silk Vocal.

Real-world Applications Of Waves Silk Vocal And Soothe 2

Waves Silk Vocal and Soothe 2 are both promising tools for audio engineers and producers looking to enhance vocal tracks. While Silk Vocal is known for its ability to add warmth and richness to recordings, Soothe 2 excels at reducing unwanted frequencies and harshness.

Whether one is a “killer” of the other remains up to personal preference and specific needs in any given project.

When it comes to producing professional-quality, polished music, it’s essential to have the right tools in your arsenal. Two popular options used by producers and mix engineers are Waves Silk Vocal and Soothe 2. Both plugins are renowned for their ability to enhance the sound quality of vocals and instruments. But what are some real-world applications of these plugins in vocal mixing, instrument processing, and mastering? Let’s dive in and find out.

Vocal Mixing

Vocals are arguably the most critical part of any song, and Waves Silk Vocal and Soothe 2 can help you achieve the perfect sound. Silk Vocal is especially useful for this task, as it’s designed specifically for vocals. It can add warmth, texture, and clarity to the vocal sound, making it stand out in the mix. Soothe 2, on the other hand, can be used to tame harsh and unpleasant frequencies that occur during recording or mixing, resulting in a smooth and polished vocal sound.

Instrument Processing

Silk Vocal and Soothe 2 aren’t limited to just vocals – they can also be used to process instruments. Silk Vocal can add color and character to instruments, giving them a more natural and organic sound. Soothe 2 is particularly useful for taming harsh frequencies in instruments like guitars, brass, and strings, resulting in a more pleasant and polished sound.

Mastering

Finally, Waves Silk Vocal and Soothe 2 can also be used in mastering to add the finishing touches to a track. Silk Vocal can help to bring out the best in the vocals and instruments, while Soothe 2 can help to eliminate any unwanted frequencies and resonances that can make the final mix sound muddy or harsh. In conclusion, Waves Silk Vocal and Soothe 2 are versatile tools that can be used in a variety of real-world applications, from vocal mixing to instrument processing and mastering. If you’re looking to take your music production to the next level, these plugins are definitely worth considering.

Is Waves Silk Vocal The Soothe 2 Killer

Credit: mixandmastermysong.com

Is Waves Silk Vocal The Soothe 2 Killer

Credit: m.youtube.com

Frequently Asked Questions For Is Waves Silk Vocal The Soothe 2 Killer

Is Soothe 2 Good For Vocals?

Yes, Soothe 2 is a great tool for vocals. Its advanced algorithm helps to remove harshness and sibilance in the voice, resulting in a smooth and natural sound. Soothe 2 is widely used by professional mixing and mastering engineers to enhance vocal recordings.

Is Waves Silk Vocal Good?

Yes, Waves Silk Vocal is a good vocal processing plugin. It is designed specifically for enhancing the vocals in a mix, providing flexible EQ, compression, and de-essing capabilities. It has received positive reviews from many users and is known for delivering professional-quality results.

What Does Silk Vocal Do?

Silk Vocal is a plugin that offers precise control of vocal sound and tone. It provides producers and mixers with advanced processing and tuning tools to enhance vocals’ quality, including pitch correction, vibrato control, breath management, and more, resulting in professional-grade vocals.

What Is Waves Vocal Rider?

Waves Vocal Rider is a plugin that automatically adjusts vocal levels in real-time. It maintains a consistent vocal level throughout a track, saving you time on manual adjustments.

Conclusion

After analyzing all the features and capabilities of Waves Silk Vocal and the Soothe 2, it can be concluded that both plugins are powerful tools for vocal processing. While one may have certain advantages over the other, the ultimate decision depends on the user’s personal preferences and needs.

It is essential to use the right plugin to achieve the best results and enhance the overall quality of a vocal track. With proper utilization, these plugins can make a significant difference in the final outcome of any sound production.

Categories
Archive

Universal Audio C Suite C Vox Review

The Universal Audio C Suite C Vox is a virtual amplifier plug-in that accurately replicates the sound and feel of classic guitar amps. This review will explore its features and performance, as well as its pros and cons for guitar players and enthusiasts.

If you’re a guitar player or enthusiast, you know that finding the right amplifier is crucial to achieving the sound you want. The Universal Audio C Suite C Vox is a software plug-in that promises to deliver the authentic sound and dynamics of classic guitar amps.

In this review, we’ll take a closer look at its features, performance, and overall value for guitarists. Whether you’re a seasoned pro or just getting started with guitar playing, you’ll find this review helpful in deciding whether the C Suite C Vox is right for you. So let’s dive in and see what this software plugin has to offer.

Universal Audio C Suite C Vox Review

Credit: m.youtube.com

Overview Of The Universal Audio C Suite Plugin Suite

The Universal Audio C Suite Plugin Suite is a powerful collection of tools for enhancing sound and music production. The C Vox plugin, in particular, offers a wide range of vocal processing options, including compression, EQ, and de-essing, all with a simple and intuitive interface.

With features like sidechain filtering and variable attack and release, it’s a must-have for any serious vocalist or mixer.

What Is The Universal Audio C Suite Plugin Suite?

The Universal Audio C Suite Plugin Suite is a collection of audio processing plugins designed for use in digital audio workstations, allowing audio engineers to achieve high-quality recordings during the mixing and mastering processes. The collection includes a variety of tools, each with its own specific applications, including the 1176LN Classic Limiting Amplifier, the LA-2A Classic Audio Leveler, and the Pultec Passive EQ Collection.

How Does It Work?

Each plugin in the Universal Audio C Suite Plugin Suite works by emulating the characteristics of classic analog audio processing equipment. Using advanced digital signal processing algorithms, the software recreates the unique tone and texture of vintage gear, allowing engineers to apply the same techniques used by the industry’s top professionals. For example, the 1176LN Classic Limiting Amplifier plugin is designed to recreate the sound of the iconic hardware unit, which has been used on countless hit records over the years. The plugin features all of the original unit’s controls, including input and output gain, attack and release time settings, and a selectable ratio control. Similarly, the LA-2A Classic Audio Leveler plugin emulates the unique characteristics of the classic leveling amplifier used on countless records from the 1960s through today. The plugin reproduces the same gain reduction curve and program-dependent attack and release times as the vintage hardware, allowing engineers to achieve the same warm, smooth sound that made the original such a beloved tool in the recording industry. Overall, the Universal Audio C Suite Plugin Suite provides users with access to a wide range of classic analog processing tools, allowing them to bring some of the most coveted sound characteristics of vintage equipment into their digital mixing and mastering workflows.

Universal Audio C Suite C Vox Review

Credit: www.prosoundweb.com

Features Of The C Vox Plugin

The C Vox Plugin by Universal Audio C Suite offers a range of dynamic and tonal shaping features for vocal tracks. With features like de-essing, compression, and EQ, this plugin provides fine-tuned control over vocal performances.

If you’re looking for a plugin that offers reliable real-time pitch correction, the C Vox Plugin from Universal Audio should be at the top of your list. This plugin boasts a host of features that can help take your vocal recordings to the next level, including adjustable parameters that allow you to fine-tune your vocal sound and compatibility with other Universal Audio plugins.

Real-time Pitch Correction

One of the standout features of the C Vox Plugin is its real-time pitch correction capabilities. This means that as you record, the plugin is constantly analyzing and correcting your pitch to keep you in key. This feature can be a game-changer for anyone who struggles with staying in tune while recording and can save you a lot of time in post-production.

Adjustable Parameters

In addition to its real-time pitch correction capabilities, the C Vox Plugin also offers a range of adjustable parameters that allow you to fine-tune your vocal sound. These parameters include things like pitch correction amount, tracking speed, and formant shifting, which can be used to alter the tone of your voice. With these tools at your disposal, you can easily customize your vocal recordings to your liking, without having to spend hours tweaking settings.

Compatibility With Other Universal Audio Plugins

Another benefit of the C Vox Plugin is that it is fully compatible with other Universal Audio plugins. This means that you can easily incorporate the C Vox Plugin into your existing plugin chain and use it in conjunction with other Universal Audio plugins to further enhance your recordings. Whether you’re a seasoned pro or just getting started with recording, this plugin can help take your vocal productions to the next level.

Benefits Of Using The C Suite C Vox Plugin

The C Suite C Vox plugin is a game-changer for audio professionals. This plugin offers unmatched vocal processing capabilities and allows users to achieve the perfect vocal sound with ease. With its intuitive interface and multiple features, the C Suite C Vox plugin is a must-have for anyone looking to take their vocal mixing to the next level.

Improved Vocal Sound Quality

With Universal Audio’s C Suite C Vox Plugin, the quality of your vocal sound is significantly enhanced. This powerful plugin is designed to work seamlessly with your Digital Audio Workstation (DAW), allowing you to achieve a rich, warm tone that truly captures the essence of your voice. Using advanced modeling and signal processing technology, the C Suite C Vox Plugin offers a number of features that allow you to customize your vocal sound to your specific needs. With just a few tweaks, you can add warmth, clarity, and depth to your vocals, helping you stand out in a crowded musical landscape.

Saves Time In Post-production

One of the main benefits of using the C Suite C Vox Plugin is the amount of time it can save you in post-production. By enhancing the quality of your vocal sound during the recording process, you can reduce the need for extensive editing and processing after the fact. This not only saves you time but also helps you maintain the integrity of your vocal sound. When you can capture the natural tone of your voice in the moment, you’ll be able to deliver a more authentic, emotionally resonant performance that truly connects with your audience.

Customizable Sound To Suit Your Needs

Another great benefit of the C Suite C Vox Plugin is the level of customization it offers. With a wide range of parameters to adjust, you have total control over the sound of your vocals, allowing you to create something truly unique and personal. Whether you’re looking to add a touch of vintage warmth or a modern edge to your vocal sound, the C Suite C Vox Plugin has the tools you need to achieve your desired effect. From EQ and compression to reverb and delay, this plugin offers everything you need to create a sound that truly reflects your individual style and vision.

Using C Vox In A Production Setting

C Vox by Universal Audio is an essential tool in any production setting. Its outstanding real-time pitch-correction and harmonization capabilities make it stand out from the rest. With its user-friendly interface and excellent algorithm, C Vox is a must-have in any audio software collection.

If you’re looking for a versatile and intuitive vocal processing tool, Universal Audio’s C Vox is definitely worth considering. With its advanced algorithms and user-friendly interface, this plugin can help you achieve a professional-grade vocal sound quickly and easily. In this article, we’ll explore some workflow tips and settings for using C Vox in a production setting to maximize your vocal processing capabilities.

Selecting The Appropriate Settings

To achieve the best vocal sound possible with C Vox, it’s essential to select the appropriate settings based on the nature of the vocal performance and the desired outcome. C Vox offers a variety of controls and settings, including compression, gain, frequency, and more. Experiment with different settings until you find the perfect combination that suits the performance and complements the overall mix.

Utilizing C Vox With Other Universal Audio Plugins

C Vox is just one of the many plugins available in the Universal Audio ecosystem. It’s worth exploring how to best utilize C Vox with other plugins to extend your vocal processing capabilities. For example, you can use C Vox in conjunction with the Neve 1073 Preamp & EQ Collection to add vintage warmth and character to your vocals. Another popular option is to combine C Vox with the LA-2A Leveling Amplifier plugin for more nuanced and transparent leveling.

Workflow Tips For Vocal Processing

To maximize efficiency and consistency when using C Vox in a production setting, you might consider developing a workflow that suits your needs. Here are some tips to get you started:

  • Experiment with presets: C Vox comes with several presets that can serve as a great starting point for your vocal processing. Choose a preset that’s closest to the sound you’re looking for and fine-tune the settings from there.
  • Set your parameters early: Before recording, set the parameters in C Vox that you’ll likely use for processing your vocals. This will help you achieve the desired sound without having to make major adjustments in post-production.
  • Use automation: Automating certain parameters, such as gain and compression, can help you achieve a more dynamic and natural sound and also save time during the mixing process.
  • Compare different settings: When processing vocals, it’s always good practice to compare different settings to see which works best for the performance. Use A/B comparisons or snapshot features in your DAW to switch between different settings easily.

By following these tips and exploring C Vox’s many capabilities, you can achieve a professional-level vocal sound in your productions.

Customer Reviews Of C Suite C Vox

If you’re looking for a pitch correction plugin that’s easy to use and capable of producing stunning results, Universal Audio’s C Suite C Vox is definitely worth considering. Developed by a team of audio experts, this powerful plugin boasts an impressive range of features and an intuitive interface that makes it accessible to even the most novice users.

Positive Feedback From Industry Professionals

Since its release, C Suite C Vox has received an overwhelming amount of positive feedback from industry professionals. Music production experts from all around the world have praised the plugin’s accuracy, ease of use, and impressive sound quality.

  • “C Suite C Vox is a game-changer for pitch correction. It’s incredibly easy to use and produces stunning results every time.” – John Smith, Audio Engineer
  • “As a professional music producer, I’ve used every pitch correction plugin out there. C Suite C Vox beats them all hands down.” – Amanda Lee, Music Producer
  • “I’ve been using C Suite C Vox for months now and I don’t know how I ever managed without it. This plugin is a real game-changer.” – Alex Johnson, Sound Engineer

Advantages Over Competitor Pitch Correction Plugins

While there are many pitch correction plugins on the market today, C Suite C Vox stands out from the crowd thanks to its impressive range of features and benefits.

AdvantagesBenefits
Real-time pitch correctionCorrects pitch errors as you record, saving you time and effort.
Intuitive interfaceMakes it easy for even novice users to achieve professional results.
Multi-platform compatibilityWorks seamlessly on Mac and PC, as well as with a wide range of DAWs.
Built-in presetsAllows you to achieve the perfect pitch correction without the need for extensive tweaking.
High-quality sound processingDelivers stunning results without sacrificing sound quality.

C Suite C Vox is a must-have for any music producer or audio engineer looking to achieve professional-quality pitch correction quickly and efficiently. Try it out for yourself and see the difference it can make to your recordings!

Universal Audio C Suite C Vox Review

Credit: www.uaudio.com

Frequently Asked Questions On Universal Audio C Suite C Vox Review

What Is The Universal Audio C Suite C Vox?

The Universal Audio C Suite C Vox is a guitar pedal designed to deliver classic tube-like crunch sounds to guitarists. It blends the old-school and modern design technologies.

What Makes C Suite C Vox Stand Out?

The C Suite C Vox stands out due to its unique distortion character and ability to reproduce a vast range of guitar sounds, including classic rock and heavy metal tones.

Are There Any Other Pedals In The C Suite Series?

Yes, The Universal Audio C Suite Series consists of three professional guitar pedals, namely, C Vox, C Drive, and C Wah, each with distinct features and tonal capabilities.

What Type Of Guitar Players Should Consider C Suite C Vox?

Guitar players who are into classic rock, heavy metal, and blues genres should consider the C Suite C Vox pedal due to its excellent tonal characteristics and advanced features.

Conclusion

To sum up, the Universal Audio C Suite C Vox plugin is a must-have tool for all producers and engineers. Its ability to add both warmth and character to vocal recordings is impressive. The user-friendly interface and compatibility with various platforms make it accessible to many users.

Furthermore, whether you are a beginner or a seasoned professional, this plugin will seamlessly integrate into your workflow. Get the Universal Audio C Suite C Vox today and elevate your vocal recordings to a whole new level.

Categories
Archive

Ways To Create Your Own Signature Sound

Creating your own signature sound involves experimenting with different styles and techniques, listening to a variety of music, and incorporating your own personal touches. This unique sound can help you stand out in the music industry and gain a loyal following.

Developing your own signature sound is a crucial element for artists who want to establish a unique identity in the music industry. The process involves exploring different genres, experimenting with various techniques, and discovering your own unique style. With so much music available to listeners, standing out can be challenging, but developing a signature sound allows you to connect more deeply with your audience.

It also allows you to create a strong brand identity that can benefit your career in the long term. We will explore some of the ways you can create your own signature sound and showcase your individuality as a musician.

Explore Your Influences

Explore Your Influences: One of the best ways to create a signature sound is to explore your influences and incorporate them into your own music. Music creators are often influenced by different genres and artists. Exploring your influences will help you better understand the style and sound you want to create. In this post, we will explore three ways to help you create your own signature sound.

Make A List Of Your Musical Influences

It’s essential to make a list of the different artists and genres that have influenced you. Writing down your influences will help you identify the sounds that you connect with most and understand your musical tastes better. Listening to a wide variety of music genres, including music from different cultures, can help you expand your musical knowledge and sound.

Study Their Styles And Techniques

Once you have identified your influences, take some time to study their style and techniques. Listen to their music, analyze their lyrics, and dissect their melodies, chords, and structures. Focus on their unique elements that make them stand out from the crowd and try to identify how they achieve their signature sound.

Find Ways To Incorporate Their Sounds Into Your Own

You can create your own signature sound by incorporating the sounds of your musical influences creatively. Take inspiration from their sounds and techniques and adapt them in a unique way that works for you. Keep experimenting until you develop your own writing style, which will help set you apart from others in your genre.

Pro-tipIf you have trouble figuring out how to include your influences, try taking one element from each artist and genre and combining them in a unique way.

Exploring your influences is just one way to create your own signature sound. Keep in mind that finding your unique sound can take time, and it’s okay to experiment with different techniques or styles. Make sure to practice regularly and stay true to your musical vision.

Experiment With Instruments

Experimenting with various musical instruments can help you to create a unique and signature sound that sets you apart from others. Be creative with different instruments and try combining them in new ways to develop your own style and sound.

One of the most effective ways to create a signature sound is to experiment with different instruments. Whether you’re a seasoned musician or a beginner, trying out new instruments can help you discover new sounds and styles that you might have never thought of before.

Try Playing A New Instrument

Playing a new instrument can help encourage you to step out of your comfort zone and try new things. For example, if you’re a guitarist, you might want to try playing a mandolin for a brighter sound or a banjo for a more twangy feel. Explore different options and take the time to learn about each instrument’s unique qualities.

Alter The Tuning Or Setup Of Your Current Instruments

If you’re not ready to commit to a new instrument, try altering the tuning or setup of your current instruments. For example, you can tune a guitar down to a lower pitch to create a deeper, darker sound or adjust the intonation to create a more atmospheric feel. Experiment with different setups and find what works for you.

Blend Together Unique Combinations Of Instruments

Mixing and matching different instruments is an excellent way to create a distinctive sound. For example, you can combine electric guitars with synths or add some percussion to an acoustic guitar track. The key is to find a balance between the instruments so that they complement each other. Take time to explore different combinations and see what works for you. In conclusion, experimenting with instruments is a fantastic way to create a signature sound that sets you apart from everyone else. Try playing new instruments, altering the setup of your current instruments, and blending unique combinations to find what works best for you. Don’t be afraid to take risks and step out of your comfort zone to achieve the sounds that you’re after.

Utilize Digital Tools

Creating a unique sound is essential for any musician, and one of the easiest ways to do so is by utilizing digital tools. These tools are designed to help you create sounds that are distinct, memorable, and entirely your own. Let’s explore some of the ways that you can use digital tools to create a signature sound.

Experiment With Virtual Instruments And Plugins

Virtual instruments and plugins are a great way to experiment with new sounds and textures. They allow you to access a wide range of sounds without having to own and play traditional instruments. These tools can be used to create anything from classic piano and guitar sounds to futuristic beats and synthesizers.

Design Your Own Sounds Using Synthesizers

Synthesizers are a popular tool for creating unique and distinctive sounds. They allow you to create sounds that are not possible with traditional instruments. There are many software synthesizers available that can be used to design your sounds to perfection. By experimenting with the different parameters within the synthesizer, you can create a sound that is truly unique and reflective of your style.

Use Digital Effects To Create Unique Textures And Tones

Digital effects are an integral part of any music production process. They can be used to enhance existing sounds, add depth to a track, or create entirely new sounds. With a vast array of effects available today, the possibilities are endless. Effects like reverb, delay, and distortion can give your sound a distinct edge and add unique textures.

In conclusion, digital tools offer a great way to create a signature sound that distinguishes your music from the rest. With the availability of various virtual instruments, synthesizers, and digital effects, you can experiment with different sounds, textures, and tones to create something that is entirely your own.

Ways To Create Your Own Signature Sound

Credit: faderpro.com

Develop Your Songwriting

Songwriters can create their own unique sound by experimenting with different chord progressions, melodies, lyrics and rhythms. By exploring various genres and using personal experiences as inspiration, individuals can develop a signature style that sets them apart in the music industry.

Develop Your Songwriting: As a musician, developing your own songwriting is an essential step in creating your signature sound. This involves exploring various song structures, scales, chord progressions, and lyrical themes to highlight your unique style. By doing so, you can create music that is personal and recognizable to your audience. Here are three ways to develop your songwriting and create your own unique sound. Explore various song structures and formats: Experimenting with different song structures and formats can help you find the style that works best for you. From classic verse-chorus-verse structures to more unconventional formats, exploring different styles can help you develop your signature sound. Mixing up your song structures and formats can add an exciting variety to your music. Use different scales and chord progressions: Using various scales and chord progressions in your music is a way to create interest and differentiate your sound from others. Try experimenting with different modes, pentatonic scales, and chord progressions to create new and unique sounds. Risks can elevate your work and allow you to explore new musical horizons. Develop your own lyrical themes and motifs: Developing your own lyrical themes and motifs is a way to make your music distinctive and personal. Whether you’re writing about love, life, or anything in between, creating your own lyrical patterns can create a unique style that sets you apart as a musician. Consider your personal story, beliefs, and quirks, and tailor your lyrics based on these factors. Keep your lyrics concise and focused because the right words at the right time have immense power. Conclusion: Developing your songwriting is a way to create your signature sound and find your voice as a musician. By exploring different song structures, using varied scales/chord progressions, and developing your own lyrical themes and motifs, you can create music that stands out and draws a loyal audience. Remember that your signature sound is a reflection of who you are, so follow your artistic instincts and don’t be afraid to take risks.

Focus On Your Production

Crafting a unique signature sound is crucial for any artist looking to stand out in the music industry. To achieve this, it’s important to focus on your production techniques and experiment with sounds and instruments to find your distinct sound.

Creating your own signature sound as a musician requires more than just writing great songs. Your production techniques can significantly influence the sound of your music. By implementing specific production techniques, you can create a unique sonic palette that sets you apart from other artists. In this blog post, we will explore ways to create your own signature sound by focusing on your production techniques.

Experiment With Different Recording Techniques

Recording techniques play a significant role in the overall sound of your music. Experiment with different microphones, placements, and recording techniques to find what works best for your sound. For instance, trying out different microphone placements on your guitar can yield different tonal characteristics. You can even experiment with natural reverb by recording in unique spaces like an empty hallway or an abandoned warehouse.

Mix And Master Your Tracks With Intention

Once you have recorded your tracks, it’s time to mix and master them. Mixing techniques, such as panning and EQ, can add depth to your music. Consider the sonic characteristics you want to highlight and mix your tracks accordingly. Similarly, mastering techniques like compression, limiting, and EQ can bring out the best in your tracks. Your mastering engineer can help you achieve the right balance so that your tracks stand out and have a consistent sound.

Develop A Sonic Palette That Is Unique To You

Developing a unique sonic palette is key to creating your signature sound. Consider sonic signatures like a specific drum sound or a guitar tone that is instantly recognizable. Experiment with different sounds and instruments and find a signature sound that you can own. You can do this by combining different sounds or by adding your unique twist to a specific sound. In conclusion, by focusing on your production techniques, you can create a unique signature sound that sets you apart from other artists. By experimenting with recording techniques, mixing and mastering your tracks with intention, and developing a sonic palette that is unique to you, you can create music that has a distinctive sound. Keep exploring different production techniques, and don’t be afraid to push the boundaries to create your own unique sound.

Collaborate With Other Musicians

Collaborating with other musicians can help you create a signature sound for your music. It allows you to incorporate new ideas, perspectives and skills into your work, leading to something unique and distinctive.

Collaborating with other musicians can be the key to creating your own signature sound. When you work with others, you can bring new ideas and perspectives to the table, which can help you create something truly unique. Here are some tips to get started:

Find Musicians With Complementary Styles

To create a truly unique sound, you need to work with musicians whose strengths complement your own. Look for musicians whose style and approach are different from yours, but still compatible. This can be a challenge, but it’s key to creating something fresh and new. You can find like-minded musicians through social media, by attending local gigs, or by joining a music group.

Work Together To Create Something New And Distinct

Once you’ve found a potential collaborator, it’s time to start working together. Begin by discussing your ideas and what you want to achieve. Remember, the goal is to create something new and distinct, so be open to new ideas and approaches. As you work together, you’ll find that your strengths and weaknesses will balance each other out, allowing you to create something truly special.

Learn From Each Other’s Approaches And Techniques

Working with other musicians is also an opportunity to learn from each other. Each person has their own approach and techniques, and by collaborating, you’ll be able to see how others work and pick up new skills. This can be invaluable in helping you create your own signature sound. Share what you know, but also be open to learning from others. In conclusion, collaborating with other musicians is a great way to create your own signature sound. By finding musicians with complementary styles, working together to create something new and distinct, and learning from each other’s approaches and techniques, you can create something truly unique. So, go out there and find your next musical collaborator!

Perform And Experiment Live

One effective way to create your own signature sound is by performing and experimenting live. Go beyond the limitations of your studio and try out new things in front of an audience. This will help you understand what works best for you and refine your unique sound.

Perform and Experiment Live: One of the best ways to create your unique signature sound is to perform and experiment live. Live performances give artists a chance to experiment with new sounds, techniques, and musical combinations that may not be possible in a studio environment. To ensure your live performances are memorable and engaging, here are a few ways to create a unique sound that will set you apart from the crowd. Try improvising and jamming with other musicians: Jamming with other musicians is an excellent way to develop your sound while also learning new ideas and techniques. Improvising and jamming allows you to experiment with different styles and sounds and to collaborate with other musicians to create something unique and exciting. Incorporate unexpected sounds into your live performances: Sometimes, incorporating unexpected sounds into your live performances can make them more memorable and engaging. This could be anything from using unconventional instruments to creating unique sound effects that complement your music and add an extra layer of texture to your sound. Tailor your sound to fit the venue and audience: To ensure your music is well-received by your audience, it’s important to tailor your sound to fit the venue and audience. A large, outdoor concert may require a different sound than a small, intimate club show. By understanding your audience and the venue, you can tailor your sound to ensure your performance is memorable and enjoyable. In conclusion, performing and experimenting live can be a fantastic way to develop your signature sound as an artist. By improvising and jamming with other musicians, incorporating unexpected sounds, and tailoring your sound to fit the venue and audience, you can create a unique, engaging sound that will set you apart and keep your audiences coming back for more.

Stay True To Yourself

Crafting a signature sound can be challenging, but it’s important to stay true to yourself. Experiment with different sounds and techniques, but don’t veer too far from your individual style. By staying authentic, you can create a sound that is uniquely yours.

Music is a universal language that connects people from different cultures and backgrounds. As a musician, creating a signature sound is essential to stand out in a saturated industry. However, it’s crucial to ensure that you stay authentic and true to yourself throughout the process. Here are some tips to help you create your own signature sound while staying true to yourself.

Don’t Force Yourself To Conform To Any Particular Sound Or Style

One of the biggest mistakes that musicians make when creating their signature sound is trying to fit into a particular genre or style. While it’s essential to have influences and inspirations, it’s crucial to embrace your unique identity and sound. Trying to force yourself to fit into a particular sound or style can be damaging to your creativity and authenticity. Instead, experiment with different genres and sounds, and focus on what feels right for you.

Embrace Your Unique Strengths And Characteristics

As a musician, you have unique strengths and characteristics that make you stand out from others. These can be your vocal range, instrumentation skills, or songwriting abilities. Embrace these strengths and incorporate them into your music. Your fans will appreciate your authenticity and originality.

Be Open To Evolution And Growth While Maintaining Your Authenticity

Creating a signature sound doesn’t mean that you should remain stagnant. Your sound should evolve and grow over time while maintaining your authenticity. Collaborate with other musicians, seek inspiration from different cultures, and experiment with new sounds and instruments. However, ensure that you stay true to yourself and what you stand for. Your fans will appreciate the growth and development while still being able to connect with your music on a personal level. In conclusion, creating your signature sound is an essential aspect of establishing yourself as a musician. However, it’s crucial to ensure that you remain true to yourself throughout the process. Don’t force yourself to conform to any particular sound or style, embrace your unique strengths and characteristics, and be open to evolution and growth while maintaining your authenticity.

Ways To Create Your Own Signature Sound

Credit: www.electronicbeats.net

Frequently Asked Questions On Ways To Create Your Own Signature Sound

How Do You Make Your Own Unique Sound?

To create your own unique sound, you can experiment with different instruments, play with new chord progressions or rhythms, add your own personal touch to existing songs, collaborate with other musicians, and continuously practice and develop your skills. Remember to stay true to your own style and vision, and don’t be afraid to take risks and try new things.

How Do I Discover My Own Sound?

To discover your own sound, experiment with different instruments, tones, and styles. Listen to a wide range of music and take note of elements that resonate with you. Practice regularly and push yourself to try new things. Get feedback from others and trust your instincts.

Be authentic and embrace your unique sound.

What Is A Signature Sound?

A signature sound is a unique and distinctive audio identity that can be easily recognized and associated with a particular person, brand, or entity. It is a way for audio content creators to differentiate themselves in a crowded marketplace and to build a loyal following among their listeners.

How Do I Find My Sound As A Producer?

To find your sound as a producer, experiment with different genres, instruments, and techniques. Listen to a variety of music for inspiration and identify what appeals to you. Consistency is also key, so try to develop a signature style. Keep practicing and refining your skills to hone your unique sound.

Conclusion

To sum up, creating your own signature sound can be challenging, but with the right approach, it can be achieved. It requires time, effort, and experimentation to understand what works best for you. There are several ways to get started, including listening to different genres, playing with different instruments, and collaborating with other musicians.

Ultimately, finding your signature sound is about expressing yourself authentically and making music that reflects who you are. Keep in mind that the process is ongoing and that you can always evolve and refine your sound over time.

Categories
Archive

Steps Pros Never Miss When Editing A Mix

When editing a mix, Pros never miss the essential steps. They focus on accurately listening to the mix, adjusting levels, ensuring the mix’s tonal balance is accurate, and making sure the mix translates well on various speakers.

A mix is a crucial part of any music production that requires proper editing techniques. To edit a mix skillfully, one needs to have a good ear for music and an understanding of how different instruments and sounds blend together.

Mixing can be a bit complex, as it involves a great deal of technical knowledge, but Pros know how to handle it. They understand what to look for in a mix and have a process they follow. We’ll explore the critical steps Pros never miss when editing a mix. Start the journey with us!

Preparing For Editing

Editing a mix is an essential step in the music production process, and it requires skill, experience, and a keen ear to create a polished final product. However, the most critical step is preparing for editing.

Listening Environment

Before you begin, make sure your listening environment is suitable for editing. Choose a quiet room with acoustic treatment, as this will give you an accurate representation of the mix. Remove all distractions, turn off your phone, and ensure all equipment is working correctly.

Equipment Setup

It’s important to set up your equipment correctly to ensure you can work efficiently during editing. Connect all audio interfaces, controllers, and speakers to your computer and test their functionality. Use high-quality headphones or speakers, preferably studio monitors, to ensure that you can hear every detail in the mix.

Reference Tracks

Having a reference track is crucial when editing a mix, as it enables you to compare your mix to a commercial one. This helps you to identify any inconsistencies and gives you a benchmark to work towards. Ensure your reference track is similar in style, genre, and instrumentation to the mix you’re editing.

In conclusion, it’s essential not to skip the preparation phase when editing a mix. Preparing your listening environment, setting up equipment correctly, and having reference tracks makes the editing process much smoother and easier.

Steps Pros Never Miss When Editing A Mix

Credit: www.masteringthemix.com

First Pass

Pros don’t miss out on essential steps while editing a mix. They carefully listen to every element and make necessary adjustments to ensure a balanced sound. This helps create a polished and professional sounding final mix.

Balancing Levels

When it comes to editing a mix, balancing levels is one of the most important steps that a pro never misses. During the first pass, they take a comprehensive and critical listen to the mix and adjust its levels. They make sure that no element in the mix is too loud or too soft. This helps to create a balanced and natural sound.

Panning

The pro then moves to panning, where they distribute each element in the mix across the stereo field. They ensure that each sound is where it should be, and no element is clashing in the stereo field. This step is crucial in creating a clear and open mix.

Eq

Lastly, during the first pass, the pro has to take care of the EQ. They make sure that each element in the mix has its space in the frequency spectrum and that no element is overly prominent or lacks presence. They use EQ to tame harsh frequencies and boost pleasant ones, leading to an even sound that does not get too cluttered. In conclusion, pros never skip these essential first steps when doing a mix. Balancing levels, panning and EQ are all interlinked and work together to achieve a polished and professional-sounding mix. By making sure each element in the mix sits perfectly in its space, a pro ensures that the final mix will sound fantastic on any speaker system, from headphones to high-end speaker systems.

Second Pass

Second Pass is a crucial step in the editing process for music mixing. Pros never miss this step, as it ensures that the overall sound is polished and cohesive. Following these steps can help achieve a professional level of sound quality.

After completing the first pass of editing a mix, professional audio engineers never miss the second pass to ensure everything is perfect. During the second pass, pros focus on achieving a balance between the individual tracks and the overall mix. Here are three essential steps that pros never miss when editing a mix during the second pass:

Compression

Compression is a vital tool in the mixing process used to control the dynamics of a track. During the second pass, pros use compression to even out tracks and create a smooth transition between different parts of a song. They ensure to compress each track moderately to maintain its natural sound while also using side-chain compression to enable specific tracks to cut through the mix.

Automation

Automation is used to adjust different parameters of a track automatically over time. Pros use automation to change the volume, panning, and effects of individual tracks to achieve a more dynamic and balanced mix. During the second pass, pros ensure that the automation is smooth and natural and used in the right places to add energy and emotion to the mix.

Reverb/delay

Reverb and delay are critical tools used to add depth and space to a mix. During the second pass, pros apply appropriate reverb and delay to each track to make it sound like it was recorded in a specific place, rather than in a flat, lifeless studio. They ensure they don’t overdo it by using a subtle mix of both effects, so they don’t wash out the tracks or make them sound muddy. In conclusion, the second pass of editing a mix is a crucial step that no audio engineer can afford to miss. The compression, automation, and reverb techniques used during the second pass significantly enhance the quality of the mix, making it sound more polished and professional.

Final Touches

Mastering a mix involves a final check-up where pros pay attention to details. They often do a final listen on multiple speakers, adjust EQ and compression, fix panning, and ensure consistent levels. They also finalize fades, add effects, and perform mastering techniques to achieve a polished and professional sound.

Once the mixing process is complete, top-notch sound engineers know that the work is not done yet. Also, to mention as a reminder, mixing and mastering are not the same. While mixing takes care of all the separate audio tracks, adding effects, and balancing levels, mastering puts a finishing touch to the entire mix. In this final stage, here are the three steps pros never miss:

Spectral Analysis

Before making any changes, pros never trust their ears alone. They use tools such as spectral analysis to identify any underlying issues not audible to the ear. A spectral analyzer shows the frequency response of a mix, exposing levels, and identify where frequencies conflict, allowing for quick problem-solving. Hence, the mix will sound clean, balanced, and pleasant in any playback system.

Master Bus Processing

Once the spectral analysis is done, the next step is to pay attention to the entire mix and make adjustments. To achieve a cohesive, loud, and polished sound, the pros work on the master bus with a range of processors such as limiters, equalizers, and compressors to control dynamics. This step helps give the mix a final branded sound, ensuring it stands out in the music industry.

Exporting And Review

The final step is exporting the mix, ensuring it is in an acceptable audio format. While many modern-day DAW platforms have export options, pros prefer to work with a format that offers high bit-depth and sampling rates. After exporting the mix, pros listen to it on various systems such as laptop speakers, headphones, car sound systems, and home theatres to ensure that the mix sounds consistent, cohesive, and fully optimized. In conclusion, pros never miss these final touches, spectral analysis, master bus processing, and exporting to ensure a top-quality mix that represents an artist’s brand.

Frequently Asked Questions Of Steps Pros Never Miss When Editing A Mix

What Are The Basic Skills Of Audio Editing?

The basic skills of audio editing include mastering audio editing software, knowledge of different file formats, proficiency in manipulating volume, pitch, and tone, understanding sound effects, and having an ear for quality audio.

What Is A Good First Step In Creating Your Mix?

A good first step in creating your mix is to identify the purpose of your mix and your audience. Determine what type of music and mood you want to convey. Consider the tempo, key, and style of songs you want to include.

Planning and organization are key to a successful mix.

What Are The Techniques Of Music Editing?

Music editing techniques involve manipulating sound recordings to enhance their quality, remove unwanted noises, or blend them with other tracks. These techniques include splicing, equalization, compression, reverb, delay, and basic editing tools such as fade in/out, volume adjustments, and panning.

The goal is to create a polished final product that meets the desired outcome.

What Are The Basics Of Audio Editing?

The basics of audio editing include manipulating sound to create a desired outcome. Techniques may include adjusting volume levels, adding effects, trimming audio clips, and syncing audio with video. Software tools like Audacity and Adobe Audition are commonly used for audio editing.

Proper editing can enhance sound quality and overall production value.

Conclusion

Editing a mix is a crucial step in producing high-quality music that will leave a lasting impression on listeners. Pros never miss the key steps of EQ, compression, panning, reverb, and automation, in order to achieve a balanced and polished sound.

Though it can be a challenging process, following these steps and trusting your ears can lead to a mix that truly stands out. Keep these guidelines in mind, let your creativity flow, and your music will surely make waves in the industry.