Categories
Archive

How To Make Beats On Your Laptop

To make beats on your laptop, you need to download software designed for music production and invest in good quality headphones. Creating beats on a laptop has become easier than ever before, thanks to advancements in music production technology.

Whether you’re a seasoned producer or a beginner, making music on your laptop can be an exciting and fulfilling experience. However, it all starts with choosing the right software for the job. Also, there’s a vast array of music production software available, each with unique features and functionality.

Related reading: Online beat mixing services and Your first drum beat in ableton live. For background, see Digital audio workstation.

Additionally, investing in good quality headphones or speakers can help you hear every detail in your beats and ensure your music sounds great on all devices. In addition, we’ll explore some tips to help you make the most of your laptop for creating beats.
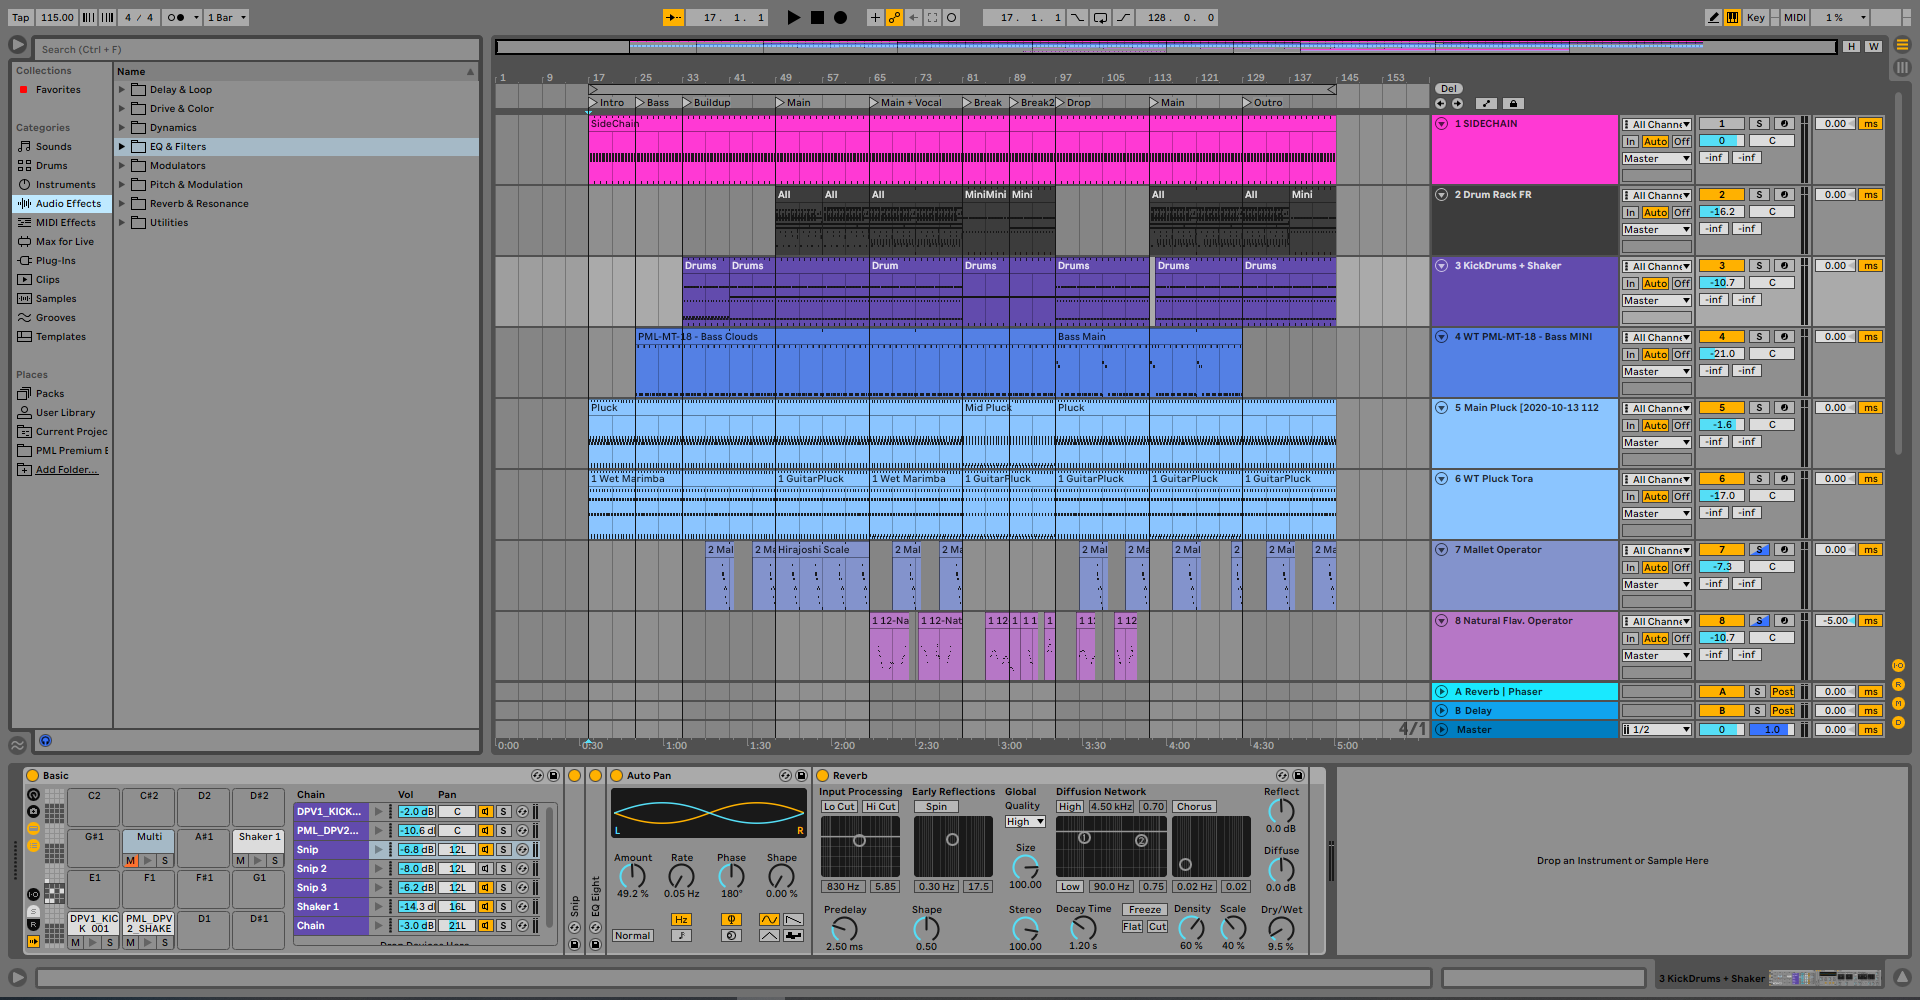
How To Make Beats On Your Laptop

Credit: www.productionmusiclive.com

Choosing Software to Make Beats on Your Laptop

If you are a budding music producer and want to make beats on your laptop, choosing the right software is crucial for your success. Moreover, with countless options available in the market ranging from free to paid ones, deciding on the perfect software can be overwhelming. Let’s dive into the most important factors to consider when choosing the right software for making beats on your laptop.

Free Vs. Paid Software

While free software may seem like a tempting option when you’re on a tight budget, it’s important to understand that you may not get the robust features and functionality of a paid software. However, if you’re just starting, free software can be a great option to get your feet wet. Furthermore, some popular free beat making software includes LMMS, Garageband, and Audacity. Paid options like Ableton Live, FL Studio, and Logic Pro offer more options, features, and better quality sounds. Ultimately, the decision between a free or paid software will depend on how much you are willing to invest in your music production.

Ease Of Use

The software you choose to make beats on your laptop must be intuitive and easy to use. No one wants to spend hours figuring out how a software works when they should be producing music. Some software is user-friendly, while others are more complex and require some training. Also, free software such as GarageBand is relatively easy to use. Meanwhile, some paid software like Ableton Live and FL Studio may require a learning curve.

Laptop Compatibility for Making Beats

It’s vital to ensure the software you choose is compatible with your laptop’s operating system and has the necessary technical specifications. In addition, check out the software’s minimum requirements to operate to ensure your laptop can handle it. If your laptop is old and doesn’t have the necessary specifications, you may need to upgrade it or choose software that is less demanding.

In conclusion, choosing the right software for making beats on your laptop is crucial. Finally, consider the factors discussed, such as free vs. paid software, ease of use, and compatibility with your laptop. Whether you choose free or paid software, remember that practice and consistency are what will help you improve and achieve success in your music production.

Setting Up Your Laptop Workspace for Beats

If you want to make beats on your laptop, the first step is to set up your workspace properly. Furthermore, a well-organized workspace can help you be more productive and efficient. It can also prevent distractions that can interrupt your creative flow. In this section, we’ll go over some essential steps to set up your workspace for beat-making success.

Clearing Your Desk Space

Before you start making beats on your laptop, make sure your desk is clean and uncluttered. Also, this will give you plenty of space to work and help you stay focused on your music. Remove any unnecessary items from your desk that may distract you, such as papers, books, or other electronic devices. Make sure you have enough room for your laptop, keyboard, and any other equipment you plan to use.

Setting Up External Equipment

If you plan to use any external equipment, such as a MIDI keyboard or a mixing console, set them up before you start working on your beats. In addition, ensure that all connections are secure, and the devices are functioning correctly. Organize your cables and keep them neat to prevent any tripping hazard. Keep the external equipment close enough, so you don’t have to stretch too far to reach them.

Optimizing Laptop Performance for Beats

Your laptop’s performance can affect how well you can make beats on it. Therefore, optimizing your laptop’s performance can ensure that it runs smoothly, and you can produce high-quality beats. Next, here are some optimization tips to follow:

  • Close all unnecessary applications to free up your laptop’s memory. You can do this manually or use an application like CCleaner.
  • Disable any automatic updates, notifications, or pop-ups that can interrupt your workflow.
  • Make sure your laptop is free of malware and viruses by using antivirus software.
  • Consider upgrading your laptop’s RAM or storage if you think it’s necessary.
  • Keep your laptop’s battery charged or plugged into a power source, as music production can be intensive and drain your laptop’s battery quickly.

By following these steps, you can set up your workspace for optimal beat-making productivity on your laptop. At this point, you are ready to start your music production journey on your laptop.

How to Make Beats on Your Laptop, Step by Step

Creating your beat is an exciting process, and with just a laptop, you can create your own beats from scratch. There are different software and tools you can use to get started, and by experimenting and practicing, you’ll be able to create unique, personal beats for your music.

Making beats on your laptop is a fun and creative process. With the right tools and a few tips, you can create beats that sound just as good as professional productions. In this section, we’ll go over the key steps to creating your beat. Understanding Beat Structure Before you start creating your beat, it’s important to understand the basic beat structure. Most beats follow a four-bar loop structure, with each bar containing four beats. The first beat in each bar is usually the kick drum, followed by other percussion elements like snare, hi-hats, and claps. Understanding this basic structure will help you create beats that are easy to listen to and follow.

Starting Your Project

To start your beat, open your preferred digital audio workstation (DAW) on your laptop. Create a new project and set the tempo to your desired BPM. Start by laying down your kick drum in the first bar. Add other percussion elements like snare, hi-hats, and claps in subsequent bars.

Don’t worry about getting everything perfect just yet; you can make changes as you go along. Selecting and Manipulating Sounds One of the keys to creating a great beat is selecting the right sounds and manipulating them to fit your composition. Browse through your sound library or sample packs to find sounds that fit the vibe you’re going for. Once you’ve selected your sounds, experiment with EQ, compression, and other effects to make them fit better in your mix. You can also chop, pitch, or reverse your sounds to add variation and interest to your composition.

Layering and Mixing Your Tracks

To add depth and complexity to your beat, consider layering multiple tracks on top of each other. For example, you can layer a low-end bass track with a mid-range synth track to create a fuller sound. When mixing your tracks, make sure each element sits well in the mix and doesn’t overpower the others. Use EQ, compression, and other effects to balance the levels and frequencies of each track. In conclusion, creating your beat is a fun and rewarding process that requires a bit of patience and experimentation. With these tips, you can make beats that sound great and express your own unique sound.
How To Make Beats On Your Laptop

Credit: m.youtube.com

Adding Effects And Polish

If you’ve followed the previous sections, you now have the foundation of your beat laid out. However, a beat isn’t truly complete without some added “polish”: effects, transitions, fades, and other finishing touches can really bring a track to life. In this section, we’ll cover how to add these extra elements to your beat to take it to the next level.

Using Effects To Enhance Your Sound

Effects can give your beat a distinct character and style. For example, reverb can create a sense of space and depth in your sounds. Meanwhile, distortion can add grit and texture. There are a ton of different effects to choose from, and experimenting with them is half the fun!

Most DAWs have built-in effects plugins that you can apply to your tracks. To add an effect, simply select the track you want to modify and choose the effect you want to apply from the plugin menu. From there, you can adjust the parameters of the effect to fine-tune the sound.

Adjusting Volume And Eq

Volume and EQ are two of the most important tools in mixing a beat. By adjusting the volume of each individual track, you can create a balanced mix where each element of the beat is audible and well-defined. EQ, on the other hand, allows you to shape the sound of each track by boosting or cutting specific frequencies.

To adjust the volume of a track, simply drag the fader up or down on the mixer. To adjust the EQ, use the built-in EQ plugin or a third-party EQ plugin. Start by cutting out any frequencies that are muddying up the sound, then boost the frequencies that are most important to the track.

Adding Transitions And Fades

Transitions and fades are important for creating a sense of movement and progression in your beat. A smooth transition can help segue between different sections of the song. Meanwhile, a fade can help create a natural ending.

To add a transition, use a crossfade or other transition effect between two clips. To add a fade, simply select the end of the clip and choose the type of fade you want to apply from the menu.

Finalizing Your Beat For Export

Once you’re happy with the way your beat sounds, it’s time to export it to a file that you can share with others. To do this, choose “Export” from your DAW’s menu and select the file format you want to use (MP3, WAV, etc.). Make sure to name your file something descriptive so that others know what they’re listening to!

EffectWhat it Does
ReverbCreates a sense of space and depth
DistortionAdds grit and texture
  1. Adjust the volume levels for a balanced mix
  2. Use EQ to shape the sound of each track
  3. Add transitions and fades for a sense of movement and progression
  4. Export your beat to a file for sharing

Sharing the Beats You Make

Learn how to make your own beats on your laptop and share them with the world! With a few simple techniques and software programs, you can create professional-quality beats at home. Get started today and unleash your creativity!

Making beats on your laptop is just the first step towards becoming a successful music producer. Once you have created your masterpiece, sharing it with the world is the next important step. Sharing your beat can help you get feedback, gain followers, and possibly even sell your music. In this section, we will explore different ways to share your beat and get it heard by as many people as possible.

Uploading To Soundcloud Or Youtube

Uploading your beat to SoundCloud or YouTube is a great way to get your music heard by a wide audience. With over hundreds of millions of users on these platforms, you can potentially reach a huge fan base. Simply create an account, upload your beat, add relevant tags and descriptions, and share the link on social media or other platforms.

Collaborating With Other Producers

Collaborating with other producers can help you reach new audiences and expand your skills as a music producer. Working with someone who has a different style or perspective can result in entirely new sounds and beats. You can find other producers to collaborate with through online forums, social media platforms, and music production communities.

Submitting Your Beat To Online Marketplaces

Submitting your beat to online marketplaces such as Beatstars and Airbit can help you sell your music and earn money. These platforms are designed to connect producers with artists who are looking for beats. All you need to do is create an account, upload your beat, and set a price. When an artist purchases your beat, you will earn a commission. In conclusion, there are many ways to share your beat and get it heard by a wide audience. Whether you choose to upload your beat to SoundCloud or YouTube, collaborate with other producers, or submit your beat to online marketplaces, the key is to get your music out there. With patience, hard work, and a little bit of luck, you can build a dedicated fan base and become a successful music producer.

How To Make Beats On Your Laptop

Credit: www.careersinmusic.com

Frequently Asked Questions On How To Make Beats On Your Laptop

Can You Make Beats On Your Laptop?

Yes, you can make beats on your laptop using various software programs specifically designed for music production. Some popular options include FL Studio, Ableton Live, and Logic Pro. These programs allow you to create and manipulate different sounds, loops, and samples to create your own unique beats.

How Can I Create My Own Beats?

To create your own beats, you can use a digital audio workstation (DAW) software. This offers various virtual instruments and sound libraries. Start by selecting a tempo and time signature, then experiment with different beats, patterns, and sounds. You can also record your own sounds and mix them in with the virtual instruments.

Practice and patience are key to mastering beat-making skills.

How To Make Beats On Computer For Free?

You can make beats on your computer for free by using online beat makers or downloading free beat making software. Some popular options include LMMS, SunVox, and GarageBand. You can also find free drum kits and samples online to use in your beats.

Experiment with different software and sounds to find the best fit for your needs.

What Software Do You Use To Make Beats?

There are several software options for making beats, including FL Studio, Ableton Live, Logic Pro, and Pro Tools. The choice ultimately depends on personal preference, budget, and desired features.

Conclusion

To sum up, making beats on your laptop is not a difficult task. With the right software and equipment, anyone can create their own unique beats and music. However, it takes time and effort to master the art of beat-making.

Remember to experiment with different sounds and techniques to find your own style. Lastly, always keep learning and exploring new ways to keep your beats fresh and exciting. Happy beat-making!

Categories
Archive

Free Vst Acoustic Instruments

Free VST acoustic instruments are available for download online. These virtual instruments can be used in music production software to create realistic acoustic sounds.

Acoustic instruments produce sounds that are natural and pleasing to the ear, making them a popular choice in music creation. However, not everyone has access to a wide range of physical instruments. This is where Virtual Studio Technology (VST) acoustic instruments come in handy.

They allow users to access a variety of acoustic sounds, all from the comfort of their computer. Additionally, many of these VSTs are available for free, making them accessible to aspiring musicians who may not have the budget for expensive sound libraries. We will explore some of the best free VST acoustic instruments available for download.

Free Vst Acoustic Instruments

Credit: www.native-instruments.com

Advantages Of Free Vst Acoustic Instruments

Free VST acoustic instruments offer numerous advantages, including access to high-quality sounds without the expensive price tag. Whether you’re a music producer or a hobbyist, free VST plugins provide a wide variety of realistic acoustic sounds that can enhance any project.

Acoustic instruments like guitar, drums, and piano have been the backbone of music for centuries. With modern technology, musicians can now create realistic and high-quality sounds without having to own expensive and bulky instruments. Free VST (Virtual Studio Technology) Acoustic Instruments offer an easy and accessible solution to create authentic soundscapes. Besides, there are several other advantages of using free VST acoustic instruments, such as:

High-quality Sound Samples

Free VST Acoustic Instruments come with high-quality sound samples that have been recorded by professionals using real instruments. This ensures that the sound produced is authentic and realistic, thereby enhancing the overall quality of the music. These samples are also available in various formats, including WAV, MP3, and MIDI.

Compatibility With Major Daws

Free VST Acoustic Instruments are compatible with all major DAWs (Digital Audio Workstations) such as Cubase, Ableton Live, and FL Studio. This means that you can easily use them within your existing workflow. You do not have to worry about whether they will be compatible with your DAW, and you can create music without any interruptions.

Customization Options

Free VST Acoustic Instruments offer a wide range of customization options. Musicians can tweak the sound samples, adjust the volume, and add different effects to create their unique sound. This allows them to produce music that matches their style, giving them the freedom to create music without any limitations. In summary, Free VST Acoustic Instruments offer several advantages, including high-quality sound samples, compatibility with major DAWs, and customization options. By incorporating these instruments in their music, musicians can create authentic soundscapes and produce music that matches their unique style.

Free Vst Acoustic Instruments

Credit: www.youtube.com

Top Free Vst Acoustic Instruments

Acoustic instruments are the backbone of any good music production. Whether it’s a soulful guitar or a powerful grand piano, acoustic instruments can add warmth, depth, and character to your tracks. While high-end VSTs can come with a hefty price tag, free options can rival expensive commercial plugins in quality and versatility. In this article, we’ll explore the top free VST acoustic instruments that offer a range of expressive and realistic sounds.

Spitfire Audio Labs

Spitfire Audio LABS is a popular plugin that offers an extensive library of free virtual instruments. The plugin features a wide range of acoustic instruments, including pianos, strings, and percussion. One of the standout instruments is the Soft Piano, which offers a gentle, organic sound perfect for ballads and background music. LABS also features a variety of experimental instruments, such as the Frozen Strings and Choir, which can add a unique touch to any production.

Pianobook

Pianobook is a community-driven project that offers free, royalty-free virtual instruments. The plugin is curated by a team of professional composers and sound designers, who contribute their own samples to the library. Pianobook features an extensive range of piano and keyboard instruments, including upright pianos, toy pianos, and harpsichords. The plugin also includes a collection of non-piano instruments, such as guitars, cellos, and choirs.

Ample Guitar M Lite Ii

Ample Guitar M Lite II is a realistic-sounding acoustic guitar plugin that offers a range of strumming patterns and techniques. The plugin features a variety of guitar models, including a Martin D-41 and Gibson J-45. The plugin allows for fine-tuned control over the guitar’s sound, with options for adjusting the pick position, string resonance, and fret noise. Ample Guitar M Lite II is an excellent choice for producers looking to add authentic-sounding acoustic guitar to their tracks.

How To Install And Use Free Vst Acoustic Instruments

Learn how to easily install and use free VST acoustic instruments in your music production. With a large variety of options available, you can add realistic sounding instruments to your tracks without breaking the bank or sacrificing quality.

Looking for free acoustic instruments for your DAW projects? VST (Virtual Studio Technology) acoustic instruments might be just what you’re looking for. VSTs are software-based plugins that simulate the sounds of real musical instruments. In this blog post, we’ll guide you through the process of installing and using free VST acoustic instruments in your DAW.

Download And Install A Vst Host

Before getting started, you’ll need a VST host installed on your computer. A VST host is a software application that enables VST plugins to work with your DAW. Some popular VST hosts include Ableton Live, FL Studio, and Reaper.

Download Your Free Vst Instrument

There are numerous websites that offer free VST acoustic instruments. Some of the most popular sites include Native Instruments, Spitfire Audio, and Waves. Once you’ve found a VST instrument you want to use, simply download the software and save it to a folder on your computer.

Add The Vst Instrument To Your Daw

To add the VST instrument to your DAW, you’ll need to open your VST host application first. Then, look for the “Plugins” or “VST Instruments” section and click on “Add Plugin.” A dialog box will appear, and you’ll need to select the folder where you saved the VST instrument to find and select it.

Adjust Settings And Start Playing

Once you’ve successfully added the VST instrument to your DAW, you can start playing! Many VST instruments come with different settings and parameters that you can adjust to achieve your desired sound. Experiment with different settings until you find the perfect sound for your project. In conclusion, installing and using free VST acoustic instruments can add a whole new dimension to your music production endeavors. By following these simple steps, you’ll be on your way to enhancing your musical creations with realistic, high-quality acoustic instrument sounds.

Free Vst Acoustic Instruments

Credit: m.youtube.com

Tips For Getting The Most Out Of Free Vst Acoustic Instruments

Enhance your music production with free VST acoustic instruments by customizing the settings and adjusting the sounds to fit your track. Experiment with different effects and techniques to achieve the perfect sound for your project.

If you’re a music producer or composer, you probably know how important acoustic instruments are. But acquiring high-quality acoustic instruments can be expensive. Thanks to technology, now anyone can make music using free VST acoustic instruments. However, not everyone knows how to make the most out of these virtual instruments. Here are a few tips that can help you get the most out of free VST acoustic instruments.

Experiment With Different Articulations

One of the biggest advantages of VST instruments is that they allow you to switch between different articulations with just a few clicks. Different articulations can give your music a unique flavor and make it sound more realistic. Experiment with different articulations to find the perfect sound for your track. You can use articulations like staccato, legato, vibrato, and more to create a dynamic range of sounds.

Use Effects To Shape The Sound

While using free VST acoustic instruments, you might feel that the sound is too dry or doesn’t fit your track. But don’t worry, you can use effects to improve the sound of your instrument. Effects like reverb, delay, and EQ can help shape the sound to your personal preferences. Try different effects and adjust the settings until you find the sound you want.

Layer Multiple Sounds For A Unique Sound

If you want to take your music to the next level, consider layering different VST acoustic instruments. Layering can give your music a full, rich sound, and make it more interesting. You can layer a piano with a guitar or a cello with a violin to create a unique combination of sounds. Experiment with different combinations and see what works for your track. In conclusion, free VST acoustic instruments have opened up a whole new world of opportunities for music producers and composers. By following these tips, you can make the most out of these virtual instruments and create amazing music that sounds just as good as the real thing. Happy composing!

Frequently Asked Questions On Free Vst Acoustic Instruments

Where Can I Get Free Vst Instruments?

You can get free VST instruments from various sites including VST4Free, Bedroom Producers Blog, and Plugin Boutique. These sites offer a wide range of VST instruments for free download and use in your music production projects.

Is Komplete A Vst?

No, Komplete is not a VST. It is a software package that includes various VST instruments and effects, along with other tools and resources for music production.

What Vst Instruments Do Professionals Use?

Professionals use a range of VST instruments, such as Kontakt, Omnisphere, and Serum. Kontakt provides access to a vast library of realistic orchestral and ethnic sounds, while Omnisphere has a wide range of synthesizer options and sound manipulation tools. Serum offers modern, cutting-edge sounds, popular in electronic music genres.

How Do I Add An Instrument To Vst?

To add an instrument to VST, you need to follow these steps: 1. Download and install the VST plugin that contains your desired instrument. 2. Open your music software and scan for new plugins. 3. Locate the newly installed plugin and load it into your project.

4. Choose your desired instrument and start creating music.

Conclusion

Overall, free VST acoustic instruments are an excellent solution for beginners, those on a budget, or anyone seeking to expand their musical capabilities. These software plugins offer high-quality sound, versatility, and convenience, without the need for expensive equipment or instrument rentals.

By taking advantage of these free resources, you can explore your creativity, enhance your productions, and refine your skills. So, whether you’re a hobbyist or a professional, be sure to check out the countless free VST acoustic instrument options available online.

Categories
Archive

Branding Yourself As A Musician

To brand yourself as a musician, utilize social media platforms to showcase your talents and engage with your audience. As a musician, creating an online brand is essential in gaining exposure and connecting with potential fans.

An effective branding strategy includes defining your unique style and image, creating a professional website, and consistently sharing your music through various digital channels. Utilize social media platforms like Instagram, YouTube, and Twitter to showcase your music, engage with fans, and promote upcoming events.

Collaborating with other musicians and industry professionals can also help expand your audience and brand. By implementing a strong branding strategy, you can establish yourself as a prominent and successful musician in the digital world.

Branding Yourself As A Musician

Credit: blog.discmakers.com

Why Branding Matters For Musicians

Creating a strong brand as a musician is essential to stand out in the competitive industry. Your brand reflects your music style, personality, and values, attracting the right audience and opportunities. By building a consistent brand image through social media, website, merchandise, and live performances, you can establish a loyal fan base and increase your chances of success.

Creating A Strong Identity

As a musician, you need to differentiate yourself from other artists. To do this, you need to create a strong identity that defines who you are and what you stand for. Your identity should be unique and memorable so that fans can easily recognize you. This can be accomplished through things like distinctive stage attire, memorable album art, or unique logos. By creating a strong identity, you give fans something to connect with and remember you by.

Establishing A Reputation

Your reputation is everything in the music industry. Building and maintaining a good reputation is crucial to your success. You want to be known as a talented, reliable, and professional musician. Every interaction you have with fans, industry professionals, and other musicians contributes to your reputation. By consistently delivering high-quality performances, responding to messages in a timely manner, and treating others with respect, you establish a positive reputation that can lead to more opportunities in the future.

Growing Your Fanbase

A strong brand can help you grow your fanbase. By creating a clear and consistent image, you can attract fans who are interested in your style of music and relate to your identity. Social media is a powerful tool to connect with fans and build your brand. Regularly posting updates, sharing behind-the-scenes content, and engaging with your followers can help you build a strong fanbase. When fans feel like they have a personal connection with you, they are more likely to support you and share your music with others. In conclusion, branding is crucial for musicians who want to establish themselves, stand out from the crowd, and build a loyal fanbase. By creating a strong identity, establishing a positive reputation, and connecting with fans through social media, you can create a successful brand that supports your music career.

Defining Your Brand As A Musician

As a musician, branding yourself is crucial to build recognition and increase your fan base. Define your unique style and image, craft a strong bio, use consistent branding across social media platforms and merchandise, and engage with your audience in authentic ways to create a memorable brand.

As a musician, defining your brand is crucial to differentiate yourself from the rest of the industry. Your brand is what sets you apart and helps you establish a unique identity in the market. It encompasses your music genre, style, image, message, and fan base. Here are the important aspects you need to consider when defining your brand as a musician.

Identifying Your Niche

Identifying your niche is the first step towards defining your brand. A niche is a specific area within the music industry that you specialize in, such as jazz, rock, blues, or hip-hop. By identifying your niche, you can focus on creating music and building relationships with fans that resonate with your style. Take time to research your competition and find the gap in the market that you can fill with your unique sound.

Developing Your Unique Style

Developing a unique style is what sets you apart from other musicians in your niche. Your style includes your musical arrangements, vocals, instrumentation, and even your fashion sense. Your unique style should be consistent across all your music releases, social media platforms, and live performances. Experiment with different elements and take feedback from your fans to refine your style and stand out from the crowd.

Clarifying Your Message

Clarifying your message is about communicating your story, values, and beliefs to your audience. Your message should be clear, concise, and relatable to your target audience. It helps you connect with your fans on a more emotional level and build a loyal following. Consider what message you want to convey through your music and use it as a guiding force for your brand identity. To conclude, defining your brand as a musician is crucial for building a successful career in the music industry. Identify your niche, develop a unique style, and clarify your message to stand out from competitors and connect with your audience on a deeper level. Remember, your brand should be consistent across all platforms to create strong brand recognition and establish a strong online presence.

Build A Cohesive Online Presence

Establishing a strong online presence is a crucial aspect of branding yourself as a musician. Create a cohesive image across all social media platforms and your website with consistent branding elements, including logos, colors, and imagery. Interact with fans, post quality content regularly, and optimize your site with relevant keywords to boost your online visibility.

As a musician, building a strong online presence is crucial in creating and sustaining your brand. One way to establish a cohesive online presence is by creating a professional website and optimizing your social media profiles. Consistency is key, so it’s important to incorporate visual consistency throughout all your online channels. Below are some tips for building a cohesive online presence that reflects your personal brand.

Creating A Website

Having a website is essential in establishing your online presence as a musician. Your website is where you can showcase your biography, upcoming events, and music. To effectively create a website that aligns with your brand, consider the following:

  • Use a domain name that is easy to remember and reflective of your brand name
  • Showcase high-quality images and videos of yourself performing
  • Include a biography that highlights your achievements and experiences
  • Make it easy for fans to connect with you through a contact form or social media links

Optimizing Your Social Media Profiles

Social media is a powerful tool in building your brand as a musician. It’s important to optimize your social media profiles to ensure they align with your brand. Consider the following tips:

PlatformTips
FacebookUse a high-quality profile picture and cover photoInclude your website and contact information in your bioShare updates about your music, upcoming events, and behind-the-scenes moments
TwitterUse a professional profile picture and header imageInclude your website and contact information in your bioTweet updates about your music and personal moments
InstagramUse a high-quality profile picture and bioShare visually appealing posts that showcase your music and personalityUse relevant hashtags to make your posts discoverable

Visual Consistency

Visual consistency is crucial in creating a cohesive online presence across all your channels. This includes the use of similar colors, fonts, and design elements that align with your brand. Consistency makes it easier for fans to recognize your brand and engage with your content. In conclusion, building a cohesive online presence is essential in establishing your brand as a musician. By creating a professional website, optimizing your social media profiles, and incorporating visual consistency, you can effectively showcase your music and personality to the world.

Collaborating With Other Musicians And Brands

Collaborating with other musicians and brands is an effective way to brand yourself as a musician. By networking and working with like-minded professionals, you can increase your exposure and reach new audiences. Leverage collaborations to showcase your unique sound and style, while aligning yourself with brands that align with your values and image.

When it comes to establishing a successful career as a musician, branding is everything. One crucial aspect of branding is collaborating with other musicians and brands. This not only helps you expand your network but also opens the door to various opportunities that can help you grow and establish yourself in the industry. In this blog post, we will discuss some of the ways in which you can collaborate with other musicians and brands to elevate your brand and career.

Networking Opportunities

Networking with other musicians and brands can help you establish new connections, broaden your fan base, and expand your knowledge in the industry. Attend events, such as music festivals and conferences, where you can meet and interact with other musicians and industry professionals. Use social media to connect with musicians who inspire you or share similar music genres. Collaborate on songs, projects, or gigs to elevate both your brands and help each other grow.

Cross-promotion

Cross-promotion is another effective way to collaborate with other musicians and brands. This technique involves promoting each other’s music, merchandise, or services on each other’s platforms. Create posts that showcase each other’s work and link to each other’s websites or social media accounts. Collaborate on a music video that showcases both your talents and helps spread the word about each other’s music. By doing this, you can leverage each other’s fan base and reach a wider audience.

Sponsorship Deals

Sponsorship deals are another way to collaborate with brands that share the same values and appeal to the same target audience. Reach out to brands that align with your brand and aesthetics. Look for products or services that are relevant to your music, such as music accessories or equipment. In exchange for promoting their products, you can receive free merchandise, equipment, or even financial support. Partnering with brands can also help you gain exposure to their audience and increase your credibility in the industry. In conclusion, collaborating with other musicians and brands is crucial for establishing and growing your career as a musician. It offers networking opportunities, cross-promotion, and the potential for sponsorship deals. By leveraging these partnerships, you can expand your network, reach a wider audience, and establish yourself as a credible and successful musician.

Marketing Your Music With Your Brand

As a musician, establishing your brand is essential to marketing your music. Your brand must convey your unique identity and style, and it should be consistent across all platforms. By branding yourself, you can stand out from the competition and attract a loyal fan base.

As a musician, it’s crucial to create an identity that resonates with your target audience. This is where branding comes in. By defining your brand, you are essentially creating a unique personality that sets you apart from other musicians.

Leveraging Your Brand To Sell Music

One of the most significant advantages of having a strong brand is the ability to sell your music more effectively. Consumers are more likely to choose artists that they feel connected to. Using your brand, you can create emotional ties with your listeners, which can translate into better sales.

Incorporating Branding Into Your Live Shows

Your live shows are an excellent opportunity to showcase your brand. Consider incorporating branding elements into your stage setup, such as backdrops, lighting, and logos. You could also encourage your fans to wear your merchandise during your performances, further reinforcing your brand and building a sense of community.

Using Merchandise To Reinforce Your Brand

Merchandise is another effective way to reinforce your brand. When designing your merchandise, focus on creating items that resonate with your target audience and incorporate your brand aesthetic. For example, if you are catering to a younger audience, consider designing items such as phone cases and hats that incorporate your logo or tagline. In conclusion, as a musician, branding yourself is crucial to your success. By leveraging your brand, incorporating branding into your live shows, and using merchandise to reinforce your identity, you can connect with your audience, build a loyal following, and increase your sales.

Navigating The Music Industry With Your Brand

As a musician, carving out a brand identity is crucial for success in the competitive music industry. Navigating this industry with your brand requires consistency in your image and message on all social media and marketing platforms. Whether it’s through your music, merchandise, or personal appearance, your brand should reflect your unique style and values.

Navigating The Music Industry With Your Brand As a musician, branding yourself is crucial for success in the highly competitive and ever-evolving music industry. Knowing how to properly navigate the industry with your brand is essential to attracting industry attention, differentiating yourself from other musicians, and securing gigs and bookings. Here’s how: Attracting Industry Attention To attract industry attention, your brand should be unique and memorable. Focus on creating a consistent message that resonates with your audience and showcases your unique talents and personality. Utilize social media platforms like Instagram or Twitter to post regular updates about your music, new releases, and upcoming events to keep your audience engaged and attract new fans. Differentiating Yourself From Other Musicians To differentiate yourself from other musicians, create a unique selling point that sets you apart from the rest. This could be a distinctive sound, style or stage presence. Additionally, collaborating with other artists, working with unique producers or featuring unique musical elements in your work, can also set you apart. Securing Gigs And Bookings Securing gigs and bookings is all about building relationships and networking with industry professionals. Attend music conferences, industry events, and meet as many people as possible in the industry to build valuable connections. Be sure to have an electronic press kit (EPK) that includes your bio, music samples, and social media links readily available to complete the picture. In conclusion, branding yourself in the music industry is a continuously evolving process and the success rate of your brand will be defined by how well you navigate the scene. By taking the time to create a unique and memorable brand, differentiating yourself from other musicians and networking with industry professionals, you’ll be well on your way to establishing a strong presence in the music industry.

Measuring The Success Of Your Branding Efforts

As a musician, it is essential to measure the success of your branding efforts. This can be done through analyzing your online presence including social media engagement, website traffic, and streaming platform statistics. Tracking these metrics will help you make the necessary adjustments to improve and strengthen your brand.

As a musician, building a personal brand is crucial for establishing a successful career in the music industry. However, your brand will only be effective if it resonates with your target audience, and that’s where measurement comes in. You need to analyze the results of your branding efforts to determine whether they are achieving the desired outcome. Here are the three key metrics you should use to measure the success of your branding efforts:

Analyzing Social Media Metrics

Social media is a powerful tool for musicians looking to build their brand. To measure the effectiveness of your social media efforts, you need to analyze your metrics, including the number of followers, likes, shares, comments, and reach. These metrics indicate how engaged your followers are with your content. When analyzing social media metrics, consistency is key. You need to regularly post content and monitor your metrics over an extended period to identify trends and make informed decisions.

Tracking Fan Engagement

Fan engagement is a crucial metric in measuring the success of your branding efforts. Engaged fans are more likely to attend your shows, purchase your merchandise, and recommend your music to others. You can track fan engagement by monitoring the number of downloads, streams, ticket sales, and merchandise sold. Additionally, you can create surveys to gather feedback from your fans, which can help you adjust your branding efforts to meet their preferences and needs.

Measuring Financial Roi

While measuring financial return on investment (ROI) may not be the most exciting metric, it is crucial in determining the success of your branding efforts. Financial ROI helps you determine whether your branding efforts are generating income. You can track financial ROI by calculating the revenue generated from ticket sales, merchandise sales, and music streams. You can also compare the costs incurred in your branding efforts, such as social media advertising, with the revenue generated. By tracking financial ROI, you can determine which branding efforts are worthwhile and adjust your strategy accordingly. In conclusion, measuring the success of your branding efforts is crucial for establishing a successful career in the music industry. Analyzing social media metrics, tracking fan engagement, and measuring financial ROI are three key metrics you should use to determine the effectiveness of your branding efforts. By consistently tracking these metrics, you can make informed decisions and adjust your branding efforts accordingly.

Staying Authentic While Building Your Brand

As a musician, it’s important to stay true to your roots while building your brand. Authenticity can set you apart from the competition and help you connect with your audience on a deeper level. By sharing your unique story and personality, you can create a strong and memorable brand that resonates with your fans.

As a musician, building a brand is essential to your success. However, it can be challenging to maintain authenticity while crafting a unique image. To build a brand that truly represents you, there are some key factors to keep in mind.

Maintaining Creative Control

When building a brand, it’s essential to maintain creative control. As a musician, it’s crucial to have a unique sound and style that sets you apart. Don’t let your brand be dictated by outside forces or trends. Stay true to your musical vision and nurture it.

Staying True To Your Vision

Your brand should be an extension of your artistic vision. Stay true to yourself and your music. Your brand should be authentic, and your image should resonate with your fans. Don’t fake your personality or change your style to fit in with a particular brand image. Being true to yourself will help you connect with your audience on a deeper level.

Balancing Branding And Artistic Expression

Branding is essential, but it’s equally important to let your music do the talking. Balancing branding and artistic expression is crucial. Your music should be the core of your brand, and it should reflect your unique voice and style. Your brand should enhance your music, not detract from it. In conclusion, building a brand is an essential aspect of a musician’s career. However, it’s important to stay authentic and true to your vision while crafting your image. Maintain creative control, stay true to yourself, and balance branding with artistic expression to build a brand that truly represents you.

Branding Yourself As A Musician

Credit: m.youtube.com

Frequently Asked Questions For Branding Yourself As A Musician

How Do I Brand Myself As A Musician?

To brand yourself as a musician, start by establishing a unique and memorable image or persona for yourself. Create high-quality music, and use social media and other digital platforms to promote your work and engage with fans. Network with industry professionals, collaborate with other artists, and consistently produce content to keep your brand fresh and relevant.

How Do I Brand Myself As An Artist?

To brand yourself as an artist, you should focus on defining your unique style, creating a portfolio that showcases your work, networking with other artists and industry professionals, building a strong online presence through social media and a personal website, and engaging with your audience through events, exhibitions, and collaborations.

Consistency and authenticity are key to establishing a strong brand as an artist.

Why Personal Branding Is Important For Musicians?

Personal branding is crucial for musicians because it helps them stand out in a crowded industry, establish their unique identity, connect with fans, and increase their value and revenue. It also helps them create a consistent image, build credibility, and attract more opportunities.

A strong personal brand can open up new doors and lead to long-term success.

How Do I Sell Myself As A Musician?

To sell yourself as a musician, identify your unique sound and brand yourself accordingly. Use social media to promote your music and connect with fans and industry professionals. Network with other musicians and attend events to increase visibility. Showcase your talent through live performances and share your music through streaming services and online platforms.

Remember to stay authentic to your style and continue to perfect your craft.

Conclusion

As a musician, branding yourself is crucial to stand out in a highly competitive industry. By developing a unique image, identifying your target audience, and utilizing social media platforms, you can establish a strong presence and attract loyal fans. Keep in mind the importance of consistency and authenticity in your branding efforts.

With dedication and effort, you can elevate your music career and achieve success.

Categories
Archive

Fj V Series Neve Vr Channel

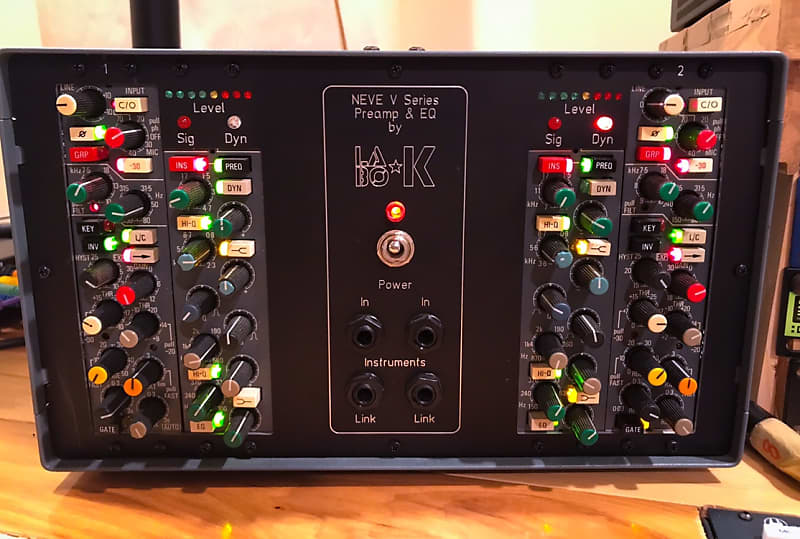
The Fj V Series Neve Vr Channel is a high-quality audio mixing console. It features preamp, EQ, and dynamics processing, making it a versatile tool for recording and mixing music.

Also, as an audio engineer, having a reliable mixing console is crucial to achieving a professional sound. It is a popular choice for many professionals thanks to its performance and versatility. This console features high-quality preamps, EQ, and dynamics processing, allowing engineers to fine-tune the sound to their liking.

Related reading: Neve 33609 Stereo Compressor and Steps Pros Never Miss When Editing A Mix.

Additionally, it offers excellent routing and connectivity options, making it easy to integrate into any studio setup. Whether you’re recording a live band or mixing a solo artist, it is a strong addition to any engineer’s toolkit.

Fj V Series Neve Vr Channel

Credit: m.youtube.com

Fj V Series Neve Vr Channel

Credit: reverb.com

Frequently Asked Questions On Fj V Series Neve Vr Channel

What Is Fj V Series Neve Vr Channel Used For?

It is a channel strip for audio mixing and processing, with a wide range of professional features.

What Are The Benefits Of Using It?

Using it can noticeably improve the sound quality of your recordings. For example, this results in a more professional and polished sound. It offers a range of features, including compression, EQ, and reverb, to shape and refine sound.

How Does It Work?

The channel strip passes audio through several stages, including amplifiers, filters, and processors. As a result, it allows the user to control the levels of different frequencies and elements of the sound, adjusting and balancing them to create a final, polished mix.

Is Fj V Series Neve Vr Channel Suitable For Home Recording Studios?

While it is aimed at professional studios, it also suits high-quality home recording setups. Its features and capabilities can help produce a more professional sound quality, even in a smaller setting.

Conclusion

To sum up, the Fj V Series Neve VR Channel is the perfect choice for professionals who demand the highest standards in their audio production. Equipped with state-of-the-art features and exceptional sound quality, this channel strip delivers outstanding results every time.

Whether you are a seasoned sound engineer or a novice, this channel strip is an investment that pays off in the long run. So, upgrade your studio today and take your audio production to new heights with the Fj V Series Neve VR Channel.

For more background, see Neve Electronics on Wikipedia. You may also like our guide: What Is the Channel Rack in FL Studio and How Can I Use It.

Categories
Archive

Self Promotion As a Musician

Self-promotion for musicians involves building a strong online presence and engaging with your audience consistently. As a musician, you’re the CEO of your own personal brand.

Promoting yourself is just as important as promoting your music. In today’s digital age, establishing a recognizable and engaging online presence is crucial to success. Fortunately, with the power of social media, it has never been easier to do so.

From Facebook to Instagram to YouTube, the options for self-promotion are endless. However, posting content isn’t enough; you need to interact with your fans and build a community. That way, you can keep your audience excited and interested in your music while actively solidifying your brand identity. We’ll take a closer look at the importance of self-promotion for musicians and provide actionable tips for getting started.

Why Self Promotion Is Important For Musicians

Self-promotion is critical for musicians to reach a wider audience, establish their brand identity, and generate opportunities. By promoting themselves, musicians can increase their visibility in the industry and connect with fans and potential collaborators.

As a musician, creating and producing music is only one aspect of your job. Self-promotion is the key to attracting new listeners, building your brand, and making lasting connections in the industry. When people don’t know about your music, they can’t listen or attend your gigs. Additionally, in today’s world, where anyone can release music with the click of a button, standing out from the crowd can be a challenge. This is where self-promotion comes in.

Building Your Brand

As a musician, you are your brand and, just like any other brand, you must promote it to reach a wider audience. Today, music listeners are always on the hunt for something fresh and new, and self-promotion can help you achieve that goal. Marketing your brand will help you create a unique identity that sets you apart from other musicians and creates a lasting impression on your audience. This can result in a loyal fanbase that will follow your music throughout your career.

Reaching A Wider Audience

The world is your stage; you need to reach the right people. Self-promotion can help you do that. With the help of social media platforms, live streaming, and podcasts, you can reach a much broader audience without spending lots of money. These platforms also give you the opportunity to interact with your fans and create lasting connections. Expanding your audience reach is crucial as it can lead to more gig bookings, higher sales, and more streams globally.

Increasing Your Fanbase

Promoting your music is a powerful tool when it comes to increasing your fanbase. Regularly promoting your content on different platforms will help you reach out to different listeners globally. This will increase your chances of being discovered by new listeners who will then appreciate your love for music. Additionally, consistent promotion will keep your music in the limelight, making it easy for your fans to share your content with their own friends and family, which can lead to even more fans organically.

Making Connections In The Industry

Making connections in the music industry can be difficult, but self-promotion can help. By promoting your music and building your brand, you create a chance to be noticed by industry professionals. This can result in invites to play shows, collaborations with other musicians, and even record deals. In the music industry, networking is essential, and self-promotion is the first step to getting the right people to notice you and your music. Self-promotion is an integral part of a musician’s career. It’s an opportunity to introduce yourself to the world, create a loyal fanbase, and connect with people in the music industry. Don’t let your music go unheard; instead, promote it and share it with the world.

Self Promotion As a Musician

Credit: angelabeeching.com

Tools For Effective Self Promotion

As a musician, self-promotion is key to success. However, to promote yourself in the best possible way, you need to use the right tools. Here are some essential tools that every musician should use to promote their music effectively.

Social Media

Social media is the most powerful tool for self-promotion. As a musician, you must leverage social media platforms such as Facebook, Twitter, Instagram, and YouTube to promote your music. Share your latest tracks, upcoming gigs, and other updates with your followers. Use hashtags, tagging, and shareable content to increase your reach.

Email Marketing

Email marketing is an effective tool to communicate with your fans. Building an email list is crucial for self-promotion as a musician. Send regular updates on your latest tracks, gigs, and other news via email newsletters. You can also offer exclusive content, discounts, and early access to your fans via email to build a strong relationship with them.

Website And Blogging

Your website is your virtual home on the internet. It should showcase your music, bio, gigs, and other essential details. Use your website to promote your music to a wider audience. Blogging is another great way to promote yourself. Write blog posts related to your music, gigs, and the music industry. It will help you build authority and attract new fans.

Networking And Collaborations

Networking and collaborations with other musicians and industry professionals are essential for self-promotion. Attend music industry events, join music groups on social media, and collaborate with other musicians on new tracks. It will help you expand your reach and get noticed by a wider audience.

Tools for Effective Self Promotion
Social MediaShare your latest tracks, upcoming gigs, and other updates with your followers.
Email MarketingSend regular updates on your latest tracks, gigs, and other news via email newsletters.
Website and BloggingUse your website to promote your music and write blog posts related to your music, gigs, and the music industry.
Networking and CollaborationsAttend music industry events, join music groups on social media, and collaborate with other musicians on new tracks.
  • Promote yourself effectively using social media platforms such as Facebook, Twitter, Instagram, and YouTube.
  • Build an email list and send regular updates and exclusive content to build a strong relationship with your fans.
  • Showcase your music, gigs, and other essential details on your website, and write blog posts related to your music and the music industry.
  • Network with other musicians and industry professionals and collaborate on new tracks to expand your reach and get noticed.

Creating A Strong Online Presence

As a musician, creating a strong online presence is essential for self-promotion. Utilize social media platforms, create a website, and engage with your audience to establish a solid brand identity and reach a wider audience. Don’t underestimate the power of a strong online presence in today’s digital age.

Creating a Strong Online Presence As a musician, having a strong online presence is vital to promoting your brand and music. In today’s digital age, connecting with fans and potential listeners through various online channels can make all the difference. In this blog post, we will delve deeper into Creating a Strong Online Presence as a Musician, while focusing on Consistent Branding, Engaging Content, Interaction with Fans, and Utilizing Analytics.

Consistent Branding

Your branding is what sets you apart from other musicians and keeps fans engaged with your music. It’s important to maintain a consistent branding strategy across various platforms, including your website, social media pages, and streaming services. This includes using the same color scheme, font style, and tone of voice in your posts and banners. This helps to create a recognizable image and strengthens brand loyalty.

Engaging Content

Engaging content is key to keeping fans interested and attracting new ones. Regularly posting content that relates to your music, such as behind-the-scenes photos and videos, updates on upcoming performances and releases, and teasers of new tracks, will create a buzz and keep fans engaged. Don’t be afraid to get creative with your content, such as interactive quizzes or live Q&A sessions on social media. This will help to foster a connection with your fans and keep them invested in your music.

Interaction With Fans

Interacting with your fans is a crucial part of maintaining a strong online presence. Replying to comments, messages, and tweets, and sharing user-generated content shows that you appreciate and value your fans. This helps to create a positive relationship with your audience, making them more likely to attend your shows and buy your music. Engaging with your fans online is an investment in your long-term success.

Utilizing Analytics

Utilizing analytics helps you to understand your audience and tailor your online presence accordingly. With data on demographics, engagement rates, and website traffic, you can tweak your content and strategy to better suit your audience. This will help to increase your online engagement, leading to more fans and an increased following. Don’t be afraid to experiment with different types of content and strategies, and use analytics to assess their effectiveness. In conclusion, a strong online presence is vital to a musician’s success. Consistent branding, engaging content, interaction with fans, and utilizing analytics are all important factors to consider. By following these tips, you can create a strong digital presence that will help you stand out in a crowded music scene.

Planning And Executing A Self Promotion Strategy

As a musician, planning and executing a self-promotion strategy is crucial for success. This involves creating a strong online presence through social media and websites, building relationships with fans and industry professionals, and consistently promoting your music through various platforms.

By prioritizing self-promotion, musicians can increase their visibility and expand their reach in the music industry.

As a musician, self-promotion is crucial to building your fan base and getting your music heard by more people. But where do you start? Planning and executing a self-promotion strategy can seem daunting, but it’s worth the effort to achieve success.

Defining Your Goals

Before you start promoting your music, you need to define your goals. What do you hope to achieve? Do you want to gain more followers, book more gigs, sell more albums, or something else? Your goals should be specific, measurable, achievable, relevant, and time-bound (SMART).

Identifying Your Target Audience

Knowing your target audience is essential for effective self-promotion. Who is your music for? What kind of people are most likely to enjoy it? Once you have identified your target audience, you can tailor your marketing efforts to their interests and needs.

Allocating Your Resources

Promoting your music takes time and resources, so it’s important to allocate them wisely. Determine your budget and decide which platforms and strategies will be most effective for reaching your target audience. Consider using social media, email marketing, press releases, and live performances to get your music out there.

Measuring Your Success

To determine the success of your self-promotion efforts, you need to measure your results. Keep track of your social media followers, email subscribers, website traffic, and other metrics to see how your promotion is performing. Use this data to adjust your strategy and improve your results. In conclusion, planning and executing a self-promotion strategy requires careful consideration and effort, but it’s worth it to achieve success as a musician. By defining your goals, identifying your target audience, allocating your resources, and measuring your success, you can effectively promote your music and grow your fan base.

Mistakes To Avoid In Self Promotion

Self promotion as a musician can be tricky, but avoiding common mistakes can set you apart. Tailor your message to your audience, be authentic, and don’t oversell yourself. Build genuine connections and nurture relationships. Remember, it’s about building a fanbase, not just promoting yourself.

As a musician, self-promotion is essential for building your brand, increasing your fan base, and advancing in your career. However, there are some common mistakes you need to avoid to ensure you don’t harm your reputation, or worse, go unnoticed. In this post, we’ll explore some of the most significant blunders you can make in self-promotion and how to steer clear of them.

Overselling Yourself

You’re passionate about your music, and you should be! However, when it comes to self-promotion, there’s a fine line between promoting yourself and overselling yourself. Don’t exaggerate your abilities, your accolades, or make outrageous claims that you can’t back up. It’s essential to be confident, but ensure that you’re honest and transparent with your audience to avoid damaging your reputation in the long run.

Neglecting Your Authenticity

Authenticity is one of the most critical aspects of self-promotion. Your fans are there to engage with you because they like what you’re creating and the message you’re portraying through your music. Neglecting your authenticity and trying to conform to someone else’s vision can lead to disconnection with your fans and damage your brand. Stay true to yourself, your values, and what you represent.

Ignoring Feedback And Criticism

No matter how talented you are, or how passionate you are about your music, you’ll receive feedback and criticism. It’s essential to listen to what others say about your music. Ignoring feedback can lead to stagnation in your career. Take constructive criticism as an opportunity to evolve, hone your craft, and grow as a musician.

Not Staying Consistent

Consistency is vital in self-promotion. Having a consistent presence on social media, releasing new music regularly and engaging with your fans is crucial. Not staying consistent can result in missed opportunities and reduced long-term success. Developing a routine and sticking to it will help you stay at the top of your game. In conclusion, self-promotion is essential for your success as a musician; however, it’s easy to make mistakes. Avoiding overselling yourself, neglecting your authenticity, ignoring feedback, and criticism and not staying consistent are some of the most significant blunders to avoid. Stay true to yourself, listen to feedback, and keep a consistent presence, and watch your career grow.

Self Promotion As a Musician

Credit: www.amazon.com

Success Stories Of Self Promoting Musicians

The journey of self-promoting musicians is filled with challenges and eventual successes. By utilizing their talents and social media platforms, many musicians have gained recognition and created a loyal fan base. Their success stories serve as inspiration for aspiring musicians to make their mark in the competitive music industry.

As a musician, self-promotion is key to success. It’s a way to establish your brand, gain new fans, and potentially secure new opportunities. While it can be a daunting task, many independent artists have found success through self-promotion. In this article, we’ll explore the various methods and approaches musicians have taken to self-promote, and how it has led to success.

Case Studies Of Independent Artists

There are numerous independent artists who have achieved success through self-promotion. Take, for example, Chance the Rapper who gained notoriety by releasing his music for free and promoting it through social media. He was eventually signed to a major label, but his success was largely due to his grassroots approach to promotion. Similarly, Grimes, an indie-pop artist, gained popularity through her DIY approach to self-promotion. She created her own music videos and posters, and actively engaged with her fans, creating a strong and loyal following. These artists are just a few examples of how independent musicians can successfully self-promote.

Lessons Learned From Major Label Success

While self-promotion is an essential aspect of success for independent artists, major labels also employ various promotional tactics to boost their artists’ success. A prime example is Taylor Swift’s strategic release of her album “Folklore” during the COVID-19 pandemic, which garnered widespread attention and critical acclaim. Additionally, Beyonce’s surprise album release of “Lemonade” generated a massive buzz on social media, with fans eagerly sharing and discussing the new music. These examples show how major labels can effectively use creative and strategic promotional tactics to build anticipation and hype around their artist’s releases.

Interviews With Self Promoting Musicians

To gain more insight into successful self-promotion, it’s helpful to hear from musicians themselves. In interviews with musicians such as Hozier and Billie Eilish, they discuss the importance of authenticity and creative control when it comes to self-promoting their music. They stress the importance of staying true to oneself and utilizing social media platforms to connect with fans and build a loyal following. Hearing directly from successful musicians can provide valuable insights and inspiration for independent artists looking to self-promote.

Exploring Different Genres Of Successfully Self Promoting Musicians

Successful self-promotion isn’t limited to just one genre of music. For example, Ariana Grande has utilized her large following on social media to promote her newly released music, while heavy metal band Metallica has found success through live performances and creating a strong and dedicated fanbase. Hip-hop artists like Kendrick Lamar have utilized unique promotional tactics, like releasing surprise albums and collaborating with other popular artists, to gain widespread acclaim and attention. The diversity of strategies utilized by successful self-promoting artists highlights the importance of being flexible and creative when it comes to promotion. In conclusion, there are numerous successful self-promoting musicians who have utilized various strategies to establish themselves in the music industry. Whether through a grassroots DIY approach or strategic major label tactics, the common thread of successful self-promotion is authenticity, creativity, and a strong connection with fans.

Navigating The Challenges Of Self Promotion

Navigating the challenges of self-promotion as a musician can be tough. It’s important to find a balance between promoting yourself and not coming across as too pushy. Building an online presence, creating quality content, networking and collaborating with others in the industry can all help in your self-promotion efforts.

As a musician, self-promotion is an essential step towards establishing yourself in the industry. However, navigating the challenges of self-promotion can be daunting, particularly when it comes to managing time, budgeting resources, maintaining mental health, and balancing artistic expression with commercial success.

Time Management

As a musician, you may find that there are never enough hours in the day to accomplish everything you need to do. To ensure that you make the most of your time, it is crucial to manage it effectively. Create a schedule that includes dedicated time for self-promotion activities such as social media marketing, email campaigns, and networking. Be disciplined and stick to your schedule, prioritizing tasks that bring the most significant benefits to your career.

Budgeting Your Resources

Self-promotion requires an investment of time, effort, and money. It is essential to develop a budget for your promotional activities that balances your resources effectively. Identify the most effective promotional channels, such as paid advertising, professional photo shoots, or attending industry conferences. Ensure that you allocate enough resources to each channel to achieve the desired results while also maintaining financial stability.

Maintaining Your Mental Health

As a musician, navigating the challenges of self-promotion can be both physically and mentally draining. Ensure that you take care of your mental health by practicing mindfulness techniques, taking regular breaks, and seeking support when needed. Avoid burnout by prioritizing self-care activities such as exercise, healthy eating, and rest.

Balancing Artistic Expression And Commercial Success

One of the biggest challenges of self-promotion as a musician is finding a balance between artistic expression and commercial success. While it is essential to establish a unique artistic identity, it is also crucial to adopt a commercial mindset that focuses on achieving success in the industry. Identify your target audience and develop a promotional strategy that aligns with your artistic vision while still catering to commercial requirements. As a musician, self-promotion is an ongoing process that requires dedication, hard work, and tenacity. By navigating the challenges of self-promotion, managing your time and resources effectively, maintaining your mental health, and finding the balance between artistic expression and commercial success, you can establish yourself in the industry and achieve your career goals.

Self Promotion As a Musician

Credit: blog.bandlab.com

Embracing Self Promotion As Part Of Your Music Career

As a musician, it’s crucial to embrace self-promotion to build your career. Share your music on social media, connect with fans online, collaborate with other artists and producers, and make the most of every opportunity to showcase your talent. With dedication and hard work, self-promotion can help you reach new audiences and realize your full potential as an artist.

As a musician, self-promotion is a crucial part of your music career. While it may seem overwhelming or uncomfortable to promote yourself, it’s essential to remember that it’s all part of building your brand and growing your fanbase. In this blog post, we’ll explore how to shift your mindset towards self-promotion, incorporate it into your creative process, stay open to new and creative ideas, and continue to learn and stay motivated.

Shifting Your Mindset Towards Self Promotion

One of the biggest hurdles to overcome when it comes to self-promotion as a musician is mindset. It’s common for musicians to feel uncomfortable or even self-promoting, but it’s essential to shift your mindset. Instead of viewing it as self-promotion, think of it as sharing your passion with others. Remember that promoting your music is an investment in your career, and being confident in your talent is key to embracing self-promotion.

Incorporating Self Promotion Into Your Creative Process

Integrating self-promotion into your creative process can help you promote your music without feeling like you’re constantly selling yourself. For example, you could write behind-the-scenes blog posts or social media updates that give fans a glimpse into your creative process. You can also create teaser videos for upcoming shows or new music releases. Additionally, using eye-catching visuals, such as album art or concert posters, can help promote your music in a visually appealing way.

Being Open To New And Creative Ideas

As a musician, being open to new and creative ideas can help you stand out from the crowd. Consider using social media platforms to interact with your fans, such as asking for their input on upcoming music releases. Collaborating with other musicians or brands can also help you gain exposure and expand your fanbase. The key is to stay open to new and creative ideas that align with your brand and music.

  • Interact with fans on social media platforms
  • Collaborate with other musicians or brands
  • Stay open to new and creative ideas that align with your brand and music

Staying Motivated And Continuing To Learn

As with any career, staying motivated and continuing to learn is crucial to success as a musician. Take time to attend music workshops, conferences or networking events. By doing so, you will be able to learn new techniques, meet industry professionals and make valuable connections. Another way to stay motivated is to set realistic goals for yourself and track your progress. Celebrating small milestones along the way can help keep you motivated and on track.

  1. Attend workshops and professional events
  2. Set realistic goals and track progress
  3. Celebrate small milestones

Conclusion

Embracing self-promotion as a musician may seem daunting, but by shifting your mindset, incorporating it into your creative process, staying open to new ideas, and continuing to learn, you can promote your music confidently and successfully. Remember, promoting your music is an investment in your brand and career as a musician.

Frequently Asked Questions Of Self Promotion As A Musician

How Do I Promote Myself As A Musician?

To promote yourself as a musician, you need to focus on creating your brand image, building a social media presence, networking with other musicians, participating in local gigs/events, and producing quality content. Utilize online platforms, such as SoundCloud and YouTube, to showcase your music and connect with your target audience.

Keep your fans engaged by updating them regularly about your upcoming gigs and releases. Collaborate with other musicians to expand your reach and gain more visibility.

How Do Independent Musicians Promote Themselves?

Independent musicians can promote themselves by utilizing social media platforms such as Instagram and Facebook, creating a website to showcase their music and upcoming shows, networking with other musicians and industry professionals, playing live shows and open mics, and submitting their music to local and online radio stations.

How Do Bands Promote Themselves?

Bands can promote themselves by using social media platforms to share their music and upcoming shows, collaborating with other artists, building an email list and communicating with their fans, playing live shows, and submitting their music to music blogs and playlists.

It’s important for bands to have a strong online presence and engage with their audience to build a larger fanbase.

How Do You Brand Yourself As A Musician?

To brand yourself as a musician, you need to define your unique style and genre, create a strong visual identity with a logo, website, social media, and merch, network with other industry professionals, and consistently promote your music. It’s also important to maintain a strong online presence by regularly posting content and engaging with your fans.

Conclusion

As a musician, self-promotion is crucial for success, but it can be challenging and intimidating. With the right tools and strategies, however, it is possible to build a successful career as an independent artist. By creating a strong online presence, networking with other musicians and industry professionals, and staying true to your unique sound, you can create a lasting impact on the music industry.

So, take the first step, be confident, and promote yourself!

More in our Music marketing guide.

Categories
Archive

Do Subs Make Your Music Louder

No, subs (subwoofers) do not make your music louder. They enhance the bass and lower frequencies, providing a fuller sound, but overall volume is controlled by your amplifier or receiver.

When it comes to audio equipment, subwoofers are often a key component for delivering better sound quality. Many people believe that subs make music louder, but in reality, they are designed to improve the low-end frequencies of a track. A subwoofer is a specialized speaker that reproduces bass frequencies and adds depth to music.

While they can make music sound more full and rich, they do not necessarily make it louder. We’ll delve deeper into how subwoofers work, their impact on audio quality, and whether they can actually boost the volume of your music.

The Science Of Subwoofers

Subwoofers can make your music feel louder by producing more bass frequencies. However, the overall loudness of your music depends on various factors such as the volume levels, audio quality, and settings. The science behind subwoofers is fascinating and can significantly enhance your musical experience.

Subwoofers are a crucial part of any sound system, particularly when it comes to amplifying bass. But have you ever wondered about the science behind it? In this blog post, we’ll explore the intricate details of subwoofers and how they affect the quality of sound they produce.

How Subwoofers Affect Sound Quality

Subwoofers are primarily responsible for the reproduction of low-frequency sounds in music, which is why they are prominently used in concerts and sound systems. These low-frequency sounds or bass are created by vibrations that travel through the air and reach our ears. Subwoofers magnify these vibrations, making the bass sound louder and more extensive. However, increasing the volume of bass isn’t the only job of subwoofers. They are also responsible for producing a clear and precise sound. Subwoofers are designed to produce a single low-frequency sound from multiple woofers. The resulting sound is clear and without any distortion.

The Role Of Bass In Music

As mentioned above, subwoofers amplify the bass sound, which is an essential component of music. The bass adds a layer of depth to the music, creates a rhythm, and sets the mood for the listener. The bass is also responsible for generating emotional responses in listeners. A strong bass line can uplift the audience’s mood, whereas a subtle bass can create a mellow atmosphere. In conclusion, subwoofers play a pivotal role in making the music experience more enjoyable for listeners. Understanding the science behind subwoofers and their role in sound quality can help music enthusiasts make informed decisions when selecting a sound system. A well-designed subwoofer provides a clear and precise low-frequency sound, making the music more engaging and immersive.

Do Subs Make Your Music Louder

Credit: www.crutchfield.ca

Measuring Sound Levels

Subwoofers can make your music seem louder due to the powerful, bass-heavy sound they produce. However, sound levels are measured in decibels (dB), and installing a subwoofer doesn’t necessarily increase the overall volume but rather enhances the low-frequency sound.

When it comes to music, we all want it to sound as good as possible. One way to achieve this is by using a subwoofer, a type of speaker that reproduces low-frequency sounds. But does having a subwoofer make your music louder? And how can we measure sound levels to determine the impact of a subwoofer on music quality? In this post, we will explore the topic of sound levels and how they relate to subwoofers.

What Is Decibel?

Decibel (dB) is a unit used to measure the intensity of sound. It is a logarithmic scale, which means that every increase of 10 dB represents a 10-fold increase in sound intensity. For example, a sound that is 80 dB is 10 times more intense than a sound that is 70 dB. The human ear can detect sounds ranging from 0 dB (the threshold of hearing) to 140 dB (the threshold of pain).

Comparing Sound Levels

When it comes to music, we often use terms like “loudness” or “volume” to describe how loud a song is. However, these terms are subjective and can vary depending on the listener. To measure sound levels objectively, we use a sound level meter. This device measures the sound pressure level (SPL) in decibels. Let’s compare the sound levels of a song with and without a subwoofer. Assume that the sound level of the song without a subwoofer is 80 dB. When we add a subwoofer, the low-frequency sounds become more prominent, and the overall sound level may increase. Let’s say that the sound level of the song with a subwoofer is 85 dB. This means that the subwoofer has increased the sound level of the song by 5 dB. In conclusion, a subwoofer can make your music sound louder by boosting the low-frequency sounds. However, the impact on overall sound levels may vary depending on the song and the type of subwoofer used. By measuring sound levels with a sound level meter, you can objectively determine the impact of a subwoofer on your music.

Do Subs Make Music Louder?

As an audio enthusiast or music lover, you may have asked the question: “Do subs make music louder?” The answer is not a simple yes or no. To understand why, we need to examine what we mean by “loudness” and how subs enhance sound.

Defining Loudness

Before we discuss whether subs make music louder, we need to understand what we mean by “loudness.” Loudness is subjective and refers to how we perceive sound volume.

Sound volume is measured in decibels (dB), but the way we interpret volume is influenced by factors such as the source of the sound, the environment, and the listener’s hearing abilities.

How Subs Enhance Sound

Subwoofers, or “subs,” are speakers that specialize in reproducing low-frequency sounds, such as bass and drums. By adding a sub to your sound system, you can improve the overall audio quality and clarity of your music.

Subs enhance sound in several ways:

  • They improve bass response, making the music sound more natural and balanced.
  • They reduce distortion by taking some of the load off the other speakers, allowing them to reproduce mid and high-frequency sounds better.
  • They can increase the overall volume of the music by adding more low frequencies, which are often perceived as “louder” than mid and high frequencies.

Perception Vs. Reality

It’s important to note that subs don’t actually make music louder in terms of decibels. However, they can create the perception of louder music by adding more bass frequencies that our ears interpret as louder.

Additionally, playing music at high volumes can cause hearing damage, so it’s important to enjoy your music at a safe volume level regardless of whether or not you have a sub.

In conclusion, while subs don’t directly make music “louder,” they can improve the overall audio quality and clarity of your music, including creating the perception of louder music by adding more bass frequencies.

Do Subs Make Your Music Louder

Credit: www.crutchfield.com

Types Of Subwoofers

If you are an audiophile, you know that music is not just about hearing the words or notes – it’s about feeling the bass too. Did you know the right subwoofer can significantly improve the bass quality in your music? In this article, we will discuss the different types of subwoofers available in the market and which one might be right for your music setup.

Passive Vs. Powered Subwoofers

Subwoofers come in two categories: passive and powered. Passive subwoofers are unamplified, adding raw power to the system. These subwoofers need an external amplifier to work and are usually heavy and big in size. On the other hand, powered subwoofers have built-in amplifiers and are more compact. They offer their benefits, such as more precise sound and less distortion.

Sizes Of Subwoofers

Subwoofers come in various sizes, typically ranging from 8 to 15 inches. But the most common sizes are 10 and 12-inch subwoofers. Choosing the size of the subwoofer depends on the amount of power you want, your budget, and the size of your music setup. Smaller subwoofers are ideal for smaller rooms or outdoor setups, while larger subwoofers offer more power and deeper bass for larger rooms or indoor setups.

Ultimately, the type and size of the subwoofer you pick will depend on your personal preferences and requirements. Regardless of the type or size, subwoofers do make your music louder and more enjoyable by delivering greater bass depth and power.

Choosing The Right Subwoofer

If you’re looking to enhance the audio quality of your music, purchasing a subwoofer is a great option. A subwoofer is a type of speaker that produces low-frequency audio sounds such as bass. It can make your music sound fuller and more dynamic, but it’s important to choose the right subwoofer to ensure it meets your needs. Here’s what you need to know when it comes to selecting the right subwoofer for your setup.

Matching Subwoofers To Your Speakers

Before choosing a subwoofer, you need to determine if it’s compatible with your existing speakers. You want to ensure the subwoofer you choose can blend well with your speakers for optimal sound quality. Here are important factors to consider when matching subwoofers to your speakers:

  • Size of speakers: The size of your speakers can impact the type of subwoofer you require. For instance, if you have large speakers, a smaller subwoofer may not produce enough bass.
  • Power rating: The power rating of your speakers will dictate the power rating required for your subwoofer.
  • Frequency range: The frequency range of your speakers matters since it’ll determine if the subwoofer can produce the right frequency to complement your setup.

Setting Up Your Subwoofer Properly

After finding a subwoofer that matches your requirements, it’s essential to set it up correctly to get the optimal sound quality you’re looking for. Here are some tips to ensure you set up your subwoofer properly:

  1. Position your subwoofer: You want to position your subwoofer in a place free from obstructions and on a sturdy surface that won’t rattle.
  2. Adjust settings: Most subwoofers come with settings to adjust volume, frequency, and other features. You want to adjust these settings to meet your preferences and the specific needs of your setup.
  3. Calibrate: You may want to calibrate your subwoofer with your speakers to achieve the best sound quality.

By following these tips for choosing the right subwoofer and setting it up properly, your music can sound louder, fuller, and more dynamic. Make sure to consider all the factors mentioned above and take the time to adjust the settings, so you get the best sound quality possible.

Common Misconceptions

Many music enthusiasts believe that subs make their music louder, but is this really the case? Let’s address some common misconceptions about subs.

Subs Can Damage Your Hearing

One of the most prevalent myths about subs is that they can damage your hearing. Yes, subs can produce extremely loud volumes, but the truth is, any audio equipment has the potential to harm your hearing if not properly used. Subs themselves aren’t inherently harmful; rather, it’s how they are used. Always listen to music at a reasonable volume, take breaks between listening sessions, and use good-quality hearing protection devices when necessary.

Subs Are Only For Bass-heavy Music

Another common misconception about subs is that they are only suitable for bass-heavy genres, such as hip-hop or EDM. But the reality is, subs can enhance the listening experience in many music genres, including classical, jazz, and rock.

Subs can bring out the lower notes in any piece of music, no matter the genre. Whether you want to feel the deep basslines, the kick drums, or the emotion behind a singer’s voice, subs can bring out the best in any song. However, it’s important to choose the right sub for your needs. Different subs have different sizes, power ratings, and frequency ranges, so it’s essential to research what will best suit your specific music preferences.

In conclusion, while there are some misconceptions about subs, they can be a valuable addition to any music lover’s audio setup. By understanding their capabilities and limitations, you can use subs to enhance your listening experience in a way that’s safe and enjoyable for your ears.

Frequently Asked Questions On Do Subs Make Your Music Louder

Does A Subwoofer Increase Volume?

Yes, a subwoofer can increase volume. Subwoofers produce low frequency bass sounds, which can add to the overall sound experience and make the music or movie feel more immersive. However, it’s important to note that subwoofers alone cannot increase the volume of your entire system, but only enhance the bass output.

Does Music Sound Better With A Subwoofer?

Yes, music sounds better with a subwoofer. A subwoofer enhances the audio quality by adding depth and richness to the lower frequencies in the music. It allows for a more immersive experience and can bring out details that may not be audible otherwise.

Will A Subwoofer Make My Speakers Sound Better?

Yes, a subwoofer can enhance the overall audio experience by adding depth and richness to the low-frequency sounds that your speakers may not be able to produce on their own. Adding a subwoofer will improve the music’s impact, making it sound fuller.

Will 2 Subs Be Louder Than 1?

It depends on certain factors like the power and configuration of the two subs and the acoustics of the room where they are placed. Generally, two subs may provide louder, more evenly distributed bass compared to a single sub. However, it’s best to consult an expert or conduct a proper sound test to determine the best setup for your space.

Conclusion

Subs do contribute to the overall loudness of music, but they are not solely responsible for it. The amplifier and other speakers also play a significant role. It is essential to strike a balance between the bass and other frequencies to produce the best sound quality.

Therefore, when choosing a sound system, it is crucial to consider various factors such as the impedance, power handling, and sensitivity to ensure optimal performance. Ultimately, the quality of music is not just about volume but also about clarity, precision, and balance.

Categories
Archive

Is It Hard to Play the Synthesizer

Playing the synthesizer can be challenging, but it is not necessarily hard. With practice, anyone can learn to play the instrument effectively.

If you are interested in creating music with synthesizers, you may wonder if it is hard to play. While it can be challenging to master the intricacies and nuances of the instrument, it is not necessarily a difficult instrument to learn.

Many people find that the synthesizer is relatively easy to play once they become familiar with its layout and functions. As with any instrument, proficiency requires dedication and practice. We will explore what synthesizers are, how to play them, and offer tips for improving your skills. Whether you are a beginner or already have some experience with synthesizers, this guide will help you develop your playing abilities and creativity.

Is It Hard to Play the Synthesizer

Credit: www.musicradar.com

The Basics Of Playing The Synthesizer

Playing the synthesizer may seem daunting at first, but with some practice and patience, it can become a rewarding experience. While there may be a learning curve in mastering its various functions, the synth’s versatility allows for endless possibilities in creating unique and exciting sounds.

Learning to play the synthesizer may seem like a daunting task at first, but with patient dedication and practice, anyone can learn. The basic knowledge of the keyboard layout, understanding sound generation, and manipulating sound parameters are the essential aspects of playing the synthesizer.

Learning The Keyboard Layout

The keyboard of a synthesizer is similar to that of a piano, but it has additional buttons, knobs, and sliders that control various sound parameters. The standard keyboard layout consists of 88 keys, and it is important to learn the position of each key. It may take time to memorize the layout, but with patience and dedication, it can be accomplished. Once you have learned the keyboard layout, you will be able to instantly spot and play the notes with ease.

Understanding Sound Generation

Understanding sound generation is the key to playing the synthesizer. Unlike traditional instruments, synthesizers create sounds electronically, and there are several methods of sound generation. The most common methods are subtractive synthesis, frequency modulation synthesis, and wavetable synthesis. Each of these methods has unique features, and it’s important to have an understanding of them to create the desired sounds.

Manipulating Sound Parameters

Manipulating sound parameters is crucial to creating unique sounds on a synthesizer. The essential sound parameters are the filter, envelope, oscillator, and LFO. The filter allows you to shape the tone and attack of a sound. The envelope controls the dynamic behavior of a sound, such as the duration and strength of its attack, decay, sustain, and release. The oscillator produces the initial waveform that creates the sound, and the LFO modulates the sound parameters over time. With an understanding of these parameters, you can create unique and personalized sounds on your synthesizer. Learning the basics of playing the synthesizer requires practice and patience, but with dedication, anyone can master it. Understanding the keyboard layout, sound generation, and manipulating sound parameters are the fundamental aspects of playing the synthesizer, and once you have developed a good grasp of these concepts, the possibilities of creating unique sounds are endless.

Techniques For Playing The Synthesizer

Playing the synthesizer is an exciting journey, and no doubt, it can be pretty challenging. However, with the right techniques, anyone can learn to play it. In this section, we will discuss these techniques and how you can create melodies, use chords and arpeggios, improvise and jam your way around the synthesizer.

Creating Melodies

To create a melody on the synthesizer, start by practicing the keys. Create a pattern with the keys that sound good together. Once you have a pattern, repeat it to create your melody. You can also use the synthesizer’s features such as the pitch bend and modulation to make your melody even more unique.

Using Chords And Arpeggios

Chords and arpeggios are essential techniques for any synthesizer player. Chords are groups of notes played at the same time, while arpeggios are the notes of a chord played in succession. Practice playing various chords and arpeggios until you are comfortable with them. You can also experiment with different chord progressions to create your unique sound.

Improvising And Jamming

Improvising and jamming are two techniques that can help you become a better synthesizer player. Start by practicing playing along with a song and improvising to match the melody. Later, try playing without the song and experiment with different sounds and styles to create your unique sound. You can also jam with other musicians to enhance your skills.

Getting Familiar With Synthesizer Software

Playing the synthesizer may seem daunting at first, but becoming familiar with synthesizer software can make the process easier. With practice and experimentation, anyone can learn to create unique sounds and music on a synthesizer.

If you’re thinking of playing the synthesizer, you have to get familiar with synthesizer software. Choosing the right software, navigating software interfaces, and handling virtual instruments are all part of synthesizer software. In this blog post, we’ll cover these aspects in detail to help you get started.

Choosing The Right Software

Before getting into synthesizer software, you first need to choose the right one for you. Different software has different features, functionalities, and pricing structures. Here are some things to consider when selecting software:

  • Compatibility with your device’s operating system
  • The level of specialization required
  • Cost and features offered

After you’ve chosen your software, installing it will be the next thing to do. You can download the software from the developer’s website or get it from an online store like Amazon.

Navigating Software Interfaces

Software interfaces can seem intimidating at first, but with practice, they become familiar. Here are some tips on navigating software interfaces:

  • Read the documentation or user guide to familiarize yourself with the controls and settings
  • Start with simple presets or templates, and make small changes to understand the effect they have
  • Experiment with different sound styles and swap out different effects to see how they blend together

Handling Virtual Instruments

Virtual instruments are software versions of traditional musical instruments that enable you to play a wide range of sounds. Here are some tips to help you handle virtual instruments:

  • Understand the sound of each virtual instrument and how they work to create a specific sound effect.
  • Experiment with different virtual instruments to create new sounds and create your own music style
  • Consider investing in quality virtual instruments with more features, functionalities, and sound effects that can enhance your music production

In conclusion, getting familiar with synthesizer software is essential to playing the synthesizer effectively. Choosing the right software, navigating software interfaces, and handling virtual instruments are all part of the process. As you practice and continue your learning journey, you’ll gain more confidence and become more comfortable handling synthesizer software.

Tips For Becoming A Better Synthesizer Player

Playing the synthesizer can be challenging for beginners, but with practice and dedication, anyone can improve their skills. Here are some tips to become a better synthesizer player: experiment with different sounds and settings, practice regularly, learn music theory, incorporate different playing techniques, listen and learn from professionals, and stay patient and persistent.

With time and effort, you can master the synthesizer and create amazing music.

If you’re someone who is interested in learning how to play the synthesizer or if you’ve just started, it can be challenging to develop the skill. However, with persistence and practice, anyone can play it like a pro. Here are some tips that can help you become better at playing the synthesizer:

Playing With Other Musicians

One of the most effective ways to improve your skills while playing the synthesizer is to practice with other musicians. Playing in a band can help you get familiar with working in a group and learning to keep your rhythm and beat steady. It can also help you learn to listen to the other instruments and adjust your playing accordingly. Moreover, playing with other musicians can teach you new concepts and methods you would have never considered before, making you a better synthesizer player overall.

Experimenting With Different Genres

Many people believe that synthesizers are restricted to a particular genre of music such as electronic music. However, the truth is that synthesizers can be used in almost any genre, from pop to jazz to classical music. Experimenting with different styles is crucial when learning to play the synthesizer. It will allow you to learn new chords and techniques that you can apply across genres. As a result, you’ll become more versatile and be able to play with more confidence in different musical scenarios.

Practicing Regularly

Just like any other skill, practice is key to becoming proficient at playing the synthesizer. Regularly practicing for at least 15 to 20 minutes a day is more effective than practicing for a 2-3 hour session once a week. This is because the more you practice, the more muscle memory you’ll develop, and the easier it will be to play the synthesizer. Moreover, practicing regularly can help you focus on specific areas of your playing and improve them over time. In conclusion, becoming a better synthesizer player requires more than just learning the right techniques. It takes a combination of dedication, passion, and regular practice. By following these tips for becoming a better synthesizer player, you’ll be on your way to mastering the instrument and impressing everyone around you.

Common Challenges Of Learning Synthesizer

Learning to play the synthesizer can pose challenges for beginners. Common obstacles include mastering technical skills, understanding complex terminology, and experimenting with sound design. Despite these difficulties, with practice and dedication, anyone can become proficient at playing this versatile instrument.

Learning the synthesizer can be a fulfilling and enjoyable experience, but like any new skill, it comes with its own set of challenges. In this section, we will explore some of the common hurdles that beginners may encounter while learning the synthesizer and how to overcome them.

Overcoming Technical Difficulties

One of the most common challenges of learning synthesizer is overcoming technical difficulties. As a beginner, it can be overwhelming to navigate the various knobs, buttons, and settings on a synthesizer. However, with time and practice, these technical aspects can become easier to manage. To overcome technical difficulties, start by learning the basic functions of your synthesizer and experiment with different sounds and settings. Watch tutorials, read manuals, and follow other experienced synthesizer players to learn more about how to use your synthesizer effectively.

Developing Musical Creativity

Another challenge that beginners face is developing musical creativity. While synthesizers offer a wide range of sounds and possibilities, it can be difficult to turn those sounds into a cohesive piece of music. To develop musical creativity, practice playing different chord progressions, melodies, and rhythms and experiment with different combinations. Listen to various genres of music to get inspiration and try covering some of your favorite songs using your synthesizer.

Dealing With Frustration And Self-doubt

Finally, many beginners struggle with frustration and self-doubt while learning the synthesizer. It can be discouraging when progress is slow, or when it feels like you’re not making any progress at all. To deal with frustration and self-doubt, remember that learning the synthesizer is a gradual process, and everyone progresses at their own pace. Celebrate your small accomplishments and focus on the fun and joy that comes with playing music. Finally, don’t be afraid to seek out help and guidance from other musicians or instructors if you’re feeling stuck or overwhelmed. Learning the synthesizer can be challenging, but with patience, practice, and perseverance, it’s a skill that can be mastered. By overcoming technical difficulties, developing musical creativity, and dealing with frustration and self-doubt, you can become a skilled synthesizer player and enjoy the many benefits that come with creating music.

Is It Hard to Play the Synthesizer

Credit: www.reddit.com

Is It Hard to Play the Synthesizer

Credit: www.csmonitor.com

Frequently Asked Questions On Is It Hard To Play The Synthesizer

Do I Need To Learn Keyboard To Play Synth?

No, it isn’t necessary to learn keyboard to play synth, but having knowledge of keyboard and playing experience will help you in understanding and making music on the synthesizer. It will also assist in playing more complicated pieces of music and executing intricate techniques.

Is A Synthesizer A Good First Instrument?

Yes, a synthesizer can be a good first instrument for beginners. It is versatile and offers various sounds, allowing for experimentation and creativity. It is also lightweight and affordable compared to other instruments. With proper guidance and practice, anyone can learn how to play and create music with a synthesizer.

What Is The Easiest Synth To Learn?

The easiest synth to learn would be the Korg Volca series, specifically, the Volca Keys, Volca FM, and Volca Bass. They’re straightforward, affordable, and user-friendly, making them perfect for beginners.

Is Playing A Synthesizer The Same As Playing A Piano?

While both instruments produce sounds by pressing keys, playing a synthesizer involves manipulating sound waves electronically. The sound of a piano, on the other hand, is created mechanically. Additionally, synthesizers offer a wider range of sound options, but pianos offer a unique, acoustic sound and feel.

Conclusion

Playing the synthesizer is not an easy task, but it’s also not hard. With the right skills, patience, and dedication, you can master this instrument. In this blog post, we have discussed some essential techniques and tips for playing the synthesizer.

Remember, practice makes perfect, and with time, you’ll become an expert in playing the synthesizer. So, go ahead, and don’t hesitate to start your journey to becoming a great synthesizer player. Keep on practicing, and success will follow!

Categories
Archive

Will Spotify Make My Song Louder

Yes, Spotify has a feature called “Loudness Normalization” that automatically adjusts the volume of songs to a consistent level. Spotify is one of the most popular music streaming services, with millions of users worldwide.

One of the features that sets it apart from other services is Loudness Normalization, which makes sure all songs on the platform are played at a consistent volume level. This means that if your song is too quiet or too loud, Spotify will adjust it to match the other songs in its library.

However, it is important to note that this feature does not change the actual volume level of your song’s master track. To make your song louder on Spotify, you would need to adjust the master track before submitting it to the platform. We will explore the concept of loudness and how it affects the sound of your music on Spotify.

The Role Of Spotify In Loudness Normalization

When it comes to streaming music services, Spotify is one of the most popular platforms available. As a musician or songwriter, having your music included on Spotify can be a crucial aspect of your success. However, you may be wondering how Spotify affects the overall loudness of your song. This is where loudness normalization comes into play and understanding its role in the platform is essential.

The Need For Loudness Normalization

When it comes to music streaming, various platforms have different loudness levels. This can make it difficult to ensure that your music sounds consistent across all platforms. The main purpose of loudness normalization is to create an even listening experience for all users, regardless of the platform they listen on.

Loudness normalization measures the perceived loudness of a song and ensures that it falls within a standardized range. This means that no matter where users listen to your music, it will sound consistent in terms of volume. This is important because if your song is louder than others on the platform, it could lead to distorted audio or cause the listener to adjust their volume settings frequently.

How Spotify Uses Loudness Normalization

Spotify uses loudness normalization to ensure that all songs on their platform are at the same perceived loudness level. This means that even if your song has a lower or higher master volume, Spotify will adjust it so that it fits within their range. By doing this, they can provide the best possible listening experience for their users.

Spotify uses the LUFS (Loudness Units Full Scale) scale to measure the loudness of each song. The standardized loudness range for Spotify is between -14 and -9 LUFS. Therefore, Spotify adjusts the track’s overall gain relative to this range, making sure all songs on their platform meet this standard.

It’s important to note that while Spotify’s loudness normalization level can affect the overall volume, it won’t change the dynamic range of your song. In other words, if your song has quiet and loud parts, those differences will still be present after loudness normalization.

Understanding the role of Spotify in loudness normalization is essential to ensuring that your music sounds great on their platform. By adhering to the standardized range, you can ensure that users have a consistent listening experience no matter where they listen to your music.

Will Spotify Make My Song Louder

Credit: www.wikihow.com

How Loudness Normalization Affects Your Music On Spotify

Spotify is one of the most popular music streaming platforms in the world, and for music producers, it’s an essential tool for getting their music out to the masses. However, many people have started questioning whether Spotify will make their songs louder or quieter than their original recordings.

What Happens To Quiet Songs?

If you’ve produced a song with a low volume, you could be at risk of having your song being drowned out by louder tracks on Spotify. Spotify uses a feature called loudness normalization, which is the process of adjusting the volume levels of songs to make them more consistent with each other.

This means that quiet songs will be automatically boosted in volume so that they can compete with louder tracks on the platform. However, this process can also affect the dynamic range of the song, potentially causing some loss of detail in the quieter parts of the track.

What Happens To Loud Songs?

Conversely, if you’ve created a song that’s already loud, you could find that Spotify reduces the volume of your track. Spotify’s loudness normalization process works by turning down the volume of loud songs so that they don’t dominate the playlist and overpower quieter tracks.

This reduction in loudness might mean that your track loses some of its “punch,” but it should still be listenable and enjoyable for your audience.

Implications For Music Producers

For music producers, the implications of Spotify’s loudness normalization can be significant. While it’s important to create songs that sound great at any volume level, you need to be aware of how your tracks will sound when they’re being played alongside others on Spotify.

To make sure your songs sound their best on Spotify, you need to ensure that the dynamic range of your tracks is preserved even after loudness normalization. This means paying careful attention to the way you mix and master your tracks, and ensuring that they don’t suffer from excessive compression or limiting.

Ultimately, loudness normalization is a tool that Spotify uses to ensure that all songs on its platform can be enjoyed at a consistent volume level. While it might be frustrating for some music producers, it’s an essential part of making sure that everyone can enjoy music on the platform.

Maximizing Your Music’s Loudness On Spotify

Spotify is one of the most popular music streaming platforms in the world, which means it is an essential platform for aspiring musicians to showcase their talents. However, standing out on a platform that is home to millions of songs can be challenging. One of the ways to make your music stand out is by ensuring it is as loud as possible without sacrificing its quality. That’s why it’s crucial to understand how mastering, EQ, and other techniques can help you maximize your music’s loudness on Spotify.

Tips For Preparing Your Music For Streaming

Even before you upload your music to Spotify, there are several things to consider to ensure the best possible outcome. These include:

  • Compression – The goal is to have a consistent volume level so that no part of the track is too quiet or too loud.
  • Normalization – This technique increases the overall volume of a track without introducing distortion or clipping.
  • Metadata – Ensure that each track has accurate and complete metadata, including artist name, album, and genre, to help with discoverability on the platform.

The Importance Of Mastering And Eq

Mastering and EQ are critical components of music production that can significantly impact the loudness of your music on Spotify:

MasteringEQ
Mastering is the process of preparing a final mix for distribution. It involves balancing the levels of each track and adding effects such as compression, stereo widening, and limiting. Proper mastering can make your music sound louder and more polished, making it stand out on Spotify.EQ is the process of adjusting the frequency response of a track to ensure all parts of the music are audible. EQ can help make your music sound more balanced and bring out certain elements, making it sound louder without increasing the overall volume.

By using mastering and EQ, you can maximize your music’s loudness and ensure that it competes favorably with other tracks on Spotify.

Will Spotify Make My Song Louder

Credit: www.cnn.com

Other Considerations For Your Music On Spotify

Spotify does not increase volume levels of songs, but instead uses a standard level for all tracks. However, there are a few other considerations to keep in mind when uploading your music to the platform, such as ensuring correct metadata and promoting your music through playlists.

The Impact Of Compression

Compression is a process that reduces the dynamic range of a track. In simple terms, it reduces the difference between the loudest and softest parts of the song. While compression can make your music sound more polished and professional, it can also make it louder. This can be a double-edged sword as Spotify already applies compression to its streaming service.

How Audio Quality Impacts Loudness

Audio quality is vital when it comes to ensuring your music is loud and clear on Spotify. The higher the audio quality, the better the sound. Spotify supports three quality settings – Normal, High, and Very High. In general, higher quality settings offer better sound quality, but they can also use more data and take longer to load.

Why Dynamic Range Is Important

Dynamic range is the difference between the loudest and softest parts of a song. For instance, a track with a high dynamic range will have wide variations in volume compared to one with a low dynamic range. While you may want your music to be loud, it is also essential to retain its musicality by keeping its dynamic range intact. Dynamic range compression can reduce the dynamic range of your music, making it sound flat and lifeless. In conclusion, while Spotify can make your music louder, there are other factors to consider. Compression, audio quality, and dynamic range are all essential in ensuring your music stands out on the platform. As a content writer, it’s crucial to optimize your music for Spotify to help it reach a wider audience and get more plays.

Will Spotify Make My Song Louder

Credit: www.groovypost.com

Frequently Asked Questions For Will Spotify Make My Song Louder

Will Spotify Make My Music Louder?

No, Spotify won’t make your music louder. The loudness of your music depends on how it was recorded and mixed. Spotify does apply automatic normalization to ensure consistent volume levels across tracks.

Why Is My Music On Spotify So Quiet?

Your music might be quiet on Spotify because of the low volume level of your recording or mixing. It is recommended that you increase the loudness of your music by mastering your tracks. You can also use Spotify’s normalization feature to adjust the volume level of your music.

Does Spotify Change The Volume Of Songs?

Yes, Spotify automatically adjusts the volume of all songs to a consistent level, called “Normalization. ” This feature helps to ensure that users have a consistent listening experience without sudden increases or decreases in volume between songs.

Is There A Volume Booster For Spotify?

Yes, there are volume boosters for Spotify. You can use various apps and software such as Equalify, Boom 3D, or Volume Booster Pro to increase the volume of your music on Spotify. Simply download the app or software and follow the instructions to set it up.

Conclusion

Spotify’s normalization feature can make your song louder but it’s important to understand that there are limitations. While it can boost the overall volume, it won’t drastically change the dynamic range or quality of your recording. Additionally, focusing solely on loudness can neglect the importance of quality and musicality.

Remember to prioritize a good mix and master, and use normalization as a supplement rather than the solution to quality issues.

Categories
Archive

How To Mix Rock Vocals Top Tips

To mix rock vocals, start with proper EQ and compression settings for the vocals and the backing track. Then, adjust the levels to make the vocals stand out in the mix.

Mixing rock vocals can be a challenging task, as it requires balancing the vocals with the rest of the instrumentation to create a cohesive and dynamic sound. To achieve this, it is essential to start with proper EQ and compression settings for both the vocals and the backing track.

By addressing any problematic frequencies and applying gentle compression to the vocals, you can emphasize the singer’s tone and control their dynamic range. Additionally, adjusting the levels of the vocals in relation to the other instruments in the mix will help to ensure that the vocals are clearly audible and prominent without overwhelming the rest of the track. We will explore some top tips on how to mix rock vocals to create a professional-sounding result.

How To Mix Rock Vocals Top Tips

Credit: m.youtube.com

1. Choosing The Right Microphone

Choosing the right microphone is crucial when mixing rock vocals. Start by determining the vocalist’s range and style, then consider the microphone’s polar pattern, frequency response, and proximity effect. Experiment with placement to achieve the desired sound.

When mixing rock vocals, choosing the right microphone is crucial. The microphone is the first stage of the recording process and ultimately affects the sound quality of the final mix. There are two main types of microphones used in recording studios – condenser and dynamic microphones. Understanding the differences between these two types of microphones is essential to selecting the perfect mic for your vocalist.

Condenser Vs Dynamic Microphones

Condenser microphones are more sensitive and responsive, making them a good option for capturing a broad range of frequencies and nuances in the vocals. They are suitable for recording low-level sounds and are ideal for capturing subtleties in the vocal performance. Dynamic microphones, on the other hand, are more rugged and durable and are better suited for capturing high sound pressure levels. They are ideal for recording loud and powerful vocals.

Selecting The Perfect Mic For Your Vocalist

When selecting a microphone for your recording, it’s important to take into account the vocalist’s unique characteristics, style and vocal range. Different vocalists may require different types of microphones to achieve the right sound. For example, a singer with a mellow voice might benefit from a condenser microphone, while a singer with a powerful voice might require a dynamic microphone. Once you have taken into account the unique characteristics of your vocalist, it’s important to test out several microphones to see which one has the right sound for your recording. Keep in mind that the microphone should complement the vocalist’s voice and not overpower it. In conclusion, choosing the right microphone is critical when mixing rock vocals. The type of microphone you choose will ultimately determine the quality of the sound you capture, so take the time to understand the differences between condenser and dynamic microphones and select the perfect mic for your vocalist.

How To Mix Rock Vocals Top Tips

Credit: www.izotope.com

2. Setting Up The Recording Environment

Setting up the recording environment is a crucial step in achieving great rock vocals mixes. The right equipment and space are essential, so it’s important to consider factors like room acoustics, microphone placement, and ambient noise.

When it comes to mixing rock vocals, one of the crucial steps is setting up the recording environment. This stage needs careful planning to ensure you get the best possible audio quality and reduce the amount of time you’ll need for the mixing process. Below are the two key areas to consider when setting up your recording space.

Creating The Ideal Recording Environment

The ideal recording environment is one that is quiet, acoustically treated, and away from any external noise sources. If you’re recording in a home studio, you’ll want to choose a room that is free from ambient sounds such as traffic or children playing outside. Additionally, you’ll need to ensure that the room is acoustically treated to reduce any unwanted reflections or echoes. This can be done by adding acoustic foam panels to the walls, ceiling, and floor.

Dealing With Background Noise

Background noise is a common problem when recording in any environment. Even in a quiet room, you might experience unwanted sounds that can affect your recording quality. To deal with background noise, consider using a noise gate plugin to remove any unwanted sounds in between vocal phrases. It’s worth noting that you should be careful not to set the noise gate too aggressively as this can result in unnatural-sounding recordings. If you’re recording in a noisy environment, you might need to consider other measures such as using a dynamic microphone that can help reject background noise or moving to a different room away from any sources of external noise.

Conclusion

By taking the time to set up your recording environment correctly, you’ll save yourself time and effort in the mixing process. Creating an ideal recording environment and dealing with background noise are the two key areas to focus on when setting up your recording space. Remember to always aim for the best audio quality possible as this will make the mixing process much easier.

3. Mic Placement Techniques

Proper mic placement techniques play a crucial role when mixing rock vocals. Experimenting with distance and angle can help achieve a desired sound, whether it’s a close and intimate vibe or a wide and expansive feel.

When it comes to mixing rock vocals, microphone placement is a pivotal part of the recording process. Proper mic placement plays a key role in capturing the true essence of the vocalist’s voice, improving clarity, and reducing background noise. In this post, we’ll dive into the top 3 mic placement techniques that can make all the difference in your rock vocal mixing game.

The Importance Of Proper Mic Placement

Mic placement is essential in capturing the perfect vocal sound. Without it, you risk losing the substance and clarity of the vocals, affecting the overall quality of the record. A simple shift in mic placement can make all the difference, and it’s essential to know the proper techniques to get the best possible results.

Top 3 Mic Placement Techniques

There’s no one-size-fits-all approach when it comes to mic placement; the technique you employ will depend on the nature of the vocalist, recording environment, and personal preferences. Here are three top techniques you can consider:

  1. Close Miking
  2. Close miking is placing the microphone very close to the vocalist’s mouth while singing. This technique is perfect for capturing the detail and clarity of the vocals and reducing the impact of background noise. It’s perfect for aggressive rock vocalists who mic-slam and move around the stage while singing.
  3. Mid-range Miking
  4. Mid-range miking involves placing the mic around six to eight inches away from the vocalist’s mouth. This approach works well for vocals that require more balance, presence or when you don’t want to capture every single detail of the voice. It is perfect for capturing a smooth mid-range and adding warmth to the microphone.
  5. Room Miking
  6. Room miking entails placing the microphone back from the vocalist and facing toward the room. It’s commonly done using Omniflex microphones. This technique is effective in recording room ambience, which is great for capturing live performances that showcase the audience response, spatial effects, and environmental noise. It works great with rock songs that have big choruses, lots of backing vocals, and crowd sing-alongs.

In conclusion, these techniques may seem simple, but they can have a significant impact on the final mix. Proper mic placement helps capture the unique essence of the vocalist and provide a high-quality recording. Give them a try and see which one works best for you!

How To Mix Rock Vocals Top Tips

Credit: joeysturgistones.com

4. Equalization For Rock Vocals

Equalization is a crucial step in mixing rock vocals to achieve a well-balanced sound. A tip is to use a high-pass filter to remove unnecessary low-frequency information and adjust the midrange frequencies to enhance intelligibility.

Rock vocals need to cut through the mix and be present without being harsh. It can be a challenging task, but using the right equalizer can make all the difference.

Understanding Eq

Equalization (EQ) is a process of adjusting the balance between different frequency components in an audio signal. It is done through an equalizer, which is a device or plugin designed to manipulate certain frequencies in a sound. EQ is important for mixing rock vocals because it allows you to enhance or reduce the specific frequencies that may be causing issues.

Setting Eq For Rock Vocals

The following tips can help you set the EQ for rock vocals:

  • Boost the high frequencies: Add a boost around 5-7 kHz using a high-shelf EQ to bring clarity to the vocals.
  • Reduce harshness: If the vocals sound harsh, cut around 2-4 kHz using a dip or notch filter to remove harshness, but be careful not to overdo it.
  • Reduce muddiness: If the vocals sound muddy, cut around 250-400 Hz using a dip or notch filter to remove muddiness and improve clarity.
  • Boost presence: Add a boost around 2 kHz using a peak filter to enhance the presence of the vocals.

Remember to use your ears and make adjustments according to the specific needs of the vocals and the mix.

Conclusion

EQ is an essential tool for mixing rock vocals. By understanding how EQ works and following the tips above, you can achieve a well-balanced and present vocal mix that fits smoothly into the overall sound of the music.

5. Compressing Your Vocal Track

One of the top tips for mixing rock vocals is compressing your vocal track. This helps to even out the dynamics and make the vocals sit better in the mix, providing a polished and cohesive sound.

The Role Of Compression In Vocal Mixing

Compressing your vocal track is an important step in the mixing process as it helps to control the dynamics of the vocals. Compression reduces the difference between the loudest and quietest parts of the vocal track, making it easier to sit in the mix and ensuring that every word is audible to the listener. Without compression, the loud parts of the vocal track may overpower the rest of the instruments in the mix, making it difficult to achieve a balanced sound.

Applying Compression To Rock Vocals

When compressing your vocal track for rock music, it’s important to keep in mind that the compression should be subtle enough to maintain the natural sound of the vocals, but effective enough to control the dynamics. Here are some tips for applying compression to your rock vocals:

  • Set your threshold just above the average level of the vocal track to catch the louder parts.
  • Use a ratio of around 3:1 or 4:1 to ensure that you’re controlling the dynamics without squashing the vocals completely.
  • Set a medium attack time to capture the initial transients of the vocal performance.
  • Use a fast release time to ensure that the compression recovers quickly and doesn’t detract from the natural sound of the vocals.

Remember, compression is just one tool in your vocal mixing arsenal. Use your ears to determine how much compression your specific vocal track needs. With a bit of experimentation, you’ll find the sweet spot that ensures your rock vocals sit perfectly in the mix.

6. Adding Effects To Enhance Your Mix

Learn how to make your rock vocals sound amazing by incorporating various effects. Adding reverb, delay, and compression can help enhance your mix and give your vocals more depth and presence. Experimenting with different effects can help you find the perfect sound for your song.

Adding effects is the final step in the process of mixing rock vocals. It is what gives your mix that professional edge and makes it stand out from the crowd. The use of effects can help enhance the clarity, depth, and overall quality of your mix. In this article, we will discuss how to add effects to your mix to enhance the quality of your rock vocals. The focus of this section will be on the use of reverb, delay, and other effects.

Reverb And Delay: The Bread And Butter Of Vocal Effects

Reverb and Delay are the most commonly used effects in vocal mixing. They are known as the bread and butter of vocal effects. Reverb enhances the natural ambience of a recording and creates a sense of space and depth. It helps glue together all the elements in a mix. Reverb is used to make vocals sound more natural and to prevent them from sounding dry. Delay adds an echo to a vocal, creating the illusion of space. It can be used to create depth and space in a mix. It can also be used to enhance the rhythm and timing of a vocal performance. A common technique is to use a delay effect to create a slapback effect, which is a quick and short delay that adds a sense of dimension to the vocal.

Using Other Effects To Enhance Your Mix

Apart from reverb and delay, there are a variety of other effects that can be used to enhance your mix. These effects can add a unique character to your vocal and bring it to life. EQ is a powerful tool that can be used to shape the sound of your vocal. It can be used to boost or cut certain frequencies to enhance the clarity and tone of the vocal. Compression is another effect that is used to control the dynamic range of a vocal performance. It can help even out the volume of a vocal performance and add a sense of consistency to the mix. Other effects include chorus, flanger, and phaser. These effects can add a sense of movement and complexity to a vocal performance. They work by modulating the audio signal, creating a unique and dynamic sound. In conclusion, adding effects can greatly enhance the quality of your rock vocal mix. Reverb and delay are the most commonly used effects in vocal mixing, and other effects such as EQ, compression, and modulation can add a unique character to your vocal. With these tips and techniques, you can take your rock vocal mix to the next level.

7. Automating Your Mix

Automating your mix can be a game-changer when it comes to mixing rock vocals. By utilizing tools like compression and EQ, you can achieve a polished and professional sound that complements the overall mix. With these top tips, you’ll learn how to automate your mix effectively.

What Is Automation And Why Is It Useful?

Automating a mix refers to using automation to control various parameters of a mix, such as volume, panning, and effects, or any other audio processing effect you’ve used in your mix. Automation helps to control those parameters automatically during the song, which is especially helpful in setting the right levels in complex music sections. By automating your mix, you will make the mix sound more professional because the levels of each track will be balanced throughout the song.

Automating Volume, Panning, And Effects

One of the most popular ways to use automation is to control the volume of tracks. You can use automation to increase and decrease the volume of each track during the song. This technique helps to balance the levels of the tracks, ensuring that each track is clear and audible in the mix. Similarly, you can use automation to control the panning of each track. This effect is especially useful for creating stereo imaging in your mix. For example, you could automate the panning of a guitar performance to move from left to right as the song progresses. Automation is also helpful in controlling effects. You can use automation to apply different effects, such as reverb, delay, and chorus, to certain parts of the song. For example, you could use automation to increase the amount of reverb on the vocals in the chorus, creating a more spacious and ethereal sound.

Automating Eq And Compression

Automation is also useful when it comes to EQ and compression. For example, you could use automation to decrease the low frequencies during the verses to reduce muddiness and increase them in the chorus to add tension and power. Likewise, you could use automation to adjust the compression settings during the song to help control the dynamic range. In conclusion, automation is highly useful when it comes to mixing rock vocals. It helps to balance the levels of each track, control the panning and apply effects, and shape the tonal balance. By using automation, you can create a mix that flows smoothly, has a solid balance and sounds professional.

8. Knowing When To Outsource Your Mixing

Knowing when to outsource your mixing can be a crucial decision when it comes to achieving high-quality rock vocals. Top tips for mixing rock vocals include getting the right equipment, experimenting with different techniques, and knowing when to call in a professional for help.

The Benefits Of Hiring A Professional Mixing Engineer

When mixing vocals for your rock music, knowing when to outsource the mixing process can be a game-changer. Mixing can be extremely challenging and time-consuming, and it can take years to develop the necessary skills to do it well. By hiring a professional mixing engineer, you can alleviate the stress of mixing and ensure that your vocals are polished to perfection. There are several benefits to having a professional mixing engineer work on your vocals. Firstly, a professional mixing engineer has years of experience and the necessary training to ensure that your vocals have a professional sound. They have a keen ear for the smallest details and can make necessary adjustments to make your vocals sound amazing. Additionally, a professional mixing engineer has access to high-end equipment, which can make a significant difference in how your vocals sound. Another benefit of hiring a professional mixing engineer is that it can save you a lot of time and energy. Trying to do the mixing process yourself can be extremely daunting and time-consuming, and it can be frustrating if you are not familiar with the software or if you do not have the right equipment. By outsourcing the mixing to a professional, you can focus on other important aspects of your music, such as writing new material or performing live shows. Finally, a professional mixing engineer can provide a fresh perspective on your vocals. When mixing your own vocals, it can be easy to become attached to specific sounds or lose sight of what is best for the song. A professional mixing engineer can offer new suggestions and ideas to enhance the overall sound of the song.

How To Find The Right Mixing Engineer For Your Rock Vocals

If you do decide to outsource your mixing to a professional, it is essential to find the right mixing engineer for your rock vocals. Here are some tips to help you find the right mixing engineer for your project: 1. Research- Take time to research and find a mixing engineer who specializes in rock music and has experience working with vocals. 2. Portfolio- Do not just rely on the mixing engineer’s word. Ask for a portfolio of their previous work, which should include rock music with vocals. 3. Reviews- Check online reviews from other clients who have worked with the mixing engineer. Feedback from other clients is a good indication of the quality of work you can expect. 4. Communication- It’s essential to find a mixing engineer who is willing to communicate with you throughout the mixing process. This will ensure that you are happy with the final product. 5. Budget- Determine your budget before searching for a mixing engineer. Prices for mixing can vary greatly, and it’s important to find a mixing engineer who can work with your budget. In conclusion, outsourcing your mixing to a professional mixing engineer can be a wise decision, provided you find the right mixing engineer. By doing your research and finding a mixing engineer who specializes in rock vocals, has a proven track record of success, and is within your budget, you can ensure that your vocals are polished to perfection.

Frequently Asked Questions For How To Mix Rock Vocals Top Tips

How Do You Make Vocals Sit On Top Of Mix?

To make vocals sit on top of a mix, you can try these techniques: 1. Use EQ to boost the frequencies that make vocals stand out in the mix. 2. Use compression to control the dynamics of the vocal track. 3.

Adjust the level of the vocal track to ensure it’s not too quiet or too loud. 4. Use reverb and delay to add depth and space to the vocal. 5. Consider using sidechain compression to make the instrumental tracks duck under the vocals.

What Is The Best Way To Mix Vocals?

The best way to mix vocals is to start with proper EQ, compression, and volume adjustments. Use automation to adjust volume levels for consistency. Consider adding effects such as reverb or chorus to compliment the vocals. A/B testing your mix with a reference track can help you achieve a balanced sound.

How Do You Fit Vocals Perfectly In Mix?

To fit vocals perfectly in a mix, you need to adjust the gain, EQ, compression, and effects. The vocals should sit well in the mix without being too loud or too soft. Use automation to adjust volume and EQ if needed.

Finally, make sure the vocals don’t clash with other elements in the mix and they sound clear and distinct.

How Do You Mix High End Vocals?

To mix high end vocals, use EQ to remove unwanted frequencies, use compression to control dynamics and add consistency, add reverb and delay to create depth and space, use automation to ride levels and bring out important parts, and use a limiter to prevent clipping.

It’s important to listen critically and make adjustments until the vocals stand out and sit well in the mix.

Conclusion

To achieve the perfect rock vocal mix, it’s important to focus on the right elements in order to bring out the raw energy and emotion of the performance. With the right tools such as compression, equalization, reverb, and delay, you can shape the sound to your liking and achieve a polished and powerful mix.

Remember to pay attention to the rhythm, timing, and dynamics of the vocals to create a cohesive and impactful sound that captures the essence of rock music. Keep these tips in mind and you’ll be well on your way to crafting the perfect rock vocal mix.

More in our Vocal production guide.

Categories
Archive

How To Slam Your Drums Like A Pro

To slam your drums like a pro, focus on your timing and technique. Start by practicing with a metronome at a slower tempo and gradually increase the speed as you improve.

Use proper grip techniques and focus on hitting the drums with precision and power. With dedication and practice, you can become a skilled drummer in no time. Drumming is an energetic form of music that adds life and soul to any beat.

Whether it’s rock, pop, or jazz, drumming is an essential element that can make or break a song. To become a skilled drummer, it takes dedication, practice, and patience. With the right techniques and guidance, anyone can learn to slam their drums like a pro. We’ll cover some tips and tricks on how to improve your drumming skills and take your playing to the next level. From timing and technique to grip and gear, we’ll provide you with everything you need to know to become a successful drummer.

Essential Techniques For Slamming Drums

Learn essential techniques from veteran drummers to enhance your drumming skills and slam your drums like a pro. Master the art of rhythm, timing, and control to bring your performances to the next level.

As a drummer, you want your beats to have that extra punch that sets your music apart from the rest. To achieve this, you need to know the essential techniques for slamming your drums like a pro. In this post, we’ll cover some of the essential techniques you need to know.

Developing Wrist Control

One of the techniques you need to develop as a drummer is wrist control. You need to be able to strike the drumhead with precision and power, and wrist control is essential for this. When you develop your wrist control, you’ll be able to play faster and more accurately. To develop your wrist control, start by practicing your single strokes. Practice playing rimshots, and focus on your technique. Ensure that you’re using just the right amount of wrist motion and not tensing up your arm or shoulders. With practice, you’ll develop the fluidity you need to execute more complex patterns.

Mastering Double Bass Drum Pedal

If you want to take your drumming to the next level, you need to learn how to use a double bass drum pedal. With a double bass drum pedal, you can create more intricate and dynamic beats that will impress even the most discerning audiences. To master the double bass drum pedal, start by practicing your foot technique. You need to be able to play fast and precise patterns with both feet. Practice your exercises at a slow tempo, and build up your speed gradually. Over time, you’ll develop the coordination needed to execute complex patterns.

Practicing With A Metronome

One of the most important techniques for any drummer is practicing with a metronome. A metronome helps you keep time and develop your sense of timing. With a metronome, you can work on your timing accuracy and develop your internal clock. To practice with a metronome, start by playing a simple pattern at a slow tempo. Gradually increase the speed, making sure that you’re playing in time with the metronome. Over time, you’ll develop the timing you need to execute complex patterns. In conclusion, these essential techniques are what you need to take your drumming to the next level. By developing your wrist control, mastering the double bass drum pedal, and practicing with a metronome, you’ll be able to create more complex and dynamic patterns that will impress any audience. So grab your sticks, and let’s get slamming!

Selecting The Right Drumsticks And Heads

Choosing the right drumsticks and heads is crucial to being able to slam your drums like a pro. Make sure to consider factors such as size, weight, material, and sound quality in order to achieve the perfect combination for your playing style.

Playing drums may seem like an easy task to some, but it’s not as simple as just hitting the drum with a stick. To play like a pro, you need to first select the right drumsticks and heads. These two factors significantly impact the sound quality, tone, and projection of drums. In this blog post, we will discuss how you can select the ideal drumsticks and heads for your kit and improve your performance.

Choosing The Perfect Stick Size And Weight

Selecting the drumstick is a critical aspect of playing drums. A drumstick is an extension of your hand that allows you to produce the sound you want. Choosing the stick size and weight depends on the type of music you play, your playing style, and your comfort level. Below are some factors that you need to keep in mind while choosing the best drumsticks for your playing.

  • The Size and Weight of the Sticks: The size and weight of the drumsticks affect the overall control, speed, and sound quality. The thicker and heavier the stick, the louder the sound it produces. Lighter sticks are good for playing fast beats, but they may not project sound well. Heavy sticks are better for rock and metal music.
  • The Tip of the Sticks: The tip of the drumstick also plays a major role in sound production. Oval tips produce a warmer tone, while acorn tips are well rounded and produce a fuller sound. Teardrop tips provide a bright, sharp, and articulate tone.
  • The Material of the Sticks: Drumsticks are made of various materials, including wood, nylon, aluminum, and carbon fiber. Wooden sticks are the most common and produce a natural sound, while nylon sticks are more durable. Carbon fiber sticks are light and durable and provide more projection.

Picking The Right Drum Head Thickness And Material

Drumheads are another vital component that affects the sound quality of drums. They come in a variety of thicknesses, materials, and coatings, which can dramatically change the tone of the drums. To select the right drumhead, you need to consider the following factors.

  • The Thickness of the Drumhead: Drumheads are available in two types- single-ply and double-ply. Single-ply heads are thin, and they produce a bright sound with less sustain. Double-ply heads are thick and have a more focused sound with more sustain.
  • The Material of the Drumhead: Drumheads come in various materials, including coated, clear, and hydraulic. Coated heads produce a warmer tone, while clear heads produce a brighter sound. Hydraulic heads have oil between two layers, which deadens overtones and reduces sustain.
  • The Size of the Drumhead: The size of the drumhead also plays a significant role in the overall sound of the drum. Larger heads provide more sustain, while smaller heads produce less sustain and a tighter sound.

Selecting the right drumsticks and heads is crucial to sound like a professional drummer and make the most out of your drum kit. Keep in mind your playing style, music genre, and the type of sound you want to produce while choosing the drumsticks and heads. With the right selection, you can take your drumming skills to the next level.

Optimizing Your Drum Kit Setup

Learn how to optimize your drum kit setup and slam your drums like a pro. Discover helpful tips to maximize the potential of your drum kit and enhance your playing experience. From drum placement to tuning, this guide covers it all.

One of the most important things to consider when it comes to drumming is the setup of your drum kit. Optimizing your drum kit setup can make a big difference in your performance and help you get the most out of your drumming experience. In this post, we will take a look at how to slam your drums like a pro by focusing on the subheading of optimizing your drum kit setup. Adjusting the Drum Height and Angle: The height and angle of your drums can greatly impact your playing experience. If your drums are too high or too low, you may experience discomfort or difficulty in playing. Adjusting the drum height and angle can help prevent these issues and make playing more comfortable. To adjust the height and angle of your drum, follow these simple steps: 1. Loosen the mounting hardware that holds the drum in place. 2. Adjust the height of the drum by raising or lowering the hardware. 3. Adjust the angle of the drum by loosening the mounting hardware and rotating the drum to the desired angle. 4. Once you have found the right height and angle, tighten the mounting hardware to secure the drum in place. Tuning Your Drums for Maximum Impact: Tuning your drums is crucial for getting the best sound possible out of them. A well-tuned drum kit will sound more professional and will make it easier to play. Here’s how to tune your drums for maximum impact: 1. Start by loosening all the tension rods on the drum. 2. Use a drum key to tighten each tension rod in a star pattern, starting at the top of the drum and working your way around. 3. Once all the tension rods are snug, tap the drum near each tension rod to hear the pitch of the drum. 4. Use the drum key to adjust the tension of each tension rod until the pitch is consistent across the entire drum. By adjusting the height and angle of your drums and tuning them for maximum impact, you can optimize your drum kit setup and slam your drums like a pro.

How To Slam Your Drums Like A Pro

Credit: m.youtube.com

Exploring Different Drumming Styles

Find your inner pro drummer by exploring various drumming styles and techniques. With determination and consistent practice, you can learn how to slam your drums like a pro and create your own unique sound.

If you’re a drummer who loves to play with passion, energy, and creativity, then exploring different drumming styles is a must. You need to learn various techniques to get the correct sound and feel that fits the music genre you’re playing. Whether you’re into rock, pop, metal, jazz, or any other genre, mastering different drumming styles is essential to becoming a professional drummer. In this article, we’ll discuss various drumming styles and techniques that will help you enhance your skills and help you learn how to slam your drums like a pro.

Learning Classic Rock Beats

Classic rock beats are an essential part of drumming. They form the foundation of the music, and to be a pro, you have to learn them. Practice playing simple rock beats with a consistent rhythm. Start by keeping a steady tempo using the hi-hat, and then add more elements like the bass drum and snare. It’s crucial to master these beats as they are used in most rock songs. Learning the basic beats will allow you to improvise once you acquire more experience.

Mastering Metal Drumming Techniques

Metal drumming is all about endurance, speed, and power. To stand out as a pro-metal drummer, you need to understand the unique drumming techniques used in the genre. Blast beats, double bass drumming, and intricate fills are the trademarks of metal drumming. It requires a lot of practice to master these techniques, and it’s essential to have the proper equipment like a double bass pedal. Playing metal drums can physically be demanding, so maintain proper posture, develop proper breathing techniques, and take breaks during your practice sessions.

Experimenting With Different Genres

Learning how to play drums in different genres is vital in becoming a versatile drummer. Experiment with various genres to improve your skills and widen your playing style. For example, try jazz drumming to improve your coordination and timing. Immerse yourself in different cultures by exploring Afro-Cuban or Latin drumming. Play some funk to improve your feel and groove. When experimenting with different genres, always listen to the music that represents that style and study the drummers that are the best in the genre. In conclusion, exploring different drumming styles and techniques is an essential part of becoming a professional drummer. Learning classic rock beats, mastering metal drumming techniques, and experimenting with different genres are necessary steps to enhance your skills and become a versatile and successful drummer. Practice as much as you can, and always strive to improve your playing. With the right mindset and dedication, you can slam your drums like a pro.

Developing Your Own Unique Drumming Style

Developing your own unique drumming style requires dedication, practice and experimentation. Start by listening to a variety of genres and incorporating different rhythms into your playing. Focus on technique and keep pushing yourself to try new things, and soon you’ll be hitting your drums like a pro with your own personal flair.

Developing Your Own Unique Drumming Style: As a drummer, it’s essential to develop your own drumming style. It’s something that sets you apart from others and helps you make a name for yourself. In today’s fast-paced and dynamic world, being different and unique in your craft will take you places. That being said, developing your unique drumming style is not an easy feat. It takes time, patience, and practice. Incorporating Your Personality into Your Playing: One of the best ways to develop your unique drumming style is to incorporate your personality into your playing. It’s all about being yourself and playing the way you feel comfortable. When you play with your heart, it allows you to express yourself more freely, and that’s what makes your playing style unique. Try to create new patterns and build your beats in a way that reflects your character. This can help you come up with creative and unique ideas that no one has tried before. Experimenting with Unconventional Techniques: Experimenting with unconventional techniques is another great way to develop your unique drumming style. By trying new and unique techniques, you can create a sound that is entirely yours. You can delve into things like polyrhythms or unusual time signatures, which can add a level of complexity and excitement to your drumming style. It’s all about breaking the rules and pushing boundaries. To conclude, developing your unique drumming style requires time and patience. Incorporating your personality into your playing and experimenting with unconventional techniques can set you apart and help you create a sound that is entirely yours. Remember to always be yourself, and let your passion for drumming guide you.

How To Slam Your Drums Like A Pro

Credit: m.youtube.com

Maintaining Your Drums And Gear

Keep your drums in tip-top shape with proper maintenance. From regular cleaning to tuning and replacing drumheads, taking care of your gear will help you play like a pro and ensure your drums last for years to come.

Playing drums is not just about hitting them hard. To play like a pro, you need to take care of your drums and follow a regular maintenance routine. Maintaining your drums and gear properly can not only enhance their lifespan but also improve their sound quality. Here are some essential tips for maintaining your drums and gear to slam like a pro:

Regularly Replacing Drumheads And Cymbals

The drumheads and cymbals are the most crucial components of a drum kit. They directly affect the sound quality of your playing. Thus, it’s essential to replace them regularly when needed. Drumheads should be replaced after every 6-8 months of regular use, while cymbals can last for years but should be changed if they lose their shine and sound quality. Always choose the drumheads and cymbals that suit your playing style and music genre.

Cleaning And Properly Storing Your Gear

After every rehearsal or performance, it’s crucial to clean your gears thoroughly. This includes wiping down your drum shells, hardware, and cymbals with a soft cloth, taking apart hardware for better cleaning, and using a mild detergent to remove any dust and grime. Proper storage of your drums and gear is also essential to maintain their appearance and function, keeping them in a dry and temperature-controlled environment. Consider investing in drum cases, drum bags, and cymbal carriers to protect your gears from dust, moisture, and scratches. By following these tips, you can maintain your drums and gear and keep them functioning at their best. Remember, taking care of your gears is as important as playing them well. So, start your maintenance routine today and improve your drumming experience like a pro.

How To Slam Your Drums Like A Pro

Credit: www.masteringthemix.com

Frequently Asked Questions For How To Slam Your Drums Like A Pro

How Do I Make My Drums Sound Professional?

To make your drums sound professional, use quality drum samples, tune your drums correctly, and apply appropriate amounts of reverb and compression. Additionally, experiment with mic placement and consider the acoustics of your recording space. Finally, use EQ to enhance the tone of each drum and ensure that they sit well in the mix.

How Do Drummers Hit So Fast?

Drummers develop speed through practice, proper technique, and muscle memory. They use a variety of techniques such as finger and wrist control, rebounding, and tension release to hit the drumhead with speed and precision. Regular practice and warm-up exercises help improve their speed and endurance over time.

How Do You Hit Drums Properly?

To hit drums properly, you need to follow these tips: 1) Set up a comfortable and correct posture with your arms and shoulders relaxed. 2) Hold the drumstick properly at the fulcrum point between your thumb and index finger. 3) Strike the drumhead at the center with a controlled and consistent motion.

4) Keep practicing different rhythms, beats, and techniques to improve your skills. 5) Listen to music to build your rhythm and timing skills.

How Does Hitting A Drum Harder Make It Louder?

Hitting a drum harder generates more energy, causing the drumhead to vibrate with a greater amplitude. This increased vibration creates more sound waves, causing the sound to be louder. The sound’s intensity depends on the amount of energy applied to the drumhead.

Conclusion

Mastering drumming techniques takes time, practice, and dedication. However, with this guide, you can quickly learn what it takes to slam your drums like a pro. From the basics of drum setup to proper playing posture, these tips will help you improve your drumming skills and boost your overall performance.

Moreover, with regular practice, you can take your skills to the next level and create your unique beat that will wow any audience. Keep at it, and with time, you too can become a master drummer!