Categories
Archive

How To Export Stems In Ableton Live

To export stems in Ableton Live, click on File, then choose Export Audio/Video. From there, select the tracks you want to export and adjust any necessary settings.

Ableton Live is a popular digital audio workstation used by producers and engineers for music creation. It is known for its intuitive interface and innovative features. Exporting stems from Ableton Live is a necessary step for sharing your music or collaborating with other artists.

Stems refer to individual audio tracks that are usually grouped together based on instrument or effect. Exporting stems allows for greater flexibility in mixing and mastering, as well as easier collaboration with other musicians. We will discuss the steps needed to export stems in Ableton Live.

How To Export Stems In Ableton Live

Credit: m.youtube.com

Preparing Your Project

To prepare your project for exporting stems in Ableton Live, first make sure all elements are organized and properly labeled. Then select the individual tracks you want to export as stems and adjust the levels and effects accordingly. Finally, use Ableton’s Export Audio/Video function and select the “Stems” option to export each track as a separate audio file.

Preparing Your Project: Before exporting stems in Ableton Live, it’s important to prepare your project thoroughly to ensure a seamless and efficient process. The following steps outline how to best prepare your project for exporting stems in Ableton Live. Consolidating Tracks: The first step in preparing your project for exporting stems in Ableton Live is to consolidate your tracks. This involves merging multiple audio clips into one audio file, which not only saves disk space but also ensures that all clips are in sync. To consolidate tracks in Ableton Live, simply select the tracks you want to consolidate, right click, and select “Consolidate”. Alternatively, use the shortcut key “Ctrl + J” on Windows or “Cmd + J” on Mac. Naming Tracks: Next, you should ensure that each track is named correctly. This makes it easier to identify each stem during the exporting process and saves time in the long run. To rename a track in Ableton Live, simply double-click on the track name and type in the desired name. Setting Individual Levels: Lastly, set the individual levels for each stem. This ensures that each stem is exported at the desired volume, and prevents any clipping or distortion. To adjust individual track levels in Ableton Live, simply use the volume fader on each track. By following these steps, you can ensure that your project is well-prepared for exporting stems in Ableton Live. This will save time, prevent any potential issues, and ultimately lead to a better end result.
How To Export Stems In Ableton Live

Credit: loopcommunity.com

Export Settings

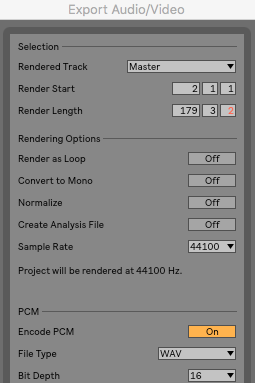
To export stems in Ableton Live, navigate to the Export Settings. Here, you can select the type of file, quality, and channels to export your stems. It’s essential to have correctly exported stems for better mixing and mastering of your music productions.

Selecting The Right File Type

Before exporting stems in Ableton Live, it is important to select the right file type. This decision depends on the project’s intended use and your personal preference. The following are the common file types that you can use to export stems in Ableton Live:

  • WAV
  • AIFF
  • MP3

WAV and AIFF are lossless audio formats that retain all the audio data from the original file. On the other hand, MP3 is a compressed audio format that discards some of the audio data for a smaller file size. However, MP3 files are compatible with most media players, making them a good choice for sharing or streaming your mixes.

Choosing Bit Depth And Sample Rate

When exporting stems in Ableton Live, you also need to choose the bit depth and sample rate. Bit depth refers to the number of bits used to represent each sample of audio. The higher the bit depth, the greater the dynamic range and the better the sound quality. Sample rate, on the other hand, refers to the number of samples per second. The higher the sample rate, the more detail and accuracy in the audio. Here are the recommended settings for exporting stems in Ableton Live:

File TypeBit DepthSample Rate
WAV / AIFF24 bit44.1 kHz
MP316 bit44.1 kHz

Considerations For Mastering

When exporting stems for mastering, there are a few things to consider. Firstly, it is important to leave enough headroom in the mix to allow the mastering engineer to make adjustments without causing distortion. Secondly, you can export multiple versions of the same stems with different EQ settings, allowing the mastering engineer to choose the best version for your project. Lastly, you should communicate any specific requirements or preferences to the mastering engineer beforehand to ensure the best outcome for your project. Exporting stems in Ableton Live is an essential skill for any producer or musician. By selecting the right file type, choosing the appropriate bit depth and sample rate, and considering the requirements for mastering, you can ensure that your stems are of the highest quality and ready for any application.

Exporting Stems

To export stems in Ableton Live, simply select the tracks you want to export and then choose “Export Audio/Video” from the “File” menu. From there, you can select your export settings and file format, and choose whether to export each track as a separate stem or all stems together.

It’s a quick and easy way to get high-quality individual tracks for mixing and mastering.

Exporting stems in Ableton Live is an essential technique every producer should know. Stems are individual audio files that contain a specific group of sounds within a track. Exporting stems is particularly useful for those who collaborate with other producers or for those who want to prepare their project for mixing and mastering. In this article, we will show you how to export individual tracks and groups in Ableton Live.

Exporting Individual Tracks As Stems

To export individual tracks as stems, take the following steps:

  1. First, make sure that the track you want to export is soloed.
  2. Head to the beginning of the track and set the left and right locators to the beginning and end of the track, respectively.
  3. Right-click on the track that you want to export in the Arrangement view and select “Freeze Track.” This process will render the track into an audio file.
  4. Right-click on the frozen track and select “Flatten.”
  5. Finally, right-click on the flattened track and choose “Export Audio/Video.” Select the location where you want to save the file on your computer, and you’re done.

Exporting Groups As Stems

Exporting groups as stems is similar to exporting individual tracks as stems. The process is as follows:

  1. First, make sure you have grouped the tracks you want to export.
  2. Head to the beginning of the track and set the left and right locators to the beginning and end of the track, respectively.
  3. Right-click on the group track and select “Freeze Track.” This process will render the tracks within the group into an audio file.
  4. Right-click on the frozen track and select “Flatten.”
  5. Finally, right-click on the flattened track and choose “Export Audio/Video.” Select the location where you want to save the file on your computer, and you’re done.

In conclusion, exporting stems in Ableton Live is an easy process once you get the hang of it. Whether you’re exporting individual tracks or groups, you’ll have the flexibility and ease of sharing your projects.

How To Export Stems In Ableton Live

Credit: help.ableton.com

Organizing And Sharing Your Stems

Learn how to export stems in Ableton Live and keep them organized and easy to share with others. This can save time and stress when collaborating with other musicians or sending files to clients.

If you’re an Ableton Live user, you already know that exporting stems can be a critical aspect of working on a track or project. Whether you want to share your stems with collaborators, send them to a mixing and mastering engineer, or just back them up for safekeeping, knowing how to export stems in Ableton Live is essential.

Naming And Tagging Stems

Before you export your stems, it’s essential to name them correctly. Choose descriptive and straightforward names to help you and anyone else who will be working with your stems remember what they are. Consider using consistent naming conventions across all of your tracks to keep things organized and easy to find. In addition to naming your stems, you can also tag them with specific attributes to make them easier to organize and search. For instance, you could use tags to designate certain stems as “drums,” “bass,” or “vocals,” making it easy to search for and find those elements later.

Creating Folders

Organizing your stems into folders is another great way to keep things organized. You could create a folder for each track, or group stems together based on their function (e.g., drums, bass, synths, etc.). Folders make it easy to find and access specific stems when you need them and keep things neat and tidy.

Sending Stems For Mixing And Mastering

When it’s time to send your stems out for mixing and mastering, it’s essential to follow a few best practices to ensure everything goes smoothly. Firstly, be sure to communicate with your mixing and mastering engineer to ensure they understand what you’re looking for. You can also provide notes or a reference track to help them get an idea of your vision. When exporting your stems, be sure to export them at the highest possible quality. Aim for 24-bit/48kHz or higher, and export each stem with a consistent level and normalization setting. This helps ensure that all of your stems have a consistent volume level and will sound balanced when mixed together. In Conclusion, organizing and sharing stems is a vital part of any Ableton Live workflow. By naming and tagging your stems, creating folders, and following best practices when exporting your stems, you can ensure that your project runs smoothly and sounds great when it’s finished.

Frequently Asked Questions Of How To Export Stems In Ableton Live

How Do I Export Stem Files From Ableton?

To export stem files from Ableton, simply go to the “File” menu and select “Export Audio/Video”. From there, choose the individual tracks or groups you want to export as stems, set your desired parameters, and click “Export”. Your stems will be saved in the designated folder.

How Do I Export Stem?

To export a stem, you need to select the track containing the stem, click on “File,” then select “Export. ” Choose the desired file format, name the file and select the destination folder. Finally, click “Export” to complete the process.

How Do You Bounce Down Stems In Ableton?

To bounce down stems in Ableton, select the audio track you want to bounce down, then go to “File” and click “Export Audio/Video. ” Choose the desired settings for the stem, then click “Export” to create a new audio file of the stem.

Repeat the process for each audio track you want to bounce down.

How Do I Export Selected Tracks In Ableton?

To export selected tracks in Ableton, first select the tracks you want to export. Then go to the “File” menu and choose “Export Audio/Video”. In the Export Audio/Video window, select “Selected Tracks Only” from the “Rendered Track” drop-down menu. Adjust your settings as desired, then click “Export”.

Conclusion

Exporting stems is an essential skill for musicians, producers, and sound engineers who want to create professional music. In Ableton Live, stem exporting is an essential feature that helps you to collaborate with other musicians and work on your projects.

By following the guidelines mentioned above, you can easily export your tracks in Ableton Live and share them with other producers and sound engineers. So go ahead and try it for yourself! The world is waiting for your music.
Categories
Archive

Your First Drum Beat In Ableton Live

The first drum beat in Ableton Live can be created by inserting a drum rack and using the step sequencer or triggering samples. Ableton’s library also offers a range of pre-made drum kits to choose from.

Mastering the skill of creating drum beats is crucial for any music producer. Also, Ableton Live is one of the most popular Digital Audio Workstations (DAWs) for music production. With its user-friendly interface and powerful features, Ableton offers endless possibilities for creating unique and exciting drum beats.

Related reading: How to sidechain in ableton and Drums in ableton guide. For background, see Instrument drum and effect racks.

Whether you choose to use the step sequencer, triggering samples, or pre-made drum kits, the key is to experiment with different sounds and patterns to create a beat that suits your style. In addition, we will explore different approaches to creating your first drum beat in Ableton Live.

Getting Started With a Drum Beat in Ableton Live

Getting started with Ableton Live can be a little intimidating at first. But once you get the hang of it, it becomes a very powerful tool. In this post, we’re going to take you through the process of creating your first drum beat in Ableton Live!

Setting Up Ableton Live

The first thing you need to do is set up Ableton Live on your computer. First, if you haven’t done this already, head over to the Ableton website and download the latest version of the software. Once you have it downloaded, go ahead and install it on your computer.

Creating A New Project

Now that you have Ableton Live installed on your computer, it’s time to create a new project. Next, open Ableton Live and choose “New Live Set” from the options menu. This will create a new, blank project for you to work with.

Understanding The Drum Rack

Now that you have a new project open in Ableton Live, it’s time to start working with the Drum Rack. Also, the Drum Rack is a powerful tool that allows you to create and edit drum beats with ease. To access the Drum Rack, simply click on the “Drums” icon in the sidebar.

Once you have the Drum Rack open, you’ll see a grid where you can assign different drum sounds to different pads. For example, to assign a sound to a pad, simply drag and drop the sound onto the pad you want to assign it to. You can then use the pads to create your drum beat.

Now that you know how to set up Ableton Live, create a new project, and use the Drum Rack, it’s time to start creating your first drum beat! Experiment with different sounds, rhythms, and patterns until you find something you like. Moreover, once you have your drum beat created, you can start adding other instruments and effects to create a full track.

Choosing The Right Drum Samples

Choosing the right drum samples is essential for creating your first drum beat in Ableton Live. Furthermore, you can experiment with different sounds and find the ones that fit your style and genre. Remember to keep it simple and focus on creating a groove that makes people dance.

Every music producer knows the importance of selecting the right drum samples for their track. A single drum kit can alter the overall sound of the beat. Also, this is why it’s crucial to invest some time and effort in finding suitable samples. In this section, we’ll guide you through the process of selecting the perfect samples for your first drum beat in Ableton Live.

Selecting The Drum Kit

Begin by selecting the right drum kit for your track. In addition, Ableton Live is equipped with a range of drum kits, each with its unique sound and flavor. Choosing the right kit depends on the music genre you’re creating and personal preference. For example, if you’re going for a pop sound, the ‘Studio Acoustic’ kit could be an excellent starting point. In contrast, the ‘Drum Machines’ kit is perfect for electronic music. The key is to experiment with different kits until you find the sound you’re looking for.

Adding Samples To The Drum Rack

Once you’ve selected the drum kit, it’s time to add some samples to your drum rack. Moreover, a drum rack is a collection of drum sounds that can be played using your MIDI controller. In Ableton Live, you can use the drag-and-drop method to add samples to your drum rack. The software supports various sample formats, such as WAV, AIFF, and MP3. Ensure the samples you choose complement each other and fit within the context of your track. If you’re creating a slow tempo track, you may want to select samples that are more laid-back, such as a low-velocity snare and a smooth hi-hat. However, if you’re going for a faster tempo, you may want to opt for punchier samples, such as a clap or kick with high velocity. The key is to experiment with different samples and focus on creating a cohesive sound.

Conclusion

In conclusion, selecting the right drum samples is an integral part of creating a drum beat in Ableton Live. Admittedly, the process may seem daunting at first. But with time and practice, you’ll develop a better understanding of what works best for your music genre. Remember to experiment with different kits and samples until you find the perfect match.

Programming Your First Drum Beat in Ableton Live

Learn how to program your first drum beat in Ableton Live with these step-by-step instructions. Also, from selecting your drum kit to creating patterns and adding effects, this tutorial will give you the tools to make your own beats in no time.

Creating your first beat in Ableton Live can be an exciting experience, especially if you’re new to music production. In this section, we’ll cover how to program your first beat in Ableton Live, step by step. Adding a MIDI track: First things first, we need to add a MIDI track to the Ableton Live session. To do this, simply navigate to the “Create” menu and select “MIDI Track”. Alternatively, you can use the shortcut “CMD+Shift+T” (Mac) or “Ctrl+Shift+T” (Windows) to create a new MIDI track. Using the Piano Roll to program beats: Once you’ve added a MIDI track, it’s time to open up the Piano Roll. For example, you can do this by clicking on the MIDI clip in the Arrangement or Session view and pressing the “E” key. The Piano Roll is where you will program your beats.

A Basic Kick-Snare Drum Beat in Ableton

To create a basic kick-snare pattern, use your mouse to click and drag on the Piano Roll grid to create MIDI notes. First, add a kick drum on beat one and a snare drum on beat three. Repeat this pattern for a few bars to create a basic loop. Adding hi-hats and cymbals: Now that you have a basic kick-snare pattern, it’s time to add hi-hats and cymbals. Use the Piano Roll to create 16th notes on the off-beats (between the kicks and snares) for the hi-hats. You can also add cymbals on the downbeats (beats one and three) to add some variety to your beat.

In conclusion, by following these steps, you should now have a basic drum beat programmed in Ableton Live. Remember, the key is to experiment and have fun with your drum programming. Furthermore, try out different patterns, velocities, and sounds to create something unique and exciting. With some practice and creativity, you’ll be well on your way to creating amazing beats.

Your First Drum Beat In Ableton Live

Credit: www.levelsmusicproduction.com

Editing Your Drum Beat in Ableton

Learn how to edit your first drum beat in Ableton Live to create unique and custom sounds. Also, with simple steps and customized tools, you can enhance your drumming skills to produce remarkable tracks and beats.

Adjusting Velocity

Adjusting the velocity of your drum beats can bring an entirely new dimension to your music. In Ableton Live, it’s straightforward to do this. You can start by clicking on the “clip view,” and then select the pencil tool to draw on the beat you want to edit. In addition, to adjust the velocity, select the grid area representing your drum beat, and raise or lower the velocity to achieve your desired result. This technique can help you perfect some key drumbeat patterns.

Using Quantization To Tighten Up Timing

Quantization is another quick way to tighten up your timing and make your drum beat sound professional. To do this, highlight the region you want to use quantization on, open the ‘Quantization’ dropdown menu and choose the desired quantization setting. This setting ranges from 1/32 to 1/4 notes. After applying quantization, you should listen to your drum beat again and assess if you’re satisfied with the timing.

Adding Variation To Your Ableton Drum Beat

Adding variation to your drum beat helps your music sound more interesting and engaging. To do this, you can use things like fills, ghost notes, and substitutions. Furthermore, you can use fills to break the monotony of your drum beat. Ghost notes can be used to add complexity and enhance rhythm. Substitutions help you replace drum beats with a new beat to give a certain part of the beat a different feel. By experimenting with these different techniques, you can add variety to your drum beat. This makes your music more vibrant and exciting. By adjusting velocity, using quantization, and adding variation to your drumbeat, you not only improve your timing. But you also achieve new and exciting drum beat patterns that add value to your music. Play around with this method and see how it works out for you!

Adding Elements to Your Ableton Drum Beat

Enhance your first drum beat in Ableton Live by adding additional elements such as shakers, hi-hats, and percussion. Also, experiment with different samples and loops to create a unique sound and add depth to your track.

Adding Additional Elements in Ableton Live drum beats is a crucial step towards creating an outstanding and professional beat. In addition, once you’ve laid the foundation and created the primary beat, you can explore the exciting world of percussion, fills, and transitions that bring depth and uniqueness to your tracks. In this blog post, we will discuss how to add different elements to your drum beat in Ableton Live, including percussion, transitions, and effects.

Adding Percussion to Your Ableton Drum Beat

One of the essential elements you can add to your drum beat in Ableton Live is percussion. Percussion instruments can range from shakers, claves, cowbells, and congas to tambourines and maracas. To add percussion to your beat, you need to create a new MIDI track by clicking on “Insert a new MIDI track.” Once you have the MIDI track, drag and drop the percussion sample you want to use onto the new track. Besides percussion, you can add other elements such as a bassline, chords, and melody to your beat. Adding these elements involves creating a new MIDI track and selecting the instrument of your choice. Ensure that you select a sound that complements the drum beat and does not overpower it.

Creating Transitions With Fills and Effects

Using fills and effects is an excellent way to create smooth transitions between different sections of your drum beat. In Ableton Live, you can use the built-in automation tools to create these effects. For example, you can automate the filter and delay effects to create a transition between the intro and the chorus sections of your beat. Fills are also an excellent way to create transitions between different drum patterns and sections of your beat. Moreover, a drum fill is typically a one-bar embellishment that bridges the gap between two different patterns.

To create a fill, you can use various percussion instruments or drum samples to create a unique rhythm that complements the primary beat. Conclusion Adding additional elements to your drum beat in Ableton Live is a critical step towards creating a professional and polished sound. By experimenting with percussion, fills, and effects, you can create unique and memorable beats that stand out from the rest. Remember to keep your overall rhythm cohesive and use different elements to complement your primary beat, not overpower it. With practice and experimentation, you can elevate your drum beats to the next level.

Arranging Your Drum Beat in Ableton Live

Learn how to arrange your first drum beat in Ableton Live with ease. Overall, this beginner’s guide will provide step-by-step instructions on setting up and programming a basic drum pattern to kick-start your music production journey.

After creating your first drum beat in Ableton Live, the next step is to arrange it like a pro. Also, arranging your beat is essential as it enables you to create different sections in your arrangement, apply automation to add interest and build tension and release in your beat. Here are some practical tips to get you started:

Creating Sections In Your Arrangement

Creating sections in your beat arrangement is essential as it helps to keep your listeners engaged and interested in your music. In addition, sections are like chapters in a book; they help to create structure and transition between different parts of your song. Here are some of the main sections you should include in your drum beat arrangement:

  • Intro: The beginning of your beat, where you introduce your main melody or rhythm.
  • Verse: The main body of your beat, where you establish the main groove and melody.
  • Chorus: The part of the song that repeats and is easy to sing or dance along to.
  • Bridge: A section that connects two different parts of your song, often used to add contrast to the melody or rhythm.
  • Outro: The end of your beat, where you fade out or finish with a bang.

Using Automation To Add Interest

Automation is a great tool to add interest and variation to your drum beat arrangement. Moreover, as the name suggests, automation involves changing the parameters of your sounds or effects over time. For example, you could apply automation to your filter cutoff or reverb decay to create a sense of movement or space in your beat. To apply automation in Ableton Live, follow these steps:

  1. Select the parameter you want to automate (e.g., filter cutoff).
  2. Click on the “automation” button in the clip or track view.
  3. Draw in your automation curve by clicking and dragging on the automation line.
  4. Adjust the curve shape and timing to your liking.

Building Tension And Release

Building tension and release is a crucial aspect of any drum beat arrangement. Tension refers to the “build-up” or anticipation in your song. Meanwhile, release refers to the “pay-off” or resolution of that tension. Here are some tips to help you build tension and release in your beat:

  • Vary the intensity: Change the volume, velocity, or complexity of your sounds to create a sense of dynamism.
  • Add silence: Insert moments of silence to create suspense and anticipation.
  • Use effects: Apply effects like risers, white noise, or sweeps to create tension and transition.
  • Change the rhythm: Experiment with different rhythms and time signatures to create surprise and contrast.

By following these tips, you can take your drum beat arrangement to the next level and create a compelling, well-structured song. Good luck and happy beat-making!

Mixing Your Drum Beat in Ableton

Learn how to create your first drum beat in Ableton Live by properly mixing your drum sounds. By adjusting the levels, panning, and EQ, you can achieve a clean and balanced sound that will set the foundation for your music production.

After creating your first drum beat in Ableton Live, it’s time to take your production to the next level by mixing your drum beat. Mixing is the process of adjusting the levels, panning and adding effects to your individual tracks to create a balanced, cohesive and exciting final mix. Here are some tips to help you mix your drum beat like a pro.

Balancing Levels Of Different Elements

The first step to mixing your drum beat is to balance the levels of each individual drum element in your mix. This is important to ensure that no single element overpowers the others and that they all play well together. A useful way to do this is to turn off all your other drum tracks and listen to each element one by one. Adjust the volume of each element, so it sits comfortably within the mix when all the other elements are playing.

Panning Drums Within The Stereo Field

Panning is another technique you can use when mixing your drum beat. This involves placing different drum elements at different positions within the stereo field. A useful guideline when panning drums is to pan the kick drum and bass instrument to the center to create a solid foundation for your mix. Then, pan the other elements like Hi-hats, cymbals, and percussion to the left or right of the center to create width and depth.

Adding Effects To Create Depth And Excitement

Adding effects like reverb, delay, and distortion can enhance your drum beat and make it more exciting. A reverb effect can create a sense of space and make your drums sound like they were recorded in a large room. A delay effect can add depth and create an echo effect. Distortion can add character and make your drums sound gritty and aggressive. Be careful not to overdo it with the effects, as they can quickly muddy up your mix. In conclusion, mixing your drum beat is an essential part of any production process. By balancing levels, panning drums and adding effects, you can create a professional-sounding mix that will make your listeners move to the rhythm!

Your First Drum Beat In Ableton Live

Credit: m.youtube.com

Exporting Your Drum Beat From Ableton Live

Exporting your beat is a crucial step in the music production process in Ableton Live. It is the final step in making sure your project can be played beyond the application and in any media player. Here’s a step-by-step guide on how to export your creation.

Preparing To Export Your Mix

Before exporting your beat, it is important to ensure that your track is ready to be shared with the rest of the world. Check that your levels are correct, and no instruments are too loud or too quiet. Make sure that you have automated your levels where necessary. As sound is subjective, listen to your creation closely, and make sure that you are happy with how it sounds.

Using File Export To Save Your Beat

Once you are done preparing your mix for export, you can proceed to export your beat. Start by clicking ‘File’ on the menu bar, followed by ‘Export Audio/Video.’ From there, you will have various options to select the export format, bitrate, and sample rate for your file. For best results, it is recommended that you export your beat in a lossless format like WAV. This will ensure that the audio quality of your creation is not compromised.

Sharing Your Creation With Others

After exporting your beat, you should test it on different media players to ensure that it plays back correctly and at the same level. If you experience issues, you can go back and tweak your mix to achieve the desired playback. Once you are satisfied with your beat’s overall sound and playback quality, you can share your creation by uploading it to a music platform or sending it directly to someone via email or another sharing platform.

Exporting your beat in Ableton Live is a straightforward process that can be done in just a few clicks. By following these steps, you can share your musical creation with the world. Enjoy making music and keep creating!

Your First Drum Beat In Ableton Live

Credit: flypaper.soundfly.com

Frequently Asked Questions For Your First Drum Beat In Ableton Live

How Do You Make A Drum Beat In Ableton?

Making a drum beat in Ableton is easy. Simply create a new MIDI clip in the Session View, choose a drum kit, and place the notes where you want them in the grid. Adjust the velocity and timing as desired, and you’re good to go!

How Do I Make My Drums Sound Real In Ableton?

Create natural sounding drums in Ableton by using realistic samples, adding groove and velocity variations, adjusting EQ and compression, and incorporating realistic room and reverb effects. Utilize Ableton’s built-in drum racks and plugins, or invest in higher quality third-party plugins or drum libraries for more realistic and dynamic drum sounds.

How Do You Sequence Drums In Ableton?

To sequence drums in Ableton, first create a MIDI clip. Next, select the drum rack and input notes into the clip using the piano roll. Adjust the velocity, timing, and duration of each note to create the desired rhythm. Use automation to add variation and interest.

Finally, refine the mix and export the track.

How Do You Use Drum Samples In Ableton?

To use drum samples in Ableton, first open up a new session. Next, drag the drum sample into a MIDI track. Then, select a drum rack from the instruments folder, and drag the drum sample into the corresponding slot. Finally, play the drum sample using a MIDI controller or computer keyboard.

Conclusion

Creating your very first drum beat in Ableton Live can feel intimidating, especially if you’re new to the software. However, thanks to Ableton’s user-friendly interface, you’ll be able to start creating music in no time. With a bit of patience and practice, you’ll soon find your groove and be able to create beats that you’re proud of.

So, what are you waiting for? Begin experimenting with Ableton Live today and let your creativity flow!

More in our Drums & beats guide.

Categories
Archive

Mixing a Song from Start to Finish

Mixing a song from start to finish involves balancing levels, setting EQs, applying compression, adding effects, and creating a stereo image. It’s the process of making all the individual tracks in a song blend together in a cohesive way.

As a music producer or sound engineer, mixing is one of the most important aspects of a recording project. It’s the art of combining all the elements of a song together to create a final mix that sounds great on any speaker system.

The mixing process involves various techniques, such as balancing levels, setting EQs, applying compression, adding effects, and creating a stereo image. We’ll take you through the steps involved in mixing a song from start to finish, covering everything from organizing your tracks to mastering your final mix. So, let’s dive in and learn how to mix a song like a pro!

Mixing a Song from Start to Finish

Credit: www.audio-issues.com

Preparation

Preparing to mix a song from start to finish involves organizing and labeling the tracks, setting levels and panning, and cleaning up any unwanted noise or hiss. This initial preparation can save time and frustration later in the mixing process, resulting in a more polished final product.

Choosing The Right Tools And Plugins

Before you start mixing a song, it’s essential to have the right tools and plugins. Choose your Digital Audio Workstation (DAW) and make sure you have the necessary plugins installed. The right tools and plugins will help you achieve a professional sound and make the mixing process easier. You can choose from a wide range of free and paid tools, so make sure you pick the ones that fit your budget and needs.

Setting Up Your Workspace

Your workspace must be set up in a way that suits your workflow and makes the mixing process more efficient. Make sure you have a comfortable chair, good monitors or headphones, and the right lighting. Adjust your screen brightness, font size, and color scheme to avoid eye strain. Organize your cables, keyboard, and mouse for easy access. A well-arranged workspace will allow you to focus on mixing and avoid distractions.

Importance Of Organization

Organizing your project files and tracks is crucial when mixing a song. Make sure each track is labeled and named appropriately. Color code your tracks to help you identify them visually. Group your tracks by instrument or type to help you make decisions about levels, EQ, and effects. Save your presets and settings for easy recall. Retain notes and comments about the mix for future reference. In conclusion, preparation is vital when mixing a song. Choosing the right tools and plugins, setting up a comfortable workspace, and staying organized will make the mixing process smoother and more enjoyable. By putting in the time and effort to prepare, you’ll be well on your way to creating a professional-sounding mix.

Mixing a Song from Start to Finish

Credit: www.youtube.com

Mixing Fundamentals

Learn the mixing fundamentals and mix a song from start to finish with expert guidance. From setting levels to balancing frequencies, this guide covers all the essential steps for achieving a professional-sounding mix.

Mixing a song is an art that takes time, practice, and patience to perfect. Before diving into advanced techniques, it is crucial to master the fundamental aspects of mixing. These include balancing your levels, using EQ techniques for clarity and separation, and creating space with reverb and delay. Let’s take a closer look at these essential concepts.

Balancing Your Levels

Balancing levels means adjusting the volume of each track so that they blend well together. This step is critical for achieving the right balance in your mix. One way to do this is to listen to your mix at a low volume level and adjust each track’s volume until you can hear every instrument clearly. Another way is to use a fader to adjust each track’s volume and ensure that they are not clipping or distorting. Spending time on leveling will help you create a balanced and clear mix.

Eq Techniques For Clarity And Separation

Equalization (EQ) is the process of adjusting the balance of frequencies in a mix. Using EQ, you can eliminate unwanted frequencies, enhance the desired ones, and add clarity to your mix. For example, you can use EQ to cut out some low frequencies from the bass to avoid overlapping with the kick drum. Additionally, you can boost some frequencies on the vocal track to make it stand out from the mix. Experiment with different EQ techniques to find the ones that work best for your mix.

Creating Space With Reverb And Delay

Reverb and delay add depth and dimension to your mix. They help to create a sense of space and distance and can make your mix sound more lively and immersive. You can use reverb to simulate different room sizes or to add a natural ambiance to your mix. Delay, on the other hand, can create an echo effect or add rhythmic interest to your mix. Use these effects sparingly and thoughtfully to avoid creating a cluttered or muddy mix. Mixing a song can be a complex and layered process, but mastering these fundamental concepts will set you on the right path. Understanding how to balance your levels, use EQ techniques for clarity and separation, and create space with reverb and delay will help you achieve a well-crafted, professional-sounding mix that will captivate your audience.

Advanced Techniques

Learn advanced techniques from professional audio mixers in order to achieve a polished product. From selecting the right effects to fine-tuning individual tracks, these techniques will help you create a cohesive sound when mixing a song from start to finish.

Advanced Techniques Mixing a song from start to finish can be a tricky task, but with a few advanced techniques, you can make your mix stand out and grab the listener’s attention. In this section, we’ll cover three essential techniques that can help you achieve a professional-sounding mix. Parallel Compression for Punch and Glue Parallel compression is a technique used by sound engineers to add more depth and dimension to the mix. It involves duplicating the track and compressing it heavily, then blending it with the original track to create a more punchy and cohesive sound. Here’s how to do it: 1. Duplicate the track you want to compress and name it “Parallel Compression.” 2. Apply heavy compression to the duplicated track. A compression ratio of 4:1 or 6:1 is a good place to start. 3. Blend the compressed track with the original track using the fader. The compressed track should be barely audible, just enough to add more punch and glue to the original track. Using parallel compression will give your mix more depth and punch, making it sound full and professional. Automation for Dynamic Variation Automation is one of the most important techniques for achieving a dynamic mix. It involves adjusting the level, panning, EQ, and other parameters of each track throughout the song to create variation and interest. Here’s how to do it: 1. Identify the parts of the song that need automation, such as the chorus, verse, or bridge. 2. Use the automation function in your DAW to adjust the parameters of each track in real-time. 3. Experiment with different automation techniques, such as volume rides, panning, and EQ sweeps, to create dynamic interest throughout the song. Using automation will keep the listener engaged throughout the song, making it feel like a journey with different highs and lows. Working with Multiple Takes and Overdubs When recording a song, it’s often necessary to record several takes of each part to achieve the desired sound. This technique is called overdubbing, and it can help create a more polished and professional sound. Here’s how to do it: 1. Record multiple takes of each part, such as vocals, guitar, or drums. 2. Use the best take as the main track and use the others to fill in any gaps or correct mistakes. 3. Blend the multiple takes together using volume, panning, EQ, and other parameters to create a cohesive sound. Using multiple takes and overdubs will help you achieve a more polished and professional sound, making your mix stand out and grab the listener’s attention. In conclusion, mixing a song from start to finish can be challenging, but with these advanced techniques, you’ll be able to create a professional-sounding mix that grabs the listener’s attention. Using parallel compression, automation, and working with multiple takes and overdubs, you’ll be able to add depth, dynamism, and polish to your mix, making it stand out and shine.

Mixing a Song from Start to Finish

Credit: www.izotope.com

Tackling Common Problems

As a music producer, you’ll come across several issues while mixing a song from start to finish. Some of the common problems include muddiness, harshness, phase issues, timing, and pitch problems. Tackling these issues can be challenging, but it’s essential to ensure that you produce the best quality mix possible. So, here’s how to solve these problems and take your mix to the next level.

Dealing With Muddiness And Harshness

Muddiness and harshness are the most common problems in mixes, and they can make the song sound unbalanced and messy. The main reason for muddiness is because of the low-frequency elements in the mix, such as the bassline, kick, and toms. To tackle this problem:

  • Try using a high-pass filter to cut out the low frequencies from the less important sounds.
  • Surgical EQ is a great tool that can help you isolate the problems and fix them precisely, so you should use it to pinpoint the muddy frequencies and boost or cut them accordingly.
  • You can use a de-esser on vocal tracks to reduce harshness in the high-frequency range.

Solving Phase Issues

Phase issues are common when you use multiple microphones to record one source, such as drums or guitar amps. The phase differences can cause cancellation of frequencies, which can result in a thin or hollow sound. Here’s how to remedy phase issues:

  • Check the phase correlation meter in your DAW or plug-ins such as the Waves InPhase, which can help you align the phase of two or more tracks.
  • Move the microphones slightly or use a different microphone placement to prevent phase problems from occurring.
  • If you don’t have the option to adjust the phase, you can try EQing the tracks to avoid overlapping frequencies.

Fixing Timing And Pitch Problems

Timing and pitch problems can occur during recording or editing, and they can make a song sound out of tune or out of sync. To fix these issues:

  • Use a time correction tool such as Elastic Audio or Flex Time to align the tracks with the beat.
  • You can use tuning plug-ins such as Melodyne or Auto-Tune to correct pitch problems. However, be careful not to overuse them as they can make the song sound robotic.
  • If you’re dealing with vocal tracks, you can also try adjusting the timing and pitch manually to retain the natural feel of the performance.

By following these tips, you’ll be able to tackle the most common problems that arise when mixing a song from start to finish. Remember, a clean, balanced mix is essential for a professional-sounding track.

Preparing Your Mix For Mastering

Preparing your mix for mastering is an essential and delicate task. A well-mixed song sets the foundation for a successful mastering process. It’s crucial to balance the levels of all individual tracks and ensure that they blend together cohesively to produce a polished, professional-sounding final song.

Preparing Your Mix for Mastering is a crucial step in the music production process. It involves a series of techniques and methods that help achieve a polished and professional-sounding mix. Before submitting your mix for mastering, it’s essential to follow a few guidelines to ensure a seamless and efficient mastering process. In this article, we’ll discuss the H3 headings: Setting Proper Levels, Preparing Your Session for Export, and Creating Alternate Mixes, which are fundamental aspects of preparing your mix for mastering. H3: Setting Proper Levels One of the critical aspects of preparing your mix for mastering is setting proper levels for your tracks. It’s important to ensure that all the tracks are appropriately balanced, with no individual track being too loud or too soft. The goal is to achieve a cohesive and balanced mix where every element can be heard clearly without overpowering other elements in the mix. Here are a few tips to help you set proper levels: – Use an RMS meter to visualize the loudness of each track and ensure that they are consistent with each other. – Solo individual tracks and listen to them carefully to determine the appropriate level. – Avoid adding too much gain in the mastering process as it can cause distortion and affect the overall sound quality. H3: Preparing Your Session for Export Once you’ve set proper levels for your tracks, the next step is to prepare your session for export. It involves creating a final mix that’s ready for mastering. Here are a few steps to follow: – Consolidate all your tracks into a single session to ensure that the mastering engineer has access to all the tracks. – Remove any unnecessary tracks, such as muted or unused tracks, to reduce the size of the session and ensure a faster and smoother export process. – Clean up and organize your session, ensuring that all the tracks are labeled correctly and are easy to identify. H3: Creating Alternate Mixes Creating alternate mixes is an essential part of the mixing process, and it can help you achieve a better sounding mix. It involves creating different versions of your mix, such as instrumental versions, acapellas, or radio edits. Here are a few reasons why creating alternate mixes is important: – It provides more options for the mastering engineer, allowing them to choose the best version to work with. – It gives you more opportunities to showcase your music in different contexts, such as in radio stations or TV commercials. – It can help you identify any flaws in the mix and improve the overall sound quality. In conclusion, preparing your mix for mastering requires attention to detail and a willingness to invest time and effort in the process. By following the H3 headings: Setting Proper Levels, Preparing Your Session for Export, and Creating Alternate Mixes, you can ensure that your mix is of the highest quality and is ready for the mastering process.

Frequently Asked Questions For Mixing A Song From Start To Finish

How Do You Master A Song From Start To Finish?

Mastering a song from start to finish involves several steps, including preparing the mix, ensuring proper levels, EQ and compression, utilizing subtle imaging techniques, and referencing other tracks. It’s important to work in a high-quality listening environment and to make detailed and precise adjustments.

Ultimately, mastering is about optimizing the mix for different playback scenarios and delivering a balanced, polished final product.

How Do You Mix Songs Step By Step?

To mix songs step by step, follow these basic steps: 1. Ensure your equipment is set up correctly 2. Adjust the volume levels of each track 3. Match the beats or adjust the tempo to make them sync 4. Use crossfading to smoothly transition between tracks 5.

Practice and experiment to improve your skills

What Is It Called When You Mix Songs Together?

Mixing songs together is called DJing.

What Is The Process Of Mixing A Song?

Mixing a song is the process of combining and balancing all the individual tracks from a recording to create a cohesive and polished final product. This involves adjusting levels, panning, EQ, compression, and other effects to make sure all the elements of the song work together and sound good on different playback systems.

Conclusion

To sum up, mixing a song from start to finish is a crucial step in music production that requires both technical skills and creative intuition. By following the right workflow, using the right tools, and keeping in mind the overall aesthetic vision, you can achieve a pleasing and polished result that will captivate your audience.

Remember, mixing is not a one-size-fits-all process, and you can always experiment with different techniques and approaches to find the one that best suits your style and genre. So, go ahead and unleash your potential as a mixing artist!

Categories
Archive

How To Export Stems In Garageband

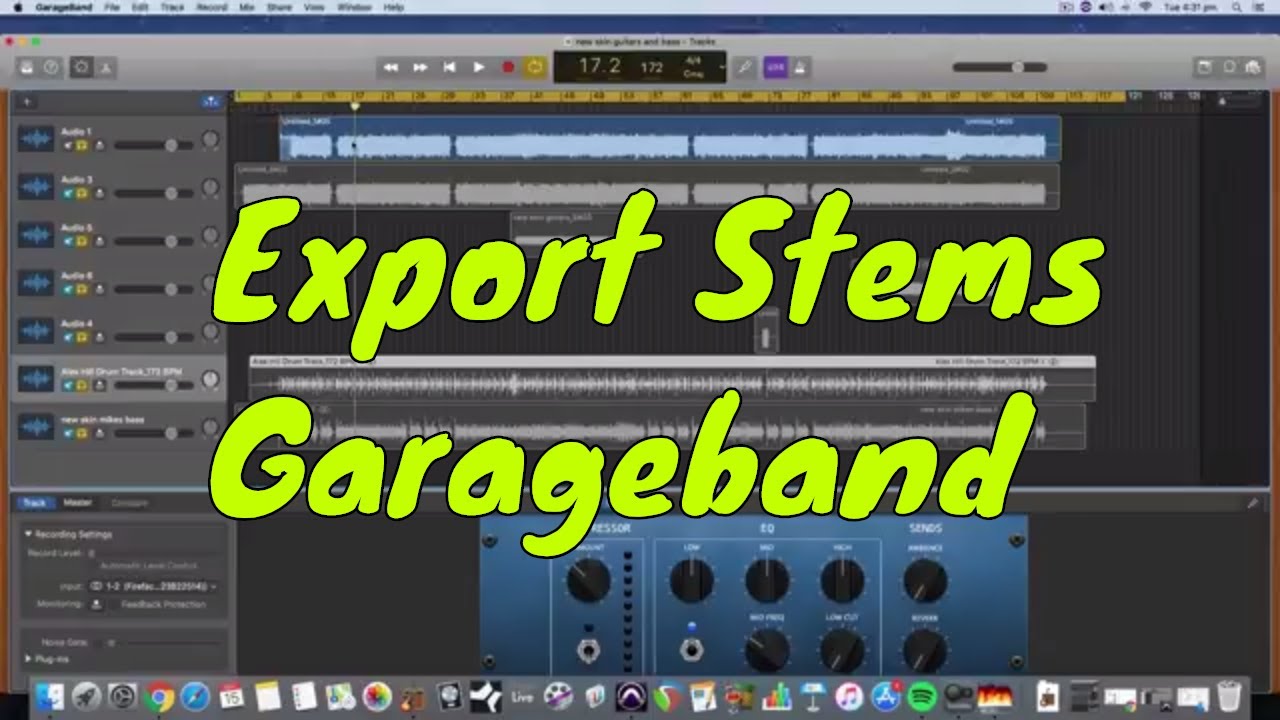
To export stems in Garageband, select the tracks you want to export and choose File > Export > All Tracks as Audio Files. Now, let’s explore the process of exporting stems in Garageband, a digital audio workstation designed for Mac users.

Stems are individual audio tracks of a song that are exported separately, allowing for greater control during the mixing and mastering stages. Whether you’re a budding producer or an experienced musician, learning to export stems in Garageband can help you achieve a professional sound and streamline your workflow.

We’ll provide you with step-by-step instructions for exporting stems in Garageband, as well as some tips for maximizing the quality of your exported audio files.

Understanding Stems

Are you a Garageband user looking to improve your music production skills? If so, then understanding how to export stems in Garageband is an essential skill to have. Stems are an important element in music production, allowing you to export individual tracks for mixing and post-production processing. In this guide, we dive into what stems are, the reason you need them in Garageband, and how to export them with ease.

What Are Stems?

Stems refer to individual tracks that make up a music project, such as drums, bass, guitar, and vocals. Exporting stems means extracting each track independently, allowing for more precise control during the mixing process. Stems are essential in the music production process since they enable mix engineers and producers to work on different elements of the music project independently. Overall, this process ensures that the project sound quality is the best it can be and fits the intended music genre before it gets released to the audience.

Why Do You Need Stems In Garageband?

Gaining control over a project’s individual tracks is crucial when it comes to Garageband production techniques. When you export stems in Garageband, you gain several benefits as a producer. Firstly, exporting stems enables you to perform any post-production processing more efficiently. Secondly, it leaves you with numerous options, such as remixing the song, quickly adjusting volumes, or creating instrumental versions or acapellas of the track. Lastly, it simplifies the mixing process because you can work on specific elements of the song.

Now that you know what stems are and their importance, it’s important to learn how to export them in Garageband. Exporting stems is a straightforward process that you can do with ease, so stay tuned for our next article.

Preparing For Export

In simple terms, exporting stems refers to the process of separating a multi-track recording into individual audio files. This makes it possible to mix and master the tracks on a professional-grade digital audio workstation (DAW) or share the files with other producers for further editing. However, before you can export stems in Garageband, you need to prepare the tracks accordingly.

Selecting The Tracks

The first step in preparing for export is selecting the tracks you want to export. In most cases, it’s advisable to export all the tracks to ensure that you have complete control over the final mix. To select all the tracks, press “Command+A” on your Mac keyboard. Alternatively, you can select specific tracks by holding down “Shift” and clicking on them individually.

Organizing The Tracks

Once you have selected the tracks, the next step is to organize them in a way that makes sense for the final mix. This may involve rearranging the tracks by dragging and dropping them in the timeline or adjusting the volume and panning to create a balanced mix. Moreover, it’s crucial to label each track accordingly to avoid confusion during the export process.

Applying Effects And Plugins

Before exporting the tracks, you may want to apply effects and plugins to enhance the overall sound quality. Garageband provides a wide range of built-in tools such as EQ, reverb, and compression. You can access these tools by clicking on the “Smart Controls” button located in the top-left corner of the Garageband interface. Alternatively, you can use third-party plugins for more advanced processing.

If you follow these steps carefully, you should be able to export stems in Garageband without any hassle. Remember to save the project before exporting to avoid losing any changes. Happy exporting!

Exporting Stems

Exporting stems is a crucial step in the music production process as it allows you to export individual tracks or groups of tracks in your Garageband project. This gives you the flexibility to work on them further in another DAW or send them to a collaborator for further editing. Here are the steps for successfully exporting stems in Garageband.

Choosing The Format

The first step to export stems in Garageband is choosing the format for your audio files. You can select from a variety of formats like AIFF, WAV or MP3. AIFF and WAV provide high-quality audio files but are bigger in size, while MP3 provides compressed audio files with lower quality but smaller file sizes. To choose the format, go to the “File” menu, click on “Export” and select “Stems” from the dropdown options. Then, under “Format”, choose your preferred audio format.

Adding Metadata

It is essential to add metadata while exporting stems in Garageband, as it helps with organizing and identifying files in the future. Metadata is information like Artist name, Song Title, and specific track information like tempo and key. You can add metadata by clicking on the “Options” button while exporting stems and fill in the relevant information in the dialog box that appears.

Setting The Output Parameters

Next, you need to set output parameters for your stems. This includes selecting the start and end points, the bit depth, and the sample rate. In Garageband, you can set the output parameters in the Export Stems dialog box. By default, Garageband selects the start time and end time based on the regions’ start and end points in the timeline. You can choose to export the whole audio or a specific time range by selecting “All Tracks” or “Custom Range” under “Export Section”. Additionally, you can set the bit depth and sample rate under the “Audio Resolution” option.

Summary

In summary, exporting stems is a simple yet crucial step in the music production process. By following the above steps and carefully choosing the format, adding metadata, and setting the output parameters, you can successfully export your stems and work seamlessly with your collaborators or editing in a different DAW.

Post-export Actions

Exporting stems in Garageband is an easy process that allows you to have more control over your mix. However, the process isn’t complete without taking post-export actions. These actions are crucial and help to ensure that the exported files are of high quality, correctly named, and adequately stored. In this section, we will look at the three post-export actions:

Checking For Quality

Before you start renaming or storing your exported stems, it’s essential to check them for quality. This step helps you identify any errors or glitches that may have occurred during the export process. Play each stem, listening carefully for any pops, hisses, or distortion. You can also use software like Audacity or Adobe Audition to check each stem’s quality. If you identify any errors, go back and re-export the stem until you get a flawless version.

Renaming The Files

The next step after checking for quality is to rename the stem files. This action is vital, especially when working on large projects with many tracks. Renaming each stem file helps you identify and locate each track quickly. It’s recommended that you use descriptive names that reflect the content of each stem. For instance, if you have a drum kit, name the exported stem “Drums” instead of “Track 1”. This action not only makes it easy to locate each track but also saves time during mixing.

Storing The Stems

The final post-export action is to store the stems in a safe and easily accessible location. Create a new folder on your computer’s hard drive and name it after the project you’re working on. Save all the stem files in this folder for easy access during mixing and editing. It’s also crucial to create a backup of the exported files in case of an unexpected computer crash or loss of data. You can save the backup files on an external hard drive or cloud storage such as Dropbox or Google Drive.

Using Stems In Other Applications

Using stems in other applications is a great way to make the most of your Garageband project. Once you have your stems exported, there are a variety of ways to use them in other digital audio workstations (DAWs) and even for mastering. Here are some quick and easy ways to use your Garageband stems in other applications:

Importing Stems Into Other Daws

One of the main reasons for exporting stems is to use them in other DAWs. Garageband is a great music creation tool, but there are many more advanced features available in other software. To import your stems into another DAW:

  1. Open your DAW of choice and create a new project.
  2. Select import audio or import stems from the file menu.
  3. Select your exported stems and import them one by one.
  4. Once all the stems are imported, you can use them just like you would in Garageband.

Creating A Remix

If you are a remixer or DJ, then creating a remix using Garageband stems is a great option. Here are some quick steps for creating a remix:

  1. Load your stems into another DAW.
  2. Arrange the stems in a new order or mixing them differently.
  3. Experiment with effects and automation to create a unique remix.
  4. Export the new mix and share it with your listeners.

Using Stems For Mastering

Exporting stems is also useful for mastering, which is the final stage of music production. Using stems for mastering gives you more control over the process, allowing you to adjust the levels of individual tracks to achieve a balanced mix. Here are some steps for using your stems for mastering:

  1. Load your stems into a dedicated mastering software.
  2. Adjust levels, EQ, compression and limiting for each stem track.
  3. Export the final mastered mix to create a radio-ready version of your track.

In conclusion, exporting your Garageband stems opens up new possibilities for creativity and allows you to use your tracks in a variety of applications.

How To Export Stems In Garageband

Credit: www.youtube.com

Frequently Asked Questions Of How To Export Stems In Garageband

How Do I Export Vocals From Garageband?

To export vocals from GarageBand, go to “Share” in the top menu and select “Export Song to Disk”. Choose the file format and options, then hit “Export” and locate the saved file on your computer.

Does Garageband Have Stems?

Yes, GarageBand does have stems. A stem is an isolated track, usually a specific instrument or vocal, that can be exported separately from the rest of the project. GarageBand allows users to export individual tracks as stems in order to make editing, remixing or mastering easier.

How Do I Export Individual Files From Garageband?

To export individual files from GarageBand, first select the track you want to export, then go to “Share” in the top-right corner, and choose “Export Song to Disk”. From there, you can select a file format and location to save the exported file.

Can You Bounce Tracks In Garageband?

Yes, you can bounce tracks in GarageBand. This allows you to combine and mix multiple tracks into a single track, creating a final version of the project. To bounce tracks, simply select the tracks you want to bounce and then choose “Share” from the menu options.

Select “Export Song to Disk” and choose your desired audio format and location.

Conclusion

Exporting stems in Garageband is a simple and essential task for any musician or producer. With the steps provided, you can now easily create and share individual tracks and components of your project. By exporting stems, you give yourself and others the flexibility to edit and mix specific parts of your composition, making the overall sound more polished and professional.

With this newfound knowledge, you can now take your music to the next level. Happy exporting!

Categories
Archive

Different Types Of Spotify Playlists

Spotify offers several types of playlists, including custom playlists, algorithmically generated playlists, and editorially curated playlists. Spotify has become one of the most popular music-streaming services globally.

It is no secret that playlists are an excellent feature that Spotify offers to its users. Playlists help to make streaming music more personalized, easy to navigate and a chance to discover new artists. There are different types of playlists offered by Spotify, namely custom playlists, algorithmically generated playlists, and editorially curated playlists.

Spotify’s custom playlists are curated by the users themselves according to their mood, genre, activity, or preference. Algorithmically generated playlists are created by Spotify’s algorithm based on the user’s listening activities. Lastly, editorially curated playlists are curated by Spotify’s editorial team based on industry trends, cultural events, and popular music. Knowing and understanding the types of playlists available can help you maximize the music streaming experience.

Editorial Playlists

Editorial playlists on Spotify are curated by the platform’s editorial team, featuring tracks across various genres. These playlists are regularly updated and provide a great platform for new artists to gain exposure.

If you are looking for fresh and curated content on Spotify, you can never go wrong with Editorial Playlists. These are playlists made and updated by Spotify’s team of experts. Editorial playlists are composed of the best tracks of the day, week, and month in different genres, moods, and themes. In this article, we will explore the different types of editorial playlists Spotify has to offer.

Official Playlists By Spotify

Official playlists by Spotify include the most popular playlists curated by the streaming platform. These playlists are compiled by Spotify’s team based on different themes and genres. Some of the most popular official playlists by Spotify include the likes of Today’s Top Hits, which includes all the latest chart-toppers, and the Rap Caviar, which is exclusively for hip-hop lovers.

Guest Playlists By Spotify

Guest playlists are playlists curated by renowned musicians, celebrities, and influencers. Spotify provides these people with the option of making their playlists public, which can then be accessed by any Spotify user. Some of the celebrities who have made their playlists public include Michelle Obama, Lana Del Rey, and Barack Obama. These playlists reflect the personalities of these celebrities, and they often include tracks that align with their personal interests.

Genre Playlists By Spotify

Spotify offers a wide range of genre playlists curated by their team of experts. These genre playlists include music from different parts of the world and are perfect to discover new and upcoming talent. Some of the most popular genres in Spotify include pop, hip-hop, rock, and jazz. Users can easily browse and access these playlists, making it easier for them to discover new artists and music.

Mood Playlists By Spotify

Mood playlists are playlists curated based on different moods and emotions. These playlists are perfect when you want to center your mind, relax, unwind or even help you study. Spotify’s team of experts handpick tracks that they believe will fit the playlist’s mood. Some of the most popular mood playlists include Calm Vibes, Chilled Covers, and Feelin’ Good. In conclusion, Spotify has an excellent range of editorial playlists that cater to various music tastes and preferences. The streaming provider offers an excellent opportunity for everyone to explore new and upcoming artists, discover different genres, and dive deep into different themes and moods.

Different Types Of Spotify Playlists

Credit: www.pinterest.com

Personal Playlists

Create a bespoke soundtrack to accompany any activity or mood on Spotify with personal playlists. From workout tunes to calming melodies, the platform offers various kinds of playlists to fit every occasion.

If you’re a music lover, you know how crucial playlists are. Spotify playlists are customized to cater to individual preferences and moods. In this blog post, we’ll explore different types of Spotify playlists, starting with personal playlists. Personal playlists consist of different types, including your library playlists, created playlists, and liked songs playlists.

Your Library Playlists

Your Library is a subsection on Spotify where you save your favorite songs, artists, and playlists. It’s the home of all your music. Your Library playlists consist of playlists saved on your Library. Whenever you save the same playlist multiple times, Spotify doesn’t create duplicate playlists. It merely adds it to your Library playlists, where you can access it anytime you want.

Created Playlists

Created Playlists are the most common types of personal playlists on Spotify. Users create personal playlists based on their preferences, moods, or events. When creating your playlist, you can choose your theme and add or remove songs you don’t like. You can create as many playlists as you wish, and they’ll be available on your Spotify account all the time.

Liked Songs Playlist

Liked Songs Playlist is another type of personal playlist on Spotify. Whenever you like a song or add it to your playlist, the Liked Songs Playlist is automatically created. This playlist contains all the songs you’ve ever liked from the time you created your Spotify account. In conclusion, personal playlists are designed to cater to individual preferences and moods. Your Library playlists, Created Playlists, and Liked Songs Playlist are the most common types of personal playlists on Spotify. You can create, edit, and save as many playlists as you like, depending on your music preferences.

Collaborative Playlists

Spotify offers a variety of playlist options that cater to different preferences, moods, and music genres. One of the most exciting features of Spotify is the ability to create, share, and collaborate on playlists with friends and family. Collaborative playlists are a great way to bond with loved ones over music, share your favorite tracks, and discover new music. Here are some different types of collaborative playlists you can create on Spotify.

Collaborative Playlists With Friends

Collaborating with your friends on a playlist is a fun way to share your music tastes and discover new music. Here’s how to create a collaborative playlist with your friends on Spotify.

  1. Choose a topic or theme for the playlist.
  2. Create a new playlist and give it a catchy name that reflects the theme.
  3. Click on the “…” button located next to the playlist’s name and select “Collaborative Playlist.”
  4. Share the playlist link with your friends, and invite them to add their favorite tracks.
  5. Each person can add, remove or reorder tracks on the playlist, making it a group effort to create the perfect playlist.

Collaborative Playlists By Spotify

Spotify also has its own collaborative playlists, created by either the company or its users. These playlists have become very popular since they cater to a wide range of music genres and moods. Here are some of the Spotify’s popular collaborative playlists.

Playlist NameDescription
Get Pysched!A playlist that features songs to pump you up and keep you motivated
Songs to Sing in the ShowerA feel-good playlist that you can sing along to while getting ready for your day
Mood BoosterA collection of uplifting and happy songs that are sure to brighten your day

Collaborative playlists on Spotify are an excellent way to share your musical taste with your friends and followers and discover new music. Whether you’re collaborating on a new playlist with friends or finding inspiration from Spotify’s playlists, it’s always good to vibe with your favorite music.

Different Types Of Spotify Playlists

Credit: www.stereofox.com

Algorithmic Playlists

Spotify offers several types of playlists, including algorithmic playlists. These playlists are curated using a user’s listening habits to provide personalized recommendations. Other types of playlists include editorial playlists curated by Spotify’s team and user-generated playlists created by listeners.

When it comes to music streaming, Spotify is one of the best platforms for discovering and listening to new music. Their algorithmic playlists use machine learning to generate personalized playlists for each of their users. The three main algorithmic playlists on Spotify are Discover Weekly, Daily Mix, and Release Radar.

Discover Weekly

Discover Weekly is a playlist that updates every Monday with 30 new songs that are chosen based on your listening habits and the listening habits of those with similar music tastes. Spotify’s algorithms analyze data like the songs you’ve listened to, the genres you seem to enjoy, and the artists you follow to select a new playlist each week. Discover Weekly is a great way to find new music tailored to your interests.

Daily Mix

Daily Mix is another personalized playlist that is created based on your listening habits. Unlike Discover Weekly, Daily Mix is updated every day and is comprised of songs that you’ve listened to recently as well as similar songs that you haven’t heard before. There are up to six Daily Mix playlists available, each representing a different music genre or mood.

Release Radar

Release Radar is a playlist that updates every Friday with new music from artists that you follow. Spotify’s algorithms scan new releases to find new music from artists you listen to frequently, and add it to your Release Radar playlist. This makes it easy to keep track of new music from your favorite artists and discover new releases from similar artists. In conclusion, algorithmic playlists are a great way to discover new music that is tailored to your interests and listening habits. They are constantly updated to stay fresh, and the personalized nature of these playlists means that you’re likely to find something that you like. Give these algorithmic playlists a try and see how they can help you discover new music.

Customized Playlists

Customized playlists on Spotify cater to a wide range of user preferences, from mood-based playlists to personalized ones curated by the user. Whether you want to discover new music or revisit old favorites, Spotify has a playlist for you.

As the name suggests, customized playlists are tailored explicitly to individual preferences and music tastes. This kind of playlist is the perfect way to curate a collection of songs tailored to a specific mood or occasion. Spotify has been applying a variety of methods to optimize personalized music recommendations through its playlist features. Let’s take a closer look at different forms of customized playlists on Spotify.

Automatic Personalized Playlists

One of the most powerful features of Spotify is that it generates automatic personalized playlists based on individual listening behavior. These playlists are also called “made for you” playlists because they are unique to each user. Spotify analyzes user data, such as location, time of day, and listening history, to create personalized playlists. These playlists are automatically updated and refreshed daily, containing new songs and artists tailored to the user.

Customized Playlists By Third-party Applications

In addition to Spotify’s own automatic playlist generation feature, there are third-party playlisting apps that allow users to create customized playlists with their preferred tracks. These apps integrate with Spotify, enabling users to create and listen to their playlists without leaving the Spotify app. They also have some advanced features, enabling users to generate playlists based on specific genres, artists, moods, or even lyrics.

Conclusion

Customized playlists are an excellent way to enhance one’s listening experience by curating and organizing the music based on individual preferences. From Spotify’s automatic personalized playlists to third-party music playlisting apps, there are numerous ways to create customized playlists and enjoy the music one loves effortlessly.

Frequently Asked Questions Of Different Types Of Spotify Playlists

What Are The 3 Types Of Playlists On Spotify?

The 3 types of playlists on Spotify are user-generated playlists, Spotify-curated playlists, and algorithm-generated playlists. User-generated playlists are created by users themselves, while Spotify-curated playlists are created by Spotify editors. Algorithm-generated playlists are automatically created by Spotify’s algorithms based on user listening history.

What Spotify Playlists Are There?

Spotify offers a vast collection of playlists for all genres, moods, and occasions. Some popular options include Today’s Top Hits, RapCaviar, and Feel Good. Users can also create their custom playlists based on their preferences.

What Kind Of Spotify Playlist Should I Make?

Make a Spotify playlist based on your personal interests, such as favorite genres or artists. Consider themes or moods for the playlist, and ensure it’s cohesive. Make it unique and specific to your tastes, while keeping in mind your audience’s preferences.

Why Are Spotify Playlists Different?

Spotify playlists are different because they are curated by different users or algorithms based on various factors like your listening history, location, time of day, and mood. The service offers personalized playlists, as well as playlists created by friends, artists, and music experts.

Conclusion

To sum up, Spotify playlists offer a variety of options for music lovers to explore and enjoy. There are playlists for every mood and occasion, including workout playlists, study playlists, and even ones specifically curated for road trips. Users can also create their own personalized playlists or follow popular playlists curated by Spotify.

With so many options available, everyone can find their perfect music match on Spotify. Keep exploring and enjoying music with Spotify playlists.

Categories
Archive

Best Mixing Plugins Fl Studio

The best mixing plugins for FL Studio are Waves SSL, FabFilter Pro-Q3, and Izotope Ozone. These plugins offer high-quality sound, versatility, and user-friendly interfaces.

FL Studio is one of the leading digital audio workstations (DAW) that offers a vast range of features for music producers and audio engineers. To enhance the mixing process, an array of mixing plugins is crucial. The right plugins streamline workflow, offer greater precision, and enable producers to manipulate audio more creatively.

Waves SSL, FabFilter Pro-Q3, and Izotope Ozone are commonly used in the music industry and have received critical acclaim. Apart from their pristine sound quality, they offer an extensive set of features like EQ, compression, limiters, and more. We will dive deep into the best mixing plugins for FL Studio.

1. Izotope Ozone 9

When it comes to mixing plugins for FL Studio, izotope Ozone 9 is the gold standard. This powerful plugin has everything you need to polish your tracks and make them sound professional.

Overview

izotope Ozone 9 is an all-in-one mastering plugin that allows you to fine-tune every aspect of your mix. It features an intuitive interface that makes it easy to use, even for beginners. With izotope Ozone 9, you can use various modules to adjust the EQ, dynamics, stereo imaging, and more.

Features

izotope Ozone 9 is packed with features that allow you to achieve the perfect mix. Some of its key features include:

  • Master Assistant that helps you make quick adjustments based on your mix
  • Tonal Balance Control for adjusting the tonal balance of your mix
  • Match EQ that allows you to match the sound of your mix with a reference track
  • EQ Match that matches the tone of your mix to another track
  • Vintage modules that add a warm, analog sound to your mix

Pros

Here are some of the pros of using izotope Ozone 9:

  • Comprehensive all-in-one mastering plugin
  • Intuitive interface makes it easy to use
  • Powerful modules for fine-tuning your mix
  • Master Assistant makes it easy to get a quick, professional sound

Cons

Despite its many benefits, there are a few cons to using izotope Ozone 9:

  • Expensive compared to other plugins
  • Requires a powerful computer to run
  • May take some time to learn how to use it effectively

If you’re willing to invest in a high-quality mixing plugin, izotope Ozone 9 is definitely worth considering. Its powerful features and intuitive interface make it a top choice for many professional producers and engineers in the music industry.

Best Mixing Plugins Fl Studio

Credit: modeaudio.com

2. Fabfilter Pro-q 3

FabFilter Pro-Q 3 is one of the best mixing plugins for Fl Studio. It offers excellent sound quality, flexible routing options, and a unique Natural Phase mode, making it an essential tool for any audio engineer.

Overview

FabFilter Pro-Q 3 is a premium equalizer plugin that offers a wide range of features to enhance the mixing experience in FL Studio. With its user-friendly interface and powerful tools, it has become a favorite among producers of all levels.

Features

The feature set of FabFilter Pro-Q 3 is unmatched. Here are some notable features:

  • Resizable interface
  • Context-dependent help
  • High-quality spectrum analyzer
  • Up to 24 EQ bands
  • MID-SIDE processing
  • Linear phase mode
  • EQ match feature
  • Full-screen mode

Pros

There are plenty of benefits of using FabFilter Pro-Q 3, such as:

  • Intuitive interface for easy use
  • Precise parameter control for detailed mixing
  • High-quality sound output
  • Wide range of features to cater to different mixing needs
  • Context-dependent help for quick assistance

Cons

While there are many advantages to using FabFilter Pro-Q 3, there are a few downsides to keep in mind, such as:

  • Slightly expensive
  • May require a learning curve for beginners
  • Requires high processing power

Overall, FabFilter Pro-Q 3 is an excellent equalizer plugin for FL Studio that can help take your mixing to the next level. Its powerful feature set and user-friendly interface make it a popular choice among producers.

3. Waves Ssl G-master Buss Compressor

The Waves SSL G-Master Buss Compressor is a top-rated mixing plugin that stands out in Fl Studio. With its advanced features, outstanding performance, and exceptional sound quality, it is a highly recommended tool for enhancing your audio mixing experience.

Overview

Waves SSL G-Master Buss Compressor is a mixing plugin that was developed in collaboration with Solid State Logic. It is specifically designed for the SSL G Series console and incorporates the classic SSL sound into your mix. This plugin is one of the most popular and widely used in FL Studio mix sessions.

Features

The Waves SSL G-Master Buss Compressor has several distinctive features that make it stand out from other mixing plugins. Here are some of the top features:

  • It includes a wide range of threshold, ratio, attack, and release settings, which allow you to tweak your mix to perfection.
  • The compression effect is incredibly smooth, transparent, and natural, making it perfect for mastering purposes.
  • The plugin offers both mono and stereo models, so you can adjust your mix accordingly.
  • It is also equipped with a handy sidechain filtering feature, allowing you to choose which frequencies get compressed.
  • The G-Master Buss Compressor also includes an auto-release feature, which adapts quickly to changing input levels and dynamics.

Pros

There are several reasons why the Waves SSL G-Master Buss Compressor is considered one of the best mixing plugins in FL Studio. Here are some of its biggest advantages:

  • It delivers a classic SSL sound that is hard to replicate with other mixing plugins.
  • The plugin is incredibly versatile and can be used for a wide range of applications, from mixing individual tracks to mastering an entire song.
  • The compression effect is incredibly smooth, transparent, and natural, making it perfect for mastering purposes.
  • The wide range of threshold, ratio, attack, and release settings allow you to fine-tune your mix with precision and accuracy.

Cons

While the Waves SSL G-Master Buss Compressor has many benefits, it also has a few drawbacks that are worth noting. Here are some of the biggest disadvantages:

  • The G-Master Buss Compressor is quite expensive, so it may not be the best option for those on a tight budget.
  • It can be a bit overwhelming for beginners to use, as it offers a wide range of advanced features that require a certain level of expertise to utilize fully.
  • The plugin can be quite CPU-intensive, which means it may not be suitable for older computers or laptops with less processing power.

Overall, the Waves SSL G-Master Buss Compressor is an excellent mixing plugin that is well-suited for both amateur and professional use. Its ability to deliver a classic SSL sound combined with its advanced features and ease of use make it a reliable and popular choice for FL Studio mix sessions.

4. Soundtoys Decapitator

The Soundtoys Decapitator is one of the best mixing plugins available for FL Studio. With its analog saturation and distortion effects, it can add warmth and character to any track, making it sound more natural and polished.

Overview

Soundtoys Decapitator is a high-quality distortion plugin that can add depth, warmth, and grit to your mix. The plugin is designed to emulate analog saturation and distortion, making your tracks sound like they were recorded on vintage equipment. Whether you’re working on a rock song or a pop track, Soundtoys Decapitator can help you achieve the perfect sound.

Features

Soundtoys Decapitator is packed with features that make it one of the best mixing plugins for FL Studio. Some of its key features include:

  • Drive, Tone, and Mix controls that allow you to fine-tune your sound
  • Five different saturation modes to choose from, including sixties and tape
  • The ability to add subtle warmth or intense distortion to your tracks
  • Compatibility with both Windows and Mac operating systems

Pros

Soundtoys Decapitator has many advantages that make it one of the best options for FL Studio users. Here are some of the benefits of using this plugin:

  • High-quality analog emulation that adds warmth and depth to your tracks
  • Intuitive interface that makes it easy to use
  • Compatible with a wide range of DAWs, including FL Studio, Ableton Live, and Pro Tools
  • Provides five different saturation modes for a wide range of tonal options

Cons

While Soundtoys Decapitator is an excellent plugin, it does have a few potential downsides to consider:

  • It can be a little expensive compared to other plugins
  • It may not be ideal for those looking for more subtle effects
  • It may not be suitable for very specific genres that require a very clean sound

In summary, Soundtoys Decapitator is an excellent plugin that can add a unique character to your tracks. Its high-quality analog emulation and intuitive interface make it a great choice for FL Studio users and producers in general. While it may not be suitable for every project or style, it’s definitely worth considering as a versatile mixing tool.

5. Izotope Neutron 3 Advanced

IZotope Neutron 3 Advanced is one of the best mixing plugins for Fl Studio. It offers a wide range of features, including a powerful EQ, compressors, and an interactive visual mixer. With its advanced technology, it helps in achieving professional-level mixing outcomes.

Just getting started with mixing? Look no further! iZotope Neutron 3 Advanced is an all-in-one mixing suite that offers advanced control over every element of your mix. This plugin is ideal for both beginners and professionals alike and has quickly become one of the most popular mixing plugins in FL Studio.

Overview

The iZotope Neutron 3 Advanced is a mixing plugin that comes equipped with an assortment of tools to help you perfect your mix. Hailed as one of the best mixing plugins for FL Studio, this all-in-one plugin offers an impressive range of features including track assistant, visual mixer, and an improved interface.

Features

  • Track assistant to help set levels, EQ, and compression
  • Visual Mixer for a more intuitive mixing experience
  • Improved interface for easy navigation
  • Improved masking meter to identify overlapping frequency ranges
  • Modular processing chains to customize your sound

Pros

  • All-in-one mixing solution
  • Easy to use interface
  • Powered by machine learning to assist with mixing
  • Customizable modular processing chains
  • A wide range of tools for every mixing scenario

Cons

  • May come with a steep learning curve for beginners
  • May be a bit pricey
  • Resource-intensive and may require higher memory and processor requirements

The iZotope Neutron 3 Advanced is an excellent all-in-one mixing plugin for FL Studio. Its innovative features make the mixing process less tedious and more enjoyable. This plugin offers advanced control over every element of your mix, from EQ to compression, as well as an intuitive interface and highly customizable processing chains. While it may come with a steep learning curve and a higher price point, its advanced features make it an excellent and powerful tool for both beginners and professionals.

Best Mixing Plugins Fl Studio

Credit: m.youtube.com

6. Waves H-delay Hybrid Delay

The Waves H-Delay Hybrid Delay is a top choice for mixing plugins in FL Studio. With its unique vintage sound and wide range of customization options, this plugin is perfect for adding depth and character to your tracks.

Overview

For any music producer, having access to quality mixing plugins is essential to create professional-sounding music. As one of the best plugins on the market, 6. Waves H-Delay Hybrid Delay is a unique and versatile plugin that’s worth considering. This plugin offers numerous features that make it a popular choice among music producers.

Features

One of the most notable features of 6. Waves H-Delay Hybrid Delay is that it combines both analog and digital delay signals, allowing you to create rich and complex echoes that can enhance your tracks significantly. This plugin offers various delay types, including ping-pong delays and slap-back echoes, enabling you to experiment with different effects. It also has a tempo-based feature that enables you to adjust delays based on the tempo of your track. Other exciting features included in this plugin are filtering, LFO modulation, and feedback damping.

Pros

One of the most significant advantages of 6. Waves H-Delay Hybrid Delay is that it can be used on various instruments, including vocals, drums, guitars, and synths. The plugin’s interface is user-friendly, making it easy for both beginners and experienced producers to navigate. The hybrid delay feature of this plugin makes it unique as it combines both analog and digital delay signals, enabling you to create complex echoes that can elevate your mixes.

Cons

The only setback of 6. Waves H-Delay Hybrid Delay is that it’s a bit expensive compared to other mixing plugins available in the market. However, the cost is worth it considering the plugin’s comprehensive features and the significant difference it can make in your tracks. If you’re serious about producing professional-quality music, investing in quality mixing plugins such as 6. Waves H-Delay Hybrid Delay is a must. This plugin offers a unique and comprehensive set of features that can elevate your tracks to the next level!

Best Mixing Plugins Fl Studio

Credit: www.blackghostaudio.com

Frequently Asked Questions For Best Mixing Plugins Fl Studio

What Are The Best Plugins For Mixing?

The best plugins for mixing are dependent on your personal preferences and the type of mixing you’re doing. However, some popular choices include FabFilter Pro-Q3 for EQ, Waves SSL E-Channel for channel strip, and iZotope Ozone for mastering. Other notable options include Soundtoys 5, Slate Digital Virtual Mix Rack, and UAD plugins.

What Is The Most Popular Fl Studio Plugin?

The most popular FL Studio plugin is the Fruity Reverb 2. It is a versatile and high-quality reverb plugin that has become a staple in the music production industry. Its intuitive interface and wide range of adjustable parameters make it a favorite among FL Studio users.

Can Fl Studio Be Used For Mixing?

Yes, FL Studio can be used for mixing. It includes a powerful mixer with various effects and plugins to enhance the sound quality. FL Studio is known for its extensive mixing capabilities and is widely used in the music production industry.

What Plugins To Use For Mixing Vocals?

For mixing vocals, some of the most popular and effective plugins used by professionals are Antares Auto-Tune, Waves Tune Real-Time, SSL E-Channel Strip, FabFilter Pro-Q 3, and iZotope Nectar 3.

Conclusion

To sum up, choosing the best mixing plugins for FL Studio requires a bit of research and testing. However, with the vast array of options available, we have highlighted the top plugins for you to consider. Whether you are a beginner or an experienced producer, these plugins will undoubtedly enhance your mixing process and take your music production to the next level.

Don’t hesitate to try out these plugins and let your creativity flow. Happy mixing!

Categories
Archive

How To Make Melodies The Easy Way

To make melodies the easy way, start with a simple chord progression and build your melody based on the notes in those chords. With practice, adding embellishments and variations will come naturally.

Melodies are an integral part of music creation, setting the tone and atmosphere of a song. However, for many aspiring musicians and producers, the idea of creating a melody can be daunting, leading to creative blocks and frustration. The good news is that there are easy and efficient ways to create melodies, even for those new to music production.

With a few simple steps and techniques, anyone can create a catchy and memorable melody that will leave a lasting impression on listeners.

Find Inspiration

Discover simple techniques to create catchy melodies effortlessly with our “Find Inspiration” guide. Learn how to tap into your creativity and develop memorable tunes with ease, even if you have little to no musical knowledge or experience.

If you want to make beautiful melodies, first you need inspiration. Inspiration can come from anywhere- a bird’s chirp, a traffic sound, or even the sound of rain. Here are some ways to find inspiration for your melodies.

Listen To Music Regularly

One of the easiest ways to find inspiration for your melodies is to listen to music regularly. Listen to different genres of music, including those you might not typically listen to. Every genre will provide you with a different perspective and inspiration. When listening, pay attention to the melody, rhythm, harmony, and instrumentation. You can also try to identify what you like about the melody and how it helps you feel.

Experiment With Different Genres

If you want to create a unique melody, experiment with different genres of music. Crossing genres and combining them in your melody can create unique sounds that have never been heard of before. Try combining classical music with electronic music or mixing hip hop beats with jazz harmonies. While experimenting, make sure you are still keeping the melody in mind and not just adding random notes.

Use Nature As Inspiration

Nature is an incredible source of inspiration. Sit outside and listen to the sounds of nature- the bird’s chirp, the sound of leaves rustling in the wind, the raindrops hitting a metal roof. You can use these sounds to create a melody. The natural world is full of inspiration, from the melody of a bird’s song to the melodic rhythms of a babbling brook. Don’t be afraid to experiment with sounds that the nature can provide you.

Collaborate With Other Musicians

Collaborating with other musicians can be an excellent source of inspiration. You can learn from other musicians’ perspective on melodies and how they create their own. When collaborating, listen to each other’s melodies, and come up with new melodies together. A great melody can come from working with another musician. In conclusion, finding inspiration can help you create beautiful melodies easily. Listen to different genres of music, experiment with different sounds and collaborate with musicians to create a unique melody. Don’t hesitate in drawing inspiration from nature sounds, as it can also work wonders in your melody.

Choose A Key

When it comes to creating melodies, choosing a key is an essential step that sets the foundation for the entire composition. Choosing the right key will help you create a melody that is pleasant to the ear and harmonious to listen to. Understanding what a key is and selecting the key that suits your track are important aspects of making melodies the easy way.

Understand What A Key Is

A key is a set of pitches that form the basis of a melody. Every song has a key signature that indicates which pitches are included in the melody and which ones are not. The key signature consists of sharps (#) or flats (b) that are placed at the beginning of the music staff, right after the clef.

For example, if the key signature has one sharp, it means that the melody will include the pitches of F#, C#, G#, D#, and A#. If the key signature has two flats, it means that the melody will include the pitches of Bb, Eb, Ab, Db, and Gb.

Select A Key That Suits Your Track

Once you understand what a key is and how it works, it’s time to select a key that suits your track. The key you choose will depend on the style of music you’re creating, the instruments you’re using, and the overall mood you want to convey.

If you’re creating a track in a major key, you can choose from keys such as C Major, G Major, D Major, A Major, or E Major. These keys are well-suited for creating happy and upbeat melodies.

If you’re creating a track in a minor key, you can choose from keys such as A Minor, E Minor, B Minor, F# Minor, or C# Minor. These keys are well-suited for creating sad or melancholic melodies.

Major KeysMinor Keys
C MajorA Minor
G MajorE Minor
D MajorB Minor
A MajorF# Minor
E MajorC# Minor

When choosing a key, you should keep in mind that certain keys work better with certain instruments. For example, a song in the key of E Major may sound better on a guitar, while a song in the key of F# Minor may sound better on a piano. It’s a good idea to experiment with different keys and see which one works best for your track.

In conclusion, choosing a key is an essential step in creating melodies. By understanding what a key is and selecting the key that suits your track, you can create a melody that is both harmonious and pleasant to the ear.

Create A Chord Progression

Want to learn how to make melodies the easy way? Creating a chord progression is the perfect place to start. With a few simple adjustments, you’ll be able to develop catchy and memorable melodies that will make your music stand out.

Creating a chord progression is an essential part of making melodies. It can seem intimidating at first, but with some basic music theory knowledge and experimentation, you can hone your skills in no time.

Use Chords That Are In The Key

When creating a chord progression, it’s important to select chords that are in the same key as your melody to ensure they harmonize well. To determine which chords are in the key, you can use a chord chart or music theory resources online.

Experiment With Chord Inversions

Chord inversions can add depth and complexity to your chord progressions. Instead of playing the root note as the lowest note in the chord, you can move it to different positions, such as the third or fifth. This can create different textures and moods in your melody. Here are some tips to help you experiment with chord inversions:

  • Try first inversion chords (root note moved to the third) to create a brighter sound.
  • Second inversion chords (root note moved to the fifth) can create tension and a darker tone.
  • Experiment with different inversions to see which ones work best for your melody.

Creating a chord progression may take time and practice, but it’s worth the effort to make your melodies stand out. So, be patient, experiment and have fun with it!

Add Rhythm And Percussion

Adding rhythm and percussion to your melodies is an easy way to take them to the next level. Not only will it enhance the groove, but it will also give your melodies a new depth that keeps them interesting to listen to. In this section, we will go over some simple tips to help you add rhythm and percussion to your melodies.

Choose A Simple Beat

The first step is to choose a simple beat that will serve as the foundation of your melody. Keep in mind that the beat you choose will determine the overall feel of your melody. For example, if you want your melody to have a laid-back, relaxed feel, you might choose a slower, more mellow beat. On the other hand, if you want your melody to have an upbeat, energetic feel, you might choose a faster, more lively beat.

Add Percussion To Enhance The Groove

Once you have your beat selected, the next step is to start adding percussion to enhance the groove. Percussion instruments can include anything from drums to shakers to tambourines, and they can be used to add texture and complexity to your melody.

  • Start by adding a simple percussive element, such as a hi-hat or a snare. These instruments are typically used to keep the beat, and they can help to give your melody a structured feel.
  • Next, experiment with adding more complex percussion elements, such as congas, bongos, or tambourines. These instruments can help to add a sense of movement and dynamics to your melody.
  • Be mindful of the volume and emphasis of your percussion. You want to make sure that it complements, rather than overpowers, the melody.

Overall, adding rhythm and percussion to your melodies can be a simple yet effective way to make them more engaging and interesting to listen to. By following these tips, you can easily create a catchy and dynamic melody that will keep your listeners coming back for more.

The Melody-making Process

Creating melodies doesn’t have to be complicated. Follow these easy steps to make melodies effortlessly. Start by selecting a key, coming up with a chord progression, and then filling in the gaps with simple and catchy melodies.

Creating a melody can seem like a daunting task, especially if you’re new to music production. However, with some knowledge and practice, anyone can make an attention-grabbing melody. The process of making melodies can be a fun and rewarding journey. In this blog post, we’ll discuss some tips to help you make melodies the easy way.

Start With Simple Melodies

When it comes to melody-making, simplicity can be the key to success. Starting with a simple melody can help you focus on the basics, such as rhythm and structure. For example, you can start creating a basic melody by playing a few notes on a piano or any other instrument. Then, try to hum a few notes to match the melody. Once you have a simple melody, you can add more layers and complexity.

Layer Multiple Melodies Together

Layering multiple melodies can add depth and complexity to your music. By layering melodies, you can also create a unique sound. To layer melodies, start by creating a basic melody as a foundation, and then add additional melodies on top. Ensure that each melody works together and does not clash. You can also experiment by adding different instruments and sounds.

Organize your layers:

  • Start with a basic melody
  • Add another melody that complements the first melody
  • Experiment with adding different instruments and sounds
  • Ensure each melody works well together

Making melodies can be a fun and creative process. With these tips, you can start making attention-grabbing melodies that will enhance your music production skills. Remember to start with simple melodies and then layer multiple melodies together to create interesting and unique sounds.

How To Make Melodies The Easy Way

Credit: m.youtube.com

Use Music Theory Techniques

Incorporating music theory techniques is an easy way to make melodies. By understanding the fundamentals of music and applying them, you can create unique and memorable melodies that resonate with listeners. Whether you are a beginner or a seasoned musician, utilizing music theory can help you in the songwriting process.

Understanding music theory can be daunting for beginners, but it is an essential aspect of creating melodies. With some knowledge of music theory, you can compose melodies easily and with confidence. In this post, we’ll cover how to use music theory to make melodies the easy way.

Add Passing Notes

One technique that can be used to create interesting melodies is the addition of passing notes. These are notes that connect two other notes, often belonging to different chords. By adding a passing note, you can create a smooth transition between chords and make your melody flow better. For example, let’s say you’re composing a melody in the key of C major and your chords are C, F, and G. To add a passing note, you could play an A note in between the G and F notes. This A note does not belong to the chord of F, but it creates a musical connection between the G and F chords.

Utilize Chord Tones

Another useful technique is to use the chord tones of the chords you’re playing. Chord tones are the notes that make up a particular chord and using them in your melody will ensure that it sounds harmonious. For example, let’s say you’re composing a melody using the chords of C major and G major. The notes that make up these chords are C, E, G, and G, B, D respectively. By using these notes in your melody, you can create a strong and stable foundation for your composition. In summary, learning some music theory techniques can help you create melodies that are both pleasing to the ear and easy to create. Adding passing notes and utilizing chord tones will give your melodies a unique and professional sound. With practice, you’ll be able to use these techniques with ease while making your melodies stand out.

Experiment And Improvise

Experimentation and improvisation are key to making melodies the easy way. Don’t be afraid to try new things and let your creativity flow. By exploring different sounds and techniques, you can discover your own unique style and create memorable melodies.

Making melodies requires patience, practice, and an innate ability to create something beautiful. While some gifted musicians can create melodies effortlessly, many others struggle to come up with catchy tunes. This is where experimentation and improvisation come into play. By trying out different scales, modes, and taking creative breaks, you can come up with melodies that are unique and captivating. In this post, we’ll discuss the various ways you can experiment and improvise to make melodies the easy way.

Try Different Scales And Modes

One way to experiment with melodies is to try out different scales and modes. Scales are essentially sequences of notes played in a specific order. While most people are familiar with the major and minor scales, there are many others that you can try out. Modes are similar to scales but have a different starting note and sequence of intervals. By experimenting with different scales and modes, you can create melodies that have a unique sound. Some scales and modes you can try out include:

ScalesModes
Blues scaleDorian mode
Pentatonic scalePhrygian mode
Harmonic minor scaleLydian mode

Take Breaks And Come Back To The Track Later

Making melodies can be taxing on the brain, and sometimes creativity needs a break. If you’re feeling stuck or frustrated, take a break, and come back to your track later. This break will allow you to clear your mind and gain a fresh perspective, which might help you come up with new ideas. You can use this time to listen to other music, play a game, or take a walk. When you come back to your track, you’ll have a renewed energy and focus, which might help you make the breakthrough you need. In conclusion, experimenting and improvising are essential ingredients for making melodies the easy way. By trying out different scales and modes and taking creative breaks, you can come up with catchy and unique tunes that will captivate your audience. So, don’t be afraid to break the rules, and let your creativity flow!

How To Make Melodies The Easy Way

Credit: www.productionmusiclive.com

Polishing The Melody

Learn how to make melodies effortlessly with the simple technique of “Polishing the Melody. ” By focusing on the foundation of your melody and refining it through repetition and experimentation, you can create captivating and memorable music with ease.

After creating a melody, it’s time to polish it to make it sound even better. Polishing the melody involves simplifying it if necessary and adding dynamics and expression to it. Here’s how to do it:

Simplify The Melody If Necessary

Sometimes a melody may be too complicated, making it challenging to remember and sing along to. Simplifying the melody can make it more memorable and pleasant to listen to. To simplify the melody, focus on the essential notes and remove any unnecessary ones. For instance, if the melody has a lot of notes, identify the most important ones and get rid of the others. You can also simplify the melody by changing the rhythm, making it slower and easier to follow. Remember, a simple melody is more comfortable to remember and sing along to, making it more effective.

Add Dynamics And Expression

Dynamics and expression can bring a melody to life, making it more exciting and entertaining. Dynamics involve adding variation in sound, creating contrast between soft and loud notes. Expression, on the other hand, involves conveying emotions and feelings through the melody. To add dynamics to the melody, focus on the volume of each note, making some louder and others softer. You can also add accents to some notes, emphasizing them. To add expression, focus on the rhythm, phrasing, and articulation of each note. Pay attention to the feeling you want to convey and adjust the melody to match it. In conclusion, polishing a melody involves simplifying it if necessary and adding dynamics and expression. A well-polished melody is more comfortable to remember, sing along to and more exciting to listen to. Use these tips, and you’ll be on your way to creating great melodies the easy way.

How To Make Melodies The Easy Way

Credit: www.productionmusiclive.com

Frequently Asked Questions On How To Make Melodies The Easy Way

How Do You Make Melodies Easier?

To make melodies easier, start by focusing on simple chord progressions. Keep your melodies simple and memorable, and try using common scales and intervals. Practice regularly to build your skills and experiment with different approaches to see what works best for you.

How Do You Make A Melody For Beginners?

To make a melody as a beginner, start by playing basic notes and experimenting with different combinations. Try to come up with a simple, catchy melody that can be built upon. Use repetition and variations to establish a foundation for your melody.

Don’t be afraid to play around with different rhythms and tempos. Practice consistently and gradually build your skills.

How Do You Make A Simple Catchy Melody?

To create a simple, catchy melody, start by identifying the key and keeping your melody within that scale. Start with a simple rhythm and natural flow, using repetition and variation to make it memorable. Keep the melody within a comfortable vocal range and try to incorporate hooks or memorable phrases.

Practice, refinement, and feedback are also essential to perfect your catchy melody.

What Makes A Melody Easy To Sing?

A melody that’s easy to sing has a clear and simple structure with repeating patterns that are easy to remember. It should also have a comfortable melody range that doesn’t require excessive effort to sing. Catchy rhythms and lyrical phrasing can also make a melody easier to sing and more memorable.

Conclusion

If you are struggling to create melodies for your music, don’t worry – the easy way has arrived! By following the methods mentioned in this blog post, you can create catchy and memorable melodies in no time. Remember to start with a simple melody and build upon it, use your intuition to guide the creative process, and always keep your audience in mind.

With these tips and tricks, you can take your music to the next level and create melodies that will have your listeners humming along. Happy composing!

Categories
Archive

How to Open Fl Studio Mixer

To open FL Studio Mixer, click on the Mixer icon or press F9. FL Studio Mixer is a powerful mixing tool that can blend several audio sources into a single track.

It is a multi-functional mixing console that allows you to route different channels, activate audio effects plugins, and make adjustments to the volume, panning, and equalization of your audio sources. Whether you are mapping out your next big hit or fine-tuning your latest project, the FL Studio Mixer offers a fast and efficient way to get the sound you want.

We will show you how to open FL Studio Mixer and explore its features in more detail. So, let’s get started with the basics!

How to Open Fl Studio Mixer

Credit: www.youtube.com

Methods To Open Mixer In Fl Studio

To open the mixer in FL Studio, click the “mixer” button on the top toolbar or press “F9” on your keyboard. You can also right-click any mixer track and select “Insert” to add a new channel.

In FL Studio, mixer is considered to be one of the most important tools for music production. It allows you to adjust volume levels, panning, and apply effects to your sounds. In this post, we will discuss different methods to open mixer in FL Studio.

Method 1: Keyboard Shortcut

Using keyboard shortcut is the quickest and easiest method to open mixer in FL Studio. Simply press ‘F9’ on your keyboard and it will instantly open the mixer. You can toggle between the mixer and the main window by pressing ‘F9’ again.

Method 2: Menu Bar

The second method to open mixer in FL Studio is by using the menu bar. Go to ‘View’ from the menu bar and select ‘Mixer’ from the dropdown menu. This will open the mixer in a new window.

Method 3: Toolbar Option

The third method is by using the toolbar option. On the toolbar, you can find the ‘Mixer’ button. Simply click the button and it will open the mixer in a new window. Overall, these three methods to open mixer in FL Studio are very convenient and easy to use. Choose the method that suits your workflow the best and get started producing high-quality music.

Detailed Steps For Each Method

To open the Fl Studio Mixer, first click on the Mixer button, or press F9 on your keyboard. Alternatively, you can use the Mixer option from the View menu or press Alt + 4. Once you have opened the mixer, you can adjust the levels, EQ, and effects for each track in your project.

Are you having trouble opening Fl Studio Mixer? Do you wish to learn how to do it yourself? In this section of the blog post, we will be providing you with a detailed guide to open Fl Studio Mixer with various methods. So, let’s get straight into it.

Step-by-step Guide For Method 1

Method 1 involves opening Fl Studio Mixer from the Menu Bar. Here is a quick step by step guide for you:

  1. Launch Fl Studio on your computer.
  2. Locate the Menu Bar on the top left corner of the interface.
  3. Select the `View` option from the Menu Bar.
  4. From the dropdown menu, select `Mixer`. Alternatively, you can also use the keyboard shortcut `F9` to open the Mixer.
  5. Voila! You have successfully opened Fl Studio Mixer in method 1.

Step-by-step Guide For Method 2

Method 2 involves opening Fl Studio Mixer from a Channel Rack. Here is a quick step by step guide for you:

  1. Launch Fl Studio on your computer.
  2. Locate the Channel Rack on the left-hand side of the interface.
  3. Click on the icon with three horizontal lines on the Channel Rack title bar.
  4. Select `Mixer` from the dropdown menu.
  5. Tada! You have successfully opened Fl Studio Mixer in method 2.

Step-by-step Guide For Method 3

Method 3 involves opening Fl Studio Mixer from the Toolbar. Here is a quick step by step guide for you:

  1. Launch Fl Studio on your computer.
  2. Locate the Toolbar on the top of the interface.
  3. Click on the `Mixer` icon in the Toolbar.
  4. Alternatively, you can use the keyboard shortcut `F9` to open the Mixer.
  5. Amazing! You have successfully opened Fl Studio Mixer in method 3.

In conclusion, opening Fl Studio Mixer with any of these methods is super easy and convenient. Mastering these simple steps will make your production experience more efficient. We hope this section of the blog post has helped you to open Fl Studio Mixer effortlessly, and should you encounter any trouble, feel free to refer back to this post.

Additional Tips And Tricks For Mixer In Fl Studio

Learn how to open FL Studio mixer with these additional tips and tricks. From keyboard shortcuts to customizing your mixer channels, mastering the mixer in FL Studio will help you take your music production to the next level.

Additional Tips and Tricks for Mixer in FL Studio Congratulations! You have learned how to open FL Studio Mixer. Now that you have access to this versatile mixing tool, it’s time to explore other tips and tricks to enhance your production process. Configuring Mixer Options One way to optimize your Mixer workflow is by customizing its options. Here, you can tweak the layout, functionality, and other parameters to suit your preferences. To access the Mixer options, go to the Menu Bar and click Options > General Settings. Under the Audio tab, you can adjust settings like the Buffer Length, Sample Rate, and Driver type. You can also enable or disable features like PDC (Plugin Delay Compensation), Auto Close PDC windows, and more. To further customize your Mixer, you can use the Layout tab. Here, you can rearrange the channels, insert gaps between them, add separator lines, and customize the track width, height, and colors. Customizing Mixer Colors Speaking of colors, did you know that you can also change the Mixer’s color scheme? This can help you organize your tracks according to color-coding systems or simply make the Mixer look more visually appealing. To customize the colors of your Mixer, go to Options > General Settings, and click the Skin tab. Here, you can select from a list of built-in color schemes or create your own by clicking the Edit button. From here, you can choose the colors for different Mixer elements, including the background, text, shadows, and more. In addition to these options, you can also explore other features of the Mixer, such as grouping, routing, and effects. With these additional tips and tricks, you can unlock the full potential of your FL Studio Mixer and take your music production skills to the next level.

How to Open Fl Studio Mixer

Credit: www.image-line.com

How to Open Fl Studio Mixer

Credit: www.image-line.com

Frequently Asked Questions On How To Open Fl Studio Mixer

What Is The Shortcut For Mixer Track In Fl Studio?

To create a quick shortcut for a mixer track in FL Studio, you can simply select the mixer track and press Ctrl+L on your keyboard. This shortcut will remember the selection and allow you to easily access the track in the future.

How Do I Dock My Mixer In Fl Studio?

To dock your mixer in FL Studio, simply left-click and drag the mixer to the top or bottom of the screen until it snaps into place. You can also dock it to the left or right side by dragging it to the desired edge.

How Do I Move My Mixer To The Left In Fl Studio?

To move your mixer to the left in FL Studio, you simply need to click on the mixer track and drag it to the left side of the mixer. You can also use the scroll bar at the bottom of the mixer window to move it horizontally.

How Do I Use Fl Studio Mixer Presets?

To use FL Studio mixer presets, first open the Mixer window and ensure the track you want to apply the preset to is selected. Right-click the mixer track you wish to add a preset and select ‘Browse presets’. Choose the relevant category and select the desired preset.

You can then adjust the settings and parameters to your liking.

Conclusion

Opening Fruity Loops (FL) Studio Mixer might seem daunting, but it’s actually a simple process. Follow the step-by-step guidelines carefully and enjoy complete control over your music production. With Mixer, you can adjust the audio levels, add effects, and create the perfect mix that suits your preferences.

So, don’t hesitate to explore this powerful tool that’ll take your music production to the next level!

Categories
Archive

Arrangement Structure in a Song

The arrangement structure in a song refers to the organization of different sections within the piece, typically following a verse-chorus-bridge pattern. It impacts the overall flow and coherence of the music, and can greatly influence the listener experience.

As a songwriter, understanding the basics of arrangement structure can help you create more powerful and engaging tracks that are well-balanced and emotionally impactful. By manipulating the length, order and content of each section, you can create a sense of tension and release that guides listeners through the song.

We’ll explore the key elements of arrangement structure and offer some tips and tricks to help you craft your own dynamic and memorable songs.

Arrangement Structure in a Song

Credit: blog.native-instruments.com

Common Parts Of An Arrangement Structure

An arrangement structure in a song is composed of common parts, each playing a significant role. The intro sets the mood, while verses tell the story and the chorus delivers the message. The bridge ties it all together, making the structure complete.

As a songwriter, it’s crucial to understand the fundamentals of arrangement structure, which involves organizing different parts of a song into a cohesive whole. Generally, a song arrangement structure consists of an intro, verse, chorus, bridge, pre-chorus, and outro. Each of these parts plays a unique role in delivering the song’s message effectively, making it essential to know how to use them correctly.

Intro

The introduction is an essential aspect of a song since it serves as the foundation on which the rest of the song is built. It’s the first thing listeners hear, and it should grab their attention while setting the mood for the rest of the song. An ideal intro should be short, catchy, and captivating enough to motivate listeners to keep listening.

Verse

After the intro, the song moves to the verse, which tells the story of the song. Most songs have several verses, each with a distinct melody and lyrics. The verses usually progress the story, building up to the chorus, and generating anticipation in the listener’s mind. An excellent verse should be captivating, easy to sing along with, and express the song’s message effectively.

Chorus

The chorus is perhaps the most critical part of the song structure since it’s the most memorable part of the song. It is the central point to which everything else leads, and it should be catchy enough to stick in the listener’s mind. It’s usually where the main message of the song is repeated, allowing listeners to sing along and remember the song effortlessly.

Bridge

The bridge is a part of the song that provides contrast to the other parts of the song. It’s an opportunity for the songwriter to take a break from the usual song structure and try out something different. A bridge often introduces a new melody, lyric, or chord progression, providing a change of pace that captures the listener’s attention. It’s crucial to use the bridge effectively to prevent song monotony.

Pre-chorus

The pre-chorus, also known as the lift, is a transitional section between the verse and the chorus. It usually comes after the second verse and before the chorus, building anticipation and making the chorus more impactful. The pre-chorus’s role is to provide a unique contrast to the verse and set the stage for the chorus, creating expectations for the listener.

Outro

The outro is the final section of the song, and its role is to bring closure to the song. It generally involves repeating the chorus or a variation of it while gradually diminishing the instrumentation until the song fades away. An excellent outro should be satisfying, bringing closure to the song and leaving the listener with a feeling of completeness. Understanding the common parts of an arrangement structure is critical when it comes to creating effective and memorable songs. By using the six common parts of an arrangement structure – Intro, Verse, Chorus, Bridge, Pre-chorus, and Outro – songwriters can create music that delivers unique messages effectively.

The Role Of Production In Arranging A Song

Production plays a vital role in arranging a song, particularly in its arrangement structure. It involves selecting suitable instruments, creating transitions between sections, balancing sound levels, and adding effects to enhance the overall sound quality. A well-arranged song can elevate the listener’s experience and make the music more memorable.

Arranging a song is a crucial aspect of music production that involves organizing its different parts into a cohesive structure. The arrangement structure of a song refers to the order and combination of different sections like the intro, verse, chorus, bridge, outro, etc. A properly arranged song has a clear and logical progression that keeps the listener engaged from the beginning to the end. The role of production in arranging a song is essential because it helps a producer to create the right arrangement structure, choose the suitable instrumentation, apply recording techniques, and make arrangement choices based on genre.

Developing The Arrangement Structure

Developing the arrangement structure of a song is one of the most crucial aspects of music production. The arrangement structure determines how the different parts of a song fit together to create a cohesive whole. A producer must have a clear vision of how the different sections of the song should work together before beginning the arrangement process. To develop the arrangement structure, a producer may sketch out a rough arrangement, experiment with different ideas, and rearrange sections to create the right flow.

Adding Instrumentation

Once a producer has developed the arrangement structure, the next step is to choose the right instrumentation to support the song’s mood, style, and genre. Adding instrumentation involves selecting the right sounds, instruments, and layers that complement the song’s melody, harmony, and rhythm. A producer must consider the balance between different instruments and sounds to avoid overcrowding the mix.

Recording Techniques

Recording techniques play a critical role in music production because they determine how the sound is captured and processed. A producer must apply the right recording techniques to ensure that the instruments and vocals are captured accurately, recorded at the right volume, and processed to enhance the overall mix. Some of the key recording techniques include mic placement, EQ, compression, reverb, and delay.

Arrangement Choices Based On Genre

Different genres of music have specific arrangement conventions that a producer must consider when arranging a song. For instance, a dance song may have a longer intro and outro to allow for DJs to mix it, while a ballad may have a shorter intro to quickly capture the listener’s attention. A producer must understand the arrangement choices for each genre to create a song that resonates with its intended audience. In conclusion, production plays a crucial role in arranging a song. By creating the right arrangement structure, selecting the suitable instrumentation, applying recording techniques, and making arrangement choices based on genre, a producer can produce a song that connects with its audience and stands out in the music industry.

Tips For Arranging A Song

Proper arrangement of a song is crucial for its success. A well-structured song arrangement can improve the overall listener experience. The arrangement should support the song’s story and create a seamless flow from start to finish.

Arrangement structure is essential in composing an engaging and memorable song. A well-structured arrangement can make a song stand out and resonate with the audience long after they have listened to it. Here are some tips on how to arrange a song in a way that captures your audience’s attention:

Start With A Hook

Your listener’s attention should be grabbed right from the beginning of the song. A hook is a catchy and memorable chord progression, melody, or lyric that sticks in the listener’s mind. It creates an emotional connection to the music and keeps them engaged throughout the song.

Create An Outline

Creating an outline is crucial to ensure your arrangement is well-organized. It helps to arrange the song’s structure into clear sections with a logical flow. You can use an introduction, verse, chorus, bridge, and outro to arrange your song in a way that flows naturally.

Utilize Dynamics

The dynamics of a song refer to the variation in volume and intensity throughout a song’s arrangement. It helps to create an emotional journey for the listener and keep the song from sounding monotonous. By strategically using volume, intensity, and instruments, you can create dynamic shifts in the song that capture the audience’s attention.

Think About Transitions

Transitions play a significant role in maintaining the song’s momentum. It helps to smoothly move from one section of the song to another, keeping the listener engaged. You can use drum fills, guitar strums, and other techniques to mark transitions between different sections or phases of the song.

Eliminate Unnecessary Parts

Eliminating unnecessary elements from the song can make the arrangement more cohesive and engaging. It’s essential to critically evaluate each element of the song and determine whether it’s serving a purpose. Elements such as long intros, repetitive choruses, or lengthy solos can bore the listener and detract from the song’s overall impact. In conclusion, arranging a song takes practice and patience. By implementing these tips, you can ensure that your arrangement structure is engaging and memorable.

Arrangement Structure in a Song

Credit: www.learnhowtoproducemusic.com

Arrangement Structure in a Song

Credit: www.youtube.com

Frequently Asked Questions Of Arrangement Structure In A Song

What Is The Arrangement Of Parts In Music?

The arrangement of parts in music is called music form. It refers to the structure of a piece of music, which includes intro, verse, chorus, bridge, and conclusion. The form of a song or composition is outlined based on repeating and contrasting sections that create a sense of musical coherence.

What Does Arrangement Mean In Music?

Arrangement in music refers to the process of adapting a piece of music for a specific purpose or performance. It involves altering the instrumentation, harmony, rhythm, and melody of a composition to create a new version with a distinct sound and style.

What Is The Structure Of The Song Called?

The structure of a song typically consists of verses, choruses, bridges, and possibly a pre-chorus or post-chorus. These components are arranged in a specific order to create the song’s overall structure.

What Are 3 Main Sections Structure Within A Song?

The 3 main sections structure within a song are the verse, chorus, and bridge. The verse tells the story and provides context. The chorus consists of the repeating section that is the main hook of the song that is easy to remember.

The bridge adds variety and transitions between the verse and chorus.

Conclusion

To sum up, the arrangement structure in a song is an essential element that can make or break a song’s success. As a songwriter, understanding the basic arrangement structure is crucial to ensuring that your music connects with your audience on a deeper level.

By utilizing intros, verses, choruses, bridges, and endings effectively, you can create a song that resonates with your listeners. By implementing the tips and techniques outlined in this blog post, you can take your songwriting skills to the next level and create music that stands out from the crowd.

Categories
Archive

How to Use Synths in Logic Pro X

To use synths in Logic Pro X, open the software and create a new software instrument track, choose a synth and explore its settings. Now, let’s dive deeper into how to use synths effectively in Logic Pro X.

Logic Pro X is a popular digital audio workstation (DAW) used by music producers to create sounds and music. One of the most important features of Logic Pro X is the ability to use synths. Synths can create a wide range of sounds, from warm analog tones to futuristic digital sounds.

However, using synths can be daunting for beginners. This is where Logic Pro X comes in, it offers an intuitive and user-friendly interface for using synths. We’ll explore the basics of using synths in Logic Pro X to create unique, interesting sounds that will take your music to the next level.

Overview Of Synths In Logic Pro X

If you are an aspiring music producer or professional music composer, you know that Logic Pro X is a go-to digital audio workstation (DAW) to create music seamlessly. Logic Pro X has rich features and tools that allow music enthusiasts to create amazing music tracks effortlessly. Synthesizers are one of the most crucial tools in this DAW that bring exceptional value to all music producers. To assist you in getting the most out of the Synths in Logic Pro X, it’s incredibly important that you understand some of the fundamental concepts of Synths in Logic Pro X. In the next sections, we will introduce Synths, types of Synths available in Logic Pro X, and provide related insights that will help you take your music production skills a notch higher.

Introduction To Synths

Synthesizers refer to sound-generating instruments that produce a wide range of audio signals. They are either virtual or hardware-based. Virtual synthesizers are software-based and come inbuilt in the Logic Pro X DAW. They contain diverse functions that allow music producers to create unique sounds that resonate with their creative ideas. Hardware-based synthesizers, on the other hand, include actual machines that a producer can interface with and play. In this post, we will only focus on the inbuilt software-based synthesizers in Logic Pro X.

Types Of Synths Available In Logic Pro X

SynthDescription
AlchemyAlchemy is a sample manipulation synthesizer that offers a wide range of granular and spectral synthesis capabilities.
ES2ES2 is a versatile synthesizer designed to deliver sublime sound quality, inspiring modulation and incredible flexibility in music production.
EVB3EVB3 is an Electronic Virtual Body Organ, simulating legendary Hammond B3 Tone wheel and Leslie rotary speaker.
EVP88EVP88 is an authentic-sounding electric piano designed to create a classic ’70s and ’80s soundscape.
ESMESM is a monophonic synth that features a single overtone oscillator, sweeping filter, and LFO for modulation.

Choosing the right synthesizer for your style of music is crucial. Logic Pro X offers a range of Synths each with its unique characteristics. For example, Alchemy is a granular and spectral synthesizer that’s perfect for creating rich pads and evolving soundscapes. On the other hand, the ES2 Synthesizer is built for fat and aggressive electronic sounds, making it perfect for producing classic dance beats. Understanding these differences can help you to identify the Synthesizer that suits you best.

In conclusion, Synthesizers are an essential tool in creating new and unique sounds that can enhance the quality of your music production and take your tracks to the next level. Knowing the different types of Synths available in Logic Pro X and their capabilities can help you to understand which one best suits your music style and create music effortlessly. Start exploring Logic Pro X’s Synth capabilities and bring your creative ideas to life!

How to Use Synths in Logic Pro X

Credit: flypaper.soundfly.com

Setting Up Synths In Logic Pro X

Learn how to set up synths in Logic Pro X and begin creating your own unique sounds. With this comprehensive guide, you’ll be able to easily navigate the software and start making music like a pro.

If you’re a producer or a music enthusiast, Logic Pro X is an excellent digital audio workstation to create and produce music. One of the most crucial elements of music production is using synthesizers to create unique sounds. Synth plugins in Logic Pro X are an essential tool to create amazing sounds. In this blog post, we will discuss how you can set up synths in Logic Pro X.

Creating A New Software Instrument Track

To utilize synths in Logic Pro X, you need to create a new software instrument track. You can create a new software instrument track by following these easy steps:

  1. Click on the “+” button located in the top left corner of the Logic Pro X interface.
  2. Select “software instrument” and click “create.”
  3. Choose a sound library from the provided list or select “external” if you have a plugin installed.

Adding A Synth To The Track

Once you have created a new software instrument track, it’s time to add a synth to the track. Follow these simple steps to add a synth to your track:

  1. Click on the “library” button.
  2. Search for the synth plugin you want to use.
  3. Click and drag the plugin to your software instrument track.

It’s essential to ensure the output of the synth is set to the software instrument track you have created. You can ensure this by checking if the output is set to the relevant track in the mixer. In conclusion, using synths in Logic Pro X is a vital tool in creating exceptional music, and it all starts with setting up software instrument tracks and adding plugins. So, follow the steps above to start using synths in your Logic Pro X tracks today!

Exploring Synth Parameters

One of the most exciting aspects of using synths in Logic Pro X is their wide range of parameters that can be tweaked and manipulated to create unique sounds. In this post, we will explore the key synth parameters – oscillators, filters, envelopes, LFOs, and arpeggiators – and how they can be used to enhance your productions.

Oscillators

Oscillators generate the basic soundwave of a synth patch. They can be adjusted to produce different waveforms, such as sine, square and sawtooth, which impacts the character of the sound. In Logic Pro X, there are a variety of different oscillator types to choose from, including analog, digital and physical modeling. By experimenting with oscillator settings, you can create everything from simple lead sounds to complex pads and textures.

Filters

Filters shape the tone of a synth patch by removing or accentuating certain frequencies. In Logic Pro X synths, filters come in various types, such as low-pass, high-pass, and band-pass. They can be adjusted using parameters like cutoff, resonance and drive to create subtle or drastic changes to the sound. Filters can be used to add warmth, brightness, or to create a more aggressive tone.

Envelopes

Envelopes control how a sound evolves over time by modulating different synth parameters. The four most common envelope settings are attack, decay, sustain, and release (ADSR). In Logic Pro X synths, envelopes can be applied to parameters like filter cutoff, amplitude, and pitch. By adjusting envelope settings, you can create long, sustained sounds, short percussive hits, or anything in between.

Lfos

LFOs stand for low-frequency oscillators and generate repeating waveforms at a much slower rate than audio oscillators. They can be used to introduce movement and modulation to a sound by controlling various synth parameters. In Logic Pro X synths, LFOs can be applied to parameters such as filter cutoff, oscillator pitch, and amplitude. You can use LFOs to create pulsing rhythms, swirling textures, or subtle modulation that adds depth to a sound.

Arpeggiators

Arpeggiators are tools that automatically play a sequence of notes from a chord in a rhythmic pattern. They are ideal for creating complex, layered melodies that would be difficult to play manually. Logic Pro X synths come equipped with arpeggiators that can be customized to fit your needs. They can be adjusted to play specific scales, keys, and rhythms, and can be synced to your project tempo.

Creating Patches With Synths

By using synths in Logic Pro X, creating patches becomes a breeze. With the ability to manipulate a variety of sounds, you can generate unique, personalized patches that are perfect for your music production needs.

One of the most exciting elements of Logic Pro X is its range of synths, which enable you to create unique, original sounds that add depth and personality to your music. If you’re new to working with synths, it can be challenging to know where to begin, but it’s worth persevering and experimenting until you find patches that suit your style. In this post, we’ll explore how to create patches with synths, including choosing sounds and settings, customizing patches, and saving and loading patches.

Choosing Sounds And Settings

When it comes to creating patches with synths in Logic Pro X, the process begins with choosing your sounds and settings. The software comes with a vast range of synth options, and it’s essential to spend time getting to know what each one does and how it works. Spend time experimenting with the different synths to determine which ones are best suited to your needs and demands. Once you’ve chosen a synth, take the time to adjust the settings to your liking, whether that’s tweaking the oscillators, modulators, or filter settings. Logic Pro X makes it easy to adjust all of these settings, so play around with them until you find the perfect configuration.

Customizing Patches

Once you have your basic patch set up, it’s time to customize it to suit your specific musical style and vision. This step requires a bit of experimentation and creativity, but it’s worth exploring different effects and modulation techniques to achieve unique and interesting sounds. For example, try adding a bit of reverb, delay, or distortion to your patch to give it extra depth and texture. Alternatively, you can experiment with modulation techniques such as using LFOs or envelope generators that can make your patch sound more dynamic and less straightforward.

Saving And Loading Patches

Once you’ve created a patch that you’re happy with, you should save it so that you can access it quickly and easily in future sessions. Logic Pro X makes it straightforward to save and load patches, and you can save them in a variety of different folders and locations. When you save a patch, you have the option to name it, add descriptions and tags, and organize it into different categories, making it easy to find and open when you need it. Additionally, you can also share your patches with other Logic Pro X users, which is a great way to get feedback and collaborate with other musicians.

Conclusion

Creating patches with synths is a fun and rewarding way to add depth and personality to your music. Whether you’re a seasoned producer or a beginner, Logic Pro X’s range of synths and customization tools makes it easy to create unique and interesting sounds. Spend time experimenting and exploring, and you’ll soon discover a whole new world of sonic possibilities.

Using Synths In Music Production

Logic Pro X provides an extensive range of synthesizers that can comprehensively aid you in music production. From classic synthesizers to modern ones, Logic Pro X offers a variety of tools that can create a wide range of sounds, melodies, basslines, and textures. In this blog post, we will explore how to use synths in Logic Pro X for creating top-notch music.

Creating Melodies With Synths

The synth tools in Logic Pro X allow users to create melodies with ease. Simply open the synth tool, choose a suitable preset, and start playing around with the MIDI keyboard. One great way of creating melodies in Logic Pro X is by recording your improvisations.

  • Open the synth tool
  • Choose a suitable preset
  • Start playing around with the MIDI keyboard
  • Record your improvisations

Once you have recorded your improvisations, you can edit them by adjusting the notes, length, and velocity. You can also add effects like reverb and delay to create a more immersive sound.

Designing Basslines With Synths

Synths can also be used to create basslines for your music production. The process for creating basslines is similar to that of creating melodies. The only difference is the choice of sounds.

  • Open the synth tool
  • Choose a bass preset
  • Start playing around with the MIDI keyboard
  • Record your improvisations

When designing basslines, it’s essential to ensure the kick and bass frequencies do not intersect. This way, you can achieve a clean and punchy sound that is perfect for any music production.

Adding Texture With Synths

Synths can also be used to add texture to your music production. Textures help give your music a unique signature that distinguishes it from others. In Logic Pro X, there are several ways to add texture to your music using synthesizers.

  • Use the arpeggiator to create unique patterns
  • Add modulation effects like chorus and phaser
  • Incorporate ambient sounds like pads and atmospheres

By utilizing the above methods, you can elevate your music production to an entirely new level, making it stand out from others.

How to Use Synths in Logic Pro X

Credit: www.dummies.com

Advanced Techniques For Synth Manipulation

Learn advanced techniques for synth manipulation in Logic Pro X, including modulation, layering, and automation. With these tools, you can create unique and complex sounds to enhance your music production.

Utilizing Automation

Automation is a powerful tool in Logic Pro X that can help you to create unique synth sounds. You can use automation to adjust any parameter of the synth over time. For instance, you can create sweeping filter effects by automating the cutoff frequency. Or, you can create pulsing rhythm by automating the synth’s LFO rate. To use automation in Logic Pro X, go to the Tracks area, select the synth track, and then select the parameter you want to automate. Click on the “A” button next to the parameter to enable automation, and then draw in the automation curve using the Automation tool.

Working With Midi Controllers

MIDI controllers are another great way to manipulate synths in Logic Pro X. You can use any MIDI controller to adjust parameters such as filter cutoff, resonance, and envelope settings in real-time. Logic Pro X supports all major MIDI controllers, including keyboards, drum pads, and control surfaces. To set up a MIDI controller, go to the Control Surfaces section of the Preferences window, and select the desired controller from the list. You can then map the controller’s knobs, faders, and buttons to various synth parameters using the Learn function.

Layering Multiple Synths

Layering multiple synths is a powerful way to create complex, rich sounds in Logic Pro X. By layering synths, you can blend different waveforms, filters, and effects to create a unique sound that is greater than the sum of its parts. To layer synths in Logic Pro X, simply create multiple synth tracks and route them to the same bus or output. You can then adjust each synth’s settings until you achieve the desired sound. Be careful not to overdo it, though – too many layers can result in a muddy, cluttered sound that lacks clarity. In conclusion, these are some advanced techniques for synth manipulation in Logic Pro X. By utilizing automation, working with MIDI controllers, and layering multiple synths, you can create truly unique sounds that stand out from the crowd. With a little experimentation and practice, you’ll be able to unlock the full potential of your synths and take your music to the next level.

Troubleshooting Synth Issues In Logic Pro X

Ensure seamless synth production with these tips to troubleshoot synth issues in Logic Pro X. Maximize the potential of Logic Pro X’s synths by gaining deeper insights into the software’s features and functions with a few simple techniques.

Using synths in Logic Pro X can help to create dynamic and captivating soundscapes. However, sometimes synth issues can occur, which can be frustrating and time-consuming. To help you resolve any issues that you may encounter, we have compiled some common synth problems and solutions.

Common Synth Problems

Here are some issues you may encounter when using synths in Logic Pro X:

  1. Sound is distorted or crackling
  2. No sound is produced
  3. Latency issues
  4. Audible clicks and pops
  5. Unresponsive synth controls

Solutions To Synth Problems

Here are some solutions to the common synth problems:

Sound is distorted or crackling

If the sound produced by the synth is distorted or crackling, try the following:

  • Check the sample rate and bit depth settings of the session
  • Ensure that the synth’s level is not too high
  • Check that the synth is not clipping or overdriven by lowering its volume

No sound is produced

If no sound is produced by the synth, try the following:

  • Check that the synth is receiving MIDI signals
  • Check the track’s output routing
  • Ensure that the synth’s volume is not set to zero or muted

Latency issues

If you are experiencing latency issues, try the following:

  • Open the Audio MIDI Setup and adjust the buffer size
  • Lower the sample rate and bit depth of the session
  • Disable any unused plugins or instruments

Audible clicks and pops

If you hear audible clicks and pops, try the following:

  • Check the sample rate and bit depth settings of the session
  • Decrease the buffer size
  • Disable any unused plugins or instruments

Unresponsive synth controls

If the synth’s controls are unresponsive, try the following:

  • Restart Logic Pro X and the synth plugin
  • Check that the track is not locked or frozen
  • Disconnect and reconnect the synth to the MIDI controller

In conclusion, synth issues can be frustrating, but with these solutions, you’ll be on your way to producing the perfect sounds. Keep this guide handy for quick reference when troubleshooting synth issues in Logic Pro X.

How to Use Synths in Logic Pro X

Credit: m.youtube.com

Frequently Asked Questions On How To Use Synths In Logic Pro X

Does Logic Pro Have Synthesizer?

Yes, Logic Pro has several built-in synthesizers, such as the ES2, Retro Synth, and Sculpture, that allow users to create various types of electronic sounds and music.

How Do You Mix Synths In Logic Pro X?

To mix synths in Logic Pro X, start by panning each instrument in the stereo field. Adjust the EQ to add clarity and separate the sounds. Use compression to control the dynamics of each track. Adjust the volume levels to balance the mix.

Finally, add reverb and delay to create space and depth.

What Is The Best Synth In Logic Pro X?

The best synth in Logic Pro X is subjective and depends on personal preferences. Some popular options among users are Retro Synth, Alchemy, and ES2. Each synth has unique features and capabilities, making it essential to experiment and find the best fit for one’s musical needs.

How Do I Open Retro Synth In Logic Pro X?

To open Retro Synth in Logic Pro X, go to the “New Track” option and select “Software Instrument”. Then, click on the drop-down menu and select “Retro Synth” to add it as a track.

Conclusion

Using synths in Logic Pro X is easy and fun. With various features and tools, it allows you to create unique and engaging music. By following the steps mentioned above, you can make the most of your synth experience. Besides, experimenting with different sounds and techniques can help you discover new approaches to synthesizing in Logic Pro X.

So, keep practicing and exploring, and see where it takes you!

More in our Synth guides.