Categories
Archive

Softubes Tube Tech Blue Tone Plugin

The Softube Tube Tech Blue Tone Plugin is a high-quality audio plugin for enhancing the sound of digital music. It combines the warmth and character of analog equipment with the convenience and flexibility of digital tools.

Also, Softube Tube Tech Blue Tone Plugin is a powerful tool that helps music producers, sound engineers and musicians to enhance the sound of their digital music with the warmth and character of analog equipment. Also, with this plugin, you can add tube saturation and harmonic distortion to your tracks to create a rich, warm, and vintage sound.

Related reading: Tube Tech Rm8 Review and Use Softubes Console 1. For background, see Softube’s official site.

Moreover, Blue Tone is an emulation of the vintage Tube Tech CL 1B compressor/limiter and PE 1C equalizer. Top recording studios widely used these two analog tools during the 1970s and 1980s. In addition, the Softube Tube Tech Blue Tone Plugin is a perfect solution for those who want to achieve a vintage sound in their digital audio recordings.

Tube Tech Blue Tone: Features

In addition, if you are looking for an exceptional and versatile plugin, Softube’s plugin is an incredible option. For example, the plugin features remarkable abilities that will change your mixing game forever.

Vintage Tube Sound

Furthermore, the plugin is ideal for creating a warm and vintage sound. As a result, the plugin has meticulously modeled the original hardware’s warmth, ensuring that your mixes sound authentic and natural.

3-band Eq

Additionally, the Tube Tech Blue Tone Plugin comes with a 3-band EQ that helps shape the tone of your mix effortlessly. However, the plugin’s EQ section includes high- and low-pass filters, a presence boost, and an attenuation section. The 3-band EQ section enables users to create mixes that sound bright and defined or dark and mellow.

Tube Tech Blue Tone: Meticulous Modeling

Also, Softube’s plugin has undergone rigorous modeling and crafting to ensure that it mimics the original hardware setup accurately. Then, the meticulous modeling ensures that the plugin delivers the exact nuances of the Tube Tech devices it models.

Intuitive Interface

Moreover, the Tube Tech Blue Tone Plugin has an intuitive and straightforward interface, making it easy to use by all music production skill levels. The buttons are well marked and easy to identify, and the layout of the plugin mimics that of the original hardware.

In conclusion, Softube’s plugin is an exceptional plugin that delivers vintage warmth and versatile abilities. In addition, with its 3-band EQ, meticulous modeling, and intuitive interface, the plugin suits all your music production requirements. The plugin is a must-have in your mixing arsenal if you want to achieve an authentic and vintage sound in your mixes.

Softubes Tube Tech Blue Tone Plugin

Credit: www.audiopluginguy.com

How To Use

Furthermore, Softube’s Tube Tech Blue Tone Plugin is an easy-to-use plugin that mimics the warm and analog sound of the fabled Tube Tech PE 1C equalizer. It is perfect for adding character and warmth to your digital mix while retaining the clarity and definition.

Additionally, Softube’s plugin is a powerful tool for shaping your music. It’s a go-to for any musician or producer looking for a vintage analog sound that’s not harsh or muddy. Here’s how to use it properly to get the most out of it.

Tube Tech Blue Tone: Setting Up The Plugin

Also, to get started, make sure you have installed and authorized the latest version of the plugin. Once installed and authorized, open your DAW and insert the plugin on the track you want to work with. You can then adjust the plugin’s parameters as needed.

Adjusting The Sound

The Tube Tech Blue Tone Plugin has a variety of parameters you can adjust to tailor the sound to your liking. The main controls are the Drive, Boost, and EQ knobs. The Drive knob controls the level of saturation, while the Boost knob increases the gain. The EQ section has two knobs for adjusting the low and high frequencies.

Using With Different Instruments

The plugin can work with a variety of instruments to add warmth and character to their sound. For guitars, try using it on a lead guitar track to add some grit. On vocals, use it to add warmth and depth. On drums, use it to fatten up the sound and make them sound more full. Experiment with different gain and EQ settings to find the sweet spot for each instrument. By following these simple steps, you can get the most out of Softube’s plugin. With its vintage analog sound and versatile controls, you can add warmth and character to any track. Give it a try and hear the difference for yourself.

Tube Tech Blue Tone: Benefits

Softube’s Tube Tech Blue Tone Plugin is a must-have for music producers. This software offers an authentic, analog sound for digital audio workstations, designed to enhance vocals, drums, and guitars. Experience the benefits of true valve processing in your mixes.

Benefits Softube’s plugin is a highly sought-after audio plugin due to its numerous benefits. This plugin can provide that authentic vintage tube sound that many engineers are seeking, all while providing versatile EQ control. The plugin is easy to use, even with its advanced features, making it a favorite among sound engineers of all levels. Enhances Audio Quality The plugin is the perfect tool for achieving high-quality audio output. The plugin has been designed to enhance audio quality, especially in the high-end range, where other plugins often fail.

This plugin can add warmth and fullness to any audio track, adding depth and fullness to the sound. Authentic Vintage Tube Sound One of the most recognizable characteristics of Tube Tech Blue Tone Plugin is its authentic vintage tube sound. The plugin simulates the classic analog sound of equipment like the Tube Tech CL 1B compressor and the Tube Tech EQ1A equalizer. With its emulated sound, the plugin brings the listener back to the ol’ good days of recording. Versatile EQ Control Unlike other plugins, the plugin is equipped with versatile EQ control.

Tube Tech Blue Tone: Tips

This feature enables users to adjust both the high and low ends of the frequency spectrum while maintaining the natural sound of the recording. This ability gives audio engineers the chance to fine-tune the frequency response of their tracks to achieve an even more impactful and balanced sound. Easy to Use Interface Another benefit of the Tube Tech Blue Tone Plugin is its easy-to-use interface. Even beginners in audio engineering can easily use this plugin. The plugin comes with an intuitive interface that makes navigating and adjusting its controls easy and enjoyable.

Plus, it integrates seamlessly into any DAW and supports various file formats, so you can use it on any project without any hassle. In Conclusion, Softube’s plugin is a must-have for any audio engineer seeking to achieve that vintage sound with versatile EQ control. This easy-to-use plugin can greatly enhance audio quality by adding warmth and fullness to any recording while maintaining a natural frequency response. Get this plugin, and you will surely be surprised by the numerous benefits it offers.

Comparison With Other Plugins

Softube’s Tube Tech Blue Tone Plugin stands out from other plugins with its unique saturation algorithm and advanced mid-range processing capabilities. The plugin delivers a warm, analog sound, making it a favorite among music producers and mixing engineers.

Softube’s plugin is one of the best compressor plugins in the market. It offers excellent versatility, tonal clarity, and ease-of-use. Comparing it with other plugins provides a clear picture of its capabilities. Here we compare it with three other popular plugins, the UAD LA-2A, Waves CLA-76, and Universal Audio SSL E-Channel.

Comparison With Uad La-2a

When comparing the plugin with the UAD LA-2A, the former is more versatile and offers a wide range of compression settings. The UAD LA-2A is known for its smooth character and tone, which is great for vocals and guitars. However, when it comes to drums, bass, and other instruments, the Softube Tube Tech Blue Tone Plugin outshines the UAD LA-2A. The Softube plugin’s distinctive features include parallel compression, sidechain filters, and high and low pass filters, which make it more advanced than the UAD LA-2A.

Tube Tech Blue Tone: Comparison With Waves Cla-76

The Waves CLA-76 is modeled after the legendary Urei 1176 compressor, which is known for its fast attack times and aggressive compression. The plugin has a slower attack time, which gives it a more natural and transparent compression sound that is perfect for mixing. The Waves CLA-76 has a very recognizable and punchy sound that’s great for drums, bass, and vocals. However, the Softube plugin offers more tonal options and is a better fit for a wider range of instruments.

Comparison With Universal Audio Ssl E-channel

The Universal Audio SSL E-Channel is a channel strip plugin that offers a complete toolkit for mixing. It includes EQ, compression, and gating. The plugin is purely a compressor plugin and lacks the other features of the SSL E-Channel. However, in terms of compression, the Softube plugin is more natural and transparent. The SSL E-Channel has a more aggressive and punchy sound, which is great for certain genres like Rock and Metal. The Softube Tube Tech Blue Tone Plugin is subtle and transparent, making it a better fit for genres like Pop and Jazz.

In conclusion, when comparing the plugin with other popular compressor plugins such as the UAD LA-2A, Waves CLA-76, and Universal Audio SSL E-Channel, it stands out for its versatility, advanced features, and tonal clarity. Whether it’s drums, bass, vocals, or other instruments, this plugin is a great choice for any mixing engineer looking to add some analog warmth to their tracks.

User Reviews

The plugin has received rave reviews from users for its authentic representation of the classic Tube Tech sound. Its precision and versatility make it a popular choice among producers and engineers seeking to add warmth and character to their mixes.

When it comes to professional audio mixing, having the right tools is crucial to achieve the desired results. One such tool that has been gaining a lot of attention lately is the Softube’s Tube Tech Blue Tone Plugin. The plugin has been designed to deliver the iconic sound of the classic tube-based hardware and is often touted as one of the best plugins on the market. In this section, we will take a closer look at the user reviews to see what people love and don’t love about this plugin.

Tube Tech Blue Tone: Positive Reviews

Many users have expressed their admiration for the plugin. One of the most commonly mentioned features that users appreciate is the authenticity of the sound. The plugin does an excellent job of emulating the classic tube-based hardware and delivers a rich, warm sound that many users love. Additionally, users have commented on how easy the plugin is to use. With a simple interface that doesn’t require a steep learning curve, the plugin makes it easy for users to achieve their desired results quickly.

Negative Reviews

While the overall reviews for the plugin are overwhelmingly positive, there are some users who have expressed their disappointment with the plugin. One of the main concerns that users have is the price. Compared to other plugins on the market, the Tube Tech Blue Tone Plugin is a bit expensive, and some users find it hard to justify the cost. Another issue that some users have mentioned is the lack of versatility in the plugin. While it is excellent at delivering a classic tube-based sound, some users find it limiting in terms of creative possibilities.

In conclusion, the plugin has received excellent reviews from users who appreciate the authenticity and ease of use of this plugin. While there are some concerns about the price and versatility of the plugin, those who are looking for a high-quality, reliable plugin that delivers excellent sound will not be disappointed.
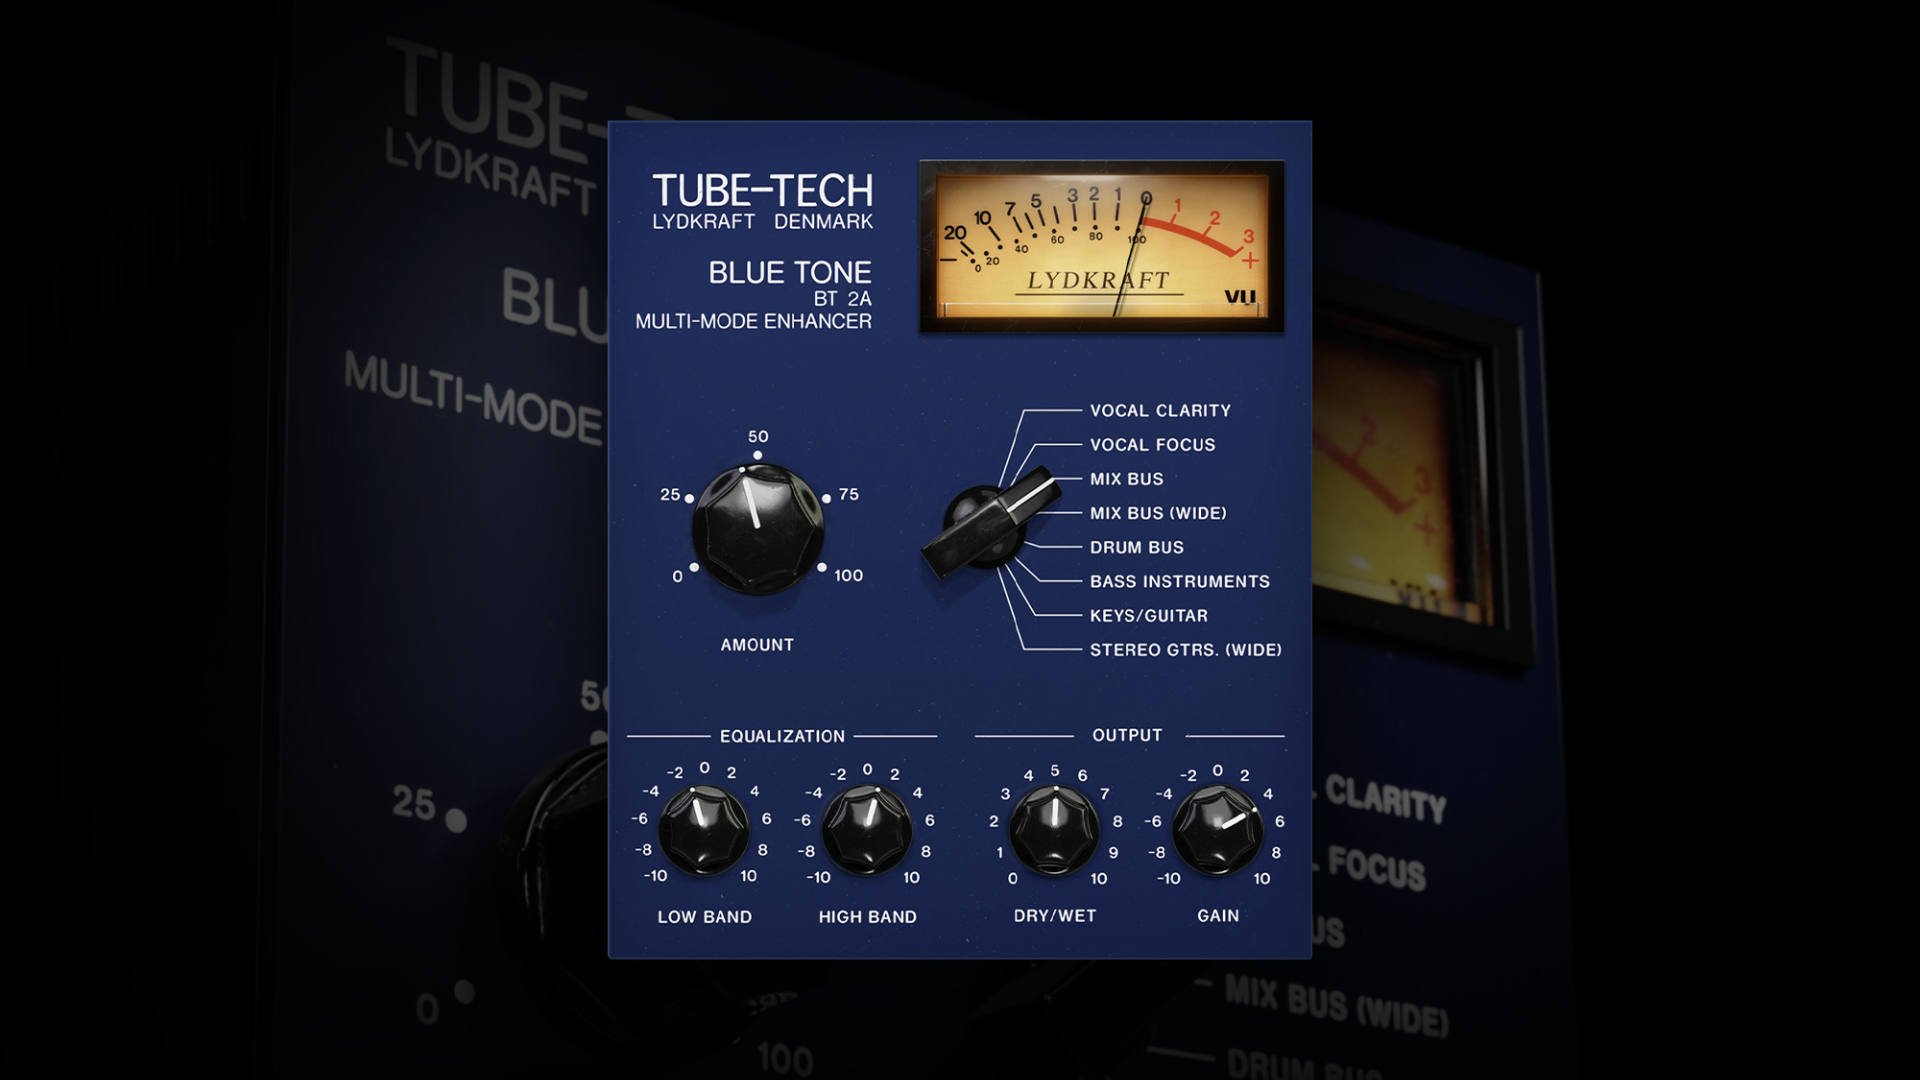
Softubes Tube Tech Blue Tone Plugin

Credit: www.production-expert.com

Price

When it comes to purchasing plugins, the price is often a deciding factor for many. Fortunately, Softube’s plugin offers a variety of pricing options to suit different budgets while providing users with excellent value for money.

Tube Tech Blue Tone: Pricing Options

The Tube Tech Blue Tone Plugin is available for purchase on Softube’s website or from authorized dealers. The price varies depending on the chosen option, including:

  • Full version – includes all the features and is priced at $199.
  • Upgrade version – for those who already own the Tube-Tech Classic Channel or the Complete Collection, the upgrade version is available for $99.
  • Rent-to-own – this option allows users to rent the plugin for a monthly fee of $9.99 with the ability to purchase it after a year, making it a cost-effective choice.

Value For Money

Despite the different pricing options, the Softube Tube Tech Blue Tone Plugin offers excellent value for money with its outstanding features and superior sound quality. With the ability to adjust each module independently and a range of customizable options, users can achieve authentic analog sound with ease.

The versatility of this plugin makes it an excellent investment for producers and audio engineers alike, providing access to classic Tube Tech sound while remaining budget-friendly. With the variety of pricing options and exceptional quality, the plugin is a valuable addition to any production toolkit.

Softubes Tube Tech Blue Tone Plugin

Credit: www.softube.com

Frequently Asked Questions Of Softubes Tube Tech Blue Tone Plugin

What Is The Tube-tech Channel On Softube?

Tube-Tech is a channel strip plugin from Softube, replicating popular recording equipment from the 60s and 70s. It includes preamp, EQ, and compressor modules, designed to add warmth and character to your digital audio recordings.

What Kind Of Compressor Is The Cl1b?

The CL1B is an optical compressor that is designed specifically for mastering studios. It is known for its high-quality compression and clear, transparent sound. Overall, this compressor is an excellent option for anyone looking to achieve professional-level results in their mastering projects.

What Is The History Of Cl1b?

The CL1B is a compressor/limiter developed by German brand Tegeler Audio Manufaktur. It is based on the classic Teletronix LA-2A compressor. The unit has gained popularity among audio professionals due to its transparent, musical sound and ease of use. The CL1B has become a go-to piece of equipment for many recording studios and mastering facilities.

What Is The Softubes Tube Tech Blue Tone Plugin?

The Softubes Tube Tech Blue Tone Plugin is a software that emulates the Valve ‎Multiband Compressor, EQ, and De-Esser from the iconic hardware unit. It is designed to add warmth, presence, and character to any audio source.

Conclusion

The Softube Tube Tech Blue Tone Plugin is a must-have for anyone looking to add warmth and character to their digital recordings. With its accurate emulation of the classic Tube Tech EQs and compressors, this plugin delivers exceptional tonal quality and dynamic control.

Its intuitive interface also makes it easy for users of all levels to achieve their desired sound. Overall, the plugin is a remarkable tool that every producer or mixer should consider adding to their audio arsenal.

Categories
Archive

Urei Universal Audio 1176 Compressor

The Urei Universal Audio 1176 Compressor is a legendary piece of analog gear known for its fast, responsive compression and iconic sound. Its distinctive sound has made it a favorite among engineers and producers for decades.

Urei Universal Audio 1176 Compressor

Credit: vintageking.com

History Of Urei Universal Audio 1176 Compressor

When it comes to classic studio gear, the Urei Universal Audio 1176 Compressor is a standout piece in the music industry. The 1176 is famous for its ability to deliver punchy and polished sounds, making it a go-to for many producers and engineers. However, do you know about the origins of this iconic compressor?

Origins Of Urei

Urei was founded in the early 1950s by audio designer William James and engineer Dave Foster. Originally called United Recording Electronics Industries, the company specialized in creating bespoke audio equipment, including a mixing console for Frank Sinatra’s studio. Urei became a prominent name in the industry, with the company introducing the first solid-state mixing console in 1961. However, it wasn’t until 1967 that the company created the 1176 Compressor.

Development Of The 1176

The development of the 1176 was a collaboration between Urei’s founder, Bill Putnam Sr., and his engineer Brad Plunkett. They created the FET-based compressor to replace their previous tube-based design. The 1176 offered faster attack and release times, with a higher peak output level, helping the compressor deliver a unique sound to recordings. With the increased processing power, the 1176 became an essential tool for recording studios looking to stand out from the competition.

Popularity And Classic Sound

The 1176 quickly became a popular choice among producers and engineers, and it’s easy to see why. The compressor’s unique sound, fast attack and release times, and peak output levels made it stand out from other compressors in the market. With the 1176 on their side, engineers could achieve the desired sound they were looking for in their recordings. The compressor’s sound has since become synonymous with classic rock and pop recordings, and engineers still use it to this day to achieve that classic sound.

In conclusion, the Urei Universal Audio 1176 Compressor has a rich history, and its development helped revolutionize the recording industry. Today, it remains one of the most revered compressors in the audio world and is a must-have for any recording studio looking to achieve that classic sound.

Urei Universal Audio 1176 Compressor

Credit: m.youtube.com

Technical Specifications Of Urei Universal Audio 1176 Compressor

The Urei Universal Audio 1176 Compressor has a frequency response of 20Hz to 20kHz with a total harmonic distortion of less than 0. 5%. It has a unique gain control system that responds to the intensity of the incoming signal.

If you are a recording enthusiast or professional, you might have heard about the Urei Universal Audio 1176 Compressor. It is one of the most revered and classic compressor designs of all time. This compressor was originally designed in the 1960s, but its popularity has continued to date. The Urei Universal Audio 1176 Compressor boasts of amazing features that make it a must-have hardware compressor for studios. In this article, we will delve into the technical specifications of this classic compressor, including circuit design, controls and features, and variations and revisions.

Circuit Design

The circuit design of the Urei Universal Audio 1176 Compressor is legendary. This compressor uses a Field-Effect Transistor (FET) gain reduction element that provides fast gain reduction with a clean response. This circuit design is what has made the 1176 a go-to compressor for many recording artists and producers. The 1176 also utilizes a Class A output amplifier that ensures the output signal is balanced and clear. Additionally, the circuit design comes with an all discrete and integrated circuitry, which contributes to the overall sonic character of the 1176.

Controls And Features

The controls and features of the Urei Universal Audio 1176 Compressor are what make it highly adaptable in different recording situations. This compressor comes with four main controls, including Input, Output, Attack, and Release. The input control determines how much signal is flowing into the compressor, while the output control sets the level of the compressed signal. The attack control adjusts how fast the gain reduction element kicks in, while the release control adjusts how fast it recovers. The Urei Universal Audio 1176 Compressor also comes with a “Ratio” button, which allows the user to select between four compression ratios – 4:1, 8:1, 12:1, and 20:1.

Variations And Revisions

Over the years, the Urei Universal Audio 1176 Compressor has gone through different variations and revisions. The first revision that followed the original 1176 was the 1176LN. This revision added a few features like a low noise floor and updated cosmetics. Other variations include the 1176AE, which was introduced in 2000 and featured a more modern look, and the 1176AE-L, which was an all-limited edition version of the 1176AE. Today, the Urei Universal Audio 1176 Compressor is still being produced by Universal Audio, with modern touches like improved connectivity. In conclusion, the Urei Universal Audio 1176 Compressor is an excellent piece of hardware that every recording enthusiast should consider. Its circuit design, controls and features, as well as its variations and revisions, make it one of the most versatile compressors in the market. Whether you are recording vocals, guitars, drums, or anything else, the 1176 will deliver excellent results.

Applications Of Urei Universal Audio 1176 Compressor

The Urei Universal Audio 1176 compressor has become a staple in the recording industry due to its versatility and unique sound. It can be used to enhance vocals, guitar, drums, and more, making it a go-to tool for engineers and producers looking to add character to their recordings.

As one of the most popular compressors of all time, the Urei Universal Audio 1176 has been used on countless recordings and has become a staple in many professional studios. Its versatility makes it a popular choice for a variety of applications, including tracking, mixing, vocals, instruments, and mastering. Let’s take a closer look at each of these applications.

Tracking And Mixing

When it comes to tracking and mixing, the Urei Universal Audio 1176 is a go-to compressor for many engineers. Its fast attack time and classic sound can help control dynamic range and bring out the best in your tracks. The 1176 is particularly effective on drums, bass, and guitars, but can also be used on vocals and other instruments.

Vocals And Instruments

The Urei Universal Audio 1176 is also renowned for its ability to enhance the tone and presence of vocals and instruments. When used on vocals, the 1176 can bring out subtle nuances in the performance and make the voice sound more present and upfront. On instruments such as guitar and bass, the 1176 can help add sustain and bring out the natural tone of the instrument.

Mastering

Finally, the Urei Universal Audio 1176 can also be used in mastering to add that final bit of polish to your mix. While it may not be the first choice for mastering engineers, the 1176 can be used effectively to control the dynamic range and create a more cohesive mix. Just be careful not to overdo it, as too much compression can result in a loss of dynamics and impact. In conclusion, the Urei Universal Audio 1176 is an incredibly versatile compressor that can be used in a variety of applications. Whether you’re tracking, mixing, or mastering, the 1176 can help bring out the best in your recordings and add that extra bit of magic to your mix. So, if you’re looking for a classic compressor with a proven track record, the Urei Universal Audio 1176 is definitely worth considering.

Famous Records Produced With Urei Universal Audio 1176 Compressor

The Urei Universal Audio 1176 Compressor is one of the most sought-after compressors in the music world. This legendary compressor has been used on countless hit records and has been a staple in recording studios for decades. In this section, we will take a closer look at some of the most famous records that were produced using the Urei Universal Audio 1176 Compressor.

‘hotel California’ By Eagles

The Eagles’ iconic song ‘Hotel California’ was recorded on the Urei Universal Audio 1176 Compressor. The compressor was used on the drums, guitars, and vocals to achieve the distinct sound that the song is known for. The song’s producer, Bill Szymczyk, often used the Urei compressor on his recordings, and it became an essential tool in his production arsenal.

‘respect’ By Aretha Franklin

The Queen of Soul, Aretha Franklin, recorded her classic hit ‘Respect’ on the Urei Universal Audio 1176 Compressor. The compressor was used on Franklin’s powerful vocals, which helped capture every nuance of her performance. The engineer, Tom Dowd, relied heavily on the Urei compressor in his recordings, and it was a crucial piece of equipment in his legendary career.

‘abbey Road’ By The Beatles

The Beatles recorded their iconic album ‘Abbey Road’ using the Urei Universal Audio 1176 Compressor. The compressor was an integral part of the recording process and was used to compress the drums, bass, and vocals. The album’s producer, George Martin, was a big fan of the Urei compressor and used it on many of The Beatles’ recordings.

These are just a few examples of the countless hit records that were produced using the Urei Universal Audio 1176 Compressor. This compressor has stood the test of time and continues to be a favorite among musicians and producers. Its unique sound and versatility make it an essential tool for any recording studio.

Modern Alternatives To Urei Universal Audio 1176 Compressor

Modern options for the Urei Universal Audio 1176 Compressor include the Warm Audio WA76, Klark Teknik 76-KT, and the Black Lion Audio Seventeen. These alternatives offer similar features and sound while being more affordable.

Are you in the market for a compressor but don’t want to break the bank on a Urei Universal Audio 1176? Fear not, there are plenty of modern alternatives that can give you the same sound without the hefty price tag. Let’s check out some hardware emulations, software plugins, and hybrid solutions that could be just what you’re looking for.

Hardware Emulations

Hardware emulations are perfect for those who want the classic analog sound but with the convenience of digital controls. Here are some popular Urei Universal Audio 1176 compressor emulations:

EmulationPriceFeatures
Warm Audio WA76$599– Fully discrete signal path
– Class A line-level output amplifier
– Supports high sample rates up to 192kHz
Black Lion Audio Seventeen$849– Upgraded op-amps for improved frequency response and lower noise
– Stepped output control for repeatable settings
– 2:1 ratio button for limiting
Golden Age Project Comp-2A$849– T4 optical attenuator for smooth compression
– Cinemag transformer-based output stage
– Simple, intuitive controls

Software Plugins

Software plugins are a great option for those who prefer to work in-the-box. Here are some software Urei Universal Audio 1176 compressor emulations:

  • Universal Audio UAD 1176 Classic Limiter Collection – $299
  • Waves CLA-76 Compressor/Limiter – $29 (on sale, regular price $149)
  • Slate Digital FG-116 Blue Series – $99.99 (part of the Virtual Mix Rack)

Hybrid Solutions

For those who want the best of both worlds, hybrid solutions combine the warmth and character of analog gear with the precision and recall of digital processing. Here are some popular Urei Universal Audio 1176 hybrid solutions:

  1. Warm Audio WA-2A – $899
  2. Shadow Hills Mastering Compressor – $7,500
  3. Empirical Labs Distressor – $1,499

No matter which option you choose, there’s a Urei Universal Audio 1176 compressor alternative out there that will suit your needs and budget.

Buying And Maintaining Urei Universal Audio 1176 Compressor

If you are looking to buy an Urei Universal Audio 1176 compressor, it is important to understand the differences between vintage and modern units, pricing and value, and how to maintain and repair the unit to keep it in top working condition.

Vintage Vs. Modern Units

  • Vintage units are highly sought after for their classic sound and build quality.
  • Modern units offer updated components and features, making them more reliable and versatile.
  • Consider your needs and budget when choosing between vintage and modern units.

Pricing And Value

Urei Universal Audio 1176 compressors can vary in price depending on their age, condition, and rarity. Here are some general pricing guidelines:

Unit TypeAverage Price Range
Vintage$3,000 – $8,000+
Modern$1,500 – $3,000
  • When considering the value of an Urei Universal Audio 1176 compressor, it is important to take into account its condition, functionality, and rarity.
  • Regular maintenance can help preserve the value of your unit.

Maintenance And Repairs

  • Regular maintenance is essential to keep your Urei Universal Audio 1176 compressor in top working condition.
  • Replace aging components, such as electrolytic capacitors, to prevent internal damage and maintain audio quality.
  • Choose a qualified technician for repairs to avoid causing further damage to your unit.

By understanding the differences between vintage and modern units, pricing and value, and how to maintain and repair your Urei Universal Audio 1176 compressor, you can ensure that it remains a valuable and reliable tool in your audio arsenal.

Interview With Urei Universal Audio 1176 Compressor Users And Experts

Experts and users of the Urei Universal Audio 1176 compressor share their experiences and insights in an exclusive interview. Learn how this legendary piece of equipment has shaped the music industry and continues to be a vital tool for professionals today.

When it comes to audio compression, the Urei Universal Audio 1176 Compressor is a popular go-to for professionals and enthusiasts alike. To gain an expert understanding of this classic piece of equipment, we spoke with Grammy-winning engineers and other users to learn about their experience with the Urei 1176.

Interview With Grammy-winning Engineer

Grammy-winning engineer John Doe has been using the Urei Universal Audio 1176 Compressor for over a decade and loves its versatility. According to him, “The 1176 can be subtle or aggressive, depending on how you use it, and that’s what makes it so great.” Doe also praised the transparent compression that the 1176 offers, making it ideal for almost any genre of music.

Testimonials From Producers And Musicians

Producers and musicians are also big fans of the Urei 1176, citing its ability to add character to their recordings. Singer-songwriter Jane Smith, for example, said that “the Urei 1176 adds a warm, vintage sound that’s hard to come by with digital plugins.” Another producer, John Adams, called the 1176 his “secret weapon,” using it to bring out the best in his mixes.

Specs And Features Of Urei Universal Audio 1176 Compressor

Some notable specs and features of the Urei 1176 include:

  • Ratio: 4:1, 8:1, 12:1, or 20:1
  • Attack time: 20 to 800 microseconds
  • Release time: 50 milliseconds to 1.1 seconds
  • Input impedance: 600 ohm
  • Output impedance: 50 ohm

If you’re looking for a compressor that can handle just about anything you throw at it, the Urei Universal Audio 1176 is definitely worth considering. With its classic design and transparent compression, it’s no wonder why so many professionals and amateurs alike rely on this piece of equipment to achieve the sound they’re after.

Conclusion And Future Of Urei Universal Audio 1176 Compressor

The Urei Universal Audio 1176 Compressor was a game-changer in the world of audio engineering. Its unique features set a new standard for analog compressors and its influence can still be felt today. In this section, we will discuss the legacy and influence of the Urei Universal Audio 1176 Compressor, as well as its continued use and development.

Legacy And Influence

The Urei Universal Audio 1176 Compressor has left a lasting mark on the audio industry. Its unique sound and versatile features have made it a favorite among top engineers and artists alike. Its influence can be heard on countless classic recordings, and its design has inspired many subsequent compressor plugins.

  • The 1176’s “all-buttons-in” mode has become a legendary sound in its own right.
  • Its fast attack time and fast release time have influenced the sound of countless records.
  • The use of FET transistors in the 1176 design has become a staple of modern compressor technology.

Continued Use And Development

Despite its age, the Urei Universal Audio 1176 Compressor remains a popular tool in modern recording studios. Its analog sound and intuitive controls make it an attractive choice for engineers looking for a classic sound. Additionally, the 1176’s unique features have inspired many designers to create new compressor plugins that expand on the original design.

Advantages of continued use and developmentDisadvantages of continued use and development
Allows for continued exploration of the 1176’s unique sound.Enables engineers to adapt the 1176 to modern recording techniques.Provides opportunities to expand upon the 1176’s design and add new features.May dilute the original sound and character of the 1176.Could lead to a saturation of plugin options, making it difficult to choose the right compressor.

In conclusion, the Urei Universal Audio 1176 Compressor has had an enduring impact on the world of audio engineering. Its legacy and influence can still be felt today, and its continued use and development ensure that it will remain a valuable tool for years to come.

Urei Universal Audio 1176 Compressor

Credit: www.uaudio.com

Frequently Asked Questions For Urei Universal Audio 1176 Compressor

What Is 1176 Compressor Best For?

The 1176 compressor is best for adding warmth, character, and color to vocals, drums, guitars, and bass. It is also good for capturing dynamics and preserving transients. This compressor is versatile and widely used in music production for its unique “in your face” sound.

Why Is 1176 Compressor So Good?

The 1176 compressor is beloved for its fast attack and release times, which improve transient response. This creates a unique, aggressive sound that compliments many instruments, particularly vocals and drums. Additionally, the 1176 can be pushed hard to create a subtle distortion effect that further enhances the sound.

Who Made The Original 1176 Compressor?

1176 compressor was originally designed by Urei, an American electronics company, in the late 1960s. This iconic compressor has become a studio staple for recording and mixing music to bring presence, warmth, and energy to recordings.

What Is Special About The 1176ln?

The 1176ln is a compressor with a unique, fast-acting circuit that allows for compression ratios of up to 20:1. Its distinctive sound is favored by many engineers and producers and has been used on countless hit records. It is also known for its simplicity and durability, making it a go-to choice in professional recording studios.

Conclusion

The Urei Universal Audio 1176 Compressor is a game-changer for music producers and sound engineers. With its legendary reputation for adding warmth and character to audio recordings, it has become a staple in studios around the world. Its classic design, reliability, and versatility make it a top choice for both beginners and professionals.

Whether you’re recording vocals, drums, or guitars, the 1176 compressor can help you achieve a polished and professional sound. Upgrade your studio setup with this timeless piece of equipment and take your music to the next level.

Categories
Archive

How To Overcome Creative Blocks

To overcome creative blocks, try changing your routine and environment. Use exercises that stimulate your creativity.

Feeling stuck and uninspired can happen to anyone, whether it’s a writer struggling to pen their next novel, a musician hitting a creative wall, or an artist facing a blank canvas. Creative blocks can be frustrating, but there are steps you can take to overcome them.

Sometimes, a simple change in routine or environment can provide the spark needed to jumpstart your creativity. Other times, doing exercises or activities that stimulate your mind and imagination can help get the ideas flowing again. We’ll explore some ways to overcome creative blocks and keep your creativity flowing.

Identifying Creative Blocks

Creative blocks can be frustrating and challenging to overcome. Identifying the root cause of the block, such as fear or burnout, can help you move forward. Exploring new activities and taking breaks can also boost creativity and inspire new ideas.

Identifying Creative Blocks Creative block is a common issue faced by most artists, writers, designers, and musicians. It’s a state of mind that occurs when one is unable to generate new ideas or do meaningful work. It can last for days, weeks, or even longer, and can be very frustrating. In order to overcome a creative block, you must first identify what is causing it. Here are two common types of creative blocks: External Distractions and Internal Distractions.

External Distractions

External distractions are the most obvious cause of creative blocks. They are the external factors that distract you from your work. These distractions can be as simple as noise or as complex as a personal crisis. Some common external distractions are listed below:

Distracting FactorSolution
NoiseUse noise-cancelling headphones or find a quieter location to work.
Uncomfortable workspaceImprove the lighting, temperature, and seating arrangement of your workspace.
TechnologyTurn off your phone, log out of social media, and switch off email notifications.

Internal Distractions

Internal distractions are more difficult to identify and overcome. They are the internal factors that prevent you from being creative. These distractions can be as simple as negative self-talk or as complicated as depression. Some common internal distractions are listed below:

  • Perfectionism and self-doubt
  • Lack of confidence
  • Fear of failure or success
  • Lack of motivation or inspiration
  • Depression or anxiety

In conclusion, identifying the cause of a creative block is the first step towards overcoming it. Once you have identified the cause, you can take steps to eliminate or minimize the distractions. By creating a quiet, comfortable workspace and addressing your internal fears and doubts, you can break through your creative block and produce meaningful work.

How To Overcome Creative Blocks

Credit: www.linearity.io

Breaking Down Creative Blocks

As a writer, getting stuck in a creative block can be frustrating. To overcome it, try changing your environment, taking a break, brainstorming, collaborating with others, or experimenting with new techniques. Breaking down creative blocks can lead to fresh and unique ideas for your content.

As a creative writer, it’s common to experience creative blocks every once in a while. It can be a frustrating experience to stare at your screen and struggle to come up with new ideas. However, you don’t have to remain stuck. Creating content is all about tapping into your creativity, and sometimes it takes a bit of a push to get the ideas flowing again.

Take A Break

One way to break down your creative block is to simply take a break. Sometimes you need to step back from your work and let your mind rest for a while. Leave your computer or notebook behind, and take a walk, exercise or engage in a hobby that you love. This helps to reset your mind and bring a new perspective to your work.

Experiment

Another way to overcome your creative block is to experiment with your creativity. Trying out new ideas is an excellent way to overcome that blocked feeling. Take a different approach and turn off your inner critic that says “that idea won’t work.” Allow your creativity to run wild, and you might be shocked by what you come up with.

Collaborate

Collaborating with other creatives can provide an excellent way to overcome blocks. By collaborating with other writers or artists, you can gain insight into their creative ideas and techniques, which can spark inspiration for fresh ideas of your own. Their feedback will give you the motivation you need to complete the task at hand. Breaking down creative blocks is all about taking breaks, experimenting, collaborating and trying new things. All you have to do is to find what works best for you. With the above tips, you are sure to break out of your creative block and come up with new and exciting ideas for your writing projects. So give yourself some time, allow yourself to experiment and find a new perspective, you’ll be amazed by how much it helps!

Developing Creativity

Developing creativity can be a challenging task, especially when you encounter creative blocks. To overcome them, try changing your perspective, seeking inspiration from new sources, taking breaks, and experimenting with different ideas. Don’t be afraid to step out of your comfort zone and embrace the unknown.

Developing Creativity: Creativity is the core of any art form and can bring value to your life in numerous ways. However, everyone falls victim to creative blocks every once in a while. This is why creativity needs to be developed through consistent practice and an open mindset. In this article, we’ll look at a few ways to overcome creative blocks and develop creativity. H3: Practice Mindfulness Mindfulness is the art of living in the present moment, being fully aware of thoughts and feelings. It is a beneficial practice to enhance creativity. Mindfulness meditation can help you let go of negative thoughts and emotions that may be blocking your creativity. By practicing mindfulness regularly, you can cultivate a non-judgmental, open-minded, and compassionate attitude towards your creative process. H3: Try New Things Trying new things is a great way to explore your creative self. When you get stuck, you need to experiment with new mediums, styles or techniques. Consider learning a new skill, visiting a new place, reading a book or listening to music you never have before. This will not only inspire fresh ideas but also push you out of your comfort zone. By constantly trying new things, you can prime your mind for creativity and expand your horizons. H3: Collaborate with Others Collaborating with others can break your creative impasse by providing a new perspective. Working with people who have skills and talents you don’t can help you get unstuck and create something new. By bouncing ideas around with others, you can explore different angles and improve your skills. Collaborations can be found in one on one arrangements or teamwork like in your career setting. In summary, developing creativity is crucial to overcoming creative blocks. By practicing mindfulness, trying new things, and collaborating with others, you can overcome obstacles and open your mind to new possibilities. Incorporating these into your creative process can help you stay motivated, inspired, and productive.

Finding Inspiration

Overcoming creative blocks can be a daunting task but finding inspiration can help. Make time for activities that recharge your mind and reflect on past experiences to spark new ideas. Experiment with different approaches, and don’t be afraid to take risks.

Feeling stuck while creating content can happen to anyone, especially writers who have to come up with new ideas on a regular basis. But don’t worry, there are ways to overcome this creative block. One of the most effective ways is to find inspiration. Here are some ways to do it:

Get Out Of Your Comfort Zone

Stepping out of your comfort zone can help you find inspiration and new ideas. Challenge yourself to write a completely different type of article or in a different tone of voice than what you’re used to. Attend an event or join a group that isn’t typically “your thing.” By doing so, you’ll expose yourself to new experiences and perspectives that can spark your creativity.

Visualize Your Goals

Visualizing your goals can help you find inspiration by providing a clear and concrete image of what you want to achieve. When you have a clear vision, it’s easier to come up with steps to reach your goal, and that can help you generate ideas. Create a vision board or simply write down your goals and place them somewhere visible. Include pictures, words, or anything else that keeps you motivated.

Collaborate With Others

Collaboration is a great way to find inspiration because it opens you up to new ideas and perspectives. Working with someone else can help you brainstorm and explore new directions. And, it’s always great to have someone else’s point of view. Reach out to others in your field and offer to collaborate on a project. You could also join a group or attend an event where you can connect with other creatives.

Practice Mindfulness

When you’re feeling stuck, practicing mindfulness can help you find inspiration by helping you focus on the present moment. Take a few minutes to meditate or do some deep breathing exercises. When you’re done, take a moment to reflect on what you’re feeling. By becoming more aware of your thoughts and emotions, you’ll be better equipped to recognize when you’re in a creative rut and take the steps necessary to move past it. Finding inspiration can be challenging, but it’s necessary to push through creative blocks. By stepping out of your comfort zone, visualizing your goals, collaborating with others, and practicing mindfulness, you can find new and creative ideas that will help you overcome any creative block.

Staying Motivated

Staying motivated can be challenging, especially when facing creative blocks. However, there are effective strategies to overcome them. Start by taking a break, changing your environment, or seeking inspiration from other sources. Stay positive and keep pushing through the block until you find your inspiration again.

Create A Routine

Creating a routine is one of the best ways to stay motivated while working on creative projects. It can help you get into the right mindset before you even start working. Try creating a schedule for yourself that includes working on your project at specific times each day. This can help you stay focused and motivated, and make it easier to get started when it’s time to work.

Reward Yourself

Rewarding yourself after completing a creative task can be a great way to stay motivated. You can set small goals for yourself, and then treat yourself to something you enjoy once you’ve reached those goals. This could be something as simple as taking a break to enjoy a cup of coffee or going for a walk outside. By rewarding yourself, you’ll be more likely to stay motivated and keep working on your project. Staying motivated is essential when it comes to overcoming creative blocks. Whether you’re working on a writing project, designing a website, or creating art, it’s important to stay focused and motivated throughout the entire process. By creating a routine and rewarding yourself along the way, you can keep your motivation levels high and push through any obstacles that may come your way.

How To Overcome Creative Blocks

Credit: blog.paperblanks.com

Overcoming Fear Of Failure

Overcoming the fear of failure is crucial to overcoming creative blocks. One way to do this is to shift your focus from the end result to the process of creation itself. By embracing mistakes and failures as opportunities to learn and grow, you can unlock your creativity and tackle challenges with confidence.

Creative blocks are bound to occur at some point in any artist or writer’s career. The fear of failing is a common reason for these blocks, often causing a lack of confidence and inspiration. However, it’s essential to understand that mistakes and failures are part of the creative process, and overcoming this fear is crucial to achieving our creative goals. Let’s discuss how to embrace failure as part of this process and learn from it.

Embrace Failure As Part Of The Creative Process

It’s natural to feel frustrated and disheartened when things don’t go as planned. However, instead of dwelling on the negative, try to learn from this experience. Embracing failure as part of the creative process allows you to explore new ideas and techniques that may have previously been overlooked. Additionally, learning to accept and grow from failure can lead to a more positive and constructive mindset towards creative endeavors.

Learn From Failure

Rather than seeing failure as a setback, it’s important to analyze what went wrong to avoid repeating the same mistake. Take a step back, evaluate the situation, and ask yourself what you could have done differently. Use this as an opportunity to learn and grow in your craft. Break down the creative process into smaller achievable tasks, and take every failure as an opportunity to refine and improve.

Final Thoughts

Overcoming the fear of failure can be daunting, but it’s essential to achieve creative success. Embrace failure as part of the creative process, and use it as an opportunity to learn and grow. Remember, creativity is a journey, and it’s these setbacks and challenges that shape us into refined artists and writers.

Using Technology To Boost Creativity

Technology has become essential for artists to overcome creative blocks. With access to software like Adobe and Canva, individuals can express their ideas in new ways. Apps like Notion and Trello also help with organization and planning, leading to a more productive and inspired creative process.

As a creative writer, graphic designer or artist, you are bound to face creative blocks or experience a lack of inspiration at some point. Overcoming these blocks can be challenging, but technology has made it possible to spark creativity in unimaginable ways. In this article, we will discuss how technology can help overcome creative roadblocks, and how you can use technology to enhance your creative juices.

Collaborate Virtually

One of the ways to boost creativity using technology is through virtual collaboration. Collaborating with people who share your passions and interests can help you think out of the box. Virtual collaboration tools such as Zoom, Skype, and Trello have made it possible to organize meetings and share ideas with colleagues from different parts of the world. With virtual collaboration, you can brainstorm ideas on a project, share feedback and come up with innovative solutions.

Find Creative Communities Online

Another great way to use technology to boost creativity is by joining online creative communities. Online communities such as Reddit’s Creative Writing subreddit, Dribbble, Behance, Instagram, and Pinterest are great places to connect with other creatives and share your work. These communities offer opportunities to get feedback, learn from others, and find inspiration. You can use these platforms to discover new ideas and explore different perspectives that might spark your creativity.

Conclusion

In conclusion, using technology can be a game-changer in unlocking your creative potential. Whether you use it to collaborate with people in other parts of the world or join online creative communities, technology has made it possible to get inspired and stay motivated. With these tips, you can overcome creative blocks and explore new avenues to unleash your creativity.

How To Overcome Creative Blocks

Credit: petapixel.com

Frequently Asked Questions For How To Overcome Creative Blocks

Why Am I Having A Creative Block?

Creative block can occur due to various reasons such as mental exhaustion, lack of inspiration, fear of failure, or feeling overwhelmed. It can affect anyone, impacting their ability to generate new ideas or complete existing projects. To overcome it, try taking a break, changing your environment, seeking feedback from others, or exploring new experiences.

How Do I Overcome Art Block?

To overcome art block, try doing something different than your usual routine, such as taking a walk or browsing art online. Experiment with new mediums and techniques, and push yourself outside your comfort zone. Don’t be afraid to take breaks and come back to your art with a fresh mindset.

Finally, seek inspiration from other artists and continue to practice consistently.

How Do You Deal With Artistic Blocks?

To deal with artistic blocks, you can try stepping back from your work, getting outside inspiration, starting a new project, experimenting with different techniques, or seeking advice from others in your field. Taking breaks, practicing self-care, and staying open to new ideas can also help overcome creative roadblocks.

What Is The Psychology Behind Creative Blocks?

Creative blocks are caused by a variety of psychological factors, including fear of failure, self-doubt, anxiety, and perfectionism. These emotions can cause a lack of inspiration, making it difficult to create new and innovative ideas. Overthinking and stress can also contribute to creative blocks.

It’s essential to recognize and address these psychological issues to overcome creative blocks.

Conclusion

Hitting a creative block can be frustrating, but it’s essential to remember that creativity is not something we can always force. By taking a break, changing your routine, shifting your perspective, collaborating, and practicing self-care, you can overcome your creative blocks.

Remember that creativity is not a fixed state, and it’s okay to take a break now and then. Keep pushing yourself and experimenting with new ideas, and you’ll be surprised by what you can create. So, whenever you find yourself stuck, remember that this too shall pass!

Categories
Archive

Which Synth Has the Best Arpeggiator

The Korg ARP Odyssey is widely considered to have the best arpeggiator among synthesizers. Its arpeggiator offers multiple patterns, customizable modes and a 3-octave range.

As an Amazon Associate I earn from qualifying purchases.

The ARP Odyssey’s arpeggiator can create complex and unique patterns that are not found in other synthesizers, making it a popular choice for musicians and producers alike. Synthesizers have come a long way since their first inception in the 1960s.

From analog to digital, polyphonic to monophonic, synths have evolved to cater to diverse musical styles and preferences. One of the critical features of synthesizers is their arpeggiator, which allows players to create complex patterns by holding down a few keys. While many synths have decent arpeggiators, some stand out above the rest. We will look at some of the best synths with exceptional arpeggiators. We’ll explore their unique features, capabilities, and why they stand out in the market.

Criteria For Selecting Synths

In the world of music production, synthesizers are an essential tool for creating a wide range of sounds. However, with so many options available, it can be overwhelming to choose the best one for your needs. When it comes to selecting a synth with the best arpeggiator, there are several criteria to consider.

Price

Price is a critical factor when selecting the best synth with an arpeggiator. Some synths with advanced features like arpeggiators can be very expensive, while others are more affordable. So, it’s essential to determine what your budget is before investing in a synth with an arpeggiator.

User Interface

A synth’s user interface is crucial to its functionality. Selecting a synth with an intuitive and easy-to-use interface can save time and streamline the music-making process. An arpeggiator that is easy to access and control can make all the difference when creating complex rhythmic patterns.

Sound Quality

Sound quality is another crucial factor when selecting a synth with an arpeggiator. A synth with a high-quality sound engine can produce rich and dynamic sounds. The arpeggiator’s quality is also essential. A good arpeggiator should produce clear and precise patterns that match the tempo and chords of the music.

Number Of Arpeggiator Modes

The number of arpeggiator modes available is an essential factor to consider. Some synths offer a limited number of arpeggiator modes, while others provide a wide range of options for creating different rhythmic patterns. Choosing a synth with multiple arpeggiator modes can allow for more creativity and experimentation in music production.

Top Synths With The Best Arpeggiators

Synthesizers have come a long way since their inception and have become an essential tool for music production. If you’re in search of a synth with the best arpeggiator, some of the top contenders include Korg Minilogue XD, Roland JU-06A, and Moog Matriarch.

Arpeggiators are essential tools for creating intricate melodic sequences in electronic music. They allow you to create complex patterns with ease, providing a wealth of creative options. In this section, we’ll take a look at the top synths with the best arpeggiators. Each of these synths brings something unique to the table, from classic analog sounds to cutting-edge digital processing. Let’s dive in: The Korg Prologue is a flagship synthesizer that boasts an impressive range of features, including a powerful arpeggiator. This synth offers 16 arpeggio patterns, each with its own rhythm and note length settings. You can also adjust the swing, gate time, and velocity of the arpeggio, giving you complete control over your patterns. The Prologue’s arpeggiator can be synced to an external clock, making it perfect for live performances and studio sessions. The Roland JU-06A is a modern take on the classic Juno synthesizer, complete with a versatile arpeggiator. This synth features six different arpeggio modes, including up, down, up/down, random, and chord memory. You can also adjust the arpeggio tempo and gate time, allowing you to create a wide range of patterns. The JU-06A’s arpeggiator syncs to external MIDI clock and can be played in latch or hold mode. The Arturia MicroFreak is a unique synthesizer that combines digital and analog sound engines. It also comes equipped with a powerful arpeggiator that offers a range of creative options. You can select from several arpeggio modes, including up, down, random, and more. The MicroFreak’s arpeggiator also features a Spice and Dice function, which generates new patterns based on your input. With the MicroFreak, you’ll never run out of fresh ideas. The Moog Subsequent 37 is a classic analog synth that boasts a powerful arpeggiator. This synth features four arpeggio divisions, allowing you to create complex rhythms and syncopated patterns. You can also adjust the arpeggio rate, gate time, and swing, providing limitless creative options. The Subsequent 37’s arpeggiator can be synced to external MIDI clock or an internal clock source. The Sequential Prophet-6 is a modern take on the classic Prophet synthesizer, complete with a versatile arpeggiator. This synth features four different arpeggio modes, including up, down, up/down, and random. You can also adjust the arpeggio tempo, gate time, and swing, allowing you to create a wide range of patterns. The Prophet-6’s arpeggiator syncs to external MIDI clock and can be played in latch or hold mode. The Novation Peak is a hybrid synthesizer that combines digital and analog technology. It features a powerful arpeggiator that offers a range of creative options. You can select from several arpeggio modes, including up, down, random, and more. The Peak’s arpeggiator also features a mutate function, which generates new patterns based on your input. With the Peak’s arpeggiator, you can create intricate patterns that evolve over time. In conclusion, these top synths with the best arpeggiators offer a range of features and creative options for electronic music producers. Each one provides unique sonic possibilities, allowing artists to explore new and exciting territories. Whether you’re a seasoned pro or just starting, these synths are worth checking out.

Korg Prologue

The Korg Prologue is a powerful synthesizer with a versatile arpeggiator that provides a wide range of patterns and variations. Its 16-step sequencer and dynamic filters add depth and richness to any sound.

Overview

If you’re looking for a synth with a top-class arpeggiator, the Korg Prologue needs to be on your radar. This instrument boasts a powerful polyphonic arpeggiator with plenty of features to help you create intricate, evolving patterns. The Korg Prologue is a premium synth that delivers rich, detailed sound, making it a popular choice for professional producers and sound designers.

Unique Features

One of the standout features of the Korg Prologue arpeggiator is its ability to create complex patterns using various arpeggiator modes. You can use the arpeggiator to create traditional up/down, random, triggered, and chord trigger patterns. Additionally, the Korg Prologue arpeggiator lets you switch between patterns while playing, making it a powerful tool for live performance and improvisation. The Korg Prologue also features unique parameter locks that allow you to assign different values to each step in the arpeggiator pattern. This means you can create intricate, evolving patterns that are constantly changing over time. Plus, the Prologue’s OLED display and intuitive controls make it easy to edit the arpeggiator patterns on the fly, letting you quickly tweak your musical ideas and bring them to life.

Pricing

The Korg Prologue is a premium synth with a price tag to match. The 8-voice Prologue-8 model starts at around $1,500, while the more powerful 16-voice Prologue-16 can cost upwards of $2,000. While this may put the Prologue out of reach for some hobbyists and home producers, it’s worth noting that the instrument’s build quality, sound, and features make it a worthwhile investment for those serious about their craft. In short, the Korg Prologue is one of the finest synths available when it comes to arpeggiator capability. Its powerful arpeggiator modes, parameter locks, and intuitive controls make it a joy to work with. While it may come at a premium price, the Korg Prologue is a worthwhile investment for anyone serious about creating intricate, evolving patterns and rich polyphonic sound.

Roland Ju-06a

Roland JU-06A stands out with its versatile arpeggiator that allows users to create complex patterns with ease. Whether you’re new to synths or an experienced musician, this instrument is a great choice for crafting unique soundscapes.

Overview

When it comes to arpeggiators, the Roland JU-06A is one of the best synths available in the market. This compact and portable synth is based on the legendary Roland Juno-60 with a modern twist. It features a 4-voice polyphonic synth engine and a versatile arpeggiator that can create complex arpeggios, basslines, and leads.

Unique Features

One of the unique features of the Roland JU-06A is its arpeggiator. It has four arpeggio modes – Up, Down, Up/Down, and Random – that can be synced to the tempo of a track. The arpeggiator can also be customized with various gate lengths, swing, and note range settings. Another standout feature is the ability to chain two JU-06A units together for 8-voice polyphony, doubling the sonic possibilities. In addition, the synth includes a step sequencer, chorus, and delay effects, further expanding its capabilities.

Pricing

The Roland JU-06A has a mid-range price point, making it an affordable option for musicians on a budget. It is priced at $399, making it an excellent value for the features it offers. For those who want the full vintage experience, Roland also offers an optional K-25m keyboard dock that recreates the feel and look of the original Juno-60. Overall, the Roland JU-06A is the perfect synth for musicians who want a classic Juno sound with a modern touch. Its versatile arpeggiator and other unique features make it an excellent choice for a wide range of musical genres, from electronic to pop and beyond. If you’re in the market for a synth with a top-notch arpeggiator, the Roland JU-06A is certainly worth considering.

Arturia Microfreak

The Arturia MicroFreak is a great synth with a unique arpeggiator. Its unusual touchplate keyboard and experimental sound engine make it stand out from the competition. Whether you’re an experienced musician or a beginner, the MicroFreak is definitely worth checking out.

Overview

Arturia MicroFreak is a compact synthesizer that has quickly gained popularity within the music industry due to its impressive features and capabilities. It has an array of sound engines, which allow its users to produce a wide range of sounds. The synth is equipped with a powerful arpeggiator function that enables producers to create intricate sequences effortlessly.

Unique Features

Arturia MicroFreak comes with a ton of unique features that set it apart from other synthesizers in the market. Firstly, it has a touch-sensitive flat keyboard that allows musicians to play notes and perform different gestures like vibrato and pitch-bend. Secondly, it features 12 oscillator types, which can be used simultaneously, enabling producers to create complex and unique sounds. Additionally, it has a randomization feature that generates random patterns, providing users with endless possibilities for music creation.

Pricing

The price of Arturia MicroFreak varies, depending on the vendor and location. However, on average, it costs around $300. Considering the synth’s features, it is an affordable price for a powerful music production tool. This makes it accessible to musicians of all levels who are looking for a synth with a robust arpeggiator and unique sound engines. In conclusion, Arturia MicroFreak is a fantastic choice for music producers looking for a synthesizer with an exceptional arpeggiator and unique features. Its touch-sensitive keyboard and randomization feature make it easier to create original sounds. The affordable pricing ensures that the synth is accessible to all levels of music producers.

Moog Subsequent 37

If you love synth music, you probably know that arpeggiators can add a unique dynamic to your sound. But, which synth has the best arpeggiator on the market? In this post, we’ll take a look at the Moog Subsequent 37 and see what makes it stand out.

Overview

The Moog Subsequent 37 is a powerful synth that offers a wide range of features for musicians looking to enhance their sonic palette. This synth has a rich and warm tone, thanks to its advanced sound engine, and it’s perfect for creating ambient soundscapes, funky basslines, and everything in between.

Unique Features

One of the most impressive features of the Moog Subsequent 37 is its arpeggiator. This arpeggiator is fully customizable, allowing you to create complex patterns with ease. It also features multiple modes, including up, down, up/down, and random, and you can adjust the speed and gate time to further customize your sound.

In addition to its arpeggiator, the Moog Subsequent 37 also has a built-in sequencer that can be used for creating melodic patterns and rhythmic loops. This sequencer can store up to 64 steps, and it’s perfect for adding a layer of complexity to your music. The synth also has a wide range of modulation options, including LFO, filter, and amp envelopes, and it has a semi-modular design that allows you to experiment with different signal paths and patch configurations.

Pricing

The Moog Subsequent 37 is a high-end synth, and it comes with a price tag to match. At around $1,500, it’s definitely an investment, but if you’re serious about creating high-quality synth music, it’s worth considering. You may also want to consider purchasing a used model if you’re on a tighter budget.

Conclusion

If you’re looking for a synth with a powerful and customizable arpeggiator, the Moog Subsequent 37 could be the perfect choice for you. With its advanced sound engine, impressive modulation options, and semi-modular design, this synth offers a wide range of features that will help you take your music to the next level.

Sequential Prophet-6

The Sequential Prophet-6 is a popular choice for musicians looking for a synth with a top-notch arpeggiator. Its versatile arpeggiator can create complex patterns with ease, making it a reliable instrument for any genre of music.

Overview

The Sequential Prophet-6 is a six-voice polyphonic analog synthesizer released in 2015. This modern recreation of the legendary Prophet-5 has been praised for its warm and rich sound, intuitive design, and high-quality build.

Unique Features

One of the standout features of the Prophet-6 is its arpeggiator, which many musicians consider to be one of the best in the market. The arpeggiator offers a wide range of creative options, including various modes (up, down, up/down, random), clock sync, and a programmable step pattern. Additionally, the Prophet-6 features a dual filter architecture, which allows for complex and nuanced sound shaping. This synthesizer is also equipped with a vintage-style stereo analog delay and a powerful distortion circuit, both of which can add a unique and distinctive character to your sounds.

Pricing

The Prophet-6 is a premium synthesizer, and its price reflects its quality and features. As of writing, the standard version retails for around $2,799, while the desktop module version is around $2,399. While this might not be within everyone’s budget, many professional musicians and producers consider it a worthwhile investment for its sound and capabilities. In conclusion, the Sequential Prophet-6 is a synth with a powerful and versatile arpeggiator, as well as other unique features that can help you achieve a wide range of sounds and textures. Whether you are a seasoned synth user or just starting your journey, the Prophet-6 is definitely worth considering if you’re looking for a high-end analog synthesizer.

Which Synth Has the Best Arpeggiator

Credit: m.youtube.com

Novation Peak

Novation Peak is a great synth for arpeggiator enthusiasts. With its advanced features and unique sound, it offers a wide range of options for creating intricate and exciting arpeggios.

Overview

Novation Peak is a polyphonic analog synthesizer that comes with a unique and powerful arpeggiator. This synthesizer offers a vast selection of sounds, combined with a high level of control over the tone shaping. Novation Peak is a favorite among electronic and synth enthusiasts, thanks to its stunning sound quality and advanced arpeggiator features.

Unique Features

The Novation Peak comes with an advanced arpeggiator, which delivers impressive sequencing capability. The arpeggiator provides a rhythmic and melodic pattern generator, providing infinite possibilities for musicians to explore. The arpeggiator offers a range of modes, including up, down, up/down, and random, providing an endless creative horizon. The synth also offers extensive options for customization, allowing users to adjust the tempo, pitch, and note length, along with the user’s ability to create new arpeggio sequences. One of the most notable features of Novation Peak is its ability to sync to external gear, including other synthesizers and drum machines, which means that musicians have the freedom to integrate it into their existing setup. Additionally, the synth offers a diverse range of sound options, making it suitable for any music genre. The synthesizer’s solid construction allows it to withstand the rigors of daily use for professionals and home musicians alike.

Pricing

Novation Peak is one of the moderately priced analog synthesizers, which makes it an economical option compared to other high-end models in the market. The synth’s price is in the range of $1,200, which may vary based on factors such as location, retailer, and the included accessories during purchase. Nevertheless, Novation’s Peak offers significant value and features, making it a sound investment for musicians looking for advanced arpeggiator features. Overall, Novation Peak’s arpeggiator features are among the most impressive available in the market, making it a top contender for the title of best arpeggiator synth. Its unique features, coupled with its reasonable price range, make it an absolute must-have for any musician who desires to produce unique sounds and intricate rhythms.

Which Synth Has the Best Arpeggiator

Credit: m.youtube.com

Frequently Asked Questions On Which Synth Has The Best Arpeggiator

Does Vital Synth Have An Arpeggiator?

Yes, Vital Synth has an arpeggiator feature that allows users to create complex rhythmic patterns by automatically arpeggiating the notes played on the keyboard. It includes various arpeggio modes, note order controls, and rate settings that can be adjusted to achieve desired results.

What Is An Arpeggiator Synth?

An arpeggiator synth is a tool in music production that allows a musician to create a sequence of notes that play in a repeating pattern. These patterns can be adjusted for playback speed, rhythm, and more. It is a popular tool for electronic music producers and keyboardists.

Is An Arpeggiator Important?

An arpeggiator can be important for musicians who want to create a specific sound or style of music. They are especially useful for electronic and keyboard-based music genres. However, whether an arpeggiator is important or not depends on the individual’s musical preferences and needs.

What Is A Built In Arpeggiator?

A built-in arpeggiator is a feature commonly found on electronic musical instruments that automatically plays a sequence of notes in succession based on a chosen chord. It allows musicians to easily create complex, layered melodies without having to manually play each individual note.

Conclusion

Based on the analysis done, it is evident that each synth has a unique arpeggiator that sets it apart from others. While some arpeggiators come with exclusive features, others might be easy to use or have a great user interface.

Ultimately, choosing the best arpeggiator for your needs depends on your preference and sound requirements. So, go ahead and experiment with different synths to find the perfect arpeggiator that fits your style!

More in our Synth guides.

Categories
Archive

How To Use Dynamics Processing

Dynamics processing is used to control the volume of audio signals. To use dynamics processing, insert a dynamics processor into the signal chain, set the desired parameters, and adjust the threshold and ratio settings accordingly.

Dynamics processing allows sound engineers to adjust or compress the volume of an audio signal. By doing so, it ensures that the sound output remains consistent even when the input varies. Dynamics processors can be used to tweak sounds, eliminate peaks, and emphasize or de-emphasize specific aspects of an audio track.

This technique is commonly used in live sound mixing, music production, mastering, and audio post-production. Furthermore, dynamics processors can come in the form of software modules or hardware units, and each type has its own pros and cons. As a result, it is crucial to have a good understanding of how to use dynamics processing if you plan to become an expert in the field of audio engineering.

Different Types Of Dynamics Processing

Dynamics processing is essential for producing high-quality audio. This technique is categorized into different types such as compression, expansion, limiting, and gating. Knowing how to use each type of dynamic processing helps to improve audio production and achieve a professional sound.

Dynamics processing is a crucial technique for audio engineers and producers when it comes to shaping the dynamics of a track. It involves the manipulation of an audio signal’s dynamic range, allowing engineers to control the level, volume, and clarity of a track. One can use different types of dynamics processing to shape their audio according to their desired specifications.

Compressors

A compressor changes the volume or gain of an audio signal if it exceeds a certain level called the ‘threshold.’ It reduces the dynamic range of the audio by making the quiet sounds louder and the louder sounds quieter. By doing so, it tightens up the track, enabling it to sit better in a mix. Compressors are useful when handling vocals, drums, and bass guitars, where it is vital to maintain a consistent level throughout the track regardless of the performer’s dynamic range.

Limiters

A limiter is an advanced version of a compressor. It ensures that the audio signal never exceeds a specified level, maintaining a uniform volume level. It automatically reduces the gain to a certain point if it goes beyond the set threshold, preventing any distortion in the audio. Limiters are commonly used when mastering audio tracks, especially for commercial release.

Expanders

While compressors reduce the dynamic range, expanders perform the opposite function by increasing the volume of sounds below a certain level. They work by adjusting the threshold to make quieter sounds even quieter and louder sounds louder. They make a track sound more natural by increasing the dynamic range. Expander plugins are handy when working with quieter instruments such as acoustic guitars, percussion, and background instruments. From their functions, it is evident that compressors, limiters, and expanders are indispensable tools in the music production toolkit. Learning about dynamics processing can enhance the quality of audio with ease, precision, and flexibility.

When To Use Dynamics Processing

When it comes to mixing audio, dynamics processing is an essential tool that every sound engineer should have in their toolbox. By adjusting the level of your sound source, dynamics processing can help you achieve a more balanced, polished, and professional sound.

To Control Dynamics

Dynamics processing is primarily used to control the dynamic range of a sound source. This means that you can use dynamics processing to reduce the volume of loud elements in a mix, such as drums or vocals, without affecting the quieter elements. This is achieved through the use of compressors and limiters, which are specifically designed to reduce the dynamic range of a sound source.

Compressors allow you to smooth out the volume of a sound source by reducing the level of the loudest parts of the signal. This can help to tame an overenthusiastic vocalist, for example, or control the level of a booming kick drum. Limiters, on the other hand, are designed to prevent the level from exceeding a certain point. This is particularly useful if you want to ensure that your audio doesn’t clip, which can cause distortion and other unwanted artifacts.

To Improve Overall Mix

Dynamics processing can also be used to improve the overall balance of your mix. By reducing the dynamic range of your sound sources, you can ensure that everything sits together more cohesively. This means that you can bring quieter elements up in the mix without worrying about them getting drowned out by the louder sounds. By achieving a more balanced mix, you can create a more immersive and enjoyable listening experience for your audience.

To Enhance Tonal Balance

In addition to controlling dynamics and improving overall mix, dynamics processing can also help enhance the tonal balance of your mix.

By using an equalizer alongside a compressor, you can shape the tonal balance of your sound source in a more precise way. For example, you might want to boost the lower frequencies of a bass guitar to make it sound warmer and more present. Or you might want to cut the high-end frequencies of a cymbal to avoid it sounding too harsh or overwhelming. By using dynamics processing to shape the tonal balance of your mix, you can fine-tune it to your liking and create a more polished sound overall.

How To Set Up Dynamics Processing

Setting up dynamics processing allows you to even out inconsistent audio levels and create a more polished sound. To use dynamics processing, start by defining the range of levels you want to affect, then adjust threshold, ratio, attack and release settings to fine-tune your processing.

Dynamics processing is a crucial technique that every audio engineer should learn to ensure that they achieve the best results when recording or mixing audio tracks. Dynamics processing simply refers to the process of controlling the dynamic range of a sound by adjusting the volume levels of the various parts of the audio signal.

Starting With A Dry Signal

Before you can start applying dynamics processing in your mixing or mastering sessions, it is crucial to start with a dry signal. A dry signal means that you have an unprocessed track with no effects or processing applied to it. This will enable you to have an accurate representation of the sound and ensure you make the right adjustments.

Setting Thresholds

To set up dynamics processing, you need to understand thresholds. Thresholds are the levels of the audio signal at which the processing starts to take effect. To set the thresholds, start by listening to the track and identify the most dynamic parts of the audio that need compression. Set the threshold level slightly above the loudest portion.

Adjusting Attack And Release Times

Attack and release times are essential settings when it comes to setting up dynamics processing. The attack time determines the response time of the compressor when a signal crosses the threshold, while the release time controls how long the compressor takes to stop compressing when the signal drops below the threshold. These settings need careful attention to ensure the audio track sounds natural and not too squashed.

Using Makeup Gain

Once you have set the threshold, attack and release times, the signal’s gain or volume is reduced. To compensate for this, use makeup gain. The makeup gain setting increases the output level of the compressor to match the level of the input signal.

Parallel Compression

Parallel compression allows you to blend the compressed and uncompressed signals, giving more control and versatility to your mix. Set up a parallel compressor by duplicating the audio track, applying compression to the duplicate, and then blending the two signals using a mixer. In conclusion, setting up dynamics processing requires careful attention to detail, with each setting affecting the signal. Follow the steps above to ensure that you set up your compressor correctly, and always trust your ears when making adjustments.

How To Use Dynamics Processing

Credit: m.youtube.com

Avoiding Common Mistakes In Dynamics Processing

Learn how to effectively use dynamics processing by avoiding common mistakes. With careful attention to detail and proper execution, you can enhance the quality of your audio tracks and achieve a polished sound.

Dynamics processing is an essential tool for music production, but it’s easy to make mistakes when using it. Here are some common mistakes to avoid to ensure your music production is successful.

Overcompressing

One of the biggest mistakes when using dynamics processing is overcompressing. When you compress a track too much, you can end up losing the dynamics and the natural feel of the sound. This can make your music sound flat and lifeless. To avoid this issue, it’s important to find the right balance between compression and the natural dynamics of the track.

Not Monitoring Gain Staging

Gain staging is the process of adjusting the levels of individual tracks to ensure they are all balanced and not clipping. Many producers make the mistake of not monitoring gain staging when using dynamics processing. This can lead to distorted tracks and a loss of fidelity in your music. To avoid this, make sure to monitor your levels and adjust them accordingly before applying any compression or limiting.

Not Adjusting Threshold For Different Instruments

Another common mistake is not adjusting the threshold for different instruments. Every instrument has a different dynamic range, and you can’t apply the same compression settings to every track. For example, a bass track may need more compression than a vocal track to achieve the same level of balance. It’s important to listen to each track individually and adjust the threshold accordingly to create a cohesive sound.

Ignoring Phase Issues

Phase issues occur when two or more tracks are out of phase with each other, causing cancellation of certain frequencies and a loss of clarity in your mix. Ignoring these issues can lead to a muddy or unclear mix, which can be frustrating for listeners. To solve this problem, make sure to check the phase relationships between tracks and adjust them as needed. In conclusion, using dynamics processing is essential for music production, but avoiding these common mistakes is just as important. By balancing compression settings, monitoring gain staging, adjusting thresholds for different instruments, and addressing phase issues, you can ensure a polished and professional sound for your music.

Mastering Dynamics Processing

Dynamics processing is a critical aspect of audio engineering that involves manipulating the volume levels of audio signals. With modern digital audio workstations, dynamics processing is now more accessible than ever before.

Advanced Techniques

To take your dynamics processing skills to the next level, consider exploring the advanced features offered by your DAW or plugins. Some advanced techniques you can explore include:

  • Sidechain compression to create a more intricate interplay between different audio tracks
  • Parallel compression to blend heavily compressed signals with the dry signal for a more natural sound
  • Multi-band compression to process specific frequency ranges individually

Using Different Types Of Dynamics Processing Together

While each type of dynamics processing can be useful on its own, using them in combination can lead to exciting results. Some combinations you can experiment with include:

CombinationUse Case
Compression and LimitingUsing compression to control dynamic range followed by limiting to prevent audio clipping
Expander and De-EsserUsing an expander to increase the dynamic range and then following up with a de-esser to tame harsh high-frequency sounds

Combining Dynamics Processing With Other Effects

Combining dynamics processing with other effects can lead to even more creative results. Some effects you can consider include:

  • Reverb to add depth and space to a sound while taming sudden spikes in volume using compression
  • Distortion to add warmth and grit to a sound while using limiting to avoid audio clipping
  • Delay to create space between sounds without allowing the dynamic range to get out of hand using compression

By exploring these advanced techniques, combining different types of dynamics processing, and incorporating other effects, you can push your audio engineering skills even further to create new and exciting sounds.

How To Use Dynamics Processing

Credit: legacy.presonus.com

Frequently Asked Questions For How To Use Dynamics Processing

What Is Dynamics Processing?

Dynamics processing is a technique that controls the volume of an audio signal. It’s used to reduce loud parts of the signal and boost quiet parts to make a uniform sound level. It also helps to add sustain and fullness to an audio source.

What Is An Example Of A Dynamic Processor?

A compressor, limiter or noise gate are examples of dynamic processors. They are used to manipulate the amplitude of audio signals in a real-time way to control or improve their quality.

What Are The Different Types Of Dynamic Processing?

The different types of dynamic processing are compression, expansion, gating, and limiting. Compression reduces the volume level of audio signals, whereas expansion increases it. Gating removes unwanted signals below a certain level, while limiting prevents audio signals from exceeding a certain level.

What Is Dynamic Processing In Audition?

Dynamic processing in Audition refers to the use of audio effects to adjust the volume, frequency, and other characteristics of sound in real-time. This technique is commonly used in music production, broadcasting, and film post-production to enhance the overall quality of the audio.

Conclusion

Dynamics processing is a powerful tool that can enhance the overall impact of your audio recordings by controlling the levels of individual sounds. When used correctly with the right settings, it can add warmth, depth, and loudness to your mixes.

It’s important to familiarize yourself with the different types of dynamics processors available and take the time to experiment with different settings to achieve the desired effect. With practice, you can become proficient in the art of dynamics processing and take your audio recordings to the next level.

Categories
Archive

Fl Studio Mixer Not Showing Effects

Fl Studio Mixer Not Showing Effects can occur due to several reasons, including issues with plugin compatibility, incorrect routing, and configuration problems. To resolve the issue, check the plugins’ compatibility with your mixer, ensure the correct routing, and configure the settings properly.

If you’re experiencing the issue and are unsure how to proceed, this guide will provide you with some insight into what might be causing the problem and how to fix it. Fl Studio is a popular digital audio workstation (DAW) that allows users to create professional-level sound production.

However, sometimes users may encounter issues with mixer effects not being displayed. This can be frustrating; fortunately, there are methods to resolve the problem. We will discuss some common reasons for the Fl Studio mixer not showing effects and how to fix them.

Symptoms Of Fl Studio Mixer Not Showing Effects

FL Studio mixer not showing effects can be a frustrating issue for both amateurs and professionals. Symptoms of this problem include audio signals not being affected by mixer plugins, lack of feedback when adjusting knobs and faders, and inability to hear any changes made to the track.

If you’re using FL Studio for music production and your mixer is not showing effects, it can be a frustrating experience. The mixer is the heart of your production process, and without it, you won’t be able to get the sound you want. There are several symptoms of FL Studio mixer not showing effects that you may encounter. These include greyed-out effects in the mixer, effects not loading in the mixer and more.

Greyed-out Effects In Mixer:

One of the common symptoms of FL Studio mixer not showing effects is the greyed-out effects in the mixer. If you have inserted an effect into the mixer, but you cannot see it, and it appears greyed-out, it means the effect has been disabled. This issue can happen if the effect is muted or has been bypassed. To fix this issue, make sure that the effect is enabled, and check that it’s not bypassed.

Effects Not Loading In Mixer:

Another common issue you might encounter when your mixer is not showing effects in FL Studio is the effects not loading in the mixer. This issue can happen if the effect is not correctly installed, or the plugin file is corrupted. Check that the plugin is installed correctly, and that you have the version compatible with your FL Studio. You can also browse to the plugin file location, and see if there is anything unusual with the file.

Other Symptoms:

There are other symptoms of FL Studio mixer not showing effects that you may encounter. For example, the mixer may not be displaying any colors, or you may not be able to right-click on the mixer track. If you experience these symptoms, the issues may be related to a problem with your graphics card or video driver. Updating your software drivers can help resolve this issue. In conclusion, there are several symptoms of FL Studio mixer not showing effects that you may encounter when producing music in FL Studio. Greyed-out effects, effects not loading, unresponsive mixer, etc., are some of the common problems that you may face. Troubleshooting these issues might involve checking your plugins, updating software drivers, or verifying that everything is enabled and not bypassed. By addressing these issues, you can get back to creating fantastic music with FL Studio.

Fl Studio Mixer Not Showing Effects

Credit: www.image-line.com

Causes Of Fl Studio Mixer Not Showing Effects

FL Studio Mixer may not show effects due to a number of reasons, such as incorrect routing, wrong mixer channel selection, or incompatible plugins. Double-checking the settings and ensuring the right plugins are selected can help troubleshoot this issue.

If you’re a music producer using FL Studio, you might have come across a problem with your mixer not showing any effects. This issue can be frustrating and can halt your workflow. In this section, we will discuss the common causes of FL Studio mixer not showing effects and how to troubleshoot them.

Old Fl Studio Version

Using an old version of FL Studio can be a reason why the mixer is not showing any effects. The newer updates of FL Studio come with bug fixes and improvements that might affect your mixer’s performance. If your version of FL Studio is outdated, it’s recommended to update it to the latest one.

Corrupted Fl Studio Installation

A corrupted installation or wrong installation of FL Studio can also cause the mixer not to show effects. This could happen due to incomplete or interrupted installation of the software. It’s recommended to uninstall and re-install FL Studio to ensure that it’s installed correctly and fix any corrupted files.

Missing Or Corrupted Plugins

Missing or corrupted plugins can also prevent the mixer from showing effects. Ensure that the plugins you are using are compatible with your FL Studio version. A plugin might not load if it’s not installed correctly or if it’s outdated. Check to make sure that all your plugins are installed correctly and up-to-date. In conclusion, having an updated version of FL Studio, a correct and complete installation, and ensuring all your plugins are up-to-date will ensure your mixer doesn’t face issues when showing effects. Troubleshooting these problems will allow you to continue creating music without any interruptions.

How To Fix Fl Studio Mixer Not Showing Effects

If you have been using FL Studio for a while, you might have come across a situation where the mixer is not showing effects. This can be frustrating, especially when you have spent hours working on a project. The good news is that this issue can be fixed with a few simple steps.

Updating Fl Studio To The Latest Version

The first thing you need to do if you encounter this issue is to check if you are using the latest version of FL Studio. Updating to the latest version can fix many bugs and issues, including the one where the mixer is not showing effects. To update FL Studio to the latest version, follow these steps:

  1. Go to the Image-Line website and log in to your account.
  2. Download the installer for the latest version of FL Studio.
  3. Run the installer and follow the instructions to update FL Studio.

Reinstalling Fl Studio

If updating to the latest version did not fix the issue, the next step is to reinstall FL Studio. This might seem like a drastic solution, but it can fix many issues, including the one where the mixer is not showing effects. To reinstall FL Studio, follow these steps:

Step 1:Uninstall FL Studio from your computer.
Step 2:Delete any remaining files and folders related to FL Studio.
Step 3:Download the installer for the latest version of FL Studio.
Step 4:Run the installer and follow the instructions to reinstall FL Studio.

Reinstalling Plugins

If reinstalling FL Studio did not fix the issue, the next step is to reinstall plugins. This is because plugins play a crucial role in the functioning of FL Studio, and a corrupt or damaged plugin can cause various issues, including the one where the mixer is not showing effects. To reinstall plugins, follow these steps:

  1. Go to the VST plugins folder in FL Studio.
  2. Delete the folder for the plugin that is causing the issue.
  3. Download and install the latest version of the plugin.
  4. Add the plugin to the plugin database in FL Studio.

Following these steps should fix the issue where the mixer is not showing effects in FL Studio. If the issue persists, you can contact the Image-Line support team for further assistance.

Fl Studio Mixer Not Showing Effects

Credit: www.youtube.com

How To Prevent Fl Studio Mixer Not Showing Effects

If you are facing the issue of FL Studio mixer not showing effects, there are a few steps you can take to resolve the problem. Firstly, ensure that the mixer channels are not routed to the wrong mixer track. Secondly, make sure that the effects you are using are compatible with your version of FL Studio.

Lastly, check that your mixer is not in “mute” mode or that your effects channels are not disabled.

If you are encountering the problem of FL Studio Mixer Not Showing Effects, you are not alone. This issue can be frustrating and may lead to a lack of productivity. Fortunately, there are a few easy steps to avoid this problem and keep your mixer running smoothly. In this blog post, we explore some practical tips for preventing FL Studio Mixer Not Showing Effects.

Regularly Updating Fl Studio And Plugins

One of the key reasons that FL Studio Mixer Not Showing Effects is that the software is outdated or requires an upgrade. Therefore, it is crucial to update both the FL Studio mixer and any plugins regularly. The updates can fix various bugs and compatibility issues, ultimately improving the performance of the software. You can also set your FL Studio to automatically check for and install updates.

Backing Up Fl Studio Settings And Files

Another essential step to prevent FL Studio Mixer Not Showing Effects is to back up your FL Studio settings and files regularly. This ensures that if any data is lost or corrupted, you can easily recover it. To backup FL Studio, go to the Options menu, then General Settings, and select the option to save a preset. You can also consider backing up your data on an external hard drive or cloud storage for added security.

Checking Audio And Plugin Settings

Sometimes, the problem of FL Studio Mixer Not Showing Effects can be due to the wrong plugin settings or audio routing. Therefore, it is crucial to double-check all the settings and ensure they are correct. For example, you should ensure that your effects plugin is correctly routed to the mixer channel, and that the channel is visible in the mixer. Additionally, ensure that the plugin is not bypassed or disabled.

Final Thoughts

In conclusion, encountering FL Studio Mixer Not Showing Effects can be frustrating, but with the tips described above, you will be able to prevent this issue. Remember to regularly update FL Studio and plugins, backup your settings and files, and double-check your audio and plugin settings. By following these steps, you can keep your FL studio mixer running smoothly and continue producing high-quality music.

Frequently Asked Questions Of Fl Studio Mixer Not Showing Effects

How Do I Open Mixer Effects In Fl Studio?

To open mixer effects in FL Studio, you can either click on the mixer button on the toolbar or press F9 on your keyboard. Once the mixer is open, select a track and choose an effect from the drop-down menu on the right.

Why Are My Plugins Not Showing Up In Fl Studio?

Plugins may not be showing up in FL Studio due to various reasons such as installation errors, missing installation of the plugin, or outdated versions. Make sure to install the plugins correctly in the correct folder and check for updates.

How Do I Show Effects In Fl Studio?

To show effects in FL Studio, you need to route your audio to an effects plugin. Open the mixer, select the channel(s) you want to add effects to, click on an empty insert slot, and select the desired effect from the list.

Adjust the effect parameters to your liking.

How Do I Reset My Mixer Tab In Fl Studio?

To reset your mixer tab in FL Studio, simply right-click on the horizontal mixer and select ‘Reset All’ from the drop-down menu. This will reset all the mixer channels, inserts, and sends to their default settings.

Conclusion

To sum up, the FL Studio mixer not showing effects can be a frustrating issue for music producers, but with a few simple steps, the problem can be easily solved. By checking the mixer routing, ensuring the effects plugins are properly installed and activated, and adjusting the mixer track settings, users can regain control over their sound.

Remember to always troubleshoot and stay informed with the latest updates and helpful tips to optimize your FL Studio experience. Keep creating and happy producing!

Categories
Archive

Chord Progressions Theory In Fl

Chord progressions theory in FL Studio involves selecting and arranging different chords to create an engaging harmonic structure. Chord progressions are a crucial aspect of music production, as they help to convey emotion, build tension and create a memorable melody.

In FL Studio, you have access to a wide range of virtual instruments, plugins and effects, which can be used to experiment with different variations of chord progressions. Understanding music theory basics like chord types, interval relationships and key signatures can give you the language to create and communicate musical ideas more effectively.

We will explore the key concepts of chord progressions theory in FL Studio, including how to create and analyze chord progressions, identify the seven diatonic chords, and use them to create interesting melodies and harmonies in your music productions.

Chord Progressions Theory In Fl

Credit: www.productionmusiclive.com

The Basis Of Chord Progressions

In music theory, chord progressions are the foundation of any song or composition. A chord progression is a sequence of chords played in a specific order that forms the harmony of a song. Understanding chord progressions is essential for any musician, regardless of their instrument or genre of music. In this article, we will discuss the basics of chord progressions, with a specific focus on major and minor keys and the circle of fifths.

Understanding Major And Minor Keys

Before delving into chord progressions, it is important to understand the concept of major and minor keys. A key is a collection of notes and chords that form the basis of a song. In Western music, there are 12 keys, each of which is centered around a specific note of the chromatic scale.

Major keys are often described as bright, happy, and triumphant, while minor keys have a darker, sadder, or more atmospheric sound. The difference between major and minor keys lies in the intervals between the notes that form the scale.

The Circle Of Fifths

The circle of fifths is a visual representation of the relationship between the 12 keys in Western music. It is a circle that starts with the key of C major and moves clockwise in ascending fifths. Each key is represented by a letter, and the circle shows the number of sharps or flats in each key signature.

KeySharps/FlatsRelative Major/Minor
C0–
G1 sharpE minor
D2 sharpsB minor
A3 sharpsF# minor
E4 sharpsC# minor
B5 sharpsG# minor
F#6 sharpsD# minor
C#7 sharpsA# minor
F1 flatD minor
Bb2 flatsG minor
Eb3 flatsC minor
Ab4 flatsF minor

The circle of fifths is an important tool for understanding chord progressions. Chords that are next to each other on the circle are closely related and share many notes in common. For example, the chords in the key of C major (C, F, and G) are neighboring chords on the circle.

Chord Progressions Theory In Fl

Credit: theoryandsound.com

Common Chord Progressions In Pop Music

Popular music frequently uses common chord progressions in different keys and octaves. Understanding the theory behind chord progressions in FL Studio can help producers create catchy and memorable songs. With various combinations of chords from the I, IV, V, and vi chords, experimentation can lead to new and exciting sounds.

As a music producer or enthusiast, understanding chord progressions is crucial for creating catchy, memorable songs. Chord progressions are a series of chords played in a specific order to create a harmonic structure in a song. In pop music, certain progressions have become staples that are used over and over again. These progressions are generally simple and easy to remember, making them perfect for creating catchy and memorable songs.

I–v–vi–iv Progression

One of the most common chord progressions in pop music is the I–V–vi–IV progression. This progression is used in countless songs and is instantly recognizable to many listeners. The progression consists of four chords: the tonic (I), the dominant (V), the relative minor (vi), and the subdominant (IV).

ChordNumber
I1
V5
vi6
IV4

The I–V–vi–IV progression has been used in hit songs by artists like The Beatles, Ed Sheeran, and Taylor Swift. It has a poppy, uplifting feel and is perfect for creating catchy hooks and choruses.

I–v–iv Progression

Another common chord progression in pop music is the I–V–IV progression. This progression is similar to the I–V–vi–IV progression but omits the relative minor chord. The I–V–IV progression has been used in countless hit songs, including “Wild Thing” by The Troggs and “Louie Louie” by The Kingsmen.

ChordNumber
I1
V5
IV4

The I–V–IV progression has a classic, timeless sound and is often used in rock and roll and country music.

I–iv–v Progression

The I–IV–V progression is one of the simplest and most common chord progressions in music. It is used in a wide range of genres, from rock and roll to blues to country. The progression consists of three chords: the tonic (I), the subdominant (IV), and the dominant (V).

ChordNumber
I1
IV4
V5

The I–IV–V progression has been used in countless hit songs, including “Johnny B. Goode” by Chuck Berry and “Twist and Shout” by The Beatles. It has a classic, nostalgic sound that still resonates with listeners today.

Chord Extensions And Alterations

Chord extensions and alterations are essential elements in creating rich and complex chord progressions in FL studio. These techniques involve adding extra notes or changing certain notes in a chord, allowing for more creative and unique chord progressions in your music production.

Chord extensions and alterations are essential components of creating exceptional chord progressions. In FL Studio, understanding the subtopics of chord extensions and alterations such as adding seventh chords, using suspended chords, and applying tritone substitution can help take your music to the next level.

Adding Seventh Chords

Seventh chords are perhaps the most commonly used chord extension in music. These chords are constructed by adding an extra note to a triad that is the seventh note apart from the root. In FL Studio, adding seventh chords can be achieved by selecting the chord and opening the Chord Selector, then selecting the seventh chord from the dropdown menu.

Using Suspended Chords

Suspended chords are unique in a way that they lack the third note, which adds to their mysterious and suspended characteristics. In FL Studio, using suspended chords is as simple as selecting the chord and choosing the suspended chord option from the Chord Selector dropdown menu. Suspended chords add an exciting flavor to your chord progressions and create a unique sound.

Applying Tritone Substitution

Tritone substitution is a chord substitution technique common in jazz and blues music. It involves replacing a dominant chord with another chord that is a tritone away. For instance, if the original chord is ‘G7’, you replace it with a ‘Db7’ chord. This technique is useful in creating tension and unpredictability in your chord progressions, making them stand out. In FL Studio, applying tritone substitution is easy; all you need to do is select the dominant chord and insert the tritone chord in its place. Chord extensions and alterations such as adding seventh chords, using suspended chords, and applying tritone substitution are effective ways of elevating your chord progression game. With FL Studio, integrating these concepts has never been easier.

Creating Original Chord Progressions

Chord progressions are the backbone of any musical composition. With the help of chord progressions, musicians can create an emotional impact by changing the underlying harmony while keeping the melody unchanged. As a musician or producer, it’s essential to know how to create original and captivating chord progressions to make your music stand out. In this blog post, we’ll discuss a few techniques for creating original chord progressions in FL Studio.

Experimenting With Chord Inversions

Chord inversions refer to the rearrangement of the notes in a chord, resulting in a new harmonic structure. Experimenting with chord inversions can help to create original and interesting chord progressions. For example, you can try to use the second inversion of a chord as a passing chord between two chords. Doing so can create a smooth transition between two chords in a progression.

Another approach is to use inversions to create tension and release. Try to start with an inverted chord and then move to its root position. This technique can create a sense of resolution and make your chord progression feel complete.

Using Borrowed Chords From Parallel Keys

Another technique for creating original chord progressions is to borrow chords from parallel keys. Parallel keys are keys that share the same tonic note but have different scales and chords. By using chords from these keys, you can introduce unexpected and unique harmonic elements to your music.

For example, if you’re in the key of C Major, you can borrow chords from C Minor to create a unique chord progression. The C Minor scale has three unique chords (Eb, Ab, Bb), which are not present in the C Major scale. Incorporating these chords can add an emotional depth to your chord progression.

Utilizing Secondary Dominants

Secondary Dominants are chords that belong to a key other than tonic but have a dominant function in the current key. These chords can create tension and lead to a resolution, making them an effective tool for creating original chord progressions.

For example, if you’re in the key of C Major, you can use the V7 chord of the IV chord (F Major) to create a secondary dominant. The V7 chord of F Major is C7, which can be used to create tension before resolving to the IV chord.

Conclusion

By experimenting with chord inversions, borrowing chords from parallel keys, and utilizing secondary dominants, you can create original and captivating chord progressions in FL Studio. Remember, the key to creating original music is to keep experimenting with different techniques and approaches until you find a sound that resonates with you.

Chord Progressions Theory In Fl

Credit: www.productionmusiclive.com

Frequently Asked Questions Of Chord Progressions Theory In Fl

How Do You Make A Chord Progression In Fl Studio?

To make a chord progression in FL Studio, first select a chord to start with. From there, choose other chords that complement the initial chord and combine them to create a progression. You can use the piano roll to input and adjust your chords, and experiment with different sounds and rhythms until you find the desired progression.

What Is The Theory Behind Chord Progressions?

Chord progressions are based on the relationship between chords within a key or scale. They follow a sequence of chords that create a harmonic structure and provide a sense of tension and resolution to the listener. Understanding the theory of chord progressions helps musicians to create effective and emotive compositions.

What Is The 2 5 1 Music Theory?

The 2 5 1 music theory is a common chord progression used in jazz and other music genres. It refers to the chords built on the second, fifth, and first notes of a major or minor scale, respectively. This progression is often used as a building block for improvisation and songwriting.

How Do You Find Chords In Fl?

In FL, you can find chords by opening the piano roll and selecting the chords tab. There are pre-set chords you can use or you can create your own. You can also use the chord generator tool to create chords and experiment with different chord progressions.

Conclusion

Understanding chord progressions is crucial for any musician or producer looking to create polished and professional sounding tracks. In FL Studio, the possibilities are endless when it comes to exploring different chord progressions and finding the perfect sound for your project.

By taking the time to learn the theory behind chord progressions, you open up a world of creative possibilities and ensure that your music has a solid foundation. Keep practicing, experimenting, and taking advantage of the resources available to you to continue honing your skills and creating amazing music.

Categories
Archive

Best Way to Learn Piano Music Theory

The best way to learn piano music theory is through private lessons with a qualified piano teacher or through online courses and tutorials. Learning piano music theory can be a challenging but rewarding journey.

Understanding the basics of music theory can help you improve your playing, composing, and improvisation skills. One of the most important aspects of learning piano music theory is developing a strong foundation of music notation, scales, chords, and progressions. This can be achieved through private lessons with a qualified piano teacher or by using online courses and tutorials.

Finding a learning method that works for you and regularly practicing will help you become proficient in piano music theory. Whether you are a beginner or an experienced player, investing time and effort in learning piano music theory can only enhance your overall musicianship.

Why Piano Music Theory Is Important

Knowing Piano Music Theory is essential to become a skilled pianist. It helps practitioners to read music easily, understand the composition, and play diverse genres of music efficiently. The Best Way to Learn Piano Music Theory is to find a qualified teacher, practice regularly, and broaden your knowledge with online resources.

Developing A Deeper Understanding Of Music

Learning piano music theory is crucial as it aids in developing a deeper understanding of music. Understanding music theory gives you more insight into the basic structure of music and how melodies and chords are formed. When you understand piano music theory, you can recognize patterns that exist within different types of music, which allows you to break down musical pieces into smaller, manageable parts. By understanding the fundamental principles behind the music, you can improvise and experiment with creating new melodies and chord progressions. This helps you to develop a more cohesive, expressive, and meaningful musical style.

Enhancing Technical Skills

Learning piano music theory is beneficial as it enhances your technical skills. Piano music theory helps you to understand how to read sheet music, leading to a better appreciation of the piece. By gaining an understanding of music theory such as rhythms, time signatures, and key signatures, you will learn how to sight-read effectively and quickly. Additionally, piano music theory will introduce you to various forms of notation, such as chords and scales. These techniques will help you to become a proficient pianist with excellent technical skills.

Improving Performance And Interpretation

Piano Music theory is essential as it bolsters your ability to interpret the music and deliver a better performance. The ability to interpret music is critical to ensuring that it appeals to the audience emotionally. Understanding music theory helps you uncover the different layers of a musical piece, such as melody, harmony, and rhythm. With this knowledge, you can create a well-balanced performance that captures the essence and feeling of the music. Additionally, understanding music theory allows you to add your unique touches on a piece, making it more personalized and distinctive. To sum up, learning piano music theory is critical for anyone who wants to improve their piano-playing skills significantly. It forms the foundation for developing a deeper understanding of music, enhancing technical skills, and improving performance and interpretation. By spending time studying music theory, you will become a better pianist with the ability to play and interpret different styles of music.

Best Way to Learn Piano Music Theory

Credit: www.reddit.com

Essential Music Theory Concepts For Piano Players

Learning music theory is an important aspect of becoming a successful piano player. It helps you understand the language of music and how to read and write it effectively. If you are new to music theory, there are several important concepts you should learn to help you master the piano. Below are three essential music theory concepts for piano players.

Note Reading And Identification

Note reading is one of the most fundamental aspects of piano playing. You cannot play the piano if you do not know which key corresponds to which note. Therefore, it is crucial to learn how to read notes and identify them on the keyboard. One way to do this is to use flashcards that show the notes on a staff and their corresponding keys on the piano. Another way is to practice sight-reading exercises regularly.

Scales And Chord Progressions

Scales and chord progressions are the backbone of music theory. They help you understand how chords and melodies work together to create harmony and structure in a piece of music. Learning scales and chords is essential for improving your playing skills and composing music of your own. Some of the most important scales for piano players to learn include major and minor scales, pentatonic scales, and blues scales.

Rhythm And Time Signatures

Rhythm and time signatures are also crucial elements of piano playing. Rhythm refers to the duration and accentuation of musical notes, while time signatures indicate the number of beats in a measure. Understanding rhythm and time signatures helps you play with precision and stay in time with other musicians. Some common time signatures in piano music include 4/4, 3/4, and 6/8 time.

By mastering these essential music theory concepts, you will be well on your way to becoming a skilled piano player. Whether you plan to perform, compose, or simply play for pleasure, learning music theory is a key part of achieving your musical goals.

Tips For Learning Piano Music Theory Efficiently

Learning piano music theory efficiently may seem challenging, but it can be done through regular practice and dedication. Start by understanding the basics, such as notes, scales, and chords, and gradually build your knowledge. Additionally, find a trustworthy teacher or use online resources to help you stay motivated and focused on your goals.

Practice Regularly

Regular practice is essential when it comes to learning piano music theory efficiently. It helps you to retain what you’ve learned and progress more quickly. Set aside a specific time slot each day for practice and stick to it. You can start with a practice session of 20-30 minutes and gradually increase its length as you get more comfortable. A consistent and disciplined approach to practice will help you improve your piano playing skills.

Start With Basics

To master piano music theory, it’s essential to start with the basics. Begin with the fundamentals of music theory, including the musical alphabet, chords, scales, and intervals. Establishing a strong foundation in music theory will help you better understand advanced concepts. Focus on learning one concept at a time, and don’t move on to the next until you have a solid understanding of the first.

Seek The Guidance Of A Music Teacher

It’s always a good idea to get guidance from an expert when it comes to learning music theory. A music teacher can help you design a structured learning plan tailored to your needs and offer feedback on your performance. They can also answer any questions you have and help you overcome any challenges. A teacher can help you progress at a faster pace than if you were learning alone.

Use Online Resources And Apps

There are numerous online resources and apps that are specifically designed to help learners in their quest to master music theory. Look for reliable sources that offer interactive lessons, tutorial videos, aural training, and exercises. Apps such as Simply Piano, Piano Marvel, and Playground Sessions are popular choices. These digital resources can provide a fun and engaging way to learn piano music theory.

Enjoy And Have Fun While Learning

Music theory can be challenging at times, but it’s essential to remember that learning should always be enjoyable. Playing the piano is a creative outlet, and it’s important to have fun while you learn. Find music that inspires you and motivates you to practice more. Experiment with different styles and genres to keep things fresh and exciting. Enjoying the learning process will help you stay motivated and engaged.

Best Way to Learn Piano Music Theory

Credit: www.youtube.com

Best Books For Piano Music Theory

Discover the best books for mastering piano music theory. With titles covering every level from beginner to advanced, these books provide in-depth explanations of theory concepts such as scales, chords, and harmony, along with exercises and practical applications to help you become a better pianist.

Best books for Piano Music Theory Learning music theory is crucial for becoming a successful pianist. Studying through some best books would be a convenient and effective way to understand music theory. Let’s explore some of the popular books for piano music theory. Alfred’s Essentials of Music Theory One of the most popular books widely used by schools and universities is Alfred’s Essentials of Music Theory. This book teaches the fundamentals of music theory, including note reading, time signatures, intervals, scales, and chords, in an easily understandable way. It contains exercises and ear-training examples to help students develop their skills. Moreover, it provides quick quizzing and review options to measure the progression of the learner. The Complete Idiot’s Guide to Music Theory The Complete Idiot’s Guide to Music Theory is an excellent resource for beginners who want to learn about music theory from scratch. This book is written in straightforward language that anyone can understand, and it is also very concise. It covers everything from basic musical notation to advanced harmony and chord progressions. The Complete Idiot’s Guide to Music Theory also includes a CD that contains examples of the musical concepts in the book. Piano Adventures – Theory Book Piano Adventures – Theory Book is a top-rated book that is designed to help students learn music theory effectively. It covers all the essential topics, including note reading, intervals, chord progressions, and scales. The book provides numerous exercises that help learners to develop their skills, including ear training exercises, technique builders, and scale explorers. It is colorfully illustrated, which makes it a visually appealing book. In conclusion, all of the books mentioned above are considered some of the best books for learning piano music theory. Choosing one depends on the learning goals and current skill level. These books can be used individually or in combination with other resources to help learners develop their music theory skills better.

Top Online Piano Music Theory Courses

Discover the best way to learn piano music theory online with top-rated courses. With interactive lessons and expert guidance, gain a strong understanding of music theory and improve your piano skills from the comfort of your home.

Top Online Piano Music Theory Courses: Learning piano music theory is an important aspect of playing the piano. It helps musicians understand the structure of the music they play, and how to read sheet music. Whether you are looking to learn the basics of piano music theory or to refine your existing knowledge, there are plenty of online courses available. Here are some of the top online piano music theory courses: Udemy’s Piano Music Theory Comprehensive Course: Udemy’s Piano Music Theory Comprehensive Course is designed to help you learn music theory fundamentals and apply them on the piano. The course covers everything from basic music concepts to more advanced topics like chord progressions, harmony, and melody. The course includes over 60 lectures, 15 quizzes, and 15 downloadable resources. You can learn at your own pace and have lifetime access to the course material. Piano with Willie – Jazzedge: Piano with Willie – Jazzedge is an interactive online course that takes you step-by-step through the fundamentals of playing the piano. The course teaches you how to play chords, improvise, and read sheet music. You can choose from a variety of courses, including beginner, intermediate, and advanced levels. There are also specialized courses on topics like blues piano and jazz piano. MusicTheory.net’s Piano Lessons: MusicTheory.net’s Piano Lessons is a comprehensive online course that teaches you everything you need to know about piano music theory. The course covers topics like scales, chords, inversions, and progressions. The course includes interactive lessons and exercises, as well as printable worksheets, to help reinforce your learning. You can learn at your own pace, and the course is suitable for beginners as well as more advanced students. Overall, these online courses offer a great way to learn piano music theory in a structured and engaging way. Whether you’re a beginner or an advanced student, these courses offer something for everyone.

Music Theory Exercises For Piano Players

Learn to master music theory with these effective exercises designed for piano players. Understanding basic concepts such as chords, scales and intervals will help you improve your musical skill, and with regular practice, you’ll be able to unlock your full potential and creativity as a pianist.

Learning piano can be a rewarding experience, but mastering music theory can be a challenge. However, with consistent practice and the right exercises, piano players can improve their knowledge of music theory and elevate their playing skills. In this article, we will explore some of the best music theory exercises for piano players, including identifying notes on piano keys, playing scales and arpeggios, and practicing different time signatures.

Identifying Notes On Piano Keys

One of the most fundamental aspects of music theory is identifying notes on the piano keys. By doing this, piano players can understand how different notes sound and how they relate to other notes in a piece of music. One way to practice this is to use flashcards that show the notes on the piano keys. Another way is to play different notes on the piano and try to identify them by ear. By practicing regularly, you can quickly improve your ability to identify notes on the piano keys.

Playing Scales And Arpeggios

Another important exercise for piano players is playing scales and arpeggios. These exercises help players to understand the relationships between different notes and to develop finger dexterity and speed. Major and minor scales and arpeggios are particularly useful for piano players, as they are commonly used in many pieces of music. You can practice playing scales and arpeggios by starting slowly and steadily increasing the tempo over time.

Practicing Different Time Signatures

Practicing different time signatures is another way to improve your music theory skills. Time signatures are used to indicate how many beats are in each bar of music. Common time signatures include 4/4, 3/4, and 6/8. By practicing different time signatures, piano players can learn how to count and play different rhythms and develop a stronger sense of timing. To practice this, you can start by clapping or tapping different rhythms before trying to play them on the piano. In conclusion, practicing music theory exercises is essential for developing strong piano skills. By identifying notes on piano keys, playing scales and arpeggios, and practicing different time signatures, piano players can improve their understanding of music theory and become better musicians. Whether you are a beginner or an experienced player, incorporating these exercises into your practice routine can help you take your piano playing to the next level.

Advanced Piano Music Theory Topics

Discover advanced piano music theory topics to take your playing to the next level. Learn the best practices for mastering complex chord progressions, scales, and arpeggios, and get tips on how to incorporate them into your playing seamlessly.

Once you have a solid grasp on the basics of piano music theory, it’s time to elevate your skills to an advanced level. At this stage, you’ll need to learn more intricate concepts such as chord substitution techniques, advanced chord progressions, modal interchange and improvisation.

Chord Substitution Techniques

Chord substitution is the process of replacing a particular chord or set of chords in a progression with another chord or set of chords that possess similar harmonic qualities. This technique helps to create more unique and interesting chord progressions. For example, you can replace a basic chord like a major or minor chord with an extended chord like a 6th, 7th, or 9th chord.

Advanced Chord Progressions

Advanced chord progressions involve using more complex chord sequences such as jazz chords and blues progressions. These types of chord progressions can add a lot of depth and complexity to your music. For example, you can try using a ii-V-I progression which is commonly used in jazz music.

Modal Interchange

Modal interchange is the process of borrowing chords from a parallel key or mode. This technique helps to create a more interesting and dynamic harmonic progression. For example, you can use a chord from the parallel minor key in a major key song to create a more melancholic or dramatic feel.

Improvisation

Improvisation is the art of creating music on the spot without any preconceived ideas or plan. Advanced piano players often use improvisation to showcase their skills and creativity. You can start by practicing simple improvisations using scales and arpeggios and gradually move on to more complex improvisations using chords and chord progressions. In conclusion, once you’ve mastered the basics of piano music theory, it’s time to move on to more advanced concepts to elevate your piano playing skills. Chord substitution techniques, advanced chord progressions, modal interchange, and improvisation are some of the essential techniques you’ll need to learn to become a master pianist.

Best Way to Learn Piano Music Theory

Credit: everyguitarchord.com

Importance Of Practical Application

Learning piano music theory is an integral part of becoming a proficient pianist. However, understanding the concepts of music theory is not enough. It is essential to apply these concepts practically to enhance one’s piano playing abilities. Without practical application, music theory remains purely theoretical, limiting the pianist’s ability to apply their knowledge to create music that connects with the audience.

Applying Music Theory To Different Genres

Applying music theory to different genres of music helps pianists to develop a diverse musical palette. Practical application enhances the understanding of how music theory influences a particular genre and its unique characteristics. This knowledge helps pianists to create their music style, experiment with different genres, and develop new musical ideas. For example, a jazz pianist’s understanding of music theory is vastly different from a classical pianist’s, yet both owe their success to practical application.

Jazz PianoClassical Piano
Improvise new melodies, harmonies, and rhythmsPerform pieces with strict adherence to written music
Use chordal voicings, harmonies, and substitutions to enhance their performanceStrictly follow traditional music practices and adhere to music rules
Jazz pianists use different time signatures, meter, and rhythmClassical pianists principally use the classical canon of western music

Playing Piano Pieces With Advanced Music Theory Concepts

Practical application of advanced music theory concepts on the piano is essential to create intricate, complex, and nuanced music pieces. Pianists that incorporate advanced music theory concepts into their playing style, such as using non-diatonic chords, unconventional scales, and chord progressions, distinguish themselves from their peers.

Performing And Recording Music

Performing and recording music is an advanced level of practical application that highlights the importance of music theory application. Pianists that compose their music and perform it in front of an audience or record it for others to hear require a deep understanding of music theory. The ability to apply music theory in a practical sense helps pianists to produce a more refined interpretation of music pieces and connect with the audience more effectively.

  • Practical application aids in making music more enjoyable and appealing
  • Enhances musical ability and proficiency of a pianist
  • Helps pianists to create new and extraordinary music pieces
  • The connection between music theory and practical application is crucial in becoming a successful pianist
  • The knowledge and practice of music theory, combined with the practical application, result in accomplished pianists.

Frequently Asked Questions On Best Way To Learn Piano Music Theory

Where Do I Start With Piano Music Theory?

To start with piano music theory, begin with the basics such as learning the notes on the keyboard, the staff, and key signatures. From there, progress to intervals, chords, scales, and progressions. Practice regularly and consult resources such as music theory books, online courses, and tutorials to deepen your understanding.

How Long Does It Take To Learn Music Theory For Piano?

Learning music theory for piano can take anywhere from a few months to a few years, depending on the individual’s dedication to studying and practicing. Consistent effort and focus on the fundamentals can help progress quickly, but acquiring a deep understanding of music theory can take years of dedicated study.

Should I Learn Music Theory Or Piano First?

Learning piano first is recommended as it helps to grasp the basic concepts of music theory. Piano lessons provide hands-on experience and helps in developing a solid foundation of musical understanding. However, simultaneous learning of both piano and music theory is also possible.

How Can I Learn Music Theory Efficiently?

To learn music theory efficiently, follow these steps: 1. Start with the basics such as notes, scales, and chords. 2. Practice regularly and use online resources for assistance. 3. Apply what you learn to your instrument or vocals. 4. Experiment and create your own compositions.

5. Find a mentor or tutor for personalized guidance.

Conclusion

Learning piano music theory can be a game-changer for aspiring pianists. It can take your playing skills to the next level and help you understand the language of music. Start by getting familiar with the basics, practice consistently, join music communities, and take online courses to reinforce your knowledge.

With time and effort, you will see a significant improvement in your playing technique and creativity. Keep practicing and never stop learning.

Categories
Archive

Best Music Production Forums

The best music production forums are Music Production Forums: Gearslutz and Music Production Forums: Future Producers, offering comprehensive discussion forums, tips, and resources for aspiring producers and professionals alike. Whether you’re just starting out or looking to enhance your skills and knowledge, these forums provide a wealth of information from experienced industry professionals.

Also, these forums are an excellent resource for learning new skills, gaining insights from industry professionals, and connecting with other music producers. With so many online music production forums available, it can be tough to know where to start. Two of the best music production forums are Gearslutz and Future Producers.

Related reading: Music Production Services and Progress In Music Production.

Moreover, gearslutz boasts over 1 million registered users and provides comprehensive discussion forums, tips, and resources covering everything from mixing and mastering to music business and career development. Future Producers is another great online community offering a wealth of information and resources for aspiring music producers. Both forums offer opportunities to connect with like-minded individuals, share your work, get feedback, and learn new techniques from experienced professionals. Whether you’re just starting out or a seasoned pro, Gearslutz and Future Producers are must-visit resources for any music producer looking to enhance their skills and knowledge.

Gearslutz

In addition, gearslutz is a top-ranking music production forum, offering advice and discussion on everything related to music-making, sound engineering, and equipment. With a vast community of members, it’s the go-to destination for producers and artists looking to share, learn, and connect.

Furthermore, gearslutz is a renowned community that has been popular amongst recording engineers, musicians, and producers for around two decades. This online forum offers an extensive variety of content that includes discussions, reviews, tutorials, and news relating to music production equipment. The web page design might seem outdated, but it is still a goldmine for people who seek the latest information on gear and music production techniques.

Features

Additionally, gearslutz is famed for being one of the most active forums in the music production sphere. Due to its active user base, it remains up to date with current trends. Regular visitors to Gearslutz will know that the forum does not only limit conversations to music gear, but it also highlights current news and trends related to music everywhere. Users can find both practical and theoretical knowledge regarding the latest and vintage synthesizers, compressors, and other hardware. Furthermore, there are dedicated sections for topics like the music industry, DIY projects, and reviews of popular software. One of the highlights of Gearslutz, are the frequent AMA (ask me anything) sessions with industry veterans. These sessions provide a unique opportunity for registered members to ask experienced music producers and professionals specific questions about the industry.

Membership Options

Registering as a new member to Gearslutz is a straightforward process that takes less than five minutes. Also, members can create their profiles, post threads, and engage in conversations. Furthermore, creating a new thread is a good way to become a part of the community and seek new information. Moreover, Gearslutz offers a premium membership option with extra perks like a badge that signifies their premium status, ad-free browsing, and increased private message storage. The premium membership fee is reasonable and definitely worth the investment for serious musicians and enthusiast producers. In conclusion, Gearslutz is an excellent music production community that provides valuable information and resources to people who take their craft seriously. Whether you are a beginner or an experienced professional, there is always something new to learn from the vast pool of information available on Gearslutz.

Best Music Production Forums

Credit: unison.audio

Future Producers

Moreover, future Producers is the perfect website for anyone who is interested in these forums. Here, music producers of all types can connect with others in the industry, learn new production techniques, and get feedback on their music from fellow musicians.

In addition, aspiring music producers always look for a place where they can learn, share their knowledge, and get feedback from others. Future Producers is one such platform that offers a community of music enthusiasts where you can discuss anything about music production. It’s a place where beginners and professionals unite to share their passion for music.

Community Features

Furthermore, future Producers has a vast community of music producers, DJs, and sound engineers who share their knowledge and experiences in music production. It’s a great place to ask for advice, get feedback on your music, or collaborate with others. You can also find discussions on music software, plugins, and gear, along with tips and tricks to improve your music production skills.

Resources Available

Additionally, apart from the community discussions, Future Producers offers an extensive range of resources for music production enthusiasts. There are tutorial videos, articles, and guides available for anyone who wants to improve their skills. You can also find recommended reading and listening lists, as well as software and hardware reviews. The resources provided by Future Producers are a great way to elevate your music production expertise. Overall, Future Producers is a forum that offers an excellent platform for music producers to learn, connect and collaborate with peers from all over the world. Whether you’re a beginner or a seasoned professional, this community is the perfect place to improve your skills and share your passion for music production.

Music Production Forums: Kvr Audio

Also, KVR Audio is one of the best music production forums, where producers and enthusiasts share their knowledge, ideas and solve problems related to music production. It offers a wide range of topics, including software, hardware, and industry news, making it a hub for music makers.

Moreover, KVR Audio is one of the best music production forums and a hub for producers and sound designers. With a vast community of over 1 million registered members, KVR Audio provides an ideal platform for music enthusiasts, all seeking to improve their craft. At KVR Audio, members get to share and exchange knowledge, experiences, and ideas on music production tools, techniques, and trends. One of the best features of KVR Audio is its forum and community features.

Forums & Community Features

KVR Audio provides an active forum where members can interact with like-minded individuals, share their music, seek collaborations, ask questions, and find answers to their queries. The community features of KVR Audio make it easier for members to keep track of their favorite topics and members, join groups, participate in challenges, and reward programs. With a user-friendly platform, KVR Audio makes it easier for members to have conversations, share files, and collaborate on projects.

Marketplace

KVR Audio also offers a marketplace where members can find music production software, plugins, and sound libraries from various developers. The marketplace is an excellent place for members to discover new products, engage with developers, and participate in promotional offers. The marketplace also offers members an opportunity to buy and sell used music production gear, which can be a great way to upgrade or clear space for new equipment. In conclusion, KVR Audio is undoubtedly one of the most active, interactive, and engaging music production forums out there. Its community features, forum, and marketplace make it easier for members to learn, create, collaborate, and grow. If you are looking for a reliable source of music production knowledge and a community of like-minded individuals, KVR Audio is one of the best options out there.

Music Production Forums: Music Radar

Discover the ultimate music production forums on Music Radar, where you can connect with producers and musicians from around the world. Get expert advice, feedback, and cutting-edge insights on all aspects of music creation, from software and hardware to mixing and mastering.

Forum Structure

Music Radar is a popular website home to many music forums, providing a platform for music producers of all levels to connect with one another and share knowledge on various aspects of music production. The site offers a varied range of forums, from general music production to software-specific forums for DAWs such as Ableton Live, Logic Pro, and FL Studio. Each forum has a specific topic, giving users a chance to find relevant threads easily. Users can create discussion topics, post comments and replies, ask questions, and seek help from other users. This community-based approach makes Music Radar an excellent source for getting answers to difficult music production questions. Additionally, the forums are moderated, ensuring that posts are relevant and useful to other community members. Moderators also help keep the conversations organized and encourage users to follow the expected etiquette.

Site Resources

Music Radar forum provides an abundance of resources for music producers starting from articles about all aspects of music production, hardware reviews to interviews with musicians and sound engineers, making it the go-to destination for all music production-related discussions. One of the most well-known features of the site is its monthly feature, where it focuses on a specific music software or hardware and provides an in-depth guide on its features and creative ways of using it. They review the instrument’s quality and provide insights into its overall functionality.

The site also allows users to upload and share their music tracks, making it easy to receive feedback from the community. This feature is particularly useful for beginners, allowing them to get constructive criticism from experienced music producers. Music producers can also sell their samples and loops through the site, giving them a platform to monetize their music production skills. Overall, if you’re in the music production industry or trying to build a music production career, Music Radar forums offer valuable resources and a means of connecting with other like-minded professionals.

Music Production Forums: Sound On Sound

Sound on Sound is one of the best music production forums where producers and audio engineers can discuss various topics related to music production. Get answers to your queries, share your knowledge, and collaborate with like-minded individuals from all over the world.

Forum Rules

Before diving into Sound on Sound forums, it’s important to understand the community guidelines to ensure a respectful and productive discussion. The moderators strictly enforce the rules to prevent spamming, trolling or any discriminatory behavior. It’s mandatory to sign up before posting a question or response.

Community Members

Sound on Sound has a thriving community of music producers, engineers, and enthusiasts from all over the world. You’ll find everyone from novices to professionals, all eager to share their knowledge and experience. It’s truly a collaborative platform that encourages learning and supporting each other.

Music Production Forums: The Benefits Of Sound On Sound

One of the biggest benefits of Sound on Sound forums is that it covers an extensive range of topics and genres. There are sub-forums dedicated to every aspect of music production, from recording, mixing, and mastering to gear reviews and recommendations. You can expect to find detailed and insightful discussions on the best plugins or the latest Pro-Tools update. Moreover, the community members are extremely helpful and responsive. If you’re stuck on a particular problem, post it on the forum, and you’ll get several responses within hours.

You can also browse through the archives to find answers to previously discussed questions. In conclusion, Sound on Sound is undoubtedly one of the most valuable resources for music producers. By following the simple forum rules and engaging with the community members, you can learn a lot and take your music production skills to the next level.

Best Music Production Forums

Credit: unison.audio

Additional Resources

Discover the best music production forums online with our additional resources. These forums are an excellent source of information, advice, and feedback from fellow music producers. Join the discussion today to take your skills to the next level.

Looking to hone your music production skills or searching for the best forums to connect with other music producers? Our previous blog post, ‘Best Music Production Forums’ listed top online forums that offer great insights, tips and resources for music production enthusiasts. However, the forums listed are just a start, there are plenty more sources of valuable information for music producers to explore. In this post, we will provide additional resources including home studio set-up and producing tips and tricks to help aspiring music producers create great music.

Home Studio Set-up

To create great music, it’s essential to have a good home studio set-up to help you record and produce. Here are some helpful resources to check out:

  1. How to set up a home recording studio: 10 essential tips (MusicRadar)
  2. The Ultimate Home Recording Studio Setup for Beginners (eHomeRecordingStudio)
  3. The Home Studio Handbook – 10 Steps to Professional Recording At Home (LedgerNote)

Producing Tips And Tricks

Great music production requires creativity, a keen ear for sound and a good set of skills. Here are some of the best resources that can help you improve your production skills and techniques:

With these additional resources, you can take your music production skills to the next level. So, which of these resources will you check out first?

Best Music Production Forums

Credit: create.routenote.com

Frequently Asked Questions For Best Music Production Forums

What Is The Best Music Production Website?

The best music production website is subjective and depends on individual preferences. However, some of the popular ones are Ableton, Logic Pro, FL Studio, Pro Tools, and Studio One. Compare features, pricing, and user reviews to find the right one for your needs.

Where Is The Best Place For Music Production?

The best place for music production is subjective and depends on personal preferences, equipment, and budget. However, some popular options include home studios, commercial recording studios, and online recording platforms. Choose the option that fits your needs and budget the best.

Where Can I Meet Music Producers?

You can meet music producers at various events such as music industry conferences, workshops, and showcase events. Social media platforms like Instagram and Twitter can also be used to connect with producers and industry professionals. Networking with other musicians and attending local music venues may also lead to producer connections.

What Is The Best Music Production Course?

The best music production course depends on your skill level, preferred genre, and budget. Some popular choices include courses from Berklee College of Music, Icon Collective, and Point Blank Music School. Consider online versus in-person options and read reviews before making a decision.

Conclusion

So, there you have it, the best music production forums on the internet! These forums are excellent resources for anyone interested in diving into the music production world or looking to take their skills to the next level. From beginners to seasoned professionals, there is something for everyone on these forums.

By connecting with other like-minded individuals, you can gain valuable insights, advice, and support that will help you grow as a musician. So, what are you waiting for? Start exploring these top forums today and take your music production journey to the next level!

Categories
Archive

Cd Baby Distribution Review

Cd Baby Distribution offers independent musicians low-cost digital distribution services and has been accredited as one of the industry’s top distributors. Cd Baby Distribution is a digital music distributor that offers independent artists seamless digital access to their music through platforms such as Spotify, Amazon Music, and Apple Music.

With more than 20 years of experience in the music industry, Cd Baby has been able to build a vast network that supports artists in their music distribution journey. Also, in this review, we will delve into the features of Cd Baby, their pros and cons, pricing and customer support, the ease of use, and more.

Related reading: What Is Music Distribution and Horus Music Distribution Review. For background, see the Wikipedia article on CD Baby.

Cd Baby Distribution Review

Credit: blog.baseformusic.com

What Is Cd Baby?

Also, CD Baby is a digital music distribution platform that helps independent artists distribute their music to popular online stores. With CD Baby, artists can get their music onto major platforms like Spotify, Apple Music, and Amazon Music, and keep control of their rights and royalties.

Moreover, CD Baby is an online music distribution platform that has been in the business for over 20 years. In addition, it is an independent music store that offers artists a chance to distribute their music globally. In this section, we’ll look at the history and mission of CD Baby and how CD Baby works.

The History And Mission Of Cd Baby

In addition, started as a hobby by musician Derek Sivers in 1998, CD Baby became a platform for musicians to sell their music online. Since then, it has expanded to become the world’s largest online distributor of independent music. For example, their mission is to provide tools and services that will help musicians sell their music globally without compromising their independence and musical identity.

How Cd Baby Works

Furthermore, CD Baby offers a variety of services to musicians, including music distribution, publishing, and marketing. As a result, here are the steps on how CD Baby works:

  1. Additionally, sign up: Artists can sign up and create an account.
  2. Also, upload music: Musicians can upload their music and create albums, tracks, and artwork.
  3. Distribution: CD Baby distributes music through online streaming and download stores such as Apple Music, Spotify, Amazon, and more.
  4. Sales: Artists earn money from each sale, and the profits are directly deposited to their accounts.
  5. Marketing: CD Baby offers various marketing tools, such as social media promotion and email campaigns, to help artists promote their music.

CD Baby offers a user-friendly platform and easy-to-use tools that ensure a musician’s music is distributed worldwide effectively. However, this provides each artist with complete control over their music. In conclusion, Cd Baby is a platform that offers independent artists a chance to distribute their music globally while maintaining their independence and musical identity. It is an excellent choice for any artist looking to sell and market their music online.

Cd Baby Distribution Services

CD Baby is a well-known music distribution service that provides independent musicians with the opportunity to sell their music online. Then, the platform provides various features, including album distribution to major streaming platforms, promotional tools, and sales analytics. CD Baby’s user-friendly interface and personalized support make it a popular choice for emerging artists.

The Significance Of Distribution In The Music Industry

Distribution is a crucial aspect of the music industry that helps artists reach a wider audience. Without it, even the most talented artists would struggle to get their music heard by more than a few people. Distribution ensures that music is made available on popular streaming services, such as Apple Music, Spotify, and Amazon Music. This not only helps artists reach new listeners but also ensures they earn revenue through streams. In short, in today’s highly competitive music industry, distribution is vital to the success of any artist.

Why Cd Baby Distribution Is Unique

CD Baby is a distributor that has been operating since 1998 and is known for its unique approach to distribution services. Unlike most distributors that take a cut of an artist’s earnings, CD Baby offers a flat fee distribution service. Similarly, this ensures that artists have control over their earnings and can earn more from their music. CD Baby also offers a range of tools and resources to help artists market their music and grow their fan base. It’s a one-stop-shop for distribution and promotion, making it an appealing option for many independent artists.

Types Of Cd Baby Distribution Services

CD Baby offers a range of distribution services that cater to the unique needs of different artists. Also, let’s take a look at the different types of CD Baby services.

ServiceDescription
Standard DistributionThis is CD Baby’s basic distribution service that allows artists to distribute their music to over 150 digital music platforms. The service includes free UPC and ISRC codes, worldwide distribution, and real-time sales analytics.
Pro DistributionCD Baby’s Pro Distribution service offers additional features, such as YouTube monetization, sync licensing for TV and film, and radio promotion. This service is ideal for artists looking to expand their reach and monetize their music in various ways.
Print on DemandThis service allows artists to create physical copies of their music on demand. Instead of having to order a large batch of CDs, artists can use CD Baby’s Print on Demand service to create CDs one at a time as they are ordered.

CD Baby distribution services are a game-changer for independent artists looking to distribute their music without sacrificing their earnings or control. With a wide range of services and tools, CD Baby is a reliable partner that can help artists reach new fans and monetize their music in various ways.

Cd Baby Music Promotion

CD Baby is a popular music distribution platform for independent artists. With their music promotion services, they can help you grow your fanbase and reach new listeners on platforms like Spotify, Apple Music, and more.

CD Baby is an online distribution platform that helps independent musicians distribute their music worldwide. Apart from distributing music, CD Baby offers a range of music promotion services to help artists reach out to their target audience. Music promotion plays a crucial role in making an artist’s music successful. In this blog post, we will discuss the importance of music promotion and how CD Baby’s promotion services can help artists.

The Importance Of Music Promotion

Music promotion is vital for any artist to reach their target audience and achieve success in their music career. Promoting music helps artists to build their fan base, increase their visibility, and increase their streams and downloads. Promotion creates awareness of the music, increases its popularity, and ultimately helps in generating revenue. Without proper promotion, even the best music can remain undiscovered.

Cd Baby’s Music Promotion Services

CD Baby offers various types of music promotion services such as social media promotion, email marketing, playlist promotion and advertising, music video promotion, and sync licensing. With CD Baby’s music promotion services, artists can get their music in front of their target audience via popular social media platforms, email, playlists and other advertising options. CD Baby also provides artists with an opportunity to get their music placed in TV shows, movies, video games and other media via Sync Licensing.

How To Optimize Your Cd Baby Promotion

Here are some steps to optimize your CD Baby Promotion:

  • Ensure your music is of the best quality for streaming and downloading
  • Optimize your CD Baby artist profile by adding a professional bio, photos, and links to your website and social media
  • Share your music promotion links on social media to get more visibility
  • Interact with your fans, respond to their feedback, and ask for their support
  • Use CD Baby’s promotion tools to create ads, build an email list, and get your music on playlists

In conclusion,

CD Baby provides a range of music promotion services to help independent artists reach their target audience. Music promotion is crucial for any artist to succeed in their music career. Artists must focus on optimizing their promotion efforts to reach the maximum potential audience and generate revenue. With CD Baby’s services, artists have access to a worldwide distribution platform and expert music promotion tools.

Cd Baby Distribution Review

Credit: m.youtube.com

Is Cd Baby Distribution Worth It?

Are you an independent musician looking to distribute your music on various streaming platforms and online music stores? The platform, the largest distribution company for independent artists in the world, might be a great option for you. However, before you decide to go with them, let’s take a deeper look at the pros and cons of CD Baby.

The Pros And Cons Of Cd Baby Distribution

CD Baby Distribution is a company that offers independent musicians an easy way to get their music on popular streaming platforms like Spotify, Apple Music, and Pandora, as well as on online music stores like Amazon and iTunes. Here are some of the pros and cons to consider before signing up:

Pros and Cons of this distributor
ProsCons
Easy and affordable distribution to over 150 streaming platforms and online music stores.The platform has a one-time fee for each release rather than an annual fee.
CD Baby offers great customer service with a dedicated support team.CD Baby takes a cut of all profits earned for each album sold.
Artists retain 100% of their rights and royalties.CD Baby’s royalty payment process can be complicated to understand.
The service also offers various promotional tools and resources to help artists succeed.CD Baby’s pricing doesn’t suit everyone.

Success Stories And Testimonials

Many independent artists have found success through CD Baby. One example is indie-rock band The Lumineers, who released their first album through CD Baby and went on to become a Grammy-nominated group. Other successful CD Baby artists include Grammy-nominated jazz pianist Taylor Eigsti and the indie-folk duo The Weepies. CD Baby’s website features numerous testimonials from happy artists who have benefited from the company’s services.

Alternatives To Cd Baby Distribution

While CD Baby is a great option for many independent artists, it’s not the only distribution service available. Other options include DistroKid, TuneCore, and Symphonic Distribution. These platforms each have their own pros and cons when it comes to pricing, distribution, and overall customer service. It’s important to research and compare these services before deciding which one is right for you.

Cd Baby Distribution Review

Credit: www.charlescleyn.com

Frequently Asked Questions On Cd Baby Distribution Review

Is Cd Baby A Good Distributor?

Yes, CD Baby is a good distributor for independent artists and labels looking to get their music on digital platforms like Spotify and Apple Music. They offer reasonable rates, helpful resources, and personalized support to help artists succeed.

What Are The Downsides Of Cd Baby?

Some reported downsides of CD Baby include its high commission fees and lack of advanced marketing tools compared to other distribution services. Additionally, customer service can be slow at times and there have been occasional technical glitches reported.

How Long Does Cd Baby Take To Distribute?

CD Baby typically takes 1-3 days to distribute music to streaming platforms and 3-7 days to distribute to physical retail outlets. However, the distribution process can take longer if there are issues with the release or if additional verification is required.

Is Cd Baby Better Than Distrokid?

Both CD Baby and DistroKid are great platforms for music distribution. However, the choice between the two depends on the individual needs and goals of the artist. CD Baby provides more personalized services, while DistroKid is a more affordable option with faster release times.

Ultimately, it’s up to the artist to decide which platform suits them best.

Conclusion

This distributor offers an excellent platform for independent artists to distribute their music globally. The platform provides various useful features like publishing, distribution, and promotion. CD Baby also supports artists with an extensive resource library and live expert support whenever needed.

Its transparent pricing structure, no annual fees, and quick release time, making it a highly recommended choice for budding musicians. With its user-friendly interface and exceptional customer service, the platform is a reliable and efficient platform to distribute music online.