Categories
Archive

The Power Of Soundscapes How To Create Ambience And Atmosphere In Your Tracks

To create ambience and atmosphere in your tracks, incorporating soundscapes can be incredibly powerful. In just a few seconds, a well-chosen sound can drastically alter the mood and tone of a composition.


Also, by layering and manipulating soundscapes, you can add depth and complexity to your music, immersing listeners in a sonic environment that complements the themes and emotions of your work. Also, we will explore the art of utilizing soundscapes in music production, examining various techniques and approaches that can help you achieve unique and compelling results.

For background, see the Wikipedia article on Soundscape.


Moreover, whether you’re an experienced producer or just starting out, mastering the use of soundscapes can take your music to new heights, setting your tracks apart from the crowd.


What Are Soundscapes?


In addition, Soundscapes are audio environments that help create a particular mood for listeners. In addition, they can influence emotions and sensory perception. This makes them a powerful tool in music production to evoke specific atmospheres and enhance storytelling. With its ability to awaken emotions and sensations, sound design can add a new level of depth and immersion to any production.

What are Soundscapes? For example, a soundscape is the combination of sounds that create a unique sonic environment. Furthermore, it is a subtle and powerful way of adding depth and texture to a track. A soundscape can include anything from a natural environment or ambient noise to musical effects and other sounds. It is an important tool in creating an atmosphere and mood in any track.

Definition Of A Soundscape

Additionally, the soundscape is a collection of sounds that occur in a specific environment. As a result, these sounds can be anything from natural sounds, such as birds chirping or waves crashing, to man-made sounds, such as cars or helicopters. Each sound in the soundscape is arranged to create an overall sonic environment that is unique to that particular place or situation.

Characteristics Of A Good Soundscape

Also, a good soundscape requires careful consideration of each sound that you add. However, here are some key characteristics that you should focus on:

  • Balance: There should be a balance between the different types of sounds in the environment, e.g., background noise, musical effects, and so on.
  • Moreover, realism: Sounds should be arranged in a way that is realistic to the environment you are trying to portray.
  • In addition, depth: A soundscape should have multiple layers of sound to create a rich and complex environment.
  • Furthermore, Atmosphere: A good soundscape adds atmosphere and mood to a track, elevating it beyond the music itself.
  • Additionally, sonic Unity: All sounds should work together harmoniously to create a cohesive and compelling environment.

Also, creating a soundscape requires a nuanced understanding of sound and how different sounds work together. With careful attention to detail, however, you can elevate any track and immerse your listeners in a fully-realized sonic environment.

The Power Of Soundscapes How To Create Ambience And Atmosphere In Your Tracks


Credit: www.masteringthemix.com


Why Are Soundscapes Important?


Moreover, Soundscapes are essential in music as they create a sense of ambience and atmosphere in tracks. Then, by carefully selecting and arranging sounds, a musician can evoke different emotions and landscapes, enhancing the listener’s experience. With the use of technology, soundscapes can be created in various genres. This makes them an integral part of the music production process.

Creating music that truly captivates your audience is a tough nut to crack. There are so many elements that go into making a great track, but soundscapes are something that often get overlooked. In short, Soundscapes are the underlying sounds that create a specific atmosphere within a song. They are what provide depth and texture to your track. They can make all the difference when it comes to creating a mood that your listeners will respond to. In this post, we’ll be exploring the importance of soundscapes, and how you can use them to create ambience and atmosphere in your tracks.

Creating A Mood

Soundscapes are powerful tools for creating a specific mood within your music. Similarly, they can convey emotions, set the tone for a scene, or create a sense of tension or calmness. The right soundscape can instantly transport your listeners to a different world, conveying the mood and emotions you wish to evoke. Whether you want your listeners to feel uplifted, pensive, or nostalgic, soundscapes provide an opportunity to craft a sonic landscape that resonates with your audience.

Setting The Tone

Soundscapes also play a crucial role in setting the tone for your track. Also, they help set the stage for your song, introducing listeners to the ambiance and vibe that your music aims to create. The right soundscape can convey a sense of time and place, evoking vivid imagery in the minds of your listeners. This can all be achieved through a careful selection of sounds. This includes effects such as rain, thunder, or crashing waves, to name a few. By using carefully chosen sounds to set the tone, you can draw your listeners into the world you are crafting and enhance their overall listening experience.

Providing Atmosphere

Finally, soundscapes also play an important role in providing atmosphere to your music. In addition, they provide a sense of depth and texture to your sound, creating a fully immersive experience for your listeners. By layering different sounds and tones, you can create a rich and complex sound that captures the listener’s imagination. This can be done with the use of instruments such as pads, drones, and ambient textures. In conclusion, soundscapes are a vital part of creating atmospheric and engaging music. They allow you to create a mood, set the tone, and provide the immersive experience that keeps your listeners engaged. By incorporating soundscapes into your tracks, you can take your music to new heights, and craft something truly special that resonates with your listeners.

The Elements Of A Soundscape


Creating a powerful soundscape involves understanding the elements that make up a track’s ambience and atmosphere. For example, Sound design, instrumentation, and mixing techniques all play a role in creating a dynamic sonic environment for listeners. With careful attention to detail and a strategic approach to production, any artist can unleash the full potential of their music through the power of soundscapes.

Soundscapes, in the simplest sense, are the different elements of sound that come together to create a rich audio landscape. As a result, to create a stunning ambiance and atmosphere, it is essential to understand the role of each element and how to use them effectively. Here are the five elements that make up a soundscape and how they contribute to creating the perfect atmosphere for your song.

Melody

Melody is the main theme of a song, and it establishes the mood of your track. However, a melody can be simple or complex, focused or abstract, catchy or brooding. It’s all about the feeling that you want to convey. When creating a melody, it’s crucial to keep the emotions you want to express in mind.

Harmony

Harmony is the supporting element of your melody. Then, it adds depth and richness to your music, and it establishes the tone of your track. In a typical song, the harmony consists of chord progressions and basslines. You can experiment with different chord progressions and intervals to create unique moods and atmospheres.

Rhythm

Rhythm is the backbone of your song. In short, it creates the groove and beat that makes your audience move. Rhythm can be simple or complex, slow or fast, steady or erratic. It’s all about finding the right rhythm that fits your melody and creates the desired atmosphere.

Sound Effects

Sound effects are critical in creating a soundscape. Similarly, it adds texture and depth to your track, and it can enhance the mood and emotion you want to convey. Sound effects can come in the form of samples, synthesizers, or foley sounds. Experiment with different sound effects and find the perfect sound to elevate your track.

Ambient Noise

Ambient noise adds realism and immersion to your soundscape. Also, it creates the illusion of a real-world environment, and it can transport your audience to a whole new world. Ambient noise can come from various sources, like natural sounds, synthetic sounds, or field recordings. It’s all about finding the right balance of ambient noise that works best for your track. Using these five elements together can create an immersive soundscape. It’s all about experimentation and finding the right balance of each element to create the desired atmosphere. Remember that each element is critical to the success of your track. So pay attention to the details and let your creativity guide you.

How To Create A Soundscape


Creating a soundscape is a powerful way to add ambience and atmosphere to your tracks. By using a variety of sounds and effects, you can create a rich, immersive experience for your listeners. Start by considering the mood and emotions you want to convey, and experiment with different combinations of sounds to achieve your desired effect.

Creating a soundscape is crucial in giving your tracks ambience and atmosphere. It involves layering different instrument sounds, sound effects, and adjusting aspects like tempo and pitch to achieve desired emotions in your music. In this article, we’ll explore how to create a soundscape, step-by-step, for your next music-making endeavor.

Choosing Your Instruments

The choice of instruments you use plays a significant role in creating your desired soundscape. Pianos, synths, and guitars are among the popular instruments to choose from, with each having unique sound qualities. For instance, pianos bring out a melancholic feel while synths pump energy and excitement. Once you pick an instrument, tailor it by bringing in various tonal and spatial effects. For instance, you can incorporate tremolo for guitars or reverb for pianos to add depth and interest to them.

Setting The Tempo And Pitch

Tempo and pitch are critical in defining the flow of your soundscape. Setting a slower tempo can give your piece a more reflective and sullen feel. Conversely, a faster tempo can create a sense of excitement and energy. Pitch, on the other hand, may change the mood of your music completely. Higher pitches can evoke happiness, while lower pitches hint on sadness or danger.

Creating Layers Of Sound

The magic of creating a soundscape lies in combining various sounds and textures to create layers of sound. Each layer should work together cohesively, bringing out the desired emotions. A good practice is starting with a bassline, followed by percussions, and finally harmonies.

Using Sound Effects

Sound effects are essential in accentuating your soundscape. They provide texture and atmosphere to your music. Adding reverb, delay, echoes, and other effects add interest and flow to your piece.

Mixing And Mastering

The final stage in creating a soundscape is mixing and mastering the piece. This stage involves harmonizing all the elements of the soundscape into a single, seamless mix. During the mixing stage, ensure that each element sits well in the mix. Volume, panning, and EQ adjustments can achieve this. The mastering stage involves the final touches, such as adding compression, equalization, and limiter to give your track the required loudness and tonal balance. By following the above steps, you can create an excellent soundscape for your tracks. This gives them the ambiance and atmosphere they deserve.


Examples Of Great Soundscapes


Creating great soundscapes is a powerful tool in setting the mood and atmosphere in your tracks. Learn from examples like Hans Zimmer’s film scores or Brian Eno’s ambient music to enhance your own soundscapes.

Creating a soundscape that captures the attention of listeners and transports them to another world is a difficult challenge that many musicians face. Immersive audio elements such as ambient noise, sound effects, and melodic motifs can help to achieve aural storytelling in a musical context. From electronic music to video game soundtracks and film scores, let’s take a look at how these three unique music styles use soundscapes to create an unforgettable listening experience.

Film Scores

Film scores are a genre of music that are specifically made for movies. They are designed to evoke an emotional response and help tell the story in a more profound manner. Often, composers use soundscapes as a tool to portray a specific atmosphere in a scene. Take the example of the epic and haunting use of a choir in the Lord of The Rings movies. The grandiose choral arrangement increases the epicness on the scene and is incredibly immersive.

Video Game Soundtracks

Video game soundtracks are unique in that they must be engaging, dynamic, and interact with the player in real-time. Games often use soundscapes to create mood and ambiance in their different stages. For example, in the Halo franchise, the use of synth and ambient electronic noises heighten the excitement levels during action-packed sequences. In contrast, slower and calm tone music allows players to unwind and relax during downtime.

Electronic Music

Finally, we have electronic music, where soundscapes play a vital role in the production. You can make each sound from scratch, and the producer has total control over all sounds used in the track. Producers use soundscapes to create a deep and intricate sonic journey among electronic music tracks. A famous example is the works of Aphex Twin, who uses sci-fi-like sounds, deep and slow basslines, and high-pitched repetitive loops to create a sense of immersion throughout the tracks. In conclusion, the power of soundscapes in music is impressive and limitless.

From enhancing the emotions in film scores to creating unique and engaging experiences in video games and exploring the depths of sounds in electronic music. By using soundscapes, a musician can take their audience on an aural journey and have them relive memories and emotions in the power of sound.


The Impact Of Soundscapes


Creating the perfect atmosphere in your tracks can be achieved through the power of soundscapes. Immersive sound design and carefully crafted soundscapes can greatly enhance the emotional impact of your music and help transport your listeners to new and exciting worlds.

The use of soundscapes in music has grown to become an integral part of music production and has proven to be a game-changer in the industry. A soundscape is an audio background that is created to add depth, an atmosphere, and mood to a piece of music. It creates an emotional, cognitive, and behavioral response from the listener, thus, transforming the quality of the music.

Emotional Response

The power of soundscapes lies in its ability to trigger emotions. It helps listeners connect to the music on a deeper and personal level. The different types of soundscape can create a range of emotions such as suspense, tranquility, happiness, fear, and even nostalgia. By incorporating appropriate soundscapes into a track, a composer can evoke an intended emotional response from the listener.

Cognitive Processing

Soundscapes have a significant impact on cognitive processing. Meanwhile, they are capable of creating mental images in the minds of listeners. Appropriate soundscape can help create a narrative for the music being played, thereby enhancing the listener’s overall experience. It allows them to visualize the story that the music is telling, hence. This leads to a more profound and memorable experience.

Behavioral Effects

The behavioral effects of soundscapes can not be overemphasized. Appropriate soundscapes can create an immersive environment for the listener. This makes them feel like they are a part of the music. It can enhance focus, concentration, and productivity, and even have therapeutic effects. The right soundscape can help reduce stress levels, boost confidence, and increase motivation. In conclusion, incorporating soundscapes not only adds depth, atmosphere, and mood to music tracks. But it also has the power to evoke an emotional, cognitive, and behavioral response from the listener. By using appropriate and relevant soundscapes, a composer can create an immersive and memorable experience for the listener.


Frequently Asked Questions For The Power Of Soundscapes How To Create Ambience And Atmosphere In Your Tracks


How Do You Make Ambience In Track?


To make ambience in a track, you can use various techniques like adding atmospheric sounds, using reverb and delay effects, manipulating EQ and arranging the track in a way that creates a particular mood or feeling. Focusing on details such as rhythm, melody and instrumentation can also contribute to the overall ambience of the track.


How Do You Make Ambient Soundscapes?


To create ambient soundscapes, you can use a combination of recorded natural sounds and electronic textures. Start by selecting the core elements of the soundscape, such as bird songs or flowing water. Use appropriate software to blend these together and add additional layers to create a cohesive and immersive environment.


Experiment with different sounds and textures to achieve the desired atmosphere.


How Do You Create An Atmosphere In Music?


To create an atmosphere in music, a composer or musician must consider elements such as rhythm, melody, dynamics, instrumentation, and tone. By carefully using these elements, they can evoke emotions, convey moods, and set a scene. This creates a unique and engaging listening experience for their audience.


How Do You Make A Good Soundscape?


To create a good soundscape, consider the specific mood or atmosphere you want to evoke and choose sounds that support that theme. Use a variety of sounds, including natural and artificial elements, to create depth and interest. Pay attention to the placement and volume of each sound to create a balanced and realistic effect.


Time and repetition can also enhance the overall impact of the soundscape.


Conclusion


Incorporating soundscapes into your tracks is an often overlooked way to create an immersive listening experience for your audience. By carefully selecting and layering ambient sounds, you can elicit a wide range of emotions and transport your listener to a different time or place.


Don’t underestimate the power of sound in your music, take the time to experiment with different soundscapes and see how they enhance the overall feel of your tracks. Your listeners will thank you for it.

Categories
Archive

The Power Of Automation Tips For Making The Most Of Automation In Your Tracks

To make the most of automation in your tracks, follow these tips: start small, plan ahead, choose the right tools, and monitor the results closely. Automation can save you time and increase your productivity, but it’s important to use it strategically in order to see the most benefit.


As technology advances and workloads increase, automation has become an increasingly important tool for businesses to stay competitive. By automating repetitive or time-consuming tasks, companies can streamline their workflows and focus on higher-level tasks that require human creativity and decision-making.


However, automation is only effective when used strategically and with the right tools. We will discuss the power of automation and provide tips for making the most of it in your tracks. Whether you’re a small business owner or a seasoned professional, these tips can help you save time, improve efficiency, and achieve your business goals.


The Benefits Of Automation In Tracks


Incorporating automation in your tracks can greatly improve your workflow by saving time and increasing efficiency. By implementing automation tips, such as using templates and creating shortcuts, you can make the most of your music production process and achieve better results.

Efficiency

Automation improves efficiency in tracks by reducing the time and effort required to complete tasks. The use of automated systems allows for faster and more precise execution of processes. For instance, automated systems can perform tasks such as loading and unloading cargo, sorting packages, and managing warehouse inventory. By automating these processes, it leads to a significant time saving, thereby increasing efficiency and productivity.

Cost-effectiveness

Automation provides a cost-effective way of improving track operations. While the initial investment might be relatively high, the long-term savings from automation outweigh the initial cost. With automation, there is a reduction in reliance on manual labor, which cuts down on labor costs. Besides, automated systems reduce the occurrence of errors, which can be costly to correct or cause losses.

Improved Accuracy

Another significant benefit of automation in tracks is the improvement in accuracy. Automated systems are designed to follow precise instructions, reducing the chances of errors and inconsistencies. For instance, automated systems for inventory management can record and update inventory levels more accurately than manual methods. Reduced errors mean better quality service, which in turn improves customer satisfaction. In conclusion, automation has a significant impact on the efficiency, cost-effectiveness, and accuracy of track operations. With better time management and reduced errors, track companies can provide faster, more reliable, and cost-effective services.

The Power Of Automation Tips For Making The Most Of Automation In Your Tracks


Credit: www.masteringthemix.com


Types Of Automation

When it comes to manufacturing processes, automation is the driving force behind the increasing efficiency and productivity of businesses. There are various types of automation available to manufacturers, each with its own set of advantages and disadvantages. Here are the three main types of automation:

Programmable Automation

Programmable automation involves the use of computerized machines that can be programmed to perform specific tasks. These machines are typically used in industries like automotive manufacturing, where the same operations are repeated thousands of times. One of the significant advantages of programmable automation is that it is highly flexible and can be reprogrammed with minimal downtime. However, the initial costs of acquiring and setting up these machines can be high.

Fixed Automation

Fixed automation is a type of automation that involves the use of specialized machines that are designed to perform a specific task. Once set up, these machines cannot be reprogrammed. Fixed automation is best suited for high volume manufacturing, where the same part is produced over and over again. One of the main benefits of fixed automation is that the production process is highly efficient, and the quality of the parts produced is consistent. However, the inflexibility of these machines makes them unsuitable for manufacturing complex parts.

Flexible Automation

Flexible automation is a type of automation that combines the benefits of both fixed and programmable automation. It involves the use of computer-controlled machines that can perform different tasks without the need for reprogramming. Flexible automation is best suited for manufacturing products that require frequent reconfiguration of the production process. One of the main benefits of flexible automation is that it can adapt to changes in demand quickly, making it an ideal solution for businesses that operate in dynamic markets. However, the cost of acquiring and setting up these machines can be high.

Choosing the right type of automation for your business depends on several factors, including the type of products you manufacture, the volume of production, and the complexity of the parts you produce. By understanding the advantages and disadvantages of each type of automation, you can make an informed decision that will help you improve your manufacturing processes and increase your bottom line.

Tools For Automation

In recent years, businesses have realized the power of automation to increase efficiency and productivity. Harnessing the latest tools to automate tasks can save time, reduce errors, and allow for a greater focus on strategic initiatives. Here are three of the most popular tools for automation:

Robotic Process Automation (rpa)

RPA is a powerful technology that automates mundane and repetitive tasks. By using software robots, RPA can execute complex processes automatically, reducing the need for manual intervention. Some examples of RPA applications include order processing, invoice management, and customer service operations.

Artificial Intelligence (ai)

AI technologies can automate even the most complex tasks by using machine learning algorithms to analyze data and learn from previous interactions. AI can perform tasks such as speech recognition, image processing, and predictive analytics, and is increasingly being used in areas such as healthcare and finance.

Internet Of Things (iot)

The IoT refers to the growing number of devices that are connected to the internet and can communicate with each other. By using sensors and other technologies, IoT systems can automate tasks such as monitoring equipment, tracking inventory, and managing energy usage. With the rapid growth of IoT devices, the potential for automation is enormous.

By using these powerful tools, businesses can streamline operations and increase productivity. Whether it’s RPA, AI, or IoT, the key to making the most of automation is to focus on the areas where automation can have the greatest impact.


Tips For Automating In Tracks

The power of automation cannot be underestimated in the current digital era. Automation is changing the way businesses operate, making processes faster and more efficient. However, for businesses to harness the power of automation, it’s crucial to know the right tips for automating in tracks. Below are some practical tips on how to make the most of automation in your tracks.

Identify Repetitive Tasks

Identifying the repetitive tasks in your business is the first step towards successful automation. Take an in-depth look into your business processes and determine which tasks are recurring. Once you have a clear understanding of these tasks, it’s easier to select the appropriate tools and channels to automate them. Automation can handle these repetitive tasks with minimal intervention from your employees, reducing errors and streamlining operations.

Set Realistic Goals

To make the most of automation, set realistic goals for your business. Ensure that your goals are measurable and specific. Avoid setting unrealistic goals that only lead to frustration and loss of time and resources. By setting achievable goals, you can measure progress and celebrate milestones. Moreover, employees understand better their roles in the automation process, and you can tailor the automation processes to your business needs.

Train Employees

Automating tasks can only be successful if your employees understand the automation processes. Before implementing automation in your business, ensure that your employees are well trained and equipped to handle the new technology. Provide an adequate amount of time for your employees to learn the new processes and answer any questions that they may have. A well-trained team can drive automation goals and achieve better results.

Monitor And Measure Progress

Monitoring and measuring progress is crucial to assess the success of your automation strategy. Tracking your automation progress through data analysis and monitoring tools can help you identify loopholes and areas for improvement. Use automation analytics to determine how automation processes are affecting various aspects of your business, including efficiency, sales, customer experience, and cost savings.

The above tips for automating in tracks can help you harness the power of automation in your business. Identify repetitive tasks, set realistic goals, train employees, and monitor progress to achieve success in automation. The automation process is a continuous improvement journey and with proper implementation, businesses can benefit from the increased efficiency and cost savings that come with automation.


Challenges Of Automation


Automation has the power to revolutionize your tracks, but it also comes with its own set of challenges. From integrating new technologies to managing data, it’s important to stay on top of the latest automation tips to make the most of its potential.

Automation has transformed the way businesses operate. It has made tasks faster, easier, and more efficient, but it also comes with its own set of challenges. These challenges must be addressed to ensure that businesses can make the most of automation in their tracks. Let’s take a look at some of the common challenges businesses may face when implementing automation:

Costs And Implementation

One of the biggest challenges of automation is its cost. Implementing automation can be expensive, and businesses may not see a return on their investment right away. The cost of automation may include hardware, software, and training costs. For smaller businesses, this cost may be too high to justify automation. Moreover, implementing automation in an existing system can be challenging. It requires retooling processes, staff training, and possibly having work processes disrupted.

Resistance To Change

Resistance to change is another challenge that businesses may face when implementing automation. Employees may feel threatened by the new technology and may resist using it. They may feel that their jobs are at risk or that they will be replaced by machines. It is important to educate and train employees about automation to get them familiar with the benefits it can bring. In this way, businesses can find ways to maximize the use of automation while still ensuring that their employees are comfortable with the new technology.

Job Losses

Another concern that businesses have with automation is the potential for job losses. As machines take over tasks previously done by humans, there is a risk that people may lose their jobs. This can cause distress and disruption in industries. However, the reality is that automation creates more job opportunities in certain industries. For example, the manufacturing industry will need more skilled people with experience in running, maintaining and updating automated equipment. In conclusion, while there are challenges to implementing automation in a business, there are also significant benefits. With careful attention to costs, employee adaptation, and a focus on reskilling and repurposing, businesses can utilize automation in their tracks. This can lead to higher productivity, better accuracy, and better outcomes overall.


Frequently Asked Questions Of The Power Of Automation Tips For Making The Most Of Automation In Your Tracks


What Is The Power Of Automation?


Automation empowers businesses to streamline repetitive and time-consuming tasks, increasing efficiency and productivity. By automating tasks, businesses can operate 24/7, reduce human error and costs, provide better customer service, and scale operations with ease. The power of automation lies in its ability to eliminate manual work and create more time and revenue opportunities.


Why Is Automation Important In Music?


Automation is important in music because it can greatly improve efficiency and precision in recording, mixing, and mastering. It allows for repeated precise adjustments and effects to be applied consistently, making the process faster and less prone to human error.


It also allows for more creative experimentation and can help musicians and producers achieve a professional sound.


What Does Automation Mean In Garageband?


Automation in GarageBand refers to the ability to transform and customize various parameters, such as volume, panning, and effects over time. It allows you to create dynamic and engaging music by controlling the actions of specific pieces of audio or instruments in a song.


What Is Volume Automation In Audio Editing And Why Is It A Valuable Technique?


Volume automation is a technique used in audio editing to adjust the volume levels of specific sections of a track. It helps ensure consistent and smooth audio levels throughout the track. This technique is valuable because it enhances the overall quality and clarity of the audio and creates a more professional sound.


Conclusion


As you can see, automation can bring significant improvements to your business operations. By implementing these tips, you can make the most of automation and improve your workflow efficiency. Remember to start small and gradually expand your automation efforts. Also, keep exploring new automation tools and technologies to stay ahead of the competition.


Automation is already paving the way for the future of work, and by embracing it, you can take your business to new heights.

Categories
Archive

Fletcher Munson Curve Decoded: Audio Secrets Unveiled

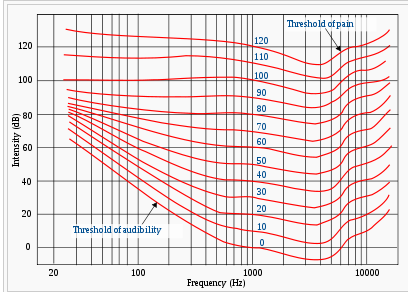
The Fletcher Munson Curve illustrates how human hearing sensitivity varies with frequency. It shows that ears perceive different frequencies at varying loudness levels.


Understanding the Fletcher Munson Curve is critical for audio professionals, highlighting the intricacies of human auditory perception. This knowledge is paramount when mixing music or calibrating sound systems to ensure that audio experiences are both pleasant and accurate. The curve emphasizes that our ears are most sensitive to frequencies between 2kHz and 5kHz, roughly the range of human speech, and less sensitive to very low and very high frequencies.


By considering this curve, sound engineers can create truly lifelike soundscapes, tailoring output to fit our natural hearing tendencies. It’s a foundational concept in the fields of acoustics, audio engineering, and psychoacoustics, guiding experts in creating sound that complements the human hearing system.


The Fletcher Munson Curve Unveiled

Discover the wonders of the Fletcher Munson Curve as we unveil its mysteries.

Origins And History

The Fletcher Munson Curve comes from deep audio history. Two scientists, Harvey Fletcher and Wilden A. Munson, presented it in 1933. This curve shows how we hear sounds differently at various frequencies and volumes. It became a cornerstone for understanding human hearing. This discovery shapes how we design sound systems and spaces.

Key Principles

At its core, the Fletcher Munson Curve maps human hearing sensitivity. It reveals a key fact: we don’t hear all frequencies equally. Loudness impacts our perception.

  • Equal Loudness Contours: The curve forms part of these contours. They show how we need different levels of power to hear frequencies as equally loud.
  • Volume Variation: Our hearing is most sensitive to frequencies between 2 kHz to 5 kHz. This changes with volume.
  • Frequency and Loudness: Low and high frequencies need a louder sound to be heard well, unlike mid-range frequencies.

The Physics Of Sound And Human Hearing

Understanding how we hear is a journey into physics and biology. Our ears translate air vibrations into sounds. This transformation involves complex processes. The Fletcher Munson Curve explains how we perceive loudness at different frequencies. Read on to explore the intricate connection between sound waves and our auditory perception.

How We Hear

Our hearing starts when sound waves enter the ear canal. These waves make the eardrum vibrate. Behind the eardrum, tiny bones in the middle ear also vibrate. These vibrations move to the inner ear. The inner ear has a snail-shaped part called the cochlea. It is filled with fluid and lined with tiny hairs. As the fluid moves, the hairs send electrical signals to the brain. The brain tells us what we are hearing.

Frequency And Amplitude

Sound waves have two important parts: frequency and amplitude. Frequency decides the pitch of a sound. High frequency means a high pitch, like a bird singing. Low frequency means a low pitch, like a drum. Amplitude decides how loud a sound is. A sound wave with high amplitude is loud, like a shout. Low amplitude is quiet, like a whisper. The Fletcher Munson Curve shows that our ears hear different frequencies at different loudness levels.

Frequency Corresponding Pitch
High High pitch (e.g., bird chirping)
Low Low pitch (e.g., drum beat)
Amplitude Loudness Perception
High Loud (e.g., shouting)
Low Quiet (e.g., whispering)

The cochlea is more sensitive to some frequencies. At normal listening levels, mid-range frequencies around 500 Hz to 3 kHz are the clearest. Sounds at these frequencies seem louder than high or low pitches at the same amplitude.

Decoding The Curve

Let’s dive into the fascinating world of how we perceive sound. The Fletcher Munson Curve is a key to understanding that. This curve shows how our ears hear different frequencies at varying loudness levels. Here’s a closer look at what this curve tells us.

Equal Loudness Contours

These contours are essential for grasping the Fletcher Munson Curve. Imagine lines that represent sounds heard at the same volume. Our ears are unique. They don’t hear all frequencies at the same level. This curve reveals this remarkable trait. It maps out many lines for different loudness levels. Each line is an equal loudness contour.

  • The curves flatten as the volume increases.
  • Human ears are most sensitive to frequencies between 2kHz to 5kHz.
  • Lower and higher frequencies need to be louder for us to perceive them as equal.

Frequency Response And Perception

Now, let’s unpack frequency response and perception. Our hearing sensitivity changes with frequency and loudness. For example:

Frequency Loudness Perception
Low Quiet Hard to Hear
Midrange Quiet Clear
High Quiet Hard to Hear
Low Loud More Audible
High Loud More Audible

This table presents a snapshot. It simplifies our complex hearing abilities. Music producers and audio engineers must understand this. It helps them create sounds that we hear clearly and comfortably at all volumes.

Fletcher Munson Curve Decoded: Audio Secrets Unveiled


Credit: www.phasure.com

Practical Applications In Audio Engineering

The Fletcher Munson Curve is a key tool in audio engineering. It shows how we hear sounds at different volumes. Engineers use this knowledge to make music sound great on any device.

Mixing And Mastering

Mixing and mastering are vital for producing quality audio. Here’s how the Fletcher Munson Curve helps:

  • Ensures consistent sound levels across frequencies.
  • Helps balance tracks for human ears at various volume levels.
  • Avoids ear fatigue during long listening sessions.

Using the curve, engineers make sure the mix is pleasing at every volume.

Room Acoustics Optimization

Knowing the Fletcher Munson Curve aids in designing better listening spaces. Look at how:

  1. Speakers are arranged for even sound at all angles.
  2. Materials are chosen to enhance the right frequencies.
  3. Noise levels are minimized for accurate sound reproduction.

Experts adjust rooms for the flattest frequency response, considering the curve.

The Listener’s Environment

Understanding the Fletcher Munson Curve becomes crucial when considering the listener’s environment. This curve illustrates how humans perceive loudness at different frequencies. The environment where we listen to sounds can dramatically alter our auditory experience.

Impact Of Background Noise

Background noise can affect our perception of sound. It can mask certain frequencies. This makes listening more challenging. The noise competes with the audio we intend to hear. For example, a bustling cafe might drown out the lower frequencies of music, or the hum of an air conditioner may cover subtle high-frequency sounds in a podcast.

  • Home settings often have quieter backgrounds.
  • Public places feature varied noise levels.
  • Work environments can mix unpredictable sounds.

Adjusting Audio For Different Spaces

Different spaces require audio adjustments. Sound engineers must consider the Fletcher Munson Curve to maintain sound quality across various environments. They use it to balance audio levels so that listeners enjoy a consistent experience.

  1. Identify the typical noise profile of the space.
  2. Adjust treble and bass to compensate for background noise.
  3. Use equalization techniques to maintain audio fidelity.

Suitable audio settings for quiet rooms differ from those for noisy gyms. In quieter surroundings, a flat equalizer setting may suffice. In louder areas, boosting certain frequencies helps the primary audio cut through the noise. This delivers a clearer listening experience.


Hearing Health And Safety

Our ability to hear is precious, yet often overlooked. The Fletcher Munson Curve is crucial to understanding how we perceive different frequencies. This curve shows that our ears have varying sensitivity to sounds at different pitches. For hearing health and safety, knowing how to protect our ears is essential. Loud sounds can harm our hearing, but we can take steps to prevent damage.

Protecting Against Hearing Loss

Hearing loss can be due to loud noise exposure. Simple habits can keep our ears healthy. Below are key strategies to protect your hearing:

  • Use Earplugs: During loud events, earplugs reduce noise levels.
  • Limit Exposure: Spend less time in noisy environments.
  • Follow the 60/60 Rule: Use headphones at no more than 60% volume for 60 minutes a day.
  • Regular Check-Ups: Get your hearing tested often.

Safe Listening Levels

To maintain good hearing health, stick to safe listening levels. The Fletcher Munson Curve helps identify safe levels for different frequencies. Generally, sounds under 70 decibels (dB) are safe. Here’s a guide to follow:

Environment Safe Duration
Bird calls (40-50 dB) No limit
Normal conversation (60-70 dB) No limit
City traffic (80-85 dB) Less than 2 hours
Concerts (100-110 dB) Less than 15 minutes

Always choose sounds that are gentle to your ears. Use sound level apps to check noise in your environment. Keep volume down on your devices. With the right care, you can enjoy sounds for a lifetime.

Advancements In Audio Technology

The journey of audio technology has been a symphony of innovation. From the vinyl era to the streaming age, our understanding of sound has greatly evolved. One pivotal discovery in this adventure was the Fletcher Munson Curve. This curve reveals how human ears perceive loudness at different frequencies. Fast forward to today, and this knowledge shapes how we experience sounds. Let’s dive into the recent advancements in audio technology sculpting the world of sound.

Modern Equalization Techniques

Equalization, or EQ, has undergone a remarkable transformation. Modern equalizers now tap into the Fletcher Munson Curve to create more nuanced soundscapes. By understanding that different frequencies require varying loudness levels for clarity, EQ technology offers precise control. DJs, producers, and audiophiles alike can sculpt audio with incredible detail. They adjust frequencies to ensure music sounds great at any volume.

  • Parametric EQs: Allow users to pinpoint and adjust specific frequency ranges effortlessly.
  • Dynamic EQs: They dynamically adapt to audio signals for real-time balance and consistency.
  • Linear Phase EQs: These preserve the time relationship between frequencies, preventing phase issues.

Together, these tools employ the Fletcher Munson Curve intelligently. They make listening a pleasure at any decibel.

Smart Audio Systems

Smart audio systems are the new era maestros. They learn and adapt to their environment for optimal sound performance. Incorporating the Fletcher Munson Curve, these systems:

Tech Feature Function
Automatic calibration They analyze room acoustics and adjust settings.
Adaptive sound control They detect ambient noise levels and modify audio accordingly.
User profiling Systems create sound profiles based on user listening habits.

Smart audio systems ensure that whether in a quiet study or a noisy gym, the audio quality remains consistently exceptional. By considering human auditory perception, they deliver a personalized, immersive listening experience.


Future Directions

Exploring the future directions of the Fletcher Munson Curve reveals fascinating advancements. The curve outlines how we perceive different frequencies at varying volumes. It acts as a guide for creating balanced sounds. As technology evolves, so does our understanding and application of this fundamental audio principle. Two exciting frontiers stand poised to revolutionize how we experience sound: personalized sound experiences and the role of AI in audio.

Personalized Sound Experiences

Imagine audio that adapts to your hearing. Personalized sound experiences aim to do just that. Headphones and speakers will soon calibrate sounds based on individual hearing profiles. This means a richer, more nuanced listening experience for everyone. Here’s how this could look:

  • Bespoke Equalization: Sound devices will tune frequencies to match your personal hearing sensitivities.
  • Hearing Health Tracking: Devices could monitor hearing changes and adjust profiles accordingly.
  • Environment Adaptation: Audio setups will optimize output considering ambient noise levels.

The Role Of Ai In Audio

Artificial Intelligence (AI) is steadily transforming the audio industry. AI algorithms can now learn and predict the Fletcher Munson Curve preferences for different listeners. The result? Smarter audio delivery systems that enhance the listening experience in real-time. Below are the roles AI will play:

Function Impact
Real-time Sound Adjustment AI modifies audio levels instantly to ensure optimal listening at all times.
Frequency Personalization Understands and adapts to your unique hearing curve for customized sound.
Audio Restoration Enhances old or low-quality recordings to match modern listening standards.

These developments hint at an audio future where listening becomes an individualized, dynamic experience.

Frequently Asked Questions Of Fletcher Munson Curve

What Is The Fletcher Munson Curve?

The Fletcher Munson Curve illustrates how human ears perceive loudness at different frequencies. It shows that our sensitivity to sound levels varies with frequency and that we’re less sensitive to low and high frequencies at lower volumes.

Why Is The Fletcher Munson Curve Important?

This curve is crucial for audio engineering because it guides equalization and mixing practices. By understanding it, engineers can create sounds that maintain consistent perceived loudness, enhancing the listener’s experience across different environments.

How Does The Fletcher Munson Curve Affect Hearing?

The curve affects hearing by indicating that louder sounds are perceived more flatly across frequencies, while at lower volumes, listeners may not hear low and high frequencies as well. This impacts how we perceive sounds daily.

Can The Fletcher Munson Curve Improve Sound Quality?

Yes. By applying knowledge of the curve, audio professionals can adjust sound systems to compensate for the human ear’s non-linear response, achieving a more balanced and pleasant sound at various listening levels.

Conclusion

Understanding the Fletcher Munson Curve is crucial for anyone passionate about sound. It reveals why we perceive frequencies differently at various volumes. By leveraging this insight, audio engineers can create balanced mixes, and music lovers can enjoy sound fully. So, embrace this knowledge, and tune in to an enhanced audio experience.

Categories
Archive

Best Stereo Imaging Plugins: Elevate Your Mixes!

The best stereo imaging plugins enhance soundstage depth and width in audio production. Waves S1 Stereo Imager and iZotope Ozone’s Imager are top choices among professionals.

Also, Stereo imaging plugins are essential tools for audio engineers and music producers aiming to create an immersive listening experience. Also, they allow for precise manipulation of the stereo field, making tracks feel wider, deeper, and more lifelike. By strategically adjusting the stereo spread and localization of sounds, these plugins can greatly improve the clarity and separation of instruments within a mix.

Related reading: The Role of Stereo Imaging in Audio Mastering and Using Stereo Imaging in Fl Studio: Enhance Your Mix. For background, see the Wikipedia article on Stereo imaging.

Moreover, whether shaping the stereo image of an individual instrument or the entire mix, these powerful tools provide the creative flexibility to craft a polished and professional sound. In addition, with user-friendly interfaces and advanced algorithms, the leading stereo imaging plugins enable both novice and veteran producers to achieve studio-quality spatial enhancement with relative ease.

Introduction To Stereo Imaging Plugins

Stereo Imaging Plugins in Modern Music Production

In addition, Stereo Imaging Plugins are crucial tools in audio production. For example, these tools manipulate the soundstage of a track. Producers use them to create width and depth in mixes. A well-imaged track stands out, bringing clarity and dynamism to music.

The Role in Modern Music Production

The Role In Modern Music Production for Stereo Imaging Plugins

Furthermore, Stereo imaging has transformed music production. As a result, it allows sounds to occupy unique spaces. Listeners experience sound as if they are in the middle of the action.

  • Additionally, positioning: Place instruments in a virtual space.
  • Also, depth: Create a sense of distance from the listener.
  • Moreover, Movement: Dynamically move sounds within the stereo field.
Benefits for Your Mixes

Benefits For Your Mixes for Stereo Imaging Plugins

In addition, enhanced clarity: Clear separation of instruments.

Furthermore, increased presence: Highlight key elements in a mix.

Additionally, better listener engagement: Create an immersive audio experience.

  1. Also, tracks sound more professional and polished.
  2. Moreover, livelier and more compelling soundscape is achieved.
  3. In addition, Mixes translate better across different playback systems.

Key Features Of Stereo Imaging Tools

Furthermore, the essence of stereo imaging tools lies in their ability to shape and enhance the spatial attributes of your sound. However, these sophisticated plugins can manipulate the stereo field, bringing a new life to your mixes. Whether it’s about achieving the perfect balance or creating an expansive soundscape, key features are crucial for desirable outcomes.

Width Control

Width Control for Stereo Imaging Plugins

Broadening or tightening the stereo width is fundamental for a mix. Then, with width control , users can:

  • Also, expand the reach of section sounds.
  • Moreover, adjust the breadth of stereo effects.
  • In addition, Center the focus on main elements.

Furthermore, this feature lets you shape the soundstage with precision, ensuring every element sits right where it needs to be.

Depth and Dimension

Depth And Dimension for Stereo Imaging Plugins

Additionally, depth and dimension cater to the sense of distance within your mix. Characteristics include:

  • Also, layering sounds for a 3D effect.
  • Adding reverb for space emulation.
  • Creating front-to-back depth.

Moreover, adjust the depth to allow elements to breathe and resonate, producing an immersive listening experience.

Mono Compatibility

Mono Compatibility for Stereo Imaging Plugins

Mono compatibility ensures:

  • No phase issues during mono playback.
  • Consistency across different sound systems.
  • In addition, reliable translation from stereo to mono.

Preserving the integrity of your mix in both stereo and mono formats can save you from setbacks during playback on various devices.

Top Stereo Imaging Plugins In The Market

Best Stereo Imaging Plugins

Furthermore, discover the game-changers in audio mixing and mastering. In short, top stereo imaging plugins give your tracks that extra dimension . They transform flat sounds into rich, immersive experiences. Embrace the tools that professional sound engineers swear by. Enhance width, depth, and space with these innovative plugins.

Widening Superstars

Widening Superstars for Stereo Imaging Plugins

  • Additionally, Ozone Imager 2 – Turn narrow tracks into wide ones instantly.
  • Also, Waves S1 Stereo Imager – Shape your sound with precision.
  • Moreover, polyverse Wider – Getextreme stereo spread with no phase issues.

In addition, these plugins push the boundaries of stereo enhancement. Similarly, create lush soundscapes that envelop your listeners.

Depth Enhancers

Depth Enhancers for Stereo Imaging Plugins

  1. Furthermore, boom Library Turbine – Real-world spatial depth at your fingertips.
  2. Additionally, FabFilter Pro-Q 3 – Cut or boost frequencies with surgical accuracy.
  3. Also, Waves Abbey Road Studios 3 – The sound of the legendary studio in your headphones.

Moreover, depth-enhancing plugins add a new layer of reality to sounds. Also, they let you sculpt the perfect aural space . Music comes to life with profound depth.

Mono-to-Stereo Converters

Mono-to-stereo Converters

In addition, transforming mono tracks into stereo soundscapes is pure magic. Here are the wizards:

Plugin Description
Waves PS22 Stereo Maker An industry classic for wider dual-mono sound.
Brainworx bx_stereomaker Create a stereo image from a mono source with ease.
Plugin Alliance BX_shredspread Perfect for guitars; turn mono to stereo naturally.

Furthermore, these mono-to-stereo converters allow for an organic expansion of mono tracks. They maintain the original character while adding spatial width.

Best Stereo Imaging Plugins: Elevate Your Mixes!

Credit: www.linkedin.com

Case Studies: Hits Made With Stereo Imaging

Additionally, Stereo imaging plugins play a vital role in modern music production. In addition, these tools enhance the spatial dimension of sound, giving tracks an immersive feel. Skilled audio engineers use them to add depth and width, helping songs to stand out. Let’s explore some hit tracks that benefited immensely from the magic of stereo imaging.

Pop Chart Toppers

Also, bold beats and catchy melodies define pop music. For example, Stereo imaging takes these features to new heights. Here’s a glance at pop songs that soared on the charts, thanks in part to stellar imaging.

  • “Shape of You” by Ed Sheeran showcased wide stereo effects, making it a global phenomenon.
  • Moreover, taylor Swift’s “Blank Space” used imaging to craft a soundscape that was both intimate and expansive.

Electronic Anthems

In addition, electronic music thrives on the vibe set by its soundscape. As a result, here’s how stereo imaging was pivotal in crafting some electronic anthems:

  • Furthermore, daft Punk’s “Get Lucky” separated layers of synths and grooves, creating a dance floor classic with palpable dimensionality.
  • Additionally, dense textures in Deadmau5’s “Strobe” were widened, offering an engulfing auditory experience.

Ambient Soundscapes

Also, the essence of ambient music lies in its ability to transport listeners to a different landscape. However, let’s consider tracks where stereo imaging was key to creating this immersive experience:

  • “Weightless” by Marconi Union utilized imaging to spread soothing tones across the stereo field, promoting relaxation.
  • Moreover, brian Eno’s “An Ending (Ascent)” gently placed sounds around the listener, creating a serene environment.

Integration Tips For Maximum Effect

Getting the best out of stereo imaging plugins means more than just slapping them on your mix. Then, it’s about using them with strategy and purpose. Let’s dive into some key integration tips. These tips will help you get that wide, immersive sound your tracks deserve.

Using Automation For Movement for Stereo Imaging Plugins

Movement in a mix makes it come alive. In short, Automation is the perfect tool for this. Consider these steps:

  • Map stereo imaging parameters to automation tracks in your DAW.
  • Select musical elements that need dynamic positioning.
  • Write automation curves to create motion throughout the track.

Tip: Use gradual panning on synths or backup vocals for an engaging audio journey.

Balancing Frequencies for Stereo Imaging Plugins

Frequency balance is key in stereo imaging. Follow this advice:

  1. Use high-pass filters to clean low end and prevent muddiness.
  2. Apply stereo widening carefully on higher frequencies.
  3. Check your mix in mono to ensure phase issues are absent.

Remember: Too much widening can cause mix problems. Similarly, be subtle for the best results.

Creating A Focused Center for Stereo Imaging Plugins

The center of your mix should be rock solid. Also, this is where your kick, snare, bass, and lead vocals usually sit.

Action Benefit
Keep crucial elements in mono Ensures power and clarity
Widen complementary elements Enhances the mix’s depth

Working on a strong center gives the rest of your mix a solid reference point.

Expert Tricks With Stereo Imaging Plugins

Auditory depth and realism in music production hinge on the masterful use of stereo imaging plugins. In addition, these potent tools can whisk listeners on a sonic journey, toying with the dimensions of sound. Now, unveil the expert tricks that separate the novices from the virtuosos.

The Haas Effect

Imagine a sound so lifelike, you can almost pinpoint its location in a room. For example, that’s the magic of the Haas Effect . With precision timing adjustments, sounds can appear closer or further away. Here’s how to harness this phenomenon:

  • Delay: Inject a slight delay on one channel.
  • Variation: Mix it subtly to avoid echoes.
  • Experiment: Tweak timings for different spatial effects.

Mid-side Processing

Mid-Side Processing offers a new dimension to your mix. As a result, Control over the middle and sides means you can sculpt a wider, more dynamic soundstage. Apply these steps for a well-balanced mix:

  1. Isolate: Separate the mid and side signals.
  2. Enhance: EQ each part for clarity and space.
  3. Balance: Compare with the original signal for cohesion.

Psychoacoustic Phenomena

Our brains interpret sounds in fascinating ways. However, by leveraging psychoacoustic phenomena , you can create a 3D auditory experience. Engage listeners with these strategies:

Technique Application Effect
Panning Place sounds in the stereo field. Create directional flow.
Frequency Shifting Adjust frequencies slightly between ears. Invoke a sense of movement.
Reverb Simulate natural environmental reflections. Instill an ambient atmosphere.

Genre-specific Applications

Exploring Genre-Specific Applications for stereo imaging plugins uncovers the power of tailored audio treatment. Then, different genres demand unique spatial characteristics. Specialists use stereo imaging tools to craft the perfect auditory landscape. Understanding genre-specific needs ensures the right plugin enhances your mix.

Rock And Metal

Crunchy guitars and thunderous drums define rock and metal. In short, Stereo imaging plugins turn flat sounds into expansive arenas . Key plugins create the illusion of wide stages. This makes every riff and drum hit feel monumental. Ideal tools separate instruments for a clear, powerful mix.

Hip-hop And Rb

Hip-Hop and R&B thrive on groove and depth. Similarly, Plugins must respect the beat. They provide space for vocals to stand out. Stereo expanders give beats a three-dimensional feel. This elevates the listener’s experience, making them feel inside the music.

Edm And Dance

EDM and Dance are about immersive experiences. Also, wide, pulsating stereo fields fill dance floors. Imaging tools spread synths and bass across the spectrum. This creates a captivating dance environment. It’s crucial for drops and builds to have maximum impact.

Acoustic Environments

Natural intimacy marks acoustic environments. In addition, the plugins emphasize the nuances of live recordings . They reproduce the feel of being in the same room as the artist. A gentle widening enchants the listener. This places them at the heart of a personal performance.

Best Stereo Imaging Plugins: Elevate Your Mixes!

Credit: www.izotope.com

Diy Stereo Imaging Techniques

For music producers and audiophiles alike, crafting the perfect stereo image can be a game-changer. For example, Stereo imaging plugins can transform a flat mix into a three-dimensional soundscape. But what if you’re on a budget or love a hands-on approach? DIY stereo imaging techniques are here to rescue your mix. Let’s discover how simple tricks can create that lush, wide sound without breaking the bank.

Simple Panning Laws

Panning is the most fundamental aspect of stereo imaging. As a result, it guides each instrument to its position in the stereo field. With the right approach, panning turns a mono track into a dynamic audio experience. Here are some tips:

  • Use the pan knob to position sounds left or right.
  • Hard panning can help separate instruments that compete for the same frequency range.
  • Panning doesn’t have to be extreme. Subtle shifts can make a big difference.

Delay And Phase Tricks

Delay and phase manipulation can widen a track without multiple takes. However, these techniques often require careful adjustment to avoid muddiness. Examples include:

  • Haas Effect: Delaying a channel by ~10-30ms can give the illusion of width.
  • Phase inversion: This can create a wider feel but risks phase cancellation.

The Power Of Eq

Equalization is not just for tone shaping — it can also impact the stereo image. Then, EQ adjustments can ensure each instrument sits well in the mix. To enhance stereo imaging:

  • Cut or boost frequencies to place sounds in the stereo field.
  • Use mid/side EQ to treat the center and sides of a stereo track differently.

Avoiding Common Pitfalls for Stereo Imaging Plugins

Mastering stereo imaging in audio productions can transform a flat mix into a dynamic soundscape. In short, it enhances the listener’s experience by adding depth and width to the sound. But, pitfalls litter the path to perfect stereo imaging. Recognizing these challenges is the first step toward creating a captivating stereo mix.

Over-widening Issues

Enthusiasm for a broad soundscape can lead to over-widening, which results in a mix that sounds unfocused or detached. Sounds may lose their punch and become less impactful when spread too thin across the stereo field. Similarly, use stereo imaging plugins with care to ensure a cohesive sound that retains its power across all playback systems.

Phase Cancellation

Phase cancellation occurs when identical frequencies from the left and the right channels are out of sync, reducing or nullifying certain sounds. Also, this mishap can make crucial mix elements disappear unexpectedly. To prevent this, monitor your mix in mono frequently and adjust the imaging accordingly.

Mix Translation Problems

A mix that sounds stellar on studio monitors might not translate well to other listening environments. Mix translation issues arise when the enhanced stereo image is lost or altered on different audio systems, like headphones or car speakers. In addition, consistent checks on multiple systems ensure your mix preserves its intended imaging characteristics everywhere.

User Reviews And Testimonials

What makes a music track stand out? For example, often, it’s the spatial depth and realism. To achieve that, stereo imaging plugins are key. They make sounds wider and more dynamic. But how well do they work? Let’s dive into user reviews and testimonials. Here we’ll see what both pros and home producers think about the top plugins. Their insights can guide you to make a sound choice.

Professional Feedback

Professionals in the music industry rely on top-tier tools. As a result, Stereo imagers are no exception. From mixing engineers to mastering gurus, the feedback centers on precision and control. Pros appreciate plugins that provide a clear visual interface and detailed width adjustments. They often point to ‘Plugin A’ for its innovative 3D imaging and to ‘Plugin B’ for its ease of use and natural soundstage enhancements.

  • Clear visuals help in fine-tuning.
  • Detailed controls offer pro-level customization.
  • 3D imaging for a cutting-edge sound experience.
  • Plugins must enhance soundstage without artifacts.

Amateur Producer Insights

Home studio owners and hobbyist musicians value different things. However, they often prefer plugins that are user-friendly and affordable . Many rave about ‘Plugin C’ for its one-knob functionality. Others love ‘Plugin D’ for the presets that kickstart their projects. These testimonials highlight the importance of a simple learning curve and quick results.

  1. User-friendly design is crucial for quick adaptation.
  2. Preset libraries provide a great starting point.
  3. Cost-effective options are highly valued by amateurs.
  4. One-knob functions ease the production process.

Comparisons And Versatility

In forums and review sites, users often compare plugins. Then, versatility emerges as a key factor. The best plugins work across different music genres and production stages. ‘Plugin E’ often gets mentioned for its adaptability in both mixing and mastering. While ‘Plugin F’ is praised for performing well whether on subtle acoustic recordings or full-on electronic tracks.

Plugin Versatility Music Genres Production Stage
‘Plugin E’ High All Mixing & Mastering
‘Plugin F’ High Electronic to Acoustic Pre to Post Production

‘Plugin G’ may also be noted for its cross-platform compatibility. In short, this makes it a versatile choice for producers using multiple DAWs .

Conclusion: Crafting The Perfect Stereo Image

A well-crafted stereo image breathes life into music, giving each element its rightful place in the aural landscape. Similarly, identifying the best stereo imaging plugins is a gateway to producing immersive audio experiences. Let’s recap the key points and explore the importance of continuous learning in stereo imaging.

Summarizing Key Takeaways for Stereo Imaging Plugins

Throughout our discussion, several plugins have proven essential for achieving professional stereo imaging.

  • Top-tier plugins offer precision and quality, enhancing tracks’ width and depth.
  • Tool versatility allows for subtle tweaks or bold transformations, catering to various mixing needs.
  • User-friendly interfaces make stereo imaging accessible to both novices and pros.

Excellent stereo imaging hinges on the right tools and an ear for detail.

Continued Learning And Experimentation

To master stereo imaging, one must embrace experimentation. Also, diving into the nuances of each plugin refines your mixing craft.

  1. Utilize tutorials to uncover hidden features and techniques within the plugins.
  2. Practice regularly on diverse tracks to gain a well-rounded understanding.
  3. Experiment with settings to discover the sweet spot for each mix.

Constant learning equips you with skills to create the perfect stereo image for any audio.

Best Stereo Imaging Plugins: Elevate Your Mixes!

Credit: lunacy.audio

Frequently Asked Questions On Best Stereo Imaging Plugins

What Are Stereo Imaging Plugins?

Stereo imaging plugins are software tools used to enhance the spatial aspects of audio tracks. In addition, they manipulate the stereo field to create depth, width, and a more immersive listening experience. These plugins are essential in music production for achieving a well-balanced mix.

How Do Stereo Imaging Plugins Work?

Stereo imaging plugins work by adjusting the panning, delay, and phase of audio signals. For example, they can spread sounds across the stereo field or focus them to a particular spot. This process aims to replicate how ears perceive sound in a natural environment, creating a realistic auditory space.

Top Features To Look For In Stereo Imaging Plugins?

Look for plugins that offer detailed visualizations, adjustable width and depth controls, and mid/side processing capabilities. A user-friendly interface and presets for quick adjustments are also valuable features. As a result, quality stereo imaging plugins should provide precise control for fine-tuning your audio’s spatial qualities.

Can Stereo Imaging Plugins Improve Mixing?

Yes, stereo imaging plugins can significantly improve mixing by offering better control over the placement of each element within the stereo field. However, they aid in preventing frequency overcrowding and can help in achieving a clearer, more defined mix with a sense of space and dimension.

Conclusion

To wrap it up, the right stereo imaging plugin can elevate your mix. Then, quality soundscapes hinge on spatial precision, and these tools deliver. Whether you’re crafting expansive sound fields or nuanced aural textures, investing in one of these plugins is a sound decision.

Remember, your mix deserves that three-dimensional edge.

More in our Plugin guides.

Categories
Archive

Workflow Tips For Producers Setting Up A Quick Start Default Song Template

Workflow tips for producers setting up a quick start default song template are to focus on organization, use presets, utilize shortcuts, and save frequently. Starting with a well-organized template, using presets for commonly-used instruments and effects, and utilizing keyboard and mouse shortcuts can all speed up the production process.


Additionally, saving frequently and backing up the template can help prevent any lost progress. By implementing these tips, producers can save time and streamline their workflow when starting new projects. As a producer, time is of the essence in the studio.


Workflow optimization is key to increasing productivity, and having a default template can be a great way to get a head start on a new project. We will explore tips for setting up a quick start default song template that will help to streamline your workflow and save you time in the studio. Whether you’re a seasoned producer or just getting started, these tips can help you get your music production process up and running quickly and efficiently.


Why A Quick Start Default Song Template Is Essential?

As a producer, one of the biggest challenges while working on multiple projects is managing time and effort effectively. Time management is crucial when it comes to meeting deadlines and delivering quality work. And that’s where Quick Start Default Song Template comes in!

Saves Time And Effort

Setting up a Quick Start Default Song Template helps you save a considerable amount of time and effort. Instead of starting from scratch every time you begin a new project, a template helps you hit the ground running, without any delay. You can now focus on the creative aspect of the project, rather than spending time on repetitive tasks.

Provides Consistency

Every producer has their way of working, which is great. But, when it comes to team collaboration, consistency is key. A Quick Start Default Song Template provides a consistent framework for all projects, ensuring that you are following the same process every time. It streamlines the workflow and makes it easy for you to keep track of the project progress.

Allows Easy Collaboration

Collaboration is a crucial aspect of any project, especially in music production. A Quick Start Default Song Template allows for easy collaboration between multiple producers. When everyone is on the same page, it helps in achieving the best possible output. It also helps in avoiding any confusion or errors, as everyone is following the same structure.

In conclusion, setting up a Quick Start Default Song Template is essential for producers looking to improve their workflow, save time and effort, and maintain consistency. It provides a framework for easy collaboration, ensuring that all team members are following the same structure while working on projects.

Workflow Tips For Producers Setting Up A Quick Start Default Song Template


Credit: www.productionmusiclive.com


Important Considerations Before Setting Up A Quick Start Default Song Template


When setting up a quick start default song template, producers should consider factors such as the specific DAW being used, the desired template format, and the time-saving benefits it will provide. Other important considerations include customizing automation settings and effect chains, as well as organizing the template in a logical and intuitive manner.

Important Considerations Before Setting Up A Quick Start Default Song Template: Creating a quick start default song template is an essential task for every music producer. It is a crucial step towards streamlining your workflow and saving a considerable amount of time. However, before setting up the default song template, there are a few important considerations that you need to make. Identify Essential Instruments And Sounds: The first step in setting up a quick start default song template is to identify the essential instruments and sounds that you will be using frequently. This can vary from one producer to another, depending on their genre and style. For instance, if you produce hip-hop music, you might need a drum kit, bassline, and some synth sounds. On the other hand, if you produce electronic dance music, you might need a few different synth sounds, drums, and some FX. Decide On The Song Structure: The next step is to decide on the song structure that you will be using for your tracks. This includes the intro, verse, chorus, and bridge. Having a fixed song structure can help you to create a consistent sound and save time in the long run. You can also experiment with different structures if you are feeling creative. Select Templates Based On Genre: Once you have decided on the essential instruments and song structure, the next step is to select templates based on your genre. Most Digital Audio Workstations (DAWs) come with a wide range of templates that you can use as a starting point. These templates include pre-configured settings for various instruments, effects, and plugins. Make sure to select templates that are appropriate for your genre. Create Proper Folder Structure: Lastly, create a proper folder structure in your DAW’s browser for your quick start default song template. This helps you keep your files organized and makes it easy to find the sounds and instruments you need. You can also create subfolders for each instrument type and label them accordingly. This will help you to navigate through your sound library quickly. In conclusion, setting up a quick start default song template can be a game-changer for every producer. By considering the essential sounds and instruments, song structure, templates, and folder structure, you can streamline your workflow and save time in the long run.

Steps To Create A Quick Start Default Song Template


As a producer, setting up a quick start default song template can save you a lot of time and streamline your workflow. To create a successful template, consider identifying your most commonly used settings and saving them as a default, organizing your virtual instruments and samples, and setting up a basic mixing and mastering chain.

Creating a quick start default song template can save producers time and increase their workflow productivity. By having a pre-made template, producers can avoid rebuilding their workflow every time they start a new project. In this section, we will explore some simple steps to create a quick start default song template to streamline your music production process. H3: Start With A Blank Template Starting with a blank template can give producers the flexibility to design their own custom workflow while also providing them with a clean slate to begin a new project. By starting from scratch, producers can incorporate their favorite plugins, shortcuts, and settings, ultimately creating a personalized music production workspace. H3: Select Essential Instruments Choosing essential instruments is crucial to the creation of a quick start default song template. Producers should consider which instruments they frequently use and include those in their template. For instance, if the producer often uses a particular drum kit, including that kit in the template will save the producer time in the long run, as they won’t have to search for it again. H3: Arrange A Basic Song Structure Arranging a basic song structure is the next step that will help producers create a quick start default song template. Designing a basic song structure should be based on the genres of music the producer creates. Each genre of music may have a different basic structure or format. By having a pre-made basic structure, producers can save time by not having to re-design this element every time they start a new project. H3: Add Common Effects And Processing Including common effects and processing in templates can speed up the production process and create consistency in the producer’s workflow. By having an EQ on their master bus, for example, producers can prevent accidental distortion or frequency imbalance in their track. H3: Save As Default Template Finally, once the above steps have been completed, producers should save their template as a default template. A default template will automatically load every time the producer creates a new project in their digital audio workstation (DAW). Saving their template as a default will ensure that producers can start their music production right away without having to go through the setup process repeatedly. In conclusion, a quick start default song template is a great productivity hack for producers looking to streamline their workflow. Starting with a blank template, selecting essential instruments, arranging a basic song structure, adding common effects and processing, and saving as a default template are simple steps that can speed up production and reduce setup time.

Useful Workflow Tips For Producers And Engineers


Producers and engineers can save time and improve efficiency by setting up a quick start default song template. This workflow tip allows for a streamlined process when starting a new project, ensuring that all necessary elements are in place from the start.

As a music producer, you know how important it is to have a streamlined workflow that allows you to work quickly and efficiently. One way to achieve this is by setting up a default song template that you can use as a starting point for every new project. In this post, we will discuss some useful workflow tips for producers and engineers to help you set up a quick start default song template.

Name Tracks And Regions Properly

One of the first things you should do when setting up your default song template is to name your tracks and regions properly. By doing this, you can easily identify which track or region contains which instrument or sound. This can save you a lot of time in the long run, especially when you are working on larger projects.

Color Code Tracks For Easy Navigation

Another useful workflow tip is to color code your tracks for easy navigation. This can help you quickly identify which tracks are drums, which are bass, which are keys, for example. This can be especially helpful when you are working on a project with a lot of tracks.

Use Track Stacks To Group Instruments

Track stacks are a great way to group instruments together in your default song template. For example, you can group all your drum tracks together, all your bass tracks together, and all your keyboard tracks together. This can make it easier to work on individual sections of your song without having to scroll through a long list of tracks.

Use Shortcuts And Macros To Speed Up Work

Shortcuts and macros can be a real time-saver when it comes to music production. By setting up custom shortcuts and macros for your most commonly used tools and functions, you can speed up your workflow significantly. For example, you can set up a macro that automatically adds a compressor to your vocal track, or a shortcut that opens your favorite synth plugin.

Backup The Templates Regularly

Finally, it’s important to remember to backup your default song templates regularly. This ensures that you always have a clean starting point for new projects, and that you don’t lose any work in the event of a system failure or other issue. Make sure to back up your templates to an external hard drive or cloud storage service for added security. In conclusion, these workflow tips for producers and engineers can help you set up a quick start default song template that allows you to work efficiently and creatively. By naming tracks and regions properly, color coding tracks, using track stacks, using shortcuts and macros, and backing up templates regularly, you can streamline your workflow and focus on what matters most – making great music!


Frequently Asked Questions For Workflow Tips For Producers Setting Up A Quick Start Default Song Template


How Do I Change The Default Template In Ableton?


To change the default template in Ableton, open the template set you want as your new default. Then, go to the “File” menu and select “Save as Default Template. ” The next time you open Ableton, it will use the set you just saved as your default.


What Is A Default Song Template?


A default song template is a pre-configured file that has everything producers need to start a new project quickly. This includes pre-set instrument tracks, effects, mixer settings, loops, and sounds.


How Can A Default Song Template Improve Workflow?


By having a pre-configured template, producers can skip the tedious process of setting up a new project from scratch, thus saving time and increasing efficiency. They can instead focus on the creative part of producing.


Can I Create My Own Default Song Template?


Yes, you can create your own default song template. It’s recommended to set up a template that fits your specific workflow and creative needs. You can customize everything from instrument tracks and effects to mixer settings and sounds.


Conclusion


To sum it up, a quick start default song template is a game-changing solution for producers looking to improve their workflow. By following the simple steps outlined in this post, you can set up a template that meets your specific needs, streamlining your workflow and making it easier to focus on the creative aspects of your craft.


With a solid default template in place, you’ll be able to jumpstart your creativity, and produce better music in less time than ever before. So why not give it a try? The benefits are clear: better workflow, better music, and a happier, more productive you.


Categories
Archive

What Is The Difference Between Mixing And Mastering In Electronic Dance Music Production

Mixing involves adjusting the levels, panning, and equalization of different tracks, while mastering is the final step of the production process, where a finished mix is polished. Electronic dance music production involves a lot of work, including mixing and mastering.


These two processes are essential for every genre, including electronic dance music. Both mixing and mastering are equally important, and understanding the difference between the two is crucial to achieving a clear and impactful final product. However, it’s not uncommon for people to confuse the two terms, which can lead to less than optimal results.


We’ll explain the difference between mixing and mastering in electronic dance music production, helping you to achieve the best possible results when working on your own music.


Mixing Vs Mastering In Edm


Mixing and mastering are two different stages in electronic dance music (EDM) production. The mixing process involves balancing and adjusting individual tracks to ensure they blend together seamlessly. Mastering, on the other hand, involves fine-tuning the overall sound of the final mix to make it sound polished and professional.

Overview

When it comes to electronic dance music (EDM) production, one crucial aspect that determines the quality of the final output is mixing and mastering. Both are crucial stages in music production that serve different purposes, but many times people tend to use them interchangeably. In this article, we’ll discuss the difference between mixing and mastering in EDM to clarify their roles and help you achieve a professional sound.

Purpose Of Mixing

Mixing is the step that comes after recording and arranging your track. It refers to the process of blending all the individual tracks, including vocals, instruments, drums, and effects, to create a cohesive and balanced sound. The primary goal of mixing is to ensure that all the elements work together harmoniously and that each track is audible without overpowering the others. This process involves adjusting levels, panning, EQ, compression, and other effects to achieve the desired sound.

Purpose Of Mastering

Mastering is the final stage of music production, where the mix is polished to sound cohesive, clear, and loud. It entails enhancing the overall sound quality of the mix so that it can sound good on different playback systems. The primary purpose of mastering is to make the mix sound as good as possible on all speakers, from small earbuds to large sound systems, by adjusting the loudness, stereo width, frequency balance, dynamics, and other sonic elements. Mastering prepares the mix for distribution and ensures that it’s optimized for streaming, radio, and other formats. In conclusion, understanding the difference between mixing and mastering in EDM is critical if you want to produce music that sounds professional and competitive. While mixing focuses on blending and balancing individual tracks, mastering emphasizes enhancing the overall sound quality of the mix. By investing time and resources in these processes, you can achieve a polished sound that stands out in the music industry.

Mixing Process


Mixing and mastering are two different processes in electronic dance music production. Mixing is the process of balancing the levels, panning, EQ, and effects of individual tracks, while mastering is the final step of enhancing the overall sound quality.

Balancing Levels And Panning

Balancing levels and panning is the first step in the mixing process. It requires adjusting the volume levels of each individual track to ensure that they blend well together. This also involves panning tracks to different positions within the stereo spectrum, creating more space and depth in the mix. One way to achieve balance and clarity in the mix is to use reference tracks to compare your own mix with a professionally mixed track. This can help you determine how loud each element of the mix should be and where they should be positioned within the stereo field. Balancing levels and panning can greatly affect the overall sound of the mix, so it’s important to get this stage right before moving on to other aspects of mixing.

Equalization

Equalization, or EQ, is the process of adjusting the frequency balance of each track in the mix. It allows you to boost or cut specific frequencies to create a more balanced and pleasing sound. When mixing EDM, EQ is particularly important since many electronic instruments and synthesizers can have overlapping frequency ranges that can muddy the mix if not properly balanced. Using a spectrum analyzer can be helpful in identifying which frequencies are clashing or lacking in the mix. By cutting or boosting these frequencies, you can create a clearer and more balanced sound.

Compression

Compression is the process of reducing the dynamic range of a track, making the loud parts quieter and the quiet parts louder. This helps to even out the volume levels of each track and can make them sit better in the mix. It also adds a sense of glue or cohesion to the overall sound of the mix. When using compression, it’s important to set the attack and release times correctly to avoid distorting the transients and losing the dynamics of the track. Listening to the track in context with the rest of the mix can help determine the appropriate settings and ensure that the compression is serving its intended purpose.

Effects And Automation

Effects such as reverb, delay, and chorus can be used to add depth and space to the mix. They can also be used to create unique and interesting textures in the overall sound. When using effects, it’s important to consider the context of the mix and use them sparingly to avoid overwhelming the listener. Automation is the process of adjusting volume, panning, and effects parameters over time. This can add movement and interest to the mix, and help draw the listener’s attention to specific parts of the song. Automation can be used to create builds, drops, and transitions, which are all important elements of EDM production.

Mix Buss Processing

Mix buss processing involves applying effects to the master output of the mix. This can include EQ, compression, and limiting to create a cohesive and polished final mix. When applying mix buss processing, it’s important to be subtle and not overdo it, as this can negatively affect the dynamics and overall sound of the mix. A/B testing the mix with and without mix buss processing can help determine what works best for the specific track.

Mastering Process


Mixing Vs Mastering Engineer


A mixing engineer is responsible for blending recorded tracks together, ensuring that each sound is clear and balanced. A mastering engineer ensures that a track is at the right volume level with the right tone, making it sound polished and professional.


The key difference between the two is that mixing is the process of combining individual tracks, while mastering is the final polish before release.

When it comes to electronic dance music production, both mixing and mastering are crucial elements of the music creation process. Understanding the differences between a mixing engineer and a mastering engineer is essential to ensure that your final product meets the industry standards. In this article, we will discuss the roles and responsibilities, as well as the necessary skills and expertise required for each engineer.

Roles And Responsibilities

A mixing engineer is responsible for taking the various individual tracks of a song, such as drums, bass, and vocals, and blending them together to create a cohesive and balanced sound. They adjust levels, EQ, panning, and effects to achieve the desired mix. The goal of a mixing engineer is to enhance the musicality of the production while maintaining the artist’s creative vision. On the other hand, a mastering engineer takes a finished mix and polishes it to achieve a cohesive and balanced sound across an entire album. They adjust the overall volume, EQ, and compression to ensure that the songs sound consistent across different devices and platforms. The goal of a mastering engineer is to optimize the audio for the medium it will be released on, whether it be CD, vinyl, or digital streaming.

Skills And Expertise

Both mixing and mastering engineers need a strong understanding of music theory, audio engineering, and technical skills. A mixing engineer should have the ability to hear subtle nuances, understand the artist’s vision and be an expert in using software and hardware to blend tracks accordingly. Moreover, they need technical knowledge to understand the equipment, including microphones, mixers and audio interfaces. A mastering engineer, on the other hand, needs to have an impeccable ear for detail, as well as advanced technical skills, including extensive knowledge of various mediums, software, and hardware. They must be able to analyze the tonal balance, dynamics, and stereo width of each track. Creativity and a passion for music play a vital role in achieving ultimate quality. In conclusion, both mixing and mastering play an essential role in music production, but they require different skill sets and expertise. A mixing engineer creates a cohesive and balanced sound, while a mastering engineer ensures that the finished product is optimized and ready for release. Understanding the differences between them is the key to creating high-quality electronic dance music that meets industry standards.


Importance Of Mixing And Mastering

When it comes to producing electronic dance music (EDM), there are two crucial steps that can make or break the final output. These steps are mixing and mastering. Often the terms mixing and mastering are used interchangeably, but they serve different purposes in creating the final product. Understanding these differences is essential to produce high-quality tracks that sound professional and stand out from the crowd.

Overall Sound Quality

The overall sound quality of your tracks plays a significant role in determining their success. Mixing is responsible for balancing all the elements in your track to create a cohesive and harmonious sound. It involves adjusting levels, panning, EQ, compression, and other effects to ensure that each instrument and sound is balanced, and the track sounds good on different playback systems.

Mastering, on the other hand, is the final polish and enhancement of the track to ensure it has a consistent sound and is ready for distribution. It involves adjustments to the overall volume, EQ, compression, and stereo width to bring out the details of each track and make it sound its best on any playback system.

Consistency Across Tracks

If you’re creating an album or EP, consistency across tracks is essential to give the listener an immersive experience. Mixing ensures that every track in your album has a similar sound and vibe, so the listener doesn’t feel jarring changes between different tracks. It also ensures that each element is balanced and sits well in the mix.

Mastering takes this to another level by making sure that each track has a consistent level, EQ balance, and stereo sound. It involves adding fades and spacing between tracks and ensuring that each track transitions smoothly into the next.

Competitive Edge In The Industry

In today’s competitive industry, having a professional sounding track is essential to stand out from the crowd. Mixing and mastering your tracks can give you the competitive edge you need to get noticed by record labels, streaming services, and fans. A well-mixed and mastered track sounds polished and professional, making it attractive to promoters and industry professionals.

Mixing and mastering are two distinct processes that serve crucial roles in creating high-quality EDM tracks. While they may seem intimidating, there are numerous resources available to hone your skills in mixing and mastering, including plugins, tutorials, and professionals. By understanding the differences between mixing and mastering and honing your skills in both, you can create professional-grade tracks that stand out in a crowded industry.


Common Mistakes In Mixing And Mastering


Mixing and mastering are crucial components of electronic dance music production. While mixing involves blending different elements of a track such as the instruments, vocals, and effects to create a cohesive and balanced sound, mastering is the final step of the production process that involves fine-tuning the mix, enhancing the overall clarity, loudness, and tonal balance of the finished track.


Many common mistakes can occur during the mixing and mastering process that can negatively impact the final product.

Mixing and mastering are two vital processes in Electronic Dance Music (EDM) production. While mixing involves balancing, panning, and EQing individual tracks, mastering involves refining a mixed track and ensuring it is ready for release. During these two processes, it is easy to make mistakes that can affect the quality of the final output. Let’s take a look at some of these common mistakes.

Over-compression And Limiting

Compression and limiting are essential tools used in music production to control dynamic range and maintain a consistent volume level. However, overusing them can lead to a “pumping” or “squashed” sound. When over-compression or limiting occurs, it can result in a lack of dynamics, making the track feel lifeless and dull. It’s crucial to use these tools sparingly and only when necessary.

Over-eqing

Equalization (EQ) is another essential tool in music production, used to balance and enhance different elements within a track. However, it’s effortless to over-EQ and create an unnatural frequency balance, causing some sounds to be too prominent or others to be buried in the mix. A balanced approach is necessary to ensure the track’s elements work harmoniously without overpowering each other.

Incorrect Use Of Effects

Effects can add depth and interest to a track, but using them incorrectly can result in a messy, chaotic sound. Using too many effects or overdoing specific effects can ruin the track’s dynamic balance and overall vibe. It is essential to use effects judiciously and ensure they enhance the track’s sonic qualities, rather than detracting from it.

Poor Mix Buss Processing

Mix buss processing is the use of plugins or hardware processors on the final mix before it goes to mastering. Overloading the mix buss with plugins or over-processing it can disturb the balance of the track, resulting in harsh, digital-sounding audio. Using high-quality plugins and processing subtly can help achieve an excellent final mix. In conclusion, the mastering process can only do so much to salvage a poorly mixed track. It’s vital for music producers to ensure they avoid these common mistakes during the mixing process to create a well-balanced and cohesive track. By following the tips, the final output will be of high quality, making it an excellent listen for music lovers.

Relationship Between Producer And Engineer

Electronic dance music production involves a highly collaborative process between the producer and engineer. They both bring their own valuable skills and expertise to the table, working together to create the perfect final product. Understanding the difference between mixing and mastering is key to achieving this final product that is ready for distribution, but the relationship between the producer and engineer is vital to the success of the project.

Effective Communication

Effective communication is the cornerstone of any successful collaboration, and the relationship between producer and engineer is no exception. Both parties must be able to communicate their vision and ideas for the project clearly and concisely to one another. When both parties are on the same page, the project can move forward smoothly and efficiently.

Trust And Respect

Trust and respect are key factors in the relationship between the producer and engineer. The producer puts a tremendous amount of trust in the engineer to understand their vision and to bring their creative ideas to life. The engineer, in turn, must respect the producer’s artistic vision and work tirelessly to help them achieve their goals. When there is mutual trust and respect, the project can truly thrive.

Collaborative Mindset

A collaborative mindset is crucial to the success of the producer and engineer working together. Both parties must be willing to listen to each other’s ideas and work together to find the best way forward. The producer may come to the table with a specific vision, but the engineer may have ideas to enhance that vision and make it even better.

When there is a true collaboration between producer and engineer, the final product can be greater than the sum of its parts. Mixing and mastering electronic dance music may involve a lot of technical skill and expertise, but the relationship between the producer and engineer is just as important to achieving that perfect final product.


Summary And Conclusion

In summary, mixing and mastering are two distinct but equally critical processes in electronic dance music production. Mixing involves balancing and enhancing individual tracks to create a cohesive and dynamic final mix. Mastering, on the other hand, involves refining the overall sound of the mix to achieve consistency across different systems and playback mediums.

Key Takeaways

  • Mixing involves balancing and enhancing individual tracks, while mastering refines the overall sound of the mix.
  • A good mix is the foundation of a great master, and a great master is the final step in the production process.
  • Proper mixing and mastering can take a track from amateur to professional-sounding.

Future Of Mixing And Mastering In Edm

The future of mixing and mastering in electronic dance music production is exciting and full of possibilities. With the emergence of new software and technologies, producers and engineers can explore new and experimental approaches to sound design and processing. Additionally, the rise of streaming services and the need for consistent and high-quality playback have led to an increased emphasis on mastering in the production process.

Overall, effective mixing and mastering are essential for producing high-quality electronic dance music that stands out in a crowded and competitive industry.

What Is The Difference Between Mixing And Mastering In Electronic Dance Music Production


Credit: www.productionmusiclive.com


Frequently Asked Questions On What Is The Difference Between Mixing And Mastering In Electronic Dance Music Production


What Is The Difference Between Mixing And Mastering Music Production?


Mixing is the process of balancing and blending individual audio tracks to create a complete piece of music. Mastering, on the other hand, is the final step in the production process where the finished mix is prepared for distribution by enhancing the overall tonal balance and adding depth and dimension to the sound.


How Do You Mix And Master Electronic Music?


To mix and master electronic music, you need to have a good understanding of music production, audio engineering, and digital audio workstations. Start by organizing your tracks, setting levels, EQ’ing, and adding effects such as reverb, delay, and compression. Mastering involves optimizing the final mix to sound great on all playback systems.


Use EQ and compression carefully and add limiting to prevent distortion. When you’re done, render your mix into the desired format.


What Is Mixing In Electronic Music?


Mixing in electronic music refers to the process of blending multiple audio tracks into a cohesive, polished final product. It involves adjusting levels, EQ, effects, panning, and other parameters to achieve a balanced and coherent sound. The goal is to create a seamless transition between tracks and enhance the overall audio quality of the mix.


Does Electronic Music Need Mastering?


Yes, electronic music needs mastering. Mastering helps in balancing the levels of each track, improving the overall sound quality, and making sure the music is loud enough to compete with other tracks. It also ensures that the music sounds good on different playback systems.


Conclusion


To sum it up, mixing and mastering are two distinct yet crucial aspects of electronic dance music production. Mixing helps to blend and balance different tracks, while mastering gives the final polish to make the final music production sound professional.


Both mixing and mastering require technical skills, creativity, and attention to detail to create a cohesive and impressive final product. By understanding the differences between these two processes, you can create music that stands out and captures your audience’s attention.

Categories
Archive

Best Drum Overhead Mics: Capture Crisp Beats!

The AKG C414 XLII and the Neumann KM184 are top choices for drum overhead mics. These mics capture the full spectrum of drum sounds with clarity and balance.

As an Amazon Associate I earn from qualifying purchases.

Choosing the best drum overhead mics is crucial for capturing the essence of your drum sound. Drum overhead mics not only pick up the cymbals but also the overall kit, reflecting the drummer’s style and the room’s acoustics. Recording engineers and studio professionals often opt for mics that offer a flat frequency response and excellent stereo imaging.

The AKG C414 XLII excels with its adjustable polar patterns that cater to different recording situations, while the Neumann KM184 is renowned for its detailed sound reproduction and consistent pickup pattern. These microphones stand out for their durability, versatility, and ability to deliver professional-grade recordings, making them favorites among musicians and audio engineers alike. Selecting one of these microphones can elevate any drum recording session, ensuring every hit and nuance is captured with precision.

Best Drum Overhead Mics: Capture Crisp Beats!

Credit: www.guitarcenter.com

Introduction To Drum Overhead Mics

Drum overhead mics capture the true essence of a drum set. These mics provide a panoramic sound image. Think of them as the ears of your audience. They pick up the cymbals, toms, and the snare’s delicate nuances. Your drum kit’s sound relies heavily on the quality of the overhead recordings.

The Role Of Overhead Mics In Drum Recording

Overhead mics do more than just record cymbals. They preserve the kit’s overall balance. These mics also collect the sound that radiates upwards. This is crucial for a natural sound. Without overhead mics, your drum recording might seem flat or lifeless.

Factors To Consider When Choosing Overhead Mics

  • Polar Patterns: They shape the sound pickup area. Cardioid patterns reject sound from the back and sides.
  • Frequency Response: This defines the range of sound a mic can capture. It’s essential for picking up high cymbal frequencies and low tom-tom thumps.
  • Durability: Drums can be loud, so mics must withstand high sound pressure levels.
  • Size and Mounting: Compact mics are easier to place without interfering with the drummer.
  • Budget: Higher quality often means a higher price, but there are budget-friendly options that still deliver.

Great overhead mics can transform your drum recordings. They require careful consideration of these factors to achieve the best sound.

The Mechanics Of Sound Capture

Understanding how drum overhead mics work is crucial for capturing the perfect sound. These mics pick up all the nuances from cymbals to the overall kit. Let’s dive into their inner workings.

Polar Patterns And Directionality

Drum overhead mics detect sound from specific directions. This is due to their polar patterns. Select the right pattern, and you capture clear, crisp sounds.

  • Cardioid: Captures sound from the front, blocks the rear.
  • Omni-directional: Picks up sound from all around the mic.
  • Figure-8: Allows sound from front and back, blocks sides.

Choose a pattern that matches your recording needs. It defines your sound stage’s depth and width.

Frequency Response Essentials

Frequency response should not be overlooked. It determines how well a mic captures various pitches.

A broad frequency range is vital for capturing the true essence of drums. Look for mics that handle both low-end thumps and high-end sizzles.

Frequency Range Good For
20Hz – 20kHz Full drum kit spectrum
50Hz – 16kHz Cymbals and snare

Note the stated frequency response on your mic choices. It guides you towards the best overhead mic for your drums.

Types Of Overhead Microphones

Exploring the realm of drum overhead mics reveals a variety of types. Professionals often debate which mics best capture the cymbals’ shimmer and the kit’s spatial ambience. It’s crucial to understand the nuances between condenser, dynamic, and ribbon microphones. Each has distinct characteristics that influence the final sound of a drum recording.

Condenser Versus Dynamic Mics

Condenser microphones are the go-to choice for overheads in most studios. Their ability to capture a wide frequency range and fast transients makes them ideal for picking up the subtle details of cymbals and the overall kit. These mics need phantom power and often come in both large and small diaphragm varieties.

  • Large-diaphragm condensers offer a warmer sound.
  • Small-diaphragm condensers provide a more accurate representation.

Dynamic microphones, on the other hand, are more rugged. They handle high SPLs (sound pressure levels) without distortion. While not as common for overheads, they can still be used effectively, especially in live stage settings where durability is key.

The Rise Of Ribbon Microphones In Overheads

The vintage charm of ribbon microphones is making a comeback. Their smooth response and figure-8 pickup pattern offer a natural sound. Ribbon mics have gained favor for recording overheads in recent years, due to their warm and round characteristics.

These mics excel in capturing room sound and providing a classic tone that blends well in the mix. Great care is needed, however, as ribbons are delicate and sensitive to phantom power, unless specifically designed to be phantom-power tolerant.

Best Drum Overhead Mics: Capture Crisp Beats!

Credit: www.soundonsound.com

Top Picks For Drum Overhead Mics

Drum overhead mics play a pivotal role in capturing the true essence of your drum’s sound. The right overhead mic can mean the difference between a good recording and a great one. Let’s explore some of the top picks for capturing stellar drum sounds.

Industry-standard Models

Professional studios and sound engineers often reach for industry-standard overhead mics. These mics are known for their exceptional clarity and durability.

  • AKG C414 XLS: A versatile favorite with nine polar patterns.
  • Neumann KM 184: Renowned for its natural sound reproduction.
  • Shure SM81: A reliable choice that delivers consistent performance.

Budget-friendly Choices For Beginners

Starting out doesn’t mean compromising on quality. Here are some budget-friendly drum overhead mics that won’t break the bank.

Microphone Features
Behringer C-2 Compact, low-mass diaphragm ensures wide frequency response.
Audio-Technica AT2021 Cardioid pattern focuses on the drums and minimizes room noise.
Rode M5 Matched Pair Matched pair for consistent sound staging.

Positioning: A Key To Capture Quality

Capturing the essence of a drum performance hinges on microphone placement. Achieving the perfect sound blend and stereo image is crucial. Explore the best techniques for exceptional drum overhead recordings.

The Xy And Ortf Techniques

The XY and ORTF techniques center on angled placement for detailed stereo imaging. Let’s delve into each:

Technique Positioning Benefit
XY Capsules close together at a 90-degree angle Phase coherence, centered sound
ORTF Spaced 17 cm apart, angled at 110 degrees Wider stereo image, natural sound

Both methods ensure minimal phase difference and a balanced capture of your drum sounds.

Ab Spacing And The Glyn Johns Method

Broaden your options with AB Spacing and Glyn Johns:

  • AB Spacing uses two microphones spaced apart above the drum set. This technique yields a wide stereo image.
  • The Glyn Johns Method requires one mic above the snare and another off to the side. It creates a full, dynamic sound.

Experiment with distance for the best results. Consistent testing leads to the perfect drum sound for your mix.

Best Drum Overhead Mics: Capture Crisp Beats!

Credit: www.shure.com

Enhancing Drum Sound With Accessories

Getting the perfect drum sound is crucial for any recording or live performance. It’s not just about having the best overhead mics, but also the right accessories. Accessories can make a big difference. They improve sound quality and recording clarity. Let’s dive into how some key add-ons can help achieve that pristine drum sound.

Mic Stands And Isolation Mounts

Stability and positioning are vital in capturing the best overhead drum sounds. Mic stands should be robust and adjustable. They need to hold mics securely in place. Isolation mounts are equally important. They reduce unwanted vibrations that can blur your drum’s sound. Make sure your setup includes:

  • High-grade mic stands that can reach above the drum set.
  • Boom arms for precise mic placement.
  • Shock mounts to isolate mics from stand vibrations.

Wind Screen And Pop Filter Necessities

Although mostly associated with vocal recordings, wind screens and pop filters are also crucial for drums. They protect the mic from blasts of air which can cause unwanted noise. This ensures the recording stays clear and free of pops and wind interference. Your drum overhead mic setup should have:

  1. Wind screens to buffer the mics from air currents.
  2. Pop filters to stop any disruptive air blasts.

Recording Tips For Crisp Drum Overheads

When recording drum overheads, capturing the essence of the kit is crucial. With the right microphones, any home studio or professional space can achieve crystal-clear drum sounds. Implementing a few tried-and-true techniques can transform a good drum recording into a great one. Let’s dive into the essentials of recording overheads for that vibrant and crisp sound every engineer aims for.

Balancing Mono And Stereo Setups

Getting the balance right is key to a good drum sound.

  • Mono setups can offer a focussed and centered sound. A single high-quality mic placed right can capture your drums in a way that feels solid and cohesive.
  • Stereo setups breathe life into recordings, giving each drum the space to shine. Two mics placed strategically provide a realistic soundstage that accurately replicates the drum kit’s layout.

Switch between the two setups to find what suits the track. Balance them for a sound that’s both powerful and defined.

Equalization And Compression Techniques

Shape your drum sound with EQ and compression. Here’s how:

Equalization Compression
  • Adjust low-end frequencies for kick-drum presence.
  • Tune mid-range to reduce boxiness.
  • Enhance highs for cymbal clarity.
  1. Use light compression to even out levels.
  2. Apply faster attack for a tighter feel.
  3. Set a slower release to maintain natural decay.

By using EQ to clean up muddiness and compression to control dynamics, your overheads will cut through the mix with precision.

Listening Tests And Final Adjustments

Best Drum Overhead Mics: Listening Tests and Final Adjustments

Drum overhead mics capture the essence of a drum kit. Choosing the best ones needs careful testing and adjustments. Listening tests and final adjustments are crucial. You can tweak the setup for perfect sound capture.

A/b Testing With Different Microphone Setups

A/B testing is a method to compare two overhead mic setups. It helps find the best sounding one.

  • Set up two pairs of overhead mics above your drum kit.
  • Record a standard drum pattern to maintain consistency.
  • Listen back and note the sound differences.

Important aspects to consider include the clarity of cymbals and the balance of the kit. Don’t rush the process. Your ear will guide you to the optimal setup.

Post-processing And Mixing Overhead Tracks

After recording, mixing plays a big role in the final sound. Mix the overhead mic tracks carefully.

  1. Balance the levels between the overhead mics and the kit.
  2. Use EQ to highlight or reduce frequencies.
  3. Apply compression to even out dynamic range.
  4. Add reverb for natural room sound.

Listen to each change you make. Small changes can make a big difference in the sound. Use quality speakers or headphones for the best results.


From Amateur To Pro: Upgrading Your Mic Locker

Embarking on the sonic journey from amateur to professional can transform your sound. Upgrading your mic locker is a crucial step. The right overhead mics capture the essence of every beat. They preserve the cymbals’ shimmer and the toms’ depth. Let’s explore when to invest in higher-end mics and how to build a versatile collection.

When To Invest In Higher-end Overheads

Recognizing the right time to upgrade your drum overheads is key. Are your current mics failing to capture the true sound? Do your recordings lack clarity or depth? A high-end overhead mic brings out the best in your recordings. Notice these signs:

  • Flat or lifeless recordings
  • Craving for more detail in your cymbals
  • Need for better stereo imaging

Invest when you require precision, depth, and a professional edge. Quality mics make a huge difference. Pros know this. They choose mics that bring out every nuance of their drum kit.

Building A Versatile Microphone Collection

A versatile mic collection is like a painter’s palette. It lets you capture every drum sound. Starting with a solid pair of overheads is vital. Overheads serve as the foundation of a good drum sound. Consider these factors:

Microphone Type Characteristics Ideal For
Condenser Mics Detail and clarity Cymbal shimmer
Ribbon Mics Warm and smooth sound Room ambience
Dynamic Mics Durability and punch Loud environments

Add different mics to handle any recording scenario. Start with condenser mics for overheads. Then add ribbon mics for warmth. Don’t forget dynamic mics for those high SPL situations. This approach ensures you’re ready for any session.

Frequently Asked Questions On Best Drum Overhead Mics

What Are The Best Drum Overhead Mics?

Overhead mics are crucial for capturing the true essence of a drum kit. AKG C414 XLII, Neumann KM184, and Shure SM81 are consistently praised for their clarity, frequency response, and reliability. These brands provide durable options that withstand studio and live situations, delivering professional-quality sound.

How To Position Drum Overhead Mics?

Optimal positioning varies, but a common technique is the “XY” configuration, which involves placing two mics above the drum kit, angled inwards towards each other to capture a balanced stereo image. The mics should be equidistant from the snare to ensure it is centered in the stereo field.

Are Condenser Mics Best For Drum Overheads?

Condenser mics are the go-to for drum overheads due to their sensitivity and ability to capture a wide frequency range. They excel in picking up the subtleties and high-end detail of cymbals and the overall kit ambiance, making them a preferred choice for studio recording.

Can Dynamic Mics Be Used As Overheads?

While less common, dynamic mics can be used as drum overheads, especially in live settings where bleed and feedback can be issues. Some engineers opt for them to capture a punchier and more focused drum sound, although they may lack the detail of condenser mics.

Conclusion

Selecting the right drum overhead mics can elevate your recording sessions. Quality mics capture the true essence of your drums, ensuring crisp and balanced sound. Remember, the perfect choice varies for every setup. Embrace the journey to finding the mic that resonates with your musical endeavors.

Happy recording!

Categories
Archive

How To Use Different Kinds Of Heavy Processing To Improve Presence And Punch In Your Mix

Improve presence and punch in your mix by using different types of heavy processing. Here’s how: Using heavy processing techniques such as parallel compression, saturation, and distortion can significantly improve the power of your mix.


By utilizing parallel processing, you can maintain the dynamic range of your mix while still adding weight and impact. Saturation and distortion can add harmonics and warmth to your sound, providing a more present and powerful mix. Additionally, using techniques like sidechain compression and multiband distortion can help to separate and define elements within the mix, allowing for more clarity and punch.


With careful consideration and experimentation, heavy processing can enhance the overall impact of your mix and make it stand out from the rest.


Understanding Heavy Processing

If you are an aspiring audio engineer who wants to take their mixing skills to the next level, understanding heavy processing is crucial. Heavy processing refers to the application of dynamic and time-based effects that alter the characteristics of an audio signal significantly. In essence, heavy processing allows you to add presence, punch, and energy to your mix, which can make it stand out in a crowded genre. However, heavy processing requires considerable knowledge and skills to avoid overdoing it and ending up with a muddy mix.

Introduction To Heavy Processing

Heavy processing is a powerful tool that you can use to manipulate audio signals and enhance their sonic qualities. However, it is essential to understand the fundamentals of mixing before incorporating heavy processing into your workflow. Heavy processing techniques are best used when fine-tuning a mix to achieve the desired atmosphere, tone, and depth. Unlike basic EQ and compression, heavy processing requires precision and experimentation to create a cohesive mix.

Different Types Of Heavy Processing Techniques

There are various types of heavy processing techniques that you can use to improve presence and punch in your mix. Each technique can have a significant impact on your audio signal, and you must understand their functions to make informed choices when using them. Some of the most common heavy processing techniques include:

Type Function
Distortion Introducing harmonics and character to add warmth, grit, and edge to your tracks.
Delay Creating a sense of space, depth, and dimension by adding repetitions of the original signal
Reverb Similar to delay but adds a more natural sound to the signal, mimicking the reflection of sound in a room.
Saturation Adds subtle harmonics to a signal to make it sound warmer and fuller without overdriving it.
Parallel Processing Combining a dry and heavily processed version of a track to preserve initial dynamics while adding a new dimension.

Knowing when and how to use these techniques will depend on the type of track you are working on and the kind of atmosphere you want to create. Applying heavy processing to vocals, for instance, may require a different approach from what you would do for drums or guitars.


Using Compression To Improve Presence And Punch


Improving the presence and punch in your mix can be achieved by using different kinds of heavy processing, such as compression. By compressing the tracks in your mix, you can bring out the quieter elements and create a more dynamic and impactful sound.


This technique can be especially effective when working with drums or vocals.

Understanding Compression

Compression is one of the most crucial tools for audio mixing and mastering. It reduces the dynamic range of audio signals by reducing the level of loud sounds while increasing the level of quieter sounds. This process helps to even out audio levels, resulting in a smoother and more controlled sound.

Types Of Compression

There are different types of compression that you can use to improve the presence and punch of your mix. Some of the most common types include:

  • VCA compression
  • FET compression
  • Optical compression
  • Multiband compression

Each type of compression offers unique sonic characteristics, so it’s best to experiment to find which one works best for your mix.

How Compression Improves Presence And Punch

Compression can help to improve the presence and punch of your mix in a few ways. Firstly, it can help to bring elements forward in the mix, making them more prominent, and adding excitement and energy. Secondly, it can help to control the level of individual tracks, resulting in a more cohesive and balanced mix. Lastly, compression can be used creatively to shape the sound of individual instruments and tracks, adding character, and enhancing their overall impact.

Best Practices For Using Compression

When using compression to improve presence and punch, there are a few best practices that you should follow:

  1. Always use compression in moderation to avoid over-processing and distortion.
  2. Set your attack and release times appropriately to avoid pumping and breathing effects.
  3. Use compression to control the level of individual tracks, not to make up for problems with recording or performance.
  4. Use multiband compression to target specific frequency ranges, ensuring a more even tonal balance.

By following these best practices, you can use compression to bring out the best in your mix, resulting in a more impactful and engaging sound.

Using Eq To Improve Presence And Punch

Equalization is an essential tool in the music production process. It is the process of adjusting the balance between frequency components within an audio signal. EQ can be used to enhance the sound quality of a recording by boosting or attenuating certain frequencies in the audio spectrum, thereby improving the presence and punch of the mix. In this post, we will cover the basics of using EQ to improve presence and punch in your mix.

Understanding Equalization

Before we dive into using EQ to improve presence and punch, it is essential to understand what equalization is and how it works. In simple terms, EQ is used to adjust the frequency response of an audio signal. EQ can be used to boost or cut specific frequencies in the audio spectrum, which can help improve the balance and clarity of the mix. It is usually accomplished using a graphical user interface, such as a parametric or graphic equalizer, which allows a user to adjust frequency and amplitude settings for each channel in the mix.

Types Of Eq

There are two main types of EQ – graphic and parametric. Graphic EQs are common in home and consumer audio equipment, while parametric EQs are used in professional audio equipment. Graphic EQs are typically less precise than parametric EQs since they are pre-set to particular frequency ranges, whereas parametric EQs offer greater control over the frequency range and bandwidth settings.

How Eq Improves Presence And Punch

In a mix, presence refers to the clarity and definition of the individual instruments and vocals. Punch refers to the impact and energy of the mix as a whole. EQ can be used to improve the presence and punch of a mix in several ways. Boosting the midrange frequencies can help improve the clarity and definition of vocals and other instruments in the mix. Boosting the bass frequencies can add depth and warmth to the mix while boosting the high-end frequencies can add air and shimmer to the mix.

By using EQ to balance the mix’s frequency spectrum, you can ensure that each instrument and vocal has its place in the mix and contributes to its overall presence and punch. EQ can also help remove any unwanted frequencies – such as room noise or low-end rumble – that can detract from the overall clarity and definition of the mix.

Best Practices For Using Eq

When using EQ to improve presence and punch, it is essential to follow some best practices to avoid over-processing the audio signal. The following are some best practices to consider when using EQ in your mix:

  • Use cuts more than boosts – cutting frequencies that are unpleasant or unnecessary can often be more effective than boosting.
  • Be subtle – small adjustments can have a big impact, so it’s best to make slight adjustments and continually listen to the mix as you make changes.
  • Start with a flat EQ – starting with a flat EQ setting can help you identify any problematic frequencies that need to be addressed.
  • Use high and low pass filters – cutting frequencies below a certain range or above a certain range can help remove unwanted noise and improve the clarity of the mix.
  • Use EQ sparingly – avoid over-processing the audio signal by using EQ sparingly and only making adjustments that are necessary.

By following these best practices and using EQ effectively, you can improve the presence and punch of your mix while maintaining a balanced and natural sound.

How To Use Different Kinds Of Heavy Processing To Improve Presence And Punch In Your Mix


Credit: www.youtube.com


Using Saturation To Improve Presence And Punch


Achieving a powerful presence and punch in your mix can be done through the use of saturation and heavy processing. By carefully manipulating these tools, you can add warmth, depth, and character to your sound, making it stand out among the competition.

Using Saturation To Improve Presence And Punch Saturation is a powerful effect that can be used to improve the presence and punch of your mix. Understanding how to use saturation can help you get the right sound for your track. In this section, we will look at the different types of saturation, how they work, and the best practices for using them. Understanding Saturation Saturation is a form of distortion that can be added to a sound to give it a warmer, more natural tone. Saturation works by adding harmonics to a sound, which can help it cut through the mix and give it a more defined presence. Saturation can be applied to individual tracks, busses, or the master channel. Types of Saturation There are many different types of saturation, each with its own unique characteristics. Here are a few of the most popular types of saturation: – Tape Saturation: This type of saturation recreates the warm, natural sound of tape. It can add subtle harmonic distortion and compress a sound, giving it a smooth, polished sound. – Tube Saturation: Tube saturation recreates the sound of a tube amplifier. It can add a rich, warm distortion to a sound, making it sound fuller and more present. – Harmonic Saturation: Harmonic saturation adds harmonics to a sound, making it brighter and more defined. This type of saturation can be useful for adding presence to vocals or guitars. How Saturation Improves Presence And Punch Saturation can improve the presence and punch of a sound by adding harmonics and making it cut through the mix. Saturation can also add warmth and depth to a sound, making it sound more natural and organic. Best Practices for Using Saturation When using saturation, it’s important to keep a few best practices in mind: – Use saturation sparingly: Saturation can quickly become overpowering, so it’s important to use it in moderation. Start with a small amount of saturation and gradually increase it until you get the desired effect. – Use the right type of saturation: Different types of saturation have different effects on a sound. Experiment with different types of saturation to find the one that works best for your track. – Use saturation in context: Saturation can sound great in isolation, but it’s important to consider how it fits into the context of the mix. Make sure the overall mix sounds balanced and cohesive. In summary, using saturation can be a great way to improve the presence and punch of your mix. Understanding the different types of saturation and following best practices can help you achieve the right sound for your track.

Using Distortion To Improve Presence And Punch


Using distortion in your mix can improve the presence and punch of your sound. Heavy processing techniques, such as saturation and overdrive, can add harmonics and increase the perceived volume of individual elements, making them stand out in the overall mix.

Distortion is a powerful tool that can add warmth, character, and harmonic content to any sound. When used correctly, distortion can add presence and punch to your mix, making instruments and vocals stand out in a way that they wouldn’t otherwise. Let’s explore how you can use different types of distortion to achieve this effect.

Understanding Distortion

Distortion occurs when a sound’s waveform is clipped or saturated, creating harmonics that add character and warmth to the sound. There are many types of distortion, each with its own unique sound and characteristics.

Types Of Distortion

There are several types of distortion available, including:

Type of Distortion Description
Tube Distortion Emulates the natural compression and saturation of analog tube circuits.
Overdrive Distortion Produces a soft clipping effect and is commonly used on electric guitar and bass.
Distortion Pedal A pedal that simulates the sound of a distorted amp or adds a unique flavor to the sound.
Fuzz Distortion Creates a rough and gritty sound by driving a signal to extreme levels.

How Distortion Improves Presence And Punch

By adding harmonic content to a sound, distortion can help it cut through a mix and be heard more clearly. It can also add a sense of power and aggression to the sound, making it more bold and dynamic. The added harmonics can also create a sense of warmth and depth, giving the sound a more organic and natural feel.

Best Practices For Using Distortion

When using distortion, it is important to keep a few things in mind:

  • Use distortion sparingly, as too much of it can quickly become overwhelming and fatiguing to the ears.
  • Experiment with different types of distortion to find the one that works best for the sound you’re trying to achieve.
  • Start with subtle amounts of distortion and gradually increase it until you find the right amount for the sound.
  • Be careful not to over compress or clip your sound, as this can cause distortion to sound harsh and unpleasant.

In conclusion, understanding how different types of distortion work and how to use them effectively can help you achieve a more powerful and dynamic mix. With a little experimentation, you can harness the power of distortion to make your music stand out and sound more professional.

Using Reverb To Improve Presence And Punch


Discover how heavy processing, like using reverb, can enhance the presence and punch of your mix. By incorporating different kinds of effects, you can achieve a dynamic sound that commands attention and leaves a lasting impact on your audience.

Using Reverb To Improve Presence And Punch Understanding Reverb Reverb is an essential tool for music producers to create the desired sound and atmosphere in a mix. It is an effect that adds a sense of space and naturalness to an audio signal, replicating the way sound waves bounce off surfaces. Understanding the different types of reverb can help you choose the right type for your mix. Types of Reverb There are several types of reverb, including plate, hall, chamber, spring, and convolution. Plate reverb is characterized by a bright and smooth sound, while hall reverb produces a lush and spacious sound. Chamber reverb provides a warm and natural sound, and spring reverb delivers a vintage and classic sound. Convolution reverb applies a sampled impulse response of an actual space to the signal, giving it a realistic and unique sound. How Reverb Improves Presence And Punch Using the right type and amount of reverb can help improve the presence and punch in a mix. Adding reverb can give the impression that an instrument is playing in a bigger space, making it appear more present and impactful. Reverb can also be used to emphasize specific parts of a track, such as the chorus, making them stand out and sound more punchy. However, too much reverb can make a mix muddy and indistinct, so it’s important to use it sparingly and in moderation. Best Practices for Using Reverb By following these best practices, you can use reverb effectively to enhance the presence and punch in your mix: – Use appropriate reverb types to complement the source sound. – Adjust the decay time of reverb to control the length of the tail. – Use EQ to shape the reverb, removing excess frequencies that may clash with the mix. – Try placing reverb on a send/return channel, allowing you to blend it in with the mix and control it independently. – Use automation to vary the reverb’s level over time, creating a dynamic and engaging listening experience. Using these tips, you’ll be able to use reverb to improve the presence and punch in your mix, giving it the depth and texture it needs to sound amazing.

https://www.youtube.com/watch?v=dlsVYk_WtDs


Using Parallel Processing To Improve Presence And Punch


By utilizing parallel processing techniques, you can greatly enhance the impact and clarity of your mix. By separating different elements and applying different heavy processing chains to each one, you can achieve a more powerful and dynamic sound with greater presence and punch.

Understanding Parallel Processing

Parallel processing is a mixing technique that involves duplicating a track, processing it differently, and then blending it back with the original track. This technique can help give your mix more presence and punch by adding more depth, width, and thickness. Parallel processing is commonly used on drums, vocals, guitars, and bass.

How Parallel Processing Improves Presence And Punch

Parallel processing can improve presence and punch by adding more harmonic content and transient response to your tracks. It can also help control the dynamic range by compressing the parallel processed track and then blending it back with the original track. This can help bring up the quieter sections and add more energy to the louder sections.

Best Practices For Using Parallel Processing

To effectively use parallel processing, it’s important to follow these best practices:

  • Duplicate the track you want to process and name it as “parallel track”.
  • Apply the desired processing to the parallel track, such as saturation or compression.
  • Blend the processed parallel track with the original track to taste using faders or blend knobs.
  • Use EQ to balance the frequency response of the parallel track with the original track.
  • Use panning to add more width and depth to your mix.
  • Use automation to adjust the level of the parallel track in different sections of the song.
  • Avoid adding too much processing that can make the track sound unnatural or muddy.

By following these best practices, you can effectively use parallel processing to improve the presence and punch of your tracks.


Frequently Asked Questions Of How To Use Different Kinds Of Heavy Processing To Improve Presence And Punch In Your Mix


How Do You Make A Mix More Punchy?


To make a mix more punchy, you can try a few things. Start by increasing the volume of the drums and bass. Use compression on individual tracks and the overall mix. EQ the low-end and midrange frequencies. Add saturation or distortion to bring out the harmonics.


Finally, use limiting to control the overall level and add more perceived loudness.


How Can I Improve My Mixing?


To improve your mixing skills, practice is key. Start by focusing on your EQ and levels to ensure a balanced mix. Use reference tracks to guide your decision making. Experiment with different panning techniques and make use of automation to bring elements in and out of the mix.


Finally, invest in quality monitors and headphones to accurately hear the details of your mix.


How Do You Professionally Mix Tracks?


Professionally mixing tracks involves careful attention to levels, panning, EQ, compression, and effects. It is important to use quality monitoring equipment, follow a mixing plan, address potential phase issues, and maintain consistency across all tracks.


How Do You Add Punch In Mastering?


To add punch in mastering, focus on improving the dynamics, EQ, and compression. Use saturation or distortion to add warmth and harmonics. Use multiband compression to control specific frequencies. Experiment with stereo widening and imaging to make the mix sound wider and more immersive.


Finally, use loudness maximization to make sure the mix is competitive with other tracks.


Conclusion


Heavy processing can greatly enhance the presence and punch of your mix. Whether it’s using compression to control dynamic range, EQ to shape the tonal balance, or distortion/saturation to add character and edge, there are a multitude of options available to shape your sound.


However, it’s important not to overdo it and maintain balance in your mix. With these techniques in your arsenal, you can take your mixes to the next level and stand out from the crowd. Keep practicing and experimenting to find what works best for your music.

Categories
Archive

How To Tune A Guitar: Simple Steps for Perfect Pitch

To tune a guitar, turn the tuning pegs until each string matches the correct pitch. Use a tuner or a mobile app for accuracy.


Tuning a guitar is essential for playing music that sounds harmonious and pleasing. Before diving into chords and melodies, every guitarist, from the beginner to the seasoned performer, must master the art of tuning. The process is simple yet critical, setting the stage for a guitar’s performance.


Ensuring your instrument is tuned correctly will not only improve your sound but also enable you to develop a good ear for pitch and tone. Whether you prefer an electronic tuner, a tuning app, or you’re training your ear with a reference pitch, tuning should be the first step in your play session. Remember, the confidence in your tunes begins with the precise tuning of your six strings.


Tuning Essentials: The Why And What

Ever picked up a guitar only to find the sound wasn’t quite right? It could be out of tune.

Tuning your guitar ensures each string produces the correct note. Whether you’re a beginner or a seasoned player, understanding the tuning process is crucial. Let’s dive into the essentials.

The Importance Of A Well-tuned Guitar

Achieving the perfect sound is essential for any guitarist.

  • Improves sound quality: A well-tuned guitar will have a harmonious, pleasing sound.
  • Facilitates learning: Correct tuning helps beginners learn faster and with better accuracy.
  • Preserves strings: Regular tuning can extend your strings’ life by keeping the tension consistent.

Components Of A Guitar That Affect Tuning

Several parts of your guitar play a vital role in its ability to stay in tune.

Component Function
Machine Heads (Tuners) Control the tension of each string to adjust pitch.
Nut Supports the strings at the guitar’s headstock, affecting tone and tuning stability.
Bridge Stabilizes string tension across the guitar body, contributing to intonation.

Identifying Your Guitar’s Tuning

Identifying Your Guitar’s Tuning starts with knowing which notes each string should produce. Guitars can have a variety of tunings, but most players begin with standard tuning. Whether you’re a beginner or an experienced musician, understanding your guitar’s tuning sets the foundation for perfect harmony.

Standard Tuning Explained

In standard tuning, the strings of the guitar from the thickest to the thinnest should sound these notes: E, A, D, G, B, and E. Here’s a simple guide:

  • 6th string (E): The lowest pitch and thickest string, also known as the low E.
  • 5th string (A): Just above the 6th string in pitch.
  • 4th string (D): Positioned below the 5th string.
  • 3rd string (G): Found after the 4th string.
  • 2nd string (B): Nearer to the floor than the 3rd string.
  • 1st string (E): The highest pitch and thinnest string, also known as the high E.

Alternate Tunings To Explore

Alternate tunings offer unique sounds and can inspire creativity. Below are some popular tunings:

Tuning Name 6th String 5th String 4th String 3rd String 2nd String 1st String
Drop D D A D G B E
Open G D G D G B D
DADGAD D A D G A D

Try different tunings to discover new chord voicings and melodies. Each tuning can provide a fresh perspective to your guitar playing. Always ensure your guitar is properly tuned before diving into a new tuning. Your ear will thank you for the sweet sounds that follow!

Tools Of The Trade

Before you dive into tuning your guitar, it’s essential to know about the different tools you can use. Tuning a guitar ensures it sounds its best. Whether you are a beginner or a seasoned musician, having the right tools makes the process easier and more accurate. Let’s explore the types of tuners and methods like using a tuning fork or pitch pipe.

Types Of Tuners: Pros And Cons

Selecting the right tuner can be a game-changer for your guitar’s sound. There are several types, each with their own benefits and drawbacks.

  • Clip-on Tuners: Attach to your guitar’s headstock and pick up vibrations. They’re compact and convenient but may struggle in noisy environments.
  • Pedal Tuners: Ideal for live performances as they mute your signal when tuning. They require a power source and are bulkier than clip-ons.
  • Soundhole Tuners: Fit inside an acoustic guitar’s soundhole. They are unobtrusive but limited to acoustic guitars.
  • Smartphone Apps: Apps can turn your phone into a tuner. They are cheap and always on hand, but they may not be as accurate as standalone tuners.

Using A Tuning Fork Or Pitch Pipe

Tuning forks and pitch pipes require a good ear but provide a traditional tuning experience.

Tool Pros Cons
Tuning Fork Durable and highly accurate. No visual aid; requires experience.
Pitch Pipe Simple to use and inexpensive. Less precise and affected by breath control.

To use a tuning fork, strike it against a surface and hold it to your guitar. For a pitch pipe, blow into the correct note pipe and match your string to the tone. Both methods help develop your ear but take practice to master.

Tuning By Ear

Tuning a guitar by ear is a valuable skill for any musician. It allows guitarists to tune their instrument anywhere, without the need for an electronic tuner. This traditional method enhances your musical ear and helps you become more in tune with your instrument.

Mastering The Reference Pitch

The process begins by establishing a single, clear reference pitch. Often, musicians use another instrument, a tuning fork, or even a phone app to get an accurate ‘A’ note. Once you have this pitch, you can tune your ‘A’ string (the 5th string) to match it.

  • Use a piano: Press the ‘A’ key to get a reference tone.
  • Pitch pipes: Blow into the one marked ‘A’ for your starting note.
  • Tuning forks: Strike the fork and hold it to your guitar to hear the ‘A’ pitch.

Tuning Each String To Its Neighbor

Once the ‘A’ string is tuned, use it to tune the other strings. Start by placing your finger on the 5th fret of the ‘A’ string to match the pitch of the open ‘D’ string.

String Fret to Press Note to Match
A (5th string) 5th fret D (4th string, open)
E (6th string) 5th fret A (5th string, open)
D (4th string) 5th fret G (3rd string, open)
G (3rd string) 4th fret B (2nd string, open)
B (2nd string) 5th fret E (1st string, open)

Repeat this process across all strings, always comparing to the neighbor string. Ensure each pitch is clear and matches exactly before moving to the next string. With practice, your ear will become sharper at detecting slight pitch differences.

Electronic Tuners: A Step-by-step Guide

How To Tune A Guitar Using Electronic Tuners

Tuning your guitar is a vital step before playing. Gone are the days of tuning by ear alone. Electronic tuners offer precision. This guide helps you tune your guitar accurately.

How to Use a Clip-On Tuner

How To Use A Clip-on Tuner

Clip-on tuners are easy to use and portable. Here’s a quick way to use them:

  1. Attach the tuner to the guitar’s headstock.
  2. Turn it on. Ensure it is in ‘guitar mode’.
  3. Pluck a string and observe the display.
  4. Adjust the tuning peg until the display indicates the correct note.
  5. Repeat for each string.

Note the display’s color change. It signals the string is in tune. Some tuners use red to green, others differ. Check the manual for specifics.

Navigating App and Pedal Tuners

Navigating App And Pedal Tuners

App tuners work on your phone. Pedal tuners are for live setups. Here’s how to use them:

  • Download a tuner app on your smartphone or tablet.
  • Open the app and allow it to access your microphone.
  • Take your guitar and pluck a string near your device.
  • Adjust your tuning based on the app’s feedback.

For pedal tuners, follow these steps:

  1. Connect your guitar to the pedal with a cable.
  2. Press the pedal to activate the tuner.
  3. Play a string and watch the pedal’s display.
  4. Tune your string accordingly.

With pedal tuners, mute your guitar during tuning. This stops notes from reaching the amplifier. Many pedal tuners do this automatically when activated.

Fine-tuning With Harmonics

Welcome to the refined world of fine-tuning guitars with harmonics. This technique allows for a level of precision that standard tuning methods can’t match. Understanding and mastering harmonic tuning could be a game-changer for your guitar sound. Let’s dive into the nitty-gritty of how harmonics work and how you can use them to achieve a perfectly tuned guitar.

The Science Behind Harmonics

Harmonics are like magic in the world of sound. When you lightly touch a guitar string at certain points, it divides the string into sections. These sections vibrate to create beautiful bell-like notes. These notes are the key to fine-tuning your guitar.

On a guitar, the most used harmonic is the 12th fret harmonic. It splits the string in half. The resulting note has the same pitch as the open string pressed on the 12th fret. This pitch is one octave above the open string. These harmonics are pure tones and are perfect for tuning because they are not affected by fret placement or finger pressure.

Harmonic Tuning Techniques

Now, let’s get your guitar in perfect tune using harmonics. It’s a simple yet effective process. Here’s what to do:

  1. Start with the low E string. Pluck the 12th fret harmonic.
  2. Next, pluck the 12th fret harmonic on the A string.
  3. Both notes should sound the same. Adjust the A string until they match.
  4. Move to A and D strings. Repeat the same process.
  5. For G string, compare its 5th fret harmonic to the B string’s 7th fret harmonic.
  6. Lastly, match the B and high E strings using their 12th fret harmonics.

Remember to gently touch the string directly above the fret. Do not press the string down. Use your ear to listen for when the two notes match. You’ll hear a wavy sound if they are out of tune. These waves slow down as you get closer to the right pitch, and stop when you are in tune.

Using harmonics for tuning your guitar ensures accuracy and is a quick way to check tuning during performances. Consistency in your tuning habits will lead to better sound every time you play.

Tuning In Different Environments

Guitar tuning can change with different places and conditions.

Know how to get the perfect sound no matter where you are.

Adjusting For Temperature And Humidity

Wood and strings feel the weather just like we do.

  • Warm air might make guitar strings looser.
  • Cold can tighten them and change the pitch.
  • Check tuning when moving to a new room.
  • Always tune at the new spot’s temperature.
  • A dry room might need a quick tune-up.
  • Use a humidifier for stable sound care.

Tuning In Noisy Settings

Background noise makes tuning tough.

  • Find a quiet corner if you can.
  • Clip-on tuners feel the vibrations, block noise.
  • Apps and pedals help in loud places.
  • Headphones can make electric tuners easier to hear.
  • Trust your ears over gadgets in the end.


Maintaining Perfect Pitch

Maintaining perfect pitch is essential for any guitarist. A finely tuned guitar not only sounds better but also allows players to blend harmoniously with other instruments. Consistent tuning habits and proper instrument care are two pillars of maintaining that desirable pitch. Explore these practices to achieve and sustain the perfect pitch for your guitar.

Daily Tuning Habits

Build a routine of checking your guitar’s tuning each time you play. Regular tuning keeps the ear attuned to proper pitch and improves musicality.

  • Invest in a reliable tuner for accurate readings.
  • Tune before each practice session.
  • Check tuning stability as you switch playing styles.

Tuning daily ensures your instrument consistently performs at its best.

Long-term Care For Tuning Stability

Take proactive steps for long-term guitar health. A well-maintained guitar holds its tune longer and withstands the rigors of use.

Care Tip Benefit
Regularly change strings Prevents string fatigue and pitch distortion.
Store in a stable environment Protects against warping and tuning drift.
Humidity control Balances wood expansion and contraction.

Neck adjustments and professional set-ups will also keep your guitar at peak performance. Clean and dust the instrument to avoid build-up that can alter sound resonance.

Common Tuning Problems And Solutions

Perfectly tuning a guitar can sometimes feel like a puzzle. You might face a few common issues while trying to get the right sound. But don’t worry, here are some of the most frequent tuning troubles and how to fix them smartly.

Dealing With String Slippage

String slippage causes your guitar to go out of tune quickly. This happens when strings don’t hold onto the tuning pegs well. Ensure strings are wound tightly. For a slippage-free experience, here’s what to do:

  • Wipe down your tuning pegs for a clean grip.
  • Re-string with an overlapping technique to lock strings in place.
  • Add extra windings, especially on the thinner strings.
  • Consider locking tuners for a more permanent fix.

Addressing Old Strings And Intonation Issues

Old strings can mislead the perfect tonality. They may cause intonation issues, leading to incorrect pitch. It’s essential to remedy this for the truest sound.

  • Change strings regularly for maintaining clarity and tuning stability.
  • Press strings at the 12th fret and check the octave. It should match the open string’s pitch.
  • If it doesn’t, adjust the bridge saddles until the intonation is correct.
  • Use a tuner to assist in these adjustments for accuracy.

Care for your guitar, and it will play with perfect harmony. Tune up and make beautiful music!

How To Tune A Guitar: Simple Steps for Perfect Pitch


Credit: www.wikihow.com

Frequently Asked Questions On How To Tune A Guitar

What Tools Are Needed To Tune A Guitar?

To tune a guitar, you’ll primarily need a tuner. You can use a clip-on tuner, an app, or an electronic tuning device. A tuning fork or piano can also be used for a more traditional approach. Make sure your guitar is in a quiet environment for better accuracy.

Can You Tune A Guitar Without A Tuner?

Yes, you can tune a guitar without a tuner. You can use the 5th fret tuning method, where you tune the strings to each other. Another option is using a piano or another instrument as a reference. Online tuning tones or pitch pipes can also aid in manual tuning.

How Often Should You Tune Your Guitar?

You should tune your guitar every time you play. Factors such as temperature changes, humidity, and even moving the guitar can affect its tuning. Additionally, new strings stretch and may require more frequent tuning until they settle. Regular tuning ensures the best sound quality.

What Is The Standard Tuning For A Guitar?

The standard tuning for a guitar from the lowest (thickest) string to the highest (thinnest) string is E-A-D-G-B-e. This tuning provides a good balance between range and playability for most styles of music. It is widely used by beginners and professionals alike.

Conclusion

Mastering the art of guitar tuning sets the stage for exceptional performances. With practice, these steps become second nature, elevating your sound. Embrace the process, refine your skill, and let every chord resonate with perfect harmony. Take your musical journey to new heights — a finely tuned guitar is your first note to success.

Categories
Archive

Why Professional Audio Mastering Is Important For Musicians Bands Artists And Labels

Professional audio mastering is crucial for musicians, bands, artists, and labels as it enhances the quality of the final mix and ensures a consistent and cohesive sound. With mastering, the overall volume of the track is balanced, frequencies are adjusted, and any imperfections are corrected.


Additionally, mastering ensures that the track meets industry-standard requirements and sounds great across different playback devices. The mastering process is the final touch on a recording project, and it can make a significant difference to the quality of the final product.


While mixing is about getting all the individual elements of a song to blend together, mastering is about getting the overall sound of the track to sound polished and professional. We will dive into the reasons why professional audio mastering is imperative for musicians, bands, artists, and labels.


Why Is Audio Mastering Important?


Professional audio mastering is essential for musicians, bands, artists and labels, as it improves the overall sound quality of the musical tracks. It can help to enhance the dynamics, balance and tonal quality of the mix, resulting in a more professional and polished sound.

Enhancement Of Audio Quality

Audio mastering is essential to improve the overall sound quality of a music track. It involves balancing and enhancing key elements of a track, such as volume, equalization, and compression, to make sure that the intended sound is achieved. This process helps to improve the clarity of various tracks, bringing out the delicate nuances of each instrument and vocal, thus resulting in an attractive and polished sound that is pleasing to the ears.

Consistency In Sound

By using professional audio mastering techniques, musicians, bands, artists, and labels can achieve consistency across an entire album, EP, or single. Audio mastering ensures that all tracks are balanced and sound cohesive while still preserving the unique character of each song. Consistency in sound helps to avoid jarring transitions between tracks that can ruin the listening experience.

Compatibility With Different Playback Systems

Mastering engineers use different techniques, tools, and standards to ensure audio mastering is compatible with different playback systems such as CD, vinyl, and streaming services. With high-quality mastering, musicians, bands, and artists can ensure their music sounds great regardless of where it’s played.

Optimizing Track Order And Gaps

Professional audio mastering also involves determining the optimal track order for an album or EP while ensuring appropriate gaps between songs. This process helps to create the right mood and feel for the listener, leading to an enjoyable experience from start to finish.

Enhancing Listener Experience

The ultimate goal of professional audio mastering is to enhance the overall listener experience. A well-mastered track can evoke the intended emotions in the listener, convey the intended message and create an immersive and engaging experience. Professional mastering ensures that every track is uniquely designed to tell its story while still sounding harmonious in the context of an album or EP.


The Role Of A Professional Audio Mastering Engineer


A professional audio mastering engineer plays a crucial role in the music industry. They elevate the quality of recordings, ensuring consistency and balance across all tracks. With their skills and knowledge, they help musicians, bands, artists, and labels achieve a professional sound that is ready for distribution and consumption.

The Role of a Professional Audio Mastering Engineer Professional audio mastering is the final step in the music production process before it is ready for distribution. It is a technical process that requires a high level of expertise and attention to detail. A professional audio mastering engineer is a critical component in ensuring that a musician’s, band’s, or artist’s work sounds polished and professional. Technical Expertise in Audio Processing Equipment and Software A professional audio mastering engineer must possess technical expertise in audio processing equipment and software. They use state-of-the-art equipment and software to enhance the audio quality of the music. They use equalization, compression, and stereo imaging techniques to balance and refine the audio. They also have knowledge of different file formats that are required for mastering. Critical Listening Skills and Attention to Detail The role of a mastering engineer requires critical listening skills and attention to detail. They listen to every sound in the music and make sure that each instrument, voice, and sound effect is audible. They also ensure that the volume levels are consistent throughout the track and optimize the dynamics of the audio. Mastering engineers are responsible for removing any sounds that might distract from the enjoyment of the music. Experience Across Different Genres A professional audio mastering engineer must have experience across different genres of music. They should be familiar with the nuances of different types of music, from rock to country to classical. Experience in multiple genres gives them the ability to understand how each genre should sound and how to personalize the sound to the artist’s vision. Collaboration with Musicians and Producers The role of a mastering engineer is not just technical but also collaborative. They work closely with musicians, producers, and recording engineers to ensure that the final product meets the artist’s vision. They take feedback from the artist and adjust the audio accordingly. Collaboration is essential to ensure that the final product is a masterpiece. Keeping Up with Industry Trends and Standards A professional audio mastering engineer must keep up with industry trends and standards. They use their knowledge of industry developments and technology advancements to remain up to date with the latest practices. They ensure that the audio is mastered to the latest industry standards for optimum playback across different devices. In conclusion, the role of a professional audio mastering engineer is crucial in creating music that appeals to the audience. Technical expertise, critical listening skills, experience across different genres, collaboration, and industry trend awareness are all crucial for a mastering engineer to produce the best possible audio. Professional audio mastering marks the difference between an amateur and professional sound, and it is important for musicians, bands, artists, and labels to prioritize mastering in their music production process.

Benefits Of Professional Audio Mastering For Musicians, Bands, Artists, And Labels


Hiring a professional audio mastering service can greatly benefit musicians, bands, artists, and labels in producing high-quality finished tracks. Audio mastering is the final step in music production that involves fine-tuning the overall sound to achieve a polished and cohesive album or single.


With the help of an experienced audio mastering engineer, artists can ensure that their music is ready for release and will sound great on any platform.

If you’re a musician, band, artist, or record label, the quality of your music is crucial to your ultimate success. While writing, recording, and producing your music is important, mastering is arguably just as crucial. Mastering can really bring out the best in your music, allowing for the highest possible sound quality. Let’s discuss the benefits of professional audio mastering and how it can help you.

Higher Sound Quality

Professional audio mastering can take your music to another level in terms of sound quality. With proper mastering, the final mix will sound more balanced and clear. It can also enhance the overall loudness of your music, which can make it more appealing to listeners. Mastering can also add depth and dimension to your tracks, making them more engaging and immersive.

Increased Audience Engagement

When you have high-quality, professionally mastered music, you’re more likely to engage your audience. The better the sound quality, the more likely people are to listen, enjoy, and share your music. This can lead to an increase in fans, followers, and ultimately, success.

Improved Marketability And Branding

Mastered music can also improve your marketability and branding. Professional mastering can give your music a polished and professional sound that can help you stand out from the competition. This can really help with branding and promoting your music.

Better Distribution And Sales

When you have high-quality, well-mastered music, you’re more likely to get noticed by distributors, retailers, and streaming services. This can lead to better distribution deals and greater exposure for your music. Ultimately, this can result in more sales and streams.

Increased Opportunities For Radio Airplay

Radio airplay is still one of the most important ways to get your music heard. If your music is professionally mastered, it’s more likely to get picked up by radio stations. A well-mastered track can catch the attention of music directors and DJs. This can lead to more airplay and greater exposure for your music. In conclusion, professional audio mastering is an essential part of the music-making process. It can help take your music to the next level in terms of sound quality, which can lead to increased audience engagement, better marketability and branding, improved distribution and sales, and increased opportunities for radio airplay.

How To Choose A Professional Audio Mastering Engineer


Professional audio mastering is crucial for musicians, bands, artists, and labels. A skilled mastering engineer can enhance the quality of your final mix and give your music the competitive edge it needs. When looking for an engineer, it’s important to consider their experience, equipment, and references to ensure the best possible outcome for your music.

Choosing the right professional audio mastering engineer is crucial for any musician, band, artist, or label. With so many options available, it can be overwhelming to decide who to trust with your music. In this blog post, we’ll explore how to choose a professional audio mastering engineer using four key factors: Checking Credentials and Experience, Listening to Samples and Previous Work, Communicating Your Needs and Vision, and Considering Pricing and Turnaround Time. By the end, you’ll have a clear understanding of what to look for in a mastering engineer, and how to ensure a successful and productive partnership.

Check Credentials And Experience

When choosing a professional audio mastering engineer, it’s important to consider their credentials and experience. Look for someone who has a degree or certification in audio engineering, and who has experience working with similar genres or styles of music to yours. Don’t be afraid to ask questions about their background and training, or to request references from previous clients. A skilled and qualified engineer will be happy to provide this information, and it will give you confidence in their abilities.

Listen To Samples And Previous Work

One of the best ways to assess a mastering engineer’s skills is to listen to their samples and previous work. Do they have a distinctive and consistent sound? Is their mastering balanced and transparent, or does it add unnecessary coloration or distortion? Listen to their work on a range of devices and environments to ensure that the quality is consistent. You can also ask for before-and-after samples from previous clients to get a sense of their mastering process and approach.

Communicate Your Needs And Vision

Effective communication is key to a successful mastering partnership. Make sure that you clearly communicate your needs, goals, and vision for your music to the engineer. This includes discussing the desired loudness and dynamic range, any preferred EQ or tonal adjustments, and any specific concerns or requests you have. A skilled engineer will be able to listen to your feedback and translate it into effective mastering decisions, resulting in a final product that meets your expectations.

Consider Pricing And Turnaround Time

Finally, it’s important to consider the cost and timing of the mastering process. Make sure you understand the engineer’s pricing structure, and what’s included in the final cost. Some engineers may offer separate revisions or additional services for an additional fee. Additionally, consider the engineer’s turnaround time, and whether it fits with your project’s timeline. Keep in mind that rush requests or complex projects may require additional time and cost.

Establish A Professional Relationship

At the end of the day, the success of your mastering project will depend on the quality of your relationship with the engineer. Look for someone who is easy to work with, communicates clearly and promptly, and who shares your passion and vision for your music. By building a professional and collaborative relationship with your mastering engineer, you’ll be able to create a final product that truly represents your artistry and vision.

Why Professional Audio Mastering Is Important For Musicians Bands Artists And Labels


Credit: www.izotope.com


Frequently Asked Questions For Why Professional Audio Mastering Is Important For Musicians Bands Artists And Labels


Why Is Mastering Important In Music?


Mastering in music is crucial for enhancing the sound quality of a recording. It involves balancing and refining the overall mix to produce a clear and professional sound. Mastering ensures that the music sounds great on all playback devices and helps the music stand out from other recordings.


Why Is The Mastering Process Essential To The Commercial Success Of A Track?


Mastering process is vital for commercial success of a track as it enhances the overall sound quality, volume and consistency of audio tracks. It creates a polished and professional sound, making a track stand out when competing with others on the market.


What Is Professional Audio Mastering?


Professional audio mastering is the process of bringing together all the individual tracks of a recording to create a cohesive final product. It involves adjusting aspects like volume, EQ, and compression to ensure the final audio sounds polished and consistent across different playback systems.


The goal of mastering is to prepare the audio for distribution and make it sound the best it can possibly be.


How Important Is Mixing And Mastering?


Mixing and mastering are crucial for the quality of the final product. They polish audio files, remove unwanted elements, and balance audio levels. Mixing combines individual elements into a compelling audio track, while mastering ensures the final product is sonically coherent and optimized for playback.


Investing in professional mixing and mastering services can ensure that your audio track sounds its best on any platform.


Conclusion


Professional audio mastering is an essential aspect of music production that should not be overlooked. It ensures that your final music product is polished, balanced, and ready for distribution. Without mastering, your music may suffer from poor sound quality, lack of clarity, and incompatibility with different audio systems.


As a musician, band, artist, or label, investing in professional audio mastering services is a worthwhile decision that will help you stand out in a crowded industry. By partnering with experienced mastering engineers who use advanced tools and techniques, you can take your music to the next level and establish your brand as a serious player in the music scene.