Categories
Archive

Why Audio Mastering Services Are So Important

Audio mastering services are crucial for achieving a polished and professional sound. Without mastering, a track may lack clarity, balance, and overall cohesiveness.


Also, Mastering is the final step in the music production process that prepares a track for distribution and public consumption. In essence, it involves taking a finished mix and preparing it for reproduction on various media platforms, such as streaming services, vinyl records, and CDs.

Related reading: AI Audio Mastering and Hip Hop Mastering Services. For background, see the Wikipedia article on Audio mastering.


Moreover, Mastering requires technical proficiency and an ear for detail. An experienced audio mastering engineer will apply EQ adjustments, compression, and other processing techniques to optimize the track’s sound quality. The result is a polished and cohesive final product that sounds great on any playback system. Without mastering, a track may lack the impact, clarity, and dynamic range needed to compete in today’s music industry. Thus, investing in audio mastering services is an essential aspect of creating professional-sounding music.

Why Audio Mastering Services Are So Important


Credit: www.levelsmusicproduction.com


What Is Audio Mastering?


Audio mastering is the final process that takes place before music is released for distribution. In addition, the process involves applying various techniques to music tracks to ensure they sound good and are suitable for different sound systems. Quality audio mastering services are crucial for achieving professional sound quality and making music stand out from the crowd.

Furthermore, Audio mastering is a crucial process of refining a recorded track to prepare it for distribution. It involves the enhancement of the audio quality, making it sound more polished, consistent, and balanced. In essence, audio mastering is the “final touch” that provides a professional finish to music recordings that are ready for commercial release. Every music production project needs mastering to achieve the desired quality and commercial success.

The Purpose Of Audio Mastering

Additionally, the purpose of audio mastering is to unify the sound of a track or an album. So it sounds consistent from start to finish, making it more enjoyable for the listener. Mastering also ensures that the audio meets industry standards and is acceptable for distribution on multiple platforms. Mastering helps remove any unwanted imperfections or inconsistencies in the sound quality, such as background noise, pops, and clicks.

The Difference Between Mixing And Mastering

Mixing and mastering are two distinct processes that serve different purposes. Mixing involves balancing and adjusting individual tracks within a recording to create a cohesive, polished sound. Mastering, on the other hand, is the final step in the process. It involves preparing the final mix for distribution by fine-tuning the overall sound of the recorded material. This ensures it is balanced, consistent, and polished. In summary, audio mastering is a critical component that ensures that music recordings are well-polished, consistent across all formats, and meet industry standards. It is vital to ensure that your music reaches its maximum potential, making it more appealing and marketable to listeners.

Why Audio Mastering Is Crucial?


Audio mastering is crucial because it ensures that the final product is polished and professional sounding. Mastering can enhance the clarity, balance, and depth of the audio. Quality audio mastering services can take your music or podcast to the next level and improve the listening experience for your audience.

Making Your Music Sound Professional for Audio Mastering Services

Audio mastering is a crucial step in creating a professional sound for your music. It smooths out any rough edges, balances the levels, and ensures that your tracks are consistent with one another. Mastering turns a good mix into a polished final product that is suitable for commercial release. It also makes sure that your music sounds great on all kinds of playback systems, from earbuds to professional sound installations.

Creating A Cohesive Sound For Your Album

If you are creating an album, mastering creates a cohesive sound across all the tracks. It can be challenging to have a consistent sound with multiple songs, especially when each song has its unique characteristics. However, mastering allows you to create a comprehensive sound that ties all your tracks together. This gives your listeners a seamless and enjoyable listening experience. In this way, mastering is essential for creating a successful album that people will want to listen to again and again.

Choosing The Right Audio Mastering Service For You

Choose a mastering company with the expertise and experience to give your music a professional edge. Look for services that offer sample mastering so you can hear their work before committing to the project. Check their portfolio of work to ensure they have experience in your genre of music.

The Bottom Line for Audio Mastering Services

Overall, audio mastering is crucial for giving your music that professional-quality sound that sets it apart from amateur projects. By creating a cohesive sound for your album and making your music sound professional, you will increase your chances of success in the competitive music industry. Therefore, it is essential to choose the right audio mastering service to ensure that your music stands out from the crowd.

The Benefits Of Professional Audio Mastering Services


Professional audio mastering services are crucial in the music industry. It helps to enhance the overall sound quality, balance the frequency and dynamics and provide a consistent volume level. With the help of mastering, music tracks become more polished and ready for distribution across various platforms.

Audio mastering is a crucial step in the music production process. It involves taking the final mixes of a song and preparing them for distribution by balancing the levels, enhancing the tonal characteristics, and creating consistency across all tracks. You may be tempted to skip this step or do it yourself. Yet professional mastering can make a big difference in your final product. Here are some benefits of working with a professional:

Years Of Experience And Expertise for Audio Mastering Services

When you hire a professional audio mastering engineer, you are benefiting from years of experience and expertise. These professionals have spent years perfecting their craft and have a deep understanding of the tools and techniques required to create a polished and professional product. They understand how to balance frequencies, adjust levels and create a cohesive final product. With this level of expertise, you can be confident that your music will sound its best.

Access To High-quality Tools And Equipment for Audio Mastering Services

Professional audio mastering engineers have access to high-quality tools and equipment that are not commonly available to the average musician. These tools allow them to achieve a higher level of precision and accuracy when processing audio. They use top-of-the-line digital audio workstations, plugins, and hardware to ensure that every track receives the attention it deserves.

An Unbiased Ear for Audio Mastering Services

One of the biggest benefits of working with a professional audio mastering engineer is that they provide an unbiased ear. When you’ve been working on a song for an extended period, you become accustomed to the sound and may miss certain nuances. A professional audio mastering engineer listens to your songs with fresh ears and can identify areas that need attention. Their keen ear ensures that your music is balanced and consistent, regardless of the playback system.

Dedicated Time And Attention To Detail for Audio Mastering Services

When you work with a professional audio mastering engineer, you benefit from their dedicated time and attention to detail. They take the time to listen to each track individually and make adjustments as necessary. They also ensure that all tracks sound cohesive, consistent, and balanced. By giving your music the time and attention it deserves, a professional can help to elevate your music to the next level. In conclusion, investing in professional audio mastering services is a wise decision. An experienced mastering engineer brings high-quality tools, an unbiased ear and close attention to detail. That can make all the difference in the final product.
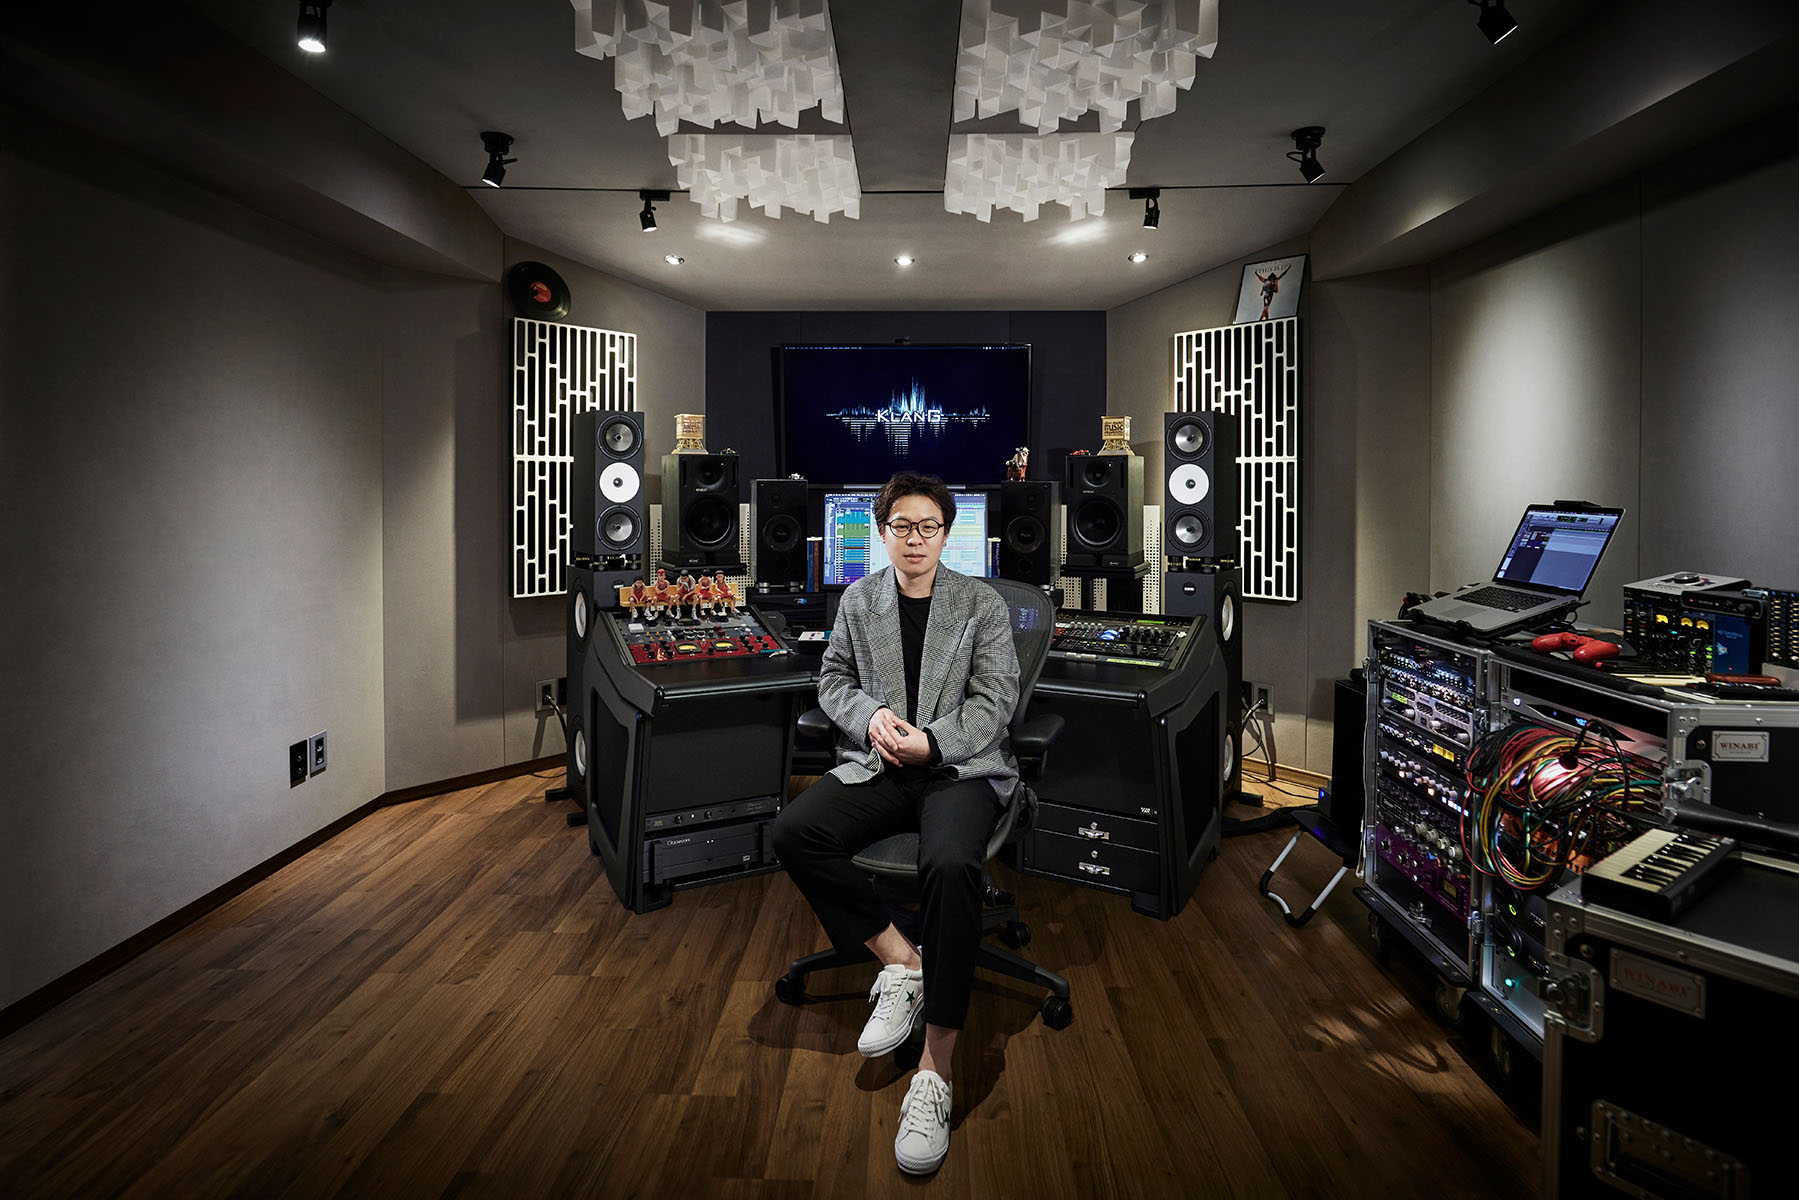
Why Audio Mastering Services Are So Important


Credit: amphion.fi


Preparing Your Music For Audio Mastering


Preparing your music for audio mastering is crucial to achieve a professional and high-quality sound. Audio mastering services can enhance the overall loudness, clarity, and balance of your music. This makes it stand out from the competition. Trusting a professional audio engineer with your music can elevate the final product and impress your audience.

Audio mastering is a crucial process that can make or break your entire music project. It is the final step in the production process, where the final mix is polished and refined. This ensures it sounds amazing across all devices and platforms. However, before you can send your mixes for audio mastering, you need to prepare them properly. In this blog post, we will discuss ‘cleaning up your mix’ and ‘preparing the final mix for export’ to help you get your music ready for audio mastering.

Cleaning Up Your Mix for Audio Mastering Services

The first step to preparing your music for audio mastering is to ‘clean up your mix’. This means going through your mix and fixing any flaws in the arrangement, such as unwanted background noise, unnecessary effects, or incorrect levels. Removing unwanted background noise and hiss is critical as these unwanted sounds can cause ‘muddy’ mixes that can be difficult to master. Additionally, removing any unnecessary effects and introducing automation to control levels can help to create a better-balanced mix.

Preparing The Final Mix For Export for Audio Mastering Services

Once you have thoroughly cleaned up your mix, the next step is to prepare the final mix for export. This involves several crucial steps, including exporting the final mix at the correct bit-depth and sample rate, rendering any fades or crossfades, and checking for any possible clipping or distortion. These steps are important as they ensure that the final mix is in its best possible form and is ready for audio mastering.

Exporting the Final Mix at the Correct Bit-Depth and Sample Rate

Exporting the final mix at the correct bit-depth and sample rate is crucial to avoid any further loss of audio quality. The standard bit-depth for digital audio is 24-bit. This offers better dynamic range and improved audio quality compared to 16-bit audio. Additionally, the sample rate should be set at 44.1 kHz or higher, which is the standard for CD-quality audio.

Rendering Any Fades or Crossfades

When exporting your final mix, it is essential to render any fades and crossfades to ensure they are applied correctly during audio mastering. This can be done by selecting the ‘render’ option in your digital audio workstation (DAW) and checking the appropriate boxes for fades and crossfades.

Checking for Any Possible Clipping or Distortion

Finally, before exporting your final mix, check for possible clipping or distortion. Clipping occurs when the audio data exceeds the maximum level that a digital audio system can handle, resulting in unwanted distortion. Checking for clipping or distortion is typically done using a frequency analyzer plugin. This helps you identify any problem areas in your mix. In conclusion, preparing your music for audio mastering is crucial in ensuring the best possible audio quality for your final project. By cleaning up your mix and preparing the final mix for export, you can ensure that your mixes are ready for the audio mastering process. This can make a huge difference in the overall quality of your music project.

How To Choose The Right Audio Mastering Service Provider?


Selecting the right audio mastering service provider is crucial for ensuring high-quality sound recordings. Audio mastering services play a vital role in taking music to the next level and making it sound professional. It is therefore essential to choose the right service provider that suits your specific needs and requirements.

When it comes to releasing your music, audio mastering is a crucial step. Audio mastering services can enhance the sound quality of your recordings, giving your music a professional touch. However, picking the right audio mastering service provider can be quite challenging. To make this process easier, we have come up with three essential factors to consider while choosing an audio mastering service provider. Check their portfolio and listen to their work, consider the price and turnaround time, and look for testimonials and reviews.

Check Their Portfolio And Listen To Their Work

Before choosing an audio mastering service provider, it’s crucial to check their portfolio, listen to their previous work, and decide if their work sounds good to you. This will help you understand their style, expertise, and experience. By analyzing their previous work, you can decide whether their technique aligns with your vision.

Consider The Price And Turnaround Time for Audio Mastering Services

As an artist, it’s vital to consider your budget while choosing an audio mastering service provider. Some providers charge per song or per project, while others may have a flat rate. You should choose a provider that suits your budget. Additionally, you should consider their turnaround time. It’s crucial to ensure that their turnaround time fits within your release schedule.

Look For Testimonials And Reviews

It’s vital to research potential audio mastering service providers and look for testimonials and reviews. By reading testimonials and reviews, you can gauge their reliability, customer satisfaction, and professionalism. You can find testimonials and reviews on their websites, social media platforms, and other online platforms. This makes it easy to determine if they are the right fit for your needs. To conclude, choosing the right audio mastering service provider is crucial. You should consider the provider’s portfolio, price, turnaround time, testimonials, and reviews to ensure they meet your needs. With these essential factors in mind, you can find the right audio mastering service provider who can help you take your music to the next level.

Why Audio Mastering Services Are So Important


Credit: www.izotope.com


The Audio Mastering Process


Audio mastering services are essential to ensure that your final audio mix sounds as best as possible. During the audio mastering process, a mastering engineer uses specialized tools and techniques to fine-tune your audio and polish it to perfection. This process can make a significant difference in the final output quality of your audio. This makes it a crucial step in the audio production process.

Audio mastering is an essential process in music production that involves the preparation of a final stereo mix for distribution. It comprises a series of post-production techniques that polish and enhance the overall sound quality of the mix. The mastering process ensures that a recording will sound consistent across various playback systems, such as speakers, headphones, or earbuds. Several critical stages compose the audio mastering process. Here are some of the stages that are involved in a typical audio mastering process.

Assessment And Analysis Of The Mix

The first stage of audio mastering is assessing and analyzing the mix. During this process, the mastering engineer will listen carefully to the mix to evaluate its overall sound quality. They will pay attention to aspects such as clarity, balance, and tonality. They will also assess the dynamics and stereo image of the mix to determine which techniques to use during the mastering process.

Equalization And Dynamic Processing

After analyzing the mix, the mastering engineer will apply equalization and dynamic processing techniques. Equalization adjusts the tone of the mix by attenuating or boosting specific frequency ranges. Dynamic processing techniques, such as compression and limiting, balance the dynamic range of the mix. This makes sure that the softer and louder parts sound consistent and well-balanced.

Stereo Widening And Multiband Compression

In addition to equalization and dynamic processing, stereo widening and multiband compression can also help improve the overall sound quality of the mix. Stereo widening techniques create a more spacious and immersive soundstage, while multiband compression reduces the impact of specific frequency ranges that sound too prominent or harsh.

Quality Control And Testing

Finally, quality control and testing is an essential part of the audio mastering process. The mastering engineer will test the final master on various playback systems to ensure that it sounds consistent and polished across different mediums. They will also verify that the levels and format of the final master are suitable for distribution and meet industry standards. In conclusion, the audio mastering process is crucial in ensuring that a recording sounds its best across various playback systems. Mastering has several stages: assessment, equalization, dynamics, stereo widening, multiband compression and quality control. Each one improves the overall sound of the mix.

Frequently Asked Questions For Why Audio Mastering Services Are So Important


Why Is The Mastering Process Essential To The Commercial Success Of A Track?


The mastering process is crucial for ensuring that a track sounds consistent and polished across different playback systems. It involves applying final EQ adjustments, compression, and limiting. A well-mastered track will have more impact on listeners, leading to greater commercial success.


Does Mastering Improve Sound Quality?


Mastering can improve sound quality by enhancing the overall clarity, balance, and depth of the mix. It can also ensure that the sound is consistent across different playback systems. However, mastering cannot fix poorly recorded or mixed tracks or significantly improve low-quality sources.


Is Mastering Essential?


Yes, mastering is essential for achieving a polished and professional sound in music production. It involves refining and enhancing the final mix through processes such as equalizing, compression, and limiting. Mastering can also ensure consistency across a collection of songs, making them sound like they belong together.


How Important Is A Mastering Engineer?


Mastering engineers are crucial to the professional audio production process. They take the final mix and optimize it for distribution, ensuring consistency and optimal quality across all playback systems. Their expertise in EQ, compression, limiting, and other techniques can make a world of difference in the final product.


Conclusion


In sum, audio mastering is an essential process for any music recording that seeks to sound professional. A series of technical adjustments improves the finished product. That makes it more attractive to listeners, radio stations and online platforms.


In today’s crowded music market, having a clean and well-mastered audio track may make the difference between getting noticed or being completely ignored. Hence, investing in mastering services is an investment in the quality of your art.



Categories
Archive

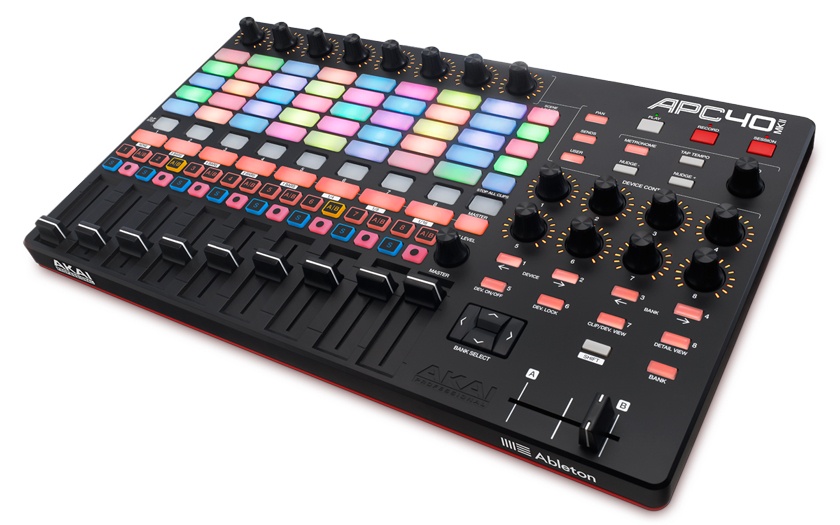
Akai Apc40 Mk2 Controller For Ableton Live

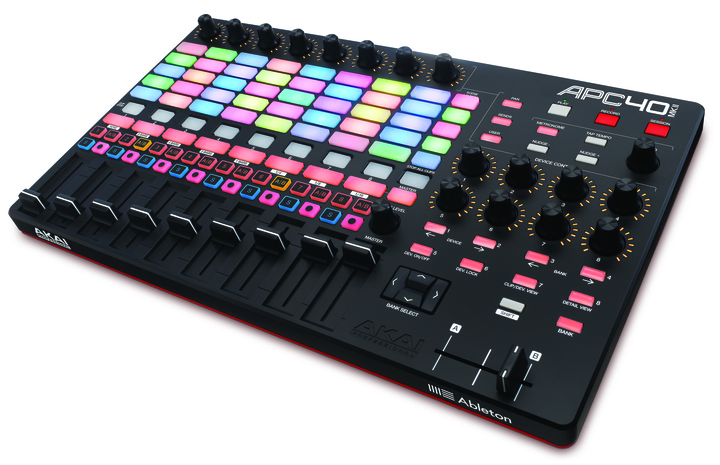
The Akai APC40 MK2 is a MIDI controller specially designed for use with Ableton Live. It offers unparalleled control over various parameters, such as clip launching, track mixing, and device control.


Ableton Live has been an essential tool for music producers and performers for years and the Akai APC40 MK2 has made it easier to control the software. The controller has 40 responsive pads, faders, and knobs that allow users to navigate Live’s features seamlessly.


The Akai APC40 MK2 is an excellent tool for live performances, as it enables users to create on the fly, triggering samples, loops, and effects. For music producers, the APC40 MK2 is an affordable controller that offers a hands-on approach to music production. Additionally, the device comes with Ableton Live Lite, making it a cost-effective solution for those just starting in music production.

Akai Apc40 Mk2 Controller For Ableton Live


Credit: m.youtube.com


Features And Design

Are you an Ableton Live user looking for an efficient way to control your music production software? The Akai Apc40 Mk2 Controller might be what you need. This powerful device is designed to provide you with a seamless experience when creating music using Ableton Live. One of the unique aspects of this controller is its superior features and design, which we’ll explore below.

Layout And Buttons

The layout of the Akai Apc40 Mk2 controller is designed to enable you to control Ableton Live with ease. The layout provides you with a clear view of parameters such as clips, tracks, and effects, which are displayed in a logical and intuitive way. The buttons on the controller are backlit, making it easy to control music even in lowly lit environments.

The buttons themselves have a good feel and are highly responsive. They are spring-loaded, which provides you with excellent tactile feedback. The buttons on the controller are also color-coded, making it easy to distinguish between clips, tracks, and effects.

Faders And Knobs

The Apc40 Mk2 controller features eight faders and eight knobs. These are highly responsive and enable you to achieve finer control over your mixes and edits. The faders are smooth and offer a tight response, providing you with greater control over the volume levels of your tracks. The knobs, on the other hand, are highly accurate, making it easy to achieve accurate parameter changes.

Integration With Ableton Live

The Akai Apc40 Mk2 controller is designed to work seamlessly with Ableton Live, providing you with excellent integration and functionality. The device is pre-mapped to work with Ableton Live, which means that you can start using it right out of the box. In addition, the device comes with an Ableton Live Lite software, which provides you with even greater capabilities when it comes to controlling Ableton Live.

The device’s integration with Ableton Live enables you to use all the features of Ableton Live to their fullest potential. For example, you can use the device to navigate between clips, add and remove effects, and even create new tracks. The integration between the device and Ableton Live is seamless, making it easy to focus on creating music rather than worrying about the technicalities of the device.

Conclusion

The Akai Apc40 Mk2 Controller is an excellent choice for Ableton Live users who want to have greater control over their music production software. Its layout, buttons, faders, and knobs are designed to provide you with superior functionality and efficiency. Moreover, its integration with Ableton Live is seamless, making it easy to use. If you’re searching for a powerful and efficient controller for your Ableton Live workflows, the Akai Apc40 Mk2 Controller is worth considering.

Performance With The Akai Apc40 Mk2 Controller

The Akai Apc40 Mk2 Controller is a powerful tool for musicians and producers who want to take their Ableton Live performances to the next level. Whether you’re performing live on stage or creating tracks in the studio, the Apc40 Mk2 Controller provides a seamless workflow and a responsive playing experience that makes it easy to create music with precision and accuracy.

Seamless Workflow

One of the key benefits of the Apc40 Mk2 Controller is its seamless workflow. With the Apc40 Mk2, you can easily control every aspect of your Ableton Live set, from launching clips and controlling loops to mixing tracks and adjusting effects. The controller’s intuitive layout and easy-to-use interface make it simple to create and manipulate your music, without ever having to touch your computer.

The Apc40 Mk2 also features a range of customizable controls that can be mapped to different functions within Ableton Live, giving you even greater flexibility and control over your performance. This allows you to tailor the Apc40 Mk2 to your specific needs, ensuring that you have everything you need to create the perfect live set or studio production.

Responsive Playing Experience

Another benefit of the Apc40 Mk2 Controller is its responsive playing experience. The controller features a high-quality, multicolor LED interface that provides instant feedback on all your actions, giving you a clear visual representation of what’s happening in your set. The controller’s responsive pads and faders also make it easy to play and manipulate your music with precision and accuracy, allowing you to create complex compositions and intricate beats with ease.

The Apc40 Mk2 is also built to withstand the rigors of live performance, with a durable, rugged design that can stand up to even the most demanding performance environments. This makes it a great choice for musicians and producers who want a reliable and durable controller that can handle even the toughest gigs.

Customization Options

The Apc40 Mk2 Controller also offers a range of customization options that allow you to create a personalized workflow that fits your unique needs and style. The controller’s customizable pads, buttons, and faders can be configured to perform a wide range of functions within Ableton Live, giving you the power to create your own custom control scheme that works best for you.

In addition, the Apc40 Mk2 comes with a range of built-in templates that make it easy to get started quickly, even if you’re new to Ableton Live. These templates provide a range of pre-configured layouts and control schemes that can be used as a starting point for your own customizations, giving you a head start on creating your perfect performance setup.

Whether you’re a seasoned musician or a beginner producer, the Akai Apc40 Mk2 Controller is a powerful tool that can help you take your performances and productions to the next level. With its seamless workflow, responsive playing experience, and customization options, the Apc40 Mk2 is the ultimate tool for musicians and producers who want to create music with precision and ease.

Comparing The Akai Apc40 Mk2 Controller

The Akai Apc40 Mk2 Controller is a popular choice among musicians and producers, thanks to its intuitive design and seamless integration with Ableton Live. However, with so many other similar controllers on the market, it can be tough to know which one to choose. In this article, we’ll compare the Akai Apc40 Mk2 with its competitors, highlighting its unique selling points and helping you make an informed decision.

Similar Controllers On The Market

When it comes to MIDI controllers for Ableton Live, there are plenty of options on the market. Here are a few of the most popular choices:

Controller Price Number of Controls Connection
Akai Apc40 Mk2 $399 80 USB
Novation Launchpad Pro $299 64 USB
Native Instruments Maschine MK3 $599 16 USB

Unique Selling Points Of The Akai Apc40 Mk2

  • Seamless integration with Ableton Live: The Akai Apc40 Mk2 is specifically designed to work with Ableton Live, providing a more intuitive and streamlined experience than other controllers on the market.
  • Dedicated faders and knobs: With 9 faders and 8 knobs, the Apc40 Mk2 provides a wealth of control options that are easily accessible and customizable for specific production needs.
  • RGB feedback: The buttons on the Apc40 Mk2 are backlit with RGB LEDs, providing clear and intuitive feedback on everything from clip status to track state.
  • Robust build quality: With a durable metal chassis and high-quality components, the Apc40 Mk2 is built to withstand the rigors of live performance and studio use.

Getting Started With The Akai Apc40 Mk2


The Akai Apc40 Mk2 is a powerful controller for the Ableton Live software. Getting started with this device requires connecting it to a computer, installing drivers and software, and familiarizing yourself with its various controls. Once you have done so, you can begin to create and produce music with increased efficiency and functionality.

Akai Apc40 Mk2 is one of the most popular controllers for performing and producing electronic music. The controller is designed specifically for use with Ableton Live, a digital audio workstation that is extensively used in the music industry. If you are a DJ, electronic musician, or producer, the Akai Apc40 Mk2 controller can help you take your music production to the next level. In this post, we will look at the basics of getting started with the Akai Apc40 Mk2 controller in Ableton Live.

Connecting The Controller

The first step in getting started with the Akai Apc40 Mk2 is to connect the controller to your computer. The controller can be connected to your computer via USB. Once you have connected the controller to your computer, Ableton Live should automatically recognize the device. If the controller is not recognized, you may need to download and install the necessary drivers from the Akai website.

Mapping The Controls

The next step is to map the controls on the Akai Apc40 Mk2 to Ableton Live. The controller has a wide range of buttons, knobs, and faders that can be assigned to various functions in Ableton Live. You can map the controls by selecting the MIDI mapping mode in Ableton Live and then selecting the parameter you want to assign to a specific control on the Akai Apc40 Mk2.

Personalizing Your Setup

Finally, you can personalize your setup by customizing the controls on the Akai Apc40 Mk2 to suit your workflow and preferences. You can change the default MIDI mappings, create custom maps, and save them in Ableton Live. You can also change the color of the LED lights on the controller to make it look more visually appealing. In conclusion, the Akai Apc40 Mk2 controller is a powerful tool for music production and live performance. By following these simple steps, you can start using the controller with Ableton Live and create amazing music.


Tips And Tricks

If you’re a musician or a music producer and you’re using Ableton Live, the Akai Apc40 Mk2 Controller is something that you should definitely consider. This powerful and intuitive controller provides an unparalleled experience when it comes to controlling and manipulating your music in Ableton Live. In this article, we’ll be sharing some tips and tricks that will help you navigate the controller like a pro, maximize its potential, and learn some performance techniques that will take your music production to the next level.

Navigating The Controller Like A Pro

The Akai Apc40 Mk2 Controller is packed with features that make it easy to navigate and control Ableton Live. Here are some tips and tricks to help you make the most of the controller:

  • Get familiar with the Session View and the Clip Launch Modes to switch between clips and scenes with ease.
  • Use the Track Control buttons to select tracks, change their volume, and launch clips.
  • Use the Device Control buttons to control various parameters of your selected device.
  • Use the Scene Launch buttons to start and stop your scenes.
  • Customize the controller to fit your workflow with Ableton’s MIDI Mapping feature.

Maximizing The Controller’s Potential

With its well-designed layout and intuitive hardware, the Akai Apc40 Mk2 Controller enables you to work more efficiently and creatively than ever before. Here are some additional tips to help you maximize the controller’s potential:

  • Use the Color Coding feature to organize your tracks, scenes, and clips.
  • Take advantage of the Velocity Sensitive pads to add expression and dynamics to your performances.
  • Use the Shift button to access alternate functions and commands.
  • Use the User Mode to create custom mappings and commands.

Performance Techniques

One of the most impressive things about the Akai Apc40 Mk2 Controller is its ability to enable you to perform your music live. Here are some performance techniques that will help you take your music to the next level:

  • Use the crossfader and the Cue buttons to create dynamic transitions between clips and tracks.
  • Use the Clip Stop buttons to create stutter effects and chop up your audio.
  • Use the Beat Repeat effect to create intricate rhythms and patterns.
  • Use the Looper to capture and manipulate loops on the fly.

The Akai Apc40 Mk2 Controller for Ableton Live is a powerful and intuitive tool for musicians and music producers. With practice, you’ll be able to navigate the controller like a pro, maximize its potential, and create incredible performances that will keep your audiences engaged and entertained.

Akai Apc40 Mk2 Controller For Ableton Live


Credit: www.akaipro.com


Akai Apc40 Mk2 Controller For Ableton Live


Credit: www.ableton.com


Frequently Asked Questions For Akai Apc40 Mk2 Controller For Ableton Live


How Do I Connect My Akai Apc40 To Ableton?


To connect your Akai APC40 to Ableton, plug in the USB cable and open Ableton Preferences. Select the Linked Devices tab and enable the APC40 as a Control Surface. Make sure the Input and Output are set to APC40 and you’re good to go!


What Is Akai Apc40 Used For?


The Akai APC40 is a popular MIDI controller used by musicians and DJs to control software, such as Ableton Live. Its 40 backlit buttons and faders are designed to give performers a tactile and intuitive way to manipulate their sounds in real-time.


Is Apc40 Discontinued?


Yes, the APC40 has been discontinued. However, its successor, the APC40MKII, is still available and provides similar functionalities with improved features.


How Do I Connect My Apc Key 25 To Ableton?


To connect your APC Key 25 to Ableton, simply plug the USB cable into your computer and connect the MIDI out to the MIDI input of your APC Key 25. Then, open Ableton’s preferences, select the MIDI tab, and enable the APC Key 25 as a control surface.


Your APC Key 25 should now be connected and ready to use with Ableton.


Conclusion


The Akai APC40 Mk2 is a powerful and versatile controller that seamlessly integrates with Ableton Live. It offers many features that allow producers and performers alike to take their music production to the next level. From its intuitive interface to its customizable options, the APC40 Mk2 makes it easy to create, mix, and perform music.


Whether you’re a beginner or a professional, this controller is definitely worth the investment. With its innovative technology and user-friendly design, you can unleash your creativity in ways that you never thought possible. Upgrade your music game today and experience the power of the Akai APC40 Mk2!

Categories
Archive

Playing Instruments In Ableton What Is Midi

MIDI stands for Musical Instrument Digital Interface. It is a protocol used for communication between musical instruments and computers, allowing you to play and record MIDI data in Ableton.


With Ableton’s MIDI capabilities, you can create and edit MIDI notes, automate parameters, and control various aspects of your virtual instruments and effects. Playing instruments in Ableton requires a basic understanding of MIDI functionality. MIDI allows your computer to recognize and record the musical notes you play on your instrument.


This way, you can control virtual instruments and effects using the sounds you produce. You can also edit and manipulate MIDI data to create unique sounds and compositions. With the right tools and techniques, the possibilities are practically endless. We’ll explore how MIDI works in Ableton and how you can use it to compose, produce, and perform with your favorite instruments.

Playing Instruments In Ableton What Is Midi


Credit: www.amazon.com


How To Set Up Midi Devices In Ableton

Are you looking to unleash your inner musician and play electronic instruments in Ableton? Connecting MIDI devices to Ableton can seem daunting at first, but it’s actually a straightforward process once you know the steps. Let’s dive into how to set up MIDI devices in Ableton, starting with enabling MIDI input/output.

Enabling Midi Input/output In Ableton

Before connecting your MIDI device to Ableton, you need to ensure your software is set up to receive MIDI input. Here’s how:

  1. Open Ableton and navigate to Preferences.
  2. Select the MIDI/Sync tab.
  3. Under Input and Output, confirm that your MIDI device is listed and enabled.
  4. Close the Preferences menu and create a new MIDI track to test your device.

Connecting Midi Devices To Ableton

Once you’ve enabled MIDI input/output in Ableton, it’s time to connect your MIDI device to your computer. Here are the steps:

  1. Plug your MIDI device into your computer via USB or MIDI cable.
  2. Power on your MIDI device.
  3. In Ableton, create a new MIDI track.
  4. Under the Input dropdown, select your MIDI device as the input source.
  5. Under the Output dropdown, select your MIDI device as the output source.
  6. Begin playing your MIDI device to test the connection.
  7. If your device doesn’t appear as an input/output option, make sure it’s properly connected and enabled in your computer’s audio settings.

Congratulations! You now know how to set up MIDI devices in Ableton and can start using electronic instruments to create music that’s uniquely yours. Happy creating!

Playing Instruments In Ableton What Is Midi


Credit: www.ableton.com


Setting Up Midi Tracks In Ableton


Setting up MIDI tracks in Ableton allows for playing virtual instruments, utilizing a controller or keyboard. MIDI (Musical Instrument Digital Interface) is a protocol that transmits data between different electronic devices, enabling the creation and manipulation of music within the software.

Setting Up MIDI Tracks in Ableton If you’re new to music production, setting up MIDI tracks can be frustrating. But don’t let that discourage you from creating your own music. In this section, we’ll explain how to set up MIDI tracks in Ableton, so you can start producing your own music with ease. Creating a New MIDI Track Ableton is a Digital Audio Workstation (DAW) that allows you to create music using virtual instruments. To create a new MIDI track, you need to click on the “Add Track” button at the bottom of the Ableton screen. Once you click on it, select “MIDI Track” from the drop-down menu. You will now have a new MIDI track on your screen. Assigning a MIDI Instrument to a Track After creating a new MIDI track, it’s time to assign a MIDI instrument to the track. To do this, click on the “MIDI From” drop-down menu and select the device that you want to assign the MIDI to. If you don’t see the device that you want to assign, it’s time to create a new MIDI device by clicking on the “Create” button at the bottom of the screen. Adjusting MIDI Settings After assigning the MIDI instrument to your track, it’s important to adjust the MIDI settings to ensure it works correctly. To do this, simply click on the “MIDI Settings” button and adjust the settings to your preference. For example, you may want to adjust the MIDI channel, velocity sensitivity, and pitch bend range. In conclusion, setting up MIDI tracks in Ableton is not as complicated as it may seem. By following these simple steps for creating a new MIDI track, assigning a MIDI instrument to a track, and adjusting MIDI settings, you’ll be on your way to producing your very own music in no time.


Recording Midi Clips In Ableton


To play virtual instruments in Ableton, you need to understand MIDI which stands for Musical Instrument Digital Interface. Recording MIDI clips in Ableton is easy, you can either use the virtual keyboard or an external MIDI keyboard to play notes and chords.


This allows for endless possibilities in creating unique melodies and sounds in your music production.

Recording MIDI clips in Ableton is a crucial part of music production. Whether you’re a seasoned professional or just starting with music production, understanding how to record MIDI clips in Ableton is essential. In this section, we’ll take a closer look at the process of recording MIDI clips in Ableton.

Setting Up Your Midi Controller

Before you can start recording MIDI clips in Ableton, you’ll need to make sure your MIDI controller is properly set up. To begin, connect your MIDI controller to your computer and open Ableton. Next, navigate to the “Preferences” menu and select “MIDI.” Here, you can select your controller from the list and ensure it’s properly configured.

Arming A Track For Recording

Once your MIDI controller is set up, you’ll need to arm a track for recording. To do this, simply click on the “Arm” button on the track you want to use for recording. This will turn the button red, indicating that the track is armed and ready for recording.

Recording A Midi Clip

With your MIDI controller set up and your track armed for recording, you’re ready to start recording MIDI clips in Ableton. To begin recording, simply press the “Record” button on the transport panel and play the notes on your controller. When you’re finished recording, press the “Stop” button to stop the recording.

Editing Midi Clips

Now that you’ve recorded a MIDI clip, you can edit it to make any necessary adjustments or changes. To edit a MIDI clip, simply double-click on the clip to open it in the MIDI editor. Here, you can edit individual notes, adjust the velocity and timing, and even add or remove notes as needed. In conclusion, recording MIDI clips in Ableton is an essential skill for any music producer. By following these steps, you’ll be able to record, edit, and perfect your MIDI clips to create professional-quality music.

Playing Instruments In Ableton What Is Midi


Credit: help.ableton.com


Using Midi Effects In Ableton

If you want to take your music production to the next level, using MIDI effects in Ableton is the perfect way to do it. By incorporating these dynamic tools into your tracks, you can create expressive, complex sounds that will set your music apart.

Adding Midi Effects To A Track

Adding MIDI effects to a track in Ableton is a simple process. First, select the track you want to add the effect to. Then, click the “MIDI Effects” button in the browser window to reveal a dropdown menu of different effects. From there, you can choose the effect that you want to add, and it will be inserted into your track.

Some popular MIDI effects in Ableton include “Arpeggiator,” “Chord,” and “Scale,” which allow you to create chord progressions and melodies easily. These effects can speed up your workflow and help you come up with new ideas faster.

Exploring Midi Effects In Ableton

Ableton offers a variety of MIDI effects that allow you to manipulate your music in unique ways. For example, the “Velocity” effect can adjust the velocity of MIDI notes to give them a more organic feel, while the “Random” effect can generate random MIDI notes, creating unpredictable melodies and harmonies.

Other popular MIDI effects include “Note Length,” which can adjust the length of MIDI notes, and “Pitch,” which allows you to manipulate the pitch of your MIDI notes in real-time. These effects can add depth and complexity to your music, opening up new creative avenues.

In Conclusion

Using MIDI effects in Ableton can take your music to the next level. By adding these dynamic tools to your tracks, you can create expressive, complex sounds that will set your music apart. Whether you’re using the “Arpeggiator” to speed up your workflow, or experimenting with the “Random” effect to generate unexpected melodies, Ableton’s MIDI effects offer endless possibilities for creative experimentation.

Frequently Asked Questions Of Playing Instruments In Ableton What Is Midi


What Does Midi Do In Ableton?


MIDI in Ableton enables you to use hardware devices or virtual instruments to generate sounds. It converts the performance into data, allowing you to edit, arrange, and manipulate the composition. This is useful for live performances, remixes, and in-studio production.


How Do I Play Midi Instruments In Ableton?


To play MIDI instruments in Ableton, connect your device to your computer, launch Ableton, and create a new MIDI track. Assign your MIDI device to the track’s input, and then choose a virtual instrument to play. MIDI notes can be recorded and edited in Ableton’s MIDI Editor.


What Does A Midi Instrument Do?


A MIDI instrument is a device that enables musicians to create and manipulate digital music by generating and transmitting MIDI signals. It does not produce sound on its own but instead sends signals to a computer or sound module that produces the sound.


MIDI instruments include keyboards, drum machines, and controllers.


What Is The Difference Between Audio And Midi Tracks In Ableton?


Audio tracks are for recording and editing audio files, while MIDI tracks are for sequencing and editing MIDI notes that control virtual instruments and hardware synthesizers. Audio tracks can’t alter pitch or note length without affecting sound quality, while MIDI tracks provide more flexibility, allowing for easy editing of pitch, tempo, and timing.


Conclusion


To sum it up, MIDI technology is a game-changer in the world of music production. With Ableton’s powerful MIDI capabilities, you can create, manipulate and edit virtual instruments with ease. Whether you are an aspiring music producer or an experienced musician, knowing how to use MIDI in Ableton can take your music to the next level.


So, start exploring the world of MIDI in Ableton, let your creativity flow and make some great music!

Categories
Archive

Why Does My Mix Sound Like Trash In My Car

Your mix sounds bad in your car due to a lack of low-end frequency and environmental acoustics. The acoustics of a car are very different from a studio or home setting, leading to variations in sound quality.


Music played on car stereo systems can reveal mixes full of both small and large problems, exposing audio frequency limitations, phase cancellation issues, and other factors that major studio monitors may not expose. Overall, producing music under different listening conditions would improve the quality of your mix and provide a better user experience.

Why Does My Mix Sound Like Trash In My Car


Credit: www.masteringthemix.com


Acoustic Differences Between A Car And Studio


The reason why your mix may sound awful in your car is due to the acoustic differences between a car and a studio. The audio system in a car is designed to produce a different sound than a studio, so it’s important to tune your audio appropriately for each environment.

If you’re a music producer or audio engineer, you’ve probably noticed that sometimes your mix sounds fantastic in your studio but terrible in your car. Why does this happen? Acoustic differences between a car and studio are the main reason behind it.

The Impact Of The Car’s Interior

The car’s interior has a significant impact on the sound of your mix. Unlike studios, cars are not acoustically treated to achieve ideal sound conditions. The car’s interior surfaces reflect the sound waves, creating echoes and reverberations that alter the true sound of your mix. Moreover, the car’s seating arrangement makes it impossible to sit in the sweet spot, where the sound is optimized, like in a studio.

The Effect Of Road Noise

Another factor that affects the sound of your mix in the car is road noise. The humming of the engine, the tires, and the sound of the wind have a significant impact on the sound in a car. The noise from the road interferes with the frequencies in your mix, making it difficult to hear some parts of the music. To avoid the effect of road noise, you can make calculated adjustments to your mix that give priority to the essential frequencies. You could also listen to your mix in noise-cancelling headphones to eliminate any potential contamination. In summation, despite the advancements in technology, cars and studios have different acoustics. As a result, the sound of your mix may differ from the car to the studio. To obtain a good mix quality in both environments, you may consider using reference tracks that have been tested in similar situations or find technological solutions such as car-specific sound systems that can help optimize your mix.

Monitoring In Different Environments

One of the most common problems faced by musicians and producers is that their mix sounds terrible when played back in a different environment. For instance, you may have perfectly mixed your track in the studio but when you play it back in your car, it sounds like trash. This problem is not uncommon and can be frustrating.

The Importance Of Testing On Different Systems

The truth is that if you only check your mix on one particular set of speakers, you are more likely to get it wrong. This is because different speakers and headphones have different frequency responses. So, it’s essential to check your mix on as many different systems as possible.

You will be surprised at how your mix sounds different on different sound systems. For example, your mix in the studio might sound punchy and tight, but in your car, it may sound too bass-heavy, muffled, or thin.

How To Optimize Your Car Setup

If you frequently listen to music while driving, it’s essential to optimize your car’s sound system. You want to make sure that it accurately reflects the mix you’ve created in the studio. Here are some ways to optimize your car’s sound system:

Tip Description
Position speakers properly Make sure that your speakers are installed in the right location and angled correctly to provide the best soundstage.
Use High-Quality Audio Files The quality of your audio file matters, and high-quality audio files will ensure that you get the best sound quality.
Adjust The EQ settings Take the time to adjust the EQ settings to ensure that the audio that comes out of the speakers accurately reflects the mix you’ve created.
Check Your Speakers Finally, make sure your speakers are working correctly. If your speakers are old or damaged, they can significantly affect the sound quality.

By optimizing your car’s sound system, you can ensure that you get the best audio quality possible. This, in turn, will help you to identify any mix problems that you need to address when you are back in the studio.

In conclusion, it’s essential to test your mix on different systems to ensure that it sounds great on all playback devices. The tips outlined above can help you to optimize your car’s sound system, which is crucial if you are frequently listening to music while driving.

Frequency Balancing For Car Playback

If you’re an audio engineer, producer, or musician, you have probably experienced a mix that sounded great in your headphones or studio monitors, but when you played it back in your car, it sounded like complete trash. This can be a frustrating experience, and many people wonder why this is happening. The answer is simple – your car’s audio system is not designed for critical listening. However, this does not mean that you cannot achieve a good mix that sounds great in your car. You need to pay attention to the frequency balance and tweak the EQ of your mix accordingly. In this article, we’ll discuss frequency balancing for car playback and how to adjust the low-end and high-end to improve your mix’s sound quality.

Adjusting For The Low-end

The low-end, also known as the bass frequencies, is the foundation of most music. If you mix your music on studio monitors with a subwoofer, you might end up with too much bass in your mix. This might sound great in the studio but will result in a muddy mix when played back in your car. To adjust for the low-end, you need to make sure that the bass frequencies are not overpowering the mix. You can use a spectrum analyzer to visualize the frequency distribution of your mix and make adjustments accordingly.

Tweaking The High-end

The high-end is the opposite of the low-end and refers to the treble frequencies. When you mix your music, you need to make sure that the high-end is not too bright or harsh. If your mix has too much high-end, it will sound shrill and piercing when played back in your car. To tweak the high-end, you can use a high-pass filter to cut off any unnecessary frequencies that are not contributing to the mix. You should also consider using a de-esser to control any sibilance or harshness in your vocals.

Ultimately, achieving a mix that sounds great in your car requires a bit of trial and error. You need to experiment with different EQ settings and listen to your mix on different audio systems to get a sense of how it sounds. Remember that your car’s audio system is not designed for critical listening, but it shouldn’t stop you from achieving a great sounding mix. By paying attention to the frequency balance and tweaking the low-end and high-end, you can improve the sound quality of your mix on all playback systems.

Sound Treatment Solutions


Wondering why your mix sounds terrible in your car? Sound Treatment Solutions offers acoustic treatments to optimize your listening environment for accurate sound reproduction. Don’t let your car speakers deceive you – trust Sound Treatment Solutions for a true representation of your music.

If you’re an aspiring music producer, you know that achieving great sound quality in your mixes is essential. However, once you’ve finally created the perfect mix, you might find that it sounds terrible when played in your car. This can be extremely frustrating since car audio systems are notoriously difficult to mix for. The good news is that there are several sound treatment solutions that you can apply to improve the sound quality of your mix in your car.

Reducing Road Noise

Road noise can be a significant contributing factor to the poor sound quality of your mix in your car. When driving on the road, the sound from outside can enter your car and interfere with the audio from your speakers. This can make it difficult to hear your mix accurately. One way to reduce road noise is to add sound-deadening materials to your car’s interior.

Using Car-specific Sound Treatments

To get the best sound quality in your car, you need to use sound treatments that are specifically designed for cars. Installing sound-deadening materials, such as acoustic foam, behind your speakers can help absorb any excess sound waves that could interfere with the quality of your mix. Additionally, applying sound barriers, like mass loaded vinyl, to the doors and trunk can help eliminate unwanted outside noise.

Upgrading Your Car’s Audio System

If you continue to have issues with your mix sounding bad in your car, you might need to consider upgrading your car’s audio system. A high-quality audio system can make an immense difference in the sound quality of your mix when played in your car. Investing in a subwoofer, amplifier, or high-quality speakers can be a game-changer for your audio quality. In conclusion, Sound Treatment Solutions can significantly improve the sound quality of your mix in your car. Reducing road noise, using car-specific sound treatments, and upgrading your car’s audio system are just a few ways to achieve superior sound quality when playing your mix in your car.

Avoiding Common Mixing Issues

Producing music can be challenging and frustrating at times, especially when your mix doesn’t sound as good as you expected when played in your car. The car’s audio system has different acoustics compared to your studio, and it can reveal mixing issues that were not evident before. In this section, we will look at common mixing issues and how to avoid them to get a better mix that sounds great in any environment.

The Negative Impact Of Excessive Reverb

Reverb can add space and depth to your mix, but too much of it can make your mix sound muddy and less defined. Excessive reverb can also cause phase cancellation, where the sound wave combines and cancels each other out, resulting in a weak and hollow sound. To avoid these issues, use reverb sparingly and adjust the decay time to create a sense of space while maintaining clarity. You can also use EQ to cut out the low end of the reverb to reduce muddiness.

Avoiding Heavy Compression

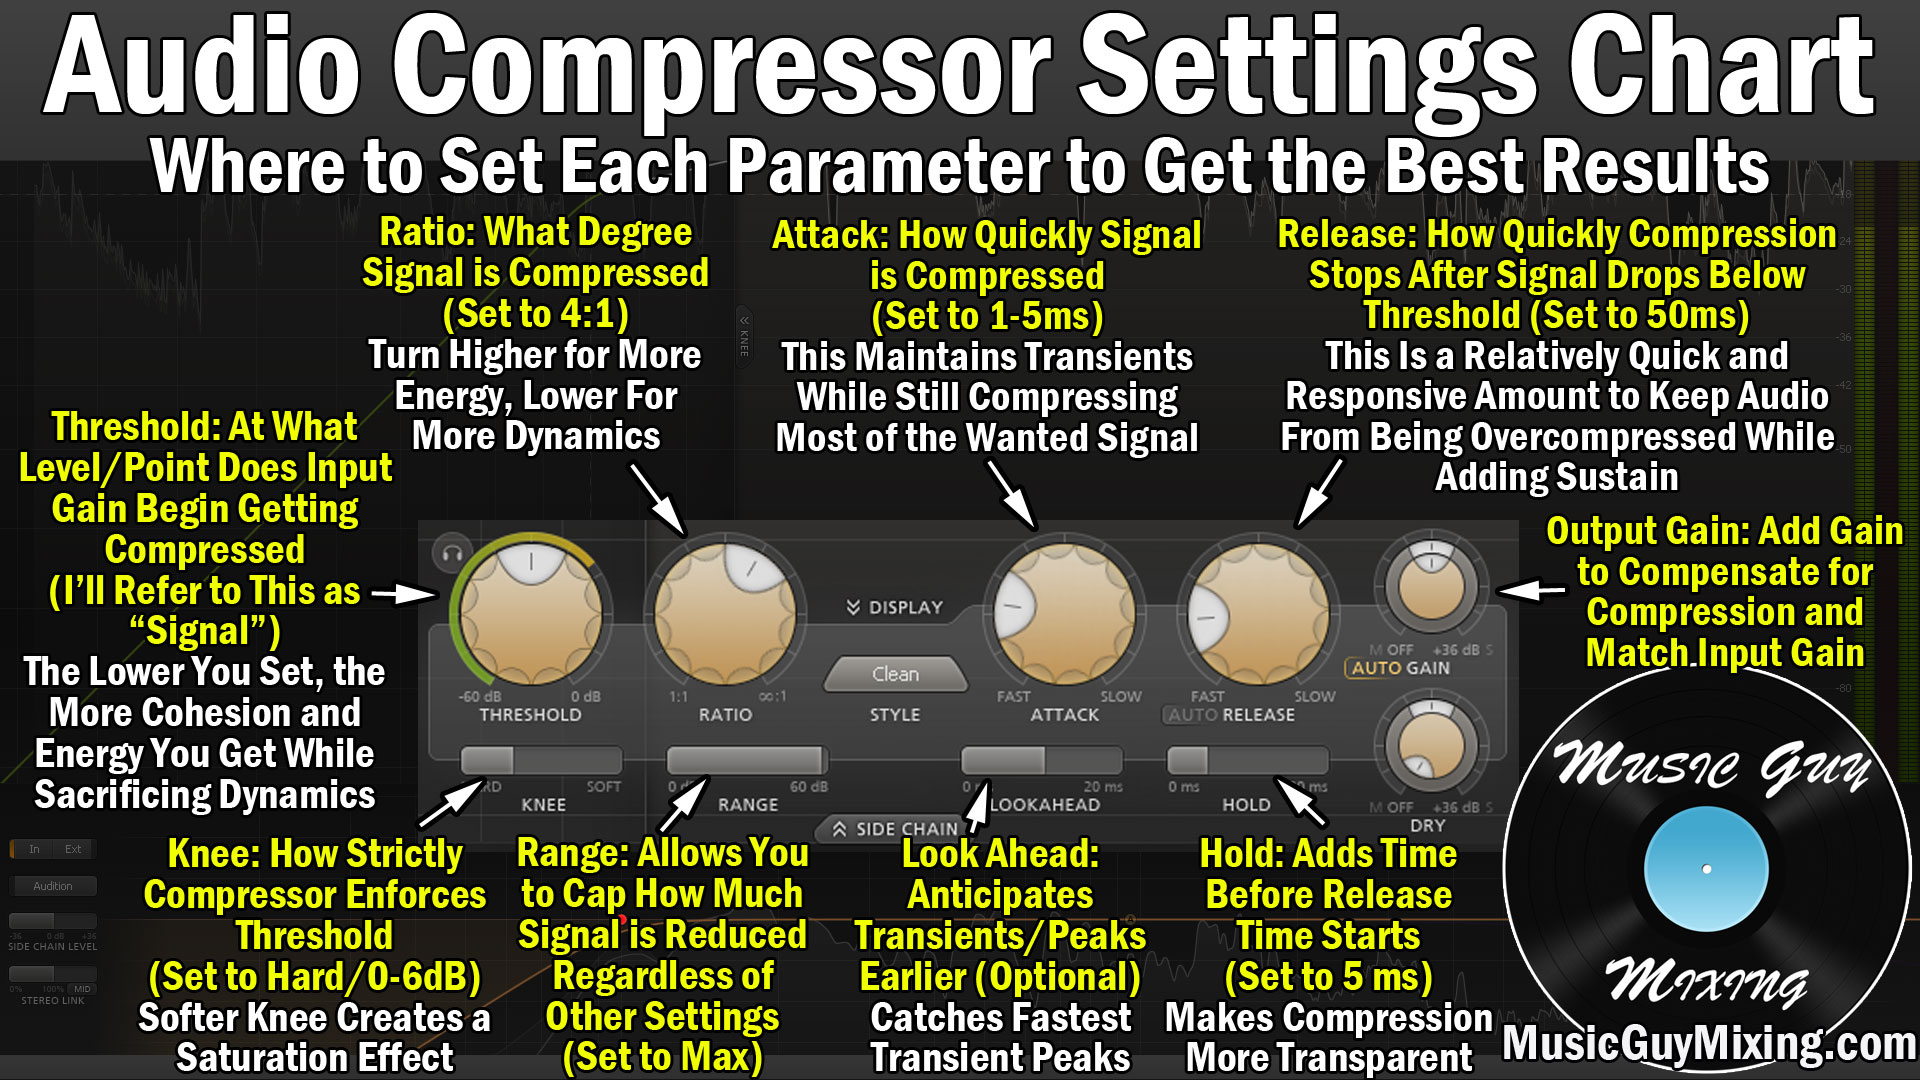
Compression is a powerful tool for controlling dynamics and adding sustain to your mix, but excessive compression can make your mix sound lifeless and dull. Heavy compression can also reduce the transients, which are the initial and sharp peaks of the sound wave responsible for the punch and clarity of the sound. To avoid these issues, use compression sparingly and adjust the attack and release time to maintain the transients. You can also use parallel compression to add sustain without compromising the transients.

By avoiding these common mixing issues, you can create a mix that sounds great in any environment, including your car’s audio system. Ensure that you mix with intention, always listening critically and making changes to suit your intended objective. With practice and a commitment to excellence, you can produce a mix that is both enjoyable and satisfying to listen to.

Why Does My Mix Sound Like Trash In My Car


Credit: www.masteringthemix.com


Optimizing Your Workflow For Car Mixing

One of the most common problems when mixing music is that it may sound fantastic in a studio or on high-end headphones, but terrible in a car. So, what can you do to ensure your mix sounds great in your car? Here we’ll focus on optimizing your workflow for car mixing.

Considering The Intended Audience

Before diving into mixing, it’s important to consider your intended audience. If you’re specifically creating music for people on the go, then it’s vital to mix for car stereos. On the other hand, if you’re mixing for audiophiles who listen to music on high-end speakers, car audio shouldn’t be your top priority. Identify who your audience is and tailor your mix accordingly.

Creating A Car-specific Mix Template

Creating a mix template for your car can be a huge time saver. By doing this, you can ensure that you’re always starting with a mix that you know will translate well in your car. Consider standardizing the volume levels of your tracks, as car audio can make quiet parts in songs even quieter. Try adding a high-pass filter to your low-end frequencies, this will help to keep your mix sounding pristine, even if your car audio system has a tendency to overpower the bass.

Another aspect to consider is that car stereos are usually in a fixed position, either in the dashboard or in the doors. This means that the stereo speakers are placed lower and more distant in comparison to a standard studio setup. You can compensate for this by adjusting the balance of your panning in your mix to the center.

You may also want to adjust your EQ settings, which can be different for different car models. Spend some time listening to music in your car to get an idea of how it sounds. This way, you’ll be able to create a setup that is tailored to your car model.

Final Thoughts

Now that you have an understanding of how to optimize your workflow for car mixing, it’s time to put these tips into action. By considering your intended audience, creating a car-specific mix template, and adjusting your EQ settings, you can achieve a mix that not only sounds great in your car but also sounds great to your intended audience.

Why Does My Mix Sound Like Trash In My Car


Credit: www.masteringthemix.com


Frequently Asked Questions For Why Does My Mix Sound Like Trash In My Car


Why Does My Music Sound Weird In My Car?


Your music may sound weird in your car due to factors such as poor speaker quality, incorrect equalizer settings, or interference from other electronics. Ensure that your speakers are compatible with your car, adjust the settings to your preference, and minimize interference for optimal audio quality.


Why Do My Mixes Sound Muffled?


A common reason for muffled mixes is the excessive use of low frequencies. To fix this, you can try reducing the bass and increasing the mids and highs. You may also want to check for phase cancellation or mixing on worn-out speakers.


Why Does My Mix Always Sound Muddy?


A mix can sound muddy due to multiple factors, like too many overlapping frequencies, heavy usage of reverb, or poor EQing. You can avoid this problem by being mindful of each instrument’s frequency range, cutting frequencies that don’t contribute to the mix, using EQ to create space, and being deliberate with your use of reverb.


Why Do My Car Speakers Sound Terrible?


Car speakers may sound terrible due to a variety of reasons like loose wiring, old materials, distorted connections, damaged speakers, or interference from other electronic devices. Replacing or repairing the faulty components can significantly improve the sound quality of car speakers.


Conclusion


Ultimately, achieving a balanced and well-mixed sound takes time, patience, and the right tools. It’s important to keep in mind that different listening environments can play a significant role in how your mix sounds. By taking steps such as referencing your mix on multiple sources, adjusting your EQ and compression appropriately, and practicing regularly, you’ll be well on your way to creating clear, polished mixes that are enjoyable to listen to in any setting.


Categories
Archive

Keith Mcmillen K-Board Review

The Keith Mcmillen K-Board Review highlights its compact size and responsive touch-sensitive keys for music production. With its sleek design, the K-Board offers portability and precision for musicians on-the-go.


The pressure-sensitive pads allow for dynamic expression, making it a versatile tool for both beginner and advanced users alike. Its plug-and-play functionality makes it easy to integrate into any music production setup, while the durable construction ensures reliability during performances.


Overall, the K-Board is a practical and user-friendly option for musicians looking for a versatile MIDI controller to enhance their music creation process.

Keith Mcmillen K-Board Review


Credit: m.youtube.com


Design And Features

When it comes to the design and features of the Keith McMillen K-Board, it’s a sleek and innovative piece of musical technology that offers a host of capabilities designed to enhance the playing experience. In this section, we’ll delve into the compact and lightweight build, the responsive keybed that musicians will appreciate, the multifunctional buttons that add versatility, and the touch-sensitive sliders that provide precise control.

Compact And Lightweight

The K-Board is impressively compact and lightweight, making it an ideal choice for musicians on the go. Weighing in at just over a pound and measuring less than an inch thick, it’s easily portable and won’t weigh you down during travel.

Responsive Keybed

Musicians will appreciate the responsive keybed of the K-Board, which provides a natural and fluid playing experience. The keys offer excellent tactile feedback and responsiveness, allowing for expressive playing and precise control over dynamics.

Multifunctional Buttons

The K-Board is equipped with multifunctional buttons that expand its capabilities beyond just a simple keyboard. These buttons can be customized to control various functions such as pitch bending, modulation, or launching samples, adding a layer of versatility to the K-Board’s functionality.

Touch Sensitive Sliders

To further enhance control, the K-Board features touch-sensitive sliders that offer precise and intuitive control over parameters such as volume, filters, and effects. The touch sensitivity allows for delicate adjustments, giving musicians more expressive control over their performance.

Keith Mcmillen K-Board Review


Credit: musictech.com


Connectivity Options

If you’re considering getting a Keith Mcmillen K-Board, one of the key aspects to look at is its connectivity options. The device comes with a range of connection possibilities, allowing you to integrate it seamlessly into your existing setup. Whether you want to link it to your computer, external MIDI devices, or use an expression pedal for added control, the K-Board has you covered. Let’s take a closer look at the connectivity options available with this innovative controller.

Usb Connectivity

The K-Board offers seamless USB connectivity, allowing for quick and easy connection to your computer. This means you can simply plug and play, eliminating the need for additional drivers or complex setup processes. The USB connection also provides power to the K-Board, so you won’t have to worry about battery replacement or charging while performing or producing music.

Midi I/o

When it comes to MIDI connectivity, the K-Board offers both MIDI input and output, giving you the flexibility to control external MIDI devices or use the K-Board as a MIDI controller for your favorite software instruments and hardware modules. This opens up a world of possibilities for integrating the K-Board into your music production and performance setups.

Expression Pedal Input

In addition to USB and MIDI connectivity, the K-Board features an expression pedal input, allowing you to connect an external pedal for precise control over parameters such as pitch, modulation, and more. This expands the expressive capabilities of the K-Board, providing a dynamic and customizable playing experience for musicians and producers alike.


Software Integration

The Keith Mcmillen K-Board is not only an exceptional MIDI keyboard controller in terms of its hardware capabilities, but also shines in its seamless software integration. This review will delve into the software features that make this controller a standout choice for musicians and producers.

Compatible With Various Daws

The K-Board ensures that you can effortlessly integrate it with your preferred Digital Audio Workstation (DAW). Its compatibility extends to popular software like Ableton Live, Logic Pro X, FL Studio, and more. This means that regardless of your choice of DAW, you can harness the power of the K-Board without any hassle.

Flexible Mapping Options

One of the remarkable features of the K-Board is its ability to offer flexible mapping options. Thanks to its software integration, you can easily customize and assign functions to each key, knob, and control surface as per your preference. This allows for a personalized experience tailored to your specific workflow, making the K-Board an incredibly versatile and adaptable controller.

Customizable Presets

To add another level of convenience, the K-Board offers customizable presets that unleashes even more creative possibilities. With these presets, you can effortlessly switch between different mappings and setups with just a few clicks. Whether you’re a producer experimenting with different styles or a live performer needing different configurations for each gig, the K-Board’s customizable presets have got you covered.

Keith Mcmillen K-Board Review


Credit: www.sweetwater.com


Performance And Versatility

The Keith Mcmillen K-Board offers a remarkable blend of performance and versatility, making it a top choice for musicians seeking an expressive playing experience. Whether you’re a beginner or a seasoned professional, this keyboard delivers outstanding functionality.

Expressive Playing Experience

  • Enjoy dynamic and expressive playing with the K-Board.
  • Responsive touch-sensitive keys allow for nuanced performance.
  • Express your musical creativity with precision and control.

Suitable For Different Music Genres

  • Versatile design makes it ideal for various music genres.
  • From classical to electronic, the K-Board can adapt to any style.
  • Perfect for musicians exploring different genres and styles.

Real-time Control

  • Instant and seamless control over your music in real-time.
  • Experience fluid and responsive interaction with your music software.
  • Unleash your creativity with real-time adjustments and effects.

Midi Mapping Capabilities

  • Customize your MIDI mappings for personalized control.
  • Effortlessly assign functions to suit your unique workflow.
  • Enhance your music production process with tailored MIDI configurations.

Build Quality And Durability

When it comes to the Keith Mcmillen K-Board, one of the most important aspects to consider is its build quality and durability. A well-constructed MIDI keyboard not only ensures longevity but also contributes to a satisfying playing experience. In this review, we will delve into the build quality and durability of the K-Board, focusing on its solid construction, responsive and durable keys, and long-lasting performance.

Solid Construction

The K-Board boasts a solid construction that is designed to withstand the rigors of regular use. Its sturdy chassis and robust build ensure that it can handle the demands of both studio and live performances. This makes it a reliable choice for musicians who require a rugged and durable MIDI keyboard.

Responsive And Durable Keys

Each key on the K-Board is not only highly responsive but also remarkably durable. The premium materials used in the construction of the keys ensure a smooth and consistent playing experience, while also standing the test of time. This combination of responsiveness and durability makes the K-Board a standout option in its category.

Long-lasting Performance

With a focus on longevity, the K-Board is engineered to deliver consistent performance over time. Its high-quality components and meticulous craftsmanship contribute to its long-lasting durability. Whether you’re a beginner or a seasoned musician, the K-Board is built to withstand countless hours of use while maintaining its performance and playability.

User Experience And Reviews

When it comes to the user experience for the Keith Mcmillen K-Board, it’s essential to take into account the feedback and reviews from actual users. In this section, we will delve into the positive user feedback as well as critiques and limitations of this innovative musical instrument.

Positive User Feedback

The K-Board has garnered positive reviews from musicians, particularly for its portability and versatility. Users have praised its compact design, making it easy to carry for on-the-go performances. The touch-sensitive keys have been lauded for their responsiveness and dynamic expression, allowing musicians to achieve a wide range of sounds with ease. Additionally, the plug-and-play functionality has been commended, as it makes the K-Board incredibly user-friendly for both beginners and experienced musicians alike.

Critiques And Limitations

While the K-Board has received widespread acclaim, certain critiques and limitations have been highlighted by users. Some musicians have noted that the lack of traditional MIDI connectors may limit its compatibility with certain devices. Additionally, the absence of aftertouch functionality has been identified as a drawback by some users who prioritize this feature in their musical performances. It is important to consider these factors when evaluating the K-Board’s suitability for individual preferences and needs.

Frequently Asked Questions Of Keith Mcmillen K-board Review


What Is The K Board?


The K board is a type of keyboard that is designed for a specific purpose or function. It is reliable, easy to use, and provides a seamless typing experience. With its sleek design and high-quality materials, the K board is a great choice for anyone in need of a reliable and efficient keyboard.


What Makes The Keith Mcmillen K-board Unique?


The Keith Mcmillen K-Board stands out due to its slim design, pressure-sensitive keys, and compatibility with various music software, offering musicians a versatile and expressive playing experience.


How Does The Pressure-sensitive Feature Enhance Playability?


The pressure-sensitive keys of the K-Board allow for dynamic control over sound articulation, enabling musicians to add nuances and expressiveness to their performances with varying levels of touch sensitivity.


Is The K-board Suitable For Beginners In Music Production?


Yes, the K-Board’s user-friendly interface and compact size make it ideal for beginners looking to start creating music, offering them a platform to explore their creativity and develop their skills in music production.


Conclusion


To sum it up, the Keith Mcmillen K-Board is a remarkable musical instrument that combines cutting-edge technology and user-friendly design. With its portable size and innovative features, such as pressure sensitivity and velocity curves, this keyboard offers musicians a versatile and intuitive playing experience.


Whether you’re a professional musician or a beginner, the K-Board is a powerful tool that can enhance your musical creativity. So, don’t hesitate to add this fantastic keyboard to your collection and unlock new possibilities in your musical journey.

Categories
Archive

Optimize Your Space With A Home Vocal Booth

To optimize your space with a home vocal booth, you can create a sound-isolated area in your living space. This can be achieved by utilizing a portable vocal booth or building a custom soundproof enclosure.


As a content writer, it’s essential to be SEO friendly to catch the attention of search engines and target audiences. Home recording studios have become increasingly popular for both amateur and professional voiceover artists, musicians, and podcasters. However, not everyone has the luxury of a dedicated room for recording.


If you’re struggling to find a quiet space in your home, creating a home vocal booth can offer an effective solution. By reducing noise and echoes, you can improve the sound quality of your recordings. There are different options available in the market that can help you create a vocal booth in your living space. We will discuss how to optimize your space with a home vocal booth.


Why You Need A Home Vocal Booth

Are you struggling to find a suitable space to record your vocals? Are you tired of having to deal with external noises and interruptions? Look no further because a home vocal booth is the perfect solution for you. Not only does it provide better acoustics for your recordings, but it also eliminates unwanted noise and provides the convenience of recording in the comfort of your own home. Read on to discover the benefits of having a home vocal booth.

Better Sound Quality

A home vocal booth provides a controlled environment for recording vocals, ensuring that the sound quality is optimal. With materials such as acoustic foam, you can effectively treat the acoustics of the booth, ensuring that there are no unwanted reflections or echoes. This results in a clear and professional-sounding recording. Additionally, the soundproofing material used in the booth walls prevents external noise from entering the recording space, further improving the quality of the recording.

Elimination Of Noise

One of the biggest challenges of recording at home is having to deal with external noises such as traffic, barking dogs, or noisy neighbors. A home vocal booth eliminates these issues by providing a soundproof environment, allowing you to focus on your recording without any distractions. With a home vocal booth, you can record at any time of the day without being disturbed by external noise.

Convenience

Recording vocals in a professional studio can be time-consuming and expensive. With a home vocal booth, you have the convenience of being able to record whenever you want, without having to spend money on studio time. Additionally, you can save time by not having to travel to the studio, allowing you to get more done in less time. A home vocal booth also allows you to experiment with your recordings, providing the freedom to try out new ideas without any external pressures.

Having a home vocal booth is a game-changer for anyone who takes their vocal recordings seriously. It not only provides better sound quality and eliminates external noise but also provides convenience and flexibility. With a home vocal booth, you can take your recordings to the next level without breaking the bank. Get started today and optimize your space with a home vocal booth!

Optimize Your Space With A Home Vocal Booth


Credit: auralex.com


Factors To Consider Before Building A Vocal Booth

Factors to Consider Before Building a Vocal Booth

A home vocal booth is essential for musicians, voice-over artists, podcasters, and others who use their voice for professional purposes. It provides a sound-controlled space, ensuring recordings are of high quality, and clear sound. However, before you start building your vocal booth, there are various factors to consider to ensure you get a space that suits your needs and preferences. Here are some of the factors to consider before building a vocal booth:

Room Selection

The first step in building a vocal booth is selecting the location of the booth in the room. The location should be isolated, and away from high traffic areas in your home. A corner or the center of a room is an ideal location, and ensure there are no windows or vents nearby, which might interfere with your recordings.

Soundproofing Materials

Soundproofing materials are necessary for a home vocal booth to ensure no unwanted noise enters the recording. You can use materials such as sound insulation panels, acoustic foam, and acoustic blankets to soundproof your booth. These materials absorb sound waves, which results in clear, crisp sound recordings.

Size Of The Vocal Booth

The size of the booth depends on your needs and what you plan to record. A too small booth will limit your movement while recording, while a too large booth might affect the quality of your recordings. The standard size for a vocal booth ranges from 4 ft x 6 ft to 8 ft x 8 ft. This size provides enough space for individuals to move around, and you can also add additional equipment, such as microphones and monitors.

Before building your vocal booth, it’s essential to consider the above factors to ensure that your booth meets your recording needs. A properly set up and soundproofed booth enhances the overall recording quality, and it’s worth the investment for any professional recording artist or podcaster.


Diy Vs. Pre-manufactured Options


Maximizing your home’s space with a vocal booth requires deciding between DIY or pre-manufactured options. With DIY, you can customize the booth to your needs, while pre-manufactured options offer convenience and ease of installation. Choose the best fit for your needs and budget.

When it comes to setting up a home vocal booth, there are two options you can choose from: DIY or pre-manufactured. Both options have their advantages and disadvantages, and it ultimately depends on your budget, space, and how much effort you’re willing to put into building a vocal booth.

Building Your Own Vocal Booth

If you’re on a tight budget, constructing your own vocal booth might be a great option for you. Building your own vocal booth is a simple process, and you can easily find instructions online or in instructional books.

  1. Choose a location: First, choose a spot in your home that can accommodate the size of your vocal booth.
  2. Choose materials: You can either use materials that you already have or purchase some from a hardware or home improvement store.
  3. Construct the frame: After gathering all necessary materials, construct the frame for your vocal booth using the materials of your choice.
  4. Add sound-absorbing insulation: Once your frame is in place, add sound-absorbing insulation material on the inside of the booth’s walls and ceiling.
  5. Seal the booth: Finally, seal the booth by covering it with materials such as soundproof curtains, blankets, or fiberglass panels.

Pre-made Vocal Booths

If you have a more flexible budget, pre-made vocal booths are a great option to consider. A pre-manufactured vocal booth is a ready-to-use solution that you can easily set up in your home without any construction work. There are many different pre-manufactured vocal booths available on the market, ranging from small and compact models to full-size booths with adjustable features. These booths are available in various sizes, designs, and materials, and you can easily find an option that suits your needs. In conclusion, whether you choose to construct your own vocal booth or purchase a pre-made one, both options can help in optimizing your space for recording quality audio. Ultimately, the choice depends on your budget, available space, and willingness to put in the necessary effort to construct a vocal booth yourself.

Building Your Diy Vocal Booth

When it comes to recording vocals at home, creating a DIY vocal booth can greatly improve the quality of your recordings. Whether you’re a professional musician or a hobbyist, having a dedicated space for vocal recording can make a world of difference. In this article, we’ll go through the process of building your own DIY vocal booth, and give you some tips on selecting materials, building the booth, and adding finishing touches.

Selecting Materials

The first step in building your DIY vocal booth is selecting the materials you’ll need. Of course, the materials will depend on the size and design of your booth, but some common materials include:

  • Insulation foam: This is the most commonly used material for vocal booths, as it helps absorb sound and reduce echo.
  • Wood: You’ll need some sort of frame for your booth, and wood is a sturdy and cost-effective choice.
  • Fabric: Once you have your frame and insulation foam in place, you’ll want to cover the exterior with some sort of fabric to give it a finished look.
  • Adhesive: You’ll need something to attach the insulation foam to the frame, and adhesive spray is a popular choice.

Building The Booth

Once you’ve selected your materials, it’s time to start building your booth. The exact process will depend on the design you’ve chosen, but the basics are:

  1. Construct the frame: Using your wood, construct a frame for your booth. This will create the structure that you’ll be attaching the insulation foam to.
  2. Install the insulation foam: Once your frame is in place, start attaching the insulation foam to the interior. Be sure to leave space for a door or entrance.
  3. Add additional layers: Depending on the thickness of your insulation foam, you may want to add additional layers for maximum sound absorption.
  4. Add the fabric: Once your insulation foam is in place, cover it with the fabric of your choice using the adhesive spray.

Adding Finishing Touches

When it comes to a DIY vocal booth, the finishing touches are what will really set it apart. Some options include:

  • Sealing the edges: Use acoustic caulk or weather stripping to seal any gaps or edges, which will further reduce sound leakage.
  • Adding lighting: To make your booth feel more professional, you may want to add some lighting. LED strips or clamp lights work well.
  • Decorating the interior: A final touch is to decorate the interior of your booth. This can make it feel like a professional space and help inspire creativity.

Pre-manufactured Vocal Booths

Pre-manufactured Vocal Booths are a great option for those who want to create a professional recording environment in their home. These booths are designed to provide an acoustically treated space that effectively reduces external noise and ensures a clean sound recording.

Types Of Vocal Booths

There are two main types of Vocal Booths:

  1. Pre-manufactured Vocal Booths
  2. Custom Built Vocal Booths

Pre-manufactured Vocal Booths are becoming increasingly popular due to their affordability and ease of installation. These booths come in different sizes ranging from small ones that can accommodate a single individual to larger ones that can host a full band.

Features Of Pre-manufactured Vocal Booths

Pre-manufactured Vocal Booths are designed to suit different budgets and recording needs. Some common features of these booths include:

Feature Description
Acoustic panels These panels are designed to absorb sound and reduce echo in the booth.
Ventilation Vocal booths can get hot and stuffy quickly, especially if you are recording for long hours. Ventilation systems ensure that air can circulate freely within the booth.
Doors and windows These features help to seal the booth and ensure that no external noise interferes with your recordings. The quality of windows and doors of these booths is such that they serve as soundproofing elements.
Lighting Pre-manufactured Vocal Booths may come with lighting systems built-in or provide pre-cut holes where you can install light fixtures.

Pre-manufactured Vocal Booths are an excellent investment for aspiring musicians, podcasters, or voice-over artists. They provide a space that is conducive for high-quality sound recordings. However, it is essential to choose a vocal booth that meets your needs and budget, and you can ensure it is soundproof, and it tries to incorporate your specific acoustics requirements.


Setting Up Your Home Vocal Booth

Setting up a home vocal booth is essential for anyone who wants to record professional-quality vocals without spending a fortune on studio time. A vocal booth provides a small, sound-isolated environment that captures your vocals without any unwanted ambient noise or reverb that can ruin a recording session. But how do you set up a home vocal booth?

Positioning Of The Vocal Booth

The first step in setting up your home vocal booth is to find the right location. You should look for a room or location that is quiet and doesn’t have much ambient noise. Additionally, the location you choose should be away from any busy roads or other sources of noise. Choose a small space that is less than 8 square feet in size. You should also consider setting up your vocal booth on a suspended floor to reduce vibrations.

Equipment You Need

The equipment you will need to set up your home vocal booth includes:

  1. A vocal booth or sound-isolated room
  2. Microphone
  3. Pop filter
  4. Headphones
  5. Computer with recording software

The vocal booth should be made of sound-absorbent materials such as foam or fiberglass. A microphone is essential to capture your vocals. A pop filter helps to reduce the amount of plosives that can cause popping sounds, which can be an issue when recording vocals. Headphones are necessary to be able to hear any background noises during the recording session. Finally, the recording software is needed to capture your recording.

Setting up your home vocal booth requires some time and effort, but the results will pay off when you are able to record professional-quality vocals from the comfort of your own home. By following these tips, you can create a suitable recording environment that will minimize unwanted ambient noise and give your vocals the clarity it deserves.

Optimize Your Space With A Home Vocal Booth


Credit: www.amazon.com


Frequently Asked Questions Of Optimize Your Space With A Home Vocal Booth


Do Diy Vocal Booths Work?


Yes, DIY vocal booths can work if they are constructed properly with the right materials and placement. A DIY booth can help reduce background noise and improve the quality of recordings. However, it’s important to note that professional vocal booths provide better sound isolation and acoustic treatment.


How Do You Set Up A Room For Vocal Recording?


To set up a room for vocal recording, start by finding a quiet space free of environmental noise. Also, use acoustic paneling and foam to reduce echoes and minimize sound reflections. It is advisable to also reduce background noise by using sound-absorbing materials such as carpets and curtains.


Set up a pop screen for the microphone, and avoid clutter in the recording space.


Is A Closet A Good Vocalbooth?


No, a closet is not an ideal VocalBooth because it lacks soundproofing features and adequate ventilation. A VocalBooth is designed to ensure optimal sound quality and acoustic treatment for recording purposes. It’s important to invest in a proper VocalBooth to achieve professional-quality recordings.


Are Vocal Isolation Booths Worth It?


Yes, vocal isolation booths are worth it for musicians and podcasters who want to produce high-quality recordings free of background noise or echoes. By isolating the sound, a booth helps achieve a professional sound and reduces the need for extensive sound editing.


Conclusion


To conclude, a home vocal booth is a great investment for anyone looking to optimize their space and improve their sound quality. With a little bit of effort and creativity, you can create a recording studio that fits your needs and budget.


Whether you are a professional musician, podcaster, or voice actor, a vocal booth can help you take your projects to the next level. So don’t wait any longer to start building your own home vocal booth and take a step towards achieving your goals.

Categories
Archive

Nektar Gx Review

The Nektar Gx excels in performance and design, offering a seamless user experience with advanced features. This review provides an in-depth analysis of its capabilities and benefits.


The Nektar Gx is a versatile tool for musicians and music producers, boasting a sleek design and intuitive controls. With its seamless integration with popular music production software, the Nektar Gx enhances workflow efficiency and creativity. Whether you’re a beginner looking to elevate your music production skills or a seasoned professional seeking a reliable MIDI controller, the Nektar Gx delivers exceptional quality and performance.


In this review, we will delve into the key features, pros, and cons of the Nektar Gx, helping you make an informed decision for your music production needs.

Nektar Gx Review


Credit: www.musicradar.com


Key Features

Nektar Gx is a feature-packed MIDI controller designed to enhance your music production experience. Let’s take a closer look at the key features that make this controller stand out.

Responsive Pads

The Nektar Gx is equipped with responsive pads that provide a tactile and dynamic playing experience. Whether you’re triggering samples, creating beats, or playing melodies, the pads offer a high level of sensitivity and responsiveness.

Integration With Daws

This MIDI controller seamlessly integrates with a wide range of Digital Audio Workstations (DAWs), including popular software such as Ableton Live, FL Studio, and Logic Pro. The integration with DAWs allows for smooth and efficient control of your music production software, enhancing your workflow.

Automapping Functionality

The Nektar Gx features automapping functionality that allows for instant and automatic mapping of its controls to various parameters within your DAW. This streamlines the process of setting up the controller and ensures that you can focus on your creativity without getting bogged down by technical setup.

Nektar Gx Review


Credit: m.youtube.com


Design And Build Quality

The design and build quality of a product play a crucial role in ensuring customer satisfaction. When it comes to the Nektar Gx, it does not disappoint. This review will delve into the compact and portable design, as well as the robust construction of this MIDI controller.

Compact And Portable

The Nektar Gx is designed with a compact form factor, making it highly portable. With its sleek and lightweight design, this MIDI controller is perfect for musicians on the go. Whether you’re a professional musician or a music enthusiast, the portability of the Nektar Gx allows you to take your creativity with you wherever you go.

Robust Construction

The Nektar Gx is built to last, thanks to its robust construction. Made with high-quality materials, this MIDI controller can withstand the rigors of everyday use. The buttons and knobs are sturdy and responsive, ensuring reliable performance, even during intense playing sessions. Whether you’re jamming in the studio or performing live on stage, you can trust that the Nektar Gx will withstand the demands of your music-making endeavors.

Performance

Performance: When it comes to the performance of the Nektar Gx, it truly excels in various aspects that elevate the overall user experience.

Midi Control Capabilities:

The Nektar Gx offers extensive MIDI control capabilities, allowing users to easily manipulate and customize their music production setup.

Playing Experience:

Playing with the Nektar Gx provides a seamless and enjoyable experience, thanks to its responsive controls and ergonomic design.

Software Integration

One of the most crucial aspects to consider when investing in a new digital audio workstation (DAW) controller is its software integration. After all, seamless compatibility with popular music production software ensures a hassle-free workflow and allows users to maximize their creative potential. In this section, we will explore the software integration capabilities of the Nektar Gx.

Compatibility With Music Production Software

When it comes to compatibility, the Nektar Gx leaves no stone unturned. This remarkable DAW controller is designed to work flawlessly with a wide range of music production software, including popular options like Ableton Live, Logic Pro X, FL Studio, Cubase, and Pro Tools. No matter which software you prefer to use for your music production needs, the Nektar Gx has got you covered.

With its versatile MIDI mapping capabilities, the Nektar Gx ensures that all the essential functions and controls of your preferred software are at your fingertips. You can easily assign knobs, faders, and buttons to control various parameters such as volume, pan, effects, and virtual instrument settings. This level of customization empowers you to work more efficiently and express your musical ideas with precision.

Customization Options

When it comes to creating your perfect workflow, customization is key. The Nektar Gx excels in this department, offering extensive customization options that cater to your unique preferences and requirements. With the help of Nektar DAW integration software, you can easily customize the functions assigned to each control element of the Gx, allowing you to create your personalized control surface.

Whether you prefer a specific layout for your mixer controls, dedicated transport buttons, or customized parameter control for virtual instruments, the Nektar Gx gives you the flexibility to tailor your setup to your liking. This level of customization not only enhances your productivity but also ensures a comfortable and intuitive working experience.

Moreover, the Nektar Gx supports MIDI learn functionality, enabling you to map controls to software parameters with just a few clicks. This feature eliminates the need for manual mapping and streamlines your workflow significantly. Whether you are a beginner or a seasoned professional, the Nektar Gx puts the power of customization in your hands.


Pros And Cons

When considering a Nektar Gx review, it’s essential to weigh the pros and cons to make an informed decision. Understanding the advantages and limitations of this product can help potential buyers determine if it aligns with their needs. Let’s take a closer look at the pros and cons of the Nektar Gx.

Advantages

  • The Nektar Gx boasts a user-friendly design, making it suitable for beginners and seasoned musicians alike.
  • It offers a wide range of controls, providing users with comprehensive functionality to enhance their music-making experience.
  • Compatibility with various music production software makes it versatile and adaptable to different workflow preferences.
  • Sturdy and durable construction ensures longevity, offering reliable performance over time.
  • Responsive and sensitive pads and keys enable precise and expressive music creation.

Limitations

  • Some users may find the Nektar Gx’s learning curve a bit steep, particularly for those new to MIDI controllers.
  • While the compatibility is extensive, certain software integrations may require additional setup or configuration.
  • For some users, the size and weight may be a consideration if portability is a priority.
  • Although the pad sensitivity is generally excellent, some users may find it overly sensitive in certain situations.
  • Limited color customization options may not fully cater to users seeking a personalized aesthetic appeal.

User Experience And Feedback

When it comes to the Nektar Gx review, the user experience and feedback play a crucial role in understanding the true value and performance of this product. Reviews from musicians and user impressions provide valuable insights into the practical application of the Nektar Gx and the overall satisfaction of its users.

Reviews From Musicians

Professional musicians have expressed their thoughts on the Nektar Gx, highlighting the various features that contribute to its appeal. From its intuitive controls to its seamless integration with music production software, the feedback from musicians underscores the device’s ability to enhance their creative process.

User Impressions

Users have been impressed by the Nektar Gx, citing its user-friendly design and ergonomic layout as standout features. The seamless connectivity and responsiveness of the device have been lauded, with many users noting a significant improvement in their workflow and productivity.

Nektar Gx Review


Credit: synthanatomy.com


Frequently Asked Questions For Nektar Gx Review


Is The Nektar Impact Gpx61 Any Good?


The Nektar Impact GX61 is a good MIDI controller with responsive keys and versatile features for music production.


How To Setup Nektar Impact Gx49?


To set up Nektar Impact GX49: 1. Connect USB cable to computer. 2. Install necessary drivers if prompted. 3. Open preferred DAW software. 4. In DAW settings, select Nektar Impact GX49 as controller. 5. Start making music with your new Nektar Impact GX49 keyboard.


What Are The Key Features Of Nektar Gx?


The Nektar Gx features include touch-sensitive pads, semi-weighted keys, DAW integration, and customizable mappings for enhanced music production.


How Does Nektar Gx Enhance Music Creation?


Nektar Gx enhances music creation by providing seamless integration with digital audio workstations, allowing for intuitive control and expression during the creative process.


Conclusion


Overall, the Nektar Gx offers an exceptional gaming experience with its ergonomic design and customizable features. Its superior performance and seamless compatibility with various gaming platforms make it a top choice for gamers of all levels. Whether you are a casual gamer or a competitive eSports player, the Nektar Gx is sure to enhance your gameplay and take your skills to the next level.


Don’t miss out on this game-changing controller that effortlessly combines comfort and functionality for an unparalleled gaming experience.

Categories
Archive

Akai Apc Review

The Akai APC series provides versatile and intuitive control for music production and performance. With its seamless integration and responsive pads, it is a popular choice among electronic music producers and DJs.


The robust build quality and user-friendly design make it a reliable tool for creating dynamic music compositions. In this detailed review, we will explore the key features of the Akai APC series and how it can enhance your workflow in the studio or on stage.


Whether you are a beginner or a seasoned music professional, the Akai APC offers a range of creative possibilities to elevate your music production experience. Let’s dive into what makes the Akai APC series a top choice for music producers worldwide.

Akai Apc Review


Credit: ask.audio


Akai Apc Series

Akai Professional, a leading brand in music production equipment, offers the APC Series – a range of innovative controllers designed for electronic music production and live performance. From its inception to the latest models, the APC Series has evolved to provide musicians and producers with intuitive, hands-on control over their creativity. Let’s dive into the history and evolution as well as the key features of this groundbreaking series.

History And Evolution

The Akai APC Series traces its roots back to the early 2000s, when electronic music production was undergoing a revolution. The demand for controllers that seamlessly integrated with Digital Audio Workstations (DAWs) led to the birth of the APC40, the first product in the series. It quickly gained traction among electronic music artists and producers for its seamless integration with Ableton Live, a popular DAW among performers. Over the years, Akai has continued to refine and expand the series with the introduction of the APC Mini, APC Key, and APC Live, catering to the diverse needs of musicians and performers.

Key Features

  • Seamless Integration: The APC Series is designed to seamlessly integrate with Ableton Live, offering a fluid and intuitive workflow for music production and live performance.
  • Versatile Control: With its array of responsive pads, sliders, and encoders, the APC controllers provide versatile control over clip launching, mixing, and navigating your music projects.
  • Compact and Portable: Whether it’s the compact APC Mini or the flagship APC Live, the series offers portable solutions for music creation, allowing artists to unleash their creativity anywhere.
  • RGB Feedback: The backlit pads on the APC controllers provide vibrant RGB feedback, allowing for visual feedback on clip status, level meters, and more, enhancing the performance experience.
  • Custom Mapping: Users can customize the APC controllers to their preferences, assigning functions and parameters to various controls for a tailored music production experience.
Akai Apc Review


Credit: www.gearnews.com


Akai Apc Model Comparison

When it comes to music production, having the right equipment can make all the difference. Akai is a well-known and respected brand in the industry, known for its high-quality music production tools. In this Akai APC model comparison, we will take a closer look at three popular models: the APC20, APC40, and APC Mini. Each of these models has its own unique features and functionalities, catering to different needs and preferences.

Apc20

The APC20 is a compact and portable MIDI controller, ideal for musicians and producers looking for a streamlined and practical device. It features 40 clip-launch buttons, allowing you to control and trigger clips with ease. The eight faders and a master fader provide precise control over volume and other parameters. With the included Ableton Live Lite software, you can start creating music right away without any hassle. The APC20 is perfect for on-the-go musicians and those with limited studio space.

Apc40

The APC40 is a versatile MIDI controller that offers enhanced functionality and performance capabilities. It features 16 durable and responsive buttons, along with eight faders and a master fader for complete control over your music. The 16 endless knobs enable you to manipulate various parameters effortlessly. With its intuitive layout and integration with Ableton Live software, the APC40 allows for a seamless and immersive music production experience. Whether you’re a professional producer or a live performer, the APC40 delivers the tools you need to express your creativity.

Apc Mini

If you’re searching for a compact and affordable MIDI controller, the APC Mini is a great choice. Its slim and portable design makes it easy to take with you wherever you go. The eight multifunctional buttons provide control over clips, tracks, and other essential functions. The eight rotary knobs offer precise control over parameters, while the master fader allows for smooth volume modulation. The included Ableton Live Lite software ensures you can start producing music right away. The APC Mini is perfect for beginners and musicians on a tight budget.

In conclusion, Akai offers a range of versatile and intuitive APC models to cater to the diverse needs of musicians and producers. Whether you’re a professional or just starting out, the APC20, APC40, and APC Mini provide efficient tools to enhance your music production workflow. Consider your specific requirements and preferences to choose the model that best suits you.

Performance And Functionality

Live Performance

Akai APC excels in live performance settings due to its intuitive layout and responsive pads.

Studio Production

When it comes to studio production, the Akai APC offers seamless integration with popular digital audio workstations.

Integration With Daws

When it comes to music production, seamless integration with your Digital Audio Workstation (DAW) is key. The Akai APC has been designed with this in mind, offering exceptional compatibility with a range of popular DAWs, including Ableton Live and other options.

Ableton Live

Ableton Live is renowned for its powerful features and intuitive interface, making it a top choice for many producers and performers. The Akai APC effortlessly integrates with Ableton Live, enhancing your workflow and allowing for a more immersive music-making experience.

The Akai APC offers full integration with Ableton Live, ensuring every control on the APC seamlessly maps to Ableton Live’s functions and features. This means you can effortlessly control your clips, scenes, effects, and instruments, all from the dedicated hardware of the APC.

With the Akai APC’s intuitive layout and responsive controls, you can quickly navigate through Ableton Live’s sessions and perform live edits with ease. The APC provides direct access to the most essential functions, allowing you to trigger clips, launch scenes, adjust levels, and control effects, all at your fingertips.

Other Digital Audio Workstations

The Akai APC’s versatility doesn’t stop at Ableton Live; it also offers integration with other popular Digital Audio Workstations. This means that regardless of your preferred DAW, you can still benefit from the APC’s intuitive controls and advanced functionality.

Whether you’re using Bitwig Studio, Logic Pro, Cubase, or any other supported DAW, the Akai APC will seamlessly integrate, allowing you to take full control of your music production. The APC’s flexible mapping capabilities mean you can customize the controls to suit your workflow, ensuring that you can work efficiently and creatively no matter which DAW you’re using.

The Akai APC’s wide range of compatibility with different DAWs ensures that you’re not limited in your music production choices. Whether you’re a beginner or a seasoned professional, the APC’s integration with various DAWs provides a seamless experience, allowing you to focus on your creativity and produce high-quality music.

https://www.youtube.com/watch?v=bKvf24ds69o


User Experience

The user experience of the Akai APC is key to understanding its usability and functionality. In this review, we’ll examine the ergonomics and customization options that contribute to the overall experience of using the Akai APC.

Ergonomics

The ergonomics of the Akai APC are designed to provide intuitive and comfortable control for the user. With its well-spaced buttons and pads, navigating the interface is effortless. Additionally, the device’s sturdy construction and ergonomic layout ensure prolonged use without discomfort or strain.

Customization Options

The Akai APC offers extensive customization options, allowing users to tailor the device to their specific needs. From mapping different functions to the pads to adjusting the sensitivity of the knobs, the customization capabilities empower users to create a personalized workflow that suits their unique preferences.

Community Feedback

When it comes to the Akai APC, the community feedback plays a crucial role in understanding its practicality and performance. Let’s dive into the Community Feedback section to uncover what both professional artists and users have to say about their experiences with the Akai APC.

Professional Artists’ Perspectives

A good number of professional artists have expressed their appreciation for the Akai APC, emphasizing its seamless integration with popular digital audio workstations (DAWs) and its intuitive interface. In addition, several renowned musicians have praised its sturdy build and high-quality performance in live settings. Their positive feedback contributes to the overall appeal of the Akai APC for industry professionals.

User Reviews And Opinions

Users across various online platforms have shared their opinions on the Akai APC, highlighting its user-friendly design and responsive pads. Many have commended its suitability for both studio production and live performances, citing its reliability and versatility as key strengths. Some users have also mentioned the helpfulness of the included software and the convenience of its compact size, making it an ideal choice for individuals seeking a practical and portable controller.

Akai Apc Review


Credit: www.youtube.com


Frequently Asked Questions For Akai Apc Review


What Does Apc Stand For Akai?


APC stands for Ableton Performance Controller, not Akai. It is a high-quality MIDI controller for music production.


What Is The Difference Between Push 3 And Akai Apc 64?


Push 3 offers integrated hardware and software for music production, while Akai APC 64 is a dedicated MIDI controller.


What Is Akai Apc Mini Used For?


The Akai APC mini is a compact MIDI controller used for music production and live performances. It allows users to control and manipulate software and virtual instruments. Ideal for DJs and electronic music producers, it provides a hands-on interface for triggering loops, samples, and effects.


What Does A Akai Apc40 Do?


The Akai APC40 is a control surface specifically designed for Ableton Live, allowing for seamless control of the software’s parameters and functions during live performances or studio production. It features an array of buttons, faders, and knobs for manipulating clips, tracks, and other elements within the software.


Conclusion


To sum it up, the Akai Apc is a highly recommended device for music enthusiasts and professionals. Its intuitive design, versatile features, and seamless integration with popular music production software make it a valuable tool for music production and live performances.


Whether you’re a beginner or an experienced musician, the Akai Apc offers a user-friendly experience that enhances your creativity and workflow. Get the most out of your music production journey with the Akai Apc.

Categories
Archive

Alesis Dm Lite Review

The Alesis DM Lite offers beginners an affordable and compact electronic drum set option. With its responsive pads and built-in coaching features, it is ideal for practice and learning.


It comes equipped with 200 sounds, 10 preset kits, and a coach mode to help players improve their skills. The kit also includes connection options for headphones and external devices, making it versatile for various playing scenarios. Overall, the Alesis DM Lite is a user-friendly and budget-friendly choice for those looking to start their drumming journey.


With its intuitive controls and compact design, it is a great option for aspiring drummers of all ages.


Design And Build

The design and build of the Alesis DM Lite is a crucial aspect to consider when looking for an electronic drum kit. Let’s delve into its features and construction to understand what it has to offer.

Compact And Lightweight

The Alesis DM Lite boasts a compact and lightweight design, making it highly portable and space-efficient. Its smaller footprint takes up less room than traditional acoustic drum sets, making it suitable for home practice or smaller rehearsal spaces.

Sturdy Construction

The Alesis DM Lite is built with sturdy construction, ensuring durability and stability during intense drumming sessions. The rugged build quality gives confidence that it can withstand the rigors of regular use, providing a reliable platform for drumming enthusiasts of all skill levels.

Alesis Dm Lite Review


Credit: reverb.com


Sound Quality

When it comes to electronic drum sets, sound quality is a critical factor that drummers look for. The Alesis DM Lite has garnered attention for its impressive sound quality, providing a realistic and immersive drumming experience.

Realistic Drum Sounds

The Alesis DM Lite is known for its realistic drum sounds, offering a true-to-life feel that mimics an acoustic drum set. Each drum and cymbal produces a natural sound that adds to the authenticity of the playing experience.

Variety Of Drum Kits

One of the highlights of the Alesis DM Lite is its wide range of drum kits, ensuring that drummers have access to various sounds and styles. From classic rock to modern electronic, the variety of drum kits allows for versatility in performance and practice.

Playability

When it comes to electronic drum kits, playability is a crucial factor that can make or break the overall experience for drummers of all skill levels. The Alesis DM Lite is designed with playability in mind, offering a range of features that ensure an enjoyable and responsive playing experience. From the responsive pads to the adjustable sensitivity, this drum kit is built for drummers who want to feel connected to the music they create.

Responsive Pads

The Alesis DM Lite comes equipped with four responsive drum pads that offer a realistic feel when played. These pads are designed to mimic the response of an acoustic drumhead, allowing drummers to express themselves with authenticity. Whether you’re a beginner or an experienced drummer, the responsive pads on the DM Lite ensure a satisfying and immersive drumming experience.

Adjustable Sensitivity

One of the standout features of the Alesis DM Lite is its adjustable sensitivity. This allows drummers to customize the response of each pad to suit their playing style and technique. Whether you prefer a softer touch or a more aggressive approach, the DM Lite can be easily adjusted to match your preference. With this level of customization, you can ensure that each pad responds exactly as you want it to, allowing for a more personalized and enjoyable drumming experience.

Alesis Dm Lite Review


Credit: www.sweetwater.com


Features

The Alesis DM Lite comes equipped with a built-in metronome that helps players stay on beat and enhance their rhythm skills.

The Alesis DM Lite offers USB MIDI connectivity, allowing easy integration with computers and music software for enhanced versatility.

Ease Of Use

Intuitive Control Panel

The Alesis DM Lite electronic drum set is designed for easy navigation and control. The intuitive control panel allows users to quickly tweak settings and access various features with minimal effort. With clearly labeled buttons and a user-friendly layout, even beginners can easily adjust volume levels, select different drum sounds, or modify other settings without feeling overwhelmed.

Quick Assembly

Setting up the Alesis DM Lite is a hassle-free process. With straightforward instructions and minimal components, the assembly can be completed in a matter of minutes. The quick and easy setup ensures that users can spend more time playing and less time assembling, making it an ideal choice for drummers who prioritize convenience and simplicity.

Alesis Dm Lite Review


Credit: www.sweetwater.com


Pros And Cons

When considering purchasing a new electronic drum kit, it’s important to weigh the pros and cons to determine if it’s the right fit for your needs. The Alesis DM Lite offers a range of features, but there are some drawbacks to consider as well. Let’s take a closer look at the pros and cons of this electronic drum set.

Pros Of The Alesis Dm Lite

  • Compact and lightweight design, making it easy to transport and set up
  • Responsive drum pads with built-in LED lights for visual feedback
  • Includes a variety of built-in drum sounds and play-along tracks to enhance practice sessions
  • Easy to assemble and suitable for drummers of all skill levels
  • Features a headphone output for quiet practice sessions

Cons Of The Alesis Dm Lite

  • Some users may find the built-in sounds to be limited compared to higher-end models
  • The kick pad may be less responsive when compared to more expensive electronic drum kits
  • The frame and stand may not be as sturdy as professional-grade drum kits
  • Does not offer advanced features such as MIDI connectivity
https://www.youtube.com/watch?v=IHa487v-7N0


Frequently Asked Questions For Alesis Dm Lite Review


Is Alesis As Good As Roland?


Alesis and Roland are both reliable brands, but it ultimately depends on personal preference and specific needs. Alesis offers affordable options for beginners, while Roland focuses on high-quality, professional gear. Consider your budget and requirements when choosing between the two.


Are Alesis Drums Worth It?


Yes, Alesis drums are worth it as they offer quality sound, durability, and versatility for various skill levels.


How Do I Connect My Alesis Dm Lite To My Computer?


To connect your Alesis DM Lite to your computer, use a USB MIDI cable. Plug one end into the drum module’s MIDI Out port and the other into your computer’s USB port. Install any necessary drivers, select the DM Lite as a MIDI input in your software, and you’re connected.


Is Alesis Command Mesh Worth It?


Yes, the Alesis Command Mesh is worth it. It offers a high-quality mesh drum head, realistic sounds, and versatile features for drummers of all skill levels. It’s built to last and provides a great playing experience.


Conclusion


To sum up, the Alesis DM Lite is a fantastic electronic drum set for beginners and aspiring drummers. With its intuitive design and responsive pads, it offers a realistic drumming experience without breaking the bank. Whether you’re practicing at home or jamming with friends, this drum set will help you improve your skills and unleash your creativity.


So why wait? Grab the Alesis DM Lite and start drumming your way to success!

Categories
Archive

Different Compressor Settings For Your Mix

Compressor settings for your mix include attack, release, ratio, and threshold. These settings help control the level and dynamic range of your mix.


Also, Compressor settings can have a significant impact on the sound of your mix. Understanding how each setting affects the overall sound is crucial in achieving the desired result. The attack setting controls how quickly the compressor responds to a signal, while the release setting determines how fast the compressor releases the signal.

Related reading: Api 2500 Compressor and Explained Ott Compressor. For background, see the Wikipedia article on Dynamic range compression.


The ratio setting adjusts the amount of compression applied. The threshold controls the level at which the compressor begins to attenuate the signal. The combination of these settings can help create a balanced and dynamic mix. By experimenting with different compressor settings, you can achieve a professional sounding mix that enhances the impact of your music.


Threshold


Adjusting compressor settings, specifically the threshold, can drastically improve your mix. Experiment with different settings to achieve a balanced and cohesive sound.

If you are new to mixing, setting a compressor can be intimidating. The threshold is one of the most critical settings on a compressor that helps to control how much of the track’s dynamics get affected by the compressor. As the audio enters the compressor, it reduces the volume of signal above the threshold level. In this blog post, we will discuss the different threshold settings and their impact on your mix.

Low Threshold Settings

Low threshold settings mean the compressor will start compressing the audio at a low level. It will increase the volume of quiet sounds and reduce the volume of louder sounds. A low threshold setting would be useful for controlling the dynamics, especially for an instrument with a low volume level, such as a snare drum or acoustic guitar. The compression can help make these sounds more present and prominent in the mix.

High Threshold Settings

A higher threshold means that the compressor will only begin compressing when the audio exceeds a higher volume level. This setting is useful for instruments with high volume levels, such as vocals or drums. If the vocals have a consistent volume across the performance, a higher threshold setting can help maintain the original sound level while controlling any sudden peaks or drops in volume. This setting is also useful for bass instruments; it helps to keep their volume level consistent in the mix.

Pros Cons
Low threshold gives it more control over quiet sounds. May suck the life out of the audio if not used properly.
High threshold can maintain the original sound level. Can cause an unnatural sound if the threshold is too high.

In conclusion, the threshold setting is an essential aspect of setting up a compressor for a mix. The decision about which threshold setting to use should be determined based on the instrument’s volume level. It is important to remember that over-using the compressor can bring negative impact on your mix; therefore, it is good to use a “less is more” approach to achieve well-balanced and dynamic audio.

Different Compressor Settings For Your Mix


Credit: www.musicguymixing.com


Ratio


To achieve a well-balanced mix, it’s essential to understand compressor settings and how they affect the ratios. Different ratios provide varying intensities of compression, making it crucial to choose the right ratio for each track in your mix.

When it comes to compressing your mix, the ratio is a key setting to pay attention to. The ratio determines how much the signal above the threshold will be compressed. For example, a 2:1 ratio would mean that for every 2 dB above the threshold, the output will be only 1 dB louder.

Low Ratio Settings

Low ratio settings are typically used to smooth out the overall dynamics of a mix and apply gentle compression. This is useful for genres such as jazz, folk, or classical music where the focus is on natural dynamics. A ratio of 2:1 to 4:1 is sufficient to achieve this. It will gently limit the loudest parts of the mix and provide more consistency.

High Ratio Settings

High ratio settings are typically used for genres such as rock, metal, or hip hop, where a more aggressive sound is desired. A ratio of 6:1 to 10:1 is common and will provide a much greater reduction in dynamic range. A high ratio setting will easily catch the transients and ensure that the mix remains punchy and loud.

Compression Tips in Compressor Settings

  • Always use your ears to determine the best ratio for your mix.
  • Start with a low ratio and gradually increase until you achieve the desired effect.
  • Avoid using extremely high ratio settings as this can result in an unpleasant and unnatural sound.
  • Use gain makeup to add back the lost volume after compression.

Conclusion

By understanding the ratio setting, you can achieve a smoother and more consistent sound for your mix. Whether you prefer a gentle or aggressive compression style, the ratio is a crucial element to consider. Combine it with other settings such as threshold and attack/release times to get the best out of your mix.

Attack And Release Times for Compressor Settings


Adjusting the attack and release times on your compressor can drastically impact the sound and dynamics of your mix. Experimenting with different settings can help you achieve the perfect balance and impact for each track.

When it comes to mixing, using a compressor can be a powerful tool for controlling dynamics. Attack and release times are two essential settings that you need to understand to get the most out of your compressor. They can significantly affect the sound of your tracks and help you achieve a balanced mix. In this article, we will discuss different compressor settings for your mix, focusing on attack and release times.

Slow Attack And Release Times for Compressor Settings

Setting a slow attack time means that the compressor will take longer to attenuate the signal. This can help you preserve the natural attack of the sound and smooth out the tail end of the signal, resulting in a warmer and more natural sound. A slow release time can help sustain the tail end of the signal, making it sound smoother and more natural. It is essential to note that slow attack and release times do not work well on all tracks. For instance, they might not work well on drums because they can blur the transients and make them sound less punchy. For slower sounds like strings, guitars, or pianos, slow attack and release times can work well.

Fast Attack And Release Times for Compressor Settings

If you want a more aggressive sound, setting a fast attack time can be helpful. The compressor will start attenuating the signal almost immediately, resulting in a punchier sound. Fast release times can be helpful in creating a more crisp and defined sound. However, fast attack and release times can also result in distortion, noise and make the sound less natural. Therefore, it is crucial to use them cautiously and only when required. In conclusion, understanding the attack and release times of your compressor is essential to achieving a balanced mix. By using fast or slow attack and release times, you can achieve a warmer or punchier sound, respectively. However, it is crucial to use these settings judiciously and based on the requirements of the track.

Different Compressor Settings For Your Mix


Credit: www.reddit.com


Makeup Gain

It’s common to experience a loss of volume after compressing your audio, which can make your mix sound flat. This is where makeup gain comes in. Makeup gain is the process of reintroducing the volume lost during compression, ensuring your track maintains the proper volume and balance.

Balancing Your Compressed Signal for Compressor Settings

When using makeup gain, it’s important to balance your compressed signal to ensure it doesn’t become too loud. If your compressed signal is too loud, it can lead to distortion and other audio issues. Using makeup gain to bring your compressed signal to the same level as your uncompressed signal is a great way to achieve balance.

How To Set Your Makeup Gain

Setting your makeup gain can be a bit tricky, but there are some general guidelines you can follow to get started. First, listen to your track and adjust the makeup gain until the compressed signal sounds as loud as the uncompressed signal. If you notice any distortion, back off the makeup gain until the distortion disappears.

Another way to set your makeup gain is to use a peak meter. Start by monitoring your uncompressed signal to find the peak level. Then, monitor your compressed signal and adjust the makeup gain until it reaches the same peak level. This ensures both signals have the same dynamic range, with no loss in volume.

Conclusion

Makeup gain is an essential tool when it comes to balancing your compressed signal and maintaining volume. Understanding how to set it correctly can take time, but the resulting balanced mix is well worth the effort.

Sidechain Compression


Sidechain compression is a popular technique used in mixing. It involves using a compressor to control the level of one track based on the level of another track. By adjusting the settings of the compressor, you can achieve different results in your mix.

How Sidechain Compression Works

Sidechain compression is a powerful tool in mixing that enables you to create a more dynamic and clear mix by selectively compressing certain elements of your mix based on the level of another element. The way it works is by using a trigger signal to activate the compressor, instead of the audio signal itself.

For example, suppose you want your kick drum to stand out in your mix, you can apply sidechain compression to the bass or the synths, which may be clashing with the kick drum, and compress them every time the kick drum hits, creating more space for the kick drum in the mix. To achieve this, you need to send the trigger signal (kick drum audio) to the sidechain input of the compressor, and set up the compressor to respond to the trigger signal rather than the audio signal being compressed.

Using Sidechain Compression In Your Mix for Compressor Settings

Sidechain compression is used in various genres, including dance, pop, and hip-hop, to create that pumping or breathing effect that adds groove and energy to the track. When using sidechain compression in your mix, it’s crucial to consider the tempo and the rhythm of the track. You can experiment with different shapes, attack, and release times to achieve the desired result. For example, in dance music, you can use a fast-attack and a slow release to create that pumping effect, while in hip-hop, you can use a slower attack and release to create a subtle breathing effect.

You can also use sidechain compression creatively to achieve other effects such as ducking, gating, or even to add movement to pads or strings. In conclusion, sidechain compression is a powerful technique that can help you create a dynamic and clear mix by selectively compressing certain elements in your mix based on another element. With a little experimentation, you can create unique and creative effects that spice up your music and make it stand out.

Different Compressor Settings For Your Mix


Credit: www.audio-issues.com


Frequently Asked Questions Of Different Compressor Settings For Your Mix


What Is The Best Compression Setting For A Mix?


It really depends on the mix and the intended output. There is no one-size-fits-all answer to this question. Experiment with different compression settings and listen carefully to the results to determine the best setting for your mix. Keep in mind that you want to balance the dynamic range while avoiding over-compression.


What Should The Compressor Settings Be On A Master Mix?


Set compressor settings on a master mix by adjusting the threshold to control the level at which the compressor activates. Set ratio to determine the amount of gain reduction. Attack controls the time it takes the compressor to activate, while release controls how quickly it disengages.


Use makeup gain to adjust the overall level of the compressed signal.


What Are The Different Compressor Settings?


Compressor settings refer to the controls that adjust the level of compression applied to an audio signal. The most common settings include threshold, ratio, attack, release, and makeup gain. These controls dictate the intensity and character of the compression, allowing for precise sound manipulation in music production and other applications.


How Much Should You Compress A Mix?


To determine how much to compress a mix, you should first set a goal for the track. Use your ears to gauge whether the mix sounds cohesive and balanced, and depending on the track style, use compression to even out the levels and add glue.


Start with a low ratio and adjust to taste, being careful not to squash the natural dynamics of the mix.


Conclusion


To sum it up, compressor settings play a crucial role in achieving a well-balanced mix. It’s essential to understand the fundamentals of attack, release, ratio, threshold, and gain reduction to use them effectively. Remember, there is no hard and fast rule regarding compressor settings.


Experimenting with different settings while keeping the mix’s context in mind is the key to achieving professional-level sound quality. By incorporating diverse compressor settings, you can add depth and dimension to your mix while preserving its dynamics. Happy mixing!