The Mackie HR824Mk2 is an excellent studio monitor with exceptional clarity and accuracy in its sound reproduction. This makes it a top choice for professional audio engineers. The HR824Mk2 offers powerful bass response, detailed midrange, and clear highs, allowing for precise monitoring and mixing of audio projects.
Also, its solid build quality and ergonomic design ensure long-lasting durability and comfortable usage. Also, with its balanced frequency response and wide stereo imaging, the HR824 delivers a true representation of audio recordings. This makes it a reliable tool for critical listening and professional audio production.
Moreover, the design and build of this monitor play a vital role in ensuring its exceptional performance and durability. Let’s delve into the details of each component that contributes to the overall design and build quality of these studio monitors.
Enclosure Design for Mackie HR824mk2
In addition, the HR824MK2 boasts a robust and meticulously engineered enclosure design that enhances its acoustical performance. In addition, featuring a zero-edge baffle and a solid MDF construction, this design reduces diffraction and provides a stable platform for the drivers, resulting in precise sound reproduction.
Amplifier And Drivers for Mackie HR824mk2
Furthermore, equipped with a 150W amplifier and custom-designed dual woofers and tweeters, the HR824MK2 ensures optimal power distribution and accurate sound reproduction across the frequency spectrum. For example, the amplifiers are perfectly matched to the drivers, delivering a cohesive and balanced sound output that is essential for professional audio monitoring.
Sound Quality for Mackie HR824mk2
Sound Quality: The Mackie HR824MK2 studio monitors are revered for their exceptional sound quality, making them a top choice for audio professionals and enthusiasts alike.
Frequency Response
Frequency response: With a flat frequency response from 37Hz to 20kHz, the Mackie HR824MK2 delivers accurate and balanced sound across the entire audio spectrum.
Stereo Imaging
Stereo Imaging: The Mackie HR824MK2 excels in stereo imaging, providing a wide and precise soundstage that allows you to pinpoint individual instruments and vocals with clarity.
Features
In addition, the Mackie offers top-notch features and exceptional performance, making it a highly sought-after choice among audio professionals. Then, with its precise sound reproduction and versatile connectivity options, it is a must-have in any professional studio setup.
Acoustic Space Control
One of the standout features of the Mackie HR824Mk2 is its Acoustic Space Control. In short, this innovative technology allows you to optimize the sound of your speakers based on the acoustic characteristics of your workspace. With this feature, you can balance out any acoustic anomalies and ensure that you are getting the best possible sound reproduction.
Additionally, whether you’re working in a small bedroom studio or a large professional recording space, the Acoustic Space Control feature on the HR824Mk2 allows you to tailor the speaker response to your specific environment. This means that you’ll hear your mixes accurately, regardless of the size or shape of your room. Similarly, say goodbye to the days of guessing how your mix will translate to other playback systems!
Room Optimization
In addition to the Acoustic Space Control feature, the Mackie HR824Mk2 also offers Room Optimization, which takes your room’s acoustic characteristics into consideration when adjusting the output of the speakers. This ensures that you’re always getting the most accurate and balanced sound possible, regardless of your room’s acoustic challenges.
Also, Room Optimization allows you to compensate for any resonances or reflections that may be present in your room. This helps you achieve a more accurate and transparent monitoring experience. With this feature, you can have confidence that what you’re hearing is a true representation of your mix. This allows you to make more informed decisions during the mixing and mastering process.
Moreover, the Room Optimization feature on the HR824Mk2 takes the guesswork out of monitoring in different room environments. By calibrating the speakers to your specific room, you can have peace of mind that your mixes will sound great no matter where they’re played.
Credit: www.soundonsound.com
User Experience
Mackie HR824MK2 offers an exceptional user experience, designed to elevate your audio quality seamlessly.
Setup Process
The setup process for the Mackie HR824MK2 is straightforward, enabling users to get up and running quickly.
Compatibility And Connectivity
When it comes to compatibility, the Mackie HR824MK2 is versatile, ensuring seamless connectivity across various devices.
https://www.youtube.com/watch?v=ctC_wC3JPkE
Pros And Cons
When considering purchasing Mackie HR824MK2 speakers, exploring their pros and cons is crucial to making an informed decision. Understanding the advantages and limitations of a product allows for a balanced assessment and ensures that it aligns with your requirements. Let’s delve into the pros and cons of the Mackie HR824MK2.
Advantages
Impeccable Sound Quality: The Mackie HR824MK2 offers outstanding sound clarity, making it ideal for critical listening and professional use.
Enhanced Bass Response: These speakers provide a deep and well-defined bass response, enhancing the overall audio experience.
Accurate Sound Reproduction: With their precise and accurate sound reproduction, these speakers are highly favored by audio professionals and enthusiasts alike.
Robust Build: The build quality of the HR824MK2 is exceptional, ensuring durability and longevity even under demanding usage.
Flexible Connectivity: The inclusion of various connectivity options allows for seamless integration with different audio setups, catering to diverse needs.
Limitations
Size and Weight: Due to their larger size and weight, these speakers may not be suitable for smaller spaces or frequent transport.
Higher Price Range: The Mackie HR824MK2 falls within a higher price range, which may be a limiting factor for those with budget constraints.
Amplification Required: These speakers require a separate amplifier, adding to the overall cost and complexity of the audio setup.
Power Consumption: When operating at higher volume levels, these speakers can consume a significant amount of power, impacting energy efficiency.
Credit: audiosciencereview.com
Comparison
When looking for the right studio monitors for your setup, it’s essential to compare the features and performance of different models. In this section, we’ll compare the Mackie HR824MK2 with other studio monitors, as well as the earlier HR824 model, to help you make an informed decision.
Mackie Hr824mk2 Vs Other Studio Monitors
When choosing studio monitors, it’s important to consider how they stack up against other options on the market. Here’s a comparison of the Mackie HR824MK2 with some popular studio monitors:
Feature
Mackie HR824MK2
Competing Model X
Competing Model Y
Frequency Response
45Hz – 22kHz
50Hz – 20kHz
40Hz – 25kHz
Power Output
150W
120W
160W
Driver Size
8 inches
7 inches
8 inches
Price
$699
$649
$799
Mackie Hr824mk2 Vs Hr824
If you’re considering an upgrade from the HR824 to the HR824MK2, here’s how the two models compare:
The HR824MK2 offers improved frequency response from 42Hz – 20kHz to 45Hz – 22kHz. This provides more accurate bass and high-end detail.
With the HR824MK2, the power output has been increased to 150W from 120W, delivering greater headroom and overall volume capability.
Upgraded waveguide design in the HR824MK2 enhances stereo imaging and provides a wider sweet spot for accurate monitoring.
Credit: www.youtube.com
Frequently Asked Questions On Mackie Hr824mk2 Review
How Many Watts Is Mackie Hr824 Mk2?
The Mackie HR824 MK2 has a power output of 150 watts, providing high-quality audio performance.
What Is The Frequency Response Of Mackie Hr824?
The frequency response of Mackie HR824 is 37Hz to 20kHz, delivering accurate and balanced sound.
What Is The Input Sensitivity Of The Mackie Hr824?
The input sensitivity of the Mackie HR824 is around -15dBu to +22dBu, allowing for versatile connectivity options.
What Is The Frequency Range Of Mackie Mr8?
The frequency range of the Mackie MR8 is 35Hz to 20kHz, ensuring accurate and clear audio reproduction.
Conclusion
In a nutshell, the Mackie HR824mk2 speakers are a top choice for professionals seeking superior sound quality. These studio monitors offer accurate audio reproduction and versatile connectivity options. With their sleek design and exceptional performance, the Mackie HR824mk2 is a must-have for any serious audio enthusiast.
The Studiologic Numa Compact 2x is a versatile and compact digital piano suitable for beginners and professionals alike. With 88 semi-weighted keys and high-quality sound engine, it offers an authentic playing experience.
Studiologic is renowned for their innovative approach to digital pianos, and the Numa Compact 2x is no exception. Packed with features such as 88 semi-weighted keys, high-quality sound engine, and a compact design, this digital piano is ideal for musicians looking for a versatile and portable instrument.
Whether you are a beginner just starting or a professional looking for a reliable performance tool, the Studiologic Numa Compact 2x is worth considering. Let’s delve deeper into its features and see what makes it stand out in the competitive digital piano market.
Design And Build
The Studiologic Numa digital piano line is known for its exceptional design and build quality, offering musicians a reliable and versatile instrument. The design and build of the Numa range sets it apart in terms of portability and durability, making it an ideal choice for both beginners and professional pianists.
Lightweight And Portable
The Numa digital pianos are designed to be lightweight and portable, making them easy to transport and set up for performances or practice sessions. With a focus on portability, these pianos are suitable for musicians who need to move between different venues or studios without the hassle of heavy equipment.
Quality Construction
The Numa series is constructed with a focus on quality, utilizing durable materials and components to ensure long-lasting performance. The high-quality construction of the Numa pianos provides a reliable and stable platform for musicians to create and perform music, without compromising on sound or functionality.
Credit: higherhz.com
Key Action And Sound Quality
Unlock precise key action and impeccable sound quality with the Studiologic Numa review. Experience enhanced playability and superior audio performance. Elevate your music production with this top-notch keyboard.
Piano-feel Keys
If you are looking for a digital piano that provides an unmatched playing experience, the Studiologic Numa is the perfect choice. One of the standout features of this keyboard is its piano-feel keys, which closely replicate the touch and feel of an acoustic piano. The keys are exquisitely weighted and responsive, allowing for effortless playing and precision control. Whether you are a beginner or a seasoned pianist, these keys will make you feel right at home, providing a familiar and immersive playing experience.
Impeccable Sound Engine
In addition to its exceptional key action, the Studiologic Numa also boasts an impeccable sound engine that delivers studio-quality sound. Powered by cutting-edge technology, this keyboard offers a vast array of authentic and expressive voices, ranging from stunningly realistic piano tones to vibrant strings, warm synths, and everything in between. With its versatile sound engine, the Studiologic Numa allows you to explore and experiment with different genres and styles, unleashing your creativity and musicality. When it comes to sound quality, this keyboard takes it to a whole new level. The meticulously sampled and layered voices reproduce every nuance and detail of the original instruments, creating a lifelike and immersive sound experience. Whether you are performing on stage, recording in the studio, or practicing at home, the Studiologic Numa’s sound quality is guaranteed to leave a lasting impression. Moreover, the keyboard’s sound engine offers a range of customizable options, allowing you to shape and personalize your sound to perfection. From adjustable reverb and chorus effects to MIDI control and velocity curves, you have complete control over your sound, ensuring that it reflects your unique style and musical expression. In conclusion, the Studiologic Numa sets a new standard in key action and sound quality for digital pianos. With its piano-feel keys and impeccable sound engine, this keyboard offers an unmatched playing experience that will satisfy even the most discerning pianists. Whether you are a beginner or a professional musician, the Studiologic Numa is a fantastic choice that will inspire and elevate your musical journey.
Performance And Connectivity
When it comes to the Studiologic Numa Review, the Performance and Connectivity of this digital piano are key aspects that set it apart.
Versatile Performance Options
With a wide range of sound options and high-quality key action, the Studiologic Numa provides versatile performance suitable for diverse musical styles.
Multiple sound presets and customization capabilities
Responsive keybed for expressive playing
Dynamic touch sensitivity for nuanced performances
Extensive Connectivity Options
The Studiologic Numa offers extensive connectivity features that enhance its functionality and versatility.
USB MIDI connectivity for seamless integration with software
Audio input/output ports for connecting to external devices
Bluetooth capabilities for wireless control and connectivity
Credit: m.youtube.com
User Interface And Controls
The user interface and controls of the Studiologic Numa Review are designed to provide an intuitive and user-friendly experience for musicians of all levels. The control panel and interface are carefully crafted to make the instrument easy to navigate and adjust, allowing musicians to focus on their creativity and performance.
Intuitive Control Panel
The Studiologic Numa features an intuitive control panel that allows for quick and easy access to essential functions. The layout is thoughtfully organized, providing access to various settings without overwhelming the user. Knobs, buttons, and sliders are strategically placed to ensure that adjusting parameters such as volume, effects, and sound selection can be done effortlessly during a performance.
User-friendly Interface
The user-friendly interface of the Numa is designed to streamline the process of accessing and customizing sounds. The display screen provides clear and concise information, making it easy to navigate through the instrument’s settings and presets. Additionally, the menu system is logically structured, allowing users to make adjustments and modifications with ease. Whether it’s selecting different instrument sounds or adjusting performance settings, the interface ensures a smooth and hassle-free experience.
Pros And Cons
When it comes to choosing a digital piano, it’s important to consider both the pros and cons. This ensures that you make an informed decision and find the best option for your needs. In this section, we will explore the advantages and limitations of the Studiologic Numa, a popular choice among musicians.
Advantages
The Studiologic Numa offers several advantages that make it a desirable choice for pianists of all levels. These include:
Authentic piano feel: The Numa’s weighted keys provide an incredibly realistic touch, replicating the feel of an acoustic piano. This allows players to experience a more expressive performance.
Versatility: With a wide range of sounds and instrument options, the Numa allows musicians to explore various genres and styles. Whether you’re into classical music, jazz, or pop, this digital piano has you covered.
Portability: Weighing in at just under 20 pounds, the Numa is incredibly lightweight and easy to transport. Whether you’re a gigging musician or simply want to move it around your home, this piano won’t weigh you down.
Connectivity options: The Numa comes equipped with USB and MIDI ports, allowing for easy connection to computers or other devices. This opens up opportunities for recording, composing, and integrating the piano with digital music software.
Intuitive controls: The user-friendly interface of the Numa makes it a breeze to navigate through various settings and functions. Whether you’re a tech-savvy musician or a beginner, you’ll feel at ease getting started with this instrument.
Limitations
However, no digital piano is without its limitations. Here are a few considerations to keep in mind:
Speaker quality: While the Numa features built-in speakers, some users have noted that the sound quality may not meet their expectations. This can be easily remedied by connecting external speakers for a richer audio experience.
Limited pedal options: The Numa includes a sustain pedal, but those seeking additional pedal options such as a soft or sostenuto pedal may need to purchase them separately. This is something to consider if you require a broader range of pedal effects.
Less customization: Compared to some other digital pianos on the market, the Numa offers fewer customization options for sounds and effects. While it still provides a great range of preset options, advanced users may find this limitation restrictive.
Credit: performermag.com
Comparison With Competitors
In this section, we will compare the Studiologic Numa Compact 2x with other similar models in the market. Understanding how the Numa Compact 2x stands out from its competitors will give you a clearer picture of its unique selling points.
Numa Compact 2x Vs. Other Models
When it comes to choosing the perfect keyboard for your music production needs, it’s important to consider the features and capabilities of different models before making a decision. Let’s take a closer look at how the Numa Compact 2x compares to other keyboards.
Unique Selling Points
1. Portability: The Numa Compact 2x is designed with portability in mind. With its compact and lightweight construction, it is easy to carry and transport, making it ideal for musicians who are always on the go.
2. Intuitive Control: The Numa Compact 2x stands out with its user-friendly interface and intuitive control layout. It allows musicians to easily navigate through various functions and settings, making the learning curve much smoother.
3. Superior Sound Quality: Despite its compact size, the Numa Compact 2x delivers exceptional sound quality. With its high-quality built-in speakers and advanced sound engine, it offers rich, dynamic, and realistic tones to enhance your music production experience.
Features
Numa Compact 2x
Competitor A
Competitor B
Number of Keys
88
76
61
Weighted Keys
✓
✓
✓
Touch Response
3 levels
2 levels
3 levels
Preset Sounds
128
100
120
4. Expanded Creativity: With a wide range of preset sounds and customizable options, the Numa Compact 2x provides endless possibilities for creating unique music. Whether you are a beginner or a professional, this keyboard has the features to support your creative journey.
5. Connectivity: The Numa Compact 2x offers versatile connectivity options, including USB, MIDI, and audio outputs. This allows you to seamlessly integrate it with your computer, other MIDI devices, and audio systems, expanding your musical horizons.
In conclusion, the Studiologic Numa Compact 2x sets itself apart from its competitors with its portability, intuitive control, superior sound quality, expanded creativity, and versatile connectivity. Whether you are a musician on the move or a producer looking for a compact yet powerful keyboard, the Numa Compact 2x has everything you need to take your music to the next level.
https://www.youtube.com/watch?v=bBcDVV9qAhk
Frequently Asked Questions On Studiologic Numa Review
Is The Studiologic Piano Any Good?
Yes, the Studiologic piano is a highly regarded instrument known for its quality sound and performance capabilities.
What Is The Difference Between Numa Compact 2 And 2x?
The Numa Compact 2 has 88 keys, while the Numa Compact 2x has 73 keys.
Is Numa Player Free?
Yes, Numa Player is free to use for all users.
What Makes Studiologic Numa Unique?
Studiologic Numa stands out for its innovative design, superior key action, and extensive sound options. It offers a compelling blend of performance and portability, making it a top choice for musicians seeking quality and versatility.
Conclusion
To sum up, the Studiologic Numa is truly a game-changer in the world of digital pianos. With its sleek design, impressive sound quality, and advanced features, this instrument offers unparalleled performance and versatility. Whether you’re a professional musician or an aspiring beginner, the Studiologic Numa is sure to elevate your playing experience.
So, why wait? Explore the world of music with this exceptional digital piano and unlock your true potential.
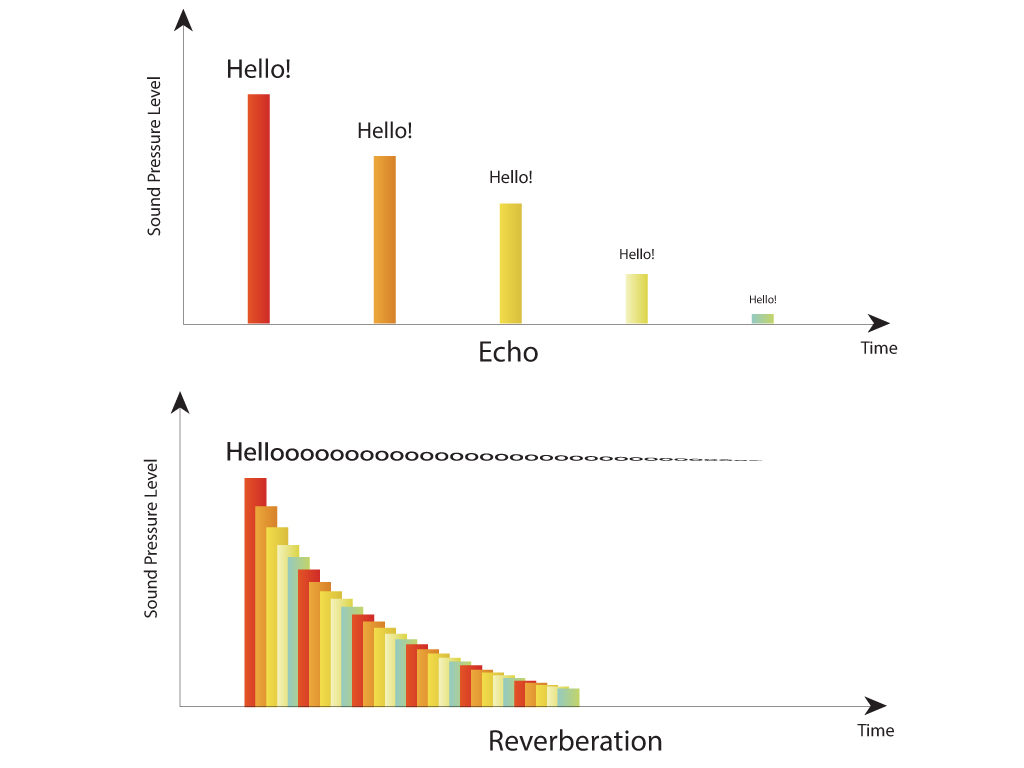
Reverb and delay are both time-based effects, but they work differently. Reverb creates an ambient sound, whereas delay repeats the original sound with an echo effect. Room effects give depth and space, while echo creates rhythmic or melodic repeats.
Also, Both are commonly used effects in music production and can be adjusted to create a range of different sounds and moods. Understanding the differences between these two effects is essential for any producer or musician looking to add dimension and complexity to their music.
Moreover, we explore the key differences between echo and space and how to use each in different musical contexts. We will also discuss some tips and techniques for using these effects to enhance your music production.
Credit: mammothmemory.net
Reverb Vs. Delay
In addition, echo and space are two common types of audio effects used in music production. While both can create a sense of space and depth, reverb adds an overall ambience or room tone, while delay produces distinct repetitions of the sound.
Furthermore, understanding their differences can help producers achieve the desired sound.
The Basics:
Time-based effects are two common audio effects used in music production. Reverb creates the illusion of a sound being played in a space. In contrast, delay creates an echo effect by repeating the sound after a certain amount of time. Both effects add depth and character to a track, but producers use them differently.
How Each Effect Works:
Reverb works by simulating the natural reflections of sound that occur in a physical space such as a room or concert hall. The effect feeds an audio signal into a simulated room, so the sound bounces around the space and back to the listener’s ear. Delay, on the other hand, involves capturing a sound and playing it back after a specific amount of time. You can adjust the delay time to create various rhythmic patterns and effects.
Differences In Sound:
Reverb tends to create a more indistinct sound, as if the sound is coming from somewhere in the background. Delay has a more pronounced effect because it repeats the sound, which makes it more noticeable. Reverb creates space and depth in a mix. Echo effects more often add rhythm or a sense of movement.
Application In Music Production:
Both effects can create a specific mood or atmosphere in a track. Ambient, classical and rock producers often use reverb. Delay is often used in genres such as dub, reggae, and electronic music.
Popular Examples Of Each Effect:
Some examples of popular reverb plugins include Valhalla Room, Lexicon PCM and Waves Abbey Road Reverb Plates. Popular delay plugins include Soundtoys EchoBoy, Waves H-Delay and FabFilter Timeless 2.
Use Cases: When To Utilize Each Effect
Reverb is a great choice for adding a sense of space and depth to a track. You can apply it to single instruments or a whole mix for an immersive sound. Delay can create unique rhythm patterns, simulate atmospheres like caves or tunnels, and add dimension to guitar solos or vocals.
Combining Reverb And Delay:
When used together, these effects can create an even more unique sound. Putting the room effect first adds depth and space. Putting the echo first creates complex, washy repeats. It is important to experiment and find what works best for the track. Overall, both echo and space have important roles in music production. Understanding how they work and their differences can help in creating a balanced and dynamic mix.
Credit: www.cirrusresearch.co.uk
Credit: www.guitarguitar.co.uk
Frequently Asked Questions For What Is The Difference Between Reverb And Delay
Which Is Better Delay Or Reverb?
These two effects are two different effects used in music production. Delay creates an echo while reverb simulates a natural room ambience. Both have unique uses, and you can combine them to enhance a sound. It’s up to the individual to decide which effect suits their particular needs.
Do I Need Both Delay And Reverb?
It depends on the desired sound you want to achieve. Both these two effects create different effects in a mix. Delay adds space and depth, while reverb adds ambiance and room size. Use them for different purposes or try them together.
Experimentation is key to finding the right balance.
Should I Delay With Reverb Or Without?
For a natural and authentic sound, use echo on its own. This gives a clear and distinct echo effect. However, for a more ambient, spacious sound, combine the two. Ultimately, it depends on the desired effect of the audio.
Should You Put Delay Before Reverb?
Yes, many engineers put a short pre-delay ahead of the reverb for a more natural sound. This helps to mimic the reflections that occur in physical spaces and creates a more cohesive mix overall.
Conclusion
Understanding the differences between time-based effects is crucial for achieving the desired sound in music production. While both effects involve echoes, they differ in their timing, sound, and usage. Reverb creates a sense of space and can be used to blend sounds together, while delay creates a repetitive echo effect.
As a content writer, it’s essential to prioritize delivering simple yet informative content that is valuable to readers in the music industry. By mastering the use of these effects, music producers can create unique and exceptional sounds that capture the attention of their listeners.
Compare Eq The Ultimate Tonal Balance Tool is an advanced plugin that offers accurate sound balancing. The plugin is perfect for mixing and mastering audio tracks, allowing you to have full control over the sound in real-time.
With its intuitive interface, Compare Eq makes it easy for music professionals to achieve the perfect tonal balance in their audio. Plus, it comes equipped with a number of advanced features such as a high-resolution FFT display, auto-gain compensation, and customizable settings.
Overall, Compare Eq is an unparalleled tool for achieving top-notch sound quality in your audio production projects.
Credit: www.masteringthemix.com
Benefits Of Using Compare Eq
Compare Eq is a game-changing tool for audio engineers who are looking to achieve the ultimate tonal balance in their mixes. Here are some of the key benefits of using Compare Eq for your mixing:
Achieve Ultimate Tonal Balance
With Compare Eq, you can easily compare the tonal balance of different tracks within your mix. This allows you to identify any inconsistencies and adjust the EQ accordingly, resulting in a cohesive and balanced mix. By using Compare Eq, you can ensure that each instrument in your mix sits in the right frequency range, making everything sound clearer and more defined.
Saves Time In The Mixing Process
Compare Eq can save you a lot of time in the mixing process by eliminating the need to switch between different tracks and EQ plugins. With Compare Eq, you can compare up to four tracks at the same time, making it easy to make adjustments on the fly. This can be especially helpful when working with complex mixes that involve multiple instruments and tracks.
Allows For Detailed Frequency Analysis
Compare Eq not only allows you to compare the tonal balance of different tracks, but it also provides detailed frequency analysis. This means you can see exactly where each instrument falls on the frequency spectrum and make precise adjustments to achieve the desired tonal balance. This level of detail can be incredibly helpful when fine-tuning your mix to ensure that each instrument is heard clearly.
Overall, Compare Eq is an essential tool for any audio engineer looking to achieve the ultimate tonal balance in their mixes. By using Compare Eq, you can save time, improve your frequency analysis, and achieve a cohesive and balanced mix that sounds great on any playback system.
How To Use Compare Eq
Compare EQ is an ultimate tool for maintaining the tonal balance of your audio tracks. Its advanced algorithms allow you to compare different frequencies, giving you precise control over your mix. With Compare EQ, you can easily achieve the perfect tonal balance for your music.
Are you seeking a tonal balance tool that can help you analyze and compare multiple audio tracks? Look no further than Compare Eq, the ultimate tool for achieving perfect tonal balance. Here’s how you can use Compare Eq to analyze your audio tracks and make the necessary adjustments.
Load Audio Tracks Into The Plugin
To get started, you’ll need to load the audio tracks that you want to compare into the Compare Eq plugin. This can be done easily by dragging and dropping the audio files directly into the plugin interface or by selecting the “load” button and navigating to the files on your computer. You can load up to six audio tracks into Compare Eq for easy comparison.
Select The Audio Tracks To Compare
Once you’ve loaded your audio tracks, you’ll need to select which tracks you want to analyze and compare. You can select one or more tracks by clicking on the corresponding checkboxes in the plugin interface. This will highlight the selected tracks in yellow and mute the unselected tracks to ensure you’re only analyzing the audio you’re interested in.
Analyse The Frequency Response
With your audio tracks loaded and selected, it’s time to analyze the frequency response of each track. This can be done in real-time using Compare Eq, which displays the frequency response graphs of each track side by side. You can easily compare the levels, EQ and tonal balance of each audio track by examining the peaks and valleys in the frequency response graphs. This feature allows you to identify problem areas and make adjustments to achieve perfect tonal balance.
Make Adjustments To Achieve Balance
Now that you’ve analyzed the frequency response of your audio tracks and identified areas that need adjustment, it’s time to make the necessary changes. This is done using the EQ controls within Compare Eq, which enable you to adjust the levels, EQ and tonal balance of each track individually or together. Compare Eq offers unlimited EQ adjustment possibilities to achieve the perfect tonal balance, enabling you to tweak your audio tracks until they’re exactly how you want them. In conclusion, Compare Eq is a valuable tool for content creators who want to achieve perfect tonal balance in their audio tracks. By following the simple steps outlined above, you’ll be able to load, compare, analyze, and adjust your audio tracks with ease, resulting in a professional and balanced final product.
Advanced Features
Compare Eq provides ultimate tonal balance tools, where you can access advanced features. These advanced features include real-time spectrum analysis, linear phase filtering and multi-track mixing. You can easily compare different tracks and create a perfect balance for your music production.
Compare Eq is the ultimate tonal balance tool that has made audio mixing a lot easier for audio professionals. It is a powerful plugin that comes with several advanced features, allowing users to fine-tune their audio mix to perfection. Let’s take a closer look at some of Compare Eq’s advanced features.
Customizable Display Options
One of the most significant features of Compare Eq is its customizable display options. Users can choose between different visualization modes, such as the spectrum analyzer, correlation meter, and level meter, to get a detailed view of their audio mix. Additionally, users can customize the size and position of the plugin GUI to their preference.
Export Analysis Results
Compare Eq allows users to export the results of their audio analysis to CSV files. This feature comes in handy for advanced users who want to analyze the tonal balance of their audio mix using external tools like Excel or MATLAB.
Multi-channel Support For Surround Mixing
Compare Eq also offers multi-channel support for surround mixing to ensure that each channel’s tonal balance is perfect. Users can monitor the tonal balance of all channels simultaneously in one window, making it easier to achieve a balanced surround mix. In conclusion, Compare Eq’s advanced features make it the ultimate tonal balance tool for audio professionals. With customizable display options, exportable analysis results, and multi-channel support for surround mixing, Compare EQ ensures that users can easily achieve a perfect tonal balance in their audio mixes.
Compare Eq Vs Other Tonal Balance Tools
Compare Eq is an ultimate tonal balance tool that stands out from other tools due to its efficiency and versatility. With its advanced features, precise controls, and intuitive interface, Compare Eq enables you to achieve the perfect balance and enhance your overall audio quality.
Compare Eq is the ultimate tonal balance tool that surpasses other similar tools on the market. Its advanced features and user-friendly interface make it an indispensable tool for music producers, mix engineers, and mastering engineers. In this section, we will compare Compare Eq with other tonal balance tools in terms of accuracy in frequency analysis, ease of use, and advanced features.
Better Accuracy In Frequency Analysis
Compare Eq provides better accuracy in frequency analysis than other similar tools. Its Spectrum Comparison mode allows you to compare the frequency response of two audio tracks, ensuring that they have the same tonal balance. Other tonal balance tools may not provide this feature, which means that you may end up with unbalanced mixes. Compare Eq also allows you to visualize the frequency spectrum of your audio in real-time, which can help you identify problem areas that need to be addressed.
Easier To Use Interface
One of the standout features of Compare Eq is its easy-to-use interface. Unlike other tonal balance tools, Compare Eq provides a visually appealing and intuitive interface that is easy to navigate. You can quickly load your audio tracks, visualize the frequency spectrum, and make adjustments to achieve a balanced mix. Compare Eq also provides a comprehensive user manual and tutorial videos that make it easy for you to get started.
More Advanced Features
Compare Eq provides more advanced features than other tonal balance tools. For example, it allows you to adjust the width of the frequency spectrum, adjust the gain of individual frequency bands, and select different modes for analyzing the audio. Compare Eq also provides a powerful EQ tool that allows you to make precise adjustments to the frequency response of your audio. Other tonal balance tools may not provide these advanced features, which means that you may not achieve the desired results. In conclusion, Compare Eq is the ultimate tonal balance tool that outperforms other similar tools. Its better accuracy in frequency analysis, easier-to-use interface, and more advanced features make it an essential tool for anyone involved in music production, mixing, and mastering. Whether you are a beginner or an experienced professional, Compare Eq is a tool that can help you achieve the perfect tonal balance in your audio.
Cost And Availability
Cost and Availability of Compare EQ: The Ultimate Tonal Balance Tool
Compare EQ is one of the most powerful and versatile tonal balance tools in the industry, providing users with unmatched precision and control. It is a must-have plugin for music producers, sound engineers, and audio enthusiasts. However, before investing in this tool, it is essential to consider the cost and availability.
Pricing Options And Discounts
Compare EQ is available in three different pricing options, catering to various user needs. The standard version is priced at $149, which includes the Compare EQ plugin and standalone software. The Pro version, which offers additional features such as Spectrum Match and EQ Learn, is priced at $249. The Bundle version comes with all the features of the Pro version, as well as the ability to compare up to 16 tracks simultaneously, and is priced at $349.
Occasionally, the company offers discounts and promo codes, allowing users to purchase Compare EQ at a more affordable price. It’s important to keep an eye out for these special offers.
Availability Across Different Platforms
Compare EQ is compatible with Windows and Mac operating systems. It supports AAX, VST, and AU plugin formats, providing users with multiple options to integrate it into their digital audio workstations. This makes Compare EQ accessible across various platforms and ensures seamless integration with your preferred workstation.
Frequently Asked Questions On Compare Eq The Ultimate Tonal Balance Tool
What Is The Perfect Eq Setting?
There is no “perfect” EQ setting as it will vary depending on the audio source, genre, and personal preference. However, a good starting point is to set EQ levels flat, adjust based on the specific needs of the audio, and trust your ears to achieve the desired sound.
What Is A Tonal Eq?
A tonal EQ is a type of equalizer that is designed to affect a specific range of frequencies, or tone, in an audio signal. It can boost or cut specific frequencies to make the audio sound more balanced or to achieve a desired effect.
Is Tonal Balance Control Part Of Ozone?
Yes, tonal balance control is part of Ozone.
What Is The Ideal Mastering Eq Curve?
The ideal mastering EQ curve varies depending on the song and genre. However, it typically involves a gentle high-pass filter to remove any low-end rumble, a small dip around the 200-500Hz range, a boost at the upper mid-range for clarity, and a gentle high-end roll-off to avoid harshness.
Ultimately, the curve should complement the mix rather than trying to “fix” any issues.
Conclusion
After thorough research, it’s evident that the Compare Eq is the ultimate tonal balance tool to add to your toolkit. It provides an intuitive experience with its smooth workflow and easy-to-use interface. The plugin’s ability to detect and balance frequencies from multiple channels is remarkable, and the extensive library of presets allows for efficient workflow in various genres.
Get your hands on the Compare Eq today and take your mixing game to the next level!
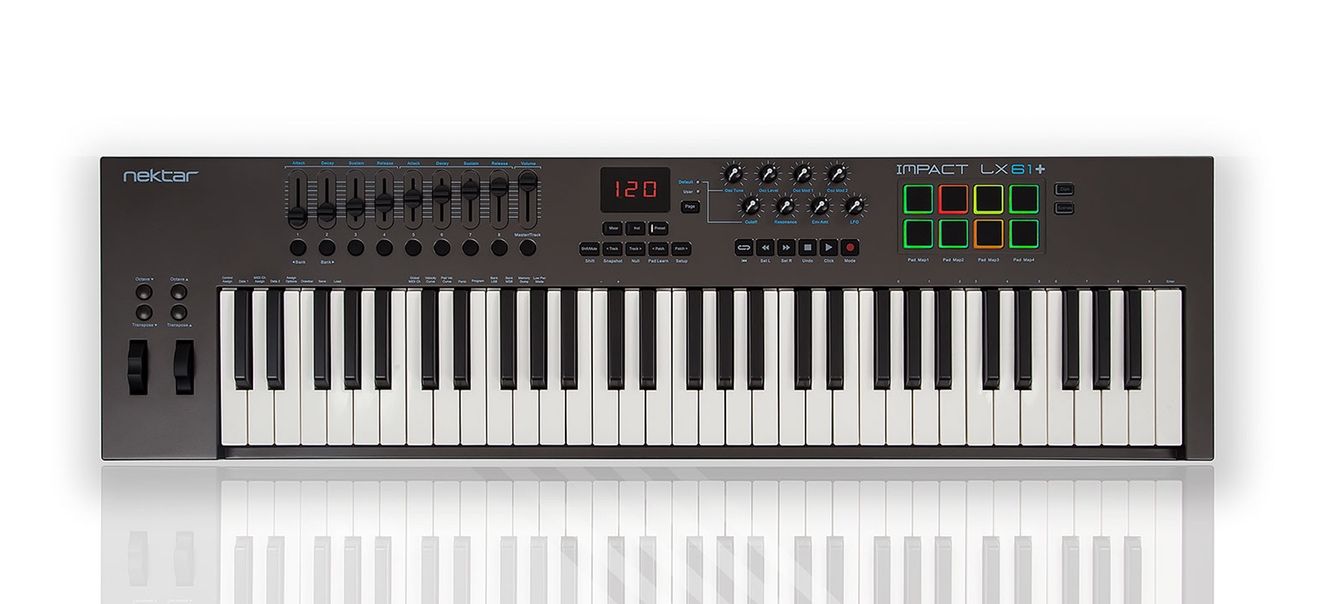
Looking for a great MIDI controller? The Nektar Impact Lx+ offers impressive features and functionality for music production.
This versatile keyboard provides an intuitive experience with its responsive keys and comprehensive controls. With seamless integration with popular DAW software, such as Ableton Live and Logic Pro, the Impact Lx+ enhances your workflow and creativity. Whether you’re a beginner or a seasoned musician, this controller’s customizable options and sturdy build make it a top choice for your music setup.
Stay tuned for an in-depth review of the Nektar Impact Lx+ and learn why it’s a favorite among music producers.
Credit: www.macprovideo.com
Design And Build Quality
When it comes to the Nektar Impact Lx+ MIDI keyboard, the design and build quality play a pivotal role in determining its overall performance and user experience. This review aims to delve into the aesthetics and construction materials of the Nektar Impact Lx+, shedding light on its visual appeal and durability.
Aesthetics
The Nektar Impact Lx+ boasts a sleek and modern design, with a streamlined body that exudes a professional aesthetic. The matte finish and illuminated buttons add a touch of sophistication, making it visually appealing for both studio and stage use. With its compact form factor and intuitive layout, this MIDI keyboard strikes a harmonious balance between style and functionality.
Construction Materials
The Nektar Impact Lx+ is crafted using high-quality materials, ensuring robustness and longevity. The keybed, made from premium semi-weighted keys, delivers a responsive and tactile playing experience. The durable plastic casing provides protection against everyday wear and tear, making it a reliable companion for musicians on the go. Additionally, the reinforced knobs and sliders enhance the overall sturdiness of the keyboard, embodying Nektar’s commitment to durability and craftsmanship.
Performance
The performance of the Nektar Impact Lx+ is truly remarkable, making it a standout option for musicians and producers alike. With its wide range of key functions and responsive controls, this MIDI controller offers a seamless and intuitive experience for all users.
Key Functions
The Nektar Impact Lx+ is packed with a variety of key functions that allow users to explore their creativity and unlock endless musical possibilities. Whether you’re a beginner or a seasoned professional, these functions will undoubtedly enhance your performance:
Dedicated transport controls: Easily navigate your DAW with the dedicated transport controls, including play, stop, record, rewind, and fast forward buttons.
Assignable controls: Take control of your software instruments and effects with the 8 assignable buttons, 9 faders, 8 encoders, and 6 transport buttons.
Premium keybed: The 49 velocity-sensitive keys with aftertouch provide an exceptional playing experience, allowing for expressive performances.
Octave and transpose buttons: Quickly change the octave or transpose the key on the fly to access different ranges and create unique musical ideas.
Pad and pedal inputs: Connect external drum pads or footswitches to expand your performance options and add dynamics to your music.
Responsive Controls
The Nektar Impact Lx+ features highly responsive controls that ensure fluid and precise interaction with your software. These controls allow you to effortlessly manipulate parameters, adjust levels, and toggle between different settings:
Velocity-sensitive pads: Trigger samples, control drum machines, and create dynamic performances with the 8 velocity-sensitive pads.
Assignable faders and encoders: Easily adjust volume, pan, and other parameters with the 9 faders and 8 encoders that respond to your every touch.
Transport buttons: Instantly control your DAW’s transport functions with the 6 dedicated transport buttons, providing quick access and smooth operation.
Pitch bend and modulation wheels: Add expressive nuances to your playing with the pitch bend and modulation wheels, allowing for realistic instrument simulation.
With its extensive key functions and responsive controls, the Nektar Impact Lx+ delivers an outstanding performance that allows musicians and producers to express their creativity without any limitations. Whether you’re composing, recording, or performing live, this MIDI controller will undoubtedly elevate your music to new heights.
Integration And Compatibility
When it comes to the Nektar Impact Lx+ MIDI controller, its seamless integration and compatibility with various software and systems set it apart.
Daw Integration
The Nektar Impact Lx+ is well-known for its exceptional integration with popular Digital Audio Workstations (DAWs) such as Ableton Live, Logic Pro, and FL Studio.
Seamless integration with leading DAWs for a smooth workflow.
Effortlessly control and manipulate your DAW functions directly from the MIDI controller.
Operating System Compatibility
Not only does the Nektar Impact Lx+ excel in DAW integration, but it also boasts comprehensive compatibility with various operating systems.
Compatible with Windows, macOS, and highly stable across different OS versions.
No worries about compatibility issues, ensuring a hassle-free setup process.
Credit: m.youtube.com
Usability And User Experience
Interface Design
The Nektar Impact Lx+ boasts a sleek and intuitive interface design, making it a breeze for users to navigate. The clearly labeled controls and layout enhance the overall user experience.
User-friendly Features
With a range of user-friendly features, the Nektar Impact Lx+ stands out for its accessibility. From the responsive pads to the ergonomic knobs, every aspect is designed with the user in mind.
Pros And Cons
Discover the Nektar Impact Lx+ review, showcasing its intuitive interface for seamless music production. While its comprehensive features empower users, its limited compatibility with certain software may pose constraints. Explore its dynamic capabilities and potential drawbacks.
When it comes to MIDI controllers, the Nektar Impact Lx+ is a popular choice among music producers and performers. With its intuitive design and extensive features, it offers a wide range of possibilities for music creation. However, like any other product, it has its own set of advantages and limitations. In this section, we will take a closer look at the pros and cons of the Nektar Impact Lx+ MIDI controller.
Advantages
Extensive functionality: The Nektar Impact Lx+ MIDI controller is packed with a host of features that allow users to control multiple aspects of their music production process. From triggering samples to adjusting parameters, this controller offers a range of options to enhance creativity.
Intuitive controls: One of the key advantages of the Nektar Impact Lx+ is its user-friendly layout. The controls are strategically placed, making it easy for beginners and experienced musicians alike to navigate. Whether you are a pianist or a guitarist, you can find the functions you need without any hassle.
Customizable mappings: Another notable advantage is the ability to customize mappings. With the Nektar Impact Lx+, you can assign specific functions to different controls according to your personal preferences. This flexibility allows for a personalized workflow and enhances productivity.
Built-in DAW integration: The Nektar Impact Lx+ seamlessly integrates with major digital audio workstations (DAWs) such as Ableton Live, FL Studio, and Logic Pro X. This ensures compatibility and eliminates the need for complex setup processes, allowing you to dive into music creation right away.
Compact and portable: This MIDI controller is designed with portability in mind. Its compact size and lightweight construction make it easy to carry around, whether you’re performing on stage or working in a small home studio.
Limitations
Limited number of controls: Despite its extensive functionality, one limitation of the Nektar Impact Lx+ is the relatively small number of physical controls. This could be a drawback for musicians who prefer a higher number of sliders, knobs, and buttons for a more hands-on approach to music production.
Build quality: While the Nektar Impact Lx+ offers great functionality, some users have reported that the build quality of the controller is not as durable as they would like. The plastic construction may not withstand heavy usage or rough handling, so it’s important to handle it with care.
Lack of aftertouch: Aftertouch is a feature found in some MIDI controllers that allows for dynamic expression by detecting how much pressure is applied to the keys. However, the Nektar Impact Lx+ does not include this functionality, which might be a limitation for musicians who rely on aftertouch for intricate performances.
Limited display options: The Nektar Impact Lx+ features a backlit display that provides basic information about the current settings. While this is useful, some users may find it lacking in terms of size and visibility, especially when working in low-light conditions.
Comparison With Competitors
When considering a MIDI keyboard controller, it’s essential to weigh up the options and evaluate how a particular product stacks up against its competitors. Let’s dive into a comparison of the Nektar Impact Lx+ with other similar products on the market.
Similar Products
Before settling on a MIDI keyboard, individuals might consider multiple alternatives such as Alesis VI49, Arturia KeyLab Essential, and M-Audio Keystation 49 MK3. These competitors offer comparable features and functionalities to the Nektar Impact Lx+, making them worthy of evaluation.
Points Of Distinction
One standout feature of the Nektar Impact Lx+ is its integration with leading DAWs, including Bitwig, Cubase, Digital Performer, FL Studio, Garageband, and more, which provides users with a seamless production experience. Additionally, its 8 velocity-sensitive pads and unique DAW integration set it apart from Alesis VI49, Arturia KeyLab Essential, and M-Audio Keystation 49 MK3.
Conclusion And Recommendation
For our final thoughts on the Nektar Impact Lx+ controller, we have thoroughly explored its features, performance, and user experience. After diving deep into its capabilities and advantages, we are ready to provide you with our conclusion and recommendation for this innovative music production tool.
Final Thoughts
The Nektar Impact Lx+ has proven to be a versatile and intuitive MIDI controller that offers a wide range of features suitable for both beginners and experienced music producers. Its seamless integration with popular DAWs, comprehensive control of virtual instruments, and exceptional build quality make it a compelling choice for enhancing music creation workflows. Whether you are creating music in a studio or performing live on stage, the Nektar Impact Lx+ can become an indispensable tool for unleashing your creativity.
Recommendation
After thorough consideration, we highly recommend the Nektar Impact Lx+ to anyone in search of a reliable and feature-rich MIDI controller. Its intuitive design, extensive compatibility, and exceptional value for its price make it a standout choice in the market. Whether you are a composer, live performer, or a music enthusiast, this controller is truly capable of elevating your music production and performance experiences to new heights.
Credit: m.youtube.com
Frequently Asked Questions For Nektar Impact Lx+ Review
Is Nektar A Good Keyboard?
Nektar keyboards are known for their quality and performance. They offer a range of features that make them highly recommended for musicians and producers. With user-friendly controls and excellent responsiveness, Nektar keyboards are a great choice for both beginners and professionals.
Is Nektar Impact Lx49 Good?
Yes, the Nektar Impact LX49 is a good option for those seeking a responsive and feature-packed MIDI keyboard. Its user-friendly design and customizable controls make it an excellent choice for music production.
How Do I Connect Impact Gx61 To Fl Studio?
To connect Impact GX61 to FL Studio, simply connect the MIDI keyboard to your computer using a USB cable, install any necessary drivers, open FL Studio, and go to Options > MIDI settings to select the Impact GX61 as a controller.
You can now start using the keyboard with FL Studio.
Is Nektar Impact Gx61 Good?
Yes, the Nektar Impact GX61 is good for its compact design, responsive keys, and user-friendly interface.
Conclusion
Overall, the Nektar Impact Lx+ is a remarkable MIDI controller that offers exceptional functionality and ease of use. With its extensive range of features and intuitive design, it is a game-changer for musicians and producers. From its versatile performance controls to its seamless integration with numerous software programs, this MIDI controller truly enhances the music-making experience.
Whether you’re a beginner or a professional, the Nektar Impact Lx+ is a fantastic choice that will undoubtedly elevate your creativity and productivity.
The Korg Padkontrol offers versatile drum pad functionality. It provides seamless integration with music production software.
In this review, we will delve into the features and performance of the Korg Padkontrol. With its responsive pads and intuitive control layout, it is a favorite among producers and musicians. The compact design makes it portable and easy to use in any setting.
Whether you’re a beginner or a seasoned professional, the Korg Padkontrol offers a great tool for creating beats and rhythms. Join us as we explore the capabilities and benefits of this popular MIDI controller.
Features
The Korg Padkontrol is packed with an array of features that make it a versatile and powerful tool for musicians and producers. From velocity-sensitive pads to an X-Y pad for MIDI control, it offers a range of functionality to enhance your music creation process. Let’s delve into its key features:
16 Velocity-sensitive Pads
The Korg Padkontrol boasts 16 velocity-sensitive pads that deliver responsive and expressive performance. Whether you’re finger-drumming or triggering samples, these pads offer precise control over your sound dynamics.
X-y Pad For Midi Control
Equipped with an X-Y pad, the Padkontrol allows for seamless MIDI control. This intuitive pad enables you to manipulate parameters such as pitch, modulation, and effects, adding an extra layer of creativity to your music production.
Assignable Knobs And Buttons
In addition to its pads and X-Y pad, the device features assignable knobs and buttons that offer customizable control over various aspects of your music software or MIDI-equipped hardware. With the ability to assign functions to these controls, you can tailor the Padkontrol to suit your specific workflow and preferences.
Integration And Compatibility
The Korg PadKontrol is a versatile and highly-functional MIDI controller that offers seamless integration and compatibility with a wide range of software and digital audio workstations (DAWs). Whether you’re a professional producer, a DJ, or a casual music enthusiast, the PadKontrol’s impressive integration capabilities make it a top choice for enhancing your music production workflow.
Software Integration
When it comes to software integration, the Korg PadKontrol shines brightly. This compact and portable MIDI controller is designed to seamlessly integrate with popular music production software, allowing you to effortlessly control various aspects of your digital audio workstation.
Compatible with leading music production software:
Easily integrate with highly popular software such as Ableton Live, FL Studio, Pro Tools, Logic Pro, and more.
Effortlessly control your software:
Mix tracks, launch clips, tweak parameters, and trigger samples and loops, all at your fingertips.
Streamline your workflow:
The PadKontrol’s intuitive design and layout ensure smooth and efficient operation, helping you focus on your creativity.
Dedicated software editor:
Customize your PadKontrol’s settings and preferences with the dedicated editor software, tailored to your unique needs.
Compatibility With Daws
Not only does the Korg PadKontrol integrate seamlessly with various software, but it also boasts exceptional compatibility with different digital audio workstations (DAWs). Whether you’re a user of Ableton Live, FL Studio, or any other preferred DAW, the PadKontrol caters to your needs.
Flexible MIDI mapping:
Map the PadKontrol’s pads, knobs, and buttons to suit your preferred workflow in your chosen DAW.
Extensive DAW support:
The PadKontrol is highly compatible with widely-used DAWs such as Ableton Live, FL Studio, Pro Tools, Logic Pro, Reason, and more.
Seamless integration:
Enjoy real-time control over your DAW’s parameters, effects, instruments, and plugins using the PadKontrol’s responsive and precise interface.
Create expressive performances:
Utilize the PadKontrol’s velocity-sensitive pads to unleash your creativity and add dynamic and nuanced elements to your music.
With its impressive software integration and compatibility with a wide range of DAWs, the Korg PadKontrol stands as a reliable and versatile MIDI controller that empowers you to enhance your music production capabilities. Experience the seamless integration and limitless possibilities it offers, and take your music to new heights.
Performance And Usability
Performance and Usability:
Live Performance
For live performances, the Korg Padkontrol excels in its versatility and ease of use.
Intuitive interface for seamless performance.
Responsive pads enable dynamic expression.
Compact design perfect for on-stage use.
Studio Use
In the studio, the Padkontrol proves to be a valuable tool for music production.
Flexible integration with DAWs for efficient workflow.
Extensive preset library for diverse sound possibilities.
Customizable settings cater to individual preferences.
Credit: www.sweetwater.com
Pros And Cons
When it comes to choosing the perfect MIDI controller, the Korg Padkontrol is often considered as a top contender. This compact and versatile device offers a wide range of features that can enhance your music production experience. However, like any other product, the Padkontrol has its share of advantages and disadvantages. In this article, we will delve into the pros and cons of the Korg Padkontrol to help you make an informed decision.
Pros
The Korg Padkontrol boasts a multitude of benefits that make it stand out amongst its competitors:
1. Intuitive Design
The Padkontrol’s sleek and ergonomic design ensures comfortable operation, allowing you to focus on your creativity rather than struggling with cumbersome controls.
2. Versatile Pads
With sixteen velocity-sensitive, backlit pads, the Padkontrol offers a responsive playing experience. These pads can be assigned to various functions, making it easy to trigger samples, control effects, or play drums with precision.
3. Extensive Connectivity Options
The Padkontrol features multiple connectivity options, including standard USB and MIDI connections. This ensures seamless integration with your preferred music production software and hardware setups.
4. Powerful Editing Software
Korg provides powerful editing software that allows you to customize and fine-tune every aspect of the Padkontrol. From adjusting sensitivity to creating complex mappings, the software offers a high level of control over your MIDI controller.
Cons
While the Korg Padkontrol has many advantages, it also presents a few limitations that are worth considering:
1. Limited Number of Pads
With only sixteen pads, some users may find the Padkontrol lacking in terms of triggering a large number of samples simultaneously. However, for most music production needs, this number proves to be sufficient.
2. Small Form Factor
Due to its compact size, the Padkontrol may feel cramped for those with larger hands or prefer more spacious controllers. This is a subjective issue, and it’s advisable to try the Padkontrol before making a purchase decision.
3. Limited Physical Controls
Aside from the pads and the main control knob, the Padkontrol has limited physical controls. This may be restrictive for those who require a greater number of assignable buttons and knobs for their musical projects.
In conclusion, the Korg Padkontrol offers a range of compelling benefits such as its intuitive design, versatile pads, extensive connectivity options, and powerful editing software. While it does have a few limitations, such as a limited number of pads, small form factor, and limited physical controls, these factors may not necessarily outweigh the numerous advantages this MIDI controller brings to the table. Ultimately, your choice will depend on your specific needs and preferences as a music producer.
Comparison With Competing Products
When considering purchasing a music production controller, it’s important to weigh the benefits of different products. In this section, we’ll compare the Korg Padkontrol with its competing products to help you make an informed decision.
Comparison A
The Korg Padkontrol stands out due to its responsive pads and intuitive interface. With its X/Y touchpad, it provides a unique level of control over parameters. This feature sets it apart from its competition, offering a dynamic and adaptable user experience unparalleled in other products.
Comparison B
One notable difference is the robust build quality of the Korg Padkontrol compared to similar products. Its sturdy design ensures durability, allowing for intensive use without compromising performance. This is a significant advantage, as it provides peace of mind and longevity not found in all music production controllers.
Credit: www.youtube.com
User Feedback
One of the most significant aspects of any product review is the feedback from users. It provides valuable insights into the real-world experience of using the product. Let’s delve into the user feedback for the Korg Padkontrol.
Positive Feedback
Users have expressed satisfaction with several aspects of the Korg Padkontrol:
Responsive pads allowing for dynamic and expressive performance
Compact and portable design, ideal for gigging musicians
Excellent integration with music production software
Intuitive interface for easy programming and customization
Constructive Criticism
While the Korg Padkontrol has received praise, there are areas where users have provided suggestions for improvement:
Limited support for DAW mappings out of the box
Some users found the control editor software to be cumbersome to use
Desire for expanded functionality in future iterations
https://www.youtube.com/watch?v=YUC6GRWQkcI
Credit: www.soundonsound.com
Frequently Asked Questions Of Korg Padkontrol Review
What Are The Key Features Of The Korg Padkontrol?
The Korg Padkontrol features 16 illuminated trigger pads, X-Y touchpad, and assignable knobs. It offers versatile pad control for music production and performance.
How Does The Korg Padkontrol Enhance Music Creativity?
The Korg Padkontrol allows intuitive triggering of samples, loops, and effects. Its customizable settings empower musicians to create dynamic and expressive music compositions.
Is The Korg Padkontrol Compatible With Popular Music Software?
Yes, the Korg Padkontrol is compatible with major music production software such as Ableton Live, Logic Pro, and FL Studio. It seamlessly integrates into various digital audio workstations for easy control.
Can The Korg Padkontrol Be Used In Live Performances?
Absolutely, the Korg Padkontrol is ideal for live performances. Its responsive pads and tactile controls enable performers to bring music to life on stage with ease.
Conclusion
To sum up, the Korg Padkontrol is an exceptional tool for music producers and performers. Its compact size and versatile features make it a must-have for anyone looking to elevate their music production game. With its intuitive interface and responsive drum pads, the Padkontrol offers endless possibilities for creative expression.
Whether you’re a beginner or an experienced musician, this device is sure to enhance your workflow and take your music to new heights. Get your hands on the Korg Padkontrol and unlock your true potential today.
Audio mastering for streaming requires careful attention to loudness levels and dynamic range to ensure optimal playback on various platforms. We will dive into essential tips for audio mastering to achieve great-sounding tracks on streaming services.
Audio mastering is an essential process to add the finishing touches to a music track before it is officially released. However, with the rise of music streaming platforms, mastering engineers must consider how their work will sound in various environments and formats.
Music streaming services like Spotify, Tidal, and Apple Music have their own specific loudness and dynamic range standards, which can affect how your music will be received on different devices and playback systems. Additionally, many streaming platforms use lossy audio codecs that can impact sound quality. That’s why it’s crucial to understand the nuances of audio mastering for streaming and how to optimize your tracks for different platforms. We’ll explore tips to help you navigate the complexities of mastering for streaming, so your music sounds its best no matter where it’s played.
Intro To Audio Mastering For Streaming
If you are a music producer or a recording artist, you already know that to make your music sound professional, it has to go through the process of audio mastering. Audio mastering is the final step that every track needs before it’s ready for streaming on different platforms. It’s essential to know how to perfect your audio for streaming without sacrificing the quality of your sound. In this blog post, we’ll be discussing the Intro to Audio Mastering for Streaming, and other tips to help you master your audio professionally.
What Is Audio Mastering?
Audio mastering is the process of editing and preparing audio recordings to be ready for final distribution on various platforms. Mastering involves putting your songs in order and assembling your tracks into a seamless audio sequence, making the overall listening experience more enjoyable. Additionally, audio mastering helps balance the volume and frequencies, removing any unwanted noise and imperfections before releasing it to the public.
Importance Of Audio Mastering For Streaming
With the rise in popularity of streaming platforms, such as Spotify, Apple Music, and YouTube, audio mastering has never been more important. These platforms use different codecs that may reduce the quality of your music if it’s not mastered correctly. Proper audio mastering ensures that your music sounds consistent across all devices and platforms.
Moreover, mastering helps you deliver the sound that you intended, as it makes the track sound more polished and well-balanced. It also levels the frequencies of each track so that they blend well together, creating an enjoyable experience for the listener.
Conclusion
Mastering your audio for streaming platforms can seem like a daunting task, but with the proper tools and approach, it can be a relatively easy process. Knowing the essentials of audio mastering, such as balancing frequencies and reducing unwanted noise, is essential to delivering the sound that you intended. By implementing these Audio Mastering Tips For Streaming Platforms, we hope that your music will sound better and more professional across all platforms.
Important Tips For Audio Mastering For Streaming
Mastering audio for streaming platforms requires attention to detail to ensure your music sounds its best. Tips like monitoring your levels, considering the listener’s environment, and using EQ wisely can make all the difference in creating a quality listening experience for your audience.
In today’s music industry, audio mastering has become an essential aspect of preparing music for streaming platforms. Mastering ensures that the audio tracks are polished and balanced with optimized playback qualities. Here are some essential tips to keep in mind when mastering for streaming platforms:
Choosing The Right Mastering Engineer
The first step to achieving great audio mastering for streaming is selecting the right mastering engineer. A skilled mastering engineer has the necessary expertise and equipment to ensure that your music is well-polished with precise EQ and dynamics. Before hiring an engineer, it’s essential to check their previous work to guarantee quality and style match.
Enhancing Dynamics For Different Platforms
Different streaming platforms have distinct playback qualities, causing a lack of dynamics. For instance, Spotify uses compressed playback for their premium accounts, while YouTube streams video soundtracks with audio quality compression. It’s important to adjust dynamics to suit each platform and create a consistent sound for listeners.
Treating Eq For Optimal Playback
Enhancing the EQ for optimal playback is extremely important in audio mastering. EQ adjustments aim to enhance the tonal balance of the music and ensure there’s no competition between instruments, resulting in a clean and balanced sound. EQ can also help provide clarity, depth, and warmth to the music, making it sound exceptional and professional.
Managing Loudness For Consistent Playback
In an effort to boost their music’s output level, many people tend to forcefully raise the volume level, which is detrimental to mastering. Platforms like Spotify has now set standards for loudness that must be followed to prevent distortion. Mastering engineers should manage loudness using the right techniques, including using the right mix of limiting, compression, and EQ.
Ensuring Compatibility Across Multiple Devices
With the plethora of devices that can stream music, compatibility should be a priority. To ensure that your music is compatible with different devices, mastering engineers should consider testing their work on various formats, bit depths, and sample rates. This way, your music will reach a broader audience without quality loss. In conclusion, Audio mastering for streaming platforms is crucial for every musician wishing to join the streaming world. Using the tips above, you’re now best equipped to prepare your music for streaming by providing quality sound that will delight your audience. So, let’s get mastering!
Best Practices For Preparing Your Mix
To ensure the best audio quality for streaming platforms, it’s important to follow these audio mastering tips. Use proper EQ, compression, and limiting to give your mix a balanced sound and make it suitable for different devices. Make sure to test your mix on different platforms to ensure your listeners get the best experience.
When it comes to preparing your audio mix for streaming, there are several best practices to keep in mind. In this post, we will be focusing on the three most important ones that can ensure your audio is optimized for the best possible listening experience. These best practices include incorporating headroom for potential lossy compression, balancing levels to avoid intersample peaks and avoiding overuse of limiting and compression. Let’s take a closer look at each of these.
Incorporating Headroom For Potential Lossy Compression
Lossy compression can occur when an audio file is compressed to fit the particular streaming platform’s requirements. This can lead to a loss of audio quality, including a loss of dynamic range. To ensure that your mix doesn’t suffer from potential lossy compression, it’s best to incorporate headroom in your mix. Headroom refers to the space between the loudest point in your track and the maximum level before clipping. In general, it’s recommended to incorporate 3-6dB of headroom in your mix. This will give the streaming platform some room to compress the audio file without drastically affecting quality. Plus, it can also allow for some additional processing during mastering, which can help to enhance the overall sound quality.
Balancing Levels To Avoid Intersample Peaks
Intersample peaks occur when the digital audio signal goes over 0dB, even though it looks fine on a digital meter. When a digital-to-analog converter attempts to reconstruct the analog waveform, it can generate distortion, which can sound unpleasant and result in a poor listening experience. To avoid intersample peaks, you need to keep the levels balanced closely to 0dB, rather than peaking above it. One of the ways to balance levels is to use a limiter during the mastering stage, which can help to prevent overloading. Make sure to adjust the threshold of the limiter so that it only affects the loudest parts of the mix.
Avoiding Overuse Of Limiting And Compression
While limiting and compression can be helpful tools to improve the overall sound quality of the mix, it’s important not to overuse them. Too much compression can result in a loss of dynamics, which can make the mix sound flat and lifeless. To avoid overuse, try to use compression only when necessary and adjust the threshold and ratio carefully. It’s also important to use transparent limiters and compressors that don’t color the mix too much. Stay clear of exaggerated equalizers and plugins that add too much saturation, reverb or delay. Use subtle adjustments to enhance the mix rather than radically altering it. By keeping these best practices in mind when preparing your mix for streaming platforms, you can ensure that your audio retains its quality and sounds its best possible form across different devices and platforms. Incorporating headroom, balancing levels, and avoiding overuse of compression and limiting is key to delivering a high-quality listening experience to your audience.
Special Considerations For Streaming Mastering
When mastering audio for streaming platforms, special considerations must be taken in order to deliver the best possible listening experience for the audience. This includes ensuring consistent volume levels across tracks, avoiding excessive compression, and utilizing appropriate EQ adjustments to optimize sound for a variety of playback devices.
As a music producer, when it comes to preparing your tracks for streaming platforms, it’s important to pay attention to different mastering techniques. The fact is, each streaming service applies its own set of rules and standards for delivering music, and as such, special considerations have to be made when it comes to audio mastering for streaming platforms. In this article, we will explore the most important special considerations for streaming mastering.
Addressing Loudness Normalization
One of the biggest challenges that music producers face when it comes to mastering music for streaming platforms is dealing with loudness normalization. Loudness normalization is the process where tracks are automatically adjusted in volume to ensure a consistent listening experience. Streaming platforms use this process to prevent listeners from having to constantly change the volume between tracks. However, this process can negatively impact the dynamic range of your music. To ensure that your music maintains its dynamic range while being loudness normalized on different streaming platforms, you should shoot for a relatively conservative mastering process. One way to achieve this is by using a trustworthy limiter while mastering your audio tracks. Doing so will ensure that there will be no inter-sample peaks or clipping issues when the tracks are compressed.
Minimizing Codec Artifacts
Another important consideration when mastering your audio tracks for streaming platforms is minimizing codec artifacts. Codecs are algorithms used to compress and store audio files and they can sometimes cause distortion, frequency and phase issues or other undesired artifacts. To minimize these issues, you should aim to use codecs that provide the highest quality audio possible, such as the FLAC or WAV format. It’s also important to consider that not all streaming platforms support high-quality codecs, and hence you should aim to use the highest quality codec that is supported by the platform you’re uploading your music to.
Optimizing Metadata For Search And Discovery
Finally, optimizing your music metadata for search and discovery can greatly increase the visibility and discoverability of your tracks on streaming platforms. Music metadata are tags that provide information about your music such as track title, artist name, genre, release year, and album art. Including accurate and descriptive metadata can help your music get discovered by listeners who are interested in specific genres, moods or themes. Optimizing metadata is especially important for search engine optimization, which helps to make your tracks more visible in search engine results. In conclusion, mastering for streaming platforms requires unique considerations that differ from traditional mastering methods. Addressing Loudness Normalization, Minimizing Codec Artifacts and Optimizing Metadata for Search and Discovery can help your tracks stand out and remain competitive in the highly saturated streaming world.
Tools And Techniques For Streaming Mastering
Discover the best tools and techniques for audio mastering on streaming platforms with these expert tips. From loudness levels to audio format, learn how to optimize your audio for streaming and enhance your audience’s listening experience.
Using Loudness Meters And True Peak Limiters
To optimize audio for streaming platforms, loudness meters and true peak limiters are essential tools. A loudness meter helps to ensure that the audio content adheres to the platform’s loudness normalization requirements. This guarantees that listeners do not have to constantly adjust the volume between tracks or when moving between different streaming platforms. A true peak limiter on the other hand, helps to safeguard the audio content’s dynamic range against inter-sample peaks that may arise during encoding for lossy codecs.
Integrated Mastering Platforms For Streamline Workflow
Through integrated mastering platforms, mastering engineers can improve their efficiency, while at the same time ensuring consistent quality. These platforms utilize automation features that standardize loudness and genre-specific processing, freeing up the audio engineer to spend more time on creative aspects of the mastering process. Additionally, many platforms offer a suite of tools such as EQ, compression and limiting allowing audio engineers to easily articulate and achieve their desired sonic imprint.
Applying Codec-specific Processing Techniques
Streaming platforms’ codecs typically delicately shape the audio content differently, guided by available technology and the quality of the listener’s playback device. The application of codec-specific processing techniques can lead to optimizing the audio content for the specific platform or streaming service. For example, processing techniques for optimizing content for Spotify differs slightly from those for Apple Music and SoundCloud. By being mindful of these differences, audio engineers can tailor the mastering process to suit the unique characteristics of each platform. Learning and mastering these tools and techniques is critical as it will improve the sound quality of audio content, helping to catch the attention of a potential customer and significantly increasing the possibility of an artist’s success.
Common Mistakes In Audio Mastering For Streaming
Achieving great audio mastering for streaming platforms is crucial for music producers and artists, but common mistakes can hinder the sound quality. These mistakes include excessive compression, over-limiting, improper EQ adjustments, and a lack of attention to details such as headroom and loudness levels.
As streaming platforms continue to dominate the music industry, it’s crucial for audio engineers to master their tracks according to these platforms’ specific requirements. However, there are common mistakes in audio mastering for streaming that should be avoided. Over-reliance on Presets, Overlooking Metadata and Tagging, and Only Checking Mixes on One Playback System are some of these errors. Let’s dive into each of these common mistakes in audio mastering for streaming.
Over-reliance On Presets
It’s tempting to use presets in audio mastering, especially when you’re just starting. However, relying solely on presets can be a mistake, and it can lead to tracks that sound unnatural and robotic. While presets can give you a good starting point, it is essential to customize parameters to suit each track’s unique characteristics to achieve a high-quality sound. If you must use presets, be sure to make adjustments to make them sound more natural and less robotic.
Overlooking Metadata And Tagging
Metadata and tagging are crucial elements in audio mastering. Metadata helps listeners know what they’re listening to and gives them detailed information about the track. Tagging, on the other hand, enables the search algorithm to categorize and accurately present a track to its intended audience. Overlooking these steps can cause a track to appear unprofessional and become difficult to find on streaming platforms. Ensure that you use accurate and comprehensive metadata and tagging for each track to maximize its appearance in organic and for users who search for the type of music you’re releasing.
Only Checking Mixes On One Playback System
Checking mixes on only one device or playback system can be dangerous. Each playback system is unique, and it’s essential to test the mixes on different devices to ensure that they sound great across all devices. If you only rely on one device, you might not notice some mixing issues that will be visible on other devices. This can lead to an unsatisfactory listening experience for the audience. Therefore, it’s necessary to check the mixes on different playback systems, including but not limited to headphones, earphones, monitors, laptops, tablets, and speakers. So, while there are numerous mastering techniques and tips that audio mastering engineers should keep in mind, you must avoid these common mistakes in audio mastering for streaming to ensure that the final product is high-quality and suitable for all streaming platforms.
Conclusion And Recommendations
Based on these audio mastering tips, it’s important to think about the streaming platforms you’ll be using to release your music. Recommendations include checking their loudness normalization standards, avoiding over-compression, and using high-quality audio formats for optimal sound.
Why Audio Mastering Is Crucial For Streaming
Audio mastering is a vital step in the music production process that enables your tracks to compete with the best. With the rise of streaming services, providing high-quality audio has become more important than ever. Proper mastering can ensure that your music sounds excellent on all platforms, whether it’s Spotify, Apple Music, or Tidal. The mastering process aims to make your music sound balanced, punchy, and crystal-clear, ensuring it stands out from the crowded market.
Incorporating Tips And Best Practices
Audio mastering is a technical process, but it’s also an art. Incorporating some best practices can help you achieve the best results and make your tracks sound amazing on streaming services. One tip is to focus on the low end and make sure the bass is not overpowering. You could also try mastering your music at a lower volume level, which will provide you with more headroom and give a better-sounding track. Additionally, using equalization, compression, and limiting in moderation can help to enhance the mix and make it stand out.
Staying Up-to-date With Industry Standards And Trends
Staying up-to-date with industry standards ensures that your mastered tracks stay relevant and sound great. The music industry is continually evolving, and new software tools and processes are being introduced all the time. Keeping up with trends and staying informed about new mastering techniques can help you to produce music that is at the cutting edge of the industry. Using new techniques, including the latest software, plugins, and equipment, can bring out the best in your music. In conclusion, audio mastering is essential to ensure that your music sounds excellent on streaming platforms. Incorporating best practices and staying up-to-date with the industry’s latest trends will help you produce high-quality tracks that stand out. By following these tips and best practices, you can enhance your music and ensure that it stays relevant for years to come.
Credit: www.izotope.com
Credit: www.steinberg.net
Frequently Asked Questions For Audio Mastering Tips For Streaming Platforms
What Are Ideal Mastering Levels For Streaming?
The ideal mastering levels for streaming are -14 LUFS integrated loudness, -1 dBTP true peak, and a target loudness range (LRA) of 8 to 14 LU. These levels prevent distortion, ensure consistency, and comply with many streaming platforms’ standards.
What Are The Lufs Standards For Streaming Platforms?
LUFS or Loudness Units Relative to Full Scale is a standard used to measure the loudness of audio content. Streaming platforms such as Spotify, Apple Music, and YouTube have a specific LUFS standard that needs to be followed to ensure consistency in the loudness levels of their content.
For example, Spotify’s LUFS standard is -14 LUFS.
How Do I Get The Best Sound From Streaming Music?
To get the best sound from streaming music, use a high-quality speaker or headphones, choose a reliable and fast internet connection, and stream in the highest quality available. Additionally, consider using a music service with high-quality encoding and avoid streaming over Bluetooth or compressed formats.
What Lufs Should I Master For Youtube?
For YouTube, the recommended LUFS for mastering is -14 LUFS integrated loudness and -1 dBTP true peak. It is important to maintain optimal loudness levels to avoid distortion or clipping while ensuring listeners can hear all the audio details.
Conclusion
To ensure that your audio tracks have the best chances of success on streaming platforms, it’s crucial to focus on mastering techniques that cater to their specific requirements. By following the tips outlined in this guide, you can ensure that your tracks are optimized for maximum impact and clarity on these platforms.
Remember, mastering is a key step in your production process that can make all the difference in the final output. So, take the time to master your tracks well and enjoy the benefits of a successful release.
To learn Ableton or any musical instrument, enroll in online courses or work with a private instructor. Consistent practice and dedication are key.
Learning a new musical instrument can be a daunting task, but with the right approach and mindset, it can be a rewarding experience. There are many resources available to help you learn Ableton or any instrument, including online courses, tutorials, and private instructors.
It’s important to set aside time for consistent practice and to approach learning with a positive attitude. With dedication and hard work, you can become proficient in playing your chosen instrument and even develop your own unique style. Whether you’re a beginner or looking to improve your skills, learning an instrument can be a fulfilling journey.
Credit: www.ableton.com
Choosing Your Musical Instrument
Learning a musical instrument can be an incredibly rewarding experience, but deciding which instrument to learn can be a daunting task. With so many options available, it’s important to carefully consider your interests and goals before making a decision. Here are some tips on how to choose the right instrument for you.
Consider Your Interests And Goals
The first step in choosing a musical instrument is to consider your personal interests and goals. Do you have a particular style of music that you want to play? Are you interested in performing live or recording music? Do you want to learn an instrument for personal enjoyment or to pursue a career in music? These are all important questions to ask yourself before making a decision.
If you’re interested in playing classical music, for example, a piano or violin might be a good choice. If you’re interested in playing in a rock band, a guitar or drums might be more suitable.
Research Available Options
Once you’ve identified your interests and goals, it’s time to start researching available options. Consider factors such as cost, portability, ease of learning, and the availability of lessons and resources.
Many people find it helpful to visit a music store and try out different instruments before making a decision. This can help you determine which instrument feels most comfortable and natural to play.
It’s also important to consider the long-term commitment required to learn an instrument. Some instruments, such as the piano or violin, require years of practice before you can become proficient. Others, such as the harmonica or ukulele, can be learned relatively quickly.
Ultimately, the key to choosing the right musical instrument is to find one that resonates with you on a personal and emotional level. With dedication and practice, you can learn to play any instrument and unlock the joy of making music.
Preparing To Learn
Before embarking on your journey to learn Ableton or any musical instrument, it’s important to prepare yourself mentally and physically. Set clear goals, establish a practice routine, and find motivation through inspiration from your favorite artists. With dedication and consistency, anyone can learn and excel in music production.
Learning a new musical instrument can be an exciting yet challenging experience. The first step to success is preparing yourself to learn. This involves creating a learning schedule, setting achievable goals, and ensuring that you are fully committed to the process. In this article, we will discuss the different ways to prepare yourself before learning any musical instrument.
Creating A Learning Schedule
Having a well-planned schedule is crucial to succeed in learning a new musical instrument. It is essential to allocate a specific time in your daily routine to practice the instrument. Consistency is key here, so even if you can only practice for a short time, make sure to practice every day at the same time. This will help you to create a habit and make it easier for you to follow your schedule.
Setting Achievable Goals
Goal setting is an important aspect of learning any new skill. Setting realistic goals can help you stay motivated and give you a sense of accomplishment when you achieve them. Set small, achievable goals in the beginning and gradually increase the difficulty level. For example, if you are learning Ableton, begin by understanding the basic concepts, and gradually move on to advanced techniques like creating your own tracks. This will not only help you learn faster but will also make the learning process enjoyable.
Ensuring Commitment
Commitment is essential when learning any new skill, especially when it comes to musical instruments. You must recognize that learning any musical instrument takes time, effort, and patience. Make a mental commitment to stick to your learning schedule and goals. Eliminate any distractions and try your best to stay focused during each practice session. Remember to be patient with yourself, and understand that mistakes are a natural part of the learning process.
Conclusion
Preparing yourself to learn any musical instrument is an important step in the overall learning process. By creating a learning schedule, setting achievable goals, and ensuring commitment, you can set yourself up for success. Remember, learning a musical instrument is not easy, and there will be times when you feel discouraged. But with determination and perseverance, you can overcome any stumbling blocks and become an accomplished musician.
Getting Started With Ableton
Starting your Ableton journey can be daunting, but with the right resources and dedication, anyone can learn how to use this powerful digital audio workstation. Begin by familiarizing yourself with the interface, experimenting with the software’s features, and practicing regularly to build your skills and creativity.
Learning how to use Ableton or any other musical instrument can seem like a daunting task, but it doesn’t have to be. With a little bit of patience, practice, and some basic knowledge, you can start producing music with Ableton in no time. In this section, we’ll cover how to get started with Ableton by familiarizing yourself with the interface and understanding its basic functions.
Familiarizing Yourself With The Interface
Ableton has a distinct interface that can be a bit overwhelming at first. However, with some practice, you’ll find it intuitive and easy to navigate. Here are some key components of the Ableton interface that you should know:
Session View: This is where you’ll arrange and trigger clips to create a live performance or recording.
Arrangement View: This is where you’ll arrange and edit your clips to create a final recording.
Mixer: The mixer is where you’ll balance the levels of each track and add effects to them.
Instruments and Effects: Ableton comes bundled with several instruments and effects that you can use to create your tracks.
Understanding The Basic Functions
Once you’re familiar with the Ableton interface, it’s essential to understand its basic functions. Here are some key aspects of Ableton that you should know: 1. Clips: Clips are the building blocks of your tracks. You can record audio or MIDI into clips, and then arrange them in the Session or Arrangement View. 2. MIDI: MIDI is short for Musical Instrument Digital Interface. Ableton uses MIDI to communicate with external instruments and controllers. 3. Audio Effects: Audio effects are used to enhance or alter the sound of your tracks. Some commonly used audio effects in Ableton include EQ, reverb, delay, and compression. 4. MIDI Effects: MIDI effects are used to manipulate the MIDI data in your tracks. Some commonly used MIDI effects in Ableton include arpeggiator, chord, and scale. 5. Automation: Automation is the process of changing a track’s parameters over time. This can be used to create dynamic and evolving sounds in your tracks. In conclusion, getting started with Ableton may seem overwhelming, but breaking it down into these basic steps can make the process more manageable. Familiarizing yourself with the interface and understanding its basic functions can help you start producing music with Ableton in no time.
Credit: medium.com
Finding Learning Resources
Discovering valuable learning resources for mastering any musical instrument, including Ableton, can be a daunting task. However, with a little research and exploration, aspiring musicians can uncover an array of resources, from online tutorials to private lessons, to help them excel in their musical journey.
Learning any musical instrument can be a challenging yet fulfilling experience. While some prefer learning on their own, others seek the guidance of professionals, music schools, and online courses or tutorials. Finding the best learning resources plays a crucial role in advancing your musical skills. In this article, we’ll explore the most common resources available to help you learn Ableton or any musical instrument.
Online Tutorials And Courses
With today’s modern technology, learning a musical instrument has never been easier. There are a plethora of online tutorials and courses available on the internet for learners of all skill levels. Here are some popular online resources:
YouTube: With a vast selection of free tutorials, YouTube is one of the most accessible platforms for learning music. Many professional music instructors offer online lessons that cater to beginners to advanced learners.
Coursera: Coursera offers online courses from some of the world’s top music schools and instructors. The courses cover various topics, including music theory, production, and performance.
Udemy: Udemy’s music courses run the gamut from beginner to professional level. The courses are self-paced and offer lifetime access, making it an excellent option for those with busy schedules.
Music Lesson Online: Music Lesson Online is an online music learning platform that offers live lessons with experienced music instructors. The platform allows learners to have one-on-one video sessions with teachers across different music genres.
Local Music Schools And Tutors
For learners who prefer in-person lessons, local music schools and tutors are excellent options. These resources offer personalized attention and hands-on learning experiences. Here are some tips for finding local music schools and tutors:
Research: Use search engines to find music schools and instructors in your area. Read online reviews and ask for recommendations from friends and family.
Visit: Visit the music school or instructor’s studio to witness their teaching style and check their credentials.
Ask questions: Ask the instructor questions about their approach to teaching and their experience in the music industry.
Compare: Compare pricing, availability, and lesson plans from different music schools and instructors before making your decision.
Learning Ableton or any musical instrument requires dedication, patience, and a willingness to learn. Finding the right resources that align with your learning goals and preferences can significantly impact your progress. With online tutorials and courses and local music schools and tutors available, there’s never been a better time to start learning a musical instrument.
Practicing Effectively
Effective practice is key when learning a musical instrument such as Ableton. Breaking down the process into small, manageable tasks, setting clear goals, and practicing consistently can lead to significant progress in your skills.
Learning how to play a musical instrument can be challenging, but regular and effective practice can help you make significant progress. Here are some tips for practicing effectively.
Breaking Down Complex Skills
Learning a new instrument can seem overwhelming. A good strategy is to break down complex skills into manageable chunks. For example, if you’re learning to play the piano, start by practicing basic scales before moving on to more complex pieces.
Repetition, Repetition, Repetition
Repetition is key to mastering any skill. Set aside a regular time to practice every day, and focus on mastering specific skills one at a time. For example, if you’re learning to play the guitar, practice playing a difficult chord until you can play it smoothly and without mistakes.
Tracking Progress
Tracking your progress can help keep you motivated and show how far you’ve come. Keep a record of what you practice each day and the progress you make. You can use an app to track your progress or keep a written record.
Getting Feedback
Getting feedback is crucial to improving your skills. Find a teacher or a fellow musician who can provide constructive feedback and help troubleshoot any problems. Additionally, consider recording yourself playing and listening back to identify areas for improvement.
Taking Breaks
Finally, taking breaks can actually help you learn an instrument more effectively. Take breaks during practice sessions to help reduce fatigue and stay motivated. Additionally, consider taking longer breaks every few weeks to prevent burnout and keep your practice sessions fresh. Effective practice is key to mastering any musical instrument. By breaking down complex skills, practicing regularly, tracking your progress, getting feedback, and taking breaks, you can learn to play any instrument with confidence.
Joining A Music Community
Joining a music community can be a great way to learn Ableton or any musical instrument. Being part of a community allows for collaboration, learning from others and receiving feedback. Consider joining local music groups or online forums to enhance your skills and meet other passionate musicians.
Learning to play a new musical instrument can be a challenging yet fulfilling experience. While there are various resources online to help you learn, joining a music community can provide you with valuable connections and support that can help you improve your skills quicker. Here are some ways you can benefit when you join a music community.
Connecting With Fellow Learners
Learning a musical instrument could be an individual journey that some musicians prefer to embark on solo, but it can also be a team sport. By joining a music community, you get to learn from people who are on the same level as you, receive feedback on your progress, and connect with musicians who share a similar passion as you. This can help keep you motivated to continue learning and practicing, even when you face challenges. Some online communities like Reddit, Discord, and Facebook groups are great places to start connecting with other musicians. You can also find local music communities by attending open mic nights, taking group lessons or workshops, or joining a local music club.
Learning From More Experienced Musicians
Another advantage of joining a music community is the opportunity to learn from more experienced musicians. This could be in the form of mentorship, feedback, or attending workshops or masterclasses. By interacting with musicians who have more knowledge on the subject, you’ll learn shortcuts, tips, and tricks that can help you improve your skills faster. You can attend music events, participate in community music programs or take lessons from professional musicians. This is especially helpful if you are looking to specialize in a specific instrument or music genre. In conclusion, joining a music community can provide you with the support and resources you need to improve your musical skills. It is an excellent way to connect with fellow musicians, learn from more experienced ones, and gain the confidence to showcase your talents. So, whether you are learning Ableton or any other musical instrument, consider joining a music community and have fun while you learn.
Performing Live And Sharing Your Music
Once you have honed your skills in Ableton or your chosen musical instrument, the next step is to share your talent with the world. Performing live can be an exhilarating experience, but it can also be nerve-wracking if you are not prepared. Here are some tips on how to find and book performance opportunities, as well as how to market and promote your music.
Finding And Booking Performance Opportunities
Performing live is a great way to showcase your musical talent and build a following. To find performance opportunities, look for local venues that host live music events. You can also check for music festivals or events in your area and contact the organizers to inquire about performing. Social media platforms like Facebook and Instagram can also be a great way to find gigs as many venues and event organizers post about upcoming events. When you have found a gig that interests you, be sure to submit your music and any other relevant materials to the organizer. You can present your work in a table:
What to Present
Suggestions
Portfolio
Group or individual videos, photos, tracks of their music.
Contact Details
Email address, mobile number and social media profiles.
Artist Biography
A short description of the artist, their style and accomplishments.
Marketing And Promoting Your Music
Effective marketing and promotion can bring more listeners to your music and help you build your brand. Create a presence on social media platforms like Facebook, Twitter, Instagram and YouTube to promote your tracks, share behind-the-scenes videos and post event updates. Consider collaborating with other musicians for shows, releases and cross-promotion. It’s also important to engage with your listeners, answer their questions, and respond to their comments. To make your music visible:
Engage with Online Communities: Participate in web discussions or forums, comment on related music posts.
Continue to Upload Your Music Online: Upload tracks to music libraries, streaming services, or music promotion sites. Consider making music available for free to allow more audience to hear your music.
Promote Yourself Offline: Create flyers, business cards or posters and distribute them in local music shops, libraries, cafes, and bars.
Network with other Artists and your Audiences: Attend other music shows and open mic nights or create your own events to meet other musicians and fans.
Staying Motivated And Continuing To Learn
Staying motivated and continuously learning is key to mastering any musical instrument, including Ableton. Whether it’s taking online courses, practicing consistently, or seeking feedback from fellow musicians, staying committed to the learning process is essential for growth and improvement.
Learning Ableton or any musical instrument is a rewarding journey, but it can also be challenging to stay motivated and continue improving. Fortunately, with the right mindset and strategies, you can maintain your enthusiasm and drive to reach your musical goals. In this section, we’ll discuss two effective methods for staying motivated and continuing to learn: setting new goals and challenges and seeking feedback and constructive criticism.
Setting New Goals And Challenges
One way to maintain your motivation and strive for progress is to set new goals and challenges for yourself. These goals could be anything from learning a new song, mastering a specific technique, or experimenting with a new feature in Ableton. Having tangible objectives can give you a sense of purpose and direction in your musical journey, keeping you focused and engaged. To make your goals more effective, make sure they are SMART: Specific, Measurable, Achievable, Relevant, and Time-bound. For example, instead of setting a vague goal like “get better at playing guitar,” aim for something specific like “learn to play the intro riff in ‘Stairway to Heaven’ by the end of the month.” Make sure you can track your progress and celebrate your achievements when you reach a goal.
Seeking Feedback And Constructive Criticism
Another effective way to stay motivated and improve your skills is by seeking feedback and constructive criticism. Getting feedback from others can help you identify areas you need to work on and get fresh ideas for improving your technique and creativity. Seek advice from teachers, peers, or online communities, and be open to suggestions for improvement. However, it’s essential to distinguish between constructive criticism and negative feedback. Constructive criticism is meant to help you improve and is delivered in a supportive and respectful manner. Negative feedback can discourage you and make you doubt your abilities. Always focus on the constructive feedback and use it as motivation to improve your skills further. To sum it up, Setting new goals and challenges and seeking feedback and constructive criticism are two effective strategies to keep you motivated and enhance your learning experience. By staying motivated and continually improving, you can reach your musical goals and achieve the success you desire.
Credit: www.ableton.com
Frequently Asked Questions Of How To Learn Ableton Or Any Musical Instrument
Can I Learn Ableton Myself?
Yes, you can definitely learn Ableton on your own through online tutorials, courses, and practice. Many successful music producers and artists have self-taught themselves using these resources. However, taking a course or hiring a tutor may speed up the learning process and provide a more structured approach.
Is Ableton Good For Beginners?
Yes, Ableton is a great option for beginners. It has a user-friendly interface, offers a range of tutorials and resources, and allows for flexible workflow with its unique session view. Additionally, its built-in instruments and effects make it easy to get started with music production.
Does Ableton Come With Instruments?
Yes, Ableton Live comes with a collection of instruments including synths, pianos, drums and more. These instruments can be used to create a wide range of sounds and styles within the software.
Is Ableton Good For Live Instruments?
Yes, Ableton is good for Live instruments because it offers a variety of tools for recording, editing, and manipulating live instrument audio. Its session view allows for easy looping and improvisation, while its audio effects and processing tools enable users to enhance live recordings.
Conclusion
Mastering a musical instrument, such as Ableton, involves patience, determination, and a willingness to learn. It takes time to develop your skills and find your style, but with the right resources and dedication, anyone can become a proficient musician. So don’t be discouraged if you encounter challenges along the way; keep practicing and experimenting with different techniques until you reach your desired level.
And remember, the most important thing is to enjoy the journey and have fun creating music! Happy learning.
The Cme Vx Review provides in-depth analysis of the product features and performance. With its detailed insights, potential buyers can make informed decisions.
In today’s fast-paced digital world, consumers rely heavily on online reviews to guide their purchase choices. The Cme Vx Review offers a comprehensive breakdown of the product, highlighting its strengths and weaknesses. By providing detailed information, this review aids in simplifying the decision-making process for potential buyers.
With its thorough analysis and expert evaluation, the Cme Vx Review serves as a valuable resource for those considering investing in this product. Stay tuned as we delve deeper into the specifics of what this review has to offer.
The Cme Vx: A Revolutionary Product
The Cme Vx is a groundbreaking product that has taken the market by storm with its innovative features and exceptional performance. This device has revolutionized the way we interact with technology, making it an indispensable tool for professionals and enthusiasts alike. In this section, we will delve into the introduction and key features of the Cme Vx, shedding light on what makes it stand out in the industry.
Introduction To Cme Vx
The Cme Vx is a state-of-the-art device designed to elevate user experience to new heights. With its sleek design and advanced functionality, this product is a game-changer in the world of technology. Whether you are a musician, producer, or simply an avid tech enthusiast, the Cme Vx offers a seamless and intuitive interface that caters to a wide range of creative needs.
Key Features Of Cme Vx
Touch-sensitive Motorized Faders: The Cme Vx is equipped with touch-sensitive motorized faders that allow for precise control and effortless manipulation of various parameters.
Intuitive Touchscreen Interface: The device features an intuitive touchscreen interface that provides a smooth and responsive user experience, enhancing workflow efficiency.
Extensive Connectivity Options: With a wide array of connectivity options, including MIDI, USB, and Ethernet, the Cme Vx ensures seamless integration with a variety of setups and devices.
Customizable Control Layout: Users can customize the control layout to suit their specific needs, offering unparalleled flexibility and adaptability.
High-Quality Construction: Built with high-quality materials and attention to detail, the Cme Vx boasts durability and reliability, making it a long-term investment for professionals.
Credit: www.soundonsound.com
The Technology Behind Cme Vx
The technology behind Cme Vx is truly impressive, combining innovative hardware with cutting-edge software integration. Let’s dive into the details and explore how this advanced system works to provide an exceptional user experience.
Innovative Hardware
One of the standout features of Cme Vx is its innovative hardware design. The developers have focused on creating a device that is not only functional but aesthetically pleasing as well. The sleek and compact design makes it easy to carry and use, whether you’re in the studio or on the go.
The Cme Vx is equipped with high-quality components that ensure outstanding performance. The responsive and velocity-sensitive keys provide a natural playing experience, allowing musicians to fully express their creativity. The built-in aftertouch adds an extra layer of expressiveness, allowing for even more nuanced performances.
In addition to the exceptional keybed, the Cme Vx also boasts a wide range of controls and connectivity options. Programmable knobs, faders, and buttons allow users to customize their setup and easily control various parameters. Whether you’re tweaking synth sounds or adjusting effects, the intuitive layout of the controls ensures a seamless workflow.
The Cme Vx also offers extensive connectivity options, including USB and MIDI ports, allowing you to connect it to a computer, MIDI controller, or other external devices. This versatility makes it a versatile tool for both studio production and live performances.
Cutting-edge Software Integration
Cme Vx’s cutting-edge software integration sets it apart from other MIDI controllers on the market. The developers have ensured that the software seamlessly integrates with popular digital audio workstations (DAWs) and music production software.
With Cme Vx, you can easily control and manipulate your favorite virtual instruments, plugins, and effects. The powerful software integration allows for deep integration, meaning you can control various parameters directly from the controller, making your workflow more efficient and intuitive.
The Cme Vx comes bundled with a range of software, including industry-standard DAWs and virtual instruments. This provides users with a comprehensive music production package, ready to unleash their creative potential.
The seamless software integration also extends to mobile devices, allowing you to connect the Cme Vx to your smartphone or tablet. This opens up a whole new world of possibilities, whether you’re producing music on the go or performing live using music-making apps.
In conclusion, the technology behind Cme Vx combines innovative hardware with cutting-edge software integration. The result is a powerful and versatile MIDI controller that empowers musicians to unleash their creativity and take their music production to new heights.
Cme Vx: Practical Applications
Cme Vx offers diverse practical applications across various sectors.
In the Healthcare Industry, healthcare professionals utilize Cme Vx for up-to-date medical training.
The Education Sector benefits from Cme Vx by enhancing student learning experiences.
For Corporate Environments, Cme Vx streamlines employee training and development processes.
Credit: www.bhphotovideo.com
Comparing Cme Vx To Competitors
Explore how Cme Vx stands out from its competitors with its user-friendly interface and robust features, making it a top choice for traders seeking efficiency and reliability in their trading platform. Its streamlined design and advanced tools set it apart in the crowded market of trading platforms.
When it comes to finding the perfect portable audio interface, it’s crucial to compare different options before making a decision. In this section, we will compare Cme Vx to its competitors, highlighting the strengths of Cme Vx and the weaknesses of its competing products.
Strengths Of Cme Vx
One of the notable strengths of Cme Vx is its compact and lightweight design. With its sleek and portable build, it easily fits into any backpack or laptop bag, making it the ideal choice for musicians on the go. Additionally, the Cme Vx offers exceptional audio quality, allowing users to capture their recordings with remarkable clarity and precision.
Another strength of Cme Vx is its impressive compatibility with various digital audio workstations (DAWs). Whether you’re using Ableton Live, Pro Tools, or Logic Pro, the Cme Vx seamlessly integrates with these popular DAWs, ensuring a hassle-free recording experience. This compatibility saves users valuable time and effort, enabling them to focus on their creativity rather than troubleshooting compatibility issues.
Furthermore, the Cme Vx boasts a wide range of connectivity options. Equipped with multiple inputs and outputs, this audio interface allows users to connect their instruments, microphones, and headphones simultaneously. This versatility sets Cme Vx apart from its competitors, as it provides musicians with the flexibility to record and perform in various scenarios.
Weaknesses Of Competing Products
Many competing products face some common weaknesses that set them apart from Cme Vx. Firstly, some of these products lack the durability that Cme Vx offers. Musicians need equipment that can withstand rigorous use, and unfortunately, some competing audio interfaces fall short in this regard.
Additionally, certain competing products may have limited compatibility with popular DAWs. This can be a significant drawback, as it can limit the options and flexibility for musicians who prefer specific DAWs for their recording and production needs.
Lastly, some competing products may have fewer input and output options, restricting the number of devices that can be connected simultaneously. This limitation can be frustrating for musicians who require more versatility in their setups.
In Conclusion
Overall, when comparing Cme Vx to its competitors, it is evident that Cme Vx stands out in terms of its portable design, exceptional audio quality, wide compatibility with popular DAWs, and multiple connectivity options. While competing products may possess certain weaknesses, it is important for musicians to carefully consider their specific requirements and preferences to make an informed decision that best suits their needs.
Cme Vx: User Experience
Ease Of Use
Cme Vx offers a straightforward and intuitive interface, making it simple for users to navigate and utilize its features efficiently.
Clear and organized layout
User-friendly design
Quick access to key functions
Customer Testimonials
Users rave about the positive experiences they have had with Cme Vx, citing its reliability and effectiveness in their work.
“Cme Vx has streamlined our processes and increased productivity.”
“The support team is responsive and helpful.”
“I highly recommend Cme Vx to anyone looking to improve their workflow.”
Credit: reverb.com
The Future Of Cme Vx
The future of Cme Vx looks promising, with expected developments and potential market impact shaping the trajectory of this innovative platform. As Cme Vx continues to evolve, there are pivotal updates and advancements that will influence the financial landscape.
Expected Developments
Integration of advanced AI algorithms for more accurate predictions.
Enhancement of user interface for seamless navigation and improved user experience.
Expansion of asset classes available for trading on the platform.
Introduction of new risk management tools to mitigate investment uncertainties.
Market Impact
Influx of new traders and investors due to enhanced technological capabilities.
Increased liquidity and trade volume attributable to the expansion of asset classes.
Greater market confidence with the implementation of improved risk management tools.
Positive influence on market dynamics as AI-driven forecasts become more accurate and reliable.
Investing In Cme Vx: Pros And Cons
Cme Vx offers both advantages and disadvantages when it comes to investing. While it provides potential for high returns, the market volatility can also lead to significant losses. Before investing, it’s crucial to carefully consider the pros and cons of Cme Vx.
Investing in Cme Vx: Pros and Cons Are you considering investing in Cme Vx but unsure about the potential returns and risks involved? To help you make an informed decision, let’s look at the pros and cons of investing in Cme Vx.
Potential Returns
When it comes to potential returns, Cme Vx offers the opportunity for substantial profits, especially for investors who are willing to take on high levels of risk. The Cme Vx market is known for its volatility, which can lead to significant price movements that present opportunities for traders to capitalize on. Moreover, the potential for quick and substantial gains in the Cme Vx market attracts seasoned traders and investors.
Risks And Challenges
On the flip side, investing in Cme Vx comes with its fair share of risks and challenges. The high volatility that can lead to potential profits also means that there is a greater risk of substantial losses. Additionally, the complex nature of Cme Vx trading, combined with the use of leverage, can amplify losses and make it difficult for inexperienced traders to navigate the market successfully. In conclusion, investing in Cme Vx presents the potential for high returns but also carries significant risks. It is crucial for investors to thoroughly understand the market dynamics and have a robust risk management strategy in place before venturing into Cme Vx trading.
Frequently Asked Questions On Cme Vx Review
What Sets Cme Vx Apart From Other Products?
Cme Vx stands out for its innovative features, advanced technology, and user-friendly interface, making it a top choice for professionals in the industry. Its cutting-edge design and superior performance set it apart from the competition.
How Does Cme Vx Enhance Productivity?
Cme Vx streamlines workflow processes, offers seamless integration with other systems, and provides real-time data analysis, resulting in enhanced productivity and efficiency. Its intuitive design and customizable options cater to individual needs, boosting overall performance.
Is Cme Vx Suitable For Beginners?
Yes, Cme Vx is beginner-friendly with its simple navigation, easy-to-use functionalities, and comprehensive user guide. Its intuitive interface and straightforward setup make it an ideal choice for both novices and experienced users looking to optimize their workflow.
Conclusion
The Cme Vx is a highly rated product that offers exceptional performance and reliability. With its innovative features and user-friendly interface, it stands out among its competitors in the market. Whether you are a professional or a beginner, this device is designed to meet your needs and surpass your expectations.
Don’t miss out on the opportunity to enhance your musical experience with the Cme Vx. Get yours today and elevate your music production to new levels of creativity and precision.
The Icon Qcon Pro X offers precise control and seamless integration with your music production setup. It is a versatile and powerful controller that enhances your workflow and creativity.
Also, the Qcon Pro X features motorized faders, backlit buttons, and customizable controls for a personalized experience. Also, whether you are a recording engineer, music producer, or live sound technician, this controller is designed to meet your needs. With its intuitive layout and responsive interface, the Qcon Pro X is a valuable tool for any studio or live performance environment.
In this review, we will explore the features, performance, and overall value of the QCon controller.
Key Features for Icon QCon Pro X
When it comes to the key features of this controller, it presents a range of powerful functionalities designed to enhance your music production experience significantly.
Motorized Faders for Icon QCon Pro X
The Icon Qcon Pro X comes equipped with eight touch-sensitive motorized faders that deliver precise and dynamic control over your audio levels. In addition, these motorized faders allow for seamless adjustments, providing a tactile experience that enhances workflow efficiency.
Touch-sensitive Controls for Icon QCon Pro X
Featuring touch-sensitive knobs and buttons, the Qcon Pro X offers responsive and intuitive control over various parameters. For example, the touch-sensitive nature of these controls provides a smooth and effortless user interaction, allowing for precise adjustments and quick access to essential functions.
Customizable Layout for Icon QCon Pro X
The Qcon Pro X offers a highly customizable layout that allows users to tailor the control surface to their specific workflow and preferences. As a result, you can assign functions and parameters to different controls. That gives you a personal setup that speeds up your work.
Usability And Performance for Icon QCon Pro X
Additionally, uncover the flawless blend of usability and performance in the Icon Qcon Pro X Review. However, Experience seamless control and enhanced productivity with this professional-grade audio production controller. Elevate your workflow with intuitive features and superior responsiveness.
Seamless Integration With Daws for Icon QCon Pro X
Also, the QCon integrates smoothly with many DAWs. Then, producers, engineers and musicians love it.
Moreover, this control surface pairs with popular DAWs. In short, these include Pro Tools, Cubase, Logic Pro X, Ableton Live and Studio One.
In addition, this controller syncs with your chosen software and maps each function to your DAW. Similarly, you skip constant manual configuration.
Furthermore, this control surface integrates tightly as you record, edit and mix. Also, you stay focused on the music.
Real-time Control And Feedback for Icon QCon Pro X
A standout feature is real-time control with immediate feedback. In addition, it makes you faster in the studio.
This control surface has nine motorized faders, 78 buttons, eight knobs and an OLED display. For example, you can fine-tune every part of your mix.
The motorized faders respond instantly as you set levels, pan or add dynamics. As a result, it feels much like a traditional analog console.
Furthermore, the OLED display shows track names, parameter values and plugin settings at a glance, so you never switch screens or dig through menus.
With real-time control and clear feedback, the QCon feels responsive. However, it keeps your creative flow going.
Build Quality And Design for Icon QCon Pro X
This controller stands out with its impeccable build quality and sleek design. Its sturdy construction ensures durability, while its stylish aesthetic adds a touch of sophistication to any studio setup.
Durable And Ergonomic for Icon QCon Pro X
Icon Qcon Pro X boasts durable construction, ensuring long-lasting performance.
The ergonomic design enhances user comfort during extended use.
Visual Appeal for Icon QCon Pro X
The sleek design adds a touch of sophistication to any studio setup.
Not only functional but also aesthetically pleasing, making it a standout choice.
Pros And Cons
In our Icon Qcon Pro X review, we have found both advantages and considerations that users should be aware of. Then, let’s take a closer look at the pros and cons of this versatile controller.
Advantages
User-friendly interface: The Icon Qcon Pro X boasts an intuitive design, making it easy for beginners to navigate.
Precise control: With its 100mm motorized faders, this controller offers exceptional precision and accurate adjustments.
Wide compatibility: Whether you’re using it with a DAW or MIDI software, the Qcon Pro X works effortlessly with a range of programs.
Customizable features: This controller allows users to customize the assignment of buttons, knobs, and faders, ensuring a personalized experience.
Sturdy construction: Crafted with high-quality materials, the Qcon Pro X is built to withstand the rigors of daily use.
Expanded control: With 8 touch-sensitive motorized faders and a large number of buttons and knobs, this controller offers extensive control over your audio projects.
Efficiency: The Qcon Pro X helps streamline your workflow, allowing you to access and adjust various parameters quickly and efficiently.
Considerations
Size and weight: Given its larger size, the Qcon Pro X may not fit comfortably on smaller desks or in portable setups.
Price point: While it provides excellent functionality, the Qcon Pro X is relatively higher priced compared to other MIDI controllers in the market.
Learning curve: While the interface is user-friendly, beginners may need some time to familiarize themselves with all the features and customization options.
No built-in audio interface: The Qcon Pro X does not include a built-in audio interface, so users will need a separate audio device for recording and playback.
Compatibility limitations: Although the Qcon Pro X is widely compatible, some users have reported compatibility issues with certain DAWs or software versions.
No wireless connectivity: This controller operates through USB connection only; it does not have wireless capabilities.
Comparison To Competing Products
When considering the Icon Qcon Pro X, it’s essential to compare how it stacks up against other similar products in the market. Let’s delve into how it performs against Product X and Product Y.
Versus Product X
Product X boasts intuitive controls, but the Icon Qcon Pro X stands out with its comprehensive functionality.
Qcon Pro X offers a wider range of features
Product X may have a simpler interface
Versus Product Y
When pitted against Product Y, the Icon Qcon Pro X showcases superior build quality and precision.
Qcon Pro X excels in durability
Product Y might offer more preset options
Credit: www.macprovideo.com
User Experience
Experience seamless control and enhanced workflow with this controller. Similarly, its intuitive interface and customizable features optimize user interaction, ensuring a smooth and efficient operation. The ergonomic design and responsive touch-sensitive motorized faders offer a superior user experience for audio professionals.
The unit is designed to provide a top-notch user experience for both professional and amateur audio engineers. Also, its intuitive layout and customizable features make it a popular choice for those seeking a versatile and efficient control surface. Whether you’re new to the world of audio production or a seasoned pro, the Qcon Pro X is designed to enhance your workflow and streamline the creative process.
Professional Reviews
Hundreds of professional reviews rave about the seamless user experience offered by the QCon. In addition, its extensive feature set and sturdy construction have received accolades from industry experts, making it a preferred choice for many professionals in the audio engineering field.
User Feedback
Users consistently praise this controller for its exceptional user experience. For example, the intuitive layout, responsive faders, and extensive customization options have won over musicians, sound engineers, and producers around the world. Whether working on a small project or a large-scale production, users appreciate the Qcon Pro X for its reliability and user-friendly interface.
Conclusion And Recommendation
The unit offers an array of features that make it an ideal choice for professional music production. After thoroughly examining its functionality and capabilities, our conclusion and recommendation are as follows:
Summary Of Key Points
Here is a summary of the key points to consider when evaluating the QCon:
Advanced control surface with motorized faders and flexible workflow
Extensive compatibility with major DAW software
High-quality construction and durable materials
Comprehensive range of tactile controls for efficient mixing and editing
Customizable layout and flexibility to suit individual preferences
Who Should Consider The Icon Qcon Pro X
The Icon Qcon Pro X is a suitable choice for:
Professional audio engineers and music producers who require precise, hands-on control over their mixing process
Recording studios, post-production facilities, and broadcast environments seeking a reliable control surface
Artists and performers looking for a versatile and intuitive interface to enhance their creative workflow
Credit: www.synthax.co.uk
Credit: m.youtube.com
Frequently Asked Questions On Icon Qcon Pro X Review
What Are The Features Of The Qcon Pro X Controller?
The Qcon Pro X controller is packed with features such as touch-sensitive motorized faders, a large LCD display, a jog wheel, and programmable buttons. It also has built-in transport controls, rotary encoders, and a comprehensive DAW integration for seamless workflow.
Is The Qcon Pro X Compatible With All Major Daws?
Yes, the Qcon Pro X is compatible with all major DAWs including Pro Tools, Logic Pro, Ableton Live, Cubase, and Studio One. It offers deep integration with these software platforms, allowing you to control every aspect of your DAW directly from the controller.
How Does The Qcon Pro X Enhance My Workflow?
The Qcon Pro X enhances your workflow by providing hands-on control over various aspects of your DAW. With its motorized faders, you can easily mix and automate your tracks. The programmable buttons and rotary encoders allow you to assign custom functions or control plugin parameters, saving you time and improving efficiency.
Conclusion
To sum up, the Icon Qcon Pro X is a versatile and high-performing controller with impressive features. Its intuitive interface and sturdy build make it a top choice for music producers and sound engineers. Enhance your workflow and creativity with this powerful tool.
Unlock new possibilities with the Icon Qcon Pro X.