Categories
Archive

How To Use Shortcuts In Your Daw

To use shortcuts in your DAW, learn the key commands and practice using them regularly. These shortcuts can speed up your workflow and make editing tasks easier.

Shortcuts can save a lot of time when using a digital audio workstation (DAW). Most DAWs have a long list of key commands that enable you to perform many functions with ease. When you memorize and regularly use these shortcuts, you can work faster and get more done in less time.

For example, instead of using the mouse to highlight a section, you can select it using keyboard shortcuts. Also, using shortcuts can lower the risk of repetitive strain injury caused by constant mouse-clicking. We’ll guide you through the most useful DAW shortcuts and show you how to customize them to suit your needs.

How To Use Shortcuts In Your Daw

Credit: www.linkedin.com

Basic Shortcuts

Improve your workflow in your DAW with basic shortcuts. Learn the most commonly used keyboard shortcuts to speed up your editing and production process. Save time and increase efficiency with these helpful tricks.

As a music producer, mastering shortcuts is essential to improving your workflow and speeding up your productivity. Basic shortcuts are the fundamental building blocks that allow you to transport the playback, edit audio and MIDI, and navigate and manage windows with ease and efficiency. In this post, we will be taking a closer look at the essential basic shortcuts that will make a significant difference to your music-making process.

Transporting The Playback

Transport controls are the primary means of navigating your DAW’s playback. By mastering the basic shortcuts outlined below, you can easily play, stop, rewind, fast-forward, and loop your tracks.

  • Spacebar or Enter – Play/Pause
  • Ctrl + Spacebar or Ctrl + Enter – Stop
  • Shift + Spacebar or Shift + Enter – Continue Playback from Specific Point
  • Left Arrow – Rewind
  • Right Arrow – Fast Forward
  • Ctrl + L – Loop/current region

Editing Audio And Midi

Editing is a crucial part of music production, and shortcuts can make the process much faster. The essential basic editing shortcuts include:

  • Ctrl + C – Copy
  • Ctrl + V – Paste
  • Ctrl + X – Cut
  • Ctrl + Z – Undo
  • Ctrl + Shift + Z – Redo
  • Ctrl + D – Duplicate
  • Ctrl + A – Select All
  • Ctrl + E – Edit a Clip

Navigation And Window Management

Navigating around your DAW and managing windows is necessary to keep the workflow streamlined. Mastering the basic navigation and window management shortcuts can help you achieve this goal. Here are the essential basic shortcuts:

  • Tab – Switch between the Edit and Mix Windows
  • Ctrl + Tab – Cycle through open windows
  • Ctrl + G – Group selected tracks
  • Ctrl + Shift + G – Ungroup selected tracks
  • Ctrl + H – Hide selected tracks
  • Alt + click – Open the plugin interface

By mastering these basic shortcuts, you can take your music production to the next level. The ability to navigate quickly and smoothly through the various processes of music production will not only improve your workflow but also turn you into a more efficient and effective music producer.

Advanced Shortcuts For Efficiency

Shortcuts are a godsend gift to musicians who want to speed up their workflow in their Digital Audio Workstations (DAW). In fact, every DAW comes with a list of keyboard shortcuts that can help you record, edit, and mix audio with ease. And if you want to take your workflow to the next level, you need to master advanced shortcuts that can perform complex tasks. In this article, we will share some advanced shortcuts you can use and how to customize them to suit your workflow.

Customizing Shortcuts

One way to improve your workflow in your DAW is to customize shortcuts based on your workflow. You can do this by going to the settings or preferences section of your DAW and finding the keyboard shortcuts tab. From there, you can view all the shortcuts and reassign them to a different key combination that you’re comfortable with. For example, you can change the Record shortcut from R to Shift + R if you find it more convenient. Customizing shortcuts will save you time and reduce the strain on your hand.

Workflow Optimization With Shortcuts

Aside from customizing shortcuts, you can optimize your workflow by using them in combination with each other. For example, you can use the Split and Delete shortcut keys together to cut out a section of audio quickly. Additionally, you can set up macros to perform complex multi-step tasks with just one click. For instance, you can create a macro that sets up a new track, adds a reverb plugin, and sets up a buss channel within seconds. Workflow optimization is essential when you’re working under pressure or have a tight deadline.

Using Macro Shortcuts

Macro shortcuts are a game-changer when it comes to expanding your DAW workflow. They allow you to automate a series of steps that would otherwise require manual input. You can set up macros to perform repetitive tasks, such as track creation, plugin insertion, and routing, freeing up your time to focus on creative work. Most DAWs come with preset macro commands that you can use to automate tasks, but you can also create your own. Macro shortcuts are an excellent way to increase your productivity and creativity.

Shortcuts are an essential tool for every musician who wants to speed up their workflow and improve their productivity. By customizing shortcuts, optimizing your workflow, and using macros, you can achieve greater efficiency and focus on your creative work. Try out these advanced shortcuts and share with us your experience in the comments section below.

Shortcuts For Specific Daw

If you’re working on a digital audio workstation (DAW) like Ableton Live, Logic Pro X, Pro Tools, FL Studio, or Studio One, using shortcuts can help you to speed up your music production. Shortcuts save time, improve workflow, and free up your hands from the mouse. Here’s a breakdown of some of the most useful shortcuts you can use in specific DAWs:

Ableton Live Shortcuts

Ableton Live is a popular DAW amongst electronic music producers, beatmakers, and DJs. Here are some essential shortcuts to help speed up workflow on Live:

ShortcutFunction
Ctrl + DDuplicate the selected clip or scene
Ctrl + Shift + MInsert a new MIDI track
Ctrl + Shift + DInsert a new audio track
Ctrl + IInsert a new MIDI clip
Ctrl + Shift + TInsert a new audio effect on the selected track

Logic Pro X Shortcuts

Logic Pro X is a popular DAW used by many professional producers, composers, and engineers. Here are some essential shortcuts for Logic Pro X:

  1. Command + D: Duplicate the selected region or track
  2. Option + Command + N: Create a new project
  3. Option + Command + I: Import audio files
  4. Option + Command + B: Bounce selected track/instrument
  5. Control + Command + Q: Quantize the selected region

Pro Tools Shortcuts

Pro Tools is the industry-standard DAW used for recording, mixing, and mastering. Here are some essential shortcuts to improve your Pro Tools workflow:

  • Ctrl + Shift + N: Create a new track
  • Ctrl + Shift + I: Import audio files
  • Ctrl + Command + Up arrow: Expand track height
  • Ctrl + Command + Down arrow: Reduce track height
  • Ctrl + Alt + R: Toggle record enable on/off for the selected track

Fl Studio Shortcuts

FL Studio is a popular DAW used for electronic music production, beatmaking, and sound design. Here are some essential shortcuts to help you improve your FL Studio workflow:

  1. F2: Rename the selected channel or track
  2. Ctrl + L: Link the selected channel to the next available mixer channel
  3. Ctrl + Alt + C: Clone the selected channel
  4. Ctrl + Alt + H: Hide the selected channel
  5. Ctrl + Shift + T: Insert a new instrument on the selected channel

Studio One Shortcuts

Studio One is a modern DAW used by many producers, songwriters, and composers. Here are some essential shortcuts to help speed up your workflow in Studio One:

ShortcutFunction
Ctrl + Alt + IInsert a new instrument track
Ctrl + Alt + AInsert a new audio track
Ctrl + Alt + TInsert a new bus track
Ctrl + EOpen the effects panel
TabToggle between the arrangement and mixer view

Additional Tips And Tricks

When it comes to using shortcuts in your DAW, efficiency is key. In addition to the basic shortcuts, there are a variety of additional tips and tricks you can use to streamline your workflow and become an even more efficient producer. Here are a few:

Expanding Daw Functionality With Third-party Plugins

While your DAW likely comes with a variety of built-in plugins, third-party plugins can help expand your functionality even further. From virtual instruments to effects plugins, there are countless options to choose from. Find plugins that fit your specific workflow and production needs and incorporate them into your setup, taking full advantage of the shortcuts they offer.

Utilizing Multiple Screens

While working with shortcuts can help you save time, utilizing multiple screens can help you save even more. Consider using multiple monitors to extend your desktop and give you more screen real estate to work with. This allows you to keep important windows and tools readily available without having to constantly switch between them.

Stick To Basics, Forgetting Unnecessary Shortcuts

While shortcuts can be incredibly helpful, it’s important not to overdo it. While it can be tempting to try to memorize every shortcut available, doing so can actually slow down your workflow, as you’ll spend more time trying to remember what keystrokes to use than actually working. Instead, focus on the basics and stick to the shortcuts that you find most useful. Forget about shortcuts that you don’t use often or don’t make sense to you. Keeping your workflow simple and streamlined can be the most effective way to be efficient in your DAW.

How To Use Shortcuts In Your Daw

Credit: www.audio-issues.com

Frequently Asked Questions Of How To Use Shortcuts In Your Daw

What Are 3 Parameters That You Can Edit Using A Daw Program?

EQ, compression, and volume are 3 parameters that can be edited using a DAW program.

What Is The Difference Between Daw And Midi Controller?

DAW is a software used for recording, editing, and mixing audio, while a MIDI controller is a hardware device used to input musical notes into the DAW. MIDI controller does not produce any sound, but triggers sounds in the DAW.

What Is A Keyboard Daw?

A keyboard DAW, or Digital Audio Workstation, is a software used for creating, editing, and mixing music on a computer. The software simulates the functions of a recording studio and allows users to record and manipulate audio tracks using a MIDI keyboard.

It offers a wide array of tools and effects to enhance the quality of the track.

How Do I Use Keyboard Shortcuts On My Iphone?

To use keyboard shortcuts on your iPhone, go to Settings > General > Keyboard > Shortcuts. From there, you can create your own custom shortcuts for frequently used phrases or words. For example, you could set “omw” to automatically expand to “On my way!” When typed.

You can also use built-in shortcuts, such as holding down the space bar to move the cursor or double tapping the shift key to enable caps lock.

Conclusion

Keyboard shortcuts are essential in your DAW workflow. By using shortcuts, you can save time and increase efficiency, which will ultimately improve the quality of your work. Knowing the most useful shortcuts can help you to focus on your creative process without the distraction of menu navigation.

So, take the time to learn and customize shortcuts in your DAW and see how it can boost your productivity and creativity.

Categories
Archive

Top Hidden Features Of Ableton Live

Ableton Live has several hidden features for music production enthusiasts. These features include a built-in tuner, complex warp mode, audio slicing, and more.

With these features, Ableton Live can unleash your creativity giving you more control over your music production process. For music enthusiasts, Ableton Live offers several hidden features that can enhance music production. Some of these features include a built-in tuner that helps adjust sound frequency, complex warp mode for fine-tuning audio, audio slicing, and more.

These features allow users to have more control, make adjustments, and unleash their creativity to the fullest. Ableton Live has earned its place as one of the best music production software out there for its seamless workflow and extensive features. It is used by professional producers, DJs, and musicians worldwide. We’ll explore Ableton Live’s top hidden features that can take music production to a whole new level.

Top Hidden Features Of Ableton Live

Credit: www.youtube.com

Ableton Live Intro

Discover the hidden features of Ableton Live Intro! Unleash your creativity with easy-to-use automation, an extensive library of sounds, and instant access to customization options. Whether you’re just starting out or a seasoned pro, these hidden features will elevate your music production game.

Quick Overview Of Ableton Live

Ableton Live is one of the most widely used and preferred digital audio workstations (DAW) among music producers and musicians. Ableton Live is a powerful and versatile music creation software that enables users to create music effortlessly. It’s a perfect tool for music production, live performance, and DJ’ing. With its intuitive interface and a wide range of features, Ableton Live is known for its user-friendliness, flexibility, and stability.

Why Learning Hidden Features In Useful

If you’re an Ableton Live user, you’re probably already familiar with many of its features. However, there are many hidden features that you may not know about. Knowing these hidden features can take your music production skills to the next level and save you a lot of time. Hidden features in Ableton Live are powerful and can help you work faster and more efficiently. Once you become familiar with these features, they can be a game changer in enhancing your music production skills. Ableton Live Intro is a version of Ableton Live that is designed for beginners and users who are on a budget. It is the most basic and affordable version of Ableton Live and still has all the essential features for music production. Ableton Live Intro has a vast library of sounds, virtual instruments, and effects that can produce professional-quality music. With its user-friendly interface and powerful editing tools, Ableton Live Intro is perfect for those who are just starting out in music production. Some of the hidden features of Ableton Live Intro include:

FeatureHow it works
Clip AutomationsThis feature allows users to automate parameters within a clip, making it easier to create complex patterns and melodies.
Group TracksGroup tracks make it easier for users to manage multiple tracks at once, providing a more organized and streamlined workflow.
Audio to MIDI conversionWith audio to MIDI conversion, users can convert audio recordings to MIDI, making it easier to edit and manipulate the recording.
MIDI mappingThis feature allows users to map MIDI controllers to different parameters in Ableton Live Intro, providing more control over the music creation process.

Learning these hidden features in Ableton Live Intro can enhance your creativity, lessen the time you spend on routine tasks, and improve your workflow. With Ableton Live Intro, you can create music like a pro without spending a fortune. Start using these hidden features and elevate your music production skills to the next level.

Top Hidden Features Of Ableton Live

Credit: www.productionmusiclive.com

Working With Audio And Midi

Discover the top hidden features of Ableton Live for working with audio and MIDI. Unlock new possibilities for your music production and live performances with Ableton’s powerful tools.

Working with Audio and MIDI in Ableton Live can be overwhelming for new users due to the array of functions at their disposal. However, by exploring the software’s hidden tools, you can create unique sounds with ease. In this article, we’ll focus on the top hidden features of Ableton Live for working with audio and MIDI. We’ll look at how to maximize the potential of audio clips, tips and tricks for MIDI editing, and automation features for better production. ### Maximizing the Potential of Audio Clips Ableton Live’s audio clip features are vast and can be utilized in a multitude of ways. One of the most powerful and lesser-known features is warp mode. This feature allows you to adjust the audio clip’s timing and pitch without altering the original sample, adding new levels of flexibility. Another useful tool is the “Slice to MIDI” option, which converts the audio clip into a MIDI track, where you can manipulate each note individually. Using these features can help maximize the potential of your audio clips, bringing your productions to the next level. ### Tips and Tricks for MIDI Editing Ableton Live offers numerous options for MIDI editing, such as quantization, velocity adjustment, and note length manipulation. However, the software has a powerful yet hidden tool called “Fold”. This feature allows you to fold the piano roll, displaying only the notes of a specific scale, making it easier to create well harmonized tracks, even if you aren’t a music theory expert. Another useful tip is to utilize the “Legato” function, which allows you to connect multiple MIDI notes without any gaps, creating smoother transitions between notes. ### Automation Features for Better Production Automation is a vital part of music production, allowing you to adjust parameters over time. Ableton Live has numerous automation options, such as automation lanes, breakpoints, and curves. However, one of the most useful hidden features is the “Draw” tool. This tool allows you to draw automation curves directly onto the timeline, making it easier to map out complex automation patterns. Similarly, the “Pencil” tool allows you to draw in MIDI notes directly, reducing the need for complex MIDI editing. These automation features help you achieve a more polished and professional sound in your productions. By exploring these top hidden features for working with audio and MIDI in Ableton Live, you can enhance your productions and streamline your workflow. Use these tools to their full potential, and you’ll be able to create unique sounds that stand out from the crowd.

Advanced Control Techniques

Ableton Live has advanced control techniques, including hidden features, that provide the user with more options to create unique and dynamic music. Some of these features include invisible automation lanes, multi-midi clip editing, and browser collections, which make Live more versatile and efficient for its users.

Ableton Live is known for its intuitive and user-friendly interface, but advanced users can push the software’s capabilities even further by using advanced control techniques. In this article, we will explore some of the top hidden features of Ableton Live under the subheading: Advanced Control Techniques. Specifically, we will cover Using External Controllers, Mapping and Modulating Parameters, and Creating Custom MIDI and Audio Effects.

Using External Controllers

One of the best ways to take advantage of advanced control techniques in Ableton Live is by using external controllers. These can be MIDI controllers, such as keyboards or drums, or even custom-built controllers. Ableton Live supports a range of controllers natively, so you can easily map buttons, knobs, faders, and other controls to various functions within the software.

Mapping And Modulating Parameters

Another advanced control technique is mapping and modulating parameters. This allows you to control multiple parameters simultaneously, creating complex and dynamic changes to your sound. Ableton Live has a wide range of built-in mapping and modulating tools, including MIDI mapping, macro controls, and Max for Live devices.

Creating Custom Midi And Audio Effects

Finally, you can take your advanced control techniques to the next level by creating custom MIDI and audio effects. Ableton Live has a powerful built-in audio engine that allows you to create your own effects using Max for Live. You can also use third-party audio plugins to expand your capabilities even further. In conclusion, taking advantage of advanced control techniques in Ableton Live can be a game-changer for any serious music producer or performer. From using external controllers to mapping and modulating parameters and creating custom effects, there are many ways to push the limits of what Ableton Live can do. Practice these techniques and unleash your creativity.

Sound Design With Ableton Live

Ableton Live is one of the most popular software applications for music production, composition, and live performance. One of its most appealing aspects is its vast range of sound design features that empower musicians and producers to create their unique sounds. In this section, we’ll explore some of the top hidden sound design features of Ableton Live. Let’s dive in!

Understanding Synthesis And Sampling In Ableton Live

To take full advantage of Ableton Live’s sound design capabilities, it’s essential to have a good understanding of synthesis and sampling. Synthesis refers to the creation of sounds using various sound generation techniques, while sampling is the process of recording and manipulating real-world sounds.

Ableton Live has several instruments that use synthesis and sampling, such as Operator and Sampler. These instruments allow you to create unique sounds by manipulating various parameters, such as waveforms, filters, and envelopes.

Creative Sound Design With Audio Effects

Apart from its powerful instruments, Ableton Live provides a wide range of audio effects that can transform your sounds. There are the typical effects like EQ, reverb, and compression, but Ableton Live also has unique effects like Grain Delay, which can create granular effects out of your sounds.

The audio effects in Ableton Live are highly customizable, and users can create racks, presets, and macros to streamline their workflow. You can stack multiple effects on top of each other to create complex sounds, and you can automate the parameters to make them dynamic and expressive.

Advanced Sound Design Techniques With Max For Live

If you want to take your sound design to the next level, then Max for Live is the perfect tool for you. Max for Live is a visual programming language that allows users to create custom devices and effects that can integrate seamlessly with Ableton Live.

There are several Max for Live devices and effects available for download, and users can also create their custom devices using the Max for Live editor. With Max for Live, users can create anything from granular synthesizers to audio-visual instruments that are completely unique to their style and workflow.

Overall, Ableton Live’s sound design capabilities are among the best in the industry. With a little bit of knowledge and experimentation, users can create a vast range of unique sounds and effects that are perfect for any style of music production.

Collaboration And Live Performance

Ableton Live, the powerhouse in music creation, has a few hidden gems that are often overlooked. One of the top features is the collaboration tool that allows for seamless live performance and studio collaborations. With Ableton Live, artists can quickly and easily connect and create in real-time, enhancing their creative experience.

Collaboration and live performance are essential aspects of music production. Ableton Live has several hidden features that make it easy for musicians to collaborate and perform together. In this article, we will discuss the top hidden features of Ableton Live that will help you collaborate and perform live with other musicians.

Sharing Projects And Collaborating Remotely

Sharing projects and collaborating remotely is one of the most important features of music production. Ableton Live makes it easy to collaborate and share projects with other musicians. Here are some tips on how to collaborate with other musicians using Ableton Live:

  • Use the ‘Collect All and Save’ feature to ensure that all audio files and plugins are included in the project folder.
  • Use the ‘Export Live Set’ feature to create a ZIP file that contains all of the project files.
  • Use Ableton Link to collaborate with other musicians over a network connection.
  • Use Splice, a cloud-based collaboration platform that allows you to share and collaborate on projects in real-time.

Tips And Techniques For Live Performance

Live performance is an essential part of music production. Ableton Live has several hidden features that make it easy to perform live. Here are some tips on how to perform live with Ableton Live:

  1. Use the Session View to organize your clips and scenes.
  2. Use the ‘Follow Actions’ feature to create automatic transitions between clips.
  3. Use the MIDI Map mode to assign controls to your MIDI controllers.
  4. Use ‘Dummy Clips’ to send MIDI messages to other tracks and plugins.

In conclusion, Ableton Live is an excellent music production software that has several hidden features that make it easy to collaborate and perform live with other musicians. By utilizing these hidden features, you can take your music production to the next level and create outstanding music with other musicians.

Top Hidden Features Of Ableton Live

Credit: www.productionmusiclive.com

Frequently Asked Questions Of Top Hidden Features Of Ableton Live

What Is Unique About Ableton Live?

Ableton Live is unique because of its non-linear workflow, session view, and integration of both MIDI sequencing and audio recording. It allows for live performance, loop-based composition, and real-time manipulation of audio and MIDI. Additionally, its extensive library of instruments and effects make it a powerful creative tool for musicians and producers.

What Is Ableton Live Best For?

Ableton Live is a digital audio workstation designed for live performance, composition, and production. It is best for electronic music production and live sets as it offers a variety of features including loop-based composition, real-time effects, and intuitive session view.

With its powerful and flexible tools, Ableton Live is popular among DJs, producers, and performers.

How Do I Get The Most Out Of Ableton?

To get the most out of Ableton, start by familiarizing yourself with its features and tools. Practice using Ableton regularly and experiment with different sounds, effects, and techniques. Utilize online tutorials, forums, and communities to expand your knowledge and skills.

Collaborate with other producers, attend workshops and events, and stay up to date with new updates and features. Don’t be afraid to take risks and have fun!

What Are Some Of The Strengths Of Ableton Live?

Ableton Live offers a user-friendly interface, versatile audio and MIDI recording capabilities, and excellent live performance features. The Session View allows for flexible, non-linear music creation, while the software’s extensive library of built-in instrumental and effects plugins enhance creativity. Additionally, Ableton Live’s ability to seamlessly integrate with other hardware and software make it a popular choice among electronic music producers and live performers.

Conclusion

Ableton Live is a powerful music production tool that users can take advantage of with little-known features. Whether it’s mastering, editing, or arranging tracks, Ableton gives users an easy and intuitive means of achieving professional results. In this blog post, we’ve listed some of the top hidden features of Ableton Live to make your music compositions even better.

Use these features to take your music to the next level, and show the world what you can do. Keep exploring and discovering new ways of enhancing your music projects with Ableton Live’s rich features. Get creative, and who knows where your music journey may take you!

Categories
Archive

Memory Locations In Pro Tools

Memory locations in Pro Tools allow users to save specific points in a session and recall them later for quick navigation and editing. Pro Tools is a popular digital audio workstation used in the music and post-production industries.

Memory locations are an important feature that helps users to easily return to important points in the session. Whether you need to mark a specific vocal take, a point where a guitar solo begins, or a particular section of a podcast, memory locations are a valuable tool for saving time and ensuring accuracy when editing audio in Pro Tools.

We will explore how to create, label, recall, delete, and import memory locations in Pro Tools.

Memory Locations In Pro Tools

Credit: www.soundonsound.com

What Are Memory Locations

Pro Tools is a digital audio workstation used by professionals in the music and entertainment industry. Memory locations play an important role in Pro Tools as they allow you to mark specific positions in your session, enabling you to quickly navigate to a specific point. Let’s dive deep and learn more about the Memory Locations in Pro Tools.

Overview

Memory Locations are markers or bookmarks that store specific positions in your session. They are used to bookmark various points in a session, such as a chorus, bridge or specific instrument or vocal tracks. Memory Locations are visual aids that allow users to quickly navigate to specific points in a session, ensuring they can make the necessary changes or adjustments as needed.

How They Are Created

Memory Locations can be created in three different ways, namely: manually, automatically, or by importing them.

MethodDescription
ManualMemory Locations are created by manually selecting the position in the timeline and pressing “Enter” or clicking on the “Add Location” button in the Memory Locations window.
AutomaticMemory Locations are created automatically when a new track or clip is added to the session, or when a plugin is inserted into a track.
ImportingMemory Locations can be imported from other sessions or from external files such as AAF or OMF. This is useful when working on a collaborative project where multiple users are working on the same session.

Once you have created a Memory Location, you can assign a color and name to it to easily identify it later. You can also add comments or notes to the Memory Locations, providing additional information for future reference.

Overall, utilizing Memory Locations can save time and help streamline your workflow, making it an essential tool for Pro Tools users.

Types Of Memory Locations

Pro Tools has different types of memory locations for organizing and recalling specific points on a timeline, such as markers, memory locations, and selection memory. These tools are essential for efficient workflow and easy navigation within a project.

Memory locations in Pro Tools enable you to recall specific points within a session quickly. They simplify the editing process and increase your efficiency while working on a project. There are various types of memory locations in Pro Tools, including markers, counters, and selection. In this article, we will delve into each type of memory location to help you understand how they work and how you can use them to enhance your workflow. Markers are useful memory locations that allow you to label specific points within a session to mark different sections, such as the chorus or the bridge. Pro Tools enables you to create markers quickly and intuitively for easy navigation. Additionally, you can create color-coded markers to identify different types of sections such as verses or instrumental breaks. Pro Tools provides different types of markers, including memory locations, clip-based markers, and timeline-based markers. Memory location markers, in particular, allow you to name and store markers that are unique for your session. Counters are memory locations that track the duration or position of a session. You can create timecode-based counters that track the time elapsed, the session duration, or the remaining time. Additionally, you can create bar and beat-based counters that count the bars and beats in the session. Counters can help you stay on track when editing a session and can provide valuable information when working with collaborators or clients. Selections are memory locations that enable you to save and recall specific regions of a session quickly. You can select and save a specific range of audio or MIDI data, making it easy to navigate to that region later. Selections can be helpful when editing long sessions or when you need to jump between specific sections frequently. Pro Tools provides different selection tools, including the grabber tool and the selector tool. Once you have selected a region, you can save it as a memory location, making it easy to recall it later. In conclusion, memory locations are essential tools in Pro Tools that can help you streamline your workflow. They allow you to quickly navigate to specific points in a session and can help you stay organized when working on long projects. By understanding the different types of memory locations available, you can create a more efficient and productive workflow in Pro Tools.

Markers

In Pro Tools, markers serve as memory locations for easily navigating through a session. By placing markers, you can quickly access specific parts of the recording and simplify your editing process.

Creating Markers

Markers are an integral part of working in Pro Tools and can be created to help organize and navigate your session quickly. To create a marker in Pro Tools, you need to follow some quick and easy steps:

  1. Select the point in the timeline where you want to place the marker.
  2. Go to the Marker menu within the toolbar and click on ‘New Marker’.
  3. Alternatively, use the keyboard shortcut “Command + Shift + M” (Mac) or “Ctrl + Shift + M” (Windows).
  4. The new marker will be added to the timeline at your selected point.

Navigating Markers

In the session, markers can help you navigate quickly to a specific point in the timeline. Once you’ve created a marker in Pro Tools, you can easily navigate back to it by following some straightforward steps:

  1. Click on the Marker menu in the toolbar or use the keyboard shortcut “Control/Command and M” to open the Marker list.
  2. All the markers you have added to the timeline will be visible in the Marker list. Click on the marker that you want to navigate towards.
  3. The timeline will automatically move to the position of the selected marker.

Conclusion

Using markers in Pro Tools is an essential technique to make sessions more organized, more accessible, and more comfortable to navigate. Creating and navigating markers is a quick and straightforward process, and it can help tremendously to develop a more efficient workflow.

Memory Locations In Pro Tools

Credit: www.production-expert.com

Counter

Counter is an essential tool in Pro Tools that helps to navigate memory locations efficiently. It allows users to quickly access marks and recall different locations in their projects, making editing and mixing tasks more efficient.

Displaying The Counter

In Pro Tools, the Counter displays the timecode or samples elapsed since the beginning of the session. It’s displayed on the main timeline when the Counter is activated. The Counter provides essential information that helps in the editing process, especially when syncing audio with video.

Setting Begin And End Values

Pro Tools allows users to set the beginning and end values of the Counter. This feature can be useful for selecting a specific section of a session for editing or playback. To set the begin and end values, follow these steps:

  1. Place the cursor at the desired start location.
  2. Click on the Counter window’s Start Time field and enter the desired value.
  3. Place the cursor at the desired end location.
  4. Click on the Counter window’s End Time field and enter the desired value.

After setting the values, the selected section is highlighted in the timeline, and only that section plays during playback. This feature can be helpful when editing a specific part of a song or audio track.

Using The Counter For Editing

The Counter in Pro Tools is essential when editing audio or music. It provides important information about the session and assists in working with audio or video. By displaying the timecode, the Counter shows how long a song or audio clip is, making it easier to trim or cut down to a specific length. The Counter can also be used to add or remove silence between tracks, synchronize tracks, and adjust the natural rhythm of a song. In conclusion, the Counter is a valuable tool available in Pro Tools for every audio producer or music editor. By displaying and allowing the setting of begin and end values, the Counter helps with the editing process and improves the productivity of music editing.

Selection

Selection in Pro Tools is a useful feature that allows users to choose a specific region of a track for editing, playing or deleting. It is a great tool for audio engineers and music producers who want to focus on a specific area of an audio clip. When it comes to editing a track in Pro Tools, the selection feature is very important because it helps users to navigate through a session and edit more efficiently. There are several ways to create and navigate within a selection in Pro Tools.

Creating Selection

Creating a selection in Pro Tools is easy and can be done in several ways. Users can use the selector tool to click and drag on the waveform display to select a specific area of a track. Alternatively, users can use the Keyboard Shortcut (Mac: Command + click and drag, Windows: Control + click and drag) to create a selection. Users can also use the Edit menu and choose the ‘Select’ option to choose a specific time range.

Navigating Selection

Once a selection is created, users can navigate within it by using the selector tool to click and drag the edges of the selection to adjust its size. Users can also use the keyboard shortcut (Mac: Shift + left/right arrow key, Windows: Shift + left/right arrow key) to navigate from one edge of the selection to the other. Moreover, users can use the Edit menu and choose the ‘Extend’ option to extend the selection to the next boundary.

In conclusion, using the selection tool in Pro Tools can save time and increase efficiency when editing audio tracks. With the ability to create and navigate within selections, users can easily edit and manipulate specific areas of a track without affecting other areas. Moreover, users can use the Edit menu to access additional selection options.

Advanced Uses Of Memory Locations

Memory locations in Pro Tools are a powerful feature that allows you to easily mark specific points in your project. You can use them to quickly jump to different parts of a song or to keep track of important sections. But did you know there are some advanced uses for memory locations that go beyond just basic navigation?

Automation

One of the most powerful uses for memory locations in Pro Tools is for automation. Automation allows you to easily control various parameters of your mix, such as volume, EQ, and panning, over time. By using memory locations to mark specific sections of your song, you can quickly make changes to your automation settings depending on where you are in your project.

ParameterMemory Location
VolumeChorus
EQBridge
PanningVerse 2

Key Commands

Another advanced use for memory locations in Pro Tools is with key commands. Key commands allow you to quickly access various functions in Pro Tools with just a few keystrokes. By assigning memory locations to specific key commands, you can quickly jump to different parts of your project without taking your hands off the keyboard.

  • Shift + 1 – Verse 1
  • Shift + 2 – Chorus
  • Shift + 3 – Bridge
  • Shift + 4 – Outro

Looping

Finally, memory locations can be used for advanced looping techniques in Pro Tools. By setting memory locations at specific points in your project, you can easily loop a specific section of your song or alternate between different sections. This is especially useful when working on specific parts of the mix, such as the chorus or a guitar solo.

  1. Set memory location at beginning of chorus
  2. Set memory location at end of chorus
  3. Loop between chorus memory locations
Memory Locations In Pro Tools

Credit: m.youtube.com

Frequently Asked Questions Of Memory Locations In Pro Tools

How Do I See Memory Locations In Pro Tools?

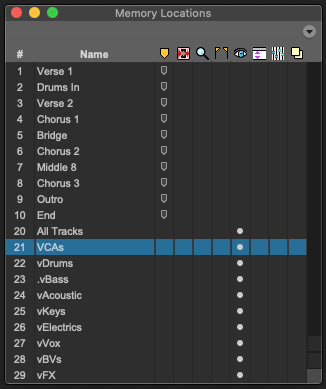
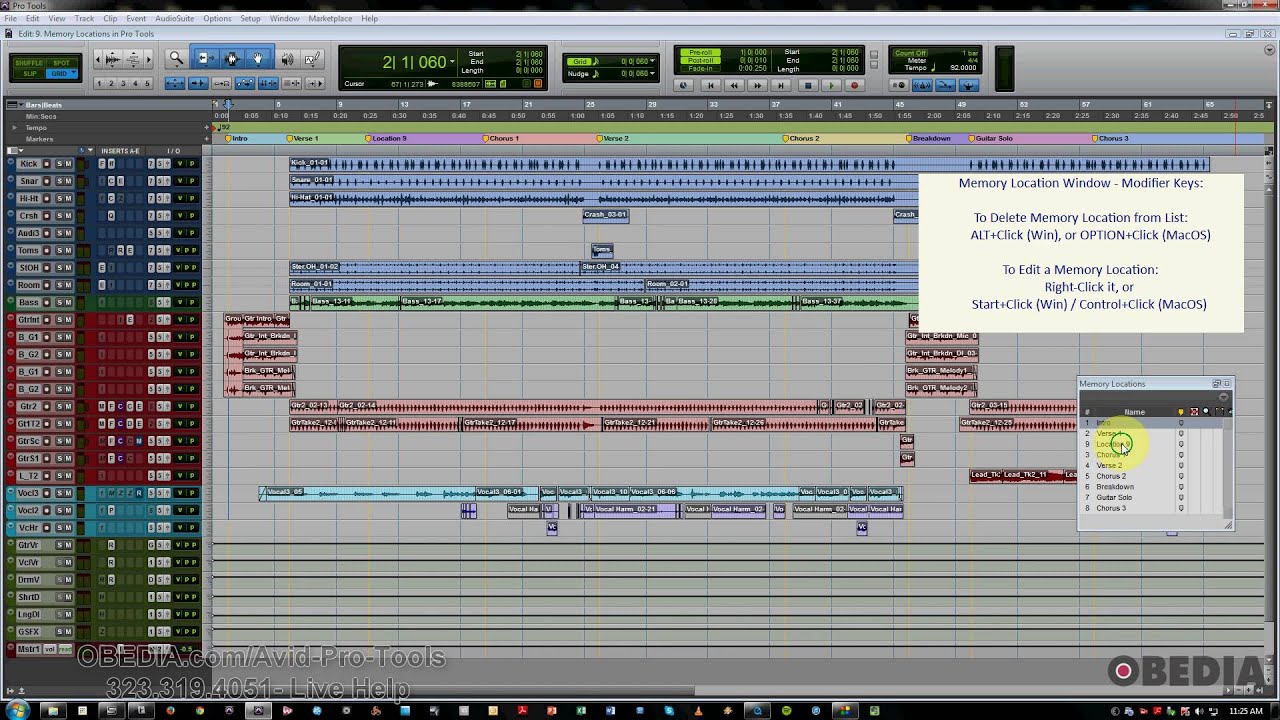
To view memory locations in Pro Tools, go to the Memory Locations window. You can open it by clicking on the Memory Locations button, which looks like a flag, on the toolbar. Once you open the window, you can create and name locations, add notes, and jump to specific locations by double-clicking them.

Where Are Pro Tools Files Stored?

Pro Tools files are usually stored in the session folder, along with any associated audio files. Users can also choose to store Pro Tools files anywhere on their computer or external hard drive.

How Do You Jump Between Memory Locations In Pro Tools?

To jump between memory locations in Pro Tools: 1. Use the `Memory Locations` window to create and name memory locations. 2. Press `Enter` and type in the memory location name to jump to that location. 3. Use `Shift+Left Arrow` and `Shift+Right Arrow` to jump between the previous and next memory locations.

4. You can also use `Command+Numeric Keypad` to directly jump to a memory location, numbered 1-9. 5. Alternatively, use the `Memory Location` marker to add shortcuts for quick access.

What Is The New Memory Location Shortcut In Pro Tools?

The new memory location shortcut in Pro Tools is “Shift”+”Option”+number on Mac or “Shift”+”Alt”+number on Windows. This allows users to quickly recall and navigate to different positions in a session.

Conclusion

Overall, understanding the memory locations in Pro Tools can greatly enhance your workflow and productivity. By utilizing the various memory locations, from markers to memory locations, you can easily navigate through sessions and make edits on the fly. Remember to save your memory locations for future use, and experiment with different ways to incorporate them into your own workflow.

With a little practice, you can become a master of memory locations in Pro Tools.

Categories
Archive

How To Become A Music Producer

Becoming a music producer involves gaining musical expertise and learning the technical aspects of music production. If you’re passionate about music and aspire to produce your own, you can become a music producer by learning how to play instruments proficiently, study music theory, take up DAW software and sound engineering techniques.

Building a network and marketing your music is also a crucial aspect of becoming a successful music producer. This profession requires a lot of hard work, determination, and creativity, with the ability to adapt to new technologies and music trends.

We will guide you on how to establish yourself as a music producer and create your path in the music industry.

How To Become A Music Producer

Credit: www.careersinmusic.com

Develop Your Musicianship

Develop Your Musicianship to become a music producer by enhancing your skills in composition, arrangement, mixing, and mastering. Acquiring technical expertise, creating a unique sound, and networking with industry professionals can help you succeed in this competitive field.

Develop Your Musicianship Becoming a music producer is not just about the technical skills but also about musicianship. Developing your musicianship is the foundation of your journey to becoming a successful music producer. In this article, we will be discussing how you can develop your musicianship by learning an instrument and studying music theory.

Learn An Instrument

Learning an instrument is crucial for any aspiring music producer. It helps you to understand the fundamentals of music such as melody, harmony, and rhythm. It also allows you to experience the expressive and emotional side of music, which can inspire you to create your own unique sound. When it comes to choosing the right instrument, it’s important to choose one that interests you and matches your preferred music genre. Some popular instruments among music producers are piano, guitar, drums, and bass guitar. However, you can choose any instrument as long as you put in the time and effort to master it.

Study Music Theory

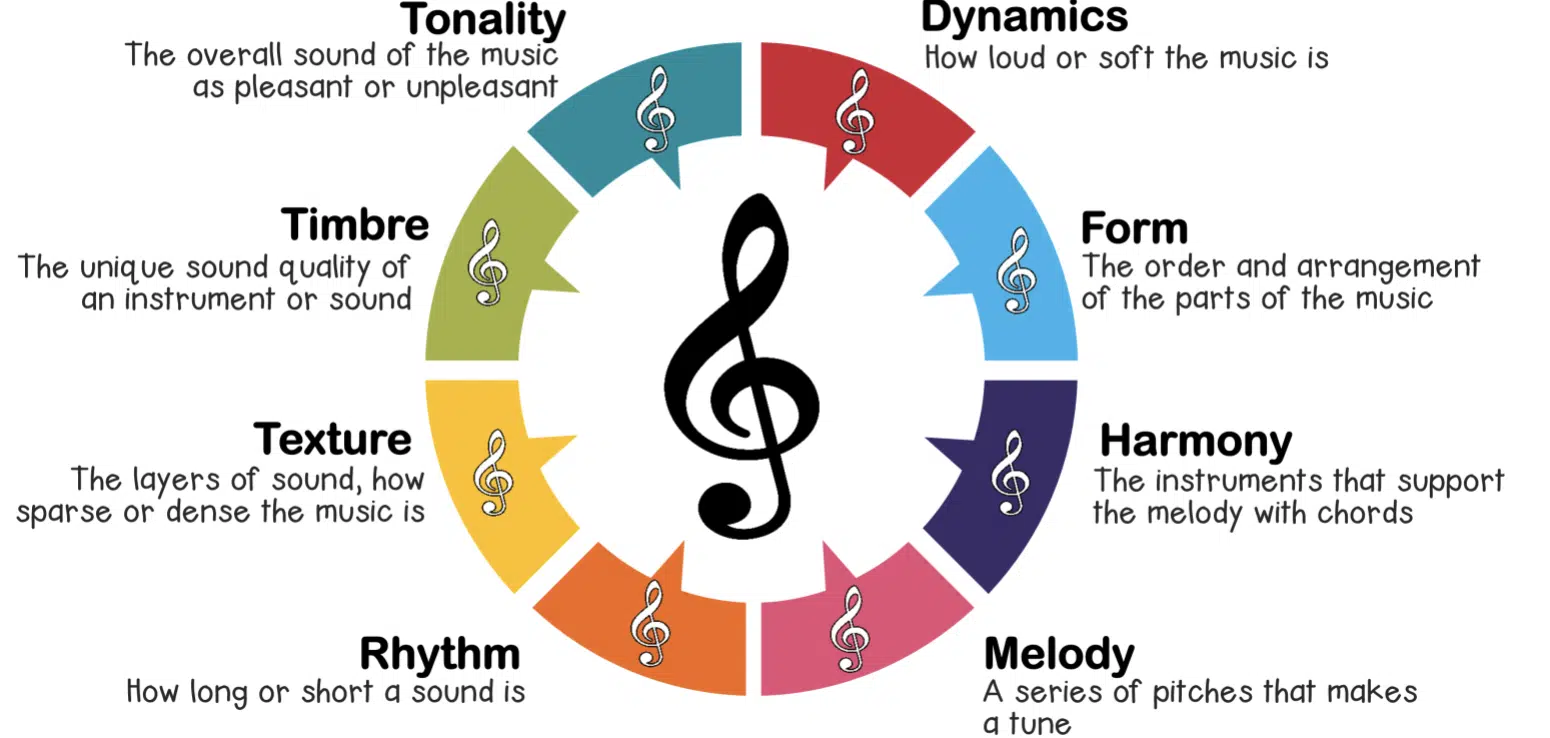
Music theory is the study of the elements of music such as rhythm, harmony, melody, and form. It is the backbone of music and an essential tool for any music producer. Studying music theory will help you understand the structure of music and how to create the desired emotions and moods in your music. The basics of music theory include learning about scales, chords, intervals, and rhythm. You don’t have to be a music theory expert, but having a good understanding of these fundamentals will help you to communicate better with other musicians and producers. To start studying music theory, there are plenty of online resources, books, and courses available that can guide you. Take your time with it, and don’t rush the process. It’s a lifelong learning journey, and you’ll continue to learn and grow as you create music. In conclusion, developing your musicianship is a vital step to becoming a music producer. By learning an instrument, you can understand the fundamentals of music and its expressive nature. Studying music theory will give you the tools to create your own unique sound and communicate better with other musicians and producers. With passion, dedication, and hard work, you can become a successful music producer.

How To Become A Music Producer

Credit: aimm.edu

Build Your Studio Skills

Develop the skills to become a successful music producer with ‘Build Your Studio Skills’. This program teaches the technical and creative aspects of music production, from recording and mixing to software and hardware use, allowing you to take your music-making abilities to the next level.

Aspiring music producers often face challenges in building their studio skills due to limited resources and experience. However, with the right tools and techniques, you can hone your craft and turn your passion for music into a successful career. In this article, we will explore how to build your studio skills in three easy steps – Learn Production Software, Master Mixing Techniques, and Develop Workflow Strategies.

Learn Production Software

Learning the right production software is crucial for any music producer who wants to succeed in the industry. Familiarizing yourself with software such as Logic Pro X, Ableton Live, and Cubase can be helpful in creating quality music that meets industry standards. You can take online classes or watch video tutorials to gain knowledge and expertise in using these tools. Understanding the essential features, shortcuts, and tricks of the software can also save you time, improve your workflow, and give you an edge over competitors.

Master Mixing Techniques

Mixing is a critical aspect of music production that requires technical and creative skills. To master mixing techniques, you need to understand the basics of frequency, dynamics, and stereo imaging. Paying attention to detail, such as correcting pitch, timing, and volume inconsistencies, can result in a polished and professional sound. You can practice mixing tracks by experimenting with various effects, filters, and plugins until you achieve the desired sound. Also, listening to other producers’ work and analyzing their mixing techniques can help you improve your skills.

Develop Workflow Strategies

Developing a streamlined workflow is vital for any music producer to manage time and increase productivity. Planning and setting realistic goals can help you work efficiently and stay organized. Creating templates, using sample libraries and sound banks, and collaborating with other producers can increase your workflow speed and quality. You can also invest in quality equipment such as studio monitors, headphones, and microphones that can enhance your studio experience. In conclusion, building your studio skills is a continuous process that requires commitment and dedication. Learning production software, mastering mixing techniques, and developing workflow strategies can help you achieve the desired results and maximize your potential as a music producer. Remember to stay focused, persistent and continue to learn and grow.

Network And Collaborate

Collaborating with other music producers and networking within the industry is crucial for aspiring music producers to gain exposure and build their reputation. Building relationships with individuals in various aspects of the music industry can provide opportunities to work and learn from different perspectives.

As a budding music producer, networking and collaborating are essential to building your career. Not only will it help you gain exposure and hone your skills but it can also lead to great opportunities. Here are some tips on how to network and collaborate effectively.

Attend Music Events

Attending local music events is a great way to get out there and meet people in the industry. You can network with other music producers, talk to artists and even make connections with record labels. Take advantage of any opportunities to showcase your work or attend workshops and panels. Keep a professional attitude and always have business cards ready to hand out.

Connect With Musicians

Connecting with musicians is a fantastic way to collaborate and build your portfolio. Reach out to local bands or solo artists by attending their shows or through social media. Show an interest in their music and ask if they would like to work on a project together. This can be a great way to showcase your skills and expand your network.

Join Online Communities

Joining online communities such as music production forums or social media groups can be a great way to connect with other producers and artists. You can share your work, ask for feedback and even collaborate online. Just be mindful of the rules and regulations for each community and keep a professional attitude.

Conclusion

Networking and collaborating are crucial for any music producer looking to build a successful career. By attending events, connecting with musicians and joining online communities, you can expand your network and gain valuable experience. Remember to stay professional, keep an open mind and always be ready to showcase your skills.

Hone Your Business Acumen

To become a music producer, it’s essential to hone your business acumen. Understand the industry’s ins and outs, including contracts, copyrights, royalties, and promotion strategies. Collaborate with accomplished professionals and network to build a solid reputation.

As a music producer, you must have a strong understanding of music production. However, honing your business acumen is equally important for success in the industry. To become a successful music producer, you must create a solid business plan and have a deep understanding of the music industry.

Create A Business Plan

Creating a business plan is a crucial step in building a successful career as a music producer. A business plan will help you establish a clear vision for your career, set measurable goals, and plan the steps necessary to achieve those goals. Your business plan should include:

  • Your mission statement
  • Your target market
  • Your budget
  • Your marketing plan
  • Your revenue streams
  • Your timeline

Understand The Music Industry

To succeed in the music industry as a producer, you need to understand the market demands and industry trends. You must research the various genres, popular styles, and the buying habits of music consumers. Understanding the music industry also means understanding legal frameworks around music, copyrights, licensing, and royalties. To gain a deeper understanding of the music industry, you can:

  • Read industry publications
  • Attend music conferences and networking events
  • Connect with professionals in the industry
  • Engage with social media outlets such as Instagram, Facebook, and Twitter

In conclusion, honing your business acumen is essential to the success of your career as a music producer. You need to create a business plan and understand the music industry to increase your chances of success in the industry.

Create Your Own Brand

Learn how to become a successful music producer by creating your own brand. From honing your skills to developing a unique sound and style, building a brand around your music can set you apart from the competition and help you achieve success in the industry.

If you want to become a successful music producer, creating your own brand is crucial. It’s essential to develop a unique presence in the industry and differentiate yourself from your competitors. Your brand should reflect your personality, style, and the type of music you produce to attract the right audience. Here are some tips on how to create your brand effectively.

Develop A Signature Sound

To create your brand, it’s important to develop a signature sound that sets you apart from others. You should experiment with different music genres, styles, and techniques until you find the one that suits your personality and identifies your brand. Once you develop your signature sound, use it consistently in your productions to make your brand recognizable.

Market Yourself Effectively

Marketing is an essential aspect of creating your brand. It’s crucial to promote your music and brand to the right audience, using various marketing tools and strategies. You can use social media platforms like Instagram, Twitter, and Facebook, to reach a broader audience and promote your brand. Additionally, creating a professional website, using email marketing, collaborating with other artists, and uploading your music on online platforms are all effective marketing strategies to promote your brand.

Conclusion

Creating your brand is an essential part of becoming a successful music producer. It’s important to develop a signature sound that identifies your brand and use various marketing strategies to promote it effectively. By following the tips mentioned above, you can create a unique and recognisable brand and differentiate yourself from your competitors in the music industry.

Start Producing

Once you have learned the foundational skills and have familiarized yourself with the equipment used by music producers, it’s time to start producing. Producing music requires practice and experimentation. Here are some tips to help you start producing music:

Experiment With Different Styles

As a music producer, experimenting with different music styles is key to finding your unique style. You can start by analyzing music of your favorite artists and producing a similar sound. Don’t be afraid to take risks and create something new. Experimenting with different styles can also help you understand your strengths and weaknesses as a music producer and help you determine the direction you want to take your music.

Produce Your Own Music

Producing your own music is one of the best ways to learn and improve your music production skills. You can start by recording samples, loops, and beats and then layering them to create a complete track. Use software like Logic Pro, Pro Tools, or Ableton to put the pieces together. Also, take feedback from others and use it constructively to improve your music production skills.

Remember, music production is not just about producing music but also about conceptualizing and creating new sounds. So, keep your creative juices flowing and produce music that speaks to your soul.

Secure Your First Clients

To secure your first clients as a music producer, an effective strategy is to network and build relationships within the industry. Attend music events, collaborate with other producers, and offer your services to artists and bands. Utilize social media to showcase your work and connect with potential clients.

Becoming a music producer is an exciting career path that offers the opportunity to work with talented musicians, create hit songs, and ultimately, produce chart-topping albums. However, in order to achieve success in this field, it is crucial to secure your first clients. Here are some tips on how to do just that.

Create A Portfolio

One of the best ways to showcase your skills and attract clients as a music producer is by creating a portfolio. This can be done by recording and producing your own music or by volunteering to produce music for up-and-coming artists. Your portfolio should include a variety of genres and styles to demonstrate your versatility as a producer.

Offer Competitive Prices

Another effective way to secure your first clients as a music producer is to offer competitive pricing. While it is important to value your time and expertise, it is equally important to be competitive in today’s music industry. Consider offering discounted rates for first-time clients or bundle deals for multiple songs.

Other Tips To Secure Your First Clients

In addition to creating a portfolio and offering competitive prices, there are other tips to help you secure your first clients as a music producer. These include networking with other industry professionals, utilizing social media to promote your services, and attending local music events and concerts to connect with potential clients. Overall, becoming a successful music producer requires hard work, dedication, and a strong focus on securing your first clients. By creating a portfolio, offering competitive prices, and utilizing other tips and strategies, you can begin to build your client base and work towards a successful career in music production.

How To Become A Music Producer

Credit: www.youtube.com

Continue Learning And Evolving

Becoming a music producer is a continuous learning process that requires consistency and dedication. The music industry is constantly evolving, and producers need to keep up with the latest trends, techniques, and technology to stay relevant.

Stay Up To Date With Technology

Technology is an integral part of music production. As a producer, it’s crucial to stay up to date with the latest software and hardware that can help you streamline your workflow and create great-sounding music. You should invest in the best equipment you can afford and learn how to use it efficiently. Some of the essential tools for music producers include:

SoftwareHardware
– Digital Audio Workstations (DAWs)– Audio Interfaces
– Virtual Instruments– MIDI Keyboards and controllers
– Sample libraries– Studio Monitors and Headphones

Continuously Improve Your Skills

Learning doesn’t stop after you acquire the necessary skills to produce great music. You must continue to improve and refine your craft by seeking out new knowledge and experiences. Consider taking courses, attending workshops, and collaborating with other producers. These actions will expose you to fresh perspectives and techniques, allowing you to develop your unique style. Here are some skills you can work to improve:

  1. Music Theory and Composition
  2. Sound Design
  3. Recording and Mixing Techniques
  4. Mastering
  5. Collaboration and Networking Skills

Becoming a music producer takes time, persistence, and dedication. By staying up to date with technology and continuously improving your skills, you can position yourself for success in a competitive industry.

Frequently Asked Questions Of How To Become A Music Producer

What It Takes To Become A Music Producer?

To become a music producer, you need to have a passion for music and a strong understanding of music theory. You also need to have excellent communication, organization, and technical skills. Networking, gaining experience, and learning from mentors can also help you break into the industry.

How Much Does A Producer Make From A Song?

A music producer typically earns between 2% to 3% of the song’s total revenue. This could vary based on factors like the producer’s experience, negotiation skills, record label, and the song’s success. But on average, a producer earns an estimated $20,000 to $300,000 per song.

Can I Be A Music Producer With No Experience?

Yes, you can be a music producer with no experience. However, you will need to learn the basics of music production, such as music theory, how to use digital audio workstations, mixing and mastering techniques, and marketing skills. You can enroll in online courses, watch video tutorials and practice regularly to gain experience and proficiency.

Do You Need Qualifications To Be A Music Producer?

No, formal qualifications are not mandatory to be a music producer. However, a solid understanding of music theory, proficiency in using various music production software, and hands-on experience are crucial for success in this field. Building a strong portfolio and networking with industry professionals can also enhance prospects.

Conclusion

Becoming a music producer takes passion, hard work, and dedication. With the right mindset, equipment, and skills, anyone can turn their love for music into a thriving career. Remember to constantly learn and grow as an artist, build relationships within the industry, and take advantage of online platforms to showcase your work.

Whether it’s producing for yourself or for others, let your creativity guide you on your journey to success. With these tips, you can confidently pursue your dream of becoming a music producer.

Categories
Archive

Cubase Stops Playing When Minimized

If Cubase stops playing when minimized, go to Devices > Device Setup > VST Audio System and switch the driver to “Generic Low Latency ASIO Driver.” This keeps audio playing after you minimize Cubase.

Cubase is a popular digital audio workstation that allows users to record, edit, and produce music. However, some users find that audio stops playing once they minimize Cubase. This can be frustrating, especially when working on other tasks while also listening to music.

Related reading: Best cubase midi controller and How many gb is cubase. For background, see Cubase.

Fortunately, there is a solution to this problem. By switching the driver to the “Generic Low Latency ASIO Driver” under the VST Audio System settings, users can keep audio running after minimizing Cubase. We will discuss how to implement this solution and ensure uninterrupted audio playback while using Cubase.

Why Cubase Stops Playing When Minimized

One possible reason why Cubase stops playing when minimized could be due to the low latency settings. Adjusting the audio setup preferences may help resolve this issue for uninterrupted playback.

It can be quite frustrating when Cubase stops playing your audio files when you minimize the application. There are several possible reasons why this issue may occur. In this section, we will take a look at some of the most common reasons for this problem. : If Cubase Stops Playing When Minimized

One possible reason why Cubase stops playing when minimized is due to incorrect audio device settings. This can happen when you pick the wrong driver for the audio device or set the device up incorrectly. To resolve this issue, open the audio device settings in Cubase, choose the correct driver, and check the device setup.

Power Saving Settings

Another possible reason why Cubase stops playing when minimized is due to power saving settings.

Some computers conserve power when nobody is using them. This can cause the audio device to stop working properly. To fix this issue, you will need to adjust the power settings on your computer to ensure that it does not go into a low-power mode when Cubase is running.

Audio Driver Issues

Finally, the audio driver itself may cause the problem. If you see this issue, update the audio driver and confirm it supports your version of Cubase. You can also try reinstalling the driver to see if that resolves the issue. Keeping these possible reasons in mind, you can now troubleshoot the issue and resolve it quickly and easily. By ensuring that your audio device settings are correct, adjusting your power saving settings, and updating your audio driver, you can continue working on your projects in Cubase without any interruptions.

Cubase Stops Playing When Minimized

Credit: forums.steinberg.net

Audio Device Settings

When Cubase stops playing audio after you minimize it, it can be frustrating. However, there is a solution to this problem. By adjusting the audio device settings, you can fix this issue and keep your audio playing even while Cubase sits in the background.

When it comes to music production in Cubase, audio device settings are vital for ensuring a high-quality output. However, some users face an issue wherein Cubase stops playing when minimized. This can be incredibly frustrating, especially when multitasking during a recording session. To solve this problem, it is important to first check the audio device settings in Cubase. Follow these simple steps:

Checking The Audio Device Settings In Cubase

1. Open Cubase and navigate to the “Devices” tab in the main menu. 2. Select “Device Setup” and then click on “VST Audio System”. 3. In the “ASIO Driver” dropdown menu, select the correct audio driver for your system. 4. Ensure that you tick the “Activate Steinberg Audio Power Scheme” option. 5. Click “OK” to save the changes. Updating Audio Drivers: If the Cubase audio device settings are correct, outdated or corrupted audio drivers may cause the issue. In this scenario, update the audio drivers to the latest version. Here are the steps for updating audio drivers:

Updating Audio Drivers

1. Type “device manager” in the Windows search bar and open it. 2. Locate the audio device and right-click on it. 3. Select “Update driver” and then choose “Search automatically for updated driver software”. 4. Wait for Windows to search for and install the latest audio driver. If updating the audio drivers does not solve the problem, it may be necessary to check for any conflicts or errors in the device manager. Search online for solutions or contact customer support for further help. In conclusion, by following the above steps to check the audio device settings or update the audio drivers, users can resolve the issue of Cubase stopping to play when minimized. This will ensure a smooth and uninterrupted recording session.

Power Saving Settings

Cubase stops playing when minimized due to its power-saving settings. This feature conserves energy and extends the lifespan of your system, but you can turn it off to prevent playback interruptions.

Adjusting Power Saving Settings

If you’re facing issues with Cubase stopping playback when minimized or the computer going to sleep, the Power Saving Settings on your computer may be the culprit. By default, your computer saves power by turning off the display or sleeping after a period of inactivity. This can cause your audio to stop. To prevent this, you may need to adjust your Power Saving Settings. Here’s how to do it:

  1. Open Control Panel and go to Power Options.
  2. Select the High Performance power plan. This ensures that your computer runs at full power without any power-saving measures.
  3. Click on Change Plan Settings and set the Turn off the display and Put the computer to sleep settings to Never.

Disabling Power Saving Mode

If adjusting the Power Saving Settings doesn’t work, you can try disabling Power Saving Mode altogether. Here’s how:

  • Go to Control Panel and click on Power Options.
  • Choose a power plan and click on Change Plan Settings.
  • Click on Change Advanced Power Settings.
  • Expand the Multimedia Settings tab and select When Sharing Media.
  • Change the setting to “Prevent Idling to Sleep.”
  • Click on Apply and OK to save the changes.

By making these changes, your computer won’t go to sleep or shut off the display when you’re using Cubase. This should resolve the issue of Cubase stopping playback when minimized or put in the background. Keep in mind that making these changes may increase your computer’s power consumption. But it’s a small price to pay for uninterrupted audio playback.

Cubase Stops Playing When Minimized

Credit: www.youtube.com

Audio Driver Issues

Audio driver issues can frustrate Cubase users, causing playback to stop when they minimize the program. These issues can arise due to outdated, corrupted, or missing audio drivers. Here are some easy steps to check and fix potential audio driver problems in Cubase:

Checking For Audio Driver Issues

The first step in solving audio driver issues in Cubase is checking the audio driver settings. In Cubase, navigate to the “Devices” menu, select “Device Setup,” and then select “VST Audio System” from the left-hand panel. Check that you selected the correct audio driver. If you chose the wrong driver, audio may cut out when you minimize Cubase.

Updating Audio Drivers

If the audio driver is up-to-date, the next step is to check if a more recent driver is available. Cubase users should check the manufacturer’s website to download and install the latest audio drivers. Updating audio drivers properly helps prevent audio cutting out when you minimize Cubase.

Reinstalling Audio Drivers

If audio problems persist after updating the audio drivers, the next step is to uninstall and reinstall them. This process can sometimes fix audio problems that occur in Cubase. Users should ensure that they have the necessary drivers for their specific hardware before proceeding with the reinstallation process.

By following these steps, Cubase users can fix audio driver problems that stop playback in the background. Employing these techniques can help users get back to their music creation and audio editing work in Cubase quickly and efficiently.

Other Fixes If Cubase Stops Playing When Minimized

Cubase users facing issues with minimized playback can opt for alternative solutions to keep the audio running. One such solution includes disabling the audio driver’s exclusive control option.

By default, Cubase stops playing audio when you minimize it. This could be a frustrating experience for users who want to multitask while using Cubase. The good news is you don’t have to put up with this issue anymore. Several alternative solutions can help you overcome this issue and keep Cubase playing audio while you work on other tasks.

Using Cubase in Windowed Mode

One of the best alternatives is to use Cubase in windowed mode instead of full screen. In windowed mode, Cubase keeps playing audio even after you minimize it. You can switch between the tasks without losing the audio. To use Cubase in windowed mode follow these simple steps: 1. Launch Cubase 2. Click on ‘Devices’ in the taskbar at the top of the Cubase window 3. Select ‘Device setup’ 4. In the device setup window, click ‘VST Audio System’ 5. Uncheck ‘Release driver when application is in the background’

6. Click ‘OK’ to save the changes

Disabling Exclusive Mode

Another solution is to disable the exclusive mode in the sound settings of Windows. Sometimes, a minimized Cubase hands control of the audio device to Windows, which then stops playback. Disabling the exclusive mode of the audio device will make sure the system will not take control of the audio device. To disable the exclusive mode of the audio device, follow these steps: 1. Right-click the speaker icon in the taskbar 2. Click on ‘Sounds’ 3. In the ‘Playback’ tab, right-click on the default audio device 4. Select ‘Properties’ 5. Click on the ‘Advanced’ tab 6.

Uncheck ‘Allow applications to take exclusive control of this device’ 7. Click ‘OK’ to save the changes Using a Different Audio Device: If the first two alternatives don’t work for you, try using a different audio device, like an external sound card or a USB audio interface. These devices have their own sound processing, so minimizing Cubase won’t interrupt them. Conclusion: Cubase stopping playing audio when minimized can be annoying, but it’s nothing to worry about. With these alternative solutions, you can keep listening even when Cubase runs in the background.

Cubase Stops Playing When Minimized

Credit: m.youtube.com

The Main Reason Cubase Stops Playing When Minimized

In current Cubase versions (Steinberg released Cubase 15 on November 5, 2025), the usual cause is the “Release Driver when Application is in Background” option in Studio > Studio Setup > Audio System. Steinberg designed it to let other applications use the audio hardware while Cubase is in the background, so playback stops when Cubase loses focus. Turn it off to keep Cubase playing. This works reliably only if your audio driver supports sharing, so another app may still take control of the driver.

Frequently Asked Questions Of Cubase Stops Playing When Minimized

Why Does Cubase Stop Playing When Minimized?

Cubase has an option, “Release Driver when Application is in Background”, that releases the audio driver when Cubase isn’t the active application, so that other apps can use your audio hardware. With it enabled, playback stops when you minimise or switch away from Cubase.

Can I Change Cubase’s Background Application Settings?

Yes. Go to Studio > Studio Setup > Audio System and untick “Release Driver when Application is in Background”. Cubase will then keep the driver, and keep playing, while it’s in the background.

What Should I Do If Cubase Still Stops Playing?

First, check your audio interface’s power management settings to ensure it’s not going into standby when not in use. Also, make sure you have the latest drivers installed.

Why Won’t Cubase Resume Playing When Maximized Again?

This issue may arise if your audio interface’s driver is not reconnecting properly. The solution is to restart Cubase or your computer.

How do I stop Cubase from stopping when I switch windows?

Go to Studio > Studio Setup > Audio System and untick “Release Driver when Application is in Background”.

Conclusion

Cubase’s playback stopping when minimized can be a frustrating issue for users, particularly when working on other projects simultaneously. However, the solutions presented in this blog post can offer a quick and efficient fix. By adjusting the audio engine settings, utilizing Cubase’s control room feature, or using a third-party application, users can continue working on their projects without interruption.

Follow these steps, and you’ll be able to enjoy uninterrupted playback of your Cubase projects even when minimized.

Categories
Archive

Melody Vs Rhythm Difference

Melody and rhythm are two distinct musical elements. Melody refers to a sequence of musical tones that are played or sung, while rhythm is the pattern of sound and silence that forms the basis of a piece of music.

Melody refers to the pitch and tune, and rhythm refers to the tempo and beat of a song. Understanding the difference between the two is important in music composition and performance. Melody is typically what we sing along to in a song, and it is made up of individual notes that are arranged in a way that creates a recognizable tune or theme.

Rhythm, on the other hand, is the foundation of the music and provides structure and coherence to the melody. It is the way in which the musical notes are spaced out in time and creates the pulse or drive of the music. Whether you are a songwriter, singer, or instrumentalist, being able to distinguish between melody and rhythm is essential to creating and performing great music.

Melody Vs Rhythm Difference

Credit: m.youtube.com

What Is Melody?

Melody and rhythm are two distinct elements of music. Melody is the series of notes that create a musical phrase, while rhythm refers to the tempo, beat, and syncopation of the music. Each element is crucial to creating a complete musical experience.

Melody is the most recognizable and memorable aspect of a song. It is the series of single notes that form a cohesive musical idea. In other words, melody is the tune of a song that you hum or remember after you’ve listened to it. It is a combination of different musical notes and patterns that provide the song with a unique identity. In this blog post, we’ll be discussing the difference between melody and rhythm, and what makes them both so important to music.

Different Musical Notes And Patterns

Melody is created using various musical notes and patterns. These notes and patterns are arranged in a specific order to create a tuneful, and coherent musical phrase. It’s fascinating how the same notes, arranged differently, can form completely different melodies. Melodies are defined by their pitch, rhythm, and tempo, which create the unique flavor of the song. For example, the notes C, D, E, F, G, A, B, and C create the familiar melody known as “Mary Had a Little Lamb.” Meanwhile, using the same notes, in a different order produces a distinct melody, such as the tune of “Twinkle Twinkle Little Star.”

Memorable And Singable Tunes

The most memorable and singable tunes consist of catchy melodies. A melody that is both easy to remember and fun to sing is what makes a song stand out above the rest. Think about songs that you’ve heard a hundred times and are still able to hum every note. Those songs have compelling melodies that are memorable enough to become a part of popular culture. A prime example of this is the song “Happy Birthday.” Most people can recite the lyrics by heart and sing the melody without much thought. The mere mention of the song’s title brings the melody instantly to their mind. In conclusion, melody is the tune of a song that we associate with specific notes, patterns, and arrangements that form its unique identity. Memorable melodies create an emotional connection with the listener and make a song unforgettable. Understanding melody and its relationship to rhythm is essential for any songwriter, composer, or music lover.

What Is Rhythm?

Rhythm is the pattern of beats and accents in music that creates a groove or flow. Melody, on the other hand, is the series of musical notes or pitches that create a tune or theme. Understanding the difference between these two elements is essential for creating and appreciating music.

Rhythm refers to the patterns of sound and silence that occur within a musical composition. It is the driving force behind the movement and flow of music. In other words, it is the element of music that gives it its sense of pulse, groove, and overall feel.

Beat And Tempo

At the heart of rhythm is the beat, which is a steady, repeating pulse that runs throughout a piece of music. The beat is the foundation upon which all other rhythmical elements are built. It provides the listener with a sense of timing and helps to create a feeling of anticipation and release. Tempo refers to the speed at which the beat is played. In other words, it is the rate at which the pulse is repeated. Different pieces of music can have different tempos, ranging from very slow to extremely fast. The tempo of a piece can greatly affect the overall mood and energy of the music.

Patterns Of Sound And Silence

One of the key components of rhythm is the way in which patterns of sound and silence are organized within a piece of music. These patterns can be simple or complex and can be created using a variety of rhythmical devices, such as syncopation, accents, and polyrhythms. Syncopation is when the emphasis is placed on a weak beat or a part of the beat that is normally unaccented. This creates a sense of tension and a feeling of being off-center. Accents are used to highlight particular beats within a measure. They can be used to create a sense of emphasis and to help establish a rhythmic feel. Polyrhythms involve the use of multiple overlapping rhythms within a piece of music. This can create a complex and intricate rhythmic tapestry that can be both exciting and challenging to listen to. In conclusion, rhythm is a fundamental and essential element of music. It provides the structure and framework that allows musicians to create and communicate their ideas. Understanding the components of rhythm, such as beat, tempo, and patterns of sound and silence, can help us to appreciate and enjoy music on a deeper level.

Key Differences Between Melody And Rhythm

Melody refers to the tune of a musical composition, while rhythm refers to the beat and tempo of the music. Melody can be seen as the main theme that is carried throughout the song, while rhythm provides the foundation and structure of the music.

Music is composed of different elements that harmonize to create an ear-pleasing sound. Two of the essential elements of music are melody and rhythm. Both of them are responsible for producing beautiful and catchy tunes. But what sets them apart? In this blog post, let’s explore the key differences between melody and rhythm.

Melody Is The Tune, Rhythm Is The Beat

The melody is the tune that we can hum and sing along to. It’s the component that makes a song memorable and catchy. On the other hand, rhythm is the beat or the pulse that gives a song its groove. It’s the element that makes us want to dance and move along with the song. Melody and rhythm work together to create a song that we enjoy listening to.

Melodies Are Memorable, Rhythms Are Repetitive

Another key difference between melody and rhythm is their level of repetition. Melodies are memorable, and we can easily remember the tune even after not hearing the song for a long time. Rhythms, on the other hand, are repetitive and follow a consistent pattern throughout the song. It’s the repetition of rhythm that makes it the foundation and backbone of any song.

Melodies Are The Top Layer Of Music, Rhythms Are The Foundation

Melodies are the top layer of music that catches our attention and makes a song enjoyable. However, it’s the rhythm that holds the song together and provides structure. Rhythm ensures that the other elements of music, like harmony and timbre, can be added to the music and don’t overshadow the melody. In conclusion, the differences between melody and rhythm are what make music a beautiful and harmonious artform. So the next time you hear your favorite song, take the time to appreciate and listen to the melody and rhythm of the song separately, and enjoy how they work together to create the music you love.

Examples Of Melody And Rhythm In Music

Melody and rhythm are two different elements in music. Examples of melody in music include memorable tunes that we hum along to, while rhythm refers to the beat and tempo that make you tap your foot or nod your head.

Both melody and rhythm work together to create a cohesive musical experience.

Music has been an integral part of human civilization since time immemorial. It has the power to evoke emotions, soothe the soul, and create memories. Melody and rhythm are the two basic elements of music. Melody refers to the sequence of single notes that create a meaningful musical phrase, while rhythm is the pattern of sound and silence that creates a sense of movement and flow.

Famous Melodies In Popular Songs

Melodies are the catchy parts of songs that stay with us. They are the parts that we hum along to and sing repeatedly. Here are some famous melodies in popular songs:

  • Yesterday by The Beatles: This melody is simple and timeless that features a repeating motif that tugs at the heartstrings.
  • Hallelujah by Jeff Buckley: This melody has a soulful quality that is both haunting and uplifting.
  • My Heart Will Go On by Celine Dion: This melody is a soaring ballad that captures the raw emotions of love and loss.

Different Rhythms In Different Genres Of Music

Rhythm is the backbone of music, giving it its groove, style, and identity. Here are some examples of different rhythms in various genres of music:

GenreRhythm
RockTypically follows a 4/4 time signature with a strong backbeat on the second and fourth beats of each measure.
Hip-HopCommonly uses syncopated rhythms with heavy bass and a strong emphasis on the downbeat.
JazzOften uses complex rhythms with irregular time signatures, giving it a unique and flexible style.

In conclusion, melody and rhythm are the essential building blocks of music. By understanding the differences between them and exploring their examples in different genres of music, we can deepen our appreciation and enjoyment of music.

Importance Of Melody And Rhythm In Music

Melody and rhythm are two key components of music. While melody refers to the tune or sequence of musical notes that make up a song, rhythm is the beat or pattern of the music. Both melody and rhythm are equally important in creating a memorable and enjoyable musical composition.

Music is an integral part of life that serves as a source of relaxation, entertainment, and even education. At the heart of every great song, two factors stand out – melody and rhythm. Melody refers to a sequence of notes that create a memorable tune, while rhythm is a pattern of sound and silence that drives the beat of the song.

Melodies Evoke Emotions And Create A Lasting Impression

Melodies create an emotional connection with listeners. The melody sets the mood and tone of the music and instantly captures the attention of the audience. When you listen to a song, it is the melody that sticks in your head long after the music stops. A great melody can make or break a song – it can either be forgettable or make an impact.

Rhythms Make People Dance And Move To The Music

Rhythm is the heartbeat of music. It is the driving force that makes music exciting and gets people moving and grooving. Rhythm creates a sense of movement and direction in a song. The right rhythm can make people want to dance, snap their fingers, or tap their feet in time with the music. Without the right rhythm, music would feel static and dull. Both melody and rhythm serve crucial roles in music. While melody creates an emotional connection with listeners and leaves a lasting impression, rhythm drives the beat and gets people moving. Think of music as a painting – melody is the color and rhythm is the texture. Without color, a painting would be dull, and without texture, a painting would be flat. The same goes for music – without melody and rhythm, it would not be as engaging and memorable.

In Conclusion

Overall, melody and rhythm are integral components of music. They work together to create captivating songs that can evoke emotions, memories, and make people want to dance. A great song is a harmonious blend of melody and rhythm, creating an unforgettable listening experience.

Melody Vs Rhythm Difference

Credit: www.quora.com

Common Misunderstandings About Melody And Rhythm

When it comes to music, melody and rhythm are two fundamental components that work together to create a captivating auditory experience. However, despite their distinct differences, they are often used interchangeably in conversation. In this section, we’ll take a closer look at some of the common misunderstandings about melody and rhythm.

Believing Melody And Rhythm Are The Same Thing

One common misconception about melody and rhythm is that they are the same. In reality, melody refers to the sequence of notes that create a musical phrase, while rhythm is the pattern created through the arrangement of those notes. Melody can exist without rhythm, but rhythm is essential to create a melody.

For example, imagine a musician playing a familiar tune like “Happy Birthday.” The melody consists of the notes that make up the tune, while the rhythm is the pattern of how long each note is held and the pauses in between. You can alter the rhythm without changing the melody, but changing the melody automatically changes the rhythm.

Using Melody And Rhythm Interchangeably In Conversation

Another misunderstanding about melody and rhythm is that they can be used interchangeably in conversation. This is not the case, as they have distinct meanings and functions in music. Using them interchangeably can lead to confusion and a lack of understanding when discussing music with others.

For example, if someone is talking about the melody of a song and another person responds by talking about the rhythm, they are not communicating effectively. It’s important to use each term correctly and understand how they contribute to the overall musical experience.

MelodyRhythm
Sequence of notes that create a musical phraseThe pattern created through the arrangement of those notes
Can exist without rhythmEssential to create melody
Changes to melody automatically changes rhythmCan alter rhythm without changing melody

In conclusion, it’s important to understand the distinct differences between melody and rhythm in music and use each term correctly to communicate effectively. By doing so, we can better appreciate and understand the complexity and beauty of music.

Developing Your Musical Ear To Recognize Melody And Rhythm

By developing your musical ear, you can differentiate between melody and rhythm. Melody is a sequence of musical notes arranged as a recognizable unit, while rhythm is the pattern of sounds that create a beat. With practice, you can train your ear to identify both melody and rhythm in any musical piece.

Music can be a beautiful and inspiring art form, but understanding the difference between melody and rhythm is key to developing your musical ear. Melody refers to the series of notes that make up the main melody of a song, while rhythm refers to the beat of the music. By learning to differentiate between melody and rhythm, you can better understand the structure of music and improve your ability to play and write music. Here are some exercises you can do to help you develop your musical ear:

Listening Exercises To Differentiate Between Melody And Rhythm

One of the best ways to differentiate between melody and rhythm is to listen to music with a critical ear. Try listening to a song and focusing on the melody – the sequence of notes that make up the main melody. Then, try listening to the song again, but this time focus on the rhythm – the beat of the music. By listening to music in this way, you can begin to train your ear to differentiate between the two.

Practice Singing Melodies And Clapping/tapping Rhythms

Another effective exercise is to practice singing melodies and clapping or tapping out the rhythm. Choose a simple melody and try singing it while tapping out the rhythm with your hands or feet. Then, try singing the melody without tapping the rhythm and see if you can still keep the beat. This exercise can help you develop a strong sense of rhythm and improve your ability to play and write music.

Play Along With Recordings

One more way to develop your musical ear is to play along with recordings of your favorite songs. Choose a song with a clear melody and rhythm and try playing along with the recording on your instrument. Focus on matching the rhythm and melody of the song as closely as possible. This exercise can improve your sense of timing and help you better understand the structure of music. In conclusion, developing your musical ear to recognize melody and rhythm takes practice and patience, but it is an essential skill for any musician. By using these exercises and consistently listening to and playing music, you can improve your ability to differentiate between melody and rhythm and become a better musician.

Melody Vs Rhythm Difference

Credit: unison.audio

Frequently Asked Questions For Melody Vs Rhythm Difference

What Is The Difference Between Rhythm And Melody?

The key difference between melody and rhythm is that melody refers to a sequence of musical notes that are played one after the other, while rhythm is the arrangement of sounds in time that creates a steady beat. Melody is the tune or song, while rhythm is the backbone that drives it.

Can You Have A Rhythm Without A Melody?

Yes, you can have a rhythm without a melody. Rhythm refers to the pattern of beats or notes in a piece of music while melody is the sequence of musical notes that make up a tune. In other words, rhythm provides the foundation on which a melody can be built, but a melody is not necessarily required for there to be a rhythm.

Does Every Melody Have A Rhythm?

Yes, every melody has a rhythm. Melody and rhythm are intertwined in music. Melodies wouldn’t make sense without rhythm. Rhythm gives melodies their pulse or heartbeat. So, in short, melody and rhythm are inseparable entities and complement each other in music.

What Is An Example Of A Melody?

A good example of a melody is the popular children’s song “Twinkle, Twinkle, Little Star. ” The simple melody consists of a series of ascending and descending notes that are easy to sing and remember.

Conclusion

While melody and rhythm are both important elements in music, they serve different purposes. Melody is the tune or series of notes that create a memorable theme, while rhythm is the beat and pace that gives structure and energy to a song.

Understanding the difference between the two can help musicians and listeners appreciate the intricate nuances of music. Keep honing your skills to master both melody and rhythm and unlock your true potential as a musician.

Categories
Archive

The Best Mixing Plugins Ever

The best mixing plugins ever are the FabFilter Pro-Q 3 and Waves SSL E-Channel. These plugins are essential for any audio engineer and music producer who wants to achieve a professional-sounding mix.

Both of these plugins provide a range of features and tools that allow you to finely tune and sculpt your mix. The FabFilter Pro-Q 3 is a highly versatile equalizer that offers a wide range of filter shapes and modes, making it perfect for fine-tuning any element in your mix.

On the other hand, the Waves SSL E-Channel plugin is a great all-purpose channel strip that emulates the classic SSL 4000 console, providing you with the renowned SSL EQ and compression. Together, these plugins are a powerful combination that can handle any mixing task. We’ll take a closer look at these two best mixing plugins ever and discuss how they can help you achieve a professional mix.

Eq Plugins

EQ plugins are essential tools for any mixing engineer looking to craft professional-sounding tracks. From graphic equalizers to parametric options, the variety of EQ plugins available today can help you achieve precise, targeted sound enhancements and adjustments.

When it comes to music production, EQ plugins play a crucial role in shaping the sound with precision. With so many options available on the market, it can be overwhelming to choose the right one. In this article, we’ll take a closer look at three of the best EQ plugins available: FabFilter Pro-Q 3, Waves SSL E-Channel, and iZotope Neutron.

Fabfilter Pro-q 3

FabFilter Pro-Q 3 is a popular choice among producers for its customizable interface, diverse features and ease of use. The plugin incorporates a high-quality EQ with an intelligent solo feature that offers precise tweaking of individual audio spectrums. Moreover, thanks to the plugin’s dynamic phase response, the Pro-Q 3 can achieve superior sound quality with negligible latency. Additionally, with the aid of mid/side processing, users can isolate the audio spectrum’s various regions. You can create up to 24 native EQ bands, making it an extremely versatile plugin. FabFilter Pro-Q 3’s built-in audio analyzer offers a visual representation of any given spectrum, making it easy to spot the problematic frequencies.

Waves Ssl E-channel

The Waves SSL E-Channel EQ plugin is an industry-standard. The plugin is modeled after the classic SSL 4000E console, which is famous for its warm and beautiful sound. The SSL E-Channel is an emulation of the console’s channel strip, providing a full EQ range of low, mid, and high bands. The SSL E-Channel plugin also incorporates a high-pass filter and a switchable 18dB/octave low-pass filter. One aspect of Waves SSL E-Channel that sets it apart from other EQ plugins is its built-in dynamics module. The dynamics section includes a compressor, limiter, gate/expander, which can all be tweaked to achieve the perfect sound.

Izotope Neutron

iZotope has released several remarkable plugins over the years, and Neutron 3 is no exception. iZotope Neutron 3 is essentially a mixing suite, incorporating several modules such as an EQ, compressor, exciter, transient shaper, and more. The plugin’s interface is customizable, and the Spectrum Analyzer offers a visual representation of the sound’s frequencies. Additionally, Neutron 3’s Sculptor module automatically corrects frequency imbalances, and the Mix Assistant offers recommendations based on the track’s existing audio. Neutron 3 is incredibly versatile and perfect for producers and engineers of varying experience levels. Looking for a precise, customizable interface? Go with FabFilter Pro-Q 3. Want to achieve a classic sound from an iconic console? Waves SSL E-Channel is the way to go. Need an all-in-one mixing suite? iZotope Neutron is perfect for you. Whatever your needs, these three EQ plugins offer superior sound quality and are sure to improve your music production.

Compressor Plugins

The best mixing plugins ever include compressor plugins, which can enhance the dynamic range of music tracks. These plugins come with versatile features, such as adjustable ratios, attack, release, and gain reduction controls, making them suitable for various mixing applications.

Compressor plugins are an essential part of any mixing setup. They help to tighten up the sound and balance the different elements in a mix. With so many compressor plugins on the market, it can be difficult to know which ones to choose. In this post, we’re going to look at three of the best compressor plugins available: Waves CLA-2A, Universal Audio LA-2A, and FabFilter Pro-C 2.

Waves Cla-2a

If you’re looking for a compressor with warm, vintage tones, then look no further than Waves CLA-2A. This plugin is modeled after the iconic Teletronix LA-2A compressor, which has been used on countless hit records over the years. With its simple and intuitive interface, the Waves CLA-2A is incredibly easy to use. It features just two knobs – gain and peak reduction – which allow you to dial in the perfect amount of compression for your mix. The plugin also has a built-in limiter, which prevents any unwanted distortion or clipping.

Universal Audio La-2a

The Universal Audio LA-2A is another plugin that is based on the Teletronix LA-2A compressor. However, unlike the Waves CLA-2A, this plugin is an exact emulation of the original hardware unit. One of the standout features of the Universal Audio LA-2A is its optical gain reduction element, which gives it a unique sound that is both smooth and transparent. The plugin also has a fast attack time and a relatively slow release time, which makes it ideal for leveling out dynamic performances.

Fabfilter Pro-c 2

If you’re looking for a compressor plugin with a more modern sound, then the FabFilter Pro-C 2 is a great choice. This plugin is incredibly versatile and can be used to achieve a range of compression effects, from transparent leveling to aggressive pumping. One of the standout features of the FabFilter Pro-C 2 is its impressive visual feedback. The plugin’s interface displays the input and output levels, as well as the gain reduction, which makes it incredibly easy to dial in the perfect amount of compression. The plugin also has a range of advanced features, such as lookahead and sidechain filtering, which make it incredibly powerful.

Reverb Plugins

Reverb plugins are essential mixing tools for any audio engineer looking to add depth and spatial ambience to their recordings. From classic spring and plate emulations to algorithmic and convolution-based reverbs, there are various options available that can enhance the sound of any mix.

Valhalla Vintageverb

Reverb plugins are essential for creating a sense of space in your mixes. One of the best reverb plugins on the market today is the Valhalla VintageVerb. It’s an incredible piece of software that offers a range of vintage reverb styles that add warmth and depth to any mix. The plugin’s vintage algorithms make it a must-have for anyone looking to add a touch of nostalgia to their mix. Some of its standout features include unique early reverb modes, smooth decay, and a powerful EQ section that allows for precise tonal shaping.

Slate Digital Verbsuite Classics

Another famous reverb plugin that is worth mentioning is the Slate Digital Verbsuite Classics. It’s a collection of classic reverb units that have been expertly modeled to create a range of unique, high-quality reverb sounds. The Slate Digital Verbsuite Classics collection comes with eight different reverb units, including the EMT 140, Plate 140, and 224. Each of these units has been carefully modeled to recreate the characteristic sound that made them famous. This plugin is perfect for adding a touch of classic vibe to your mixes.

Uad Emt 140 Classic Plate Reverberator

The UAD EMT 140 Classic Plate Reverberator is a highly regarded reverb plugin in the music industry, known for its ability to create rich, smooth and lush-sounding reverbs. The plugin recreates the classic EMT 140 plate reverb unit, one of the most iconic pieces of studio equipment ever made. The plugin offers a range of realistic and warm-sounding reverb options, as well as several unique features like a modulation section which adds subtle movement to the reverb tail. With UAD EMT 140 Classic Plate Reverberator, you can add depth and space to your mixes while maintaining a natural, organic feel. In conclusion, when it comes to choosing the best reverb plugins for your mixes, it’s essential to select a plugin that can add warmth, depth and space, while maintaining natural and organic feel. Valhalla VintageVerb, Slate Digital Verbsuite Classics, and UAD EMT 140 Classic Plate Reverberator are three of the best reverb plugins on the market today, each offering unique features that make them truly stand out from the rest. So why wait? Try one of these plugins in your next mix and hear the difference for yourself.

The Best Mixing Plugins Ever

Credit: producelikeapro.com

Delay Plugins

Delay plugins are essential for adding depth and a sense of space to your mixes. If you’re looking for the best delay plugins available in the market, you’ve come to the right place. Here are some of the best delay plugins that you can consider:

Soundtoys Echoboy

The Soundtoys EchoBoy is a versatile and powerful delay plugin that has been used by many professional mix engineers. The plugin comes with a range of presets that can be used as-is or as a starting point for creating your own unique sounds. With its vintage tape emulation, modulation options, and filter controls, the EchoBoy is a must-have for any serious mixing engineer.

Izotope Ddly Dynamic Delay

The iZotope DDLY Dynamic Delay is a unique delay plugin that uses dynamic processing to create interesting and musical delays. The plugin analyses the audio input and adjusts the delay time and feedback based on the sonic energy of the material. This results in delays that are always in sync with the track and feel natural. With its intuitive interface and creative controls, the DDLY is a great tool for creating exciting and dynamic effects.

Waves H-delay Hybrid Delay

The Waves H-Delay Hybrid Delay is a classic-sounding delay plugin that offers a range of vintage and modern delay effects. The plugin comes with a range of presets that cover everything from slapback delays to atmospheric soundscapes. With its hybrid design that combines analog and digital processing, the H-Delay has a warmth and character that is difficult to replicate with other plugins. The plugin also features a tempo-sync function that makes it easy to lock in the delay time with your mix.

Each of these delay plugins has its own unique features and strengths. Depending on your mixing needs and preferences, one of these plugins could be the perfect addition to your mixing toolbox.

Saturation Plugins

Saturation plugins are the perfect tool for adding warmth and character to your mixes. These plugins are used to recreate the subtle distortion and harmonic content of analog equipment, adding a level of depth and richness to digital recordings. In this article, we will explore the top saturation plugins that you can use on your tracks to give them that coveted analog sound.

Slate Digital Vcc Virtual Console Collection

The Slate Digital VCC Virtual Console Collection is a bundle of plugins that accurately models the sound of various analog consoles. The VCC plugin features six different console emulations that are based on models from companies like SSL, Neve, and API. Each emulation features its own unique sound, with options for adding different levels of harmonic distortion and saturation. The plugin also offers a mix-bus emulation that adds subtle warmth and glue to your tracks, giving them a finished and polished sound. The VCC plugin is a must-have for anyone looking to add analog warmth to their mixes.

Psp Vintagewarmer2

The PSP VintageWarmer2 plugin is a classic saturation plugin that has been used on countless records. The plugin features a variety of saturation and harmonic distortion modes, with options for adjusting the bias and saturation levels. The VintageWarmer2 also includes a unique “Fat” mode that adds extra harmonics to the low-end, making it perfect for adding warmth and weight to bass and kick tracks. The plugin has a simple and intuitive interface, making it easy to add analog character to your tracks.

Fabfilter Saturn

The FabFilter Saturn plugin is a versatile saturation plugin that offers a range of distortion and saturation modes. The plugin features sixteen different distortion algorithms that can be used individually or in combination to create custom distortion chains. The Saturn also offers per-band processing, allowing you to add saturation and distortion to specific frequency ranges. The plugin also includes a variety of modulation options, making it perfect for adding movement and interest to your tracks. The FabFilter Saturn is a powerful and flexible saturation plugin that can be used to add color and character to any mix.

The Best Mixing Plugins Ever

Credit: colinchildsmixing.medium.com

The Best Mixing Plugins Ever

Credit: mixandmastermysong.com

Frequently Asked Questions For The Best Mixing Plugins Ever

What Plugins Do Pros Use?

Professional website builders use a variety of plugins depending on their needs. The most common are SEO plugins like Yoast, social media sharing plugins, caching plugins such as WP Rocket, and contact form plugins like WPForms.

What Mastering Plugins Do Professionals Use?

Professionals in audio mastering may use a combination of mastering plugins like iZotope Ozone, Fabfilter Pro-MB, Waves SSL G-Master Buss Compressor, and UAD-2 Precision Multiband. These plugins allow for precise control over EQ, dynamics, and other sound parameters, helping to achieve the desired final mix.

Can You Get A Professional Mix With Stock Plugins?

Yes, it is possible to get a professional mix with stock plugins. Talented mixing engineers can produce high-quality results using built-in plugins in a Digital Audio Workstation. With experience and creativity, they can achieve the sound needed for any commercial project.

What Is The Best Mastering Eq Plugin?

The best mastering EQ plugin is subjective and depends on personal preference. However, some of the top options include FabFilter Pro-Q 3, iZotope Ozone 9, T-RackS EQ, and Waves SSL G-Master Buss Compressor. It’s important to experiment and find the EQ plugin that works best for you and your music.

Conclusion

Overall, the best mixing plugins provide incredible tools for music engineers and producers to create extraordinary sounds. From the classic EQs to the latest emulations, each plugin has its unique features, making it superior in its own right. Whether you use them for display, color, compression or anything else, these plugins will help you achieve the desired sound you have in mind.

So, get your hands on these plugins and take your music mixing to the next level!

Categories
Archive

How To Uninstall Spitfire Labs

To uninstall Spitfire Labs, go to your computer’s control panel and select “uninstall a program”. Find Spitfire Labs in the list and click “uninstall”.

Spitfire Labs is a software that allows you to create your own computer games. Once installed, it can take up valuable storage space on your computer. If you no longer need the program, it is important to uninstall it properly to free up space and improve the overall performance of your computer.

We will provide you with step-by-step instructions on how to uninstall Spitfire Labs from your computer.

How To Uninstall Spitfire Labs

Credit: www.youtube.com

Check If Spitfire Labs Is Installed

To uninstall Spitfire Labs, first check if it’s installed by going to the Control Panel and searching for it under the list of programs. If it’s there, click on it and select “Uninstall”. If it’s not listed, look for it in the list of browser extensions and remove it from there.

Before uninstalling Spitfire Labs, you need to check if it is installed on your system. There are various methods to check if Spitfire Labs is installed. In this post, we will discuss the two main methods to check if Spitfire Labs is present on your system.

Check Program Files

The first method to check if Spitfire Labs is installed on your system is to look for it in the Program Files folder. Follow the below steps to check:

  1. Press the “Windows key + E” on your keyboard to launch the Windows File Explorer.
  2. Scroll down and click on “Local Disk (C:)” or your system drive where your programs are usually installed.
  3. Click on the “Program Files” or “Program Files (x86)” folder depending on your system.
  4. Scan through the list of installed programs or search for “Spitfire Labs” using the search bar.
  5. If you find “Spitfire Labs” listed, then it is installed on your system.

Check Control Panel

Another way to check if Spitfire Labs is installed on your system is to look for it in the Control Panel. Follow the below steps to check:

  1. Press the “Windows key + X” and select “Control Panel” from the options.
  2. Click on “Programs and Features” or “Uninstall a Program”.
  3. Scan through the list of installed programs and search for “Spitfire Labs”.
  4. If you find “Spitfire Labs” listed, then it is installed on your system.

If you found Spitfire Labs in either of these two methods, then it is present on your system, and you can proceed to uninstall it.

Uninstall Spitfire Labs Via Control Panel

Uninstall Spitfire Labs through Control Panel by following these simple steps. Go to Programs and Features, locate Spitfire Labs and select Uninstall.

Uninstalling unwanted software is crucial to keep your computer running smoothly and efficiently. If you’re facing issues with Spitfire Labs, then don’t worry, uninstalling it through the Control Panel is easy. In this blog post, we will guide you through the process of uninstalling Spitfire Labs via Control Panel, step-by-step.

Access Control Panel

The first step is to access the Control Panel on your Windows computer. There are various ways to access the Control Panel, but the easiest way is to search for it in the Start menu.

Navigate To Programs And Features

Once you’ve accessed the Control Panel, navigate to the Programs and Features section. In some versions of Windows, this may be labeled as “Add or Remove Programs.”

Locate Spitfire Labs

Next, locate Spitfire Labs in the list of installed programs. You can use the search bar to find it quickly. Once you’ve located it, select it and click on the “Uninstall” button.

Uninstall Spitfire Labs

After clicking on the “Uninstall” button, the uninstallation wizard will launch. Follow the wizard’s instructions to uninstall Spitfire Labs completely from your computer. Once the wizard has finished, restart your computer. Uninstalling Spitfire Labs from your computer via Control Panel is straightforward. Remember to restart your computer to complete the process properly. If you’re still facing issues, contact Spitfire Labs’ support team for assistance.

Uninstall Spitfire Labs Using Third-party Uninstaller

Uninstall Spitfire Labs with ease using a third-party uninstaller. This method will ensure complete removal of the program, including any leftover files or registry entries.

Download And Install Third-party Uninstaller

If you find that Spyfire Labs is causing issues on your computer and you want to remove it, one option is to use a third-party uninstaller. You can download one of the many uninstallers available online and install it on your computer by following the on-screen instructions.

Launch Third-party Uninstaller

Once the third-party uninstaller is installed, you need to launch it. Look for the icon on your desktop or in your list of applications and double-click it to open the program.

Locate Spitfire Labs

Once the uninstaller is up and running, you will need to locate Spitfire Labs in the program list. You can either search for it manually or use the search bar available in the program.

Uninstall Spitfire Labs

When you have identified Spitfire Labs in the program list, select it and click the ‘Uninstall’ button. Follow the prompts and make sure you select all the relevant options, including deleting any leftover files and registry entries. Once the process is complete, restart your computer to ensure that all the changes take effect. Using a third-party uninstaller is a quick and easy way to remove Spitfire Labs from your computer. By following these simple steps, you can easily uninstall the program and keep your computer running smoothly.

How To Uninstall Spitfire Labs

Credit: www.whippedcreamsounds.com

Remove Spitfire Labs From Startup

If you have installed Spitfire Labs add-on on your computer and noticed that it’s causing issues or slowing down your system, you might want to remove it from your startup programs. Removing Spitfire Labs from startup ensures that it won’t start automatically when you turn on your computer, saving memory and avoiding possible performance issues.

Open Task Manager

The first step to disabling Spitfire Labs from startup is by opening the Task Manager. You can access the Task Manager by pressing the “Ctrl + Shift + Esc” keys on your keyboard or right-clicking on the taskbar and selecting “Task Manager.”

Disable Spitfire Labs From Startup

Once you have opened the Task Manager, go to the “Startup” tab, and look for Spitfire Labs. Right-click on it and select “Disable.” You can also select multiple programs by holding down the “Ctrl” key and clicking on each one you want to disable from startup. Once you’ve disabled Spitfire Labs, make sure to click on the “Apply” button to save the changes.

That’s it! By following these simple steps, you can disable Spitfire Labs from starting up with your computer, reducing the load on your system, and avoiding possible performance issues.

Delete Spitfire Labs Leftover Files And Registry Entries Manually

Manually deleting leftover files and registry entries of Spitfire Labs can help in completely uninstalling it from your system. Ensure that you follow the correct steps and remove all the associated files to avoid any issues.

If you’ve uninstalled Spitfire Labs, but its files and registry entries are still present on your computer, you need to delete them manually. Note that this process can be a bit technical, so proceed with caution. Here are the steps you can take to delete Spitfire Labs leftover files and registry entries manually.

Unhide System Files

Before you can delete Spitfire Labs leftover files, you need to unhide system files on your computer. Here’s how to do it:

  1. Open Windows File Explorer by pressing the Windows key + E.
  2. Click on the View tab in File Explorer.
  3. Check the “Hidden items” box.

Delete Spitfire Labs Leftover Files

Once you’ve unhidden system files, you can delete Spitfire Labs leftover files. Here’s how:

  1. Open Windows File Explorer.
  2. Navigate to the following folders and delete any Spitfire Labs files you find:
    C:\Program Files\Spitfire Labs\
    C:\ProgramData\Microsoft\Windows\Start Menu\Programs\Spitfire Labs\
    C:\Users\%username%\AppData\Local\Spitfire Labs\

Remove Spitfire Labs Leftover Registry Entries

Finally, you need to remove Spitfire Labs leftover registry entries. Here’s how to do it:

  1. Press the Windows key + R to open the Run dialog box.
  2. Type “regedit” in the Run dialog box and press Enter.
  3. In the Registry Editor, navigate to the following keys:
    HKEY_CURRENT_USER\Software\Spitfire Labs
    HKEY_LOCAL_MACHINE\SOFTWARE\Spitfire Labs
  4. Delete any Spitfire Labs keys you find under these two keys.

By following these steps, you can manually delete Spitfire Labs leftover files and registry entries, and keep your computer clean from this software.

How To Uninstall Spitfire Labs

Credit: www.logicprohelp.com

2026 Update: LABS Is Being Sunset

Spitfire Audio is now owned by Splice, and Spitfire says LABS and LABS+ are being sunset on 31 October 2026. If you already have LABS installed it will keep working in your projects, but it won’t receive updates, bug fixes, new packs or support after that date, and you won’t be able to install or redownload LABS content. The LABS sounds live on in Splice INSTRUMENT. If there are LABS packs you want to keep using, install them before 31 October 2026.

If you’re uninstalling because an old LABS plugin keeps loading in your DAW, Spitfire’s help centre says to delete the old plugin files by hand. On Windows, look for LABS.vst3 and LABS.dll in C:\Program Files\Common Files\VST3 and C:\Program Files\VSTPlugins. On Mac, remove LABS.vst3, LABS.vst and LABS.component from Macintosh HD/Library/Audio/Plug-Ins. Then restart your DAW and rescan your plugins.

Frequently Asked Questions Of How To Uninstall Spitfire Labs

How Do I Completely Uninstall Spitfire?

To completely uninstall Spitfire, go to the Start menu and open Control Panel. Click on Programs and Features, then locate Spitfire in the list of installed programs. Click on it and select Uninstall. Follow the on-screen instructions to complete the process.

How Do I Delete Labs Instruments?

Delete the pack in the LABS app, or remove that pack’s content folder from your LABS content location on disk.

How Do I Reinstall Spitfire Labs?

To reinstall Spitfire Labs, you need to follow these steps: First, uninstall the current version of Spitfire Labs from your system. Then, download the latest version of Spitfire Labs from the official website. After that, run the downloaded file and follow the instructions provided by the installer. Finally, launch Spitfire Labs and start using it.

How Do I Delete My Spitfire Library?

To delete your Spitfire library, go to your library manager and select the library you want to delete. Click on the gear icon and choose “delete library. ” Confirm your choice and the library will be removed from your computer.

What happens to Spitfire LABS after October 31, 2026?

Spitfire says existing LABS installs keep working, but the plugin gets no more updates, fixes, new content or support, and LABS content can no longer be installed or redownloaded. The same content is available in Splice INSTRUMENT.

Should I install LABS packs before October 31, 2026?

Yes. Spitfire recommends installing any LABS packs you want before 31 October 2026, because after that date LABS content can’t be installed or redownloaded.

Conclusion

Uninstalling Spitfire Labs can be a simple process if you follow the steps outlined in this post. Remember to backup your data and delete any remaining files after uninstalling the program. As always, be cautious when downloading and installing programs to avoid unwanted software on your device.

With these tips in mind, enjoy a cleaner and more efficient computer.

Categories
Archive

Amazing Free Vst Synth Plugins

There are numerous Free VST Synth Plugins available that could enhance your sound production. With just a few clicks, you could download them and integrate them into your projects to improve the sound quality and achieve better results.

VST Synths are a great way to produce unique and impressive sounds without breaking the bank. They are a crucial component of any digital audio workstation (DAW), and they offer a wide range of possibilities for sound design. Choosing a high-quality VST Synth that aligns with your needs and preferences could, without a doubt, improve the quality of your production manifold.

We will explore some of the finest free VST Synth Plugins currently available in the market that can save you money while enhancing your sound.

Amazing Free Vst Synth Plugins

Credit: routenote.com

Top 5 Free Vst Synth Plugins

Discover the top 5 free VST synth plugins for your music production needs. These amazing virtual instruments offer a variety of sounds and features to enhance your creative process without breaking the bank.

Are you a music producer looking for new synthesizer plugins? Look no further! Here are the top 5 free VST synth plugins that will enhance your music production experience.

Dexed

Dexed is a fantastic FM synthesizer plugin that perfectly emulates the sound of the legendary Yamaha DX7. Whether you’re after classic electric piano sounds or lush pad textures, Dexed has got you covered. With its simple interface and wide variety of presets, this plugin is perfect for beginners and professionals alike.

Helm

Helm is a versatile synth plugin that allows you to create a wide range of sounds, from warm analog tones to futuristic digital textures. Its simple layout and intuitive modulation system make it easy to use, even for those new to synthesis. With its powerful sound engine and customizable interface, Helm is a must-have for any music producer.

Tyrell N6

The Tyrell N6 is a virtual analog synth that combines classic sound with modern technology. With its vibrant filter and modulation options, the Tyrell N6 is perfect for creating everything from deep basslines to shimmering leads. Its user-friendly interface and extensive preset library make it a popular choice among music producers of all skill levels.

Synth1

Synth1 is a popular software synthesizer known for its versatility and advanced sound design capabilities. With its extensive modulation options and flexible architecture, Synth1 allows you to create a virtually endless variety of sounds. Combine that with its large community of users sharing presets and tips, and you’ve got a plugin that is perfect for those looking to push the boundaries of their music production.

Charlatan

Charlatan is a unique synth plugin that combines the warmth of analog with the precision of digital. With its intuitive interface and versatile sound engine, Charlatan is perfect for everything from basslines to leads to pads. Its ability to create rich, warm tones sets it apart from other popular plugins, making it a must-try for any music producer. No matter your skill level or music production goals, these top 5 free VST synth plugins are sure to enhance your creative experience. So why wait? Download them today and start creating!

Amazing Free Vst Synth Plugins

Credit: producelikeapro.com

Features Of Each Plugin

The world of music production is incomplete without the use of VST synth plugins. With numerous options available both paid and free, it might be overwhelming for music enthusiasts to choose the right one. Here we present some of the best free VST synth plugins that can be downloaded without costing you a dime.

Dexed

Dexed is an excellent free VST plugin that can recreate the iconic Yamaha DX7 sound. This plugin has an intuitive interface that perfectly mimics the look of the original hardware. Dexed is compatible with Windows, Linux, and MacOS. Some of the exciting features of Dexed include:

  • Multi-platform support.
  • Fully programmable 6 operator FM synth.
  • Offers a range of algorithms (operators connection sequence).
  • Precise envelope and filter controls.

Helm

Helm is another popular free VST synth plugin, best known for its unique wavetable and subtractive synthesis. Helm is suitable for both beginners and experienced producers and offers a range of presets that are customizable. This plugin is compatible with Windows, Linux, and MacOS. Some of the features of Helm include:

  • Intuitive Interface – Fast workflow.
  • Customizable wavetable synthesis.
  • Can import 3rd party presets (read-only).
  • Real-time graphical feedback.

Tyrell N6

Tyrell N6 is a great free VST plugin that offers an excellent analog sound. This plugin is suitable for creating lead and bass sounds and offers ample scope for customization. Tyrell N6 is compatible with Windows, Linux, and MacOS. Some of the features of Tyrell N6 include:

  • Classic analog sound.
  • 16 voice polyphony.
  • 2 oscillators with PWM and Sync.
  • 2 LFOs with multiple waveforms.

Synth1

Synth1 is a highly-rated free VST plugin known for its wide range of sounds. This plugin is ideal for producing ambient, EDM, and hip-hop sounds. The interface of Synth1 is simple, making it easy for even beginners to use. This plugin is compatible with Windows and MacOS. Some of the features of Synth1 include:

  • 2 oscillators with FM, ring modulation, and sync.
  • 2 filters with saturation and resonance.
  • 2 LFOs with multiple waveforms.
  • 16 note polyphonic.

Charlatan

Charlatan is another fantastic free VST synth plugin that provides a warm analog sound. This plugin is ideal for creating pad sounds and offers a range of customization options. Charlatan is compatible with Windows and MacOS. Some of the features of Charlatan include:

  • VA-style oscillator with PWM
  • 2 ADSR envelopes with velocity sensitivity
  • 2 LFOs with several waveforms and phase adjustment
  • Zero-delay filter with LFO modulation
Amazing Free Vst Synth Plugins

Credit: bedroomproducersblog.com

Frequently Asked Questions For Amazing Free Vst Synth Plugins

What Are The Best Free Synth Plugins?

There are many free synth plugins available, but some popular ones are TyrellN6, Helm, Dexed, and Full Bucket Music’s FB-3100. All offer unique sound possibilities and customization options, making them great tools for music production.

What Is The Free Plugin Like Diva?

A free plugin similar to Divi is Elementor. It offers a drag-and-drop page builder and includes a library of pre-designed templates and widgets. Elementor also allows for customization of site typography, colors, and responsive design.

What Is The Best Free Plugin?

The best free plugin highly depends on your website’s needs. However, some popular and reliable free plugins are Yoast SEO, Jetpack, Sucuri Security, WPForms, and Contact Form 7.

What Is The Name Of Our Top Vst Synthesizer?

Our top VST synthesizer is called [insert name here].

Conclusion

With these amazing free Vst synth plugins, you don’t have to break the bank to create high-quality music. These plugins offer a range of features and flexibility that allow you to experiment and create unique sounds. Incorporating these plugins into your music production workflow will not only save you money, but it will also give you more creative freedom.

So what are you waiting for? Download these plugins today and start creating your next masterpiece!

Categories
Archive

Create Awesome Chord Progressions

To create awesome chord progressions, start with a basic understanding of chord theory and experiment with different combinations and variations of chords. Developing a good sense of melody and harmony can also help in creating interesting chord progressions that enhance your music.

As you become more comfortable with chord progressions, try incorporating different inversions and chord extensions to add complexity and texture to your music. We will explore some tips and tricks for creating awesome chord progressions that can take your music to the next level.

Whether you are a beginner or an experienced musician, these techniques can help you unleash your creativity and create unique and memorable chord progressions.

Why Chord Progressions Matter

Mastering chord progressions is essential for creating awe-inspiring music. They add depth, emotion, and structure to any piece of music, making it stand out from the crowd. By understanding chord progressions, you can take your music to the next level, and it’s a skill that every musician should develop.

The Role Of Chord Progressions In Music

Chord progressions are a crucial element of music composition. It refers to a series of chords played in a particular sequence that forms the basis of a song. Chord progressions provide structure, harmony, and atmosphere to the music. Without chord progressions, music would sound a bit aimless and directionless. They give a song a sense of movement and progression, leading the listener from one section to another, creating a musical journey.

How Different Chord Progressions Elicit Different Emotions

Chord progressions can elicit various emotions. Different chord progressions can make the listener feel happy, sad, excited, or nostalgic. For example, playing a major chord progression may create a happy, cheerful mood, whereas playing a minor chord progression can evoke sadness and melancholy. Moreover, the order of chords can affect the overall emotional impact. For instance, playing a minor chord progression in reverse order, such as vi-IV-I-V, can create a different emotional impact than playing it in the usual order of I-IV-vi-V.

Creating Awesome Chord Progressions

A great chord progression is a combination of both creativity and theory. There are various chord progressions, ranging from simple to complex. It’s essential to explore different chord progressions to create captivating music. A good starting point is to use popular chord progressions, such as I-IV-V or ii-V-I, as a foundation, and then use your creativity to change and modify them according to your preferences. Additionally, understanding music theory concepts such as chord function, scale degree, and chord quality can help you create interesting and unique chord progressions.

Chord ProgressionEmotion
I-IV-VHappy, upbeat
vi-IV-I-VSad, melancholic
ii-V-IJazzy, sophisticated
  • Experiment with different chord progressions.
  • Use music theory concepts to create unique and captivating chord progressions.
  • Modify popular chord progressions to suit your preferences.
  • Consider the emotional impact of chord progressions and use them to convey the intended mood and atmosphere.

In conclusion, chord progressions are an essential element of music composition that provides structure, harmony, and atmosphere to a song. Combining theory and creativity can help create captivating and unique chord progressions that elicit various emotions. Understanding chord progressions and their emotional impact can help convey the intended mood and atmosphere of a song.

Getting To Know Chord Types

Learning about different chord types is crucial for creating unique and impressive chord progressions. By understanding major, minor, dominant, diminished, and augmented chords, you can elevate your compositions and express yourself through music.

Creating chord progressions can be a challenging task, especially for beginners. Getting to know chord types is an essential step when it comes to creating excellent chord progressions. If you want to make music that sounds good, you need to know what chords are and how they work. There are several types of chords, including major, minor, seventh, and extended chords. Let’s dive into each chord type and discuss how they work.

Major Chords

A major chord, denoted by a capital ‘M’, is a chord that consists of the root note, the major third, and the perfect fifth. Major chords are the most commonly used chords in music and sound happy and uplifting. For example, C major chord consists of the notes C, E, and G.

Minor Chords

A minor chord, denoted by a lowercase ‘m’, is a chord that consists of the root note, the minor third, and the perfect fifth. Minor chords are known for their sad or melancholic sound and are often used to create a sense of tension in music. For example, A minor chord consists of the notes A, C, and E.

Seventh Chords

A seventh chord is a chord that consists of the root note, the major or minor third, the perfect fifth, and the seventh note of the major scale. Seventh chords are commonly used in jazz and blues music but can also be found in other genres. There are four types of seventh chords: major seventh, dominant seventh, minor seventh, and half-diminished seventh.

Extended Chords

Extended chords are chords that have additional notes beyond the seventh. Some common extended chords are ninth, eleventh, and thirteenth chords. Extended chords are commonly used in jazz and other genres that utilize complex harmony. In conclusion, understanding chord types is crucial when it comes to creating awesome chord progressions. Major and minor chords are the most commonly used chords, while seventh and extended chords are often used in jazz and other genres that utilize complex harmony. By getting to know the different chord types and their characteristics, you can start creating awesome chord progressions today!

Beginner-level Chord Progressions

Learn the basics of creating awesome chord progressions with beginner-level guides and tutorials. Improve your music production skills and gain confidence in songwriting with simple but effective techniques.

For beginners, chord progressions might seem like a daunting task, but they’re an essential part of songwriting. Creating chord progressions can seem overwhelming and complex, but some beginner-level progressions can help get you started. In this post, we’ll explore some of the most common and easy-to-understand chord progressions that can help you create awesome music without getting overwhelmed.

The I-iv-v Progression

The I-IV-V progression is one of the most commonly used chord progressions when it comes to songwriting, and for a good reason. It’s a simple and effective way to create a catchy tune that can easily grab people’s attention. This chord progression consists of chords that are based on the first, fourth, and fifth notes of the scale. For example, in the key of C, the I-IV-V progression would consist of the C, F, and G chords, respectively. By using these three chords in different orders, you can create a wide range of different tunes and melodies that sound great.

The I-v-vi-iv Progression

Another beginner-level chord progression that’s often used in songwriting is the I-V-vi-IV progression. Like the I-IV-V progression, this one also uses simple chords, which makes it an excellent starting point for anyone who’s just getting started with creating chord progressions. This progression starts with the chord based on the first note of the scale, followed by the chord based on the fifth note, then the chord based on the sixth note, and finally the chord based on the fourth note. For example, in the key of C, this progression would consist of the chords C, G, Am, and F. This progression has been used in many popular songs and is great for creating catchy tunes that people can easily sing along to.

The I-iv-vi-v Progression

Last but not least, we have the I-IV-vi-V progression. This chord progression consists of the chords based on the first, fourth, sixth, and fifth notes of the scale, respectively. Like the previous progressions, the I-IV-vi-V progression is easy to create, and it can help you create some wonderful music. For example, in the key of C, this progression would consist of the chords C, F, Am, and G. This progression is used in many famous songs and is great for creating a memorable melody that can easily get stuck in people’s heads. In conclusion, these three beginner-level chord progressions are great starting points for anyone who’s just getting started with songwriting. By using them, you can create some awesome tunes without getting overwhelmed by the complexity of more advanced chord progressions. So, grab your guitar, piano, or whatever instrument you prefer, and start experimenting with these beginner-level chord progressions today!

Create Awesome Chord Progressions

Credit: www.productionmusiclive.com

Intermediate-level Chord Progressions

Crafting intermediate-level chord progressions is an essential skill for composing captivating music. With practice and experimentation, chord progressions can be constructed to evoke a range of emotions, from melancholy to ecstatic, and bring your music to life.

As an intermediate-level musician, you may have already perfected basic chord progressions. Now it’s time to move on to more complex and melodious arrangements. Learning intermediate-level chord progressions is a crucial step towards becoming a skilled songwriter. In this article, we’ll explore two intermediate-level chord progressions – The Circle Progression and The I-IV-iii-VI-ii-V Progression and guide you on how to create an awesome chord progression.

The Circle Progression

The Circle Progression is one of the most widely used chord progressions in music. It revolves around the Circle of Fifths and includes chords that are a fifth apart. It typically begins with the I chord and ends with the vi chord. The chords in the Circle Progression are as follows:

Chord NumberChord NameDegree
1MajorTonic
2MinorSupertonic
3MinorMediant
4MajorSubdominant
5MajorDominant
6MinorSubmediant

The Circle Progression is an easy yet effective way to add some spice to your chord progression.

The I-iv-iii-vi-ii-v Progression

Another intermediate-level chord progression is the I-IV-iii-VI-ii-V Progression. This progression has a unique and beautiful sound and is often used in pop and rock music. It includes chords that are from the same key and allows for easy melodic movement. Here are the chord progressions:

  1. I chord
  2. IV chord
  3. iii chord
  4. VI chord
  5. ii chord
  6. V chord

When creating an awesome chord progression, feel free to experiment with different chord patterns and melodies. Using the Circle Progression or the I-IV-iii-VI-ii-V Progression as a base can help you expand your songwriting horizon and create something truly unique. The key is to practice and experiment until you find the right chord progression.

Advanced-level Chord Progressions

If you have a good understanding of the basics of chord progressions, it’s time to step up your game and dive into more advanced-level chord progressions. These chord progressions add a new level of sophistication and depth to your music, and are often used by skilled musicians to add variety and interest to their work.

The Andalusian Cadence

The Andalusian Cadence is a classic chord progression often used in Flamenco music. It has a distinct sound that evokes a sense of passion and drama. The progression goes like this: Am -> G -> F -> E. This is a great progression to experiment with and can be used in a variety of musical styles.

The Coltrane Changes

The Coltrane Changes, also known as the Coltrane Matrix, are a series of complex chord progressions used in modal jazz. The progression involves a cycle of chords that move in a chromatic cycle of major thirds. This progression is a challenging one, but it can add a new level of depth and complexity to your music.

The Chromatic Mediant Progression

The Chromatic Mediant Progression is a unique chord progression that involves shifting from one chord to another that is either a major or minor third apart. This creates a distinct and almost eerie sound that can add a lot of character to your music. This progression is often used in film scores, especially in horror and suspense genres.

Overall, experimenting with advanced-level chord progressions is a great way to take your music to the next level. Whether you decide to try out the Andalusian Cadence, the Coltrane Changes, or the Chromatic Mediant Progression, adding these progressions to your repertoire can help you create music that is sophisticated, exciting, and memorable.

Tools And Techniques For Creating Chord Progressions

Discover the tools and techniques for creating awesome chord progressions and elevate your music production to new heights. With a range of tips and tricks at your disposal, you’ll be able to craft unique and memorable chord progressions that capture the essence of your music.

Creating awesome chord progressions is an essential part of songwriting. As a songwriter, you always want to compose unique yet captivating music to catch the attention of your audience. In this article, we will discuss the various Tools and Techniques for Creating Chord Progressions.

Creating Melodies First

Creating melodies first helps you to develop a solid foundation for your chord progressions. Once you have a melody that you like, you can then harmonize it with chords. Harmonization refers to the process of adding chords to melodies. When you harmonize a melody, you need to ensure that the chords fit well with the melody’s notes and rhythm.

Using Chord Progression Generators

Chord Progression Generators are online tools that help to generate chord progressions. You can use them to develop new ideas quickly, instantly creating a chord progression for you. This tool is an excellent option if you’re experiencing writer’s block or if you’re looking for fresh inspiration. Some of the popular chord progression generators include Hooktheory, Autochords, and Chord Progression Hub.

Deconstructing Popular Chord Progressions

Deconstructing popular chord progressions is an effective strategy for creating unique music. Analyzing other artists’ music can help you understand the principles of chord progressions and how to use them effectively. You can experiment with different modifications of the popular chord progressions to create new, creative music. In conclusion, chord progressions are the backbone of any song. If you want to create excellent music, you need to put effort into crafting memorable and captivating chord progressions. By using these tools and techniques, you can improve your music composition skills and create memorable music that resonates with your audience.

Putting It All Together: Developing Your Own Chord Progressions

Developing your own chord progressions can seem daunting, but with practice and experimentation, you can create awesome chord progressions that are unique to your personal style. Building off of basic chord theory and exploring various chord combinations, you can create melodies and harmonies that truly reflect your musical vision.

Creating awesome chord progressions involves identifying the target emotions, experimenting with different chord types and progressions, and adding personal touches and variations. While it might seem daunting, with a bit of practice, anyone can develop their own chord progressions. So, let’s dive in!

Identifying Your Target Emotion

The first step in creating your own chord progressions is to identify the emotion you want to convey. Different chords convey different emotions and moods. For example, major chords are associated with happy and joyful emotions, while minor chords are associated with sad and melancholic emotions. Once you have identified the target emotion, you can start choosing chords that match the emotional tone.

Experimenting With Different Chord Types And Progressions

After identifying the target emotion, the next step is to experiment with different chord types and progressions. There are various chord types and progressions that can help you convey different emotions. For example, a I-IV-V progression is a popular chord progression in pop music that creates a sense of resolution and stability. On the other hand, a ii-V-I progression is commonly used in jazz music to create a sense of tension and release. By experimenting with different chord types and progressions, you can create unique and interesting chord progressions that convey the desired mood.

Adding Personal Touches And Variations

The final step in creating your own chord progressions is to add personal touches and variations. This is where you can express your creativity and make your chord progressions stand out. You can add different rhythms, chord inversions, extensions, and substitutions to your chord progressions to make them more interesting and unique. Experimenting with these variations can help you create distinctive chord progressions that are not only enjoyable for you to play, but also engaging for your listeners. In conclusion, creating your own chord progressions requires a bit of experimentation and practice, but it’s a rewarding process that can lead to unique and memorable music. By identifying your target emotion first, experimenting with different chord types and progressions, and adding personal touches and variations, you can create awesome chord progressions that convey the desired mood and emotions.

Create Awesome Chord Progressions

Credit: soundation.com

Create Awesome Chord Progressions

Credit: m.youtube.com

Frequently Asked Questions Of Create Awesome Chord Progressions

How Do You Make Amazing Chord Progressions?

Amazing chord progressions can be made by experimenting with different chord combinations, using various chord inversions and adding tension to the progression. Furthermore, analyzing existing songs and studying music theory can also help in creating interesting chord progressions. Practicing and constantly trying new ideas is key to developing the skill of making amazing chord progressions.

How Do You Come Up With Creative Chord Progressions?

To come up with creative chord progressions, experiment with different chord combinations and try breaking traditional rules. Start with a simple pattern and adjust notes or timing. Listen to songs in your desired genre for inspiration and keep your creativity flowing by playing with new sounds.

How Do You Make A Funky Chord Progression?

To make a funky chord progression, experiment with chords that are not typically used together, such as adding 7th or 9th chords. Try variations on familiar progressions or borrow progressions from different genres. Don’t be afraid to take risks and follow your ear to create unique and interesting chord progressions.

Can You Create Your Own Chord Progression?

Yes, you can create your own chord progression by experimenting with different chords until you find a combination that sounds good to you. It’s important to have a basic understanding of music theory, such as chord functions and keys, to create a cohesive and pleasing progression.

Additionally, there are online resources and tools that can assist in generating chord progressions.

Conclusion

Chord progressions are an essential component of music creation. These progressions determine the rhythm, melody and overall feel of a song. With these simple steps and tips, you can create incredible chord progressions that will become the foundation of your masterpiece.

So, keep practicing, try new things, and have fun. With time, patience, and creativity, you can create awesome chord progressions like a pro. So what are you waiting for, go ahead and put your skills to the test!