Categories
Archive

How To Get A Cleaner Drum Mix

To get a cleaner drum mix, use high-pass filtering and EQ. Increase the muddy frequencies and decrease the harsh frequencies.

Mixing drums for better clarity is a vital part of music production. A cluttered drum mix can cause other instruments to get lost in the mix. To get a cleaner drum mix, it is crucial to understand how to use high-pass filters and EQ.

High-pass filtering helps remove any unnecessary low-end frequencies that muddy the mix. EQing the drums involves increasing the frequencies that give the drums body and decreasing the harsh frequencies that produce an unpleasant sound. By carefully mixing the drum tracks, one can achieve a cleaner and crisper drum sound that elevates the entire mix.

Start With A Good Recording

To ensure a cleaner drum mix, you must first start with a good quality recording. This is the foundation for any great mix. If you have a poorly recorded drum sound, no amount of mixing will fix it. Here are some tips to achieve a good quality recording:

Use High-quality Equipment

Using high-quality equipment is essential for achieving a clean drum mix. You should invest in a good mic, preamp, and audio interface to capture the best possible sound. This will eliminate the noise and distortion that lower quality equipment can introduce.

Choose The Right Room

The recording space you use can have a significant impact on the quality of your drum recording. Choose a room that is acoustically treated to minimize unwanted reflections. A smaller room with minimal furniture and soft surfaces helps to minimize the echo in the recording.

Eliminate External Noise

External noise, such as traffic, can greatly affect your drum recording. Be sure to choose a quiet location to record and, if possible, schedule your session during a time when outside noise is at a minimum. You can also use sound barriers to further isolate the drums from external sounds.

Utilize Proper Mic Placement

Mic placement is crucial for achieving a great drum sound. A good rule of thumb is to place the mic close to the drumhead, angled slightly to capture the sound of the drum and the cymbals. Experiment with different mic positions to find the sweet spot for each drum in your kit.

Effective Equalization Techniques

Effective Equalization Techniques are essential to achieve a cleaner drum mix. In this post, we’ll discuss some tried-and-true EQ techniques you can use to enhance your mix and bring out the best in each drum. Understanding the Frequency Spectrum, EQing Vocals Carefully, Treating the Kick Drum, Controlling the Bass Guitar, Enhancing the Snare, and Reinforcing Your Overheads are all key components to achieving optimal sound quality.

Understand The Frequency Spectrum

Your primary objective when mixing drums is to create clarity and balance by understanding which frequencies occupy which instruments. For instance, the kick drum occupies the lower end of the frequency spectrum, whereas the snare drum is more concentrated in the mid-range. This division means that you don’t want to boost the bass frequencies of the snare as this will create a muddy sound. On the other hand, a slight boost to the highs can make the snare sound crispier.

Eq Vocals Carefully

The vocal EQ is critical to ensure that it doesn’t “fight” with the rest of the instruments in the mix. The vocals should occupy the frequency range that doesn’t conflict with other instruments but compliments them. For instance, the kick drum’s frequency range overlaps with the vocals. By EQing the vocal tracks, you can remove some of the lower range frequencies, making room for the kick drum to cut through the mix.

Treat The Kick Drum

The kick drum provides the foundation for the entire drum kit, so it should sound prominent in the mix. You’ll want to highlight the low-end frequencies between 60-80Hz and around 3-4kHz for attack and click. If the kick happens to sound boomy or muddy, try to cut the 200-400Hz region to clear it up.

Control The Bass Guitar

The bass guitar’s lower frequency range can overlap with the kick drum, resulting in an overpowered low-end mix. To manage both instruments, some EQ settings, such as a cut in the 60-80Hz range of the bass guitar, can help make room for the kick drum to shine.

Enhance The Snare

The snare drum offers most of the drum kit’s mid-range frequencies. By setting a high-pass filter around 100Hz, you can remove unwanted low-end frequencies and give the snare a tight and snappy character. For added clarity, you might want to boost around the 2-4kHz range.

Reinforce Your Overheads

Your overheads provide a birds-eye view of the drum kit’s overall sound and should contribute to the stereo image. Before applying EQ settings to your overhead microphones, try to balance them altogether. Once balanced, you can carefully apply some EQ to emphasize cymbals or high-end details while avoiding making the mix sound too compressed or harsh.

Achieving Clarity With Compression

Achieving clarity with compression is critical for achieving a clean drum mix. By using compression, you can even out drastic drum level jumps while bringing up softer hits. This technique not only helps you achieve balance but also clarity in your mix.

Getting a cleaner drum mix involves various techniques, but one of the most crucial ones is compression. A compressor can control the dynamics of a drum track and even out the levels to make the mix sound more cohesive. In this section, we’ll look at how to use compression on different elements of the drum kit to achieve clarity and balance.

Compress The Kick Drum

The kick drum is the heart of the rhythm section, and it sets the foundation for the entire mix. It’s essential to have a consistent level and punch for the kick to cut through in the mix. A compressor can help in achieving this by controlling the peaks and adding sustain to the sound. Start by setting the threshold to around -5dB and a ratio of 4:1. Adjust the attack and release times to allow the transients to come through while compressing the sustain and decay. You can also use sidechain compression to duck the kick on other tracks that may compete for the same frequency range.

Control The Snare Drum’s Dynamics

The snare drum is the backbone of the groove, and it’s crucial to have it well-defined in the mix. Compression can help tame the transients and add some body to the sound. Set the threshold to around -6dB and a ratio of 3:1. Adjust the attack and release to allow the initial transient to come through while compressing the sustain and tail of the sound. You can also use parallel compression to add some extra punch to the snare without sacrificing the dynamic range.

Balance The Overheads

The overheads are where you get the cymbals and the stereo width of the drum kit. However, they can also pick up a lot of bleed from other instruments, making it essential to balance them carefully. Use a gentle compression with a threshold of around -10dB and a ratio of 2:1 to smooth out any volume inconsistencies. Adjust the attack and release to avoid squashing the transients and to preserve the natural ringing of the cymbals.

Blend The Bass Guitar

The bass guitar is closely related to the kick drum, and it’s essential to have them working together in the mix. Compression can help control the low-end and glue the two elements seamlessly. Start by setting the threshold to around -7dB and a ratio of 3:1. Adjust the attack and release to let the initial attack through while compressing the sustain and decay of the sound. You can also use sidechain compression to duck the bass on the kick drum hits, enhancing the tightness and impact of the rhythm section.

Give Vocals Presence

Finally, the vocals are the most crucial element in most genres, and they need to be clear and prominent in the mix. Compression can help control the level and add some character to the sound. Set the threshold to around -8dB and the ratio to 2:1. Adjust the attack and release to allow the natural phrasing of the singer while compressing any peaks or sibilance. You can also use parallel compression to add some warmth and thickness to the vocals without making them too loud in the mix.
How To Get A Cleaner Drum Mix

Credit: www.youtube.com

Utilizing Effects Optimally

To achieve a cleaner drum mix, it’s essential to use effects optimally. This involves EQing the individual drum tracks, using compression properly, and adding reverb to create a sense of space without overpowering the mix. It’s important to experiment with these techniques to find the best combination for your mix.

Use Reverb To Create Depth

Reverb is a powerful tool that can help to add depth and ambiance to your drum mix. It is essential to choose the right type of reverb to ensure it complements the other elements in your mix. If you’re mixing a rock song, you might use a large plate or hall reverb to create a sense of space. In contrast, a smaller room or chamber reverb might be more applicable for jazz or acoustic tracks. It’s also essential to adjust the reverb’s pre-delay, decay, and wet/dry mix to achieve the desired effect.

Add Delay For Space And Width

Adding some delay to drum tracks can provide a subtle sense of space and width to your mix. While there are multiple types of delay, tape delay or analog delay can be perfect for balancing the original sound with the delayed sound. Using this effect on overheads and snare can widen the mix, but be careful not to overdo it, as it can make the mix sound muddy. Start with a subtle amount of delay and gradually increase the time until the desired effect is achieved.

Add Parallel Compression For Impact

Parallel compression, also called “New York-style compression,” is a technique used to provide thickness and impact to the drums in the mix. To apply this technique, duplicate the drum track, compress it, and blend it with the original uncompressed track. Using this technique can increase the overall volume and the sustain of the drums. However, it’s important to mix this technique carefully and not to over-compress the mix. Try to blend the two tracks to achieve the appropriate level of impact without squashing the dynamic range. Utilizing effects such as reverb, delay, and compression can significantly enhance your drum mix. Be aware of the type of sound you want to achieve and adjust your effects settings to match that. Remember to use these effects subtly and carefully to avoid over-processing and to get a cleaner drum mix.

Maintaining Balance In The Mix

When it comes to mixing drums, achieving a clean and balanced mix is essential. A well-balanced drum mix ensures that all the elements sit well together, with no one sound overshadowing the others. In this post, we’ll explore some tips on how to get a cleaner drum mix by maintaining balance using specific techniques.

Start With Good Gain Staging

The first step in achieving a balanced drum mix is good gain staging. Gain staging ensures that each channel’s level is appropriately set, which allows the mix to have enough headroom without distortion. To start, make sure every channel’s input gain is appropriately set, with each drum sound sitting at the right level. This way, you avoid overloading the channel that will lead to unwanted distortion in the mix.

Create A Solid Foundation With Drums And Bass

When it comes to mixing drums, it’s critical to create a solid foundation with the kick and snare. The kick and snare are the heart of the rhythm section, and getting them right means everything else falls into place. Make sure the kick and snare levels are balanced to allow for a good foundation. Once you have this foundation set, it’s much easier to add other drum elements like the hat and cymbals while maintaining balance in the mix. Remember, less is often more when it comes to drumming.

Make Panning Choices Carefully

One way to achieve balance in a drum mix is by panning, which helps to create space in the stereo field. However, it’s essential not to overdo it. Panning every element of the drum kit to the extreme isn’t necessary and can result in unwanted phasing issues. The key is to make panning choices based on the tracks you’re working with, allowing room for each drum element to breathe and sit well in the mix.

Maximize Loudness Without Sacrificing Balance

It’s natural to want your drum mix to sound loud and punchy. However, it’s essential to ensure the mix stays balanced while maximizing loudness. Use compression, EQ, and other mixing techniques to help the drums cut through the mix and sound clear and impactful. But be sure not to overcompress or EQ any of the drum elements. Doing so can lead to a loss of balance, and the mix can sound thin and artificial.

Conclusion

StepAction
1Start with Good Gain Staging
2Create a Solid Foundation with Drums and Bass
3Make Panning Choices Carefully
4Maximize Loudness without Sacrificing Balance

Creating a balanced drum mix can be challenging, but by following these tips, you can produce a cleaner and more balanced mix. Remember to start with good gain staging, create a solid foundation with drums and bass, make panning choices carefully and maximize the loudness without sacrificing balance. These techniques can help you achieve a well-mixed and professional drum sound.

How To Get A Cleaner Drum Mix

Credit: www.youtube.com

Time-based Effects

Enhance the sound of your drum mix by incorporating time-based effects. Include reverb, delay, and echo to create an immersive sound. Adjusting the parameters of these effects can help achieve a cleaner and more professional sound.

If you’re looking to improve your drum mix, time-based effects can be a powerful tool. These effects can help to create width, add depth, and give your drums a more spacious feel. By using effects like reverb and delay, you can create a more cohesive and polished sound.

Creating Stereo Width

One of the key benefits of time-based effects is their ability to create stereo width. By using techniques like panning and stereo imaging, you can give your mix a wider, more spacious feel. To create stereo width in your drum mix, try using stereo delay, chorus, or flanger effects. These can help to create a wider sense of space around your drums, making them feel bigger and more impactful.

Making Space With Reverb

Another powerful use of time-based effects is to create space with reverb. By adding reverb to your drum tracks, you can create a sense of depth and space around your drums. This can help to give your mix a more professional and polished sound. To use reverb effectively, try experimenting with different decay times and pre-delay settings. This can help to create a more natural and organic sound, while still allowing your drums to cut through the mix.

Adding Depth And Delay

Finally, you can use time-based effects like delay to add depth and dimension to your drum mix. This can help to create a more dynamic and engaging sound, while still keeping your drums front and center. To use delay effectively, try using short delay times and low feedback settings. This can help to create a more subtle and understated effect, while still adding depth and complexity to your drums.

Utilizing Automation For Movement

In addition to using time-based effects, you can also use automation to create movement and excitement in your drum mix. By automating the volume, panning, or effects parameters of your drum tracks, you can add a sense of movement and variation to your mix. This can help to keep your drums interesting and engaging throughout the track, while still allowing them to sit comfortably in the mix. In conclusion, time-based effects can be a powerful tool for creating a cleaner and more professional drum mix. By using techniques like stereo width, reverb, delay, and automation, you can add depth, dimension, and excitement to your drums. So why not experiment with some of these techniques in your next mix, and see what kind of results you can achieve?

Adding Character To Your Mix

Enhance your drum mix by adding character to it. Focus on precise editing and polishing techniques, using frequency control and compressors to clean up the sound. Additionally, experiment with EQ and parallel compression to add depth and dimension to your mix.

Mixing can be a tedious task if you want to achieve a cleaner and polished sound. However, sometimes a mix can sound too clean and lack character, which may make it feel sterile and boring. To add character, you need to introduce some grit and warmth into your mix. In this blog post, we’ll discuss how to add character to your mix through saturation, vintage equipment emulation, adding texture with distortion, and creative use of automation.

Use Saturation For Warmth

Saturation can add warmth to your mix by introducing harmonic distortion. It can make your drums sound less sterile and more natural. One way to use saturation is to apply it to the drum buss. By using a tape saturation plugin, you can achieve the warmth and saturation that analog tape provides.

Emulate Vintage Equipment

Emulating vintage equipment can also add character to your mix. Vintage equipment introduces a unique character to the drum sound, which can be difficult to replicate with modern equipment. You can use plugins that emulate vintage compressors, EQs, and preamps to achieve a similar sound. For example, using a vintage compressor plugin can add color, warmth, and character to your mix.

Add Texture With Distortion

Distortion can add texture to your mix, which can make your drums sound more interesting and less sterile. There are various types of distortion plugins that you can use, such as tube, tape, and transistor distortion. Tube distortion can add warmth and harmonics to your mix, while transistor distortion can add grit and aggression. You can experiment with different types of distortion to find the one that best suits your mix.

Creative Use Of Automation

Creative use of automation can also add character to your mix. For example, you can automate the volume of your drums to create dynamic changes throughout the song. You can also automate the panning of your drums to create movement and a sense of space. Additionally, you can use automation to add effects such as reverb and delay to your drums to create interesting textures. By using automation creatively, you can add character to your mix while also adding dimension and depth. To summarize, adding character to your mix can make it more interesting and engaging for your listeners. You can achieve this by introducing warm saturation, emulating vintage equipment, adding texture with distortion, and creatively using automation. Incorporating these techniques into your mix can take your drum mix to the next level.

Final Touches To Improve Mix Clarity

Achieving a clean drum mix requires attention to detail. Final touches like EQ adjustments, compression, and panning can greatly improve mix clarity. Paying close attention to each individual instrument can make a big difference in the overall sound.

Getting your drum mix to sound clean and polished requires careful attention to detail. Sometimes, it’s the final touches that can make all the difference in creating that professional sound. In this article, we’ll take a look at some final touches that can help you achieve a cleaner drum mix.

Cleaning Up The Low-end

One of the most important elements of a clean drum mix is a controlled low-end. Too much low-frequency energy can muddy the mix, making it hard to distinguish individual sounds. To clean up the low-end, consider using EQ to remove any unnecessary low-frequency information. You can also try using high-pass filters to remove any frequencies that aren’t essential to the mix.

Utilizing Mid/side Processing

Mid/side processing can be a useful technique for cleaning up your drum mix. It involves separating the mid and side information in the mix and processing each separately. By doing this, you can control the width of the stereo image and create a more focused, centered sound. Try using mid/side EQ to remove any unwanted frequencies in the middle of the mix, or mid/side compression to tame any elements that are too wide.

Checking The Mix On Different Devices

Checking your drum mix on multiple devices is a crucial step in making sure it sounds good everywhere. You want to make sure that the mix translates well to different speakers and headphones, as well as different listening environments. Try listening on studio monitors, headphones, and even car speakers to get a sense of how the mix sounds in different contexts. Adjust the mix as needed to make sure it sounds good on every device.

Utilizing Reference Tracks

Using reference tracks can be a great way to ensure that your drum mix holds up against professional standards. Choose a reference track that has a similar style and sound to your mix, and compare the two to see how yours measures up. Pay attention to things like EQ balance, stereo imaging, and overall clarity. Use the reference track as a benchmark to gauge the quality of your own mix, and make adjustments as necessary.

Avoiding Common Mix Mistakes

Finally, it’s important to be aware of common mix mistakes that can sabotage your drum mix. These mistakes include things like over-compression, over-use of effects, and poor gain staging. By being mindful of these mistakes and making an effort to avoid them, you can improve the overall clarity and quality of your mix. To sum up, final touches are essential to achieving a clean drum mix. By cleaning up the low-end, utilizing mid/side processing, checking the mix on different devices, utilizing reference tracks, and avoiding common mix mistakes, you can create a polished and professional sound that will impress your listeners!

Frequently Asked Questions For How To Get A Cleaner Drum Mix

How Do You Make A Mix Sound Cleaner?

To make a mix sound cleaner, use EQ to cut any unnecessary frequencies and boost any lacking frequencies, use a noise gate to remove unwanted background noise, use compression to even out the levels and add clarity, use reverb and delay moderately, and ensure the overall mix isn’t too loud or distorted.

What Is The Best Product To Clean Drum Shells?

The best product to clean drum shells is a microfiber cloth with warm water and mild soap. Avoid using harsh chemicals or abrasive materials that may damage the finish. Gently wipe down the drum shells and dry immediately to prevent water spots.

How Do You Get Drums To Stand Out In The Mix?

To get drums to stand out in a mix, use EQ to cut competing frequencies in other instruments, add compression to even out dynamic range, and use panning or stereo widening to create space. Additionally, utilizing different microphone techniques, like close miking or room miking, can help achieve a unique drum sound.

What Do You Clean Drum Sets With?

To clean drum sets, wipe them down with a soft cloth dampened with warm water and mild soap. Avoid using abrasive cleaners or solvents that could damage the finish. Be gentle with hardware and cymbals to prevent scratches or other damage.

Conclusion

To sum up, achieving a cleaner drum mix takes a combination of knowledge, patience, and careful attention to detail. By addressing issues such as phase cancellation, EQ, and compression, you can give your drums the clarity and punch they need to truly shine in your mix.

Remember to trust your ears, experiment with different techniques, and never be afraid to make adjustments until you achieve the perfect sound. With these tips in mind, you’ll be well on your way to crafting professional-grade drum mixes that stand out from the crowd.

More in our Drums & beats guide.

Categories
Archive

Fixing A Mix Using A Dynamic Eq

To fix a mix using a dynamic EQ, use the EQ to target specific frequencies that need adjustment based on the overall dynamic range of the mix. A dynamic EQ can help reduce harshness, balance the mix, and improve clarity in a more natural way than traditional EQs.

Fixing a mix using a dynamic EQ can be a game-changer when it comes to achieving a professional sounding mix. By using a dynamic EQ, it allows you to address specific frequencies that need adjustment based on the overall dynamic range of the mix.

This targeted approach to EQing can help to reduce harshness, balance the mix, and improve clarity in a more natural way than traditional EQs. We will discuss in more detail what a dynamic EQ is and how you can use it to fix common mix issues. We will also provide tips and best practices to help you achieve the best results possible.

Understanding Dynamic Eq

Dynamic EQ is a popular method used by audio engineers to refine the sound of a mix. It helps in fixing problems without affecting the overall balance of the mix by adjusting the equalizer response dynamically.

Dynamic EQ is a powerful mixing tool that enhances the mixing process by offering more control and precision than traditional EQ. When it comes to fixing a mix, Dynamic EQ can be particularly useful as it allows you to target specific frequencies only when needed. In this article, we’ll delve into the specifics of Dynamic EQ, how it works, and the differences between Dynamic EQ and traditional EQ.

Dynamic Eq Vs Traditional Eq

Traditional EQ and Dynamic EQ both share the same goal, which is to alter the frequency content of an audio signal. However, with Traditional EQ, you can only adjust the gain or attenuation of a band, regardless of the signal level. This means that if you apply a boost or cut at a certain frequency, that frequency will always be boosted or cut by the same amount, regardless of the incoming signal’s dynamic nature. Dynamic EQ, on the other hand, allows adjustments to be made only when the incoming signal exceeds a certain threshold. This means that, for example, if you apply a boost to a certain frequency, the boost will only be applied when that particular frequency is too low. When the frequency is at an appropriate level, the boost will be bypassed, creating a smoother, more natural sound.

How Dynamic Eq Works

So, how does Dynamic EQ achieve this level of precision and control? Essentially, a Dynamic EQ combines aspects of a Dynamic Range Processor and an EQ to create a tool that can affect the audio signal’s frequency response only when needed. A Dynamic EQ is made up of the following blocks:

  • Input Gain: This adjusts the input signal’s amplitude.
  • Sidechain Filter: This determines the frequency content that the Dynamic EQ will act upon.
  • Level Detector: This measures the incoming signal’s level and sends a control signal to the EQ section.
  • EQ Section: This is where the boost or attenuation of the desired frequencies is applied.
  • Output Gain: This adjusts the level of the processed signal.

With a Dynamic EQ, you can apply a boost or cut to only a specific frequency range. You can also control how much gain or attenuation is applied when the incoming signal exceeds the threshold. With precise tuning of the Sidechain Filters and Level Detectors, you can pinpoint specific frequencies that need attention, and with the EQ section’s precision controls, you can ensure only the necessary frequencies are adjusted. In conclusion, Dynamic EQ is a powerful mixing tool that can help fix problem frequencies in a mix quickly and easily while avoiding over-processing. By allowing precise control over specific frequencies, you can create a more dynamic and natural-sounding mix that is a joy to listen to.

Fixing A Mix Using A Dynamic Eq

Credit: www.youtube.com

When To Use Dynamic Eq

Dynamic EQ is a versatile tool that can help you fix a mix that sounds either too dull or sharp. It works by only lowering or boosting frequencies when needed rather than statically cutting entire bands. This allows you to achieve a more natural and transparent sound.

Dynamic equalization is a powerful tool that can be used to fix problematic frequencies, balance a track, and control harshness and sibilance. In essence, dynamic EQ is a cross between a compressor and an equalizer, which allows you to selectively equalize certain parts of a track. Before using dynamic EQ, it is important to identify problematic frequencies, so you can determine which parts of your track need fixing. Here’s a closer look at when to use dynamic EQ and how it can be beneficial for your mix.

Identifying Problematic Frequencies

The first step in fixing a mix using dynamic EQ is identifying problematic frequencies. This involves identifying frequencies that are too prominent or interfering with other parts of your track. For example, if you have a kick drum that is getting lost in your mix, you may need to use dynamic EQ to boost the frequencies that are most important for the kick drum. You could also use dynamic EQ to tame harsh or sibilant parts of your track, such as a singer’s “S” sounds or cymbals that are too bright. By identifying problematic frequencies, you can use dynamic EQ to selectively equalize certain parts of your track and create a more balanced mix.

Controlling Harshness And Sibilance

Another time to use dynamic EQ is when you need to control harshness and sibilance. Harshness and sibilance can be caused by frequencies that are too prominent or by the way that sounds interact with each other. If you find that certain parts of your track are too harsh or sibilant, you can use dynamic EQ to selectively reduce the offending frequencies. For example, if you have a singer with an “S” that is too prominent, you could use dynamic EQ to reduce the frequency range that is causing the problem. This will help to tame harshness and sibilance, while maintaining the natural sound of the rest of your track.

Balancing A Track

Finally, you can use dynamic EQ to balance a track. Balancing a track involves making sure that each part of your mix is heard clearly, and that nothing is getting lost in the mix. Dynamic EQ can be used to selectively boost or reduce certain frequencies, which can help to create balance in your mix. For example, if you have a bass guitar that is getting lost in your mix, you could use dynamic EQ to selectively boost the frequencies that are most important for the bass guitar. By using dynamic EQ to balance your mix, you can create a more polished, professional sound that is easy to listen to and enjoyable for your audience. In conclusion, dynamic EQ is a powerful tool that can be used to fix problematic frequencies, control harshness and sibilance, and balance a track. By identifying problematic frequencies and using dynamic EQ to selectively equalize certain parts of your track, you can create a more balanced mix that is enjoyable for your listeners. Try using dynamic EQ in your next mix to see how it can benefit your sound and take your mix to the next level.

Step-by-step Guide To Fixing A Mix With Dynamic Eq

Learn how to fix a mix using a dynamic EQ with this step-by-step guide. With careful attention to detail and proper use of the dynamic EQ, you can bring balance to your mix and ensure that every element is working together harmoniously.

If your mix sounds muddy or harsh, then it’s time to give a dynamic EQ a try. Dynamic EQs are powerful tools that can help you fix problems in your mix with precision and ease. In this guide, we’ll take you through the step-by-step process of fixing a mix using a dynamic EQ.

Identifying The Problematic Frequencies

The first step in fixing a mix with a dynamic EQ is to identify the troublesome frequencies that are clashing and causing the problem. You can use a frequency analyzer to locate the frequencies that need adjustments. Make a note of the frequency range that needs reducing or boosting.

Adding The Dynamic Eq To The Track

Once you’ve identified the problematic frequencies, the next step is to add a dynamic EQ to the track. This step involves inserting the EQ plugin on the channel of the track you want to adjust.

Setting The Threshold And Ratio

After adding the dynamic EQ to the track, set the threshold and ratio. The threshold refers to the amount of volume at which the dynamic EQ starts to work. The ratio represents how much gain reduction the dynamic EQ will apply to frequencies that exceed the threshold. You can use a gentle ratio to fix minor issues or a higher one for more severe problems.

Choosing The Bandwidth

Choosing the bandwidth is the next step. The bandwidth setting determines the width of the frequency range that the dynamic EQ will affect. You should choose a bandwidth that is as narrow as possible to avoid affecting frequencies that don’t need adjusting.

Adjusting The Gain

After setting the bandwidth, adjust the gain control for the troublesome frequencies. This step requires carefully dialing in a reduction or boost for the target frequencies. You can use the gain knob or slider in the dynamic EQ plugin to adjust the frequencies based on your notes.

Checking The Results

Lastly, check the results of your adjustments to see if the dynamic EQ has helped fix the problematic frequencies. You should listen to the mix again with critical listening and analyzers to see whether the mix has improved or not. If it hasn’t, repeat the process and make further adjustments. That’s it! Now you know the step-by-step process of fixing a mix using a dynamic EQ. Practice these steps and, over time, you will become an expert at fixing problematic frequencies and creating an amazing mix.

Using Dynamic Eq In Different Mix Scenarios

Dynamic EQ is a versatile tool for fixing problems in a mix. It can be used to tame harsh frequencies, boost certain elements, and control dynamics. By adjusting the threshold and attack/release times, you can target specific problem areas in the mix and make precise corrections.

Dynamic EQ is a powerful tool that can be used to fix mixing issues. This EQ works differently than traditional EQ, as it can apply compression only at certain frequencies. This makes it ideal for situations where a specific frequency range needs to be addressed. In this post, we will explore the different scenarios in which dynamic EQ can be used to fix common mixing problems in vocals, drums, guitars, and full mixes.

Fixing A Vocal Mix

When fixing a vocal mix, dynamic EQ can be used to address harsh frequencies that may be present in the recording. Using a dynamic EQ, the frequency range where the harshness exists can be pinpointed and compressed. This will result in a smoother and more pleasant sounding vocal. For example, if the vocal has an unpleasant presence around 3 kHz, a dynamic EQ can be set to compress only that frequency range.

Fixing A Drum Mix

Dynamic EQ is also useful when fixing a drum mix. One common problem with drums is that the snare can sometimes be too prominent, overpowering the rest of the drums. Using a dynamic EQ, the snare can be compressed only when it is too loud, allowing the other drums to be heard more clearly. This can be achieved by setting the dynamic EQ to compress only when the snare hits a certain threshold level.

Fixing A Guitar Mix

Guitar mixes can also benefit from dynamic EQ. For example, if there is too much string noise or pick noise in a guitar track, a dynamic EQ can be used to compress only the frequency range where the noise exists. This will result in a cleaner and clearer guitar sound.

Fixing A Full Mix

Finally, dynamic EQ can be used to fix a full mix. One common problem is that the mix may have certain frequency ranges that are too loud or too quiet. Using a dynamic EQ, these ranges can be compressed or boosted to achieve a more balanced mix. For example, if the mix has too much low end, a dynamic EQ can be used to compress the low frequencies and bring them in line with the rest of the mix. In conclusion, dynamic EQ is a powerful tool that can be used in many different mix scenarios. By understanding how to use dynamic EQ in specific situations, you can achieve a smoother, clearer, and more balanced mix.

Advanced Tips For Using Dynamic Eq

Enhance your mixing skills with advanced tips for using dynamic EQ. Fixing a mix using a dynamic EQ involves careful frequency identification, followed by targeted attenuation or boosting, to give each track its own space in the mix.

Dynamic EQ is a versatile tool that can help fix any mix and enhance the overall sound quality. There are several ways to use dynamic EQ, and mastering these techniques can make a significant difference in your audio production. In this article, we’ll provide some advanced tips for using dynamic EQ effectively with subheadings such as Side-Chain Compression with Dynamic EQ, Parallel Processing with Dynamic EQ, and Using Dynamic EQ in a Mastering Chain.

Side-chain Compression With Dynamic Eq

Side-chain compression is a technique used in audio production to attenuate or boost certain frequencies while keeping others intact. This method can also be applied to dynamic EQ processing for better results. Here’s how it works:

  • Insert a dynamic EQ plugin on the track you want to process.
  • Select the frequencies you want to target, set the threshold and the ratio.
  • Insert a compressor on another track, such as the kick drum or bass, and side-chain the dynamic EQ plugin.
  • Now, whenever the kick drum or bass plays, the dynamic EQ will react and attenuate or boost the selected frequencies, creating space in the mix.

Parallel Processing With Dynamic Eq

Parallel processing is a mixing technique that involves duplicating a track and processing it differently from the original. This method can be used with dynamic EQ for more control over the sound. Here’s how:

  • Duplicate the track you want to process and insert a dynamic EQ plugin on the duplicate.
  • Choose the frequencies you want to enhance or attenuate and adjust the corresponding settings.
  • Blend the duplicate track with the original by adjusting the volume fader or using a send channel.
  • The original track contributes to the overall sound, while the duplicate track adds extra control and clarity.

Using Dynamic Eq In A Mastering Chain

Using dynamic EQ in a mastering chain can add depth and clarity to the final mix. Here’s how to incorporate it:

  1. Insert a dynamic EQ plugin on the master bus.
  2. Select the frequencies you want to enhance or attenuate, adjusting the settings accordingly.
  3. Set the threshold and ratio to control the amount of gain reduction and add some makeup gain for consistency.
  4. Keep track of the overall gain reduction to avoid over-compression and loss of dynamics.

Conclusion

Dynamic EQ is a powerful tool that can help you fix a mix by controlling specific frequencies. Whether you’re using it for side-chain compression, parallel processing, or in a mastering chain, dynamic EQ can make a noticeable difference in the sound quality. Keep these advanced tips in mind and experiment with dynamic EQ to achieve the best results possible.

Fixing A Mix Using A Dynamic Eq

Credit: www.izotope.com

Fixing A Mix Using A Dynamic Eq

Credit: www.masteringthemix.com

Frequently Asked Questions For Fixing A Mix Using A Dynamic Eq

What Is Dynamic Eq In Mixing?

Dynamic EQ in mixing is a process that dynamically adjusts the EQ levels of a signal based on its frequency content and amplitude changes. It allows for precise control over specific frequencies without affecting the overall balance of the mix.

This technique is useful for correcting problem areas in a track and adding clarity to the mix.

What Is Dynamic Eq Good For?

Dynamic EQ is good for controlling and correcting specific problematic frequencies in real-time, allowing audio engineers to make accurate and precise adjustments to a mix. It’s particularly useful in situations where certain frequencies may be louder or quieter than others, or if the frequency response of speakers or headphones is non-linear.

What Is A Good Dynamic Range For A Mix?

The ideal dynamic range for a mix depends on the genre, instruments, and overall sound. However, generally, a dynamic range of 8-12 dB is considered good as it allows the music to have a balanced and natural sound without being too compressed or too dynamic.

It’s essential to maintain the right balance and preserve the energy of the music while enhancing its clarity.

Is Dynamic Eq The Same As Multiband Compression?

No, dynamic EQ and multiband compression are not the same. Although they share some similarities, static EQ is more like a combination of both where you can adjust the intensity and duration of certain frequencies, while multiband compression brings down signal levels when they cross a certain threshold.

Conclusion

The dynamic EQ is an indispensable tool for anyone who wants to achieve accurate and fast results in mixing. Its unique abilities to control certain frequencies and adapt to dynamic audio signals can save hours of work and eliminate the need for various plugins.

This tool is a must-have for professionals and beginners alike, as it streamlines the mixing process and ensures that the final result is polished and high-quality. So, if you want to take your mixing skills to the next level, make sure to include a dynamic EQ in your arsenal.

More in our EQ guide.

Categories
Archive

How to Mix Vocals in Garageband

To mix vocals in Garageband, first set up and record your vocals using a microphone. Then, adjust the volume and panning of each track and add effects such as EQ, reverb, and compression to enhance the sound.

Garageband is a versatile digital audio workstation with powerful features that enable users to record, edit and mix their music. When it comes to mixing vocals in Garageband, it is important to have a clear understanding of the basic fundamentals of mixing.

With proper techniques and settings, you can create a polished and professional sound for your project. This guide will show you how to mix vocals in Garageband using tools such as volume, panning, and effects to achieve the desired sound. Whether you are a beginner or an experienced producer, these tips will help you get the most out of your vocal recordings. So, let’s get started!

Preparing The Track For Vocal Mixing

Preparing your vocal track properly is crucial to achieving a polished vocal mix in Garageband. Start by cleaning up any unwanted noise or silence, adjusting panning and volume, and adding EQ and compression to enhance the vocals. With these steps, your vocals will shine in your mix.

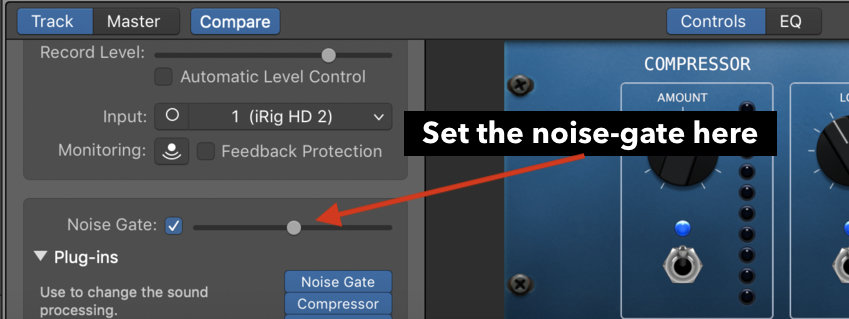
Preparing the Track for Vocal Mixing Before you jump straight into mixing your vocals in Garageband, it’s essential to make sure your track is pristine and ready for the vocal. In this section, we’ll cover the steps you should take to prepare your track, including basic EQ adjustments, compression settings, and reverb, and delay settings. EQ Adjustments The first step in preparing your track for vocal mixing is to make basic EQ adjustments. To do this, select the EQ plugin from the channel strip on your track. Start by rolling off any unnecessary low-end frequencies below 100Hz, then sweep the mid and high ranges to discover any harsh frequencies that may need to be removed. You can also boost specific frequencies that will make your vocals sound more prominent. Compression Settings Adding compression will help even out the dynamics of your vocal track, making it sound more polished and professional. Start by adding the compressor plugin to your channel strip. Adjust the threshold to around -20dB and set your ratio to 3:1. The attack and release times will depend on the style and tempo of your track, but generally, you want to choose faster attack times to catch sudden peaks and longer release times to allow the compressor to release smoothly. Reverb and Delay Settings Adding reverb and delay to your vocals will help them sit in the mix better, giving them a sense of space and depth. Start by adding the reverb plugin to your channel strip and choose a preset that suits the vibe of your track. Adjust the wet/dry mix to taste, but be careful not to overdo it. Too much reverb can make your vocals sound washed out and distant. Next, add a delay plugin and set the time and feedback to create an echo effect that complements your vocals. In conclusion, by following these basic steps, you can prepare your track for vocal mixing in Garageband, giving your vocals a polished and professional sound. Remember to start with basic EQ adjustments, add compression to even out the dynamics, and use reverb and delay to create space and depth.

How to Mix Vocals in Garageband

Credit: www.youtube.com

Setting Up Garageband For Vocal Mixing

Learn how to mix vocals like a pro in Garageband with these easy steps. Set up your project with the correct settings, adjust EQ levels, add compression, and perfect your vocal mix using reverb and delay effects.

If you have been struggling with mixing vocals in Garageband, then you are in the right place. Mixing vocals is an integral part of audio production and can be quite challenging even for experienced audio engineers. However, with Garageband, it becomes easier, and we are going to show you how. In this segment, we will take you through the basics of setting up Garageband for vocal mixing. We will cover everything from creating a new project to using the mixer window to ensure that the process is seamless.

Creating A New Project

Before you start mixing vocals, you need to create a new project in Garageband. Follow these simple steps:

  1. Open Garageband on your computer.
  2. Click on the “New Project” button, which is located at the bottom left of the screen.
  3. In the pop-up window, select the “Empty Project” option and click “Choose.”
  4. Name your project and choose the location where you want to save it.

Adding Vocals To The Project

Once you have created a new project, the next step is to add vocals to it. Here is how you can add vocals in Garageband:

  1. Click on the “Tracks” button, which is located on the right side of the screen.
  2. In the pop-up menu, select “Audio,” then “Record using a microphone” and click “Create.”
  3. Connect your microphone to your computer and set it up correctly.
  4. Click on the red record button to start recording your vocals.
  5. When you’re done, press the stop button.

Using The Mixer Window

The mixer window is where you can adjust the levels and effects of your vocal tracks. Here’s how to use the mixer window:

  1. Click on the “Mixer” button, which is located at the top of the screen.
  2. In the mixer window, you will see sliders that correspond to individual tracks.
  3. Adjust the volume of each track by dragging the slider up or down.
  4. You can also add effects by clicking on the “Smart Controls” button, which is located on the left side of the screen.
  5. In the Smart Controls pane, you can add effects such as reverb, EQ, or compression.

Now that you have learned the basics of setting up Garageband for vocal mixing, you are ready to start mixing your vocals. Remember, practice makes perfect, so don’t be afraid to experiment with different effects and settings until you achieve the sound you want. With these tips, you can produce high-quality vocal tracks with ease.

Mixing Vocals In Garageband

If you’re new to Garageband, mixing vocals can be a daunting task. In this guide, we will walk you through the process of mixing vocals in Garageband, step by step. We will cover how to adjust the vocal levels, apply EQ, and add compression to your vocals to get that professional sound that you’re after.

Adjusting The Vocal Levels

Before you start mixing your vocals, it’s crucial to ensure that all your recorded tracks have a consistent level. Garageband’s audio mixer provides a simple way of adjusting the vocal levels. Here’s how:

  1. Select your vocal track by clicking on it.
  2. In the mixer window, adjust the fader up or down to raise or lower the volume.
  3. You can also mute or solo tracks by clicking the M or S buttons next to the fader, respectively.
  4. Check the levels by playing back your tracks and adjusting the faders to ensure that each track is audible and sits well in the mix.

Applying Eq To Vocals

Equalization (EQ) is a critical process in mixing vocals. It allows you to adjust the frequency levels of your vocal, giving it more clarity and presence. Here are the steps to apply an EQ effect to your vocals in Garageband:

  1. Select your vocal track in the track header area.
  2. Go to the Smart Controls pane and click on the EQ button. The equalizer window will open up.
  3. Adjust the sliders to boost or cut different frequency ranges that fit the vocal nicely. For example, add a boost to the high-end frequencies to add more air and sparkle to your vocals.
  4. Use your ears! Listen to the changes as you adjust the EQ to determine which setting sounds best.

Adding Compression To Vocals

Compression is an essential tool in mixing vocals that helps keep your vocal levels consistent throughout the performance. Here’s how you can apply compression to your vocals in Garageband:

  1. Select your vocal track and go to the Smart Controls pane.
  2. Click the Compressor button to open the compressor window.
  3. Adjust the threshold, ratio, and gain settings to compress the vocal audio signal.
  4. Be careful not to over-compress as it can lead to an unnatural and lifeless sound.
  5. Listen to the changes carefully and make adjustments as necessary.

Creating Space With Reverb And Delay

When it comes to mixing vocals in Garageband, it’s important to create space in the mix to allow the vocals to sit comfortably. One way to do this is by using reverb and delay effects. These effects help to create a sense of depth and space, making the vocals sound less dry and upfront. Here are some tips on setting up and adjusting reverb and delay in Garageband:

Setting Up Reverb And Delay

Garageband comes with a range of built-in reverb and delay plugins that you can use. To set up these effects, first go to the track where you want to apply the effect. Click on the Smart Controls button and select the plugin slot for either reverb or delay. Select the plugin you want to use and adjust the settings as desired.

Adjusting Reverb And Delay Levels

Once you’ve set up the reverb and delay plugins, you can start adjusting their levels. You want to strike a balance between having enough effect to create space in the mix and not having too much that it becomes distracting. One way to do this is to use the Send feature in Garageband. This allows you to send a proportion of the vocal signal to an effects channel, where you can adjust the level of the effect. Start by sending a small amount of the vocal signal to the effects channel and gradually increase it until you reach the desired level. Do the same for the delay effect to ensure the vocal sits nicely in the mix.

Reverb and Delay Tips
Use shorter decay times and less wetness for a more subtle effect
Try different presets to find one that works well with your vocal
Don’t overdo it! Too much reverb or delay can make the vocal sound distant and muddy

By using reverb and delay, you can create a sense of space in your vocal mix, making the vocals sound more professional and polished. Keep in mind that these effects are just tools, and it’s up to you to use them wisely to enhance the mix. With these tips, you can take your vocal mixing skills to the next level in Garageband.

Adding Final Touches To The Vocal Mix

After applying compression, EQ, and reverb to your vocal mix, it’s time to add some final touches to make it sound top-notch. Here are two essential techniques that will bring your vocals to life:

Automation For Vocal Mixes

Automation is a technique that allows you to fine-tune the levels of your tracks throughout the mix. By automating the vocal tracks, you can adjust the volume of specific sections where the vocal needs a boost or a reduction in level.

  • Open the automation lane in Garageband by clicking on the “A” icon in the left-hand corner of the track.
  • Click on the “Volume” automation box to adjust the vocal levels over time.
  • Draw in automation by clicking on the line and dragging it up and down as required.
  • Adjust the automation parameters until you’re satisfied with the vocal’s balance in the mix.

Grouping Vocals For Better Mixing

Grouping is a technique that helps you to manage and mix multiple tracks as a single unit. By grouping similar tracks together, you can apply the same effects chains to multiple tracks at once, making it easier to balance and maintain consistency across the mix.

Steps to Group Vocal Tracks
Select the vocal tracks you want to group by clicking on the track headers while holding the “shift” key.Right-click on the selected tracks and choose “Group” in the context menu. Alternatively, use the “cmd+g” keyboard shortcut.Click on the newly created “group” header to reveal group options on the track header.Apply effects on the group header track, and the changes will affect all the tracks in the group.

Applying automation and grouping techniques to your vocal mix in Garageband can make a significant difference between a good and a great sound. By practicing these techniques, in no time, you’ll be able to produce professional-sounding vocal mixes that will make your music stand out from the crowd.

How to Mix Vocals in Garageband

Credit: thegaragebandguide.com

How to Mix Vocals in Garageband

Credit: producersociety.com

Frequently Asked Questions For How To Mix Vocals In Garageband

How Do You Blend Vocals Together?

To blend vocals together, start by balancing the levels of each vocal track and removing any unwanted noise or frequency clashes. Use EQ and compression to enhance the vocals and create a cohesive sound. A stereo imaging plugin can also be helpful in creating a wide and spacious vocal sound.

Remember to listen carefully and make subtle adjustments until the vocals sound like they belong together.

How Do You Clean Up Vocals On Garageband?

To clean up vocals on GarageBand, first, you need to identify the unwanted sounds. Then, you can use effects like EQ, compression, and noise reduction to remove those sounds and enhance the vocals. Additionally, you can use the “strip silence” function to remove the dead air between the vocal phrases.

Is Garageband Good For Mixing Audio?

Yes, GarageBand is a good software for mixing audio. It has features like multitrack editing, virtual instruments, and real-time effects. With its user-friendly interface, it’s a great option for beginners and professionals alike.

Can You Use Garageband To Mix Songs?

Yes, GarageBand can be used to mix songs. It is a popular music production software that allows users to create and edit music tracks, including mixing and mastering functionalities. GarageBand offers a wide range of audio effects and filters, making it a powerful tool for music mixing and production.

Conclusion

After going through the process of mixing vocals in Garageband, you can now proudly create your own tracks that sound just as professional as any other artist. Remember to always keep in mind the important tools and techniques such as equalization, compression, and panning.

By doing so, you will be able to achieve a crisp, clear vocal sound that will stand out from the rest. With continued practice and experimentation, you will be on your way to perfecting your craft and producing music that you can be proud of.

Categories
Archive

Free Standalone Guitar Amp Simulator

A free standalone guitar amp simulator is a software that imitates the sound of an amplifier to modify the tone of an electric guitar. These guitar amp simulators can be used with headphones or integrated into a recording setup.

Despite being free, these tools provide quality sound effect options for guitarists to experiment with and can be downloaded from several online sources. Additionally, with the use of a digital interface, guitar players who depend on guitar effects can play and practice without disturbing those around them.

With so many options to choose from, whether you are a novice or a professional, finding the right guitar amp simulator could do wonders for your guitar playing. We’ll take a look at some of the best free standalone guitar amp simulators that you can download and start using today.

Benefits Of A Free Standalone Guitar Amp Simulator

A Free Standalone Guitar Amp Simulator can provide convenience and versatility to musicians without the need for an actual amplifier. It allows for a wide range of tones and effects to be experimented with, while also saving valuable space and money.

If you’re a guitar player, you’ll know the importance of having the right amp and the right setup. However, making changes to your setup can be expensive and time-consuming. That’s why a free standalone guitar amp simulator can be a game changer. Here are some of the benefits of using a free standalone guitar amp simulator:

No Need For Additional Hardware

One of the most significant benefits of using a free standalone guitar amp simulator is that it eliminates the need for additional hardware. Traditionally, guitar players have had to invest in expensive amps and processors to create the desired sound. However, with a standalone guitar amp simulator, you can achieve similar results without spending money on additional hardware.

Saves Money

By using a free standalone guitar amp simulator, you’ll save a considerable amount of money. As we’ve previously mentioned, investing in additional hardware can put a significant dent in your wallet. With a free standalone guitar amp simulator, you can achieve the same effects without spending a dime.

Easily Accessible

Another advantage of using a free standalone guitar amp simulator is that it is easily accessible. You don’t need to visit a music store or wait for a delivery to get started. You can download a free standalone guitar simulator online and begin using it immediately.

User-friendly Interface

Finally, a free standalone guitar amp simulator is incredibly easy to use. You don’t need to be a tech expert to understand how it works. The user interface is straightforward, and you can get started right away. Additionally, you can customize the settings to achieve the desired sound for your guitar playing. In conclusion, a free standalone guitar amp simulator is an excellent tool for guitar players looking to save money, reduce setup time, and experiment with different sounds. The benefits of using a guitar amp simulator include no need for additional hardware, saving money, easily accessible, and the user-friendly interface.

Free Standalone Guitar Amp Simulator

Credit: test-audified2.myshopify.com

Features Of The Best Free Standalone Guitar Amp Simulators

The best free standalone guitar amp simulators come with a range of features that enhance the overall experience. These features may include a variety of amp models, effects, and easy-to-use interfaces. They provide an accessible and cost-effective solution for all guitar enthusiasts.

If you’re a guitarist, you know the importance of having the right amplifier to produce great sound. However, not everyone can afford expensive guitar amps. To solve this problem, free standalone guitar amp simulators have become popular among guitarists. With a wide range of options, it can be tricky to choose the right one. Here are some features to consider when choosing the best free standalone guitar amp simulator.

Authentic Amp Models

The best free standalone guitar amp simulators offer a variety of authentic amp models. Authenticity is crucial since the ultimate aim is to replicate the sound of a real amplifier. The ability to switch between different amplifier models is also a plus. This feature offers guitarists more flexibility as they can experiment with different sound effects and find the perfect match for their playing style.

Effects And Pedals

A quality guitar amp simulator should have a range of effects and pedals. These effects and pedals enhance the overall sound quality by adding texture and depth to the music. Examples include distortion, reverb, and delay effects. The best free standalone guitar amp simulators offer a variety of effects and pedals, allowing guitarists to customize the sound of their music to their preference.

Customizable Tone

Another feature of the best free standalone guitar amp simulators is customizable tone. The strength of guitar amp simulator lies in its ability to enable customization of the guitar’s sound. A good simulator should allow guitarists to tweak the tone to their liking. The ability to perform equalization adjustments is also an important consideration to create the perfect sound.

Presets

The best free standalone guitar amp simulators should provide presets that allow guitarists to save their custom settings. Presets enable guitarists to switch between different sounds quickly. They also help in reproducing tones that were difficult to create originally or were created accidentally. A guitar amp simulator that doesn’t have presets can be frustrating when you want to quickly switch between multiple sounds.

Compatibility And Connectivity

Lastly, compatibility and connectivity are necessary features to consider when choosing the best free standalone guitar amp simulator. Many guitarists use their computers, laptops, or mobile devices to record their music, and it’s essential that the selected simulator is compatible with those devices. Compatibility with different operating systems and connectivity with USB and MIDI interfaces are crucial considerations. In conclusion, selecting the best free standalone guitar amp simulator can be challenging. However, with the above-discussed features, it’s easier to make an informed choice. Prioritizing the above aspects will help you find the right simulator for your guitar and enable you to achieve the perfect sound for your music.

Top Free Standalone Guitar Amp Simulators

Are you a guitar enthusiast looking for free standalone guitar amp simulators? Check out these top free options available online, including AmpliTube Free, Ignite Amps Emissary, and LePou Amp Suite. Each offers a unique set of features and customization for your guitar playing needs.

If you are a guitarist, you know the importance of a guitar amp simulator. It is a software that emulates the sound of a physical guitar amplifier and allows you to experiment with different tones, effects, and settings. While there are plenty of paid guitar amp simulators available in the market, there are also some free standalone options that can rival their premium counterparts in terms of sound quality and features. In this article, we’ll take a look at some of the top free standalone guitar amp simulators and what makes them great.

Amplitube Custom Shop

AmpliTube Custom Shop is a popular guitar amp simulator that offers a wide range of features and customization options. It comes with over 50 models of amps, cabinets, and effects from top brands like Fender, Ampeg, and Orange. The interface is intuitive and easy to use, allowing you to quickly tweak your settings and experiment with different combinations. Additionally, the software includes a range of recording and mixing tools, making it a comprehensive tool for guitarists of all levels.

Guitar Rig 6 Player

Guitar Rig 6 Player is another powerful guitar amp simulator that is available for free. It offers a range of amps, cabinets, and effects that can help you achieve any tone you desire. The software is highly customizable, allowing you to adjust parameters like gain, tone, and EQ. Additionally, it includes a range of innovative features, such as the Control Room Pro that gives you total control over your sound and the Tape Deck that lets you record and play back your tracks.

Lepou

LePou is a collection of standalone guitar amp simulators that are known for their high-quality sound and realistic emulation. They are designed to replicate the sound of popular guitar amps like the Marshall JCM800 and the Mesa Boogie Dual Rectifier. The interfaces are simple and straightforward, making them easy to use for beginners. Additionally, they are highly customizable, allowing you to adjust parameters like gain, tone, and EQ, and include a range of effects like distortion, delay, and reverb.

Studio Devil British Valve Custom

Studio Devil British Valve Custom is another free guitar amp simulator that is designed to replicate the sound of classic British amps like the Marshall JCM800 and the Vox AC30. The software offers a range of features like gain, tone, and EQ that can help you achieve any tone you desire. Additionally, it includes a built-in cabinet simulator that can emulate the sound of different speaker cabinets. The interface is simple and intuitive, making it easy for you to find the sound you’re looking for.

Free Standalone Guitar Amp Simulator

Credit: www.charlescleyn.com

Installation And Setup

Setting up a free standalone guitar amp simulator is easy with our installation guide. Simply download and follow the steps to enjoy a virtual amp experience with your guitar.

Are you a guitar player who wants to record your own music without the hassle of a physical amplifier? A free standalone guitar amp simulator could be the solution you’ve been looking for. In this post, we’ll guide you through the installation and setup process, so you can start playing your electric guitar through your computer today!

How To Download And Install A Free Standalone Amp Simulator

The first step in setting up your standalone amp simulator is to download and install the software. You can usually find free amp simulators on the developer’s website or a reputable forum. Here’s what you need to do:

  1. Visit the website of your preferred amp simulator developer.
  2. Locate the download page for the software.
  3. Select the appropriate operating system version (e.g., Windows, Mac, Linux).
  4. Download the installation file.
  5. Run the file and follow the on-screen instructions to install the software.

Connecting Your Guitar And Configuring Inputs

Once the software is installed, it’s time to connect your guitar to your computer and configure the input settings. Follow these steps:

  1. Connect your guitar to your computer using a 1/4″ to 1/8″ audio cable or an audio interface.
  2. Open the amp simulator software.
  3. Select your guitar’s input as the source.
  4. Adjust the input gain levels as necessary to optimize the sound quality.

Configuring Output To Speakers Or Headphones

Finally, you’ll need to configure the output settings to ensure you can hear your guitar through your computer’s speakers or headphones. Here’s how to do it:

  1. Select the audio output device you want to use – speakers or headphones.
  2. Adjust the output volume levels as necessary to avoid feedback or clipping.
  3. Select the appropriate audio driver for your computer’s operating system.

And there you have it! By following these simple steps, you’ll be able to set up your free standalone guitar amp simulator and start making music right away. Happy playing!

Tips For Getting The Best Experience With A Free Standalone Amp Simulator

To get the best experience with a free standalone guitar amp simulator, start by choosing the right software based on your preferences, and be aware of the system requirements. Familiarize yourself with the interface and controls, experiment with different settings, and consider using additional effects plugins.

Practice with headphones and adjust your setup for optimal sound quality.

Looking for an excellent way to bring your guitar sound to life? A free standalone amp simulator can be a fantastic solution, helping you elevate your guitar sound by simulating the sound of actual amplifiers. Here are a few tips for getting the best experience with a free standalone amp simulator:

Experiment With Different Amp Models

One of the most exciting things about using a free standalone amp simulator is the ability to experiment with various amp models. Different models can give your guitar a unique sound that might not be possible with a traditional amplifier. Explore the different presets and effects provided by the simulator to find your preferred tone that complements your playing style.

Tweak The Settings To Get The Perfect Tone

Once you have chosen an amp model, the next step is to tweak the settings to perfection. Spend some time experimenting with each setting, such as bass, treble, and mid. Adjusting the settings can make a significant difference in the overall sound of your guitar. Take your time and try some adjustments until you get the sound you desire.

Use Effects And Pedals To Enhance Your Sound

Aside from experimenting with different amp models and adjusting the settings, using pedals and effects can help you further personalize your guitar sound. Some free standalone amp simulators come packed with effects like chorus, reverb, and delay. Try out different combinations to see which best compliments your playing style.

Save Your Settings As Custom Presets

Once you get the perfect sound as per your liking, save your settings as custom presets. Saving your presets will allow you to perform consistently while rehearsing or performing live. This will save your valuable time that might have gone into searching for the perfect tone every time you start playing. In conclusion, free standalone amp simulators provide an excellent solution to enhance your guitar sound. Experimenting with different amp models, adjusting the settings, using pedals and effects, and saving your presets can help you achieve the perfect tone you were looking for. Try these tips and tricks to unleash your guitar’s hidden sounds with a free standalone amp simulator.

Free Standalone Guitar Amp Simulator

Credit: www.gearnews.com

Frequently Asked Questions On Free Standalone Guitar Amp Simulator

Do I Need A Daw To Use An Amp Sim?

No, you don’t need a DAW to use an amp SIM. Some amp SIMs are standalone and can be used without a DAW. However, if you want to record and mix your guitar tracks, you will need a DAW.

Is There A Free Version Of Guitar Rig?

Yes, there is a free version of Guitar Rig available. It’s called Guitar Rig 5 Player and it comes with a limited selection of amps, effects, and cabinets compared to the paid version. However, it’s still a great tool for guitar players looking to experiment with different sounds and effects.

Do You Need An Amp Simulator?

Yes, you can benefit from an amp simulator if you wish to recreate the sound of a guitar amplifier without the need for the physical device. It helps to achieve a consistent and predictable sound while also offering the flexibility to experiment with different tone settings.

Is Amped Roots Free?

Yes, Amped Roots is free to use. However, there are some premium features that come with a cost.

Conclusion

Overall, the Free Standalone Guitar Amp Simulator offers guitar players an excellent opportunity to create high-quality musical recordings without the need to purchase expensive equipment. With its flexible and easy-to-use features, this software promises to enhance the sound quality of your recordings by providing a vast range of tones and effects.

Moreover, the fact that it is entirely free makes it an accessible tool for any musician who is just starting or wants to experiment with different sounds. If you’re looking for a cost-effective and efficient option that delivers amazing results, this software is the way to go.

Start using it today and unleash your creativity!

Categories
Archive

Tips For Achieving Width In The Mix

To achieve width in the mix, use panning, stereo imaging, EQ, and volume balancing. These techniques will help create space and separation between instruments and vocals, resulting in a wider sound.

Mixing is a crucial part of music production, and achieving width in the mix is essential to make your tracks sound professional. When mixing, you want to create a sense of space that allows each instrument and vocal to stand out while working together cohesively.

To achieve this, you need to use techniques such as panning instruments, adjusting stereo imaging, EQing the mix, and balancing the volumes of each track. We’ll explore these techniques and provide tips for achieving width in your mix. By implementing these tips, you can take your mixes to the next level and create a sound that stands out in the industry.

Tips For Achieving Width In The Mix

Credit: www.masteringthemix.com

Start With Arrangement

When it comes to achieving width in a mix, the arrangement is a crucial starting point. The placement and balance of each instrument can make all the difference in creating a wide, spacious sound. Here are some tips to keep in mind when arranging your mix:

Consider Instrumentation

The instruments you choose to include in your arrangement can greatly affect the overall width of the mix. For example, adding more elements in the stereo field, such as panned instruments or effects, can create a wider sound. However, it’s important to balance this with the risk of overcrowding the mix. Consider using instrumentation that compliments each other and gives each element its space in the mix.

Understand The Role Of Each Instrument

Understanding the role of each instrument is essential to achieving a well-balanced final mix. Each instrument should serve a purpose and fit seamlessly into the overall arrangement. For example, panning acoustic guitars to opposite sides of the mix can create a wide stereo field while leaving room for vocals and drums in the center. Keep in mind the frequency range of each instrument relative to the others to create separation and balance.

Use Stereo Width Techniques

Using stereo width techniques to enhance your mix can be beneficial, but it’s important not to overdo it. Some common techniques include panning, stereo delay, and stereo reverb. With panning, consider widening the stereo image of instruments that compliment each other in the frequency spectrum. Be cautious with using stereo delay and reverb, as too much can lead to a messy and cluttered mix that lacks definition.

In conclusion, achieving width in a mix takes careful planning and execution. Starting with a well-balanced arrangement is the key to creating a wide and spacious sound. Consider instrumentation to create a complimentary mix, understand the role of each instrument, and use stereo width techniques in moderation to achieve a professional-level mix that stands out from the rest.

Tips For Achieving Width In The Mix

Credit: www.masteringthemix.com

Use Panning Techniques

To achieve width in a mix, implementing panning techniques is a helpful tool. By spreading out the different elements of a song across the stereo image, it creates a wider sense of space and depth in the overall sound.

Create Space With Panning

One of the crucial elements of mixing music is creating space so that each instrument can be heard clearly. A popular technique for achieving width in the mix is the use of panning. Panning allows you to position the audio signal of an instrument to either the left or right stereo field. This technique can create a wider, more spacious mix, making it easier to distinguish and appreciate each instrument’s unique qualities.

Use Automation To Highlight Parts

Automation is an incredibly powerful tool in mixing music. By adjusting the volume levels, panning position, and the frequency content of individual instruments, automation can bring out the unique parts of a mix. This tool can highlight important elements for the listener, increasing the emotional impact of the music.

The Importance Of Balance

When panning in a mix, it’s essential to keep balance in mind. You don’t want one channel to be too loud or panned too much to one side. Creating a sense of balance will ensure a natural, clear sound. Remember that achieving width in a mix should be subtle and not overdone.

Experiment With Panning Techniques

When using panning, don’t be afraid to experiment with different techniques to achieve a wide, spacious mix. One way to do this is by creating contrast between instruments. For example, panning a guitar to one side and a keyboard to the other can create a sense of movement and excitement in a mix. In conclusion, using panning techniques can create a wide, spacious mix and bring out the unique qualities of each instrument. Ensure that you keep balance in mind, experiment with different techniques, and use automation to highlight important parts of the mix. By following these tips, you can achieve exceptional results in your music mixes.

Sculpt Frequencies With Eq

Achieving width in the mix requires carefully sculpting frequencies using EQ. By carving out space for each element and enhancing stereo width, you can create a more spacious and polished mix.

When it comes to achieving width in the mix, one of the most important tools at your disposal is equalization or EQ. With the right approach and technique, you can sculpt frequencies in a way that creates a sense of space and dimension in your mix. Follow these tips to take full advantage of EQ and achieve optimal width in your mix.

Focus On Low-end Frequencies

To achieve width in the mix, start by focusing on managing the low-end frequencies. One of the biggest challenges in creating a wide mix is avoiding muddiness, especially in the lower frequencies. This is why it’s important to use a high pass filter to cut any unnecessary low-end information. Another technique to consider is to use a stereo widening plugin on the lower frequency range. This can enhance the sense of width and spaciousness in the mix without compromising the clarity and punch of the bassline.

Cut Unnecessary Frequencies

Cutting unnecessary frequencies is essential to create a mix that is free of clutter and optimized for width. Begin by analyzing each track in the mix and cutting any frequencies that do not add value to the overall sound. For example, you can cut excessive “boxy” midrange frequencies to make room for the other elements in the mix, which can lead to improved clarity and width. Make sure that each track has a distinctive role to play in the mix, always keeping an eye on the overall picture.

Use Eq To Create Contrast

One powerful technique to consider is using EQ to create contrast between different elements in the mix. By sculpting different frequency ranges of different instruments and tracks in the mix, you can give each element its own space in the stereo field. This can help create a sense of separation and width, even in busy or dense mixes. For example, you can consider boosting the high-end frequencies of a rhythmic guitar to create contrast with a low-end-heavy bassline. Use EQ to create complementary frequency ranges for each element, to create a stereo image that is balanced and wide.

Conclusion

By following these three essential tips, you can sculpt frequencies with EQ to achieve optimal width in your mix. Remember to focus on managing low-end frequencies, cutting unnecessary frequencies, and using EQ to create contrast between different elements in the mix. Use these techniques in combination with panning, reverb, compression, and other tools for a well-crafted, professional sound.

Use Stereo Widening Effects

When it comes to mixing, having a wide stereo image can help make your tracks stand out. The good news is that achieving width in the mix is easier than you might think. One effective approach is to use stereo widening effects.

Experiment With Chorus And Flanger Effects

Chorus and flanger effects can help you make your tracks sound wider by simulating the sound of multiple instruments playing the same thing at the same time. The effect is achieved by splitting the signal into two and then delaying one of the signals by a few milliseconds before combining them again. The resulting sound is much wider than it would be if you didn’t use these effects.

When using chorus and flanger effects, you should experiment with different settings until you find the perfect balance. You want the effect to be noticeable but not overwhelming. Start with small amounts and gradually increase the effect until it complements the track without overshadowing it.

Apply Stereo Imaging Plug-ins

If you want more control over the stereo image of your mix, you can use stereo imaging plug-ins. These plug-ins allow you to adjust the stereo width of individual tracks and achieve a more precise and tailored effect.

A few popular stereo imaging plug-ins include the Waves S1 Stereo Imager, the Izotope Ozone Imager, and the Brainworx bx\_Control V2. Make sure to read the user manuals of these plug-ins to fully understand how they work and how you can use them to achieve width in your mix.

In Conclusion

Using stereo widening effects is a great way to achieve width in your mix. Whether you choose to use chorus and flanger effects or stereo imaging plug-ins, make sure to experiment with different settings and find the perfect balance for your track. With a little bit of practice, you’ll be able to achieve a wide and professional sound that stands out from the crowd.

Utilize Reverb And Delay

As a music producer or audio engineer, one of your core responsibilities is to craft compelling and captivating soundscapes that stand out. To achieve that, you need to know the art of mixing and mastering. In this article, we’ll be sharing some tips and tricks on how to achieve width in your mix by utilizing reverb and delay.

Use Reverb To Create A Sense Of Space

Reverb is an essential tool for creating a spacious sound in your mix. It’s a way to add depth and dimension to instruments and vocals, allowing them to sit well in the mix. By applying reverb to a sound, you’re simulating the effect of a sound occurring in a physical space such as a room or hall. This simulates an organic feel to the sound and is an excellent way to make it sound natural and full.

Tips for using reverb:

  • Use less reverb on sounds that already have a natural ambiance such as drums and bass.
  • Avoid using too much reverb as it can make your mix sound muddy.
  • Place the reverb accordingly to create a unique sense of space.
  • Use a short reverb for sounds that need to be upfront in the mix, and a longer reverb for sounds that need to be at the back.

Use Delay To Add Depth And Dimension

Delay is another powerful tool that you can use to give width to your mix. Delay is an effect that creates a sonic echo of the sound. It adds a sense of spaciousness to the sound and can create a fascinating call-and-response effect with itself.

Tips for using delay:

  • Use shorter delay times for lead sounds so that they don’t get lost in the mix.
  • Use a longer delay time for pads or background sounds to create a unique ambiance.
  • Use a stereo delay effect for sounds that need to be wide.
  • Use feedback to create an evolving soundscape. Keep in mind that too much feedback can quickly become distracting.

By utilizing reverb and delay, you can create a mix that sounds full, engaging, and spacious. Don’t be afraid to experiment and take your time to find the perfect settings that work for your mix. Remember, mixing is an art, and experimentation is key to finding a unique and creative sound that stands out.

Tips For Achieving Width In The Mix

Credit: www.izotope.com

Layer Sounds

If you want your mix to sound big and spacious, you need to know how to layer sounds. Layering sounds is the process of combining multiple tracks to create a thicker and more complex sound. In this post, we’ll give you tips for achieving width in the mix by layering sounds.

Duplicate Tracks To Thicken The Sound

One of the easiest ways to layer sounds is by duplicating tracks. Duplicating a track creates another identical track which can be panned differently, added with different effects or EQs, and allows you to create a thicker sound. For instance, if you duplicate a guitar track and pan one to the left and the other to the right, it can create a sound that is both wide and thick.

You can also change the pitch, delay, or reverb on the duplicated tracks to create a deeper and more complex sound. However, be careful not to overdo it as it can result in a cluttered mix.

Blend Sounds To Create Unique Textures

Blending sounds is the process of layering two or more sounds to create a unique texture. This technique is useful for emphasizing the best qualities of each sound while masking the weaknesses. For example, blending a distorted guitar with a clean guitar can create a fuller and more complex sound.

You can use EQ to balance the frequencies of each sound or apply different effects on each track to make it stand out. Be careful not to add too many different elements, or your mix may become muddy and indistinct.

Conclusion

Layering sounds is an excellent way to achieve width in the mix. Make sure to keep your mix clean, balanced and blending the sounds well. Try these tips, and you’ll be on your way to creating a mix that is both wide and complex.

Avoid Clutter

Creating a mix with width requires a delicate balance, and one thing that can easily disrupt that balance is clutter. When there are too many elements in a mix, it can become chaotic and overwhelming, making it difficult for listeners to discern individual elements and follow the intended narrative of the track. To achieve width in a mix, you need to avoid clutter. Read on to find out how.

Limit The Number Of Layers

The first step in avoiding clutter is to limit the number of layers in your mix. While layers are essential to create depth and richness in a song, having too many layers can cause confusion and make it difficult to achieve width. Start by identifying the essential elements of your track and determine which layers are necessary to bring them to life. Eliminate any layers that don’t contribute to the overall sound and reduce the number of elements in your mix.

Eliminate Conflicting Frequencies

Another way to avoid clutter is to eliminate conflicting frequencies. When different elements in a mix occupy the same frequency range, they create a muddy sound that can muffle the individual instruments and vocals. To achieve width, it’s essential to create space in the frequency spectrum, ensuring that each element has its own place in the mix. Use EQ and other tools to remove any conflicting frequencies and give each instrument its own space.

Finalize The Mix With Stereo Enhancement

Achieving width in your mix can be tricky, but finalizing it with stereo enhancement can make all the difference. By widening the stereo field and introducing subtle panning, your mix can have a professional and spacious sound that captivates listeners.

Mastering the art of stereo mixing can elevate the impact of a song and make it stand out from the rest. The process of achieving width in a mix can take time and practice, but with the right tips in mind, it can become a seamless process. Once you have achieved a balanced mix, it’s time to enhance the stereo image with these expert tips.

Master The Final Mix To Boost The Stereo Image

Before diving into finalizing the mix with stereo enhancement, make sure that you have a well-balanced mix. All elements should have their own place in the mix, and none should overpower the others. Once you have achieved this, it’s time to boost the stereo image.

Refer To Reference Tracks For Comparison

Taking inspiration from reference tracks can help you to understand how other established songs have achieved width in their mix. A good reference track should be in the same genre, with similar instrumentation and production elements. Listen to the reference track in a critical way and make notes of how they have panned instruments, used reverb, and placed elements in the stereo field.

Use Stereo Enhancement Plugins

Stereo enhancement plugins can help you to enhance the width of a mix by manipulating the stereo field. These plugins can widen the stereo image, add depth, and create a spacious feel. However, use these plugins sparingly, as overuse can cause phasing issues and make the mix sound unnatural.

Pan Instruments Creatively

Panning instruments can create a sense of space and width in the mix. Experiment with different panning techniques, such as hard panning, mid-side panning, and alternating panning to achieve a balanced and wide stereo image.

Conclusion

In conclusion, mastering the art of stereo enhancement can add depth and impact to your songs. Follow these tips to finalize the mix with stereo enhancement, but use your ears and make sure that everything sounds natural and balanced. With time and practice, achieving width in a mix can become effortless, and your songs will sound professional and stand out from the rest.

Frequently Asked Questions For Tips For Achieving Width In The Mix

How Do I Make My Mix Wider?

To make your mix wider, use stereo widening techniques like panning, stereo delay, and reverb. Also, consider using stereo imaging plugins or techniques like mid-side processing. However, be careful not to overdo it as too much stereo widening can make your mix sound unnatural.

How Do You Get More Separation In A Mix?

Achieving more separation in a mix can be done by utilizing EQ to carve out space for each element, panning instruments to different areas of the stereo field, using reverb and delay to create depth and space, and ensuring proper levels and dynamic range for each track to prevent muddiness and masking.

How Do You Think You Can Accomplish This If You Want To Add Width And A Sense Of Space To Your Stereo Mix?

To add width and a sense of space to your stereo mix, you can use panning and stereo effects. Be careful not to overdo it, as too much widening can cause a loss of focus and clarity in your mix.

Experiment with different techniques until you find the right balance for your music.

How Wide Should A Mix Be?

The width of a mix depends on the type of music and intended effect. Generally, the width should be balanced, with instruments panned appropriately and not overcrowding the mix. Avoid extreme panning and monitor in mono to check for phase issues.

Use your ears as the ultimate guide.

Conclusion

To achieve width in the mix, there are several tips that you can implement. You should ensure to organize your elements well, and use effects sparingly. Additionally, mono compatibility is key, and you should always keep your listeners in mind.

Although it can seem daunting, with practice and patience you can achieve the mix you desire. Utilizing these tips will take you closer to the perfect mix. Remember to experiment and try new things, and eventually, you will find the best practices to suit your style.

Categories
Archive

Equalize Your Compressors Sidechain

To equalize your compressors sidechain, adjust the ratio, attack, release, and threshold settings in your audio software. This allows you to fine-tune the compression and improve the overall sound quality.

Also, Equalizing your compressor’s sidechain can be a crucial step in achieving the desired sound quality in your audio production. Compression is an essential tool in audio engineering, used to even out the dynamic range of a sound or mix. The sidechain is a tool that allows you to manipulate the compressor’s response to specific frequencies, to reduce noise, increase clarity, or add depth and texture to the sound.

Related reading: Sidechain Compression and How To Sidechain In Ableton. For background, see the Wikipedia article on Dynamic range compression.

Moreover, by setting the right ratio, attack, release, and threshold, you can fine-tune the compression on specific frequency ranges. This results in a more polished and professional-sounding mix. We will walk you through the process of equalizing your compressor’s sidechain. So you can take your audio production to the next level.

The Importance Of Equalizing Your Compressors

When mixing and mastering audio, compression is a common technique used to even out the dynamics of a track. However, using a compressor without equalization can result in unwanted frequency buildup and an unbalanced mix. In addition, Equalizing your compressors is a crucial step to ensure a smooth and transparent sound.

Prevents Unwanted Frequency Buildup

Furthermore, without equalization, a compressor can exaggerate certain frequencies, causing buildup in specific ranges and making the mix sound muddier and less defined. By using equalization, you can target these problematic frequencies and cut or boost them accordingly. This allows the compressor to work more efficiently and resulting in a clearer and more balanced mix.

Allows For A Smoother And More Transparent Sound

Equalizing your compressors can also assist in creating a more natural and transparent sound. Additionally, by cutting unwanted frequencies and boosting others, you can achieve a smoother transition between the compressed and uncompressed parts of the audio. This results in a more pleasing and natural sounding mix that doesn’t suffer from overly aggressive compression artifacts.

Overall, equalizing your compressors can significantly improve your mix, so treat it as an essential step in the compression process. Also, prevent unwanted frequency buildup and aim for a more transparent sound. Then every element of your track comes through clearly and sits well in the mix.

Tools Needed

Equalizing your compressors sidechain requires a few simple tools, such as a compressor, EQ plugin, and a reference track. Moreover, with these tools, you can ensure that your audio tracks are mixed with precision and clarity. This makes them sound professional and polished.

In addition, to equalize your compressors sidechain, you will need two specific tools: an Equalizer plugin and a Compressor plugin. These tools work together to balance the frequencies of the music during the mixing and mastering processes. Here is a brief description of these two plugins:

Equalizer Plugin

The Equalizer plugin is a tool that helps balance the frequencies of your music. With this plugin, you can adjust the levels of bass, mid, and treble, thus toning down or sharpening the sound. Most equalizers have a visual representation of the sound wave. This allows you to view and manage the specific ranges of frequency that need balancing.

Compressor Plugin

The Compressor, on the other hand, helps make the volume levels of the music more even. By reducing the gain of the louder parts of the music, and increasing the quieter parts, the overall volume becomes more consistent. Once the compressor is engaged, the next step is to set the threshold and ratio. This will determine how much and when the compressor will act upon the sound. In addition to these two essential plugins, some of the popular equalizer and compressor plugins that can be used include FabFilter Pro-Q3, Waves SSL G-Master Buss Compressor, and Sonnox Oxford Dynamic EQ.

These plugins have different features and settings that can help you achieve the desired outcome. It is crucial to choose the right plugins that work best with your music style and production needs. Using the right tools, you can achieve a well-balanced and well-compressed sound. By equalizing and compressing your sidechain, you can create music that has a more even volume, with controlled and balanced frequencies. So pick up the right tools, and start equalizing your compressors sidechain today!

Setting Up Your Sidechain Compression

Equalizing your compressor’s sidechain is a vital step in setting up your sidechain compression. By adjusting the EQ settings, you can customize the sidechain inputs to achieve the desired effect on your audio signal.

Sidechain compression is a powerful mixing technique that allows you to lower the volume of one track when another track plays. This technique helps to create more dynamic and open-sounding mixes. However, it requires careful setup to work correctly. In this article, we’ll explore the crucial steps involved in setting up your sidechain compression, including routing your tracks, adjusting your threshold and ratio, and activating the sidechain filter.

Routing Your Tracks Correctly for Sidechain Equalization

The first step in setting up your sidechain compression is to route your tracks correctly. To do this, you’ll need to create a bus or auxiliary track that receives the input from the track you want to use to trigger the compressor. For example, if you wanted to use a kick drum to trigger the compression on a bass guitar track, you would send the output of the bass guitar track to the bus track. Then, you would set the input of the compressor on the bus track to the kick drum track. This setup allows the compressor to lower the volume of the bass guitar track when the kick drum plays.

Adjusting Your Threshold And Ratio for Sidechain Equalization

Once you’ve set up your sidechain routing, you’ll need to adjust the threshold and ratio settings on the compressor. The threshold determines the level at which the compressor starts to reduce the volume of the secondary track. Meanwhile, the ratio determines how much the volume of the secondary track is reduced. It’s important to find the right balance between these settings and to adjust them in context with the rest of your mix. For example, if the secondary track is being completely drowned out by the primary track, you’ll need to increase the ratio and lower the threshold to ensure the compression is audible.

Activating The Sidechain Filter

Finally, you’ll need to activate the sidechain filter. This filter allows you to specify what frequency range triggers the compressor. For example, if you want the bass guitar track to be compressed only when the kick drum’s lower frequencies are playing, you would set the sidechain filter to cut the higher frequencies of the kick drum track. This step is crucial to ensuring that the compression only affects the desired frequency range and doesn’t create unwanted artifacts in the rest of the mix. In conclusion, setting up your sidechain compression correctly takes some know-how and experimentation.

By following the steps outlined in this article, you can ensure that your sidechain compression is effective and helps create a more dynamic mix. Remember to route your tracks correctly, adjust your threshold and ratio, and activate the sidechain filter to get the most out of this powerful mixing technique.

Equalize Your Compressors Sidechain

Credit: www.mixinglessons.com

Equalizing Your Sidechain

Equalizing your sidechain is an important technique that can help you achieve a more balanced mix. By equalizing your sidechain, you can remove unwanted frequencies that may be causing your compressor to trigger unnecessarily. This results in a distorted and uneven sound. Here, we’ll discuss how to identify problem frequencies and adjust your equalizer settings using a spectrum analyzer.

Identifying Problem Frequencies for Sidechain Equalization

If you’re experiencing issues with your compressor triggering too frequently or at the wrong times, the first step is to identify problem frequencies. Problem frequencies are frequencies that are particularly loud or that clash with other instruments within the mix, causing your compressor to jump in unexpectedly. To identify these frequencies, you can use a spectrum analyzer.

Using A Spectrum Analyzer for Sidechain Equalization

A spectrum analyzer is an essential tool for identifying problem frequencies in your mix. It allows you to see the frequency content of your mix in real-time, making it easy to spot problem frequencies. To use a spectrum analyzer, you’ll need to insert it into your sidechain’s plugin chain and play your mix. Look for frequencies that are notably louder than others or that clash with other instruments, and make a note of those frequencies.

Adjusting Your Equalizer Settings in Sidechain Equalization

Once you’ve identified problem frequencies using your spectrum analyzer, you can begin to adjust your equalizer settings. Using your equalizer, you can remove unwanted frequencies and boost others that may be lacking in presence. Make sure you’re adjusting the equalizer on your sidechain, not your main mix, as this can cause unwanted changes to your overall sound. Start by reducing the gain of the problem frequencies you identified, and adjust the levels of the surrounding frequencies to compensate. Take your time and make small adjustments, checking your sound regularly to make sure you’re achieving the desired effect.

Advanced Techniques

Achieving a perfectly balanced audio mix requires mastering advanced techniques such as equalizing your compressors’ sidechain. This technique allows you to control the dynamic range of different instruments in the mix. This results in a professional-sounding final product. With proper implementation, equalizing your compressors’ sidechain can take your audio engineering skills to the next level.

Using Multiband Compression In Your Sidechain

In advanced techniques, multiband compression is a great tool for refining your compressor sidechain. It provides a more selective approach for controlling the dynamics of your mix. This technique permits you to compress particular frequency bands inside the sidechain’s detector circuit. Bear in mind that too much reduction of the wrong frequencies can lead to an unnatural sound. This is why it’s essential to experiment with different settings.

Automating Your Eq Settings in Sidechain Equalization

Another advanced technique for equalizing your compressor sidechain is to automate your EQ settings. Automating your equalizer guarantees that the dynamic range of certain portions of your mix is preserved. EQ automation enables you to adjust your EQ shapes around the vocal’s syllables or kick or snare hits.

For instance, you can decrease the bass frequencies on the bass guitar only when the kick drum is played. Automating EQ settings is a type of compression that preserves the natural rhythm and timing of your instruments while giving you greater control.

Moreover, you can select specific frequencies and create EQ automation allowing you to attenuate or boost only when there is a conflict with other instruments’ frequencies.

The options are enormous, and EQ automation enables you to produce a unique audio sound that is impossible to achieve with conventional EQ.

Example

FrequentlyDecibel (dB)
30Hz-3
60Hz-7
120Hz-3
240Hz-1

Using an equalizer, you can make these cuts. On the other hand, with EQ automation, you can adjustand boost different frequencies according to the song’s dynamic range. It’s quite immersive, empowering you to make a unique sound that stands out among the rest.

Automating your EQ settings and using multiband compression is an advanced technique to equalize your compressor sidechain. Try both techniques in your next mix and enjoy the amazing benefits they offer.

Examples In Practice

Achieving a balanced sound can be difficult with multiple compressors in use, but by equalizing their sidechains, you can create a more cohesive mix. By adjusting the frequency response of each compressor’s sidechain, you can ensure that they’re all working together, keeping your mix sounding natural and dynamic.

Applying Sidechain Equalization To Drums

When it comes to music production, applying sidechain equalization to drums can make a significant difference in the overall mix. To achieve this, it is essential to use a compressor with sidechain functionality.

  • Insert a compressor plugin on the drum track.
  • Engage the sidechain function on the compressor and select the track you want to trigger the compressor, such as the bass track.
  • Configure the sidechain equalization parameters to boost or cut specific frequency ranges on the triggered track that clash with the drum track.
  • Tweak the threshold and ratio settings to achieve the desired amount of compression and gain reduction.

Applying Sidechain Equalization To Vocals

Sidechain equalization can also be useful when applied to vocals, particularly in busy arrangements. Here’s how to do it:

  1. Insert the compressor on the vocal track.
  2. Activate the sidechain function and select the track that you want to trigger the compressor, such as the piano track.
  3. Set the parameters of the equalizer to cut or amplify specific frequencies on the triggered track that compete with the vocal frequencies.
  4. Adjust the threshold and ratio to achieve the desired compression and gain reduction effect.

In conclusion, applying sidechain equalization to compressors is crucial in producing a clean and balanced mix. Whether you’re dealing with drums or vocals, the sidechain equalization technique can help you achieve the sound you’re aiming for.

Equalize Your Compressors Sidechain

Credit: www.youtube.com

Frequently Asked Questions For Equalize Your Compressors Sidechain

What Should The Compressor Settings Be For Sidechain?

The compressor settings for sidechain dependent on the type of music, desired effect, and the material being mixed. Experiment with Attack, Ratio, Threshold, and Release time. Maintain transparency when utilizing sidechain compression and also mix in consideration of low-end material.

Should I Sidechain Or Eq First?

You should apply EQ before sidechaining in most cases. EQing allows for better control of the frequency balance, while sidechaining regulates the volume levels. EQ helps achieve a cleaner sound before sidechaining, which can then be used for enhancing the mix during sidechaining.

Should You Sidechain Compression?

Yes, sidechain compression can be a useful technique for creating a more balanced mix by reducing the volume of certain instruments when others are playing. This can help to prevent clashing frequencies and improve overall clarity. However, it should be used judiciously and not overdone, as it can also lead to an unnatural sounding mix if not properly set up.

What Is The Best Ratio For Sidechain?

The best ratio for a sidechain depends on the specific use case and desired outcome. Different applications may require different ratios to optimize performance and achieve desired results. It is important to consult with technical experts and conduct thorough testing to determine the optimal ratio for your specific needs.

Conclusion

Balancing and enhancing the audio is crucial in the music production industry. Sidechain compression can be the perfect solution by giving your tracks the necessary space they need. Understanding and equalizing the compressors sidechain can achieve the desired effect. It’s important to experiment with different settings and find what works best for your specific track.

Utilize this technique to achieve a professional sound, and take your music production to the next level.

Categories
Archive

Solid State Logic Sigma Tutorial

This guide covers SSL Sigma in plain terms. Solid State Logic Sigma is a workflow solution and analogue summing mixer. This tutorial will cover the features and functions of Solid State Logic Sigma, including how to use it in live sound mixing, analogue mixing, and hybrid mixing environments.

Also, Solid State Logic (SSL) is known for its advanced engineering and high-quality audio equipment. Also, the Sigma is an analogue summing mixer that was designed to improve workflow for engineers by providing an easy way to combine analogue and digital audio sources in one system.

Related reading: Analog Vs Digital Summing and SSL Uf1 A Deep Dive Review. For background, see the official Solidstatelogic website.

Moreover, it is a unique piece of equipment that gives users creative options for mixing, boosting sound quality and enhancing the dynamics of music. In addition, in this tutorial, we will take a closer look at the features of the Sigma and explore how it can work in various applications to achieve professional results.

Sigma’s Features

In addition, Solid State Logic Sigma is a premium-quality mixing console that features a wide range of advanced features. For example, its innovative functionality allows sound engineers to create professional sound outputs that sound amazing on any sound system. Here are some of Sigma’s top features:

Flexible Channel Processing for SSL Sigma

Furthermore, Sigma provides versatile channel processing that makes it easier to create customized sounds for different applications. As a result, with a range of high-pass filters, parametric equalizers, and compressors, you can adjust the sound to suit any taste. The console also allows you to integrate analogue and digital processors into the mixer, making it easier to balance between the two and achieve a more refined sound.

Advanced Automation Capabilities for SSL Sigma

Additionally, sigma’s advanced automation capabilities allow you to create complex mixes with ease. However, the mixer has a wide range of automation options that can be fine-tuned for specific sound needs, including automation for channel faders, mutes, panning, EQs, and dynamics. This feature allows sound engineers to take complete control of the mix process, making it an invaluable tool for live performances as well as studio recording and mixing.

Intuitive User Interface

Also, sigma’s user interface is straightforward and intuitive, making it easy to operate even for beginners. Then, the console provides a simple control layout that allows you to navigate the various features without any complications. The mixer’s touchscreen interface provides a rich visual representation of the sound output, which makes it easier to make precise adjustments. Moreover, the mixer’s interface can be customized to suit individual preferences, making it more user-friendly.

SSL Sigma – Solid State Logic Sigma Tutorial

Credit: m.youtube.com

Set Up And Configuration for SSL Sigma

Moreover, learn how to set up and configure the Solid State Logic Sigma in this comprehensive tutorial. From installing the software to connecting the hardware, this step-by-step guide will help you get started with your SSL Sigma.

Plugin Installation

In addition, installing the Solid State Logic Sigma plugin is a straightforward process. After purchasing the plugin, download it from the SSL website. Extract the files and run the installer. Select the plugin format compatible with your DAW, then follow the on-screen instructions. Once the installation is complete, launch your DAW and locate the SSL Sigma plugin in the plugin list.

Hardware Connections

Before connecting your SSL Sigma, ensure your equipment is turned off. Furthermore, connect the Sigma to your computer via USB and turn it on. Connect your Outboard gear as per your requirements. Select and modify the signal chain to suit your workflow. The SSL Sigma gives you the capability to switch between different routing chains without modifications to physical cabling.

System Configuration

System configuration can be a tricky process, but the Solid State Logic Sigma simplifies it with a straightforward setup process. Additionally, launch the Sigma Delta control software and select Sigma Delta-Studio Settings. In the Audio Device settings, select the appropriate audio interface, sample rate and clock source. Once you have configured these settings, you can configure routing preferences between the Sigma and your DAW or setup routing to your analog outboard gear. In conclusion, setting up and configuring the Solid State Logic Sigma is a relatively simple process. By following the above steps, you will be ready to start exploring the sophisticated routing features and premium sonic quality of the SSL Sigma.

Getting Started With Sigma

Also, a helpful Sigma tutorial can aid in getting started with Solid State Logic’s innovative software. New users can learn about the various features and tools available to maximize their experience.

Moreover, if you’re new to Solid State Logic’s Sigma, you might feel overwhelmed by its functionality and features. But don’t worry – Sigma has a streamlined interface that’s intuitive and easy to navigate. In this tutorial, we’ll walk you through the basics of getting started with Sigma, from creating a session to setting up your inputs and outputs.

Navigating The Interface for SSL Sigma

When you first launch Sigma, you’ll see a clean, uncluttered interface that’s designed to be easy to use. The main window has three sections:

  • The Mixer section, which is where you’ll be doing most of your work.
  • The Workstation section, which provides access to Sigma’s file management and session settings.
  • The Settings section, which contains global settings for Sigma.

To navigate between these sections, you can use the tabs at the top of the screen. Additionally, you can use the buttons in the top-right corner of the window to access various menus and settings.

Creating A Session for SSL Sigma

Before you can start mixing, you’ll need to create a session in Sigma. To do this, go to the Workstation tab and click on the New Session button. This will open a dialog where you can specify the name and location of your session. Once you’ve created your session, you’ll be taken back to the Mixer section. Here, you’ll see a blank mixer with no channels or inputs.

Setting Up Input And Outputs for SSL Sigma

To start routing audio through Sigma, you’ll need to set up your inputs and outputs. You can do this by going to the Settings tab and clicking on the Audio tab. Here, you’ll see a list of all of the inputs and outputs that Sigma has detected on your system. To add an input or output, simply click on the + button next to it. Once you’ve added your inputs and outputs, you can start routing audio by clicking on the Routing tab in the Mixer section. Here, you can drag and drop inputs and outputs to create your routing path. And that’s it – you’re ready to start mixing with Sigma! With its powerful features and intuitive interface, Sigma is a great choice for anyone looking to take their mixing to the next level.

Working With Sigma’s Channel Strip

Solid State Logic Sigma is a powerful mixer that offers flexibility and versatility like no other. One of its key features is the Channel Strip, which allows you to process your audio signals with precision and finesse. With Sigma’s Channel Strip, you can shape your sound as if you’re working with a classic analog mixer. Let’s take a closer look at how you can use Sigma’s Channel Strip.

Eq Section

The EQ section is the heart of the Channel Strip and allows you to shape your audio signals by boosting or cutting specific frequencies. Sigma’s EQ section includes four bands of EQ with switchable high and low pass filters. This allows you to make precise adjustments to your audio signal and tailor it to your needs. The EQ section also features a variable Q control, which lets you adjust the width of the filter bands and create a more gentle or sharper curve.

Dynamics Section

The Dynamics section is where you can apply compression, limiting, and gating to your audio signal. Sigma’s Dynamics section includes a sophisticated compressor/limiter with variable threshold, ratio, attack and release times. You can also use the sidechain options to trigger the compressor from an external source. The gating section includes adjustable threshold, attack, hold, and release controls, which is useful for reducing unwanted noise or bleed from other channels.

Filters And Stereo Width

Sigma’s Channel Strip also includes a high-pass filter with adjustable frequency and a variable-width stereo spread control. The high-pass filter is useful for removing unwanted low-frequency rumble or noise, while the stereo spread control lets you adjust the width of the stereo image for a broader or more focused sound. The filters and stereo width controls are a great way to add depth and dimension to your mix without having to resort to complex processing techniques.

Advanced Automation Techniques

Learn how to use advanced automation techniques with Solid State Logic Sigma through this tutorial. Discover new ways to maximize your workflow and improve your audio production.

Solid State Logic (SSL) Sigma is a high-quality mixing console that has gained wide recognition in the professional audio industry. One of its key features is its automation capabilities, allowing users to streamline workflows and create custom mixes with ease. In this tutorial, we will focus on some advanced automation techniques that can take your mixing game to the next level.

Basic Automation Workflow

Before diving into the advanced techniques, let’s first understand the basic automation workflow in SSL Sigma. The console features motorized faders and rotary encoders, which can be automated to control various parameters such as volume, pan, and EQ. You can record the automation data and edited using the SSL Sigma Remote software, or directly on the console itself.

Customizing Channel Strip Automation for SSL Sigma

SSL Sigma allows for complete customization of channel strip automation, giving users the ability to fine-tune their mixes to perfection. Users can create custom automation curves, adjust automation sensitivity and even automate plug-in parameters. The console also has a feature called “Q-Link,” which enables users to control multiple parameters with a single fader or knob.

Using Snapshot Automation for SSL Sigma

Snapshot Automation is another powerful feature in SSL Sigma that allows users to save and recall specific console settings instantly. This is especially handy when switching between different parts of a song or when mixing for different artists. You can record Snapshot Automation along with other automation data for complete mixing flexibility. In conclusion, with its powerful automation capabilities and advanced features, Solid State Logic Sigma is a top-of-the-line mixing console that can take your mixing skills to new heights.

SSL Sigma – Solid State Logic Sigma Tutorial

Credit: mixandmastermysong.com

Tips And Tricks For Using Sigma

Learn how to make the most out of your Solid State Logic Sigma mixer with our comprehensive tutorial! Our tips and tricks cover everything from routing and EQ to compression and dynamics control, helping you get the most from this powerful mixing tool.

Solid State Logic Sigma Tutorial is an advanced mixing tool that offers a lot of features for producers and engineers. It can be a bit overwhelming at first, but with a little bit of practice and some tips and tricks, you can master it quickly. In this article, we will discuss some tips and tricks that will help you use Sigma optimally. Here are some of the things that we will cover:

Maximizing Cpu Performance for SSL Sigma

One of the benefits of using Sigma is that it can help you save CPU power. However, to do this, you need to make some adjustments to the settings. First, try to disable any unnecessary plugins or channels that are not used in your session. Additionally, turn off any visualizations and animations that may consume more processing power. Another way to save some CPU power is to use automation sparingly. Automating too many parameters can quickly eat up your CPU power.

Using Sigma For Mixing And Mastering

Sigma is an excellent tool that can be used for both mixing and mastering. One of the most useful features is its ability to change the mix bus and insert processing quickly. This means that you can switch between different EQs, compressors, and saturation plugins without having to re-route anything. Sigma also provides separate control over the wet/dry mix, which is helpful when applying parallel processing. Additionally, you can use Sigma to create custom monitoring setups. For instance, you can use the monitor control to route multiple studio speaker sets seamlessly.

Troubleshooting Common Issues for SSL Sigma

Sigma is a potent plugin, but it’s not immune to issues. Here are some of the common Sigma issues and how to solve them:

  • Sigma not loading: If Sigma fails to load, try reinstalling the plugin or restarting your DAW.
  • Inconsistent sound: If your mix is sounding different than usual, try bypassing Sigma and see if the sound improves. If the sound is the same without Sigma, then the issue is probably with other elements of the mix.
  • Latency issues: Sigma may introduce latency in some DAWs. To solve this, try adjusting your DAW’s audio buffer size or disable any visualizations that consume too much CPU.
  • Compatibility issues: Sigma can be quite picky about the format it uses, so make sure that you are using the correct version for your DAW and operating system.

In conclusion, Solid State Logic Sigma Tutorial is an excellent tool for mixing and mastering. With a little bit of practice and some tips and tricks, you can use Sigma optimally to improve your mixes. Whether it’s maximizing CPU performance or troubleshooting common issues, Sigma has a lot to offer. So, go ahead and give it a try, and you won’t be disappointed!

SSL Sigma – Solid State Logic Sigma Tutorial

Credit: solidstatelogic.com

Frequently Asked Questions For Solid State Logic Sigma Tutorial

What Is The Solid State Logic Sigma?

The Solid State Logic Sigma is a remote control unit designed for use with DAWs and analog equipment.

What Features Does The Sigma Offer?

The Sigma offers hands-on control, digital connectivity, and the ability to switch between multiple analog devices.

How Can The Sigma Improve My Workflow?

The Sigma can save time and streamline your workflow through its integration with various software and analog equipment.

Is The Sigma Easy To Use?

Yes, the Sigma has an intuitive design that is easy to navigate, even for those new to using remote control units.

Conclusion

The Solid State Logic Sigma provides advanced mixing capabilities that simplify the process for professional sound engineers. By focusing on flexibility and power, this tutorial has shown how to navigate the interface, redesign multiple channels, and save presets. The SSL Sigma is the perfect tool for mixing multiple analog and digital audio sources while maintaining high sound quality.

Sharpen your audio mixing skills with the Solid State Logic Sigma today.

Categories
Archive

How To Get A Loud Punchy Master

To get a loud and punchy master, use a combination of compression, EQ, and limiting. When mastering your audio, you want it to stand out and be heard in a crowded field.

In order to achieve this, it’s important to use some specific tools and techniques to give your audio that extra oomph. Compression is useful for controlling the dynamic range of your audio, while EQ can help you to carve out any problem areas in your audio spectrum.

Limiting is also critical, as this will help you to push your levels as high as possible without introducing distortion. By mastering these tools and techniques, you’ll be able to achieve a cool, bold sound that will sound fantastic on any system.

How To Get A Loud Punchy Master

Credit: m.youtube.com

Understand Compression

When it comes to achieving a loud and punchy master for your music tracks, understanding compression is crucial. Compression is a tool used to control the dynamic range of audio signals, which is the difference between the loudest and quietest parts of a track. In this post, we’ll take a closer look at compression, including what it is, how it works, the different types of compression, and its applications in mastering.

What Is Compression?

Compression is a process that reduces the dynamic range of an audio signal by attenuating the loudest parts and amplifying the quieter parts. This results in a more even overall volume level, which can make a track sound louder and more consistent. Compression is often used in music production to help instruments sit well in a mix, to tame peaks and bring out detail.

How Does Compression Work?

Compression works by setting a threshold level, which determines the point at which the compression kicks in, and a ratio, which determines how much the audio signal is attenuated beyond that point. When the audio signal exceeds the threshold level, the compressor begins reducing the level of the signal by the amount set by the ratio. This creates a more consistent overall volume level, without exceeding the maximum level allowed.

Types Of Compression

Type of CompressionDescription
VCA CompressionUses voltage controlled amplifiers to apply compression
Optical CompressionUses an optical circuit to apply compression
FET CompressionUses field-effect transistors to apply compression
Variable-Mu CompressionUses vacuum tubes to apply compression

Applications Of Compression In Mastering

  • Dynamics Control: Compression can help control the dynamics of a mix, ensuring all elements are heard and none are too loud or too quiet.
  • Tightening: Compression can help tighten up a mix, making it sound more cohesive and professional.
  • Clarity: Compression can help bring out the details in a mix, making it sound more clear and defined.
  • Loudness: Compression can help make a mix sound louder and more punchy, without exceeding the maximum level allowed.

By understanding compression and its applications in mastering, you can achieve a loud and punchy master that sounds professional and cohesive. Keep in mind that compression is just one tool in the mastering process, and it’s important to use it in combination with other tools, such as EQ and limiting, to achieve the best possible results.

Eqing Your Master

Achieving a loud and punchy master requires careful EQing. Start with a balanced mix and use EQ to enhance the desired frequencies. Avoid over-compressing or limiting and make subtle adjustments for a polished final product.

As a music producer, mastering your tracks is crucial to ensure that your music is ready for distribution. One of the essential steps in mastering is equalization or EQing. It involves adjusting the balance between different frequencies in your mix. In this section, we will explore what equalization is, different types of EQ, and how to use EQ to create a loud, punchy master.

What Is Equalization?

Equalization or EQ is a process of adjusting the balance of different frequencies in your mix. It is done by boosting or cutting specific frequency ranges to improve the overall sound quality of your track. EQing can be done at the individual track level or during the mastering phase of your music production.

How To Use Eq

Using EQ during mastering needs patience, skills, and practice. Correct use of EQ can significantly improve the sound quality of your track. Follow these steps to use EQ effectively:

  1. Load your mastered mix into a new session.
  2. Apply a high pass filter to eliminate unwanted low frequencies.
  3. Listen to the mix and identify problematic frequencies.
  4. Use a parametric EQ to cut or boost specific frequency ranges.
  5. Be subtle with your EQ adjustments to avoid over-processing.
  6. A/B test your mix to ensure that your adjustments have improved the overall sound quality of your track.

Types Of Eq

There are different types of EQ plugins that you can use during mastering, each with their unique features and characteristics, including:

EQ TypeDescription
Parametric EQAllows you to adjust the center frequency, bandwidth and amplitude of equalization.
Graphic EQHas a set number of fixed frequency bands that you can adjust.
Dynamic EQApplies EQ adjustments to specific frequency ranges based on input level.
Multiband EQAllows you to adjust different frequency ranges with separate EQ bands, ideal for more complex EQ adjustments.

Tips For Eqing Your Master

When EQing your master, follow these tips to achieve a loud, punchy master:

  • Use EQ as a complementary tool to enhance your mix, not as a corrective tool to fix problems.
  • Avoid over-processing by making subtle adjustments.
  • Start by cutting frequencies that don’t need to be in your mix.
  • Boost the kick and bass frequencies to create a punchy mix.
  • Use a spectrum analyzer to identify problem frequencies.
  • Perform frequent A/B testing to evaluate your adjustments.

Preparing Your Mix To Be Mastered

Before you begin mastering, ensure that your mix is well balanced, and each element is audible. Here are some tips to prepare your mix for mastering:

  • Avoid clipping and ensure that your levels are within the acceptable dB range.
  • Eliminate unwanted artifacts such as clicks, pops, and noise.
  • Ensure that your tracks are arranged appropriately, and there is no phase cancellation.
  • Use reference tracks to evaluate the loudness and tonality of your mix.

Setting Up An Effective Mastering Chain

Creating an effective mastering chain involves selecting the right plugins, the correct order of these plugins, and applying the necessary adjustments. Here is an example of a mastering chain:

  1. EQ – Cut unwanted frequencies and boost desirable ranges.
  2. Compressor – Control dynamics and bring out more detail in your mix.
  3. Limiter – Reduce peaks and increase loudness without clipping.
  4. Stereo Widener – Expand the stereo field and create more space in your mix.
  5. Loudness Meter – Ensure that your track meets the desired loudness standards.
  6. Dithering – Apply noise shaping to reduce quantization distortion during conversion to a lower bit depth format.

Now that you know how to EQ your master effectively, try implementing these techniques to create a loud and punchy master. Remember, mastering takes practice, patience, and attention to detail, so keep experimenting and refining your skills.

Maximizing Your Dynamics

In music production, dynamics refer to the range of volume in a song. Maximizing your dynamics will produce a loud and punchy master that stands out among others. There are various techniques to achieve this, with the use of limiters and multiband compression being the most effective.

What Are Dynamics?

Dynamics in music refer to the variation in volume between different sections or parts of a song. It is what gives a song its emotional impact by creating tension, release, and drama. The use of dynamics is what sets professional recordings apart from amateur ones.

How To Use Limiters

Limiters are compressors that operate on the loudest parts of a song, reducing their volume to increase overall loudness without causing distortion. To use a limiter, first, adjust the threshold to the point where the quieter parts of the song are left untouched. Then, adjust the makeup gain to increase overall loudness while ensuring that the limiter does not crush the dynamics altogether. Repeat the process until you achieve the desired level of loudness.

Multiband Compression

Multiband compression operates on specific frequency ranges, allowing for more precise control over dynamics. To use multiband compression, first, identify which frequency ranges require compression. Then, adjust the threshold, attack, and release settings for each band to achieve a balanced and punchy sound across the frequency spectrum. This technique should be used sparingly to avoid squashing the dynamics too much.

Tips For Maximizing Dynamics On Your Master

  • Use EQ to remove unnecessary low-end frequencies that may cause muddiness and reduce the clarity of your mix.
  • Ensure that your mix is properly balanced and not overly compressed before applying additional limiting and compression on the master channel.
  • Avoid over-limiting, which can cause distortion and reduce the impact of the quieter sections of the song.
  • Use the A/B comparison feature on your limiter to compare your mixes with professional recordings to ensure that you are on the right track.
  • Master your tracks at an appropriate loudness level to avoid causing fatigue to listeners’ ears.

By applying these techniques and tips, you can achieve a loud and punchy master that competes with professional recordings. Remember to always use your ears as your guide and avoid overdoing it to produce a balanced and dynamic sound.

Stereo Imaging

To achieve a loud and punchy master, stereo imaging plays a crucial role. Focus on widening the stereo field by using panning techniques and adding stereo effects to individual tracks. This gives the mix a sense of depth and clarity, resulting in a more impactful and professional sound.

Understanding Stereo Imaging

Stereo imaging refers to the perceived spatial relationship between sounds in a mix. A good stereo image can create a wider, deeper, and more engaging listening experience. In mastering, stereo imaging is especially important, as it can help individual elements stand out in the mix and create a sense of balance. Understanding stereo imaging is the first step to achieving a loud, punchy master.

How To Use Stereo Widening

Stereo widening is a technique used to enhance the stereo field of a mix. It can make a track sound wider and more three-dimensional. But, it’s essential to use stereo widening carefully because too much can lead to phase cancellation and a weaker mono mix. To use stereo widening, apply it in small amounts to elements that benefit from a wider stereo field, like synths, backing vocals, and guitars.

How To Use Panning

Panning is a basic technique used to position sounds in a stereo mix. It helps to create a sense of space, depth, and balance. Panning individual elements can create separation between sounds, making it easier to distinguish each element of the mix. To use panning, experiment with different positions for each element in the mix. Keep in mind that low-frequency elements like bass and kick drums should typically be panned center to maintain a strong low end.

Mid/side Imaging Techniques

Mid/side imaging techniques can help to create a more defined stereo image. The mid channel contains information that is present in both left and right channels, while the side channel contains information that is unique to each side. Using mid/side processing can allow you to adjust the stereo image without affecting the center of the mix. Try adding a mid/side EQ to boost the side channels or using a mid/side compressor to control the stereo image.

Tools For Stereo Imaging On Your Master

There are several tools available to help with stereo imaging in the mastering process. Widening plugins like Ozone’s Imager can enhance stereo width, while EQ plugins like FabFilter’s Pro-Q 3 offer mid/side processing for precision control over the stereo field. Additionally, metering plugins like Voxengo’s SPAN can help identify and correct phase cancellation issues that may arise from over-processing the stereo image. Proper use of these tools can help create a loud, punchy master with a well-defined stereo image.

Preparing Your Master For Export

To get a loud and punchy master ready for export, it’s essential to start with a well-mixed track. Make sure the levels are balanced, and there’s no distortion. Then, apply compression, EQ, and limiting to enhance dynamics and loudness without sacrificing quality.

Are you a music producer or sound engineer who wants to know how to get a loud punchy master? Look no further! In this section, we will focus on the crucial steps to prepare your master for export. Following these steps will help ensure that your final master is of high quality and ready for distribution.

Setting The Final Limiter

The final limiter is an essential tool in the mastering process. It ensures that the audio level does not exceed the maximum threshold, giving your music a polished, coherent sound. When setting the final limiter, make sure that the gain reduction levels are not too high as this can result in audio distortion. Use a limit between 1-3dB to avoid excessive compression.

How To Export Your Audio

Exporting your audio correctly is critical to ensuring that you get the best possible sound quality. First, select “Export Audio” in your digital audio workstation (DAW). Next, open the export settings window and select the desired audio format and sample rate. Set your export as a WAV file as this format retains the highest quality of your audio.

Export Formats And Settings

Choosing the right export format and settings can make a significant difference to your final master. We recommend exporting as a WAV file as it is an uncompressed audio format that retains the highest quality of your audio files. Additionally, ensure that your sample rate is set to 44.1kHz or higher, as this provides a professional-grade sound that is compatible with most distribution platforms.

How To Check Your Master For Errors

Before sending your master for distribution, it is essential to check for any potential errors. Use spectrum analyzers or loudness meters to ensure your audio is not peaking excessively or suffering from poor frequency balance. Make sure that your track sounds great and is free from any artifacts or unwanted noises.

Preparing Your Master For Distribution

Once you have checked and exported your master, it’s time to prepare it for distribution. We recommend that you normalize your audio to prevent any loss of volume during playback. You can also add metadata such as track info, artist name, and artwork. Once you have completed these steps, you are ready to send your master to a distribution platform. With these essential steps for preparing your master for export, you are on your way to getting a loud, punchy master that is ready for distribution. Keep in mind that mastering is an art, and your approach may vary based on your preferences, equipment, and listening environment. But these steps will help you achieve the best possible sound for your music.

How To Get A Loud Punchy Master

Credit: www.audio-issues.com

Frequently Asked Questions On How To Get A Loud Punchy Master

How Can I Make My Master Louder?

To make your master louder, you can use equalizers to boost specific frequencies or use a limiter to increase overall loudness without clipping. It’s important to use these tools carefully to avoid damaging the audio quality or causing distortion. Additionally, making sure your original recordings are high quality and properly mixed can also help improve overall loudness.

How Do You Make A Mix More Punchy?

To make a mix more punchy, use compression and EQ. Use a compressor to reduce the dynamic range and make the sound louder. Adjust the EQ to emphasize the mid and high frequencies. Use distortion or saturation to add harmonics.

Finally, use limiting to increase the overall volume without clipping.

How Do You Get The Right Amount Of Punch In Your Master?

To get the right amount of punch in your master, you should start by making sure each track is well balanced and not competing for space. Use compression, EQ, and saturation to enhance the desired frequency ranges and add harmonics.

Use a limiter to adjust the overall loudness without clipping or distorting the mix. Experiment with different settings until the desired punch is achieved.

How Do You Get Loud And Clear Masters?

To get loud and clear Masters, follow these guidelines: 1. Use high-quality audio recording equipment. 2. Maintain a consistent recording level. 3. Monitor and adjust the EQ and compression settings. 4. Use a limiter to prevent audio clipping. 5. Ensure the final mix is balanced and free of distortion.

Conclusion

Achieving a loud and punchy master requires not just technical expertise, but also a great deal of perseverance. It involves understanding the intricacies of compression, EQ, and limiting, while also recognizing the unique needs of each track. By adhering to the guidelines discussed you can be well on your way to creating a master that stands out and grabs the listener’s attention.

Remember, mastering is both an art and a science, and with practice, dedication, and a willingness to learn, you can achieve the results you desire.

Categories
Archive

Use Multiband Compression Vocals

Multiband compression can enhance a vocal’s clarity and balance. It achieves this by compressing specific frequency bands independently, allowing for targeted control of the vocal dynamics.

Multiband compression is a powerful tool for achieving a polished vocal sound. Unlike traditional compression, which applies the same level of compression to the entire audio signal, multiband compression allows for focused control of specific ranges of frequencies. This targeted control helps to ensure that specific aspects of the vocal performance, such as sibilance or low-end rumble, are properly compressed without affecting other areas of the sound.

When used correctly, multiband compression can enhance a vocal’s clarity, balance, and impact, making it an essential technique for any serious vocal producer or music engineer.

Use Multiband Compression Vocals

Credit: www.soundonsound.com

The Basics

Multiband compression is a useful technique for vocals as it enhances tonal balance and reduces harshness. By splitting the audio into different frequency bands and applying compression independently, the dynamic range is better controlled, resulting in a more polished sound.

How Does Multiband Compression Work?

Multiband compression is a technique used to compress different frequency ranges or “bands” separately, giving more control over the tonal balance of a sound. In simpler terms, multiband compression takes the whole frequency spectrum and divides it into several smaller frequency ranges that can be processed individually. By processing different bands separately, you can achieve more precise control over the levels of specific frequencies and make sure that important elements, such as vocals, stand out in the mix.

What Are The Different Bands In Multiband Compression?

Multiband compression divides the frequency spectrum into various bands such as lows, mids, and highs. Typically, it may have around three to five bands that cover the full frequency spectrum. The number of bands can vary based on the intended purpose and personal preference. Each band can be further processed separately, using its threshold, ratio, attack, and release settings. When using multiband compression on vocals, it is essential to split the frequency spectrum to make proper compression adjustments. Placing more emphasis on vocals, while compressing the background noise, will improve vocal clarity and ensure that all frequencies are at their optimal levels in the mix. In conclusion, multiband compression is an effective technique to improve the overall sound quality of vocals in a mix. By dividing up the frequency spectrum and compressing each band separately, you can achieve a well-balanced mix that allows the vocals to stand out. Understanding the basics of multiband compression is necessary to make the right adjustments that enhance the quality and clarity of the vocals in any audio track.

Use Multiband Compression Vocals

Credit: m.youtube.com

Best Practices

Multiband compression on vocals is a useful technique to adjust and balance the tonal qualities of a recording. By dividing the frequency range into different bands, it allows for more precise control over the dynamics and adds depth and clarity to vocals in a mix.

Multiband compression for vocals is a popular technique used by many audio engineers to achieve a balanced and polished sound. But proper execution of multiband compression is essential to avoid over compression and produce a nuanced vocal mix. In this post, we’ll discuss the best practices to use multiband compression on vocals.

When Should You Use Multiband Compression On Vocals?

Multiband compression can help to control the dynamics of a vocal mix, making it sound polished and cohesive. It is useful when you want to control specific frequency ranges of the vocal mix and compress them differently. You typically use multiband compression when the dynamic range of the vocal mix is wide, and the vocals have inconsistent levels.

What Are Some Common Settings Used For Vocal Multiband Compression?

To get the best results with multiband compression, it is essential to understand the settings commonly used. Here are some of them:

  • Threshold: It decides at what point the compression will start working. The lower the threshold, the more the compression effect.
  • Ratio: It refers to the amount of compression applied once the signal crosses the threshold. The higher the ratio, the more compression applied to the signal.
  • Attack and Release: These are the times taken to activate and release compression. Quick settings can create an edgy sound, and slow settings can cause pumping.
  • Makeup Gain: It restores the output gain lost after compression. The objective is to restore the original level of signals before compression.

How Can You Avoid Overusing Multiband Compression On Vocals?

Using excessive multiband compression can lead to a loss of dynamics and create an artificial sound. Here are some tips to help you avoid over-compression:

  • Listen to the mix after every tweak and ensure that the mix doesn’t lose its natural sound.
  • Use multiple bands only if necessary. Keep in mind that using more bands on vocals can sometimes lead to an over-processed sound.
  • Start with lower compression ratios and thresholds and work your way up gradually.
  • Watch out for unwanted artefacts such as distortion and pumping.

Multiband compression on vocals can be a powerful tool to add nuance and balance to your mix. Keep these best practices in mind, and you’ll be able to produce a polished, professional sound.

Advanced Techniques

Multiband compression is a powerful technique that can be used to enhance vocals in music production. By using multiband compression, you can achieve a smoother and more consistent vocal sound, which can make a big difference to the overall quality of your mix.

Advanced Techniques: Use Multiband Compression Vocals

Multiband compression is an essential tool to have in your mixing arsenal. It allows you to control the dynamics of your vocals across specific frequency bands, enhancing their clarity and presence. While it’s a well-known fact that multiband compression can be used to shape and tame a vocal’s dynamic range, it can do much more than that when used creatively and intelligently. In this article, we’ll explore some advanced techniques that will bring your vocal mixing game to the next level with multiband compression.

How Can Multiband Compression Be Used Creatively On Vocals?

Multiband compression can be used creatively on vocals to create a unique and dynamic sound. By splitting the frequency spectrum of the vocal and applying different settings to each band, you can emphasize or de-emphasize specific aspects of the vocal performance. For instance, you could use multiband compression to reduce the sibilance of a singer or add warmth to the low end. You could also use multiband compression to add texture and character to a vocal, creating a more interesting and engaging sound. The possibilities are endless, and the key is to experiment with different settings and find what works best for the specific vocal performance.

What Are Some Advanced Settings For Vocal Multiband Compression?

To use multiband compression effectively, you need to understand the different settings available and how they affect the sound of your vocals. Here are some advanced settings to consider:

  • Threshold: Set the threshold for each band to achieve the desired dynamic range reduction.
  • Ratio: Adjust the ratio to control the amount of gain reduction applied to the band.
  • Attack: Set the attack time to control how quickly the compressor responds to changes in level.
  • Release: Set the release time to control how quickly the compressor releases the gain reduction.
  • Knee: Adjust the knee to control the compressor’s transition between the unprocessed and compressed signal.
  • Makeup Gain: Apply makeup gain to increase the level of the compressed signal to match the original level.

What Are Some Alternative Techniques To Multiband Compression For Vocal Mixing?

While multiband compression is a powerful tool, it’s not always the go-to solution for every vocal mixing situation. Here are some alternative techniques to consider:

  • Equalization: Use equalization to adjust the frequency response of the vocals.
  • De-essing: Use de-essing to reduce the sibilance of a vocal performance.
  • Parallel Compression: Use parallel compression to enhance the presence and impact of a vocal performance.
  • Saturation: Use saturation to add warmth and character to a vocal performance.
  • Automation: Use automation to adjust the level and other parameters of the vocals throughout the song.

In conclusion, multiband compression is a powerful tool for vocal mixing that can be used creatively and intelligently to enhance the sound of your vocals. By experimenting with advanced settings and alternative techniques, you can find the right approach for each vocal performance and create a unique and dynamic mix that stands out from the rest.

Use Multiband Compression Vocals

Credit: www.stockmusicmusician.com

Frequently Asked Questions Of Use Multiband Compression Vocals

Should You Use Multiband Compression On Vocals?

Yes, multiband compression can be effective on vocals to achieve an even and balanced sound. However, it should be used with caution and adjusted based on the specific needs of the vocal track. It’s important to avoid over-compressing and to use proper EQ and other techniques in conjunction with multiband compression for optimal results.

When Should You Use Multiband Compression?

Multiband compression is useful when you want to compress different frequency ranges separately. It helps in controlling the dynamics of a mix and managing the louder and quieter parts of individual tracks. It can be used to enhance clarity and balance in a mix, and to manage frequency masking between tracks.

Why Use Multiple Compressors On Vocals?

Multiple compressors are used on vocals to control the dynamics and improve the clarity of the sound. By using different compressors with different settings, you can target specific aspects of the vocals, such as reducing sibilance or evening out the volume.

This can result in a more polished and professional sound.

What Type Of Compression Is Best For Vocals?

The best type of compression for vocals is typically a gentle-to-moderate opto compressor or a transparent VCA compressor with a low ratio. These can help level out dynamics, reduce peaks, and smooth out the vocal sound without adding unwanted artifacts.

Ultimately, the best approach depends on the specific vocalist and style of music.

Conclusion

Multiband compression is a powerful tool to take your vocal sound to the next level. By effectively controlling the dynamics of the vocals, multiband compression can make them sound fuller, more consistent, and professional. However, it’s essential to use multiband compression judiciously and with a clear understanding of how it affects your sound.

Remember to experiment with different settings and listen carefully to the results. When used properly, multiband compression can be a game-changer in making your vocal tracks sound their best. Happy mixing!

Categories
Archive

Can You Mix a Song Without Stems

Mixing a song without stems is possible, but it can be challenging. It requires a lot of creativity and skills to make the track sound cohesive and balanced.

Mixing a song is an essential aspect of producing music. It involves adjusting and manipulating individual audio tracks to create a polished and coherent sound. However, when you don’t have the original stems, the process becomes much more difficult. Stems are individual tracks of an audio recording, such as vocals, drums, guitars, and bass.

They provide the flexibility to adjust each element of a song’s mix separately. Mixing without stems means working with only one or two stereo files, which can limit your options. Nevertheless, some talented mixing engineers can create amazing mixes with less. We will explore the challenges of mixing without stems and provide some tips to help you navigate this terrain.

Importance Of Stems In Mixing

Anyone who has dabbled in the world of audio mixing knows how important stems are in the process. In simple terms, stems represent isolated audio tracks (e.g., drums, guitar, vocals) that have been grouped together and exported as one audio file. These stems are an essential tool for mixing engineers, and their use can make all the difference in the final sound quality of a song.

What Are Stems In Mixing?

In layman’s terms, a music stem is a collection of tracks that represent various parts of a song, such as the drums, bass, guitar, and vocals. These tracks can be edited independently and mixed together to create a final product. Stems are usually exported in WAV or AIFF format, and they allow mixing engineers to have more control over the sound of a song during the mixing process.

Why Are Stems Essential?

Stems are essential for mixing because they allow mixing engineers to manipulate each track individually and make adjustments to the overall sound of the song. Mixing engineers can adjust the levels, EQ, compression, and other effects on each stem, isolate problematic tracks, and make necessary changes to parts of the song.

Without stems, the mixing process would be significantly more complicated, as mixing engineers would have to work with one single stereo audio file that contained all of the tracks. This lack of control and precision would make it much harder to achieve a polished final product.

Conclusion

As we have seen, stems are essential in the mixing process. They provide more control and precision in the mixing process, allowing engineers to achieve a much higher quality final product. So, if you are planning to mix a song, it is crucial to ensure that you have access to high-quality stems.

Challenges Of Mixing Without Stems

Mixing without stems poses several challenges for audio engineers. It makes it difficult to isolate specific elements in the track, such as vocals or individual instruments. Without proper separation, it can be challenging to fine-tune the mix and achieve the desired sound.

Mixing is an essential part of music production that involves combining different tracks into one cohesive arrangement. While having separate audio files, known as stems, for each instrument and vocal track makes mixing easier, it is possible to mix a song without stems. However, mixing without stems presents several challenges that can make it difficult to achieve a professional-sounding mix.

Limited Control Over Individual Tracks

When mixing without stems, the producer has limited control over individual tracks. Instead, they must rely on processing techniques like EQ, compression, and panning to shape the overall sound. This can make it challenging to address specific issues in the mix, such as a muddy bass or harsh vocals. Additionally, without access to individual tracks, it can be hard to add or remove elements from the mix and to make subtle adjustments in volume or tone.

Difficulty In Making Significant Changes

Mixing without stems can also make it difficult to make significant changes to the arrangement. For instance, if the producer decides to change the chord progression or add a new section to the song, they may need to reconstruct the entire mix from scratch. This is because they do not have access to the individual tracks that make up the song. Consequently, making significant changes to the mix can be time-consuming, tedious, and may not yield the desired results. In summary, mixing without stems presents several challenges that can make it difficult to achieve a professional-sounding mix. Limited control over individual tracks and difficulty in making significant changes are some of the challenges that producers face when mixing without stems. While it is possible to mix a song without stems, it is advisable to have separate audio files for each track to make the mixing process more manageable and efficient.

Approaches To Mixing Without Stems

Mixing a song without stems can be a challenging task, but there are various approaches to make it possible. These include using EQ and compression techniques, working with phase inversion and utilizing stereo wideners. With the right approach and skills, it is possible to achieve a quality mix without stems.

When it comes to audio mixing, the general rule of thumb is that you need access to all of the individual stems to get the most control and creative freedom. However, there can be situations where you have to mix a song without the stems, say, when you’re dealing with an old recording or a live performance. In such cases, you may find yourself with a limited set of tools to work with. But, don’t worry, several proven techniques can help you mix without stems. Let’s take a look at a few of them.

Use Of Mastering Tools

Mastering tools can be your savior in situations where you do not have access to individual stems. EQ, compression, and limiting can help you sculpt, refine, and optimize your mix. To get started, use EQ to enhance the overall tonal balance of the mix. Trim out the unnecessary frequencies and boost the essential ones. Compression will help control the dynamics and add punch, and limiting can help you bring up the volume while retaining the clarity.

Automation And Eq Techniques

Automation can be one of the most effective ways to balance out the mix and create space for different elements. Volume automation can help you smoothly blend the different parts and make sure that nothing is too loud or too soft. Panning automation can be used to create stereo width and give the mix more depth. EQ techniques such as subtractive EQ can also be used to remove unwanted frequencies and help you shape the sounds. These techniques require a lot of technical know-how, but they’re powerful tools in the right hands.

Conclusion

Mixing without stems is challenging, but it’s not impossible. You may not have access to the individual elements, but you can still be creative and use various techniques such as mastering tools and EQ to shape and enhance the mix. Automation is also an effective tool that can help you create drama and dynamics in your track. So, if you find yourself in a situation where you have to mix without stems, be confident, and use your creativity to make the most out of what you have.

Can You Mix a Song Without Stems

Credit: fr.fiverr.com

Mastering Tools For Mixing Without Stems

Mastering tools for mixing without stems can be a challenging task, but it’s not impossible. By making use of a combination of EQ, compression, panning, and other techniques, you can create a mix that’s similar to the original song even without the stems.

Mixing without stems can be a challenging task, but with the right mastering tools, you can achieve great audio quality. Even though working with stems offers more control, having to deal with a stereo mixdown file doesn’t mean you cannot deliver a top-notch track. Here, we will discuss some of the mastering tools you can use to get your track sounding amazing.

Loudness Meters

In the absence of stems, loudness meters are a fantastic tool for setting consistent loudness levels throughout your track. These meters help you gauge the dynamic range of the music and ensure that the levels remain controlled. One of the most popular loudness meters is the LUFS (Loudness Units Relative to Full Scale) meter. This meter measures the loudness of your track, and you can use it as a reference point to balance the levels of different parts of your song.

Multiband Compressors

Another mastering tool that you can use when mixing without stems is a multiband compressor. This audio plugin lets you target specific frequency ranges in a mix to enhance or reduce them. It works by compressing the dynamic range of certain frequencies in your track and adjusting the volume levels of the particular frequency ranges.

Harmonic Exciters

Harmonic exciters are another plugin that can help you enhance audio quality when mixing without stems. This tool works by adding harmonics or overtones to the audio signal, which can help the music sparkle and shine. Harmonic exciters can provide a subtle boost to the high end of the mix, and you can also use them to stimulate certain frequency ranges that may lack punch or lack character. In conclusion, mixing without stems is not an easy task, but with the right mastering tools, it can be done. Loudness meters, multiband compressors, and harmonic exciters are just a few of the mastering tools you can use to improve the quality of your track and deliver a version that you can be proud of. So, try them out, experiment with different settings, and see what works best for your music.

Automation Techniques For Mixing Without Stems

Automation techniques have made it possible to mix songs without stems, allowing for a smoother and more efficient process. With the use of advanced tools and software, mixing engineers can now achieve the desired sound without relying on individual track elements.

Mixing music without stems can be a daunting challenge, but it’s not impossible. The process involves using various automation techniques to create a cohesive and balanced sound. In this post, we’ll explore some of the most effective techniques, including volume and panning automation, reverb and delay automation.

Volume And Panning Automation

Automating the volume and panning of different elements in a mix is crucial for achieving balance and separation. One effective technique is to use volume automation to adjust the levels of each track throughout the song. For example, you could use volume automation to bring up a guitar solo during its section or to fade out a vocal track during a bridge. Similarly, panning automation allows you to create a sense of space and width in your mix. You can use this technique to move elements from left to right or create a stereo image. For example, you could pan a guitar to the left during the intro and move it to the center during the chorus for extra impact.

Reverb And Delay Automation

Reverb and delay are two effects that can help bring your mix to life, but they can also muddy it up if not used properly. Automating the wet/dry mix of your reverb and delay effects can help you achieve a clean and polished sound. For example, you can use reverb automation to add extra depth to a vocal during the chorus without making it sound too washed out during the verse. You can also use delay automation to create rhythmic patterns with a guitar or synth, creating a hypnotic effect that draws the listener in. In conclusion, mixing without stems requires a creative approach and an understanding of how to use automation techniques effectively. By using volume and panning automation as well as reverb and delay automation, you can create a professional-sounding mix that rivals those mixed with stems.

Eq Techniques For Mixing Without Stems

Mixing a song without stems can be quite challenging, but with EQ techniques, it is possible to bring out the desired sound. By manipulating the frequency spectrum of individual tracks, you can achieve a balanced mix without the need for stems.

When it comes to music production, mixing plays a crucial role in enhancing the quality and overall impact of a song. However, it can be quite challenging to mix a song without stems, which are the individual tracks of a song separated into vocals, drums, bass, etc. Despite this, there are still EQ techniques that can be used to improve the mixing process, even without stems. In this article, we will delve into two popular EQ techniques for mixing without stems: Surgical EQing and Broad EQing.

Surgical Eqing

Surgical EQing is an EQ technique that involves making precise adjustments to specific frequencies in a song. When mixing without stems, it is essential to use surgical EQing to detect and correct any specific issues within the mix. For example, if there is a particular frequency that is causing muddiness or masking other instruments, surgical EQing can help target that frequency and make the necessary adjustments to ensure all instruments are heard clearly in the mix.

Broad Eqing

Broad EQing, in contrast, involves adjusting broad ranges of frequencies across multiple tracks to create the desired tonal balance. This method is particularly helpful for improving overall tonal balance and reducing frequency buildup in the mid-range. With broad EQing, it is essential to use your ears and make adjustments until the mix becomes more balanced. In conclusion, mixing without stems can be a significant challenge, but it is not impossible. With the right EQ techniques, the quality of the mix can be improved. Using surgical EQing to make precise adjustments and broad EQing for overall tonal balance are both effective strategies for mixing without stems. So, if you find yourself in a situation where you don’t have access to stems, make sure to use these EQ techniques to improve the mixing process.

Tips For Mixing Without Stems

Mixing without stems can be a challenge, but it’s possible. You’ll need to focus on EQ and volume adjustments, as well as creative use of effects, to compensate for the lack of individual tracks. It may take some experimentation, but with practice, you can successfully mix a song without stems.

Mixing a song without stems can be a challenging task. Stems are essential components of a track, as they provide a clear separation of instrument sounds. However, there are times when you may not have access to stems, but you still need to mix a track. Here are some tips to help you mix a song without stems.

Organizing Tracks Before Mixing

Organizing your tracks before mixing is vital as it allows you to have a clear understanding of the various components of the song. Create a folder for each instrument or vocal track to ensure that you can easily access the audio files. Label each track appropriately, indicating the instrument name, and use color coding to help differentiate the tracks. Additionally, before mixing, ensure that all the tracks are in sync, so they are all playing at the same time.

Understanding The Song Structure

Understanding the song’s structure before mixing is essential to create a clear mix. Listen to the track several times to detect changes in the song’s structure and identify the parts of the song, such as the intro, verse, chorus, bridge, and outro. You can create markers for each section to help you visualize the song’s structure and ensure each section is mixed correctly.

Using Eq To Balance Frequencies

When mixing without stems, it’s essential to balance frequencies manually using EQ to ensure each track is audible in the mix. Use EQ to remove unwanted frequencies and ensure each instrument has its space in the mix. Start by cutting frequencies in one track and listening to the impact on the other tracks. Eventually, you will be able to balance all the frequencies correctly.

Using Compression To Control Dynamic Range

Dynamic range refers to the difference between the quietest and the loudest parts of the track. You can use compression to reduce the dynamic range and ensure that all the parts of the track stay in balance. Start by applying compression to your vocal tracks, then move to other instruments that require it. Adjust the attack and release times to ensure the compression sounds natural.

Using Reverb To Create Space

Reverb is an essential component of any mix, as it can add depth and space to a track. When mixing without stems, use reverb to create an ambient space for the instruments. Place the reverb on an aux send, creating a common space for all the instruments. Use different reverb settings for different instruments to ensure they are all audible. Mixing without stems can be a challenging task. However, with proper organization, understanding of the song’s structure, balancing frequencies, compression, and the use of reverb, you can create a professional-sounding mix. Follow these tips to achieve a great mix without stems.

Frequently Asked Questions For Can You Mix A Song Without Stems

Is It Better To Mix With Stems?

Mixing with stems can enhance the overall sound quality and provide more control in the mixing process. Stems can also make it easier to make adjustments without affecting other elements. Ultimately, whether to mix with stems depends on the individual project and preferences of the mixer.

Do You Need Stems To Master A Song?

No, it is not necessary to have stems to master a song. However, having access to the individual tracks (vocals, drums, etc. ) Can give the audio engineer more control over the final product. It ultimately depends on the specific needs and goals of the mastering process.

Are Track Stems Necessary?

Track stems are not necessary, but they can be helpful in the music production process. They provide a way to access individual elements of a mix, allowing for greater control over the sound. Additionally, they can be useful for remixing and collaboration purposes.

Do You Need Stems To Do A Remix?

No, you do not necessarily need stems to do a remix. However, having access to the separate instrumental and vocal tracks can make the remixing process easier and more effective. Stems provide greater flexibility and control over the mix and allow the remixer to isolate and manipulate specific elements.

Conclusion

Mixing a song without stems is possible, but it requires an arduous process that involves creativity, experimentation, and a solid understanding of audio manipulation techniques. A good mixing engineer knows how to extract and enhance the best qualities of individual sounds and make them work together to achieve an outstanding final product.

While having access to stems can save time and effort, mixing from scratch can also provide unique and unexpected results. Trust your ears, keep learning, and have fun with the process.