Categories
Archive Audio Production

Your Rights As The Copyright Holder : Unleashing Legal Power

As the copyright holder, you have the exclusive rights to reproduce, distribute, and display your work. These rights allow you to control and profit from your creative content.


Protecting your copyright is essential to safeguarding your intellectual property and maintaining control over its usage and dissemination. By understanding your rights as a copyright holder, you can effectively assert your ownership and protect your work from unauthorized use. This not only ensures you receive proper credit for your creations, but also enables you to potentially generate income through licensing and other opportunities.


As the copyright holder, your rights afford you the ability to maintain the integrity and value of your original work, providing you with the legal foundation to defend against infringement and unauthorized exploitation.


Understanding Copyright


As the holder of copyright, you have the exclusive rights to reproduce, distribute, display, and perform your work. These rights allow you to control how your content is used and ensure that you are properly credited and compensated for your creative efforts.

Understanding Copyright Before delving into your rights as a copyright holder, it is crucial to grasp the concept of copyright. Essentially, copyright grants exclusive rights to creators and owners of original works, prohibiting others from using, reproducing, or distributing the work without permission. It protects various forms of expression, including literary, artistic, and musical works, among others. ———- What is copyright? Copyright is a legal right that ensures the creators of original works have control over the use and distribution of their creations. It grants exclusive rights to the creators, dictating who can reproduce, distribute, publicly display, or create derivative works based on the original creation. In essence, copyright protects intellectual property by providing creators with the legal framework to control the use of their work. ———- Why is copyright important? Copyright is essential as it safeguards the interests of creators and encourages innovation and creativity. It ensures that creators can benefit from their work by granting them control over its use and distribution. This, in turn, fosters a conducive environment for the creation of new and original works, enriching culture and promoting progress in various fields. ———- Copyright ownership Copyright ownership typically belongs to the creator of the original work. However, in some instances, ownership may transfer to another individual or entity through a legal agreement. It’s critical for creators to understand and assert their ownership rights to protect their work from unauthorized use or exploitation. ———- Duration of copyright The duration of copyright protection varies depending on the type of work and the laws in the relevant jurisdiction. Generally, copyright protection lasts for the creator’s lifetime plus a designated number of years after their death. Knowing the duration of copyright protection is crucial for creators to assert their rights and prevent unauthorized use of their work. ———- In conclusion, understanding copyright is paramount to effectively exercising your rights as a copyright holder. By comprehending the basics of copyright, such as its definition, importance, ownership, and duration, creators can protect their works and ensure they receive due recognition and reward for their creative endeavors.
Your Rights As The Copyright Holder  : Unleashing Legal Power


Credit: www.ebay.com


Exclusive Rights

Reproduction Rights

As the copyright holder, you have the exclusive right to reproduce your work in various formats, including printed copies, digital copies, and recordings. This means that others cannot make copies of your work without your permission.

Distribution Rights

With distribution rights, you have the exclusive authority to control how your work is distributed to the public. This includes selling or renting copies of your work, as well as determining which channels and platforms can distribute your content.

Public Performance Rights

As the copyright holder, you hold the exclusive right to authorize or prohibit the public performance of your work. This covers live performances, broadcasts, and digital streaming of your content to the audience.

Modification Rights

Your modification rights grant you the exclusive power to create derivative works based on your original content. Others cannot modify or adapt your work without obtaining your permission.

Enforcing Your Copyright


As the copyright holder, you have the right to enforce your copyright if someone infringes on your work. This means you can take legal action to protect your intellectual property and stop others from using it without your permission. By enforcing your copyright, you can safeguard your creations and ensure that you receive the recognition and rewards you deserve for your original work.

Registering Your Copyright

When it comes to enforcing your copyright, one of the first steps you can take is registering it. By registering your copyright with the relevant authorities, you gain important legal protections and establish a public record of your ownership. This makes it easier to take legal action if someone infringes upon your rights. Registration grants you the ability to seek statutory damages and attorney’s fees in a court case, which can provide significant leverage in protecting your work.

Cease And Desist Letters

In some cases, sending a cease and desist letter can be an effective way to enforce your copyright. This formal letter communicates your ownership rights to the person or entity using your work without permission. It serves as a warning and requests an immediate halt to the infringing activities. By clearly outlining your rights, detailing the infringement, and providing a deadline for compliance, a well-crafted cease and desist letter can often lead to a resolution without escalating the matter to a legal battle.

Dmca Takedown Notices

Another powerful tool for enforcing your copyright is the Digital Millennium Copyright Act (DMCA) takedown notice. This notice allows you to request the removal of infringing content from websites or online platforms. By submitting a properly formatted and legally compliant DMCA takedown notice, you can force the removal of the unauthorized use of your work or have it made inaccessible. Websites and platforms typically have policies and procedures in place to handle these notices, making it a relatively straightforward process to protect your intellectual property online.

Legal Remedies Available

When all else fails, there are legal remedies available to copyright holders. If someone continues to infringe upon your copyright despite your previous efforts, you have the option to pursue legal action. This can include filing a lawsuit seeking damages, injunctive relief, or a court order to cease the infringing activities. It’s important to consult with an attorney who specializes in copyright law to understand the specific legal remedies available in your jurisdiction and the potential costs and benefits associated with pursuing such action. In conclusion, enforcing your copyright is crucial to protect your creative work from unauthorized use and infringement. Registering your copyright, sending cease and desist letters, and utilizing DMCA takedown notices are effective methods to address infringement issues. However, it’s important to remember that legal action may be necessary in some cases to ensure your rights are fully protected. Consulting with a legal professional can provide you with the necessary guidance to effectively enforce your copyright and safeguard your intellectual property.

Your Rights As The Copyright Holder  : Unleashing Legal Power


Credit: craftshack.com


Fair Use And Copyright Infringement

In understanding Fair Use and Copyright Infringement, it is crucial for copyright holders to know their rights. This includes the concepts of fair use and copyright infringement, which play a vital role in protecting intellectual property.

What Is Fair Use?

Fair use allows for the limited use of copyrighted material without the permission of the copyright owner. It provides a balance between the rights of the copyright holder and the public’s interest in using the material for purposes such as criticism, commentary, news reporting, teaching, scholarship, or research.

Factors To Consider For Fair Use

  • The purpose and character of the use
  • The nature of the copyrighted work
  • The amount and substantiality of the portion used
  • The effect of the use on the potential market for the copyrighted work

Determining Copyright Infringement

Copyright infringement occurs when someone violates the exclusive rights of the copyright holder without authorization. This includes reproducing, distributing, performing, displaying, or creating derivative works based on the original material.

Consequences Of Copyright Infringement

  1. Legal action such as a lawsuit
  2. Payment of damages to the copyright holder
  3. Possible criminal penalties, including fines and jail time
  4. Loss of credibility and reputation in the industry
https://www.youtube.com/watch?v=gLEFGK-A0U0


Protecting Your Copyright Online


As the copyright holder, it is crucial to protect your rights online. This involves actively monitoring your work and taking action against any unauthorized use. By staying informed about copyright laws and utilizing legal protections, you can maintain control over your intellectual property in the digital landscape.

Digital Rights Management

Watermarking Your Work

Monitoring For Online Infringement

When it comes to protecting your copyright online, it’s essential to utilize digital rights management tools to prevent unauthorized use of your work. By employing secure platforms and technologies, you can safeguard your content.

Watermarking your work is an effective way to assert your ownership over digital content. By imprinting a unique identifier on your images or videos, you can deter unauthorized usage and prove ownership.

Regularly monitoring for online infringement is crucial to protect your creations. By utilizing tools that scan the internet for unauthorized copies, you can take action against violators swiftly.

Working With Online Platforms And Isps

To combat online infringement, collaborate with online platforms and ISPs to take down infringing content promptly. Establishing a strong relationship with these entities can streamline the process of protecting your copyrighted material.

Your Rights As The Copyright Holder  : Unleashing Legal Power


Credit: developer.salesforce.com


Frequently Asked Questions For Your Rights As The Copyright Holder


What Are The Exclusive Rights Of A Copyright Holder?


The exclusive rights of a copyright holder include reproduction, distribution, adaptation, public performance, and display of their work.


How Long Does Copyright Protection Last?


Copyright protection typically lasts for the lifetime of the author plus an additional 70 years. However, this duration can vary based on different factors.


Can A Copyright Holder Transfer Their Rights To Another Party?


Yes, a copyright holder can transfer their rights to another party through licensing or assigning the copyright. This allows others to use their work legally.


What Actions Can Be Taken Against Copyright Infringement?


In case of copyright infringement, the copyright holder can take legal actions such as issuing a cease-and-desist letter, pursuing monetary damages, or seeking an injunction.


Conclusion


As the copyright holder, it is crucial to be aware of your rights. Understanding the legal protections available to you empowers you to protect your creative work. Whether it’s the right to reproduce, distribute, or display your work, exercising these rights can safeguard your intellectual property.


Remember, copyright laws vary by country, so it is important to familiarize yourself with the laws in your jurisdiction. By staying informed, you can ensure that your creative endeavors are respected and that the value of your work is protected.

Categories
Archive Audio Production

Social Media Scheduling Tools For Musicians: Boosting Your Online Presence

Social media scheduling tools help musicians plan and automate their social media posts. These tools allow musicians to reach their target audience at the most optimal times, without having to constantly monitor and update their social media accounts.


Using social media scheduling tools can simplify the process of managing multiple social media platforms, increase engagement with followers, and ultimately help musicians grow their online presence. With these tools, musicians can plan and schedule their posts in advance, analyze the performance of their social media content, and make data-driven decisions to improve their online marketing strategies.


This can lead to increased visibility, more opportunities for audience engagement, and ultimately, a stronger connection with their fan base.

Social Media Scheduling Tools For Musicians: Boosting Your Online Presence


Credit: www.upwork.com


Benefits Of Social Media Scheduling Tools

Social media scheduling tools are essential for musicians to effectively manage their online presence. With the ability to plan and publish content in advance, these tools offer numerous benefits that can significantly enhance a musician’s digital marketing strategy.

Time Management

Social media scheduling tools enable musicians to efficiently plan and organize their social media posts ahead of time. By scheduling posts in advance, artists can save time and maintain a consistent online presence, allowing them to focus on creating music and engaging with their audience.

Consistency

Scheduling tools aid in establishing a consistent posting schedule, which is crucial for maintaining audience engagement and brand visibility. Musicians can ensure that their content is distributed evenly and regularly, helping to establish a reliable online presence.

Audience Reach

With the help of scheduling tools, musicians can reach a wider audience by optimizing the timing of their posts to coincide with peak user activity. By strategically planning and scheduling posts, artists can maximize their reach and visibility across different time zones and social media platforms.

Top Social Media Scheduling Tools For Musicians

When it comes to managing social media for musicians, time is a precious commodity. With the demands of creating and performing music, it can be challenging to find the time to consistently post on social media platforms. This is where social media scheduling tools come in handy. These tools allow musicians to plan and schedule their social media posts in advance, saving time and ensuring a consistent online presence. In this article, we’ll explore the top social media scheduling tools that can help musicians streamline their online marketing efforts and engage with their audience more effectively.

Tool A

Tool A is a powerful social media scheduling tool designed specifically for musicians. It offers a user-friendly interface and a range of features to simplify the process of scheduling posts across multiple platforms. With Tool A, musicians can create and schedule posts, track engagement, and analyze performance metrics, all from one convenient dashboard.

Tool B

Tool B is a popular social media scheduling tool that provides musicians with the ability to schedule posts in advance, ensuring a consistent and engaging social media presence. It offers advanced features such as post optimization, audience targeting, and performance analytics, allowing musicians to make informed decisions about their social media strategy.

Tool C

Tool C is a versatile social media scheduling tool that offers musicians the flexibility to schedule posts across various platforms, including Instagram, Facebook, and Twitter. With its intuitive interface and robust features, Tool C enables musicians to plan and organize their social media content with ease, saving time and maximizing their online visibility.

Features To Consider When Choosing A Social Media Scheduling Tool


When selecting a social media scheduling tool for musicians, there are several key features to consider. Look for tools that offer seamless integration with various platforms, the ability to schedule posts in advance, analytics to track engagement, and features for visual content creation.


Additionally, prioritize tools that provide ease of use and customization options to suit your specific needs.

When it comes to managing and growing your social media presence as a musician, staying organized and consistent is key. This is where social media scheduling tools come in handy. With the right tool, you can save time, streamline your content creation process, and ensure that your posts reach your audience at the optimal times. However, with so many options available, it can be overwhelming to choose the right one. To help you make an informed decision, here are three features to consider when choosing a social media scheduling tool: Content Calendar, Post Scheduling, and Analytics.

Content Calendar

A content calendar is a visual representation of your upcoming social media posts. It allows you to plan, organize, and schedule your content in advance, ensuring a consistent flow of posts. When choosing a social media scheduling tool, look for one that provides a user-friendly content calendar interface. This will allow you to easily view and manage your scheduled posts at a glance. Some tools even offer drag-and-drop functionality, making it effortless to move posts around to different dates and times.

Post Scheduling

Being able to schedule your posts in advance is one of the main advantages of using a social media scheduling tool. Look for a tool that allows you to schedule posts across multiple platforms, such as Facebook, Twitter, and Instagram. It should also offer the ability to customize the date and time for each post, so you can reach your audience when they are most active. Additionally, a tool that offers the option to automatically repost evergreen content can help you extend the life of your posts and maximize their reach.

Analytics

Analytics provide valuable insights into your social media performance, allowing you to measure the effectiveness of your posts and make data-driven decisions. Look for a social media scheduling tool that offers comprehensive analytics, including engagement metrics, follower growth, reach, and clicks. These analytics will help you identify which types of content resonate with your audience, so you can refine your strategy and optimize your posts for better results. Additionally, some tools offer competitor analysis, allowing you to benchmark your performance against other musicians in your niche.

Social Media Scheduling Tools For Musicians: Boosting Your Online Presence


Credit: sproutsocial.com


Tips For Effectively Using Social Media Scheduling Tools

Tips for Effectively Using Social Media Scheduling Tools

Efficiently managing your social media presence as a musician is crucial for engaging with fans and promoting your music. Here are some actionable tips to maximize the effectiveness of social media scheduling tools.

Create A Posting Schedule

  • Consistency: Schedule posts at regular intervals to keep your audience engaged.
  • Peak Times: Identify when your followers are most active and schedule posts during those times.
  • Variety: Mix up your content and post different types of updates to keep things interesting.

Tailor Content For Each Platform

  • Platform-Specific: Customize posts based on the unique features and audience preferences of each social media platform.
  • Visuals: Utilize high-quality images, videos, and graphics that are optimized for each platform.
  • Hashtags: Research relevant hashtags for each platform to increase visibility and reach.

Engage With Your Audience

  • Reply Promptly: Respond to comments and messages in a timely manner to show your followers that you value their interaction.
  • Ask Questions: Encourage engagement by asking questions in your posts and responding to comments.
  • Show Appreciation: Acknowledge and thank your fans for their support to build a stronger connection.

Case Studies: Successful Musician Strategies With Social Media Scheduling

“Case Studies: Successful Musician Strategies with Social Media Scheduling”

Musician A

Musician A effectively uses social media scheduling tools to release snippets of their upcoming music, creating anticipation among fans.

Musician B

Musician B leverages social media scheduling to maintain a consistent posting schedule, engaging with their audience regularly.

Musician C

Musician C employs social media scheduling for targeted promotions, reaching a wider audience and increasing visibility.

Social Media Scheduling Tools For Musicians: Boosting Your Online Presence


Credit: blog.hubspot.com


Frequently Asked Questions Of Social Media Scheduling Tools For Musicians


What Are The Benefits Of Using Social Media Scheduling Tools For Musicians?


Using social media scheduling tools helps musicians save time, maintain consistency, reach a wider audience, and analyze performance metrics efficiently.


How Can Social Media Scheduling Tools Enhance A Musician’s Online Presence?


By scheduling posts strategically, musicians can engage followers, promote new releases, create buzz, and keep fans updated regularly.


Which Social Media Platforms Are Compatible With Most Scheduling Tools For Musicians?


Commonly used social media platforms like Facebook, Instagram, Twitter, and LinkedIn are typically supported by scheduling tools favored by musicians.


Conclusion


To effectively manage their social media presence, musicians can benefit greatly from utilizing social media scheduling tools. These tools allow musicians to streamline their posting process, maintain a consistent online presence, and easily engage with their audience. By automating their social media activities, musicians can save time and focus more on creating and sharing their artistic content.


With the variety of scheduling tools available, musicians can choose the one that best suits their needs and enhances their online visibility and reach.


https://www.youtube.com/watch?v=nCF26DGMzis


Categories
Archive Audio Production

Why Musicians Fail On Social Media : 7 Reasons You Need to Know

Many musicians fail on social media due to inconsistent content and lack of engagement with their audience. Without a strong content strategy and genuine interaction, musicians struggle to gain traction and build a loyal following.


Social media is a powerful tool for musicians to connect with fans and promote their music, but it requires consistent effort and authenticity. In this competitive digital landscape, understanding why some musicians fail on social media can help others avoid the same pitfalls.


By identifying the common reasons for failure, musicians can empower themselves to create a successful social media presence that amplifies their music and expands their fan base. Let’s delve into the key factors contributing to musician’s struggles on social media and explore effective strategies to overcome these challenges.

Why Musicians Fail On Social Media  : 7 Reasons You Need to Know


Credit: neilpatel.com


Lack Of Consistent Presence

One of the primary reasons why musicians fail on social media is the lack of consistent presence. Building a strong and thriving online presence requires time, effort, and strategic planning.

Inconsistent Posting Schedule

One common mistake musicians make is having an inconsistent posting schedule. Posting sporadically can lead to a loss of engagement and interest from followers. In the fast-paced world of social media, maintaining a regular posting schedule is crucial for retaining the attention of your audience.

Neglecting Engagement

Avoiding engagement with followers is another pitfall that musicians fall into. Engaging with your audience creates a sense of connection and fosters loyalty. Neglecting to respond to comments, messages, or mentions can give the impression that you are not invested in your fan base, leading to a decline in interest and support.

Poor Targeting And Audience Understanding

One of the key reasons why musicians fail on social media is their poor targeting and audience understanding. To effectively engage and grow on platforms like Facebook, Twitter, Instagram, and TikTok, it is crucial for artists to conduct thorough research on their target audience and understand the insights and analytics provided by these platforms. Failure to do so can significantly hinder the success of their social media endeavors.

Lack Of Research On Target Audience

Many musicians make the mistake of not conducting comprehensive research on their target audience. They fail to understand the demographics, interests, and behaviors of their potential fans, which leads to ineffective content creation and promotional strategies. As a result, they struggle to truly resonate with their audience and often miss out on valuable opportunities for growth.

Ignoring Insights And Analytics

Another common pitfall is the tendency of musicians to ignore the valuable insights and analytics provided by social media platforms. By disregarding crucial data such as audience engagement, reach, and demographics, they miss out on the opportunity to optimize their content and strategies for better results. This lack of attention to analytics often leads to stagnation and underperformance on social media.

Low-quality Content

When it comes to social media marketing for musicians, the quality of your content can make or break your success. In this digital era, a musician’s online presence plays a significant role in building a fanbase and attracting opportunities. However, many musicians struggle to make an impact due to low-quality content.

Unprofessional Visuals

Visuals play a crucial role in capturing the attention of social media users. As a musician, if your visual content is unprofessional and lacks a polished look, you risk turning away potential fans. Investing time and effort in creating visually appealing content can significantly enhance your online presence.

  • Design eye-catching album covers and promotional images
  • Use high-quality images and videos that are visually pleasing
  • Ensure your branding is consistent across all platforms

By adopting these practices, you can establish a professional image that resonates with your target audience and encourages them to engage with your music.

Inadequate Music Promotion

Creating outstanding music is just one part of the equation. Without effective music promotion, your content may go unnoticed in the vast sea of social media posts. To prevent this, it is crucial to develop a comprehensive promotion strategy that reaches your target audience.

  • Identify your target audience demographics and interests
  • Engage in collaborations with other musicians or influencers in your genre
  • Utilize popular hashtags relevant to your music

Strategic music promotion efforts will increase the visibility of your content, allowing you to reach a broader audience and potentially attract new fans.

Why Musicians Fail On Social Media  : 7 Reasons You Need to Know


Credit: www.facebook.com


Failure To Utilize Different Social Media Platforms

While social media can be a powerful tool for musicians, many fail to achieve success due to their limited presence across various platforms.

Focusing On A Single Platform

By concentrating efforts on one platform only, musicians miss out on reaching a broader audience and diverse demographics.

Ignoring Emerging Platforms

Failure to stay updated and engage on new or emerging platforms could result in missed opportunities and potential fan growth.

https://www.youtube.com/watch?v=n0Uq7O51s3Y


Lack Of Authenticity And Connection

When musicians lack authenticity and fail to connect with their audience on social media, their online presence suffers. This disconnect hinders their ability to build meaningful relationships with fans.

Overpromotion And Salesy Approach

Overpromotion can push fans away and damage the authenticity of a musician’s brand. A salesy approach often feels insincere and turns audiences off.

Ignoring Fans And Community

Neglecting fans can lead to a loss of trust and interest. Ignoring the community prevents musicians from fostering a loyal and engaged following.

Why Musicians Fail On Social Media  : 7 Reasons You Need to Know


Credit: www.socialtalent.com


Frequently Asked Questions On Why Musicians Fail On Social Media


Why Is Social Media Important For Musicians?


Social media provides a platform for musicians to connect with fans, promote their music, and build a loyal following. It allows for direct communication, engagement, and exposure to a wide audience.


How Can Musicians Increase Engagement On Social Media?


Engage with followers by responding to comments, posting regularly, sharing behind-the-scenes content, running contests, and collaborating with other musicians. Consistent interaction and creative content can boost engagement.


What Are Common Mistakes Musicians Make On Social Media?


Some common mistakes include inconsistent posting, not engaging with followers, overposting promotional content, neglecting to analyze data, and failing to stay authentic. Avoiding these pitfalls can help musicians succeed on social media.


Conclusion


Social media has become an invaluable tool for musicians to reach a wider audience and engage with fans. However, many aspiring artists find little success in their social media endeavors. While there are various reasons for musician’s failure on these platforms, it ultimately boils down to a lack of strategy, consistency, and understanding of their target audience.


By implementing a well-thought-out plan and actively connecting with fans, musicians can overcome these challenges and truly make their mark on social media. Success awaits those who take the time to understand the platform, engage with their audience authentically, and consistently offer valuable content.


It’s time to make the most out of social media and take your music career to new heights.

Categories
Archive Audio Production

How To Uninstall Plugins Mac : Effortless Guide to Plugin Removal

To uninstall plugins on a Mac, open the Finder, click on “Go” in the menu, and then select “Go to Folder.” Type “/Library/Internet Plug-Ins” and hit Enter.


Delete the plugins that you want to uninstall. When it comes to optimizing your Mac’s performance, managing plugins is essential. Uninstalling unnecessary plugins can help improve system performance, free up storage space, and enhance security. Read on to discover the simple steps for uninstalling plugins on a Mac and ensure smooth functioning of your device.


Keep your Mac running efficiently by removing unwanted plugins and streamlining its performance.

How To Uninstall Plugins Mac  : Effortless Guide to Plugin Removal


Credit: support.apple.com


Why Uninstall Plugins

When it comes to managing your Mac’s performance and storage space, uninstalling unnecessary plugins can make a significant difference. By removing unwanted plugins, you can improve performance and free up storage space, ultimately enhancing the overall efficiency of your Mac.

Improve Performance

Uninstalling unnecessary plugins can help enhance your Mac’s performance. When your system is overloaded with plugins, it can slow down the overall speed and responsiveness of your device. By removing unused plugins, you can reduce the burden on your system and ensure that the remaining plugins operate efficiently.

Free Up Storage Space

Unused plugins can take up valuable storage space on your Mac. This can lead to a cluttered system and limited available storage for other essential files and applications. By uninstalling plugins that are no longer needed, you can effectively free up storage space and ensure that your Mac has ample room for important data and applications.

Before You Begin

When uninstalling plugins on your Mac, there are some important steps to take before getting started. By following these necessary precautions, you can ensure a smooth and uninterrupted process of uninstallation. Let’s take a look at what you should consider before uninstalling plugins from your Mac.

Check Compatibility

Prior to uninstalling any plugins from your Mac, it is essential to check for compatibility with your operating system. Some plugins may not be compatible with the latest updates of macOS and could cause issues if not uninstalled correctly. Verify the compatibility of the plugin with your current operating system version to avoid any potential conflicts during the uninstallation process.

Create Backup

Creating a backup of your system is vital before removing any plugins. This is an important precautionary step to safeguard your data in case of any unexpected issues arising during the uninstallation process. You can create a backup using Time Machine or any other reliable backup system available for Mac. By having a backup, you can easily restore your system to its previous state if anything goes wrong during the uninstallation.

Uninstalling Plugins

When it comes to maintaining your Mac’s performance and optimizing its functionality, it’s essential to keep your plugins in check. Unnecessary or outdated plugins can slow down your system and even compromise its security. In this section, we will guide you through the process of uninstalling plugins on your Mac, step by step.

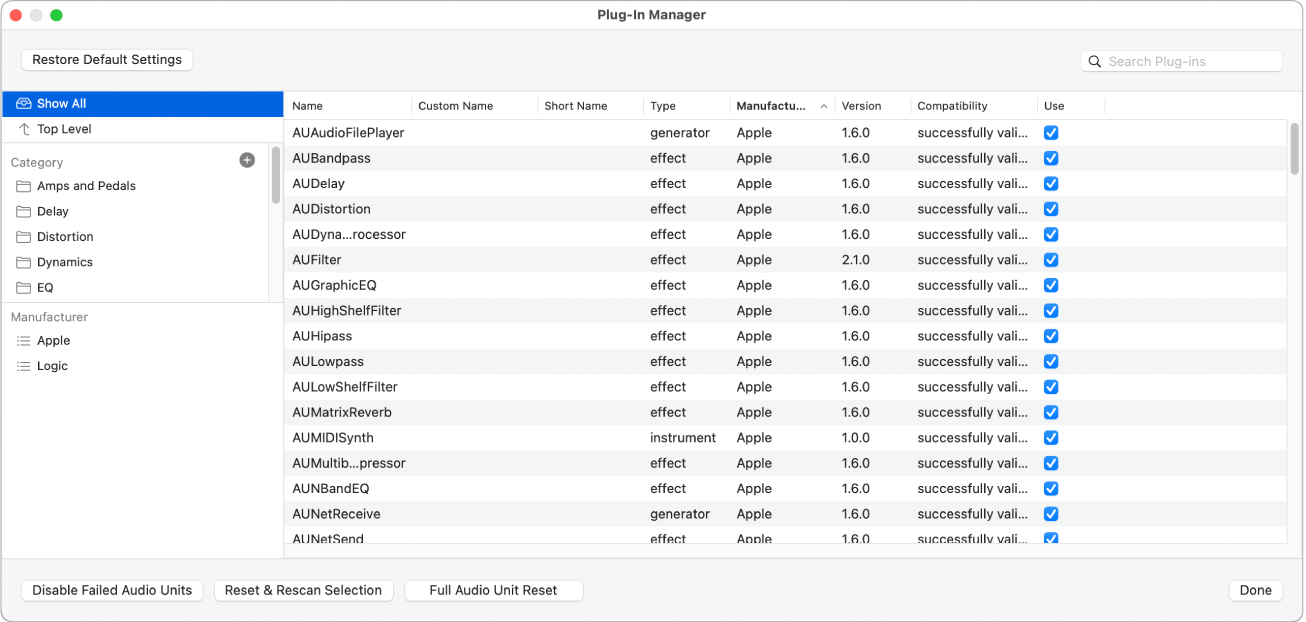
Access Plug-in Manager

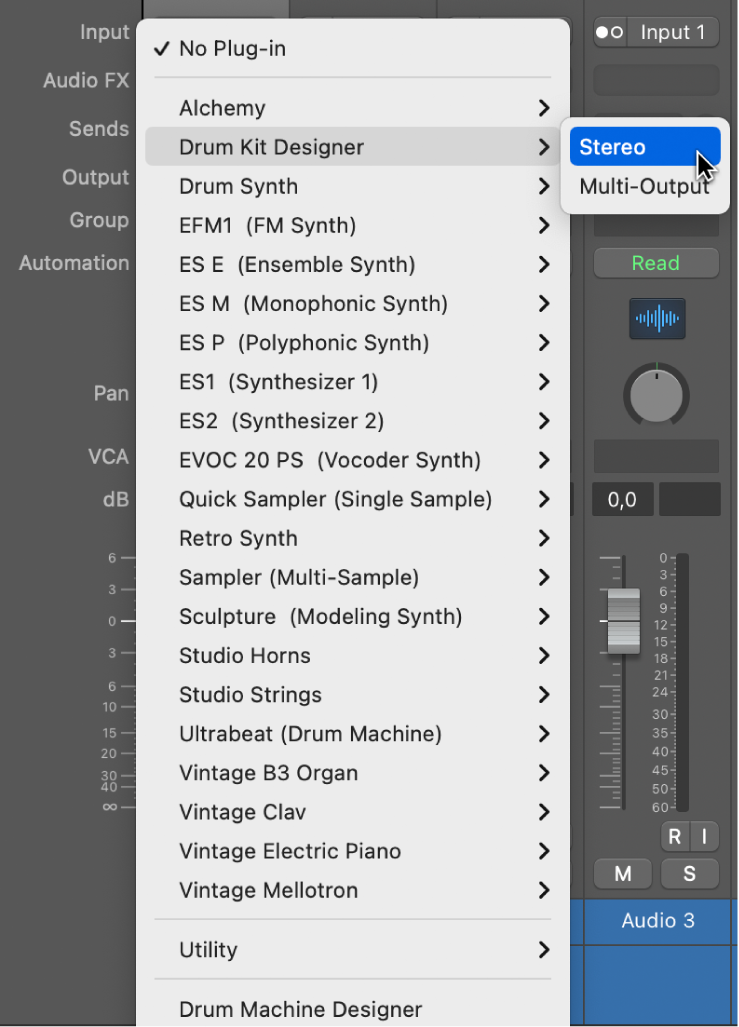
To begin the process of uninstalling plugins, you’ll need to access the Plug-in Manager on your Mac. The Plug-in Manager is a central hub where you can easily manage and remove all the plugins installed on your system.

  1. First, click on the Apple menu in the top-left corner of your screen.
  2. From the drop-down menu, select “System Preferences.”
  3. In the System Preferences window, locate and click on the “Extensions” icon.
  4. Now, in the left sidebar, you’ll find “Plug-in Manager.”
  5. Click on “Plug-in Manager” to open it.

Find Desired Plugin

Once you’ve accessed the Plug-in Manager, the next step is to locate the plugin you want to uninstall.

  1. In the Plug-in Manager, you’ll find a list of all the plugins installed on your Mac.
  2. Scroll down or use the search function to find the desired plugin.
  3. Note: If you’re unsure about the plugin’s name or location, you can also check the corresponding application’s website or support documentation for more information.

Remove Plugin

Once you’ve found the plugin you want to uninstall, you can now proceed with removing it from your Mac.

  1. In the Plug-in Manager, select the plugin you want to remove by clicking on it.
  2. After selecting the plugin, you’ll see an option to disable or remove it.
  3. Click on the “Disable” or “Remove” button, depending on your preference.
  4. Confirmation prompt: In some cases, you may be prompted to confirm the removal. If so, click “OK” or “Confirm” to proceed.
  5. The chosen plugin will now be uninstalled from your Mac.

By following these simple steps, you can easily uninstall plugins from your Mac and streamline its performance. Remember to regularly review and remove any unnecessary plugins to ensure your system runs smoothly and efficiently.

How To Uninstall Plugins Mac  : Effortless Guide to Plugin Removal


Credit: support.apple.com


Additional Steps

When uninstalling plugins on a Mac, there are some additional steps you can take to ensure a clean removal process. These extra measures will help in deleting any leftover files and clearing cache associated with the plugin.

Delete Associated Files

It’s crucial to delete any files related to the plugin to avoid any remnants causing issues later on. Locate the plugin’s folder in the Library directory and delete it manually.

Clear Plugin Cache

Clearing the plugin cache is essential to eliminate any cached data that may interfere with future installations. Navigate to the Cache folder in the Library directory and delete the plugin’s cache files.


Final Thoughts


Uninstalling plugins on a Mac can be a simple process. Follow these steps to easily remove unwanted plugins from your device.

Regular Plugin Maintenance

Regularly audit and remove unnecessary plugins to improve system performance.

Review plugin usage and relevance to avoid cluttering your Mac internally.

  • Identify plugins causing issues by checking for compatibility and updates.
  • Delete inactive plugins to prevent system slowdowns and conflicts.

Consider Alternative Solutions

Explore other options before resorting to plugin removal for specific functionalities.

  1. Search for built-in Mac features that can replace the plugin’s function
  2. Consider standalone applications that perform plugin tasks more efficiently.

To optimize your Mac’s performance, regular maintenance and exploring alternative solutions are key.

How To Uninstall Plugins Mac  : Effortless Guide to Plugin Removal


Credit: www.geeksforgeeks.org


Frequently Asked Questions Of How To Uninstall Plugins Mac


How Do I Uninstall Plugins On A Mac?


To uninstall plugins on a Mac, open the Applications folder, locate the plugin you want to remove, and drag it to the Trash. Empty the Trash to complete the uninstallation process.


Can I Disable Plugins Instead Of Uninstalling Them?


Yes, you can disable plugins on a Mac without uninstalling them. Go to the browser’s settings or application preferences to disable the plugin temporarily. This can help troubleshoot issues without removing the plugin completely.


Are There Any Third-party Uninstaller Tools For Mac Plugins?


Yes, there are third-party uninstaller tools available for Mac that can help you remove plugins more thoroughly. Some popular options include AppCleaner, CleanMyMac, and Hazel. These tools can ensure complete removal of plugins and associated files.


Conclusion


To summarize, removing plugins from your Mac is a straightforward process that can optimize your device’s performance. By following the steps outlined in this guide, you can easily uninstall unwanted plugins and free up valuable resources on your Mac. Remember, regularly reviewing and removing plugins deemed unnecessary is a proactive approach to maintaining a smooth and efficient system.


So, don’t hesitate to take control of your Mac’s plugins and enjoy a clutter-free experience.

Categories
Archive Audio Production

Melodyne Vs Autotune Which Is Best : A Vocal Editing Showdown

When choosing between Melodyne and Autotune, it ultimately depends on your specific needs and preferences in pitch correction software. Melodyne is known for its versatile and precise pitch editing capabilities, allowing for detailed manipulation of vocals and other melodic elements.


Autotune, on the other hand, is highly regarded for its quick and intuitive pitch correction, popular in genres like pop and hip-hop. The decision between Melodyne and Autotune comes down to the level of control and flexibility you require in your vocal editing process.


Both have their strengths, and the best choice will depend on your individual workflow and desired outcome.


Comparison Of Features

Pitch Correction

Melodyne and Autotune both offer advanced pitch correction features, allowing for precise manipulation of individual notes within a recorded performance. Melodyne utilizes polyphonic pitch correction, which means it can correct the pitch of multiple notes simultaneously, whereas Autotune primarily focuses on monophonic correction, ideal for simple vocal tuning. The flexibility of Melodyne’s pitch correction is unmatched, giving users a more natural and transparent result compared to Autotune.

Time Correction

When it comes to time correction, Melodyne shines with its powerful time-stretching capabilities. Melodyne allows for seamless manipulation of timing and rhythm, making it an ideal tool for fixing timing issues in a performance without altering the original audio quality. On the other hand, Autotune provides basic time correction features, but it lacks the intricate control offered by Melodyne.

Vocal Effects

Both Melodyne and Autotune offer a range of vocal effects to enhance a vocal performance. However, Melodyne stands out with its comprehensive array of creative vocal effects, including formant shifting, harmonization, and modulation. These features enable users to explore unique vocal textures and embellishments. While Autotune does provide some vocal effects, it’s not as extensive or diverse as Melodyne’s offering.

Workflow And Ease Of Use

When it comes to workflow and ease of use, Melodyne excels in providing a user-friendly interface and intuitive workflow. Its visually oriented editing allows for effortless navigation and precise editing, making it suitable for both beginners and professionals. While Autotune offers a straightforward workflow, it can be less flexible and intuitive, especially when compared to Melodyne’s user-centered approach.

Melodyne Vs Autotune Which Is Best  : A Vocal Editing Showdown


Credit: www.discountmags.com


Pros And Cons Of Melodyne

When it comes to pitch correction and audio editing, two popular tools stand out: Melodyne and Autotune. Each has its own set of benefits and limitations. In this section, we’ll delve into the pros and cons of using Melodyne, a powerful pitch correction software.

Benefits Of Using Melodyne

  • Natural Sound: Melodyne offers natural-sounding pitch correction, preserving the original timbre and character of the audio.
  • Note-based Editing: This software provides granular control over individual notes, allowing precise correction and manipulation of melodies.
  • Flexibility: Melodyne enables users to tweak the pitch, timing, and dynamics of the audio, providing versatile editing options.
  • Polyphonic Editing: It allows for polyphonic audio editing, making it a valuable tool for working with complex musical arrangements.
  • Time-stretching and Formant Adjustments: Users can perform time-stretching and formant adjustments, expanding the creative possibilities for audio manipulation.

Limitations Of Using Melodyne

  1. Learning Curve: For beginners, Melodyne may have a steeper learning curve compared to some of its counterparts.
  2. Resource Intensive: Using Melodyne may require significant computational resources, especially when handling large, multi-track projects.
  3. Complexity for Basic Tasks: Simple pitch correction tasks might be more straightforward to accomplish using other, more user-friendly tools.


Pros And Cons Of Autotune


Autotune offers quick pitch correction, but may sound robotic. Melodyne provides more control and natural-sounding results. Choose based on desired effect.

Autotune has become a popular tool in the music industry, allowing artists to correct pitch and enhance vocal performances. However, like any technology, Autotune has its advantages and limitations. Let’s explore the benefits and drawbacks of using Autotune to better understand its impact on music production.

Benefits Of Using Autotune

Autotune offers several advantages that have revolutionized the way singers create music. Here are some of the key benefits:

  1. Improved Pitch: Autotune allows artists to achieve perfect pitch, ensuring that every note is in tune. This results in a polished and professional sound.
  2. Creative Freedom: With Autotune, singers can experiment with different vocal effects and styles without worrying about hitting every note perfectly. This flexibility gives artists the freedom to explore their creativity and push the boundaries of their vocal performances.
  3. Efficiency: Autotune saves time and effort by automating the pitch correction process. Artists can quickly fix minor vocal imperfections, eliminating the need for extensive retakes and reducing production time.
  4. Consistency: Autotune helps create consistency in vocal performances, allowing artists to maintain a uniform sound throughout a song or album. This ensures that the audience has a cohesive listening experience.

Limitations Of Using Autotune

While Autotune offers many benefits, it also has some limitations that are important to consider:

  • Artificial Sound: Overuse of Autotune can result in an unnatural and robotic sound, stripping away the authenticity and emotion of a vocal performance. It’s crucial for artists to find the right balance and avoid excessive pitch correction.
  • Dependency: Relying too heavily on Autotune can make artists less inclined to work on improving their vocal skills. It’s essential to view Autotune as a tool to enhance rather than replace talent.
  • Overcorrection: Autotune can sometimes lead to overcorrection, altering the intended pitch and rhythmic variations, which can negatively impact the artistic expression and musicality of a performance.
  • Perception: There is a perception among some listeners that Autotune is a shortcut to talent. This can result in skepticism and criticism from music enthusiasts who value authenticity and raw performances.

While Autotune has revolutionized the music industry and enabled artists to achieve flawless vocal performances, it is crucial to use it judiciously and in moderation. Ultimately, it’s essential for artists to strike a balance between the benefits Autotune offers and preserving the natural artistry of their craft.

Melodyne Vs Autotune Which Is Best  : A Vocal Editing Showdown


Credit: www.discountmags.com


Choosing The Best Vocal Editing Tool

When it comes to vocal editing tools, Melodyne and Autotune are popular choices. Each has its own strengths and features, making it essential to consider various factors to determine which one is best suited for your needs.

Factors To Consider:

  • Accuracy of pitch correction
  • Flexibility in editing capabilities
  • Integration with digital audio workstations
  • Real-time processing performance

Personal Preferences:

Personal preferences play a significant role in the decision-making process. It’s essential to consider your own workflow and editing style when choosing between Melodyne and Autotune.

Preference Of Professionals:

Professionals often have specific preferences based on their experience and the demands of their projects. The preference of industry professionals can provide valuable insight into which vocal editing tool may be best suited for your needs.

Melodyne Vs Autotune Which Is Best  : A Vocal Editing Showdown


Credit: www.youtube.com


Frequently Asked Questions On Melodyne Vs Autotune Which Is Best


Which Is Better, Melodyne Or Autotune For Pitch Correction?


Melodyne excels in natural sound manipulation while Autotune is known for its digital precision. The choice depends on the desired outcome and user preference.


Can Melodyne And Autotune Be Used Together For Vocal Editing?


Yes, combining Melodyne and Autotune can enhance vocal editing results. Melodyne offers detailed pitch control, while Autotune provides real-time automatic correction.


How Does Melodyne Differ From Autotune In Terms Of User Interface?


Melodyne’s interface allows for precise manual pitch adjustments, whereas Autotune offers a more automated approach with real-time tuning capabilities.


What Are The Key Features Of Melodyne And Autotune For Music Production?


Melodyne provides polyphonic pitch editing and timing adjustments, while Autotune offers automatic pitch correction and formant control for vocals.


Conclusion


When deciding between Melodyne and Autotune, it ultimately comes down to personal preference and specific needs. Melodyne excels in natural-sounding pitch correction and advanced editing capabilities, while Autotune offers a more standardized and polished sound. Both plugins have their strengths and weaknesses, so it’s crucial to consider factors like budget, desired outcome, and user-friendliness before making a choice.


No matter which plugin you choose, both Melodyne and Autotune are powerful tools that can take your music production to the next level.

Categories
Archive Audio Production

Music Finance Tips For Musicians: Boost Your Financial Gain

To manage music finances effectively, musicians should create a budget and track their income and expenses. They can also consider alternative funding sources such as crowdfunding and grants to support their projects and career growth.


When building financial strategies, it’s essential to prioritize saving, create multiple income streams, and seek professional financial advice tailored to the music industry’s unique challenges. As musicians navigate the dynamic landscape of the music industry, staying on top of their finances is crucial for long-term success and sustainability.


Balancing creativity with financial management is an essential aspect of a musician’s career, and understanding the nuances of music finance can lead to a more secure and prosperous future.

Music Finance Tips For Musicians: Boost Your Financial Gain


Credit: www.npr.org


1. Diversifying Income Streams

As a musician, it’s essential to diversify your income streams to ensure financial stability and growth. Relying on just one source of income can be risky in the unpredictable music industry. Diversifying your income allows for more stability and flexibility to pursue your musical career.

1.1 Merchandising And Merchandise Sales

Selling merchandise is a great way for musicians to generate additional income. When planning your merchandise, consider creating items such as t-shirts, hats, posters, or even customized musical instruments. Setting up an online store or selling merchandise at live shows enables you to reach a wider audience and increase your revenue streams.

1.2 Licensing And Sync Opportunities

Licensing your music for use in commercials, TV shows, movies, or video games can provide a significant source of income for musicians. Seeking out sync opportunities and licensing agents can help you get your music in front of a larger audience and generate royalties. It’s important to protect your rights and ensure that you are properly compensated for the use of your music.

1.3 Performing Live Shows

Performing live shows remains a core income stream for musicians. Whether it’s small local venues or larger music festivals, live performances allow you to connect with your fans and generate income through ticket sales, merchandise, and potentially even sponsorships or endorsements. Strive to continually improve your live show to attract larger audiences and increase your earning potential.

2. Budgeting And Financial Planning

2. Budgeting and Financial Planning

2.1 Tracking Income And Expenses

Firstly, tracking income and expenses is crucial for financial stability. Musicians should maintain detailed records of all their earnings and spending. This can be done by using accounting software or creating a simple spreadsheet. By diligently recording income sources and expenditures, musicians can gain insight into their financial health.

2.2 Creating A Realistic Budget

Creating a realistic budget is essential for musicians to manage their finances efficiently. This involves outlining all anticipated income and identifying necessary expenses such as equipment, marketing, and travel costs. By setting realistic spending limits, musicians can avoid overspending and work toward financial stability.

2.3 Saving And Investing

When it comes to saving and investing, musicians should prioritize setting aside a portion of their income for emergencies and future projects. Establishing a savings account or exploring investment opportunities can help build a financial safety net and ensure long-term financial security.

3. Building A Strong Fan Base


Build a strong fan base by implementing effective music finance tips. This helps musicians establish financial stability, gain recognition, and grow their audience.

3.1 Engaging With Fans Through Social Media

Engaging with your fans through social media is a powerful way to establish a strong and loyal fan base. Social media platforms such as Facebook, Instagram, and Twitter provide a direct line of communication between musicians and their fans.

Here are some effective strategies to keep your fans engaged:

  1. Regularly post updates about your music, upcoming gigs, and behind-the-scenes moments to keep your fans informed and excited.
  2. Interact with your followers by responding to their comments, messages, and mentions.
  3. Create engaging content, such as live videos or behind-the-scenes footage, to give your fans a glimpse into your world.
  4. Run contests, giveaways, or exclusive promotions for your social media followers to reward their support and encourage them to spread the word.
  5. Collaborate with other musicians or influential figures in the industry to expand your reach and gain exposure to their audience.

3.2 Utilizing Email Marketing

Email marketing is another effective tool to build a strong fan base and foster a personal connection with your supporters. By collecting email addresses from your website visitors, event attendees, or social media followers, you can communicate with your fans directly.

Here are some tips for utilizing email marketing effectively:

  • Segment your email list based on your fans’ preferences, location, or engagement level to send targeted and personalized messages.
  • Create a compelling newsletter that includes updates about your music, upcoming shows, exclusive content, and special offers.
  • Offer incentives, such as free downloads or early access to new releases, to encourage fans to subscribe to your email list.
  • Regularly engage with your subscribers by sending them exclusive content, behind-the-scenes stories, or personal messages to make them feel connected and valued.
  • Track your email campaigns’ performance and analyze the data to optimize your communication strategies.

3.3 Collaborating With Influencers

Collaborating with influencers in the music industry can significantly boost your fan base and expose your music to a wider audience. Influencers are individuals or organizations with a large following and influence over their fans’ tastes and decisions.

Consider the following steps when collaborating with influencers:

Steps Description
1. Identify influential bloggers, vloggers, social media personalities, or music curators in your genre or niche.
2. Reach out to them by introducing yourself and your music, expressing genuine interest in collaborating.
3. Create a mutually beneficial partnership, such as featuring their content on your website or social media in exchange for exposure to their audience.
4. Collaborate on projects, such as joint performances, interviews, or content creation, to tap into their fan base and gain credibility.
5. Regularly engage with the influencer’s audience by participating in discussions or responding to comments to build a connection and gain new followers.
Music Finance Tips For Musicians: Boost Your Financial Gain


Credit: blog.groover.co


4. Monetizing Your Music Online

As a musician, it’s crucial to explore various avenues to monetize your music online effectively.

Distribution Platforms And Streaming Services

Utilize platforms like Spotify, Apple Music, and Amazon Music to reach a wider audience.

Crowdfunding And Patronage

Engage with fans through crowdfunding campaigns on sites like Kickstarter or offer patronage through platforms like Patreon.

Selling Music Directly

Consider selling music directly through your website or digital platforms such as Bandcamp for higher profits.


5. Understanding Royalties And Copyrights

5. Understanding Royalties and Copyrights: As a musician, it’s crucial to grasp the concepts of royalties and copyrights to protect your music and ensure you earn what you deserve.

5.1 Registering And Protecting Your Music

Register your music with the appropriate copyright office to safeguard your intellectual property rights.

5.2 Collecting Performance Royalties

Performance royalties can be collected through Performance Rights Organizations like ASCAP or BMI.

5.3 Maximizing Digital Royalties

Make the most of digital royalties by distributing your music on streaming platforms and ensuring proper metadata.

Music Finance Tips For Musicians: Boost Your Financial Gain


Credit: www.aarp.org


Frequently Asked Questions On Music Finance Tips For Musicians


What Are Some Ways Musicians Can Manage Their Finances Effectively?


Musicians can track expenses, budget wisely, diversify income sources, save for emergencies, and seek financial advice for long-term stability.


Why Is It Important For Musicians To Have A Solid Grasp Of Their Finances?


Understanding finances helps musicians plan for the future, make informed decisions, avoid debt, and sustain a successful music career.


How Can Musicians Increase Their Revenue Streams Besides Music Sales?


Musicians can earn from live performances, merchandising, online courses, teaching, streaming platforms, sponsorships, and sync licensing opportunities.


Conclusion


Mastering the business side of music is just as critical as honing your artistic skills. By following the music finance tips covered in this blog post, you can take control of your financial success as a musician. From budgeting to revenue streams, understanding taxes to investing wisely, these strategies will help you navigate the world of music finance with confidence.


So, go ahead and apply these tips to secure your financial future while pursuing your passion!

Categories
Archive Audio Production

Is Output Arcade Worth It : Unbiased Review & Demo

Yes, Output Arcade is worth it for musicians, producers, and music enthusiasts. It offers a vast library of high-quality sounds and an intuitive interface, making it a valuable tool for music production.


Output Arcade is a versatile and user-friendly platform that provides an extensive collection of customizable loops and samples, catering to a wide range of musical styles. With its innovative features and constant updates, it’s a valuable resource for enhancing creativity and production efficiency.


The subscription-based model allows for regular content updates and ensures access to the latest sounds and samples. Whether you’re a professional musician or a music enthusiast exploring creative expression, Output Arcade provides a valuable resource for crafting unique and captivating music productions.

Is Output Arcade Worth It : Unbiased Review & Demo


Credit: www.pcmag.com


What Is Output Arcade?

What is Output Arcade?

Output Arcade is a groundbreaking and innovative software instrument that offers an extensive and ever-expanding library of curated sounds. It is a cloud-connected loop synthesizer that allows music producers to access a vast collection of high-quality sounds directly within their DAW (Digital Audio Workstation). Through a subscription-based model, Arcade provides users with an array of tools to manipulate these sounds, thereby enabling them to create unique and captivating music compositions.

Overview

Output Arcade transcends the traditional boundaries of a sample library by offering a dynamic and diverse selection of sounds that cater to various musical genres and styles. Its intuitive and user-friendly interface empowers producers to efficiently navigate through a vast array of sounds and creatively manipulate them to suit their artistic vision.

Features

  • Cloud-connected loop synthesizer
  • Wide-ranging library of curated sounds
  • Subscription-based model
  • Intuitive and user-friendly interface
  • Tools for sound manipulation and customization
  • Ability to easily integrate with DAWs
  • Regular updates and additions to the sound library

Pros And Cons Of Output Arcade

When considering the value of Output Arcade, weighing its pros and cons is paramount. By examining the advantages and drawbacks, you can determine whether Arcade is worth the investment for your creative needs.

Pros

  • Vast Content Library: Offers a diverse range of high-quality sounds and loops
  • User-Friendly Interface: Intuitive and streamlined platform for easy navigation
  • Constant Updates: Regularly refreshed content keeps the library dynamic and relevant
  • Flexible Subscription Model: Access to a wealth of content without hefty upfront costs

Cons

  • Subscription Dependency: Content becomes inaccessible if the subscription is discontinued
  • Internet Requirement: Relies on a consistent internet connection for access and use
  • Limited Customization: Users may find constraints when trying to customize certain sounds
  • Resource Consumption: Heavy on system resources, potentially impacting performance

Use Cases Of Output Arcade

Are you wondering if Output Arcade is worth it? Look no further, as we delve into the various use cases of this powerful music production and sound design tool. Whether you are a seasoned music producer or an aspiring sound designer, Output Arcade offers a wide range of features and functionalities to cater to your specific needs. Let’s explore the potential applications of Output Arcade in music production and sound design.

Music Production

Output Arcade shines brightly in the realm of music production, providing a versatile platform for creating and refining your musical compositions. With its extensive library of high-quality sounds, loops, and samples curated by top-notch producers and sound designers, Output Arcade offers an endless well of inspiration to aid you in your creative journey. You can harness the power of Arcade to quickly and effortlessly layer multiple sounds, experiment with different genres, and craft unique melodies and rhythms that captivate your audience.

Sound Design

Output Arcade’s influence extends beyond music production, finding its place in the realm of sound design as well. Whether you are working on soundtracks for films, video games, or multimedia projects, Arcade provides a rich set of tools to help you sculpt and manipulate audio to perfection. You can explore a vast array of presets, effects, and modulation options, enabling you to create immersive soundscapes, atmospheric textures, and intricate sound effects. By using Output Arcade for sound design, you can elevate your projects and enhance the overall auditory experience for your audience.

Is Output Arcade Worth It : Unbiased Review & Demo


Credit: www.youtube.com


Is Output Arcade Worth It : Unbiased Review & Demo


Credit: www.pcmag.com


Frequently Asked Questions Of Is Output Arcade Worth It


Is Output Arcade Easy To Use?


Output Arcade is designed with user-friendly features, making it easy for both beginners and professionals to navigate. The intuitive interface and simple controls allow for a seamless music production experience.


What Sets Output Arcade Apart From Other Plugins?


Output Arcade stands out due to its vast library of high-quality sounds, constantly updated content, and innovative features such as Play Head mode. This plugin offers a unique approach to sample manipulation, making it a top choice for producers.


Can Output Arcade Be Integrated With Other Daws?


Yes, Output Arcade seamlessly integrates with all major DAWs, ensuring compatibility with various music production setups. Its flexibility allows users to incorporate Arcade’s sounds and effects into their existing workflow with ease.


Conclusion


Overall, Output Arcade proves to be a valuable tool for music producers and music enthusiasts alike. With its vast library of high-quality sounds, user-friendly interface, and versatile features, Arcade offers a convenient and inspiring way to create music. Whether you’re a professional looking to enhance your productions or a beginner eager to explore new sonic possibilities, Arcade delivers on its promise of delivering top-notch sound and endless creativity.


Unlock your potential with Output Arcade and take your music to new heights.


Categories
Archive Audio Production

Loopcloud Vs Splice : The Ultimate Showdown

Loopcloud and Splice are both music production platforms that offer a variety of features and tools for musicians and producers. Loopcloud provides a vast library of sounds and samples, while Splice offers a similar library along with collaboration and project management tools.


Both platforms have their strengths and weaknesses, and the choice between them depends on the specific needs and preferences of the user. We will compare Loopcloud and Splice in terms of their features, pricing, ease of use, and overall user experience to help you make an informed decision about which platform is right for you.


Whether you are a beginner or a seasoned professional in the music industry, understanding the differences between Loopcloud and Splice will help you determine which platform is the best fit for your music production needs.


Features

When choosing between Loopcloud and Splice, it’s important to consider the features offered by each platform. Both services provide a range of tools and resources for music producers, but they differ in terms of their offerings. Let’s take a closer look at the features provided by Loopcloud and Splice to help you make an informed decision.

Loopcloud Features

Loopcloud offers a variety of features designed to streamline the music production process. Some key features include:

  • Cloud Storage: Store and access your samples and sounds from any device with an internet connection.
  • Loop Editor: Edit and manipulate audio loops with ease using the built-in loop editor.
  • Tags and Metadata: Organize your samples by adding tags and metadata for easy searching and browsing.
  • Plugin Integration: Seamlessly integrate Loopcloud with your favorite DAW and VST plugins.
  • Community Collaboration: Collaborate with other producers and artists through the Loopcloud platform.

Splice Features

Splice also offers a range of features to enhance the music production experience. Here are some of the standout features provided by Splice:

  • Sample Management: Organize and manage your samples with Splice’s cloud-based sample management system.
  • Rent-to-own Plugins: Access high-quality plugins through Splice’s rent-to-own program.
  • Collaboration Tools: Work with others on projects by sharing and collaborating on Splice’s platform.
  • Artist Packs: Gain access to exclusive sample packs and sounds created by top artists and producers.
  • Backup and Sync: Automatically back up and sync your projects and samples to the cloud.
Loopcloud Vs Splice  : The Ultimate Showdown


Credit: blog.boostcollective.ca


Pricing

Pricing is a crucial factor to consider when choosing between Loopcloud and Splice. Both platforms offer various pricing plans with distinct features. Understanding the differences in pricing can help you make an informed decision on which platform best suits your needs.

Loopcloud Pricing

Loopcloud offers a range of pricing plans to accommodate different needs. Whether you’re a beginner or a professional music producer, Loopcloud has a plan tailored to your requirements. The pricing plans include:

  • Loopcloud Free Plan: This plan provides basic access to Loopcloud’s features, including 500 credits per month, limited sample imports, and access to the Loopcloud store.
  • Loopcloud Studio Plan: The Studio Plan offers unlimited credits, advanced features such as time-stretching, and exclusive content from industry-leading artists.
  • Loopcloud Pro Plan: As the most comprehensive plan, the Pro Plan includes advanced features, exclusive access to plugins, and a larger credit allowance for importing samples.

Splice Pricing

Similar to Loopcloud, Splice provides flexible pricing options to cater to the diverse needs of music producers. The pricing plans offered by Splice are:

  • Splice Free Plan: This plan allows access to Splice’s basic features, including a limited library of sounds and samples, cloud storage, and collaboration tools.
  • Splice Creator Plan: The Creator Plan offers unlimited access to Splice’s entire catalog, advanced production tools, and the ability to license sounds for commercial use.
  • Splice Sounds Plan: Subscription-based plan that offers access to Splice’s vast library of sounds, loops, and presets for an affordable monthly fee.

User Experience

When it comes to choosing between Loopcloud and Splice, one of the most crucial factors to consider is the user experience. Both platforms offer a range of features and tools for music producers, but how they are presented and how intuitive they are to use can make a significant difference in the overall workflow.

Loopcloud User Experience

Loopcloud prides itself on providing a seamless and user-friendly experience for music producers of all skill levels. The platform’s sleek and modern interface allows users to navigate effortlessly through its various features.

One of the standout aspects of the Loopcloud user experience is its intuitive search and browsing capabilities. With a vast library of high-quality sounds, samples, and loops, Loopcloud enables users to quickly find the perfect elements for their production. The well-organized tags and filters make it easy to narrow down search results based on genre, mood, tempo, and other parameter

Additionally, Loopcloud’s drag-and-drop functionality allows users to audition and preview sounds directly in their DAW (Digital Audio Workstation) before making a final selection. This feature saves time and ensures a smoother creative workflow.

Pros of Loopcloud User Experience
Ease of use Intuitive search and browsing Drag-and-drop functionality
Facilitates quick navigation Makes finding the right sounds easier Effortless auditioning of samples
Simplifies the creative process Streamlines the production workflow Enhances productivity

Splice User Experience

Splice also offers a user-friendly experience with its sleek and straightforward interface. The platform focuses on collaboration and cloud-based storage, allowing music producers to work seamlessly across different devices.

One of the notable features of Splice’s user experience is its integration with popular DAWs. This integration allows users to sync their projects with Splice, ensuring that all changes and versions are saved in real-time. This feature simplifies collaboration and promotes a more efficient workflow, especially for producers working with a team.

In addition to collaboration features, Splice offers a diverse range of sounds, samples, and plugins. Users can easily navigate through the extensive library and preview sounds before making a selection, which enhances the overall user experience.

Pros of Splice User Experience
Seamless integration with DAWs Real-time project syncing Extensive sound library
Fosters collaboration and teamwork Ensures project version control Provides a wide variety of creative assets
Promotes efficient workflow Enhances productivity Facilitates inspiration and creativity

Ultimately, whether you prefer the Loopcloud or Splice user experience will depend on your individual workflow and specific needs as a music producer. Both platforms prioritize ease of use and provide a range of powerful tools to enhance your production process, making them valuable assets in any musical endeavor.

Loopcloud Vs Splice  : The Ultimate Showdown


Credit: www.stockmusicmusician.com


Integration

Integration plays a vital role in the efficiency and workflow of music production. Let’s dive into the integration options offered by Loopcloud and Splice:

Loopcloud Integration Options

  • Loopcloud seamlessly integrates with popular DAWs like Ableton Live, FL Studio, and Logic Pro.
  • Users can drag and drop samples directly from Loopcloud into their DAW projects.
  • Real-time syncing ensures that changes made in Loopcloud reflect instantly in the DAW.

Splice Integration Options

  1. Splice offers a plugin that syncs with your DAW, providing access to the Splice library directly within your project.
  2. Users can preview and download samples, loops, and presets without leaving their DAW interface.
  3. Any changes or edits made to the Splice samples are automatically updated in the DAW project.


Loopcloud Vs Splice  : The Ultimate Showdown


Credit: bandpioneer.com


Frequently Asked Questions On Loopcloud Vs Splice


What Are The Key Features Of Loopcloud And Splice?


Loopcloud offers a vast library of samples and integrates with your DAW. Splice provides collaboration tools and rent-to-own plugins, making it a great choice for music production.


How Does Loopcloud Simplify Sample Browsing And Management?


Loopcloud’s cloud storage allows easy access to your samples from anywhere. With tagging and key detection, finding the right sample is quick and efficient.


What Makes Splice Stand Out In The Music Production Realm?


Splice’s collaboration features enable seamless teamwork on projects. Its rent-to-own plugin system offers affordability and flexibility to producers.


Conclusion


To sum up, both Loopcloud and Splice offer a plethora of features for producers and musicians seeking top-quality samples and sound libraries. While Loopcloud excels in its extensive loop and sample library, Splice shines with its collaborative features and sync options.


Ultimately, the choice between Loopcloud and Splice comes down to individual preferences and needs. Explore both platforms to find the one that best suits your creative journey. Happy producing!

Categories
Archive Audio Production

The Difference Between Clipping And Limiting: Mastering Audio Dynamics

Clipping occurs when the waveform is cut off, creating distortion, while limiting sets a maximum level for the audio signal. Understanding the difference between clipping and limiting is crucial for maintaining sound quality.


When audio signals exceed the maximum level set by a limiter, clipping can occur, resulting in distortion. On the other hand, limiting prevents the signal from surpassing a specific level, preserving the audio quality. Both processes are used in audio production to control the dynamic range and prevent signal overload.


By utilizing clipping and limiting effectively, audio engineers can ensure a balanced, distortion-free sound output. Let’s delve deeper into the nuances of clipping and limiting and their impact on audio quality and production.

The Difference Between Clipping And Limiting: Mastering Audio Dynamics


Credit: m.youtube.com


Clipping

Clipping, in the realm of audio engineering, is a phenomenon that occurs when a signal exceeds the maximum capacity of a system, resulting in a distorted waveform. Understanding the concept of clipping is crucial for ensuring the quality of audio recordings and preventing undesirable distortions in sound output.

What Is Clipping?

Clipping is the distortion that occurs when the amplitude of a signal exceeds the maximum level that can be accurately represented in a digital or analog system. When a signal surpasses this threshold, the waveform is ‘clipped,’ resulting in a flattened or squared-off appearance.

Causes Of Clipping

  • Input signal levels set too high
  • Improper gain staging
  • Overdriven preamplifiers
  • Excessive compression or limiting
  • Inadequate headroom in the recording or mixing process

Effects Of Clipping

Clipping can have detrimental effects on audio quality, including:

  • Harsh, distorted sound
  • Loss of dynamic range
  • Unintended artifacts and noise
  • Potential damage to speakers and other audio equipment
The Difference Between Clipping And Limiting: Mastering Audio Dynamics


Credit: en.wikipedia.org


Limiting

Limiting is an essential process in audio mastering that involves controlling the peak levels of audio signals to prevent them from exceeding a set threshold. When used correctly, limiting can help to maintain a consistent and balanced sound while preserving the dynamic range of the music.

What Is Limiting?

Limiting is a dynamic range compression process that is used to prevent the audio signal from exceeding a specific level. It works by reducing the gain of the signal when it reaches the set threshold, effectively “limiting” the maximum peak level. This helps to control the overall volume and prevent clipping without significantly affecting the perceived loudness of the audio.

Use Of Limiting In Audio Mastering

  • Limiting is a crucial stage in the audio mastering process as it allows engineers to fine-tune the dynamics and loudness of the audio before its final release.
  • By carefully applying limiting, mastering engineers can ensure that the audio maintains a consistent and optimal level throughout, enhancing its overall quality and impact.
  • Mastering engineers often use specialized limiters and plugins to achieve precise control over the dynamics and peaks of the audio, enabling them to achieve the desired tonal balance and clarity.

Effects Of Limiting

  1. The primary effect of limiting is to prevent the audio signal from clipping, which can cause distortion and degrade the quality of the sound.
  2. By controlling the peaks, limiting can help to create a more polished and professional-sounding audio track, making it suitable for a wide range of playback systems and environments.
  3. When used judiciously, limiting can enhance the perceived loudness and impact of the audio, making it sound more dynamic and engaging without sacrificing its overall quality.


Comparing Clipping And Limiting

When it comes to audio production, two terms that often get thrown around are “clipping” and “limiting.” These processes are commonly used to control the audio signals and prevent distortion. While they may have some similarities, there are distinct differences between clipping and limiting that are important to understand in order to achieve the desired sound quality.

Similarities

Clipping and limiting both aim to control audio signals and prevent distortion. They are both techniques used in audio production to ensure that the audio signal remains within a desired range, while removing any unwanted peaks or spikes in volume.

Both clipping and limiting work by reducing the audio signal level when it exceeds a specified threshold. This helps to prevent audio distortion and ensures a more balanced and polished sound.

Differences

While clipping and limiting have similarities, there are key differences that set them apart:

  1. Effect on audio signal: Clipping results in a harsh and distorted sound when the audio signal exceeds the threshold. It cuts off the peaks of the waveform, leading to a square or flat-topped appearance. On the other hand, limiting aims to control the audio signal without causing distortion. It does this by reducing the gain of the audio signal when it exceeds the desired threshold, allowing for more dynamic control.
  2. Application: Clipping is often used intentionally to create a specific effect or sound. It can be used creatively in music production to add a distorted or edgy vibe to the audio. Limiting, on the other hand, is primarily used in the mastering stage of audio production to control the overall loudness and ensure that the audio conforms to industry standards.
  3. Dynamic range: Clipping reduces the dynamic range of the audio signal, as it limits the difference between the softest and loudest parts. This can result in a compressed and less dynamic sound. Limiting, while also reducing the dynamic range to some extent, aims to maintain a more balanced and controlled dynamic range.

Understanding the differences between clipping and limiting is crucial for achieving the desired sound quality in audio production. Both techniques have their specific applications and effects on the audio signal, and choosing the right one depends on the goals and requirements of the production.

The Difference Between Clipping And Limiting: Mastering Audio Dynamics


Credit: www.waves.com


Frequently Asked Questions For The Difference Between Clipping And Limiting


What Is Clipping In Audio Production?


Clipping in audio production occurs when the audio signal reaches its maximum amplitude, resulting in distortion. This can lead to a harsh, unpleasant sound that negatively impacts the quality of the audio.


How Does Limiting Differ From Clipping?


Limiting is a process that controls the peaks of an audio signal to prevent them from exceeding a certain level, without causing distortion. Unlike clipping, limiting allows for the preservation of the overall audio quality while still preventing peaks from going too high.


Why Is It Important To Understand Clipping And Limiting?


Understanding clipping and limiting is crucial in audio production to maintain the integrity of the sound. Proper use of these techniques can help prevent audio distortion and ensure that the final product is of high-quality.


Conclusion


To sum up, understanding the difference between clipping and limiting is crucial for audio professionals. While both techniques are used to control audio levels, clipping involves distortion when the signal exceeds its maximum limit, whereas limiting smoothly reduces levels to avoid distortion.


By employing these techniques effectively, one can achieve optimal audio quality and avoid unwanted artifacts. So, keep experimenting and mastering these techniques to enhance your audio production skills. Happy exploring!

Categories
Archive Audio Production

1176 Compressor Plugins: Master Your Mix with Power Tools

1176 compressor plugins are essential for audio production, offering dynamic control and sonic enhancement. These plugins replicate the classic hardware processor, delivering punchy, characterful compression in the digital realm.


In the world of audio production, achieving the right balance and texture in your music is critical. The 1176 compressor plugins are a go-to choice for many professional engineers and producers. With their ability to add warmth, punch, and presence to audio tracks, these plugins have become a staple in modern music production.


Whether you’re looking to tame dynamic range or add creative coloration to your sound, 1176 compressor plugins offer a versatile solution. We’ll explore the significance of 1176 compressor plugins, their key features, and the top options available in the market.


The Power Of Compressor Plugins

Compressor plugins are indispensable tools in the arsenal of any audio engineer or music producer. They hold the key to achieving that polished, professional sound that is essential for any mix to stand out. Harnessing the power of compression, these plugins play a crucial role in shaping the dynamics and overall balance of a recording, delivering a clean and coherent sonic experience. Let’s delve deeper into the realm of compressor plugins and unveil their significance in the world of audio production.

What Are Compressor Plugins?

Compressor plugins are specialized audio processing tools designed to control the dynamic range of audio signals. They act as virtual counterparts of hardware compressors, offering a wide array of features and functionalities to manipulate the amplitude of sound waves. By applying compression, these plugins effectively reduce the volume of louder parts of the audio while boosting quieter sections, resulting in a more uniform and consistent audio output.

Why Are They Essential For Mixes?

In the realm of audio mixing, compressor plugins are indispensable for achieving a professional and polished sound. They play a pivotal role in taming the dynamics of individual tracks and enhancing the overall cohesiveness of a mix. By exerting precise control over the dynamics, these plugins ensure that the audio elements blend seamlessly, creating a cohesive and balanced sonic landscape that captivates listeners.

1176 Compressor Plugins: Master Your Mix with Power Tools


Credit: www.sweetwater.com


Understanding The 1176 Compressor

History And Background

Introduced in 1967 by Universal Audio, the 1176 compressor quickly became a staple in recording studios worldwide. It was the first solid-state dynamics processor and revolutionized the audio industry with its unique FET (Field-Effect Transistor) design. The 1176 was initially designed to address the limitations of previous tube-based compressors, offering faster response times and a distinctive sound that remains sought-after to this day.

Key Features And Functions

The 1176 compressor is renowned for its incredible versatility and distinct sonic character. With its signature “all buttons in” mode, it can deliver aggressive and punchy compression ideal for drums, vocals, and other dynamic sources. Its simple control layout allows for quick adjustments, including input and output level, attack and release times, and ratio settings. The 1176 also features a famous “analog” sound, adding warmth and color to audio signals, making it a go-to choice for both tracking and mixing.

https://www.youtube.com/watch?v=SUd4U87EcDo


Benefits Of Using 1176 Compressor Plugins

1176 compressor plugins are powerful tools that can greatly enhance the audio quality of your recordings. These plugins offer a range of benefits that can help you achieve professional-sounding results with ease. In this article, we will explore three key advantages of using 1176 compressor plugins: Improved Dynamics Control, Enhanced Punch and Presence, and Versatility and Flexibility. Let’s delve into each of these benefits in detail.

Improved Dynamics Control

One of the primary advantages of using 1176 compressor plugins is their ability to provide improved dynamics control. With these plugins, you can effectively manage the dynamic range of your audio, ensuring that quiet sections are raised to a more audible level and loud portions are brought down to avoid distortion. By fine-tuning the threshold, attack, release, and ratio settings, you can achieve a balanced and polished sound that allows every element of your mix to shine through.

Enhanced Punch And Presence

1176 compressor plugins are renowned for their ability to add punch and presence to your audio. These plugins are designed to enhance the impact and energy of individual tracks, be it vocals, drums, guitars, or any other instrument in your mix. By compressing and shaping the sound, you can make instruments sound larger-than-life, injecting vitality and excitement into your recordings. Whether you are working on rock, pop, hip-hop, or any other genre, these plugins can help you achieve a compelling and powerful sound.

Versatility And Flexibility

The versatility and flexibility offered by 1176 compressor plugins make them an essential tool for any audio engineer or music producer. These plugins can be used in a wide range of scenarios, from subtle compression that adds warmth and glue to your mix to aggressive compression for creative effects. Additionally, 1176 compressor plugins are compatible with most digital audio workstations (DAWs), allowing you to seamlessly integrate them into your existing workflow. With their intuitive controls and adjustable parameters, these plugins empower you to experiment and customize the dynamics of your audio according to your artistic vision.

Top 1176 Compressor Plugins On The Market

Looking to enhance your audio production quality? Check out the top 1176 compressor plugins available, each offering unique features and functionalities to elevate your sound.

Plugin A: Features And User Reviews

Plugin A is praised for its intuitive interface and customizable settings. Users rave about its transparent compression and ease of use.

Plugin B: Performance And Sound Quality

Plugin B stands out for its exceptional performance in maintaining dynamics while delivering top-notch sound quality. It’s a favorite among professionals for its accuracy.

Plugin C: Unique Functionalities

Plugin C offers innovative features such as sidechain capabilities and advanced metering options. Users appreciate the versatility it brings to their workflow.

Tips And Techniques For Mastering Your Mix With 1176 Compressor Plugins

Adjust the attack for transient shaping and the release for overall dynamic control.

Utilize sidechain compression to carve out space for specific elements in your mix.

Try parallel compression to enhance the impact of drums or vocals without losing detail.

1176 Compressor Plugins: Master Your Mix with Power Tools


Credit: theproaudiofiles.com


1176 Compressor Plugins: Master Your Mix with Power Tools


Credit: www.sweetwater.com


Frequently Asked Questions For 1176 Compressor Plugins


What Are The Key Features Of 1176 Compressor Plugins?


The key features include fast attack/release times, analog saturation, and versatile sound shaping capabilities.


How Do 1176 Compressor Plugins Enhance Audio Quality?


They provide dynamic control, add warmth, and boost clarity to audio recordings, resulting in a professional sound.


Can 1176 Compressor Plugins Be Used For Vocals?


Yes, 1176 Compressor Plugins are popular for enhancing vocals by controlling dynamic range and adding character.


Are 1176 Compressor Plugins Compatible With Different Daws?


These plugins are compatible with various Digital Audio Workstations, offering flexibility for different production setups.


Conclusion


These 1176 compressor plugins offer a wide range of options and capabilities for audio professionals. Their versatility, easy-to-use interfaces, and powerful compression algorithms make them essential tools in any studio setup. Whether you are a novice or a seasoned professional, these plugins can help you achieve the desired sound and enhance your audio projects.


Incorporating these plugins into your workflow can greatly enhance the quality and impact of your audio recordings. So why wait? Start exploring the world of 1176 compressor plugins and take your audio production to the next level.