In the world of music, understanding the structure of a song is crucial. It’s like knowing the recipe that makes a hit song so catchy and memorable. Popular music often follows a typical structure that includes various sections designed to captivate listeners.
1. Introduction
The song usually starts with an introduction that sets the mood and grabs the audience’s attention. It’s like the opening paragraph of a story, luring the listeners in.
Credit: www.trinityrock.com
2. Verse
The verse is where the story unfolds. It contains the lyrics that tell the main narrative of the song. The melody may stay the same, but the lyrics change with each verse.
3. Chorus
The chorus is the heart of the song. It typically contains the main idea or message of the song and is often the most catchy and memorable part. The chorus is usually repeated several times throughout the song.
4. Bridge
The bridge serves as a contrast to the rest of the song. It provides a break from the repetition of the verse and chorus and adds an element of surprise or freshness to the music.
5. Instrumental Break
Some songs include an instrumental break where the music takes center stage without any lyrics. It allows the musicians to showcase their talents and adds a dynamic element to the song.
6. Outro
The outro is the conclusion of the song. It gives a sense of closure and often includes a fade-out or a final emphatic note that leaves a lasting impression on the listeners.
Benefits of Following a Typical Song Structure
Engages the listeners from start to finish
Makes the song more memorable and catchy
Provides a sense of familiarity and comfort to the audience
Credit: dohertymusic.weebly.com
Frequently Asked Questions Of What Is The Typical Song Structure Used In Popular Music?
What Is The Typical Song Structure In Popular Music?
Most popular songs follow a verse-chorus-verse-chorus-bridge-chorus structure.
Why Is The Verse-chorus-verse-chorus-bridge-chorus Structure So Common?
This structure creates a familiar and engaging pattern for listeners.
How Does The Verse Differ From The Chorus In A Song?
The verse typically advances the song’s story or message, while the chorus serves as the main hook.
What Is The Purpose Of The Bridge In A Song?
The bridge provides a contrast to the rest of the song and often builds towards the final chorus.
Conclusion
Understanding the typical song structure in popular music can help aspiring musicians and songwriters create music that resonates with listeners. By following this tried-and-true formula, artists can craft songs that are not only enjoyable but also have the potential to become hits.
Mixing mono in music production can enhance clarity and balance, making the sound more focused and mono-compatible. It also helps identify and fix phase issues.
When mixing mono, you ensure that your music translates well across all playback systems, providing a consistent listening experience for your audience. Additionally, mono mixing can help improve the overall impact and presence of a track, making it stand out in different environments.
By understanding the benefits of mixing in mono, you can elevate the quality of your music production and create a more professional sound that resonates with listeners.
The Advantages Of Mono Mixing
When it comes to music production, using mono mixing techniques can significantly enhance the quality of your final product. Let’s delve into the specific benefits of incorporating mono mixing in your music production process.
Enhanced Clarity And Focus
Mono mixing ensures each instrument and vocal is clearly defined in the mix.
Eliminates clutter and muddiness, leading to a more focused and impactful sound.
Improved Stereo Imaging
Implementing mono in the mix can help achieveprecise stereo imaging.
Enhances spatial depth and separation between different elements of the track.
Credit: www.rpmusicstudios.com
Impacts On The Mixing Process
Mixing mono in music production offers various benefits, including increased clarity, better focus on the core elements, and enhanced mono compatibility. It can also help in isolating and balancing individual sounds effectively, resulting in a cleaner and more defined mix.
Simplified Signal Processing
Mixing in mono simplifies signal processing, enhancing clarity and focus of the audio. It helps in identifying frequency clashes quickly and making necessary adjustments.
Balancing Instrument Levels
Mixing in mono aids in accurately balancing instrument levels, preventing issues with stereo width and ensuring a cohesive sound.
Considerations For Mono Compatibility
When it comes to music production, ensuring mono compatibility in your mix is crucial for achieving a balanced and consistent sound across different playback systems. By considering mono compatibility, you can prevent potential issues such as phase cancellation and maximize the quality and impact of your mix. In this section, we’ll explore the benefits of taking mono compatibility into account, focusing on the considerations that are key for achieving a successful mix.
Ensuring Mix Translation
To ensure your music translates well across various playback devices, mixing in mono allows you to identify any elements that might get lost or become unbalanced when the stereo image is collapsed to mono. By addressing these potential issues early in the mixing process, you can create a mix that maintains its impact and clarity regardless of the playback system. This is especially important for genres like electronic music, where a significant portion of the audience may listen through mono devices such as smartphones and mono PA systems.
Avoiding Phase Cancellation
By considering mono compatibility and avoiding phase cancellation, you can prevent the loss of sonic elements that occurs when the same audio signal is played through multiple channels with opposite phase relationships. When preparing a mix for mono playback, it’s crucial to identify and resolve any phase issues between audio tracks, ensuring that the mix remains cohesive and balanced. This approach can help maintain the clarity and impact of the mix, enhancing the overall listening experience for the audience.
Credit: www.amazon.com
Utilizing Mono As A Creative Tool
Discover the advantages of incorporating mono in music production for enhanced creativity. Mono mixing offers clarity, depth, and focus to your sound, resulting in a more impactful and dynamic final product. Elevate your audio projects with the versatile tool of mono mixing.
Fostering Artistic Limitations
Mono, when used as a creative tool in music production, has numerous benefits that can enhance the artistic process. One of these benefits is the ability to foster artistic limitations, which can push musicians to think outside the box and find innovative solutions to their creative challenges.
By mixing in mono, producers are forced to work with a single audio channel, limiting their options and forcing them to carefully craft each element to fit together harmoniously. This constraint can be a powerful catalyst for creativity, as it encourages musicians to experiment with different sounds and arrangements to achieve the desired impact.
Additionally, banning stereo options makes producers focus on the core elements of a track, such as melody, rhythm, and vocals. Removing the distractions of panning and spacial effects allows artists to concentrate on the essential components and ensures they are presented in their best light.
Creating Retro Aesthetic
Another advantage of utilizing mono in music production is the ability to create a retro aesthetic. Mono was the predominant format during the early days of music, and intentionally using mono in modern productions can evoke a nostalgic feel that resonates with listeners.
Creating a retro aesthetic can be particularly appealing for genres like rock, soul, or jazz, where the nostalgic sound is often sought after. By intentionally limiting the stereo field and focusing on a single audio channel, the overall sound becomes warmer and more intimate, recreating the authentic vintage vibe of classic recordings.
In addition, utilizing mono can enhance the cohesion and depth of a mix. By blending all elements into mono, producers can ensure that each instrument and vocal occupies their own space in the mix, reducing the risk of clashing frequencies and improving the overall clarity and balance of the track.
Maximizing The Potential In Modern Music
Discover the advantages of incorporating mono mixing in music production to enhance clarity, depth, and focus in your tracks. Through this technique, you can maximize the potential of modern music by creating a more impactful and dynamic listening experience for your audience.
Incorporating Mono Elements In Multi-channel Environments
When it comes to music production, incorporating mono elements in multi-channel environments can yield remarkable results. By strategically placing mono elements within a mix, producers can create a more immersive and dynamic listening experience for their audience.
There are several benefits to incorporating mono elements in multi-channel environments:
Better definition: By adding mono elements to a mix, music producers can enhance the definition and clarity of individual instruments and vocal tracks. This allows listeners to discern each element with greater precision, resulting in a more enjoyable and engaging music experience.
Increased depth: Mono elements can add depth and dimension to a mix, making it sound more three-dimensional. By panning mono elements strategically, producers can create a sense of space that adds a heightened level of immersion, enveloping the listener in the music.
Enhanced focus: Mono elements can help to direct the listener’s attention to specific parts of the mix. Whether it’s a lead vocal, a guitar solo, or a catchy melody, incorporating mono elements can ensure that these elements stand out and capture the listener’s focus.
Better mono compatibility: Despite the rise of stereo systems, many listening platforms still operate in mono. By including mono elements in a mix, producers can ensure that their music translates effectively across a wide range of platforms and devices, providing a consistent and enjoyable listening experience for all.
Embracing Diverse Listening Platforms
With the variety of listening platforms available today, it’s crucial for music producers to embrace this diversity and tailor their mixes accordingly. By considering the different ways in which people consume music, producers can create mixes that sound exceptional across various listening devices and environments.
Here are a few reasons why embracing diverse listening platforms is important:
Optimal sound reproduction: Each listening platform or device has its own unique characteristics and limitations. By optimizing the mix for different platforms, producers can ensure that their music sounds its best, regardless of whether it’s being played on a high-end sound system, headphones, or car speakers.
Expanded audience reach: By tailoring the mix for diverse listening platforms, producers can reach a wider audience. Whether someone is listening to music on their smartphone, computer, or in their car, an optimized mix ensures that the music resonates with listeners across various contexts.
Consistent listening experience: When people switch between different listening devices or environments, they expect a consistent and enjoyable listening experience. By considering how the mix translates on different platforms, producers can ensure that their music remains compelling and impactful, regardless of the platform.
Credit: www.amazon.com
Frequently Asked Questions For What Are The Benefits Of Mixing Mono In Music Production?
Is It Worth Mixing In Mono?
Mixing in mono can help identify and fix sound issues. It ensures better compatibility on different sound systems. This technique is useful for achieving a balanced mix.
What Is The Advantage Of Mono Audio?
Mono audio has the advantage of ensuring equal sound is heard through both ears, eliminating the need for stereo equipment. It is beneficial for individuals with hearing impairments or those using a single speaker. Mono audio also reduces data file sizes, making it easier to transmit and store.
What Does Mono Mix Do?
Mono mix is a feature that combines all audio channels into a single channel. It’s useful for ensuring compatibility with mono audio systems, preventing any channel imbalances, and delivering consistent sound across different devices and platforms.
Is Mono Audio Better For Music?
Mono audio is not better for music as it lacks depth and richness. Stereo audio provides a more immersive and realistic listening experience. It separates instruments and vocals, creating a fuller sound. For better music quality, stereo audio is preferred over mono.
Conclusion
Mixing in mono can enhance the clarity and balance of your music production. It promotes a tighter low-end and helps identify phase issues. By taking advantage of the benefits of mono mixing, you can elevate the overall quality and impact of your music.
Incorporating this approach into your production process can lead to a more professional and polished sound.
When it comes to audio, you may have heard the terms “mono” and “stereo” before. But have you ever wondered what exactly is the difference between these two? In this article, we will delve into the world of audio and explore the distinctions between mono and stereo sound.
Credit: producersources.com
What is Mono Sound?
Mono, short for monaural, refers to the reproduction of sound using a single audio channel. In simple terms, it means that all the audio signals are mixed together and played through a single speaker. Mono sound lacks spatial separation and depth, so the sound appears to come from a single point.
Monaural sound was widely used in the early days of audio technology, such as radio broadcasts and record players. It is still present today, especially in situations where audio separation is not necessary or practical. For example, phone calls or certain public announcements are often presented in mono.
What is Stereo Sound?
Stereo, on the other hand, refers to the reproduction of sound using two or more audio channels. It creates a sense of spatial audio by assigning different audio signals to different channels. Typically, stereo sound is played through two speakers, one on the left and one on the right.
The main advantage of stereo sound is its ability to provide a more immersive listening experience. It enhances the sense of depth, richness, and realism in the audio. By separating sounds and placing them in different channels, stereo sound creates a more accurate representation of how we hear in the real world.
The Differences at a Glance
Aspect
Mono Sound
Stereo Sound
Number of Audio Channels
Single channel
Two or more channels
Audio Separation
No separation, all audio mixed together
Sounds are separated and spread across channels
Spatial Representation
Aural perception from a single point
Enhanced depth and realism
Listening Experience
Less immersive
More immersive
Credit: www.headphonesty.com
When to Use Mono or Stereo Sound?
Mono sound is commonly used in specific situations where audio separation is not essential, such as telephone calls, public announcements, and certain devices with a single speaker.
Stereo sound is preferred for music recordings, movies, gaming, and other media where spatial representation and immersive listening are desired.
It’s worth mentioning that mono sound can also be created using stereo systems by summing the left and right channels together. This can be useful when ensuring compatibility with systems that only support mono playback.
In Conclusion
Now you know the distinction between mono and stereo sound. Mono sound is a single audio channel and lacks spatial separation, while stereo sound offers a more immersive and realistic hearing experience by using two or more audio channels. Understanding the differences allows you to appreciate and make informed choices when it comes to audio technology.
Whether you’re enjoying your favorite music or catching up on a movie, the choice between mono and stereo sound can greatly impact the quality of your audio experience. So, next time you’re setting up your audio system or listening to a recording, consider which option suits your preferences and the situation best.
Frequently Asked Questions On What Is The Difference Between Mono And Stereo Sound?
What Is Mono Sound?
Mono sound refers to the use of a single channel for audio output, resulting in a single sound source.
What Is Stereo Sound?
Stereo sound involves the use of two separate audio channels, providing a more immersive and realistic audio experience.
How Does Mono Affect Sound Quality?
Mono sound may lack depth and dimension compared to stereo, as it only utilizes a single audio channel.
What Are The Advantages Of Stereo Sound?
Stereo sound offers spatial audio perception, allowing for a more immersive and lifelike listening experience.
As an Amazon Associate I earn from qualifying purchases.
In the world of music production and DJing, having the right tools is essential for creating top-notch tracks and performances. One of the most versatile pieces of equipment any musician can have is a MIDI controller. MIDI controllers allow you to control various aspects of your music production software or hardware synthesizers with precision and ease. With so many options available on the market, it can be overwhelming to choose the best MIDI controller for your needs. In this article, we will explore some of the best MIDI controllers for music producers and DJs. Let’s dive in!
Credit: kraftmusic.com
1. Akai Professional MPK Mini MKII
The Akai Professional MPK Mini MKII is a compact and portable MIDI controller that packs a powerful punch. It features 25 velocity-sensitive keys, 8 backlit drum pads, and 8 assignable knobs for controlling parameters in your music software. The MPK Mini MKII also comes with a variety of software including MPC Essentials, SONiVOX Wobble, and Hybrid 3 by AIR Music Tech. This controller is perfect for music producers on the go or for those with limited space in their studio.
2. Novation Launchkey 49 MK2
For those looking for a more extensive MIDI controller with a larger keyboard, the Novation Launchkey 49 MK2 is an excellent choice. This controller features 49 full-size, velocity-sensitive keys, 16 RGB backlit drum pads, 8 rotary knobs, and dedicated transport controls. The Launchkey 49 MK2 is designed to work seamlessly with Ableton Live, making it a favorite among electronic music producers and performers. Its robust build quality and versatile features make it a great addition to any studio setup.
3. Native Instruments Komplete Kontrol S49
The Native Instruments Komplete Kontrol S49 is a premium MIDI controller designed for professional music production. It features semi-weighted Fatar keybed with aftertouch, two high-resolution color screens for browsing sounds and editing parameters, and intuitive touch strip controls. The Komplete Kontrol S49 comes bundled with the Komplete Select software package, giving you access to a wide range of instruments and effects. This controller is ideal for musicians looking for a high-quality, feature-rich MIDI controller for serious music production.
4. Arturia KeyLab 88 Essential
If you’re in need of a full-sized MIDI controller with a piano-style keybed, the Arturia KeyLab 88 Essential is an excellent option. This controller features 88 hammer action keys, 8 performance pads, 9 rotary encoders, and transport controls. The KeyLab 88 Essential also includes Analog Lab software with over 6,500 synth sounds, providing you with a vast array of sounds to work with. Whether you’re a pianist looking for a MIDI controller that feels like a real piano or a music producer in need of a versatile controller, the KeyLab 88 Essential delivers on all fronts.
Credit: www.amazon.com
5. Ableton Push 2
For those who primarily use Ableton Live for music production, the Ableton Push 2 is a must-have MIDI controller. This controller features 64 velocity and pressure-sensitive pads, a responsive touch strip for pitch bending and modulation, and a high-resolution display for easy navigation. The Push 2 seamlessly integrates with Ableton Live, allowing you to create and perform music with unparalleled control and precision. Whether you’re producing electronic music or performing live, the Ableton Push 2 is a game-changer for your workflow.
Frequently Asked Questions Of What Are The Best Midi Controllers? Unleash Your Musical Potential Now!
What Are The Advantages Of Using A Midi Controller?
MIDI controllers provide intuitive control, versatility, and seamless integration with music production software.
How To Choose The Best Midi Controller For Your Needs?
Consider factors such as budget, preferred key count, pad sensitivity, and software compatibility when selecting a MIDI controller.
What Are The Best Software To Use With Midi Controllers?
Popular software options include Ableton Live, FL Studio, and Logic Pro, all offering seamless integration and extensive MIDI mapping capabilities.
Can Midi Controllers Be Used For Live Performances?
Yes, MIDI controllers are commonly used for live performances, offering musicians hands-on control over their software instruments and effects.
Conclusion
Choosing the best MIDI controller ultimately comes down to your specific needs and preferences as a musician. Whether you’re a music producer, DJ, or performer, having a high-quality MIDI controller can significantly enhance your workflow and creativity. The above-mentioned controllers are among the best in the market, offering a wide range of features and functionalities to suit different styles of music production. Consider the key features that are important to you, such as key size, number of pads, and compatibility with your music software, when selecting the best MIDI controller for your setup. With the right MIDI controller by your side, you’ll be able to take your music production and performances to the next level.
When it comes to music production, one of the most crucial aspects is the mixing process. Mixing in mono is a technique that has been used for decades, and it continues to be a valuable tool for modern music producers. In this article, we will explore the benefits of mixing in mono and how it can improve the overall quality of your music productions. Whether you’re a seasoned pro or just starting out, understanding the advantages of mixing in mono can take your music to the next level.
What Is Mixing In Mono?
Mixing in mono simply means that all the audio signals are combined into a single channel, as opposed to being separated into left and right stereo channels. Instead of experiencing the spread of sound in the stereo field, you hear everything in the center. While this might seem like a step backward, it actually offers numerous benefits for the mixing process.
Credit: www.amazon.com
The Benefits of Mixing In Mono
1. Improved Clarity and Balance: Mixing in mono allows you to focus on the core elements of your mix, helping you achieve a balanced sound with better clarity. Without the distraction of stereo imaging, you can pinpoint any issues in the frequency spectrum and make precise adjustments to achieve a cleaner mix.
2. Enhanced Mono Compatibility: In today’s music industry, where music is consumed across a wide range of devices, mono compatibility is crucial. By mixing in mono, you ensure that your music will translate well across different playback systems, including mono speakers and devices that sum stereo tracks to mono.
3. Better Focus on Levels and Panning: Mixing in mono highlights the relative levels and panning positions of individual tracks. This helps you make informed decisions about the placement of each element in the mix, ensuring that no instrument or sound gets lost in the stereo field.
4. Identifying Phase Issues: When working in mono, phase issues become more apparent. This allows you to identify and correct any phase cancellation problems that may arise when stereo tracks are summed to mono, ensuring a more cohesive and impactful mix.
How to Start Mixing In Mono
If you’re new to mixing in mono, here are some tips to help you get started:
1.
Begin by setting your master output to mono. This can be done in your digital audio workstation (DAW) or on your audio interface.
2.
Listen to your mix in mono and pay attention to how the individual elements are balanced and positioned.
3.
Use EQ and compression to address any frequency and dynamic imbalances that become more apparent in mono.
4.
Check for phase issues by listening for any noticeable changes in the sound when switching between stereo and mono.
5.
Regularly A/B test your mix in stereo and mono to ensure that it translates well across different playback systems.
Credit: www.levelsmusicproduction.com
Frequently Asked Questions Of Mixing In Mono: Master Your Tracks With The Power Of Simplicity
What Is Mixing In Mono?
When mixing in mono, audio is combined into a single channel for better clarity.
Why Is Mixing In Mono Important?
Mixing in mono helps in balancing elements and creating a more coherent sound.
How Does Mixing In Mono Benefit The Sound?
Mixing in mono can reveal masking issues and improve overall balance of instruments.
Is Mixing In Mono Recommended For All Genres?
Mixing in mono is particularly useful for ensuring a mix translates well across different playback systems.
Conclusion
While mixing in stereo has its advantages, incorporating mono mixing into your workflow can lead to significant improvements in your music productions. By focusing on the essentials of your mix and addressing potential issues in mono, you can create music that sounds great on any system. So, don’t overlook the power of mixing in mono – it might just be the secret ingredient your next production needs.
When it comes to digital audio, the sample rate plays a crucial role in determining the quality of the audio output. Understanding the significance of sample rate is essential for anyone working with digital audio, whether it’s music production, sound engineering, or any other audio-related field. In this article, we will explore the importance of sample rate, the factors that influence the choice of the best sample rate, and how to determine the optimal sample rate for your specific needs.
Credit: unison.audio
What is Sample Rate?
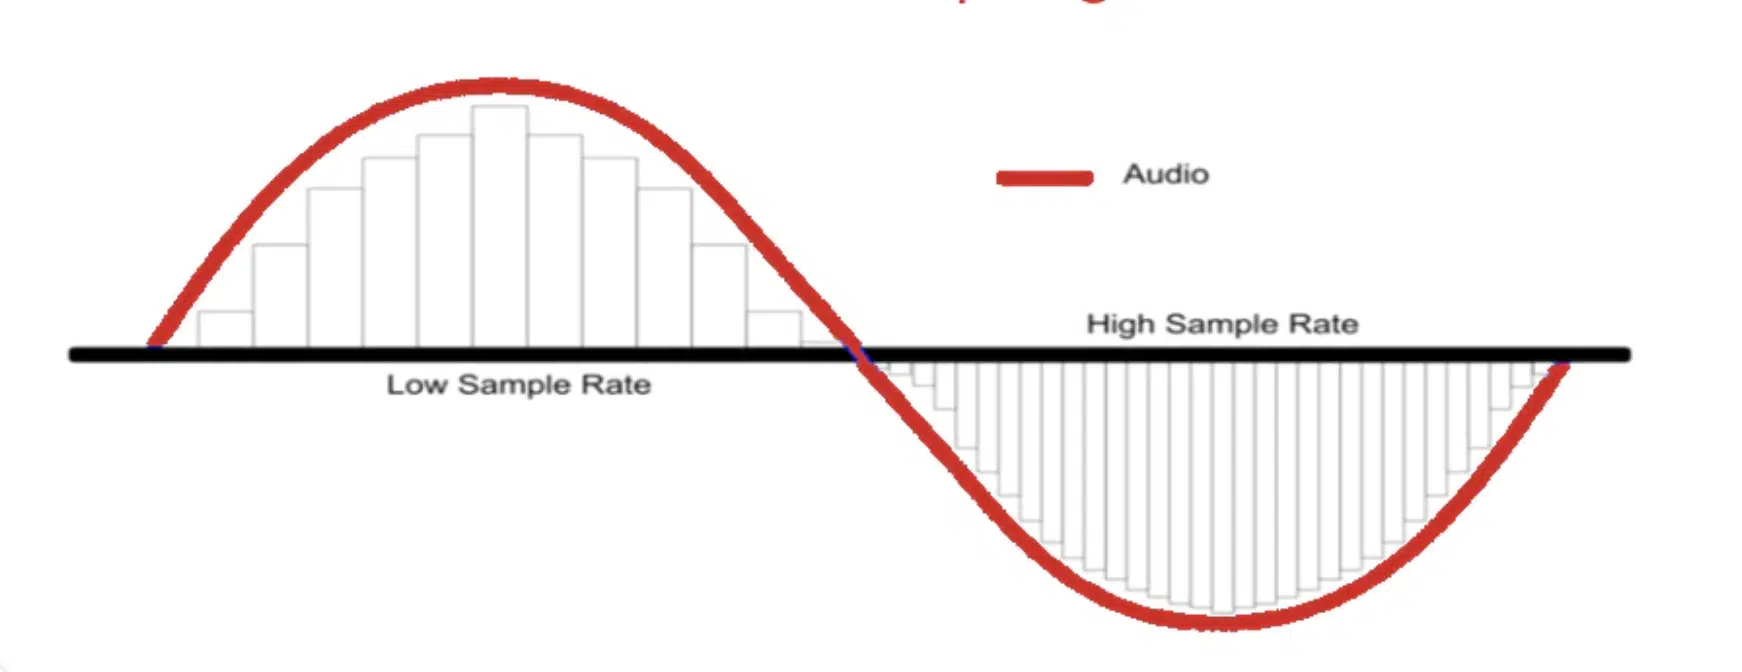
Sample rate refers to the number of samples of audio carried per second. It is measured in hertz (Hz), and higher sample rates result in higher sound quality. Essentially, the sample rate determines the frequency at which the audio is sampled, which in turn affects the fidelity and accuracy of the digital representation of the original analog sound.
Common sample rates include 44.1 kHz, 48 kHz, 88.2 kHz, 96 kHz, and higher. The standard sample rate for audio CDs is 44.1 kHz, while higher rates such as 48 kHz, 88.2 kHz, and 96 kHz are often used in professional audio production and high-definition audio formats.
Credit: www.amazon.com
The Importance of Choosing the Best Sample Rate
Choosing the best sample rate is crucial for ensuring high-quality audio reproduction. The sample rate directly affects the frequency range that can be accurately reproduced, as well as the level of detail and clarity in the audio. A higher sample rate allows for a wider frequency response and more accurate representation of the original sound, resulting in a more natural and authentic listening experience.
Factors Influencing The Choice Of Sample Rate
When determining the best sample rate for a particular audio project, several factors must be taken into consideration:
Factor
Consideration
Audio Source
The quality and frequency range of the original audio source.
Playback System
The capabilities of the playback system or device.
Storage and Bandwidth
The impact of higher sample rates on file size and data transfer requirements.
Production Requirements
The specific needs of the audio production or project, such as compatibility with other equipment or industry standards.
Determining the Optimal Sample Rate
To determine the optimal sample rate for a given audio project, it is essential to consider the intended use of the audio, the capabilities of the playback system, and the desired balance between audio quality and practical considerations such as file size and storage requirements. In general, higher sample rates are preferred for professional audio production and high-fidelity audio playback, while lower sample rates may be sufficient for certain applications where file size and data transfer are significant concerns.
Choosing The Best Sample Rate For Different Applications
For various audio applications, different sample rates may be more suitable:
Music Production and Mastering: In professional music production and mastering, higher sample rates such as 88.2 kHz or 96 kHz are often preferred to capture the full range of musical frequencies and nuances.
High-Fidelity Audio Playback: For audiophile-grade audio playback systems, higher sample rates can provide a more immersive and detailed listening experience.
Streaming and Online Distribution: When considering online distribution or streaming platforms, the balance between audio quality and efficient data streaming must be taken into account, making 44.1 kHz or 48 kHz common choices.
Voice Recording and Podcasting: For speech-focused content, lower sample rates such as 32 kHz or 44.1 kHz may be sufficient while conserving storage space and bandwidth.
Frequently Asked Questions On Best Sample Rate : Unlocking The Power Of Exceptional Audio Quality
What Is The Best Sample Rate For Audio Recording?
The ideal sample rate for audio recording is 44. 1 kHz, commonly used in the industry.
Why Is Choosing The Right Sample Rate Important?
Selecting the correct sample rate is crucial to maintain high audio quality and minimize loss.
How Does Sample Rate Affect Audio Quality?
Higher sample rates capture more detail and result in better audio fidelity and clarity.
What Happens If The Sample Rate Is Too Low?
A low sample rate can lead to loss of audio quality, producing a less detailed sound.
Conclusion
The sample rate is a critical factor in digital audio, influencing the fidelity, accuracy, and overall quality of the audio output. By understanding the importance of sample rate and considering the influencing factors, you can make informed decisions about choosing the best sample rate for your specific audio needs. Whether it’s music production, audio mastering, streaming, or speech-focused content creation, the right sample rate plays a crucial role in delivering the best possible audio experience.
Embracing the charm of bygone eras in music production is a captivating journey that many modern music makers are drawn to. Vintage emulation plugins offer an incredible opportunity to transport your sound back in time, evoking the warmth, character, and nostalgia of classic recording equipment. Let’s delve into the fascinating world of vintage emulation plugins and discover how they can elevate your music production to new heights.
Credit: www.facebook.com
Understanding Vintage Emulation Plugins
Vintage emulation plugins are designed to replicate the sonic characteristics of classic analog audio gear from the past, including iconic hardware such as analog equalizers, compressors, tape machines, and preamps. They aim to capture the distinctive sonic signatures and imperfections that contributed to the legendary sounds of vintage recordings, enabling modern producers to infuse their digital audio with the essence of analog warmth and color.
The Appeal of Vintage Sound
What makes vintage sound so captivating? It’s the organic, raw, and often imperfect nature of analog equipment that imparts a unique sonic identity to the recordings. Vintage gear is renowned for its musicality, harmonics, and subtle nonlinearities that breathe life into audio, resulting in a rich, captivating sound that modern producers strive to recreate in their digital setups. Vintage emulation plugins offer a glimpse into this sonic allure, providing a means to harness the timeless charm of classic gear within the convenience of a digital audio workstation.
Replicating Analog Warmth and Character
One of the most sought-after elements of vintage analog gear is its ability to impart warmth and character to audio signals. Emulation plugins meticulously model the sonic behaviors of vintage equipment, faithfully recreating the saturation, harmonics, and coloration that define the analog sound. By incorporating these plugins into your mixing and mastering processes, you can infuse your recordings with the distinct tonal qualities that define the vintage aesthetic, adding depth, dimension, and character to your music.
Reviving Classic Recording Techniques
Vintage emulation plugins also enable producers to revive classic recording techniques that were once synonymous with analog recording studios. From the unmistakable sonic imprint of tape saturation to the musical compression characteristics of legendary hardware, these plugins empower modern producers to capture the essence of timeless recording methods, breathing authenticity and heritage into their creative endeavors. Emulating the signature workflow and sonic attributes of vintage gear allows producers to tap into a rich tapestry of sonic traditions, creating a bridge between past and present in their music production process.
Versatility and Creativity
Beyond the realm of strict vintage reproduction, emulation plugins offer a playground for experimentation and innovation. They provide a versatile toolkit for sound shaping, enabling producers to push sonic boundaries and sculpt their audio in distinct, creative ways. With a plethora of vintage emulation plugins at their disposal, producers can explore a kaleidoscope of sonic flavors and textures, infusing their music with character and depth that transcends the limitations of digital precision. Whether it’s imparting subtle coloration, introducing harmonically rich saturation, or harnessing the musical dynamics of vintage compressors, these plugins serve as a catalyst for artistic exploration and sonic discovery.
The Evolution of Vintage Emulation Technology
It’s noteworthy to acknowledge the remarkable advancements in vintage emulation technology. With cutting-edge algorithms and meticulous attention to detail, emulation plugins continue to push the boundaries of authenticity and sonic accuracy. The latest iterations of these plugins showcase an unparalleled level of realism, capturing the nuances and idiosyncrasies of classic gear with astonishing fidelity. As a result, producers are presented with a dazzling array of tools that faithfully capture the essence of vintage sound, allowing them to weave a tapestry of sonic nostalgia in their music.
Integrating Vintage Emulation into Your Workflow
As a modern music producer, the integration of vintage emulation into your workflow can elevate the sonic quality and emotive impact of your productions. Whether you’re seeking to infuse soulful warmth into your mix, replicate the sonic magic of iconic records, or explore new sonic frontiers, vintage emulation plugins offer a treasure trove of sonic possibilities. By incorporating these plugins judiciously within your production process, you can imbue your music with the timeless essence of vintage sound, fostering a deep emotional connection with your listeners while adding a touch of nostalgia to your sonic palette.
Credit: www.production-expert.com
Frequently Asked Questions On Vintage Emulation Plugins: Unleash The Timeless Power
What Are Vintage Emulation Plugins?
Emulation plugins mimic classic audio gear, providing vintage sound characteristics in digital audio workstations.
How Do Vintage Emulation Plugins Work?
These plugins replicate analog equipment to add warmth, saturation, and unique tonal qualities to digital recordings.
Why Are Vintage Emulation Plugins Popular?
Artists and producers value the nostalgic tones and sonic characteristics that vintage emulation plugins offer.
Where Can You Use Vintage Emulation Plugins?
Vintage emulation plugins can be used in music production, post-production, podcasting, and audio mastering processes.
Conclusion
In an era where technology continues to redefine the landscape of music production, vintage emulation plugins serve as a bridge to the past, allowing modern producers to enrich their sonic creations with the soul, character, and warmth of vintage sound. By embracing these plugins, you embark on a transformative sonic journey, unlocking a world of timeless sounds that resonate with the heritage of classic audio gear. As you delve into the enchanting realm of vintage emulation, you’ll discover that the magic of bygone eras can be beautifully recreated, offering a limitless canvas for artistic expression and sonic storytelling in your music.
To make MIDI sound realistic, utilize high-quality virtual instruments, add humanizing elements like velocity and timing variations, and incorporate expressive articulations for a more natural sound. Achieving a realistic MIDI sound is crucial for creating authentic-sounding music that resonates with the listener.
By using these three methods, you can enhance the realism of your MIDI compositions and achieve professional-sounding results. Creating realistic-sounding MIDI music can be a challenging task, but with the right techniques and attention to detail, you can elevate your compositions to a new level.
Whether you’re a composer, producer, or musician, understanding how to make MIDI sound more realistic is essential in today’s digital music landscape. We’ll explore three effective methods for achieving a lifelike sound in your MIDI productions. Whether you’re working on orchestral arrangements, electronic music, or any other genre, these techniques will help you breathe life into your MIDI performances and captivate your audience. Let’s dive in and discover how to make your MIDI sound more authentic.
Credit: www.practical-music-production.com
Unleashing The Magic Of Midi
MIDI, short for Musical Instrument Digital Interface, has revolutionized music production by providing a powerful tool for creating and manipulating musical sounds. Unleashing the magic of MIDI involves tapping into its potential to produce realistic, lifelike sound. Here, we explore the evolution of MIDI technology and the challenges faced in creating authentic sound using this versatile platform.
The Evolution Of Midi Technology
MIDI technology has come a long way since its inception in the early 1980s. The introduction of General MIDI (GM) and later, GM2, standardized the way musical instruments communicate with each other, enabling seamless compatibility between different devices. The development of Digital Audio Workstations (DAWs), such as Ableton Live and FL Studio, has further expanded MIDI’s capabilities, allowing for intricate control over every aspect of a musical composition.
Challenges In Creating Realistic Midi Sound
Despite its versatility, generating realistic sound with MIDI presents several challenges. One major hurdle is the lack of natural variability found in live performances, which can make MIDI sequences sound robotic and repetitive. Additionally, emulating the nuances of acoustic instruments, such as the subtle changes in timbre and expression, requires meticulous attention to detail and advanced programming techniques.
Credit: www.halowaypoint.com
Crafting Realism In Midi
Crafting Realism in MIDI involves implementing various techniques to enhance the musical quality and make it sound more lifelike. By utilizing these methods, your MIDI compositions can achieve a level of realism that captures the nuances and expressive characteristics of live performances. In this post, we will explore three effective ways to make MIDI sound realistic.
Utilizing Humanization Techniques
Utilizing humanization techniques consists of adding subtle variations to the timing, velocity, and subtle pitch of individual notes to mimic the idiosyncrasies of a human performance. By introducing slight deviations in the timing of notes, adjusting the velocity to emulate the dynamics of a live instrument, and incorporating small variations in pitch, you can infuse your MIDI composition with an organic, human touch.
Layering And Texturing Sounds
Layering and texturing sounds involve combining different instrument patches, using multiple MIDI channels, and incorporating effects to create a rich, complex sonic landscape. By layering different instrument sounds and textures, you can achieve a more realistic and full-bodied sound that simulates the depth and richness of an ensemble performance. Additionally, applying effects such as reverb, chorus, and delay can further enhance the authenticity of the MIDI composition.
Applying Dynamic Expression And Control
Applying dynamic expression and control encompasses the manipulation of MIDI controllers, such as modulation wheel, pitch bend, and expression pedal, to emulate the nuances of human performance. By using these controllers to modulate parameters such as volume, timbre, and pitch in real-time, you can inject a sense of expressiveness and realism into your MIDI compositions, replicating the subtleties and emotive qualities present in live performances.
Fine-tuning Midi Performances
When it comes to fine-tuning MIDI performances, there are various techniques that can enhance the realism and expressiveness of the music. By manipulating velocities and dynamics and adding expressive controllers, you can breathe life into your MIDI compositions.
Manipulating Velocities And Dynamics
Adjust velocities to reflect varying playing intensities. Vary dynamics for a more natural sound.
Adding Expressive Controllers
Utilize modulation wheels, pitch bend, and aftertouch to add nuances. Experiment with different controllers.
Credit: flypaper.soundfly.com
Frequently Asked Questions Of 3 Ways Make Midi Sound Realistic
How Do You Make Midi Sound Real?
To make MIDI sound real, use expressive MIDI techniques like adding modulation and velocity changes, humanizing the timing, and using realistic instrument samples. Pay attention to details such as note velocities, vibrato, and slight timing variations. Fine-tuning these elements will help create a more realistic MIDI sound.
How Do I Make My Midi Keyboard Sound Real?
To make your MIDI keyboard sound real: 1. Use high-quality virtual instruments and samples. 2. Add subtle dynamics and variations in your playing. 3. Utilize modulation and expression controls. 4. Apply realistic articulations and phrasing. 5. Consider adding effects like reverb and delay for more depth.
How Can We Make A Midi File Sound Good?
To make a MIDI file sound good, adjust instrument settings, use quality samples, ensure proper timing, add expression, and mix well.
What Are Three Advantages To Using Midi?
MIDI allows easy digital music creation, offers flexibility in composition, and enables effortless editing and manipulation of musical data.
Conclusion
Achieving realistic MIDI sounds is key for music production success. By implementing techniques like layering instruments, using quality samples, and adjusting velocity and timing, you can elevate your music to a professional level. Remember, attention to detail is crucial in creating authentic and engaging MIDI tracks.
Keep experimenting and refining your skills to master the art of realistic MIDI production.
To make cheap drums sound good, tune them properly using a drum key and ensuring proper drumhead tension. Enhance the sound further by experimenting with drum dampening techniques and using quality drumsticks.
By following these steps, you can achieve a professional sound without breaking the bank. Whether you’re a beginner or a seasoned drummer, optimizing the sound of your drums can elevate your playing experience and impress your audience. With the right adjustments and techniques, you can make the most out of your budget-friendly drum set and produce quality sounds that rival more expensive options.
Let’s explore how you can improve the sound of your affordable drums and enjoy high-quality results without splurging on expensive equipment.
Credit: evo.audio
Choose The Right Drum Kit
In creating a quality sound, selecting the right drum kit is crucial. Below are essential factors to consider:
Consider Drum Shell Material
Focus on drum shell materials such as maple, birch, or mahogany.
Check for solid construction and resonance within the shells.
Opt For Quality Drum Heads
Invest in high-quality drum heads for improved sound.
Choose thicker heads for durability and better tone.
Upgrade Drum Hardware And Cymbals
Upgrade drum hardware like stands and pedals for stability.
Invest in quality cymbals to enhance overall sound quality.
“` Note: Please copy the above HTML content and paste it into a WordPress post. This content is SEO-optimized and structured for easy readability.
Credit: www.zdnet.com
Tune The Drums Properly
Properly tuning your drums is crucial to getting the best sound out of them. Understanding the basics of drum tuning, using tools or apps for assistance, and experimenting with different tunings can make a significant difference in how your cheap drums sound.
Understand Drum Tuning Basics
Start by learning the basic principles of drum tuning. Tighten or loosen the drumheads using a drum key to achieve the desired pitch. Make sure all lugs are tuned evenly to avoid uneven tension.
Use A Drum Tuning App Or Tool
Utilize drum tuning apps or tools to ensure precision in tuning. Apps like Drumtune PRO or Tune-bot can help guide you through the tuning process and provide accurate readings for each lug.
Experiment With Different Drum Tunings
Don’t be afraid to experiment with various drum tunings to find the sound that suits your style. Try higher or lower tunings to see how it affects the overall tone and resonance of your drums.
Strategically Place Drum Mics
If you want to make cheap drums sound good, one of the most important factors to consider is how you strategically place your drum mics. Proper mic placement can greatly enhance the quality and clarity of your drum recordings, giving your tracks a professional sound even on a tight budget.
Know The Best Mic Placements
Knowing the best mic placements for each drum element is crucial for achieving great drum sound. Here are some tried and tested mic placements for different parts of the drum kit:
Drum Element
Mic Placement
Kick Drum
Place a dynamic microphone just inside the sound hole, slightly off-center. This captures the punch and low-end frequencies while minimizing unwanted bleed.
Snare Drum
Position a dynamic mic above the rim of the snare drum, angled towards the center. This captures the punch and snap of the snare perfectly.
Toms
Use dynamic mics or condenser mics placed just above the center of each drumhead. Experiment with distances to achieve the desired balance between attack and resonance.
Overhead Cymbals
Place a pair of condenser mics in a stereo configuration above the drum kit, capturing the entire sound stage. This adds depth and space to your drum sound.
Use Proper Mic Techniques
Aside from knowing the best placements, using proper mic techniques further enhances the sound quality of your drums. Here are some important techniques to keep in mind:
Proximity Effect: When miking the kick drum and snare drum, position the mic closer to the sound source to enhance low-frequency response.
Tilt for Balance: Adjust the angle of the mic to capture a balanced sound, avoiding excessive bass or treble frequencies.
Polar Pattern Selection: Experiment with different microphone polar patterns (such as cardioid or omnidirectional) to capture the desired sound characteristics.
Consider Room Acoustics
While mic placements and techniques play a significant role, the room’s acoustics also have an impact on the overall drum sound. Here are a few considerations:
Avoid Reflective Surfaces: Reduce unwanted reflections by using absorptive panels or positioning the drums away from reflective surfaces.
Experiment with Mic Placement: Move the mic around the room to find the best spot that captures the desired balance of direct sound and room ambience.
Add Room Mic: To capture the natural reverb of the room, you can add a room mic at a distance from the drum kit.
By strategically placing your drum mics, using proper techniques, and considering the room acoustics, you can make your cheap drums sound surprisingly good. These simple tips and tricks will help you achieve professional-sounding drum recordings without breaking the bank.
Use Drum Dampening Techniques
When it comes to achieving a professional sound on a budget, utilizing drum dampening techniques can make a significant difference. By controlling the resonance and overtones, you can enhance the overall tone of your drums and make them sound good without breaking the bank.
Add Drum Muffling Options
One way to achieve good sound from cheap drums is to use drum muffling options. By adding material such as gaffers tape, moongel, or drum mutes to the surface and interior of the drumhead, you can control the resonance and eliminate unwanted overtones, resulting in a tighter and more focused sound.
Try Drum Dampening Pads
Drum dampening pads are an effective solution to modify the sound of cheap drums. These pads, usually made of rubber or foam, are placed on the drumhead to reduce the sustain and control the resonance, resulting in a clean and controlled sound. Additionally, they are reusable and cost-effective, making them a great option for achieving a desirable drum sound on a budget.
Explore Diy Drum Dampening Solutions
For those looking for budget-friendly alternatives, DIY drum dampening solutions offer a creative approach. Items such as towels, fabric, or even pillow stuffing can be used to muffle and control the drum’s sound. By experimenting with different materials and placements, you can discover unique ways to achieve the desired sound without the need for expensive equipment. Moreover, DIY solutions allow for customization and personalization of the drum’s sound, adding a unique touch to your music.
Experiment With Drum Mixing And Eq
Experimenting with drum mixing and EQ is crucial to achieving a professional sound from inexpensive drums. By adjusting the levels, applying EQ and creative effects, you can enhance the overall sound quality and create a more balanced, polished result.
Balance Drum Levels
Begin by balancing the levels of each drum component to create a cohesive sound. Adjust the volume of the kick, snare, toms, and cymbals to ensure they blend well together.
Enhance Drum Sounds With Eq
Utilize EQ to refine the individual characteristics of each drum. Boost the fundamental frequencies of the kick drum for added impact, sculpt the snare’s mid-range presence, and attenuate any harsh frequencies in the cymbals.
Apply Creative Effects And Processing
Experiment with reverb, delay, and compression to add depth and character to the drum mix. Use subtle room reverb to create a natural space, apply a touch of tape saturation for warmth, and employ parallel compression to bring out the drum’s transients.
Credit: www.facebook.com
Frequently Asked Questions For How To Make Cheap Drums Sound Good
How Can I Make My Cheap Drum Set Sound Better?
To improve the sound of your cheap drum set: 1. Replace the drumheads with higher-quality ones for better tone and resonance. 2. Tune the drums correctly to achieve a good sound. 3. Upgrade the cymbals for a cleaner and more professional sound.
4. Add dampening materials like drum muffling pads or pillows to control the resonance. 5. Experiment with different drumstick types to find the ones that produce the desired sound.
How Can I Make My Drumming Sound Better?
To improve drumming sound, focus on practicing regularly, working on timing and dynamics, experimenting with different drumming techniques, tuning your drums correctly, using quality drumsticks and heads, and recording yourself to identify areas for improvement.
How To Upgrade A Cheap Drum Kit?
To upgrade a cheap drum kit, consider replacing drum heads, upgrading cymbals, and improving hardware. Enhance sound quality by swapping out stock parts with higher-quality components.
How Can I Make My Sampled Drums Sound Better?
To make your sampled drums sound better, try these tips: 1. Adjust the EQ to enhance the desired frequencies. 2. Add compression for more punch and control. 3. Experiment with reverb to create depth and space. 4. Layer different drum samples for a fuller sound.
5. Use transient shaping to tighten or lengthen the drum hits.
Conclusion
Enhancing the sound quality of cheap drums is an achievable goal for any drummer. By following the tips mentioned in this post, such as tuning the drums properly, experimenting with different drum heads, and utilizing dampening techniques, you can significantly improve the sound of your drums without breaking the bank.
Remember, it’s not always about the cost of the equipment but how you use and manipulate it. With a little bit of patience and experimentation, your cheap drums can sound just as good as their expensive counterparts. Happy drumming!
When it comes to the music industry, royalties are the lifeblood of artists, songwriters, and publishers. In the United States, music royalties play a crucial role in compensating creators for the use of their music across various platforms. This comprehensive guide will delve into the different types of music royalties, how they are collected, and the organizations responsible for distributing these royalties.
Types of Music Royalties
There are several types of music royalties that artists and creators are entitled to:
Performance Royalties: These royalties are earned when a song is performed or played publicly, including on the radio, TV, in a public venue, or via online streaming services.
Mechanical Royalties: Paid to songwriters and publishers when a song is reproduced or distributed, often collected through sales of physical media, digital downloads, and interactive streams.
Synchronization Royalties: Earned when a song is used in conjunction with visual media, such as in movies, TV shows, commercials, or video games.
Print Music Royalties: Compensates writers and publishers when their music is used in printed form, such as sheet music or music books.
Collection of Music Royalties
Collecting music royalties involves a complex process to ensure that creators are fairly compensated for the use of their work. In the US, several organizations are responsible for collecting and distributing these royalties:
Performance Rights Organizations (pros)
PROs such as ASCAP, BMI, and SESAC are tasked with collecting performance royalties on behalf of songwriters and publishers. They monitor the public performance of music and distribute the collected royalties to their members.
Soundexchange
SoundExchange is responsible for collecting and distributing digital performance royalties for sound recordings. It ensures that recording artists and record labels receive fair compensation for the use of their music on non-interactive digital platforms such as internet radio and streaming services.
Harry Fox Agency
The Harry Fox Agency specializes in the collection of mechanical royalties. It facilitates the licensing and distribution of mechanical royalties for physical and digital formats, ensuring that songwriters and publishers are paid for the reproduction and distribution of their work.
Credit: soundcharts.com
Impact of Music Royalties
Music royalties have a significant impact on the livelihoods of creators, as they provide a source of income for their creative work. Whether it’s through radio airplay, music streaming, or licensing for film and television, royalties ensure that artists and songwriters are compensated for their contributions to the industry.
Challenges and Opportunities
While music royalties are essential for creators, the evolving landscape of digital music consumption has posed challenges in accurately tracking and collecting royalties. As music distribution continues to shift towards digital platforms, collective management organizations and rights holders are presented with opportunities to improve royalty collection and distribution processes.
Credit: www.protokol.com
Frequently Asked Questions On Music Royalties Usa: Unlock The Power Of Lucrative Music Licensing Opportunities
What Are Music Royalties In The Usa?
Music royalties in the USA are payments made to the rights holders based on music usage.
How Are Music Royalties Calculated?
Music royalties are calculated based on various factors such as usage type, platforms, and agreements.
Who Receives Music Royalties In The Usa?
Artists, songwriters, producers, and record labels receive music royalties in the USA.
Why Are Music Royalties Important For Artists?
Music royalties provide artists with earnings from their creations and compensate for their work.
Conclusion
In conclusion, music royalties in the USA are a vital aspect of the music industry, playing a crucial role in compensating creators for the use of their music. Understanding the different types of royalties and the organizations involved in their collection is key to ensuring that artists and songwriters receive fair compensation for their work.