As any guitarist knows, the search for the perfect tone and sound is an ongoing journey. With the plethora of guitar pedals available today, musicians have the opportunity to explore and experiment with an endless array of effects to enhance their music. In the world of guitar pedals, there are some truly strange and unique creations that have pushed the boundaries of innovation and creativity. Let’s take a look at some of the weirdest guitar pedals that have captured the imagination of musicians around the world.
1. EarthQuaker Devices Rainbow Machine
The EarthQuaker Devices Rainbow Machine is a pedal that defies traditional definitions of sound modulation. With its surreal and otherworldly effects, this pedal has earned a reputation for creating sounds that are simply out of this world. It features a pitch-shifting, polyphonic harmonizer that can produce everything from subtle shimmers to full-on sonic landscapes reminiscent of an intergalactic journey. This pedal truly lives up to its name, as it can transport your music into a realm of color and texture that is unlike anything you’ve ever heard before.
Credit: www.pinkbike.com
2. ZVEX Effects Fuzz Probe
The ZVEX Effects Fuzz Probe takes the concept of a traditional fuzz pedal and turns it on its head. What makes this pedal so unique is its interactive copper plate that responds to touch, allowing the player to manipulate the pedal’s oscillation and feedback using their hands. This hands-on approach to manipulating the fuzz and feedback creates an interactive and dynamic experience that is both unpredictable and exciting. With the Fuzz Probe, you’re not just playing a pedal – you’re engaging in a tactile and immersive sonic adventure.
3. Electro-Harmonix Mel9 Tape Replay Machine
The Electro-Harmonix Mel9 Tape Replay Machine is a pedal that allows guitarists to recreate the sounds of vintage tape-based Mellotron keyboards. By using advanced polyphonic tracking, this pedal can transform your guitar’s signal into an array of classic Mellotron sounds, including orchestral strings, flutes, and choirs. This pedal opens up a whole new world of sonic possibilities, allowing guitarists to access the lush and evocative sounds of the Mellotron in a compact and versatile stompbox.
4. Death By Audio Robot
The Death By Audio Robot is a pedal that defies categorization, offering a universe of surreal and otherworldly sounds. This pedal features a combination of pitch-shifting, waveform modulation, and filter effects that can take your guitar into uncharted sonic territory. With its interactive controls and expressive capabilities, the Robot pedal encourages experimentation and exploration, making it a favorite among musicians who are seeking to push the boundaries of traditional guitar tones.
5. Red Panda Particle Granular Delay/Pitch Shifter
The Red Panda Particle Granular Delay/Pitch Shifter is a pedal that harnesses the power of granular synthesis to create unique and atmospheric textures. By breaking down your guitar signal into tiny grains and manipulating them in real time, this pedal can produce a wide range of delay, pitch-shifting, and time-stretching effects. From shimmering ambient soundscapes to glitchy and granular textures, this pedal is a playground for sonic experimentation and sonic exploration.
Credit: www.rollingstone.com
Frequently Asked Questions Of Weirdest Guitar Pedals : Unleash Your Creativity With These Mind-bending Effects!
What Are Some Unique Guitar Pedal Designs?
Some unique guitar pedal designs include synthesizer pedals, octave pedals, and even looper pedals.
How Do Unconventional Guitar Pedals Enhance Sounds?
Unconventional guitar pedals enhance sounds by adding unique effects like fuzz, modulation, or loop functions.
Why Are Weird Guitar Pedals Prized By Musicians?
Weird guitar pedals are prized for their ability to create unique tones and inspire creativity.
Are There Any Practical Uses For Strange Guitar Pedals?
Strange guitar pedals can be used to add texture, depth, and individuality to a musician’s sound.
Conclusion
These are just a few examples of the weirdest and most innovative guitar pedals available today. Whether you’re seeking to create otherworldly soundscapes, interact with your pedals in new and exciting ways, or access vintage sounds in a modern context, these pedals offer a wealth of sonic possibilities. By embracing the unconventional and thinking outside the box, these pedals have redefined what is possible in the world of guitar effects, inspiring musicians to explore new sonic frontiers and break free from the confines of traditional guitar tones.
As an Amazon Associate I earn from qualifying purchases.
When it comes to capturing the rich and resonant tones of a guitar, having the right microphone can make all the difference. Whether you’re recording in a studio or playing live on stage, choosing the best microphone for your guitar is crucial to achieving a professional sound. Here are some of the top guitar microphones that are favored by musicians and audio engineers alike:
1. Shure SM57
The Shure SM57 is a legendary microphone known for its versatility and durability. It is a dynamic microphone that excels at capturing the nuances of acoustic and electric guitars. With its frequency response tailored for guitar applications, the SM57 delivers crisp and clear sound quality.
2. Sennheiser e609
The Sennheiser e609 is a dynamic microphone specifically designed for miking guitar cabinets. Its unique side-address design allows for easy placement on a speaker cabinet, ensuring optimal sound capture. The e609 produces a robust and punchy sound that is perfect for rock and metal genres.
3. AKG C414
The AKG C414 is a versatile condenser microphone that is highly regarded for its smooth and detailed sound reproduction. With multiple polar patterns and adjustable sensitivity levels, the C414 offers a wide range of sonic possibilities for recording acoustic guitars with exceptional clarity and depth.
4. Royer R-121
The Royer R-121 is a ribbon microphone that is prized for its warm and natural sound characteristics. Ideal for capturing the delicate nuances of acoustic guitars, the R-121 adds a touch of vintage warmth to recordings, making it a popular choice among discerning guitarists and producers.
5. Neumann KM 184
The Neumann KM 184 is a small-diaphragm condenser microphone that is renowned for its pristine audio quality and transparency. With its exceptionally low self-noise and high SPL handling, the KM 184 is perfect for recording both acoustic and electric guitars with exceptional detail and definition.
Credit: www.amazon.com
6. Audio-Technica AT4050
The Audio-Technica AT4050 is a versatile multi-pattern condenser microphone that offers exceptional audio fidelity and versatility. With its switchable polar patterns and high SPL handling, the AT4050 is well-suited for a wide range of guitar recording applications, from intricate fingerstyle playing to high-energy rock performances.
7. Rode NT5
The Rode NT5 is a pair of small-diaphragm condenser microphones that are perfect for stereo miking acoustic guitars. With their low self-noise and wide frequency response, the NT5s capture the intricate harmonics and dynamics of acoustic instruments with stunning realism and clarity.
8. Beyerdynamic M160
The Beyerdynamic M160 is a ribbon microphone that is cherished for its smooth and velvety sound quality. With its natural and warm tonal character, the M160 is an excellent choice for capturing the organic sound of acoustic guitars, adding a touch of vintage warmth to recordings.
Credit: www.practical-music-production.com
Frequently Asked Questions On What Are The Best Guitar Microphones?: Unlocking The Power Of Sound
What Are The Top Guitar Microphones For Live Performances?
The Shure SM57 and Sennheiser e906 are popular choices for their versatility and quality sound.
How To Choose The Best Microphone For Recording Acoustic Guitar?
Consider a small-diaphragm condenser like the Audio-Technica AT2021 for clear, natural sound reproduction.
What Is The Best Dynamic Microphone For Electric Guitars?
The Electro-Voice RE20 delivers excellent transient response and dynamic range, making it a top choice.
What Are The Key Features To Look For In A Guitar Microphone?
Look for high SPL handling, low self-noise, and microphone type compatibility for capturing the best guitar sound.
Conclusion
Choosing the best microphone for your guitar is essential to achieving a professional sound quality in your recordings and performances. Whether you prefer the crispness of a dynamic microphone or the warmth of a ribbon microphone, selecting the right microphone can greatly enhance the tone and texture of your guitar sound. Consider the characteristics of each microphone mentioned above and choose the one that best suits your playing style and sonic preferences.
A noise gate can improve your recordings by eliminating unwanted background noise and enhancing overall clarity. By setting a threshold level, the noise gate only allows sound above this threshold to pass through, effectively reducing interference and improving the quality of your recordings.
This results in cleaner audio tracks with minimal distractions, making your recordings sound more professional and polished. Gates are particularly useful in situations where there is background noise or hissing present. This allows you to achieve a cleaner and more professional final product.
Whether you are recording music, podcasts, or voiceovers, a gate can significantly elevate the quality of your audio recordings.
Credit: www.izotope.com
The Benefits Of Using A Noise Gate
Using a gate can elevate the quality of your recordings by having more control over unwanted background noise. Let’s explore the benefits of incorporating a gate into your recording setup.
Reducing Background Noise
A gate helps eliminate background noise during silent passages, providing a cleaner and more professional sound.
Improving Clarity And Definition
By cutting off unwanted noise when the input falls below a set threshold, a gate enhances clarity and definition in recordings.
Credit: flixier.com
Implementing A Noise Gate Effectively
Improve the quality of your recordings by effectively implementing a gate. This audio effect helps eliminate unwanted background noise, resulting in cleaner and more professional-sounding audio. By setting the threshold appropriately, a gate can significantly enhance the overall clarity of your recordings.
Understanding Threshold And Release Settings
Setting the threshold appropriately determines when the gate will kick in.
Adjusting release settings controls how quickly the gate closes after the signal drops below the threshold.
Threshold and release settings play a crucial role in how effectively a gate operates.
Applying Noise Gates In Different Recording Situations
Gates can be used to clean up recordings with unwanted background noise.
For instruments with sustain, adjusting the release time is essential to avoid cutting off notes prematurely.
Live recordings benefit from gates to reduce stage noise between musical passages.
Choosing The Right Noise Gate For Your Setup
Choosing the Right gate for Your Setup
Hardware Vs. Software Noise Gates
When selecting a gate for your recording setup, one of the primary considerations is whether to opt for a hardware or software solution. Hardware gates are physical devices that can be integrated into your signal chain, offering dedicated processing capabilities. On the other hand, software gates can be utilized within your digital audio workstation (DAW) as plugins, providing flexibility and convenience. Both options have their advantages, and the choice depends on your specific needs and workflow.
Considerations For Different Instruments And Vocals
Each instrument and vocal source has its own dynamics and noise characteristics, influencing the type of gate that best suits your recording setup. Guitars and bass may require a gate tailored to manage their sustained notes and nuances. Meanwhile, drums and percussion can benefit from a gate that handles transient spikes effectively. Vocals demand a gate that can delicately suppress background noise during silent parts without affecting the natural timbre of the voice. Understanding the unique requirements of each source allows you to choose a gate that optimally enhances your recordings.
Common Mistakes When Using A Noise Gate
Improve your recordings with a gate, but watch out for common mistakes. For best results, set the threshold carefully to avoid cutting off desired sounds. Adjust attack and release times for a natural, professional sound.
Overuse Leading To Unnatural Sound
One common mistake that many people make when using a gate is overusing it. This can result in an unnatural and robotic sound. It’s important to remember that the purpose of a gate is to reduce unwanted noise and create a cleaner recording. However, using it excessively can strip away the natural dynamics of your audio and make it sound sterile and lifeless.
Instead, strike a balance: When using a gate, it’s crucial to find the right threshold and release settings that work for your specific recording. Keep in mind that the goal is to eliminate unwanted noise while preserving the natural character and dynamics of the sound. Gradually adjust the settings to achieve the desired level of noise reduction without sacrificing the overall quality and authenticity of your recordings.
Neglecting Pre- And Post-processing
Another common mistake in using a gate is neglecting pre- and post-processing tasks. While a gate can significantly improve your recordings, it cannot do all the work on its own. Properly preparing your audio before applying the gate and applying necessary processing afterward are essential for achieving the best results.
Pre-Processing Tasks
Post-Processing Tasks
Ensure good microphone placement and technique to minimize background noise.
Use a high-quality pop filter to reduce plosive sounds.
Consider using a dedicated vocal booth or acoustic treatment in your recording space to minimize environmental noise.
Apply equalization (EQ) to balance the frequencies and enhance the overall sound.
Use compression to control dynamic range and add warmth to your recordings.
Add reverb or delay to create a sense of space and depth.
Remember: A noise gate is just one piece of the puzzle. Taking care of these pre- and post-processing tasks will optimize your recordings and ensure a more professional and polished final result. By combining these techniques, you can achieve a clean and sonically pleasing audio recording.
Creative Uses Of Noise Gates In Music Production
Explore the transformative potential of noise gates in music production. Enhance your recordings by effectively eliminating unwanted background noises, ensuring a cleaner and more polished sound. Noise gates offer precision and control, allowing you to craft professional-grade tracks with ease.
Achieving Artistic Effects With Sidechain Routing
In music production, noise gates aren’t just for removing unwanted background noise. They can also be used in creative ways to add depth and character to your recordings. One of the popular techniques is using a noise gate in combination with sidechain routing.
Dynamic Control In Electronic Music Production
Electronic music often involves complex layers of sounds that need careful control to achieve the desired impact. This is where noise gates can prove to be invaluable. With their ability to precisely control the dynamics of a sound, noise gates can help shape the music and give it that professional polish.
Rhythmic Pumping With a Sidechained Gate
When it comes to electronic music production, sidechain routing is a powerful tool that can create exciting and unique effects. By using a noise gate in a sidechain configuration, you can create a rhythmic pulsing effect that is commonly heard in genres like EDM and techno. The noise gate acts as a virtual volume control, opening and closing the audio signal based on the input from another audio source. The beauty of sidechain routing is that it allows you to create a “pumping” effect, where the music breathes and moves in sync with the rhythm of another element. For example, you can use a kick drum as the sidechain trigger for the noise gate on a bass track. Every time the kick drum hits, the noise gate on the bass track opens up. This allows the bass to be heard.
When the kick drum stops, the noise gate closes, creating a tight and controlled sound. But sidechain routing with noise gates goes beyond just the rhythmical effect. It can also be used to create interesting sonic textures and enhance certain elements of your music.
Sidechain Gating on Vocals, Pads and Guitars
For instance, you can apply sidechain compression on a vocal track. This makes it stand out more prominently when the instrumental parts are playing. This technique is commonly used in modern pop and electronic music to give the vocals a sense of presence and impact. In addition to vocals, sidechain routing with noise gates can also be applied to other elements like pad synthesizers, pianos, or guitars to create unique sonic effects and enhance the overall mix. By selectively controlling the dynamics, you can create a dynamic and lively sound that adds depth and interest to your recordings. So, if you’re looking to take your music production skills to the next level, consider experimenting with noise gates and sidechain routing. With a little creativity and experimentation, you can achieve stunning artistic effects that will make your recordings stand out from the crowd.
Credit: krisp.ai
Frequently Asked Questions For How Can A Noise Gate Improve My Recordings?
Should I Use A Noise Gate When Recording?
Using a noise gate when recording can help minimize unwanted background noise. It’s particularly useful for capturing clean audio in environments with distractions. However, it’s important to adjust the settings carefully to avoid cutting off desired sounds.
What Is A Noise Gate Good For?
A noise gate is useful for reducing unwanted background noise in audio recordings. It cuts off audio signals below a certain threshold, allowing only the desired sound to pass through. This helps improve the clarity and quality of the audio.
What Is The Best Setting For A Noise Gate?
The best setting for a noise gate depends on the specific audio environment and equipment being used. It’s important to adjust the threshold to cut out unwanted noise while still allowing desired sounds to pass through. Experiment with different settings to find the optimal balance.
Do Noise Gates Affect Tone?
Noise gates can affect tone by altering the decay of sustained notes. They can also impact the natural dynamics and character of the sound. Adjusting the threshold and release settings can help minimize tone changes. Experimenting with different configurations will help find the best balance between noise reduction and preserving tone.
Conclusion
Enhancing your recordings with a noise gate can significantly improve their overall quality. With its ability to reduce unwanted background noise, a noise gate ensures that your recordings are clean and professional-sounding. By incorporating this powerful tool into your recording process, you can elevate the sound quality and clarity of your music or audio productions.
Loudness streaming refers to the process of delivering audio content over the internet on platforms such as music streaming services, video streaming platforms, and podcasts. With the rise in popularity of these platforms, it has become crucial to ensure consistent loudness levels across different devices and content, leading to the emergence of loudness normalization and measurement techniques.
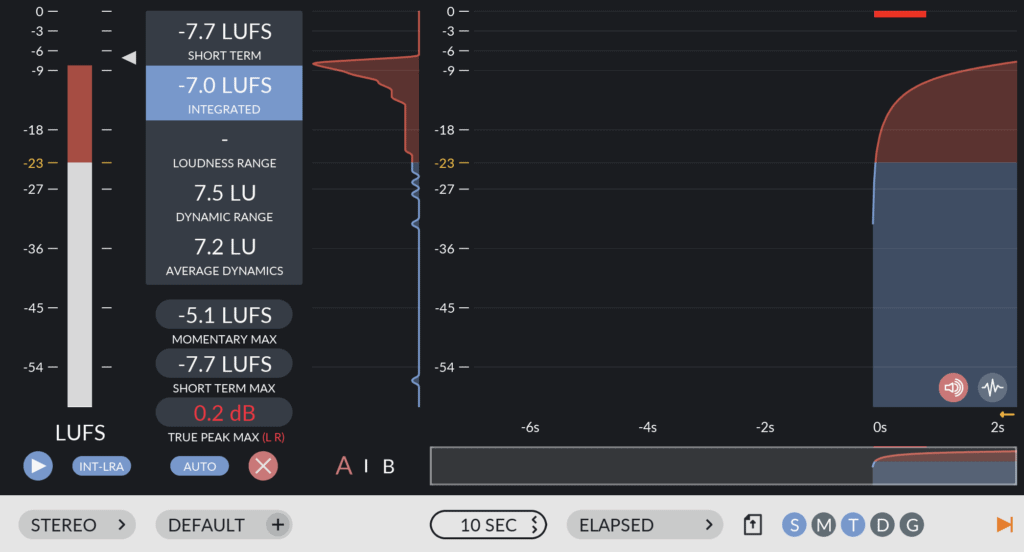
One such technique used to measure loudness is LUFS (Loudness Units Full Scale). LUFS is a standard measurement unit that determines the perceived loudness of audio content. It takes into account both the average and dynamic range of the audio signal to provide a more accurate representation of loudness.
How is Loudness Measured?
Measuring loudness involves analyzing the audio signal and quantifying its perceived loudness level. This is important because different audio content can have varying loudness levels, and inconsistent loudness between tracks can disrupt the listening experience.
Traditional measurement methods, such as peak normalization based on the highest peak level in the audio, do not accurately reflect how loud the audio actually sounds. LUFS, on the other hand, considers human perception and takes into account various factors to provide a more accurate loudness measurement.
The loudness measurement process involves analyzing the audio signal using filters that mimic the human ear’s frequency response. These filters divide the audio signal into different frequency bands, and the energy of each band is measured over time.
Once the audio signal has been divided into frequency bands, it is weighted according to the equal loudness contour, which represents how the human ear perceives different frequencies at different sound pressure levels. This weighting compensates for the ear’s non-linear response to different frequencies.
The weighted energy of each frequency band is then averaged over time to calculate the Integrated Loudness. This value is expressed in LUFS and represents the perceived loudness of the entire audio track. LUFS measurements also take into account short-term and momentary loudness levels to capture both the average and dynamic loudness of the content.
Credit: www.masteringthemix.com
Credit: www.edmprod.com
The Importance of LUFS in Loudness Streaming
Loudness normalization using LUFS has become a crucial aspect of streaming platforms to ensure a consistent listening experience for users. Without loudness normalization, users may experience abrupt changes in volume when switching between tracks, causing frustration and discomfort.
By implementing loudness normalization using LUFS, streaming platforms can maintain a consistent loudness level across all content. This means users can enjoy their favorite tracks, podcasts, and videos without constantly adjusting the volume.
Advantages of LUFS Measurement
LUFS measurement offers several advantages over traditional peak level normalization:
Accuracy: LUFS provides a more accurate representation of perceived loudness, taking into account human perception and dynamic range.
Consistency: With LUFS loudness normalization, content from various sources can be played back at a consistent loudness level, regardless of the original recording levels.
Cross-Platform Compatibility: LUFS-based loudness normalization ensures that audio content sounds consistent across different devices and platforms.
User Satisfaction: By eliminating drastic volume changes between tracks, users can enjoy a seamless listening experience without constantly adjusting the volume.
Frequently Asked Questions On What Is Loudness Streaming And How Is It Measured With Lufs?
What Is Loudness Streaming?
Loudness streaming refers to the consistent volume level of audio during playback on digital platforms.
Why Is Loudness Streaming Important?
Maintaining a consistent loudness level ensures a pleasant and uniform listening experience for the audience.
How Is Loudness Measured With Lufs?
Loudness is measured using LUFS (Loudness Units Relative to Full Scale), which quantifies perceived loudness levels in audio content.
What Role Does Lufs Play In Audio Mastering?
LUFS helps audio engineers optimize the loudness of audio content for various streaming platforms, ensuring consistent playback volume.
Conclusion
Loudness streaming and the measurement of loudness using LUFS have revolutionized the way audio content is delivered and consumed on streaming platforms. LUFS provides a more accurate measurement of perceived loudness, ensuring a consistent and enjoyable listening experience for users.
By implementing loudness normalization based on LUFS, streaming platforms can eliminate the annoyance of inconsistent volume levels and allow users to focus on the content they love. As a result, content creators and consumers alike can benefit from a more enjoyable and immersive audio experience.
If you’re new to Reaper software and looking for a tutorial to guide you through the process, you’ve come to the right place. Reaper is a powerful digital audio workstation (DAW) that offers a wide range of features for music production, sound design, and audio editing. Learning how to navigate and make the most out of this software can greatly enhance your creative possibilities. In this article, we’ll explore various resources where you can find tutorials for using Reaper software.
1. Official Reaper Website
The official Reaper website is undoubtedly one of the best places to start your search for Reaper tutorials. The website offers an extensive knowledge base, including a comprehensive user guide, video tutorials, and community forums. The user guide provides a detailed overview of Reaper’s functions, features, and workflows, making it an essential resource for beginners. The video tutorials cover a wide range of topics, from basic navigation to advanced techniques, allowing you to learn at your own pace.
Credit: mastering.com
2. Online Video Platforms
Online video platforms such as YouTube and Vimeo are home to a plethora of Reaper tutorials created by enthusiasts, experts, and professionals. You can easily find step-by-step tutorials, tips and tricks, and in-depth explanations of specific features or techniques. Some channels even specialize in Reaper tutorials, offering a dedicated playlist for learners. Don’t forget to subscribe to your favorite channels to stay updated with new content.
3. Reaper Community Forums
The Reaper community is passionate and supportive, and their forums are an excellent place to connect with fellow users, exchange knowledge, and find tutorials. The forums have dedicated sections for tutorials and guides, where experienced users share their expertise. You can explore existing threads or create a new one to seek assistance or specific guidance. Engaging with the community will not only help you find tutorials but also provide opportunities to network and expand your knowledge base.
4. Third-Party Websites and Blogs
Various third-party websites and blogs offer Reaper tutorials and user guides. These platforms can provide different perspectives and approaches to using Reaper software. Some sites offer text-based tutorials with screenshots, while others provide downloadable resources and templates. Search for popular music production or audio engineering blogs and websites as they often have dedicated sections or articles on Reaper tutorials. Make sure to bookmark valuable resources for future reference.
5. Reaper Workshops and Courses
If you prefer a more structured learning approach, consider attending Reaper workshops or enrolling in online courses. Many music production schools, universities, and online platforms offer comprehensive courses on Reaper software. These courses often include video lessons, assignments, and quizzes to ensure you grasp the concepts and can apply them practically. Check out renowned platforms like Udemy, Coursera, or Skillshare for a wide variety of Reaper courses.
Credit: www.youtube.com
Final Thoughts
Learning how to use Reaper software effectively can significantly enhance your music production or audio editing skills. With a plethora of tutorials available, you have the flexibility to choose the platform and learning style that suits you best. Whether it’s official resources like the Reaper website or third-party platforms, take advantage of these valuable tutorials to unlock the full potential of Reaper software. Happy learning!
Frequently Asked Questions On Where Can I Find A Tutorial For Using Reaper Software?
What Are The Main Features Of Reaper Software?
Reaper software offers powerful audio recording, editing, and mixing capabilities with a customizable interface.
Is There A Free Tutorial Available For Reaper Beginners?
Yes, many online platforms offer free tutorials to help new users get started with Reaper.
How Can I Import Audio Files Into Reaper Efficiently?
You can easily import audio files into Reaper by clicking on “Insert” and selecting the audio file.
Can I Use Plugins With Reaper Software For Mixing?
Reaper supports a wide range of plugins for mixing, enhancing your audio production capabilities.
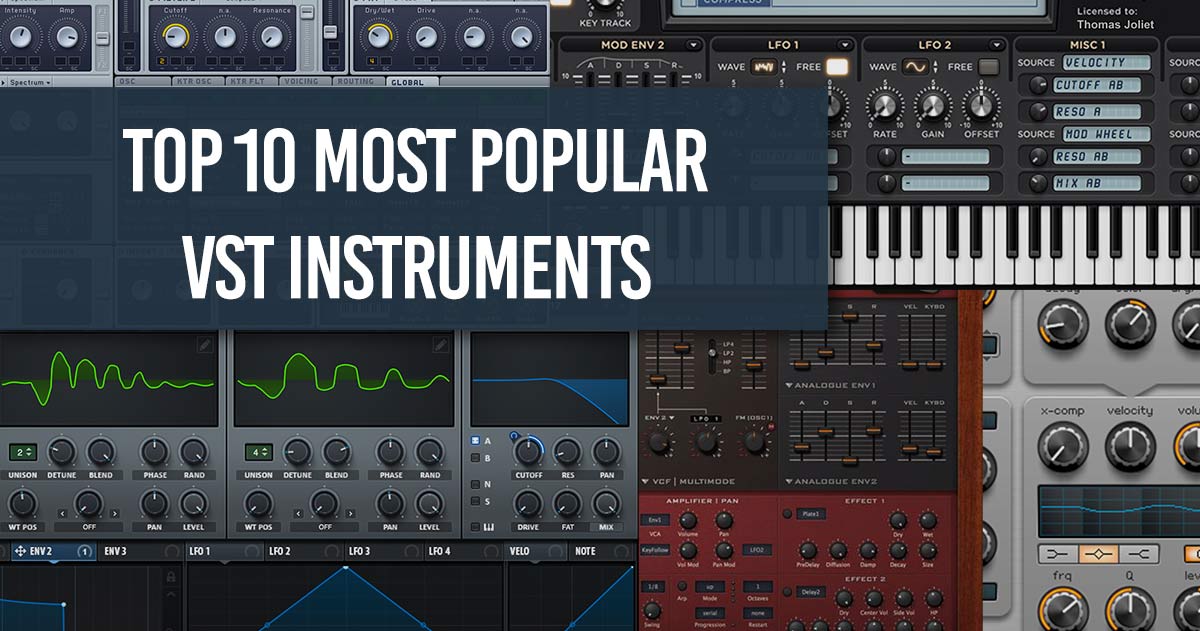
When it comes to music production, Virtual Studio Technology (VST) instruments play a crucial role in creating high-quality sounds and unique melodies. These software synthesizers and samplers have become essential tools for producers, offering a wide range of virtual instruments to enhance the creative process.
1. Serum
Serum is a popular wavetable synthesizer known for its versatile sound design capabilities. It allows users to create complex, evolving sounds that are commonly used in electronic music genres like EDM and dubstep.
2. Kontakt
Kontakt by Native Instruments is widely used for its extensive library of sampled instruments. It offers realistic emulations of acoustic instruments, making it a favorite choice for producing orchestral and cinematic music.
Credit: darkhorseinstitute.com
3. Massive
Massive is a powerful synthesizer that is favored for its deep bass and cutting-edge lead sounds. It is commonly used in genres such as techno, house, and trap for creating dynamic and impactful tracks.
4. Omnisphere
Omnisphere is a feature-rich synthesizer that offers a wide variety of sounds ranging from lush pads to intricate textures. It is a versatile tool used in various music styles, including ambient, pop, and soundtracks.
5. Sylenth1
Sylenth1 is a classic virtual analog synthesizer known for its warm and rich sound quality. It is popular among producers for its ease of use and ability to create classic sounds found in trance, house, and progressive music.
6. Nexus
Nexus is a ROMpler synthesizer that is famous for its ready-to-use presets and high-quality sounds. It is widely used in modern pop and electronic dance music (EDM) due to its quick access to professional-sounding patches.
7. Addictive Drums
Addictive Drums is a VST instrument designed specifically for realistic drum programming. It offers various drum kits and percussion instruments suitable for genres such as rock, jazz, and hip-hop.
8. FabFilter Twin 2
FabFilter Twin 2 is a versatile synthesizer known for its high-quality filters and modulation options. It is valued for its sound-shaping capabilities and is often used in electronic and experimental music productions.
9. Arturia V Collection
The Arturia V Collection is a bundle of vintage synthesizer emulations that pay homage to iconic instruments from the past. It is a go-to choice for musicians looking to recreate classic analog sounds in their productions.
Credit: www.productionmusiclive.com
10. Spitfire Audio LABS
Spitfire Audio LABS offers a range of free virtual instruments that provide high-quality orchestral and cinematic sounds. It is a great resource for composers and producers seeking realistic instrument samples for their projects.
Overall, these popular VST instruments offer a diverse range of sounds and features to inspire creativity and elevate music productions across various genres. Whether you’re a beginner or a seasoned producer, having access to these virtual instruments can enhance the quality and depth of your music compositions.
Frequently Asked Questions On What Are Some Popular Vst Instruments Used In Music Production?
What Are Vst Instruments In Music?
VST instruments are virtual software plugins used to produce music in digital audio workstations.
Why Are Vst Instruments Popular In Music Production?
VST instruments offer a wide range of sounds, effects, and flexibility, enabling musicians to create diverse and high-quality music.
How Do Vst Instruments Enhance The Music Production Process?
VST instruments provide access to an extensive library of virtual instruments, amplifiers, and effects, empowering musicians to unleash their creativity.
Can Vst Instruments Be Used Across Different Music Genres?
Yes, VST instruments cater to various music genres, such as electronic, hip-hop, rock, pop, and orchestral compositions, offering versatility to producers and composers.
When it comes to recording acoustic guitar, there are several factors to consider in order to capture the best sound possible. Whether you’re a beginner or a seasoned musician, these tips will help you achieve a high-quality recording that truly showcases the beauty of your acoustic guitar.
1. Room Selection
The first step in recording acoustic guitar is choosing the right room for the job. Ideally, you want a room with minimal background noise and good acoustics. Look for a space that has a balanced sound and avoid rooms with excessive reverb or echo.
2. Microphone Placement
Proper microphone placement is crucial in capturing the rich and balanced tone of the acoustic guitar. Start by positioning the microphone around the 12th fret, pointing towards the soundhole. Experiment with different mic distances and angles to find the sweet spot that captures the desired sound.
3. Use Multiple Microphones
An effective technique for recording acoustic guitar is to use multiple microphones. This allows you to capture different aspects of the guitar’s sound. Consider combining a close microphone on the soundhole with a room microphone to add depth and ambience to the recording.
4. Experiment with Mic Types
There are various types of microphones that can be used for recording acoustic guitar, such as condenser, dynamic, and ribbon microphones. Each type has its own unique characteristics and tonal qualities. Experiment with different mic types to find the one that best suits your acoustic guitar and desired sound.
5. Monitor the Recording
While recording, it’s important to monitor the sound to ensure optimal results. Use high-quality headphones or studio monitors to accurately gauge the recording. Pay attention to any unwanted noises, such as string squeaks or fret buzz, and make adjustments accordingly.
Credit: acousticguitar.com
Credit: www.waves.com
6. Control External Noise
Avoid external noise interference during recording sessions. Turn off fans, air conditioners, or any other sources of noise that may affect the recording. Consider using soundproofing materials to minimize background noise and reflections.
7. Use a Pop Filter
A pop filter is a screen placed in front of the microphone to prevent plosive sounds, such as “p” and “b” sounds, from distorting the recording. This accessory helps to ensure a clean and clear recording of your acoustic guitar.
8. Pay Attention to String Noise
Acoustic guitars can produce string noise, especially during fast strumming or fingerpicking. To minimize this noise, try using lighter gauge strings or applying a lubricant to the strings. Additionally, practice playing techniques that reduce the amount of string noise produced.
9. Consider Post-Processing
After recording, consider post-processing to enhance the sound of your acoustic guitar. This can include adjusting EQ settings, adding reverb or delay effects, or applying compression to even out the dynamics. Experiment with different techniques to achieve the desired sound.
10. Practice and Experiment
Recording acoustic guitar is a skill that improves with practice. Take the time to experiment with different techniques, microphone placements, and recording environments to find the combination that best captures your unique sound. Don’t be afraid to try new things and trust your ears.
By following these tips, you’ll be well on your way to recording acoustic guitar tracks that sound professional and allow the true essence of your instrument to shine through. Remember, practice makes perfect, so keep honing your recording skills to achieve the best results!
Frequently Asked Questions For What Are Some Tips For Recording Acoustic Guitar?
How Can I Get The Best Sound Recording?
To get the best sound recording of acoustic guitar, ensure a quiet environment and use high-quality microphones.
What Are Some Common Mistakes To Avoid While Recording?
Common mistakes to avoid while recording acoustic guitar include using low-quality microphones and not optimizing room acoustics.
How Can I Enhance The Recording Quality?
To enhance the recording quality, use high-quality microphones, experiment with microphone placement, and optimize room acoustics.
What Is The Ideal Room For Recording Acoustic Guitar?
The ideal room for recording acoustic guitar is a quiet, well-insulated space with minimal sound reflections.
The Haas Effect, also known as the precedence effect or the law of the first wavefront, is a psychoacoustic phenomenon that determines how humans perceive sound based on the timing and direction of arrival. This effect plays a crucial role in audio perception and is widely used in audio engineering to create a sense of width and spaciousness in recordings. In this article, we will explore the Haas Effect, its concept, and its impact on our audio perception.
The Concept of the Haas Effect
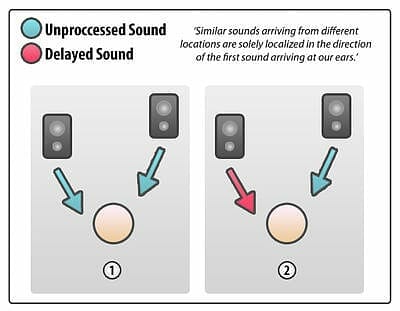
The Haas Effect is based on the idea that when two identical sounds are played simultaneously to a listener, with a slight time delay between them, the listener perceives only one sound source. The delayed sound, called the “preceding sound,” has a shorter delay time of up to approximately 30 milliseconds (ms), while the second sound, called the “following sound,” arrives within this time frame or with a longer delay. The listener predominantly localizes the perceived sound source based on the direction and timing of the preceding sound, rather than considering the following sound. This phenomenon is known as the Haas Effect.
To elaborate further, the Haas Effect states that if a sound reaches the listener’s ear within that short delay time of up to 30 ms, the listener perceives it as originating from the direction of the first sound. However, if the delay time exceeds 30 ms, the listener starts to perceive the sound as an echo or a separate sound source.
Impact on Audio Perception
The Haas Effect has a significant impact on how humans perceive audio, particularly in stereo audio recordings and sound reinforcement systems. By utilizing the Haas Effect, audio engineers can create a wideness or spaciousness effect, adding depth and realism to the sound experience. This effect helps to simulate a more natural and immersive environment, enhancing the audio quality.
Audio engineers often implement the Haas Effect by introducing a slight delay to one of the stereo channels. This creates a perceived localization of sound that is wider than the physical separation of the speakers. By manipulating the delay time and the panning position of the sound sources, engineers can control the perceived width and depth of the audio image.
Furthermore, the Haas Effect is extensively used in sound reinforcement systems to enhance the intelligibility of audio in large venues or outdoor settings. By time-aligning speakers and utilizing delay speakers, engineers can reduce echo and improve sound localization, ensuring that the sound arrives at the listener’s ears within the Haas Effect time frame. This allows for a clear and accurate sound reproduction, enhancing the overall audio perception for the audience.
Credit: output.com
Considerations and Limitations
Despite its benefits, the Haas Effect does come with some considerations and limitations that audio engineers and professionals need to be aware of. One significant consideration is the potential for phase cancellation when combining delayed and non-delayed signals. If the audio signals are not handled correctly, phase cancellation can occur, leading to a negative impact on the audio quality and the perceived stereo image.
Additionally, it is important to note that the Haas Effect can vary depending on various factors such as the listener’s environment, the sound level, and the frequency of the audio signals. Excessive use of the Haas Effect or incorporating long delay times can result in a loss of clarity and precise localization. Therefore, it is crucial for audio engineers to carefully consider these factors and use the Haas Effect sparingly and effectively.
Credit: www.eurekalert.org
In Conclusion
The Haas Effect is a psychoacoustic phenomenon that significantly impacts audio perception. By understanding and implementing this effect in audio engineering, professionals can create a sense of width, spaciousness, and immersion in stereo audio recordings and sound reinforcement systems. However, it is crucial to consider its limitations and use it judiciously to ensure optimal audio quality and localization. The Haas Effect is just one of many tools audio engineers have at their disposal to enhance the overall listening experience.
Frequently Asked Questions For What Is The Haas Effect And How Does It Impact Audio Perception?
What Is The Haas Effect?
The Haas Effect refers to the human ear’s ability to perceive a single sound as two distinct sources when heard with a slight delay.
How Does The Haas Effect Impact Audio Perception?
The Haas Effect affects the localization and spaciousness of audio, enhancing stereo imaging and creating a sense of depth in sound.
As an Amazon Associate I earn from qualifying purchases.
In the world of music and audio recording, having the right microphone can make all the difference in capturing that perfect vocal performance. Here, we will explore some of the best vocal microphones that are favored by professionals and amateurs alike for their exceptional sound quality and versatility.
1. Shure SM58
The Shure SM58 is a legendary microphone known for its durability and clear, vibrant sound. It is a staple in the industry and is favored by singers, podcasters, and live performers for its reliability and consistency.
2. Audio-Technica AT2020
The Audio-Technica AT2020 is a popular choice for those looking for a high-quality microphone at an affordable price. It delivers a smooth, natural sound that works well for a variety of vocal styles.
3. Neumann U87
For those looking for top-of-the-line quality, the Neumann U87 is a go-to microphone for many professionals. It offers pristine sound reproduction and is ideal for studio recording and broadcasting.
Credit: en-ca.sennheiser.com
4. AKG C414
The AKG C414 is a versatile microphone that is highly regarded for its transparent sound and ability to capture vocals with exceptional detail. It is a favorite among recording engineers and producers for its flexibility and reliability.
5. Rode NT1-A
The Rode NT1-A is a favorite among home studio owners and budding musicians for its clear and detailed sound reproduction. It is an excellent choice for vocals and acoustic instruments.
6. Sennheiser MD 421 II
The Sennheiser MD 421 II is a dynamic microphone known for its warm, full-bodied sound and versatility. It is often used for recording vocals, drums, and guitar amps, making it a valuable addition to any recording setup.
7. Blue Yeti
For those looking for a plug-and-play USB microphone, the Blue Yeti is a popular choice. It offers excellent sound quality and versatility, making it ideal for podcasting, streaming, and voiceover work.
Credit: www.amazon.com
Frequently Asked Questions On What Are The Best Vocal Microphones? Discover The Power Of Clear And Dynamic Sound!
What Are The Best Vocal Microphones For Live Performances?
The Shure SM58 and Sennheiser e935 are popular choices for live vocal performances.
How To Choose The Best Vocal Microphone For Recording?
Consider the microphone’s polar pattern, frequency response, and sensitivity when choosing for recording.
What Are The Key Features To Look For In Vocal Microphones?
Look for features like low self-noise, high SPL handling, and frequency response tailored for vocals.
Can I Use A Condenser Microphone For Vocal Recording?
Yes, condenser microphones are commonly used for vocal recording due to their sensitivity and detail.
Conclusion
Choosing the right vocal microphone is essential for capturing a studio-quality sound. Whether you are a professional recording artist or a hobbyist, investing in a high-quality microphone can elevate the quality of your recordings and performances. Consider your budget, recording environment, and intended use when selecting a microphone, and don’t be afraid to test out different options to find the one that best suits your needs.
As an Amazon Associate I earn from qualifying purchases.
Drum microphones play a crucial role in capturing the essence of a drum set, ensuring that each beat and cymbal crash is heard with clarity and precision. Whether you are a professional drummer or a passionate music enthusiast, investing in high-quality drum mics is essential to elevate your sound quality. Here are some of the best drum microphones that can take your drumming experience to the next level:
1. Shure SM57
The Shure SM57 is a versatile microphone that works exceptionally well on drums, particularly for recording snare drums. Its durability and high-quality sound make it a go-to choice for many drummers and recording engineers.
2. Sennheiser e604
The Sennheiser e604 is a dynamic microphone specifically designed for toms, providing excellent sound isolation and clarity. Its compact size and easy setup make it a popular choice among drummers for live performances and studio recordings.
3. AKG D112
The AKG D112 is a dynamic microphone optimized for kick drums, delivering powerful and punchy low-end frequencies. Its robust construction and superior bass response make it an ideal choice for capturing the thunderous beats of your kick drum.
4. Audix D6
The Audix D6 is another top choice for kick drums, known for its deep bass response and minimal distortion. Its tailored frequency response enhances the clarity and definition of your kick drum, making it a favorite among drummers and sound engineers.
5. Shure Beta 52A
The Shure Beta 52A is a reliable microphone for kick drums, offering extended low-frequency response and maximum sound pressure levels. Its robust design and precise sound reproduction make it a popular choice for capturing the dynamic range of your kick drum performance.
Credit: m.facebook.com
6. Audio-Technica ATM450
The Audio-Technica ATM450 is a versatile condenser microphone suitable for both overhead and cymbal miking. Its wide frequency response and low self-noise ensure accurate and detailed sound capture, making it an excellent choice for capturing the shimmering tones of your cymbals.
Credit: www.sweetwater.com
7. Neumann KM 184
The Neumann KM 184 is a high-end condenser microphone well-suited for capturing the nuances of drum overheads and room mics. Its transparent sound and exceptional detail make it a favorite among professional drummers and recording studios seeking pristine audio quality.
Frequently Asked Questions Of What Are The Best Drum Mics?: Discover The Ultimate Drumming Sound
What Are The Essential Drum Mics?
Quality kick, snare, and overhead mics are essential for capturing the full drum set sound.
How To Choose Drum Mics?
Consider the type of sound you want, drum size, and mic durability for an optimal selection.
Which Brands Offer Top Drum Mics?
Shure, Sennheiser, AKG, and Audio-Technica are renowned for their high-quality drum microphones.
Why Are Dynamic Mics Popular For Drums?
Dynamic mics handle high sound pressure levels and are excellent for capturing the punch and impact of drums.
Conclusion
Choosing the right drum microphone is essential for achieving the perfect sound quality in your drum recordings or live performances. Each of the drum mics mentioned above offers unique features and benefits that cater to different drumming styles and preferences. Whether you are looking to enhance the punch of your kick drum or capture the subtle nuances of your cymbal work, investing in quality drum mics can make a significant difference in your drumming experience.
Make sure to explore the options available and select the drum microphones that best suit your specific needs and budget. With the right combination of drum microphones, you can unlock the full potential of your drumming talent and create impressive soundscapes that resonate with your audience.