This guide covers music theory in FL Studio. Music theory plays a crucial role in creating compelling and harmonious music. When it comes to producing music using FL Studio, having a solid understanding of music theory can be a game-changer. In this article, we will explore the basics of music theory and how you can apply it in FL Studio to enhance your music production skills. Let’s dive in!
The Importance of Music Theory
Music theory is the foundation of creating melodies, harmonies, and chord progressions. It helps you understand how different musical elements work together and enables you to express your musical ideas effectively. By learning music theory, you gain the tools to compose music with intention and create a cohesive sound.
Credit: eightify.app
Key Concepts in Music Theory
Before we delve into applying music theory in FL Studio, let’s familiarize ourselves with some key concepts:
Notes: Notes are the fundamental building blocks of music. Each note is represented by a letter ranging from A to G.
Scales: Scales are a series of notes arranged in ascending or descending order. They form the basis for melodies and harmonies.
Chords: Chords are formed by playing multiple notes simultaneously. They add depth and richness to your music.
Chord Progressions: Chord progressions are a series of chords played in a specific sequence. They create musical tension and resolution.
Rhythm: Rhythm refers to the timing and duration of musical sounds. It influences the feel and groove of a composition.
Applying Music Theory in FL Studio
FL Studio offers a range of tools and features that enable you to apply music theory seamlessly. Here’s how you can use FL Studio to enhance your understanding and application of music theory:
1. Piano Roll View
The Piano Roll view in FL Studio is an essential tool for composing melodies and exploring scales. It allows you to visualize and edit MIDI notes easily. By using the Piano Roll, you can experiment with different melodies, adjust note durations, and create harmonies.
2. Chord Progressions And Arpeggiation
FL Studio provides several plugins and features that make it easy to create chord progressions. The Chords & Scales plugin allows you to generate chords based on a selected scale, making it a handy tool for beginners. Additionally, FL Studio’s Arpeggiator plugin can help you create intricate rhythmic patterns based on your selected chords.
3. Midi Controllers And Virtual Instruments
FL Studio offers support for MIDI controllers and a vast library of virtual instruments. By connecting a MIDI keyboard or controller, you can play melodies and chords in real-time, giving you a more organic feel while composing. The virtual instruments in FL Studio provide a wide range of sounds and effects to enhance your compositions.
4. Quantization And Swing
Quantization and Swing are powerful features in FL Studio that allow you to adjust the timing and groove of your MIDI notes. Quantization aligns the notes to a grid, ensuring they are in perfect time. Swing introduces subtle variations in timing, giving your music a more human-like feel. Experimenting with these features can help you create unique rhythms and grooves.
5. Music Theory Plugins And Resources
FL Studio also offers various music theory plugins and resources that can assist you in learning and applying music theory concepts. These plugins provide scale recommendations, chord suggestions, and guidance on building chord progressions. Familiarize yourself with these tools to streamline your music theory process.
Credit: www.productionmusiclive.com
Frequently Asked Questions For Understanding Music Theory In Fl Studio: Mastering Melodies & Chords
What Is The Importance Of Music Theory In Fl Studio?
Understanding music theory in Fl Studio is crucial for creating harmonious and melodious compositions. It provides a solid foundation for composing, arranging, and understanding the structure of music.
How Can Music Theory Benefit My Music Production In Fl Studio?
Music theory enables you to create complex chord progressions, melodies, and harmonies with confidence. With a solid understanding of music theory, you can enhance the creativity and complexity of your music production in Fl Studio.
Where Can I Learn Music Theory For Fl Studio?
There are various online tutorials, courses, and resources specifically designed to teach music theory for Fl Studio. Additionally, you can find books and videos that focus on music theory as it relates to this software.
Can I Produce Professional-quality Music In Fl Studio Without Understanding Music Theory?
While it’s possible to create music in Fl Studio without in-depth knowledge of music theory, understanding its principles can immensely improve the quality and depth of your compositions.
Conclusion
Understanding music theory in FL Studio is essential for producing high-quality music. By grasping the fundamental concepts of music theory and utilizing the powerful tools and features in FL Studio, you can unlock endless creative possibilities. Incorporate music theory into your workflow and watch your compositions flourish!
Are you a music producer or enthusiast using FL Studio? If so, you may already be familiar with the powerful Sylenth1 synthesizer. This virtual instrument plugin has become a staple in the industry, known for its exceptional sound quality and versatile features. In this article, we will explore how to use the Sylenth1 synthesizer in FL Studio to take your music production to new heights.
Credit: www.productionmusiclive.com
Installing Sylenth1
Before we delve into using Sylenth1, ensure that you have the latest version of FL Studio installed on your computer. Next, you’ll need to acquire Sylenth1 and install it as a VST plugin. Visit the LennarDigital website and download the appropriate version for your operating system. Once downloaded, follow the installation instructions provided by the plugin manufacturer.
Setting Up Sylenth1 in FL Studio
After successfully installing Sylenth1, open FL Studio and create a new project. To use Sylenth1, you need to add it as an instrument track. Here’s how:
Click on the “Add” tab in the FL Studio toolbar and select “More plugins” from the drop-down menu.
In the plugins window, locate Sylenth1 and click on it to select it.
Click on the “Add” button at the bottom right corner of the plugins window to add Sylenth1 to your project.
Once added, Sylenth1 will appear as an instrument track in the FL Studio playlist. Click on the track to open the Sylenth1 interface and start exploring its features.
Exploring the Sylenth1 Interface
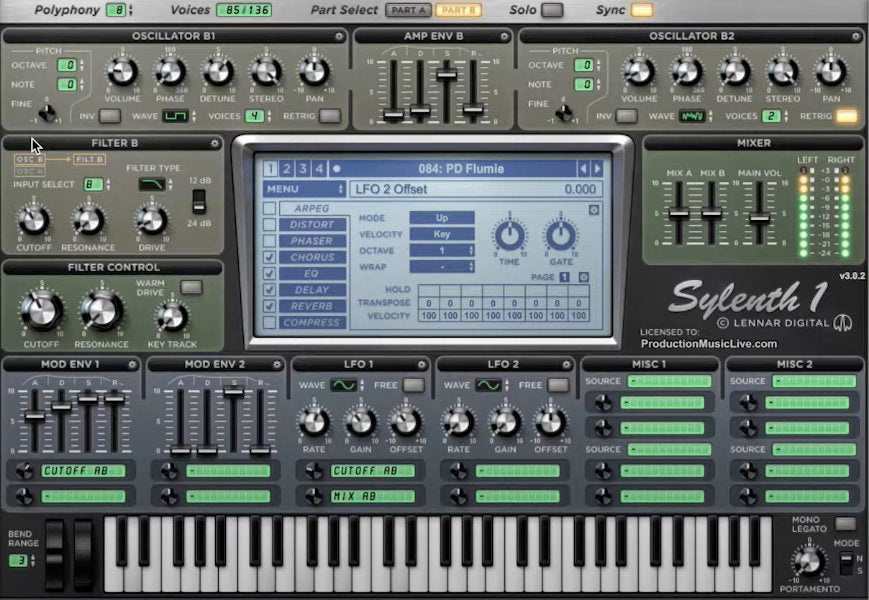
The Sylenth1 interface consists of various sections that allow you to shape and manipulate your sounds. Let’s take a closer look at each section:
Section
Description
Oscillators
Here you can select and shape the basic waveforms of your sound. Sylenth1 offers four oscillators with a wide range of waveform options.
Filters
Filters help you control the frequency content of your sound. Sylenth1 provides a variety of filter types, including low-pass, high-pass, and band-pass filters.
Envelopes
Envelopes determine the behavior of various parameters over time. With Sylenth1, you can shape the volume, filter, and modulation envelopes to create dynamic sounds.
Modulation
The modulation section allows you to apply modulation effects to your sound, such as modulation envelopes, LFOs (Low-Frequency Oscillators), and more.
Effects
Sylenth1 offers a wide range of built-in effects, including reverb, delay, chorus, and distortion. These effects can add depth and character to your sounds.
Each section of the Sylenth1 interface provides numerous parameters to tweak and shape your sounds. Spend time experimenting with these parameters to create unique and captivating sonic textures.
Creating Sounds with Sylenth1
Now that you are familiar with the Sylenth1 interface, let’s dive into creating sounds from scratch:
Start by selecting an oscillator waveform for your sound. Experiment with different waveforms to find the desired timbre.
Adjust the filter settings to shape the frequency content of your sound. Use low-pass filters for warmer tones, high-pass filters for brightness, and band-pass filters for more focused sounds.
Apply envelopes to add movement to your sound. Use volume envelopes to shape the overall volume, filter envelopes to control the filter cutoff, and modulation envelopes to modulate various parameters.
Experiment with the modulation section to introduce effects like vibrato or tremolo. Utilize LFOs to create dynamic modulation and movement in your sounds.
Enhance your sounds with built-in effects. Add reverb to create a sense of space, delay for echoes, chorus for width, and distortion for added grit and character.
Remember, the key to creating unique sounds with Sylenth1 is experimentation. Don’t be afraid to push the boundaries and explore the vast possibilities this synthesizer has to offer.
Credit: www.productionmusiclive.com
Frequently Asked Questions On Using The Sylenth1 Synthesizer In Fl Studio: Mastering Sound Design
What Is The Sylenth1 Synthesizer?
The Sylenth1 Synthesizer is a popular software synthesizer known for its high-quality sound and user-friendly interface.
How To Install Sylenth1 In Fl Studio?
To install Sylenth1 in Fl Studio, simply run the installer and follow the prompts. Then, in Fl Studio, go to “Options” > “Manage plugins” and enable Sylenth1.
What Makes Sylenth1 Popular Among Producers?
Producers love Sylenth1 for its warm analog sound, versatile oscillators, and intuitive interface that allows for easy sound design.
What Are The Key Features Of Sylenth1?
Sylenth1 features four unison oscillators, two analog-sounding filter sections, and a powerful modulation system, among other highly regarded features.
Conclusion
Sylenth1 is a remarkable synthesizer that can unlock a world of sonic possibilities in your FL Studio projects. By following the steps outlined in this article, you should now be equipped with the knowledge to use Sylenth1 with confidence. As with any instrument, continuous practice and experimentation will help you master its capabilities. So, start creating captivating sounds with Sylenth1 and elevate your music production.
Fl Studio is a powerful and versatile digital audio workstation that offers a wide array of tools and features for music production. One of its standout features is the Directwave sampler, which allows musicians and producers to manipulate and create unique sounds from samples.
Getting Started with Directwave Sampler
When working with Directwave in Fl Studio, the first step is to load the plugin onto a track. Once loaded, users can drag and drop audio samples directly into Directwave or choose from a library of included samples. This intuitive process makes it easy to start experimenting with the sampler and discovering its capabilities.
Manipulating Samples
Directwave offers a wide range of tools for manipulating samples, including pitch shifting, time stretching, and loop manipulation. These tools allow producers to alter the characteristics of a sample to fit their composition and create unique sounds.
Credit: www.bhphotovideo.com
Layering and Mixing
With Directwave, users can layer multiple samples together to create rich, complex sounds. Additionally, the sampler includes comprehensive mixing features, allowing users to adjust the volume, panning, and effects of each layered sample to create a cohesive and balanced sound.
Advanced Features and Modulation
Beyond basic sample manipulation, Directwave offers advanced features such as modulation, filters, and effects. These tools enable users to add depth and complexity to their sounds, allowing for creative exploration and experimentation.
Credit: homestudiogenie.com
Integration with Fl Studio Workflow
One of the key advantages of using Directwave in Fl Studio is its seamless integration with the DAW’s workflow. Directwave can easily be automated and controlled using Fl Studio’s automation and modulation capabilities, allowing for precise control over the sampler’s parameters.
Optimizing for Performance
Directwave includes optimization features to ensure smooth performance even with complex, layered samples. Users can adjust settings to optimize memory usage and performance, ensuring that their compositions run efficiently within the DAW.
Exporting and Sharing
Once the desired sounds have been created and manipulated in Directwave, users can export them as individual audio files or save preset settings for future use. This allows for easy sharing and collaboration with other musicians and producers.
Frequently Asked Questions For Using The Directwave Sampler In Fl Studio : Mastering The Power Features
Faq 1: What Is The Directwave Sampler In Fl Studio?
The Directwave Sampler in FL Studio is a powerful virtual sampler plugin that allows users to create and manipulate high-quality sampled instruments and sounds in their music production.
Faq 2: How Does The Directwave Sampler Work?
The Directwave Sampler works by loading and mapping audio samples onto virtual keyboards or pads, allowing users to play and manipulate the sampled sounds using various parameters such as pitch, velocity, filters, and effects.
Faq 3: Can I Import My Own Samples Into The Directwave Sampler?
Yes, you can import your own audio samples into the Directwave Sampler. This gives you the freedom to use your own customized sounds and create unique instruments for your music compositions.
Faq 4: What Are The Key Features Of The Directwave Sampler?
The Directwave Sampler offers various key features such as multi-sampled instruments, advanced sample mapping and looping, built-in effects and filters, real-time sample manipulation, and support for popular sample formats like WAV, AIFF, and SFZ.
Conclusion
Overall, the Directwave sampler in Fl Studio is a powerful tool for musicians and producers looking to create unique, custom sounds from samples. Its intuitive interface, robust feature set, and seamless integration with Fl Studio make it an essential tool for any music production workflow.
Whether you’re a beginner experimenting with samples for the first time or an experienced producer looking to push the boundaries of sound design, Directwave offers a wealth of possibilities for creating and manipulating samples in Fl Studio.
Cubase preferences are stored in the application data folder of the operating system. On Windows, this folder is located in the user’s AppData directory; on macOS, it’s in the Library.
Cubase stands as a stalwart in the digital audio workstation (DAW) realm, offering musicians, producers, and audio engineers a robust platform for music production and audio editing. With a wealth of features that cater to a wide range of audio tasks, Cubase allows users to tailor their experience to their preferences.
These personalized settings are crucial for streamlining workflow, hence understanding where Cubase stores these preferences is essential. The storage of these settings is system-dependent, enabling users to back up or transfer their configurations when needed. As a professional tool, Cubase ensures that user settings are kept in a predictable and accessible location, making the technical aspects of music production more manageable. Whether tweaking audio plugins, key commands, or interface layouts, knowing where to find these preference files can save time and frustration for seasoned professionals and newcomers alike.
Credit: forums.steinberg.net
Introduction To Cubase Preferences
Cubase, a powerhouse in music production, offers a suite of features for audio editing and recording. At the heart of a streamlined workflow lies the Cubase Preferences panel. This central hub stores your custom settings, ensuring a personalized and efficient creative process. Accessing and managing these settings is crucial for any user looking to optimize their Cubase experience.
Importance Of Preference Settings
Preference settings in Cubase allow users to tailor the software to their unique needs. These settings cover a wide array of options, from project handling to audio connections. Custom preferences ensure that the software reacts in a way that complements an artist’s workflow, leading to quicker access to tools and a smoother creative experience. Key settings include:
Audio setup
MIDI configurations
Control room setup
Appearance tweaks
Common Challenges With Preferences
Despite their benefits, managing preferences can sometimes pose challenges. Users often face difficulties such as losing custom settings after an update or struggling to find where preferences are stored. Another common issue is transferring settings to a new computer, which can disrupt workflow consistency. A proper understanding of how to locate and backup preference files will prevent these issues from impacting your production environment.
Accessing Cubase Preferences
Accessing Cubase Preferences is crucial for tailoring your music production workflow. Whether you’re a newcomer to Cubase or a seasoned expert, understanding how to navigate and customize these preferences can greatly enhance your productivity.
Navigating The Menu
Finding preferences in Cubase is straightforward. Start by opening Cubase and focusing on the main menu bar at the top.
Click on ‘Edit’.
Select ‘Preferences’ from the dropdown list.
This action will open the preferences window, displaying a range of settings.
The preferences window has multiple tabs on the left-hand side. These tabs help you locate specific settings.
Keyboard Shortcuts For Efficiency
Pro users often rely on keyboard shortcuts to save time. Cubase allows for rapid preferences access via these shortcuts.
Operating System
Shortcut
Windows
Ctrl + ,
Mac
Cmd + ,
Memorize these shortcuts for efficiency. With these, you can access preferences without navigating through menus.
Location Of Cubase Preferences On Windows
If you’re using Cubase on a Windows-based system, knowing where Cubase preferences are stored can save you time. Preferences hold crucial settings for your projects. Let’s look at the exact location on Windows.
Default Preference Folder
Cubase stores its default preferences in a system folder. For Windows, this folder is usually located in the user’s AppData directory. The exact path is:
Replace ‘[Your Username]‘ with your actual Windows username. ‘[Version]‘ stands for the version of Cubase you’re running.
Finding Hidden Files And Folders
By default, Windows hides the AppData folder. This means you need to reveal it to access Cubase preferences. Here’s a simple guide:
Open File Explorer.
Choose the ‘View’ tab.
Check the box for ‘Hidden items’.
With hidden items visible, navigate to the path mentioned above to find your Cubase preferences.
Cubase Preferences On Macos
For music producers and audio engineers using Cubase on macOS, managing preferences is key to a smooth workflow. These settings control how Cubase behaves, from keyboard shortcuts to plugin paths. But what happens when you need to find your customized preferences or back them up? In macOS, Cubase stores preferences in specific directories that can be easily accessed with a few steps.
Mac-specific Preference Directories
User-specific preference files for Cubase live deep within the macOS Library folder. These files are essential for maintaining your personalized Cubase experience. They hold your custom settings and configurations, which Cubase reads on startup. Here’s where Cubase keeps its data:
Home Folder: Your personalized settings
Library: Shared between apps
Preferences: Specific to Cubase
Remember, macOS may hide the Library folder by default. This prevents accidental changes to critical system files.
Using Finder To Locate Preferences
Finding your Cubase preferences in Finder is straightforward. Here’s how:
Open Finder.
Hold the ‘Option’ key and click ‘Go’ in the menu.
Select the ‘Library’ that appears.
Navigate to ‘Preferences’ and search for ‘Cubase’.
Your preferences are in folders named with the Cubase version number. Copy these to backup your settings. Use this method before major updates or reinstalls to keep your customized setup safe.
Backing Up Cubase Preferences
Backing up Cubase preferences is a crucial step for Cubase users. Knowing your settings and customizations are safe can give you peace of mind. In times when you’re upgrading, migrating to a different computer, or recovering from data loss, these backups can be a lifesaver. Let’s explore how you can ensure your preferences and settings remain intact.
Methods To Backup
Backing up your Cubase preferences is straightforward. Follow these methods to protect your customized settings:
Access Preferences: Navigate to ‘Edit’ > ‘Preferences’ in Cubase.
Locate Preferences Folder: Cubase stores its preferences in a folder which you can access via the ‘Preferences’ dialog.
Manual Copy: Manually copy the preference files onto a secure location like an external hard drive or cloud storage.
Restoring Preferences From A Backup
If you need to restore your preferences, follow these simple steps:
Close Cubase: Ensure Cubase is not running before restoring preferences.
Find Backup: Locate your preference backup you previously saved.
Copy Back: Copy the files back to the original preference folder in Cubase.
Open Cubase: Launch Cubase to apply restored settings.
Transferring Preferences Between Systems
Transferring Preferences Between Systems becomes crucial when upgrading to a new computer or sharing settings with collaborators. Cubase stores custom preferences facilitating a unique workflow tailored to users’ needs. Moving these preferences saves time and maintains consistency across different systems. Delve into the seamless process of exporting and importing your Cubase preferences to ensure a smooth transition.
Preparing Preferences For Transfer
Boldly venture into the preparation phase of transferring your Cubase preferences. Backup and consolidation are the key steps to success here:
Locate the Cubase preferences folder on the current system.
Copy the entire folder or selective settings files.
Save them to a secure location, like a USB drive or cloud storage.
Importing Preferences On A New System
Bringing your workflow to a new computer is simple and can be done with a few steps:
Install Cubase on the new system, if not already done.
Access the preferences folder in Cubase’s designated directory.
Replace the default preferences files with your own.
Restart Cubase to apply the imported settings.
Moving your preferences lets you jump right back into your music production with the familiar setup you love.
Troubleshooting Preference Issues
When using Cubase, you might face an issue where preferences need a fix. These steps will guide you in getting things back on track.
Dealing With Corrupted Preferences
Preferences in Cubase can sometimes get corrupted. This could cause unexpected behavior or crashes. To resolve this:
Locate the preferences folder – it’s found in the Cubase application data directory.
Rename the folder – something like ‘Preferences_old’ will do. This forces Cubase to create a new set of defaults.
Restart Cubase – to see if problems are gone. If issues persist, further steps may be needed.
Resetting To Default Settings
If problems continue, it may be best to reset to the original settings. Here’s how to make a fresh start:
Close Cubase before making changes to avoid conflicts.
Delete the preferences folder – Cubase will create a new one when it restarts.
Reopen Cubase – and start with a clean slate.
Advanced Tips For Managing Preferences
Exploring the depths of Cubase’s preferences can unleash a powerhouse of productivity. Mastering preference management is key for streamlining the creative process. Let’s dive into some advanced tips to customize and share your ideal setup.
Customizing Preferences For Workflow
Personalizing Cubase to fit your workflow is paramount. Follow these steps to tweak your preferences to perfection:
Open Cubase and go to Edit > Preferences to access your current settings.
Explore each tab—customize settings like color themes, key commands, and audio connections.
Test different configurations to find the optimal setup that suits your workflow.
Remember, a tailored workspace means faster navigation and enhanced focus.
Exporting And Sharing Settings
Cubase allows you to export your preferences for backup or to share with others:
Access the Preferences dialog as before.
Select the Presets drop-down menu, typically found at the bottom of the window.
Choose Save Preset and give your settings a unique name.
Use the Export option to save a file to your desired location.
Share your settings file with team members or across multiple workstations to ensure a consistent environment.
User Community And Support
Many Cubase users find answers in the community. People with the same passion help each other. They share where preferences are stored and more.
Engaging With Other Users
Connect with peers for tips and insights. Share your own experiences. Find answers together. Build a network of Cubase pros.
Join online forums and groups.
Follow threads about Cubase preferences.
Exchange custom settings.
Use the community wisdom to solve problems. This helps you get the most from Cubase’s features.
Leveraging Official Support Channels
For tough questions, official sources have the best answers. They offer precise information about preferences and settings.
Visit the Cubase support website.
Check out the Cubase knowledge base and FAQs.
Contact customer service for direct help.
Official support provides exact details on preferences storage. Use this to customize and troubleshoot effectively.
Frequently Asked Questions On Where Are Cubase Preferences Stored
Where Do I Find Cubase Preferences Files?
Cubase preferences are stored in the application data folder on your computer. For Windows, this is usually under `C:Users[Username]AppDataRoamingSteinbergCubase [version]`. On Mac, find them in `~/Library/Preferences/Cubase [version]`.
Can I Transfer Cubase Settings To Another Machine?
Absolutely! To transfer settings, copy the Cubase preferences folder from the current machine to the equivalent location on the new machine. Ensure Cubase is not running during the transfer to avoid any conflicts.
What Happens If I Delete Cubase Preferences?
Deleting Cubase preferences resets the software to its default state. It can solve issues caused by corrupt or conflicting settings. However, you will lose all personalized configurations, so it’s best to back them up first.
How To Backup Cubase Preferences?
Backing up Cubase preferences is simple. Navigate to the preferences folder, then copy the entire folder to a backup location such as an external drive or cloud storage.
Conclusion
Understanding Cubase preferences and their storage location enhances your audio production workflow. Keep regular backups to safeguard your customizations. By knowing where these files sit, you’re set for smoother sessions. Remember, managing preferences is pivotal for a personalized and efficient Cubase experience.
What is the Purpose of a True Peak Meter in Audio Production?
In the world of audio production, accuracy is key. Engineers and producers strive to create high-quality audio that sounds great on various playback systems. To achieve this, they rely on a range of tools and techniques, one of which is the true peak meter.
Understanding True Peak Meter
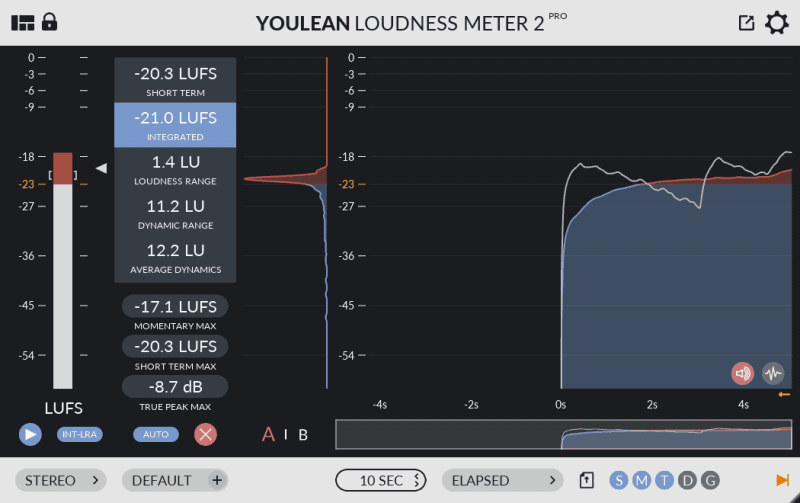
A true peak meter is an essential tool used to measure the peak levels of an audio signal. Unlike a regular peak meter, which measures the maximum sample value of a signal, a true peak meter takes into account the inter-sample peaks that can occur when an analog signal is converted to digital format. This ensures that the audio remains within the required limits, preventing the occurrence of digital clipping and distortion.
The Purpose of True Peak Meter
The main purpose of a true peak meter is to ensure that audio signals do not exceed the maximum level allowed by the respective medium, such as streaming platforms, broadcast standards, or music distribution platforms. This is crucial because exceeding these limits can lead to audio distortion and loss of quality, especially when the signal is decoded and played back on different systems.
True peak meters provide accurate readings of the actual peak levels that would occur during the analog-to-digital conversion process. By capturing these inter-sample peaks, audio engineers can make adjustments to avoid any potential issues before the audio is finalized for distribution or playback.
Credit: www.izotope.com
Benefits of Using True Peak Meter
The use of true peak meters offers several benefits:
Preventing distortion: By monitoring and controlling the peak levels, audio professionals can avoid distortion and ensure that the audio maintains its integrity across various playback systems.
Compliance with standards: Different platforms and mediums have specific loudness standards that audio must adhere to. True peak meters help engineers ensure compliance with these standards, preventing potential rejection or poor listening experiences.
Preserving dynamic range: True peak meters allow engineers to find the optimal balance between the desired loudness and the preservation of the audio’s dynamic range. This ensures that the music or audio maintains its intended impact on the listener.
Enhanced audio quality: By avoiding digital clipping and distortion, true peak meters contribute to overall improved audio quality, creating a more enjoyable experience for the listeners.
Using True Peak Meters Effectively
To make the most of true peak meters, it is important to:
Monitor levels consistently: Regularly check the true peak meter throughout the audio production process to ensure that the levels are within acceptable limits.
Adjust levels when necessary: Use the information provided by the true peak meter to make necessary adjustments to the audio levels, applying techniques such as compression or limiting to control peaks and prevent distortion.
Test across different systems: Playback the audio on various devices and systems to ensure that it maintains its quality and does not exceed the allowed peaks.
Stay up to date with standards: Standards for audio levels and loudness can change over time. Stay informed about the specific requirements for different platforms and mediums to ensure compliance and optimal audio quality.
Credit: mastering.com
Frequently Asked Questions Of What Is The Purpose Of A True Peak Meter In Audio Production?
What Is A True Peak Meter In Audio Production?
A true peak meter measures the peak levels of an audio signal without any digital clipping.
Why Is It Important To Use A True Peak Meter?
Using a true peak meter is essential for preventing distortion and ensuring audio doesn’t clip.
How Does A True Peak Meter Differ From A Standard Peak Meter?
Unlike a standard peak meter, a true peak meter accounts for inter-sample peaks accurately.
Can A True Peak Meter Help In Mastering Audio Tracks?
Yes, a true peak meter helps in mastering by ensuring the audio doesn’t exceed the peak limit.
Conclusion
A true peak meter is a valuable tool in audio production, helping engineers and producers maintain accurate levels and prevent audio distortion. By monitoring and controlling the actual peak levels that occur during the analog-to-digital conversion, true peak meters ensure compliance with standards and preserve the overall audio quality. Proper use of true peak meters is essential for creating high-quality audio that sounds great on any playback system.
How is a High Pass Filter Used in Audio Production?
A high pass filter is a critical tool in audio production that allows for precise control over the low-frequency content of a sound signal. It is commonly used to remove unwanted low-frequency noise or to sculpt the tonal balance of a recording. In this article, we will explore the functions and applications of high pass filters in audio production.
What is a High Pass Filter?
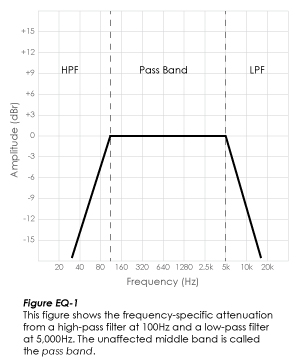
A high pass filter is an audio processing tool that attenuates or cuts off frequencies below a certain cut-off point while allowing higher frequencies to pass through unaffected. This cut-off point is determined by the filter’s settings and is measured in Hertz (Hz).
The Function of a High Pass Filter
High pass filters are used to eliminate low-frequency rumble, stage noise, and other unwanted sounds that may compromise the clarity and quality of a recording. By removing these low-frequency components, a high pass filter helps to clean up the audio signal and makes it more focused and defined.
Credit: theproaudiofiles.com
Applications of High Pass Filters
High pass filters have a variety of applications in audio production. Some common uses include:
Removing rumble and hum: High pass filters can eliminate low-frequency background noise such as air conditioning hum or ground loop interference.
Improving clarity: By removing unnecessary low-end frequencies, high pass filters can make vocals and instruments sound clearer and more defined.
Creating space: High pass filters can help create separation between instruments in a mix by reducing low-frequency masking.
Credit: www.youtube.com
How to Use a High Pass Filter
Using a high pass filter in audio production is relatively straightforward. Most digital audio workstations (DAWs) and audio processors have built-in high pass filters that can be applied to individual tracks or the overall mix. To use a high pass filter:
Select the audio track you want to apply the high pass filter to.
Locate the high pass filter control in your software or hardware device.
Adjust the cut-off frequency to the desired point where you want to start filtering out low frequencies.
Listen to the track and make any additional adjustments as needed to achieve the desired sound.
Frequently Asked Questions Of How Is A High Pass Filter Used In Audio Production?
How Does A High Pass Filter Work In Audio Production?
A High Pass Filter allows higher frequencies to pass through while attenuating lower frequencies, resulting in a cleaner and clearer audio signal.
Why Is A High Pass Filter Important In Audio Production?
A High Pass Filter is crucial in Audio Production as it helps eliminate unwanted low-frequency noise, such as rumble and background hum, improving the overall sound quality.
What Are The Benefits Of Using A High Pass Filter In Audio Production?
Using a High Pass Filter in Audio Production helps remove low-frequency rumble, resulting in a cleaner mix, increased clarity, and better definition of high-frequency elements like vocals and instruments.
When Should I Use A High Pass Filter In Audio Production?
You should use a High Pass Filter in Audio Production when you want to remove low-frequency noise, enhance the intelligibility of vocals, emphasize the clarity of instruments, or reduce muddiness in the mix.
Conclusion
In conclusion, high pass filters play a crucial role in audio production by helping to clean up and enhance the quality of sound recordings. By selectively removing unwanted low-frequency content, high pass filters allow audio engineers and producers to achieve a more polished and professional sound. Understanding how to effectively use high pass filters can greatly improve the overall clarity and impact of your music productions.
When it comes to music production, creating a spacious and immersive mix is essential. One powerful tool that can help achieve this is stereo imaging. In this article, we’ll explore how you can harness the power of stereo imaging in FL Studio to enhance the width and depth of your mixes.
Understanding Stereo Imaging
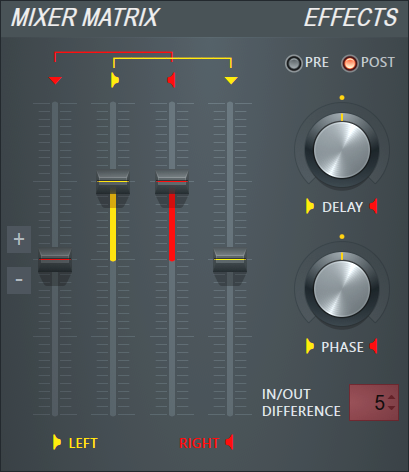
Stereo imaging refers to the spatial placement of audio within the stereo field. It allows you to position different elements of your mix across the left and right channels, creating a sense of width and depth. In FL Studio, you can manipulate the stereo image of your tracks using a variety of techniques and tools.
Using Panning
One of the fundamental techniques for creating a wide stereo image is panning. FL Studio provides a simple and intuitive way to adjust the panning of individual audio channels. By placing different sounds at varying positions across the stereo spectrum, you can achieve a balanced and spacious mix.
Utilizing Stereo Widening Plugins
FL Studio offers a range of stereo widening plugins that can instantly enhance the width of your mix. Plugins like Fruity Stereo Enhancer and Fruity Stereo Shaper allow you to manipulate the stereo field, expand the stereo image, and add depth to your tracks. These tools are particularly useful for giving synths, pads, and other elements a wider, more expansive sound.
Layering and Duplicating Tracks
An effective way to create a rich stereo image is by layering and duplicating tracks. By stacking multiple versions of the same sound and subtly altering their panning and processing, you can achieve a sense of fullness and width. FL Studio’s versatile audio editing capabilities make this process seamless and intuitive.
Credit: www.image-line.com
Credit: www.image-line.com
Applying Effects and Automation
Effects such as chorus, flanger, and reverb can further enhance the stereo image of your mix. FL Studio’s extensive collection of effects plugins empowers you to add spatial depth, movement, and character to your tracks. Additionally, automation can be used to dynamically modulate parameters and create evolving stereo landscapes within your mix.
Checking Mono Compatibility
While stereo imaging is essential for creating an immersive listening experience, it’s important to ensure that your mix translates well to mono playback systems. FL Studio allows you to easily switch between stereo and mono monitoring to assess the mono compatibility of your mix. This ensures that your music will sound great across diverse playback environments.
Best Practices for Stereo Imaging in FL Studio
Here are some best practices to keep in mind when utilizing stereo imaging in FL Studio:
Use stereo imaging to create a sense of space and dimension in your mix.
Experiment with different panning positions to achieve a balanced stereo image.
Be mindful of phase cancellation when layering and processing stereo tracks.
Regularly check your mix in mono to ensure mono compatibility.
Consider the playback environment when optimizing your stereo image.
By incorporating these best practices into your workflow, you can harness the power of stereo imaging to elevate the impact and appeal of your music productions in FL Studio.
Frequently Asked Questions For Using Stereo Imaging In Fl Studio: Enhance Your Mix
Can Stereo Imaging Enhance The Sound In Fl Studio?
Yes, stereo imaging can significantly enhance the sound in Fl Studio by creating a wider and more spacious audio experience.
How Does Stereo Imaging Work In Fl Studio?
Stereo imaging in Fl Studio works by manipulating the stereo field of a sound, allowing you to position elements in the stereo image and adjust their width and depth.
What Are The Benefits Of Using Stereo Imaging In Fl Studio?
Using stereo imaging in Fl Studio can give your mixes more depth, separation, and clarity, making them sound more professional and immersive.
How Can I Use Stereo Imaging To Create A Wider Soundstage In Fl Studio?
To create a wider soundstage in Fl Studio, you can use techniques like panning, stereo widening, and spatial effects to position elements in the stereo field.
Conclusion
Stereo imaging is a potent tool for enhancing the spatial characteristics of your music. In FL Studio, you have access to a wealth of features and plugins that enable you to sculpt a captivating stereo image for your mixes. By strategically applying panning, utilizing stereo widening plugins, experimenting with layering and effects, and adhering to best practices, you can create mixes that captivate and immerse your listeners.
Mastering the art of stereo imaging in FL Studio empowers you to unleash the full potential of your creativity and bring your music to life in thrilling dimensions.
When it comes to electronic music production, one of the most important elements is the creation of captivating lead sounds. A lead sound serves as the main melodic component of a track, drawing the listener in and setting the mood for the entire composition. In this article, we will explore the process of creating lead sounds in FL Studio, one of the most popular digital audio workstations (DAWs) used by music producers worldwide.
The Basics of Sound Design
Before we dive into the specifics of creating lead sounds, it is crucial to understand the basics of sound design. Sound design is the process of manipulating audio to create unique and interesting sounds. In FL Studio, sound design can be achieved through various techniques, such as synthesis, sampling, and processing.
Synthesis: The Foundation of Lead Sound Creation
Synthesis is the process of creating sounds from scratch using various oscillators, filters, and modulation techniques. FL Studio provides a wide range of synthesizers, including the popular “Sytrus” and “Harmor.” These synthesizers offer a plethora of options to shape and mold your lead sound.
1. Oscillator Selection
The first step in creating a lead sound is to select an oscillator. Oscillators generate the fundamental waveform of the sound. FL Studio offers various waveform options such as sine, sawtooth, square, and more. Experiment with different waveforms to find one that suits the vibe you are aiming for.
2. Modulation And Filters
Once you have chosen your oscillator, it’s time to add modulation and filtering to shape your sound further. Modulation introduces movement and variations to the sound, making it more dynamic. FL Studio provides tools like envelopes, LFOs, and modulation matrix, allowing you to modulate parameters such as pitch, amplitude, and filter cutoff.
3. Effects And Processing
To give your lead sound a polished and professional touch, it’s essential to add effects and processing. FL Studio offers a vast array of effects plugins such as reverb, delay, distortion, and compression. Experiment with different effects to find the perfect combination for your lead sound.
Credit: www.levelsmusicproduction.com
Sampling: Exploring Endless Possibilities
In addition to synthesis, FL Studio allows you to create lead sounds through sampling. Sampling involves taking snippets of audio from various sources and manipulating them to create unique and interesting sounds. Here are a few steps to follow when using samples to create leads:
Find or record a suitable audio sample that contains the desired tonality or texture you are looking for in your lead sound.
Import the sample into FL Studio and assign it to a sampler channel.
Experiment with pitching, time-stretching, and layering to transform the sample into a lead sound that fits your arrangement.
Apply effects and processing to enhance the sampled lead sound and make it stand out in the mix.
Tips for Creating Unique and Attention-Grabbing Lead Sounds
Now that you understand the fundamentals of lead sound creation in FL Studio, here are some tips to help you create unique and attention-grabbing sounds:
Experiment with different combinations of oscillators, filters, and effects to find your signature sound.
Layer multiple lead sounds to create depth and richness in your compositions.
Don’t be afraid to push the boundaries and try unconventional sound design techniques.
Use automation to add movement to your lead sounds and make them more expressive.
Take inspiration from existing tracks and lead sounds but strive to put your own creative spin on them.
Credit: mixedinkey.com
Frequently Asked Questions For Creating Lead Sounds In Fl Studio : Ultimate Guide For Music Producers
How To Create Lead Sounds In Fl Studio?
To create lead sounds in FL Studio, start by selecting a synthesizer, tweaking oscillator settings, adding filters, and experimenting with effects like delay and reverb.
What Are Some Popular Lead Sound Presets In Fl Studio?
Popular lead sound presets in FL Studio include saw leads, square leads, and pluck leads, which can be further customized to create unique sounds.
What Is The Role Of Modulation In Creating Lead Sounds?
Modulation adds movement and expression to lead sounds by controlling parameters such as pitch, volume, and filter cutoff, enhancing the overall sonic character.
How Can Layering Enhance Lead Sound Creation In Fl Studio?
Layering allows combining multiple sounds to create a rich and unique lead sound, providing depth and complexity to the final result.
Conclusion
In conclusion, creating lead sounds in FL Studio is an exciting and creative process that allows you to craft unique and attention-grabbing elements for your music productions. Whether you choose to delve into synthesis or explore the endless possibilities of sampling, FL Studio provides the tools and features necessary to bring your creative ideas to life. So go ahead, experiment, and let your imagination soar as you craft captivating lead sounds for your next electronic music masterpiece.
Understanding the Different Types of Synthesizers in Fl Studio
In the world of music production and composition, synthesizers play a crucial role in creating unique sounds and melodies. FL Studio, a popular digital audio workstation, offers a wide range of synthesizers that cater to various musical genres and styles.
With so many options to choose from, it can be overwhelming for beginners to understand the different types of synthesizers available in FL Studio. In this article, we will explore the various synthesizers and their functionalities to help you make informed decisions when crafting your musical compositions.
1. Subtractive Synthesizers
Subtractive synthesis is one of the most commonly used techniques in electronic music production. It involves starting with a complex waveform and then using filters to remove specific frequencies, resulting in a desired sound. FL Studio offers several subtractive synthesizers, such as:
Sytrus
Harmless
3xOSC
2. Additive Synthesizers
Additive synthesis is the opposite of subtractive synthesis. Instead of removing frequencies, additive synthesizers generate sound by combining multiple sine waves together. FL Studio features additive synthesizers like:
Harmor
Sytrus (capable of both additive and subtractive synthesis)
3. FM Synthesizers
Frequency Modulation (FM) synthesis involves using one sound source, called a modulator, to modulate the frequency of another sound source, known as a carrier. This technique produces complex and evolving tones. FL Studio offers FM synthesizers such as:
Sytrus
Flex
4. Granular Synthesizers
Granular synthesis is a method that manipulates small portions of an audio sample to create new sounds. FL Studio’s granular synthesizer, Granulizer, lets you adjust the grain size, envelope, and other parameters to transform audio into unique textures and atmospheres.
5. Wavetable Synthesizers
Wavetable synthesis utilizes pre-recorded waveforms, or wavetables, to generate sounds. FL Studio offers multiple powerful wavetable synthesizers, including:
Serum
Massive
Surge
Credit: www.image-line.com
6. Sample-Based Synthesizers
Sample-based synthesizers use recorded audio samples as their sound sources. FL Studio’s Sampler and DirectWave are popular sample-based synthesizers that allow you to manipulate and shape the samples to fit your musical needs.
Credit: www.groove3.com
7. Physical Modeling Synthesizers
Physical modeling synthesis emulates the sound produced by physical instruments, such as pianos, guitars, and drums. FL Studio’s Sakura offers realistic physical modeling capabilities, allowing you to create authentic instrument sounds.
Frequently Asked Questions Of Understanding The Different Types Of Synthesizers In Fl Studio : Master Your Music
What Are The Different Types Of Synthesizers Available In Fl Studio?
There are various types such as subtractive, additive, FM, and wavetable synthesizers widely used in FL Studio.
How Do Subtractive Synthesizers Work In Fl Studio?
Subtractive synthesizers work by filtering harmonically rich waveforms to produce diverse sound effects in FL Studio.
Why Are Additive Synthesizers Popular In Fl Studio Music Production?
Additive synthesizers are favored in FL Studio for their ability to control individual harmonics and create unique sounds.
Can Fm Synthesizers Create Complex And Dynamic Sounds In Fl Studio?
Yes, FM synthesizers excel at producing complex and dynamic sounds by modulating one waveform with another in FL Studio.
Conclusion
FL Studio provides a wide array of synthesizers that cover various synthesis techniques, allowing you to explore and enhance your creativity. Whether you prefer subtractive, additive, FM, granular, wavetable, sample-based, or physical modeling synthesis, FL Studio has the perfect synthesizer for your musical endeavors.
Take some time to experiment with different synthesizers within FL Studio and discover the limitless possibilities they offer in shaping your own unique sound signature. Happy synthesizing!
If you are a music producer or a beatmaker using FL Studio, then the Slicex sampler is a powerful tool that can greatly enhance your workflow and creativity. Slicex is a beat slicing and resequencing sampler that allows you to chop up and rearrange audio samples with ease. In this article, we will explore the features and functionality of Slicex and provide you with some tips and tricks to get the most out of this versatile tool.
Getting Started
Before we dive into the details, let’s first talk about how to access Slicex in FL Studio. To open Slicex, simply navigate to the Channel Rack and select an empty slot. Then, click on the “+” icon and choose Slicex from the list of available plugins. Once Slicex is added, you can start using its various features to manipulate your samples.
Chopping and Slicing
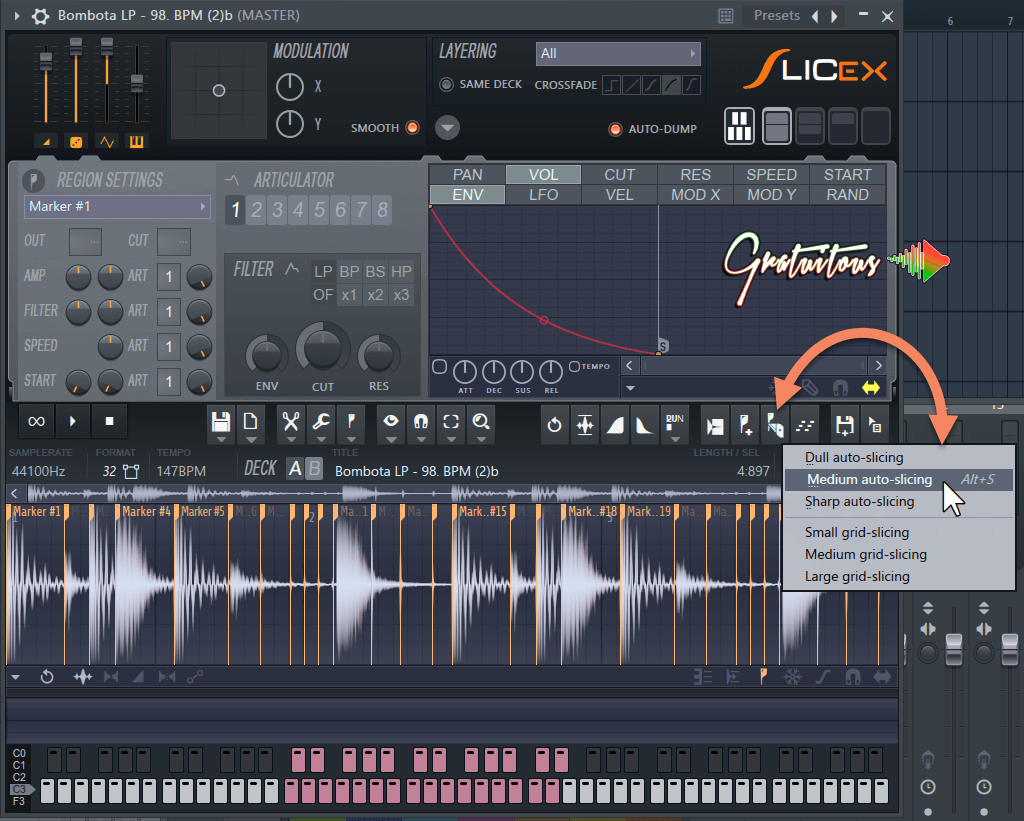
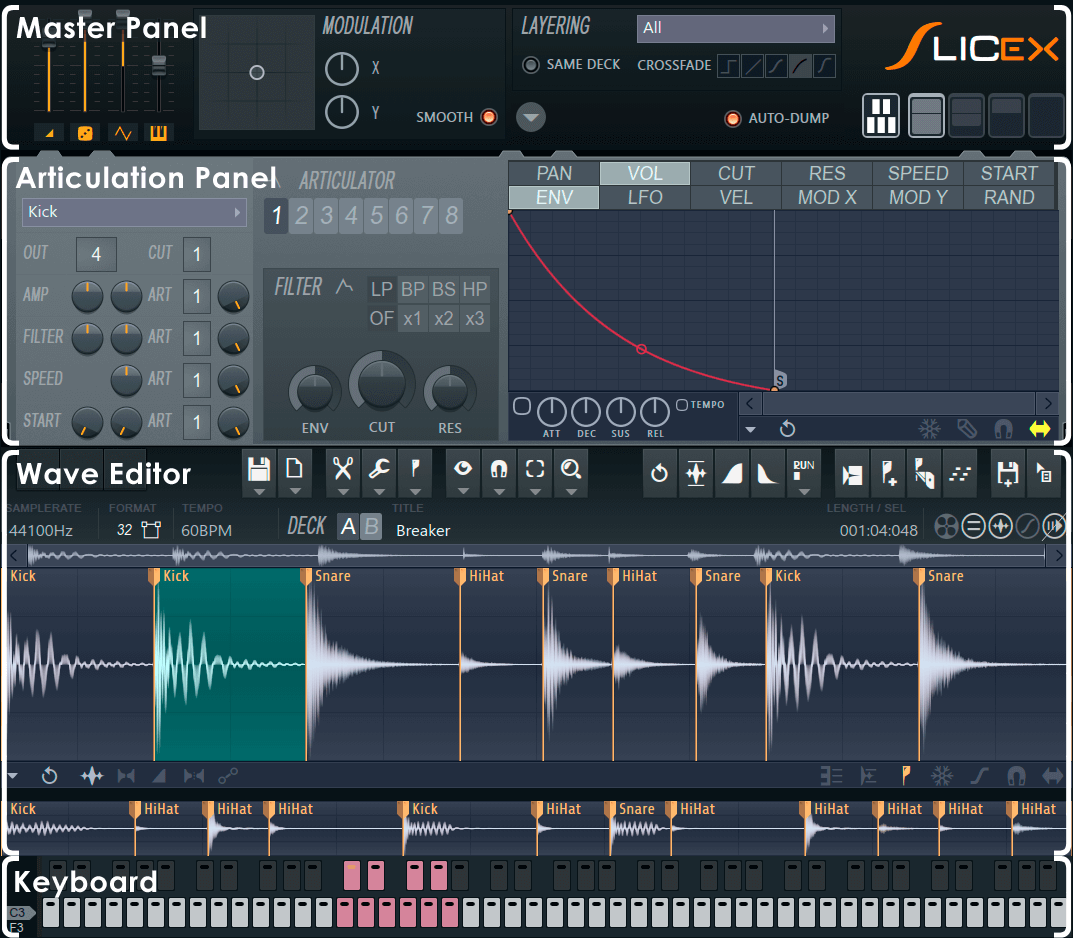
The main function of Slicex is to chop and slice audio samples, allowing you to extract specific sections or individual sounds. To do this, simply load an audio file into Slicex by clicking on the sample slot and selecting your desired file. Once loaded, Slicex will automatically detect the transients in your sample and create slices accordingly. You can adjust the sensitivity of the transient detection using the Sensitivity knob.
Once your sample is sliced, you can start rearranging the slices and creating new patterns. Slicex provides a visual representation of the slices in the waveform display, making it easy to identify and rearrange specific sections. You can move slices around by clicking and dragging them, or you can use the built-in step sequencer to create complex rhythmic patterns.
Credit: itsgratuitous.com
Time Stretching and Pitch-shifting
In addition to slicing, Slicex also offers powerful time stretching and pitch-shifting capabilities. With the Time tab, you can adjust the length of your slices without affecting their pitch. This is great for creating interesting variations and tempo changes in your beats. The Pitch tab, on the other hand, allows you to transpose your slices to different notes, giving you endless possibilities for melody and harmony.
Effects and Automation
One of the advantages of using Slicex is the ability to apply effects and automation to individual slices. By right-clicking on a slice, you can access a range of processing options such as filter, EQ, distortion, and more. This allows you to add unique textures and dynamics to specific elements of your sample. You can also automate the parameters of these effects to create evolving and dynamic sounds.
Exporting and Integration
Once you have created your sliced and manipulated sample, you can export it as a new audio file to use in your projects. Simply click on the Export button in the top right corner of the Slicex interface and choose your desired settings. You can export individual slices or the entire sample as a single file. Alternatively, you can drag and drop the slices directly into the Playlist or arrange them in the Channel Rack for further experimentation.
Tips and Tricks
Here are some additional tips and tricks to help you master the Slicex sampler:
Experiment with different slicing methods to find the best results for your samples.
Use the Crossfade feature to smooth out transitions between slices and minimize artifacts.
Try reversing slices or adding effects to create unique and unexpected variations.
Use the Slice Marker tab to manually adjust and fine-tune the position of individual slices.
Explore the Slicex library for ready-to-use sample packs and presets.
Combine Slicex with other FL Studio plugins and effects to unleash your creativity.
Credit: www.image-line.com
Frequently Asked Questions For Using The Slicex Sampler In Fl Studio: Master Sampling Techniques
What Is The Slicex Sampler Used For?
The Slicex Sampler in Fl Studio is used for slicing and rearranging audio samples for music production.
How To Import Audio Samples Into Slicex?
To import audio samples into Slicex, simply drag and drop the audio file onto the Slicex interface.
Can Slicex Be Used For Time-stretching Audio?
Yes, Slicex can be used to time-stretch audio samples without affecting the pitch, providing flexibility in music production.
What Are The Primary Features Of Slicex?
The primary features of Slicex include automatic slicing, loop points, cue points, and the ability to export sliced audio to piano rolls.
Conclusion
The Slicex sampler is a powerful tool that can revolutionize your beatmaking process. Its intuitive interface, advanced slicing capabilities, and flexible manipulation options make it a must-have for any FL Studio user. Whether you’re a beginner or an experienced producer, mastering Slicex will open up a world of possibilities for creating unique and professional-sounding beats. So, go ahead and start exploring the endless possibilities of the Slicex sampler in FL Studio!