Fl Studio is a powerful digital audio workstation that offers a wide range of tools and plugins to enhance your music production skills. One of the fascinating plugins available in Fl Studio is the Granulizer, which allows you to create unique and intricate sound textures.
Credit: www.image-line.com
Credit: m.youtube.com
What is the Granulizer?
The Granulizer is an advanced audio manipulation plugin that enables you to granulate audio samples into small time segments called grains. These grains can then be rearranged, stretched, and manipulated to generate entirely new sonic textures and effects.
With the Granulizer, you can take any audio sample, whether it’s a drum loop, vocal recording, or synthesizer sound, and transform it into something completely different and original. The possibilities are truly endless!
Getting Started
Using the Granulizer in Fl Studio is relatively straightforward. Here’s a step-by-step guide to help you get started:
Open Fl Studio and load the Granulizer plugin onto a mixer track.
Import an audio sample you want to granulate by dragging and dropping it onto the Granulizer interface.
Adjust the pitch, speed, and grain size parameters to tailor the sound to your liking.
Experiment with the various controls such as grain position, density, and modulation to create unique sound variations.
Use the envelope and filter controls to shape the sound even further.
Apply various effects like reverb, delay, or distortion to add depth and character to your granulated sound.
Automate parameters and experiment with different automation patterns to introduce movement and dynamics into your music.
Once you’re satisfied with the granulated sound, you can record it onto another mixer track for further processing or export it as a WAV file.
Advanced Techniques
Once you’ve become familiar with the basic functionality of the Granulizer, you can explore more advanced techniques to push your creative boundaries even further. Here are a few ideas to get you started:
Layer multiple instances of the Granulizer with different audio samples to create rich and complex textures.
Experiment with different modulation sources like LFOs or envelopes to create evolving and dynamic granulated sounds.
Combine the Granulizer with other effects and plugins in Fl Studio to create unique soundscapes.
Try granulating non-traditional audio sources like field recordings or foley sounds to add organic elements to your music.
Utilize the built-in automation system in Fl Studio to create evolving and dynamic granulated textures over time.
Explore the granular synthesis technique of time-stretching to create unreal soundscapes or rhythmic patterns.
With the Granulizer plugin in Fl Studio, you have the power to transform mundane audio samples into innovative and inspiring sonic landscapes. Embrace experimentation, and let your creativity flow!
Start granulating your sounds today with the incredible Granulizer plugin in Fl Studio. Unleash your creativity and embark on a sonic journey like no other!
Frequently Asked Questions Of Using The Granulizer In Fl Studio: Mastering Sound Design
How Do I Use The Granulizer In Fl Studio?
You can use the Granulizer in FL Studio by selecting it from the list of plugins and then manipulating the various parameters to create unique granular synthesis textures.
What Kind Of Sounds Can Be Created With The Granulizer?
The Granulizer in FL Studio allows you to create a wide range of sounds including ambient textures, vocal manipulations, and evolving soundscapes.
Can The Granulizer Be Automated In Fl Studio?
Yes, you can automate parameters such as grain position, size, and pitch to create dynamic and evolving granular textures in your FL Studio projects.
Are There Any Recommended Tutorials For Using The Granulizer?
Yes, there are various tutorials available online that provide step-by-step guidance on using the Granulizer to create innovative sound textures in FL Studio.
What is the Function of a Low Pass Filter in Audio Processing?
In the realm of audio processing, filters play an essential role in shaping and enhancing sound. One type of filter that is commonly used is known as a low pass filter. In this article, we will explore the function of a low pass filter and its significance in audio processing.
A low pass filter is designed to allow low-frequency sounds to pass through while attenuating or reducing the amplitude of high-frequency sounds. It allows only frequencies below a certain cutoff frequency to pass, effectively removing or reducing high-frequency noise or unwanted signals.
The primary purpose of a low pass filter in audio processing is to control and shape the frequency response of a signal. By removing unwanted high-frequency components, it helps improve the overall clarity and quality of the audio signal.
Credit: www.mathworks.com
Applications of Low Pass Filters in Audio Processing
Low pass filters find application in various audio processing scenarios:
Noise Reduction: High-frequency noise can be introduced during the recording or transmission of audio signals. By using a low pass filter, the noise can be effectively attenuated or removed, resulting in cleaner audio.
Speaker Protection: In audio systems, it is essential to protect the speakers from handling frequencies they cannot reproduce accurately. By incorporating a low pass filter, the high-frequency content beyond the speaker’s range is filtered out, preventing potential damage.
Bass Enhancement: Low pass filters are also used to enhance the bass response in audio systems. By allowing only the low-frequency components to pass through, the bass becomes more pronounced, resulting in a more dynamic and impactful listening experience.
Equalization: In audio mixing and mastering, low pass filters are frequently used as part of the equalization process. By adjusting the cutoff frequency, the overall tonal balance of the audio can be manipulated, achieving the desired frequency response.
Types of Low Pass Filters
There are different types of low pass filters used in audio processing:
Butterworth Filter: This filter type has a maximally flat frequency response within its passband and is commonly used for applications where a smooth transition between frequency ranges is required.
Chebyshev Filter: A Chebyshev filter allows for steeper roll-off characteristics but may introduce some ripples in the passband. It is often used in situations where a sharper cutoff is desirable.
Bessel Filter: Bessel filters offer a nearly linear phase response while maintaining a moderate roll-off slope. They are frequently used in audio applications where preserving phase integrity is crucial.
Elliptic Filter: An elliptic filter offers a combination of stopband attenuation and passband ripple characteristics. It is often used when a rapid transition between the stopband and passband is required.
Credit: www.izotope.com
Frequently Asked Questions Of What Is The Function Of A Low Pass Filter In Audio Processing?
What Is A Low Pass Filter Used For In Audio Processing?
A low pass filter is used to allow low-frequency signals to pass through while attenuating higher frequencies. It helps remove unwanted noise from audio signals.
How Does A Low Pass Filter Improve Audio Quality?
By removing high-frequency noise and interference, a low pass filter helps to create a cleaner, clearer, and more pleasant sound experience for listeners.
What Types Of Audio Signals Can Benefit From A Low Pass Filter?
Any audio that contains unwanted high-frequency noise, such as background hiss or interference, can benefit from the use of a low pass filter.
When Should A Low Pass Filter Be Applied In Audio Processing?
A low pass filter should be applied when you want to remove or reduce high-frequency noise without affecting the desired low-frequency components of the audio.
Conclusion
A low pass filter serves a crucial function in audio processing. By allowing only low-frequency sounds to pass through while attenuating higher frequencies, it helps shape the frequency response, reduce noise, protect speakers, enhance bass, and achieve the desired tonal balance. With different types of low pass filters available, audio professionals have the flexibility to choose the right filter for various applications.
When it comes to producing music, adding percussion sounds can significantly enhance the rhythm and energy of a track. FL Studio, one of the most popular digital audio workstations (DAWs), provides a wide range of tools and features that enable music producers to create unique and captivating percussion sounds.
Understanding Percussion Sounds
Percussion sounds are a vital component of music production, contributing to the overall groove and dynamics of a composition. In FL Studio, percussion sounds can range from traditional drum kit elements such as kicks, snares, and hi-hats to more experimental and unconventional sounds like shakers, congas, and electronic samples.
Using FL Studio to Create Percussion Sounds
FL Studio offers various methods for creating and customizing percussion sounds, providing producers with the flexibility to design their own unique sonic palette. Here are some techniques for creating percussion sounds in FL Studio:
1. Sample-based Percussion
One approach to creating percussion sounds in FL Studio involves using samples. FL Studio provides a comprehensive library of pre-recorded percussion samples that users can utilize in their productions. Additionally, producers can import their own samples and manipulate them using FL Studio’s built-in effects and processing tools to achieve the desired sound.
2. Drum Synthesis
FL Studio’s powerful drum synthesis capabilities enable users to design and shape their percussion sounds from scratch. With features such as the Drumaxx plugin, producers can create custom kicks, snares, toms, and other percussion elements by adjusting parameters such as pitch, decay, and harmonics to craft unique and impactful sounds.
3. Layering And Processing
Layering multiple percussion sounds and processing them through FL Studio’s mixer and effects modules can add depth and complexity to the overall sound. By combining various elements such as acoustic and electronic samples, producers can create rich and textured percussion layers that enhance the rhythmic foundation of their music.
Optimizing Percussion Sounds for Impact
Creating compelling percussion sounds is not only about generating the initial sound but also optimizing it for maximum impact within the mix. Here are some tips for optimizing percussion sounds in FL Studio:
1. Eq And Compression
Using parametric equalizers and dynamic range processors, producers can sculpt and refine the tonal characteristics of percussion sounds. EQ adjustments can help emphasize desired frequencies, while compression can ensure the sounds are consistent in volume and maintain a powerful presence in the mix.
2. Stereo Imaging
Employing stereo imaging techniques can spatialize percussion sounds, providing a wider and more immersive listening experience. FL Studio offers tools for adjusting the stereo width of individual sounds, enabling producers to create a sense of depth and dimensionality within the percussion elements.
3. Creative Effects
Experimenting with creative effects such as reverb, delay, and modulation can impart character and personality to percussion sounds. By incorporating these effects judiciously, producers can imbue their percussion elements with movement, ambiance, and a sense of spatial realism, elevating the overall production value of the music.
Credit: www.sweetwater.com
Enhancing Percussion Workflow with FL Studio
As the music production landscape continues to evolve, FL Studio remains at the forefront of innovation, providing producers with a versatile platform for creating compelling percussion sounds. By leveraging the diverse tools and capabilities within FL Studio, producers can streamline their workflow and elevate the sonic quality of their percussion productions.
1. Pattern-based Sequencing
FL Studio’s renowned pattern-based sequencing allows producers to arrange and edit percussion patterns with ease. By utilizing the pattern editor, users can efficiently program intricate rhythms, experiment with variations, and construct dynamic percussion sequences that form the backbone of their music.
2. Automation And Modulation
FL Studio’s automation and modulation features empower producers to add movement and expression to their percussion sounds. By automating parameters such as filter cutoffs, pitch modulation, and effect levels, users can introduce evolving textures and dynamic shifts, enhancing the expressiveness and impact of their percussion elements.
3. Streamlined Workflow And Collaboration
FL Studio’s intuitive interface and collaborative capabilities enable seamless workflow efficiency and creative synergy. Producers can easily organize and manage their percussion projects, integrate third-party plugins and virtual instruments, and collaborate with other artists, ensuring a cohesive and productive music production process.
Credit: www.sweetwater.com
Frequently Asked Questions Of Creating Percussion Sounds In Fl Studio: Expert Tips For Dynamic Beats
How Do I Create Percussion Sounds In Fl Studio?
To create percussion sounds in FL Studio, you can use the built-in sampler and synthesizer plugins, or import your own samples. Experiment with different drum kits, adjust parameters like pitch and decay, and add effects to create unique percussion sounds.
Can I Record My Own Percussion Sounds In Fl Studio?
Yes, you can record your own percussion sounds in FL Studio. Simply connect a microphone or audio interface to your computer, set up a recording track in FL Studio, and start recording. You can then edit and manipulate the recorded sounds to your liking.
What Are Some Popular Percussion Plugins In Fl Studio?
FL Studio offers a range of popular percussion plugins, such as FPC, Drumaxx, and DirectWave. These plugins provide a variety of drum kits and percussion instruments that you can use to enhance your tracks and create unique sounds.
Are There Any Tutorials Available For Creating Percussion Sounds In Fl Studio?
Yes, there are plenty of tutorials available online for creating percussion sounds in FL Studio. YouTube and the FL Studio website offer video tutorials, while forums and communities provide written guides and tips from experienced users.
Conclusion
Creating percussion sounds in FL Studio is a dynamic and rewarding endeavor, facilitated by the diverse array of tools and features that FL Studio offers. By exploring the various techniques for sound creation, optimization, and workflow enhancement within FL Studio, music producers can unlock the potential to craft impactful and innovative percussion sounds that elevate their musical compositions to new heights.
Cubase is moderately easy to use for beginners due to its intuitive interface. Its complexity grows with advanced features that cater to professional needs.
Steinberg’s Cubase, renowned for its comprehensive features, caters to musicians and producers seeking a robust digital audio workstation (DAW). Whether you’re recording, editing, or mixing, Cubase streamlines these processes with a user-friendly layout, which can ease newcomers into the world of music production.
The platform offers a diverse range of tools, from basic to advanced, allowing users to scale their skills progressively. The learning curve may seem steep, yet online tutorials and an extensive community forum aid in overcoming initial hurdles. Aspiring artists and seasoned professionals alike turn to Cubase for its meticulous attention to audio quality and a vast array of virtual instruments and effects. With each iteration, Steinberg focuses on enhancing accessibility, ensuring that Cubase remains a competitive choice for music creation and audio engineering.
Cubase At A Glance
Cubase stands as a powerhouse in the realm of digital audio workstations. Known for its robust features, it caters to the needs of professionals across the music industry. From recording artists to sound engineers, its intuitive design promises to streamline the creative process. Yet the question looms — is Cubase user-friendly for the uninitiated? Let’s dive into its interface and flexibility to uncover the truth.
Feature-rich Interface
Cubase’s interface shines with its abundance of tools and functions. Users discover a variety of features at their fingertips:
Track Handling: Organize and manage audio, MIDI, and video tracks efficiently.
Editing Suite: Robust editing tools aid in precise audio manipulation.
MixConsole: Emulates a traditional mixing desk for an authentic feel.
Virtual Instruments: Vast library of sounds for music production.
Despite its extensive capabilities, Cubase maintains an approachable user interface. Novice users appreciate the well-documented tutorials and aids that facilitate learning.
Compatibility And Flexibility
Cubase stands out for its ability to adapt to various hardware and software environments:
Cross-Platform: Operates seamlessly on both Windows and macOS.
VST Support: Integration with a multitude of Virtual Studio Technology instruments and effects.
Hardware Integration: Compatible with a wide range of audio interfaces and controllers.
Project Collaboration: Enhanced features for project sharing and collaboration.
Its strong focus on being universally compatible ensures that Cubase fits into any production workflow.
First Encounter: Initial Setup
Welcome to your first encounter with Cubase! This post will guide you through the initial steps from installation to software configuration. Starting with a new digital audio workstation (DAW) can be daunting, but Cubase’s user-friendly interface aims to make the process as smooth as possible. Let’s dive in and see just how easy it is to get started with Cubase, ensuring you’re ready to make music in no time.
Installation Process
The journey begins with a straightforward download from the Steinberg website. Follow the on-screen instructions to ensure a successful setup. Here’s a quick breakdown:
Select the correct version for your operating system.
Download the Steinberg Download Assistant.
Use this assistant to download Cubase.
Run the installer and follow the prompts.
Enter your activation code when asked.
Complete the installation and reboot your computer.
This hassle-free installation sets the stage for your musical creations.
Ease Of Software Configuration
Once Cubase is installed, configuring your software is a breeze. You’ll be greeted by the Steinberg Hub, which offers a variety of templates to get you started. Take these simple steps:
Launch Cubase and select your project template.
Configure your audio interface and driver settings.
Set your project folder for easy file organization.
Customize your preferences, like keyboard shortcuts and control room settings.
With an emphasis on accessibility and a customizable workflow, Cubase is designed to cater to both beginners and professionals alike.
Navigating The Interface
Cubase stands as a powerhouse in the music industry. Its rich features might seem daunting. Still, Steinberg designed Cubase’s interface with clarity. Even beginners find ease after a short learning phase. The goal is straightforward: turn creativity into music. Now, let’s dive into the core components of the interface that make Cubase user-friendly and highly customizable.
User-friendly Design
The first smile of a newcomer to Cubase is often due to its user-friendly design. At first gaze, you’ll see a clean layout. There are tracks, mixers, and editors. They all serve one purpose – to ease your workflow. Think of the Project Window as your canvas, where sounds transform into songs. This central part shows your arrangement with tracks laid out neatly.
Toolbar: Access essential tools quickly.
Inspector: Control track parameters with a click.
MediaBay: Find sounds and loops in seconds.
Hover over any tool or button. A tool-tip pops up, guiding your choice. The goal: make music without confusion. Simplicity joins hands with power in Cubase’s interface.
Customization Options
Every artist is unique. So is every Cubase screen. You can craft your own workspace with ease. Move sections around. Pin them. Hide them. Dock them.
Personalize to match your workflow. With a few clicks, Cubase bends to your will. Imagine having just the tools you need.
Drag and drop to reposition elements.
Right-click to customize toolbars.
Save layouts for different tasks with Workspaces.
No need for endless scrolling. Your plugins, tools, and consoles are where you want them. It’s about your music, your method.
Credit: www.bhphotovideo.com
Recording Made Simple
Many people dream of recording their music. Cubase makes this dream a reality.
It’s the perfect tool for both professionals and beginners. With Cubase, recording is no longer a challenge; it’s a fun, simple experience.
Effortless Audio Capture
Getting your sound into Cubase is a breeze. Here’s how Cubase makes audio capture easy:
One-click setup: Just plug in your instrument or mic, hit record, and you’re good to go!
Intuitive interface: All controls you need are front and center.
Visual feedback: Waveforms show as you record. You see what you’re getting.
Whether you are laying down a guitar track or capturing vocals, your focus stays on creating.
Midi Management
Cubase shines with MIDI. Even if you’re new, these tools help you:
Drag-and-drop MIDI: Set up virtual instruments with ease.
Quantize in a flash: Notes off-beat? One click and they snap into place.
Extensive library: Tons of sounds and loops to spark your creativity.
With these features, your MIDI tracks come to life without the steep learning curve.
So, unleash your musical ideas. Let Cubase handle the technical side.
Editing And Mixing Essentials
Delve into the world of audio production with Cubase’s user-friendly suite of editing and mixing tools. Achieve professional-quality sound, whether you’re a seasoned engineer or a beginner. Let’s explore the essentials that make Cubase an accessible and powerful DAW for creating, editing, and mixing your audio tracks.
Intuitive Editing Tools
Cubase provides a range of intuitive editing tools designed to streamline your workflow. With features like snap-to-grid and easy-to-manipulate audio warping, Cubase makes precision edits fast and effortless.
Drag-and-drop functionality simplifies moving and copying parts.
Use Key Editor for precise MIDI adjustments.
AudioWarp Quantize Panel to sync beats effortlessly.
Mixing Console Accessibility
The mixing console in Cubase is just like working with a physical mixer. With its clear layout and color-coded faders, navigating between channels and adjusting levels is straightforward, even for novices.
Feature
Benefit
Channel Strip
Access essential tools like EQ and compression.
Visibility Settings
Focus on the channels you need, hide the rest.
VST MultiPanner
Create immersive surround sound mixes.
Every adjustment in the mixing console is reflected in real-time, giving you instant feedback on your creative choices. Easy routing options and quick link groups allow for a smooth mixing experience. Cubase empowers you to craft the perfect mix with confidence and ease.
Creating With Virtual Instruments
Imagine painting with sound. That’s what creating with virtual instruments in Cubase feels like. Users can bring melodies to life without physical instruments. Let’s dive into the sonic world of Cubase and explore its features.
Vst Integration
Cubase shines with its VST integration. Artists connect a world of sounds with ease. This tech makes adding instruments to projects a breeze.
Drag and drop VSTs into your session
Explore presets for quick inspiration
Customize settings for unique sounds
Versatile Sound Libraries
With Cubase, sound options never end. The platform offers a range of libraries.
Library Type
Features
Synth Pads
Warm textures, atmospheric layers
Orchestral Sounds
Cinematic strings, brass, woodwinds
Drum Kits
From rock beats to electronic patterns
These libraries help users make music across all genres. You get a rich palette to craft your masterpiece.
Making The Most Of Midi
Exploring the realm of digital music, ‘Making the Most of MIDI’ unlocks Cubase’s potential for artists. Whether a beginner or a seasoned pro, Cubase’s layout streamlines creativity. Let’s discover how it puts you in the driver’s seat of musical expression.
Midi Editing Capabilities
With Cubase, shaping music happens with precision and ease. Its MIDI editing is top-tier, offering an array of tools to refine your sound. Look at the features:
Key Editor: Manipulate notes, velocities, and timings.
Drum Editor: Craft rhythms with a specialized workspace.
List Editor: For those who love control, edit MIDI as text.
Each tool offers something special. They ensure that every note hits the mark. You’ll be arranging like a pro in no time.
Editor Type
Main Function
User Level
Key Editor
Note manipulation
Beginner to Pro
Drum Editor
Rhythm creation
Intermediate to Pro
List Editor
Textual MIDI editing
Advanced
Sequencing And Programming
Sequencing in Cubase captures your musical ideas swiftly. It offers a straightforward approach to building tracks. Check out the benefits:
Intuitive sequencing that aligns with your workflow
Robust programming tools for intricate patterns
Flexible quantization options for perfect timing
Create complex arrangements with simple steps. Cubase’s sequencing feels like having a studio band at your fingertips.
Now, turn ideas into full-blown tracks with flair!
Music Production Workflows
When diving into Cubase, you’ll find a suite of features designed to enhance music production workflows. Whether you’re a seasoned producer or just starting, understanding these workflows is key to harnessing the software’s power. Beginners may question, “Is Cubase easy to use?” Let’s explore the intuitive tools that streamline your creative journey.
Streamlining Creative Processes
Cubase shines with features that make the creation process smoother. Let’s break down how it sets you up for success:
Real-time audio warping lets you manipulate timing easily.
Integrated beat making helps produce rhythmic patterns quickly.
Chord pads assist in composing without deep music theory knowledge.
Use drag and drop for adding effects and samples with simplicity.
These tools mean less time figuring things out and more time creating music.
Project Management Features
Cubase’s project management features aid in keeping productions organized. Key functionalities include:
Feature
Description
Track Versions
Manage different takes and edits effortlessly.
MediaBay
Find and organize samples and presets quickly.
Automation
Apply complex effects with precise control.
Marker Tracks
Navigate large projects by marking sections.
These features ensure that your project components stay manageable and accessible, even as projects grow complex. With Cubase, you’re equipped to manage your music production from idea to final master.
Troubleshooting Common Hurdles
Welcome to the ‘Troubleshooting Common Hurdles’ section of our blog post. Cubase, the powerhouse of music production, can sometimes pose challenges. Don’t worry, help is at hand. We will go through some common issues users encounter and provide practical solutions. Mastering these fixes will ensure your creative flow remains uninterrupted!
Resolving Technical Issues
Technical troubles in Cubase might feel daunting at first. Let’s simplify the process:
Update Cubase: Always run the latest version. It fixes many known bugs.
Check Audio Drivers: Ensure your drivers are updated and compatible.
Reboot: Sometimes, a simple restart can clear unexpected errors.
Project Backup: Regular backups prevent data loss during crashes.
Error Codes: Note any codes and search them on the Cubase forums.
For more complex problems:
Go to the ‘Help’ menu in Cubase.
Find ‘Troubleshoot’ and follow guided steps.
Finding Community Support
The Cubase community is ready to assist. Embrace the collective knowledge:
Official Forum: The Steinberg forum is rich with expert advice.
Social Media Groups: Facebook and Reddit offer real-time help.
YouTube Tutorials: Visual guides can simplify complex fixes.
Connect with other users:
Platform
Description
Steinberg Forum
Official platform for detailed discussions.
Reddit Cubase
Community-driven tips and tricks.
Cubase Facebook Group
Join a global network of Cubase users.
Need hands-on assistance? Consider:
Training workshops.
One-on-one expert sessions.
As you navigate through the common hurdles, remember, each problem solved is a step forward in mastering Cubase.
Learning Resources And Tutorials
Cubase, the powerful music production software, comes with a steep learning curve. Beginners might feel overwhelmed. Yet, numerous resources can help ease the learning process. Whether you are a newbie or a seasoned pro looking to refresh your skills, the availability of comprehensive learning resources and tutorials makes it easier to master Cubase’s functionalities.
Official Guides And Documentation
The starting point for any Cubase user is the official documentation. Steinberg, the maker of Cubase, provides detailed manuals and guides. These are perfect for understanding the basics and advancing to more complex features. Explore the following resources:
Operation Manual: A thorough guide that covers all the features.
Quick Start Videos: Short clips to get you started with the basics.
Plug-in Reference: Insight into the effects and instruments within Cubase.
Third-party Video Tutorials
Besides the official materials, the internet is abundant with Third-party video tutorials. These videos range from beginner to expert levels and often provide practical, real-world examples. These video guides allow you to learn at your own pace:
Type
Description
Platform
Beginner Tutorials
Introduce basic functions and workflows.
YouTube, Udemy
Topic-Specific Tutorials
Dive into specific production techniques.
Vimeo, Skillshare
Advanced Techniques
Explore deep features of Cubase.
LinkedIn Learning, Groove3
Learning Cubase becomes a joy with these resources. Start experimenting and making music with ease.
Evaluating User Experiences
Cubase stands tall as a powerhouse in the world of digital audio workstations. Yet, for newcomers and pros alike, the crucial question often is: “Is Cubase easy to use?” Diving into user experiences paints a clearer picture for those eyeing this software. Here’s what they have to say:
Testimonials from Beginners
Testimonials From Beginners
Many new users share their journey with Cubase. Stories of initial intimidation followed by delight are common. See what they found after uncapping the pen on their musical sketches:
“Intuitive layout made my start-up phase smooth.“
“After a few tutorials, I was on my way!“
“The included instruments and effects sparked my creativity.“
These snapshots from novices highlight a learning curve offset by rich features and supportive resources. They underline an ease of use linked to dedication and exploration.
Professional Endorsements
Professional Endorsements
Seasoned professionals who master audio landscapes also weigh in. Their views shine a light on Cubase’s prowess. Consider these endorsements:
Grammy-Award Winning Producer:
“Cubase remains my go-to for complex projects.“
Film Score Composer:
“The control and detail are unmatched.“
Audio Engineer:
“Reliability in every session, with top-notch features.“
From the horse’s mouth, these insights confirm Cubase as a staple in the professional sphere. Its depth and flexibility earn it a revered spot on many a pro’s desk.
Comparing Cubase To Other Daws
Exploring the vast world of Digital Audio Workstations, Cubase stands out with its features and workflow. This segment dissects its ease-of-use relative to its peers, assisting producers in choosing the ideal DAW.
Ease-of-use Vs. Competitors
Cubase is renowned for its user-friendly interface. It caters to both novices and seasoned pros. Let’s see how it measures up against other leading DAWs:
Cubase
Logic Pro
Ableton Live
FL Studio
Intuitive workflow
Streamlined design
Live performance tools
Pattern-based music creation
Customizable layout
Mac integration
Clip-based editing
Touch support
Strong MIDI capabilities
Comprehensive library
Nonlinear approach
Beginner-friendly
Compared to others, Cubase’s learning curve can be steep at first. Its depth and complexity also mean a fuller feature set, offering a rewarding experience over time.
Decision Factors For Producers
Workflow: Does the DAW align with your project needs?
Features: Consider the tools required for your music production.
Compatibility: Check your hardware aligns with the DAW’s requirements.
Cost: Analyze your budget for a cost-effective solution.
Producers often choose Cubase for its adaptive environment. It provides comprehensive tools for recording, editing, mixing, and mastering. As you assess your choices, consider these key factors to make an informed decision.
Making The Decision: Is Cubase Right For You?
Cubase: Is It The Right DAW for Your Music Production Journey?
Cubase stands out as a sophisticated digital audio workstation (DAW). It offers a vast range of features for recording, editing, mixing, and composing music. Yet, the question remains, is Cubase the perfect fit for your creative journey? Let’s delve into its capabilities to see if it aligns with your production needs and future aspirations.
Assessing Your Production Needs
To make the right choice, consider the following points:
Genre – Cubase excels across various genres, from electronic to classical music.
Workflow – Its interface is user-friendly, aiding a seamless creative process.
Tools – Abundant editing and mixing tools are at hand for precision.
Virtual Instruments – A rich library of sounds fuels musical experimentation.
Assess how these factors match with your current and potential projects before jumping in.
Long-term Use And Scalability
Think ahead about your growth as a music creator:
Upgrades – Cubase continuously evolves, offering updates to enhance its ecosystem.
Compatibility – Future-proof your setup with its broad hardware and software integration.
Community – Tap into a supportive network of Cubase users for collaboration and advice.
Choose Cubase if its trajectory matches the direction you dream for your music career.
Credit: www.youtube.com
Frequently Asked Questions Of Is Cubase Easy To Use
Is Cubase Suitable For Beginners?
Cubase offers a range of features fit for beginners but due to its rich functionality, the learning curve can be steep. It provides tutorials and a user-friendly interface to ease the learning process.
Can You Get Cubase For Free?
Cubase does not offer a completely free version. However, Steinberg provides a free trial period. The trial includes nearly all the features of the full version for a limited time.
What Are Cubase’s Key Features?
Cubase is known for its robust MIDI capabilities, high-quality audio engine, numerous virtual instruments, and vast library of sounds. It’s also praised for its mixing and editing tools.
How Does Cubase Compare To Other Daws?
Cubase stands out for its comprehensive feature set and workflow efficiency. While it competes closely with DAWs like Pro Tools and Logic Pro, user preference often depends on specific needs and familiarity.
Conclusion
Navigating Cubase may appear daunting initially, but it’s quite user-friendly once you grasp the basics. Tutorials and online forums can offer valuable assistance. With practice, the intuitive interface and powerful features become second nature, streamlining the music production process. Give Cubase a chance and watch your audio projects flourish.
Using the Maximus Multiband Compressor in FL Studio
As an aspiring music producer or audio engineer using FL Studio, you’re constantly on the lookout for tools that can help you take your music to the next level. One such tool that has gained widespread acclaim in the music production community is the Maximus Multiband Compressor. In this article, we’ll explore the features and benefits of the Maximus Multiband Compressor and how you can harness its power to enhance your music productions within FL Studio.
Credit: www.image-line.com
Understanding the Maximus Multiband Compressor
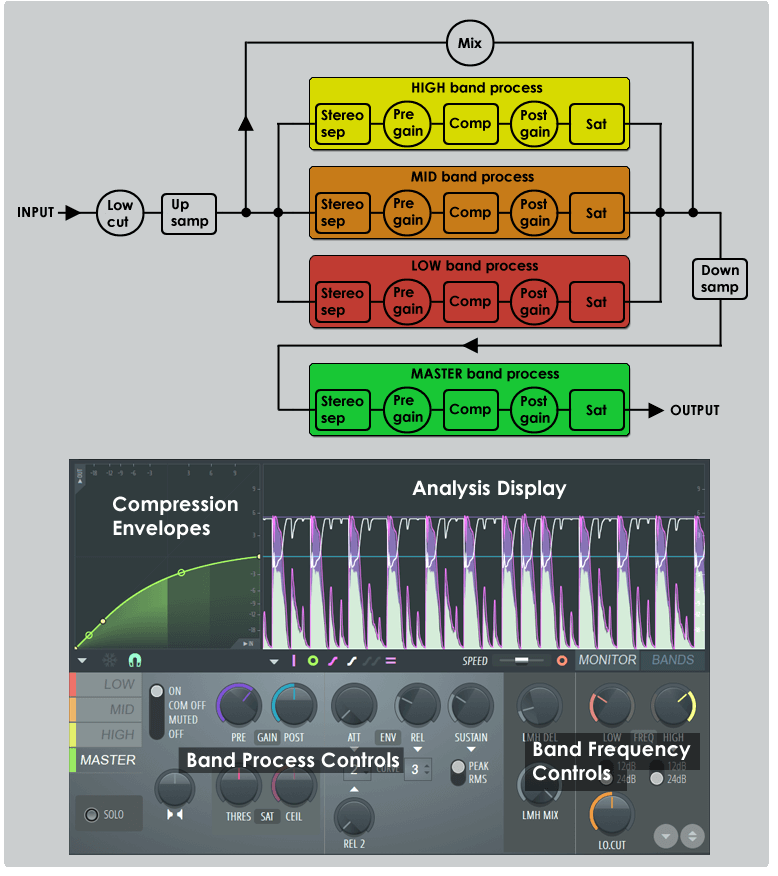
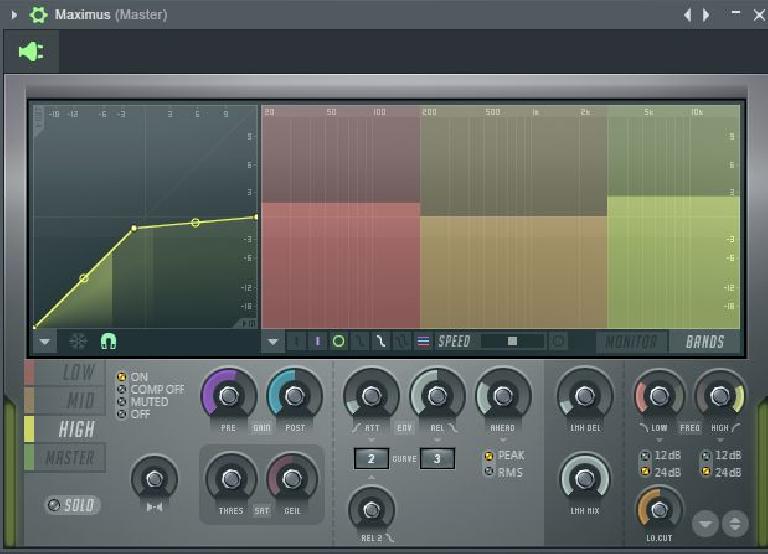
The Maximus Multiband Compressor is a dynamic processing plugin that is included in the suite of plugins available in FL Studio. Designed to provide precise control over the dynamic range of your audio, the Maximus allows you to compress different frequency bands independently, offering unparalleled flexibility and customization options for shaping the sound of your tracks.
Key Features Of The Maximus Multiband Compressor
Let’s take a closer look at some of the key features that make the Maximus Multiband Compressor an indispensable tool for FL Studio users:
Multi-Band Processing: The Maximus divides the audio signal into three frequency bands – low, mid, and high – allowing you to apply specific compression settings to each band individually.
Spectral Analysis: The plugin provides detailed spectral analysis of the audio signal, giving you insights into the frequency content and dynamics of your tracks.
Advanced Controls: With features like saturation, stereo separation, and parallel compression, the Maximus offers advanced controls to fine-tune the character and tonal balance of your music.
Credit: ask.video
Using the Maximus Multiband Compressor in Your FL Studio Projects
Now that we’ve covered the features of the Maximus, let’s delve into how you can effectively incorporate this powerful tool into your FL Studio projects. Here are some tips to get you started:
1. Mastering With Maximus
When mastering your tracks in FL Studio, the Maximus is a go-to plugin for achieving professional-grade results. By applying multiband compression, you can control the dynamics of the lows, mids, and highs separately, ensuring a balanced and polished sound.
2. Bus Compression For Instruments
Utilize the Maximus on instrument bus channels to sculpt the tonal characteristics and dynamics of individual instruments within your mix. Tailoring the compression settings to each frequency band can help enhance the clarity and impact of your instrument tracks.
3. Vocal Processing
For vocal processing, the Maximus becomes an invaluable tool for addressing specific frequency ranges that may require compression. Whether it’s controlling sibilance in the high frequencies or adding warmth to the lower register, the multiband capabilities of the Maximus offer precise control over the vocal sound.
4. Specialized Sound Design
Whether you’re creating electronic music, hip-hop beats, or intricate soundscapes, the Maximus can aid in crafting unique sonic textures. Experiment with the saturation and stereo separation features to add depth and character to your sounds, unleashing your creativity in the process.
Optimizing Your Workflow with Maximus
In addition to its sound-shaping capabilities, the Maximus Multiband Compressor can significantly enhance your workflow within FL Studio. Here’s how:
Save Presets: Create custom presets for specific instruments or mastering scenarios, streamlining the process for future projects.
Real-Time Visualization: Take advantage of the spectral analysis to visually monitor and fine-tune the compression settings as your track plays in real time.
Utilize Default Templates: FL Studio provides default templates with Maximus already set up for mastering and mixing purposes, allowing you to jumpstart your sessions with optimal settings.
Frequently Asked Questions For Using The Maximus Multiband Compressor In Fl Studio: Master Professional Sound Mixing
How Does The Maximus Multiband Compressor Enhance Audio Quality In Fl Studio?
The Maximus Multiband Compressor greatly improves audio quality by intelligently analyzing and dynamically compressing multiple frequency bands, resulting in a balanced and professional sound.
What Are The Key Features Of The Maximus Multiband Compressor In Fl Studio?
The Maximus Multiband Compressor offers a variety of powerful features such as comprehensive visual feedback, precise waveform compression, advanced limiting options, stereo separation control, and intuitive parameter adjustment.
How Can I Effectively Use The Maximus Multiband Compressor In My Tracks?
To get the most out of the Maximus Multiband Compressor, utilize its advanced settings to target specific frequency ranges, adjust attack and release times, and experiment with the stereo imaging controls to achieve a polished and professional sound.
Can The Maximus Multiband Compressor Be Used On Individual Instruments Or The Entire Mix?
Absolutely! The Maximus Multiband Compressor can be applied to individual instruments, groups of tracks, or even the entire mix, allowing you to sculpt the audio dynamics with precision and finesse.
Conclusion
The Maximus Multiband Compressor stands as a versatile and essential tool for music producers and audio engineers working within FL Studio. By leveraging its multiband processing capabilities, advanced controls, and spectral analysis features, you can elevate the sonic quality and impact of your music productions. Whether you’re mastering, mixing, or engaging in creative sound design, the Maximus empowers you to achieve professional results with precision and finesse. With a thorough understanding of its features and practical implementation techniques, you can harness the full potential of the Maximus Multiband Compressor to take your FL Studio projects to new heights.
What is the Difference between Reverb And Delay Effects?
Understanding the distinctions between reverb and delay effects is crucial for musicians and audio engineers. Both effects add depth and ambiance to audio recordings or performances, but their characteristics and uses differ significantly. In this article, we will explore the key differences between reverb and delay effects.
Reverb Effects
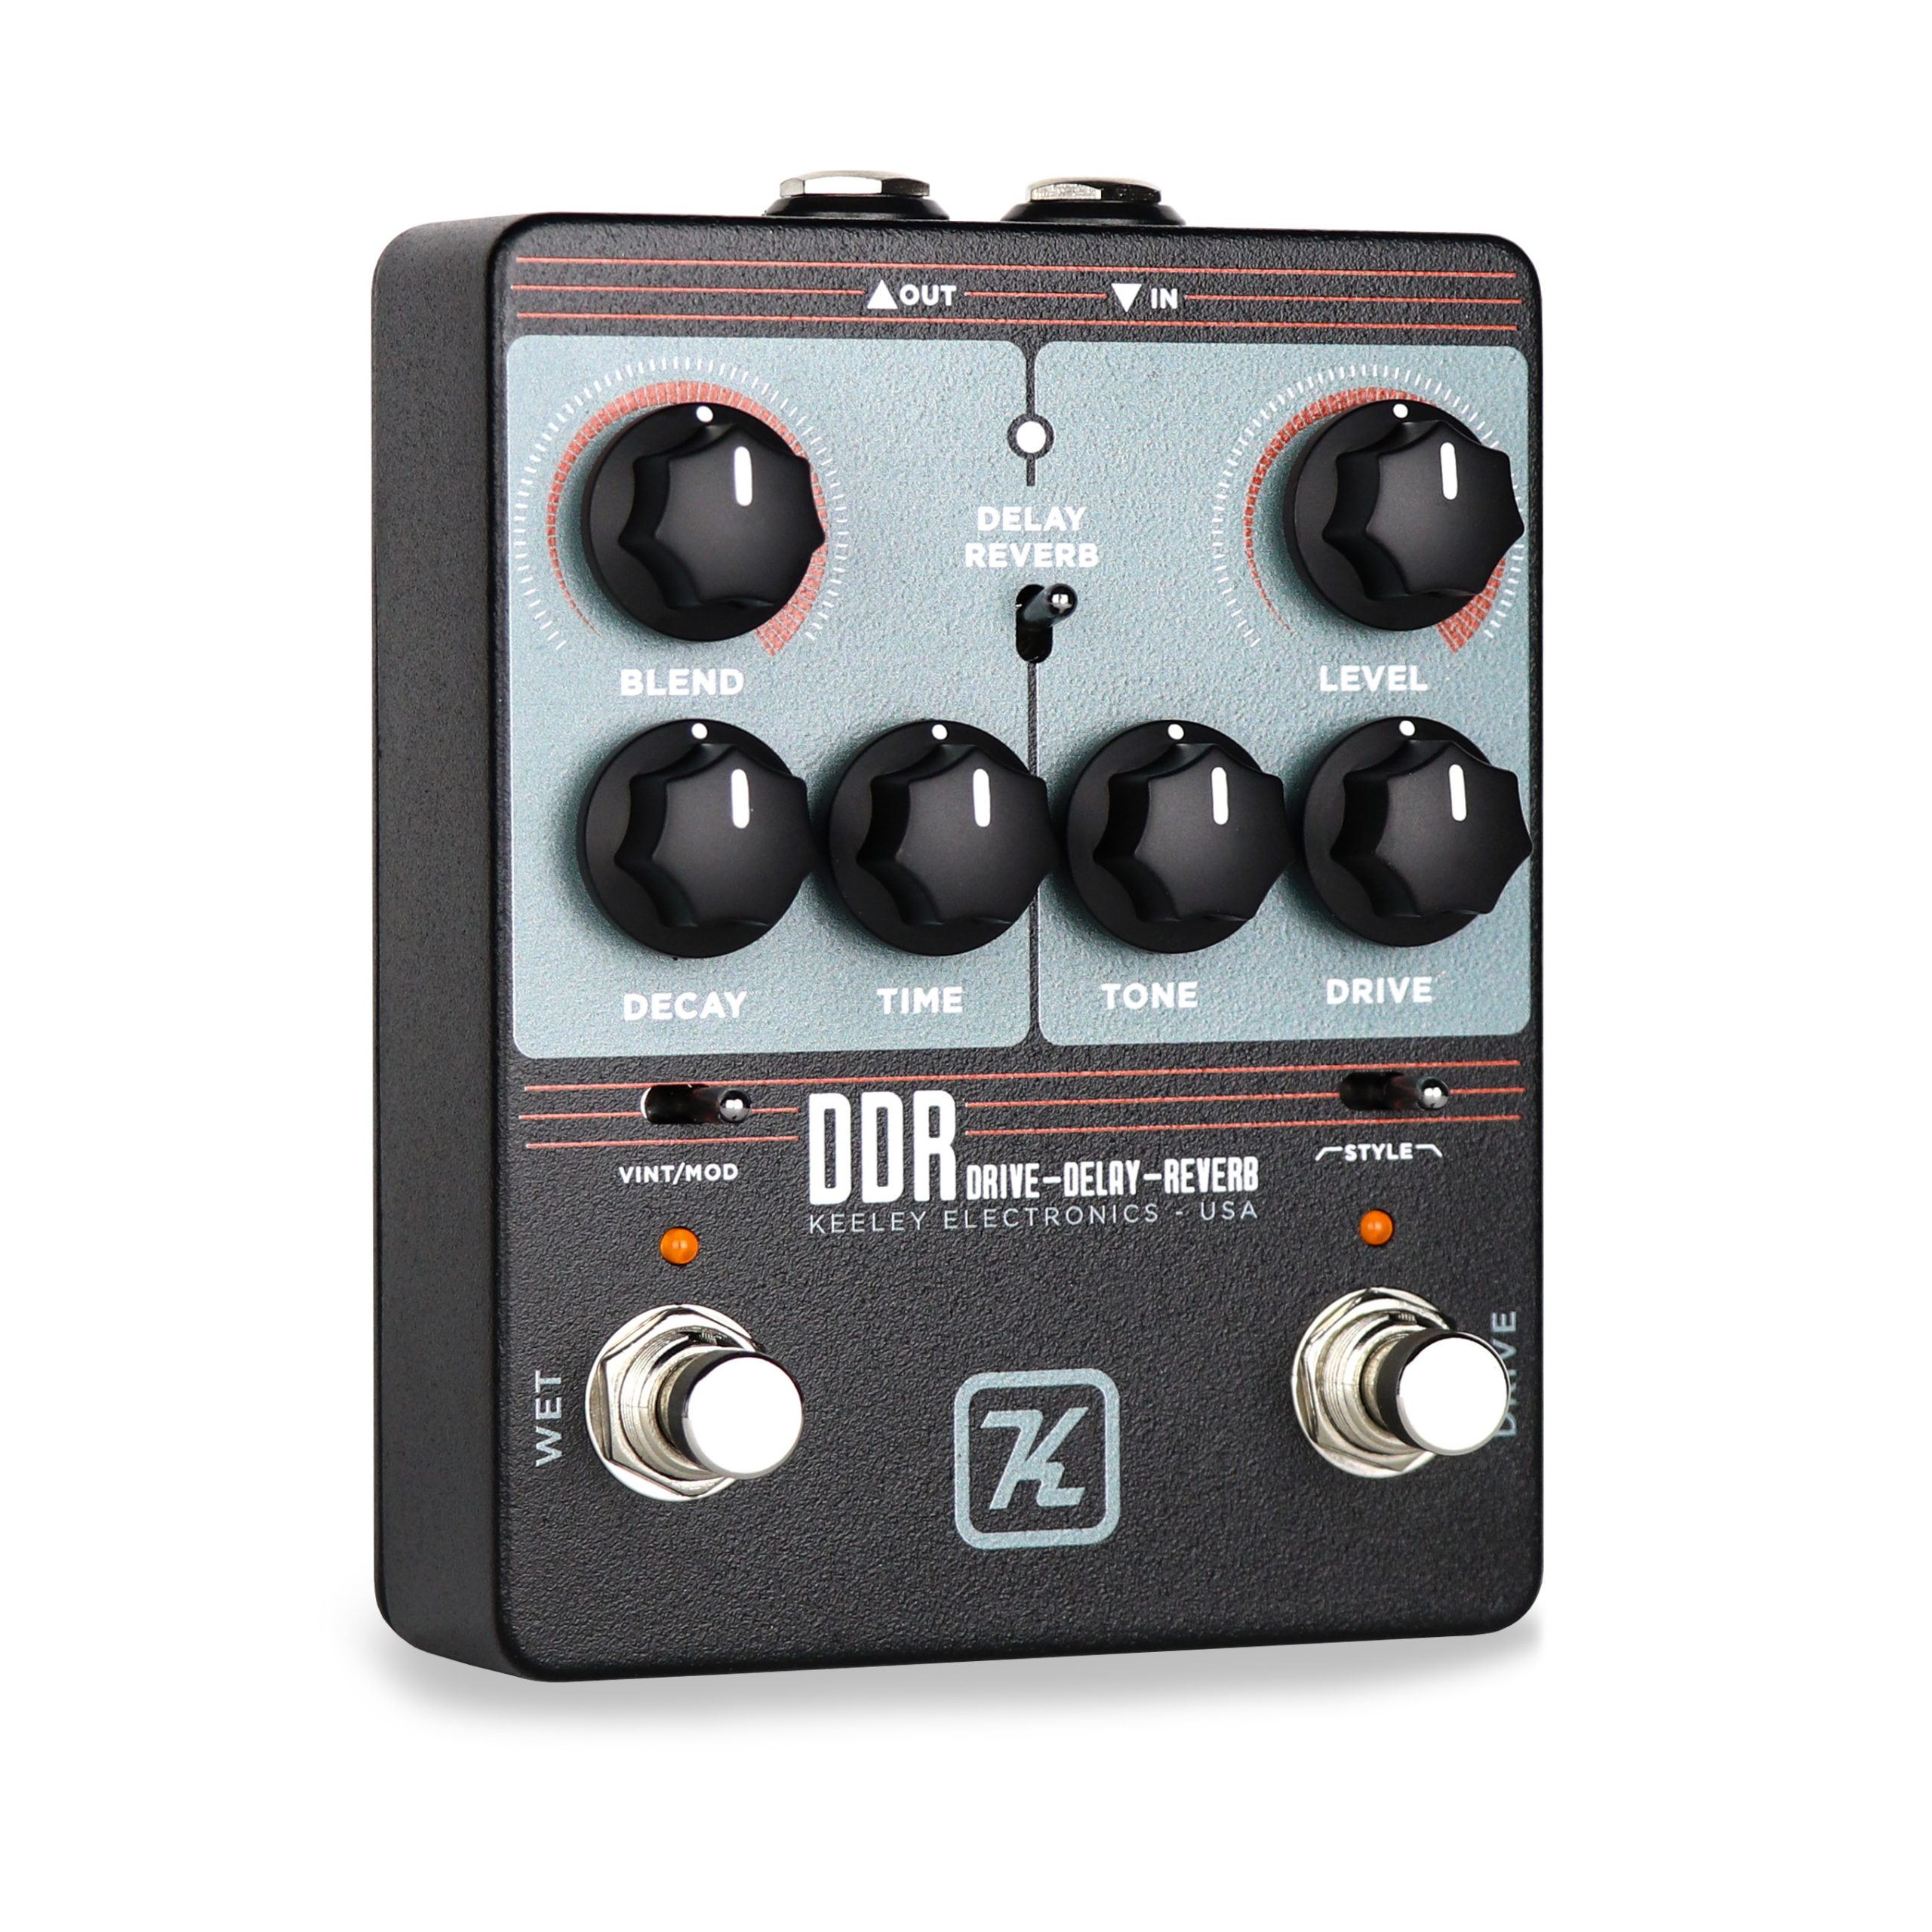
Reverb, short for reverberation, refers to the persistence of sound due to reflections in an enclosed space. It mimics the natural reverberation heard in various environments, such as concert halls or caves. When applied as an effect, reverb adds spaciousness and creates a sense of depth within the audio.
Unlike delay, reverb does not create distinct repetitions of the original sound. Instead, it simulates the decay of sound over time by blending the original signal with its reflections. The reflections can multiply quickly as they bounce off various surfaces, creating a complex and immersive auditory experience.
Reverb effects can be classified into different types, including hall, plate, room, spring, and chamber, each generating its unique sonic characteristics. Hall reverbs simulate the sound of large concert halls, while plate reverbs emulate the resonance of a metal plate. Room reverbs duplicate the ambience of small to medium-sized spaces, while spring and chamber reverbs offer distinct vintage tones.
Delay Effects
Delay creates distinct repetitions of the original sound by capturing and reproducing it after a specific time interval. It is similar to an echo effect, where the sound is repeated at regular intervals. These repetitions can be manipulated to create various rhythmic patterns, adding depth and spaciousness to the audio.
Unlike reverb, delay creates clear and distinguishable echoes. The number of repetitions, their volume, and their timing can be adjusted based on the desired effect. Additionally, delay effects often come with features like feedback, which controls the number of repetitions, and modulation, which adds subtle pitch variations to the echoes.
Delay effects are commonly used in music production as creative tools. They can be used to generate rhythmic patterns, enhance solos, add texture to vocals, or create ambient soundscapes. Musicians and producers often experiment with different delay settings and combinations to achieve unique and innovative sounds.
Differences at a Glance
Reverb Effects
Delay Effects
Simulates sound decay over time
Creates distinct repetitions of sound
Blends original signal with reflections
Repeats the original sound after a specific time interval
Creates immersive and ambient effects
Used for rhythmic patterns and adding texture
Can be classified into hall, plate, room, spring, and chamber types
Often manipulated with features like feedback and modulation
Credit: robertkeeley.com
Credit: www.amazon.com
Frequently Asked Questions Of What Is The Difference Between Reverb And Delay Effects?
What Is The Main Difference Between Reverb And Delay Effects?
Reverb creates a sense of space, while delay produces copies of the original sound.
How Does Reverb Alter The Sound?
Reverb simulates different acoustic environments to add depth and texture to the sound.
What Are The Primary Uses Of Reverb Effects?
Reverb effects are commonly used to create a sense of space and add depth to vocals and instruments.
How Does Delay Affect The Sound?
Delay creates echoes or repetitions of the original signal, enhancing the texture and rhythm.
Conclusion
While reverb and delay effects both contribute to the depth and ambiance of audio recordings, their functionalities and characteristics set them apart. Reverb simulates the decay and persistence of sound, creating immersive soundscapes, while delay generates distinct repetitions, adding rhythmic patterns and texture. Understanding the differences enables musicians and audio engineers to make informed decisions in applying these effects to enhance their music or audio projects.
FL Studio is a popular digital audio workstation (DAW) used by many music producers and enthusiasts worldwide. One of the first steps in mastering FL Studio is to understand its interface and how to navigate through its various features and tools. In this article, we will dive into the different elements of the FL Studio interface, helping you become familiar with its layout and functionality.
1. The Browser
The Browser is the hub for managing your files, plugins, and presets in FL Studio. Located on the left side of the interface, it allows you to effortlessly browse and access your audio samples, virtual instruments, and effects. The Browser features multiple tabs, including the Plugin Database, where you can organize and categorize your plugins for easy access.
2. The Channel Rack
The Channel Rack is where you arrange and design patterns for your instruments and samples. It acts as a canvas for your musical ideas, allowing you to create melodies, drum patterns, and chord progressions. Each channel in the Channel Rack represents an instrument or sample, and you can apply various effects and automation to individual channels.
3. The Piano Roll
The Piano Roll is a powerful tool for creating melodies, chords, and basslines in FL Studio. It provides a visual representation of musical notes and allows you to edit and manipulate them easily. You can draw notes with a mouse or use a MIDI keyboard to record your performance. The Piano Roll also includes features like scaling, strum, and arpeggiator for added creativity.
Credit: aeccloud.com
4. The Mixer
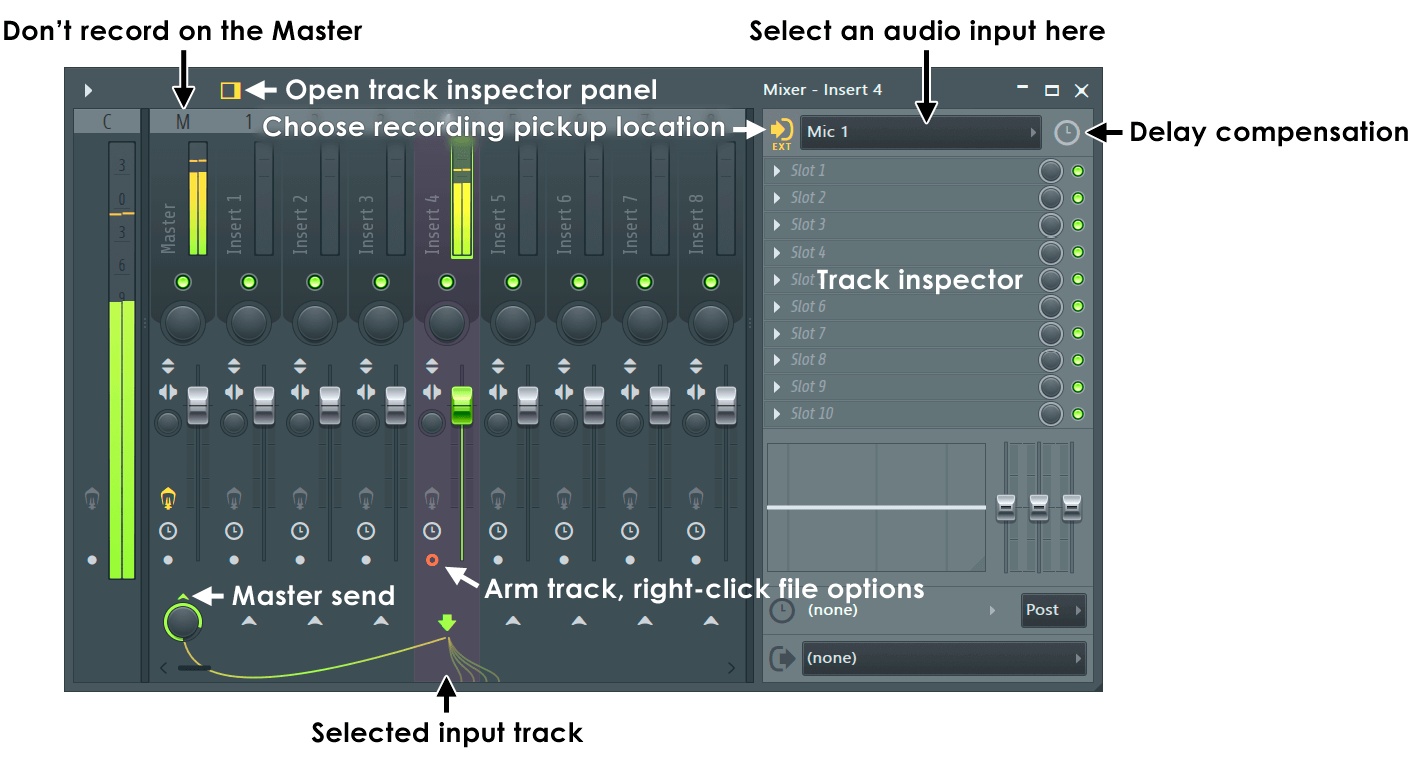
The Mixer is where you control the volume, panning, and effects of each individual channel in your project. It allows you to fine-tune the sound of your instruments and samples, as well as apply various audio processing techniques. The Mixer includes inserts for adding plugins and sends for applying effects to multiple channels simultaneously. It is essential for achieving a professional and balanced mix.
5. The Playlist
The Playlist is where you arrange your patterns, creating the structure and arrangement of your composition. It allows you to arrange and layer multiple patterns to create a complete song. The Playlist provides a timeline-based interface, where you can easily place and edit your patterns using drag-and-drop functionality. You can also use the Playlist for arranging audio clips and automation events.
Credit: www.image-line.com
6. The Step Sequencer
The Step Sequencer is a drum machine-like interface that allows you to create beats and rhythms using a grid-based pattern workflow. It is a handy tool for creating drum patterns, basslines, and other repetitive sequences. Each step in the Step Sequencer represents a beat or a note, and you can easily program complex rhythms by activating or deactivating steps in the sequencer grid.
7. The Toolbar and Transport Panel
The Toolbar and Transport Panel are located at the top of the FL Studio interface and provide quick access to essential functions and controls. The Toolbar includes buttons for saving, undoing, and redoing actions, as well as shortcuts for various tools. The Transport Panel includes controls for playing, stopping, and recording your project, allowing you to navigate through your compositions smoothly.
Frequently Asked Questions Of Understanding The Fl Studio Interface : Mastering The Basics
What Are The Main Features Of Fl Studio Interface?
The FL Studio Interface includes a customizable toolbar, a step sequencer, mixer, and piano roll.
How To Navigate Through The Fl Studio Interface?
Navigation in FL Studio Interface can be done using the toolbar, browser, channel rack, and transport controls.
What Is The Purpose Of Mixer In Fl Studio Interface?
The mixer in FL Studio Interface helps in adjusting levels, panning, and adding effects to tracks.
Can The Fl Studio Interface Be Customized To Your Preference?
Yes, FL Studio Interface allows customization through resizing, rearranging windows, and creating custom layouts.
Conclusion
Understanding the FL Studio interface is crucial for efficient music production. By familiarizing yourself with the Browser, Channel Rack, Piano Roll, Mixer, Playlist, Step Sequencer, and Toolbar/Transport Panel, you’ll have a solid foundation for creating music in FL Studio. Take the time to explore each element, experiment with different features, and unleash your creativity in this powerful DAW.
What are Some Basic Music Theory Concepts That Every Musician Should Know? – Blog Post
Music theory is the foundation upon which all great music is built. Whether you’re a beginner or an experienced musician, understanding the basic concepts of music theory can significantly enhance your musical understanding and creativity. In this article, we will explore some essential music theory concepts that every musician should know.
1. Notes and the Musical Alphabet
Notes are the building blocks of music. The musical alphabet consists of seven letters: A, B, C, D, E, F, and G. These letters represent individual pitches, and by combining them, we create melodies and harmonies.
2. Scales and Keys
Scales are sequences of notes arranged in order of pitch. They provide the framework for melodies and harmonies. The most commonly used scale is the major scale, which has a distinct pattern of whole and half steps. Understanding scales is crucial in determining the key of a piece of music.
3. Chords and Harmony
Chords are groups of three or more notes played simultaneously. They form the foundation of harmony in music. Learning how to build and manipulate chords allows musicians to create rich and complex sounds, adding depth to their compositions.
Credit: ask.audio
4. Rhythm and Time Signatures
Rhythm is the pattern of sounds and silences in music. Time signatures indicate the number of beats in a measure and the type of note that receives one beat. Understanding rhythm and time signatures enables musicians to play in sync with others and master complex rhythmic patterns.
5. Intervals
Intervals are the distances between two notes. They are used to describe the relationship and sound between pitches. From simple intervals like seconds and thirds to more complex ones like sevenths and ninths, understanding intervals helps musicians create melodies and harmonies that evoke specific emotions.
6. Music Notation
Music notation is a system of writing music using symbols. It allows musicians to communicate and share their compositions. Learning how to read and write sheet music opens up a vast treasure trove of musical knowledge and repertoire.
Credit: www.gunnostudio.com
7. Dynamics and Articulation
Dynamics and articulation refer to the variations in volume and expression of a musical piece. Understanding and utilizing different dynamics and articulations add depth, emotion, and musicality to performances.
8. Ear Training and Sight Singing
Ear training and sight singing are essential skills for musicians. Ear training helps develop the ability to recognize and reproduce pitches, intervals, and melodies by ear. Sight singing enhances the musician’s ability to read and sing music accurately.
9. Musical Forms
Musical forms provide structure to compositions. From the simple A-B-A form to more complex forms like sonatas and symphonies, understanding musical forms helps musicians analyze and appreciate the organization and development of musical ideas.
10. Transposition and Modulation
Transposition involves shifting a piece of music to a different key, while modulation refers to changing the key within a piece. These techniques allow musicians to explore different tonalities and expand their musical possibilities.
These are just a few of the basic music theory concepts that every musician should know. By mastering these core concepts, musicians will have a solid foundation to explore complex compositions, improvise, and compose their own music. So, start exploring the world of music theory and unlock your full potential as a musician!
Frequently Asked Questions On What Are Some Basic Music Theory Concepts That Every Musician Should Know?
What Is The Importance Of Learning Basic Music Theory Concepts?
Understanding basic music theory helps musicians communicate ideas, play in different keys, and interpret musical notation.
How Does Music Theory Knowledge Help In Songwriting And Composition?
It provides the foundation for harmonizing melodies, creating chord progressions, and arranging musical elements effectively.
What Are Some Essential Music Theory Concepts For Beginners To Grasp?
Key signatures, intervals, scales, and chords are fundamental concepts that form the backbone of music theory understanding.
Why Is It Crucial For Musicians To Comprehend Time Signatures And Rhythm?
Mastering these concepts enhances a musician’s ability to keep time accurately and interpret rhythmic patterns.
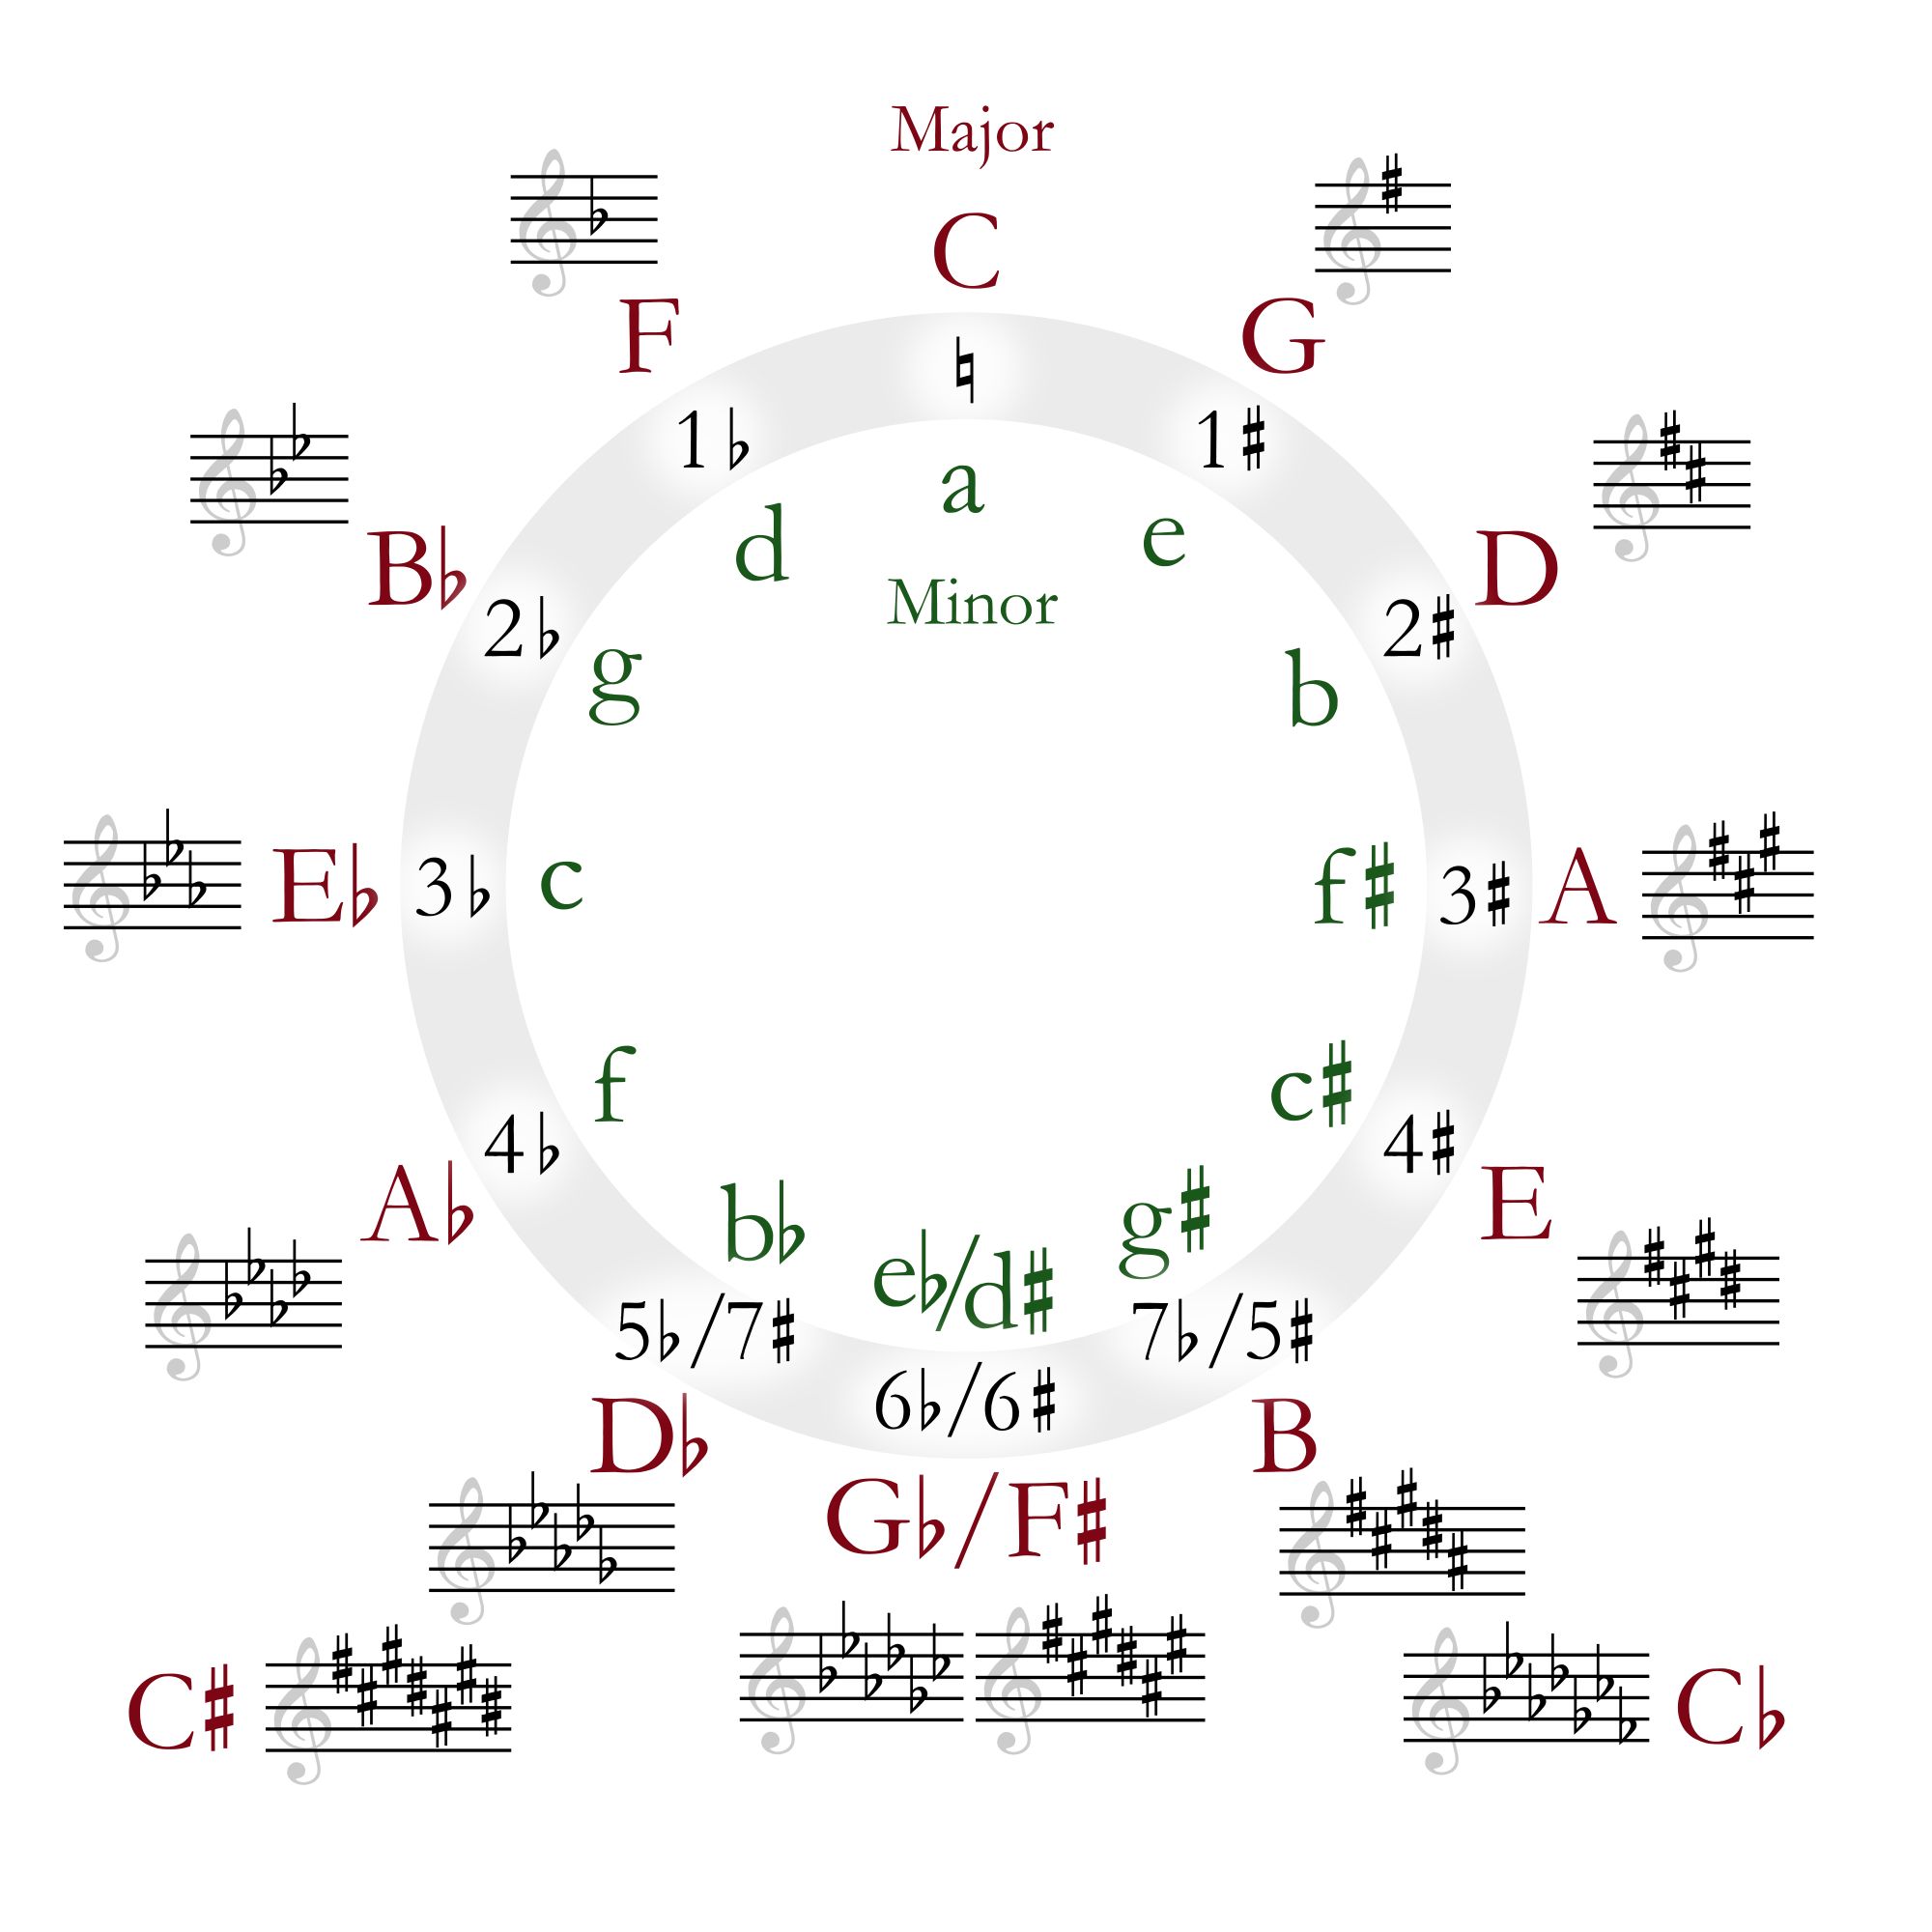
In music theory, the circle of fifths is an essential tool that helps musicians understand the relationship between keys and the organization of musical scales. It is a circular diagram that illustrates the relationships between the twelve pitches of the chromatic scale, their corresponding key signatures, and the intervals between them.
The Construction of the Circle of Fifths
To construct the circle of fifths, we start with the key of C major at the top of the circle. Moving clockwise, each key is a fifth higher than the previous one. This means that each key shares six out of seven notes with its adjacent keys, with only one note changing with each progression. The circle is completed once we reach the key of C major again, but this time in the next octave.
Key
Sharps
Flats
C
0
0
G
1
0
D
2
0
A
3
0
E
4
0
B
5
0
F#
6
0
C#
7
0
F
0
1
Bb
0
2
Eb
0
3
Ab
0
4
Db
0
5
Gb
0
6
Cb
0
7
The table above showcases the number of sharps or flats in each key. As mentioned earlier, each key shares six out of seven notes with its adjacent keys, meaning they have a close relationship in terms of musical structures and tonality.
Credit: en.wikipedia.org
The Circle of Fifths and Key Signatures
Key signatures are a fundamental aspect of music notation. They consist of sharps or flats placed at the beginning of a line or measure to indicate which notes are altered throughout the piece. The circle of fifths provides a visual representation of the relationship between the keys and their respective key signatures.
Each key, as it progresses clockwise around the circle, adds one sharp to its signature. For example, the key of C major has no sharps or flats, while the key of G major has one sharp. This pattern continues until we reach the key of F# major, which has six sharps.
On the other hand, each key, as it progresses counterclockwise around the circle, adds one flat to its signature. Following this pattern, the key of C major has no sharps or flats, while the key of F major has one flat. The circle continues until we reach the key of Cb major, which has seven flats.
Credit: www.classicfm.com
Functionality of the Circle of Fifths
The circle of fifths has several practical uses in music theory and composition. Here are a few notable examples:
Key Progressions: The circle of fifths helps musicians determine the most harmonically pleasing progression of keys. Moving clockwise around the circle allows for smooth transitions by following the natural resolution pattern.
Modulation: Modulation is the process of changing from one key to another within a musical piece. The circle of fifths aids in identifying compatible keys for modulation, as keys that are adjacent on the circle share many tonal and structural characteristics.
Chord Progressions: Many chord progressions in music are based on the circle of fifths. Musicians often use chord progressions that move in fifths to create a sense of harmonic movement and stability.
Transposition: Transposing a piece of music involves changing the key while maintaining the same harmonic structure. The circle of fifths helps musicians transpose accurately by showing the relationships between different keys.
Composition and Improvisation: Composers and improvisers use the circle of fifths to select chords, scales, and melodic patterns that work harmonically and melodically. It serves as a guide, ensuring coherent musical ideas.
The circle of fifths acts as a fundamental tool in music theory, aiding musicians in understanding the relationships between keys, key signatures, and tonality. Its application extends to various musical aspects, such as chord progressions, modulation, and transposition. By utilizing the circle of fifths, musicians can enhance their musical compositions and improvisations while maintaining a strong harmonic structure.
Frequently Asked Questions Of How Is The Circle Of Fifths Used In Music Theory?
How Is The Circle Of Fifths Beneficial In Music Theory?
The Circle of Fifths helps musicians understand key relationships, chord progressions, and modulation.
Why Is The Circle Of Fifths Essential For Learning Music Theory?
It provides a visual representation of the relationship between keys, aiding in understanding scales and chord progressions.
What Is The Significance Of The Circle Of Fifths In Composition?
It assists composers in creating harmonious chord progressions and choosing key modulations for creating musical tension and resolution.
How Does The Circle Of Fifths Aid In Understanding Key Signatures?
It simplifies the process of identifying and memorizing key signatures, making it easier to comprehend tonal relationships.
Fl Studio is a widely popular digital audio workstation, known for its intuitive user interface and powerful features. Among the various tools and plugins available within Fl Studio, the Serum synthesizer stands out as one of the most versatile and capable tools for creating and manipulating sounds. In this comprehensive guide, you will learn everything you need to know about using the Serum synthesizer in Fl Studio to take your music production to the next level.
Understanding the Serum Synthesizer
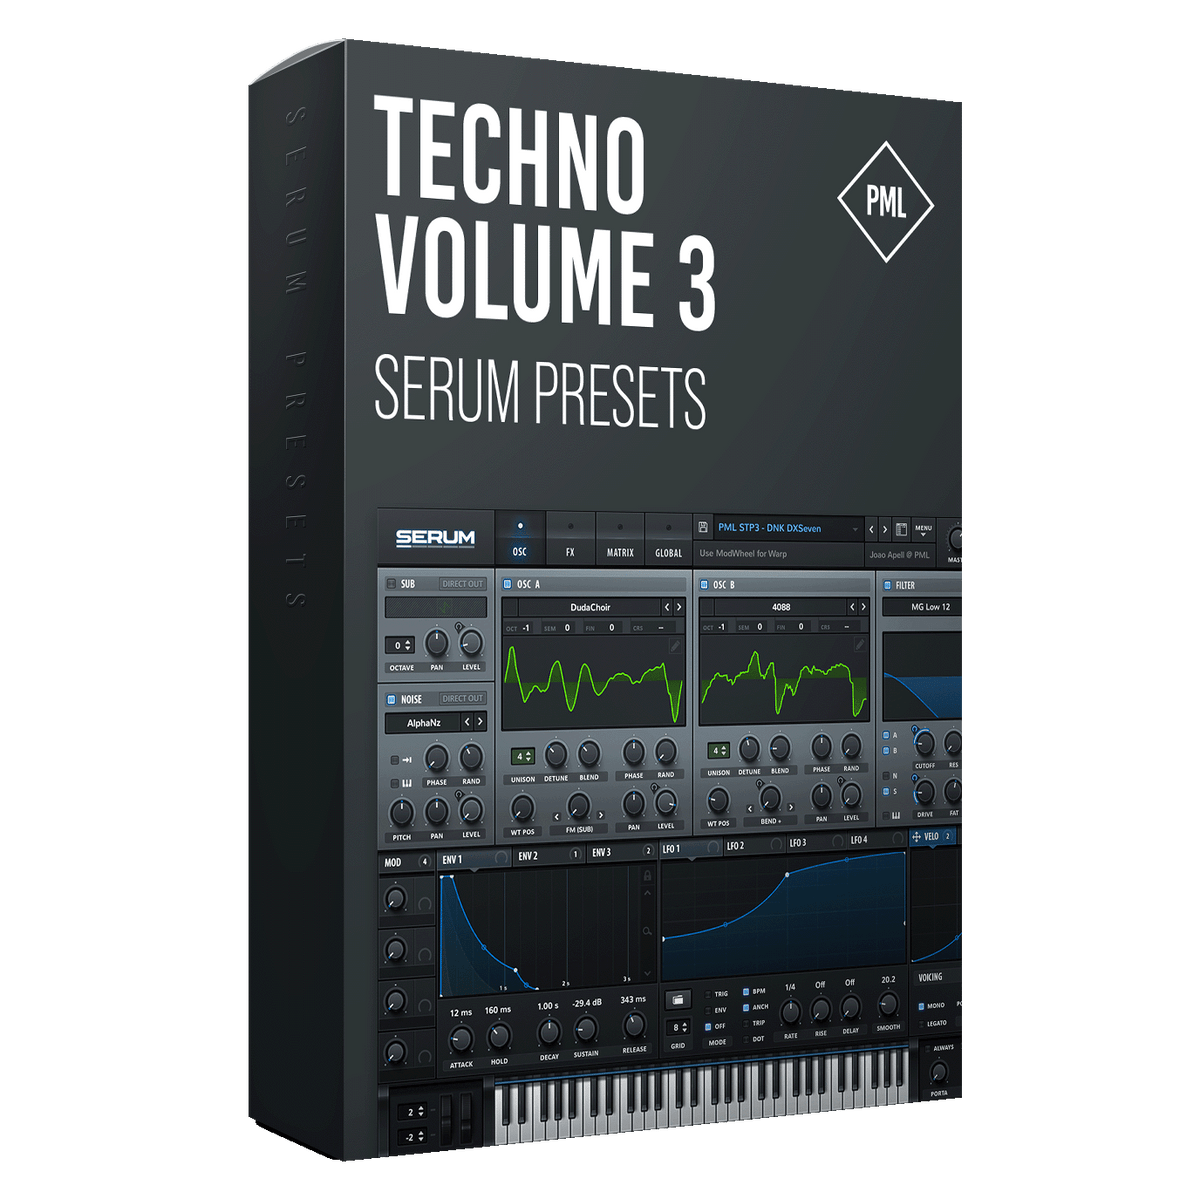
Serum is a wavetable synthesizer developed by Xfer Records, offering a wide range of features that enable users to create and customize complex sounds. The interface is sleek and user-friendly, making it accessible for both beginners and experienced producers. The synthesizer supports both subtractive and wavetable synthesis, allowing for endless sonic possibilities.
Getting Started With The Serum Synthesizer
When you first open the Serum synthesizer in Fl Studio, you will be greeted by a clean and intuitive interface. The main components of the synthesizer include:
Two wavetable oscillators
Modulation and effects section
Filter and global controls
Creating Sounds with Wavetable Oscillators
The wavetable oscillators are at the heart of the Serum synthesizer’s sound creation capabilities. You can select from a wide range of wavetables or even import custom wavetables to experiment with different harmonic content. By adjusting parameters such as wavetable position, spectral warping, and unison settings, you can sculpt rich and dynamic sounds with ease.
Modulation and Effects Section
Serum offers a comprehensive set of modulation tools, including envelopes, LFOs, and custom-drawn shapes. These modulation sources can be assigned to various parameters within the synthesizer, allowing for dynamic and evolving sound design. Additionally, the effects section provides a variety of audio processing tools such as reverb, delay, distortion, and more, enabling you to further enhance your sounds directly within the synthesizer.
Filter and Global Controls
The filter section in Serum offers a diverse selection of filter types, each with its own character and sonic qualities. Whether you need a smooth low-pass filter or a aggressive comb filter, Serum has you covered. Furthermore, the global controls provide essential features such as tuning, voicing, and sub oscillator options, giving you complete control over the overall behavior and tonality of your sounds.
Integrating Serum into Fl Studio Workflow
Using the Serum synthesizer seamlessly within Fl Studio’s workflow can greatly enhance your music production process. By leveraging features such as MIDI routing, automation, and mixer integration, you can fully exploit the potential of Serum as a creative tool.
Midi Routing And Automation
Fl Studio’s MIDI routing capabilities allow you to easily set up Serum to respond to MIDI input from external controllers or other virtual instruments within your project. This gives you the flexibility to perform and record expressive MIDI sequences with Serum, adding a human touch to your synthesized sounds. Furthermore, you can take advantage of Fl Studio’s powerful automation system to create intricate modulations and parameter changes over time, bringing your sounds to life through dynamic automation.
Mixer Integration and Signal Processing
When using Serum within Fl Studio, you can make use of the mixer to apply additional signal processing to your synthesized sounds. Whether you need to apply EQ, compression, or spatial effects, the integrated mixer in Fl Studio allows for seamless and efficient audio processing. This integration empowers you to sculpt and refine your Serum sounds within the context of your entire mix, ensuring that your synthesized elements sit perfectly within your productions.
Advanced Tips and Techniques for Serum in Fl Studio
As you become more familiar with the Serum synthesizer, you can explore advanced tips and techniques to further expand your sonic palette and creativity. Here are some valuable strategies to consider:
Experiment with wavetable modulation and dynamic sound shaping
Utilize custom wavetables and sample manipulation for unique textures
Explore the use of macro controls and performance features for expressive sound manipulation
Combine Serum with other Fl Studio plugins and instruments for integrated sonic explorations
Study and apply synthesis theory to deepen your understanding of sound design principles
By delving into these advanced concepts and techniques, you can unlock the full potential of Serum within Fl Studio and elevate your music production to new heights.
Credit: www.productionmusiclive.com
Credit: www.productionmusiclive.com
Frequently Asked Questions Of Using The Serum Synthesizer In Fl Studio : Mastering Electronic Music Production
How Do I Install The Serum Synthesizer In Fl Studio?
To install the Serum synthesizer in Fl Studio, simply download the plugin file from the official website and run the installer. Then, follow the on-screen instructions to complete the installation process.
Can I Use Serum Synthesizer For Creating Edm Tracks?
Certainly! The Serum synthesizer is perfect for creating EDM tracks. It offers a wide range of high-quality sounds and advanced features that will help you shape your desired electronic music soundscapes.
What Makes Serum Synthesizer Stand Out From Other Plugins?
One of the key factors that sets the Serum synthesizer apart from other plugins is its advanced wavetable synthesis engine. This allows you to create and manipulate an extensive variety of unique and complex sounds with exceptional precision and flexibility.
Does Serum Synthesizer Support Midi Control?
Absolutely! The Serum synthesizer fully supports MIDI control, allowing you to map your MIDI controllers to various parameters within the plugin. This makes it easier to perform and automate your sounds while producing music in Fl Studio.
Conclusion
The Serum synthesizer in Fl Studio is a powerhouse tool for sound design and music production. Its intuitive interface, vast sound creation capabilities, and seamless integration with Fl Studio’s workflow make it an essential instrument for producers in all genres. By mastering the intricacies of Serum and exploring its advanced features, you can unleash your creativity and craft captivating sounds that define your unique artistic vision.
Whether you’re a seasoned producer or just starting out, the Serum synthesizer in Fl Studio offers endless possibilities for sonic exploration and artistic expression. With the knowledge and techniques shared in this guide, you are well-equipped to harness the full potential of Serum and create compelling, professional-quality music with ease.