Categories
Archive

Critical Elements Your Techno Track Needs

To create a top-notch techno track, one must incorporate critical elements such as a strong beat, catchy melodies, engaging transitions, and unique sound design within the first few seconds of the track. These elements, when combined with creative songwriting, groove, and attention to detail, can make the difference between a track that goes unnoticed and one that becomes a hit.


The techno genre has evolved over the years, but the fundamental elements remain the same, and staying true to these elements while adding your spin to them can lead to a successful track. So, whether you’re a seasoned producer or just getting started, incorporating these critical elements into your techno tracks is key to composing memorable, attention-grabbing music.


Effective Techno Production


To produce an effective techno track, it must contain critical elements such as a strong bassline, driving beats, atmospheric effects, and unique sound design. These elements work together to create an intense and engaging listening experience for techno enthusiasts.

Effective Techno Production is what grabs the attention of techno enthusiasts and keeps them hooked. If you want to create a techno track that captures the essence of this music genre, there are several critical elements that you must include in the track. These elements include a pulse-pounding rhythm, impactful bassline, intricate synths, and well-crafted percussion. Let’s dive deeper into each of these elements in this post, which is specifically designed for anyone interested in producing techno music.

Pulse-pounding Rhythm

The rhythm is the backbone of techno music. It is what drives the energy and keeps the listener engaged. A pulse-pounding rhythm comprises of a steady, repeating beat that is hard to resist. The repetition creates a hypnotic effect that takes the listener on a journey. To create a technos track with this critical element, you must choose drum samples carefully. Experimenting with various drum samples can lead to fantastic results. You can also add percussion layers on top of the beat to add texture and keep the listeners interested.

Impactful Bassline

The bassline is another critical element of techno music that helps to create a groove and adds intensity to the track. It creates a foundation for the rhythm to sit on, and the impact of the bassline can make or break a track. To create an impactful bassline, you can experiment with different bass sounds and play with the rhythm and notes to find what sounds best with your track. Use compression techniques to make the bassline stand out and emphasize its impact.

Intricate Synths

Synths are a crucial element of techno music. They add a layer of complexity to the track and define the melody. It is essential to choose the right synth for your track as it can completely alter the mood and energy of the track. When creating a techno track, experiment with different synth sounds, and try layering them to get an intricate sound. Modifying parameters like LFO, filter envelopes, and pitch-bend can result in exciting and complex sounds, making your track stand out from others.

Well-crafted Percussion

It’s the percussion that adds that final touch of polish and character to your techno track. A well-constructed percussion section can infuse energy and rhythm, harmonizing with the rest of the elements in your track. To create a great percussion track, you must experiment with different percussion sounds, be it claps, hats, cymbals, or shakers. Combining unique sounds can lead to interesting results. But use them sparingly and tastefully as too much can ruin the track. In conclusion, including these critical elements in your techno track creates a dynamic and captivating experience for your listeners. A carefully crafted track with a pulse-pounding rhythm, impactful bassline, intricate synths, and well-crafted percussion can set you apart from the competition. So, start experimenting and let your creative juices flow!


Structuring And Arrangement

Structuring and arrangement are critical elements that can make or break your techno track. The way your track is structured and arranged can determine whether it will be a hit or miss. It is important to understand how to structure and arrange your track to keep your listeners engaged from start to finish and leave them wanting more.

Attention-grabbing Intro

Your techno track’s intro is the first impression you make on your listeners. It should be attention-grabbing enough to make your listeners want to keep listening. Your intro should set the tone for the entire track and should give your listeners a taste of what’s to come. An attention-grabbing intro can be achieved through the use of unique sounds, creative rhythms, and exciting effects.

Building Tension In The Breakdowns

The breakdowns in your techno track are critical moments that can make or break the track’s overall impact. Breakdowns are the moments where you can build tension and anticipation in your listeners, creating a sense of excitement that keeps them engaged. You can achieve this by using filters, drops in volume, or other effects that create a feeling of anticipation and tension. Keep your breakdowns exciting and impactful to keep your listeners hooked.

Payoff In The Drop

The drop is the moment your listeners have been waiting for. It should be an explosive moment that delivers on the promise of your techno track. The drop should be a culmination of the tension and excitement you’ve built throughout your track. Use powerful and dynamic sounds, creative rhythms, and bold effects to create a drop that your listeners won’t forget.

Dynamic Outro

Your techno track’s outro is the last impression you make on your listeners. It should be dynamic enough to leave a lasting impression. Your outro should be exciting and impactful enough to leave your listeners wanting more. Use creative sounds, unique rhythms, and exciting effects to take your listeners on one final journey before the track comes to a close.

Key Takeaways:
An attention-grabbing intro can be achieved through unique sounds, rhythms, and effects.
Use breakdowns to build tension and anticipation in your listeners.
Create a powerful and explosive drop that delivers on the promise of your track.
Leave a lasting impression with a dynamic and exciting outro.

With the right structuring and arrangement, you can create a techno track that captures your listeners’ attention and keeps them engaged from start to finish. Use these critical elements to create a track that stands out from the crowd and leaves a lasting impression.

Mixing And Mastering


Achieving the perfect mix and master for your techno track involves incorporating critical elements such as a strong kick drum, dynamic synth lines, and well-balanced levels. Attention to detail with EQ, compression, and reverb can also enhance the overall sound and impact of your production.

Mixing and mastering are essential processes in producing a professional-sounding techno track. Properly mixing and mastering your track ensures that it sounds good on all playback devices and in different environments. These two processes are often the difference between a good track and a great one. In this post, we’ll explore the critical elements that your techno track needs, with a particular focus on the subheading of mixing and mastering.

Balancing Frequencies

Balancing frequencies is the first critical element to consider when mixing and mastering. Proper balance ensures that each element in your track can be heard clearly. It’s best to start by identifying the most crucial parts of your track, such as the drums, bass, and melody. EQ can be used to adjust the balance between these elements. Using a visual representation of your track in software such as Ableton Live or Logic, you can identify the frequencies that need adjustment and use the EQ to adjust them. Compressors can also be used to control dynamic range and ensure that each element in your track has equal emphasis.

Eq And Compression Techniques For Maximum Impact

EQ and compression techniques can be used strategically to create maximum impact in different sections of your track. For instance, boosting the low end of your kick drum with EQ and then compressing it will make it sound more prominent and powerful. Compression can also be used to glue elements together, making the track sound cohesive and uniform. Proper use of compression and EQ can significantly improve the overall clarity and impact of your track.

Creating Space With Reverb And Delay

Reverb and delay are essential effects that can create space and depth in your mix. Reverb can be used to create a sense of space by adding a spatial “tail” to sounds, simulating their natural acoustic environment. Delay can be used to create movement and interest, mimicking the natural echoes heard in different environments. When using reverb and delay, it’s important to be careful not to overdo it, as too much can muddy your mix. You can use sends and returns to apply reverb and delay to specific elements in your track, allowing you to control the amount of effect on each element.

Volume Control

Lastly, volume control is crucial in ensuring that each element in your track is heard clearly. Proper use of volume can create tension, atmosphere, and impact. Using automation, you can control the volume of each element over time, creating movement and dynamics in your track. It’s important to ensure that the volume of each element in your mix is balanced, with no element overpowering the others. In conclusion, mixing and mastering are essential processes in producing a professional-sounding techno track. Balancing frequencies, using EQ and compression techniques, creating space with reverb and delay, and proper volume control are all critical elements to consider when mixing and mastering your track. Ensure that you pay attention to each of these elements, and your final track will sound excellent on all playback devices and in different environments.


Critical Elements Your Techno Track Needs


Credit: www.thefader.com


Frequently Asked Questions Of Critical Elements Your Techno Track Needs


What Are The Key Elements Of Techno Music?


The key elements of techno music include the use of electronic instruments, repetitive rhythms, mechanical sounds, and a minimalistic approach to composition. Techno music often incorporates futuristic and experimental elements, and can evoke a sense of energy and movement.


What Are The Fundamentals Of Techno Music?


The fundamentals of techno music include the use of electronic instruments and a repetitive beat with a tempo ranging from 120 to 150 BPM. The genre originated in Detroit in the mid-1980s and is known for its futuristic and experimental sound.


Techno music often incorporates various samples and uses synthesizers to create a unique and energetic sound.


How Do You Structure A Techno Track?


To structure a techno track, you should first start with a consistent beat and rhythm. Next, add layers of sound and melody gradually, building towards the climax. Use effects to enhance the overall atmosphere of the track. The arrangement should be dynamic with contrasting parts to keep the listener engaged.


Finally, mix and master the track to achieve a professional sound.


What Are The Elements Of Minimal Techno?


Minimal techno is characterized by stripped-down beats and a focus on repetitive percussion and minimal melodic elements. The genre is built on a foundation of 4/4 rhythms and features sparse arrangements with a focus on sound textures and atmospheric effects.


The elements of minimal techno are typically produced using digital instruments and software, and are often created through careful manipulation of loops and samples.


Conclusion


Based on the critical elements highlighted in this blog post, it is evident that every techno track should be treated with technical precision, creativity, and artistic expression. Your ultimate goal as a techno music artist should be to deliver an immersive and unforgettable experience that will keep your audience longing for more.


As you implement the essential elements discussed here, always remember to stay true to yourself, stay curious, and keep pushing the boundaries of techno music. Remember, your art is your voice; use it to tell your story, connect with your audience, and leave a lasting impression.


Categories
Archive

How To Create A Radio Edit Of Your Song

To create a radio edit of your song, remove any explicit language and shorten the length to fit within radio time constraints. Creating a radio edit of your song involves editing the content to fit within radio time limits, tightening the arrangement or structure, and removing any explicit language.


This allows your song to gain airplay on radio stations that might not play songs with explicit lyrics. It is also a great opportunity to make a shortened version of your song that still captures the essence and mood of the original, which can attract new listeners.


We will go through some of the key steps and considerations in creating a top-quality radio edit of your song that will help you reach a wider audience.

How To Create A Radio Edit Of Your Song


Credit: support.tracklib.com


The Importance Of A Radio Edit


Creating a radio edit of your song is crucial to ensure it gets airplay and reaches a wider audience. You need to condense the length and edit out any explicit or inappropriate content, while still maintaining the essence of the song.


Don’t underestimate the importance of a radio edit in promoting your music career.

What Is A Radio Edit?

A radio edit is a version of a song that has been edited to fit into the limited time available for radio airplay, typically between 3-4 minutes. This version of a song is usually created by removing any unnecessary intros, outros, or extended instrumental solos that may not be suitable for radio play. The focus is on creating a more concise and listener-friendly version of the original song.

Why Is A Radio Edit Important?

When a song is released, it is important to create a radio edit version to increase the chances of it being played on the radio. Radio stations have strict guidelines on how long a song can be and what content they can broadcast. A radio edit helps ensure your song meets these requirements and increases the likelihood of it being played. Creating a radio edit also allows you to showcase the essence of your song in a shorter amount of time. Since most listeners only have a limited attention span, a shorter and more engaging version of your song can help grab their attention and keep them interested. In addition, a radio edit can help you reach a wider audience by increasing the chances of your song being played in different markets and stations. This can lead to increased exposure and help you gain more fans and listeners for your music. Ultimately, creating a radio edit of your song is essential in enhancing your chances of getting airplay and increasing your exposure to potential listeners. By keeping it concise, engaging, and suitable for radio play, you can give your music the best chance of success.

Evaluate Your Song For A Radio Edit


Creating a radio edit of your song can ensure it gets airtime on popular stations. To do this, you should evaluate the length, structure, and lyrics of your piece, and make adjustments accordingly.

Creating a radio edit of your song is crucial if you want to get airplay on mainstream radio stations. The process involves assessing your track and identifying the sections that need to be trimmed to fit within the typically 3-4 minute time slot that most radio stations allow for songs. This is where evaluating your song for a radio edit comes in. In this article, we will discuss how to evaluate your song for a radio edit, identify key sections to trim, consider the length of your song and determine the best structure for a radio edit.

Identify Key Sections To Trim

The first step in evaluating your song for a radio edit is to identify the key sections to trim. These sections are typically the verses, choruses, intros, and outros of the song. Analyze your song and pay attention to the parts that are repetitive, less catchy, or have unnecessary instrumentation. These parts are the ones to trim down, so your song can come out sounding more concise and radio-friendly.

Consider The Length Of Your Song

Another factor to consider is the length of your song. Radio stations generally prefer songs that are 3 to 4 minutes long, and anything over five minutes might be too long for a radio edit. If your song is longer than 4 minutes, it would help if you shaved off some sections to fit within the standard radio time frame. Remember that your listeners are most likely busy people, and they might not have the luxury of listening to a lengthy radio edit.

Determine The Best Structure For A Radio Edit

To determine the best structure for a radio edit, you can start by removing the least impressive or essential section of your song. It could be the intro, an instrumental section or even some of the verses. Organize your song to make sense while fitting within the 3-4 minutes timeframe. Structure your song, so it has a clear beginning, middle, and end. Keep the most catchy and memorable parts of your song in the edit as it will make it more enjoyable for your listeners.

Conclusion

Evaluating your song for radio edit is essential to make your music more accessible to a broader audience. By identifying key sections to trim, considering the length of your song, and determining the best structure for a radio edit, you can make sure your music is radio-friendly while still maintaining its originality and uniqueness. Remember, even with a radio edit, your song still needs to sound great and deliver your message or story effectively.


Tips For Creating A Radio Edit


Crafting a radio edit of your song can be tricky, especially if you’re new to the process. Here are some tips to make it easier. Keep it short, stick to the main chorus and avoid using excessive instrumentation.

Tips for Creating a Radio Edit Creating a radio edit of your song can be a challenging task, but it’s a necessary one if you want your music to be played on the radio. A radio edit is a shortened version of your song that usually lasts between 3-4 minutes. It’s crucial to create a radio edit that captures the essence of your song and conveys your message in a shorter time frame. Here are some tips for creating a radio edit. Focus on the Most Memorable Parts of Your Song When creating a radio edit, it’s essential to focus on the most memorable parts of your song. This could be the chorus or the hook that people will remember. Ensure that the most memorable parts of your song feature prominently in the radio edit. Remove any unnecessary sections such as instrumental interludes, long intros, or outros that don’t add value to the song. The goal is to create a concise and memorable version of your song. Consider Using a Different Introduction When creating a radio edit, you may want to consider using a different introduction than the one in the original version of your song. A shorter and more immediate introduction can capture the listener’s attention from the start. A good radio edit intro is usually shorter and more upbeat than the original. Use Crossfades to Blend Sections Use crossfades to blend sections of your song together smoothly, and this can make your radio edit more cohesive. Crossfades allow you to merge two sections of your song seamlessly, which helps to make your radio edit sound more polished. Additionally, using a crossfade can help you to shorten particular sections of your song while ensuring that it doesn’t sound abrupt. Shorten Instrumental Breaks Shortening the instrumental breaks in your song can help you to reduce the length of your radio edit significantly. Ensure that the instrumental breaks don’t take up too much time and that they don’t detract from the memorability of your song. Edit Lyrics to Fit the Time Requirements Finally, editing your lyrics to fit the time requirements of your radio edit is essential. In most cases, the lyrics need to be shorter than those in the original version. Ensure that you keep the essential message of your song while still keeping it relevant and catchy. Be concise and to the point; ensure that every single word counts. In conclusion, creating a compelling radio edit of your song takes time and effort. However, with these tips, you’ll be on your way to creating a memorable and concise version of your song that will capture the attention of radio stations and listeners alike. Stick to them, and you’ll create a radio edit that your fans will love.

How To Create A Radio Edit Of Your Song


Credit: www.wikihow.com


Using Technology To Help Create A Radio Edit


Technology can be helpful in creating a radio edit of your song. Editing software can help you trim your music to meet time restrictions and enhance the audio quality for radio broadcast. Consider using available tools to create a perfect radio edit that draws listeners’ attention and conveys your message effectively.

Creating a radio edit of your song can significantly enhance its chances of getting airplay. However, editing a full-length song to fit in a radio-friendly runtime can be a daunting task. Thanks to technology, creating a radio edit of your song has become relatively easy. In this blog, we will explore how to use digital audio workstations, effects and plugins, and automated tools to slice your track and make it a perfect fit for radio.

Using A Digital Audio Workstation (daw) To Edit Your Song

A DAW can make the editing process much more manageable, especially if you have a large number of tracks. The software allows you to slice the track to remove the parts that you don’t want and rearrange the remaining sections to create a seamless song. You can also use the DAW to modify the tempo, pitch, and volume of the track. Most DAWs have intuitive user interfaces, making it easy for you to identify and isolate portions of the track you need to edit.

Utilizing Effects And Plugins To Modify Your Track

Applying effects and plugins can genuinely enhance your song’s overall quality and fit it more effectively into the radio format. Mixing plugins, such as equalizers and compressors, can bring out more clarity in the song and create a more polished sound. Additionally, reverbs and delays can create more depth, making the song more immersive. Careful consideration of the effects and plugins to apply is crucial as some effects can muddy the song rather than improve it.

Using Automated Tools To Create A Quick Radio Edit

If you’re looking for a quick and effortless way to create a radio edit, you can use automated tools like Avid’s Pro Tools or iZotope’s RX7. These tools can quickly give you a rough mix of your song, which you can then further edit. You can also use tools like Toontrack’s EZdrummer 2, which can create drum patterns that perfectly match the song’s tempo, saving you time that you would otherwise use to manually create a drum pattern. In conclusion, using technology can significantly simplify the task of creating the perfect radio edit. By using a DAW, effects and plugins, and automated tools, you can create a polished and precise radio edit that suits your song. With these tools at your disposal, you can also experiment with different sounds and effects, giving your song a unique touch that stands out from the crowd.

Testing Your Radio Edit

After creating a radio edit of your song, it’s important to test it. This gives you an opportunity to listen to the track multiple times, play it alongside other popular songs in the same genre, and receive feedback from others. These tests will help you identify any issues that need to be fixed before releasing your song. Here are the three ways to test your radio edit:

Listening To Your Radio Edit Multiple Times

Listening to your radio edit multiple times will help you identify parts of the song that need improvement. It will also help you identify pacing errors, tonal inconsistencies, and any other issues that need fixing. Play your song several times until you’re satisfied with the result.

Playing Your Radio Edit Next To Other Popular Songs In The Same Genre

Playing your radio edit next to other popular songs in the same genre will help you determine if your song has the same level of loudness and sound quality as other songs in the same category. It will help you identify if your song matches the genre’s standards or if it needs further editing and changes.

Getting Feedback From Others

Receiving feedback from others is an essential step in creating a perfect radio edit. Share your track with someone you trust who is knowledgeable about music and ask for their honest opinion. This feedback will help you fine-tune your song and make necessary adjustments. Keep in mind that feedback may not always be positive, but it’ll help you improve the quality of your music.

How To Create A Radio Edit Of Your Song


Credit: flypaper.soundfly.com


How To Distribute Your Radio Edit


Creating a radio edit of your song is crucial for getting airtime. To distribute it effectively, choose the right radio stations, research their submission guidelines, and personalize your pitch. With some networking and persistence, your radio edit will reach its intended audience.

Creating a radio edit of your song is only one part of the process. Once you have the perfect edit, the next step is to distribute it to radio stations and make it available online. In this post, we will take you through some steps for distributing your radio edit to make sure that it reaches your audience effectively. ###Submitting Your Radio Edit to Radio Stations Submitting your radio edit to radio stations is the first step in getting your music played on air. There are several ways you can get your music on the radio, one of them is by submitting your music directly to the station. Radio stations usually have a website where you can submit your music or a contact email for music submissions. Submitting directly to the station can be time-consuming and sometimes tedious, but it is an effective way to get noticed. ###Uploading Your Radio Edit Online In addition to submitting your radio edit to radio stations, you can also upload it on various online platforms. By doing this, you make your music easily accessible to a larger audience, regardless of where they are. One of the most popular platforms for uploading music is SoundCloud. By creating an account, you can upload your song, add descriptions and tags, and share it across social media platforms. Other platforms include YouTube, Spotify, and iTunes. ###Using a Music Distributor to Release Your Radio Edit on Streaming Platforms Using a music distributor is another option for releasing your radio edit on streaming platforms. It’s a cost-effective way of getting your music on various streaming platforms. There are several digital distribution services available, including DistroKid, TuneCore, and CD Baby. These platforms allow you to upload your music, and they handle the rest of the processes, such as distributing your music to various platforms, including Spotify, iTunes, and Amazon Music. This option is advantageous, especially if you want to reach a large audience worldwide. Conclusion Overall, these are great ways to distribute your radio edit for the world to hear. From submitting your music directly to radio stations to using music distributors, the possibilities are endless. By following these steps, you can increase your chances of getting your music played on the radio and discovered by new listeners online.

Frequently Asked Questions On How To Create A Radio Edit Of Your Song


How Do I Get My Song On The Radio?


To get your song on the radio, you need to follow these steps: 1. Find radio stations that play your genre of music. 2. Research the submission process for each station. 3. Prepare a press kit with your bio, music, and contact info.


4. Follow up with each station to ensure they received your submission. 5. Promote your music through social media and shows to increase visibility.


What Is A Radio Edit Of A Song?


A radio edit of a song refers to a shorter version of the original track that has been modified to fit the time constraints of radio stations. Generally, radio edits eliminate any explicit content, instrumental solos, or extended intros/outros present in a song, making them more accessible to a broad audience.


What Is The Difference Between Radio Edit And Clean Version?


A radio edit refers to a shortened version of a song that has been edited for time and content. A clean version, on the other hand, refers to a version of a song that has had any explicit or offensive language removed or replaced with milder options.


What Makes A Song Radio Friendly?


A radio friendly song has a catchy tune, easy to sing along lyrics, and is generally between 3 to 4 minutes in length. It must also have a clean version free from explicit language and a structure that can easily fit into commercial breaks.


Additionally, it should be relatable to a broad audience, something that people will hum or sing along for hours.


Conclusion


Creating a radio edit of your song is essential if you want it to be played on air. Follow the tips outlined in this post such as understanding the format, considering the length, and editing out any explicit content. Keep in mind that a radio edit doesn’t have to mean compromising your artistic vision.


By making a version that is radio-friendly, you increase your chances of getting your music heard by a larger audience. Happy editing!

Categories
Archive

Essential Scales For Making Melodies

The essential scales for making melodies are major and minor scales. These scales provide a strong foundation for creating beautiful and memorable melodies.


If you want to create great music, understanding scales and how they work is essential. The two most important scales for making melodies are the major and minor scales. The major scale is known for its happy and uplifting sound, while the minor scale lends a more melancholic and emotional feel to music.


Knowing how to play these scales on your instrument and using them in your compositions can help you create music that resonates with your audience. We will explore the major and minor scales in more detail and show you how to incorporate them into your melodies. Whether you’re a beginner or an experienced musician, mastering these essential scales is a key step in becoming a great composer.

Essential Scales For Making Melodies


Credit: www.productionmusiclive.com


Major Scales


Mastering major scales is crucial for composing engaging melodies. These essential scales provide the foundation for creating music in various genres and are a must-have skill for any aspiring musician.

Major scales are the foundation of Western music and are a crucial component of creating melodies. Understanding the structure and formula of major scales, as well as common major scales used in music, is essential for any aspiring musician or composer. By using major scales effectively, you can create memorable and compelling melodies that will captivate your audience. In this section, we will explore major scales in detail and provide some tips for creating melodies using major scales.

The Structure And Formula Of Major Scales

Major scales have a distinct pattern consisting of whole and half steps. Every major scale starts with a note, known as the “tonic,” and then follows a specific sequence of whole and half steps. The formula for creating a major scale is: Tone, Tone, Semitone, Tone, Tone, Tone, Semitone Translated into a musical language, this means that the major scale is created using the following sequence of notes: `Do, Re, Mi, Fa, Sol, La, Ti, Do` This formula and sequence form the foundation of major scales and are essential for understanding how to use them in melodies.

Common Major Scales Used In Music

There are twelve unique major scales in Western music, each starting on a different note. However, some major scales are more common than others. The most commonly used major scales are:

  • C major
  • G major
  • D major
  • A major
  • E major
  • B major
  • F# major

These scales are popular because they closely align with the natural harmonics of instruments like the guitar and piano. By learning these common major scales, you can create melodies that are in sync with the long musical tradition.

Tips For Creating Melodies Using Major Scales

Now that you understand the structure and formula of major scales and have some examples of commonly used scales, let’s discuss some tips for creating melodies using major scales.

  • Start with the tonic note and focus on the melody’s mood or emotion.
  • Use the notes of the major scale in a simple and repetitive pattern.
  • Use the notes of the major scale in a complex and intricate pattern to create a more sophisticated melody.
  • Use the major scale as a base, but experiment with chord progressions to add variety and interest.
  • Listen to popular melodies and analyze how the composer used major scales.

By using these tips and experimenting with major scales, you can create melodies that capture your audience’s attention and convey the emotion or mood of your piece. In conclusion, major scales are an essential tool for creating melodies in Western music. By understanding their structure and formula, learning common scales, and using some tips and tricks, you can create music that is both harmonious and captivating. Continue exploring and practicing major scales, and soon you’ll be creating your memorable melodies.


Minor Scales


One essential scale for making melodies is the minor scale. It creates a moody and emotional sound that can add depth to a melody. Incorporating the minor scale can bring complexity to a melody and invoke a range of emotions in the listener.

Minor scales are an essential tool for creating powerful and emotive melodies. The unique structure and formula of minor scales create a distinct sound that can convey a variety of moods, from melancholy to angst and everything in between. In this article, we’ll explore the structure and formula of minor scales, common minor scales used in music, and share tips for creating melodies using minor scales.

The Structure And Formula Of Minor Scales

Minor scales are created using a specific formula of whole steps (W) and half steps (H). The three types of minor scales, natural minor, harmonic minor, and melodic minor, all use different formulas to create their unique sound. The natural minor scale follows the formula: W-H-W-W-H-W-W. For example, the A natural minor scale would include the notes A-B-C-D-E-F-G. The harmonic minor scale differs from the natural minor scale by raising the seventh note one half step, following the formula: W-H-W-W-H-A2-H. Using the A harmonic minor scale, the notes would be A-B-C-D-E-F-G#. The melodic minor scale has a unique structure, using a different formula for ascending and descending notes. The ascending formula is W-H-W-W-W-W-H, while the descending formula is W-H-W-W-H-W-W. Using the A melodic minor scale, ascending notes would include A-B-C-D-E-F#-G#. Descending notes would use the natural minor formula, resulting in the notes A-B-C-D-E-F-G.

Common Minor Scales Used In Music

The natural minor scale is the most commonly used minor scale, frequently heard in classical, jazz, and pop music. The harmonic minor scale is also popular in classical and jazz music, with its unique raised seventh note creating tension and drama in melodies. The melodic minor scale is commonly used in jazz and fusion music, with its unique ascending and descending formulas making it versatile for creating complex melodies. Other minor scales, including the Dorian and Aeolian mode, are also used in a wide range of music genres.

Tips For Creating Melodies Using Minor Scales

One way to use minor scales is to start with a chord progression in a minor key and build the melody from there. Experimenting with different scales and modes can also bring unique flavor to your melodies, creating unexpected twists and turns that engage your listener. Start by identifying the root note of your scale, then work with notes that harmonize with the chord progression to create a melody that fits the overall mood. Adding rhythmic variety and dynamics to your melodies can also keep them engaging and emotionally impactful. In conclusion, minor scales are a powerful tool for creating emotive and memorable melodies. By understanding the structure and formula of common minor scales and experimenting with different modes and chord progressions, you can create melodies that resonate with your listener and leave a lasting impact.

Pentatonic Scales


Pentatonic scales are essential for making melodies, as they consist of five notes and create a distinct sound in music. Musicians often use pentatonic scales in various genres, including blues, folk, and rock. Learning how to use these scales can enhance your skills as a music creator.

Pentatonic scales have been used in music for centuries. They are extensively used in modern pop music, rock, and jazz. The word “pentatonic” comes from the Greek word “pente,” which means “five,” and “tonic,” which means “sound.” As the name suggests, the pentatonic scale consists of five notes, which make it easy to learn for beginners.

The Structure And Formula Of Pentatonic Scales

The pentatonic scale is a five-note scale that can be formed by removing the fourth and the seventh note from the diatonic scale. This results in a unique and basic sound to the scale. The formula for a major pentatonic scale is Root, 2nd, 3rd, 5th, 6th, and it can be represented in intervals as W-W-W+H-W-W+H. Similarly, the formula for the minor pentatonic scale is Root, minor 3rd, 4th, 5th, and minor 7th, and its interval representation is W+H-W-W-W+H.

Common Pentatonic Scales Used In Music

The pentatonic scale has two variations: the major and minor scales. Some commonly used pentatonic scales in music are:

  • Major Pentatonic
  • Minor Pentatonic
  • Blues Scale
  • Egyptian Scale
  • Japanese Scale

Tips For Creating Melodies Using Pentatonic Scales

One of the easiest ways to create a melody using the pentatonic scale is to start with the root note and build a simple sequence of notes. Here are some tips to create melodies using pentatonic scales:

  • Start by playing the pentatonic scale in sequences, up and down, or in patterns.
  • Use repetition to add a catchy element to the melody. This helps in creating a memorable tune.
  • Try playing the scale in different octaves to explore different sound ranges.
  • Include variations in the melody, such as rhythm changes, to maintain the listener’s interest.


Major Pentatonic Interval Notes
C Major Pentatonic Root, 2nd, 3rd, 5th, 6th C, D, E, G, A
G Major Pentatonic Root, 2nd, 3rd, 5th, 6th G, A, B, D, E
D Major Pentatonic Root, 2nd, 3rd, 5th, 6th D, E, F#, A, B


Minor Pentatonic Interval Notes
A Minor Pentatonic Root, minor 3rd, 4th, 5th, and minor 7th A, C, D, E, G
E Minor Pentatonic Root, minor 3rd, 4th, 5th, and minor 7th E, G, A, B, D
B Minor Pentatonic Root, minor 3rd, 4th, 5th, and minor 7th B, D, E, F#, A

Blues Scales


Blues scales are essential for creating melodies in blues music. These scales provide the foundation for improvisation and are commonly used in both lead and rhythm playing. By mastering the blues scales, musicians can create soulful and expressive melodies that capture the spirit of this genre.

Blues scales are essential to creating powerful and impactful melodies in certain genres of music. These scales add depth, emotion, and soulfulness to music, making them a must-know for any aspiring music producer or songwriter. In this article, we will discuss the structure and formula of blues scales, common types used in music, and tips for creating melodies using blues scales.

The Structure And Formula Of Blues Scales

Blues scales are a six-tone scale that consists of the root, flat third, fourth, augmented fourth, fifth, and flat seventh notes of a major scale. This scale produces a distinct blues sound when played, and the flattened third, fifth, and seventh notes are what gives the scale its unique and bluesy sound. The formula for constructing a blues scale is as follows: Root, flat third, fourth, augmented fourth, fifth, flat seventh, and back to the root.

Common Blues Scales Used In Music

There are several types of blues scales used in music, each with their unique characteristics. Some of the most common blues scales include:

  • Minor blues scale: Similar to the natural minor scale, this scale adds a flat fifth and flat seventh to produce a bluesy, melancholic sound.
  • Major blues scale: This is the same as the major scale, but with a flattened third and seventh, creating a bluesy feel.
  • Pentatonic blues scale: A five-tone scale that omits the fourth and seventh notes of the minor blues scale.

Tips For Creating Melodies Using Blues Scales

When creating melodies using blues scales, there are some tips you can follow to make your music more impactful:

  1. Experiment with different variations of the blues scale to create unique and interesting melodies.
  2. Use slides, bends, and vibrato to add expression and emotion to your melodies.
  3. Combine different blues scales to create chord progressions that add variety and depth to your music.
  4. Try incorporating external notes to add color and complexity to your melodies.

By following these tips, you can create soulful and emotional melodies using blues scales that will captivate your audience. In conclusion, blues scales are an essential tool for any musician looking to add depth and feeling to their music. By understanding the structure and common variations of these scales, you can create powerful melodies that evoke a range of emotions in your listeners.

Modal Scales

Modal scales have played a pivotal role in the creation of music for centuries. These scales differ from standard scales by their unique tonal centers and specific modal qualities. Unlike traditional major and minor scales, modal scales offer a more diverse, eclectic range of musical expression. Whether you’re a seasoned musician or an aspiring songwriter, understanding the structure and formula of these scales can take your melodies to new heights.

The Structure And Formula Of Modal Scales

Modal scales are based on different sets of intervals that determine their unique sound. The most common types of modal scales include Dorian, Phrygian, Lydian, and Mixolydian. Each scale has a distinctive formula and structure that sets it apart from others. Here’s a breakdown of some common modal scales used in music:

Modal Scale Formula
Dorian 1 2 b3 4 5 6 b7
Phrygian 1 b2 b3 4 5 b6 b7
Lydian 1 2 3 #4 5 6 7
Mixolydian 1 2 3 4 5 6 b7

Common Modal Scales Used In Music

Modal scales have a rich history in various styles of music. From jazz and blues to rock and classical, they are a fundamental part of creating unique melodies. Here are some examples of common modal scales used in different genres:

  • The Dorian mode is frequently used in blues music, such as the song “The Thrill is Gone” by B.B. King.
  • The Phrygian mode is often used in metal music, such as Metallica’s “Enter Sandman”.
  • The Lydian mode is used in many jazz and fusion songs, such as John Coltrane’s “Giant Steps”.
  • The Mixolydian mode is common in rock music, such as “All Along the Watchtower” by Jimi Hendrix.

Tips For Creating Melodies Using Modal Scales

When creating melodies using modal scales, there are a few tips to keep in mind to ensure your composition is cohesive and expressive:

  1. Start by identifying the tonal center of the modal scale and use it as the basis for your melody.
  2. Experiment with the different intervals of the scale to create unique chord progressions and note combinations.
  3. Try incorporating passing tones or chromatic notes to add tension and release within your melody.
  4. Pay attention to the overall feel of your composition and adjust accordingly by using different modal scales or modes.

By keeping these tips in mind, you can create dynamic and compelling melodies using modal scales that capture your desired emotions and moods.

Exotic Scales


Get creative with your melody-making by exploring exotic scales. These scales, like the Hungarian minor and the Phrygian dominant, add unique flavor and depth to your music. Incorporate them into your compositions for a truly distinct sound.

As a musician, exploring various scales and incorporating them into your melodies can add flavor and uniqueness to your music. One such category of scales that can add a touch of exoticism to your tunes is the “Exotic scales.” These scales are commonly used in traditional music from different cultures and can help create an ethnic vibe to your composition.

Examples Of Exotic Scales Used In Music

Here are some exotic scales you can experiment with in your compositions:

Scales Origin Intervals
Phrygian Dominant Middle Eastern 1, b2, 3, 4, 5, b6, b7
Hungarian Major Hungary 1, b2, 3, #4, 5, b6, 7
Mohammedan India 1, 2, b3, 4, b5, b6, 7

How To Incorporate Exotic Scales Into Your Melodies

Incorporating exotic scales into your melodies can add a unique touch to your composition. Here are a few ways to do it:

1. Experiment with the scales

Play around with the scales and get a feel for them. Try playing them up and down and improvising melodies with them. This way, you will understand the tonality and intricacies of the scales.

2. Combine scales with each other

To make your music even more exotic, try combining different exotic scales. This can lead to interesting results and can add layers to your composition. Experiment with different scales until you find the combination that you enjoy.

3. Start simple

If you’re new to incorporating exotic scales into your melodies, start with simple patterns. Begin by adding a few notes of an exotic scale to a familiar scale or melody, and then expand from there. This way, you won’t feel overwhelmed, and you’ll be able to slowly incorporate exotic scales into your compositions. Overall, exotic scales can add a unique and exotic feel to your melodies. Experiment with different scales and incorporate them into your compositions to take your music to the next level.


Essential Scales For Making Melodies


Credit: www.fender.com


Frequently Asked Questions Of Essential Scales For Making Melodies


What Scale Do Most Songs Use?


Most songs use the major or minor scale, which are both seven-note scales in Western music. The major scale produces a happy, upbeat sound, while the minor scale creates a more somber and melancholy tone. Other scales, such as the pentatonic and blues scales, are also commonly used in certain genres of music.


What Are The Melodic Major Scales?


Melodic major scales are a series of notes or tones arranged in ascending and descending order with a particular pattern of half-steps and whole-steps. This scale is also known as the jazz melodic minor scale or the altered scale. The scale is a derivative of the major scale and is used mostly in jazz music.


What Is The Most Important Musical Scale?


The major scale is considered the most important musical scale. It’s used as a foundation for many types of music and can evoke different emotions based on the variation used. The major scale consists of seven notes with a pattern of whole-steps and half-steps.


What Is The 5 Music Scale?


The 5 music scale refers to the pentatonic scale, which is a musical scale consisting of five notes per octave. It is used in various musical traditions and is popular in blues, rock, and pop music. The scale is known for its simplicity and versatility.


Conclusion


With plenty of options for scales to choose from, it can be overwhelming for a musician to select the right ones. However, after going through this post, you have gained an understanding of key scales and their usage. By using these essential scales, you can create unique and beautiful melodies that resonate with your audience.


Keep practicing and experimenting with these scales to elevate your music and bring forth your creativity to the forefront.

Categories
Archive

Audio Compression Threshold Explained

Audio compression threshold refers to the level at which a compressor begins to reduce the dynamic range of audio signals. Audio compression is an important tool for helping to control the dynamic range of audio recordings. This makes them sound clearer and more polished.


Also, the threshold is the level at which the compressor begins to activate its gain reduction process. It decides how much of the signal’s dynamic range the compressor affects. We’ll take a closer look at audio threshold, what it is, and how it works.

Related reading: Compressor Threshold Setting and Compression Meters. For background, see the Wikipedia article on Dynamic range compression.


We’ll also explore some of the common uses of audio compression, and provide some tips on how to use compression effectively in your own recordings.

Audio Compression Threshold Explained


Credit: www.iconcollective.edu


What Is Audio Compression?


Moreover, Audio Compression is a process that reduces the dynamic range of an audio signal. The threshold is the level at which the compression starts to work. Understanding the threshold control will help you control the loudness of your audio and ensure a balanced mix.

Dynamic Range Compression Threshold

In addition, Audio compression is a process that reduces the dynamic range of an audio signal. It is a crucial and widely-used technique in the field of audio engineering. This enables audio professionals to achieve a more consistent volume level throughout a recording. Compression is particularly useful in cases where the audio content has a wide dynamic range, such as with live recordings or performances where the volume can vary greatly.

Threshold

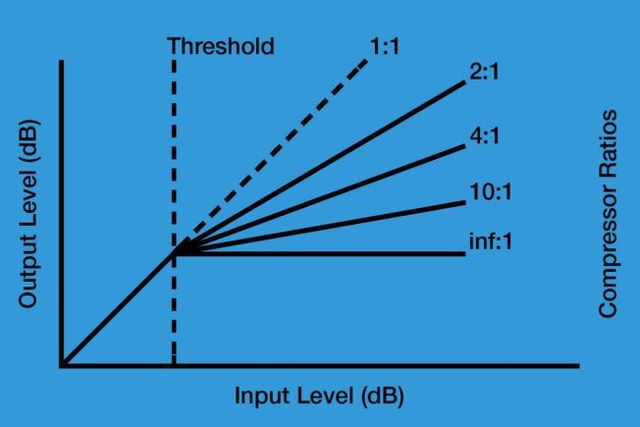
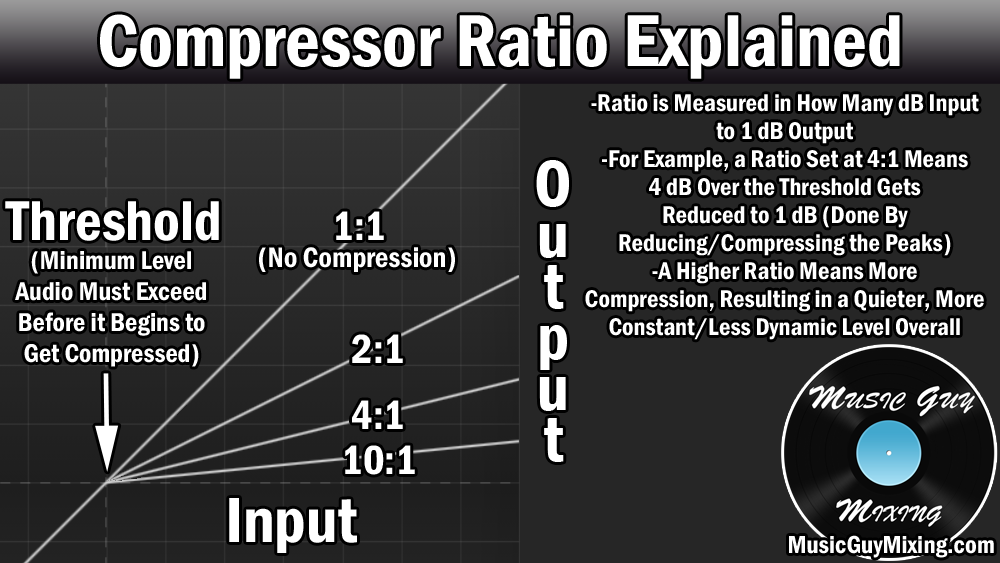
Furthermore, the threshold is one of the most important parameters of audio compression. It determines the point at which the compressor starts to act on the audio signal. Audio below the threshold stays uncompressed, while the compressor reduces anything above it by the set ratio. We express the threshold in decibels (dB), and you can adjust it to suit each recording.

Examples Of Thresholds

As a reference, engineers often start vocals at around -10 dB. Meanwhile, that for drums is around -20 dB. A higher threshold will allow more dynamic range to pass through uncompressed, resulting in a more natural and unprocessed sound. On the other hand, a lower threshold will compress more of the dynamic range. This results in a more consistent and polished sound.

Final Words for Compression Threshold

In conclusion, audio compression is a powerful tool for achieving a consistent volume level in audio recordings. The threshold parameter is a crucial aspect of dynamic range compression and can greatly affect the overall sound of a recording. By understanding how the threshold works and experimenting with different settings, audio professionals can achieve a well-balanced and polished sound that meets the requirements of their clients.

Why Is Compression Used In Audio Production?

Audio compression is an essential tool in music production. The process of compression helps to manipulate the dynamics of an audio signal, controlling the levels of both loud and soft sounds in order to achieve a desired sound. It is an integral part of the recording and mixing process, used to ensure that recordings have a balanced and polished sound.

Balance And Clarity for Compression Threshold

One of the main reasons for using compression in audio production is to achieve a balanced and clear sound. Compression helps to tame the peaks of an audio signal. This makes the difference between the louder and quieter parts of a track less extreme. This creates a more consistent sound, so no part of the recording disappears in the mix. By bringing up quieter elements, compression can help to bring out the details and nuances in a song. This leads to a more dynamic and exciting final product.

Volume Control

Compression is also often used to control volume and maintain a consistent overall level. Compressing the louder parts brings the signal down to a more manageable level, which frees up headroom. This means you can bring up softer elements without causing distortion or clipping. Compression can also help to prevent individual tracks from getting lost in the mix. This makes it easier to hear all of the different elements of a song.

Overall, compression is a powerful tool in audio production that helps to create a balanced and polished final product. By controlling the dynamics of an audio signal, compression can help to bring out the details in a recording and make sure that no parts of the mix are lost in the shuffle.

What Is Compression Threshold And How Does It Work?

Audio compression is an important tool for any music producer, sound designer, or audio engineer. This setting is a key element of understanding how audio compression works. It is an important parameter that determines when the audio signal will be compressed, limiting its dynamic range and making the audio sound more consistent.

Definition Of Compression Threshold

The threshold is the level at which the compressor begins to work. Once the audio signal reaches the threshold level, the compressor kicks in and starts reducing the volume of the signal. This helps to bring the loudest parts of the audio signal down to a more manageable level, while not affecting the quieter parts of the audio. This can help to even out the overall dynamics of the audio. This makes it sound more consistent and easier to mix.

Adjusting The Threshold

Adjusting the threshold control is an important part of using compressors effectively. With a threshold that sits too high, the compressor won’t engage until the signal is too loud. The compressor won’t reduce the dynamic range much. On the other hand, a threshold that sits too low makes the compressor work all the time. The audio may sound overly compressed or flattened.

A good starting point for setting this setting is to aim for a gain reduction of around 3-6 dB. This will help to reduce the dynamic range of the signal without overly affecting the audio quality. After setting the threshold, it’s important to monitor the audio output carefully and adjust the settings as necessary.

Conclusion

Understanding threshold is an essential part of using compression effectively. By adjusting the threshold and monitoring the output, you can achieve a more even, consistent sound that is easier to mix and master. Keep these tips in mind when working with audio compression to get the most out of your tracks.

Types Of Compression Threshold


The threshold sets the level above which the compressor acts on loud sounds. The types of compression threshold include hard, soft, and medium, with each type affecting the audio differently.

Understanding the types of compression threshold is crucial for audio engineers and producers. This setting determines the level at which the compressor starts to reduce the dynamic range of an audio signal. There are two types of compression threshold – Soft Knee and Hard Knee.

Soft Knee

A soft knee reaches full compression gradually. In this case, the amount of gain reduction increases gradually as the input signal level passes the threshold. A soft knee is ideal when you need natural, smooth dynamic control. It’s perfect for vocals, acoustic guitar, and other instruments that require a smooth transition between quiet and loud parts.

Hard Knee

Hard Knee threshold is a clear and defined threshold that kicks in abruptly. It starts being effective right from the point when the audio signal hits the threshold. It is best suited for situations that require a more transparent effect, such as drums or percussion. Hard Knee processing is most effective when working with material with a relatively consistent dynamic range.


How Does The Compression Threshold Affect Sound?


The compression threshold refers to the level at which an audio compressor starts to reduce the volume of a signal. Essentially, by setting a threshold, you’re telling the compressor to activate only when a certain volume level is exceeded, which can impact the overall sound of your audio.

The threshold control is a crucial feature in audio recording, mixing, and production. It is the point at which a compressor starts reducing the volume of an audio signal. This setting affects sound in several ways, and it is essential to understand how it impacts audio quality. In this article, we will explore the implications of the threshold and how it affects sound.

Reduction Of Dynamic Range

One of the primary ways that the threshold control affects sound is through the reduction of dynamic range. Dynamic range is the difference between the loudest and softest parts of an audio track, and it is an essential aspect of audio quality. When this setting is low, the dynamic range of the audio signal is reduced. As a result, the loudest parts of the track are quieter, and the softest parts are louder. This can lead to a dull and lifeless sound, which is undesirable in most cases.

Creating A More Consistent Sound for Compression Threshold

On the other hand, a higher compression threshold results in a more consistent sound. This means that the loudest parts of the track are not significantly louder than the softest parts, and the overall volume is more controlled. A consistent sound can be desirable in some cases, especially when recording vocals, where a consistent volume level is critical.

Impacts On Natural Dynamics

While a consistent sound may be desirable in some cases, it can have significant impacts on natural dynamics. When you push compression too far, it squashes the track’s natural dynamics and the audio can sound unnatural. This is because the compressor is reducing the differences in volume between the loudest and softest parts of the track. This compression can result in a loss of detail and nuance in the audio signal. In conclusion, the compression threshold has a significant impact on audio quality, and it is essential to understand its implications.

A low compression threshold can lead to a dull and lifeless sound, while a high compression threshold can result in a loss of detail and nuance. Ultimately, finding the right compression threshold will depend on the specific needs of the audio project, but understanding its impact is crucial to achieving the desired sound.

Tips For Using Compression Threshold

Compression threshold is an essential feature in audio compression that determines the part of a track that needs compressing. Using it effectively can help achieve a balanced and professional sound output. Below are some tips on how to use compression threshold:

Start With A Low Threshold And Ratio

Begin the compression process by setting a low threshold, bagingin at -20db. This way, the compressor only touches the louder parts of the track. Also keep the ratio low, about 2:1 or 3:1, for softer compression. A lower ratio is necessary, especially when mixing vocals, as it helps to maintain the track’s dynamic range.

Adjust The Threshold To Suit The Track

The nature of the track dictates which compression threshold to use. Use your ears to identify the loudest and quietest parts of the track, and then set the threshold at a level that balances the two. If it’s a drum-heavy track, a higher threshold would be more appropriate, but for a vocal track, a lower compression threshold is required.

Use Your Ears To Determine The Right Balance

After setting the threshold level and the ratio correctly, before hitting the compression button, listen to the track to determine if it sounds balanced. Adjust the compression threshold and ratio accordingly until you achieve the desired result. Remember that every track is unique, and there is no set formula for applying compression. Therefore, it’s essential to trust your ears and experiment to achieve the best sound output.

In conclusion, using compression threshold correctly requires patience and a good ear. Start with a low threshold and ratio, adjust the threshold to suit the track, and use your ears to determine the right balance.

Common Mistakes When Using Compression Threshold


Setting the compression threshold can be a tricky task, and some common mistakes are often made. One of the most common mistakes is setting the threshold too low, resulting in over-compression and a loss of dynamic range. It is important to carefully consider the desired effect and adjust the threshold accordingly.

When it comes to audio compression, setting the threshold is crucial. The threshold determines the level at which the compressor kicks in and starts reducing the volume of the audio signal. However, many people make some common mistakes when using compression threshold. Here are some of them:

Over-compression

One of the most common mistakes people make when using compression threshold is over-compressing the audio signal. Over-compression can result in a lack of dynamics and a loss of natural sound. It can also make the audio sound squashed and lifeless. It’s important to find the right balance when setting the compression threshold, so that the audio remains dynamic and natural-sounding while still being controlled.

Setting The Threshold Too High/low

Another mistake people make when setting compression threshold is setting it too high or too low. If the threshold is set too high, only the loudest parts of the audio will be compressed, while quieter parts will remain untouched. This can result in inconsistent volume levels and an unbalanced mix. On the other hand, if the threshold is set too low, the compressor will kick in too often, compressing almost the entire audio signal. This can result in a lack of dynamics and an unnatural sound.

To avoid these mistakes, it’s important to find the sweet spot where the compression is applied consistently across the entire audio signal, while still preserving the natural dynamics of the sound. In conclusion, setting compression threshold correctly is essential to achieving a well-balanced and controlled audio signal. By avoiding these common mistakes, you can ensure that your audio sounds natural, dynamic and professional.

Audio Compression Threshold Explained


Credit: theproaudiofiles.com


Audio Compression Threshold Explained


Credit: www.musicguymixing.com


Frequently Asked Questions Of Audio Compression Threshold Explained


What Should My Compression Threshold Be?


Set your compression threshold based on the needs of each track and source. For most sources, a moderate setting balances control and natural dynamics. It’s important to regularly analyze and adjust your compression settings to ensure optimal performance.


What Is The Threshold Of Audio Compression?


The threshold is the point where the compressor starts to change the volume of the audio. It is the level at which the compressor reacts, reducing the volume of the audio when it exceeds the threshold.


What Is A Good Compressor Setting For Audio?


The ideal compressor setting for audio depends on the type of audio you are compressing. Generally, the ratio should be set between 2:1 to 4:1, the threshold should be set just below the peak level of the audio, attack should be set between 5-30ms, and release should be set between 100-300ms.


It’s best to experiment with different settings to find what sounds best for your particular audio.


What Is A Low Threshold Compressor?


A low threshold compressor is a type of compressor that uses a lower starting pressure compared to other types of compressors. This means that the compressor will start working at a lower pressure rather than waiting for a higher pressure to build up.


This makes it useful for applications where there is a requirement for low pressure air.


Conclusion


As we have seen, audio compression thresholds play a crucial role in determining the quality and loudness of a sound. Understanding compression and how it works is essential for any audio enthusiast, musician, or sound engineer. By manipulating the audio compression threshold, you can achieve a balanced and defined sound that is pleasing to the ears.


To truly master the art of compression, it’s essential to study its different parameters and how they interact. Get creative and experiment with different settings to find your unique sound signature. With dedication and practice, you can become an expert in audio compression and take your music to the next level.

Categories
Archive

A Tip For Huge And Clean Sounding Mixes

To achieve huge and clean sounding mixes, focus on gain staging and EQ. By correctly adjusting levels and frequencies, you can prevent any signal distortion and create a clear and powerful sound.


As a music producer or audio engineer, creating a perfect mix is always the ultimate goal. However, achieving that can be quite challenging, especially when you have to balance different tracks with various instruments and vocals. One key tip to getting that huge and clean sound is through gain staging and EQ.

Related reading: How To Achieve Loud Mixes and How To Get A Cleaner Drum Mix. For background, see the Wikipedia article on Audio mixing.


This means ensuring that each track has the right volume and adjusting the frequencies to create a harmonious blend. The right balance between these two elements will help prevent any distortion and give your mix the clarity and power it needs to stand out. We’ll delve deeper into these essential techniques and provide tips on how to implement them effectively.


Start With A Good Recording for Clean Sounding Mixes

Starting with a good recording is the foundation of producing a huge and clean sounding mix. It’s easy to make a bad recording sound better, but it’s impossible to make a bad recording sound great. Here are some tips for achieving excellent recordings.

Choose The Right Microphone for Clean Sounding Mixes

Choosing the right microphone is critical to capturing the sound you’re looking for. There’s no one-size-fits-all solution when it comes to microphones, and each microphone has its own unique characteristics.

For vocals, a large diaphragm condenser microphone is usually the go-to option. It’s also essential to choose the right microphone for the instrument being recorded. For example, a dynamic microphone is often used for drums and guitar amps.

Use A Suitable Room for Clean Sounding Mixes

The recording environment plays an important role in capturing a good sound. You don’t need a fancy, expensive recording studio to produce great recordings. However, it’s crucial to select a room with good acoustics.

The room should be relatively quiet, and its size will depend on what you’re recording. A smaller room is preferable for vocals and acoustic instruments, while a larger space is best for drum recording.

Record At The Right Level for Clean Sounding Mixes

Recording at the right level is critical for getting a good sound. Too much gain, and the recording will clip, too little, and it will be too quiet. It’s essential to set the recording level correctly to ensure that the recording is neither too hot nor too quiet.

It’s also crucial to ensure that each instrument or vocal is recorded at the right level. For example, recording drums requires careful balancing of each mic to produce a cohesive sound.

By following these recording tips, you can ensure that you end up with a recording with excellent sound quality, which is essential for producing a huge and clean sounding mix.

Focus On Eq for Clean Sounding Mixes


Focus on EQ is a crucial tip for achieving huge and clean sounding mixes. By attentively balancing the different frequencies in your mix, you can enhance the overall sonic quality and achieve a professional sound.

The key to achieving a huge and clean-sounding mix is in the details, and one crucial aspect of this is equalization (EQ). EQ is the process of boosting or cutting specific frequencies of a track to enhance or reduce its tonal qualities. By manipulating the EQ, you can make certain elements of your mix stand out without getting lost in the overall sound.

Cut Before Boosting

When applying EQ, it’s essential to cut problematic frequencies before boosting desirable ones. Boosting frequencies can introduce unwanted noise and distortion, making your mix sound muddy and cluttered. On the other hand, cutting frequencies helps to remove any unwanted sounds and create clarity in your mix. Before boosting any frequency, consider whether you can achieve the desired effect by cutting undesirable frequencies instead.

Sculpt The Sound

EQ isn’t just about removing or boosting frequencies; it’s also about sculpting the sound of your mix. By using different EQ settings on different tracks, you can create a tonal balance that complements each element of your mix. For example, you can remove low frequencies on the vocal track, so it doesn’t clash with the bass or kick drum. Similarly, you can remove high frequencies on the guitar tracks, so they don’t clash with cymbals.

Make Room For All Tracks

Each element of your mix needs its space to breathe, so it’s crucial to make room for all tracks. When every track is fighting for the same frequency space, it’s easy for the mix to become muddy and cluttered. EQ can help you create space by cutting out frequencies that aren’t essential for a specific track. For example, you can cut the low end of the vocals to make room for the bass and kick drum or cut the high end of the guitar to make room for the high-end percussion.

In summary, EQ is an essential tool for achieving a huge and clean-sounding mix. By cutting before boosting, sculpting the sound, and making room for all tracks, you can create a tonal balance that complements each element of your mix. So, take the time to experiment with EQ, and you’ll be well on your way to creating a professional-sounding mix.

https://www.youtube.com/watch?v=QiBmQuz9yr4


Use Compression for Clean Sounding Mixes

The secret ingredient to a huge and clean sounding mix is the use of compression. Compression is a tool that can make a significant difference in the quality of your mixes, whether you’re a seasoned pro or just getting started.

Set The Right Threshold And Ratio for Clean Sounding Mixes

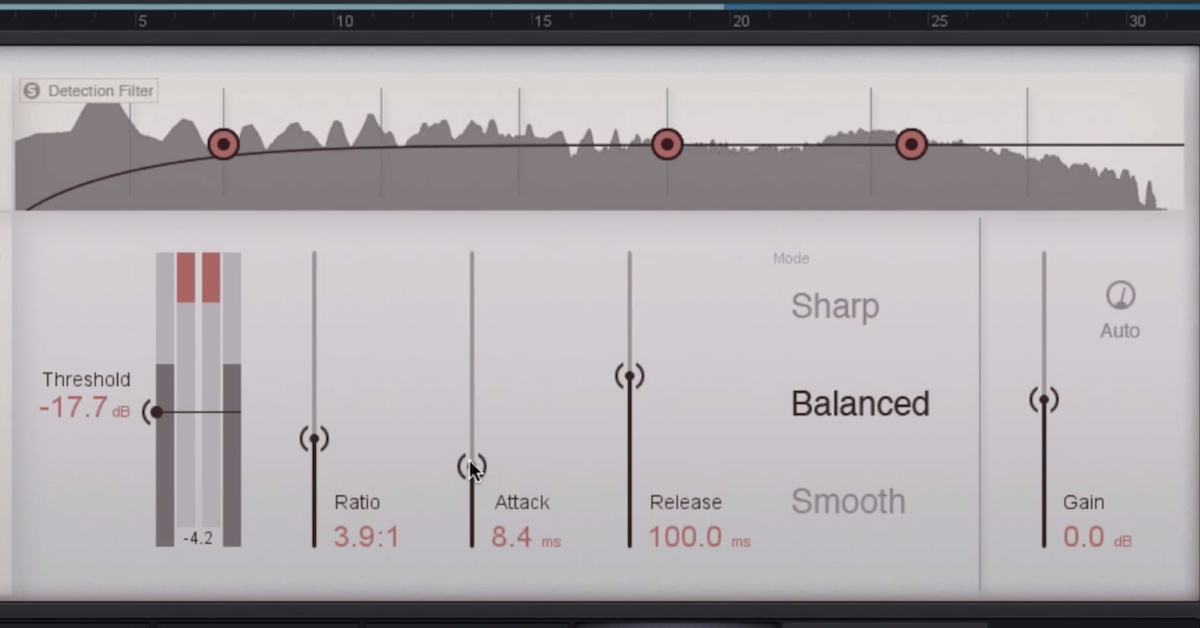
When using compression, it’s important to set the right threshold and ratio. The threshold determines the level at which the compressor will start working. The ratio determines the amount of gain reduction that will be applied to the signal. To get a smooth and even sound, set the threshold so that the compressor is only triggered by the loudest parts of the track, and adjust the ratio until you achieve the desired level of compression.

Adjust Attack And Release

The attack and release settings control how quickly the compressor responds to dynamic changes in the signal. A fast attack time will let the compressor react quickly to transients, while a slower attack time will allow the initial transient to pass through without being compressed. Similarly, a fast release time will let the compressor recover quickly, while a slower release time will allow the compressor to smoothly release the compressed signal. Adjusting these settings can help you get a more natural and transparent compression sound.

Parallel Compression

Parallel compression is a technique where a compressed signal is blended with an uncompressed signal. This can help you achieve the benefits of compression without losing the natural dynamics of the track. To apply parallel compression, duplicate the track, apply heavy compression to the duplicate, and mix the compressed and uncompressed signals together to taste.

Apply Effects Sparingly for Clean Sounding Mixes

When it comes to mixing music, applying the right amount of effects is crucial. Too little and your mix may sound flat and dull. However, too much and you risk drowning out the important elements of your track. The key is to apply effects sparingly so you can achieve high-quality, crystal-clear audio.

Less Is More

It’s a common temptation for beginners to go overboard with effects. They assume that adding reverb, delay, compression, and EQ to every channel is the key to their track’s success. However, that is far from the truth. In reality, less is more. Applying too many effects creates a jumbled and muddy mix, leading to a lack of clarity and definition. Instead, focus on adding the right effects to the right channels to achieve a more balanced and harmonious sound.

Use Sends And Returns for Clean Sounding Mixes

If you want to apply multiple effects to your track without muddying up the mix, consider using sends and returns. This technique involves creating separate channels for effects that you can send multiple channels to. By doing so, you can add the effects to several channels all at once, leading to a cleaner, more organized sound. Plus, you can adjust the amount of effect applied to each channel, giving you greater control over your mix.

Consider The Overall Mix for Clean Sounding Mixes

It’s important to remember that every element of a mix is connected. When applying effects to a specific track, think about how it will affect the overall mix. Too much reverb on one channel can bleed into another, while over-compressing can squash the dynamic range and reduce clarity. Take the time to listen to each channel in context and consider how the overall mix will be impacted. Doing so will lead to a cleaner, more polished sound.

Pay Attention To Panning for Clean Sounding Mixes


When it comes to achieving huge and clean sounding mixes, one tip to pay attention to is panning. By distributing instruments and sounds in the stereo field, you can create more depth and space in your mix, resulting in a balanced and professional sounding production.

Create A Stereo Image for Clean Sounding Mixes

One tip for achieving a huge and clean sounding mix is to pay attention to panning. Panning is the technique of distributing audio signals between the left and right channels of a stereo mix. By taking advantage of panning, you can create a stereo image that gives your mix depth and dimension. A well-panned mix can transport the listener into the song, making it more enjoyable and engaging. To create a stereo image, try experimenting with panning instruments and vocals. For instance, consider panning the drums, bass, and piano to the center to provide a solid foundation for your mix. Then, pan other instruments such as guitars and synths to the left and right channels to create a wider soundscape. Be sure to adjust the panning of each track so that they don’t overlap and clash with each other.

Experiment With Different Arrangements

Another way to optimize your panning technique is to experiment with different arrangements. Sometimes, simply swapping the panning of two tracks can make a huge difference in the mix. For example, placing a lead guitar on the right side of the mix may create a more balanced and natural sound. Try different combinations to find the most pleasing arrangement.

Mono Compatibility

It’s important to remember that not all playback systems have stereo capabilities. Therefore, mono compatibility is also crucial for achieving a huge and clean sounding mix. To ensure mono compatibility, listen to your mix in mono and check for any phase cancellations or frequency imbalances. If you notice any issues, adjust the panning until the mix sounds good in both stereo and mono. In conclusion, paying attention to panning is an essential technique for achieving a wide, clean, and professional-sounding mix. By creating a stereo image, experimenting with different arrangements, and ensuring mono compatibility, you can achieve the best possible audio experience for your listeners.

A Tip For Huge And Clean Sounding Mixes


Credit: twitter.com


Don’t Forget About Levels


To achieve a huge and clean sounding mix, don’t forget about levels. Properly adjusting the levels of each instrument and vocals can make a significant difference in the overall quality of your mix. Keep tweaking until you achieve the perfect balance between all elements for a professional-sounding result.

Mixing can make or break a track, and paying attention to levels is crucial. With proper leveling, you can achieve a clear, balanced, and professional-sounding mix. If you’re struggling to get your mix to sound clean, it’s time to revisit your levels and ensure you’re not making some common mistakes.

Avoid Clipping for Clean Sounding Mixes

Clipping occurs when the input level of a track is too high, causing distortion and harshness. It’s important to avoid clipping by keeping an eye on your levels and making adjustments where necessary. You can use a limiter or compressor to prevent clipping, but it’s best to avoid it in the first place. Remember, a clean mix is a crucial aspect of professional music production.

Maintain Balance for Clean Sounding Mixes

Another common mistake in mixing is failing to maintain a proper balance between tracks. This can result in an unbalanced mix, making it difficult for listeners to distinguish each element of the track. Balance is key, and you can achieve it by adjusting the levels of each track. Keep in mind that each element of the mix plays a role in creating a cohesive and harmonious sound.

Use Automation for Clean Sounding Mixes

Automation is a useful tool that allows you to make precise adjustments to levels over time. It’s particularly useful for achieving dynamic range and creating interest in your mix. You can use automation to adjust levels on individual tracks, automate panning, or apply effects. With automation, you can ensure that each element of your mix has its place in the spotlight. In conclusion, levels are an important element of a clean and professional-sounding mix. Avoid clipping, maintain balance between tracks, and use automation to achieve a dynamic and interesting sound. With these tips, you can take your mixing skills to the next level and create music that sounds amazing.

Take Breaks


Taking regular breaks while mixing is a crucial tip for achieving a huge and clean sound. By taking breaks, your ears will have a chance to rest and reset, allowing you to come back to the mix with a fresh perspective and prevent ear fatigue.

Prevent Ear Fatigue

As much as we love mixing music, our ears can only take so much auditory stimulation before they start to fatigue. Ear fatigue can lead to a distorted perception of sound, making it difficult to make accurate mixing decisions. Taking breaks can help prevent ear fatigue. It’s essential to rest your ears for a few minutes every hour or two to avoid straining your hearing. Your ears will thank you for it, and your mixes will sound much better as a result.

Gain Fresh Perspective

Mixing a track can be time-consuming, and it’s easy to get lost in the details. During extended mixing sessions, it’s easy to lose perspective on how the track sounds. Taking breaks can help you get a fresh perspective on the mix. When you return from a break, you’ll be able to hear the mix with a fresh set of ears. This can help you expose any problem areas and identify areas that need improvement. You’ll be amazed at how much better your mixes will sound after taking a short break.

Refresh Your Ears

Taking a break not only helps prevent ear fatigue and gain fresh perspective, but it also refreshes your ears. Listening to music for an extended period can cause our ears to become accustomed to a particular sound. By taking breaks, you’re giving your ears a chance to rest and reset. When you return, you’ll be able to hear the details much better, resulting in more precise mixing decisions. Remember, taking breaks is an essential component of creating huge and clean sounding mixes. Don’t overlook the power of giving your ears some rest. Your ears will thank you, and your mixes will sound better as a result!

A Tip For Huge And Clean Sounding Mixes


Credit: www.musicradar.com


Master Your Mix


Achieving a massive and polished sound for your mix is a must for audio production. To attain this, carefully setting levels, panning, and utilizing effects are key. It’s also important to use EQ to carve out space for each instrument and to pay attention to the arrangement in order to mix elements cohesively.

Mixing can be one of the most challenging parts of music production. It requires a keen ear, knowledge of various software and hardware tools, and an understanding of how to blend different sounds together in harmony. If you’re looking for a tip to help you achieve huge and clean sounding mixes, then mastering your mix is key.

Prepare For Mastering

Before you begin mastering your mix, there are a few things you should do to prepare. First, make sure all of your tracks are properly mixed to avoid any volume or frequency imbalances. Second, create a high-quality mixdown of your song, and make sure you save it as a lossless audio file format such as WAV or AIFF. Finally, identify any mixing errors or problem areas in your track, and make the necessary adjustments before moving on to mastering.

Check For Mono Compatibility

Mono compatibility refers to how your mix will sound when played in mono, such as on a small speaker or in a club sound system. To ensure your mix is mono-compatible, use a stereo imaging plug-in to adjust the stereo width of your mix. This will help you to identify any phasing or frequency cancellation issues that can occur when playing your mix in mono.

Final Adjustments

Finally, you’re ready to master your mix. Use a mastering software tool to apply compression, equalization, and other mastering techniques to your mix. Be sure to test your mix on a variety of playback systems to ensure it sounds great no matter where it’s played. Once you’re happy with your mix, export it as a high-quality audio file and distribute it to your listeners. In conclusion, mastering your mix is an essential step in achieving a huge and clean-sounding mix. By preparing your mix for mastering, checking for mono compatibility, and making final adjustments, you can ensure that your mix will sound great on any playback system.

Frequently Asked Questions On A Tip For Huge And Clean Sounding Mixes


How Do You Make Your Mixes Sound Good?


To make your mixes sound good, you must focus on several key areas. First, ensure proper levels and balance of each element. Second, utilize EQ to remove unwanted frequencies and boost desired ones. Third, use compression to smooth out dynamics and add punch.


Fourth, consider the use of reverb and delay for spatial depth. And finally, consistently reference your mix against professional productions.


How Do I Make My Mix Sound Bigger?


To make your mix sound bigger, focus on adding depth and width to your sound. Use reverb and delay to create a sense of space. Pan different elements to different parts of the stereo field. Use EQ and compression to help certain frequencies stand out.


Experiment with layering sounds and adding harmonies to create a fuller, richer sound.


How Do You Mix Clean Audio?


To mix clean audio, follow these steps: 1. Start with high quality audio recordings. 2. Use EQ to reduce background noise and enhance clarity. 3. Adjust levels to balance volume between tracks. 4. Apply compression to keep volume levels consistent.


5. Use reverb and/or delay effects sparingly for spatial depth.


How Do You Mix And Master Loud?


To mix and master loud, make sure to use compression, EQ, and limiters to boost the overall volume without causing distortion. However, be careful not to overdo it and avoid clipping or excessive compression. Additionally, use reference tracks to ensure your mix sounds balanced and clear at loud volumes.


Finally, consider hiring a professional mastering engineer for the best results.


Conclusion


Achieving a huge and clean sounding mix requires a combination of factors. Starting with a well-recorded track, utilizing proper gain staging, and implementing techniques such as EQ, compression, and reverb can make a significant impact. It’s also crucial to trust your ears, take breaks when needed, and experiment with different approaches.


By applying these tips consistently, musicians and producers can enjoy their music in all its glory and take their productions to a whole new level.

Categories
Archive

How Much Does It Cost To Start A Record Label

Starting a record label can cost anywhere from $5,000 to $50,000, depending on various factors such as equipment, marketing, and distribution fees. Initially, there are numerous expenses a start-up record label must consider, including funds for studio time, music production, distribution, promotion, merchandise, and legal fees.


Creating a record label can prove to be a profitable business, but requires adequate financing and preparation to establish a notable place in the music industry. This article provides insight into the costs incurred while starting a record label, including the factors that influence them.


It also gives an overview of the steps involved in launching a record label and the potential profits associated with owning one.

How Much Does It Cost To Start A Record Label


Credit: startupjungle.com


Licensing And Legal Fees


Starting a record label involves hefty expenses including licensing and legal fees. These expenses can vary based on the type of label, location and the services required. It is crucial to budget accordingly to ensure a smooth operation in the long run.

When it comes to starting a record label, one of the most important things to consider is licensing and legal fees. In order to operate your record label legally, you will need to obtain certain licenses and registrations, as well as pay for legal services to ensure that everything is set up correctly. In this post, we will explore the various licensing and legal fees that come with starting a record label.

Music Business License

A music business license is a permit that allows individuals or businesses to operate legally in the music industry. This license is important if you want to operate a record label, as it ensures that you are obeying all the laws and regulations that govern the music industry. The cost of a music business license can vary depending on your location, but it usually ranges from $50-$500.

Copyright Registration

Copyright registration is another important step in setting up a record label. Copyright registration protects your music from being used without your permission. This registration can be done through the United States Copyright Office and costs around $35-$85 per registration, depending on the type of registration.

Legal Services

Finally, it’s important to hire legal services to ensure that your record label is set up correctly. This can involve drafting contracts, reviewing licensing agreements, and providing legal advice on copyright infringement issues. The cost of legal services can vary depending on the complexity of your record label and the services required, but you can expect to pay around $200-$500 per hour. In conclusion, licensing and legal fees are a crucial aspect of starting a record label. Obtaining the necessary licenses and registrations, as well as hiring legal services, is essential to ensuring that your record label operates legally and efficiently. While these fees can add up quickly, they are necessary to protect your music and ensure that you are operating within the bounds of the law.

Office And Equipment


Starting a record label requires office space and necessary equipment such as computers, printers, and recording gear. The cost of starting a record label depends on the quality of equipment and office space required, ranging from a few thousand to tens of thousands of dollars.

Rent

Starting a record label requires finding an office space. The cost of an office space will vary depending on the location and size of the space. Rent is usually the biggest expenses for a record label start-up. If a record label is running on a tight budget, renting a co-working space or subleasing space from another company can be more cost-effective. Renting an office space in a prime location with high rent may also boost the image of the company.

Furniture And Fixtures

It is essential to have comfortable and functional furniture in the office to improve productivity and comfort of employees. The cost of furniture and fixtures will vary depending on the size of the office space and the style of the furniture. Office chairs, desks, and tables are some of the essential furniture that a record label will need. You may also need to consider purchasing phone systems, printers, scanners, filing cabinets, and other equipment to set up a functional office.

Software And Computers

In the digital age, running a successful record label requires powerful computers and software programs. Investing in high-quality computers and software can be expensive, but it is a worthwhile investment. As a record label, you will need software for accounting, managing inventory, creating marketing materials, creating music, and more. Some examples of software used in record labels include Logic Pro, ProTools, Adobe Creative Suite, and Steinberg Cubase. Purchasing the software and hardware upfront can be expensive, but there are financing options available that can help alleviate the cost. Starting a record label office and equipment can be costly. Understanding the costs associated with running a record label can help in budgeting and making informed decisions about what to purchase and where to save. By considering things like co-working spaces, used furniture, and leasing equipment, it is possible to set up an office without breaking the bank. Remember, the right investments in software, hardware, and physical space are essential to the success of a record label.

Audio Recording And Production


Starting a record label can cost anywhere from a few hundred to thousands of dollars. It all depends on the equipment you need and the services required. The cost of audio recording and production can vary based on location, experience, and quality of equipment used.

As far as starting a record label is concerned, the cost of audio recording and production is one of the major factors that you need to consider. The quality of music that you produce highly depends on your recording and production decisions. Therefore, you need to invest in a recording studio, equipment, software, and producers for your label. Here, we will explore each of these elements of audio recording and production and highlight the possible costs involved in starting a record label.

Recording Studio Rent

One of the significant costs you need to consider when planning to start a record label is the rent for a recording studio. The recording studio serves as the hub for all your audio recording and production activities. The cost of renting a recording studio varies depending on the location, size, and equipment included. On average, renting a recording studio costs between $500 to $2000 per month. However, you can negotiate with the studio owner for a favorable price.

Recording Equipment And Software

In addition to the recording studio, you need to invest in equipment and software for quality music production. The essential equipment for a recording studio includes microphones, headphones, mixers, and speakers, among others. The cost of purchasing recording equipment varies based on the brand, quality, and required quantity. You may set aside a budget of around $10,000 to $20,000 for equipment purchase. Additionally, you will require music production software such as Pro Tools or Logic Pro, which costs between $200 to $600 depending on the software’s version.

Producers And Sound Engineers

The final cost element for audio recording and production is hiring producers and sound engineers. These professionals play a crucial role in producing high-quality music that meets industry standards. The cost of hiring a sound engineer ranges from $100 to $500 per hour, while producers’ fees depend on their experience and status. You may opt for a freelance producer, which costs between $3000 to $5000 per album. Alternatively, you can go for a signed producer that charges a commission fee of around 20% to 30% of the album’s profits.

Conclusion

In conclusion, the cost of audio recording and production is a significant factor when starting a record label. You should budget for the rent of a recording studio, purchase of recording equipment and software, and hiring of producers and sound engineers. Nonetheless, remember that cost considerations should not compromise on the quality of music produced.

How Much Does It Cost To Start A Record Label


Credit: www.zippia.com


Artists And Repertoire


Starting a record label can cost anywhere from a few hundred dollars to tens of thousands of dollars. The biggest expense is A&R or Artists and Repertoire, which involves finding and signing talent. Other costs include legal fees, marketing and promotion, recording and production, and distribution.


It’s important to have a solid business plan and budget in place before starting a label.

Artists and Repertoire One of the most critical components in starting a record label is securing a strong and talented artists and repertoire (A&R) team. A&R representatives are tasked with finding and developing talented artists that will appeal to the label’s target audience. This involves scouting for talent, building relationships with artists and their management teams, and overseeing the production of albums and singles. A&R Representatives A&R representatives are the frontline of the record label and are responsible for discovering and signing new talent. They work closely with artists to develop their sound and help them create albums that resonate with audiences. A&R reps are responsible for securing the rights to any music created by the artist and for negotiating contracts and deals on behalf of the label. Music Producers Music producers are integral to the success of a record label. They work alongside artists and A&R reps to produce and develop the music. They are responsible for overseeing the production process, selecting the right songs to record, and working with artists to bring their creative visions to life. Producers play a key role in getting the final product ready for distribution to ensure it meets the required quality standards. Songwriters Songwriters are often an essential part of the A&R team and can help the record label discover new talent. They are responsible for producing the lyrics and melodies that make up songs. Songwriters also work with producers and artists to ensure that the music matches the intended image of the artist. Songwriters are often a valuable resource for developing new songs that will appeal to the label’s target audience. Talent Acquisition When it comes to talent acquisition, the record label has an important role to play in finding and developing new artists. They should be always on the lookout for up-and-coming artists that might be suitable to sign. This can be done through scouting, attending live performances, or networking. In conclusion, starting a record label requires a dedicated team of professionals that can work together to find and develop new talent. A strong A&R team, which includes music producers, songwriters, and representatives, is critical to the success of the label. By investing in the right talent and developing their skills, a record label stands to reap the financial benefits of producing world-class music.

Marketing And Promotion


Starting a record label requires funding for artists, marketing, advertising, promotion, and distribution. Depending on the scope of the label and the goals, the initial costs could vary widely, but a rough estimate is around $10,000 to $50,000. These costs include legal fees, recording equipment, album artwork, website development, venue rental, and paid advertising.

Record labels invest a lot of time and money in marketing and promotion because they want their artists to get noticed by the right people. With the internet, marketing and promoting music have become easier and more accessible to everyone. However, it is essential to understand that marketing and promotion require a budget. As an aspiring record label owner, it is vital to know the cost of marketing and promotion. Here are some H3 headings that focus on specific areas of marketing and promotion:

Artist Promotion

Artist promotion involves creating a buzz around the artist and their music. This means getting them noticed by the public, record labels, media outlets, and other industry professionals. Some of the tools used in artist promotion include EPKs (Electronic Press Kits), Press Releases, and Live Performances. A reputable publicist can help with artist promotion, but the costs can vary. A typical range of cost could be anywhere from $2000 to $5000 per month.

Music Marketing

Music marketing helps reach out to the target audience and potential fans. It includes creating a brand for the artist, designing album artwork, and creating and promoting their music videos. Additionally, music marketing includes building a media kit, identifying key influencer networks, and creating a launch plan. The costs vary based on the services and professionals hired, but it can cost anywhere between $5000 to $20000 for a well-planned and executed campaign.

Social Media Advertising

Social media advertising has become one of the most critical tools for music promotion. It is a cost-effective way to reach a broader audience for music promotion. Social media platforms like Facebook, Instagram, and Twitter provide target audience selection and budgeting options. The costs of social media advertising depend on the platform and the budget set. However, for Facebook, the average cost per click is around $1.72.

Public Relations

Public relations are all about managing the communication that surrounds the artist and their label. It involves maintaining and building relationships with journalists, influencers, music curators, and other key industry players. Public relation agencies work on a whole range of activities including media coverage, social media presence, and event organization. Depending on the services provided and the duration of the campaign, the costs for public relations can start from $2500 per month. In conclusion, record label owners must consider marketing and promotion costs while starting their business. Marketing and promotion could range from artist promotion to public relations. While creating a budget for the promotion, it is essential to consider all the costs involved, and finding a reliable agency with a successful track record is highly recommended.

How Much Does It Cost To Start A Record Label


Credit: recordlabelmavericks.com


Distribution


Starting a record label requires a lot of distribution costs such as manufacturing, promoting, and distributing the records. The cost to start a record label varies depending on various factors like the geographical location, genre of music, the number of people working, and marketing strategies.

Distribution is a crucial element for any record label. It ensures that the music reaches the audience, through various mediums such as physical and digital distribution. It involves the process of getting the music from the production stage to the retail stores for the fans to purchase. Let’s take a closer look at distribution costs for a record label.

Physical Distribution

Physical distribution involves printing CDs, vinyl, cassettes, and distributing them physically to the stores. The cost of physical distribution varies, with factors such as the quantity, format, and country of production coming into play. The cost of printing CDs depends on the desired quantity, packaging, and artwork. Printing 500 CDs with standard packaging and artwork can cost anywhere from $700 to $1200. Vinyl records, on the other hand, require larger investments. The production cost per unit is higher, with prices on average ranging from $4 to $6 per unit. However, vinyl has a higher resale value, making it more profitable than CDs. Cassettes, another physical medium, have gained popularity among indie labels due to their low-cost production. They cost between $1 and $2 per unit, making them an affordable option.

Digital Distribution

Digital distribution has revolutionized the music industry, making it easier for independent record labels to get their music out there. Digital distribution offers more affordable options compared to physical distribution, eliminating the need to produce physical copies. Digital distribution costs vary, with platforms such as Apple Music, Spotify, and Deezer charging a percentage of the total revenue generated. For example, Apple Music charges 30% for sales in the first year, reducing to 15% afterward.

Distribution Fees

Record labels incur various distribution fees, including shipping, handling, and storage fees. These fees vary depending on the distributor and the product’s format and quantity. Reputable distributors such as DistroKid, CD Baby, and TuneCore offer affordable and reliable distribution services, charging a percentage of the total revenue generated. On average, distribution fees range anywhere from 10% to 20% of the total revenue. In conclusion, distribution is among the most significant costs when starting a record label. The cost of physical and digital distribution varies depending on the medium, quantity, and distributor. Record labels require proper budgeting and planning to ensure that distribution costs do not overrun their overall budget, allowing them to produce music successfully.

Frequently Asked Questions Of How Much Does It Cost To Start A Record Label


How Much Does It Cost To Start A Record Label Business?


The cost to start a record label business can range from a few thousand dollars to several hundred thousand dollars, depending on factors such as equipment, office space, legal fees, and marketing expenses. The exact cost varies based on individual circumstances.


How Much Do I Need To Start My Own Record Label?


The amount needed to start a record label depends on factors like production costs, staffing, marketing, and distribution. It could range from a few thousand to over a million dollars, depending on your plans and goals. It’s important to create a budget and business plan to determine your financial needs.


Is It Profitable To Start A Record Label?


Yes, starting a record label can be profitable if done correctly. With the right business model, marketing strategies, and the ability to sign successful artists, a record label can generate significant revenue through music sales, live performances, and merchandise sales.


It is important to develop a solid plan and budget before launching a record label.


How Do I Start A Low Budget Record Label?


Starting a low budget record label involves careful planning and budgeting. Identify your niche, establish a business plan, build your team, scout for talented artists, and promote your music through digital platforms. Leverage social media and build relationships with industry insiders to achieve success.


Conclusion


Starting a record label requires a considerable amount of money, but it ultimately depends on factors such as the genre of music, marketing strategies, and the number of resources you can afford to hire. It is important to have a well-detailed plan, creativity, and research before embarking on the journey of starting a record label.


With hard work and dedication, success is achievable.


Categories
Archive

Mastering Tip What Are Rms Peak Levels

RMS (Root Mean Square) and Peak levels are measurements of different aspects of audio signal amplitude. RMS level expresses the average power of an audio signal, while Peak level indicates its maximum value.


Mastering Tip: Control the RMS and Peak levels of your audio signal to achieve a balanced and clean sound. Mastering audio involves bringing out the best in a recording, making it sound polished, professional, and suitable for its intended delivery format.


While a great deal of knowledge and experience is necessary to master audio successfully, there are some core concepts that underpin the process. One of these is the importance of RMS (Root Mean Square) and Peak levels: two crucial metrics that every audio engineer and producer should be familiar with. We will explore what RMS and Peak levels are, why they matter, and how they can be used to make your music sound its best.


Understanding Rms And Peak Levels


Understanding RMS and peak levels is essential for mastering audio. RMS represents the average loudness of a sound, while peak levels refer to the highest level of a sound waveform. Balancing these levels is crucial for achieving a polished and professional sound.

Mastering is the final step of music production, where the audio is carefully processed and prepared for distribution. One crucial aspect of mastering is understanding the levels of audio signals, specifically RMS and peak levels. These levels determine the overall volume and dynamic range of the audio. In this blog post, we’ll dive into the differences between RMS and peak levels and how to master them for optimal sound quality.

What Are Rms Levels?

RMS (Root Mean Square) is a measure of the average power of an audio signal over time. It is often used to determine the overall loudness or perceived volume of a sound. RMS levels are calculated by squaring each sample of the audio waveform, averaging them out, and taking the square root of the result. In simpler terms, RMS levels give a good indication of the average loudness of a track. This is useful for ensuring consistent volume levels throughout a song or an album.

What Are Peak Levels?

Peak levels, on the other hand, measure the highest point in an audio signal. It is the maximum level an audio signal can reach without distorting or clipping. Peak levels are essential in mastering as they ensure that the audio doesn’t distort or clip when played back at high volumes. Peak levels are measured in dBFS (decibels relative to full scale), where 0 dBFS is the maximum level that the audio can reach without clipping or distorting.

What Is The Difference Between Rms And Peak Levels?

The main difference between RMS and peak levels is that RMS levels give an average indication of volume, while peak levels measure the maximum volume level of an audio signal. RMS levels are useful in maintaining consistent volume levels throughout a song or an album, while peak levels are essential in ensuring that the audio doesn’t distort or clip when played back at high volumes. In summary, mastering is all about achieving the perfect balance between RMS and peak levels. Too much compression can result in lost transients and dynamics, while not enough compression can result in an inconsistent and muddy mix. By understanding RMS and peak levels, you’ll be able to master your audio tracks for optimal sound quality and volume levels.

How To Measure Rms And Peak Levels


To measure RMS and Peak Levels, it’s important to understand their differences. RMS Level indicates the average power output while Peak Level measures the highest amplitude of an audio signal. Knowing how to measure these levels can enhance your mastering skills and create a better final product.

Whether you’re new to audio engineering or a seasoned professional, understanding RMS and peak levels is crucial to producing high-quality audio. Learning how to measure these levels correctly can help you properly mix and master your tracks, resulting in well-balanced, professional-sounding music. In this post, we’ll discuss how to measure RMS and peak levels using audio software and hardware equipment.

Using Audio Software

When it comes to measuring RMS and peak levels, audio software is a popular and easy-to-use option for many music producers and engineers. Here are the steps for measuring these levels in audio software:

  1. Load your audio track into your preferred DAW software.
  2. Locate the metering section of your DAW, which may include RMS and peak level meters.
  3. Adjust the playback of your track and monitor the levels in real-time.
  4. Ensure that your RMS levels are at an appropriate level, usually around -6 dB to -10 dB, to allow for headroom and prevent distortion.
  5. Check that your peak levels are not too high and are within a safe range to avoid clipping and distortion.

Using audio software is a quick and easy way to measure RMS and peak levels, making it an excellent option for beginners or those short on time.

Using Hardware Equipment

If you’re looking for a more hands-on approach to measuring RMS and peak levels, using hardware equipment may be the way to go. Here are the steps to measure these levels using hardware:

  1. Start by selecting the appropriate equipment, such as a multimeter or an audio analyzer.
  2. Connect your equipment to your audio device or mixer and set your device’s output at an appropriate level.
  3. Play back your audio and monitor the levels displayed on your equipment.
  4. Adjust your levels as necessary to ensure that your RMS and peak levels are at the desired levels.

Using hardware equipment to measure your levels is a more traditional method and may take a bit longer than using audio software. However, it can provide more accurate measurements and is a great choice for those who prefer a hands-on approach. In conclusion, measuring RMS and peak levels is an essential part of the audio mastering process. Whether you prefer to use software or hardware equipment, knowing how to measure these levels properly can help you create a well-balanced mix and produce professional-quality music.

Why Rms And Peak Levels Are Important

Understanding RMS and peak levels is crucial when it comes to audio production and mastering. Keeping your levels in check will not only ensure consistent audio quality but also prevent audio clipping, distortion, and other technical issues that can negatively impact the listening experience. In this article, we explore how maintaining audio quality, preventing audio clipping, and ensuring consistent audio levels can be achieved by mastering RMS and peak levels.

Maintaining Audio Quality

RMS levels measure the average audio power, while peak levels measure the highest level of audio before it clips or distorts. Maintaining a good balance between these two levels is crucial to ensuring the overall audio quality.

When RMS levels are too low, the audio may sound weak and lacking in impact. On the other hand, if the RMS levels are too high, the audio may sound distorted or muddy, leading to listener fatigue. Maintaining optimal RMS levels will ensure that the listener can hear all the elements in the mix, resulting in a better listening experience.

Preventing Audio Clipping

Audio clipping occurs when the peak levels are too high, causing the audio waveform to exceed the maximum possible level. This results in distortion or even total loss of audio data. Preventing audio clipping is crucial to maintaining audio quality and ensuring that the listener hears all audio elements in the mix.

One way to prevent audio clipping is to adjust the RMS levels. Lowering the RMS levels will reduce the overall volume, which, in turn, will reduce the peak levels and prevent audio clipping. Alternatively, a limiter can be used to control the peak levels and prevent clipping.

Ensuring Consistent Audio Levels

Consistent audio levels are crucial to maintaining a uniform listening experience across all audio devices. When audio levels are inconsistent, the listener may have to manually adjust the volume, which can be annoying and distracting.

By mastering RMS and peak levels, you can ensure that the audio levels are consistent across all devices. This can be achieved by normalizing the audio levels to a particular standard, such as -14 dB RMS or -0.1 dB peak level. Through this standardization, the listener can have a consistent listening experience regardless of the device used.

Mastering Tip What Are Rms Peak Levels


Credit: www.waves.com


Tips For Mastering Rms And Peak Levels


To master RMS and peak levels for audio mastering, it’s essential to have a full understanding of these terms. RMS is the average audio level while peak levels indicate the highest volume of the audio waveform. Using a combination of both can help you achieve a well-balanced and professional sound.

Mastering RMS and peak levels is essential for creating high-quality audio recordings. Properly setting these levels can help you achieve the best sound possible, allowing your music to be heard the way it was intended. In this section, we will provide tips for mastering RMS and peak levels, including setting the correct levels during recording, using compression to control dynamics, using limiting to control peak levels, and using normalization to boost overall loudness.

Setting The Correct Levels During Recording

The first step in mastering RMS and peak levels is setting the correct levels during recording. It is essential to avoid clipping or distortion by ensuring that the input levels are not too high. High input levels can cause distortion and result in a poor-quality recording. To set the correct recording levels, it is important to use a peak meter and adjust the gain on your preamp until the peak level is around -6dB. This will provide enough headroom to prevent clipping and ensure a clean recording.

Using Compression To Control Dynamics

Compression is a widely used technique to control dynamics during the mastering process. It can help to even out the levels of a recording, making it sound more polished and professional. When using compression, it is important to pay attention to the attack and release times, as well as the ratio and threshold settings. These settings should be adjusted according to the genre of music and the desired sound.

Using Limiting To Control Peak Levels

Limiting is another important technique for mastering RMS and peak levels. It is used to prevent clipping by controlling the peak level of a recording. Limiting works by reducing the gain of the audio signal when it exceeds a certain threshold. When using limiting, it is important to set the threshold, attack, and release times correctly to avoid altering the feel of the music.

Using Normalization To Boost Overall Loudness

Normalization is a technique used to boost the overall loudness of a recording. It works by adjusting the gain of the audio signal to its maximum level without causing clipping. Normalizing a recording can help to make it sound louder, but it is important not to overdo it, as it can lead to a loss of dynamic range and cause distortion. When normalizing, it is important to adjust the level to a maximum of -0.3dB to ensure the best possible sound quality. In conclusion, mastering RMS and peak levels is an important aspect of creating high-quality audio recordings. By following these tips for setting the correct levels during recording, using compression to control dynamics, using limiting to control peak levels, and using normalization to boost overall loudness, you can achieve the best possible sound for your music.

Mastering Tip What Are Rms Peak Levels


Credit: unison.audio


Frequently Asked Questions For Mastering Tip What Are Rms Peak Levels


What Is A Good Rms Level For Mastering?


The ideal RMS level for mastering music can vary depending on the genre and preferences of the listener, but generally it falls between -9 dBFS and -14 dBFS. It is important to note that the RMS level is not the only factor that determines the perceived loudness or quality of a track.


Other elements such as dynamics, EQ, and stereo imaging also play a critical role in mastering.


What Is A Good Rms For The Master?


A good RMS (Root Mean Square) for the master depends on various factors such as genre, dynamic range, loudness, and personal preference. However, most mastering engineers aim for an RMS value between -8dB and -12dB to ensure that the track has a balanced and consistent sound without compromising the dynamics.


What Are The Peak Levels For Mastering?


Peak levels for mastering refer to the maximum level of sound amplitude that can be used during the audio mastering process without compromising the overall quality of the audio. The recommended peak level is usually -0. 1dB to -0. 3dB, allowing for maximum loudness while avoiding any clipping or distortion.


What Is Rms In Lufs?


RMS stands for Root Mean Square and is a measure of the average power of a signal. In LUFS, RMS is used to determine the loudness level of audio content. It helps to maintain a consistent and acceptable loudness level throughout the content.


Conclusion


As we conclude this article, we can confidently say that achieving the optimal levels of RMS and Peak in our audio productions is crucial for high-quality sound. Using appropriate tools and techniques for measuring and controlling these levels can make all the difference in the final output.


Although it might take some practice to get a good grasp of these concepts, being mindful and attentive to them will go a long way in elevating your audio game and ensuring a satisfying listening experience for your audience.


Categories
Archive

How To Fix Channels Fighting For Space In A Mix

To fix channels fighting for space in a mix, use EQ to remove competing frequencies and adjust volume levels. When mixing multiple audio tracks, it’s common for certain channels to clash for space, resulting in a muddy and indistinct sound.


To address this issue, you can use equalization to remove frequencies that are clashing between channels and adjust individual volume levels to create a more balanced mix. With careful attention to EQ and volume adjustments, you can create a clear and cohesive audio mix that allows each element to shine.


Creating a well-balanced mix is essential for any music or audio production, whether it’s a podcast, film score, or commercial jingle. Mixing requires careful attention to detail, and even small adjustments can make a big difference in the overall sound. We’ll explore some tips and techniques for fixing channels fighting for space in a mix using EQ and volume adjustments. We’ll also discuss some common mistakes to avoid when mixing and highlight some useful tools and resources for improving your mixing skills.


Understanding Channel Conflict


To create a balanced mix, it’s important to understand channel conflict. When multiple channels compete for the same space, the result can be messy and unclear. By taking the time to carefully adjust and EQ each channel, you can fix conflicts and create a cohesive sound that shines.

Understanding Channel Conflict In audio production, channel conflict occurs when different channels in a mix compete for the same sonic space, causing a cluttered or muddy sound. This is a common problem that arises due to various reasons, but understanding the fundamentals of channel conflict can help you fix the issue quickly and effectively. What Is Channel Conflict In A Mix Channel conflict happens when the frequencies, amplitudes, or stereo image of two or more channels overlap. It can occur at any stage of audio production, from recording to mixing and mastering. Simply put, it’s like a traffic jam where every channel is trying to occupy the same sonic space, resulting in a lack of clarity, definition, and separation. Why Does Channel Conflict Occur Channel conflict can occur due to several reasons that are often interconnected. One of the most common culprits is improper frequency balance, where two or more channels have too much energy in the same frequency range, causing masking or cancellation. This can happen when recording multiple sources of the same instrument or using similar sounding instruments. Another reason for channel conflict is the presence of too many channels in a mix, making it difficult to balance the levels and pan positions. This can make it difficult for the listener to focus on the main elements of the mix and result in a confusing sound. In addition, channel conflict can also arise due to improper use of processing tools like EQ, compression, and reverb. For instance, applying too much EQ to a channel can cause it to mask other elements in the mix. Similarly, over-compressing a channel can reduce its dynamic range and make it difficult to sit well in the mix. In conclusion, channel conflict is a significant challenge that every audio engineer faces, but understanding its causes can help you get better results. In the next section, we’ll look at some practical solutions to fix channel conflict in a mix.

How To Fix Channels Fighting For Space In A Mix


Credit: www.youtube.com


Techniques To Fix Channel Conflict


To fix channels fighting for space in a mix, there are several techniques you can use. These include using EQ to carve out space for each channel, panning to separate sounds, using compression and sidechain techniques, and adjusting the levels of each channel to create a balanced mix.


With these methods, you can ensure that all channels sound clear and distinct without clashing or creating unwanted conflicts.

If you’re dealing with a mix where channels are fighting for space, there are some techniques you can employ to fix the issue. Here are some effective techniques that can help you deal with channel conflict to achieve a well-balanced and polished mix.

Eq Techniques To Fix Channel Conflict

Equalization is an essential tool when it comes to fixing channel conflict in your mix. EQ can help you reduce or remove conflicting frequencies that make your instruments sound muddy or unclear in the mix. To start with, try using a narrow bandwidth to pinpoint the problem frequency and then cut or boost the level accordingly. Also, try applying a low-pass filter on channels that have too much high-frequency content and a high-pass filter on channels that have too much low-frequency content.

Pan Your Channels To Stop Fighting For Space

Panning is another excellent technique that can help you fix channel conflict. Panning your channels can help you create space and separation in your mix, allowing each instrument to breathe and stand out more. If two instruments are fighting for space in the same range, try panning them in different directions. This way, they won’t clash, and they’ll be easier to distinguish in the mix.

Leveling And Compression To Avoid Channel Conflict

Leveling and compression are two techniques that can help you maintain a consistent balance between your mix’s different elements. Leveling can help you match the volume of each channel against the others, ensuring they aren’t too loud or too soft. Compression, on the other hand, can help you manage the dynamic range of each channel, making them more consistent with the rest of the mix.

Use Low-cut And High-cut Filters To Avoid Channel Overlap In Mix

If you have a mix with many channels, it might be hard to find space for each instrument to fit without overlapping. In such cases, you can use low-cut and high-cut filters to filter out the unwanted frequencies that might be causing channel overlap. For instance, you can use a low-cut filter on the bass guitar channel to remove the sub-bass frequencies that clash with the kick drum.

Avoid Frequency Clashes And Maximize The Frequency Range

Frequency clashes are a common issue in any mix, but they don’t have to ruin your mix. To avoid frequency clashes, you need to maximize the frequency range of your mix. Ensure each instrument has its space in the frequency spectrum to avoid overlapping. Using EQ and other mixing techniques, you can carve out a space for each element, making sure they don’t clash and fighting for space. It’s also essential to ensure that your mix has a balanced low, mid, and high-frequency content. In conclusion, these techniques can help you fix channel conflict in your mix and achieve a professional-sounding mix that’s well-balanced and polished. With EQ, panning, leveling, compression, and filtering, you can tackle any channel conflict issue and create a mix that’s enjoyable to listen to. Remember, the key to a successful mix is to keep experimenting and fine-tuning until you get the sound you want.

Tips For Better Mix


If you’re struggling with channels competing for space in your mix, try these tips for a clearer sound. First, ensure each channel has a distinct frequency range. Use EQ to cut overlapping frequencies and make each instrument stand out. Then, use panning to separate each channel in the stereo field.


Finally, use volume adjustments to balance the levels of each channel.

When it comes to mixing music, one common issue that audio engineers face is channels fighting for space in a mix. This can result in a cluttered and muddy sound that lacks definition and clarity. Fortunately, there are several steps you can take to fix this problem and achieve a better mix. Here are some tips to consider:

Take Breaks To Avoid Ear Fatigue And Get A Fresh Perspective

Mixing can be a time-consuming process, and it’s easy to get lost in the details. However, it’s important to take regular breaks to rest your ears and gain a fresh perspective. Ear fatigue can cause you to make poor decisions in your mix, and taking a break can help you come back with a clear mind. Additionally, listening to your mix with fresh ears can help you identify problem areas that you may have missed before.

Use Reference Tracks To Guide Your Mix Decisions

Using reference tracks is an excellent way to guide your mix decisions. A reference track is a professional mix that you can use as a benchmark for your own mix. By comparing your mix to a reference track, you can identify areas that need improvement and make adjustments accordingly. Pay attention to the frequency balance, level, and stereo width of the reference track and try to match it as closely as possible without compromising your artistic vision.

Emphasize Key Elements Without Making Them Overpowering

One common mistake that audio engineers make is overemphasizing key elements in a mix. While it’s important to highlight important instrument or vocal parts, it’s equally important to maintain balance and avoid overpowering other elements. One way to achieve this is by using EQ to carve out space for each element in the mix. You can also use compression to control dynamics and ensure that all elements are heard clearly without competing for space. In conclusion, fixing channels fighting for space in a mix is a crucial step in achieving a great-sounding mix. By taking breaks, using reference tracks, and emphasizing key elements without overpowering them, you can achieve a balanced and professional mix that sounds great on any system.


Frequently Asked Questions Of How To Fix Channels Fighting For Space In A Mix


How Do You Get Better Separation In A Mix?


To get better separation in a mix, start with using EQ to carve out space for each instrument, pan tracks to their unique position, use stereo effects to create width, and apply compression to even out the dynamics while adding clarity and punch.


Additionally, using volume automation and editing out unnecessary sounds can also help improve separation.


How Do You Give A Mix Space?


To give a mix space, ensure there is enough room for each element to be heard clearly and distinctly. Use panning to spread out the sounds, adjust volume levels, and use EQ to cut out any clashing frequencies. Experiment to find the right balance and make sure there is no overcrowding or muddiness.


How Do I Make My Mix Wider?


To make your mix wider, try using mid/side processing to spread the stereo image. You can also use stereo widening plugins or manually pan elements to the sides. Be cautious not to overdo it, as too much width can result in a muddy mix.


How Do I Make My Mix Sound Professional?


To make your mix sound professional, you need to focus on the EQ, compression, and levels. Ensure that each instrument sits well in the mix and doesn’t overpower other sounds. Use reference tracks to compare and improve your mix. Remember to use appropriate reverb, delay, and other effects to add depth and interest.


Finally, ensure your mix is consistent across different listening devices.


Conclusion


A well-balanced mix is crucial for any music production, and channels fighting for space can be a major obstacle. However, by following the tips mentioned above, you can easily resolve this issue in your mix. With practice and patience, you can achieve a clean and polished mix that delivers a powerful and impactful sound.


Don’t be afraid to experiment and try new techniques. Remember, making great music is all about creativity and passion!


Categories
Archive

How Long Does Mixing And Mastering Take

Mixing and mastering time can vary based on the complexity of the project, but typically takes anywhere from a few hours to a few days. When recording music, the process of mixing and mastering is essential to create a polished and professional sound.


Mixing involves balancing the levels of each instrument and vocal track, adding effects, and ensuring that each element is heard clearly. Mastering takes the final mixed version of the track and applies audio processing to enhance the overall sound. However, the time it takes to complete this process can vary depending on the complexity of the project and the experience of the audio engineer.


Additionally, revisions and feedback may extend the timeline. Nonetheless, it is crucial to allocate enough time for mixing and mastering to achieve the desired end-product.


The Importance Of Mixing And Mastering


Mixing and mastering can vary in time duration depending on the complexity of the project. However, it is essential to invest enough time in these processes to ensure the highest quality of your audio output. Rushing these processes may result in poor sound quality, affecting the overall success of your final product.

Mixing and mastering are two essential stages of the music production process. Both of these stages add a professional touch to the songs, which is important for appealing to listeners. Mixing and Mastering determines the final production quality of your music and ensures that it sounds great on multiple audio systems.

Why Mixing And Mastering Is Crucial

Proper Mixing and Mastering can enhance your music by making it listenable on various audio systems. Mixing involves balancing all the tracks in the song, such as vocals, drums, and instruments. Mastering, on the other hand, focuses on the overall sound of the track, finalizing the sound, and making the song ready for distribution. Without appropriate mixing and mastering, the track may sound dull, flat, or muddy, and it may not sound consistent throughout.

How Mixing And Mastering Affects Your Tracks

Mixing and Mastering can add value to your music by making the tracks sound polished and balanced. It can enhance the overall sound quality of your track, making it more appealing to the listeners. When done correctly, mixing and mastering can help create separate space for individual sounds; for instance, the bass must not interfere with the vocals, which should be audible and clear. In addition, mastering ensures that the sound levels are normalized, making them compatible with the music industry standard. In conclusion, Mixing and Mastering is an important process that adds professionalism to your music. Both of these stages must not be compromised, as the quality produced can make or break the perception of the songs in the ears of the listeners.

What Is Mixing?


Mixing is the process of combining different audio tracks and elements into one cohesive sound. The amount of time required for mixing and mastering depends on the complexity of the project and can range from a few hours to several days.

The Process Of Mixing

Mixing is the process of combining all the elements of a song to create a well-balanced, sonically pleasing final product. During mixing, each instrument or track in the song is adjusted in terms of volume, tone, and effects to ensure that everything works together harmoniously. The process typically begins with setting the levels for each track in the mix, including adjusting the panning and balancing of the stereo image. Then, EQ and compression are added to each track to help shape the tone and dynamics. Effects such as reverb, delay, and chorus may also be added to enhance the overall sound.

Mixing Techniques

There are many mixing techniques used by professional audio engineers to achieve the desired sound. One popular technique is called “volume ducking,” which involves lowering the volume of one track when another track comes in. This can help to create a smoother transition between sections of a song. Another technique is “sidechain compression,” which involves using the signal from one track to control the level of another track. This can be useful for creating a pulsing, rhythmic effect or for making the kick drum stand out in a busy mix. Many engineers also use high-pass and low-pass filters to eliminate unwanted frequencies in each track. This can help to clean up the mix and prevent it from becoming too cluttered. In conclusion, mixing is a critical step in the music production process that can take hours or even days to complete. It involves adjusting each track in a mix to create a well-balanced, professional sounding final product. By utilizing various techniques and tools, engineers can create a unique and sonically pleasing mix that enhances the song and keeps the listener engaged.


What Is Mastering?


Mastering is the final process in music production where the track is optimized for distribution on multiple platforms. The length of mixing and mastering varies depending on the complexity and quality of the track and the experience of the music producer.

The Process Of Mastering

Mastering is the final step in the music production process. It involves taking the final mix and making it sound as polished and professional as possible. The mastering engineer will use a combination of EQ, compression, and other techniques to enhance the clarity, balance, and overall sound of the recording. The mastering process typically involves several stages:

  • Assessment
  • Pre-mastering
  • Mastering
  • Post-mastering

During the assessment stage, the mastering engineer will listen to the final mix and take notes on any issues that need to be addressed. This will inform the processing decisions that are made during the pre-mastering stage. During pre-mastering, the mastering engineer will make corrective EQ adjustments, apply dynamic processing, and make any necessary edits. They may also apply other processing techniques such as saturation, stereo enhancement, or harmonic excitation to enhance the sound and add character. During the mastering stage, the final master will be created. This will involve making final adjustments to the EQ, dynamics, and other processing. The final master will be optimized for playback on various systems and formats. Post-mastering is the final quality control step. The mastering engineer will listen to the final master on various playback systems to ensure that it translates well across different environments.

Mastering Techniques

There are several techniques that mastering engineers use to enhance the sound of a recording. These include:

  • EQ
  • Compression
  • Stereo Enhancement
  • Excitement
  • Limiting

EQ is used to adjust the balance of different frequencies in the mix. This can be used to enhance clarity, reduce muddiness, or make specific instruments or vocals stand out. Compression is used to control dynamic range in the mix. This can be used to even out levels and make the mix sound louder and more punchy. Stereo enhancement is used to create a wider, more spacious soundstage. This can be particularly useful for genres like electronic or pop music. Excitement is used to add character and harmonics to a mix, making it sound more full and vibrant. Limiting is used to prevent the mix from clipping or distorting during loud sections. This can be used as a final processing step to make the mix sound louder and more competitive in a commercial context. Overall, the mastering process is critical to making a recording sound polished and professional. While the length of time it takes to master a track can vary depending on the complexity of the mix, the expertise of the engineer, and the number of revisions required, the mastering process is well worth the time and investment.

How Long Does Mixing And Mastering Take


Credit: medium.com


Factors Affecting Mixing And Mastering Time


Mixing and mastering time can be affected by a number of factors, such as the complexity of the project, the skill level of the engineer, and the amount of revisions needed. Rush jobs can often be completed in a few days, but higher-quality work may require several weeks or more.

Mixing and mastering are essential stages in the production of a high-quality audio track. The duration of these stages can vary according to several factors. Understanding these factors can help you estimate how long it will take to complete your project. Here are some of the most common factors that affect the time required for mixing and mastering.

Track Complexity

The complexity of a track is one of the significant factors in determining how long it takes to mix and master. A more complicated track, with multiple instruments and unique arrangements, requires a more significant amount of time to mix and master. The sound engineer must take time to adjust the volumes of each instrument, apply EQ, compression, reverb, and other effects to achieve a balanced and polished sound. If your track comprises only a handful of instruments and only a few effects, it will take less time to mix and master. The sound engineer can finalize the mix-down once they’ve got a suitable level of every instrument in the track.

Number Of Tracks

The number of tracks in a project also plays a critical role in determining the time it takes to mix and master. Each additional track will require additional time from the editor to balance the overall sound. Similarly, if there are many backing vocals or instrumental tracks in your audio, it may take a longer time. The sound engineer must give individual attention to each track. If you have a few tracks, it will take less time to mix and master. This will also help in reducing the time consumed by editing different tracks.

Quality Of Audio Files

The quality of your audio files is another essential factor that can impact the time taken to mix and master. If the original files have too much noise or other distortions, editing and correction is required. Correcting and cleaning up the audio will affect the overall processing time. It takes less time in mixing and mastering if your audio files are clean and of high quality, meaning they don’t require extensive cleaning, enhancing, or processing.

Conclusion

Mixing and mastering require a significant amount of time, effort, and expertise to produce a polished and professional track in line with today’s audio quality standards. Now that you’re aware of the factors that impact the time required to complete the mixing and mastering stages, you can plan accordingly and allocate your time and resources accordingly. With careful planning and right execution, you can produce exceptional audio that meets your expectations and satisfies your clients’ needs.

How Long Does Mixing And Mastering Take?

Understanding how long mixing and mastering take is crucial for any musician or music producer. These are the final stages that guarantee high-quality sound for a song or album. However, the duration of this process varies depending on several factors.

Typical Turnaround Times For Mixing And Mastering

Generally, mixing and mastering take different amounts of time. It is crucial to keep in mind that the length of these processes ultimately determines the quality of the final product. Mixing involves adjusting the levels, panning, EQ and compression of individual elements – such as drums, bass, guitar, vocals – to create a cohesive sound for a song or album. On the other hand, mastering focuses on ensuring a song sounds balanced and consistent across different playback platforms. This stage involves leveling, eqing, compressing, limiting and adding a final polish to the sound.

On average, mixing a single song can take between two to four hours while mastering can take between thirty minutes to four hours. However, this timeline depends on the size of the project, the extent of editing required, and the experience of the audio engineer or production team.

Factors That Can Affect Turnaround Time

Several factors can impact how long mixing and mastering take. Some of these include:

Possible factors Impact
Length of the song or tracks Longer songs will take more time
Number of tracks or instruments in a song Higher number of tracks equal more time needed
The quality and condition of the mix that will be sent for mastering A poorly mixed song will require more time to fix and improve
Choosing revisions on a project Asking for too many revisions can increase turnaround time
Availability of the audio engineer If the engineer has multiple projects can extend the delivery date

Therefore, it is essential to consider these factors in advance to ensure a realistic and accommodating timeline for delivery. Communication between the musician or producer and the audio engineer is also essential in understanding the project’s specific requirements, budget, and turnaround time.

How Long Does Mixing And Mastering Take


Credit: majormixing.com


How To Prepare Your Tracks For Mixing And Mastering


Preparing your tracks for mixing and mastering is crucial for achieving a polished and professional sound. The length of time it takes for mixing and mastering can vary depending on the complexity of the tracks, but it’s important to allow enough time for the process to ensure the best possible end result.

Before sending your tracks for mixing and mastering, it’s essential to prepare them in a way that will make the process smoother and more effective. This section will focus on some basic steps for getting your tracks ready, as well as common mistakes to avoid.

Basic Mixing And Mastering Prep Steps

The following steps are essential for preparing your tracks for mixing and mastering:

  • Ensure that all tracks are properly labeled and organized.
  • Clean up any unwanted noise or sounds, such as background hiss, clicks, and pops by using noise reduction tools.
  • Make sure that all levels are balanced and consistent, with no tracks peaking or clipping.
  • Eliminate any empty or silent spaces in between clips or tracks.
  • Ensure that all tracks are exported as high-quality audio files.

By following these basic steps, you can ensure that your tracks are well-organized and sound clean and even. This will make it easier for the mixing and mastering engineer to work with your tracks and achieve a polished end result.

Common Mistakes To Avoid

When preparing your tracks for mixing and mastering, there are several common mistakes that you may run into. By avoiding these mistakes, you can help ensure that your tracks sound as good as possible.

  • Leaving unnecessary effects or processing on tracks.
  • Not leaving enough headroom for the mixing engineer to work with.
  • Using EQ or compression in a heavy-handed or inconsistent way.
  • Not providing clear instructions or guidelines for the mixing and mastering engineer.
  • Not allowing enough time for the mixing and mastering process to be completed properly.

By avoiding these mistakes, you can help ensure that your tracks are properly prepared for the mixing and mastering process. This will help you achieve the best possible end result and improve your chances of a successful release.

How To Find The Right Mixing And Mastering Engineer


Finding the right mixing and mastering engineer can be a daunting task, and the time it takes to complete these processes can vary depending on the complexity of the project. It’s important to do thorough research and communicate clearly with the engineer to ensure quality results within a reasonable timeframe.

Are you looking for a mixing and mastering engineer for your music production? A good engineer can mean the difference between a mediocre and a professional sound. But how do you find the right mixing and mastering engineer? What factors should you consider before hiring one? In this blog post, we will cover some of the important factors to consider when choosing a mixing and mastering engineer. We will also go over some of the questions you should ask before hiring an engineer.

Factors To Consider When Choosing An Engineer

First, let’s look at some of the important factors you should consider when choosing a mixing and mastering engineer:

Factor Description
Experience The engineer should have relevant experience in mixing and mastering music in your genre.
Reviews Look for reviews and testimonials from previous clients. A good track record is a good sign that the engineer is reliable and produces quality work.
Equipment Make sure the engineer has access to high-end equipment and software that is suitable for your music production.
Communication The engineer should be easy to communicate with and should be able to understand your requirements.

Questions To Ask When Hiring An Engineer

Before hiring a mixing and mastering engineer, you should ask some important questions to ensure that they are a good fit for your project. Here are some questions to ask:

  1. What is your experience in mixing and mastering music in my genre?
  2. Can you provide some samples of your previous work?
  3. What equipment and software do you use for mixing and mastering?
  4. How long does it usually take for you to complete a mixing and mastering project?
  5. What is your pricing structure?

By considering these factors and asking the right questions, you can find the right mixing and mastering engineer for your music production. Remember, investing in a good engineer can make a world of difference in the final quality of your music.

How Long Does Mixing And Mastering Take


Credit: www.youtube.com


Frequently Asked Questions For How Long Does Mixing And Mastering Take


How Long Will It Take To Learn Mixing And Mastering?


The amount of time it takes to learn mixing and mastering varies depending on individual dedication and practice. Some may pick up the skills in a few months, while others may take years. Consistent focus and hands-on experience with quality equipment can speed up the learning process.


How Long Does A Mastering Session Take?


The duration of a mastering session can vary depending on the complexity of the project, the number of tracks to be mastered, and the proficiency of the mastering engineer. However, on average, a single track mastering session can take anywhere from 1 to 3 hours, while a full album can take anywhere from 8 to 12 hours.


How Long Should It Take You To Mix A Song?


The time it takes to mix a song depends on various factors such as the length of the song, the complexity of the arrangement and the skill level of the engineer. Generally, it can take anywhere from a few hours to several days to mix a song.


However, it’s important to prioritize quality over speed to ensure the best possible outcome.


Is Mixing And Mastering Hard?


Mixing and mastering can be challenging tasks that require technical knowledge and expertise. However, with practice and training, anyone can learn to do it. The key is to have a good understanding of the software and equipment used, as well as to have a good ear for sound quality and balance.


Conclusion


The process of mixing and mastering a track can take anywhere from a few hours to several weeks, depending on various factors such as the complexity of the music, the skill level of the engineer and the budget. It is essential to understand that rushing the process can have a negative impact on the overall quality of the final product.


By allowing ample time for the mixing and mastering process, you can ensure that your music sounds the best it can be. Remember, patience is key in the world of music production.

Categories
Archive

How To Hire The Perfect Mixing Engineer

Hiring a perfect mixing engineer requires researching potential candidates and reviewing their past work. You can find the best candidate by determining your budget, seeking recommendations, and conducting interviews with multiple candidates.


Ensuring that your tracks sound good to your audience’s ears is key to a successful music career. Whether you’re an independent artist, or just looking to produce a hit record, hiring a skilled mixing engineer is crucial. However, finding the right mixing engineer can be a challenging task, especially if you’re not familiar with the music industry.


Mixing engineers are creative sound experts who have an ear for good music. They have a knack for blending different sounds to create a cohesive, polished sound. We’ll take you through the process of hiring the perfect mixing engineer.


Know Your Project

When it comes to hiring a mixing engineer, understanding the nature of your project is crucial. This knowledge will help you find the perfect mixing engineer that meets your specific needs. Without a clear idea of what your project entails, you may end up hiring an engineer who is not the right fit for your project, leading to a subpar end product.

Determine Your Project’s Complexity

The complexity of your project will determine the expertise and experience level you need in a mixing engineer. For example, a basic mixing project of a few tracks with simple instrumentation and minimal editing may not require an experienced mixing engineer. On the other hand, a complex project with many tracks, complex effects, and intricate editing will require an experienced mixing engineer. Therefore, before hiring a mixing engineer, determine the complexity of your project.

Choose The Genre And Style Of Your Project

The genre and style of your project will also play a crucial role in hiring the right mixing engineer. Different mixing engineers have different specialties, so if your project involves a particular genre or style, it’s important to choose a mixing engineer with experience in that area. If you’re uncertain about the genre or style, take the time to research mixing engineers to find the right fit for your project.

Knowing your project can make the difference between hiring the wrong mixing engineer and finding the perfect one. By understanding the complexity and genre of your project, you can find a mixing engineer with the required expertise, experience, and style to deliver an exceptional end product.

How To Hire The Perfect Mixing Engineer


Credit: mixandmastermysong.com


Look For Relevant Experience


When hiring a mixing engineer, it is important to look for relevant experience. This means finding someone who has experience in the specific genre of music you are working with and who has worked with artists similar to yourself. By hiring an experienced mixing engineer, you can ensure that your music will sound its best.

When it comes to hiring a mixing engineer, one of the most critical factors to consider is their relevant experience. You’ll want to select someone with the appropriate expertise that reflects your project’s style and genre. But how do you know if a mixing engineer has enough experience?

Check Their Previous Work

The most effective method is to examine their previous work. Take the time to listen to samples of their previous projects, paying attention to the genres they have experience in, the quality of their work, and whether their previous projects are similar in style to yours. Look for samples that slipped through the cracks and have minor flaws, listen to how they resolved flaws in the mix. If the mixing engineer has previously worked on a song or project in your genre, there is a good chance he understands that genre’s trends, sonics, and techniques. So, you should also analyze each track’s balance, clarity, stereo imaging, cohesion, and other quality factors to help you determine if this mixing engineer will be a good fit for your style.

Consider Education And Training

The education and training a mixing engineer has are also essential criteria to consider. Although a formal education is not mandatory, many mixing engineers have a degree or diploma in music production, audio engineering, or a related field. Review their education, courses taken, and certification. An engineer who has spent time working in a professional studio will likely have gained valuable experience and skills that will be beneficial to your project. In conclusion, looking for a mixing engineer with relevant experience, checking their previous work, and examining their education and training are crucial steps in hiring the perfect mixing engineer. Take the time to do your research, and you’ll have a better chance of finding an engineer who can turn your music into an award-winning sensation.


Assess Their Technical Skills


Assessing the technical skills of a potential mixing engineer is crucial when hiring the perfect fit for your project. Look for evidence of experience, software proficiency, and technical knowledge to ensure the best possible outcome for your music production.

Examine Their Technical Knowledge

To find the perfect mixing engineer, assessing their technical skills is paramount. You must examine their technical knowledge to assess their abilities to meet your requirements. You can ask them to give a brief description of their studio setup and mixing process. Looking at their previous projects, you can ask about the equipment they used, software they utilized, and the various techniques they employed to achieve the final sound.

Judge Technical Skills By Simple Audio Tests

Another way to examine their technical skills is to conduct simple audio tests. For instance, you can give them a mix with a complex arrangement and ask them to clean up the mix, enhance the vocals, and balance the levels. Look at how they handle the dynamic range, tonal balance and imaging of the mix. You can also ask them to demonstrate their knowledge of compression, EQ, and reverb techniques. The aim is to find out how well they can use their technical knowledge to achieve the sound you envision.

Avoid Common Technical Mistakes

It is essential to hire a mixing engineer who can avoid common technical mistakes. Technical errors such as clipping, harshness in the upper frequency range, over-processing, distorted levels, and too much reverb can ruin a mix. Look for someone who can produce a clean and well-balanced sound.

Ensure Knowledge Of Mixing Genres

Someone who can mix different genres of music can be a valuable asset. Ensure the mixing engineer you hire has knowledge of the different genres you want to create. Each genre has its artistic elements and technical requirements. Your engineer should know how to mix specific genres well, whether it is pop, rock, jazz, or classical. Hiring someone who is well-versed will ensure you get the best results.

Conclusion

Assessing the technical skills of a mixing engineer helps you determine if they are capable of meeting your sound requirements. Judge them based on their technical knowledge, their ability to handle various frequencies, their capability to avoid technical mistakes and their knowledge of diverse genres. By conducting simple audio tests, you can determine their capacity to produce the sound you are looking for. Find a mixing engineer who is experienced with blending different genres and can confidently bring your sound to life.


Check For Communication Skills

When hiring the perfect mixing engineer, it’s important not to overlook their communication skills. Whether you’re working on a project remotely or in-person, good communication is key to a successful collaboration. Here are some ways to evaluate a mixing engineer’s communication skills:

Evaluate Their Listener Capability

Before hiring a mixing engineer, evaluate their ability to listen to your needs and understand what you want from the project. This includes their ability to ask questions and clarify your requirements. A good mixing engineer will listen attentively to your vision and ideas, as well as offer feedback and suggestions that align with your goals.

Analyze Their Communicative Confidence

Confidence in communication is important when it comes to hiring a mixing engineer. They should be able to explain their process, what they’re doing, and why they’re doing it in a way that is easy for you to understand. They should also be able to communicate any potential issues or challenges they foresee, as well as how they plan to overcome them.

A mixing engineer who lacks confidence in their communication skills may struggle to effectively collaborate with you throughout the project and may not be able to deliver the results you’re looking for.

Simplify The Technical Jargon

It is important that a mixing engineer should be able to explain technical terms in a way that you can understand. Ensure they structure their communication, and that you do not miss any information due to misunderstandings or lack of coherence.

Communication is key when it comes to hiring the perfect mixing engineer for your project. By evaluating their listener capability, communicative confidence, and ability to simplify technical jargon, you’ll be able to find a mixing engineer who is the right fit for you and your project.

Look For An Up-to-date Professional


Hiring the perfect mixing engineer for your project requires finding someone who is up-to-date with the latest technology and techniques. Look for a professional with experience in your particular genre and a portfolio of successful projects. Choosing the right mixing engineer can make all the difference in the final product of your music.

When looking for a mixing engineer, it is important to find someone who is up-to-date with the latest technologies and industry trends. The music industry is constantly evolving, and a mixing engineer who stays current with new software, tools, and techniques is more likely to deliver high-quality work that meets your standards. Here are some tips on how to find an up-to-date professional.

Find Someone Who’s Current

Before hiring a mixing engineer, research their work and reputation. Check out their website and social media profiles to see if they have been active recently. Read their blogs or articles to see if they share insights into the latest trends, software, or tools. Attending conferences or workshops also show their eagerness to stay up-to-date.

Make Sure They Have The Right Tools And Software

The right tools and software are the essential elements in making great music. A mixing engineer must have top-notch hardware and software to produce music that matches your expectations. The software and tools they are using must be up-to-date because the old software may not work with new music production software. A mixing engineer should have a good understanding of the most recent mixing and mastering solutions and know which tools and software work best for a particular project. Here are some essential software and tools a mixing engineer must have and know how to use:

  • DAW (Digital Audio Workstation)
  • Plugins such as EQ, Compression, and Reverb
  • Mastering tools such as multiband compressors
  • Reference headphones or studio monitors
  • Backup solutions such as cloud storage

Conclusion

In conclusion, it is crucial to look for a mixing engineer who is up-to-date with the latest technologies, software, and tools. When finding a mixing engineer, research their portfolios, testimonials, and social media profiles to determine whether they are active and relevant to the industry. You must ensure that they have the right tools and software to meet your music standards, and they know-how and when to use them. By hiring an up-to-date mixing engineer with exceptional hardware and software and the right knowledge, you can expect to get the best quality music that matches your expectations.

How To Hire The Perfect Mixing Engineer


Credit: www.airgigs.com


Consider Their Personality


When hiring a mixing engineer, it’s important to consider their personality in addition to their technical skills. Look for someone who is easy to communicate with, has a positive attitude, and is passionate about their work. A good personality fit can make a big difference in the success of your project.

When it comes to finding the right mixing engineer for your project, technical skill is only one piece of the puzzle. Another key factor to consider is the engineer’s personality. Working with someone who has the right temperament and communication style can make a big difference in the success of your project. Here are two things to keep in mind when evaluating an engineer’s personality:

Hire Someone Calm And Patient

Mixing a song can be a time-consuming and detail-oriented process, and it’s not uncommon for tensions to run high in the studio. That’s why it’s important to work with an engineer who can remain calm and patient even under pressure. Look for someone who has a reassuring presence and a track record of staying calm in stressful situations. You want an engineer who will be able to help you navigate any bumps in the road that arise during the mixing process.

Judge If They’re Comfortable With Feedback

Another important aspect of an engineer’s personality is how they respond to feedback. You want to work with someone who is open and receptive to your input, and who won’t take it personally if you suggest changes to their work. Look for an engineer who is willing to listen to your ideas and try to bring them to life in the mix. To gauge an engineer’s comfort level with feedback, try giving them some specific notes during your initial consultation. See how they respond – are they defensive or open to your input? Are they able to incorporate your suggestions into the mix in a way that satisfies you? You want to work with someone who is willing to collaborate with you and who values your input.

Conclusion

When it comes to finding the perfect mixing engineer, don’t overlook the importance of personality. Focus on hiring someone who is calm, patient, and comfortable with feedback – these traits will make for a much smoother and more successful project overall.

Check Their Availability

When it comes to hiring the perfect mixing engineer, one of the most important things to consider is their availability. No matter how skilled or experienced an engineer is, if they’re not available when you need them, then they’re not the right fit for your project. Therefore, it’s crucial to check their availability before making any commitment.

Confirm They Can Work Within Your Timeframe

The first step in checking an engineer’s availability is to confirm that they can work within the timeframe you need. Whether you have a tight deadline or a more flexible schedule, it’s important to find an engineer who can accommodate your needs. Be sure to discuss your timeframe with them upfront and ask if they have any conflicting commitments during that period. If the engineer cannot commit to your timeframe, then it’s best to look elsewhere.

Know Their Average Production Turnaround

In addition to confirming that an engineer can work within your timeframe, it’s also important to know their average production turnaround. Some engineers may work more quickly than others, and you want to make sure that their production speed aligns with your expectations. Ask about their typical turnaround time for a project of similar size and complexity to yours. This will give you a better idea of what to expect and help you plan accordingly.

By checking an engineer’s availability and production turnaround time, you can make a more informed decision about whether they’re the right fit for your project. Remember, the perfect engineer is one who is not only skilled and experienced but also available and able to deliver within your desired timeframe. Take the time to vet potential candidates carefully to ensure the success of your project.

Finalize Your Choice

After careful consideration and reviewing multiple candidates, you’ve finally found the perfect mixing engineer for your project. However, before moving forward, there are a few crucial steps to take to ensure a successful partnership. In this article, we’ll cover negotiating the price and services and finalizing your choice by signing a contract and setting a deadline.

Negotiate The Price And Services

Once you’ve identified your top pick, it’s essential to discuss the terms of the project before diving in. The first thing to consider is the price. Be upfront about your budget and the scope of work you require. Don’t be afraid to negotiate with your mixing engineer to find a mutually beneficial agreement.

In addition to the price, ensure that you are both clear about the services that the mixing engineer will provide. This includes the number of revisions, the timeline of the project, and any additional fees. Make sure that all the terms of the project are in writing to avoid disputes down the line.

Sign A Contract And Set A Deadline

Before starting work, it’s essential to document all the terms and conditions of the project. This is where a contract comes in. A contract protects both you and the mixing engineer by outlining the scope of work, payment terms, and project timeline.

You can create a contract yourself or seek legal advice to ensure everything is legally sound. Once both you and the mixing engineer have reviewed and agreed to the terms, it’s time to sign. The contract serves as a legally binding agreement and protects both parties in case of any disputes.

Finally, set a deadline for the project that suits both you and the mixing engineer. Be sure to factor in any unforeseen circumstances that may arise. Having a clear deadline will keep everyone on track and ensure that the project is completed in a timely manner.

Hiring the perfect mixing engineer requires time and effort, but the result is well worth it. By negotiating the price and services, signing a contract, and setting a deadline, you’ll ensure a successful collaboration that results in a high-quality finished product.

Frequently Asked Questions Of How To Hire The Perfect Mixing Engineer


How Much Does A Good Mixing Engineer Cost?


The cost of a good mixing engineer varies. You can expect to pay anywhere from $50 to $500 per hour depending on the level of experience and expertise. Some mixing engineers charge a flat fee per song, which can range from $150 to $1,000.


Ultimately, it is important to find an engineer that fits your budget and has a high level of quality.


Should I Hire A Mixing Engineer?


Yes, hiring a mixing engineer can greatly improve the sound quality of your music. With their expertise, they can properly balance and enhance each instrument and vocal track, resulting in a polished and professional sound. This can make a significant difference in how your music is received by listeners.


Who Is The Best Mix Engineer?


It’s tough to pinpoint a single best mix engineer as mixing is subjective. Some well-respected names include Dave Pensado, Manny Marroquin, and Chris Lord-Alge. Ultimately, the best engineer for your project will depend on the specific needs and style of the music you’re working on.


How Do I Find Someone To Mix My Music?


To find someone to mix your music, you can search online for mixing engineers and producers. Look for recommendations and reviews, and reach out to potential candidates to discuss their services and rates. You can also ask fellow musicians or industry contacts for referrals.


Conclusion


After reading this guide, you should be well equipped to hire the perfect mixing engineer for your recording project. The key is to determine your specific needs and goals, do your research on potential candidates, and ask the right questions during the interview process.


Remember to prioritize experience, communication, and compatibility when making your final decision. Investing in the right mixing engineer can make all the difference in the quality of your final product.