Categories
Archive

Sustaining Creative Momentum In Music

Sustaining creative momentum in music requires consistent practice and experimentation. It is a delicate balance between refining your skills and taking risks to push your boundaries.

Music is a form of art that requires creativity and inspiration. However, as a musician, you may find yourself facing creative blocks and struggling to sustain your momentum. To keep your music-making process fresh and engaging, it is important to continually practice and experiment with new ideas.

Whether it’s refining your skills or taking risks to push your boundaries, finding a balance between the two is key. We will explore various ways to sustain your creative momentum in music and keep your passion for your craft alive. From building a routine to collaborating with other musicians, these tips will help you stay inspired and motivated to create excellent music.

Sustaining Creative Momentum In Music

Credit: www.linkedin.com

Creativity And Music

The relationship between creativity and music is undeniable. Music has been a medium for creative expression for centuries, with musicians and artists pushing boundaries and creating new sounds that have influenced generations. Creativity is an essential component of music-making, and it allows artists to tap into their imagination, emotions, experiences, and perspectives to create something new, unique, and inspiring.

The Relationship Between Creativity And Music

Creativity and music are interconnected. Music allows artists to express themselves creatively, creating a medium through which they can communicate their emotions and experiences to their audience. Every musician approaches music-making differently, and creativity plays a significant role in the process.

Musicians use their creativity to experiment with new sounds, rhythms, and techniques, combining different musical elements to create something unique and innovative. Creativity also allows musicians to collaborate, draw inspiration from different genres and styles, and break free from convention in their music-making.

The Importance Of Sustaining Creative Momentum In Music

For musicians, sustaining creative momentum is crucial for their artistic growth and success. Without creative momentum, artists can get stuck in creative ruts, leading to a lack of inspiration, motivation, and progress in their work. Sustaining creative momentum in music is paramount, and every musician should strive to keep their creativity alive and thriving.

Creativity is not just about creating new and innovative music. Sustaining creative momentum also involves exploring different themes, perspectives and experimenting with different sounds, rhythms, and instruments. It means keeping an open mind, embracing feedback, and being willing to learn from others. Sustaining creative momentum also involves taking breaks, stepping back, and recharging your creative energy when needed.

In conclusion, creativity is an essential component of music-making, and it allows artists to tap into their imagination, emotions, experiences, and perspectives to create something new, unique, and inspiring. Sustaining creative momentum in music is crucial for artists’ artistic growth and success, and every musician should strive to keep their creativity alive and thriving.

Challenges To Sustaining Creative Momentum

Sustaining creative momentum in music can be a challenging task for artists. The pressure to consistently produce innovative and unique works, coupled with maintaining relevance in an ever-changing industry, can lead to creative burnout. It requires a delicate balancing act between artistic expression and commercial success.

As a musician, sustaining creative momentum can be a challenging task. While creativity is a spontaneous process, there are several hurdles that musicians face in their journey of producing quality music. In this segment, we will discuss some of the most common challenges that may hinder progress and how they can be overcome.

Creative Blocks In Music Making

Creative blocks are common challenges faced by musicians. It can be frustrating when the creative process seems to come to a standstill, leaving the artist facing the dreaded blank page or screen. But, it is essential to understand that creative blocks are temporary and can be overcome with patience and determination. Here are some ways to lift creative blocks in music making:

  • Experiment with new sounds and instruments.
  • Collaborate with other artists to bring fresh perspectives.
  • Try a new genre or writing style to break from routine.

Lack Of Inspiration And Motivation

Feeling uninspired and unmotivated can be another hurdle in the creative process. External factors such as criticism, lack of recognition, and negative feedback can all contribute to musicians feeling drained and unmotivated. However, there are several ways to spark inspiration and motivate oneself:

  • Attend live concerts of other artists to learn and draw inspiration from.
  • Take a break and engage in unrelated activities such as reading, painting, or traveling.
  • Practice self-care through exercise, yoga, or meditation for a positive and refreshed mindset.

Time Constraints And Financial Challenges

The music industry can be a competitive and financially challenging landscape. As a result, musicians face time constraints and financial difficulties that can impact their creative momentum. These challenges include balancing a full-time job, raising a family, and producing music simultaneously while trying to meet financial obligations. Here are some steps artists can take to overcome these challenges:

  1. Create a schedule to allocate time effectively and prioritize tasks.
  2. Optimize financial resources through research and budgeting.
  3. Consider alternative funding sources such as crowdfunding to fund music projects.

Overall, the challenges to sustaining creative momentum in music are often temporary and can be overcome with resilience, determination, and discipline. Musicians must continue to experiment with and explore new sounds and ideas, find reliable support systems and prioritize self-care, and stay motivated and dedicated to their craft.

Strategies To Sustain Creative Momentum In Music

Maintaining creative momentum in music can be challenging, but by setting achievable goals, trying new techniques, collaborating with others, and taking breaks when necessary, you can sustain your creative drive. Stay connected with your passion for music and experiment with new ideas to keep your inspiration flowing.

Being a musician is a creative and fulfilling journey, but sometimes it can be difficult to sustain momentum. As with any creative endeavor, one can face burnout or creative blocks. These hurdles can be discouraging, but there are strategies to help you push through these tough times. In this post, we will explore some effective techniques for sustaining creative momentum in music. These techniques include collaboration and group work, active listening and music exploration, taking breaks and engaging in other activities, and setting realistic goals and deadlines.

Collaboration And Group Work

Collaborating with other musicians is an excellent way to sustain creative momentum. When you work with others, you get to share ideas and build on each other’s strengths. Engage in group work by joining a band or working with other musicians in a studio. When collaborating, it’s essential to have open communication, respect each other’s opinions, and stay flexible. By working with others, you’ll gain inspiration and a fresh perspective that can help you sustain your creative momentum.

Active Listening And Music Exploration

Active listening and music exploration exercises your brain and helps you stay creative. To keep your momentum going, take time to listen to new music, experiment with new genres, and explore different sounds and instruments. Make a habit of attending live performances and engaging with other musicians. Active listening and music exploration can help expose you to new ideas and help you sustain your creative momentum.

Taking Breaks And Engaging In Other Activities

Taking breaks and engaging in other activities can help you sustain your creative momentum by giving your mind a chance to rest and recharge. Taking a break can be as simple as going for a walk outside or spending time with friends and family. These activities will give your brain a chance to process information, come up with new ideas, and stay motivated. Don’t forget that breaks are essential to the creative process.

Setting Realistic Goals And Deadlines

Setting realistic goals and deadlines can help keep you motivated and focused. It’s essential to break down your goals into manageable tasks and assign deadlines to each one. This way, you can track your progress and stay motivated by seeing the results of your hard work. Staying on track with your goals will help you sustain your creative momentum. In conclusion, sustaining creative momentum in music requires determination, discipline, and creativity. By collaborating with others, actively listening and exploring music, taking breaks and engaging in other activities, and setting realistic goals and deadlines, you can keep your creative momentum going and achieve your musical dreams.

Tools And Resources For Sustaining Creative Momentum In Music

Sustaining creative momentum in music can be a challenging task. However, there are various tools and resources available to artists that can help them stay on track. These may include collaboration platforms, productivity apps, creative exercises, and me-time breaks.

As a musician, sustaining creative momentum is essential to consistently producing high-quality music. Luckily, there are a variety of tools and resources available to help you remain inspired and productive. In this post, we’ll explore some of the most helpful resources for sustaining creative momentum in music. Specifically, we’ll be discussing music production software and tools, online communities and networks, and music education and workshops.

Music Production Software And Tools

The right music production software and tools can make all the difference in keeping your creative juices flowing. Here are some popular options to consider:

  • Ableton Live: This software is designed for both live performance and studio production, making it a versatile option for electronic musicians.
  • Logic Pro X: This software is a favorite among many producers and offers a user-friendly interface and a diverse range of features.
  • Pro Tools: This software is considered an industry standard for audio recording and editing.
  • Native Instruments: This company offers a variety of software and hardware options for music production, including virtual instruments and effects.

Online Communities And Networks

Connecting with other musicians can provide a valuable source of inspiration and collaboration opportunities. Here are some online communities and networks to consider joining:

  • Splice: Splice offers a variety of sample packs and plugins, as well as a community where users can share their work and collaborate.
  • GitHub for Music: GitHub is a platform originally designed for software development, but this community repurposes it for sharing and collaborating on open source music projects.
  • Reddit: There are many subreddits dedicated to various music genres and production techniques, making it a great resource for connecting with like-minded musicians.

Music Education And Workshops

Investing in your skills and knowledge is key to sustaining creative momentum. Consider taking advantage of these music education and workshop opportunities:

  • Berklee Online: Berklee offers online courses in various topics related to music production and performance.
  • MasterClass: This platform offers courses in music production and songwriting taught by industry professionals, such as Timbaland and St. Vincent.
  • Sonic Academy: This website offers in-depth video tutorials on music production, as well as an active community forum.

In summary, staying motivated and productive as a musician can be challenging, but utilizing these tools and resources can help you sustain and even enhance your creative momentum. From music production software to online communities to music education, there are many options available to support your growth and development as a musician.

Famous Musicians And Their Creative Journey

Famous musicians have sustained their creative momentum by experimenting with new music styles, collaborating with other artists, and continuously practicing their craft. They have overcome creative blockages by remaining persistent and committed to their artistic journey, which has resulted in a legacy of timeless hits.

Musicians are often seen as the epitome of creative energy, producing beautiful melodies and lyrics that touch the soul. But sustaining that creative momentum throughout their lifetime can be a daunting task. In this article, we will take a look at some of the famous musicians and their creative journey that can inspire emerging musicians to keep pushing themselves to new heights.

Case Study: How Mozart Sustained Creative Momentum Throughout His Lifetime

Wolfgang Amadeus Mozart, one of the most renowned classical composers of all time, composed more than 600 works in his short life. From his early works as a child prodigy to his mature compositions, Mozart’s creative energy never faltered. He had a relentless drive to keep improving and innovating the classical music genre. Mozart dedicated countless hours to honing his craft, practicing and writing music daily without fail. He surrounded himself with fellow musicians who inspired him and performed his music to perfection. Mozart’s creative journey reminds us that the key to sustaining creative momentum is relentless dedication and hard work.

A Look At Some Of Today’s Most Innovative Musicians

In today’s music world, new artists are pushing the boundaries of creativity and innovation. Among them, Billie Eilish, an American singer-songwriter, stands out for her unique style and approach. From her breakout single “Ocean Eyes” to her critically acclaimed album “When We All Fall Asleep, Where Do We Go?”, her music is a reflection of her artistic vision, raw emotions, and experiences. Eilish’s success story highlights that sustaining creative momentum requires a willingness to experiment and take risks, to be vulnerable and honest in your art, and to always stay true to your unique voice. Another innovative musician is Tyler, The Creator, an American rapper, singer, and songwriter. Tyler’s music is a mixture of genres, from hip-hop to jazz, punk, and soul, all of which blend together seamlessly to form his unique sound. He believes in the importance of constantly pushing himself out of his comfort zone. Tyler’s creative journey reminds us that sustained creative momentum requires a willingness to break out of the expected mold and explore new territories. In conclusion, sustaining creative momentum in music is not an easy feat, but the examples of Mozart, Billie Eilish, and Tyler, The Creator, showcase that it is possible. Dedication to your craft, willingness to experiment and take risks, and staying true to your unique voice are key factors to sustain creative momentum in the music industry.

The Future Of Music Making And Creative Momentum

Sustaining creative momentum is crucial for innovation in music making. As technology continues to evolve, musicians can look forward to new tools and resources to harness their creativity. Being aware of the latest trends in music technology and experimenting with new techniques can help them stay ahead of the game.

Music has come a long way since the first recorded notes were made. Today, music makers face a plethora of technologies and advancements that have revolutionized the way they create sounds and melodies. The future of music making is filled with endless possibilities, and sustaining creative momentum has become more important than ever. In this blog post, we will explore the latest trends and innovations in music making, the impact of technological advancements on music creativity, and the role of music in our digital world.

Trends And Innovations In Music Making

The evolution of music making has brought about various trends and innovations that make more music accessible than ever before. There has been a surge in the creation of new music genres such as Electronic Dance music (EDM), and the incorporation of technology in music production has skyrocketed. Today, artists can make music using advanced software programs, electronic instruments, and virtual synthesizers. The use of live streaming services has also provided platforms for artists to share their music and connect with fans globally.

The Impact Of Technological Advancements On Music Creativity

Technological advancements have been a game-changer for music creatives. The introduction of digital audio workstations (DAWs), music-making apps, and other software tools has made music production more accessible than ever before. These tools have allowed artists to create high-quality music, even without expensive studio equipment. The use of artificial intelligence in music generation and distribution has also led to more personalized interactions between musicians and music lovers.

The Role Of Music In Our Digital World

Music has always been an essential part of human culture, and the digital age has made it even more so. With the rise of music streaming platforms such as Spotify, Apple Music, and Amazon Music, music lovers can access a vast collection of songs instantly. Social media platforms have also allowed musicians to connect with their fans, promote their music, and grow their fanbase. The digital world has made it possible for music to be shared and enjoyed globally, breaking geographical barriers.

In Conclusion

Music making is constantly evolving, and sustaining creative momentum has become more important than ever. With the latest trends and technological advancements in music making, music creatives have limitless possibilities to create high-quality music and promote their work globally. As more people consume music digitally, the role of music in our digital world will only continue to grow. By taking advantage of these advancements, music creatives can sustain their creative momentum and make their mark in the music industry.

Frequently Asked Questions Of Sustaining Creative Momentum In Music

How Do You Develop Creativity In Music?

To develop creativity in music, you can start by experimenting with different styles and sounds. Practice improvisation and try new techniques to expand your skills. Collaborate with other musicians and take inspiration from your surroundings. Constantly challenge yourself to think outside the box and push the boundaries of your music.

What Does Momentum Mean In Creative Arts?

In creative arts, momentum refers to the feeling of energy and movement within a piece of work. This can be achieved through the use of rhythm, repetition, and dynamic composition that propels the viewer’s eyes across the piece. It can help create a sense of excitement and engagement for the viewer or audience.

How Can Music Be A Creative Outlet?

Music can be a creative outlet by allowing individuals to express themselves through lyrics, melody and rhythm. Songwriting, composing, and performing can be cathartic and therapeutic. Music can also inspire others, spread messages, and connect people from different cultures and backgrounds.

Those who create music often find joy in the process and a sense of fulfillment upon completion.

How Can Musicians Maintain Their Creative Momentum?

One way to maintain creative momentum is to invest in ongoing education, whether it’s taking online courses or attending workshops. It’s also important to consistently practice and set goals for yourself.

Conclusion

Sustaining creative momentum in music requires dedication, perseverance and consistency. It’s essential to continue exploring new ideas and techniques, collaborate with other artists, and continually improve skills. By following these strategies, musicians can maintain their creative momentum and thrive in the highly competitive music industry.

With devotion and persistence, one can achieve success and create music that resonates with their audience. Remember, creativity is a journey, and it’s essential to enjoy the process along the way.

Categories
Archive

Better Mixes Series Vocal Delays Part 1

Better Mixes Series Vocal Delays Part 1 covers how to use vocal delays in mixes. We will delve deeper into the topic and explore different types of vocal delays and their uses.

Delay effects are crucial in music production as they add depth and character to vocals. Vocal delays come in various forms and offer different decay times, feedback, and stereo width. Creating a balanced vocal mix with delays requires an understanding of how to use these parameters to suit the song’s style and mood.

We will learn about various delay types, such as Slapback delay, Ping-Pong delay, Stereo delay, and Analog delay, and their unique features. We will also discuss techniques for processing vocal delays for maximum impact.

Better Mixes Series Vocal Delays Part 1

Credit: www.production-expert.com

Types Of Vocal Delays

Vocal delays can enhance a track’s ambiance and create a unique sound. Different types of vocal delays, such as tape and digital delays, offer varying textures and characteristics that can complement a singer’s voice. This is the first part of the Better Mixes Series Vocal Delays.

Vocal delay effects continue to be a staple in music production, and with good reason. Delays can add depth and dimension to a vocal recording, making it sound richer and more dynamic. There are myriad vocal delay plugins out there, each with its unique set of features, but they can all be categorized into different types of delays. In this article, we’ll explore four types of vocal delays to better understand what each one brings to the table. Let’s get started.

Slapback Delay

Slapback delay is the most common vocal delay effect, and for good reason. This type of delay provides a quick and simple effect, creating a sense of space and dimension around a vocal track. A slapback delay is essentially a single repeat with a low feedback setting, usually in the range of 10-30%. This short delay time of 80 to 120ms emulates a sound reminiscent of a recording made in the 1950s rock and roll era and is widely used in modern pop and rock music.

Ping Pong Delay

Ping-pong delay adds a bit more complexity than slapback delay, creating a stereo effect by bouncing the delayed signal back and forth between the left and right channels. This type of vocal delay is great for creating a sense of movement in your mix, and it can also be used to emphasize phrases or lyrics. Different ping pong delays use different delay times, making the effect unique.

Tape Delay

Tape delay is a vintage-style delay that emulates the sound of a real tape machine. It offers a warm and naturally saturated sound, adding depth to a vocal recording in a way that digital delays can’t. The tape delay effect produces a subtle modulation, which is pleasant to the ears. Often it is equipped with other controls such as, drive, filter and EQ which makes the sound rich and full.

Reverse Delay

Reverse delay is a bit of an esoteric effect, but it can add an interesting and unique sound to a vocal recording. As the name suggests, a reverse delay plays the signal delay backward. This reversed vocal can create a novelty sound that captivates your listeners. The effect produces a dramatic build-up before the vocal hits, which can be a particular sound you want. In conclusion, understanding the different types of vocal delays and their applications can help you use the right effect to create interest in your mix. Slapback and ping pong delays are perfect for adding a sense of space and movement, respectively. Tape delay is excellent for adding warmth and natural saturation, and reverse delay can create a unique and dramatic sound. Choose the type of delay that best suits your mix, and create a standout vocal recording.

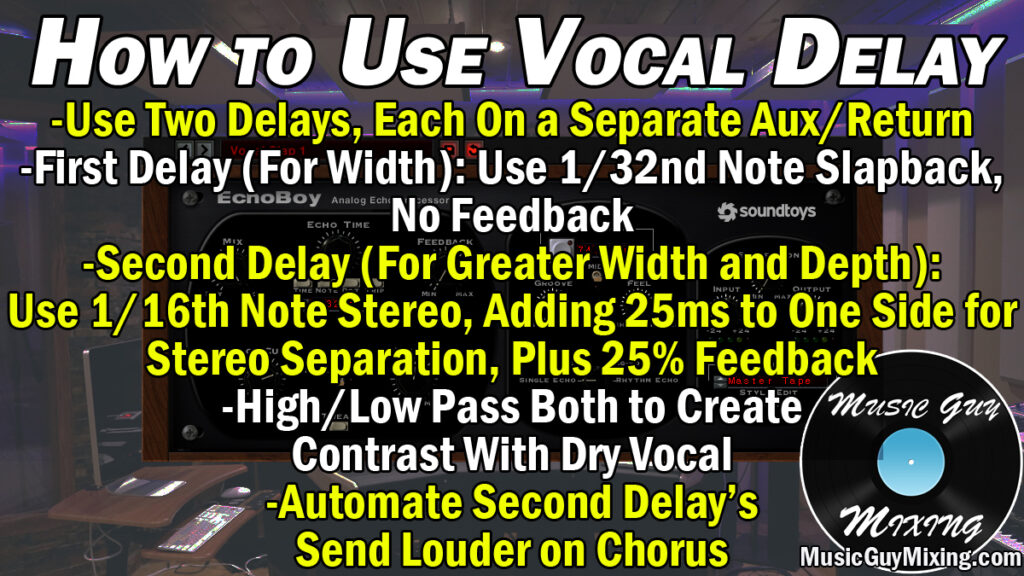
Better Mixes Series Vocal Delays Part 1

Credit: www.musicguymixing.com

Creating Exciting Vocal Delays

In the first part of the Better Mixes Series Vocal Delays, you’ll learn how to create exciting and unique vocal delays in your mixes. With some simple techniques and tips, you can elevate your tracks and take your production skills to the next level.

Creating Exciting Vocal Delays is an essential aspect of mixing music. Vocal delays add depth and dimension, turning a flat mix into an engaging listening experience. In the Better Mixes Series Vocal Delays Part 1, we explore how to create exciting vocal delays that capture your listener’s attention. Playing with Delay Time One way to create excitement with your vocal delays is by playing with delay time. This technique allows your vocals to stand out in the mix, creating a powerful impact on the listener. A shorter delay time creates a tight and punchy sound while a longer delay time creates a more expansive and ethereal sound. By experimenting with different delay times, you can create a unique and unforgettable vocal delay. Automating Your Delays Another way to add excitement to your vocal delays is to automate them. Automating your delays means that you control when and where the delay effect occurs within your mix. By playing with the intensity of delay effects, you can create tension or excitement within your music. Automating the delay time, feedback, and wet/dry mix can add a dynamic and exciting element to your vocal tracks. Using Filters on Your Delays Filters can also add a creative and exciting element to your vocal delays. Using filters allows you to manipulate the frequency spectrum, creating an entirely new vocal effect. By filtering out specific frequencies, you can create a more natural-sounding delay or a more digital and futuristic sound. Using filters on your delays can help your vocals cut through the mix while also creating a unique and captivating sound. In conclusion, creating exciting vocal delays is an essential part of mixing music. By experimenting with delay time, automating your delays, and using filters, you can add a dynamic and memorable element to your vocal tracks.

Better Mixes Series Vocal Delays Part 1

Credit: www.amazon.com

Frequently Asked Questions Of Better Mixes Series Vocal Delays Part 1

What Delay Should I Use For Vocals?

Use a delay that complements the rhythm of the song and enhances the vocals. The length of the delay depends on the tempo and genre of the music. Start with a short delay of 20-30ms and adjust accordingly to achieve the desired effect.

Experiment with different delay times to find what works best for your vocals.

What Is The Delay Effect On Mixers?

The delay effect on mixers is a sound processing technique that adds an echo effect to an audio signal. It is used to create spaciousness and depth in music production. Delay time, feedback, and mix levels can all be adjusted to achieve different results.

How Do You Add Delay To Vocals?

To add delay to vocals, you need to use an effects processor or plugin that has a delay effect. Adjust the delay time and feedback settings to achieve the desired effect. Consider syncing the delay time with the tempo of the song for a more cohesive sound.

What Is The Difference Between Delay And Reverb Vocals?

Delay adds a repeating echo effect on vocals while reverb adds a sense of space and depth to vocals. Delay repeats the original sound while reverb spreads it out in a natural way. Both can be adjusted to create a desired effect and can be used together for a fuller sound.

Conclusion

If you’re looking to take your vocal mixes to the next level, adding delays can be a game-changer. From creating depth and dimension to emphasizing certain words or phrases, vocal delays can add a level of excitement and emotion to your tracks.

Remember to experiment with different settings and techniques to find the perfect balance for each individual mix. With these tips and tricks, you’ll be on your way to creating better vocal mixes and wowing your listeners in no time.

Categories
Archive

How To Export Multiple Tracks In Reaper

To export multiple tracks in Reaper, select the tracks you want to export and go to File, then Render. In the render screen, select “selected tracks” and choose your export settings.

Reaper is a powerful digital audio workstation that allows you to create, edit, and manipulate audio tracks. Once you’ve finished working on a project, the next step is to export your tracks so you can share them or use them in other programs.

However, exporting multiple tracks can be a daunting task if you’re not familiar with Reaper’s interface. We will guide you through the process of exporting multiple tracks in Reaper. We will provide step-by-step instructions, explain any technical terms, and offer tips to help you get the best results. Whether you’re a musician, podcaster, or sound engineer, this tutorial will help you master the essential skill of exporting your tracks in Reaper.

How To Export Multiple Tracks In Reaper

Credit: forum.cockos.com

Exporting Multiple Tracks

Exporting multiple tracks in Reaper is a useful feature when you want to export individual audio stems or tracks for your projects. To export multiple tracks, simply select the tracks you want to export, choose the export settings, and save the files to your desired location.

With this easy process, you can efficiently manage your audio files and projects.

Exporting multiple tracks is an essential feature of any digital audio workstation, and it is no different with Reaper. Whether you’re working on a large-scale project with multiple tracks or just a single composition, being able to export multiple tracks together can save you time and effort. In this post, we’ll go over the process for exporting multiple tracks in Reaper, from setting up your tracks to naming and saving your exports. We’ll also cover some additional options for exporting with effects or stems, doing batch exports, and troubleshooting any potential errors you may encounter. ### Setting Up Tracks for Export Before you can export multiple tracks, you’ll need to ensure that your tracks in Reaper are set up to be exported. This involves making sure that each track has the appropriate settings and routing assigned to it. To set up your tracks, follow these steps: 1. Open the “Routing” window for each track by right-clicking on the track and selecting “Routing”. 2. Ensure that the output of each track is set to the master track. 3. Make sure that each track has the correct volume, panning and any effects settings you want to include on the export. ### Choosing the Right File Format The next step is to choose the file format that your exported tracks will be saved in. Reaper offers a range of options, including WAV, MP3, FLAC, OGG and more. Choose the file format that best suits your needs, taking into account any file size restrictions or compatibility issues you may encounter. ### Naming and Saving Your Export Once you have chosen the file format, you’ll need to name and save your export. You can do this by following these steps: 1. Click on the “File” menu in Reaper, then select “Render”. 2. In the “Render” dialog box, select the tracks you want to export, as well as any other relevant settings. 3. Choose a file name and directory for your export. 4. Click “Render” to complete the export. ### Options for Exporting Reaper offers a range of options when it comes to exporting, allowing you to customize your export to suit your needs. Some of the options you can choose from include: – Including or excluding any audible tracks – Tailoring export settings for each track – Choosing alternate outputs for each track ### Exporting with Effects One useful feature that Reaper offers is the ability to export tracks with effects applied. This can be useful if you want to include any reverb, delay, or chorus effects that you’ve used in your mix. To export with effects, select the tracks you want to export, and make sure that any effects are enabled on each track before exporting. ### Exporting with Stems Another useful option for exporting in Reaper is to export single stems of each track, rather than the entire mix. This can be useful if you want to have more control over the mix during the post-production process. To export as stems, follow these steps: 1. In the “Render” dialog box, select the tracks you want to export. 2. Select the “Stems” option under “Render to File”. 3. Choose a file name and directory for each stem. 4. Click “Render” to complete the export. ### Batch Exporting If you have multiple tracks or stems that you want to export, you can save time by using the batch export feature in Reaper. This allows you to export multiple tracks simultaneously. To batch export, follow these steps: 1. In the “Render” dialog box, select the tracks you want to export. 2. Choose the directory where you want to save the files. 3. Click “Batch File” to complete the export. ### Troubleshooting Export Errors If you encounter any errors during the exporting process, there are several things you can do to troubleshoot the issue. Some common issues that can occur include: – Incorrect routing or settings on one or more tracks – Plugin conflicts or other software issues To troubleshoot these issues, try re-routing your tracks, disabling any plugins or effects, or experimenting with different export settings. If all else fails, you can consult the Reaper user manual or contact customer support for assistance. In conclusion, exporting multiple tracks in Reaper is a straightforward process that can save you time and effort in your audio production workflow. By following the steps outlined in this post, you can ensure that your exports are of high quality and tailored to your specific needs. Whether you’re exporting with effects, stems, or batch exporting multiple files, Reaper has all the tools you need to get the job done right.

How To Export Multiple Tracks In Reaper

Credit: m.youtube.com

How To Export Multiple Tracks In Reaper

Credit: www.mixedbyrecio.com

Frequently Asked Questions On How To Export Multiple Tracks In Reaper

How Do I Export Multiple Tracks In Reaper?

To export multiple tracks in Reaper, select all the tracks you’d like to export by holding the Shift key and clicking on each track. Then go to File > Render and choose your desired settings, such as file format and destination folder.

Finally, click Render 1 file per track and Reaper will export each track as a separate audio file.

How Do I Export All Files From Reaper?

To export all files from Reaper, navigate to “File” on the main menu and select “Render. ” From there, choose the folder where you want to save the exported files, set your desired format, codec, and other options, and click “Render.

” Then, all your files will be exported to the location you specified.

How Do I Send Multiple Tracks To A Bus In Reaper?

To send multiple tracks to a bus in Reaper, simply select the tracks you want to send, right-click and choose “Route to selected tracks via this track. ” Choose the desired bus from the drop-down menu and adjust the bus’ volume, panning, and effects as needed.

How Do I Select And Move Multiple Tracks In Reaper?

To select multiple tracks in Reaper, hold down the CTRL key and click on each track you want to select. To move them, click and drag them to the desired location. Alternatively, use the mouse to click and drag a rectangular selection around the tracks you want to move, then drag them as a group.

Conclusion

Exporting multiple tracks in Reaper can be a bit tricky, but once you know the process, it can save you a lot of time. By following the steps outlined in this tutorial, you can easily export multiple tracks at once and achieve the desired result.

With Reaper’s comprehensive set of tools and features, it’s easy to understand why it’s such a popular DAW among audio professionals. Now that you know how to export multiple tracks in Reaper, you can apply this knowledge to your next project and save yourself some valuable time.

Categories
Archive

Massive Tutorial Trombone Style Bass Sound

To get a Massive Tutorial Trombone Style Bass Sound, use a trombone sound with heavy saturation and filtering. This will give your bass a unique edge and depth that stands out in a mix.

When applied and tweaked correctly, the Trombone Style Bass Sound can be a heavy-hitting addition to any genre. Also, if you are looking to add an innovative and distinctive sound to your bass, the trombone style sound can be an excellent option.

Related reading: Bass Guitar Eq and How To Mix The Bass. For background, see the Wikipedia article on Bass.

Moreover, this sound style provides a remarkable depth and edginess to your music and can ideally complement various genres. You can create this sound by using a trombone sound with heavy saturation and filtering to make it stand out in the mix. Applying and adjusting these effects correctly will result in a bass sound that is tough to ignore. With a few trial and error phases, you can produce a truly custom trombone style bass sound that fits your musical style and preferences. This makes your production stand out.

Massive Tutorial Trombone Style Bass Sound

Credit: www.youtube.com

Intro To Trombone Style Bass

In addition, this bass is a unique bass sound that has been making waves in the music scene for some time now. It is a bass sound that combines several techniques to imitate a trombone. This technique involves playing long notes with slides and bends, creating a smooth and groovy sound.

History And Evolution

The patch has been around for many years, but it was first popularized by Reggae musicians in the 1960s. Furthermore, they saw the potential of using the bass guitar to imitate the melodic lines of the trombone, and it quickly caught on.

Over the years, the technique has evolved and expanded beyond the Reggae genre, and today it is commonly used in genres such as Jazz, Funk, and R&B. It has become especially popular in electronic music. Additionally, there, it is used to create a unique sound that is both funky and futuristic.

Musical Genres Where It Is Common

Also, the brassy bass is most common in Reggae, Jazz, Funk, and R&B. In Reggae music, it creates a deep, groovy bassline that complements the upbeat rhythm. In addition, in Jazz and Funk, it is often used to create a melodic line that complements the horn section. Furthermore, in R&B, it provides a smooth and groovy foundation for the rest of the band.

As mentioned earlier, this bass has also made its way into electronic music, where it is commonly used in genres such as Dubstep, Trap, and Future Bass. Moreover, in these genres, it creates a futuristic, wobbly bassline that contrasts with the other electronic sounds.

GenreCommon Use of Trombone Style Bass
ReggaeDeep, groovy bassline
JazzMelodic line to complement the horn section
FunkMelodic line to complement the horn section
RBSmooth and groovy foundation for the band
DubstepFuturistic, wobbly bassline
TrapFuturistic, wobbly bassline
Future BassFuturistic, wobbly bassline

In conclusion, the patch is a unique bass sound that has been around for many years and has evolved and expanded beyond its Reggae roots. In addition, it is now a common sound in many genres, and it continues to be used in new and innovative ways.

Building The Foundation for Trombone Style Bass

Furthermore, the brassy bass sound is a popular trend among EDM producers. To achieve the perfect sound, one has to choose the appropriate bass and ensure the right tuning and setup. Building the foundation is crucial for getting the desired sound. In this article, we will take you through the process of selecting the appropriate bass and tuning and setup.

Selecting The Appropriate Bass

Additionally, the first step in building the foundation for massive tutorial trombone style bass sound is selecting the right bass. A bass guitar with a long scale length and fewer strings, preferably between four and six strings, will give the ideal sound. The long scale length ensures that the instrument produces deep sounds, while having fewer strings makes it easier to play complex notes.

Tuning And Setup for Trombone Style Bass

Also, the next step after selecting the right bass is tuning and setup. The tuning and setup determine the quality of the sound produced. The standard tuning for a bass guitar is E – A – D. G, but for a trombone style bass sound, drop-D tuning is the most preferred. In drop-D tuning, the bass guitar is tuned to D-A-D-G. This tuning enables the bassist to play the lower notes effortlessly.

Moreover, the setup of the bass guitar is essential in achieving the desired sound. Ensure that the action, which is the string height, is low, enabling you to play without exerting too much effort. Additionally, the intonation, which is the tuning of each individual note, should be accurate. Proper intonation ensures that every note is played correctly, giving the desired sound.

In conclusion, building the foundation for massive tutorial trombone style bass sound involves selecting the right bass, tuning it to drop-D, and ensuring proper setup. In addition, follow these steps to achieve the desired sound and become an expert in EDM production.

Posture And Technique

Furthermore, achieving a massive tutorial trombone style bass sound requires proper posture and technique. Focus on maintaining a straight spine and relaxed shoulders while using the right breath support and embouchure to produce a powerful and resonant sound.

Posture and technique are essential when it comes to playing the trombone style bass sound. Additionally, without proper posture and technique, it can be challenging to create a massive and impressive sound. This section covers standing position and grip. It also covers breathing and support techniques for the trombone style bass sound.

Standing Position And Grip for Trombone Style Bass

Also, a crucial component of playing trombone style bass is the standing position and grip. You need to maintain a balanced and upright posture with your feet shoulder-width apart. Moreover, make sure your spine is straight and your head is level.

When you grip the trombone, it’s important to have a relaxed grip that doesn’t constrict or restrain your playing. Moreover, your left hand should hold the slide, keeping your arm straight. Meanwhile, your right hand rests on top of the valve casing. You need to maintain these positions consistently throughout your performance.

Breathing And Support for Trombone Style Bass

The right breathing and support are critical for achieving a massive tutorial trombone style bass sound. To do this, you need to inhale deeply, filling up your lungs entirely. Then support the outflow of air through your instrument.

The support happens when you engage your diaphragm muscles and direct the air through your instrument. Doing so will help you achieve a solid and stable pitch, which makes for an impressive performance.

  1. Stand upright with your feet shoulder-width apart, keeping your spine straight and your head level.
  2. Hold the slide with your left hand, keeping your arm straight and your grip relaxed.
  3. Place your right hand on top of the valve casing, maintaining a relaxed and comfortable grip.
  4. Inhale deeply and support the outflow of air through the trombone with your diaphragm muscles.

Following these techniques will help you cultivate excellent posture and technique. This allows you to create a massive tutorial trombone style bass sound that everyone will remember.

Massive Tutorial Trombone Style Bass Sound

Credit: www.productionmusiclive.com

The Trombone Style Bass Sound

If you’re a fan of bass sounds with character and depth, then you’ll want to know about the trombone style bass sound. This sound is a staple in various genres of music, from jazz and funk to hip-hop and dubstep. Today we’re going to explore this sound, looking at how you can create it and use it in your music.

Using The Slide for Trombone Style Bass

The key to creating the trombone style bass sound is to use the slide. The slide is what gives the sound its unique character. This allows you to bend the pitch and add a touch of vibrato. To use the slide, you’ll need to have a bass with a slide or pitch bend wheel. If you’re using a MIDI controller, you can map the slide function to a wheel or fader.

Manipulating Pitch And Tone for Trombone Style Bass

Once you have the slide activated, you can start manipulating the pitch and tone of your bass sound. Sliding up or down will change the pitch, while oscillating the slide back and forth will add vibrato. You can also adjust the amount of vibrato by changing the speed and depth of your slide movements.

To get the best results, it’s crucial to practice and experiment with the slide. Start by playing simple basslines and gradually introduce slide movements. You’ll soon get a feel for how the sound changes and can start incorporating it into your music.

Summary

  • The trombone style bass sound is a characterful, deep sound that’s found in various genres of music.
  • To create this sound, you need to use the slide function on your bass or MIDI controller.
  • You can manipulate the pitch and tone of your bass sound by sliding up or down and adding vibrato.
  • To get the best results, practice and experiment with the slide to get a feel for how the sound changes.
BenefitsDrawbacks
Unique and characterful bass soundRequires a bass with slide or pitch bend wheel
Can add depth and texture to basslinesMay not suit all genres of music

The trombone style bass sound is a fantastic addition to any musician’s toolkit. Use the slide and experiment with pitch and tone. You’ll create a unique sound with depth and texture. Whether you’re playing jazz, funk, or hip-hop, it’s worth exploring the possibilities of this sound.

Advanced Techniques

Learn how to shape your sound and create a massive tutorial trombone-style bass sound with advanced techniques. This tutorial dives deep into the nuances of the trombone sound and helps you add finesse to your bass lines.

If you’re looking to create a massive tutorial trombone-style bass sound, you’ll need to utilize some advanced techniques to achieve that desired effect. In this section, we’ll be discussing three of those techniques: vibrato, harmonics, and overtones.

Vibrato

Vibrato is a technique that involves creating a slight fluctuation in pitch to add depth and emotion to your bass sound. To achieve this effect, you’ll want to start by playing a note. Then gently applying pressure to the string or horn slide. As you do this, gradually increase and decrease the pressure, causing the pitch to raise and lower in a flowing manner.

Harmonics And Overtones

Harmonics and overtones are created when you play a note on your bass, and additional higher or lower pitches are produced that coincide with the vibrations of the original note. These sounds can add complexity and uniqueness to your bass sound. To play harmonics, rest your finger lightly on the string at the half, third or quarter point. Then pluck it. This will create a higher pitch that is more delicate and subtle. To produce overtones, try playing a note with more intensity and pressure on the string. This will cause additional pitches to resonate from the instrument and add a more jagged, distorted quality to your sound.

In Conclusion

By utilizing techniques like vibrato, harmonics, and overtones, you can take your bass sound to the next level and create something truly unique. Experiment with each of these techniques. See how they shape your instrument’s sound and your trombone-style bass tone.

Playing Trombone Bass In A Band Setting

Learn how to achieve a massive tutorial trombone style bass sound while playing the trombone bass in a band setting. Enhance your performance with these tips and techniques to create a unique and captivating sound.

In a band setting, a trombone style bass adds unique depth and warmth to any arrangement. However, mastering this technique takes practice and skill. This post looks at playing trombone bass in a band. That means locking in with a drum kit and complementing other instruments.

Playing With A Drum Kit

When playing trombone bass alongside a drum kit, it’s important to establish a solid rhythm that complements the drummer’s beat. The trombone player should pay close attention to the kick and snare drum patterns, and adjust their playing accordingly. For example, the player may use long, sustained notes during slower periods, while using faster, staccato notes during intense drum fills.

Complementing Other Instruments

In addition to the drum kit, the trombone player must also complement the other instruments in the band. One effective way to achieve this is by playing a bass line that follows the rhythm of the bass guitar or keyboard. This creates a seamless, cohesive sound that enhances the overall performance. Additionally, the trombone player can experiment with different playing techniques, such as glissandos and vibrato, to add texture and diversity to the arrangement. Playing trombone bass in a band setting requires skill, attention to detail, and a strong sense of rhythm. By playing with a drum kit and complementing other instruments, the trombone player can enhance the overall sound and create a memorable performance.

Famous Trombone Bass Players

Some of the most influential bass players in jazz history have been trombonists. To achieve that massive tutorial trombone style bass sound, study the techniques of legends like Ray Anderson or Roswell Rudd. Listen to their recordings and take notes on how they use the trombone to create such a unique and powerful sound.

Trombone style bass is a unique approach to bass playing, pioneered by several musicians who have contributed significantly to jazz and other genres. Famous trombone bass players such as Ray Brown, Milt Hinton. Jaco Pastorius have been key figures in popularizing this style.

Their Contribution To The Trombone Style Bass

Ray Brown, also known as “the bass player’s bass player,” was a significant contributor to the evolution of trombone style bass. His precise articulation and phrasing were integral to the swing sound of the 1940s and beyond. Milt Hinton, often referred to as the “dean of bass players,” was another key figure in the development of this style. He introduced new techniques, such as using the bow to create a smooth, melodic sound. His playing was characterized by a deep, resonant tone. Jaco Pastorius, a virtuoso bassist who played with Weather Report, is also deserving of mention.

He brought an electric bass version of trombone style bass to the fore, using a fretless bass to create a more personalized sound. Through his innovative use of harmonics and percussive effects applied to the bass, he transformed the playing style into something more dynamic and expressive.

Notable Performances

The contributions of these famous trombone bass players have been immortalized in various performances throughout music history. Ray Brown’s influential bass playing can be heard in recordings such as the Oscar Peterson Trio’s “Night Train.” Milt Hinton’s use of the bow can be heard on numerous recordings, including Bing Crosby’s rendition of “My Funny Valentine.” Jaco Pastorius’s work with Weather Report, especially on the song “Birdland,” greatly expanded the possibilities of the bass guitar. These legendary musicians have not just expanded the possibilities of the bass but have also brought them into the mainstream. Their work continues to inspire and guide young musicians to this day.

Massive Tutorial Trombone Style Bass Sound

Credit: www.productionmusiclive.com

Frequently Asked Questions Of Massive Tutorial Trombone Style Bass Sound

How Do You Make A Massive Bass?

To make a massive bass, try these steps. Boost the bass frequencies with EQ, use a bass boost pedal and play heavier gauge strings. You can also tune down and play with a pick instead of your fingers.

It’s important to remember to not go overboard and balance your bass with the rest of the mix.

How Do You Make A Trombone Sound?

To play a trombone, the player buzzes their lips into the mouthpiece. Then they move the slide to change pitch. By changing the length of the air column, different notes can be produced.

What Is A Trombone Style Bass Sound And How Is It Achieved?

A trombone style bass sound is a deep and rich tone generated in bass music. Achieving this sound requires specific techniques such as playing with a slide and varying the pressure and speed of air flow to create different tones.

What Equipment Is Needed To Create A Trombone Style Bass Sound?

To create a trombone style bass sound, you will need a bass instrument, such as an electric bass guitar, and a slide. You may also want to invest in accessories such as a compressor pedal or a wah-wah pedal to enhance your sound.

Conclusion

To sum it up, mastering the trombone-style bass sound may seem intimidating, but with practice and the right techniques, it’s definitely achievable. Incorporating breath control, proper embouchure, and utilizing the slide can all contribute to this unique and powerful sound.

Play around with different notes and experiment with different articulations to truly make it your own. So grab your bass and get ready to rock the stage with your massive trombone-style bass sound!

Categories
Archive

Can You Become a Musician Later in Life

Yes, one can become a musician later in life. Embracing a musical career is not limited to one’s age, and it’s never too late to learn an instrument or pursue a career in music.

Music is an art form that knows no age, and people are increasingly pursuing careers in music after the age of 30. Many legends like Leonard Cohen, Susan Boyle, and Andrea Bocelli started their music career later in life, proving that age is just a number.

For some, a love for music may come later in life, or perhaps they were busy pursuing other careers earlier. Whatever the reason may be, it’s never too late to begin learning an instrument or start working towards a career in the music industry. This article will discuss some steps you can take to become a musician later in life and how you can navigate this unique career path.

Can You Become a Musician Later in Life

Credit: www.eastbayri.com

1. The Barriers To Starting Later In Life As A Musician

Starting a music career later in life can be challenging due to several barriers. Ageism, lack of financial resources, and limited time to dedicate to music learning and practice are among the main obstacles that aspiring older musicians may face.

However, with perseverance, passion, and a solid plan, it is possible to pursue a successful music journey at any age.

1.1 Financial

Starting a career in music can be expensive, especially if you’re considering taking private lessons or attending music school. As an adult, you may have other financial obligations like bills and a family to support, which can make pursuing a career in music seem impossible. However, there are ways to make it work. You can start by investing in affordable online courses or attending community college music programs. Additionally, it’s important to look for scholarships and grants that may be available to adult learners.

1.2 Time

Time is another barrier for those considering a career in music later in life. Balancing work, family, and music practice can seem overwhelming, but it’s not impossible. You can start by setting achievable goals and creating a schedule that allows time for practice. It’s also important to prioritize your music career and make time for the things that matter most.

1.3 Confidence

Confidence can play a significant role in pursuing any career, especially a creative one like music. As an adult, you may feel hesitant to start something new or put yourself out there, but it’s important to remember that it’s never too late to pursue your passions. You can start by finding a supportive community of fellow musicians who can offer encouragement and help you build confidence. It’s also important to practice often and seek feedback from others to improve your skills and gain confidence in your abilities. Regardless of age, pursuing a career in music can be challenging, but with determination and a willingness to overcome obstacles, it’s possible to achieve your dreams. By acknowledging and addressing the barriers to starting later in life, you can take the first step towards a fulfilling career in music.

2. Benefits Of Starting Later In Life As A Musician

Starting a career in music later in life has its advantages. Older musicians tend to have more experience and confidence, as well as a stronger sense of personal style. Additionally, they often have more stability and resources to pursue their passion.

If you’ve always had a passion for music but never pursued it, it’s not too late to start. In fact, starting later in life as a musician can have some unique benefits. Here are three of them:

2.1 Experience

When you start pursuing music later in life, you likely have more life experience to draw from. This can give your music a level of depth and sophistication that might be harder to achieve if you were younger. You may also have more experience with performance, which can make it easier to step onto a stage and play in front of others.

2.2 Motivation

As an adult, you may have a stronger sense of motivation and determination than you did when you were younger. You may have a better understanding of what you want out of life and be more willing to take risks to achieve your goals. This can help you stay focused and committed to your music, even when the going gets tough.

2.3 Resources

When you start pursuing music later in life, you may have more resources at your disposal. You might have a stable income that allows you to invest in high-quality instruments or lessons with top-notch instructors. You may also have a broader network of connections that can help you get gigs or collaborate with other musicians. Overall, while there are certainly challenges to starting a musical career later in life, there are also unique advantages. With the right mindset and approach, it’s possible to pursue your passion for music at any age and achieve great things.

3. Strategies For Starting As A Musician Later In Life

Starting a career in music is a dream for many people. However, the question often arises, “Can you become a musician later in life?” The answer is YES! Just because you didn’t start learning music at a young age doesn’t mean you can’t pursue a career in music now. It’s never too late to start, and with dedication and hard work, you can achieve your music goals. In this post, we will talk about three strategies for starting as a musician later in life.

3.1 Set Realistic Goals

As a musician starting later in life, it’s important to set realistic goals for yourself. These goals should be specific, measurable, achievable, relevant, and time-bound (SMART). Start by identifying what you want to accomplish with your music. Do you want to become a professional musician, or do you simply enjoy playing music as a hobby? Once you have identified your goals, break them down into smaller steps and create a plan to achieve them. Remember to be realistic and give yourself enough time to reach each goal.

3.2 Find A Supportive Community

Building a supportive community is crucial when starting as a musician later in life. Surround yourself with like-minded individuals who share your passion for music. Attend concerts and music festivals to connect with other musicians. Join music groups on social media or in your local community and exchange ideas and knowledge. Having a support system helps you stay motivated and inspired to continue pursuing your dream.

3.3 Embrace Self-learning

Learning music is a continuous process, and it’s never too late to start. Embrace self-learning and make use of the various resources available on the internet. There are numerous online courses, tutorials, and videos that can help you learn music at your own pace. Practice regularly, and don’t be afraid to make mistakes. Remember, it’s all about progress, not perfection. If you can afford it, consider hiring a music teacher to guide you on your musical journey.

In conclusion, becoming a musician later in life is achievable with the right mindset and strategies. Set realistic goals, find a supportive community, and embrace self-learning. Remember to practice regularly and have fun on your musical journey. So, go ahead and pursue your dream of becoming a musician. Who knows, you might just become the next big thing in the music industry!

4. Stories Of Successful Musicians Who Started Later In Life

Discover inspiring stories of successful musicians who found their passion later in life. These musicians prove that it’s never too late to follow your dreams and become a successful musician. With determination and hard work, anyone can achieve their goals.

Age is just a number, and these musicians are a living proof of it. They decided to pursue their passion for music later in life and succeeded beyond anyone’s expectations. Their stories are an inspiration to everyone who believes that it’s too late to start something new. Let’s take a look at some of them.

4.1 Susan Boyle

Susan Boyle won the hearts of millions with her stunning performance in “Britain’s Got Talent.” But before that, she lived a quiet life in a small town in Scotland, never imagining that she could make it big as a singer. Susan started her music journey at the age of 12, but her career never really took off. It was only when she auditioned for the reality show at the age of 47 that the world discovered her extraordinary talent.

4.2 Charles Bradley

Charles Bradley was 62 years old when he released his debut album “No Time For Dreaming.” Before that, he was working odd jobs to make ends meet, including a job as a James Brown impersonator. Charles’ soulful voice and honest lyrics struck a chord with music lovers. He went on to become a celebrated musician and rightly earned the nickname “The Screaming Eagle of Soul.”

4.3 Sharon Jones

Sharon Jones was in her 40s when she got her break in the music industry. She had been working as a backup singer for decades before forming her band, Sharon Jones, and The Dap-Kings. The band’s old-school funk and soul sound became an instant hit, making Sharon a household name. Despite battling cancer, she continued to perform and inspire people with her music until her untimely death at the age of 60. Age should never stop anyone from following their dreams. Susan, Charles, and Sharon are just a few examples of how talent and determination can make anything possible. So, if you’re thinking of pursuing music, there’s no time like the present.

Frequently Asked Questions For Can You Become A Musician Later In Life

Is 30 Too Old To Become A Musician?

No, 30 is not too old to become a musician. Many successful musicians, such as Lady Gaga and Pharrell Williams, started their careers in their 30s. Age should not deter anyone from pursuing their passion for music. With hard work and dedication, anyone can succeed at any age.

Is It Possible To Become A Musician Later In Life?

Yes, it’s possible to become a musician later in life. Age shouldn’t define your abilities or passion for music. With dedication, hard work, and practice, you can start your musical journey and achieve your dreams. It’s never too late to pursue your passion and become a musician.

Is 40 Too Old To Become A Musician?

No, 40 is not too old to become a musician. Many successful musicians started later in life. With dedication, hard work and consistent practice, anyone can learn and hone their skills, regardless of age. The key is to focus on your passion and drive to pursue a career in music, regardless of any age-related limitations.

Are There Any Musicians That Started Late In Life?

Yes, there are many famous musicians like Susan Boyle, Andrea Bocelli, and Charles Bradley who started late in life and became successful through their talent and hard work. It’s never too late to pursue your passion if you have the dedication and determination to make it happen.

Conclusion

Whether it’s a passion you’ve always had or an interest sparked later in life, there’s no reason why you can’t become a musician at any age. While it may require a bit more effort and dedication, it’s never too late to pursue a dream.

With patience, practice, and the desire to improve, you can overcome any obstacle in your path. Remember, age is just a number, and music is for everyone to enjoy. So don’t hesitate to start your journey today.

Categories
Archive

How To Compress Vocals For Professional Results

To compress vocals for professional results, use a transparent compressor and aim for an overall reduction of 4-6 dB. Compressing too much can make the vocals sound unnatural and lifeless.

When mixing vocals, compression is a key tool used to even out the level of the performance, making quiet parts louder, and reducing the level of louder parts. But with great power comes great responsibility, and it’s important to use compression carefully to avoid destroying the vital intimate qualities of the vocal performance such as dynamics and expressiveness.

We’ll be discussing how to compress vocals for professional results. We’ll take you through the steps of compressing vocals and provide you with some tips and tricks to perfect your craft.

Understanding Vocal Compression

Vocal compression is an essential tool for achieving a professional sounding mix. It controls the dynamics of a vocal performance, making it sound smoother and less harsh in the context of a song. Understanding how to use compression can greatly improve the quality of your vocals.

The Basics Of Vocal Compression

Vocal compression is an essential technique used in the recording and mixing process to ensure a balanced and professional sound. Compression is a process where the dynamic range of a vocal performance is reduced. It means that all the loud and quiet parts of a vocal take are compressed to the same level. Compression enhances the overall quality of the vocal performance, making it sound cohesive and polished. The technical process of vocal compression involves using a compressor plugin or hardware to control the dynamic range of a vocal track. A compressor reduces the amplitude of stronger signals while leaving weaker ones unchanged. When set correctly, a compressor can make the vocal sound louder, clearer, and more defined.

Benefits Of Vocal Compression

Vocal compression is an essential tool for producers and sound engineers who want to achieve a professional sound. By understanding the basics of compression and its benefits, you can apply the right amount of compression to a vocal track for the best results. Some of the benefits of vocal compression include:

  • Smooths out the dynamic range of a vocal performance.
  • Reduces background noise and hiss.
  • Increases the overall volume of the vocal, making it stand out in the mix.
  • Makes the vocal sound more consistent and polished.
  • Allows the vocal to cut through the mix without being too loud or harsh.

By applying compression to your vocal tracks, you can create a more professional and polished sound that stands out in any mix. However, it’s essential to use compression with care and to avoid over-compressing your vocal tracks. With the right techniques and a good understanding of vocal compression, you can achieve stunning results with your vocal recordings and mixes.

How To Compress Vocals For Professional Results

Credit: www.masteringthemix.com

Preparing Your Vocal Track

Preparation is the key to achieving professional-sounding vocals. This involves cleaning up your vocal recording, setting the right input levels and making other necessary adjustments. By following these steps, you can ensure that your vocal track is well-prepared for compression.

Cleaning Up Your Vocal Recording

The first step in preparing your vocal track is to clean up your recording. This involves identifying and removing any unwanted noises or background sounds that can detract from the quality of your vocals. Some common noises to look out for include clicks, pops, hiss, and hum. To remove these noises, you can use a noise reduction plugin or filter. Alternatively, you can edit them manually using an audio editing software.

Setting The Right Input Levels

Once you have cleaned up your vocal recording, the next step is to set the right input levels. This involves ensuring that your vocal recording is neither too loud nor too soft. If your recording levels are too low, you risk introducing noise and other unwanted artifacts when you raise the volume. On the other hand, if your recording levels are too high, you risk introducing distortion and other audio-related issues. To set the right input levels, you can use a level meter plugin or adjust the gain settings on your audio interface.

Now that you have cleaned up your vocal recording and set the right input levels, your vocal track is ready for compression. These simple steps can make all the difference in achieving professional-sounding vocals, giving your music the edge it needs to stand out from the crowd.

Choosing The Right Compressor

Choosing the right compressor for your vocals is essential to achieve a professional and polished sound. With a plethora of compressor options available in the market, it may be challenging to decide which one will fit your need. It is crucial to familiarize yourself with the different types of compressors and the features to consider before making your purchase.

Types Of Compressors For Vocals

There are several types of compressors you can use to compress your vocals depending on your preference and the type of music you are producing. Below are the most popular types:

TypeDescription
FET compressorsThe FET compressor works fast, making it suitable for vocals with a lot of dynamic range.
VCA compressorsThe VCA compressor is versatile and suitable for most vocal recordings.
Optical compressorsThe optical compressor provides a smooth and natural vocal sound ideal for genres like jazz and blues.
Tube compressorsThe tube compressor provides a warm and analog sound that is desirable for many genres.

Features To Consider

When selecting a compressor for your vocals, here are some features to consider:

  • Ratio: This feature determines the extent of compression applied to your vocals. You need to consider the level of compression you require to achieve a professional sound.
  • Threshold: The threshold sets the point at which compression applies to your vocals. It would be best to select a compressor that has a threshold range suitable for your recording.
  • Attack: The attack determines how fast the compressor kicks in when it detects a loud vocal. You need to select a compressor with an attack time that aligns with the tempo of your vocal recording.
  • Release: The release is how long it takes for the compressor to stop compressing when your vocal drops below the threshold point. A slow release time provides a natural sound, while a fast release time produces a more aggressive sound. You need to select a compressor with a release time appropriate for your music style.
  • Makeup gain: This feature amplifies your vocals after compression, helping to restore its volume level. It would help if you considered selecting a compressor that has a makeup gain feature.

Choosing the right compressor can make a significant difference in your vocal recording. With the right type of compressor and features, you can achieve a professional and polished sound that can set your music apart. Keep in mind the above-discussed factors when selecting a compressor for your vocals.

How To Compress Vocals For Professional Results

Credit: www.masteringthemix.com

Setting Up Your Compressor

Setting up your compressor correctly is essential to achieve professional quality vocals. Firstly, choose a compressor with the correct settings for the job. Secondly, adjust the attack and release times accordingly to control the dynamics of the vocals. Lastly, apply a light compression to avoid artifacts and distortion.

Setting Up Your Compressor Compressing vocals is an essential step in producing high-quality music. The compressor is a tool that is often used to control the dynamics of a vocal performance, giving it a more polished and professional sound. But before you start compressing your vocals, you need to know how to set up your compressor correctly. In this blog post, we will go over the various settings that you need to keep in mind when setting up your compressor. Threshold and Ratio Settings Threshold and ratio settings are two of the most important settings that you need to adjust when setting up your compressor. The threshold is the point at which the compressor starts to work, while the ratio determines how much compression is applied. For vocals, a good range for the threshold is between -20dB and -10dB. The ratio can be set between 2:1 to 4:1 for a natural compression effect or between 6:1 to 10:1 for a more obvious compression effect. Attack and Release Settings Attack and release settings refer to how quickly the compressor starts and stops working. An attack time of 10-30ms is recommended for vocals to allow the initial transients to come through. The release time can be set between 100ms to 500ms to avoid pumping or breathing sounds. The most important thing to keep in mind is to match the attack and release time to the tempo of the song. Make-Up Gain and Output Settings After you have set the threshold, ratio, attack, and release settings, you need to adjust the make-up gain and output settings. The make-up gain adjusts the overall volume of the compressed signal, while the output setting controls the level of the compressor output. You need to adjust these settings to ensure that the compressed signal matches the volume of the original signal. A good rule of thumb is to aim for a 2-5dB gain reduction, and then adjust the make-up gain to make up for any perceived loss in volume. Conclusion Setting up your compressor is crucial for creating professional-sounding vocals. The threshold, ratio, attack, and release settings all play a significant role in determining the final sound. By taking the time to set up your compressor correctly and adjust the make-up gain and output levels, you can produce high-quality vocals that stand out in any mix.

Using Sidechain Compression For Vocals

One effective technique for professional vocal compression is using sidechain compression. By routing a separate track to trigger the compressor on the vocal track, you can achieve a more natural and controlled sound, with the effect only applied when needed.

Using Sidechain Compression for Vocals Sidechain compression is a popular technique used in audio production to create a clear and professional sound. It’s especially effective when used on vocals. In this post, we will discuss what sidechain compression is, how to set it up for vocals, and why it’s an essential tool to have in your production arsenal. What is Sidechain Compression? Sidechain compression is a form of dynamic processing that allows one audio signal to control the compression of another. It’s commonly used in music production to create a pumping or breathing effect in dance tracks or to make room for other elements in a mix. By applying sidechain compression to vocals, you can create a more consistent and professional sound. This is because the compressor will kick in only when the vocal is present, allowing other elements in your mix to have more breathing space. Setting Up Sidechain Compression for Vocals To set up sidechain compression for vocals, you’ll need to follow these steps: 1. Start by inserting a compressor plugin on the track where your vocals are recorded. 2. Next, set the compressor to the desired threshold, ratio, and attack/release settings. You can experiment with these settings to find the sweet spot for your vocals. 3. Then, activate the sidechain feature on your compressor plugin and select the audio track you want to use as the sidechain signal. 4. Adjust the sidechain settings to your liking, paying close attention to the input gain, filter, and delay settings. 5. Finally, adjust the level and panning of your vocals to sit nicely in the mix. By using sidechain compression in this way, you can smooth out any dynamics in your vocals and create a consistent, polished sound. In conclusion, using sidechain compression for vocals is an essential technique for any audio producer looking to create professional-quality tracks. By following the steps outlined above, you’ll be able to create a clear and polished vocal sound that sits comfortably in your mix.

Tips And Tricks For Achieving Professional Results

Tips and Tricks for Achieving Professional Results with Vocal Compression

Compressing vocals can be a tricky process. It requires careful attention to detail to achieve professional results without over-compressing the vocals and ruining the sound. In this article, we will explore some tips and tricks that will help you compress vocals for professional results.

Using Parallel Compression

One of the most effective ways to compress vocals is through parallel compression. This technique involves duplicating the vocal track and compressing the duplicate track while leaving the original untouched. By blending the compressed track with the uncompressed track, you can achieve a fuller, more dynamic vocal sound.

To use parallel compression, follow these steps:

  1. Duplicate the vocal track
  2. Apply heavy compression to the duplicate track
  3. Blend the compressed track with the original track

This technique allows you to compress the vocal without losing its dynamics or detail. It can help the vocal stand out in a mix and make it sound more polished.

Automating Vocal Compression

Automating the compression settings of a vocal can be a great way to achieve a professional sound. By adjusting the compression settings throughout the song, you can ensure that the vocal is dynamic and not overly compressed in any part of the song.

To automate the compression settings of a vocal, follow these steps:

  1. Set up the compressor with your desired settings
  2. Automate the threshold, ratio, attack, and release settings to adjust as needed throughout the song

By automating the compression settings, you can ensure that the vocal remains dynamic and interesting throughout the song.

Avoiding Over-compression

One common mistake when compressing vocals is over-compressing. Over-compression can make the vocals sound dull, lifeless, and amateur. To avoid over-compression, follow these guidelines:

  • Use compression sparingly
  • Set a moderate ratio (around 2:1 or 3:1)
  • Avoid compressing too heavily in the low end of the frequency spectrum
  • Apply compression after any EQ adjustments

By following these guidelines, you can avoid over-compression and achieve a professional sound.

Compressing vocals can be a challenging process, but with these tips and tricks, you can achieve professional results. Whether you use parallel compression, automate the compression settings, or avoid over-compression, these techniques will help you compress vocals for a polished, dynamic sound.

How To Compress Vocals For Professional Results

Credit: headlinermagazine.net

Frequently Asked Questions For How To Compress Vocals For Professional Results

How Do You Compress Vocals Professionally?

To compress vocals professionally, use a compressor plugin to control the dynamic range of the vocal performance. Adjust the attack, release, ratio, and threshold according to the style of music and level of vocal performance. Use automation for fine-tuning, and always use your ears to listen for any unwanted artifacts.

What Is The Best Compressor Ratio For Vocals?

The best compressor ratio for vocals depends on the style and genre of music, as well as the dynamics of the vocals. A general starting point is 2:1 or 3:1 for a smooth and natural sound, and up to 5:1 or 6:1 for more aggressive compression.

It is important to use your ears and adjust the ratio to achieve the desired effect.

Should I Use 2 Compressors On Vocals?

No, using two compressors on vocals is not recommended as it can lead to over-compression and loss of dynamic range. It is better to use one good quality compressor with proper settings to achieve the desired effect.

How Much Gain Reduction When Compressing Vocals?

The amount of gain reduction in compressing vocals depends on the track and the effect you’re trying to achieve. Typically, a reduction of 3-6dB will smooth out the waveform and control peaks without compromising the overall volume or quality of the vocals.

Always use your ears to determine the ideal gain reduction amounts for your vocals.

Conclusion

To achieve professional results in vocal compression, it’s essential to understand the ins and outs of the process. Starting from identifying the right compressor to choosing the perfect settings, consistency is the key. With the guidelines listed you are all set to take your vocal game to the next level.

So embrace experimentation, trust your ear, and give your vocals the compression it deserves. Remember, practice makes perfect, so don’t shy away from taking on new challenges. Cheers to producing that perfect vocal sound!

Categories
Archive

Inspirational Music Quotes For Musicians

Inspirational music quotes for musicians provide a source of motivation and encouragement. This helps them to believe in their talents and overcome obstacles. These quotes inspire a positive attitude, encourage perseverance, and ignite a passion that drives creative expression.

Also, from iconic musicians to legendary composers, the history of music is filled with inspirational quotes and words that have inspired generations of musicians. Also, whether it’s the sage wisdom of Bob Dylan or the immortal words of Mozart, these quotes remind us that music is not just a craft. But a powerful force that can change lives, bring people together, and transform the world.

Related reading: Music Theory for Producers: The Complete Guide Hub and Music Business, Distribution and Royalties: The Complete Guide. For background, see the Wikipedia article on Music.

Moreover, as a musician, look to these inspirational quotes to stay focused on your goals, stay motivated, and stay inspired.

Inspirational Music Quotes For Musicians

Credit: www.classicfm.com

Powerful Music Quotes

In addition, discover inspiring music quotes that will resonate with every musician’s heart. In addition, these powerful quotes are a reminder of the profound effect that music can have on our lives, from its ability to heal, uplift, and unite us. Explore these words of wisdom from legendary musicians and rediscover your passion for music.

Music is more than just a form of entertainment – it is a powerful tool that can motivate, inspire, and heal. For example, whether you are a musician or simply a lover of music, you have likely felt the profound impact that a powerful lyrical or musical phrase can have on your life. Furthermore, in this post, we have compiled a list of inspirational music quotes that capture the true essence of the power of music.

Words Of Wisdom From Musical Icons

Additionally, Musical icons throughout the ages have recognized the transformative power of music and have shared their thoughts and insights with the world. As a result, here are some powerful quotes from some of the most beloved musical icons of all time:

QuoteAuthor
Music is the divine way to tell beautiful, poetic things to the heart.Pablo Casals
Music is the strongest form of magic.Marilyn Manson
If music be the food of love, play on.William Shakespeare
Music can change the world because it can change people.Bono

Inspiring Quotes About The Power Of Music

In addition to the words of musical icons, there are countless other quotes that illustrate the incredible power of music. However, here are some inspiring quotes that showcase the profound impact that music can have on our lives:

  • Also, Music is the soundtrack of your life. – Dick Clark
  • Moreover, Music is the wine that fills the cup of silence. – Robert Fripp
  • In addition, Music is the art which is most nigh to tears and memories. – Oscar Wilde
  • Furthermore, without music, life would be a mistake. – Friedrich Nietzsche

In conclusion, the power of music is undeniable. Then, it has the ability to inspire, motivate, heal, and transform our lives in ways that few other things can. Additionally, hopefully, these inspirational music quotes have reminded you of the incredible impact that music can have and have inspired you to keep listening, creating, and sharing your love of music with the world.

Motivational Quotes For Musicians

Also, discovering inspiring words can give musicians a boost of motivation to pursue their musical aspirations. In short, reading through inspirational quotes from various artists such as Beethoven or Freddie Mercury can help musicians push through challenges and find new ways to express themselves through their music.

Moreover, as a musician, staying motivated is essential for pursuing your passion. Sometimes, it can be challenging to keep going, especially in the face of adversity. Similarly, it’s normal to feel demotivated and uninspired at times. But with the right mindset and attitude, you can overcome any obstacle and achieve your musical goals. The following are some motivational quotes to inspire and keep you motivated on your journey.

Quotes To Help You Stay Motivated

  • “Music is the divine way to tell beautiful, poetic things to the heart” – Pablo Casals
  • “You are never too old to set another goal or to dream a new dream” – C.S. Lewis
  • “When words fail, music speaks” – Hans Christian Andersen
  • “The only thing better than singing is more singing” – Ella Fitzgerald
  • “Music is a higher revelation than all wisdom and philosophy” – Ludwig van Beethoven

Encouraging Quotes For When You Face Challenges

  • “The show must go on” – Queen
  • “Success is not final, failure is not fatal, it’s the courage to continue that counts” – Winston Churchill
  • “Don’t watch the clock; do what it does. Keep going” – Sam Levenson
  • “I will prepare and someday my chance will come” – Abraham Lincoln
  • “The harder the struggle, the more glorious the triumph” – Unknown

In addition, with these motivating quotes, you can conquer any musical challenge and keep pushing forward towards your goals. Also, whether it’s learning a new instrument, recording an album, or performing in front of a large audience, remember that you have the talent and determination to succeed. Keep these quotes close to your heart, and let them inspire you to greatness.

Quotes About Creativity

Furthermore, Music has the power to inspire and unleash our creativity. In addition, here are some inspirational music quotes for musicians to motivate and encourage you on your creative journey. Let the power of music work its magic and unlock your potential.

How Music Can Inspire Creativity

When it comes to writing and composing music, creativity is a vital component. For example, without it, musicians can get stuck in a rut, playing the same notes and melodies over and over again. Additionally, this is where inspirational music quotes can come in handy, providing a fresh perspective and inspiring new ideas. Here are a few quotes about creativity and how music can help get those creative juices flowing:

  • “Without deviation from the norm, progress is not possible.” – Frank Zappa
  • “Music is a higher revelation than all wisdom and philosophy.” – Ludwig van Beethoven
  • “You don’t write because you want to say something, you write because you have something to say.” – F. Scott Fitzgerald

Also, these quotes illustrate the importance of pushing boundaries, exploring new ideas, and expressing oneself through music. As a result, whether you’re a beginner or a seasoned musician, taking a fresh approach to your music can help unlock new levels of creativity.

Quotes About Pushing The Boundaries Of Artistry

Moreover, being a musician is all about pushing the boundaries of what is considered normal or traditional. However, here are some inspirational quotes from musicians and artists who did just that:

  1. “The most exciting rhythms seem unexpected and complex, the most beautiful melodies simple and inevitable.” – W.H. Auden
  2. “The world is a hellish place, and bad writing is destroying the quality of our suffering.” – Tom Waits
  3. “The most valuable skill you can develop is a dissatisfaction with the status quo.” – James Clear

These quotes encourage musicians to experiment with their music, try something new, and not be afraid to take risks. Pushing the boundaries of artistry can lead to new and exciting adventures in music that can inspire others and make an impact on the world. In conclusion, as a musician, it’s essential to remain open to new ideas and take inspiration from others. These inspiring quotes about creativity and pushing boundaries can help musicians cultivate their craft and produce beautiful music that touches people’s hearts.

Quotes About Practice

“Practice makes perfect” is a common saying among musicians. These quotes about practice emphasize the importance of putting in the work to achieve success. From Miles Davis to Beethoven, these inspirational music quotes encourage musicians to keep practicing and honing their craft.

Inspiring Quotes About The Importance Of Practice

“Practice makes perfect” – this classic adage from an unknown author has become a timeless reminder to musicians that practice is the only way to truly improve their skills. Another quote that emphasizes the importance of practice is from the famous pianist Lang Lang, “If I don’t practice for a day, I know it; if I don’t practice for two days, the critics know it; if I don’t practice for three days, the audience knows it.” These quotes remind us that consistently dedicating time to practice is essential to mastering our craft.

The Relationship Between Hard Work And Talent

“While talent sets the limits on what we can do, it is our hard work that will ultimately determine how far we can reach those limits,” said renowned cellist Yo-Yo Ma. Success in music, and any craft, requires not just natural talent but also hard work and dedication. As implied by the famous quote from Thomas Edison, “Genius is 1% inspiration and 99% perspiration.” So, whether you believe that talent is innate or developed, the importance of hard work remains non-negotiable if you want to succeed in music. In conclusion, practice and hard work are essential elements in music.

Whether you are a beginner or a seasoned professional, these quotes serve as the perfect reminder to keep practicing and working hard to achieve your goals. So, listen to Lang Lang, Yo-Yo Ma, and other great musicians who have achieved success through the magic of practice. Remember, a musician’s journey is not just about the destination but also the journey itself. So, roll up your sleeves, grab your guitar, and practice, practice, practice!

Quotes About Perseverance

“Musicians often face challenges in their careers, but perseverance is key. Inspirational music quotes, such as ‘You can’t lose hope when it’s hopeless… you gotta hope more, then put your fingers in the ground and dig with everything you’ve got’ by Eddie Vedder, remind us to keep pushing forward.

“

How To Stay Committed To Your Dreams

Perseverance is the key to achieving your dreams. It takes commitment, dedication, and a strong desire to succeed. Here are some quotes to help you stay focused on your goals:

  1. “Don’t watch the clock; do what it does. Keep going.” – Sam Levenson
  2. “Believe you can and you’re halfway there.” – Theodore Roosevelt
  3. “The only way to do great work is to love what you do.” – Steve Jobs
  4. “Success is not final, failure is not fatal: it is the courage to continue that counts.” – Winston Churchill

Use these words of wisdom to stay motivated and committed to achieving your dreams.

Quotes To Help You Overcome Setbacks

Setbacks are a natural part of any journey, but they don’t have to derail your progress. Use these quotes to help you pick yourself up and keep moving forward:

  • “When you come to the end of your rope, tie a knot and hang on.” – Franklin D. Roosevelt
  • “Success is not how high you have climbed, but how you make a positive difference to the world.” – Roy T. Bennett
  • “Tough times never last, but tough people do.” – Robert H. Schuller
  • “When everything seems to be going against you, remember that the airplane takes off against the wind, not with it.” – Henry Ford

Remember that setbacks are temporary and can often provide valuable lessons. Use these quotes to help you stay focused and motivated when facing challenges.

Inspirational Music Quotes For Musicians

Credit: musicianandcompany.com

Quotes About The Healing Power Of Music

Music has long been recognized to have the power to heal and inspire. Here are some inspirational music quotes for musicians that remind us of the transformative power of music: “Music is a higher revelation than all wisdom and philosophy” (Ludwig van Beethoven), “Music is the healing force of the universe” (Albert Ayler), and “If music be the food of love, play on” (William Shakespeare).

Quotes About The Healing Power Of Music is a reminder of how music has the power to transform our minds and souls. Music has the ability to move us in ways nothing else can. It fills us with joy, lifts our spirits, and gives us solace. And it’s no wonder that people often turn to music as a source of comfort during challenging times. In this section, we’ll explore Ways In Which Music Can Heal The Soul and share some Inspiring Words From Musicians Who Have Overcome Adversity.

Ways In Which Music Can Heal The Soul

Music has been shown to have healing effects on the mind, body, and soul. Here are some ways in which music can heal the soul:

  1. Reduces stress and anxiety levels by slowing down the heart rate and lowering blood pressure.
  2. Helps in regulating emotions and moods, promoting calmness and relaxation.
  3. Enhances memory and cognitive function, making it an effective tool for people suffering from Alzheimer’s and Dementia.
  4. Improves physical health by boosting the immune system and reducing chronic pain.

Inspiring Words From Musicians Who Have Overcome Adversity

Many musicians have turned to music to deal with challenging times in their lives. Here are some words of wisdom from musicians who have overcome adversity:

  • “Without music, life would be a mistake.” – Friedrich Nietzsche
  • “Music is the divine way to tell beautiful, poetic things to the heart.” – Pablo Casals
  • “If music be the food of love, play on.” – William Shakespeare
  • “Music is a higher revelation than all wisdom and philosophy.” – Ludwig van Beethoven
  • “The best way to predict the future is to invent it.” – Alan Kay

Music can indeed work wonders on the mind and soul. Whether you need motivation, comfort, or just upliftment, music can provide it all. So the next time you’re feeling down, turn to your favorite tunes, and let it work its magic.

Inspirational Lyrics for Music Quotes

As a musician, you understand the power of lyrics. Lyrics can be uplifting, powerful, and motivational, providing you with the inspiration you need to compose that perfect melody. In this post, we’ll explore the power of words set to music and the timeless lyrics that continue to inspire musicians.

The Power Of Words Set To Music

Words are powerful, but when they’re set to music, they can take on a new life. Music has the power to evoke emotions and memories, and lyrics can amplify those feelings to create an unforgettable experience. When you’re creating music, it’s essential to choose your lyrics carefully to ensure that they resonate with your audience and inspire them to action. Here are some inspirational lyrics from renowned musicians that you can use to fuel your creativity:

MusicianInspirational Lyrics
John Lennon“You may say I’m a dreamer, but I’m not the only one.”
Bob Dylan“The answer is blowin’ in the wind.”
Queen“We are the champions, my friends.”
Whitney Houston“I’m every woman, it’s all in me.”

Timeless Lyrics That Continue To Inspire Musicians

Some lyrics are timeless – they appeal to people of all generations and continue to inspire musicians today. These lyrics are so special because they tap into something universal, something that resonates with everyone who hears them. Here are some of the most timeless lyrics in music history:

  • “Imagine all the people living life in peace.” – John Lennon
  • “You can’t always get what you want, but if you try sometimes, you might find, you get what you need.” – The Rolling Stones
  • “What a Wonderful World.” – Louis Armstrong
  • “I will always love you.” – Whitney Houston

As you can see, there’s no shortage of inspirational lyrics in music history. The next time you’re feeling stuck or searching for inspiration, turn to music. Whether it’s timeless classics or contemporary hits, there’s something out there that can inspire you to create something truly special.

Final Thoughts for Music Quotes

Discover the power of music through these inspirational quotes for musicians. Let the words of legends like Beethoven and Bob Marley inspire you on your creative journey and remind you of the impact you can make through your art.

How Inspirational Music Quotes Can Help You On Your Musical Journey

Music is an excellent way to express oneself and connect with others. Musicians are often inspired by the experiences and emotions they encounter, and this inspiration is what makes their music beautiful. Inspirational music quotes can help musicians stay motivated, inspired and creative on their musical journey. These quotes can provide guidance, motivation or simply a source of comfort when things become tough. Achieving success as a musician can be a challenging task, as it can involve dedication, perseverance, and hard work.

Inspirational music quotes can help with this, as they can provide a sense of motivation and encouragement for those struggling on their musical journey. By reminding them of their love for music and giving them the courage to overcome any hurdles, these quotes can help musicians continue to create beautiful music. Inspirational music quotes for musicians can be a great source of inspiration and guidance on their musical journey. Whether you are a beginner or a seasoned musician, these quotes can provide the motivation and encouragement you need to continue your artistic pursuit.

Practical Tips

By staying inspired and enthusiastic, you can create memorable music that will be cherished by your fans for years to come. Remember, success in music is not just about talent, it is also about perseverance and hard work. So, when feeling discouraged, take solace in some of these inspiring music quotes and keep moving forward towards your musical dreams.

Inspirational Music Quotes For Musicians

Credit: indianexpress.com

Frequently Asked Questions On Inspirational Music Quotes For Musicians

What Is An Inspirational Quote For A Musician?

“Music expresses that which cannot be put into words and that which cannot remain silent” – Victor Hugo. This quote reminds musicians that their music has the power to communicate emotions and feelings that words simply can’t.

What Is A Good Quote For Music?

“Music is the universal language of mankind. ” – Henry Wadsworth Longfellow.

What Is An Inspirational Quote For A Singer?

“Every great singer was once a beginner. Don’t be afraid to take the first step. ” – Unknown

What Is An Inspiring Quote About The Power Of Music?

“Music has the power to inspire and unite people, regardless of language or culture. It has the ability to heal, uplift and bring peace to the soul. “

Conclusion

Great music has the power to touch our souls and inspire us beyond measure. With these inspirational music quotes for musicians, we hope that you have found the motivation to continue pursuing your passion, overcoming obstacles and never giving up on your dreams.

Remember that music is a language that transcends borders and connects us all. As you craft your own unique sound, let these quotes remind you of the magic and endless possibilities that lie ahead. By staying true to yourself and your art, you can create music that truly resonates with others and leaves an indelible mark on the world.

Categories
Archive

Normal Headphones For Music Production

Normal headphones can be used for music production, but they may not provide the best accuracy and sound quality required for professional use. Music production requires a high degree of accuracy and attention to detail.

As an Amazon Associate I earn from qualifying purchases.

When mixing or editing tracks, you want to hear all the nuances of the sound and any errors or inconsistencies that need to be fixed. Normal headphones may not be able to provide the same level of accuracy as professional headphones designed specifically for music production.

However, if you’re just starting out or on a budget, normal headphones can still be used, as long as you have a good understanding of their limitations and compensate for them accordingly. Ultimately, it’s important to invest in a high-quality pair of headphones designed for music production to ensure the best results.

Why Use Normal Headphones For Music Production

Normal headphones are a great choice for music production because they offer a more balanced sound than specialized studio headphones. Using normal headphones also allows you to better understand how your music will sound to listeners on a variety of devices.

Using the right headphones for music production can make or break your final product. While specialized headphones may offer advanced features, everyday headphones have their advantages too. Here we explore some reasons why normal headphones can be a good pick for music production.

Flat Frequency Response

Normal headphones have a flat frequency response, which means they produce sound as it is intended to be heard. It doesn’t enhance any frequencies or boost the bass like interior audio headphones. This neutrality in sound is necessary in music production because it helps the user to make sound judgments and mix the tracks appropriately. When using normal headphones, the mix won’t have a built-in coloration giving you accurate results, ultimately producing high-quality tracks.

Less Expensive

Normal headphones are often less expensive than audio-production headphones, which can be helpful for those who are working on a low budget or are beginning in the music production world. Choosing headphones that are cheaper does not mean compromising on the quality. In fact, many headphones under $100 provide clear and flat sound responses as needed.

Easy To Use

Normal headphones are incredibly easy to use and do not involve any complicated setups or technical know-how. All you need to do is plug them in, and you can start working on your track immediately. You don’t have to worry about configurations, connectivity, or learning how to use the various functions. Also, normal headphones can be used for a range of purposes, including listening to music, gaming, and video editing. In conclusion, while normal headphones may not be as fancy or specialized as interior audio headphones, they offer a lot of benefits for music production, including a flat frequency response, affordability, and simplicity. No matter what stage of music production you are on, it’s always advisable to invest in a good pair of headphones to produce high-quality tracks.

What To Look For When Choosing Normal Headphones For Music Production

Choosing normal headphones for music production requires paying close attention to various factors. Look for headphones that offer accurate sound reproduction, good frequency response, and sufficient noise isolation. Comfort and durability also play a crucial role.

Choosing the right headphones for music production requires consideration of a few important features. Normal headphones are headphones that don’t have any built-in technology for noise cancellation or equalization. Here are the features you should look for when choosing normal headphones for music production.

Comfort

When choosing headphones for music production, it is important to consider their level of comfort. Comfortable headphones are paramount for extended use. Look for headphones with soft or padded ear cups, adjustable headbands, and lightweight designs.

Noise Cancellation

Normal headphones are not designed to block external noise. However, it is still important to consider the level of noise isolation they offer. Look for headphones that provide a good seal over the ear, which also helps isolate low-frequency sounds and outside noise that may disrupt your audio production.

Durability

Durability is an important consideration when choosing headphones for music production. Musicians often move around a lot during a performance or recording session, and the headphones need to withstand that. Look for headphones with robust parts, durable cables, and a design that can take a bit of everyday wear and tear. Overall, when choosing normal headphones for music production, one should also keep in mind other factors like sound quality, portability, and compatibility with different devices. By looking for comfortable, noise-isolating, and durable headphones, you can improve your audio production experience, without breaking the bank.

Top Normal Headphones For Music Production

Discover the best normal headphones for music production that deliver crisp sound and accurate tones. These top headphones offer superior comfort and durability, making them perfect for long hours in the studio.

If you’re a music producer, then investing in a good pair of headphones is crucial. Normal headphones for music production are designed with high-quality materials to help you hear sounds with great clarity. With so many options available, it can be challenging to choose the best one. We’ve rounded up a list of top normal headphones for music production to help you get started.

Sennheiser Hd 660 S

The Sennheiser HD 660 S is a top-of-the-line pair of headphones ideal for music production. The pair is designed with an ergonomic design with a robust feel, which ensures comfort even during extended use. Additionally, the headphones boast a dynamic designed transducer, which provides excellent clarity and accuracy in the mid and high frequencies.

Beyerdynamic Dt 880 Pro

The Beyerdynamic DT 880 Pro is a favorite among music producers, and for a good reason. The pair has an easy-to-use design, with its semi-open build. This feature ensures ventilation, making it suitable for extended use. Additionally, the headphones have a broad stereo image, which makes sounds sound more precise.

Audio-technica Ath-m50x

The Audio-Technica ATH-M50x is another excellent pair of headphones ideal for music production. The pair delivers top-class sound accuracy, even at high volumes. Additionally, the headphones have a foldable design, which makes them easy to carry and store. They also come with three detachable cables making them compatible with a vast variety of music devices.

Sony Mdr-7506

The Sony MDR-7506 headphones have been a top choice for music producers for ages. The pair has closed-back ear-framing, which ensures clear sound without external distractions. The headphones also have a high sensitivity and excellent sound balance, making them perfect for producing music.

Akg K240 Studio

The AKG K240 Studio is a fantastic pair of headphones designed for excellent sound quality. They have a semi-open design, which ensures accurate sound without causing ear fatigue. Additionally, the headphones are lightweight, making them comfortable to wear for extended periods. The pair comes with a gold plated jack, which connects to a variety of music devices seamlessly. In conclusion, these are the top normal headphones for music production. Investing in high-quality headphones is essential for any music producer, and with this list, you have a great place to start. Each of the above pairs has unique features that make them ideal for producing music, and you won’t go wrong with any of them.

Normal Headphones For Music Production

Credit: m.youtube.com

How To Set Up Normal Headphones For Music Production

Setting up normal headphones for music production involves adjusting the volume levels and equalization to enhance the clarity of sound. Calibration of the device and selection of the right headphones is crucial for accurate monitoring of music during the production process.

If you are a music producer, you know how important it is to have good quality headphones. Normal headphones can work just as well as specialized headphones. However, to get the most out of them, you need to set them up properly. In this post, we will show you how to connect your normal headphones to your audio interface, calibrate them, and test them to ensure that you get the best possible sound quality.

Connecting To Audio Interface

The first step in setting up your normal headphones for music production is to connect them to your audio interface. Most modern audio interfaces have a headphone input that you can use to plug in your headphones. Here are the steps to follow:

  1. Locate the headphone input on your audio interface. It is usually labeled “Headphone” or “Phones”.
  2. Plug in the headphone jack into the audio interface.
  3. Make sure the volume on your audio interface is turned down low.
  4. Put on your headphones and gradually increase the volume until you can hear sound.

Calibrating Headphones

After you have connected your headphones to your audio interface, the next step is to calibrate them. Calibration involves adjusting the volume and the frequency response to ensure that your headphones are giving you accurate sound. Here are the steps to follow:

  1. Play a reference track that you are familiar with and listen to it carefully.
  2. Gradually increase the volume until it is at a comfortable listening level.
  3. Listen to the reference track and adjust the frequency response of your headphones using an EQ plugin.
  4. Adjust the bass, mid, and treble frequencies until they sound balanced.

Testing Headphones

The final step in setting up your normal headphones for music production is to test them. Testing ensures that each side of your headphones is working correctly and that you are getting a balanced stereo image. Here are the steps to follow:

  1. Play a stereo test track that has separate audio signals for the left and right channels.
  2. Carefully listen to the audio signal in each ear. Make sure that both sides are working correctly.
  3. Check for a balanced stereo image by listening to the test track in both ears. Make sure that you are hearing the audio signal equally in each ear.
  4. If your headphones come with a detachable cable, test them by swapping the cable and listening to the test track again.

By following these steps, you will be able to set up your normal headphones for music production and get the best possible sound quality.

Tips For Using Normal Headphones For Music Production

Using normal headphones for music production can save you money, but it’s important to keep these tips in mind for best results: choose closed-back headphones for better isolation, adjust the volume to avoid ear fatigue, and test your mixes on different devices to ensure accurate sound reproduction.

If you’re a budding music producer, you might have started your journey with a good set of normal headphones. But, using them for music production might not be as straightforward as you think. Here are some tips to help you get the most out of your normal headphones for music production.

Take Breaks

Music production involves long hours looking at a computer screen and listening to audio. It’s important to take regular breaks to rest your ears and avoid ear fatigue. A few minutes every hour is a good rule of thumb.

Compare With Other Speakers

Normal headphones are known for their isolated sound and perfect frequency response. But, to ensure your mix translates well across different sound systems, it’s important to compare your mix with other speakers like studio monitors and car speakers.

Mix At A Low Volume

Normal headphones tend to emphasize bass frequencies, which can be misleading. Mixing at a low volume will help you hear the balance of each track and prevent bass-heavy mixes that might not translate well across different sound systems. Other tips include checking the EQ balance of your headphones and using reference tracks to gauge the sound quality of your mix. Using normal headphones for music production might not be ideal, but with these tips, you can maximize their potential and create professional-sounding tracks.

Normal Headphones For Music Production

Credit: melodiefabriek.com

Normal Headphones For Music Production

Credit: twitter.com

Frequently Asked Questions Of Normal Headphones For Music Production

Do Headphones Matter For Music Production?

Yes, headphones matter for music production as they allow you to hear subtle nuances in the mix that might not be audible with regular speakers. It is important to invest in high-quality headphones to make accurate decisions in the mixing process and ensure the final product translates well on different playback systems.

Can You Use Normal Headphones For Music Production?

Normal headphones can be used for music production to some extent, but they are not recommended for professional-level work. Studio headphones provide a flatter frequency response and better isolation, allowing for more accurate and detailed sound monitoring. It’s important to use headphones specifically designed for music production to achieve the best results.

What Headphones Should I Use For Music Production?

For music production, the best headphones are those that give you a flat frequency response. This means that the headphones will accurately reproduce the sound without adding any coloration or emphasis to certain frequencies. Examples of such headphones include Sennheiser HD600, Sony MDR-7506, and Beyerdynamic DT 990 Pro.

Can I Produce Music With Any Headphones?

No, not all headphones can be used for producing music. To produce professional-quality music, you require headphones that are specifically designed for music production. Such headphones feature a flat frequency response and provide accurate sound reproduction. Avoid using ordinary headphones, as they may alter the sound and affect the overall quality of your music.

Conclusion

Music production is a sensitive process, and every detail matters. Choosing the right headphones is a crucial aspect of creating quality music. Normal headphones are suitable for casual listening, but they may not be the best choice for music production, considering their limitations.

Investing in high-quality headphones designed for music production can enhance the accuracy and clarity of the sound produced. Therefore, it’s essential to select headphones that will provide the best feedback for accurate mixing and mastering. Ultimately, the right headphone choice can lead to quality sound production, thus making it worth the investment.

Categories
Archive

Sample Rates And Bit Depth In A Nutshell

Sample rates determine the number of times that audio is sampled per second, while bit depth represents the number of bits used to express each sample. In other words, sample rates and bit depth define the quality of digital audio recordings.

Digital audio is ubiquitous in our media-driven world, from music streaming to video game sound effects, and accurate reproduction of sound is a crucial aspect of audio production. The specific settings for sample rates and bit depths can impact the final product, influencing factors such as the size of the audio files, the level of detail in the recordings, and the compatibility with different playback devices.

Understanding these settings is vital for audio professionals and enthusiasts alike, as they work to create high-quality digital audio productions. We will explore the basics of sample rates and bit depth, and how they play a crucial role in digital audio recording and reproduction.

Sample Rates And Bit Depth In A Nutshell

Credit: fifinemicrophone.com

Sample Rate

When it comes to digital audio, there are two important technical concepts to understand: sample rate and bit depth. The sample rate determines how many times per second the audio is measured, while the bit depth determines how many bits are used to represent each sample. In this article, we will focus on the sample rate.

Definition Of Sample Rate

The sample rate, also known as the sampling frequency, is the number of times per second that a sound is digitally recorded. It is measured in Hertz (Hz), which is the equivalent of cycles per second. A higher sample rate means more samples per second, which results in more accurate audio reproduction.

How Sample Rate Affects Audio Quality

The sample rate has a direct impact on the quality of your audio. If the sample rate is too low, the audio will sound distorted and you may experience a loss of detail and clarity. On the other hand, a higher sample rate will result in better sound quality and a more realistic representation of the original audio.

Here is how different sample rates affect the quality of audio:

Sample RateQuality
22.05 kHzLow quality, suitable for speech recordings and telephony
44.1 kHzCD-quality, suitable for music production
48 kHzDVD-quality, suitable for video production
96 kHzHigh definition, suitable for professional audio production

It is important to note that a higher sample rate also means a larger file size, which may be a concern if you are working with limited storage space. Ultimately, the sample rate you choose will depend on your specific needs and intended use.

Sample Rates And Bit Depth In A Nutshell

Credit: www.izotope.com

Common Sample Rates

Sample rates in digital audio refer to the number of times per second that the analog sound wave is measured and recorded. Common sample rates include 44. 1 kHz, 48 kHz, and 192 kHz. The higher the sample rate, the more accurately the digital representation of the audio resembles the original analog signal.

Common Sample Rates: Sample rate and bit depth are the two fundamental concepts that determine the audio quality of a recorded sound. Sample rate refers to the number of audio samples per second, and bit depth refers to the number of bits used to represent each sample of audio data. The higher the sample rate, the more accurately the audio waveform is captured. The higher the bit depth, the more accurately the captured waveform is represented in digital form. In this article, we’ll explore common sample rates, including CD sample rate and high-resolution audio sample rates. CD Sample Rate: The most common sample rate used in the music industry is CD quality, which has a sample rate of 44.1 kHz and a bit depth of 16 bits. CD quality is the most widely used sample rate and bit depth for music production and distribution because it provides excellent sound quality and is compatible with most consumer-grade equipment. High-Resolution Audio Sample Rates: In recent years, high-resolution audio has gained popularity among audiophiles. High-resolution audio is an umbrella term used to describe formats that provide higher audio quality than CD-quality audio. High-resolution audio commonly has a sample rate of 96 kHz or 192 kHz and a bit depth of 24 bits. These higher sample rates and bit depths provide much greater detail and more accurate representation of the original sound recording. High-resolution audio formats are commonly used in professional audio production and mastering. Overall, the choice of sample rate and bit depth depends on the application and the desired audio quality. For most consumers listening to music on consumer-grade equipment, CD-quality audio is more than sufficient. However, for professional audio production and audiophiles, high-resolution audio with sample rates of 96 kHz or 192 kHz and bit depths of 24 bits is a must-have.

Bit Depth

Bit depth refers to the number of bits of information recorded for each sample in digital audio. Higher bit depth means more accurate representation of audio, resulting in better sound quality. It is important to consider both bit depth and sample rate when working with digital audio.

Definition Of Bit Depth

In a nutshell, bit depth refers to the number of bits of information that are recorded for each sample in a digital audio recording. Bit depth is measured in bits, and it determines the dynamic range of a recording. To put it simply, a higher bit depth means that more information is recorded for each sample. This results in a recording with a greater dynamic range and less noise.

How Bit Depth Affects Audio Quality

The bit depth of a recording has a direct impact on its audio quality. The higher the bit depth, the more accurate and faithful the recording will be to the original source. In general, 16-bit audio is considered to be CD quality, while 24-bit audio is considered to be high-resolution. This is because 16-bit audio has a limited dynamic range, which can result in clipping and distortion. On the other hand, 24-bit audio has a much wider dynamic range, which allows for a much more natural and lifelike sound. It is important to note that increasing the bit depth of a recording also increases the size of the audio file. This is because more information is being recorded for each sample, resulting in a larger amount of data being stored. However, the increase in quality that comes with a higher bit depth is generally considered to be worth the extra space required. In summary, bit depth is a critical factor in determining the quality of a digital audio recording. A higher bit depth allows for a greater dynamic range and more accurate representation of the original source, resulting in a superior recording overall.

Common Bit Depths

When it comes to recording audio, understanding the concept of bit depth is crucial. Bit depth refers to the number of bits of information captured for each sample. A larger bit depth means that there is more information captured, which results in higher overall sound quality.

16-bit Audio

16-bit audio is the most common bit depth used in audio recording and is the standard for CDs. This means that each sample is represented by 16 bits of data, resulting in a total of 65,536 possible values. While 16-bit audio is suitable for most recordings, it may not be sufficient for more complex projects.

24-bit Audio

24-bit audio is becoming increasingly popular, as it offers superior sound quality compared to 16-bit audio. With each sample represented by 24 bits of data, there are 16,777,216 possible values, resulting in clearer and more detailed recordings. 24-bit audio is ideal for recording high-quality music, sound effects, and voice-overs that require a higher level of detail.

32-bit Audio

32-bit audio is a relatively new addition to the audio recording world, and it offers the highest level of detail and sound quality. With 32 bits of data representing each sample, there are an enormous 4,294,967,296 possible values, resulting in incredibly accurate, high-fidelity recordings. 32-bit audio is typically used in professional studios for recording and mastering music.

Choosing Sample Rates And Bit Depths

Choosing the right sample rates and bit depths is crucial in recording and producing high-quality audio. The sample rate is the number of audio samples captured per second, while bit depth is the number of bits of information stored in each sample. In a nutshell, the higher the sample rate and bit depth, the better the audio quality.

Matching Sample Rate And Bit Depth To Recording

Matching the sample rate and bit depth to your recording equipment is the first step in producing high-quality audio. Setting a high sample rate and bit depth will capture more accurate audio and give you more flexibility during the editing process. Keep in mind that choosing too high of a sample rate and bit depth can lead to large file sizes and require more processing power.

Sample RateBit DepthBest Use
44.1 kHz16-bitCD-quality audio
48 kHz24-bitProfessional recording
96 kHz24-bitMastering and high-quality productions

Matching Sample Rate And Bit Depth To Playback Equipment

Matching the sample rate and bit depth to your playback equipment is just as important as matching it to your recording equipment. For example, if you’re producing music for CD release, it’s best to record in 16-bit/44.1 kHz because that’s the standard for CD audio. However, if you’re producing music for digital distribution, you may want to consider recording in a higher sample rate and bit depth to ensure the best possible sound quality.

Unordered List: Tips for Choosing Sample Rates and Bit Depths

  • Consider your recording and playback equipment
  • Choose the right sample rate and bit depth for your project
  • Be mindful of file size and processing power
  • Test your audio on different playback devices to ensure optimal sound quality

Overall, choosing the right sample rates and bit depths is an essential aspect of audio production. Keeping in mind your recording and playback equipment, choosing the right sample rate and bit depth for your project, and being mindful of file size and processing power will ensure that you produce high-quality audio that’s optimized for your intended audience.

Pros And Cons Of Higher Sample Rates And Bit Depths

In audio recording, sample rates and bit depths refer to the quality and resolution of the recorded sound. When it comes to professional audio recording, the higher the sample rates and bit depths, the better the audio quality will be. However, this comes with certain pros and cons that should be considered before choosing which sample rate and bit depth to use.

Improved Audio Fidelity

The primary advantage of using higher sample rates and bit depths is improved audio fidelity. When you record at a higher sampling rate, the resulting audio has more detail and nuance. The same is true for bit depth; the more bits you use, the more dynamic range the audio will have. This improved fidelity is especially important for recording music or sound effects that will be heard on high-end playback systems or in professional audio environments.

Increased Storage And Processing Requirements

One of the main disadvantages of using higher sample rates and bit depths is that they require more storage and processing power. The higher the sample rate and bit depth, the more memory and processing power required to record, edit, and mix the audio. This is a major concern for anyone recording on a budget or using a less powerful computer or recording device.

In conclusion, it is important to consider the pros and cons of using different sample rates and bit depths when recording audio. While higher sample rates and bit depths offer improved audio fidelity, they also require more storage and processing power. It’s important to strike a balance between quality and practicality based on your specific recording needs.

Sample Rates And Bit Depth In A Nutshell

Credit: legacy.presonus.com

Frequently Asked Questions On Sample Rates And Bit Depth In A Nutshell

What Is Bit Depth And Sample Rate?

Bit depth refers to the number of bits used to represent each sample in a digital audio file, while sample rate is the number of samples taken per second. A higher bit depth means more accurate representation of sound, while a higher sample rate means more samples per second and therefore higher frequency range.

How Do You Explain Sample Rate?

Sample rate is the number of samples of audio taken per second. Higher sample rates produce better quality sound, but require more storage space. It is measured in Hertz (Hz) and generally ranges from 44. 1 kHz to 192 kHz for audio.

What Does Bit Depth Of A Sample Mean?

The bit depth of a sample refers to the amount of data used to represent each audio sample. It determines how fine the audio resolution is and the dynamic range of the audio signal. The higher the bit depth, the more accurately the original audio can be reproduced.

What Is The Effect Of Sample Rate Duration And Bit Depth?

Sample rate duration and bit depth affect the quality of digital audio. Higher sample rates capture more detail and produce clearer sound. Bit depth determines the dynamic range and accuracy of sound reproduction. Higher bit depths result in more detailed and accurate sound, while lower bit depths lead to potential distortion and loss of information.

Conclusion

To wrap things up, understanding sample rates and bit depth is crucial in producing high-quality audio. While higher sample rates and bit depths do result in better sound quality, they also require more storage and processing power. It’s important to strike a balance between quality and practicality.

When choosing your desired sample rate and bit depth, consider your project’s specific needs and budget. With these factors in mind, you can create audio that truly shines.

Categories
Archive

The Ultimate Guide To Preparing For Mastering

Preparing for mastering requires attention to detail and mastering fundamentals before sending tracks to a mastering engineer. This involves leveling, balancing, EQ adjustments, proper metering and file preparation, ensuring the final mix is of the highest quality.

Mastering is a crucial stage in music production that polishes the final mix and ensures it sounds consistent across different systems. However, before sending off your tracks to a mastering engineer, you need to prepare adequately. This involves checking the levels, making balancing adjustments, performing EQ cuts and boosts, proper metering, and file preparation.

By adhering to these fundamental guidelines, you’ll deliver a high-quality mix that the mastering engineer can work with, leading to a more polished and refined final product. In this guide, we’ll walk you through the necessary steps to prepare your mix for mastering.

Importance Of Preparing For Mastering

Preparing for mastering is crucial for ensuring that your audio tracks sound their best. This ultimate guide provides tips and strategies for optimizing the mix, understanding the mastering process, and communicating effectively with mastering engineers to achieve the desired end result.

Preparing for mastering is a crucial step that shouldn’t be overlooked. Mastering is the final stage in music production before the final product is released. It involves the adjustment of different elements, including frequencies, tones, and volume, to ensure that the final product sounds clear, balanced, and professional. This process can be time-consuming and overwhelming, but it is necessary to achieve a high-quality result that stands out.

Why Preparation Is Key

Preparing for mastering sets the tone for the entire process. It ensures that all necessary materials and tools are available in advance, reducing the risk of mishaps or delays. When you are well-prepared, you can approach the mastering process with confidence and a clear direction.

Expectations And Benefits Of Preparing

When you prepare, you can set realistic expectations and goals for your mastering process. You can plan and prioritize the different elements that require attention, ensuring that you don’t overlook anything essential. Preparation also allows you to allocate the necessary time and resources to ensure that everything is in place and ready for mastering. The benefits of preparation extend beyond the mastering process itself. When you are well-prepared, you can avoid rushed decisions, reducing the risk of mistakes. You can also ensure that the final product is of high quality, which can translate into better reviews, sales, and recognition.

How Failure To Prepare Affects The Mastering Process

Failure to prepare can have significant consequences for the mastering process. It can result in delays, wasted time and resources, and suboptimal results. Without adequate preparation, you may miss essential elements or overlook potential issues, which can affect the quality of the final product. Moreover, a lack of preparation can lead to stress, frustration, and disappointment, which can impact your creativity and motivation. It can also result in missed opportunities, such as deadlines and collaborations, which could have furthered your career. In conclusion, preparing for mastering is crucial for achieving high-quality results, minimizing stress and delays, and maximizing your potential. By setting realistic expectations, allocating resources, and prioritizing essential elements, you can approach the mastering process with confidence and achieve your desired outcome.

Preparing Your Mix For Mastering

Prepare your mix for mastering by ensuring that all the elements are balanced and the mix is dynamic. It’s important to leave enough headroom and avoid any clipping or distortion, as well as removing any unnecessary low-end frequencies. Finally, export the mix at the highest quality possible for the mastering engineer to work with.

Preparing Your Mix for Mastering is an important step in ensuring that your music sounds as professional as possible. This process involves preparing the individual tracks of your mix for the mastering stage. One of the most important aspects of this preparation is ensuring that the levels and balance are correct. Followed by the equalization, compression, and stereo imaging. In this section of The Ultimate Guide To Preparing For Mastering, we will go over each of these elements in detail, ensuring that you’re ready to send off your tracks to a mastering engineer and get the best results possible.

Level And Balance

Before sending your tracks for mastering, it’s essential to ensure that the levels and balance of each track are correct. If a track is too loud, it can cause distortion and clipping, which can be difficult for a mastering engineer to fix. In contrast, if a track is too quiet, it can be challenging for the mastering engineer to bring up the volume without introducing unwanted noise. Therefore, it’s important to make sure that the levels of your tracks are consistent and balanced.

Equalization

Equalization is the process of adjusting the frequency balance of each track. It’s essential to ensure that each track has a clear and distinct frequency range, with no muddiness or masking of other frequencies. Furthermore, it’s essential to make sure that each track’s frequency range doesn’t overlap with other tracks, as this can lead to muddiness and an overall lack of clarity in the mix. Using EQ to make subtle and precise adjustments can help create a polished and professional-sounding final product.

Compression

Compression is a powerful tool used to balance the dynamics of a track. It’s important to make sure that the levels of each track are consistent before applying compression to avoid over-compression. Over-compression can lead to a loss of dynamics, which can make the track sound flat and lifeless. Properly applying compression can help to balance the levels of a track and create a professional-sounding mix.

Stereo Imaging

Stereo Imaging is the process of adjusting the placement of sounds in the stereo field. It’s essential to make sure that each track has a clear and distinct placement in the stereo field. Furthermore, it’s important to ensure that the placement of each track doesn’t overlap with other tracks, as this can lead to a cluttered and confusing mix. Making precise stereo adjustments can help create a spacious and natural-sounding final product.

Preparing The Files To Send To Mastering Engineer

Once you’ve gone through the steps outlined above, it’s time to prepare the files for sending to a mastering engineer. Ensure that you export each track individually, with the correct level and balance. Additionally, make sure that each file is labeled correctly, indicating the track name and order if necessary. Most importantly, ensure that the files are high quality, with a bit depth of at least 24-bit and a sample rate of 44.1kHz or higher. Preparing the files correctly can save time and ensure that the mastering engineer can work to the best of their ability. In conclusion, preparing your mix for mastering is an essential step in creating a professional-sounding final product. By following the steps outlined in this section of The Ultimate Guide To Preparing For Mastering, you can be confident that your tracks are ready to be sent to a mastering engineer. With proper level and balance, equalization, compression and stereo imaging, and ensuring the files are ready for mastering; you can achieve a polished and professional sound that will make your music stand out.

Pre-mastering Checklist

Preparing for mastering is a crucial step in ensuring the final product meets your expectations and the requirements of the mastering engineer. One of the essential steps in this process is following the Pre-Mastering Checklist. This checklist helps you organize and prepare your audio files for mastering efficiently. Below, we’ll discuss each point on the Pre-Mastering Checklist that you don’t want to miss.

Check Your Mixes

Before sending your mixes for mastering, make sure you’ve checked them thoroughly. It’s crucial to ensure your mix sounds the way you want it to before handing it off to the mastering engineer. Also, check the mix for any technical issues like noise, clicks, and pops. You don’t want the mastering engineer to spend time fixing issues that could easily have been sorted out at the mixing stage.

Organize And Label Tracks

It’s essential to keep your audio files organized to save time and avoid confusion. Properly naming your audio tracks and labeling them can help the mastering engineer navigate through your session with ease. You can use abbreviations or numerical labeling to streamline the process. Ensure all your tracks are in the right order, and each one has a purpose in the mix.

Make Sure All Audio Clips Are Consolidated

Consolidating audio clips refers to combining all the segments of an audio track into a single file. It makes it more manageable for the mastering engineer during the mastering process. Be sure to check if any audio clips are missing, and if so, consolidate them before sending them off for mastering.

Create A Backup

Backing up your audio files is essential. In case of unforeseen circumstances, you need a backup copy of your mix, which you can revert to if something goes wrong. Hard disk failure, accidental deletion, or computer crashes can cause you to lose all your hard work. Therefore, ensure you create a backup copy of your mixes and store them in a safe and secure place.

Prepare A Rough Mix For The Mastering Engineer

While the mastering engineer can enhance the overall quality of your audio files, a rough mix can help them understand your vision for the final product. Provide a reference mix that can guide them in the mastering process and ensure they deliver the final product that meets your expectations.

Mastering Tools

Mastering is an important final step in music production. Here, all the individual tracks are blended into a cohesive masterpiece ready for public consumption. The process involves several tools that enhance the overall sound quality of the final mix. Below are some of the Mastering tools that every music producer should know.

Equalizers

Equalizers are tools used for modifying the frequency content of an audio signal. They help balance different elements of a mix, enabling them to sit together harmoniously. They come in different types, such as parametric, graphic, and shelving, each with its unique way of adjusting the gain of the audio spectrum. They can be used to pull out unwanted frequencies or boost wanted ones depending on the specific track requirements.

Compressors

Compressors are used to control the dynamics of a mix. They help reduce the dynamic range, tighten up the mix, and make it sound consistent. They do this by reducing the volume of loud sounds and boosting the volume of soft sounds, ensuring that all tracks are audible. They are great tools for making tracks sound full, punchy, and professional.

Limiters

Limiters are a special type of compressor that prevent the signal from exceeding a certain threshold. They are useful in controlling the maximum volume of a mix, ensuring that it doesn’t clip or distort. They help bring out the details in a mix, making it sound polished and professional.

Stereo Widening Tools

Stereo widening tools are used to manipulate the stereo field of a mix. They can be used to make the mix sound wider, narrower, or mono. They are great for making a mix sound more interesting and appealing to the listener. They do this by delaying one channel or boosting one channel’s volume relative to the other.

Exciters

Exciters are used to add harmonics to a mix, making it sound livelier and more exciting. They do this by generating additional harmonies that weren’t there in the original recording, making it sound fuller. They are useful for breathing new life into old recordings and making them sound fresh again.

Reverb And Delay

Reverb and Delay are time-based effects used to add space and depth to a mix. Reverb is used to create a sense of space, making the sound appear as if it was recorded in a large room or hall. Delay, on the other hand, is used to create an echo effect, making the sound repeat after a specific period. They are great tools for adding texture and ambiance to a mix, making it sound more realistic and immersive.

Mastering Techniques

The ultimate guide to preparing for mastering involves mastering techniques that can take your music to the next level. From preparing your mixes to understanding proper EQ and compression, this guide will help you perfect your sound.

Mastering is a process that requires technical expertise, experience, and a good ear. The main goal of mastering is to enhance the sound quality of a final mix and ensure the production is competitive in terms of commercial audio standards. In this guide, we will explore some of the essential mastering techniques that engineers use to achieve a professional outcome.

Equalization And Dynamic Processing

Equalization and Dynamic Processing, also known as EQ and Compression are the most basic tools for mastering. EQ is used to balance the frequency spectrum of a mix, making sure each element has its space within the frequency range. Compression helps to control the dynamic range of the material, making softer sections louder and ensuring louder sections aren’t distorted. When used effectively, EQ and Compression can yield excellent results.

Stereo Enhancement

Stereo Enhancement is the process of manipulating stereo tracks to create the perception of a wider or deeper sound field. This can be achieved by using various tools like Stereo Widening and Haas Effect. Widening can help push the elements slightly further away from the center while maintaining the balance of the mix. On the other hand, the Haas Effect can be used to create the perception of a broader soundstage by delaying the signal on one side of the mix.

Harmonic Excitement

Harmonic excitement is a technique that involves adding harmonic content to a mix to make it more exciting. Engineers often use harmonic distortion to achieve this. Harmonic distortion can be produced both by analog and digital plugins but requires some attention to the harmonics being generated. Proper use of saturation and harmonic generation can add character, excitement, and depth to a mix.

Mastering For Loudness

Mastering for loudness is about making a track sound louder without damaging the dynamics or destroying the mix. Loudness maximization involves dynamic range compression, limiting, and careful EQing to create a competitive and loud product. A mastering engineer has to be careful not to crush the dynamics of the music when trying to get a wider and louder sound.

Daw Plug-ins Vs. Outboard Gear

DAW plugins and Outboard Gear, both are essential tools for mastering but have their strengths and weaknesses. DAW plugins provide an easy-to-use, software-based solution for mastering, but the sound quality can be limited by the sound card and CPU processing power. Outboard Gear offers high-quality sound and is often used for analog processing. However, they are more expensive and can be difficult to use. Ultimately, it’s up to the engineer to decide which tools to use based on their experience and the project’s requirements.

Selecting A Mastering Engineer

Preparing for mastering your music can be overwhelming, but selecting the right mastering engineer can greatly impact the final product. It is important to do your research, listen to their previous work, and communicate your vision clearly to ensure the best outcome.

Selecting a Mastering Engineer is a crucial step in ensuring the success of your project. A mastering engineer is responsible for creating the final mix of your sound recording that is suitable for distribution and playback across various platforms. Finding the right mastering engineer can mean the difference between an excellent-sounding record and a mediocre one. When selecting a mastering engineer, there are several key factors to consider.

Experience And Portfolio

One of the first things to consider when selecting a mastering engineer is their experience and portfolio. Look for someone who has been working in the industry for a good number of years and has mastered a broad range of genres. A mastering engineer with experience and a diverse portfolio is a good sign that they have the skills and knowledge to handle your project. When reviewing their portfolio, pay attention to the similarity in the style of work they have done in the past with the results you are aiming to achieve.

Communication

Communication is vital when working with a mastering engineer. Choose someone who is easy to communicate with and promptly responds to your queries and questions. Open communication will help you to establish your needs and goals for the project. Ensure that they understand your vision and are committed to delivering the results you desire.

Budget

Budget is also a crucial consideration when selecting a mastering engineer. A mastering engineer’s rates may vary depending on their experience and reputation. It’s important to find an engineer whose prices align with your budget. While it’s tempting to go for a cheap option to save money, it’s not always the best move. The mastering process is significant, and poor quality mastering can ruin a great mix, costing you more in the long run. Therefore, prioritize choosing a mastering engineer based on quality rather than cost.

Expertise In Your Genre

Expertise in your genre is another critical factor in selecting a mastering engineer. Each genre requires particular techniques to enhance its unique characteristics. The right mastering engineer should understand the techniques needed to make your music stand out in your genre. It’s important to find out if they have worked on projects similar to yours and if they are confident in their ability to bring out the best in your sound.

Testimonials And Reviews

Finally, don’t forget to check the mastering engineer’s testimonials and reviews. These can provide essential insights into the quality of their work, professionalism, and customer service. Look for feedback from clients with similar needs to yours to see if they were satisfied with the results. Positive reviews and ratings are an excellent indication that the engineer is credible and reliable. In summary, selecting a mastering engineer requires careful consideration of their experience and portfolio, communication style, budget, genre expertise, and testimonials and reviews. Taking the time to research and find the right engineer for your project will ensure that your music is given the best chance of success.

Common Mistakes To Avoid

To prepare for mastering, avoid common mistakes such as using overused phrases and lengthy sentences. Keep the content SEO friendly, unique, and easy to comprehend with a variety of expressions to keep readers engaged. Steer clear of a traditional conclusion paragraph and aim for a human-like writing style.

Common Mistakes to Avoid: When preparing for mastering, it’s important to be aware of the common mistakes that can hinder the process. By avoiding these mistakes, you’ll have a better chance of achieving the desired sound for your music. Here’s a list of the most common mistakes to avoid: H3: Overcompressing Overcompressing can result in a loss of dynamics and make the music sound flat. Compression should be used to even out the levels, but should not be overused. To avoid overcompressing, try A/B testing different compression settings to find the sweet spot for your mix. H3: Over-limiting Over-limiting can cause distortion and leave very little dynamic range in the mix. It’s important to be aware of the loudness of your mix, but over-limiting is not the solution. Avoid over-limiting by using limiters sparingly and setting them to achieve a moderate amount of gain reduction. H3: Over-EQ’ing Over-EQ’ing can make the mix sound unnatural and unbalanced. It’s important to have a balanced frequency spectrum in your mix, but don’t go overboard with EQ’ing. To avoid over-EQ’ing, try to use EQ only when it’s necessary and make subtle changes. H3: Not Leaving Enough Headroom Not leaving enough headroom can lead to digital distortion during the mastering process. It’s important to leave enough headroom to allow for some gain during mastering. To avoid this mistake, make sure to leave at least -6db headroom in your mix before exporting it for mastering. H3: Not Getting Feedback from Multiple Sources Not getting feedback from multiple sources can result in missed issues in the mix. It’s important to get feedback from different people and different listening environments to get a well-rounded perspective. To avoid this mistake, consider having a test listening session with a group of people and ask for their feedback. By being aware of these common mistakes and taking steps to avoid them, you can ensure that your mix is best prepared for mastering. Remember to use compression, limiting, and EQ sparingly, leave enough headroom, and get feedback from multiple sources. With these tips, your mix will be well-prepared for the mastering process.

Finalizing Your Master

Learn the best practices to prepare for mastering with our ultimate guide. From checking your mix to choosing the right mastering engineer, we’ll take you through each step to help finalize your masterpiece.

The final stage of the mastering process is crucial to achieving a polished and professional sound. Finalizing your master involves comparing your master with the mix, preparing the final formats, creating metadata, and naming and exporting the finished files. In this article, we’ll delve deeper into each of these steps to ensure you have everything covered when preparing for mastering.

Comparing Your Master With The Mix

The first step in finalizing your master is comparing it with the mix. It is important to make sure that the master version is an improvement over the mix, and that it sounds consistent and balanced. A good way to compare the two is to A/B test them, switching between the mix and master versions and listening carefully for any differences. Pay attention to the overall sound, EQ, dynamics, and volume levels.

Preparing The Final Formats

Once you are satisfied with the mastering result, it’s time to prepare the final formats. This involves creating high-quality audio files that are ready for distribution or duplication. Common formats include WAV or AIFF files with a sample rate of 44.1kHz/16-bit for CD distribution, or high-resolution 24-bit files for online streaming. You may also need to consider creating alternate versions for radio edit or instrumental versions.

Creating Metadata

Metadata is essential for organizing and identifying your music online. This includes information such as the album title, artist name, track titles, and artwork. It is important to ensure your metadata is accurate and consistent across all platforms, such as iTunes, Spotify, and YouTube. Take the time to double-check it before you move on to the next step.

Naming And Exporting The Finished Files

The final step in finalizing your master is naming and exporting the finished files. This involves choosing appropriate filenames that reflect the contents of each file, such as the track title or version. You may also need to add a suffix to indicate the file format, such as .wav or .mp3. Make sure to save your files in a separate folder to avoid any confusion with previously saved files. In conclusion, finalizing your master requires attention to detail, patience, and a thorough understanding of the technical aspects involved. By following these steps and taking the time to carefully consider each aspect, you will be well on your way to achieving a professional-sounding master that is ready for distribution.

Frequently Asked Questions Of The Ultimate Guide To Preparing For Mastering

How Do You Prepare Music For Mastering?

Preparing music for mastering involves several steps such as selecting suitable tracks, editing, mixing, and finishing. To optimize the music for mastering, you need to make sure that the tracks are properly leveled, EQ’d, and compressed, and that there are no unwanted noises or distortions.

Additionally, it may also be helpful to ensure that all tracks have a similar volume level and tonality, and that they are compatible with the desired delivery format.

At What Db Should Beat Be Before Mastering?

There is no specific dB level that beats should be at before mastering, as it depends on the genre, intended audience, and artistic preferences. It is recommended to aim for a peak level between -3 dB and -6 dB to ensure headroom and prevent clipping during the mastering process.

What Should My Mix Be Before Mastering?

Your mix should be balanced in terms of levels, panning, and EQ before mastering. Make sure to leave enough headroom for mastering to add additional loudness. It’s important to listen to your mix on various systems to ensure it translates well across different environments.

Referencing professionally mixed and mastered tracks can also help guide the mixing process.

What Is The Peak Level For Mastering?

The peak level for mastering, also known as the maximum peak level, refers to the highest level of audio signal in a mix that can be achieved without introducing distortion or clipping. This level is typically around -0. 3 dBFS to -0.

1 dBFS, or slightly lower for streaming services. Going beyond this level can result in a loss of audio quality.

Conclusion

Great job on reading through this comprehensive guide on preparing for mastering! By following the steps outlined in this post, you can ensure that your audio tracks are optimized and ready for professional mastering. Remember to take the time to focus on your mix, utilize high-quality software, and properly label your files for seamless communication with your audio engineer.

With these basics in place, you’ll be on your way to producing high-quality audio that stands out in a competitive industry. Keep practicing and happy mastering!

More in our Mastering guide.