Categories
Archive

How Much Should I Charge for Mixing a Song

For mixing a song, a fair industry rate varies between $100 – $1000 per track, which depends on the experience and skill level of the sound engineer. Various factors may influence it.

As music creation is a joyful endeavor, and you’ve enjoyed composing your latest hit. Now, you’re ready to mix it up with a competent sound engineer who will bring your track to life. A question often arises on what sort of service rate is appropriate to charge for professional-level mixing.

There isn’t a one-size-fits-all solution to pricing music since various variables, such as the record label, the album’s distribution outlets, and everyone included in the making of a hit track, must be taken into account. The mixing rate might rely on the quality level of the sound engineer’s work. It is essential to consider having a contract with the sound engineer to avoid any confusion.

Factors To Consider For Pricing

Pricing for mixing a song requires consideration of various factors, including the experience and skillset of the mixer, the complexity of the project, and the time involved in completing the task. It is crucial to strike a balance between charging a fair price and keeping clients satisfied while also remaining competitive in the market.

When it comes to charging for mixing a song, there are many factors to consider. As an audio professional, you want to make sure that you are pricing your services appropriately so that you are compensated for the time, effort, and skill that goes into mixing a song. Here are the most important factors to consider when determining your pricing:

Experience

Your experience level plays a significant role in how much you can charge for mixing a song. New audio engineers or hobbyists generally charge a lower rate than experienced mixing engineers with years of training and experience. If you have many years of experience mixing, you can charge more for your services since there is generally greater demand for highly experienced engineers.

Efficiency

When clients pay for mixing services, they expect the job to be completed within a reasonable period. The more efficient you are, the more value you can provide, and the more you can charge for your services. However, be careful not to sacrifice quality to speed up the work process.

Equipment

The equipment you use also influences the pricing. High-end gear and studio rentals can increase your costs, which means you may need to charge more. Clients often choose audio engineers with high-quality equipment for their projects as they tend to produce higher quality mixes.

Market Demand

The market demand for your services will also affect how much you can charge. More prominent artists or labels with bigger budgets will tend to pay more, while independent artists or small labels may not have the same financial resources. Also, consider the competition in your area, the cost of living and operating a business. In conclusion, these factors dictate how much you should charge for mixing a song. You should carefully consider all of these factors before deciding on how much to charge for your services. You want to provide quality mixes that fit in your client’s budget, and at the same time, you want to be adequately compensated for the time, effort and skill required for your work.

How Much Should I Charge for Mixing a Song

Credit: m.youtube.com

Per Hour Vs Per Project

As a song mixer, it can be challenging to price your services. While charging per hour may seem logical, going with a per project rate may be more profitable. Consider the complexity of the song, your experience level, and the client’s budget when determining your rate.

As a mixing engineer, one of the most difficult decisions you’ll make is determining your pricing. Some mixing engineers charge an hourly rate, while others prefer a project-based approach. In this post, we’ll look at the advantages and disadvantages of both options, so you can make an informed choice.

Advantages Of Per Hour Pricing

  • Provides a sense of consistency to clients
  • Ensures payment for all the work done
  • Flexibility in changing prices

Disadvantages Of Per Hour Pricing

  • Clients may feel that it is more expensive than a project-based approach
  • May not account for the extra work needed for revisions and adjustments
  • “Clock-watching” can lead to a rushed job

Advantages Of Per Project Pricing

  • Gives clients a clear idea of the overall cost
  • Encourages the mixing engineer to take as long as necessary to get the job done right
  • Provides room for negotiation

Disadvantages Of Per Project Pricing

  • May not account for extra work needed for revisions and adjustments
  • Difficult to track time spent on the project accurately
  • May lead to the mixing engineer spending too much time to ensure a high-quality final result

Ultimately, the decision between hourly and project-based pricing depends on your personal preferences and what your clients are looking for. Consider the pros and cons of both methods to determine what works best for you and your business.

Industry Standards

Setting an industry standard for how much to charge for mixing a song can be difficult but important for ensuring fair compensation and maintaining competitiveness. Factors such as experience, reputation, and the complexity of the project should be considered when determining a rate.

Researching Standard Prices

Researching standard prices for mixing a song is essential in determining how much a music engineer should charge. It will help to understand the current market conditions and set a reasonable rate. Generally, the standards of mixing charges depend on the type of project, the experience of the engineer, and the genre of music. The best way to do this is to analyze the industry diligently by examining similar projects’ prices then arrive at a competitive rate to charge per mix for a song.

Comparing To Competitors

Comparing your mix prices with competitors’ mix prices will assist in arriving at an accurate fee to charge. This is because mix engineers have different levels of experience, different expertise, and a range of clients. It’s essential to compare the rates with those of an engineer who is at the same level as you. For instance, if you’re a novice engineer, don’t compare your rates to that of an experienced engineer, and vice versa. By doing this, you can easily set a reasonable and competitive fee that will not discourage potential clients.

Market Saturation

Market saturation involves ensuring that your mix prices are reasonable compared to the amount of work available in the market. Sometimes, you may charge too low rates that don’t allow you to make enough income, or excessively charges, which will discourage customers. The key to ensuring market saturation is to analyze the number of mix engineers available in the market and compare their prices. Come up with a rate that’s reasonable and one that the market can support. In conclusion, the music industry is highly competitive, and musician’s expectations can be high. Researching standard prices, comparing with competitors, and market saturation are the critical factors to consider when setting your prices. With this knowledge, you can set realistic rates that can satisfy you and your clients, and help grow your business.

Negotiating With Clients

Negotiating with clients on how much to charge for mixing a song can be tricky. It’s important to consider factors such as the complexity of the project, your level of experience, and the client’s budget. Communication and transparency are key in reaching a mutually beneficial agreement.

Client negotiation can be a tricky task, especially when it comes to discussing payment for your mixing services. However, it is important to establish open communication with the client from the get-go to avoid any misunderstandings and to ensure both parties are on the same page. Here are a few things to consider when negotiating with clients for mixing a song.

Setting A Minimum Rate

It is always a good idea to set a minimum rate for your mixing services. This not only helps establish your value but also protects you from undervaluing your work. Setting a minimum rate allows you to avoid low-paying clients and gives you the freedom to choose which clients you want to work with.

Considering The Client’s Budget

While you want to ensure that your services are valued, it is also important to take the client’s budget into consideration. If the client’s budget is lower than your rate, consider negotiating a compromise or finding a middle ground. This may include offering a discounted rate for first-time clients or offering a payment plan.

Additional Charges For Revisions

Sometimes revisions are necessary to ensure the client is satisfied with the final product. This may involve extra time and effort on your part, so it is important to factor this into your pricing. Consider charging an additional fee for revisions beyond a certain point or offering a set number of revisions included in the overall price.

Payment Schedule

Establishing a payment schedule ensures that both parties are clear on the timeline for payment and helps avoid any payment disputes. Consider requesting a deposit upfront and including milestones for payments throughout the process. It is essential to ensure that both parties are satisfied with the payment schedule before beginning the mixing process. In conclusion, negotiating with clients for mixing a song requires open communication and transparency from both parties. By setting a minimum rate, considering the client’s budget, factoring in additional charges for revisions, and establishing a payment schedule, you can ensure a successful client negotiation and a smooth mixing process.

Marketing Your Rates

Deciding how much to charge for mixing a song can be tricky. It’s important to consider factors such as your level of expertise, the complexity of the project, and industry standard rates. Research what others are charging and adjust accordingly.

As a mixing engineer, it’s important to be transparent about your rates. However, simply listing prices on your website may not be the most effective approach. In this section, we will discuss the different ways to market your rates for mixing a song.

Listing Prices On The Website

While some mixing engineers choose to list their rates on their website, it’s important to keep in mind that potential clients may not fully understand the value of your services. Listing your prices without any context may also make it difficult to stand out amongst competitors. If you choose to list your prices on your website, consider including a brief summary of your mixing process and what sets you apart from other engineers. This can help potential clients understand the value of investing in your services.

Providing Quotes

Providing a customized quote based on each client’s specific needs is a great way to market your rates. This approach allows you to showcase your expertise and attention to detail. When providing a quote, be sure to clearly communicate what services are included and any additional fees that may apply. This level of transparency can help build trust with potential clients and encourage them to invest in your services.

Explaining The Value Of Your Services

Ultimately, the key to marketing your rates is explaining the value of your services. Mixing a song is more than just adjusting levels and applying effects – it’s about bringing a client’s vision to life. When discussing your rates with potential clients, highlight the benefits they will receive from investing in your services. These may include a polished, professional sound; improved sonic clarity; and a mix that stands out on streaming platforms. By emphasizing the value of your services and tailoring your approach to each client’s unique needs, you can effectively market your rates and attract more business.
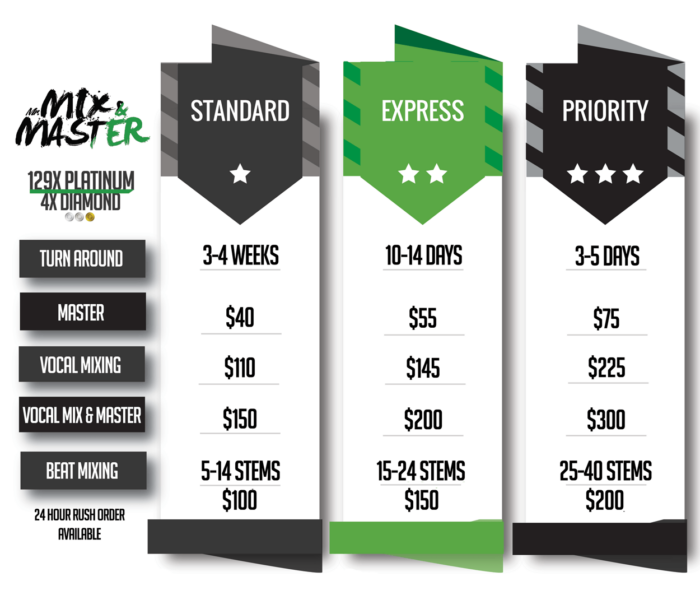
How Much Should I Charge for Mixing a Song

Credit: mrmixandmaster.com

Discounts And Added Value

When it comes to determining how much to charge for mixing a song, many factors come into play, such as the complexity of the project, the time required, and your level of experience. However, giving discounts and adding value to your services can be a great way to win over clients and establish a long-term relationship with them. Here are some ways you can provide discounts and added value to your clients:

Giving Discounts For Multiple Projects

If a client wants you to mix multiple songs for them, giving them a discount for the total cost can be a great way to attract their business. For instance, you can offer a sliding scale of discounts such as:

Number of SongsDiscount
1-2No Discount
3-510% off total cost
6-1015% off total cost
10+20% off total cost

Adding Value With Extra Services

In addition to your standard mixing services, you can provide added value to your clients by offering extra services, such as:

  • Mastering
  • Editing
  • Pitch correction
  • Background vocals
  • Adding instrumentation

By providing extra services, you can differentiate yourself from your competitors and add value to your clients’ projects, making them more likely to come back for future work.

Rewarding Repeat Clients

Repeat clients are the lifeblood of any mixing business, and it’s important to keep them satisfied. By rewarding repeat clients with perks such as discounts, priority scheduling, or free services, you can incentivize them to continue working with you. Additionally, you can incentivize them to refer you to their friends and colleagues by offering discounts or free services for each new client they bring in.

By implementing these strategies, you can provide discounts and added value to your clients, establish long-term relationships, and grow your mixing business.

Calculating Your Rate

As a mixing engineer, it can be challenging to determine how much to charge for your services. Consider factors such as your level of experience, the complexity of the project, and the client’s budget to calculate a fair rate that benefits both parties.

Calculating Your Rate: Determining Total Hours Worked One of the key factors in determining how much you should charge for mixing a song is calculating the total hours worked per project. This can include not only the amount of time spent actually mixing the song, but also any additional work such as file organization, communications with the client, and revisions. It’s important to be honest and accurate when calculating your hours so that you can ensure you are being compensated fairly for your time and effort. You can keep track of your hours manually or by using time-tracking software. Calculating Your Rate: Factoring in Equipment and Software Costs In addition to your time, it’s important to factor in the costs of the equipment and software you use for your mixing services. This can include items such as your computer and speakers, as well as any plugins or other software you use specifically for mixing. You should consider the cost of these items over time, factoring in things such as maintenance and upgrades. Additionally, you may want to consider including a markup on these costs to ensure you are adequately covering your expenses. Calculating Your Rate: Value-Based Pricing vs Cost-Based Pricing When calculating your rate for mixing a song, you have two main pricing strategies to consider: value-based pricing and cost-based pricing. With value-based pricing, you determine your rate based on the value you bring to the client. This can include factors such as your experience, reputation, and the quality of your work. With cost-based pricing, you determine your rate based on your expenses, including the costs of your time, equipment, and software. Ultimately, the strategy you choose will depend on your individual business goals and the unique needs of your clients. However, it’s important to remember that value-based pricing can often lead to higher rates and a greater focus on delivering high-quality work.

How Much Should I Charge for Mixing a Song

Credit: m.youtube.com

Frequently Asked Questions Of How Much Should I Charge For Mixing A Song

How Much Do You Charge For Mixing A Song?

Mixing rates vary depending on the complexity and length of the song. Please contact me directly to discuss your specific project.

Should I Pay Someone To Mix My Song?

Yes, if you want a professional and polished final product, then it might be wise to pay someone to mix your song. However, if you have the skillset and software to do it yourself, then you may not need to pay for this service.

Consider your experience and the quality you are trying to achieve.

How Much Does It Cost To Mix Vocals?

The cost to mix vocals can vary depending on who you hire and the amount of work needed, but expect to pay around $100-$300 per song for professional mixing services. Factors such as the complexity of the mix and the experience of the engineer can also impact the final cost.

How Much Does It Cost To Mix A Beat?

The cost of mixing a beat varies depending on factors such as the producer’s experience, location, and the complexity of the beat. Generally, prices range from $50 to $500 per track. However, it’s advisable to research to find a producer who suits your budget and producing needs.

Conclusion

Taking care of the financial aspect of music production is crucial. The amount you charge for mixing a song is dependent on several factors such as your experience, the number of tracks, and complexity. Do your research, find the right price for your services, and learn to communicate value to your clients.

By following these guidelines, you can create a sustainable business while providing high-quality services. Remember, pricing is an ongoing process that will change over time; as you grow, so should your rates.

Categories
Archive

Common Mixing Mistakes To Avoid At All Costs

To avoid common mixing mistakes, accurately measure ingredients and avoid overmixing. Overmixing can lead to tough and chewy baked goods.

Now, let’s delve into some commonly made mistakes when it comes to mixing your doughs and batters and how to avoid them. Ingredients that aren’t properly measured may result in baked goods that are too dense, too dry, or too wet.

Moreover, overmixing your batter can lead to gluten development, which can cause your finished product to be tough and chewy. Additionally, not mixing enough will result in unevenly distributed ingredients and less than desirable texture and flavor. By following some simple tips and avoiding these common mistakes, you’ll be able to achieve bakery-quality results in your own kitchen.

Common Mixing Mistakes To Avoid At All Costs

Credit: www.masteringthemix.com

Starting With Common Mixing Mistakes

Starting with Common Mixing Mistakes, many sound engineers, including professionals, usually fall prey to errors that can ruin the quality of a mix. Avoiding such mistakes is essential if you aspire to achieve excellent sound quality and a professional-sounding mix.

Failing To Prepare Before Mixing

One common mistake that many engineers make is starting a mix without proper preparation. Preparation plays a crucial role in ensuring that your mix is of high quality. Before you start mixing, ensure that you have all the necessary tools to make the process easier. Set up your project, organize your files, and label them properly to make it easier to navigate during the mixing process.

If you start mixing without preparing, you will spend more time searching for files and figuring out how to utilize your tools. This will lead to a poor-quality mix because you will be rushing to complete the mixing process rather than focusing on producing a high-quality sound.

Working In A Poorly Treated Room

The quality of your mix is greatly influenced by the environment in which you are mixing. Working in a poorly treated room can result in a faulty mix. Poor room acoustics can cause sound waves to bounce off walls and create unpleasant sounds, rendering your mix flat and lifeless.

To avoid this mistake, make sure that you mix in a properly treated room. You can achieve this by setting up acoustic treatment panels to absorb sound reflections and create a balanced sound. You can also use bass traps to control low-frequency sounds and prevent them from bouncing off walls.

In conclusion, avoiding mixing mistakes is crucial if you want to produce high-quality mixes. Failing to prepare before mixing can make the process longer and less productive. Additionally, working in a poorly treated room can lead to an unpleasant listening experience for your audience. By avoiding these common mistakes, you can achieve a high-quality sound that is pleasing to the ear.

Mistakes During Mixing

Avoiding mistakes during mixing is crucial to producing high-quality content. Common mixing mistakes to avoid at all costs include over-processing, improper leveling, neglecting phase issues, and not properly balancing levels. By avoiding these mistakes, your mixes will sound clearer and more professional.

Mixing can take your music to the next level, but if not done correctly, it can ruin all the efforts put into producing the track. While mixing, there are several areas where mistakes can happen. Here are some common mistakes during mixing that you need to avoid at all costs.

Skipping Gain Staging

Gain staging is one of the critical aspects of sound engineering that’s often underrated. It’s the process of setting the levels of the track, ensuring that the volume doesn’t clip or distort. Skipping this process can result in muddy or washed-out sounds and can cause significant problems further down the mixing chain. Always start by setting the correct gain levels on all the tracks and plugins in the session.

Over Eqing Tracks

Equalization or EQ is one of the most widely used tools during mixing, but overdoing it can lead to negative impacts on the mix. Boosting or cutting too much from a particular frequency range can cause masking issues, reducing the clarity of the sound and making it hard to stand out in the mix. It’s essential to use EQ only where it’s needed and always try to adjust the levels with balance in mind.

Using Too Many Plugins

Plugins are an excellent way to enhance the sound of your tracks and improve the overall mix. Still, overusing them can quickly clutter the mix and create unwanted distortion or artifacts. Each plugin you add to the chain can affect the sound differently, so it’s crucial to use only the necessary plugins and focus on getting the right sound through careful selection.

Neglecting Panning

Panning is one of the most effective ways to create space in a mix and prevent elements from clashing with each other. Neglecting to pan the tracks can lead to a flat, one-dimensional mix. It’s essential to consider the placement of each element in the stereo image and use panning to separate them, creating a wider and more spacious sound.

Losing The Vocal In The Mix

In a vocal-driven song, the vocal is the most critical element and should be clear, powerful, and upfront in the mix. However, not getting the vocal levels right can cause it to get lost in the mix, making it hard to hear and understand the lyrics. It’s crucial to set the vocal levels early in the process and make sure it sits comfortably in the mix, not ducking under or competing with other elements. To sum it up, avoiding these common mixing mistakes will help you create a polished and professional mix that stands out. Remember to always start with gain staging, use EQ and plugins sparingly, employ proper panning techniques, and keep the vocals upfront. Eliminating these mistakes can be the key to taking your music to the next level.

Finalizing The Mix

Finalizing the mix is an essential part of music production. It requires you to put all the pieces together to create a cohesive sound. It’s the point where everything should come together, but unfortunately, this is also where most mistakes occur. In this section, we’ll discuss two common mistakes: Not taking breaks and failing to reference mixes.

Not Taking Breaks

Mixing a track can be an extensive and exhausting process, so taking breaks can be beneficial not only for your ears but also for your overall workflow. It’s crucial to take short breaks and come back to your mix with a fresh perspective. Continuously listening to a mix for an extended period can lead to ear fatigue, making it difficult to make accurate judgments about your music.

So, it’s a good idea to take a break after 20 to 30 minutes of mixing. You can use this time to refresh your mind or do some stretching exercises. It’s also important to take breaks between mix sessions, so you can approach the mix with a fresh set of ears each time.

Failing To Reference Mixes

Another common mistake people make during the finalizing process is not properly referencing other mixes. Referencing is when you compare your mix to other tracks in the same genre to assess how your mix sounds comparatively.

Referencing is a crucial step in the mixing process because it helps you to understand how your mix stands against professionally mixed tracks and gives you an idea of the adjustments you need to make to enhance your mix.

Things to look for when referencing:
Volume balance between instruments
The clarity of individual instruments
The stereo width of the mix

Referencing can be done fairly quickly, but it’s essential to do it in a proper listening environment. A good pair of headphones or studio monitors is crucial to make accurate comparisons.

Finalizing your mix can be a tricky process, but by avoiding these common mistakes, you can make it more manageable. Taking breaks can help improve your workflow and keep you from making mistakes, while referencing can provide you with valuable feedback on your mix.

Common Mixing Mistakes To Avoid At All Costs

Credit: www.masteringthemix.com

Frequently Asked Questions For Common Mixing Mistakes To Avoid At All Costs

How Much Should You Charge To Mix And Master A Song?

The cost of mixing and mastering a song varies depending on several factors such as the audio engineer’s experience, the quality of the audio, and the duration of the song. Generally, the cost ranges from $50 to $500 per song.

However, it’s best to request a quote from your desired audio engineer for more accurate pricing.

What Is The First Thing To Do When Mixing?

The first thing to do when mixing is to set up your equipment and ensure everything is properly connected and functioning. This includes checking levels, adjusting gain, and testing equipment such as microphones and speakers. It’s important to get everything set up correctly before starting the actual mixing process.

How Do You Mix Properly?

To mix properly, follow these 5 guidelines: 1) Use the correct equipment and follow the recipe carefully. 2) Make sure your ingredients are at room temperature. 3) Add ingredients in the correct order and mix at the correct speed. 4) Scrape the sides of the bowl frequently.

5) Don’t overmix or undermix your ingredients.

How Can I Get Better At Mixing?

To get better at mixing, practice and experimentation is key. Focus on learning the technical aspects of mixing such as EQ, compression, and gain staging. Invest in quality equipment and reference tracks. Use soundproofing and monitoring to enhance your experience.

Consider seeking guidance from experienced engineers, attending workshops, and doing online courses to keep up with the latest practices.

Conclusion

To achieve professional sounding mixes, avoiding common mixing mistakes is crucial. Ensure that your mix stays clean and clear by paying attention to levels, frequency balance, and stereo field. By avoiding these mistakes, you can elevate the quality of your tracks and take your music to the next level.

Ultimately, understanding and actively avoiding these common mixing mistakes will help you to achieve the professional sound you’re after. Happy mixing!

Categories
Archive

Which Music Keyboard is Best for Beginners

For beginners, the Casio CTK-2550 is the best music keyboard to start with. Its affordable price, user-friendly interface, and features make it an excellent choice for those just starting to learn the instrument.

Learning to play the keyboard can be an exciting and rewarding experience. However, choosing the right instrument can be challenging, especially for beginners. There are so many different models available, each with its own set of features and functions. So, how do you know which music keyboard is the best choice for you?

We’ll look at some of the key considerations you should keep in mind when shopping for your first keyboard. We’ll also review some of the top music keyboard models on the market today, to help you make an informed decision.

Which Music Keyboard is Best for Beginners

Credit: futurism.com

Types Of Music Keyboards

Music keyboards are popular instruments that offer different types suitable for beginners, intermediates, and professionals. As a beginner student, choosing the right type of keyboard is essential to ensure you are comfortable with playing and practicing.

Portable Keyboards

Portable keyboards are ideal for beginners because they are lightweight and easy to transport, making them perfect for travelling. They come with a range of sounds, rhythms, and instrument voices, giving the learner an opportunity to experiment with different styles of music.

Most portable keyboards come with a built-in lesson feature, which helps beginners learn the basics of playing. Furthermore, they have a dynamic range of polyphony notes, which lets beginners play complex harmonies and chords without missing any notes.

Digital Pianos

Digital Pianos are real pianos in terms of their look and feel, but they produce sound digitally, making them highly versatile. They are perfect for beginners who want to learn and play classical music, as they sound and feel like traditional pianos and come with weighted keys.

Digital pianos have an exceptional sound quality, with some featuring onboard speakers and others allowing for connection to external sound amplifiers. They also offer in-built recordings, and most digital pianos come with USB connectivity, allowing you to connect it to your computer and record your progress.

Synthesizers

Synthesizers are suitable for learners who want to experiment and create different sound effects and unique sounds. These keyboards produce sound electronically, making them ideal for making music in modern genres such as electronic dance music, jazz, and rock music.

Synthesizers feature a range of features that can be manipulated to produce distinctive sounds, including filters, envelopes, and oscillators. They also have a range of in-built effects, such as reverb and delay, which let learners create complex soundscapes.

Summary

Ultimately, the choice of keyboard depends on the learner’s specific preferences and goals. Portable keyboards are excellent for learners who want to experiment with various musical genres due to their lightweight nature. Digital pianos are suitable for classical musicians and have an excellent sound quality, while synthesizers are ideal for learners who want to experiment with creating unique sounds and effects. Whichever option you choose, ensure that it suits your unique learning needs and preferences.

Which Music Keyboard is Best for Beginners

Credit: www.nytimes.com

Features To Consider

To choose the best keyboard for music beginners, consider features such as the number of keys, touch sensitivity, weighted keys, and connectivity options. Also, look for features like LED displays, built-in speakers, and adjustable stands to enhance the learning experience and make playing easier.

Features to Consider Are you looking for the best music keyboard for beginners? With so many options available in the market, it can be overwhelming to make the right choice. You need to consider certain features before buying a music keyboard to ensure that it meets your requirements. In this post, we will discuss the features that you need to consider while buying a music keyboard. Number of Keys The number of keys is an important feature that you need to consider while buying a music keyboard. Most music keyboards come with 61, 76, or 88 keys. If you’re a beginner, a 61-key keyboard would be sufficient for practicing. However, if you are serious about learning to play a piano, you should opt for a keyboard with 76 or 88 keys. Action Action refers to the touch sensitivity of the keyboard keys. It determines how much control you have over the sound produced by the keyboard. There are three types of actions you should consider, namely, non-weighted action, semi-weighted action, and fully weighted action. Non-weighted action keyboards are suitable for beginners, while semi-weighted and fully weighted actions are preferred by intermediate and advanced players. Polyphony Polyphony refers to the number of notes that can be played simultaneously. A keyboard with higher polyphony allows you to play complex pieces of music without losing any notes. For beginners, a polyphony of 32 or 64 notes is sufficient. Voices and Sounds A good music keyboard should have a variety of voices and sounds to choose from. This allows you to experiment with different types of music and genres. Look for keyboards with a minimum of 100 voices and 100 rhythms. Built-in Learning Tools Many music keyboards come with built-in learning tools such as lessons, tutorials, and instructional videos. These tools are very beneficial for beginners as they help them learn the basics of playing a keyboard. Look for keyboards with built-in learning tools if you are a beginner. Connectivity Look for music keyboards that offer different connectivity options such as USB, MIDI, and Audio In/Out. These options allow you to connect the keyboard to different devices such as a computer, tablet, or smartphone. MIDI and USB connectivity are essential if you plan to use the keyboard with music production software. In conclusion, considering these features will help you make an informed choice while buying a music keyboard for beginners. Remember to choose a keyboard that meets your current needs while also keeping in mind your future requirements.

Top Keyboards For Beginners

If you’re just starting out with music, finding the right keyboard can be overwhelming. With so many options available, it can be difficult to know which one is the best fit for your needs. To help you out, we’ve compiled a list of the top keyboards for beginners.

Yamaha Psr-e363

The Yamaha PSR-E363 is a great option for beginners who are interested in exploring different music styles. It comes with 574 different sounds and 165 accompaniment styles, so you can play along with your favorite songs. The keyboard also has a built-in lesson function that can help you learn to play different songs step-by-step.

Casio Ctk-2550

The Casio CTK-2550 is another great option for beginners. This keyboard comes with 400 different tones, 100 built-in songs, and 150 rhythms to play along with. It also has a step-up lesson system that allows you to learn at your own pace. The keyboard is lightweight and portable, so you can take it with you wherever you go.

Alesis Recital Pro

The Alesis Recital Pro is a full-sized keyboard that is designed specifically for beginners. This keyboard comes with 88 weighted keys that provide a realistic feel, and it has five built-in voices, including electric piano, acoustic piano, and organ. The keyboard also has a lesson mode that splits the keyboard into two sections, allowing you to play along with your instructor.

Roland Go:keys

The Roland GO:KEYS is a popular keyboard for beginners because it is easy to use and has a lot of great features. It comes with over 500 different sounds, including piano, electric piano, and strings. The keyboard also has a loop mix function that allows you to create your own music, and it has a built-in recorder that allows you to record and play back your performances.

In conclusion, each of these keyboards offers unique features that can help beginners learn to play the piano. When choosing a keyboard, it’s important to consider your individual needs and preferences. By doing so, you can find a keyboard that will give you the best chance of success in your musical journey.

Which Music Keyboard is Best for Beginners

Credit: www.rollingstone.com

Keyboard Accessories

HTML Response:

Keyboard accessories can play a vital role in improving your playing experience while practicing or performing on your instrument. With the right accessories, even a beginner can enhance their musical skills in no time. Below are some must-have keyboard accessories:

Keyboard Stand

A keyboard stand is an essential accessory that provides a stable base for your piano keyboard. A good keyboard stand will keep your instrument at an ergonomic height, which is essential for playing and avoids strain on your back and neck. Additionally, it provides enough legroom to sit comfortably and pedal space to support your feet while playing.

Some popular keyboard stand brands in the market include:

Brand NameFeatures
On-Stage KS7190 Classic Single-X Keyboard StandLightweight and Portable
RockJam Xfinity Heavy Duty Adjustable Double X Keyboard StandSupports Heavy weight, Double braced design
World Tour Keyboard StandSleek design, adjustable height settings

Headphones

Headphones are a great accessory to have, especially if you live in a shared space or with roommates, and you don’t want to disturb others while practicing. Headphones allow you to hear every note with clarity and without external noises. Moreover, some headphone models have extended frequency range that can reproduce the richness of sound demanded by classical music and enhance your playing experience.

Some popular models include:

  • Audio-Technica ATH-M30X Professional Studio Monitor Headphones
  • Sony MDR-7506 Professional Large Diaphragm Headphone
  • Beyerdynamic DT 990 PRO Professional Headphones

Sustain Pedal

A sustain pedal is an accessory that helps the notes in your piano sound to be prolonged or carry over without needing to hold the keys down yourself. A sustain pedal is essential to creating beautiful and lifelike sounds without having to stretch your fingers frequently. Sustain pedals come in various designs, and the most common is the footswitch.

Some popular brands in the market include:

  • M-Audio SP-2 | Universal Sustain Pedal with Piano Style Action for Electronic Keyboards
  • Donner DK-1 Sustain Pedal for Keyboard Digital Piano Foot Pedal
  • Yamaha FC5 Compact Sustain Pedal

Frequently Asked Questions On Which Music Keyboard Is Best For Beginners

Which Music Keyboard Is Good For Beginners?

A Yamaha PSR-E363 electronic keyboard is a great option for beginners. It has touch-sensitive keys, a variety of sounds and rhythms, and built-in lessons to help you learn. Plus, it’s affordable and portable.

Should A Beginner Get A Keyboard Or Digital Piano?

A beginner should get a digital piano. Digital pianos are cheaper and generally easier to use for beginners. They also offer a variety of sounds and features that can help with practice. However, if the beginner is interested in classical piano, a keyboard might not have the necessary touch sensitivity and key weight.

How Do I Choose A Music Keyboard?

Choosing a music keyboard requires considering your skill level, budget, preferred key size and weight, desired features, and planned use. It is important to try out different models before buying and make sure it has a good sound quality and touch response.

Do I Need 61 Or 88 Keys?

The key range you need depends on your playing style and music genre. If you play mainly classical music, 88 keys are more suitable. But if you’re into pop, rock, or electronic music, 61 keys can work just fine. Determine how many keys you need based on your music preference and personal preference.

Conclusion

After considering all the factors, it is clear that the best keyboard for beginners is one that is affordable, has the right number of keys, and comes with helpful features and tools. There are numerous options available on the market, but the Yamaha PSR-EW300 stands out as the best choice for beginners due to its user-friendly interface, versatile functionality, and high-quality sound.

With this keyboard, beginners can hone their craft and take their music skills to the next level.

Categories
Archive

Melodic Techno Track Start To Finish Ableton

In Ableton, creating a melodic techno track from start to finish involves understanding music theory, selecting appropriate sounds, constructing a cohesive arrangement, and applying effects and automation. This process requires attention to detail and creative decision-making to produce a track that captivates the listener.

As a content writer, I will break down each step and provide tips for crafting a successful melodic techno track that reflects your musical vision. Whether you’re a seasoned producer or a beginner, this guide will help you create a dynamic and engaging melodic techno track using Ableton’s extensive features and tools.

So, let’s dive into the creative process of producing a melodic techno banger!

Melodic Techno Track Start To Finish Ableton

Credit: www.productionmusiclive.com

Setting Up The Project

To set up a melodic techno project in Ableton, start by creating a new MIDI track and selecting a favorite sound or preset. Then, make use of the session view to organize your sounds into clips that can be edited and arranged in the arrangement view.

Finally, adjust the tempo and add effects to enhance the overall sound of the track.

Before diving into the creative process of producing a melodic techno track, it’s crucial to have a solid foundation set up. This includes selecting the right tempo, configuring the Ableton workstation and organizing the project. In this section, we’ll go over each step to ensure that your project is set up for success.

Choosing The Right Tempo

The tempo of your track can make or break the vibe you’re going for. In melodic techno, the tempo typically ranges between 120 and 128 BPM, giving the track an energetic yet introspective feel. Consider the overall mood you want to convey and experiment with different tempos until you find the sweet spot.

Configuring The Ableton Workstation

Configuring Ableton to your liking is key to ensuring a smooth and efficient production process. Here are some tips on how to configure your workstation:

  • Customize your channel strip in the mixer to include your most frequently used effects and plugins.
  • Set up a template with all your essential tracks and settings, so you can jump right into the creative process.
  • Assign hotkeys to streamline your workflow and save time.

Organizing The Project

Staying organized throughout the production process can save you a lot of time and headache. Here are some ways to keep your project organized:

  • Group similar tracks together and color-code them for easy navigation.
  • Label each track in a clear and concise manner.
  • Use folders to categorize your tracks and keep them organized.

Setting up your project may not be the most exciting part of producing a melodic techno track, but it’s a necessary step that can save you a lot of time and hassle in the long run. By following these steps, your project will be set up for success, and you’ll be ready to jump into the creative process with ease.

Creating The Beat

In this tutorial, you will learn how to create a melodic techno track from scratch using Ableton. Follow along step-by-step as we start with building the beat and gradually add elements like the bassline, synths, and effects to create a complete track.

Creating The Beat is a crucial step in producing a melodic techno track. It sets the foundation for the entire song and provides the necessary energy and groove. In this section, we will go over the step-by-step process of creating the beat for your melodic techno track using Ableton. ### Creating The Kick Pattern To start, create a new MIDI clip in Ableton and set the tempo to your desired speed. Begin by choosing a kick sample that suits the vibe of your track. Then, create a simple four-on-the-floor kick pattern by placing the sample on the first beat of each bar. Once you have the basic pattern, experiment with variations by adding or removing kicks to create interest and groove. ### Adding The Clap and Hi-hat Now that you have a solid kick pattern, it’s time to add some high-frequency elements to your beat. Choose a clap sample and add it on the second and fourth beats of each bar. This will create a standard clap pattern that complements the kick. Next, add a closed hi-hat on every eighth note to create a continuous driving rhythm. ### Enhancing The Beat With Percussions To add depth and texture to your beat, layer in some percussion samples. Choose percussive sounds such as shakers, congas, and tambourines and place them in between the kick and clap hits. This will create a more dynamic and complex rhythm that transitions smoothly throughout the track. Experiment with different samples and patterns until you find the perfect combination. In conclusion, Creating The Beat is a critical component of producing a melodic techno track. It sets the foundation for the entire song and provides the necessary energy and groove. By following these steps and experimenting with different samples and patterns, you can create a unique and compelling beat that drives your track forward.

Bassline Creation

Learn how to create a melodic techno track from start to finish in Ableton with Bassline Creation. This tutorial takes you step-by-step through the process, including how to create harmonies, layer drums, and arrange your track for maximum impact.

Creating a compelling bassline is an essential step in producing a Melodic Techno track. The bassline can elevate the energy of your track and give it the much-needed depth. Here’s a detailed guide on how to create an engaging bassline from scratch, step-by-step in Ableton Live.

Choosing The Right Bass Sound

The first step to creating a convincing bassline is deciding on the right bass sound. Ableton Live has a wide range of built-in bass synth options, and you can also use third-party plugins. You want a sound that has enough low-end presence and clarity to stand out in the mix. Look for a sound that complements the other elements in your track.

Creating The Bassline Pattern

Once you have chosen the right bass sound, the next step is creating a bassline pattern. Start by drawing in a MIDI clip and keeping it simple. Use the root notes of the chords in your track and emphasize the root notes of each bar. Next, add in rhythmic variations by changing the note lengths and adding in ghost notes. You can also experiment with octaves, glide, and other effects to create interest in the pattern.

Here are some tips to keep in mind:

  • Use longer note lengths on the root notes and shorter note lengths on other notes
  • Use ghost notes to add subtle variations in the pattern
  • Add slides and glide to create smoother transitions between notes
  • Experiment with octaves to add texture

Example Bassline Pattern

Bar 1Bar 2Bar 3Bar 4
C2G2A#2D#2
–C2–G#2
C2G2F2D#2

Now that you have created your bassline pattern, you can start processing it with filters, distortion, and other effects to make it more interesting. Remember, the bassline is the foundation of your track, and it’s essential to get it right. Keep practicing with different patterns and sounds until you find the perfect one for your Melodic Techno track.

Melody Creation

Explore the art of creating melodic techno tracks with an in-depth Ableton tutorial from Melody Creation. From choosing the right synths to layering melodies, this comprehensive guide will help you bring your musical visions to life.

Creating an engaging melody is the heart and soul of any music production, and Melodic Techno is no different. A well-crafted melody can evoke emotions and make a track stand out. In this post, we will guide you through the melody creation process for a Melodic Techno track, using Ableton software. We will cover everything from coming up with a melodic idea, developing it, and completing the melody.

Creating A Melodic Idea

Before starting with the melody creation process, it’s essential to have a basic understanding of the music theory and scales you want to use. With that, let’s move onto the first step – creating a melodic idea. To create a melodic idea for your Melodic Techno track, follow these steps:

  • Start with a simple chord progression that you like
  • Choose a sound that complements your chord progression
  • Experiment with different note combinations using the chosen sound and chord progression
  • Keep it simple and stick to a few notes initially

Remember to trust your instincts and not overcomplicate things.

Developing The Melodic Idea

Once you have a basic melodic idea, the next step is to develop it further. This is where you can get creative and add more complexity to the melody. Here are some steps to develop your melodic idea:

  1. Play around with the rhythm and timing of the notes in your initial melodic idea
  2. Add some harmonies to enhance your melody
  3. Try changing the arrangement of the notes to create variation within your melody
  4. Use automation to add modulation and expression to your melody

Remember to experiment with different sounds and effects to give your melody more character and depth.

Completing The Melody

The final stage of creating a melody is completing it. This means adding any finishing touches, making edits, and ensuring your melody is cohesive and well-structured. Here are some tips to complete your melody:

  • Listen to your melody multiple times to ensure it flows smoothly and makes sense
  • Make any necessary edits to ensure proper harmonies and arrangements
  • Remove any unnecessary notes and sounds that do not fit the melody
  • Use reverb and delay to add depth and space to your melody

By following these tips and tricks, you can create a captivating melody for your Melodic Techno track in no time. In conclusion, creating a melody for a Melodic Techno track can be challenging, but with the right approach, it can be rewarding. By following the steps mentioned above, you can create a melody that stands out and evokes emotions. Keep experimenting and honing your skills to create unique and memorable melodies.

Arrangement

Arranging a melodic techno track from start to finish in Ableton requires careful attention to detail. Each element must blend seamlessly with the others to create a cohesive and compelling piece of music. From selecting the right sounds to crafting the perfect transitions, every step in the arrangement process is crucial to a successful track.

Structuring The Track

The first step in arranging a melodic techno track is to establish a structure. A common structure for this genre is intro, build-up, main section, breakdown, and outro. Each section should have a clear purpose in the progression of the track. The intro builds anticipation, the build-up creates tension, the main section delivers the driving groove, the breakdown provides relief, and the outro brings resolution. Start by sketching out your sections in the Arrangement View.

Adding Transitions And Fills

Once you have established the basic structure, it’s time to add transitions and fills. These elements help move the listener from section to section and create interest and excitement in the track. Use drum fills, risers, white noise sweeps, and other effects to create smooth transitions between sections. Add short breaks or drops to keep the listener engaged and build tension.

Polishing The Arrangement

The final step in arranging a melodic techno track is to polish the arrangement. Focus on making the transitions between sections seamless. Check the energy, tension, and flow of the track. Make sure each section has its own unique character while still contributing to the overall story of the track. Experiment with automating effects, such as reverb and delay, to add depth and movement. Don’t be afraid to make changes and listen to the track with fresh ears, always refining until the track is polished and ready for release. Overall, arrangement is a crucial part of creating a successful melodic techno track. By focusing on structure, transitions, and polish, you can create a track that keeps the listener engaged and delivers a satisfying experience.

Melodic Techno Track Start To Finish Ableton

Credit: www.youtube.com

Mixing

In this tutorial, you will learn how to create a melodic techno track from start to finish using Ableton. We will walk through the process of mixing your track, including adjusting levels, EQ, compression, and more to achieve a polished and professional sound.

Now that all the melodic elements of our techno track are in place, it’s time to start mixing. Mixing can make or break a track, so it’s important to take your time and get it right. In this section, we’ll cover the three main stages of mixing: balancing the levels, processing the sounds, and adding effects.

Balancing The Levels

The first thing you want to do when mixing is to balance the levels of your tracks. This means making sure that no element of the track is too loud or too quiet in relation to the other elements. Use a volume meter to get a rough idea of where each track sits in the mix. Alternatively, you can use a visual mixing plugin like Waves’ VU Meter to help you balance the levels visually. Be sure to adjust the levels by ear as well, and trust your instincts when it comes to getting the right balance in your mix. Remember, less is often more when it comes to mixing, so don’t be afraid to trim unnecessary elements in your mix to make sure everything has its place.

Processing The Sounds

The next step in the mixing process is to add processing to each element of the mix to shape its sound. Start with EQ, which allows you to adjust the frequency content of each element, cutting out any unwanted frequencies and boosting any that need more presence. Then move on to compression, which evens out the volume of each element so that they sit more evenly in the mix. Depending on the specific sound you’re working with, you may also want to add other processing plugins like reverb or delay. These can help add ambiance and depth to your elements, making them sound more immersive. Just be careful not to overdo it with the processing – subtlety is key when it comes to mixing.

Adding Effects

Finally, once you’ve balanced the levels and processed each element, you can start adding effects to enhance the overall sound of the mix. Effects like filters can help create build ups and tension in the track, while looping and stutter effects can add a sense of rhythm and momentum to the elements. Again, it’s important not to overdo it with the effects – you want to enhance the sound, not make it overwhelming. Remember, the main purpose of mixing is to create a cohesive, balanced sound, so always listen to your mix and adjust as necessary to achieve that goal.

Mastering

Learn how to create a professional-quality melodic techno track from start to finish in Ableton with our comprehensive course. With detailed guidance, you’ll master everything from crafting the perfect melody to arranging and mixing your finished product.

Mastering is the final step in the production process of any melodic techno track. It ensures that the mix sounds cohesive and professional. The mastering stage prepares the track for distribution by adjusting the overall tonal balance, dynamic range, and stereo width.

Preparing The Track For Mastering

Before you start mastering your melodic techno track, you need to prepare it for the process. Here are some essential steps you should take before the mastering process:

  • Make sure that all individual tracks are adequately mixed and balanced.
  • Ensure that there is no clipping in the mix.
  • Export your mixdown at 24-bit / 44.1kHz or higher resolution.
  • Remove any unnecessary effects or processing like limiters, compressors, or EQs.

Mastering Techniques

Once you have prepared your melodic techno track, it’s time to start the mastering process. Here are some essential techniques to ensure that your track sounds crisp and professional:

  • Equalization: Use EQ to balance the track’s frequency spectrum.
  • Compression: Control the dynamic range of the track, ensuring it sounds lively and cohesive.
  • Stereo Widening: Create a stereo image that feels balanced across the width of the mix.
  • Loudness Maximization: Ensure your track’s perceived volume is now competitive with other tracks in the same genre.
  • Multiband Compression: Fine-tune the transitions between frequency ranges to ensure optimal balance.
  • Limiter: Ensure that the final output’s maximum level doesn’t exceed -0.3dBFS or -1dBFS.

In conclusion, mastering is the final step in producing your melodic techno track. Through proper preparation and by implementing mastering techniques during the process, you can add polish and professionalism to a mix making it stand out.

Melodic Techno Track Start To Finish Ableton

Credit: www.productionmusiclive.com

Frequently Asked Questions Of Melodic Techno Track Start To Finish Ableton

How Do You Write A Melodic Techno Track?

Writing a melodic techno track requires careful attention to musical elements such as chord progressions, melodies, and sound design. Start by establishing a strong groove, build tension with a dynamic structure, and use layering and effects to create a unique sonic atmosphere.

Experimentation and creativity are key, so don’t be afraid to try new ideas and push boundaries.

How Do You Arrange Techno Tracks?

To arrange techno tracks, start by creating an outline of the track and determining the structure. Use a consistent tempo and key throughout, and layer different elements gradually to build the energy. Experiment with transitions and effects to keep the listener engaged, and remember to keep the overall flow cohesive.

What Is A Melodic Techno?

Melodic techno is a subgenre of techno music that focuses on its melodic content, putting equal emphasis on both the melody and the beat. It typically has a more emotional, uplifting feel compared to other techno subgenres.

How Do I Cut In Ableton?

To cut in Ableton, select the audio clip you want to cut and position the playhead where you want to make the cut. Press “Command + E” on Mac or “Ctrl + E” on Windows to make the cut. Use the “Command + J” or “Ctrl + J” command to join clips back together.

Conclusion

Creating a Melodic Techno track from scratch using Ableton requires a combination of creativity and technical know-how. By following the step-by-step guide, you can produce a track that will impress your listeners. Remember, the key is to experiment with different sounds, add your personal touch, and strive for perfection.

With practice, patience, and persistence, you can master the art of producing stunning Melodic Techno tracks that will captivate and entertain your audience. Keep learning, keep improving, and keep pushing the boundaries of what you can accomplish with Ableton.

Categories
Archive

How To Compress A Snare Drum Properly

To properly compress a snare drum, use a fast attack and release time and a low ratio. To start, set the attack at around 20ms and the release at 150-200ms, then adjust accordingly.

Keep the ratio low, around 2:1 or 3:1, to avoid over-compression and maintain the natural dynamics of the drum. The snare drum is one of the most important elements of a drum kit, providing the backbeat and driving the rhythm of a track.

Properly compressing the snare can help it cut through the mix and add definition to the drum sound. However, over-compression can flatten out the natural dynamics and suck the life out of the drum. We’ll explore how to compress a snare drum properly, focusing on the attack and release times, ratio, and other important settings. By following these tips, you can achieve a powerful, punchy snare sound that sits perfectly in your mix.

How To Compress A Snare Drum Properly

Credit: www.drumeo.com

Understanding The Snare Drum

To properly compress a snare drum, it’s important to first understand the role it plays in a song. The snare drum is often the backbone of a track, providing a solid rhythm and adding depth. Using a compressor can help bring out the snare’s unique qualities and make it stand out in the mix.

Exploring The Anatomy Of A Snare Drum

The snare drum is a crucial element of any drum kit used in music production. To compress a snare drum properly, it is essential to understand its anatomy. A typical snare drum consists of a cylindrical shell, two heads (top and bottom), snare wires or cords, lugs, tension rods, and drum hoops. The top head is thinner than the bottom head, which is responsible for the drum’s resonance. The snare wires or cords are wire or gut strings stretched across the bottom head that vibrate when the drum is played, producing a characteristic buzzing sound.

Different Types Of Snare Drums

Different snare drums have distinct tones; some sound louder, brighter, or warmer than others. Snare drums come in various sizes, materials, and designs, and they produce different sounds based on these properties. For instance, metal snare drums are known for their loud, cutting sound, while wooden snare drums produce a warm, richer tone. Some of the most common types of snare drums are maple, birch, steel, and brass.

Importance Of Snare Drum Compression In Music Production

In music production, snare drum compression is essential to glue the snare sound together, making it punchier and more prominent in a mix. Compression helps balance the levels of each hit, making them more consistent in volume and less likely to overpower other elements in a mix. By reducing the dynamic range of the snare hits, compression helps tame the snare’s transients, creating a more consistent and focused sound. Compression can also add sustain and warmth to a snare drum sound and even out the tone. Overall, snare drum compression is a crucial tool in music production that every producer should master. In conclusion, understanding the snare drum’s anatomy and the different types available is essential to achieve the desired sound when compressing a snare drum. Compressing a snare drum promotes consistency in volume, balances the levels, and tames the transients, ultimately creating a more focused sound.

Preparation For Compression

Proper preparation is vital when it comes to compressing a snare drum. Begin by ensuring the drum is tuned and dampened correctly to achieve the desired sound. Then, use a high-quality compressor plugin and adjust the attack, release, ratio, and threshold settings until the snare sounds balanced and polished.

Choosing The Right Compressor

When it comes to compressing a snare drum, the choice of compressor is crucial. You need a compressor that is appropriate for the genre of music you are working on and the sound you want to achieve. Different compressors work differently on various drums, so it is essential to choose the one that fits your need. For instance, a fast-acting compressor may work best for rock and metal, while a slower compressor may be ideal for softer genres.

Setting Up The Daw

After selecting the right compressor, the next step is to set up your DAW properly. One of the best ways to do this is by using buss compression. Set up a buss track, route your snare mix to it, and add your compressor here. Then control the amount of snare being sent to the buss. This way, you can easily adjust the level of compression without affecting other elements of your mix.

Optimizing The Recording And Mixing Environment

Your snare drum’s sound can significantly influence the compression outcome. Thus, it is essential to have an optimized recording and mixing environment. Ensure that the snare is mic’d correctly and is recorded in a well-treated room. Also, remove any unwanted noise captured during the recording process. This way, when compressing, you will have a clean and clear sound to work with. In conclusion, preparation for compression is a crucial step in achieving a well-compressed snare drum. Choose the right compressor, set up your DAW efficiently, and optimize your recording and mixing environment to get an excellent sound. By following these steps, you’ll be on your way to producing professional-quality drum sounds that will enhance the overall sound of your mix.

Compression Techniques

To properly compress a snare drum, start by setting the attack and release times appropriately. Use a ratio of 4:1 and adjust the threshold until you get a gain reduction of about 3 decibels. Adjust the makeup gain accordingly, and you’ll have a compressed snare drum without losing its natural sound.

If you’re looking to improve your snare drum sound, compression can be your best friend. Compression is a popular technique used by professional sound engineers to give depth and character to the drums. In this article, we will explain the various compression techniques that you can use to improve your snare drum sound.

Understanding Threshold, Ratio, And Attack Times:

Before delving into the compression techniques, it’s important to understand the technical terms. The threshold refers to the audio level at which compression starts to take effect. The ratio determines the amount of gain reduction that takes place when the audio exceeds the threshold. Attack time is the time it takes for the compressor to start compressing the audio after it exceeds the threshold level. These settings are adjustable, and one can tweak them for different genres.

Applying Different Compression Techniques – Parallel Compression, Sidechain Compression, Etc.:

There are several different ways to compress snare drums effectively, and each technique produces a distinct sound. One of the most popular methods is parallel compression, which involves blending a compressed version of a track with an uncompressed version. Sidechain compression, another widely used compression technique, uses the input signal from one source to control the compressor’s action on another. This technique can help achieve a more consistent overall mix.

Tips And Tricks To Achieve The Perfect Snare Drum Compression:

When it comes to snare drum compression, there are no fixed rules. However, a few tips and tricks can improve your sound.

  • Use short attack times to keep the drum’s initial attack intact.
  • Adjust the release time to allow the compressed signal to level out.
  • Try using a slow ratio for a more transparent sound or a high ratio for a more exaggerated effect.
  • Use EQ to shape the sound before compressing.

In conclusion, compression techniques can add life and character to snare drums to make them sound more powerful and interesting. By understanding the technical settings, trying out various compression techniques, and following a few tricks, you can achieve the perfect snare drum compression sound that fits your music.

Post-compression Processing

Post-compression processing is an important step when it comes to properly compressing a snare drum. You can achieve a punchy and dynamic sound by adding EQ, saturation, and reverb to the compressed track.

After compressing your snare drum, you may think that the job is done, but there’s still work to be done. Post-compression processing is crucial in achieving the perfect sound.

Equalization

With equalization, you can bring out the best frequencies in your snare drum. Boosting the high frequencies will give your snare drum more snap, while boosting the low frequencies will give it more depth. Alternatively, you could cut the high frequencies to reduce harshness or cut the low frequencies to reduce muddiness.

Reverb And Delay

Reverb and delay are both effects that can add depth and space to your snare drum sound. Reverb can give your drum sound a sense of space, like it’s being played in a room. On the other hand, Delay can add an echo-like effect, which can sound great for certain styles of music.

Volume Adjustment

After compression, you may need to adjust the volume of your snare drum to fit in with the rest of your mix. You could bring the volume up a bit to make it more prominent, or bring it down if it’s too loud. Finding the right volume balance in the mix is key. Remember, post-compression processing is just as important as compression itself. These techniques, when applied correctly, can help you achieve the perfect snare drum sound for your mix.

Mixing And Mastering

Proper snare drum compression is essential for creating a dynamic and punchy mix. To achieve this, it is important to select the right compressor settings, adjust the attack and release times, and experiment with parallel compression techniques. With these tips, you can achieve a well-balanced and impactful snare sound for your mix.

Balancing The Snare Drum In The Mix

After compressing the snare drum, the next step is to balance it in the mix. It is essential to find the sweet spot for the snare drum in the mix. This can be achieved by soloing the snare drum, adjusting the volume, and bringing in other elements of the mix one by one. The kick drum and bass guitar should be balanced first, followed by the snare drum, then the rest of the instruments. A well-balanced mix ensures that all the instruments can be heard clearly, without any one instrument overpowering the others.

Mastering The Final Mix With A Comprehensive Approach

The final step in the process of compressing a snare drum is mastering the final mix. Mastering involves a comprehensive approach that involves equalization, compression, and limiting to achieve a polished and professional sound. EQ is used to enhance the tonal balance of the mix, ensuring that all frequencies are represented evenly. Compression is applied to the mix to control the peaks and valleys in the volume, ensuring a consistent loudness level. Limiting is used to bring the overall loudness level up to commercial standards. In conclusion, compressing a snare drum is a crucial step in achieving a well-balanced and professional mix. Balancing the snare drum in the mix and mastering the final mix with a comprehensive approach are two essential steps to achieving a polished and professional sound. Use these tips to create a mix that will impress your listeners.

How To Compress A Snare Drum Properly

Credit: www.masteringthemix.com

Frequently Asked Questions On How To Compress A Snare Drum Properly

How Should I Compress My Drums?

To compress your drums properly, you should first ensure that your drums are recorded well. When it comes to compressing drums, you should use a gentle ratio, a quick attack and release, and a low threshold to prevent overcompression. Try using a parallel compression technique to achieve a fuller sound while retaining the dynamics of the original recording.

What Is The Best Compression Ratio For Snare?

The best compression ratio for snare depends on your preference and the specific song or style of music. Generally, a range of 3-6:1 with a fast attack and a medium release can be a good starting point. Experimenting with different settings can help you find the perfect ratio for your desired sound.

How Do You Muffle A Snare Drum?

To muffle a snare drum, place a piece of cloth or foam on top of the drumhead. Experiment with different materials and amounts until you achieve the desired level of dampening. Avoid over-dampening the snare as it can negatively impact the sound.

What Is The Best Compression Ratio For Drums?

A compression ratio of 3:1 is generally recommended for drums. This helps to even out the dynamic levels and provide a consistent sound. However, it ultimately depends on the individual track and the desired outcome. Experimentation may be necessary to find the optimal compression ratio.

Conclusion

Compressing a snare drum properly is a crucial part of achieving a great-sounding mix. Understanding the basics of compression and applying the right settings can make all the difference in getting the desired effect. From adjusting the attack and release times to adjusting the ratio and threshold, there are many factors to consider.

By following the tips outlined in this post, you can achieve a professional-quality sound and take your music production skills to the next level.

Categories
Archive

How Much Does It Cost to Mix And Master a Song

The cost to mix and master a song varies between $50 to $500, depending on the number of tracks, the complexity of the mix, and the experience of the audio engineer. Mixing and mastering are essential steps in the music production process that can make or break the final product.

The mixing process involves balancing the levels of different tracks, adding effects, and creating a cohesive sound. On the other hand, mastering helps to enhance the overall sound quality and make it ready for distribution. These processes require technical expertise and professional equipment, which can come at a cost.

However, investing in these services can lead to better-sounding music and increase the chances of success in the music industry. We will explore the factors that affect the cost of mixing and mastering a song and how to choose the right provider for your needs.

Finding The Right Sound Engineer

Choosing the right sound engineer is crucial when it comes to getting a high-quality, professional mix and master for your song. With so many sound engineers out there, it can be challenging to know how to find one that will meet your needs and budget. In this post, we’ll discuss how to research and evaluate experienced sound engineers to ensure you find the perfect match for your musical vision.

Researching Experienced Sound Engineers

The first step in finding the right sound engineer is to research your options. A quick online search for sound engineers in your area will give you a list of potential candidates. Take the time to check out their websites and social media profiles to get a sense of their style, experience, and previous work.

You can also reach out to other musicians or industry professionals for recommendations. Ask for referrals from individuals you trust and respect, and gather a list of sound engineers that come highly recommended. Word-of-mouth referrals are often a great way to find a reliable and skilled sound engineer.

Evaluating Their Portfolio And Credentials

Once you’ve compiled a list of potential candidates, evaluate their portfolio and credentials. Check out their website to see examples of their previous work and listen to their mixes in different genres. This is an excellent opportunity to see if their style and sound match what you’re looking for in your song.

Another essential factor to consider is their credentials. Check if the sound engineer has had any formal training or certifications. This provides proof of their knowledge and expertise in the field. The best sound engineers should also be able to provide you with references or testimonials from previous clients to validate their skills and professionalism.

Conclusion

Finding the right sound engineer is critical when it comes to producing high-quality music. By researching and evaluating experienced sound engineers, you can ensure that you choose someone who will help you achieve your musical goals. Remember, the right sound engineer will not only have the necessary technical skills but will also be able to understand and translate your artistic vision into a fantastic final product.

Cost Of Mixing A Song

The cost of mixing and mastering a song can vary greatly depending on several factors. Factors such as the studio or engineer’s experience, the length of the song, the number of tracks and effects used, and the turnaround time required can all play a role.

Generally, costs can range anywhere from a few hundred to several thousand dollars.

When it comes to the final stages of music production, mixing and mastering are critical for producing a polished sound. Mixing is the process of combining individual tracks and adjusting their levels, tones, and effects to create a cohesive sound. As an artist or producer, understanding the cost of mixing a song is essential to budgeting and ensuring a high-quality final product. So, let’s dive into the factors affecting the cost and the average rates for mixing a song.

Factors That Affect The Cost Of Mixing A Song

The cost of mixing a song can vary widely based on several factors. Here are some of the most common factors that can affect the price:

  • The experience and skill level of the mixing engineer
  • The complexity of the song, including the number of tracks and the level of detail required for each track
  • The timeline for the project, such as rush orders or turnaround times
  • The recording quality and how well tracks were recorded
  • The genre of music and the elements required for that genre (e.g., vocal tuning for pop music or intricate guitar effects for rock music)

Average Rates For Mixing A Song

Mixing a song typically ranges from $100 to $1000 per song, depending on the factors mentioned above. This range may vary according to the experience of the mixing engineer, with rates being higher for professionals with more years of experience. For example, a beginner-level mixing engineer might charge around $100-250 per song, while an experienced mixing engineer may charge upwards of $500 per song. It is worth noting that most mixing engineers offer discounts when mixing multiple songs at once. In conclusion, understanding the cost of mixing a song is essential to budgeting and ensuring a high-quality final product. The cost of mixing a song varies depending on various factors such as experience levels of the mixing engineer, the complexity of the song, timeline requirements, recording quality, and the genre of music required. Knowing these factors can help you understand and negotiate with a mixing engineer to ensure a well-mixed track at an affordable cost.

Cost Of Mastering A Song

The cost of mixing and mastering a song can vary depending on a few factors such as the experience level of the engineer, the studio equipment and how complex the project is. On average, it can cost between $50 to $500 per song.

When it comes to producing a high-quality track, there are many things to consider, from lyrics to beats and instruments. However, one of the most critical aspects of producing a great song is the mastering process. Mastering is the final step in the music production process and ensures that your track’s sound is balanced and polished for optimal listening experiences. The cost of mastering a song depends on many factors, including the quality of the song, the complexity of the mix, and the experience of the audio engineer.

Factors That Affect The Cost Of Mastering A Song

To determine the cost of mastering a song, several factors must be considered. These factors include the quality of the original mix and the complexity of the song. If you have a simple track that’s easy to mix, the mastering price will likely be lower than a more complex mix that requires more work. The experience and reputation of the audio engineer are also vital factors that affect the mastering cost. A highly-skilled mastering engineer with a long list of projects and satisfied clients will charge more for their services than a less experienced one.

Average Rates For Mastering A Song

The cost of a professional mastering service varies greatly depending on the studio, location, and the quality and experience of the engineer. On average, however, you can expect to pay between $50 and $500 per song for mastering. In some cases, a professional studio may charge even more, especially if you’re looking for a high-quality service that includes a full audio massage. However, the quality of your master can be enhanced by choosing a professional mastering engineer with a great track record of producing polished, well-balanced audio tracks.

Conclusion

In conclusion, mastering is an important part of the music production process that ensures your track is well-balanced and polished and provides optimal listening experiences. When it comes to the cost of mastering a song, many factors must be considered, including the quality of the original mix, the complexity of the song, and the experience of the mastering engineer. While the cost of mastering a song varies greatly, the average price is between $50 and $500 per song. By selecting a professional mastering engineer with a great track record, you can ensure that your song will be polished and ready to present to your listeners.

How Much Does It Cost to Mix And Master a Song

Credit: medium.com

Mixing Vs Mastering

The cost of mixing and mastering a song varies based on several factors such as the level of complexity, the experience of the engineer, and the duration of the song. A basic mix can range from $100 to $1,000, while mastering can cost from $50 to $350 per song.

Understanding The Difference Between Mixing And Mastering

When it comes to music production, mixing and mastering are two distinct processes that are often confused with each other. Mixing is the process of bringing together multiple audio tracks into a final stereo mix. Mastering is the process of polishing and enhancing the final mix to achieve a cohesive, balanced, and commercial-ready sound. Understanding the difference between these two processes is important to know how much it costs to mix and master a song. Mixing involves adjusting the levels, panning, equalization, compression, reverb, and other effects to achieve a cohesive and balanced mix. It requires arranging the tracks in a way that each instrument and vocal sits well in the mix without overpowering each other. This process is done using a Digital Audio Workstation (DAW) by a mixing engineer. On the other hand, mastering is the final stage of music production. It involves optimizing the audio mix for distribution across different platforms like CD, streaming platforms, and radio. Mastering engineer’s goal is to bring out the best in the stereo mix while addressing any issues such as lack of clarity, harshness, and imbalance in frequencies.

Which One Should Be Done First?

Mixing should be done first before mastering. It is important to get the final mix right before sending it to the mastering engineer. If the mix is not balanced, polished, and sounds off, no amount of mastering can fix it. Additionally, a poorly mixed track can result in a subpar master. Therefore, it’s essential to invest time and effort to get the best mix possible before submitting it for mastering.

Cost Of Mixing And Mastering A Song

The cost of mixing and mastering a song depends on various factors such as the complexity of the mix, the length of the song, the number of tracks, and the experience of the mixing and mastering engineer. Typically, the cost of mixing a song can range from $100 to $1000 per song, while the cost of mastering can range from $50 to $300 per song. However, it’s essential to note that the pricing varies across different studios and professionals. In conclusion, understanding the difference between mixing and mastering is vital to achieving a cohesive, balanced, and commercial-ready sound. Mixing should be done first before mastering, and the cost of mixing and mastering varies depending on different factors. Investing in a professional mixing and mastering engineer is key to achieving a high-quality final product.

Diy Vs Professional Services

When it comes to music production, mixing and mastering are two of the most crucial processes that can make or break a song’s success. While DIY mixing and mastering may seem like a cost-effective option, it may not always produce the desired results. On the other hand, hiring a professional may seem like an expensive investment, but it may eventually lead to a better outcome. Let’s explore the pros and cons of DIY mixing and mastering and why hiring a professional is worth the cost.

Pros And Cons Of Diy Mixing And Mastering

DIY mixing and mastering are often preferred by artists who are on a budget or want to have complete control over their music production. However, this comes with its set of pros and cons.

Pros of DIY Mixing and Mastering

  • Cost-effective option for artists on a budget
  • Complete control over the final outcome of the production
  • Learn new skills and gain experience in music production

Cons of DIY Mixing and Mastering

  • Steep learning curve and requires a lot of time and effort to get right
  • May not have access to professional-grade equipment and software
  • May not be able to identify and fix every issue in the song
  • May not have the required objective ear to make accurate judgments and decisions

Why Hiring A Professional Is Worth The Cost

While DIY mixing and mastering may be a good option for some, it’s important to understand that it requires a significant amount of time and effort. Hiring a professional not only saves time and effort, but it also offers a multitude of benefits, including:

Pros of Hiring a ProfessionalCons of Hiring a Professional
Access to professional-grade equipment, software, and techniquesObjective ear and experienced judgment to identify and fix issues in the songExpertise in creating a cohesive, polished soundFast turnaround timeExpensive investmentMay not have complete control over the final outcomeMay require additional communication and revisions

In conclusion, the decision between DIY mixing and mastering and hiring a professional ultimately depends on an artist’s specific needs, goals, and constraints. However, it’s important to understand that while DIY mixing and mastering may seem like a cost-effective option, it requires a significant amount of time, effort, and experience to get it right. Hiring a professional may seem like an expensive investment, but it may lead to a better, polished, and cohesive sound that may help an artist stand out in the competitive music industry.

How Much Does It Cost to Mix And Master a Song

Credit: www.planetarygroup.com

Negotiating A Fair Price

Negotiating a fair price for mixing and mastering a song can vary depending on the specific project. Factors such as the number of tracks and the level of production quality can impact the overall cost. It is important to communicate your budget and expectations clearly to ensure a fair and satisfactory agreement is reached.

When it comes to mixing and mastering a song, one of the biggest concerns is the cost. While quality comes at a price, it’s important to make sure that you get a fair quote from the sound engineers. Negotiating a fair price can be challenging, but it’s worth it to ensure that you’re not overcharged for their services. In this post, we’ll discuss some tips and strategies for negotiating a fair price for your song’s mixing and mastering.

How To Negotiate With Sound Engineers

Negotiating with sound engineers can be tricky, but it’s essential to ensure that you get a fair quote. Here are some tips on how to negotiate with sound engineers:

  • Do your research and have an idea about the average cost of mixing and mastering a song.
  • Communicate your budget and ask for a breakdown of their quote.
  • Show them that you value their expertise by discussing their experience and skill level.
  • Be willing to compromise and find common ground.
  • Ask for samples of their work to ensure that they have the necessary skills to mix and master your song.

Establishing A Budget And Sticking To It

Before negotiating with sound engineers, it’s important to establish a realistic budget. A budget will help you determine what you can and can’t afford. Here are some tips on how to create and stick to your budget:

  1. Decide how much you can afford to spend on mixing and mastering your song.
  2. Determine the most important aspects of your song that need to be mixed and mastered.
  3. Consider different levels of service offered by the sound engineers and choose the one that fits your budget best.
  4. Stick to your budget by prioritizing your needs and saying no to any unnecessary services that may be offered.

Remember that quality comes at a price, but negotiating a fair price for mixing and mastering your song is possible with the right knowledge and communication. By doing your research, establishing a budget, and negotiating with sound engineers, you can ensure that you get the best value for your money.

Alternatives To Mixing And Mastering

When it comes to producing a high-quality song, mixing and mastering are two crucial steps that ensure that the song sounds professional. However, not everyone can afford to spend a fortune on these services. Luckily, there are alternatives to mixing and mastering that can help artists save money without compromising on quality. In this blog post, we’ll discuss two alternatives to mixing and mastering: using automated software and utilizing online mixing and mastering services.

Using Automated Software

Automated software has become a popular alternative to mixing and mastering. This software uses artificial intelligence to automatically adjust the levels and frequencies of a song, which can save artists a lot of time. Not only is automated software less expensive, but it is also more convenient, as artists can mix and master their songs from the comfort of their own home.

Utilizing Online Mixing And Mastering Services

Online mixing and mastering services are another option for artists who want to save money. These services are typically less expensive than hiring a professional mixing and mastering engineer because they often use a team of engineers based in different parts of the world. This means that the cost of labor is lower, and artists can save money without compromising on quality.

Moreover, online mixing and mastering services typically have a quick turnaround time, which is beneficial for artists who need their songs mixed and mastered quickly. Additionally, these services often provide a preview of the final mix and master, which gives artists the opportunity to provide feedback and make changes before the final version is delivered.

In conclusion, there are alternatives to mixing and mastering that can help artists save money without sacrificing quality. By using automated software or online mixing and mastering services, artists can produce high-quality songs that sound professional and polished.

How Much Does It Cost to Mix And Master a Song

Credit: www.planetarygroup.com

Frequently Asked Questions For How Much Does It Cost To Mix And Master A Song

How Much Does It Cost To Get One Song Mixed?

The cost of getting one song mixed varies depending on the experience and reputation of the mixing engineer, the complexity of the song, and the studio’s location. On average, the cost can range from $100 to $1,000 per song.

How Much Should I Pay For A Mix And Master?

The cost of a mix and master can vary depending on a range of factors, such as the studio and engineer, the quality of the recording, and the complexity of the project. However, on average, you can expect to pay anywhere between $50 to $500 per song.

It’s important to discuss your budget upfront with your potential engineer to avoid any surprises.

How Much Do People Charge For Mastering A Song?

The cost for mastering a song varies greatly depending on factors such as experience, reputation, and location of the mastering engineer. Generally, prices range from $50 to $300 for a single song. However, some mastering engineers offer packages or hourly rates which can affect the final cost.

How Much Does It Cost To Master A Track?

The cost of mastering a track varies greatly depending on a number of factors including the experience level of the mastering engineer, the length of the track, and the complexity of the mix. Typically, mastering services can range from $50 to $300 per track, but it’s important to research and compare pricing before making a decision.

Conclusion

The cost of mixing and mastering a song can vary greatly depending on several factors. However, it is important to keep in mind that this process is crucial in ensuring that your music is of high quality and ready for distribution.

Whether you decide to go with a professional studio or an online service, it is essential to do thorough research and choose a reputable provider. By investing in the mixing and mastering of your music, you are investing in your career as a musician and ultimately in the satisfaction of your audience.

Categories
Archive

Top Free Chorus Vst Effects For Pc Mac

The top free chorus VST effects for PC and Mac are Tal-Chorus-LX, TDR Nova, ReaPlugs, and Acon Digital Multiply. Adding a chorus effect to your sound can give it a richer, thicker quality that can help it stand out in a mix.

While there are many expensive chorus VST plugins available, there are also plenty of quality free options. We will explore the top free chorus VSTs available for both PC and Mac. From versatile plugins like Tal-Chorus-LX to more specialized VSTs like Acon Digital Multiply, there’s sure to be a chorus effect on this list that will enhance your sound without breaking the bank.

Whether you’re a seasoned producer or just getting started, adding a free chorus VST to your toolkit is a great way to improve your mixes.

Top Free Chorus Vst Effects For Pc

Discover the top free chorus VST effects available for both PC and Mac. These effects offer a wide range of modulation options to enhance the sound of your music productions, from subtle warbling to intense pitch modulation, all with easy-to-use interfaces.

Looking for top-quality chorus VST effects for free? Well, we’ve got you covered. In this blog post, we will highlight some of the best free chorus VST effects for PC that will take your music production to the next level. These VSTs will add a unique character to your sound and make your music more lively and interesting.

Tal-chorus-lx

TAL-Chorus-LX is one of the best chorus VST plugins available for free. It is known for its pure analog chorus sound that is perfect for any music genre. TAL-Chorus-LX offers a great sound quality that is equivalent to paid VSTs. It comes with two chorus algorithms and a unique spread control that helps you adjust the stereo image.

Acon Digital Multiply

If you are looking for a chorus VST that offers a versatile sound, then Acon Digital Multiply is the way to go. It is a free chorus effect that can create everything from subtle to extreme modulation effects. Acon Digital Multiply comes with two separate delay lines that can be controlled separately. This allows you to create a unique sound with precision.

Blue Cat’s Chorus

Blue Cat’s Chorus is a classic-sounding chorus plugin that offers a wide range of sound modulation options. This VST is ideal for creating a vintage and warm sound. It comes with two different modes, one for classic chorus effects and another mode for flanger effects. This plugin offers a flexible interface, making it easy to operate.

Meldaproduction Mchorusmb

MeldaProduction MChorusMB is a sophisticated VST plugin that offers a customizable sound. It comes with a dynamic interface that allows you to tweak the parameters to create a unique chorus sound. This VST offers up to six individual voices that can be pitched up or down to create a thick and wide sound. MChorusMB is a cutting-edge VST that delivers a professional-quality chorus sound. In conclusion, these free chorus VSTs will take your music production to the next level. They offer a range of sound modulation options that will add unique characteristics to your music. Whether you are just starting or an experienced producer, these VSTs will make your music sound more lively, interesting, and engaging.

Top Free Chorus Vst Effects For Pc Mac

Credit: synthanatomy.com

Top Free Chorus Vst Effects For Mac

Discover the top free chorus VST effects for Mac and elevate your music production. Use these highly rated plugins to create stunning, immersive soundscapes that enrich your tracks. Don’t miss out on these indispensable tools for any budding music producer.

If you’re a Mac user looking for some top-quality free chorus VST plugins to enhance your audio production, then look no further. Here’s a list of some of the best chorus VST plugins that are available for Mac users.

Artsacoustic Reverb

One of the best chorus VST plugins for Mac users is ArtsAcoustic Reverb. This plugin offers a wide variety of controls to adjust the chorus effect, including the depth, speed, and feedback. ArtsAcoustic Reverb is also known for its smooth sound quality and is perfect for adding depth and space to your mix.

Js Chorus

Another excellent option for Mac users is JS Chorus. This plugin provides a classic chorus effect that replicates the sound of analog chorus pedals. JS Chorus offers adjustable controls for the depth and rate of the chorus effect, as well as a mix control for blending the effect with your dry signal.

Audio Damage – Freqdelay

Audio Damage’s FreqDelay plugin is another great choice for Mac users. This plugin offers a unique take on the chorus effect, with the ability to modulate the delay time and feedback using an LFO. FreqDelay also features adjustable controls for the speed, depth, and mix of the effect. Overall, these chorus VST plugins offer great value and can greatly enhance the sound quality of your productions. So, give them a try and see what kind of creative potential they unleash.

How To Install And Use Free Chorus Vst Effects

Learn how to easily install and use top free chorus VST effects for PC and Mac. These plugins can add depth, dimension and warmth to your tracks, creating a fuller sound. Enhance your audio production by experimenting with different chorus effects.

Downloading The Plugin

To get started with using free chorus VST effects, the first step is to download the plugin from a reputable source. You can find free chorus VST plugins by doing a simple search online. Ensure that you only download from trustworthy websites to avoid downloading malware.

Installing The Plugin

Once the plugin has been downloaded, the next step is to install it on your computer. The installation process may differ depending on the plugin and your computer’s operating system. However, most plugins come with an installer that you can use to install the plugin with just a few clicks.

Using The Plugin In A Daw

After successfully installing the plugin, the next step is to use it in your digital audio workstation (DAW) software. Simply open your DAW and check that the plugin has been successfully installed and is available in the list of plugins. You can then add the plugin to your project in the same way you would add any other plugin. Simply drag and drop the plugin onto the track you want to add chorus effects to. In conclusion, downloading, installing, and using free chorus VST effects is easy and straightforward. With this guide, you can take your music production to the next level, adding depth and dimension to your sound. So why not give it a try and see the difference it can make in your music!

Top Free Chorus Vst Effects For Pc Mac

Credit: www.productionmusiclive.com

Top Free Chorus Vst Effects For Pc Mac

Credit: synthanatomy.com

Frequently Asked Questions Of Top Free Chorus Vst Effects For Pc Mac

What Is The Best Chorus Plugin For Vocals?

The best chorus plugin for vocals varies based on personal preference and the specific needs of the project. Some popular options include Waves Doubler, Soundtoys Microshift, and UAD Cooper Time Cube. It’s best to experiment with different plugins to find the one that works best for your vocals.

What Are The Best Plugins For Mixing Vocals Free?

Some of the best free plugins for mixing vocals include Tal-Reverb-4, NastyDLA MkII, Klanghelm DC1A, Voxengo OldSkoolVerb, ReaComp and ReaEQ. These plugins help to enhance vocal sounds by reducing noise, adding effects and improving overall quality.

What Is The Vocal Changer Plugin?

A vocal changer plugin is a tool used to modify the pitch and modulation of recorded or live vocals. It is commonly used in music production, podcasting, and voice-over work to achieve desired vocal effects such as robotic, animal, or gender changes.

What Does Vintage Chorus Do?

Vintage chorus adds a warbling or wavy effect to guitar or vocal tracks. It creates depth and texture to audio by taking the original sound signal and processing it through a chorus module, which adds multiple audio signals to create a new, harmonious signal.

Conclusion

To conclude, these top free chorus VST effects for PC and MAC can enhance the quality of your music production without breaking the bank. Whether you are a professional music producer or a beginner, these plugins offer a variety of features that allow you to customize your sound the way you prefer.

We hope this list is helpful and inspires you to explore new sounds and techniques in your music production journey. Remember to share your thoughts, feedback, and experiences with us in the comments below.

Categories
Archive

Can You Be a Musician Without a Degree

Yes, you can be a musician without a degree. Having a degree can be beneficial, but it’s not necessary to become a successful musician.

Many successful musicians such as Beyonce, Rihanna, and Jay-Z did not receive a formal music education. Also, what matters most is your passion for music, your talent, commitment, and dedication to continuous learning and growth. Also, a degree in music can provide you with technical knowledge and training. But it doesn’t guarantee success in the music industry.

Related reading: Can You Be a Music Producer Without a Degree: Unleash Your Creative Potential Today and Can You Be a Musician Without Social Media. For background, see the Wikipedia article on Musician.

Moreover, ultimately, becoming a successful musician requires a combination of talent, hard work, creativity, networking skills, and a bit of luck.

Can You Be a Musician Without a Degree

Credit: sidehustles.com

Exploring The Pros Of Obtaining A Degree In Music

In addition, many aspiring musicians wonder if they need a music degree to make a successful career in music. In addition, some of the biggest names in music never studied it formally. Still, a music degree has its perks. Let’s explore some of the advantages of getting a degree in music.

Exposure To Diverse Styles Of Music for Musician Without a Degree

Furthermore, one big advantage of a music program is the chance to learn styles from around the world. For example, this exposure to diverse music styles will help you expand your horizons, challenge your understanding of music, and open up new avenues of creativity.

Networking Opportunities for Musician Without a Degree

Additionally, attending a music program provides an opportunity to meet people from different backgrounds and music styles. As a result, you’ll network with professional musicians, professors, and other students, which can lead to unique collaborations that can advance your career.

Institutional Resources Including Access To Facilities And Equipment

Also, Music programs have access to different kinds of equipment and facilities that you might not be able to afford as an independent musician. However, this includes full-sized performance halls, recording studios, and access to various instruments. These resources can help you hone your skills and develop your craft. This leads to better performance and recording quality, which can ultimately lead to more work.

Internship & Performance Opportunities for Musician Without a Degree

Music programs provide access to vital performance and internship opportunities, such as playing in the school orchestra or working on a production team. These experiences can help build your resume, gain performance experience, and eventually lead to job opportunities.

Pursuing a career in music is challenging, but getting a degree in music can provide some advantages that can give you an edge in an increasingly competitive industry.

Examining The Cons Of Pursuing A Degree In Music

When it comes to pursuing a career in music, the traditional route often involves obtaining a degree in the field. However, with rising costs of education and the unpredictable nature of the industry, it’s important to examine the drawbacks of this path. Then, here, we’ll take a closer look at some of the cons of pursuing a degree in music.

The Cost Of Tuition & Student Loans

Moreover, the cost of tuition for music schools can be incredibly expensive, with many private institutions charging upwards of $40,000 a year. Additionally, with student loans, this cost can add up quickly, leaving many graduates with tens or even hundreds of thousands of dollars in debt. This financial burden can make it difficult to pursue a career in music, especially given the industry’s unpredictable nature.

Lack Of Focus On Entrepreneurship & Music Business

In addition, Music degrees teach theory and performance in depth. However, they may not cover the business side of the industry. These skills are vital to success as a musician but may not be adequately taught in a traditional music program. Without this knowledge, many graduates struggle in a competitive field. Earning money from music can be hard.

Traditional Barriers Preventing A Career As Musician

Furthermore, historically, the music industry has had a variety of barriers to entry that make it challenging for aspiring musicians to break through. These barriers can include lack of connections, nepotism, and even geographic location. A degree may build technical skills. Yet it may not bring the connections you need to succeed.

Overall, while obtaining a degree in music can be beneficial in some respects, it’s important to consider the drawbacks of this path. Additionally, Tuition, student loans, little business training and traditional barriers can all make success harder.

Can A Musician Without A Degree Succeed In The Industry?

Also, many aspiring musicians believe a formal degree is a necessary step toward a music career. However, with changing times and the internet revolutionizing the way music is consumed, the relevance of a music degree has been a topic of debate. In this post, we look at what established musicians say and at statistics on successful musicians without degrees.

The Opinions Of Established Musicians About The Relevance Of Music Degrees

Moreover, conversations with established musicians reveal that their opinions on the relevance of a music degree vary. Some believe that a degree in music provides a strong foundation and understanding of music theory. This can be helpful in creating music that resonates with audiences. For instance, Grammy award-winning artist John Mayer has spoken extensively about the benefits of studying music theory and its significance in his career.

On the other hand, there are those who believe that talent and real-world experience trump a formal education in music. In addition, rock legend Gene Simmons famously dropped out of college to pursue his musical ambitions. He has always been vocal about the belief that one’s musical talents are not dependent on a music degree.

Statistics On Successful Musicians Without Music Degrees

The importance of a music degree is further debatable when considering the number of successful musicians who have made it big without a music degree. For instance, the late Eddie Van Halen, a renowned musician and songwriter, never received formal training in music.

Similarly, singers like Adele and Bruno Mars have found massive success without any formal music education. Both artists credit talent and hard work, not a degree, for their success.

This data shows that a degree helps with theory and foundations. However, it is not necessary for success. Real-world experience, talent, and hard work remain the key drivers of success in the music industry.

Can You Be a Musician Without a Degree

Credit: www.zippia.com

Alternative Routes For A Musician Without A Degree

Having a degree in music is not always necessary when it comes to pursuing a career in music. There are alternative routes aspiring musicians can explore which do not require attending music school. Traditional music education and a degree in music do offer ample opportunities for honing your skills and learning about music theory. Nevertheless, many successful musicians have taken different routes to get to where they are today.

Private Lessons For A Musician Without A Degree

Private lessons and mentorship opportunities are great ways to gain valuable knowledge and experience in music. A one-on-one learning approach with an experienced musician can provide personalized attention and feedback. This helps aspiring musicians to learn at their own pace. Mentorship opportunities also allow aspiring musicians to learn about the industry and navigate the challenges that come with building a successful music career.

Taking Advantage Of Online Resources for Musician Without a Degree

The internet is filled with resources for aspiring musicians. YouTube tutorials, online courses, and instructional websites cater to a wide range of skill levels and music categories. You can learn everything from music theory to songwriting and music production. There are also online communities where musicians can connect and collaborate with each other, furthering their learning and networking opportunities.

Joining Or Starting A Band for Musician Without a Degree

Joining or starting your own band can provide ample opportunities to practice and perform music. Collaborating with other musicians can help you learn new techniques, hone your instrumentation skills, and work on your stage presence. Additionally, it’s an excellent way to gain exposure and build a fan base.

Participating In Music Competitions & Festivals for Musician Without a Degree

Music competitions and festivals are great opportunities to showcase your talent and gain exposure. Competitions of all types of music categories are regularly held worldwide, providing opportunities for musicians to get noticed. Festivals are great networking opportunities for musicians looking to get their foot in the industry. They provide opportunities to perform in front of a live audience and meet industry professionals and other musicians.

The Importance Of Hands-on Experience In Pursuing A Career As A Musician

A degree in music is not the only path to becoming a successful musician. Formal education builds knowledge and skills. Hands-on experience matters just as much for a music career.

Hands-on Experience For A Musician Without A Degree

One way to gain hands-on experience is to work in a music-related field, such as a recording studio or a music venue. This can give aspiring musicians a behind-the-scenes view of the industry, as well as opportunities to network with other professionals and gain practical skills.

The Value Of Performing Live Shows And Recording Music

Performing live shows and recording music are crucial aspects of building a career as a musician. These experiences build performance skills and bring audience feedback. They also give you a portfolio to promote yourself.

  • Performing live shows:
    • Develops performance skills
    • Receives feedback from audiences
    • Networking opportunity
  • Recording music:
    • Opportunity to create a portfolio of work
    • Develops technical skills
    • Promotion material to share with industry professionals

Identifying Mentors And Learning From Established Professionals

Another way to gain hands-on experience is to identify mentors and learn from established professionals in the industry. Mentors can provide guidance, feedback, and networking opportunities that can be invaluable in building a successful career.

Hands-on learning gives you a valuable education. It can help you build a career without a formal degree.

The Role Of Technology In Music And Breaking Barriers

Technology has allowed for greater accessibility to music creation. Formal education is not always necessary in becoming a successful musician. With resources such as virtual instruments, samples, and production software, aspiring musicians can break down barriers in the industry.

The Impact Of Technological Advances In Music Creation And Distribution

Technology has been an essential factor in the growth of the music industry, breaking down barriers and creating opportunities for aspiring musicians. Advancements in music production software and equipment have made it easier and more accessible for anyone to create and distribute their music with the world. Musicians no longer need to rely on expensive tools or recording studios to produce their music. With just a computer or a smartphone, one can create a high-quality, professional-sounding track that caters to their audience’s taste. Production software and AI tools that track market trends have made music production simpler and faster. Cloud-based storage and online platforms make it possible to work collaboratively with people from different parts of the world. This makes music production more inclusive and diverse.

The Role Of Social Media And Online Platforms In Promoting Music And Gaining Exposure

Social media platforms have opened up new avenues for musicians to showcase their work, gain exposure, and connect with their audience. Social media lets musicians reach fans and the wider community from home. With just a few clicks, one can share their music with millions of people worldwide. Online platforms like YouTube, SoundCloud, and Spotify have created a level playing field for both established and emerging artists, giving them equal opportunities to be heard. Moreover, social media platforms allow musicians to interact with their audience in real-time, provide them with updates about their work, and receive feedback. Through social media, musicians can build relationships with their fans, develop their brand, and cultivate a loyal following.

Gear And Software For A Musician Without A Degree

One of the significant obstacles aspiring musicians face in pursuing their passion is the high cost of music equipment and professional-grade software. In the past, only those who had the resources could afford to produce their music. However, with the rise of technology, affordable and accessible software and equipment have become available. The cost of music production tools has significantly decreased, and free software is now available to anyone who wants to create and distribute their music. The open source community has designed a range of efficient and user-friendly software that can be used by anyone, irrespective of their level of expertise. Additionally, hardware manufacturers now offer affordable options for music production, reducing the barriers of entry for aspiring musicians.

Conclusion

Technology has revolutionized the music industry, breaking down barriers and creating opportunities for aspiring musicians to pursue their passion. With the rise of accessible software and equipment, online platforms, and social media, the possibilities for individuals to create and distribute their music have become endless. The future of music production and distribution has never been more exciting, with technology paving the way for innovative and diverse creations.

Can You Be a Musician Without a Degree

Credit: minds-in-bloom.com

Frequently Asked Questions Of Can You Be A Musician Without A Degree

Can You Succeed As A Musician Without A Degree?

No, a degree is not necessary to become a musician. Success in the music industry relies on talent, hard work, and dedication to one’s craft rather than formal education. While a degree may be helpful, it is not a requirement.

Many successful musicians have achieved success without a degree.

Can You Be A Music Artist Without A Degree?

Yes, you can be a music artist without a degree. While a music degree can be helpful, it is not necessary for success in the music industry. Talent, hard work, and networking are often more important factors in becoming a successful musician.

How Can I Get Into Music Without A Degree?

Getting into music without a degree can be achieved through various ways. First, get familiar with music theory and key concepts. Study instrumentation and different genres. Attend live shows, jams and network with aspiring artists. Build a following on social media and platforms, create original content and seek feedback.

In conclusion, passion, dedication, and practice are key to success.

What Qualifies As A Musician?

A musician is a person who creates, performs, or produces music using his or her voice or a musical instrument. They can be amateurs or professionals, and are required to have a certain level of skill and training in playing an instrument or singing.

The main qualification for being a musician is the ability to produce rhythm, melody, and harmony in a way that is pleasing to the ear.

Conclusion

A degree does not determine one’s success or capacity in becoming a successful musician. What matters most is the passion and dedication to the craft, coupled with hard work, patience, and continuous learning. One can start by establishing connections, honing their skills, and getting involved in the music industry.

With the right mindset and work ethic, anyone can pursue a rewarding career in music.

Categories
Archive

Can You Make A Bad Recording Sound Good

Yes, it is possible to make a bad recording sound good with the right tools and techniques. To achieve a polished and professional sound, it is important to understand the common issues that lead to a poor recording and how to address them effectively.

In today’s digital age, anyone can record and produce their own music or podcast from the comfort of their home. However, not everyone has access to a professional recording studio or the expertise to create a pristine sound. A bad recording can be characterized by various problems such as background noise, poor microphone placement, distorted sound, and inconsistent levels.

Despite these issues, it is possible to salvage a bad recording and make it sound good with the help of editing software, plugins, and some basic audio engineering skills. We will explore some tips and tricks on how to improve the quality of your recording and achieve a better sound.

Exploring Bad Recordings

As an audio engineer or music producer, you may have encountered situations where you need to work with a bad recording. It could be a demo recorded on a phone, a live recording from a concert, or a low-quality recording made by an amateur. Whatever the case, the question remains, can you make a bad recording sound good?

Common Issues With Bad Recordings

When working with a bad recording, the first step is to identify the common issues that could be affecting the quality of the recording. Some of these issues include:

  • Noise: Background hiss, hum, or static noise can be distracting and make a recording sound unprofessional.
  • Distortion: When the levels are too high, recording equipment can clip or distort, resulting in a harsh, unpleasant sound.
  • Poor Acoustics: Recording in an untreated room or a room with poor acoustics can result in a boomy or muddy sound.
  • Off-Key Vocals: If the singer is out of tune, it can be challenging to fix it in post-production without affecting the rest of the recording.

Types Of Bad Recordings

Not all bad recordings are made equal; they can vary in quality depending on the recording equipment used, the recording environment, and the performance itself. Here are some types of bad recordings:

TypeDescription
Low-Resolution RecordingsRecordings made at a low bitrate or sample rate, resulting in a loss of audio quality.
Noisy RecordingsRecordings with a high noise floor, making it hard to hear the actual sound.
Unbalanced RecordingsRecordings with imbalanced levels, where one or more instruments/vocals are either too loud or too soft.
Distorted RecordingsRecordings that are saturated or clipped, resulting in a distorted sound.
Off-Key RecordingsRecordings where the vocals or instruments are out of tune.

Working with a bad recording can be challenging, but with the right techniques and tools, you can make it sound good enough for release. Whether it’s using noise reduction plugins, EQ to balance the mix, or pitch correction plugins to fix off-key vocals, there are ways to salvage even the worst recording.

Is It Possible To Salvage Bad Recordings?

Fixing a bad recording is possible, but the quality of results varies. Basic fixes, like adjusting EQ and levels, can improve sound quality, but significant issues, such as distortion or clipping, may be harder to resolve. However, with the right tools and expertise, you can make a bad recording sound decent.

When working on a music project, there are several factors that can affect the quality of recorded audio. One of the most common problems is poor microphone placement, which often results in distorted or muffled sound. Additionally, inferior recording equipment, high levels of background noise, and improper mixing and mastering can also contribute to bad recordings. While it may seem like a hopeless situation, there are several tools available for audio restoration that can potentially salvage bad recordings and produce a more polished final product.

Factors Affecting Quality Of Recorded Audio

There are many factors that contribute to the quality of recorded audio. Knowing these factors is vital for identifying the cause of poor sound quality and for determining which tools should be used to restore the audio. Some of these factors include:

  • Microphone placement
  • Room acoustics and ambient noise
  • Recording equipment
  • Distortion and clipping
  • Background hiss and hum
  • Improper mixing and mastering

Tools Available For Audio Restoration

There are several audio restoration tools available to help improve the quality of bad recordings. Some of these tools are:

ToolFunction
Noise reduction softwareRemoves hiss, hum, and other background noise.
EqualizersCorrects frequency imbalances and enhances tonal quality.
CompressorsHelps to even out volume levels and control dynamics.
LimitersPrevents clipping and distortion in audio.
De-clipperRepairs audio clips caused by over modulation.

Assessing The Feasibility Of Audio Restoration

Before attempting to salvage bad recordings, it’s important to assess the feasibility of audio restoration. If the recordings are too distorted or contain too much noise, it may not be possible to restore them effectively. It’s also important to consider factors such as the intended use of the recording and whether the level of restoration required is worth the time and effort. Assessing the feasibility of audio restoration can help to save time and resources while ensuring that the final product meets the desired quality standards. In conclusion, while bad recordings can be a frustrating setback, it is often possible to salvage them with the right tools and techniques. Understanding the factors that contribute to poor audio quality and the available tools for restoration can help to make the process more efficient and effective.

When To Give Up And Redo The Recording

Sometimes it’s just not worth it to try and salvage a bad recording. While there are tools and techniques to improve the sound quality, sometimes the flaws are too great to overcome. In these cases, it may be better to start fresh and create a new recording.

Knowing When Audio Restoration Won’t Work

Even the best recording equipment may not capture the perfect sound, especially if you’re working in a non-professional studio environment or recording on a budget. Fortunately, audio restoration technology has advanced significantly in recent years, making it possible to improve the quality of poorly recorded sound. However, it is important to note that there are limitations to what even the best audio restoration software can achieve – there comes a point when the recording is past the point of saving. Knowing when to give up and start from scratch is an important skill to develop as a recording artist or engineer. Factors that may signal the need for a redo include excessive background noise or hiss, poorly captured vocals or instrumentals, and distorted sound that can’t be corrected without compromising overall audio quality.

Weighing The Benefits Of Redoing A Recording

The decision to redo a recording is not one that should be taken lightly, as it can be time-consuming and expensive. However, there are advantages to starting fresh that merit serious consideration. For one, redoing a recording allows you to fix mistakes and improve the overall quality of the sound. You’ll also have more creative control over the final product and can make adjustments to ensure it sounds exactly as you want it to. Another benefit of redoing a recording is that it can save you time and money in the long run. While it may seem like re-recording is an extra step that will make the overall process take longer, the truth is that it’s usually faster to get things right the first time than to spend countless hours tweaking an unfixable recording.

Making The Decision To Redo Or Not

Making the decision to redo a recording can be difficult, but it’s ultimately up to you to determine whether the benefits outweigh the downsides. If you’re working on a project that requires perfection or you’re not satisfied with the quality of a recording, it’s probably worth considering a redo. That being said, it’s important to weigh the cost and time investment against the potential benefits. In some cases, you may be able to salvage a recording through audio restoration techniques, but in others, redoing it may be the only viable option. In conclusion, while audio restoration software has come a long way, there are limitations to what it can achieve. Knowing when to give up and start from scratch is an important skill to develop as a recording artist or engineer. When making the decision to redo a recording, consider the benefits it could bring in terms of improved sound quality, creative control, and time and money saved.

Technical Tips For Improving Performance

Creating a high-quality recording can be tricky, even for experienced engineers and producers. Occasionally, a recording may not come out as expected. The question is can you make a bad recording sound good? Yes, you can! It all comes down to a few technical tips for improving performance, which we will look into in this article.

Maximizing Sound Quality During Recording

The first step towards creating a great recording is ensuring that you capture the best sound during the recording process. This includes proper microphone placement, selecting the right microphone for the job, and making use of sound baffles or acoustic treatment. It is important to remember that recording is a delicate process that requires patience and attention to detail. That means it is always better to invest the necessary time and effort during recording rather than trying to fix issues in post-production.

Optimizing Post-production Processes

While capturing good sound quality during recording is important, post-production processes are equally important to ensure a great final product. In some cases, it may be impossible to entirely fix certain issues during recording, and post-production becomes more critical. EQ, compression, and other effects can be used to enhance the sound quality, but be careful not to overdo it and end up with a washed-out or unnatural sound. Automated processes like noise reduction and de-esser plugins can help reduce unwanted background noise and harsh ess sounds, respectively.

Troubleshooting Audio Issues

In some cases, you may find that your recording has significant audio issues that cannot be fixed through editing or post-production. These issues can range from phase cancellation, distortion, or clipping. Troubleshooting audio issues requires an understanding of the underlying problem and the tools needed to fix it. The best approach here could be reaching out to someone with the right expertise or experience to help optimize your workflow and get the results you desire.

Maximizing Sound Quality During RecordingOptimizing Post-Production ProcessesTroubleshooting Audio Issues
– Proper microphone placement– Use EQ and compression sparingly– Identify underlying problem(s)
– Selecting the right microphone– Consider automated processes like noise reduction and de-esser plugins– Get help from an expert
– Use sound baffles and acoustic treatment– Understand the underlying problem before attempting to fix it

Overall, fixing a bad recording can be challenging, but with enough care and the appropriate technical know-how or help, you can make a bad recording sound good. Whether it is during recording, post-production, or audio troubleshooting, the important thing is to create a great final product that meets your needs or exceeds your expectations.

Creative Solutions For Enhancing Bad Recordings

Enhancing bad recordings may seem like a daunting task, but with a few creative solutions, it is definitely possible to make a bad recording sound good. By using noise reduction tools, equalization techniques, and proper compression settings, you can improve the overall quality of your recordings and achieve a more professional sound.

Creative Solutions for Enhancing Bad Recordings Recording a great piece of audio should be the aim of every sound engineer, but sometimes, due to technical issues, everything may not go as planned. A bad recording can be a real headache, but all is not lost. There are several techniques available to turn a bad recording into a quality one. In this article, we will delve into some creative solutions for enhancing bad recordings, with a focus on using effects, creative mixing techniques, and adding Foley to improve sound quality. Using Effects to Mask Audio Issues The best way to fix a bad recording is to prevent it from happening in the first place. However, if you’re dealing with a problematic recording, there are several professional-grade effects that can be used to help mask the audio issues. By doing so, the recording can be made more pleasant to the listener’s ear. Some of the common effects that can be used to mask audio issues are: – EQ and Filters: This is used to highlight or cut the frequency range to achieve a balanced sound. – Compressors: These help in smoothing out the peaks and lows of the recording to make it more natural and even. – Noise Reduction: This helps to remove unwanted sounds that might be causing interference. Creative Mixing Techniques Another way to enhance a bad recording is by using creative mixing techniques. These techniques involve working with various audio tracks, adjusting levels, panning, and creating space within the recording. For instance, by applying the side-chain compression technique, you can make the vocal or primary instrument more present and punchy while lowering the background noise. Another technique is to use reverb or delay to create the sense of space and depth. Adding Foley to Improve Sound Quality Foley is a technique where sound effects are created and recorded in a studio and then added to the final mix. This technique is used to replace or enhance the sound of real-life objects that may have been poorly recorded. For example, if the sound of a door opening or closing was not captured correctly, Foley can be used to create a more realistic sound. These sounds are then blended in with the original audio. Conclusion Enhancing bad recordings is a complex process that requires technical prowess and creative skills. By using the right effects, creative mixing techniques, and Foley, you can turn a bad recording into a quality one. The tips and solutions we’ve discussed above are only the tip of the iceberg. If you keep practising these techniques with your recordings, you will eventually develop your approach. With time, you might even be able to tackle the most complex audio issues with ease.

Can You Make A Bad Recording Sound Good

Credit: studiobricks.com

The Importance Of Audio Quality In Your Work

Great audio quality is crucial in professional work as it affects its credibility and accessibility; however, it is challenging to fix a poorly recorded audio. With the latest technology and software, you can enhance the sound quality to some extent, but it cannot replace the original recording’s clarity and dynamics.

Understanding The Importance Of Sound Quality

As a content creator, you’re probably aware that your work is only as good as the quality of audio you produce. Whether you’re creating a podcast, recording a song, or producing a video, audio quality should always be one of your top priorities. When it comes to content creation, good audio quality is just as important as good visuals. Poor quality sound can ruin the credibility of an otherwise great piece of content.

Ways Poor Audio Quality Can Affect Your Work

Poor audio quality can have a significant impact on your work. Here are some ways it can affect you:

  • Distractions: Poor sound quality can be distracting for the listener, making it hard for them to focus on your message.
  • Loss of credibility: Poor sound quality can make you appear unprofessional and lower your credibility among your audience.
  • Reduced engagement: Difficult-to-hear audio can hinder the listener’s experience, reducing their engagement, and decreasing the likelihood of them sharing your content.

Investing In Better Audio Equipment

Investing in the proper audio equipment is a wise investment in the success of your content. Not only does it improve the quality of your audio, but it also can provide a more engaging experience for your audience. Here are some examples of audio equipment that may help improve your recordings:

EquipmentDescription
Condenser MicrophoneProvides clear, high-quality audio recording that captures sounds accurately.
Pop FilterReduces plosives and sibilance for a cleaner sound.
MixerAllows you to control volume levels, minimize background noise and add effects to your audio.

Investing in a good quality microphone and other equipment can help ensure that your audio is always clear and of a high standard. Remember, good audio quality can result in higher engagement, increased credibility, and ultimately, better results for your content.

Can You Make A Bad Recording Sound Good

Credit: thatsweetroar.com

Frequently Asked Questions For Can You Make A Bad Recording Sound Good

How Can I Make My Recording Sound Better?

To improve the sound quality of a recording, try these tips: 1. Use a quality microphone 2. Record in a quiet space 3. Adjust microphone position and distance 4. Use headphones for monitoring 5. Edit and enhance with EQ, compression, and other effects.

Can You Improve Audio Quality?

Yes, you can improve audio quality through various methods such as using high-quality equipment, adjusting microphone placement, reducing background noise, using equalization, and enhancing the audio in post-production.

How Do I Fix Poor Sound Quality Recording?

To fix poor sound quality recording, try these solutions: use a better microphone, reduce background noise, adjust microphone settings, check and update sound drivers, and edit the recording using audio software.

How Do You Clean Up A Bad Voice Recording?

To clean up a bad voice recording, you can use audio editing software like Audacity. First, listen to the recording and identify any unwanted noise or background sounds. Use the noise reduction tool to remove any static or hum. Cut out any unnecessary parts of the recording and adjust the volume levels.

Use equalization to balance the sound and add clarity. Finally, export the cleaned-up recording in a high-quality format.

Conclusion

To conclude, making a bad recording sound good can be a daunting task, but it’s not impossible. With the right set of tools and techniques, you can improve the quality of your recordings significantly. However, it is important to remember that there is no substitute for professional equipment and expertise.

So, if you want to produce high-quality recordings consistently, it’s always better to hire a professional recording studio or expert. With a combination of skill, experience, and a passion for music, they can help take your recordings to the next level.

Categories
Archive

What Format Should I Use To Send My Tracks

Use WAV format to send your tracks. It provides the highest quality and is the industry standard for professional audio files.

As a musician, it’s crucial to know the best format for sending your tracks. WAV format ensures that your music retains its original quality and is compatible with most music software. It’s essential to use the industry standard format along with other proper logistics when sending your music to producers, record labels, or collaborators.

We’ll explore why WAV format is necessary and look at some other tips for sending your tracks effectively. So, let’s dive in!

File Formats For Sending Tracks

Sending tracks to clients or collaborators is an important part of the music production process. However, with so many different file formats available, it can be confusing to know which one to use. In this post, we will guide you through the different file formats available for sending tracks.

Lossless

Lossless file formats retain all the original data from the recording and enable you to produce high-quality tracks that are almost identical to the original recording. These files often come in the form of WAV, AIFF, or FLAC. Some of these files can be large, but they offer the highest sound quality.

Compressed

Compressed file formats are a great option for those who want to reduce the file size without compromising too much on the audio quality. These files can come in the form of MP3 or AAC. However, it is important to note that compressing audio files can result in some loss of audio quality. If sound quality is your main concern, it is recommended to use lossless file formats instead.

Uncompressed

Uncompressed file formats are the largest files to send. Uncompressed audio files can come in the form of WAV, AIFF, or BWF. And these types of files need more space in your hard drive to be saved. But, they offer the highest sound quality and best suited to sending tracks of songs and recordings to clients or collaborators.

Conclusion:

Using the appropriate file format for sending tracks can make a big difference in the audio quality and compatibility. If you’re sending tracks to clients or collaborators, choose a file format that’s suitable for them to work with. By following the guidelines mentioned above, you can easily choose the right file format for your specific needs and produce high-quality tracks that everyone will enjoy.

Choosing The Right Format

Selecting the appropriate file format to deliver your tracks is essential for ensuring that your music sounds its best and can be easily shared among different platforms and devices. Consider using lossless formats like WAV or FLAC for maximum audio quality, while compressed formats like MP3 and AAC are more suitable for online streaming and storage.

Consider The Recipient

When sending tracks to someone, it’s important to consider the recipient’s technical capabilities. Some recipients may prefer certain formats or may not have the software to play certain files. If the recipient is unsure, it’s always a good idea to ask them directly what format they prefer.

Consider The Purpose

Another factor to consider when choosing a format is the purpose of the track. Different formats may be better for certain tasks. For example, if the track is for streaming, MP3 or AAC formats are usually recommended. However, if the track is intended for professional use, a higher quality format, such as WAV or FLAC, may be more appropriate.

Consider The File Size

File size is another important factor to consider. While high-quality formats may provide better sound, they also result in larger file sizes. This can be an issue when sending tracks, as some recipients may have limitations on the size of the file they can receive. If file size is a concern, it may be necessary to compress the track or choose a lower quality format. In conclusion, when choosing a format to send tracks, it’s important to consider the recipient, purpose, and file size. By carefully considering these factors, you can ensure that your tracks are sent in a format that is both compatible and appropriate for their intended use.

Different Formats And Their Pros And Cons

To ensure the highest quality sound, it’s best to use uncompressed audio formats like WAV or AIFF when sending tracks. They provide better sound quality and retain all the details in a track. However, they also take up more storage space, whereas compressed formats like MP3 are more space-efficient but may lose some details in the process.

Consider the advantages and disadvantages of each format before sending your tracks.

When it comes to sending your tracks, choosing the right format can make all the difference. Different formats have their pros and cons, and it’s important to understand what each format offers before deciding which one to send. In this section, we’ll take a look at some of the most popular formats and their pros and cons.

Wav

WAV or Waveform Audio File Format is an uncompressed audio format that offers high-quality sound. This format is commonly used in professional settings and is compatible with most digital audio workstations. Some of the pros of WAV include its high sound quality and compatibility with most hardware and software. However, one major con of WAV is its large file size, which can make it difficult to send and store.

Aiff

AIFF or Audio Interchange File Format is another uncompressed audio format that offers high-quality sound. This format is commonly used in Mac-based systems and is compatible with most digital audio workstations. Some of the pros of AIFF include its high sound quality, compatibility with most hardware and software, and support for metadata. However, like WAV, one major con of AIFF is its large file size.

Flac

FLAC or Free Lossless Audio Codec is a lossless audio format that offers high-quality sound while compressing the file size. This format is compatible with most digital audio workstations and is commonly used in audiophile settings. Some of the pros of FLAC include its high sound quality, support for metadata, and smaller file size. One major con of FLAC is that it may not be compatible with some hardware and software.

Mp3

MP3 or MPEG Audio Layer III is a compressed audio format that offers good sound quality while significantly reducing the file size. This format is widely used for online streaming and is compatible with most digital audio players and software. Some of the pros of MP3 include its small file size, compatibility with most hardware and software, and widespread use. However, one major con of MP3 is its reduced sound quality compared to uncompressed formats like WAV and AIFF. In conclusion, choosing the right format to send your tracks will depend on your specific needs and preferences. If you’re looking for the highest sound quality and compatibility with most hardware and software, an uncompressed format like WAV or AIFF might be the best choice. If you’re looking for a balance between sound quality and file size, a lossless format like FLAC might be a good option. And if you’re looking for smaller file sizes and widespread compatibility, a compressed format like MP3 might be the way to go.

Conversion Of Formats

Choosing the right format for sending your tracks depends on the preferences of the recipient and the purpose of the tracks. Generally, WAV and AIFF formats provide higher quality, while MP3 is more common and convenient for sharing online. It’s important to make sure the recipient can easily access and open the chosen format.

Why You May Need To Convert

When you send music tracks to clients, collaborators, or platforms, you may need to convert the format of your files to meet their requirements. Some may prefer MP3, while others may require WAV or AIFF. The format you choose can influence the quality, compatibility, and playback of your tracks.

Tools For Conversion

There are several tools you can use for converting your tracks, including online converters, audio editing software, and digital audio workstations (DAWs). Some popular online converters include Zamzar and CloudConvert, whereas popular audio editing software includes Adobe Audition and Audacity. If you already have a DAW in which you produce your tracks, you can use it to export your files in the desired format.

Loss Of Quality

When converting formats, it’s important to note that there may be a loss of quality in the process. For instance, when you convert a WAV file to an MP3 file, it’s compressed and some of the original data is lost. However, you can minimize the loss of quality by using high-quality conversion tools and adjusting the settings to reduce compression. In conclusion, when sending tracks, it’s important to use the right format according to your recipient’s requirements. You should also ensure that the format you use is compatible with their system and devices. Finally, when converting formats, you should consider the potential loss of quality and take steps to minimize it.

Best Practices For Sending Tracks

To ensure that your tracks are received and played correctly, the best format to use when sending them is in WAV or AIFF format. These formats provide the best quality and are the industry standard for sending audio tracks. It’s important to also compress the file to a reasonable size to make it easier to send via email or other file-sharing platforms.

Sending tracks to clients, collaborators or labels can be a nerve-wracking experience, especially if you’re not sure about the best practices that you should follow. In order to ensure that your music is received properly and professionally, there are certain guidelines that you can follow. Here are some best practices for sending tracks that you should keep in mind:

Using A File Transfer Service

One of the easiest and most reliable ways to send your tracks is through a file transfer service. Several file transfer services are available, such as Dropbox, Google Drive, WeTransfer, and others. These services allow you to upload your music files and generate a link that you can share with the recipient. It is a safe and secure way to send large files, and you can easily track when the files have been downloaded.

Naming Conventions

Naming conventions are essential to ensure that your tracks are organized and easy to locate. It is recommended that you use a consistent naming convention, which includes the track’s name, artist name, and version number.(e.g trackname_artistname_v1.mp3). This will ensure that the recipient knows exactly what they are listening to, and it will save them time organizing their files.

Send In Batches

If you’re sending multiple tracks, it is recommended that you send them in batches rather than all at once. This will allow the recipient to focus on each track individually and provide feedback on them accordingly, without getting overwhelmed. Sending tracks in batches also ensures that if there is a technical issue, only a small number of files need to be resent. In conclusion, by following the best practices for sending tracks, you can ensure your music is received professionally and increase the chances of getting a positive response from the recipient. By using a file transfer service, applying naming conventions, and sending in batches, you make the process easier for yourself and for the recipient.

Frequently Asked Questions On What Format Should I Use To Send My Tracks

What File Format Should You Choose When Sending Music Files?

When sending music files, it is best to use a compressed file format such as MP3 or AAC. These formats are smaller in size which makes uploading and downloading faster. They also retain quality while reducing file size. Be sure to check with the recipient to see if they have a preference for file format.

Should I Send Beats As Wav Or Mp3?

It’s best to send beats as WAV files because they offer higher sound quality than MP3s. WAV files capture more detail and have better dynamics, making them ideal for music production. However, if file size is an issue, you can send MP3s as long as they have a bitrate of at least 256 kbps.

What Is The Best Format For Audio Files?

The best format for audio files is typically MP3. It is a compressed audio format that offers high-quality sound with smaller file size compared to other formats. This allows for better storage and easier file sharing. Other popular formats include WAV, AIFF, and FLAC, which offer even higher quality but with larger file sizes.

Is A Wav Better Than Mp3?

WAV and MP3 are different in audio quality and file sizes. WAV offers better sound quality but large file size while MP3 offers compressed audio and smaller file sizes. It’s up to your preferences and usage which one is better.

Conclusion

Choosing the right format to send your tracks is crucial for ensuring the highest quality and compatibility with different platforms. By following the guidelines discussed including selecting the appropriate file type, compressing files, and utilizing cloud storage for large files, you can avoid common errors and optimize your music distribution.

Regardless of whether you are sending tracks to record labels, media outlets, or collaborators, taking the time to properly format your files can greatly improve your chances of success in the music industry.