Categories
Archive

What is the Difference between Mixing And Mastering Music : Unraveling the Sonic Secrets

Mixing involves blending individual tracks together, adjusting levels, and adding effects, while mastering focuses on refining and optimizing the overall sound of a mix for distribution. Both processes are crucial in the music production chain to ensure a polished and professional final product that sounds great across various devices and platforms.


Mixing allows for the fine-tuning of individual elements of a song, such as vocals, drums, and instruments, to create a cohesive sound. Mastering, on the other hand, enhances the entire mix by balancing frequencies, improving clarity, and ensuring consistency throughout the entire album or playlist.


Understanding the distinction between these two stages is essential for aspiring musicians and producers to achieve high-quality sound in their music projects.


The Art Of Mixing

Mixing music involves blending different audio tracks together harmoniously.

It ensures that each sound complements the others to create a cohesive song.

The Role Of A Mixing Engineer

A mixing engineer uses various tools to adjust levels, balance frequencies, and add effects.

Mastering In A Nutshell

Mastering is the final step in audio production where the overall sound is polished.


Tools And Techniques

Tools and techniques play a crucial role in both mixing and mastering music. Let’s delve into the specific tools and techniques used for each process.

Balancing Tracks

In mixing music, the primary goal is to balance tracks so that each instrument and vocal can be heard clearly.

This involves adjusting the volume levels, panning, and applying EQ to create a cohesive sound.

Applying Audio Effects

Audio effects are essential in both mixing and mastering to enhance the sound quality. In mixing, effects like reverb, delay, and compression are used to shape the individual tracks.

During mastering, effects such as limiting and multiband compression are applied to the overall mix to achieve a polished and professional sound.

The Mastering Process

The Mastering Process is the final step in the music production process, which involves enhancing the overall sound quality of a track and making final touches to ensure it is ready for distribution. Mastering is crucial in achieving a polished, professional sound that is consistent across all playback systems.

Enhancing Overall Sound

During the mastering process, the audio engineer focuses on enhancing the overall sound quality of the track. This involves adjustments in volume levels, equalization, dynamics processing, and stereo enhancement to ensure a balanced and cohesive sound. The engineer also addresses any tonal discrepancies and corrects any imperfections that may be present in the mix.

Final Touches

Once the sound is balanced and cohesive, the mastering engineer applies the final touches to the track. This includes fine-tuning the overall tonal balance, adjusting the spacing between tracks, and ensuring the proper sequencing of songs in an album. Additionally, the engineer applies compression and limiting to optimize the track’s overall loudness and prevent any clipping or distortion.


Key Differences

When it comes to producing high-quality music, mixing and mastering are two vital steps that play distinct roles in the creation process. While both processes focus on enhancing the overall sound of a song, they have different roles and objectives. In this blog post, we will delve into the key differences between mixing and mastering, uncovering their primary objectives and technical aspects.

Primary Objectives

Mixing music involves combining individual audio tracks in a way that creates a balanced and cohesive sound. It aims to refine the individual elements of a song, such as vocals, instruments, and effects, to ensure they work harmoniously together. The primary objective of mixing is to shape the sound, adjust levels and panning, apply equalization and effects, and create a well-balanced stereo or surround sound mix.

On the other hand, mastering music is the final step in the production process before distribution. It focuses on fine-tuning the already mixed track to achieve a polished and professional sound. The core objective of mastering is to optimize the overall sonic characteristics of the song, ensuring it sounds consistent and translates well across different playback systems. This includes tasks such as adjusting the overall volume, enhancing clarity, controlling dynamics, and applying global equalization and compression.

Technical Aspects

When it comes to the technical aspects, mixing primarily deals with individual tracks and their elements. This involves adjusting the volume levels, panning positions, and applying various audio effects to shape the sound. Mixing also involves cleaning up unwanted noise, splicing or rearranging sections, and ensuring smooth transitions between different parts of the song.

Mastering, on the other hand, focuses on the entire mixed track as a whole. It involves making precise adjustments to the overall tonal balance, dynamic range, and stereo image of the song. This is achieved by utilizing advanced tools such as multi-band compression, stereo widening, harmonic excitation, and other mastering-specific techniques. Additionally, mastering also involves applying noise reduction, fade-ins, fade-outs, and adding track spacing to prepare the final master for distribution.

In conclusion, although both mixing and mastering play crucial roles in the music production process, they serve different purposes. While mixing focuses on individual tracks and creating a balanced mix, mastering fine-tunes the overall sound of the entire mixed track. Understanding these key differences is essential for musicians, producers, and sound engineers to ensure their music achieves its full potential and resonates with listeners.

Impact On The Final Product

When it comes to music production, mixing and mastering are two essential steps that play a crucial role in shaping the final product. Each step has its own purpose and distinct impact on the overall sound quality of the music. Understanding the difference between mixing and mastering can help both musicians and producers make informed decisions about their music. In this article, we will explore the impact of mixing and mastering on the final product, focusing on the listener’s experience and the commercial viability of the music.

Listener’s Experience

The mixing process primarily involves adjusting individual tracks, such as vocals, instruments, and effects, to create a well-balanced and cohesive sound. It brings all the individual elements together, making sure that each sound sits in the right place and is audible. Mixing plays a significant role in enhancing the listener’s experience by achieving clarity, cohesion, and dynamics in the music.

During the mixing process, audio engineers may use techniques like equalization, compression, panning, and reverb to shape the sound and create a sense of space. By adjusting the levels and frequencies, they can highlight certain elements, remove unwanted noise, and ensure that every instrument and vocal can be heard clearly. A well-mixed track can make the listener feel immersed in the music, hear the lyrics clearly, and appreciate the nuances of each instrument.

Commercial Viability

On the other hand, mastering is the final step in the production process that gives the music a polished and professional touch. It involves making overall adjustments to the entire mix, ensuring consistency and compatibility across different audio systems and formats. Mastering prepares the music for distribution and commercial release.

During the mastering process, audio engineers optimize the track’s overall volume, frequency balance, stereo width, and dynamic range. They also add final touches like fade-ins, fade-outs, and spacing between tracks. The goal is to ensure that the music sounds great on various playback devices, such as headphones, car speakers, and club sound systems.

Commercial viability is greatly influenced by mastering, as it helps the music stand out when competing with other songs on radio, streaming platforms, and other mediums. A well-mastered track will have a consistent and professional sound throughout, making it more attractive to listeners and increasing its chances of being played on various platforms.

Comparison between Mixing and Mastering
Aspect Mixing Mastering
Focus Adjusting individual tracks Optimizing the overall mix
Impact Listener’s experience, clarity, and cohesiveness Commercial viability, consistency, and compatibility
Techniques Equalization, compression, panning, and effects Volume optimization, frequency balance, and final touches

In conclusion, both mixing and mastering are essential steps in music production, with each step serving a distinct purpose in shaping the final product. Mixing focuses on creating a balanced and immersive listening experience, while mastering ensures commercial viability and polish. By understanding the impact of these two processes, musicians and producers can make informed decisions to create high-quality music that resonates with listeners and stands out in the industry.


Frequently Asked Questions On What Is The Difference Between Mixing And Mastering Music

Which Is Harder Mixing Or Mastering?

Mixing and mastering both require different skills and are equally challenging.

Does Mixing And Mastering Make A Big Difference?

Mixing and mastering does make a big difference in the final sound quality of music. It enhances clarity, balance, and overall professional polish, making the tracks sound cohesive and professional.

What Is Difference Between Mixing And Mastering A Song?

Mixing balances individual tracks, adjusting volume, panning, and effects. Mastering enhances overall audio, ensuring it’s polished and ready for distribution.

What Is The Purpose Of Mastering A Song?

Mastering a song enhances its overall sound quality, balance, and consistency. It ensures that the song sounds good across different audio devices and platforms. Mastering also brings out the best in the mix and prepares the song for distribution and playback.

Conclusion

The nuances between mixing and mastering music are crucial for achieving a polished final product. Understanding the distinctions and their impact on the overall sound is vital for any music producer or artist. By grasping these differences, you can effectively enhance your music and propel it to the next level of professionalism.
Categories
Archive

Waves Tune Vs Melodyne: Which Will Perfectly Harmonize Your Music?

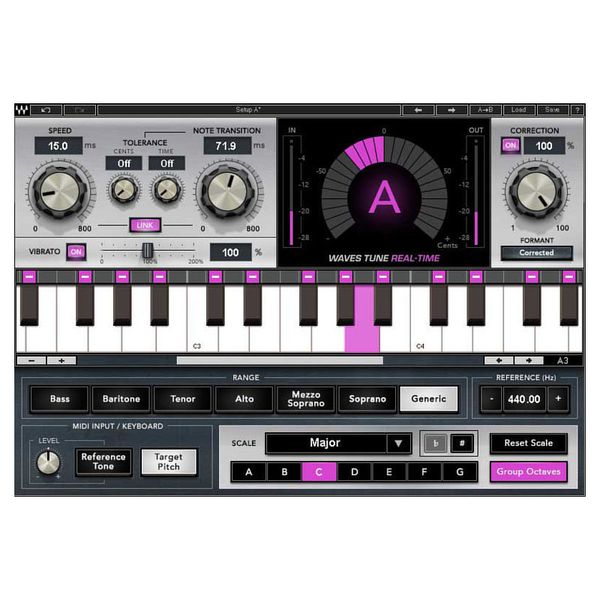
Waves Tune and Melodyne are both vocal tuning plugins but differ in their user interface and flexibility. Waves Tune offers real-time pitch correction with a straightforward interface, while Melodyne provides advanced vocal editing capabilities.


When choosing between Waves Tune and Melodyne for vocal tuning needs, it’s essential to consider the specific requirements of your project. Waves Tune is suitable for quick and easy pitch correction during live performances or recording sessions, whereas Melodyne excels in detailed and precise vocal editing, allowing for manipulation of individual notes and phrases to achieve a natural sound.


Both plugins have their strengths and can be valuable tools for enhancing vocal performances.

Waves Tune Vs Melodyne: Which Will Perfectly Harmonize Your Music?


Credit: www.thomann.ae

Comparing Features

When comparing Waves Tune and Melodyne, examining their features is crucial to make an informed decision. Let’s delve into the key aspects of these popular pitch correction tools.

Pitch Correction

Waves Tune: Offers real-time pitch correction, allowing you to achieve precise tuning for vocals effortlessly.

Melodyne: Provides unmatched control over individual notes within chords, enabling detailed pitch editing.

Time Correction

Waves Tune: Includes advanced time correction features to align vocals perfectly with the music track.

Melodyne: Employs innovative algorithms for time stretching and manipulation, ensuring seamless time adjustments.


User Interface

Start of User Interface Section

The user interface of a music production software plays a crucial role in ensuring a smooth and efficient workflow. When comparing Waves Tune and Melodyne, the user interface can significantly impact the user experience and the overall quality of music production.

Start of Workflow Efficiency H3 Heading

Workflow Efficiency

Waves Tune offers a user-friendly interface that allows for quick and intuitive pitch correction. Users can easily navigate through the software and make real-time adjustments to vocal recordings. On the other hand, Melodyne provides a more detailed interface with advanced editing features, which may require a learning curve but offer extensive control over pitch and timing.

Start of Customization Options H3 Heading

Customization Options

In terms of customization options, Waves Tune excels in its simplicity, providing preset settings and basic customization tools for quick pitch correction. Melodyne, on the other hand, offers a wide range of customization options, including the ability to adjust individual notes, pitch modulation, and timing with precision.

Flexibility And Control

In the world of audio editing, having the flexibility and control to manipulate pitch and timing is crucial. When it comes to choosing between Waves Tune and Melodyne, the level of flexibility and control each software offers is a key consideration.

Editing Capabilities

Both Waves Tune and Melodyne offer extensive editing capabilities that allow users to precisely adjust the pitch and timing of audio recordings. Waves Tune provides a straightforward interface with real-time pitch correction and time-stretching features, making it ideal for quick and easy editing tasks. On the other hand, Melodyne offers a more in-depth approach, enabling users to manipulate individual notes within a recording. This level of control is particularly beneficial for detailed pitch and timing adjustments.

Compatibility With Daws

When it comes to integrating with digital audio workstations (DAWs), both Waves Tune and Melodyne offer seamless compatibility, allowing users to incorporate their editing capabilities directly into their workflow. Waves Tune is designed as a plugin for popular DAWs, ensuring smooth integration and real-time editing. Similarly, Melodyne offers compatibility with various DAWs, making it a versatile choice for professional audio production.

Sound Quality

When it comes to finding the perfect tool for pitch correction, two popular options that often come up are Waves Tune and Melodyne. Both plugins offer impressive features and functionality, but one crucial aspect that sets them apart is sound quality. Let’s dive deeper into the sound quality of Waves Tune and Melodyne, exploring two significant factors: artifact minimization and natural sound retention.

Artifact Minimization

One aspect that makes Waves Tune and Melodyne stand out is their ability to minimize artifacts during pitch correction. Artifacts are unwanted distortion or anomalies that may occur when altering the pitch of a vocal or instrument. Both plugins excel in this area but in slightly different ways.

With Waves Tune, you can expect exceptional artifact minimization through its advanced algorithms and meticulously designed pitch detection. This allows for seamless pitch correction without compromising the audio quality. Waves Tune ensures that your vocal tracks or instrument recordings remain crisp and natural, free from any noticeable artifacts.

On the other hand, Melodyne offers powerful tools for artifact minimization through its Direct Note Access feature. By using note separation technology, Melodyne can isolate individual notes in a recording, enabling precise adjustments while simultaneously minimizing artifacts. This results in a transparent and artifact-free pitch correction process, allowing for the preservation of the original character of the audio.

Natural Sound Retention

Another vital aspect to consider when comparing Waves Tune and Melodyne is their ability to retain the natural sound of the audio being processed. Maintaining the natural character of a vocal or instrument is crucial for a professional and authentic sound.

Waves Tune excels in this area as it preserves the natural sound of the original recording. By focusing on accurate pitch detection and subtle correction, Waves Tune ensures that the essence and expression of the performance are retained. This plugin empowers you to make precise pitch adjustments while maintaining the integrity and authenticity of the audio.

Similarly, Melodyne is renowned for its exceptional natural sound retention capabilities. The software’s advanced algorithms allow for transparent and unobtrusive pitch adjustments while preserving the original tonal qualities of the recorded material. Melodyne enhances the overall sound without compromising the natural timbre, enabling you to achieve professional results that sound incredibly natural and seamless.

In conclusion, both Waves Tune and Melodyne offer exceptional sound quality when it comes to pitch correction. Whether you prioritize artifact minimization or natural sound retention, these plugins have you covered. Understanding their unique approaches and features will help you make an informed decision based on your specific needs and preferences. So, take your time, experiment, and choose the plugin that best complements your style of music production or audio editing.

Price And Accessibility

When it comes to choosing the right pitch correction software, two popular options that often come up are Waves Tune and Melodyne. Both of these tools offer powerful features for fixing pitch and tuning vocals. However, one factor that greatly influences a musician’s decision is the price and accessibility of these plugins. In this section, we will take a closer look at the affordability of Waves Tune and Melodyne, as well as the availability of free options.

Affordability

When considering the affordability of pitch correction plugins, Waves Tune and Melodyne differ significantly in terms of pricing. Waves Tune, offered by Waves Audio, comes as part of their Waves Tune Real-Time plugin, which is priced at $249 as of April 2021. This plugin provides a budget-friendly option for those who only require real-time pitch correction capabilities without the need for extensive editing.

On the other hand, Melodyne, developed by Celemony, offers a range of versions with varying prices based on the user’s needs. The starting price for Melodyne Essential, which includes basic pitch correction functionality, is around $99. For enhanced features like polyphonic pitch editing, users can opt for Melodyne Editor starting at $399. Although these prices may seem higher compared to Waves Tune, it’s important to consider the additional capabilities that come with the Melodyne software.

Availability Of Free Options

If you’re looking for a more cost-effective solution or simply want to try out pitch correction software without investing money upfront, there are several free alternatives available. One popular option is the free version of Waves Tune, called Waves Tune LT. Though it has limited features compared to its paid counterpart, Waves Tune LT can still provide basic pitch correction functionalities for those on a tight budget.

Additionally, there are free alternatives like GSnap and MAutoPitch. GSnap, created by GVST, is a simple pitch correction plugin that can be used with popular digital audio workstations (DAWs) such as Ableton Live, FL Studio, and Logic Pro. Similarly, MAutoPitch, developed by MeldaProduction, is another free pitch correction plugin that offers a range of adjustable parameters for fine-tuning vocals.

All in all, whether you choose Waves Tune or Melodyne for your pitch correction needs, the cost and accessibility factor depend on your budget and requirements. While Waves Tune provides a more affordable option with its real-time capabilities, Melodyne offers a broader range of features at a higher price point. If you’re just starting or experimenting with pitch correction, the availability of free options like Waves Tune LT, GSnap, and MAutoPitch can be a great way to get started without breaking the bank.

Waves Tune Vs Melodyne: Which Will Perfectly Harmonize Your Music?


Credit: www.gearnews.com

Frequently Asked Questions On Waves Tune Vs Melodyne

Is Waves Auto-tune Any Good?

Yes, Waves Auto-Tune is a good choice for precise pitch correction and creative vocal effects. It offers advanced features and a user-friendly interface for audio editing.

Do Most Artists Use Melodyne?

Many artists use Melodyne for vocal editing, pitch correction, and creative manipulation in their music production process.

What Is The Difference Between Waves Tune And Auto-tune?

Waves Tune focuses on pitch correction for vocals. Auto-Tune corrects pitch for vocals and instruments.

Does Waves Tune Sound Natural?

Yes, Waves Tune sounds natural by correcting pitch while maintaining the original vocal characteristics. Being seamlessly integrated, it preserves the natural nuances of the voice.

Conclusion

Based on the comparison of Waves Tune and Melodyne, both offer unique features for vocal tuning. Waves Tune is known for its real-time pitch correction and user-friendly interface, while Melodyne is praised for its extensive editing capabilities. Ultimately, the choice between the two will depend on individual preferences and specific project needs.

Categories
Archive

Best Open Source DAWs: Unleash Your Musical Creativity Today!

Ardour and LMMS are popular open-source DAWs, offering comprehensive features for music production. These platforms provide efficient tools and interfaces for audio editing and mixing, suitable for both beginners and advanced users.


Are you looking for quality open-source digital audio workstations (DAWs) to enhance your music production skills? In today’s digital era, having access to versatile and cost-effective software can greatly benefit music creators of all levels. Fortunately, there are excellent options available in the form of open-source DAWs.


Two standout choices in this category are Ardour and LMMS. These platforms offer a wide range of features and tools that cater to the diverse needs of musicians and producers. Whether you are just starting out or looking to expand your capabilities, exploring the world of open-source DAWs can be a game-changer in your music production journey.


What Is An Open Source Daw?


Best Open Source DAWs

What is an Open Source DAW?

Open Source DAW (Digital Audio Workstation) software refers to music production programs that are freely available for anyone to use, modify, and distribute.

Benefits Of Open Source Daws

  • Community-driven development fosters innovation.
  • Cost-effective options for aspiring musicians.
  • High level of customization and flexibility.
  • Regular updates and enhancements.

Drawbacks Of Open Source Daws

  • Lack of comprehensive customer support.
  • Potential compatibility issues with hardware.
  • Learning curve for users unfamiliar with open-source software.

In conclusion, Open Source DAWs offer a range of benefits but also come with certain drawbacks that users should be aware of before making a decision.

Best Open Source DAWs: Unleash Your Musical Creativity Today!


Credit: www.groovyspin.com

Top Open Source Daws

Discover the best open-source DAWs that offer high-quality audio production and recording capabilities. With their customizable features and user-friendly interfaces, these DAWs provide a cost-effective solution for music enthusiasts and professional producers alike. Unleash your creativity with these top open-source DAWs.

In the realm of digital audio workstations (DAWs), open-source software provides powerful and versatile options for music production. Let’s explore some of the top open-source DAWs available today.

Ardour

Ardour is a robust and feature-rich DAW that offers professional-grade audio editing capabilities. It supports multi-track recording and editing, along with automation and plugin support.

Lmms (linux Multimedia Studio)

LMMS, also known as Linux MultiMedia Studio, is a popular open-source DAW that provides a user-friendly interface for creating music tracks. It offers tools for composing, sequencing, and mixing audio.

Audacity

Audacity is a versatile audio editing software that is widely used for recording, editing, and mixing audio tracks. Its simple interface and powerful features make it a go-to choice for many music enthusiasts.

Qtractor

Qtractor is a lightweight and easy-to-use DAW that offers MIDI sequencing and audio recording capabilities. It is known for its stability and intuitive workflow, making it a favorite among musicians and producers.

Key Features To Look For

When choosing an open-source digital audio workstation (DAW), it’s essential to consider the key features that will best suit your music production needs. Here are the primary features to look for in a DAW:

Support For Multiple Platforms

A versatile DAW should be compatible with various operating systems, including Windows, macOS, and Linux. Cross-platform support ensures flexibility and accessibility for users with different devices and preferences.

Midi Capabilities

MIDI capabilities are crucial for digital music production, allowing users to create, edit, and playback musical performances. A DAW with robust MIDI functionality enables seamless integration with external MIDI controllers and devices.

Audio Editing And Mixing Tools

Comprehensive audio editing and mixing tools are paramount for achieving professional-quality sound. Look for a DAW that offers a wide range of editing features, such as audio slicing, time-stretching, pitch correction, and advanced mixing capabilities.

Plugin Support

Extensive support for third-party plugins enhances a DAW’s capabilities, allowing users to expand their sonic palette and access additional effects, instruments, and processors. A DAW with plugin compatibility empowers creators to customize their workflow and achieve unique sounds.

Community And Support

When it comes to open-source digital audio workstations (DAWs), having a strong and supportive community is essential. The community of users and developers plays a crucial role in the growth and improvement of these software, providing valuable feedback, bug reports, and even contributing code. This collaborative environment not only ensures the quality and reliability of the DAW but also fosters a sense of inclusiveness and openness.

Active User Community

An active user community is a vital aspect of any open-source project. It not only reflects the popularity of the software but also indicates the level of engagement and dedication of its users. Open-source DAWs have an enthusiastic and thriving user community that constantly interacts and shares their knowledge and experiences. The active community creates an environment of growth, where users are encouraged to learn from one another and explore new possibilities.

Through forums, online communities, and social media groups, users can connect with like-minded individuals who share their passion for music production. They can exchange ideas, seek help with technical issues, and even collaborate on projects. Additionally, the user community often organizes meetups, workshops, and conferences, providing invaluable opportunities to network, learn, and stay up-to-date with the latest developments in the world of open-source DAWs.

Available Documentation And Tutorials

One of the major advantages of open-source DAWs is the wealth of available documentation and tutorials. The dedicated user community, along with the software developers, puts significant effort into creating detailed and user-friendly documentation. This documentation serves as a comprehensive guide for beginners, offering step-by-step instructions on installation, configuration, and usage of the DAW.

Moreover, tutorials, video walkthroughs, and online courses are readily accessible, offering users the opportunity to enhance their skills and knowledge. These learning resources cover a wide range of topics, from basic techniques to advanced mixing and mastering concepts. Users can easily find tutorials for specific features or plugins, enabling them to maximize the potential of the open-source DAW.

Additionally, open-source DAWs often have an extensive plugin library, allowing users to customize their workflows. The documentation and tutorials help users navigate through the vast collection of plugins, guiding them in selecting the most suitable tools for their specific needs. With the abundance of resources available, users can confidently explore and experiment, empowered by the support and guidance of the open-source DAW community.

Making The Right Choice

When it comes to selecting the best open source digital audio workstation (DAW) for your needs, making the right choice is crucial. With so many options available, it’s important to match your workflow and requirements to ensure a seamless music production experience. Additionally, thorough testing and evaluation can help you narrow down your options and find the perfect DAW that suits your music production needs. In this article, we will explore two essential factors to consider when making your decision: matching your workflow and requirements, and the importance of testing and evaluating different DAW options.

Matching Your Workflow And Requirements

Each musician and producer has a unique workflow and specific requirements when it comes to music production. It’s important to find a DAW that aligns with your creative process and caters to your specific needs. Whether you prefer a simple and intuitive interface or require advanced features and extensive customization options, there is a DAW out there that suits your working style.

  • Consider the type of music you produce and the genre-specific tools and effects you might need.
  • Think about your preferred method of composing and arranging music, such as MIDI sequencing, loop-based production, or recording live instruments.
  • Take into account your level of expertise and comfort with different software interfaces.

By carefully considering these factors, you can ensure that the DAW you choose enhances your workflow and enables you to create music more effortlessly.

Testing And Evaluating

Before committing to a particular DAW, it’s crucial to thoroughly test and evaluate different options. This enables you to get a hands-on experience with each software and determine its suitability for your needs. Here are some steps you can take to test and evaluate a DAW:

  1. Download trial versions of various open source DAWs and explore their features and functionalities.
  2. Create a small project and test how each DAW handles your specific music production workflow.
  3. Consider compatibility with your preferred operating system and hardware, ensuring seamless integration.
  4. Read user reviews and forums to understand the experiences and opinions of other musicians and producers.

By following these steps, you can make an informed decision and select the open source DAW that best suits your needs. Remember, the right DAW should align with your workflow, cater to your requirements, and offer a seamless music production experience.


Frequently Asked Questions Of Best Open Source Daws

What Is The Best Free Daw?

The best free DAW is Cakewalk by BandLab. It offers advanced features, user-friendly interface, and professional tools for music production.

Is There A Free Open Source Daw?

Yes, there are free open-source DAWs available for music production, such as Audacity, Ardour, and LMMS.

Is Cakewalk The Best Free Daw?

Yes, Cakewalk is a top choice for a free DAW with its intuitive interface and powerful features.

What Is The #1 Daw?

The #1 DAW is subjective, as it depends on personal preference and specific needs. Some popular options include Ableton Live, Logic Pro, and Pro Tools.

Conclusion

Open-source DAWs offer professional-quality features without the hefty price tag. With an array of options available, producers and musicians can find the perfect DAW to suit their needs. From customizable interfaces to extensive plugin libraries, these open-source DAWs provide endless opportunities for creativity and innovation in music production.

Categories
Archive

Mixing And Mastering Burnout: Expert Tips to Find Your Creative Spark

Mixing and mastering burnout occurs from prolonged audio editing leading to fatigue and reduced creativity. It’s essential to prioritize self-care and take breaks to avoid burnout in the music production process.


As an audio engineer or music producer, the demands and intricacies of mixing and mastering can be overwhelming, resulting in burnout. This can impact the quality and efficiency of your work, leading to unsatisfactory outcomes. By understanding the signs of burnout and implementing strategies to mitigate its effects, you can maintain your passion and quality in music production.


We will explore the causes, symptoms, and effective ways to prevent and overcome mixing and mastering burnout in the music industry.


Recognizing Burnout Signs

Recognizing burnout signs is crucial in the mixing and mastering process. It’s important to be attentive to emotional and physical cues, such as fatigue, decreased productivity, and irritability. Taking timely breaks and seeking support can help prevent burnout and maintain a healthy work-life balance.

Recognizing Burnout Signs

Physical Signs
– Lack of energy and constant fatigue
– Headaches, stomach issues, and muscle tension

Emotional Signs
– Increased irritability and mood swings
– Feelings of cynicism and detachment

Burnout can manifest through various Physical Signs like fatigue and muscle tension. Additionally, Emotional Signs such as irritability and cynicism indicate burnout.

Understanding The Causes

Discover the root causes of mixing and mastering burnout to prevent its negative impacts on your music production journey. Identifying these triggers can help you implement effective strategies to maintain your creativity and passion in the long run.


Workload And Pressure

Balancing a heavy workload and facing immense pressure can lead to burnout.

Work overload and stress can take a toll on mixing and mastering professionals.

It’s crucial to manage tasks effectively to prevent burnout from excessive workload.


Lack Of Inspiration

Facing a lack of inspiration can be a significant cause of burnout in music production.

Creativity is essential in the mixing and mastering process, and without it, burnout looms.

Seeking new sources of inspiration can help combat burnout and revitalize creativity.

Effective Strategies For Overcoming Burnout

Discover practical tactics to combat burnout in the mixing and mastering realm. Implement self-care routines, set boundaries, and seek support to rejuvenate your passion for the craft and maintain peak performance.

Effective Strategies for Overcoming Burnout

Setting Realistic Goals

When dealing with mixing and mastering burnout, it’s important to set realistic goals for your projects. One effective strategy is to break down your tasks into smaller, achievable milestones. This approach can help you maintain a sense of progress and prevent feeling overwhelmed. By setting realistic goals, you can avoid putting undue pressure on yourself and reduce the risk of burnout.

Taking Breaks

Regular breaks are essential for combating burnout. It’s crucial to acknowledge the need for rest and taking breaks in between intense mixing and mastering sessions. Incorporating short, frequent breaks into your workflow can help alleviate mental fatigue, enhance productivity, and provide a much-needed mental respite. Remember, breaks are not a hindrance; they are a strategy for sustaining creativity and mental well-being.

Setting Realistic Goals

When dealing with mixing and mastering burnout, it’s important to set realistic goals for your projects. One effective strategy is to break down your tasks into smaller, achievable milestones. This approach can help you maintain a sense of progress and prevent feeling overwhelmed. By setting realistic goals, you can avoid putting undue pressure on yourself and reduce the risk of burnout.

Taking Breaks

Regular breaks are essential for combating burnout. It’s crucial to acknowledge the need for rest and taking breaks in between intense mixing and mastering sessions. Incorporating short, frequent breaks into your workflow can help alleviate mental fatigue, enhance productivity, and provide a much-needed mental respite. Remember, breaks are not a hindrance; they are a strategy for sustaining creativity and mental well-being.

Incorporating Self-care Practices

When it comes to dealing with burnout as a mixing and mastering professional, incorporating self-care practices becomes crucial. Taking care of your mental and physical well-being is essential to maintain a healthy balance and prevent burnout from taking over. Here are a few self-care practices you can incorporate into your routine to combat burnout:

Mindfulness And Meditation

Mindfulness and meditation can work wonders in reducing stress and promoting relaxation. Taking a few moments each day to focus on your breath and clear your mind can help you regain clarity and improve your overall well-being. Setting aside dedicated time for mindfulness and meditation can be as simple as finding a quiet space, closing your eyes, and focusing on your breath, allowing any stressful thoughts to melt away.

Physical Exercise

Physical exercise not only benefits your body but also has a positive impact on your mental health. Engaging in regular physical activity helps release endorphins, the feel-good hormones, which can boost your mood and alleviate stress. Whether it’s going for a run, taking a yoga class, or simply taking a brisk walk, incorporating physical exercise into your routine can help you combat burnout and maintain a healthy work-life balance.

Seeking Professional Help

Seeking professional help is a crucial step in addressing and managing burnout. When struggling with mixing and mastering burnout, reaching out to trained professionals can provide valuable guidance and support. There are various options available, including therapy and counseling, as well as collaborating with a mentor.

Therapy And Counseling

Therapy and counseling offer a safe space for individuals to explore their burnout-related challenges. During therapy sessions, a licensed therapist or counselor listens attentively, provides empathetic support, and helps individuals develop coping strategies. These professionals can assist in identifying underlying causes of burnout, understanding triggers, and implementing effective stress management techniques.

Collaborating With A Mentor

Collaborating with a mentor who has experience in the music industry can be highly beneficial for individuals experiencing burnout in mixing and mastering. A mentor can offer guidance, share their personal experiences, and provide valuable insights into navigating the challenges of the industry. This collaborative relationship can help individuals gain perspective, learn new techniques, and regain their passion for their work.


Frequently Asked Questions On Mixing And Mastering Burnout

Why Is Mixing And Mastering So Difficult?

Mixing and mastering can be difficult due to the technical skills required for intricate audio adjustments. Achieving a balanced and polished sound involves a deep understanding of sound engineering principles and sophisticated equipment. It demands a keen ear to discern fine nuances and ensure optimal quality.

What Is The Average Mixing And Mastering Rate?

The average rate for mixing and mastering can vary, but it typically ranges from $50 to $150 per song. The cost depends on factors such as the complexity of the project, the experience of the engineer, and the studio’s location.


Be sure to get quotes from different professionals before making a decision.

How Many Hours Does It Take To Mix And Master A Song?

Mixing and mastering a song typically takes between 10-40 hours. The timeframe depends on factors like the complexity of the song, the skill level of the engineer, and any revisions needed. Efficient communication and clear directions can help streamline the process.

What Is The Truth About Mixing And Mastering?

Mixing and mastering are crucial elements in producing high-quality audio tracks. Mixing involves blending individual elements to create a cohesive sound, while mastering focuses on optimizing the final mix for distribution. Both processes are essential for achieving professional-sounding music.

Conclusion

After understanding the serious implications of burnout in the mixing and mastering industry, it becomes evident that safeguarding one’s mental and emotional well-being is crucial. By prioritizing self-care, setting boundaries, and seeking support when needed, music professionals can mitigate the risks of burnout.


Remember, a healthy work-life balance is key to a sustainable and fulfilling career in the music industry.

Categories
Archive

What Does It Mean to Mix And Master a Song? Tips and Tricks

Mixing involves blending individual tracks together, ensuring balance and clarity in the sound. Mastering optimizes the final mix for distribution and playback, enhancing overall quality and coherence.


Mixing combines all elements such as vocals, instruments, and effects in a song to create a cohesive sound. Mastering fine-tunes the mixed track by adjusting levels, EQ, and dynamics to achieve a polished, professional sound. Both processes are essential for producing a high-quality, commercially viable music track that resonates with listeners and meets industry standards.


Whether you are a musician, producer, or audio engineer, understanding the art of mixing and mastering is crucial for achieving a competitive edge in the music industry.


The Basics Of Mixing And Mastering


The Basics of Mixing and Mastering

Mixing is the process of blending individual tracks together to create a cohesive and balanced sound.

Mastering is the final step in the music production process where the song is polished and prepared for distribution.

Mixing

Mixing involves adjusting levels, adding effects, and enhancing the overall quality of each track.

Mastering

Mastering focuses on optimizing the overall sound of the entire song, ensuring consistency and clarity.

What Does It Mean to Mix And Master a Song? Tips and Tricks


Credit: online.berklee.edu

Key Differences Between Mixing And Mastering

When working on a music project, it’s essential to understand the distinctions between mixing and mastering. Each process plays a unique role in shaping the final sound of a song.

Goal Of Mixing

Mixing focuses on blending individual tracks together to create a cohesive and balanced sound.

  • Adjusting levels
  • Applying EQ and effects
  • Panning instruments

Goal Of Mastering

Mastering involves polishing the overall mix to achieve a professional and consistent sound across all playback systems.

  • Enhancing clarity and dynamics
  • Optimizing loudness levels
  • Preparing for distribution

Common Techniques In Mixing

Common Techniques in Mixing are crucial in achieving a high-quality audio product. Skilled engineers utilize various methods to ensure the individual elements of a song blend seamlessly together, ultimately creating a cohesive sound. Let’s explore some of the fundamental techniques used in the art of mixing.

Balancing Levels

Balancing levels is a key aspect of the mixing process. It involves adjusting the volume of each track to ensure that no element overpowers the others, resulting in a well-balanced and harmonious mix. By meticulously adjusting the levels of instruments and vocals, the engineer can create a clear and defined sound.

Panning And Stereo Imaging

Panning and stereo imaging play a pivotal role in creating a sense of space and depth within a mix. By strategically placing the audio elements across the stereo field, the engineer can establish a panoramic sonic landscape. This technique can enhance the listener’s experience, creating a sense of immersion within the music.

Advanced Mixing Tips And Tricks

In the world of music production, mixing and mastering play vital roles in bringing a song to life. While mixing involves blending and balancing different elements of a track, mastering focuses on finalizing the overall sound. In this article, we will delve deeper into some advanced tips and tricks that can enhance your mixing skills and help you achieve professional-sounding results.

Eq And Compression

EQ and compression are two powerful tools that can significantly impact the sound of a mix. Proper utilization of these techniques can bring clarity, definition, and cohesion to individual instruments and the overall mix.

1. EQ:

Equalization, or EQ, allows you to adjust the frequency content of a sound, enabling you to sculpt and shape its tonal balance. Here are a few tips to optimize your use of EQ:

  • Identify and attenuate frequencies that clash or mask each other, to prevent muddiness and improve separation of instruments.
  • Use high-pass filters to remove low-frequency rumble or unwanted noise from each track, freeing up headroom for other elements.
  • Boosting or cutting specific frequencies can emphasize or de-emphasize certain instruments or elements in the mix, bringing them forward or pushing them back.

2. Compression:

Compression helps control dynamic range, ensuring that different elements in a mix sit more cohesively together. Here are some compression tips to enhance your mix:

  • Use compression to tame peaks and even out the levels of individual tracks, making them more consistent.
  • Utilize sidechain compression to create space for important elements by ducking certain frequencies when competing sounds are present.
  • Experiment with different attack and release settings to shape the transient response of instruments, adding punch or smoothing out their dynamics.

Effects And Automation

Effects and automation can add depth, movement, and excitement to your mix, elevating it from a stagnant soundscape to an engaging sonic experience.

1. Effects:

Effects such as reverb, delay, chorus, and distortion can enhance the sonic characteristics of individual instruments or the overall mix. Consider these tips when using effects:

  • Apply reverb and delay strategically to create a sense of space and depth within the mix.
  • Experiment with different types of modulation effects, like chorus or flanger, to add movement and width to instruments.
  • Use distortion or saturation effects subtly to add warmth or edge to specific elements, providing them with character and presence.

2. Automation:

Automation involves changing parameters over time to create dynamic shifts and enhance the emotional impact of a mix. Here are some tips for effective automation:

  • Automate volume levels to emphasize certain parts or bring attention to a particular instrument during important sections of the song.
  • Adjust the panning of instruments using automation to create movement and width, adding depth and dimension to the mix.
  • Automate effect sends to control the intensity or presence of effects on specific parts or individual tracks.

Mastering Best Practices

Mastering is the final step in the music production process. It is the stage where the audio engineer fine-tunes the mix to ensure it sounds polished, balanced, and professional. The goal of mastering is to bring out the best qualities of a song, making it ready for distribution and playback on any system. When it comes to mastering, there are several best practices that audio engineers follow. In this article, we will explore some of the essential techniques used in mastering, including equalization and dynamic range control.

Equalization Techniques

Equalization, often referred to as EQ, is a vital tool in the mastering process. It allows audio engineers to adjust and shape the frequency response of a song. EQ helps in enhancing the clarity, balance, and tonality of individual elements within a mix. By using EQ, audio engineers can emphasize certain frequencies or reduce unwanted ones, ensuring that each instrument and vocal sits well within the mix.

There are various equalization techniques employed during mastering:

  • Broad EQ: This technique involves making subtle adjustments to the overall frequency balance of the mix. It helps in correcting any imbalances and ensuring a smooth and cohesive sound.
  • Narrow EQ: For specific issues like resonant frequencies or harshness, narrow EQ is used. It allows audio engineers to target specific problem areas and fix them without affecting the rest of the mix.
  • Mid-Side EQ: With mid-side EQ, audio engineers have the ability to control the balance between the center and the sides of a mix. This technique is useful for widening the stereo image or enhancing the focus of the vocals.

Dynamic Range And Loudness

Dynamic range refers to the difference between the softest and loudest parts of a song. Maintaining an appropriate dynamic range is crucial in mastering as it ensures that the song does not sound overly compressed or lack depth. Audio engineers utilize various techniques to control the dynamic range and achieve optimal loudness levels, such as:

  1. Compression: Compression is a popular technique used in mastering to control the dynamic range. It helps in reducing the volume of the loud parts while maintaining the overall balance of the mix. By carefully applying compression, audio engineers can enhance the sustain, control peaks, and create a more polished sound.
  2. Limiting: Limiting is a technique used to prevent the audio from exceeding a predetermined loudness level. It effectively acts as an invisible ceiling, ensuring that the loudest parts of the song do not clip or distort. Limiting helps in achieving a consistent and commercially competitive volume for the final mix.
  3. Normalization: Normalization adjusts the overall volume of a song to a specified level. It is commonly used to ensure that multiple songs have a consistent volume level, especially when listening to an album or playlist. Normalization does not affect the dynamic range but rather brings all the songs to a similar perceived loudness.

Mastering, when done correctly, can elevate a song to its full potential. By employing equalization techniques and controlling the dynamic range, audio engineers ensure that the mix sounds balanced, clear, and optimized for all playback systems. These best practices play a crucial role in delivering a professional and impactful musical experience.


Frequently Asked Questions On What Does It Mean To Mix And Master A Song

What Does It Mean To Master Your Song?

Mastering your song means fine-tuning its audio, ensuring balance, clarity, and consistency for optimal sound quality. It involves adjusting levels, EQ, compression, and adding final touches for a polished and professional sound.

What Does Mix Master Mean In Music?

A mix master in music refers to a skilled sound engineer or producer who specializes in blending and enhancing audio tracks.

How Do You Master Mix Music?

To master mix music, focus on balancing levels, EQ, and effects for a cohesive sound. Use reference tracks and practice regularly.

Is Mastering Easier Than Mixing?

Mastering is generally considered easier than mixing. It involves final touches to enhance audio quality and ensure consistency. Mixing, on the other hand, is more complex, involving blending individual tracks to create the final mix. Both are crucial for a polished sound.

Conclusion

The mixing and mastering process is a crucial step in creating high-quality music. Understanding the differences between the two and their individual roles is essential for achieving a professional sound. By working with skilled professionals or learning the techniques yourself, you can ensure that your music reaches its full potential.

Categories
Archive

Amazon Pay Per Stream: Unlocking the Power of Music Monetization

Amazon Pay Per Stream pays artists based on the number of streams their music receives on the platform in a concise manner. Artists earn a fraction of a cent per stream, resulting in revenue based on the total number of streams.


This payment model can provide artists with a steady income stream as their music gains popularity on Amazon Music.


Introduction To Amazon Pay Per Stream

In the digital age, Amazon Pay Per Stream is revolutionizing how artists and creators get paid for their music and content.

What Is Amazon Pay Per Stream?

Amazon Pay Per Stream is a payment model where content creators earn revenue based on the number of streams their music or content receives.

How Does It Differ From Traditional Streaming Models?

  1. Direct Revenue: Content creators earn money based on the actual number of streams, unlike traditional streaming models.
  2. Transparency: Amazon Pay Per Stream offers clear insights into earnings per stream, providing transparency to creators.
  3. Fair Compensation: Artists receive fair compensation for their work as the payment is directly tied to stream counts.

Benefits For Artists And Labels

Amazon Pay Per Stream offers numerous benefits for artists and labels, providing a platform for monetizing their music and connecting with their fan base. From maximizing revenue potential to direct fan engagement, this service has the potential to revolutionize the way musicians interact with their audience.

Maximizing Revenue Potential

With Amazon Pay Per Stream, artists and labels have the opportunity to generate income through the streaming of their music. This payment model ensures that artists are rewarded for each individual playback of their songs, providing a steady revenue stream that can grow with the popularity of their music.

Direct Engagement With Fans

One of the most significant advantages of Amazon Pay Per Stream is the direct engagement it allows artists and labels to have with their fans. By offering their music through this platform, musicians can interact with their audience, build a loyal fan base, and gather insights into their listeners’ preferences. This direct connection fosters a deeper connection between artists and fans, leading to increased support for their work.

Navigating Challenges And Opportunities

As Amazon Pay Per Stream continues to reshape the landscape of music consumption, it presents both challenges and opportunities for artists, content creators, and listeners alike. In this article, we will explore two key aspects of this phenomenon – the impact on music consumption habits and the delicate balance between monetization and audience reach.

Impact On Music Consumption Habits

Amazon Pay Per Stream has fundamentally changed the way people listen to music. With the ability to stream their favorite songs instantly, listeners now have access to an unbelievable variety of music at their fingertips. This shift has revolutionized music consumption habits, as people are no longer bound by physical albums or limited radio rotations.

The convenience and affordability of streaming services have propelled the growth of subscription-based music platforms. With Amazon Pay Per Stream at the helm, listeners are empowered to discover new genres, artists, and songs effortlessly.

Additionally, personalized recommendations based on listening history and preferences have further enhanced the overall music discovery experience.

Balancing Monetization With Audience Reach

While artists and content creators appreciate the visibility and exposure that Amazon Pay Per Stream can bring, finding a balance between monetization and audience reach remains a challenge.

On one hand, streaming platforms offer a vast reach to global audiences, giving artists the opportunity to connect with a larger fan base. The potential for increased exposure, brand recognition, and even live performance opportunities for emerging artists is unparalleled.

On the other hand, streaming services also encounter criticism for the royalties paid to artists. With an ever-expanding catalog, the challenge lies in ensuring that artists receive fair compensation for their work while maintaining a sustainable streaming model.

This delicate balance requires continuous dialogue and collaboration between streaming platforms, artists, and industry stakeholders to establish a system that fairly rewards creators while providing affordable and accessible music to listeners.

In conclusion, the rise of Amazon Pay Per Stream presents exciting opportunities for music lovers and creators. As the industry navigates the challenges associated with this new era of music consumption, it is imperative to strike a balance that supports both artistic expression and economic sustainability.

The Future Of Music Monetization

Trends In Pay Per Stream Models

The music industry has experienced a significant shift in recent years, with digital music streaming platforms becoming the primary mode of music consumption. With this shift, the traditional revenue models for musicians and artists have also undergone a transformation. One of the emerging trends in the music industry is the introduction of pay per stream models, where artists are compensated based on the number of streams their music receives. This model has gained popularity due to its potential for providing a more transparent and fair method of monetizing music.

With pay per stream models, artists can earn revenue directly from their music in a way that aligns more closely with the value it generates. Instead of relying on album sales or digital downloads, artists now have the opportunity to earn income with every stream their music receives. This shift in monetization presents a significant opportunity for independent artists and emerging talent who may not have access to traditional revenue channels.

Moreover, pay per stream models enable artists to connect directly with their audience and gain valuable insights into their music consumption habits. Streaming platforms like Amazon Music provide artists with detailed data on the number of streams, listener demographics, and geographic locations. Armed with this information, artists can make better-informed decisions about their marketing strategies, tours, and collaborations.

Innovations And Potential Disruptions

As the music industry continues to evolve, innovations and potential disruptions are bound to arise in pay per stream models. One notable development is the integration of blockchain technology to enhance transparency and streamline royalty payments. By leveraging blockchain, artists can ensure accurate and timely compensation, reducing the need for intermediaries in the payment process.

Another area of innovation is the exploration of tokenization as a means of monetizing music. Tokenization involves creating unique digital tokens that represent ownership or access rights to music. This approach opens up new possibilities for artists to engage directly with their fans, offering exclusive content, and creating a sense of ownership in the music itself. By tokenizing music, artists can tap into a dedicated community of supporters while also generating revenue.

However, potential disruptions to pay per stream models may arise from shifts in consumer behavior or technological advancements. The rise of voice-controlled smart devices, for example, could lead to changes in how people access and listen to music. Streaming platforms will need to adapt to these new interfaces and ensure a seamless user experience.

Furthermore, as the music streaming landscape becomes even more crowded, platforms will need to differentiate themselves by offering unique features and tailored experiences for listeners. This could involve personalized playlists, curated content, and immersive audio experiences. By staying ahead of these trends and expectations, streaming platforms can continue to attract users and drive engagement.


Frequently Asked Questions Of Amazon Pay Per Stream

How Much Does 1,000 Streams Pay?

1,000 streams typically pay around $4 to $7, depending on the streaming platform and location.

How Many Music Streams Does It Take To Make $100?

It typically takes around 50,000 music streams to earn $100 from streaming platforms, such as Spotify or Apple Music.

What’s The Highest Paying Streaming Service?

HBO Max is the highest paying streaming service. With exclusive content and premium features, it offers top earnings for creators.

How Much Does Amazon Unlimited Music Pay Per Stream?

Amazon Unlimited Music pays an average of $0. 004 per stream, but the actual amount can vary.

Conclusion

Amazon Pay Per Stream offers a lucrative opportunity for artists. With its transparent payment system and vast audience reach, it provides a promising platform for artists to monetize their music. As the streaming landscape continues to evolve, Amazon’s model holds the potential to offer fair compensation and increase artist earnings.

Categories
Archive

Is Distrokid A Publisher? Unveiling the Music Distribution Platform’s Publishing Features

Distrokid is a digital distribution service, not a publisher. They help musicians distribute music online.


Distrokid simplifies the process of getting songs onto music platforms like Spotify, Apple Music, and more. Musicians can easily upload and share their music with a wide audience. While Distrokid does not act as a traditional music publisher in terms of managing copyrights and royalties, it does offer valuable distribution services for independent artists seeking to reach a global audience.


By leveraging Distrokid’s platform, musicians can focus on creating and promoting their music without the complexity of dealing with traditional publishing arrangements. This user-friendly service has become a popular choice for artists looking to get their music out into the world efficiently.

Is Distrokid A Publisher? Unveiling the Music Distribution Platform's Publishing Features


Credit: www.femnoise.com

The Role Of Distrokid

When discussing the Role of Distrokid, it is important to understand how this platform operates in the music industry.

Music Distribution

Distrokid serves as a digital music distribution service that allows artists to upload and distribute their music to various online platforms.

Artists can easily reach a global audience through streaming services like Spotify and Apple Music with Distrokid.

The platform simplifies the distribution process, making it accessible for independent artists and labels.

Publishing Features

In addition to music distribution, Distrokid also offers publishing features that help artists protect their copyrights.

Artists can register their songs with performance rights organizations and receive royalties for their work.

Distrokid acts as a publishing administrator, making sure artists get paid for their music.

Understanding Publishing

Is Distrokid a Publisher? Let’s dive into understanding the concept of publishing in the music industry.

Copyright Ownership

Copyright Ownership refers to the rights an individual or entity holds over their creative work.

  • Artists retain copyright ownership of their music.
  • Publishers help manage and protect these rights for artists.

Royalties And Licensing

When it comes to royalties and licensing, understanding how they work is crucial for artists.

  1. Royalties are payments artists receive for the use of their music.
  2. Licensing involves granting permission for the use of copyrighted music.

Distrokid’s Publishing Functionality

Distrokid offers comprehensive publishing services that cater to the needs of musicians and songwriters. From royalty collection to songwriter credits, Distrokid’s publishing functionality provides artists with a seamless way to manage their music rights.

Royalty Collection

One of the key aspects of Distrokid’s publishing functionality is its ability to handle royalty collection. Artists can track and receive their royalties from various streaming platforms and music stores, ensuring a steady income stream from their music.

Songwriter Credits

With Distrokid, artists can easily manage songwriter credits for their music. This allows them to ensure that proper credit is given to all contributors involved in the creation of a song, fostering transparency and fairness within the music industry.


Benefits And Drawbacks

Considering DistroKid as a publisher for your music distribution comes with both advantages and disadvantages. Understanding the benefits and drawbacks can help you make an informed decision. Let’s take a closer look at what DistroKid has to offer:

Advantages

  • Distribution to multiple streaming platforms: DistroKid allows you to easily distribute your music to popular streaming platforms like Spotify, Apple Music, and more, reaching a wider audience.
  • Artist-friendly pricing: DistroKid offers a straightforward pricing model with an annual fee, allowing you to keep 100% of your royalties.
  • Simplified music release process: With DistroKid, you can upload songs, create releases, and set release dates quickly and efficiently, minimizing the administrative hassle.
  • Fast distribution turnaround: DistroKid boasts a fast distribution system, ensuring your music reaches streaming platforms within a short timeframe.
  • Monthly royalty payments: Unlike some other distributors, DistroKid provides monthly payouts, allowing artists to receive their earnings more frequently.
  • Additional services: DistroKid offers a range of tools and services, such as YouTube Content ID and Shazam integration, at no extra cost.

Disadvantages

  • Limited publishing features: While DistroKid focuses primarily on music distribution, it lacks comprehensive publishing services, which may be a drawback for some artists.
  • One-time fee per release: Although DistroKid’s annual fee covers unlimited uploads, some may find the per-release charges for extras like cover songs to be an additional cost.
  • Less personalized support: As a self-service platform, DistroKid may have limited customer support options compared to traditional publishers.
  • Issuing takedown notices: If you encounter copyright infringement issues, taking them down can be a bit more complex since DistroKid acts as a middleman between you and the streaming platforms.

Considering these benefits and drawbacks, DistroKid remains a popular choice for many independent musicians. Its user-friendly interface, competitive pricing, and vast distribution network can provide a valuable platform for artists to get their music heard.

Comparison With Other Platforms

When it comes to distributing your music online, DistroKid is definitely a top contender. But how does it stack up against other platforms? Let’s delve into a competitor analysis and explore the feature variations.

Competitor Analysis

When comparing DistroKid with other music distribution platforms, it’s essential to consider factors such as pricing, royalty rates, and additional services offered. Let’s take a closer look at some well-known competitors:

Feature Variations

While DistroKid offers a comprehensive range of features, it’s important to understand how they differ from other platforms. Here’s a breakdown of the feature variations:

Platform Royalty Rates Additional Services Price
DistroKid 100% of royalties YouTube monetization, Shazam/Siri integration, customizable label name, and more $19.99/year for basic plan
Competitor A 85% of royalties Music video distribution, sync licensing opportunities, and artist analytics $9.99/month for standard plan
Competitor B 80% of royalties Artist collaboration platform, marketing tools, and social media integration $19.99/month for premium plan

As you can see, DistroKid stands out with its unbeatable royalty rate of 100%, giving artists complete control over their earnings. Additionally, DistroKid offers various unique services such as YouTube monetization and customizable label name, providing artists with powerful tools to enhance their music career.

While competitors may offer additional features like music video distribution or sync licensing opportunities, it’s crucial to weigh the benefits against the costs. DistroKid’s annual plan of $19.99 is a cost-effective option, especially for independent artists looking to maximize their earnings without compromising on quality.

In conclusion, when comparing DistroKid with other digital distribution platforms, it’s clear that DistroKid offers a compelling package with its affordable pricing and extensive feature set. By choosing DistroKid, artists can confidently distribute their music while retaining full control over their royalties and benefiting from unique services.


Frequently Asked Questions Of Is Distrokid A Publisher

What Publisher Does Distrokid Use?

DistroKid uses DistroKid Music, an in-house and unique digital music distribution platform. This platform makes it easy for musicians to distribute their music to major online stores and streaming services.

Who Is Considered A Music Publisher?

A music publisher is a company that administers song copyrights, collects royalties, and promotes songs to artists.

Is Distrokid A Publisher For Bmi?

No, DistroKid is a music distributor, not a publisher for BMI.

Is A Music Distributor The Same As A Publisher?

A music distributor is not the same as a publisher. A distributor helps artists get their music to digital platforms. A publisher handles rights and licenses for songs.

Conclusion

DistroKid is not a publisher for music in the traditional sense. However, it does offer distribution services for independent artists. It is important for musicians to understand the distinction between distribution and publishing, and to consider their specific needs when choosing a platform for their music.


DistroKid can be a valuable tool for artists, but it is essential to be clear on its role.

Categories
Archive

How to Master the Art of Music Mixing on Bandlab: Unleash Your True Potential!

To mix your music on Bandlab, use the built-in mixer feature and adjust levels and effects. Diving in, Bandlab offers an intuitive platform for mixing music, allowing creators to blend tracks seamlessly.

Whether you’re a seasoned producer or a beginner looking to polish your sound, Bandlab provides the tools needed to create a professional mix. With easy-to-use functions and a variety of effects at your disposal, mixing your music on Bandlab is a straightforward process.

We’ll explore the steps to efficiently mix your tracks on Bandlab and enhance the overall quality of your music production. Let’s delve into the key techniques and features that will help you achieve a well-balanced and captivating mix for your music projects.

Setting Up Your Workspace

The first step in achieving a professional sound for your music is setting up your workspace properly. This involves choosing the right equipment and optimizing your BandLab settings to ensure a smooth mixing process.

Choosing The Right Equipment

  • Invest in a quality pair of headphones or studio monitors.
  • Consider getting a MIDI controller for easier control over your tracks.
  • Ensure your computer or laptop meets the necessary requirements for running BandLab smoothly.

Optimizing Your Bandlab Settings

  1. Adjust the audio settings to match the sample rate and buffer size of your audio interface.
  2. Set up your tracks with proper levels and panning for a balanced mix.
  3. Explore the various effects and plugins available on BandLab to enhance your sound.
How to Master the Art of Music Mixing on Bandlab: Unleash Your True Potential!

Credit: bchillmusic.com

Understanding The Basics Of Music Mixing

Understanding the Basics of Music Mixing

Music mixing on Bandlab involves several key elements that can greatly impact the final quality of your track. To create a polished and professional sound, it is essential to understand the basics of music mixing.

Importance Of Instrumentation

Each instrument in a song plays a crucial role in the overall sound. Balancing different instruments properly is essential to prevent overcrowding and ensure clarity in your mix.

Balancing Levels And Panning

Adjusting the volume levels of individual tracks and utilizing panning techniques can give your mix depth and dimension. Balancing is about making sure each element is heard without overpowering others.


Exploring Advanced Mixing Techniques

Mixing music is not just about balancing the levels of different tracks. It involves utilizing advanced techniques to enhance the overall sound and create a professional-sounding mix. In this section, we will explore some advanced mixing techniques that can take your music to the next level.

Utilizing Effects And Plugins

Effects and plugins are essential tools for shaping the sound of individual tracks and the overall mix. Understanding how to use these tools effectively can significantly impact the final result. Here are some key points to consider:

  • Experiment with different types of effects such as reverb, delay, and modulation to add depth and character to your mix.
  • Use EQ plugins to shape the frequency response of individual tracks and carve out space for each instrument in the mix.
  • Explore dynamic processors like compressors and limiters to control the dynamics and transients of your tracks, ensuring a more consistent and polished sound.
  • Consider using creative effects such as distortion, saturation, and pitch-shifting to add texture and vibes to your mix.

Creating Depth And Space In Your Mix

Creating depth and space is essential for achieving a professional-sounding mix that feels immersive and three-dimensional. Here are some techniques to enhance the spatial characteristics of your mix:

  1. Use panning to position different elements of the mix in the stereo field, creating a sense of width and separation.
  2. Utilize reverb and delay to place sounds in a simulated acoustic environment, adding a sense of depth and distance.
  3. Consider using ambience and room impulse responses to create the illusion of performing in a particular space.
  4. Experiment with parallel processing to create richer, fuller sounds without cluttering the mix.
How to Master the Art of Music Mixing on Bandlab: Unleash Your True Potential!

Credit: www.upwork.com

Mastering Your Final Mix

Learn how to master your final mix and perfect your music on Bandlab with our step-by-step guide. Achieve professional sound quality and create a polished track that stands out. Elevate your music production skills and deliver a top-notch final mix that captivates your audience.

Applying The Finishing Touches

Once you’ve achieved a balanced and polished mix, it’s time to apply the finishing touches to master your final mix. Mastering is the process of enhancing the overall sound of your song, making it sound professional and ready for distribution. Let’s explore some essential steps to take when mastering your final mix.

Exporting And Sharing Your Work

After mastering your final mix, you’ll want to export and share your masterpiece with the world. Follow these simple steps to ensure your music is ready to be enjoyed by others: 1. Exporting: In Bandlab, navigate to the mix editor and click on the export button. Choose the desired format and quality settings for your export. It’s recommended to export your mix in high-quality audio formats such as WAV or FLAC to preserve the integrity of your music. 2. Naming and Tagging: Before exporting, give your track a meaningful name and add relevant tags. This will help listeners discover your music easily when searching for specific genres or keywords. 3. Metadata: Fill in the metadata fields such as artist name, track title, album name, and release year. This information will be embedded in the exported file, making it easier for streaming platforms and media players to recognize and display the correct details. 4. Cover Art: Design an eye-catching cover art that represents your music. Bandlab allows you to upload custom cover art for each project. A visually appealing cover art can attract listeners and make your music stand out among the crowd. 5. Sharing: Once you’ve exported your final mix and added all the necessary metadata, it’s time to share your work. You can upload your music to streaming platforms like Soundcloud, Spotify, or Bandcamp. Additionally, you can create a social media post with a snippet of your track to tease your followers and direct them to the full release. Remember, the way you present your music is just as important as the music itself. Take the time to ensure your exports are of high quality, properly tagged, and visually appealing. This will give your music the best chance of grabbing attention and making a lasting impression on listeners. Now that you’ve mastered your final mix and learned how to export and share your work, it’s time to let your music be heard! Share your creations with the world and watch your audience grow. Happy mixing and mastering on Bandlab!

Refining Your Skills And Creativity

When it comes to mixing your music on Bandlab, refining your skills and creativity is essential for creating a high-quality and professional sound. By experimenting with different genres, seeking feedback and collaborations, you can enhance your mixing abilities and produce unique and exciting tracks that resonate with your audience.

Experimenting With Different Genres

One way to refine your mixing skills and boost your creativity on Bandlab is by experimenting with different genres. Mixing styles can vary greatly between genres, so exploring various musical styles allows you to understand and adapt your techniques to suit different sounds. Whether it’s pop, rock, hip-hop, or electronic, each genre offers its own set of challenges and opportunities for creative expression.

By exploring different genres, you can gain a deeper understanding of how various elements such as instrumentation, arrangement, and effects contribute to the overall sound. This knowledge will enable you to develop a versatile mixing style that adapts to different musical contexts and expands your creative horizons.

Seeking Feedback And Collaborations

Another valuable way to refine your mixing skills and creativity on Bandlab is by seeking feedback from others and collaborating with fellow musicians. Getting feedback from trusted sources such as experienced mix engineers or fellow musicians can provide valuable insights and perspectives on your work.

Consider joining online communities or forums where you can share your music and receive constructive criticism. Engaging in discussions and actively seeking feedback will help you identify areas for improvement and learn new techniques. It’s important to remember that feedback is an invaluable tool for growth, so embrace it with an open mind.

In addition to seeking feedback, collaborating with other musicians can also enhance your mixing skills. Working with artists from different backgrounds and styles challenges your ability to blend diverse elements harmoniously. Collaborations can fuel your creativity by exposing you to new ideas, expanding your musical palette, and pushing your boundaries as a mix engineer.

Remember, refining your skills and creativity on Bandlab is an ongoing process. Embrace experimentation, seek feedback, and collaborate with others to continuously grow as a mix engineer. By staying open to new ideas and approaches, you’ll be able to take your music to new heights and deliver an exceptional listening experience.

How to Master the Art of Music Mixing on Bandlab: Unleash Your True Potential!

Credit: blog.bandlab.com

Frequently Asked Questions For How To Mix Your Music On Bandlab

Does Bandlab Have A Mixer?

Yes, BandLab offers a mixer that allows users to control and adjust audio levels for optimal sound quality.

How Do You Mix Professional On Bandlab?

To mix professionally on BandLab, access the Mix Editor, adjust volume levels, add effects and plugins, and fine-tune the overall sound.

How Do You Mix Your Own Music?

Mix your own music by setting levels, panning, and adding effects. Use EQ to balance frequencies and compression to control dynamics. Adjust reverb and delay for depth. Check on different speakers and make tweaks as needed. Master the final mix for a polished sound.

How Do You Mix And Master A Song On Bandlab?

To mix and master a song on BandLab, simply import your audio files and use the platform’s built-in mixing and mastering tools. Adjust individual track levels, apply effects, and optimize the overall sound quality. BandLab’s user-friendly interface makes the process easy and accessible for both beginners and experienced musicians.

Conclusion

To sum up, BandLab is an incredible platform for mixing your music. With its user-friendly interface and comprehensive features, you can effortlessly create professional-sounding tracks. By following the suggestions and tips provided you’ll be well on your way to mastering the art of music mixing on BandLab.

Start creating your masterpiece today!

Categories
Archive

How to Create an Epic Music Studio in Your Room: Maximize Your Home Recording Setup!

To make a music studio in your room, start by selecting a quiet space with good acoustics and minimal sound interference. Set up necessary equipment like a computer, audio interface, microphone, and speakers to create a functional workspace.


Consider soundproofing the room with acoustic panels to improve audio quality and reduce noise distractions. Lighting and decor can also enhance the ambiance for creativity and productivity. With careful planning and organization, you can transform your room into a personalized music studio that inspires your artistic vision and allows for seamless music production.


Let’s delve into the process of setting up a music studio in the comfort of your own room.


Choosing The Right Space

Transform your room into a music studio by carefully selecting the right space. Consider factors like acoustics, layout, and noise control to create an optimal environment for recording and producing music. Pay attention to the room’s dimensions and incorporate soundproofing materials to enhance the quality of your music.

Choosing the Right Space:Assessing Room Acoustics
The acoustics of your room impact sound quality significantly.

Optimizing Space Layout
Arrange furniture strategically to enhance sound quality and workflow.

Assessing Room Acoustics:
Consider sound reflection and absorption in the room.

– Position the studio away from noisy areas like the kitchen.
– Utilize carpets or curtains to reduce sound reflection.
– Invest in acoustic panels or foam for better sound quality.

Optimizing Space Layout:
Create a layout that maximizes both functionality and comfort.

– Place the desk where it reduces sound reflections.
– Organize equipment for easy access and operation.
– Ensure proper ventilation in the room.

Choose a space that allows for proper sound quality and functionality in your home music studio.


Essential Equipment

Transform your room into a music studio with essential equipment. Invest in quality soundproofing, microphones, and recording software to create professional-grade music. Build a creative space that inspires your passion for music production.

Selecting Recording Software

When setting up a music studio in your room, selecting the right recording software is crucial for capturing your music creations. Opt for software like Pro Tools or Logic Pro for professional-grade recording capabilities.

Investing In Quality Microphones

One of the essential pieces of equipment for your home music studio is a quality microphone. Condenser microphones are great for capturing vocals and acoustic instruments with clarity and precision.

Soundproofing And Acoustic Treatment

Making a music studio in your room can be an exciting and rewarding project. One of the key aspects to consider when setting up a music studio is soundproofing and acoustic treatment. Understanding soundproofing techniques and implementing acoustic panels are crucial to creating a conducive environment for recording and producing music.

Understanding Soundproofing Techniques

Soundproofing is the process of minimizing the transmission of sound between spaces. There are various techniques that can be used to achieve effective soundproofing in a music studio. This includes:

  • Sealing gaps and cracks in walls, doors, and windows to prevent sound leakage.
  • Using dense materials such as double drywall or mass-loaded vinyl to block sound transmission.
  • Installing soundproof curtains or acoustic door seals to reduce sound transfer.

Implementing Acoustic Panels

Acoustic panels play a crucial role in treating the sound within the studio space. These panels can absorb unwanted reflections and reverberations, creating a more balanced and controlled acoustic environment. When implementing acoustic panels, consider the following:

  1. Identify the areas of the room with the most significant sound reflection and install acoustic panels strategically to address these areas.
  2. Choose panels with different thickness and densities to effectively absorb a wide range of frequencies.
  3. Position bass traps in corners to address low-frequency issues and improve overall sound quality.

Setting Up For Success

When it comes to creating a music studio in your room, setting up for success is key. By organizing cables and equipment and creating a comfortable workspace, you can ensure that your music studio is a productive and inspiring environment. In this article, we will dive into these two essential elements of setting up your music studio.

Organizing Cables And Equipment

One of the most important aspects of setting up your music studio is organizing cables and equipment. No one wants to deal with a tangled mess of cables or have to search for the right piece of gear in the middle of a creative flow. Here are a few tips to keep your cables and equipment neat and accessible:

  1. Label your cables: Use colored tape or labels to clearly mark each cable, so you can easily identify what it’s for.
  2. Invest in cable management tools: Cable ties, Velcro straps, and cable sleeves are all great tools for keeping your cables organized and untangled.
  3. Use cable organizers: Cable clips, cable trays, and cable raceways can help keep your cables neatly arranged and prevent them from getting tangled.
  4. Arrange your equipment: Place your equipment in a logical and ergonomic layout, ensuring that the cables are easily accessible.

Creating A Comfortable Workspace

Creating a comfortable workspace is essential for long hours of creativity and productivity. Here are a few tips to make your music studio a comfortable environment:

  • Ergonomic chair: Invest in a comfortable chair that supports proper posture and provides cushioning for long recording or mixing sessions.
  • Adjustable desk height: Consider using an adjustable desk that allows you to switch between sitting and standing positions, promoting circulation and reducing fatigue.
  • Proper lighting: Ensure that your music studio is well-lit with a mix of natural and artificial light. Consider using adjustable or dimmable lights to control the ambiance.
  • Adequate ventilation: Music production can get hot and stuffy. Make sure your studio has proper ventilation to keep the air fresh and prevent overheating.
  • Soundproofing: If possible, add soundproofing elements to minimize outside noise and optimize the acoustics of your room.

By organizing your cables and equipment and creating a comfortable workspace, you are setting up your music studio for success. These simple steps will not only make your studio more efficient and functional but also contribute to a conducive creative environment. Now that you have a solid foundation, you can focus on making music and let your creativity soar!

Maximizing Recording Quality

Elevate the recording quality of your room music studio by optimizing acoustic treatment, using quality microphones, and proper microphone placement. Implement soundproofing panels, diffusers, and bass traps to enhance sound clarity. Experiment with room layout to achieve optimal sound balance and reduce unwanted noise.

Mastering Mixing Techniques

To achieve professional-sounding recordings in your home music studio, it’s crucial to master the art of mixing. Mixing techniques involve adjusting and balancing the levels, frequencies, and stereo image of each individual track in your recording, creating a cohesive and polished final product.

Consider the following tips to take your mixing skills to the next level:

  1. Use proper gain staging to ensure optimal signal-to-noise ratio.
  2. Apply compression to control dynamics and add depth to your recordings.
  3. Utilize equalization (EQ) to shape the tonal balance of each track and create space in the mix.
  4. Add effects like reverb and delay to enhance depth and create a sense of space in your recordings.
  5. Pay attention to panning and stereo imaging to create a wide and immersive soundstage.

Utilizing Vocal Booths And Isolation Shields

When it comes to maximizing recording quality, creating a suitable environment for capturing vocals is essential. Vocal booths and isolation shields can significantly improve the clarity and accuracy of your recordings, minimizing unwanted background noise and ambience.

Consider the following options for vocal recording:

  • Vocal Booths: A dedicated vocal booth offers a controlled environment with optimal acoustics. These sound-isolated spaces minimize outside noise and ensure clean, focused recordings.
  • Isolation Shields: When setting up a studio in your room, isolation shields can be a cost-effective solution. These portable acoustical barriers help reduce reflections and control the sound that enters the microphone.

Remember, a well-captured vocal performance is the foundation of any great song, so don’t overlook the importance of creating an ideal recording space.


How to Create an Epic Music Studio in Your Room: Maximize Your Home Recording Setup!


Credit: unison.audio

Frequently Asked Questions For How To Make A Music Studio In Your Room

How Do I Build A Music Studio In My Bedroom?

To build a music studio in your bedroom, start by choosing a quiet and well-insulated space. Invest in soundproofing materials, acoustic treatments, and good-quality recording equipment. Optimize space with compact furniture and utilize digital tools for music production. Consider professional advice for layout and equipment setup.

How Do I Set Up A Mini Studio In My Room?

To set up a mini studio in your room, start by choosing a space with good lighting, preferably near a window. Next, set up a backdrop or use a blank wall as your background. Position your camera or smartphone on a tripod for stability.


Add additional lighting if needed, and ensure your space is clutter-free. Finally, experiment with different angles and poses to get the desired results.

Can You Make A Music Studio At Home?

Yes, you can make a music studio at home. All you need is the right equipment and setup. Choose a quiet space, invest in quality recording equipment, soundproof your room, and create a comfortable working environment. Transform your home into a music studio today.

How Can I Make My Room Good For Recording?

To improve your room for recording, use soundproofing materials, minimize reflecting surfaces, and position the mic strategically. Additionally, consider adding carpets and curtains to dampen sound and make the space more conducive to recording.

Conclusion

Creating a music studio in your room is achievable with some creativity and organization. By utilizing the available space, investing in essential equipment, and optimizing soundproofing, you can turn your room into a professional and inspiring music studio. With dedication and passion, you can unleash your musical talents right from the comfort of your own home.

Categories
Archive

Amuse Vs Distrokid : The Ultimate Music Distribution Comparison

Amuse offers free music distribution, while DistroKid charges a fee per release. Amuse and DistroKid are two popular music distribution services that cater to independent artists looking to get their music onto streaming platforms such as Spotify and Apple Music.

Amuse stands out for its free distribution model with no upfront fees or annual subscription, making it an attractive option for artists on a budget. On the other hand, DistroKid offers a more comprehensive range of features for a fee per release, including faster uploads, detailed analytics, and the ability to distribute cover songs.

Both platforms have their strengths and limitations, so choosing between them depends on your specific needs as an artist.

Amuse Vs Distrokid  : The Ultimate Music Distribution Comparison

Credit: aristake.com

Cost And Pricing

When it comes to choosing between Amuse and DistroKid for music distribution, understanding the cost and pricing structure is key. Let’s compare the pricing offerings of both platforms to help you make an informed decision.

Amuse Pricing

Amuse offers a free plan that allows you to release music at no cost. Their premium plan provides additional features at a monthly fee.

Distrokid Pricing

DistroKid offers a straightforward annual fee for unlimited music uploads, with no percentage taken from your royalties.

Amuse Vs Distrokid  : The Ultimate Music Distribution Comparison

Credit: www.youtube.com

Features And Benefits

When choosing between Amuse and DistroKid, it’s crucial to understand the features and benefits each platform offers. Let’s dive into the key aspects to help you make an informed decision.

Amuse Features

  • Amuse provides free music distribution services for independent artists.
  • Offers unlimited free uploads for both singles and albums.
  • Allows artists to keep 100% of their royalties without charging any fees.
  • Provides detailed analytics to track the performance of your music.

Distrokid Features

  • DistroKid offers quick music distribution to all major streaming platforms.
  • Provides features like YouTube Music Content ID and Spotify for Artists access.
  • Enables automatic splits for collaborating artists to distribute royalties efficiently.
  • Offers customized hyperfollow pages to promote your music effectively.

Both Amuse and DistroKid have distinct features catering to the needs of independent musicians. Consider the specific requirements of your music career to choose the platform that aligns best with your goals.

Royalties And Revenue Share

When it comes to choosing between Amuse and DistroKid, understanding the royalties and revenue share is crucial. Both platforms offer different approaches to distributing royalties and sharing revenue with artists. Let’s delve into the specifics of Amuse’s royalties and DistroKid’s revenue share to help you make an informed decision.

Amuse Royalties

Amuse offers a transparent and artist-friendly royalty system. Artists retain 100% of their royalties without any hidden fees. Amuse utilizes a free distribution model, allowing artists to keep all the earnings from their music. Additionally, Amuse tracks and delivers royalties without taking a cut, providing a fair and straightforward approach to revenue distribution.

Distrokid Revenue Share

On the other hand, DistroKid employs a revenue sharing model with artists. The platform collects a flat fee for music distribution, enabling artists to keep 100% of their royalties. DistroKid offers various payment options, including daily payouts, and ensures that artists receive their earnings directly. Through its revenue share system, DistroKid aims to provide flexibility and reliable revenue distribution for musicians.

User Experience And Support

When it comes to choosing a music distribution service, user experience and support play a crucial role in ensuring a smooth and hassle-free process. In this section, we will explore the user experience and support provided by both Amuse and DistroKid.


Amuse User Experience

Amuse is known for its user-friendly interface and intuitive design, making it easy for artists to navigate and use the platform effectively. The sign-up process is simple, with minimal steps required to get started. Artists can easily upload their music, add artwork, and input metadata, all within a few clicks.

Furthermore, Amuse offers a clean and organized dashboard that provides artists with a comprehensive overview of their distribution activities. This includes information such as sales and stream analytics, geographical data, and earnings, allowing artists to track their progress and make informed decisions regarding their music career.

To enhance the user experience, Amuse also provides helpful features such as personalized release campaigns, marketing tools, and the ability to schedule releases in advance. These features not only streamline the distribution process but also empower artists to promote their music effectively.


Distrokid User Support

DistroKid takes user support seriously, offering a range of avenues through which artists can seek assistance. Their help center provides comprehensive guides and tutorials, addressing common issues and inquiries artists might encounter during the distribution process.

In addition to their extensive help center, DistroKid offers prompt customer support via email. Artists can reach out to their support team and expect a timely response, ensuring that any concerns or questions are addressed promptly.

Moreover, DistroKid takes pride in their reliability and strives to provide a seamless experience for artists. They boast a 99.9% server uptime, ensuring that artists can distribute their music without any interruptions or delays.

For artists who prefer a more hands-on approach, DistroKid also offers a premium service called “Leave a Legacy” that allows artists to retain their catalog indefinitely, even if they cancel their subscription.


Both Amuse and DistroKid prioritize user experience and support, albeit in different ways. While Amuse focuses on an intuitive platform and powerful features, DistroKid places emphasis on comprehensive support and reliability. Depending on an artist’s preferences and needs, either option can offer a valuable user experience and ample support throughout the music distribution process.

Amuse Vs Distrokid  : The Ultimate Music Distribution Comparison

Credit: www.one-submit.com

Frequently Asked Questions On Amuse Vs Distrokid

Is Distrokid Better Than Amuse?

DistroKid and Amuse are both popular music distribution services. However, DistroKid offers more features like unlimited uploads and quick distribution. Amuse, on the other hand, offers free distribution, but with limited features. Ultimately, the better choice depends on your specific needs and budget.

Who Is Better Than Distrokid?

Some alternatives to DistroKid are TuneCore, CD Baby, and Ditto Music. Each offers different features and pricing.

Is Amuse Good For Distribution?

Yes, Amuse is good for music distribution due to its user-friendly platform and no-cost distribution model.

Is Amuse Really Free?

Yes, Amuse is completely free to use. No hidden costs or fees involved.

Conclusion

In choosing between Amuse and DistroKid, the decision ultimately hinges on your specific needs and goals. Both platforms offer unique features and benefits, making them valuable assets for independent artists. Understanding your priorities and weighing the advantages of each service will enable you to make an informed choice for your music distribution needs.