Categories
Archive

Inspiring Movies For Musicians

Some inspiring movies for musicians include “La La Land” and “Whiplash.” These films showcase the struggles and triumphs of aspiring musicians as they navigate the competitive music industry.

Music has the power to move people and touch their souls. From classical orchestral pieces to modern pop tunes, music speaks to us in ways that words alone cannot. Many musicians draw inspiration from movies that showcase the ups and downs of pursuing a career in music.

Whether you are a budding musician or simply enjoy a good flick, there are plenty of inspiring movies out there worth watching. We will highlight some of the best movies for musicians that will inspire you to pursue your musical passions and overcome obstacles in your career.

Movies Showcasing The Life Of Musicians

These inspiring movies showcase the ups and downs of the life of musicians, offering valuable lessons for aspiring artists. From biopics to documentaries, these movies provide an insight into the music industry, highlighting the dedication, passion and hard work required to succeed.

Movies showcasing the life of musicians are a great source of inspiration for aspiring musicians. Not only do they provide a glimpse into the lives of famous musicians, but they also shed light on the struggles and perseverance required to achieve stardom. Watching these movies can motivate aspiring musicians to push through the challenging times and keep working towards their dreams.

Get Inspired By The Story Of Famous Musicians

Famous musicians have overcome trials and tribulations to make it big in the music industry. These musicians’ stories can inspire others to follow in their footsteps. Movies such as “Walk the Line” (based on the life of Johnny Cash), “Bohemian Rhapsody” (based on the life of Freddie Mercury), and “Ray” (based on the life of Ray Charles) are excellent examples of musicians’ stories that can motivate and inspire.

How Their Perseverance Led Them To Stardom

The musicians’ stories showcased in these movies often include examples of their perseverance and determination to succeed. Despite the difficulties they faced along the way, they did not give up on their dreams of making it big in the music industry. These stories send a powerful message to aspiring musicians—a message that says “if they can do it, so can you”. Watching movies showcasing the life of famous musicians is an excellent way to stay motivated and inspired. Aspiring musicians can learn a lot from the struggles and perseverance required to make it to stardom. With hard work, dedication, and a never-give-up attitude, anyone can achieve their dreams and make it in the music industry.

Inspiring Movies For Musicians

Credit: www.productionmusiclive.com

Movies About The Power Of Music

Discover the power of music with these inspiring movies for musicians. From the upbeat rhythms of “The Blues Brothers” to the soulful melodies of “Whiplash”, these films showcase the transformative power of music and its ability to bring people together.

Music is a universal language that speaks to people of all ages, races, and cultures. Music has the power to bring people together, heal broken hearts and inspire change. This is why many inspiring movies about the power of music have been produced to document how musicians inspire and transform lives through music. In this blog post, we will discuss some of the most inspiring movies for musicians that emphasize the impact of music on people’s lives.

How Music Can Change Lives

Music has the power to heal, inspire and unite people regardless of their background. The movie “The Soloist” is a testament to the influence of music on changing the way people view mental illness. The story revolves around the life of Nathaniel Ayers, a musician living on the streets of Los Angeles who is battling with schizophrenia. His talent caught the attention of a journalist, Steve Lopez, who became fascinated with Nathaniel’s story and they became friends. Through this uplifting story, the power of music to evoke emotions, connect people and overcome challenges is emphasized. Another movie that captures the power of music to change lives is “Whiplash”. The movie showcases the life of a young jazz drummer named Andrew Neiman, who is determined to become one of the greatest drummers of all time. His dream is however challenged by his abusive and perfectionist jazz band instructor, Terence Fletcher. The movie highlights the value of hard work, discipline, and the importance of pushing through obstacles to achieve success.

Examples Of Musicians Who Used Music To Inspire Change

Music has often been used as a powerful tool to create social change. “Selma”, a movie based on the life of American civil rights activist Dr. Martin Luther King Jr. is an example of how music played a critical role in the fight for equality. The movie showcases how protest marches were led by Dr. King, with a musical accompaniment that represented the heartbeat of the civil rights movement. The movie shows how music and activism combined, bringing attention to the injustices and inspiring change. Another example of how music has been used to inspire change is the movie “Rize”. The movie showcases how dance and music are used to combat gangs and drugs in South Central Los Angeles. Through the use of dance styles like krumping, the movie highlights how youth utilize music to empower themselves and gain a sense of community. In conclusion, music has the power to inspire, transform and unite people from different backgrounds. The movies discussed above are just a few examples of how music has the ability to change people’s lives. If you are a musician seeking inspiration, watching these movies will provide you with a renewed sense of hope and motivation to pursue your dreams.

Movies With Great Musical Performances

Movies with great musical performances can inspire aspiring musicians. From the iconic “The Sound of Music” to the recent biopic “Bohemian Rhapsody,” these films showcase the talent and dedication it takes to succeed in the music industry.

Experience The Magic Of Live Performances

Movies with great musical performances are more than just entertainment. They allow the audience to experience the magic of live performances from the comfort of their own homes. From Jazz to Rock, movies have captured some of the most awe-inspiring musical performances of all time. One such movie is ‘Whiplash’, the story of a young drummer who dreams of becoming one of the greats in jazz. The movie delivers an intense and suspenseful experience of jazz drumming and performances. You will feel the excitement of being in a jazz band and the pressure that comes with it.

Be Inspired By The Talent Of The Musicians

If you are looking for a movie with amazing performances by musicians, then ‘The Soloist’ is a must-watch. It tells the real-life story of a journalist who discovers a talented, yet homeless musician. The movie showcases the musical talent of Nathaniel Ayers, a highly skilled cellist who suffers from schizophrenia. The performances in the movie are emotional and will leave you inspired by the power of music. Another great example is ‘Ray’, which tells the story of Ray Charles, one of the greatest musicians of all time. The movie features some of his most iconic performances, including his famous hit ‘What’d I Say.’ You will be mesmerized by the acting and musical talent displayed in this movie.

Summing It Up

Movies with great musical performances are more than just entertainment, they offer inspiration, emotional experiences, and breathtaking talent. From jazz to classical and everything in between, movies have captured the best performances in music history. So, sit back, relax, and enjoy these cinematic masterpieces that will take you on an unforgettable musical journey.

Inspiring Movies For Musicians

Credit: m.youtube.com

Movies With Messages Relevant To Musicians

Movies with messages that resonate with musicians can be incredibly inspiring for their art. From Whiplash to Almost Famous, these movies showcase the highs and lows of pursuing a career in music, offering valuable lessons in dedication, passion, and perseverance.

Music can inspire, motivate, and stir emotions. It is a medium that connects people across different cultures and languages. Some movies capture the struggles and triumphs of musicians, giving insight into their lives and challenges. These movies showcase perseverance, dedication, and the role of music in people’s lives. Here are some inspiring movies for musicians with messages that are relevant to them:

Learning From The Struggles Of The Characters

The following movies depict the struggle and hard work put in by musicians to achieve their dreams. These stories can inspire other musicians to strive for their goals and not give up, no matter the circumstances.

  • Whiplash
  • Crazy Heart
  • Ray
  • La La Land

In “Whiplash,” the movie shows the struggles of a young drummer who aspires to be one of the greats in jazz. He is pushed beyond his limits by his demanding instructor, but his desire to succeed never waivers. The movie teaches musicians that hard work and discipline are essential to achieving greatness. In “Crazy Heart,” a washed-up country singer must confront his demons and overcome his personal struggles to revive his career. This movie teaches that setbacks and failures are part of the journey, but one must persevere to achieve success. In “Ray,” the movie depicts the life of legendary musician Ray Charles. Despite losing his sight at an early age, he persevered and went on to become one of the greatest musicians of all time. The movie teaches musicians to never let setbacks or disabilities hold them back from achieving their dreams. In “La La Land,” the movie follows the story of two struggling artists in Los Angeles who dream of making it big in Hollywood. They face rejection and disheartening setbacks but do not give up on their dreams. This movie showcases the importance of passion and determination in the pursuit of a career in music.

How The Characters Overcame Challenges Through Music

The following movies showcase how music helped the characters overcome challenges and adversities in their lives. These movies can teach musicians that music can be a powerful tool for healing and self-expression.

  • August Rush
  • Once
  • The Soloist
  • Music of the Heart

In “August Rush,” the movie follows the journey of a young orphan boy who uses his musical talent to reconnect with his parents. Music helps him overcome the challenges he faces in his life and brings him closer to his family. In “Once,” the movie portrayal of the music brought two struggling artists together, healing their individual pain and inspiring them to pursue their passion in music. In “The Soloist,” the movie is a story about a journalist who forms a bond with a homeless musician. Music helps the musician to escape the harsh realities of his life and gives him hope. In “Music of the Heart,” the movie is a story of a music teacher who helps inner-city children realize their musical talent. The journey through music helps these children believe in themselves and their abilities. These movies offer invaluable lessons and can inspire and motivate musicians to pursue their passion without fear. Movies with messages relevant to musicians can provide insight and guidance to anyone seeking a career in music, and these movies will serve as a great guide for music lovers.

Foreign Films For A Fresh Perspective

Explore the world of foreign films and gain new perspectives as a musician. These inspiring movies offer a fresh take on different cultures and musical styles, allowing you to broaden your creative horizons and find new sources of inspiration.

Explore The Culture And Music Of Other Countries

Looking for some inspiration to up your musical game? Forget the usual English and American movies, and explore the world of foreign films. Foreign films give you a unique perspective on culture and music, which can help you in your own musical journey.

Discover New Forms Of Music And Inspiration

One of the biggest advantages of watching foreign films as musicians is the opportunity to discover new forms of music and inspiration beyond what you normally hear on the radio. From Korean pop to Indian classical music, you can gain exposure to new sounds and techniques that can inform your own musical style.

Expand Your Creativity By Stepping Out Of Your Comfort Zone

One of the best ways to expand your creativity is to step out of your comfort zone. Watching foreign films allows you to experience cultures, music, and stories that are unfamiliar to you, which in turn can spark new ideas and creative insights.

Broaden Your Horizons And Challenge Yourself

If you’re in a creative rut, watching foreign films is a great way to broaden your horizons and challenge yourself. It’s easy to get stuck in familiar patterns and styles, but getting exposed to foreign music and culture can help you break free and find new ways to express yourself musically. Overall, watching foreign films as a musician is a great way to gain new perspectives, discover new forms of music, expand your creativity, and challenge yourself. So the next time you’re looking for inspiration, consider stepping outside of your comfort zone and watching a movie from a foreign country.

Inspiring Movies For Musicians

Credit: www.globalrescue.com

Documentaries Featuring Musicians

Documentaries featuring musicians are an excellent source of inspiration for aspiring artists. These films offer a behind-the-scenes look at the lives of famous musicians, highlighting their struggles and achievements. Whether you’re a seasoned pro or just starting out, these documentaries will give you the motivation and insight you need to succeed.

Behind The Scenes Look At The Lives Of Famous Musicians

Documentaries that take a behind-the-scenes look at the lives of famous musicians provide aspiring musicians with valuable insights into what it takes to succeed in the industry. These films show the hard work, discipline, and dedication required to become a successful musician. They also offer a glimpse into the personal lives of these artists, showing how they balance their passion for music with their personal lives.

Born Into This, is a documentary about Charles Bukowski’s life as a writer and a poet. His work and experiences inspired many musicians, including Bono and Tom Waits, among others. The movie explores how Bukowski found his voice and how he maintained it throughout his career. It provides a unique perspective on the creative process, which is something every musician can relate to.

How They Broke Barriers In The Industry

Documentaries featuring musicians who broke barriers in the industry are essential for any aspiring musician. These films offer a glimpse into how groundbreaking artists challenged societal norms and paved the way for future musicians.

One such documentary is What Happened, Miss Simone? The film chronicles the life of Nina Simone and how she fought against racial discrimination and gender inequality in the music industry. It also highlights how Simone used her music to express her political views and advocate for civil rights. This documentary is a must-watch for musicians who want to challenge the status quo and make their mark on the world.

The Bottom Line

Documentaries featuring musicians are an excellent source of inspiration and insight for aspiring artists. Whether you’re looking for a behind-the-scenes look at the lives of famous musicians or want to learn how groundbreaking artists challenged societal norms, there’s a documentary out there for you. So go ahead, grab some popcorn, and get ready to be inspired!

Movies With Soundtracks Worth Listening To

Movies with soundtracks that are worth listening to can be a great source of inspiration for musicians. From iconic classics like The Sound of Music to modern-day hits like La La Land, these films offer a glimpse into the creative process behind some of the most memorable songs in history.

Listening to these soundtracks can help musicians develop new techniques and ideas for their own music.

Curated Soundtracks Featuring Great Musicians And Songs

Movies with great soundtracks can be a perfect way to inspire a musician. The creative work can encourage songwriters, composers and musicians to grow their creativity. Fortunately, there are lots of movies with excellent soundtracks that can give direction to a musician’s path. The best thing about these soundtracks is that they feature renowned musicians and their most exceptional creations. The “A Star is Born” soundtrack features Lady Gaga, one of the most prominent female musicians of the 21st century. Songs like “Shallow” and “Always Remember Us This Way” are perfect examples of how great soundtracks enhance movies. The hit songs won a Grammy award for best song written for visual media. The soundtrack is a perfect companion to the movie and makes it one of the best movies of all time for musicians to watch. Another exceptional soundtrack worth listening to is from the movie “The Lion King,” composed and produced by Sir Elton John. The opening song, “Circle of Life,” remains an iconic song to this day and still inspires new music. Similarly, Phil Collins’ work on “Tarzan” is a great source of motivation for musicians.

How Music Helped Bring These Movies To Life

Music is an essential part of the filmmaking process, and it’s an art that fuses with all aspects of the movie. The right music enhances the mood, accents the visual effects and helps create a lasting impression on the audience, making the movie complete. It’s amazing how a great piece of music can make a mediocre movie experience a fantastic one. Take the movie “The Social Network.” The score, composed by Trent Reznor and Atticus Ross, perfectly captures the story’s emotion, adding tension, suspense and excitement. To create the playlist for the movie “Guardians of the Galaxy,” Director James Gunn spent months selecting the perfect songs that would match the film’s tone, creating a great mix of music and visuals. In conclusion, movies with soundtrack worth listening to can be a great source of inspiration for musicians. They feature some of the greatest musicians and composers of our time and can provide new directions for creative growth. All that’s left is to sit back, watch and let the music uplift your creativity.

Movies With Relatable Characters For Musicians

Discover movies with relatable characters that inspire musicians in their musical journey. From the biopic of Freddie Mercury in “Bohemian Rhapsody” to the soulful story of “The Soloist” featuring Jamie Foxx, these movies showcase the power of music and the perseverance of musicians in pursuing their dreams.

Movies have the power to inspire and motivate us in many ways. For musicians, finding inspiration in the arts in all forms is an essential part of the creative process. Whether you’re a professional artist or just starting out, watching inspiring movies with relatable characters can be an excellent way to get into the right mindset for your next project.

Finding Inspiration In Relatable Characters

One of the best ways to get inspired as a musician is to watch movies that have characters who you can relate to. These characters show us that anyone can overcome even the toughest challenges as long as they are determined and passionate about their craft. One of the most inspiring films for musicians is “Whiplash,” where the main character, Andrew, faces numerous obstacles but eventually goes on to become a successful drummer. Another great movie for musicians is “A Star is Born.” Through the film, we see the journey of Ally, played by Lady Gaga, rise to fame while also navigating the struggles of the music industry.

How These Characters Used Music To Overcome Challenges

One of the main themes of many music-related movies is perseverance in the face of adversity. These characters teach us that no matter how hard things may seem, music can be a powerful tool to help us overcome challenges. In the movie “August Rush,” we see how even a child prodigy can face extreme circumstances, but music inspires him to ultimately find his way back to his family. Moreover, in “Ray,” the protagonist, Ray Charles, overcomes his blindness and struggles with addiction to become one of the most iconic musicians of all time.

Conclusion

Music plays an integral role in our lives, and movies that showcase talented musicians and their stories can be a great source of inspiration. Watching these movies can help you understand the struggles and triumphs of those who have gone before you, and inspire you to keep pushing forward with your craft. So, the next time you need some inspiration, why not watch one of these inspiring films? You never know what kind of spark they might ignite within you.

Frequently Asked Questions Of Inspiring Movies For Musicians

What Is The Inspirational Movie About A Musician?

The inspirational movie about a musician is “Whiplash” which was released in 2014. The movie revolves around the story of a jazz drummer who is an aspiring musician.

What Is The No 1 Motivation Movie?

The No. 1 motivation movie is “The Pursuit of Happyness. ” The movie is based on the true story of Chris Gardner, who overcomes extreme hardships to become a successful stockbroker. The movie inspires viewers to persevere and never give up on their dreams.

What Do You Call A Movie About A Musician?

A movie about a musician is called a music biopic or musical film.

What 90s Movie Is About The Music Industry?

The 90s movie about the music industry is called “Almost Famous”, a coming-of-age story of a teenage journalist who accompanies a rising rock band on tour.

Conclusion

Movies can provide great inspiration for musicians. They teach us about perseverance, passion, and the power of music. Whether you’re a seasoned musician or just starting out, there’s a film out there that can motivate you to keep pushing forward.

From “Whiplash” to “A Star is Born”, these movies offer valuable insights into the music industry and can help you stay focused on your goals. Take some time to watch a few of these inspiring films and see how they can impact your musical journey.

Categories
Archive

What Is Music Recording Software

Music recording software is a tool used to create and produce music digitally. It enables musicians, composers, and producers to record, edit, and mix audio tracks using their computers or mobile devices.

With this software, they can record, produce, and distribute music worldwide seamlessly. In today’s world of fast-paced technology, music recording software has become an essential part of creating and recording music. It has opened up a new world of possibilities to music producers and musicians alike.

This software is accessible to anyone with a computer and can be used to record, edit, and produce music in a variety of genres. Furthermore, it allows for experimentation and exploration of new sounds and techniques that were previously impossible with traditional recording methods. Music recording software has forever changed the way we create and enjoy music.

What Is Music Recording Software

Credit: www.digitaltrends.com

Types Of Music Recording Software

Music recording software is software used to record and produce music. There are many types of music recording software, ranging from basic recording software to professional recording software. These software differ in features, price, and complexity, but all of them are designed to help musicians and producers create high-quality recordings.

Music recording software has become a crucial tool for musicians and sound engineers to record, edit, and produce music. With the advancement of technology, there are various types of music recording software that cater to different levels of expertise and purposes. Generally, music recording software can be divided into two types: basic audio recording software and advanced digital audio workstations (DAW).

Basic Audio Recording Software

Basic audio recording software is usually simple, user-friendly software that enables users to record and edit simple audio tracks. This type of software is suitable for beginners or those who only need to create simple audio recordings. Some notable basic audio recording software includes:

  • Audacity
  • GarageBand
  • Ocenaudio
  • Ableton Live Lite

Advanced Digital Audio Workstations (daw)

Advanced digital audio workstations (DAW) are professional-level software that offer a vast range of features and tools that cater to the needs of professional sound engineers and producers. This type of software usually has a steeper learning curve and requires more technical expertise. Some notable advanced digital audio workstations (DAW) include:

  • Pro Tools
  • Logic Pro X
  • Ableton Live
  • FL Studio

Music recording software has revolutionized the music industry and has made it accessible for anyone to record and produce high-quality music. Whether you are a beginner or a professional, there is music recording software suitable for your level of expertise.

Features Of Music Recording Software

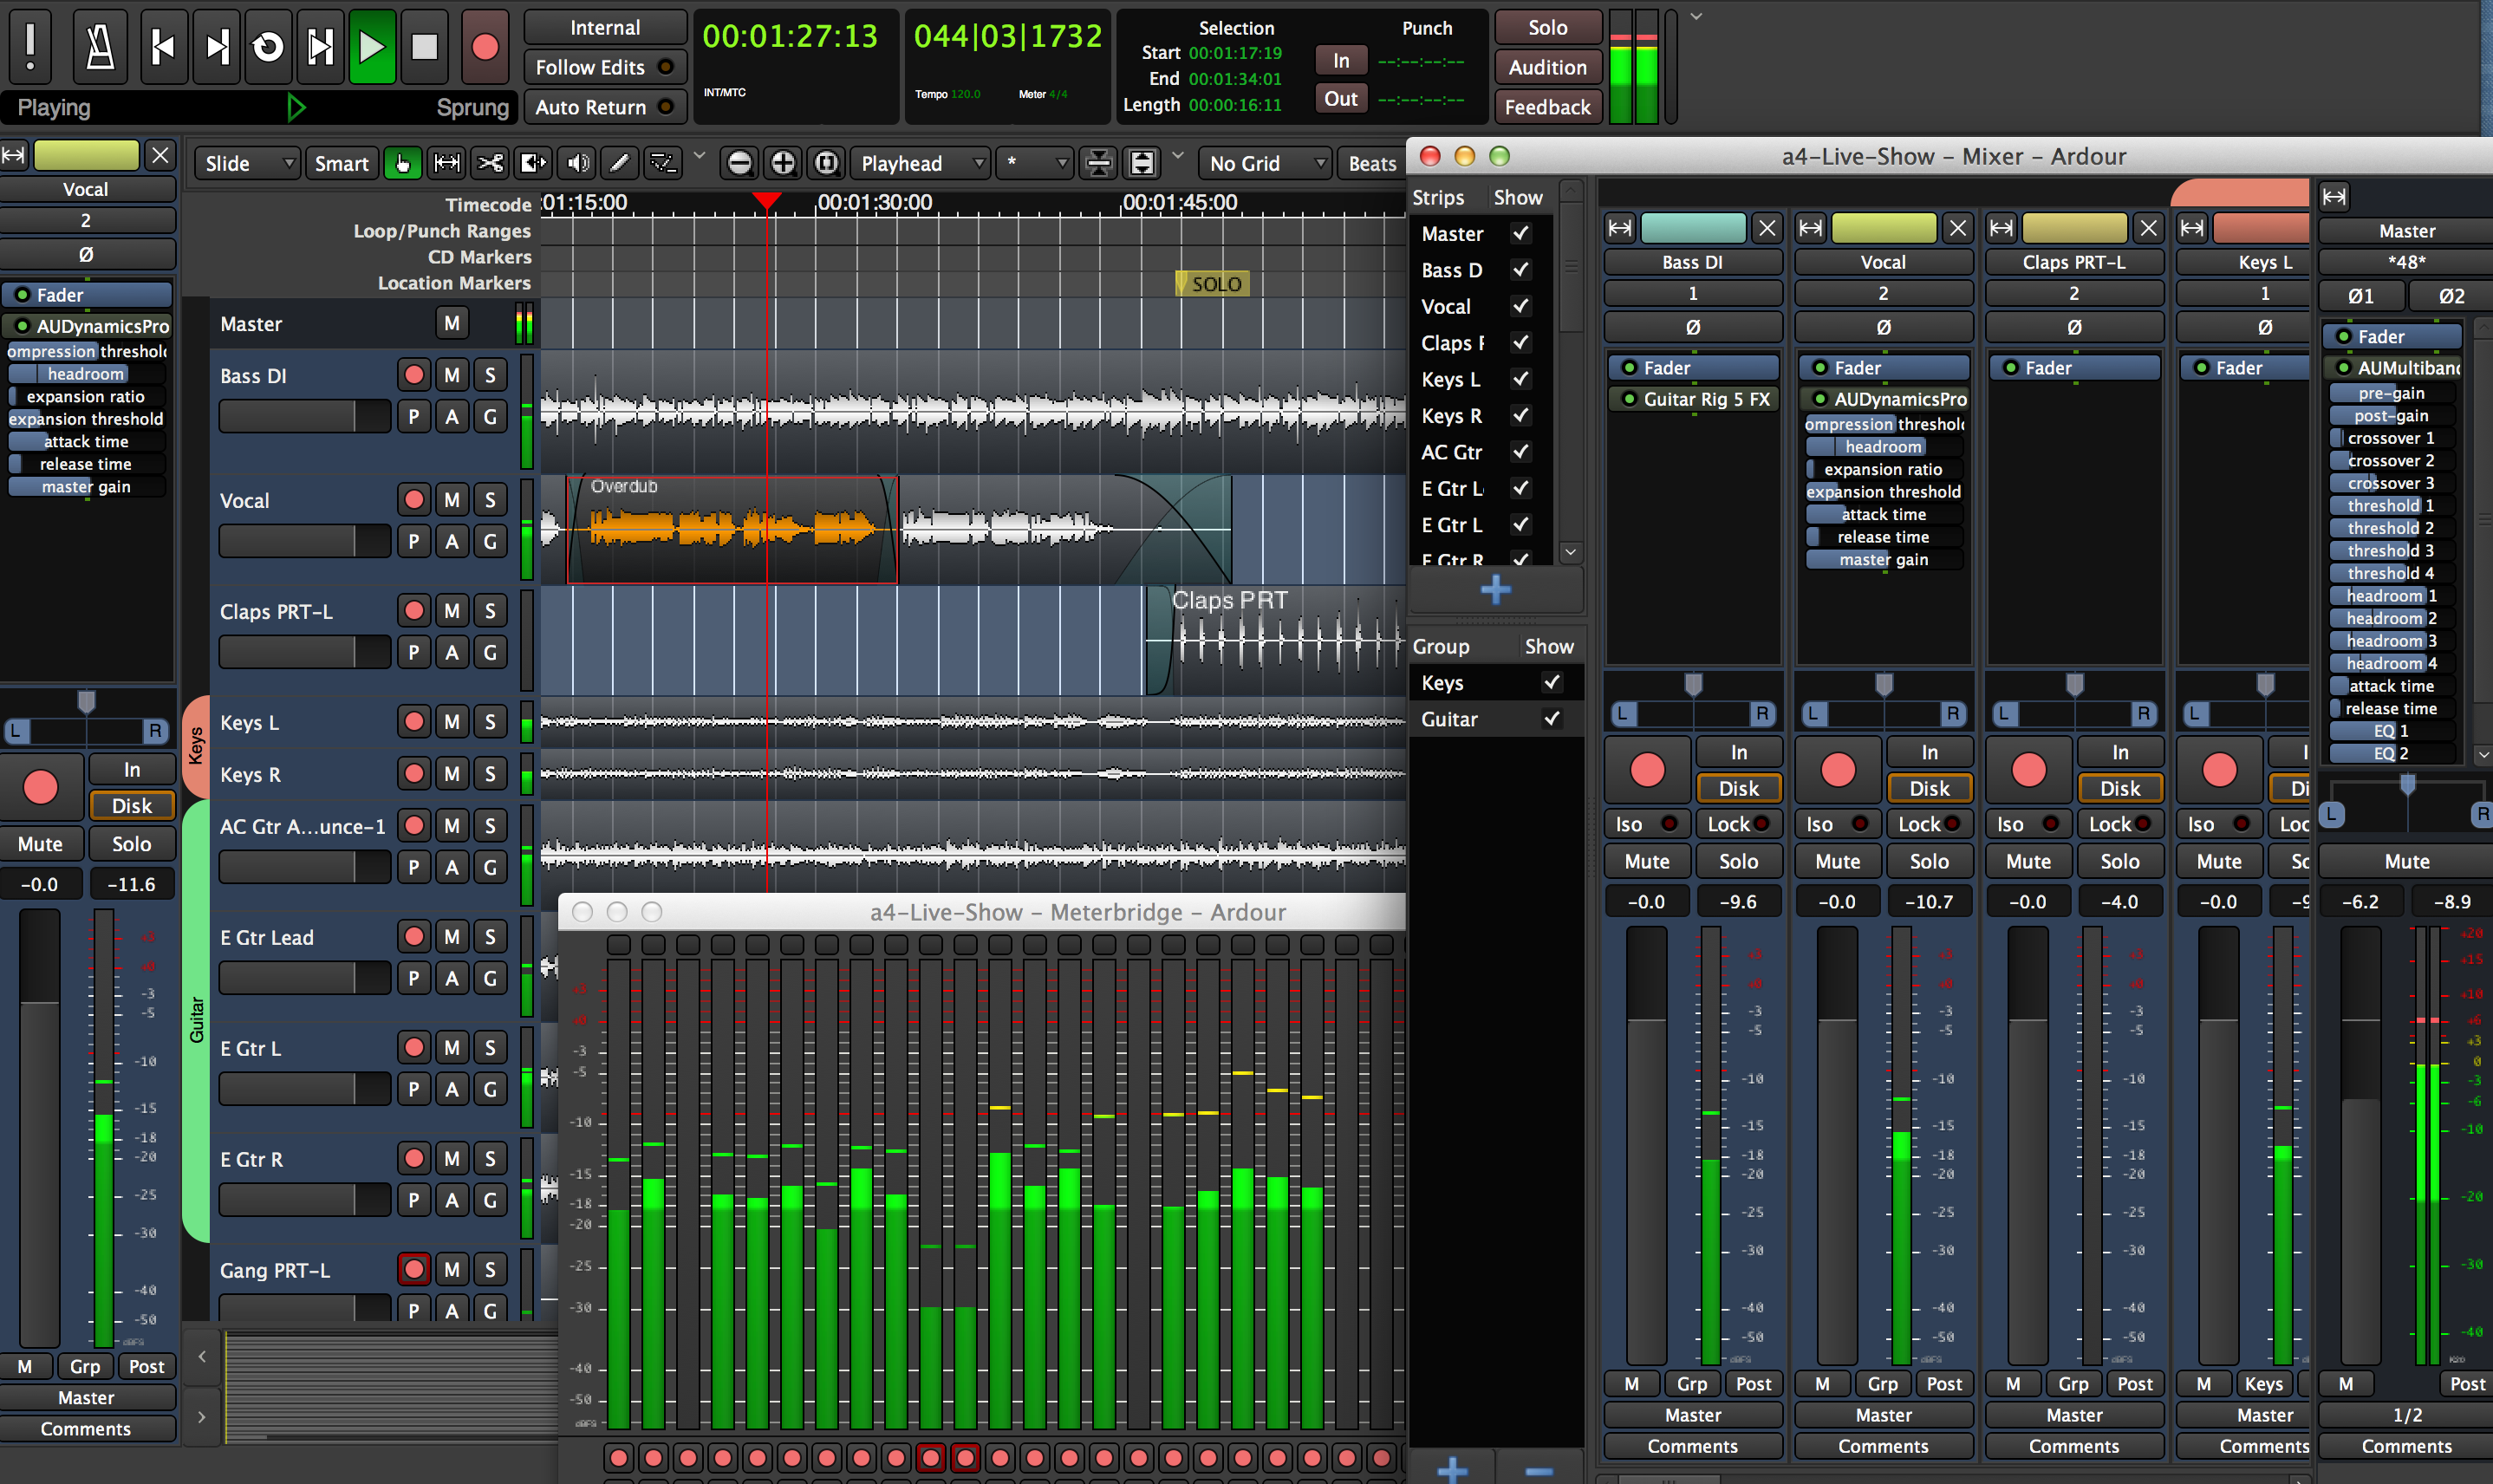
Music recording software is designed to record, edit, and mix music tracks. It offers various features such as multi-track recording, virtual instruments, effects, and automation. With music recording software, artists and producers can create professional-grade music from the comfort of their own homes.

Music recording software enables musicians to record, edit, mix and produce high-quality audio recordings. There are several essential features of music recording software that are crucial for making music, including multi-track recording, virtual instruments, audio effects and plugins, and MIDI compatibility.

Multi-track Recording

Multi-track recording is the ability to record multiple audio tracks simultaneously or separately. This feature is essential for recording live instruments or vocals and enables musicians to isolate the various sounds in the mix to adjust volume levels, add effects, or mute individual tracks. In short, multi-track recording provides greater control of the audio recording process and yields professional results.

Virtual Instruments

Virtual instruments refer to software plugins that generate sound based on MIDI input. These instruments can mimic a wide range of acoustic and electronic instruments, including pianos, drums, guitars, and synthesizers. Virtual instruments can produce high-quality sound, and with advances in technology, they are becoming increasingly realistic, allowing musicians to create tracks that sound incredibly lifelike.

Audio Effects And Plugins

Audio effects and plugins add depth and character to music recordings. These features allow musicians to manipulate an audio signal, enhancing it with effects such as reverb, delay, chorus, or other creative effects. Plugins, in particular, are an essential feature of music recording software, as they allow third-party developers to add new features and effects, pushing the envelope of what is possible.

Midi Compatibility

MIDI (Musical Instrument Digital Interface) is a protocol used for communicating musical information between devices, including digital audio workstations (DAWs), synthesizers, and other hardware. With MIDI compatibility, musicians can control the virtual instruments and effects within their DAW, giving them greater control over their music production. By sending MIDI messages to the software, musicians can adjust pitch, tempo, volume, and more, making music production a creative and collaborative process. In conclusion, music recording software has revolutionized the way musicians create music. With features like multi-track recording, virtual instruments, audio effects and plugins, and MIDI compatibility, musicians can produce high-quality recordings without the need for expensive studio equipment.

Popular Music Recording Software Programs

Music recording software is a digital tool that enables producers to record, edit, and produce high-quality audio tracks. From Pro Tools to Ableton Live, music recording software programs have become increasingly popular in the music industry. These programs not only simplify the recording process but also allow producers to create complex arrangements and effects on their tracks.

Popular Music Recording Software Programs Music recording software programs have been a game-changer for the music industry, particularly for music producers, sound engineers, and musicians. The popularity of music recording software has led to the development of different programs, each with unique features. Here are some of the popular music recording software programs that are commonly used by musicians, producers, and sound engineers. H3: Pro Tools Pro Tools is a well-known and widely used music recording software program for its advanced and user-friendly features. From recording to mixing and mastering, Pro Tools has got all the essential tools to produce high-quality music recordings. It’s best suited for professional music studios, making it a popular choice for music production and sound engineering. H3: Logic Pro Logic Pro is an exclusive music recording software program for Apple users. Its advanced features and user-friendly interface make it a popular choice for music producers and sound engineers. Logic Pro offers various tools for audio editing, mixing, and mastering, making it an all-in-one music production software. H3: Ableton Live Ableton Live is a program designed for electronic music production, live performance, and DJing. Its unique features allow for on-stage music creation and improvisation, making it the go-to software program for electronic music producers and live performers. H3: FL Studio FL Studio is a music production software program designed for musicians who want to create high-quality music recordings. Its user-friendly interface and comprehensive tools enable musicians to produce professional-sounding music recordings. FL Studio is popularly used by electronic music producers and hip-hop artists. H3: Cubase Cubase is a comprehensive music production software program developed by Steinberg. It is widely used by music producers, composers, and sound engineers for recording, editing, mixing, and mastering music. Cubase offers various tools for MIDI sequencing, audio editing, and mixing, making it an all-in-one music recording software program. In conclusion, having a music recording software program is essential for music producers, sound engineers, and musicians who want to create high-quality music recordings. These popular music recording software programs have unique features and tools that cater to different music production needs.

What Is Music Recording Software

Credit: ardour.org

How To Choose The Right Music Recording Software For You

Music recording software is a tool that allows you to record and produce music on your computer. With numerous options available in the market, it can be challenging to choose the right software for you. Factors that can influence your decision include your budget, level of experience, and preferred features.

How to Choose the Right Music Recording Software for You In today’s world, music recording software has become an essential tool for every musician or music producer. The right software makes all the difference in capturing high-quality sounds, mixing and editing tracks, and producing professional-sounding music. However, with so many options available in the market, it can be quite overwhelming to select the right music recording software for your needs. In this article, you will learn how to choose the right music recording software by considering your budget, assessing your needs, researching and reading reviews.

Consider Your Budget

The first thing you should do when looking to invest in music recording software is to consider your budget. Recording software can range from free to high-end software worth thousands of dollars, so it’s essential to know how much you’re willing to spend. While free software might seem like a good deal, keep in mind that the features and functionality might not be as good as paid software. If you’re just starting, it’s best to start with some free software to understand recording basics, but if you’re serious, investing in professional software is necessary.

Assess Your Needs

After considering your budget, assess your needs next. Understand what features you require in your software for producing the music you want to make. For instance, if you’re an electronic musician, you might need a synthesizer or drum machine built into the software or plug-ins that can help you produce certain sounds. Ensure the software you choose has all the necessary features and tools you need to produce your desired sound.

Research And Read Reviews

Before investing in music recording software, do thorough research and read reviews. Check various online forums, reviews from experts, and consumer reviews to determine the efficiency and reliability of the recording software. Reviews often highlight the strengths and weaknesses of a product, giving you an idea of what to expect. It would help if you considered both the audio quality of the software and the ease of use to determine the best software option for your music production needs. In conclusion, selecting the right music recording software can be challenging, but the process becomes easier by considering your budget, assessing your needs, and researching and reading reviews. Keep in mind that no music recording software is perfect, but selecting the right one can make all the difference in producing high-quality music.

What Is Music Recording Software

Credit: producelikeapro.com

Frequently Asked Questions For What Is Music Recording Software

What Does Music Software Do?

Music software allows the user to create, edit, and manipulate music digitally using a computer. It includes features like recording, mixing, sound editing, and effects processing, enabling musicians and producers to create professional-quality music.

What Does Music Recording Do?

Music recording captures and stores sound that is performed by musicians, singers, and other audio performers using various recording technologies. It creates a permanent record of a musical performance that can be reproduced and shared with an audience. Music recording makes it possible to preserve and distribute musical compositions for commercial release, broadcasting, and personal enjoyment.

What Software Is Used For Music?

There are many software used for music production such as Ableton Live, Logic Pro X, FL Studio, Pro Tools, Garageband, Audacity, Cubase, and more. They have different features and tools for recording, editing, mixing, and mastering music to create professional-quality tracks.

Which Software Is Best For Audio Recording?

The best software for audio recording depends on your needs, budget, and skill level. Some popular options include Pro Tools, Logic Pro X, Ableton Live, FL Studio, and Audacity. Research and compare their features before choosing the one that suits you best.

Conclusion

Music recording software is brilliant in helping musicians and enthusiasts produce high-quality sound recordings with ease. With the right knowledge and a bit of experimentation, one can get creative with their music and produce their own unique sound. It’s important to choose the appropriate software that’ll best suit your needs and skillset, regardless of whether you’re a beginner or a professional.

Always remember that music recording software is a tool to bring your vision and creativity to life. So, let it inspire you to make your music dreams a reality!

Categories
Archive

Best Platforms For Musicians

The best platforms for musicians are SoundCloud and Bandcamp. With the rise of digital technology, musicians have more options than ever to share and distribute their music.

However, with so many choices available, it can be difficult to determine which platforms will best suit their needs. SoundCloud and Bandcamp are two of the best platforms for musicians. SoundCloud allows users to upload and share their music, as well as connect with other musicians and fans.

Bandcamp provides a platform for artists to sell their music and merchandise directly to fans, and also offers tools for promotion and analytics. Both platforms have proven to be effective in helping musicians gain exposure and build their audience, making them a must-have for any musician looking to share their music with the world.

Best Platforms For Musicians

Credit: niasounds.com

Top Music Platforms

Musicians can benefit from a variety of platforms for hosting and promoting their music. Some of the top music platforms include Spotify, YouTube, SoundCloud, Bandcamp, and Apple Music. These platforms offer a range of features such as distribution, analytics, and promotion, making it easier for musicians to reach their audience and grow their fanbase.

As a musician, having your music on different platforms can help increase your fanbase and get your music heard by more people. With so many music platforms available, it can be difficult to choose which ones to use. Here are some of the top music platforms that musicians can use to promote their music and reach a wider audience: Spotify is one of the most popular music platforms in the world, with over 356 million active users, including both free and premium subscribers. As a musician, you can upload your music to Spotify and make it available to listeners all over the world. You can also create playlists, interact with fans, and get featured on editorial playlists to help increase your reach. With its massive user base and user-friendly interface, Spotify is a great platform for musicians to use. SoundCloud is a popular platform for independent musicians to promote their music. With its easy-to-use interface, you can upload your music and share it with your fans in just a few clicks. SoundCloud also allows you to interact with your listeners by commenting on their tracks and giving feedback. You can also join groups and communities to connect with other musicians and collaborate on projects. With over 2 billion monthly active users, YouTube is one of the largest platforms for music discovery. YouTube Music allows you to upload your music videos and reach a global audience. You can also create a channel for your band and engage with your fans by responding to comments and creating playlists. YouTube Music is a great platform to use if you want to gain exposure and build a loyal following. Bandcamp is a popular platform for independent musicians and labels to sell their music directly to fans. Unlike other platforms, Bandcamp allows you to set your own prices and keep 85% of your sales revenue. You can also offer discounts, giveaways, and other incentives to encourage fans to support your music. With its easy-to-use interface and vast community of listeners, Bandcamp is a great platform for independent musicians to monetize their music and grow their fanbase. In conclusion, these top music platforms give musicians a variety of options to promote their music and reach a wider audience. Each platform has its own unique features and benefits, so it’s important to choose the ones that best suit your needs as a musician.

Spotify

Spotify is one of the most prominent music streaming platforms, and it provides an excellent opportunity for musicians to showcase their talents to a vast audience worldwide. Launched in 2008, Spotify boasts of over 356 million active users every month, and it also offers free and premium subscription services.

Overview:

Spotify has revolutionized the way we listen to music by making it easy for artists to share their music directly with their fans. Musicians can upload their songs, albums, or EPs and make them available on the platform, giving their audience a chance to stream their music whenever and wherever. Spotify is an excellent platform for artists who want to gain more exposure and grow their fanbase.

Benefits Of Using Spotify For Musicians:

  • Spotify provides a significant revenue stream for music artists and creators by paying them royalties for every stream they receive.
  • Artists can access Spotify for Artists, which is a dashboard that gives them insights about their audience, including where their music is being played, demographics, and listenership trends.
  • Spotify’s algorithms recommend new tracks to listeners based on their listening history, making it easier for musicians to reach potential fans.
  • Spotify provides a platform for music artists to collaborate and connect with other artists by creating playlists and sharing their music on social media platforms.

How To Get Your Music On Spotify:

To get your music on Spotify, you need to follow these simple steps:

  1. Create a Spotify account.
  2. Verify your artist profile
  3. Upload your music. You can do this directly on Spotify or use a third-party distributor such as DistroKid, TuneCore, or CD Baby.
  4. Once your music is uploaded, you need to submit it for review. The review process can take up to a week.
  5. Once your music is approved, it will be available on Spotify for your fans to stream.

Overall, Spotify is a powerful music streaming platform that provides significant benefits for musicians who want to grow their audience and gain more exposure. If you’re a musician looking to get your music out to the world, Spotify is an excellent platform to start with.

Soundcloud

SoundCloud is one of the best digital platforms for musicians, as it allows them to upload and share their tracks with a large audience. With its user-friendly interface and promotional tools, SoundCloud is an ideal platform for both established and emerging musicians to showcase their talent and connect with their fans.

Overview Of Soundcloud For Musicians

SoundCloud is a music-sharing platform that provides emerging and established musicians with a globally-reaching platform to share their music. It offers a host of features specifically designed for artists who want to promote their music to a broader audience.

Benefits Of Using Soundcloud For Musicians

With over 76 million registered users, SoundCloud is a platform that offers significant benefits to musicians. Here are some of the critical advantages of using SoundCloud:

  • Reach a Global Audience: SoundCloud allows artists to promote their music to a global audience of music lovers, making it an ideal platform to gain followers and connect with fans.
  • Easy to Share: SoundCloud makes it easy to share your music on other social media platforms such as Facebook, Twitter, and Instagram, which can help increase your audience reach.
  • Promote Your Music: SoundCloud allows artists to promote their music with SoundCloud ads, which can increase their reach and visibility on the platform.
  • Engage with Fans: SoundCloud has a comment section where fans can interact with artists by giving feedback and asking questions about their music.
  • Insights: SoundCloud provides musicians with data and information on how their music is performing, including the number of plays, likes, and reposts.

How To Get Your Music On Soundcloud

Getting your music on SoundCloud is easy and straightforward. Here are the simple steps that you can follow:

  1. Create an account: To get started on SoundCloud, you need to create an account and verify your email.
  2. Upload your music: SoundCloud allows you to upload your music files, write descriptions, and add tags, making it easier for users to find your music.
  3. Share your music: Once you have uploaded your music, you can share it with your followers, and also on other social networks.
  4. Promote your music: SoundCloud offers several promotional tools to help you reach a larger audience, including SoundCloud ads and partnerships with music blogs and websites.

In conclusion, SoundCloud is an excellent platform for musicians to promote their music, engage with fans, and reach a broader audience. With its user-friendly interface and a host of features designed explicitly for musicians, it is no surprise that SoundCloud has become the go-to platform for artists who want to succeed in the music industry.

Best Platforms For Musicians

Credit: www.didgeproject.com

Youtube Music

YouTube Music is a great platform for musicians, offering access to a vast collection of songs as well as the option to upload music and connect with fans. With its powerful algorithm, musicians can easily reach their target audience and grow their online presence.

Overview

When it comes to music promotion and discovery, YouTube Music is one of the most popular platforms among musicians and fans. It is a music streaming service launched by YouTube, featuring a vast library of official music videos, live performances, remixes, covers, lyrics, and playlists. YouTube Music is available as a mobile app, web player, and through the YouTube Premium subscription.

Benefits Of Using Youtube Music For Musicians

YouTube Music can be a game-changer for emerging and established musicians alike. Here are some ways in which YouTube Music can benefit musicians:

  • Global Reach: YouTube Music has over 2 billion monthly active users worldwide, making it an effective way to reach a massive audience. Whether you’re a local artist or an international superstar, YouTube Music can help you expand your fanbase.
  • Monetization: YouTube Music allows musicians to earn revenue from their music through advertising, fan subscriptions, merchandise sales, and other monetization options. This can be a significant source of income for independent artists who may not have access to traditional distribution channels.
  • Analytics: YouTube Music provides in-depth analytics and insights into your audience, including demographics, watch time, engagement, and traffic sources. This information can help you optimize your content strategy and create more engaging music videos.
  • Collaboration: YouTube Music enables musicians to collaborate with other artists and creators, as well as collaborate with YouTube influencers to reach a wider audience.

How To Get Your Music On Youtube Music

Getting your music on YouTube Music is relatively easy and straightforward. Here are the steps:

  1. Create a YouTube Channel: If you don’t already have one, create a YouTube channel and upload your music videos.
  2. Sign up for YouTube Music for Artists: YouTube Music for Artists is a free platform that allows musicians to manage their artist profiles and get access to insights and promotional tools. Sign up and verify your artist profile through Google for Artists.
  3. Optimize Your Music Videos: Make sure your music videos have attractive thumbnails, descriptive titles, accurate metadata, and annotations. This will help your videos get discovered by users searching for similar music.
  4. Promote Your Music: Promote your YouTube Music videos on social media, your website, and other online platforms. Encourage your fans to subscribe to your channel, leave comments, and share your videos.

In conclusion, YouTube Music can be an essential platform for musicians who want to reach a wider audience, monetize their music, and engage with their fans. By following these tips and using the features and tools available on YouTube Music, musicians can increase their visibility and grow their career in the music industry.

Bandcamp

Bandcamp is among the top platforms for musicians. It allows artists to sell and stream their music directly to fans and keep a significant portion of the revenue. With Bandcamp, musicians can gain exposure to a vast audience and control their creative work.

Bandcamp is a music distribution platform that provides musicians with an easy and affordable way to sell and distribute their music. It is an independent, artist-friendly platform that allows musicians to have total control over their music, pricing, and distribution. In this article, we will look at the benefits of using Bandcamp for musicians and how to get your music on the platform.

Overview

Bandcamp is a unique platform that offers a comprehensive set of tools to help musicians grow their fan base, connect with fans, and sell their music. It provides a variety of features such as customizable storefronts, fan messaging, and real-time sales notifications. Bandcamp also has a massive community of music lovers who use the platform to discover new music. It is a popular platform among indie musicians, labels, and underground genres.

Benefits Of Using Bandcamp For Musicians

Bandcamp has many benefits for musicians. Here are some of the most significant ones:

  • Control over pricing: Musicians can set their pricing for their music products, albums, singles, and merchandise. They can also create different pricing tiers and bundle options.
  • Control over distribution: Musicians can choose which countries they want to sell their music, and there are no restrictions on streaming.
  • Customizable storefronts: Musicians can create a unique storefront that reflects their brand, upload their own artwork, and customize their website.
  • Direct-to-fan communication: Musicians can communicate directly with their fans, offer exclusive content, and grow their fan base.
  • Real-time sales notifications: Musicians receive real-time notifications for all sales, giving them greater control over their revenue.
  • Analytics: Musicians can monitor their sales, track fans, and understand their audience with Bandcamp’s comprehensive analytics.

How To Get Your Music On Bandcamp

Here are the steps to get your music on Bandcamp:

  1. Sign up for an account: Create an account on Bandcamp by providing your name, email, and password.
  2. Upload your music: After creating an account, upload your music in WAV, AIFF, FLAC, or ALAC format.
  3. Customize your storefront: Customize your storefront by uploading your album or single artwork, and creating a unique website reflecting your brand
  4. Set your pricing: Set the price for your music, merchandise, or bundle options.
  5. Promotion: Promote your music by sharing it on social media, sending it to your fan mailing list, and using Bandcamp’s marketing tools.

Bandcamp, with its musician-friendly features and vast community, provides a unique platform for independent artists to sell, distribute their music, and grow their fan base. Follow the steps outlined above to get your music on the platform and start taking advantage of this fantastic opportunity.

Best Platforms For Musicians

Credit: emastered.com

Frequently Asked Questions For Best Platforms For Musicians

What Platform Do Musicians Use?

Musicians use various platforms to promote their music, such as Spotify, Apple Music, SoundCloud, Bandcamp, and YouTube. These platforms allow them to distribute and monetize their music, gain exposure, and build a fan base.

What Social Media Platform Is Best For Musicians?

Instagram and YouTube are the best social media platforms for musicians because they allow for visual and audio content to be shared easily. Instagram also has engagement features like IGTV and stories, while YouTube has a large audience and search engine optimization capabilities.

What Is The Best Platform To Start A Music Career?

The best platform to start a music career depends on your goals and strengths. YouTube and social media can help with exposure and audience building. Music streaming services like Spotify and Apple Music can aid in gaining fans and revenue.

Local gigs and open mics can create opportunities for live performance experience. Ultimately, a combination of these platforms can be the most effective approach.

What Platform Should I Put My Music On?

To reach a wider audience, you should put your music on various platforms such as Spotify, Apple Music, Amazon Music, Deezer, Tidal and many others. By strategically using these platforms, you can increase your exposure and maximize your earnings as each platform offers different benefits and caters to different listeners.

Conclusion

Overall, there are many impressive platforms catering to musicians in today’s digital era. Each of those we have discussed offers particular advantages and features for artists looking for affordable ways to promote and sell their music. From SoundCloud’s social networking capabilities and user-friendly interface to Bandcamp’s customizable storefront and seamless integration with social media, there’s something for every artist.

Ultimately, it’s all about finding the right platform that caters to your specific needs, and we hope this post has helped you to make a more informed decision.

Categories
Archive

Cubase Doesn’t Recognize Sound Card

If Cubase doesn’t recognize your sound card, check the sound card settings and drivers. Incompatible or outdated drivers may be the cause of the problem.

In order to produce high-quality music recordings and audio productions using Cubase, a sound card is required. However, sometimes Cubase may fail to recognize the installed sound card. This can be frustrating for users who want to create quality sound without any hiccups.

If you are experiencing such issues, the first thing to check is the sound card settings and drivers. An outdated, missing, or incompatible driver might prevent Cubase from detecting your sound card. This article will explain some of the common reasons why Cubase fails to recognize sound cards and offer potential solutions to the problem.

Cubase Doesn'T Recognize Sound Card

Credit: www.amazon.com

Outdated Drivers

Outdated drivers can cause issues with sound recognition. If Cubase doesn’t recognize your sound card, check that your drivers are up to date.

If you are encountering issues with Cubase not recognizing your sound card, it could be due to outdated drivers. Drivers are the software programs that allow the communication between your computer and the hardware components, such as your sound card. When the drivers become outdated, they can cause issues with the functioning of your sound card and other hardware components.

Identifying Outdated Drivers

The task of identifying outdated drivers can often seem daunting, but it is relatively simple. Windows offers various ways of identifying outdated drivers, such as using the device manager. To access the device manager on Windows, press the Windows key + XDevice Manager from the list. In the Device Manager window, expand the relevant hardware category and right-click on the device for which you want to update the drivers. Select Update DriverSearch automatically for updated driver software. Windows will then search for the latest driver updates, if available.

Updating Drivers

Updating drivers is critical to maintaining optimum system performance and ensuring that the hardware components function correctly. Updating drivers can fix issues such as Cubase not recognizing the sound card. It is important to note that the process of updating drivers can vary depending on your system and the hardware component you are updating. To update drivers manually, visit the manufacturer’s website for your sound card and search for the latest drivers available. Download the drivers and install them according to the instructions provided. Alternatively, you can use third-party driver updating software such as Driver Booster, IObit Driver Updater, and Driver Easy. These tools scan your system for outdated drivers and then download and install the latest versions for you. In conclusion, outdated drivers can cause numerous issues, including problems with sound card recognition in Cubase. It is essential to keep your drivers updated to ensure that hardware components function correctly. By following the steps outlined in this post, you can easily identify and update any outdated drivers on your system.

Incorrect Sound Card Settings

Incorrect sound card settings might be the reason why Cubase can’t recognize the sound card. Double-check if the sound card is selected as the primary audio device and its settings match the ones in Cubase.

Checking Sound Card Settings In Cubase

If Cubase doesn’t recognize the sound card, it might be due to incorrect sound card settings. To fix this issue, you should check the sound card settings in Cubase and adjust them accordingly. Here’s how:

  • Open Cubase and click on “Devices” in the menu bar.
  • Select “Device Setup” from the drop-down menu.
  • In the “VST Audio System” section, make sure the correct sound card is selected from the list of available devices.
  • Check the “ASIO Driver” settings and configure them according to the sound card’s specifications.
  • If the sound card requires specific sample rates or buffer sizes, make sure to set them in the “Control Panel” section of the ASIO Driver settings.
  • Save the changes and restart Cubase to see if the sound card is now recognized.

Adjusting Sound Card Settings

If the sound card is still not recognized after checking the settings in Cubase, adjusting the sound card settings might help. Here are some steps you can take:

  • Open the sound card manufacturer’s control panel or settings application.
  • Make sure the sound card is selected as the default audio device and enabled.
  • Check the sound card’s input and output settings and configure them according to your needs.
  • If the sound card has multiple inputs or outputs, make sure to select the appropriate ones in Cubase.
  • Adjust the sample rate and buffer size settings if necessary.
  • Save the changes and restart both the sound card settings application and Cubase to see if the issue is resolved.

By following these steps, you should be able to check and adjust the sound card settings in Cubase to resolve any issues with sound card recognition.

Incompatible Sound Card

Cubase may not recognize your sound card if it is incompatible, which can lead to frustrating issues when trying to create music. Double-check that the sound card is listed as compatible with Cubase before investing.

If Cubase is not recognizing your sound card, it is likely that you are dealing with an incompatible sound card issue. This can be frustrating, but luckily, there are ways to check compatibility and replace an incompatible sound card. In this post, we’ll cover the steps you can take to get Cubase to recognize your sound card.

Checking Sound Card Compatibility With Cubase

When you’re experiencing issues with Cubase recognizing your sound card, the first step is to check if your sound card is compatible with Cubase. You can do this by checking the system requirements for your version of Cubase. If your sound card doesn’t meet the minimum requirements for Cubase, you’ll need to upgrade to a sound card that does. Alternatively, you can downgrade to an earlier version of Cubase that works with your current sound card.

Replacing Incompatible Sound Card

If you’ve determined that your sound card is not compatible with Cubase, the next step is to replace your sound card. Before replacing your sound card, make sure to research and purchase a sound card that is compatible with your version of Cubase. When you receive your new compatible sound card, you’ll need to physically install it into your computer. This will require some technical skills, so if you’re not confident in doing it yourself, seek the help of a professional. Once your new sound card is installed, make sure to set it as your default sound card in Windows or macOS settings. This will ensure that Cubase recognizes the new sound card and you can begin using it without issues. In summary, if you’re experiencing issues with Cubase not recognizing your sound card, it’s likely that you have an incompatible sound card issue. Take the time to check compatibility and replace your sound card if necessary, and you’ll be back to working with sound in no time.

Cubase Doesn'T Recognize Sound Card

Credit: forums.steinberg.net

Device Manager Configuration

To resolve the issue of Cubase not recognizing the sound card, configuring the device manager settings is crucial. Check the sound card’s drivers and ensure that they are up to date. Also, make sure that the sound card is selected as the default device in the device manager.

If you are experiencing sound card recognition problems with Cubase, you may need to review your device manager configuration. The device manager is a crucial component of your computer system as it manages your hardware devices, including sound cards. This article will examine how to check and update your device manager settings so that Cubase can recognize your sound card properly.

Checking Device Manager Settings

Before you can update your device manager settings, you will need to check if there are any issues that need fixing. The following steps will guide you:

  1. Open the Start menu and search for “Device Manager.”
  2. Click on “Sound, video and game controllers” to expand the category list.
  3. If your sound card is listed, check if it has a yellow exclamation point or red “x” mark beside it. This indicates an issue with the sound card drivers.
  4. If there is no sound card listed, check if it is identified in “Other devices” with a yellow exclamation mark beside it.
  5. If your sound card is not listed in either category, you may need to install the drivers or replace the hardware device.
  6. Right-click on the sound card and select “Properties.”
  7. Click on the “Driver” tab and verify if the driver provider, date, and version are correct.

Updating Device Manager Settings

If there is an issue with the sound card drivers, you will need to update them for proper recognition within Cubase. Follow these steps:

  1. Open the Start menu and search for “Device Manager.”
  2. Click on “Sound, video and game controllers” to expand the category list.
  3. Right-click on the sound card with the issue and select “Update driver.”
  4. Choose “Search automatically for updated driver software” and follow the prompts to install the latest driver.
  5. Restart your computer to apply the changes.

In conclusion, checking and updating your device manager settings is crucial if Cubase doesn’t recognize your sound card. By using the steps provided above, you can quickly and easily troubleshoot any issues, helping you get back to music-making in no time.

Bios Configuration

To resolve the issue of Cubase not recognizing the sound card, you should check the BIOS configuration. Make sure that the onboard audio is enabled in the BIOS, and the correct driver is installed. You can also try updating the BIOS to the latest version.

If your Cubase software is unable to recognize the sound card in your system, it could be due to incorrect BIOS settings. The BIOS (Basic Input/Output System) is a firmware component that initializes hardware components and allows communication between the software and hardware. Incorrect BIOS settings can prevent the sound card from functioning correctly.

Checking Bios Settings

The first step to resolving the sound card recognition issue is to check the BIOS settings. Access the BIOS by pressing the designated key during startup, which varies depending on your system manufacturer. Check the following settings:

  • Ensure that the onboard audio card is enabled.
  • Check if the BIOS version is outdated and update it if necessary.
  • Verify that the IRQ (Interrupt Request) for the sound card is correctly assigned.
  • Ensure that the plug and play feature is enabled.

If all these settings are correct and the issue persists, move on to adjusting the BIOS settings.

Adjusting Bios Settings

If checking the BIOS settings didn’t resolve the problem, it might be necessary to adjust them. The following steps can help:

  1. Disable the onboard audio card to prevent conflicts with the external sound card.
  2. Change the audio settings from “Auto” to “Enabled” or “Disabled” (depending on your system manufacturer).
  3. Assign the IRQ for the sound card manually.
  4. Disable the plug and play feature for the sound card.
  5. Save the changes and exit the BIOS.

After making these adjustments, restart your system and check if Cubase recognizes the sound card now.

In conclusion, incorrect BIOS settings can cause Cubase to not recognize the sound card. By checking and adjusting the BIOS settings, you can resolve the issue and get back to creating music with your external sound card.

Reinstalling Cubase

Reinstalling Cubase can be a solution when the software doesn’t recognize the sound card. Uninstalling and then reinstalling the latest version of Cubase can fix this issue, ensuring that the sound card is properly detected.

If your Cubase software isn’t recognizing your sound card, you may need to consider reinstalling the software. Reinstalling Cubase is a simple process that can help you solve this problem. But, before reinstalling Cubase, you need to uninstall the existing software properly.

Uninstalling Cubase

To uninstall Cubase from your computer, follow these steps:

  1. Go to the Control Panel on your computer.
  2. Select “Programs and Features” or “Add or Remove Programs.”
  3. Find Cubase from the list of installed programs, and click on it.
  4. Select “Uninstall.”
  5. Follow the prompts to complete the uninstallation process.

Once you have completely uninstalled Cubase from your computer, you can now proceed to reinstall the software. You can either reinstall from your original installation CD or download the software from the official website. Here are the steps on reinstalling Cubase:

  1. Insert the Cubase installation CD or locate the downloaded file on your computer.
  2. Run the installation wizard and follow the on-screen prompts.
  3. When prompted, enter your Cubase activation code or serial number.
  4. Complete the installation process and launch the software.

By reinstalling Cubase, you can ensure that all the necessary drivers and software are installed correctly, which can help your computer recognize your sound card and give you a better experience with Cubase. Don’t forget to restart your computer after the installation process is complete.

Frequently Asked Questions Of Cubase Doesn’t Recognize Sound Card

Why Is My Sound Card Not Detected?

Your sound card might not be detected due to driver issues, faulty hardware, or incorrect BIOS settings. Ensure that your sound card drivers are up to date and check for any hardware problems. You can also try disabling and re-enabling the sound card in the BIOS settings.

If the issue persists, seek assistance from a professional.

How Do I Connect My Sound Card To Cubase?

To connect your sound card to Cubase, you need to ensure that your sound card is installed and configured properly on your computer. Then, open Cubase and go to the “Devices” menu and select “Device Setup”. From there, choose your sound card as the ASIO driver.

Finally, adjust your inputs and outputs in the “Audio Connections” menu to match your sound card.

How Do I Change The Audio Driver In Cubase?

To change the audio driver in Cubase, go to “Studio Setup” in the “Devices” menu. Then select “Audio System” and choose your desired driver from the drop-down menu under “ASIO Driver”. Save the changes and restart Cubase for the new driver to take effect.

How Do I Know If My Sound Card Is Installed?

To see if your sound card is installed, go to your computer’s Device Manager. Look for the Sound, video and game controllers section and click on it. If you see your sound card listed, it is installed. If not, you may need to install it or update the driver.

Conclusion

Overall, troubleshooting audio problems in Cubase can be a daunting task, especially if you can’t seem to get it to recognize your sound card. However, there are some practical solutions that you can try out to get your sound card up and running.

Whether you’re dealing with outdated drivers or faulty hardware, following these steps can help you diagnose and resolve the issue quickly and efficiently. With these guidelines in mind, you should have no trouble getting back to your music production in no time!

Categories
Archive

Gain Staging Presonus Studio One

Gain staging in Presonus Studio One is essential to balancing the levels in your DAW. Ensure all your tracks are set to peak at around -18dBFS to prevent overloading and clipping.

Presonus Studio One is a powerful digital audio workstation with a comprehensive set of tools for music production. Gain staging is critical in Studio One, as it allows you to balance the levels of your tracks for optimal sound quality.

The process involves adjusting the input and output levels of your tracks to ensure that the sound remains clear and free of distortion, clipping, and overloading. Gain staging in Studio One is a straightforward process, and by following a few simple steps, you can achieve a well-balanced mix that sounds professional and polished. We’ll explore how to gain stage in Presonus Studio One and offer some tips and tricks to get the most out of your DAW.

Setting Up Your Gain Staging In Presonus Studio One

Gain staging is an essential task that ensures optimum sound quality in Presonus Studio One. With the right gain structure, you can prevent distortion, minimize noise, and achieve pristine recordings. Follow these easy steps to set up your gain staging in Presonus Studio One.

Setting up your gain staging in Presonus Studio One is an important aspect of recording, mixing, and mastering audio. Gain staging refers to the process of properly setting the gain levels at each stage of the audio signal flow. In this blog post, we will guide you on how to configure your audio interface, choose the right input channels, and set input levels in Presonus Studio One.

Configuring Your Audio Interface

Before you start working on your audio recordings, it’s important to ensure that your audio interface is properly configured. To configure your audio interface in Presonus Studio One, follow these simple steps:

  1. Go to Studio One -> Options -> Audio Setup to access your Audio Device settings.
  2. Ensure that your audio interface is selected as your Audio Device.
  3. Choose the appropriate sample rate and buffer size for your project.
  4. Once you have configured your audio interface, you can move on to setting up your input channels.

Choosing The Right Input Channels

Choosing the right input channels is crucial to the success of your recording project. In Presonus Studio One, you can choose to record from a wide variety of input sources, including microphones, instruments, and line-level sources. To choose the right input channels in Presonus Studio One, follow these steps:

  • Open your Studio One session and create a new track.
  • Go to the top of the screen and click on the drop-down box labeled Input.
  • Select the appropriate input channel for your recording source.
  • Make sure that your input channels are properly connected to your audio interface.

Setting Input Levels

The next step in the gain staging process is to set your input levels. Input levels refer to the amount of gain that is applied to the audio signal from the input source. In Presonus Studio One, you can easily set your input levels by following these steps:

  • Select your track by clicking on it.
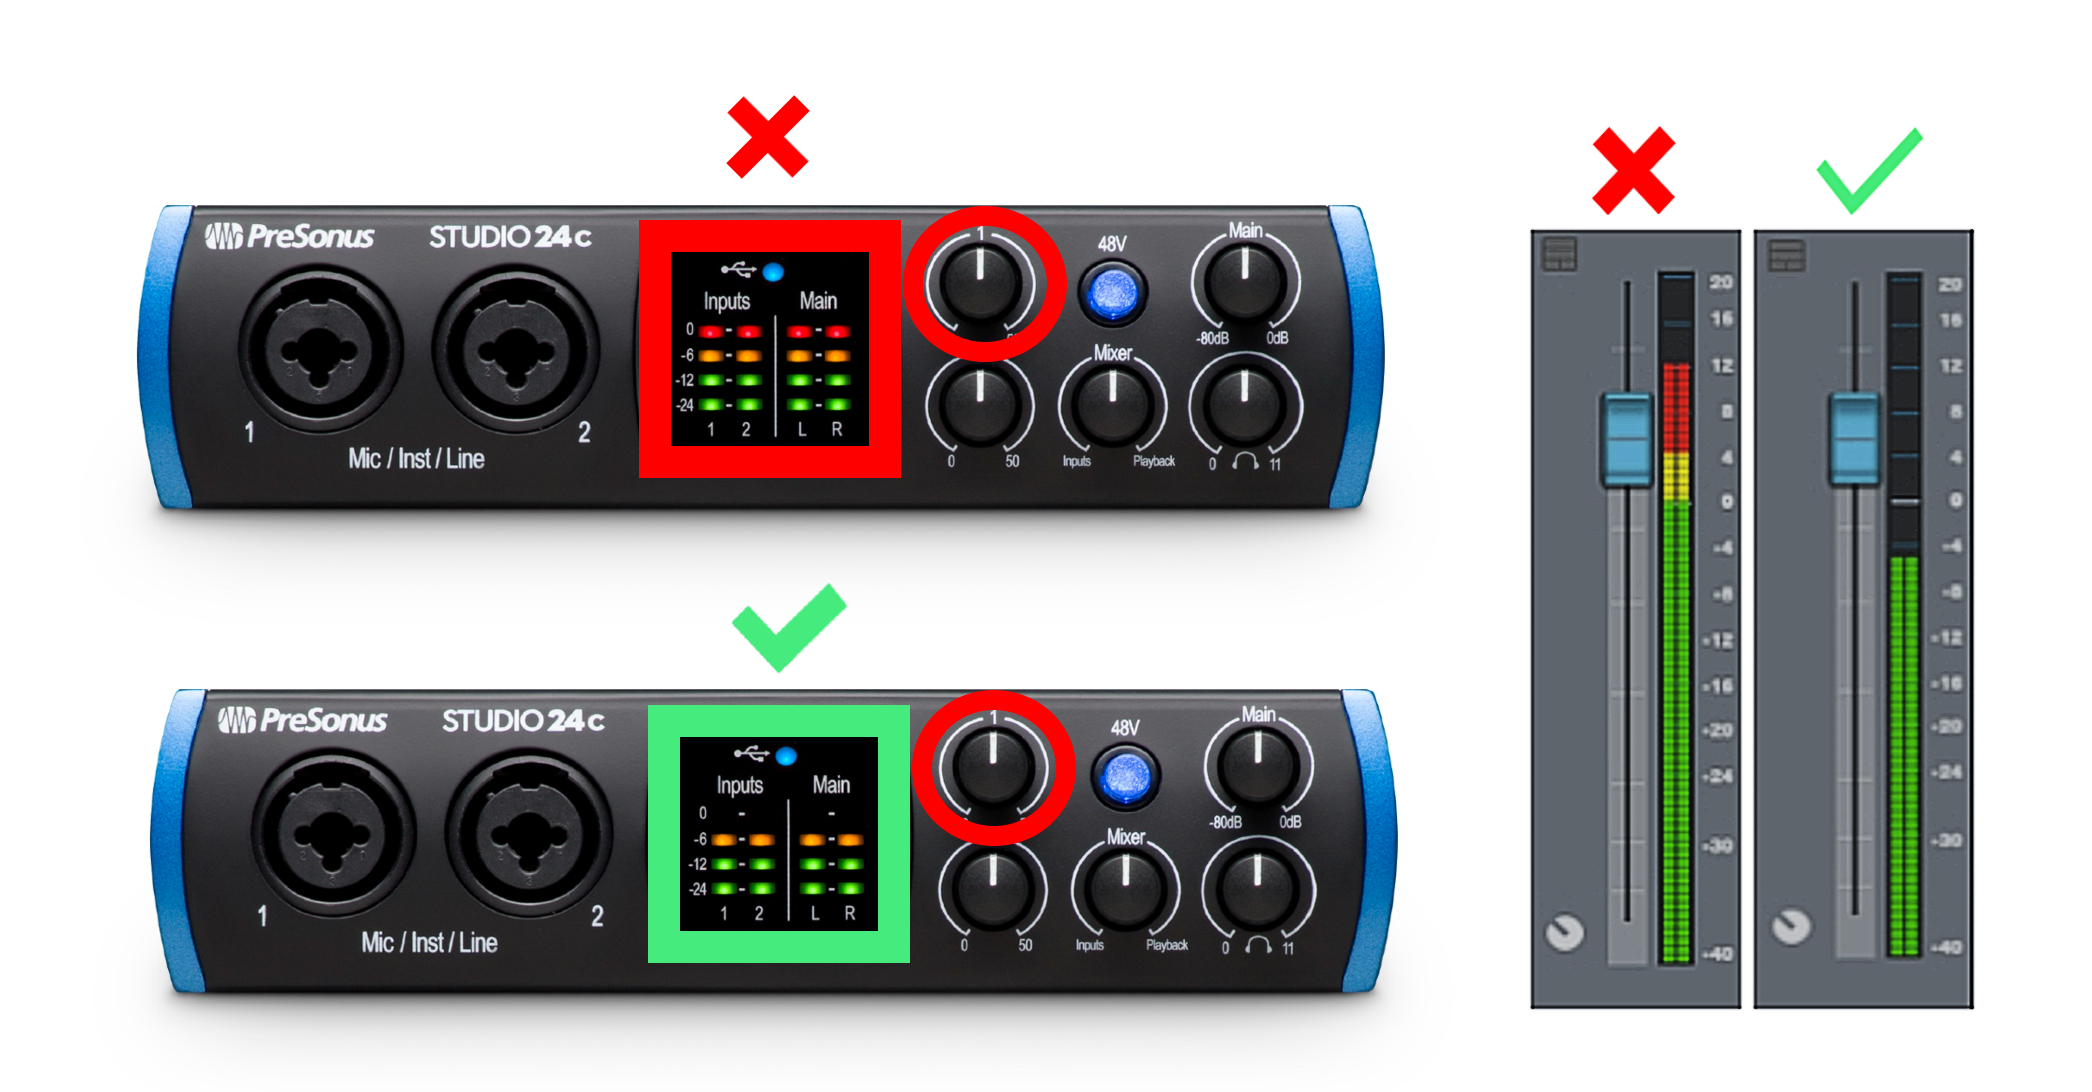
  • Locate your Input Gain knob in the mixer section of your screen.
  • Adjust the input gain knob until your input levels are within the recommended range, typically between -12 dB and -6 dB.
  • Use the Clip Gain feature to make minor level adjustments before the signal reaches any plugins or effects.

In conclusion, setting up your gain staging in Presonus Studio One is a crucial step in the recording, mixing, and mastering process. By properly configuring your audio interface, choosing the right input channels, and setting your input levels, you can achieve optimal gain staging and ensure the best possible sound quality for your project.

Gain Staging Presonus Studio One

Credit: www.youtube.com

Adjusting Levels With Plugins

Setting the Gain Staging in Presonus Studio One is crucial when adjusting levels with plugins. By using the plugin chain and correctly gain staging each plugin, you’ll optimize the sound quality of your mix.

Adjusting Levels with Plugins is one of the most critical aspects of producing high-quality audio content. In Presonus Studio One, one of the most efficient ways of adjusting levels accurately is through the use of plugins. While there are different types of plugins available in the software, three of the most commonly used are compressors, limiters, and equalizers.

Compressors

Compressors are plugins that aid in controlling dynamic ranges. Dynamic range refers to the difference between the loudest and softest parts of an audio track. A compressor accomplishes this by decreasing the volume of the loudest parts while increasing the softest parts. By doing this, the audio track’s dynamic range is compressed, resulting in a more consistent sound. This consistency is desirable for most types of audio content and can improve the overall mix.

Limiter

A limiter is similar to a compressor. However, its primary function is to control peak levels rather than dynamic range. When an audio track’s peaks go above a certain threshold, a limiter is used to prevent the volume from going too high. This ensures that the audio remains clear and consistent, and that distortion or clipping does not occur.

Equalizers

Equalizers are plugins that come in handy when trying to improve the tonal quality of an audio track. They aid in adjusting the levels of different frequency bands, enabling you to boost or cut certain frequencies to balance or enhance the audio. For instance, cutting out the low frequencies can eliminate rumble and muddiness, or increasing the mid frequencies of a vocal track can add clarity and warmth. Equalizers come in varying types, such as graphic, parametric, and shelving. Understanding these different types can help you select the most appropriate equalizer for your audio track. In summary, understanding plugins, such as compressors, limiters, and equalizers, enables you to make precise and accurate adjustments to audio tracks. By gaining an in-depth knowledge of these plugins, you can maximize their potential in Presonus Studio One and create audio that is rich, clear, and of excellent quality.

Using Volume Automation In Presonus Studio One

Gain staging in Presonus Studio One can be achieved with volume automation, a powerful tool that allows you to control the volume of individual tracks or entire mixes. By setting the right levels, you can avoid distortion and achieve a well-balanced sound.

When it comes to mixing music, gain staging is a critical aspect that every audio engineer should understand. Having proper gain staging ensures that each track in your mix sounds clear and crisp, without any unwanted distortion or noise. In Presonus Studio One, you can use volume automation to adjust the levels of your tracks, allowing you to achieve smoother transitions between parts of your song. Below, we’ll look at the three volume automation modes in Presonus Studio One: Draw Mode, Latch Mode, and Touch Mode.

Draw Mode

In Draw Mode, you can manually draw volume curves on your track’s automation lane. This mode is handy for making precise volume adjustments over time. You can access Draw Mode by clicking the Draw Mode button at the top of your Studio One window. Once you’re in Draw Mode, you can choose from a range of drawing tools to create the exact curves you need. Using Draw Mode, you can create completely custom volume adjustments that may not be possible with the other two modes.

Latch Mode

Latch Mode is an automation mode that lets you record volume adjustments directly into your track’s automation lane. In this mode, when you press the volume fader on your mixer, the automation lane will start recording the changes you make. Once you release the fader, the changes will stop recording, and the automation lane will keep the recorded adjustments. Using Latch Mode allows you to create dynamic volume changes in real-time, and it’s particularly useful for creating dynamic swells and fades.

Touch Mode

Touch Mode is a mode that starts recording volume adjustments when you touch a fader or knob on your controller and stops recording when you release it. Unlike Latch Mode, which keeps the recorded adjustments, Touch Mode only applies the recorded changes when you’re actually touching the controller. In other words, if you release the controller before the end of a segment, the automation lane will revert to its previous level. Touch Mode is particularly useful when you need to make subtle adjustments to your track’s volume, such as during a vocal performance. In conclusion, using volume automation in Presonus Studio One is an excellent way to achieve smoother transitions and more dynamic mixes. By understanding the three automation modes – Draw Mode, Latch Mode, and Touch Mode – and using them appropriately, you can create professional-sounding mixes that truly stand out.

Gain Staging Presonus Studio One

Credit: support.presonus.com

Tips And Tricks For Gain Staging In Presonus Studio One

Learn how to properly set gain levels in Presonus Studio One with these easy-to-follow tips and tricks. From understanding the importance of headroom to using the clip gain tool, this guide will help you achieve optimal sound quality in your recordings.

If you are looking for a high-quality sound output, then gain staging is a step you cannot afford to skip. Presonus Studio One is a fantastic digital audio workstation (DAW) that can help you gain stage your project to perfection. In this blog post, we will discuss tips and tricks for gain staging in Presonus Studio One, including using reference tracks, using low cut filters, and avoiding digital clipping.

Using Reference Tracks

Reference tracks are an excellent tool to help guide your gain staging process. To use reference tracks in Presonus Studio One, follow these steps:

  1. Choose a reference track that has a similar sound to the project you are working on.
  2. Import the reference track into your Presonus Studio One project.
  3. Adjust the reference track’s volume so that it matches the volume of your project’s mix.
  4. Listen to how the reference track’s levels sound and compare them to your mix.
  5. Make adjustments to your mix to match the reference track’s levels.
  6. Continue to adjust and compare until you are satisfied that your mix matches the reference track.

Using reference tracks will give you an additional tool to help you achieve the desired results in your gain staging.

Using Low Cut Filters

Low cut filters are an essential tool for gaining stage your mixes with Presonus Studio One. They work by removing frequencies below a specified threshold, allowing you to clean up your mix and remove any unwanted sounds. To use low cut filters in Presonus Studio One, follow these steps:

  • Select the track you want to apply the low cut filter to.
  • Open the inserts section of the track.
  • Select the EQ plugin from the list of available plugins.
  • Select the low cut filter option.
  • Choose the frequency you want to cut from the list of available frequencies.
  • Adjust the filter to taste, carefully monitoring the sound to avoid removing too much of the desired frequencies.

Using low cut filters is an excellent way of removing unwanted sounds and ensuring your mix is clean and well balanced.

Avoiding Digital Clipping

Digital clipping can occur when your mix is too loud, and your system cannot handle the volume. To avoid digital clipping in Presonus Studio One, follow these tips:

  • Use gain staging to ensure that your mix’s overall volume is not too high.
  • Use volume envelopes to avoid sudden changes in volume.
  • Use limiters to avoid any sudden spikes in volume.
  • Export your mix at a lower volume to give your listeners the best experience and avoid digital clipping.

Avoiding digital clipping will help ensure that your mix sounds fantastic and is free from any unwelcome noise. In conclusion, gain staging is an important step in the music production process, and Presonus Studio One is a powerful tool to help achieve it. Remember, using reference tracks, low cut filters, and careful volume management can make a significant difference in the quality and clarity of your mix.

Gain Staging Presonus Studio One

Credit: support.presonus.com

Frequently Asked Questions For Gain Staging Presonus Studio One

What Is The Best Level For Gain Staging?

The best level for gain staging is between -18dB and -12dB. This allows enough headroom for additional processing and prevents clipping. It also ensures a clear and consistent signal throughout the mixing process.

Is Gain Staging Necessary?

Gain staging is necessary in music production to achieve optimal sound quality and prevent distortion. By properly setting the levels of each instrument and track, you can maintain a balanced mix and improve the overall clarity and detail of your music.

Is Gain Staging The Same As Mixing?

No, gain staging is not the same as mixing. Gain staging refers to setting the appropriate levels of audio signals to minimize distortion and noise. Mixing, on the other hand, involves adjusting the volume, panning, and EQ of individual tracks to create a balanced and cohesive final mix.

What Is Gain Staging For Audio Recording?

Gain staging for audio recording is the process of adjusting the levels of each individual audio signal in a recording chain to ensure that they remain at a consistent and appropriate level throughout the recording process. This helps to prevent clipping and distortion while improving the final sound quality of the recording.

Conclusion

Proper gain staging is essential in achieving high-quality sound recordings. Presonus Studio One makes it easy to adjust the input, output, and track levels to ensure minimal distortion and optimal signal-to-noise ratio. As you work through your recording and mixing process, keep in mind the importance of gain staging and how it can impact the final product.

With the tools and techniques provided by Studio One, you have everything you need to create professional-grade recordings and take your music to the next level.

Categories
Archive

How to Make Piano Music in Fl Studio

To make piano music in FL Studio, open the software and create a new project, then add a piano instrument and start programming the notes using the piano roll editor. FL Studio is a popular digital audio workstation used by music producers and composers.

FL Studio is a versatile tool that allows you to create high-quality piano music. However, it can be overwhelming and confusing for beginners. Therefore, it is important to know some basics before you dive into making piano music in FL Studio.

We will guide you on how to make piano music in FL Studio in simple and easy-to-follow steps. We will cover everything from setting up your project to programming the notes using the piano roll editor. By the end of this article, you will be able to create your own beautiful piano music in FL Studio.

Setting Up The Basics

Start creating your piano music in FL Studio by setting up the basics. Choose a tempo, select your preferred instruments and set up your project file with the correct channel settings to start composing your masterpiece.

Installing Fl Studio And Setting Up A New Project

Before diving into creating piano music using FL Studio, you need to have the software installed on your computer. Simply head over to the FL Studio website and download the latest version available. Once you have installed the software, launch it and start setting up your project. First, you need to create a new project. To do this, click on FileNew from the dropdown menu. Alternatively, you can use the hotkey combination, which is CtrlN. This will open up a new project window. In the new project window, you will see several options to customize your project. You can select the desired tempo, time signature, and other settings based on your preference. Once you are done, click on the Accept button to set up your new project.

Connecting A Midi Keyboard To Your Computer

To create piano music in FL Studio, you need to connect a MIDI keyboard to your computer. If you do not have a MIDI keyboard, you can also use your computer keyboard as a controller. However, for better results, it’s recommended that you use a MIDI keyboard. Start by connecting one end of the MIDI cable to the MIDI out port on your keyboard and the other end to the MIDI in port on your computer. Once connected, launch FL Studio and click on Options from the menu bar. Select MIDI settings from the dropdown menu. In the MIDI settings window, you will see a list of devices. Find your MIDI keyboard and select it to enable it as a MIDI input device. You can also customize other settings based on your preference. Once you are done, click on the Close button to save your settings. With your MIDI keyboard connected and set up, you are now ready to create beautiful piano music using FL Studio.

Understanding The Interface

An understanding of the interface is essential for making piano music in Fl Studio. Familiarize yourself with the different tools and functions to create beautiful melodies and harmonies with ease.

When it comes to creating piano music in FL Studio, understanding the interface is the first step towards making progress. The interface is the control center of FL Studio that allows you to access all the features necessary to create amazing music.

Navigating The Channel Rack And Piano Roll

The Channel Rack and Piano Roll are two essential components of FL Studio. The Channel Rack consists of all the instruments, sounds, and samples that you can use in your project. On the other hand, the Piano Roll is where you create and edit your melody. To navigate around the Channel Rack or Piano Roll, you can use the arrow keys or the scroll wheel of your mouse.

Getting Familiar With The Mixer And Playlist

The Mixer and Playlist are two other essential components of FL Studio. The Mixer is where you apply effects, adjust volume levels, and create tracks. The Playlist is where you arrange your patterns, create song structure, and add automation clips. To get familiar with the Mixer and Playlist, simply click and drag your mouse to create new tracks and patterns.

Using The Browser To Find Sounds And Plugins

The Browser is another feature that you will use often when creating piano music in FL Studio. It allows you to browse through samples, presets, plugins, and other resources that you may need for your project. To use the Browser, simply click on the icon on your toolbar or press the F8 key on your keyboard. From there, you can search for specific sounds, instruments, or plugins that you want to use in your project. Overall, FL Studio provides a user-friendly interface that makes it easy for beginners and experts alike to create music. By understanding the interface and getting familiar with the essential components, you will be well on your way to creating amazing piano music in no time.

Creating A Melody

Learn how to make piano music in FL Studio by creating a melody. Start by selecting notes that work well together, build on them to create a chord progression, and use various tools within the software to refine the sound.

Creating a Melody Creating a melody is essential in making piano music in FL Studio. It is no doubt the backbone of any music piece, regardless of the genre. With that in mind, this section will cover the crucial steps to creating a melody that sounds great and keeps your listeners hooked. Choosing the Right Instrument Before starting, choose a piano instrument that you like and suits the song’s feel and genre. FL Studio offers several piano instruments, such as the FL Keys, Grand Piano, and others. They differ in settings, volume, and tonality, which you can customize depending on what you want. Writing Notes in the Piano Roll With your piano instrument of choice ready in the Channel Rack, go to the Step Sequencer and create a pattern. Once done, go to the Piano Roll to write notes. Make sure you have the right piano sound selected, as mentioned before, and choose the right note duration. Generally, shorter notes sound more upbeat and faster, while longer notes sound more relaxed and slower. Using the Paintbrush and Stamp Tools The Paintbrush and Stamp Tools are some of the most used Piano Roll tools in FL Studio. The Paintbrush tool is the default tool for adding and drawing notes to your melody. Conversely, the Stamp tool copies and pastes notes from other regions or patterns. With these tools, you can create unique melodies that fit the song’s style and direction. Adding Variation and Dynamics to Your Melody A monotonous melody can be boring and uninteresting to the listener. To make your melody stand out, add some variation and dynamics. Variation can be achieved by shifting notes an octave higher or lower, using different rhythms or patterns, and changing the note’s velocity. Adding dynamics means adjusting the notes’ volume, accentuating some notes more than others to create an emotional effect. In Conclusion Creating a melody is an exciting and creative process that requires patience and experimentation. Making music is more of an art than science, so don’t be afraid to try out new ideas and sounds. Remember, the most important thing is to keep your listener engaged and create emotions through your melody. With these few tips on hand, you are one step closer to making beautiful piano music in FL Studio.

How to Make Piano Music in Fl Studio

Credit: www.image-line.com

Building Chords And Harmonies

Creating unique and captivating harmonies and chords is essential for making beautiful piano music in Fl Studio. Experiment with different notes and progressions to develop your own style and sound that will keep your audience engaged and captivated.

Building chords and harmonies is the foundation of making beautiful piano music in Fl Studio. Understanding basic music theory is crucial for creating chords that complement each other and bring depth to your melody. In this article, we will dive into the process of building chords and harmonies step by step. Let’s get started! ### Understanding basic music theory Before we start creating chords in the Piano Roll, let’s understand some basic music theory. Chords are made of three or more notes played together, which create harmony. The basic chords in music are the major and minor triads. The major triad consists of the first, third, and fifth notes of the major scale, while the minor triad consists of the first, third, and fifth notes of the minor scale. Knowing these chord types will be helpful when constructing chords in Fl Studio. ### Creating chords in the Piano Roll Now that we have an understanding of basic theory let’s create some chords. To create chords in the Piano Roll, place your first note in the grid and drag it across to the desired length. Next, add the third note of your chosen triad by placing it two steps higher, and then add the fifth note two steps higher than the third. This creates a complete triad. You can also shift the notes up or down octaves to create more complex chords. ### Using the Chord Stamp tool If you want to save time creating your chords, the Chord Stamp tool in Fl Studio can be used to create complex chords in one click. To use it, select the Chord Stamp tool and choose your chord type. Then, click on the grid where you want the chord to appear, and it will be added instantly, saving you time and effort. ### Adding tension and release with harmonies Once you have your chords, it’s time to add some depth to your composition by using harmonies. Harmonies are additional notes that complement your chords. Adding tension and release with harmonies can make your music more dynamic and interesting. For instance, if your chord progression is C – Am – F – G, adding a minor seventh to the Am chord creates tension that is subsequently released when the song progresses to F. In conclusion, building chords and harmonies is the foundation of creating beautiful piano music in Fl Studio. Understanding basic music theory is crucial to this process. Creating chords in the Piano Roll is easy once you have a grasp of basic theory, and the Chord Stamp tool can help you create complex chords in seconds. Adding tension and release with harmonies creates a more dynamic and interesting sound. Keep these tips in mind when creating your next piano composition!

Working With Drums And Percussion

Drums and percussion are key elements in producing a great piano track in FL Studio. They add rhythm, complexity and texture to the music. If you’re looking to create a dynamic and engaging piano track, it’s important to pay attention to the drums and percussion used in your composition. In this section, we will discuss how to choose the right drum samples, program a drum pattern in the Piano Roll, and use the Step Sequencer to add swing and groove to your drums.

Choosing The Right Drum Samples

When selecting drum samples for your composition, it’s essential to consider the style and genre of music you’re creating. Are you making a classical piano piece, or are you going for a more modern, electronic vibe? Ensure you choose the right drum kit that complements the piano sound, tempo and melody of your track.

Classical Piano:Electronic Music:
Bowed cymbals, Orchestra snare, Woodblock808 kick, Claps, Hi-hats, Snares
Percussion Ensemble, Timpani, TriangleTrap drums, Dubstep drums, House drums

Programming A Drum Pattern In The Piano Roll

After choosing the appropriate drum kit, select the Piano Roll and start programming your drum pattern. The Piano Roll is a graphical representation of the MIDI notes in your composition. It is a powerful tool that allows you to edit and manipulate your music’s rhythm. Here are some simple steps to follow when programming your drum pattern:

  1. Click on the Piano Roll icon from the toolbar
  2. Select the drum sampler channel from the Channel Rack
  3. Click on the pattern grid to create your drum pattern
  4. Adjust the velocity of each note to create a dynamic groove

Using The Step Sequencer

The Step Sequencer is another tool in FL Studio that helps to create drum patterns quickly and efficiently. It’s ideal for creating drum patterns with repetitive beats, such as trap or hip-hop. Here’s how to use the Step Sequencer:

  1. Select the Step Sequencer icon from the toolbar.
  2. Select the drum sampler channel from the Channel Rack.
  3. Click on the pads in the Step Sequencer to create your drum pattern.
  4. Adjust the velocity and duration of each pad to create a dynamic and rhythmic pattern.

Adding Swing And Groove To Your Drums

Swing and groove are essential elements in any music production. Adding swing to your drums can make your composition sound more natural and human-like, whereas adding groove can give it a more mechanical, robotic feel. Here’s how to add swing and groove to your drum tracks:

  • Open the Piano Roll of your drum track
  • Click on the Snap option and select “Step”
  • Select the notes you want to add swing or groove to
  • Right-click and select “Humanize” or “Quantize” to add swing or groove respectively.

To sum up, the drums and percussion in your composition play a fundamental role in creating a compelling and engaging piano track. Make sure you choose the right drum samples, program your pattern, and add swing and groove using the Piano Roll and Step Sequencer. Experiment with different combinations until you achieve the desired sound and rhythm that complements your piano track.

Mixing And Mastering Your Track

Learn the process of creating piano music in FL Studio and how to mix and master your track to achieve a professional sound quality. With the right techniques and tools, you can produce music that stands out and captures the emotions of your audience.

Mixing and mastering your track is the final step in creating a professional-sounding piano music production in FL Studio. When it comes to mixing, you will balance the levels of each instrument in the mixer to ensure that they work together in the most effective way possible. Additionally, you can use EQ, compression, reverb, and delay to help improve the overall quality of the mix and make each instrument sound unique. After mixing is complete, you’ll move on to the mastering stage, where you adjust the overall levels and apply equalization, compression, and limiters to the final mix.

Balancing Levels In The Mixer

Balancing levels in the mixer is an essential part of piano music production in FL Studio. To balance levels, you’ll need to use the slider in the mixer to adjust the volume for each instrument. Every instrument should sound clear and present, and the mixing process will ensure they sound good together in the final production. If the drums are too loud, try lowering their volume. If the piano is too quiet, boost its volume slightly. You need to balance levels so that no single instrument overpowers the track.

Applying Eq And Compression

Using EQ and compression in FL Studio can help you create a professional-sounding final mix. EQ could be used to adjust the balance of different frequencies, while compression helps maintain a consistent level of volume. You can use these effects to give each instrument its place in the mix. A technique called “side-chaining” can be useful for genres like EDM or Techno. This technique uses an instrument to “duck” when another instrument is playing.

Using Effects Like Reverb And Delay

Effects like reverb and delay give piano music a sense of space and atmosphere. Reverb creates a sense of space, while delay creates the impression of echoes. You can use these effects to create depth within the mix and make each instrument sound unique. Don’t overdo it, or the effects may become too intrusive, and the mix will sound muddy.

Mastering Your Track For Radio Or Streaming

Mastering your final mix involves preparing it for the different platforms where it will be played. You want to make sure that your track sounds great on a variety of devices like home music systems, headphones, smartphones, or car stereos. To achieve this, you should balance the overall volume and apply EQ, compression, and limiters to the final mix. Make sure your track has a good dynamic range and not too loud, or it might result in distortion. You want to ensure that your final mix sounds just as great on the various platforms where your track will be played. In summary, mixing and mastering your track is the final and most important stage of creating a professional-sounding piano music production in FL Studio. You should balance levels in the mixer, use EQ, compression, reverb, and delay to help improve the mix, and master your final mix for radio or streaming. Keep these tips in mind, and your piano music production will be sure to sound great!

Collaborating With Others

Collaborating with other musicians can enhance the quality of your piano music created in FL Studio. By working with others, you can brainstorm new ideas and add different musical elements to your composition. Communication and imagination are essential for a successful collaboration.

Collaborating with other musicians can be incredibly rewarding, bringing fresh perspectives and ideas to your compositions. This is especially true for piano music, which can benefit greatly from collaborating with other instrumentalists. Here are some tips for successful collaboration in Fl Studio.

Exporting Your Stems For Collaboration

Sharing your project with other musicians in Fl Studio is easy. To start, make sure you have all of your project’s components saved and backed up. Then, go to the File menu and select Export > Project Bones. This will save all of your project’s individual instrument tracks as separate files, making them easy to share. You can also choose to export your entire project as a single MIDI file, which can be opened and edited in any other DAW.

Using The Zgameeditor Visualizer For Videos

If you’re collaborating with someone on a music video, Fl Studio’s ZGameEditor Visualizer can be a great tool. This plugin allows you to create visually stunning music videos that synchronize with your music. To use it, simply add the plugin to your project and customize the visualizer settings to fit your music. You can also use the built-in video recorder to capture your visualizations for use in music videos or live performances.

Finding Other Musicians To Collaborate With

Finding other musicians to collaborate with can be a bit tricky, but there are plenty of online resources available. Try searching for local music groups on social media, or join an online music community to connect with like-minded musicians. Be sure to communicate your goals and expectations clearly, and be open to different ideas and approaches. With the right collaboration partner, you can create beautiful and unique piano music that you never would have created on your own. With these tips, you’re well on your way to successfully collaborating with other musicians in Fl Studio. Remember to communicate effectively and be open to new ideas, and you’ll be sure to create beautiful and unique piano music that you can be proud of.

How to Make Piano Music in Fl Studio

Credit: www.image-line.com

Promoting Your Music

Learn how to create beautiful piano music using FL Studio, a popular digital audio workstation. From setting up your project to adjusting the tempo and learning keyboard shortcuts, this guide has everything you need to start producing your own original tracks.

Once you’ve created your stunning piano music in FL Studio, it’s time to promote it to the world. Without promotion, your music may not get the exposure it needs to be successful. Here are some tips on how you can promote your music to get it heard by a wider audience:

Uploading Your Music To Streaming Platforms

One of the easiest ways to promote your piano music is to upload it to streaming platforms like Spotify, YouTube, and Apple Music. These platforms have millions of active users who are constantly searching for new music. By uploading your music, you’ll make it available to a wider audience, and with a little bit of luck, your music may end up on the platform’s popular playlists.

Using Social Media To Get Your Music Heard

Social media is another powerful tool that you can use to promote your piano music. Platforms like Twitter, Facebook, and Instagram provide you with an opportunity to reach a larger audience. You can share your music with your followers, post updates about your upcoming performances, and participate in conversations related to your music.

Networking With Other Musicians And Fans

Networking with other musicians and fans is another great way to promote your piano music. Attend local events and connect with other musicians and fans in your area. Collaborating with other musicians can help you expose your music to new audiences, while connecting with fans can help you build a dedicated following.

Submitting Your Music To Blogs And Playlists

Finally, you can submit your piano music to various blogs and playlists. Music blogs and online radio stations are always looking for new music to feature on their websites. Submitting your music to these platforms can help you get exposure to a wider audience. Similarly, submitting your music to curated playlists on platforms like Spotify can also help you reach new listeners. In conclusion, promoting your piano music in FL Studio is all about making it available to a wider audience. By uploading your music to streaming platforms, using social media to get your music heard, networking with other musicians and fans, and submitting your music to blogs and playlists, you can increase your chances of getting your music heard by a wider audience.

How to Make Piano Music in Fl Studio

Credit: m.youtube.com

Frequently Asked Questions On How To Make Piano Music In Fl Studio

How Do I Make My Fl Studio Sound Like A Piano?

To make FL Studio sound like a piano, you can use the software’s built-in piano sound or a plugin like Keyscape or Pianoteq. Adjust the velocity and timing of the notes to mimic a piano player’s touch. Use reverb and EQ to create a realistic piano sound.

Experiment with different microphone positions and techniques to enhance the sound further.

Does Fl Studio Have A Piano Plugin?

Yes, FL Studio does come with a piano plugin. It’s called “FL Keys” and it’s a sample-based plugin that offers high-quality piano sounds. You can find it in the browser under the “Plugin presets” > “Generators” > “FL Keys” folder.

How Do You Make Piano Notes In Fl Studio?

To make piano notes in FL Studio, you need to select a plugin like FL Keys or Kontakt. Then, open the piano roll, choose the length of the notes and place them on the grid. You can also adjust the timing and velocity to create more realistic piano sounds.

How Do I Record Piano Sounds In Fl Studio?

To record piano sounds in FL Studio, connect your MIDI controller to your computer and open FL Studio. Create a new project and insert a new instrument channel for the piano sound. Select a piano VST plugin and start playing your MIDI controller to record the piano sounds in FL Studio.

Conclusion

To sum it up, creating piano music in FL Studio is an exciting and fulfilling process. It requires a combination of technical skills and creativity to produce a unique melody that resonates with the audience. By following these steps and experimenting with various features, you can produce music that reflects your personal style and artistic vision.

Whether you are a seasoned musician or a beginner, FL Studio offers endless possibilities to explore and express yourself through music. So, let your imagination run wild and start making beautiful piano music today!

Categories
Archive

Making Bass Pop Production Tips

To make bass pop in music production, try layering sounds and emphasizing mid-range frequencies. Additionally, use sidechain compression to avoid muddiness in the mix and try experimenting with distortion to add harmonics.

Bass is a crucial element in music production, especially in genres like hip-hop, R&B, and electronic dance music. When the bass pops, it adds depth, power, and groove to the track, making it more enjoyable to listen to. However, achieving that perfect bass sound can be challenging, requiring a careful balance of different techniques and tools.

We will explore some effective production tips for making bass pop, from layering and equalizing to compression and distortion. Whether you are a beginner or a seasoned producer, these techniques will help you produce bass that truly thumps and grooves.

Start With High Quality Samples

Creating a popping bassline is a vital component in producing high-quality, memorable music. However, to achieve this, it’s essential to begin with the right foundation. Starting with high-quality samples sets the tone for your entire mix. It ensures that your sound is coherent, and every layer blends well. Here are some tips to help you make the most out of your bass pop production:

Choose The Right Kick Drum

The kick drum is the backbone of your bassline. It establishes a rhythm and the groove of your track. Therefore, it’s crucial to choose a high-quality sample with a powerful punch. A good kick drum should be well EQ’d and compressed, without any unnecessary noise. It should blend seamlessly with the bassline and other elements of the track, and most importantly, it should be the right key for the rest of the instrumental, ensuring it doesn’t clash with the bass.

Find The Perfect Bassline

The bassline is where your track comes to life. Experiment with different basslines until you find one that complements your instrumental. Your bassline should sync well with the kick drum and be easy to follow along with. Depending on your track’s genre, you might want to go for a simple or complex bassline. In any case, it should be the focal point of the mix, so take your time to get it perfect.

Experiment With Synth Sounds

If you want your bassline to sound unique and memorable, don’t shy away from experimenting with synth sounds. A synth bassline can add some exciting texture and tonal elements to your mix. Try layering multiple sounds to get a fuller, deeper bass. You can even add some effects to create a more dynamic sound.

By following these tips, you can achieve a high-quality bassline that elevates your mix to the next level. Remember to start with high-quality samples, choose the right kick drum, find the perfect bassline, and don’t be afraid to experiment with synth sounds.

Making Bass Pop Production Tips

Credit: www.youtube.com

Focus On Low End Eq

As a music producer or mixer, one of the critical areas of focus to make bass pop is the low end. A well-mixed low end can make or break a track, and it is essential to get it right. One of the most important tools for shaping the low end is the EQ.

Cut Unnecessary Frequency

The first step to crafting a killer low end is to cut out any unnecessary frequencies. Start by using a high-pass filter to roll off any unwanted rumble or noise below the fundamental frequency. This can help reduce muddiness and create space for other instruments to breathe.

Next, identify any non-essential low-end frequencies in individual tracks and use a cut to remove them. This approach can help create a more defined and punchy low end.

Eq And Compress The Kick Drum

The kick drum plays a crucial role in shaping the low end. It is essential to get it just right. Start by using an EQ to boost the kick drum’s fundamental frequency around 60-100 Hz. This step can help to make the kick drum more prominent and give it a fuller sound.

After EQ-ing, it’s time to compress the kick drum. Compression can help control the dynamic range of the kick drum, making it more consistent and creating a more compelling low end for the track.

Eq For Clarity

It’s not just about boosting and cutting frequencies. EQ can also be a powerful tool for creating clarity in the low end. Pay attention to the relationship between the kick and bass in the mix.

Use EQ to carve out space for each element. For example, if the bass and kick drum are competing for space around 80-100 Hz, consider dipping the bass a few dB in this range. This step can help create more room for the kick drum to punch through the mix.

Remember, the low end is where the power of the track resides. Taking the time to get it right can make the difference between a weak or powerful sounding track.

Add Layering For Depth

Incorporating layering in your bass production can add depth and make it stand out in the mix. By layering different bass sounds, you can create a fuller and more complex sound that will enhance the overall quality of your track.

With this production tip, your bass will pop and give your music a more professional sound.

Layering is a great technique for creating a sense of depth and energy in your bass tracks. Adding multiple layers of bass can create a fuller sound that captures the listener’s attention. Layering bass tracks may seem daunting, but it’s a simple process that can add a considerable punch to your songs.

Layer Multiple Bassline Elements

To add depth to your bassline, consider layering multiple bass elements. Combine different bass sounds, such as a sawtooth wave with a sub-bass, to create a more complex sound profile. By layering bassline elements, you can add a unique character to the sound and create a more memorable track.

Use Distortion For Texture

Adding distortion to your bass track can create unique textures that weren’t previously present. It’s a simple process that can add grit and a growling quality to your sound. Start by adding some mild harmonic distortion and dialling up the effect depending on your desired sound. Distortion can also help in creating a dirty and aggressive sound that will cut through any mix.

Add Percussion For Movement

It’s essential to add percussion elements to your bass tracks to create movement, groove and interest in the song. Experiment with different rhythms and play with the placement of percussion elements. You can try adding shakers, snaps, claps, or hi-hats, moving them offbeat or playing around with different velocities to achieve a unique sound. By adding percussion, you can create a distinct rhythm that will add energy and flow to the song. Incorporating these tips into your production process will help you create bass tracks that stand out from the rest. Layering, distortion, and percussion can transform monotonous bass tracks into energetic and exciting pieces. Remember to experiment with these techniques and find what works best for your tracks.

Create Movement With Automation

Creating movement in a bassline is crucial to ensure it stands out in a mix, and automation is a powerful tool to achieve this. With automation, you can add variation and dynamism to your tracks and make them more interesting to the listener. In this section, we’ll explore some tips for using automation creatively in your bassline production.

Automate Filters For Builds And Drops

Filter automation is a great way to add excitement and energy to your builds and drops. By automating low-pass, high-pass, or band-pass filters, you can create a sweeping effect that builds tension and anticipation before the drop. For example, you can start with a low-pass filter and gradually open it up to reveal the full bassline just before the drop. Conversely, you can start with a high-pass filter and gradually close it to create a sense of closure.

Add Modulation Effects For Interest

Modulation effects such as chorus, flanger, and phaser can also be automated to create interest and movement in your bassline. You can automate the rate, depth, and feedback parameters of these effects to create varying textures and tones. For example, you can use a flanger effect to create a swirling, undulating bassline, or a phaser effect to create a pulsating, rhythmic bassline. These effects can help your bassline cut through the mix and add depth and dimensionality to your track.

Use Sidechain Compression For Rhythm

Sidechain compression is a popular technique used in EDM and other electronic genres to create a pumping, rhythmic effect. By sidechaining your bassline to another element in your mix, such as the kick drum, you can create a rhythmic pumping effect that adds to the energy of your track. You can use a compressor with a quick attack and release time to achieve this effect and adjust the threshold and ratio settings to control the amount of compression.

Consider Spatial Effects

When it comes to making bass pop in your music production, there are several techniques you can use to take your tracks to the next level. One essential area to focus on is spatial effects. Spatial effects create a sense of space and dimension within your music, allowing your bass to stand out and make an impact. In this post, we’ll explore some tips for using spatial effects to enhance your bass production.

Add Reverb For Space And Dimension

One of the most effective techniques for creating a sense of space around your bass is using reverb. Reverb can give the impression that your bass is playing in a large room or hall, adding depth and dimension to your track. It can be especially effective if you want your bass to sit back in the mix and provide a subtle foundation for the rest of your music.

When using reverb on your bass, keep in mind that too much can quickly muddy up your mix. Instead, use a subtle amount of reverb and experiment with different room sizes and decay times to find the perfect balance. A short decay time can add a sense of clarity, while a longer decay time can create a more pronounced reverb effect.

Use Delay For Depth And Movement

In addition to reverb, adding delay to your bass can create a sense of depth and movement. Delay can create a sense of space by introducing a slight delay or echo that adds dimension to your bass. It can also help your bass cut through a busy mix by giving it a sense of movement and dynamics.

When using delay on your bass, try experimenting with different delay times and feedback settings. A shorter delay time can add a subtle sense of depth, while longer delay times can give your bass a distinct character and personality.

Experiment With Panning And Stereo Imaging

Panning and stereo imaging can also be effective techniques for creating spatial effects in your bass production. By panning your bass to one side of the mix, you can create a sense of space and openness, allowing your bass to stand out and be heard more clearly. Stereo imaging can also be used to create a sense of width and dimension, allowing your bass to fill up the mix and create a sense of balance and harmony.

When experimenting with panning and stereo imaging, try to keep the overall balance of your mix in mind. While it can be tempting to pan your bass hard to one side, this can quickly throw off the balance of your mix and create an unpleasant listening experience. Instead, use subtle panning and stereo imaging to add dimension and space without sacrificing balance.

By considering spatial effects in your bass production, you can bring a new level of depth, dimension, and impact to your tracks. Whether you’re using reverb, delay, panning, or stereo imaging, these techniques can help your bass stand out and create a memorable listening experience.

Mastering For A Powerful Low End

Every music producer strives to create a powerful bass sound to grab listener’s attention and enhance the overall music experience. Mastering is one of the critical processes to achieve a punchy low end for bass-heavy music genres, but it requires a delicate approach to avoid ruining the mix. This blog provides some practical mastering tips for making bass pop production.

Control Dynamics With Compression

Compression is a potent tool for controlling the dynamics of a track, bringing out the quieter elements while suppressing the louder ones. When used correctly, compression can help glue the low end of the mix together, delivering a consistent, powerful sound. However, it’s crucial to use compression sparingly, avoiding over-compressing the low frequencies, which may result in a weak, lifeless sound.

Eq For Punch And Clarity

As much as compression helps blend the elements of the mix, EQ can help shape the sound of each individual element, including the bass. EQ allows you to boost specific frequency ranges in the mix, and when done correctly, it can make the bass sound more defined and punchier. Boosting the fundamental frequency range of the bass, typically below 100Hz, can help bring out the power and body of the low-end, giving the track the necessary weight and depth.

Use Limiting For Volume And Loudness

Limiting is another crucial tool when it comes to mastering bass-heavy music. It helps to control the dynamics of the mix and ensures that the track remains at a consistent volume, resulting in a loud and powerful sound. When limiting, it’s essential to set the threshold low enough to catch any rogue peaks but not too low that it stifles the dynamics of the bass. A good starting point is a 1 to 2dB gain reduction, but this may vary depending on the genre and individual track requirements.

Collaborate With Other Producers

To make your bass pop productions stand out, consider collaborating with other producers. Work with others to come up with new ideas and techniques for making your sound unique and dynamic. By pooling your skills and resources, you can create something truly special that will capture the attention of your audience.

Collaborating with other producers is a great way to improve your bass pop production skills. Working with others allows you to share ideas, learn new techniques, and get valuable feedback on your mix. Here are a few ways to collaborate with other producers to improve your bass pop production.

Share Ideas And Techniques

When you collaborate with other producers, you get the opportunity to share ideas and techniques that can help you improve your bass pop production skills. By sharing your knowledge and experience, you can learn from each other and push each other’s boundaries. For example, you can discuss your favorite software, sample packs, or plugins. You may also discuss the tips and tricks that you’ve learned along the way to achieve that perfect bass sound.

Get Feedback On Your Mix

Another advantage of collaborating with other producers is that you can get valuable feedback on your mix. With fresh ears, other producers can provide you with an unbiased opinion on your mix and let you know where you can make improvements. They can suggest changes to the arrangement, sound selection, levels, and processing to make your mix more cohesive and professional.

Learn From Different Production Styles

When working with other producers, you will get a chance to learn from different production styles. Each producer has their own unique approach to music production that can teach you new ways of approaching your own work. By exposing yourself to different styles of music, you can incorporate new ideas and techniques into your bass pop productions. You may also learn new ways of using software, processing, or techniques you never thought of before. Overall, collaborating with other producers can be a fruitful experience that can help you improve your bass pop production skills. So, try to connect with other producers, share ideas, and learn from each other to take your bass pop productions to the next level.

Keep Experimenting

If you’re into music production or electronic music, you’ll know the value of a good bassline. A well-crafted bassline can take a track to new heights, making it feel more dynamic, powerful, and engaging. But how can you make your bass pop? One key way to achieve this is by experimenting with different sounds and techniques. Here are some tips on how to keep experimenting and creating killer basslines.

Try New Sounds And Techniques

The first step in creating popping basslines is to experiment with different sounds and techniques. This means trying out different synthesizers, effects, and processing chains to find the perfect sound for your track. You can also experiment with different playing techniques, such as slapping, tapping, or fingerstyle, to add more texture and dynamics to your bassline.

One of the key aspects of trying new sounds and techniques is to have an open mind. Don’t be afraid to try something that might seem unconventional or outside the box. Sometimes these experimental techniques can lead to some of the most interesting and engaging basslines.

Keep Learning And Improving

Another way to keep experimenting and creating killer basslines is to keep learning and improving. This can involve taking online courses, reading articles, watching tutorials, or even just practicing on your own. The more you learn and practice, the more you’ll be able to push your own boundaries and create truly unique and engaging basslines.

Learning and improving also means being open to feedback. Whether it’s from other producers, your fans, or even your own critical ear, being able to take feedback and use it to improve your craft is key to creating popping basslines.

Don’t Be Afraid To Break The Rules

Finally, don’t be afraid to break the rules. Sometimes the best basslines come from breaking conventions and trying something new. This might mean experimenting with different time signatures, using unusual chord progressions, or even just breaking away from the typical verse-chorus-bridge structure.

Breaking the rules can also mean creating something truly unique and different. By pushing the boundaries, you can create something that stands out from the crowd, and that people will remember and want to listen to again and again.

In conclusion, creating popping basslines is all about experimenting, learning, and breaking the rules. By staying open-minded and continually pushing your own boundaries, you can create truly engaging basslines that take your tracks to new heights.

Making Bass Pop Production Tips

Credit: m.youtube.com

Frequently Asked Questions On Making Bass Pop Production Tips

How Do I Make My Bass Stand Out More In Mix?

To make your bass stand out more in a mix, start by using EQ to boost the low-frequency range, add compression to even out the sound, and use sidechain compression to create space for the bass in the mix. Ensure your bass has a unique tone to stand out and experiment with different layering techniques.

Finally, try using stereo widening to create a wider soundstage.

How Can I Make My Bass Speaker Sound Better?

To make your bass speaker sound better, here are some tips: 1. Adjust the equalizer settings to enhance frequencies. 2. Keep the speaker away from walls or corners. 3. Ensure the speaker is properly powered and connected. 4. Replace any damaged or worn out components.

5. Play with different sound settings and experiment to find your ideal setup.

How Do I Make My Bass Sound Fuller?

To make your bass sound fuller, you can try boosting the low frequencies with an EQ, adding harmonic saturation or distortion, using a compressor to even out the volume, and experimenting with different playing techniques. You may also consider using a bass amplifier or speaker that is designed to enhance the bass frequencies.

How Can I Make My Bass Guitar More Punchy?

To enhance the punchiness of your bass guitar, try these techniques: adjust your playing style to hit the strings harder, use a compressor pedal to even out the tone, experiment with different EQ settings to boost the low-end frequencies, and consider upgrading your strings to ones that are thicker or made of a different material.

Conclusion

To sum it up, producing bass pop music requires a thoughtful approach that takes into account all the essential elements, including melody, rhythm, harmonies, and sound engineering techniques. With these tips, you can ensure that your bass pop production elevates to the next level, creating a unique and memorable experience for the listeners.

So, get creative, experiment with different tools and techniques, and make sure to always keep your audience in mind. By following these tips, you can produce catchy and compelling bass pop music that resonates with your audience.

Categories
Archive

Best Studio Monitors Under 500

The best studio monitors under $500 are the JBL Professional 305P MkII and the PreSonus Eris E5. Both models have received highly positive reviews from audio professionals and enthusiasts for their accurate sound reproduction and affordability.

As an Amazon Associate I earn from qualifying purchases.

If you’re a music producer, mastering engineer, or simply looking to upgrade your home studio setup, having a good pair of studio monitors is essential. They allow you to hear and mix audio with precision and accuracy, making sure your music sounds great on all types of speakers and headphones.

But with so many options available in the market, it can be overwhelming and confusing to choose the right one. That’s why we’ve researched and found two excellent studio monitor options that won’t break the bank: the JBL Professional 305P MkII and the PreSonus Eris E5. We’ll take a closer look at their features, pros, and cons to help you make an informed purchase decision.

Best Studio Monitors Under 500

Credit: m.youtube.com

Top 5 Studio Monitors

Experience superior sound quality with these top 5 studio monitors for under $500. Whether you’re recording vocals or mixing tracks, these monitors offer excellent sound accuracy and clarity. Upgrade your home studio today.

Are you searching for the best studio monitor within a budget of $500? If yes, then you’re in the right place. Studio monitors play a crucial role in your music production journey. Whether you’re mixing, mastering, or recording, you need the best monitor available within your budget to get accurate and reliable feedback. In this article, we have compiled a list of the top 5 studio monitors under $500 with their features and benefits.

Monitor #1: Presonus Eris E5

The Presonus Eris E5 is a two-way active studio monitor that delivers an accurate and clean sound. With a 5.25-inch Kevlar low-frequency driver and a 1-inch silk-dome tweeter, the Eris E5 offers frequency response ranging from 53 Hz to 22 kHz. It also has a built-in Acoustic Tuning feature that compensates for low-frequency bass boost and high-frequency treble boost caused by room acoustics. With its compact size and well-balanced sound, the Eris E5 is perfect for small mixing and recording setups.

Monitor #2: Jbl Professional 305p Mkii

The JBL Professional 305P MkII is a renowned studio monitor that has been upgraded with the latest technology. With its 5-inch low-frequency transducer and 1-inch soft-dome high-frequency tweeter, it delivers an accurate and detailed sound. The 305P MkII has a wide sweet spot and an impressive frequency response ranging from 49 Hz to 20 kHz. It also offers flexible connectivity options, including balanced XLR and 1/4-inch inputs, making it a perfect fit for any studio environment.

Monitor #3: Mackie Cr-x Series Cr5bt

The Mackie CR-X Series CR5BT is a versatile studio monitor that provides excellent sound quality and connectivity options. With its 5-inch polypropylene-coated woofer and 0.75-inch ferrofluid-cooled silk-dome tweeter, it delivers crystal clear sound with a frequency response ranging from 60 Hz up to 20 kHz. It also has built-in Bluetooth connectivity, making it easy to stream audio from any compatible device. The CR5BT is perfect for small home studios or for music enthusiasts who appreciate a balanced and accurate sound.

Monitor #4: Krk Rp5 Rokit G4

The KRK RP5 Rokit G4 is a popular studio monitor among music producers worldwide. With its 5-inch Kevlar low-frequency driver and 1-inch Kevlar tweeter, it delivers a clear and precise sound with a frequency response ranging from 43 Hz to 40 kHz. It also has a built-in LCD screen that displays input level, EQ settings, and other vital information. The KRK RP5 Rokit G4 has a well-balanced sound that allows you to hear all the details in your music production.

Monitor #5: M-audio Bx5 D3

The M-Audio BX5 D3 is a compact studio monitor that offers great sound quality at an affordable price. With its 5-inch low-frequency driver and 1-inch natural silk-dome tweeter, it delivers a well-defined sound with a frequency response ranging from 52 Hz to 35 kHz. It also has a rear port that reduces boundary coupling and offers a more extended low-frequency response. The BX5 D3 is perfect for music producers who want a decent monitor within a tight budget. In conclusion, these are the top 5 studio monitors under $500. Whether you’re a professional music producer or just starting, these monitors will provide you with the necessary accuracy and clarity to produce quality music.

Features To Consider

When selecting the best studio monitors under $500, one must consider factors such as frequency response, size and design, power, connectivity, and accuracy. These features impact the overall sound quality and performance of the monitors, making thoughtful consideration crucial to achieving optimal results.

When it comes to producing music or any audio content, having the right set of studio monitors can make all the difference. However, with so many options available in the market, it can be overwhelming to choose the perfect one for your needs. Before making a purchase, it is important to consider the different features that are available to ensure that you get the best value for your money. Here are some important features to consider when choosing the best studio monitors under 500.

Size And Power

The size and power of a studio monitor determine its output capability, with larger monitors often having more power and producing a higher sound pressure level. It is important to consider the size and power of the studio monitor based on your room size and the distance between your listening position and the monitor. A 5-inch monitor might be enough for a small room, whereas a larger 8-inch monitor might be required for a larger space.

Frequency Response

The frequency response of a studio monitor refers to the range of frequencies that the monitor is capable of producing. A wider frequency range means that the monitor can reproduce a broader spectrum of sounds, resulting in more accurate and detailed sound reproduction. A good studio monitor should have a frequency response of at least 50Hz to 20kHz, which covers most of the audible frequency spectrum.

Driver Configuration

The driver configuration of a studio monitor refers to the number and type of drivers used to produce sound. A 2-way monitor uses a woofer for low and mid frequencies and a tweeter for high frequencies, while a 3-way monitor also includes a mid-range driver. A 3-way monitor provides more accurate and detailed sound reproduction, but it is more expensive than a 2-way monitor.

Connectivity Options

The connectivity options of a studio monitor determine the different ways in which it can be connected to your audio interface or mixer. Most studio monitors come with balanced XLR and TRS inputs, which provide a cleaner signal and reduce interference. Some monitors also include unbalanced RCA inputs, which are suitable for connecting consumer-level devices such as CD players and gaming consoles. In conclusion, choosing the right studio monitor requires careful consideration of its features to ensure that it meets your specific requirements. By considering the size and power, frequency response, driver configuration, and connectivity options of a studio monitor, you can make an informed decision and enhance your listening experience.

Budget-friendly Alternatives

Looking for budget-friendly alternatives for studio monitors? Check out our list of the best studio monitors under $500 for excellent sound quality without breaking the bank. These options are perfect for home studios and content creation.

Budget-Friendly Alternatives When it comes to studio monitors, you can easily spend a small fortune on a pair. However, if you’re just starting out or on a tight budget, there are plenty of affordable options available. Here are three monitors that won’t break the bank:

Monitor #6: Model And Description

JBL Professional 305P MkII is a compact two-way nearfield studio monitor that delivers high-quality sound without breaking the bank. With a 5″ low-frequency transducer and 1″ soft-dome high-frequency transducer, this monitor offers a frequency response of 49Hz – 20kHz. The JBL 305P MkII also features JBL’s patented Image Control Waveguide technology, which ensures a wide sweet spot and accurate imaging.

Monitor #7: Model And Description

Presonus Eris E5 XT may be just what you need. This monitor features a 5.25″ woven composite low-frequency driver and a 1″ silk-dome tweeter, which deliver a frequency response of 48Hz – 20kHz. The Eris E5 XT also includes acoustic tuning controls that allow you to adjust the monitor’s response to your room.

Monitor #8: Model And Description

Edifier R1850DB is an affordable option that’s ideal for home studios and desktop setups. This monitor features a 4″ bass driver and a 13mm silk dome tweeter, which deliver a frequency response of 60Hz – 20kHz. The Edifier R1850DB also includes a built-in amplifier, Bluetooth connectivity, and a remote control, making it a versatile option for music producers on a budget. No matter which monitor you choose, these budget-friendly options offer high-quality sound and are a great way to get started with music production.

How To Choose The Right Studio Monitors

If you’re an audio engineer or producer, you know that studio monitors are an essential tool in your kit. They allow you to accurately hear the sounds you’re working on, which is crucial when mixing or mastering music. However, with so many options available on the market, it can be challenging to choose the right one, especially if you’re on a budget. In this article, we’ll explore how to choose the right studio monitors under 500 dollars.

Define Your Budget

The first thing you need to do is to define your budget. Studio monitors can range from a few hundred to several thousand dollars. By setting a budget, you’ll narrow down your search options and can focus on models that fit your price point. It’s essential to keep in mind that more expensive doesn’t always mean better, and you can find excellent options under 500 dollars.

Consider Your Space

The space you’ll be working in can significantly impact your choice of studio monitors. If you’re working in a small room, you’ll need monitors that are efficient and compact. On the other hand, if you have a larger studio space, you may want to consider larger monitors with more power. Additionally, it’s essential to pay attention to the acoustics of your space as certain monitors may be more suited to particular room types.

Determine Your Needs

The type of music you’ll be working on and what you’ll be using the speakers for should also be considered when choosing studio monitors. For example, if you’re mixing music with a lot of bass, you’ll want monitors with good bass reproduction. Consider the genre you’ll be working with, the instruments used, and other factors that could impact your choice of studio monitors.

Research And Compare

Once you’ve narrowed down what you’re looking for, it’s time to research and compare different models. Look for reviews and feedback from other audio engineers or producers who have used the monitors you’re interested in. Compare specifications such as frequency range, wattage, and driver size of different models. Take your time, and don’t rush into buying the first studio monitors that pique your interest.

In conclusion, choosing the right studio monitors is essential for achieving accurate and high-quality sound. By defining your budget, considering your space and needs, and researching and comparing different models, you’ll be able to choose the best studio monitors under 500 dollars that will suit your needs and budget. Take your time and carefully weigh your options to make an informed decision.

Setting Up Your Studio Monitors

Great quality sound is important for any music producer, artist, or audio engineer. The sound quality depends mostly on the type of studio monitors and how they are set up. This section will focus on how to properly set up your studio monitors to ensure the best sound quality possible.

Placement

The placement of your studio monitors is crucial to achieve the best sound quality possible. Position your monitors at the same distance from the listener creating an equilateral triangle between your chair and the two monitors. Keep the monitors at an angle of approximately 30 degrees facing your ears. Ensure that the monitors are positioned at the same height as your ears or slightly tilted towards your ears.

Placing monitors against a wall or in a corner will create a bass build-up. Therefore, it’s recommended to pull the monitors away from the walls to reduce bass build-up and maintain proper stereo imaging.

Calibration

The next step to setting up your studio monitors is calibration. This means adjusting the volume levels and frequency response of the monitors. The ideal volume level for studio monitors is between 85 dB to 100 dB, but monitors should not exceed their maximum SPL at the listening position. This is important to protect your ears from hearing damage.

You can also calibrate your monitors using a software frequency-response measurement tool that allows you to measure the frequency response of your monitors and room. This calibration helps correct any anomalies in the frequency response caused by the room’s acoustic properties.

Room Treatment

Room treatment is crucial to achieve accurate sound reproduction from your studio monitors. Acoustic foam panels or bass traps can be added to the room to reduce unwanted room reflections, echoes, and resonance. The panels reduce the first reflections from walls, ceilings, and floors, which improves clarity and sound quality. It’s recommended to add absorptive panels to the first reflection points on the walls, ceiling and floor.

Another solution is to use digital room correction (DRC) to correct the frequency response caused by the room’s acoustics. DRC captures the frequency response of the room in real-time and corrects it to provide optimal sound quality.

Conclusion

Proper placement, calibration, and room treatment are key factors to achieve the best sound possible from your studio monitors. With these tips, you can get the most out of your monitors without having to spend a fortune.

Best Studio Monitors Under 500

Credit: plus.pointblankmusicschool.com

Best Studio Monitors Under 500

Credit: www.sweetwater.com

Frequently Asked Questions Of Best Studio Monitors Under 500

How Much Should I Spend On Studio Monitors?

The amount you should spend on studio monitors depends on your needs, budget and quality expectations. Decent budget monitors can cost around $200, while high-end models can go for $5,000 or more. It’s recommended to invest in quality monitors as they impact the overall sound quality.

Why Is Genelec So Popular?

Genelec is popular because of its superior sound quality, reliable performance, and innovative design in the professional audio industry. The company’s commitment to sustainability and green practices has also contributed to its popularity among environmentally conscious consumers.

Is It Worth Getting Studio Monitors?

Yes, it is worth getting studio monitors if you want to produce high-quality audio recordings. Studio monitors provide accurate and transparent sound which is essential for mixing and mastering audio tracks. They allow you to hear every detail of your recordings and make better decisions in the mixing process, resulting in better overall sound quality.

What Size Monitor Is Best For Home Studio?

The ideal monitor size for home studios is between 22 and 27 inches. This size range offers a perfect balance between screen size and desk space usage. A smaller monitor may compromise the visual details while a larger monitor may be too overpowering for smaller workspaces.

Conclusion

All in all, finding the best studio monitor under 500 dollars can be a challenge, but it’s definitely worth the effort. With the right pair of monitors, you’ll be able to hear your mixes more clearly, resulting in better songs and more satisfied clients.

Whether you’re a professional audio engineer or an aspiring artist, investing in a good set of monitors is never a bad idea. So, take a look at our top picks and choose the one that suits your needs the best – you won’t be disappointed!

More in our Headphones & monitors guide.

Categories
Archive

Do You Need a Studio to Make Music

No, you do not need a studio to make music. Nowadays, with advancements in technology, one can create music from the comfort of their own home using a computer and digital audio workstation (DAW) software.

While having a studio with high-quality equipment may enhance the sound quality of your recordings, it is not a necessity. Many successful musicians have started producing music from their bedrooms or home studios. With some basic equipment and the right skills, anyone can make music without the need for a professional setup.

Related reading: Using the Arpeggiator in Fl Studio and Studio Desk. For background, see the Wikipedia article on Recording studio.

This article will explore the options available for those who wish to start producing music independently and offers tips on how to get started.

Do You Need a Studio to Make Music

Credit: www.djtechdirect.com

The Advantages Of Having A Music Studio

Having a studio for making music comes with numerous advantages such as having a dedicated space to work on music without distractions, improved acoustics for recording vocals and instruments, and access to professional equipment and software. Overall, a studio can greatly enhance the sound quality and production value of the music being created.

Access To High-end Equipment

One of the most significant advantages of having a studio is the access to high-end equipment that can take your music production to the next level. High-quality microphones, speakers, mixers, and other recording equipment are essential for creating professional-grade recordings with exceptional sound quality that stands out in the crowded music industry.

Better Sound Quality

A well-equipped studio enables you to create tracks with superior sound quality compared to what you can produce at home. The controlled environment of a studio provides optimal acoustics for capturing sound without disruptions from external noise and distortions. This means that your music will sound clearer, more balanced, and professional. Better sound quality is essential for standing out in the competitive music industry and increasing your chances of success.

Separation From Distractions

Another major advantage of having a studio is that it provides a space to focus solely on music production. When you are at home, there are several distractions, such as family, pets, and everyday noise that can interfere with your creative flow and productivity. However, in a studio, you can create an environment designed to keep distractions at bay, enabling you to concentrate solely on recording, mixing and producing your music. This enhances the quality of your work and can lead to more efficient use of your time.

To Conclude

While having a studio may come with a significant investment in equipment and rent, the advantages it offers are irreplaceable. Access to high-end equipment, superior sound quality, and a distraction-free environment are some of the reasons why having a studio is critical to creating world-class music.

Do You Need a Studio to Make Music

Credit: m.youtube.com

The Advantages Of Not Having A Music Studio

Contrary to popular belief, you don’t need a big, expensive studio to make music. In fact, there are several advantages to not having a studio that can actually improve the quality of your music.

Cost Savings

One of the biggest advantages of not having a studio is the cost savings. Building and maintaining a studio can be quite expensive. From purchasing the equipment to paying rent for the physical space, the costs can quickly add up. Without a studio, you can save a lot of money that can be used for other important things like marketing your music.

Flexibility

Another major advantage of not having a studio is flexibility. When you have your own studio, you are limited to only creating music in that space. However, without a studio, you have the flexibility to record music anywhere. You can record at home, in a hotel room, or even outside. This flexibility allows you to be more creative and make music whenever inspiration strikes.

Utilizing Technology for Music Studio

Advancements in technology have made it easier than ever to create music without a studio. With just a laptop and some software, you can create, mix, and master your music from anywhere in the world. Additionally, there are many online platforms that allow you to collaborate with other musicians and producers from around the world.

Mobility

Without a studio, you have the ability to be mobile. You can take your music with you wherever you go. Whether you’re on tour or traveling for leisure, you can continue to make and produce music. This mobility also allows you to play live shows and perform in different locations without the burden of having to maintain a physical studio.

In conclusion, not having a studio can actually provide many advantages for musicians. From cost savings to flexibility, utilizing technology, and mobility, there are many reasons why you don’t need a studio to make great music.

Factors To Consider Before Building A Music Studio

Before deciding if you need a studio to make music, consider your budget, space, and equipment needs. Evaluate if you prefer working alone or collaborating, and if you want access to specialized resources. Ultimately, the decision should align with your goals and creative process.

Factors to Consider Before Making a Decision If you are an aspiring musician or a seasoned professional, you may have wondered whether a studio space is necessary to make music. While many successful musicians have created chart-topping hits in their bedrooms or living rooms, there are several factors you must consider before making a decision. These factors include budget, type of music being made, space available, and collaboration needs. In this blog post, we will explore each of these factors in detail to help you make an informed decision. Budget The first factor to consider is your budget.

Setting up a professional recording studio can be expensive, and it may not be feasible for everyone. However, with advances in technology, you can create high-quality music from the comfort of your home without breaking the bank. You can opt for budget-friendly equipment and software that can help you produce professional-grade recordings without spending a fortune. Type of Music Being Made The type of music you are producing is also an important factor to consider. Different genres may require different setups, and some may require acoustically-treated recording spaces.

Practical Tips for Music Studio

For instance, if you are producing electronic music, you may not need a full-fledged recording studio. Conversely, if you are recording a live band, you may need a larger space with sound isolation and acoustic treatment to capture the best recording. Space Available Your available space is another factor to consider. If you have a dedicated room in your house or apartment that can double up as a recording space, you may not need a separate studio. Outfitting your available space with appropriate equipment and sound treatment can help you create a recording that sounds professional.

However, if you are cramped for space, a commercial studio may be a more practical option. Collaboration Needs Lastly, consider your collaboration needs. If you are working on a project with other musicians or producers, you may need a space that can accommodate multiple people. Commercial studios may offer larger spaces that are conducive to collaboration, whereas a small home setup may not be suitable. In conclusion, there is no one-size-fits-all answer to the question of whether you need a studio to make music.

It ultimately depends on your budget, the type of music you are producing, your available space, and your collaboration needs. By considering each of these factors carefully, you can make an informed decision and create high-quality music that sounds professional no matter where you choose to record.

Examples Of Musicians Who Do Or Don’t Use Studios

When it comes to making music, many aspiring musicians wonder if they need a studio to achieve their goals. The answer is no, but having a studio can certainly make things easier. In this post, we will explore the examples of musicians who do or don’t use studios.

Famous Musicians Who Use A Studio

Many famous musicians choose to use studios to record their music. For example, Taylor Swift, Beyoncé, and Drake are just a few of the musicians who have recorded albums in studios.

Recording studios can offer several benefits. They typically have state-of-the-art equipment and experienced sound engineers who can help perfect a sound. Studios also provide a professional environment free of distractions, allowing musicians to focus solely on their music.

Famous Musicians Who Don’t Use A Studio

On the other hand, there are also many famous musicians who choose not to use a studio. Some musicians, like Justin Bieber, prefer to record their music in a more casual setting, such as a home studio.

Other musicians, like Billie Eilish, have recorded entire albums in bedrooms or other non-studio environments. The rise of home recording software has made it easier than ever for musicians to create professional-sounding recordings without ever leaving their homes.

However, recording outside of a studio does come with its challenges. Musicians may not have access to the same high-end equipment as they would in a studio. Additionally, outside noises and distractions can affect the quality of the recording.

Conclusion

Overall, whether or not a musician needs a studio depends on their personal preference and resources. While a studio can provide access to top-of-the-line equipment, recording outside of a studio is becoming increasingly more common and accessible. Ultimately, the goal should always be to create music that speaks to the listener, regardless of where it was recorded.

Importance Of Finding The Right Balance

Music creation can be an immensely satisfying experience, regardless of whether you are an amateur or a professional musician. You might think renting a recording studio is necessary if you want to produce high-quality music, but that’s not always the case. With modern technologies, producing music is more accessible than ever.

How To Strike The Right Balance

It can be challenging to find a balance between the resources you have and the quality of music you want to produce. You don’t want to compromise the quality of your music, but you also need to work within your budget. So how do you strike the right balance?

Here are some tips to help you:

  1. Invest in quality equipment – It’s important to invest in equipment that will produce high-quality sounds.
  2. Choose a suitable location – A quiet place free of distractions is essential for effective music production.
  3. Utilize technology – Modern equipment and software can significantly enhance the quality of your music.
  4. Collaborate with other artists – Working with other musicians can help fill the gaps in your knowledge or experience.

The Consequences Of Getting It Wrong

Getting the balance wrong can have severe consequences. For example, investing too heavily in equipment can negatively impact your overall budget. Poor production quality is another consequence that can lead to underwhelming music that won’t be accepted by an audience. A noisy or distracting location can also lead to distractions and might only result in poor quality work.

Overall, the importance of finding the right balance can’t be overstated when it comes to music production. Collaboration and advanced technology can help offset some of the deficiencies in your resources. By utilizing cost-effective and modern techniques, you can produce high-quality music that will captivate your fans.

Do You Need a Studio to Make Music

Credit: www.compassselfstorage.com

Frequently Asked Questions For Do You Need A Studio To Make Music

Can I Make A Song Without A Music Studio?

Yes, you can make a song without a studio. With a good microphone, computer, and software, you can record and produce your song at home. There are many affordable options for equipment and software that can help you create a quality song from the comfort of your own home.

Can You Make A Music Studio At Home?

Yes, it is possible to make a music studio at home. You can start with a computer, digital audio workstation, and audio interface. You will also need some acoustic treatment, monitors, headphones, and a microphone. With a bit of research and investment, you can create a fantastic home studio.

What Do You Need To Own A Music Studio?

To own a music studio, you need a suitable location, music equipment, and soundproofing to minimize noise. In addition to this, you may need to hire professionals, such as sound engineers, to assist with the technical aspects of recording music.

It is also important to have a solid business plan and budget to ensure your studio’s success.

How Much Does It Cost To Build A Music Studio?

The cost of building a music studio depends on various factors such as studio type, size, equipment, and location. The cost can range from a few thousand dollars to over $100,000. It’s important to have a detailed budget plan and consult with professionals in the industry for an accurate estimate.

Conclusion

There’s no doubt that having a studio can make the process of making music much more convenient and efficient. However, it’s not the only way. Advances in technology mean that home recording setups have become increasingly accessible and affordable. Ultimately, the choice of whether or not to invest in a studio depends on your personal circumstances and goals as a musician.

Whether you choose to create in a professional or home-based environment, the most important thing is to enjoy the process and let your creativity flourish.

Categories
Archive

How To Write 5 Finger Melodies

To write 5 finger melodies, you need to focus on 5 notes within a particular key and use them to create simple but memorable melodies. Writing 5 finger melodies can seem like a daunting task for many beginner musicians, but with the right approach and some practice, it can become more comfortable and fulfilling.

The first step is to select a key you want to work with, and then focus on the 5 most important notes in that key. By using these notes to create simple and catchy melodies, you can make music that is easy to play and easy to remember.

Whether you’re writing for piano, guitar, or any other instrument, 5 finger melodies are a great way to get started and build your musical skills. We’ll explore some tips and tricks to help you write your own memorable 5 finger melodies.

Understanding Melodies

Writing melodies can be an exciting yet daunting task for beginners. But understanding the basics of melody writing can make it easier and enjoyable. Melodies are the catchy tunes that we hum and remember long after we have forgotten the lyrics. They are the heart of any song and can make or break it. The challenge lies in creating a melody that not only sounds good but also complements the lyrics and evokes the intended emotion. To write a good melody, one needs to understand the importance of notes, rhythm, and timing.

Notes

Notes are the building blocks of melody. They are the sounds that we create by pressing down a key on a piano or by plucking a string on a guitar. The distance between two notes is called an interval, and it determines the pitch or frequency of the sound produced. The different combinations of notes and intervals create melodies. As a beginner, it is essential to choose a key or scale that suits your voice or instrument. It will help you to stay in tune and create a cohesive melody.

Rhythm

Rhythm refers to the timing and emphasis of notes in a melody. It is the way in which the melody flows and creates a musical pattern. Rhythm can make a melody catchy or monotonic. The rhythm of a melody depends on the speed or tempo of the song and the time signature. The time signature is indicated at the beginning of a piece of music and tells the musician how many beats are in each measure and what type of note receives a beat. Practicing rhythm exercises can help improve your melody writing skills.

Timing

Timing is crucial in melody writing. It refers to the duration of each note and how long it is held. The timing of a note can create tension or release in a melody. It can also affect the emotion that the melody evokes. The timing of a melody depends on the tempo of the song, the time signature, and the phrasing. Phrasing is the way in which a melody is divided into smaller sections, and it can affect the timing and flow of a melody. It is essential to practice timing exercises to ensure that your melody is well-structured and flows smoothly.

Writing a memorable melody takes practice and patience. Understanding the basics of notes, rhythm, and timing can help you write better melodies. By experimenting with different combinations of notes, rhythm, and timing, you can create a melody that is unique and evokes the intended emotion.

How To Write 5 Finger Melodies

Credit: galaxymusicnotes.com

The 5 Finger Technique

Are you struggling to write simple melodies on the piano? The 5 Finger Technique might be just what you need to get started with. This technique is a simple and effective way to write melodies that are easy to play and remember, even if you’re a beginner pianist.

What Is It?

The 5 Finger Technique is a basic piano technique that uses only five notes played with the five fingers of your hand. Typically, the starting note is C, and the notes are played in ascending or descending order on the white keys only.

Using the 5 Finger Technique, you can create simple melodies with just a few notes. This makes it an ideal method for novice pianists who are just learning about melody writing.

How It Works

To get started with the 5 Finger Technique, you need to select one of your hands. The right hand is usually the best option for beginners, but you can use your left if you prefer.

Next, place your hand in the C position, with your thumb on C and your other four fingers on the next four white keys in a row. Then, play the five notes in order, moving your fingers up or down the keyboard.

Once you are comfortable with playing the five notes in order, you can begin to experiment by playing them out of order. Try playing the notes in different rhythms and sequences to create a melody.

Another great way to use the 5 Finger Technique is to create harmonies. You can use your other hand to play chords that will harmonize with the melody that you create with the 5 Finger Technique.

Examples

Here are some simple examples of melodies you can create using the 5 Finger Technique:

Example 1Example 2
C-D-E-C-D-E-E-EC-C-C-E-C-C-E-E

As you can see, these melodies are made up of just a few notes, but they are still catchy and memorable. With practice, you can use the 5 Finger Technique to write longer, more complex melodies that will impress your friends and family.

So, if you’re looking to get started with melody writing on the piano, give the 5 Finger Technique a try. It’s a simple, effective, and fun way to create melodies that you can be proud of.

Step-by-step Guide

To write captivating 5 finger melodies, first, start with a simple melody that you can remember easily. Then, apply basic music theory to expand your melody and give it structure. Build your melody with a few variations and repeat it to ensure the tune is catchy.

Finally, record and listen to your melody to make sure it sounds right.

Are you looking for a step-by-step guide to write 5 finger melodies? Look no further! In this post, we’ll provide you with a detailed tutorial to help you create beautiful melodies using only 5 fingers. We’ll cover everything from selecting a key to adding dynamics.

Selecting A Key

Before you start writing your melody, it’s essential to choose the right key. The key you select will determine the overall mood and emotion of your melody. There are 12 different keys to choose from, and each key has its unique sound. To select the right key for your melody, consider the following factors:

  • What feeling or mood are you trying to convey?
  • What is your song’s overall theme?
  • What is the range of the singer or instrument playing the song?

Once you’ve considered these factors, select a key that best fits your song’s mood and theme. You can use a piano or keyboard to experiment with different keys and find the one that works best for your melody.

Choosing A Chord Progression

The next step is to choose a chord progression. A chord progression is a sequence of chords that repeats throughout the song. It provides the foundation for your melody and helps establish the song’s overall structure. Choosing the right chord progression can take your melody to the next level. Here are some tips to help you choose the right chord progression:

  • Consider the key you’ve selected
  • Choose chords that complement the melody you have in mind
  • Experiment with different chord progressions to find the one that works best

Building A Melody

Now that you’ve selected a key and chord progression, it’s time to start building your melody. Here are some tips to help you create a memorable melody.

  • Start with a simple rhythm using quarter notes or eighth notes
  • Limit your melody to 5 consecutive notes
  • Consider the intervals between the notes (e.g., step-wise, skipping, or repeating)
  • Experiment with different note lengths to add interest

Adding Dynamics

Finally, it’s time to add dynamics to your melody. Dynamics refer to the loudness or softness of notes in a song. Adding dynamic changes can make your melody more interesting and expressive. Here are some tips to help you add dynamics to your melody:

  • Use crescendos (gradually getting louder) and decrescendos (gradually getting softer) to build tension and release
  • Experiment with adding accents and staccatos to emphasize certain notes
  • Consider the emotion or feeling you want to convey and use dynamics to support that emotion

Conclusion

Congratulations! You now have a step-by-step guide to help you write 5 finger melodies. Remember to select the right key, choose a chord progression, build a melody, and add dynamics to create a memorable and expressive melody. Now it’s time to start creating!

How To Write 5 Finger Melodies

Credit: www.songbirdsmusicartdancecenter.com

Common Mistakes To Avoid

Learn how to write 5 finger melodies by avoiding common mistakes. Keep sentences brief, use unique and SEO-friendly content without overused words, vary expressions, and skip the conclusion paragraph to keep readers interested. Additionally, ensure your writing passes AI writing detection and sounds like a human.

Common Mistakes to Avoid When Writing 5 Finger Melodies Writing 5 finger melodies can be a fun and creative experience. However, there are some common mistakes that people tend to make when writing them. In this post, we will discuss three of these mistakes and how to avoid them. Overusing Repetition One of the biggest mistakes people make when writing 5 finger melodies is overusing repetition. While repetition can be a powerful tool in music, too much of it can make a melody sound boring and uninspired. To avoid this mistake, try adding some variation to your melody. For example, you can change the rhythm, use different notes, or add some ornamentation. This will keep your melody interesting and engaging for the listener. Ignoring Dynamics Dynamics are an essential part of music. However, when it comes to 5 finger melodies, people tend to ignore dynamics and focus solely on the notes. To avoid this mistake, try experimenting with dynamics in your melody. You can play some notes louder or softer than others to create contrast and add dimension to your melody. This will make your melody more dynamic and interesting to listen to. Forgetting to Vary Timing Timing is critical in music. However, when writing a 5 finger melody, people tend to forget about it and stick to a strict tempo. This can make your melody sound robotic and lifeless. To avoid this mistake, try varying the timing in your melody. You can speed up or slow down certain sections to create tension and release. This will add interest and excitement to your melody. Conclusion Writing 5 finger melodies is a fun and creative process that allows you to express yourself through music. However, by avoiding these common mistakes, you can take your melodies to the next level and create something truly unique and memorable.

Tips For Improvement

To write 5 finger melodies, it’s crucial to start by understanding basic music theory. Begin by learning about scales and chords, then experiment with different chord progressions. Once you have a solid foundation, use your creativity to develop unique and memorable melodies.

Consistent practice and experimentation will lead to improvement over time.

As a beginner, writing 5 finger melodies can be quite challenging. However, with consistent practice and effective tips, you can improve your melody writing skills and even write beautiful melodies that people can enjoy. Here are some tips for improvement:

Practice Makes Perfect

The more you practice, the better you become. Therefore, it’s essential to practice writing melodies every day to enhance your skills. It’s advisable to start with simple melodies and gradually progress to complex ones. Consistent practice will help you develop a better understanding of melody structure and composition, making melody writing more comfortable in the long run.

Experiment With Different Styles

Writing melodies in different styles is a great way to hone your skills. Experiment with various genres such as classical, pop, rock, jazz, and folk to learn how to write melodies that suit each style. By doing so, you’ll develop a better understanding of rhythm, harmony, and melody composition, which will make your melodies more diverse and exciting.

Listen To Music Critically

Listening to music critically can improve your melody writing skills significantly. When listening to songs, pay attention to the melody, rhythm, and overall composition. Analyze how the melody fits with the lyrics and the overall feel of the song. By doing this, you’ll develop a more critical ear, which will help you in melody composition. In conclusion, consistently practicing, experimenting with different styles, and listening to music critically are effective ways of improving your 5 finger melody writing skills. These tips will help you develop your musical composition abilities and create melodies that are pleasing to the ears.

How To Write 5 Finger Melodies

Credit: pianoadventures.com

Frequently Asked Questions Of How To Write 5 Finger Melodies

How Do You Write A Catchy Melody?

To write a catchy melody, start by choosing a key and tempo that fits the mood you want to create. Then, experiment with different chord progressions and melodies until you find one that feels memorable and engaging. Consider adding repetition, contrast, and climax to make your melody more dynamic.

Finally, practice and refine until the melody flows smoothly and sounds great on its own.

How To Do Five Finger Chords?

To play five finger chords, place your five fingers on the piano keys, with the thumb on C, index finger on D, middle finger on E, ring finger on F and pinky finger on G. This forms the C Major chord.

Practice moving your fingers to different positions to play other chords in different keys.

How Do Musicians Write Melodies?

Musicians write melodies through a combination of creativity and technical music knowledge. They experiment with different musical notes, scales, and rhythms until they find an arrangement that sounds good. Some use a natural talent or inspiration, while others follow specific composition techniques.

It takes practice, patience, and dedication to produce a catchy and memorable melody.

How Do You Write A Pop Melody?

To write a pop melody, focus on creating a simple, catchy tune with a memorable hook. Keep the melody within a comfortable vocal range, use repetition or variation to create interest, and consider the lyrics as you compose. Experiment with chord progressions and different instruments to find the sound that works best for your melody.

Conclusion

To wrap it up, writing 5 finger melodies can seem complex, but it’s definitely achievable. Keeping in mind the techniques discussed above, you can produce stunning melodies in no time. Practicing and experimenting with different combinations can help you find your style and develop it further.

With patience and persistence, you can create melodies that will capture listeners and leave them wanting more. Focus on your creativity and let your musical instincts guide you. Happy composing!